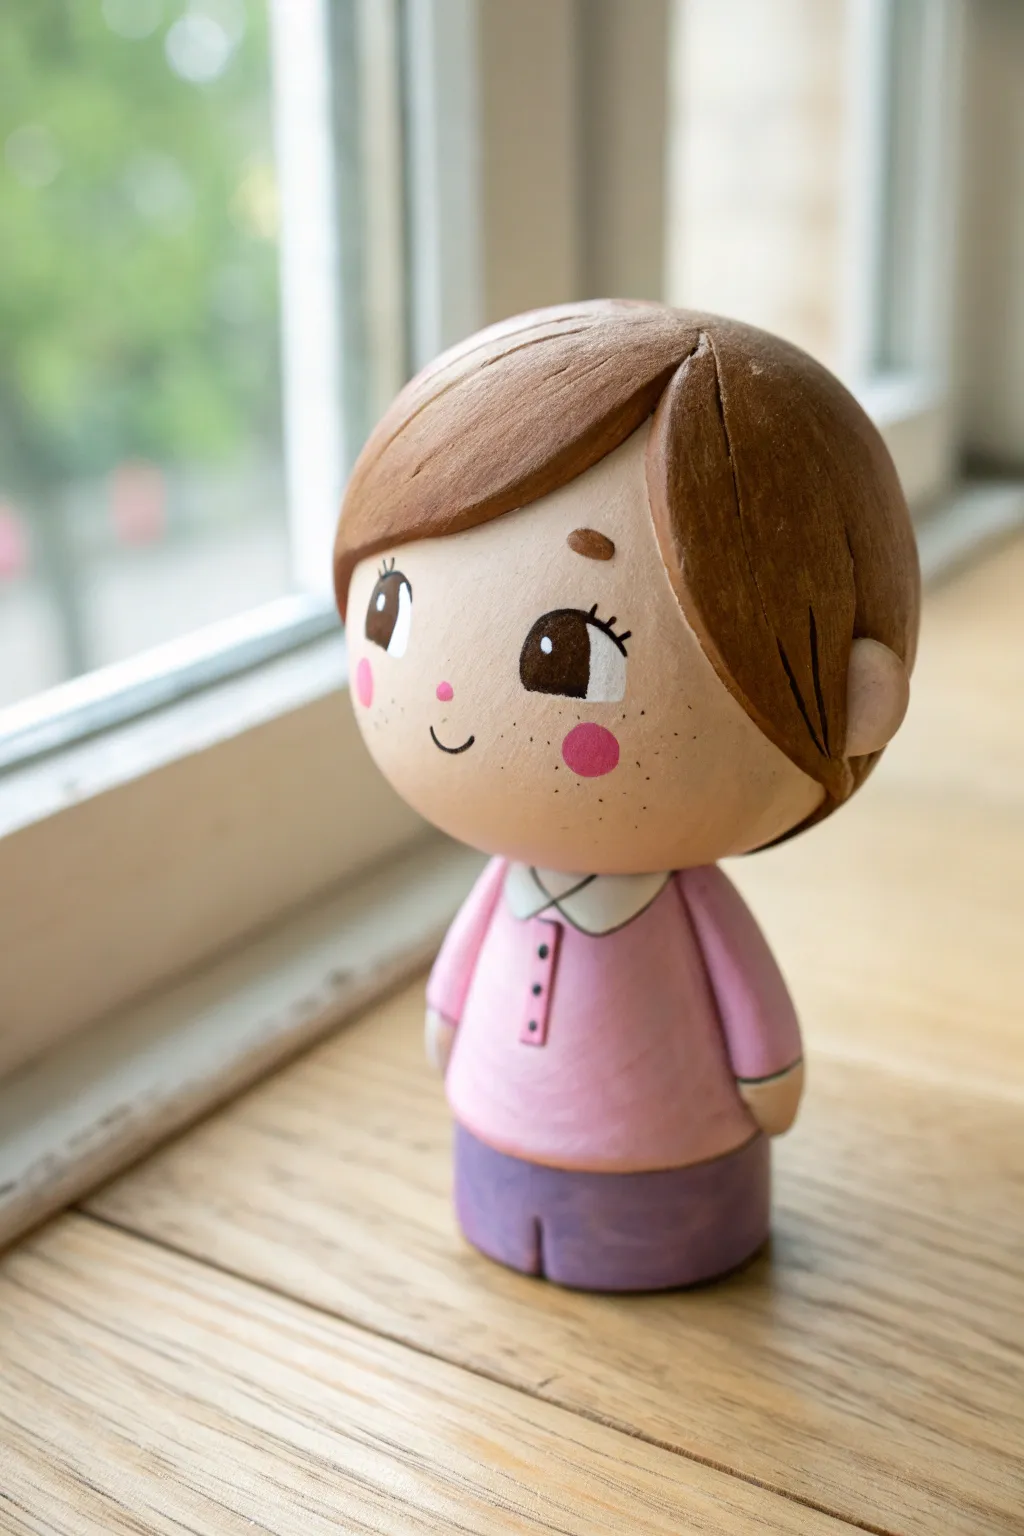
If you’re craving a project that’s equal parts cute and satisfying, a clay bobblehead totally delivers. I love how a simple oversized head on a tiny body instantly turns into a character you can’t help but tap to make it bob.
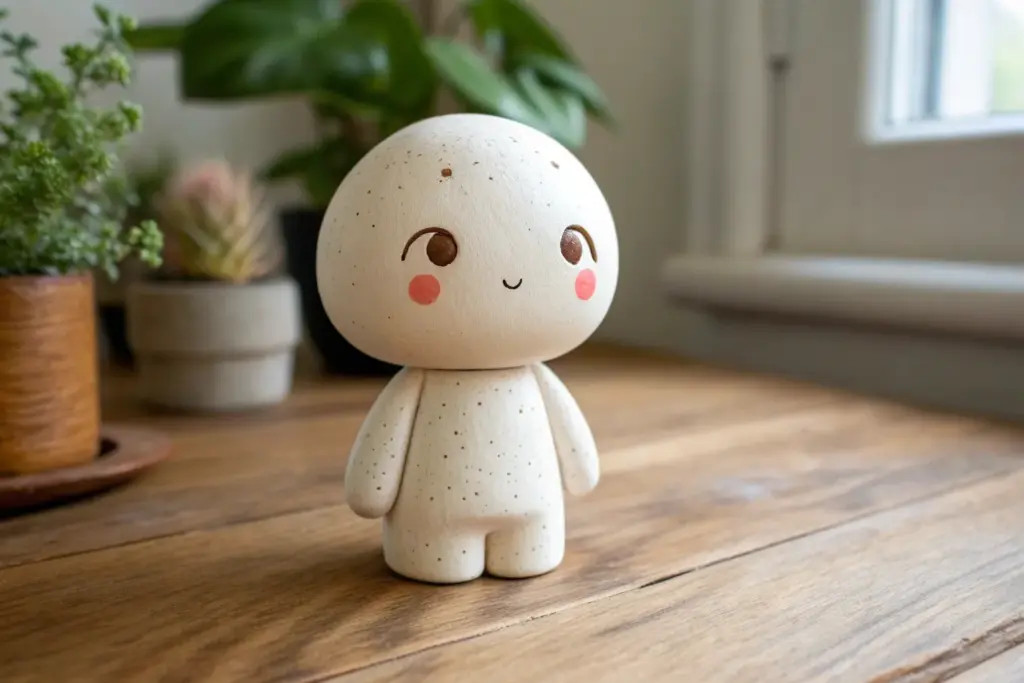
Chibi Self-Portrait Clay Bobblehead
Capture the charm of a sweet self-portrait with this oversized-head chibi figure. The simple geometric shapes and soft pastel colors create a delightful, minimalist aesthetic perfect for brightening up any windowsill.
Step-by-Step Guide
Materials
- Polymer clay (flesh tone, brown, light pink, purple, white)
- Aluminum foil
- Bobble head spring mechanism
- Sculpting tools (needle tool, ball stylus)
- Acrylic paints (black, white, bright pink)
- Fine detail paintbrush
- Small rolling pin
- Oven for baking
Step 1: Forming the Base Structure
-
Create the core:
Begin by crinkling a ball of aluminum foil roughly 2 inches in diameter to serve as the lightweight core for the oversized head. Compress it tightly so it provides a firm base for the clay. -
Cover with flesh tone:
Condition your flesh-toned polymer clay until it is soft and pliable, then roll it into a thin sheet. Wrap this sheet entirely around the foil ball, smoothing the seams with your thumb until you have a perfect, seamless sphere. -
Shape the body:
Roll a smaller cylinder of pink clay for the torso. Keep the shape simple—slightly wider at the bottom than the top. -
Add the legs:
Form a short, stout cylinder from purple clay. Use a needle tool or the back of a knife to gently press a vertical line halfway up the center to suggest two legs without fully separating them. -
Assemble the body:
Attach the purple legs to the bottom of the pink torso. Gently blend the clay at the seam or press them firmly together to ensure they bond during baking.
Clean Clay Pro-Tip
Keep baby wipes or hand sanitizer nearby. Clean your hands thoroughly when switching from the dark brown hair clay to the light flesh tone to avoid dirty smudges.
Step 2: Refining the Clothes and Hair
-
Add the collar:
Roll a tiny amount of white clay into a thin strip. Cut two small triangles or rounded tabs and place them at the neck of the pink shirt to create a distinct Peter Pan collar. -
Create the button placket:
Place a very thin vertical strip of pink clay down the center of the shirt. Use a needle tool to poke three tiny indentations for buttons based on the reference. -
Add the arms:
Roll two small sausages of pink clay for sleeves and attach them to the sides of the body. Add tiny balls of flesh-toned clay at the ends for hands. -
Sculpt the hair cap:
Roll out a sheet of brown clay. Cut a large circle and drape it over the back and top of the head sphere, smoothing it down. -
Detail the bangs:
Cut a separate, crescent-shaped piece of brown clay for the bangs. Attach this to the forehead, sweeping it to the side. I find using a modeling tool to carve deep grooves creates a nice stylized hair texture. -
Add the ears:
Form two small discs of flesh-toned clay and attach them to the sides of the head, just under the hair line.
Level Up: Accessories
Personalize your chibi! Add tiny clay accessories like glasses made of wire, a miniature book in the hand, or a patterned texture to the shirt before baking.
Step 3: Assembly and Finishing
-
Install the spring:
Before baking, create an indentation in the bottom of the head and the top of the neck large enough to house your spring mechanism. Check the fit, but remove the spring before baking. -
Bake the pieces:
Bake the head and body separately according to your clay package instructions (usually 275°F for 15-30 minutes). Support the round head in a curve of foil so it doesn’t flatten. -
Attach the spring:
Once cool, use strong super glue or epoxy to secure the spring into the neck hole, and then attach the head to the top of the spring. -
Paint the face:
Using a very fine brush and black acrylic paint, carefully paint two large oval eyes. Add small eyelashes to the outer corners for a sweet expression. -
Highlight the eyes:
Dip the end of a toothpick in white paint and add a ‘catchlight’ dot to the upper corner of each black eye pupil to bring the character to life. -
Add rosy cheeks:
Using bright pink paint or even real makeup blush applied with a soft brush, create two distinct circle cheeks below the eyes. -
Final details:
Paint a tiny curved smile and freckles using a fine-point marker or the very tip of your brush. Paint the buttons on the shirt black for contrast.
Place your adorable mini-me on a desk or shelf and give it a gentle tap to watch it nod along with your day


Sitting Cat Clay Bobblehead With Big Cheeks
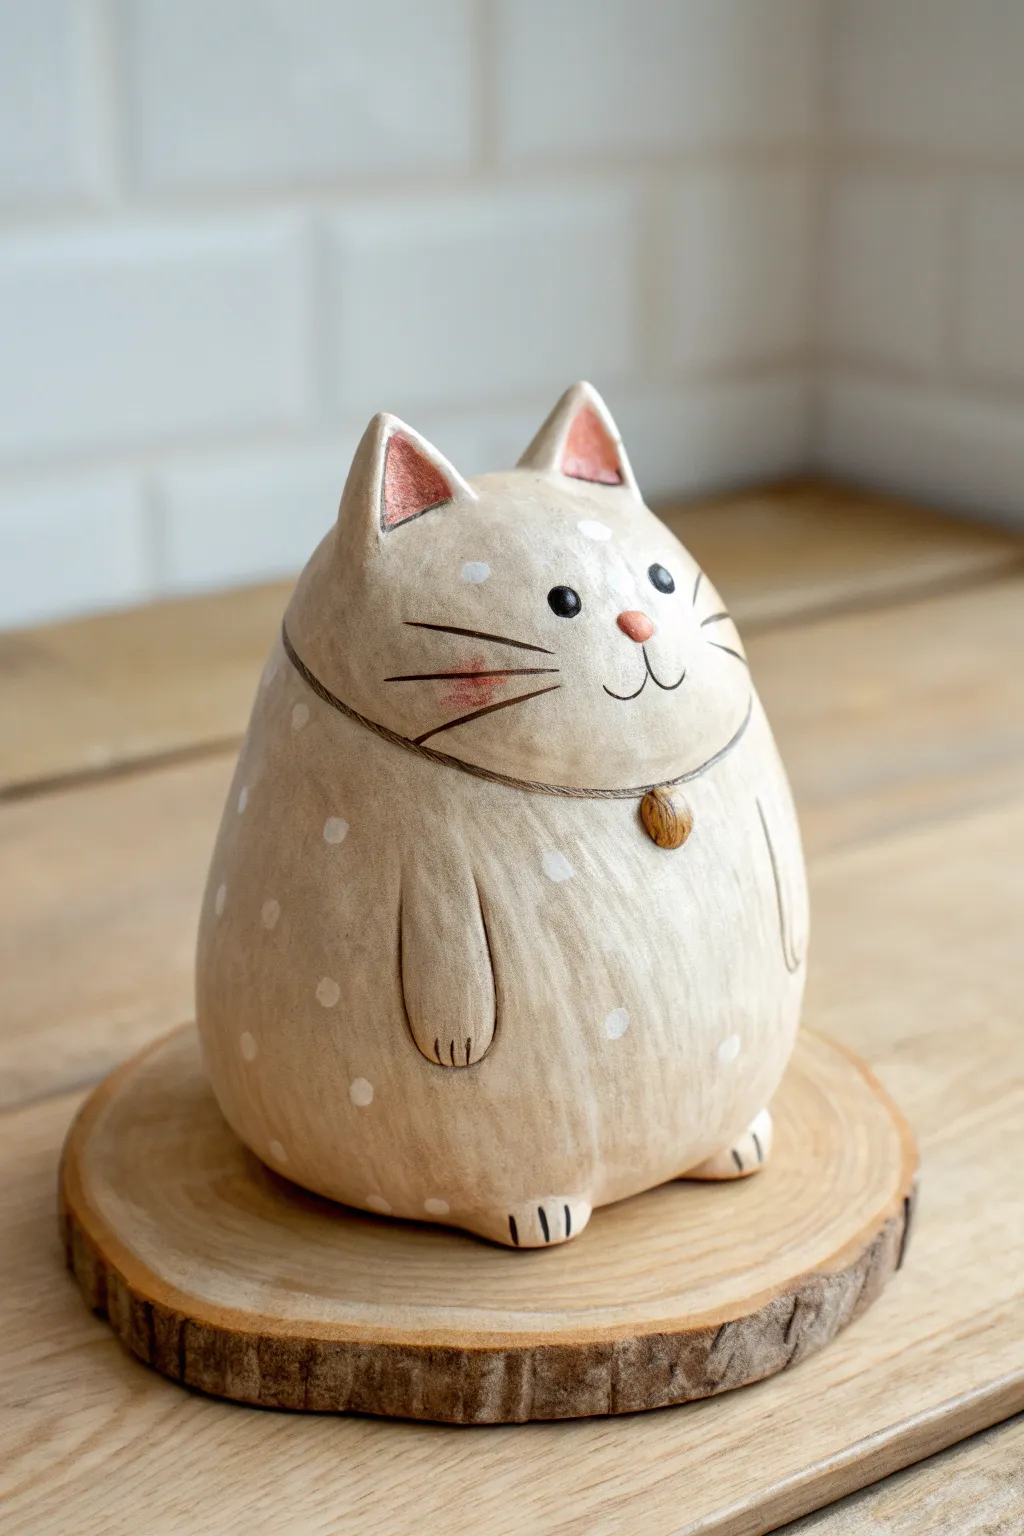
This adorable project features a round, teardrop-shaped cat with a distinctively rustic, pottery-like finish. Its simple form is enhanced by charming painted details like white polka dots and a tiny clay bell, making it a perfect decorative piece for any shelf.
Step-by-Step
Materials
- Air-dry clay or polymer clay (neutral beige or light brown color recommended)
- Aluminum foil (for armature)
- Acrylic paints (white, black, pink, warm brown/gold)
- Small detail paintbrushes
- Modeling tools (or a toothpick)
- Thin wire or a strong toothpick (if making a bobble head mechanism)
- Rolling pin
- Matte varnish or sealant
- Texture sponge or stiff brush
Step 1: Basic Form & Body Shape
-
Core Structure:
Begin by crumpling a ball of aluminum foil into a fat pear or egg shape. This saves clay and keeps the figurine light. Ensure the base is flat so it sits completely stable without wobbling. -
Clay Covering:
Roll out a sheet of your beige clay to about 1/4 inch thickness. Wrap this smoothly around your foil core, pressing seams together and smoothing them out with a little water (for air-dry clay) or baby oil (for polymer). -
Refining the Shape:
Use your palms to roll and shape the figure until it looks like a smooth, heavy droplet. The bottom should be wide and the top slightly tapered but still rounded.
Step 2: Adding Features
-
Ears:
Form two small triangles of clay. Attach them firmly to the top of the head, blending the clay downwards at the back so they look integrated rather than just stuck on. Use a tool to gently indent the front of each ear. -
Arms:
Roll two small sausages of clay. Flatten them slightly and attach them to the ‘chest’ area of the cat. They should hang vertically. Use a knife tool to press two small lines into the bottom of each arm to suggest paws. -
Feet:
Create two tiny flattened ovals and attach them peeking out from under the bottom front of the body. Add similar toe indentations here. -
The Bell Choker:
Roll a very thin snake of clay for the collar string, wrapping it horizontally around the cat’s upper third. Add a tiny flattened ball for the bell in the center. -
Creating Texture:
Before the clay hardens, take a stiff bristle brush or a texture sponge and gently tap it all over the surface. This mimics a stone or rough ceramic look rather than smooth plastic.
Pro Tip: Hidden Weight
To prevent your cat from tipping over, press a metal washer or a small stone into the very bottom of the foil core before wrapping it in clay.
Step 3: Painting & Finishing
-
Base Tone:
Once fully dry (or baked), assess the color. If you used white clay, paint the entire figure with a wash of watered-down beige or biscuit-colored acrylic paint. Wipe away excess to let it settle into the texture. -
Face Details:
Using a fine-tip brush and black paint, add two small solid circles for eyes. Draw a simple ‘W’ shape for the mouth. Add whiskers with quick, light strokes. -
Rosy Elements:
Mix a soft pink color. Paint the insides of the ears and a small inverted triangle for the nose. I like to dry-brush a little pink on the cheeks for a gentle blush effect. -
Polka Dots:
Dip the back end of a paintbrush into white paint. Dot it randomly over the cat’s body to create the pattern seen in the image. Keep the dots relatively sparse. -
Golden Bell:
Paint the small bell charm with a metallic gold or warm brown paint to make it stand out against the pale body. -
Sealing:
Protect your work with a coat of matte varnish. Avoid glossy finishes, as the charm of this piece lies in its rustic, matte appearance.
Troubleshooting: Cracks
If small cracks appear as your air-dry clay shrinks, don’t panic. Mix a tiny bit of fresh clay with water to make a paste and fill in the gaps.
Place your charming new feline friend on a small wooden coaster to complete the earthy aesthetic


Baby Panda Clay Bobblehead With Tiny Belly
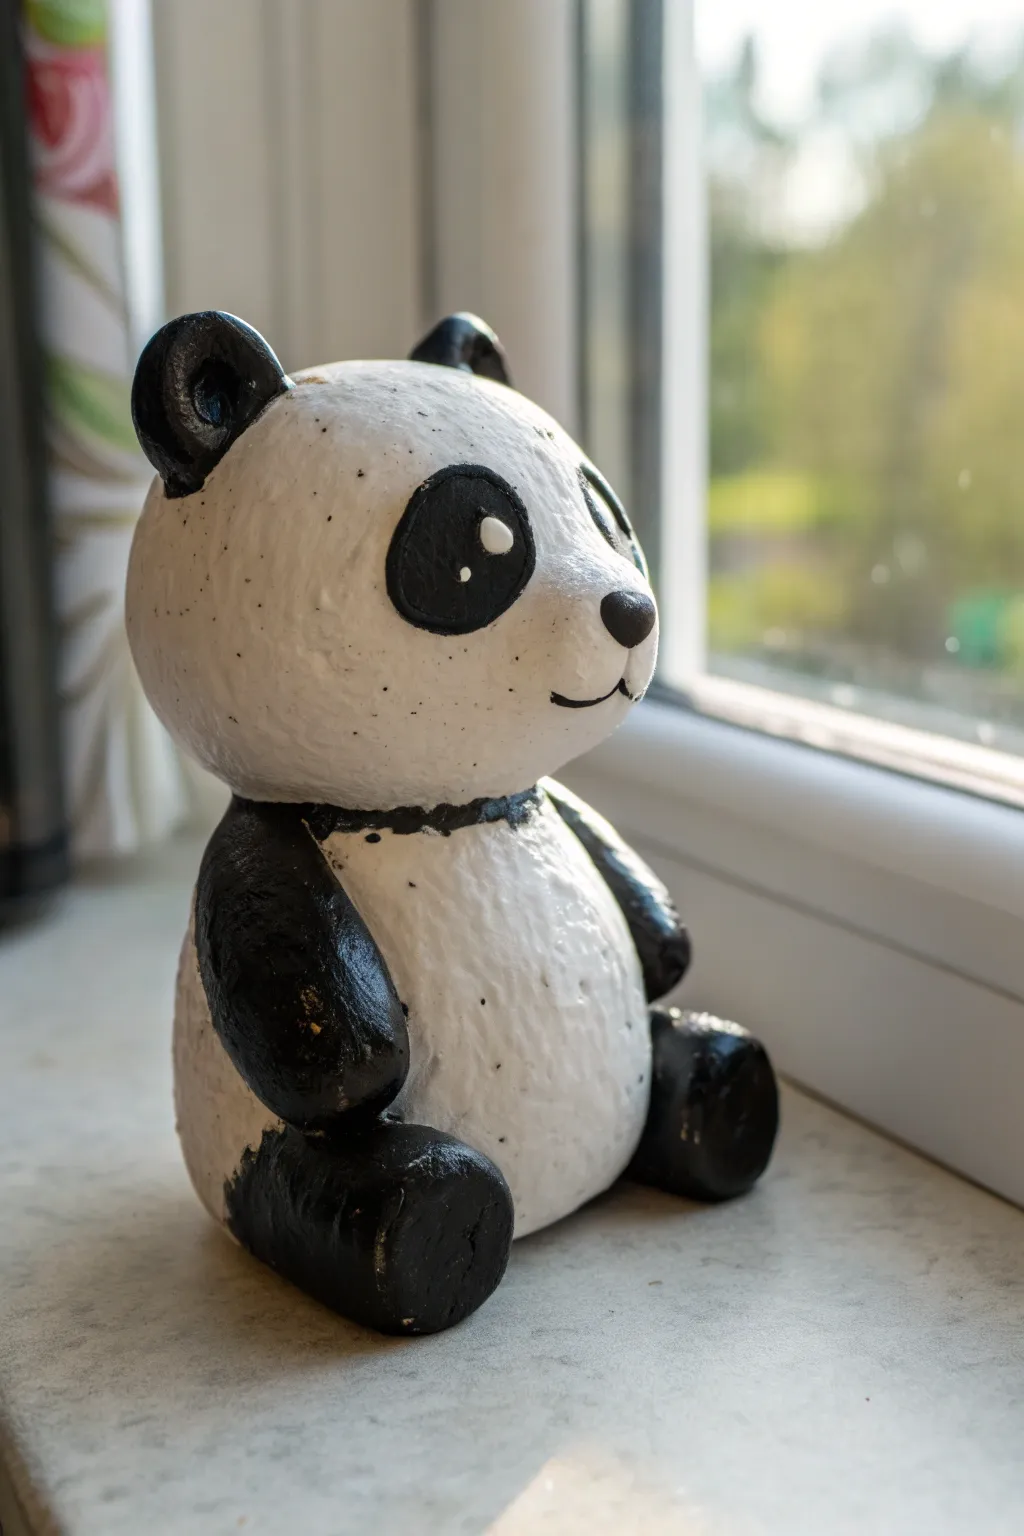
This adorable baby panda brings a smile to any space with its oversized head and lovingly textured finish. With its simple shapes and classic black-and-white palette, it’s a perfect project for beginners looking to practice basic sculpting and painting techniques.
How-To Guide
Materials
- White air-dry clay (or polymer clay)
- Aluminum foil
- Bobblehead spring mechanism (or stiff wire)
- Sculpting tools (ball tool, needle tool)
- Acrylic paints (Black, White)
- Paintbrushes (small round, medium flat)
- Matte varnish or sealant
- Water and sponge (for smoothing)
- Sandpaper (fine grit)
Step 1: Shaping the Core
-
Form the foil armature:
Begin by crumpling aluminum foil into two tight spheres: a larger one for the head (about the size of a tangerine) and a slightly smaller, slightly more oval one for the body. This saves clay and reduces weight. -
Wrap the body:
Flatten a sheet of white clay and wrap it fully around the body foil ball. smooth the seams until you have a seamless, slightly pear-shaped egg. -
Wrap the head:
Repeat the process for the head, ensuring the clay layer is even (about 1/4 inch thick). Roll it gently on your work surface to rounds it out, but keep the chin area slightly flatter. -
Texture the surface:
Take an old toothbrush or a stiff bristle brush and gently tap it all over both wet clay spheres. This stippling creates a soft, fur-like texture that gives the panda its organic charm.
Smooth Operator
Before the clay dries, dip your finger in water and run it over any fingerprints. For a stone-like texture, avoid making it perfectly smooth.
Step 2: Adding Features
-
Attach the legs:
Roll two thick, short logs of clay for the legs. Score and slip (scratch the surface and add water) the bottom of the body, then press the legs into place so the panda sits flat. -
Create the arms:
Form two teardrop shapes for the arms. Attach them to the sides of the upper body, angling them slightly forward to rest on its belly. -
sculpt the ears:
Make two small balls of clay and flatten them slightly. Press a thumb or ball tool into the center to create a cup shape, then attach these to the top of the head. -
Add the snout:
Roll a small oval of white clay and press it onto the lower center of the face for the muzzle. Blend the edges very gently into the face so it doesn’t look stuck-on. -
Install the spring:
Make a depression in the top of the body and the bottom of the head. Secure your spring mechanism into the body first, ensuring it stands straight. Test the fit of the head, but don’t glue it permanently yet if you need to paint separately. -
Dry thoroughly:
Let all pieces dry completely. I find air-dry clay needs at least 24-48 hours depending on humidity; turn the pieces occasionally so the bottom dries too.
Bamboo Snack
Sculpt a tiny cylinder of green clay to place in the panda’s hand. It adds a pop of color and gives your bobblehead a fun snack.
Step 3: Painting & Details
-
Base coat touches:
If your clay dried off-white, apply a fresh coat of white acrylic paint over the head and belly to brighten it up. -
Paint the limbs:
Using black acrylic paint, carefully fill in the ears, arms, and legs. Use a smaller brush near the body to keep the lines crisp against the white fur. -
Create the eyes:
Paint two large, tilted ovals in black for the eye patches. Once dry, paint a smaller white circle inside, followed by a black pupil, and finally a tiny white shine dot for life. -
Nose and mouth:
Paint a small, rounded triangular nose on the snout tip. Use a very thin liner brush to paint a simple anchor shape for the smiling mouth. -
Add speckles:
To mimic the stone-like texture in the photo, dip a toothbrush in watered-down black paint and flick tiny speckles over the white areas. Keep it subtle. -
Final assembly:
Once the paint is fully dried, secure the head onto the spring mechanism with strong adhesive (like E6000) if you haven’t already. -
Seal the work:
Finish with a coat of matte varnish. This protects the paint and unifies the sheen, giving it that professional ceramic look.
Place your new swaying friend on a sunny windowsill and enjoy the gentle nod of approval


Koala Clay Bobblehead Hugging a Little Branch
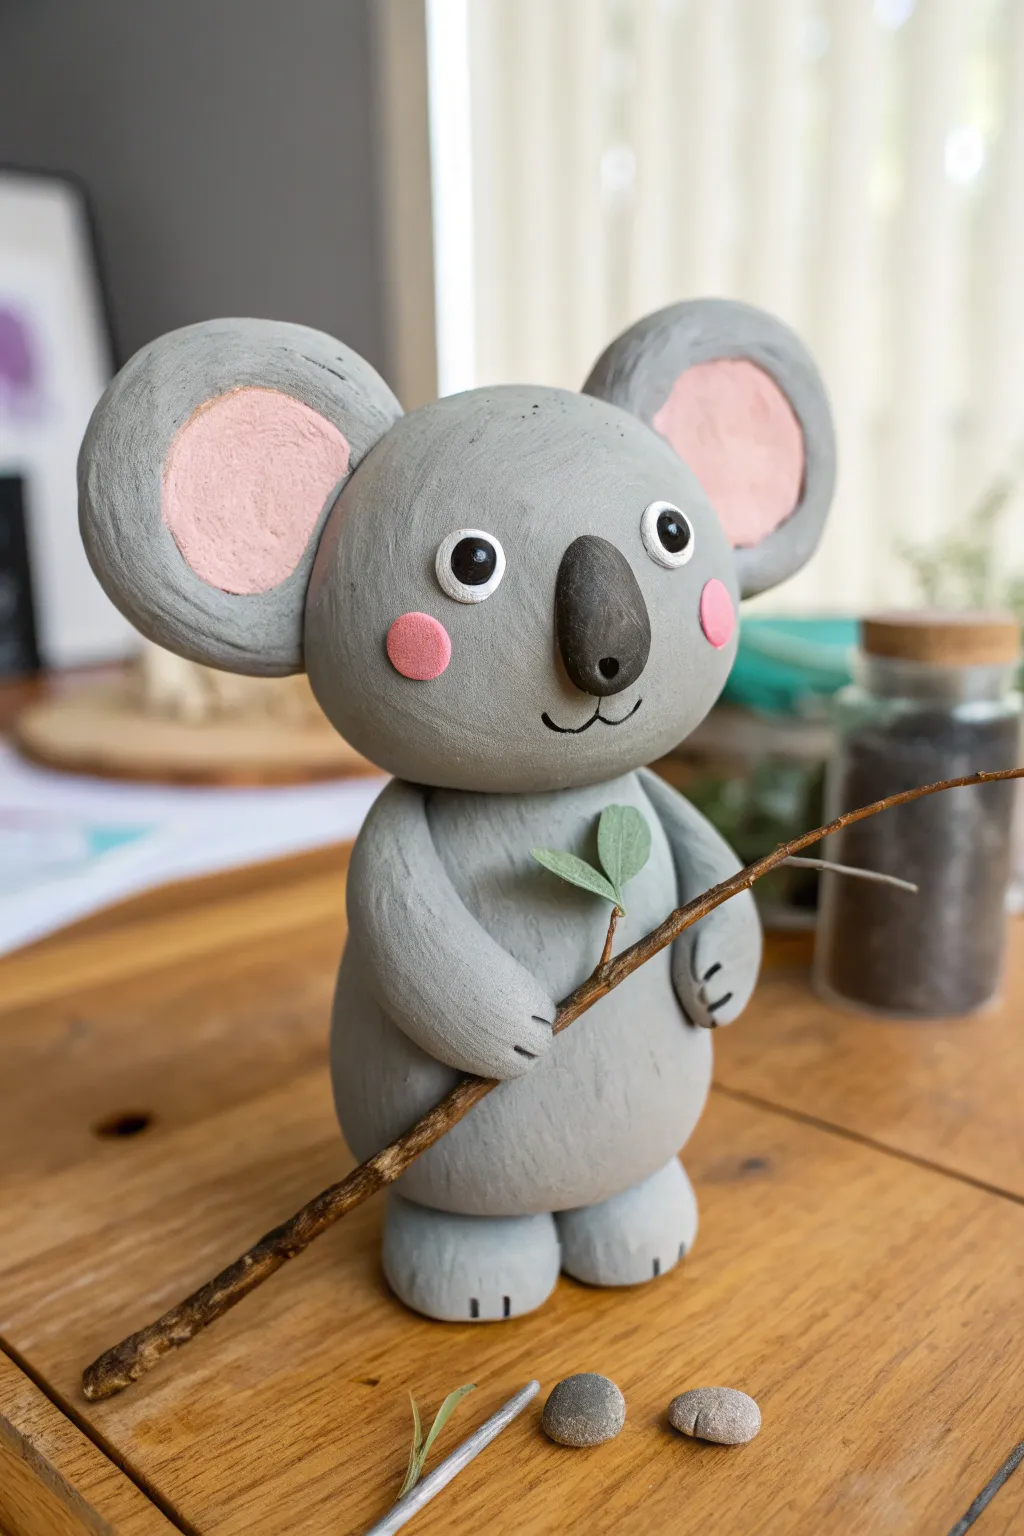
This charming koala bobblehead features oversize ears, a sweet expression, and a natural wooden twig accessory. It’s a whimsical and sturdy clay project that adds a touch of Australian wildlife to your desk.
Detailed Instructions
Materials
- Air-dry clay (grey and pink) or polymer clay
- Acrylic paints (black, white, pink) if using white clay
- Wire or a small bobblehead spring mechanism
- Real wooden twig or branch
- Sculpting tools (needle tool, smoother)
- Strong craft glue or E6000
- Two small faux leaves or green paper
- Matte varnish (optional)
Step 1: Sculpting the Head
-
Shape the Base:
Start by rolling a large ball of grey clay for the head. It should be slightly oval-shaped horizontally to create that classic wide koala face. -
Create the Ears:
Form two smaller balls of grey clay and flatten them into thick discs. Using your thumb, press a depression into the center of each to create the inner ear space. -
Add Ear Details:
Take small amounts of pink clay (or paint later) and press them into the depressions of the ears. Smooth the edges so the pink blends seamlessly into the grey border. -
Attach the Ears:
Attach the ears to the sides of the head. I like to score the clay slightly at the connection points and add a dab of water or liquid clay to ensure a strong bond. -
Form the Nose:
Roll a teardrop shape from black or dark grey clay. Flatten it slightly and attach it prominently in the center of the face, pointing the narrower end upward. -
Create the Eyes:
Roll two small white balls for existing eyes and flatten them onto the face. Add smaller black pupils on top, placing them slightly off-center for a cute, looking-sideways expression. -
Final Facial Details:
Add two small pink circles for cheeks below the eyes. Use a needle tool or small brush to draw or paint a simple ‘w’ shape for the mouth directly under the nose.
Step 2: Body and Assembly
-
Form the Body:
Roll a slightly larger oval of grey clay for the body. Flatten the bottom so it stands securely on a flat surface. -
Make the Legs:
Create two short, thick cylinders for legs. Attach them to the bottom of the body, ensuring the figure is balanced and won’t tip over. -
Shape the Arms:
Roll two sausage shapes for arms. Attach them to the shoulders, curving them forward as if they are ready to hold something. -
Detail the Paws:
Use a knife tool to gently press two or three lines into the ends of the arms and feet to suggest claws or toes. -
Prepare the Bobble Mechanism:
Insert your spring or coiled wire into the top of the body neck area. Add a drop of strong glue to secure it. -
Attach the Head:
Once the body side is secure, attach the head to the top of the spring. The head should hover slightly above the body to allow for movement. -
Add the Branch:
Select a thin, real twig. Carefully thread it through the koala’s curved arms, using a dot of glue where the wood touches the clay paws to keep it in place. -
Attach Leaves:
Glue two small faux leaves or paper cutouts to the twig near the koala’s chest to add a pop of green. -
Surface Texture:
Before the clay fully hardens, use a stiff brush or texture tool to gently tap the grey surface, creating a subtle fur-like texture. -
Seal the Project:
If you painted any details, wait for them to dry completely. Apply a coat of matte varnish to protect your koala and give it a finished professional look.
Head Too Heavy?
If the head droops, your spring might be too weak. Shorten the spring to make it stiffer, or support the head with a prop until the glue cures fully.
Smooth Seams
Use a little water (for air-dry clay) or baby oil (for polymer) on your finger to smooth out fingerprints and seam lines for a polished finish.
Give the head a gentle tap to see your little koala come to life with a friendly wobble

The Complete Guide to Pottery Troubleshooting
Uncover the most common ceramic mistakes—from cracking clay to failed glazes—and learn how to fix them fast.
Simple Astronaut Clay Bobblehead With Bubble Helmet

Blast off into creativity with this charming, chunky astronaut figure featuring a classic bubble helmet and distinct red stripes. This project captures a retro space vibes with a textured, matte finish that looks great on any bookshelf.
Step-by-Step Guide
Materials
- White polymer clay or air-dry clay
- Aluminum foil
- Acrylic paints (gold/silver, red, yellow, blue, black)
- Glossy varnish or UV resin
- Sculpting tools (needle tool, ball stylus)
- Rolling pin
- Strong craft glue or liquid clay
- Spring (for bobble mechanism)
- Fine grit sandpaper
Step 1: Base Structure
-
Form the core:
Crumple a piece of aluminum foil into a tight ball for the helmet and a rectangular block for the body. This reduces weight and saves clay. -
Cover the head:
Roll out a sheet of white clay and wrap it smoothly around the foil ball. Aim for a slightly oversized, spherical shape for that classic helmet look. -
Create the body block:
Wrap the foil rectangle in white clay. Shape it into a boxy torso with slightly rounded edges to match the friendly aesthetic. -
Connect the pieces:
If making a static figure, press the head onto the body. For a bobblehead, leave a cavity in the neck and head to insert your spring later.
Head Heavy?
If the head keeps tipping over before baking, insert a toothpick through the body into the head as temporary support. Remove it carefully before the clay fully hardens.
Step 2: Sculpting the Suit
-
Add the visor area:
Roll a thin snake of clay and form a large oval on the front of the helmet face. Blend the outer edges into the helmet, leaving a defined ridge for the visor frame. -
Sculpt legs and boots:
Form two thick logs for legs. Flatten the bottoms for stability and add slightly wider, rounded blobs for the boots. Attach these firmly to the bottom of the torso. -
Shape the arms:
Roll two cylinders for arms. Bend them slightly at the ‘elbow’ natural position and attach them to the sides of the torso. -
Detail the gloves:
Add small, mitten-like shapes or simple rounded ends to the arms to represent heavy space gloves. -
Refine the surface:
Use your fingers or a flat tool to smooth out fingerprints, but keep a slightly matte, hand-sculpted texture.
Visor Depth
Mix a tiny drop of black into your silver paint for the edges of the visor. This creates a shadow effect that makes the glass look curved and 3D.
Step 3: Tech Details
-
Chest control panel:
Cut a small, thin square of white clay and press it onto the center of the chest. -
Add buttons:
Roll tiny distinct balls of clay for buttons. Press a larger one (for red) and a medium one (for yellow) onto the upper chest. Add smaller ones on the square panel. -
Create the earpieces:
Fashion a band going over the top of the helmet and end it with circular ‘earmuffs’ on each side. -
Indent details:
Use a needle tool or knife to gently press horizontal lines around the shins and forearms where the red stripes will go later. -
Cure or dry:
Bake your polymer clay according to package instructions or let air-dry clay harden completely (24-48 hours).
Step 4: Painting & Assembly
-
Paint the visor:
Fill the oval visor area with metallic silver or gold paint to mimic the reflective sun shield. -
Apply stripes:
Carefully paint thin red rings around the indentation lines on the arms and legs using a fine detail brush. -
Color the buttons:
Paint the chest buttons in bright primary colors—red, yellow, and blue—and add a small black touch to the earpiece centers. -
Install the bobble:
If making a bobblehead, glue the spring securely into the neck cavity of the body, then glue the head onto the top of the spring. -
Final finish:
Apply a coat of glossy varnish or UV resin ONLY to the metallic visor to make it shine like glass, keeping the rest of the suit matte.
Place your little explorer on a stack of books and enjoy the space-age atmosphere
Masked Superhero-Inspired Clay Bobblehead
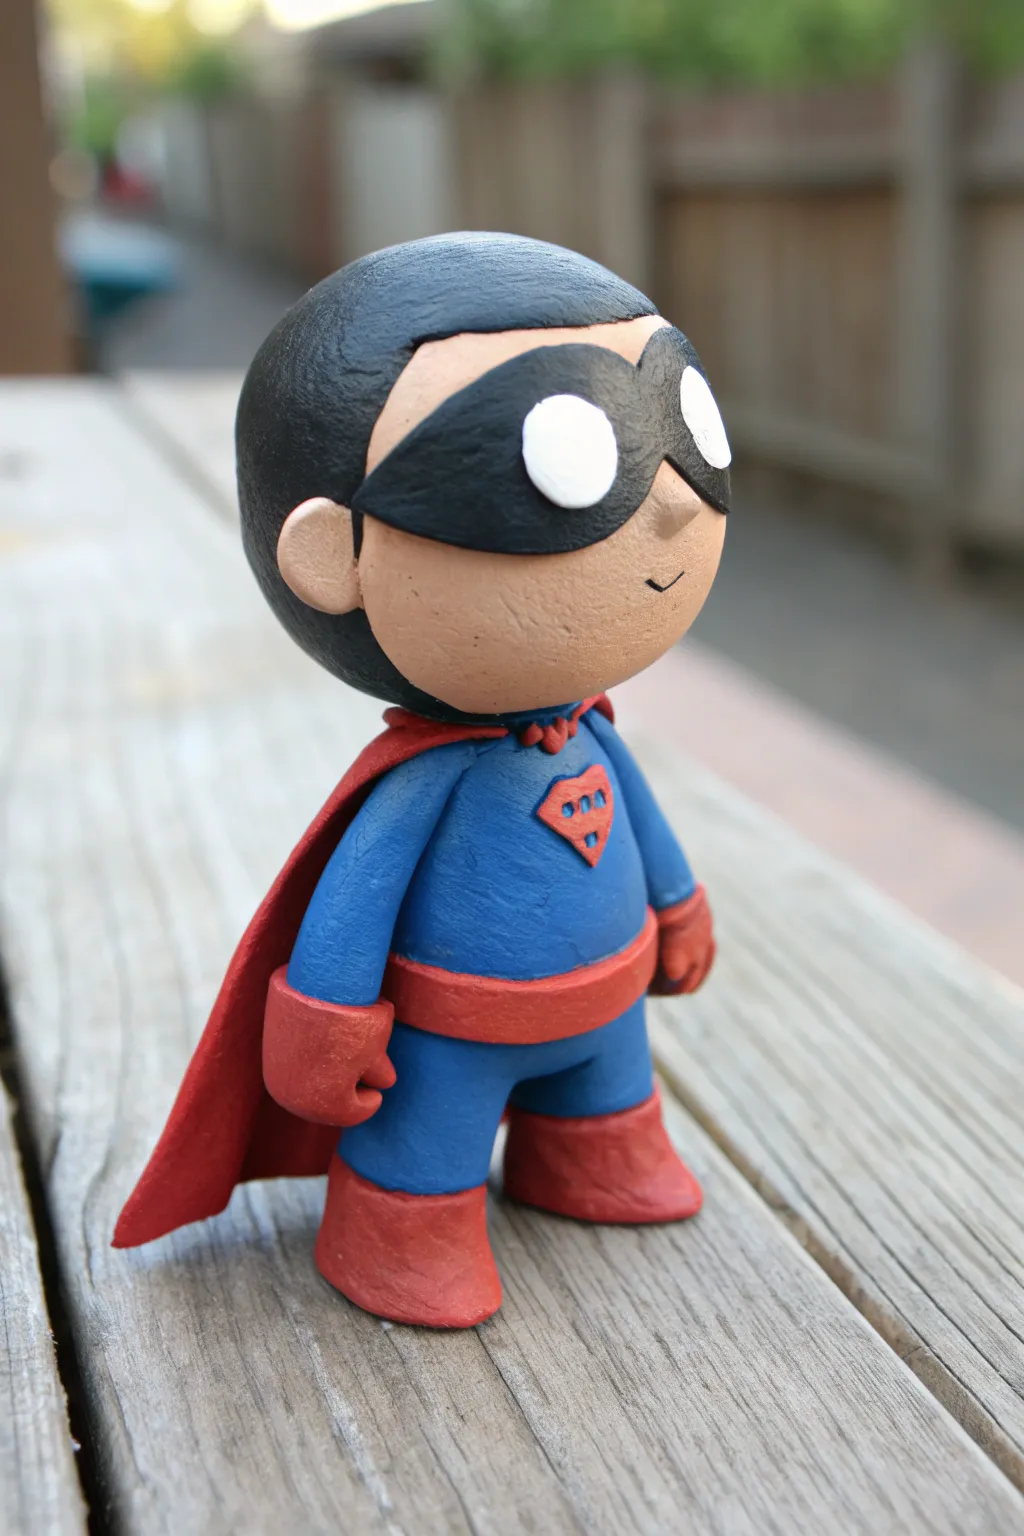
Create a charming, stylized superhero sidekick with this polymer clay project, featuring a distinctive black mask and vibrant red-and-blue suit. This figure uses simple shapes for the body and an oversized head to achieve that classic, adorable bobblehead aesthetic without complex armature.
Step-by-Step
Materials
- Polymer clay (flesh tone, blue, red, black, white)
- Aluminum foil (for the core)
- Clay sculpting tools (needle tool, ball stylus)
- Rolling pin or pasta machine
- Craft knife
- Liquid polymer clay (optional adhesive)
- Oven and baking tray
- Matte varnish (optional)
Step 1: Sculpting the Head & Face
-
Form the core:
Start by scrunching a piece of aluminum foil into a tight ball, slightly smaller than a golf ball. This keeps the head lightweight and saves clay. -
Cover with flesh tone:
Condition your flesh-colored clay until pliable, flatten it into a sheet, and wrap it completely around the foil ball. Roll it generally between your palms to smooth out any seams until you have a perfect sphere. -
Create the mask base:
Roll out a thin sheet of black clay. Cut an elongated oval shape that will span across the upper half of the face. -
Apply the mask:
Gently press the black oval onto the face. Use your fingers to smooth the edges so it merges seamlessy with the skin tone rather than sitting too high on top. -
Add the eyes:
Flatten two small balls of white clay into discs. Place them onto the black mask area to serve as the expressive, blank eyes characteristic of this style. -
Sculpt the nose and mouth:
Add a tiny triangle of flesh clay under the mask for the nose, blending it onto the face. Use a needle tool to gently carve a simple, curved smile. -
Form the hair:
Create a black clay ‘cap’ for the back of the head. Add a separate, slightly scalloped strip for the hairline that overlaps the top of the mask slightly, blending the seams for a smooth helmet-hair look. -
Add ears:
Roll two small balls of flesh tone, flatten them slightly, and press them onto the sides of the head where the mask strap would maximize coverage.
Fixing Fingerprints
Polymer clay loves to hold onto fingerprints. If your smooth superhero suit looks textured, brush it lightly with a little baby oil or cornstarch before baking to smooth it out.
Step 2: Building the Body
-
Shape the torso:
Roll a cylinder of blue clay for the body. It should be significantly smaller than the head to get that cute proportion. -
Add the legs:
Split the bottom of the blue cylinder slightly to suggest legs, or simply attach two short, thick logs of blue clay to the bottom of the torso. -
Attach the boots:
Form two chunks of red clay into boot shapes—wide at the bottom for stability. Attach these to the bottom of the blue legs, smoothing the seam where the colors meet. -
Create the utility belt:
Roll a thin snake of red clay. Flatten it into a strip and wrap it around the distinct waistline of the figure. -
Attach the arms:
Roll two tapered blue tubes for arms. Attach them to the shoulders, blending the clay downward so they don’t fall off. -
Add gloves:
Make two red cylinder shapes for the gauntlets. Press them onto the ends of the blue arms. Use a craft knife to create a simple thumb separation for a mitten-like hand.
Make it Bobble
Instead of a toothpick neck connection, use a small, stiff spring. Embed one end in the body and one in the head (hollow out a space first) for true bobblehead action.
Step 3: Assembly & Details
-
Make the emblem:
Cut a tiny diamond shape from red clay. Use a needle tool to scratch in a stylized ‘R’ or generic geometric pattern and press it onto the left side of the chest. -
Fashion the cape:
Roll a flat sheet of red clay. Cut out a trapezoid shape. Pleat the top narrow edge slightly to create folds. -
Attach the cape:
Drape the cape over the back of the figure, pressing the pleated top firmly onto the shoulders and upper back. -
Connect head to body:
Insert a piece of toothpick or wire into the neck of the body. Push the head down onto this support. I usually dab a little liquid clay here to ensure a permanent bond during baking. -
Bake and finish:
Bake the figure according to your specific clay package instructions (usually 275°F/135°C for 15-30 minutes). Once cool, you can seal the eyes with gloss or the whole figure with matte varnish.
Place your finished hero on your desk to guard your workspace from villains


What Really Happens Inside the Kiln
Learn how time and temperature work together inside the kiln to transform clay into durable ceramic.
Princess-Inspired Clay Bobblehead With Big Hair
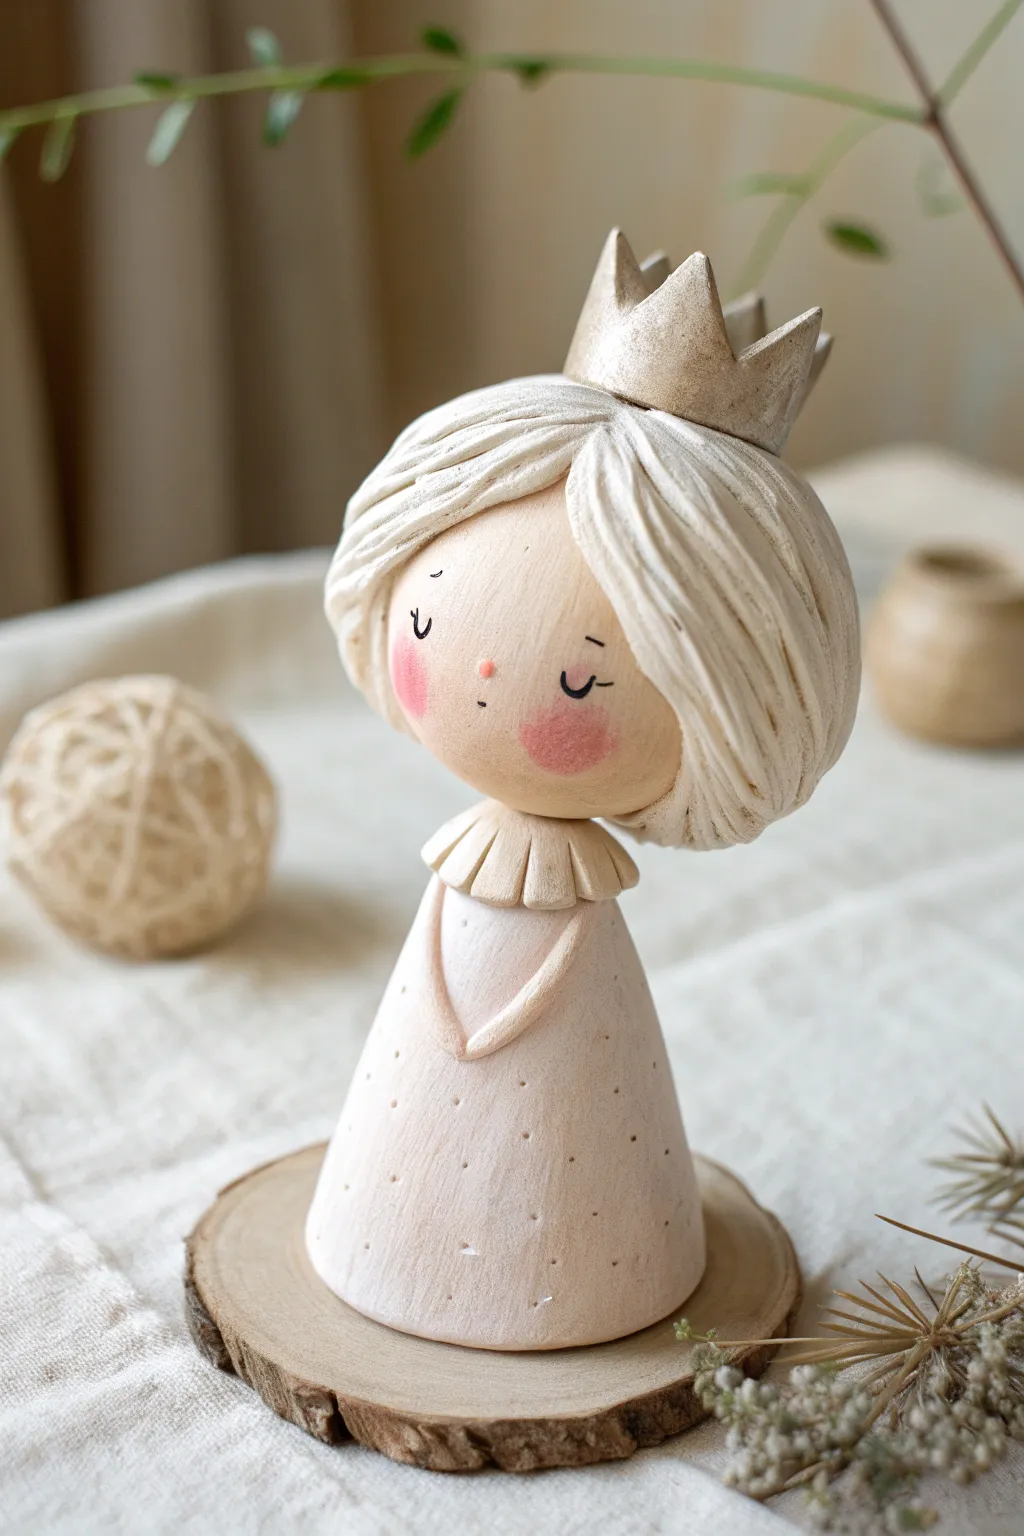
This charming figurine captures a dreamy princess with oversized, textured hair and a delicate speckled dress. Her sweet, serene expression and golden crown make her a perfect regal addition to your clay collection.
Step-by-Step Guide
Materials
- Polymer clay (white, beige/skin tone, gold)
- Aluminum foil
- Bobblehead spring or small tension spring
- Sculpting tools (needle tool, ball stylus, rubber shaper)
- Acrylic paints (black, pink, white)
- Fine detail paintbrush
- Super glue or strong craft adhesive
- Wooden slice for the base
- Matte varnish (optional)
- Pastel chalks (pink) for cheeks
Step 1: Forming the Base Structure
-
Create the core:
Begin by crumpling aluminum foil into a cone shape for the body and a slightly flattened sphere for the head. This saves clay and keeps the figurine lightweight. -
Cover the body:
Roll out a sheet of white polymer clay until it’s about 1/4 inch thick. Wrap this around your foil cone, smoothing the seams at the back to create a clean, conical dress shape. -
Shape the head:
Cover the foil sphere with beige or skin-tone clay. Roll it firmly between your palms until the surface is completely smooth and free of fingerprints. -
Install the mechanism:
Press a small indentation into the top of the dress cone and the bottom of the head. If you are making a true bobblehead, test-fit your spring now, but don’t glue it yet. If making a static figure, insert a toothpick or wire for support.
Needle Tool Secret
When texturing the hair, wipe your needle tool with a baby wipe every few strokes. This prevents clay buildup and keeps your lines crisp and deep.
Step 2: Sculpting the Dress and Details
-
Add the texture:
Take a needle tool and gently poke tiny, random holes all over the white dress to create the speckled fabric effect shown in the original design. -
Create the collar:
Roll a small snake of white clay and flatten it slightly. Use a knife tool to cut small vertical lines to simulate ruffles, then wrap this around the neck area of the dress cone. -
Form the arms:
Roll two thin tapered logs of white clay for the arms. Attach them starting from the shoulders and curve them inward so they meet at the center of the belly. -
Refine the pose:
Blend the clay at the shoulders so the arms look seamless with the dress, keeping the hands simply pressed together in a gentle V-shape.
Step 3: Constructing the Hair and Crown
-
Prepare the hair base:
Mix white clay with a tiny bit of beige or grey for an off-white look. Create a thick, flattened pancake of clay and drape it over the head. -
Texture the strands:
Using a needle tool or a clay shaper, draw deep grooves into the hair clay, starting from a center point and curving outward to mimic large, sweeping locks of hair. -
Shape the bob:
Curve the ends of the hair inward toward the neck to create that voluminous, bubble-bob silhouette. Ensure the hair covers the ears and frames the face perfectly. -
Mold the crown:
Roll a strip of gold clay (or white clay you plan to paint gold). Cut a zigzag pattern along the top edge to create three to five points. -
Mount the crown:
Curve the strip into a circle, joining the ends. Place it slightly tilted on top of the textured hair and press down gently to secure it.
Petal Power
Give her a nature theme by replacing the gold crown with a wreath of tiny clay flowers and green leaves for a ‘forest spirit’ variation.
Step 4: Final Touches and Assembly
-
Bake the pieces:
Bake the head and body separately according to your polymer clay package instructions. I usually tent them with foil to prevent scorching the white clay. -
Paint the face:
Once cool, use a very fine brush or a toothpick with black paint to draw two small U-shapes for closed, sleeping eyes and tiny eyebrows. Add a minuscule dot for the nose. -
Blush the cheeks:
Scrape some pink pastel chalk into a fine dust. Use a soft, dry brush to gently apply rosy circular cheeks to the face. -
Enhance the crown:
If you didn’t use gold clay, paint the crown now with metallic gold acrylic paint. A dry-brush technique can make it look authentically aged. -
Final assembly:
Glue the spring into the neck hole of the body and the head hole. Finally, glue the base of the dress onto a rustic wooden slice for stability.
Place your little princess on a shelf where she can nod sweetly at passersby
Tiny Dragon Clay Bobblehead With Rounded Spikes
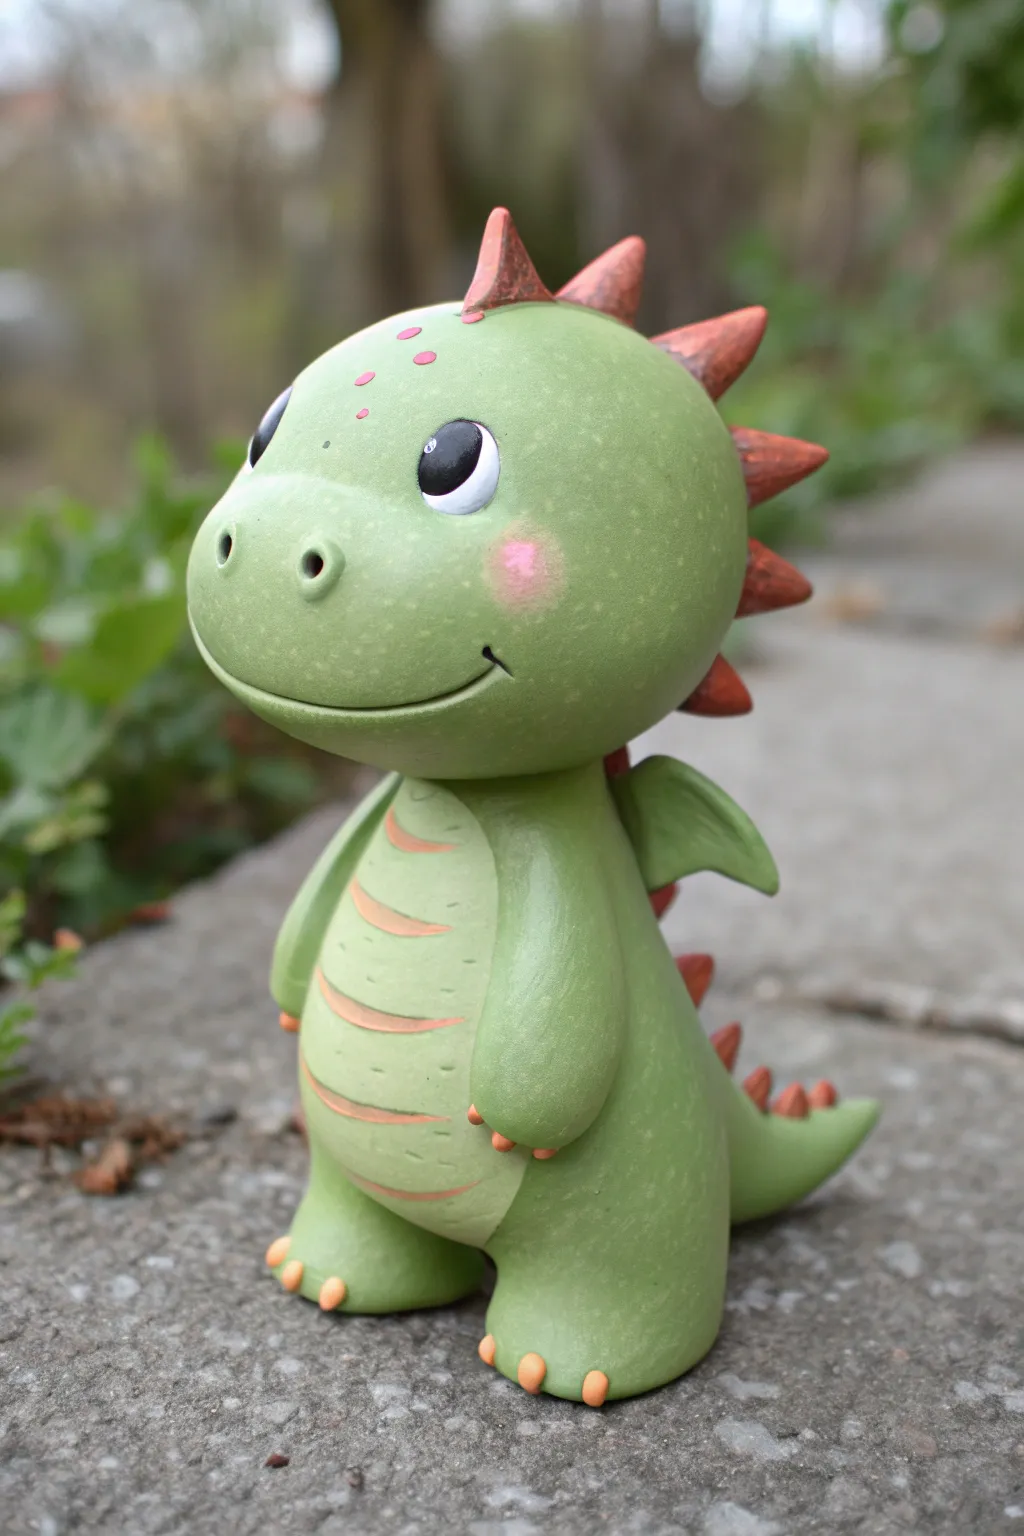
Bring a touch of fantasy to your desk with this adorable little green dragon. Its smooth, rounded features and playful terracotta spikes give it a friendly charm that is perfect for beginners and seasoned sculptors alike.
Step-by-Step Tutorial
Materials
- Sage green polymer clay
- Terracotta/burnt orange polymer clay
- White polymer clay
- Black polymer clay
- Pale pink soft pastel (shaved into powder)
- Small bobblehead spring mechanism
- Ball stylus tools (large and small)
- Needle tool or toothpick
- Soft paintbrush
- Wire cutters
- Oven for baking (if using polymer clay)
Step 1: Prepping the Base Shape
-
Form the body base:
Start with a generous ball of sage green clay. Roll it into a smooth pear shape, flattening the bottom slightly so it stands upright securely. This will serve as the stable base for your dragon. -
Add the belly detail:
Take a smaller piece of the same green clay and flatten it into a thin oval. Press this onto the front of the pear shape to create a slightly raised belly area, smoothing the edges into the main body until seamless. -
Create the belly stripes:
Roll very thin, short snakes of terracotta clay. Gently press four or five of these horizontal lines across the belly area. Use a rolling tool to flatten them flush with the body surface. -
Attach the feet:
Roll two medium balls of sage green clay for the feet. Flatten the bottoms and attach them to the base of the body, blending the clay upwards so they look integrated rather than just stuck on. -
Add tiny claws:
Roll tiny specks of terracotta clay into little cones. Attach three to the front of each foot to act as toes or claws.
Head Too Heavy?
If the head tilts too much, the clay might be too thick. Use a ball of aluminum foil as a core for the head to reduce weight while maintaining volume.
Step 2: Sculpting the Head
-
Shape the head:
Roll a large ball of sage green clay—slightly larger than the body for that cute bobble look. Refine it into a rounded egg shape, keeping the wider part at the bottom for chubby cheeks. -
Carve the mouth:
Use a needle tool or clay knife to slice a curved smile low on the face. Add a small vertical tick mark at the corner of the mouth to give it personality. -
Create nostril indentations:
With a medium ball stylus, press two deep indentations above the mouth for the nostrils. The depth here adds a lot of character. -
Position the eyes:
Make two shallow indentations where the eyes will go. Fill these with flattened ovals of white clay. Press a smaller circle of black clay onto the white, positioning it toward the front for a focused gaze. -
Add eye sparkle:
I always find this step magical—place a tiny dot of white clay in the upper corner of each black pupil. This reflection brings the dragon to life. -
Blushing cheeks:
Using a soft paintbrush, pick up some shaved pink pastel powder and gently dust round circles on the cheeks just below the eyes for a rosy glow. -
Forehead spots:
Add three or four tiny, flat dots of pink clay to the forehead area for subtle texture and color variation.
Level Up: Glossy Eyes
After baking, paint a thin layer of UV resin or glossy varnish over just the eyes. This makes them look wet and shiny like real glass.
Step 3: Assembly and Details
-
Insert the spring:
Press the bobble spring into the top of the neck area on the body. Ensure it is centered and embedded securely in the clay. -
Form the arms:
Roll two teardrop shapes of green clay. Attach them to the sides of the body, blending the shoulder area smooth but leaving the rounded hands free. -
Craft the wings:
Create small triangular wedges of green clay for wings. Attach them to the back of the body. -
Make the tail:
Roll a cone of green clay and attach it to the lower back, curving it slightly to one side so it’s visible from the front. -
Add the spikes:
Form several small cones from terracotta clay. Press these in a row starting from the top center of the head, going all the way down the back and tail spine. -
Texture the body:
For a stone-like finish, gently tap the green surfaces with a toothbrush or stiff bristles to create a subtle, pitted texture, avoiding the eyes and belly stripes. -
Final connection:
Place the head onto the spring mechanism temporarily to check balance, then remove it for baking. Bake all parts according to your clay package instructions. Once cooled, use strong glue to permanently fix the spring into the head.
Give your little dragon a gentle tap and watch it nod happily on your shelf

TRACK YOUR CERAMIC JOURNEY
Capture glaze tests, firing details, and creative progress—all in one simple printable. Make your projects easier to repeat and improve.
Pumpkin Patch Clay Bobblehead With Leaf Collar
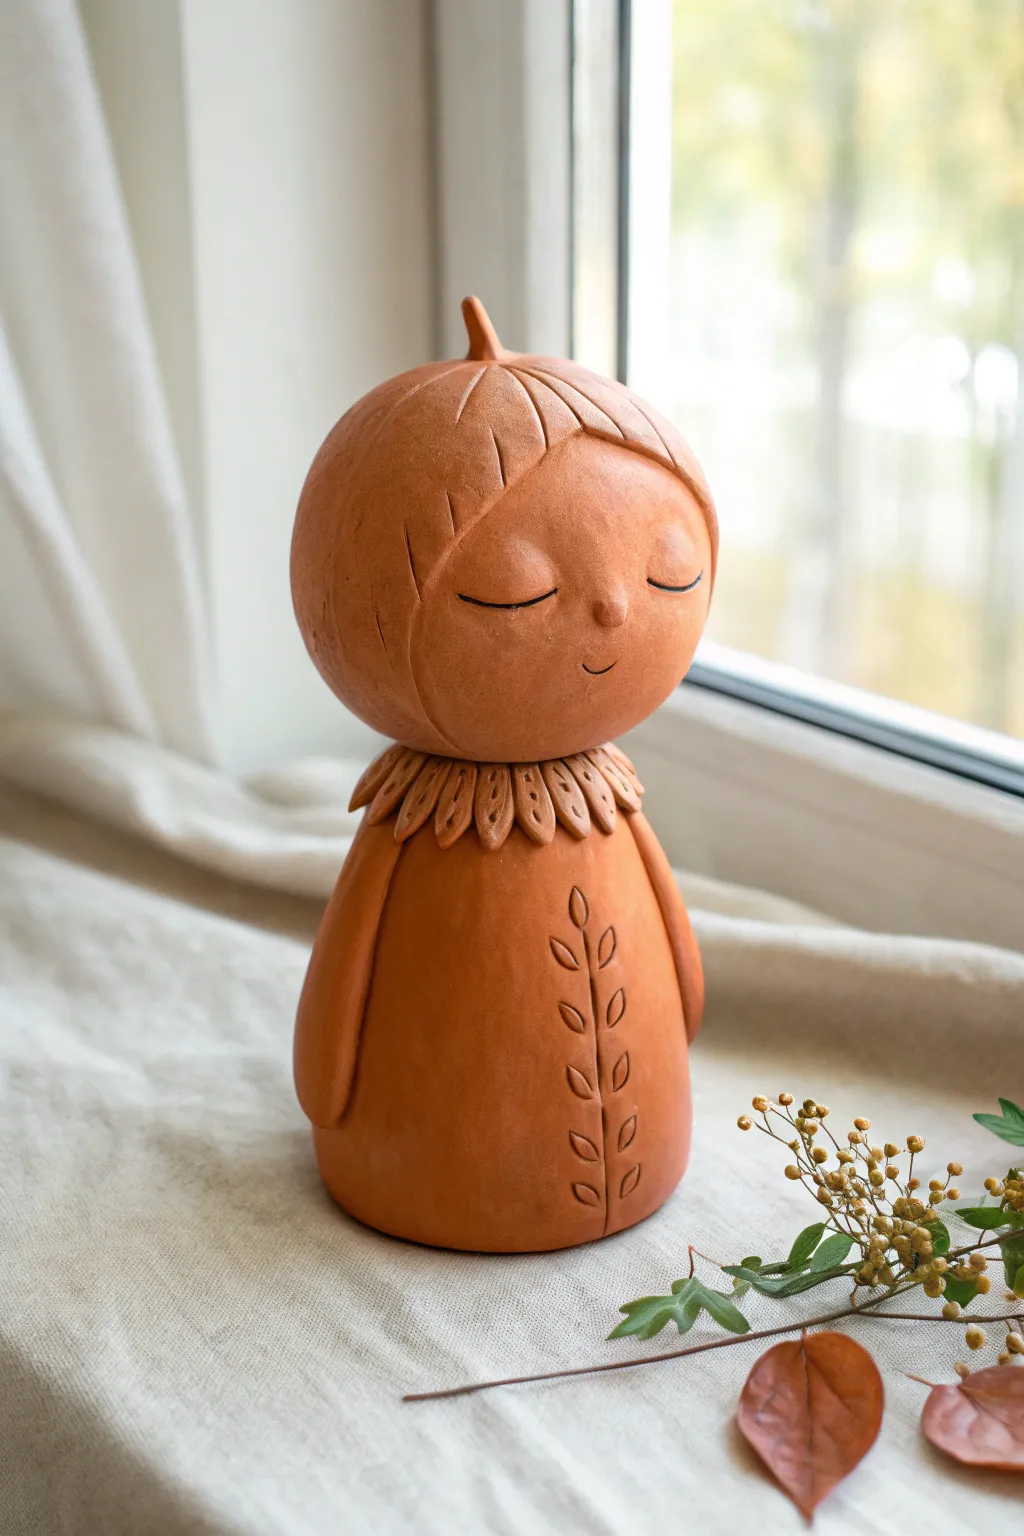
Capture the serene essence of autumn with this charming terracotta-colored clay figure. Featuring a pumpkin-inspired head that gently wobbles on a leafy collar, this project combines simple slab and pinch pot techniques for a delightful seasonal decoration.
Step-by-Step
Materials
- Terracotta-colored polymer clay (or air-dry clay painted terracotta)
- A small metal spring or strong flexible wire
- Aluminum foil
- Clay sculpting tools (needle tool, ball stylus)
- Rolling pin
- Strong craft glue (E6000 or similar)
- Black acrylic paint
- Fine detail paintbrush
- Damp sponge or smoothing tool
- Matte varnish (optional)
Step 1: Sculpting the Head
-
Form the foil core:
Crumple a piece of aluminum foil into a tight ball, slightly smaller than a tennis ball. This reduces the weight of the head so it can bobble effectively and saves clay. -
Cover with clay:
Roll out a sheet of your terracotta clay to about 1/4 inch thickness. Wrap it completely around the foil ball, smoothing the seams together until you have a perfect sphere. -
Add the stem:
Roll a tiny, tapered snake of clay. Attach it to the very top center of the head, blending the clay downwards so it looks like it grew naturally from the sphere. -
Create the pumpkin ridges:
Using a modeling tool or the back of a butter knife, gently press curved vertical lines starting from the stem and fading out halfway down the face to suggest the segments of a pumpkin. -
Sculpt the face:
Roll a minuscule ball of clay for the nose and press it onto the center of the face. Use a needle tool to etch a small, curved smile below it. -
Hollow the neck connection:
On the underside of the head, create an indentation (a socket) large enough to hide the top half of your spring mechanism. Ensure the walls are thick enough to support the spring.
Step 2: Building the Body
-
Shape the base:
Roll a large cylinder of solid clay and taper it upwards to create a bell shape. Flatten the bottom so it stands firmly on your work surface. -
Add the arms:
Roll two long, thin logs of clay. Attach them vertically to the sides of the body, blending the top seam into the ‘shoulder’ area so they hang naturally. I find blending with a rubber tip tool works best here. -
Detail the front:
Using your needle tool, gently carve a vertical stem down the center of the belly. Press simple leaf shapes branching off this stem to create the botanical pattern. -
Sculpt the leaf collar:
Roll small teardrop shapes of clay. Flatten them and press a center vein into each. Arrange these in a circle around the top of the body neck, pointing downwards like petals. -
Prepare the neck mount:
Create a small platform or depression at the top of the body (inside the collar ring) where the bottom of the spring will eventually sit.
Head Tilt Fix
If the head tilts too far back or forward, your spring is too weak or long. Snip a coil off the spring to shorten it, making the bobble tighter and more controlled.
Step 3: Assembly and Finish
-
Texture check:
Before baking or drying, use a damp sponge to smooth out any fingerprints. The finish should look matte and earthy like unglazed pottery. -
Bake or dry:
Follow the instructions for your specific clay. Ensure the head is propped up so the bottom indentation doesn’t deform. -
Paint the eyes:
Once cool and dry, use a fine liner brush and black acrylic paint to draw two curved, closed eyelids. Keep lines thin for a delicate look. -
Attach the spring:
Glue the bottom of the metal spring firmly into the depression on the body. Let it set completely before proceeding. -
Mount the head:
Apply glue to the top of the spring and carefully lower the head onto it. Hold it in place until the glue grabs, ensuring the face is centered. -
Final touches:
If desired, brush a very light wash of darker brown paint into the indented textures (leaves and hair) and wipe it off to accentuate the depth.
Simulating Terracotta
Using white clay? Mix burnt sienna, a touch of yellow ochre, and a speck of white acrylic paint directly into the raw clay for that perfect earthy pot hue before sculpting.
Place your little pumpkin sprite near a window and watch it nod cheerfully in the breeze
Best Friends Mini Clay Bobblehead Pair
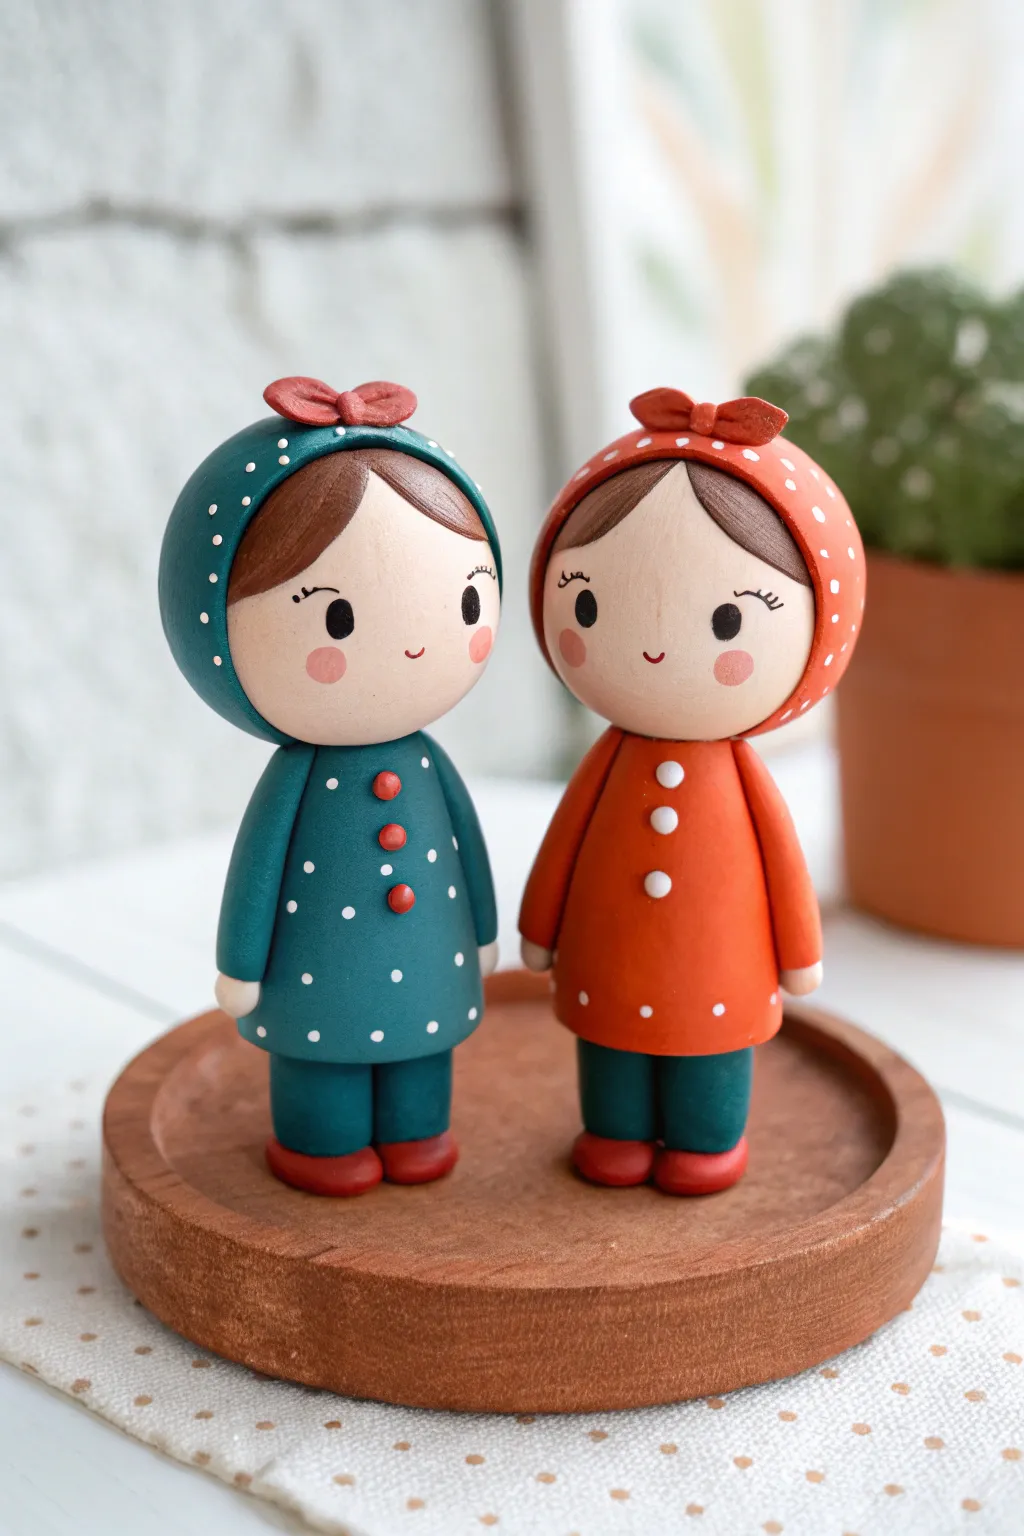
Celebrate friendship with this adorable pair of matching clay figures, featuring cozy hoods and charming polka-dot outfits. These miniature dolls, one in teal and one in terracotta, make perfect keepsakes or gifts for your closest companion.
Step-by-Step Guide
Materials
- Polymer clay (Teal, Terracotta/Orange, Beige/Skin tone, Brown, Red, White)
- Clay sculpting tools (dotting tool, needle tool, small blade)
- Aluminum foil (for armature core)
- Small springs or stiff wire coils (for the bobble mechanism)
- Oven for baking
- Acrylic paint (optional details like eyes if not using clay)
- Fine detail brush
- Gloss glaze (optional)
Step 1: Sculpting the Base Structure
-
Form the core bodies:
Start by rolling two balls of aluminum foil, roughly 1 inch in diameter, to serve as the lightweight core for the heads. Roll two slightly smaller, cylindrical foil shapes for the bodies. -
Cover the bodies:
Roll out a sheet of teal clay and a sheet of orange clay. Wrap the cylindrical body foils: one teal, one orange. Smooth the seams at the back and gently taper the distinctive A-line coat shape. -
Create the legs:
For the teal figure, form two small logs of dark teal clay. For the orange figure, use dark teal or green logs as shown to create contrast. Attach these securely to the bottom of the coats. -
Add the shoes:
Fashion four tiny ovals from red clay. Flatten the bottoms slightly so the figures stand stable, then attach them to the bottom of the legs.
Head Tilt Fix
If the head tilts too much or looks floppy, your spring might be too long. Snip a coil off the spring with wire cutters to lower the center of gravity suitable for the clay weight.
Step 2: Creating the Heads and Hoods
-
Cover the head cores:
Wrap your foil head spheres in a layer of beige/skin-tone clay. Ensure the surface is perfectly smooth and free of fingerprints by rolling it gently in your palms. -
Add the hair:
Flatten a disc of brown clay. Place it over the top of the head for hair. Use a blade to trim the front into a swooping bang shape that frames the face. -
Form the hoods:
Roll out teal and orange clay into circular sheets slightly larger than the heads. Drape the teal sheet over the teal figure’s head and the orange sheet over the other, covering the back and sides but leaving the face and bangs visible. -
Secure the bows:
Create two tiny red bows. Place a small dot of red clay on top of each hood and press the bow into it to secure it firmly. -
Install the bobble mechanism:
Before baking, press a small hollow or hole into the neck of the body and the base of the head where the spring will go. Do not glue yet; just ensure the fit is right so the head ‘floats’ slightly above the collar.
Accessories Upgrade
Personalize the duo! Add tiny clay accessories like a miniature book, a coffee cup, or a tiny purse in the hands to match your real-life hobbies with your best friend.
Step 3: Adding Details and Assembly
-
Apply the buttons:
Roll three tiny balls of red clay for the teal coat and three white balls for the orange coat. Press them vertically down the center of each chest. -
Create the hands:
Roll small balls of beige clay and attach them to the sides of the coats to represent hands peeking out from imaginary sleeves. -
Add Polka Dots:
Roll out tiny, minuscule specks of white clay. Gently press them onto the teal coat and hood in a random pattern. Repeat with the orange coat. -
Refine the faces:
Using a very small dotting tool, indent the spots for the eyes. Add black clay for eyes or plan to paint them later. Add tiny pink circles for blushing cheeks. -
Bake the pieces:
Bake the heads and bodies separately according to your polymer clay package instructions (usually 275°F/135°C for 15-30 minutes). Support the heads with extra foil so they don’t flatten. -
Paint facial features:
Once cool, use a fine brush or needle tool dipped in black paint to add eyelashes and a tiny curved smile. I find adding white catchlights to the eyes really brings them to life. -
Final Assembly:
Superglue one end of your spring into the body cavity and the other into the head cavity. Hold until set to ensure the bobble action works properly.
Enjoy watching these little heads nod in agreement as they sit on your shelf
Sports Fan Clay Bobblehead With a Chunky Jersey

Capture the spirit of the game with this charmingly minimalist clay figure, sporting a classic number 10 jersey and oversized boots. Its wide, bald head and simplistic facial features give it a timeless, emotive quality perfect for a desktop mascot or a personalized gift for a sports lover.
Step-by-Step Tutorial
Materials
- Polymer clay (White, Skin Tone, Burnt Orange, Teal/Dark Green)
- Aluminum foil (for armature core)
- Sculpting tools (needle tool, ball stylus, clay knife)
- Stiff wire or a strong spring (for the neck connection)
- Acrylic paints (Black, Burnt Orange)
- Fine detail paintbrush
- Matte varnish or sealant
- Oven for baking
Step 1: Building the Head and Torso
-
Form the core:
Start by crunching a ball of aluminum foil into a slightly flattened sphere shape. This keeps the head lightweight, which is crucial for a bobble-style figure. -
Cover the head:
Roll out a sheet of skin-tone polymer clay. Wrap it completely around your foil ball, smoothing out any seams until you have a flawless, bald surface. Gently slightly flatten the front area where the face will go. -
Sculpt the ears:
Create a ‘C’ shaped ear on the left side. It should be relatively large and stylized. Use a ball stylus to indent the inner ear, creating depth and a distinct rim. -
Add facial details:
Using a very small sculpting tool or a needle, gently imply the eyes and mouth. You aren’t painting them yet, just creating the slightest indentations or using tiny bits of clay to mark placement for later. Keep the expression neutral and contemplative. -
Create the body block:
Form a solid cylinder of white clay for the torso. It should be significantly smaller than the head to achieve that ‘chibi’ proportion. Round off the bottom edge where the shorts will begin.
Head Too Heavy?
If the head keeps tipping over before baking, prop it up with a small customized cradle of folded aluminum foil. This supports the weight while it hardens in the oven.
Step 2: Dressing the Player
-
Sculpt the shorts:
Add a layer of white clay to the bottom of the torso, shaping two short, wide legs. Use a knife tool to create a clean horizontal line separating the shirt hem from the shorts. -
Shape the arms:
Roll two small sausages of white clay for arms. Attach them flush against the sides of the body; they should look stiff and doll-like rather than dynamic. Add small skin-tone balls at the ends for hands. -
Add the trim:
Roll extremely thin snakes of teal and orange clay. Carefully press these around the cuffs of the sleeves, the hem of the shirt, and the bottom of the shorts to create the piping. Smooth them gently so they bond without losing their shape. -
Applying the number:
Cut a ‘1’ and a ‘0’ from a thin sheet of orange clay. Press them firmly onto the center of the chest. Outline them with a microscopic snake of black clay or paint them later for deeper contrast.
Step 3: Boots and Assembly
-
Form the boots:
Create two chunky, rectangular blocks from orange clay. These serve as the feet and provide stability for the standing figure. -
Shoe details:
Add white toe caps to the front of the orange boots. I find it easiest to use a needle tool to scratch in the lace crossed pattern on the white toe cap, then fill those scratches with a tiny bit of teal clay. -
Connect the body:
Insert a strong wire or a spring into the neck area of the torso and press the boots firmly onto the legs. Ensure the figure stands balanced on a flat surface before baking. -
Bake the clay:
Bake the head and body separately according to your clay manufacturer’s instructions (usually 275°F/130°C for 15-30 minutes). -
Painting facial features:
Once cool, use a fine brush with black acrylic paint to carefully fill in the small oval eyes. Add thin eyebrows high on the forehead for that surprised, innocent look, and a tiny dash for the mouth. -
Final Assembly:
Attach the head to the body using superglue on the wire or spring connection. Finish with a coat of matte varnish to protect the paint and remove any glossy shine from the clay.
Clean Lines Pro Tip
For the crispest jersey numbers, don’t sculpt them by hand. Roll the clay flat and let it sit on paper for 10 mins to firm up, then cut with an X-Acto knife.
Place your finished little athlete on a shelf to watch over your workspace with quiet determination