I love making a ceramic mask because the face gives you an instant story to play with—sweet, spooky, elegant, or totally weird. Here are my favorite ceramic mask ideas to spark your next slab project, from classic styles to full-on sculptural experiments.
Simple Half-Face Wall Mask With Clean Lines
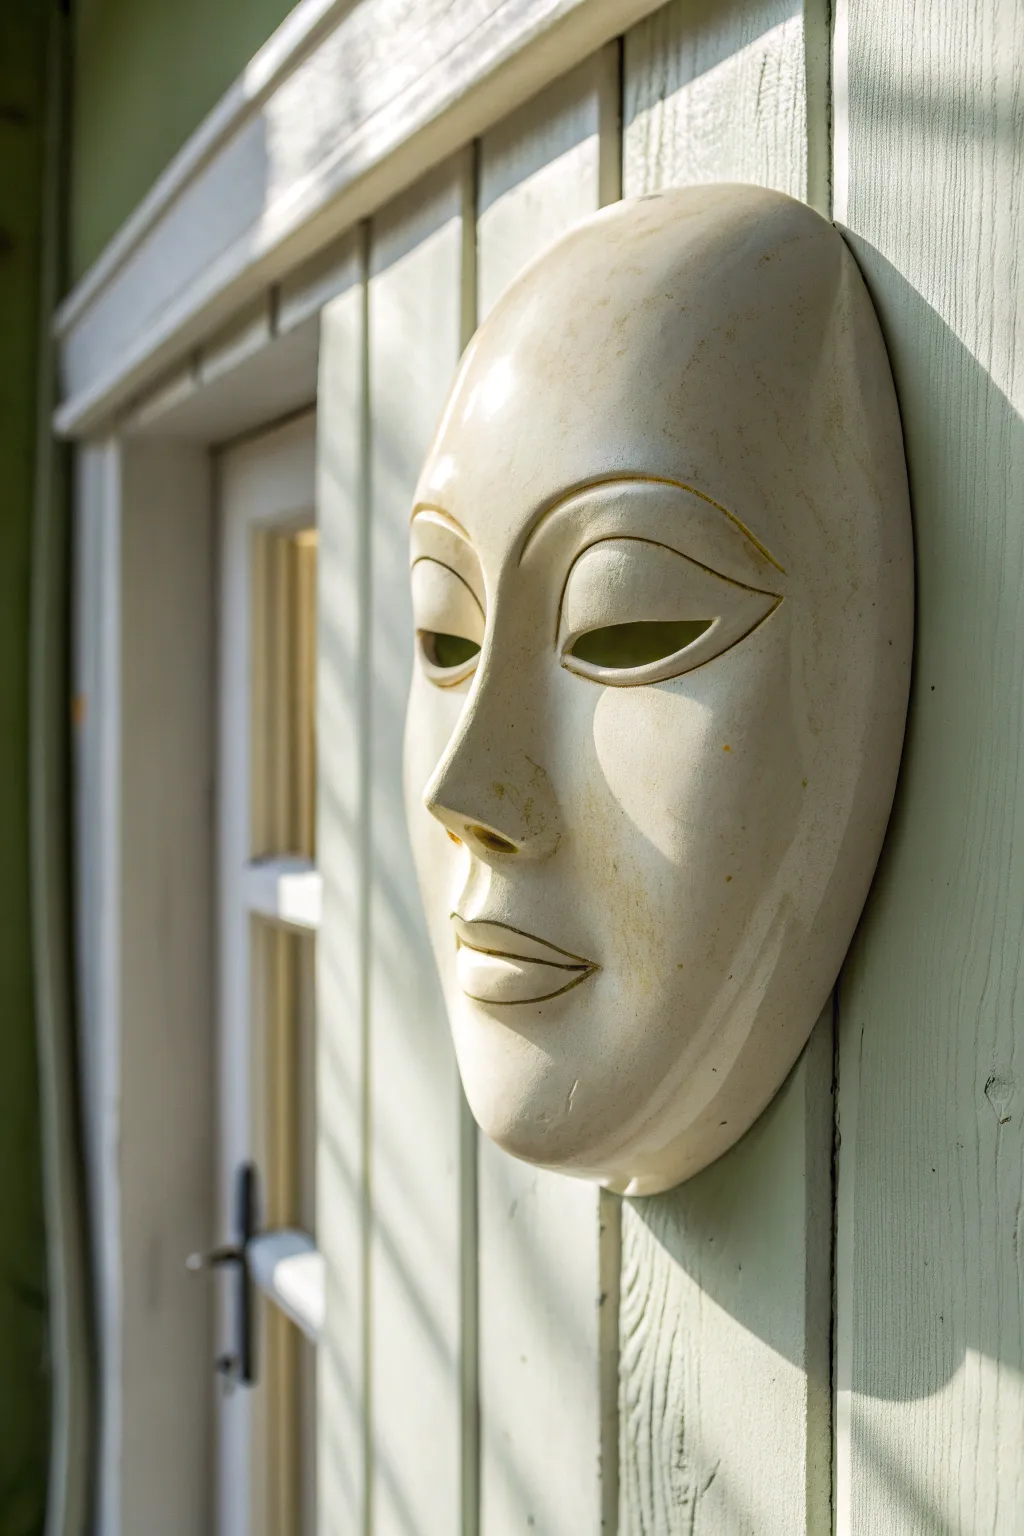
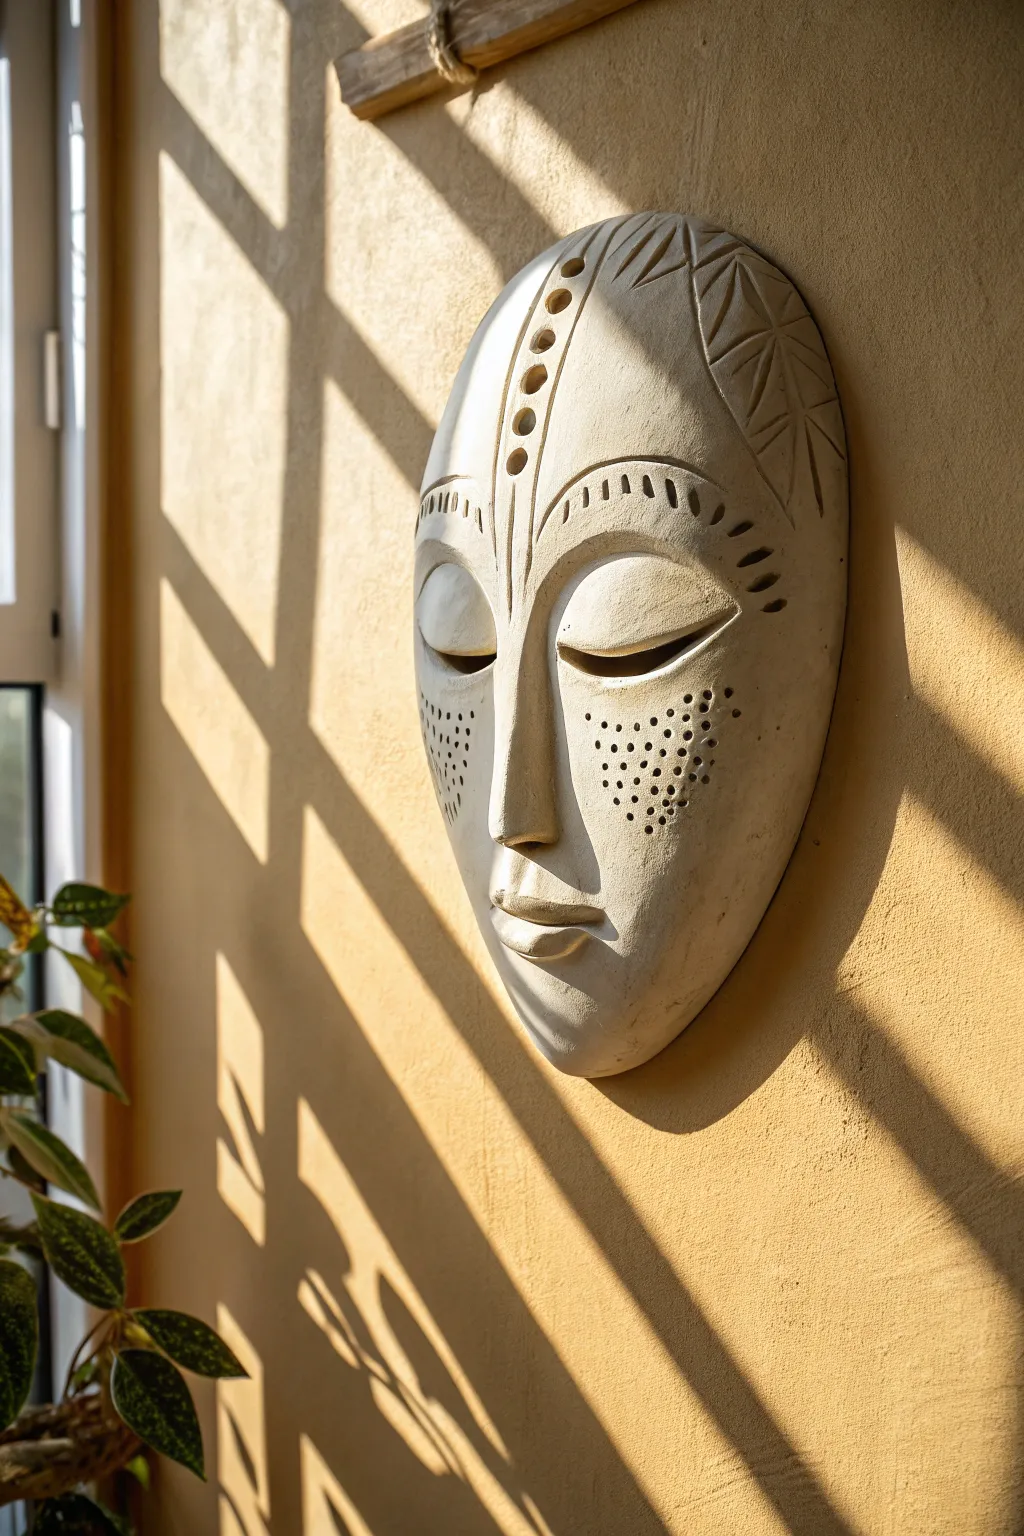
Capture a sense of peaceful observation with this smooth, stylized ceramic mask. Its classic oval contours, defined brow lines, and monochromatic glaze create a sophisticated architectural accent perfect for an entryway or garden wall.
Step-by-Step Guide
Materials
- White or buff stoneware clay (smooth body)
- Plaster face mold (or a styrofoam head form)
- Rolling pin and canvas mat
- Fettling knife
- Loop tool for carving
- Provide tool or needle tool
- Rubber kidney rib
- Sponge
- Satin white or cream stoneware glaze
- Heavy-duty mounting wire or epoxy glue-on hanger
Step 1: Forming the Base
-
Prepare the Clay Slab:
Begin by wedging your clay thoroughly to remove air bubbles. Roll it out on a canvas mat into an even slab that is approximately 1/4 to 3/8 inch thick. -
Drape Over Mold:
Carefully lift your clay slab and drape it over your plaster face mold or form. If using a non-porous form like styrofoam, cover it with plastic wrap or tights first to prevent sticking. -
Initial Shaping:
Gently press the clay against the form, starting from the nose and working outward to the cheeks and forehead. Use the flat of your hand to smooth the clay down, ensuring it hugs the contours without stretching too thin. -
Trim the Outline:
Once the main features are defined, use a fettling knife to cut the outer perimeter of the mask. Create a smooth, elongated oval shape that eliminates the ears and hair for that clean, stylized look shown in the image.
Smoothness Secret
Burnish the clay with the back of a spoon when leather-hard. This compresses the particles for a stone-like surface even before glazing.
Step 2: Sculpting the Features
-
Define the Brow:
Roll two thin coils of clay. Place them along the brow ridge area to build up volume. Blend the clay downwards into the eyelids and upwards into the forehead using your thumb or a modeling tool until the seam disappears. -
Carve the Eye Sockets:
Using a loop tool, gently carve out the recessed area for the eyes. The goal is to create defined, heavy lids that slope elegantly. -
Shape the Eyes:
Cut out the eye openings. Instead of realistic almond shapes, cut stylized, elongated curves that taper sharply at the corners. Use a damp sponge to smooth the cut edges so they aren’t sharp. -
Build the Nose:
Refine the nose bridge. It should form a straight, continuous line from the forehead. I like to add a tiny bit of extra clay to the tip to ensure it has a sharp, structural profile before smoothing it back. -
Sculpt the Mouth:
For the lips, refrain from cutting an opening. Instead, sculpt the lips in slight relief. Create a ‘cupid’s bow’ on the top lip and kept the mouth neutral and closed. Use a needle tool to incise the line between the lips.
Step 3: Refining and Finishing
-
Smooth the Surface:
Wait until the clay is leather hard. Take a rubber kidney rib and compress the entire surface of the mask. This step is crucial for achieving that porcelain-smooth finish seen in the photo. -
Crisp Up Lines:
Go back over the eyebrow arches and the eyelids with a modeling tool to sharpen the creases. The design relies on shadow and light, so these recesses need to be deep and clean. -
Add Mounting Holes:
While the clay is still leather hard, punch two small holes near the temples or disguise them in the upper sides of the mask for the mounting wire. Alternatively, you can score the back now to attach a hanger later. -
Bisque Fire:
Allow the mask to dry very slowly under loose plastic to prevent warping at the edges. Once bone dry, bisque fire the piece to the appropriate cone for your clay body (usually Cone 04 or 06). -
Glaze Application:
Wipe the bisque ware with a damp sponge to remove dust. Pour a satin white or cream glaze over the mask or dip it if you have a large enough container. A satin finish is better than high gloss here, as it mimics the texture of smooth skin or stone. -
Glaze Firing:
Fire the piece a second time to the glaze’s maturation temperature (often Cone 5 or 6 for stoneware). Ensure the mask is stilted or the back is wiped clean so it doesn’t fuse to the kiln shelf. -
Antiquing (Optional):
If the mask looks too sterile after firing, apply a very diluted wash of brown acrylic paint or an iron oxide wash, then wipe it off almost immediately. This will leave just a hint of color in the crevices of the eyes and lips.
Garden Variation
Use coarse grogged clay and leave it unglazed. Over time, moss will grow in the eye sockets and mouth for a stunning ancient ruin effect.
Hang your finished sculpture near a window where the shifting daylight will animate the features subtly throughout the day


Green Man Mask With Vines and Leaf Veins
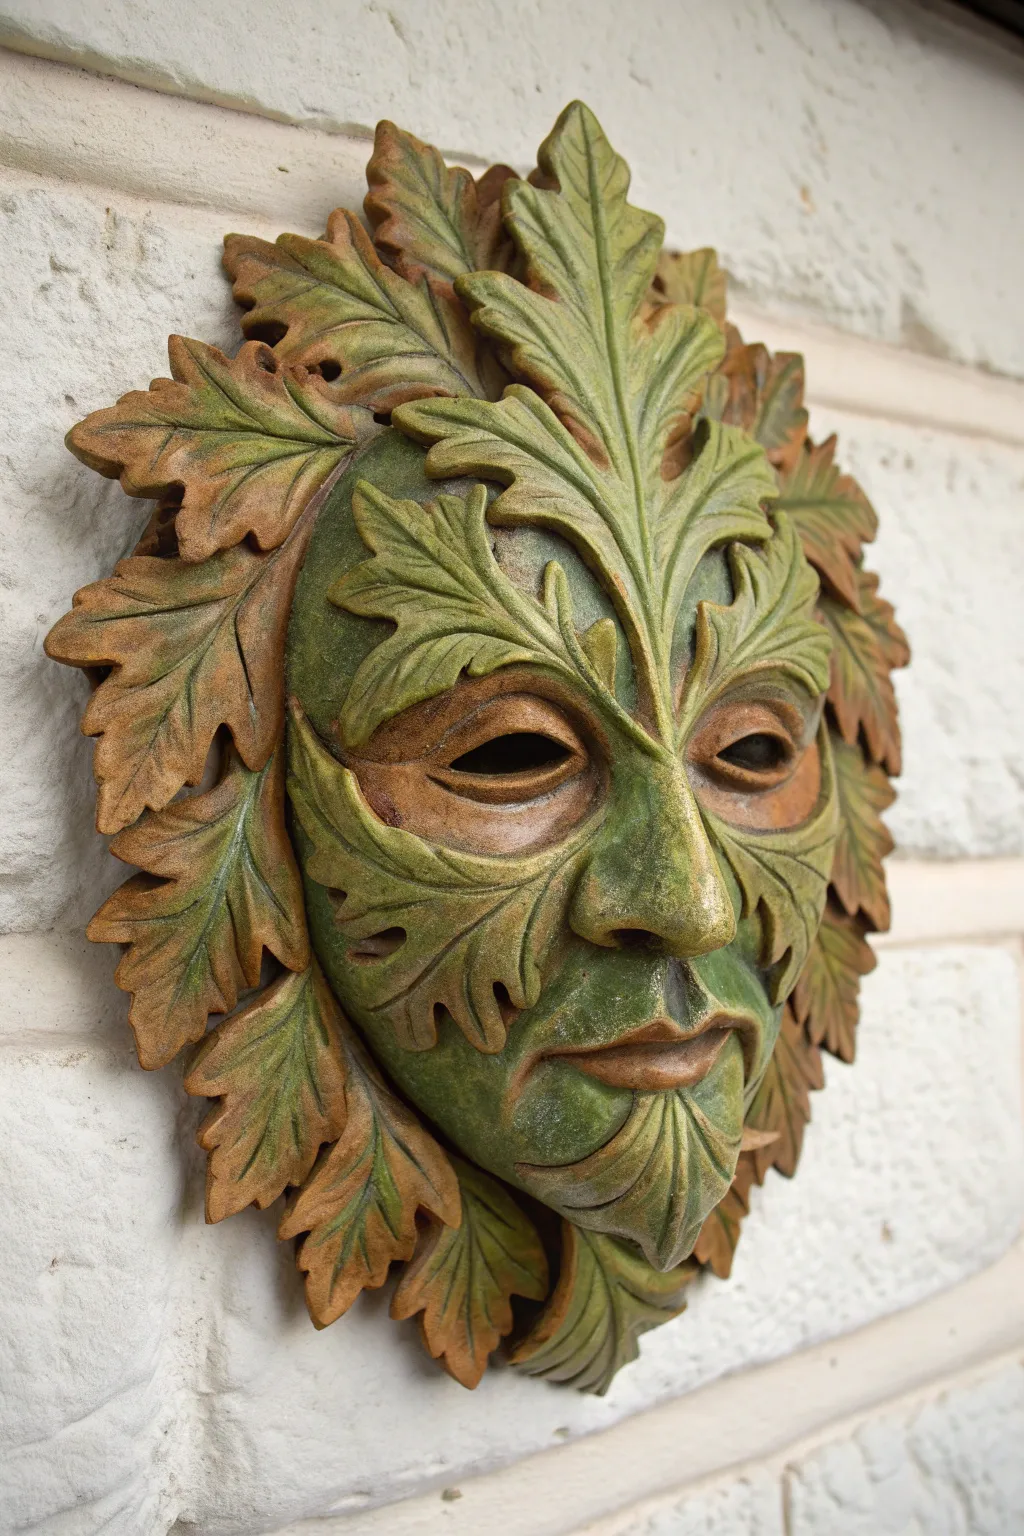
Embrace the spirit of nature with this intricate Green Man mask, where overlapping leaves form a stern yet serene face. The finish mimics aged stone or wood, blending earthy greens and bronzes for a timeless, organic look.
Step-by-Step Tutorial
Materials
- Earthenware or stoneware clay (grogged for strength)
- Clay carving tools (needle tool, loop tool, wooden rib)
- Rolling pin and canvas mat
- Plaster face mold or wig head (for base shape)
- Slip and scoring tool
- Underglazes: Leaf Green, Deep Forest, Burnt Umber, Bronze/Gold
- Sponge and water
- Clear matte or satin glaze
- Soft brushes and a stiff distinct brush for dry-brushing
Step 1: Forming the Base
-
Prepare the foundation:
Begin by rolling out a slab of clay to about 1/4 inch thickness on your canvas mat. Drape this gently over your plaster face mold or wig head to establish the basic convex curve of the mask. Trim the edges into an oval shape, leaving plenty of room for the outer leaf perimeter. -
Define the facial features:
Using your fingers, press the clay into the mold’s features if using a face mold. If using a plain wig head, add small coils of clay to build up the brow ridges, nose bridge, cheeks, and chin. Smooth these additions thoroughly to create a structured ‘skull’ for the leaves to sit on. -
Carve the eyes and mouth:
Cut out almond shapes for the eyes and a slit for the mouth. Refine the edges with a damp sponge or soft brush so they aren’t sharp. The eyes on this mask are hollow, allowing the shadow behind to create depth.
Cracking Leaves?
If leaves crack while drying, cover the specific cracks with a vinegar-soaked paper towel and wrap tightly in plastic for 24 hours to rehydrate and mend.
Step 2: Sculpting the Foliage
-
Create individual leaves:
Roll out a separate, slightly thinner slab of clay. Cut out roughly 15-20 oak or maple leaf shapes in varying sizes. You want some large ones for the center and smaller ones for the periphery. -
Building the central leaf:
This design features a prominent, vertical leaf running from the nose bridge up to the forehead. Score and slip the back of a large leaf shape and attach it directly over the nose. Use a modeling tool to press a deep central vein that runs down the bridge of the nose. -
Cheek and chin placement:
Apply large leaves to the cheek areas, curving them so the tips point outward like whiskers. Add a distinct leaf shape over the chin area, ensuring the tip points downward to mimic a beard. -
Layering the perimeter:
Work your way around the edges of the mask, attaching leaves that fan outward. Overlap them significantly; the mask should look like a dense canopy. Score and slip every connection point securely so pieces don’t pop off during firing. -
Detailing the veins:
Once the leaves are placed, use a needle tool or a fine loop tool to carve deep, varied veins into every leaf. Don’t simply scratch the surface; displace the clay to create ridges that will catch the glaze later. -
Refining the face:
Around the eyes and mouth, use a small wooden tool to tuck the edges of the leaves inward, ensuring the transition from ‘leaf’ to ‘skin’ is seamless. The leaves *are* the skin in this design.
Step 3: Finishing and Glazing
-
Slow drying:
Allow the piece to dry very slowly under loose plastic for several days to prevent warping, then bisque fire according to your clay body’s specifications. -
Base coat application:
Apply a wash of Burnt Umber underglaze over the entire bisqued piece. Wipe it back with a damp sponge so the dark brown stays trapped in the deep veins and recesses, creating instant shadows. -
Adding the greens:
Paint the leaves with your mid-tone green underglaze. Avoid filling in the deep crevices you just darkened. I like to focus the brightest greens on the high points of the cheeks and forehead. -
Dry grazing for highlights:
Dip a stiff, dry brush into a small amount of bronze or gold underglaze (or a lighter yellow-green). lightly brush across the raised veins and tips of the leaves to catch the texture. -
Final firing:
Apply a thin coat of clear matte or satin glaze to seal the work without making it too glossy—you want an organic, earthy sheen. Fire the piece a second time to the glaze temperature.
Seasonal Variation
Swap the oak leaf shapes for holly leaves and berries for a Winter King version, or use flowers and softer leaves for a Spring Goddess variation.
Hang your finished Green Man in a garden nook or on a patio wall to watch over your own patch of nature


Floral Crown Face Mask With Raised Petals
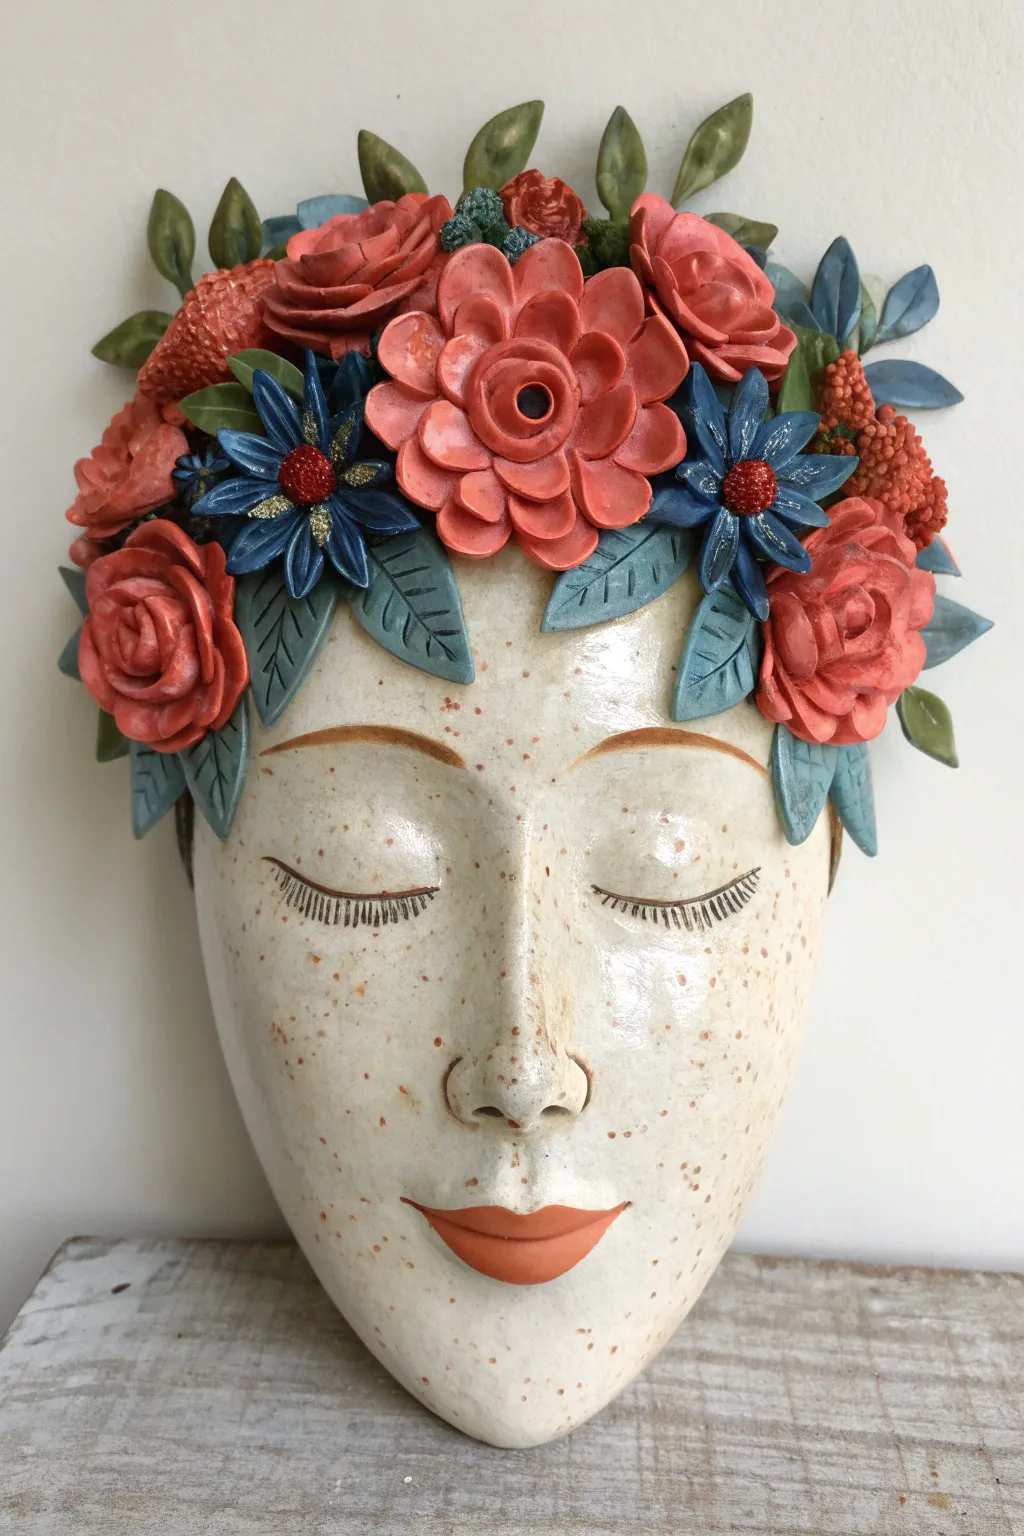
This enchanting wall sculpture combines the tranquility of a sleeping face with the vibrancy of a bursting garden. You’ll sculpt a smooth, freckled visage adorned with an intricate headdress of individually modeled clay flowers and leaves, creating a striking piece of dimensional art.
Detailed Instructions
Materials
- White earthenware or stoneware clay (smooth body)
- Clay sculpting tools (needle tool, wooden modeling tool, ribbon tool)
- Rolling pin and canvas mat
- Newsprint or plastic wrap
- Slip (clay slurry)
- Scoring tool or serrated rib
- Underglazes (coral red, deep blue, sage green, forest green, black)
- Clear transparent glaze
- Fine liner brush and sponge
- Kiln
Step 1: Sculpting the Face Base
-
Prepare the slab:
Roll out a slab of white clay to approximately 3/8-inch thickness on your canvas mat. It needs to be thick enough to support the flowers but not so heavy it cracks. -
Form the convex shape:
Cut an oval shape for the face. To create the dimensional curve, drape the slab over a hump mold or a bundle of scrunched newspaper covered in plastic wrap. Smooth the edges gently with a damp sponge. -
Build facial features:
Add small coils or lumps of clay to build up the nose, brow bone, and chin. Blend these additions seamlessly into the base slab using your thumb or a wooden tool. -
Refine the expression:
Sculpt the closed eyelids by adding thin, almond-shaped clay pieces. Smooth them down to look relaxed. Add a small, gentle mouth with slightly raised lips, ensuring the expression remains peaceful.
Cracking Issues?
If flowers crack off as they dry, your slip might be too thin. Make a thick ‘joining paste’ by mixing vinegar with dry clay dust for a super-strong bond.
Step 2: Creating the Floral Crown
-
Model the central roses:
Roll thin strips of clay and pinch the edges. Coil them loosely to create open rose shapes. Make a large central one and several smaller ones for the sides, varying their openness. -
Craft the daisies:
Cut individual pointed petals and arrange them in a circle. Press a small, textured ball of clay into the center of each to create the pollen area. I like to use a tool to add texture to the center specifically. -
Form the leaves:
Cut leaf shapes from a thinner slab. Use a needle tool to lightly score vein patterns onto the surface. Gently curve the leaves so they don’t lie perfectly flat, giving them life. -
Create filler textures:
Make small clusters of berries by rolling tiny balls of clay and grouping them together. Create textured seed pods or buds to fill gaps between the larger blooms. -
Assemble the crown:
Score and slip the top forehead area of the mask thoroughly. Attach the leaves first as a base layer, then layer the flowers on top. Ensure every attachment point is secure so pieces don’t pop off during firing.
Add Gold Luster
For an opulent finish, apply real gold luster to the flower centers or eyelash tips after the glaze firing. Fire a third time at cone 018 for a glowing metallic effect.
Step 3: Decoration and Glazing
-
Bisque fire:
Allow the mask to dry very slowly under loose plastic to prevent warping, usually for a week. Once bone dry, bisque fire it to cone 04 (or your clay’s specification). -
Apply base skin tone:
Wipe the bisque ware with a damp sponge. Leave the face unglazed if the clay body is naturally nice, or apply a very thin, watery wash of a creamy underglaze. -
Paint the flowers:
Use coral red underglaze for the roses and lips. Paint the daisies with a deep blue, and use a mix of sage and forest greens for the leaves. Add metallic or glittery accents to the daisy centers if desired. -
Detail the face:
Using a very fine liner brush and black underglaze, carefully paint the eyelashes and thin eyebrows. Create the freckles by flickering a stiff brush loaded with diluted brown underglaze. -
Final glaze and fire:
Apply a clear transparent glaze over the entire piece to seal it and make the colors pop. Fire the piece again to the glaze temperature appropriate for your clay body.
Hang your finished mask in a well-lit spot to let the shadows play across the raised petals


Split Face Mask With One Side Covered by a Large Leaf
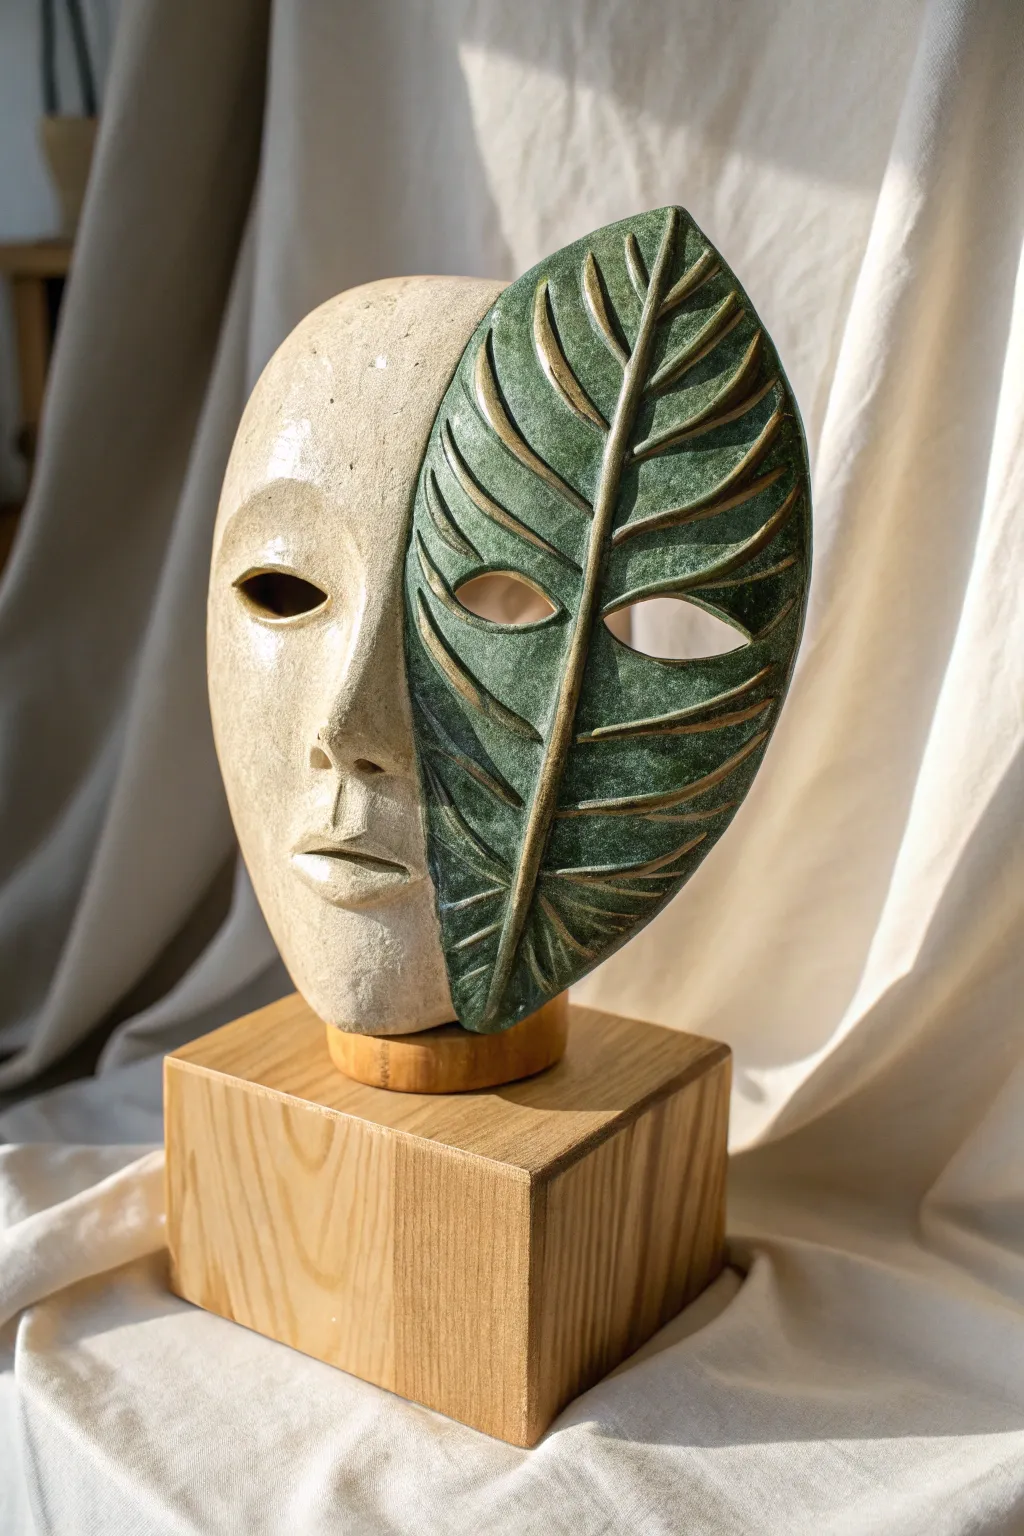
Merge human expression with organic form in this stunning ceramic piece featuring a serene face partially obscured by a textured leaf. The contrast between the matte, creamy clay of the face and the glossy, deep green glaze of the botanical side creates a captivating duality.
Step-by-Step Tutorial
Materials
- White or speckled stoneware clay
- Clay carving tools (loop tools, needle tool)
- Small sponge
- Rolling pin and guide sticks
- Face mold (plaster or bisqueware) or newspaper for armature
- Paper template of a large leaf
- Slip and scoring tool
- Deep green translucent glaze
- Dark oxide wash (optional, for enhancing leaf veins)
- Clear matte glaze (optional, for the face side)
- Wooden block base for mounting
- Metal rod or dowel for mounting
Step 1: Forming the Base Structure
-
Prepare the clay slab:
Roll out a slab of stoneware clay to a uniform thickness, roughly 1/4 inch. Using guide sticks helps ensure the slab is perfectly even, which is crucial for preventing cracking during drying. -
Shape the face base:
Drape your clay slab over a convex face mold. If you don’t have a mold, create a rounded armature using crumpled newspaper covered in masking tape, shaped like an oval face. -
Establish facial features:
Allow the clay to stiffen slightly to leather-hard. Gently press and carve to refine the nose, brow ridge, and lips. The goal is a serene, neutralized expression rather than hyper-realism. -
Cut the eye holes:
Using a needle tool or fettling knife, carefully cut out almond-shaped openings for the eyes. Smooth the sharp edges of the cut clay with a damp sponge or your fingertip.
Step 2: Sculpting the Leaf Integration
-
Mark the division:
Draw a faint line down the center of the face, curving slightly to follow the contour. This line marks where the human features end and the botanical element begins. -
Add the leaf volume:
Score and slip the right side of the mask heavily. Add a fresh layer of clay slab over this area, cut to the shape of a large, oval leaf that extends slightly beyond the face’s original edge. -
Define the central vein:
Roll a thin coil of clay and attach it down the center of the leaf section to create the primary midrib (stem). Smooth the edges so it looks fused to the leaf body. -
Carve the leaf veins:
I prefer using a small V-tip carving tool here. Carve deep, purposeful lines radiating from the center vein to the outer edges. These channels will hold the glaze beautifully later. -
Re-open the eye on the leaf side:
Locate the eye hole you cut earlier (now covered by the leaf layer). Carefully cut through the leaf layer to match the opening underneath, integrating the cut into the vein pattern if possible. -
Refine the texture:
Use a sponge to gently texture the ‘face’ side to keep it smooth and skin-like. On the ‘leaf’ side, add subtle surface pitting or texture to mimic plant matter.
Warping Woes
Is the leaf pulling away? Dry remarkably slowly. If the leaf clay is wetter than the face clay, cover the leaf side with plastic while leaving the face exposed to equalize moisture levels.
Step 3: Mounting Preparation & Firing
-
Create the mounting hole:
While the clay is still leather-hard, create a hole at the base of the chin or the back rim. This needs to be sized correctly for your mounting rod. -
Slow drying:
Loosely cover the mask with plastic and let it dry very slowly over several days to prevent warping between the two different thicknesses. -
Bisque fire:
Once bone dry, fire the piece to bisque temperature (usually cone 04 or 06) to prepare it for glazing.
Pro Tip: Depth of Field
Before glazing the green side, apply a dark iron oxide wash into the carved veins and wipe it back. This adds shadows underneath the green glaze for a more realistic plant look.
Step 4: Glazing and Finishing
-
Wax resist application:
Apply wax resist carefully to the ‘human face’ side of the mask. We want this area to remain unglazed (raw clay) or just receive a clear matte coat, highlighting the natural stone texture. -
Glazing the leaf:
Brush or pour a deep green translucent glaze over the leaf section. Ensure the glaze gets into the deep carved veins. -
Highlighting the veins:
Wipe back the glaze on the raised ridges of the leaf with a damp sponge. This leaves more glaze in the recesses, creating depth and highlighting the vein structure. -
Glaze firing:
Fire the piece to the maturity temperature of your clay and glaze (often cone 5 or 6 for stoneware). -
Mount to base:
Insert your metal rod into the wooden block base. Slide the finished ceramic mask onto the rod. Use a strong epoxy if necessary to secure the connection point.
Place your sculpture near natural light to let the shadows play across the divided textures

The Complete Guide to Pottery Troubleshooting
Uncover the most common ceramic mistakes—from cracking clay to failed glazes—and learn how to fix them fast.
Sun and Moon Duality Mask
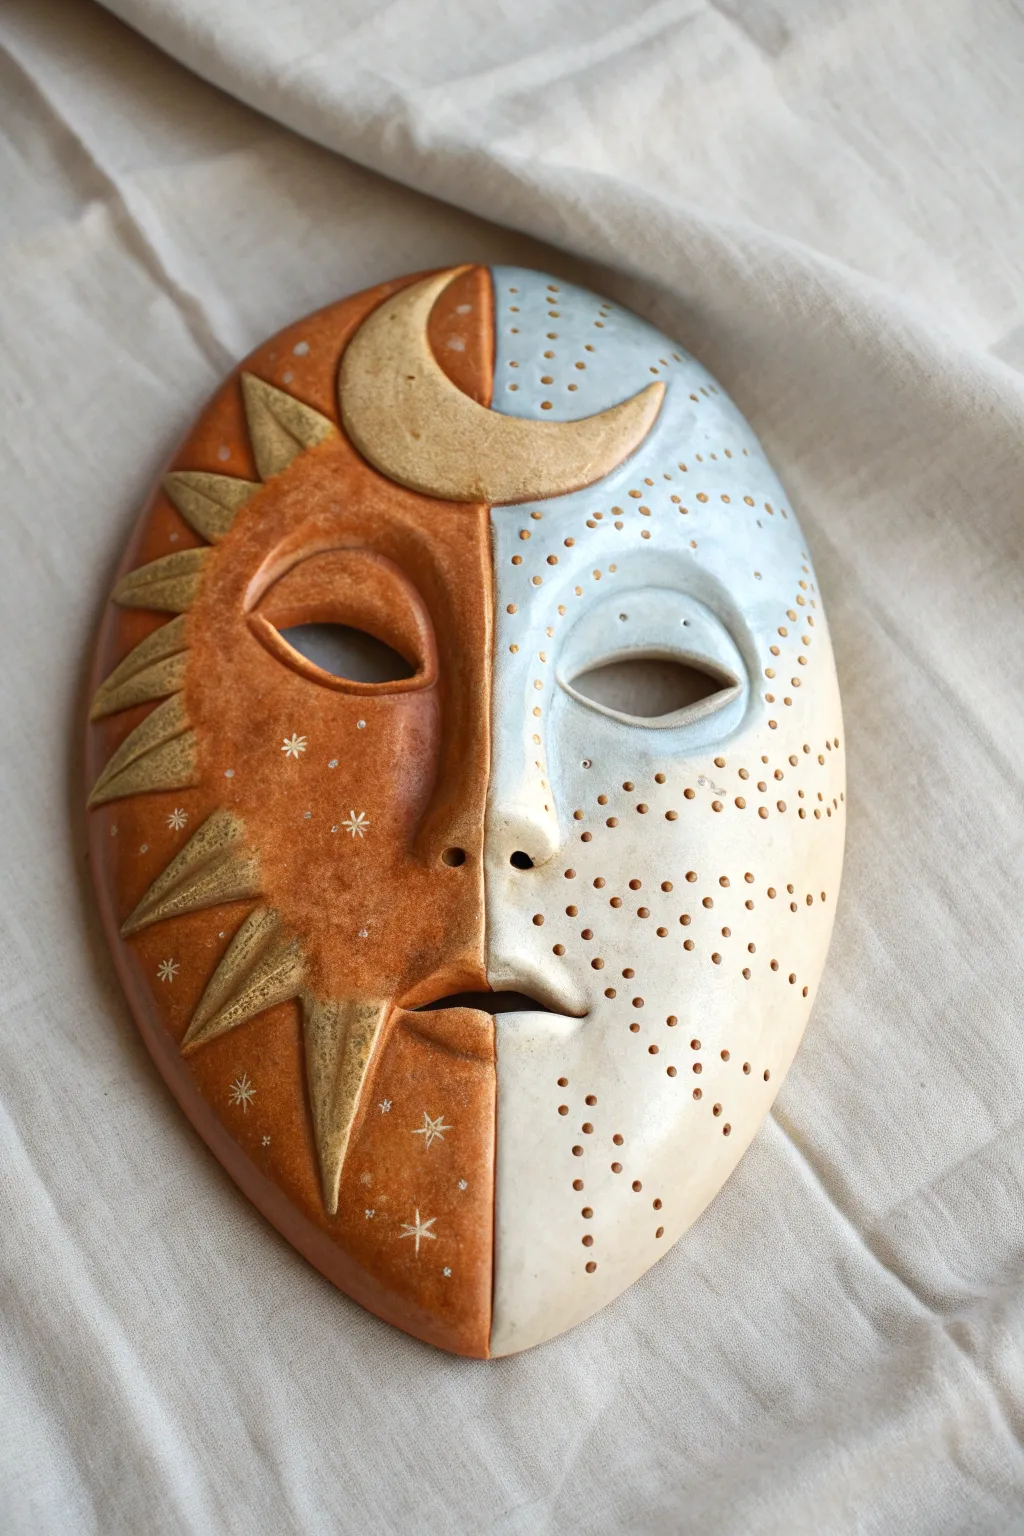
This captivating ceramic project explores the classic duality of day and night in a single, harmonious face mask. By splitting the visage down the middle, you will sculpt warm, radiating sun rays on one side and a cool, dotted starfield on the other, united by a crescent moon on the forehead.
How-To Guide
Materials
- High-quality white clay (low-fire or stoneware)
- Clay slab roller or rolling pin
- Plaster face mold or convex hump mold
- Modeling tools (wooden sculpting tools, needle tool)
- Slip and scoring tool
- Underglazes: Warm terracotta or reddish-brown, pearlescent white or pale blue-grey
- Gold luster or gold acrylic paint (for non-fired finish)
- Small round brushes and detail brushes
- Clear glaze (glossy or matte depending on preference)
- Sponge
Step 1: Sculpting the Base Form
-
Roll the slab:
Begin by rolling out an even slab of white clay, roughly 1/4 inch thick. Ensure the surface is smooth and free of air bubbles by compressing it gently with a rubber kidney rib. -
Form the mask shape:
Drape your clay slab over a plaster face mold or a simple convex hump mold to get the basic curvature. Press the clay gently into the eye sockets, nose, and mouth areas if using a detailed mold, or hand-sculpt these features if working on a plainer form. -
Trim the edges:
Cut away excess clay around the perimeter to create a clean oval shape. Smooth the cut edges with a damp sponge so they are rounded and comfortable. -
Define the eyes and mouth:
With a fettling knife, carefully cut out the almond shapes for the eyes. For the mouth, create a slight opening between the lips to add depth and expression.
Uneven Drying?
If the edges curl up while drying, weigh them down lightly with small bean bags or dry the mask on a piece of foam to allow even airflow underneath.
Step 2: Adding Celestial Details
-
Divide the face:
Using a needle tool, lightly sketch a vertical line down the exact center of the face, starting from the forehead, going down the nose bridge, and ending at the chin. This is your guide, not a deep cut. -
Sculpt the sun rays:
On the left side (the ‘Sun’ side), roll small coils of clay and shape them into pointed triangles. Score and slip these onto the cheek and edge of the face to create relief rays radiating outward. -
Add the crescent moon:
Roll a small slab and cut out a crescent moon shape. Attach this firmly to the forehead area so it bridges the two halves, with the curve resting mostly on the sun side and the tips pointing toward the moon side. -
Texture the moon side:
On the right side (the ‘Moon’ side), press a small, blunt tool repeatedly into the clay to create a pattern of recessed dots. These will become the stars or crater textures later. -
Carve starry details:
Back on the sun side, use a fine needle tool or sgraffito tool to carve tiny starbursts and asterisks into the smooth clay surface between the raised rays. -
Dry and Bisque Fire:
Allow the mask to dry slowly under plastic to prevent warping. Once bone dry, fire it to the appropriate bisque temperature for your clay body.
Step 3: Glazing and Finishing
-
Apply the Sun color:
Paint the left side of the mask with a warm terracotta or reddish-orange underglaze. I like to sponge off a bit of the color on the high points (like the cheekbone and ray ridges) to give it a weathered, antique look. -
Glaze the Moon side:
Apply a pearlescent white or very pale blue-grey glaze to the right side. Ensure the glaze settles into the recessed dots but doesn’t obscure them completely. -
Highlight the rays and moon:
Use a gold luster or a golden-yellow underglaze to paint the raised sun rays and the forehead crescent moon. This contrast is key to the design’s impact. -
Accentuate the carvings:
Fill the tiny carved stars on the orange side with white or gold underglaze. Wipe away any excess on the surface so the color remains only in the incised lines. -
Add dot details:
Dip a fine brush or skewer into brown or gold traverse glaze and carefully dab color into the recessed dots on the moon side to make them pop against the pale background. -
Final Fire:
Apply a coat of clear glaze over the entire piece if you want a glossy finish, or leave parts matte for texture contrast. Fire the piece again according to your glaze instructions.
Make it Wearable
Before the clay is leather hard, punch two small holes near the temples. After firing, thread a silk ribbon through to hang it on a wall or wear it.
Hang your finished piece where the light can catch the contrasting textures of sun and moon
Cracked Porcelain Look Mask With Gold Vein Lines
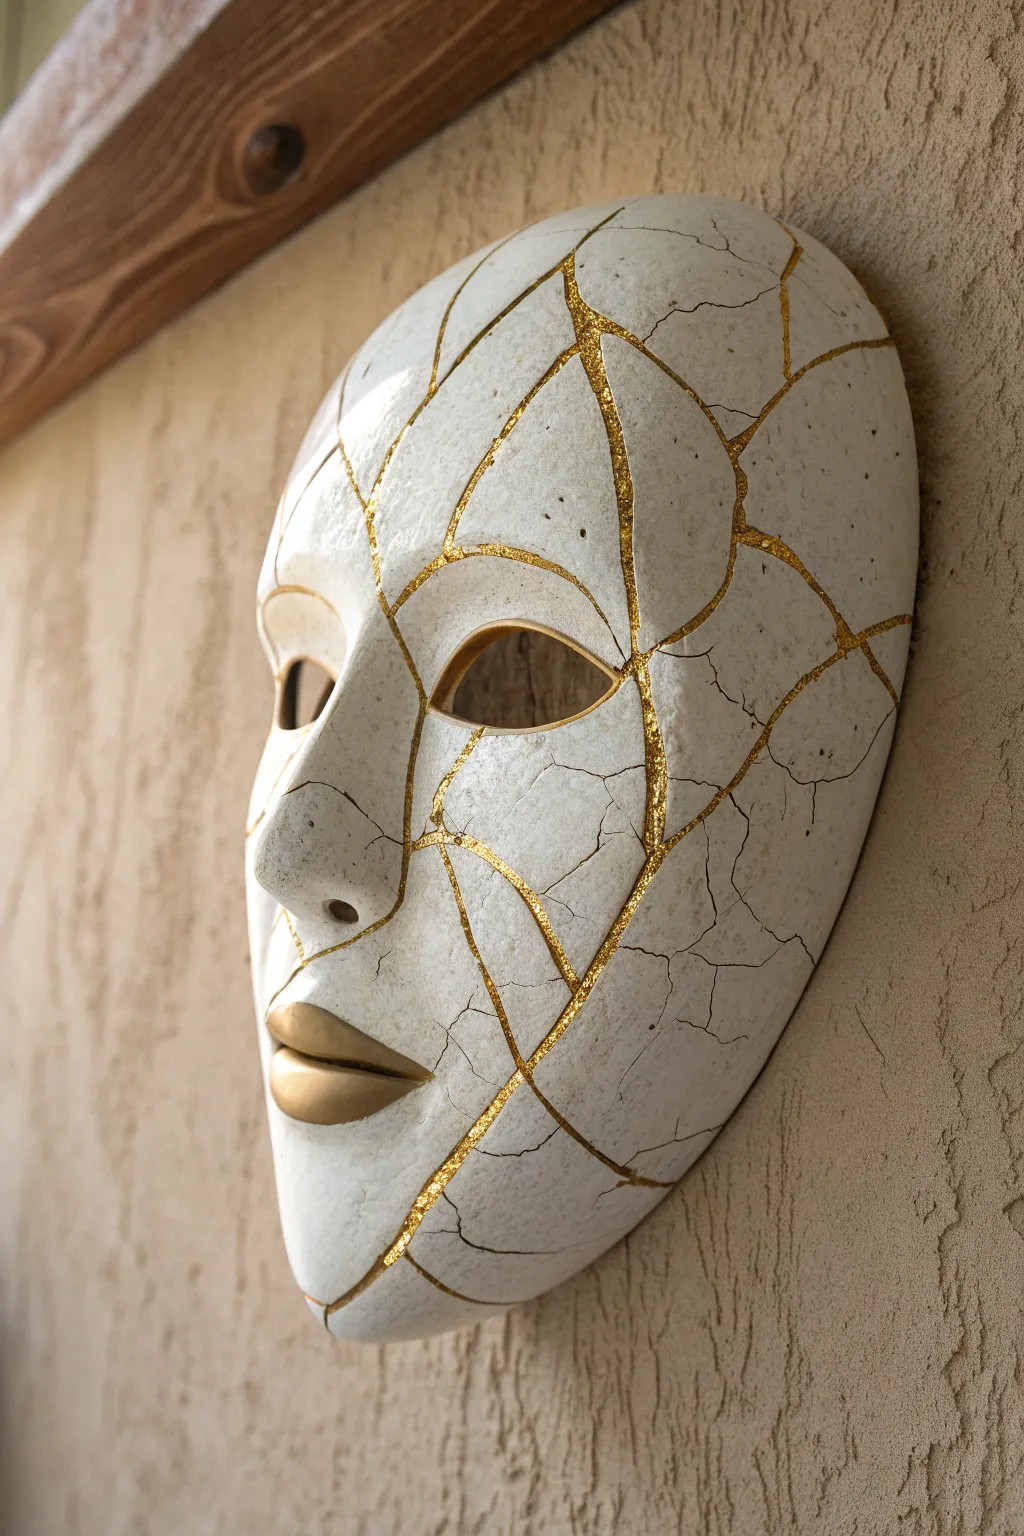
Embrace the beauty of imperfection with this striking mask project that mimics the ancient Japanese art of Kintsugi. By fracturing a simple base and reassembling it with gleaming gold veins, you’ll create a sophisticated faux-ceramic piece that looks like a restored artifact.
Detailed Instructions
Materials
- Plastic or paper maché face mask base (plain white)
- Air-dry clay or lightweight spackling paste (optional, for texture)
- White matte acrylic paint or gesso
- Fine-grit sandpaper
- Hammer or heavy tool (for breaking)
- Strong craft adhesive or epoxy (clear drying)
- Gold leaf flakes or liquid gold leafing paint
- Gold acrylic paint (for lips)
- Small detail brushes
- Tweezers
- Clear matte sealant spray
- Protective cloth
Step 1: Preparation & Breaking
-
Select the Base:
Start with a sturdy base mask. A thick paper maché or a rigid ceramic-style plastic mask works best. If using thin plastic, reinforce the back with a layer of paper maché strips first. -
Prime the Surface:
Apply two coats of white gesso or matte white acrylic paint to create a uniform, pottery-like finish. Let it dry completely. -
Plan the Breaks:
Lightly sketch lines with a pencil where you want your ‘cracks’ to be. Aim for large, varied shard shapes rather than tiny dust-like pieces. -
The Breakage:
Place the mask inside a protective cloth or heavy-duty plastic bag. Using a hammer, give it a few controlled taps on the back side to snap it along your structural weak points. You want clean breaks, not shattered dust. -
Clean the Edges:
Carefully remove the shards from the bag. Use fine-grit sandpaper to briefly smooth any extremely jagged or dangerously sharp edges, but keep the fit generally tight.
Don’t Break It?
Don’t want to actually break the mask? You can simulate the look by cutting a paper maché mask with an X-Acto knife or simply carving deep V-grooves into the surface before painting.
Step 2: Reassembly & Gold Veining
-
Dry Fit:
On a flat surface, puzzle your mask pieces back together to ensure you haven’t lost any critical components. It’s helpful to take a reference photo of this arrangement. -
Glue the Major Seams:
Begin gluing the largest pieces back together using strong craft adhesive. Leave a tiny, deliberate gap (about 1-2mm) between the shards to accommodate the gold filling later. -
Fill the Gaps:
Once the mask structure is stable again, mix a small amount of textured paste or spackling. Force this into the cracks you created, smoothing it slightly but leaving it recessed below the surface level. -
Apply the Gold Base:
Dip a fine liner brush into liquid gold leaf paint. Carefully paint over the filled cracks. The messy texture here actually adds to the realism of the repair. -
Add Texture with Foiling:
While the gold paint is still tacky (or using specific gold leaf size), apply small flakes of gold leaf with tweezers. Press them into the veins for that brilliant, irregular sparkle seen in the reference. -
Brush Off Excess:
Use a soft, dry brush to sweep away loose gold leaf flakes, leaving defined, glittering lines.
Step 3: Finishing Touches
-
Refine the Surface:
Inspect the white areas. If any gold smudged onto the porcelain sections, touch it up with your matte white paint to keep the contrast sharp. -
Paint the Lips:
Using a flat shader brush, paint the lips entirely with the liquid gold leaf or metallic gold acrylic. I find two thin coats provide a smoother sheen than one thick glob. -
Add Faux Hairlines:
To mimic the micro-fractures of aged porcelain (craquelure), use a very sharp pencil or a 005 micron pen to draw faint, wandering lines branching off the main gold veins. -
Seal the Work:
Spray the entire piece with a clear matte sealant. This protects the gold leaf from tarnishing and unifies the sheen of the white paint.
Level Up: Antique Wash
Mix burnt umber paint with water (1:10 ratio). Brush it over the white areas and immediately wipe it off with a cloth. This leaves subtle grime in the texture.
Hang your reconstructed masterpiece on a textured wall to highlight the interplay between shadow and gold light


What Really Happens Inside the Kiln
Learn how time and temperature work together inside the kiln to transform clay into durable ceramic.
Ocean Siren Mask With Shell and Wave Textures
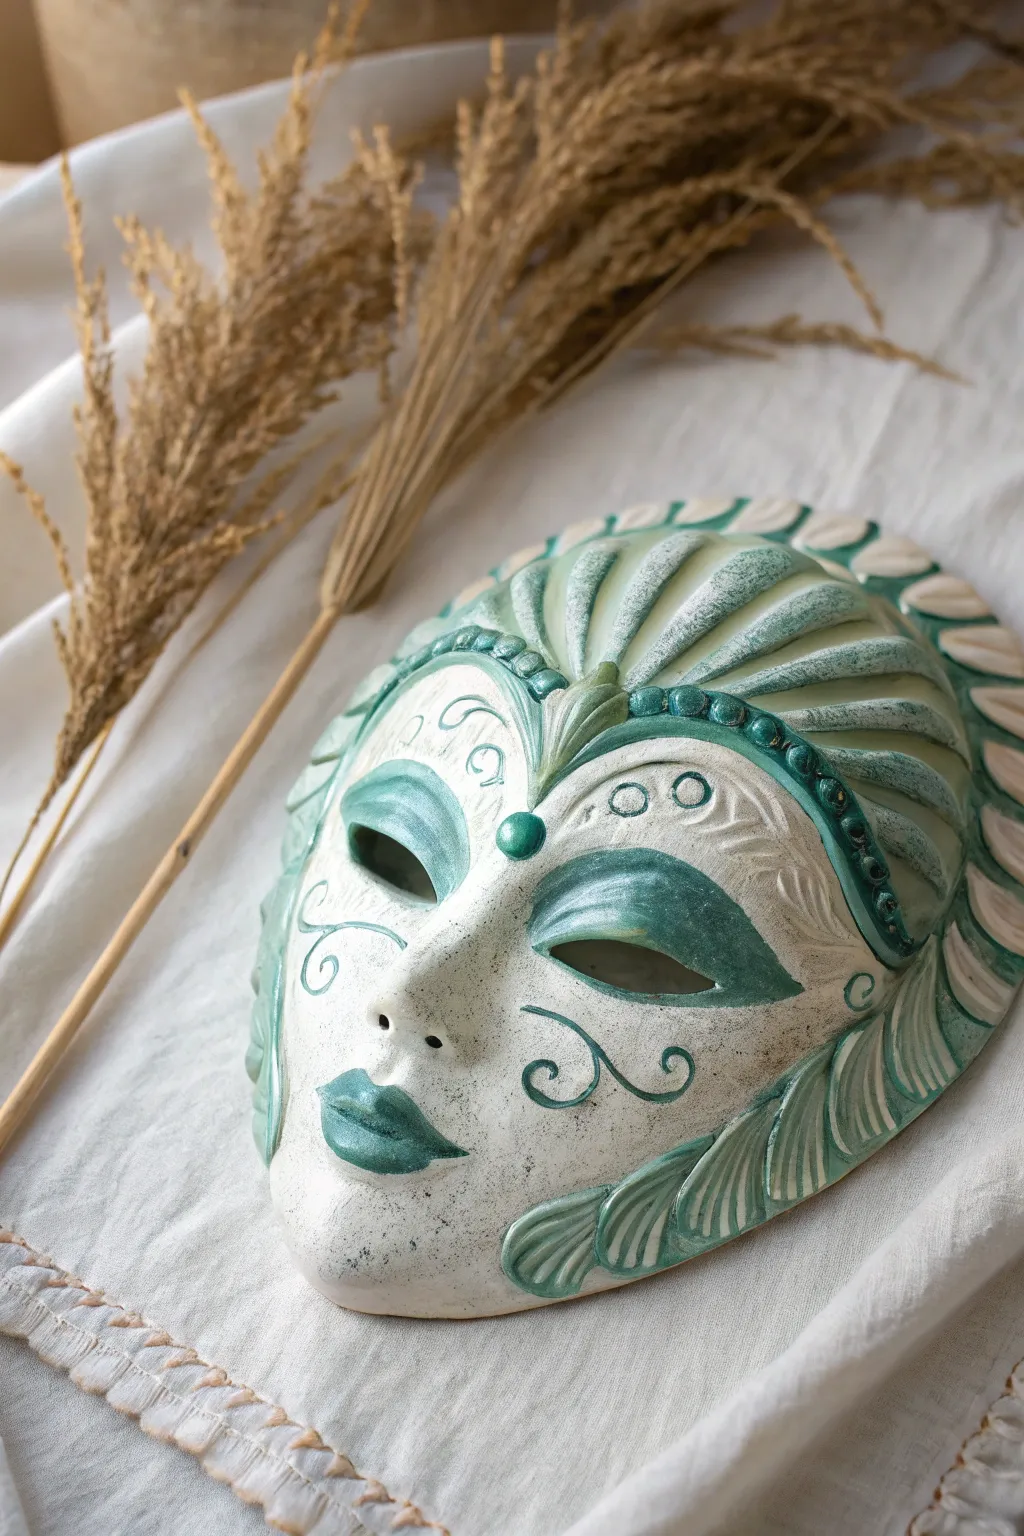
Capture the elegance of the deep with this stylized ceramic mask that mimics the look of weathered sea glass and carved stone. Featuring gentle wave reliefs, shell-like scallops, and a serene teal patina, this piece makes a stunning wall hanging for any coastal-themed space.
Detailed Instructions
Materials
- White earthenware or stoneware clay (low-fire)
- Plaster face mold (generic feminine)
- Clay sculpting tools (needle tool, loop tools)
- Slip and scoring tool
- Underglaze (Teal/Sea Green)
- White semi-matte glaze or satin clear glaze
- Sponge and water
- Soft paintbrushes (various sizes)
- Fine-grit sandpaper (optional, for greenware)
- Kiln
Step 1: Forming the Base
-
Prepare the slab:
Roll out a slab of white clay to an even thickness of about 1/4 inch. Smooth out any canvas texture with a rib tool to ensure a clean surface. -
Mold the face:
Drape your clay slab over a plaster face mold. Gently press the clay into the contours of the nose, eyes, and lips, taking care not to stretch the clay too thin in high points like the nose bridge. -
Trim the edges:
Once the clay has stiffened slightly (leather hard), trim the excess clay around the perimeter to create a clean oval shape for the mask base. -
Open the eyes:
Using a sharp fettling knife or needle tool, carefully cut out the almond-shaped eye holes. Smooth the inner edges of these cutouts with a damp sponge or fingertip.
Step 2: Sculpting the Ocean Details
-
Create the forehead crest:
Roll a coil of clay and attach it across the forehead area using the score and slip method. Flatten and shape this into a fan-like crest that radiates from the center of the forehead upwards. -
Carve the shell fluting:
Using a loop tool or modeling tool, carve deep, radiating grooves into the forehead crest to mimic the ridges of a scallop shell. Make the lines curve gently outward. -
Add the brow ridge:
Attach a smaller, curved coil directly above the eye openings to create a defined brow line. Use a tool to press small dimples or ‘pearls’ along this ridge for texture. -
Form the cheek waves:
Attach flat pieces of clay to the lower sides of the mask, sweeping back from the chin line. Carve these to look like stylized curled leaves or breaking waves. -
Detail the center connection:
Place a small ball of clay at the center of the forehead, between the eyes, to act as a jewel or focal point connecting the brows. Smooth the edges seamlessly. -
Incise decorative swirls:
With a needle tool or fine stylus, lightly draw symmetrical swirl patterns on the cheeks and forehead area. These delicate lines add a sense of movement like ocean currents. -
Refine the surface:
Go over the entire piece with a barely damp sponge to smooth any rough burrs from carving, softening the transitions between added clay and the base mask.
Smoother Transitions
Use a soft, dry watercolor brush to sweep away tiny clay crumbs after carving. It cleans the grooves better than blowing on them and keeps the lines crisp.
Step 3: Glazing and Finishing
-
Bisque fire:
Allow the mask to dry completely (bone dry), which may take several days. Fire it in the kiln to a bisque temperature (usually cone 04) to prepare it for glazing. -
Apply the base wash:
Dilute your teal underglaze with water to create a wash. Brush this over the entire mask, ensuring it gets into all the carved crevices and textures. -
Wipe back the color:
While the underglaze is still slightly damp, wipe the high points of the face (nose, cheeks, shell ridges) with a clean, damp sponge. This leaves the teal color deep in the recesses while revealing the white clay on the raised areas, creating an antiqued look. -
Accentuate features:
I prefer to use a smaller brush to re-apply undiluted teal underglaze specifically to the lips, eyelids, and the beaded brow ridge for stronger definition. -
Apply finishing glaze:
Coat the entire mask with a thin layer of satin clear glaze or a semi-matte white glaze. Avoid thick applications which might obscure your carving. -
Final firing:
Fire the mask again to the recommended temperature for your specific glaze (typically cone 05 or 06 for low-fire clay).
Add Realism
Before firing, press real seashells or coarse fabric into the wet clay on the sides of the mask to create authentic, organic textures without manual carving.
Hang your finished siren mask in a well-lit spot to let the shadows play across those lovely carved details
Stitched-Shut Mouth Mask for Creepy Drama
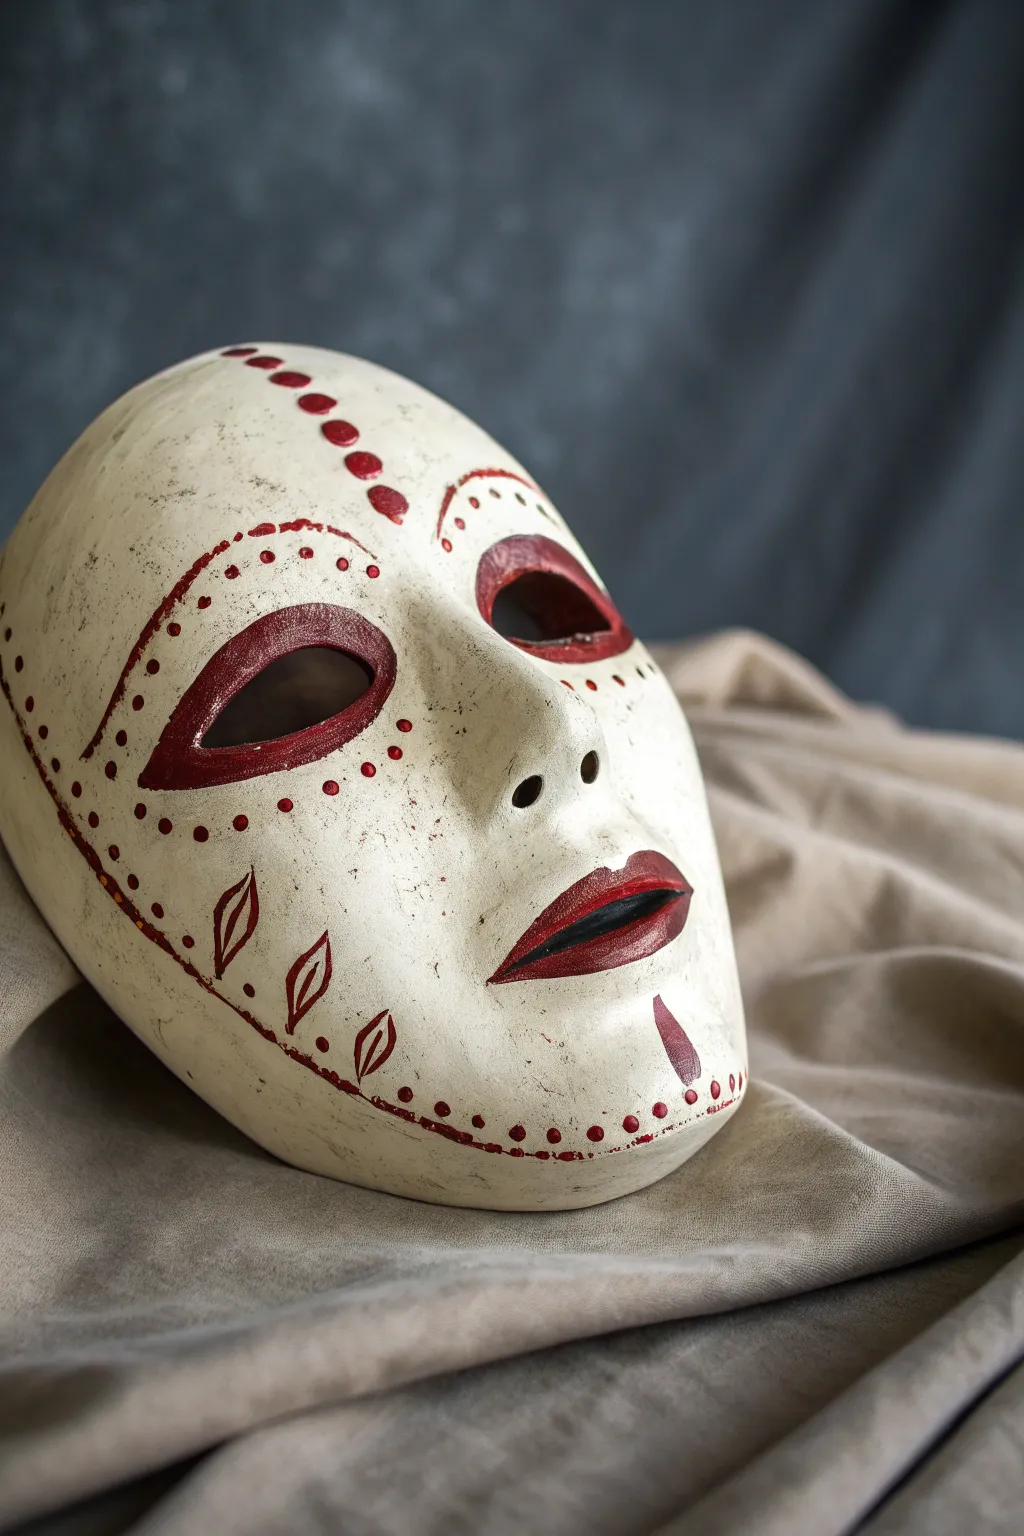
This striking mask blends primitive artistry with theatrical elegance, featuring deep crimson accents on a textured, bone-white base. The design uses repetitive dot-work and bold geometric lines to create a piece that feels both ancient and delightfully eerie.
How-To Guide
Materials
- Bisque ceramic face mask blank (or sturdy papier-mâché mask)
- Acrylic heavy body paints (Antique White, Titanium White, Deep Crimson, Burnt Umber)
- Matte finish medium or gesso
- Fine grit sandpaper (220-300 grit)
- Flat shader brush (size 6)
- Round detail brush (size 1 or 2)
- Stylus tool or toothpick
- Water cup and palette
- Matte spray sealant
Step 1: Preparing the Canvas
-
Sand the Surface:
Begin by lightly sanding your mask blank to remove any seams or rough manufacturing divots. You want the surface smooth but with just enough tooth to hold the paint. -
Base Coat Application:
Mix Antique White with a tiny dot of Burnt Umber to create a warm, bone-like cream color. Apply this over the entire mask using your flat brush. -
Build Texture:
While the first coat is still tacky, stipple a second layer of the same cream mixture on top to create a slight, uneven texture that mimics hand-molded clay. -
Distressing the Finish:
Once dry, take a very dry brush with a whisper of watered-down Burnt Umber and lightly scuff it over cheeks and forehead. This adds that aged, unearthed look. -
Highlighting High Points:
Dry brush pure Titanium White on the nose bridge, brow ridge, and chin to bring the dimension back out from the antiquing layer.
Step 2: Painting the Crimson Features
-
Outline the Eyes:
Using Deep Crimson and a round brush, carefully paint a thick, almond-shaped band around each eye opening. Taper the lines sharply at the inner and outer corners for a dramatic, cat-like shape. -
Fill the Lips:
Paint the lips with the same Deep Crimson. Keep the shape defined but slightly stylized, ensuring the upper lip has a pronounced cupid’s bow and the pigment is opaque. -
Defining the Center Line:
Starting from the top of the forehead, paint a series of dots or dashes descending toward the nose bridge. I find using the handle end of a brush makes these dots perfectly uniform. -
Cheek Markings:
On the lower cheek area, paint three leaf-shaped outlines on each side, angling them upwards towards the ears. -
Chin Accent:
Paint a small, teardrop or inverted spade shape directly in the center of the chin, pointing downwards.
Steady Hand Trick
Rest your pinky finger against the dry surface of the mask while you paint details. It acts as a pivot point and stabilizes your brush strokes significantly.
Step 3: Detailed Dot-Work
-
Forehead Arches:
Above each eyebrow area, paint a thin red arch. Use a stylus or toothpick dipped in red paint to create a row of small dots just underneath this arch. -
Eye Dot Border:
Create a perimeter of evenly spaced red dots surrounding the thick red eye bands you painted earlier. Keep the spacing consistent for a rhythmic look. -
Cheek Curves:
Paint a long, curved red line sweeping from the temple down beneath the cheekbone towards the jawline. -
Tracing the Curve:
Follow this long curved line with another series of red dots on the outer side of the line. -
Jawline Details:
Add a final row of dots along the very bottom edge of the jaw, connecting the design from side to side. -
Final Seal:
Allow all paint to cure fully for at least 24 hours, then mist the entire mask with a matte spray sealant to protect your work and unify the sheen.
Crackle Finish
Apply a clear crackle medium between your base coat and top coat. As it dries, faint fissures will appear, making the ceramic look centuries old.
Display your finished mask on a stand or hang it against dark velvet to let those crimson details truly pop.

TRACK YOUR CERAMIC JOURNEY
Capture glaze tests, firing details, and creative progress—all in one simple printable. Make your projects easier to repeat and improve.
Geometric Cubist Mask With Misaligned Features
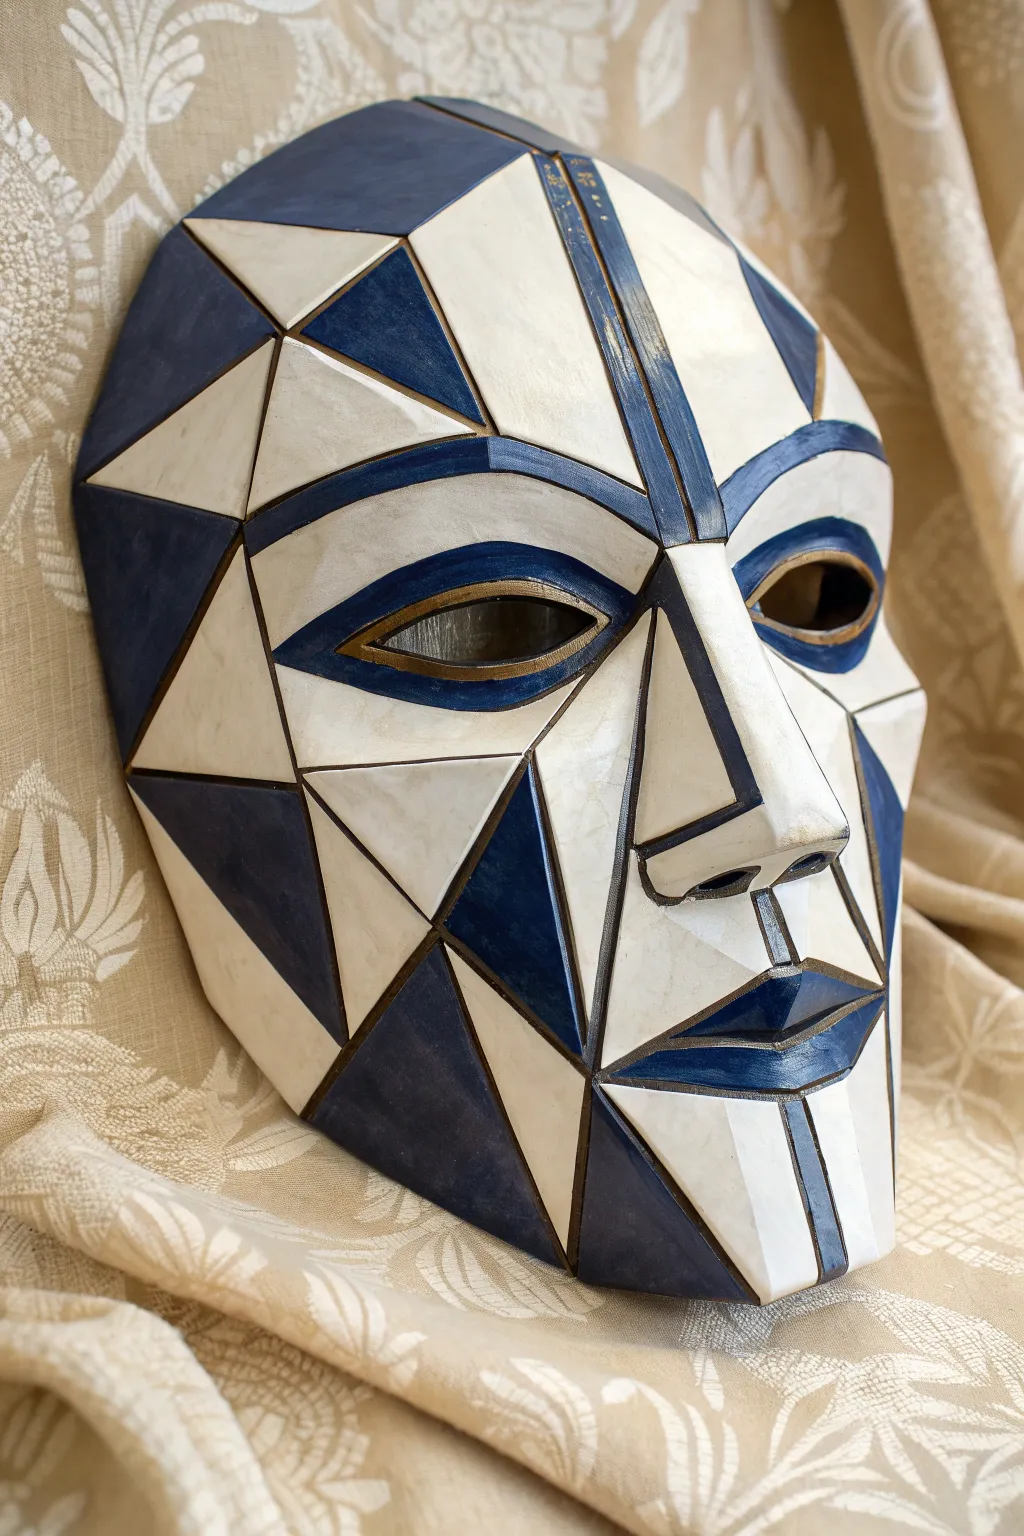
This striking mask project breaks the human face into a sophisticated puzzle of geometric planes, combining sharp angles with a serene expression. Using a bold palette of deep navy blue, warm cream, and subtle gold accents, you will create a sculptural piece that feels both ancient and futuristically modern.
Step-by-Step Tutorial
Materials
- Plastic face form or mannequin head (as a base)
- Air-dry clay (stone effect preferred) or paper maché clay
- Sculpting tools (flat modeling tool, knife)
- Fine-grit sandpaper (220 and 400 grit)
- Acrylic paints: Titanium White, Unbleached Titanium (Cream), Navy Blue, Gold
- Flat shader brushes (medium and small)
- Fine detail brush
- Matte or satin varnish
- Painter’s tape or thin masking tape (optional)
- Pencil
Step 1: Sculpting the Geometric Base
-
Prepare the armature:
If using a smooth plastic face mask as a base, lightly grease it with petroleum jelly so your clay won’t stick permanently. Alternatively, you can build directly over a foil-covered mannequin head for more custom sizing. -
Establish the foundational layer:
Roll out a uniform slab of clay, approximately 1/4 inch thick. Drape this carefully over your base form to capture the general curve of the face, pressing gently to adhere to the underlying shape without creating deep indents yet. -
Build the sharp nose bridge:
The nose is a distinct geometric pyramid. Add a triangular wedge of clay to the nose area, smoothing the seams. Use a flat tool to paddle the sides until they form flat, angular planes rather than a rounded organic nose shape. -
Define the eye sockets:
Cut out the eye holes with a sharp craft knife. Instead of leaving raw edges, build up a raised rim around each eye using small coils of clay. Flatten these rims into sharp, angular ‘eyelids’ that taper at the corners. -
Carve the geometric planes:
This is the most critical step. Using a flat modeling tool or a knife, carve or press flat planes into the cheeks and forehead. You aren’t just smoothing the clay; you are creating distinct facets. -
Construct the mouth:
Form the lips as a series of four or five distinct geometric shapes (triangles and trapezoids) rather than soft curves. Ensure the philtrum (the space above the lip) connects sharply to the nose.
Uneven Lines?
If painting straight lines on curved surfaces is tricky, use thin automotive masking tape (pinstriping tape) to mask off sections before painting navy blocks.
Step 2: Refining and Surfacing
-
Dry partially and refine:
Let the clay dry until leather-hard. This is when I like to go back in with a knife and sharpen up any edges that became rounded during handling. The distinct separation between planes is what sells the cubist look. -
Full drying:
Allow the mask to dry completely, which may take 24-48 hours depending on thickness. It must be bone dry before sanding. -
Sand for sharp edges:
Use 220-grit sandpaper to smooth the flat surfaces. Be careful not to round over your sharp corners—you want crisp lines where the planes meet. Switch to 400-grit for a polished, ceramic-like finish. -
Map the pattern:
Using a pencil, lightly draw the geometric design onto the dry mask. Follow the physical sculpted planes you created, sketching triangles and trapezoids that reinforce the 3D shape.
Faux-Ceramic Finish
Apply a coat of high-gloss polyurethane varnish specifically to the eyes and lips while keeping the skin matte. This contrast mimics glazed vs. unglazed pottery.
Step 3: Painting the Facets
-
Base coat application:
Apply two coats of Unbleached Titanium (Cream) to the entire mask. This provides a warm, antique neutral base that prevents the raw clay color from dulling your blues. -
Painting the navy sections:
Using a flat shader brush, carefully paint the specific geometric sections in Navy Blue. Use the edge of the flat brush to get razor-sharp lines where the blue meets the cream. -
Detailing the eyes:
Inside the eye sockets and along the rim of the ‘eyelids’, paint a thin border of Navy Blue. This adds depth and makes the eyes the focal point. -
Adding gold accents:
For a touch of luxury, use a fine detail brush to apply a thin outline of Gold paint specifically around the eye openings, right inside the navy border. -
Defining the segment lines:
To simulate the look of separate tiled pieces, you can mix a very dark grey or diluted brown paint. Use your finest brush to paint thin lines in the deep crevices between the geometric planes. -
Sealing the work:
Finish with a coat of satin varnish. This protects the paint and gives the ‘ceramic’ surface a slight sheen without being overly glossy.
Display your finished mask on a stand to let the light play across those dramatic architectural angles
Spiral Divider Mask With a Swirling Raised Line
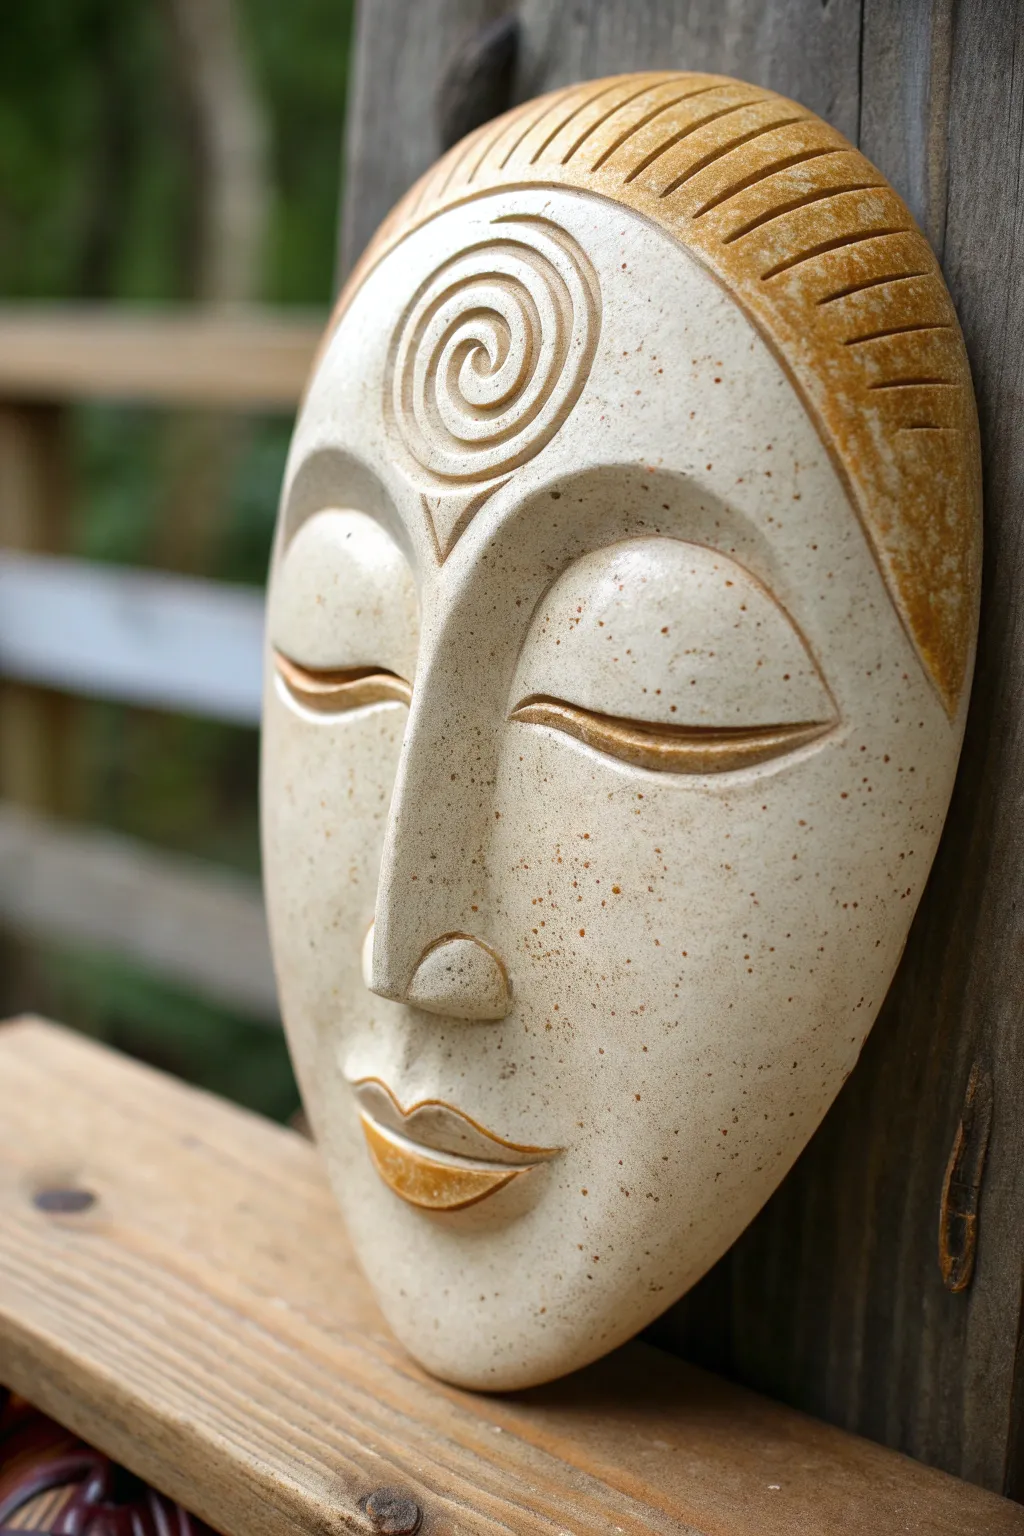
This elegant ceramic mask captures a sense of meditative peace with its elongated features and prominent spiral third-eye motif. The smooth, speckled clay body contrasts beautifully with the textured, amber-stained hair and lip accents, creating a striking wall relief.
Detailed Instructions
Materials
- Speckled buff stoneware clay (about 3-4 lbs)
- Plaster face mold or hump mold (elongated oval shape)
- Wooden modeling tools
- Loop tools for carving
- Needle tool
- Rib tool (metal and rubber)
- Sponge
- Slip and scoring tool
- Amber or honey-colored oxide wash or ceramic stain
- Clear matte glaze (optional, for sealing)
- Kiln
Step 1: Forming the Base
-
Prepare the slab:
Roll out a slab of speckled stoneware clay to a uniform thickness of about 1/4 inch. Smooth it on both sides with a rib to compress the particles. -
Drape the mold:
Carefully drape your clay slab over your plaster hump mold. If you don’t have a mold, you can form a gentle dome shape by hand over a bundle of newspaper, but a mold ensures consistency. -
Shape the perimeter:
Trim the excess clay to create an elongated oval face shape. Smooth the edges with a damp sponge so they are rounded, not sharp. -
Establish facial planes:
Using your fingers or a wooden paddle, gently define the brow ridge and the sides of the nose. You aren’t adding clay yet, just pushing the existing slab to suggest the underlying bone structure.
Step 2: Sculpting the Features
-
Add the nose:
Roll a coil of clay for the nose bridge. Score and slip the center of the face, attach the coil, and blend it seamlessly into the forehead and cheeks. Aim for a long, straight Grecian profile. -
Define the eyes:
Mark the eye placement with a needle tool. Roll two almond-shaped pieces of clay and attach them for the eyelids. They should be prominent and convex, resembling closed eyes. -
Carve the eyelids:
Use a small wooden tool to press a horizontal line across the center of each almond shape to define the meeting point of the upper and lower lids. Smooth the transition where the lids meet the brow bone. -
Form the mouth:
Add a small, bow-shaped piece of clay for the lips. Blend the edges into the face, keeping the center volume full. Use a needle tool to softly incite the line between the lips.
Crack Prevention
Masks often crack at the nose or rim. Dry very slowly by tenting loose plastic over the form for 3-4 days. Flip it regularly so both sides dry evenly.
Step 3: The Spiral and Hair
-
Create the third eye medallion:
Roll a flat circle of clay about 2 inches in diameter. Attach this to the forehead area. Be sure to score and slip aggressively here so it doesn’t pop off during firing. -
Carve the spiral:
Using a small loop tool or a semi-blunt carving tool, carefully carve a continuous spiral starting from the center of the forehead medallion and working outward. Keep the channel depth consistent. -
Define the hairband:
Identify the hair area at the top of the mask. Use a modeling tool to create a clear border line separating the smooth face from the hair section. -
Texture the hair:
Carve deep, parallel grooves into the hair section using a loop tool. These lines should curve gently to follow the shape of the head, creating a combed geometric look.
Wall Hanging Rig
Before the clay dries, create two small holes near the temples or attach a clay loop on the concave back. Thread sturdy wire through after firing for easy hanging.
Step 4: Finishing and Firing
-
Smooth the skin:
Once the clay is leather hard, burnish the facial area (cheeks, nose, forehead) with a stone or the back of a spoon to make it ultra-smooth. Avoid the textured hair and spiral areas. -
Bisque fire:
Allow the mask to dry slowly under plastic for several days to prevent warping, then bisque fire to Cone 04 (or your clay’s specific bisque temperature). -
Apply the wash:
Mix your amber oxide wash. Brush it heavily onto the hair section, the lips, and into the spiral groove. I find it helpful to wipe away any excess from the high points of the spiral with a damp sponge to enhance contrast. -
Glaze and final fire:
Leave the skin area unglazed to show off the raw speckled clay provided it has been burnished well. You can apply a thin clear matte glaze over the stained areas if desired, then fire to maturity (likely Cone 5 or 6).
Hang your serene creation in a quiet corner and enjoy the calming presence it brings to the room
Heart-Framed Face Mask With Soft Curves

This whimsical ceramic wall hanging combines a romantic heart silhouette with a serene, sculpted face. The design features a rich maroon border framing a creamy white face, accented with charming pink heart cheeks and a glossy finish.
Step-by-Step
Materials
- White low-fire earthenware clay
- Rolling pin and guide strips (canvas or wood)
- Paper template (heart shape)
- Needle tool or fettling knife
- Small loop tool for carving
- Modeling tools (wooden and rubber ribs)
- Sponge and water bowl
- Underglazes: Deep Maroon/Red, Cream/Off-White, Pink, Black/Dark Brown
- Clear gloss glaze (cone 04 or 06 compatible)
- Paintbrushes: Soft fan brush, fine detail liner brush, medium round brush
- Kiln
Step 1: Sculpting the Base Form
-
Prepare the slab:
Begin by rolling out a slab of white earthenware clay to a thickness of approximately 3/8 inch. Use guide strips to ensure an even thickness across the entire piece. -
Cut the heart shape:
Place your paper heart template onto the slab. Trace around it gently with a needle tool to mark the outline, then cut through the clay cleanly. Smooth the cut edges with a damp sponge. -
Relief sculpt the face:
To create the raised face, add a smaller, teardrop-shaped slab of clay in the center of the heart. Score and slip both surfaces thoroughly to join them. This added volume will become the nose and forehead area. -
Define the facial planes:
Using your thumbs and a wooden modeling tool, blend the added clay outward into the heart shape. Create a smooth transition where the ‘face’ meets the ‘border,’ leaving a raised ridge around the permiter to define that maroon heart frame later. -
Form facial features:
Push the clay gently from the back to bulge the cheekbones and forehead slightly. Use a modeling tool to define the nose bridge and the slope of the brows.
Bleeding Colors?
If your red border glaze seeps into the white face during firing, try using a wax resist line between the two sections before glazing to create a perfect barrier.
Step 2: Detailing and Refining
-
Carve the eyes:
Instead of painting eyes, cut them out completely. Use a small fettling knife to slice two crescent-moon shapes. Be keen on symmetry here, as it defines the expression. -
Add the mouth:
sculpt a small, smiling mouth. I find it easiest to roll a tiny coil of clay, attach it for the lips, and then blend the edges so it looks organic rather than stuck on. -
Refine the surface:
Smooth the entire face with a damp sponge or a soft rubber rib. Remove any tool marks or fingerprints. The surface needs to be pristine for the glossy glaze to look right. -
Create hanging holes (optional):
If you plan to hang this, pierce two small holes near the top of the heart arches or add a clay loop on the back while the clay is leather hard. -
Bisque fire:
Allow the mask to dry slowly under plastic for a few days, then uncover to bone dry. Fire the piece to shelf cone 04 (or your clay’s specific bisque temperature).
Pro Tip: Smooth Skin
Burnish the clay with the back of a spoon when it’s leather hard. This compresses the particles and creates an incredibly smooth canvas for the facial features.
Step 3: Glazing and Finishing
-
Base coat the face:
Apply three even coats of Cream or Off-White underglaze to the center face area. Avoid the border. Let each coat dry to the touch before applying the next. -
Paint the border:
Apply three coats of Deep Maroon underglaze to the heart-shaped border. Use a steady hand to create a clean line where the red meets the cream face. -
Detail the features:
Using a fine liner brush and Dark Brown underglaze, paint thin, arched eyebrows above the eye cutouts. Paint the lips with a rust-red or translucent reddish-brown. -
Add the heart cheeks:
Dip a small round brush into Pink underglaze. Paint two small heart shapes on the cheeks. This mimics the overall shape of the mask and adds a cute, distinctive touch. -
Apply clear glaze:
Once the underglaze is fully dry, apply two coats of clear gloss glaze over the entire front of the mask. This will seal the clay and make the colors pop. -
Final firing:
Place the mask on stilts in the kiln to prevent the glazed back from sticking to the shelf. Fire to the maturity temperature of your glaze (usually cone 05 or 06).
Hang your glossy heart mask in a spot that catches the light to show off that beautiful ceramic shine
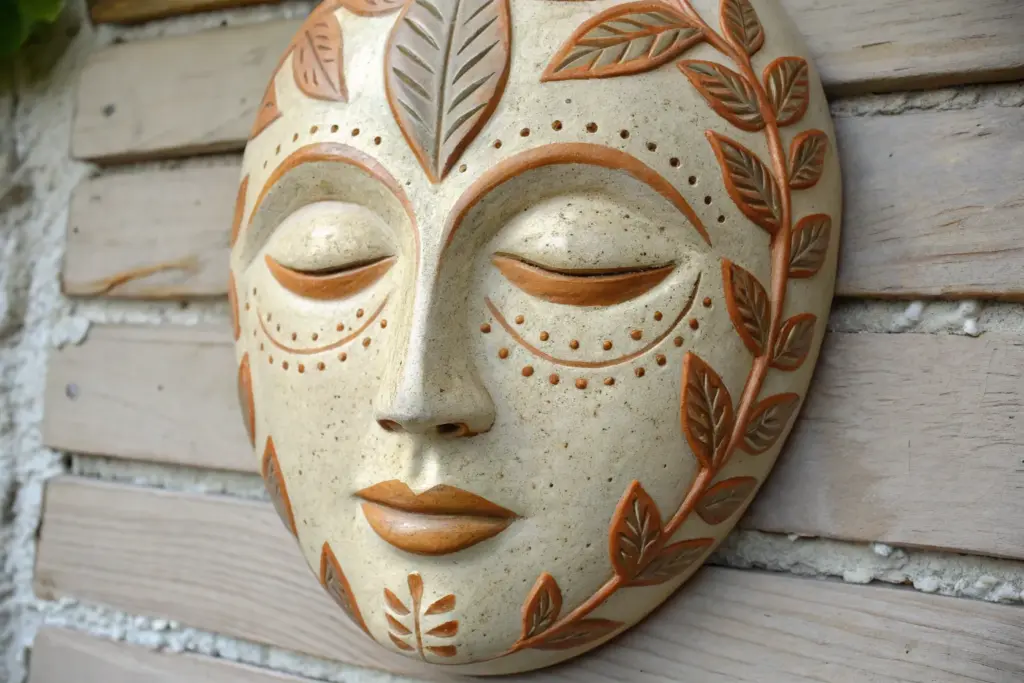
Embedded Texture Mask Using Lace, Leaves, or Fabric Imprints
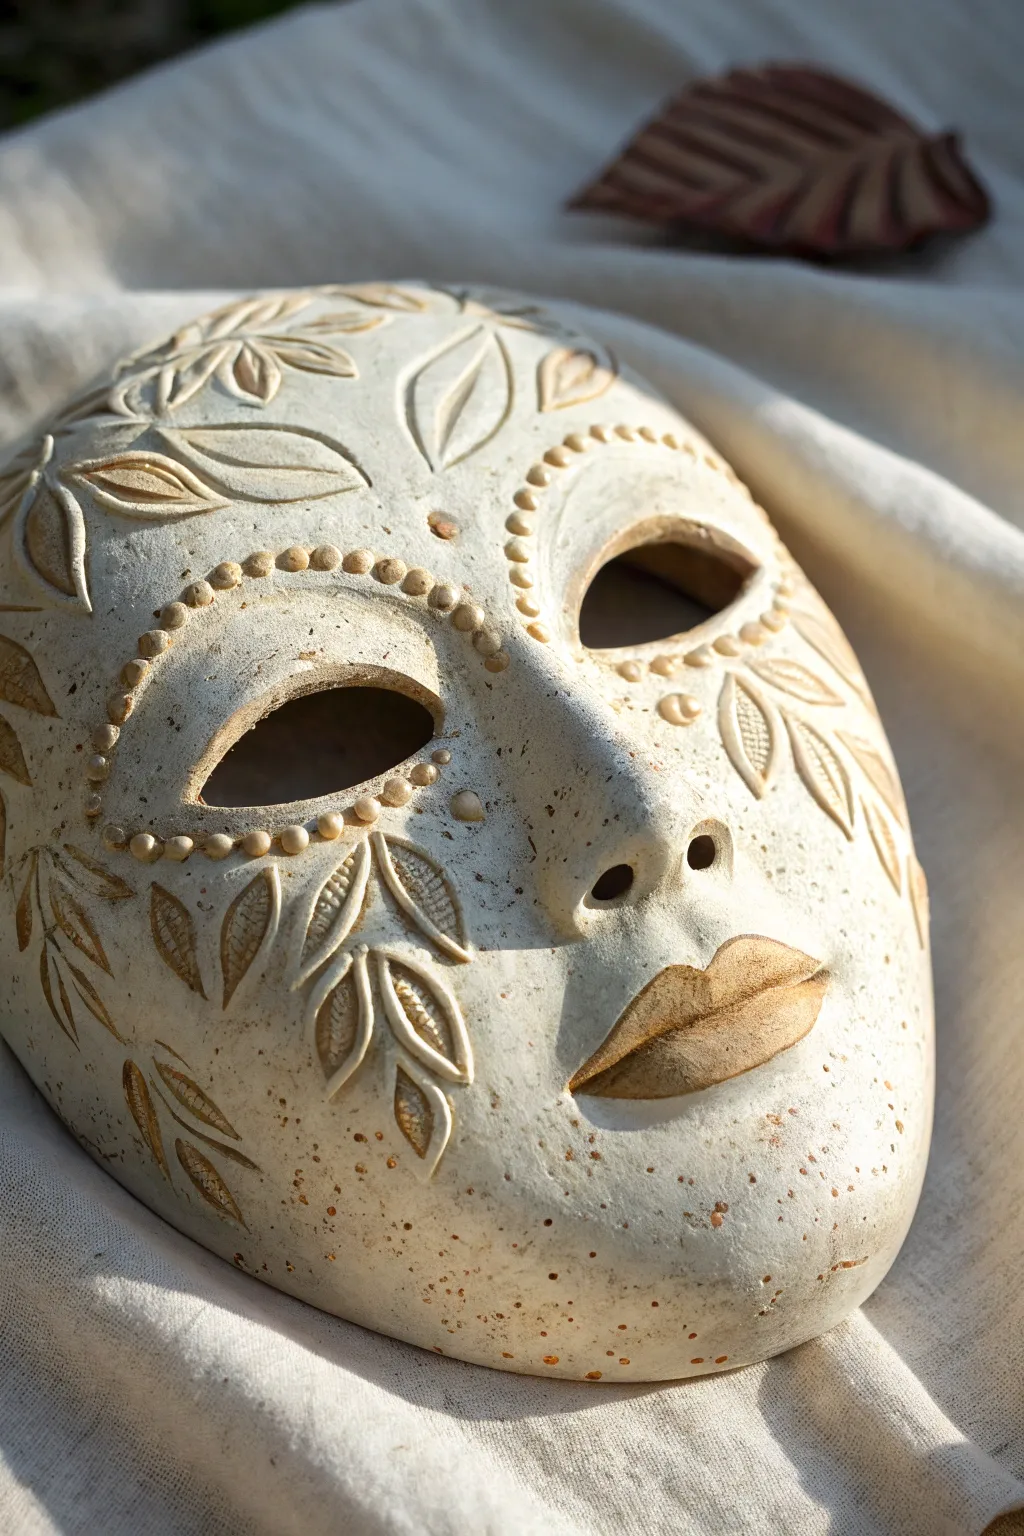
Embrace the beauty of the natural world with this intricately carved ceramic mask, featuring delicate leaf motifs and organic textures. The finished piece has a serene, earthy quality, achieved through careful sculpting and a subtle oxide wash that highlights every detail.
How-To Guide
Materials
- White or buff stoneware clay (smooth body)
- Plaster face mold or hump mold
- Rolling pin and guide sticks (approx. 1/4 inch thickness)
- Needle tool
- Loop carving tools (small and medium)
- Small ball stylus tool
- Rib tool (soft silicone or rubber)
- Sponge
- Iron oxide wash or dark brown underglaze
- Clear matte glaze (optional)
- Kiln
Step 1: Forming the Base
-
Roll the Slabs:
Begin by wedging your clay thoroughly to remove air bubbles, then roll out a smooth slab using guide sticks to ensure an even thickness of about 1/4 inch. -
Drape Over Mold:
Gently drape the clay slab over your plaster face mold. Smooth the clay down firmly with a damp sponge or soft rib to ensure it takes the shape of the forehead, nose, and cheeks without trapping air pockets. -
Trim the Edges:
Using a needle tool, trim the excess clay around the perimeter of the mask form. You can leave the edges slightly organic or smooth them for a cleaner oval shape. -
Define Features:
Press gently into the recessed areas like the eye sockets and around the nose to sharpen the definition of the facial features before the clay begins to stiffen. -
Initial Drying:
Allow the clay to dry to a sturdy leather-hard stage while still on the mold. This is crucial so the form holds its shape during the carving process.
Step 2: Carving and Detailing
-
Outline the Design:
Lightly sketch your leaf patterns and floral motifs directly onto the leather-hard clay using a needle tool. Map out the placement of the leaves on the cheeks and forehead to ensure symmetry. -
Carve the Leaves:
Using a small loop tool, carefully carve away the negative space around your leaf outlines. You aren’t cutting all the way through; you are lowering the background to make the leaves appear raised in relief. -
Refine Leaf Veins:
Take a sharp needle tool or a very fine carving tool to incise the central veins and smaller details inside each leaf shape. -
Create Eye Details:
Cut out the eye holes cleanly with a fettling knife. Then, create the decorative beaded border around the eyes by pressing a small ball stylus into the clay in a consistent, repetitive pattern. -
Sculpt the Lips:
Refine the lips by carving slightly deeper around their perimeter to make them pop. Smooth the surface of the lips with a damp finger to keep them soft and rounded. -
Add Texture:
For the speckles visible in the reference, you can gently flick stiff brush bristles against the clay surface to create tiny divots, or wait to achieve this effect later with glaze application. -
Clean Up:
Go over the entire mask with a barely damp sponge to smooth any sharp burrs created during carving, softening the edges of the relief work.
Fixing Cracks
If hairline cracks appear at the eye corners while drying, score the area immediately, add a tiny bit of vinegar slip, and compress the clay with a rib to heal the join.
Step 3: Finishing and Firing
-
Bisque Fire:
Slowly dry the mask completely to bone dry, then load it into the kiln for a bisque firing to cone 04 (or your clay body’s specific recommendation). -
Apply Oxide Wash:
Mix iron oxide with water (or use a watered-down brown underglaze). Brush this wash over the entire textured surface, ensuring it gets into all the carved crevices and leaf veins. -
Wipe Back:
Using a damp sponge, wipe away the majority of the oxide from the raised surfaces. This leaves the dark color in the recesses, highlighting the carving, while the high points return to the natural clay color. -
Final Glaze (Optional):
If you want a slight sheen, apply a thin coat of clear matte glaze. Alternatively, leave the clay bare for a raw, stony finish. -
Glaze Fire:
Fire the mask a second time to the final temperature required by your clay and glaze combination.
Antique Finish
To enhance the aged look, sand the high points of the fired piece lightly with wet-dry sandpaper after the final firing to expose the raw grit of the clay body.
Hang your finished mask on a wall where the light can catch the relief carving and cast intricate shadows
Cutout Shadow Mask With Pierced Patterns
Capture the serene beauty of this elongated ceramic mask, featuring delicate incised patterns and pierced details that play beautifully with light and shadow. The unglazed finish emphasizes the pure texture of the clay, making it a timeless addition to any wall collection.
Step-by-Step Tutorial
Materials
- Light stoneware or white clay block (approx. 5 lbs)
- Hump mold (plaster or DIY foam wrapped in plastic)
- Rolling pin
- Fettling knife
- Needle tool
- Loop tool (small)
- Hole punch tool or drill bit
- Rib tool (wooden or silicone)
- Sponge
- Scoring tool or fork
- Slip (clay mixed with water)
Step 1: Forming the Base
-
Roll the slab:
Begin by rolling out a smooth, even slab of clay, approximately 3/8-inch thick. Ensure there are no air bubbles. -
Shape the initial oval:
Cut a large, elongated oval shape from the slab. This mask is taller than it is wide, resembling a stretched face. -
Drape over the mold:
Gently drape your clay slab over a hump mold to give it a convex, three-dimensional curve. If you don’t have a mold, you can shape aluminum foil or newspaper into a mound and cover it with plastic wrap. -
Refine the perimeter:
Use your fettling knife to trim the edges clean, ensuring a symmetrical, egg-like silhouette. -
Smooth the surface:
Take a rib tool and compress the clay surface. This aligns the clay particles and creates that smooth, stone-like finish visible in the photo.
Cracks around holes?
If tiny cracks appear near your pierced holes as the clay dries, compress the area gently with the back of a spoon. Always smooth holes while clay is leather-hard.
Step 2: Sculpting the Features
-
Create the nose bridge:
Roll a coil of clay and attach it vertically down the center using the score-and-slip method. Blend the edges seamlessly into the main slab so the nose rises naturally from the face. -
Define the nose shape:
Sculpt the nose to be long and slender, slightly widening at the nostrils. Use your fingers to smooth the transition areas. -
Construct the eyelids:
Form two large, almond-shaped pads of clay. Score and slip the area where the eyes will sit, then attach the pads. These will become the heavy, prominent eyelids. -
Detail the eyes:
Using a modeling tool, carve a deep, curved line across the lower third of each eye pad to separate the lid from the eye slit. The eyes should look closed or downcast. -
Add the mouth:
Attach a small, slightly protruding mound for the mouth area. Use a wire tool or knife to slice the horizontal opening for the lips, then model the upper and lower lips to be full and pouty. -
Refining the chin:
Gently push the clay from the inside (if accessible) or add a small amount of clay to the exterior to define a subtle, protruding chin.
Pro Tip: Depth illusion
After carving the lines, gently rub a finishing sponge over the surface. This softens the edges but leaves the deeper recesses sharp, enhancing the shadow play.
Step 3: Incising and Piercing Details
-
Carve the forehead:
Using a needle tool or small loop tool, carve a vertical line extending upward from the nose bridge. Add a row of small circular indentations running parallel to this line. -
Detail the brow line:
Carve arched lines above the eyes to suggest eyebrows. Add decorative vertical dashes or ‘stitches’ along these arches. -
Create the cheek patterns:
I like to map this out lightly first—mark the areas on the cheeks where the dots will go. Using a hole punch tool or a small drill bit, carefully pierce grouping of holes on both cheeks. -
Add hair texture:
On the upper forehead area, carve geometric, leaf-like patterns to represent a hairline or headdress. Use confident, sweeping strokes. -
Create the hanging holes:
Don’t forget to pierce two small holes near the temples or top edge so you can hang the mask once it’s fired. -
Final smoothing:
Once the clay is leather-hard, use a slightly damp sponge to soften any sharp burrs created by the carving tools. -
Drying and firing:
Allow the mask to dry slowly under plastic to prevent warping. Bisque fire the piece. To achieve the look in the photo, you can leave it unglazed or apply a matte white underglaze before the final firing.
Hang your finished sculpture in a spot where the changing daylight can interact with the carved textures throughout the day