I love turning tic tac toe into a tiny sculptural world you can actually play with, because it’s part game and part mini art collection. These clay tic tac toe ideas are all about themed boards and two clearly different sets of pieces that feel like they belong together.
Classic Tic Tac Toe Slab With Raised Grid Lines
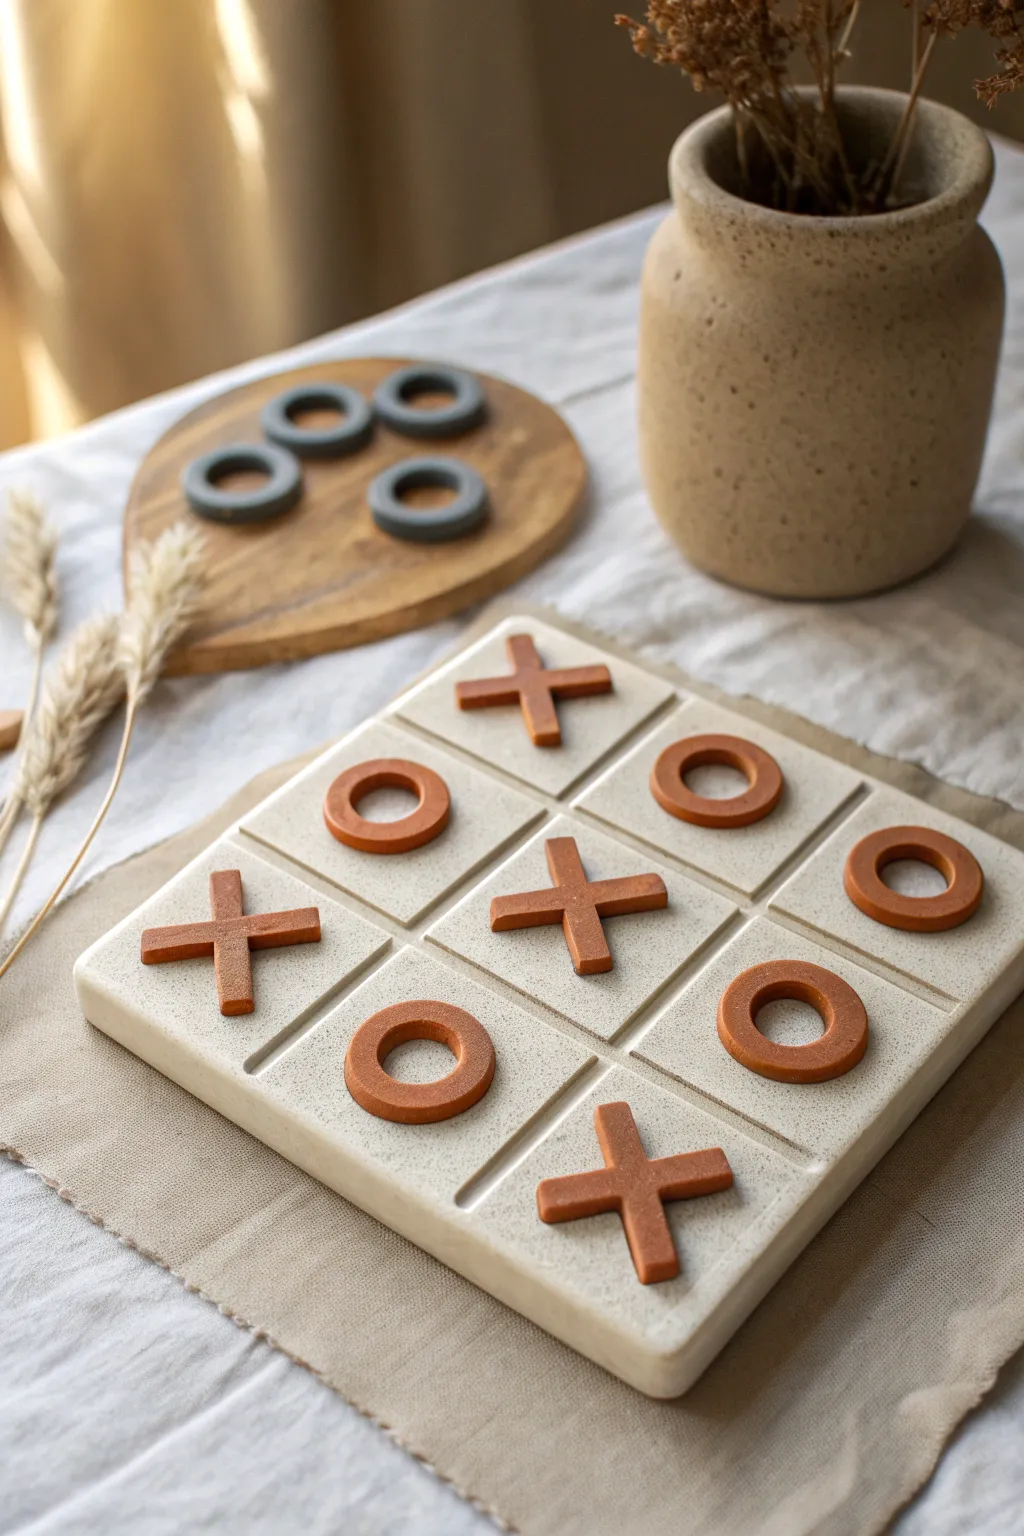
Elevate your game night with this sophisticated, stoneware-inspired Tic Tac Toe set featuring raised grid lines and rich, earthy tones. It combines a clean, modern aesthetic with the tactile warmth of handcrafted clay, making it a perfect functional decor piece.
Step-by-Step Guide
Materials
- White or speckled stoneware clay (approx. 2 lbs)
- Terracotta colored clay or rust-colored slip/underglaze
- Rolling pin with guide rings (1/4 inch and 1/8 inch)
- Square template (approx. 6×6 or 7×7 inches)
- Fettling knife or X-Acto knife
- Ruler or straight edge
- Clay scoring tool or serrated rib
- Slip (liquid clay)
- Small circle cookie cutters (2 sizes for the O’s)
- Rib tool (smooth wood or rubber)
- Sponge
- Matte clear glaze
Step 1: Creating the Base Slab
-
Roll the foundation:
Begin by rolling out your white/speckled clay on a canvas board. Use 1/4 inch guide rings to ensure an even thickness across the entire slab, which prevents warping later. -
Cut the square:
Place your square paper template onto the rolled clay. Using your fettling knife and a ruler, cut a clean, perfect square. Don’t discard the scraps; you might need them for the grid lines. -
Smooth the surface:
Take a rubber rib tool and gently compress the surface of the clay. This aligns the clay particles and removes any canvas texture. -
Round the corners:
Gently tap the sharp corners of your square with a paddle or your finger to create a soft, rounded edge similar to the reference image.
Step 2: Adding the Raised Grid
-
Prepare grid strips:
Roll out a small amount of the same white clay, this time thinner (about 1/8 inch). Use a ruler to cut long, thin strips, approximately 1/4 inch wide. -
Measure and mark:
Lightly mark your square slab into a 3×3 grid. Using your scoring tool, scratch the surface along these marked lines where the raised strips will go. -
Attach the lines:
Apply a thin layer of slip to the scored lines. Place your thin clay strips onto the slip. I find it easiest to lay the two vertical lines first, followed by the two horizontal ones. -
Clean connections:
Gently press the strips down to secure them. Use a damp paintbrush or a small modeling tool to smooth the seam where the strip meets the slab, ensuring it looks like one cohesive piece rather than just stuck on. -
Refine the grid intersection:
Where the strips cross over each other, gently press them flat so the height remains consistent. You can use a damp sponge to soften the top edges of the grid lines for a finished look.
Flatness Guarantee
To prevent the main board from warping during drying, place a piece of drywall or a wooden board on top of it (weighted slightly) once it reaches the leather-hard stage.
Step 3: Drafting the Game Pieces
-
Roll colored clay:
Roll out your terracotta-colored clay (or white clay you plan to paint later) to a 1/4 inch thickness. -
Cut the O’s:
Use the larger circle cutter to cut out five circles. Then, use the smaller circle cutter in the exact center of each to create the ring shape. Smooth the inner and outer edges with a damp finger. -
Cut the X strips:
For the X pieces, cut uniform strips of the terracotta clay. You will need 10 short strips of equal length. -
Assemble the X’s:
Take two strips and form a cross. Score and slip the center point where they overlap. Gently press them together on a flat surface to bond them without squishing the shape. -
Final smoothing:
Check all your game pieces for sharp edges or burrs. A quick wipe with a slightly damp sponge will give them that professional, soft matte finish shown in the photo.
Texture Play
Before cutting your X and O shapes, press a subtle texture into the clay—like canvas or linen—to give the game pieces a tactile, fabric-like finish that contrasts with the smooth board.
Step 4: Firing and Finishing
-
Slow drying:
Place the board and pieces on a wire rack or drywall board. Cover loosely with plastic for the first day to let them dry slowly and evenly, preventing the large slab from curling. -
Bisque fire:
Once bone dry, bisque fire the pieces according to your clay body’s instructions (usually Cone 04). -
Glaze application:
Apply a clear matte glaze to the white base to seal it while keeping that raw stone look. For the colored pieces, you can leave them unglazed if the clay is vitrified, or apply a matte clear coat to enhance the color depth. -
Final firing:
Glaze fire to maturity (likely Cone 5 or 6). If you didn’t glaze the bottom of the board, you can fire it directly on the kiln shelf, or use stilts if glazed.
Once cooled, your durable new game set is ready for years of coffee table strategy sessions


Minimal Modern Tic Tac Toe With Terrazzo-Style Tokens
Bring a touch of minimalist elegance to your coffee table with this handcrafted Tic Tac Toe set. Featuring a sleek, grooved board and beautifully textured tokens, this project balances modern design with the rustic warmth of stoneware clay.
Step-by-Step
Materials
- White or beige polymer clay (or air-dry clay)
- Speckled clay or crushed black pepper/dried tea leaves (for terrazzo effect)
- Square clay cutter or sharp blade
- Small round cutter (approx. 1 inch)
- Acrylic rolling pin
- Ruler
- Needle tool or thin wooden skewer
- Fine-grit sandpaper
- Matte varnish or sealant
- Parchment paper
Step 1: Creating the Game Board
-
Condition the clay:
Start by kneading your main block of white or beige clay until it is soft and pliable. This prevents cracks and ensures a smooth surface for your board. -
Roll out the slab:
On a sheet of parchment paper, roll the clay out into a thick, even square. You want it to be substantial, roughly 1/2 inch thick, to give the game board a weighted, high-quality feel. -
Cut the square:
Use a large square cutter or a ruler and a sharp blade to trim your clay slab into a perfect square. A size of about 6×6 inches usually works well for a compact travel set. -
Smooth the edges:
Gently run your finger dipped in a little water (or cornstarch for polymer clay) along the cut edges to round them off slightly, removing any sharp corners. -
Measure the grid:
Using a ruler, lightly mark where your grid lines will go. You need to divide the square into three equal columns and three equal rows. -
Score the lines:
Take your needle tool or a thin wooden skewer and press down firmly to create the grid lines. I like to drag the tool slowly to create a clean, deep groove rather than just scratching the surface. -
Refine the grooves:
Go back over your lines to ensure they are even widths. If the clay displaced slightly, smooth it back down with your fingertip so the playing surface remains flat.
Clean Lines Tip
When scoring the grid lines, place a piece of plastic wrap over the clay before pressing your tool down. This softens the edges of the groove instantly, saving you sanding time later.
Step 2: Crafting the Tokens
-
Mix the terrazzo effect:
Take a separate portion of your neutral clay and mix in your speckling agent. You can use pre-made granite-effect clay, or knead in coarsely ground black pepper or dried tea leaves for a natural, organic look. -
Roll the token sheet:
Roll this textured clay out to a thickness of about 1/4 inch. It should be thinner than the board but thick enough to be easily picked up. -
Cut the circles:
Using your small round cutter, punch out at least 10 circles (5 for each player, just to be safe). If you want two teams, you can leave one set plain and the other speckled, or simply make them all speckled like the inspiration image. -
Soften the edges:
Just as you did with the board, gently embrace the edges of each token with your finger to soften the cut lines for a polished look. -
Add surface texture:
To mimic the stone-like texture in the photo, gently press a piece of coarse sandpaper or a stiff bristle brush onto the top of each token.
Make It Magnetic
Embed small magnets into the bottom of the tokens and the center of each grid square before the clay dries. This makes the set perfect for travel or hanging on a fridge.
Step 3: Finishing Touches
-
Bake or dry:
Follow the instructions for your specific clay type. If baking polymer clay, place the pieces on a ceramic tile or baking sheet parchment and bake at the recommended temperature. If using air-dry clay, let it sit undisturbed for 24-48 hours. -
Cool down:
Allow the pieces to cool completely inside the oven if baking, as this prevents thermal shock and cracking. -
Sand for smoothness:
Once fully cured, use fine-grit sandpaper to buff the edges of the board and the tokens. This final polish makes the set feel professionally made. -
Seal the project:
Apply a thin coat of matte varnish to protect the clay from dirt and oils from handling. A matte finish preserves that natural, stoneware aesthetic.
Place your new game set on a sunlit table and invite a friend over for a match


Pocket Tic Tac Toe In a Lidded Clay Box
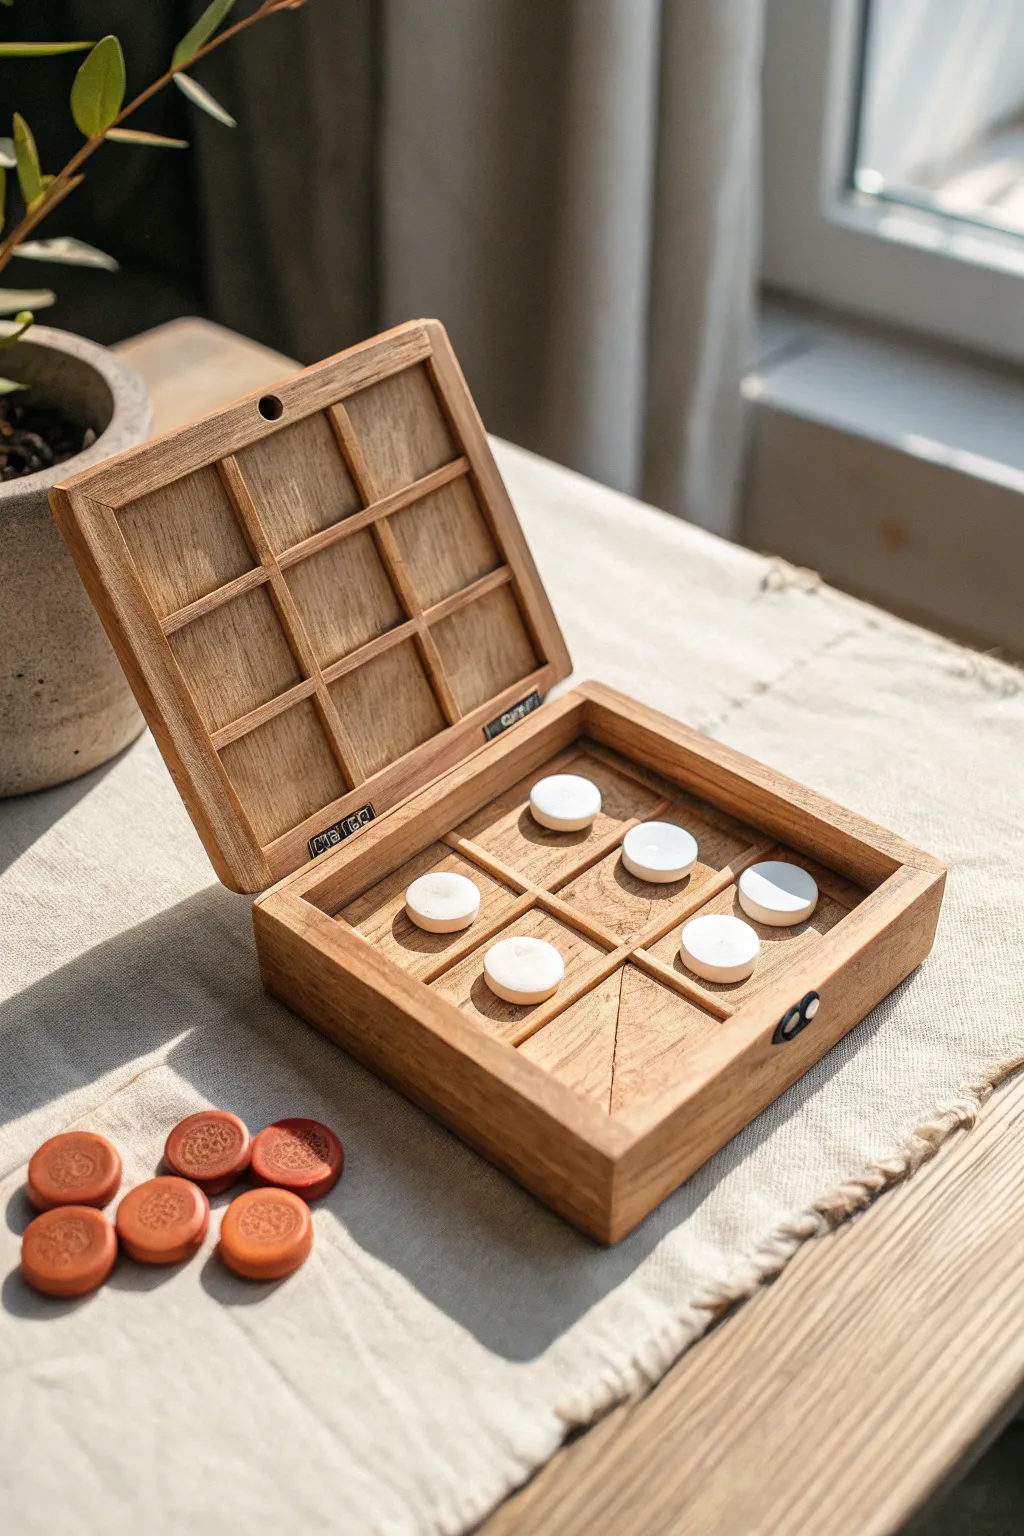
Transform ordinary polymer clay into a stunning heirloom-quality game set that mimics the warmth and grain of carved oak. This two-part box features an integrated grid and custom-stamped playing pieces, creating a portable treasure that looks far more complex than it actually is.
Step-by-Step Guide
Materials
- Polymer clay (caramel or light brown color)
- Polymer clay (white or cream for X pieces)
- Polymer clay (terracotta or dark brown for O pieces)
- Acrylic roller or pasta machine
- Clay blades (rigid and flexible)
- Texture tools (wire brush, coarse sandpaper, needle tool)
- Brown acrylic paint (burnt umber)
- Small rubber stamps or patterned buttons
- Hinges and clasp hardware (miniature size)
- Strong craft glue (E6000 or similar)
- Matte UV resin or matte varnish
- Ruler
- Paper towels
Step 1: Constructing the Box Base
-
Roll and measure:
Begin by conditioning your caramel-colored clay and rolling it into a thick slab, approximately 1/4 inch thick. Cut a precise square for the base, roughly 4×4 inches. -
Build the walls:
Cut four strips of the same clay thickness to create the walls. Bevel the edges at 45-degree angles for seamless corners, or butt the joints and blend the seams thoroughly with a rubber tool. -
Simulate wood texture:
Before baking, use a wire brush or coarse sandpaper to drag lines horizontally across all exterior surfaces. This mimics natural wood grain. -
Add the grid:
Roll thin snakes or extrude square strips of clay for the game grid. Lay them inside the box in a hashtag pattern (#), pressing them gently into the raw clay base to bond them. -
Initial bake:
Bake the base according to your clay package instructions. I suggest tenting foil over it to prevent scorching the wood-colored clay.
Fixing Warped Lids
If your lid doesn’t sit flat after baking, reheat it slightly with a heat gun until pliable, then press it firmly onto a cool tile with a heavy book on top until cold.
Step 2: Creating the Lid & Finish
-
Form the lid:
Create a slab slightly larger than your box base. Add a small lip around the underside edge so it sits securely on the box without sliding off. -
Texture the lid:
Using a needle tool, carve deeper grain lines and ‘knots’ into the top of the lid to enhance the realistic wood effect. -
Bake the lid:
Bake the lid separately on a flat tile to ensure it stays perfectly level. -
Apply the antiquing wash:
Once cool, dilute burnt umber acrylic paint with a little water. Brush it over the entire box and lid, getting into every crevice. -
Wipe back:
Immediately wipe away the surface paint with a damp paper towel. The dark paint will remain in the textured grooves, instantly revealing the faux wood grain.
Step 3: Crafting the Tokens
-
Cut the circles:
Roll out your white and terracotta clays. Use a small circle cutter (about the size of a quarter) to punch out 5 pieces of each color. -
Stamp the design:
Press a patterned stamp or an ornate button into the center of the terracotta pieces to give them a carved look. Keep the white pieces smooth or add a simple texture. -
Smooth the edges:
Gently rub the edges of each token with your finger to remove any sharp cutting lines, giving them a worn, tactile feel. -
Bake tokens:
Bake all game pieces. Since they are small, closely monitor the oven temperature.
Magnetize It
Embed tiny neodymium magnets into the box rim and lid corners before baking. This creates a satisfying ‘snap’ closure without needing external hardware.
Step 4: Assembly & Hardware
-
Seal the ‘wood’:
Apply a coat of matte varnish to the box and lid. This protects the paint wash and removes the plasticky feel of raw clay. -
Attach hinges:
Mark the position for your miniature hinges on the back of the box and lid. Use a tiny dab of strong glue to secure them in place. -
Install the latch:
Glue the small clasp to the front center. I like to use a tiny bit of tape to hold hardware in place while the adhesive sets completely.
Now you have a charming, rustic game set ready for travel or display on your coffee table


Cat and Fish Tic Tac Toe With a Cat-Face Board
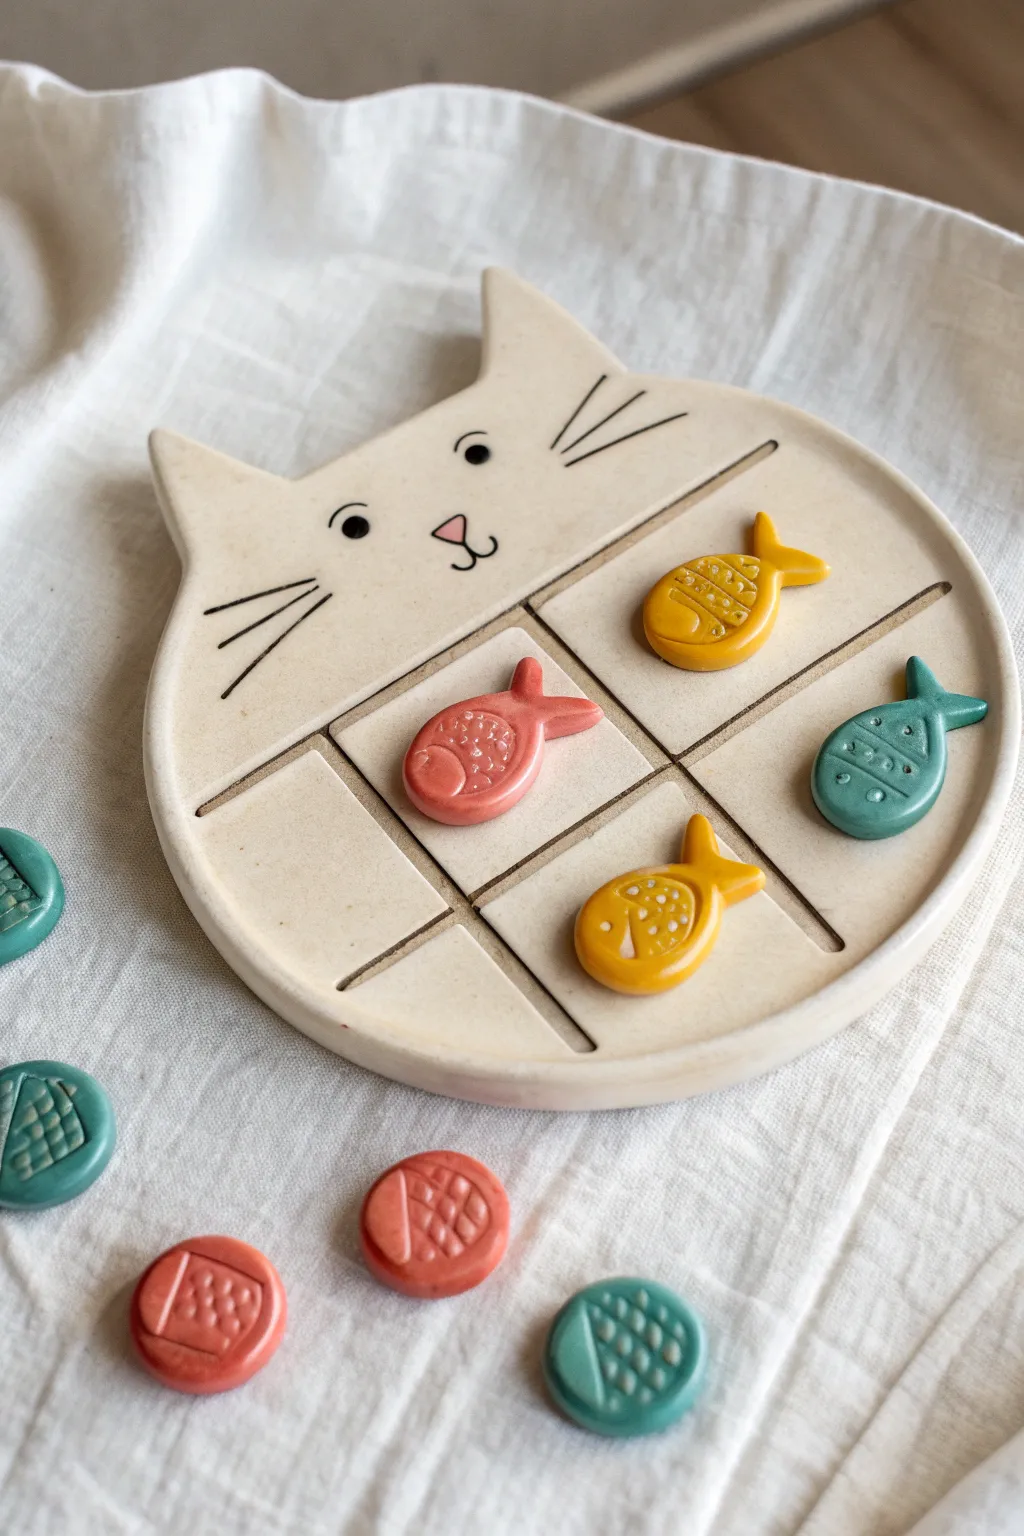
This adorable ceramic game set transforms a classic pastime into a functional piece of art, featuring a sweet cat-face board and miniature fish tokens. With its smooth, creamy glaze and cheerful accent colors, it serves as both a fun activity and a charming coffee table display.
Step-by-Step
Materials
- White air-dry clay or polymer clay
- Rolling pin
- Clay knife or craft scalpel
- Needle tool or toothpick
- Circle cutters (large for face, small for tokens)
- Small teardrop cutter (optional for fish)
- Fine-grit sandpaper
- Acrylic paints (pale cream, salmon pink, teal, mustard yellow, black)
- Small detail brushes
- Glossy varnish or sealant
- Bowl of water and sponge (for smoothing)
Step 1: Sculpting the Cat Board
-
Prepare the base:
Begin by rolling out a large slab of white clay to an even thickness of about 1/4 inch (6mm). Ensure the surface is smooth and free of air bubbles. -
Cut the shape:
Use a large circle cutter or a bowl as a template to cut out the main round face. Then, hand-cut two triangular ear shapes from the remaining clay slab. -
Attach the ears:
Score the bottom of the ears and the top edge of the round face, apply a little water or slip, and press the ears firmly in place. Blend the seams on both the front and back until they are invisible. -
Create the grid:
Using a ruler and your needle tool, gently impress a hashtag (#) grid onto the lower two-thirds of the cat’s face. The lines should be deep enough to see but not cut all the way through. -
Refine the edges:
Dip your finger in water and run it along the outer rim of the cat face to soften any sharp cutting marks for a professional finish.
Step 2: Crafting the Game Pieces
-
Shape the fish:
Roll out a slightly thinner slab of clay. Cut out five small oval shapes. Pinch one end of each oval to create a tail fin, slightly curving it upwards for movement. -
Shape the round tokens:
Cut out five small circles from the same slab. These will serve as the opposing player’s pieces (resembling yarn balls or simple treats). -
Add textures:
Use your needle tool to press tiny scales, eyes, and fin lines onto the fish pieces. For the round tokens, scratch a cross-hatch or grid pattern to mimic the texture of woven yarn or a waffle cookie. -
Dry the clay:
Place the board and all ten playing pieces on a flat surface to dry completely. This usually takes 24-48 hours depending on your clay type.
Smoother Surfaces
Use a baby wipe or a damp sponge to smooth the clay edges *before* drying. This reduces the amount of sanding needed later and prevents dusty cleanup.
Step 3: Painting and Finishing
-
Sand for smoothness:
Once fully dry, lightly sand the edges of the board and pieces to remove any roughness. Wipe away the dust with a barely damp cloth. -
Base coat the board:
Paint the entire cat board with a creamy off-white or pale beige acrylic paint. I find that applying two thin coats gives better coverage than one thick one. -
Paint the face details:
Using a very fine brush and black paint, carefully draw the eyes (small dots with outer circles), the nose, the mouth, and three whiskers on each cheek. Make sure these sit above the grid lines. -
Highlight the grid:
Mix a diluted brown or dark beige wash and carefully paint inside the impressed grid lines to make them stand out subtly against the cream face. -
Color the fish:
Paint the fish pieces in varying vibrant colors like mustard yellow, teal, and salmon pink. Use white to add tiny dot accents or highlight the scales. -
Color the tokens:
Paint the round tokens in complementary colors—salmon pink and teal work beautifully here—ensuring the impressed texture remains visible. -
Seal the project:
Finish by applying a coat of glossy varnish to all pieces. This mimics the look of fired ceramic glaze and protects your game from wear and tear.
Make it Magnetic
Glue small circular magnets to the back of the pieces and embed magnets into the board’s grid spots to make this a travel-friendly game set.
Once the varnish cures, your whimsical cat board is ready for its first game.

The Complete Guide to Pottery Troubleshooting
Uncover the most common ceramic mistakes—from cracking clay to failed glazes—and learn how to fix them fast.
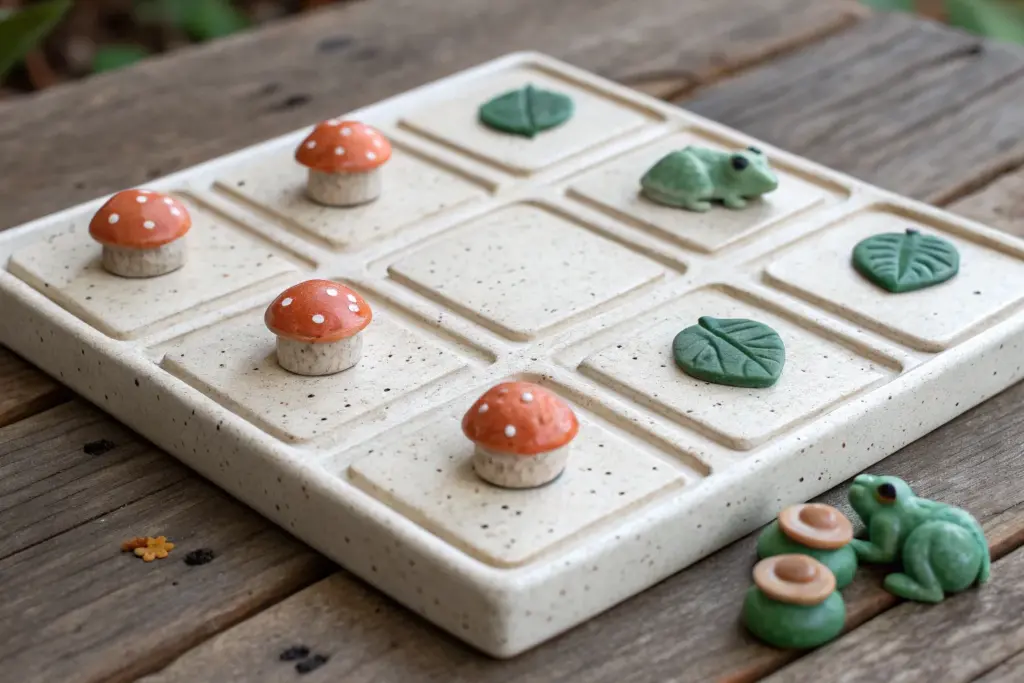
Pond Life Tic Tac Toe With Lily Pad Grid and Frog Pieces

Bring the tranquility of a lily pad pond to your game nights with this charming handmade clay set. Featuring a glazed green board that mimics a large leaf and sculpted frog and seed pod playing pieces, this project is as delightful to display as let it is to play.
How-To Guide
Materials
- Polymer clay (green, beige/tan) or air-dry stoneware clay
- Rolling pin
- Circular cookie cutter or template (approx. 8-10 inches)
- Ruler or straight edge
- Needle tool or toothpick
- Clay sculpting tools (ball stylus, knife tool)
- Clear acrylic glaze or glossy varnish
- Green acrylic paint (if using white air-dry clay)
- Fine grit sandpaper
- Baking sheet and parchment paper (if using polymer)
Step 1: Creating the Lily Pad Grid Board
-
Prepare the clay base:
Start by conditioning your green clay until pliable. Roll it out into a smooth, even slab about 1/4 inch thick. Aim for a consistent thickness to prevent cracking during drying or baking. -
Cut the circular shape:
Using a large circular cutter or a paper template with a knife, cut out the main board shape. Smooth the edges with your finger or a damp sponge to remove any sharpness. -
Mark the grid lines:
Measure the diameter of your circle to find the center. Using a ruler and a needle tool, lightly score a standard tic-tac-toe grid (two vertical lines, two horizontal lines) directly onto the surface. -
Deepen the grid and add variation:
Go back over your scored grid lines with a sculpting tool to widen and deepen them significantly. This channel needs to be distinct. For the playful look in the photo, allow the squares to be slightly irregular rather than perfectly geometric. -
Add nature-inspired texture:
Within the central squares of the grid, use a needle tool to scratch in erratic, radiating lines or tiny ‘X’ marks. This mimics the vein structure of a leaf and adds that rustic, handmade charm. -
Form the rim:
Before the clay hardens, gently lift the very edge of the circle slightly upwards to create a shallow rim, which helps keep the pieces contained.
Uneven is Better
Don’t stress about perfect symmetry for the grid lines. Slightly wavy or distinctively hand-carved lines make the board look more organic, like a real leaf vein pattern.
Step 2: Sculpting the Game Pieces
-
Shape the frog bases:
For the ‘X’ player, we are making frogs. Take small balls of dark green clay. Pinch them slightly to create a rounded, lumpy body shape. -
Add frog details:
Attach two tiny balls of clay to the top for eyes and two smaller pieces for legs tucked underneath. Use a needle tool to press pupils into the eyes and distinct toes into the feet. -
Create the seed pods:
For the ‘O’ player, use beige or tan clay. Roll five small balls and flatten them slightly into domes, reminiscent of lotus seed pods. -
Add pod texture:
Using a small ball stylus or the end of a paintbrush, press a circular pattern of holes into the top of each beige dome. Add petal details around the edges using a knife tool if desired. -
Make scorekeeper discs (Optional):
Use leftover green and beige clay to make flat, coin-sized discs. Use a knife to impress radial lines (like pizza slices) into them, matching the accessories seen in the photo.
Magnetic Magic
Make this a travel set! Glue tiny neodymium magnets into the base of each piece and bury washer weights inside the clay board before baking so pieces stay put during car rides.
Step 3: Finishing and Assembly
-
Bake or dry:
Follow the instructions for your specific clay type. If using polymer, bake on parchment paper at the recommended temperature. If using air-dry clay, allow it to dry completely for 24-48 hours. -
Sanding edges:
Once hardened, take a piece of fine-grit sandpaper and gently smooth the outer rim of the board and the bottoms of your game pieces so they sit flat. -
Applying color washes:
I prefer to dilute a little darker green acrylic paint with water and brush it into the grid lines and texture marks. Wipe away the excess on the surface to highlight those engraved details. -
Sealing the board:
Apply a coat of gloss varnish or glaze to the green board to give it that wet, ceramic leaf look. -
Sealing the pieces:
Finish by glazing the frogs to make them look slimy and wet, but consider using a matte varnish for the beige pods to provide a textual contrast.
Now you have a serene little pond scene ready for your next strategy session
Woodland Leaf Tic Tac Toe With Acorns vs. Squirrels
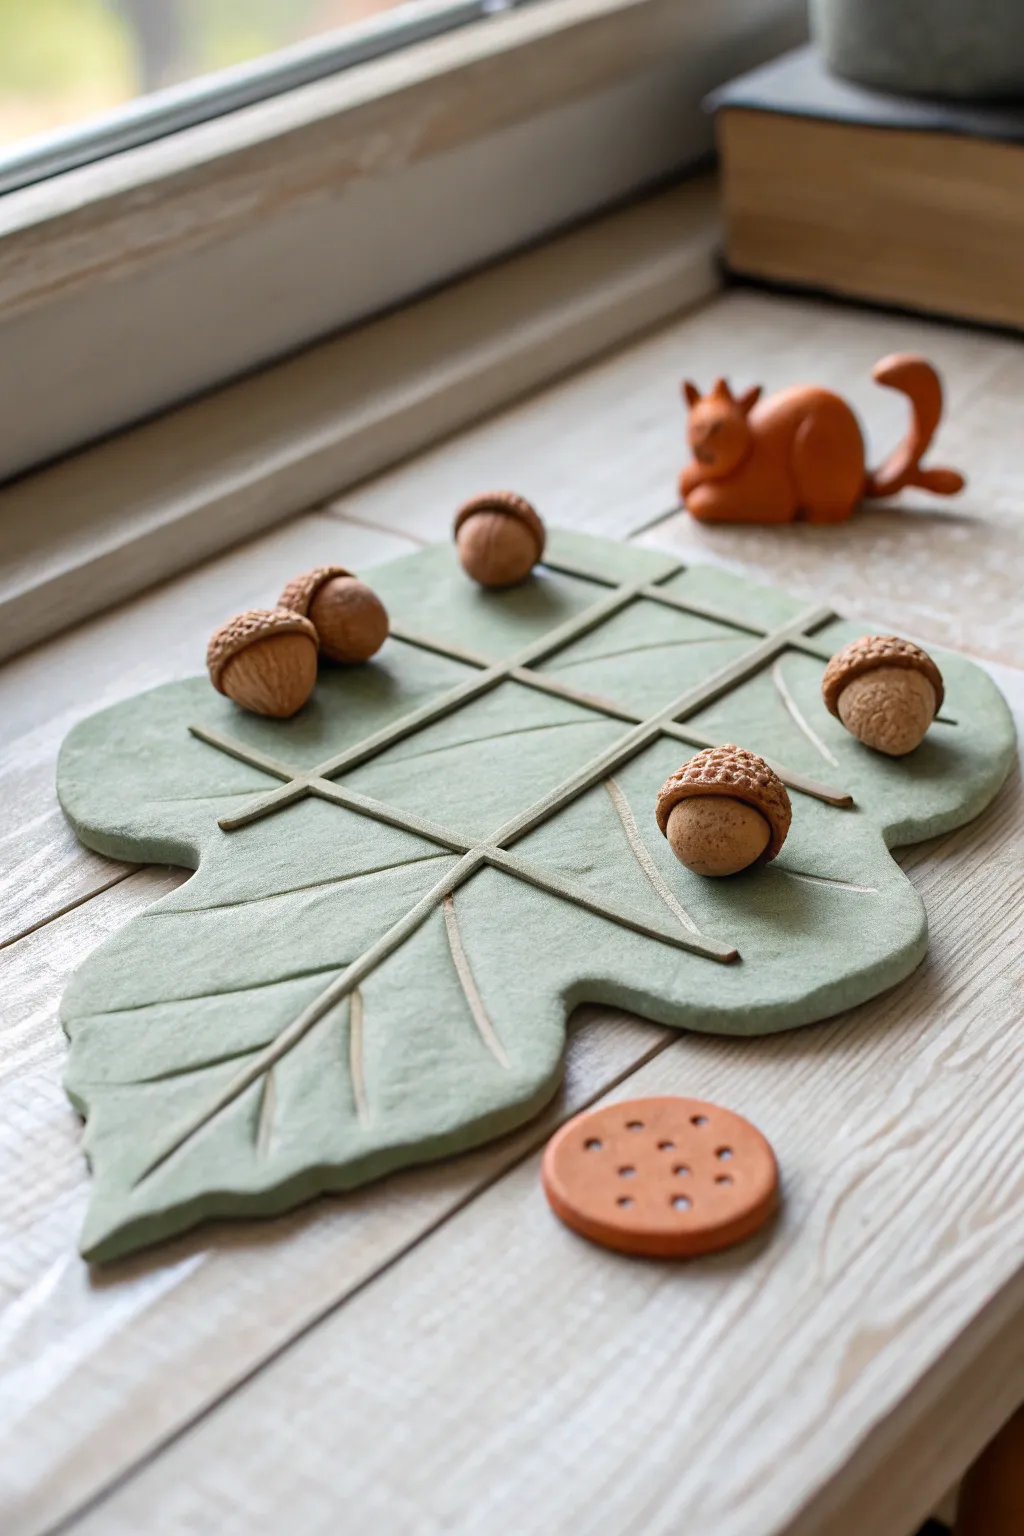
Bring the forest floor indoors with this charming clay project featuring a large leaf playing board and miniature acorn markers. The matte sage green finish and tactile raised grid make this a delightful, nature-inspired twist on the classic game.
Detailed Instructions
Materials
- Air-dry clay or polymer clay (white or light grey base)
- Rolling pin
- Large leaf template (real or paper)
- Clay knife or X-Acto blade
- Modeling tools (or a toothpick)
- Acrylic paints: Sage green, warm brown, terracotta orange
- Texturing tool or real acorn cap
- Fine-grit sandpaper
- Matte sealant spray or varnish
- Small paintbrushes (flat and detail)
Step 1: Sculpting the Leaf Board
-
Roll the base:
Begin by conditioning your clay until it’s pliable, then roll it out into a large, even slab about 1/4 inch thick to ensure durability. -
Cut the shape:
Place your leaf template over the slab. Using a sharp clay knife, carefully trace around the edge to cut out the leaf silhouette. Smooth the raw edges with a wet finger to remove any sharpness. -
Create the grid:
Roll out four thin ‘snakes’ or coils of clay. Arrange them on the leaf surface in a hashtag (#) pattern to form the tic-tac-toe grid. Press them gently to adhere. -
Add vein details:
Roll smaller, thinner coils to act as the decorative leaf veins. Attach these radiating from the center or sides of the leaf, blending the ends slightly into the main surface. -
Refine the surface:
Use a damp sponge or your finger to smooth the connection points between the raised grid, veins, and the leaf base so everything looks like one cohesive piece.
Natural Texture Hack
For ultra-realistic texture on the leaf surface, press a real, heavily veined leaf into the wet clay before adding your grid lines.
Step 2: Crafting the Game Pieces
-
Form acorn bodies:
Roll five small balls of clay into slightly oval shapes to create the nut portion of the acorns. Flatten the bottom slightly so they stand upright. -
Sculpt acorn caps:
Create five small disk shapes, slightly wider than the acorns. Press these gently onto the tops of your oval shapes. -
Texture the caps:
Here is where I like to use a texturing tool or a ball of crumpled foil to stipple the surface of the caps, giving them that rough, bumpy realism. -
Make the second team:
For the opposing team, create five small, round ‘cookie’ shapes or sculpt simplified squirrel silhouettes if you are feeling ambitious. Ensure they are distinctly different from the acorns. -
Dry thoroughly:
Allow all pieces and the main board to dry completely according to your clay’s package instructions. Rotate the board occasionally to prevent warping.
Warping Woes?
If the leaf edges curl up while drying, place a lightweight book on top of it once the surface is dry to the touch but the core is still damp.
Step 3: Painting and Finishing
-
Sand imperfections:
Once fully cured, use fine-grit sandpaper to gently smooth out any rough fingerprints or jagged edges on the leaf rim. -
Base coat the leaf:
Paint the entire leaf board, including the raised grid, with a soft sage green acrylic paint. You may need two coats for opaque coverage. -
Paint the acorns:
Paint the acorn bodies a smooth, light tan color. Use a darker textured brown for the caps to create contrast. -
Highlight the pieces:
Apply a very subtle dry brush of a lighter shade over the textured acorn caps to make the details pop. -
Seal the work:
Finish the project by spraying the board and all pieces with a matte sealant. This protects the paint from chipping during gameplay and maintains that natural, earthy look.
Place your new board on a coffee table or windowsill for a playful decoration that is ready for a quick match anytime


What Really Happens Inside the Kiln
Learn how time and temperature work together inside the kiln to transform clay into durable ceramic.
Beach Day Tic Tac Toe With Sand Texture and Shell Tokens
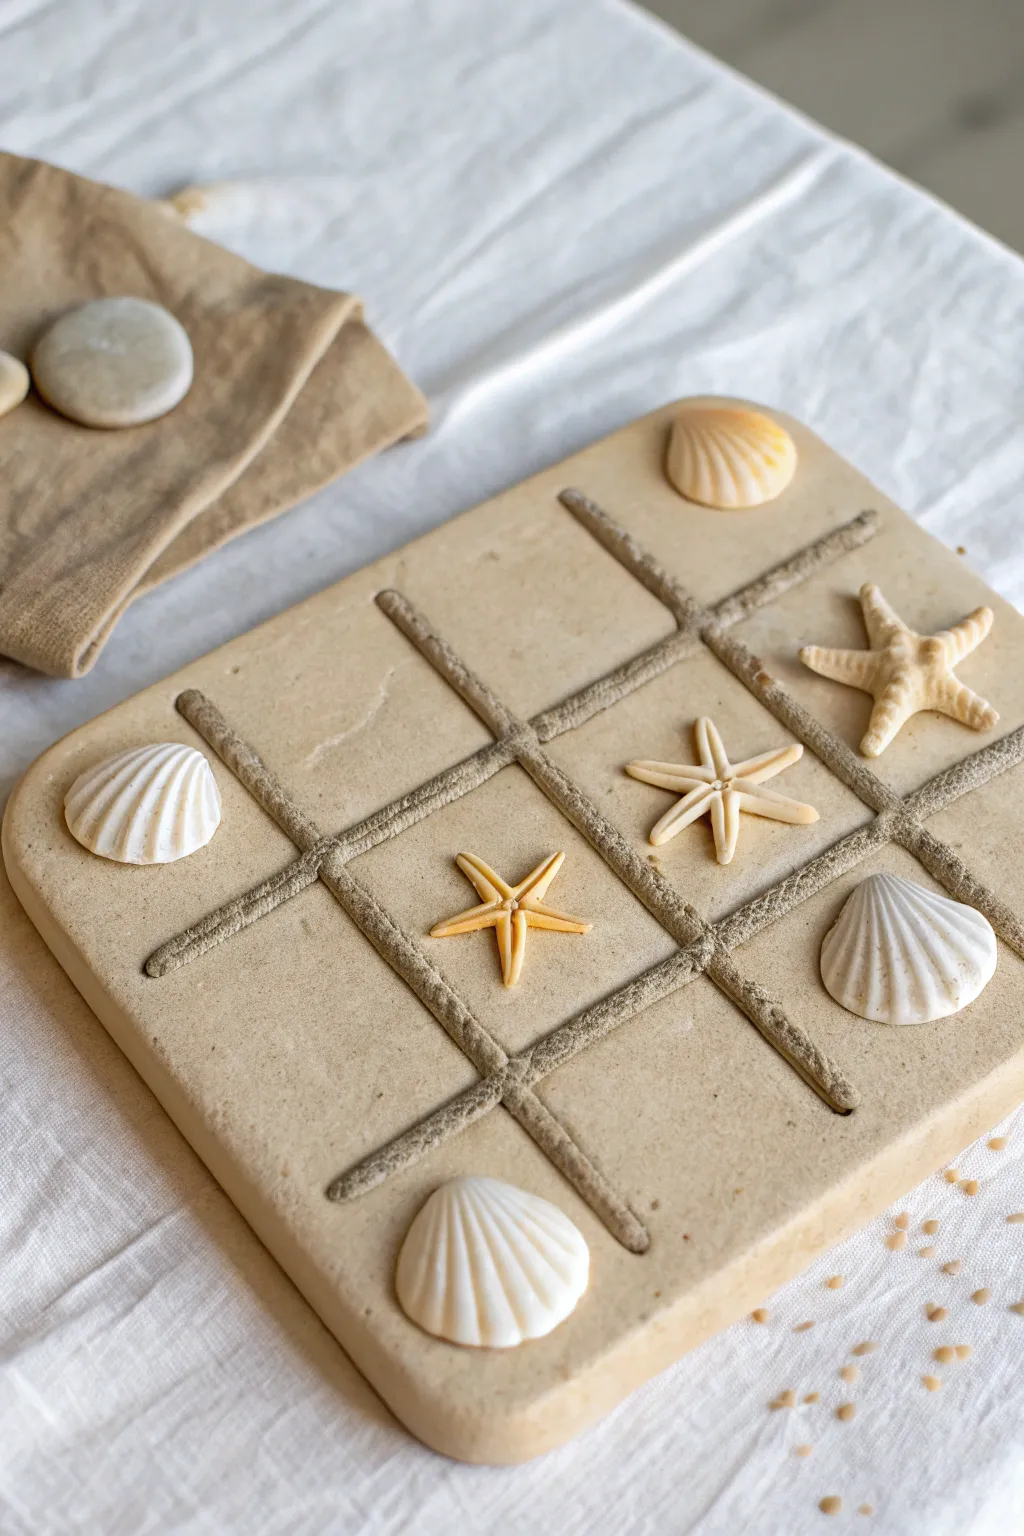
Bring the beach home with this textured clay Tic Tac Toe board that looks like it was just sculpted from wet sand. Using real shells and starfish as playing pieces creates a charming coastal game set that doubles as beautiful coffee table decor.
Step-by-Step Tutorial
Materials
- Air-dry clay (white or beige)
- Acrylic paint (warm beige/sand color)
- Fine craft sand or real beach sand
- Rolling pin
- Square template or ruler
- Clay knife or plastic cutting tool
- Sculpting tool with a rounded tip
- Mod Podge or white craft glue
- Small paintbrush
- Real seashells (5 small scallops)
- Real starfish (5 small knobby starfish)
- Clear matte sealant spray
- Sandpaper (fine grit)
Step 1: Base Construction
-
Prepare the clay:
Begin by conditioning your air-dry clay. Knead a large chunk in your hands until it feels pliable and warm, removing any air bubbles that might cause cracks later. -
Roll the slab:
Roll the clay out onto a smooth surface to a thickness of about 1/2 to 3/4 inch. You want a substantial, chunky feel for this board, similar to a stone tablet. -
Cut the square:
Place your square paper template (approx. 8×8 inches) on the clay or use a ruler to measure. Use your clay knife to cut a clean, perfect square, keeping the knife vertical to ensure straight edges. -
Soften the corners:
Using your fingers and a little water, gently round off the four sharp corners and smooth the cut edges. The goal is a soft, eroded stone look rather than sharp, manufactured angles.
Natural Texture
For a hyper-realistic sandy look, skip the paint brush for the base coat. Instead, sponge the paint on to create a porous, organic surface.
Step 2: Creating the Grid
-
Mark the lines:
Lightly score the board to divide it into nine equal squares. Don’t cut deep yet; just make faint guide lines to ensure your spacing is symmetrical. -
Carve the channels:
Using a rounded sculpting tool or even the handle of a paintbrush, press firmly into your scored lines to create distinct channels. You want these grooves to be wide enough to hold the textured ‘sand’ later. -
Texture the surface:
Before the clay dries, take a crumpled ball of aluminum foil or a stiff bristle brush and gently tap it all over the surface of the board (avoiding the grooves) to give the smooth clay a natural, pitted stone texture. -
Dry the board:
Set the board aside to dry completely. Depending on humidity and thickness, this usually takes 24-48 hours. Flip it over halfway through to prevent warping. -
Sand imperfections:
Once fully cured, use fine-grit sandpaper to smooth out any unintentional sharp ridges or burrs on the edges.
Warping Prevention
If the corners curl up while drying, place a lightweight book on top of the clay (with parchment paper in between) once it’s dry to the touch but still soft inside.
Step 3: Painting and Texturing
-
Base coat:
Paint the entire board with a warm beige acrylic paint. I find mixing a tiny drop of white into a standard ‘sand’ color gives it a more natural, sun-bleached look. -
Create the sand paste:
In a small cup, mix equal parts beige paint, white craft glue, and actual fine sand. Mix until you have a thick, gritty paste. -
Fill the grooves:
Carefully paint this gritty mixture into the recessed grid lines you carved earlier. Build it up slightly so the lines look like raised ridges of wet sand. -
Apply loose sand:
While the paint-glue mixture in the grooves is still wet, sprinkle a pinch of dry sand directly onto the lines. Shake off the excess immediately. This adds extra dimension and authentic sparkle. -
Add surface speckles:
Dilute a darker brown paint with water. Dip a toothbrush in it and flick the bristles to splatter tiny speckles over the board, mimicking the look of granite or sedimentary rock.
Step 4: Finishing Touches
-
Seal the board:
Once all paint and glue is dry, spray the entire board with a clear matte sealant. This protects the textured sand from flaking off over time. -
Prepare the tokens:
Select your best 5 scallop shells and 5 starfish. Ensure they fit comfortably within your grid squares without overcrowding the board. -
Clean playing pieces:
If using found shells, wash and dry them thoroughly. You can give them a light coat of clear varnish if you want them to look permanently ‘wet’ and shiny. -
Final assembly:
Arrange your seashells and starfish on the board to complete the set, ready for display or a game.
Now you have a serene, coastal game set that captures the relaxing essence of a day at the shore.
Waffle Dessert Tic Tac Toe With Topping Game Pieces
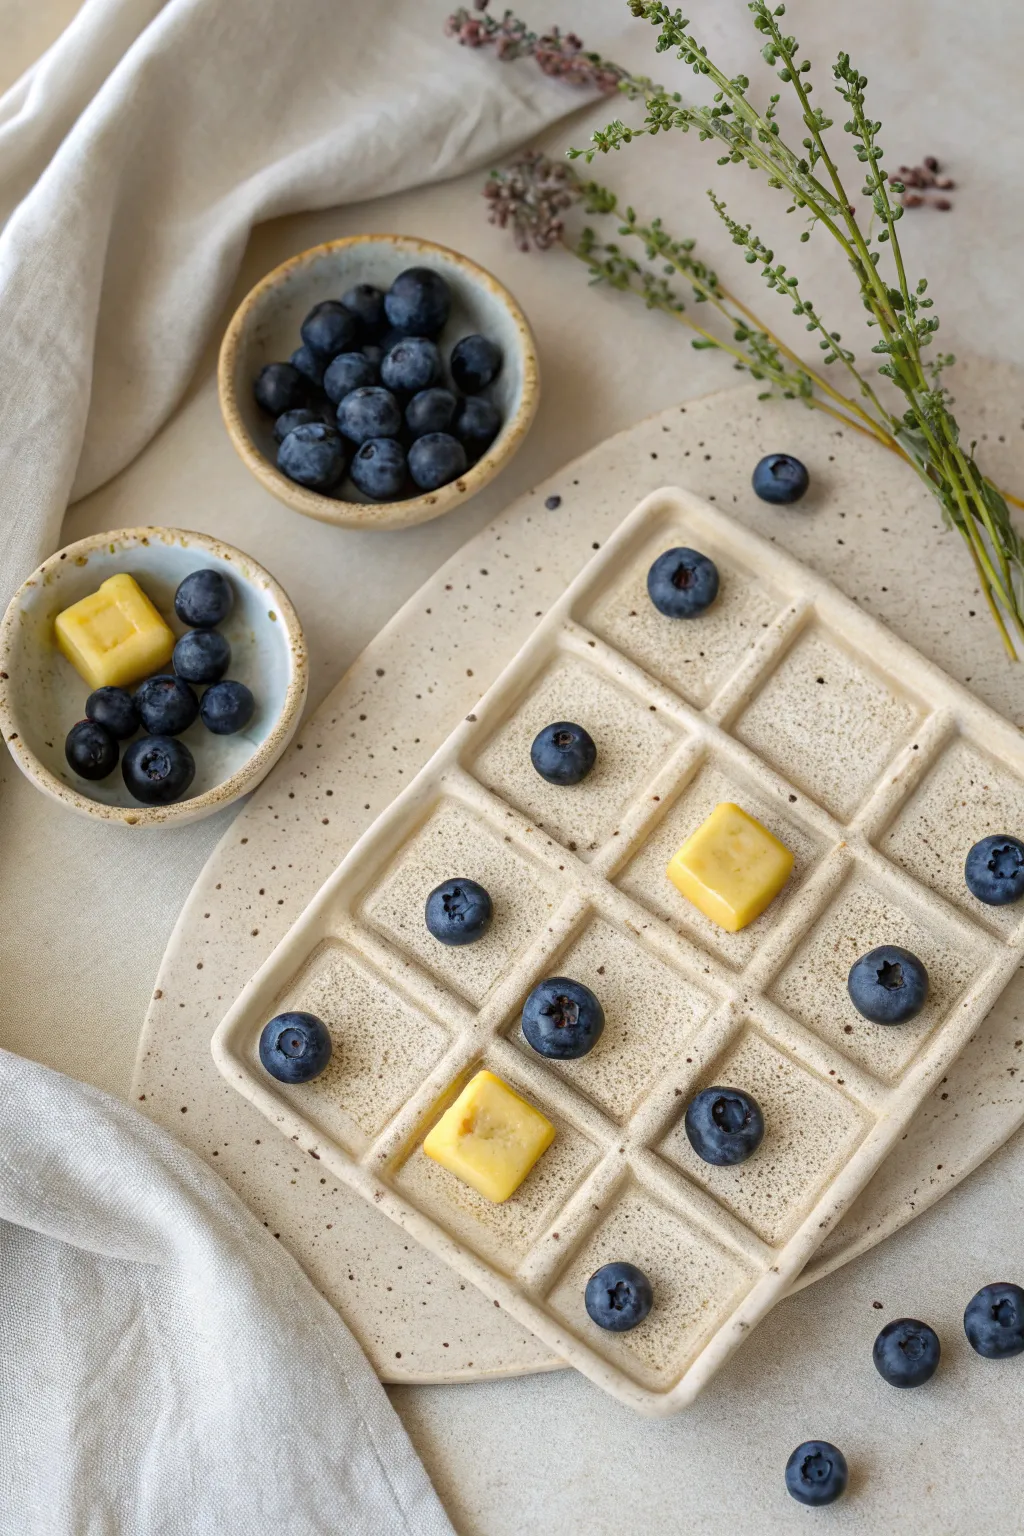
Transform a classic grid game into a delightful dessert-themed centerpiece with this ceramic waffle project. The speckled clay finish mimics toasted batter, while sculpted blueberries and butter pats serve as charmingly realistic playing pieces.
Step-by-Step Guide
Materials
- Speckled stoneware clay (beige/buff)
- Small rolling pin
- Square template (approx. 6×6 inches)
- Fettling knife or clay cutter
- Wooden ruler or straight edge
- Sponge
- Modeling tool (rounded tip)
- Small bowl mold or slump mold
- Yellow underglaze or slip
- Dark blue/purple underglaze
- Clear matte or satin glaze
- Slip and scoring tool
Step 1: Sculpting the Waffle Grid
-
Roll the base:
Begin by rolling out a slab of speckled stoneware clay to an even thickness, slightly thicker than 1/4 inch to ensure durability for the game board. -
Cut the square:
Place your square paper template on the slab and cut around it cleanly using a fettling knife. Smooth the raw edges with a damp sponge. -
Create grid strips:
From the remaining clay slab, cut four long strips that are roughly 1/4 inch wide and the length of your waffle square. -
Attach the grid:
Score and slip the clay surface in a hashtag pattern (#) to create a 3×3 grid. I find it easiest to lay the strips down gently first to check spacing before fully adhering them. -
Refine the walls:
Use a wooden tool or your fingers to smooth the seams where the strips meet the base, ensuring there are no gaps. Gently pinch the tops of the strips to round them off slightly for that soft, baked waffle look. -
Add a border:
Roll four more strips for the outer edge. Score and slip these around the perimeter of the square to frame the waffle grid completely.
Clay Texture Tip
For an even more realistic waffle texture, gently press a clean sponge onto the clay surface of the grid walls before firing to create a porous, baked look.
Step 2: Creating the Game Pieces
-
Shape the blueberries:
Roll small balls of clay, approximately 1/2 inch in diameter. You’ll need at least 5 for one player, but making a few extras is always wise. -
Detail the berries:
Using a small, round modeling tool or the end of a paintbrush, press a star-shaped indentation into the top of each ball to mimic the calyx of a blueberry. -
Cut the butter pats:
Roll a small, thick slab of clay and cut out 5 small squares (about 1/2 inch wide). Soften the sharp edges just a touch so they look like melting butter. -
Form the serving bowls:
Pinch two small balls of clay into simple, round pinch pots to hold your game pieces. Keep the walls even and smooth the rims with a damp sponge. -
Dry slowly:
Place the board, bowls, and all game pieces under loose plastic to dry slowly to the bone-dry stage. This prevents warping, especially on the flat board.
Warping Woes?
If your main flat board starts curling up as it dries, place a wooden board and a light weight on top of it (sandwiching it with paper) to force it to dry flat.
Step 3: Color and Glazing
-
Bisque fire:
Once bone dry, fire all pieces in the kiln to cone 04 (or your clay body’s bisque temperature). -
Color the butter:
Apply 2-3 coats of yellow underglaze to the square game pieces. Let each coat dry before applying the next. -
Color the berries:
Paint the round game pieces with a deep blue or purple underglaze. Don’t worry if it looks flat now; the glaze will add depth later. -
Wax the bottoms:
Apply wax resist to the bottom of the board, the bowls, and the undersides of all game pieces to prevent them from sticking to the kiln shelf. -
Apply clear glaze:
Dip or brush a clear matte or satin glaze over the entire waffle board and the serving bowls. The clear glaze will let the natural speckles of the clay shine through. -
Glaze the pieces:
Carefully apply the same clear glaze over the underglazed game pieces to seal them and make the colors pop. -
Final firing:
Fire everything to the maturity temperature of your clay and glaze (typically cone 5 or 6 for stoneware). Ensure no pieces are touching in the kiln.
Set up your waffle board and enjoy a sweet game of strategy.

TRACK YOUR CERAMIC JOURNEY
Capture glaze tests, firing details, and creative progress—all in one simple printable. Make your projects easier to repeat and improve.
Flower Garden Tic Tac Toe With Bees vs. Ladybugs
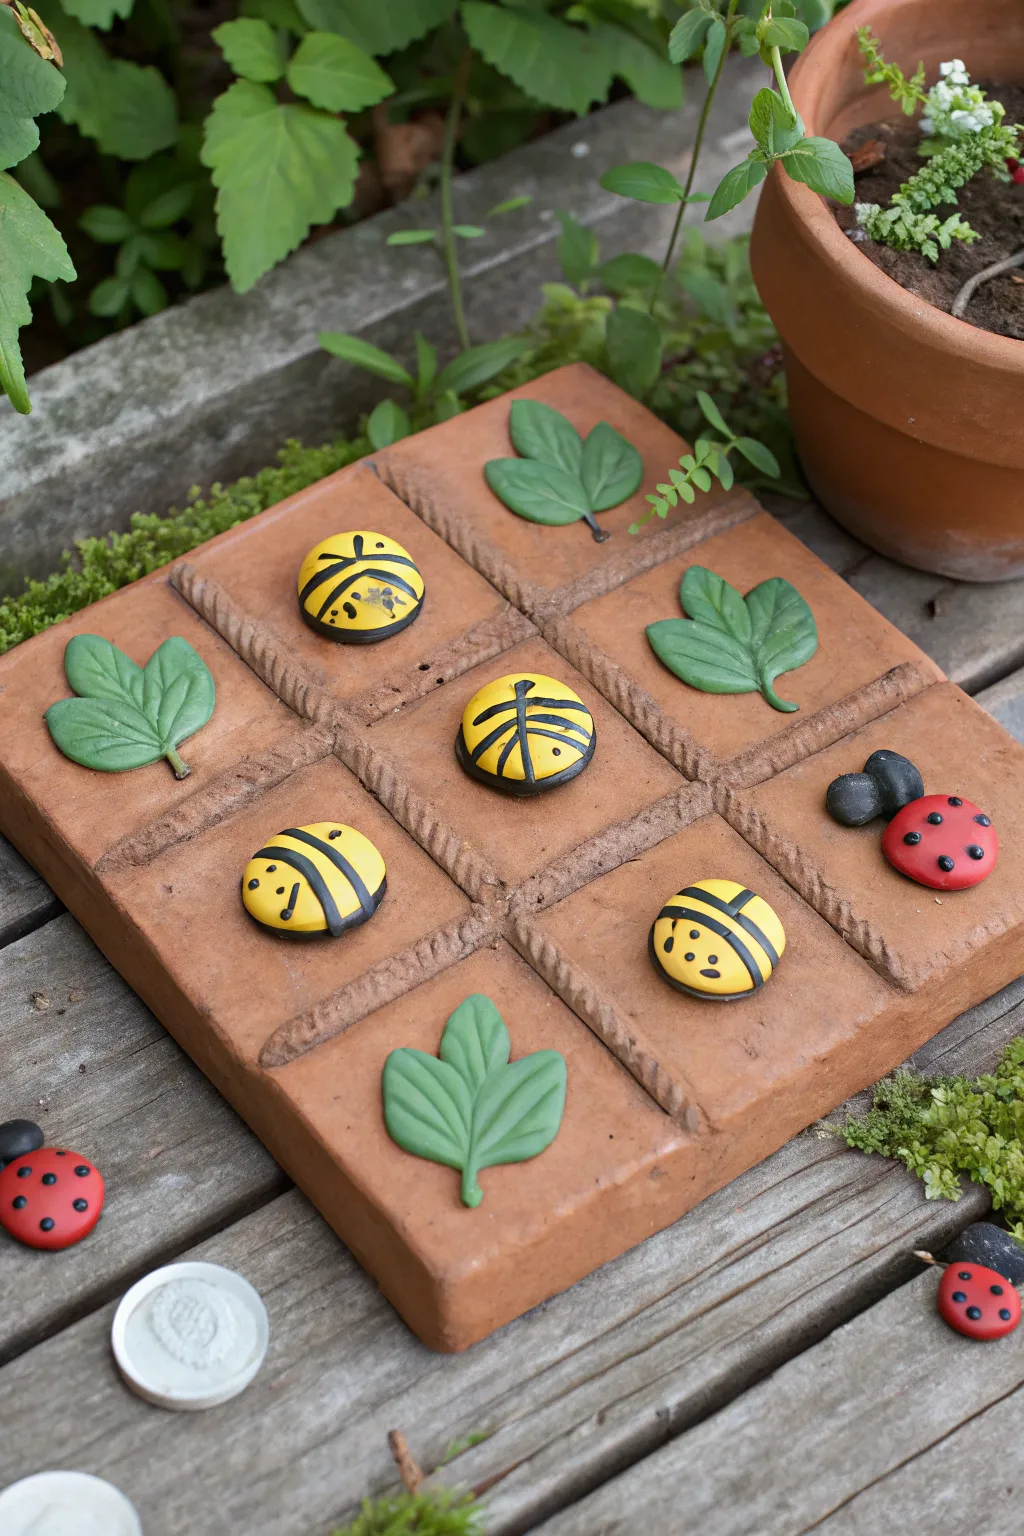
Bring the charm of a summer garden to your game table with this delightful terracotta-style tic-tac-toe set. Featuring cheerful bumblebees and sculpted green leaves as playing pieces, this sturdy board is perfect for outdoor play or rustic decor.
Detailed Instructions
Materials
- Terracotta-colored polymer clay or air-dry clay
- Yellow polymer clay
- Green polymer clay
- Red polymer clay (optional for ladybugs)
- Black acrylic paint
- Sculpting tools (needle tool, ball stylus)
- Rolling pin
- Ruler
- Clear matte varnish or sealant
- Fine detail paintbrush
- Texture tool or rope for stamping
Step 1: Crafting the Game Board
-
Form the base:
Start with a large block of terracotta-colored clay. Knead it until pliable, then roll it out into a thick, square slab approximately 6×6 inches and at least 3/4 inch thick. Keep the sides intentionally chunky. -
Smooth the surface:
Using your fingers or a flat tool, smooth out the top surface and the four sides to ensure the board sits flat and looks neat. -
Create the grid lines:
Mark a 3×3 grid on your slab using a ruler to ensure even spacing. Instead of cutting the clay, press a rope or a twisted clay tool into the surface along these lines to create a rustic, rope-impressed texture that divides the nine squares. -
Clean the edges:
After pressing the grid, you might have some displaced clay. Gently tap the edges back into a square shape to keep the board looking crisp.
Texturing Tip
Don’t have a texture tool? Twist two strands of scrap clay together, bake them hard, and use that hard coil to stamp the grid lines into your wet clay.
Step 2: Sculpting the Playing Pieces
-
Shape the bee bodies:
Roll small balls of yellow clay, roughly 1 inch in diameter. Consider flattening the bottoms slightly so they sit securely on the board without rolling away. -
Add stripe details:
Since painting stripes can be tricky on round objects, I find it easier to indent the stripe pattern first. Use a sculpting tool to gently groove two or three horizontal lines across the bee’s back. -
Create the wings:
For the wings, you can paint lines later, but for texture, lightly press a ‘Y’ or ‘V’ shape into the top of the bee’s back. -
Form the leaf pieces:
Take your green clay and divide it into equal portions. Flatten each piece into a teardrop shape. -
Add leaf veins:
Use a needle tool or knife to score a center line down the leaf, and then add diagonal veins branching out from the center for a realistic look. -
Curving the stems:
Pinch the bottom of the teardrop to form a small stem, giving it a slight twist or curve to add character. -
Optional ladybugs:
If you want extra pieces or decoration like in the photo, shape small red domes and indent a line down the center for the wings, adding small black clay balls for the head.
Step 3: Finishing Touches
-
Bake or dry:
Follow the manufacturer’s instructions for your specific clay. If using polymer clay, bake on a foil-lined sheet. If using air-dry clay, allow several days for it to fully cure. -
Paint the bees:
Once cool and dry, use a fine detail brush and black acrylic paint to fill in the grooves solely on the bees. Paint the stripes, the wing dividing lines, and add two small dots for eyes. -
Paint ladybug spots:
If you made ladybugs, use the end of a paintbrush handle dipped in black paint to stamp perfect little dots onto their red backs. -
Seal the project:
Apply a coat of clear matte varnish to all pieces. This protects the paint and gives the clay a refined, finished look that resists fingerprints.
Make It a Gift
Sew a small drawstring canvas bag to hold the bees and leaves when not in use. You can even stamp a bee or leaf design onto the fabric to match the set.
Place your board on a patio table or garden bench and enjoy a classic game surrounded by nature
Citrus Slice Tic Tac Toe With Orange vs. Lime Wedges
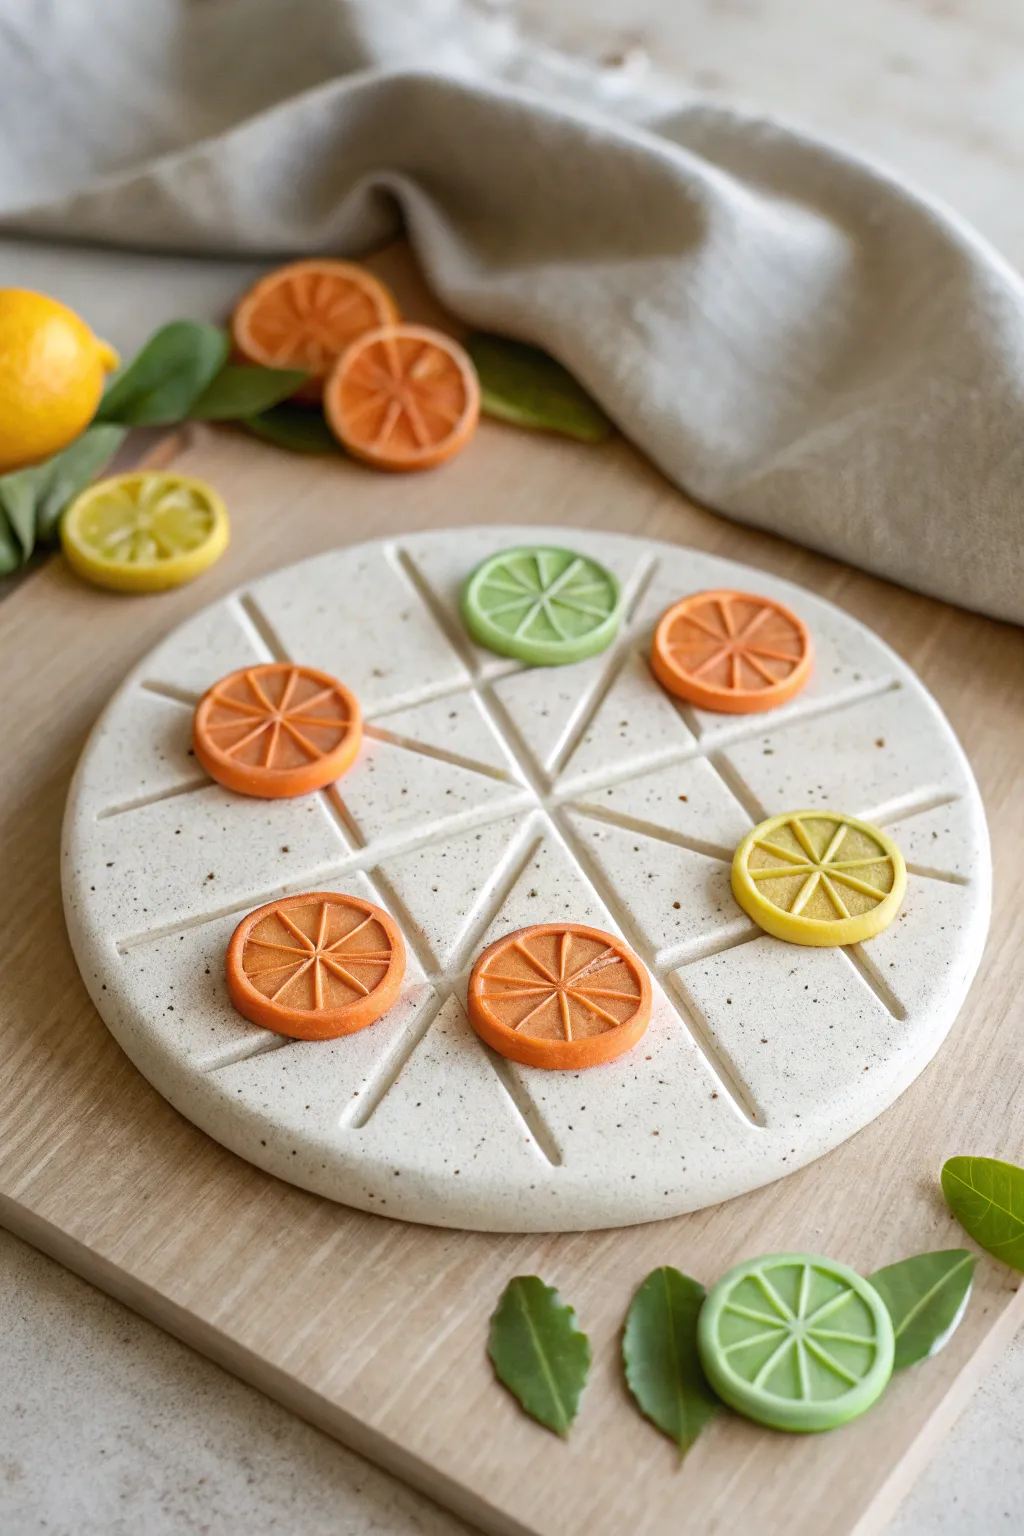
Bring a fresh squeeze of fun to your coffee table with this delightful citrus-themed tic-tac-toe set. Featuring a speckled earthen board and vibrant fruit slice playing pieces, this project is as satisfying to make as it is to play.
Step-by-Step Tutorial
Materials
- White granite or speckled polymer clay
- Orange polymer clay
- Lime green polymer clay
- Lemon yellow polymer clay (optional)
- Translucent liquid clay or bake-and-bond
- Acrylic rolling pin
- Round cookie cutters (large for board, small for pieces)
- Clay carving tools or a dull knife
- Needle tool
- Sandpaper (fine grit)
- Matte spray varnish
Step 1: Crafting the Game Board
-
Condition and Roll the Base:
Start by conditioning your speckled granite polymer clay until it’s pliable and smooth. Roll it out into a thick slab, approximately 1/4 to 1/2 inch thick, to give the board a substantial, stone-like feel. -
Cut the Circular Shape:
Using a large round cookie cutter or a bowl as a template, cut out a perfect circle from your rolled clay slab. Smooth the edges with your finger to remove any harsh cuts or fraying. -
Mark the Center:
Find the approximate center of your circle. Use a needle tool to make a tiny, faint guide mark. This will help you keep your grid lines symmetrical. -
Carve the Grid Lines:
Instead of a traditional hashtag grid, this board uses a radial design. Use a dull knife or clay tool to firmly press three lines across the diameter, intersecting at the center point, creating six pie-shaped wedges. -
Connect the Segments:
Create the inner triangle spaces by carving straight lines connecting the radial spokes about halfway between the center and the edge. This forms the classic tic-tac-toe play spaces but in a geometric, pie-chart style. -
Detail the edges:
Soften the carved grooves with a clay shaper or your fingertip so they look like engraved stone rather than sharp cuts. I like to gently tap the surface with a toothbrush to enhance the stone texture.
Sticky Situation?
If clay sticks to your cutter, dip the cutter in cornstarch or water before pressing down. This acts as a release agent for clean edges.
Step 2: Creating the Citrus Pieces
-
Prepare the Fruit Colors:
Condition your orange, lime green, and yellow polymer clays separately. Roll them into sheets about 1/4 inch thick. -
Cut the Slices:
Use a small round cutter (about 1 inch in diameter) to punch out 5 orange circles and 5 lime (or lemon) circles. You need at least 5 of each fruit for a full game. -
Create the Rind:
For a realistic look, roll a thin snake of the matching color clay and wrap it around the edge of each circle to form a distinct rind, smoothing the seam where the ends meet. -
Indent the Segments:
Using a knife tool, press an asterisk (*) shape into the center of each fruit slice. Do not cut all the way through; just press deep enough to define the juicy segments. -
Texture the Pulp:
Take a needle tool and gently prick the clay inside each triangular segment repeatedly. This stippling effect mimics the texture of citrus pulp brilliantly. -
Refine the Shape:
If the pieces got slightly distorted during texturing, gently reshape them back into perfect circles. Ensure they lie flat so they won’t wobble on the board.
Realistic Rinds
Wrap a very thin layer of white clay around the colored center before adding the outer colored rind for an authentic pith layer.
Step 3: Baking and Finishing
-
Bake the Components:
Place your board and fruit pieces on a ceramic tile or baking sheet lined with parchment paper. Bake according to your polymer clay manufacturer’s instructions (usually 275°F for 15-30 minutes). -
Cool Down:
Allow all pieces to cool completely in the oven before removing them. This helps prevent cracking, especially for the larger board piece. -
Sand for smoothness:
Once cool, lightly sand the bottom of the board and the fruit pieces with fine-grit sandpaper to ensure they slide smoothly without scratching surfaces. -
Seal the Deal:
Finish the project by spraying a light coat of matte varnish over everything. This protects the clay from dust and gives the ‘fruit’ a nice, natural satiny finish without being too glossy.
Place your board on a sunny table and challenge a friend to a refreshing game.
Space Theme Tic Tac Toe With Moon-Crater Board and Planet Tokens
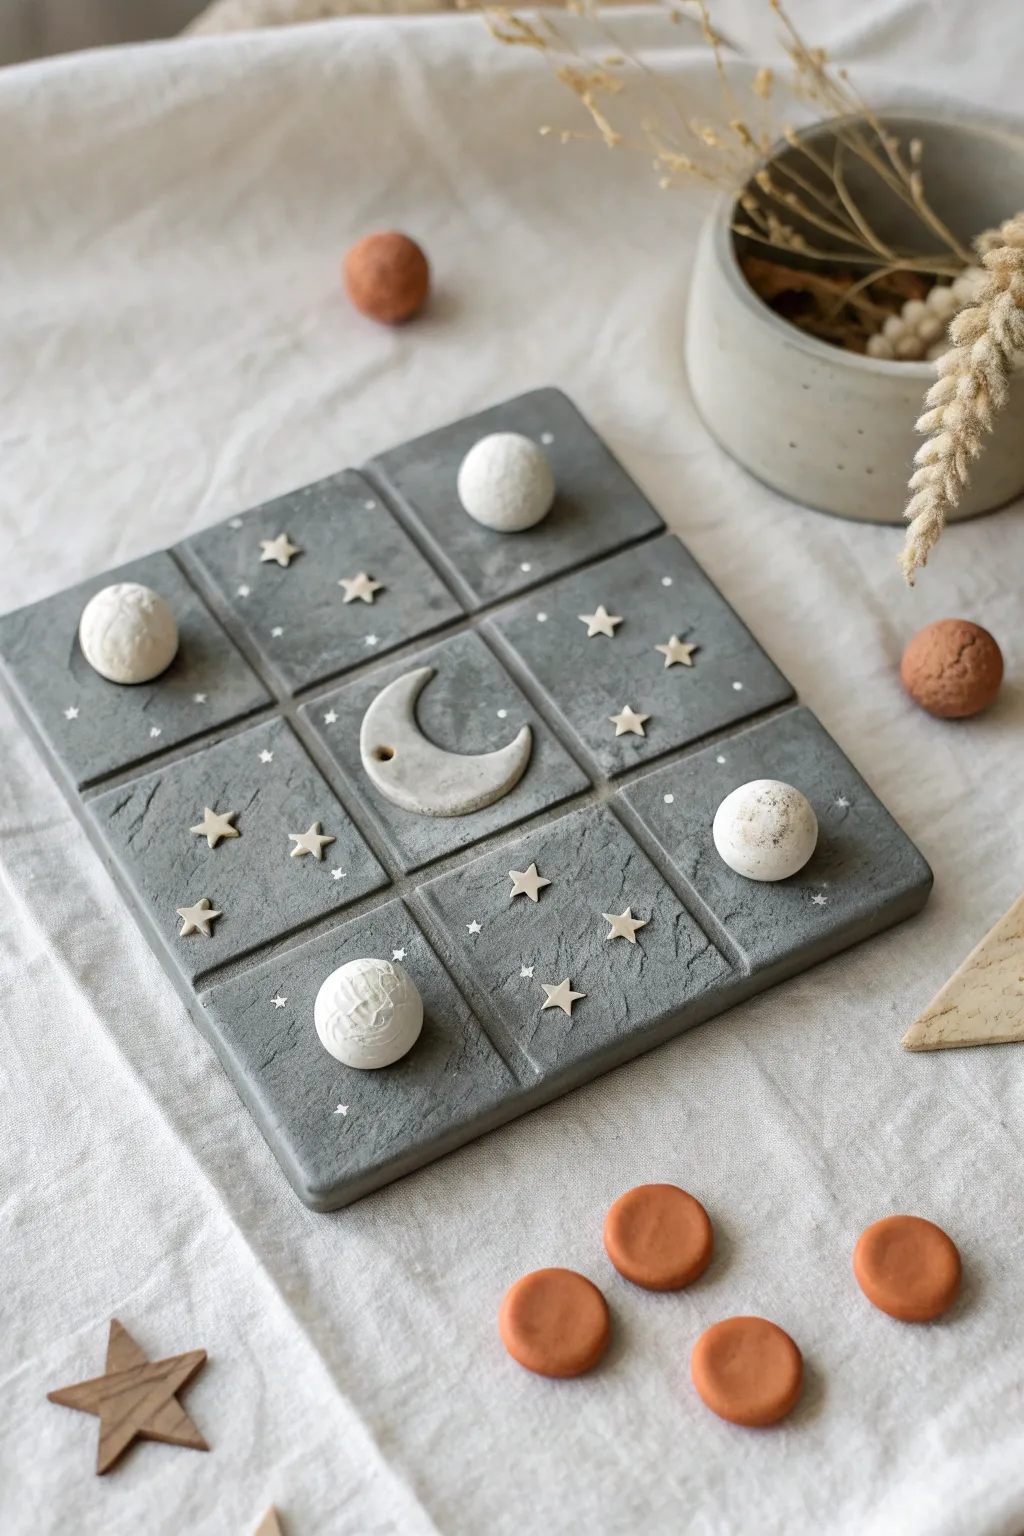
Bring the night sky down to your tabletop with this moody, textured tic-tac-toe set. Featuring a stone-effect board adorned with stars and craters, plus tactile moon and planet playing pieces, it’s a stellar addition to any coffee table.
Detailed Instructions
Materials
- Air-dry clay (grey stone effect or paintable white)
- White or cream air-dry clay (for moon pieces)
- Terracotta colored polymer or air-dry clay (as planet pieces)
- Rolling pin
- Ruler
- Utility knife or clay cutting tool
- Small star-shaped plunger cutters or stamps
- Modeling tools (specifically a ball tool and a needle tool)
- Sandpaper (fine grit)
- Acrylic paint (charcoal grey, light grey, white)
- Sponge or stiff bristle brush
- Matte sealant spray
Step 1: Sculpting the Board
-
Roll the base:
Begin by rolling out a large slab of grey clay to a uniform thickness of about 1/2 inch. Aim for a square shape slightly larger than your final desired dimensions, roughly 8×8 inches. -
Cut the square:
use a ruler and a sharp knife to trim the rough edges, creating a perfect, clean-edged square foundation for your game board. -
Carve the grid:
Lightly measure out a 3×3 grid. Using a long ruler and a clay tool, press firmly to create deep, straight grooves dividing the nine playing spaces. Don’t cut all the way through; just create distinct separation lines. -
Add texture:
Take a crumpled ball of aluminum foil or a stiff brush and press it randomly across the surface of the clay to give it that pitted, realistic stone texture. -
Embed the stars:
Using small star cutters or stamps, impress star shapes into various squares. For added dimension, you can actually cut tiny clay stars and press them slightly into the surface so they are flush or slightly raised. -
The central moon:
Sculpt a flat crescent moon shape from a scrap of clay. Score the back of the moon and the center square of the board, add a touch of water or slip, and press the moon firmly into the center of the grid. -
Create craters:
Use a ball stylus tool to gently press indentations into the clay surface around the stars, simulating lunar craters. Vary the sizes for a more organic look. -
Smooth the edges:
Dip your finger in a little water and run it along the outer edges of the board to soften sharpness and prevent cracking as it dries.
Fixing Warp
If the board edges curl up while drying, place a heavy book on top once the clay is mostly dry but still slightly flexible.
Step 2: Creating the Tokens
-
Form the Moons:
Take your white clay and roll five spheres about 1 inch in diameter. Roll them firmly in your palms to ensure they are smooth and round. -
Texturize the Moons:
Gently embrace the imperfection here by rolling the spheres over a textured fabric or pressing them lightly with the crumpled foil again to mimic the moon’s surface. -
Flatten the bases:
Tap each moon sphere gently on the table to create a small flat spot on the bottom so they won’t roll away during gameplay. -
Form the Planets:
Using the terracotta-colored clay, roll five small balls. Flatten these into thick, uniform discs, resembling small planetary tokens or checker pieces. -
Drying time:
Set the board and all ten playing pieces aside on a flat surface. Allow them to dry completely according to the package instructions, usually 24-48 hours. Flip the board halfway through to prevent warping.
Step 3: Finishing Touches
-
Sanding:
Once fully dry, lightly sand any rough edges on the board or tokens. Be careful near the raised star details. -
Painting the stone:
If your base clay wasn’t pre-colored, paint the entire board a dark charcoal grey. Once dry, dry-brush a lighter grey over the raised textures to highlight the ‘stone’ effect. -
Detailing the stars:
Use a fine-tip brush and white paint to fill in or highlight the star impressions and the central crescent moon, making them pop against the dark background. -
Highlighting the Moons:
If you used plain white clay, you might want to do a very subtle wash of watered-down grey paint over the white moon spheres, then wipe it off quickly, leaving shadows in the craters. -
Seal everything:
Finish by spraying the board and all pieces with a matte clear sealant to protect the paint and clay from chipping during intense gaming sessions.
Starry Night Effect
Flick white paint from a toothbrush over the dried grey board to create a distant galaxy spray effect background.
Enjoy challenging friends to a cosmic duel on your handcrafted lunar landscape
Ocean Reef Tic Tac Toe With Coral Grid and Sea Creature Pieces
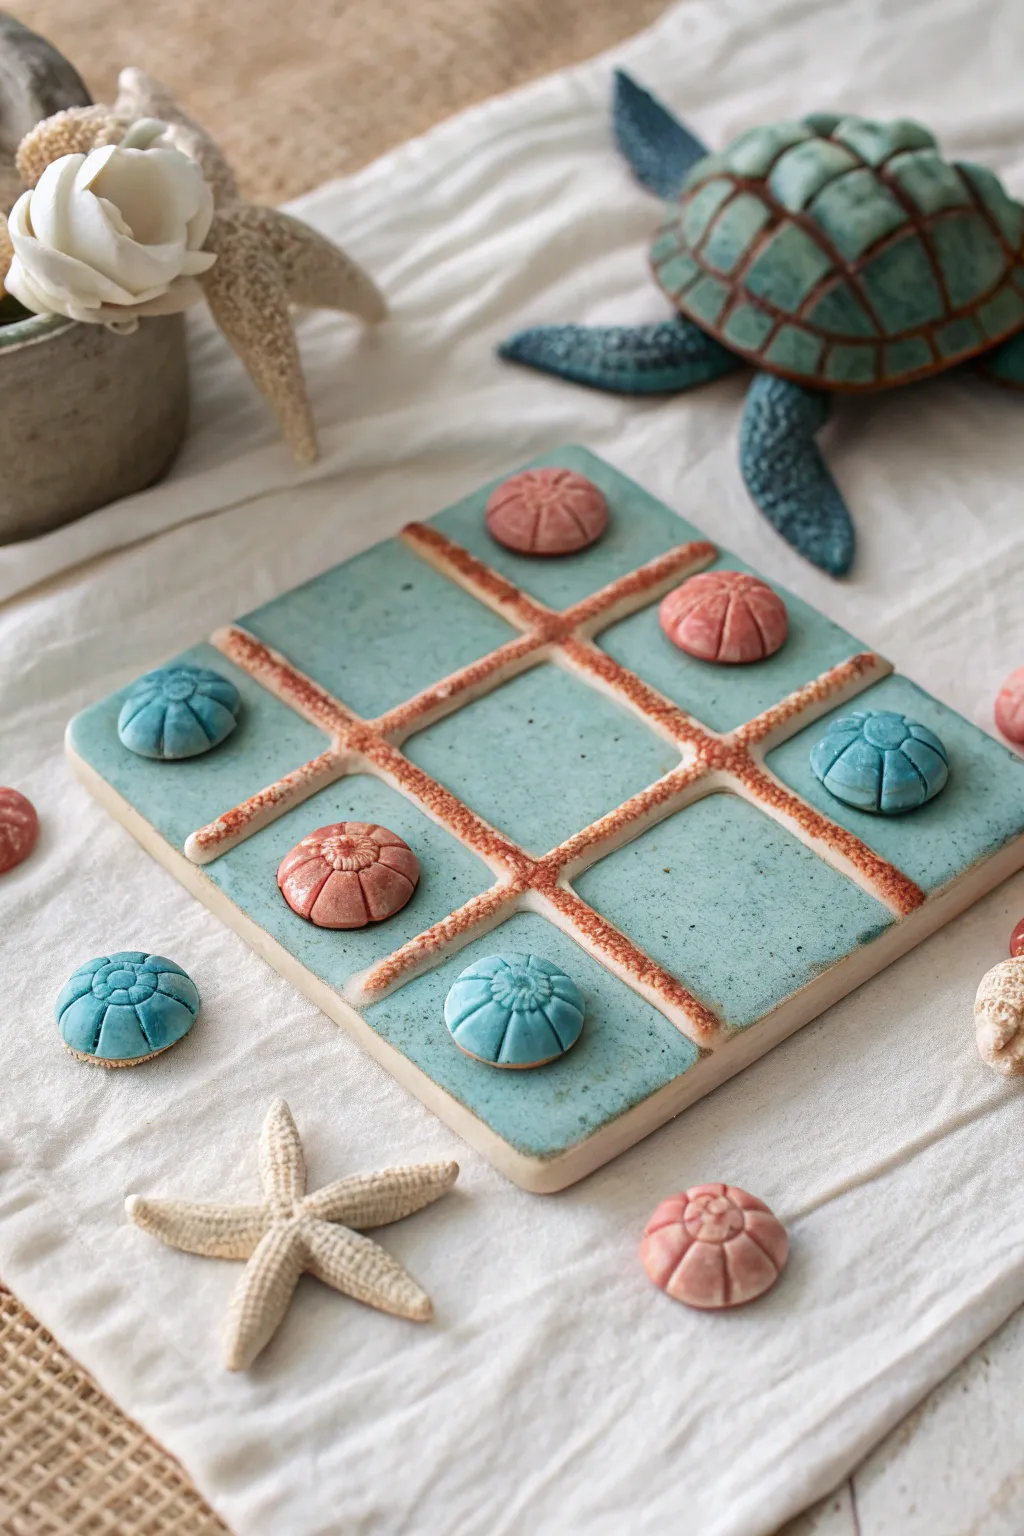
Bring the calming vibes of the coast to your game nights with this handcrafted ceramic set. Featuring a textured coral reef grid and delightful sea urchin playing pieces, this project captures the essence of a beachcomber’s treasure.
How-To Guide
Materials
- Light-colored stoneware or earthenware clay
- Rolling pin and guide sticks (approx. 1/4 inch thick)
- Square template (paper or cardboard, approx. 6×6 inches)
- Needle tool or fettling knife
- Sponge
- Slip (liquid clay) and scoring tool
- Turquoise or seafoam green ceramic glaze (food safe recommended)
- Coral pink ceramic glaze
- Red iron oxide wash or brown underglaze
- Small round sculpting tool or ball stylus
- Canvas work surface
- Fine-grit sandpaper (for dry greenware)
Step 1: Sculpting the Base Board
-
Roll the slab:
Begin by wedging your clay to remove air bubbles. Roll it out on your canvas into a smooth, even slab about 1/4 inch thick, using guide sticks to ensure uniform thickness. -
Cut the square:
Place your square template onto the clay slab. Using a needle tool or fettling knife, cut straight down around the edges to create a clean specific square shape for your game board. -
Smooth the edges:
Dip your finger or a small sponge in water and gently run it along the cut edges of the square to soften the sharpness and prevent future chipping.
Warped Board?
To prevent the flat board from curling up at the corners while drying, dry it very slowly between two pieces of drywall or heavy wooden boards.
Step 2: Creating the Coral Grid
-
Roll coils:
Take leftover clay and roll out four long, thin coils (snakes). These should be slightly longer than the width of your board and about the thickness of a pencil. -
Position the grid:
Lay the coils onto the board to form the tic-tac-toe hashtag pattern. Adjust them until the nine resulting spaces look relatively equal in size. -
Score and slip:
Lift one coil at a time. Score (scratch) the board surface where the line will sit and the bottom of the coil itself. Apply a dab of slip and press the coil firmly back into place. -
Texture the coral:
This is the fun part—use a needle tool or a stiff bristled brush to poke and stipple the coils vigorously. You want to create a rough, pitted surface that mimics the organic texture of natural coral.
Level Up: Starfish!
Instead of round urchins for both teams, sculpt five tiny starfish for the ‘X’ pieces to add even more variety to your ocean theme.
Step 3: Forming the Sea Urchin Pieces
-
Divide the clay:
Portion out ten small balls of clay, each slightly larger than a marble. You’ll need five for one player and five for the other (extras are always good just in case). -
Shape the domes:
Gently press each ball against the table to flatten the bottom, creating a low dome shape. Smooth the tops so there are no cracks. -
Add radial lines:
Using a needle tool or a plastic clay rib, gently press vertical indentations from the center top down to the edges, creating the segmented look characteristic of sea urchin shells. -
Detail the center:
Take a small ball stylus and press a tiny dot into the very center of the top of each piece to finish the urchin design. -
Dry slowly:
Place the board (on a flat board to prevent warping) and the playing pieces aside. loosely cover with plastic for a day, then uncover to let them dry completely to the ‘bone dry’ stage.
Step 4: Glazing and Firing
-
Bisque fire:
Load your bone-dry pieces into the kiln and fire to cone 04 (or your clay’s specific bisque temperature). Let the kiln cool completely before unloading. -
Wax the playing pieces:
Apply wax resist to the flat bottom of every sea urchin piece. This prevents them from sticking to the kiln shelf during the glaze firing. -
Glaze the board base:
Brush or pour the turquoise glaze onto the flat sections of the board. Be careful not to get too much glaze on the raised coral grid lines yet. -
Accent the coral grid:
I prefer to use a red iron oxide wash on the textured coils. Brush it on, then wipe away the high points with a damp sponge so the color stays deep in the crevices, enhancing the texture. -
Glaze the pieces:
Glaze five of the sea urchins in the same turquoise as the board. Glaze the other five in a soft coral pink. Ensure the glaze doesn’t pool too thickly in the radial lines so the detail remains visible. -
Final wipe:
Check the bottom of the board and pieces one last time to ensure they are free of glaze. Sponge off any drips. -
Glaze fire:
Fire the project again to the maturity temperature of your glaze (typically cone 5/6 for stoneware). Once cool, your reef game is ready.
Display your beautiful ceramic creation on a coffee table and enjoy a relaxing game by your imaginary shores
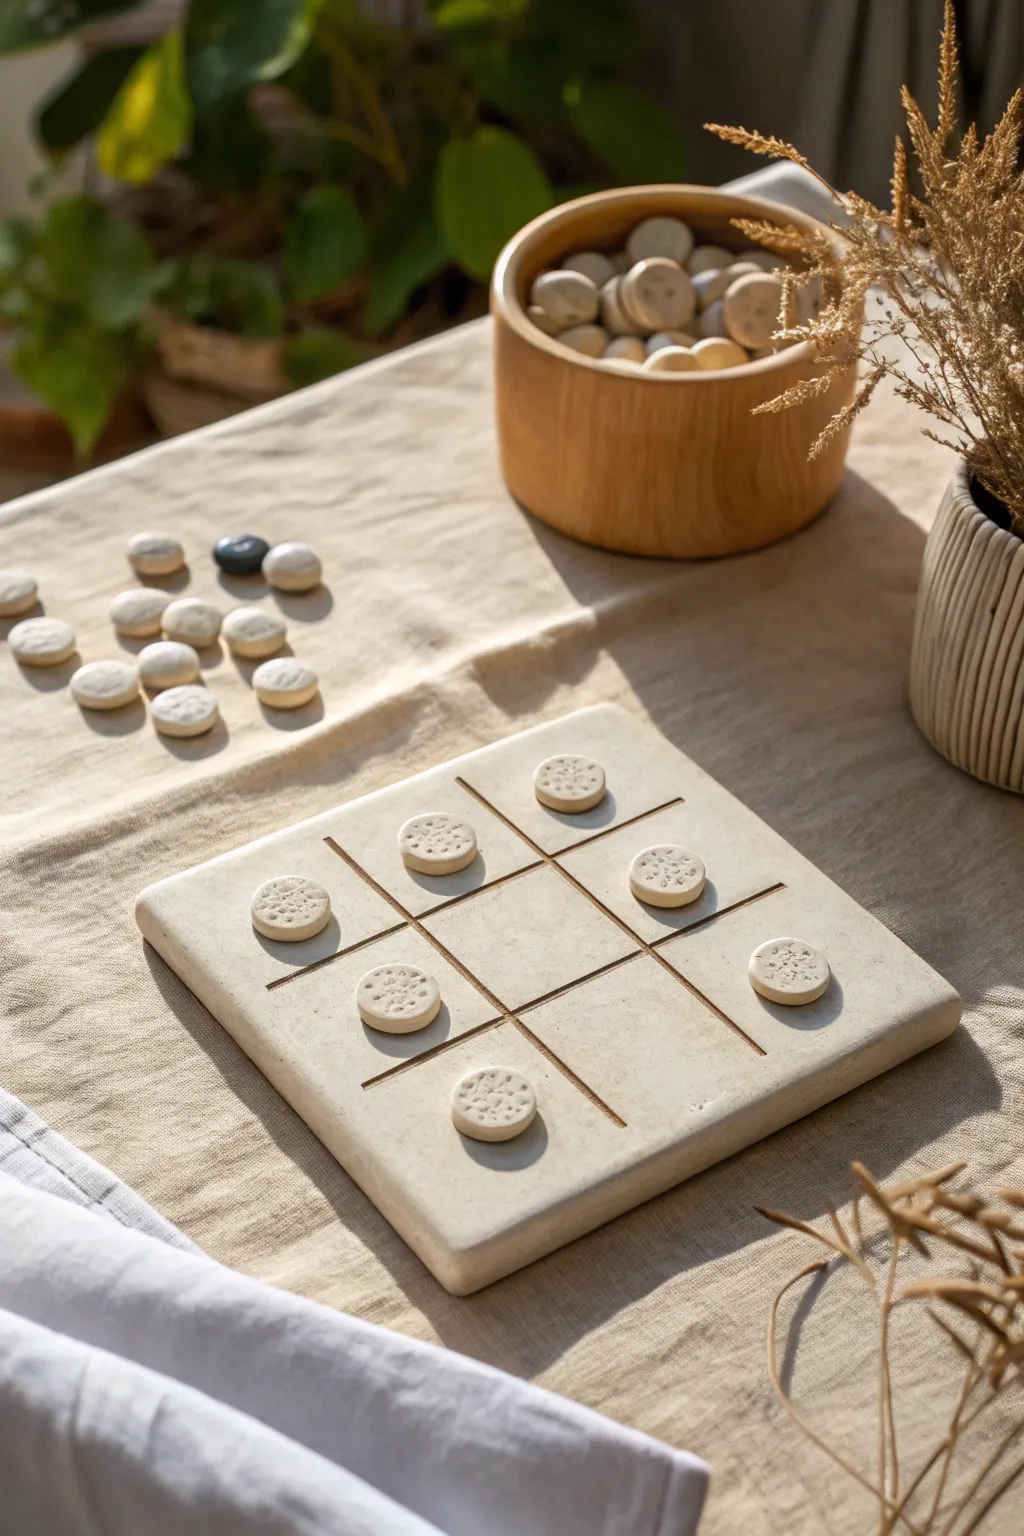
Cozy Baking Tic Tac Toe With Cookies vs. Cupcakes
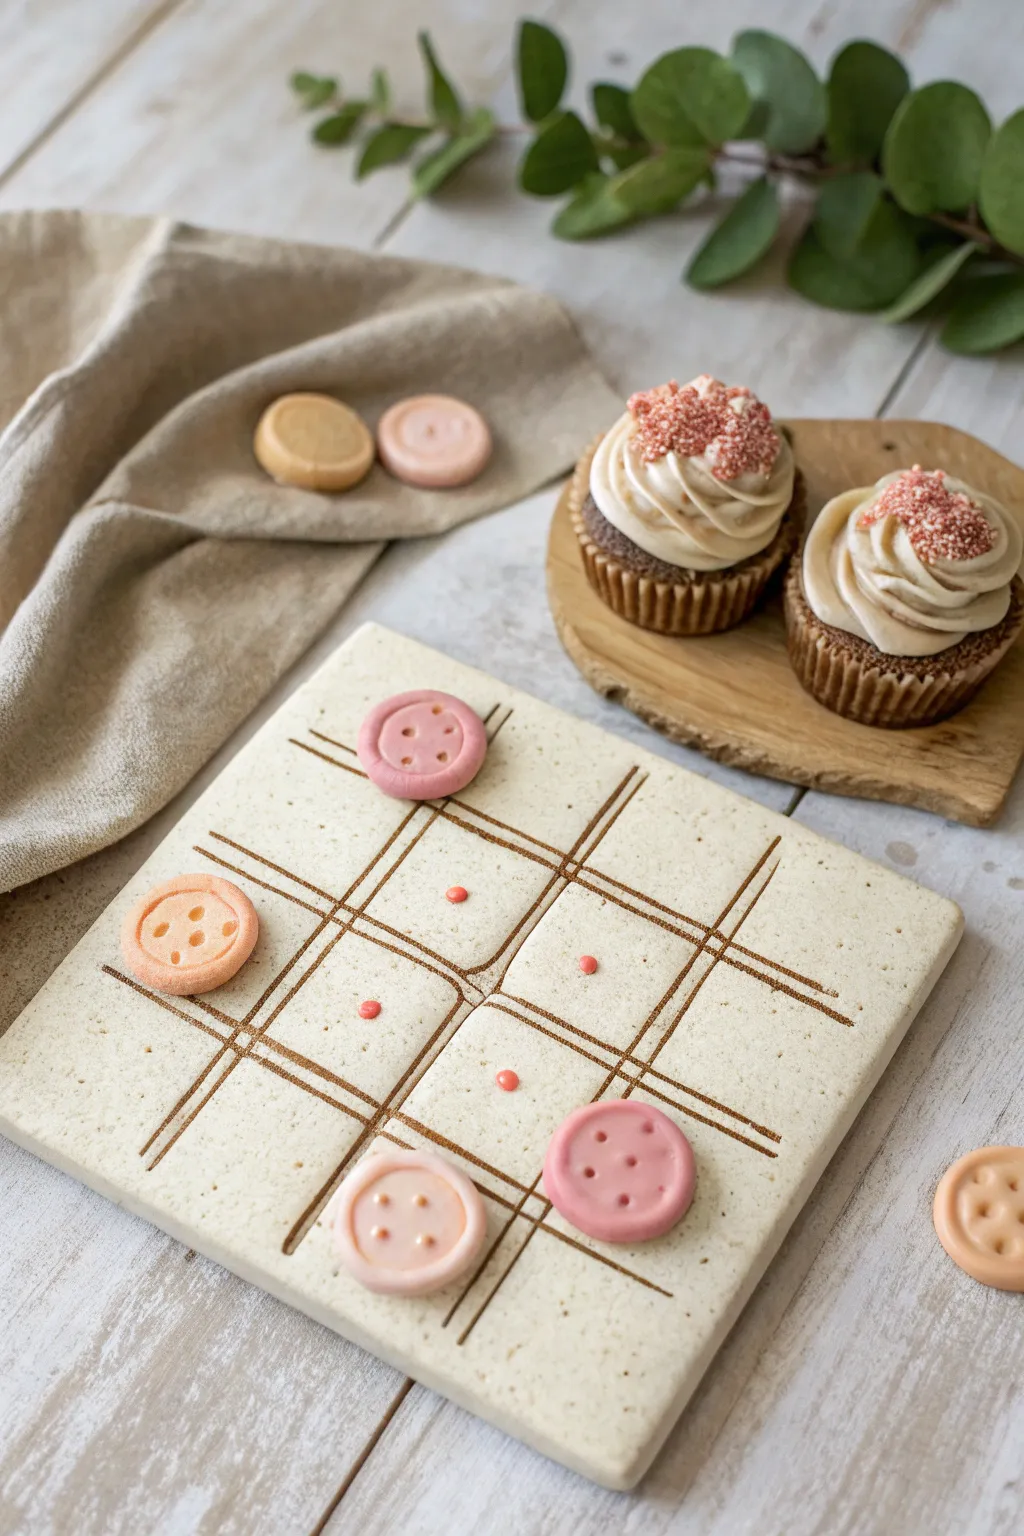
Blend the warmth of baking with classic gaming by creating this delightful clay tic-tac-toe set designed to look like a rustic cookie slab and sugar buttons. The finished piece features a textured, speckled dough effect for the board and charmingly realistic button markers in soft pastel shades.
Step-by-Step Guide
Materials
- Polymer clay (white, beige, translucent, pink, peach/orange)
- Ground black pepper or vanilla bean specks (real or faux)
- Square clay cutter or craft knife
- Rolling pin with ¼ inch depth guides
- Needle tool or toothpick
- Small circle cutter (approx. 1 inch)
- Acrylic roller
- Texture sponge or toothbrush
- Brown soft pastel chalk or acrylic paint
- Fine liner brush
- Baking sheet and parchment paper
- Matte or satin varnish (optional)
Step 1: Mixing the Cookie Dough Clay
-
Base Color Creation:
Start by mixing white polymer clay with a small amount of beige and translucent clay. You want a color that resembles unbaked sugar cookie dough—creamy but not stark white. -
Adding Texture:
To achieve that realistic baked good look seen in the photo, mix in a tiny pinch of real ground black pepper or faux vanilla specks into your clay ball. Knead thoroughly until the specks are evenly distributed. -
Rolling the Board:
Take about two-thirds of your mixed clay and roll it out into a flat, even slab. Use depth guides to ensure it’s roughly ¼ inch thick, giving it substantial weight like a ceramic tile. -
Cutting the Square:
Use a large square cutter or a ruler and craft knife to cut a perfect square for your game board. Soften the sharp edges slightly with your finger so they look more like a baked cookie edge.
Step 2: Sculpting the Game Board
-
Creating the Grid:
On your fresh clay slab, lightly mark the tic-tac-toe grid using a ruler. Don’t cut through; just make guide marks. -
Scoring the Lines:
Using a needle tool or the back of a knife, deepen these lines to create the hashtag pattern. I like to double-score each line slightly apart to mimic the look of etched stoneware or scored dough. -
Adding Surface Texture:
Gently tap the surface of the clay with a texture sponge or an old clean toothbrush. This removes the plastic shine and gives it that porous, baked texture. -
Pre-shading the Lines:
Scrape a little brown pastel chalk into a powder. With a fine brush, dust this powder into the deep grooves of your grid lines to create a ‘baked’ shadow effect before heating.
Pastry Texture Secret
Use a ball of tin foil to gently roll over the clay surface. The crinkles create an incredibly realistic ‘baked cookie’ texture.
Step 3: Crafting the Button Pieces
-
Mixing Button Colors:
Take your remaining dough-colored clay and divide it. Mix one part with pink clay and the other with peach or orange clay to get the two distinct team colors shown in the image. -
Rolling and Cutting:
Roll these colored clays out slightly thinner than the board. Use your small circle cutter to punch out at least five pieces for each color team. -
Forming the Rim:
To create the button rim, gently press a slightly smaller circle cutter or a round object into the center of each distinct piece, not cutting through, but creating an indented inner circle. -
Poking Holes:
Using your needle tool, poke four symmetrical holes in the center of each button. Make sure the holes go all the way through for realism. -
Optional Detail:
For added cuteness, roll tiny spheres of pink clay and press them onto the board intersection points as decorative accents, as seen in the center of the grid.
Level Up: Scented Pieces
Mix a tiny drop of vanilla or sugar cookie fragrance oil into the raw clay before sculpting for a game set that smells as good as it looks.
Step 4: Baking and Finishing
-
Baking:
Arrange the board and button pieces on a parchment-lined baking sheet. Bake according to your polymer clay manufacturer’s instructions (usually 275°F/130°C for 15-30 minutes). -
Cooling Down:
Allow the pieces to cool completely on a flat surface. Retaining heat can make the board warp, so don’t move it until it’s room temperature. -
Enhancing the Grid:
If your grid lines aren’t dark enough, you can now gently paint into the grooves with diluted brown acrylic paint. Wipe away excess from the surface immediately with a damp cloth. -
Sealing:
Apply a very light coat of matte varnish if you want to protect the ‘pastry’ finish without making it look glossy and plastic.
Once the varnish is dry, invite a friend over for a cozy game on your new handmade board
Inset-Well Tic Tac Toe Board With Satisfying “Click-In” Spots
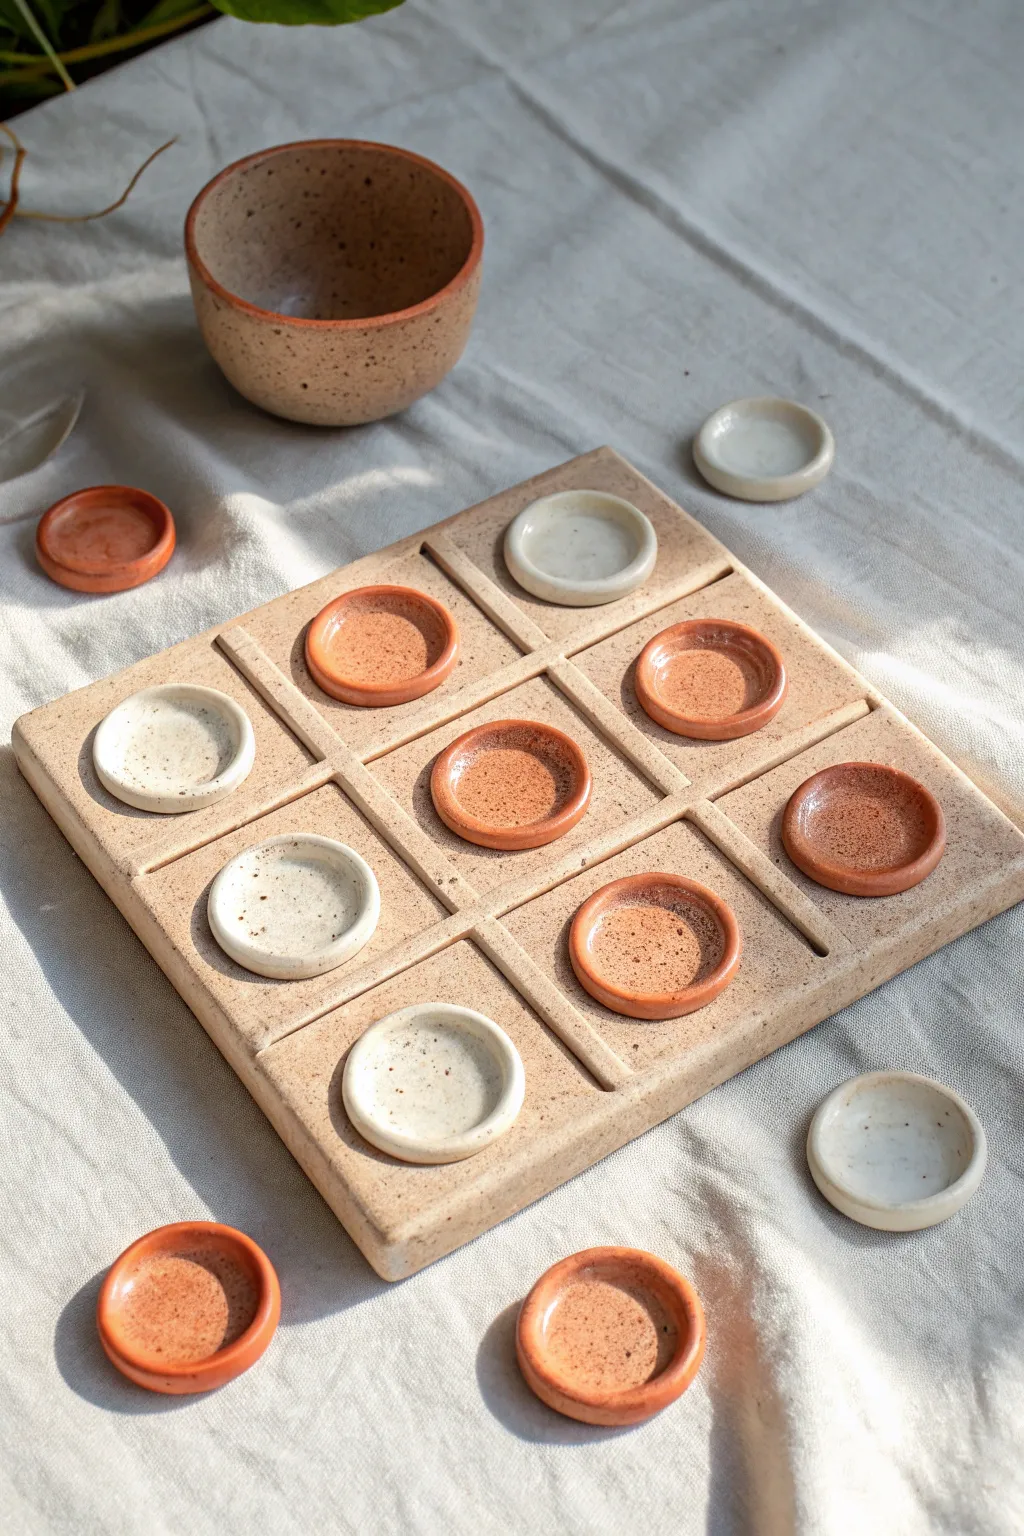
This project elevates the classic game with a substantial ceramic board featuring recessed wells that perfectly cradle the playing pieces. The natural, speckled clay body gives it a timeless, earthy aesthetic while the precise circular insets provide a tactile satisfaction every time a piece lands.
Step-by-Step Tutorial
Materials
- Speckled stoneware clay (approx. 3-4 lbs)
- Rolling pin
- Two thickness strips (1/2 inch thick)
- Square template (paper or cardboard, approx. 8×8 inches)
- Small circular cookie cutter (approx. 1.5 inch diameter)
- Ruler or straight edge
- Needle tool or fettling knife
- Modeling tool with a rounded back (or a spoon)
- Small bowl representing the pinch pot (optional)
- Sponge and water
- Rib tool (wood or rubber)
Step 1: Preparing the Board Base
-
Wedge the clay:
Start by thoroughly wedging your speckled stoneware clay to remove air bubbles and ensure particle alignment. This is crucial for a thick slab to prevent warping later. -
Roll the slab:
Using your 1/2-inch thickness strips as guides, roll out a large, even slab. Cross-roll in multiple directions to compress the clay platelets, which adds strength. -
Cut the square:
Place your 8×8 inch square template onto the slab. Use a needle tool or fettling knife to cut vertically for clean, sharp edges. Save the excess clay for the playing pieces. -
Smooth the surface:
Take a rubber or wood rib and compress the surface of the slab. This removes canvas texture and brings the fine grog to the surface, enhancing that speckled look. -
Soften the edges:
Gently run a damp sponge or your finger along the sharp cut edges of the square to round them slightly, preventing chipping after firing.
Step 2: Creating the Grid and Wells
-
Measure the grid:
Using a ruler, lightly mark a 3×3 grid on your slab. Instead of drawing lines, just mark the intersections where the center of each square would be. -
Create the grid lines:
Lay a straight edge or dowel across the clay to press in the grid lines. Press firmly enough to create a distinct groove, but not so deep that it weakens the slab. -
Mark the wells:
Take your circular cookie cutter and gently press it into the center of each of the nine grid squares. Don’t cut all the way through; just make a clear impression to guide you. -
Excavate the clay:
Using a loop tool or a spoon, carefully scoop out the clay from inside your circular marks. I like to go slowly here to ensure a flat, even bottom for each well. -
Smooth the wells:
Use a slightly damp finger or a rounded modeling tool to compress the inside of each recessed circle, ensuring the walls are vertical and the bottom is smooth.
Warping Woes?
If the corners of your board lift while drying, gently weight them down with small sandbags or drywall squares to keep the slab perfectly flat.
Step 3: Forming Pieces and Pinch Pot
-
Prepare piece clay:
Gather your leftover clay and roll out a thinner slab, roughly 1/4 inch thick this time. -
Cut the playing pieces:
Use the same circular cutter from the board steps to punch out at least 10 circles (5 for each player, plus spares). These will fit perfectly into your wells since they shrink at the same rate. -
Differentiate the teams:
Keep five discs simple and flat. For the opposing five, gently press the center with your thumb to create a concave, dish-like shape. This distinguishes the teams without using different glazes. -
Refine the pieces:
smooth the edges of all playing discs with a damp sponge to remove any sharp burrs. -
Make the storage bowl:
Form a simple pinch pot from a ball of clay to hold the pieces. Keep the walls thick and sturdy to match the aesthetic of the board. -
Dry slowly:
Cover the board, pieces, and bowl loosely with plastic. Let them dry very slowly over several days to prevent the thick board from curling at the corners. -
Bisque fire:
Once bone dry, fire the set to cone 04 (or your clay’s specific bisque temperature). -
Glaze and fire:
Apply a clear matte glaze to enhance the speckles without adding shine, or leave the raw clay unglazed on the outside if fully vitrified. Fire to maturity (usually Cone 5/6 for stoneware).
Sizing Secret
Make the recessed wells slightly wider than your cutter. Clay shrinks, and you want the pieces to click in easily, not get stuck!
Once fired, you will have a durable, heirloom-quality game set perfect for coffee table display.
Magnetic Tic Tac Toe Set for a Fridge-Friendly Display
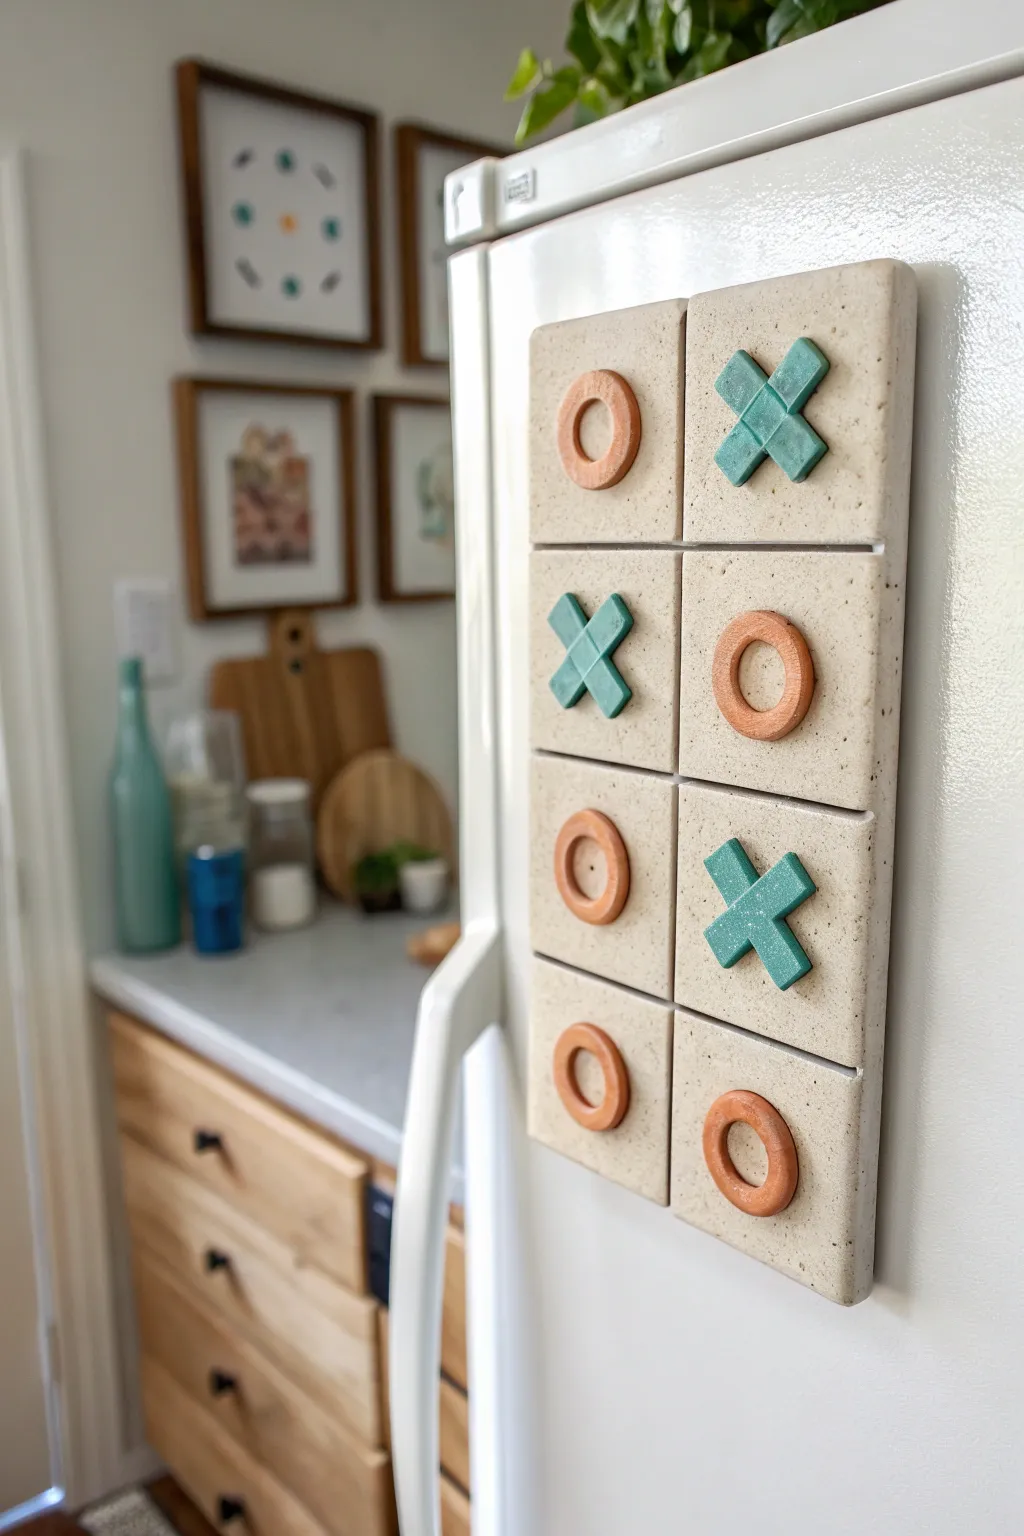
Transform your refrigerator into a playful game zone with this sophisticated clay tic-tac-toe set. The speckled, stone-effect finish gives it a high-end ceramic look, while the strong magnets make it a functional and interactive piece of kitchen decor.
Detailed Instructions
Materials
- Polymer clay (white, beige, or translucent)
- Black pepper or dried coffee grounds (for speckling)
- Acrylic paint (terracotta orange and teal/turquoise)
- Heavy-duty ceramic magnets (round)
- Strong craft glue (E6000 or similar)
- Clay roller or pasta machine
- Square clay cutter (approx. 2 inches)
- X-acto knife or craft blade
- Circle cutter (small, approx 1 inch)
- Small round cutter (for O center)
- Sandpaper (fine grit)
- Oven for baking
Step 1: Crafting the Faux-Stone Base
-
Mix the stone clay:
Begin by conditioning your base color polymer clay—a mix of white and beige works beautifully. To achieve that realistic speckled stone effect, knead in a generous pinch of cracked black pepper or dried used coffee grounds until evenly distributed. -
Roll out the slab:
Roll the speckled clay out to a uniform thickness, aiming for about 1/4 inch. A pasta machine is perfect for this, but a hand roller with depth guides works just fine. -
Cut the grid tiles:
Using your square cutter, punch out eight to nine square tiles. If you don’t have a cutter, create a paper template and carefully cut around it with your craft blade for straight edges. -
Texture the surface:
Before baking, gently press a piece of sandpaper or a stiff-bristled toothbrush onto the surface of each square. This adds a subtle, pitted texture that enhances the stone illusion. -
Smooth the edges:
Use your finger to gently soften the sharp cut edges of the squares. You want them to look like tumbled stone, not sharp plastic.
Stone Texture Trick
Mix translucent clay into your base color (about 1:4 ratio). When baked, the pepper flakes will show through deeper layers, adding realistic depth.
Step 2: Sculpting the Game Pieces
-
Form the O pieces:
Roll out fresh clay slightly thinner than your base tiles. Use a circle cutter to cut out discs, then use a smaller circle cutter in the exact center to create rings. -
Create the X pieces:
Cut strips of clay the same width as your O rings. Cut these strips into short lengths and crisscross them to form X shapes. Gently press the intersection point so they bond together. -
Press onto tiles:
Center your X and O shapes onto the unbaked square tiles. Press them down firmly enough to adhere, but be careful not to distort the square shape. -
Bake the set:
Arrange all your tiles on a parchment-lined baking sheet. Bake according to your polymer clay package instructions (usually around 275°F for 15-30 minutes). -
Cool down:
Allow the tiles to cool completely in the oven with the door cracked open to prevent cracking.
Step 3: Finishing and Assembly
-
Paint the X pieces:
Once cool, paint the X shapes carefully with teal or turquoise acrylic paint. Apply 2-3 thin coats for opaque coverage, letting each coat dry fully. -
Paint the O pieces:
Paint the O rings with a warm terracotta orange shade. A small angled brush helps keep the paint strictly on the raised game piece and off the ‘stone’ background. -
Seal the pieces:
For durability, coat the painted areas (or the whole tile if you prefer a uniform sheen) with a matte varnish. This protects the paint from chipping during rigorous fridge gameplay. -
Prepare the backs:
Lightly sand the back center of each tile to create a rough surface for better glue adhesion. -
Attach magnets:
Apply a dab of strong adhesive like E6000 to the back of each tile. Press a heavy-duty magnet into the glue. -
Final cure:
Let the glue cure for at least 24 hours before sticking them to your fridge. Gravity is the enemy of wet glue.
Make it a Gift
Sew a simple muslin drawstring bag to hold the pieces. It makes the set portable and keeps the fridge tidy when you aren’t playing a game.
Now you have a stylish, permanent fixture for kitchen entertainment that looks great even when no one is playing
Totem-Style Tic Tac Toe Where the Pieces Stack Into Mini Sculptures
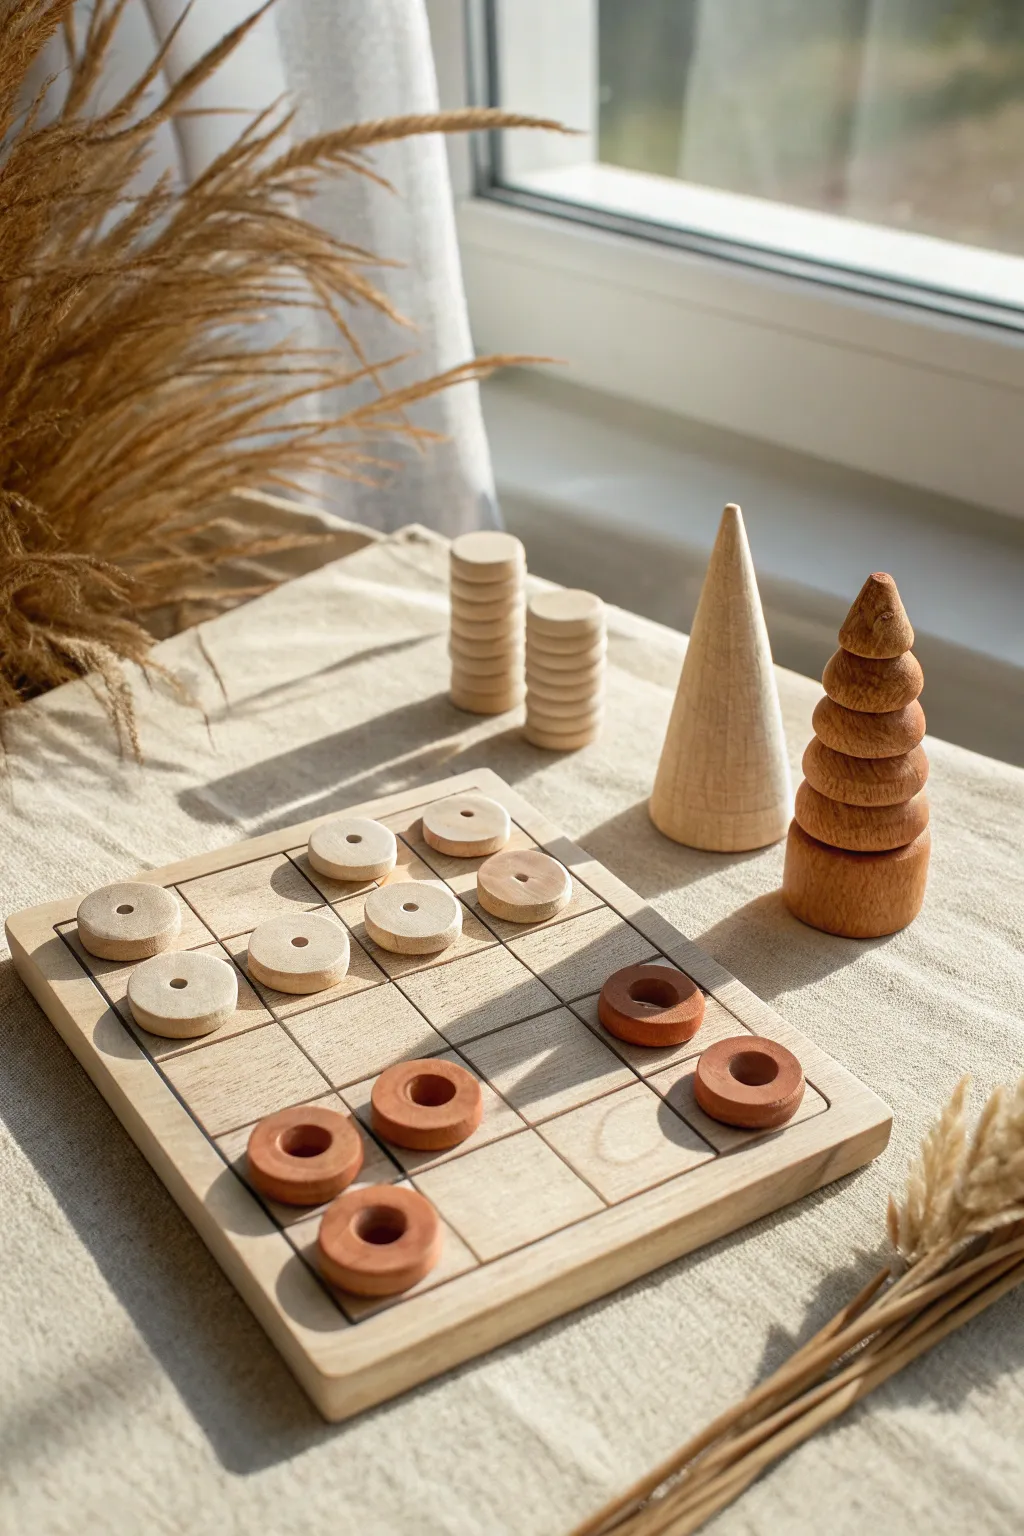
Create a stunningly minimalist tic-tac-toe set that mimics the warmth of natural wood using polymer or air-dry clay. This project combines simple geometric shapes with earthy tones for a game board that doubles as beautiful coffee table decor.
Step-by-Step
Materials
- Light beige polymer clay (or air-dry clay)
- Terracotta or reddish-brown polymer clay
- Rolling pin or pasta machine
- Small round cookie cutter (approx. 1 inch)
- Small straw or piping tip (for center holes)
- Square wooden board (approx. 8×8 inches)
- Ruler
- Pencil
- Wood burning tool or fine-tip brown permanent marker
- Sandpaper (fine grit)
- Matte varnish or sealant
Step 1: Crafting the Playing Pieces
-
Condition the clay:
Begin by thoroughly kneading your light beige clay until it’s soft and pliable. If you are using polymer clay, this conditioning step is crucial to prevent cracking later on. -
Roll out the slab:
Roll the beige clay out to a consistent thickness of about 1/4 inch. I find that using guide sticks or a pasta machine helps ensure every piece is perfectly uniform. -
Cut the base shapes:
Use your round cookie cutter to punch out at least six circles. You will need five for the game, but making a spare is always a good idea. -
Create the ring shape:
Find the exact center of each circle and punch a hole using a straw or a small piping tip to create the distinct washer-like shape seen in the inspiration photo. -
Repeat for the opposing team:
Clean your work surface, then repeat the rolling and cutting process using the terracotta-colored clay to create the opposing set of five or six rings. -
Smooth the edges:
Gently run your finger around the cut edges of each ring to soften them. You want them to look like tumbled wood, not sharp, fresh-cut clay. -
Create decorative stackers (Optional):
If you have leftover clay, cut out additional varied sizes of circles to create the decorative stacking towers seen in the background of the scene. -
Bake or dry:
Follow the manufacturer’s instructions for your specific clay. For polymer clay, bake on a tile or parchment-lined tray. For air-dry clay, let them sit for 24-48 hours until fully hardened.
Step 2: Preparing the Game Board
-
Sand the wood base:
Take your square wooden board and sand the surface with fine-grit sandpaper until it feels silky smooth to the touch. -
Measure the grid:
Using a ruler and a pencil, lightly mark out a 3×3 grid. Measure the total width, divide by three, and mark your lines to ensure equal spacing. -
Burn the lines:
Carefully trace over your pencil lines using a wood burning tool with a straight tip. Move at a steady pace to keep the burn line consistent. -
Alternative grid method:
If you don’t have a wood burning tool, you can achieve a similar look by drawing the lines with a fine-tip brown permanent marker or paint pen. -
Lightly sand again:
Once the lines are done, give the surface a very light sanding to remove any raised grain from the burning or stray pencil marks.
Uneven Clay Surface?
If your clay circles have fingerprints, brush them with a tiny amount of baby oil (for polymer) or water (for air-dry) before baking to smooth them out completely.
Step 3: Finishing Touches
-
Sand the clay pieces:
Once your clay rings are fully cured/dried, sand the edges lightly to mimic the soft texture of wooden toy blocks. -
Seal the board:
Apply a thin coat of matte varnish to the wooden board to protect it from oils and fingerprints during play. -
Seal the pieces:
Apply the same matte varnish to your clay rings. This unifies the sheen between the ‘wood’ board and the ‘clay-wood’ pieces. -
Assemble the scene:
Set up your board and place your new clay pieces on the grid, stacking any extras on the side for that styled aesthetic.
Forest Theme
Instead of rings, sculpt the pieces into simple cones and stacking triangles to mimic the trees seen in the background for a woodland-themed game set.
Enjoy your minimalist game night with this beautiful handmade set that looks just as good on the shelf as it does in play