A simple square slab can turn into a little masterpiece once you start playing with texture and relief carving. Here are some of my favorite clay tile ideas to help you go from flat to wow—whether you want something classic, modern, or a little bit quirky.
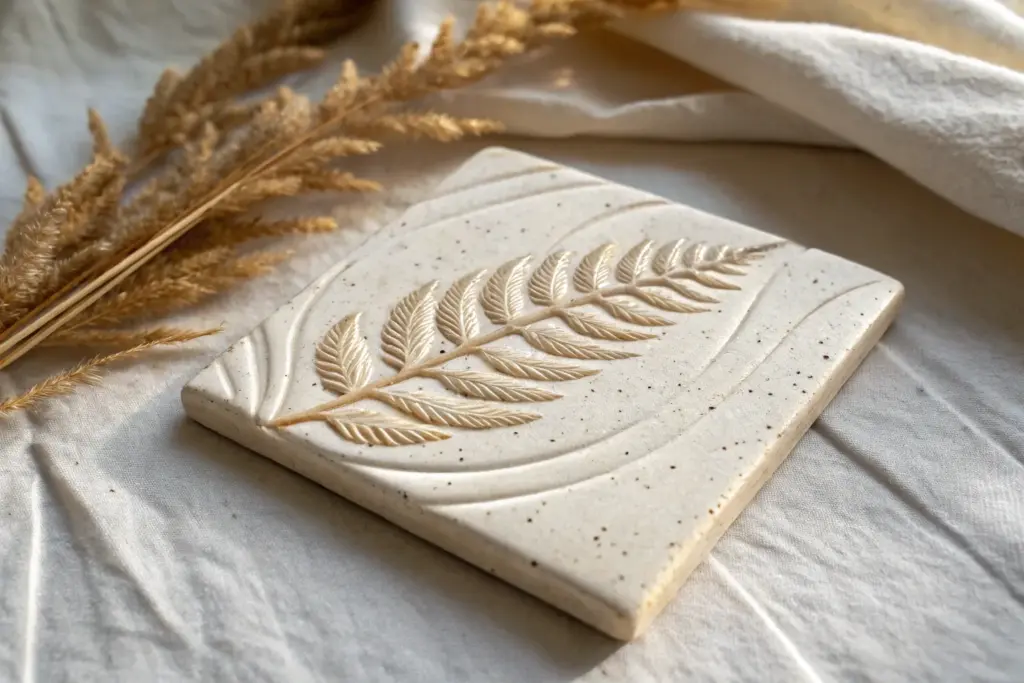
Botanical Leaf Imprint Clay Tile
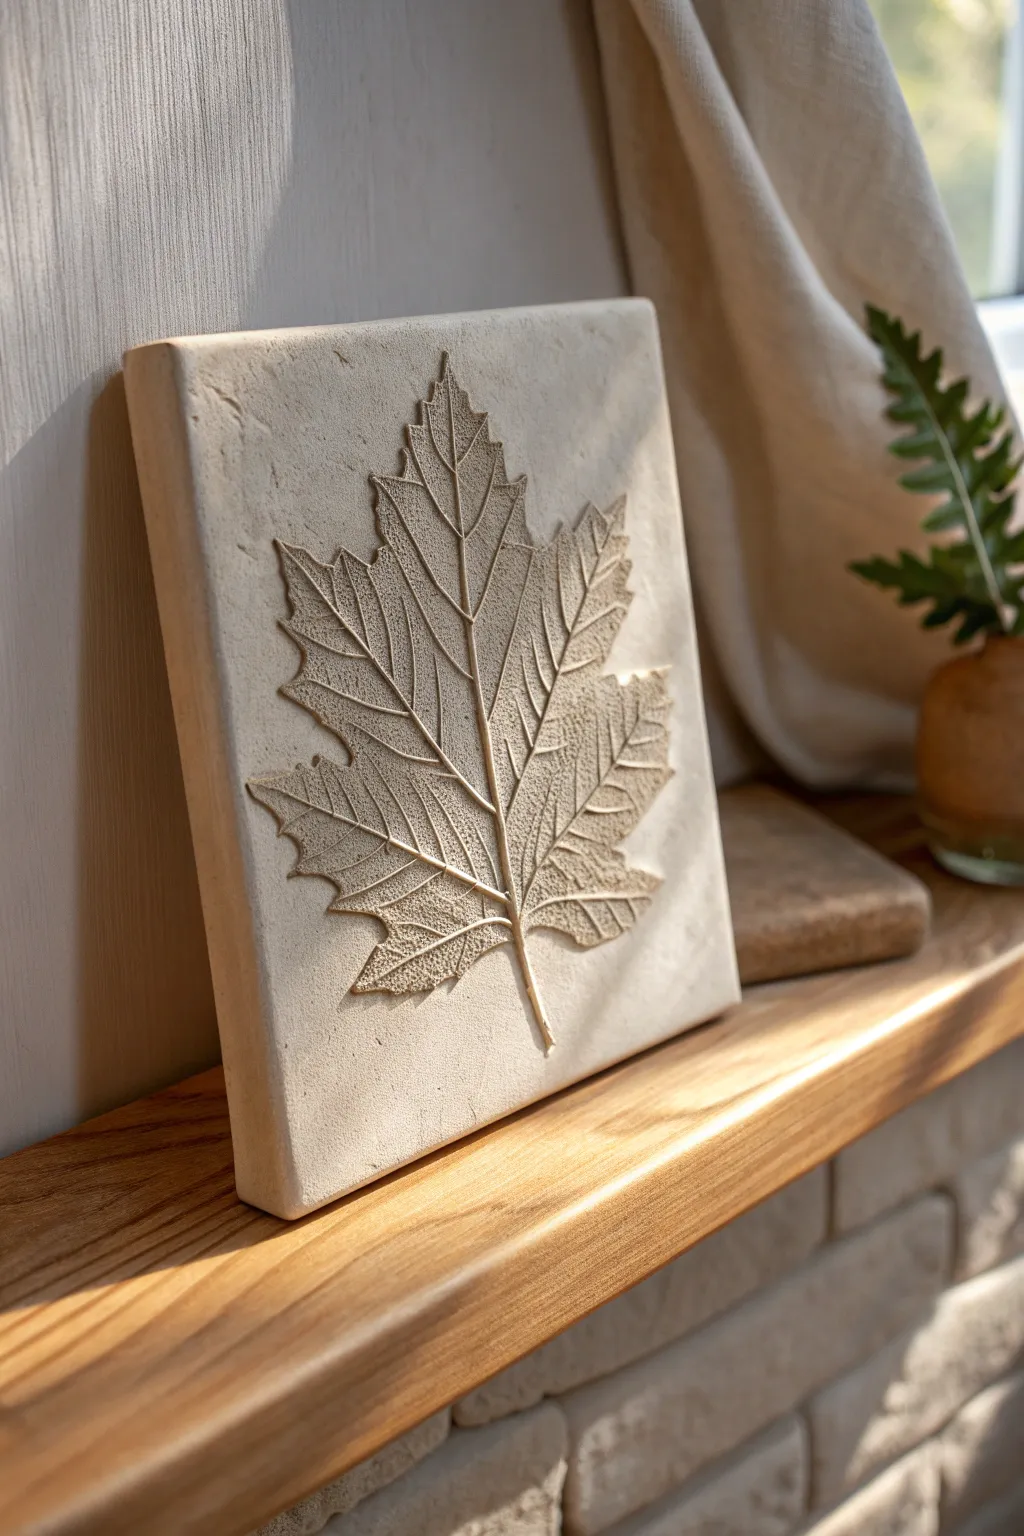
Capture the delicate details of nature with this elegant botanical relief tile which immortalizes a single maple leaf in textured clay. The finished piece has a soft, sandstone-like quality that brings an organic, earthy calm to any shelf or mantel.
Step-by-Step Guide
Materials
- White or light beige air-dry clay (or polymer clay)
- Fresh, sturdy maple leaf (with prominent veins)
- Rolling pin
- Two 1/2-inch wooden guide strips (optional but helpful)
- Sharp clean knife or clay cutting tool
- Square template (card stock or plastic)
- Fine-grit sandpaper (220-400 grit)
- Small bowl of water
- Sponge
- Matte clear sealant spray
Step 1: Preparation & Rolling
-
Prepare your workspace:
Lay down a clean, smooth surface to work on. A canvas cloth or a sheet of parchment paper works well to prevent the clay from sticking to your table. -
Knead the clay:
Take a large chunk of your clay and knead it thoroughly until it is soft, warm, and pliable. This removes air bubbles and prevents cracking later. -
Set up thickness guides:
Place your two wooden guide strips on either side of the clay. These will ensure your tile has a perfectly uniform thickness when you roll it out. -
Roll out the slab:
Using the rolling pin, flatten the clay ball into a smooth slab, resting the pin on the guides as you work. Aim for a thickness of about half an inch to give the tile substantial weight.
Step 2: Creating the Impression
-
Select and place the leaf:
Choose a fresh maple leaf that hasn’t become brittle. Place it vein-side down onto the center of your clay slab. I prefer to place it slight off-center for a more dynamic look, but centered works great too. -
Initial press:
Gently press the leaf into the clay with your fingers first to tack it in place, ensuring the stem and all tips are flat against the surface. -
Roll the impression:
Take your rolling pin and roll over the leaf firmly once or twice. Use enough pressure to embed the veins deep into the clay, but not so much that you distort the slab’s shape. -
Remove the leaf:
Locate the stem or a sturdy edge of the leaf. Use a needle tool or the tip of your knife to gently lift it, then peel the leaf away to reveal the intricate texture.
Preventing Cracks
If using air-dry clay, slow the drying process by lightly covering the tile with plastic wrap for the first 24 hours. The slower it dries, the less likely it is to warp or crack.
Step 3: Shaping & Refining
-
Position the template:
Place your square card stock template over the impression. Adjust it until the leaf is framed exactly how you want it within the square. -
Cut the tile shape:
Holding the knife vertically, cut straight down along the edges of the template. Remove the excess clay scraps and set them aside. -
Smooth the edges:
Dip your finger or a slightly damp sponge into water and run it along the cut edges of the tile to soften the sharp corners and smooth out any cutting marks. -
Dry partially:
Let the tile sit for about an hour until it is ‘leather hard’—firm but still cold to the touch. This makes it safer to handle without warping. -
Flip for drying:
To prevent warping as it fully dries, gently flip the tile over or place it on a wire rack. Let it dry completely according to your clay package instructions (usually 24-48 hours).
Highlight the Veins
For more contrast, mix a tiny drop of brown acrylic paint with water (creating a wash). Brush it into the leaf imprint and wipe the surface immediately, leaving dark color only in the deep veins.
Step 4: Finishing Touches
-
Sand the surface:
Once fully bone dry, use the fine-grit sandpaper to gently buff the flat surfaces around the leaf imprint. Do not sand the leaf itself, as you’ll lose the texture. -
Clean up dust:
Wipe the tile with a dry, soft brush or cloth to remove all sanding dust from the crevices of the leaf veins. -
Seal the piece:
Take the tile to a well-ventilated area and apply a light coat of matte clear sealant spray. This protects the clay from moisture and gives it a finished, professional look without making it shiny. -
Final cure:
Allow the sealant to cure completely before placing your new botanical art on a shelf or installing a hanger on the back.
Now you have a timeless piece of botanical art that captures the fleeting beauty of autumn in stone-like permanence


Classic Geometric Stamped Pattern Tile Set
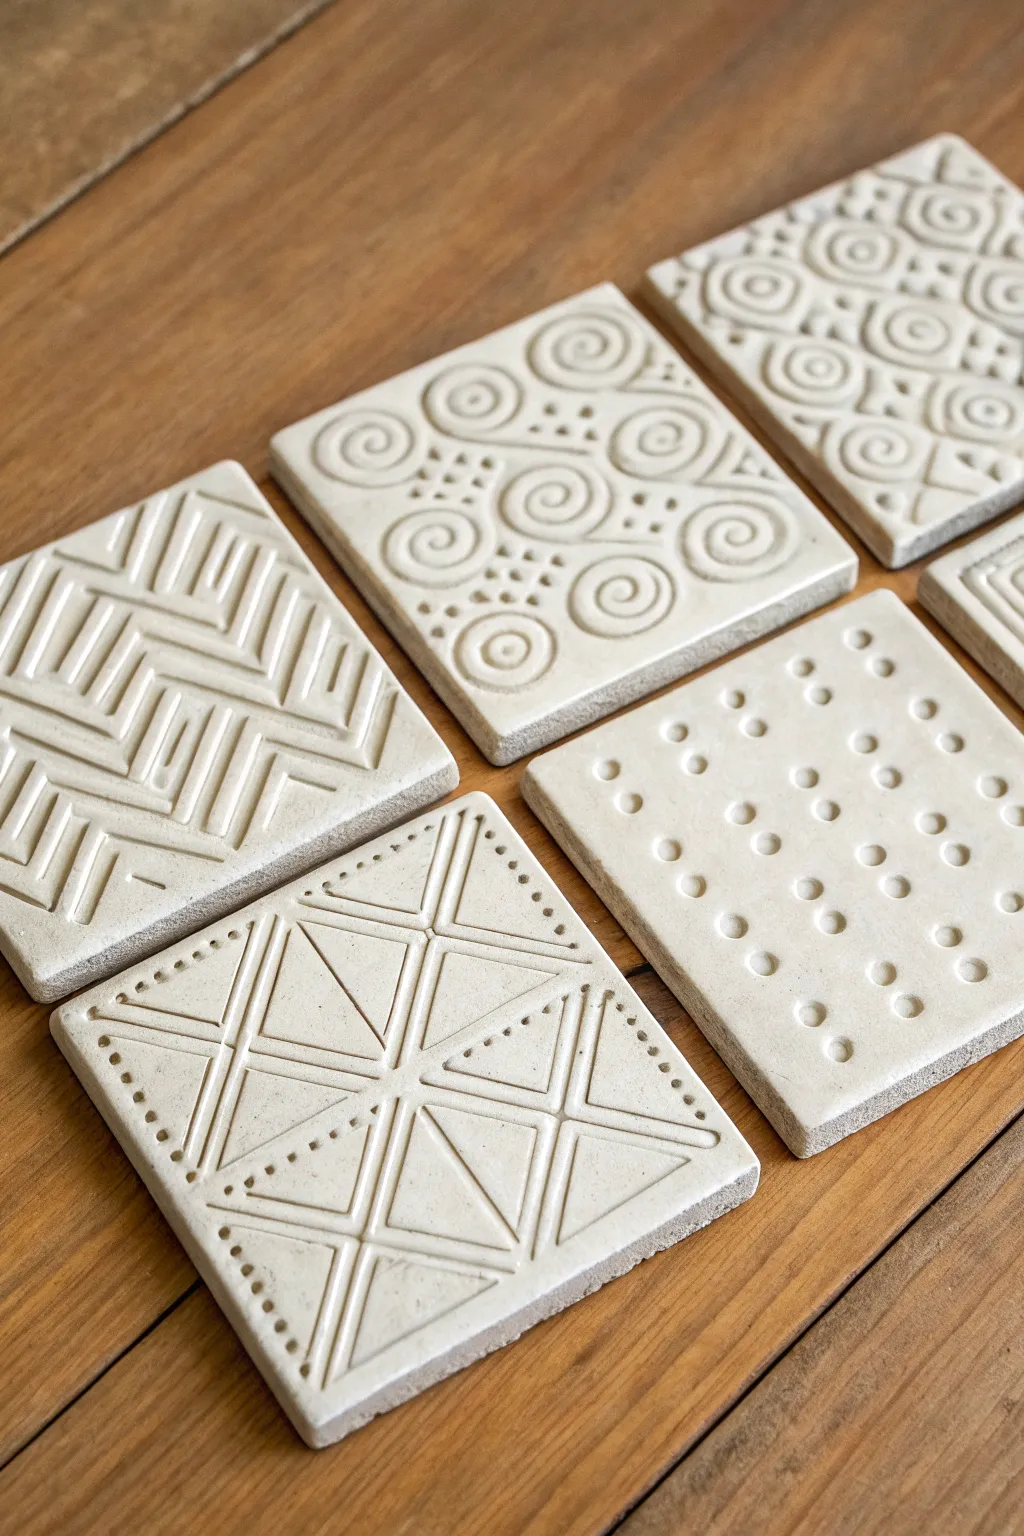
Bring an earthy, artisanal touch to your home decor with these beautifully textured geometric clay tiles. Using basic stamping tools and air-dry clay, you can achieve a sophisticated, minimalist look that mimics high-end ceramic studio work.
Step-by-Step Tutorial
Materials
- White air-dry clay (or polymer clay)
- Rolling pin
- Square cookie cutter (approx. 4×4 inches)
- Clay slab guides or two wooden paint stirrers
- Fine-grit sandpaper
- Acrylic matte sealer or varnish
- Various stamping tools (household objects, clay tools, or custom 3D printed stamps)
- Canvas or parchment paper
- Small sponge
- Modeling tool or dull knife
Step 1: Preparing the Clay Base
-
Wedging the Clay:
Begin by taking a substantial chunk of air-dry clay and kneading it briefly to remove air bubbles. This conditioning process prevents cracks from forming later as the tiles dry. -
Setting up the Guides:
Place your canvas or parchment paper on a flat work surface. Position your slab guides or wooden stirrers on either side of the clay. These guides ensure your tiles will have a completely uniform thickness, which is crucial for a professional look. -
Rolling the Slab:
Use your rolling pin to flatten the clay between the guides. Roll from the center outwards with firm, even pressure until the rolling pin rests on the guides and the clay surface is perfectly smooth. -
Cutting the Squares:
Press your square cookie cutter firmly into the clay slab. If you don’t have a cutter, I usually measure a square template from cardstock and carefully cut around it with a dull knife. Create as many squares as you need for your set. -
smoothing the Edges:
Dip your finger in a tiny bit of water and run it gently along the cut edges of each square. This softens the sharp corners and removes any burrs left by the cutting tool.
Clean Impressions
Dust your stamps or tools with a tiny amount of cornstarch before pressing them into the clay. This acts as a release agent and prevents the clay from sticking to detailed tools.
Step 2: Designing the Patterns
-
Planning the Layout:
Before pressing into your good clay, lightly sketch your intended designs (spirals, zig-zags, or dot grids) on a scrap piece of paper or a spare bit of clay to test your spacing. -
Creating the Spiral Tile:
For the spiral design, find a spiral stamp or use a coiled rope impression tool. Press firmly into the clay at even intervals. Use a small stylus or toothpick to add the tiny decorative dots between each spiral. -
Stamping the Dot Grid:
Use the rounded end of a paintbrush or a medium-sized ball stylus for the dotted tile. Work in rows, pressing vertically to create clean, circular depressions. Consistency in depth is key here. -
carving the Geometric Lines:
For the zig-zag and triangle patterns, use a ruler and a modeling tool to gently press lines into the clay. Don’t drag the tool like a pencil; instead, press it down to create a clean indentation without raising rough burrs. -
Refining the Details:
Inspect each tile closely. If any stamped areas caused the clay to bulge slightly at the edges, gently tap it back down with a flat tool.
Level Up: Antique Wash
Dilute brown acrylic paint with water and brush it over the dried texture. Wipe it off immediately with a cloth; paint stays in the grooves, highlighting the patterns.
Step 3: Finishing and Sealing
-
Slow Drying:
Place the tiles on a wire rack or clean mesh screen to dry. To prevent warping, I like to place a piece of parchment paper and a light book on top of them for the first 12 hours. -
Checking Dryness:
Allow the clay to dry fully for 24-48 hours. The clay will turn a stark white and feel room temperature (not cool) to the touch when it is completely dry. -
Sanding Imperfections:
Once bone dry, take fine-grit sandpaper and lightly buff the edges and surface. Focus on erasing any fingerprints or rough textures left during the handling process. -
Cleaning Dust:
Wipe the tiles down with a slightly damp sponge or cloth to remove all sanding dust before sealing. -
Applying Sealer:
Apply a thin, even coat of matte acrylic varnish. This protects the clay from moisture and stains without creating an unnatural glossy shine. -
Adding Felt Backing:
If using these as coasters, cut a square of felt slightly smaller than the tile and glue it to the bottom to protect your furniture surfaces from scratches.
Arrange your finished tiles on a coffee table or mount them as wall art to enjoy your handmade geometric masterpiece


Sunflower Bas-Relief Clay Tile
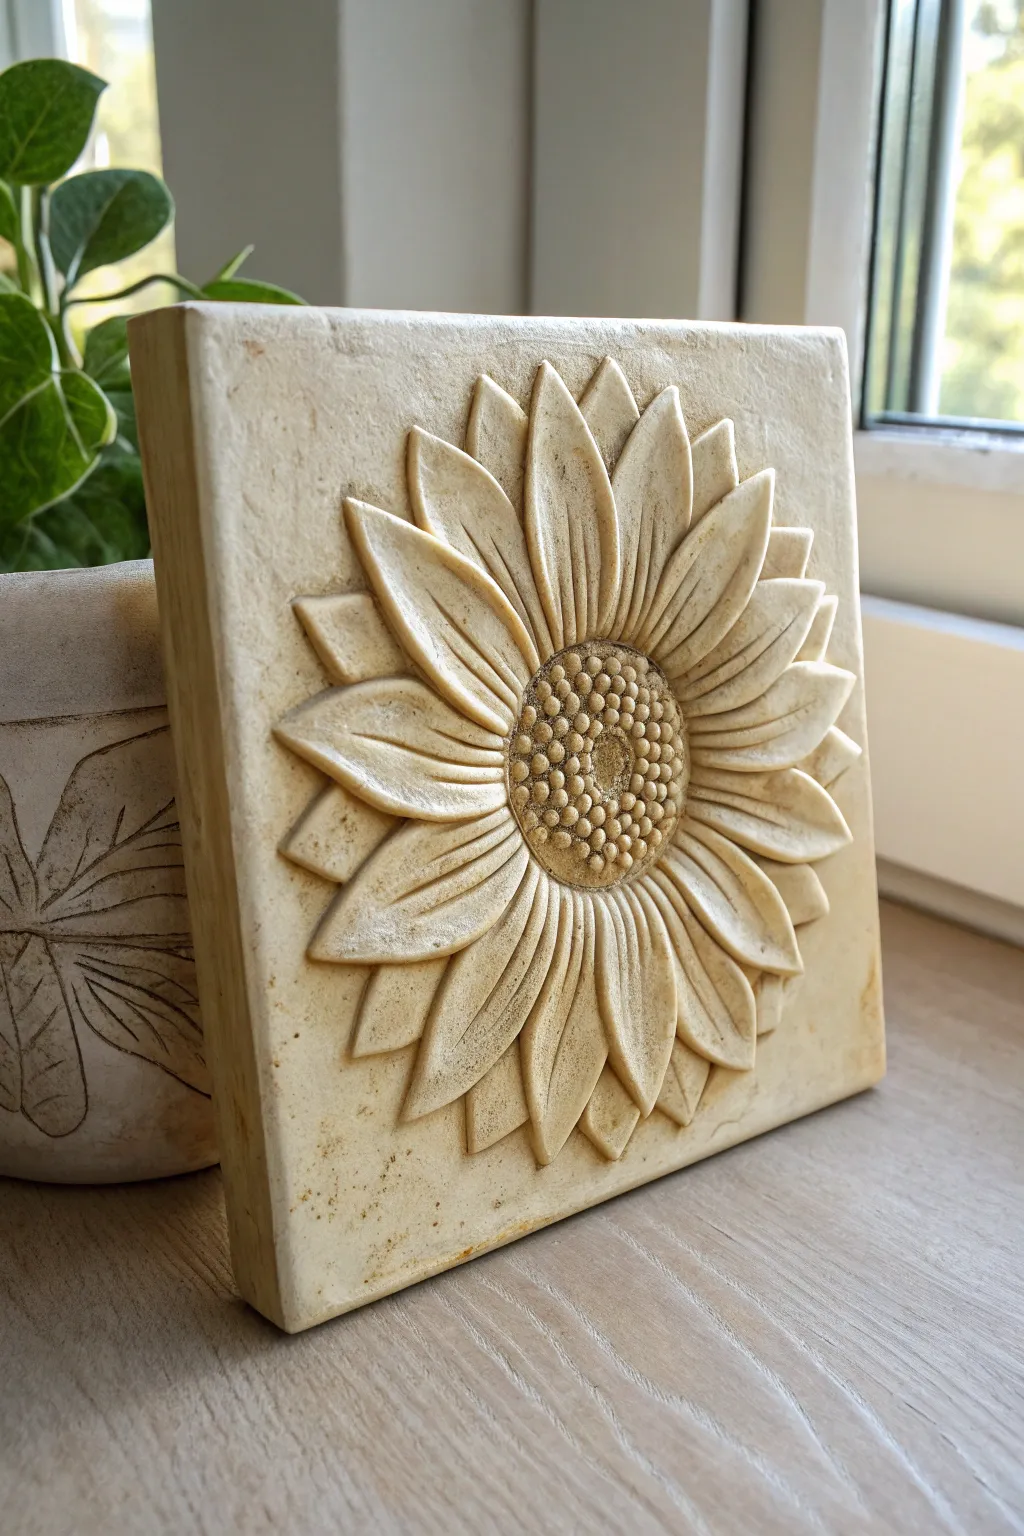
Bring the warmth of summer indoors with this elegant bas-relief sunflower tile. This project focuses on carving techniques to create depth and texture, resulting in a timeless piece that mimics the look of carved limestone.
Step-by-Step
Materials
- White stoneware clay or air-dry stone clay (approx. 2 lbs)
- Rolling pin
- Two 1/2-inch thickness strips (wood slats)
- Square tile cutter or ruler and knife (6×6 inches)
- Needle tool
- Loop tools (various sizes for carving)
- Rubber rib tool
- Small sponge
- Soft bristle brush
- Antique oxide wash or diluted brown acrylic paint
- Matte clear sealant (optional)
Step 1: Preparation and Layout
-
Roll the slab:
Begin by wedging your clay to remove air bubbles. Place your 1/2-inch thickness strips on either side of the clay and roll it out into a smooth, even slab. -
Cut the tile shape:
Using a ruler and a potter’s knife (or a square cutter if you have one), cut a generous 6×6 inch square. Smooth the cut clay edges with a damp finger to remove sharpness. -
Draw the guide:
Find the center of the tile. Using a needle tool, lightly scratch a small circle for the flower center (about 1.5 inches wide) and a larger circle nearly touching the edges to mark the petal limits. -
Sketch the petals:
Lightly sketch the primary layer of petals radiating from the center. Don’t worry about perfection; organic variations make it look natural.
Step 2: Carving the Relief
-
Carve negative space:
Use a medium loop tool to carve away the clay around the sunflower’s outer edge. Lower this background area by at least 1/8th of an inch to make the flower pop. -
Define the first petal layer:
With a smaller loop tool or a modeling tool, carve around the outline of your main petals, tapering the edges down where they meet the background. -
Add secondary petals:
In the gaps between the main petals, carve smaller, recessed petals that appear to be peeking out from behind. This layering is the secret to a realistic 3D effect. -
Detail the petal texture:
Use a fine needle tool or a small stylus to gently press a central vein line down the middle of each petal. Add tiny parallel striations for a realistic texture. -
Soften the edges:
Take a slightly damp brush or your fingertip and gently smooth any harsh burrs or sharp ridges on the petals.
Clean Lines Pro-Tip
Wait until the clay is ‘leather hard’ (stiff but cool/damp) before doing the finest petal details. The clay will carve like cheese without dragging.
Step 3: Detailing the Center
-
Create seed texture:
For the center disk, use a small ball styler or the dull end of a paintbrush. Press rows of small indentations in a spiral pattern, starting from the outside and working inward. -
Define the inner ring:
Leave a tiny, slightly raised mound in the very center of the disk to create visual interest and break up the texture. -
Refine the border:
I like to go back around the outer edge of the flower petals with a clean tool to ensure the separation between the flower and the background is crisp. -
Adding age:
Texture the flat background slightly by dabbing it with a stiff brush or a crumpled piece of foil to give it a stone-like appearance.
Level Up: Functional Art
Before drying, press four small holes in the corners. Once finished, use rustic twine for hanging, or embed a hook on the back for a hidden mount.
Step 4: Finishing Touches
-
Dry slowly:
Place the tile between two pieces of drywall board or cover loosely with plastic to dry very slowly. This prevents the corners from curling up. -
Bisque fire:
If using kiln-fire clay, fire to bisque temperature (usually Cone 04) once fully bone dry. -
Apply wash:
Mix a dark brown oxide wash (or watered-down acrylic paint for air-dry clay). Brush it over the entire piece, getting into the deep crevices. -
Wipe back:
Immediately wipe the surface with a damp sponge. The dark color will stay in the carved lines and textures, highlighting the relief. -
Final seal:
Once fully dry, apply a matte sealant if you used air-dry clay or fire to maturity for ceramic clay.
Now you have a stunning piece of architectural art ready to brighten any corner of your home


Carved Linework Clay Tile With Simple Borders
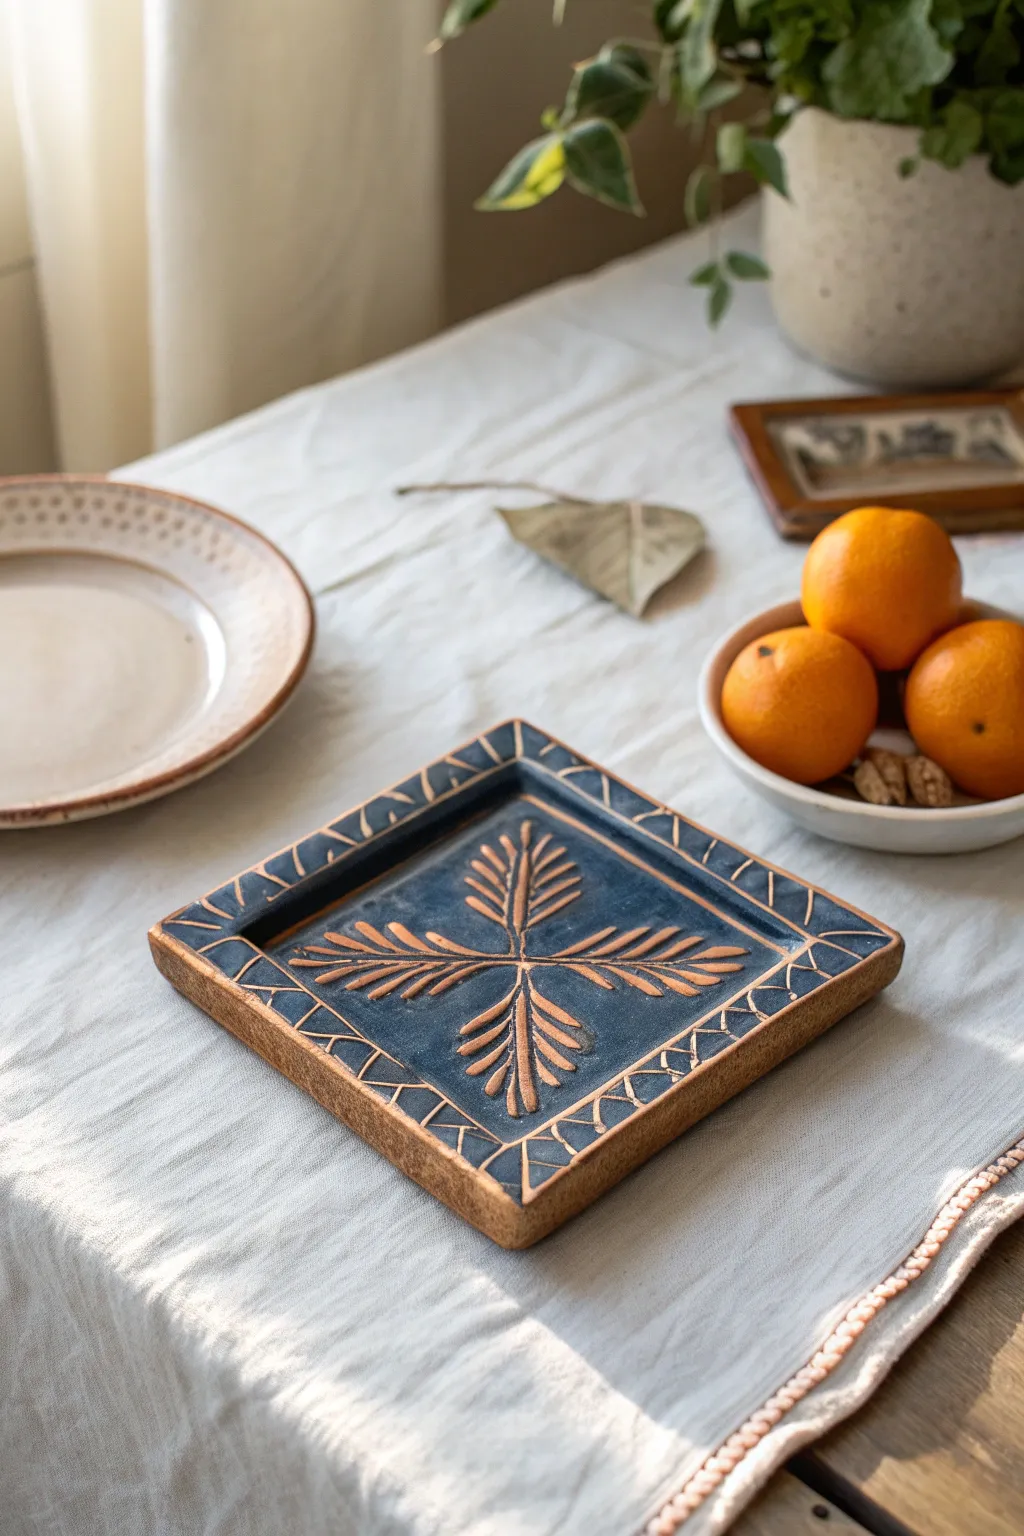
This project transforms a simple slab of clay into a striking decorative tray using the sgraffito technique to reveal warm terracotta tones beneath a deep indigo glaze. The contrast between the dark surface and reddish clay body creates a timeless, folk-art aesthetic perfect for a table centerpiece.
Detailed Instructions
Materials
- Red earthenware or terracotta clay (low fire)
- Square slump mold or wooden board (approx. 8×8 inches)
- Rolling pin
- Guide strips (1/4 inch thick)
- Needle tool
- Fettling knife
- Rib tool (kidney shaped, soft rubber)
- Dark blue underglaze (cobalt or navy)
- Small carving loop tool (wire end)
- Soft fan brush
- Clear matte glaze (optional)
- Sponge
Step 1: Forming the Base
-
Prepare the Clay Slab:
Begin by wedging your red earthenware clay thoroughly to remove air pockets. Place it between two 1/4 inch guide strips on a canvas mat and roll it out until you have a smooth, even slab. -
Cut the Shape:
Using a ruler and a fettling knife, cut a precise square from the slab. A size of roughly 8×8 inches works well, but remember the clay will shrink during drying and firing. -
Smooth the Surface:
Take your soft rubber rib tool and gently compress the clay surface. This realigns the clay particles and creates a pristine canvas for your carving later. -
Create the Lifted Edge:
To create the raised rim seen in the image, lightly score the outer 1/2 inch perimeter. You can either fold the edges up slightly or attach a separate coil of clay, smoothing it down thoroughly so no seam remains. -
Refine the Form:
Use a damp sponge to soften the sharp edges of the rim. The goal is a slightly rounded, organic edge rather than a precision-cut industrial look.
Step 2: Pattern and Sgraffito
-
Apply Underglaze:
While the clay is leather-hard (stiff but still cool to the touch), apply 2-3 coats of deep blue underglaze to the top surface and the rim. Allow each coat to dry until matte before adding the next. -
Initial Marking:
Once the final coat of underglaze is dry to the touch, use a needle tool to very lightly scratch your layout lines. Mark an ‘X’ from corner to corner to find the center, and sketch the border width. -
Carving the Central Motif:
Using a small wire loop tool, begin carving the central four-leaf design. Start at the center point and pull the tool outward to create the main spine of each leaf. -
Adding Veins:
Carve the smaller veins branching off the main spine. Vary your pressure: press deeper at the start of the stroke and lift up at the end to create a tapered line that mimics a feather or leaf. -
Border Layout:
Move to the rim. Carve a continuous straight line that separates the central recessed area from the raised border. This frames the artwork. -
Detailing the Border:
Carve the zig-zag or triangle pattern along the border. Aim for a loose, hand-drawn consistency rather than geometric perfection; this adds to the charm. -
Clean Up:
You will likely have ‘burrs’ or crumbs of clay along your carved lines. Wait until the piece is bone dry, then use a stiff dry brush to vigorously sweep them away. Don’t pick at them while wet or you’ll smudge the blue. -
Firing:
Bisque fire the piece according to your clay body’s instructions (usually Cone 04). Since the red clay provides the color contrast, you can leave the carved areas raw. -
Finishing Glaze:
For a functional surface, apply a thin coat of clear matte glaze over the entire top surface and fire again to the recommended temperature. This seals the red clay and makes the blue pop.
Clean, Crisp Lines
Keep your carving tool clean! A buildup of clay on the wire loop creates ragged lines. Wipe the tool on a sponge after every few strokes.
Smudged Blue?
If blue crumbs fall into the carved red lines, don’t wipe them with a wet finger. Wait for them to dry completely, then blow them out or brush gently.
Place your finished tile on the table as a trivet or decorative tray and enjoy the warmth of the handmade clay

The Complete Guide to Pottery Troubleshooting
Uncover the most common ceramic mistakes—from cracking clay to failed glazes—and learn how to fix them fast.
Texture Sampler Clay Tile (Your Personal Swatch Book)
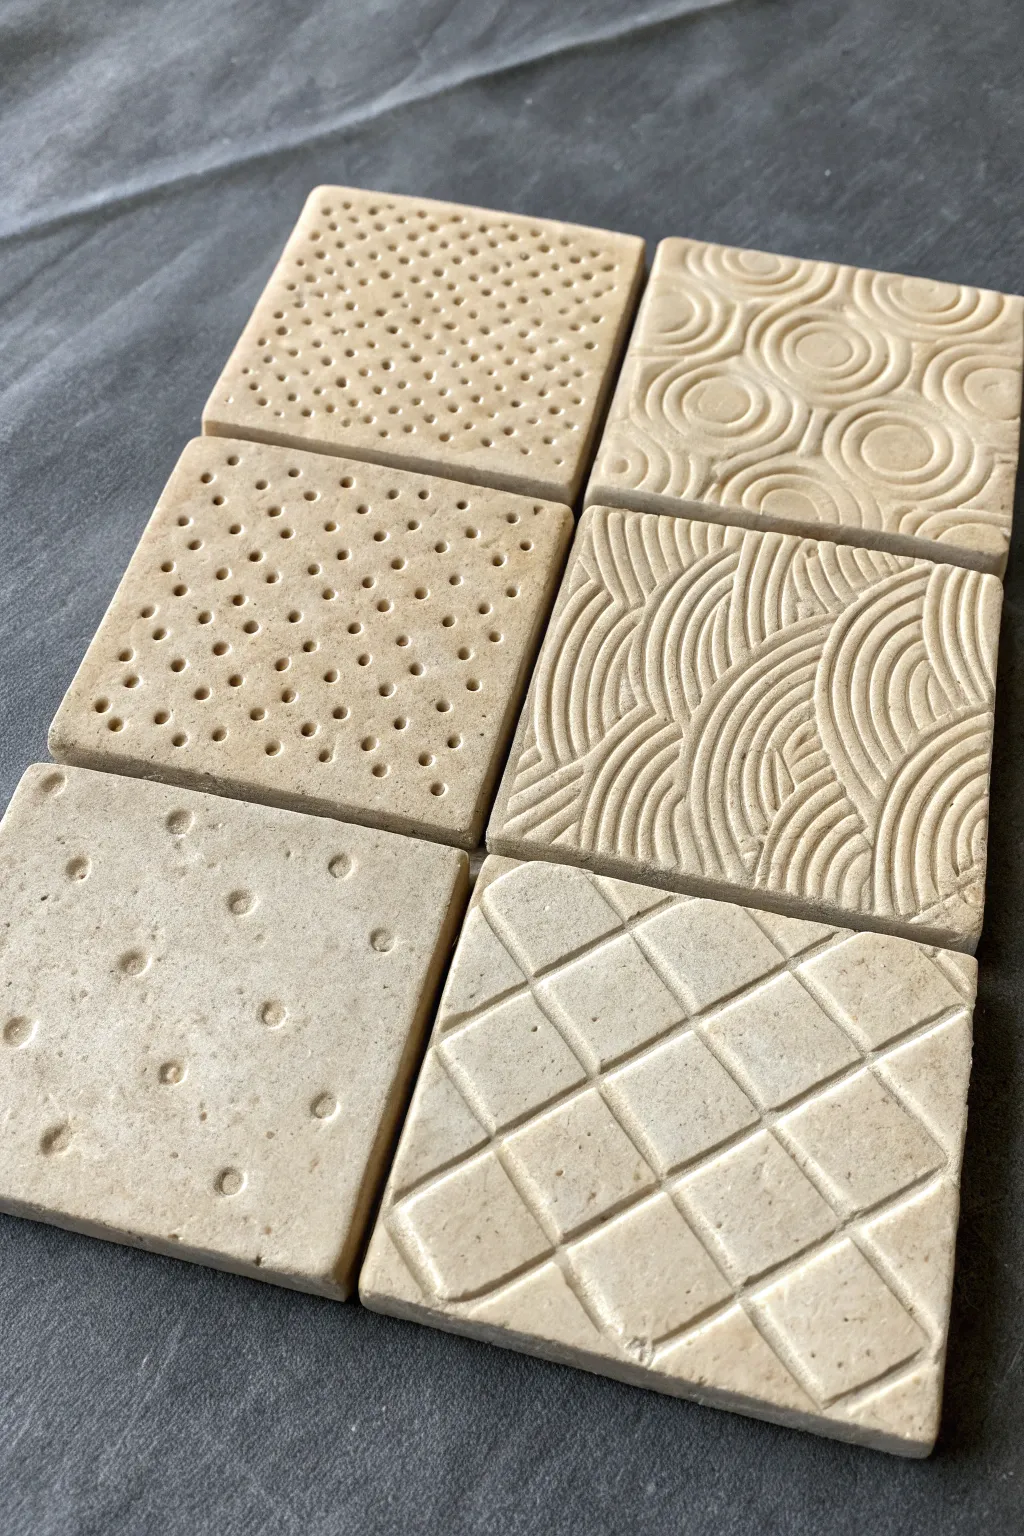
Create a stunning reference library of tactile finishes with these texture sampler tiles. This project guides you through creating six unique patterns, ranging from precise geometric grids to organic flowing waves, serving as both art and a practical index for future pottery work.
Step-by-Step
Materials
- Light-colored stoneware or polymer clay (about 1 lb)
- Rolling pin
- Two 1/4-inch wood slats or depth guides
- Sharp knife or clay blade
- Ruler
- Needle tool of various thicknesses
- Small round piping tip or straw (small diameter)
- Medium round piping tip or straw (medium diameter)
- Ball stylus tool (large)
- Loop tool or U-shaped carving tool
- Wooden modeling tool with a flat edge
- Clean canvas or heavy cotton cloth for working surface
- Sandpaper (fine grit)
Step 1: Preparation & Base Creation
-
Prepare the workspace:
Lay down your canvas or heavy cloth on a flat table. This prevents the clay from sticking and adds a very subtle texture to the back of your tiles. -
Roll out the slab:
Wedge your clay thoroughly to remove air bubbles. Place the clay between your two 1/4-inch depth guides. Roll the clay out until the rolling pin rides smoothly on the guides, ensuring a perfectly even thickness. -
Measure and mark:
Using your ruler and a needle tool, lightly mark out six squares. For the look in the photo, 3×3 inches or 4×4 inches works best. -
Cut the tiles:
Use a sharp knife or clay blade to cut straight down along your marked lines. Avoid dragging the knife, which can warp the edges; instead, press and lift. -
Smooth the edges:
Gently run your finger along the cut edges to soften the sharpness just slightly without losing the square shape.
Step 2: Stippled Textures (Left Column)
-
Create the dense micro-dots:
Take the first tile. Using a very fine needle tool or a small diameter straw, press rows of small dots into the surface. Keep the spacing tight and offset the rows slightly for a honeycomb effect. -
Create the medium perforation:
On the second tile, use a tool with a slightly larger diameter, like a coffee stirrer or a medium piping tip. Press vertically to create clean holes that do not go all the way through the clay. -
Arrange the medium dots:
Try to keep these dots in somewhat orderly rows, but allow for hand-made variation. -
Create the large sparse dots:
For the bottom-left tile, use a large ball stylus or the rounded end of a paintbrush handle. Press deep, widely spaced indentations into the clay. -
Randomize the spacing:
Unlike the previous tiles, scatter these large dots randomly to create an organic, crater-like surface.
Uneven Impressions?
If your stamp depth varies too much, try rocking the tool slightly in a circular motion before lifting it. This ensures all edges of the tool make contact with the clay.
Step 3: Line & Carved Textures (Right Column)
-
Imprint the concentric circles:
On the top-right tile, press circular objects of varying sizes (like bottle caps or washer rings) into the clay. Overlap them to create a rippled water effect. -
Carve the wave pattern:
For the middle-right tile, use a U-shaped loop tool. Carve curved, sweeping lines that echo each other. I find it helpful to start from one corner and fan outwards. -
Deepen the varying grooves:
Vary the pressure on your carving tool to create lines that have different depths, adding visual interest to the waves. -
Score the diamond grid:
For the final bottom-right tile, use a flat-edged wooden tool or the side of a ruler. Press diagonal lines across the tile in one direction. -
Complete the lattice:
Cross those lines with diagonal indentations in the opposite direction. Press deeply enough to create ‘pillows’ of clay in the spaces between lines.
Design Your Own Tools
Don’t limit yourself to store-bought tools! Scavenge creating textures with screws, burlap, old credit cards, or natural items like seed pods to expand your library.
Step 4: Finishing
-
Dry slowly:
Place all six tiles on a drying rack or between sheets of drywall. Let them dry slowly away from direct drafts to prevent the corners from curling up. -
Clean up burrs:
Once the clay is bone dry (greenware), lightly sand away any rough crumbs or sharp burrs created during the texturing process. -
Fire or seal:
If using ceramic clay, bisque fire to cone 04. If using polymer clay, bake according to the package instructions.
Now you have a permanent record of textures to inspire your future ceramic projects
Mandalas and Radial Designs on Clay Tiles
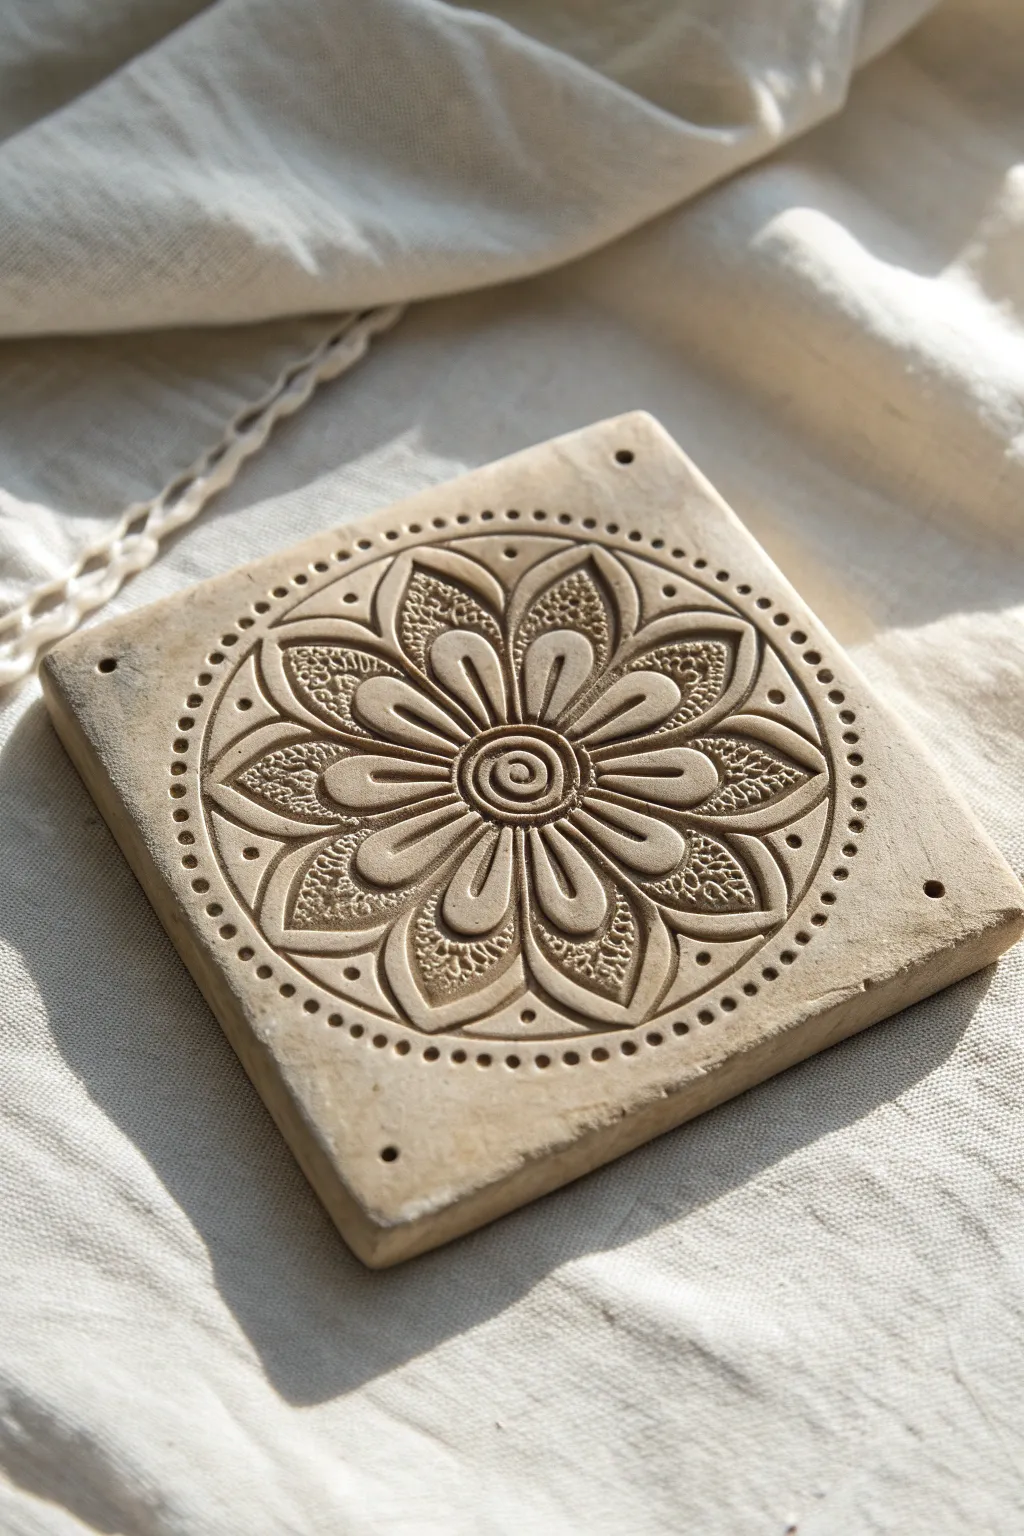
Embrace the meditative process of clay carving with this symmetrical floral mandala tile. The design features deep relief work and delicate textures on a smooth stoneware canvas, creating a timeless piece perfect for use as a trivet or decorative wall art.
Step-by-Step Tutorial
Materials
- Rolled slab of light buff stoneware clay (approx. 1/2 inch thick)
- Square template (paper or cardboard, 6×6 inches)
- Needle tool
- Loop carving tools (small and medium)
- Ball stylus tool
- Small carving gouge
- Pencil and tracing paper
- Damp sponge
- Ruler
- Canvas board or ware board
Step 1: Preparation and Transfer
-
Prepare the slab:
Begin with a clay slab rolled to a consistent thickness of about 1/2 inch. Smooth the surface with a rib tool to remove any canvas texture, ensuring a clean slate for your carving. -
Cut the shape:
Place your square template over the clay slab. Using a needle tool held vertically, cut around the perimeter to create your square tile. -
Design the mandala:
On a piece of tracing paper the same size as your tile, draw your mandala design. Start with a central circle, adding radiating petals and a concentric outer ring using a compass and ruler to maintain symmetry. -
Transfer the image:
Lay the tracing paper gently over the clay surface. Trace over your lines with a dull pencil or stylus, using just enough pressure to leave a faint impression on the soft clay without gouging it. -
Define the borders:
Once the paper is removed, re-trace the main outline of the flower petals and circles with your needle tool to make the guides clear before you start removing material.
Uneven Carving Depth?
If your background looks bumpy, use the flat side of a small wood modeling tool to compress and smooth the carved-out areas. This burnishing also strengthens the tile.
Step 2: Carving the Relief
-
Carve the negative space:
Using a small loop tool, begin removing clay from the areas between the petals. Keep your depth consistent—about 1/8 to 1/4 inch deep—to make the petals pop forward. -
Bevel the edges:
Taking a very small tool, gently bevel the outer edges of the main petals to round them off slightly, removing the sharp 90-degree angle from your initial cuts. -
Create the center:
In the very center circle, use a small gouge or needle tool to carve a tight spiral. I find it helpful to start from the absolute center and work my way out to ensure the line flows smoothly. -
Detail the petals:
Inside each large petal, carve a smaller, tear-drop shape. This creates a double-petal effect typical of traditional mandala patterns. -
Add inner texture:
For the textured areas seen in the image (the background between the inner and outer petal shapes), use a stippling technique. Poke the clay repeatedly with a needle tool or small textured stamp to create a rough surface.
Level Up: Oxide Wash
After bisque firing, apply an iron oxide wash and wipe it back with a sponge. The dark color will remain in your textured stippling and carved lines, highlighting the design.
Step 3: Finishing Details
-
Create the border:
Define the outer circle that frames the flower. Carve a shallow groove to separate the central design from the square corners of the tile. -
Add dot accents:
Using a ball stylus tool, press evenly spaced dots around the perimeter of the circular border. You can also add single dots between the tips of the petals for extra detail. -
Clean up burrs:
Once the clay has stiffened slightly to leather-hard, use a stiff brush or a slightly damp sponge to knock off any little crumbs or clay burrs left from carving. -
Smooth the edges:
Run a damp sponge or your finger along the outer square edges of the tile to soften them, preventing chipping after firing. -
Drill corner holes:
If you plan to hang this tile, use a straw or hole cutter to create small holes in the four corners while the clay is still workable. -
Weigh down for drying:
To prevent warping, which is common with flat tiles, sandwich the tile between two pieces of drywall or place a weighted board on top of it while it dries slowly.
Allow your tile to dry completely before firing or sealing to preserve your intricate carving work


What Really Happens Inside the Kiln
Learn how time and temperature work together inside the kiln to transform clay into durable ceramic.
Koi Fish and Lily Pads Relief Clay Tile
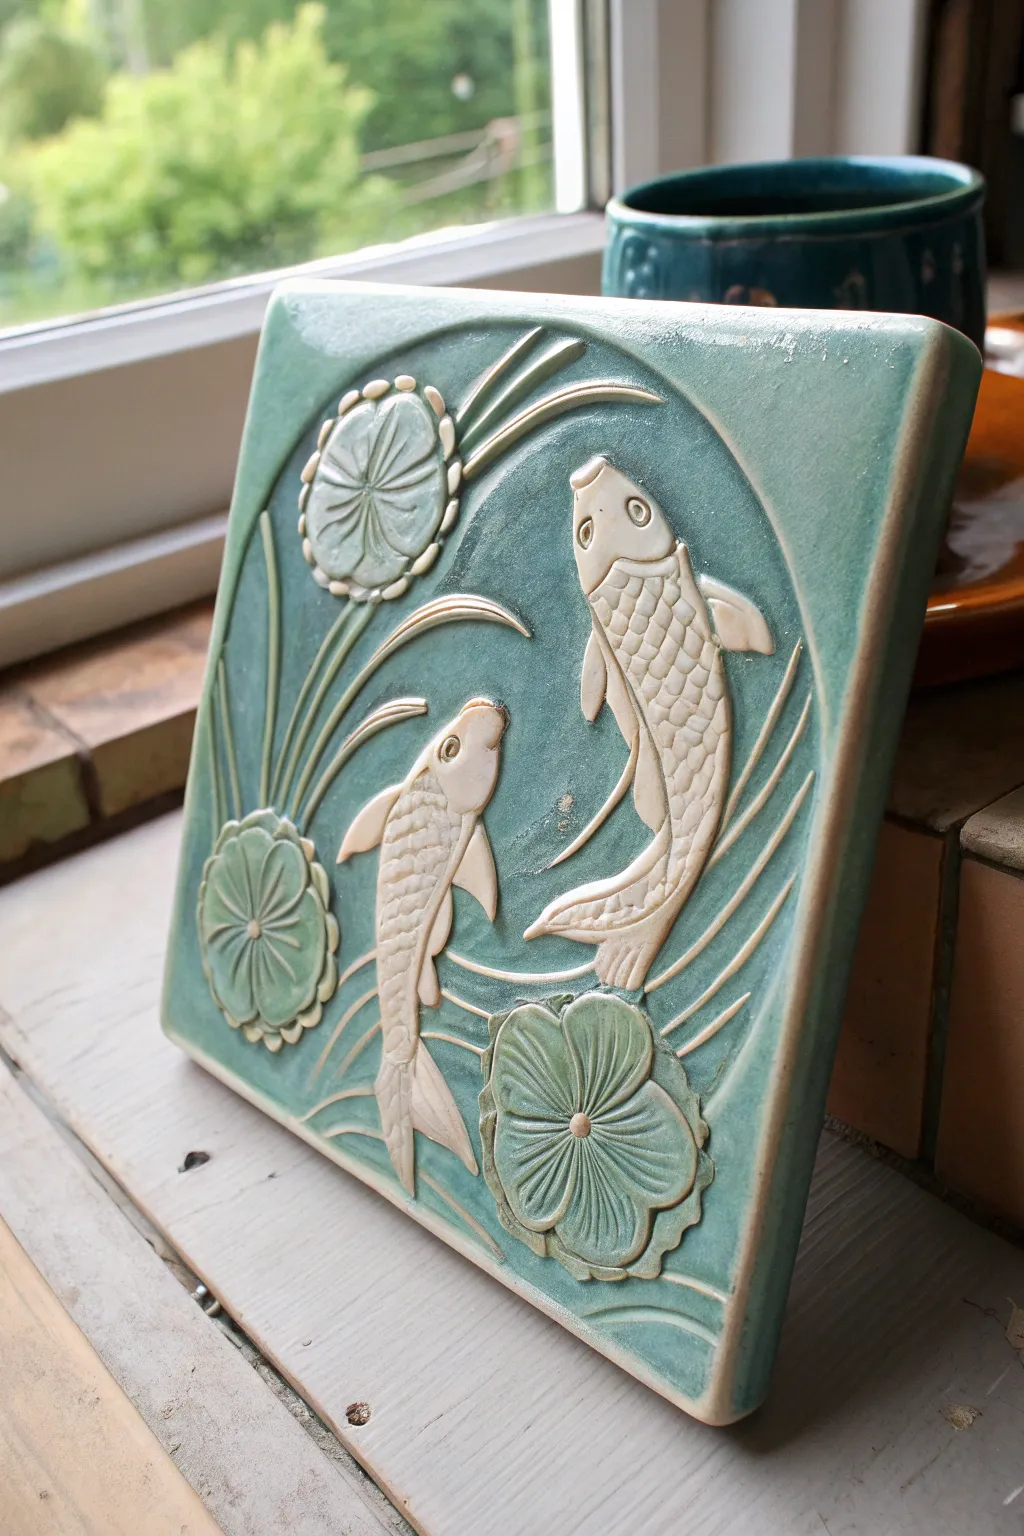
Capture the serenity of a garden pond with this low-relief ceramic tile project. Using basic carving and additive sculpting techniques, you will create a harmonious scene featuring two swimming koi and floating lily pads finished with a classic celadon-style glaze.
How-To Guide
Materials
- Stoneware clay (smooth body recommended)
- Rolling pin
- Two 3/8-inch thickness strips (guide slats)
- Square tile cutter or ruler and needle tool
- Carving tools (loop tools, wire end tools)
- Modeling tool or wooden skewer
- Fettling knife
- Slip (clay slurry)
- Scoring tool or serrated rib
- Celadon glaze (Deep Sea or Jade Green)
- Clear transparent glaze (optional)
- Small sponge
- Soft paintbrush
Step 1: Base Preparation
-
Roll the Slab:
Begin by wedging your clay to remove air bubbles, then roll it out into a slab. Use the 3/8-inch thickness strips on either side of the clay to ensure an even surface that won’t warp during firing. -
Cut the Square:
Measure and mark a perfect square, roughly 6×6 inches (or your desired size). Use a fettling knife or needle tool held vertically to cut clean, straight edges. -
Smooth the Canvas:
Wipe the surface gently with a damp sponge to remove any canvas texture or rolling marks. This creates a pristine background for your aquatic scene. -
Sketch the Design:
Lightly trace your design onto the leather-hard clay using a needle tool. Draw two koi swimming in a circular motion, three lily pads, and flowing water lines. keep the lines faint so they don’t interfere with the final look.
Tile Warping?
To prevent curling edges, dry your tile slowly between two pieces of drywall or wooden boards. Weight the top board slightly to keep it perfectly flat as moisture evaporates.
Step 2: Sculpting the Relief
-
Rough Out the Koi:
Roll small coils and teardrop shapes of additional clay. Score and slip the areas where the fish will be, then attach these added pieces to build up the bodies of the koi so they sit higher than the background. -
Define the Fish Bodies:
Use a modeling tool to smooth the added clay into the base, refining the streamlined shape of the koi. Define the head, curving tail, and dorsal fins. -
Add Texture:
With a small loop tool or a specialized scale tool, press a pattern of scales onto the fish bodies. Use a needle tool to create the eyes and the delicate lines inside the fins and tail. -
Sculpt Lily Pads:
Roll three small balls of clay and flatten them into discs. Attach them to the background with slip. Press a modeling tool into the center and drag outward to create the radiating veins characteristic of lily pads. -
Create Water Movement:
Roll very thin, long coils of claw. Arrange them in sweeping curves around the fish and plants to mimic ripples in the water. Smooth these down gently so they look like fluid currents rather than stuck-on worms. -
Clean Up Edges:
Wait until the clay is leather hard. Use a damp sponge to sharpen the edges of the tile and smooth any roughness on your sculpted elements. -
Bisque Fire:
Allow the tile to dry slowly under plastic for several days to prevent warping, then bisque fire it according to your clay body’s specifications (usually Cone 04).
Celadon Secrets
For deeper contrast, apply a dark wash (like iron oxide) to the textured areas before the main glaze. Wipe it back, then apply the celadon over the top for shadowing.
Step 3: Glazing and Finishing
-
Initial Glaze Application:
Dip or brush your celadon-style glaze over the entire tile. Celadon is translucent and pools in recesses, which highlights texture beautifully. -
Wipe Back Relief:
This is the most critical step for the ‘cameo’ effect. While the glaze is still slightly damp, take a clean, slightly moist sponge and gently wipe the glaze off the raised surfaces (the fish and lily pad tops). -
Refine the Details:
Continue wiping carefully until the bare clay body is revealed on the highest points, leaving the green glaze deep in the background, the scales, and the veins of the leaves. -
Clean the Rim:
Wipe the edges of the tile clean with your sponge. If you want a glossy finish on the bare clay parts, you can carefully brush a clear transparent glaze over the fish, but leaving them matte creates a nice contrast. -
Glaze Fire:
Load the kiln for a glaze firing (typically Cone 5 or 6 for stoneware). Place the tile flat on a kiln shelf.
Once cooled, your tile is ready to be framed or installed as a peaceful focal point in your home
Sea Turtle and Wave Texture Clay Tile

Capture the calm motion of the ocean with this charming relief tile project, featuring a detailed sea turtle and stylized waves. The combination of unglazed clay texture and glossy blue glazes creates a beautiful contrast that mimics sea foam and deep water.
Detailed Instructions
Materials
- White earthenware or stoneware clay slab (approx. 1/2 inch thick)
- Square tile cutter or ruler and needle tool
- Tracing paper and pencil
- Carving tools (loop tool, ribbon tool)
- Needle tool or sgraffito tool
- Modeling tool with a small ball end
- Underglazes (Navy Blue, Teal, Turquoise)
- Clear transparent glaze (optional, for over the color)
- Small liner brushes
- Sponge and water bowl
- Rolling pin and guide strips
Step 1: Preparing the Slab and Scale
-
Roll the slab:
Begin by rolling out your white clay on a canvas board. Use guide strips on either side of your rolling pin to ensure an even thickness of about 1/2 inch, which prevents warping later. -
Cut the square:
Measure and cut a perfect square, roughly 6×6 inches or your desired size. Smooth the edges with a damp sponge or your finger to remove any sharp burrs. -
Draft the design:
Sketch your turtle and wave design on paper first. The turtle should be central, angled slightly upward, with swirled waves in the bottom right corner and subtle water ripples in the background. -
Transfer the image:
Lay your paper sketch over the leather-hard clay slab. Gently trace over the lines with a stylus or dull pencil to leave a faint impression in the clay surface without tearing it.
Step 2: Carving the Relief
-
Define the outlines:
Using a needle tool, deepen the outline of the turtle and the main wave shapes. This separates your main subjects from the background. -
Lower the background:
This is a reductive process. Use a ribbon or loop tool to gently shave away the clay *around* the turtle and the raised wave sections. You want the turtle to sit about 1/8 inch higher than the background. -
Smooth the background:
Once the excess clay is removed, use a damp fingertip or a soft rubber rib to smooth the recessed background area so it is flat. -
Add background ripples:
Using a modeling tool, carve the flowing, curved lines into the background clay. These should be wider and softer than sharp cuts, mimicking current lines in the water. -
Detail the shell:
Carve the scutes (the patterned plates) into the turtle’s shell. Instead of just drawing thin lines, carve small ‘V’ shaped grooves to give the shell distinct dimension. -
Texture the skin:
For the flippers and head, use a needle tool to scratch in the distinctive scaly texture. These areas need to be rough so the glaze will break over them nicely later. -
Carve the waves:
Deepen the spiral grooves in the wave section. Create layers within the wave to suggest movement and volume.
Warping Woes?
If your tile curls up at the corners while drying, flip it over daily and dry it slowly under a loose sheet of plastic. Weighing down the corners can also help keep it flat.
Step 3: Glazing and Finishing
-
Bisque fire:
Allow the tile to dry slowly between two boards to prevent warping. Once bone dry, bisque fire it according to your clay body’s specifications. -
Paint the turtle shell:
Apply a deep teal or turquoise underglaze to the turtle’s shell plates. Use a fine liner brush to keep the grooves between the plates free of glaze, letting the white clay show through as an outline. -
Detail the flippers:
I like to wash a dark navy blue underglaze over the textured flippers, then quickly wipe the surface with a damp sponge. This leaves color in the recesses but exposes the high points. -
Glaze the waves:
Paint the waves in gradients of teal and blue. You can alternate colors between the carved ridges to emphasize the swirling motion. -
Apply dots and accents:
Use the tip of a small brush or a needle tool dipped in white underglaze (or just leave spots unpainted) to add tiny dots on the flippers and sea foam speckles on the waves. -
Clean up borders:
Check the edges of your painted areas. If any glaze strayed onto the background, gently scrape it off with a craft knife or clean it with a wet brush. -
Final wipe:
Ensure the background incised lines are free of glaze dust. A quick puff of air or a soft dry brush works well here. -
Glaze fire:
If you want a shiny finish on the colored parts, apply a clear glaze over just the turtle and waves. Fire the piece again to your glaze outcome temperature.
Clean Lines Trick
Apply liquid wax resist to the lines between the turtle shell plates before glazing. The glaze will bead off the wax, leaving those crisp white separating lines instantly.
Once fired, you can frame this piece or install it as a stunning feature tile in a backsplash

TRACK YOUR CERAMIC JOURNEY
Capture glaze tests, firing details, and creative progress—all in one simple printable. Make your projects easier to repeat and improve.
Cactus Garden Clay Tile With Raised Blooms
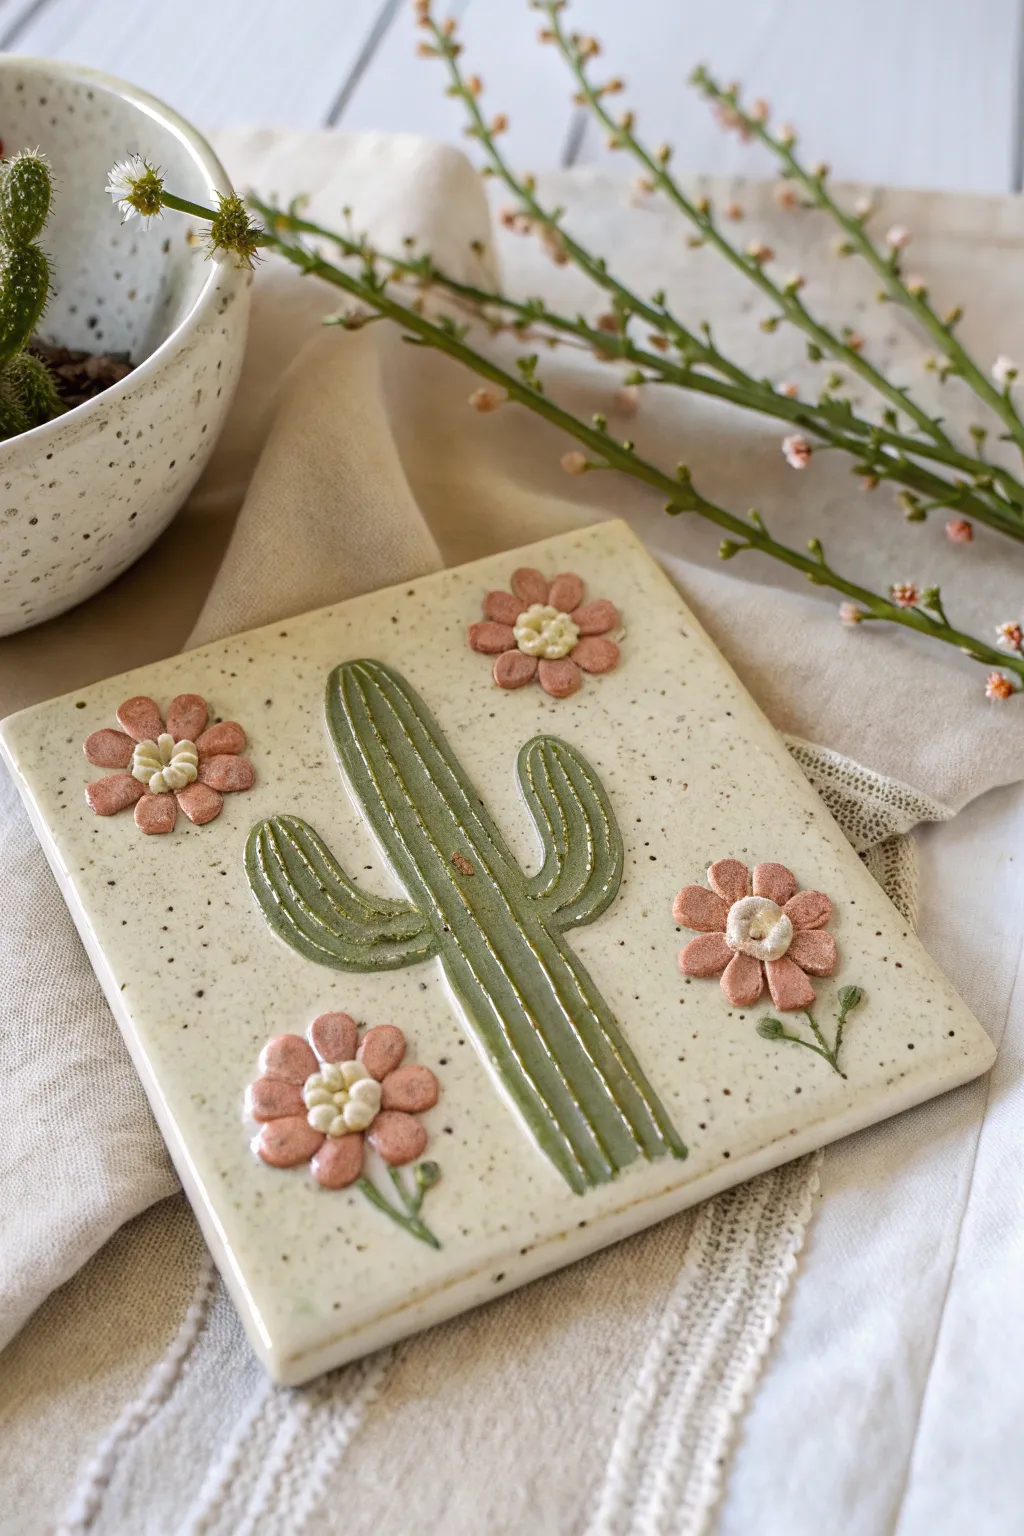
Bring the warmth of the desert into your home with this delightful handmade ceramic tile, featuring a raised cactus motif and dusty pink blooms. The speckled cream glaze gives it a lovely rustic finish, perfect for use as a coaster or a decorative wall hanging.
How-To Guide
Materials
- Light colored stoneware clay with speckles (or plain white clay)
- Rolling pin
- Two wooden guide strips (approx. 1/4 inch thick)
- Square tile cutter or ruler and needle tool
- Needle tool or X-Acto knife
- Slip (clay and vinegar/water mixture)
- Scoring tool (or an old toothbrush)
- Underglazes: Sage Green, Dusty Pink, Creamy White, Dark Green (for stems)
- Small paintbrushes (detail and flat)
- Clear transparent glaze (cone 5/6 or suitable for your clay)
- Sponge
Step 1: Shaping the Base
-
Roll the slab:
Begin by wedging your speckled clay to remove air bubbles. Place the clay between your two wooden guide strips and roll it out until it is perfectly even and smooth. -
Cut the square:
Using a square cutter or a ruler and needle tool, cut out a precise 4×4-inch (or desired size) square. Smooth the edges with a damp sponge to remove any sharpness. -
Prepare appliqué clay:
Roll out a second, thinner slab of clay (about 1/8 inch thick) to use for your decorative elements. This ensures your cactus and flowers aren’t too bulky.
Warping Woes?
Tiles love to warp. Dry very slowly between two sheets of drywall or wood ware boards. Weighted bags on the corners during drying help keep it perfectly flat.
Step 2: Sculpting the Cactus
-
Cut the cactus shape:
Freehand or trace a saguaro cactus shape onto the thinner slab. You’ll need a main body and two curved arms. Carefully cut these out with your needle tool. -
Score and slip:
Position the cactus pieces on the center of your tile. Lightly score (scratch) both the back of the cactus pieces and the spot on the tile where they will sit. Apply a dab of slip to the scored areas. -
Attach the cactus:
Press the cactus firmly onto the tile. Use a modeling tool to blend the very edges just slightly so it bonds well but retains its visual ‘pop’. -
Add texture:
Using a dull pencil or modeling tool, gently press vertical lines down the length of the cactus body and arms to mimic the plant’s ribs. Don’t press too hard; you just want surface indentation.
Step 3: Adding the Blooms
-
Create flower petals:
From your scrap clay, roll tiny balls and flatten them into small oval petal shapes. You will need about 7-8 petals for each flower. -
Assemble the flowers:
Arrange the petals in circles directly on the tile—two floating near the top corners, and two near the bottom. Score and slip each petal before pressing it down. -
Add flower centers:
Roll tiny balls of clay, press them into the center of each flower, and use a needle tool to poke small dots for pollen texture. -
Form the stems:
For the bottom two flowers, roll minuscule coils of clay for stems. Attach them curved slightly beneath the blooms, connecting visually toward the cactus base. -
Slow drying:
Loosely cover the tile with plastic and let it dry slowly to the leather-hard stage to prevent warping. Once bone dry, bisque fire the piece according to your clay’s instructions.
Make It a Set
Create 3 more tiles featuring different desert plants like aloe or prickly pear. Use the same color palette to make a cohesive coaster set.
Step 4: Painting and Glazing
-
Apply cactus color:
Water down your Sage Green underglaze slightly. Paint the raised cactus body, letting the color settle naturally into the vertical grooves you created. -
Highlight the ridges:
I like to take a slightly damp sponge and wipe the cactus ribs very gently. This reveals a bit of the raw clay on the high points while keeping the green in the recesses. -
Paint the petals:
Carefully paint the flower petals with 2-3 coats of Dusty Pink underglaze. Use a tiny detail brush to keep the edges crisp. -
Detail centers and stems:
Dot the flower centers with Creamy White underglaze. Use a dark green underglaze for the delicate stems on the bottom flowers. -
Final glazing:
Once the underglaze is dry, dip or brush the entire tile with a clear transparent glaze. If you used speckled clay, the specks will now show through beautifully. -
Final firing:
Load the kiln carefully and glaze fire to the temperature required for your specific clay and glaze combination.
Once cooled, attach felt pads to the bottom corners to protect your surfaces and enjoy your new desert-inspired art
Sunrise Landscape Clay Tile With Layered Bands

Capture the warmth of a desert sunrise with this layered dimensional landscape tile. Using varied clay bodies and subtle glazing, you’ll build rolling hills and a glowing sun contained within a neat wooden frame.
Step-by-Step
Materials
- Stoneware clay (buff or white)
- Small rolling pin
- Fettling knife or X-Acto blade
- Needle tool
- Wooden sculpting tool (rounded edge)
- Underglazes (terracotta, mocha, moss green, cream)
- Speckled clay or grog (optional for texture)
- Clear matte glaze
- Square wooden frame (approx. 6×6 inches)
- Strong craft adhesive (E6000 or similar)
- Canvas work surface
- Slip and scoring tool
Step 1: Preparing the Base
-
Measure frame interior:
Begin by measuring the precise interior dimensions of your wooden frame. Subtract about 1/8th of an inch from these measurements to account for clay shrinkage during drying and firing. -
Roll out the slab:
Roll out a slab of buff stoneware clay to approximately 1/4 inch thickness on your canvas. Ensure the surface is smooth and free of air bubbles. -
Cut the tile shape:
Using a ruler and fettling knife, cut a perfect square based on your adjusted measurements. Keep the edges clean and right-angled. -
Smooth the edges:
Run a slightly damp sponge along the cut edges to soften any sharp corners and compress the clay particles, which helps prevent cracking.
Step 2: Sculpting the Landscape
-
Sketch the design:
Lightly trace your landscape lines directly onto the damp clay slab using a needle tool. Draw three distinct rolling hill sections and a circle for the sun in the upper right quadrant. -
Create the sun:
Roll a small ball of clay and flatten it into a disc that matches your sketched sun circle. Score and slip the back, then press it firmly onto the background slab. -
Build the first hill:
For the furthest hill (the middle layer), roll a thin coil or small slab piece. Shape it to match the curve of your sketch, beveling the top edge so it seems to recede backward. -
Add the middle dune:
Create the reddish-brown middle dune layer. Cut a flat shape that overlaps the bottom of the first hill. I like to smooth the bottom edge of this piece down completely so it blends into the base, while keeping the top edge distinct and raised. -
Form the foreground:
Shape the two bottom sandy sections. These should be the thickest layers (highest relief). Position them at the very bottom, creating a sense of depth. -
Refine the lines:
Use a rounded wooden tool to define the deep grooves between the hills. This is crucial—you want a deep channel between sections, not just a drawn line. -
Add texture:
Take a needle tool or small stiff brush and gently stipple the two bottom ‘sand’ sections to mimic grains of sand or pebbles. Leave the sun and upper sky smooth.
Warp-Proofing Tip
To prevent warping, cut shallow diagonal grooves into the *back* of your tile before drying. This relieves tension and helps the tile dry evenly from both sides.
Step 3: Finishing and firing
-
Slow drying:
Sandwich your tile between two pieces of drywall or place it under loose plastic for several days. Slow drying is essential to keep the tile flat and warp-free. -
Bisque fire:
Once bone dry, bisque fire the tile to Cone 04 (or according to your clay’s specifications). -
Apply base colors:
Paint the background sky with a cream or pale grey underglaze. Paint the sun with a warm orange-yellow underglaze. -
Paint the hills:
Apply a mossy green-brown to the furthest hill. Use a rich terracotta underglaze for the middle dune. -
Detail the foreground:
For the textured foreground hills, use a very pale beige underglaze. Before it dries, dab in tiny dots of brown underglaze into the texture divots you made earlier. -
Glazing:
Apply a coat of clear matte glaze over the entire piece. Avoid glossy glaze, as the reflection can obscure the subtle topography of the landscape. -
Final firing:
Glaze fire the piece to the maturity temperature of your clay body (likely Cone 5 or 6). -
Mounting:
Apply a strong adhesive like E6000 to the back of the tile and press it firmly into the wooden frame. Let it cure flat for 24 hours.
Level Up: Glossy Sun
Make the sun pop by using a high-gloss clear glaze just on the sun circle, while keeping the rest of the landscape matte. The contrast catches the light beautifuly.
Hang your finished relief tile on a gallery wall or use it as a stunning standalone coaster.
Clouds and Wind Swirls Clay Tile
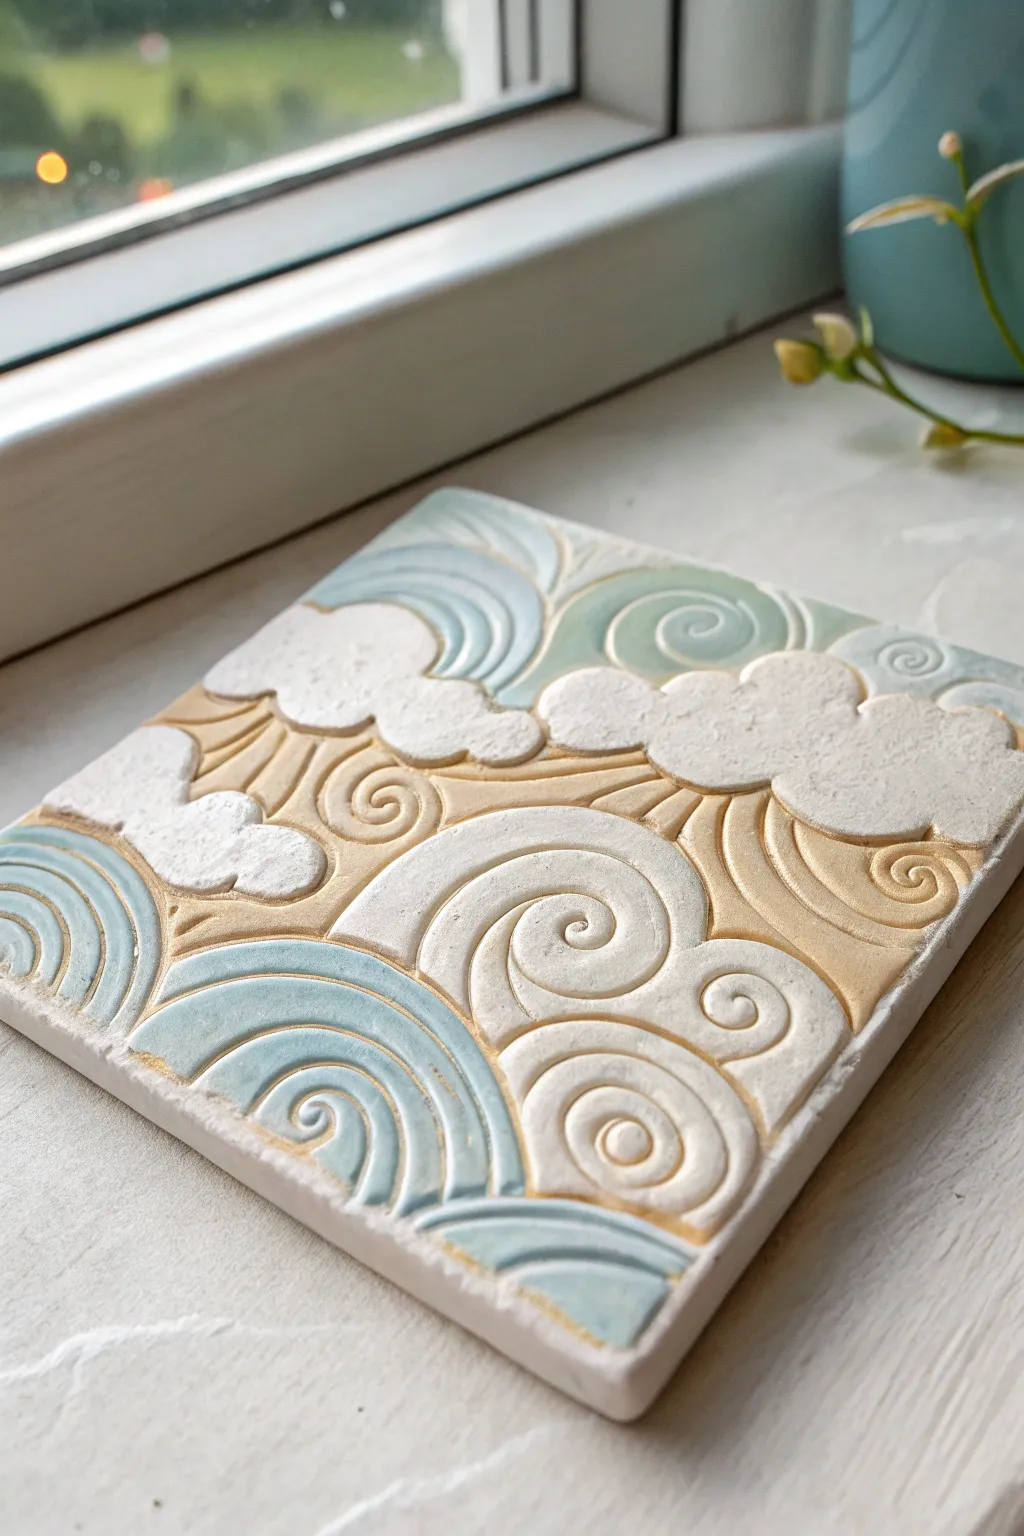
Capture the whimsy of a breezy day with this textured relief tile featuring soft, billowing clouds and elegant wind spirals. The piece combines low-relief carving with a gentle pastel palette to create a serene, decorative artwork perfect for displaying on a windowsill or shelf.
How-To Guide
Materials
- White earthenware or stoneware clay slab (approx. 6×6 inches, 1/4 inch thick)
- Needle tool or X-Acto knife
- Loop tools (small and medium sizes)
- Small carving gouges (u-tip and v-tip)
- Rubber kidney rib
- Rolling pin and canvas mat
- Sponge
- Underglazes: Light Blue-Grey, Cream/White, Golden Ochre/Tan
- Clear transparent glaze (or matte varnish if using air-dry clay)
- Small soft brushes (round and flat)
- Gold luster or gold acrylic paint (optional for detailing)
Step 1: Shaping the Foundation
-
Prepare your slab:
Roll out your clay on a canvas mat to an even thickness of about 1/4 to 3/8 inch. Use guide sticks if you have them to ensure the surface is perfectly flat. -
Cut the square:
Using a ruler and a needle tool or knife, cut a precise 5×5 or 6×6 inch square. Smooth the edges with a damp sponge so they are rounded and soft rather than sharp. -
Sketch the design:
Lightly trace your design directly onto the damp clay using a dull pencil or needle tool. Draw large spiral shapes for the wind at the bottom and sides, puffy cloud shapes in the middle, and radiating lines for the sky background.
Step 2: Carving the Relief
-
Define the outlines:
Go over your traced lines with a V-tip carving tool or needle tool, pressing slightly deeper to create clear boundaries between the clouds, wind swirls, and background rays. -
Carve the background levels:
Using a small loop tool, gently scrape away clay from the areas that interpret the sky background (the golden rays). These should sit slightly lower than the puffy clouds. -
Sculpt the spirals:
For the wind swirls, carve a continuous channel that spirals inward. Keep the ridges between the spiral lines raised to create a tactile 3D effect. -
Texture the clouds:
Instead of smoothing the clouds, dab them gently with a coarse sponge or stipple them with a stiff brush to give them a fluffy, organic texture that contrasts with the smooth spirals. -
Refine the edges:
Use a damp paintbrush to smooth over any sharp burrs of clay left from carving, softening the transitions between the raised and powered areas while keeping the design crisp. -
Dry the tile:
Sandwich the tile between two pieces of drywall or place it under plastic to dry slowly. This is crucial for flat tiles to prevent warping. Let it dry to bone dry stage.
Warp Prevention
Tiles warp easily! Dry your tile very slowly between two boards or weighted drywall pieces to keep it perfectly flat.
Step 3: Adding Color & Finish
-
Apply base underglaze:
Once bisque fired (or fully dry if using non-fired clay), apply the Cream/White underglaze to the cloud sections. Dab it on rather than brushing to maintain that textured look. -
Paint the wind:
Carefully paint the spiral wind shapes with a watered-down Light Blue-Grey underglaze. Let the deeper carved recesses hold slightly more pigment to emphasize depth. -
Fill the background:
Paint the background rays and negative spaces with the Golden Ochre. I like to keep this layer slightly translucent so the white clay body shines through, giving it a luminous quality. -
Clean up the lines:
If any paint crossed the carved boundaries, scrape it back gently with a clean tool or wipe with a very careful damp brush to keep the separation distinct. -
Glazing:
Apply a clear transparent glaze over the entire piece if firing. If possible, use a satin or matte clear glaze to preserve the soft aesthetic of the carving. -
Final firing:
Fire the tile according to your clay and glaze instructions. -
Optional gold accent:
For a touch of magic, apply a tiny amount of gold luster (or gold paint for non-functional pieces) to the very tops of the wind spiral ridges and fire/dry again.
Deepen the Detail
After applying blue underglaze, wipe the surface back with a damp sponge. Color stays in the carved lines for an antique look.
Now you have a serene piece of sky art ready to brighten any corner of your home
Additive Dot-and-Coil Rhythm Clay Tile
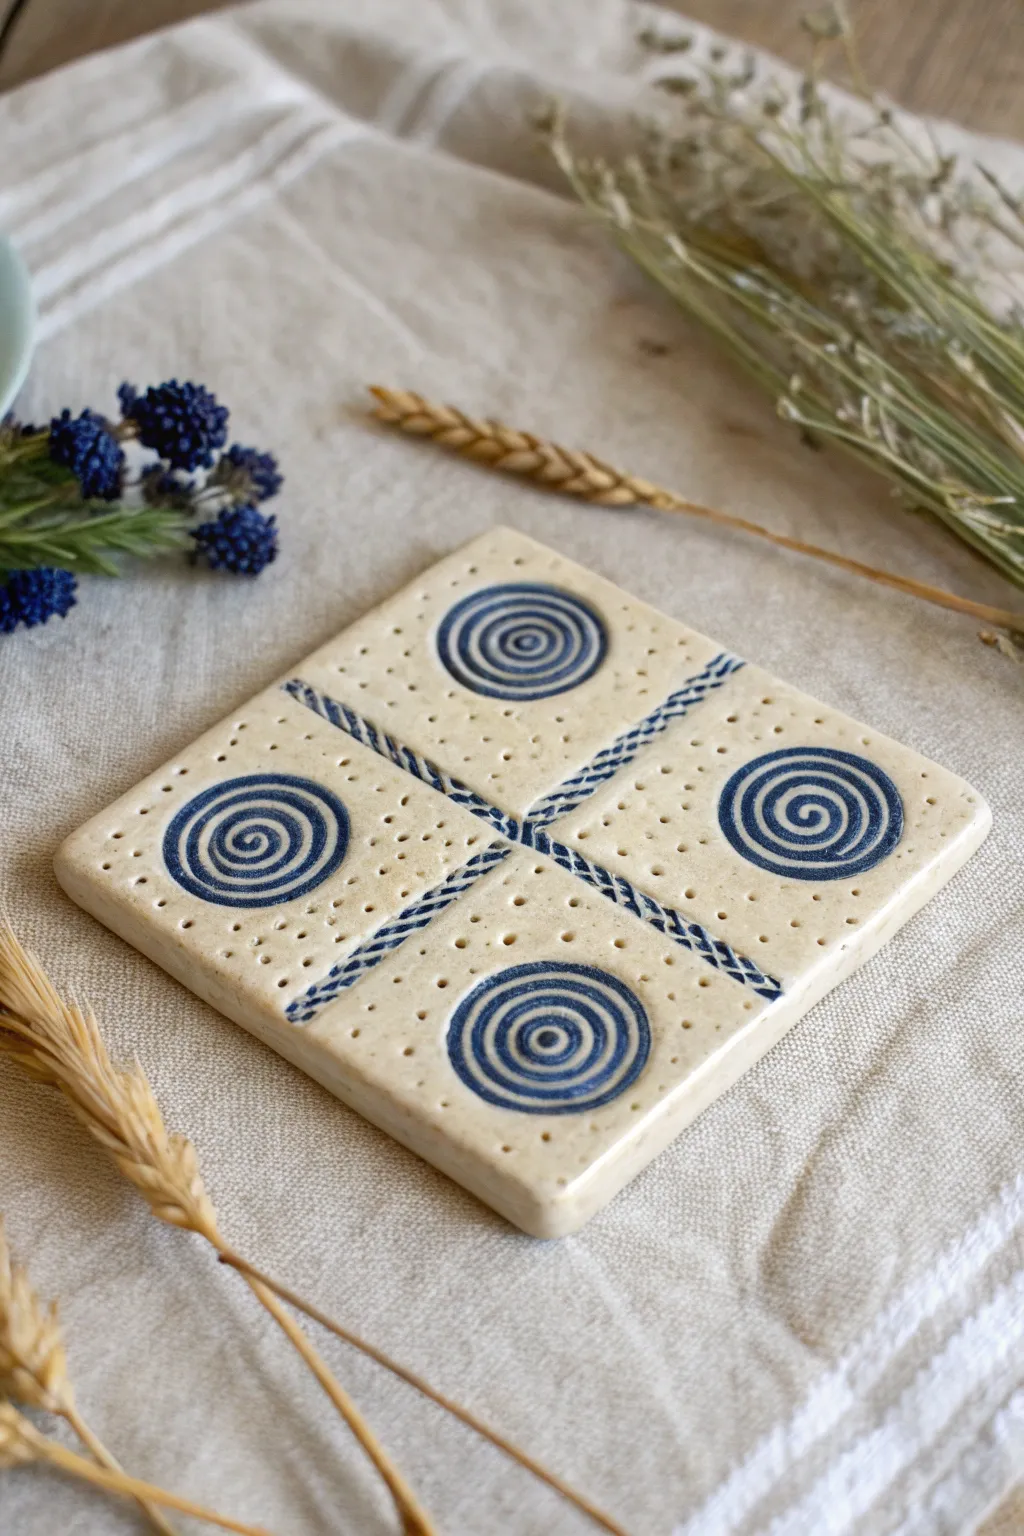
This charming ceramic tile combines rustic simplicity with precise geometric patterns, creating a tactile piece perfect for use as a trivet or coaster. The design features four hypnotic cobalt blue spirals set against a creamy, speckled background, divided by textured rope-like borders.
Step-by-Step Guide
Materials
- Light-colored stoneware clay or air-dry clay (creamy white)
- Rolling pin
- Two wooden guide strips (approx. 1/4 inch thick)
- Square template (cardboard or paper, 4×4 or 5×5 inches)
- Fettling knife or craft knife
- Carving tool or needle tool
- Small twist drill bit or dull pencil point (for stippling)
- Cobalt blue underglaze (or acrylic paint if using air-dry clay)
- Fine detail paintbrush (size 0 or 1)
- Clear matte or satin glaze/varnish
- Sponge
Step 1: Preparation and Shaping
-
Wedge the clay:
Begin by thoroughly wedging your ball of clay to remove any air bubbles and ensure an even consistency. This is crucial to prevent your tile from cracking or bending during drying. -
Roll the slab:
Place your wooden guide strips on either side of the clay ball on a canvas surface. Roll the clay out until the rolling pin rests flat on the guides, creating a perfectly uniform slab. -
Cut the square:
Lay your square template gently on top of the slab. Using your fettling knife held vertically, carefully cut around the template. Peel away the excess clay. -
Smooth the edges:
With a slightly damp sponge or your finger, gently soften the sharp cut edges of the square to give the tile a finished, comfortable feel. -
Mark the quadrants:
Lightly trace a large ‘X’ or cross onto the surface to divide the square into four equal quadrants. Don’t press too hard; these are just guidelines for your rope pattern.
Step 2: Creating the Texture
-
Carve the dividing ropes:
Over your guidelines, use a carving tool to incise two parallel lines about 1/4 inch apart for each arm of the cross. This defines the ‘rope’ borders. -
Add the rope detail:
Inside the parallel lines, use your needle tool or knife to make small, diagonal repeating hash marks. Angle them consistently to mimic the twisted texture of a rope. -
Position the spiral centers:
In the exact center of each of the four quadrants, press a small indentation to mark the starting point for your spirals. -
Carve the spirals:
Starting from the center indentation, carefully carve a continuous spiral outward. I find it easiest to rotate the tile itself rather than moving my hand too much. -
Stipple the background:
Using a small drill bit, blunt pencil, or dotting tool, press small holes randomly into the negative space around the spirals. Keep the dots away from the immediate edge of the spirals and rope borders.
Warping Woes?
Tiles love to warp. Dry very slowly by loosely covering with plastic. Flip the tile over once a day during drying so both sides lose moisture evenly.
Step 3: Finishing and Color
-
Initial drying:
Allow the clay to dry to a ‘leather hard’ state. This makes it firm enough to handle without warping but still receptive to underglaze. -
Clean up burrs:
Gently brush away any clay crumbs created by the stippling or carving. A soft, dry paintbrush works perfectly for this. -
Apply blue to details:
Dip your fine detail brush into the cobalt blue underglaze. Carefully paint inside the carved spiral grooves. Don’t worry if you get a little outside the lines; we can fix that later. -
Accent the rope:
Apply the same blue underglaze to the diagonal hash marks of your rope borders. Ensure the pigment gets deep into the crevices. -
Clean the surface:
Once the underglaze is touch-dry, take a slightly damp, clean sponge and wipe the surface of the tile. This removes excess blue from the high points, leaving color only deep in the carved recesses. -
Bisque fire or dry:
If using ceramic clay, fire the piece to bisque temperature. If using air-dry clay, allow the piece to dry completely for 24-48 hours. -
Glazing:
Apply a clear satin or matte glaze over the entire face of the tile. This seals the clay and deepens the contrast of the blue. -
Final steps:
Fire the piece again for the glaze (if ceramic) or apply a sealant (if air-dry). Glue felt pads to the bottom corners to protect your table surface.
Level Up: Cookie Cutter
Instead of carving spirals, press an unexpected object—like a vintage patterned button or a seashell—into the center of each quadrant for unique textures.
Enjoy the rhythmic process of making this piece and the beautiful geometric simplicity it adds to your home
Scalloped Edge Clay Tiles for a Soft, Vintage Look
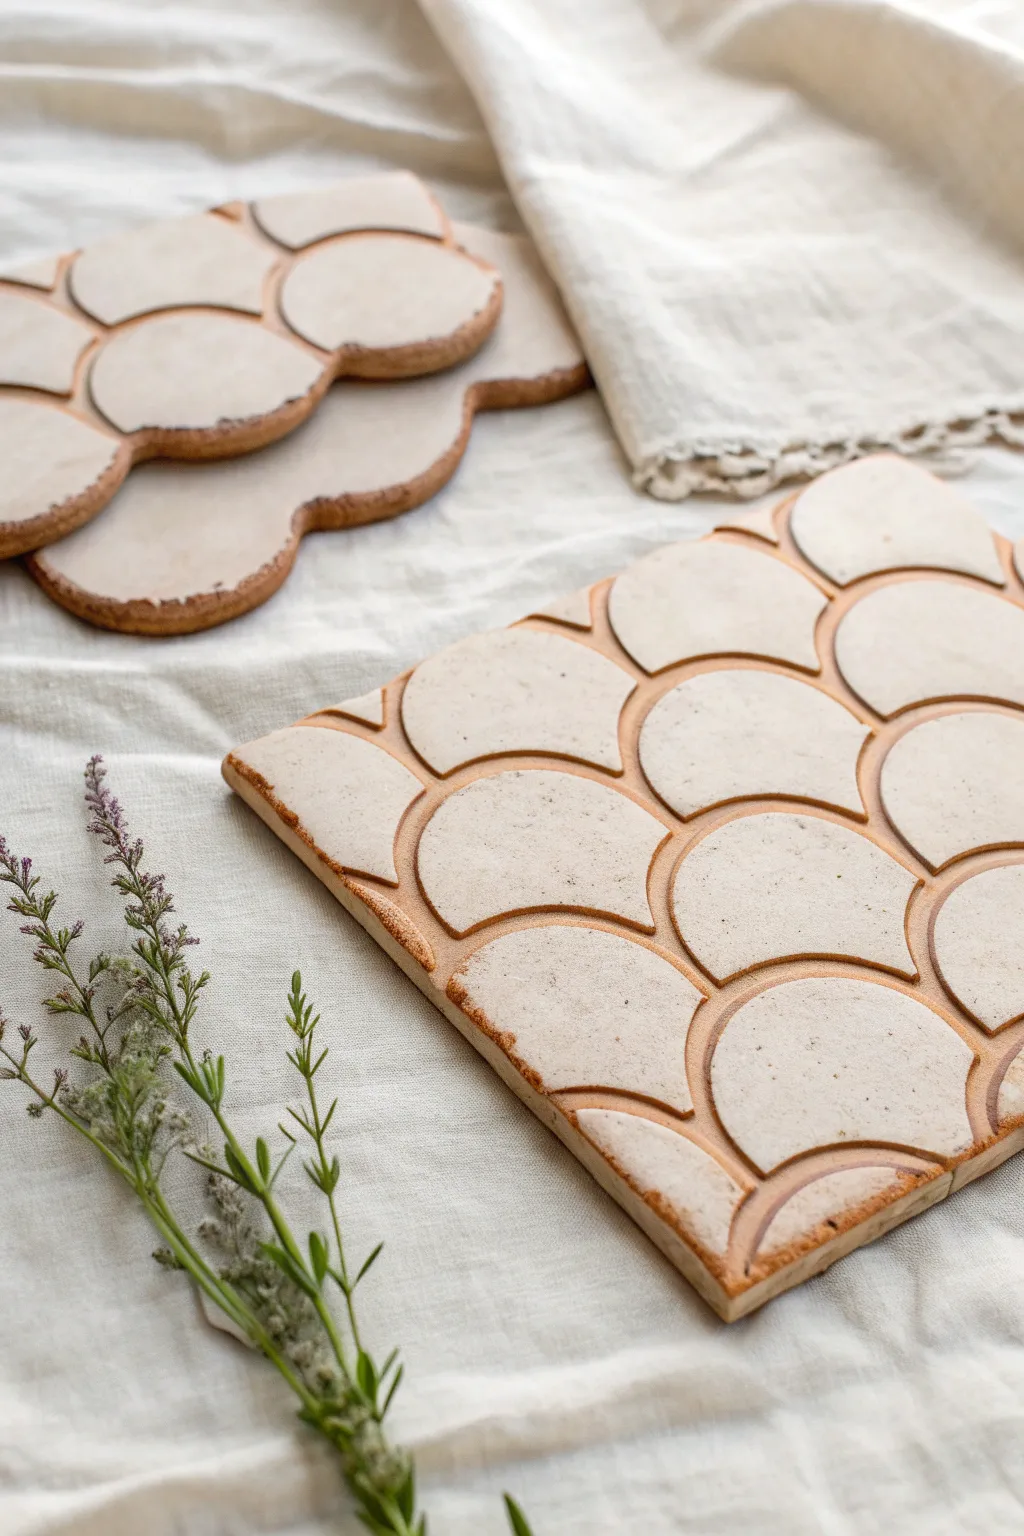
Create beautiful, vintage-inspired ceramic tiles featuring a classic fish scale pattern. This project results in lovely textured slabs that can be used as trivets, coasters, or decorative wall art, showcasing the natural warmth of unglazed clay.
How-To Guide
Materials
- Stoneware clay (smooth or fine grog)
- Rolling pin
- Canvas work surface or clay mat
- Two wooden guide strips (approx. 1/4 inch thick)
- Scallop-shaped cookie cutter (or round cutter)
- Round cookie cutter (same diameter as scallop width)
- Needle tool
- Rib tool (metal or rubber)
- Modeling tool with a curved edge
- Sponge
- Bowl of water
- Ruler
- Wire cutter for clay
Step 1: Preparing the Slab
-
Wedge the clay:
Start by thoroughly wedging your clay to remove any air bubbles and ensure an even consistency. This is crucial for preventing warping later on. -
Set up guides:
Place your canvas on a flat surface. Lay down your two wooden guide strips parallel to each other, spacing them slightly wider than your intended tile size. -
Roll out the slab:
Place the wedged clay between the guides. Using the rolling pin, roll the clay out until the pin rests on the wooden strips, ensuring a perfectly even thickness across the entire slab. -
Compress the surface:
Take your rib tool and firmly drag it across the surface of the clay in multiple directions. I find this compression step vital for aligning the clay particles and creating a smooth canvas for the pattern. -
Cut the tile shape:
Using a ruler and needle tool, cut the slab into your desired rectangular dimension. For a Coaster, 4×4 inches works well; for a trivet, aim for 6×8 inches.
Step 2: Creating the Scallop Pattern
-
Mark the first row:
Starting at the bottom edge of your slab, lightly press the round cookie cutter into the clay to create an arc. Do not cut all the way through; you just want to make an impression. -
Imprint the row:
Continue pressing these arcs side-by-side along the bottom edge. Ensure the tips of the arcs touch perfectly to start the scale pattern. -
Offset the second row:
For the next row up, position the cutter so the center of the arc aligns with the point where two arcs below meet. This offset placement creates the classic fish scale look. -
Continue the pattern:
Repeat this process, moving up the tile row by row, keeping the spacing consistent until the entire surface is covered in impressed arcs. -
Deepen the lines:
Go back over your impressed lines with a modeling tool to deepen the grooves slightly. This adds definition that will catch glaze or stain later.
Warping Woes?
If tiles curl while drying, flip them over daily and weigh down the corners with small bean bags or weights to keep them perfectly flat.
Step 3: Refining and Drying
-
Clean the edges:
Use a damp sponge to gently smooth the outer edges of the rectangular tile, removing any sharp burrs left from cutting. -
Smooth the surface:
Lightly wipe the surface with the damp sponge to soften any rough crumbs of clay displaced during the impressing process, being careful not to erase your pattern. -
Slow drying:
Place the tile on a piece of drywall or a wooden board. Cover it loosely with plastic sheeting to allow it to dry slowly and evenly, preventing the corners from curling up. -
Initial firing:
Once bone dry, bisque fire the tile in a kiln according to your specific clay body’s temperature requirements (usually Cone 06 or 04). -
Staining (Optional):
To achieve the aged look in the photo, brush a red iron oxide wash or a dark underglaze over the bisque tile, then wipe it back with a sponge so the color only remains in the recessed scalloped lines. -
Final wipe:
Clean the high points of the tile thoroughly to reveal the bare clay body, leaving that rich contrast in the grooves. -
Final firing:
Fire the tile a second time to the maturation temperature of your clay (e.g., Cone 5 or 6) to vitrify the piece and seal the stain.
Level Up: Cut-Out Edge
Instead of a rectangle, use the scallop cutter to actually cut through the clay on the borders, creating a shaped, organic edge like the background tile.
Now you have a stunning, tactile piece of ceramic art that brings an earthy elegance to your table setting
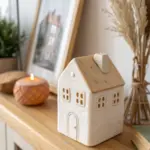
Framed Vignette Clay Tile (A Little Window Scene)
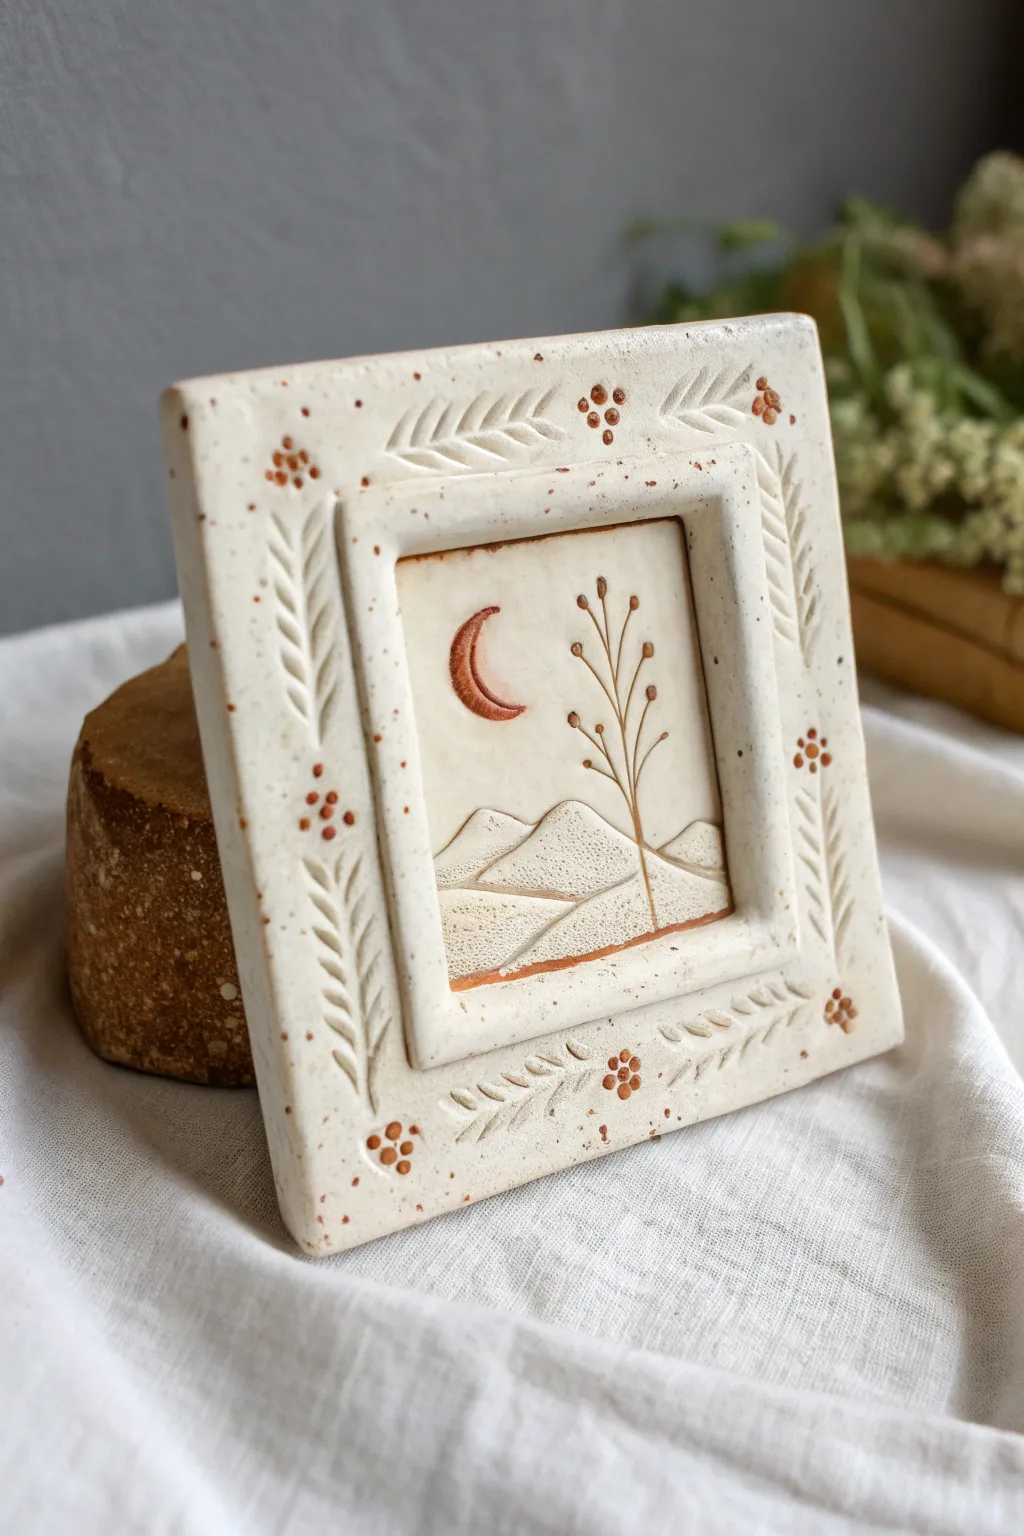
Create a serene little window into a desert night with this framed ceramic relief tile. This project combines slab building with delicate impress techniques to form a dimensional piece that feels like a treasured artifact.
Step-by-Step
Materials
- Speckled cream stoneware clay (mid-fire)
- Red iron oxide wash or terra sigillata (for details)
- Clear matte glaze
- Rolling pin
- Square tile cutter or ruler and knife
- Carving tools (needle tool, small loop tool)
- Small round paintbrush
- Sponge
- Canvas work surface
Step 1: Forming the Base
-
Roll the main slab:
Begin by rolling out your speckled clay on a canvas surface until it is approximately 1/4 inch thick. Aim for an even consistency to prevent warping later. -
Cut the square:
Using a ruler and a sharp knife (or a square cookie cutter if you have one large enough), cut out a perfect square. A 4×4 or 5×5 inch square works well for this level of detail. -
Create the frame border:
Roll a second, smaller slab of the same thickness. Cut four strips that are about 3/4 inch wide and the same length as your tile’s sides to create the raised frame. -
Attach the frame:
Score the outer edges of your base square and the backs of your four strips. Apply slip, press the strips firmly onto the edges, and smooth the seams slightly, though keeping a distinct ‘frame’ look is desired. -
Refine the edges:
Use a damp sponge to soften the sharp outer edges of the frame and the inner lip where the frame meets the central recess.
Clean Lines
When joining the frame pieces, cut the corners at a 45-degree angle (miter cut) rather than butt-joints. This makes the frame look much more professional and seamless.
Step 2: Sculpting the Scene
-
Carve the dunes:
In the recessed center, use a needle tool or small loop tool to gently carve curving lines representing sand dunes. Press slightly deeper on the bottom edge of each line to create a sense of overlapping hills. -
Texture the sand:
To differentiate the sand from the sky, gently press a piece of coarse sandpaper or a stiff bristle brush into the lower dune sections to add a grainy texture. -
Add the plant life:
Draw a simple, vertical stem rising from the dunes using a needle tool. Press small, teardrop-shaped indentations along the stem to represent leaves or buds. -
moon impression:
For the crescent moon, you can either carve the shape directly or press a small, C-shaped tool into the upper left sky area.
Make it a Trivet
Glue a square of cork or felt to the back of the finished fired tile. It instantly transforms the art piece into a functional coaster or trivet for hot dishes.
Step 3: Detailed Embellishment
-
Impress the frame foliage:
On the raised frame, use a carving tool or a dedicated leaf stamp to press fern-like patterns. Angle them towards the corners for a flowing design. -
Add berry accents:
Using the back of a small paintbrush or a dotting tool, press clusters of three or four small circles between the fern patterns on the frame and near the plant in the center. -
Slow drying:
Sandwich the tile between two pieces of drywall or place it under plastic to dry very slowly. This is crucial for tiles to prevent the corners from curling up. -
Bisque fire:
Once bone dry, bisque fire the tile to cone 04 (or according to your clay body’s instructions).
Step 4: Glazing and Finishing
-
Apply oxide wash:
Paint red iron oxide wash or terra sigillata into the moon, the plant stem, the frame berries, and the dune lines. Let it set for a moment. -
Wipe back:
Gently wipe the surface with a damp sponge. The color should remain trapped in the deep impressions (the moon, the lines) while clearing off the high points. -
Matte glaze application:
Dip or brush a thin layer of clear matte glaze over the entire piece. I find a matte finish enhances the rustic, stony feel better than a gloss. -
Final firing:
Glaze fire the piece to the maturity temperature of your clay (typically Cone 5 or 6 for stoneware).
Place your finished tile on a shelf or wall to bring a quiet, earthy calmness to your space
Whimsical Animal Relief Clay Tile (Owl, Fox, or Cat)
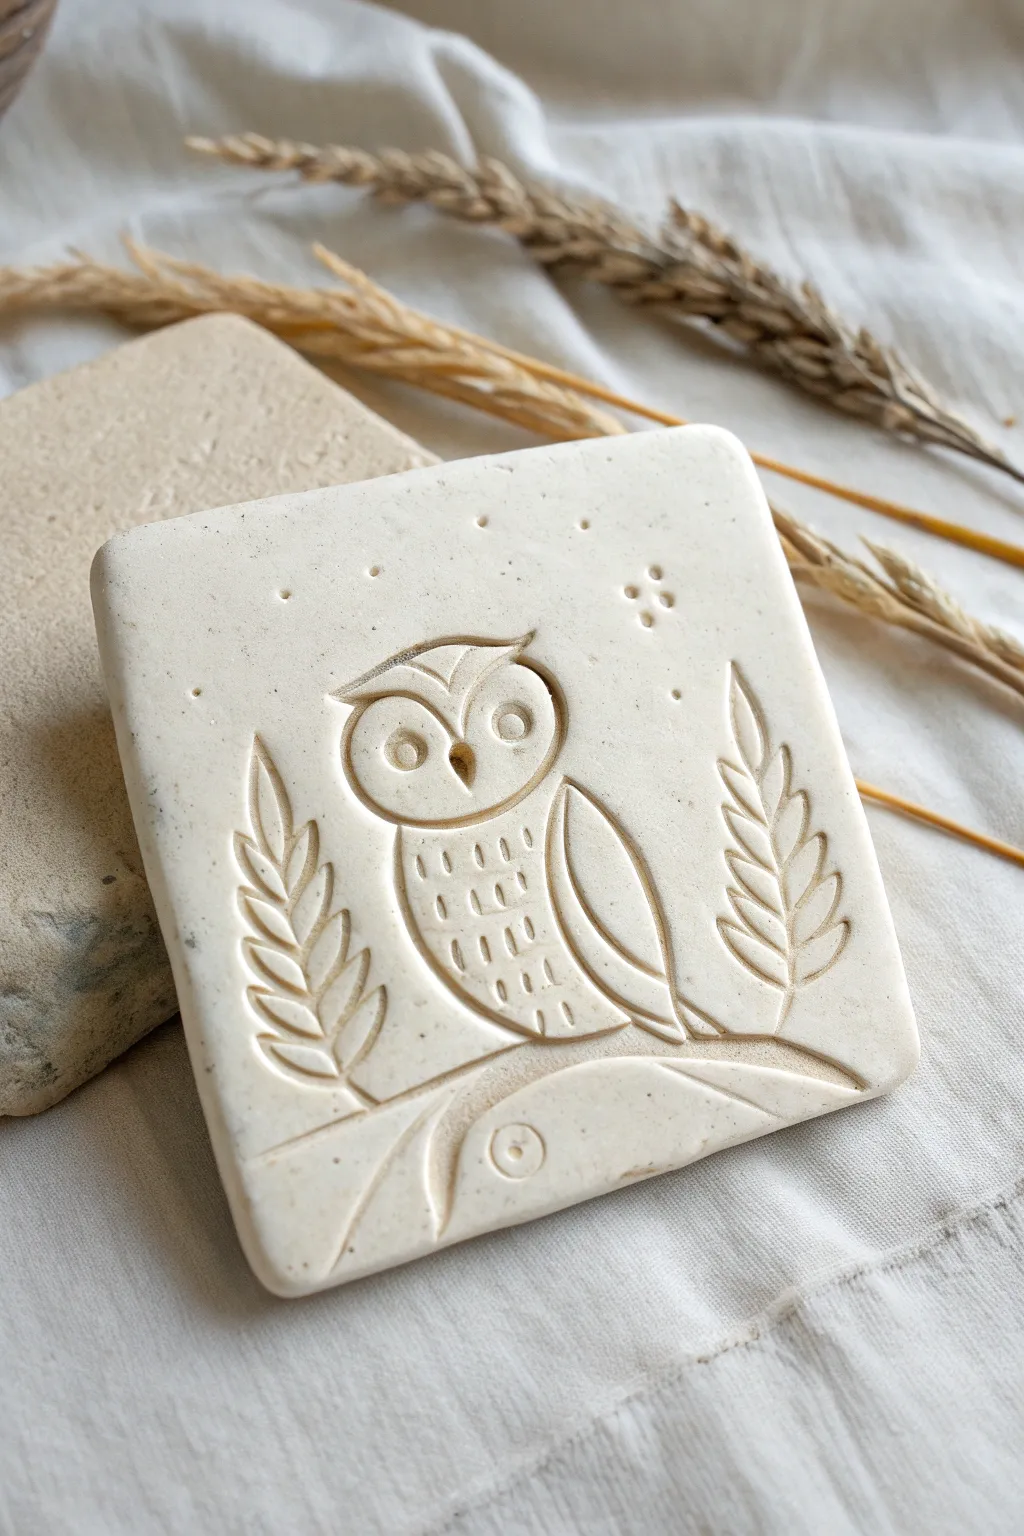
Capture the charm of woodland creatures with this elegant owl relief tile, featuring clean lines and stylized wheat stalks. The result is a smooth, minimalist piece of ceramic art perfect for use as a coaster or decorative accent.
Step-by-Step Tutorial
Materials
- White polymer clay or low-fire white earthenware clay
- Rolling pin
- Two wooden guide strips (approx. 1/4 inch thick) or playing cards
- Square cookie cutter (approx. 4×4 inches) or a knife and ruler
- Needle tool or sharp pencil
- Small loop carving tool or linoleum cutter
- Rubber-tipped clay shapers (optional but helpful)
- Small circular drinking straw or hole punch tool
- Piece of canvas or heavy fabric (to roll on)
- Fine-grit sandpaper (for finishing)
Step 1: Preparation and Shaping
-
Prepare the workspace:
Lay down your canvas or heavy fabric on a flat work surface. This prevents the clay from sticking and adds a nice, subtle texture to the back of your tile. -
Condition the clay:
Take a handful of white clay and knead it thoroughly until it is warm and pliable. If using polymer clay, ensure there are no air bubbles trapped inside. -
Roll the slab:
Place your guide strips on either side of the clay ball. Roll the clay out into a smooth, even slab. The guides ensure your tile has a uniform thickness, crucial for preventing warping. -
Cut the square:
Using your square cookie cutter or a ruler and knife, cut out a clean square shape. If cutting by hand, double-check your corners are at 90-degree angles. -
Smooth the edges:
Dip your finger in a little water (for earthenware) or baby oil (for polymer) and gently run it along the cut edges to soften them and remove any sharp burrs.
Step 2: Designing the Relief
-
Mark the horizon line:
Lightly sketch a curved line near the bottom third of the tile using your needle tool. This will be the hilltop or branch the owl perches on. -
Outline the owl body:
In the center, lightly sketch an oval shape for the owl’s body, slightly overlapping your horizon line so the owl appears grounded. -
Add the head details:
Sketch a wider oval on top for the head, adding two small points for ears. Draw two large circles for the eyes and a small triangle for the beak. -
Draft the wheat stalks:
On the left and right sides of the owl, draw vertical curved lines for the wheat stems. Add small, leaf-like loops ascending up the stems to represent the grain kernels.
Clean Lines Secret
To get those crisp, shadow-catching grooves, keep your loop tool clean. Wipe clay buildup off the blade after every few strokes to prevent dragging.
Step 3: Carving and detailing
-
Carve the main outlines:
Using your small loop tool or linoleum cutter, carefully carve out the lines you just sketched. Press deep enough to create a shadow but not so deep that you weaken the tile. -
Sculpt the eyes:
Press a small circular tool or the back of a paintbrush into the center of the eye circles to create the pupils. Carve a ring around them to define the eye sockets. -
Add feather texture:
On the owl’s chest, use the needle tool to press short, vertical dashes in rows. Stagger the rows slightly to mimic the pattern of breast feathers. -
Detail the wing:
Carve a curved line separating the wing from the body, simpler and bolder than the feather texture. -
Refine the wheat:
Go back to your wheat stalks and deepen the center line of each kernel leaf. This ‘V’ groove creates a beautiful visual rhythm. -
Add atmospheric texture:
Using the tip of your needle tool, poke random small dots in the ‘sky’ area above the owl to suggest stars or snow. Group four thicker dots together on the right side for a stylized sparkle. -
Create the maker’s mark:
At the very bottom center of the hill, press a small circle (using a straw or tool) to add the decorative circular element seen in the original design.
Warping Woes?
If your tile curls up while drying, flip it over periodically. Drying it slowly between two pieces of drywall or wood helps keep it perfectly flat.
Step 4: Finishing
-
Clean up debris:
Use a soft, dry brush to sweep away any little crumbs of clay created during the carving process. -
Initial smoothing:
I like to take a rubber-tipped shaper and gently run it through the carved grooves to smooth out any rough tracks left by the loop tool. -
Drying or Baking:
If using earthenware, let the tile dry slowly under loose plastic for a few days before firing. If using polymer clay, bake according to the package instructions on a ceramic tile. -
Sand and buff:
Once fully cured or fired, use fine-grit sandpaper to buff the surface and edges one last time for a stone-smooth finish.
Now you have a charming woodland tile ready to be displayed on a shelf or used as a unique coaster
Triptych Clay Tile Panel (One Design Across Three Tiles)
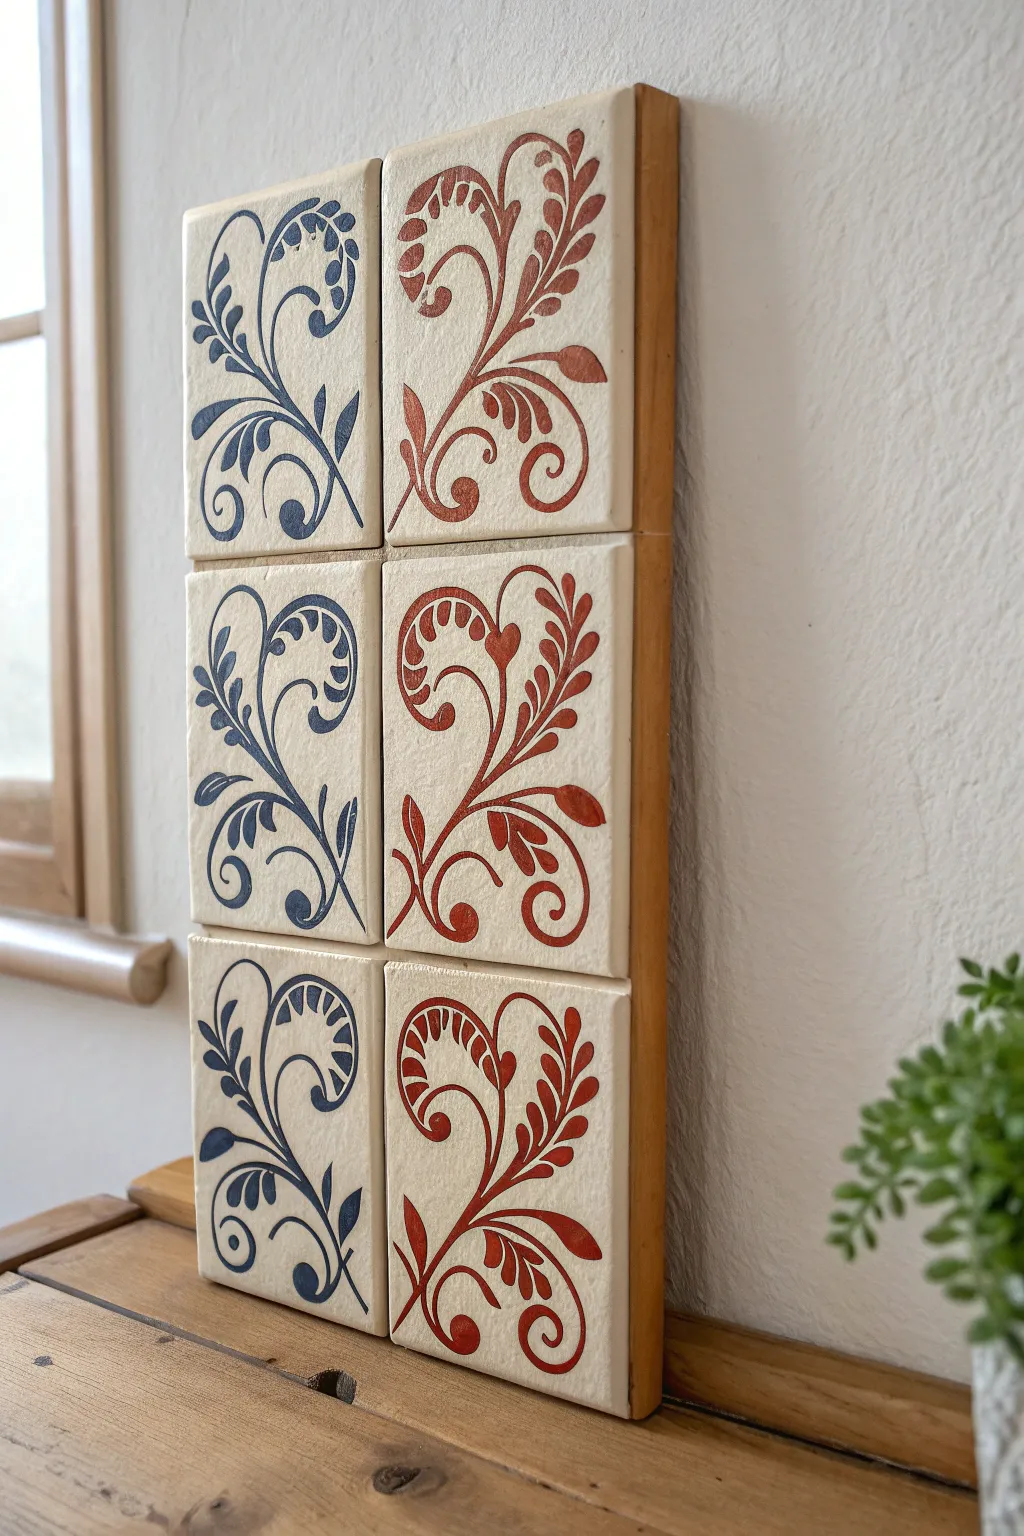
This elegant wall hanging features a repeating floral motif stamped or carved into clay tiles, creating a stunning visual rhythm in contrasting indigo and rust tones. The project combines the tactile beauty of relief ceramics with the clean presentation of mounted gallery art, perfect for adding a touch of rustic charm to any room.
How-To Guide
Materials
- Air-dry clay or polymer clay (white or cream)
- Square cookie cutter (approx. 4 inches)
- Small rolling pin
- Carving tool set (loop tool and needle tool)
- Acrylic paints (Indigo Blue and Burnt Sienna/Rust)
- Small flat paintbrush
- Fine-grit sandpaper
- Wooden backing board (sized to fit six tiles with minimal spacing)
- Strong craft glue or construction adhesive
- Clear matte varnish or sealant
- Ruler
- Pencil and tracing paper
Step 1: Shaping the Clay Base
-
Roll out the slab:
Begin by conditioning your clay and rolling it out on a smooth, flat surface to an even thickness of about 1/4 inch. Using guide sticks on either side of your roller can ensure the surface is perfectly level. -
Cut the tiles:
Use your square cookie cutter to stamp out six identical tiles. If you don’t have a cutter, measure carefully with a ruler and cut sharp, clean lines with a craft knife. -
Smooth the edges:
Dip your finger in a little water (for air-dry clay) or baby oil (for polymer) and gently run it along the cut edges to soften any sharpness or burrs.
Uneven Clay Surface?
If your tiles warp while drying, try placing a heavy book on top of them (with wax paper in between) during the final stages of drying to keep them perfectly flat.
Step 2: Creating the Design
-
Draft the motif:
Sketch a scrolling vine design on a piece of paper cut to the same size as your tiles. The design should feature a main stem curling upwards with teardrop-shaped leaves branching off. -
Transfer the pattern:
Place your tracing paper sketch over the first damp tile. Gently re-trace your lines with a dull pencil or stylus to leave a light impression on the clay surface. -
Carve the relief:
Using a small loop tool, carefully carve out the negative space within your leaves and along the stems. You want to create a recessed area where the paint will later sit, leaving the background higher. -
Refine the details:
Use a needle tool to sharpen the points of the leaves and ensure the curves of the vines are smooth and flowing. Repeat this carving process for all six tiles. -
Allow to dry:
Let the tiles dry completely according to your clay package instructions. For air-dry clay, I usually carefully flip them over halfway through the drying time to prevent warping.
Antique Effect
For a vintage look, apply a diluted brown wash over the entire tile, then wipe it back. The dark pigment will settle in the texture, making the design pop.
Step 3: Painting and Finishing
-
Sand imperfections:
Once bone dry (or baked, if using polymer), lightly sand the surface edges and the flat background areas with fine-grit sandpaper to remove any rough texture. -
Apply the first color:
Take three of the tiles and paint the recessed carved design with your Indigo Blue acrylic paint. Use a flat brush to lay the color into the depressions. -
Clean up the surface:
If paint gets on the raised background surface, quickly wipe it away with a damp cloth or lightly sand it off after it dries for a crisp, inlaid look. -
Apply the second color:
Repeat the painting process with the remaining three tiles, this time using the Burnt Sienna or Rust color to create a warm contrast. -
Seal the tiles:
Apply a coat of clear matte varnish to all six tiles. This protects the paint and gives the unpainted clay background a finished, professional sheen.
Step 4: Mounting the Panel
-
Prepare the backing board:
Ensure your wooden board is clean and dry. It should be large enough to hold the tiles in a 2×3 grid with a very small gap between them. -
Arrange the layout:
Lay out the tiles on the board to check spacing. Place the three blue tiles in a vertical column on the left and the three red tiles in a column on the right. -
Glue in place:
Apply a strong construction adhesive or heavy-duty craft glue to the back of each tile. Press them firmly onto the wood backing. -
Final cure:
Let the adhesive cure fully with the panel laying flat horizontally to prevent any sliding before hanging it up.
Hang your new ceramic masterpiece near a window where the natural light can highlight the delicate relief carving
Abstract Patchwork Clay Tile Grid Wall Art
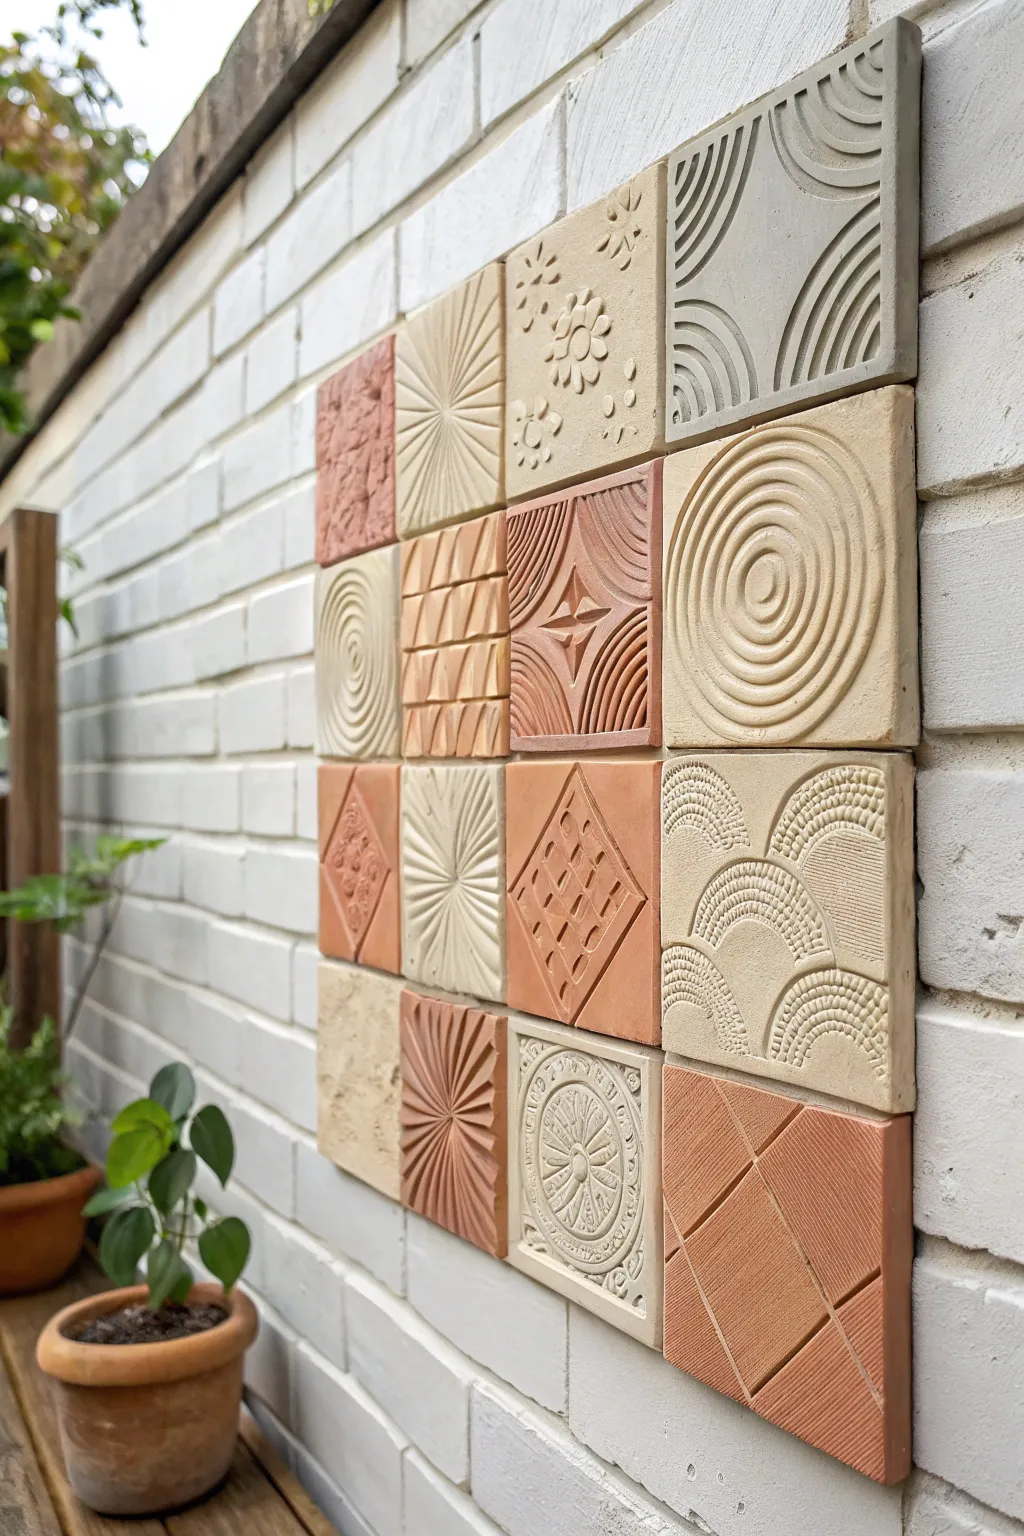
Bring warmth and tactile beauty to a bare garden wall or interior space with this striking grid of handmade relief tiles. By combining earthy terracotta and stoneware clays with varying geometric textures, you’ll create a modern patchwork that plays beautifully with light and shadow.
Step-by-Step Guide
Materials
- Earthenware clay (terracotta)
- Stoneware clay (cream or buff)
- Rolling pin
- Two wooden guide slats (approx. 1/2 inch thick)
- Square tile cutter or ruler and knife
- Carving tools (loop tools, needle tool)
- Stamps/found objects for texture (optional)
- Pottery kiln (access to one is required)
- Construction adhesive (suitable for exterior use)
- Sanded grout (optional, if spacing allows)
- Clean sponge
- Canvas mat
Step 1: Preparing the Clay Slabs
-
Wedge the clay:
Begin by thoroughly wedging your clay bodies to remove air bubbles. Since this design uses multiple colors, prepare separate batches of terracotta and buff stoneware clay. -
Set up your guides:
Place your canvas mat on a sturdy work surface. Lay your two wooden guide slats parallel to each other, slightly wider than the width of your clay block. -
Roll the slabs:
Roll the clay out between the slats. The guides ensure every tile has a uniform thickness, which is crucial for even drying and mounting later. -
Smooth the surface:
Before cutting, run a rubber rib or a damp sponge lightly over the surface of the clay slab to compress the particles and create a pristine canvas for your designs. -
Cut the squares:
Using a square cutter or a ruler and needle tool, cut out 16 squares. I recommend cutting a few extras in case of cracking during the firing process. Aim for tiles around 4-6 inches square.
Warping Woes?
If tiles curl while drying, flip them over daily and weight down the corners with small sandbags or extra clay chunks to keep them flat.
Step 2: creating the Textures
-
Plan your grid:
Arrange your cut squares on a board to visualize the final composition. Alternate the clay colors in a checkerboard or random pattern to balance the warm reds and cool creams. -
Carve the concentric circles:
For the spiral designs, use a loop tool to carve deep grooves. Start from the center and carefully work your way outward, maintaining consistent spacing between the ridges. -
Create radial bursts:
Use a needle tool or knife to incise lines radiating from a central point for the starburst patterns. Vary the depth of the lines to catch glaze or light differently. -
Impress textures:
For tiles with floral or repeated motifs, press stamps or found objects into the soft clay. Ensure you support the tile edges so they don’t distort under pressure. -
Carve geometric hatching:
Use a straight edge to guide your carving tool for the hatch marks and diamond patterns. Clean lines provide a nice contrast to the organic spirals. -
Smooth the edges:
Once textured, gently run a finger or sponge along the cut edges of each tile to soften any sharp burrs created during carving.
Step 3: Drying and Firing
-
Dry slowly:
Place the finished greenware tiles on a drywall board or wire rack. Cover loosely with plastic for the first day to ensure slow, even drying, which prevents warping. -
Uncover and finish drying:
Remove the plastic and let the tiles dry until they are bone dry and no longer cool to the touch. This may take several days depending on humidity. -
Bisque fire:
Load the tiles into the kiln for a bisque firing. If you want the raw clay look shown in the example, you can fire them once to maturity without glaze. -
Glaze (optional):
If you prefer a sealed surface, apply a clear matte glaze and fire a second time. However, leaving the clay raw highlights the natural texture best.
Level Up: Oxide Wash
Apply an iron oxide wash and wipe it back before firing. The dark oxide will settle into the carved crevices, emphasizing the texture depth.
Step 4: Installation
-
Prepare the wall:
Ensure the brick or wall surface is clean, dry, and free of dust. Use a wire brush if necessary to remove loose debris. -
Apply adhesive:
Apply a strong construction adhesive to the back of each tile. A zigzag pattern usually provides the best coverage and grip. -
Mount the tiles:
Starting from a bottom corner, press the tiles firmly onto the wall. Use tile spacers if you want precise gaps, or butt them close together for a tight mosaic look. -
Let it cure:
Allow the adhesive to cure fully according to the manufacturer’s instructions before exposing the artwork to heavy rain or elements.
Step back and admire how the shifting sunlight throughout the day transforms your textured grid into a living piece of art