If you’re craving that soft, dreamy aesthetic clay vibe, these ideas are the kind of projects I love making on a slow afternoon in the studio. Think sweet shapes, cozy colors, and pieces that look adorable on your desk, vanity, or shelf.
Pastel Trinket Dish With Wavy Edges
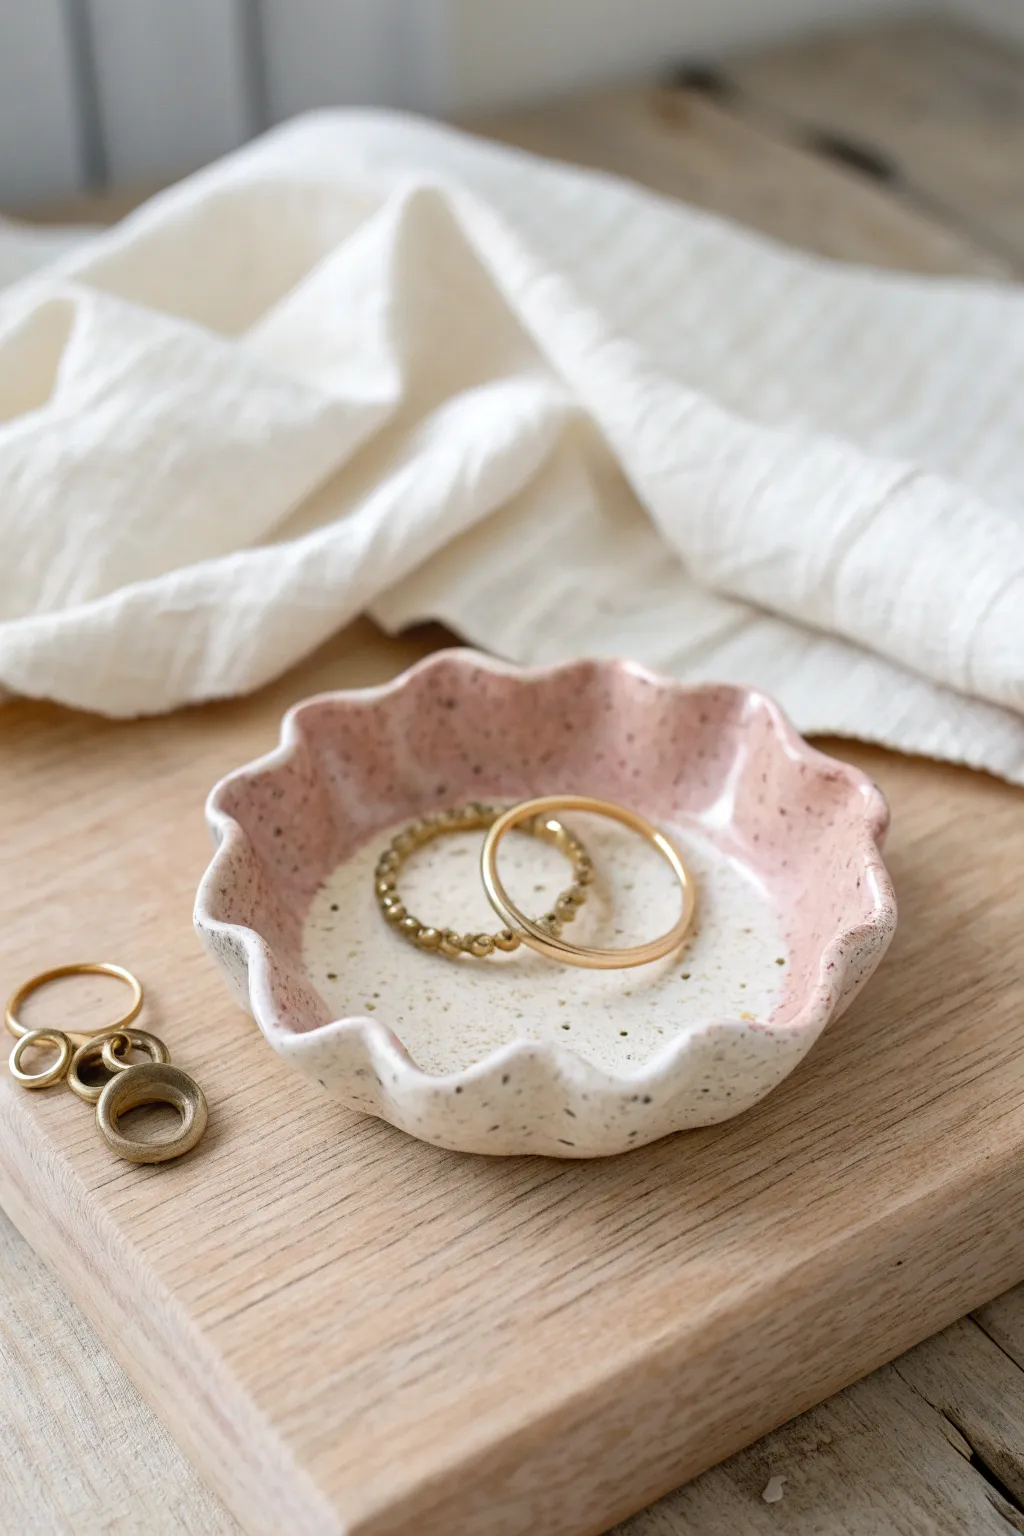
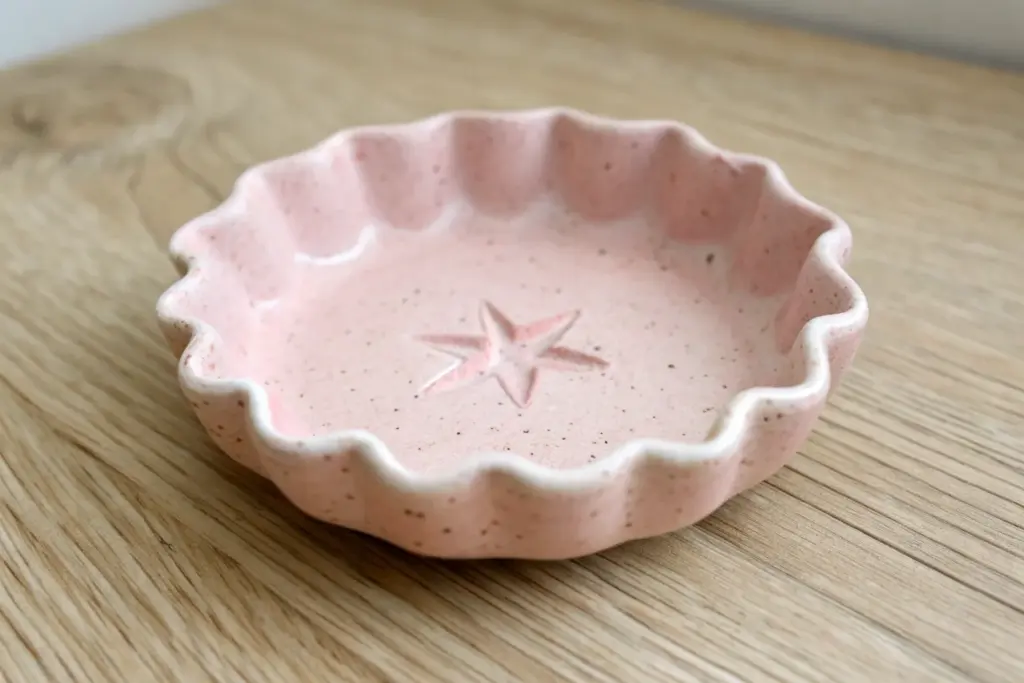
This charming little catch-all features a playful, wavy rim and a delicate speckled finish that gives it an organic, handmade feel. The soft contrast between the glossy pastel pink interior and the natural creamy white speckles makes it the perfect resting spot for your favorite daily jewelry.
Step-by-Step Guide
Materials
- Speckled whitish-buff stoneware clay (or white clay with speckles added)
- Pastel pink glossy glaze suitable for your clay’s firing range
- Clear or transparent glossy glaze (optional)
- Rolling pin
- Canvas mat or slab roller
- Needle tool or fettling knife
- Round template (a small bowl or lid about 5-6 inches wide)
- Sponge
- Soft rib tool (rubber or silicone)
- Small paintbrush (for glazing)
- Kiln (or access to a firing service)
Step 1: Forming the Base
-
Prepare the Clay:
Begin by wedging a baseball-sized ball of speckled clay to remove any air bubbles. If you don’t have pre-speckled clay, you can knead in some granular ilmenite or manganese, though buying a pre-mixed body is much easier. -
Roll the Slab:
Roll the clay out into an even slab about 1/4 inch thick. I like to flip the clay over and rotate it every few passes with the rolling pin to ensure it doesn’t stick to the canvas. -
Smooth the Surface:
Before cutting, take a soft rubber rib and gently compress the surface of the slab. This aligns the clay particles to prevent cracking and creates that lovely smooth finish you see in the photo. -
Cut the Circle:
Place your round template onto the slab. Using your needle tool, trace around the template to cut out a perfect circle. Remove the excess clay. -
Soften the Rim:
Use a barely damp sponge to gently run around the cut edge of the circle. This rounds off the sharp 90-degree angle left by the blade, giving the final piece a softer, more professional look.
Fixing Flat Waves
If your waves flop down while drying, prop them up with small crumpled balls of paper towel or plastic wrap underneath the taller curves until the clay is leather hard.
Step 2: Shaping the Waves
-
Lift the Edges:
Place the clay circle on a piece of foam or directly in the palm of your hand. Gently curl up the edges to form a shallow bowl shape. Don’t worry about being perfect yet; just establish the curve. -
Create the Scallops:
Using your thumb and forefinger, pinch the rim at regular intervals to create the wavy pattern. Push out gently from the inside with one finger while supporting the outside with two fingers to form each curve. -
Refine the Undulations:
Go around the rim a second time to deepen the waves. The goal is an organic, ruffled look, so vary the height slightly if you want a more natural feel. -
Allow to Dry (Bisque):
Let the dish dry slowly to the bone-dry stage. Once completely dry, fire it in the kiln for a bisque firing (usually to cone 04 or 06, depending on your clay).
Gold Rim Magic
For extra elegance, apply a thin line of gold luster to the very edge of the rim after the final firing. This requires a third, low-temperature firing and adds a luxurious touch.
Step 3: Glazing and Finishing
-
Clean the Bisqueware:
Wipe the fired piece with a damp sponge to remove any dust that might prevent the glaze from adhering properly. -
Apply Pink Glaze:
Using a soft brush, apply your pastel pink glaze to the interior walls of the dish. Start from the inner bottom edge and work your way up to the rim. Be careful to follow the wavy contours. -
Create the Gradient Look:
For the look in the photo, leave the very bottom center unglazed or apply a thinner wash of clear glaze so the speckles show through clearly against the white clay. Ensure the pink glaze covers the top rim for that defined color break. -
Check the Exterior:
Decide if you want to glaze the outside. The photo shows a natural, unglazed exterior which highlights the raw clay texture. Simply wipe away any pink drips that may have run down the outside. -
Final Firing:
Place the dish in the kiln for the final glaze firing according to your clay and glaze instructions (typically cone 5 or 6 for stoneware). -
Sand the Bottom:
Once cool and out of the kiln, check the bottom of the dish. If it feels rough, lightly sand it with wet-dry sandpaper or a grinding stone to ensure it won’t scratch your furniture.
Place your rings in the center and enjoy the gentle ripple of color on your dresser


Flower-Petal Ring Dish in Soft Neutrals
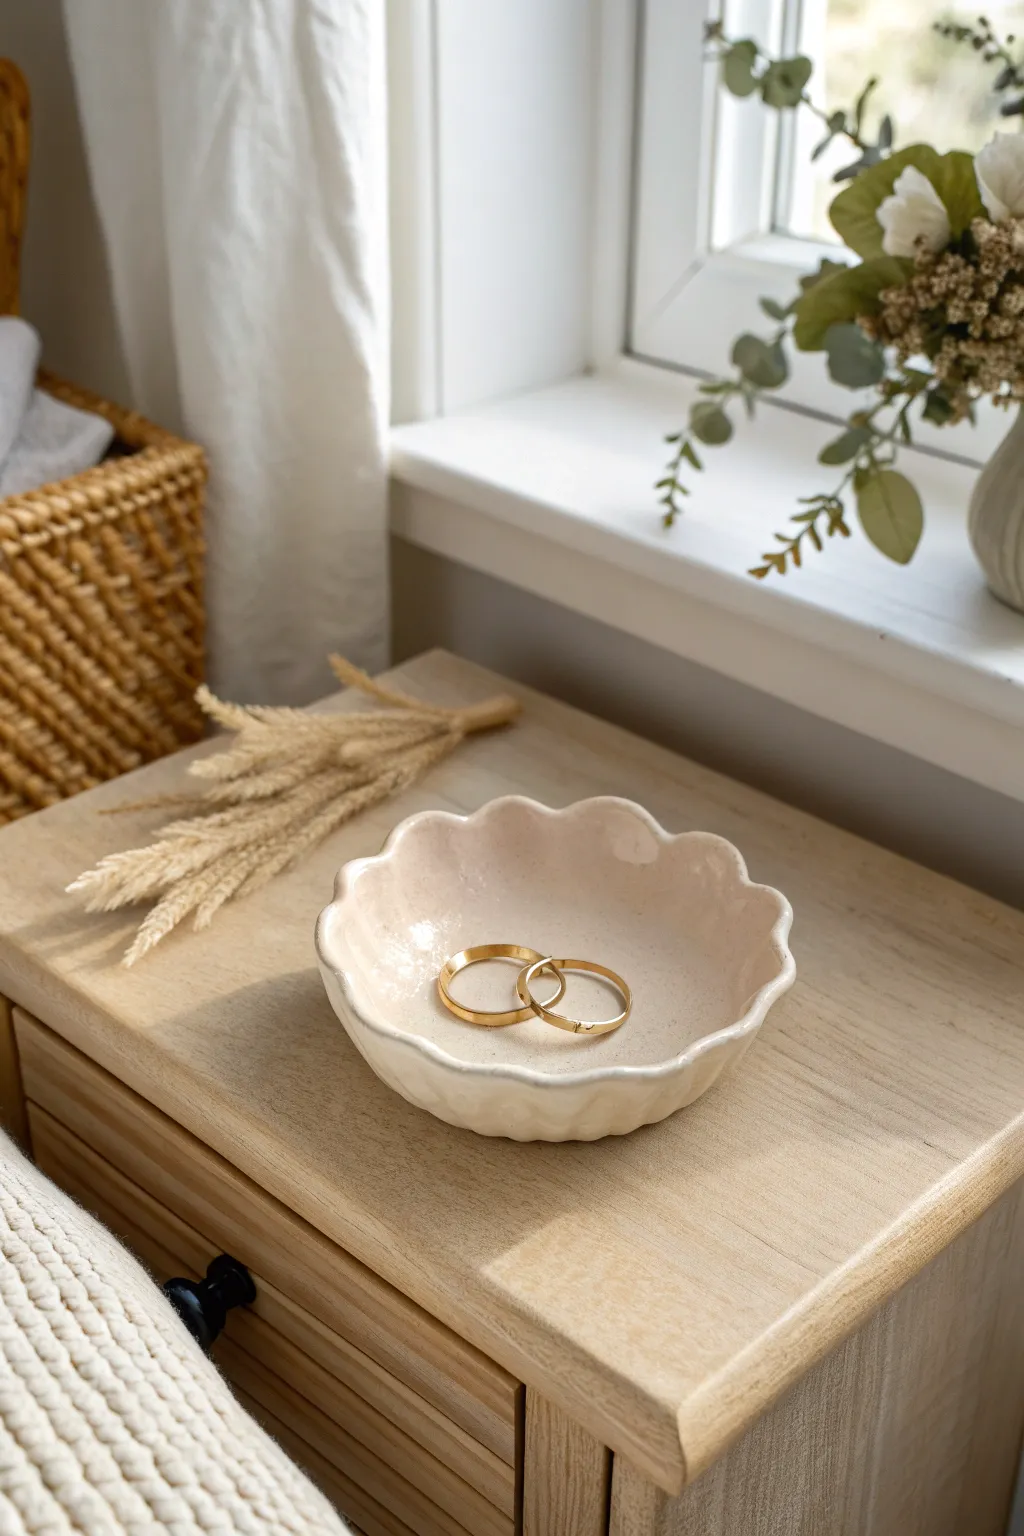
Capture the elegance of soft, organic forms with this ruffled-edge jewelry dish. Its gentle curves and milky-white gloss finish make it the perfect minimalist catch-all for your favorite gold rings.
Step-by-Step
Materials
- White air-dry clay or polymer clay
- Rolling pin or acrylic roller
- Small bowl or sphere (for molding the curve)
- Round cookie cutter or drinking glass (approx. 4-inch diameter)
- Modeling tool or skewer handle
- Sponge and water
- Fine-grit sandpaper
- Milky pearl or white acrylic paint
- High-gloss varnish or UV resin
- Paintbrushes (soft bristle)
Step 1: Shaping the Clay
-
Condition the clay:
Begin by taking a ball of white clay about the size of a lemon. Knead it thoroughly in your hands until it feels warm, pliable, and free of cracks. If you are using air-dry clay, keep your hands slightly damp to prevent drying out too quickly. -
Roll out a slab:
Place the clay on a smooth surface or silicone mat. Using your rolling pin, flatten the clay into an even slab that is roughly 1/4 inch thick. Try to keep the pressure consistent so the bottom of your dish is level. -
Cut the circle:
Press a round cookie cutter or the rim of a drinking glass firmly into the clay to cut out your base circle. This ensures a perfect starting shape. -
Clean the edges:
Remove the excess clay from around your circle. Dip your finger in a little water and gently run it along the cut edge to smooth out any sharpness or roughness left by the cutter. -
Create the petals:
This is where the magic happens. Using the handle of a paintbrush or a rounded modeling tool, gently press indentations into the edge of the circle at regular intervals. Aim for 6 to 8 indentations total to mimic a flower shape. -
Pinch and form:
Between each indentation, use your thumb and forefinger to gently pinch and lift the clay upwards. This creates the soft, wavy ‘petal’ peaks visible in the reference image. Don’t make them too sharp; keep the curves organic. -
Establish the curve:
To give the dish its bowl shape, gently press the center of the clay downwards into your palm. Alternatively, you can drape the clay over a small overturned bowl or sphere to let gravity help form the curve. -
Final smoothing:
Before setting it aside, do one last check for fingerprints. A slightly damp sponge works wonders here to erase texture marks and ensure the surface is perfectly sleek.
Step 2: Setting and Refining
-
Drying process:
Place your formed dish on a piece of parchment paper to dry. If you want a deeper bowl shape, let it dry inside a small bowl. Allow air-dry clay to cure for 24-48 hours until completely hard and white. -
Sanding imperfections:
Once fully dry, inspect the rim. Take a piece of fine-grit sandpaper and very gently buff away any rough spots on the petal edges or the underside of the dish. Wipe away the dust with a dry cloth.
Pro Tip: Gravity Assist
To get identical curvature on multiple dishes, dry them inside small condiment bowls lined with plastic wrap. This supports the ‘petals’ so they don’t flop down while wet.
Step 3: Finishing Touches
-
Base coat:
Load a soft brush with milky white or pearlescent acrylic paint. Apply a thin, even coat to the entire top surface of the dish. I like to brush in the direction of the petals to enhance the flow. -
Paint the underside:
Once the top is dry to the touch, flip the dish over and paint the bottom and sides. Ensure you get good coverage inside the crevices of the petal waves. -
Add a second coat:
For a truly opaque, creamy look like the photo, a second coat of paint is usually necessary. Let this layer dry completely before moving to the glaze. -
Apply the glaze:
To achieve that ceramic-like shine, apply a thick layer of high-gloss varnish. If you have UV resin and a UV lamp, this will give you the hardest, glass-like finish, but a standard glossy craft varnish works beautifully too. -
Pop bubbles:
Inspect the wet glaze immediately. If you see tiny air bubbles, blow gently on them or pop them with a pin to ensure the final surface is mirror-smooth. -
Final cure:
Let the varnish dry undisturbed overnight in a dust-free area. Once fully cured, your dish is ready to hold your jewelry.
Troubleshooting: Cracking?
If you see tiny hairline cracks appearing as the clay dries, mix a small amount of fresh clay with water to make a paste (slip) and fill the cracks, then smooth over.
Place this lovely handmade piece on your nightstand to add a touch of handcrafted warmth to your daily routine


Minimal Clay Coasters With Tiny Daisies
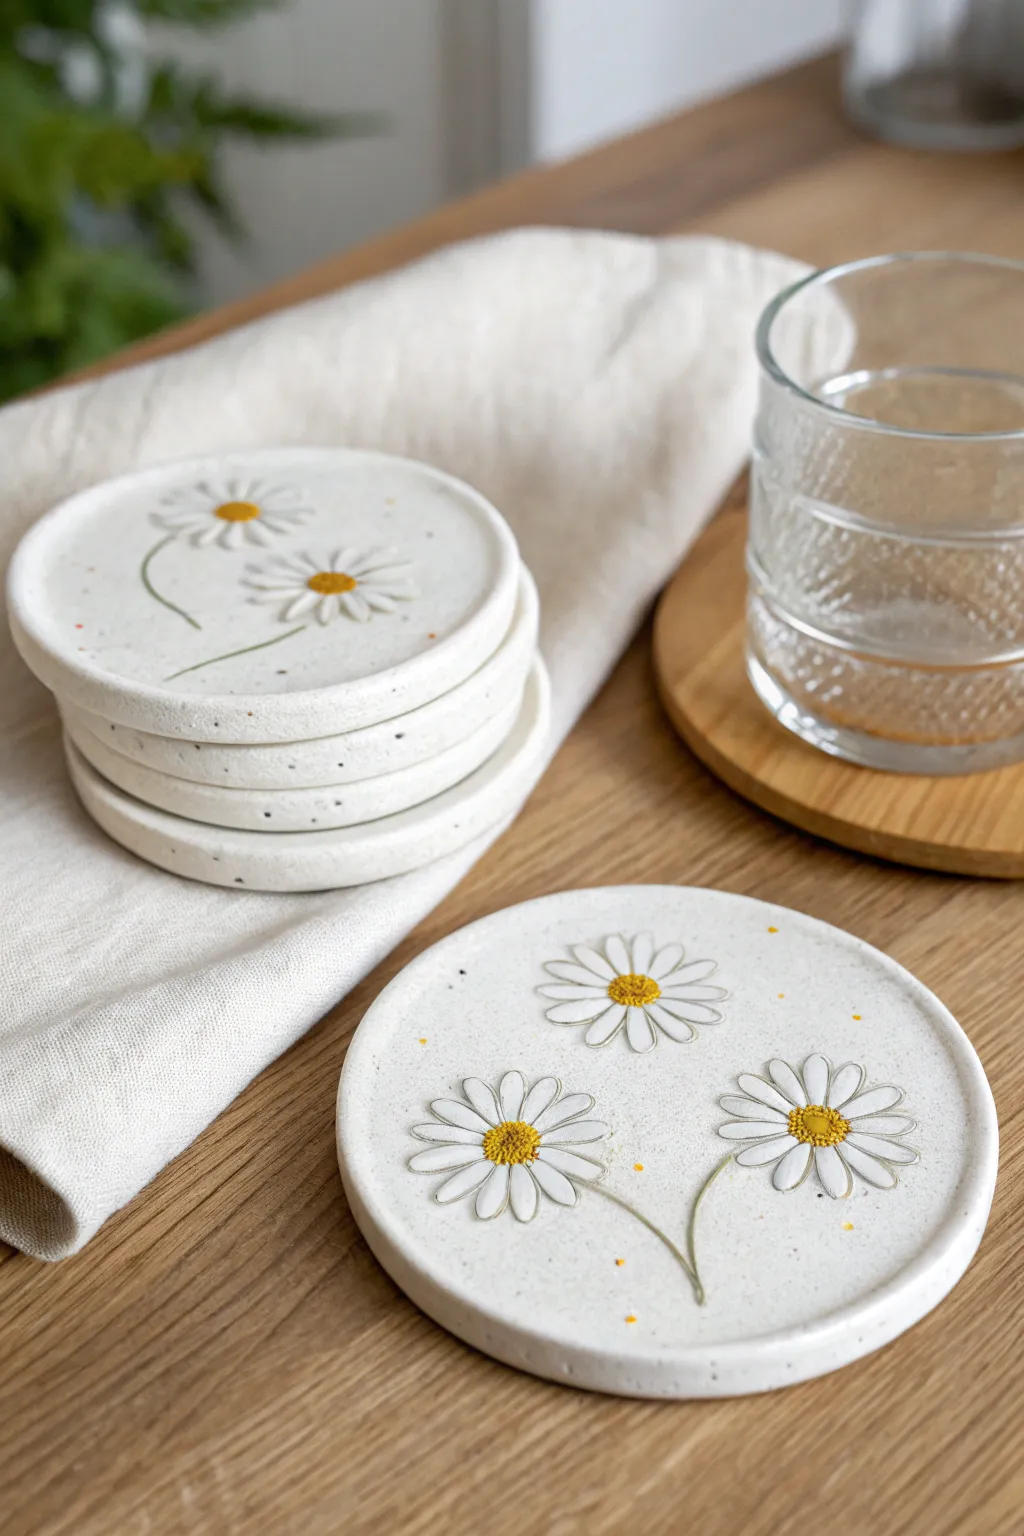
These charming coasters combine the rustic appeal of speckled stone with delicate floral motifs. Perfect for a minimal aesthetic, the white clay base features subtle embossing and hand-painted yellow centers for a sweet, functional piece of art.
How-To Guide
Materials
- White air-dry clay or polymer clay (speckled effect preferred)
- Rolling pin
- Circle cutter (approx. 4 inches/10 cm)
- Clay sculpting tools (needle tool, small ball tool)
- Small paintbrush
- Yellow acrylic paint
- Green acrylic paint (muted/olive tone)
- Clear matte varnish or sealant
- Sanding sponge (fine grit)
- Small bowl of water
- Parchment paper or canvas mat
Step 1: Shaping the Base
-
Prepare the Clay:
Start by conditioning your clay until it is soft and pliable. If you want that lovely speckled look shown in the photo but only have plain white clay, knead in some ground black pepper or dried used coffee grounds before rolling. -
Roll it Out:
Roll the clay onto a piece of parchment paper to a thickness of about 1/4 inch (6mm). Try to keep the thickness consistent so your coaster sits flat. -
Cut the Circles:
Use your large circle cutter to stamp out your coaster shapes. If you don’t have a cutter, trace around a wide mug or bowl with a needle tool. -
Smooth the Edges:
Dip your finger in a little water and run it around the cut edge to smooth out any roughness. -
Create the Lip:
To get that slight rim visible in the image, gently press into the center of the circle with the bottom of a smooth glass, leaving about a 1/4 inch border untouched, or simply pinch the edges upwards very slightly with your fingers.
Step 2: Sculpting the Daisies
-
Draft the stems:
Using a needle tool, very lightly sketch thin, curved lines where you want your flower stems to be. Do not cut deep; just mark the surface. -
Form Petal Canes:
Roll tiny, rice-grain-sized pieces of clay for the petals. You’ll need about 10-12 per flower. Flatten them slightly with your finger. -
Assemble the Flowers:
Arrange the petals in a circle at the top of your sketched stems. Press them gently onto the base so they adhere. -
Add Texture Details:
Use a needle tool or small knife to press a single line down the center of each petal. This gives them that realistic daisy texture. -
Create the Center:
Roll a small ball of clay for the flower center. flatten it into a disk and press it into the middle of the petals. Stipple the surface with a needle tool to mimic pollen texture. -
Refine the Stems:
Roll very thin snakes of clay and lay them over your sketched stem lines. Blend the edges into the base clay slightly so they don’t pop off later.
Pepper Hack
No speckled clay? Knead cracked black pepper into white clay creates that trendy stone effect instantly.
Step 3: Finishing Touches
-
Dry Time:
Allow the coasters to dry completely. For air-dry clay, this usually takes 24-48 hours. Turn them over halfway through to ensure the bottom dries evenly. -
Sand for Smoothness:
Once bone dry, take your sanding sponge and gently smooth just the rim and the underside. Be careful not to sand off your raised flower details. -
Painting the Centers:
Using a fine brush, carefully dab yellow acrylic paint onto the textured centers of the daisies. A mustard or ochre yellow looks more natural than bright lemon. -
Painting the Stems:
Mix a very watery wash of olive green paint. I like to carefully line the raised stem with this wash so it looks subtle and faded rather than opaque. -
Sealing:
Apply two coats of clear matte varnish to waterproof the coasters. This is crucial if you plan to put cold drinks on them to prevent water damage.
Go Botanical
Instead of sculpting, press real dried flowers into the wet clay, remove them, and paint the impression for an imprinted look.
Stack your finished coasters on your coffee table for a sweet handcrafted accent


Chunky Arch Photo Holder for a Dreamy Desk

Add a touch of modern minimalism to your workspace with this chunky, pastel-toned rainbow arch. Its substantial weight and smooth, matte finish make it the perfect functional sculpture for holding photos or standing alone as a statement piece.
Step-by-Step Tutorial
Materials
- Air-dry clay (white or terracotta)
- Rolling pin
- Sharp craft knife or clay slicing tool
- Water in a small cup
- Fine-grit sandpaper (220-400 grit)
- Acrylic paint (Sage Green or Mint mixed with a touch of Grey)
- Matte sealant or varnish
- Paintbrushes (medium flat wash)
Step 1: Shaping the Base Arch
-
Condition the clay:
Begin by taking a large handful of air-dry clay and kneading it thoroughly in your hands. This warms up the material and removes air pockets, ensuring a smoother finish later on. -
Roll a thick log:
Roll the clay on a flat surface into a very thick, even cylinder. Aim for a diameter of about 1.5 to 2 inches to get that satisfying ‘chunky’ aesthetic. -
Form the curve:
Gently bend the cylinder into a ‘U’ or horseshoe shape. Be careful not to create cracks at the stress point of the curve; if cracks appear, smooth them immediately with a wet finger. -
Flatten the faces:
Stand the arch up to check for stability, then lay it flat. Gently press it down with a book or flat board to ensure the front and back faces are uniform and not too round. -
Squared edges:
Use your fingers or a flat tool to tap the sides, creating slightly squared-off edges rather than perfectly round ones. This structure gives it a more modern architectural look. -
Trim the feet:
Stand the arch up again. Use a sharp craft knife to slice the bottom of each ‘leg’ cleanly so it sits perfectly distinct and flat on your desk surface.
Smooth Operator
Water is your best friend for smoothing, but don’t overdo it. Too much water can weaken the clay structure or cause it to crack as it dries.
Step 2: Refining and Smoothing
-
Smoothing water technique:
Dip your finger in water and run it over the entire surface of the clay. This helps bond the outer layer and removes fingerprints. I like to spend extra time here because a smooth base means less sanding later. -
Carve the grooves:
Using a modeling tool or the back of a butter knife, gently score two concentric curved lines along the face of the arch to simulate the separation of rainbow bands. -
Deepen the lines:
Go over your scored lines again, pressing slightly deeper to create distinct grooves. Keep the pressure consistent so the lines are uniform in width. -
Smooth the grooves:
Run a damp paintbrush (with just water) through the grooves you just carved to soften any jagged crumbs of clay created by the tool. -
Initial drying:
Set the arch aside in a cool, dry place. Let it dry for at least 24-48 hours. Rotate it occasionally so the bottom dries evenly with the top.
Step 3: Finishing Touches
-
Sanding:
Once bone dry, take your fine-grit sandpaper and gently buff the entire piece. Focus on flattening any bumps and smoothing the bottom feet. -
Dust removal:
Wipe the sculpture down with a slightly damp cloth or a dry tack cloth to remove all sanding dust before you start painting. -
Base coat:
Apply a base coat of white acrylic paint if you used terracotta clay, or go straight to your color if using white clay. This makes the final color pop. -
Pastel painting:
Mix a sage green or soft mint color. Apply 2-3 thin coats of paint, letting each layer dry completely in between to avoid brush strokes. -
Detailing the grooves:
If paint pooled in the carved grooves, use a clean, dry brush to gently sweep it out before it dries, preserving the dimensional look. -
Sealing:
Finish with a coat of matte varnish or sealant. This protects the clay from moisture and gives it that professional, ceramic-like texture seen in the photo.
Make It Functional
Before drying, use a craft knife or wire to slice a thin slit across the very top center of the arch. This creates a hidden slot to securely hold photos.
Place your finished arch on your desk and enjoy the calm, creative vibe it brings to your workspace

The Complete Guide to Pottery Troubleshooting
Uncover the most common ceramic mistakes—from cracking clay to failed glazes—and learn how to fix them fast.
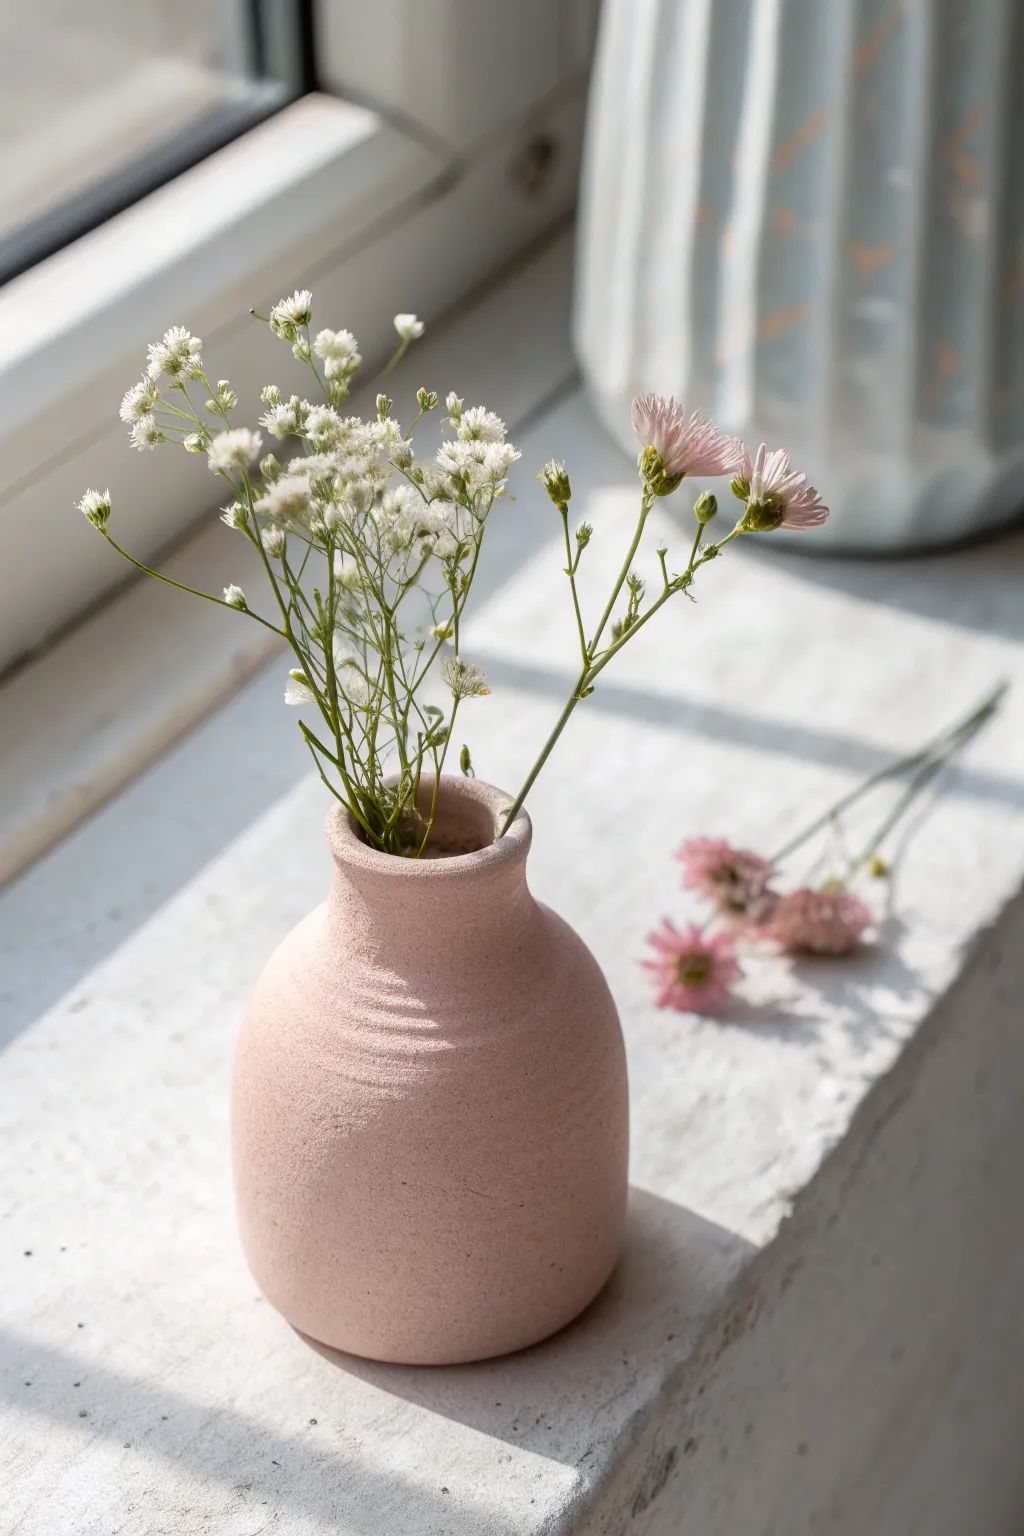
Speckled Mini Vase With a Single Stem

Embrace the beauty of imperfection with this charming bud vase, featuring a classic rounded belly and a narrow, elegant neck. The gentle cream glaze dotted with random speckles gives it a lovely organic feel, perfect for displaying dried botanicals on a sunny windowsill.
Step-by-Step
Materials
- Speckled stoneware clay (or white clay + black inclusion stain)
- Pottery wheel (or hand-building tools for pinch method)
- Sponge
- Wire cutter
- Trimming tools
- Rib tool (wooden or metal)
- Calipers (optional)
- Clear matte or satin glaze
- Kiln
Step 1: Throwing the Form
-
Prepare the clay:
Start by wedging a small ball of speckled stoneware clay, about the size of a tennis ball or slightly larger (approx. 1 lb). Ensure it is free of air bubbles to prevent explosions in the kiln. -
Center specifically:
Secure the clay to the wheel head and center it with firm pressure. Since this is a mini vase, centering needs to be precise so the small neck doesn’t wobble later. -
Open the clay:
Open the centered mound, but keep the floor relatively narrow. You want the base to be small to emphasize that round, bulbous look. -
Pull the cylinder:
Pull up the walls into a cylinder. Don’t worry about the shape yet; focus on getting an even wall thickness from bottom to top. -
Belly it out:
From the inside, use your fingers or a rib to gently push the clay outward while supporting the outside. Create a nice, round curve for the body of the vase, leaving the top third untouched for the neck. -
Collar the neck:
Using both hands, gently squeeze the upper cylinder inward (collaring) to narrow the opening. Do this gradually to avoid buckling the clay. -
Refine the rim:
Once the neck is sufficiently narrow, use a chamois or a wet fingertip to smooth and compress the rim. I like to flare it very slightly outward for a finished look. -
Cut underneath:
Use a wooden modeling tool to cut away excess clay at the foot, creating a slight undercut which makes trimming easier later. Wire it off the wheel and let it dry to leather hard.
Collaring Cracks?
If the neck clay wrinkles or cracks while narrowing, the clay is too dry or you’re squeezing too fast. Add a tiny bit of slip and collar in smaller increments.
Step 2: Trimming and Finishing
-
Centering for trim:
Once the vase is leather hard—firm enough to handle but not dry—place it upside down on the wheel. Use lugs of clay to secure it in place. -
Define the foot:
Use a sharp trimming tool to carve away excess weight from the bottom. Define a foot ring if desired, or curve the bottom smoothly if you prefer a flat base. -
Smooth the surface:
Before firing, run a soft rib or a slightly damp sponge over the surface to remove any finger marks or grog that might be protruding. -
Dry thoroughly:
Let the piece dry slowly and completely. Quick drying can sometimes cause cracks, especially at the transition between the belly and the neck. -
Bisque fire:
Load the bone-dry vase into the kiln for a bisque firing (usually to cone 04 or 06, depending on your clay body).
Faux Speckles
Using plain clay? Mix coarse cracked black pepper or coffee grounds into the wet clay. They burn out in the kiln, leaving charming little voids and dark spots.
Step 3: Glazing
-
Clean the bisque:
Wipe the fired piece with a damp sponge to remove any kiln dust. This ensures the glaze adheres properly without crawling. -
Select the glaze:
For this look, choose a transparent or semi-transparent cream glaze. The transparency is key because it allows the natural speckles of the clay body to show through. -
Pour and dip:
Pour glaze inside the vase, swirl it around, and pour it out. Then, hold the vase by the foot (or use tongs) and dip the exterior into the bucket for an even coat. -
Clean the foot:
Use a sponge to wipe the bottom of the vase completely clean of glaze so it doesn’t stick to the kiln shelf. -
Final fire:
Fire the glazed piece to the maturity temperature of your clay (often cone 5 or 6 for stoneware). Once cooled, insert dried stems to complete the aesthetic.
Place your finished vase near a window to let the natural light highlight those beautiful organic speckles
Swirl-Pattern Jewelry Tray in Blush and Cream
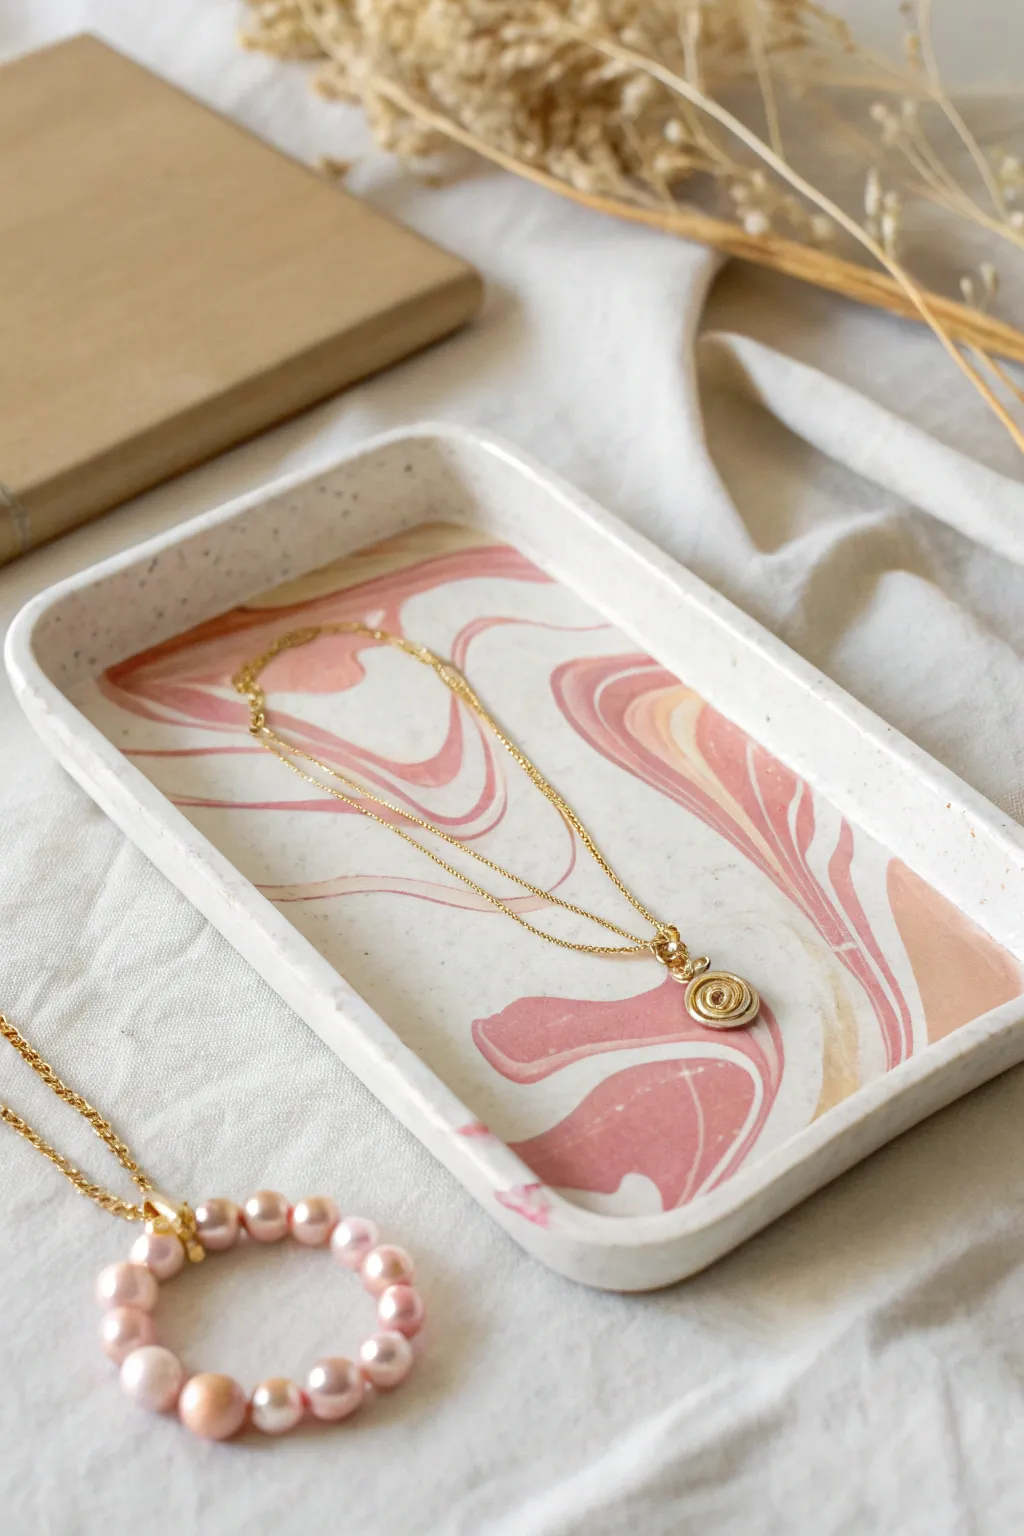
Elevate your vanity with this chic, handmade jewelry tray featuring a mesmerizing swirl of blush pink, cream, and soft white marble. This project uses polymer or air-dry clay to create a functional piece of art perfect for displaying your favorite delicate chains and rings.
How-To Guide
Materials
- Polymer clay (white, blush pink, beige/cream)
- Acrylic rolling pin
- Rolling guides or playing cards (optional)
- Rectangular clay cutter or sharp craft knife/blade
- Sandpaper (fine grit)
- Gloss or matte varnish (optional)
- Smooth work surface (ceramic tile or glass)
- Oven (for baking polymer clay)
Step 1: Marbling the Clay
-
Condition the clay:
Start by warming up your clay. Take separate chunks of white, blush pink, and beige clay and knead them individually until they are soft and pliable. This prevents cracks later on. -
Create logs:
Roll each color into a long, snake-like log. The white log should be the thickest since it’s the base color, while the pink and beige logs can be slightly thinner. -
Twist together:
Gather your three logs and twist them together into one large rope. Fold the rope in half and twist it again. Repeat this folding and twisting process 3-4 times, but be careful not to over-mix or the colors will become muddy. -
Compress into a ball:
Once you like the look of the twisted rope, squish it all together into a smooth ball. You should see distinct veins of color running through the lump.
Step 2: Shaping the Tray
-
Roll out the slab:
Place your marbled ball on your work surface. Using your acrylic rolling pin, flatten it into an even slab about 1/4 inch thick. I sometimes use rolling guides on either side to ensure perfectly even thickness. -
Check the pattern:
Inspect your rolled slab. If you don’t love the swirl pattern yet, fold it and roll it once more to elongate the marble veins. -
Cut the rectangle:
Use a rectangular cutter or a ruler and sharp blade to cut out your base shape. Remove the excess trim. -
Create the rim strips:
Gather the excess trimmed clay and roll it out into a long, thin snake. Flatten this slightly to create a long strip that will become the raised wall of your tray. -
Attach the rim:
Place the strip along the outer edge of your rectangular base. Press it down gently to adhere it. -
Blend the seams:
This is the most crucial part. Use your thumb or a clay tool to smooth the inside seam where the wall meets the base, ensuring there is no gap. Do the same for the outside seam until the wall and base look like one solid piece. -
Shape the corners:
Gently pinch and round the corners of the rim to soften the look, matching the organic feel of the marble pattern. -
Smooth imperfections:
Dip your finger in a tiny bit of water (or clay softener) and run it over the entire piece to remove fingerprints and smooth out any bumps.
Clean Cuts Pro Tip
Before cutting your rectangle shape, cover the clay slab with a sheet of plastic wrap. Press the cutter down through the plastic to get beautifully rounded, ‘domed’ edges instead of sharp, flat ones.
Step 3: Finishing Touches
-
Bake the tray:
Place your tray on a baking sheet lined with parchment paper. Bake according to your specific clay package instructions (usually 275°F/135°C for 15-30 minutes). -
Cool down:
Let the tray cool completely in the oven with the door cracked open. Sudden temperature changes can sometimes cause brittleness. -
Sand the edges:
Once fully cool, use fine-grit sandpaper to gently buff the top rim and edges. This removes any sharp bits and gives it a professional, stone-like feel. -
Clean up dust:
Wipe the tray with a damp cloth or rinse it quickly under water to remove sanding dust. -
Seal (optional):
If you want a glossy, ceramic look, apply a thin coat of polyurethane varnish or glaze. For a matte, natural stone finish, you can leave it as is.
Level Up: Gold Speckles
Mix tiny flecks of gold leaf foil or gold glitter into the white clay before marbling. The metallic specks will add a luxurious, terrazzo-style shimmer to the final swirl pattern.
Now you have a stunning, custom-made spot to keep your treasures safe and organized


What Really Happens Inside the Kiln
Learn how time and temperature work together inside the kiln to transform clay into durable ceramic.
Aesthetic Incense Holder With Star and Moon Imprints
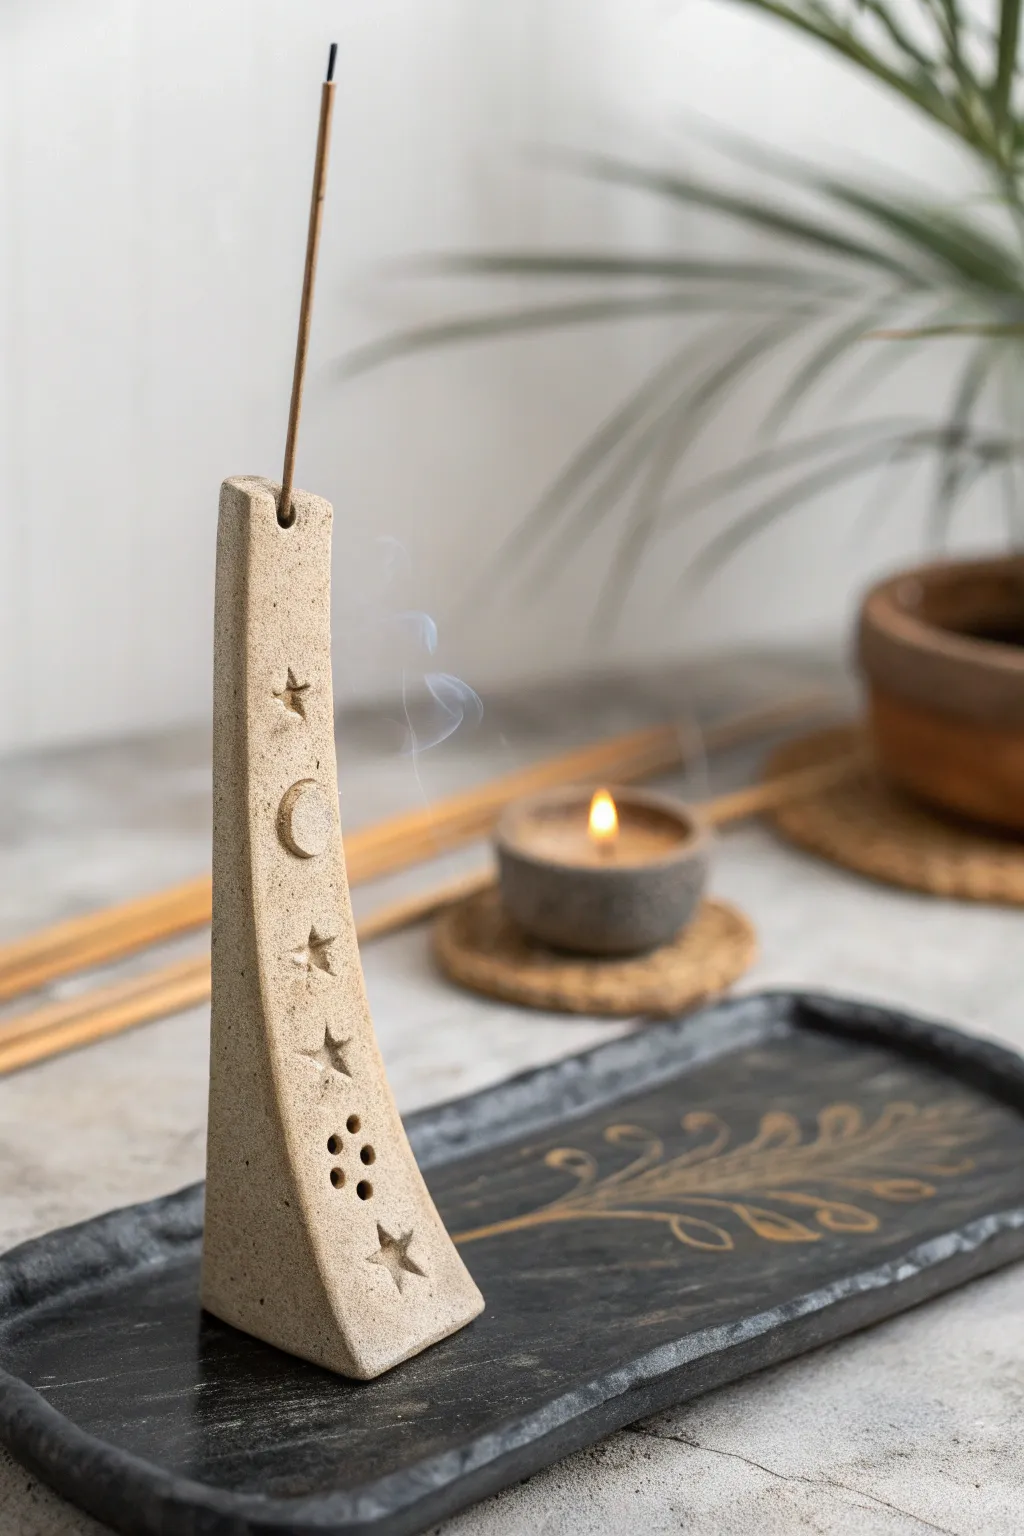
Bring a touch of cosmic energy to your sacred space with this minimalist vertical incense tower. Crafted from speckled clay and featuring delicate star and moon impressions, its slender form catches ash while serving as a beautiful sculptural element.
Detailed Instructions
Materials
- Speckled sandstone clay (or buff clay with grog)
- Small rolling pin
- Fettling knife or craft blade
- Small star and moon stamps (or sculpting tools to carve)
- Needle tool
- Ruler
- Slip (clay slurry)
- Sponge
- High-grit sandpaper (optional)
- Clear matte glaze
Step 1: Shaping the Base Form
-
Prepare the Clay:
Begin with a handful of speckled clay. Wedge it thoroughly to remove air bubbles, ensuring the consistency is uniform and ready for hand-building. -
Roll the Slab:
Roll your clay out into a thick slab, aiming for approximately 1/4 to 1/2 inch in thickness. You want it sturdy enough to stand tall without bowing. -
Cut the Shape:
Using your ruler as a guide, cut a long, tapered trapezoid shape. The base should be wider (about 2-3 inches) and it should taper gently to a narrower top (about 1 inch wide). -
Add a Back Wedge:
To make it stand upright, you need a support wedge. Cut a triangular piece of clay to attach to the back, creating a stable, three-dimensional tent or wedge shape. -
Join the Pieces:
Score the edges where the main face and the back wedge will meet. Apply slip generously and press them firmly together. I like to reinforce the seam on the inside with a tiny coil of clay to ensure it doesn’t crack during firing. -
Smooth the Seams:
Use your fingers or a modeling tool to blend the seams on the outside until the connection is invisible and the form looks like one cohesive block.
Clean Imprints
Dust your stamps with a tiny bit of cornstarch before pressing them into the clay. This acts as a release agent and prevents the stamps from sticking or pulling up the clay.
Step 2: Adding Details & Functionality
-
Create the Incense Hole:
At the very top of your tower, use a needle tool to pierce a hole. Angle it slightly downward into the clay body so the incense stick will stand securely at an angle. -
Test the Fit:
Gently insert the non-burning end of an incense stick to ensure the hole is wide enough, keeping in mind clay shrinks during firing. -
Plan the Celestial Design:
Visualize spacing for your celestial elements. You’ll want a vertical alignment running down the front face of the tower. -
Imprint the Stars:
Press your small star stamp firmly into the clay near the top. Add two more stars lower down, spacing them out to leave room for the moon and vent holes. -
Add the Crescent Moon:
Between the top two stars, press a crescent moon stamp or use a loop tool to carve a raised ‘C’ shape. Smooth the edges of the impression with a damp finger or soft brush. -
Pierce Vent Holes:
Near the bottom, use a small drill bit tool or straw to punch a cluster of small circular holes. Arranging them in a hexagon pattern adds a nice geometric touch. -
Carve the Bottom Star:
Add one final, larger star impression at the very base to anchor the design visually.
Gold Luster Accent
After the final glaze firing, paint real gold luster into the star and moon depressions, then fire again at a low temperature for an incredibly luxurious, magical finish.
Step 3: Finishing Touches
-
Refine Edges:
Once the clay is leather-hard, use a slightly damp sponge to soften any sharp corners on the top and sides of the tower. -
Dry Slowly:
Place the piece specifically away from drafts. Because of its vertical nature, fast drying can cause warping. -
Bisque Fire:
Fire the bone-dry piece in the kiln to bisque temperature (usually cone 04). -
Apply Glaze:
For this natural look, you might choose to leave the speckled clay raw on the outside or apply a very thin wash of clear matte glaze to seal it without hiding the texture. -
Final Fire:
Fire the piece again to the maturation temperature of your specific clay body.
Now your handcrafted incense holder is ready to elevate your meditation sessions with its grounding, earthy aesthetic
Tiny Magnet Vases for Found Flowers
Transform tiny scraps of clay into functional art with this charming magnet vase project. The soft, textured finish gives these miniature vessels an organic, stoneware look perfect for displaying single stems or dried wildflowers on your fridge.
Step-by-Step Tutorial
Materials
- Polymer clay (terracotta or beige)
- White polymer clay (for mixing)
- Baking soda or cornstarch (for texture)
- Small rolling pin
- Modeling tools or a toothpick
- Strong round magnet (neodymium recommended)
- Super glue or E6000
- Soft paintbrush
- Matte varnish (optional)
Step 1: Preparing the Clay
-
Mix your color:
Start by conditioning your clay. I like to mix a terracotta color with a generous amount of white to achieve that soft, pale earthy pink seen in the photo. Knead until the color is completely uniform. -
Add texture:
To mimic the stoneware pottery look without actual kiln firing, sprinkle a small amount of baking soda or cornstarch onto your work surface. Roll your clay ball into the powder lightly. -
Incorporate the texture:
Knead the powder into the clay. It will stiffen the clay slightly and give it a grainy, realistic ceramic surface texture.
Loose Magnets?
If the magnet pops out, roughen both the back of the magnet and the clay indentation with sandpaper before re-gluing to give the adhesive more grip.
Step 2: Shaping the Vessel
-
Create the base form:
Roll a piece of clay about the size of a walnut into a smooth ball. This will be the main body of your vase. -
Elongate the neck:
Using your fingers, gently pinch and roll the top third of the ball to start forming a neck. Keep the bottom heavy and rounded. -
Hollow the center:
Insert the rounded end of a paintbrush handle or a modeling tool into the top of the neck. press down gently to create the opening, but don’t go all the way through the bottom. -
Refine the shape:
With the tool still inside, gently roll the vase against your palm to smooth the sides. You want a bulbous bottom tapering into a distinct neck. -
Detail the rim:
Press the clay slightly outward at the very top of the neck to create a small, flared rim. -
Add surface lines:
For that wheel-thrown pottery effect, take a needle tool or toothpick. While holding the vase steady, lightly etch horizontal rings around the neck and shoulder area. -
Flatten the back:
Since this is a magnet, firmly press the backside of the vase against your table to create a flat surface. This ensures it sits flush against the magnetic surface later. -
Check balance:
Stand the vase up. Even though it will be mounted on a magnet, flattening the bottom slightly helps it look grounded.
Faux Stone Effect
Mix black pepper or used dried coffee grounds into the clay instead of baking soda. This adds tiny speckles that look just like speckled pottery clay.
Step 3: Finishing and Assembly
-
Embed the magnet space:
Press your chosen magnet into the flat back of the clay to create an indentation, then carefully remove it. This creates a perfect pocket for gluing later. Do not bake the magnet. -
Final texture check:
Tap a stiff-bristled brush or an old toothbrush gently over the surface to enhance the stone-like texture, removing any fingerprints. -
Bake:
Bake the piece according to your polymer clay package instructions. Usually, this is around 275°F (135°C) for 15-30 minutes depending on thickness. -
Cool down:
Allow the clay to cool completely in the oven. This annealing process makes the clay stronger. -
Attach the magnet:
Place a drop of strong super glue or E6000 into the indentation you made earlier. Press the magnet in firmly and let it cure fully. -
Seal (Optional):
If you want extra protection, brush on a coat of ultra-matte varnish. Avoid glossy finishes if you want to maintain the raw terracotta aesthetic.
Pop in a few dried wildflowers or baby’s breath to bring a breath of fresh air to your kitchen space

TRACK YOUR CERAMIC JOURNEY
Capture glaze tests, firing details, and creative progress—all in one simple printable. Make your projects easier to repeat and improve.
Cloud-Shaped Desk Organizer Tray With Compartments
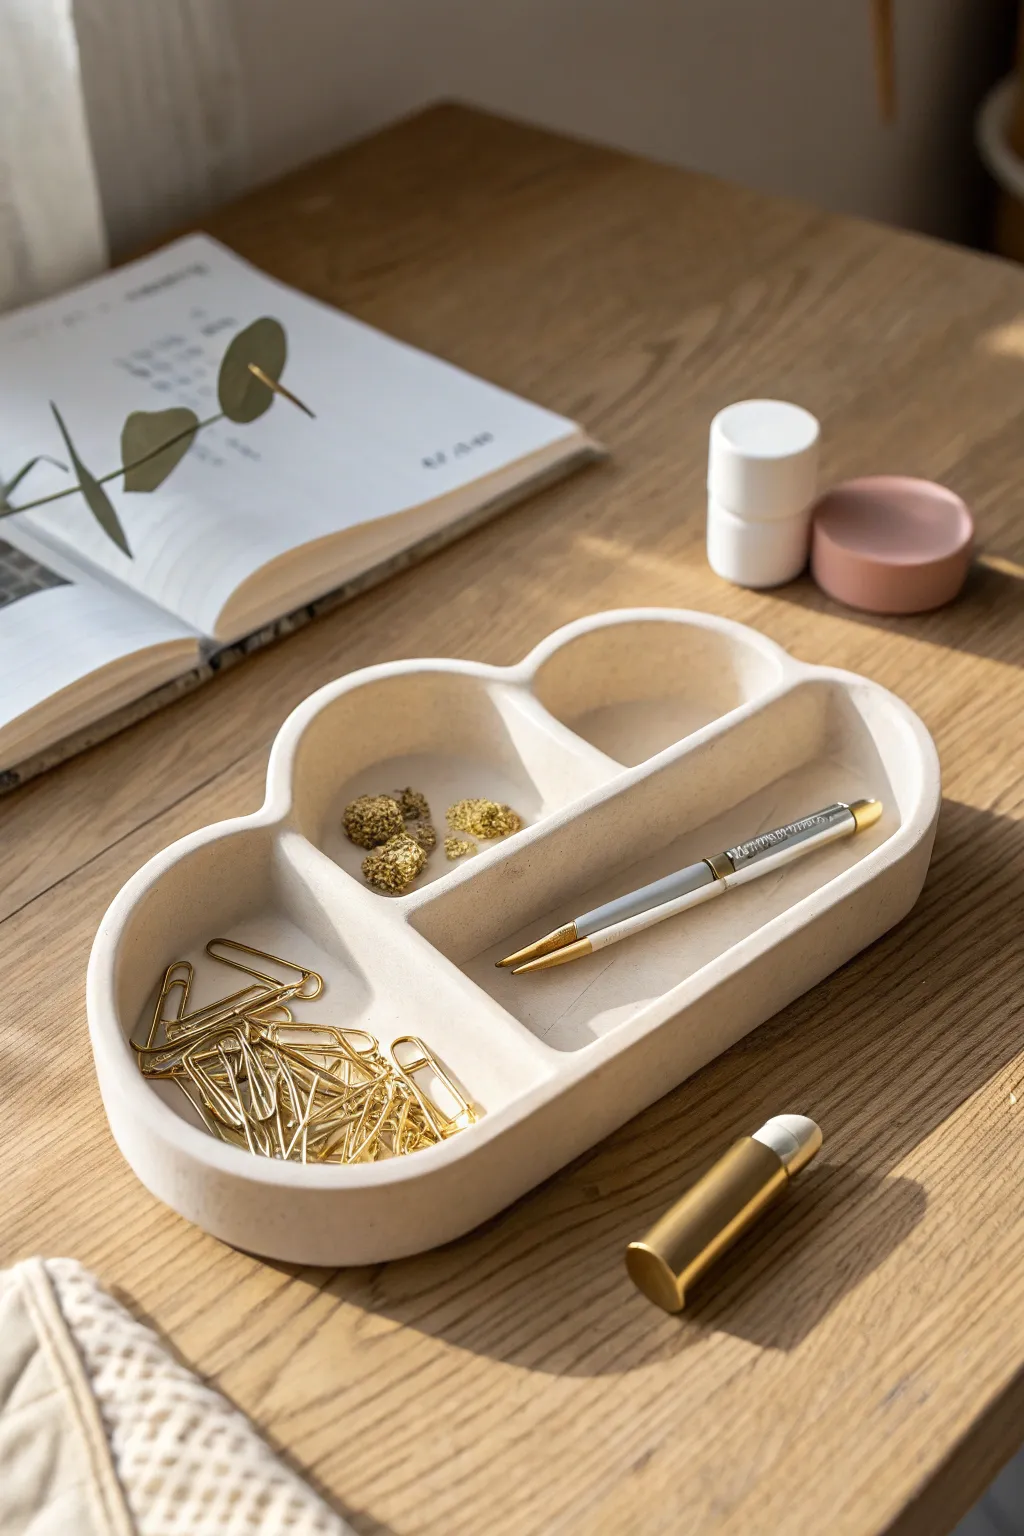
Bring a touch of dreamy organization to your workspace with this cloud-inspired desk tray. Its soft curves and matte finish provide a perfect home for paperclips, pens, and little treasures, blending function with aesthetic calm.
Step-by-Step Guide
Materials
- Air-dry clay (white or cream)
- Rolling pin
- Clay knife or craft knife
- Sponge
- Small bowl of water
- Sandpaper (medium and fine grit)
- Ruler
- Cardstock (for template)
- Matte acrylic varnish
- Optional: Speckled clay or acrylic paint for texture
Step 1: Preparation & Base
-
Draft your template:
Sketch a long, cloud-like shape on cardstock. Draw a straight line across the bottom for stability, then add three curved humps on top—two smaller ones on the left and a larger one on the right. Cut this shape out. -
Condition the clay:
Knead a large chunk of air-dry clay until it is warm, pliable, and free of cracks. This conditioning step is crucial to prevent breakage later. -
Roll the slab:
Roll out the clay to a uniform thickness of about 1/4 inch (6mm). If you want that uniform look, place guide sticks on either side of your clay while rolling. -
Cut the base:
Place your cardstock template onto the rolled clay slab. Use your craft knife to trace around the perimeter, cutting out the cloud shape cleanly. Remove the excess clay.
Smooth Seams
If you struggle to blend seams with fingers, use the back of a spoon. The convex shape helps smooth the inner curves of the cloud compartments perfectly.
Step 2: Constructing Walls & Dividers
-
Prepare the walls:
Roll out long snakes of clay and flatten them into strips, or roll another slab and cut strips that are roughly 1 inch tall. These will form the outer rim and inner dividers. -
Score and slip:
Use a needle tool or knife to scratch cross-hatch marks along the top edge of your base. Do the same on one edge of your wall strip. Apply a little water or liquid clay (slip) to the scored areas. -
Attach the outer rim:
Gently press the wall strip onto the perimeter of the base. Work your way around the curves, bending the clay strip to follow the cloud shape. I find it helpful to overlap the ends slightly and slice through both for a seamless join. -
Blend the seams:
Use a modeling tool or your finger to smooth the clay where the wall meets the base, both on the inside and outside. The seam should disappear completely for a solid structure. -
Plan the compartments:
Decide where your dividers will go. For the look in the image, you need a long horizontal divider splitting the bottom section, and a vertical divider separating the two smaller top sections. -
Install the dividers:
Cut your clay strips to fit these internal lengths. Score, slip, and attach them inside the tray. Ensure they connect firmly to both the base and the outer walls.
Faux Stone Effect
Mix dried coffee grounds or cracked black pepper into your white clay before rolling to achieve a trendy, speckled ceramic granite look effortlessly.
Step 3: Refining & Finishing
-
Smooth the edges:
Dip a sponge in water and wring it out well. Gently wipe over all the top rims and the join lines to soften any harsh angles. The goal is a rounded, soft aesthetic. -
Let it dry:
Place the tray on a wire rack or a piece of parchment paper. Allow it to dry completely for 24-48 hours. Turn it over halfway through to ensure the bottom dries evenly. -
Sand for perfection:
Once fully dry, use medium-grit sandpaper to level out any uneven bumps on the rim. Follow up with fine-grit sandpaper to make the entire surface silky smooth to the touch. -
Clean dust:
Wipe away all sanding dust with a slightly damp cloth or a dry brush before moving on to sealing. -
Apply finish:
Coat the entire tray with a matte acrylic varnish. This protects the clay from scratches and moisture without adding an unwanted glossy shine, preserving that natural stone look.
Now fill your new cloudy creation with your favorite stationery items for an instantly tidier desk
Froggy Toothbrush Holder With a Cozy Smile
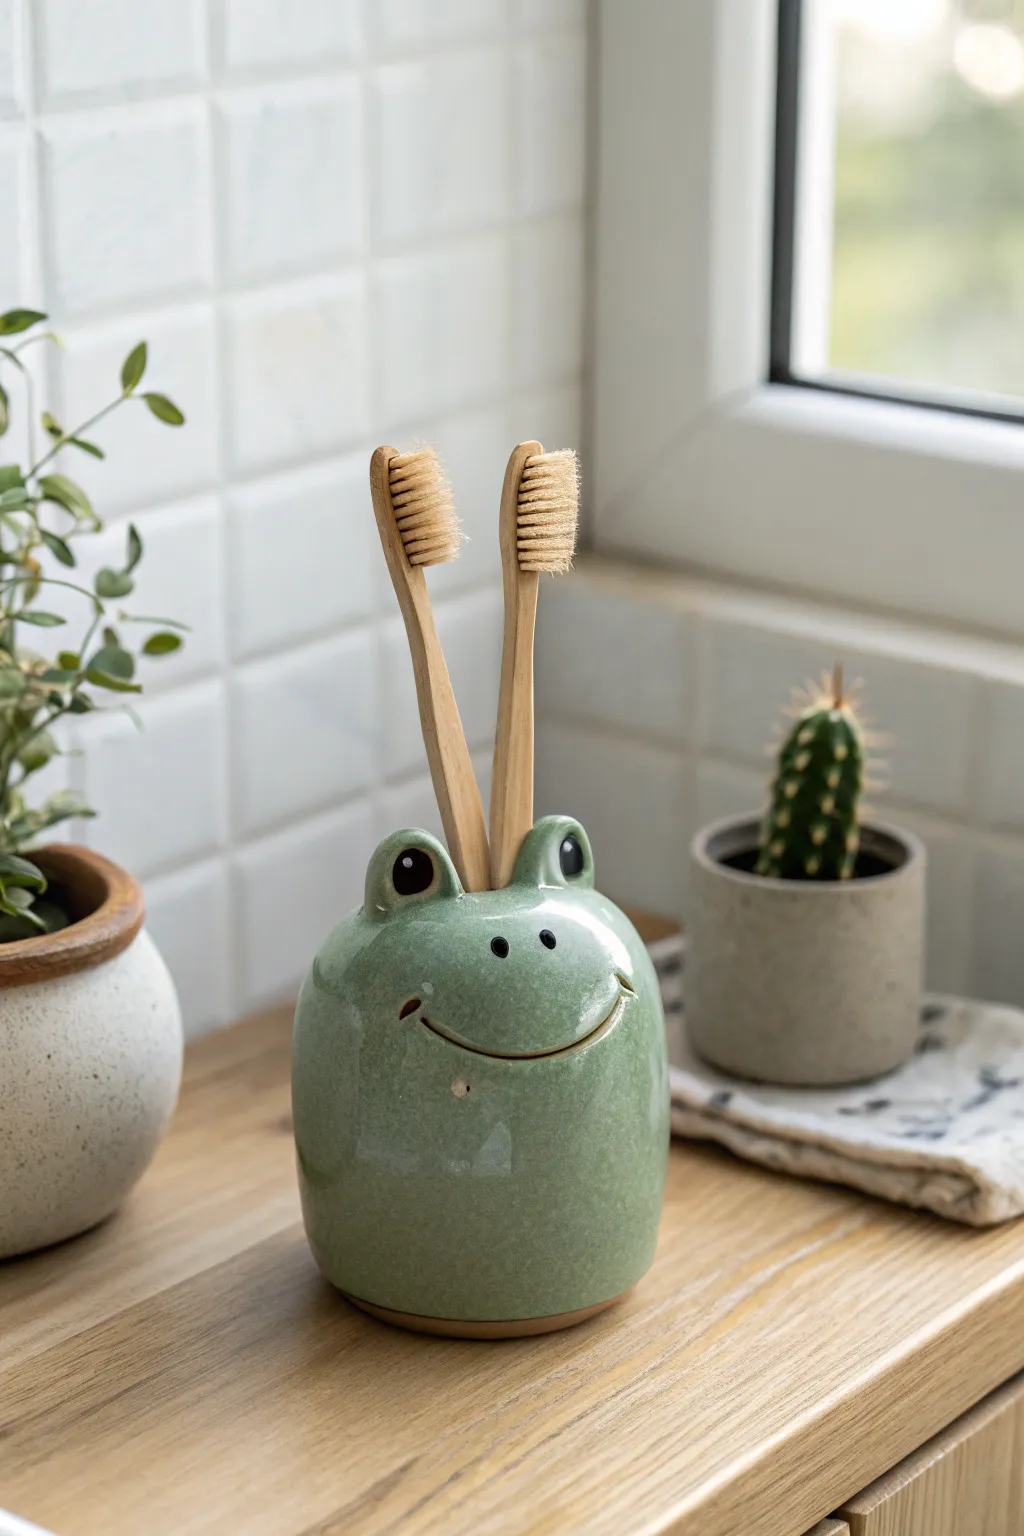
Transform a lump of clay into a charming, functional bathroom companion with this glossy green frog project. With its simple rounded shape and welcoming smile, this toothbrush holder adds a touch of whimsical nature to your daily routine.
How-To Guide
Materials
- White stoneware or earthenware clay (approx. 1 lb)
- Pottery wheel (optional, can be hand-built)
- Pin tool or needle tool
- Modeling tool with a small ball end
- Sponge
- Wire cutter
- Slip (clay mixed with water)
- Scoring tool or serrated rib
- Celadon or transparent green glaze
- Black underglaze
- Small paintbrush
- Clear glaze (if not using glossy green)
- Kiln access
Step 1: Forming the Base Body
-
Prepare the Clay:
Begin by thoroughly wedging your clay to remove any air bubbles, which is crucial for preventing cracks during firing. Shape it into a smooth, round ball about the size of a large orange. -
Establish the Dome Shape:
If throwing on a wheel, center the clay and pull up a short, thick cylinder, then collar the neck inwards to close the form into a dome. If hand-building, create two pinch pots, score and slip them together to form a sphere, then flatten the bottom gently for stability. -
Smooth the Surface:
Use a damp sponge or a flexible rib to smooth the exterior walls. You want a continuous, organic curve that mimics the roundness of a frog’s body. -
Create the Openings:
Once the clay is leather-hard, use a circular cutter or carefully carve out a large opening at the very top. This needs to be wide enough to hold two toothbrushes comfortably without them touching too much.
Uneven Glaze?
If the green glaze pools or looks streaky, heat the bisque ware slightly with a hair dryer before dipping. The warm clay absorbs water faster, grabbing the glaze for an even coat.
Step 2: Sculpting the Features
-
Shape the Eye Mounds:
Roll two small balls of clay, roughly the size of large marbles. Flatten the bottoms slightly so they will sit flush against the main body. -
Attach the Eyes:
Score the top of the body near the rim of your opening, and score the bottom of your eye mounds. Apply slip generously and press them firmly into place, closer to the back edge to leave room for the face. -
Blend the Seams:
Using a modeling tool or your finger, blend the clay from the eye mounds down into the main body so they look integrated rather than just stuck on. Smooth this transition carefully with a damp sponge. -
Carve the Smile:
Use a needle tool or a wire loop tool to carve a wide, upward-curving smile. Cut fairly deep to ensure the glaze doesn’t fill it in completely later, giving it that friendly grin. -
Add Dimples:
At the ends of your smile line, press inward gently with a small ball tool to create cute dimples, which adds character and softens the expression. -
Refine the Bottom:
Flip the piece over and trim a small foot ring or simply ensure the bottom is slightly concave so it sits flat without wobbling.
Lily Pad Base
Make a flat, slab-rolled coaster shaped like a lily pad with a notch cut out. Glaze it a darker green to give your frog a perfect waterproof resting spot on the counter.
Step 3: Glazing and Finishing
-
Bisque Fire:
Allow the frog to dry slowly and completely, covered loosely with plastic if necessary to even out drying. Fire it in the kiln to a bisque temperature (usually cone 04). -
Apply Underglaze Details:
Using a fine detail brush and black underglaze, paint the pupils onto the eye mounds. I like to add two tiny dots for nostrils just above the smile line as well. -
Highlight the Smile:
You can carefully paint a thin line of black underglaze into the carved smile groove to make the mouth pop, wiping away any excess on the surface with a damp sponge. -
Glaze the Interior:
Pour your green glaze inside the hollow body, swirl it around to coat the entire interior, and pour out the excess. This waterproofs the inside for holding wet brushes. -
Glaze the Exterior:
Dip the exterior into the green glaze or brush it on evenly. If you used underglaze requiring a clear coat, ensure your green glaze is translucent (like a celadon) so the black details show through. -
Check the Bottom:
Before the final firing, meticulously wipe the bottom of the frog clean of any glaze with a sponge to prevent it from fusing to the kiln shelf. -
Final Firing:
Fire the piece again to the maturation temperature of your specific clay and glaze (often cone 5 or 6 for stoneware) to achieve that durable, glossy finish.
Now you have a durable, adorable holder ready to brighten up your morning routine
Tiny Shelf Friends: Mini Frogs, Snails, and Mushrooms

Bring the forest floor to your bookshelf with these adorable mixed-media figurines featuring a friendly frog, a spiral snail, and cheerful mushrooms. By combining polymer clay with natural wood dowels, you achieve a charming rustic look that feels both handmade and polished.
Step-by-Step Guide
Materials
- Polymer clay (green, brown, white, yellow)
- Wooden dowels (approx. 1-inch diameter)
- Acrylic paints (black, white, red, brown)
- Small detail paintbrushes
- Ball stylus tool
- Sandpaper (fine grit)
- Craft knife or clay blade
- Strong craft glue or E6000
- Matte varnish
- Aluminum foil (for frog core)
Step 1: Prepping the Wood Bases
-
Cut the stems:
Cut your thick wooden dowel into varied short lengths, approximately 1 to 1.5 inches tall. These will serve as the stems for your mushrooms. -
Sand the edges:
Use fine-grit sandpaper to smooth the cut ends of the dowels. Round the top edge slightly so the clay cap will sit flush without sharp corners poking through. -
Create texture (optional):
If you want a more natural look, use a coarse sandpaper or a wire brush to drag vertical lines down the sides of the dowels, mimicking bark texture.
Natural Texture Hack
Before baking, lightly roll a textured sponge or sandpaper over the frog’s green clay body. This removes fingerprints and gives it a skin-like texture.
Step 2: Sculpting the Mushrooms
-
Form the brown cap:
Condition a ball of reddish-brown clay until pliable. Flatten it slightly into a dome shape that is wider than your wooden dowel. -
Fit the cap:
Press the dome gently onto one of the wooden dowels to check the fit. Establish a slight concave indentation underneath so it hugs the wood, but don’t glue it yet. -
Sculpt the yellow cap:
Repeat the process with yellow clay for the second mushroom, perhaps making this cap slightly more rounded or taller for variety. -
Add spots:
For the brown mushroom, roll tiny balls of white clay and press them flat onto the cap. For the yellow mushroom, press larger, flat white circles onto the sides. -
Add face structure:
Press two small indentations into the front of each cap where the eyes will go. I find this helps the painted eyes sit better later.
Foraging Fun
Instead of dowels, try using real thick sticks found on a nature walk! Bake them at 200°F (95°C) for 30 mins first to dry them out and kill any bugs.
Step 3: Crafting the Frog & Snail
-
Shape the frog body:
Roll a ball of aluminum foil to use as a core, then cover it with green clay. Shape it into a stout, rounded cylinder that is slightly wider at the bottom. -
Add frog legs:
Roll two small snakes of green clay. Attach them to the sides of the body, curving them forward to create the hind legs. -
Frog eyes:
Place two small balls of green clay on top of the head. Press a slightly smaller ball of white clay onto the front of each green mound to create the whites of the eyes. -
Model the snail shell:
Take a long snake of beige or light brown clay. Starting from one end, coil it tightly around itself to create a spiral shell shape. Keep the bottom slightly flattened so it stands upright.
Step 4: Baking & Assembly
-
Bake the clay:
Place your clay pieces (mushroom caps, frog, and snail) on a baking sheet. Bake according to your brand’s specific temperature instructions. Do not bake the wood. -
Cool down:
Let the pieces cool completely before handling. The clay is strongest once it has returned to room temperature. -
Glue the mushrooms:
Apply a dab of strong craft glue to the top of your wooden dowels and firmly press the baked clay caps into place.
Step 5: Painting & Details
-
Paint the eyes:
Using your smallest detail brush or a toothpick, paint tiny black dots for pupils. On the frog, add them to the white clay circles; on the mushrooms, paint white circles first if you didn’t sculpt them, then add black dots. -
Draw the smiles:
With a fine-tip black marker or very thin black paint, draw simple curved smiles on the frog and mushrooms. -
Frog details:
Use diluted darker green paint to create thin lines for the frog’s toes and leg definition. Add two rosy pink cheeks with a dry brush or a q-tip. -
Refine the snail:
Use a brown wash (paint diluted with water) to darken the crevices of the snail shell spiral, wiping away the excess on the surface to highlight the texture. -
Seal the work:
Coat the clay portions with a matte varnish to protect the paint and give the finish a consistant soft look.
Arranging these little friends on a shelf will instantly add a cozy, magical touch to your room