Whenever I’m teaching kids, I lean into simple shapes, bold color, and projects that feel like toys, treasures, or tiny masterpieces. Here are my go-to clay art ideas for kids that stay fun (and doable) from the first squish to the final display.
Air-Dry Clay Animal Pinch Pots

Transform a simple ball of clay into an adorable bunny bowl that’s perfect for holding tiny treasures or Easter treats. This project combines basic pinch pot techniques with sweet hand-painted details, resulting in a charming, handmade piece with a rustic texture.
How-To Guide
Materials
- White air-dry clay
- Small bowl of water
- Sculpting tools (or a plastic knife/toothpick)
- Acrylic paints (black, pink, yellow, white)
- Fine detail paintbrushes
- Clear acrylic sealer or varnish (optional)
Step 1: Sculpting the Base Shape
-
Prepare the clay:
Start with a ball of air-dry clay roughly the size of a tennis ball. Knead it in your hands until it feels soft, warm, and pliable, removing any air bubbles. -
Create the pinch pot:
Push your thumb into the center of the ball, but not all the way through to the bottom. Begin pinching the clay between your thumb and fingers, rotating the ball as you go to thin out the walls. -
Shape the bowl:
Continue pinching and turning until you have a nice bowl shape. Aim for walls that are about a quarter-inch thick—too thin and it might crack, too thick and it takes ages to dry. Gently tap the bottom on the table to flatten it so it sits stable. -
Smooth the surfaces:
Dip your finger in a tiny bit of water and rub it over the clay to smooth out major cracks or fingerprints. Don’t use too much water, or the clay will get slimy.
Cracks happen!
If small cracks appear as the clay dries, don’t panic. Mix a tiny bit of fresh clay with water to make a paste and fill the cracks, then smooth it over.
Step 2: Adding the Bunny Ears
-
Form the ears:
Take two smaller pieces of leftover clay and roll them into short logs. Flatten them slightly to create long oval shapes that taper at the top, just like bunny ears. -
Score and slip:
Use a toothpick or sculpting tool to scratch rough hatch marks (scoring) on the bottom of the ears and the spot on the bowl rim where they will attach. Dab a little water (slip) on the roughed-up areas. -
Attach the ears:
Press the ears firmly onto the back rim of the bowl. I like to use a sculpting tool or my finger to drag clay from the base of the ear down onto the bowl to blend the seam completely so they don’t fall off. -
Refine the shape:
Check that the ears are standing upright. If they are drooping, you can prop them up with crumpled paper towels or cardboard while they dry. -
Dry completely:
Set your bunny aside in a safe spot. Let it air dry for at least 24-48 hours until the clay turns chalky white and feels hard.
Make it a planter
Want to use this for a tiny succulent? Poke a drainage hole in the bottom with a straw while the clay is still wet so water can escape.
Step 3: Painting the Details
-
Paint the inner ears:
Once fully dry, mix a soft pink acrylic paint. Using a small brush, paint ovals inside the sculpted ears, leaving a white border around the edges. -
Add the face:
Using a very fine brush and black paint, carefully draw two round eyes. Add a tiny white dot inside each black circle to give the eyes a sparkle of life. -
Draw the nose and mouth:
Paint a small pink heart shape for the nose right between the eyes. Use the fine black brush to draw a little anchor shape extending down from the nose for the mouth. -
Whiskers matter:
Paint three quick, short black lines on each cheek for the whiskers. Keep your hand steady and use just the very tip of the brush. -
Decorate the body:
Create a pattern of simple egg shapes around the outside of the bowl using yellow and pink paint. You can add tiny dots or patterns inside the eggs for extra texture if you like. -
Speckled finish:
To mimic the speckled look in the photo, dip an old toothbrush or stiff brush into watered-down black paint. Run your thumb across the bristles to flick tiny specks of paint onto the bowl. -
Seal (Optional):
If you want your pot to be shiny and protected, cover it with a layer of clear acrylic varnish or Mod Podge after the paint is totally dry.
Now you have a sweet little bunny companion to brighten up your desk or shelf


Silly Play Dough Monster Faces
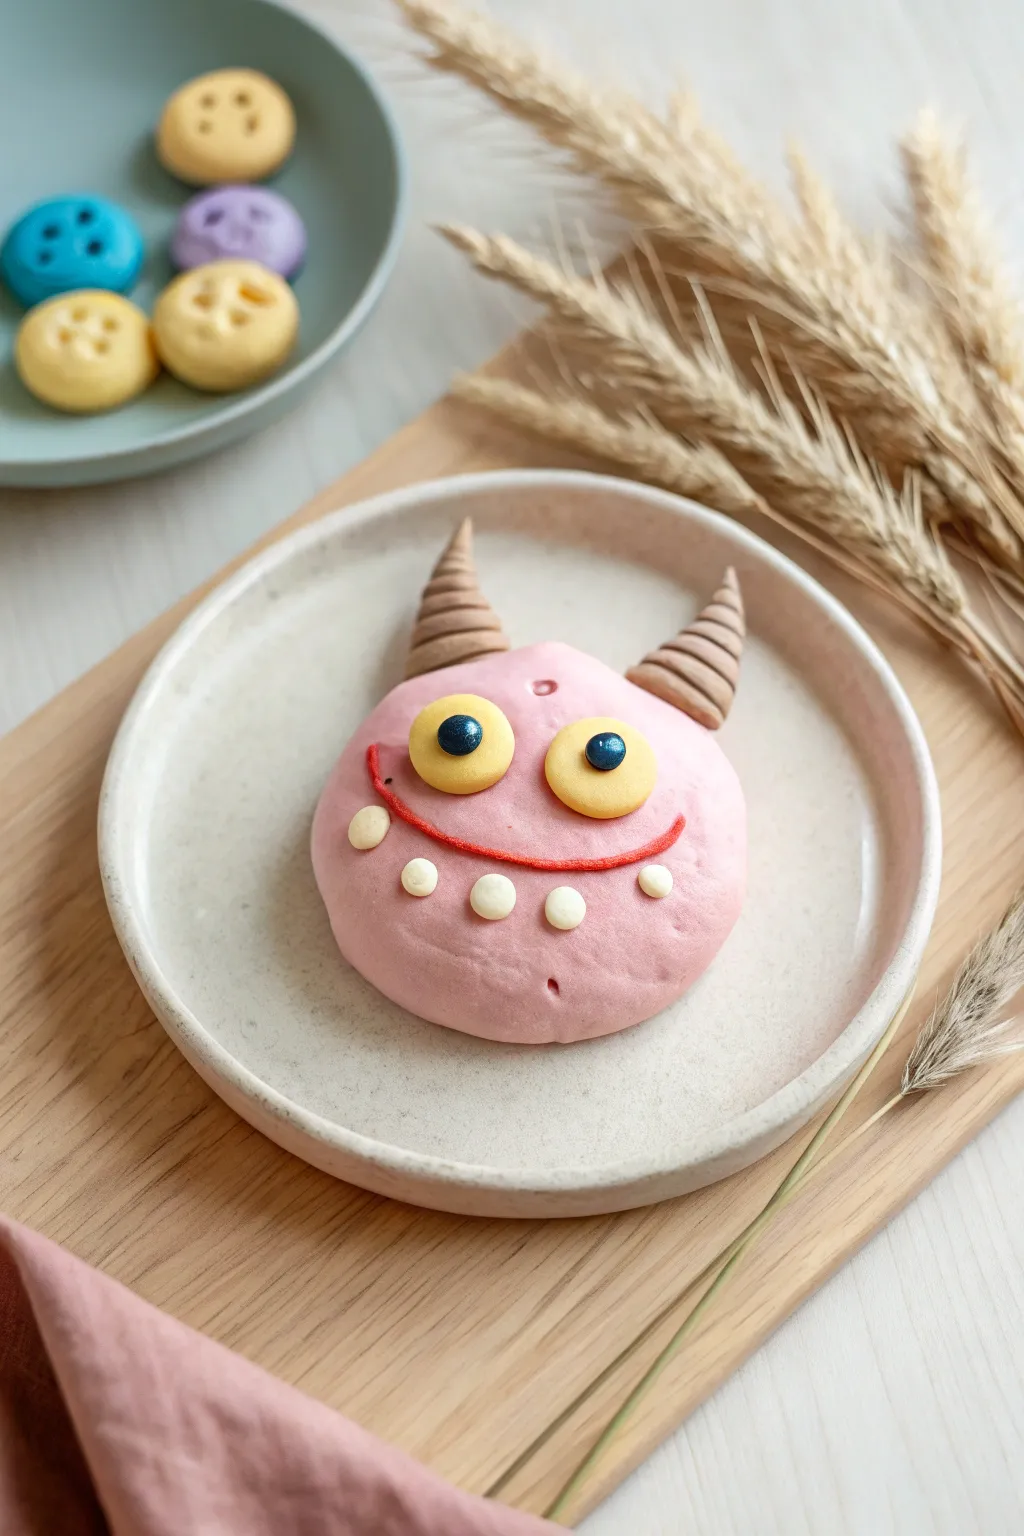
This adorable pink monster face is less scary and more sweet, making it a perfect project for little hands. With its spiraled horns and goofy grin, you’ll practice basic shaping and layering techniques to create a lovable character.
Step-by-Step
Materials
- Pink modeling dough (or polymer clay)
- Brown modeling dough
- Yellow modeling dough
- White modeling dough
- Red modeling dough
- Dark blue or black modeling dough
- Plastic knife or clay sculpting tool
- Small rolling pin
- Clean work surface or mat
Step 1: Shaping the Head
-
Prepare the pink base:
Start by taking a generous amount of pink dough. Roll it between your palms until you have a smooth, crack-free sphere. -
Flatten the face:
Gently press the sphere down onto your work surface with your palm. You want a thick, flattened bun shape, not a pancake. -
Refine the shape:
Use your fingers to smooth out the edges, making sure the shape is slightly wider at the bottom cheeks than at the top. -
Create a forehead dimple:
Using a small tool or just a fingertip, press a tiny indentation near the top center of the pink face for a little extra character.
Sticky Situation
If the clay parts aren’t sticking together, lightly score (scratch) the surfaces where they join or use a tiny drop of water as glue.
Step 2: Adding the Horns
-
Form the horn base:
Take two small pieces of brown dough and roll them into cone shapes. Try to keep them roughly the same size. -
Add the texture:
Take a very thin string of brown clay and wrap it spirally around each cone, or use a sculpting tool to gently press horizontal rings all the way up the horns. -
Attach the horns:
Press the horns firmly onto the top left and right sides of the head. I find slight curving them inward gives the monster a cuter expression.
Crumbly Dough?
If your dough is cracking while creating the main pink head, work a small amount of water or baby oil into it to regain elasticity.
Step 3: Making the Eyes
-
Make yellow eye bases:
Roll two small balls of yellow dough and flatten them into discs. These should be fairly large to give that bright-eyed look. -
Place the eyes:
Press the yellow discs onto the upper half of the face, spacing them somewhat close together. -
Add pupils:
Roll tiny balls of dark blue or black dough. Press these into the center of the yellow discs. Adding a tiny white reflection dot is optional but adds life.
Step 4: Creating the Smile
-
Create the mouth line:
Roll a very thin snake of red dough. It needs to be long enough to span across the monster’s face. -
Shape the smile:
Position the red snake in a wide ‘U’ shape below the eyes and press it gently to adhere. -
Form the teeth:
Roll five or six tiny balls of white dough. Flatten them slightly so they look like little buttons. -
Attach the teeth:
Place these white dots just below the red mouth line, following the curve of the smile. -
Add side details:
Place one additional white dot on the far left and right ends of the smile to frame the mouth.
Display your charming monster on a plate or shelf to bring a smile to everyone who sees it


Mini Clay Food Treats for Pretend Play

Transform simple lumps of clay into a delectable assortment of miniature desserts perfect for a dollhouse tea party. This project focuses on soft pastel colors and tiny realistic details like sprinkles and waffle textures that make these treats look good enough to eat.
Step-by-Step Guide
Materials
- Polymer clay or air-dry clay (tan/beige, pink, white, mint blue)
- Clay sculpting tools (plastic knife, needle tool)
- Small dotting tool or toothpick
- Liquid clay (TLS) or white craft glue
- Chalk pastels (brown/orange for shading)
- Soft paintbrush
- Gloss glaze or varnish
Step 1: Doughnut Delights
-
Form the base:
Start by rolling small balls of tan or beige clay about the size of a marble. Gently flatten them slightly into thick discs to form the dough base. -
Create the hole:
Using the back of a paintbrush or a specialized clay tool, press directly into the center of each disc to create the doughnut hole. Smooth out the edges so the dough looks puffed and baked. -
Mix the frosting:
Condition small amounts of pink and mint blue clay until soft. I like to roll these into very thin, flat sheets to prepare them for draping. -
Frost the treats:
Use a small round cutter or your fingers to shape the frosting sheet into a circle slightly smaller than the doughnut. Place it on top, gently pressing the edges down to mimic melted icing. -
Add sprinkles:
Roll extremely tiny, thin snake-like strips of yellow, pink, and white clay. Chop them into microscopic bits with a craft knife and press them gently onto the frosting.
Step 2: Ice Cream & Cream Puffs
-
Shape the cones:
Roll tan clay into a cone shape. Use a plastic knife or needle tool to gently score a cross-hatch grid pattern all around the cone to create a realistic waffle texture. -
Swirl the soft serve:
Take a long, thin snake of pink clay and coil it upward into a spiral, tapering it at the top. Ensure the base of the swirl is wide enough to sit on your cone. -
Attach and decorate:
Press the ice cream swirl firmly onto the cone base. Add tiny sprinkles or use a dot of pink clay for a cherry on top. -
Make the cupcake base:
Form a small cylinder of mint blue clay. Use a needle tool to press vertical ridges all around the sides to simulate a paper cupcake liner. -
Pipe the frosting:
Similar to the ice cream, create a swirl of white clay. Place a tiny pink ball of clay on the very peak for a finishing touch.
Bakery Texture Trick
Gently texture the tan dough parts with a clean toothbrush or a balled-up piece of aluminum foil before baking to make it look like real sponge cake.
Step 3: Finishing Touches
-
Create the striped cookie:
Flatten a ball of tan clay into a cookie shape. Lay thin strips of pink and blue clay across the surface in a random pattern, then gently roll over them to embed the stripes. -
Shade for realism:
Scrape some brown chalk pastel into a powder. Using a soft, dry brush, lightly dust the edges of the waffles, doughnuts, and cookies to give them a golden-baked appearance. -
Bake or dry:
If using polymer clay, bake according to the package instructions (usually 275°F for 15 minutes). If using air-dry clay, leave them in a safe place for 24-48 hours. -
Glaze:
Once cool or dry, paint a layer of gloss glaze specifically over the ‘frosting’ and ‘ice cream’ parts to make them look shiny and sweet.
Turn Them Into Charms
Before the clay hardens, insert a small metal eye pin into the top of the ice cream or doughnut. Add a chain later to make a sweet necklace.
Set up your miniature bakery scene and enjoy serving these tiny, calorie-free confections


Handprint Trinket Dishes

Transform a simple slab of clay into a vibrant, functional keepsake with this distinct handprint design. The finished piece features a bold, raised hand relief painted in coral pink against a deep glossy blue background, making it perfect for holding small treasures like rings and buttons.
Step-by-Step Tutorial
Materials
- White creative clay (air-dry or kiln-fire depending on preference)
- Rolling pin
- Fettling knife or plastic clay tool
- Small bowl (to use as a slump mold)
- Plastic wrap
- Sponge and water cup
- Acrylic paints (Coral Pink and Navy/Royal Blue)
- Small paintbrush (for fine edges)
- Medium flat paintbrush
- Glossy sealant, varnish, or clear glaze
Step 1: Shaping the Clay Base
-
Roll the slab:
Start with a ball of clay about the size of a grapefruit. Flatten it slightly with your palm, then use a rolling pin to roll it out into an even slab, approximately 1/4 inch thick. Aim for a circular shape, but it doesn’t need to be perfect yet. -
Cut the circle:
Find a bowl or a round template that matches your desired dish size. Place it gently on the clay slab and trace around it with a needle tool or fettling knife to cut out a clean circle. Remove the excess clay. -
Smooth the edges:
Dip a small sponge or your finger into water and run it along the cut edge of the circle. This removes any sharp burrs and creates a professional, rounded rim for your bowl.
Fixing Cracks
If you see hairline cracks while air-drying, mix a tiny bit of fresh clay with water to make a paste. Fill the cracks, smooth it out, and let it dry again.
Step 2: Creating the Hand Relief
-
Trace the hand:
Roll out a separate, thinner piece of clay from your scraps. Have the child place their hand on this slab. Using a needle tool, carefully trace around the fingers and palm. Don’t worry about getting too close to the skin; a slightly wider outline is easier to handle. -
Refine the cutout:
Lift the hand away and clean up the traced lines with your knife. Smooth the edges of each clay finger with a damp finger so they aren’t sharp or jagged. -
Score and slip:
To attach the hand to the bowl base, use the ‘score and slip’ method. Use a tool to scratch cross-hatch marks onto the back of the clay hand and the spot on the circle where it will sit. Dab a little water (slip) on the scratches. -
Press into place:
Firmly press the clay hand onto the circle base. Use your fingers to gently smooth the edges of the hand down so it looks integrated with the bowl, not just floating on top.
Make it Personal
Before the clay dries, use alphabet stamps to press the child’s name or the year into the palm area for an extra sentimental touch.
Step 3: Forming and Drying
-
Prepare the mold:
Take the small bowl you are using as a mold and line the inside with plastic wrap. This prevents the clay from sticking as it dries. -
Slump the clay:
Gently lift your clay circle (with the hand attached) and place it inside the lined bowl. Press it down gently so it takes on the curved shape of the bowl. -
Add texture:
While the clay is in the mold, the rim might become a bit uneven. I like to purposefully pinch the rim slightly between my thumb and forefinger to give it that organic, handmade wavy look seen in the photo. -
Let it dry:
Allow the clay to dry completely in the mold. For air-dry clay, this usually takes 24-48 hours. If using kiln clay, follow your specific firing instructions.
Step 4: Painting and Finishing
-
Outline the hand:
Once fully dry (and fired, if applicable), start painting. Use a small brush and your coral pink paint to carefully outline the hand shape first. This ensures clean lines where the colors meet. -
Fill the hand:
Fill in the rest of the hand shape and the outer rim of the bowl with the coral pink. You may need two coats for opaque coverage. -
Paint the background:
Paint the negative space inside the bowl—the area surrounding the hand—with a deep royal blue or navy. The contrast makes the hand pop. -
Seal the piece:
Once the paint is totally dry, apply a high-gloss varnish or sealant over the entire dish. This creates that shiny, ceramic-like finish and protects the paint from chipping.
Now you have a charming, handmade catch-all dish ready to display on a shelf or gift to a loved one

The Complete Guide to Pottery Troubleshooting
Uncover the most common ceramic mistakes—from cracking clay to failed glazes—and learn how to fix them fast.
Rainbow Clay Bead Bracelets and Necklaces
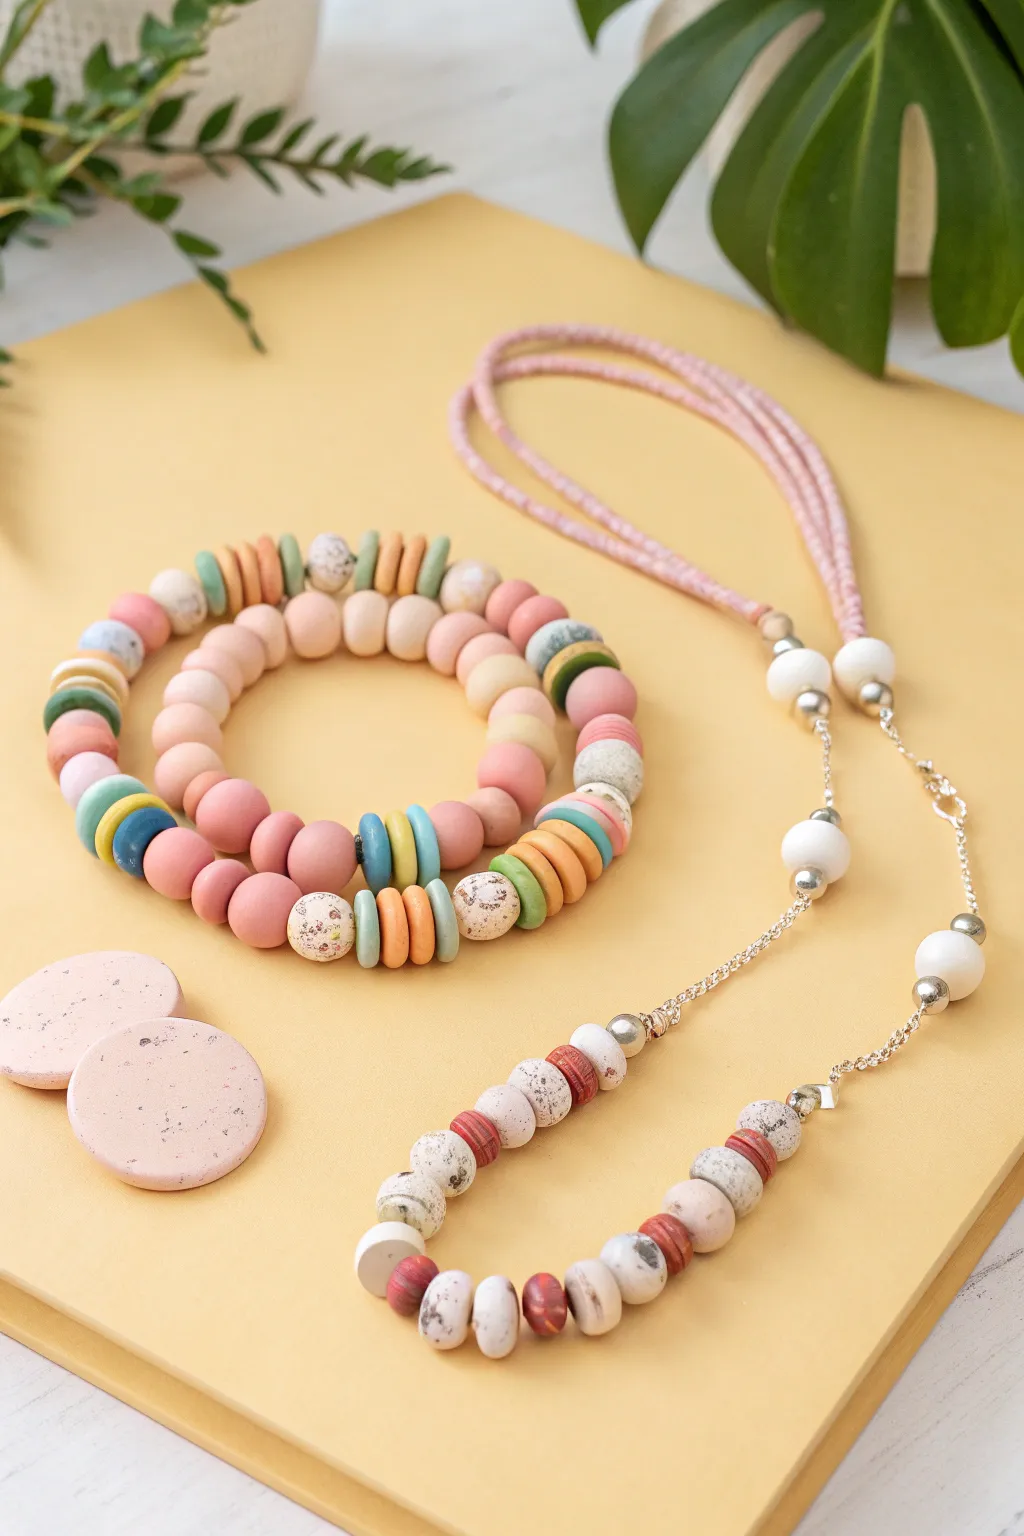
These stylish bracelets and necklaces combine soothing pastel tones with earthy textures for a modern, artistic look. By mixing smooth round beads with flat, speckled discs, you’ll create a layered or matching set that looks professionally handcrafted.
Step-by-Step
Materials
- Polymer clay (shades of pink, peach, white, mustard yellow, sage green, and soft blue)
- Ground pepper or craft sand (for speckled texture)
- A smooth rolling pin or acrylic roller
- A small circle cutter (approx. 1cm diameter)
- Toothpick or bead piercing tool
- Elastic jewelry cord (for bracelets)
- Silver chain, jump rings, and lobster clasp (for necklace)
- Light pink cord or waxed cotton string
- Jewelry pliers
- Parchment-lined baking sheet
- Oven (for baking clay)
Step 1: Crafting the Beads
-
Prepare the speckled clay:
Start by taking a portion of your white and light pink clay. Knead a small pinch of ground pepper or craft sand into the clay to create the beautiful speckled stone effect seen on the focal beads. -
Roll spheres:
For the basic round beads, pinch off equal-sized pieces of pink, peach, and white clay. Roll them vigorously between your palms until they are perfectly smooth spheres, about 1-1.5cm wide. -
Create flat discs:
Roll your colorful clays (blue, green, yellow, pink) into a flat sheet about 3mm thick. Use your small circle cutter to punch out numerous discs. -
Smooth the edges:
Take each disc and gently run your finger around the edge to soften any sharp cuts from the cutter, giving them a more organic, tumble-worn look. -
Pierce the holes:
Using a toothpick or piercing tool, carefully poke a hole through the center of every bead. I find twisting the toothpick as you push helps prevent the clay from squashing. -
Bake the beads:
Arrange all your beads on a parchment-lined baking sheet. Bake according to your clay package’s specific temperature and time instructions, usually around 275°F (130°C) for 15-30 minutes. -
Cool completely:
Let the beads cool fully before handling. They harden as they cool, so don’t be alarmed if they feel slightly flexible right out of the oven.
Step 2: Assembling the Bracelets
-
Plan the pattern:
Lay out your beads on a table first. For the mixed bracelet, alternate small stacks of colorful discs (2-3 of the same color) with single speckled white or peach round beads. -
String the elastic:
Cut a piece of elastic cord about 10 inches long. Thread your planned pattern onto the cord, checking the length against your wrist as you go. -
Secure the finish:
Once satisfied with the length, tie a strong surgeon’s knot (right over left, left over right). trim the excess elastic, and dab a tiny drop of super glue on the knot for extra security.
Hole Perfection Pro-Tip
To avoid flattening your round beads while piercing them, let the clay sit in the fridge for 10 minutes first. This firms it up just enough to hold its shape perfectly against the toothpick.
Step 3: Constructing the Necklace
-
Prepare the main strand:
Cut a length of silver chain to your desired length. Attach a lobster clasp and jump ring to the ends using your pliers. -
Create bead links:
Thread a speckled bead or a small stack of colored discs onto a jewelry headpin. Create a loop at the top of the pin with round-nose pliers. -
Attach links to chain:
Open the loops you just made and attach these bead charms to the silver chain at regular intervals. -
Add the cord detail:
For the upper section shown in the image, braid three strands of pink cord or use a thick piece of waxed cotton. Attach this to the top of your chain using jump rings or crimp ends for a mixed-media texture. -
Final touches:
Inspect all jump rings to ensure they are fully closed so your necklace stays secure during wear.
Level Up: Texture
Before baking, gently press a piece of coarse sandpaper or a clean toothbrush against some of the beads. This adds a subtle, stony texture that contrasts beautifully with the smooth beads.
Enjoy wearing your custom jewelry set or gift it to a friend for a handmade surprise
Easy Coil Pot Pots With Bright Patterns
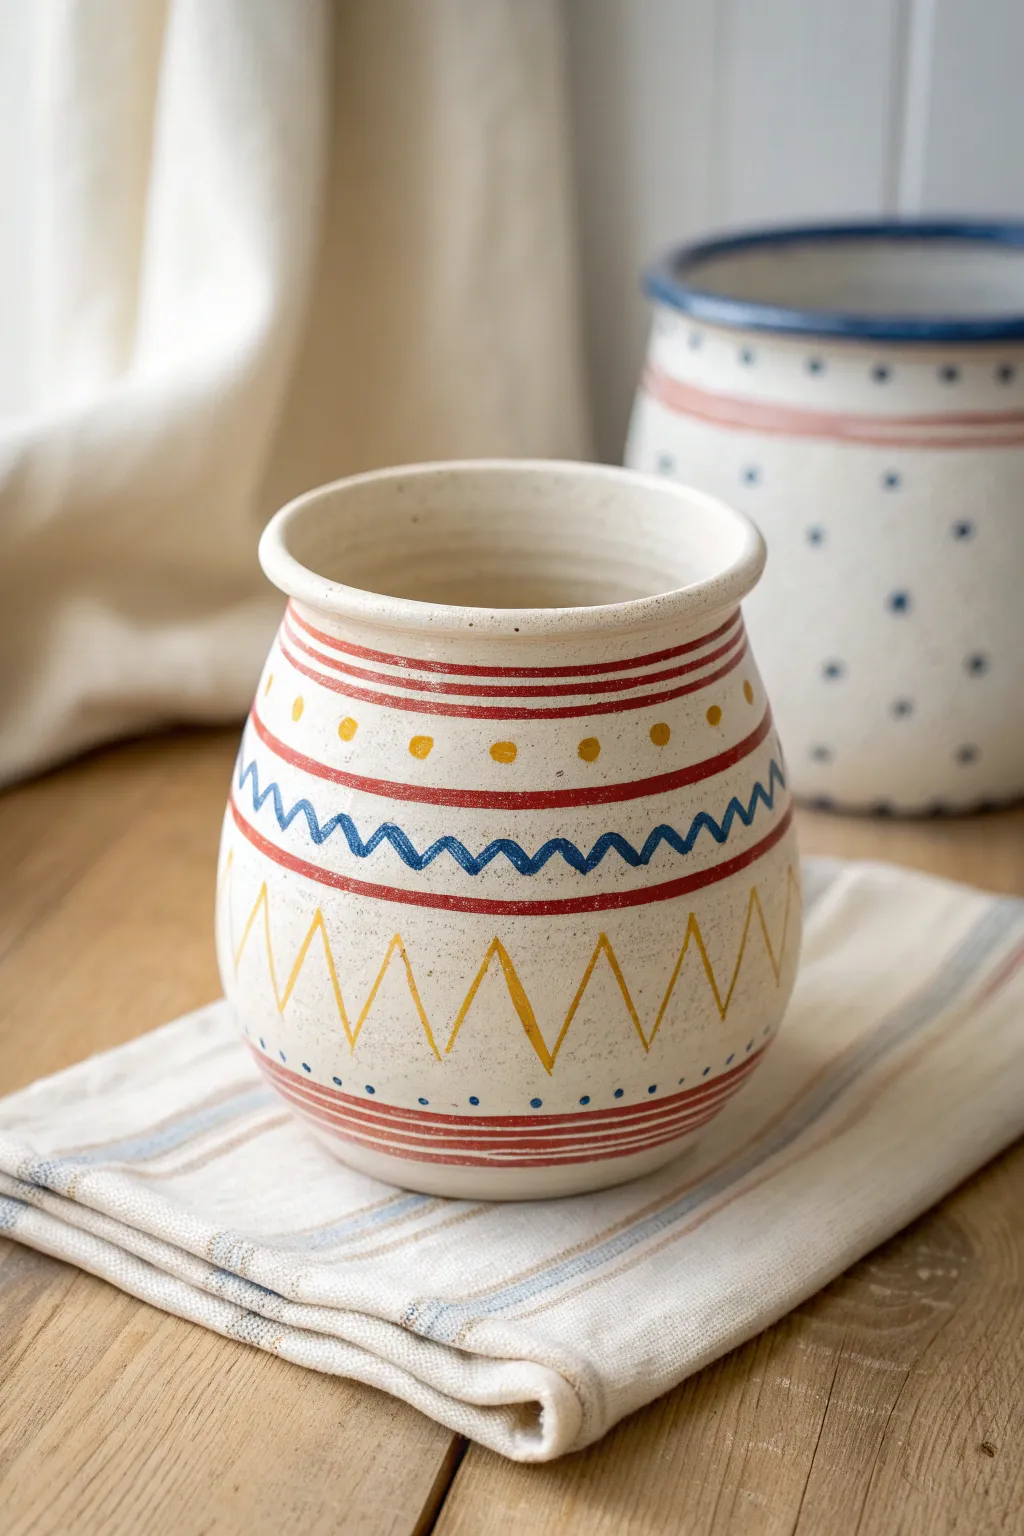
Learn to make a charming, rustic vessel using the classic coil-building technique, smoothed out for a clean canvas. This pot features vibrant folk-art inspired bands of zigzags, dots, and lines that bring a pop of color to any shelf.
Step-by-Step Guide
Materials
- White stoneware or air-dry clay (approx. 1-2 lbs)
- Clay roller or rolling pin
- Sharpened wooden tool or needle tool
- Sponge
- Serrated metal rib or old credit card
- Acrylic paints (Red, Blue, Yellow)
- Small fine-tipped paintbrushes
- Clear acrylic sealer or glaze
Step 1: Building the Form
-
Create the Base:
Start by rolling a ball of clay about the size of a lemon and flattening it into a disk about 1/4 inch thick. This circular disk will become the floor of your pot. -
Roll Coils:
Take a chunk of clay and roll it back and forth on your table with the palms of your hands. Aim for long, even ‘snakes’ roughly the thickness of your pinky finger. -
Score and Slip:
Before attaching the first coil, use a needle tool or fork to scratch up (score) the outer edge of your base. Add a dab of water or slip (liquid clay) to act as glue. -
Stack the First Layer:
Place the first coil directly on the scored edge of the base. Gently press it down to adhere it securely. -
Smooth the Inside:
With your thumb or a wooden tool, smear the inside of the coil down onto the base so the seam disappears. This is crucial for strength. -
Continue Stacking:
Repeat the scoring and slipping process for each new coil layer. As you stack, slightly offset the coils outward to widen the belly of the pot, then gradually bring them inward near the top to create the neck. -
Smooth the Exterior:
Once the pot is built, use a rib tool or your fingers to drag clay across the outer coil seams. I like to smooth vertically first, then horizontally, until the surface looks like a single uninterrupted wall. -
Create the Rim:
Roll one final, slightly thicker coil for the rim. Attach it to the top opening and smooth it nicely with a damp sponge so it flares out just a tiny bit.
Smooth Operator
To get that perfectly smooth finish hiding the coils, use a damp sponge periodically while building, but don’t over-wet the clay or it might sag.
Step 2: Painting the Design
-
Dry and Prime:
Allow your pot to dry completely (several days for air-dry clay). If the clay isn’t naturally white, give the whole pot a base coat of white or cream acrylic paint. -
Paint the Upper Bands:
Using a fine brush and red paint, carefully draw two parallel horizontal lines just below the flared rim. Keep your hand steady by resting your pinky on the pot. -
Add Polka Dots:
Between the two red bands, dip the back end of your paintbrush into yellow paint and stamp small dots around the circumference. -
Create the Wave:
About an inch below the red bands, paint a continuous blue zigzag or wave pattern. Try to keep the peaks and valleys consistent as you rotate the pot. -
Frame the Wave:
Paint a single red line above and below the blue wave to frame it. This helps the blue color pop against the white clay. -
Paint Large Zigzags:
On the lower half of the pot, use yellow paint to create large, sharp zigzag triangles. These should be much taller than your blue waves. -
Finishing Details:
Add a thin red band near the very bottom. Just above this line, add tiny blue dots using the tip of a toothpick or a very fine brush. -
Seal the Work:
Once the paint is fully dry, apply a coat of clear acrylic sealer or a glossy varnish to protect the design and give it a ceramic-like shine.
Uneven Walls?
If one side of your pot starts getting higher than the other, simply pinch the lower side gently to stretch it up, or gently tap the high side down.
Now you have a beautiful, hand-patterned vase ready to display dried flowers or pencils


What Really Happens Inside the Kiln
Learn how time and temperature work together inside the kiln to transform clay into durable ceramic.
Nature Texture Prints With Leaves and Flowers
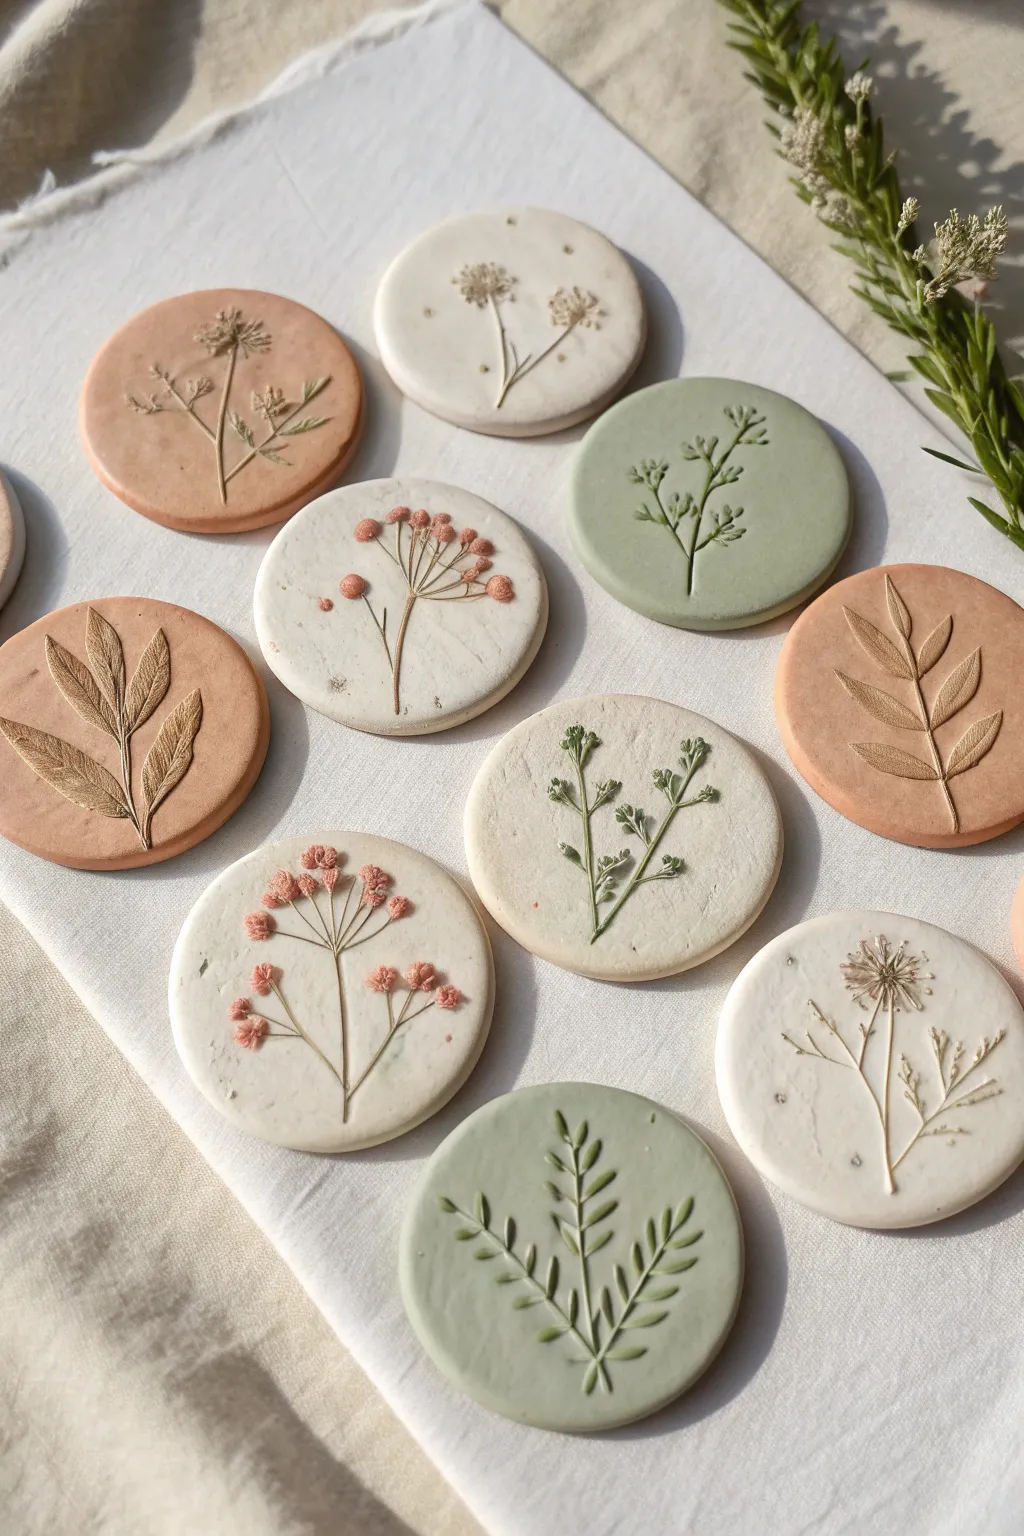
Capture the delicate details of nature with these elegant clay discs, perfect for showcasing the textures of stems, leaves, and tiny blooms. The finished pieces have a smooth, matte finish with earthy tones of terracotta, sage, and cream that highlight the beautiful botanical imprints.
Step-by-Step Tutorial
Materials
- Air-dry clay (white, terracotta, and colored varieties)
- Small rolling pin or acrylic roller
- Round cookie cutter or a glass cup
- Fresh or dried plant cuttings (lavender, ferns, baby’s breath, small weeds)
- Parchment paper or a silicone mat
- Fine-grit sandpaper (optional)
- Acrylic paints (botanical greens, soft pinks)
- Very fine detail paintbrush
- Matte spray varnish or Mod Podge (optional)
Step 1: Preparing the Clay Canvas
-
Condition the Clay:
Start by taking a handful of clay and kneading it in your hands until it is warm and pliable. This prevents cracks from forming later. -
Select Your Palette:
Decide on your base colors. For this project, you’ll want a mix of plain white, terracotta, and a soft sage green. You can mix white clay with a tiny drop of green acrylic paint if you don’t have pre-colored green clay. -
Roll It Out:
Place your clay ball on a sheet of parchment paper. Roll it out evenly until it is about 1/4 inch thick. Aim for a consistent thickness so the discs dry flat. -
Cut the Shapes:
Using a round cookie cutter or the rim of a glass, press firmly into the rolled clay to cut out perfect circles. Lift the excess clay away from the circles. -
Smooth the Edges:
Dip your finger in a little bit of water and gently run it along the cut edge of the circle to smooth out any roughness or sharp corners.
Step 2: Imprinting Nature
-
Choose Your Specimen:
Select a small sprig or leaf. Sturdier stems and defined veins work best. Place the plant material directly onto the center of a clay circle. -
The Initial Press:
Gently press the plant into the clay with your fingertips first to set its position. -
Roll to Imprint:
Take your rolling pin and roll over the plant material with firm, even pressure. You want to push the plant flush with the surface of the clay without thinning the disc too much. -
The Reveal:
Find the stem end of your plant and very carefully peel it away from the clay. Do this slowly to ensure you leave a crisp, clean impression behind. -
Repeat and Vary:
Continue this process for all your clay circles. Try different plants for each one to create a diverse botanical collection.
Sticky Situation?
If the clay sticks to the leaves, lightly dust the plant with cornstarch before pressing. A pair of tweezers helps remove stubborn stem bits without gouging the clay.
Step 3: Drying and Refining
-
Drying Phase:
Let the discs dry completely on a flat surface. Depending on humidity and clay type, this usually takes 24-48 hours. Is good to flip them over halfway through so the bottom dries evenly. -
Sanding:
Once fully hard, check the edges. If there are any sharp bits, lightly sand them with fine-grit sandpaper for a professional finish. -
Adding Color (Optional):
For the designs with colored details, take a very fine brush and water down a small amount of acrylic paint. Carefully paint into the deep recesses of the imprint. -
Highlighting Blooms:
If your imprint has flowers (like the baby’s breath style), dab tiny dots of pink or ochre paint into the floral heads to make them pop against the white clay. -
Sealing:
To protect your artwork, apply a thin coat of matte varnish or Mod Podge. This preserves the earthy look while preventing smudges.
Make Them Hangable
Before the clay dries, use a straw or skewer to poke a neat hole near the top edge. Once dry, thread some twine or ribbon through to turn these into lovely ornaments.
Display your botanical reliefs on a shelf or gift a set to a nature lover to bring a touch of the outdoors inside
Clay Relief Tiles as Mini “Paintings”
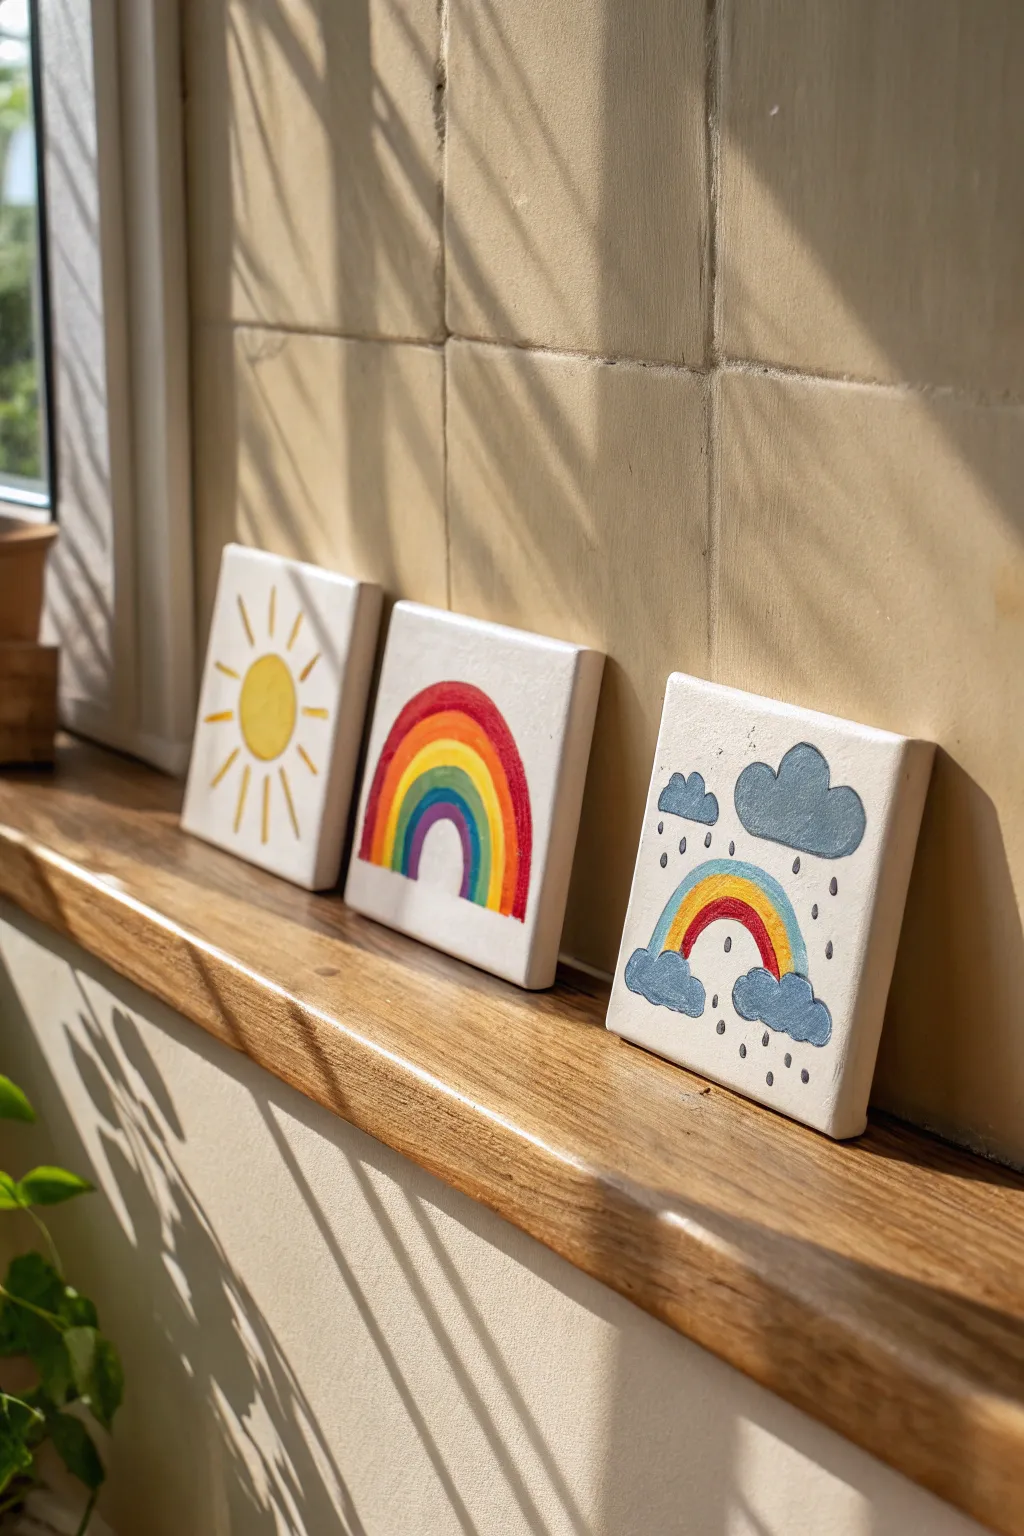
Brighten up any windowsill with this charming set of hand-painted clay relief tiles featuring cheerful weather motifs. These square mini-canvases are the perfect size for kids to practice their painting skills while creating durable little artworks.
Detailed Instructions
Materials
- White air-dry clay (or polymer clay)
- Square cookie cutter (approx. 3-4 inches) or a knife and ruler
- Rolling pin
- Sandpaper (fine grit)
- Acrylic paints (yellow, orange, red, green, blue, purple, light grey, dark grey)
- Small flat paintbrushes and fine detail brushes
- Parchment paper or non-stick work mat
- Water cup and paper towels
- Matte or glossy varnish (optional)
Step 1: Shaping the Canvases
-
Prepare the workspace:
Lay down your parchment paper or non-stick mat on a flat, even surface to prevent the clay from sticking. -
Condition the clay:
Take a generous handful of white air-dry clay and knead it until it feels soft, pliable, and free of cracks. -
Roll it out:
Use the rolling pin to flatten the clay to a uniform thickness, aiming for about 1/4 inch to ensure the tiles are sturdy enough to stand upright. -
Cut the squares:
Press your square cookie cutter firmly into the clay to create three identical shapes. If you don’t have a cutter, measure 3×3 or 4×4 inch squares with a ruler and carefully cut them out with a craft knife. -
Smooth the edges:
Dip your finger in a tiny bit of water and gently run it along the cut edges of each square to soften any sharp corners or roughness. -
Let them cure:
Set the tiles aside to dry completely according to the package instructions. This usually takes 24-48 hours; flip them over halfway through so they dry evenly without warping. -
Sand for perfection:
Once fully hard, use fine-grit sandpaper to lightly buff the surface and edges, creating a smooth, professional base for your paint.
Step 2: Painting the Sunlight
-
Outline the sun:
On the first tile, use a pencil to very lightly sketch a circle in the center and radiating lines for rays. -
Fill the center:
Use a bright, sunny yellow acrylic paint to fill in the central circle. You may need two coats for opaque coverage. -
Paint the rays:
Using a thinner brush, paint the radiating lines. Alternate between shorter and longer strokes to give the sun a dynamic, shining effect.
Warp Watch
To prevent curling edges while air-dry clay cures, place a light book or board gently on top of the tiles once the surface is dry to the touch.
Step 3: Creating the Class Rainbow
-
Sketch the arch:
On the second tile, pencil in a large arch shape starting from the bottom edge, leaving room for about five stripes. -
Paint the red band:
Start with the outermost band using red paint. I find it easier to rotate the tile itself while painting the curve rather than twisting my wrist. -
Complete the spectrum:
Work your way inward with orange, yellow, green, blue, and purple stripes. Allow adjacent colors to dry briefly if you’re worried about them bleeding into each other.
Raised Relief
Add 3D texture by molding tiny coils of clay for the rainbows or flat lumps for clouds and pressing them onto the wet base tile before drying.
Step 4: Rainy Days & Clouds
-
Draft the scene:
For the third tile, sketch two fluffy clouds at the bottom corners and two floating higher up, with a rainbow arching between the lower ones. -
Paint the clouds:
Fill in the cloud shapes with a slate blue or grey paint. Add a few highlights with a lighter grey or white to give them volume. -
Add the mini rainbow:
Paint a small, three-color rainbow connecting the two bottom clouds. Use fine lines of red, yellow, and blue. -
Make it rain:
Using the very tip of your finest brush or a toothpick, dot small grey vertical dashes falling from the upper clouds to simulate gentle rain. -
Seal the deal:
Once all paint is bone dry, apply a coat of matte varnish to protect your artwork from dust and sunlight.
Arrange your finished trio on a sunny ledge to enjoy these happy skies regardless of the weather outside

TRACK YOUR CERAMIC JOURNEY
Capture glaze tests, firing details, and creative progress—all in one simple printable. Make your projects easier to repeat and improve.
Fairy House Lanterns and Tiny Doors
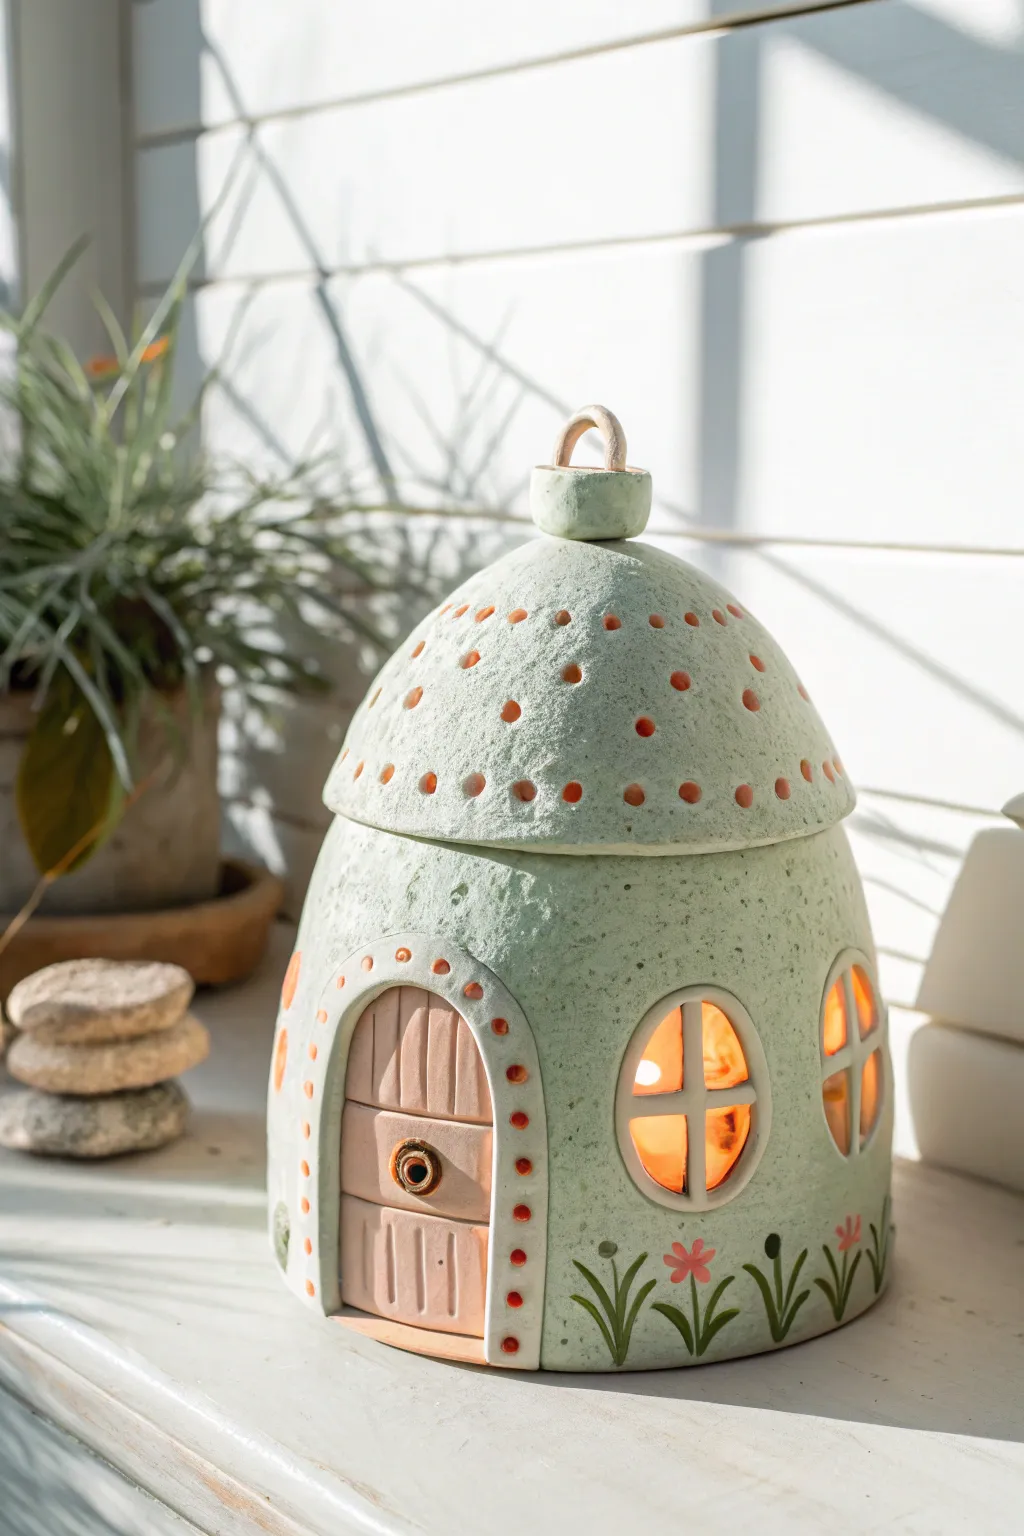
Transform a slab of clay into this enchanting little abode, complete with a removable roof and warm candlelight glowing through the windows. The soft sage green finish and charming pink door make it a perfect addition to a child’s bedroom or a magical garden corner.
How-To Guide
Materials
- White earthenware clay or air-dry clay (approx. 2-3 lbs)
- Rolling pin
- Fettling knife or clay cutting tool
- Slip and scoring tool (toothbrush or needle tool)
- Round cookie cutters (various small sizes)
- Bowl (small, approx. 4-5 inches diameter) for roof mold
- Cardboard tube or can (for wall support)
- Sponge
- Soft green underglaze or acrylic paint (if using air-dry)
- Pink and orange underglaze or acrylic paint
- Simple clear glaze (if firing)
- Battery-operated tea light
Step 1: Building the Base Structure
-
Roll the Slabs:
Begin by rolling out a medium slab of clay to an even thickness of about 1/4 inch. You will need enough for a rectangular wall and a circular floor piece. -
Cut the Base:
Cut a circle for the floor of your house. I usually use a bowl or large lid as a template to get a perfect circle, roughly 5 inches in diameter. -
Form the Walls:
Cut a long rectangular strip for the walls. Wrap this strip loosely around a cardboard tube or just form a cylinder by hand that matches the circumference of your base circle. -
Attach Walls to Base:
Score (scratch) and slip (wet) the bottom edge of the wall and the outer edge of the base. Press them firmly together to create a seal, then smooth the seam on the inside and outside using a wooden tool or your finger. -
Create the Doorway:
Use a knife to cut an arched opening for the door. Save the piece of clay you cut out—you will use this to make the actual door later. -
Add Windows:
Use small round cutters to punch out window holes on the sides. While the clay is still pliable, hand-roll thin coils and arrange them inside the window frames to create a crossbar effect.
Make it texture-perfect
Before assembling, gently dab the clay surface with a stiff brush or a textured sponge. This creates that lovely organic, stippled look seen on the green walls.
Step 2: Crafting the Roof & Door
-
Mold the Roof:
drape a fresh slab of clay over a small, inverted bowl covered in plastic wrap to create the dome shape. Trim the edges so it sits somewhat flush with the diameter of your house base. -
Add Decorative Holes:
Using a small straw or needle tool, poke rows of tiny holes around the dome. This isn’t just decoration; it helps vent heat if you ever use a real candle, though battery lights are safer. -
Top Loop:
Fashion a small loop or knob from a scrap of clay and attach it securely to the very top of the dome using the score-and-slip method. -
Detail the Door:
Take the clay arch reserved earlier and trim it slightly so it fits loosely in the doorway. Scribe vertical lines to look like wood planks and add a tiny clay donut for a doorknob. -
Assemble Door Frame:
Roll a thin snake of clay and attach it around the exterior of the door arch to create a frame. Carefully press small indentations into this frame with a tool tip to mimic nail holes or texture.
Level Up: Magic Glow
Make the windows translucent! Glue small pieces of yellow or orange tissue paper inside the dry house (behind the window crosses). It diffuses the tea light warmly.
Step 3: Finishing Touches
-
Smooth and Dry:
Use a slightly damp sponge to wipe down all surfaces, removing rough fingerprints and sharp edges. Let the pieces dry slowly under loose plastic to prevent warping. -
Bisque Fire (If Ceramic):
If using kiln clay, fire the piece to bisque temperature once fully bone dry. -
Apply Base Color:
Sponge on a textured coat of sage green paint or glaze over the entire exterior of the house and roof. Leave the door unpainted for now. -
Paint Details:
Paint the door a soft blush pink. Use orange paint to highlight the tiny holes in the roof and the dots around the door frame. -
Garden Accents:
Using a fine brush, paint simple grass blades and small pink flowers around the bottom edge of the house to ground it. -
Final Glaze/Seal:
If traditional pottery, apply a clear glaze and fire again. If using acrylics on air-dry clay, seal with a matte varnish spray.
Place a battery-operated candle inside and watch your fairy cottage come to life with a cozy glow
Under-the-Sea Coral Reef Wall Plaques
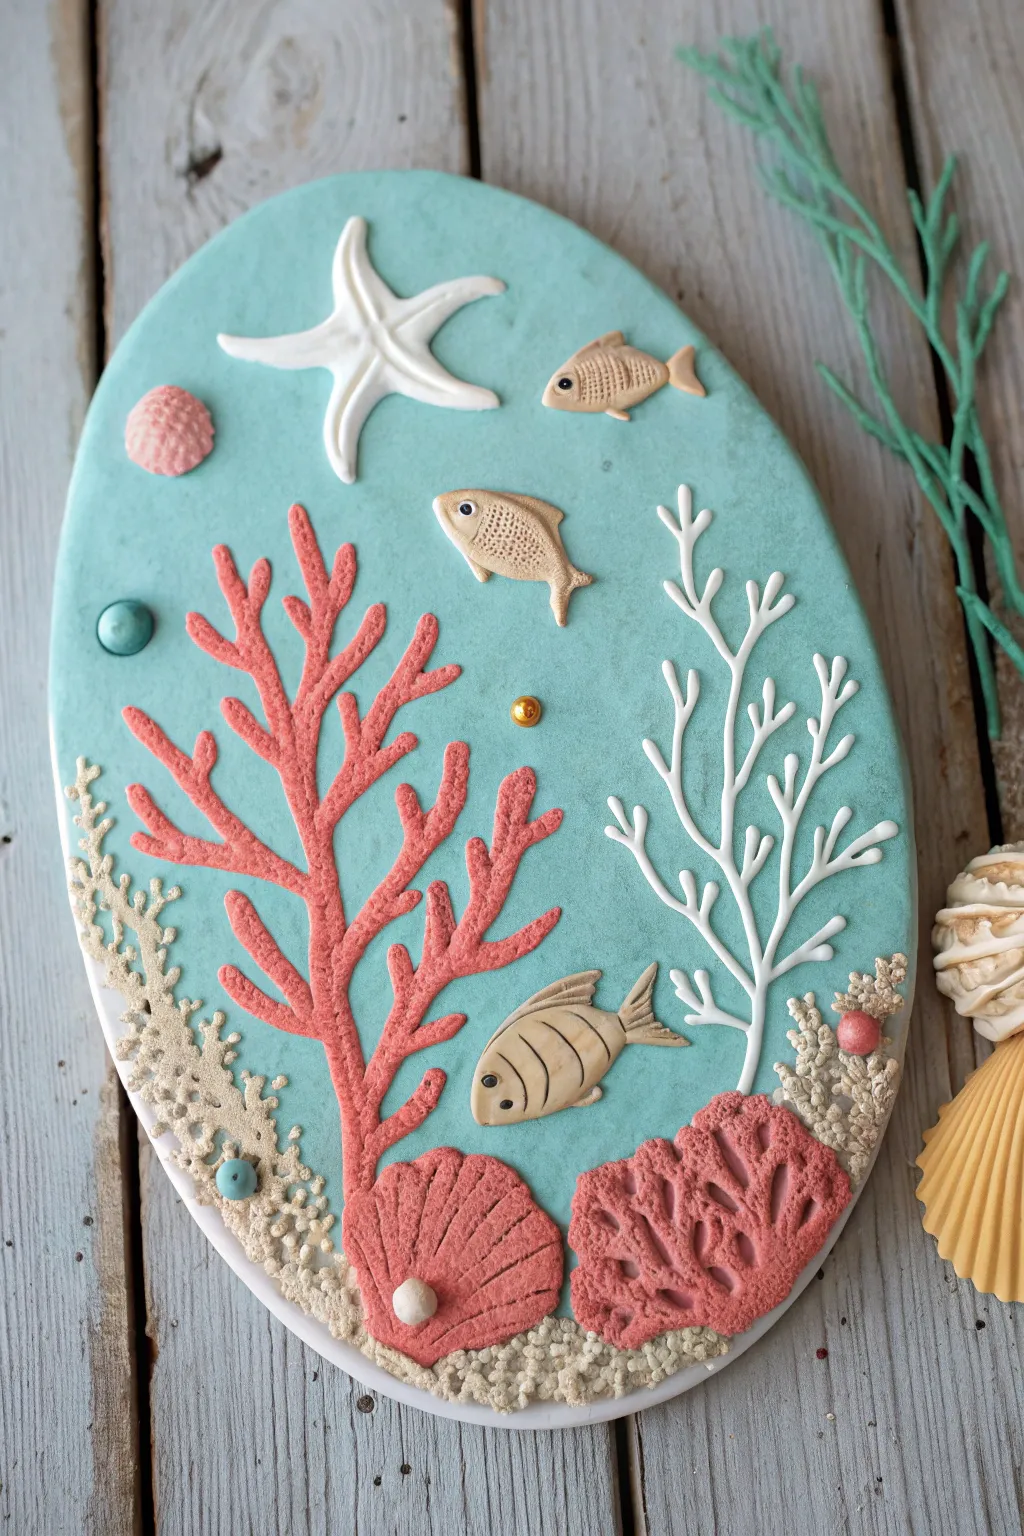
Dive into creativity with this stunning underwater scene made entirely from air-dry clay. This oval plaque features delicate coral branches, textured sea friends, and a soft blue ocean backdrop that looks lovely on any wall.
Step-by-Step Guide
Materials
- White air-dry clay (or polymer clay)
- Acrylic rolling pin
- Oval cookie cutter or oval template
- Modeling tools (needle tool, ball tool)
- Acrylic paints (teal/aqua, coral pink, white, beige, gold)
- Paintbrushes (fine detail and medium flat)
- Texture tools (clean toothbrush or sandpaper)
- Craft glue or clay slip
- Small beads (pearls, gold, teal)
Step 1: Creating the Ocean Base
-
Prepare the Background Clay:
Start by taking a large ball of white clay and mixing in a drop of teal acrylic paint (or use pre-colored clay) to get that soft ocean blue visible in the background. Knead it until the color is completely uniform. -
Roll and Cut the Oval:
Roll the blue clay out on a smooth surface to an even thickness of about 1/4 inch. Use a large oval cutter or trace around a paper oval template with a knife tool to create the plaque shape. -
Smooth the Edges:
Dip your finger in a little water and gently run it along the cut edges of the oval to smooth out any roughness or stray clay bits.
Sticky Situation?
If your thin coral branches keep breaking as you lift them, roll and shape them directly onto the blue background rather than trying to move them after rolling.
Step 2: Sculpting the Coral & Sea Floor
-
Texture the Sand Bed:
Mix a small amount of beige clay. Press small, irregular bits along the bottom left and bottom edge of the oval to mimic the sea floor. -
Add Sandy Detail:
Using a needle tool or an old toothbrush, stipple the beige clay vigorously to give it a rough, grainy texture that looks just like sand. -
Form the Large Pink Coral:
Roll thin snakes of coral-pink clay. Arrange them on the left side, branching outward like a tree. Use your needle tool to gently texture the surface of these branches for a porous look. -
Create White Branch Coral:
Roll very thin, delicate snakes of white clay. Arrange these on the right side of the plaque in a branching pattern similar to the pink coral but slightly thinner. -
Add the Bottom Coral Mound:
Form a flat, irregular shape from a darker pink or reddish clay and place it at the bottom right. Use a ball tool to press indentations all over it, creating a sponge-like texture. -
Sculpt the Scallop Shell:
Press a small fan shape of pink clay near the bottom center. Use a knife tool to score vertical lines radiating from the base to resemble a scallop shell.
Step 3: Adding Sea Life & Finishing Touches
-
Make the Starfish:
Flatten a small piece of white clay and cut out a five-pointed star shape. Pinch each arm gently to taper the ends and press a groove down the center of each arm. -
Position the Starfish:
Attach the starfish near the top left of the plaque using a tiny dab of water or clay slip to secure it. -
Shape the Fish Bodies:
Create three small, flat teardrop shapes from beige or light brown clay. These will be your swimming fish. -
Detail the Fish:
Place the fish in the open water areas. Use a knife tool to impress scale patterns (cross-hatching) or stripes onto their bodies, and add small triangles for fins. -
Add Eyes:
Use the smallest ball tool or a needle to make an eye socket on each fish. Place a tiny black bead or a speck of black clay inside for the pupil. -
Create Texture Features:
Roll a small ball of pink clay and press a texture tool into it to make a ‘sea urchin’ or textured bump near the top left. -
Embellish with Beads:
While the clay is still slightly soft, press a pearl bead onto the scallop shell and a gold bead into the center of the water area for magical bubbles. -
Final Drying:
Let the entire piece dry flat for at least 24-48 hours. I usually flip it over carefully halfway through to ensure the back dries evenly too.
Ocean Shimmer
Once dry, brush a very thin layer of pearlescent medium or diluted glitter glue over the blue water areas to make it look wet and glistening.
Now you have a permanent piece of the ocean to hang up and admire
Clay Picture Frames With Fun Borders
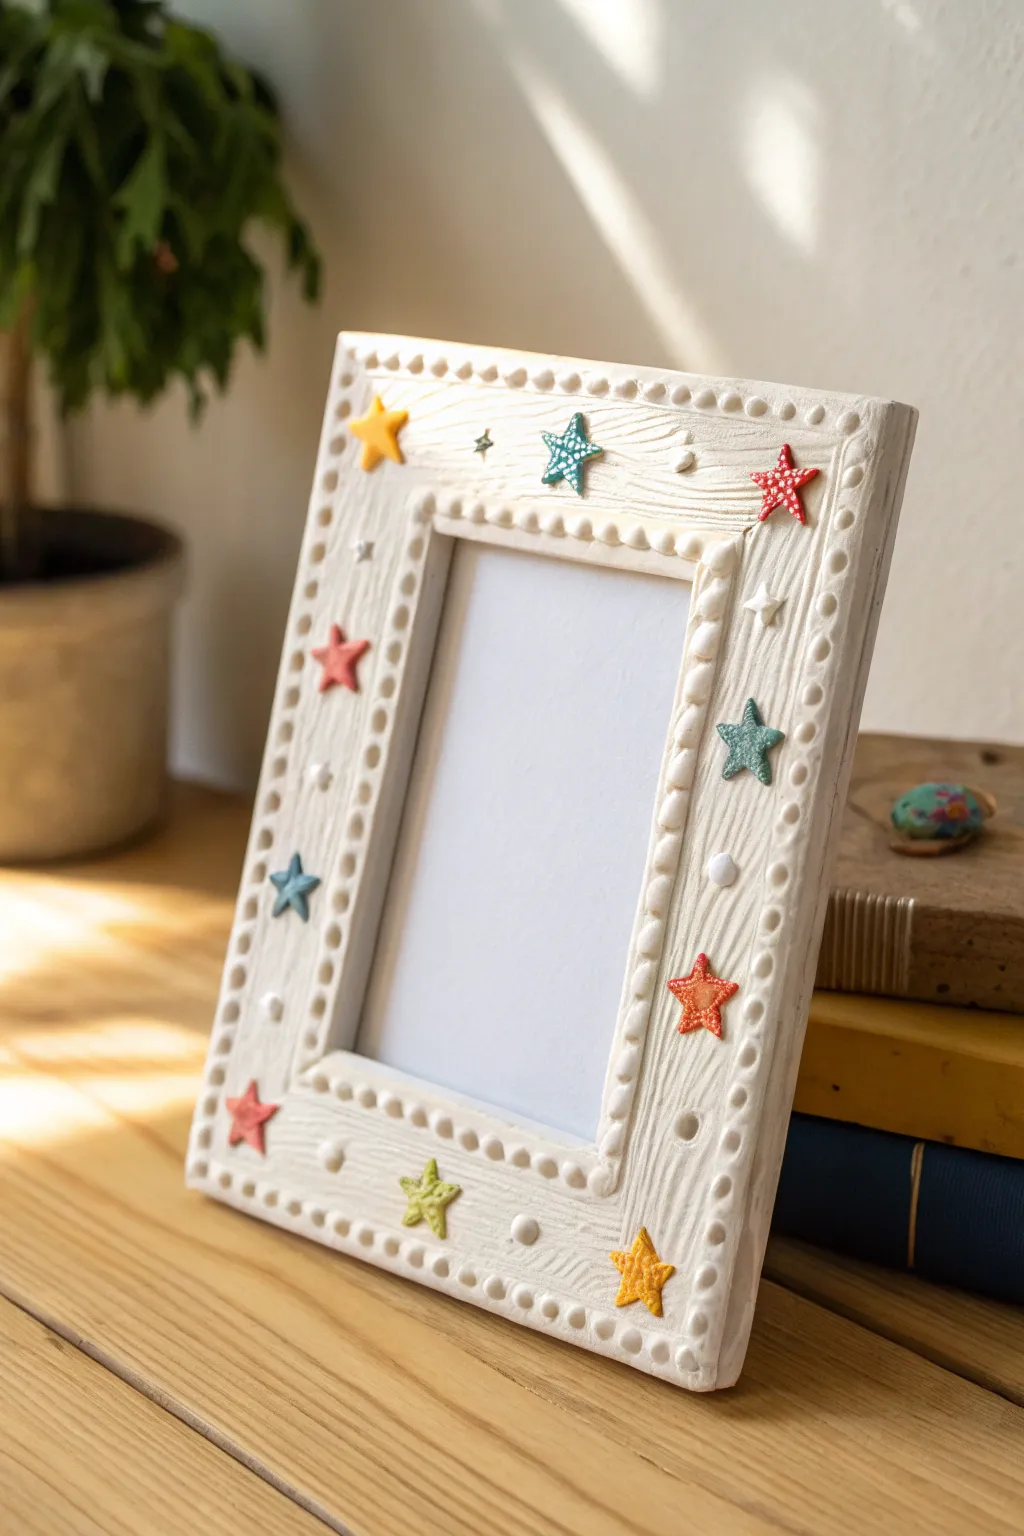
Transform a plain picture frame into a whimsical keepsake using air-dry clay and cheerful star embellishments. The textured white clay border gives it a sophisticated, beachy feel while the pops of color add playfulness.
Detailed Instructions
Materials
- Wide, flat wooden picture frame (unfinished or old)
- White air-dry modeling clay (preferred choice for texture)
- Colored polymer clay (yellow, red, blue, green) or air-dry clay painted later
- Small star-shaped cookie cutters (various sizes)
- Sculpting tools or a craft knife
- Texture tool (comb, fork, or stiff brush)
- Craft glue or strong adhesive
- White acrylic paint (optional, for touch-ups)
- Rolling pin
- Clear matte varnish or sealant
Step 1: Preparing the Base
-
Clean the Frame:
Before you begin, wipe down your wooden frame with a damp cloth to remove any dust or grease. This ensures the clay adheres properly to the surface. -
Roll the White Clay:
Take a large portion of white air-dry clay and knead it until soft. Roll it out into long, flat strips approximately 1/4 inch thick. These strips should be wide enough to cover the face of your frame. -
Apply the Clay Layer:
Brush a thin layer of craft glue onto the wooden frame face. Carefully lay your clay strips over the wood, pressing them down gently. Don’t worry about perfection; join the seams by smoothing them with a little water on your finger. -
Trim Excess:
Using a craft knife or plastic sculpting tool, trim away the excess clay from both the outer and inner edges of the frame to keep clean, straight lines.
Clay Cracking?
If the white clay cracks while drying, mix a tiny bit of fresh clay with water to make a paste (slip) and fill in the cracks, then smooth it over.
Step 2: Adding Texture
-
Create the Wood Grain Effect:
While the clay is still wet, take a texture tool or a stiff-bristled brush. Drag it lengthwise along the frame to create subtle grooves that mimic a painted wood grain or combed plaster effect. -
Make the Beaded Borders:
Roll tiny balls of white clay, roughly the size of peas. Press them gently along the inner and outer perimeters of the frame to create a dotted, beaded border. Try to space them evenly for a polished look. -
Refining the Beads:
Use the rounded end of a paintbrush handle or a ball stylus to press a small indentation into the center of each tiny clay ball. This secures them better and adds a cute detail.
Step 3: Crafting the Stars
-
Roll Colored Clay:
Switch to your colored clays. I find it helpful to wipe my hands or tools between colors to avoid smudging. Roll out small patches of yellow, red, blue, and green clay. -
Cut Out Shapes:
Use small star-shaped cutters to punch out varied stars. If you don’t have cutters, you can hand-cut them with a plastic knife for a more organic, handmade look. -
Add Star Details:
Give the stars some personality by adding texture. Use a needle tool to poke tiny dots on the red stars or scratch cross-hatch patterns onto the blue ones. -
Position the Stars:
Arrange the stars randomly around the frame while the white base is still slightly damp. Press them gently into the white clay so they nestle into the texture. -
Add Tiny Filler Stars:
For extra charm, press very tiny silver or white star sequins, or minuscule bits of clay, into the empty spaces between the larger colored stars.
Make It Sparkle
Mix fine iridescent glitter into the varnish before sealing. It gives the white textured background a magical, snowy shimmer.
Step 4: Finishing Touches
-
Dry Completely:
Let the frame sit undisturbed in a warm, dry area. Air-dry clay can take 24 to 48 hours to fully cure depending on thickness. -
Seal the Work:
Once hardened, brush a coat of clear matte varnish over the entire frame. This protects the clay from moisture and prevents the colored stars from fading. -
Insert Photo:
After the sealant is dry to the touch, place the glass and your favorite photo back into the frame.
This charming frame makes a wonderful gift for grandparents or a colorful addition to a child’s bedroom shelf
Hanging Clay Mobile With Stars and Shapes
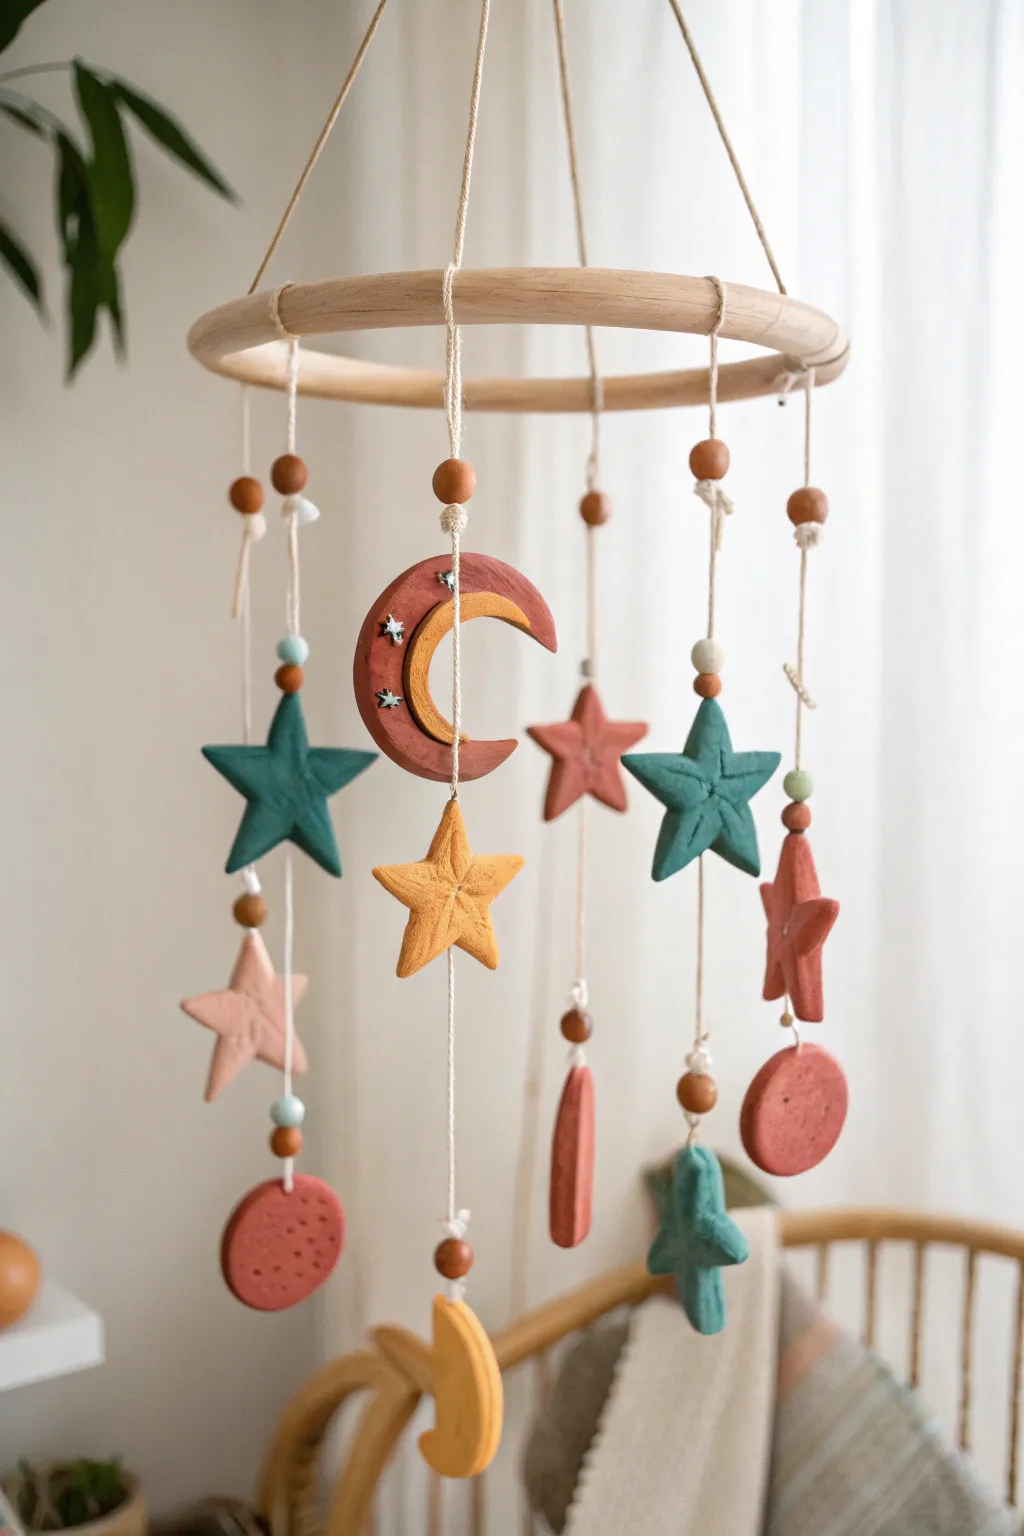
Bring the night sky indoors with this charming mobile, featuring rustic clay stars, crescent moons, and planets in a soothing, earthy color palette. It creates a gentle, handmade focal point perfect for a nursery or a cozy reading nook.
Step-by-Step Tutorial
Materials
- Air-dry clay (white or terra cotta)
- Wooden embroidery hoop (inner ring only) or mobile ring
- Rolling pin
- Cookie cutters (various sized stars, circles)
- Knife or clay cutting tool
- Acrylic paints (terracotta, teal, mustard yellow, dusty pink)
- Small paintbrushes
- Cotton twine or macramé cord (natural color)
- Wooden beads (various sizes)
- Straw or skewer (for poking holes)
- Fine-grit sandpaper
- Clear matte varnish (optional)
Step 1: Shaping the Elements
-
Prepare the Clay:
Start by kneading your air-dry clay until it is soft and pliable. Roll it out on a flat surface to an even thickness of about 1/4 inch (6mm). If the clay sticks, lay down a sheet of parchment paper first. -
Cut the Stars:
Use star-shaped cookie cutters to press out several shapes. You’ll want a mix of large and medium stars. Aim for about 4-5 main star pieces. -
Create the Moons:
For the crescent moons, you can use a large circle cutter. Cut a circle, then move the cutter slightly to the side and cut again to create a crescent shape. Alternatively, freehand the slightly rustic moon shape with a knife for a more organic look. -
Add Circles and Planets:
Cut out several simple circles using a cutter or the rim of a small glass. These will serve as planets or abstract weights at the bottom. -
Add Texture Details:
While the clay is still wet, you can gently press smaller star shapes or tiny dots into the surface of the moons and planets to create crater-like textures. Don’t press too hard; just enough to make an impression. -
Make Hanging Holes:
This is crucial: before drying, use a straw or skewer to poke holes in every piece. Stars need a hole at the top and bottom (if connecting pieces below them). Bottom pieces only need a top hole. Ensure the hole is wide enough for your twine. -
Drying Time:
Lay all pieces flat on a drying rack or parchment paper. Let them dry completely, which usually takes 24-48 hours depending on humidity. Flip them halfway through to ensure even drying and prevent curling.
Cracking Clay?
If you see cracks forming while drying, smooth a tiny bit of water and fresh clay mud (slip) into the crack with your finger to patch it up.
Step 2: Painting and Finishing
-
Sand the Edges:
Once fully dry, gently sand any rough edges with fine-grit sandpaper for a cleaner finish. -
Apply Base Colors:
Paint your shapes in earthy tones. I recommend doing the large moons and planets in terracotta, the large stars in teal, and smaller accents in mustard yellow or dusty pink. You may need two coats for opaque coverage. -
Highlighting Details:
For the indented textures you created earlier (like on the moon), you can use a tiny brush to paint the little recessed stars white or silver to make them pop against the darker clay. -
Seal (Optional):
If you want the mobile to last longer or have a slight sheen, apply a coat of clear matte varnish.
Add Sparkle
Mix a tiny amount of baking soda into your acrylic paint. It gives the stars a stone-like, textured finish that looks incredibly high-end.
Step 3: Assembly
-
Prepare the Ring:
Take your wooden ring. Cut four long pieces of twine (about 2-3 feet each) to serve as the hanging mechanism. Tie them to the ring at four equidistant points. -
Create the Central Hanger:
Gather the four strings at the top, ensure the ring is level, and tie them together in a strong knot or loop for hanging. -
Stringing the Drops:
Cut five new lengths of twine for the decorative drops. Tie one firmly onto the wooden ring at each of the four compass points, plus one distinct strand suspended from the very center knot. -
Thread the Beads and Shapes:
Start threading your items. Tie a knot, thread a wooden bead, then thread a clay shape. Tie another knot below the shape to hold it in place. Continue adding beads and shapes down the line. -
Varying Heights:
To get the look in the photo, vary the order. Some strands should start with a star, others with a moon. Make the central strand slightly longer or heavier visually. -
Secure the Ends:
Finish each strand with a final knot below the last piece (usually a disc or planet shape). Trim any excess string for a tidy look. -
Final Balance Check:
Hang the mobile up temporarily to check the balance. If it tilts, you may need to adjust the position of the strings on the hoop slightly.
Now suspend your masterpiece and watch how the gentle rotation brings a peaceful atmosphere to the room
Personalized Initial Charms and Bag Tags
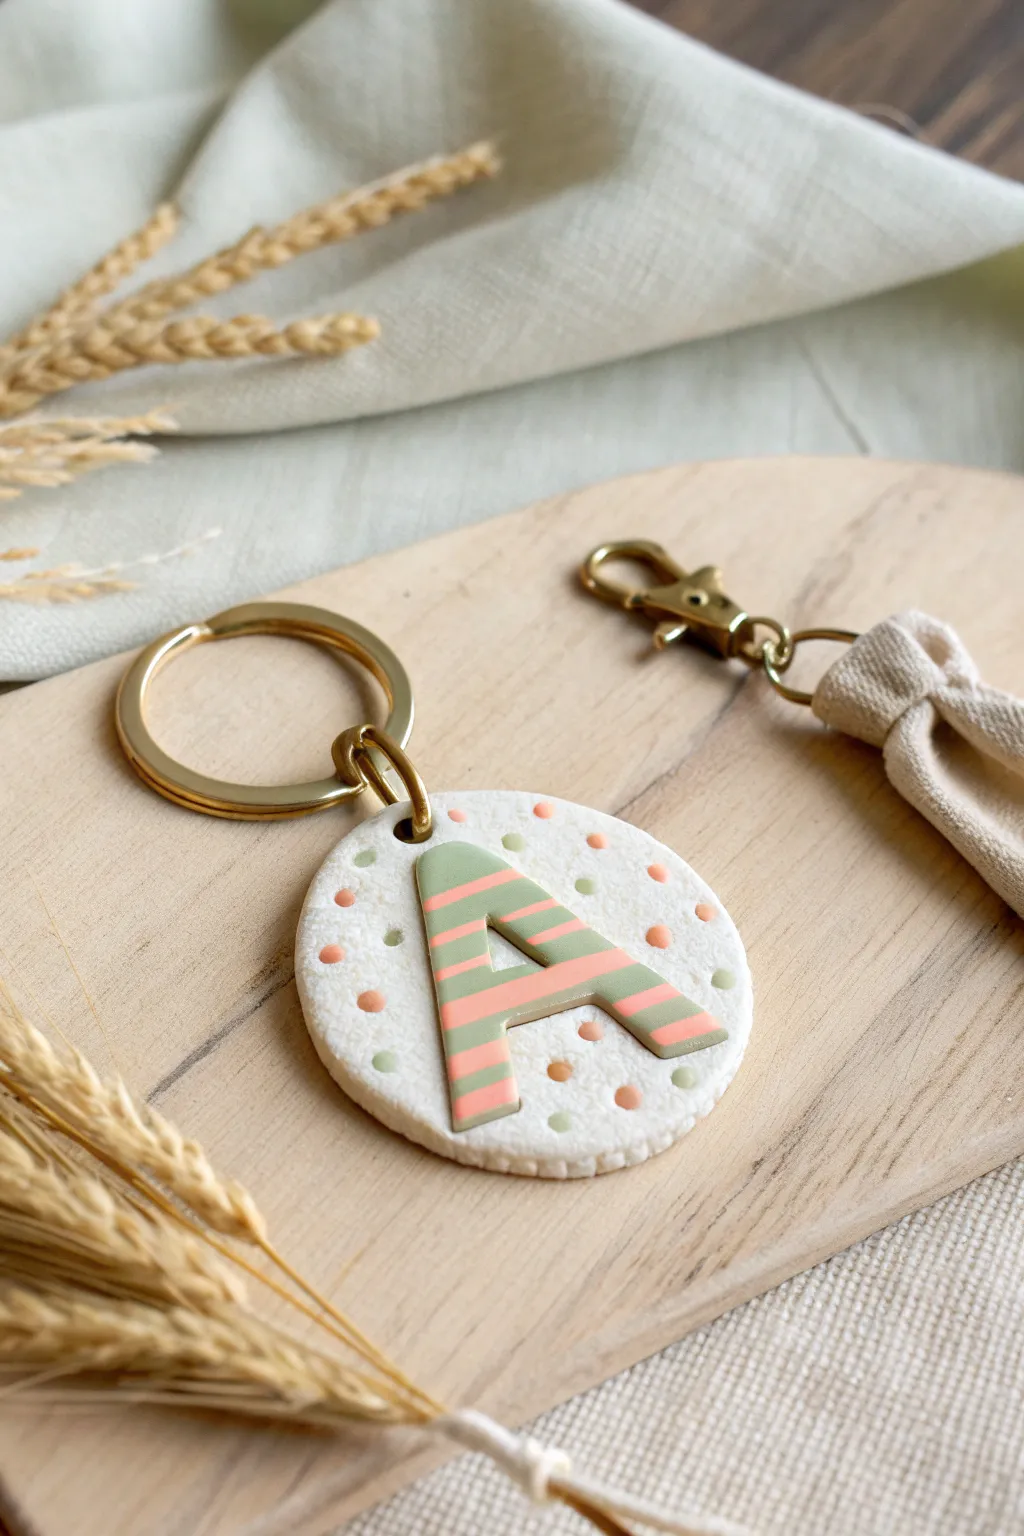
Create a personalized accessory that is as fun to make as it is to use. This charming clay project features a whimsical striped initial set against a polka-dotted background, perfect for adding flair to backpacks or keys.
Step-by-Step
Materials
- White polymer clay
- Sage green polymer clay
- Coral pink polymer clay
- Acrylic roller or rolling pin
- Round clay cutter (approx. 2-3 inches)
- Small dotting tool or toothpick
- Craft knife or scalpel blade
- Jump ring (gold)
- Keychain hardware (gold)
- Parchment paper
- Oven (for baking)
- Gloss glaze (optional)
Step 1: Creating the Striped Letter Block
-
Roll out colors:
Begin by conditioning the sage green and coral pink clay until soft. Roll each color out into a flat sheet, aiming for a thickness of about 2mm each. -
Cut strips:
Use your craft knife to slice thin, even strips from both the green and pink sheets. These will form the stripes of your letter. -
Assemble the pattern:
Lay the strips side-by-side on a piece of parchment paper, alternating green and pink. Press them gently together so the edges touch without overlapping. -
Smooth the stripes:
Place a piece of parchment paper over your stripe assembly and gently roll over it with the acrylic roller to bond the seams and create a single, smooth sheet. -
Cut the letter:
Using a stencil or just freehanding with your craft knife, carefully cut out your desired initial from the striped clay sheet. Set this aside safely.
Clean Slates
White polymer clay picks up dust easily. Wipe your work surface and wash your hands thoroughly before handling the white base to keep it pristine.
Step 2: Forming the Base
-
Prepare the base clay:
Condition a ball of white polymer clay. Roll it out to a thickness of about 4-5mm—you want it sturdy enough to hold the hardware. -
Cut the circle:
Press your round circular cutter firmly into the white clay to create the keychain base. Smooth the edges with your finger to remove any fuzz or sharp bits. -
Create the hole:
Use a straw to punch a hole near the top edge of the circle. Make sure it isn’t too close to the edge to prevent tearing later. -
Texture the surface (optional):
If you want the granite look seen in some clays, you can use specialty speckled clay, or gently dab a toothbrush on the white surface for subtle texture.
Step 3: Assembly and Detailing
-
Mount the letter:
Gently lift your striped letter and place it in the center of the white circle. Little hands might need help centering it perfectly. -
secure the letter:
Press the letter down lightly to ensure it bonds with the base layer. You shouldn’t need glue if the clay is unbaked; just firm pressure works. -
Make tiny dots:
Roll extremely tiny balls of the leftover green and pink clay. These should be smaller than a peppercorn. -
Apply the polka dots:
Scatter the tiny colored balls randomly around the letter on the white background. Vary the colors so pink and green are evenly mixed. -
Flatten the dots:
I like to use the very tip of a clean finger to gently squash each dot flat so it becomes flush with the surface of the white clay.
Sticky Situation?
If the clay sticks to your cutter or table, dust the surface lightly with cornstarch or baby powder before rolling it out.
Step 4: Baking and Finishing
-
Bake the project:
Place the assembled piece on a parchment-lined baking sheet. Bake according to your polymer clay package instructions (usually 275°F/135°C for 15-30 minutes). -
Let it cool:
Allow the clay to cool completely in the oven or on a wire rack. It is fragile while warm, so patience is key here. -
Add hardware:
Using pliers, open the jump ring by twisting it sideways. Loop it through the hole in your clay charm. -
Attach keychain:
Slip the main keychain hardware onto the open jump ring before twisting the ring closed again securely. -
Finish (optional):
For extra durability and shine, you can brush a thin layer of gloss glaze over the front of the charm.
Now you have a custom, durable tag ready to make any bag look special
Storytelling Letter and Icon Tiles for Games
Create a tactile world of imagination with these smooth, minimalist clay tiles featuring simple icons and word prompts. The soft, earthy tones of cream, terracotta, and caramel give them a modern, warm aesthetic perfect for creative play.
Detailed Instructions
Materials
- Polymer clay (colors: cream/white, terracotta, caramel/tan)
- Acrylic rolling pin
- Square cookie cutter (approx. 1 inch)
- Rectangular cookie cutter (approx. 1 x 2 inches)
- Letter stamp set (small aesthetic font)
- Small icon stamps (star, smiley face, heart, etc.)
- Parchment paper
- Baking sheet
- Fine-grit sandpaper (optional)
- Oven
Step 1: Preparation & Rolling
-
Condition the clay:
Begin by warming up your polymer clay in your hands. Knead each color—cream, terracotta, and caramel—separately until they are soft, pliable, and free of cracks. -
Roll out the slab:
Place a ball of the cream clay on a sheet of parchment paper. Use your acrylic rolling pin to roll it out to an even thickness, aiming for about 1/4 inch (6mm) to ensure the tiles feel substantial. -
Ensure smooth surfaces:
Inspect the surface for air bubbles. I find that lightly running the rolling pin over the clay one last time helps smooth out any fingerprints or texture. -
Repeat for all colors:
Repeat the rolling process for your terracotta and caramel clay blocks, ensuring all slabs are the same thickness for a uniform set.
Step 2: Cutting & Stamping
-
Cut square shapes:
Using the square cutter, press firmly into the clay slabs to create the base picture tiles. Cut a mix of colors to add variety to your game set. -
Cut rectangular shapes:
Use the rectangular cutter to make space for word tiles. These will typically be done in the cream color to make the text more legible, as seen in the example. -
Smooth the edges:
Gently lift the cut shapes. If the edges are sharp or ragged, softly tap them with your finger to round them off slightly without distorting the square shape. -
Stamp the icons:
Select your square tiles. Press your icon stamps (stars, smileys, etc.) into the center of the clay. Apply firm, even pressure to get a clean impression, but don’t push all the way through. -
Stamp the words:
On the rectangular tiles, use your letter set to spell out corresponding words like ‘STAR’, ‘TREE’, or ‘SMILEY FACE’. Align them carefully in the center. -
Add visual cues to word tiles:
For an extra touch, stamp a corresponding small icon next to the word if space allows, like the star next to ‘HEART’ in the example. -
Texture check:
Look closely at your stamped impressions. If any clay displaced by the stamp created a raised ridge, you can gently pat it down.
Fixing Stamping Mistakes
If you mess up a stamp impression, don’t try to fix it while cut. Ball the clay up, re-roll it, cut a fresh shape, and stamp again for a crisp look.
Step 3: Baking & Finishing
-
Arrange for baking:
Transfer your parchment paper with the tiles onto a baking sheet. Ensure none of the tiles are touching so they bake evenly. -
Bake the tiles:
Bake according to your clay package instructions. This is usually around 275°F (135°C), often for 15-30 minutes depending on brand and thickness. -
Cool down vertically:
Once baked, remove from the oven and let them cool completely on the baking sheet. Do not handle them while hot, as they are still fragile. -
Sand edges (optional):
If there are any rough spots on the sides after cooling, take a piece of fine-grit sandpaper and lightly buff the edges for a professional finish. -
Clean up dust:
Wipe the tiles with a slightly damp cloth to remove any sanding dust or residue.
Make Them Magnetic
Turn this into a fridge game by gluing small, strong magnets to the back of each tile after they have been baked and cooled.
Once cooled, your durable storytelling tiles are ready to spark new adventures and games.
Whimsical Pinch Pot Whistles Shaped Like Animals
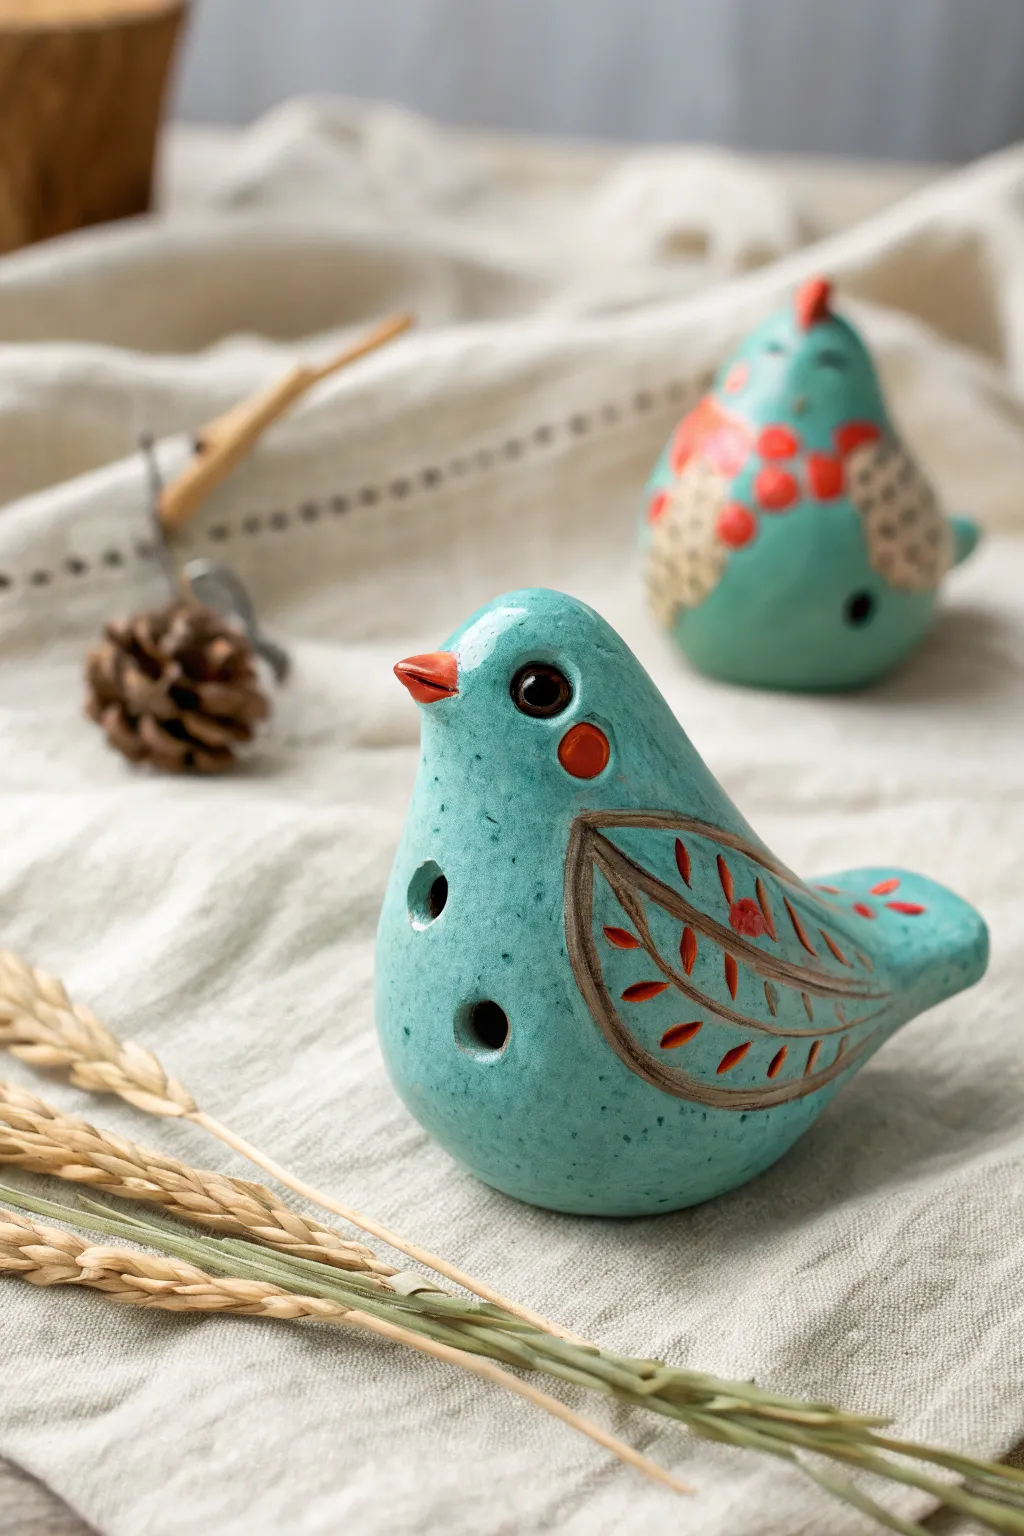
These enchanting ceramic bird whistles combine the fun of sculpting with the magic of music. With their bright teal glaze, leaf-patterned wings, and sweet expressions, they look as lovely on a shelf as they sound when played.
Step-by-Step
Materials
- EARTHENWARE CLAY (low-fire)
- Popsicle stick or wooden modeling tool
- Fettling knife
- Small sponge
- Needle tool
- Slip (clay mixed with water)
- Glaze: Teal/Turquoise (opaque)
- Underglaze: Orange/Rust
- Glaze: Clear (transparent)
- Paintbrushes (small detail & medium rounds)
- Small bowl of water
Step 1: Sculpting the Bird Body
-
Form the pinch pot:
Start with a ball of moist clay roughly the size of a tangerine. Push your thumb into the center to create an opening, pinching the walls gently while rotating the ball to create a uniform, cup-like shape. -
Close the form:
Gently pinch the rim of your pot inward until it closes completely, trapping a hollow pocket of air inside. Smooth the seam with your thumb so the sphere is sealed tight. -
Shape the silhouette:
Ideally, you want an egg shape. Gently roll and tap the clay on your table to flatten the bottom slightly so the bird sits upright without wobbling. -
Pinch the tail:
Choose one end of the egg to be the tail. Gently pinch and pull the clay outward to form a short, triangular tail feather shape. -
Form the head:
On the opposite end, smooth the clay upward to define a rounded head area. Pinch a tiny, pointed beak protruding from the front of the face.
Silent Bird Syndrome?
If your whistle won’t tweet, the air channel likely isn’t hitting the bevel edge cleanly. Clear any clay crumbs obstructring the airway with a needle tool.
Step 2: Creating the Sound Mechanism & Details
-
Make the mouthpiece:
This is the tricky part! Using a flat popsicle stick, insert it horizontally into the tail end to create the air channel. Do not push it all the way into the hollow body yet. -
Cut the bevel:
Flip the bird over. On the underside, just below the tail, cut a small, sharp rectangular window (the fipple) connecting to the air channel. The edge of this window needs to be angled cleanly (about 45 degrees) to split the air and create sound. -
Test the whistle:
Blow gently through the tail. If it doesn’t whistle, adjust the angle of the bevel hole slightly with your stick until you get a clear tone. -
Add tuning holes:
Using a small round tool or straw, punch two clean holes on the side of the bird’s belly. These will allow you to change the pitch when playing. -
Carve the wings:
Use a needle tool or small loop tool to carve a tear-drop wing shape on the bird’s side. Inside the wing, incise a central vein line and small leaf-like notches for feathers. -
Refine the surface:
Before the clay dries, take a slightly damp sponge and smooth out any rough fingerprints or jagged edges around the whistle hole.
Textured Plumage
Before the clay dries, press a piece of lace or burlap into the chest area to give your bird a soft, feathery texture without needing to carve every line.
Step 3: Glazing and Finishing
-
Bisque fire:
Allow the clay to dry completely (bone dry) for several days, then fire it in a kiln to cone 04 (or according to your clay’s instructions). -
Apply base color:
Brush 2-3 coats of the teal glaze over the entire bird, avoiding the beak and the wing pattern if possible. I find wiping the glaze back slightly from the carved lines helps them pop later. -
Paint details:
Using a fine brush and orange underglaze, carefully paint the beak, two round rosy cheeks, and tap small dots into the carved ‘feathers’ on the wing. -
Accent the eyes:
Dip the handle end of a paintbrush into black underglaze (or dark brown) and dot the eyes. Add a tiny speck of white reflection if you want extra character. -
Clear coat and fire:
If you used underglazes for details, apply a coat of clear transparent glaze over those specific spots (or the whole bird if your teal glaze isn’t glossy). Fire the kiln again to the glaze temperature.
Once cooled from the kiln, your little ceramic flock is ready to sing its first song
Space Explorer Clay Rockets With Recycled Tubes
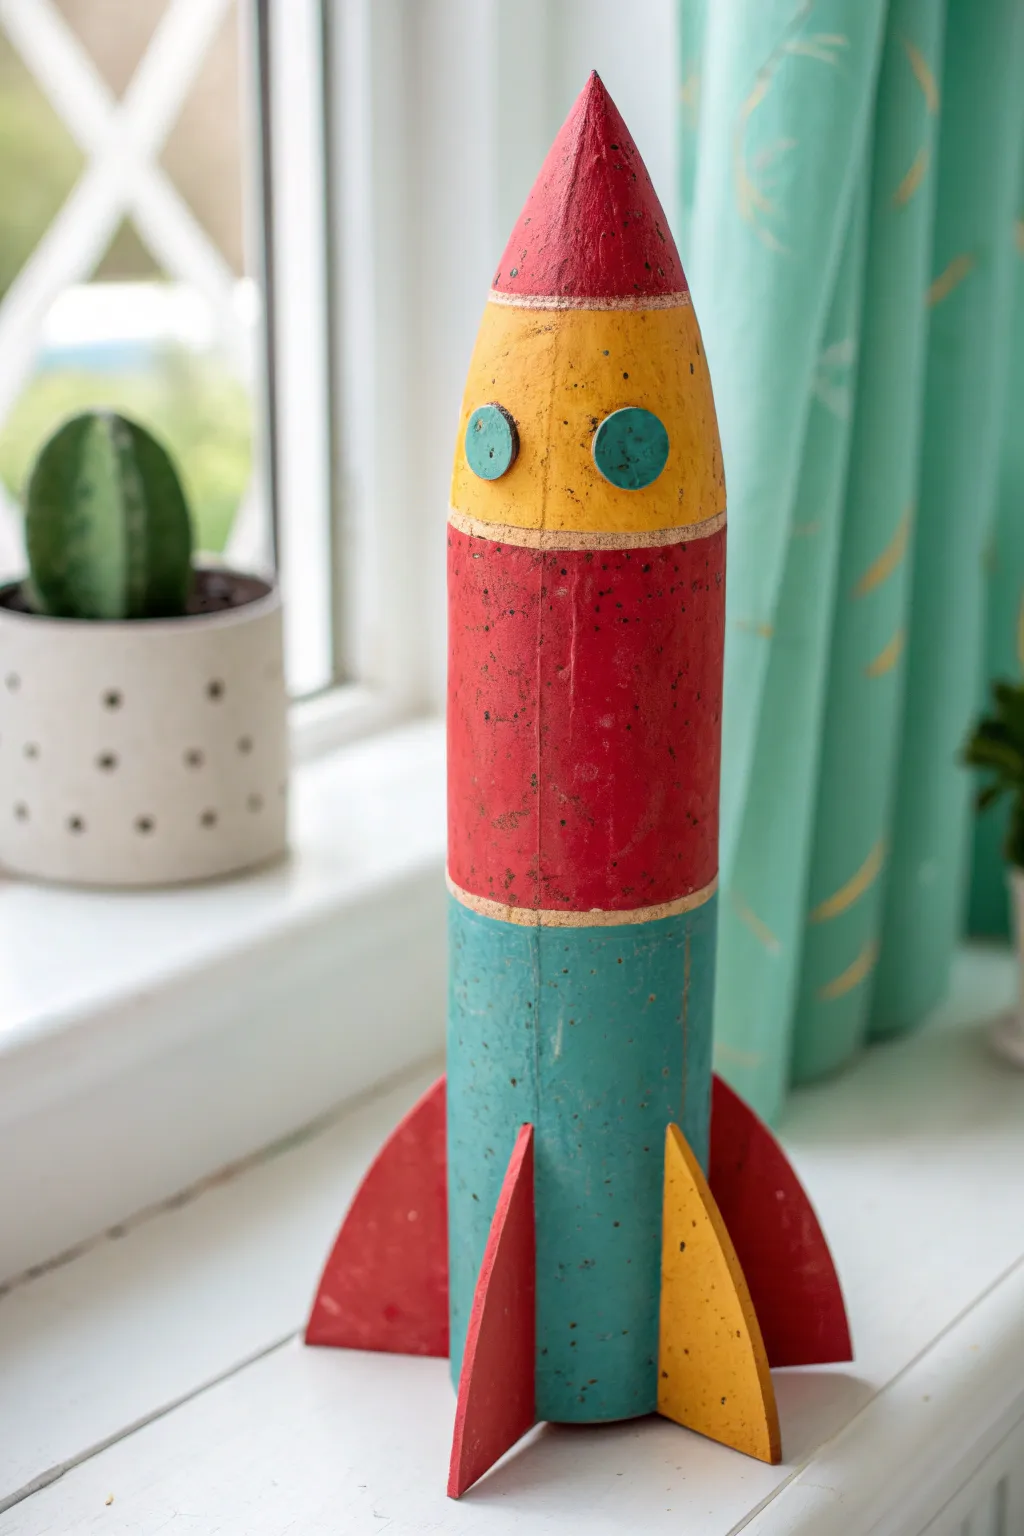
Blast off with this vintage-style rocket sculpture that ingeniously combines recycled materials with clay crafting. By covering a sturdy cardboard tube with a thin layer of air-dry clay, you create a solid, textured surface perfect for painting in classic retro colors without using a massive block of clay.
Step-by-Step Tutorial
Materials
- Sturdy cardboard tube (poster tube or heavy-duty paper towel roll)
- Cardboard (cereal box thickness for the cone, corrugated for fins)
- Air-dry clay (white or grey)
- Acrylic paints (Red, yellow, teal/turquoise, black)
- Strong craft glue or hot glue gun
- Rolling pin
- Craft knife or scissors
- Sandpaper (medium and fine grit)
- Paintbrushes (flat shader and small round)
- Masking tape
- Clear matte varnish (optional)
Step 1: Building the Armature
-
Prepare the body:
Cut your cardboard tube to the desired height of your rocket body. A length of about 8-10 inches works well for a desk decoration. -
Form the nose cone:
Cut a circle from your thinner cardboard. Cut a slit from the edge to the center, overlap the edges to form a cone shape that fits the diameter of your tube, and tape it securely. Glue this cone to the top of the tube. -
Cut the fins:
Sketch a fin shape onto corrugated cardboard. You will need three or four fins depending on your design preference. Cut them out carefully. -
Attach the fins:
Glue the fins to the base of the tube, spacing them equally around the circumference. Use masking tape to hold them in place while the glue sets if needed. -
Create portholes:
Cut two small circles from cardboard to serve as the window frames and glue them near the top of the straight section of the tube.
Clay Cracking?
If small cracks appear as the clay dries on the tube, don’t panic. Mix a small amount of fresh clay with water to make a paste (slip) and fill in the cracks, then smooth over.
Step 2: Applying the Clay
-
Roll out the clay:
Takes a chunk of air-dry clay and roll it out into a thin, even sheet, roughly 1/8 to 1/4 inch thick. I find rolling it on a canvas cloth prevents sticking. -
Wrap the body:
Apply a thin layer of PVA glue to the cardboard armature to help adhesion. Carefully wrap the clay sheet around the tube, smoothing the seam where the edges meet with a little water. -
Cover the cone:
Add clay to the nose cone, smoothing it down to join seamlessly with the body clay. Keep the point sharp but safe. -
Detail the fins:
Cover the cardboard fins with clay. You can do this by sandwiching the cardboard between two thin layers of clay or just smoothing clay over the surface. Ensure the connection point between the fin and body is smoothed out for strength. -
Refine the surface:
Dip your finger in water and run it over the entire rocket to smooth out fingerprints. If you want that pitted, vintage texture seen in the photo, you can gently tap the surface with a stiff bristle brush or a crumpled ball of foil. -
Add separation lines:
Use a modeling tool or an old credit card to verify the horizontal ‘seam’ lines separating the different sections (nose, body, base) are distinct. -
Let it dry completely:
Place the rocket in a safe, draft-free spot. Drying can take 24-48 hours depending on humidity; turn it occasionally so it dries evenly.
Level Up: Engine Blast
Before the clay dries, poke a few holes in the bottom of the tube. After painting, you can insert strips of red and orange tissue paper to look like flames shooting out.
Step 3: Painting and Finishing
-
Sand imperfections:
Once fully dry and hard, lightly sand any rough spots or sharp edges with fine-grit sandpaper. Wipe away the dust with a slightly damp cloth. -
Paint the base coat:
Start with the teal section at the bottom. Paint the lower third of the body, painting around the fins carefully. -
Paint the middle section:
Paint the large middle section red. Use a flat brush to get a clean line where it meets the teal section, or use masking tape if the clay is perfectly smooth. -
Add the yellow top:
Paint the section just below the nose cone yellow. This creates the classic tri-color retro look. -
Finish the nose cone:
Paint the very tip of the nose cone red to match the body section. -
Detail the fins:
Paint the fins in alternating colors—red for the back ones and yellow for the front ones to create visual depth. -
Add the windows:
Paint the raised porthole circles teal to tie in with the base color. -
Create the speckled effect:
To achieve the aged, speckled look, mix a tiny bit of black paint with water. Dip an old toothbrush in it and flick the bristles with your thumb to spray tiny dots over the rocket. Less is more here.
Place your finished rocket on a shelf near a window to let natural light highlight the cool textures you created