Every December, I reach for polymer clay and air-dry clay because nothing beats making tiny, cute Christmas keepsakes that actually last. Here are my favorite cute Christmas clay ideas—super doable, super giftable, and basically guaranteed to make you grin while you’re sculpting.
Classic Cookie-Cutter Tree Ornaments
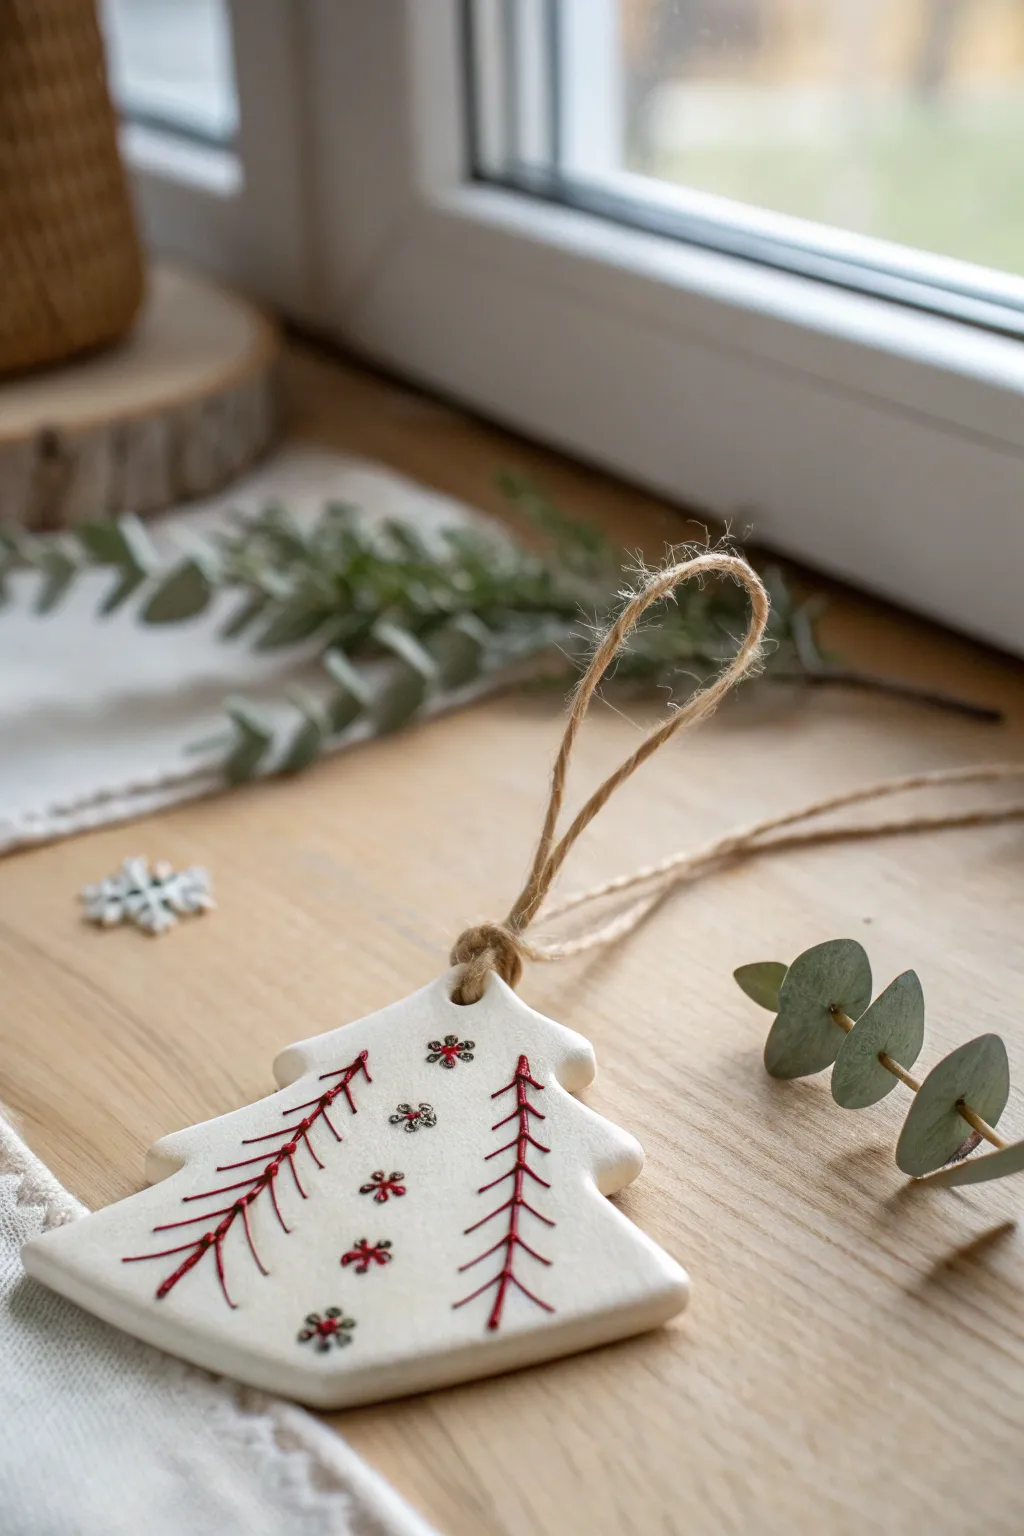
Achieve the cozy look of traditional embroidery without picking up a needle with these charming ceramic-style ornaments. Using simple clay and fine-point markers, you can create the illusion of stitched red thread on pristine white porcelain.
How-To Guide
Materials
- White air-dry clay or polymer clay
- Christmas tree cookie cutter
- Rolling pin
- Parchment paper or canvas mat
- Fine-grit sandpaper (optional)
- Small straw or skewer (for the hole)
- Red extra-fine point permanent marker or acrylic paint pen
- Metallic silver or grey gel pen
- Small snowflake or flower stamp (optional)
- Jute twine
- Gloss or matte varnish (optional)
Step 1: Shaping the Base
-
Prepare your workspace:
Lay down your parchment paper or canvas mat to prevent the clay from sticking to your table. Take a handful of white clay and knead it in your hands until it is soft, pliable, and free of cracks. -
Roll the slab:
Using your rolling pin, flatten the clay to an even thickness. Aim for about 1/4 inch (6mm) thick. You want it sturdy enough to not act brittle, but light enough to hang. -
Cut the shape:
Press your Christmas tree cookie cutter firmly into the clay. Give it a tiny wiggle to ensure it cuts all the way through, then lift it straight up. Carefully peel away the excess clay. -
Smooth the edges:
Dip your finger in a little bit of water and run it gently around the cut edges of the tree to smooth out any roughness or jagged bits left by the cutter. -
Create the hanging hole:
Use a straw or a skewer to punch a clean hole at the very tip of the tree. Make sure the hole is large enough for your jute twine to pass through later. -
Initial dry time:
Let the clay ornament dry completely according to the package instructions. For air-dry clay, this usually takes 24-48 hours. Flip the tree over halfway through the drying process to ensure it stays flat.
Fixing Smears
If your red marker smears on the white clay, let it dry completely, then gently scrape the mistake off with an X-Acto knife or sandpaper.
Step 2: Adding the ‘Stitched’ Details
-
Sand for smoothness:
Once fully dry, check the surface. If there are any bumps, gently buff them away with fine-grit sandpaper. Wipe away the dust with a dry cloth. -
Plan your pattern:
Visualize the design shown in the image: two vertical ‘branches’ on either side and a central column of snowflakes. You can lightly sketch this with a pencil if you’re nervous about freehanding. -
Draw the main red lines:
Using your red extra-fine point marker or paint pen, draw a long, slightly curved vertical line down the left side of the tree, starting from the second tier of branches. -
Add the ‘stitches’:
To create the faux-embroidery look, draw short, diagonal dashes crossing the main red line. These mimic the v-shape of pine needles or feather stitches. -
Detail the needles:
Add tiny little dots or beads of ink at the tips of some of the diagonal ‘stitches’ to give the design texture and a more organic feel. -
Repeat the branch:
Repeat the previous three steps on the right side of the tree, mirroring the design so the branches curve slightly inward. -
Stamp or draw snowflakes:
Down the center of the tree, you can either stamp small snowflake designs using grey ink or draw them by hand. If drawing, create a central dot and radiate six small lines outward. -
Add mixed media accents:
I like to take a metallic silver or grey gel pen and add tiny dots or centers to the snowflakes and some of the red branch tips. This subtle metallic sheen adds a lovely festive touch.
Textured Dimension
Instead of drawing, use a needle tool to scratch the design into the wet clay first. After drying, fill the grooves with red paint for real depth.
Step 3: Finishing Touches
-
Seal the design:
To protect your drawing, apply a thin coat of matte or gloss varnish. Make sure your ink is 100% dry before brushing this on to avoid smearing the red lines. -
Add the hanger:
Cut a length of jute twine about 8 inches long. Thread it through the hole at the top of the tree. -
Secure the loop:
Tie a secure knot at the base of the loop, close to the tree, and another knot at the ends to create a hanging loop.
Hang your beautiful new ornament on a branch and enjoy the rustic charm it adds to your holiday decor


Chibi Santa Face Charms
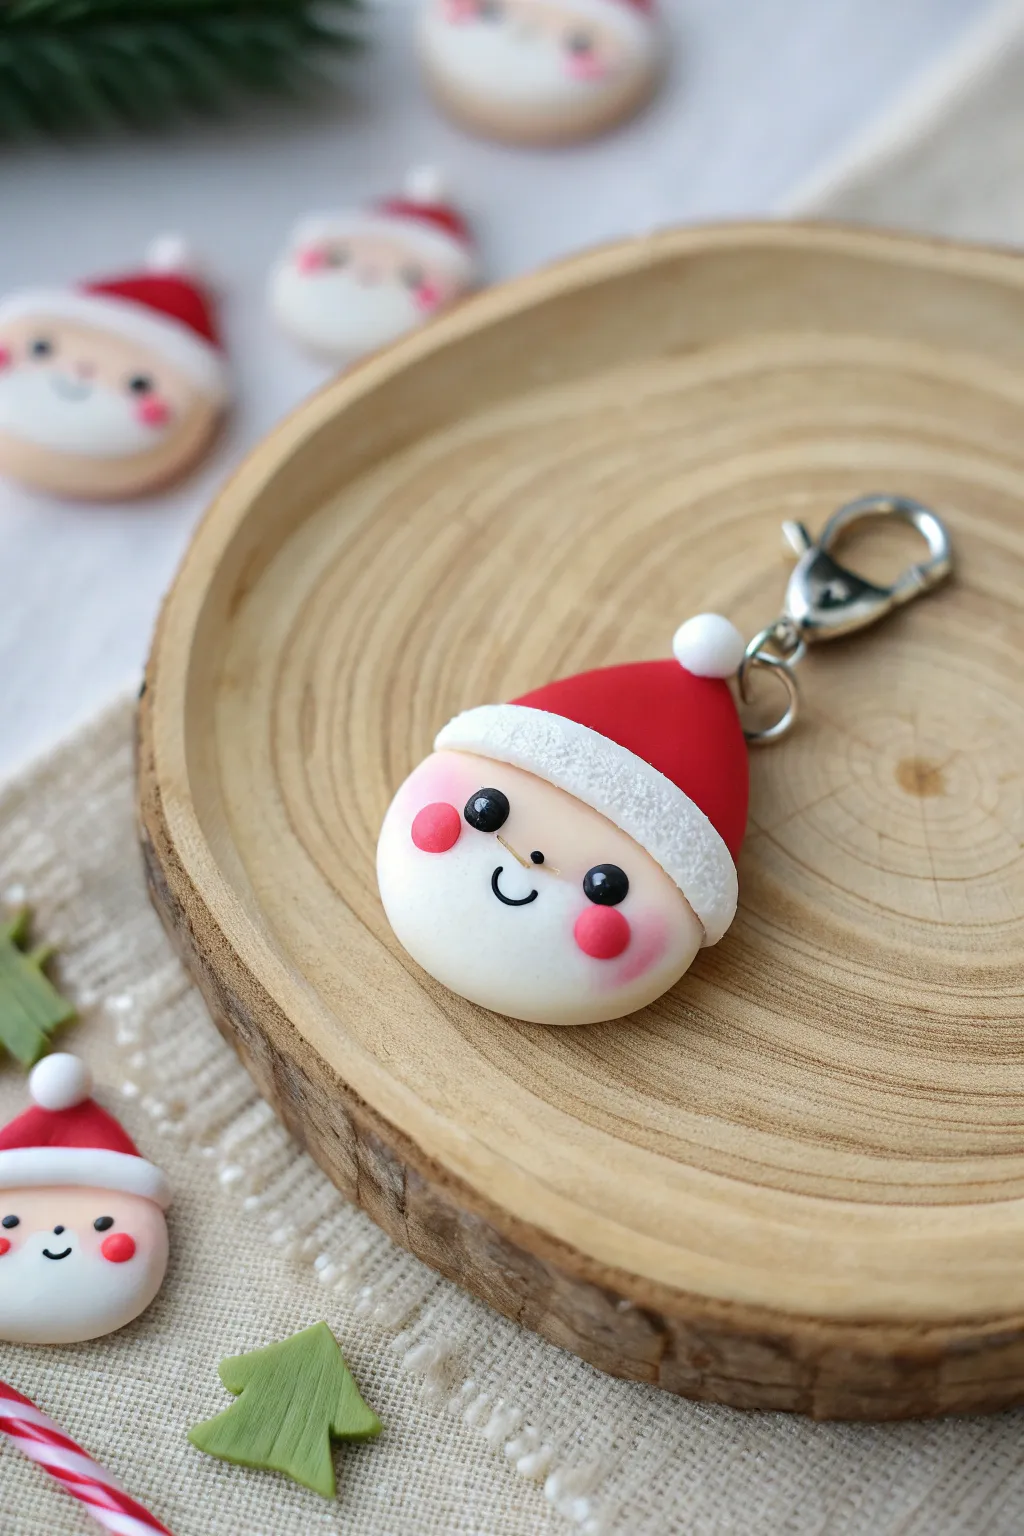
Capture the magic of the holidays with these irresistibly sweet Santa face charms made from polymer clay. Featuring rosy cheeks, a tiny smile, and a snowy textured hat, this kawaii-style Santa makes the perfect zipper pull or festive keychain.
Step-by-Step
Materials
- Polymer clay (white, red, black, pink)
- Small metal lobster clasps with jump rings
- Ball stylus tool
- Pointed silicone smoothing tool
- Craft knife or scalpel
- Needle tool
- Soft pastel chalk (pink or red)
- Small fluffy paintbrush
- Old toothbrush or stiff bristle brush
- Rolling pin (acrylic)
- Eye pin or screw eye
- Oven for baking
Step 1: Shaping the Jolly Face
-
Condition the clay:
Start by conditioning your white polymer clay until it is soft and pliable, ensuring there are no cracks when you flatten it. -
Form the base:
Roll a smooth ball of white clay about the size of a large grape, then gently flatten it into a thick, rounded disc for the head. -
Add rosy cheeks:
Using a soft pink pastel chalk, scrape a little powder onto a surface. Dip a dry, fluffy brush into the powder and gently dust blushing cheeks onto the white clay base where the face will be. -
Make cheek accents:
Roll two tiny dots of pink clay, smaller than a peppercorn. Press these firmly onto the center of the blushed areas to create distinct, kawaii-style cheek spots. -
Create the eyes:
Roll two very small balls of black clay. Position them evenly between the pink cheeks and press them flat against the face. -
Add the smile:
Roll an extremely thin snake of black clay. Cut a tiny u-shaped segment and carefully place it centered between the eyes using a needle tool to form the mouth. -
Create the nose:
Take a microscopic dot of black clay and place it just above the mouth for a dainty nose. -
Highlight the eyes:
For that sparking look, take a needle tool and dot the tiniest speck of white acrylic paint or white liquid clay onto the upper right corner of each black eye.
Keep it Clean
White clay picks up dust instantly. Work with the white clay first, or keep a pack of baby wipes nearby to clean your hands thoroughly before switching back.
Step 2: Crafting the Santa Hat
-
Form the red hat:
Condition a piece of red clay and shape it into a cone. Flatten the back slightly so it rests against the top of the white head. -
Attach the hat:
Curve the tip of the red cone slightly to one side for character, then press the base of the hat firmly onto the top curve of the Santa face. -
Make the brim:
Roll a snake of white clay. Flatten it into a strip long enough to cover the seam between the red hat and the white face. -
Apply the brim:
Wrap the white strip across the forehead, pressing it down gently. Ensure it wraps slightly around the sides for a clean finish. -
Texture the brim:
This is my favorite part: use an old toothbrush or a stiff brush to stipple the white brim. Tap repeatedly to create a fluffy, fur-like texture. -
Add the pom-pom:
Roll a small ball of white clay and attach it to the tip of the red hat. Texture this ball with the toothbrush as well to match the brim.
Step 3: Assembly and Baking
-
Insert hardware:
Trim an eye pin to the correct length and dip the end in a tiny bit of liquid clay or bake-and-bond. Insert it into the top of the red hat. -
Inspect and clean:
Check for any fingerprints or lint. Use a little rubbing alcohol on a Q-tip to smooth out imperfections on the white face area. -
Bake carefully:
Bake the charm according to your clay manufacturer’s instructions, typically around 275°F (130°C) for 15-20 minutes. -
Cool down:
Let the piece cool completely inside the oven or on a wire rack before handling to prevent cracking. -
Add the clasp:
Once cool, use pliers to open a jump ring, thread it through the eye pin loop, and attach your lobster clasp before closing the ring securely.
Make it a Set
Use the same technique to make a matching Mrs. Claus by adding tiny gray buns on the sides, or a Reindeer using brown clay and tiny antlers.
Now you have an adorable holiday accessory ready to gift or keep


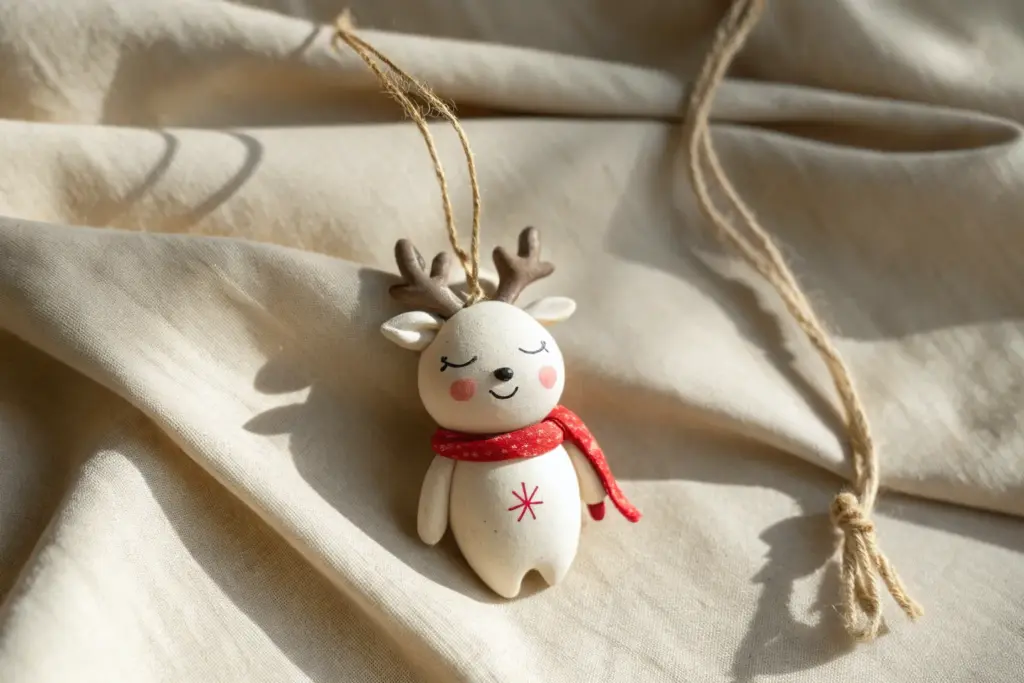
Blushing Reindeer Ornaments
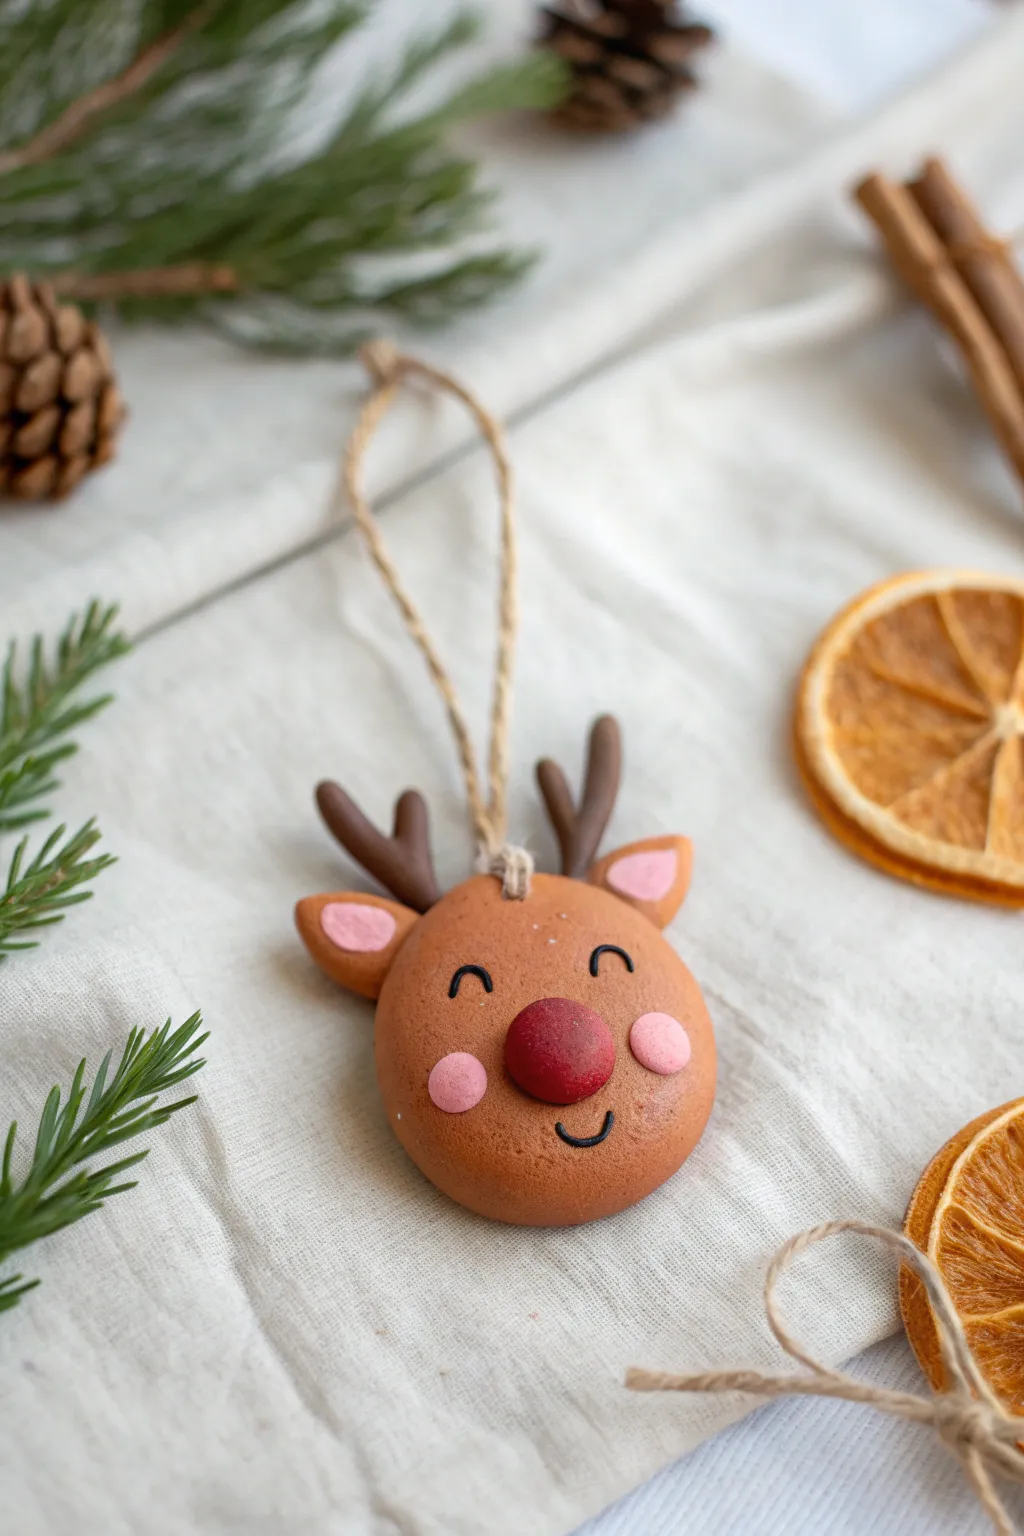
This adorable reindeer ornament captures the warmth of the holidays with its sweet, simple expression and rosy cheeks. The smooth finish and earthy tones make it a charming addition to any rustic or woodland-themed Christmas tree.
Detailed Instructions
Materials
- Polymer clay (medium brown, dark brown, red, light pink)
- Acrylic roller or pasta machine
- Circle cutter (approx. 2-3 inches)
- Needle tool or toothpick
- Jute twine
- Black acrylic paint
- Fine detail paintbrush (size 00 or 000)
- Oven for baking
- Parchment paper
Step 1: Shaping the Reindeer Face
-
Condition the clay:
Start by warming up your medium brown clay in your hands until it is soft and malleable. Roll it into a smooth ball free of cracks. -
Flatten the base:
Using an acrylic roller, flatten the ball into a thick disc, about 1/4 inch thick. Use your circle cutter to punch out a perfect round shape for the head, then smooth the edges gently with your finger. -
Create the nose:
Take a piece of red clay and roll it into a ball slightly smaller than a marble. Press this firmly onto the center of the face, flattening it just enough so it sticks but retains a nice, rounded dome shape. -
Add the cheeks:
Roll two very small balls of light pink clay for the cheeks. Press them onto the face on either side of the nose, positioning them slightly lower than the center of the nose for a cute look.
Clean Clay Tip
Keep baby wipes nearby to clean your hands between colors. Red clay can leave residue that stains light colors like the pink cheeks.
Step 2: Adding Details and Ears
-
Form the ears:
Create two small teardrop shapes from the medium brown clay. Flatten them slightly with your thumb. -
Add pink inner ears:
Make two smaller teardrops from the light pink clay. Press these into the center of the brown ear shapes. -
Attach the ears:
Press the wide end of each ear onto the top sides of the head. I like to use a smoothing tool or the back of a fingernail to blend the seam on the back side so they stay secure. -
Create the hanging loop:
Roll a tiny scrap of brown clay into a small coil to create a U-shaped loop. Attach this to the very top center of the head, blending the clay at the base. This will hold your twine later. -
Make the hole:
Use a needle tool or a toothpick to poke a clean hole through the loop you just created. Wiggle the tool slightly to ensure the hole is wide enough for your twine.
Make it Sparkle
Before baking, lightly brush the red nose with pearl mica powder or add a layer of glossy varnish after baking for a shiny ‘Rudolph’ effect.
Step 3: Antlers and Baking
-
Shape the antlers:
Roll thin snakes of dark brown clay. Create a main branch for each antler and add smaller, shorter pieces branching off to form the tines. -
Attach antlers:
Press the base of the antlers onto the top of the head, just behind the ears. Ensure there is a strong connection by blending the clay slightly on the back of the ornament. -
Check for lint:
Before baking, examine the surface for fingerprints or dust. A little bit of rubbing alcohol on a q-tip helps smooth out imperfections. -
Bake the ornament:
Place your reindeer on a baking sheet lined with parchment paper. Bake according to your specific clay manufacturer’s instructions, usually around 275°F (135°C) for 15-30 minutes. -
Cool down:
Allow the ornament to cool completely before touching it, as the clay is fragile when hot.
Step 4: Painting and Finishing
-
Paint the eyes:
Dip a fine detail brush into black acrylic paint. Carefully paint two small upside-down U shapes above the nose for the smiling eyes. -
Paint the mouth:
Paint a small, simple U shape directly under the nose to give him a happy grin. If your hand is shaky, you can use a fine-tip permanent marker instead. -
Add freckles (optional):
For extra detail, you can dip a toothpick in white paint to add tiny dots to the cheeks, though the original design looks clean without them. -
String it up:
Cut a length of jute twine, thread it through the loop at the top, and tie a knot to finish your ornament.
Hang this cheerful little reindeer on your tree and enjoy his sweet smile all season long


Flat-Back Stocking Appliqués for Gifts and Garlands
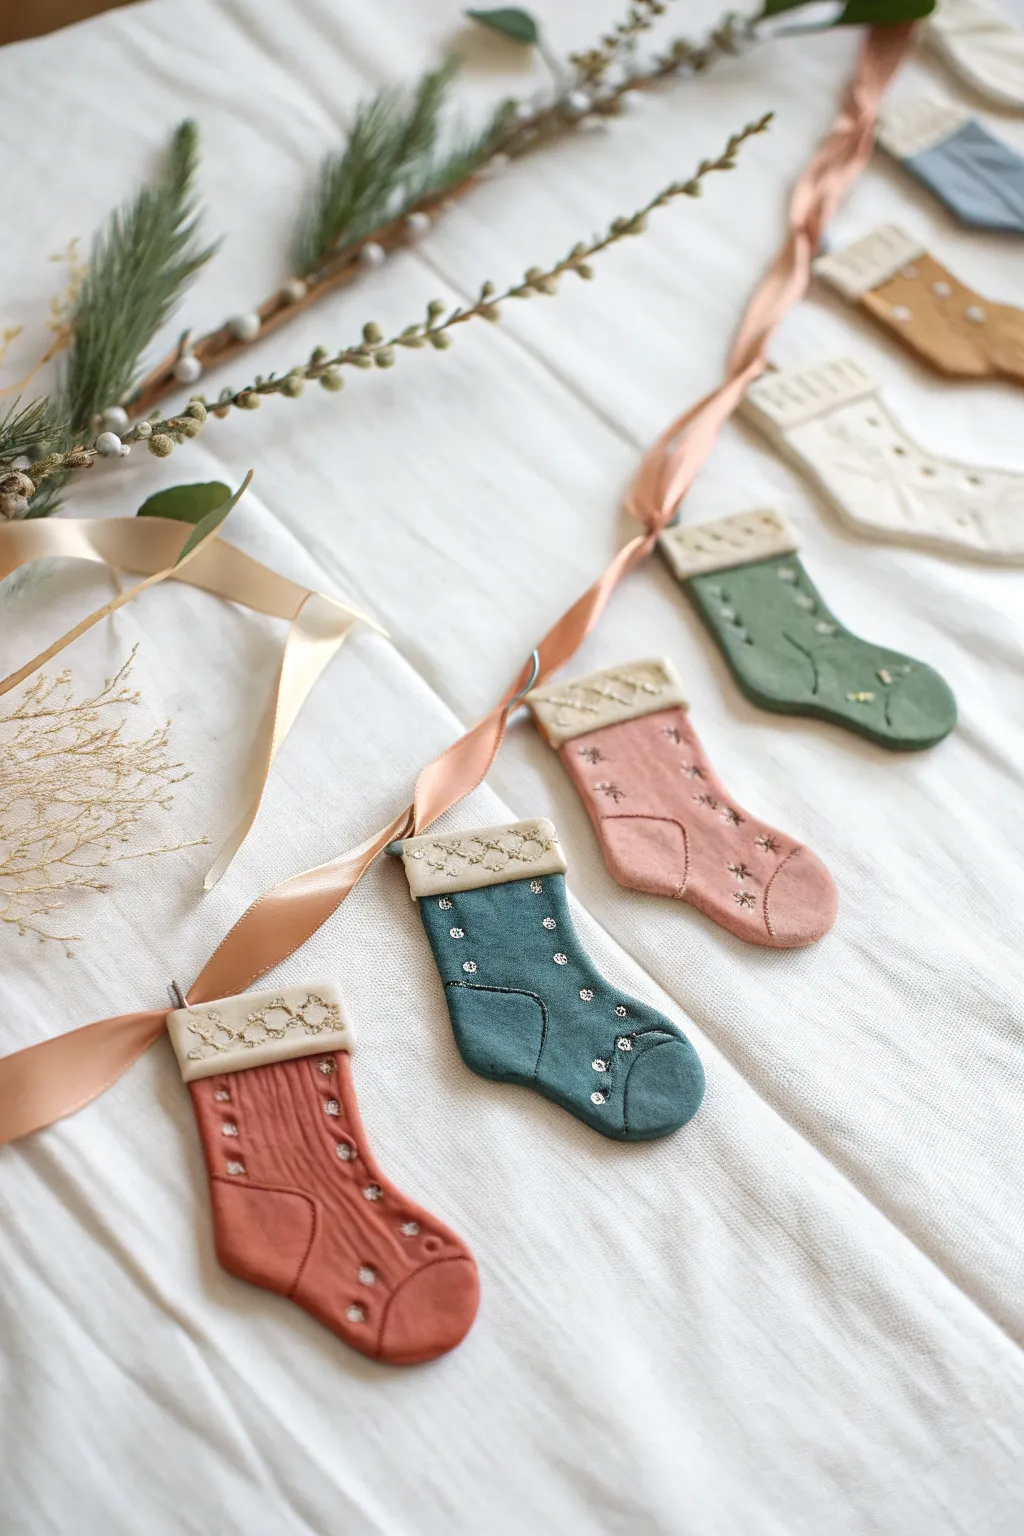
Capture the cozy spirit of the holidays with these delicate clay stocking appliqués, perfect for stringing into a sweet garland or using as unique gift toppers. The soft, muted color palette and simple stamped textures give them a charming, handmade heirloom quality.
Step-by-Step Tutorial
Materials
- Polymer clay in muted tones (terracotta, slate blue, dusty rose, sage green, cream, mustard)
- Small rolling pin or acrylic roller
- Stocking-shaped cookie cutter (approx. 2-3 inches) or craft knife and stencil
- Fine-point needle tool or toothpick
- Small palette knife
- Texturing tools (clean toothbrush, lace scrap, or specialized clay texture sheet)
- Metallic acrylic paint (gold or silver)
- Very fine detail paintbrush
- Satin or silk ribbon (peach/blush tone)
- Baking sheet and parchment paper
- Gloss or matte varnish (optional)
Step 1: Shaping the Base
-
Prepare your palette:
Begin by conditioning your polymer clay blocks. Mix custom shades if needed to achieve that soft, vintage look—adding a touch of white or grey can help desaturate bright colors. -
Roll the slabs:
Roll out each color of clay to an even thickness, roughly 1/4 inch (about 5-6mm). You want them thick enough to be sturdy but not heavy. -
Cut the shapes:
Using your stocking cutter, press firmly into the clay to create clean shapes. If cutting by hand with a craft knife, use a cardstock template to ensure uniformity across the set. -
Smooth the edges:
Gently run your finger dipped in a little cornstarch or water along the cut edges to soften any sharp ridges left by the cutter.
Step 2: Adding Details & Texture
-
Create the cuff:
Roll out a thin strip of cream-colored clay. Cut small rectangles sized to fit the top width of each stocking. -
Texture the cuff:
Before attaching, press a texture tool (like a scrap of lace or a distinct pattern stamp) into the cream strip to mimic an knitted or embroidered effect. -
Attach the cuff:
Place the textured cream strip over the top of the stocking base. Press gently to bond the clays together without smashing the texture. -
Define the heel and toe:
Using a needle tool, lightly score a curved line to visually separate the toe and heel areas from the main sock body. Do not cut all the way through. -
Add hanging holes:
Use a straw or a large needle tool to punch a clean horizontal hole through the top corner of the cuff. Ensure the hole is wide enough for your chosen ribbon.
Clean Edges Secret
Place a sheet of cling wrap over the clay before pressing your cutter down. This creates a soft, rounded ‘pillowed’ edge that needs zero sanding later.
Step 3: Baking and Finishing
-
Bake the batch:
Arrange the stockings on a parchment, lined baking sheet. Bake according to your clay manufacturer’s instructions (usually around 275°F/135°C for 15-30 minutes). -
Cool down:
Allow the clay pieces to cool completely on the baking sheet. Moving them while hot can warp the flat shape. -
Paint metallic accents:
Once cool, dip your fine brush into metallic gold or silver paint. Add tiny details like dots, snowflakes, or highlighting the texture on the cuff. -
Seal the work:
I prefer to brush on a thin layer of matte varnish over the painted areas to protect the design, though leaving the clay natural works beautifully too. -
String the garland:
Thread your satin ribbon through the holes. You can knot the ribbon at each stocking to keep them spaced evenly, or let them slide freely.
Personalized touch
Before baking, use small alphabet stamps to impress a different family member’s initial into the toe area of every stocking for custom gift tags.
Now you have a charming string of festive decorations ready to hang on the mantel or tree

The Complete Guide to Pottery Troubleshooting
Uncover the most common ceramic mistakes—from cracking clay to failed glazes—and learn how to fix them fast.
Personalized Name-and-Date Clay Gift Tags
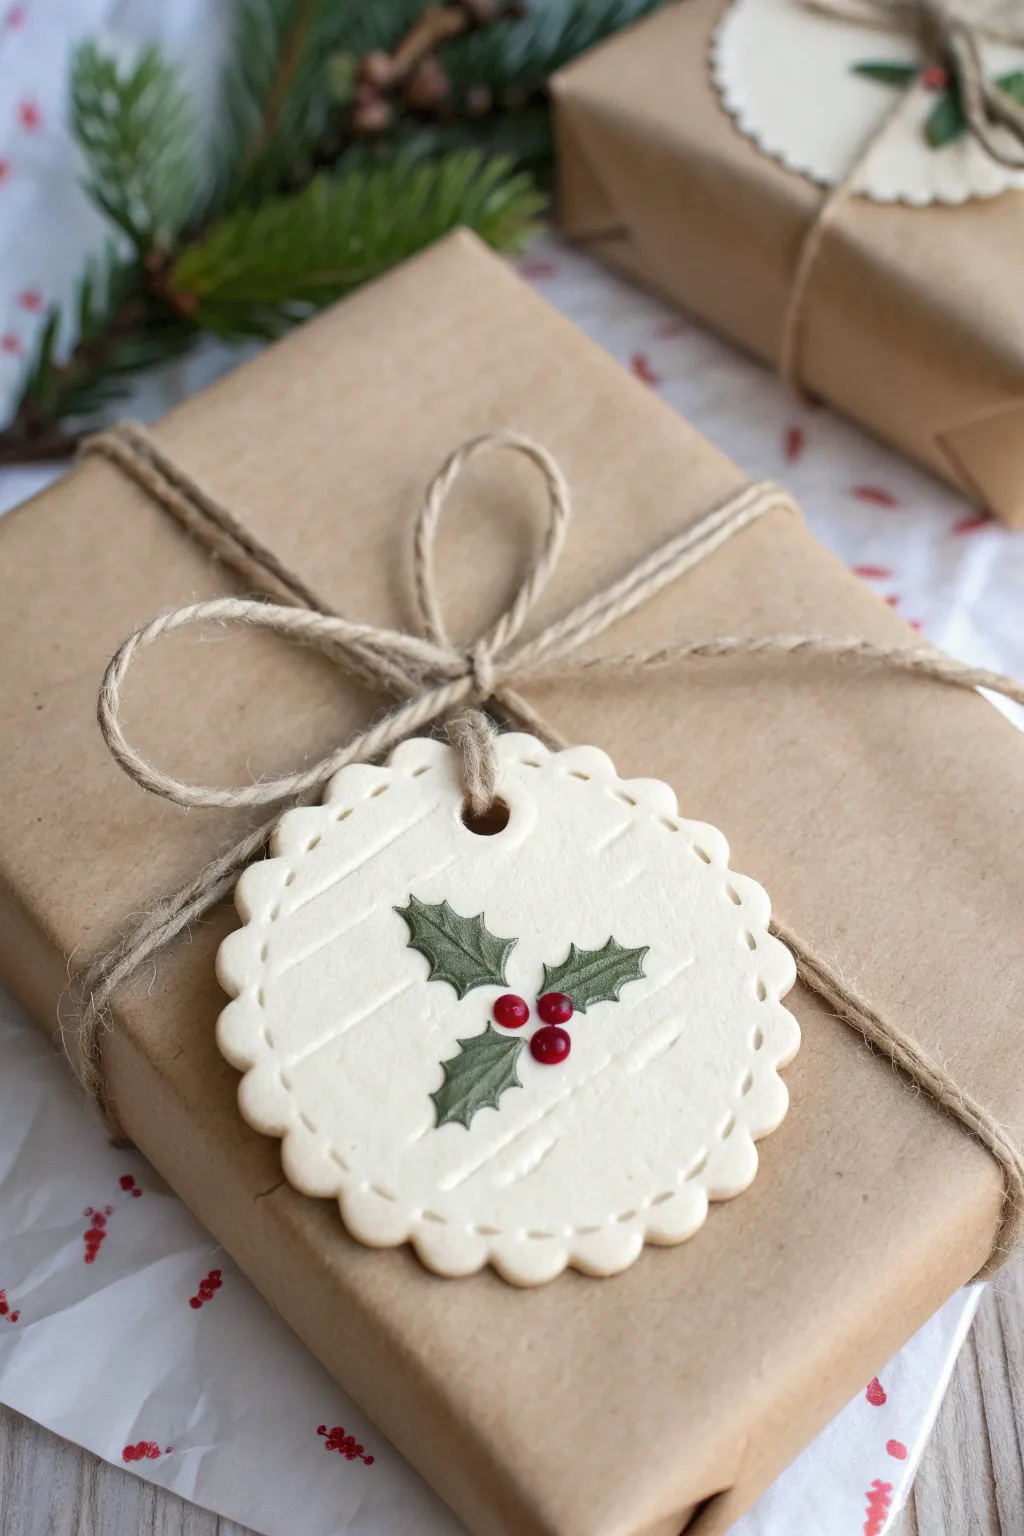
Elevate your gift wrapping this season with these charming, cookie-style clay tags. Featuring delicate scalloped edges and a classic holly motif, they add a handcrafted warmth that makes even plain brown paper look sophisticated.
Step-by-Step Guide
Materials
- White or beige air-dry clay (or polymer clay)
- Small scalloped circle cookie cutter (approx. 2-3 inches)
- Rolling pin
- Parchment paper or non-stick craft mat
- Plastic straw or small hole punch tool
- Fine-grit sandpaper
- Dark green acrylic paint
- Bright red dimensional fabric paint (puffy paint) or red acrylic paint
- Very fine detail paintbrush (0 or 00 size)
- Jute twine for hanging
- Matte spray varnish (optional)
Step 1: Shaping the Clay Base
-
Prepare your workspace:
Lay down a sheet of parchment paper or a silicone craft mat to prevent sticking. This ensures your clay releases easily later. -
Condition the clay:
Take a handful of your clay and knead it gently until it is pliable and smooth. The goal is to remove any air bubbles or cracks. -
Roll it out:
Using your rolling pin, flatten the clay to an even thickness of about 1/8 to 1/4 inch. If you want a textured background like in the photo, gently roll a textured roller or even a piece of wood grain paper over the surface now. -
Cut the shapes:
Press your scalloped circle cookie cutter firmly into the clay. Give it a tiny wiggle to ensure it cuts all the way through, then lift away the excess clay. -
Add the hole:
Use a plastic straw or a small circular cutter to punch a hole near the top edge of the tag. Make sure it’s centered and not too close to the delicate scalloped rim. -
Smooth the edges:
Dip your finger in a little bit of water and gently run it along the cut edges of the fresh clay to smooth out any rough spots left by the cutter. -
Let it dry:
Allow the tags to dry completely according to your clay package instructions. For air-dry clay, flipping them over halfway through the drying process helps prevent curling. -
Sand for perfection:
Once fully cured and hard, lightly sand the edges with fine-grit sandpaper if there are any remaining burrs or sharp points.
Use Puffy Paint
For the berries, use 3D fabric paint (puffy paint) straight from the bottle tip. It dries raised and shiny, giving you that perfect berry texture without sculpting.
Step 2: Painting the Holly design
-
Sketch the placement:
Lightly mark the center point where your holly leaves will meet using a pencil, just enough to guide your painting. -
Paint the first leaf:
Load your fine detail brush with dark green acrylic paint. Paint a three-pointed holly leaf shape extending upwards from the center point. -
Add side leaves:
Paint two more holly leaves extending outwards to the left and right, ensuring their stems meet in the middle where the berries will go. -
Create leaf details:
If you want extra dimension, mix a tiny bit of white into your green paint and add a very subtle highlight line down the center of each leaf. -
Apply the berries:
Using red dimensional (puffy) paint, squeeze three small dots directly at the center junction of the leaves. The dimensional paint recreates the raised look of real berries perfectly. -
Dry the paint:
Let the paint dry completely. Dimensional paint often takes longer than standard acrylics—sometimes up to 4 hours—so be patient. -
Seal (optional):
I like to finish these with a light coat of matte spray varnish to protect the artwork, especially if the gifts will travel. -
String it up:
Cut a length of jute twine, thread it through the hole, and tie it onto your gift package with a simple knot or bow.
Add Subtle Texture
Before cutting the circle, lightly roll a piece of linen fabric or canvas over the raw clay. This imitates the subtle surface texture seen in the photo.
Now you have a set of timeless, reusable holiday tags ready for gifting
Photo Frame Ornament With a Clay Wreath Border
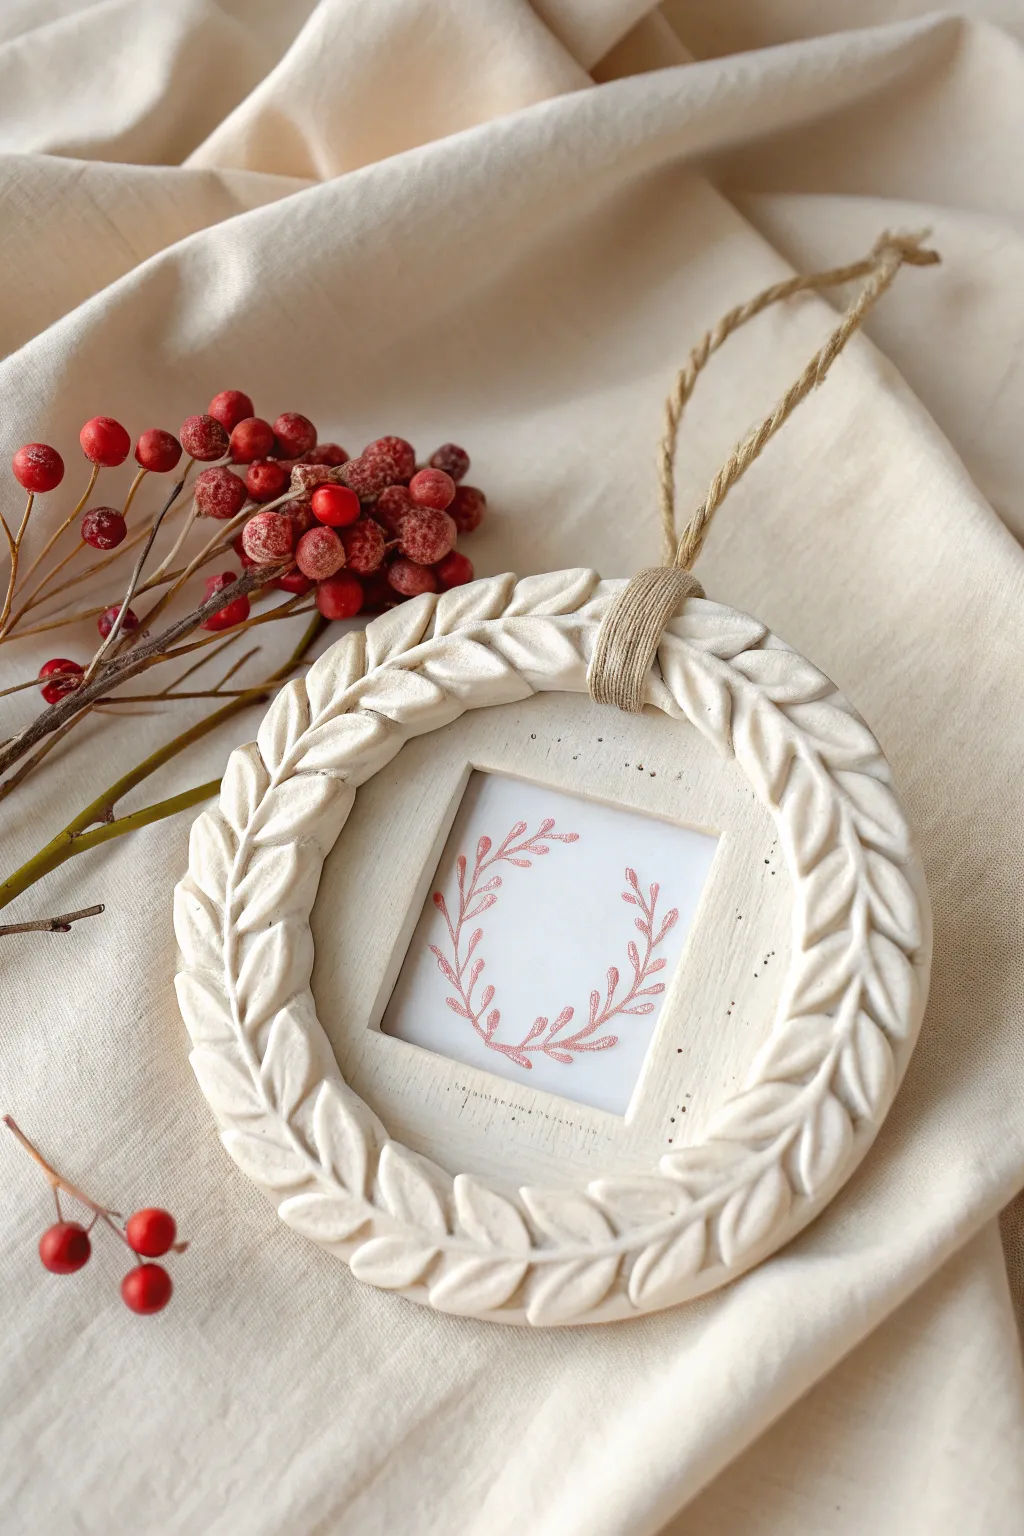
This charming ornament combines the rustic texture of sculpted leaves with the delicate simplicity of a custom photo frame. It’s a perfect keepsake for capturing a holiday memory or displaying a tiny piece of festive art.
Detailed Instructions
Materials
- White sculpting clay (air-dry or polymer, depending on preference)
- Rolling pin
- Square cookie cutter (approx. 1.5 inches)
- Round cookie cutter (approx. 3.5 inches)
- Sculpting tool or plastic knife
- Small printed image or cardstock drawing
- Jute twine
- Craft glue or strong adhesive
- Fine-grit sandpaper
- Matte white acrylic paint (optional)
- Clear sealant (spray or brush-on)
- Straw or toothpick (for hanging channel)
Step 1: Shaping the Base
-
Condition the clay:
Begin by kneading a ball of white clay until it is smooth, pliable, and free of cracks. If using polymer clay, the warmth of your hands will make this easier. -
Roll it out:
Roll the clay into a flat slab on a smooth surface to a thickness of about 1/4 inch. Ensure the thickness is even so the frame sits flat. -
Cut the outer circle:
Firmly press your large round cookie cutter into the clay to create the outer boundary of the wreath. -
Create the inner window:
Center the square cookie cutter carefully in the middle of the circle and press down to remove the center clay, creating the photo window. -
Clean the edges:
Using a fingertip dampened with a little water, smooth out any rough edges on both the exterior circle and the interior square cutout.
Creating Uniform Texture
Instead of carving, you can roll tiny individual balls of clay, flatten them into teardrops, and overlay them onto the ring for a 3D effect.
Step 2: Sculpting the Leaves
-
Mark the pattern:
Lightly trace a guideline around the rim to help you visualize where the leaves will flow. They should angle slightly outward, mimicking a real laurel wreath. -
Score the leaves:
Using a sculpting tool or the back of a small knife, press leaf shapes into the clay rim. Start from the top center and work your way down each side so the leaves point upwards. -
Add definition:
Go back over each leaf shape and press a central vein line down the middle. Slightly depress the areas between the leaves to make the foliage pop forward. -
Create the hanger loop:
At the very top of the wreath, where the two sides of leaves meet, fashion a small horizontal loop or channel using a spare strip of clay. Secure it well. Alternatively, you can pierce a hole here, but the loop adds a nice finished look.
Step 3: Drying and Refining
-
Let it cure:
Follow the instructions for your specific clay. If air-drying, leave it in a cool, dry place for at least 24-48 hours. If baking, place on a parchment-lined sheet and bake according to package directions. -
Sand for smoothness:
Once fully cured and cool, gently run fine-grit sandpaper over the flat surfaces and edges to remove any sharp burrs or fingerprints. -
Paint (optional):
To achieve that pristine, matte stoneware look shown in the photo, apply a thin coat of matte white acrylic paint. This unifies the color if your clay has discolored during drying. -
Apply sealant:
Protect your work with a light coat of clear matte sealant. I find this creates a much more professional finish and prevents the clay from yellowing over time.
Fixing Cracks
If air-dry clay cracks while drying, mix a tiny bit of fresh clay with water to make a paste and fill the gaps before painting.
Step 4: Assembly
-
Prepare the insert:
Cut your photo or drawing slightly larger than the square window opening. The example uses a sweet drawing of pink sprigs on white cardstock. -
Attach the image:
Flip the frame over. Apply a thin line of craft glue around the back edge of the square cutout and press your image face-down onto it. -
Create a backing:
For a tidy look, glue a square of white felt or cardstock over the back of the photo to conceal the raw edges. -
Add the hanger:
Cut a length of jute twine. Thread it through the clay loop you created at the top. -
Secure the loop:
Tie the twine securely, doubling it up if you want the thicker rustic look seen in the photo. Trim any excess ends.
Now hang your beautiful handmade frame on the tree and enjoy the cozy, personalized touch it adds to your holiday decor


What Really Happens Inside the Kiln
Learn how time and temperature work together inside the kiln to transform clay into durable ceramic.
Cone Tree Forest Tabletop Set
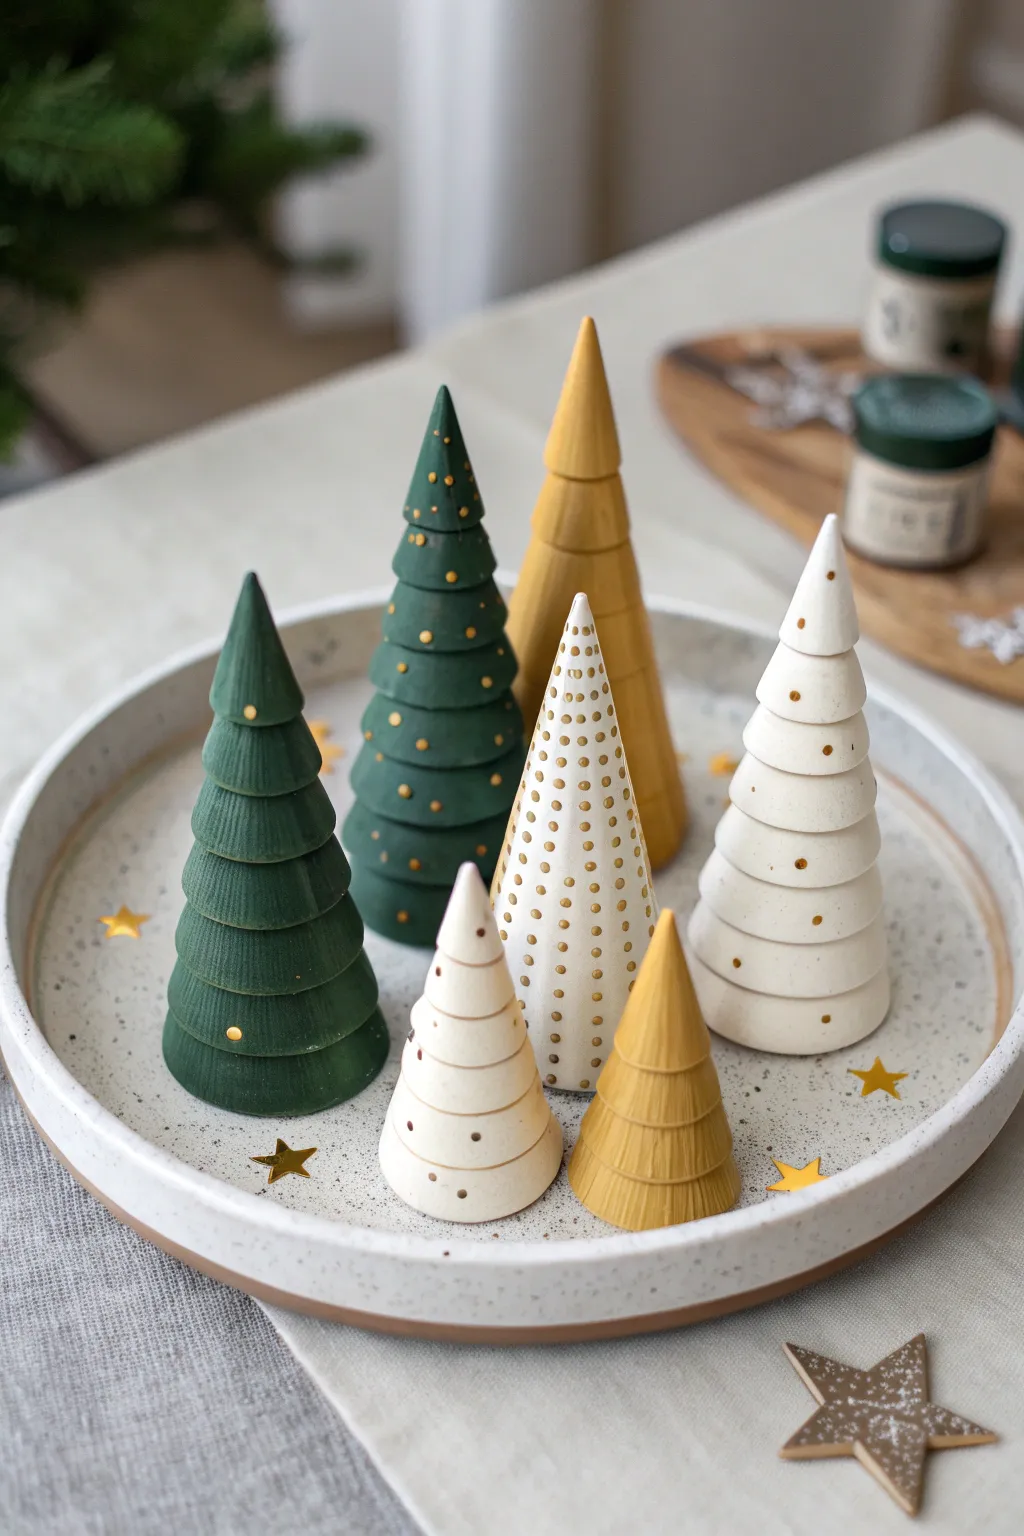
Bring a touch of modern Nordic charm to your holiday decor with this sleek, minimalist forest. Using simple cone shapes and muted earth tones, you’ll sculpt a sophisticated tabletop set that looks like polished ceramic.
Detailed Instructions
Materials
- Air-dry clay or polymer clay (white)
- Acrylic paints (hunter green, sage green, ochre/mustard, cream/off-white)
- Gold acrylic paint or paint pen
- Rolling pin
- Clay knife or craft blade
- Modeling tools (or a toothpick)
- Fine-grit sandpaper
- Paintbrushes (flat and fine tip)
- Matte varnish or sealant
Step 1: Sculpting the Tiered Trees
-
Form the base cone:
Start by rolling a ball of clay and shaping it into a smooth, tall cone. This will be the core structure for your tree. Make sure the bottom is flat so it stands securely. -
Create clay strips:
Roll out a sheet of clay to about 1/8 inch thickness. Use your craft knife to cut several long, even strips. These will become the ‘boughs’ of your tree. -
Apply the bottom tier:
Wrap a strip of clay around the base of your cone. Angle it slightly outward to mimic the flare of branches. Trim the excess where the ends meet and blend the seam smoothly with your finger or a tool. -
Layer the tiers:
Continue adding strips, working your way up the cone. Each new strip should slightly overlap the top edge of the one below it. Aim for 5-7 layers depending on the height of your tree. -
Cap it off:
For the very top, shape a tiny cone of clay and blend it onto the highest tier to create a pointed tip. -
Final shaping:
Gently press and mold the tiers to ensure they look cohesive. I like to smooth the underside of each tier slightly so they don’t look too chunky.
Cracking Clay?
If small cracks appear while air-dry clay is drying, mix a tiny bit of fresh clay with water to make a paste (slip) and fill the cracks, then sand smooth once dry.
Step 2: Creating the Smooth & Dotted Trees
-
Roll smooth cones:
For the minimal trees, roll generous amounts of clay into smooth, solid cones of varying heights. These don’t need layers; their beauty lies in their sleek silhouette. -
Check stability:
Tap the base of each cone firmly on your work surface to flatten it. This ensures they won’t wobble on your display tray. -
Add texture (optional):
If you want the textured look seen on the tallest central tree, use a needle tool to gently impress tiny dots or lines into the wet clay before it hardens.
Step 3: Refining and Painting
-
Dry thoroughly:
Allow all your clay pieces to dry completely. For air-dry clay, this usually takes 24-48 hours. Don’t rush this, or moisture might get trapped under the paint. -
Sand for smoothness:
Once dry, gently sand any rough fingerprints or sharp edges with fine-grit sandpaper. Wipe away the dust with a slightly damp cloth. -
Base coat colors:
Paint your trees in a coordinated palette. Use deep hunter green for the tiered trees, mustard/ochre for the smaller accents, and a creamy off-white for the tall, sleek ones. Two coats usually give the best solid coverage. -
Add gold details:
Using a fine-tip brush or a gold paint pen, add small dots. On the green tiered trees, place dots sporadically on the tier edges. For the white trees, create organized vertical rows of tiny gold points. -
Seal the forest:
Protect your work with a coat of matte varnish. This gives the trees a finished, high-quality look and prevents the paint from chipping.
Metallic Magic
Instead of painted dots, press tiny gold seed beads into the wet clay before drying for actual texture and varied shine.
Step 4: The Speckled Tray (Optional)
-
Form the tray:
Roll out a large circle of clay. Roll a long snake of clay and attach it to the perimeter to create a rim, blending the seam on the inside and outside for a seamless look. -
Speckled effect:
Paint the tray a light grey or cream. Once dry, load an old toothbrush with diluted brown or black paint and flick the bristles to splatter tiny specks across the surface.
Arrange your finished forest on the tray with some scattered gold stars for a scene that feels both festive and peaceful