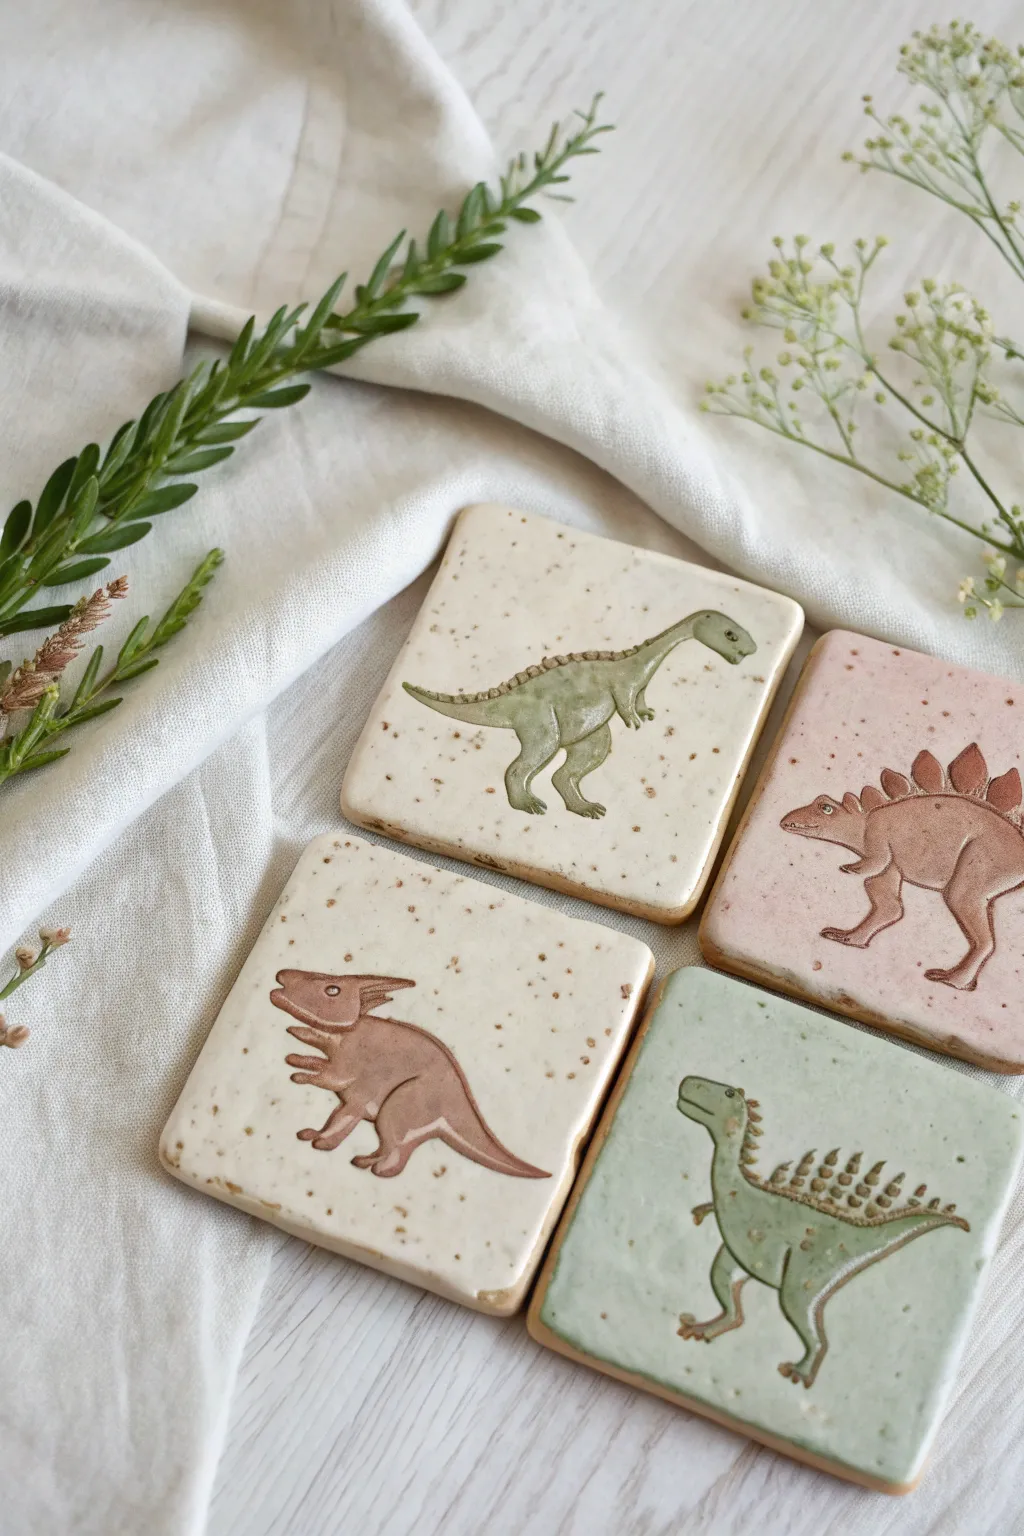
If you’ve ever wanted to make dinos in clay but felt intimidated by all the spikes, horns, and tails, I’ve got you. These dinosaur clay ideas keep things cute, simple, and totally doable with beginner-friendly shapes you can build up in minutes.
Chubby Chibi T-Rex Desk Buddy

Sculpt your own prehistoric pal with this adorable, stout T-Rex project, perfect for greeting you every time you sit at your desk. Designed with a charmingly oversized head and a friendly grin, this smooth, teal-green figurine brings a touch of whimsy to any workspace.
How-To Guide
Materials
- Air-dry clay (white or pre-colored teal)
- Acrylic paints (teal/turquoise, beige/cream, brown, white, black)
- Foil (for armature)
- Small rolling pin
- Sculpting tools (needle tool, smoothing tool, ball tool)
- Paintbrushes (medium flat, small detail)
- Water cup (for smoothing)
- Fine-grit sandpaper
- Matte varnish or sealant
Step 1: Building the Armature & Body
-
Form the core:
To save clay and reduce weight, crumple aluminum foil into two main shapes: a larger, squat oval for the body and a slightly smaller, rounded shape for the head. Compress them tightly so they are firm. -
Cover with clay:
Roll out a sheet of your main body clay to about 1/4 inch thickness. Wrap the foil shapes completely, smoothing the seams together with a bit of water until you have a seamless egg-like body and a round head. -
Connect head and body:
Attach the head to the body. Insert a small piece of toothpick or wire between the two for stability, then blend the clay at the neck downwards so no seam remains. -
Shape the tail:
Roll a thick cone of clay and attach it to the lower back of the body curve to create a sturdy tail. This third point of contact will help your dinosaur stand up on its own, so test the balance now.
Cracks happen!
If small cracks appear as the clay dries, don’t panic. Mix a small amount of fresh clay with water to make a paste perfectly suited for filling the gaps.
Step 2: Adding Extremities & Features
-
Create the legs:
Roll two short, thick cylinders for the legs. Press them firmly onto the bottom sides of the body, blending the clay upwards. Use a sculpting tool to press in three simple toe indentations at the front of each foot. -
Attach the arms:
Form two smaller, teardrop-shaped pieces for the arms. Attach them high on the chest, smoothing the shoulder area into the body so they look integrated rather than just stuck on. -
Sculpt the face:
I like to gently press the snout area to flatten it slightly. Use a needle tool or small knife to carve a wide, curved smile line across the muzzle. -
Nose and teeth:
Poke two small nostrils above the smile using a ball tool. For the teeth, roll tiny triangles of clay (or create indentations to paint later) and attach two small fangs hanging from the upper lip. -
Wait for drying:
Let the sculpture dry completely. Depending on the thickness and humidity, this could take 24 to 48 hours. Rotate it occasionally so the bottom dries evenly.
Step 3: Painting & Finishing
-
Sand and smooth:
Once bone dry, use fine-grit sandpaper to gently buff away any fingerprints or rough bumps, focusing on the head and back for a clean finish. -
Base coat:
Paint the entire dinosaur in a solid coat of teal or turquoise acrylic paint. You may need two thin layers to get opaque coverage. -
Paint the belly:
Mix a cream or beige color and paint a large oval patch on the tummy, extending from the chest down between the legs. -
Add dorsal plates:
Using a brownish-orange paint (or clay if you added them before drying), paint a row of small triangular spikes running from the top of the head down to the tail. If you didn’t sculpt them, you can paint them as flat details or glue on small dried clay triangles now. -
Detail the eyes:
Paint two vertical white ovals for eyes. Once dry, add a black pupil looking sideways or forward, and a tiny white dot for a highlight to bring him to life. -
Final touches:
Paint the tiny teeth white and use a very fine brush or pen to line the mouth smile and outline the eyes if you want a more cartoonish look. -
Seal:
Finish with a coat of matte varnish to protect the paint and give the dinosaur a professional, smooth texture.
Accessorize Him
Give your buddy some personality by sculpting a tiny tie, a party hat, or even a miniature pair of glasses from thin wire to perch on his nose.
Set your new prehistoric friend on your desk and enjoy the creative company while you work


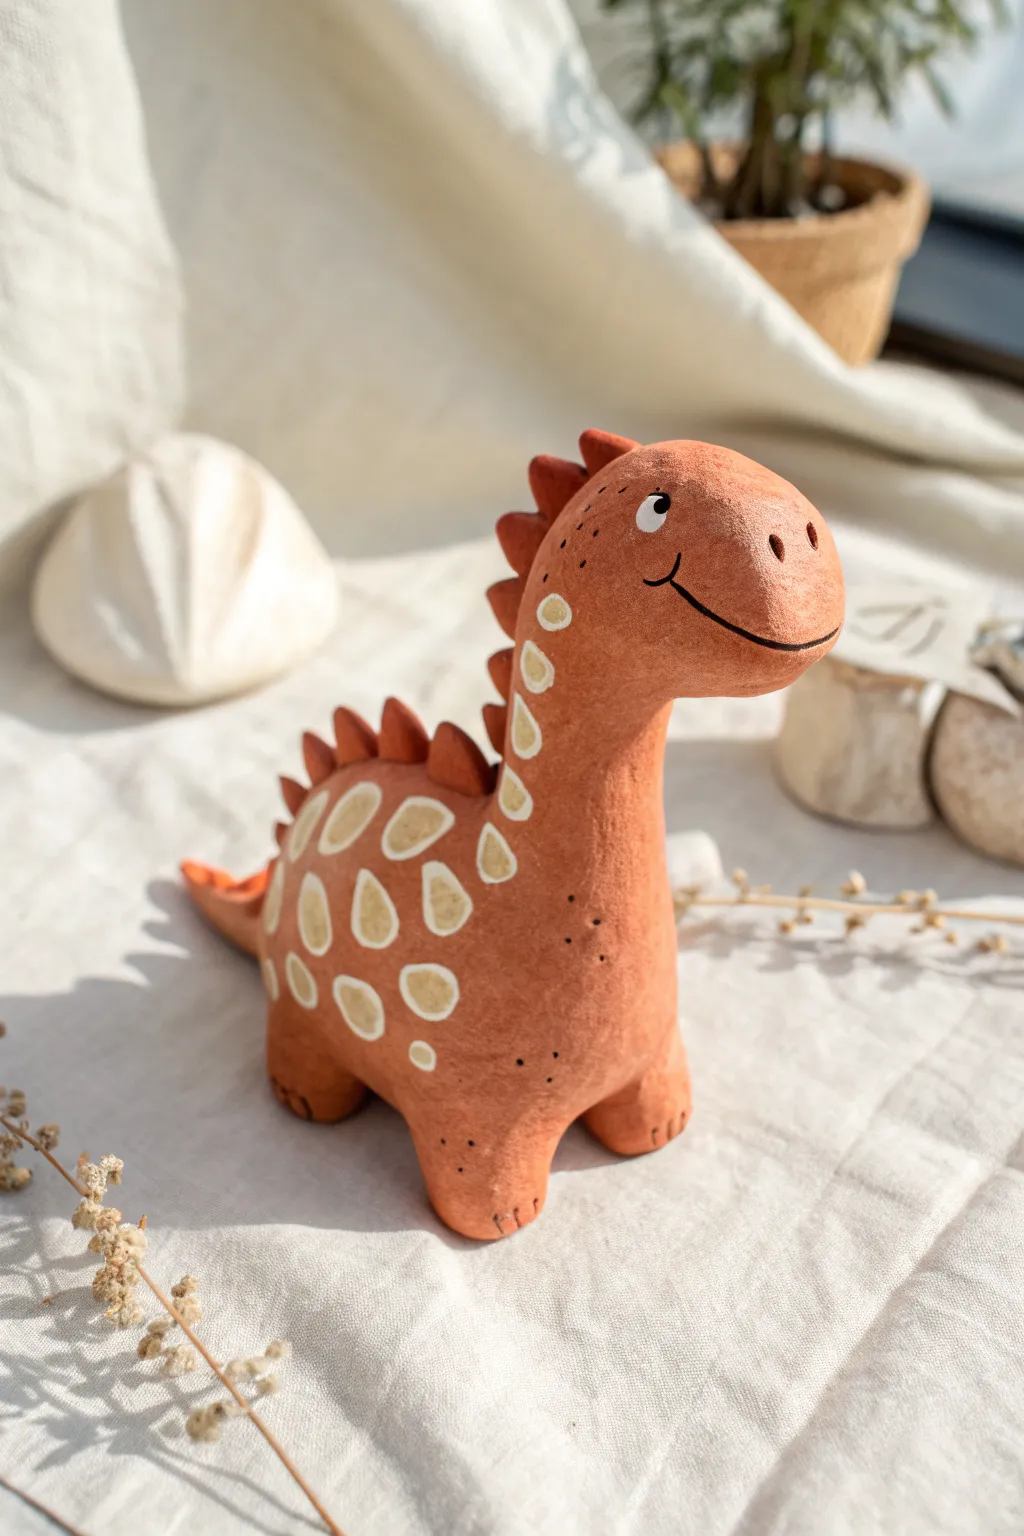
Simple Stegosaurus With Big Back Plates
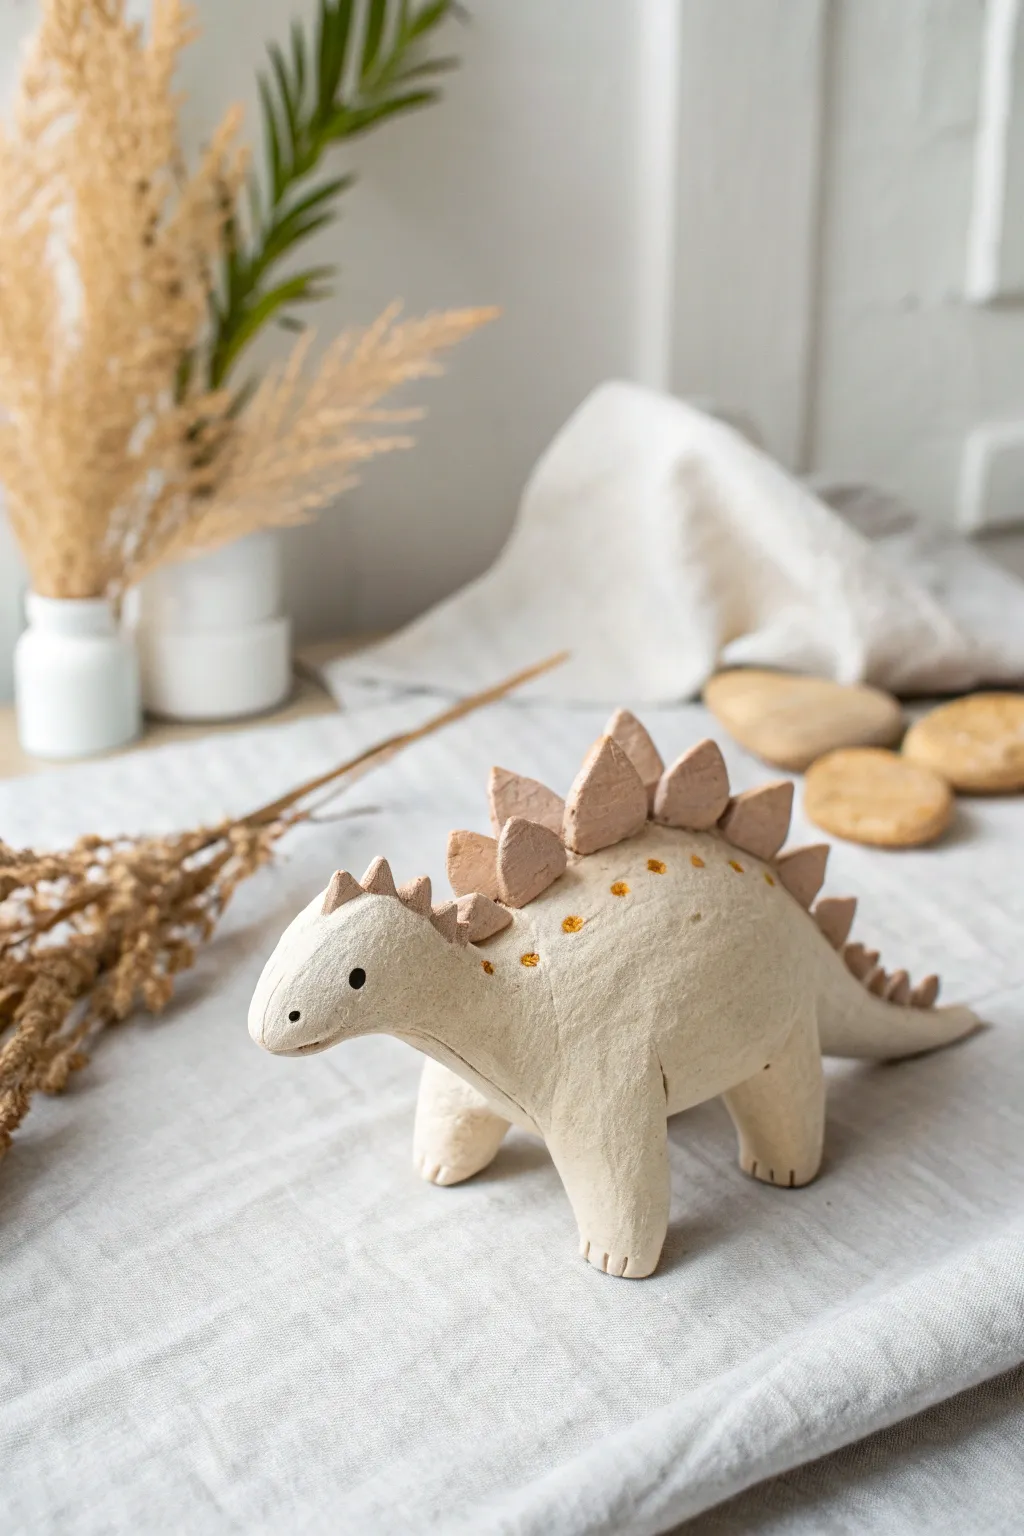
This charming, rustic stegosaurus features soft, earthy tones and a delightful matte texture that gives it a timeless, handmade feel. With its oversized back plates and gentle expression, it makes a perfect decorative piece for a nursery or a shelf companion.
Step-by-Step Tutorial
Materials
- Air-dry clay or polymer clay (cream/beige color)
- Clay roller or rolling pin
- Modeling tools (or a toothpick and a small knife)
- Acrylic paint (black, burnt orange, dusty pink/terracotta)
- Small fine-point paintbrush
- Water and sponge (for smoothing)
- Texturing sponge or brush (optional)
Step 1: Shaping the Body
-
Form the torso:
Start with a large ball of cream-colored clay. Roll it into a thick, elongated oval shape to form the main body of the dinosaur. -
Pull the neck:
Gently pinch and pull one end of the oval upwards and outwards to create a sturdy neck, smoothing the clay as you go to avoid cracks. -
Shape the head:
At the end of the neck, mold a rounded, slightly tapered nub for the head. It shouldn’t be too sharp; keep the snout soft and blunt. -
Extrend the tail:
On the opposite end, pull the clay into a long, tapering tail that curves slightly downward. Ensure the transition from the back to the tail is smooth and gradual. -
Create the legs:
Roll four stout cylinders of clay for the legs. The back legs should be slightly thicker than the front ones to support the weight. -
Attach the legs:
Score the body where the legs will go, dab a little water (or liquid clay if using polymer) on the joints, and press the legs firmly in place. Blend the seams upward into the body until invisible. -
Refine the stance:
Stand the dinosaur up and press down gently to flatten the feet bottoms, ensuring it stands stable and level.
Step 2: Adding Details
-
Prepare the plates:
Roll out a separate slab of clay—you can tint this slightly darker or paint it later—about 1/4 inch thick. Cut out roughly 8-10 jagged, triangular shapes of varying sizes. -
Attach the plates:
Arranging from smallest to largest and back to smallest, attach the plates in a single row along the spine. Use a little water or slip to bond them, blending the bottom edge of each plate into the back. -
Add tail spikes:
Form four very small cones of clay and attach them to the very end of the tail for the thagomizer spikes. -
Texture the skin:
I like to take a slightly damp sponge or a stiff brush and dab it all over the body. This removes fingerprints and gives the surface a lovely, organic stone-like texture. -
Define the toes:
Use a modeling tool or knife to press small vertical indentations into the bottom of each foot to imply toes. -
Face details:
Use a small dotting tool to create shallow indentations where the eyes will go, and use a knife to incise a simple, straight line for the mouth. -
Dry or Bake:
If using air-dry clay, let the figure dry completely for 24-48 hours. If using polymer clay, bake according to the package instructions.
Legs Keep Sinking?
If the heavy body makes the legs sag, insert short pieces of toothpick or crumpled aluminum foil inside the legs as an armature for internal support.
Step 3: Painting & Finishing
-
Paint the plates:
Using a dusty pink or terracotta acrylic paint, carefully paint the back plates. You can feather the paint slightly downward onto the body for a natural blend. -
Add the spots:
Dip a fine brush into burnt orange paint. Dab small, irregular spots along the upper back, just beneath the row of plates. -
Paint the eyes:
Using a tiny drop of black paint, fill in the eye indentations. Keep them small and round for a cute look. -
Highlight the texture:
If the body looks too flat, you can do a very light dry-brushing with a lighter cream color to catch the raised textures we made earlier. -
Final matte coat:
Once all paint is dry, seal the project with a matte varnish spray to protect the clay while maintaining that soft, non-glossy finish.
Try Stoneware Texture
Mix dried tea leaves or ground coffee into your clay before sculpting. This creates a speckled, faux-ceramic effect that looks amazing unpainted.
Now you have a sturdy prehistoric friend ready to roam your desk or shelf with plenty of style


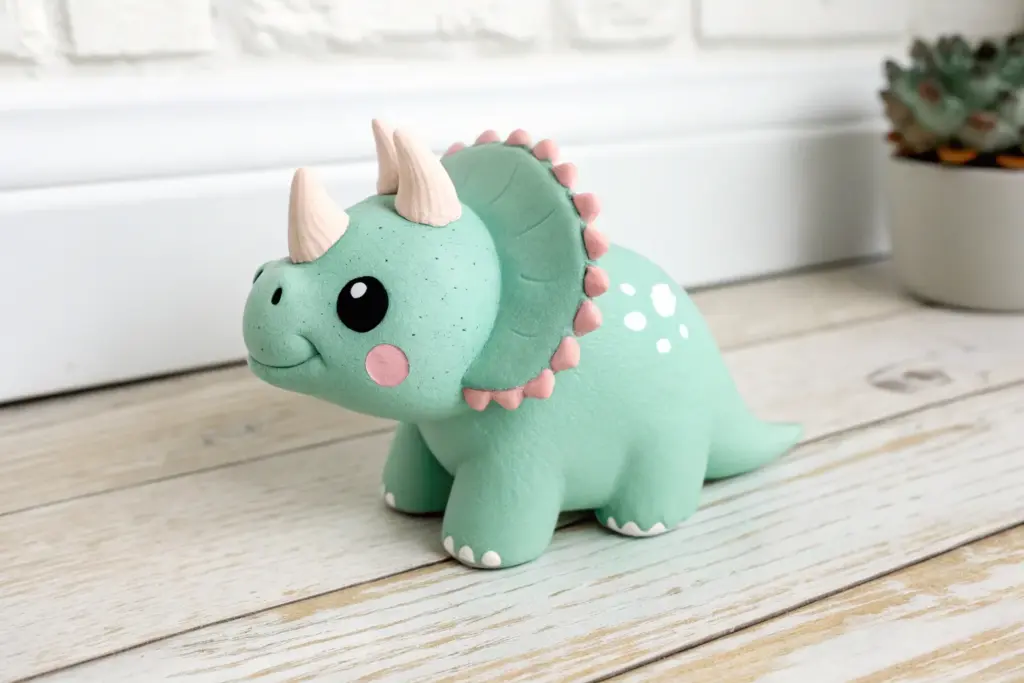
Round Triceratops With a Bold Frill
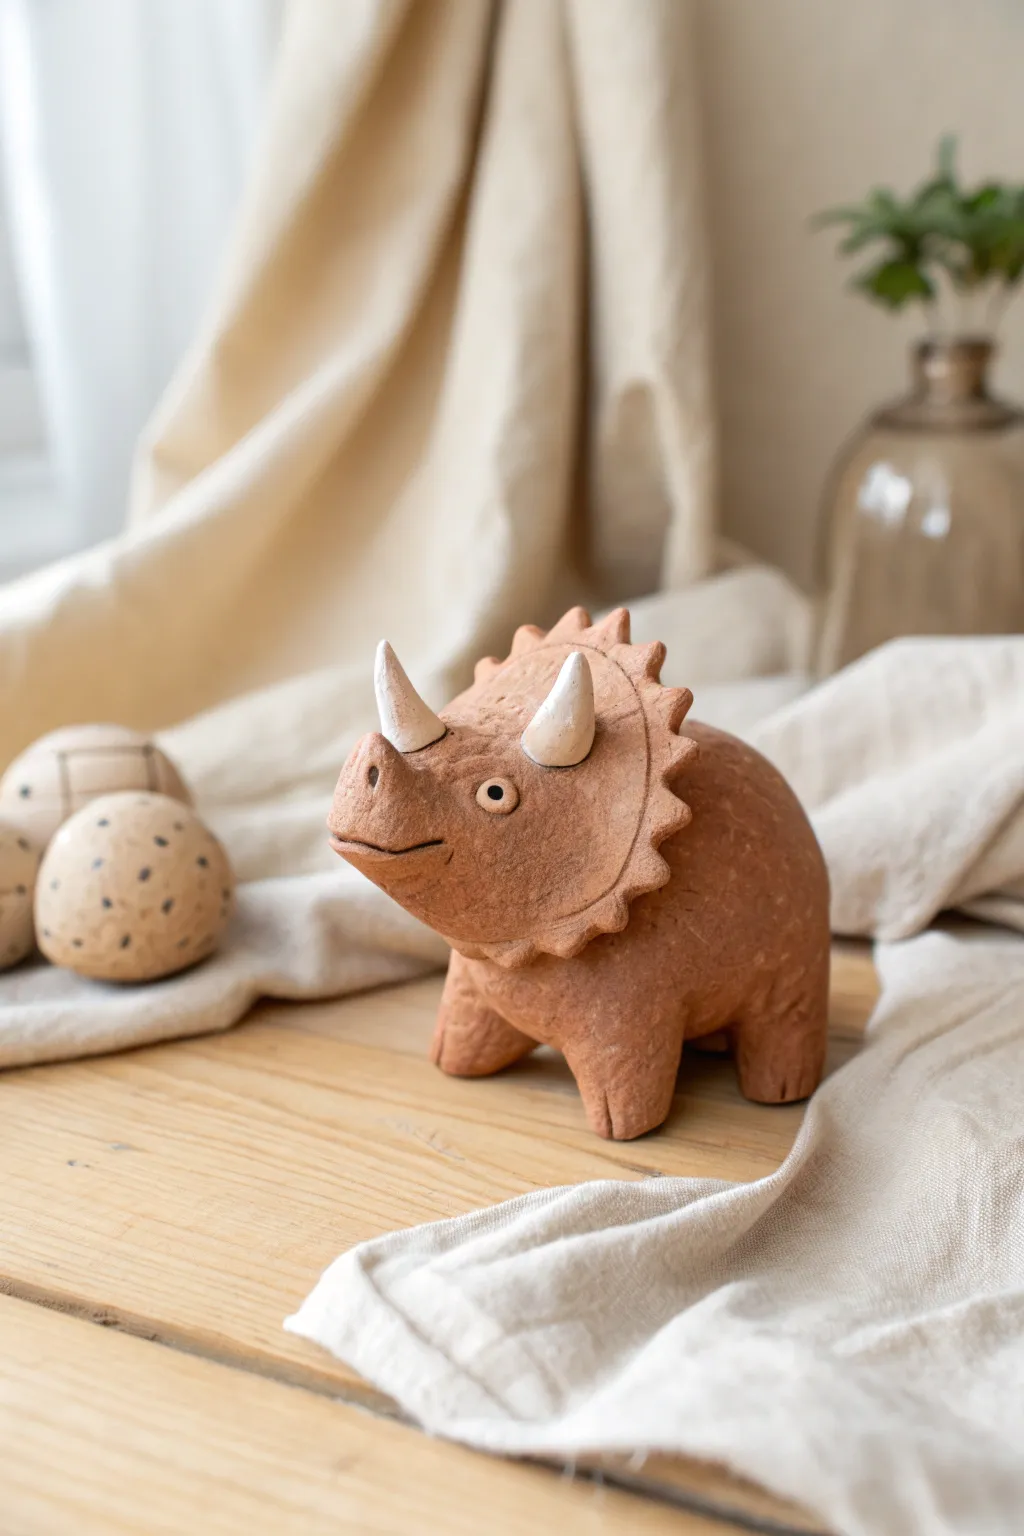
This charming, chunky triceratops features a warm terracotta finish and a delightfully round body that makes it approachable for sculptors of all levels. Its standout feature is the bold, jagged frill that frames the face, giving it a classic dinosaur silhouette with a handmade, earthy feel.
Step-by-Step
Materials
- Terracotta air-dry clay or polymer clay
- White air-dry clay (for the horns)
- Clay sculpting tools (needle tool, blending tool)
- Black acrylic paint
- Small detail paintbrush
- Water (for smoothing)
- Aluminum foil (optional, for armature)
Step 1: Forming the Base
-
Shape the body:
Start with a large ball of terracotta clay about the size of a tennis ball. Roll it firmly between your palms to smooth out cracks, then gently gently flatten the bottom so it sits stable on your work surface. -
Create the legs:
Roll four smaller, equal-sized cylinders of terracotta clay for the legs. They should be thick and sturdy, like tree stumps. -
Attach the legs:
Score the bottom of the body and the tops of the leg cylinders with a needle tool. Add a dab of water (or slip) to the scored areas and press the legs firmly onto the underside of the body. -
Blend the seams:
Use a blending tool or your thumb to smooth the clay where the legs meet the body. You want a seamless transition so the dino looks like one cohesive piece. -
Create the tail:
Pinch the clay at the back of the body and gently pull it outwards to form a short, stubby tail. Keep it rounded rather than sharp for that cute, chunky aesthetic.
Frill Stability
If the frill flops backward, prop it up with a small object (like a crumpled paper towel or sponge) behind the head while the clay dries or bakes.
Step 2: Sculpting the Head & Frill
-
Form the head shape:
Take a medium-sized ball of clay and shape it into a rounded cone. The wider end will attach to the body, and the narrower end will be the snout. -
Attach the head:
Score and slip the front of the body and the back of the head piece. Press them together firmly, blending the clay at the neck so the head is integrated, tilting it slightly upward. -
Make the frill slab:
Flatten a piece of terracotta clay into a pancake shape about 1/4 inch thick. It should be large enough to frame the back of the head. -
Cut the serrated edge:
Using a knife or needle tool, cut a triangular zigzag pattern along the top edge of your flattened slab to create the iconic triceratops frill points. -
Attach the frill:
Score the back of the head and the center of the frill. Press the frill onto the head, smoothing the seam where they connect. I find it helps to add a small coil of clay behind the frill for extra support while it dries. -
Detail the snout:
Press a small, unpainted cone of terracotta clay onto the very tip of the snout for the nose horn, blending it smoothly. -
Add the mouth:
Use a sculpting tool to carve a simple, curved line for the mouth, giving your dinosaur a slight smile.
Step 3: Horns & Finishing Touches
-
Shape the main horns:
Switch to your white clay. Roll two tapered cones, about an inch long, curving them slightly to mimic natural horn growth. -
Attach the horns:
Place the white horns on the forehead, just above where the eyes will go. Press them in deeply or use a small bit of wire for internal support if the clay is soft. -
Add texture:
Take a stiff bristle brush or a crumpled ball of aluminum foil and gently tap it all over the terracotta skin to create a rough, stone-like texture. -
Sculpt the eyes:
Roll two tiny balls of white clay and flatten them onto the face. Press a small indentation in the center of each. -
Paint the pupils:
Once the clay is dry (or after baking if using polymer), dip the handle end of a paintbrush into black paint and dot the center of each eye for a focused look. -
Optional texture wash:
To enhance the rustic look, mix a little brown paint with water and brush it over the body, wiping away the excess so the dark color stays in the textured crevices.
Dino Eggs
Use leftover clay to form oval eggs. Once dry, splatter them with diluted black paint using a toothbrush to create a speckled, realistic eggshell pattern.
Place your finished dino on a shelf near some plants to give it a natural habitat feel


Long-Neck Brachiosaurus in One Smooth Curve
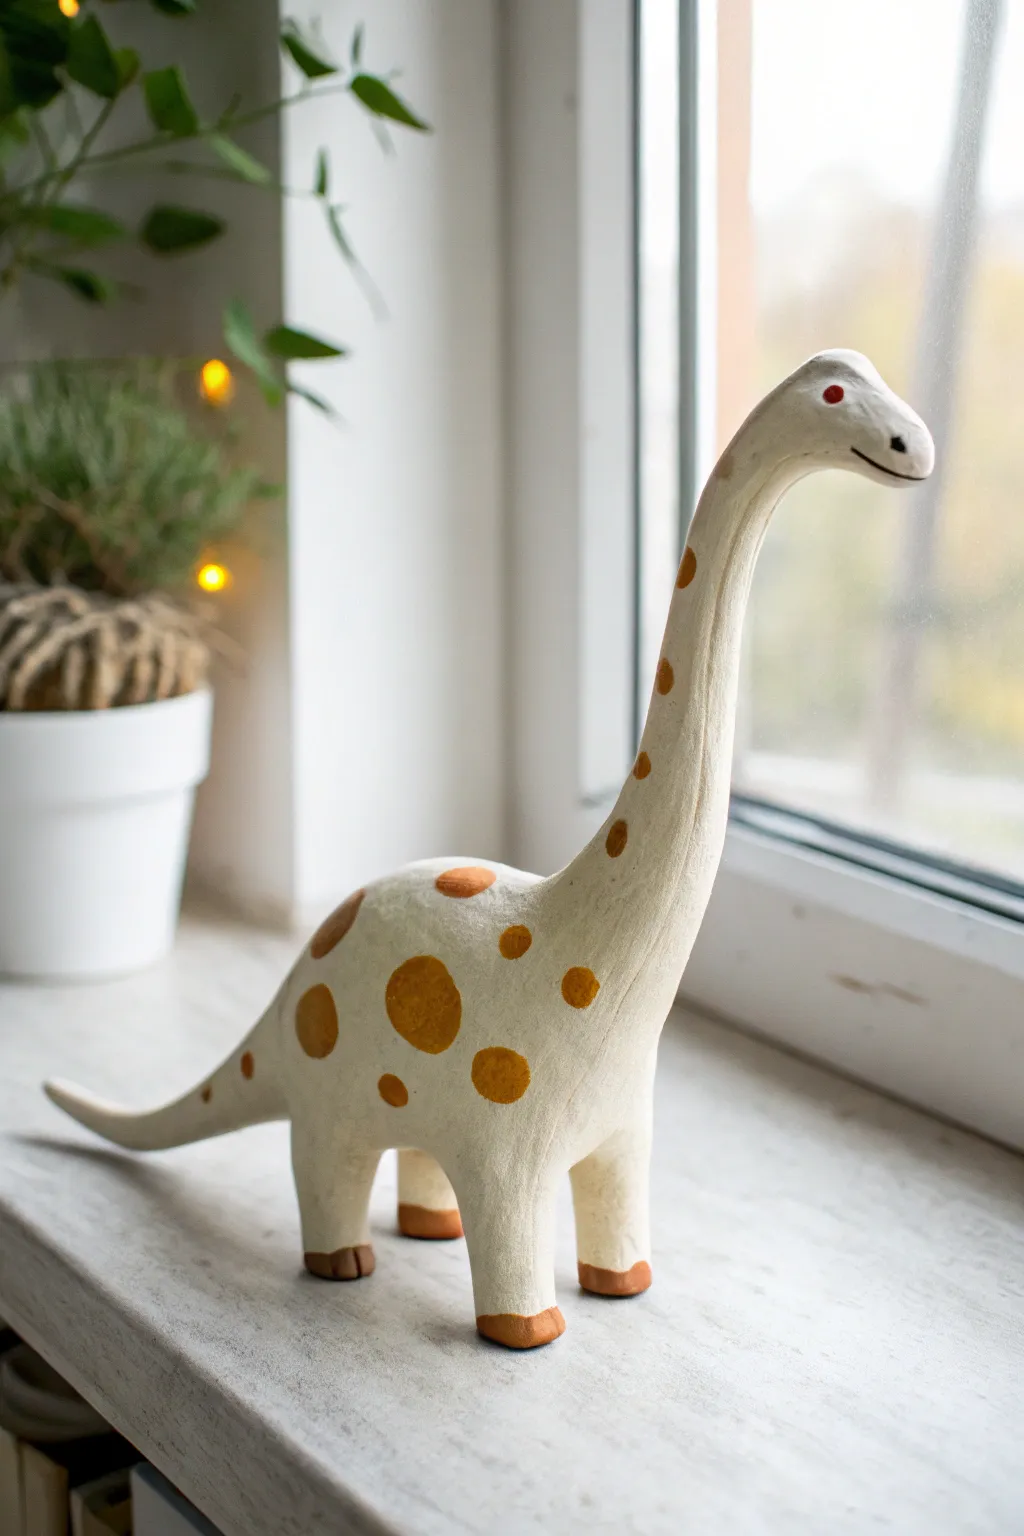
Capture the graceful silhouette of a Brachiosaurus with this elegant clay project. The finished piece features a creamy white body adorned with charming terracotta-colored spots, perfect for a sunny windowsill display.
Detailed Instructions
Materials
- Air-dry clay (white or light grey)
- Wire armature (optional, for neck support)
- Acrylic paints (Cream/Off-White, Burnt Sienna/Terracotta, Black, Red)
- Small flat paintbrush
- Fine detail paintbrush
- Medium-grit sandpaper
- Cup of water
- Sculpting tools or a simple kitchen knife
- Matte sealant or varnish
Step 1: Sculpting the Form
-
Prepare the clay:
Begin by kneading a large handful of air-dry clay until it is warm, pliable, and free of air bubbles. This conditioning step prevents cracks later. -
Form the body base:
Roll the clay into a thick oval shape for the main body. It should look somewhat like a large potato. -
Pull the neck:
Instead of attaching a separate piece, gently pinch and pull the clay from one end of the oval upwards to form the neck. Aim for a gradual taper. -
Shape the head:
At the top of the neck, flatten and curve the clay slightly forward to create the head shape. It should round off smoothly at the snout. -
Create the tail:
From the rear of the body, pull and extend the clay outwards to form a tail. Keep it relatively short and pointed, curving slightly upwards. -
Attach the legs:
Roll four sturdy cylinders of clay. Attach them to the underside of the body using the ‘score and slip’ method (scratching both surfaces and applying a bit of water). Blend the seams completely until they disappear. -
Refine the curve:
I like to smooth the transition from the back to the neck with a wet finger to ensure that signature continuous curve shown in the photo. -
Dry thoroughly:
Let the sculpture dry completely. This can take 24-48 hours depending on thickness. Rotate it occasionally so the bottom dries too.
Armature Secret
If the long neck keeps drooping while wet, insert a piece of floral wire or aluminum foil inside the clay neck for hidden structural support.
Step 2: Painting and Details
-
Sand for smoothness:
Once bone dry, use medium-grit sandpaper to gently buff away any fingerprints or rough bumps, focusing on the neck and back. -
Base coat:
Paint the entire dinosaur with a cream or off-white acrylic paint. You may need two coats to get a solid, opaque finish. -
Paint the feet:
Using the Burnt Sienna or Terracotta paint, carefully paint the bottom section of each foot to look like dipped boots. -
Map out spots:
Visualize where you want the spots. Notice how they are larger on the body and get smaller as they ascend the neck. -
Apply the spots:
Using the same terracotta color, paint organic, circular spots. Don’t make them perfect circles; slight irregularities look more natural. -
Add neck details:
Continue the spots up the back of the neck in a single line, making them progressively smaller until you reach the head. -
Paint the face:
Use a fine detail brush to paint a simple curved line for the mouth. Add a small red dot for the eye with a tiny black center. -
Seal the work:
Protect your dinosaur with a coat of matte varnish to prevent the paint from chipping and to give it a finished look.
Natural Texture
Before the clay dries, gently dab the surface with a rough sponge. After painting, this creates a subtle skin-like texture instead of being perfectly smooth.
Now find a bright spot on a shelf for your prehistoric friend to gaze out at the world

The Complete Guide to Pottery Troubleshooting
Uncover the most common ceramic mistakes—from cracking clay to failed glazes—and learn how to fix them fast.
Tiny Dinosaur Keychain Charm Shapes

These adorable little dinosaur charms are the perfect whimsical addition to any set of keys or a backpack zipper. With their soft, matte finish and tiny spines, these friendly stegosauruses are simpler to sculpt than they look and make fantastic gifts.
Detailed Instructions
Materials
- Polymer clay (peach, sage green, olive green, white, black, and burnt orange/brown)
- Small eye pins or screw eyes
- Keychain rings with chain
- Pointed sculpting tool or toothpick
- Small ball tool
- Acrylic roller or pasta machine
- Needle nose pliers
- Super glue (optional)
Step 1: Shaping the Base Body
-
Roll the main form:
Start with a small ball of your conditioned base color (like peach or sage green)—about the size of a large marble. Roll it into a smooth sphere to remove any cracks. -
Form the dinosaur shape:
Gently pinch one side of the ball and pull it upwards and outwards to form the neck and head. Pull the opposite side to create a tapering tail. -
Refine the silhouette:
Press the bottom of the body gently against your work surface to flatten the belly slightly so the dinosaur can stand. Curve the neck slightly upward and bend the tail for a lively posture. -
Create the legs:
Instead of attaching separate legs, which can be fragile, you can pinch the clay from the underside of the body to form four nubby legs. Alternatively, roll four very tiny logs and blend them seamlessly onto the belly using your sculpting tool.
Spines Falling Off?
Work the clay pieces together firmly. If spines won’t stick, use a dab of liquid polymer clay or ‘Bake & Bond’ as an adhesive before baking.
Step 2: Adding Details & Personality
-
Add the spines:
For the stegosaurus plates, take a contrasting clay color (like rust orange for the peach dino). Roll tiny balls, flatten them into teardrop shapes, and press them in a row along the dinosaur’s back, starting from the neck down to the tail. -
Blend the spines:
Sometimes I use a silicone tool to gently blend the base of each spine into the body for extra durability, ensuring they won’t pop off later. -
Give it spots:
Roll extremely tiny balls of a lighter or darker shade of clay. Press these randomly onto the dinosaur’s flanks and flatten them flush with the body to create a spotted texture. -
Detail the neck:
For the dots on the neck, apply tiny white clay flattened discs. You can layer them slightly for a cute, patterned look.
Step 3: Designing the Face
-
Make eye sockets:
Use a small ball tool or the rounded end of a paintbrush to make shallow indentations where the eyes will go on either side of the head. -
Insert the eyes:
Roll two minuscule balls of black clay. Provide a tiny white backing if you want them to pop, or press the black clay directly into the sockets. Adding a microscopic speck of white as a highlight gives them life. -
Add a smile:
Use a sharp blade or a needle tool to gently impress a small, curved line near the snout for a mouth. You can also poke two tiny holes for nostrils.
Glaze It Up
For extra durability and shine, coat your finished dino in a water-based polyurethane varnish or UV resin after baking.
Step 4: Finishing & Assembly
-
Insert hardware:
Before baking, trim an eye pin to the right length. Dipping the end in a tiny bit of liquid clay or translucent bake-and-bond helps secure it. Push it deep into the center of the dinosaur’s back, between the plates. -
Bake the charms:
Bake your clay pieces according to the manufacturer’s instructions for your specific brand of polymer clay. Usually, this is around 275°F (135°C) for 15-30 minutes. -
Cool down:
Allow the dinosaurs to cool completely before handling them. Polymer clay is still slightly soft when hot and hardens as it cools. -
Secure the pin:
If the eye pin feels loose after baking, gently pull it out, add a drop of super glue, and reinsert it immediately. -
Attach keychain:
Using your pliers, open the jump ring on your keychain hardware. Loop it through the eye pin on the dinosaur and close it securely.
Now you have a prehistoric pal to guard your keys wherever you go
Two-Piece Dino Couple With Matching Belly Patches
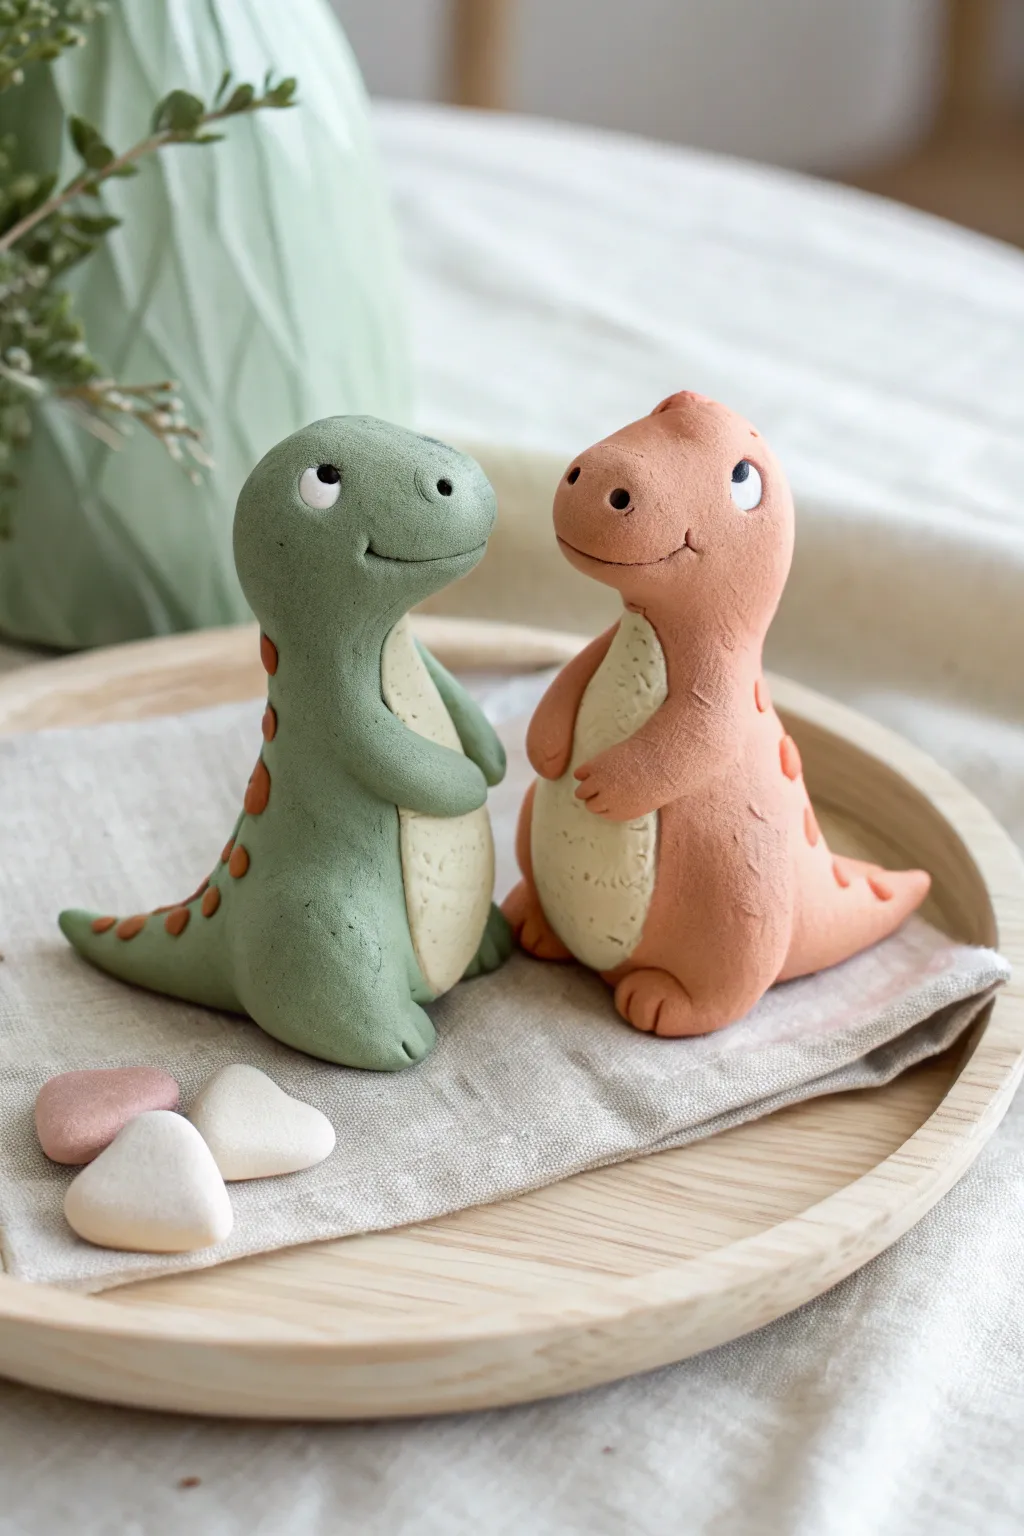
These adorable twin dinosaurs, standing face-to-face with sweet expressions, make the perfect handmade gift or desk companion. With their textured bellies and contrasting spine ridges, this project is a wonderful way to practice blending simple shapes into expressive characters.
Step-by-Step Guide
Materials
- Polymer clay (Sage Green, Terracotta/Coral, Cream, White, Black)
- Aluminum foil (for armature core)
- Basic sculpting tools (needle tool, ball stylus)
- Toothbrush or texturing sponge
- Rolling pin
- Shape cutters (small teardrop or oval, optional)
- Baking sheet and parchment paper
- Oven (if using polymer clay)
Step 1: Forming the Body Bases
-
Prepare the cores:
Start by crumpling two pieces of aluminum foil into rough, pear-like shapes. The bottom should be wider for the sitting base, tapering up to a rounded head area. This saves clay and keeps the figures lightweight. -
Cover the green dino:
Condition your sage green clay until soft. Roll out a sheet roughly 1/4 inch thick. Wrap the clay completely around one of the foil cores, smoothing the seams with your thumb until the surface is uniform. -
Cover the terracotta dino:
Repeat the process with the terracotta or coral-colored clay for the second figure, ensuring both bodies are roughly the same height and stoutness so they look like a matched set. -
Define the silhouettes:
Gently gently pinch and gently pull the clay to distinguish the head from the body. You want a very subtle neck—just a slight indentation so the head looks like a bulbous extension of the body. -
Shape the tails:
Roll two thick cones of clay (green and terracotta). Attach these to the lower back of each respective figure, blending the clay seamlessly into the body so the heavy tail acts as a third leg for balance.
Pro Tip: Seamless Blending
Use a drop of baby oil or clay softener on your finger when smoothing seams. It melts the clay surface slightly, erasing join lines instantly.
Step 2: Adding the Matching Details
-
Create the belly patches:
Roll out a thin sheet of cream-colored clay. Cut two elongated oval or lightbulb shapes that will fit from the dinosaur’s neck to its lower belly. -
Apply texture:
Press the cream patches onto the front of each dinosaur. Before the clay sets, lightly press a clean toothbrush or texture sponge over the cream area to give it a dimpled, skin-like texture. -
Sculpt the legs:
Form two small balls for each dino’s feet. Flatten them slightly and attach them to the base of the body. Use a modelling tool or knife to press two indentations into the front of each foot for toes. -
Add the arms:
Roll small sausages of clay for the arms. Attach them high on the belly, curving them inward as if the dinos are holding their tummies. Blend the shoulder area into the main body.
Troubleshooting: Head Heavy?
If your dinos keep tipping forward, add a bit more clay weight to the tail or flatten the bottom feet base further to increase the surface area.
Step 3: Facial Features and Spines
-
Carve the mouths:
Use a needle tool or a curved blade to cut a simple, happy smile into each snout. I find that placing the smile slightly high up on the snout makes them look cuter. -
Add eyes:
Make tiny sockets with a ball tool. Insert small white balls of clay, then add minuscule black pupils. Position the pupils so the dinos appear to be looking at each other. -
Create the nostrils:
Poke two small holes or indentations above the mouth for the nose. -
Form the spine ridges:
For the green dino, use small bits of terracotta clay. For the terracotta dino, use green or a slightly lighter orange. Roll tiny balls, flatten them slightly, and press them in a line down the back and tail. -
Final texture check:
Look over the main body color. If you want a more organic feel, lightly tap the non-belly areas with a crumpled piece of foil or sponge to remove fingerprints and add subtle skin texture. -
Bake:
Follow your clay package’s instructions for baking temperature and time. Usually, this is around 275°F (130°C) for 15-30 minutes per 1/4 inch of thickness.
Once cooled, your prehistoric pair is ready to display or gift to a special friend


What Really Happens Inside the Kiln
Learn how time and temperature work together inside the kiln to transform clay into durable ceramic.
Spotted Dinosaur Using Pressed Dot Scales
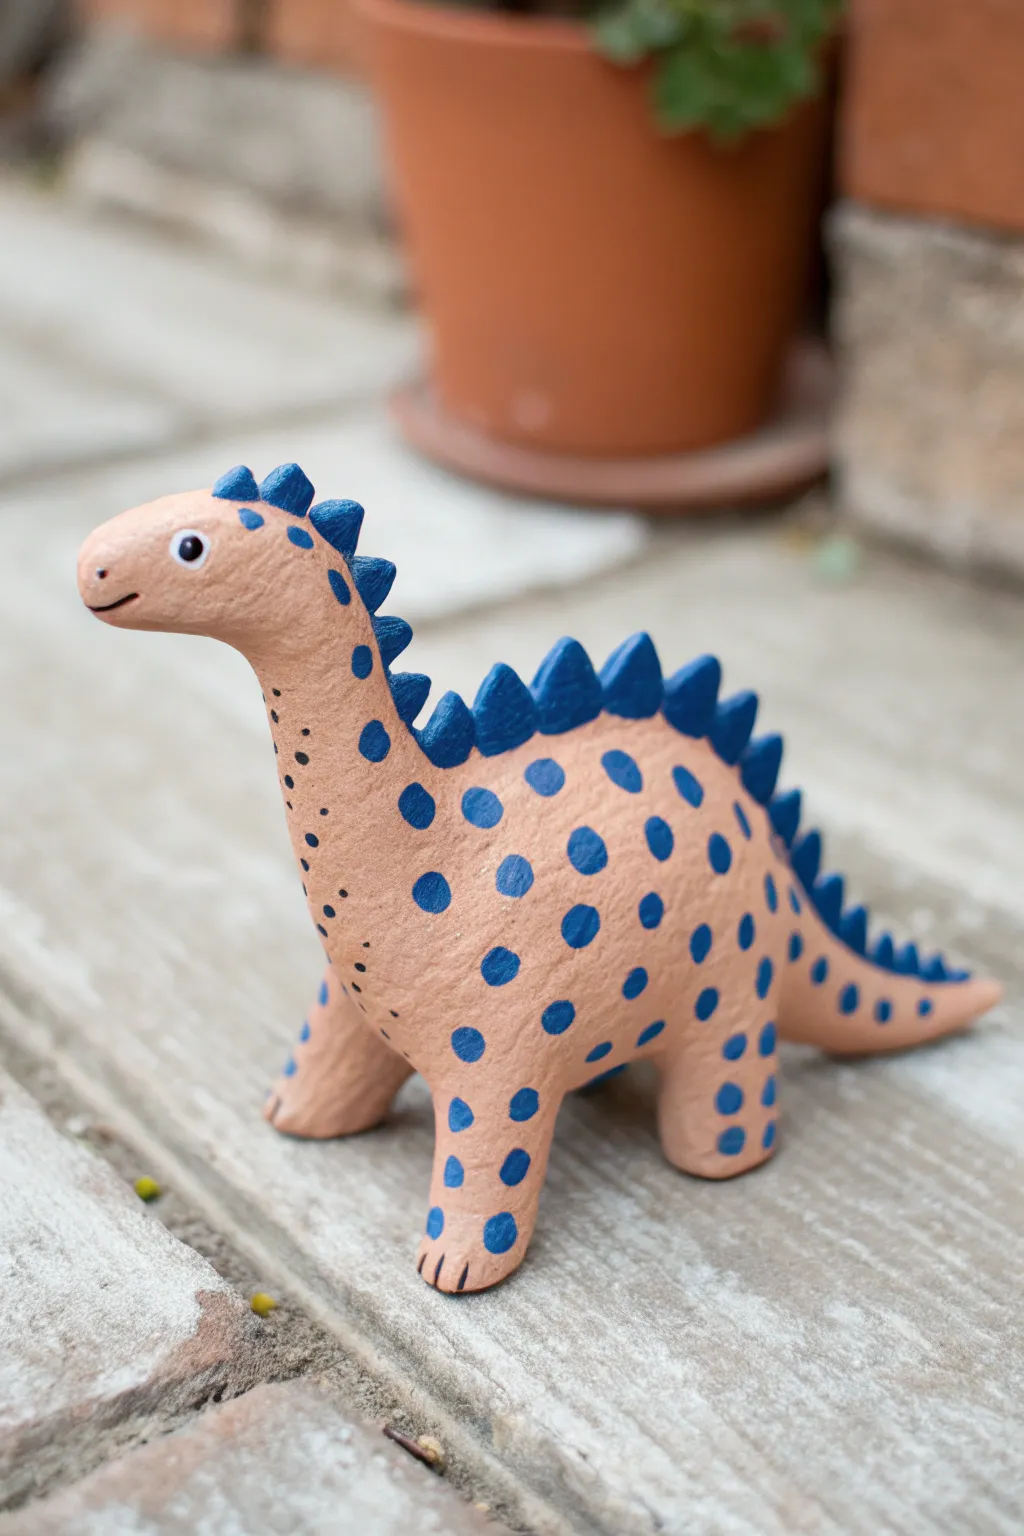
Create a friendly prehistoric pal with a charming textured finish and vibrant blue polka dots. This project uses simple sculpting techniques to form a classic dinosaur shape that sits perfectly on a shelf or in a garden pot.
How-To Guide
Materials
- Air-dry clay (terracotta or peach color)
- Acrylic paint (deep blue, white, black)
- Small paintbrush
- Dotting tool or back of a paintbrush handle
- Cup of water
- Modeling tools (optional)
- Varnish or sealant (matte or satin finish)
Step 1: Sculpting the Body
-
Form the Torso:
Start by taking a large handful of clay and rolling it into a smooth, thick oval shape. This will be the main body of your dinosaur. -
Pull the Neck:
Gently pinch one end of the oval and begin pulling the clay upward and outward to form the neck. Smooth the transition so there are no seams. -
Shape the Head:
At the top of the neck, flatten the clay slightly to create the head. Gently pinch the front to form a rounded snout. -
Create the Legs:
Roll four small, equal-sized cylinders of clay. These should be thick and sturdy to support the body. -
Attach the Legs:
Score (scratch) the clay on the bottom of the body and the top of each leg. Add a dab of water to slip the clay, then press the legs firmly onto the underside of the body. -
Create the Tail:
Pinch the rear of the body and pull the clay outwards to form a tapered tail. You can curve it slightly to one side for a more dynamic pose. -
Smooth the Joints:
Use your fingers or a modeling tool to smooth the clay where the legs join the body, blending the edges until they disappear completely.
Leg Stability Fix
If the heavy body makes the legs sag, insert toothpicks or crumpled foil into the legs as an armature before attaching them.
Step 2: Adding Details
-
Make the Spikes:
Roll a series of small clay balls, graduating in size. Pinch each ball into a flattened triangle shape to create the stegosaurus plates. -
Attach the Spikes:
Score and slip the bottom of each triangle. Press them in a single line running from the top of the head, down the spine, and onto the tail. -
Refine the Surface:
Look over your dinosaur for any rough fingerprints. You can leave some texture for a rustic look, or smooth it out with a damp finger. -
Dry the Sculpture:
Set your dinosaur aside in a dry, room-temperature spot. Allow it to dry completely for 24-48 hours until it hardens and lightens in color.
Go Prehistoric
Instead of blue paint, use metallic gold or bronze for the spikes and spots to give your dinosaur a magical, fossilized treasure look.
Step 3: Painting and Finishing
-
Paint the Spikes:
Using a small brush and deep blue acrylic paint, carefully paint each of the triangular spikes along the back. -
Add the Spots:
I prefer using a dedicated dotting tool here, but the back of a paintbrush works great too. Dip it in blue paint and stamp circles randomly across the body, neck, and legs. -
Detail the Face:
Paint a small white circle for the eye. Once dry, add a tiny black dot in the center for the pupil. -
Add Black Accents:
Use a very fine brush or a black fine-liner pen to draw a small smile, a nostril, and little lines on the feet to suggest toes. -
Add Texture Dots:
For extra detail, use a toothpick to add tiny black speckles on the neck or between the blue spots. -
Seal the Project:
Once all paint is fully dry, apply a coat of matte or satin varnish to protect your dinosaur from moisture and dust.
Now your prehistoric friend is ready to roam your bookshelf or desk
Dinosaur Mini Planter With a Tiny Tail
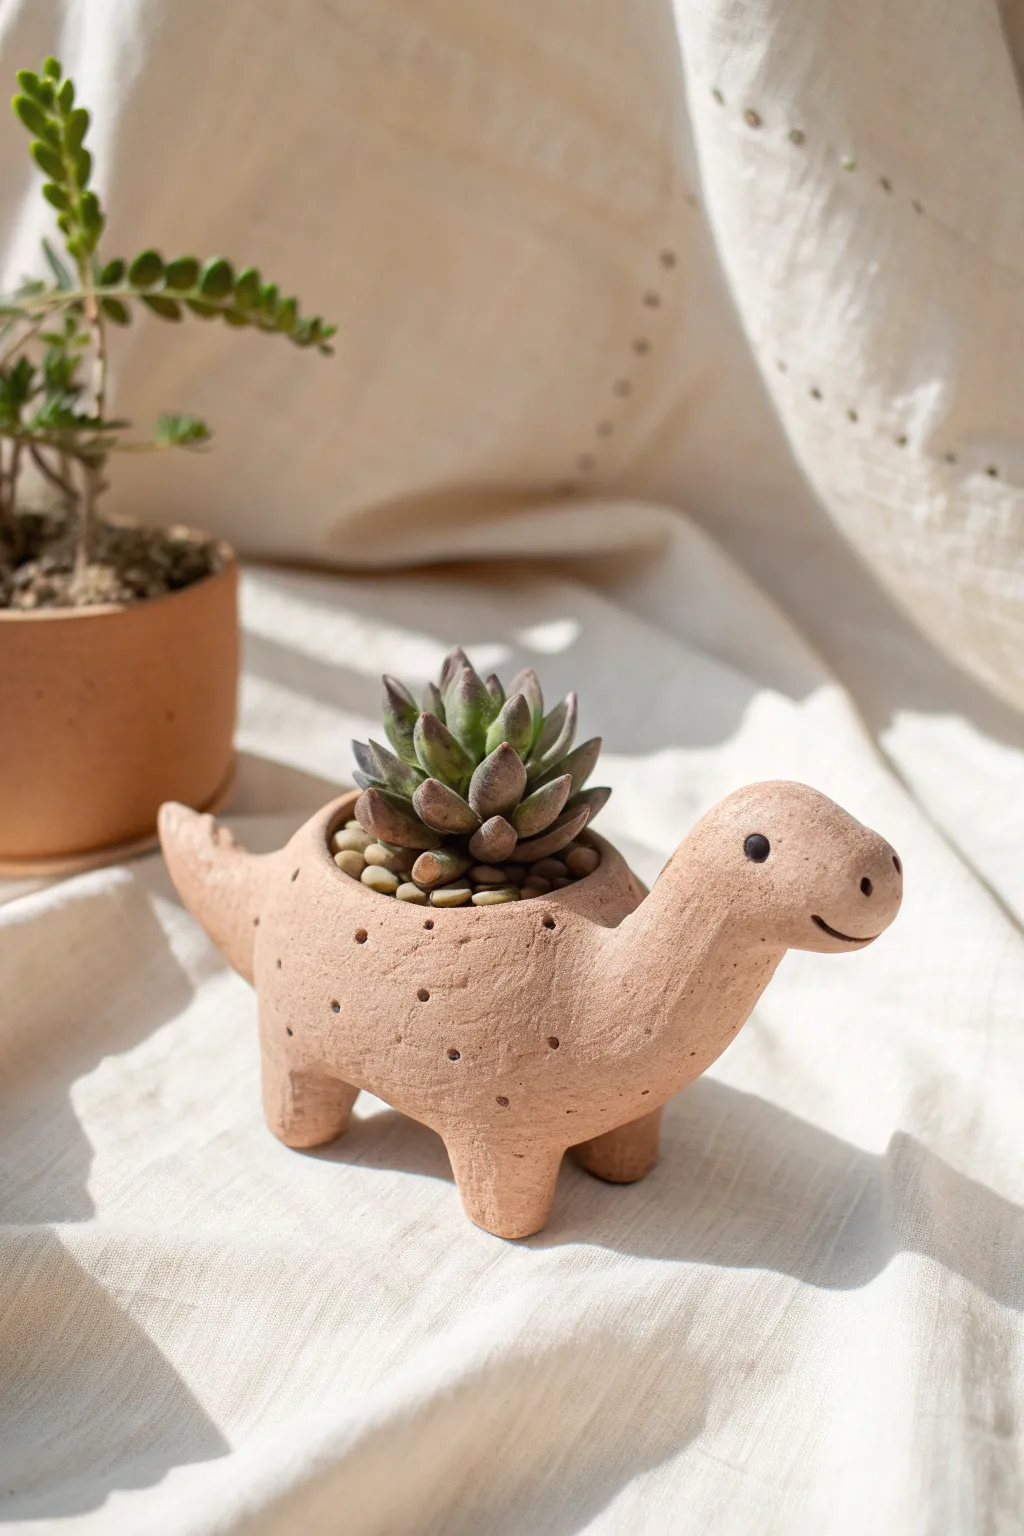
Transform a lump of clay into this adorable prehistoric companion, perfect for housing a small succulent on your desk. This hand-built dinosaur planter features a warm terracotta tone, delicate dotted textures, and a charmingly simple face that brings a touch of whimsy to your indoor garden.
Step-by-Step Guide
Materials
- Terracotta-colored polymer clay (or air-dry clay)
- Small succulent plant
- Small pebbles or gravel for top dressing
- Potting soil mixed with perlite
- Sculpting tools (needle tool and ball stylus)
- Rolling pin
- Small round cutter or bottle cap
- Aluminum foil (for armature/shaping)
- Water (if using air-dry clay) or Clay softener (if using polymer)
- Black acrylic paint (for eyes) or tiny black beads
- Clear matte varnish (optional)
Step 1: Shaping the Base Body
-
Prepare the foil core:
Crumple a small ball of aluminum foil slightly smaller than a golf ball. This will create a lightweight center for the body and save on clay. -
Condition the clay:
Warm up your terracotta clay by kneading it thoroughly in your hands until it becomes soft, pliable, and free of cracks. -
Create the main body slab:
Flatten a thick portion of clay into a smooth pancake shape, roughly 1/4 inch thick. Wrap this slab entirely around your foil ball, smoothing the seams together until you have a solid clay egg shape. -
Form the planting hollow:
Gently press your thumb deep into the top center of the egg shape to create the cavity for the plant. Widen it by pinching the walls between your thumb and forefinger, ensuring the walls remain sturdy and even.
Use Aluminum Foil
Using a foil core prevents thick clay from cracking during baking and keeps the planter lightweight. Be sure to compress the foil tightly beforehand.
Step 2: Adding Prehistoric Parts
-
Sculpt the neck and head:
Roll a thick coil of clay for the neck. Bend it slightly upwards and smooth one end onto the front of the body, blending the clay downwards so no seam is visible. Round the top end to form the head. -
Attach the tiny tail:
Shape a smaller cone of clay for the tail. Attach it to the rear of the body, curving it slightly upward for a cheerful look. Just like the neck, blend the clay seamlessly into the main body using your thumb or a modeling tool. -
Add the feet:
Roll four small, equal-sized cylinders of clay. Position these under the body—two in front, two in back—and press firmly. Use a smoothing tool to blend the tops of the legs into the belly so they are securely attached. -
Check stability:
Set the dinosaur down on a flat surface. Press gently to flatten the bottom of the feet slightly, ensuring the planter stands level and doesn’t wobble.
Head Drooping?
If the long neck starts to sag while shaping, support it with a crumpled piece of paper towel or a sponge wedge until the clay firms up or is baked.
Step 3: Detailing and Finishing
-
Refine the face:
Use a small ball stylus to indent pockets for the eyes. If using beads, press them in now; if painting, leave the indents clean. Use a needle tool to carve a simple, curved smile line and two tiny nostrils at the front of the snout. -
Add texture:
Take a needle tool or a toothpick and poke shallow, random holes all over the body, neck, and tail. I find this simple stippling effect mimics dinosaur skin perfectly while adding visual interest. -
Smooth the rim:
Go back to the opening on the back and gently smooth the rim with a wet finger (for air-dry) or a tiny bit of baby oil (for polymer) to ensure a polished look before baking or drying. -
Drainage hole (optional):
If you plan to water the plant directly in this pot, poke a hole through the bottom belly and foil with a straw. If using it just as a cachepot, you can skip this step. -
Cure the clay:
Bake your planter according to the manufacturer’s instructions for your specific brand of polymer clay. If using air-dry clay, leave it in a cool, dry place for 24-48 hours. -
Final touches:
Once cool or dry, paint tiny black dots inside the eye sockets if you didn’t use beads. You can create a highlight in the eye with a pinhead dot of white paint. -
Planting time:
Fill the cavity with succulent potting mix. Carefully nestle your small succulent into the opening. -
Top dressing:
Surround the base of the succulent with tiny pebbles or gravel. This hides the soil and gives the planter a finished, professional appearance.
Enjoy your charming little dinosaur planter as it brings a prehistoric smile to your windowsill

TRACK YOUR CERAMIC JOURNEY
Capture glaze tests, firing details, and creative progress—all in one simple printable. Make your projects easier to repeat and improve.
Dinosaur Incense Holder With a Curled Tail
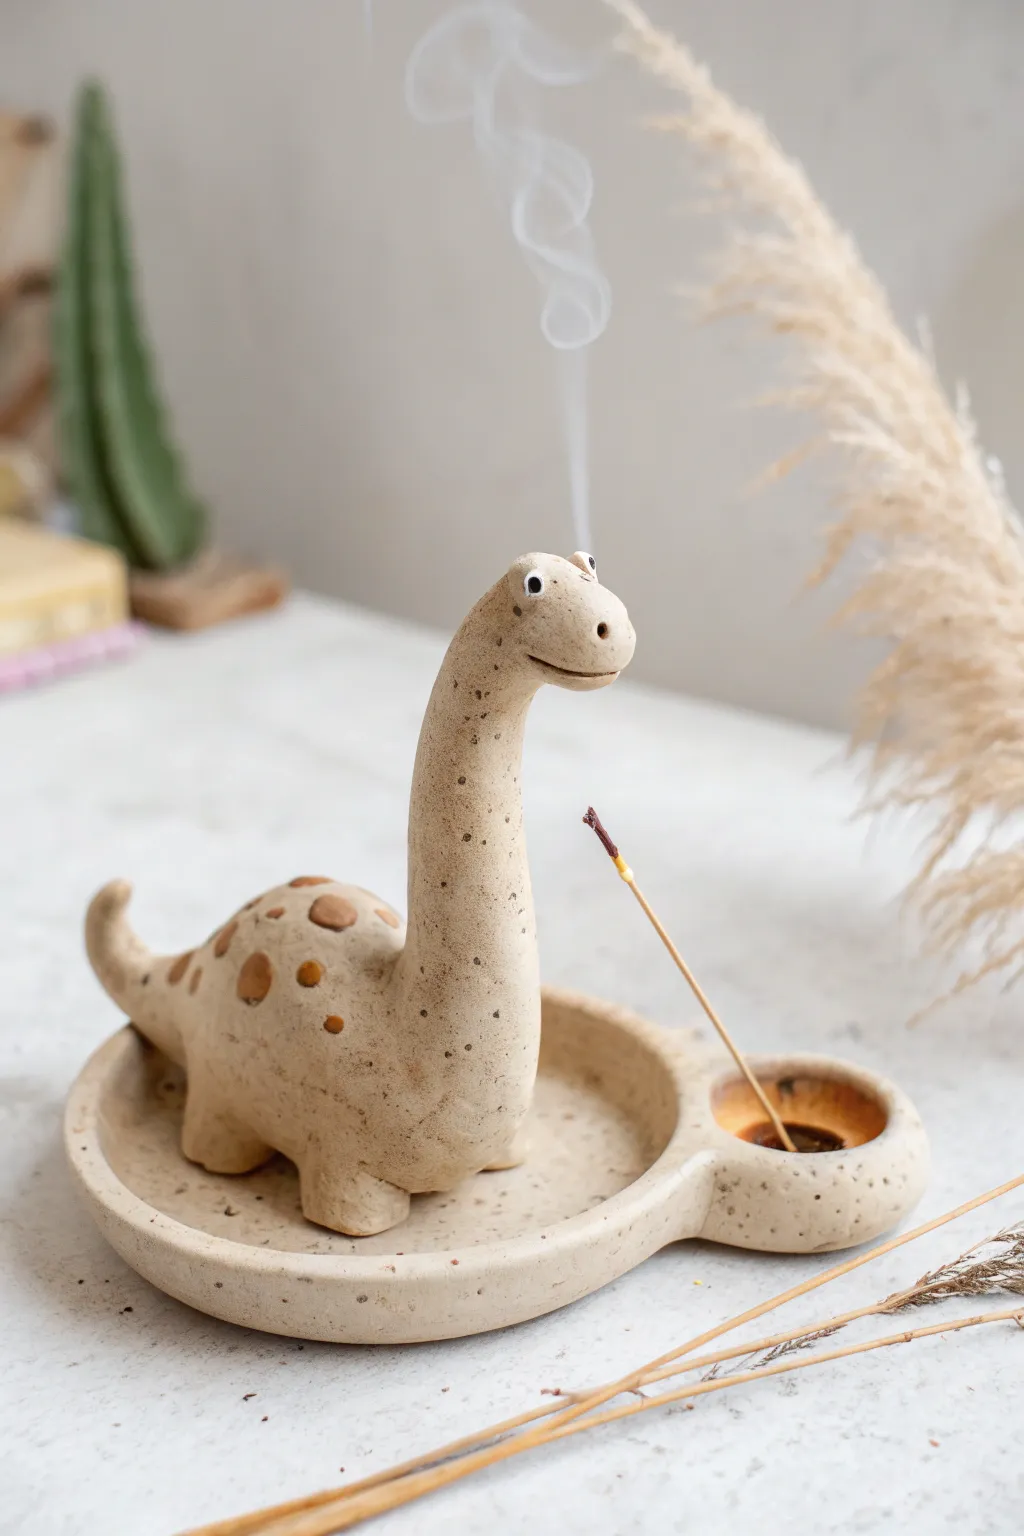
Sculpt a charming, speckled dinosaur that doubles as a functional incense holder, bringing a Jurassic touch to your relaxation ritual. This project features a hollow body design that allows incense smoke to gently drift from the dinosaur’s mouth, all resting on a custom tray.
How-To Guide
Materials
- Speckled stoneware clay (or beige polymer clay with faux speckles)
- Pottery tools (needle tool, sponge, wooden modeling tool)
- Rolling pin
- Slip (clay slurry)
- Small bowl of water
- Incense stick (for sizing holes)
- Clear glaze (if using ceramic clay)
- Brown underglaze or acrylic paint (for spots and eyes)
- Kiln (if using ceramic clay) or oven (if using polymer)
Step 1: Sculpting the Dinosaur Body
-
Form the pinch pot base:
Start with a ball of clay roughly the size of a tangerine. Stick your thumb into the center and gently pinch the walls while rotating the ball to create a hollow ‘pinch pot’ shape. This will be the dinosaur’s body. -
Shape the body oval:
Gently squeeze the circular opening of your pinch pot to create an oval shape. Place it upside down on your work surface and smooth the bottom rim so it sits flat. -
Attach the legs:
Roll four small, equal-sized cylinders of clay for the legs. Score (scratch) the attachment points on the body and the legs, apply slip, and press the legs firmly onto the body. Smooth the seams completely so they look like one piece. -
Create the long neck:
Roll a coil of clay that tapers slightly at one end. This will be the neck. Score and slip the thicker end to the front of the body, blending the clay downward to secure it upright. I like to give the neck a gentle curve for a more natural look. -
Form the head:
Shape the top of the neck coil into a rounded head. Use your thumb to smooth the transition. Use a needle tool to create a smiling mouth line and nostrils. -
Add the tail:
Roll a smaller tapered cone for the tail. Attach it to the rear of the body using the score and slip method. Curl the tip upwards slightly to add character. -
Ventilation holes:
This step is crucial for the smoke effect. Use a needle tool or small drill bit to create a hole connecting the hollow body cavity up through the neck, exiting at the mouth. Ensure the airway is clear. -
Incense placement hole:
Create a hole in the back of the dinosaur large enough to insert a cone incense or short stick if you plan to burn inside the body. Alternatively, leave the body solid and just create a small hole in the tray later.
Step 2: Creating the Base and Details
-
Roll out the slab:
Roll out a slab of clay about 1/4 inch thick. Use a circular cutter or a bowl as a template to cut out a round base large enough to hold the dinosaur. -
Create the incense catch:
Cut a smaller circle connected to the main circle (like a figure-eight, but with one side smaller) to create a designated spot for an incense stick holder, or shape a small raised rim on the main circle. -
Build the rim:
Roll a long, thin coil of clay. Score and slip the outer edge of your base slab, then attach the coil to create a raised rim. This keeps ash contained. -
Refine the surface:
Use a damp sponge to smooth all edges of the tray and the dinosaur. Remove any fingerprints or rough texture. -
Add the spots:
Roll tiny, flat discs of clay or use brown underglaze later to create the spots on the dinosaur’s back. If adding clay spots, press them firmly onto the surface so they don’t pop off. -
Make the eyes:
Roll two tiny balls of white clay and press them onto the head. Add minuscule pupils using a needle tool or a dot of black glaze. -
Dry and fire (Ceramics):
Let the piece dry slowly under plastic to prevent cracking. Once bone dry, bisque fire it in a kiln. After bisque, apply a clear glaze if desired and fire again. -
Finishing touches (Polymer):
If using polymer clay, bake according to the package instructions. Once cool, you can paint the spots and eyes with acrylic paint and seal with a matte varnish.
Smoke Flow Tip
For smoke to flow out the mouth, ensure the neck is hollow all the way through. Use a pipe cleaner to carefully clear the airway before firing or baking.
Level Up: Texture
Before drying, gently press a coarse sponge or sandpaper against the clay skin. This gives the dinosaur a realistic, stony texture.
Place your finished dino on a shelf and enjoy the peaceful vibe as it holds your favorite scents
Textured Dino Skin With Easy Tool Marks
This charming clay dinosaur captures the warmth of traditional pottery with its earthy terracotta tone and simple, folk-art inspired patterns. The matte finish and hand-painted details give it a delightful, rustic character that looks lovely on any shelf.
Step-by-Step Tutorial
Materials
- Terracotta-colored air-dry clay (or polymer clay)
- White acrylic paint (cream or off-white)
- Black fine-tip acrylic paint pen or liner brush
- Small round paintbrush
- Modeling tools (or a toothpick and knife)
- Water cup
- Matte varnish (optional)
Step 1: Shaping the Body
-
Check Conditioning:
Begin by kneading your terracotta clay until it is warm and pliable. If you are using air-dry clay, keep your hands slightly damp to prevent cracking. -
Form the Torso:
Roll a large ball of clay into a smooth egg shape. This will serve as the main body of the dinosaur. Gently flatten the bottom so it sits securely on your work surface. -
Create the Neck and Head:
Roll a thick sausage shape for the neck. Smooth on one end to attach it to the narrower side of the body egg. Bend the top slightly forward to create the head shape, smoothing the seams downward until the join is invisible. -
Add Legs:
Roll four short, stout cylinders for legs. Attach these to the bottom of the body. I find it helpful to score the clay surfaces—scratching them up a bit—before pressing them together to ensure a strong bond. -
Shape the Tail:
Pull a small amount of clay from the rear of the body to form a short, pointed tail. Ensure it curves slightly upward or rests on the ground for stability. -
Refine the Snout:
Gently press the front of the head to blunt the nose slightly, creating a friendly, rounded snout profile.
Step 2: Adding Details & Spines
-
Make the Spines:
Roll a small snake of clay and flatten it. Cut out a series of small triangles, graduating in size from small to large and back to small. -
Attach the Spines:
Starting at the top of the head and working down to the tail, attach the triangles along the spine line. Press gently at the base of each triangle to blend it into the back. -
Toe Details:
Use a knife tool or toothpick to press three small vertical indentations into the bottom of each foot to represent toes. -
Drying:
Allow your dinosaur to dry completely. For air-dry clay, this usually takes 24-48 hours. Turn it over halfway through to ensure the bottom dries evenly.
Problem: Cracks while drying?
Mix a tiny bit of fresh clay with water to make a paste (slip). Fill the cracks with this paste and smooth over with a finger.
Step 3: Painting & Finishing
-
Base Spots:
Once dry, use a small brush to paint irregular oval shapes along the sides and neck using cream or off-white acrylic paint. Keep the edges soft and organic rather than perfectly sharp. -
Spot Outlines:
Mix a tiny bit of water into your cream paint to make it semi-transparent. Paint a faint, thin outline around each oval spot, leaving a small gap of bare clay between the spot and this outer ring. -
Paint the Eye:
Paint a small white circle on the side of the head for the eye. Let it dry completely. -
Facial Features:
Using a fine-tip black marker or a very thin liner brush, draw a long, curved smile line and a small dot for the nostril. Add a small black dot inside the white eye circle for the pupil. -
Freckle Texture:
Use the tip of your pen or brush to add tiny black specks casually around the face, neck, and lower legs. This adds a speckled, stone-like texture to the character. -
Sealing:
If desired, apply a coat of matte varnish to protect the paint without making the dinosaur shiny, preserving that natural earthy look.
Pro Tip: Better Balance
Before attaching legs, tap the body on the table to flatten the belly. This creates a hidden base that helps the heavy head stay upright.
Now you have a prehistoric friend with a timeless, artisanal look to guard your desk
Dinosaur Magnets for the Fridge or Locker

Brighten up your refrigerator or school locker with these adorable prehistoric pals. Modeled with smooth curves and charming details, these polymer clay magnets are functional art pieces that bring a pop of playful color to any magnetic surface.
How-To Guide
Materials
- Polymer clay (Sage Green, Cream, Black, White, Charcoal Grey, Salmon Pink)
- Clay roller or pasta machine
- Circle clay cutter (small)
- Needle tool or toothpick
- Ball stylus tool (small)
- X-acto knife or clay blade
- Strong round craft magnets (approx. 1/2 inch)
- Super glue or E6000
- Oven and baking sheet
Step 1: Shaping the T-Rex Body
-
Condition the clay:
Start by kneading your sage green clay until it is soft, pliable, and free of cracks. This conditioning step is crucial for achieved that smooth, finished look seen in the photo. -
Roll out the base slab:
Using a roller or pasta machine on a medium setting, flatten the green clay into an even sheet about 1/4 inch thick. It needs to be thick enough to hold the magnet but not too heavy. -
Cut the basic outline:
Sketch a simple ‘S’ shape on paper first to use as a template if you aren’t confident freehanding. Use your clay blade to cut out the dinosaur silhouette: a rounded head, a curving neck, a larger body, and a thick tail. -
Smooth the edges:
Gently run your finger along the cut edges of the green clay to round them off. You want the dinosaur to look soft and pillowy, not sharp or angular. -
Form the legs:
Roll two small balls of green clay. Flatten slightly and attach them to the bottom of the body. Use a needle tool to press two small vertical indents into the bottom of each foot to create toes.
Step 2: Adding Details and Personality
-
Create the belly scales:
Roll out a very thin sheet of cream-colored clay. Use a small circle cutter (or the end of a straw) to punch out 6-7 small circles. -
Attach the belly details:
Starting at the neck and working down towards the tail, press these cream circles onto the front curve of the dinosaur’s body. Overlap them slightly or space them evenly, pressing firmly so they bond with the green base. -
Make the eyes pop:
Roll two white balls of clay for the eyes and flatten them onto the head. Roll two tiny black balls for pupils and press them onto the white circles. I like to place the pupils slightly off-center to give him a goofy, friendly expression. -
Sculpt the smile:
Roll an extremely thin snake of black clay. Cut a small curved section and press it gently onto the snout area to create a happy smile. -
Add dorsal spikes:
Roll out a small amount of charcoal grey or black clay. Cut small triangles and attach them along the back edge of the dinosaur, starting from the back of the head down to the tail. -
Textural spots:
For extra detail, roll varying sizes of tiny cream balls. Press three tiny ones onto the cheek area and larger ones onto the dinosaur’s side for a speckled texture.
Sticky Fingerprints?
If you see fingerprints on your raw clay, dip your finger in a tiny bit of cornstarch or baby oil and gently buff the surface smooth before baking.
Step 3: Baking and Assembly
-
Embed the magnet (Method A):
If you want the magnet flush, gently press your round magnet into the back of the raw clay figure to create an indentation, then remove it before baking. -
Bake the clay:
Place your dinosaur on a parchment-lined baking sheet. Bake according to your polymer clay package instructions (usually 275°F for 15-30 minutes depending on thickness). -
Cool down:
Let the clay cool completely on the baking sheet. It will harden as it returns to room temperature. -
Attach the magnet:
Apply a dab of strong super glue or E6000 to the back of the dinosaur (or into the indentation you made earlier) and press the magnet firmly in place. Let the glue cure fully before sticking it to the fridge.
Clean Color Tip
Always wash your hands or use baby wipes when switching between clay colors, especially before handling the white clay for the eyes, to keep them bright.
Now you have a prehistoric buddy ready to guard your grocery list
Dino Cookie Cutter Style Wall Tiles
These charming ceramic tiles feature raised dinosaur reliefs against a rustic, speckled background, perfect for adding a prehistoric touch to a nursery or play area. The soft, muted glazes in sage, cream, and dusty rose give them a timeless, handcrafted appeal.
Step-by-Step
Materials
- Speckled stoneware clay (white or cream base)
- Square tile cutter or rolling pin and knife
- Dinosaur cookie stamps (plunger style works best)
- Wooden slats or depth guides (approx. 1/4 inch)
- Underglaze (sage green, dusty pink, brown)
- Semi-transparent or satin clear glaze
- Small soft paint brushes
- Sponge
- Canvas working mat
Step 1: Shaping the Tiles
-
Prepare the clay:
Wedge your speckled clay thoroughly to remove air bubbles. This ensures your tiles won’t crack during firing. -
Roll out the slab:
Place the clay between two wooden depth guides on your canvas mat. Roll it out until the rolling pin rests flat on the guides, creating a perfectly even slab about 1/4 inch thick. -
Smooth the surface:
Take a slightly damp sponge or a silicone rib and smooth the surface of the clay slab to remove canvas texture and tiny imperfections. -
Cut the squares:
Using a square cutter or a knife and ruler, cut out four identical squares. I find it helpful to cut them slightly larger than the final desired size to account for shrinkage. -
Soften the edges:
Gently run a damp sponge or your finger along the sharp cut edges of each square to round them off slightly. This prevents chipping later.
Stamp Release Trick
Dust your cookie stamp lightly with cornstarch before pressing it into the clay. This prevents sticking and ensures a crisp, clean impression every time.
Step 2: Stamping the Design
-
Position the stamp:
Center your dinosaur plunger stamp over the first tile. If you want a uniform look, measure the center point; otherwise, eyeball it for a more organic feel. -
Press and reveal:
Press the stamp firmly and evenly into the clay. Push the plunger down to engage the detail, then lift straight up to reveal the raised dinosaur relief. -
Refine the impression:
Inspect the stamped edge. If the stamp left a harsh square outline around the dinosaur, gently smooth that line away with a modeling tool or your fingertip so the dinosaur appears to emerge from the tile surface. -
Repeat the process:
Continue stamping the remaining tiles with different dinosaur designs, cleaning the stamp between uses if clay gets stuck in the details. -
Initial drying:
Place the tiles between two pieces of drywall or under a loose plastic sheet to dry very slowly. This helps prevent warping, which is common with flat tiles.
Step 3: Glazing and Finishing
-
Bisque fire:
Once bone dry, fire the tiles to cone 04 (or per your clay body’s instructions) in the kiln. -
Apply background wash:
For the cream tiles, brush a thinned wash of brown or tan underglaze over the surface, then sponge most of it off. This leaves color in the speckled recesses and texture without darkening the whole piece. -
Paint the dinosaurs:
Carefully paint the raised dinosaur bodies. Use sage green for the long-neck and t-rex, and a dusty pink for the stegosaurus and triceratops. Apply 2-3 coats for solid coverage. -
Add definition:
To make the details pop, mix a tiny bit of dark brown underglaze with water. Run this into the deepest crevices of the dinosaur (like the eye or scales) and wipe away the excess on the high points. -
Glaze the colored tiles:
For the tiles with a full colored background (like the pink and green ones), apply the colored underglaze to the entire background surface, avoiding the dinosaur if you want contrast, or painting the whole thing for a monochrome look. -
Clear coat application:
Once the underglaze is dry, dip or brush a clear satin or semi-transparent glaze over the entire face of the tile. Avoid the back to prevent sticking to the kiln shelf. -
Rim removal:
Wipe the very edges of the tile with a sponge if you want the raw clay body to show through on the borders, creating a framed effect. -
Final firing:
Fire the tiles again to the glaze temperature appropriate for your clay and glaze combination (usually cone 5 or 6 for stoneware).
Turn Them Into Magnets
Glue strong neodymium magnets to the back of the finished tiles with E6000 adhesive to create a heavy-duty, decorative set for your fridge.
Display your prehistoric art on a shelf or adhere cork backing to use them as durable coasters
Dinosaur Spoon Rest With a Smiling Head
Bring some prehistoric charm to your kitchen counter with this adorable speckled clay spoon rest. This functional piece features a friendly long-necked dinosaur standing guard over a matching catch-plate, perfect for keeping your stovetop mess-free while you cook.
Step-by-Step Tutorial
Materials
- Speckled buff stoneware clay (or polymer clay with speckled effect)
- Small rolling pin
- Fettling knife or clay needle tool
- Score and slip tool (or an old toothbrush)
- Small sponge
- Black underglaze or acrylic paint
- Fine detail brush
- Clear food-safe glaze (if using ceramic clay)
- Kiln access (if using ceramic clay)
Step 1: Forming the Base
-
Roll the slab:
Begin by wedging your speckled clay to remove air bubbles. Roll it out into a smooth, even slab about 1/4 inch thick. You want it sturdy enough to hold the dinosaur but not too heavy. -
Cut the circle:
Use a round cookie cutter or trace around a small bowl (approx. 4-5 inches diameter) to cut a perfect circle from your slab. Smooth the cut edges with a damp finger or sponge. -
Curve the rim:
Gently lift the edges of the circle to create a shallow dish shape. I like to press the center down slightly into a foam pad while lifting the rim to get that nice, organic curve.
Balance Check
Before attaching the dinosaur, set it on a flat surface. Does it tip over? If the neck is too heavy, make the tail thicker or the back legs wider to act as a counterweight.
Step 2: Sculpting the Dinosaur
-
Shape the body:
Roll a medium-sized bal of clay into a thick oval for the body. It should be proportional to your base plate—not too big that it tips over, but substantial enough to stand. -
Create the legs:
Roll four short, sturdy cylinders for the legs. Attach them to the bottom of the body oval using the score and slip method. Blend the seams completely so the legs look like they grow out of the body. -
Form the neck and head:
Roll a tapered coil of clay for the neck. Bend it slightly to create an ‘S’ curve or an inquisitive leaning posture. Form a small, rounded oblong shape for the head and attach it to the thinner end of the neck. -
Attach the neck:
Score and slip the base of the neck onto the front of the body. Smooth the clay downwards to integrate it seamlessly. This connection needs to be strong, so take your time blending. -
Add the tail:
Roll a smaller tapered cone for the tail. Attach it to the rear of the body, allowing it to curve slightly for a bit of movement. -
Attach the dino to the base:
Position your dinosaur on the plate. Score the bottom of the feet and the spot on the plate where it will stand. Apply slip and press down firmly. Use a small tool to blend the feet into the plate surface for a permanent bond.
Step 3: Adding Details
-
Make the spine spikes:
Roll tiny balls of clay and pinch them into small triangles. You will need a row of these running from the back of the neck down to the tail. -
Attach the spikes:
Score a line down the dinosaur’s back. Slip and attach each triangle spike individually, blending the base of each spike into the main body so they don’t pop off during firing. -
Refine the surface:
Use a damp sponge to smooth out any fingerprints or rough tool marks. The natural speckle of the clay often looks best on a very smooth surface. -
Paint the face:
Using a very fine brush and black underglaze, paint a simple dot for the eye and a curved line for the smile. Keep the expression minimal and sweet.
Color Pop
Instead of leaving the spikes natural, paint them with a muted earth tone underglaze like sage green or terracotta before the clear glaze for a soft splash of color.
Step 4: Finishing
-
Dry slowly:
Loosely cover your piece with plastic to let it dry slowly. This prevents the neck or tail from cracking due to uneven drying rates. -
Bisque fire:
Once bone dry, fire the piece to bisque temperature (usually cone 04) based on your clay’s specifications. -
Glaze application:
Dip the entire piece in a clear, food-safe glaze. This will seal the clay and make the speckles pop while keeping the spoon rest functional and washable. -
Final firing:
Fire the piece a final time to the maturity temperature of your clay body (usually cone 5 or 6 for stoneware).
Now you have a charming and helpful kitchen companion ready to hold your saucy spoons.
Stacked Shape Dino to Practice Proportions
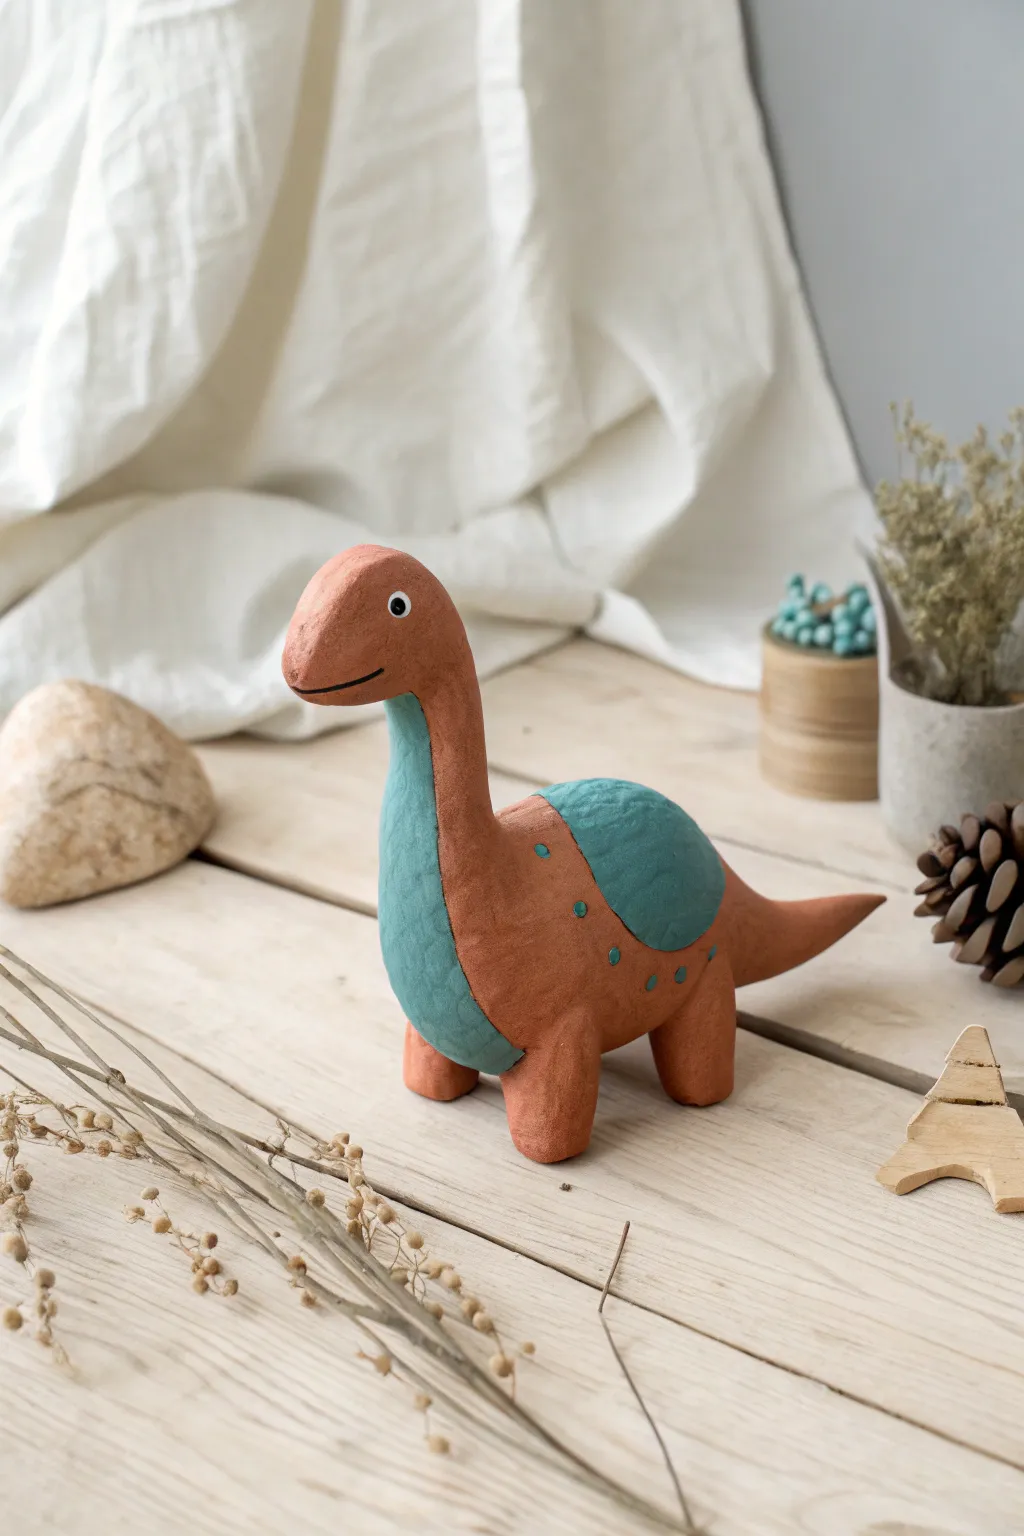
Master the art of proportion with this charming sauropod sculpture, characterized by its earthy reddish-brown body and contrasting teal accents. The project creates a stylized, matte-finish dinosaur perfect for nursery decor or a playful desk companion.
How-To Guide
Materials
- Air-dry clay or polymer clay (terracotta/red-brown and teal colors)
- Acrylic paints (if using white clay): Burnt Sienna, Teal, White, Black
- Aluminum foil (for armature)
- Sculpting tools (needle tool, blending tool)
- Water cup (for smoothing)
- Small paintbrush
- Clear matte varnish (optional)
Step 1: Forming the Body Structure
-
Create the core:
Ball up a piece of aluminum foil into an oval shape roughly the size of a lemon to act as the internal armature for the body. This saves clay and reduces weight. -
Cover with clay:
Roll out a thick sheet of your reddish-brown clay and wrap it completely around the foil egg. Smooth all seams until you have a solid, seamless oval. -
Shape the legs:
Roll four equal-sized cylinders of reddish-brown clay. These should be thick and sturdy, like tree stumps. -
Attach the legs:
Press the four legs onto the bottom of the body oval. Use a blending tool or your thumb to drag the clay from the leg onto the body, smoothing the joint so they become one single unit. -
Check the stance:
Stand the figure up on a flat surface. Press down gently to flatten the feet bottoms and ensure the dinosaur stands stable and level.
Use Water to Weld
When joining air-dry clay pieces, score both surfaces (scratch them up) and add a drop of water or ‘slip’ (liquid clay) to create a glue-like bond.
Step 2: Neck, Head, and Tail
-
Roll the neck coil:
Create a tapered cylinder of reddish-brown clay for the neck. It should be thicker at the base and slightly thinner near the top. -
Form the head:
Roll a smaller oval of clay for the head. Smoothly attach it to the thinner end of the neck coil, blending the clay so there is no visible line. -
Attach neck to body:
Place the neck assembly onto the front top of the body. Blend the clay downwards onto the shoulders thoroughly to support the weight. -
Add the tail:
Roll a cone shape for the tail. Attach it to the rear of the body, blending the seam and giving it a slight upward curve for personality. -
Refine the face:
Use a needle tool or knife to gently carve a simple, smiling mouth line on the snout.
Heavy Head Drooping?
If the long neck keeps sagging, insert a toothpick or piece of wire through the neck and into the body to act as an internal support spine.
Step 3: Adding the Teal Accents
-
Create the chest patch:
Roll a thin flat sheet of teal clay (or paint this area later if using white clay). Cut a long, curved strip that fits from the underside of the neck down the chest. -
Apply chest color:
Press the teal strip onto the front of the neck and chest. Smooth the edges so it looks inlaid rather than just stuck on top. -
Add the back saddle:
Cut a semi-circle or oval of flattened teal clay. Place it over the rounded back of the dinosaur like a saddle. -
Detailed spots:
Roll tiny little balls of teal clay and flatten them. Press these dots along the side of the body, following the curve of the ‘saddle’ patch. -
Eyes:
Make two small white flat circles for the eyes and press them onto the head. Add a tiny black dot or dab of paint in the center for the pupil. -
Final texture check:
Does the surface look too slick? I like to tap the clay gently with a toothbrush or sponge to remove fingerprints and give it that organic texture.
Let your prehistoric pal dry completely before displaying it on your shelf.
Glow-in-the-Dark Dino Stars and Moon Scene
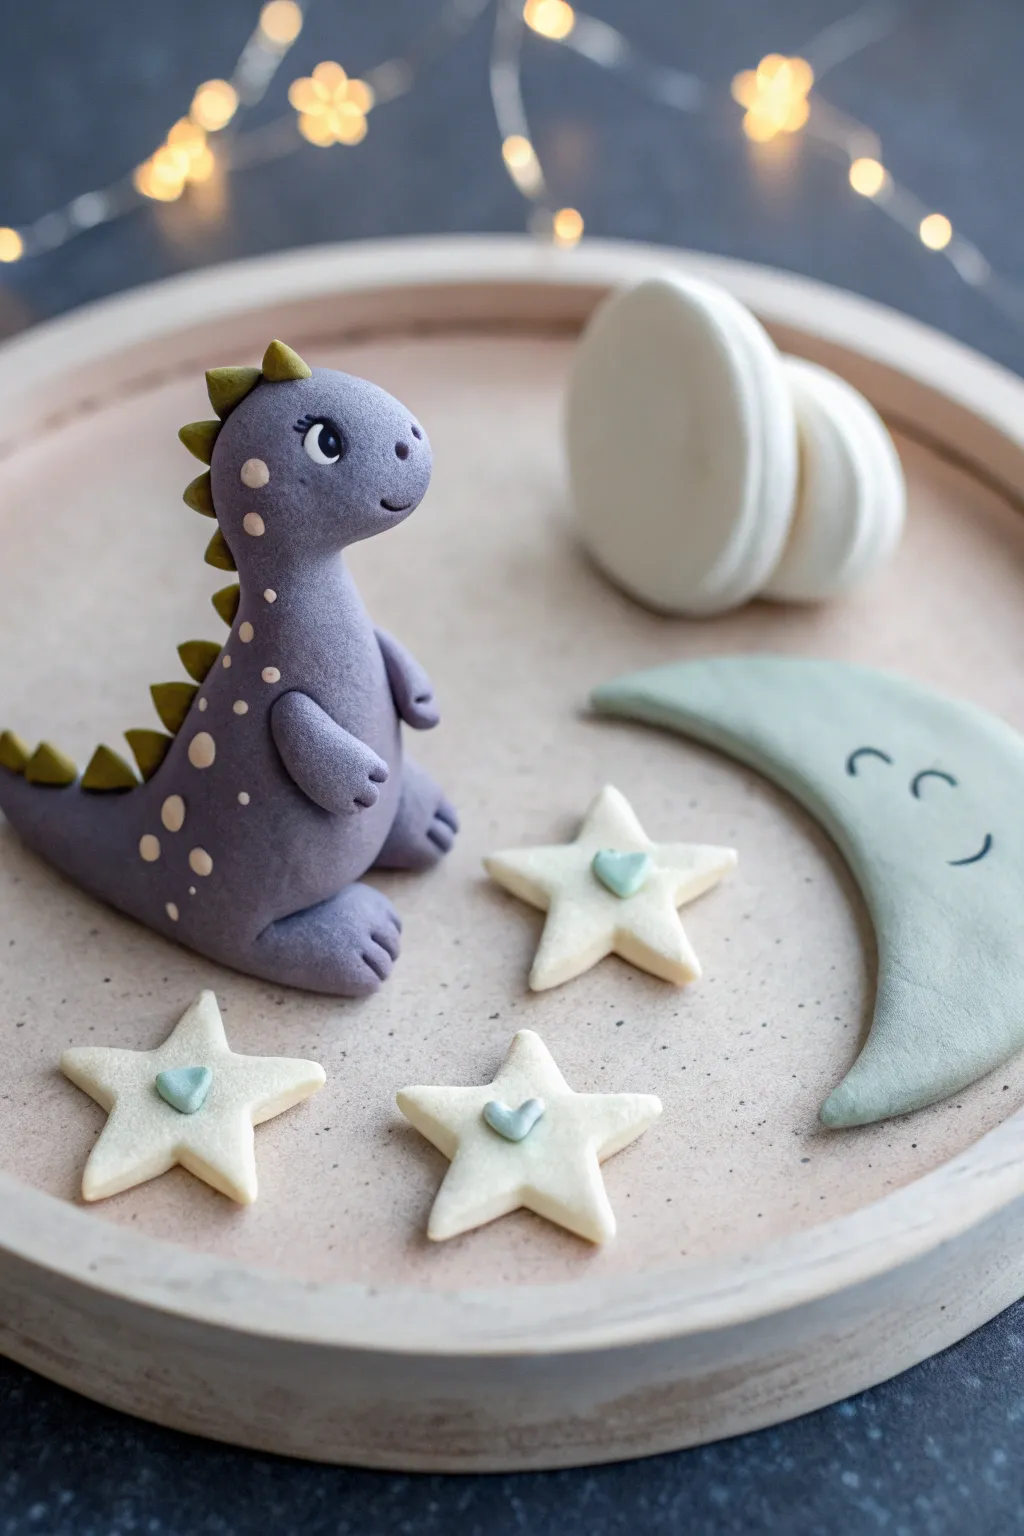
Create a soothing, magical bedtime scene featuring this adorable purple dinosaur gazing at the stars. This polymer clay project combines simple shapes with charming details to craft a perfect decorative piece for a nursery or desk.
Detailed Instructions
Materials
- Polymer clay (purple, light green/sage, white, pale yellow, dark olive green)
- Glow-in-the-dark polymer clay (optional, for stars and moon)
- Small ball tool and needle tool
- Rolling pin or pasta machine
- Star cookie cutter (small)
- Circle cutter (small, for moon curve)
- Black acrylic paint or clay for eyes
- Small detail brush
- Oven-safe baking plate or tile
Step 1: Sculpting the Dinosaur
-
Form the Body Base:
Start with a large ball of purple clay. Roll it into a smooth, thick teardrop shape that is flat on the bottom so it sits upright securely. This will serve as both the body and the tail. -
Shape the Head:
Roll a smaller ball of purple clay for the head. Gently pinch and pull the front to create a rounded snout area. Blend this securely onto the top of the teardrop body, smoothing the seam with your finger or a clay tool. -
Add Legs and Feet:
Create two small ovals for the legs. Attach them to the lower sides of the body. Use a needle tool or knife to press three small indentations into the front of each foot to define the toes. -
Attach the Arms:
Roll two smaller teardrops for the arms. Attach them higher up on the body, positioning them so they rest gently against the dinosaur’s belly. Add tiny toe marks here as well. -
Create the Spikes:
Take your dark olive green clay and roll many tiny cones. Beginning at the top of the head and working down to the tail tip, press these cones firmly onto the dinosaur’s spine line. -
Detail the Face:
Use a small ball tool to make an indentation for the eye. Insert a tiny ball of white clay, press flat, and add a smaller black pupil. Don’t forget a tiny white highlight dot. Use a needle tool to carve a small, happy smile and a nostril.
Droopy Neck?
If the head feels too heavy for the neck, insert a short piece of toothpick or wire into the body and head to act as an internal armature for support before baking.
Step 2: Adding Texture and Surroundings
-
Apply Spots:
Roll very tiny balls of pale yellow or lighter purple clay. Flatten them slightly and press them randomly onto the dinosaur’s back and sides to create a spotted texture. -
Create the Stars:
Roll out a sheet of white or glow-in-the-dark clay to about 1/4 inch thickness. Use your star cutter to punch out three stars. Soften the sharp edges slightly with your fingertip. -
Decorate the Stars:
Make tiny hearts using a minuscule amount of sage green or light blue clay. Place one tiny heart in the absolute center of each star. -
Shape the Moon:
Roll out sage green clay. Use a large round cutter to make a circle, then offset the cutter and cut again to create a crescent moon shape. Use a needle tool to draw a sleeping eye and smile on the moon’s face. -
Form the Clouds:
Roll two thick discs of white clay. Smooth the edges until they look like soft, pillowy marshmallows or abstract circular clouds.
Step 3: Assembly and Baking
-
Arrangement:
Place the dinosaur on your oven-safe plate. Arrange the stars, moon, and cloud pillows around the figure to create a cozy scene. Ensure nothing is touching if you want them to remain separate pieces. -
Final Surface Check:
I like to do a quick scan for fingerprints here. If you find any, lightly brush them away with a bit of baby oil or cornstarch on your finger. -
Bake the Set:
Bake according to your specific clay brand’s instructions (usually 275°F/135°C for 15-30 minutes per 1/4 inch thickness). Let the pieces cool completely in the oven to prevent cracking.
Starry Night Glow
Dust the finished stars and the dinosaur’s spots with phosphorescent powder before baking for an intense glow-in-the-dark effect.
Arranging your peaceful dino scene near a window creates a lovely silhouette during the day and a comforting friend at night
Surprise Inside: Dino With a Tiny Hidden Baby
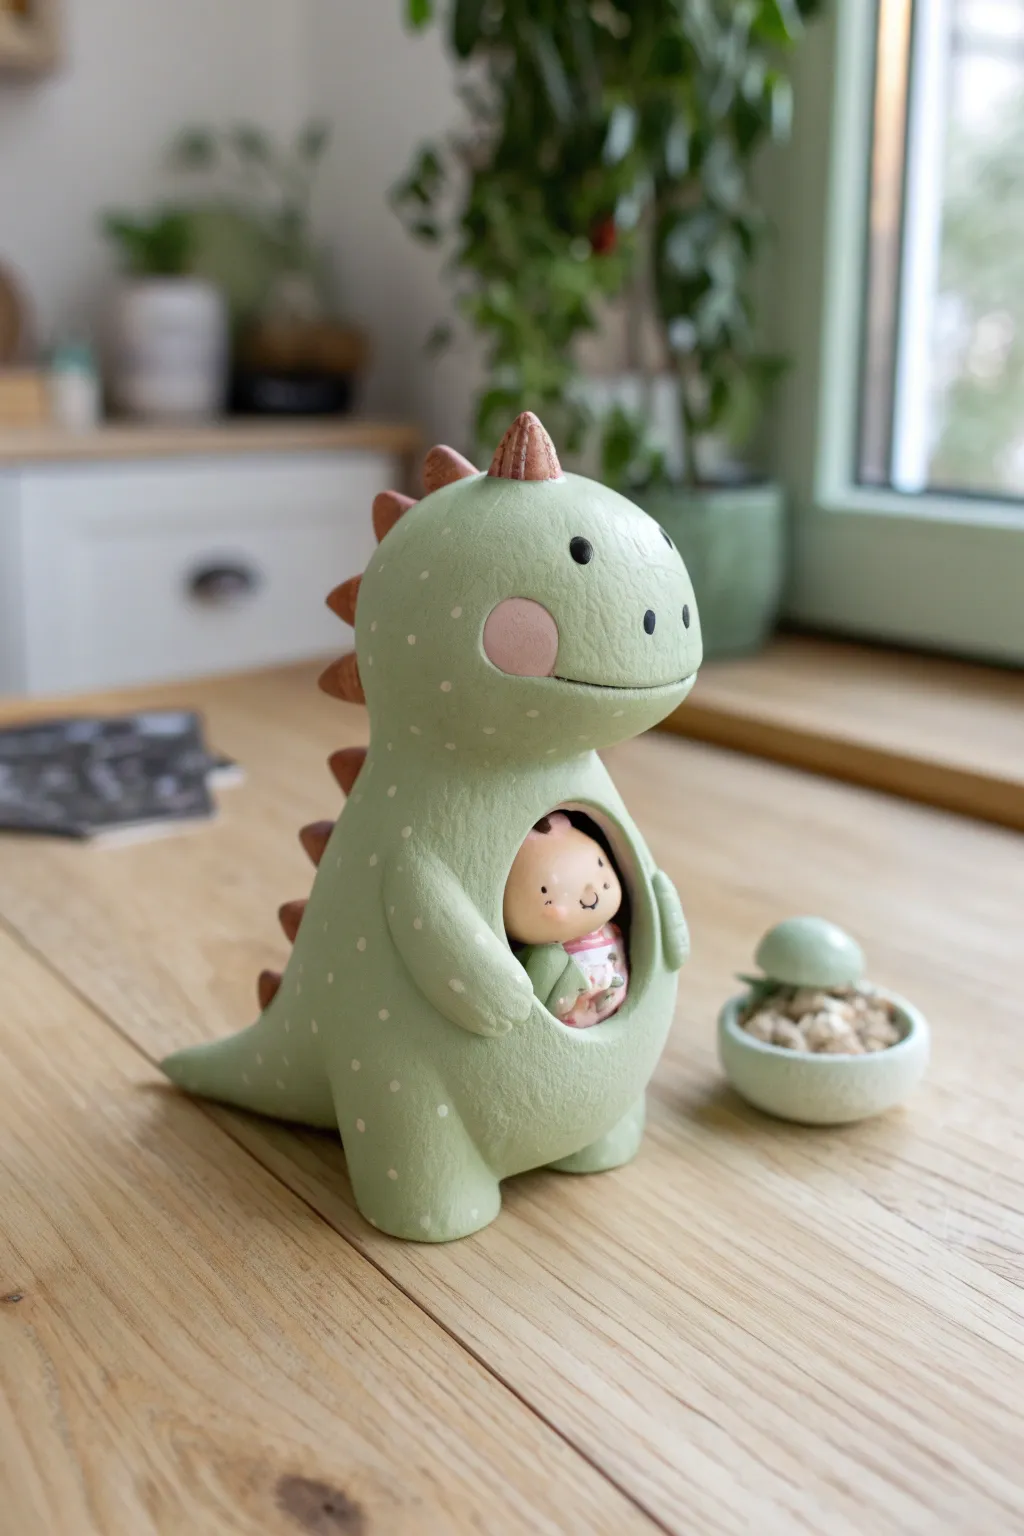
Create a whimsical clay companion that holds a delightful secret within its hollow belly. This smooth, pastel-green dinosaur features stylized spikes, friendly eyes, and a small cutout revealing a miniature matching baby nestled safely inside.
Step-by-Step
Materials
- Polymer clay (Sage Green, Light Pink, Cream/White, Terracotta/Brown, Black)
- Aluminum foil
- Rolling pin or pasta machine
- Clay sculpting tools (dotting tool, needle tool, smoothing tool)
- X-acto knife or clay blade
- Baking sheet and parchment paper
- Oven (for baking)
- Small circle cutter (approx. 1 inch)
- Acrylic matte varnish (optional)
Step 1: Sculpting the Hidden Baby
-
Form the baby’s base:
Start by rolling a very small ball of cream-colored clay for the head and a tiny cylinder of green clay for the body. The total height should be under 1 inch to fit inside the larger dino. -
Add tiny details:
Using a needle tool, gently indent eyes and a smile onto the face. You can use minuscule specks of black clay for eyes or paint them later. -
Wrap it up:
Roll a paper-thin strip of pink clay and wrap it around the baby’s body like a swaddle or blanket, texturing it slightly if desired. Set this aside; you can bake it briefly now to harden it, making it easier to handle later.
Smooth Seams
To erase seams completely where limbs attach, use a rubber-tipped sculpting tool. It drags the clay without leaving harsh tool marks like metal tools sometimes do.
Step 2: Building the Dino Body
-
Create the foil armature:
Crumple aluminum foil into a pear shape. This saves clay and keeps the figurine lightweight. The base needs to be wide enough to stand stable. -
Prepare the green clay:
Condition your sage green clay until it is soft and pliable, then roll it into a sheet about 1/4 inch thick. It needs to be thick enough to hold its shape when cut. -
Cover the armature:
Wrap the green clay sheet around your foil core, smoothing all seams with your fingers or a smoothing tool so the surface is seamless and uniform. -
Define the head:
Add extra bulk to the top of the pear shape to define a rounded, oversized head. Smooth the neck area slightly so it flows naturally into the body. -
Make the belly window:
Using your small circle cutter or a sharp knife, carefully cut a round hole in the center of the belly area. If you hit foil, gently push it back or remove that section of foil to create a deeper recess. -
Insert the baby:
Place your pre-made baby figure into the recess you just created. I find using tweezers helps position it perfectly without smudging the surrounding clay.
Glow in the Dark
Swap the white dots for glow-in-the-dark polymer clay. During the day it looks normal, but at night your dino becomes a comforting nightlight buddy!
Step 3: Adding Character & Limbs
-
Attach the legs:
Roll two thick, short logs of green clay for the legs. Press them firmly onto the bottom sides of the body and blend the seams upward so the dinosaur looks like it’s sitting heavily. -
Sculpt the arms:
Create two smaller teardrop shapes for arms. Attach them so they curve around the belly opening, as if the dinosaur is cradling the baby inside. -
Add the tail:
Form a cone of green clay and attach it to the back base, blending the seam. Curve the tip slightly for movement. -
Create the spikes:
Using terracotta or brown clay, roll several small balls. Pinch them into triangles and attach them in a row running from the top of the head down the spine. -
Detail the face:
Press two black seed beads or tiny clay balls into the head for eyes. Add a flattened circle of pink clay for the cheek. -
Carve the mouth:
Use a needle tool or knife to carve a long, curved smile line extending from the cheek across the snout.
Step 4: Finishing Touches
-
Add texture:
Using a dotting tool or the head of a pin, gently press tiny white clay dots all over the green skin for a speckled texture. Keep the pressure light. -
Smooth everything out:
Do a final check for fingerprints. A tiny bit of baby oil on your finger can help buff away stray prints before baking. -
Bake the project:
Bake exactly according to your clay package instructions (usually 275°F/135°C for 15-30 minutes per 1/4 inch thickness). -
Cool and varnish:
Let the piece cool completely inside the oven to prevent cracking. Once cold, you can apply a matte varnish for protection.
Place your finished dinosaur on a shelf where its sweet secret can be discovered by curious eyes