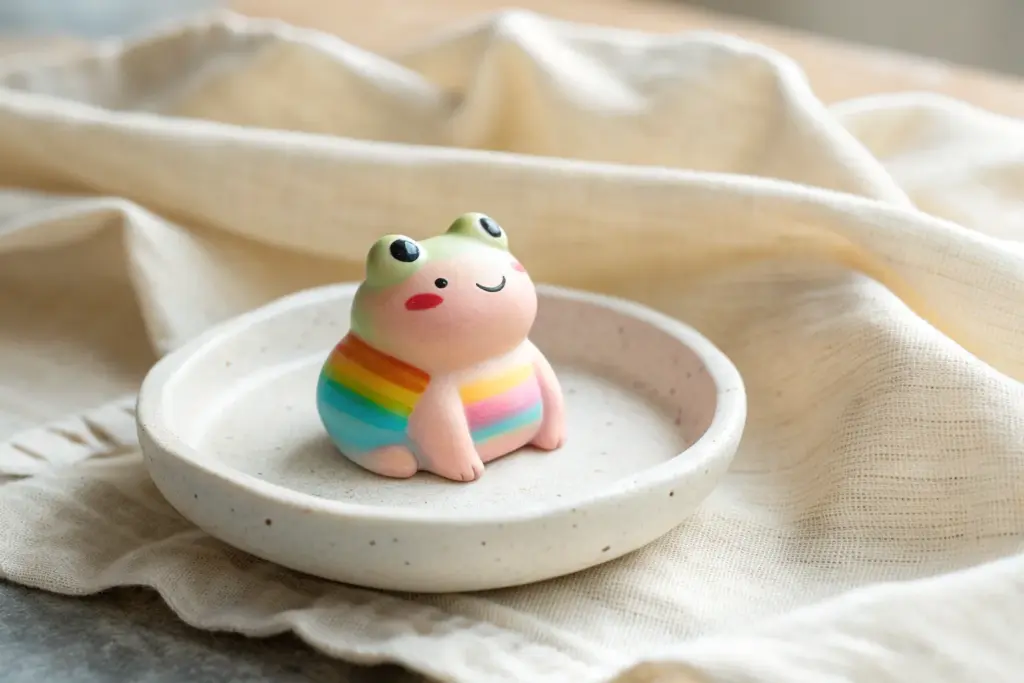
When I want a fun, low-pressure creative win, I reach for polymer clay because it turns into something sturdy, colorful, and genuinely useful. Here are my favorite polymer clay craft ideas—starting with the classics you’ll make on repeat, then drifting into the delightfully weird stuff that makes a studio day extra fun.
Easy Polymer Clay Earrings With Simple Shapes
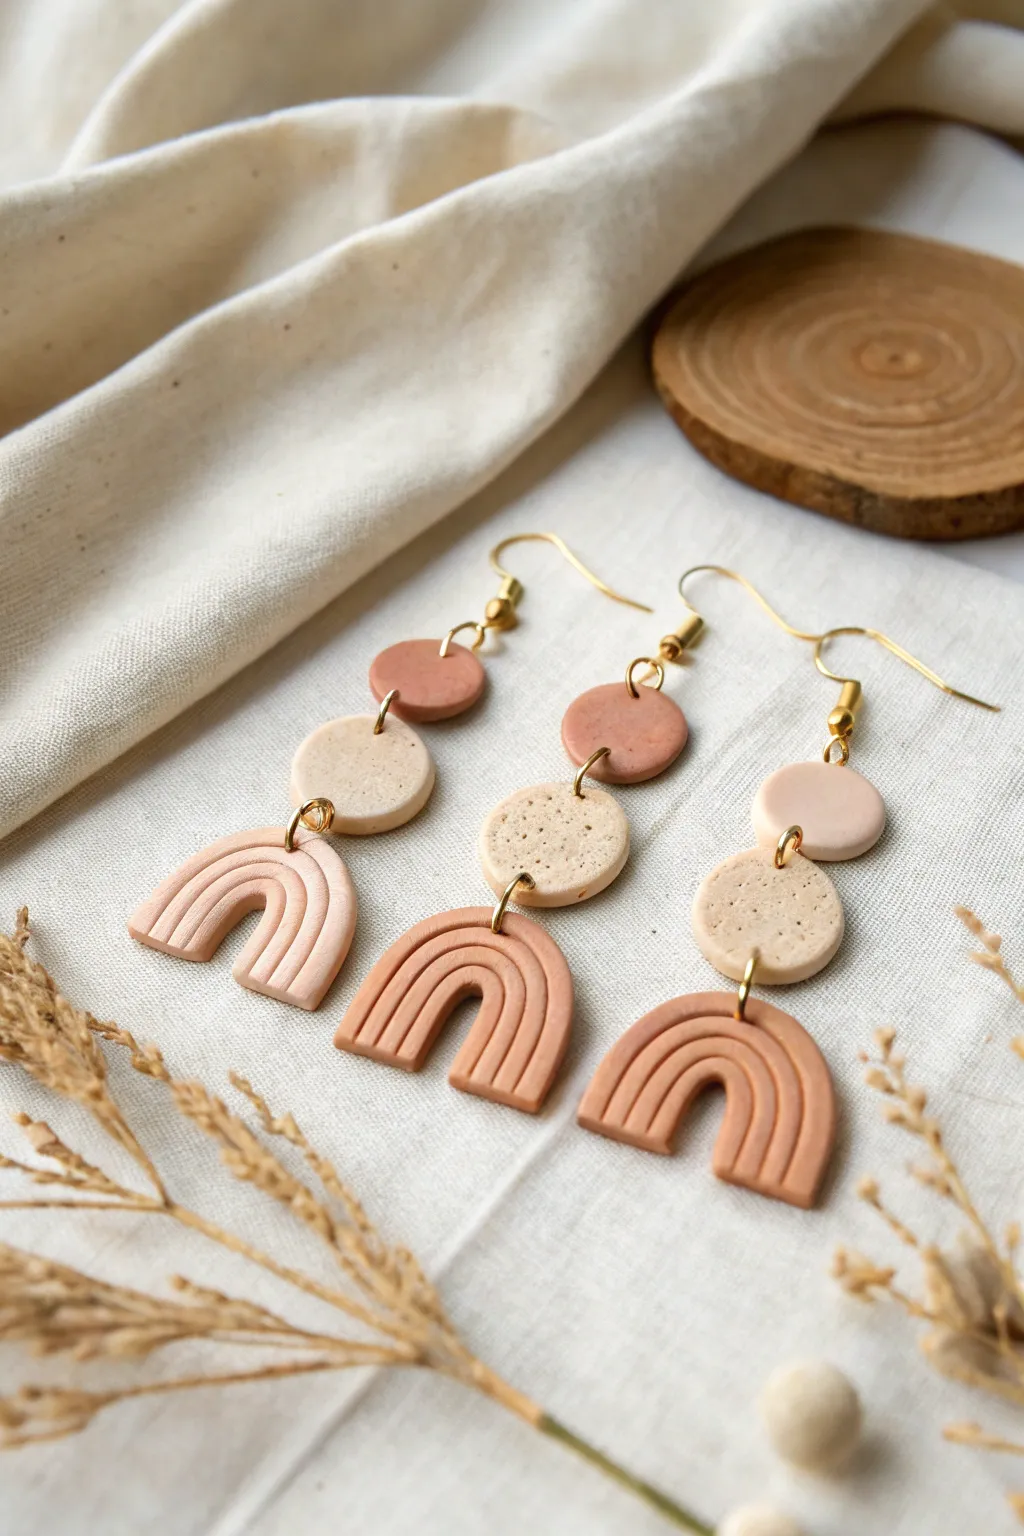
Embrace earthy tones and organic textures with these chic polymer clay dangle earrings. Featuring a stack of circles and a signature grooved arch, this design combines modern style with a soft, bohemian aesthetic.
Step-by-Step Tutorial
Materials
- Polymer clay in three colors: terracotta/rust, beige/sand, and speckle/granite
- Rolling pin or acrylic roller
- Small circle cutter (approx. 10mm)
- Medium circle cutter (approx. 15mm)
- Clay knife or blade
- Sandpaper or buffing block
- Needle tool or cocktail stick
- 4mm and 6mm gold jump rings
- Gold fish-hook earring wires
- Jewelry pliers (flat nose and round nose)
- Parchment paper and baking tray
Step 1: Preparing the Shapes
-
Condition the clay:
Begin by warming up your clay colors in your hands until they are soft and pliable. You’ll need a rust color, a plain beige, and a speckled beige. -
Roll out slabs:
Roll each color out onto a flat surface to an even thickness of about 3mm. Using an acrylic roller works best to keep the surface smooth. -
Cut the top circles:
Use your smallest circle cutter to punch out two circles from the rust-colored clay. These will be the very top tier of the earring stack. -
Cut the middle circles:
Switch to the medium-sized cutter and punch out two circles from the speckled beige clay. If you don’t have speckled clay, I like to mix a little black pepper or dried coffee grounds into plain beige clay. -
Create the arch base:
From the remaining beige or rust clay (depending on which color you want the bottom arch), cut a distinct rectangle or wide oval shape, then use a cutter to remove a semi-circle from the bottom to form an arch. -
Add texture lines:
Take your needle tool and carefully press vertical grooves into the arch shape. Keep the lines parallel to follow the curve of the arch, creating a ribbed rainbow effect.
Step 2: Assembly and Finishing
-
Pierce holes:
Before baking, use a needle tool to poke holes for assembly. The small top circle needs a hole at the top and bottom. The middle circle needs top and bottom holes. The arch needs just one top hole. -
Double check holes:
Make sure your holes are large enough for your jump rings to move freely. Give the needle a little wiggle to widen them slightly. -
Bake the pieces:
Arrange all your clay pieces on a parchment-lined baking tray. Bake according to your polymer clay brand’s instructions (usually 275°F/135°C for 15-30 minutes). -
Cool and sand:
Let the pieces cool completely before handling. If there are any rough edges on the sides of your circles, gently smooth them over with fine-grit sandpaper. -
Open the jump rings:
Using two pairs of pliers, twist your gold jump rings open sideways (never pull them apart). This keeps the circle shape intact. -
Connect the tiers:
Use a larger jump ring to connect the bottom arch to the middle circle. Close the ring securely. -
Attach the top tier:
Connect the middle circle to the small top circle using another jump ring. -
Add the hook:
finally, attach the earring hook to the very top hole of the small circle using a small jump ring.
Uneven Surfaces?
If fingerprints mark your clay, lightly dust the surface with cornstarch before rolling, or wipe the unbaked clay gently with baby oil to smooth it.
Make it Shine
After baking, apply a thin coat of UV resin or glossy water-based varnish to the clay pieces for a high-shine ceramic look.
Enjoy wearing your handcrafted, lightweight statement earrings or gift them to a friend who loves boho style.


Marbled Pattern Pendant Necklaces
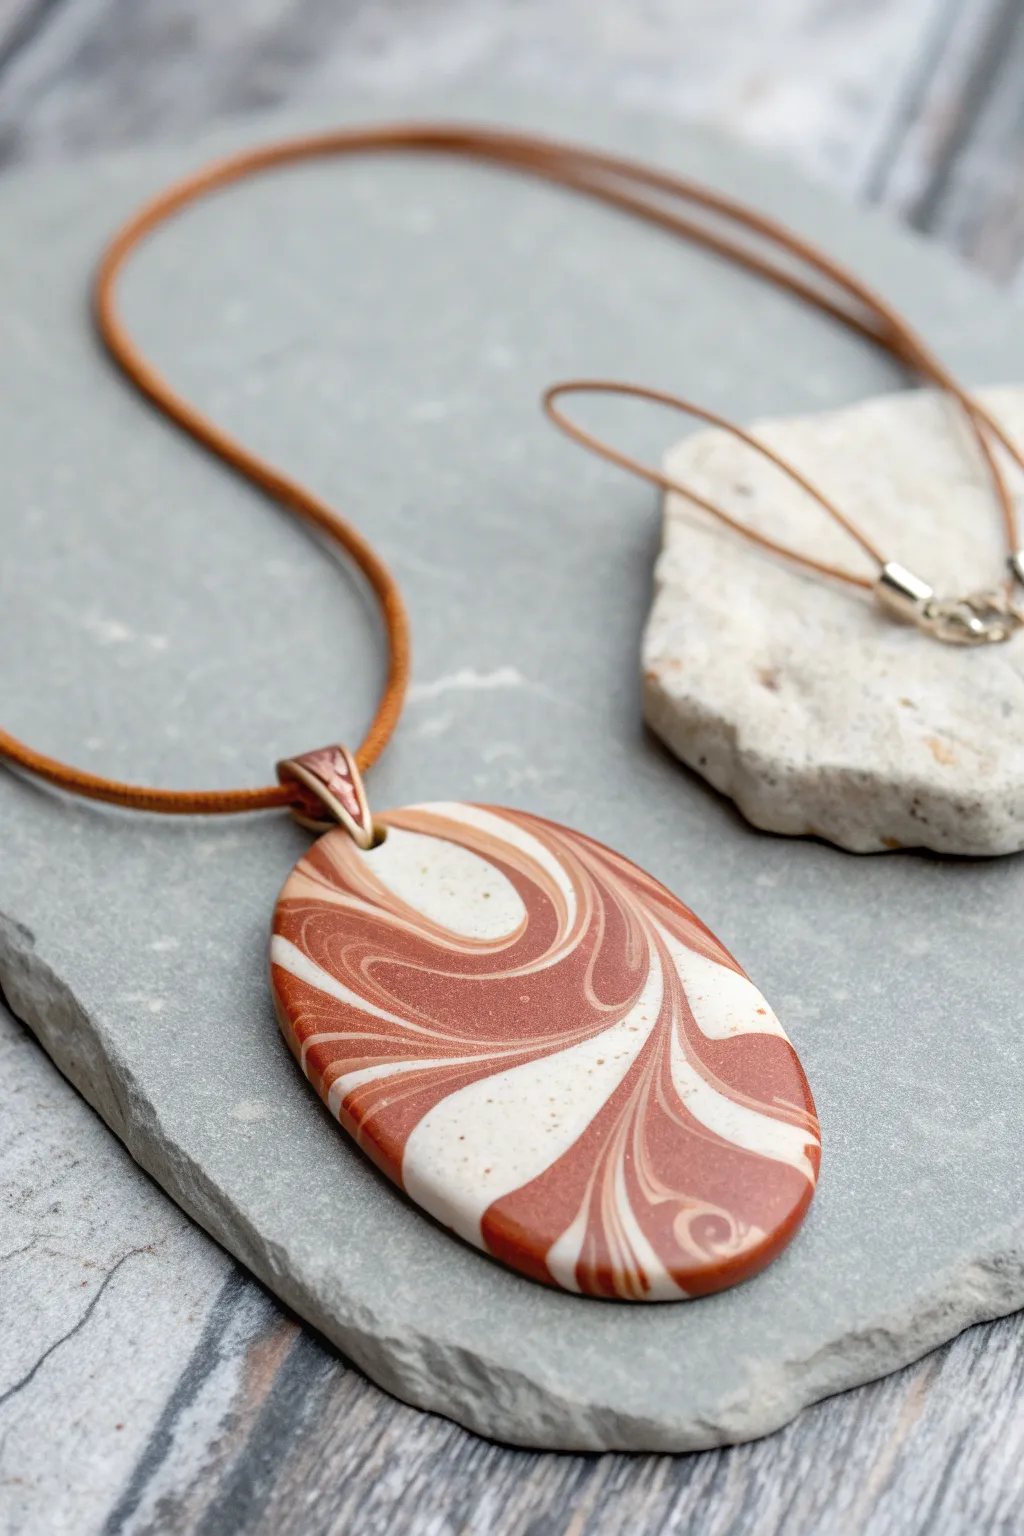
Capture the organic elegance of sandstone canyons with this striking polymer clay pendant featuring a bold rust and cream marbled pattern. This project demonstrates how a simple swirl technique can create sophisticated, fluid lines that look like professional ceramic work.
Detailed Instructions
Materials
- Polymer clay: Rust/Terracotta (metallic or mica-shift preferred)
- Polymer clay: Cream or translucent white (with specks/inclusions)
- Polymer clay: Bright White (small amount)
- Acrylic rolling pin or pasta machine
- Oval cutter (approx. 2 inches long)
- Flexible tissue blade
- Pendant bail (antique copper or bronze finish)
- Leather or waxed cotton cord (tan/camel color)
- Cord end caps and clasp findings
- Wet/dry sandpaper (400 to 1000 grit)
- Buffing wheel or denim cloth (optional)
Step 1: Creating the Marbled Slab
-
Condition the clay:
Begin by thoroughly conditioning your rust and cream clays separately until they are soft and pliable. If the cream clay doesn’t have specks, mix in a tiny pinch of ground black pepper or spices to mimic the stone look seen in the photo. -
Form logs:
Roll the rust-colored clay into a thick log about 3 inches long. Do the same with the cream clay. Make a much thinner snake of the bright white clay to add crisp separation lines. -
Combine the colors:
Twist the rust and cream logs together like a candy cane. Lay the thin white snake into one of the grooves of the twist. This white line will define the swirl later. -
Fold and roll:
Roll the twisted log into a smooth sausage shape, doubling its length. Fold it in half, twist it again, and roll it out once more. Repeat this process 2-3 times, but be careful not to over-mix, or the distinct bands will turn into a muddy orange. -
Create the block:
Squish your marbled log into a rectangular block shape. Using your acrylic roller or pasta machine on a thick setting, flatten it into a sheet that is approximately 1/4 inch thick. -
Review the pattern:
Examine the surface of your rolled sheet. Look for areas where the rust and cream form wide, sweeping curves rather than tight, busy scribbles. You want that fluid motion shown in the example.
Muddy Colors?
If your swirl looks brown instead of distinct rust and cream, you over-mixed. Stop twisting sooner next time. The distinct lines come from leaving the clay only partially blended.
Step 2: shaping and Baking
-
Cut the shape:
Position your oval cutter over the area with the most pleasing design. Press down firmly to cut the shape. Alternatively, use a needle tool to trace and cut an oval freehand if you prefer a more organic edge. -
Refine the edges:
Gently lift the oval from your work surface. Use your finger to smooth the cut edges, softening the sharp rim left by the cutter so it looks like polished stone. -
Drill the hole:
Using a small tool or toothpick, pierce a hole at the very top center of the oval. Make sure the hole is large enough to accommodate the jump ring or bail attachment. -
Bake the piece:
Place the pendant on a ceramic tile or baking sheet lined with cardstock. Bake according to your clay manufacturer’s instructions (usually 275°F/135°C for 30-45 minutes). I always use an oven thermometer to ensure the temperature creates a durable cure. -
Cool down:
Allow the piece to cool completely in the oven with the door cracked open to prevent thermal shock.
Step 3: Finishing Touches
-
Sand the surface:
Under running water, sand the pendant starting with 400 grit sandpaper and working up to 1000 grit. This removes fingerprints and reveals the depth of the marble pattern. -
Buff to a sheen:
Vigorously rub the pendant with a piece of denim or use a buffing wheel on a rotary tool. You are aiming for a satin sheen rather than a high-gloss glass look. -
Attach the bail:
Open the jump ring or pinch bail with pliers and thread it through the hole you created. Squeeze it shut securely, ensuring the metal finish complements the rust tones of the clay. -
Prepare the cord:
Cut a length of tan leather or cotton cord to your desired necklace length. Thread the cord through the bail. -
Add fasteners:
Use a dab of superglue to secure the cord ends into the metal caps. Attach the clasp hardware using jump rings to finish the necklace.
Pattern Selection
Use a ‘viewfinder’ (a piece of paper with an oval hole cut out) to move over your clay slab. This helps you isolate the best section of the marbling before committing to the cut.
Wear your new earthy pendant with pride and enjoy the unique patterns of your handmade stone


Mixed-Size Polymer Clay Beads for Bracelets
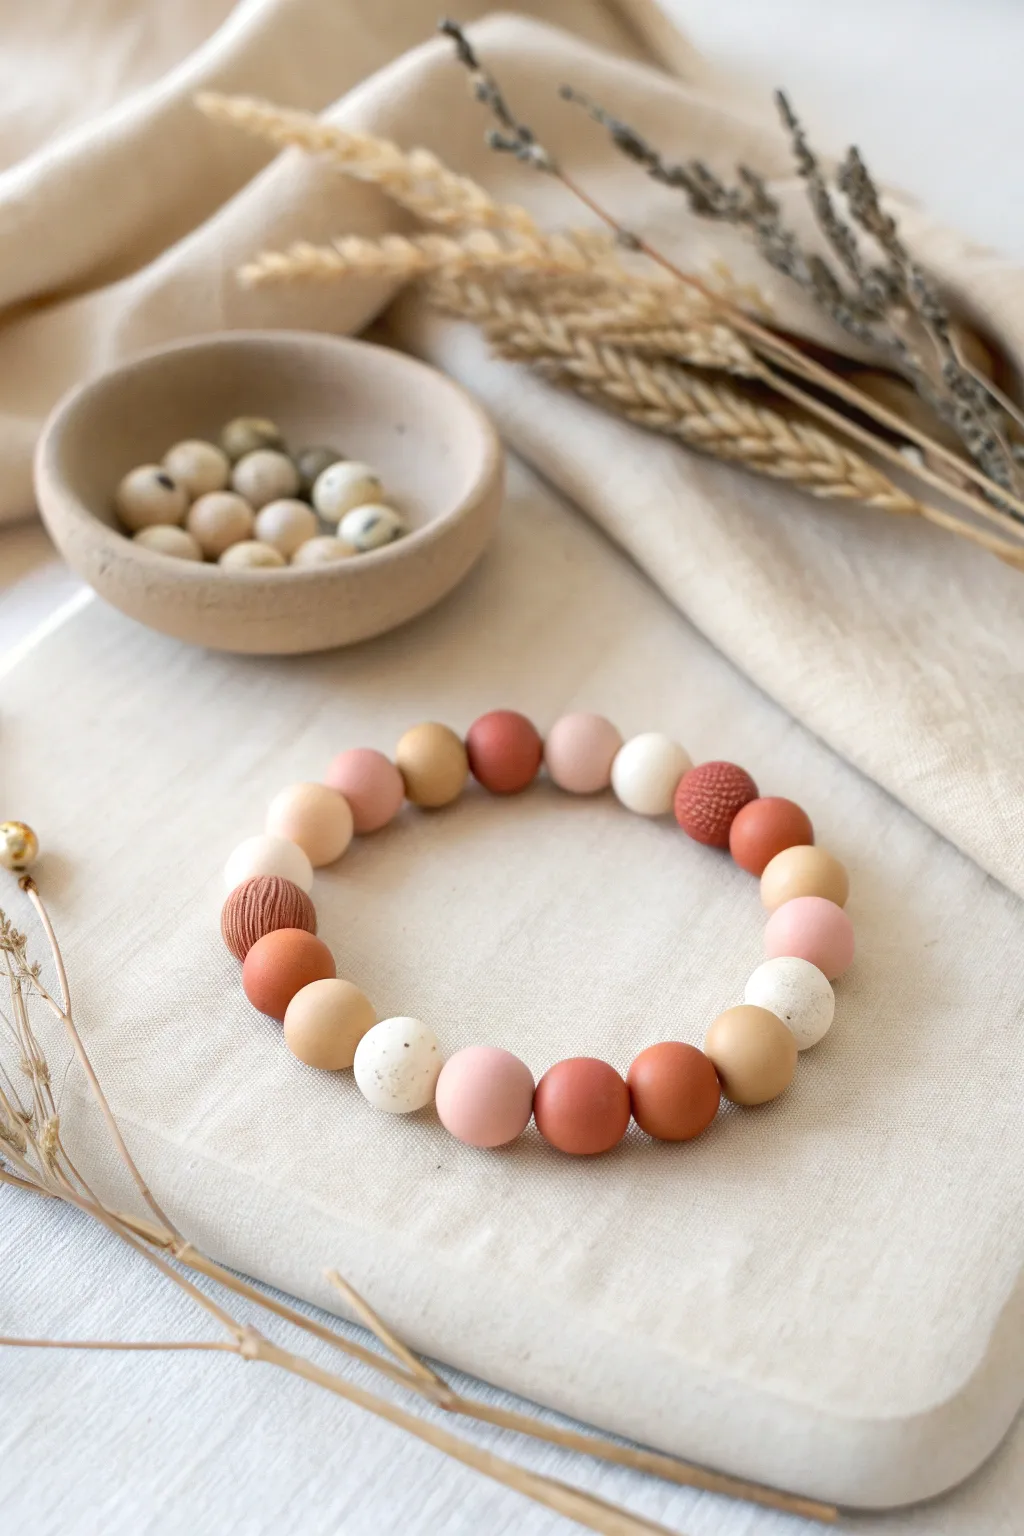
These warm, minimalist beads combine smooth matte finishes with earthy textures to create a sophisticated piece of wearable art. The alternating tones of terracotta, peach, and speckled cream give this bracelet a natural, organic feel perfect for everyday wear.
Step-by-Step Guide
Materials
- Polymer clay in muted tones (terracotta, peach, beige, mustard, white)
- Black pepper or dried coffee grounds (for speckling)
- Bead rolling tool or acrylic block
- Toothpicks or a bead piercing pin
- Texture tools (fine comb, needle tool, or textured sponge)
- Elastic jewelry cord (0.8mm or 1mm)
- Super glue or jewelry cement
- Parchment paper-lined baking tray
- Wet sandpaper (400-800 grit)
Step 1: Creating the Clay Palette
-
Mix custom colors:
Start by conditioning your clay. Knead your primary colors until soft. To achieve the muted, earthy look shown, mix bright oranges with a touch of brown or beige to tone them down into terracotta and rust shades. -
Create the speckled stone effect:
Take a portion of white or cream clay and flatten it. Sprinkle a pinch of ground black pepper or dried coffee grounds onto the surface. Fold the clay over and knead it thoroughly until the specks are evenly distributed, mimicking natural stone. -
Portion the clay:
Roll each color into a uniform log or ‘snake’ about the thickness of your thumb. Slice these logs into equal-sized segments to ensure your finished beads are relatively consistent in size.
Hole distortion?
If your beads flatten when you pierce them, try letting the rolled balls sit in the fridge for 15 minutes to firm up before inserting the pin.
Step 2: Rolling and Texturing
-
Roll spheres:
Roll each segment between your palms to form a rough ball. For a perfectly spherical finish, place the ball on your work surface and use an acrylic block or bead roller tool in a circular motion over the top. -
Add ridged texture:
Select a few beads to be focal points (like the dark terracotta ones in the image). Gently press a fine comb or a needle tool against the side of the bead and rotate it to create fine, vertical parallel lines. -
Add pitted texture:
For the beige beads, you can add a subtle pitted texture by gently rolling them over a piece of coarse sandpaper or tapping them lightly with a stiff toothbrush before baking. -
Pierce the holes:
While the clay is still raw, carefully insert a toothpick or piercing pin through the center of each bead. I find twisting the pin as leading it through prevents the bead from squishing out of shape.
Step 3: Baking and Finishing
-
Bake the beads:
Arrange your beads on a parchment-lined baking tray. Follow the temperature instructions on your specific brand of clay package, usually baking for 30-45 minutes to ensure durability. -
Cool and sand:
Let the beads cool completely. Once cool, use wet sandpaper to buff away any fingerprints or sharp edges around the holes, giving them that professional matte finish. -
Plan your pattern:
Lay your beads out on a bead board or a towel. Experiment with the arrangement, alternating the darker terracotta colors with the lighter peaches and speckled creams to create a balanced gradient effect. -
String the beads:
Cut a piece of elastic cord about 10 inches long. Pre-stretch the cord by pulling it firmly a few times; this prevents the bracelet from loosening later. String your beads in your chosen order. -
Tie the knot:
Tie a secure surgeon’s knot (right over left, left over right). Pull the elastic tight to ensure there are no gaps between beads, but not so tight that the bracelet creates waves. -
Secure and hide:
Dab a tiny drop of super glue or jewelry cement onto the knot. Allow it to dry for a few seconds, then trim the excess cord and gently tuck the knot inside the hole of an adjacent bead.
Pro Tip: Matte Finish
To get that ultra-matte look, dip your baked beads in a mixture of cornstarch and water, then rinse. It removes shine and adds a velvety feel.
Enjoy styling your new handmade accessory with your favorite neutral outfits


Cute Charm Keychains You Can Personalize
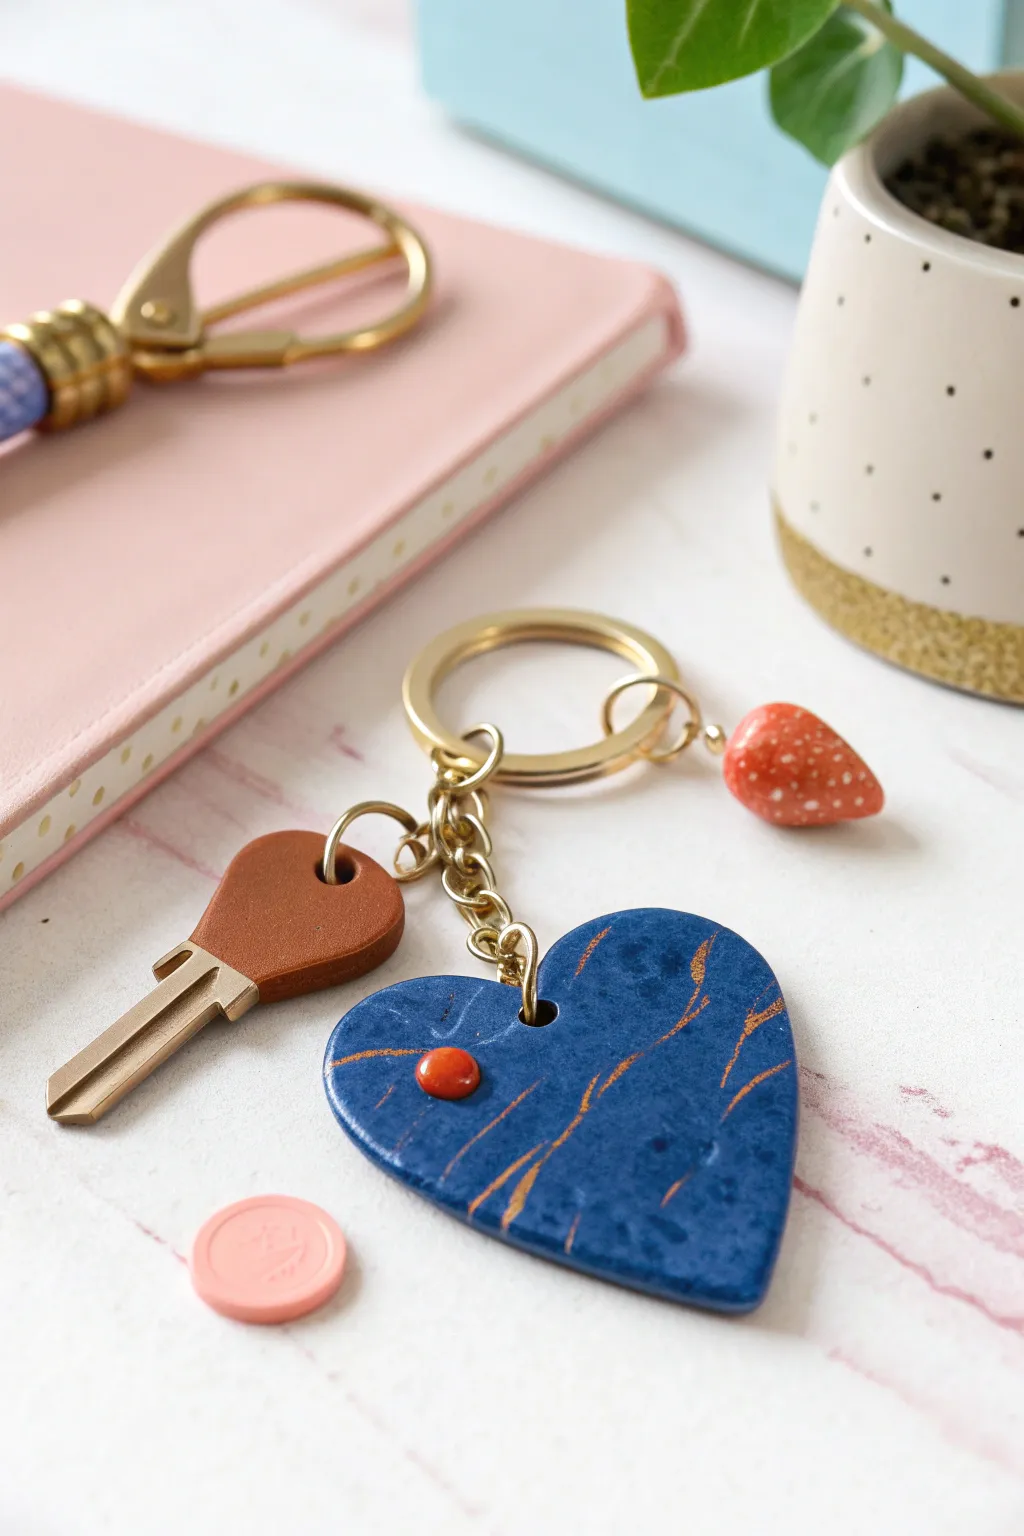
This custom keychain set combines a faux-stone heart with a sweet little strawberry charm for a playful pop of color. The deep blue polymer clay mimics lapis lazuli with subtle gold veining, creating an elegant yet durable accessory perfect for gifting.
Step-by-Step
Materials
- Polymer clay (denim or navy blue)
- Polymer clay (coral red or reddish-orange)
- Polymer clay (white)
- Gold acrylic paint
- Fine tip paintbrush
- Rolling pin or pasta machine
- Heart-shaped clay cutter (medium)
- Small dotting tool or toothpick
- Small jump rings (gold)
- Chain links
- Keyring hardware (gold)
- Clear gloss glaze or resin (optional)
- Oven for baking
Step 1: Shaping the Blue Heart
-
Condition the blue clay:
Start by warming up your navy blue polymer clay in your hands until it is pliable and smooth. Roll it into a ball to ensure there are no air bubbles trapped inside. -
Roll out the slab:
Using a rolling pin or pasta machine, flatten the blue clay into a sheet about 1/4 inch thick. You want it substantial enough to be sturdy on a keychain but not too heavy. -
Cut the heart shape:
Press your heart-shaped cutter firmly into the clay slab. Wiggle it slightly before lifting to ensure clean edges, then carefully remove the excess clay from around the shape. -
Smooth the edges:
Gently run your finger along the cut edges of the heart to soften any sharpness left by the cutter. A smooth, rounded edge looks more professional and finished. -
Add the accent dot:
Take a tiny pinch of the coral red clay and roll it into a small ball. Press this gently onto the face of the blue heart, slightly off-center, flattening it just enough so it adheres well. -
Create the hanging hole:
Use a straw or a small circular cutter to punch a hole near the top center of the heart lobes. Ensure the hole is large enough for your jump rings but not so close to the edge that it might break.
Clean Edges Trick
Before baking, use a bit of cornstarch on your finger to buff away fingerprints without distorting the shape. It makes sanding later much easier.
Step 2: Crafting the Strawberry Charm
-
Form the strawberry base:
Roll a small piece of the same coral red clay into a ball, then gently taper one end to create a teardrop or strawberry shape. It should be proportional to, but smaller than, the heart. -
Add white seeds:
Using a needle tool or toothpick, pick up tiny specks of white clay (or use white paint after baking) and press them onto the surface of the strawberry to mimic seeds. -
Insert an eye pin:
Carefully insert a small gold eye pin into the top (wider end) of the strawberry. You can add a drop of liquid clay or bake-and-bond on the pin shaft for extra security.
Make It Marble
Mix translucent clay into your blue base before cutting. The subtle depth will make the gold veining pop even more like real lapis stone.
Step 3: Baking & Finishing
-
Bake the pieces:
Place your clay pieces on a baking sheet lined with parchment paper. Bake according to your polymer clay brand’s instructions—usually around 275°F (135°C) for 15-30 minutes. -
Cool down:
Let the pieces cool completely inside the oven or on a wire rack. Polymer clay is slightly soft when hot and hardens fully as it cools. -
Apply gold marbling:
Dip a very fine brush into gold acrylic paint. With a light, shaky hand, drag thin, broken lines across the blue heart to mimic natural stone veins. I like to cross the lines occasionally for a realistic rock effect. -
Seal the surface:
Once the paint is dry, coat the blue heart with a thin layer of satin or gloss glaze. This protects the gold paint and gives the ‘stone’ a polished look. -
Attach hardware to heart:
Open a gold jump ring using two pairs of pliers. Thread it through the hole in the heart pendant and attach it to a short length of gold chain. -
Attach strawberry charm:
Connect the strawberry charm to the main keyring using its own small jump ring. -
Assemble the keychain:
Attach the chain holding the heart to the main keyring loop. You can also add a distinct leather key cove or other keys to complete the set.
Now you have a chic, personalized accessory that keeps your keys stylishly organized

What Really Happens Inside the Kiln
Learn how time and temperature work together inside the kiln to transform clay into durable ceramic.
Sweet Little Ring Dish Trinket Trays
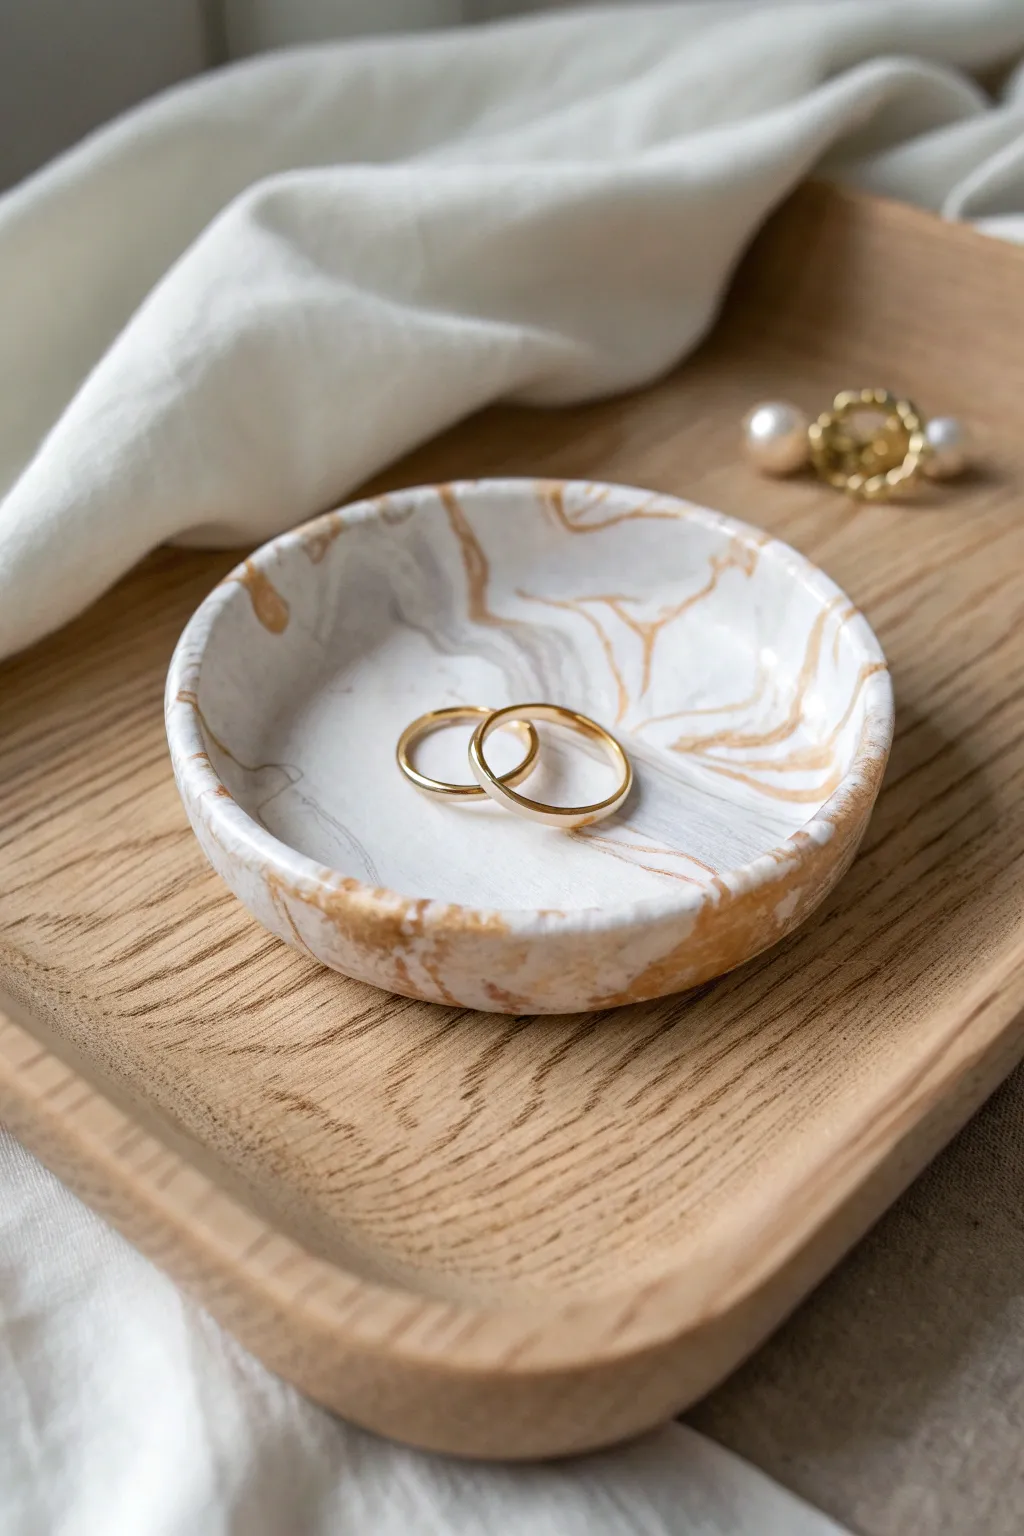
Create a sophisticated resting place for your favorite rings with this beautiful faux-stone trinket dish. The classic marbling technique swirls white, transluscent grey, and metallic gold clays together effortlessly, resulting in a piece that looks like high-end ceramic.
Step-by-Step Guide
Materials
- Polymer clay (White)
- Polymer clay (Translucent or Grey)
- Polymer clay (Metallic Gold or Bronze)
- Acrylic rolling pin or glass bottle
- Round cookie cutter or drinking glass (approx. 3-4 inches)
- Oven-safe small bowl or ramekin (to mold the shape)
- Blade or X-Acto knife
- Fine grit sandpaper (400-800 grit)
- Gloss glaze or varnish (polyurethane or water-based)
- Soft paintbrush
- Parchment paper
Step 1: Preparing the Clay
-
Condition the Clay:
Begin by kneading your polymer clay blocks individually until they are soft and pliable. You’ll want a large portion of white (about 70% of your total volume), a smaller portion of grey (20%), and just a pinch of the metallic gold (10%). -
Create Snakes:
Roll each color of conditioned clay into a long, thin snake on your work surface. The white snake should be the thickest, while the gold and grey should be thinner to prevent them from overpowering the white base. -
Combine the Strands:
Bundle the snakes together, twisting them into one large rope. Fold this rope in half and twist it again. This twisting action begins the marbling process.
Muddy Colors?
If your colors look blended rather than swirled, you over-mixed the clay. Next time, stop kneading as soon as streaks appear. Marbling happens quickly!
Step 2: Creating the Marble Pattern
-
Knead Lightly:
Roll the combined rope into a ball, then roll it back into a snake. Repeat this fold-and-twist motion a few times, but be careful not to over-mix, or the colors will blend into a muddy grey instead of distinct veins. -
Form a Ball:
Once you see nice streaks of color throughout the clay rope, squish it into a tight ball. You should see interesting lines of gold and grey running through the white. -
Flatten the Clay:
Place the ball on a piece of parchment paper. Using your acrylic roller, flatten the ball into a smooth, even sheet about 1/4 inch thick. Rotate your roller frequently to ensure an even thickness. -
Inspect the Pattern:
Look at your flattened sheet to see the marbling. If you aren’t happy with the swirl placement, you can fold the clay and roll it out one more time, but remember that less is usually more with marbling.
Gold Liquid Leaf
Painting the very edge of the rim with gold liquid leaf after baking adds a luxe, high-end finish that mimics real porcelain with gold trim.
Step 3: Shaping and Baking
-
Cut the Circle:
Press your round cookie cutter or using the rim of a glass firmly into the clay sheet to cut out a perfect circle. Peel away the excess scrap clay (you can save this for a smaller project). -
Smooth the Edges:
Gently run your finger along the cut edge of the clay circle to soften any sharp corners or roughness left by the cutter. A smoother edge gives a more professional, ceramic look. -
Form the Dish:
Take your clay circle and gently place it inside your chosen oven-safe bowl or ramekin. Press it down very lightly so it takes on a slightly curved, concave shape. You don’t need it to fill the bowl, just borrow the curve. -
Bake:
Place the bowl containing your clay onto a baking sheet. Bake according to the manufacturer’s instructions on your specific package of clay (usually around 275°F or 130°C for 15-30 minutes). I prefer to bake slightly longer at a lower temp to prevent burning the white clay. -
Cool Down:
Once baking is complete, remove the tray from the oven and let the clay cool completely inside the mold. Removing it while hot can cause the dish to warp.
Step 4: Finishing Touches
-
Sand for Smoothness:
Once cool, pop the clay dish out of the mold. Dip the dish in a little water and use wet sandpaper to gently buff the rim and the surface, removing any fingerprints or rough spots. -
Wipe Clean:
Rinse the dish thoroughly to remove any clay dust from sanding and dry it completely with a lint-free cloth. -
Apply Gold Rim (Optional):
For extra glamour, use a small detail brush to paint a thin line of liquid gold leaf or metallic acrylic paint along the very edge of the rim. -
Seal the Dish:
Apply a thin layer of gloss glaze or polyurethane varnish to the entire surface. This seals the clay, protects the gold accents, and gives the piece that shiny, ceramic-like finish visible in the photo. -
Dry Completely:
Allow the glaze to dry fully in a dust-free area for at least 24 hours before placing any jewelry inside.
Now you have a chic, handmade vessel perfect for keeping your most treasured rings safe and organized
Modern Terrazzo Speckle Coasters
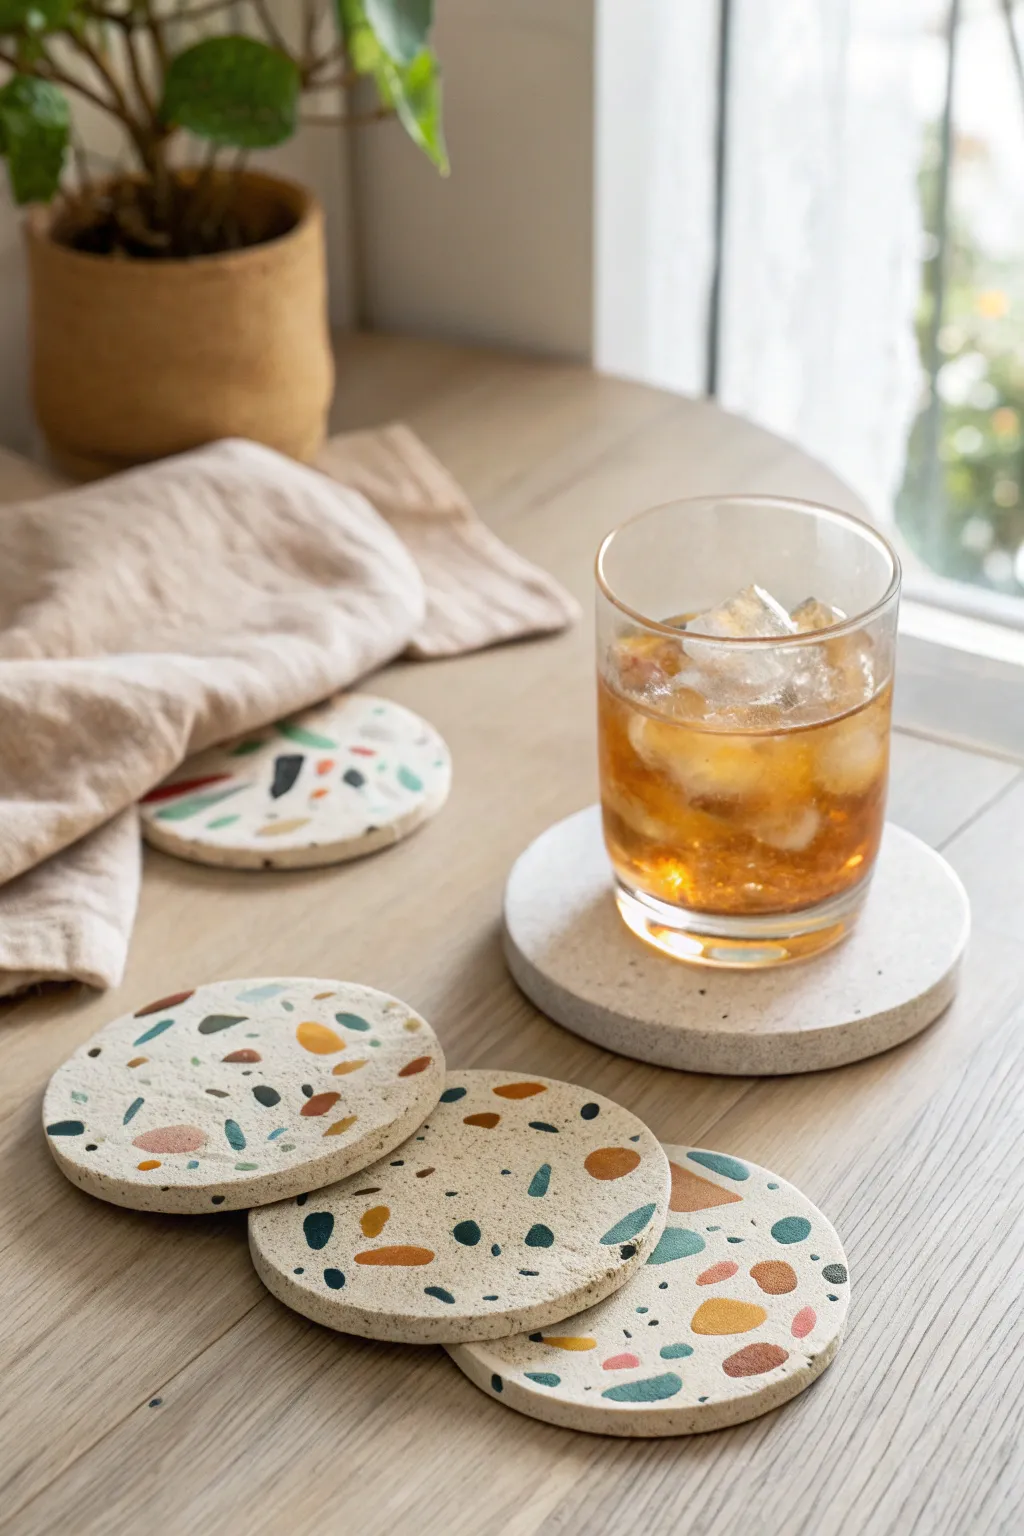
Bring a touch of modern artistry to your coffee table with these stunning polymer clay coasters featuring a classic terrazzo effect. The scattered, colorful chips against a neutral stone-like background create a sophisticated yet playful look that mimics real ceramic beautifully.
Detailed Instructions
Materials
- Polymer clay (White or Beige for the base)
- Polymer clay (Various colors: Teal, Rust, Mustard, Black, Navy)
- Acrylic rolling pin or clay machine
- Round cookie cutter (approx. 3.5 – 4 inches)
- Parchment paper or ceramic tile for baking
- Craft knife or tissue blade
- Sandpaper (grits 400, 600, 1000)
- UV resin or clear polyurethane glaze (optional for sealing)
- Rolling guides or playing cards (to ensure even thickness)
Step 1: Preparing the ‘Chips’
-
Condition the colored clay:
Start by conditioning your small amounts of colored clay (teal, rust, mustard, etc.) until they are soft and pliable. You don’t need much; scraps work perfectly for this. -
Roll thin sheets:
Roll each color out into a very thin sheet. The thinner these sheets are, the more delicate your final terrazzo pattern will look. -
Create the fragments:
Tear these thin sheets into tiny, irregular pieces. I find that tearing by hand creates more organic-looking shapes than cutting with a knife. -
Pre-bake the chips (Optional trick):
For sharper edges that don’t smear during rolling, bake these tiny chips on a piece of parchment paper for just 5-10 minutes. This keeps their shape crisp later on.
Smear Campaign?
If your colored chips are smearing into muddy streaks when you roll them, your base clay is too soft or you are rolling too aggressively. Let the clay leach on paper for 20 mins to firm it up.
Step 2: Forming the Base
-
Condition base clay:
Take a large block of your white or beige clay and condition it thoroughly. If you want a speckled stone look like the photo, you can mix in a tiny pinch of cracked black pepper or sand. -
Roll the slab:
Roll the base clay out into a thick slab, about 5mm (1/4 inch) thick. Use rolling guides to ensure the thickness is perfectly even. -
Apply the chips:
Sprinkle your prepared colored chips onto the slab. Be random! Let some overlap and leave some open space to let the base color breathe. -
Embed the pattern:
Cover the slab with a piece of parchment paper and gently use your acrylic roller to press the chips into the base clay until the surface is smooth and flush. -
Roll again slightly:
Roll over the slab one more time to ensure everything is bonded. The chips will stretch slightly, adding to that authentic terrazzo aesthetic.
Metallic Pop
Add sophistication by incorporating gold leaf flakes alongside the colored clay chips. Apply the gold leaf just before the final roll so it embeds into the surface without tearing too much.
Step 3: Cutting and Baking
-
Cut the shapes:
Place your round cutter on the best-looking section of your patterned slab. Press down firmly to cut your coaster shape. Repeat for as many coasters as you can fit. -
Smooth the edges:
Gently lift the circles and smooth the cut edges with your fingertip to remove any harsh lines or loose bits of clay. -
Bake:
Place the rounds on a ceramic tile or parchment-lined baking sheet. Bake according to your clay manufacturer’s instructions—usually around 275°F (130°C) for 30 minutes. -
Weight them down:
Immediately after removing them from the oven, place a heavy book on top of the coasters (with paper in between) while they cool. This ensures they dry perfectly flat.
Step 4: Finishing Touches
-
Sand the surface:
Once fully cooled, dampen your sandpaper and wet-sand the surface. Start with 400 grit to reveal the crisp chip designs, then move to 600 and 1000 for a buttery smooth finish. -
Clean up:
Wash off any sanding residue with water and dry thoroughly with a lint-free cloth. -
Seal (Optional):
For extra durability against moisture, apply a thin layer of matte varnish or UV resin. However, the raw sanded finish often looks most like real stone.
Enjoy styling your new chic coasters with your favorite afternoon beverage


The Complete Guide to Pottery Troubleshooting
Uncover the most common ceramic mistakes—from cracking clay to failed glazes—and learn how to fix them fast.
Bright Fridge Magnets With Simple Icons
These charming fridge magnets bring a touch of playful elegance to any magnetic surface with their soft pastel tones and raised 3D icons. The collection features a mix of dusty pink, mint, and white bases adorned with simple yet striking motifs like rainbows, daises, and gold stars.
Step-by-Step Tutorial
Materials
- Polymer clay in pastel shades (dusty pink, peach, mint, white, muted yellow)
- Gold polymer clay or gold acrylic paint
- Round circle cutter (approx. 1.5 – 2 inches)
- Small star cutter
- Small teardrop cutter (optional for petals)
- Acrylic rolling pin
- Detail needle tool or toothpick
- Small round magnets
- Strong craft glue (E6000 or similar)
- Baking sheet and parchment paper
- Gloss glaze (optional)
Step 1: Base Preparation
-
Condition the Clay:
Begin by kneading your chosen base colors—white, dusty pink, and mint blue—until they are soft and pliable. This conditioning step is crucial to prevent cracking later. -
Roll the Slabs:
Roll out each color of clay to an even thickness, roughly 1/4 inch (about 5-6mm). You want them thick enough to be sturdy but thin enough for the magnet to work well. -
Cut the Circles:
Using your round circle cutter, punch out several discs from each color. These will serve as the canvas for your icons. Smooth the edges of each disc with your fingertip to remove any sharp cut marks.
Dirty Clay?
White clay picks up dust easily. Keep a pack of baby wipes or rubbing alcohol nearby to clean your hands and tools before handling light colors.
Step 2: Creating the Gold Star
-
Cut the Stars:
Roll out a slab of gold polymer clay slightly thinner than your base. Use a small star cutter to press out star shapes. -
Attach to Base:
Gently press a gold star onto the center of a white or cream base disc. If the clay isn’t sticking, a tiny dab of liquid clay or translucent Sculpey acts as a perfect adhesive. -
Refine the Edges:
Use the flat side of a tool or your finger to gently tap the star, ensuring it makes full contact with the base without distorting the points.
Smooth Seams
For the rainbow icon, lightly roll over the assembled arches with an acrylic roller before cutting the ends. This fuses the strands together seamlessly.
Step 3: Crafting the Daisy
-
Form the Petals:
Roll white clay into a very thin snake and cut it into equal, tiny segments. Roll each segment into a ball and then slightly flatten into a teardrop shape. -
Arrange the Flower:
On a pink or blue base, arrange 5-7 teardrop petals in a circle, with the pointed ends meeting in the center. Press them down gently. -
Add Detail:
I like to use a needle tool to press a single line down the center of each petal, giving it more dimension and a realistic look. -
Yellow Center:
Roll a tiny ball of yellow or mustard clay. Place it in the very center of the petals and press lightly to secure the flower.
Step 4: Building the Rainbow
-
Roll Snakes:
Select three coordinating colors (e.g., rust, peach, and mint) and roll them into thin even snakes. -
Form Arches:
On a flat surface, bend the snakes into arches, fitting them snugly inside one another to create the rainbow shape. Trim the ends so they are perfectly flush and straight. -
Transfer to Base:
Carefully lift your assembled rainbow stack and place it onto a pink or blue base disc. Press gently to bond the layers.
Step 5: Baking and Assembly
-
Bake:
Arrange all your decorated discs on a parchment-lined baking sheet. Bake according to your polymer clay package instructions (usually 275°F/135°C for 15-30 minutes). -
Cool Down:
Let the pieces cool completely on the baking sheet. Moving them while warm can cause warping. -
Attach Magnets:
Once cool and hard, apply a dot of strong craft glue to the back of each clay disc and press a magnet firmly into the glue. Let it cure fully before placing on the fridge.
Now your fridge has a custom gallery of miniature art that is as functional as it is beautiful
Pocket-Size Animal Figurines With Big Personality
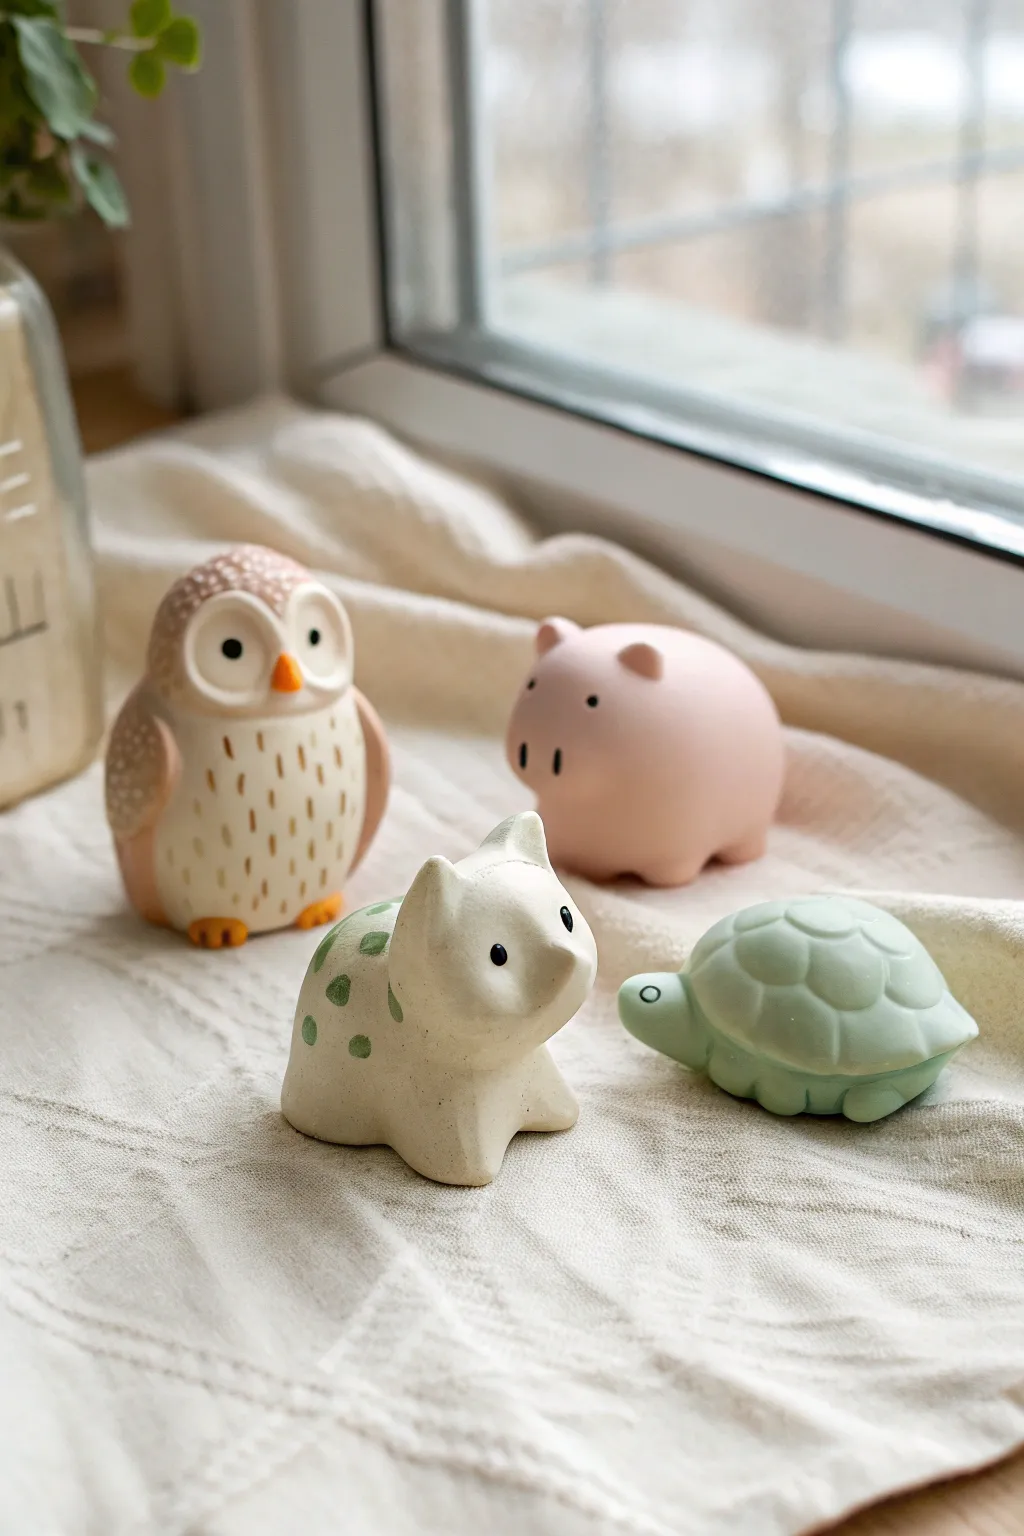
These charming pocket-sized figurines capture the essence of woodland creatures with simple, rounded shapes and soft matte finishes. Perfect for beginners, this set features a wise owl, a cheerful pig, a spotted pup, and a gentle turtle.
Detailed Instructions
Materials
- Polymer clay (white, beige, soft pink, mint green)
- Acrylic paints (brown, orange, black, moss green)
- Fine detail paintbrush (size 000 or 00)
- Ball stylus tool
- Clay sculpting tools (needle tool, smoothing tool)
- Baking sheet and parchment paper
- Matte varnish (optional)
Step 1: Sculpting the Shapes
-
Base forms:
Begin by conditioning your clay until it is soft and pliable. For each animal, start with a simple sphere approximately the size of a golf ball or slightly smaller. -
Forming the Pig:
Take a ball of soft pink clay and gently press it onto your work surface to create a flat bottom so it doesn’t roll away. Keep the top rounded and smooth. -
Pig details:
Create two small triangles for ears and blend them seamlessly onto the top of the head. Add a tiny oval of pink clay for the snout, pressing it gently into the center of the face. Use a needle tool to poke two small nostrils. -
Shaping the Turtle:
Form a flattened dome using mint green clay for the shell. Roll a separate, smaller cylinder for the head and four tiny flattened balls for legs. Attach the head and legs under the rim of the shell, blending the clay where it connects underneath. -
Turtle shell texture:
Use a rounded modeling tool to gently press hexagonal indentations into the green shell to mimic a scute pattern. Keep the pressure light so the shell retains its dome shape. -
Creating the Owl:
Use beige or white clay to form an upright egg shape. Flatten the bottom for stability. Press a large ball stylus into the face area to create two large, shallow indents for the eyes. -
Owl wings:
Roll two teardrop shapes of slightly darker beige or light brown clay. Press these against the sides of the body for wings. Add a tiny triangle beak in the center of the face indents. -
Sculpting the Pup:
Form a chunky, four-legged shape using white clay. Instead of detailing individual legs, pull four corners down from a central block to create a stylized, modern look. Pinch two triangles at the top for ears and smooth the snout forward.
Smooth Operator
Before baking, brush a tiny amount of baby oil or clay softener over the surface with your finger. This removes fingerprints and creates that flawless ceramic look.
Step 2: Baking and Painting
-
Baking:
Place all your figurines on a parchment-lined baking sheet. Bake according to your clay manufacturer’s instructions (usually 275°F/135°C for 15-30 minutes depending on thickness). Let them cool completely before handling. -
Painting the Owl:
Using a fine brush and brown paint, add small vertical dash marks on the owl’s chest to suggest feathers. Paint the beak orange and add large black circles for eyes within the facial indents. -
Painting the Pig:
Keep the pig simple. Use a toothpick or fine brush to dot two tiny black eyes wide apart on the face. I find placing them further apart makes the expression cuter. -
Painting the Pup:
Mix a muted moss green paint. Add organic, soft-edged spots to the back of the white pup. Dot two black eyes on the snout. -
Painting the Turtle:
Add a tiny black dot for an eye on the side of the turtle’s head. If you want more definition, you can lightly dry-brush a lighter green over the shell texture. -
Protection:
The image shows a very matte finish, which looks like unglazed ceramic. If you want protection, apply a matte varnish, but avoid glossy sealers to maintain that natural, earthy aesthetic.
Make it a Set
Turn these into functional desk buddies by slicing a shallow slot in the top of the animal’s back before baking to hold a photo or business card.
Once cooled, arrange your little menagerie on a windowsill or shelf to bring a quiet charm to your space

TRACK YOUR CERAMIC JOURNEY
Capture glaze tests, firing details, and creative progress—all in one simple printable. Make your projects easier to repeat and improve.
Adorable Plant Pot Picks and Garden Markers
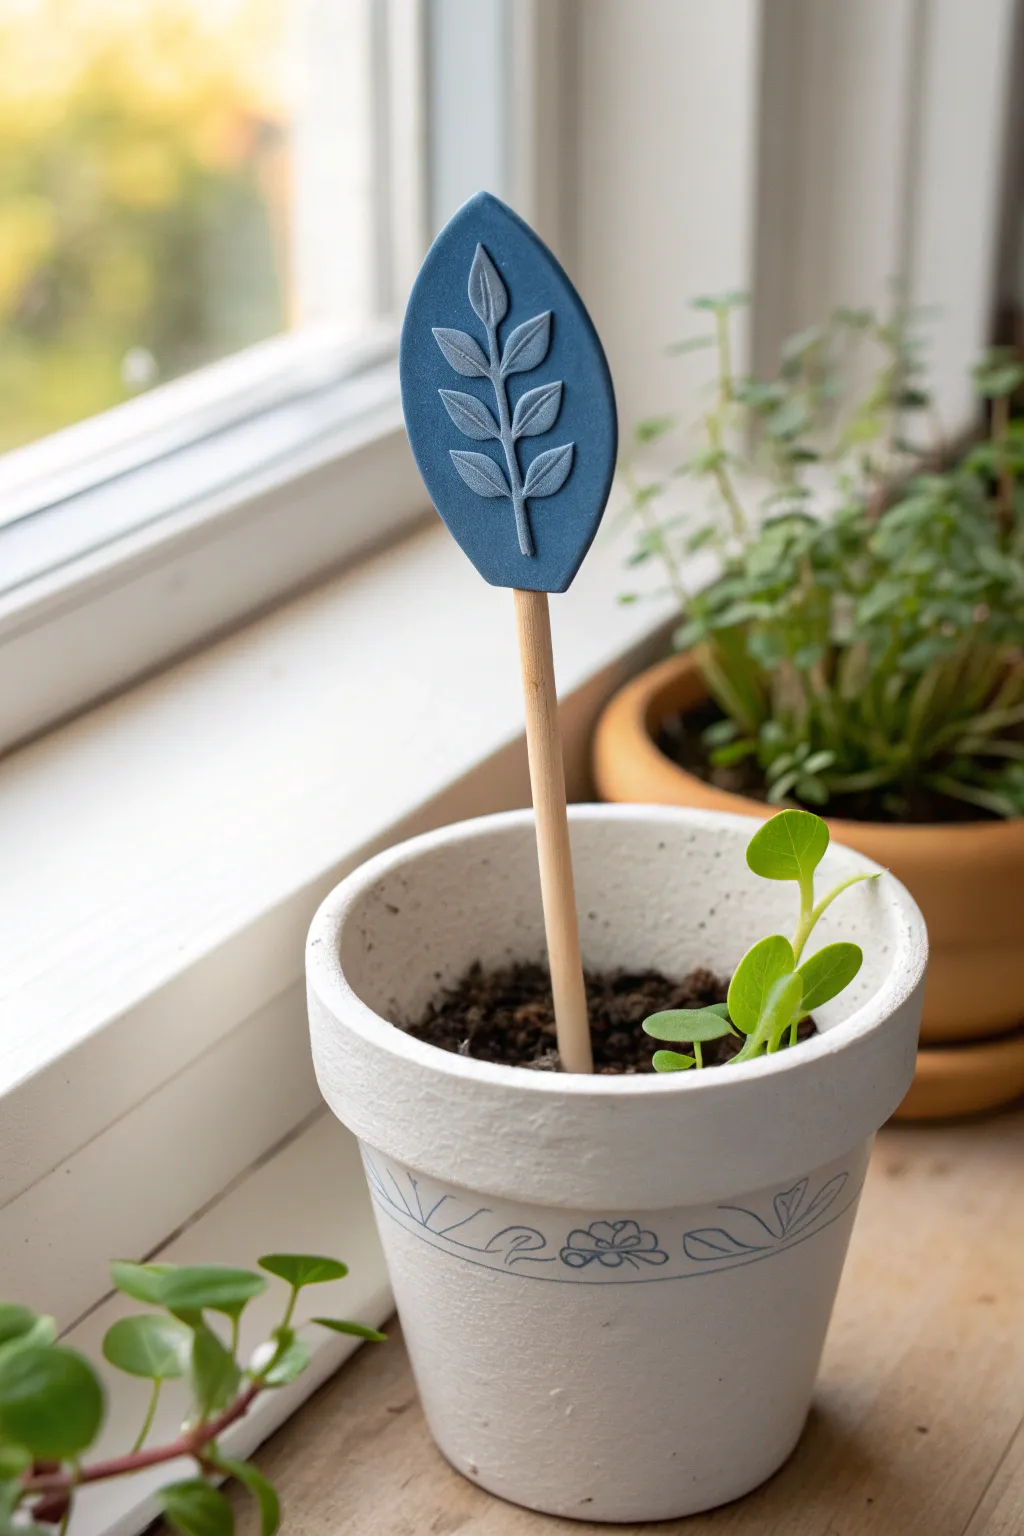
Add a touch of handcrafted charm to your indoor garden with this elegant matte blue plant marker featuring a raised botanical relief. The simple, organic design pairs beautifully with terra cotta or white ceramic pots, creating a serene and customized look for your herbs or succulents.
Step-by-Step
Materials
- Polymer clay (matte denim blue or slate blue)
- Wooden dowel or bamboo skewer (approx. 4mm diameter)
- Liquid polymer clay (translucent)
- Detail needle tool or craft knife
- Small rolling pin or acrylic roller
- Oval clay cutter (medium size) or cardstock template
- Botanical texture stamp or a small, fresh sprig for pressing
- Super glue or strong craft adhesive
- Sandpaper (fine grit)
- Oven and baking tray
Step 1: Shaping the Base
-
Condition the clay:
Start by thoroughly conditioning your blue polymer clay until it is soft and pliable. Warm it in your hands to prevent cracking later. -
Roll out the slab:
Use your acrylic roller to flatten the clay into a smooth, even slab. Aim for a thickness of about 4-5mm so it’s sturdy enough to stand upright. -
Cut the oval shape:
Press your oval cutter firmly into the slab to create the main leaf shape. If you don’t have a cutter, trace around a cardstock template with a craft knife. -
Smooth the edges:
Gently run your finger dipped in a tiny bit of water or baby oil along the cut edges to round them off and remove any sharp angles. -
Indent the base:
Use the blunt end of your wooden dowel to create a shallow indentation at the very bottom center of the oval. This will serve as a pilot hole for inserting the stick later.
Smooth Operator
Before baking, wipe the clay surface gently with a baby wipe or a finger dipped in rubbing alcohol. This removes dust and lint for a pristine finish.
Step 2: Creating the Botanical Relief
-
Roll a thin snake:
Roll a very thin snake of the same blue clay to serve as the central stem. It should be delicate, tapering slightly at the top. -
Apply the stem:
Lay the clay snake vertically down the center of your oval. Press it down very gently so it adheres but retains its roundness. -
Form the leaves:
Create six to eight tiny teardrop shapes from small balls of clay. Flatten them slightly between your fingers to resemble leaves. -
Attach the leaves:
Arranging them in pairs, press the leaves onto the oval base, connecting them to the central stem. Start from the bottom and work your way up. -
Add vein details:
Using your needle tool, carefully score a single line down the center of each tiny applied leaf to create a vein texture. This adds dimension without needing complex molds. -
Use a stamp (Alternative):
If you prefer a simpler method, simply press a botanical rubber stamp into the initial slab before cutting the oval, though the appliquéd method shown here gives a nicer 3D effect. -
Clean up:
Check for any fingerprints. Lightly brush with a soft paintbrush dipped in cornstarch if needed to smooth out imperfections before baking.
Step 3: Assembly and Baking
-
Insert the dowel:
Put a drop of liquid polymer clay into the indentation you made earlier. Push the wooden dowel into the clay about 1cm deep. Ensure it is straight. -
Secure the join:
Gently pinch the clay around the dowel insertion point to close the gap and secure the wood. -
Baking:
Place the marker on a baking tray lined with parchment paper. Bake according to your clay package instructions (usually 275°F/130°C for 15-30 minutes). -
Cooling:
Allow the piece to cool completely in the oven with the door slightly ajar. This gradual cooling helps prevent cracks. -
Reinforce (Optional):
If the stick feels loose after baking, carefully pull it out, add a dab of super glue, and reinsert it for a permanent bond.
Garden Variety
Make a set with different tops: try hexagons, circles, or squares, and paint the raised leaf design with white acrylic for a high-contrast look.
Pop this charming marker into a pot of basil or mint to instantly elevate your kitchen windowsill display
Fun Pencil Toppers for a Happy Desk
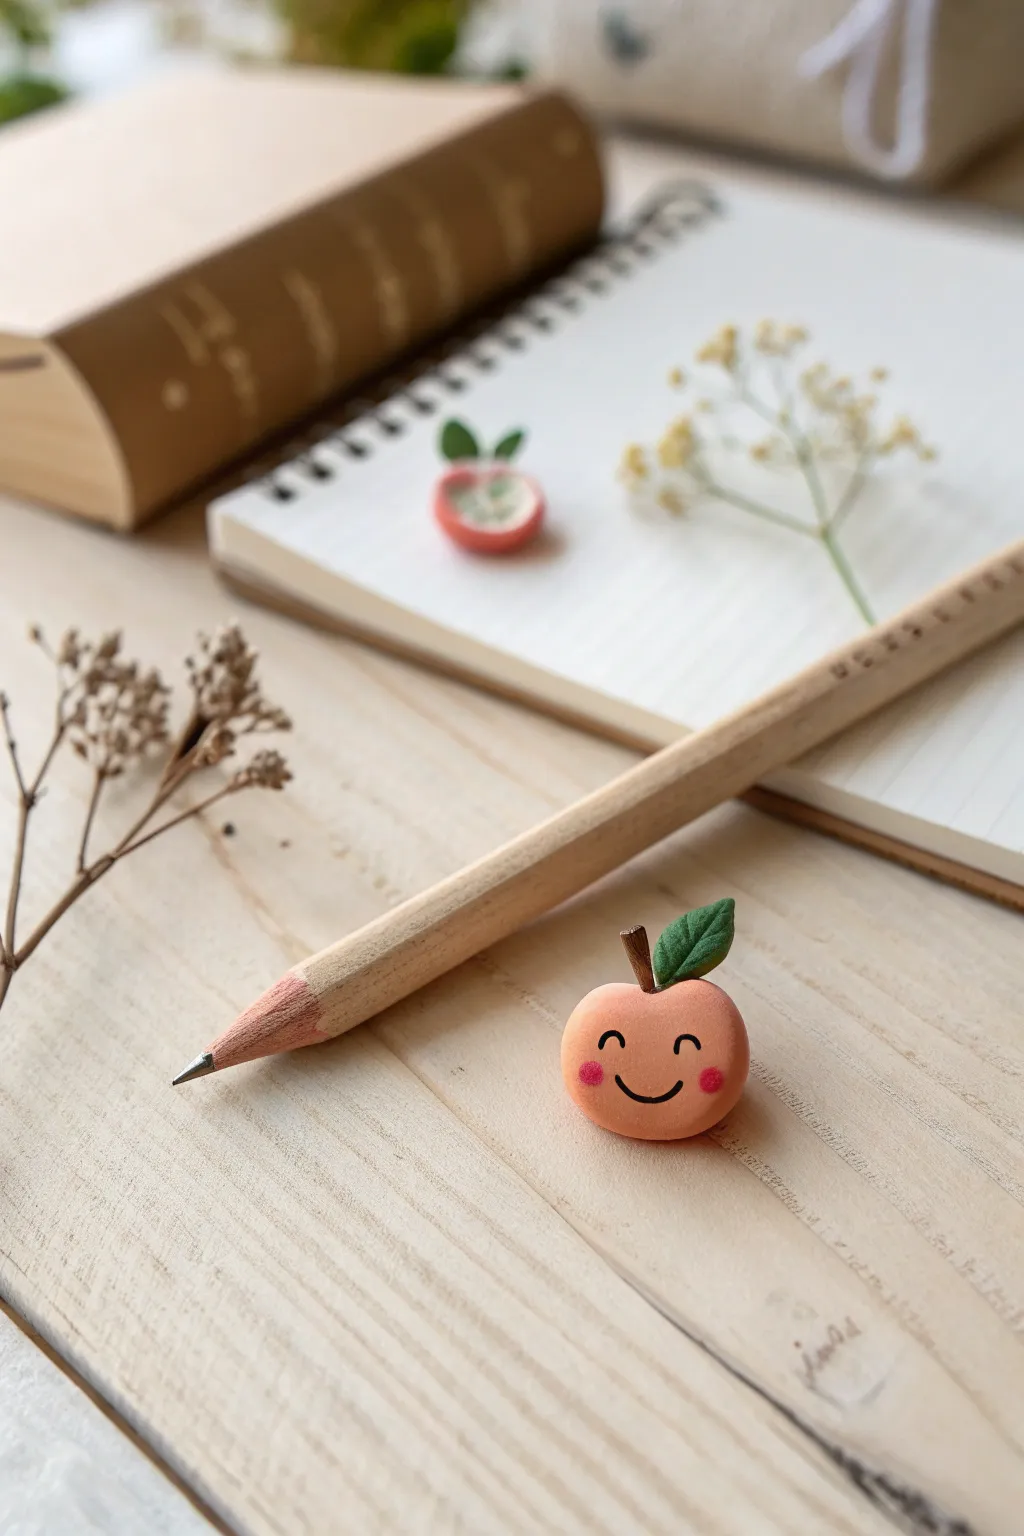
Brighten up your workspace with this adorable peach pencil topper that brings a smile to every study session. With its soft pastel hues, tiny green leaf, and cheerful expression, this little fruit friend is the perfect mix of functional and cute.
How-To Guide
Materials
- Polymer clay (peach/pale orange, dark brown, leaf green)
- Pencil for fitting
- Ball stylus tool or toothpick
- Fine-point black permanent marker or acrylic paint
- Small paintbrush
- Pink chalk pastel or blush
- Blade or craft knife
- Oven (for baking)
- Gloss glaze (optional)
Step 1: Shaping the Base
-
Condition the clay:
Start by taking a chunk of peach-colored polymer clay about the size of a large marble. Warm it up in your hands by rolling and kneading it until it is soft and pliable to prevent cracking later. -
Form the fruit:
Roll the conditioned clay into a smooth ball. Once it’s round, gently press it down slightly onto your work surface to create a flat bottom so it doesn’t roll away while you work. -
Create the signature cleft:
Using the side of a toothpick or a modeling tool, gently press an indentation down the center of the top of the fruit, smoothing it out to create that classic peach heart shape. -
Drill the pencil hole:
Flip the peach over. Take the pencil you intend to use and carefully push the eraser end into the bottom of the peach roughly halfway deep. Wiggle it slightly to ensure the fit isn’t too tight, then remove the pencil gently to preserve the shape.
Step 2: Adding Details
-
Make the stem:
Take a tiny amount of dark brown clay and roll it into a very thin, short log. Use your blade to cut a small segment, approximately 3-4mm long. -
Attach the stem:
Use your toothpick to poke a tiny guide hole in the top cleft of the peach. Insert the brown stem, pressing it gently to bond the clays together. -
Sculpt the leaf:
Pinch off a small piece of green clay and shape it into a teardrop. Flatten it between your fingers to create a leaf shape. -
Texture the leaf:
I like to use a craft knife or needle tool to gently score a central vein line down the leaf for extra realism. You can add tiny diagonal veins if you’re feeling precise. -
Attach the leaf:
Place the leaf next to the stem, pressing the wider end of the teardrop into the peach body. You can curve the tip slightly upwards for a more dynamic look.
Loose Fit?
If the baked topper is too loose on your pencil, add a tiny drop of hot glue inside the hole or wrap a small piece of washi tape around the pencil end for a snug fit.
Step 3: Bringing it to Life
-
Bake the project:
Place your peach on a baking sheet lined with parchment paper. Bake according to your specific clay manufacturer’s instructions (usually 275°F/135°C for 15-30 minutes). -
Cool down:
Let the clay cool completely before handling. It creates a stronger finish and ensures firmly set details. -
Draw the face:
Using a very fine-point permanent marker or a tiny brush with black acrylic paint, carefully draw two small dots for eyes and a wide, U-shaped smile. -
Add rosy cheeks:
Scrape a little bit of pink chalk pastel into dust. Dip a dry brush or q-tip into the dust and gently dab small circles onto the clay cheeks for a soft, blushing effect. -
Seal (Optional):
If you want extra durability, brush a thin layer of matte or gloss varnish over the piece, being careful not to smear the marker ink.
Make a Fruit Salad
Use this same base technique to create an entire fruit bowl set! Try round red clay for apples, elongated yellow shapes for pears, or a bright yellow sphere for a lemon.
Now you have a sweet little companion to keep you company while you write or draw
Chunky Phone Stand Sculpted From One Block
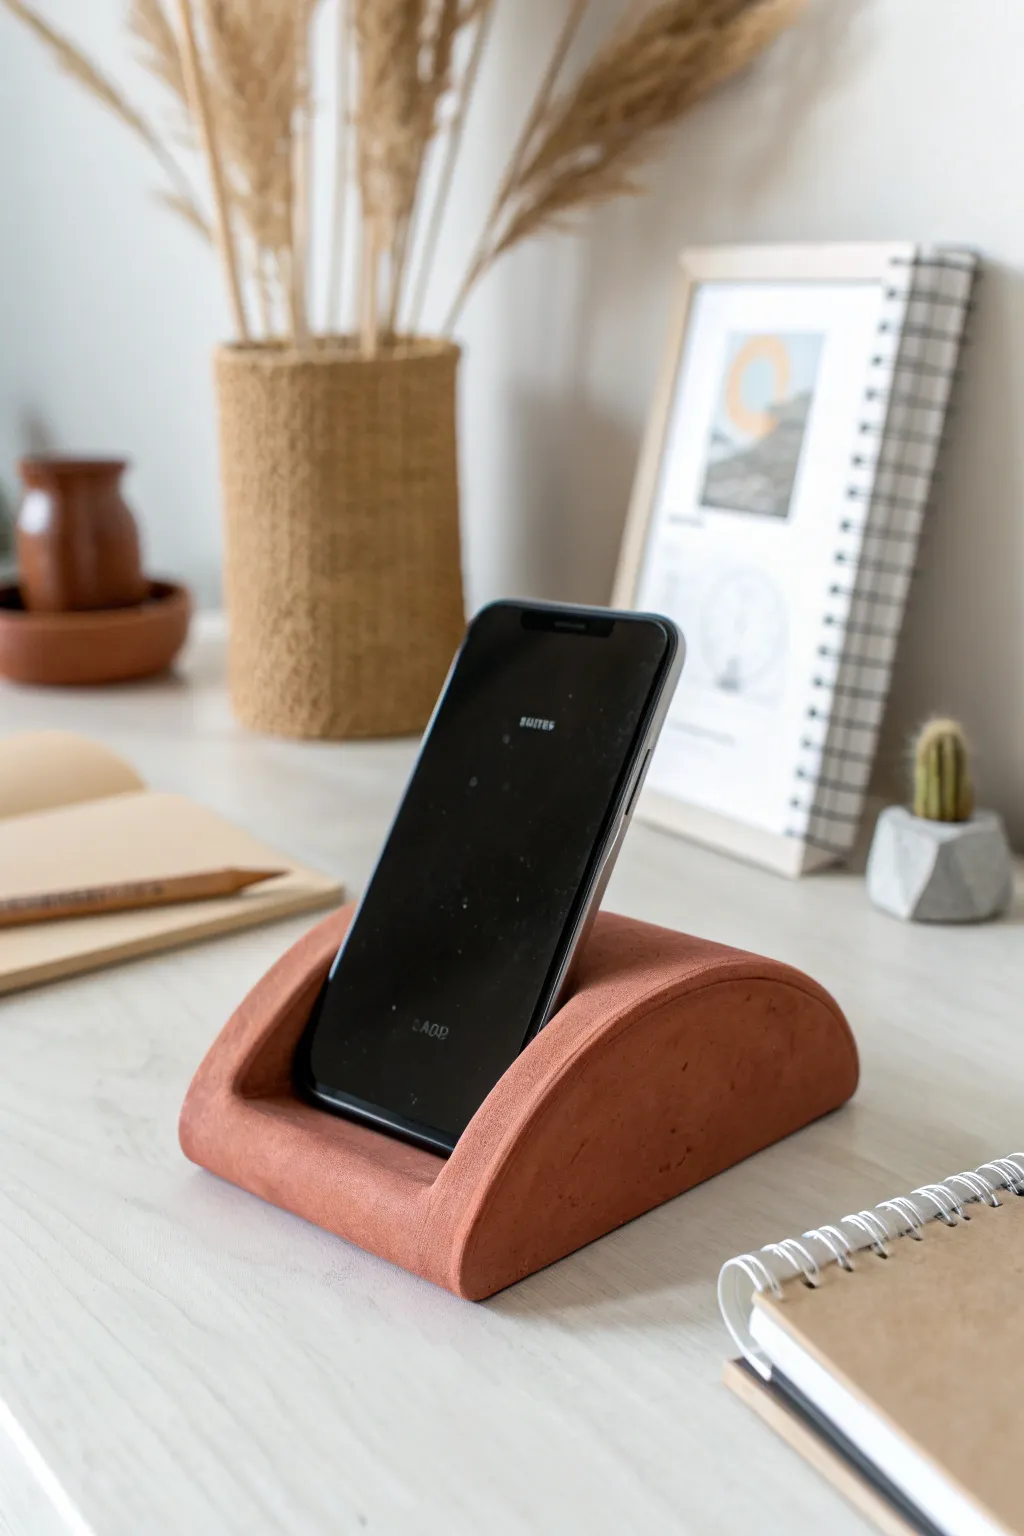
Sculpt a minimalist, chunky phone stand that combines functional design with modern aesthetics. This terracotta-toned piece features a smooth, satisfying arch shape that holds your device securely while doubling as a stylish desk accessory.
Step-by-Step
Materials
- Terracotta or rust-colored polymer clay (approx. 4-6 blocks)
- Acrylic rolling pin or clay machine
- Flexible tissue blade
- Measuring ruler
- Aluminum foil (for bulking)
- Smoothing tool or old credit card
- Fine-grit sandpaper (400 and 800 grit)
- Cornstarch or baby powder (as release agent)
- Oven and baking tray
Step 1: Preparing the Base
-
Condition the clay:
Begin by conditioning all your polymer clay. Since this is a chunky project, mix several blocks together until the clay is soft, warm, and pliable. I find cutting the blocks into smaller chunks first makes the initial kneading much easier on the hands. -
Create the core structure:
To save clay and reduce weight, crumple aluminum foil into a tight log shape. This will act as the core armature. Shape it roughly into a half-cylinder or arch shape, slightly smaller than you want your final stand to be. -
Sheet the clay:
Roll your conditioned clay into a thick sheet, about 1/4 inch (6mm) thick. You want it substantial enough to cover the foil without tearing or showing bumps. -
Cover the armature:
Wrap the clay sheet completely around your foil core. Press it firmly against the foil to remove air pockets, ensuring the bottom is flat and the top forms a smooth, high curve.
Weight Distribution Tip
Ensure the foil core is centered. If the stand feels too light, embed a few heavy metal washers into the bottom layer of clay before baking to prevent tipping.
Step 2: Sculpting the Groove
-
Shape the block:
Place the clay-covered log on your work surface. Use your hands and a flat tool to refine the shape into a clean, semi-circle prism. The sides should be vertical and the bottom perfectly flat. -
Mark the phone slot:
Using your ruler, mark a straight line across the top curve where the phone will sit. This should be positioned slightly forward of the center to balance the weight of the phone. -
Carve the channel:
Use a rigid blade or a loop tool to carefully carve out a transverse channel. The cut needs to be angled slightly backward so the phone leans comfortably rather than standing perfectly upright. -
Test the fit:
Gently press your actual phone (or a dummy object of similar thickness) into the groove to test the width. Widen the slot gradually until the phone slides in easily but feels supported. -
Refine the slot edges:
Smooth the interior edges of the cut groove with a clay shaper or your finger. Sharp edges can scratch devices, so aim for a soft, rounded lip where the clay meets the screen.
Step 3: Finishing Touches
-
Check symmetry:
Look at the stand from the front and sides. Ensure the arch is symmetrical and the base sits flush on the table without wobbling. -
Smooth the surface:
Lightly dust your finger with cornstarch and buff the entire surface in circular motions. This removes fingerprints and creates that seamless, stone-like appearance seen in the photo. -
Baking:
Place the stand on a ceramic tile or cardstock on your baking tray. Bake according to your clay package instructions. Because this piece is thick, I recommend baking for an extra 15-20 minutes to ensure the center cures fully. -
Cooling down:
Let the piece cool completely in the oven with the door cracked open. This gradual cooling helps prevent thermal cracking in thick sculptures. -
Sanding for texture:
Once cool, wet-sand the piece under running water. Start with 400 grit to remove any tiny bumps, then finish with 800 grit for a matte, professional finish akin to raw ceramic. -
Final cleaning:
Wash off any sanding residue and dry the stand thoroughly with a soft cloth.
Faux Stone Effect
Mix coarse black pepper or dried used coffee grounds into your clay before sculpting. After sanding, this speckling mimics real granite or stoneware perfectly.
Now you have a sturdy, stylish home for your device that looks like high-end decor
Moon and Star Hanging Garland Decor
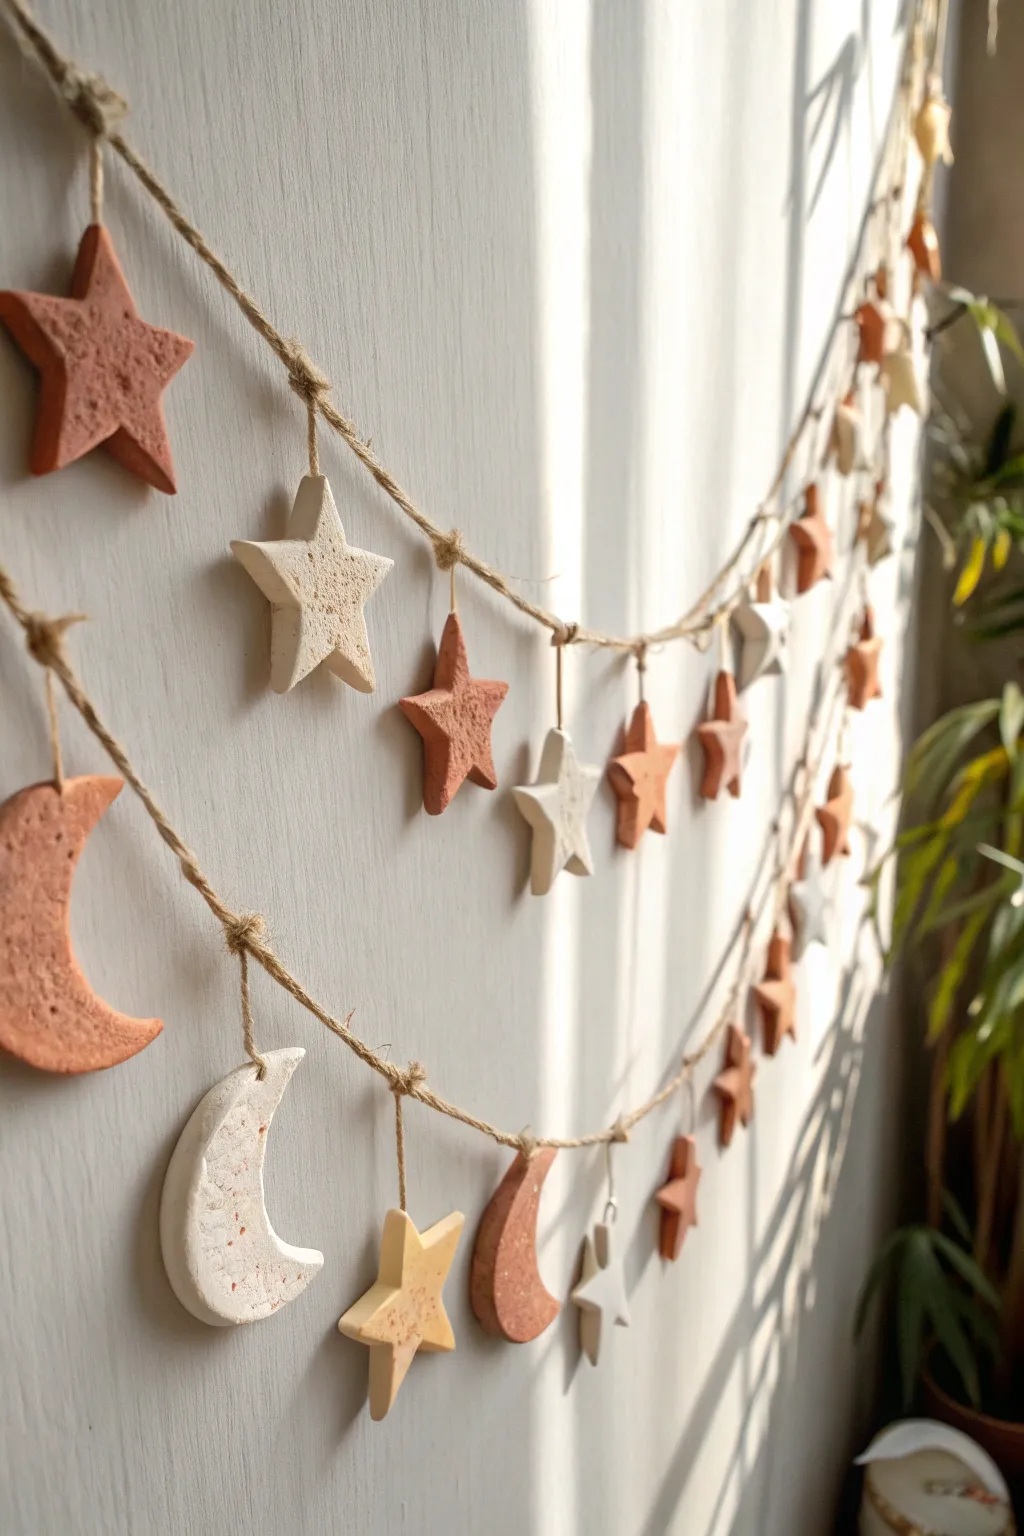
Bring the calming beauty of the night sky indoors with this rustic hanging garland featuring hand-shaped moons and stars. The mix of terracotta and cream tones creates a warm, earthy aesthetic perfect for a nursery or cozy reading nook.
Step-by-Step Tutorial
Materials
- Polymer clay (terracotta or reddish-brown)
- Polymer clay (white or cream)
- Speckled clay (optional, or black pepper/sand for texture)
- Rolling pin
- Star cookie cutters (various sizes)
- Moon cookie cutter (or round cutter)
- Jute twine
- Toothpick or skewer
- Sandpaper (fine grit)
- Baking sheet and parchment paper
- Oven (for baking clay)
Step 1: Preparing the Clay
-
Condition the Clay:
Begin by kneading your polymer clay blocks until they are soft and pliable. You’ll want two distinct color groups: a warm terracotta and a soft cream. -
Create Texture:
To achieve that stony, natural look seen in the photo, mix a small pinch of sand, black pepper, or dried coffee grounds into your white clay. Knead it thoroughly until the specks are evenly distributed. -
Roll Out Slabs:
Roll out your clay on a flat working surface to a thickness of about 1/4 inch (6mm). Keeping the clay slightly thick gives the stars and moons a nice visual weight.
Sticky Situation
If your clay sticks to the table or cutter, dust your surface and tools with a little cornstarch or baby powder before rolling for a clean release.
Step 2: Shaping the Elements
-
Cut Out Stars:
Use star-shaped cookie cutters to punch out your celestial shapes. If you have multiple sizes, cut a variety to create visual interest along the garland. -
Cut Out Moons:
Use a crescent moon cutter for the lunar shapes. If you don’t have one, use a round circle cutter, then move the cutter over slightly and cut again to create a crescent slice. -
Smooth the Edges:
Gently run your finger around the cut edges of each shape to soften them. This removes any sharp drag marks from the cutter and gives a more finished, ceramic look. -
Create Hanging Holes:
Using a toothpick or a skewer, pierce a hole near the top point of each star and the top horn of each moon. Ensure the hole is wide enough for your jute twine to pass through. -
Add Surface Texture (Optional):
For an extra rustic feel, lightly tap the surface of the clay with a crumpled ball of aluminum foil or a toothbrush to add subtle pitting.
Step 3: Baking and Finishing
-
Bake the Pieces:
Arrange your shapes on a parchment-lined baking sheet. Bake according to your polymer clay package instructions (usually around 275°F/135°C for 15-30 minutes depending on thickness). -
Cool Down:
Allow the pieces to cool completely on the baking sheet. They will harden fully as they return to room temperature. -
Light Sanding:
Once cool, use fine-grit sandpaper to refine any rough edges or bumps, particularly around the hanging holes.
Make It Sparkle
Before baking, lightly brush gold mica powder on the edges or press in tiny seed beads to catch the light and add a magical shimmer to your garland.
Step 4: Assembly
-
Prepare the Main Line:
Cut a long length of jute twine to be your main horizontal garland strand. Tie loops at both ends for easy hanging. -
Cut Vertical Strings:
Cut shorter pieces of twine, ranging from 3 to 6 inches long. Varying these lengths adds a lovely cascading effect. -
Attach Shapes:
Thread a short piece of twine through the hole of a clay shape. Tie a small knot directly above the clay to secure it. -
Tie to Garland:
Tie the other end of the short strings onto your main horizontal twine. I like to alternate colors (terracotta, then cream) and shapes (star, then moon) for a balanced pattern. -
Secure Knots:
For extra security, place a tiny dot of clear glue on the knots attaching the vertical drops to the main line to prevent them from sliding around.
Hang your new celestial creation near a window to let the natural light play across the earthy textures