Hand building is the sweetest way to start pottery because you can make real, useful pieces without a wheel or fancy equipment. These beginner-friendly ideas focus on simple shapes, forgiving techniques, and that satisfying feeling of making something with your own two hands.
Classic Pinch Pot Bowl With Even Walls
This project focuses on refining the humble pinch pot into a sleek, functional vessel with consistent wall thickness. The result is a beautifully textured, organic bowl that highlights the natural warmth of raw stoneware clay.
Step-by-Step Guide
Materials
- Light-colored stoneware clay (smooth or fine grog)
- Wooden paddle or flat wooden spoon
- Metal kidney rib
- Rubber kidney rib (soft)
- Needle tool
- Sponge
- Board or banding wheel
- Water
Step 1: Forming the Base
-
Prepare the clay ball:
Start with a ball of clay roughly the size of a large orange. Pat it back and forth between your hands to ensure it is perfectly round and free of air pockets. -
Create the opening:
Hold the ball in your non-dominant hand. Press your dominant thumb gently into the center of the ball, pushing down until you are about a half-inch from the bottom. Be careful not to push all the way through. -
Begin pinching:
With your thumb still inside, begin pinching the clay between your thumb and fingers. Rotate the ball slightly with each pinch to ensure even expansion. -
Work from bottom to top:
Focus your pinching on the thickest part near the base first, gradually moving upward toward the rim. Aim for a rhythmic motion to keep the shape symmetrical.
Cracking Rims?
If the rim starts cracking while you pinch, the clay is too dry or you are stretching it too fast. Compress the rim downward with a damp sponge to heal the cracks immediately.
Step 2: Refining the Shape
-
Check wall consistency:
Pause and feel the walls with your fingers. Locate areas that are thicker than others and pinch those specific spots to even them out. -
Paddle the form:
Place the pot upside down on your board. Gently tap the exterior with a wooden paddle or flat spoon. This compresses the clay particles and helps shape the curve while removing lumpy finger marks. -
Level the rim:
Turn the bowl right side up. If the rim is very uneven, use a needle tool to trim off the excess, creating a level top edge. -
Smooth the lip:
Run a slightly damp sponge or a piece of chamois over the rim to round it off and prevent it from becoming sharp after firing.
Add Subtle Color
Mix a small amount of mason stain (like burnt umber) into white clay before you start pinching. This creates a custom colored clay body that needs only a clear glaze.
Step 3: Surfacing and Finishing
-
Scrape the interior:
Use a metal kidney rib to scrape the inside of the bowl. This removes excess clay slurry and refines the interior curve, getting rid of deep thumb tool marks. -
Smooth the exterior:
I like to use a soft rubber kidney rib on the outside now. Glide it firmly over the surface to burnish the clay slightly and create that smooth, matte texture seen in the photo. -
Define the foot:
While the clay is leather hard, you can gently press the base onto a flat surface to create a stable bottom, or use a trimming tool to carve a small foot ring if you prefer a lifted look. -
Final texture check:
Look closely at the surface. If you want a more rustic ‘stone’ look like the image, gently pat the exterior with a heavily textured cloth or a rough sponge. -
Slow drying:
Cover the bowl loosely with plastic to let it dry slowly. This prevents the rim from warping as the moisture evaporates. -
Bisque fire:
Once bone dry, fire the piece to bisque temperature (usually cone 04) to prepare it for the final steps. -
Glazing or staining:
To achieve the look in the photo, apply a matte cream glaze or simply use a clear matte glaze over a light clay body. Alternatively, leave the exterior unglazed if your clay is vitrified.
Enjoy the meditative process of shaping the earth into a vessel that is uniquely yours


Easy Slab Trinket Dish With Soft Corners
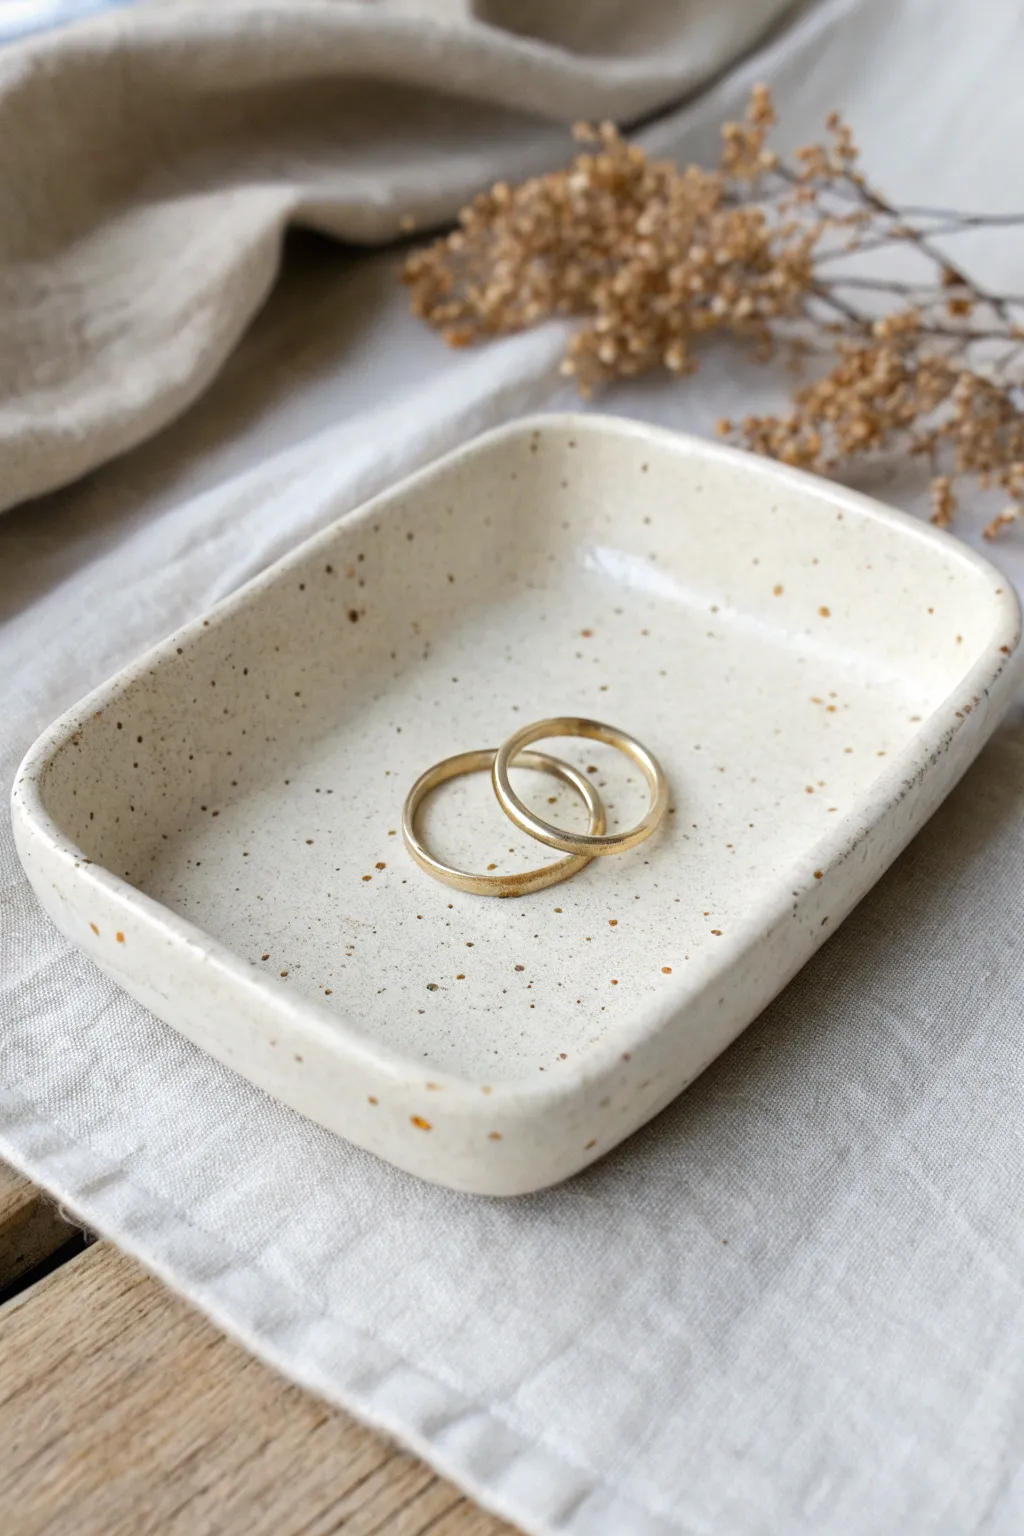
This charming trinket dish combines a soft, rectangular form with a lovely speckled cream glaze, perfect for holding rings or small treasures. Its approachable slab-built construction relies on simple paper templates to achieve those gently rounded corners.
Step-by-Step
Materials
- Speckled stoneware clay (or plain clay with speckled glaze)
- Rolling pin
- Two wooden guide slats (approx. 1/4 inch thick)
- Canvas or heavy fabric mat
- Fettling knife or needle tool
- Cardstock or paper for template
- Sponge
- Small bowl covering (for drape mold, optional)
- Cream glossy glaze
- Rib tool (flexible metal or rubber)
- Scoring tool or serrated rib
- Slip (clay mixed with water)
Step 1: Preparing the Slab
-
Wedge the clay:
Begin by wedging your clay thoroughly to remove air bubbles and ensure the moisture is evenly distributed. -
Set up your workspace:
Place your canvas mat on a sturdy table. Position the two wooden guide slats parallel to each other, slightly wider than the final dish size you want. -
Roll out the slab:
Place a ball of clay between the slats. Use your rolling pin to flatten the clay, rolling over the slats to ensure a perfectly even thickness. -
Compress the slab:
Take a rubber or metal rib and run it firmly over the surface of the clay slab in multiple directions. This aligns the clay particles and prevents warping later.
Smooth Moves
Use a chamois leather strip to compress the rim while it’s still wet. This creates that professional, ultra-soft lip seen in the photo.
Step 2: Cutting and Forming
-
Create a template:
Cut a rectangle from cardstock with rounded corners. The size should include the base plus the height of the walls. For this dish, aim for roughly 4×6 inches. -
Cut the shape:
Place your template gently onto the smoothed slab. Trace around it with a needle tool or fettling knife held vertically to get a clean edge. -
Smooth the edges:
Run a damp sponge or your finger along the cut edge to soften the sharp corner left by the knife. -
Lift the sides:
Gently lift the edges of the slab upward to form the walls. You can pinch the corners slightly to encourage the curve, or simply press the center down into a foam pad. -
Refine the shape:
I like to use a small damp sponge to smooth the interior curve where the floor meets the wall, ensuring a seamless, soft transition rather than a sharp angle. -
Let it firm up:
Allow the dish to dry to leather-hard. If the walls are slumping, prop them up with small crumpled pieces of paper towel or foam.
Step 3: Finishing and Glazing
-
Bisque fire:
Once bone dry, facilitate a bisque firing in the kiln to prepare the piece for glazing. -
Prepare the glaze:
Stir your cream-colored glaze thoroughly. If your clay body isn’t naturally speckled, choose a glaze that contains iron speckles. -
Apply the glaze:
Dip the dish into the glaze or brush on 2-3 even coats, letting each coat dry before applying the next. -
Check the rim:
Inspect the rim for any sharp glaze drips or thick spots and smooth them with a finger while the glaze is still powdery. -
Wipe the foot:
Use a damp sponge to wipe any glaze off the very bottom of the dish so it doesn’t fuse to the kiln shelf. -
Glaze fire:
Fire the piece again to the maturation temperature of your specific clay and glaze combination.
Gold Rush
After the final firing, apply a gold luster to just the rim for a luxurious touch. This requires a third, lower-temperature firing.
Enjoy finding the perfect spot for your new handmade dish


Simple Spoon Rest Using Slab Building
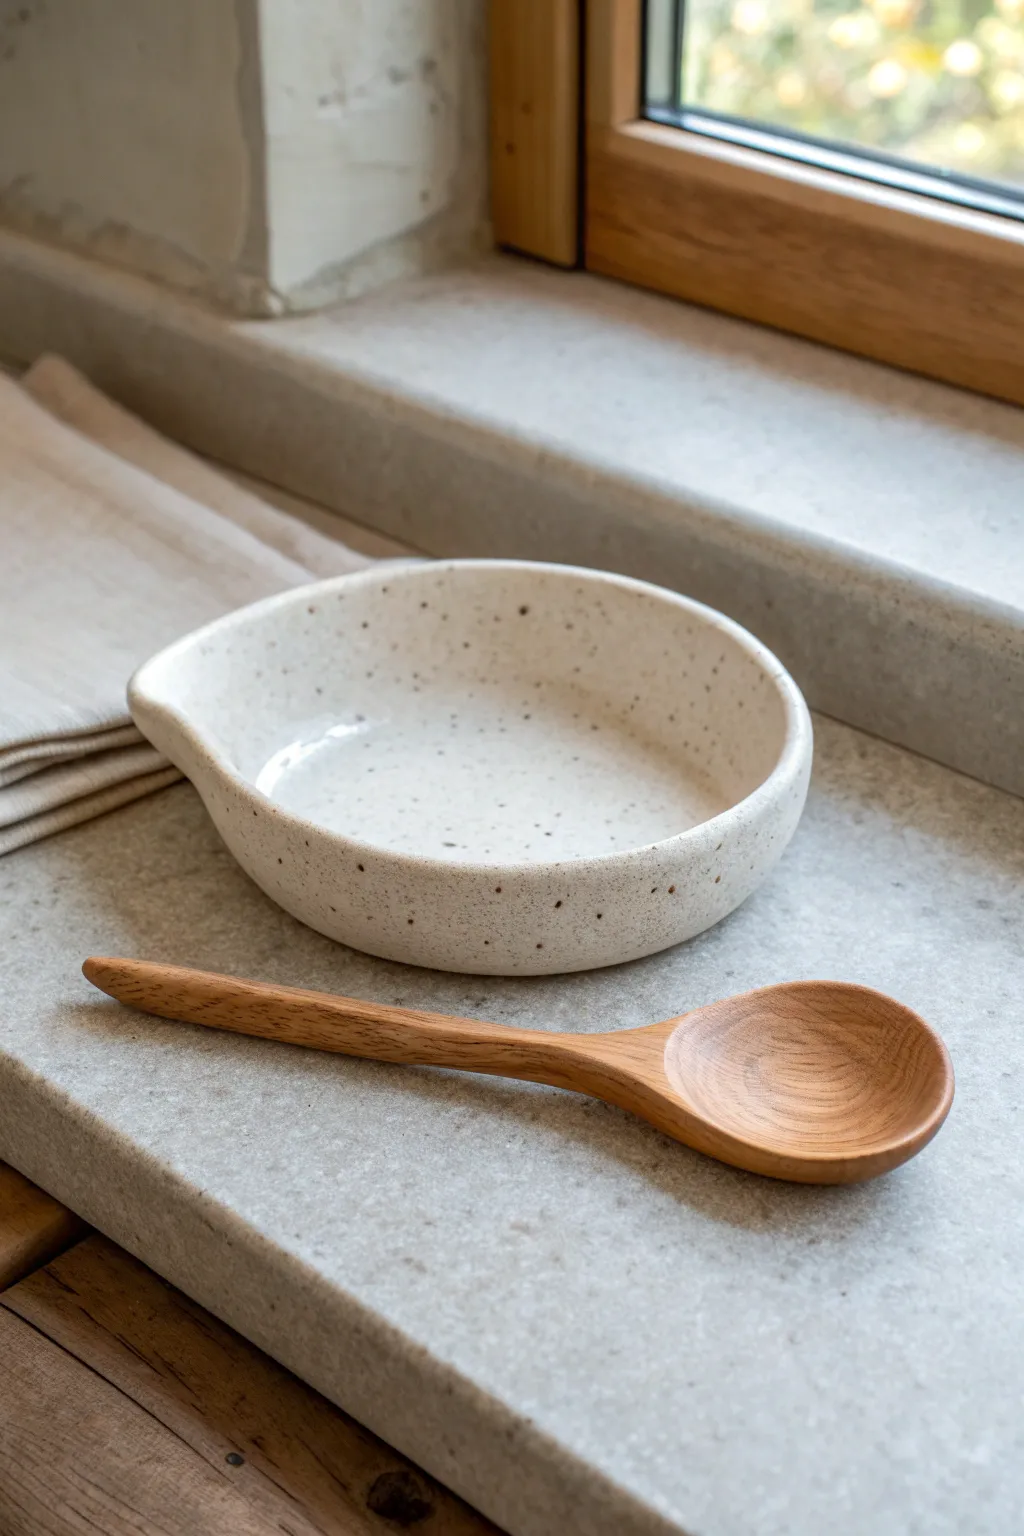
This charming, low-profile spoon rest combines functionality with a minimalist aesthetic, featuring a gentle spout that serves perfectly as a handle rest. Its speckled clay body and matte white glaze create a modern, earthy look that complements any kitchen counter.
Step-by-Step Guide
Materials
- Speckled stoneware clay (e.g., Laguma or similar)
- Rolling pin
- Canvas mat or slab roller
- Needle tool
- Rubber kidney rib
- Sponge
- Small bowl for a mold (bisque or plastic)
- Matte white glaze
Step 1: Preparing the Slab
-
Wedge the clay:
Start by wedging a softball-sized amount of speckled clay to remove air bubbles and align the particles. -
Roll the slab:
Roll out your clay on a canvas mat until it is an even thickness, roughly 1/4 inch thick. Move the clay often to prevent sticking. -
Compress the surface:
Take a rubber kidney rib and drag it across the surface of the slab in all directions. This compresses the clay particles to prevent cracking and creates that smooth finish we want. -
Cut the rough shape:
Using a needle tool, cut a freehand circle or oval shape from the slab. It doesn’t need to be perfect; organic shapes add character.
Uneven Rim?
If your slab rim looks too ragged after cutting, wait until the leather-hard stage. Then, use a surform tool (a rasp for clay) to gently shave the edge even before sponging smooth.
Step 2: Forming the Shape
-
Prepare the mold:
Find a shallow bowl to use as a slump mold. If it’s plastic or glass, cover it with a layer of newspaper or plastic wrap to stop the clay from sticking. -
Slump the clay:
Gently lift your clay slab and place it inside the mold. Let gravity do most of the work, then lightly press the center down to conform to the curve. -
Refine the rim:
While it’s in the mold, use your fingers or a damp sponge to smooth the cut edge of the rim. You want a rounded, comfortable edge, not a sharp cut. -
Create the spout:
Choose one section of the rim to be the spoon rest notch. Gently press your thumb down on the rim while supporting the outside with your index finger to curl the clay outward, creating a ‘spout’ shape.
Step 3: Drying and Refining
-
Initial drying:
Let the piece sit in the mold until it is leather hard—stiff enough to hold its shape but still cool to the touch. This usually takes a few hours. -
Remove and smooth:
Gently pop the piece out of the mold. Flip it over and smooth the bottom with your rib tool if needed. -
Refine the spout:
I like to go back over the spout area with a barely damp sponge just to ensure the curve is smooth enough for a spoon handle to rest without rocking. -
Bone dry:
Allow the spoon rest to dry completely to the bone-dry stage. It will turn a lighter color and no longer feel cold.
Make it a Set
Create a nesting set by using three different sized bowls as molds. Make a large serving-spoon rest, a standard spoon rest, and a tiny tea-bag rest using the same technique.
Step 4: Glazing and Firing
-
Bisque fire:
Load the bone-dry piece into the kiln for a bisque firing (usually cone 04 or 06). -
Wipe down:
Once cooled, wipe the bisque piece with a clean, damp sponge to remove any kiln dust before glazing. -
Apply glaze:
Pour a matte white glaze into the interior, swirl it to coat, and pour the excess out. Alternatively, dip the entire piece if you have enough glaze. -
Wipe the foot:
Use a sponge to wipe all glaze off the very bottom of the piece so it won’t fuse to the kiln shelf. -
Glaze fire:
Fire the piece to the maturity temperature of your clay and glaze (likely cone 5 or 6 for stoneware).
Once cooled, your new spoon rest is ready to catch drips and keep your counters tidy with subtle elegance


Beginner Soap Dish With Drainage Grooves
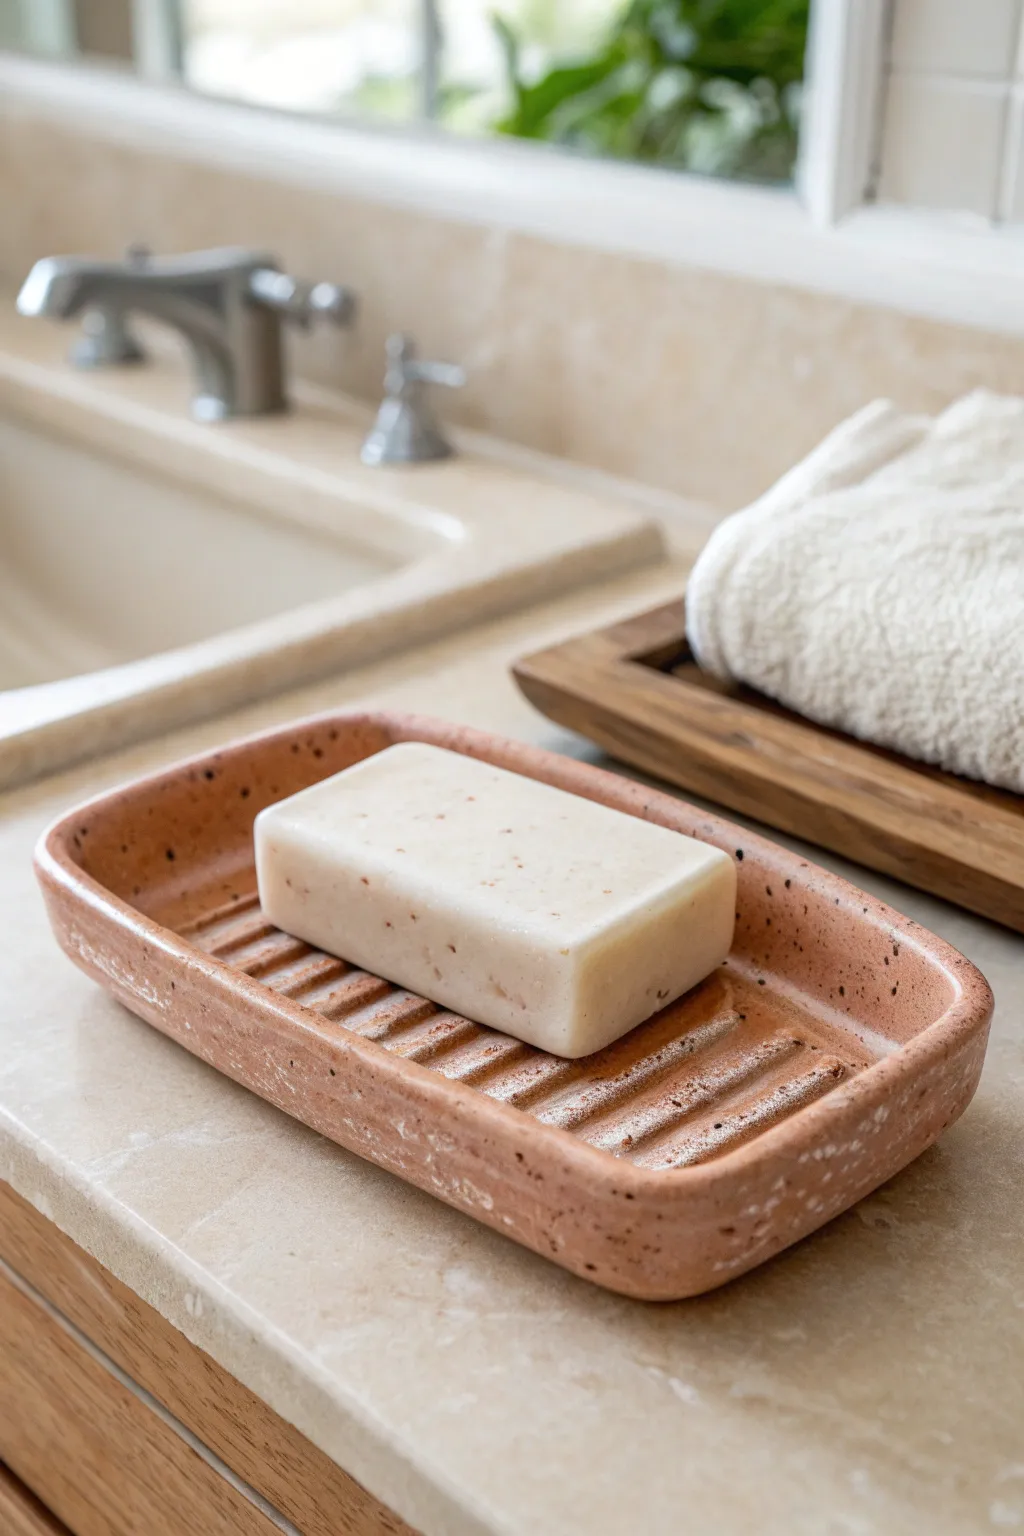
This charming soap dish combines functionality with a lovely speckled finish, featuring deep, hand-carved grooves to extend the life of your favorite soap bars. The soft, rounded rectangle shape and glossy surface make it a spa-like addition to any bathroom or kitchen sink.
Step-by-Step Tutorial
Materials
- Speckled stoneware clay (mid-fire)
- Canvas mat or cloth
- Rolling pin
- Two wooden guide slats (approx. 1/4 inch thick)
- Needle tool
- Soft rubber rib
- Carving tool or loop tool (small to medium size)
- Sponge
- Bowl of water
- Paper template (rounded rectangle, approx. 4×6 inches)
- Clear glossy glaze
Step 1: Forming the Basin
-
Prepare the Clay:
Begin by wedging your speckled stoneware clay thoroughly to remove air bubbles. This step is crucial for preventing cracks during firing, so take your time. -
Roll the Slab:
Place your clay on the canvas mat between two wooden guide slats. Using the rolling pin, roll the clay out until the pin rests on the slats, ensuring an even quarter-inch thickness across the entire slab. -
Smooth the Surface:
Run a soft rubber rib firmly over the surface of the clay slab. This compresses the clay particles, aligning them for better strength, and creates a pristine, smooth canvas for your dish. -
Cut the Shape:
Lay your rounded rectangle paper template onto the smooth slab. Lightly trace around it with a needle tool, then cut all the way through, keeping your needle tool perpendicular to the table for a clean edge. -
Lift the Rim:
Gently lift the edges of the slab upwards to create a shallow basin shape. I like to support the clay with my thumb underneath while using my index and middle fingers to pinch and curl the rim upward about an inch. -
Refine the walls:
Smooth out the pinched walls. Use your damp sponge fingers to gently even out any lumpy areas, ensuring the walls are upright and slightly curvy, giving the dish its soft, organic look.
Step 2: Adding the Functionality
-
Leather Hard Stage:
Set the dish aside to dry until it reaches the leather-hard stage. The clay should be firm enough to hold its shape perfectly when handled, but still cool to the touch and carvable. -
Mark the Grid:
Lightly sketch parallel lines lengthwise across the interior bottom of the dish using a dull pencil or the back of your needle tool. Space them evenly to act as guides for your drainage grooves. -
Carve the Grooves:
Using a loop tool or carving tool, carefully scoop out clay along your marked lines. Apply consistent pressure to create deep, rounded channels that run almost the full length of the interior. -
Clean the Burrs:
Wait for the carved areas to dry slightly more. Once the ‘crumbs’ are crumbly, brush them away. Then, use a damp sponge or a finger dipped in water to smooth the edges of the ridges so they aren’t sharp. -
Refine the Rim:
Check the upper rim of the dish one last time. Use the sponge to make sure it is perfectly rounded and comfortable to touch, matching the softness of the carved grooves. -
Dry Slowly:
Cover the dish loosely with plastic to let it dry very slowly. Uneven drying can cause warping, especially with slab-built pieces, so patience is key here.
Warped Walls?
If walls slump while drying, bolster them with small balls of newspaper tucked under the rim. This supports the curve until the clay hardens enough to hold itself.
Step 3: Glazing and Finishing
-
Bisque Fire:
Once the piece is bone dry, fire it in the kiln to bisque temperature (usually cone 04). This prepares the ceramic to accept glaze without disintegrating. -
Clean:
Wipe the bisque-fired dish with a clean, damp sponge to remove any kiln dust. This ensures the glaze adheres properly to the surface. -
Apply Glaze:
Dip the dish into a clear glossy glaze, or brush on three smooth flowing coats. A clear glaze is perfect here because it lets those beautiful speckles in the clay body shine through. -
Wipe the Bottom:
Use a sponge to wipe the glaze completely off the underside/foot of the dish. If glaze is left on the bottom, it will fuse your masterpiece to the kiln shelf. -
Final Fire:
Fire the dish to the maturation temperature of your specific clay and glaze combination (usually cone 5 or 6). Once cooled, inspect the grooves for any sharp glassy bits before use.
Pro Tip: Smoother Grooves
Use the back of a small paintbrush handle to burnish the inside of your carved grooves. Compressing this area makes it easier to clean soap scum later.
Place your finished dish by the sink and enjoy the satisfaction of using something beautiful you built with your own hands

The Complete Guide to Pottery Troubleshooting
Uncover the most common ceramic mistakes—from cracking clay to failed glazes—and learn how to fix them fast.
Coil-Built Planter With Stack-and-Smooth Sides
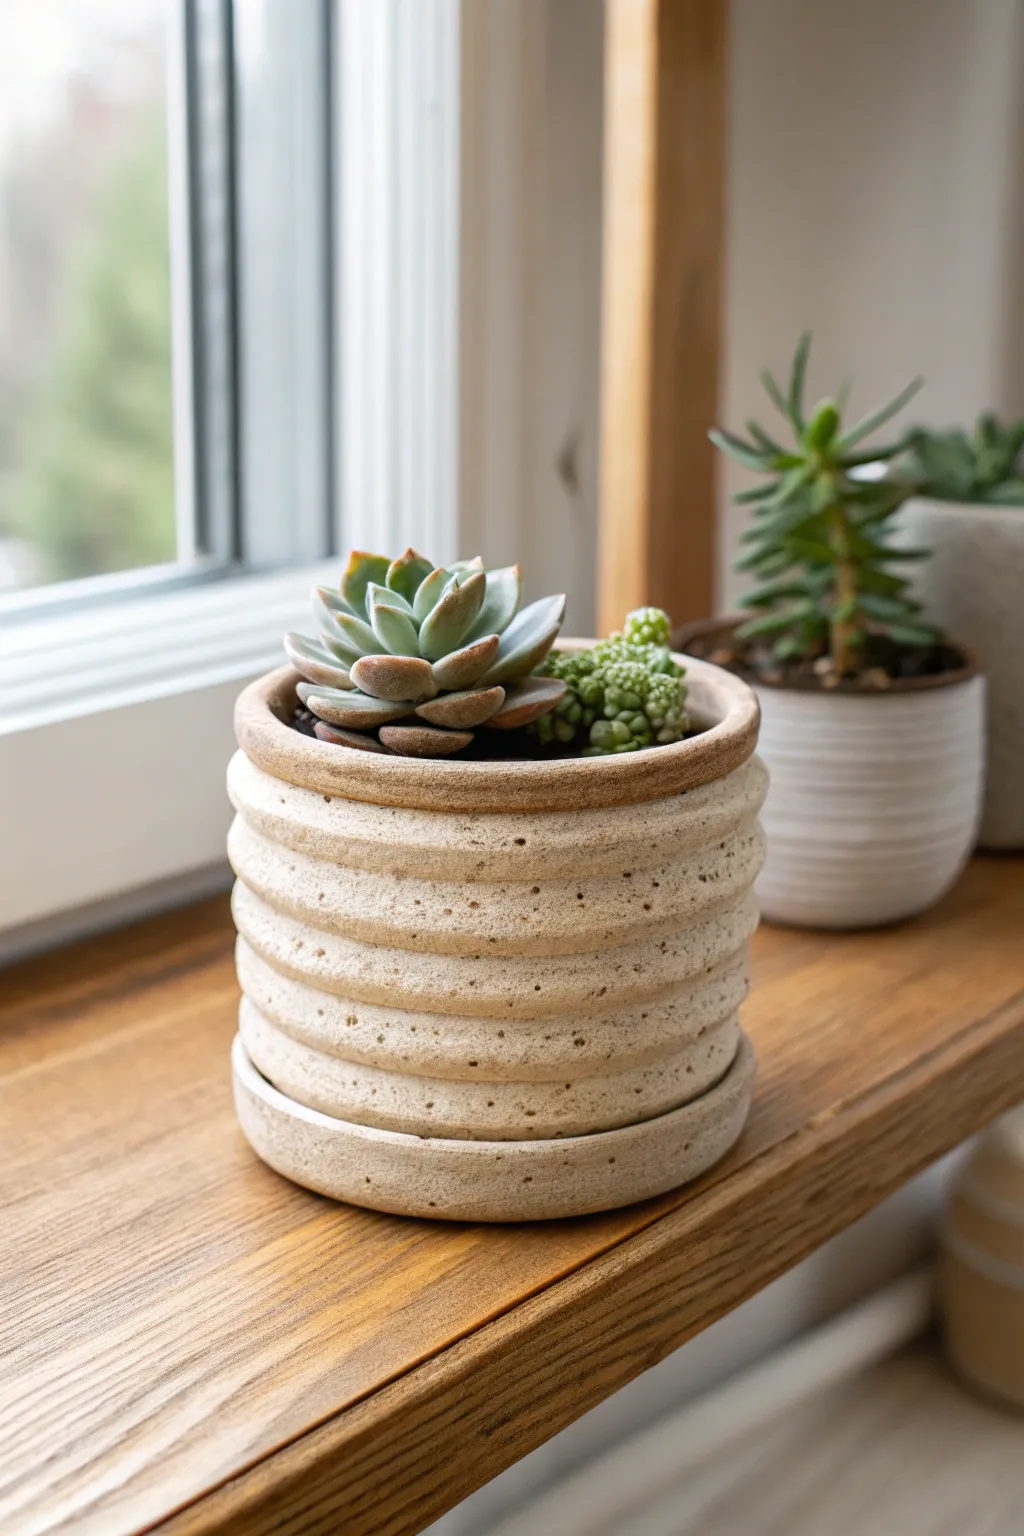
This rustic planter celebrates the organic beauty of visible coils, offering a tactile, ribbed texture that feels both modern and homemade. The accompanying saucer completes the look, creating a functional home for your favorite succulents that catches drainage while keeping surfaces dry.
Detailed Instructions
Materials
- Stoneware clay (speckled clay body recommended)
- Clay cutting wire
- Rolling pin
- Needle tool
- Scoring tool or fork
- Slip (clay mixed with water)
- Wooden modeling tool or rib
- Sponge
- Circle template or compass
- Kiln and matte cream glaze
Step 1: Base and Saucer Construction
-
Roll the Slabs:
Begin by wedging your clay to remove air bubbles, then roll out a slab to approximately 1/4 inch thickness. You will need enough clay for two circular bases—one for the pot and a slightly larger one for the saucer. -
Cut the Circles:
Using your needle tool and a template, cut out a 4-inch circle for the planter base. Cut a second circle about 5 inches wide for the saucer base. -
Prep the Saucer Rim:
Roll a thin coil of clay, roughly the thickness of a pencil. Score and slip the outer edge of the larger saucer base, then attach the coil to create a small raised rim. -
Refine the Saucer:
Gently pinch the saucer coil upward to create a shallow wall. Smooth the inside seam where the coil meets the base using a wooden tool or your finger, ensuring it’s water-tight.
Uneven Coils?
If your coils are wobbling or the wall is leaning, let the lower section stiffen for 30 minutes before adding more height. Wet clay can sag under its own weight.
Step 2: Building the Planter Walls
-
Roll Thick Coils:
Roll out several consistent coils of clay. For this ribbed look, aim for coils that are slightly thicker than a finger—about 3/4 inch thick. Try to keep them even throughout their length. -
Score the Base:
Take your smaller 4-inch circle. Thoroughly score the top outer edge and apply a generous amount of slip. -
First Coil Layer:
Lay your first thick coil onto the scored edge. I like to cut the ends of the coil at an angle to create a stronger seamless join where they meet. -
Build Upward:
Score the top of the first coil and slip it. Place the next coil directly on top. Repeat this process until you have stacked about 5 or 6 coils to reach your desired height. -
Blend the Interior:
Support the outside of the pot with one hand. With the other, use a wooden tool or your thumb to smear the clay from the upper coil down onto the lower coil on the *inside* only. This bonds the pot structurally. -
Refine the Interior:
After blending the coils downward, use a damp sponge or a flexible rib to smooth the entire interior wall. A smooth inside makes repotting easier later on.
Step 3: Finishing the Texture
-
Define the Exterior Seams:
On the outside, we want to keep the coil definition. Instead of smoothing them flat, use a wet finger or a round wooden tool to gently run along the horizontal grooves between coils. This emphasizes the stacked look. -
Shape the Form:
If the pot looks a bit uneven, gently paddle the outside with a wooden paddle or flat hand to straighten the walls while preserving the horizontal ridges. -
Create Drainage:
Once the clay has stiffened slightly to leather-hard, create a drainage hole in the center of the pot’s bottom using a hole cutter or needle tool. -
Clean the Rim:
smooth the very top coil with a damp chamois or sponge. It should feel pleasant to the touch so you don’t scratch your hand when handling the plant. -
Drying:
Place the planter loosely on top of the saucer (with a piece of paper or plastic between them so they don’t stick) and let them dry slowly under loose plastic to prevent warping. -
Bisque Fire:
Fire the pieces to bisque temperature (usually Cone 04 or 06) once bone dry. -
Glazing:
For the look in the photo, apply a matte cream or ‘oatmeal’ glaze that allows the speckles of the clay body to show through. Brush or dip the pieces, ensuring you wipe the bottom of the pot and saucer clean. -
Glaze Firing:
Fire accurately to the maturity temperature of your clay and glaze (likely Cone 5 or 6 for stoneware).
Get That Speckle
Don’t have speckled clay? Mix 1 tsp of granular manganese or ilmenite into your regular white clay body before rolling to mimic the sandy texture seen here.
Once fired, fill your new ribbed planter with a gritty soil mix and nestle a few succulents inside for a cozy windowsill display
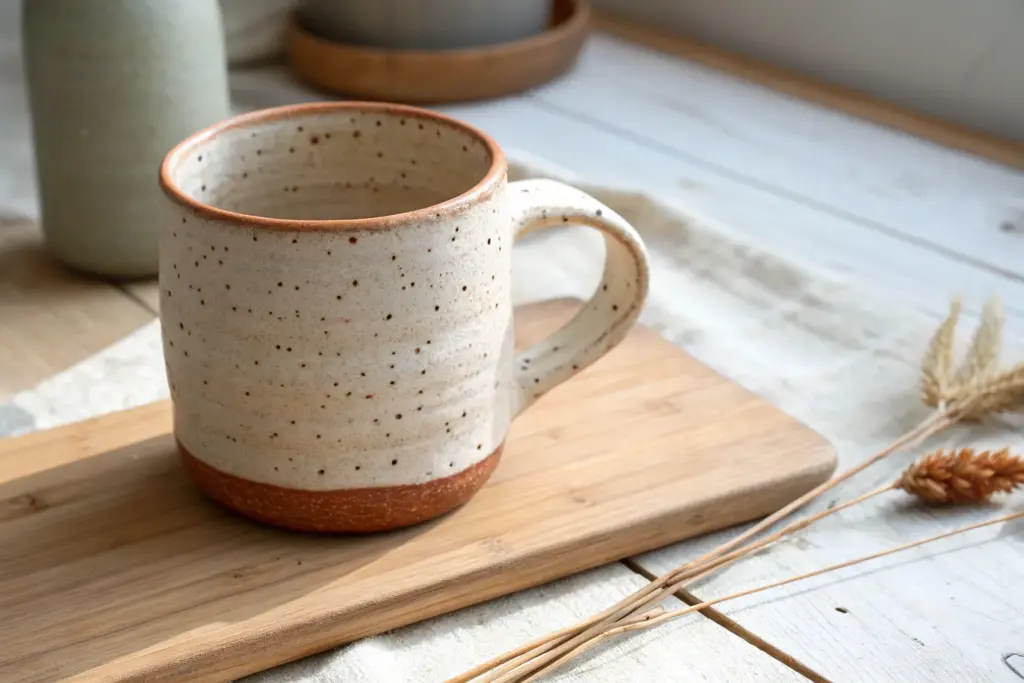
Slab Mug With an Easy Pull-and-Attach Handle
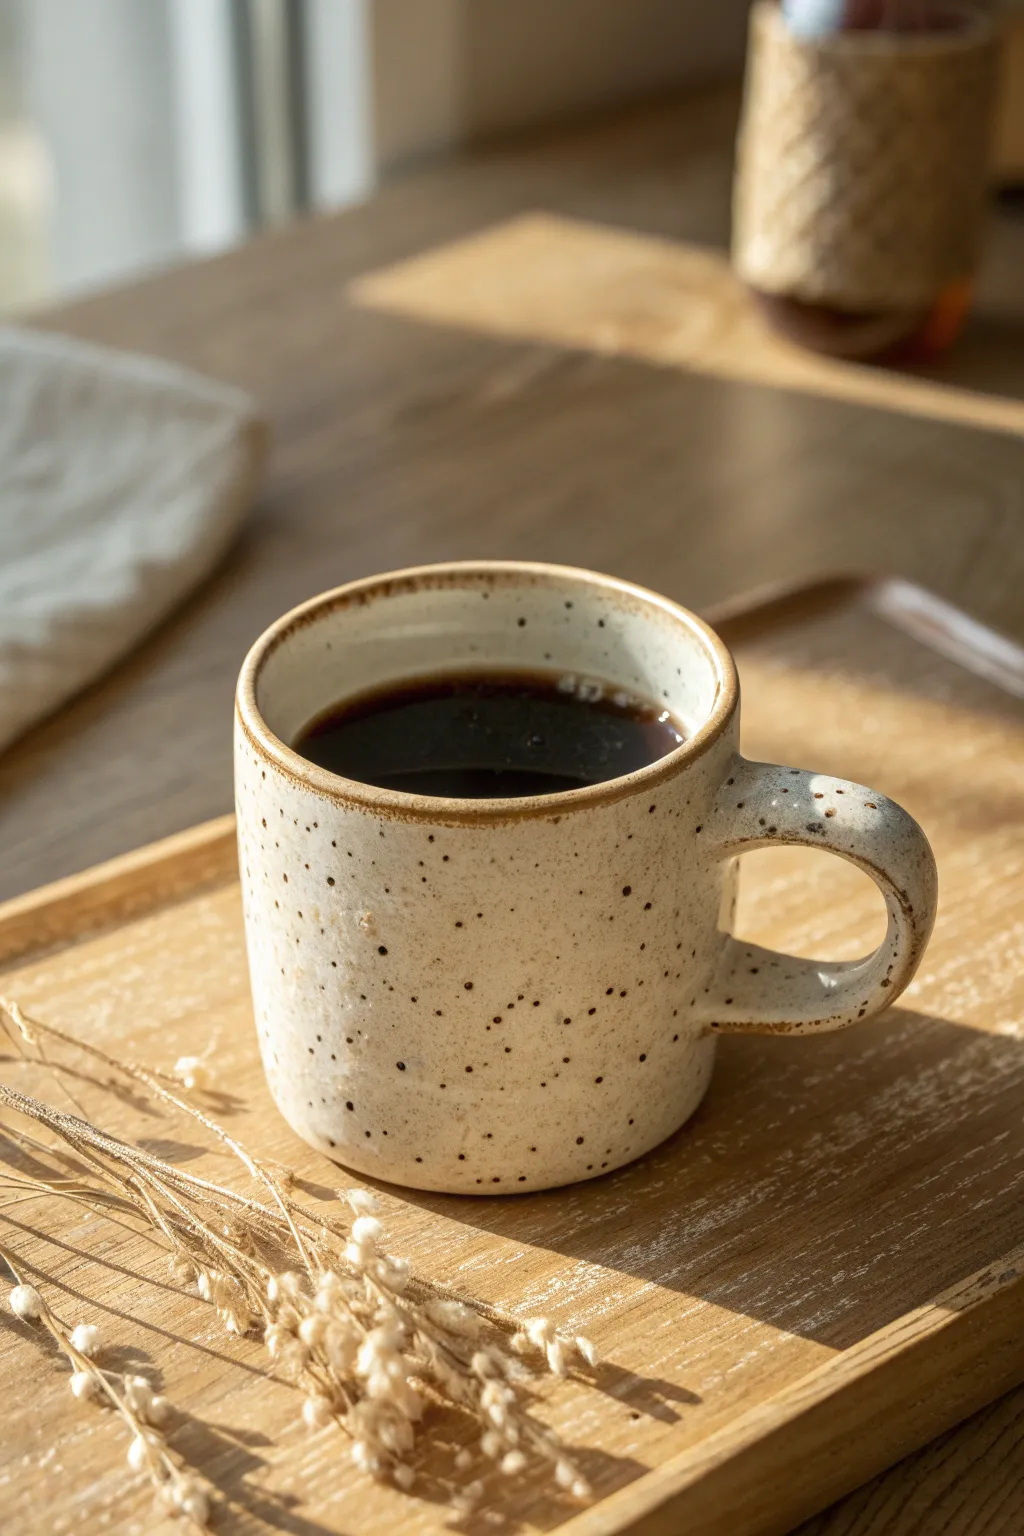
Capture the essence of cozy mornings with this handcrafted slab-built mug, featuring a warm, speckled cream glaze and a contrasting earthy rim. The approachable cylinder shape pairs perfectly with a traditionally pulled handle that fits comfortably in your hand.
How-To Guide
Materials
- Stoneware clay (speckled or buff)
- Rolling pin
- Guide strips or slats (approx. 1/4 inch thick)
- Clay knife or fettling knife
- Scoring tool or serrated rib
- Slip (clay and water mixture)
- Wooden modeling tool
- Sponge
- Ruler
- Speckled cream glaze
- Iron oxide wash or toasted brown glaze (for the rim)
- Kiln
Step 1: Forming the Mug Body
-
Roll the Slab:
Begin by wedging your clay to remove air bubbles, then roll it out into a flat slab. Use your guide strips on either side of the clay to ensure an even thickness of about 1/4 inch. -
Check Consistency:
Run a rubber rib over the surface of the slab on both sides. This compresses the clay particles to prevent warping later and smooths out any canvas texture. -
Cut the Rectangle:
Decide on the height and circumference of your mug. Using a ruler and your fettling knife, cut a precise rectangle. A standard size is roughly 4 inches high by 10-11 inches long. -
Shape the Cylinder:
Carefully lift the rectangle and curve it into a cylinder. Bevell the short ends—cutting one angle inside and one angle outside—so they overlap cleanly without creating a thick lump. -
Join the Seams:
Score the beveled edges aggressively and apply a generous amount of slip. Press the ends together firmly. I like to use a wooden tool on the inside and outside to knit the clay together until the seam is invisible. -
Attach the Base:
Roll a small piece of slab for the bottom. Place your cylinder on top, trace around it, and cut out the circle. Score and slip both the bottom edge of the cylinder and the base, then press them together. -
Refine the Lip:
Use a damp sponge or a piece of chamois leather to smooth the top rim. Round it over gently so it will be comfortable to drink from.
Straighten Up
To prevent the handle from sagging while drying, let the mug dry upside down once the rim is sturdy enough to support the weight.
Step 2: The Pull-and-Attach Handle
-
Prepare the Nugget:
Take a carrot-shaped nugget of clay for the handle. It should be slightly thicker than you think you need, as pulling will thin it out. -
Identify Attachment Points:
Hold the nugget up to the leather-hard cup to gauge placement. Score a spot near the rim and a spot lower down where the handle will connect. -
Attach the Top:
Smear the thick end of your clay nugget onto the top scored mark. Blend the clay downwards onto the mug body very securely so it looks like it’s growing out of the pot. -
Pull the Handle:
With wet hands, gently pull the clay downward from the attached point. Use vertical strokes to elongate the clay into a strap shape, tapering it slightly as you go. -
Create the Curve:
Once the handle is the desired length and thickness, curve it downwards to meet the bottom attachment point. The curve should have a nice spring to it, resembling an ear. -
Secure the Tail:
Press the bottom of the handle onto the lower scored mark. Cut off any excess clay, then blend the tail firmly into the mug body using your thumb or a modeling tool. -
Final Smoothing:
Wipe away any slip globs with a clean, damp sponge. Check that the handle is straight vertically and comfortable to hold.
Step 3: Glazing and Finishing
-
Bisque Fire:
Allow the mug to dry slowly to the bone-dry stage, then bisque fire it according to your clay body’s specifications (usually Cone 04). -
Apply Main Glaze:
Dip the entire mug into a speckled cream or oatmeal matte glaze. Hold it by the foot for a few seconds to ensure an even coat. -
Clean the Foot:
Wait for the glaze to dry to the touch, then meticulously wipe the bottom of the mug clean with a wet sponge so it doesn’t stick to the kiln shelf. -
Rim Detail:
Dip just the very top rim (about 1/4 inch) into an iron oxide wash or a toasted brown glaze. This creates that distinct, darker rustic band shown in the photo. -
Final Firing:
Fire the mug to maturity (Cone 5 or 6 for most stony matte glazes). Let the kiln cool completely before unloading.
Sand It Smooth
If you want the raw clay feel shown in the photo, leave the outside unglazed and just glaze the inside. Sand the outside after firing for a soft touch.
Now brew your favorite coffee and enjoy the warmth of your handmade creation


What Really Happens Inside the Kiln
Learn how time and temperature work together inside the kiln to transform clay into durable ceramic.
Pinch Pot Cup Turned Into a Tiny Mug
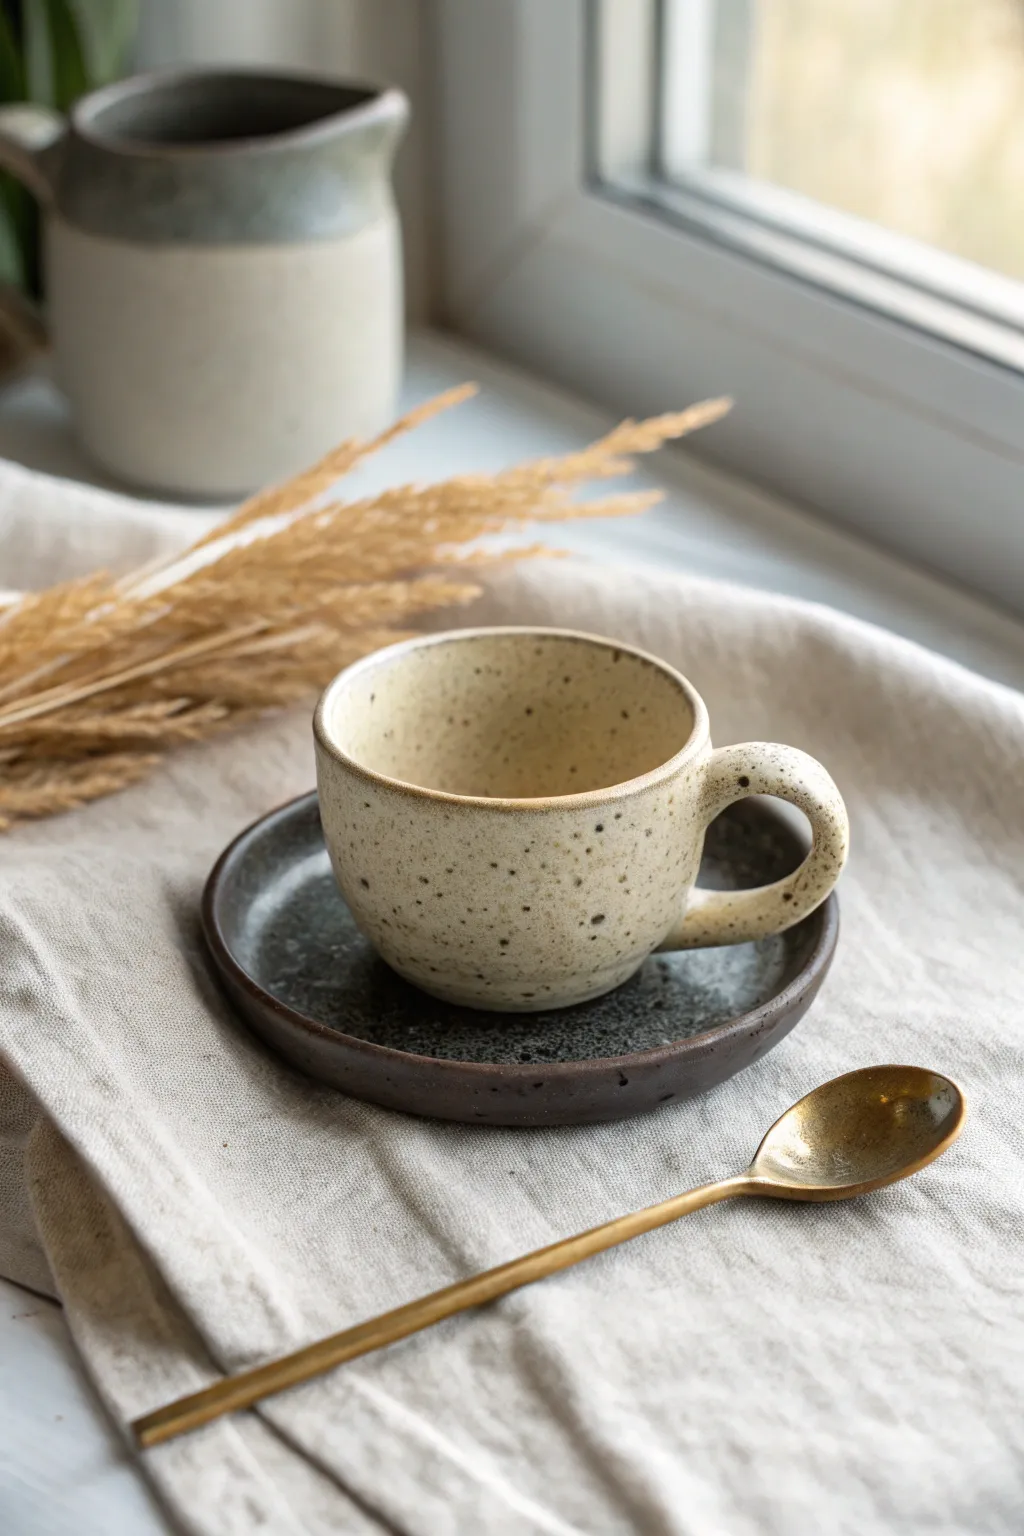
This charming, rustic mug and saucer set combines earthy tones with a delightfully tactile speckled finish. Using simple pinch pot techniques, you’ll create a perfectly imperfect vessel that feels cozy in the hand and looks beautiful on any windowsill.
Step-by-Step Tutorial
Materials
- Speckled stoneware clay (mid-fire)
- Dark charcoal or black stoneware clay
- Pottery wire cutter
- Needle tool
- Serrated rib tool (or fork)
- Small sponge
- Wooden modeling tool
- Clear glaze (food safe)
- Matte white glaze (optional, for subtle tinting)
- Kiln
Step 1: Creating the Mug Body
-
Determine clay amount:
Cut a piece of speckled stoneware clay about the size of a tangerine. This amount fits comfortably in the palm and creates a standard espresso-sized cup. -
Form the ball:
Roll the clay firmly between your palms to create a smooth, tight sphere. Ensure there are no air pockets or cracks on the surface. -
Open the pot:
Hold the ball in your non-dominant hand. Gently press your thumb into the center, stopping about a half-inch from the bottom base. -
Pinch the walls:
Rotate the ball slowly while rhythmically pinching the clay between your thumb (inside) and fingers (outside). Start at the bottom and work your way up to thin the walls evenly. -
Shape the cylinder:
As you pinch, guide the clay upwards rather than just outwards to create a vertical wall shape. Aim for a slightly cylindrical form with a gentle curve at the bottom. -
Smooth the rim:
Once the walls are even (aim for roughly 1/4 inch thickness), gently compress the rim with a damp sponge or a piece of soft leather chamois to round it off.
Clean Those Rims
Always double-check your drinking rim before firing. Run a finger wrapped in plastic wrap over the rim at the leather-hard stage to compress and smooth it flawlessly.
Step 2: Adding the Handle
-
Roll a coil:
Take a small nugget of the same speckled clay and roll it into a short, thick coil, roughly the thickness of your pinky finger. -
Shape the curve:
Bend the coil into a ‘C’ shape or a small ear shape. Hold it up to your cup to check the proportion; for this style, a small, tight handle looks best. -
Score the attachment points:
Mark where the handle will attach on the mug. Use your serrated rib or needle tool to rough up (score) both the mug surface and the handle ends. -
Apply slip and attach:
Dab a little water or slip onto the scored areas. Press the handle firmly onto the mug body, supporting the inside wall with your other hand to prevent collapsing. -
Blend the seams:
Use a wooden modeling tool to drag clay from the handle onto the mug body, smoothing the seam completely so it looks like one continuous piece.
Step 3: Crafting the Saucer
-
Preparing the dark clay:
Switch to your dark charcoal clay. Roll a ball slightly larger than the one used for the mug. -
Flatten into a disk:
Press the ball flat onto your work surface or roll it out with a rolling pin until it is a slab about 1/4 inch thick. -
Raise the lip:
Using your fingertips, gently pinch up the outer edge of the slab all the way around to create a shallow rim. This keeps spills contained. -
Refine the shape:
Use a damp sponge to smooth the dark clay, removing any fingerprints and refining the transition from the base to the rim.
Two-Tone Twist
Try marbling a small amount of the dark clay into the light speckled clay before forming the mug for a swirled, galaxy-like effect that ties the set together.
Step 4: Glazing and Finishing
-
Bisque fire:
Allow both pieces to dry slowly under plastic for at least a day, then uncover until bone dry. Fire them in the kiln to bisque temperature (usually Cone 04). -
Wax resist (optional):
If you want the raw clay texture on the bottom, apply wax resist to the foot of the mug and the underside of the saucer. -
Glaze the mug:
Dip the speckled mug into a transparent or semi-transparent milky glaze. The goal is to let the clay’s natural speckles show through clearly. -
Glaze the saucer:
For the saucer, use a clear matte glaze to enhance the dark clay color without making it too shiny, or leave the rim raw for contrast if your clay is vitrified. -
Final firing:
Fire the pieces to the final glaze temperature required by your specific clay body (typically Cone 5 or 6 for stoneware).
Enjoy your morning espresso or tea in a vessel that is uniquely yours
Slab Plate With a Textured Rim

This project transforms a simple slab plate into a sophisticated piece of dinnerware with a rustic, hand-drawn aesthetic. The warm terracotta colored stripes on the rim contrast beautifully with the creamy white glaze, giving it a classic farmhouse feel.
Detailed Instructions
Materials
- Stoneware clay body for hand-building (speckled or plain buff)
- Clay slab roller or rolling pin with thickness strips
- Circular bat or template (approx. 9-10 inches)
- Needle tool
- Soft rib (kidney tool)
- Sponge
- Carving tool or sgraffito loop tool
- Underglaze (Terracotta, Rust, or Red Iron Oxide wash)
- Small liner brush
- Satin or Matte White glaze
- Kiln
Step 1: Forming the Plate
-
Roll the slab:
Begin by wedging your clay to remove air bubbles, then roll out a slab to a uniform thickness of about 1/4 inch. If you are using a rolling pin, use guide strips on either side to keep the height even. -
Compress the clay:
Take a rubber or metal rib and smooth the surface of the slab firmly in multiple directions. This compression is crucial for preventing warping later and aligning the clay particles. -
Cut the circle:
Place your circular template or bat onto the clay. Trace around it with a needle tool held vertically to cut out your perfect circle shape, then peel away the excess clay. -
Soften the edge:
Run a damp sponge or your finger gently along the sharp cut edge of the circle. Rounding this off now prevents chipping later on. -
Shape the rim:
You can use a slump mold (a shallow bowl shape) or simple hand manipulation. I prefer placing the slab on a foam bat and gently pressing a smaller plate into the center to define the well, leaving the rim slightly raised. -
Refine the curve:
Once the basic shape is established, user a soft rib on the inside curve where the flat eating surface meets the rising rim to ensure a smooth, seamless transition. -
Dry to leather hard:
Set the plate aside to dry slowly. Cover it loosely with plastic if you are leaving it overnight. It needs to be leather hard—stiff enough to hold its shape but soft enough to carve—before proceeding.
Wobbly Rim?
If your rim slumps down while drying, prop it up with small wedges of foam or crumpled newspaper underneath the edge until it stiffens to leather hard.
Step 2: Adding Texture and Glaze
-
Apply underglaze band:
Paint a solid band of your rust-colored underglaze or iron oxide wash around the rim. It doesn’t need to be perfect, but it should cover the area where you want the texture. -
Carve the pinstripes:
Using a small carving tool or sgraffito tool, scratch thin, vertical lines through the underglaze to reveal the raw clay body beneath. Space them closely together for that dense, textured look. -
Clean up burrs:
After carving, you might see little crumbs of clay (burrs). Wait until the clay is bone dry, then gently brush them away with a soft brush rather than wiping them, which could smudge your lines. -
Bisque fire:
Load your fully dry plate into the kiln for a bisque firing (usually Cone 04 or 06). This prepares the clay for the final glaze application. -
Wax the rim:
After the bisque fire, apply a coat of wax resist carefully over your textured rim. This will prevent the white glaze from covering up your hard work. -
Dip or pour glaze:
Dip the plate into a bucket of creamy white satin glaze, or pour the glaze over it if you don’t have a dipping container large enough. Ensure the glaze covers the entire eating surface. -
Wipe back:
Use a damp sponge to wipe any stray beads of glaze off the wax-resisted rim. You want the underglaze texture to be completely exposed. -
Final wipe:
Always wipe the foot (bottom) of the plate completely clean of glaze before firing to prevent it from fusing to your kiln shelf. -
Glaze fire:
Fire the plate to the maturation temperature of your specific clay and glaze combination (commonly Cone 5 or 6 for stoneware).
Pro Tip: Depth Control
When carving the lines, hold your tool like a pencil but keep your wrist rigid. Move the plate on a banding wheel rather than moving your hand for steadier lines.
Now you have a stunning, food-safe plate ready for your next dinner party.

TRACK YOUR CERAMIC JOURNEY
Capture glaze tests, firing details, and creative progress—all in one simple printable. Make your projects easier to repeat and improve.
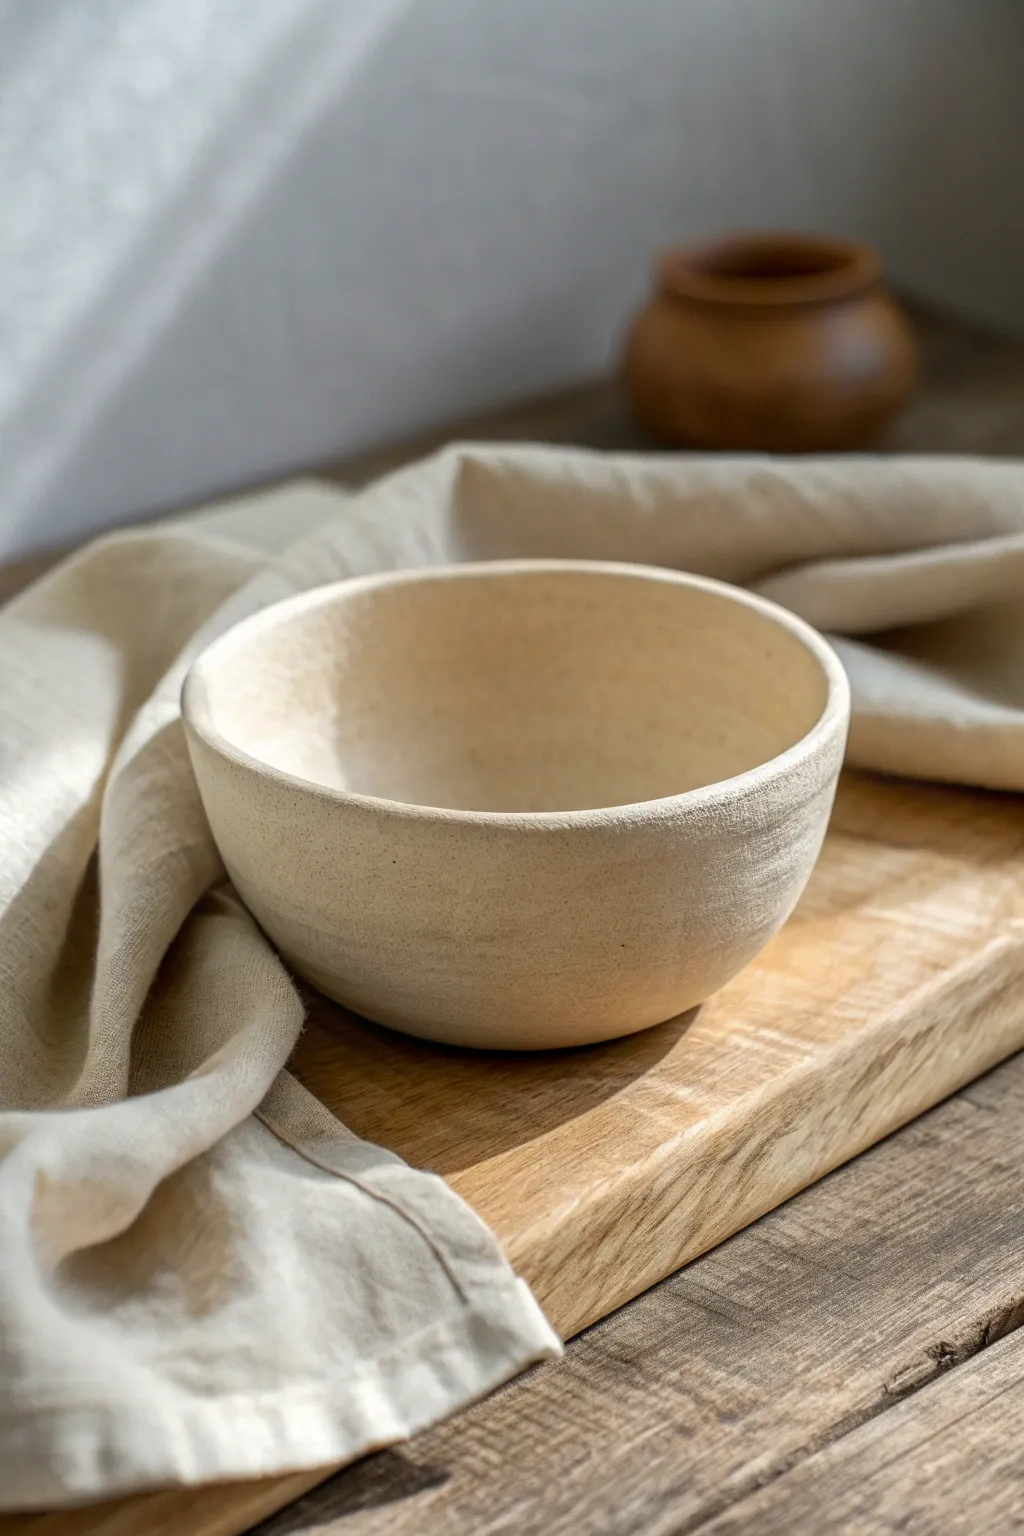
Mini Bud Vase Using Pinch-and-Pull Shaping
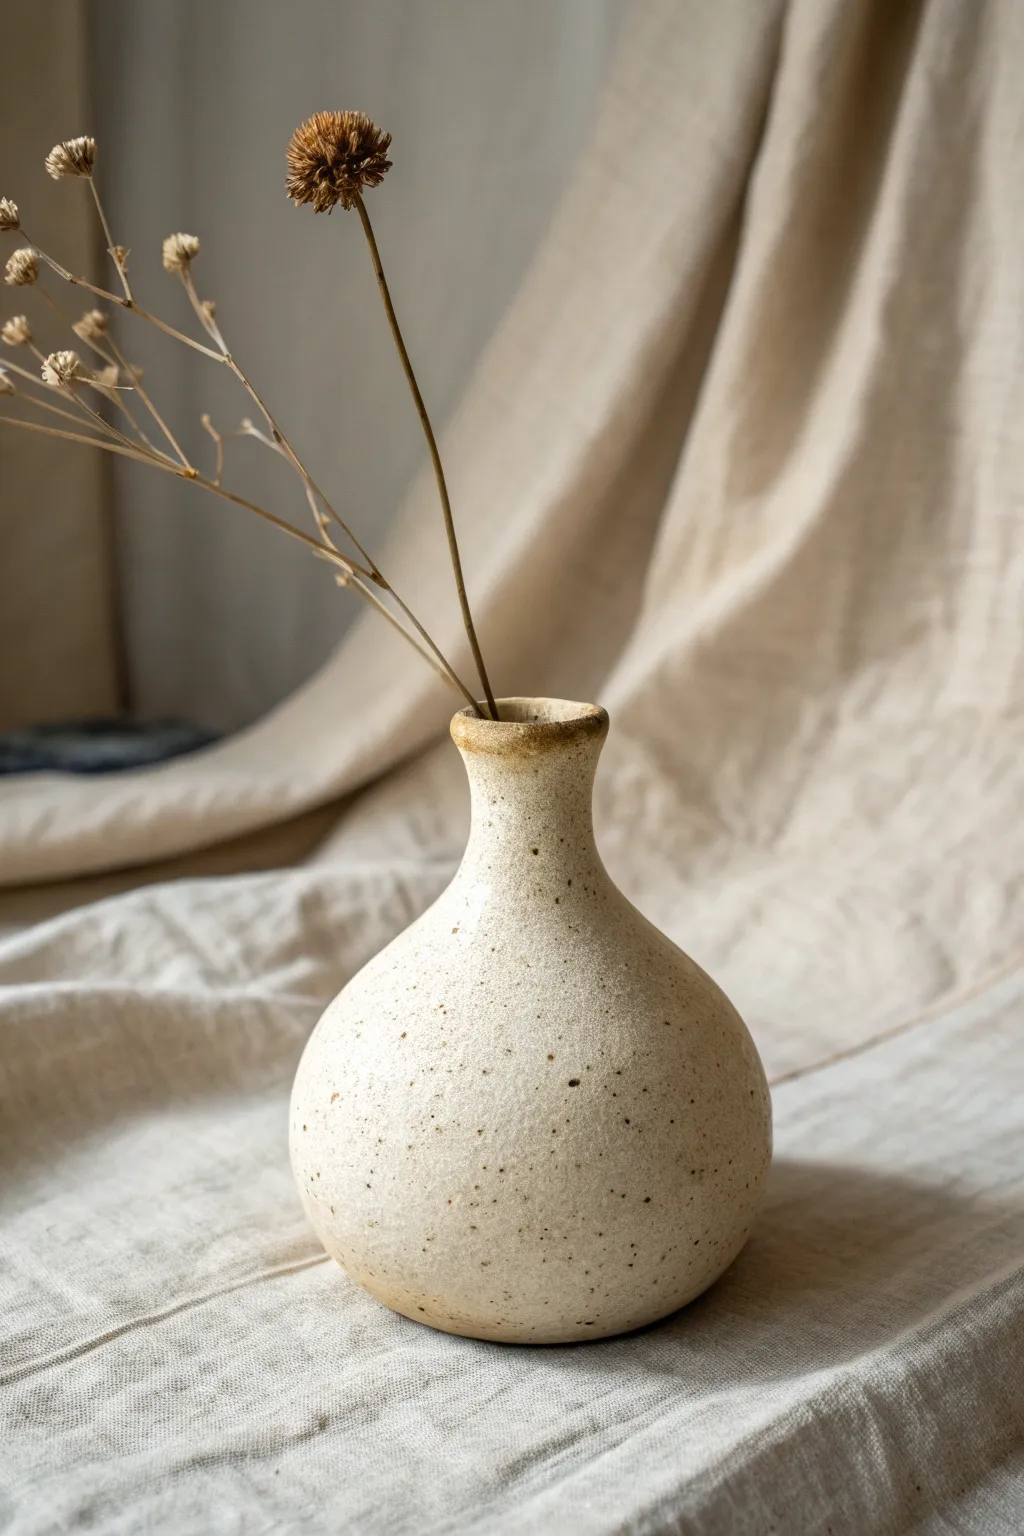
Embrace the imperfect, organic beauty of hand-built pottery with this serene bud vase tutorial. The final piece features a delightful speckling that peeks through a milky glaze, and a classic bulbous shape achieved entirely through pinch pot methods, making it a perfect, low-pressure project for a Sunday afternoon.
Step-by-Step Guide
Materials
- Speckled Stoneware Clay (cone 5 or 6)
- Small bowl of water
- Pony sponge
- Wooden modeling tool (with a smooth, spoon-like end)
- Needle tool
- Cutting wire
- Potter’s ribs (soft yellow silicone and metal)
- Matte white or ‘milk’ glaze
Step 1: Forming the Base
-
Prepare your clay ball:
Cut off a piece of speckled stoneware clay roughly the size of a tennis ball. Roll it firmly between your palms until it is perfectly round and smooth, ensuring there are no air pockets or seams. -
Open the center:
Cradle the ball in one hand. With your other thumb, press gently but firmly into the center of the ball. Create a divot that goes down about three-quarters of the way through, leaving a thick base at the bottom. -
Begin pinching:
Insert your thumb into the hole and keep your fingers on the outside. Using a rhythmic pinching motion, rotate the clay in your hand. Start at the bottom and work your way up the walls. -
Establish the curve:
As you pinch, aim for an even wall thickness of about a quarter-inch. To get that round belly shape, push slightly outward with your thumb while supporting the outside with your fingers. -
Refine the belly:
Continue rotating and pinching until you have a round, open bowl shape. I usually take a moment here to feel the walls for any thick spots and thin them out to match the rest of the form.
Keep it Wet but Not Slushy
Keep a damp sponge handy while collaring the neck. The clay needs slip to slide through your hands without torqueing, but too much water will make walls collapse.
Step 2: Collaring the Neck
-
Gather the rim:
Now for the ‘pull’ part of the process. Place the pot on your work surface. Create a circle with your thumbs and index fingers around the wide rim of your pinch pot. -
Squeeze gently:
Slowly squeeze inwards (collar) while rotating the pot. This will force the clay upwards and inwards, narrowing the opening. -
Create the height:
As you collar the clay in, gently pull that excess clay upward to form the neck. You might notice the clay walls getting thicker as you narrow the neck; pinch them lightly to thin them back out. -
Shape the flare:
Once the neck is about an inch tall, use your index finger to gently flare the very top rim outwards slightly. This creates a soft lip that contrasts beautifully with the straight neck. -
Smooth the exterior:
The outside will likely look lumpy from your finger marks. Take a soft silicone rib or a slightly damp sponge and run it over the exterior to smooth out the major bumps while keeping the handmade character. -
Refine the shape:
Use a wooden modeling tool to define the curve where the neck meets the shoulder of the vase. This transition should be smooth but distinct.
Try a Cluster
Make 3 vases of varying heights and belly widths. Grouping them together creates a stunning centerpiece that highlights the individual handmade variations.
Step 3: Finishing Touches
-
Compress the rim:
Using a small piece of soft plastic or chamois leather (or just a wet finger), gently run it over the rim to compress the clay particles. This prevents cracking later. -
Check the foot:
Turn the vase over gently. If the bottom is rounded and wobbly, tap it lightly against the table to flatten it excessively, or use a tool to trim a shallow concave area in the center for stability. -
Slow drying:
Cover the vase loosely with plastic for the first 24 hours to let the moisture redistribute evenly, especially between the thick bottom and thin neck. Then uncover to dry completely to the bone dry stage. -
Bisque fire:
Fire the piece to cone 04 (or your clay body’s bisque temperature) in a kiln.
Step 4: Glazing
-
Wax resist:
Apply wax resist to the bottom of the vase and about 2mm up the side to ensure the glaze doesn’t run onto the kiln shelf. -
Dip into glaze:
Using glazing tongs or a gloved hand, dip the vase into a matte white or ‘milk’ glaze. Hold it under for 3 seconds to get good coverage without it being too thick. -
Reveal the rim:
Before the glaze dries completely, take a damp sponge and gently wipe the glaze off the very top rim. This exposes the raw toasted clay color seen in the reference photo. -
Final fire:
Fire to cone 5 or 6 (depending on your clay and glaze combination). The white glaze will allow the iron speckles in the clay to bleed through, creating that lovely spotted texture.
Pop a few dried wildflowers into your new vase and enjoy the simple elegance you’ve created.
Coil Bowl With Visible Coil Lines for Style
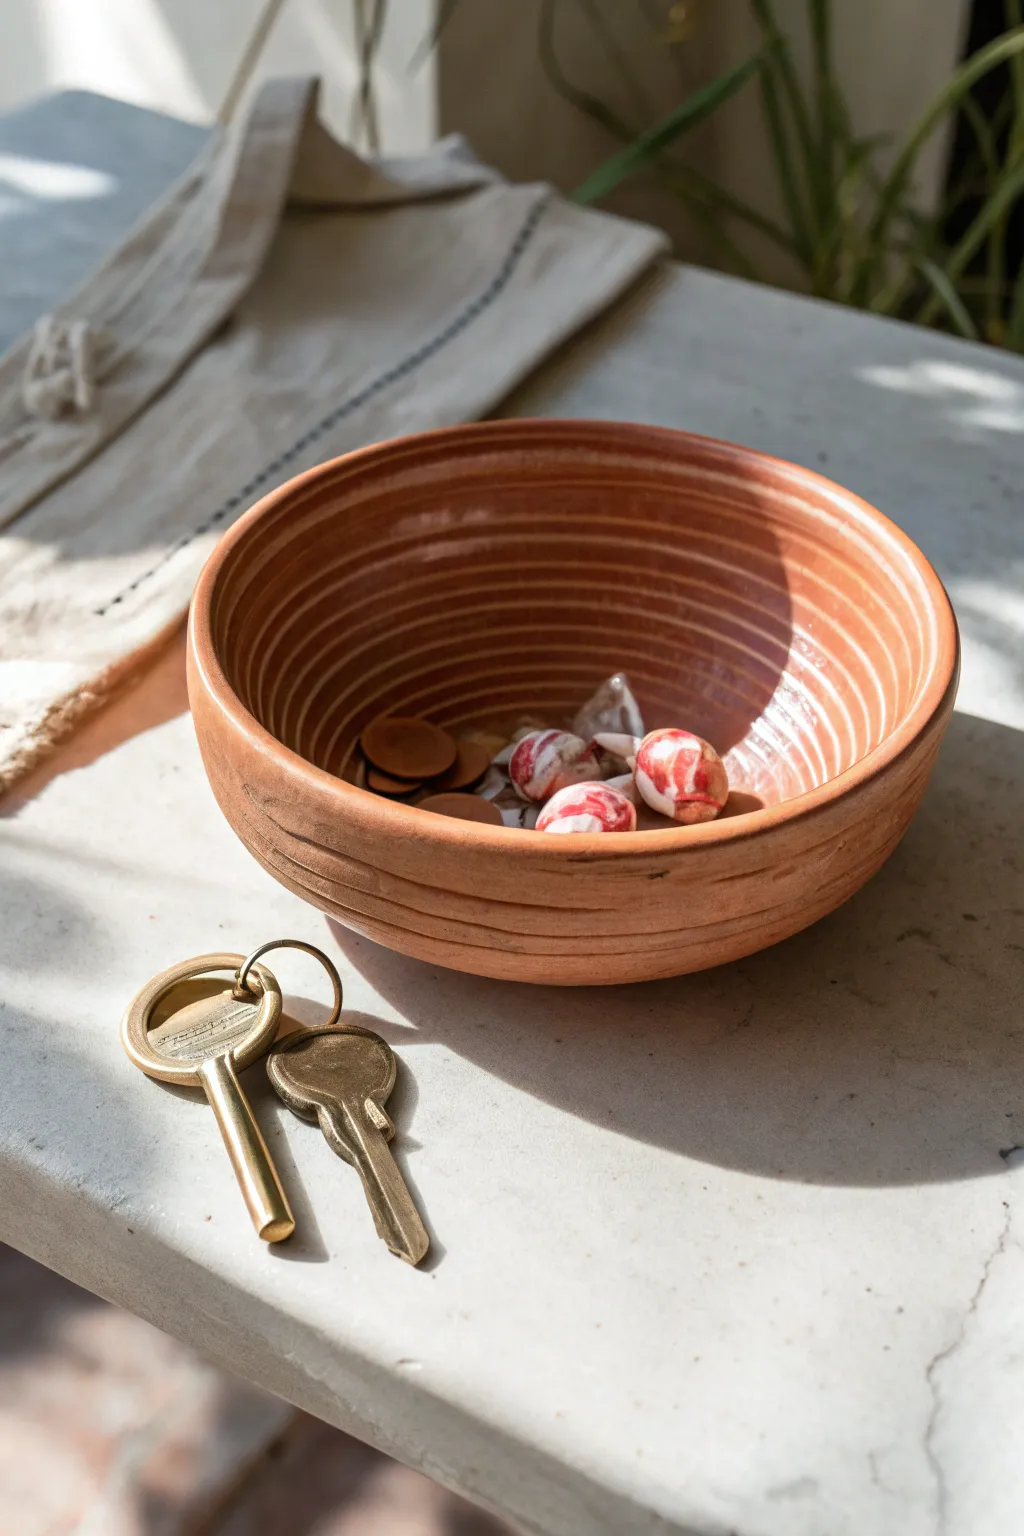
This rustic terracotta dish transforms the simple coil technique into a deliberate design element, letting each concentric ring shine. The result is a warm, tactile piece perfect for holding keys, loose change, or small treasures.
Detailed Instructions
Materials
- Terracotta clay (or similar warm-toned stoneware)
- Clay scoring tool or fork
- Slip (clay and water slurry)
- Wooden modeling tool
- Smooth wooden rib or metal rib
- Rolling pin (optional)
- Small sponge
- Cutting wire
Step 1: Forming the Base
-
Prepare the slab:
Begin by flattening a ball of terracotta clay into a disk. You can use a rolling pin or just pat it out with your palms until it is about 1/4 to 1/2 inch thick. -
Cut the base circle:
Use a needle tool or knife to cut a perfect circle for your base. A diameter of about 4-5 inches is a good starting size for a small catch-all dish. -
Score the edge:
Take your scoring tool and rough up the outer edge of the upper surface of your base disk. This creates ‘tooth’ for the first coil to grab onto. -
Add slip:
Dab a generous amount of slip onto the scored area. This acts as the glue that bonds your coils to the base.
Pro Tip: Consistent Rolling
Use two wooden dowels of the same thickness as guide rails. Roll your hands over the clay between the dowels to ensure every coil is exactly the same thickness.
Step 2: Building the Coils
-
Roll your first coil:
Roll a chunk of clay on a table using the palms of your hands. Aim for an even snake-shape that is roughly the thickness of your pinky finger. -
Place the first ring:
Lay the coil onto the slipped edge of the base. Cut the ends at an angle where they meet to ensure a seamless join without a lump. -
Blend the interior:
For structural integrity, use your thumb or a wooden tool to smear the *inside* of the coil down into the base. I prefer to leave the outside unblended to maintain that distinct line, but the inside needs to be smooth. -
Score and slip the new top:
Score the top surface of the coil you just placed and apply a little more slip. -
Build upward:
Roll out more coils and stack them one by one. To create the gentle outward slope shown in the photo, place each new coil slightly toward the outer edge of the one below it. -
Smooth the interior surface:
After every 2-3 coils, stop to smooth the inside of the bowl. Dragging a wooden rib up the interior wall compresses the clay and removes the coil lines on the inside, leaving a smooth, functional surface.
Level Up: White Slip Inlay
Before firing, brush white slip into the exterior grooves. Once dry, gently scrape the outer surface. The white slip stays in the cracks, highlighting the spiral design.
Step 3: Refining and Finishing
-
Check the exterior profile:
Look at the outside of your bowl. The coil lines should be visible, but you want to ensure they are bonded. Run a damp finger lightly over the exterior grooves to soften any sharp edges without erasing the lines. -
Rim finishing:
Once you reach the desired height (about 3-4 inches), smooth the very top rim with a damp sponge so it is comfortable to the touch. -
Clean the foot:
Flip the bowl over (carefully, if it’s still soft) or clean up the bottom edge while it sits. Some artists like to carve a small ring into the base for stability. -
Dry slowly:
Terracotta can wrap if dried too fast. Loosely cover your piece with plastic for the first day, then uncover it to let it bone dry. -
Bisque fire:
Fire the piece in a kiln to bisque temperature. -
Glaze application:
To recreate the look in the photo, apply a clear glaze to the interior and rim. Apply a very thin wash of clear glaze—or leave it raw if your clay body allows—on the exterior to keep that matte, earthy texture visible. -
Final firing:
Fire the piece a final time according to your clay and glaze instructions.
Your finished bowl will have a beautiful tactile quality that celebrates the building process itself
Tea Light Holder With a Recessed Seat
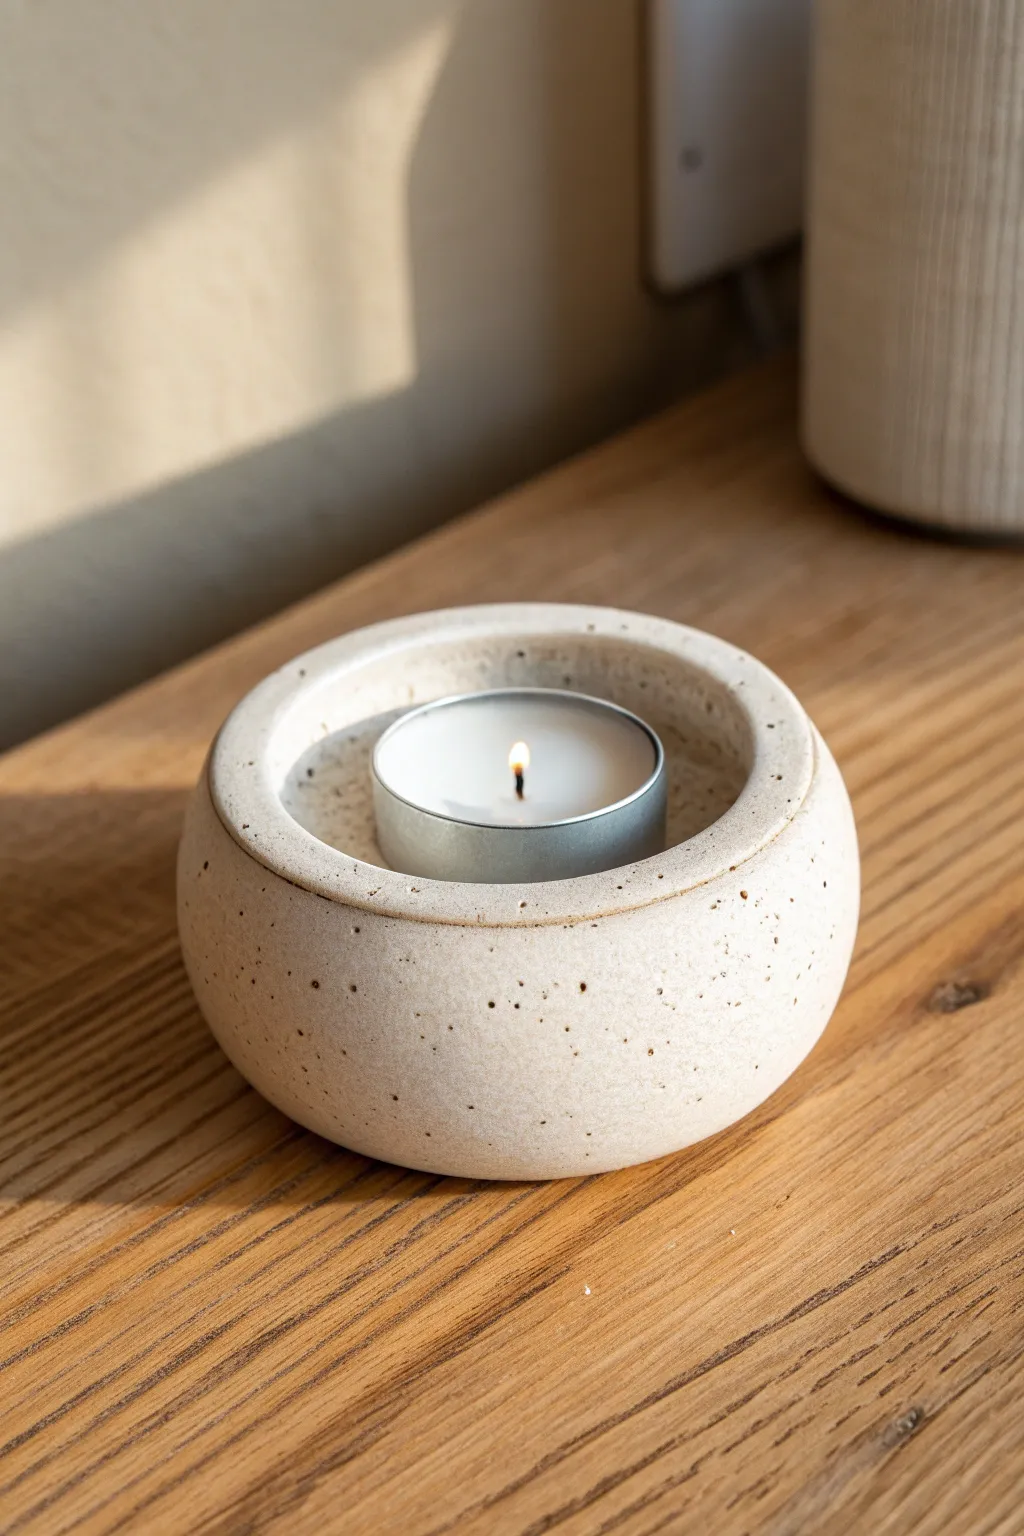
This minimalist tealight holder brings a grounding, earthy feel to any room with its thick walls and stone-like speckled finish. The recessed seating ensures the candle sits flush and secure, creating a seamless and safe display for warm candlelight.
Step-by-Step Guide
Materials
- Speckled buff stoneware clay
- Rolling pin
- Two guide sticks (0.5 to 0.75 cm thick)
- Rib tool (metal or rubber)
- Needle tool
- Scoring tool (or fork)
- Slip (clay and water slurry)
- Circle cutter (approx. 4 inches / 10cm)
- Standard metal tealight candle (for sizing)
- Sponge
- Modeling tool or wooden knife
- Matte white or transparent matte glaze
Step 1: Forming the Base
-
Prepare the slab:
Begin by wedging your speckled buff clay to remove air bubbles. Flatten it onto a canvas work surface and place your guide sticks on either side. -
Roll to thickness:
Roll the clay out until the rolling pin rests flat on your guide sticks. You want a nice, substantial thickness for this project to give it that heavy, stone-like quality. -
Smooth the surface:
Take your rib tool and firmly compress the clay slab on both sides. This aligns the clay particles to prevent warping and creates that perfectly smooth texture we want for the final finish. -
Cut the circles:
Using your 4-inch circle cutter (or a paper template and needle tool), cut out two identical circles from the slab. One will be the base, and the other will form the top.
Shrinkage Check
Tealight cups are standard, but clay shrinks! Cut your center hole 10-12% larger than the metal cup to ensure it fits perfectly after firing.
Step 2: Creating the Recess
-
Measure the opening:
Take one of your clay circles and place a standard metal tealight cup exactly in the center. Lightly trace around it with your needle tool. -
Cut the aperture:
Remove the candle and cut along your traced line to create a donut shape. Give yourself an extra millimeter of wiggle room, as the clay will shrink during firing and you don’t want the candle to get stuck. -
Create the walls:
Roll a thick coil of clay, about the thickness of your finger. This will act as the spacer between the top and bottom circles. -
Shape the coil:
Form the coil into a ring that matches the outer circumference of your base circle. Flatten it slightly so it sits stable.
Trapped Air Warning
Since this is a hollow form, poke a tiny, invisible hole in the bottom with a needle tool. This lets expanding hot air escape in the kiln so it won’t explode.
Step 3: Assembly
-
Score and slip:
Score the outer edge of the solid base circle and the bottom of your coil ring. Apply a generous amount of slip to the scored areas. -
Attach the wall:
Press the coil ring firmly onto the base. Blend the clay together on the inside and outside using a wooden tool or your thumb to ensure a seamless connection. -
Prepare the top:
Score the top of the coil wall and the underside of your ‘donut’ circle. Apply slip to these surfaces as well. -
Seal the form:
Place the donut piece on top, aligning the outer edges. I find it helpful to gently press down evenly around the rim to ensure a tight seal without distorting the shape. -
Fill the gap:
If there is a gap between the inner recessed hole and the base, you can add a small coil inside to bridge the height, or simply smooth the interior seams if the wall height was short.
Step 4: Refining and Finish
-
Paddle into shape:
Gently paddle the outside of the form with a wooden spatula or flat tool to create a rounded, continuous curve. We want it to look like a solid pebble, not layers. -
Smooth the rim:
Use a damp sponge to round over the sharp edges of the top rim and the inner circle cutout. The transition should feel soft to the touch. -
Drying:
Loosely cover the piece with plastic to let it dry showly. This prevents the seams from cracking apart as the moisture evaporates. -
Bisque fire:
Once bone dry, fire the piece to bisque temperature (usually cone 04 or 06, depending on your clay body). -
Glazing:
Apply a matte white or transparent matte glaze. If using speckled clay, the dark spots will burn through the glaze beautifully during the final firing. -
Final Fire:
Glaze fire to maturity (likely cone 5 or 6). Ensure no glaze has pooled in the candle recess, as it needs to remain flat.
Light a candle in your new holder and enjoy the cozy atmosphere you have built with your own hands
Incense Holder Dish With a Single Angled Hole
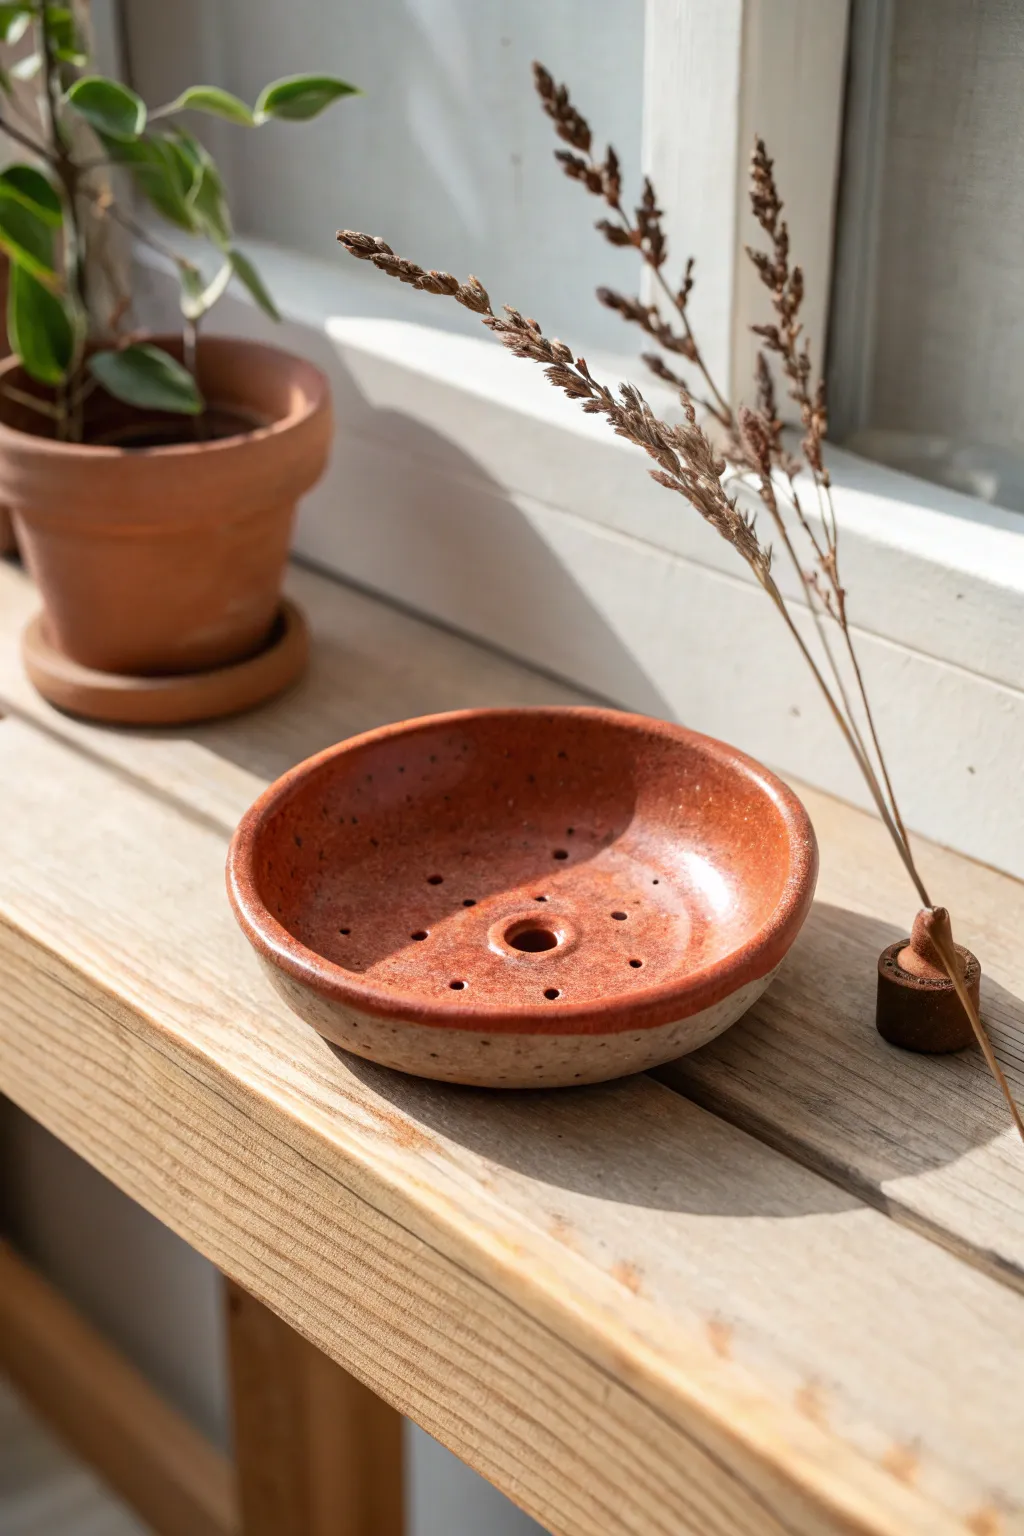
This charming, rustic incense holder combines function with earthy aesthetics, featuring a speckled reddish-brown glaze that glows in the sunlight. Its simple bowl shape is dotted with a playful pattern of holes, making it perfect for catching ash while looking sculptural on your windowsill.
Step-by-Step Tutorial
Materials
- Speckled stoneware clay (buff or terracotta)
- Small rolling pin
- Rolling guides (approx. 1/4 inch)
- Small circular slumping mold (or a small bowl)
- Needle tool
- Sponge
- Drinking straw (or small hole punch tool)
- Bamboo skewer
- Loop trimming tool
- Rib tool (flexible)
- Red-brown glossy glaze (like Amaco Ancient Jasper or similar)
Step 1: Forming the Dish
-
Prep the clay:
Begin with a baseball-sized ball of speckled stoneware clay. Wedging it thoroughly is crucial to remove air bubbles and ensure an even consistency. -
Roll the slab:
Using your rolling pin and guides, roll the clay out into a smooth, even slab about 1/4 inch thick. I find turning the slab frequently helps keep the thickness uniform. -
Smooth the surface:
Take a flexible rib tool and gently compress the surface of the slab. This removes canvas texture and aligns the clay particles for strength. -
Cut the circle:
Use a needle tool or a cookie cutter to cut a perfect circle from your slab, approximately 4 to 5 inches in diameter. -
Shape the curve:
Gently lift your clay circle and place it into your slumping mold or a small bowl lined with plastic wrap. Press gently to help it take on that shallow, curved shape. -
Refine the rim:
While the clay is supported by the mold, use a damp sponge to smooth the rim. You want a rounded, soft edge rather than a sharp, cut angle.
Clean Hole Trick
When punching holes with a straw, twist the straw as you pull it out to remove the clay plug cleanly. Don’t smooth the exit holes until the clay is stiffer to avoid smudging.
Step 2: Adding Details
-
Create the central holder:
Roll a very small ball of clay, slightly larger than a pea. Flatten it just slightly and score and slip it into the exact center of the dish. -
Define the center hole:
Take a tool with a cylindrical handle (like the back of a paintbrush) and press into that center raised bead to create a distinct divot. This will hold the incense cone or catch the stick’s end. -
Pierce the incense hole:
Using a bamboo skewer, poke a hole directly into the center divot. Angle it slightly if you prefer your incense to lean, or go straight down for a vertical stance. -
Add decorative perforations:
Use a drinking straw to punch a secondary pattern of holes around the central point. In the example, these radiate outward, adding visual lightness to the piece. -
Dry to leather hard:
Let the piece stiffen up in the mold until it is leather hard—firm enough to handle without warping, but still cool to the touch.
Make it a Set
Create a separate, tiny geometric block from the same clay (as seen in the photo) with a single hole. This acts as a portable, standalone holder for shorter burns.
Step 3: Finishing and Glazing
-
Trim the foot:
Remove the dish from the mold and flip it over. Using a loop tool, gently carve a shallow foot ring or simply smooth the bottom so it sits flat on a table. -
Clean up the holes:
Inspect your punched holes. If there are sharp burrs of clay on the underside, smooth them away with a finger or a slightly damp sponge. -
Bisque fire:
Once bone dry, fire the piece to bisque temperature (usually cone 04) to prepare it for glazing. -
Apply wax resist:
Paint a layer of wax resist on the bottom exterior and the outer rim area if you want to keep the raw clay texture visible like the photo. -
Pour the glaze:
Pour your reddish-brown glaze inside the bowl. Swirl it quickly to coat the entire interior surface, then pour the excess back out. -
Wipe the exterior:
Immediately use a damp sponge to wipe away any glaze drips that landed on the outside wall. The contrast between the shiny interior and matte exterior is key. -
Clear hole blockages:
Double-check that the glaze hasn’t clogged your small decorative holes. Use a needle tool to clear them if necessary. -
Final firing:
Fire the piece to the maturity temperature of your clay and glaze (likely cone 5 or 6) to achieve that rich, glassy finish.
Once fired, place this on a sunny ledge to highlight the rich glaze texture and enjoy a moment of calm.
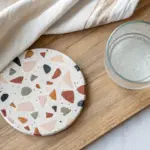
Tile Coasters Using Slab Cuts and Simple Stamps
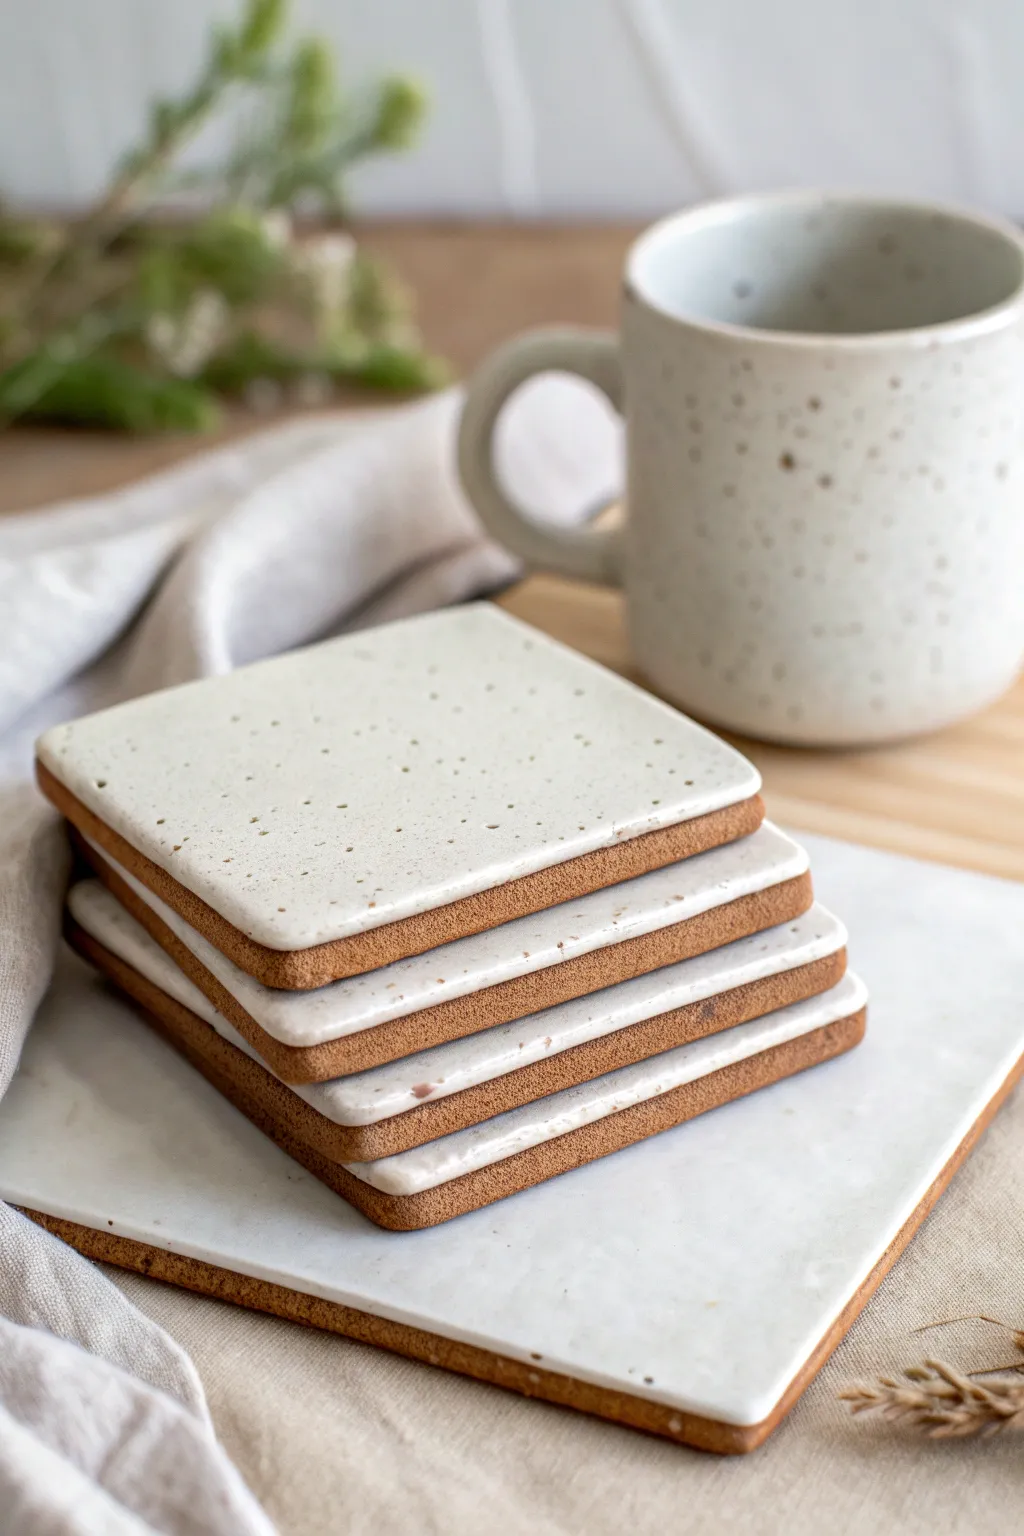
Create a set of modern, minimalist coasters that look like frosted cookies using a simple slab-building technique. These square tiles feature a beautiful contrast between the warm, unglazed toasted clay body and a glossy, speckled cream glaze.
Detailed Instructions
Materials
- Speckled stoneware clay (mid-fire)
- Rolling pin
- Two wooden guide strips (approx. 1/4 inch thick)
- Square cookie cutter (approx. 4 inches) or a ruler and needle tool
- Fettling knife or clay slicer
- Clean sponge and water
- Flat ware board
- Plastic sheet or canvas
- Cream or white semi-opaque glossy glaze
- Wax resist emulsion
- Paintbrush for wax
- Fine grit sandpaper
Step 1: Slab Preparation
-
Wedge the Clay:
Begin by thoroughly wedging your speckled stoneware clay. This removes air bubbles and ensures the clay particles are aligned, which is crucial for preventing warping in flat tiles. -
Set Up Guides:
Place your wooden guide strips on either side of your canvas work surface. These will ensure your slab is a perfectly even thickness, which is the secret to professional-looking coasters. -
Roll the Slab:
Flatten the clay slightly with your palm, then use the rolling pin to roll the clay out across the guides. Roll in multiple directions to compress the clay platelets, flipping the slab over once or twice. -
Smooth the Surface:
Take a soft, flexible rib tool or a slightly damp sponge and compress the surface of the slab on both sides. This removes the canvas texture and seals the pores.
Warping Woes?
Flat tiles love to warp. If your corners lift during drying, lightly mist the dry center to re-hydrate it, stack them under a heavy board, and let them dry very slowly.
Step 2: Cutting and Drying
-
Cut the Shapes:
Using your square cutter or a ruler and needle tool, cut out your coaster shapes. I find that 4-inch squares are ideal as they shrink during firing to a standard mug size. -
Design the Tray:
Don’t forget to cut a larger rectangular slab if you want to create the matching serving tray shown at the bottom of the stack. -
Soften the Edges:
Once the shapes are cut, use your finger or a damp sponge to gently round over the sharp top edges and corners. This makes the finished coaster pleasant to touch and more durable. -
Slow Drying Scheme:
Place the tiles on a ware board covered with drywall or canvas. Place another board on top of the tiles (sandwiching them) to add light weight. This restricted drying prevents the corners from curling up. -
Bisque Fire:
Once the tiles are completely bone dry, fire them to cone 04 (or your clay’s specific bisque temperature).
Step 3: Glazing and Finishing
-
Sand the Bases:
After the bisque fire, briefly sand the bottom and sides of each coaster if there are any rough burrs. Wipe away all dust with a damp sponge. -
Apply Wax Resist:
This is the critical design step. Carefully paint liquid wax resist along the vertical side edges of the coaster, but leave the top surface clean. This ensures the glaze stays only on the top face. -
Check the Wax:
Let the wax dry completely. Any glaze that touches the wax will bead up and can be wiped away, revealing the raw clay contrast. -
Pour or Dip Glaze:
Stir your speckled cream glaze thoroughly. Using a ladle, pour the glaze over the top of the coaster (held over a bucket), or dip the face of the coaster flat into the glaze bucket. -
Clean the Edges:
Immediately use a damp sponge to wipe any stray glaze droplets off the waxed sides and the un-waxed bottom. The sides should be completely free of blaze material. -
Final Glaze Fire:
Load the coasters into the kiln. Since the bottoms are unglazed, you can place them directly on the kiln shelf without stilts. Fire to the maturity temperature of your clay (usually Cone 5 or 6). -
Inspect and Finish:
Once cool, inspect the bottoms. If the clay feels gritty, give it a quick sand with fine-grit wet/dry sandpaper to ensure it won’t scratch any table surfaces.
Add Texture
Before the first firing, gently press a piece of lace or a textured rolling pin onto the surface. The glaze will break over the texture for added depth.
Enjoy your set of sleek, handmade coasters that bring a touch of earthy elegance to your morning coffee routine
Ring Cone and Dish Set With Beginner-Friendly Forms
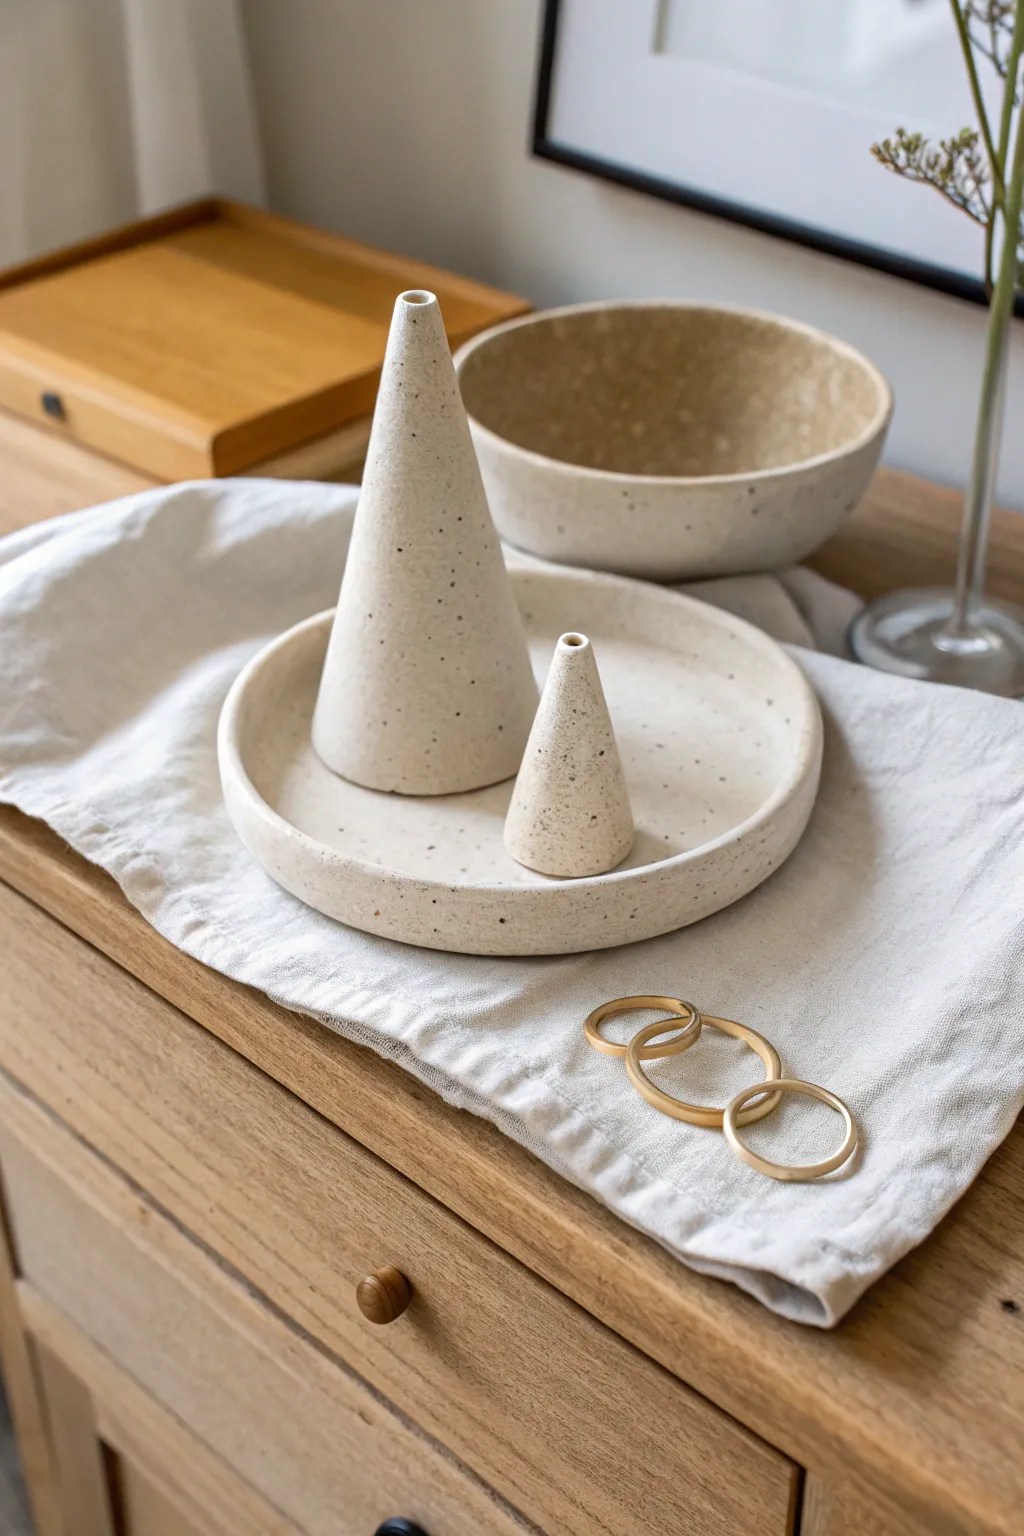
Create a serene, minimalist home for your jewelry with this clean-lined ring dish and matching cone holders. The speckled clay lends an organic touch to the simple geometric forms, making this a perfect beginner project to practice consistent hand-building techniques.
Step-by-Step
Materials
- Speckled stoneware clay (mid-fire)
- Rolling pin
- Canvas work surface or ware board
- Needle tool or fettling knife
- Flexible metal rib or rubber kidney
- Small cup of water
- Sponge
- Carving tool or round cookie cutter (approx. 5-6 inches)
- Scoring tool (or serrated rib)
- Sanding pad (optional, for bisque stage)
Step 1: Forming the Dish Base
-
Prepare the slab:
Begin by wedging your speckled clay thoroughly to remove air bubbles, then flatten it onto your canvas. Use your rolling pin to create a smooth, even slab that is approximately 1/4 inch thick. I like to flip the clay over once or twice during rolling to keep it from sticking. -
Cut the circle:
Place your circular template or cookie cutter onto the slab. If you are using a template, trace around it carefully with a needle tool to cut out a perfect circle, which will form the base of your dish. -
Smooth the surface:
Before manipulating the clay further, take your flexible rib and gently compress the surface of the circle. This aligns the clay particles to prevent warping and creates that professional, smooth finish seen in the photo.
Step 2: Building the Dish Rim
-
Create a coil:
Roll out a separate piece of clay into a long, even coil, slightly thicker than a pencil. This will become the upright rim of your dish. -
Score and slip:
Using your scoring tool, roughen the outer top edge of your circular base. Do the same to one side of your coil. Apply a small amount of water or slip to the scored areas. -
Attach the rim:
Place the coil onto the edge of the base, pressing down firmly to secure it. Cut off any excess coil length and blend the two ends together seamlessly. -
Blend the interior:
Use your thumb or a wooden modeling tool to drag the clay from the coil down onto the base on the inside of the dish. Smooth this seam completely so it looks like one continuous piece of clay. -
Refine the walls:
Support the outside of the rim with one hand while using a damp sponge or rib on the inside to smooth the walls upright. Aim for a low, straight profile rather than a flared bowl shape.
Warping Woes
If your dish base curls up while drying, gently weigh it down with a small sandbag or a board placed on top during the leather-hard stage to keep it perfectly flat.
Step 3: Creating the Cones
-
Shape the clay:
Take a small ball of clay (about the size of a golf ball for the large cone, smaller for the other) and begin rolling it between your palms to elongate it. -
Refine the cone:
Place the clay on your board and roll it back and forth while applying more pressure to one end. This will naturally create a tapered cone shape. -
Flatten the base:
Pick up the cone and tap the wider end firmly against your table to create a completely flat, stable bottom. Check that it stands vertically without wobbling. -
Hollow or pierce (optional):
If the cone is thick, you can gently pierce the bottom with a needle tool to allow air to escape during firing, or gently hollow it out from the bottom to reduce weight. -
Add the detail:
Use the blunt end of a paintbrush or a small shaping tool to press a small indentation into the very tip of the cone, mimicking the look of the reference image.
Clean Edges
For a super crisp, modern rim on your dish, let the clay firm up to leather-hard, then use a vegetable peeler or a sharp trimming tool to bevel the top edge slightly.
Step 4: Finishing Touches
-
Final smoothing:
Wait until the clay is leather-hard. Take a slightly damp sponge and wipe down all rim edges and the surfaces of the cones to reveal the speckled texture of the grog. -
Drying:
Place the cones and the dish on a board, covering them loosely with plastic to dry slowly. This prevents the flat dish from warping as moisture evaporates. -
Firing and Glazing:
Bisque fire the pieces. For the final look, apply a transparent matte glaze or simply leave the raw clay unglazed on the outside if perfectly vitrified, glazing only the interior of the dish for contrast.
Once fired, place this elegant set on your dresser to organize your favorite rings with modern style
Wall Hanging Tiles With Cutout Shapes and String Holes
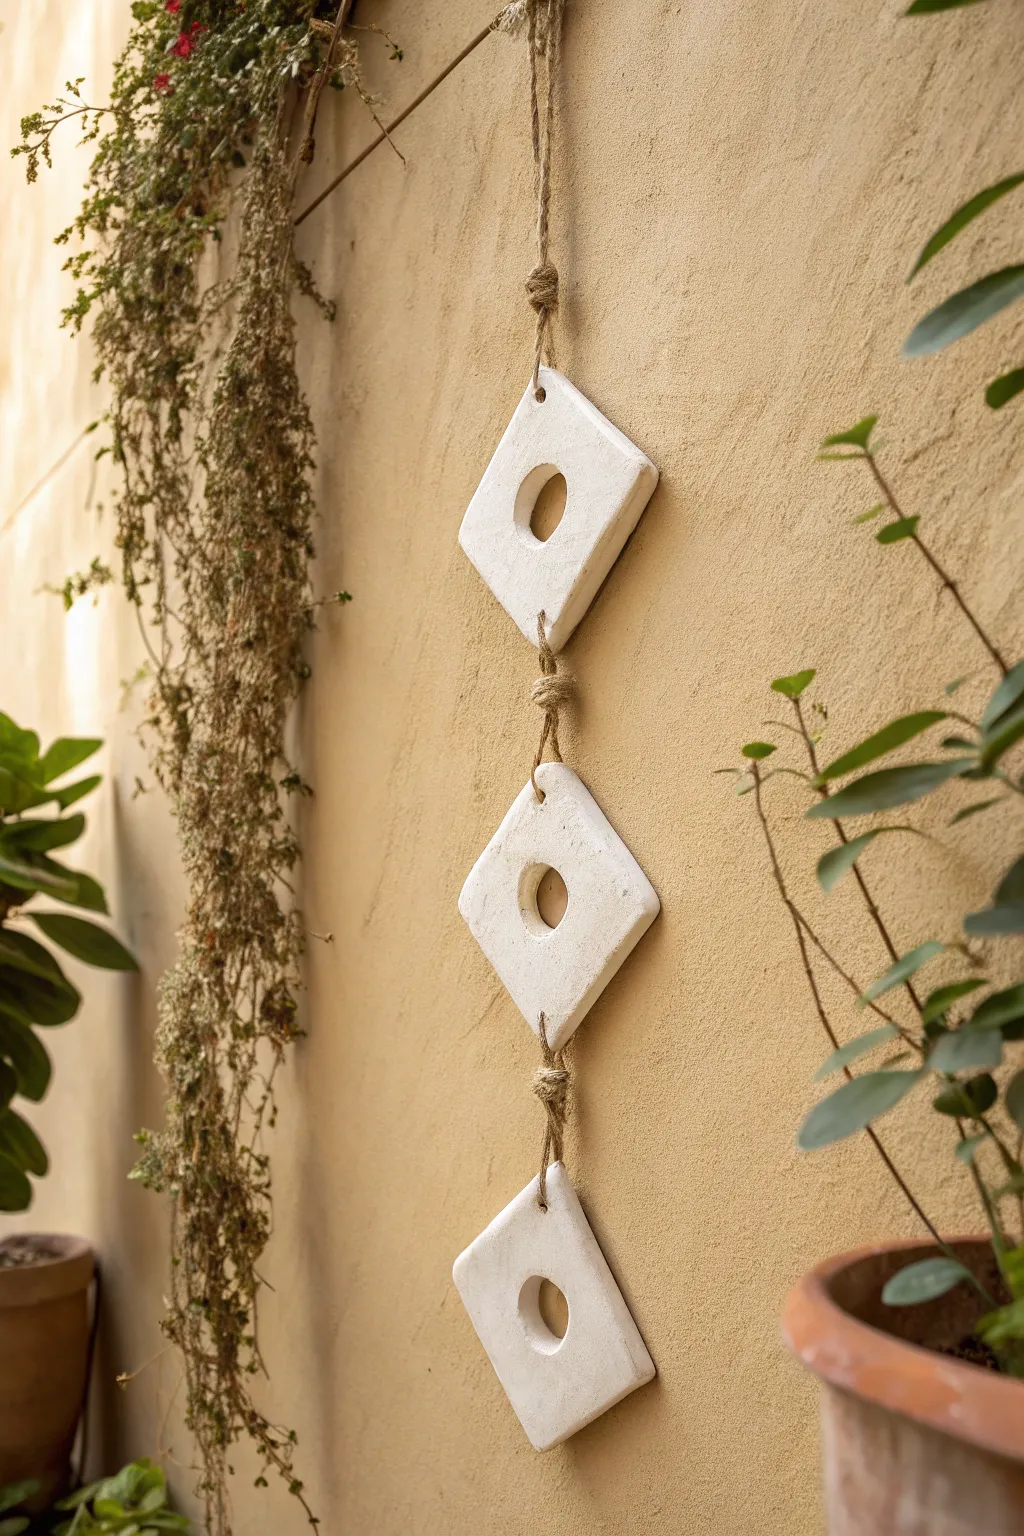
Bring a touch of organic modernism to your garden wall or living room with this textured ceramic hanging. Featuring three diamond-shaped tiles with negative space cutouts, this project embraces the beauty of simple geometric forms and natural twine.
How-To Guide
Materials
- Light-colored stoneware or earthenware clay
- Rolling pin
- Two wooden guide strips (approx. 1/4 inch thick)
- Square paper template (approx. 4×4 inches)
- Needle tool or fettling knife
- Small circular cutter (approx. 1 inch diameter)
- Drinking straw or small hole punch tool
- Sponge
- Ware board or canvas mat
- Natural jute twine
- Scissors
- White matte glaze (optional, or leave raw)
Step 1: Prepping and Cutting
-
Roll the slab:
Start by wedging your clay to remove air bubbles, then place it on your canvas mat between the two wooden guide strips. Roll the clay out firmly until your rolling pin rests on the guides, ensuring a perfectly even thickness. -
Smooth the surface:
Before cutting, take a slightly damp sponge or a rubber rib and compress the surface of the clay slab. This cleans up texture marks from the canvas and strengthens the clay particles. -
Cut the diamonds:
Place your square paper template onto the clay, orienting it like a diamond. Using a needle tool, cut straight down the sides to create three identical diamond shapes. -
Create the center cutout:
Find the visual center of each diamond. Press your small circular cutter firmly through the clay to remove the middle section, creating that bold negative space. -
Add connecting holes:
Use a drinking straw or a small hole punch tool to create holes at the very top and very bottom points of each diamond. Make sure these aren’t too close to the edge, or the clay might crack closer to the firing stage.
Keep it Flat
Slabs love to warp! Flip your diamonds over daily while they dry, or dry them sandwiched between two pieces of drywall to keep them perfectly straight.
Step 2: Refining and Drying
-
Clean the edges:
Once the clay has stiffened to a ‘leather hard’ state (usually after a few hours), run a damp finger or sponge along all the cut edges to soften any sharp corners left by the knife. -
Dry slowly:
Place your three tiles on a ware board, covering them loosely with plastic to ensure they dry slowly and evenly. This helps prevent warping, which flat slabs are prone to do. -
Bisque fire:
Once bone dry, fire the pieces in a kiln to bisque temperature (usually Cone 04). This hardens the clay and prepares it for glazing or finishing. -
Finish the surface:
To achieve the look in the photo, you can either apply a matte white glaze and fire again, or wash the bisque with a white underglaze and wipe it back for a distressed look. If using high-fire white stoneware, you might even leave it unglazed for a natural stone texture.
Step 3: Assembly
-
Prepare the twine:
Cut a long length of thick, natural jute twine. You will need one long continuous piece or several segmented pieces depending on your tying preference, but a single piece folded over creates a strong loop at the top. -
Start the knotting:
Thread the twine through the top hole of the first diamond. Tie a sturdy overhand knot just above the clay to secure it, leaving a loop for hanging at the very top. -
Connect the first tile:
Thread the twine down through the backside of the top hole and out the front, then down through the front of the bottom hole to the back. This keeps the string visible and central. -
Create spacing knots:
Decide on the distance between your tiles—about 2-3 inches looks balanced. Tie a knot in the twine where you want the top of the *next* tile to sit. This knot will act as a stopper. -
Add remaining tiles:
Thread the second diamond onto the twine, letting it rest on the stopper knot you just made. Repeat the threading pattern (in through top, out through bottom) and knotting process for the third tile. -
Secure the bottom:
Once the final tile is threaded, tie a secure double knot just below its bottom hole. You can trim the excess string or leave a short tail for a rustic fringe effect.
Add Driftwood
Instead of a simple loop at the top, tie the main hanging string around a piece of driftwood or a copper pipe for a more substantial, mixed-media wall hanging.
Hang your new creation in a spot that receives raking light to emphasize the beautiful shadows cast by the cutouts
Friendly Animal Planter Built From a Pinch Pot Base
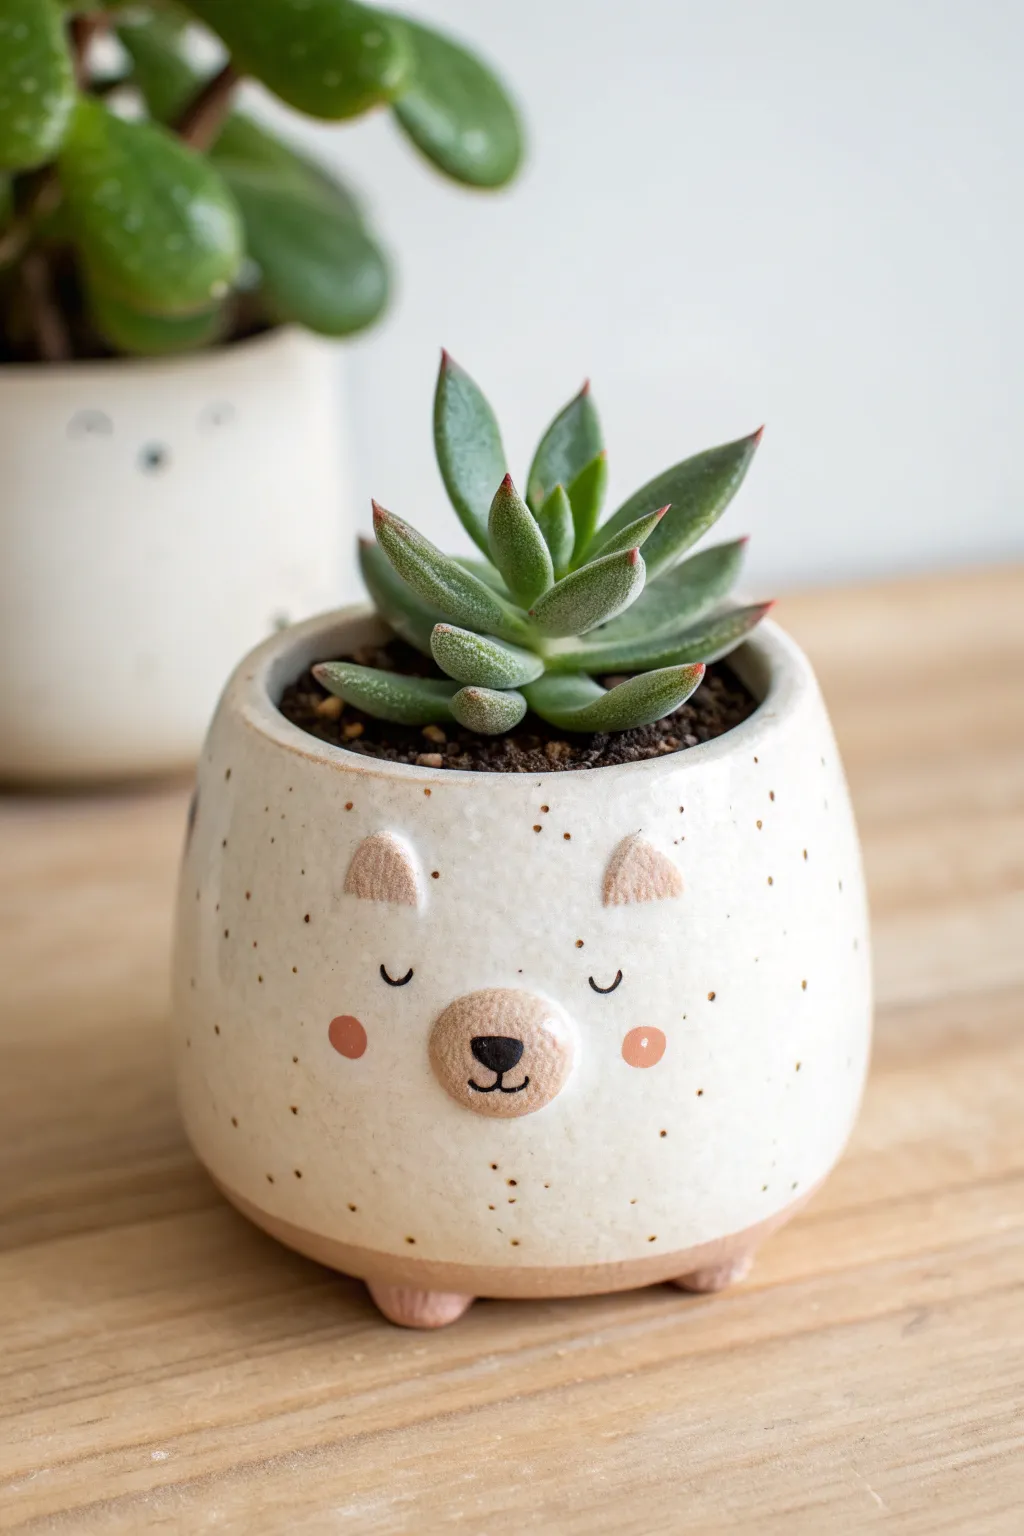
This adorable bear-themed planter adds a whimsical touch to any windowsill with its sleepy expression and charming speckled finish. Built from a simple pinch pot base, it’s the perfect beginner project to practice adding small features and experimenting with underglaze detailing.
Step-by-Step Tutorial
Materials
- Stoneware clay (speckled or white)
- Potter’s needle tool
- Small sponge
- Rib tool (kidney shaped)
- Scoring tool or serrated rib
- Slip (clay and water slurry)
- Black underglaze
- Pink or terra cotta colored underglaze
- Clear transparent glaze
- Fine detail brush
- Rolling pin (optional)
Step 1: Forming the Body
-
Prepare the clay ball:
Start with a ball of clay roughly the size of a large orange. Pat it between your hands to ensure it is perfectly round and smooth. -
Open the pot:
Push your thumb into the center of the ball, stopping about a half-inch from the bottom. This thickness will be crucial for the feet later. -
Pinch the walls:
Gently pinch the clay between your thumb and fingers, rotating the ball as you go. Work from the bottom up to thin the walls evenly to about 1/4 inch thickness. -
Shape the bear’s belly:
As you pinch, encourage the form to belly out slightly in the middle and curve back in at the rim to create a gentle, rounded enclosure rather than a straight bowl. -
Refine the surface:
Use a rib tool to smooth the exterior walls, compressing the clay and removing distinct finger marks for a clean, modern look. -
Flatten the rim:
Gently tap the rim upside down on your canvas or table to level it, then smooth the edges with a damp sponge so they are rounded, not sharp.
Cracked Seams?
If ears fall off during drying, you likely didn’t score deeply enough. Use a serrated rib to really rough up the surface before adding slip next time.
Step 2: Adding Features & Feet
-
Create the feet:
Roll three small balls of clay. Flip your pinch pot over and space them evenly in a tripod formation on the bottom. -
Attach the feet:
Score the bottom of the pot and the tops of the feet, apply slip, and press them firmly into place. Smooth the seams with your finger or a modeling tool. -
Make the ears:
Roll two small, marble-sized balls of clay. Pinch them slightly into triangles. I like to curve them just a bit to give the bear a relaxed look. -
Attach the ears:
Score and slip the contact points on the rim and the ears. Press them onto the rim, blending the clay downward onto the body on the back side for strength. -
Form the snout:
Roll a small, flattened oval of clay for the nose area. Score the center of the bear’s face and the back of the oval, then attach with slip. -
Refine edges:
Go over the ears and snout with a damp sponge or finger to soften any harsh connection lines.
Clean Lines
When painting the sleepy eyes, rest your pinky finger on the pot to stabilize your hand. This helps you paint smooth, confident curves.
Step 3: Decoration & Glazing
-
Bisque fire:
Allow the piece to dry completely (bone dry) before firing it in the kiln to bisque temperature. -
Paint the snout & cheeks:
Using the pink or terra cotta underglaze, paint a solid circle on the snout area and two small circles for rosy cheeks. Paint the triangle insides of the ears as well. -
Paint facial details:
With a very fine brush and black underglaze, carefully paint two ‘U’ shapes for sleepy eyes and a small nose and mouth on the snout. -
Glaze application:
Once the underglaze is dry, dip or brush the entire pot with a clear transparent glaze to let the clay body and painting show through. -
Final wipe:
Wipe the glaze off the bottom of the feet using a wet sponge to prevent them from sticking to the kiln shelf. -
Glaze fire:
Fire the piece a second time to your clay’s maturity temperature (likely Cone 5 or 6 for stoneware).
Plant your favorite little succulent inside and enjoy your new ceramic friend
Sgraffito-Style Pattern Plate for Easy Surface Play
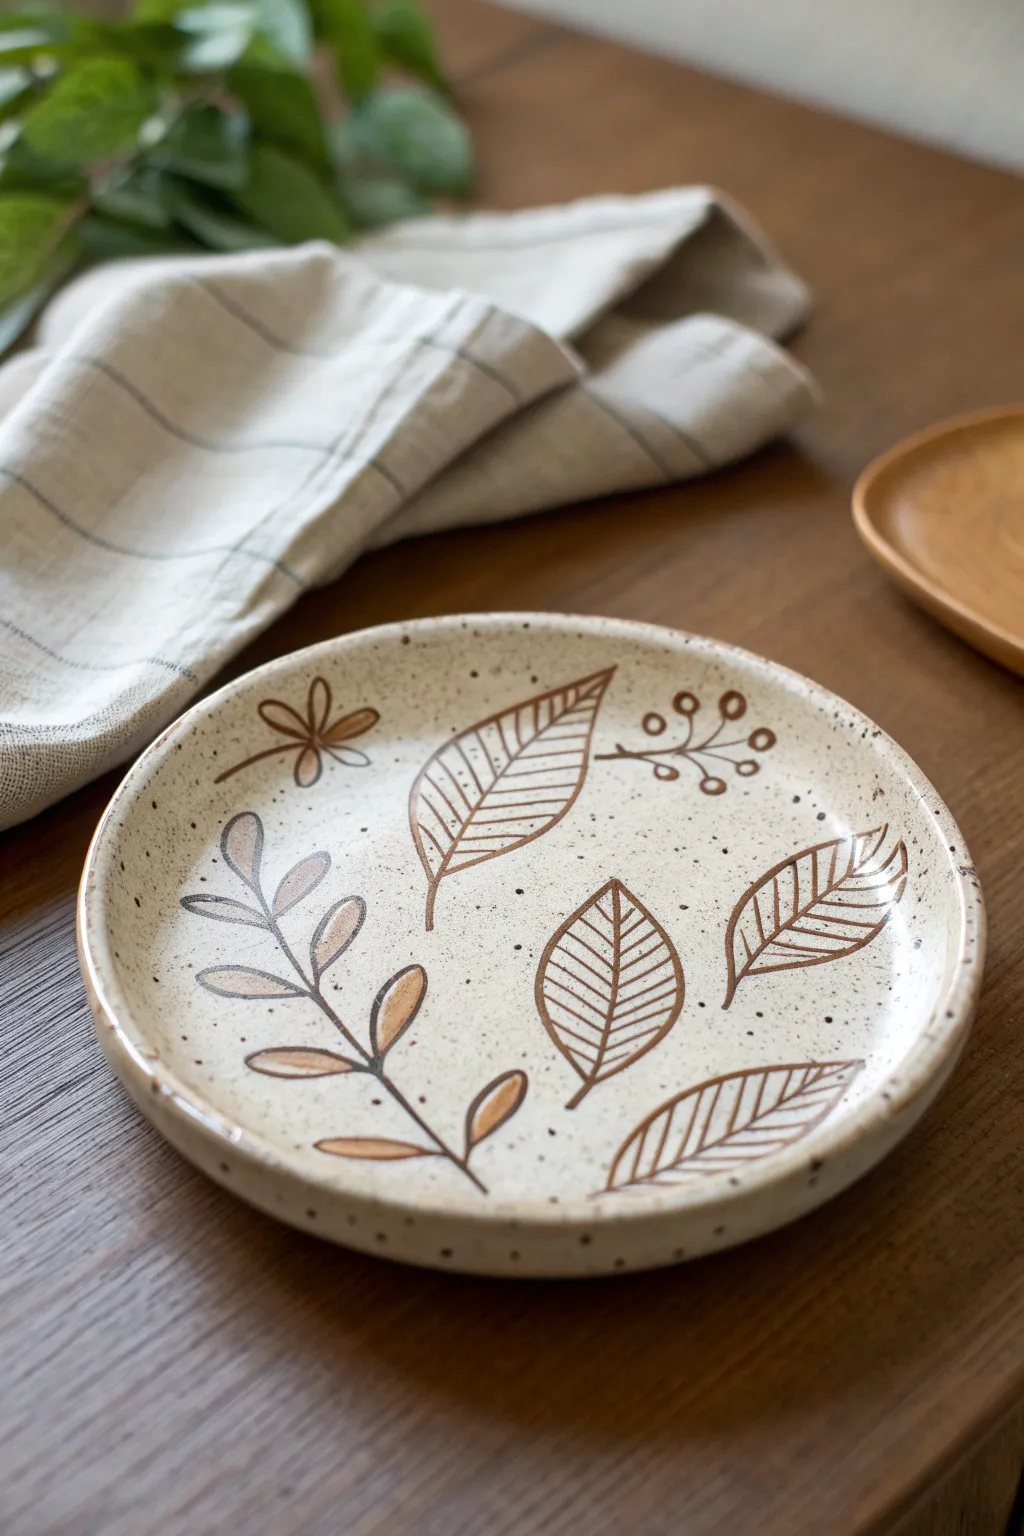
This charming project combines simple slab building with a delicate surface design that resembles a sketchbook drawing brought to life. The warm, speckled clay body provides a rustic canvas for freehand leaf and vine motifs, creating a piece that feels both earthy and elegant.
How-To Guide
Materials
- Speckled stoneware clay (mid-fire recommended)
- Rolling pin
- Canvas board or mat
- GR Pottery Form (circle) or a slightly curved dinner plate to use as a mold
- Needle tool
- Sponge
- Dark brown underglaze
- Fine detail paintbrush (size 0 or 00)
- Clear matte or satin glaze
- Rib tool
- Foam bat or large cushion (optional)
Step 1: Building the Plate
-
Prepare the slab:
Begin by wedging your speckled clay to remove air bubbles. Roll it out into an even slab, approximately 1/4 inch thick. I like to rotate the clay periodically while rolling to ensure it stretches evenly in all directions. -
Compress the surface:
Take a rib tool and gently drag it across the surface of the slab on both sides. This compression step is crucial for preventing warping later and creates a smooth canvas for your artwork. -
Cut the circle:
Place your circular template or mold lightly on top of the clay. Using your needle tool, trace and cut a clean circle around the perimeter. Remove the excess clay. -
Shape the rim:
If using a GR Form, drape the clay over it and gently press the edges down to create the rim. If using a standard plate as a mold, lay the slab inside it. Gently smooth the rim with a damp sponge to soften the square cut edge into a rounded lip. -
Dry to leather hard:
Let the plate set up until it reaches a leather-hard state. It should be firm enough to handle without flopping but still cool to the touch. This is the perfect stage for decorating.
Warped Rim Woes?
Plates love to warp. Dry them very slowly by covering them loosely with plastic for a few days before exposing them to open air. Weighing down the center with a sandbag while drying can also help.
Step 2: Designing the Surface
-
Plan your composition:
Using a very light touch with a pencil, you can sketch your placement directly onto the leather-hard clay. The pencil lines will burn out in the kiln, leaving only your underglaze design. -
Paint the first leaf:
Load your fine liner brush with dark brown underglaze. Start with the central leaf shape, painting the outline first with a steady hand. The line doesn’t need to be perfect; a little wavering adds to the handmade charm. -
Add leaf veins:
Inside the leaf outline, paint a central line and then add angled lines for the veins. Keep these lines thinner than the outline if possible. -
Create the vine stem:
On the left side of the plate, paint a long, curving line for a vine stem. Let it drift naturally from the center toward the edge. -
Populate the vine:
Add small, almond-shaped leaves along the vine stem. For variety, you can fill some leaves in slightly with watered-down underglaze for a lighter brown tone, or leave them as outlines. -
Add floral details:
Use the tip of your brush to add small dots or berry clusters on delicate stems. Include a simple five-petal flower outline near the top for balance. -
Balance the layout:
Step back and look at the negative space. Add additional loose leaves or seed pods where the design feels empty, ensuring the pattern flows around the circle rather than sitting rigidly in the middle. -
Clean up smudges:
If you drip any underglaze, let it dry completely before gently scraping it off with an X-Acto knife or needle tool. Wiping it while wet will likely smear it into the clay pores.
Step 3: Finishing and Firing
-
Bisque fire:
Once the plate is bone dry, load it into the kiln for a bisque fire (usually cone 04 or 06). -
Apply clear glaze:
After the bisque firing, wipe the plate with a damp sponge to remove dust. Dip or brush on a clear matte or satin glaze over the entire piece. Avoid glossy glazes if you want to maintain that natural, earthy look. -
Final fire:
Fire the plate to the final temperature required by your specific clay and glaze (typically cone 5 or 6 for stoneware). This will melt the glaze and seal your beautiful brushwork.
Try Mishima
Instead of painting on top, carve your lines with a needle tool, fill the grooves with underglaze, and scrape the surface clean. This creates an inlaid effect that is flush with the surface.
Your finished plate is now ready to bring a touch of handcrafted warmth to your next meal