A good ceramic paint palette makes painting feel smoother, calmer, and honestly a lot more fun. I love when a palette is both practical (hello, mixing wells and brush rests) and pretty enough to leave out on the table.
Classic Oval Palette With Shallow Mixing Wells

Embrace the timeless appeal of a traditional painter’s tool with this handcrafted oval ceramic palette. Featuring a creamy, speckled finish that mimics natural stone, its thoughtful design balances a generous central mixing area with perfectly sized surrounding wells for your pigments.
Step-by-Step Tutorial
Materials
- Speckled stoneware clay (white or buff)
- Rolling pin
- Wooden guide strips (1/4 inch thick)
- Oval paper template (approx. 8×10 inches)
- Needle tool or fettling knife
- Kemper tool or carving loop tools (various sizes)
- Sponge
- Rib tool (kidney shaped, wood or rubber)
- Clear or transparent white glaze
- Canvas work surface
- Small bowl for water
Step 1: Prepping the Slab
-
Wedge the Clay:
Begin by thoroughly wedging your speckled stoneware clay. This removes air bubbles that could cause explosions in the kiln and ensures the clay particles are aligned for easier working. -
Roll the Slab:
Place your clay on a canvas surface between two 1/4 inch thick wooden guide strips. Roll the clay out firmly until your rolling pin rests flat on the guides, ensuring a perfectly even thickness across the entire slab. -
Smooth the Surface:
Before cutting, take a rubber or wooden rib tool and compress the surface of the slab. I like to do this in multiple directions to align the clay particles, which helps prevent warping later during the drying process.
Step 2: Shaping the Palette
-
Cut the Shape:
Place your paper oval template onto the smoothed slab. Using a needle tool or fettling knife, carefully trace around the template, keeping the blade vertical to create a clean, 90-degree edge. -
Refine the Edges:
Once the oval is cut, use a damp sponge to gently round over the sharp top and bottom edges of the rim. This makes the palette more comfortable to hold and less likely to chip. -
Plan the Wells:
Lightly sketch the layout of your wells onto the clay surface using a dull pencil or tool. Draw a large circle in the center for mixing, surrounded by 8-10 smaller circles for individual paints.
Clean Separation
Keep the walls between wells distinct and sharp. If they are too low or rounded, runny watercolors might bleed from one well into another during use.
Step 3: Carving the Wells
-
Hollow the Center:
Use a large loop tool to begin carving out the central mixing area. Start in the middle and work your way out to your sketched line, keeping the depth consistent (leave about 1/8 inch of clay at the bottom). -
Carve the Paint Cups:
Switch to a smaller loop tool that matches the diameter of your outer circles. Carve these wells, making sure each one has a scooped, concave bottom rather than flat corners, as this makes it easier to clean paint out later. -
Smooth the Transitions:
Use a damp finger to smooth the interior walls of each carved well. You want to eliminate any tool marks or ridges where paint could get stuck. -
Refine the Lip:
Pay special attention to the ‘walls’ between the wells. Gently compress these raised areas with a rib or sponge to ensure they are smooth and strong.
Add a Brush Rest
While the clay is leather hard, carve two small parallel notches on the right side of the rim to hold your paintbrush safely when not in use.
Step 4: Drying and Firing
-
Slow Drying:
Place the palette on a board covered with newspaper. Loosely cover it with plastic for the first 24 hours to let moisture even out, then uncover it to let it reach a bone-dry state over several days. -
Bisque Fire:
Load the bone-dry piece into your kiln for a bisque firing (typically Cone 04). This initial firing hardens the clay and prepares it for glazing. -
Wipe Down:
After the kiln cools, remove the palette and wipe it down with a damp sponge to remove any kiln dust that might prevent the glaze from adhering properly. -
Glazing:
Dip the palette into a clear or transparent white glaze, or brush it on evenly. The transparency is crucial because it allows the beautiful natural speckles of the clay body to show through. -
Wipe the Foot:
Use a wax resist or a damp sponge to completely remove any glaze from the bottom surface (the foot) of the palette so it doesn’t fuse to the kiln shelf. -
Glaze Fire:
Fire the piece again to the maturity temperature of your specific clay and glaze combo (often Cone 5 or 6 for stoneware). High firing ensures the clay vitrifies completely, making it non-porous and stain-resistant.
Now you have a durable, custom tool that makes every mixing session feel a little more artistic


Round Palette With a Center Well and Petal Wells
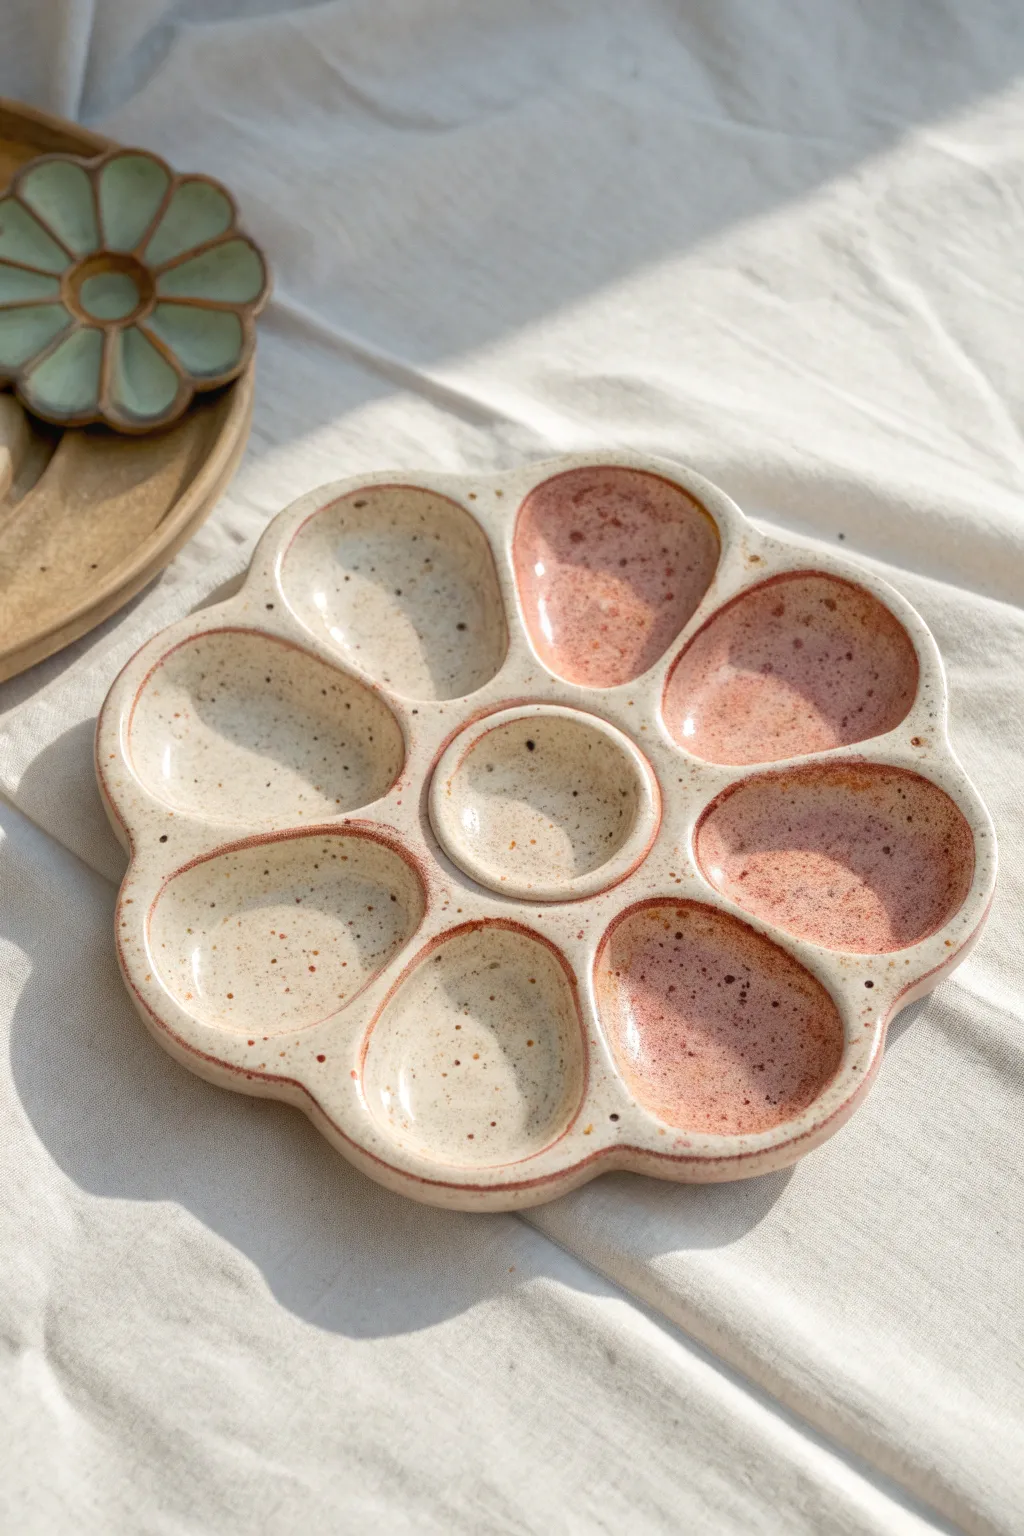
Transform a lump of clay into this stunning, functional flower-shaped palette perfect for mixing watercolors or gouache. The design features a central circular well for water or a primary color, surrounded by eight petal-shaped wells, all finished with a glossy speckled glaze that highlights portions of the clay.
How-To Guide
Materials
- Speckled Stoneware Clay (e.g., cone 5/6)
- Pottery wheel (optional)
- Rolling pin and canvas (if hand-building)
- Needle tool
- Loop carving tool
- Sponge
- Rib tool (flexible metal or rubber)
- Clear Glaze (glossy)
- Pink Reactive Glaze (or a semi-transparent pink)
- Kiln
- Small paintbrush for glazing
- Wax resist (optional)
Step 1: Forming the Base
-
Prepare the clay:
Begin with a ball of speckled stoneware clay, roughly the size of a large grapefruit. Wedge it thoroughly to remove any air pockets and ensure even consistency. -
Roll out the slab:
If hand-building, roll the clay out on a canvas surface to a thickness of about 3/4 inch. You want it thick enough to carve into later without breaking through the bottom. -
Cut the rough circle:
Place a circular template (a bowl works well) on the clay and trace around it with a needle tool to cut out your main disc shape. Smooth the raw edge with a damp sponge. -
Mark the design:
Lightly sketch the design onto the surface of the clay using a needle tool. Draw a small circle in the exact center, then sketch eight petal shapes radiating outward from that center ring.
Smooth Operator
Use the back of a spoon to burnish the wells before the clay dries completely. This compresses the clay particles for a super-smooth surface that’s easier to clean.
Step 2: Carving the Wells
-
Carve the center well:
Using a loop tool, carefully scoop out the clay from the central circle. Go slow and check the depth frequently—you want a distinct well, but the bottom should remain at least 1/4 inch thick. -
Begin the petal wells:
Start carving out the first petal shape. Use the loop tool to create a smooth, concave depression. Aim for a seamless curve so paint won’t get stuck in sharp corners later. -
Refine the remaining petals:
Continue carving the remaining seven petals. I find it helpful to rotate the piece constantly so I am always carving at a comfortable angle. -
Shape the rim:
Once all wells are carved, use a sponge or your fingers to gently pinch and round the outer rim of the palette to follow the curves of the petals, giving it that scalloped flower edge. -
Smooth the ridges:
Use a damp sponge or a soft rib to smooth the raised ridges between the wells. These walls need to be distinct but rounded so they are pleasant to touch and easy to clean.
Uneven Drying?
If the edges curl up while drying, weight the center gently with a small sandbag or dry the piece very slowly under loose plastic to ensure flat results.
Step 3: Firing and Glazing
-
Bisque fire:
Allow the piece to dry slowly until bone dry, then bisque fire it in the kiln according to your clay body’s specifications (usually Cone 04). -
Clean the bisque:
Wipe the fired piece with a damp sponge to remove any kiln dust, which can prevent glaze from adhering properly. -
Apply the pink glaze:
Select alternating petals to glaze with color. Using a small brush, apply two to three coats of the pink reactive glaze into four of the petal wells. Let each coat dry before adding the next. -
Glaze the center:
You can choose to glaze the center well pink or leave it neutral. In this design, the center and alternating petals are kept fairly neutral, but adding a touch of clear glaze is essential. -
Apply clear glaze:
Brush a coat of clear, glossy glaze over the entire top surface of the palette, including over the pink sections and the bare clay sections. This seals the clay and makes it waterproof for mixing paint. -
Wipe the foot:
Ensure the bottom of the palette is completely free of glaze. Use a wet sponge to wipe back any drips on the foot or underside. -
Glaze fire:
Fire the palette again to the temperature required for your glaze and clay body (typically Cone 5 or 6). This final firing will melt the glaze and bring out the speckles in the clay.
Once cooled, your custom palette is ready to be filled with your favorite paints and admired on your creative desk


Rectangular Watercolor Palette With a Long Mixing Strip
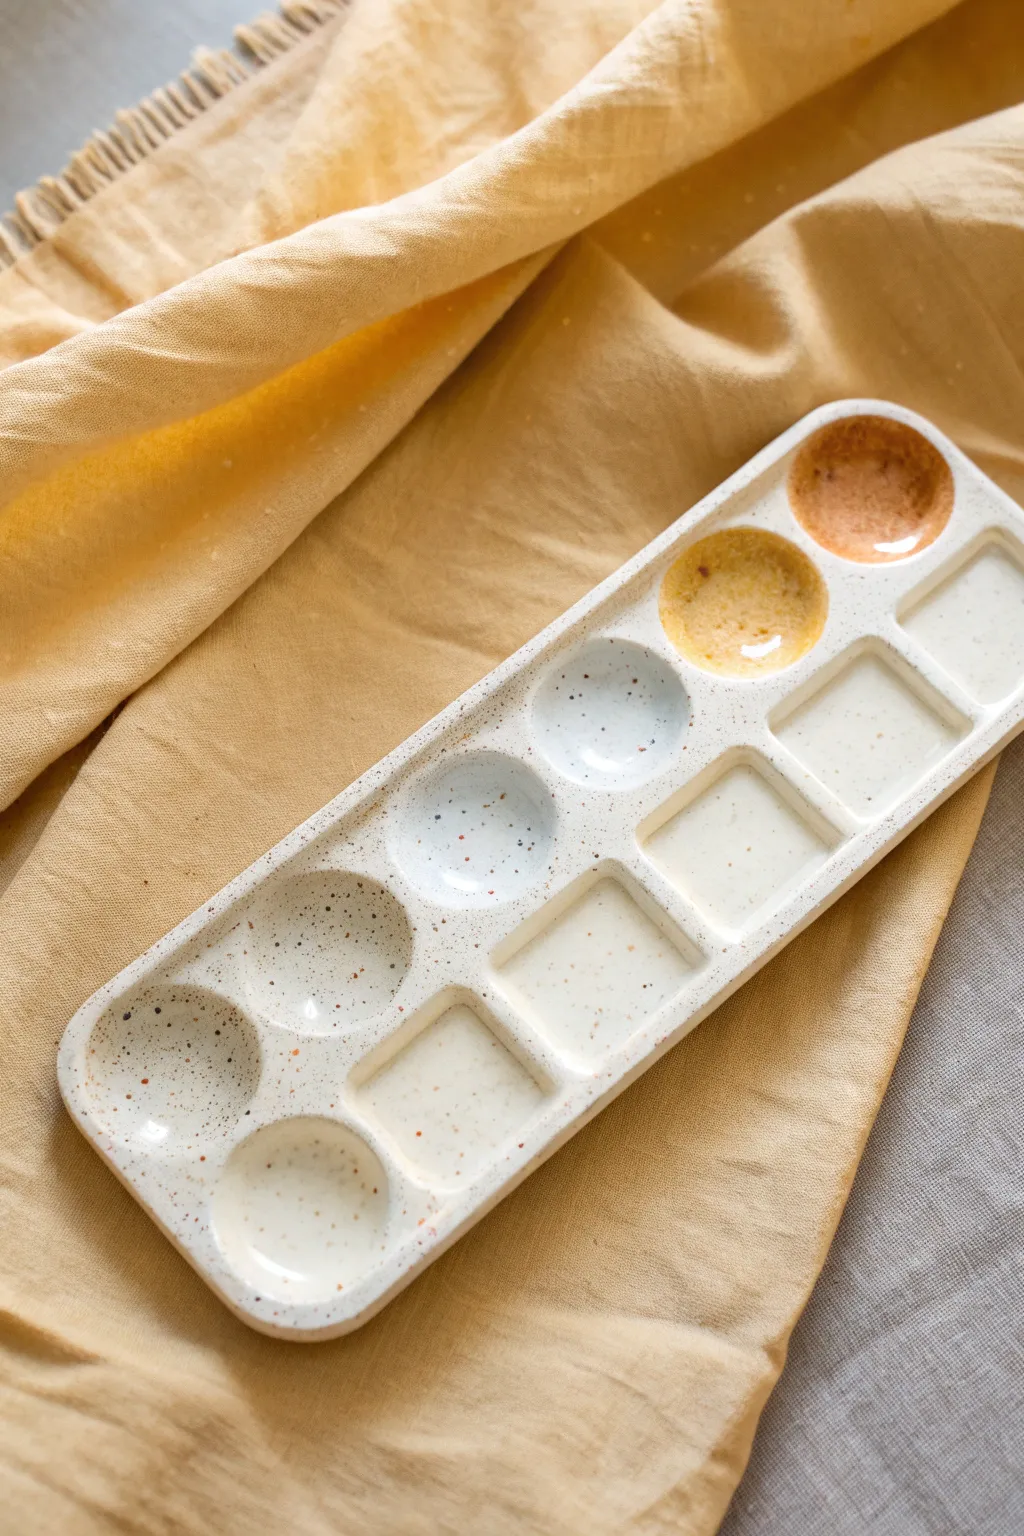
Create a sleek and functional art tool with this rectangular ceramic palette featuring both round and square wells. The speckled clay body adds a charming organic texture, while the distinct well shapes offer versatile mixing options for your watercolor practice.
Detailed Instructions
Materials
- Speckled stoneware clay (white base with grog/speckles)
- Clean canvas or cloth-covered work surface
- Rolling pin with guide strips (approx. 1/4 inch thickness)
- Needle tool or fettling knife
- Paper template (rectangle, approx. 4″ x 10″)
- Smoothing rib (rubber or metal)
- Small carving tools (loop tool or specific well-carving tool)
- Sponge
- Water
- Measuring ruler
- Sandpaper (for greenware stage)
- Clear glaze (food safe recommended)
- Kiln access
Step 1: Shaping the Slab Base
-
Prepare the clay:
Begin by wedging your speckled stoneware clay thoroughly to remove any air bubbles. This ensures a uniform consistency and prevents cracking later in the kiln. -
Roll out the slab:
Place the clay on your canvas workspace. Using guide strips and a rolling pin, roll the clay out into a smooth, even slab that is approximately 3/4 inch thick. This extra thickness is crucial because you will be carving into it rather than building up walls. -
Smooth the surface:
Take your rib tool and gently compress the clay slab on both sides. This aligns the clay particles, strengthening the piece and creating a pristine surface for your palette. -
Cut the rectangle:
Lay your rectangular paper template onto the slab. Using a needle tool or fettling knife, cut cleanly around the template. I like to keep the knife vertical to ensure straight edges. -
Soften the corners:
Use your fingers or a damp sponge to gently round off the sharp corners of the rectangle. This gives the palette a friendlier, more finished feel similar to the reference image.
Warping Woes?
If your slab curls up while drying, place a drywall board or wooden ware board directly on top of the rim to gently weight it down during the leather-hard stage.
Step 2: Carving the Wells
-
Mark the layout:
Lightly trace your design onto the slab surface with a needle tool. Draw a grid that accommodates two rows: one row of five circles and one row of five squares. Leave a central spine of about 1/2 inch between the two rows. -
Carve the round wells:
Using a rounded loop tool, carefully scoop out the clay from the circular markings. Start in the center and work outward, creating a smooth, bowl-like depression. Aim for a consistent depth, leaving at least 1/4 inch of clay at the bottom. -
Carve the square wells:
Switch to a square-tipped loop tool or carefully use a smaller ribbon tool to carve out the square sections. Maintain straight walls and sharp corners to contrast with the round wells. -
Refine the edges:
Once the bulk of the clay is removed, use a damp fingertip to smooth the interior of each well. Pay special attention to the rims where the wells meet the flat surface, softening any sharp burrs. -
Dry slowly:
Place the palette on a ware board and cover it loosely with plastic. Let it dry very slowly to the leather-hard stage to prevent warping, which is common with flat slabs.
Step 3: Finishing and Firing
-
Sanding the greenware:
Once the piece is bone dry (greenware stage), lightly sand any rough spots on the edges or inside the wells. Wearing a mask is essential here, or do this outdoors. -
Bisque fire:
Load the bone-dry palette into the kiln for a bisque firing (usually around Cone 04). This prepares the clay to accept glaze. -
Wipe clean:
After the kiln has cooled, remove the palette and wipe it down with a damp sponge to remove any dust created during firing. -
Apply clear glaze:
Dip the entire palette into a clear glaze, or brush on three even coats. The clear glaze will seal the porous clay while allowing the beautiful speckles to show through. -
Clean the foot:
Use a sponge or wax resist to ensure the entire bottom surface of the palette is free of glaze. If glaze remains on the bottom, it will fuse to the kiln shelf. -
Glaze fire:
Fire the palette again to the maturity temperature of your specific clay and glaze (often Cone 5 or 6 for stoneware). This vitrifies the clay, making it waterproof and durable.
Add a Resting Nook
Before firing, carve a small, shallow U-shaped notch on the right edge of the palette. This creates a perfect spot to rest your paintbrush between colors.
Enjoy mixing your favorite hues in your custom handmade ceramic palette


Thumb-Hole Palette for Easy Holding While Painting
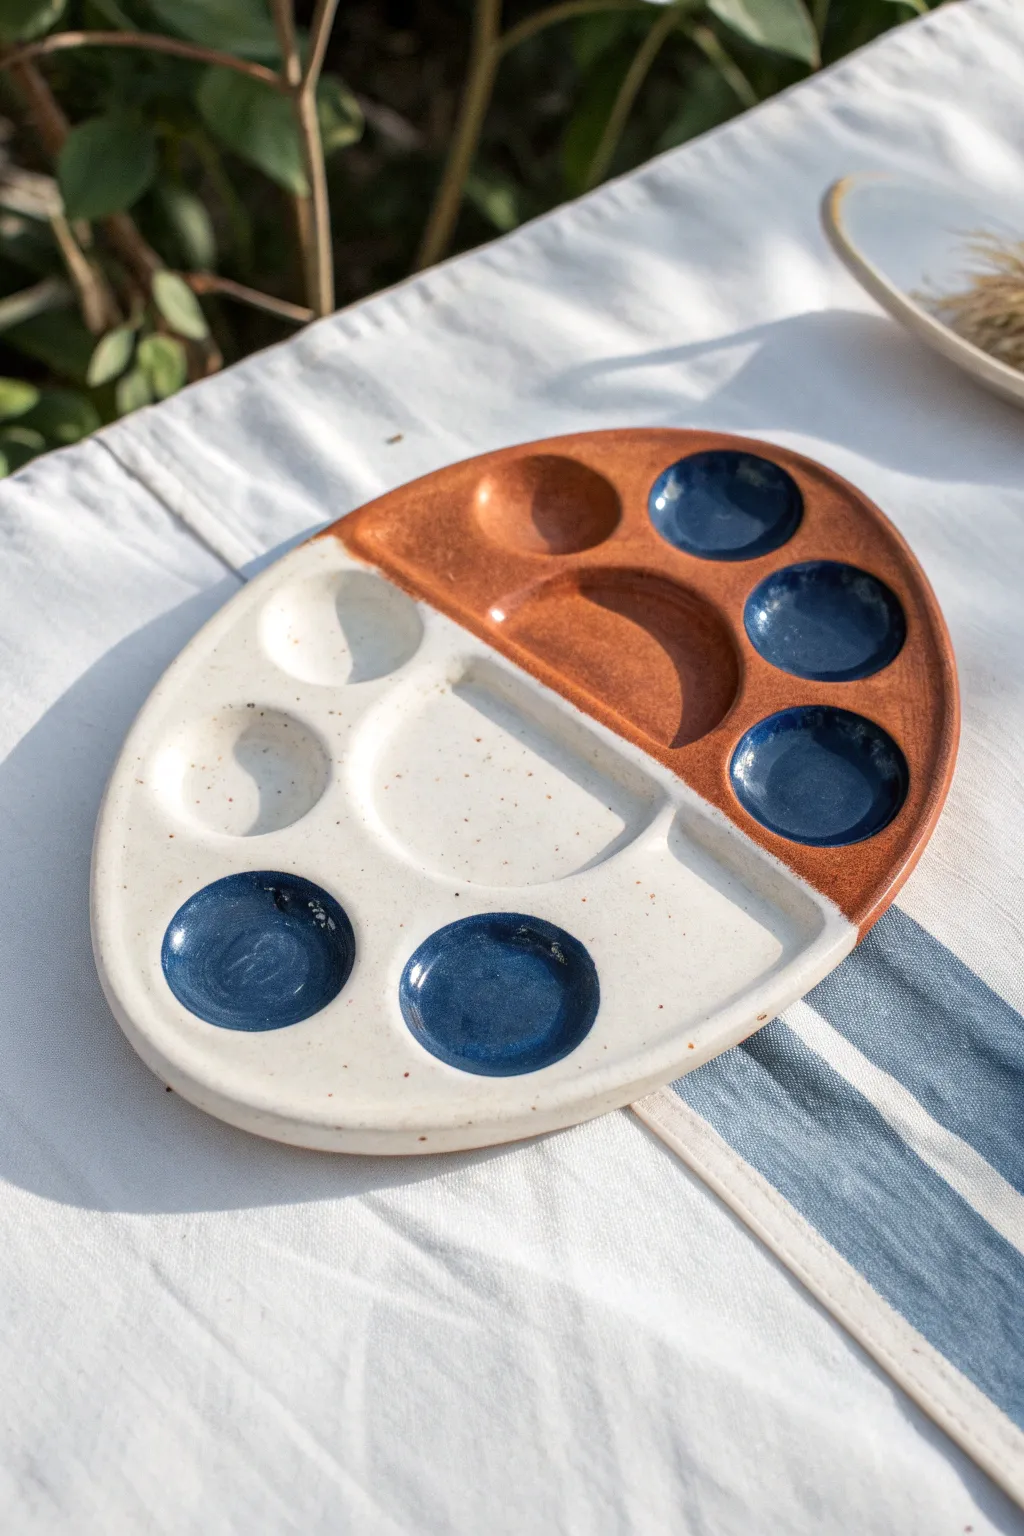
This handcrafted ceramic palette balances form and function with its comfortable oval shape and classic thumb hold for easy gripping. The design features a striking split-glaze finish, combining natural raw stoneware warmth with a crisp, speckled white and deep glossy blue wells.
Step-by-Step
Materials
- White or speckled stoneware clay body (approx. 1-1.5 lbs)
- Rolling pin
- Guide sticks or slats (1/4 inch thickness)
- Rib tool (kidney shaped, rubber or metal)
- Needle tool
- Fettling knife
- Oval template (paper or cardstock)
- Sponge
- Small trimming loop tool or spoon
- Bisque firing kiln access
- Glaze firing kiln access
- Glossy white glaze (speckled optional)
- Glossy dark cobalt blue glaze
- Wax resist
- Brush for glazing
Step 1: Shaping the Clay Foundation
-
Prepare the slab:
Begin by wedging your clay thoroughly to remove air bubbles. Flatten it slightly with your palm, then use a rolling pin and guide sticks to roll out an even slab that is approximately 1/4 inch thick. -
Smooth the surface:
Before cutting, take a rubber rib tool and compress the clay surface on both sides. This aligns the clay particles, preventing warping later, and creates that smooth, professional finish. -
Cut the oval shape:
Place your oval paper template lightly onto the slab. Trace around it carefully with a needle tool or fettling knife to cut out the main palette shape. -
Refine the edges:
Dip a small sponge in water and wring it out almost completely. Gently round and smooth the sharp cut edges of the oval to ensure it will be comfortable to hold.
Warping Worries?
If your slab curls while drying, flip it over daily and weigh down the edges with small bean bags or weights to keep it perfectly flat
Step 2: Creating Wells and Mixing Areas
-
Mark the layout:
Lightly sketch the position of your mixing area (the large central crescent), the thumb hole, and the smaller paint wells using the very tip of your needle tool. -
Form the mixing area:
Use a carving tool or a simple spoon to gently press and scoop out clay for the large central mixing area. Don’t go too deep; you just need a shallow depression to hold mixed paint. -
Create the paint wells:
For the circular wells, press your thumb or a rounded tool directly into the clay at your marked spots. Rotate your thumb slightly to widen and smooth the indentation. -
Cut the thumb hole:
Locate the spot where your thumb will naturally rest. Use a small circular cutter or your needle tool to cut a hole completely through the slab. -
Smooth the hole:
This step is crucial for comfort. Spend extra time smoothing the interior edges of the thumb hole with a damp sponge so it won’t be sharp against your skin. -
Dry slowly:
Place the palette on a board covered with newspaper or canvas. Cover it loosely with plastic to let it dry very slowly to the bone-dry stage. This prevents curling. -
Bisque fire:
Once fully dry, fire the piece in a kiln to cone 04 (or your clay’s specific bisque temperature) to prepare it for glazing.
Add Texture
Before drying, press real leaves into the ‘raw’ clay section. When the glaze melts later, the organic texture will contrast beautifully with the smooth areas
Step 3: Glazing the Design
-
Clean the bisque:
Wipe the fired piece with a damp sponge to remove any kiln dust, which can prevent glaze from adhering properly. -
Tape the division:
To achieve the clean split look, apply a line of masking tape or wax resist diagonally across the palette, dividing the ‘white’ section from the ‘raw’ section. -
Apply white glaze:
Pour or brush the glossy white glaze onto the lower section of the palette, covering the mixing area and the surrounding flat space. Avoid the specific wells you want to be blue. -
Glaze the blue wells:
Using a smaller brush, carefully fill the interior of five specific paint wells with the deep cobalt blue glaze. I find dropping a pool of glaze in the center and pushing it to the edges works best. -
Leave areas raw:
Ensure the top section (the reddish-brown area in the reference) remains unglazed. If you happen to smudge glaze there, wipe it off cleanly with a sponge. -
Glaze the upper blue wells:
Apply the same cobalt blue glaze to the interiors of the wells located in the unglazed/raw clay section. -
Clean the foot:
Flip the palette over and carefully wipe away any glaze that may have dripped onto the bottom, ensuring it won’t stick to the kiln shelf. -
Final firing:
Load the palette into the kiln for the glaze firing (typically Cone 5 or 6 for stoneware). Fire according to your clay and glaze specifications.
Enjoy using your custom palette for your next watercolor masterpiece

The Complete Guide to Pottery Troubleshooting
Uncover the most common ceramic mistakes—from cracking clay to failed glazes—and learn how to fix them fast.
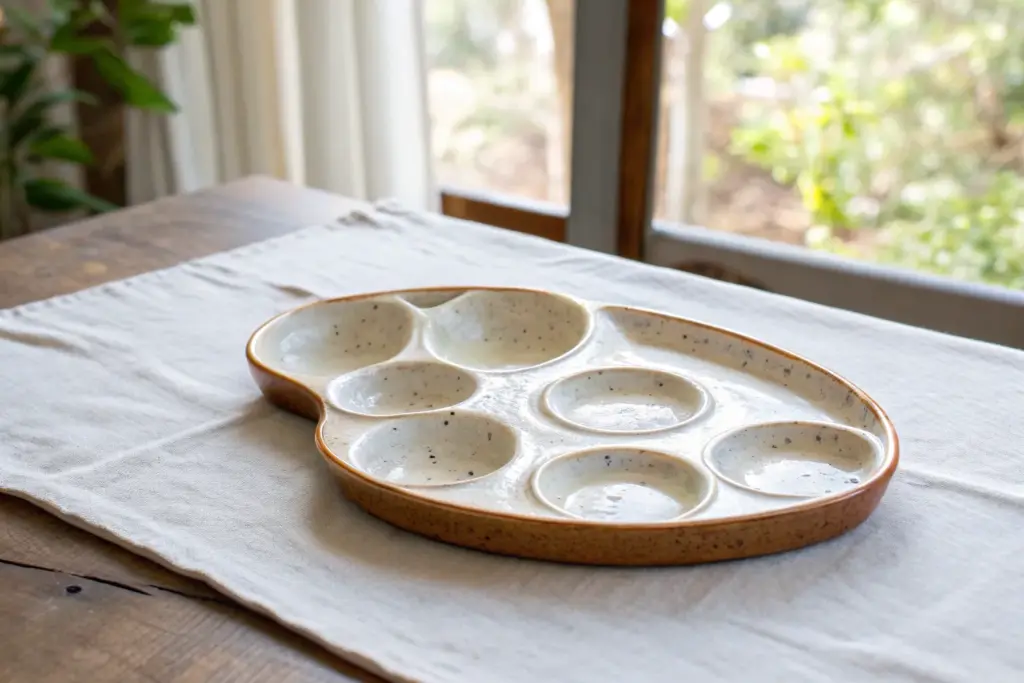
Built-In Brush Rest Notches Along the Rim
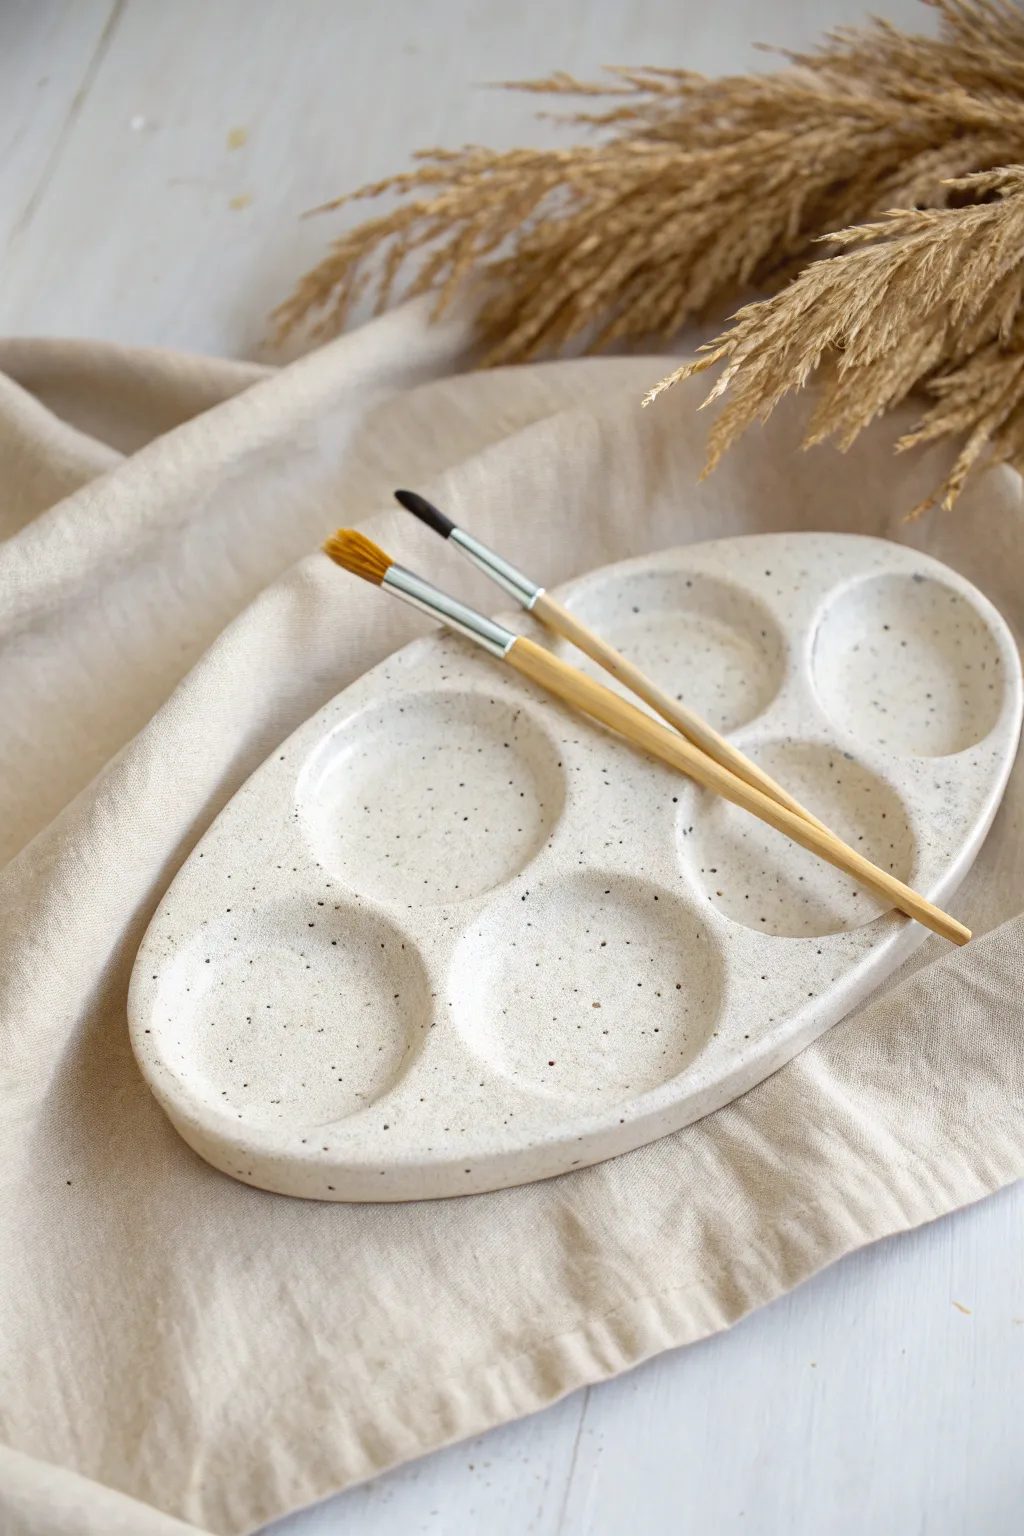
Create your own functional art tool with this elegant, egg-shaped ceramic palette featuring a lovely speckled finish. Its organic form and six deep wells make it perfect for mixing watercolors or gouache while adding a professional touch to your studio setup.
Step-by-Step Tutorial
Materials
- Speckled stoneware clay (white or buff with grog)
- Small rolling pin
- Slab guides or wooden slats (approx. 1/4 inch thick)
- Needle tool
- Sponge
- Rib tool (flexible metal or rubber)
- Round contour tool or small smooth stone (for pressing wells)
- Loop tool (optional for carving)
- Clear transparent glaze (food safe recommended)
- Kiln access
- Canvas work surface
Step 1: Prepping and Rolling the Slab
-
Wedge the clay:
Begin by thoroughly wedging a ball of speckled stoneware clay to remove air bubbles and ensure an even consistency. A well-wedged ball should feel firm but pliable, like stiff bread dough. -
Set up your workspace:
Lay down your canvas cloth to prevent sticking. Place two wooden slab guides on either side of your clay ball to ensure the final slab is perfectly even in thickness. -
Roll the slab:
Use your rolling pin to flatten the clay between the guides. Focus on rolling from the center outwards, flipping the clay occasionally to keep the texture uniform on both sides. -
Smooth the surface:
Before cutting, run a flexible rib tool gently over the entire surface of the slab. This compresses the clay particles and creates that silky smooth finish we want for the painting surface.
Step 2: Shaping the Form
-
Cut the outline:
Using a needle tool, freehand an asymmetrical egg shape or oval. Aim for a length of about 8-9 inches. Don’t worry about perfect symmetry; the organic look is part of the charm. -
Refine the edges:
Take a damp sponge and run it along the cut edge to soften the sharp corner. I like to round it over slightly so it feels comfortable in the hand later. -
Plan the layout:
Lightly trace six circles onto the slab surface using a very light touch, just to map out where your paint wells will go. Leave ample space between them for structural integrity.
Clay Body Tip
For maximum specking, avoid filtering your clay slip if you make your own. If buying, look for ‘Dalmatian’ or ‘Speckled Buff’ varieties.
Step 3: Creating the Wells
-
Press the wells:
Using a rounded contour tool, a specialized slump mold, or even a very smooth, round river stone, gently press into the marked circles to create depressions. -
Support the clay:
As you press down to create the wells, gently cup underneath the slab with your other hand to prevent the clay from stretching too thin or tearing at the bottom. -
Deepen and define:
Work in circular motions to widen the wells slightly. Ensure the walls between the wells remain standing but slope gently into the depressions for easy cleaning later. -
Raise the rim:
Gently pinch and lift the outer edge of the entire palette upward slightly. This creates a small lip that prevents water or paint from spilling off the side of the palette. -
Create the brush rests:
Unlike the prompt title suggests, this specific design uses the natural curvature of the raised rim. However, you can use your pinky finger to gently depress two small notches on the right side of the rim to hold brushes securely.
Warping Fix
If the palette curls up while drying, gently weigh down the edges with small sandbags or rice bags to encourage it to dry flat.
Step 4: Finishing and Firing
-
Slow drying:
Loosely cover the palette with plastic and let it dry very slowly for several days. This helps prevent warping, which is common with flat slab pieces. -
Bisque fire:
Once bone dry, fire the piece to bisque temperature (usually cone 04 or 06, depending on your clay body specifications). -
Glaze application:
Wipe the bisque ware with a damp sponge to remove dust. Apply 2-3 coats of a high-gloss clear transparent glaze. The clear glaze is crucial because it allows the natural speckles of the clay to show through. -
Wipe the foot:
Carefully wipe all glaze off the very bottom of the palette so it doesn’t stick to the kiln shelf during final firing. -
Glaze fire:
Fire the palette to the maturity temperature of your clay (likely Cone 5 or 6 for stoneware). Allow the kiln to cool completely before removing your new tool.
Now you have a stunning, durable palette ready for your next watercolor masterpiece
Palette With an Attached Rinse Cup
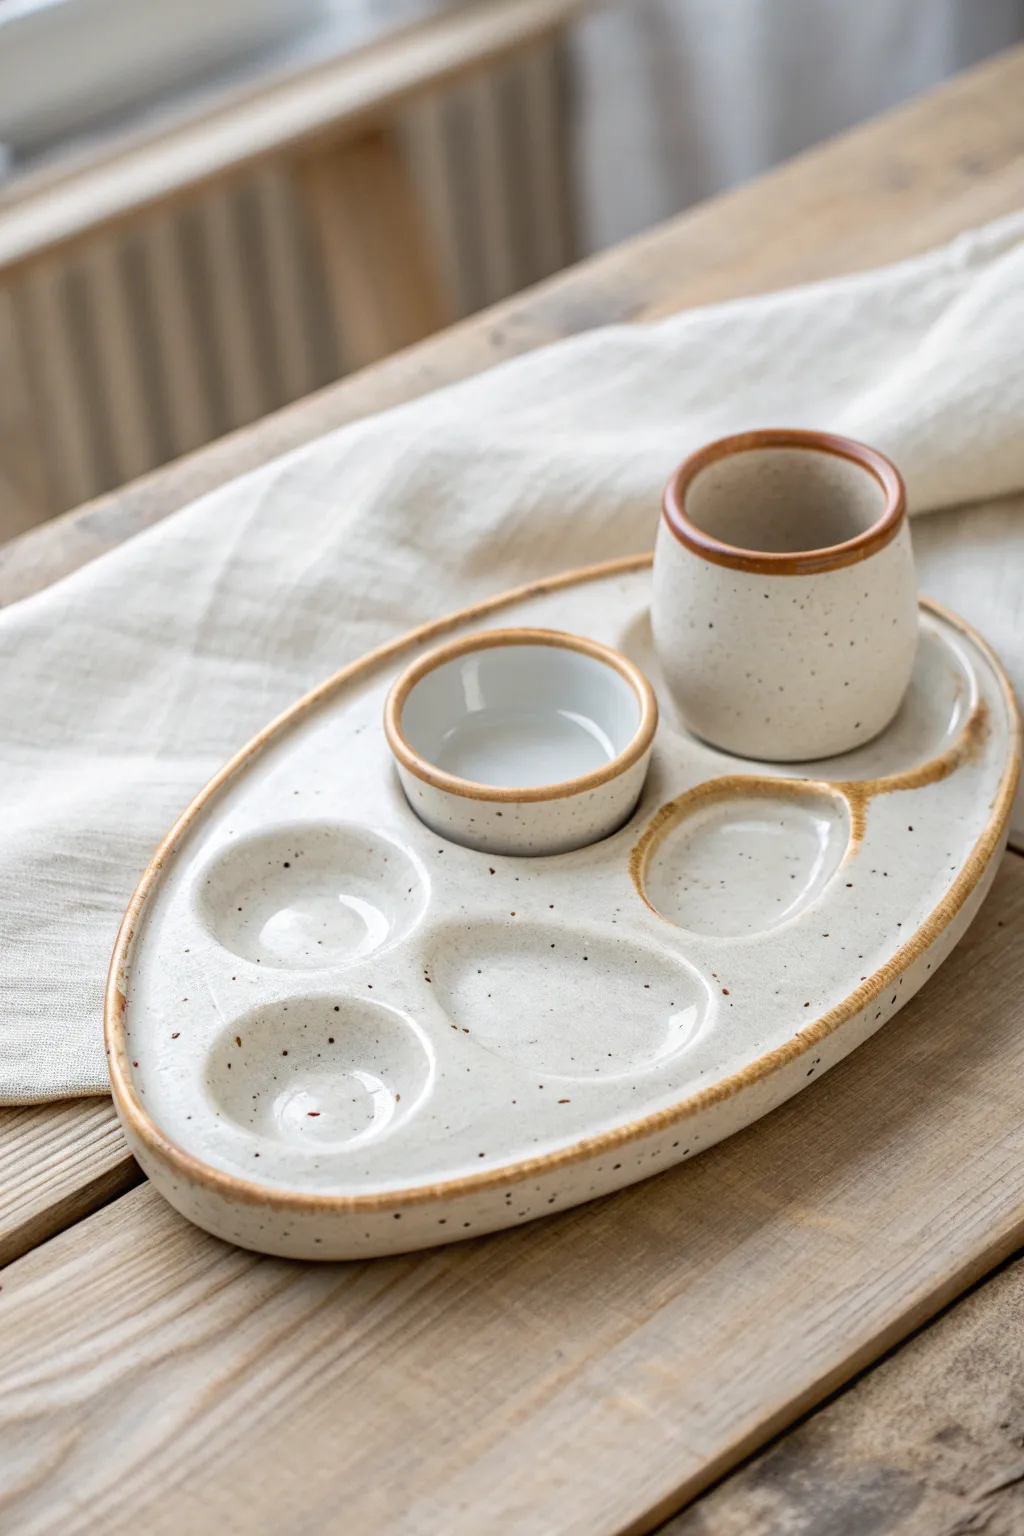
This elegant ceramic set features a functional oval tray designed to hold removable cups alongside integrated paint wells. The speckled clay body and warm brown rim give it a cozy, artisanal feel perfect for your creative space.
Detailed Instructions
Materials
- Speckled stoneware clay (approx. 2-3 lbs)
- Rolling pin
- Canvas work surface or slab mat
- Oval paper template
- Needle tool
- Fettling knife
- Ribs (kidney-shaped scrapers)
- Sponge
- loop tool or carving tool
- Creamy matte white glaze
- Iron oxide wash or brown underglaze
- Kiln access
Step 1: Forming the Base Tray
-
Roll the Slab:
Begin by wedging your speckled stoneware clay to remove air bubbles. Roll out a slab to an even thickness of about 3/8 inch. I like to flip the clay and roll from multiple directions to ensure the clay particles are compressed well. -
Cut the Shape:
Place your oval paper template onto the slab. Using your needle tool or fettling knife, cut vertically around the template to create the main tray shape. -
Smooth the Edges:
Run a damp sponge or your finger along the cut edge to soften the sharp corners. This prevents chipping later and gives the piece a more refined look. -
Lift the Rim:
Gently lift the outer edge of the oval slab upwards with your fingers. Use a small wooden rib on the outside to help shape a slight vertical wall, creating a shallow tray form. -
Create the Wells:
Decide on the layout for your paint wells. You can either press rounded tools (like the back of a measuring spoon) into the soft clay or add coils to build walls for the dividers. For this look, gentle depressions work best. -
Define the Cup Holder:
Determine where your water cup will sit. Ensure this area is completely flat so the removable cup won’t wobble. Using a loop tool, you can carve a very shallow recessed circle here to help locate the cup.
Clean Rims
For a distinct rim color, apply wax resist over the brown oxide painted rim before dipping the whole piece in white glaze. The glaze will bead off the brown edge.
Step 2: Creating the Accessories
-
Throw or Handbuild the Cup:
Create the main rinse cup. If handbuilding, roll a rectangular slab, cylinder form it, and attach a round base. If wheel throwing, throw a simple cylinder with slightly tapered walls. -
Refine the Cup Rim:
Smooth the drinking rim of the cup excessively. It needs to look rounded and soft to match the aesthetic of the tray. -
Make the Small Bowl:
Form a tiny pinch pot or throw a miniature bowl. This will serve as the smaller insert shown in the center of the palette. -
Check the Fit:
While the clay is leather hard but not fully dry, place the cup and small bowl onto the tray to ensure they fit their designated spots. Adjust as necessary before they stiffen up.
Texture Play
Before the clay dries, gently press a piece of linen fabric into the back of the slab. This adds a secret texture that also helps the palette grip the table.
Step 3: Glazing and Finishing
-
Bisque Fire:
Allow all pieces to dry slowly to the greenware stage. Once bone dry, load them into the kiln for a bisque firing (usually Cone 04 or 06). -
Highlight the Rims:
Using a small brush, apply a line of iron oxide wash or brown underglaze specifically to the rim of the tray, the rim of the cup, and the rim of the small bowl. Wipe away any excess that drips down. -
Apply the Base Glaze:
Dip or brush your creamy matte white glaze over the entire piece. If dipping, hold the pieces by the foot or use tongs. -
Review the Speckles:
The speckled clay body will naturally show through a semi-opaque glaze. If your glaze is too thick, it might hide the specks, so aim for a medium application. -
Clean the Foot:
Wipe the glaze off the bottom of the tray and the bottoms of the cups with a wet sponge. This prevents them from sticking to the kiln shelf. -
Glaze Fire:
Fire the pieces again to the maturity temperature of your clay and glaze (often Cone 5 or 6 for stoneware).
Once cooled, your custom palette is ready to hold your paints and water for your next masterpiece


What Really Happens Inside the Kiln
Learn how time and temperature work together inside the kiln to transform clay into durable ceramic.
Matching Multi-Piece Set: Palette, Water Cup, and Brush Rest
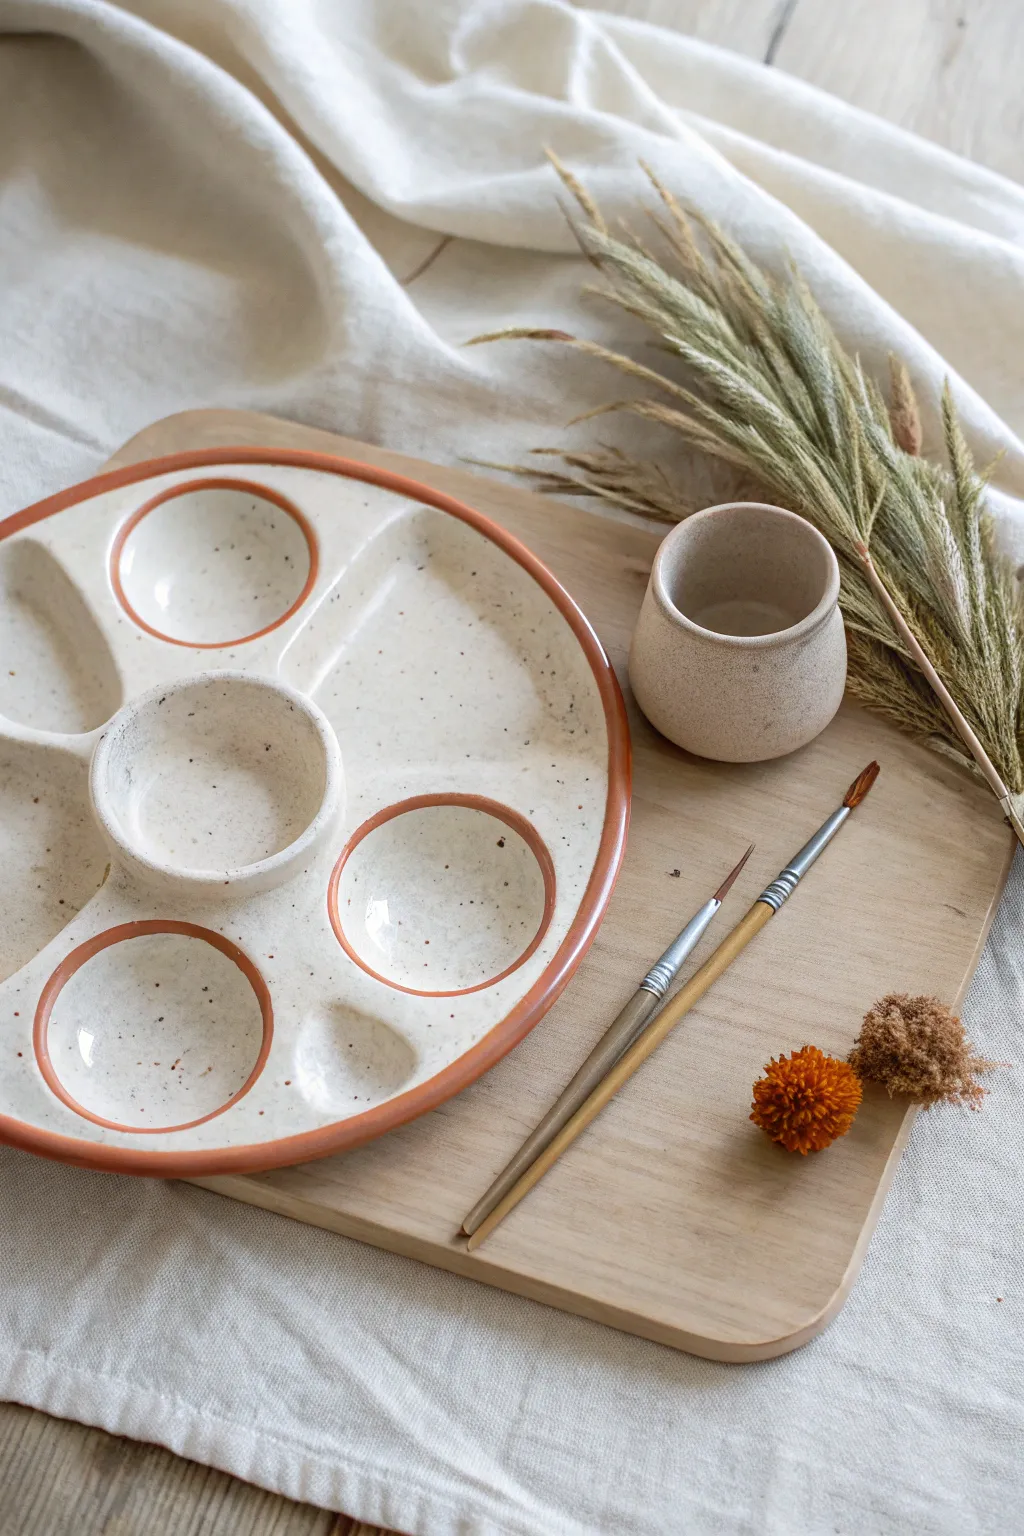
This project guides you through creating a cohesive and functional ceramic set featuring a multi-well palette and a matching water cup. The look is defined by a warm, speckled cream glaze that contrasts beautifully with raw terracotta edges, bringing an earthy, artisanal feel to your workspace.
Step-by-Step Guide
Materials
- Earthenware or stoneware clay (terracotta color recommended)
- Slab roller or rolling pin with guide sticks (approx. 1/4 inch thick)
- Circular template or large bowl (approx. 8-10 inches diameter)
- Small circular cookie cutters or cups (for well sizing)
- Needle tool
- Loop tool for carving
- Pottery sponge
- Rib tool (kidney)
- Speckled cream or ‘oatmeal’ brush-on glaze
- Wax resist (optional)
- Fan brush or soft glazing brush
- Kiln access
Step 1: Forming the Palette Base
-
Roll the slab:
Begin by wedging your clay thoroughly to remove air bubbles. Roll out a consistent slab about 1/4 inch thick. I find using wooden guide sticks on either side of the rolling pin ensures an even thickness throughout. -
Cut the shape:
Place your large circular template onto the slab and trace around it with a needle tool to cut the main palette shape. Smooth the cut edge immediately with a damp sponge. -
Establish the layout:
Lightly sketch your design onto the clay surface using the needle tool. For this specific look, aim for a central circular well, surrounded by four or five outer circular wells, and perhaps a larger mixing area on one side. -
Create the wells:
There are two ways to do this: you can press small molds into the wet clay, or build them up. To match the image, hand-building is best. Roll thick coils of clay and form rings where your wells will be. -
Attach the coils:
Score and slip the base where the rings will sit. Press the clay rings firmly down. Use a modeling tool to blend the outside of the ring into the base slab so it looks seamless. -
Refine the interior:
Blend the inside of the coils down into the base as well. Use your thumb or a rounded tool to smooth the transition, creating a curved ‘bowl’ shape inside each well. This prevents paint from getting stuck in sharp corners.
Weighted Base Pro-Tip
Make the bottom of the water cup slightly thicker than the walls. This added weight at the base prevents it from tipping over when you have heavy brushes resting in it.
Step 2: Crafting the Water Cup
-
Pinch pot method:
Start with a ball of clay roughly the size of a tennis ball. Press your thumb into the center and gently pinch the walls while rotating the ball to open it up. -
Shape the vessel:
Aim for a rounded bottom and slightly tapered walls. The cup in the image has a gentle curve that narrows slightly at the rim, which adds stability. -
Smooth the surfaces:
Once you have the general shape, use a flexible rib tool to smooth the exterior walls. Compress the rim with a piece of chamois or a damp sponge to make it pleasant to touch.
Warping Prevention
Flat slabs like palettes love to warp. Dry it very slowly under plastic for the first 2-3 days, and consider drying it on a drywall board which absorbs moisture evenly.
Step 3: Drying and Bisque Firing
-
Slow drying:
Place both the palette and cup on a ware board. Cover them loosely with plastic to ensure they dry slowly and evenly, which prevents warping—especially important for the flat palette. -
Bone dry check:
Once the pieces are bone dry (room temperature and no longer cold to the touch), sponge off any sharp burrs lightly. -
Bisque fire:
Load the pieces into the kiln for a bisque fire, typically to cone 04, to prepare them for glazing.
Step 4: Glazing the Set
-
Clean the bisque:
Wipe the fired pieces with a damp sponge to remove any kiln dust. This ensures the glaze adheres properly. -
Masking the rims:
To achieve the specific look in the photo, apply wax resist carefully to the very top rim of every well and the outer edge of the palette. Do the same for the rim of the water cup. This keeps the terracotta raw and exposed. -
Apply the glaze:
Using a fan brush, apply 2-3 coats of a speckled cream glaze. Cover the entire face of the palette (avoiding the waxed rims) and the inside/outside of the water cup. -
Wipe back method:
If you don’t have wax resist, apply glaze everywhere, let it dry slightly, and then use a steady hand and a damp sponge to wipe the glaze off the rims. -
Final check:
Ensure the bottom of the palette and the foot of the cup are free of glaze so they don’t stick to the kiln shelf. -
Glaze fire:
Fire the pieces again to the temperature recommended by your glaze manufacturer (usually cone 5 or 6 for stoneware).
Once cooled, your custom ceramic set is ready to inspire your next painting session
Stackable Mini Palettes for Color Families
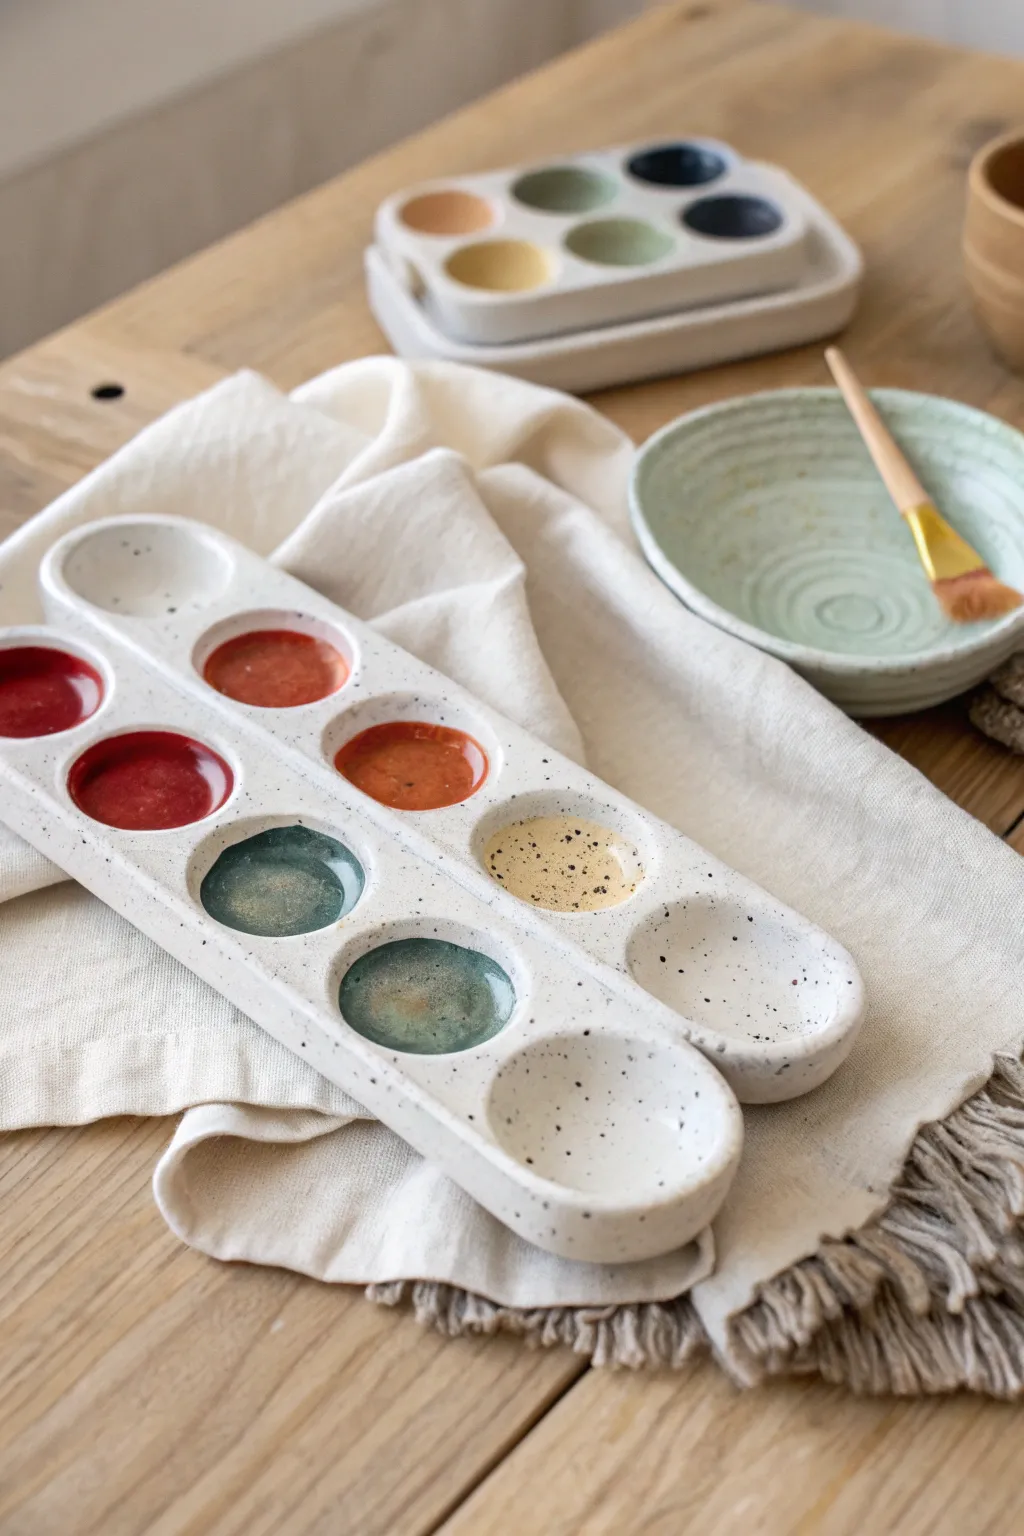
Create your own artist-grade ceramic tools with this modular, stackable palette design featuring varied well sizes. The speckled stoneware finish gives it a professional studio look while the distinct sections keep your warm and cool tones perfectly separated.
How-To Guide
Materials
- White or buff speckled stoneware clay
- Rolling pin with guide strips (approx. 1/4 inch)
- Small round cookie cutters or bottle caps (various sizes)
- Needle tool or fettling knife
- Sponge
- Rib tool
- Scoring tool
- Slip
- Glossy clear or white glaze
- Rubber kidney tool
Step 1: Forming the Base Slabs
-
Roll out the clay:
Begin by wedging your speckled stoneware clay thoroughly to remove air bubbles. Roll it out into an even slab about 1/4 inch thick, using guide strips to ensure a uniform surface. -
Cut the rectangles:
Measure and cut two identical long rectangles. A good size is approximately 10 inches by 2.5 inches, but you can adjust this to fit your workspace. These will become the top and bottom tiers of your palette. -
Smooth the edges:
Using a damp sponge or your finger, gently round over the sharp cut edges of both rectangular slabs. This prevents chipping later and gives the piece a finished, soft look. -
Shape the ends:
If you prefer the rounded look shown in the photo, use a large circle template or a jar lid to mark and cut rounded curves on both ends of your rectangular slabs.
Step 2: Creating the Paint Wells
-
Mark well positions:
Lightly plan out where your paint wells will go. On the bottom slab, you might want deeper, larger wells. On the top slab, plan for shallower mixing areas or smaller wells. -
Form clay balls:
Roll several balls of clay that correspond to the size of your desired wells. These shouldn’t be solid balls, but rather pinch pots. Press your thumb into a ball of clay to create a small cup shape. -
Use a mold technique:
Alternatively, I find it easier to press a rounded object—like the back of a measuring spoon—directly into the wet slab to create indentations. Support the slab from underneath so you don’t push all the way through. -
Refine the depressions:
Smooth the inside of each well with a wet finger. You want a seamless transition from the rim of the well to the bottom so paint doesn’t get stuck in crevices. -
Attach raised rims (optional):
If you want the wells to be raised above the surface (like the circular rims shown), roll thin coils of clay. Score and slip the area around your indentation, place the coil, and blend it downward onto the slab.
Smooth Mixing Ahead
Use the back of a spoon to burnish the inside of your wells before firing. This compresses the clay particles, creating an ultra-smooth surface that’s easier to clean later.
Step 3: Assembling the Stacking Mechanism
-
Check fit:
Since these are meant to stack or nest, ensure the bottom of the top palette sits flat. You may need to add small clay feet or a continuous ridge on the bottom of the upper palette so it doesn’t crush the paint below. -
Dry slowly:
Place your pieces between two boards or cover loosely with plastic to dry. Flip them occasionally to prevent warping, which is crucial for stackable items. -
Bisque fire:
Once bone dry, fire the pieces to bisque temperature (usually cone 04) based on your clay body’s specifications.
Custom Brush Rest
Carve small notches into the long edges of the palette while the clay is leather hard. This creates perfect resting spots for your wet brushes between colors.
Step 4: Glazing and Finishing
-
Clean the bisque:
Wipe down your fired pieces with a damp sponge to remove any dust, which can cause glaze defects. -
Apply glaze:
Dip or brush on a glossy white or clear glaze. A clear glaze will highlight the natural speckles of the clay body beautifully. Avoid matte glazes for the mixing areas, as they can stain. -
Wipe the feet:
Carefully wipe any glaze off the bottom of the palette and any contact points where the pieces will stack to prevent them fusing together in the kiln. -
Final smooth:
Check the rim of each well one last time. If the glaze is too thick here, it might run. Smooth it down with your finger. -
Glaze fire:
Fire to the final maturity temperature of your clay and glaze (often cone 5 or 6 for stoneware). -
Sand the bottom:
After the final firing, use wet-dry sandpaper to polish the unglazed bottom surface so it won’t scratch your table.
Enjoy your beautiful new studio tool that makes color mixing a true pleasure

TRACK YOUR CERAMIC JOURNEY
Capture glaze tests, firing details, and creative progress—all in one simple printable. Make your projects easier to repeat and improve.
Lidded Travel Palette to Keep Paint Clean Between Sessions
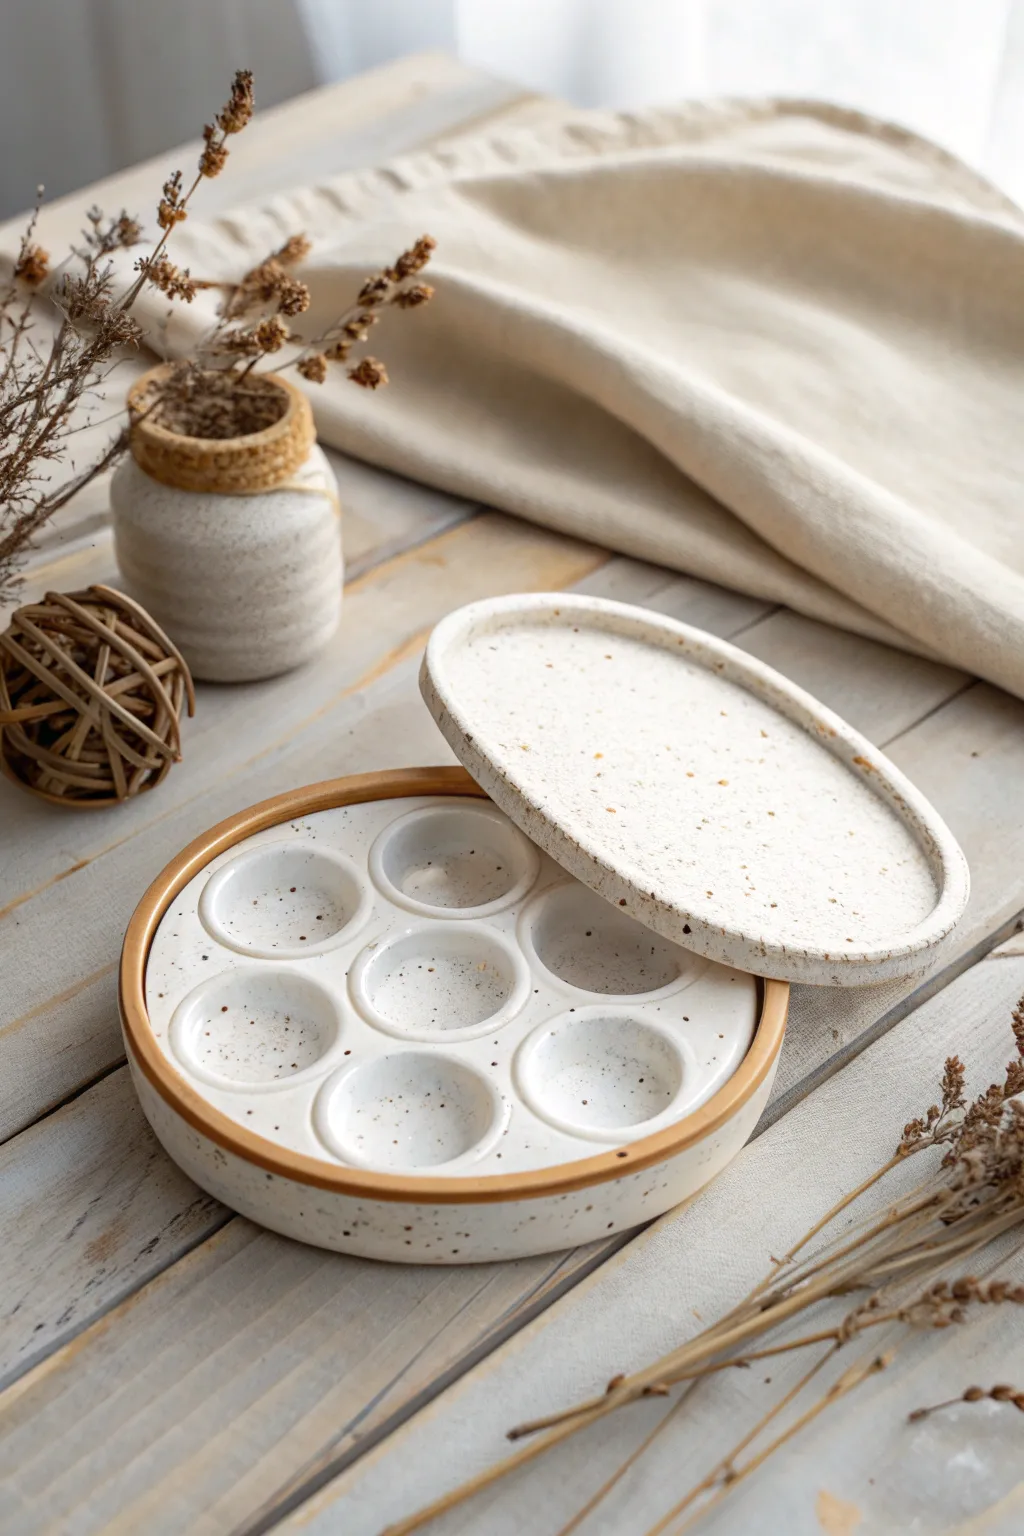
This charming lidded palette is perfect for keeping your gouache or watercolors moist between painting sessions. Its natural, speckled cream glaze and exposed clay rim give it a warm, earthy aesthetic that looks beautiful on any studio desk.
Step-by-Step
Materials
- White stoneware clay with grog or speckles
- Pottery wheel (or slab roller/rolling pin for hand-building)
- Circle cutter or needle tool
- Loop trimming tools
- Sponge
- Rib tool (wooden or silicone)
- Speckled cream or white matte glaze
- Wax resist
- Kiln
- Calipers (optional but helpful)
Step 1: Forming the Base
-
Center the clay:
Begin with a ball of wedged clay, about 1-1.5 lbs. Secure it to your wheel head and center it thoroughly, ensuring a wide, low puck shape rather than a tall cylinder. -
Open the form:
Open the clay down to the bat, leaving a floor about 1/4 to 1/2 inch thick. This thickness is crucial because you will be carving the wells directly into this floor later. -
Pull the walls:
Pull a short, vertical wall. You want a total height of about 1 inch. Keep the rim thick and flat to support the eventual lid. -
Create the gallery:
Using a wooden tool or your thumb, press slightly into the inside of the rim to create a small ledge or ‘gallery.’ This is where the lid will rest securely. -
Refine and cut:
Compress the floor with a rib to prevent cracking. Use a wire cutter to separate the piece from the wheel, but leave it on the bat to firm up to a leather-hard state.
Step 2: Creating the Lid
-
Measure the gallery:
Before throwing the lid, measure the diameter of your base’s gallery using calipers. This ensures a snug fit. -
Throw a flat disk:
Center a smaller amount of clay. Flatten it into a pancake shape. Use your caliper measurement to determine the width, adding just a tiny fraction for shrinkage differences, though usually, they shrink similarly. -
Trim the lid:
Create a slight lip on the underside of the lid that will sit inside the gallery. Clean up the edges with a sponge and set it aside to dry alongside the base.
Lid Doesn’t Fit?
If the lid warped during firing and wobbles, apply a tiny amount of grinding paste to the rim and rotate the lid manually against the base to sand them into a perfect match.
Step 3: Carving the Wells
-
Map the layout:
Once the base is leather-hard (firm but carvable), lightly scratch the outline of your seven wells—one in the center and six surrounding it—using a needle tool. -
Scoop the clay:
Using a round loop tool, gently carve out the marked circles. I like to start shallow and gradually go deeper, aiming for a rounded bottom in each well which makes cleaning paint easier. -
Smooth the interior:
After carving, the clay will be rough. Use a damp sponge or your finger to vigorously smooth the inside of each well, erasing tool marks and compressing the clay.
Custom Mixing Area
Instead of a center well, leave the middle flat and uncarved. This creates a larger central mixing area for blending colors while still having the six surrounding wells for pure pigment.
Step 4: Finishing and Glazing
-
Bisque fire:
Load both dry pieces into the kiln and bisque fire them according to your clay body’s specifications (usually Cone 04 or 06). -
Wax the contact points:
Apply wax resist carefully to the gallery ledge on the base and the corresponding rim of the lid. This prevents the lid from fusing to the base during the glaze firing. -
Expose the outer rim:
For the look in the photo, apply a strip of wax resist or masking tape around the top exterior edge of the base, leaving a raw clay band. -
Apply glaze:
Dip or brush your speckled cream glaze over the entire piece. Ensure the wells are fully coated for a smooth mixing surface. Wipe away any glaze that splashed onto your waxed areas. -
Final wipe:
Use a damp sponge to clean the foot of the palette and the very edge of the lid one last time. -
Glaze fire:
Fire the kiln to the maturity temperature of your clay and glaze (often Cone 5 or 6). Once cooled, sand the unglazed rim lightly if it feels rough.
Your durable, custom palette is now ready for a lifetime of colorful creations
Speckled Clay Palette With a Glossy Clear Finish
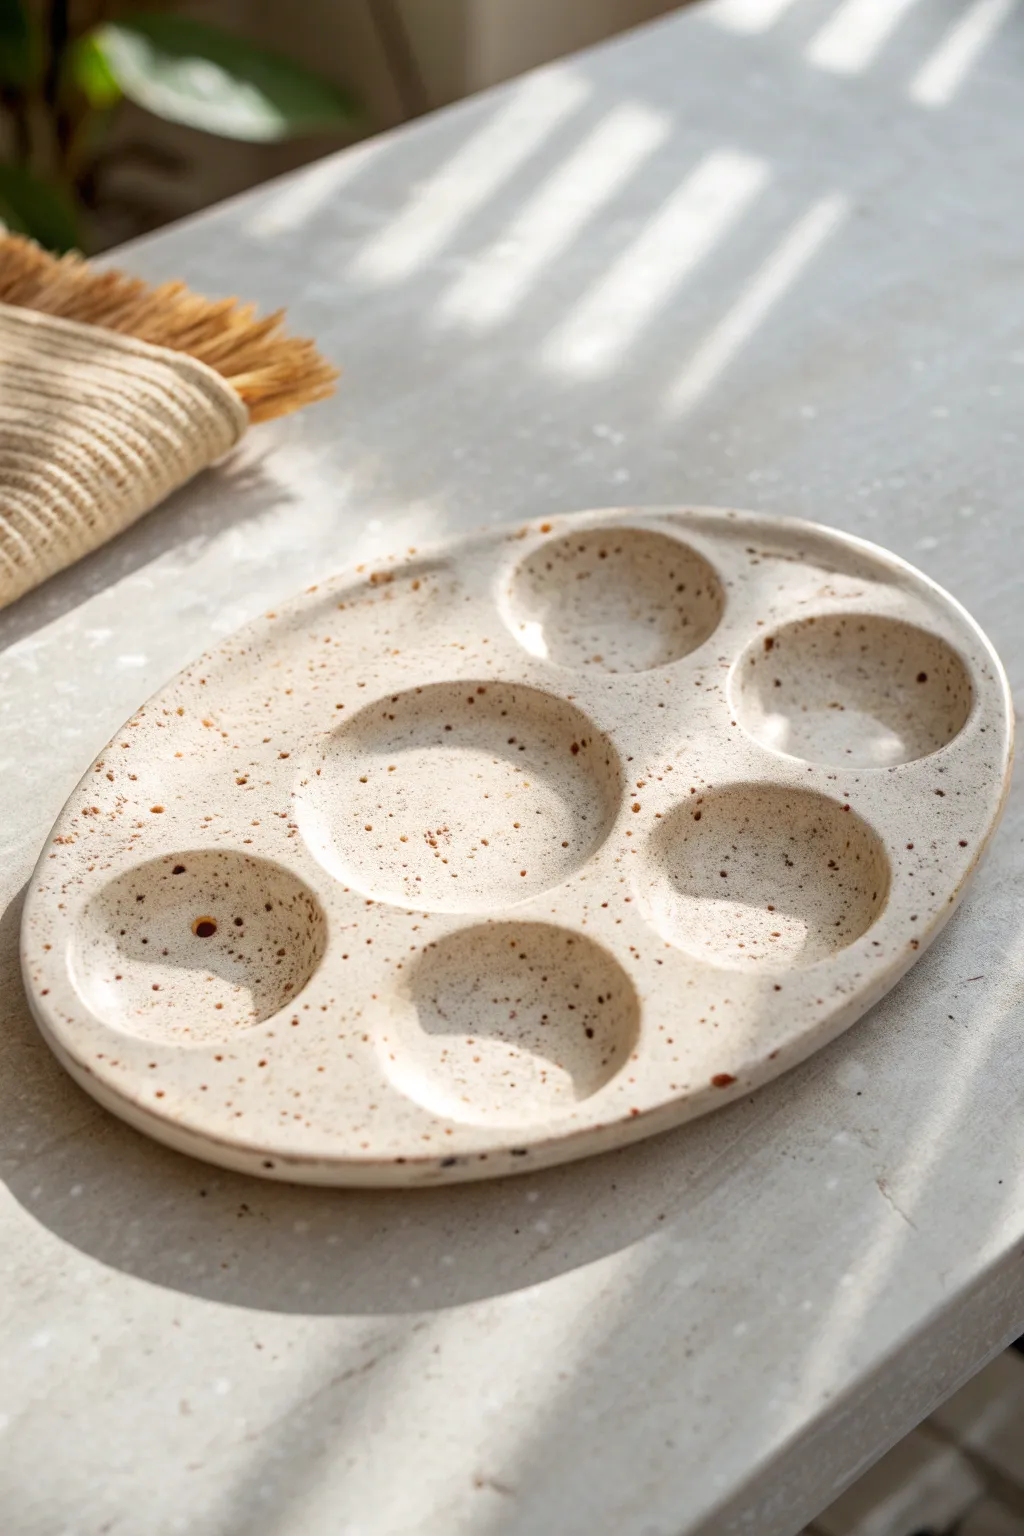
Embrace the natural beauty of clay with this minimalist oval palette, featuring a gorgeous speckled body and six wells surrounding a central mixing area. Its organic shape and glossy clear finish make it both a functional tool and a stunning piece of studio decor.
Step-by-Step Tutorial
Materials
- Speckled stoneware clay (mid-fire)
- Rolling pin
- Canvas work surface or slab mat
- Guide strips or dowels (1/4 inch thick)
- Needle tool or fettling knife
- Oval paper template (approx. 8×6 inches)
- Large round sponge
- Small round sponge or shaping tool
- Rib tool (metal or rubber)
- Clear transparent glaze
- Kiln access
Step 1: Slab Preparation
-
Prepare the Clay:
Begin by wedging your speckled stoneware clay thoroughly to remove any air bubbles. Pat it into a rough, flat pancake shape with your palms to get started. -
Roll the Slab:
Place the clay on your canvas work surface between two 1/4 inch guide strips. Roll the clay out into a smooth, even slab using your rolling pin, ensuring the thickness is consistent across the entire piece. -
Compress the Surface:
Take a rubber rib tool and gently drag it across the surface of the clay slab. This compression step is crucial—it aligns the clay particles to prevent warping and creates a silky smooth canvas for your palette. -
Cut the Shape:
Lay your oval paper template onto the slab. Using a needle tool or fettling knife, trace around the template and cut out the oval shape. Hold the tool vertically to ensure a clean, straight edge. -
Smooth the Edges:
After cutting, dip your finger or a small sponge in a little water and run it along the cut rim to soften the sharp edges. I like to take a moment here to really round off distinct corners for a more organic feel.
Step 2: Forming the Wells
-
Map the Wells:
Lightly mark the positions of your paint wells on the surface. Aim for one larger central well and six smaller wells evenly spaced around the perimeter. -
Create the Central Well:
For the center mixing area, use a slightly damp, large round sponge. Press it firmly into the center mark and rotate it gently. Apply even pressure to compress the clay downwards rather than digging it out. -
Form Perimeter Wells:
Using a smaller sponge or a round-ended tool, press into the six outer markings. Use a circular motion to widen and deepen each depression, creating distinct concave bowls for holding paint. -
Refine the Shapes:
Go back over each well with a damp finger to smooth out any tool marks. Ensure the transition from the flat surface into the well is seamless and gentle. -
Check Depth:
Verify that your wells are deep enough to hold liquid but not so deep that the bottom of the palette becomes dangerously thin. Aim for leaving about 1/8 inch of clay at the thinnest point. -
Dry Slowly:
Cover the palette loosely with plastic and let it dry very slowly to the leather-hard stage. This prevents the edges from curling up as the clay shrinks.
Sponge Technique
When pressing wells, wrap your sponge in thin plastic wrap. This prevents the sponge texture from transferring to the clay, leaving a flawlessly smooth bowl.
Step 3: Finishing and firing
-
Bisque Fire:
Once the piece is bone dry, wipe it down with a slightly damp sponge to remove dust, then load it into the kiln for a bisque firing (typically Cone 04). -
Clean and Glaze:
After the bisque fire, wipe the piece with a wet sponge to remove any dust. Dip the entire palette into a glossy clear glaze, or brush on three even coats if you are using a commercial brush-on glaze. -
Wipe the Foot:
Use a wax resist solely on the bottom contact points, or simply wipe the glaze off the very bottom of the palette with a sponge so it doesn’t stick to the kiln shelf. -
Glaze Fire:
Fire the palette a second time to the maturation temperature of your specific clay and glaze combination (often Cone 5 or 6 for stoneware). -
Sand the Base:
Once cool, check the bottom of the palette. If there are any rough patches of bare clay, use fine-grit sandpaper wet-sanding to smooth them so they won’t scratch your table.
Creative Notch
Before the clay dries, carve a small notch or groove on the right side. This serves as a perfect resting spot for your paintbrush between color changes.
Your finished palette is now ready for watercolor mixing or to be gifted to an art-loving friend
Wabi-Sabi Torn-Edge Palette With Organic Wells
Embrace imperfection with this handmade ceramic palette that features a beautifully organic, torn-edge shape and natural speckling. Its generous central mixing area and deep color wells make it as functional as it is sculptural, perfect for artists who cherish the tactile nature of their tools.
Step-by-Step Guide
Materials
- Speckled Stoneware Clay (buff or white with grog)
- Rolling pin
- Canvas mat or slab roller board
- Large sponge and small smoothing sponge
- Loop carving tool (medium and large)
- Potter’s needle tool
- Rib tool (flexible metal or rubber)
- Small bowl of water
- Clear gloss glaze (food safe recommended)
- Kiln access
Step 1: Shaping the Slab
-
Prepare the clay slab:
Begin by wedging your speckled stoneware clay to remove air bubbles. Roll it out into a slab that is approximately 1/4 to 1/2 inch thick on your canvas mat. Avoid rolling it too thin, as the palette needs some heft to stay stable during use. -
Create the organic outline:
Instead of cutting a perfect circle, use your needle tool to trace a loose, kidney-bean-inspired shape on the slab. Aim for asymmetry—the ‘torn edge’ look relies on gentle wobbles rather than geometric precision. -
Refine the edges:
Cut away the excess clay. Wet your fingers slightly and run them along the cut rim to soften the sharp angle. I like to gently push the rim inward in random spots to enhance the handmade, wabi-sabi character. -
Smooth the surface:
Use a flexible rib tool to effortless compress the clay particles on the top surface. This step is crucial for preventing future warping and creates that buttery-smooth finish perfect for mixing paint later.
Pro Tip: Compression is Key
To keep this slab perfectly flat, flip it continuously while rolling it out. Compressing both sides with a rib tool before carving prevents the edges from curling upward during drying.
Step 2: Forming the Wells
-
Map out the wells:
Lightly sketch the position of your paint wells using the needle tool. Space about 7-8 circles around the perimeter, leaving the large central area open for mixing. -
Carve the mixing area:
Using a large loop tool, begin carving out the center recess first. Gently scoop out layers of clay, leaving a slightly raised border between this area and the smaller paint wells. Keep the bottom flat. -
Hollow out the paint cups:
Switch to a medium loop tool to carve the smaller peripheral wells. Dig them deep enough to hold a good amount of watercolor or gouache, but be careful not to puncture through the bottom of the slab. -
Refine the thumb notch:
Locate the deep inward curve of your kidney shape (the ‘bite’ of the palette). If you want a thumb grip, carve a slight bevel or depression on the underside here so it sits comfortably in your hand.
Step 3: Refining and Firing
-
Sponge smooth:
Dip a small blending sponge in water and wring it out almost completely. Gently wipe the inside of every well and the mixing area to remove carving marks and grog trails, ensuring a slick surface. -
Dry slowly:
Place the palette between two pieces of drywall ware board or loosely cover with plastic to let it dry very slowly to the leather-hard stage. This prevents the flat slab from curling up at the edges. -
Bisque fire:
Once bone dry, fire the piece in a kiln to cone 04 (or your clay body’s specific bisque temperature). This hardens the clay and prepares it for glazing. -
Apply clear glaze:
Dip the entire palette into a clear gloss glaze, or brush it on carefully. The clear glaze allows the natural speckles of the clay body to shine through, which is the signature aesthetic of this piece. -
Wipe the foot:
Use a damp sponge to meticulously wipe all glaze off the very bottom of the palette so it won’t fuse to the kiln shelf during the final firing. -
Glaze fire:
Fire the palette a second time to the temperature required by your glaze and clay (typically cone 5 or 6 for stoneware). Allow the kiln to cool completely before opening. -
Sand the bottom:
After firing, inspect the bottom. If there are any rough burrs of clay, use wet sandpaper or a grinding stone to smooth them down so the palette won’t scratch your table.
Level Up: Brush Rest
Before the clay dries, use a round tool handle to press 1-2 shallow grooves into the rim. This creates a functional resting spot for wet paintbrushes so they don’t roll away.
Now you have a stunning, durable ceramic tool that will inspire your painting sessions for years to come
Honeycomb Well Layout for Quick Color Switching
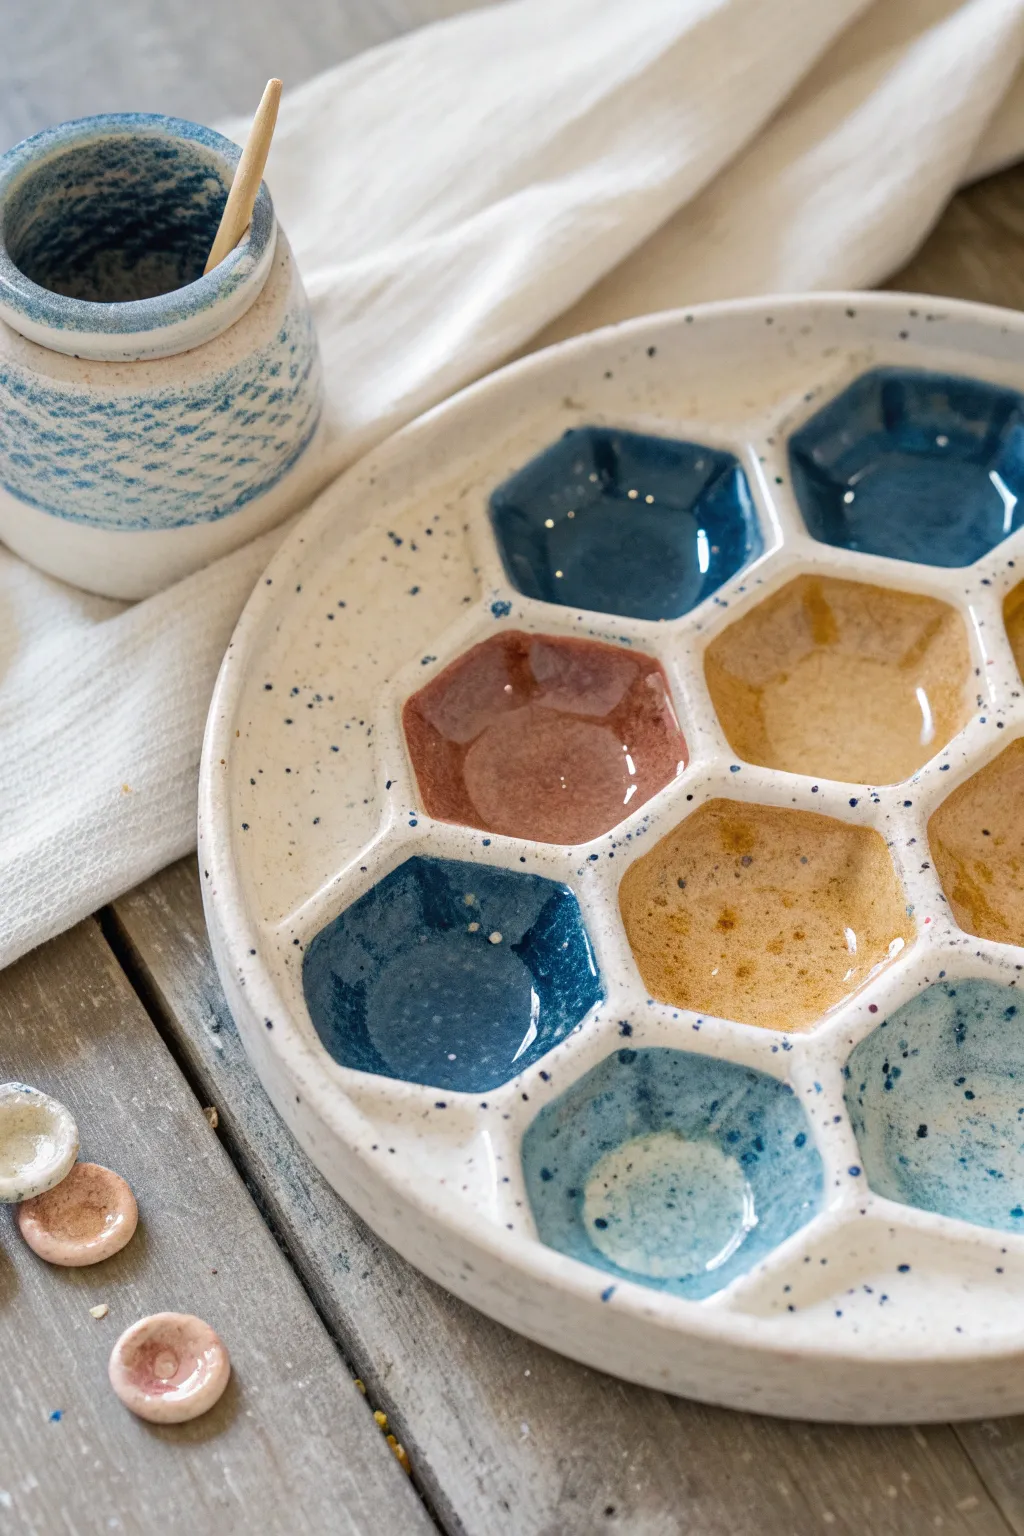
This custom palette combines the geometric beauty of nature with practical functionality for your watercolor or gouache painting sessions. Featuring a creamy, speckled clay body and a variety of glassy, pooled glazes in the hexagonal wells, it keeps your colors organized while looking lovely on your desk.
Step-by-Step
Materials
- Speckled stoneware clay (white base with grog)
- Rolling pin
- Canvas board or slab mat
- Hexagon cookie cutter (approx. 1.5 – 2 inches)
- Needle tool
- Potter’s ribs (wood and flexible metal)
- Scoring tool
- Slip (liquid clay)
- Sponge
- Assorted cone 6 glazes (deep blue, sky blue, amber/honey, reddish-brown)
- Clear transparent glaze
- Small paintbrush for glaze application
- Kiln access
Step 1: Forming the Base
-
Roll the main slab:
Start by wedging your speckled clay to remove air bubbles, then roll out a smooth slab about 3/8-inch thick. This will serve as the substantial base for your palette, so aim for an even surface. -
Cut the circular form:
Place a large bowl or a circle template (around 8-9 inches diameter) onto the slab. Trace around it with your needle tool to cut out the main palette shape. -
Create the rim:
Roll a long coil of clay, roughly the thickness of a pencil. Score and slip the outer edge of your circular base, then attach the coil to create a raised rim that will contain any accidental spills. -
Smooth the rim:
Using a wet finger or a damp sponge, blend the coil downward onto the base and upward to round it off, ensuring a seamless transition.
Pro Tip: Testing Depth
Before firing, test your wells with water. If the water beads up too high, carve the well a bit deeper. You want enough capacity for mixing washes.
Step 2: Building the Honeycomb Cells
-
Cut the hexagons:
Roll out a second, slightly thinner slab (approx. 1/4-inch). Use your hexagon cookie cutter to punch out roughly 7 to 10 hexagonal shapes. -
Arrange the layout:
Place the hexagons onto the palette base to find a pleasing arrangement. You can cluster them tightly like a true honeycomb or leave some negative space between them. -
Mark and score:
Once satisfied with the placement, lightly trace around each hexagon. Remove them, then vigorously score both the traced areas on the base and the undersides of the cutouts. -
Attach the cells:
Apply slip to the scored areas and press the hexagons firmly into place. I like to twist each one slightly as I press down to ensure a tight bond without trapping air. -
Hollow the wells:
This is the crucial step: Use a modeling tool or a small spoon tool to gently depress the center of each hexagon, creating a concave ‘well’ for paint. Don’t dig too deep; just create a gentle depression. -
Refine the edges:
Smooth the interior curves of each well with a slightly damp sponge to remove fingerprints and tool marks. Sharp clay edges can be brutal on paintbrushes later, so soften everything. -
Dry slowly:
Cover the piece loosely with plastic to let it dry slowly over several days. This prevents warping, especially with the added weight of the wells.
Step 3: Glazing and Firing
-
Bisque fire:
Once bone dry, fire the piece to bisque temperature (usually Cone 04) to prepare it for glazing. -
Wax resist the bottom:
Apply wax resist to the entire underside of the palette to prevent it from sticking to the kiln shelf. -
Glaze the body:
Apply a clear glaze or a very light, milky white glaze to the main body of the palette (the rim and the spaces between hexagons). This highlights the natural speckles in the clay. -
Fill the wells:
Using a spoon or dropper, carefully fill each hexagonal well with your chosen colored glazes. Alternate deep blues, translucent ambers, and reddish-browns for that eclectic look. -
Clean the ridges:
If any colored glaze spilled onto the ‘walls’ between the wells, wipe it back with a damp sponge so the color sits only in the depression. -
Final fire:
Fire to the maturation temperature of your clay and glazes (likely Cone 6). The glazes will melt and pool in the wells, creating a glassy, jewel-like effect.
Troubleshooting: Warping
If the palette curls up at the edges while drying, flip it upside down on a flat board and place a small weighted bag of sand on top for a day.
Once cooled, your durable stoneware palette is ready to inspiring your next painting session
Stamped Texture Border That Doubles as a Brush Wipe Area
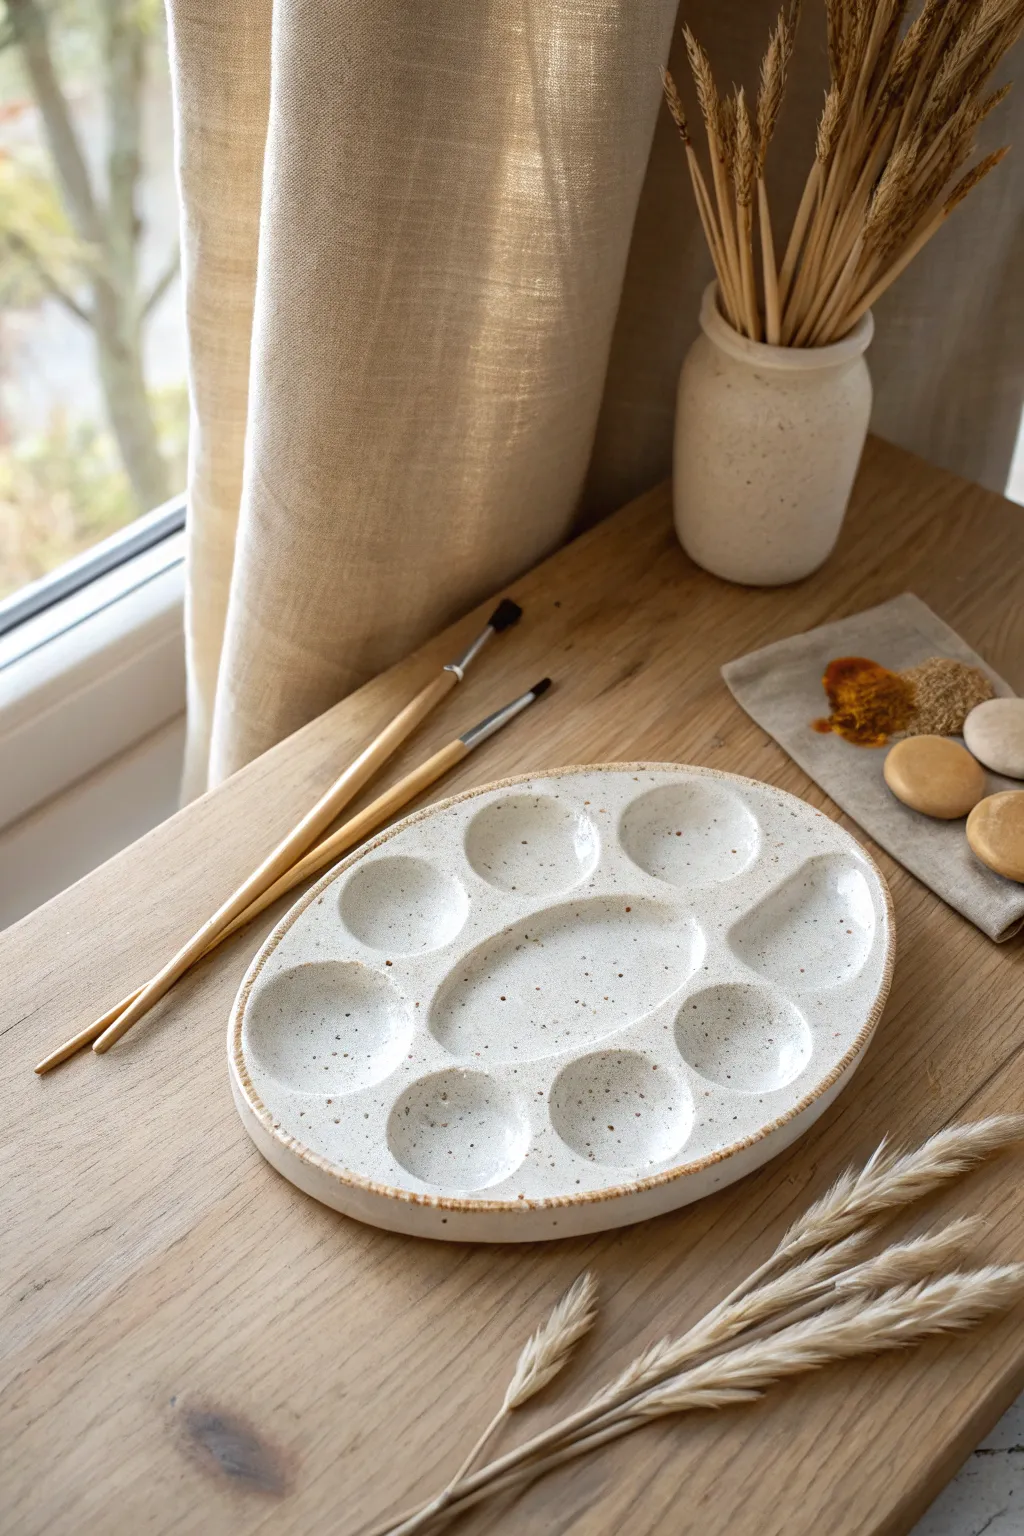
This handmade ceramic palette features a classic oval shape with eight circular wells surrounding a central mixing area, all finished in a creamy speckled glaze. The raw, textured rim adds visual interest while providing a practical surface for wiping excess water from your brushes.
How-To Guide
Materials
- Speckled stoneware clay (white or light buff)
- Rolling pin with thickness guides (approx. 1/4 inch)
- Canvas work surface or slab mat
- Pottery needle tool
- Oval paper template (approx. 8×5 inches)
- Small sponge or chamois
- Rib tool (flexible metal or rubber)
- Loop tool or carving tools
- Alternatively: Small spherical mold/plaster hump mold for wells
- Circular cookie cutter or jar lid (approx. 1.5 inches)
- Fork or serrated rib (for the textured edge)
- White gloss glaze (transparent enough to show speckles)
- Kiln access (bisque and glaze firing)
Step 1: Slab Preparation & Shaping
-
Roll the slab:
Begin by wedging your speckled stoneware clay thoroughly to remove air bubbles. Roll it out into a smooth, even slab about 1/4 inch to 3/8 inch thick. Using thickness strips or guides helps ensure the entire surface is level. -
Smooth the surface:
Take your flexible rib tool and compress the clay slab on both sides. This aligns the clay particles to prevent warping later and creates a pristine canvas for your palette. -
Cut the oval shape:
Place your paper oval template onto the clay. Using your needle tool, trace around the template effectively cutting out the main body of the palette. Remove the excess clay. -
Clean the edges:
Run a damp finger or a slightly moist sponge along the sharp cut edge of the oval to round it off softly, ensuring no sharp burrs remain.
Step 2: Creating the Wells
-
Mark the positions:
Lightly sketch the position of your wells on the surface. You’ll want one large oval in the center for mixing, surrounded by roughly eight circular wells for individual colors. -
Form the wells:
There are two ways to do this. I prefer to use a small spherical mold or the back of a measuring spoon to gently press indentations into the slab while it is supported on soft foam. Alternatively, you can use a loop tool to carefully carve out the clay. -
Refine the center:
For the central mixing area, carve or press a larger, elongated oval depression. Ensure the bottom is relatively flat to make mixing paints easier later on. -
Smooth the transitions:
Use your damp sponge or a chamois to smooth the interior of every well. It is crucial that these are perfectly smooth so paint doesn’t get stuck in tiny crevices.
Rim Texture Hack
Don’t press too hard with the fork on the rim. You want texture, but you don’t want to make the edge fragile or sharp enough to damage expensive brush hairs.
Step 3: Applying Texture & Finishing
-
Create the rim:
Slightly lift the outer edge of the palette all the way around to create a shallow containment wall. This prevents messy paint water from spilling over onto your table. -
Texture the border:
Using the tines of a fork or a serrated rib tool, gently press a hatched or dashed pattern along the very top rim of the palette. This creates the ‘brush wipe’ texture visible in the photo. -
Slow drying:
Place the palette on a board and cover it loosely with plastic. Let it dry very slowly over several days to prevent the flat shape from curling up at the edges. Once bone dry, it’s ready for the bisque firing. -
Glazing:
After the bisque fire, wipe the piece down with a damp sponge to remove dust. Dip or brush on a semi-transparent white gloss glaze. -
Wipe the texture:
If you want the rim texture to pop, you can lightly wipe the glaze off the high points of the textured rim with a sponge, allowing the raw toasted clay body to show through after firing. -
Final Fire:
Fire the piece to the temperature recommended for your specific clay and glaze (likely Cone 5 or 6 for stoneware). Ensure the bottom is wiped clean of glaze so it doesn’t stick to the kiln shelf.
Level Up: Brush Rests
While the clay is soft, gently press the handle of a paintbrush into the rim at two or three spots to create custom indentations where brushes can rest without rolling away.
Once cooled, your durable stoneware palette is ready to host your watercolors and gouache mixes for years to come
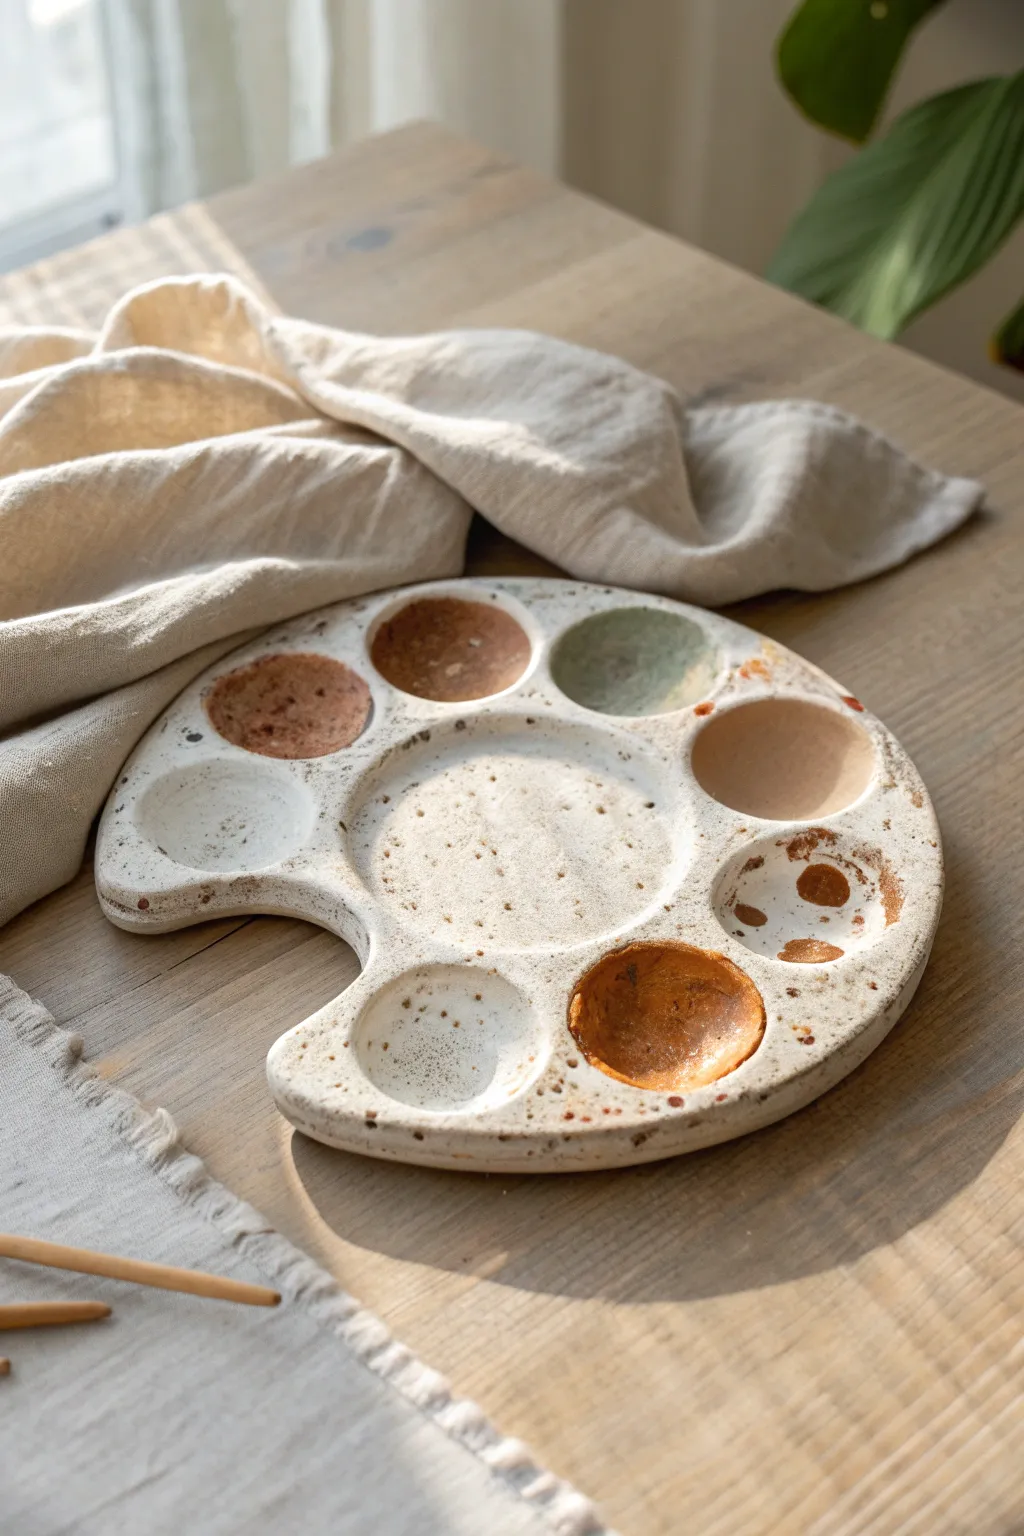
Marbled Surface for a Swirly Mixing Zone
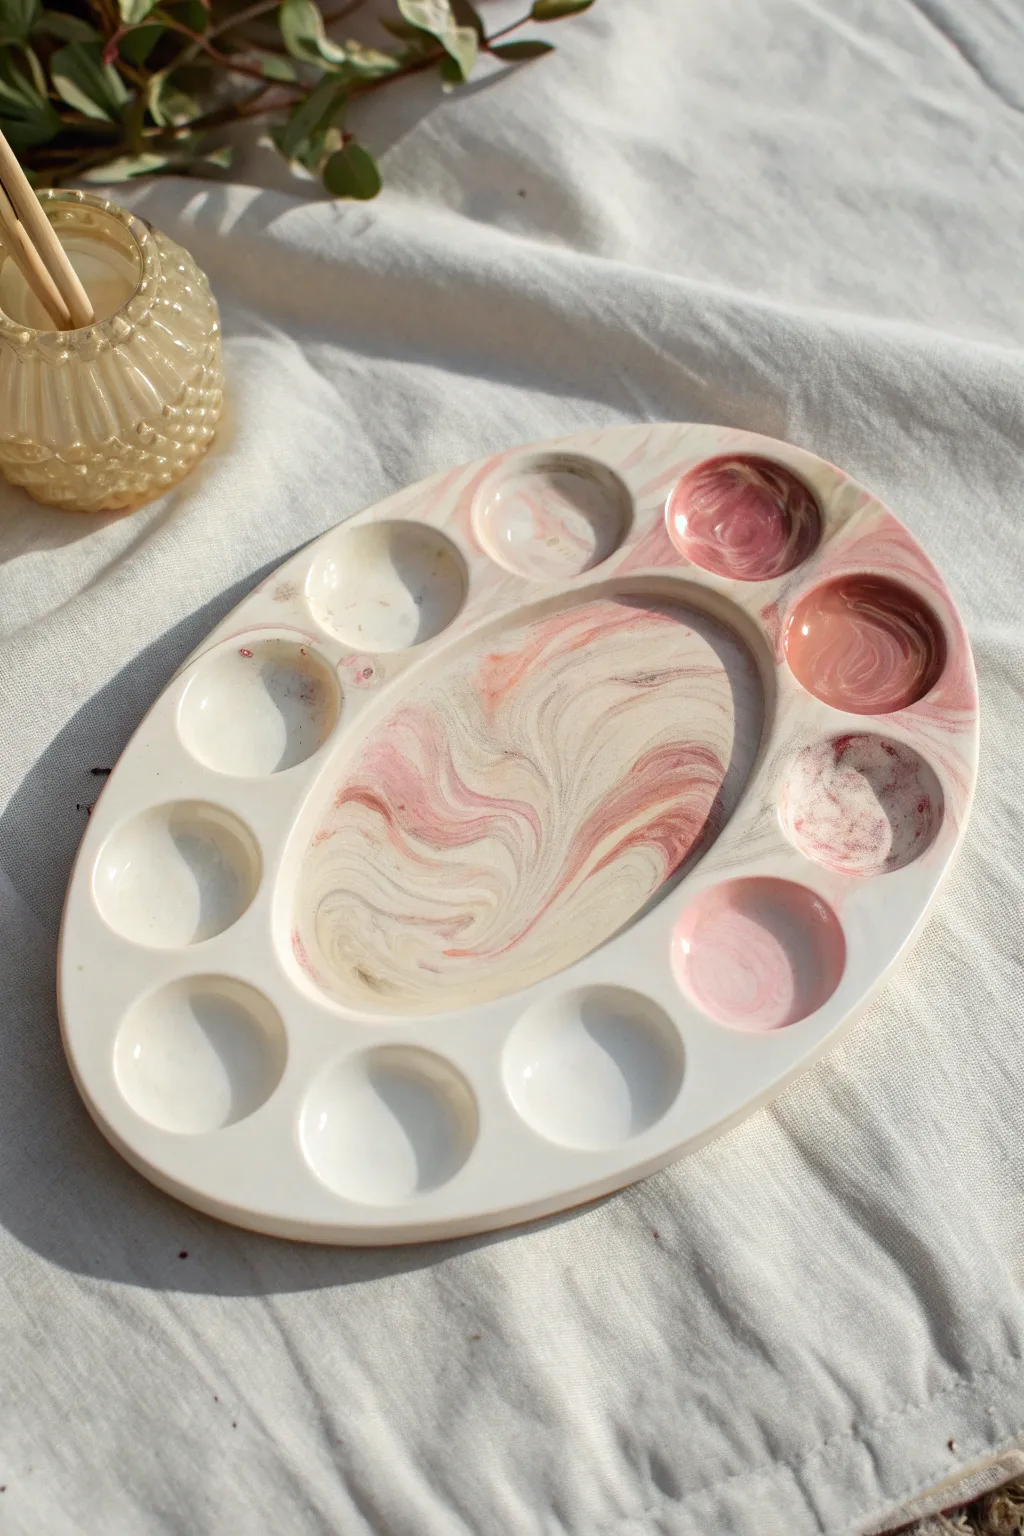
Elevate your painting practice with a custom ceramic palette featuring a mesmerizing pink and white marbled mixing surface. This project combines the sleek utility of designated paint wells with a central zone that captures the fluid beauty of marble, making the color-mixing process an art form in itself.
Step-by-Step Tutorial
Materials
- White low-fire earthenware clay
- Pink colored clay (or mason stain to tint white clay)
- Pottery rib tool (rubber or wood)
- Needle tool
- Small sponge
- Rolling pin
- Canvas mat or guide cloths
- Palette template (oval paper cutout)
- Modeling tool with a rounded end (or a large marble)
- Clear ceramic glaze
- Kiln access
Step 1: Preparing the Marbled Slab
-
Tinting the clay:
If you don’t have pre-mixed pink clay, wedge a small amount of red or pink mason stain into a handful of white clay until the color is uniform and streak-free. -
Creating coils:
Roll out several thick coils of plain white clay and thinner coils of your pink clay. The ratio should be roughly 70% white to 30% pink to keep the palette bright. -
Twisting the colors:
Gather the coils together into a thick bundle and twist them tightly like a candy cane. Fold the twisted log in half and twist again to increase the marbling complexity. -
Forming the slab:
Slam the twisted clay onto your canvas mat to flatten it slightly. Using your rolling pin, roll the clay out to a consistent thickness of about 1/4 inch. Roll in different directions to stretch the marble pattern organically. -
Cutting the shape:
Place your oval paper template over the most attractive section of the marbling. Trace around it with a needle tool held vertically to cut out the palette’s base shape. -
Smoothing the edges:
Dip your finger or a small sponge in water and gently run it along the cut rim to round off any sharp edges left by the needle tool.
Muddy Pattern?
If your colors look muddy rather than distinct, you likely over-wedged the clay. Stop twisting as soon as you see distinct striations appear.
Step 2: Sculpting Wells and Mixing Zone
-
Marking the layout:
Lightly trace where you want your paint wells to go—typically around the perimeter—and outline a large oval in the center for the mixing area. -
Pressing the wells:
Using a rounded modeling tool or your thumb, gently press into the marked circles to create concave depressions. Support the clay from underneath with your other hand to prevent warping. -
Defining the mixing zone:
For the central marbled area, press down broadly with a rubber rib or the palm of your hand to create a shallow, large basin. Create a slight ridge between this area and the smaller wells. -
Refining the shape:
Go back over each well with a damp sponge to smooth out fingerprints and ensure the transitions between the wells and the flat surface are seamless. -
Drying slowly:
Cover the palette loosely with plastic to let it dry slowly to a leather-hard state. This prevents the flat shape from curling up at the edges.
Gold Rim Detail
Apply a ceramic gold luster to the rim after the glaze firing. You’ll need a third, lower-temperature firing (around cone 018) to set the metallic edge.
Step 3: Firing and Glazing
-
Bisque firing:
Once bone dry, fire the piece in a kiln to cone 04 (or according to your clay body’s specifications) to harden it into bisque ware. -
Cleaning the bisque:
Wipe the fired piece down with a damp sponge to remove any kiln dust that might interfere with the glaze application. -
Applying clear glaze:
Dip the palette into a clear gloss glaze, or brush on three even coats. The clear coat is crucial as it will make the pink marble pattern pop and create a non-porous surface for mixing paint. -
Checking the foot:
Wipe the very bottom of the palette clean with a sponge to ensure no glaze touches the kiln shelf, or use a wax resist before glazing. -
Glaze firing:
Fire the palette again to the temperature required by your clear glaze (usually cone 05 or 06 for low-fire clay).
Enjoy using your elegant new tool for your next watercolor masterpiece
Geometric Block Palette With Deep Square Wells
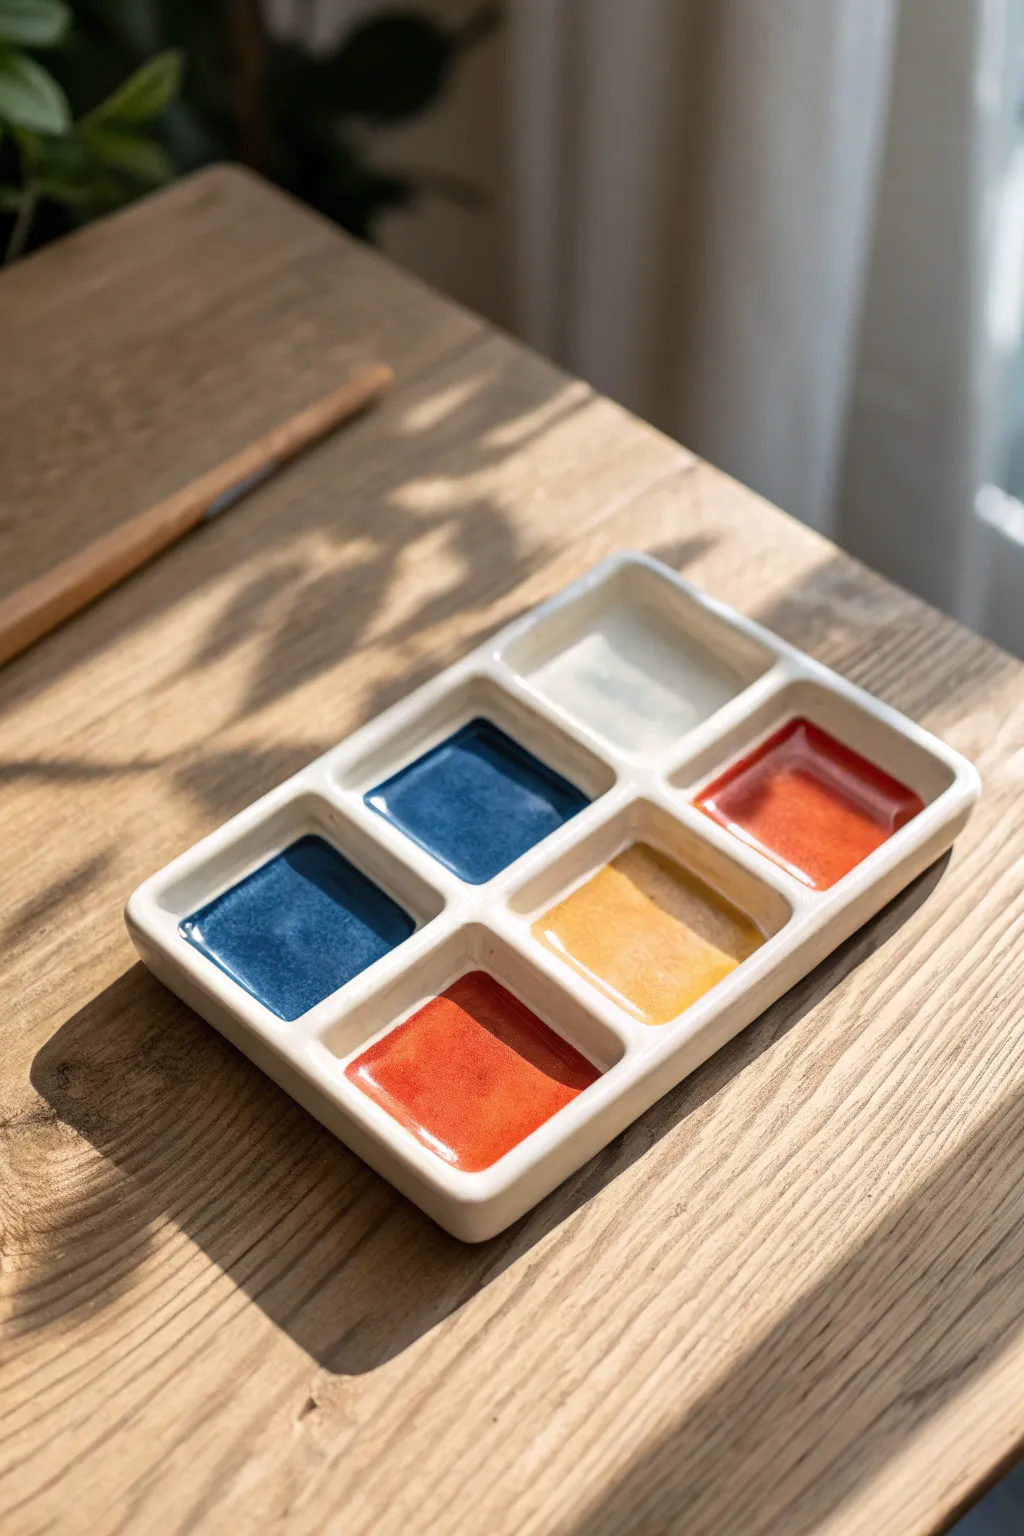
This minimalist, rectangular palette features deep square wells perfect for holding generous amounts of watercolor or gouache. Its clean lines and sturdy, glossy finish make it both a functional tool and a beautiful object for your studio desk.
Step-by-Step Guide
Materials
- White clay slab (porcelain or smooth stoneware)
- Rolling pin
- Guide strips or rulers (approx. 1/4 inch thick)
- Needle tool
- Fettling knife
- Ruler
- Slip and scoring tool
- Sponge
- Flat shader paintbrush (for glazing)
- Clear or white glossy glaze
- Kiln access
Step 1: Forming the Base
-
Roll the slab:
Begin by wedging your white clay thoroughly to remove air bubbles. Roll it out into a smooth, even slab using guide strips to secure a consistent thickness of about 1/4 inch. -
Cut the base:
Using a ruler and your fettling knife, cut a clean rectangle for the base. For a six-well palette like this, aim for roughly 4 inches by 6 inches, though you can adjust size based on preference. -
Smooth the surface:
Run a damp sponge or a rubber rib over the slab to compress the clay particles and remove any canvas texture from the rolling process.
Step 2: Building the Wells
-
Cut internal walls:
Roll a second slab of clay to the same thickness. Cut long strips that are approximately 3/4 inch high. These will form the outer rim and the internal dividers. -
Measure the grid:
Lightly mark a 2×3 grid on your base slab using the needle tool to guide where your walls will go. -
Score the perimeter:
Score the outer edges of the base slab and apply a generous amount of slip. -
Attach outer walls:
Place your clay strips along the perimeter to create the box frame. Press firmly to adhere, cut the corners at a 45-degree bevel for a neat join, and blend the clay together on both the inside and outside seams. -
Install dividers:
Cut shorter lengths of your clay strip to create the internal cross-section. Score and slip the connection points on the base and the interior of the outer walls. -
Secure the grid:
Place the long central divider first, then add the shorter cross-pieces. Use a modeling tool to smooth the clay where the walls meet the floor and where they intersect with each other.
Warping Walls?
If inner walls warp during drying, place a small, identically sized block of soft foam inside each well while it dries to gently hold the shape.
Step 3: Refining and Finishing
-
Round the edges:
Once the walls are stiffened slightly (leather hard), take a damp sponge and gently round over the top edges of all the walls. This softening prevents sharp edges that wear down brushes. -
Clean the corners:
I like to use a small, wet paintbrush to get into the deep corners of each well, smoothing out any excess slip or rough clay burrs. -
Slow dry:
Cover the palette loosely with plastic to let it dry very slowly. This helps prevent the walls from warping away from the base. -
Bisque fire:
Once bone dry, fire the piece to bisque temperature (usually cone 04 or 06) according to your clay body’s specifications. -
Apply glaze:
Dip the piece or brush on a glossy white glaze. Ensure the glaze isn’t too thick in the corners of the wells, as it can crawl or pinhole if pooled too deeply. -
Wipe the foot:
Clean the bottom of the palette thoroughly with a sponge to ensure no glaze touches the kiln shelf. -
Glaze fire:
Fire the palette again to the maturity temperature of your clay and glaze (often cone 5/6 or cone 10).
Add a brush rest
Before firing, carve shallow notches into the top rim of the two short sides. This creates a dedicated spot to rest your wet paintbrush without it rolling away.
Fill the wells with your favorite tube watercolors and enjoy painting with your custom ceramic tool
Leaf-Shaped Palette With Vein Grooves as Paint Channels

Bring the tranquility of nature into your studio with this elegant, hand-built ceramic palette. Modeled after a fallen leaf, it features organic vein grooves and a milky white glaze that makes your watercolor mixtures pop beautifully.
Step-by-Step Tutorial
Materials
- White stoneware clay or porcelain
- Rolling pin
- Needle tool or fettling knife
- Rib tool (smooth metal or rubber)
- Small circular cookie cutter (approx. 1 inch) or a large bottle cap
- Sponge
- Modelling tool with a rounded tip
- Canvas mat or slab mat
- Clear or white glossy glaze
- Kiln access
Step 1: Shaping the Foundation
-
Roll the slab:
Begin by wedging your white stoneware clay to remove air bubbles. Roll it out onto a canvas mat to a uniform thickness of about 1/4 inch (6mm). Ensure the surface is smooth and free of canvas texture by compressing it with a rib tool. -
Cut the leaf shape:
Lightly sketch a large, elongated leaf shape onto the clay surface with a needle tool. You want a broad lanceolate shape that tapers at both ends. Once satisfied, cut distinct, clean lines along the outline. -
Smooth the edges:
Dip a small sponge in water and wring it out almost completely. Gently run it along the cut edges of your leaf to soften the sharp angles, creating a rounded, professional finish. -
Form the stem:
At the top of the leaf, pinch and shape the clay to form a small, curved stem. This adds a realistic touch and can serve as a brush rest later.
Warping Woes?
If the leaf curls up unintentionally while drying, flip it over onto a piece of drywall or plaster bat for a few hours. The absorbent surface helps draw moisture evenly from the back.
Step 2: Creating Wells and Veins
-
Mark the wells:
Take your small circular cutter or bottle cap. Gently press it into the clay slab to mark the positions of your paint wells. Arrange about seven circles, following the outer curve of the leaf on both sides of the center. -
Depress the wells:
Instead of cutting the circles out, use your thumbs or a rounded modeling tool to gently press down inside the marked circles. Compress the clay to create smooth, concave indentations deep enough to hold paint. -
Refine the rims:
Smooth the rims of each well with your finger or a damp sponge so they transition seamlessly into the flat surface of the leaf. -
Add the central vein:
Using a modeling tool, carve a long, central vein running from the stem tip down to the bottom point of the leaf. I like to make this groove slightly deeper than the side veins. -
Carve side veins:
Carve angled lines branching out from the central vein, running between the paint wells. These act as decorative elements but also help structure the visual flow. -
Create the mini-leaf accessory:
With a scrap piece of clay about the size of a coin, press it into a small leaf mold or hand-carve a tiny leaf shape. This can be fired separately and used as a color swatch later.
Add Texture
Before cutting the outline, gently roll a real leaf or a textured fabric into the wet clay slab. This transfers intricate natural veins that glaze will highlight beautifully.
Step 3: Firing and Glazing
-
Lift the edges:
Carefully lift the outer edges of the main leaf slightly upward. Place small bits of foam or rolled clay underneath the rim to support this curve while it dries; this ensures wet paint stays on the palette. -
Slow drying:
Loosely cover the piece with plastic to let it dry very slowly over several days. This prevents the large flat shape from warping or cracking. -
Bisque fire:
Once bone dry, fire the piece in a kiln to cone 04 (or your clay’s specific bisque temperature). -
Apply glaze:
Wipe the bisque ware with a damp sponge to remove dust. Brush or dip the palette in a glossy white or clear glaze. -
Glaze wiping:
Ensure the glaze doesn’t pool too thickly in the vein grooves, which might obscure the detail. If using a colored glaze, you might wipe back the high points to accentuate the texture. -
Glaze fire:
Fire the palette again to the maturity temperature of your clay and glaze (typically cone 5 or 6 for stoneware). -
Final polish:
After cooling, check the bottom for any sharp burrs and sand them down if necessary to protect your table surface.
Now you have a stunning, nature-inspired tool ready for your next watercolor session