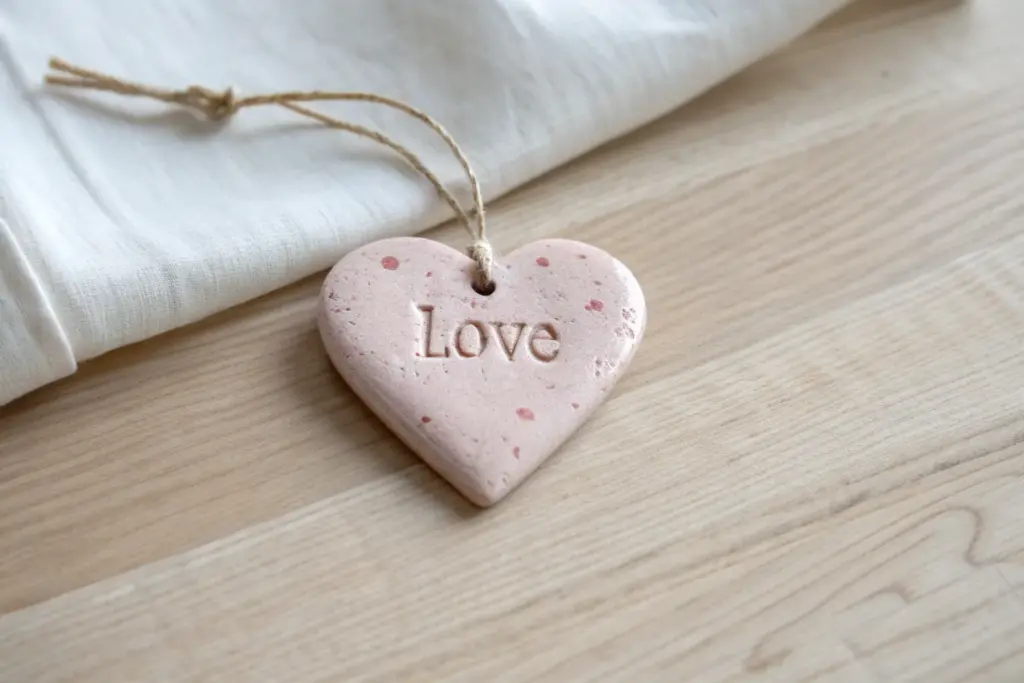
Whenever February rolls around, I can’t help reaching for clay and turning it into something sweet, heartfelt, and giftable. These Valentine’s clay ideas are beginner-friendly, small enough to finish in a cozy crafting session, and full of classic heart-day charm.
Heart-Shaped Trinket Dish for Rings and Earrings
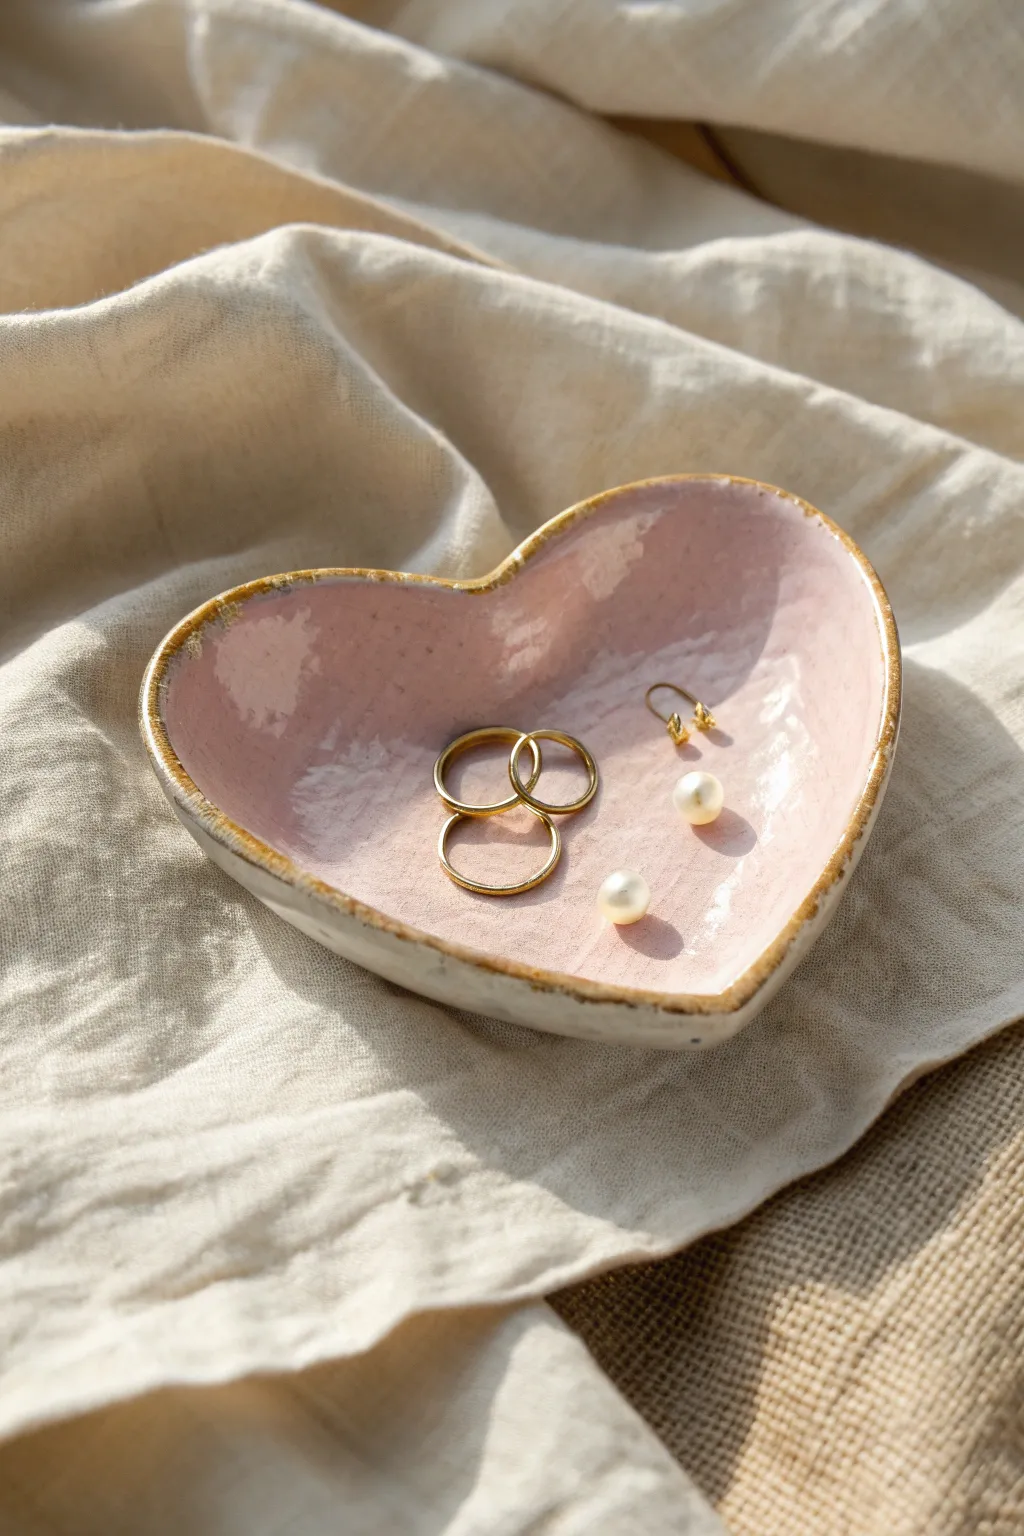
This rustic, charming trinket dish combines a soft, speckled pink interior with an organic, handmade shape that feels special and personal. The brownish-gold rim gives it a vintage pottery vibe without needing a professional kiln if you choose the right clay.
How-To Guide
Materials
- Air-dry clay (white) or polymer clay
- Rolling pin
- Heart-shaped cookie cutter (large) or paper template and knife
- Small bowl specific for water
- Sponge or smoothing tool
- Sandpaper (fine grit)
- Acrylic paints: Blush pink, White, Burnt Umber or Metallic Gold
- Stiff bristle brush (e.g., old toothbrush)
- Small round detail brush
- High-gloss varnish or resin (for the faux glazed look)
Step 1: Shaping the Base
-
Condition and roll:
Start by kneading a handful of white clay until it is warm and pliable. Roll it out on a smooth surface to an even thickness of about 1/4 inch (6mm). If it’s too thin, the edges might crack as they dry. -
Cut the heart:
Press a arge heart-shaped cookie cutter firmly into the clay. If you don’t have one, lightly trace a heart shape with a toothpick or place a paper template on the clay and carefully cut around it with a craft knife. -
Initial smoothing:
Dip your finger in a tiny bit of water and run it along the cut edges to soften any sharp angles left by the cutter. You want this to look hand-thrown, not machine-stamped. -
Form the curve:
Gently lift the clay heart and cup it in your palm. Using your thumbs, press gently into the center while lifting the edges slightly to create a shallow bowl shape. You aren’t making a deep cup, just a gentle curve to hold jewelry. -
Refine the rim:
Pinch the edges slightly between your thumb and forefinger to create a slightly uneven, organic rim. If the clay feels too perfect, I like to gently tap the edge with a texture tool or a stone to give it character.
Glazing Pro Tip
For a hyper-realistic ceramic look, use ‘Triple Thick’ brush-on gloss glaze. It self-levels much better than standard varnish, creating that pooling effect often seen in real pottery.
Step 2: Drying and Refining
-
Slow drying:
Place your heart dish on a piece of foam or a crumpled paper towel to maintain its curved shape while drying. Let it air dry completely according to your clay package instructions—usually 24 to 48 hours. -
Sanding:
Once fully dry and hard, use fine-grit sandpaper to smooth out any unwanted fingerprints or rough texture on the underside. Wipe away all dust with a barely damp cloth.
Step 3: Painting the Faux Glaze
-
Base coat the interior:
Mix a soft blush pink acrylic paint. Apply two coats to the inside of the heart, letting the first coat dry before adding the second. Keep the paint slightly thick to mimic the look of ceramic glaze. -
Create the speckles:
Dilute a tiny amount of white or light grey paint with water. Dip a stiff-bristled brush or old toothbrush into it, and flick the bristles with your thumb to spray fine speckles over the pink interior. Practice on paper first to control the splatter size. -
Paint the exterior:
Paint the underside and outer walls of the dish with a creamy white or off-white color. It doesn’t need to be perfect; a bit of brushstroke texture adds to the handmade appeal. -
The signature rim:
Mix a Burnt Umber or a deep metallic gold paint. Using a small detail brush, paint the very top edge of the rim. Use a slightly shaky hand here—allow the line to vary in thickness to replicate that reactive glaze firing line.
Level Up: Texture
Before drying, press a piece of lace or linen into the wet clay on the OUTSIDE of the dish. This leaves a subtle fabric texture that contrasts beautifully with the smooth, glossy inside.
Step 4: Baking or Sealing
-
Final gloss coat:
To achieve that high-shine ceramic look without a kiln, apply a thick coat of high-gloss varnish or a layer of UV resin over the entire inside of the dish. This seals the paint and gives it that wet, glassy finish. -
Let it cure:
Allow the varnish or resin to cure completely in a dust-free area. Ensure it is non-tacky before placing any jewelry inside.
Now you have a sweet, boutique-style dish ready to hold your favorite rings and studs.


Stamped Love Note Heart Tags for Gift Wrap
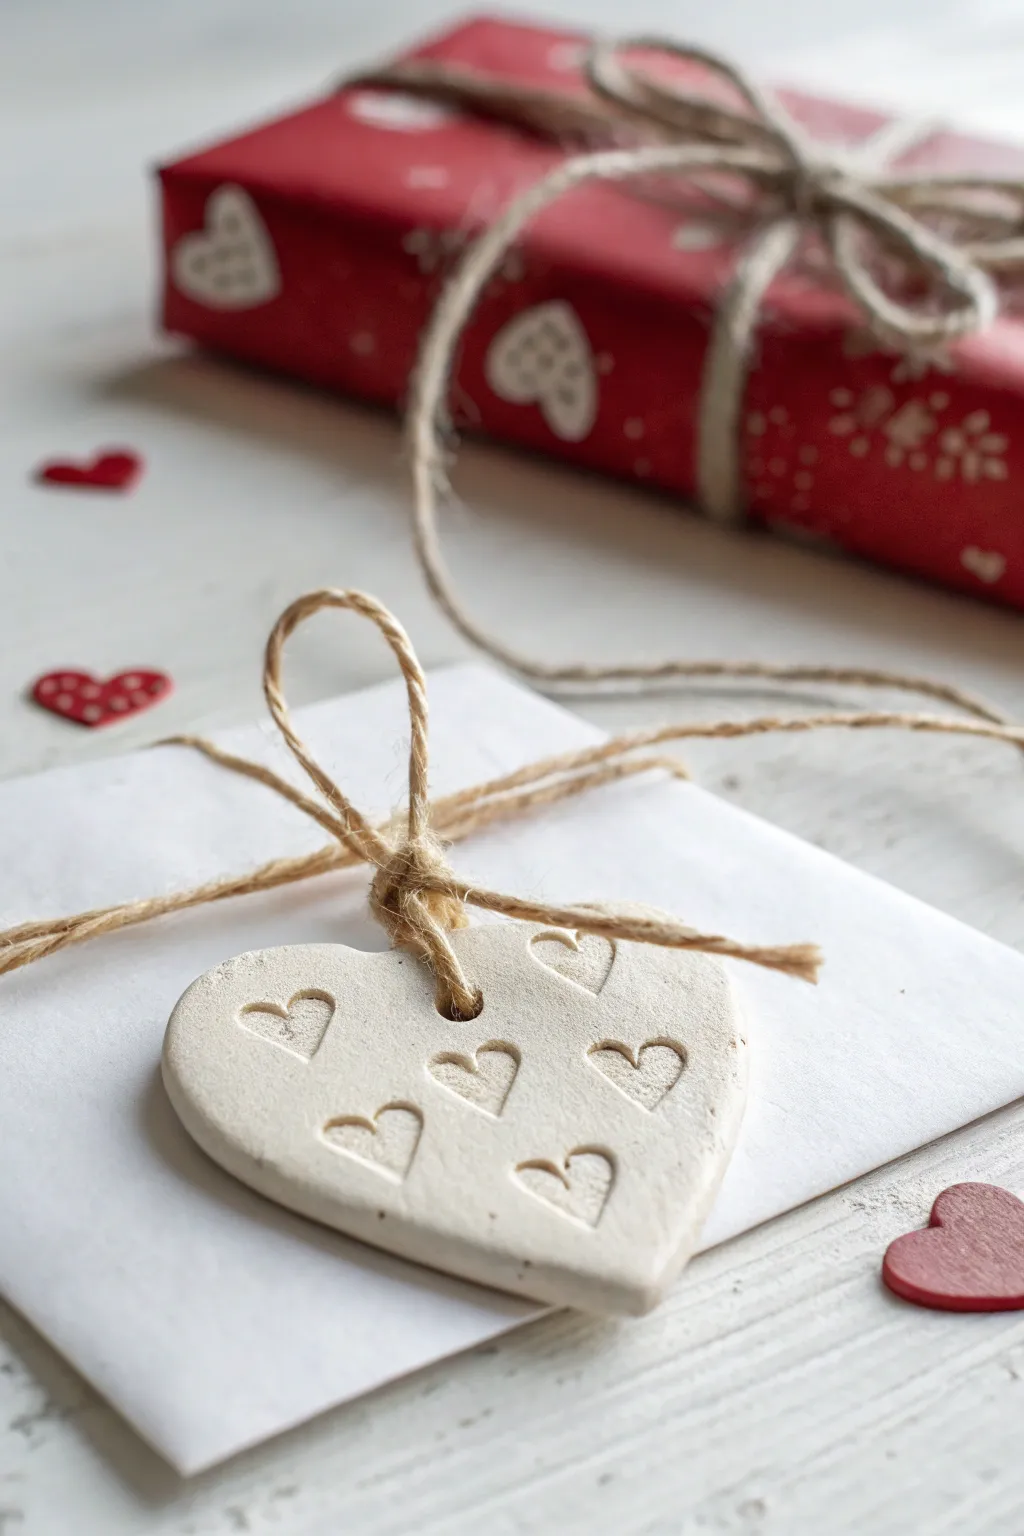
Add a handmade touch to your Valentine’s Day gifts with these charming clay heart tags, featuring sweet stamped heart impressions. Their rustic white finish and natural twine tie create a cozy, heartfelt aesthetic perfect for pairing with simple wrapping paper.
Detailed Instructions
Materials
- White styling clay (air-dry clay or polymer clay)
- Small heart-shaped cookie cutter (approx. 2-3 inches)
- Tiny heart-shaped stamp or embossing tool
- Rolling pin
- Parchment paper or non-stick craft mat
- Jute twine
- Straw or stylus tool (for creating the hole)
- Fine-grit sandpaper (optional)
- Matte finish sealant (optional)
Step 1: Shaping the Clay Base
-
Prepare the workspace:
Lay down a sheet of parchment paper or a non-stick craft mat to protect your table and prevent the clay from sticking. -
Condition the clay:
Take a handful of white clay and knead it in your hands until it becomes soft, pliable, and free of cracks. -
Roll it out:
Using your rolling pin, roll the clay out to an even thickness of about 1/4 inch. I find that keeping it slightly thick makes the tag more durable. -
Cut the shape:
Press your heart-shaped cookie cutter firmly into the rolled clay. Wiggle it slightly before lifting to ensure a clean cut. -
Release the shape:
Gently push the clay heart out of the cutter if it stuck, or peel away the excess clay surrounding the shape on your mat. -
Smooth the edges:
Dip your finger in a tiny bit of water and run it along the raw edges of the heart to smooth out any roughness or loose bits of clay.
Stamp Hack
Don’t have a tiny heart stamp? You can shape the end of a paperclip or use the tip of a stylus tool to draw or press small hearts manually.
Step 2: Adding Detail & Finishing
-
Plan your pattern:
Visualize where you want the small impressed hearts to go. A random scatter or neat rows both look lovely. -
Stamp the hearts:
Gently press your tiny heart stamp into the surface of the clay. Apply even pressure so the impression is clear but doesn’t distort the overall shape of the tag. -
Repeat the pattern:
Continue stamping small hearts across the surface, leaving a little breathing room between each one. -
Create the hanging hole:
Use a straw or a stylus tool to punch a hole near the top center of the heart, ensuring it is large enough for your twine to pass through. -
Allow to dry:
Let the clay dry completely according to the package instructions. For air-dry clay, this usually takes 24-48 hours. Flip it occasionally to prevent curling. -
Sand imperfections:
Once fully dry, use a piece of fine-grit sandpaper to lightly buff the edges or surface if you want an ultra-smooth finish. -
Seal (optional):
Apply a thin coat of matte sealant if you want to protect the tag from moisture or stains, though the raw finish has a nice rustic look. -
Cut the twine:
Cut a length of specific jute twine, about 8-10 inches long. -
Thread the tag:
Fold the twine in half, push the loop through the hole in the heart, and pull the loose ends through the loop to create a lark’s head knot. -
Attach to gift:
Tie the loose ends of the twine onto your gift box or envelope to complete the presentation.
Preventing Cracks
If you see tiny cracks forming while the clay dries, smooth a surprisingly small amount of water (slurry) over them with your finger immediately.
Now your gift is ready to be given with a personalized touch that shows how much you care


Simple Heart Ornaments With Ribbon Hangers
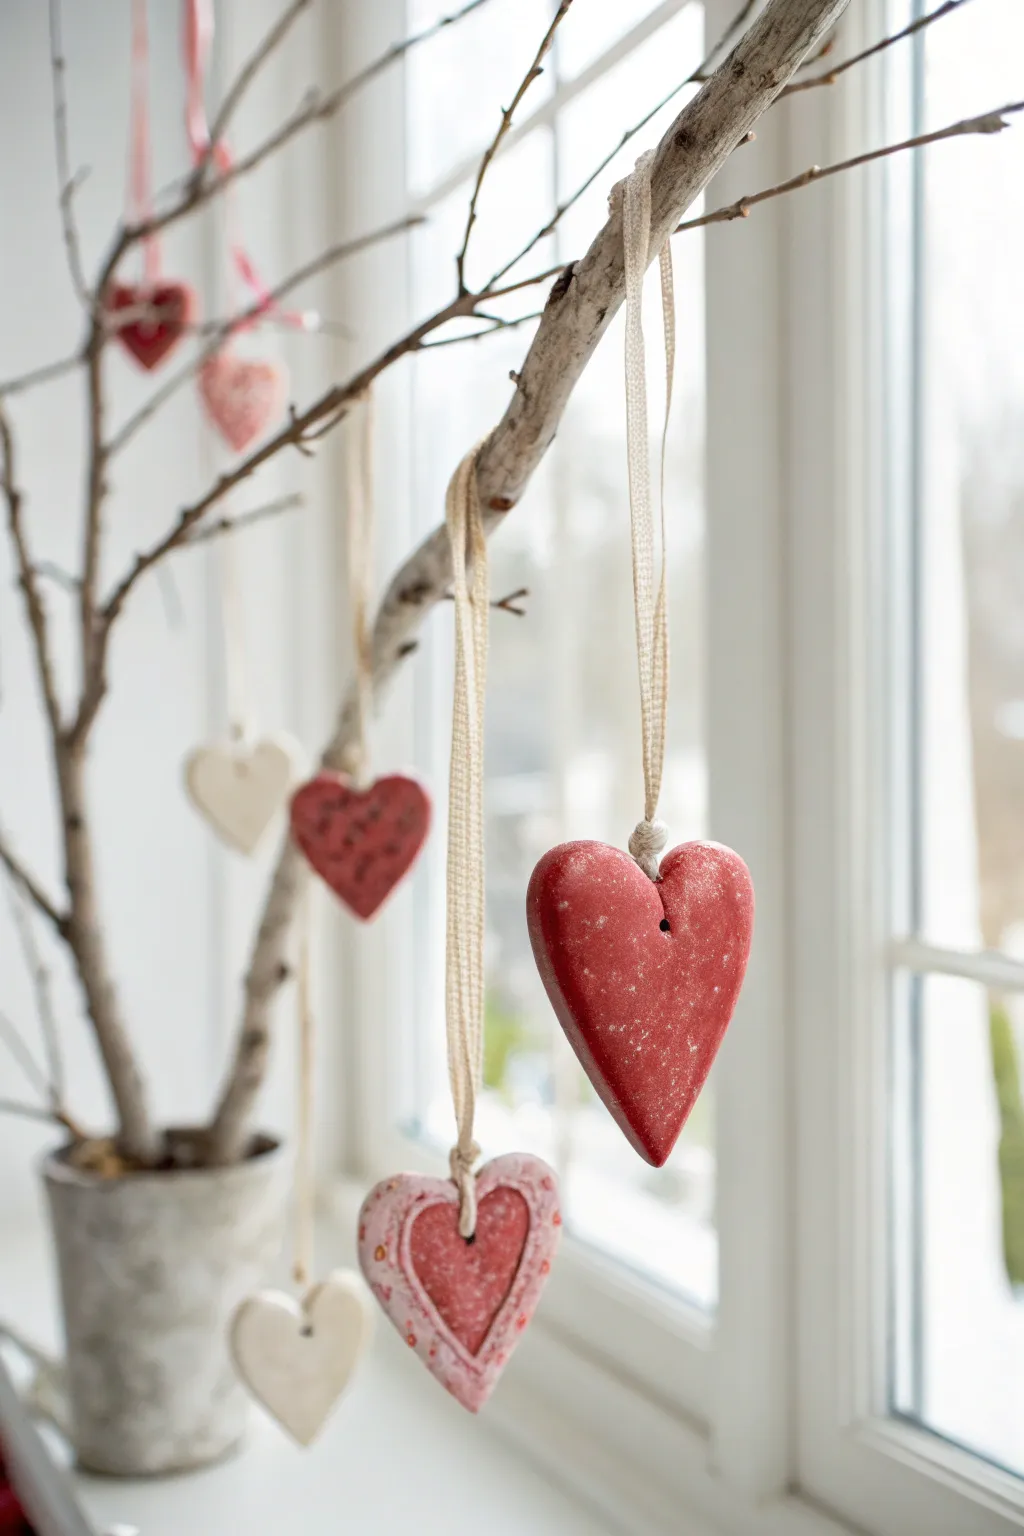
Bring a touch of Scandinavian simplicity to your Valentine’s décor with these charming handmade clay ornaments. Suspended from foraged branches, the mix of deep red, soft pink, and white hearts creates a lovely, natural centerpiece that celebrates love in an understated way.
Step-by-Step
Materials
- Air-dry clay or salt dough (white)
- Acrylic paints (deep country red, soft pink, white)
- Rolling pin
- Heart-shaped cookie cutters (various sizes)
- Parchment paper or craft mat
- Drinking straw or skewer
- Fine-grit sandpaper
- Cream or beige cotton ribbon/twine
- Small paintbrush
- Foraged tree branch
- Small rustic pot or vase
- Stones or floral foam (for stability)
Step 1: Shaping the Hearts
-
Prepare your workspace:
Lay down parchment paper or a craft mat on a flat surface to prevent sticking. -
Roll the clay:
Take a handful of air-dry clay and knead it briefly until pliable. Roll it out to an even thickness of about 1/4 inch (6mm). -
Cut the shapes:
Use your heart-shaped cookie cutters to press out multiple hearts. For the layered look seen in the photo, cut a large heart and then gently press a smaller heart cutter into the center of a separate piece to create a frame, or simply layer a smaller cut-out on top of a larger one using a dab of water as glue. -
Create hanging holes:
While the clay is still wet, use a drinking straw or a skewer to poke a hole near the top center of each heart. Make sure the hole is wide enough for your ribbon to pass through later. -
Smooth the edges:
Dip your finger in a little water and gently run it along the cut edges of the hearts to soften any sharp ridges or burrs. -
Allow to dry:
Place the hearts on a flat surface to dry completely. This usually takes 24-48 hours depending on humidity; flip them halfway through to ensure even drying.
Cracking Clay?
If you see small surface cracks while drying, mix a tiny bit of fresh wet clay with water to make a paste and smooth it over the crack with your finger.
Step 2: Decorating and Painting
-
Sand imperfections:
Once fully dry and hard, lightly sand the edges with fine-grit sandpaper if there are any rough spots remaining. -
Apply base coats:
Paint a selection of hearts in a deep country red. Leave some hearts natural white or paint them a creamy off-white for contrast. -
Create the layered effect:
For the two-tone hearts seen in the project, paint the outer border a soft pink and the inner heart a deeper rose color. I find a small detail brush helps keep the lines crisp here. -
Add texture (optional):
To mimic the speckled, rustic look in the photo, you can flick a toothbrush with thinned white paint over the red hearts, or lightly sand the painted surface to reveal a bit of the white clay underneath. -
Seal the ornaments:
Apply a thin coat of matte varnish or Mod Podge to protect the paint and give the hearts a finished look, though leaving them matte keeps the rustic vibe.
Natural Texture
Before cutting your shapes, press a piece of lace or linen fabric into the wet clay with a rolling pin to give the hearts a subtle, imprinted texture.
Step 3: Final Assembly
-
Cut the ribbon:
Cut lengths of cream cotton ribbon, varying the lengths between 6 to 10 inches so the ornaments will hang at different heights. -
Attach the hangers:
Thread a ribbon through the hole of a heart and tie a simple knot at the ends to create a loop. -
Prepare the display:
Place stones or floral foam into your rustic pot to weigh it down. Insert your foraged branch securely so it stands upright. -
Hang the ornaments:
Drape the ribbon loops over various twigs on the branch. Step back occasionally to check the balance of colors and heights.
Enjoy the cozy atmosphere these simple, handcrafted hearts bring to your window or table


Mini Heart Keychains With Sweet Color Blocking
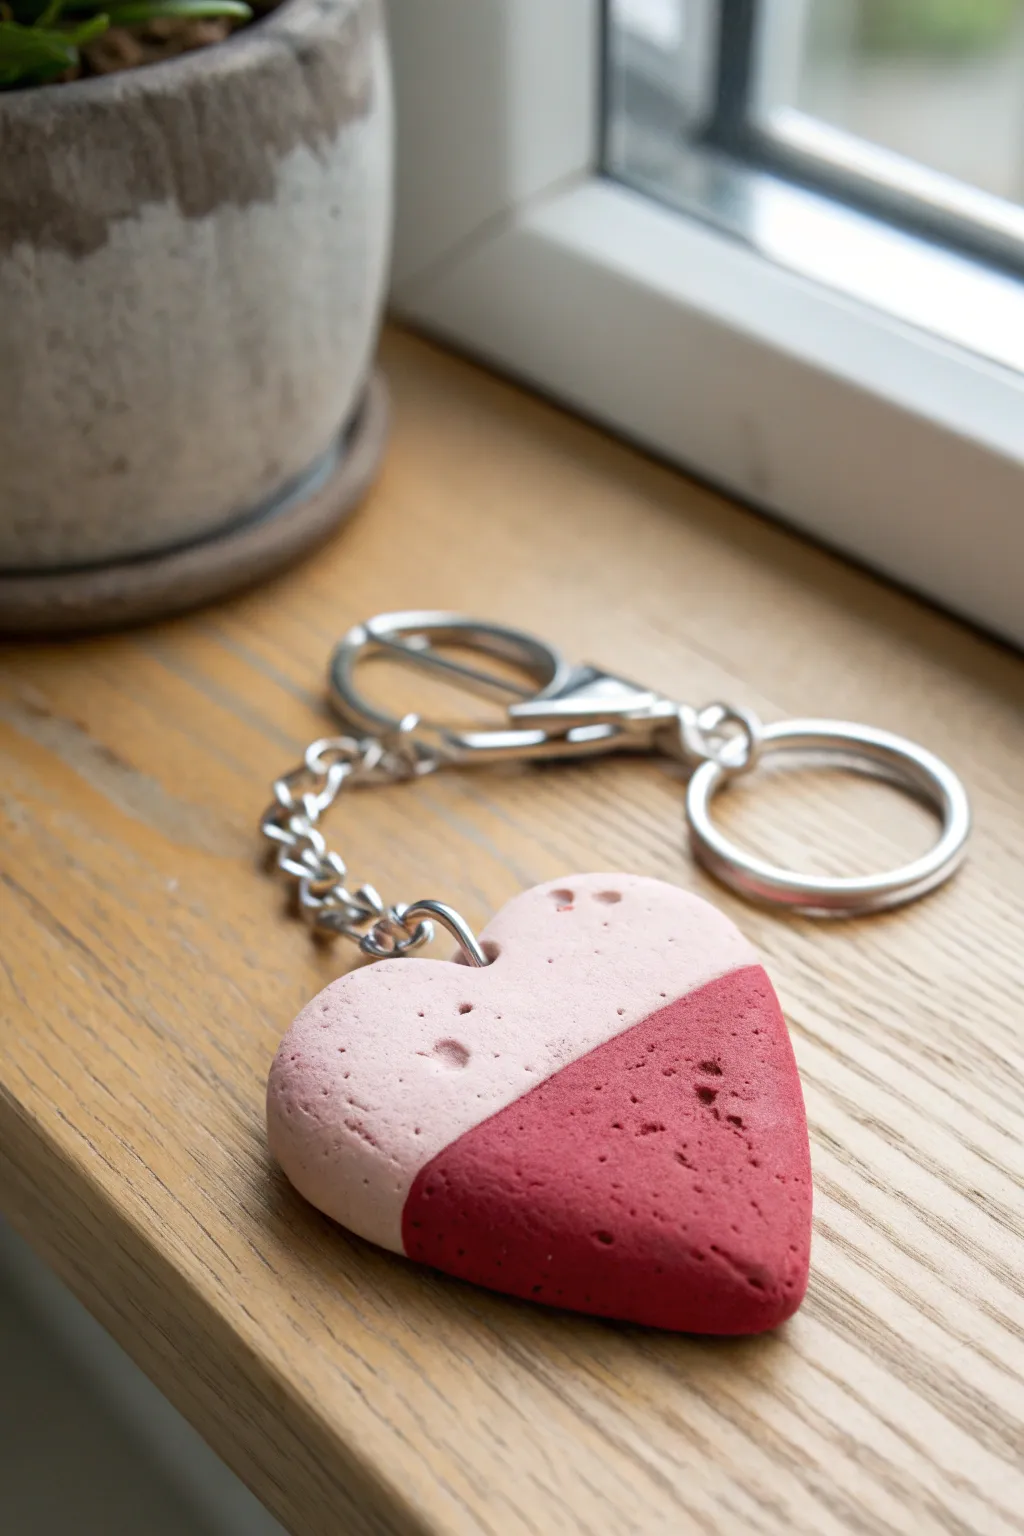
Create a sweet, modern accessory with this color-blocked heart keychain that plays with contrasting shades of pink/red and rough, stone-like textures. Simple to mold and fun to customize, these sturdy charms make the perfect little Valentine’s Day gift for friends or loved ones.
Step-by-Step Guide
Materials
- Polymer clay (white, red, and pink) OR air-dry clay
- Heart-shaped clay cutter
- Rolling pin or pasta machine
- Acrylic paint (light pink and deep red/burgundy)
- Painter’s tape
- Paintbrushes
- Clear matte varnish or sealant
- Needle tool or toothpick
- Silver keychain ring with lobster clasp accent
- Jump rings and small chain segment
- Jewelry pliers
- Optional: Texture sponge or sandpaper
Step 1: Shaping the Clay Foundation
-
Condition the Clay:
Begin by kneading your chosen clay (polymer or air-dry) until it is soft and pliable. If you want the speckled, stony look seen in the photo, you can mix a tiny bit of black sand or pepper into white clay, but we will focus on painting the effect later. -
Roll It Out:
Use your rolling pin to flatten the clay into a slab that is approximately 1/4 inch thick. You want it substantial enough to hold the hardware without cracking. -
Cut the Shape:
Press your heart-shaped cutter firmly into the slab. Wiggle it slightly to ensure a clean cut, then lift the cutter. If edges are ragged, smooth them gently with a fingertip dipped in a little water (for air-dry) or baby oil (for polymer). -
Add Texture (Optional):
To mimic the porous, stone-like texture in the image, lightly press a coarse sponge or a crumpled ball of aluminum foil over the surface. Do not press too hard; you just want subtle surface pitting. -
Create the Eyelet:
Using a needle tool or a cocktail stick, poke a hole near the top center of one of the heart’s lobes. Ensure the hole is wide enough for your jump ring to pass through, keeping in mind clay can shrink slightly.
Fixing Paint Bleed
If paint seeps under the tape, wait for it to dry fully. Then, use a fine detail brush and the original light pink color to carefully paint over the mistake and sharpen the line.
Step 2: Drying and Refining
-
Cure or Dry:
If using polymer clay, bake according to the package instructions (usually 275°F for 15-30 mins). If using air-dry clay, let it sit in a dry spot for 24-48 hours until completely hard and white. -
Sanding:
Once fully cured or dried, gently sand the edges and flat surfaces. This smooths out fingerprints and enhances the matte, stone-like finish we are aiming for. -
Dust Off:
Wipe the heart with a slightly damp cloth or tack cloth to remove all sanding dust before you begin painting.
Step 3: Color Blocking
-
Base Coat:
Paint the entire heart with a layer of pale, dusty pink acrylic paint. You may need two coats for full opacity. Let this dry completely. -
Tape the Line:
Apply a strip of painter’s tape diagonally across the heart to section off the area you want to keep light pink. Press the tape edge down firmly to prevent bleed-under. -
Apply Contrast Color:
Paint the exposed bottom section with a deep red or burgundy acrylic paint. I like to use a stippling motion here to maintain that textured look rather than smooth brush strokes. -
Remove Tape:
Carefully peel back the tape while the red paint is still slightly tacky but mostly set. This creates the crispest line. -
Seal the Charm:
Once the paint is fully dry, apply a coat of matte varnish. A glossy finish would ruin the raw clay aesthetic shown in the photo, so stick to matte.
Level Up: Terrazzo
Before baking polymer clay, mix in tiny chopped bits of different colored dried clay. Roll it flat to create a trendy terrazzo pattern instead of painting.
Step 4: Assembly
-
Open the Jump Ring:
Using two pairs of jewelry pliers, twist a jump ring open sideways (never pull it apart outwards, as this weakens the metal). -
Attach the Chain:
Slip the open jump ring through the hole you made in the clay heart. Thread the last link of your small chain segment onto the same ring. -
Close the Ring:
Twist the jump ring back completely closed so there is no gap for the chain to slip through. -
Final Connection:
Attach the other end of the chain to your larger keychain mechanism (the split ring and lobster clasp assembly) using another jump ring if necessary.
Now your stylish, handmade keychain is ready to organize your keys or add a pop of color to a bag

The Complete Guide to Pottery Troubleshooting
Uncover the most common ceramic mistakes—from cracking clay to failed glazes—and learn how to fix them fast.
Heart Locket Pendant With a Tiny Hidden Message
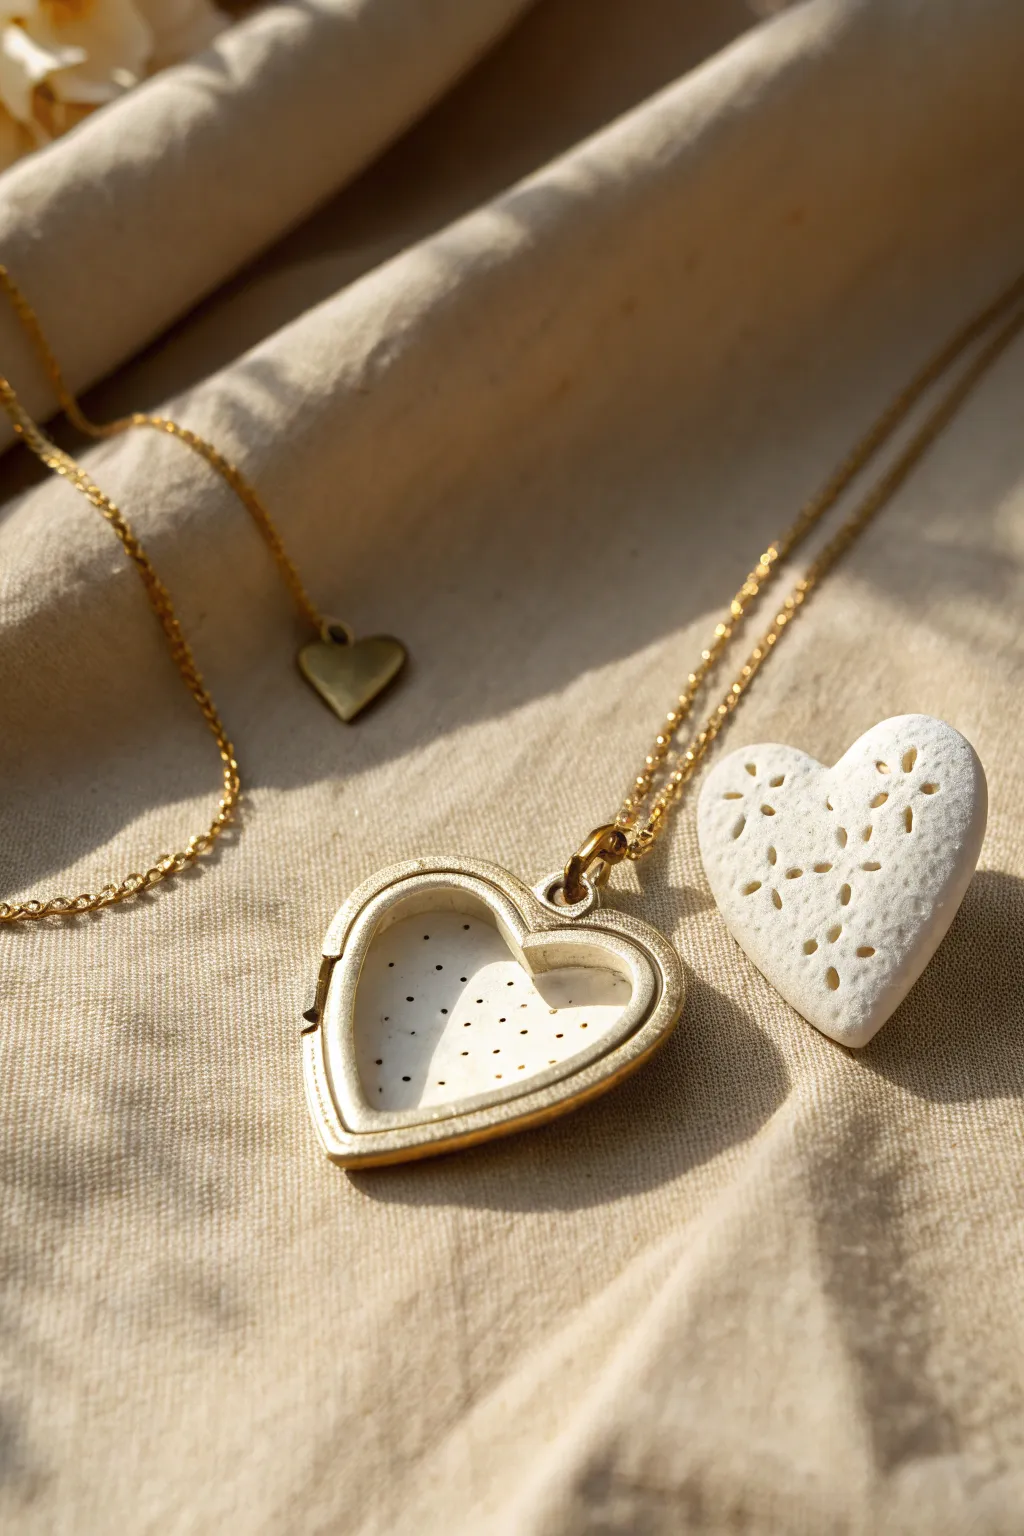
Create a stunning faux-gold locket that holds a secret: a porous clay insert perfect for diffusing your favorite essential oils. This elegant piece combines the look of vintage jewelry with the thoughtful utility of aromatherapy.
Step-by-Step
Materials
- Polymer clay (white or translucent)
- Polymer clay (metallic gold)
- Small heart-shaped cutter
- Slightly smaller heart cutter (for the insert)
- Needle tool or thick sewing pin
- Gold mica powder
- Soft paintbrush
- UV resin or strong craft glue
- Jump rings and necklace chain
- Small eye pin
- Sandpaper (fine grit)
- Oven for baking
Step 1: Creating the Locket Frame
-
Condition the metallic clay:
Start by warming up your metallic gold polymer clay in your hands until it is pliable and smooth. -
Roll out the base slab:
Roll the gold clay into a sheet approximately 3mm thick. This needs to be sturdy enough to act as the frame. -
Cut the outer shape:
Use your larger heart-shaped cutter to punch out the main heart shape. -
Create the frame opening:
Using the smaller heart cutter, gently press into the center of your gold heart to remove the middle, leaving just a rim or frame. Save the inner cutout for a separate charm if you like. -
Clean the edges:
Smooth any rough edges of your gold frame with your fingertip or a silicone tool to ensure it looks like polished metal. -
Add the backing:
Roll a very thin sheet of gold clay and cut another large heart. Place your frame on top of this backing piece and gently press the seams together so it forms a shallow dish. -
Insert hardware:
Carefully push a small eye pin into the top center of the heart frame or embed a jump ring directly into the clay before baking. -
Apply mica powder:
For that realistic metal shine, brush a layer of gold mica powder over the raw clay frame, buffing it slightly with the brush.
Step 2: Making the Diffuser Insert
-
Prepare the absorbent clay:
Roll out your white polymer clay. To make it more porous for oils, I sometimes mix in a tiny pinch of cornstarch, though plain baked clay works too. -
Cut the insert:
Use the smaller heart cutter to create a white heart that will fit perfectly inside your gold frame. -
Texture the surface:
Using a needle tool, gently prick a pattern of tiny dots across the surface of the white heart. This adds texture and visual interest. -
Create the secondary heart (optional):
If you want to make the patterned puffy heart shown in the photo, roll a thicker piece of white clay, smooth the edges to be rounded, and create a decorative starburst pattern with a needle tool. -
Bake the components:
Place all pieces on a tile or parchment paper. Bake according to your clay package instructions (usually 275°F/135°C for 15-30 minutes).
Fixing a Warped Frame
If the locket frame warps while baking, re-heat it briefly with a hair dryer until slightly soft, then press it flat under a heavy book while it cools down.
Step 3: Assembly and Finish
-
Cool and sand:
Let the pieces cool completely. If the white insert fits too tightly, lightly sand the edges until it nestles comfortably into the frame. -
Secure the insert:
Apply a small drop of strong glue or UV resin to the back of the gold frame ‘dish’ and press the white porous heart inside. -
Seal the metal (optional):
If you want extra shine on the gold frame, apply a thin coat of gloss varnish, but be careful not to get varnish on the white porous clay, or it won’t absorb scents. -
Attach the chain:
Open a jump ring with pliers, loop it through the eye pin on your heart pendant, and thread your necklace chain through. -
Add the scent:
Once fully cured and assembled, place a single drop of essential oil onto the white center and let it soak in.
Antique Finish
After baking, rub a tiny amount of brown acrylic paint into the crevices of the gold frame and wipe the surface clean to create a vintage, aged look.
Wear your beautiful new locket and enjoy the subtle fragrance it carries throughout your day
Easy Heart Earrings in Pastel Pairs
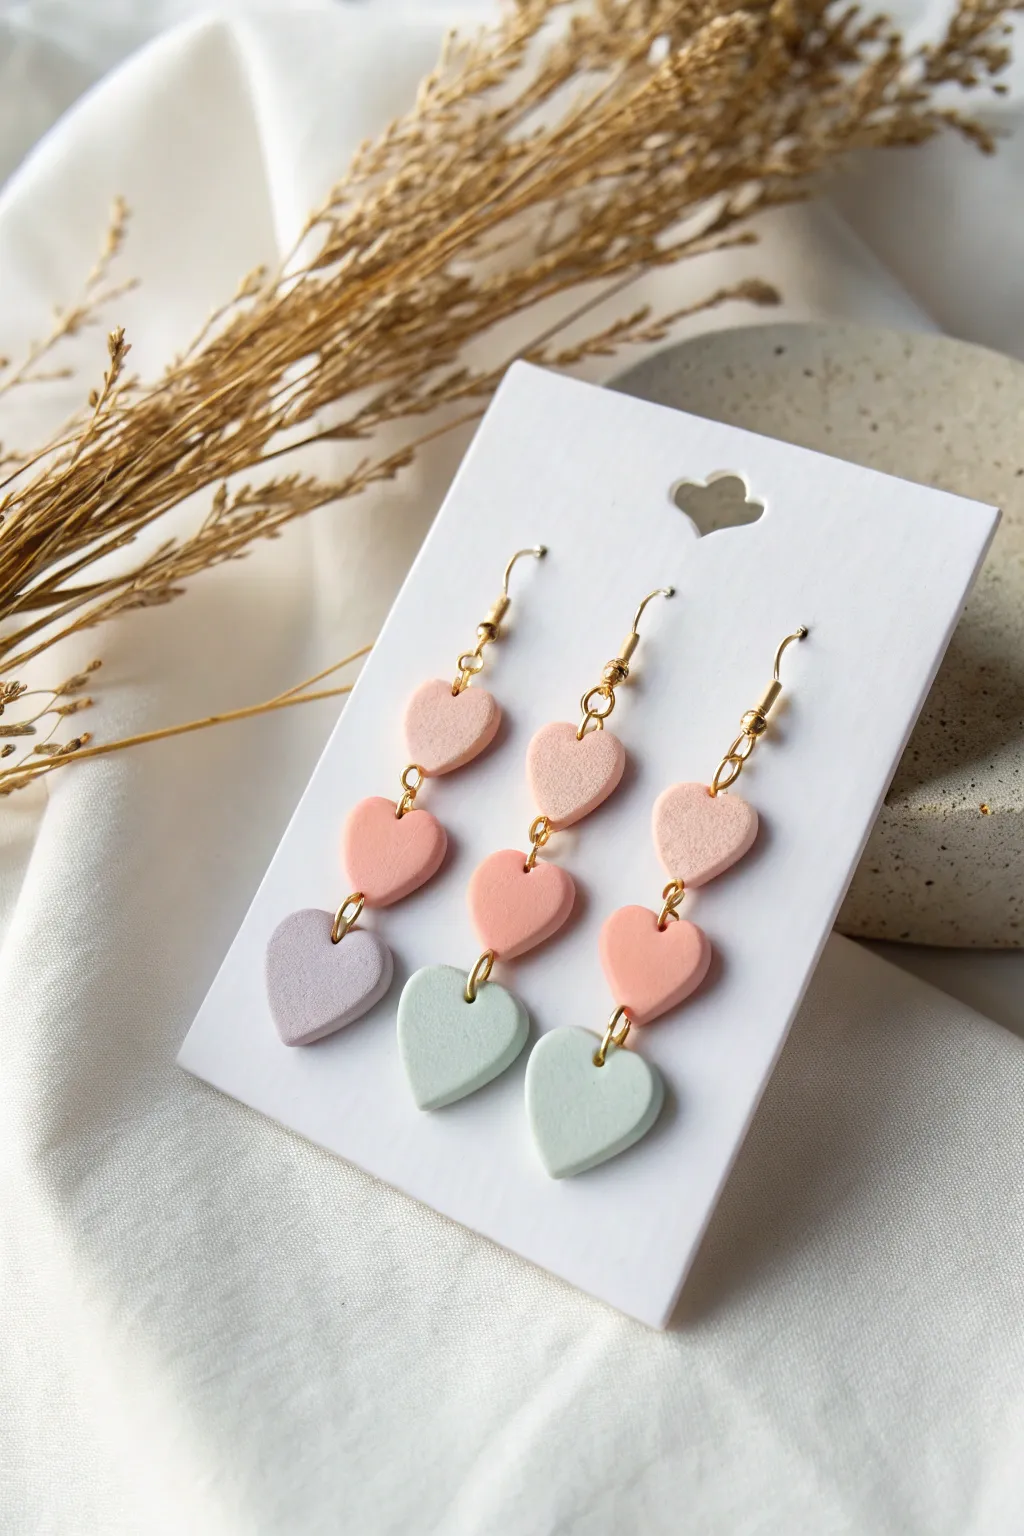
Create a sweet, romantic accessory with these triple-stack heart earrings in soft, dreamy pastel shades. The matte finish and delicate color transitions make them perfect for a subtle Valentine’s look or everyday wear.
Detailed Instructions
Materials
- Polymer clay in pastel pink, peach, lilac, and mint green
- Small heart-shaped clay cutter (approx. 1 cm)
- Acrylic rolling pin or pasta machine
- Clay slicer blade
- Needle tool or small awl
- 6 Gold jump rings (4-6mm)
- 2 Gold earring hooks (fishhook style)
- Jewelry pliers (flat nose and round nose)
- Parchment paper or ceramic tile for baking
- Fine grit sandpaper (optional)
Step 1: Preparing the Clay Hearts
-
Condition the clay:
Begin by warming up your polymer clay in your hands. Knead the pastel pink, peach, lilac, and mint green clays separately until they are soft and pliable. -
Roll out sheets:
Using an acrylic roller or a pasta machine on a medium setting (about 2-3mm thick), roll each color into a smooth, even sheet. Aim for consistent thickness across all colors to ensure the earrings hang evenly. -
Cut the shapes:
Use your small heart cutter to punch out your shapes. For the design shown, you will need two pink hearts, two peach hearts, one lilac heart, and one mint heart. If you want matching pairs, double the lilac and mint counts. -
Smooth the edges:
Gently pick up each heart and use your fingertip to lightly smooth any rough edges left by the cutter. This little bit of refining now saves sanding time later. -
Pierce the holes:
Use a needle tool to create holes for the jump rings. For the top and middle hearts, pierce a hole at the very top center (between the lobes) and the bottom point. For the bottom heart, only pierce the top center. -
Verify hole size:
Ensure the holes are large enough for your jump rings to move freely. I always give the needle a gentle wiggle to slightly widen the opening before baking.
Step 2: Baking and Assembly
-
Bake the pieces:
Arrangement the hearts on a ceramic tile or parchment paper-lined baking sheet. Bake according to your brand of clay’s instructions—usually around 275°F (130°C) for 15–30 minutes. -
Cool down:
Allow the clay to cool completely before handling. If the clay is still warm, it can be slightly flexible and prone to warping. -
Open jump rings:
Using two pairs of pliers, twist your jump rings open sideways (never pull them apart). This maintains the circle’s shape. -
Connect the bottom tier:
Slide an open jump ring through the top hole of your bottom heart (mint or lilac) and connect it to the bottom hole of the middle heart. -
Connect the middle tier:
Use another jump ring to connect the top hole of the middle heart to the bottom point of the top pink heart. Close the ring securely. -
Attach the hardware:
Open the loop on your earring hook (or add a small jump ring if needed) and attach it to the top hole of the top pink heart. -
Repeat assembly:
Follow the same assembly steps for the second earring to complete the pair. -
Final check:
Hold the earrings up to ensure all jump rings are fully closed and the hearts dangle freely without getting stuck.
Clean Cuts
Place a piece of cling wrap over the clay before pressing down with your cutter. This creates a lovely domed ‘pillow’ effect on the edges and reduces the need for sanding later.
Texture Play
Before cutting the hearts, gently press a piece of lace or a texture mat into the rolled clay slab to give the surface a subtle, tactile pattern.
Enjoy wearing your handcrafted dangle earrings that add a soft pop of color to any outfit


What Really Happens Inside the Kiln
Learn how time and temperature work together inside the kiln to transform clay into durable ceramic.
Cupid’s Arrow Heart Pins or Brooches
Capture the essence of romance with this minimalist, matte-finish clay heart pin featuring a delicate golden arrow. It’s the perfect accessory to add a touch of whimsy to a denim jacket or scarf for Valentine’s Day.
Step-by-Step Tutorial
Materials
- Red or terracotta polymer clay
- Rolling pin or acrylic roller
- Heart-shaped cookie cutter (approx. 2 inches)
- Small metal arrow charm OR gold pigment powder and a fine brush
- Super glue (cyanoacrylate) or jewelry glue
- Pin back or brooch finding
- Parchment paper
- Oven (for baking)
- Sandpaper (fine grit, optional)
- Mod Podge or clear sealant (optional)
Step 1: Prepping the Heart Base
-
Condition the clay:
Begin by taking a chunk of your red or terracotta polymer clay. Knead it in your hands for several minutes until it becomes soft, pliable, and free of cracks. -
Roll it out:
Place the conditioned clay onto a piece of parchment paper to prevent sticking. Using an acrylic roller or rolling pin, roll the clay out to a uniform thickness of about 1/4 inch (6mm). You want it thick enough to hold the pin back securely later. -
Cut the shape:
Press your heart-shaped cutter firmly into the clay. Give it a tiny wiggle to ensure it cuts all the way through, then lift the cutter. Peel away the excess clay from the outside. -
Smooth the edges:
Gently pick up the clay heart. Using your fingertip and a tiny bit of water or baby oil, smooth down any sharp ridges along the cut edge to give it a finished, professional look.
Step 2: Adding the Golden Detail
-
Option A: Embedding a metal charm:
If you are using a metal arrow charm like in the photo, gently press it into the surface of the unbaked clay heart. Press just deep enough so it sits flush but doesn’t distort the heart shape. You can bake it with the charm in place. -
Option B: Using gold pigment:
If you don’t have a charm, use a needle tool to gently scribe or ‘draw’ the arrow shape into the raw clay. Dip a fine brush into gold mica powder or pigment and carefully fill in the scribed lines. -
Final inspection:
Before baking, check for any fingerprints or dust. Lightly brush them away with a soft brush or smooth them out with a finger.
Loose Arrow?
If the metal charm doesn’t stick after baking, don’t panic. The clay doesn’t fuse to metal on its own. Pop the charm out, add a dab of gel super glue, and press it back into the bespoke indent.
Step 3: Baking and Assembly
-
Bake the heart:
Transfer the parchment paper with the heart onto a baking sheet. Bake according to your specific clay package instructions. This is usually around 275°F (130°C) for 15-30 minutes depending on thickness. -
Cool down:
Once baked, remove the tray from the oven and let the heart cool completely. I like to let this rest for at least an hour to ensure the clay hardens fully. -
Secure the charm (if applicable):
If your metal arrow didn’t bond perfectly during baking, pop it out now, add a tiny dot of super glue to the indentation, and press the metal piece back in. -
Add the backing:
Flip the heart over. Apply strong jewelry glue or ample super glue to the flat side of your pin back. -
Attach the pin:
Press the pin back onto the center of the heart. Hold it in place for 30-60 seconds to ensure the initial bond sets. -
Let it cure:
Allow the glue to cure fully—usually 24 hours for jewelry glue—before pinning it onto heavy fabrics like denim.
Smooth Finish Tip
To remove fingerprints before baking, lightly brush the raw clay surface with a little cornstarch or baby powder. This acts as a buffer and leaves a lovely matte texture.
Pin your new creation on a jacket lapel or tote bag to carry a bit of love wherever you go
Marbled Valentine Heart Coasters
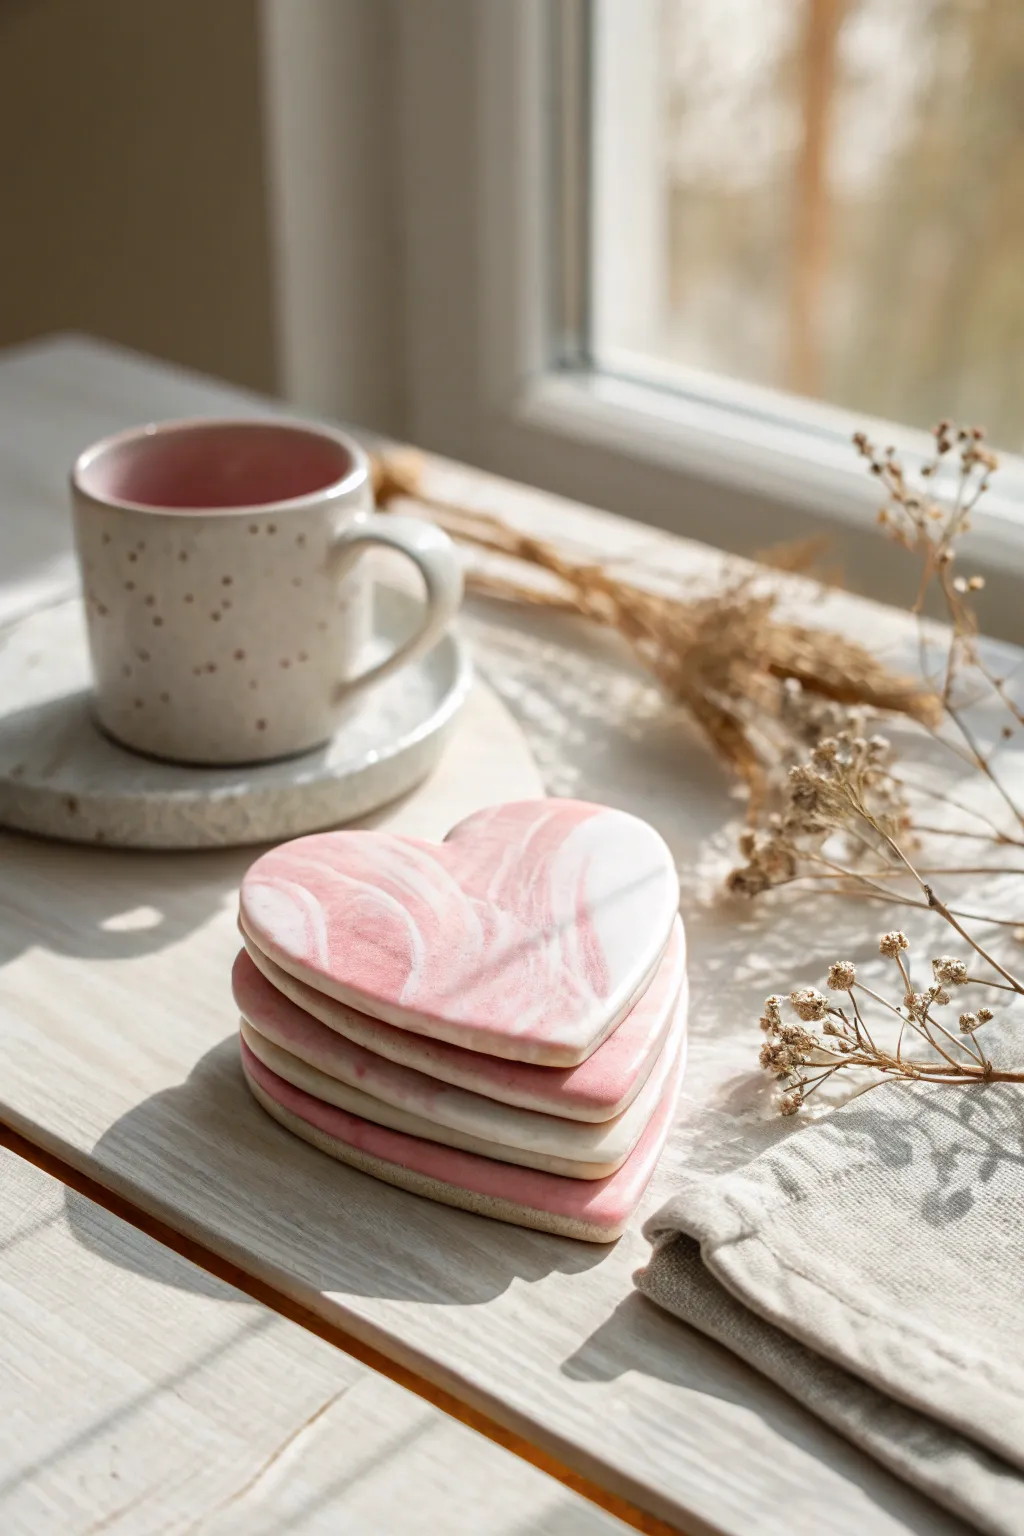
Create a stunning set of functional decor with these swirling pink and white heart coasters. Their glossy, marbled finish makes them look like expensive ceramic pieces, but they are surprisingly simple to craft at home using polymer or air-dry clay.
Step-by-Step
Materials
- White polymer clay (or air-dry clay)
- Pink polymer clay (soft rose shade)
- Darker pink or magenta polymer clay (for contrast, optional)
- Heart-shaped cookie cutter (approx. 3-4 inches)
- Acrylic rolling pin
- Parchment paper or baking mat
- Craft knife
- Fine-grit sandpaper (400-600 grit)
- Glossy polyurethane varnish or UV resin
- Soft paintbrush or foam brush
- Oven (for polymer clay) or drying rack (for air-dry)
Step 1: Preparing the Clay
-
Condition the white clay:
Begin by taking a large block of white clay. Knead and warm it in your hands until it becomes soft and pliable, which is crucial to prevent cracks later on. -
Prepare accent colors:
Take a smaller amount of your soft pink clay. Condition it just like the white. If you want more depth, prepare a tiny amount of darker pink or magenta as well. -
Create clay snakes:
Roll the white clay into a thick log, about 1 inch in diameter. Then, roll your pink clay into thinner snakes, varying their thickness slightly for a more natural look. -
Combine the colors:
Lay the pink snakes longitudinally along the white log. If you are using a darker pink accent, add a few very thin threads of it now. Twist the entire bundle together like a candy cane.
Step 2: Marbling and Shaping
-
Twist and fold:
Fold the twisted log in half and twist it again. Repeat this process 2-3 times. This helps distribute the color without blending it into a single solid shade. -
Form a ball:
Smush the twisted log into a rough ball shape. You should see swirling lines of pink and white running through the mass. -
Roll out the slab:
Place the clay ball on parchment paper. Using your acrylic roller, roll it out to an even thickness of about 1/4 inch. Roll in different directions to stretch the marble pattern organically. -
Cut the hearts:
Position your heart-shaped cutter over the most attractive parts of the marble pattern. Press down firmly to cut your shapes. Lift the excess clay away carefully. -
Smooth the edges:
Before baking or drying, run your finger dipped in a little water (or baby oil for polymer clay) along the cut edges to round them off slightly and remove any sharp ridges.
Fixing Ugly Muddy Colors
If your pinks and whites are blending into a solid light pink instead of marbling, stop twisting! You’ve over-mixed. Stop sooner next time to keep distinct streaks of white and color.
Step 3: Finishing Touches
-
Bake or dry:
If using polymer clay, bake according to the package instructions (usually 275°F/135°C for 15-30 minutes). Place the hearts between two sheets of parchment paper and weigh them down with a baking tray to ensure they stay perfectly flat. If using air-dry clay, let them dry for 24-48 hours, flipping occasionally. -
Cool down:
Allow the coasters to cool completely inside the oven if baking, or ensure they are bone dry if air-drying. -
Sand the edges:
Once hardened, take your fine-grit sandpaper and gently sand the sides of the hearts. This creates that professional, stone-like finish seen in the photo. -
Wipe clean:
Use a slightly damp cloth or alcohol wipe to remove all sanding dust from the surface. Dust will ruin the final glossy coat, so be thorough. -
Apply the gloss:
Using a soft brush, apply a coat of glossy varnish or resin. I like to start in the center and push the liquid toward the edges to avoid drips. -
Let it cure:
Allow the first coat to dry completely. For a glass-like finish similar to the image, apply a second thin coat and let it cure fully before stacking.
Add a Flash of Gold
Before rolling out your slab, press small flakes of gold leaf onto the clay ball. As you roll it flat, the gold will crackle and embed into the surface for a chic metallic accent.
Stack your set of hearts on the coffee table for a lovely pop of romance

TRACK YOUR CERAMIC JOURNEY
Capture glaze tests, firing details, and creative progress—all in one simple printable. Make your projects easier to repeat and improve.
XOXO Textured Heart Tiles for a Mini Wall Grid
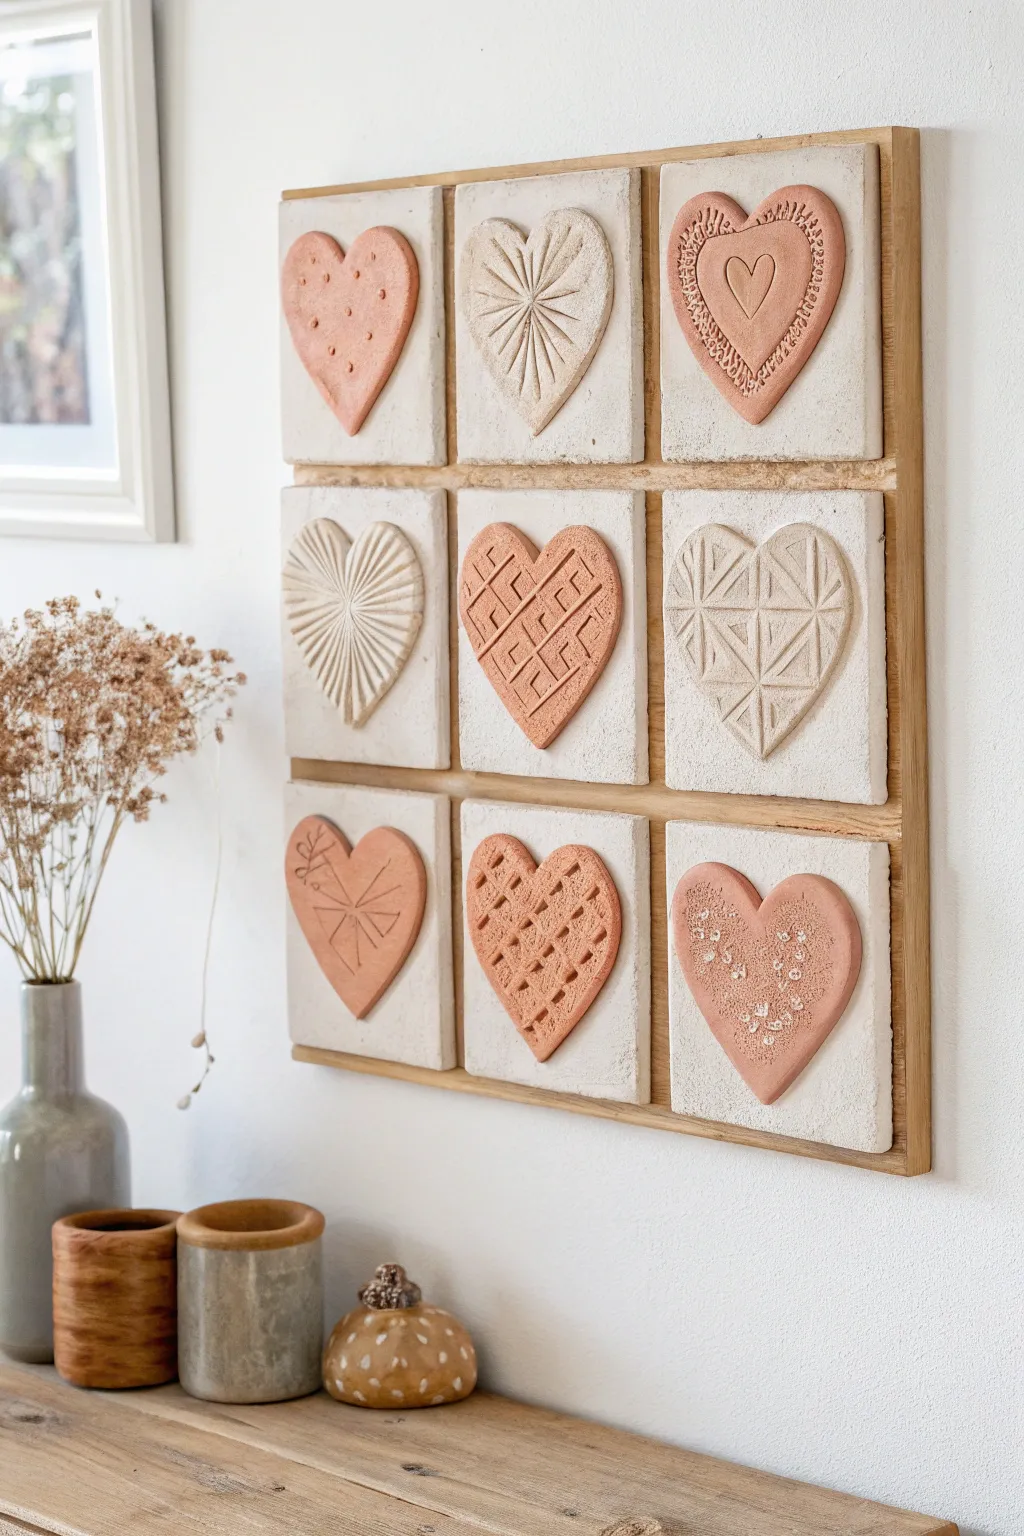
Create a stunning gallery wall in miniature with these textured clay hearts mounted on limestone-effect tiles. This grid combines rustic terracotta warmth with creamy neutrals for a sophisticated take on Valentine’s décor that works year-round.
Step-by-Step Guide
Materials
- Air-dry clay (terra cotta color)
- Air-dry clay (white or cream)
- Square ceramic tiles (approx. 4×4 inches) or wooden squares
- Rolling pin
- Heart-shaped cookie cutter (sized to fit inside the tiles)
- Texture tools (lace doily, stamps, plastic fork, toothpick, mesh)
- Craft knife
- Textured stone spray paint (cream/beige)
- Strong craft glue (like E6000)
- Wooden frame with grid dividers (or square shadow box)
- Fine grit sandpaper
Step 1: Preparing the Base
-
Create the tile backing:
If you aren’t using pre-cut ceramic tiles, cut 9 squares from thick cardboard or thin wood paneling to fit your frame’s grid openings. They should be identical in size. -
Apply stone texture:
Spray your square tiles (or prepared backings) with a textured stone effect spray paint in a creamy off-white color. This mimics the limestone look seen in the photo. Apply 2-3 light coats, letting them dry fully between layers.
Clay Curling?
If your hearts curl up at the edges while drying, place a lightweight book or board on top of them (with wax paper in between) once they are semi-dry to flatten them back out.
Step 2: Sculpting the Hearts
-
Roll out the clay:
Roll out your terra cotta air-dry clay to about 1/4 inch thickness on a smooth surface. Do the same with a smaller amount of the white clay. -
Cut the shapes:
Using your heart cutter, stamp out 9 hearts. Based on the reference, make about 5 terra cotta hearts and 4 white/cream hearts to create an alternating pattern. -
Smooth the edges:
Dip your finger in a little water and gently run it along the cut edges of each heart to remove any jagged bits or clay burrs.
Framing Hack
Can’t find a 9-grid frame? Buy a standard deep square frame. Use thin balsa wood strips, cut to size and stained, to build your own internal grid structure directly on the backing.
Step 3: Adding Textures
-
Design 1: Dotted Texture:
For the first terra cotta heart, use a dull pencil point or the back of a small paintbrush to gently press dots into the surface. Keep the pressure light for subtle dimples. -
Design 2: Sunburst Lines:
On a white heart, use a craft knife or a needle tool to carve lines radiating from the center point outward to the edges, creating a starburst effect. -
Design 3: Lace Impression:
Take a terra cotta heart and press a piece of lace or a doily firmly onto the surface, then peel it back to reveal an intricate floral pattern. Use a toothpick to draw a smaller heart inside the center. -
Design 4: Fan Texture:
On a white heart, use a sculpting tool to press deep, fan-like grooves starting from the bottom center point and radiating up toward the rounded top edges. -
Design 5: Checkerboard/Weave:
For the center terra cotta heart, use a flat-edge tool to press a grid pattern, alternating the direction of your lines to mimic a basket weave or waffle texture. -
Design 6: Geometric Triangles:
On a white heart, carefully draw a grid of triangles. You can slightly depress alternating triangles to create a faceted, 3D geometric look. -
Design 7: Botanical Etching:
On a terra cotta heart, lightly drag a needle tool to sketch a simple branch or leaf motif on one half, and geometric radiating lines on the other half. -
Design 8: Deep Grid:
For a bold texture on a terra cotta heart, press a wire mesh or a clay texture mat deeply into the clay to create a uniform, waffle-like grid pattern. -
Design 9: Floral Stamp:
On the final terra cotta heart, press small flower stamps or use the end of a straw to create circle clusters that look like tiny blossoms.
Step 4: Assembly
-
Dry the hearts:
Allow all your clay hearts to dry completely for at least 24-48 hours. I like to flip them over halfway through so the bottom breathes and dries evenly. -
Check fit:
Once dry, place your hearts onto the stone-textured tiles to ensure you like the arrangement before gluing. -
Glue components:
Apply a generous dab of strong craft glue (like E6000) to the back of each heart and press firmly into the center of the textured tiles. -
Mount in frame:
Secure the finished tiles into your wooden grid frame using glue or framing points, ensuring the hearts are all oriented correctly.
Hang your new textured masterpiece in a well-lit spot to let the shadows highlight those beautiful details
Puffy Heart Beads for a Friendship Bracelet Set
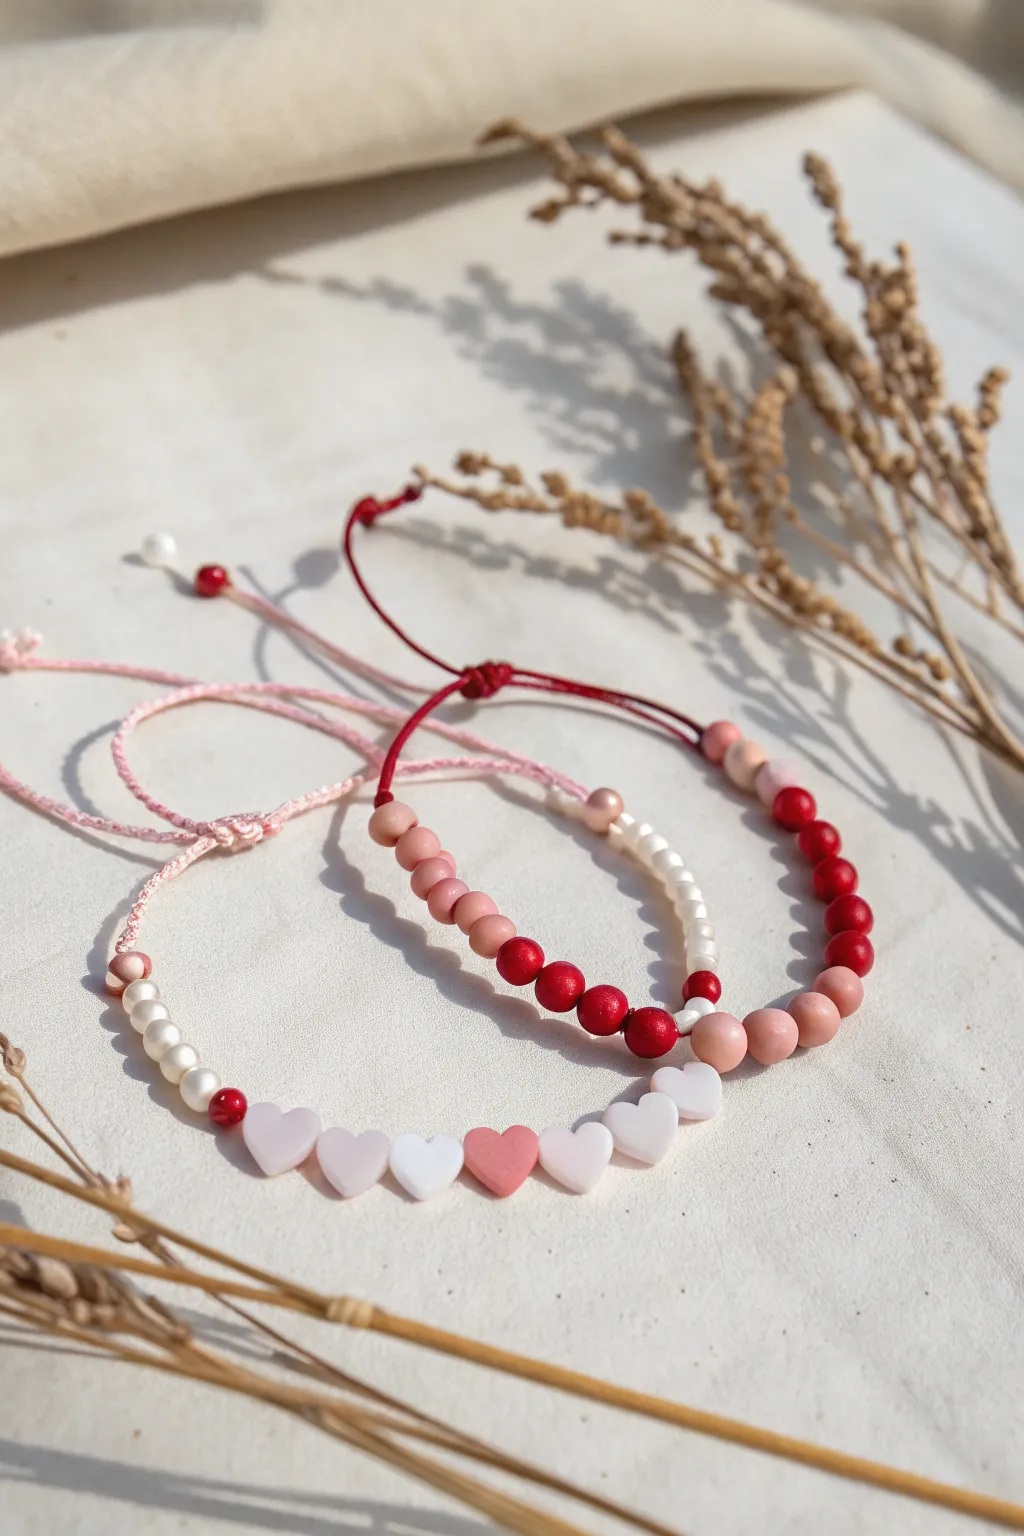
These charming bracelets combine delicate seed beads and pearls with custom puffy heart beads made from polymer clay. The adjustable macramé closure ensures a perfect fit, making them a sweet and personalized gift for Valentine’s Day or best friends.
Step-by-Step
Materials
- Polymer clay in white, baby pink, and rose pink
- Nylon beading cord or waxed polyester thread (0.8mm or 1mm comfortable for beading) in pink and red
- Small round clay cutters (or a drinking straw) and a craft knife
- Needle tool or toothpick
- Faux pearl beads (approx. 4mm)
- Round beads in coordinating reds, pinks, and matte textures (6mm)
- Small accent beads (seed beads or 2mm metal spacers)
- Lighter (for sealing cord ends)
- Scissors
- Tape or a clipboard
- Baking sheet and parchment paper
Step 1: Making the Puffy Heart Beads
-
Condition the Clay:
Begin by conditioning your polymer clay until it is soft and pliable. Roll out the white, baby pink, and rose pink clays into thin slabs, approximately 3mm thick. -
Cut the Hearts:
Use a very small heart-shaped cutter to punch out your shapes. If you don’t have a tiny cutter, use a straw to cut small circles, then pinch the bottom to form a point and indent the top with a needle tool to create the heart cleavage. -
Smooth the Edges:
Gently tap the edges of each heart with your fingertip to soften the cut marks, giving them that adorable ‘puffy’ look rather than a sharp, cookie-cutter edge. -
Pierce the Holes:
This is crucial: carefuly insert a needle tool or toothpick horizontally through the side of the heart. Rotate the tool slightly as you push through to prevent distorting the shape. Ensure the hole is wide enough for your cord. -
Bake the Beads:
Arrange your hearts on a parchment-lined baking sheet. Bake according to your clay manufacturer’s instructions (usually 275°F/135°C for 15-30 minutes). Let them cool completely before handling.
Heart Holes Closing Up?
Make the bead holes slightly larger than you think you need. Clay can sometimes swell slightly or contract during baking. Re-poke the holes gently while the clay is still warm from the oven.
Step 2: Assembling the Pink Heart Bracelet
-
Prepare the Cord:
Cut a length of pink nylon cord about 30 inches long. Melt the very tip with a lighter for a split second and roll it between your fingers (carefully!) to create a stiff ‘needle’ end for easier stringing. -
Start Beading the Center:
Slide on your clay hearts first. Alternate the colors—for example, white, pink, white, dark pink, white—to create a pattern. I like to lay them out on a table first to check the balance. -
Add Side Details:
On either side of the heart cluster, add a tiny red accent bead, followed by three or four faux pearl beads. -
Secure the Beads:
Once the beads are centered on the cord, tie a simple overhand knot on both outer sides of the beaded section. This keeps the beads from sliding around while you wear it.
Add a Glaze
For a professional finish, coat your baked clay hearts with a thin layer of UV resin or glossy polyurethane varnish. This protects them from dirt and gives them a ceramic-like shine.
Step 3: Assembling the Red Ombré Bracelet
-
String the Second Design:
Using the red cord, prepare the ends as before. This design relies on round beads. Start threading beads in a gradient pattern: dark red in the center, transitioning to lighter pinks and matte peach tones moving outward. -
Mix Textures:
Incorporate a few faux pearls or smaller gold spacers between the larger round beads to break up the solidity and add visual lightness. -
Knot the Section:
Just like the first bracelet, tie an overhand knot on either side of your bead grouping to lock the design in the center of the cord.
Step 4: Creating the Adjustable Closure
-
Form the Circle:
Take the two loose ends of your bracelet cord and cross them over each other to form a circle. Temporarily taping these crossed cords to a table can help keep them steady. -
Start the Macramé Knot:
Cut a separate piece of matching cord (about 10 inches). Slide it under the crossed bracelet strands. Tie a basic regular knot to secure it. -
Square Knot Technique:
Make a square knot: take the right string, pass it over the center strands and under the left string. Take the left string, go under the center strands and up through the loop on the right. Pull tight. -
Complete the closure:
Repeat the square knot process, alternating starting sides (left, then right), until you have about half an inch of knotting. Trim the excess knotting cord (not the bracelet cord!) and carefully melt the ends to seal them against the knots. -
Finish the Ends:
Tie a small regular knot at the very end of each bracelet tail string to prevent them from slipping through the adjustable closure. Add a tiny seed bead before the knot for extra flair if desired.
Now you have a beautiful matching set ready to wear or share with someone special
Sweetheart Garland With Mixed Heart Shapes
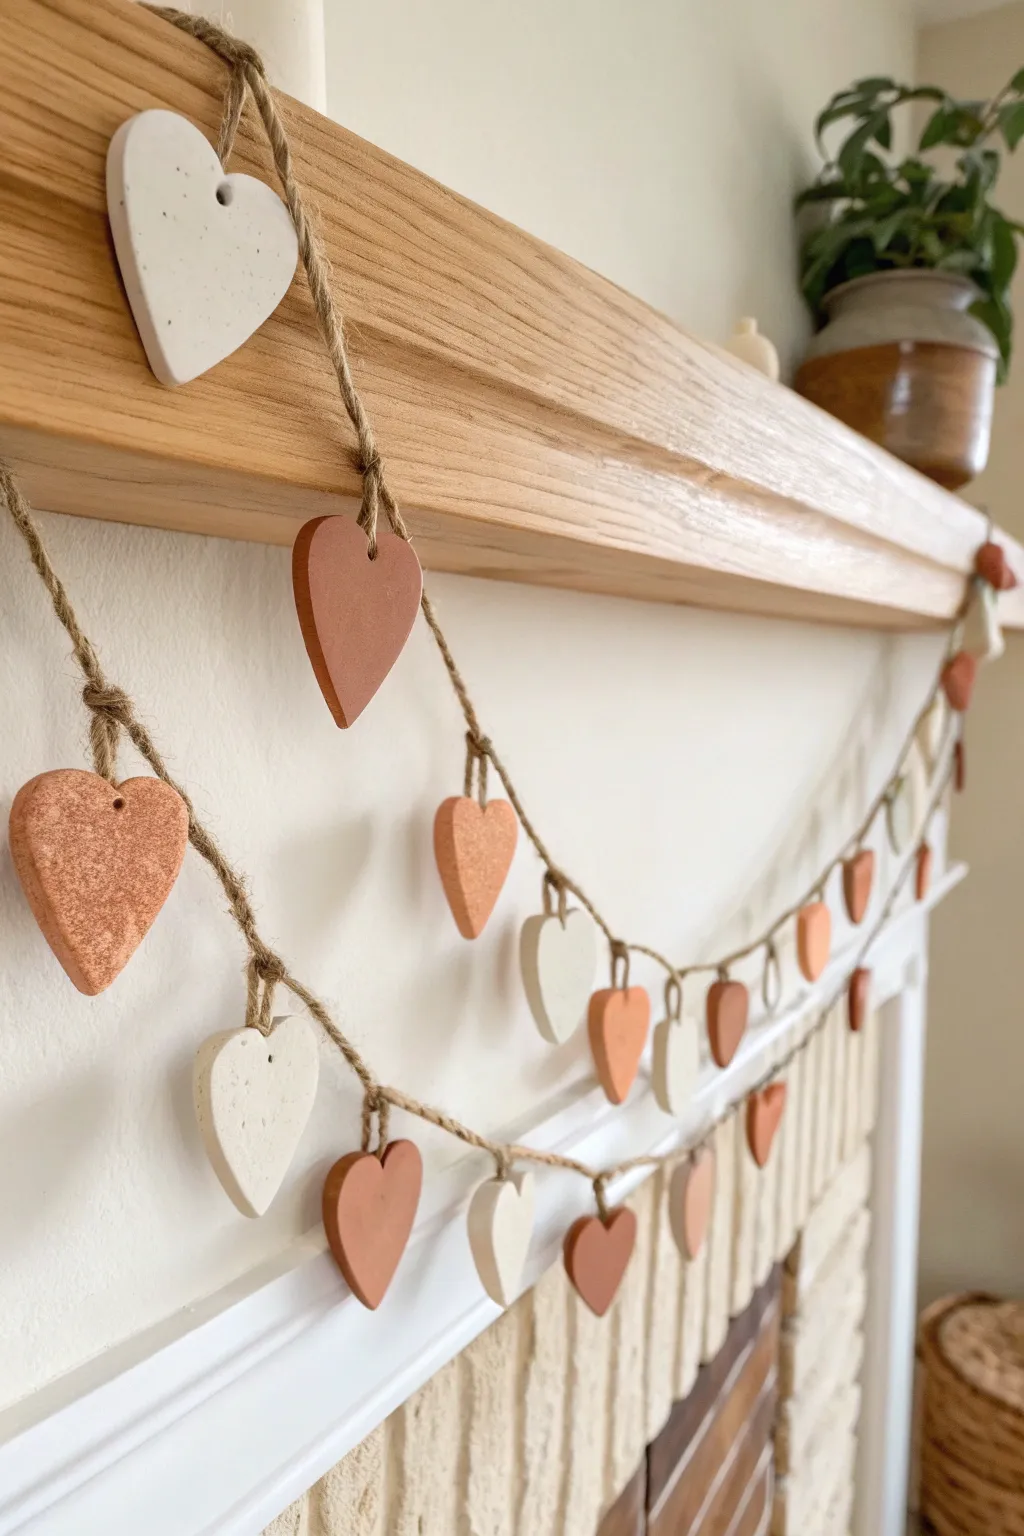
Create a warm and inviting display with this handcrafted garland made from clay hearts in varying sizes and tonal shades of terracotta, white, and beige. Suspended on rustic jute twine, these textured hearts add a charming, organic touch to any mantel or wall space.
How-To Guide
Materials
- Air-dry clay (white and terracotta/colored)
- Acrylic paint (burnt sienna, beige, cream – optional if using colored clay)
- Jute twine
- Heart-shaped cookie cutters (small and medium sizes)
- Rolling pin
- Parchment paper or non-stick craft mat
- Small straw, toothpick, or skewer (for making holes)
- Fine-grit sandpaper (optional)
- Scissors
- Clear matte sealant (water-based)
Step 1: Shaping the Hearts
-
Prepare your workspace:
Lay down a sheet of parchment paper or a non-stick craft mat on a flat surface to prevent the clay from sticking while you work. -
Condition the clay:
Take a portion of your white air-dry clay and knead it in your hands until it becomes soft, pliable, and free of cracks. -
Create color variations:
If you are using white clay for everything, separate it into three batches. Leave one white. Knead a small amount of burnt sienna or terracotta acrylic paint into the second batch for a deep rust color, and a tiny drop of brown into the third for a beige tone. Knead until the color is uniform. -
Roll out the clay:
Using a rolling pin, roll the clay out to an even thickness, aiming for about 1/4 inch (6mm). If you want a uniform look, place two wooden rulers on either side of the clay as depth guides. -
Cut the shapes:
Press your heart-shaped cookie cutters firmly into the rolled clay. Cut a mix of sizes if you have multiple cutters to add visual interest to the final garland. -
Soften the edges:
Gently lift the clay hearts. Dip your finger in a little water and carefully smooth out any rough or sharp edges left by the cutter.
Step 2: Texturing and Drilling
-
Add optional texture:
For a rustic look like the image, you can gently press a piece of rough fabric or a crumpled ball of foil onto the surface of the damp hearts to give them a stone-like texture. Some hearts can be left smooth for contrast. -
Create the hanging holes:
Using a small straw or a skewer, poke a hole through the top center of each heart. Ensure the hole is large enough for your jute twine to pass through easily, but not so close to the edge that the clay might break. -
Let them dry:
Place the hearts on a clean sheet of parchment paper. Let them air dry completely, which usually takes 24-48 hours depending on humidity. Flip them over halfway through the drying process to prevent curling.
Preventing Cracks
If you see tiny hairline cracks as the clay dries, smooth a small amount of fresh, wet clay paste (slip) into the crack with your finger and let it dry again.
Step 3: Finishing Touches
-
Sand imperfections:
Once fully dry, check the edges again. If they feel too sharp or rough, lightly sand them with fine-grit sandpaper for a polished finish. -
Create a speckled effect:
To mimic the speckled stoneware look seen in the photo, dilute a tiny bit of dark brown or black paint with water. Load an old toothbrush with the mixture and run your thumb over the bristles to flick tiny specks onto the white hearts. -
Seal the clay:
Apply a thin coat of clear matte sealant to protect the clay and give it a finished look without adding too much shine.
Pro Tip: Better Draping
For a double-drape effect like the photo, make two separate garlands—one slightly shorter than the other—and hang them from the same hooks.
Step 4: Stringing the Garland
-
Measure the twine:
Measure the space where you intend to hang the garland (like your fireplace mantel) and cut a length of jute twine. Add at least 2 extra feet to allow for the drape and tying loops at the ends. -
Attach the hearts:
Thread a heart onto the twine. Decide where you want it to sit. To secure it in place so it doesn’t slide, tie a simple loose overhand knot in the twine right above the heart’s hole. -
Create the pattern:
Continue threading hearts, alternating colors (white, terracotta, beige) and sizes. Space them out according to your preference—about 4 to 6 inches apart usually looks balanced. -
Secure the knots:
I find it helpful to tie the knot first, then slide the heart down to meet it, or tie a knot directly through the loop if your twine is thin enough. -
Adjust and hang:
Once all hearts are attached, create loops at both ends of the twine for hanging. Drape it across your mantel, adjusting the hearts so they all face forward.
Enjoy the cozy, handcrafted atmosphere this beautiful garland adds to your home
Paint-Splatter Abstract Valentine Hearts as Modern Decor
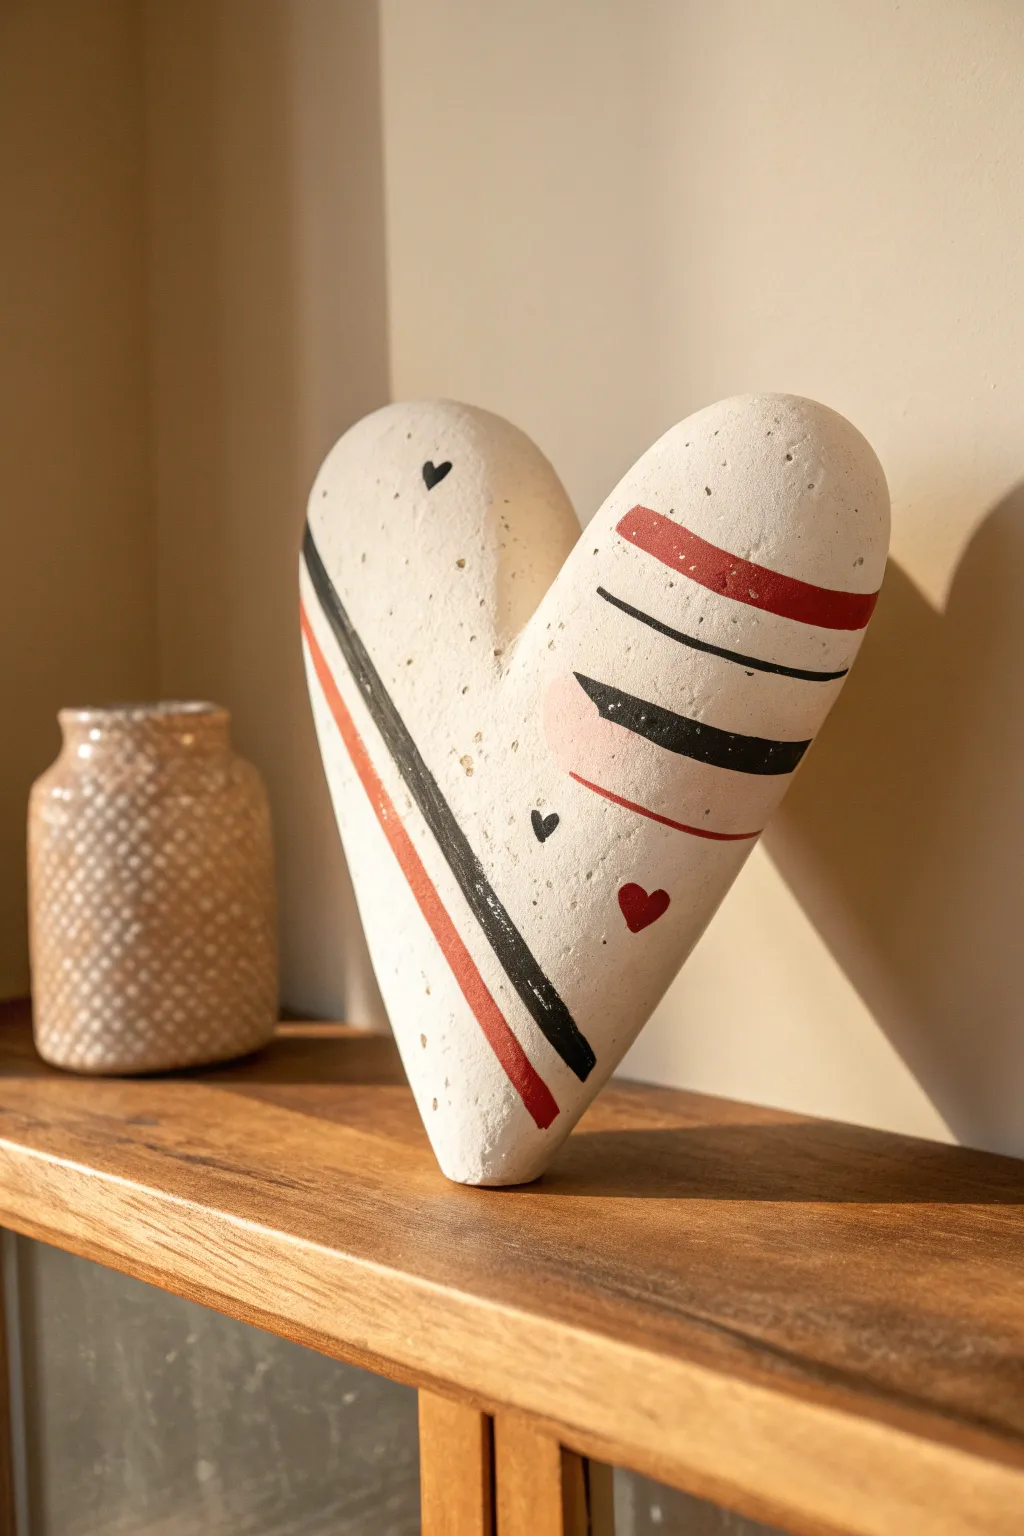
Capture the essence of contemporary design with this chunky, free-standing clay heart featuring bold abstract lines and sweet micro-motifs. The speckled white finish and geometric red and black accents make it a sophisticated alternative to traditional Valentine’s decor.
Step-by-Step
Materials
- Air-dry clay (white or stone effect)
- Acrylic paints (matte black, deep red, soft pink)
- Fine-grit sandpaper
- Rolling pin
- Modeling tools or a butter knife
- Fine detail paintbrush (size 0 or 00)
- Flat shader brush (size 4 or 6)
- Old toothbrush (for speckling)
- Small bowl of water
- Matte spray varnish or sealant
- Cardboard or cardstock (for template)
Step 1: Sculpting the Form
-
Create a Template:
Sketch a symmetrical, elongated heart shape on a piece of cardstock or cardboard and cut it out. This ensures your final sculpture has balanced proportions before you even touch the clay. -
Condition the Clay:
Take a large handful of air-dry clay and knead it thoroughly until it is soft and warm. If the clay feels too dry or cracks, work in a few drops of water. -
Form the Base Shape:
Roll the clay into a thick ball, then flatten it slightly with your palm. Use a rolling pin to create a slab that is quite substantial—aim for at least 1.5 to 2 inches thick so it can stand upright on its own. -
Cut the Heart:
Place your paper template over the slab and trace around it with a modeling tool or knife. Cut away the excess clay, keeping your knife vertical to ensure clean, straight edges. -
Refine the Edges:
Dip your finger in water and smooth all the cut edges, rounding them off gently to remove any sharpness. Pay special attention to the ‘V’ at the top and the point at the bottom. -
Test the Balance:
Stand the heart up on its tip. If it wobbles, gently tap the bottom point against your work surface to create a tiny flat spot, stabilizing the sculpture without ruining the heart shape. -
Dry Completely:
Let the sculpture dry for at least 24-48 hours. Turn it over occasionally to ensure even drying. The clay will become lighter in color and hard to the touch when ready.
Cracks happen?
Mix a tiny bit of fresh clay with water to make a paste (slip). Fill the crack, smooth it over, and let it dry again before sanding.
Step 2: Painting the Design
-
Sand for Smoothness:
Once bone dry, use fine-grit sandpaper to buff away any fingerprints or rough textures. Wipe away the dust with a slightly damp cloth. -
Apply the Base Coat:
Paint the entire heart with a creamy white or stone-colored acrylic paint. I usually apply two thin coats rather than one thick one to avoid brush strokes. -
Create Texture:
Dilute a tiny amount of black or dark grey paint with water. Dip an old toothbrush into it, and flick the bristles with your thumb to spray a fine mist of speckles over the heart, mimicking natural stone. -
Paint the Diagonal Stripe:
Using a flat brush and black paint, create a bold diagonal line starting from the left edge and moving down towards the bottom center. Add a thinner red line parallel to it. -
Add Abstract Elements:
On the right lobe of the heart, paint horizontal abstract stripes. Mix in a soft pink patch behind some black lines to add depth and break up the stark contrast. -
Paint Micro Hearts:
Switch to your finest detail brush. Carefully paint tiny black hearts scattered near the center and a small red heart near the bottom right for a pop of romance. -
Seal the Artwork:
Allow the paint to cure fully, then finish with a coat of matte spray varnish. This protects the clay from moisture and gives the piece a professional, finished look.
Clean Lines Hack
For super crisp stripes, use washi tape or painter’s tape to mask off your lines. Press the edges down firmly to prevent paint bleed.
Place your finished sculpture on a mantel or bookshelf to add a touch of modern love to your living space