Cute clay art is all about simple shapes, sweet faces, and that tiny burst of joy you get when a little character starts looking back at you. I’m sharing my favorite beginner-friendly ideas that lean hard into kawaii clay vibes—think pastel colors, chubby animals, and mini functional things you’ll actually use.
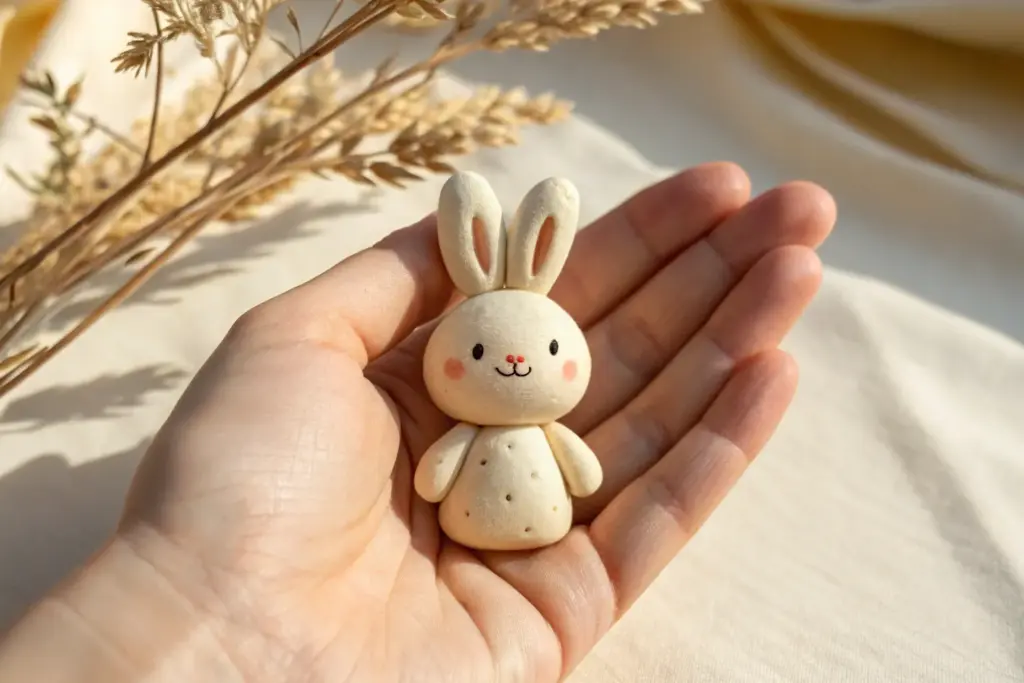
Chubby Kawaii Bunny Figurines
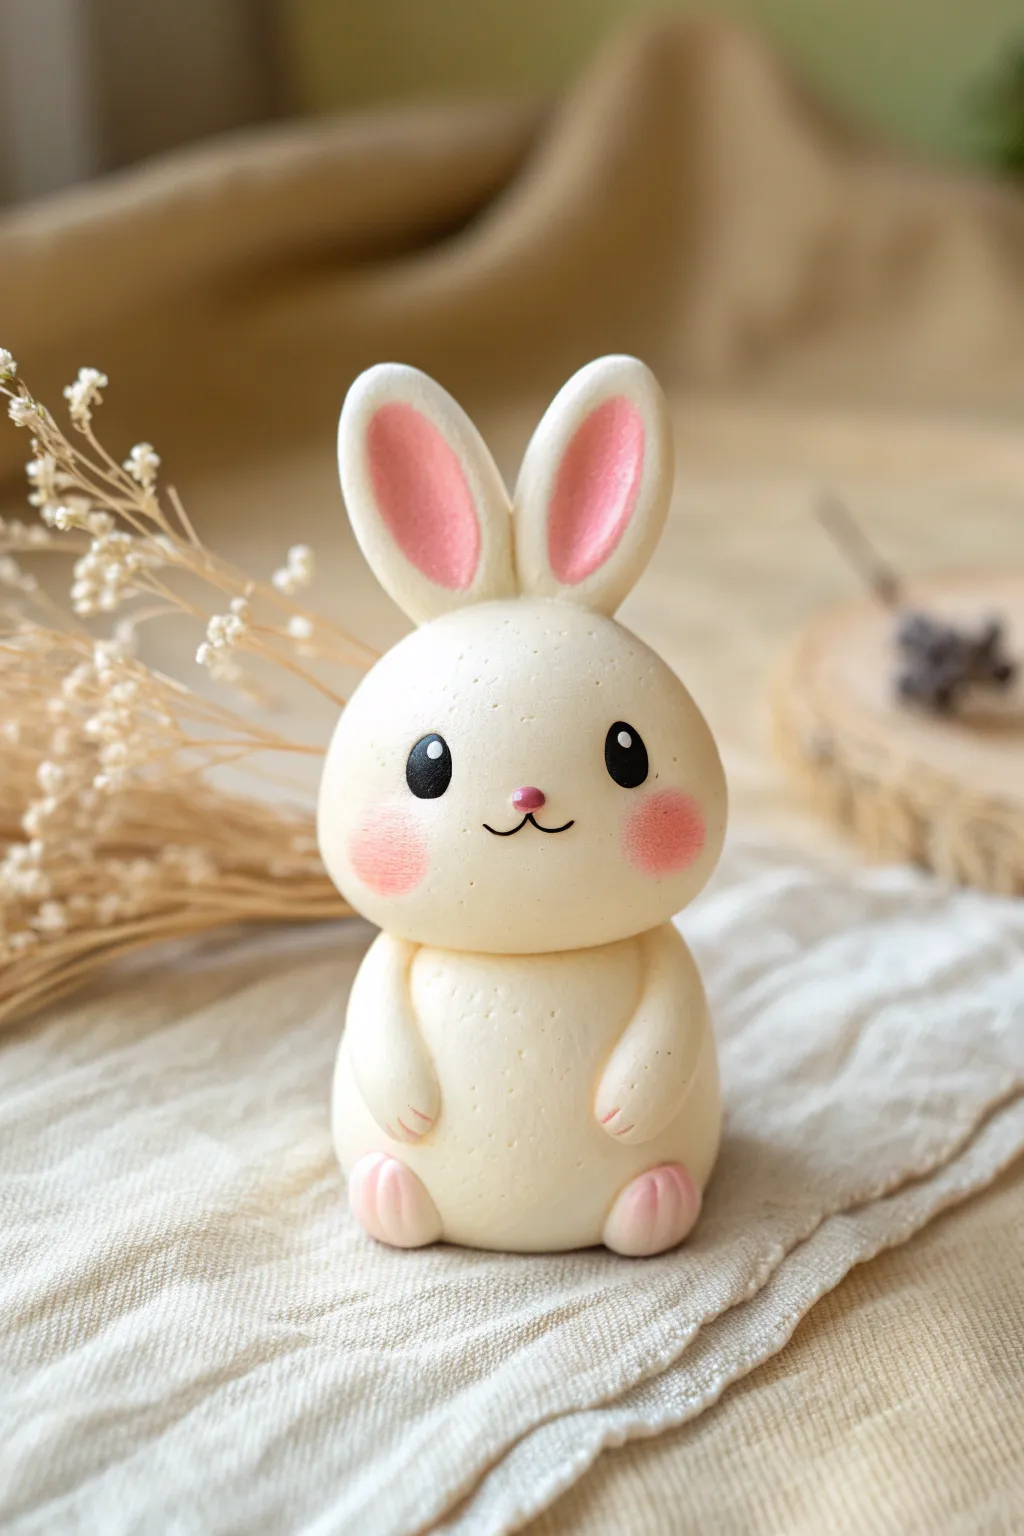
This ridiculously adorable figurine captures the essence of kawaii with its round, oversized head and simple, sweet expression. The soft cream color paired with gentle pink accents gives it a delicate, marshmallow-like appearance that’s perfect for a desk buddy.
Step-by-Step
Materials
- Polymer clay (Cream/Off-white)
- Polymer clay (Soft Pastel Pink)
- Polymer clay (Black)
- Ball stylus tools (various sizes)
- Needle tool or toothpick
- Soft pastel chalk (Pink/Rosy Red)
- Small fluffy paintbrush
- Translucent liquid clay or bake and bond
- Oven for curing
Step 1: Shaping the Body and Head
-
Condition the Clay:
Begin by thoroughly conditioning your cream-colored clay until it is soft and pliable. This prevents cracks during baking. -
Create the Head:
Roll a large ball of cream clay, slightly larger than a golf ball. Gently press it on your work surface to flatten the bottom just a tiny bit so it stays upright; shape it into a very subtle rounded egg shape, heavier at the bottom. -
Form the Body:
Roll a second, slightly smaller ball of cream clay for the body. It should be about two-thirds the size of the head to get that cute, bobble-head look. Flatten the top slightly and the bottom so it sits stable. -
Connect the Pieces:
Insert a small piece of toothpick or wire into the center of the body, add a drop of liquid clay, and press the head firmly onto the body. Smooth the seam slightly if desired, though a distinct separation is part of the charm.
Clean Clay Secret
White clay picks up everything! Keep a pack of wet wipes or a ball of scrap clay nearby. Roll the scrap clay in your hands between steps to pull off dust and lint before touching your pristine white clay.
Step 2: Adding Sweet Details
-
Shape the Ears:
Roll two medium-sized logs of cream clay, tapering them at both ends like teardrops. Flatten them gently with your thumb. -
Pink Ear Insides:
Take a very small amount of pink clay and mimic the teardrop shape, but smaller. Press this pink layer into the center of your cream ears. -
Attach the Ears:
Place the ears on top of the head, spacing them slightly apart. Use a blending tool or stylus to merge the bottom of the ears seamlessly into the head clay so they don’t pop off later. -
Make the Arms:
Roll two small sausage shapes of cream clay for the arms. They should curve slightly. -
Attach the Arms:
Press the arms onto the sides of the body, curving them inward so they look like they are resting on a round belly. Use a needle tool to make two tiny indents for ‘fingers’. -
Create the Feet:
Roll two small balls of cream clay and flatten them into ovals. Place these at the bottom front of the body. Add a tiny pad of pink clay to the front of each foot. -
Detail the Feet:
Use a knife tool or needle to gently score three lines into the pink pads of the feet to suggest toes.
Step 3: The Face and Finishing Touches
-
Socket Indentation:
Find the center of the face and use a large ball stylus to make two shallow indents where the eyes will go. This helps the eyes sit flush rather than bulging out. -
Create the Eyes:
Roll two tiny balls of black clay. Place them into the sockets you just made and flatten them gently. Add a microscopic dot of white clay to the top right of each eye for a highlight. -
The Nose:
Place a teeny-tiny oval of pink clay between the eyes, slightly lower, for the nose. -
The Mouth:
Using a very fine needle tool or a piece of black clay rolled thread-thin, create a small ‘w’ shape directly under the nose for the mouth. -
Blushing Cheeks:
Before baking, scrape some pink soft pastel chalk into a powder. Use a fluffy brush to gently dust rosy circles onto the cheeks. Build the color up slowly—it’s easier to add than remove. -
Final Texture Check:
Look over your bunny for any fingerprints. I like to lightly buff them away with a bit of baby oil on my finger before baking. -
Bake:
Bake according to your clay manufacturer’s instructions (usually 275°F/130°C for 15-30 minutes). Let it cool completely before handling.
Accessory Upgrade
Give your bunny a personality! Before baking, sculpt a tiny carrot, a red heart, or a miniature flower for the bunny to hold in its paws. No glue needed if attached with liquid clay before the oven.
Once cooled, your chubby bunny is ready to bring a touch of sweetness to any shelf


Tiny Smiling Dino Pals With Soft Spikes
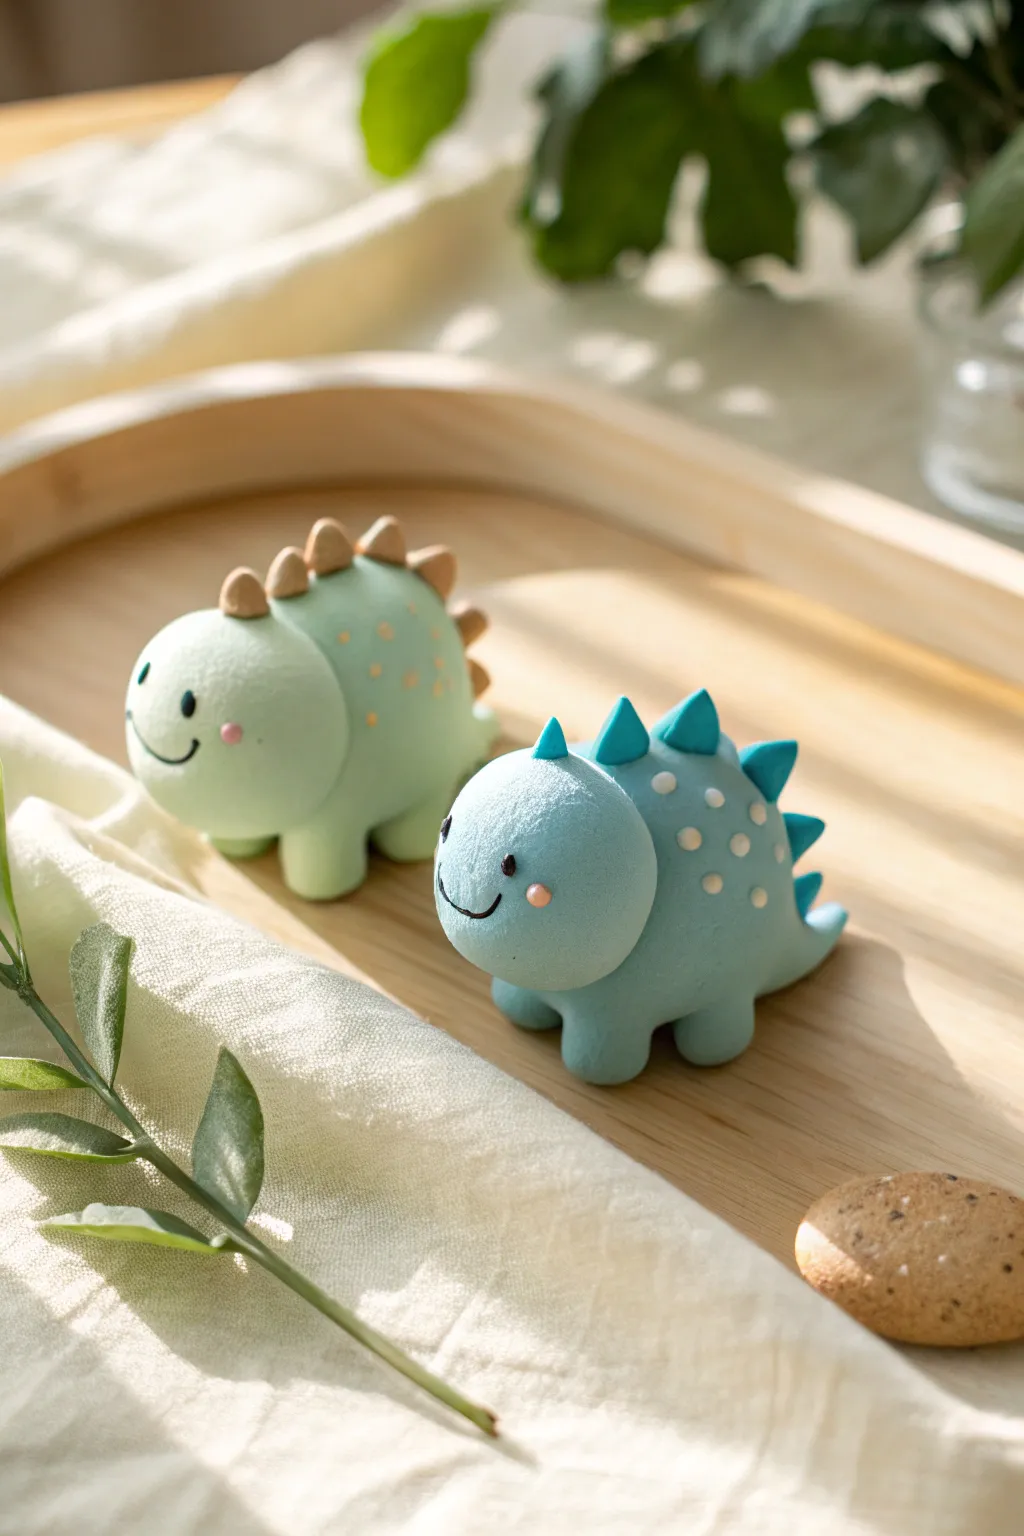
These delightfully chubby dinosaurs are the perfect desk companions, featuring soft pastel bodies and friendly little smiles. Their simple, rounded shapes make them an ideal project for beginners looking to practice creating smooth textures and consistent forms.
Step-by-Step Guide
Materials
- Polymer clay or air-dry clay (Light Mint Green, Light Blue)
- Small amount of Tan clay
- Small amount of Teal/Darker Blue clay
- Black acrylic paint or clay for eyes
- Pink chalk pastel or blush (for cheeks)
- Small ball tool or dotting tool
- Needle tool or toothpick
- Craft knife
- Soft paintbrush
- Matte varnish (optional)
Step 1: Shaping the Bodies
-
Prepare the base:
Start by conditioning your light mint green or light blue clay until it is soft and pliable. Roll a large portion into a smooth, seamless ball to form the main body. -
Form the dinosaur shape:
Gently gently roll one side of the ball to elongate it slightly for the tail area, but keep the overall shape very round and chubby. It should look like a large egg lying on its side. -
Create the legs:
Roll four small, equal-sized balls of the same body color clay. Flatten the tops slightly to create a strong attachment point. -
Attach the legs:
Press the four leg balls onto the bottom of the body. I find it helps to blend the clay seams upward into the body using a sculpting tool or your thumb to ensure they don’t fall off later. -
Refine the stance:
Gently tap the entire figure on your work surface to flatten the bottoms of the feet, ensuring the dinosaur stands stable and won’t wobble.
Cracks Appearing?
If you see cracks forming while smoothing air-dry clay, dip your finger in water and gently rub the area to fuse the clay back together immediately.
Step 2: Adding the Spikes
-
Prepare the spike clay:
Take your contrasting color clay (tan for the green dino, teal for the blue one) and toll it into a thin log or snake shape. -
Cut the segments:
Using your craft knife, cut the log into small, equal-sized pieces. You will need about 5-7 pieces depending on the size of your dinosaur. -
Shape the cones:
Roll each small piece into a ball, then pinch one side to form a soft cone or triangle shape. -
Place the spikes:
Starting from the top of the head and working down to the tail, press the spikes firmly onto the center of the back. Space them evenly. -
Add decorative dots:
For extra detail, roll tiny balls of a lighter color (like white or cream) and press them onto the sides of the body to create a spotted pattern.
Softer Spikes
To get the soft, rounded look of the spikes in the photo, gently blunt the sharp tip of each cone with your finger after attaching it to the back.
Step 3: Bringing Them to Life
-
Mark the eye sockets:
Use a small ball tool to make two shallow indentations on the face area where you want the eyes to sit. This helps the features look integrated rather than just stuck on. -
Add the eyes:
Roll two tiny specks of black clay and press them into the sockets. Alternatively, you can paint these on after the model is dry or baked. -
Carve the smile:
Use a needle tool or the edge of a small spoon tool to carve a simple, curved smile line just below and between the eyes. -
Apply the blush:
Scrape a little bit of pink chalk pastel into a powder. Use a soft, dry paintbrush to gently dust pink ‘cheeks’ just below the eyes for a rosy glow. -
Smooth the texture:
Before finishing, check for any fingerprints. Gently buff the surface with a tiny bit of baby oil (for polymer clay) or water (for air-dry clay) to get that matte, smooth look seen in the photo. -
Final cure:
Bake your polymer clay according to package instructions or let your air-dry clay sit for 24-48 hours until completely hard.
Now you have an adorable prehistoric pair ready to guard your desk or shelf in the cutest way possible


Kawaii Bear Heads as Mini Charms
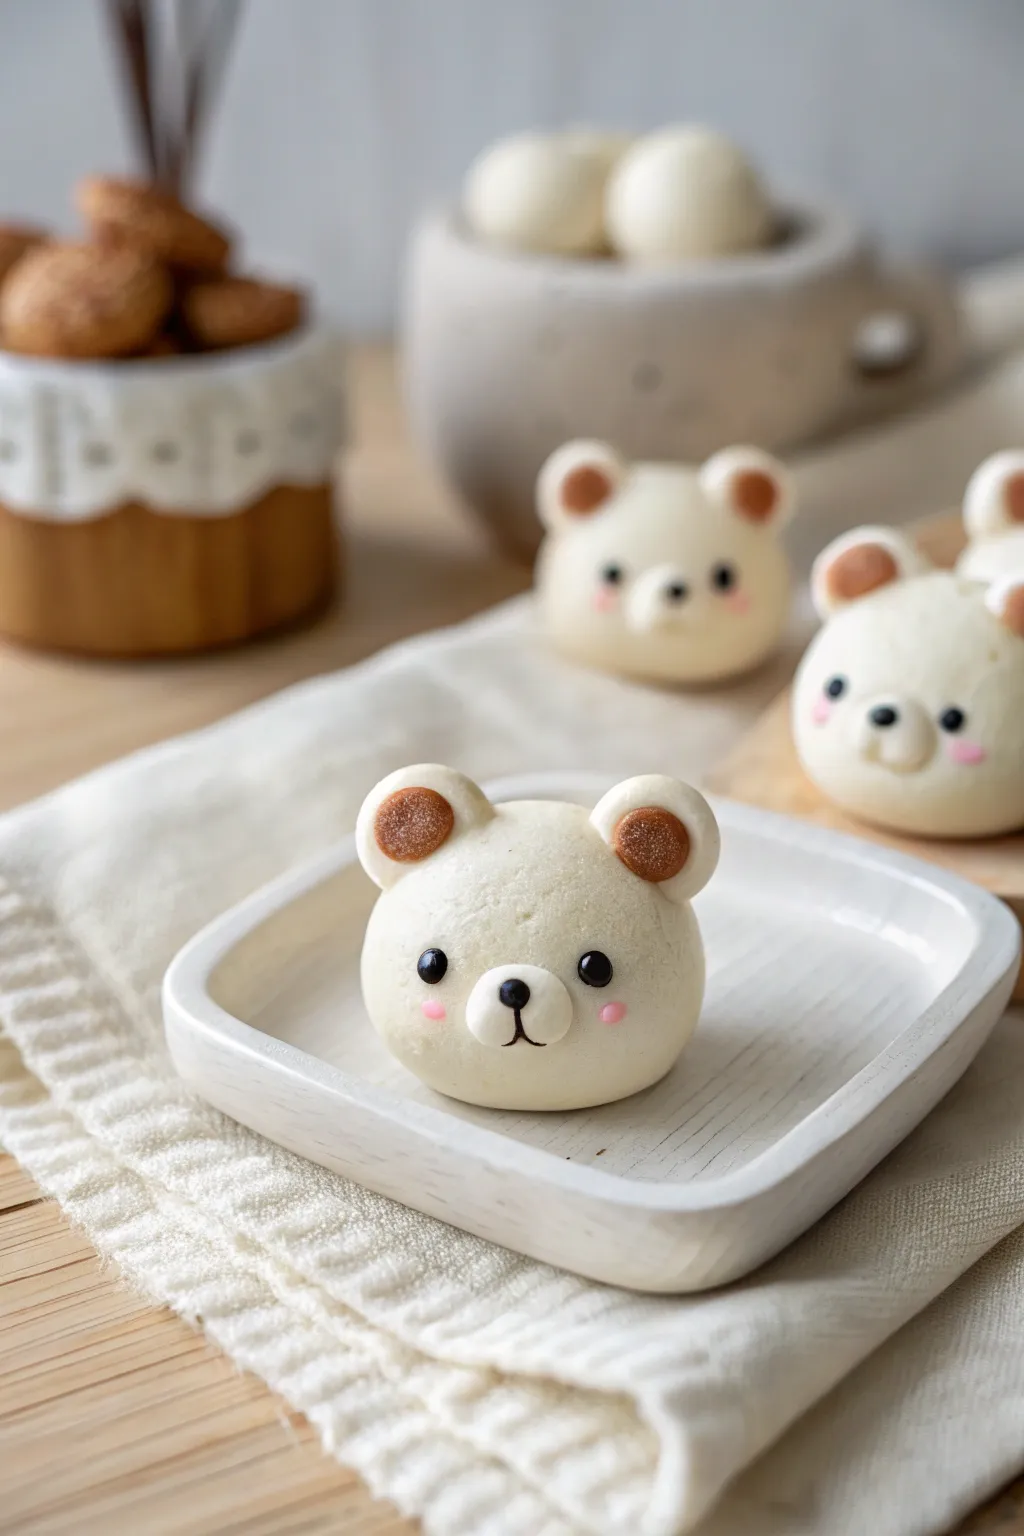
These adorable, round bear heads capture the essence of kawaii style with their sweet expressions and soft, matte finish. Perfect for beginners, this project focuses on simple spheres and tiny details to create a charm that looks almost edible.
Step-by-Step Tutorial
Materials
- White polymer clay
- Light brown polymer clay
- Black polymer clay
- Pale pink soft pastel chalk
- Small paintbrush (soft bristle)
- Needle tool or toothpick
- Dotting tool (small ball end)
- Ceramic tile or baking surface
- Oven (for baking)
- Eye pins (optional, for charms)
Step 1: Shaping the Base
-
Condition the white clay:
Start by kneading a chunk of white polymer clay until it is soft and pliable. This prevents cracks during baking. -
Form the head:
Roll the clay between your palms to create a smooth, perfect sphere about the size of a large marble (approximately 1 inch in diameter). -
Flatten the base:
Gently press the sphere onto your work surface just enough so it sits flat without rolling away, but keeps its round shape overall. -
Create the ears:
Roll two tiny balls of white clay, roughly the size of peppercorns. Place them on top of the head, spaced widely apart. -
Blend the ears:
Using a silicone tool or your finger, gently smooth the seam where the ears meet the head so they look like one continuous piece.
Clean Hands, Clean Clay
White clay attracts dust like a magnet. Keep a pack of baby wipes nearby or use a piece of scrap white clay to ‘blot’ dust off your fingers before shaping the final ball.
Step 2: Adding the Details
-
Prepare the ear centers:
Take a very tiny amount of light brown clay and roll two minuscule balls. -
Attach the ear centers:
Press these brown balls into the front center of each white ear, flattening them slightly to create the inner ear detail. -
Make the snout:
Roll another small ball of white clay, slightly larger than the ears, and flatten it into an oval. -
Position the snout:
Place this oval on the lower half of the bear’s face, right in the center. Press gently to adhere. -
Indent for eyes:
Use a ball tool to make two small, shallow indentations where the eyes will sit, just above the snout line. -
Insert the nose:
Roll a microscopic speck of black clay into a triangle or oval and press it onto the top center of the snout. -
Add the mouth:
Roll a thin black thread of clay or use a needle tool to drag a tiny vertical line down from the nose, splitting into an inverted ‘V’ for the mouth.
Fingerprint Fix
If you see fingerprints on your smooth bear head, lightly brush the unbaked clay with a drop of baby oil or clay softener to smooth them away instantly.
Step 3: Finishing Touches
-
Add the eyes:
Roll two small balls of black clay and place them into the indentations you made earlier. Press them in gently so they don’t bulge out too much. -
Prepare the blush:
Scrape a little powder from your pink pastel chalk using a craft knife. -
Apply the blush:
Dip a soft brush into the pink powder and gently dab it onto the cheeks, just under the outer corners of the eyes. -
Insert hardware (optional):
If you want this to be a wearable charm, carefully twist an eye pin into the top center of the head now. -
Bake carefully:
Bake according to your clay manufacturer’s instructions (usually 275°F/135°C for 15-30 minutes). I like to tent foil over them to prevent browning. -
Cool down:
Let the bears cool completely in the oven before moving them to ensure the clay hardens properly.
Once cooled, these sweet little bears are ready to be turned into keychains or kept as desk buddies


Baby Piggies With Button Snouts
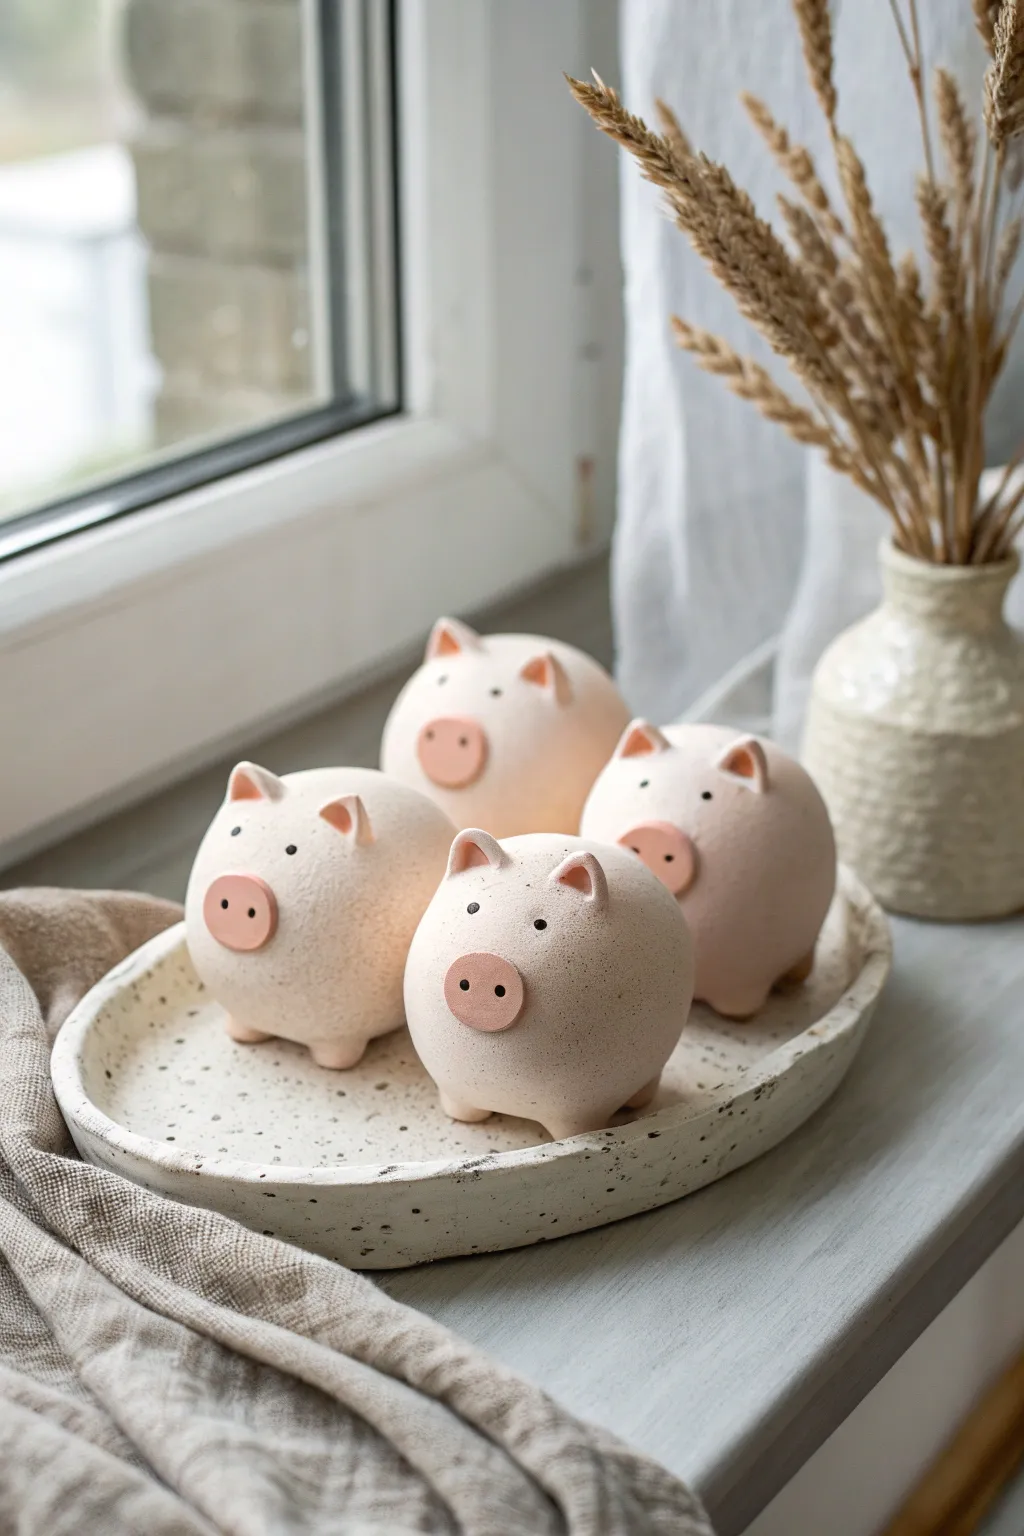
These delightfully chubby clay piglets feature simple, rounded forms and distinctive button noses that give them instant personality. Their minimalist design and earthy, speckled finish make them perfect as a modern nursery decoration or a charming desk companion.
Step-by-Step Guide
Materials
- Light-colored polymer clay or air-dry clay (warm beige/peach)
- Speckled clay (optional, for the tray)
- Small rolling pin
- Modeling tools (ball tool, needle tool)
- Small circle cutter (approx. 1/2 inch)
- Varnish (matte finish)
- Black acrylic paint
- Fine-tipped paintbrush or toothpick
- Slightly darker pink clay (for snouts/ears) or soft pastel chalks for shading
- Water or liquid clay (for joining)
Step 1: Shaping the Bodies
-
Prepare the base clay:
Start by conditioning your main neutral-colored clay until it is soft and pliable. If you want that stone-like texture shown in the photo, you can mix in a tiny amount of ground black pepper or dried tea leaves into the clay body. -
Roll the spheres:
Divide your clay into four equal portions. Roll each piece into a smooth, tight ball between your palms. -
Form the teardrop shape:
Gently gently roll one side of the ball to create a very subtle egg or teardrop shape. This slight taper will be the snout end. -
Flatten the base:
Tap the bottom of each sphere onto your work surface firmly. You want a flat bottom so the pigs sit stable without rolling away.
Clean Edges Tip
When cutting the circular snouts, place a piece of cling film over the clay before pressing down the cutter. This creates a soft, rounded edge ‘pillow’ effect rather than a sharp, harsh cut.
Step 2: Adding Features
-
Create the snouts:
Roll out a small sheet of the contrasting pink clay (or use the main color mixed with a touch of rose clay). Use your small circle cutter to punch out four discs. -
Attach the button noses:
Score the back of the disc and the front of the pig’s face lightly with your needle tool. Apply a tiny dab of water or liquid clay and press the disc firmly onto the face. -
Add nostrils:
Using a small ball tool or the blunt end of a paintbrush, press two distinct indentations into the button snout. Place them slightly wide apart for a cuter look. -
Make the ears:
Roll four tiny balls of clay for the ears. Cut each ball in half to get two equal hemispheres for each pig. -
Shape the triangles:
Pinch each hemisphere into a soft triangle shape. Use your thumb to create a small depression in the center of each triangle. -
Attach the ears:
Place the ears high on the head, spacing them fairly wide apart. Blend the back of the ear seam into the head for a seamless look, but leave the front distinct. -
Create the legs:
For each pig, roll four very small balls of clay. These will be stubby little feet. -
Attach the feet:
Flip the pig over gently. Attach the four small balls to the underside, near the edges of the flat base. Press them down slightly so the pig still sits level.
Add a Tail Twist
Make a curly tail by rolling an extremely thin ‘snake’ of clay. Wrap it around a toothpick to set the spiral shape, then carefully attach it to the pig’s backside for extra detail.
Step 3: Finishing Touches
-
Smooth the surface:
Dip your finger in a little water (or baby oil if using polymer) and gently rub over the entire pig to remove fingerprints and ensure smooth transitions. -
Bake or dry:
If using polymer clay, bake according to the package directions (usually 275°F for 15-30 mins). If using air-dry clay, allow it to dry for 24-48 hours until fully hardened. -
Paint the eyes:
Once cool and dry, use a toothpick or fine spotting brush dipped in black acrylic paint. Dot two tiny eyes fairly wide apart, situated just above the snout line. -
Paint the nostrils:
Add a tiny dot of darker pink or brown paint inside the snout indentations to add depth, though the shadow of the indentation often does this naturally. -
Create the tray (optional):
Roll out a slab of speckled clay into an oval. Curl the edges upward slightly to create a rim. -
Seal the work:
I prefer to finish these with a coat of matte varnish. This protects the paint and gives the clay that smooth, ceramic-like sheen without being too glossy.
Set your finished piglets on their tray near a window where the natural light can highlight their simple, charming forms

The Complete Guide to Pottery Troubleshooting
Uncover the most common ceramic mistakes—from cracking clay to failed glazes—and learn how to fix them fast.
Food With Faces: Smiling Strawberry and Peach Minis
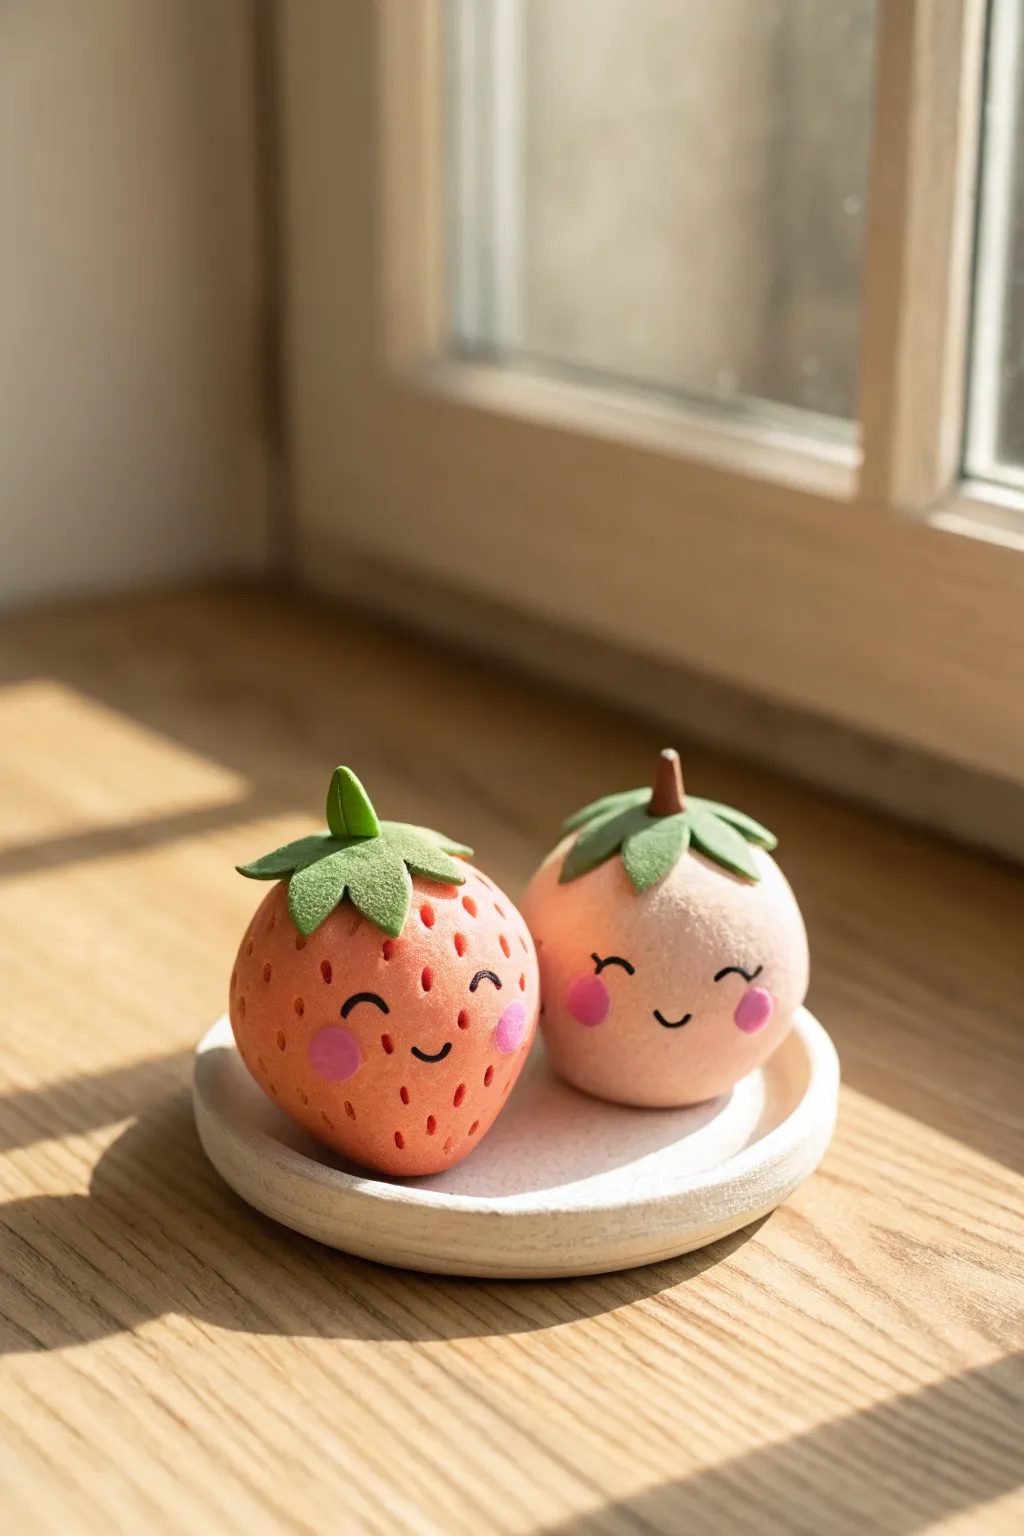
Brighten up your desk or shelf with this pair of adorable fruit friends, featuring a cheerful strawberry and a sweet, rosy peach. These miniature clay sculptures capture a soft, matte texture and delightful Kawaii expressions that are sure to make anyone smile.
How-To Guide
Materials
- Polymer clay (warm red/coral, pale pink, leafy green, dark brown)
- Needle tool or toothpick
- Ball stylus tool
- Soft pastel chalks (dark pink or red)
- Small fluffy paintbrush
- Black acrylic paint or fine-tip black marker
- Baking sheet and parchment paper
- Old toothbrush or stiff bristle brush
- Sculpting blade
Step 1: Shaping the Strawberry Body
-
Condition the Clay:
Begin by conditioning your coral or warm red polymer clay until it is soft and pliable. Roll it into a smooth ball about the size of a golf ball or slightly smaller. -
Form the Strawberry Shape:
Gently taper the bottom of the ball to create a rounded cone shape. It shouldn’t be too pointy; keep the bottom relatively rounded for a cute, chubby look. -
Add Texture:
Using a needle tool or toothpick, gently press small indentations all over the surface of the strawberry to mimic seeds. Don’t press too deep; just enough to catch the light. -
Refine the Surface:
To remove fingerprints and soften the look, lightly tap the surface with an old toothbrush. This adds a subtle, realistic skin texture.
Bumps & Dents?
If you accidentally squish your texture while handling, pop the piece in the fridge for 10 minutes to firm up, then re-texture the area lightly.
Step 2: Creating the Peach Body
-
Mix the Peach Color:
If you don’t have a perfect peach color, mix white clay with a tiny dot of orange and pink. Roll this into a smooth ball similar in size to your strawberry. -
Shape the Cleft:
Using your finger or a modeling tool, press a gentle groove down one side to create the signature peach cleft. Soften the edges so it looks organic. -
Texturizing:
Just like with the strawberry, lightly stipple the surface with your toothbrush. This mimics the fuzzy skin of a peach and helps matte the clay.
Turn them into Charms
Insert a small metal eye-pin into the top center of the stem before baking to turn these into adorable keychains or necklace pendants.
Step 3: Leafy Toppers & Details
-
Roll Out Green Clay:
Condition green clay and roll it out into a thin sheet. Use a small cutter or cut freehand triangles for the leaves. -
Assemble Strawberry Leaves:
Cut five or six small, pointed leaves. Arrange them in a starburst pattern on top of the strawberry, pressing the centers down gently. -
Add the Strawberry Stem:
Roll a tiny sausage of green clay and attach it to the center of the leaves, standing upright. -
Peach Leaves:
Cut 3-4 slightly wider, rounded leaves for the peach. Drape them over the top, allowing the tips to curl slightly upwards for movement. -
Peach Stem:
Use a tiny bit of brown clay to make a short, woody stem. Press this securely into the center of the peach leaves.
Step 4: Bringing Faces to Life
-
Pre-Bake Blushing:
Before baking, scrape some pink soft pastel chalk into a powder. Use a soft, dry brush to apply rosy circles to the ‘cheeks’ of both fruits. -
Bake:
Place your creations on parchment paper and bake according to your clay package instructions. Let them cool completely before handling. -
Paint the Faces:
Using a very fine brush and black acrylic paint, carefully paint two curved lines for squinting eyes and a small ‘u’ shape for the mouth. I find resting my pinky on the table helps steady my hand for these tiny details. -
Alternative Option:
If painting is intimidating, a fine-tip permanent marker works well too, but ensure the clay is fully cool first to prevent bleeding. -
Add Highlights:
For the peach cheeks, you can add a tiny dot of brighter pink paint on top of the pastel blush for extra dimension. -
Final Seal:
If desired, coat your pieces with a matte varnish to protect the paint, avoiding a glossy finish to keep that soft fruit look.
Place your happy fruit duo on a small trinket dish and enjoy their perpetual cheerfulness
Kawaii Cloud and Star Desk Buddy Set
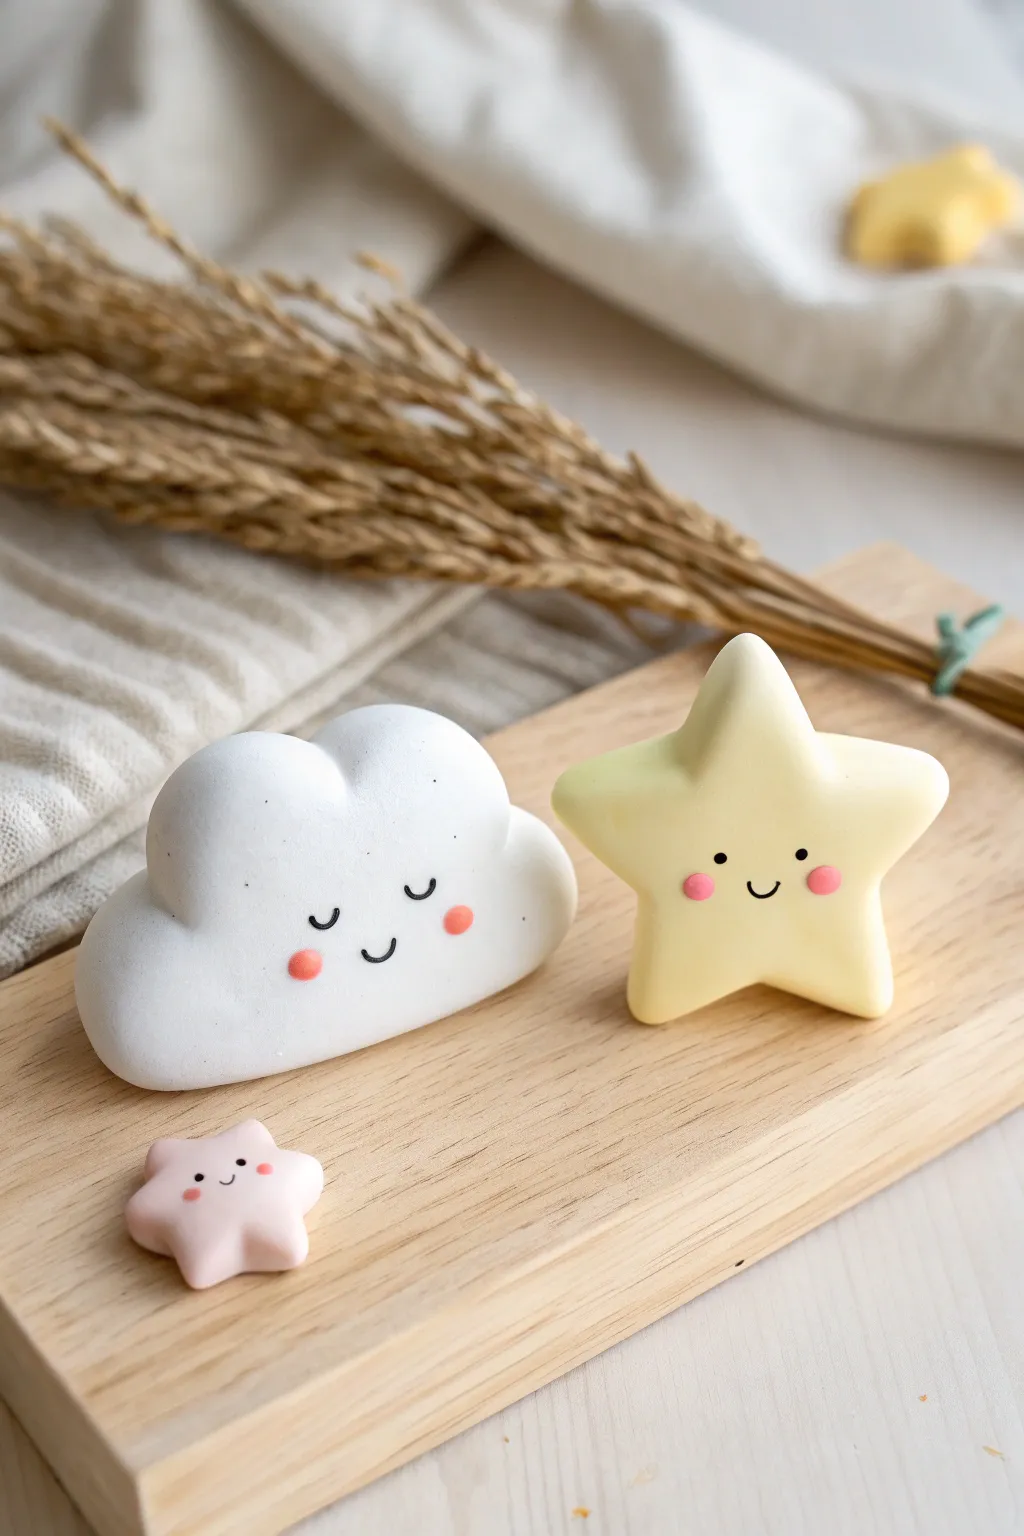
Bring a little sky-high cheer to your workspace with this adorable trio of kawaii clay figures. This project features a fluffy white cloud, a cheerful yellow star, and a tiny pink companion, all finished with sweet, rosy cheeks.
Step-by-Step
Materials
- White air-dry clay or polymer clay
- Acrylic paints (pastel yellow, pastel pink, black)
- Small paintbrush
- Dotting tool or toothpick
- Fine-grit sandpaper (optional)
- Matte varnish or sealant
- Clean work surface
Step 1: Sculpting the Cloud
-
Base Shape:
Start with a golf-ball-sized amount of white clay. Knead it until it is soft and pliable, then roll it into a smooth, slightly flattened oval log. -
Forming scallops:
Using your thumbs, gently press into the top edge of the oval to create indentations. You want to define three main rounded humps to mimic a fluffy cumulus cloud shape. -
Smoothing the base:
Tap the bottom of the cloud firmly against your work surface. This creates a flat base so the figure will stand upright on your desk without wobbling. -
Refining edges:
Dip your finger in a tiny bit of water (if using air-dry clay) and smooth out any fingerprints or harsh creases between the cloud bumps. The surface should be very soft and rounded.
Step 2: Shaping the Stars
-
Mixing yellow clay:
If using air-dry clay, mix a drop of yellow acrylic paint into a walnut-sized ball of white clay until the color is an even, pale pastel yellow. If using polymer, condition your yellow clay. -
Creating the star points:
Roll the yellow clay into a ball, then flatten it slightly. Pinch five points outward from the center. I like to keep the points slightly rounded and chubby rather than sharp for a cuter look. -
Flattening the star:
Gently press the star flat against the table to ensure the front and back are even. Refine the V-shapes between the points using a modeling tool or the side of a toothpick. -
Making the mini star:
Repeat the previous steps with a tiny pea-sized amount of clay. For this one, mix in a speck of pink paint to create a baby pink shade. Shape it into a miniature five-pointed star. -
Drying time:
Set all three figures aside to dry completely. For air-dry clay, this usually takes 24-48 hours. Turn them over halfway through so the bottoms dry evenly.
Cracks on drying?
If small cracks appear as the clay dries, mix a tiny bit of fresh clay with water to make a paste (slip) and fill in the gaps, then smooth over.
Step 3: Painting the Faces
-
Sanding:
Once fully dry, check for any rough spots. You can gently buff them away with fine-grit sandpaper for a professional, smooth finish. -
Drawing the eyes:
Dip a fine-point toothpick or a tiny detail brush into black acrylic paint. For the cloud, paint two small U-shapes for sleeping eyes. For the stars, paint two tiny dots for awake eyes. -
Adding the mouths:
Paint a tiny, shallow U-shape centered between the eyes on all three figures. The smile should be very small to maintain the kawaii aesthetic. -
Rosy cheeks:
Using a dotting tool or the round end of a paintbrush handle, dip into pink paint. Stamp two round cheeks on either side of the smile. The cloud needs slightly larger cheeks than the stars. -
Sealing:
Allow the face paint to dry completely. Finish by coating each figure with a matte varnish to protect the clay and keep the colors looking soft and natural.
Turn them into magnets
Before the clay dries, press a small, strong round magnet into the back of each shape. Secure it with a dab of superglue after the clay is fully hard.
Arrange your new friends on your desk or shelf for an instant mood booster whenever you work


What Really Happens Inside the Kiln
Learn how time and temperature work together inside the kiln to transform clay into durable ceramic.
Sweet Heart Cheek Magnets With Tiny Faces
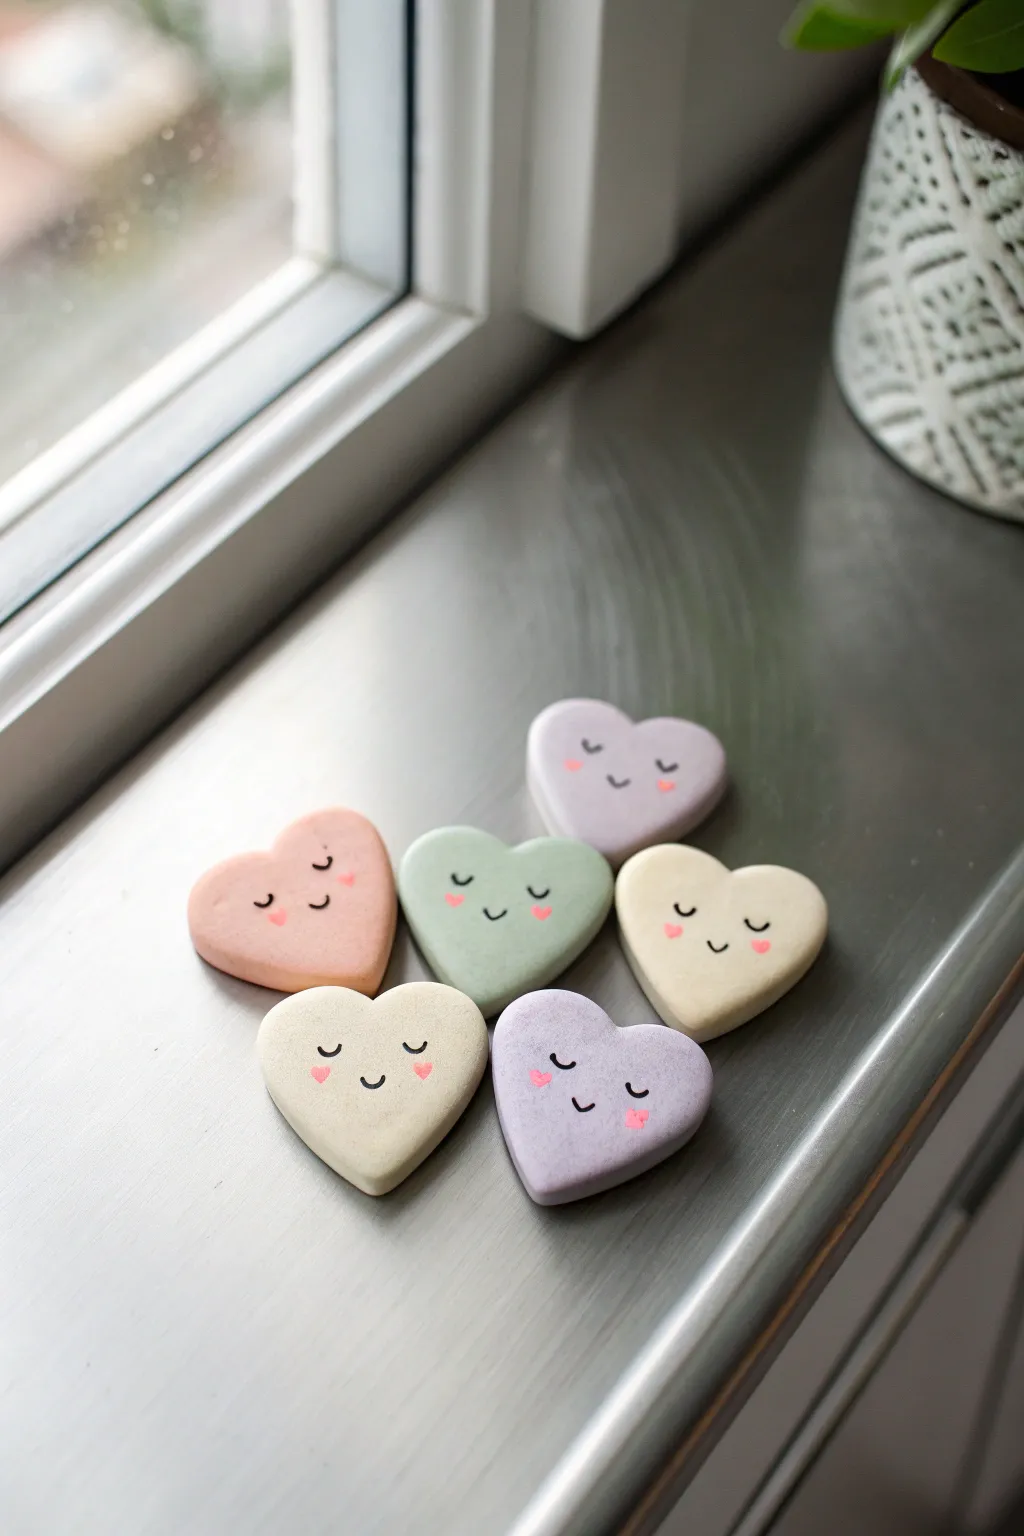
These charming little hearts bring a touch of sweetness to any magnetic surface with their soft pastel hues and sleepy smiles. Their matte finish and gentle expressions make them perfect for brightening up a fridge or filing cabinet.
Step-by-Step Guide
Materials
- Polymer clay (white, pastel pink, mint green, lavender, cream)
- Small heart-shaped cookie cutter (approx. 1.5 inches)
- Acrylic rolling pin
- Parchment paper or ceramic tile
- Fine-point black paint pen or liner brush
- Small round tool or toothpick (for cheeks)
- Pink acrylic paint
- Strong round magnets (neodymium recommended)
- Super glue (E6000 or gel formula)
- Matte sealant or varnish (optional)
- Fine-grit sandpaper (400-600 grit)
Step 1: Shaping the Hearts
-
Condition the clay:
Start by taking small portions of your pastel polymer clay colors. Knead each piece thoroughly in your hands until it becomes soft, pliable, and free of cracks. -
Roll it out:
Place a ball of conditioned clay onto a piece of parchment paper or a clean ceramic tile. Use your acrylic roller to flatten the clay to a uniform thickness of about 1/4 inch. You want them thick enough to look chubby and cute. -
Cut the shapes:
Press your heart-shaped cutter firmly into the clay. Give it a tiny wiggle to ensure a clean cut, then lift the cutter. Gently push the clay heart out if it sticks inside. -
Soften edges:
The cutter can leave sharp, harsh edges. Use your fingertip to very gently smooth and round over the top edges of the heart, giving it a softer, pillowy appearance. -
Refine the surface:
Check the surface for any fingerprints or lint. I like to lightly brush the surface with a tiny bit of cornstarch or baby oil if I need to smooth out stubborn imperfections before baking. -
Bake the batch:
Arrange your hearts on a baking sheet lined with parchment paper. Bake according to the manufacturer’s instructions on your specific package of clay—usually around 275°F (135°C) for 15-20 minutes.
Smooth Surface Secret
Before baking, wipe your raw clay hearts lightly with a baby wipe or a finger dipped in rubbing alcohol. This melts away fingerprints and dust instantly.
Step 2: Adding Personality
-
Cool and sand:
Once baked, let the hearts cool completely. If there are any rough spots on the sides, lightly sand them with fine-grit sandpaper until buttery smooth. -
Draw the eyes:
Using a fine-point black paint pen, carefully draw two small ‘U’ shapes in the center of the heart for the closed, sleepy eyes. Keep them relatively low on the heart for a cuter look. -
Add the mouth:
Draw a tiny, simple curve right between the eyes for the smile. Keep the line thin and delicate to match the sweetness of the face. -
Mix cheek color:
Squeeze a tiny dot of pink acrylic paint onto a palette. You can mix it with a speck of white to get a softer, bubblegum pink if your paint is too bright. -
Dot the cheeks:
Dip round dotting tool or the flat end of a chopped toothpick into the pink paint. Gently stamp two small oval or heart-shaped cheeks just below the eyes on the outer sides. -
Dry the paint:
Allow the paint marker and acrylics to dry completely. This usually takes about 10-15 minutes, ensuring you don’t smudge the faces in the next step.
Make Them Glittery
Mix a tiny amount of iridescent fine glitter into the varnish before sealing. This adds a subtle, magical shimmer without altering the pastel colors.
Step 3: Finishing Touches
-
Seal the surface:
To protect the painted faces and give the hearts a professional look, apply a thin coat of matte varnish. Matte is key here to replicate the soft, almost velvety look of the original image. -
Prepare the back:
Flip the hearts over once the varnish is fully dry. Make sure the back surface is clean and dust-free. -
Glue the magnet:
Place a small drop of super glue or E6000 onto the back of the heart, centered or slightly towards the top. -
Attach and set:
Press a magnet firmly into the glue. Let the adhesive cure fully (often 24 hours for maximum strength) before sticking them to your fridge.
Now you have a whole family of sweet, smiling hearts to hold up your favorite photos and notes
Cute Mini Mushroom Friends in Pastels
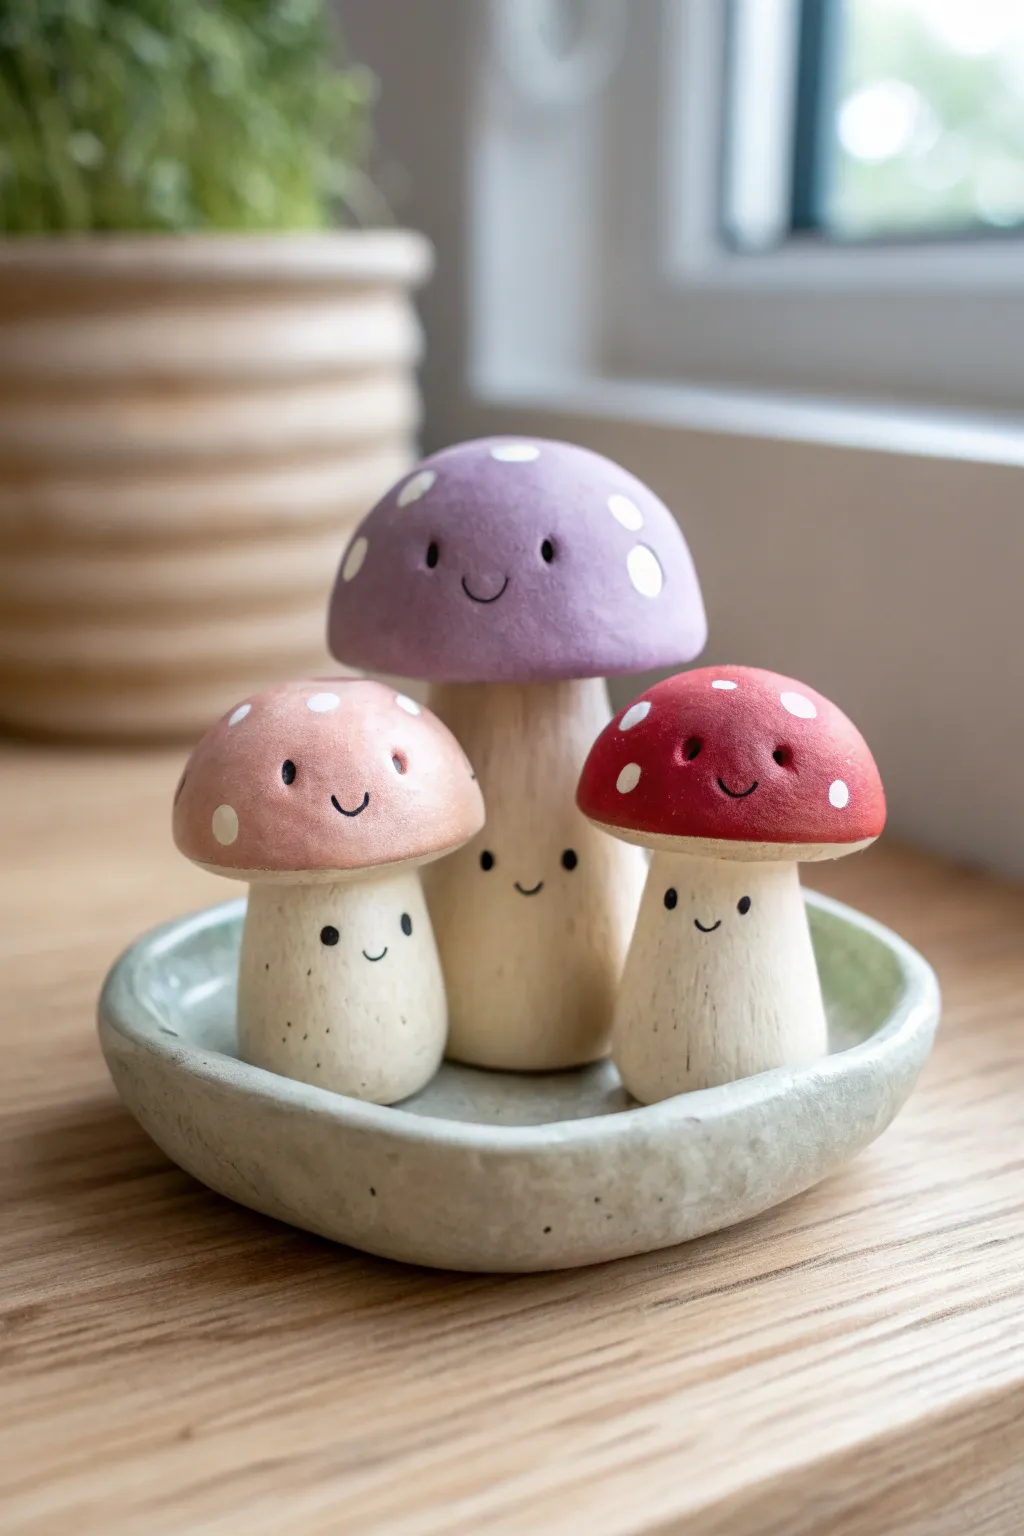
These utterly adorable clay mushrooms bring a touch of woodland magic to any shelf with their sweet smiles and soft, muted colors. The set features three distinct sizes nested in a handmade speckled dish, creating a cohesive and heartwarming display.
Step-by-Step
Materials
- Air-dry clay or polymer clay (white or beige bases)
- Acrylic paints (pastel purple, dusty pink, deep red, white, black, beige)
- Fine grit sandpaper
- Small paintbrush (flat and fine round)
- Dotting tool or toothpick
- Matte varnish or sealant
- Sculpting tools (needle tool, smoothing tool)
- Small bowl of water
- Roller or rolling pin
- Circle cutter or small bowl (for the dish base)
Step 1: Sculpting the Mushrooms
-
Form the Stems:
Start by rolling three cylinders of clay in varying sizes: one large and distinctively tall, and two shorter, stouter ones. Slightly taper the tops so the caps will sit securely later. -
Shape the Caps:
Roll three balls of clay corresponding to your stem sizes. Press your thumb into the center of each ball and gently pinch around the edges to create a domed cap shape. -
Test the Fit:
Before attaching anything, place the caps onto their respective stems to ensure the proportions look right. The caps should slightly overhang the stems. -
Attach Cap to Stem:
Score the top of the stem and the underside of the cap with a needle tool. Apply a tiny bit of water (or slip) to the scored areas and press them firmly together. -
Smooth the Seams:
Use a smoothing tool or your finger to blend the underside of the cap to the stem slightly for extra stability, though leaving a distinct separation line is also fine for this style.
Pro Tip: Weighted Base
To prevent the tall mushroom from tipping, press a small ball of aluminum foil into the center of the stem while sculpting to reduce weight, or widen the base slightly.
Step 2: Crafting the Dish
-
Roll the Base:
Roll out a slab of clay to about a 1/4 inch thickness. Use a circle cutter or trace around a bowl to cut a perfect circle approximately 4-5 inches wide. -
Raise the Rim:
Gently curve the outer edges of the circle upwards to create a shallow lip. You can smooth the rim with a wet finger to ensure it’s rounded and soft, not sharp. -
Check the Grouping:
While the dish is still pliable, set your three raw mushrooms inside to make sure they fit comfortably without feeling crowded. -
Dry Completely:
Allow all clay pieces to air dry for 24-48 hours. I always suggest turning the pieces occasionally to ensure even drying on all sides.
Step 3: Painting & Details
-
Sand for Smoothness:
Once bone dry, lightly buff the surfaces with fine-grit sandpaper to remove any fingerprints or rough textures. -
Base Coat the Stems:
Paint the stems of the mushrooms a creamy beige or off-white color. Add vertical streaks of a slightly darker beige to mimic the natural texture of a mushroom stalk. -
Paint the Caps:
Apply your cap colors: a soft lavender purple for the tall one, dusty pink for the medium one, and a muted red for the smallest. You may need two coats for opaque coverage. -
Add Polka Dots:
Using a small brush or dotting tool, dab random white spots onto the colored caps. Vary the sizes slightly for a natural, organic look. -
Draw the Faces:
With your finest brush or a black paint pen, draw two small wide-set eyes and a simple U-shaped smile on both the cap AND the stem of each mushroom. This double-face detail is key to the cute look. -
Paint the Dish:
Paint the shallow dish a pale, earthy grey-green. Once dry, speckle it by flicking a toothbrush loaded with diluted dark grey paint over the surface. -
Seal the Work:
Finish by applying a layer of matte varnish to all pieces to protect the paint and give them a professional, non-shiny finish.
Troubleshooting: Cracks
If small cracks appear as the clay dries, mix a tiny amount of fresh clay with water to make a paste and fill the cracks, then sand smooth once dry.
Arrange your little mushroom family in their dish and enjoy the cheer they bring to your space

TRACK YOUR CERAMIC JOURNEY
Capture glaze tests, firing details, and creative progress—all in one simple printable. Make your projects easier to repeat and improve.
Kawaii Flower Coasters With Blushing Faces
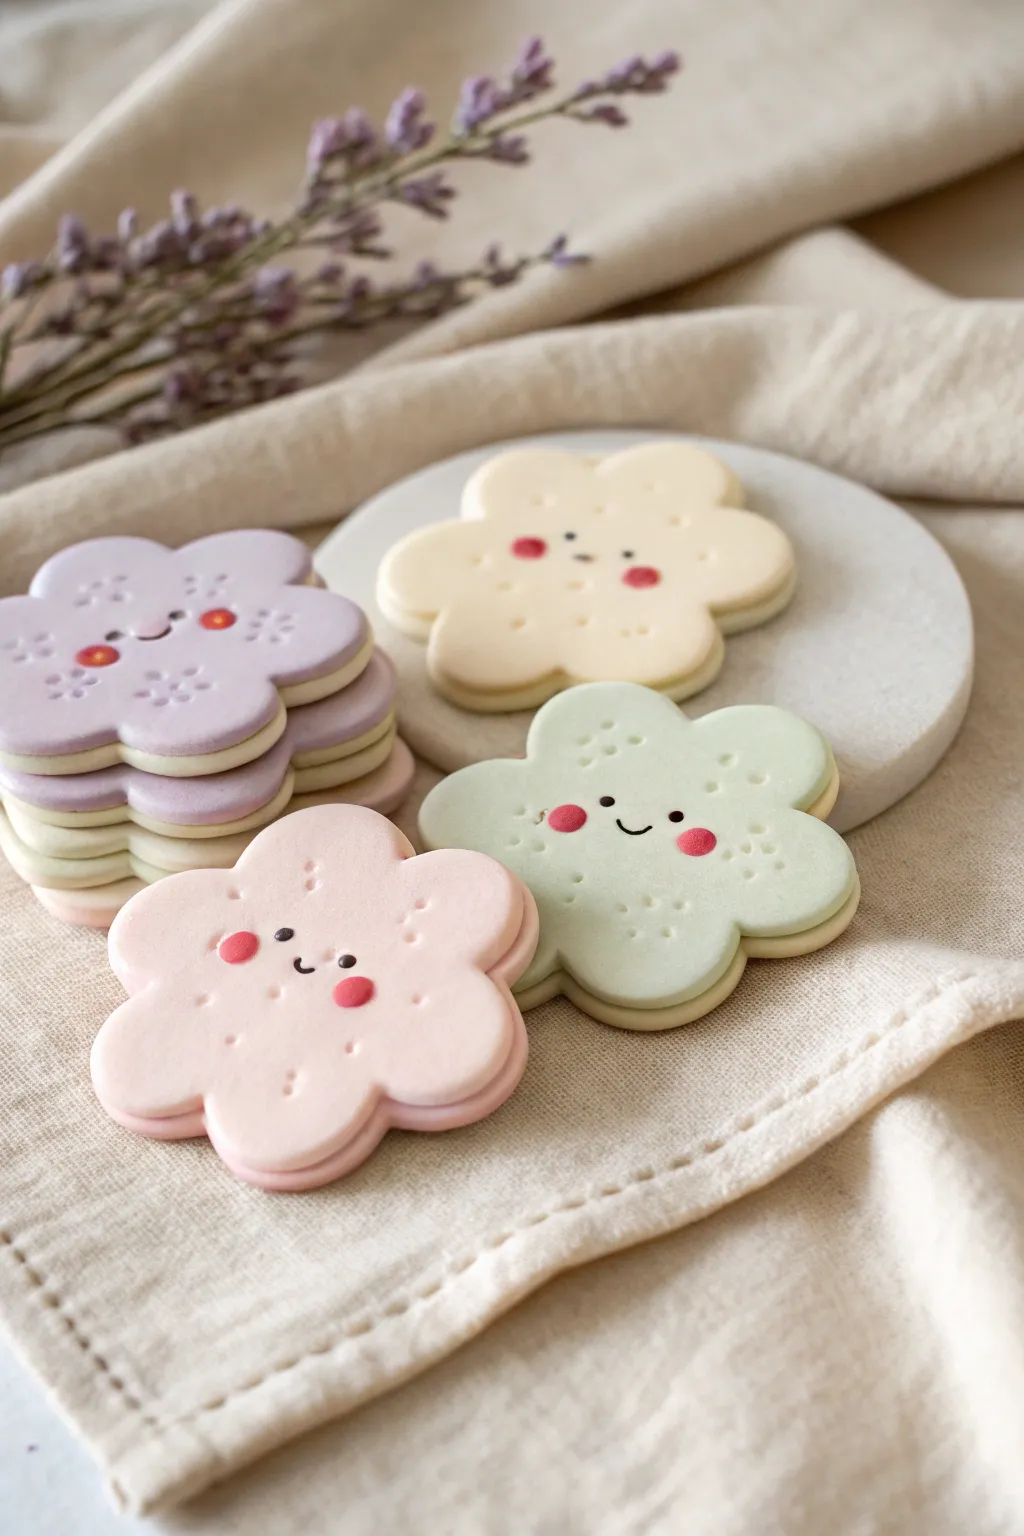
These adorable flower-shaped coasters look good enough to eat with their soft pastel colors and sweet expressions. Fashioned to resemble frosted sugar cookies with a cream filling, they add a touch of whimsy to any desk or coffee table.
Step-by-Step Guide
Materials
- Polymer clay (white, pastel pink, pastel purple, pastel yellow, light green)
- Acrylic rolling pin
- Flower-shaped cookie cutter (approx. 3-4 inches wide)
- Needle tool or toothpick
- Ball stylus tool (small)
- Black acrylic paint
- Pink soft pastel chalk (for blushing)
- Small fine-point paintbrush
- Parchment paper
- Oven (for baking polymer clay)
- Matte varnish (optional)
Step 1: Shaping the Cookie Base
-
Condition the white clay:
Start by taking a generous amount of white polymer clay. Knead and warm it in your hands until it is soft, pliable, and free of cracks. -
Roll the filling layer:
Using your acrylic rolling pin, roll the white clay out on parchment paper to a uniform thickness of about 1/4 inch. This will be the creamy ‘filling’ of your sandwich cookie. -
Cut the filling shapes:
Press your flower-shaped cutter firmly into the white clay sheet. Cut out four flower shapes and set them aside carefully on a baking sheet lined with parchment paper. -
Prepare the colored clay:
Repeat the conditioning process with your pastel colors (pink, purple, yellow, and green). You’ll need enough of each color to create a top and bottom layer for one coaster. -
Roll the colored layers:
Roll each pastel color out. Aim for a thickness slightly thinner than your white layer, perhaps around 1/8 to 3/16 inch thick. -
Cut the outer cookies:
Cut two flower shapes from each pastel color. You should now have pairs of matching colored flowers and single white flowers for the centers.
Step 2: Assembly & Detailing
-
Stack the sandwich:
Take one pastel flower and place it on your work surface. Gently lay a white filling flower on top, aligning the petals perfectly. Finally, place the second matching pastel flower on top to complete the sandwich. -
Smooth the edges:
Very gently press the layers together to ensure they adhere, but be careful not to squash the shape. Use your finger to smooth any rough edges around the petals. -
Add texture:
To mimic the look of a baked biscuit, use a needle tool or toothpick to poke small, random groupings of dots on the top surface of the clay. I like to concentrate these slightly away from the center where the face will go. -
Position the eyes:
Determine the center of the coaster. Use a small ball stylus to make two shallow indentations where the eyes will sit. This helps the paint stay in place later. -
Create the blushing cheeks:
Scrape a little pink soft pastel chalk into a powder. Use a dry, soft brush or your finger to gently dab two round rosy spots onto the clay below the eye indentations. -
Bake the clay:
Arrange your assembled coasters on a baking sheet. Bake according to your customized clay package instructions (usually around 275°F or 130°C for 15-30 minutes). Let them cool completely before handling.
Clean Clay Tip
Baby wipes are essential! Use them to clean your hands and tools strictly between switching clay colors. This prevents the dreaded transfer of dark lint or color onto your pristine white or pastel clays.
Step 3: Painting the Face
-
Paint the eyes:
Using a very fine paintbrush and black acrylic paint, carefully fill in the small indentations you made earlier for the eyes. A tiny dot is all you need. -
Draw the mouth:
Paint a small, curved ‘U’ shape between the eyes for a smiling mouth. Keep the line thin and delicate for the cutest expression. -
Add cheek highlights:
For extra dimension, you can add a tiny dot of darker pink paint or clay in the center of the dusted blush area, as seen in the pink coaster example. -
Seal the coaster:
Once the paint is fully dry, apply a thin coat of matte varnish to the top surface. This protects the face paint and gives the coaster a finished, non-sticky feel perfect for holding cups.
Make it Magnetic
Instead of coasters, make these smaller (1-2 inches) and glue a strong round magnet to the back after baking. They make incredibly cute fridge magnets for holding notes or photos.
Enjoy your sweet new desk accessories and try experimenting with different facial expressions for each color
Tiny Frog Calendar Buddy (Mini Desk Companion)

Brighten up your workspace with this adorable clay frog figurine, designed to sit faithfully beside your desk calendar or daily planner. With its smooth, rounded features and cheerful expression, this little green friend adds a touch of nature and whimsy to your daily routine.
Detailed Instructions
Materials
- Polymer clay (Leaf Green, White, and Black)
- Acrylic paints (Dark Green, Cream/Off-White)
- Gloss glaze or polyurethane varnish
- Sculpting tools (ball styluses, needle tool, rubber smoothers)
- Aluminum foil (for the core)
- Liquid clay or Bake & Bond
- Soft paintbrush
- Texture sponge or stiff brush
Step 1: Forming the Body Structure
-
Create the armature:
Crumple a piece of aluminum foil into a squat, rounded egg shape. This will be the core of the frog’s body, saving clay and reducing baking time. -
Condition the clay:
Warm up your Leaf Green polymer clay in your hands until it is pliable. Roll it into a sheet roughly 1/4 inch thick. -
Wrap the core:
Cover the foil armature completely with the green clay sheet. Smooth all seams with your thumbs until the surface is uniform and no foil is visible. -
Shape the posture:
Gently press the bottom of the shape against your work surface to flatten it slightly so the frog sits stably. Keep the top rounded for the head and back.
Seamless Blending
Use a tiny drop of baby oil or clay softener on your finger to smooth out fingerprints and seam lines before texturing the surface.
Step 2: Sculpting the Features
-
Add the legs:
Roll two thick sausage shapes of green clay for the hind legs. Press them onto the sides of the body, blending the upper thigh area smoothly into the torso. -
Form the feet:
At the base of the leg rolls, flatten the clay slightly and use a needle tool to indent toes. Gently curve the feet so they rest naturally on the surface. -
Create the arms:
Roll two smaller logs for the front arms. Attach them to the front of the belly, positioning the hands so they rest on the frog’s stomach. Use a small ball tool to define the fingers. -
Make the eye sockets:
Roll two medium-sized balls of green clay and place them on top of the head for the prominent frog eyes. Blend the bottom edges onto the head so they look integrated, not just stuck on. -
Insert the eyes:
Press a depression into the front of each green eye mound. Fill these with small flattened distinct discs of cream or white clay for the eyeballs. -
Add pupils:
Place tiny discs of black clay onto the white eyeballs. Center them carefully to give the frog a focused, friendly gaze.
Step 3: Detailing and Texture
-
Carve the mouth:
Use a needle tool or a thin clay knife to cut a long, wide smile across the face. Curve the ends slightly upward to enhance the happy expression. -
Add texturing:
I prefer to gently dab the green skin with a coarse sponge or a stiff brush. This stippling creates a realistic, slightly bumpy skin texture rather than a perfectly smooth plastic look. -
Refine the nostrils:
Poke two small holes above the mouth line for nostrils using a small dotting tool. -
Bake the piece:
Bake the figurine according to your specific clay package instructions. Let it cool completely inside the oven to prevent cracking.
Level Up: Accessories
Sculpt a tiny clay fly or a water lily pad for your frog to sit on, or create a matching clay base for the numbered blocks.
Step 4: Painting and Finishing
-
Apply a wash:
Mix a small amount of dark green acrylic paint with water. Brush it over the frog and quickly wipe most of it off with a paper towel. This leaves dark paint in the textures and crevices, adding depth. -
Highlight the skin:
Dry brush a tiny amount of lighter green or yellowish-green paint on the tops of the eye ridges and knees to make the details pop. -
Gloss the eyes:
Carefully paint a layer of high-gloss glaze or UV resin over just the eyes to make them look wet and shiny. -
Seal the body:
Apply a matte or satin varnish over the green skin to protect the paint wash while maintaining a natural, non-plastic appearance.
Place your new green buddy next to your calendar blocks and enjoy the cheerful company while you work
Animal Mouth Toothbrush Holders (Cute Bathroom Crew)
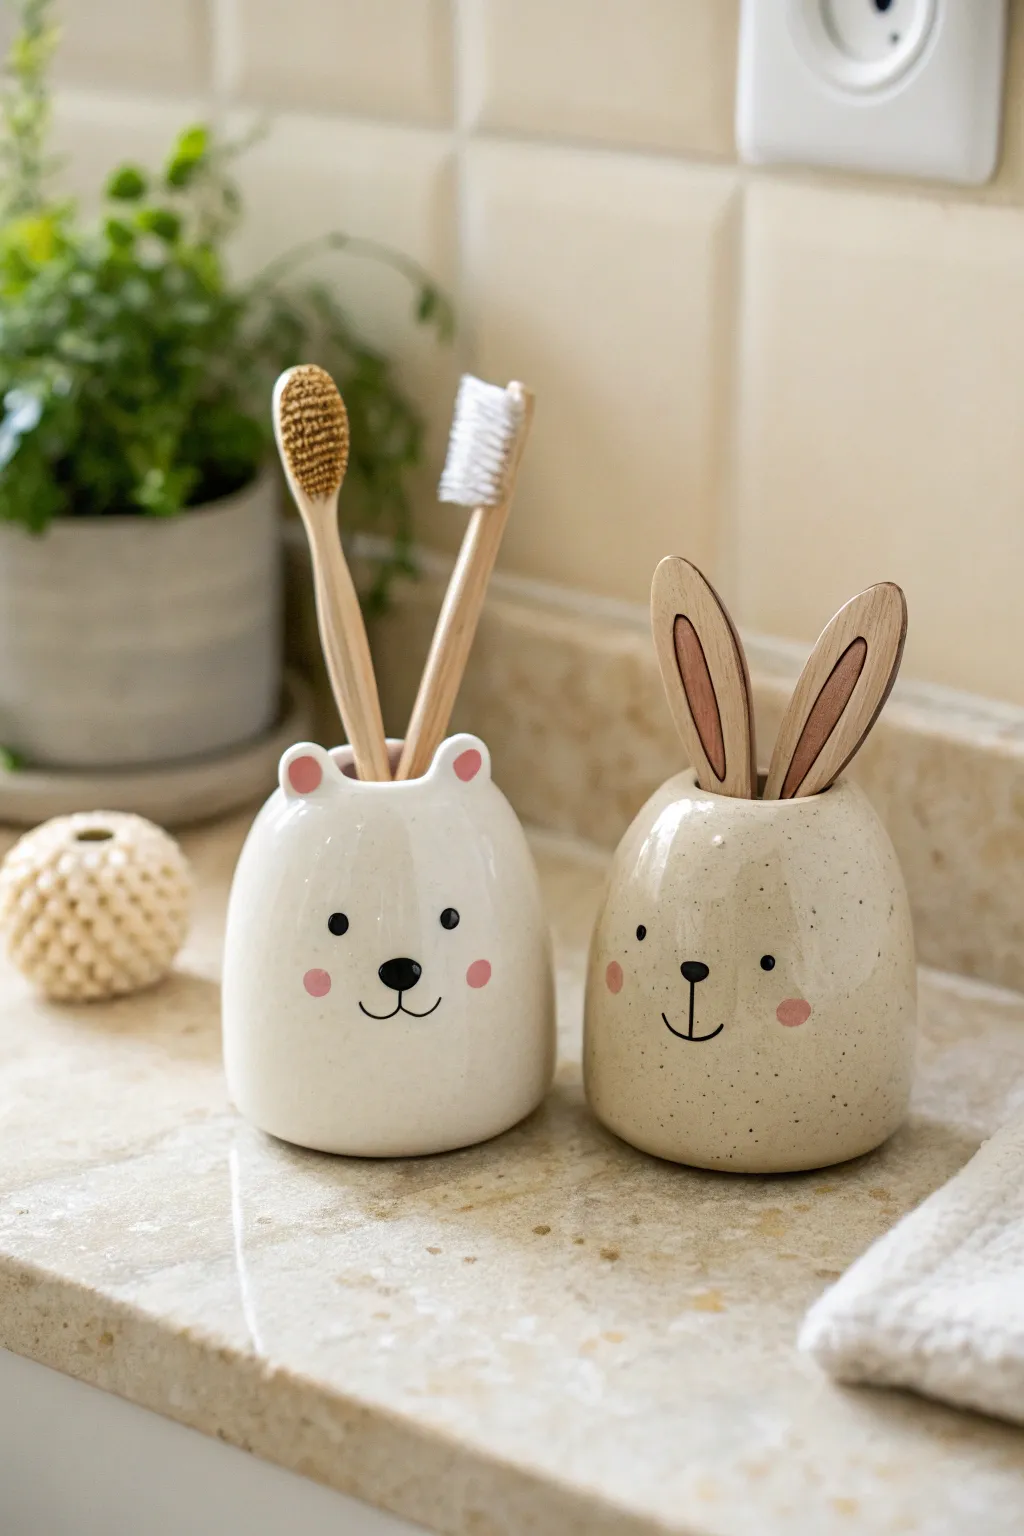
These adorable ceramic toothbrush holders feature a sweet white bear and a speckled bunny, both perfect for adding a touch of charm to your bathroom sink. Their simple, rounded forms and minimalist painted faces make them a delightful beginner-friendly pottery project.
Step-by-Step Guide
Materials
- White earthenware or stoneware clay
- Pottery wheel (optional, can be hand-built)
- Wooden sculpting tools
- Needle tool
- Sponge
- Underglazes (black, pink, soft brown)
- Clear glossy glaze
- Small detail paintbrushes
- Kiln
- Wooden spoon handles (for bunny ears structural support during drying, optional)
Step 1: Forming the Base Bodies
-
Wedging the clay:
Start by wedging two balls of white clay, roughly the size of a large orange, ensuring there are no air bubbles. -
Shaping the primary form:
If throwing on a wheel, center the clay and pull a small, enclosed cylinder that tapers inward at the top. If hand-building, create two pinch pots and join them together, or coil build a dome shape. -
Smoothing the surface:
Use a rib tool or a damp sponge to smooth out the exterior walls. You want a consistent, rounded ‘egg-like’ shape with a flat bottom for stability. -
Creating the opening:
At the very top of your dome, use a needle tool or your thumb to press gently inward, creating a smooth, rounded opening about an inch wide. This is where the toothbrushes will sit.
Clean Lines Pro-Tip
For perfectly round cheeks, use the flat end of a drill bit or a specialized foam dauber as a stamp instead of trying to paint the circle freehand.
Step 2: Adding Animal Features
-
Modeling the bear ears:
For the bear, roll two tiny balls of clay and flatten them slightly. Score and slip the clay near the top opening, attaching them as rounded nubs. -
Refining the bear ears:
Use a modeling tool to create small indentations inside the bear ears to give them depth, blending the seams seamlessly into the main body. -
Shaping the bunny ears:
For the bunny, roll out two elongated teardrop shapes. Flatten them slightly to resemble tall rabbit ears. -
Attaching the bunny ears:
Score the back rim of the bunny’s opening and the base of the ears. Attach them firmly, smoothing the clay downward to secure the bond. -
Inner ear detail:
Carve a shallow, elongated oval recess inside each bunny ear. This area will be painted later to mimic the inner ear skin. -
Drying phase:
Allow both pieces to dry slowly to the leather-hard stage. I often cover them loosely with plastic to ensure the ears don’t dry faster than the bodies.
Wobbly Ears?
If the bunny ears sag while drying, prop them up from behind with a small piece of foam or crumpled newspaper until the clay stiffens.
Step 3: Painting and Glazing
-
Bisque firing:
Once fully bone dry, fire the pieces in the kiln to a bisque temperature (usually Cone 04). -
Painting the bear face:
Using a fine brush and black underglaze, paint two small dots for eyes and a rounded triangle for the nose. Draw a thin anchor shape for the mouth. -
Adding rosy cheeks:
Dip a small round brush or a sponge dauber into pink underglaze and gently stamp two circles on the bear’s cheeks and inside the ears. -
Painting the bunny face:
For the bunny, paint wider-set eyes and a simple ‘T’ or anchor shape for the nose and mouth. Add pink cheeks just like the bear. -
Filling the bunny ears:
Carefully paint the recessed inner ovals of the bunny ears with a soft brown or muted pink underglaze. -
Creating the speckled effect:
Dilute a small amount of brown or black underglaze with water. Dip a toothbrush into it and run your thumb over the bristles to flick tiny speckles onto the bunny holder. -
Applying clear glaze:
Once the underglaze designs are dry, dip the entire piece into a clear glossy glaze or brush it on evenly. Ensure the bottom is wiped clean. -
Final firing:
Fire the pieces again to the maturity temperature of your clay and glaze (often Cone 5 or 6) to vitrify the clay and make it waterproof.
Place your finished holders on the vanity and enjoy the cheerful company every morning while you brush
Mini Plant Pots With Sleepy Faces (Teeny Succulent Size)
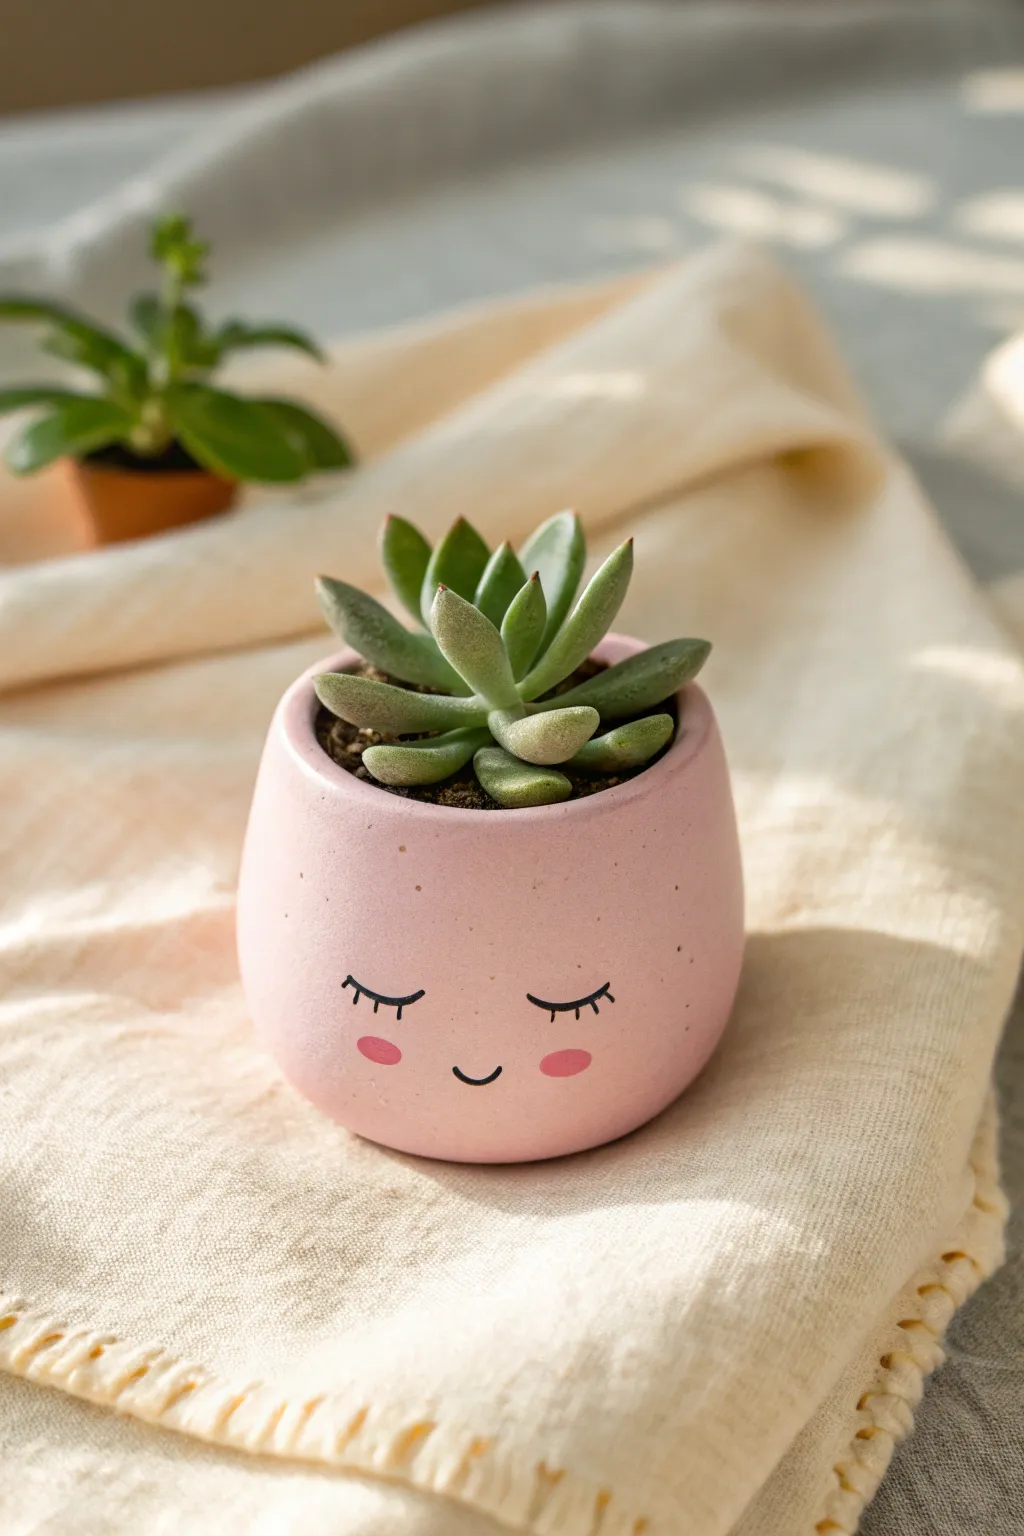
Brighten up your windowsill with this adorable pastel pink planter that looks peaceful and sweet. Perfect for tiny succulents, this rounded pot features a charming sleepy face that adds a touch of personality to your plant collection.
Detailed Instructions
Materials
- Polymer clay (white and pastel pink, or white + pink acrylic paint)
- Small rolling pin
- Circle cutter (or a clean jar/cup)
- Clay sculpting tools (specifically a needle tool and a blending tool)
- Fine-grit sandpaper
- Baking sheet and parchment paper
- Acrylic paint (black and extra soft pink for cheeks)
- Fine detail paintbrush (size 0 or 00)
- Matte or satin varnish
- Small succulent and potting soil
Step 1: Shaping the Pot
-
Condition the clay:
Start by warming up your pink polymer clay in your hands. Knead it thoroughly until it’s soft, pliable, and free of any air bubbles. -
Roll the base:
Roll a portion of the clay into a ball, then flatten it slightly. Use your rolling pin to create a smooth, thick disc about 0.5cm thick. This will be the bottom of your pot. -
Create the walls:
Take a larger chunk of clay and roll it into a long, even snake. Alternatively, for a smoother finish like the example, roll out a rectangular slab that matches the circumference of your base disc. -
Form the cylinder:
Wrap your slab or coil around the base disc to form the walls. If using a slab, cut the edges at a diagonal angle where they meet to create a seamless join. -
Blend the seams:
Using your blending tool or finger, gently smooth the clay where the walls meet the base, and where the side seam joins. The goal is to make the pot look like one solid piece. -
Shape the curve:
To achieve that specific rounded look, gently cup the pot in your hands and smooth the sides upward, curving them slightly inward toward the top rim. -
Refine the rim:
Use your finger and a little bit of water (if using water-based clay) or baby oil (for polymer) to smooth the top rim so it’s rounded and pleasant to touch, not sharp. -
Make drainage (optional):
If you plan to plant directly into the pot, punch a small hole in the center of the bottom using a straw or cutting tool.
Step 2: Baking and Finishing
-
Bake the clay:
Place your pot on a baking sheet lined with parchment paper. Bake according to your specific clay brand’s instructions (usually 275°F/135°C for 15-30 minutes). -
Cool down:
Let the pot cool completely inside the oven with the door cracked open; this prevents cracking from sudden temperature changes. -
Sand for smoothness:
Once cool, use fine-grit sandpaper under running water to gently buff away any fingerprints or rough spots, giving it that matte ceramic look. -
Prepare for painting:
Dry the pot thoroughly. If you used white clay, paint the entire exterior with two coats of pastel pink acrylic paint, letting it dry between coats.
Paint Smudges?
If you make a mistake with the black paint, don’t wipe it! Let it dry completely, then paint over the error with your background pink color before trying again.
Step 3: Painting the Face
-
Map the face:
Lightly sketch the position of the eyes and mouth with a pencil. I prefer to place the features slightly lower on the pot to enhance the ‘cute’ factor. -
Paint the lashes:
Using your finest brush and black acrylic paint, carefully draw two curved lines for the closed eyes. Add three tiny vertical ticks to each curve for the eyelashes. -
Add the smile:
paint a tiny, shallow ‘U’ shape right between the eyes for the mouth. Keep the line thin and delicate. -
Rosy cheeks:
Dip the back end of a paintbrush into darker pink paint (or mix red with your base pink). Dot this onto the cheeks just below the eyes for perfect circles. -
Seal the work:
Once the paint is completely dry, apply a coat of matte or satin varnish to protect your artwork from water and dirt. -
Planting:
Fill the pot with succulent soil and gently nestle your tiny plant inside to complete the look.
Add Texture
Before baking, gently dab the surface with a crumpled ball of aluminum foil or a toothbrush. This creates a faux-stone texture that looks great on matte clay.
Now you have a sweet little companion to keep your desk company
Kawaii Axolotl Figure With Tiny Frills

Bring a little underwater magic to your shelf with this adorable, freestanding axolotl figure. Its soft pearlescent pink finish and delicate frilled gills make it a soothing and charming sculpting project perfect for practicing smooth shapes.
Step-by-Step
Materials
- Polymer clay (pale coral pink or white + red)
- Pearl mica powder or shimmering pearl acrylic paint
- Sculpting tools (needle tool, ball stylus)
- Black acrylic paint (or black clay)
- Darker rose-pink clay (or pastel chalks for shading)
- Satin or matte varnish
- Aluminum foil (for armature core)
- Soft paintbrush
Step 1: Forming the Body Base
-
Core Preparation:
Start by crumpling a small piece of aluminum foil into a peanut shape—larger at the top for the head and slightly wider at the bottom for the belly. This saves clay and keeps the figure lighter. -
Mixing the Color:
Condition your clay until it is soft and pliable. Use a pale coral pink; if you only have white, mix in a tiny pinhead amount of red to achieve that soft, baby-pink hue. -
Covering the Core:
Flatten a sheet of your pink clay and wrap it fully around the foil armature. Roll the shape between your palms to smooth out any seams completely, aiming for a seamless, continuous silhouette. -
Refining the Shape:
Gently gently press the neck area to define the separation between the round head and the chubby body, but keep the transition very subtle and organic.
Droopy Gills?
If the gill frills sag while you work, prop them up with small bits of tissue paper or cardstock during the baking process. Remove the props once the clay is cured and hard.
Step 2: Arms and Legs
-
Creating Legs:
Roll two small balls of clay for the feet. Press them onto the bottom of the body, slightly apart, to create a stable base so your axolotl stands on its own. -
Detailing Toes:
Use a needle tool or small knife to make two tiny indents on each foot, creating three little toes. Smooth the connection point where the leg meets the body. -
Shaping Arms:
Roll two teardrop shapes for the arms. Flatten the wider end slightly and attach the thinner end to the shoulder area. -
Curving the Limbs:
Bend the arms slightly forward so they rest gently against the belly. Add tiny toe details to the hands just like you did for the feet.
Seamless Blending
Use a silicone clay shaper tool or a finger dipped in a little baby oil (or clay softener) to smooth out the seams where the arms and legs join the body for a flawless look.
Step 3: The Famous Frills
-
Prepping the Gills:
Create six small, flattened teardrop shapes from your pink clay. These will be the external gills. -
Texture Work:
Before attaching them, use a needle tool to press tiny, textured lines or dots into the surface of these gill pieces to mimic the feathery look shown in the reference. -
Attaching Gills:
Attach three gills to each side of the head, fanning them out like a crown. Blend the clay at the attachment point onto the back of the head so they don’t fall off. -
Adding Contrast:
If you want the gill tips to look darker like the photo, brush a tiny amount of rose-pink pastel dust or pigment onto the tips before baking.
Step 4: Face and Finishing Touches
-
Facial Indents:
Use a large ball stylus to press shallow intents where the eyes will go. Since the eyes are wide-set, place them far apart for maximum cuteness. -
Adding Eyes:
Roll two tiny spheres of black clay (or paint them later) and press them into the sockets. Add a tiny speck of white for a highlight if you want extra sparkle. -
The Smile:
Use a curved tool or a straw cut in half to impress a gentle, wide smile connecting the area between the eyes. -
Blushing Cheeks:
Apply a small oval of darker pink clay or brush some pink pastel chalk under each eye for those classic rosy cheeks. -
Texture Stippling:
To mimic the matte, stone-like texture seen in the image, I like to gently tap the entire surface with a toothbrush or stiff brush before baking. This removes fingerprints too. -
Baking:
Bake the figure according to your clay manufacturer’s instructions, typically around 275°F (130°C) for 15-30 minutes depending on thickness. -
The Pearly Finish:
Once cool, lightly dry-brush the entire figure with a pearl mica powder or a very thin layer of shimmering acrylic medium to give it that aquatic glow.
Place your new smiling friend on a windowsill or desk for a daily dose of joy
Mix-and-Match Kawaii Face Library (Swap-On Expressions)
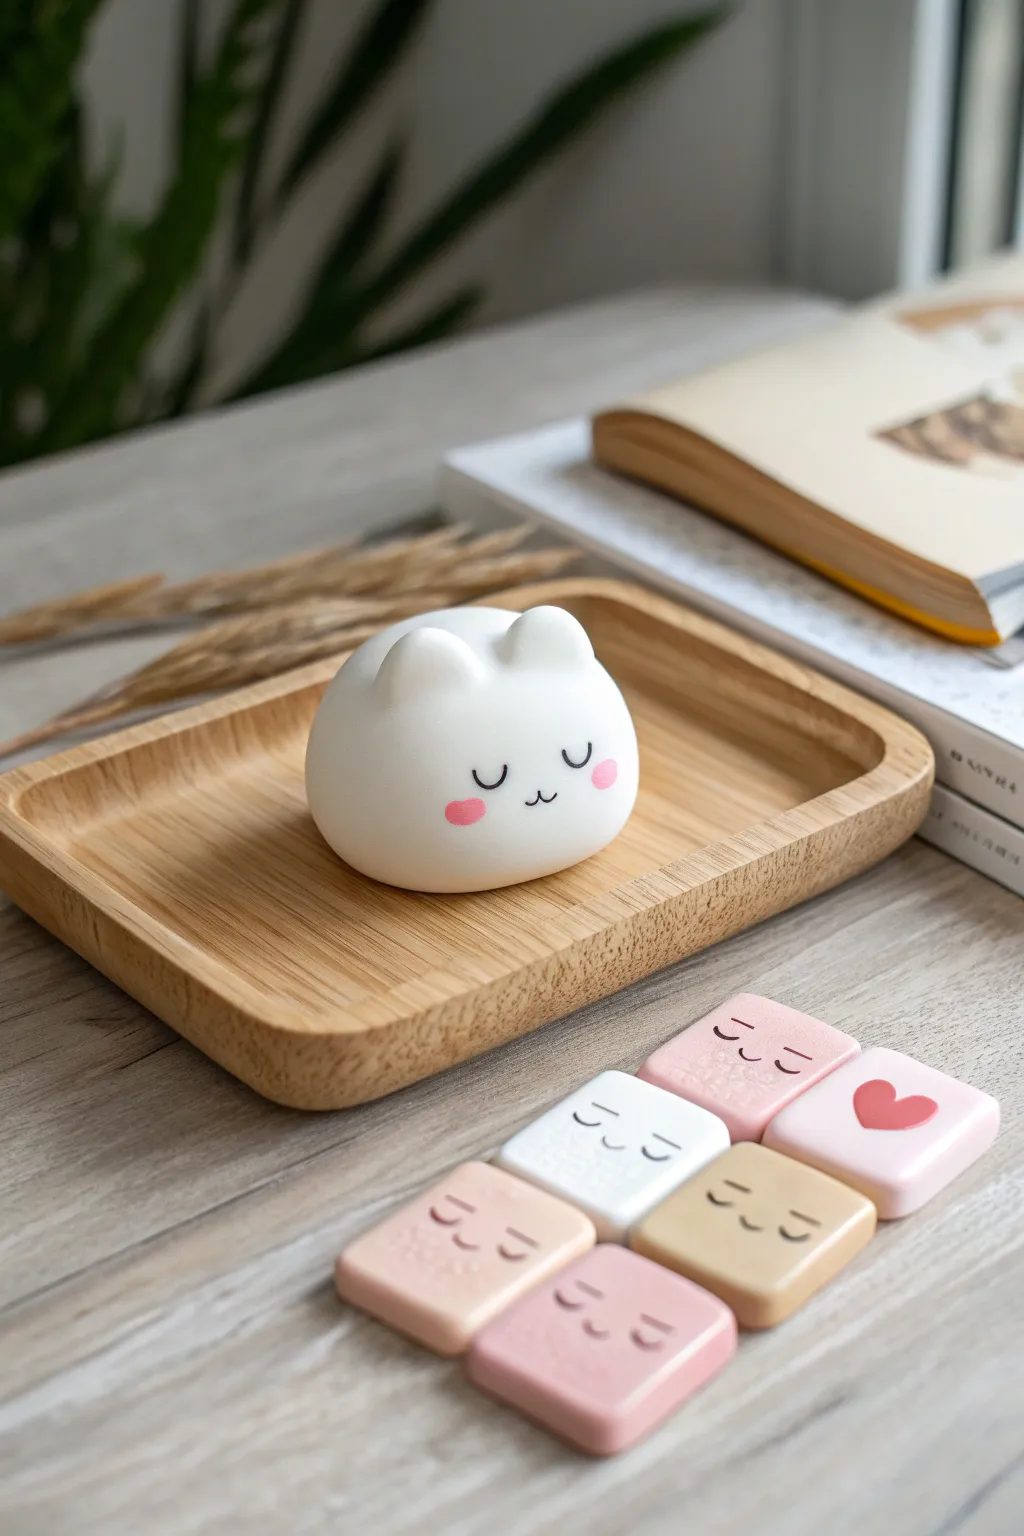
Create a calming desk companion with this smooth, matte-finish white bunny and a matching set of pastel expression tiles. This project combines simple geometric sculpting with minimalist kawaii face painting for a serene, tactile collection.
Step-by-Step
Materials
- White polymer clay (soft variety)
- Pastel polymer clay colors (blush pink, creamy beige, soft white)
- Fine-grit sandpaper (400-800 grit)
- Black acrylic paint or fine-tip permanent marker
- Pink acrylic paint (for cheeks)
- Small dotting tool or toothpick
- Rolling pin (acrylic)
- Clay slicing blade
- Small fine-point liner brush
- Matte finish varnish (optional)
Step 1: Sculpting the Gentle Bunny
-
Conditioning the base:
Begin by thoroughly conditioning a large ball of white polymer clay until it is pliable and warm. This prevents cracks and ensures a smooth finish. -
Forming the body:
Roll the clay into a smooth sphere, then gently press it down onto your work surface to create a flat bottom, creating a slightly flattened dumpling or ‘mochi’ shape. -
Shaping the ears:
Take two small, equal-sized pieces of white clay and roll them into small balls. Gently pinch one side of each ball to form a rounded teardrop shape. -
Attaching the ears:
Place the ears on top of the head, spacing them slightly apart. Use a blending tool or your finger to smooth the seam where the ears meet the head so they look like one continuous piece. -
Smoothing the surface:
Check the entire surface for fingerprints. Dip your finger in a tiny bit of baby oil or cornstarch and gently buff the clay to get perfectly smooth curves.
Uneven Clay Surface?
If fingerprints are stubborn, brush a light coat of rubbing alcohol or baby oil over the raw clay before baking to melt away imperfections.
Step 2: Creating the Expression Tiles
-
Mixing pastel shades:
Prepare your pastel clays. If your colors are too vibrant, mix in a generous amount of white clay to achieve those soft, milky hues seen in the reference. -
Rolling the slab:
Roll out your colored clays into sheets clear of consistent thickness, roughly 1/4 inch thick. I find acrylic spacers helpful here to keep everything even. -
Cutting the tiles:
Use a sharp clay slicing blade to cut uniform squares or slightly rounded rectangles. Aim for about 1 inch by 1 inch. -
Rounding the edges:
Gently tap the cut edges with your finger to soften the sharp corners, giving the tiles a soft, polished look similar to a game piece. -
Baking the collection:
Place the bunny and all tiles on a ceramic tile or parchment-lined baking sheet. Bake according to your specific clay package instructions (usually 275°F for 15-30 minutes). -
Cooling and sanding:
Let the pieces cool completely. If there are any rough spots, lightly sand them with fine-grit sandpaper under running water for a porcelain-like feel.
Make Them Magnetic
Glue small round craze magnets to the back of the tiles after baking to turn your expression library into a cute mood board for your fridge.
Step 3: Painting the Kawaii Faces
-
Drafting the features:
Lightly sketch the placement of the eyes and mouth with a pencil if you feel unsteady. Position the features low on the face for extra cuteness. -
Painting the sleepy eyes:
Using a very fine liner brush and black acrylic paint, paint two small ‘U’ shapes for closed, sleepy eyes. Keep the lines thin and delicate. -
Adding the mouth:
Paint a tiny ‘w’ or a small smile centered between the eyes. For the heart tile, swap the face for a bold red heart shape. -
Blushing the cheeks:
Dip a dotting tool into pink paint. Dab two distinct circles on the bunny’s cheeks. Repeat this for the tiles, keeping the pink soft and consistent. -
Sealing the work:
Once the paint is fully dry, apply a thin coat of matte varnish to protect the paint without making the clay too shiny, preserving that soft aesthetic.
Arrange your bunny and tiles on a tray for a centerpiece that radiates calm energy