Glazing is the part of pottery where a simple form suddenly turns into a little surprise when it comes out of the kiln. In my studio, I lean on glaze layering, color palettes, and a few easy application tricks to get finishes that feel special without being fussy.
Classic Dip Glaze for Smooth, Even Coverage
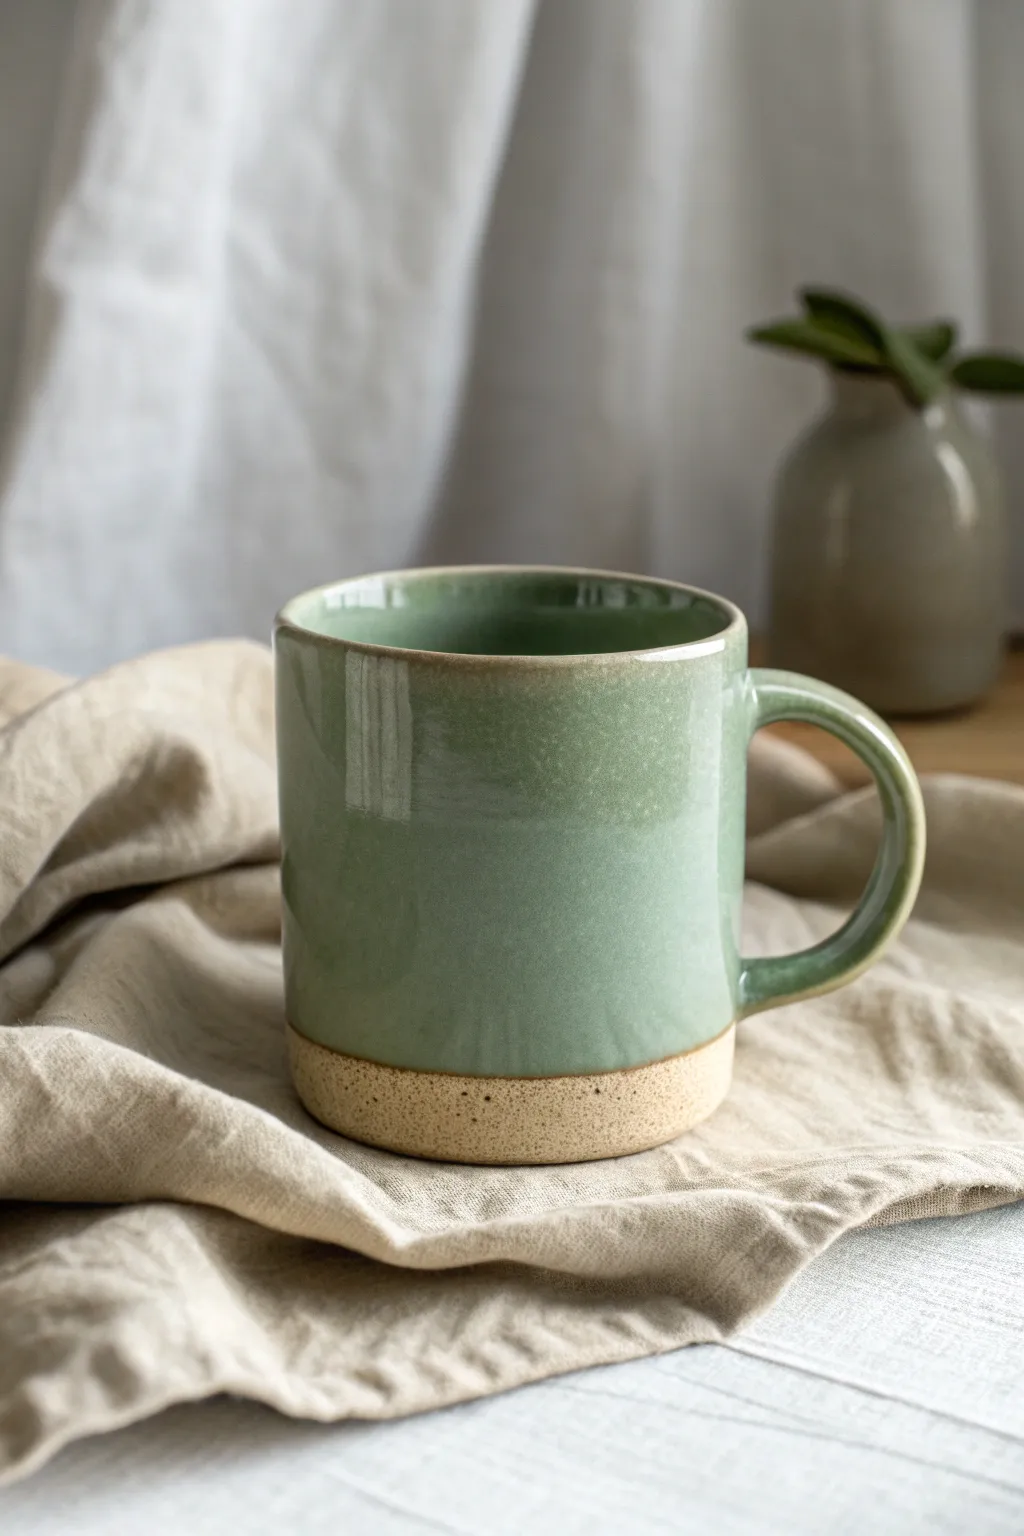
Achieve a timeless, earthy aesthetic with this two-tone glazing technique that highlights the natural beauty of speckled clay. By leaving the base unglazed, you create a delightful tactile contrast between the smooth, glossy sage green glaze and the raw, sandy texture of the ceramic body.
Detailed Instructions
Materials
- Bisque-fired ceramic mug (preferably speckled stoneware)
- Sage green dipping glaze (cone 6 stoneware glaze recommended)
- Wax resist (liquid, brushing type)
- Sponge or brush for wax application
- Large bucket or container wide enough to submerge the mug
- Clean damp sponge
- Glaze tongs (optional, but helpful)
- Kiln
Step 1: Preparation
-
Clean the bisque:
Begin by wiping down your bisque-fired mug with a slightly damp sponge. This removes any dust or oils from handling that might repel the glaze or cause crawling later on. -
Determine the dip line:
Visualize where you want the glaze to stop. For this project, a 1/3 unglazed ratio looks best, so the glaze line will sit about an inch or so up from the bottom edge. -
Apply wax resist to the foot:
Dip a brush or sponge into your liquid wax resist. Carefully coat the entire bottom foot of the mug. -
Extend the wax line:
Continue painting the wax up the side of the mug to your determined dip line. I like to rotate the banding wheel slowly to get a reasonably straight line, though a little wobble adds handmade character. -
Let the wax dry:
Allow the wax resist to dry completely. It should feel dry to the touch and usually turns darker or clearer depending on the brand. This ensures a crisp line when you dip.
Drip Doctor
Glaze too thick initially? It may run down over the raw clay section during firing. Fix this by gently sanding the dry glaze layer down slightly before it goes into the kiln.
Step 2: Glazing
-
Mix the glaze:
Thoroughly mix your sage green dipping glaze. Use a whisk or a drill mixer to ensure all sediment at the bottom of the bucket is fully integrated and the consistency is like heavy cream. -
Check viscosity:
Dip a test stick or your finger (if safe materials are used) into the glaze. It should cover well but not be gloppy. If it’s too thick, add small amounts of water; if too thin, let it settle and remove water. -
The main dip:
Hold the mug upside down by the foot (the waxed area). In one smooth, confident motion, plunge the mug straight down into the glaze bucket. -
Submerge the interior:
Push the mug down until the glaze rushes over the rim and fills the inside. You may need to tilt it slightly to let air bubbles escape, then straighten it back out to coat the exterior evenly. -
Hold and count:
Hold the mug submerged for about 3-4 seconds. This timing is crucial for getting the right thickness—too long and the glaze might run; too short and the color will be thin. -
The lift:
Pull the mug straight up and out of the bucket. Give it a gentle shake to remove excess drips while still holding it upside down. -
Handle check:
Ensure the handle was fully submerged. If you held the mug by the foot, the handle should naturally have been coated. If you used tongs, check for tong marks.
Make it Pop
Try layering a second, contrasting glaze just on the rim. A float blue or white dip on the top inch creates a beautiful ‘waterfall’ effect as it interacts with the green.
Step 3: Cleanup & Firing
-
Dry the mug:
Turn the mug right side up once the glaze sheen turns matte (indicating it’s drying). Set it down on a clean surface. -
Wipe the wax:
The glaze should bead up on the waxed bottom section. Take a damp sponge and firmly wipe away these beads of glaze from the waxed area. -
Refine the line:
Where the glaze meets the bare clay, use the corner of your sponge to tidy up the line if any glaze dripped past the wax resist. -
Check the rim:
Gently smooth the glaze on the rim with your finger to ensure there are no sharp burrs or thin spots. -
Final drying:
Let the mug dry completely for at least 24 hours before firing. The moisture from the glaze needs to evaporate to prevent kiln accidents. -
Load the kiln:
Place the mug in the kiln. Since the bottom is unglazed, you don’t need a stilt, but ensure it’s not touching other pots. -
Fire to temperature:
Fire the kiln to the cone temperature specified by your clay and glaze manufacturer (typically Cone 6 for this look).
Enjoy your morning coffee knowing you crafted this beautiful vessel by hand.


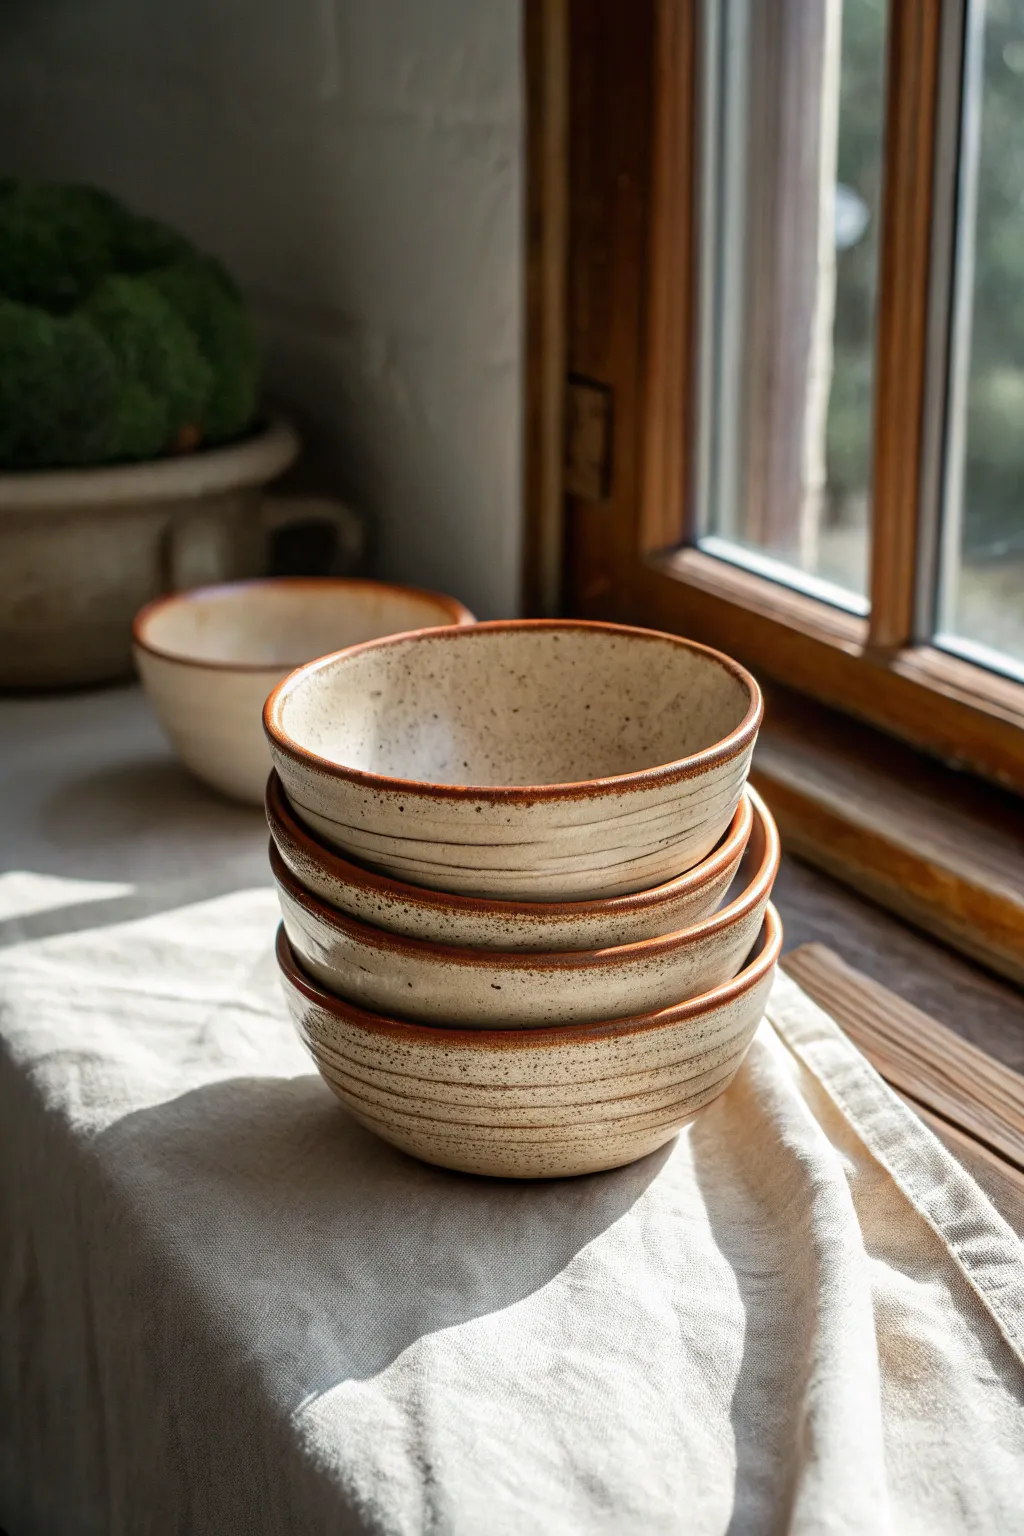
Brushed-On Glaze in Cozy, Buildable Layers
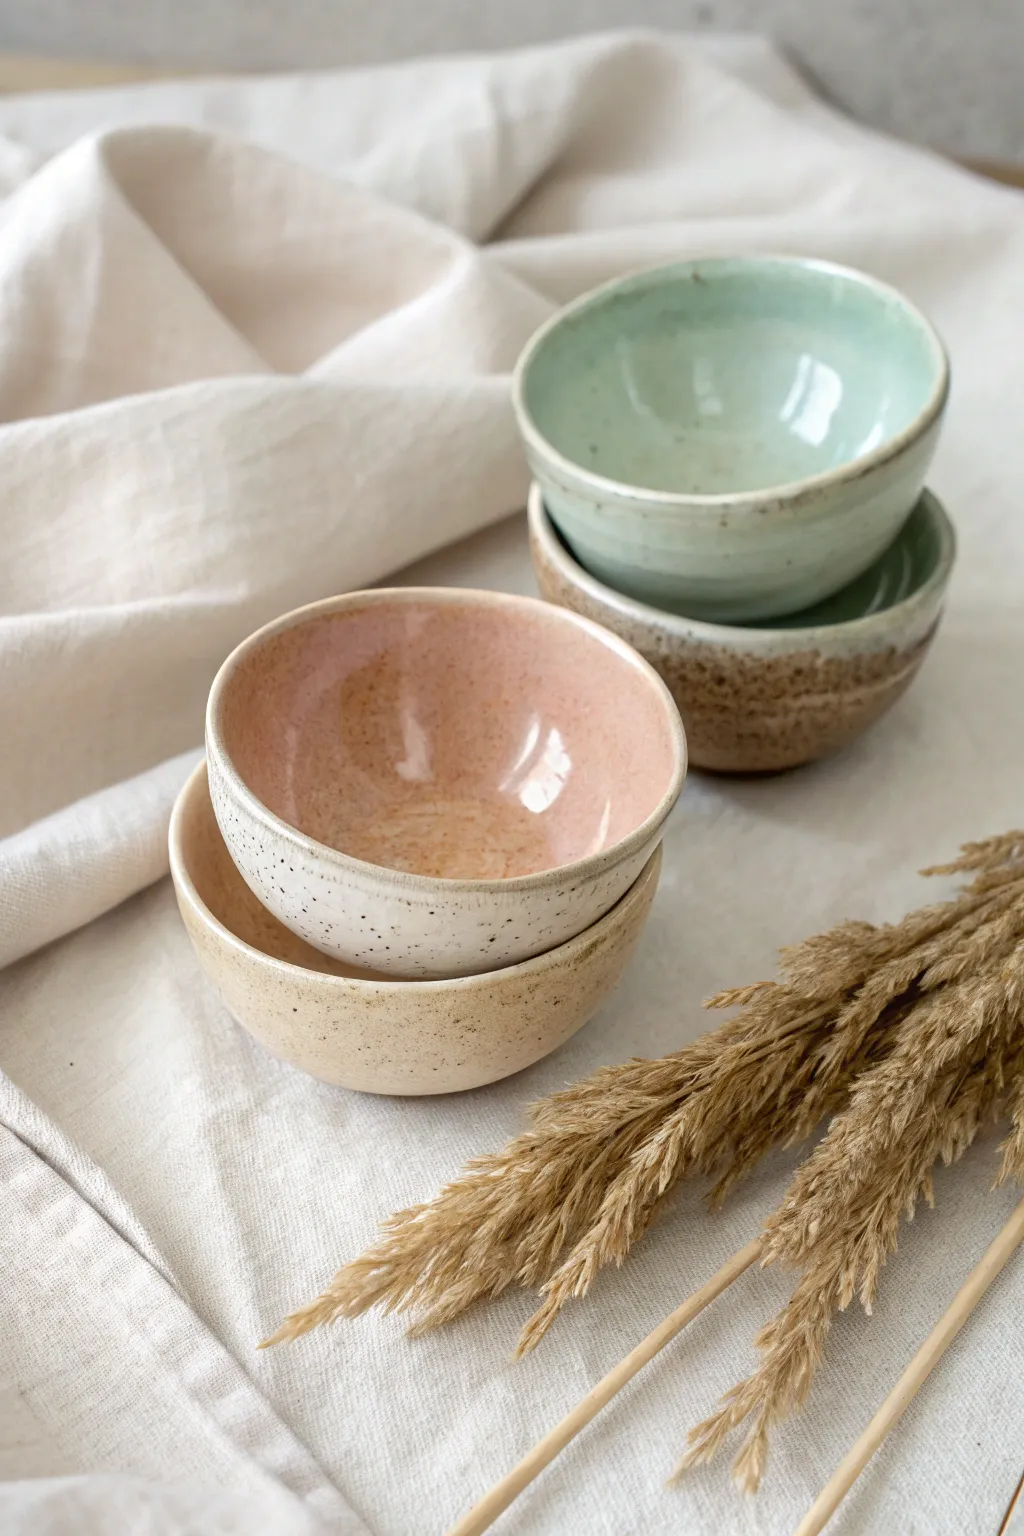
These charming, nesting bowls showcase the beauty of layering brushed-on glazes to create depth and texture. The result is a soft, speckled matte exterior paired with glossy, pastel interiors that feel both modern and handmade.
Step-by-Step Tutorial
Materials
- 4 Bisque-fired small ceramic bowls (stoneware clay recommended)
- Speckled clay body or speckled underglaze (optional, if using white clay)
- White matte glaze (brush-on)
- Pastel pink glaze (brush-on)
- Mint green celadon or translucent glaze
- Soft fan brush (for broad coverage)
- Detail brush (for rim cleanup)
- Wax resist
- Sponge and bucket of water
- Kiln (fired to cone 5/6 or appropriate temperature for your clay/glaze)
- Fettling knife or cleanup tool
Step 1: Preparation & Exterior Glazing
-
Clean the bisque:
Start by wiping down your bisque-fired bowls with a damp sponge. This removes any dust or oils that might prevent the glaze from adhering properly. -
Wax the foot:
Apply a coat of wax resist to the very bottom foot ring of each bowl. This saves you significant cleanup time later and protects your kiln shelves. -
First exterior coat:
Using a soft fan brush, apply a coat of white matte glaze to the exterior of the bowl designated for the pink interior. For the other bowls, you might choose a clear matte if you want the raw speckled clay to show through, as seen in the bottom bowls. -
Let it dry:
Allow the first coat to dry until it feels chalky and cool to the touch, but not wet. Patience here ensures you don’t drag the first layer off when applying the second. -
Second exterior coat:
Apply a second coat of the matte white (or clear matte) to the exteriors. Brush in the opposite direction of your first coat to ensure even coverage without streak marks. -
Optional speckling:
If your clay body isn’t naturally speckled, you can flick a toothbrush loaded with iron oxide wash or a specialized speckled glaze gently over the exterior wet glaze.
Glaze Consistency
For brushing, glazes should be like heavy cream. If too thick, add water drops; if thin, let it sit and pour off clear water.
Step 2: Interior Glazing
-
Pour or brush pink:
For the pink bowl: Pour a small amount of pastel pink glaze into the interior. Roll it around to coat the walls evenly, then pour the excess back into your container. -
Brush alternative:
If you prefer brushing, apply three even coats of pink glaze to the interior, waiting for each coat to dry in between layers. -
Glaze the mint bowl:
Repeat the interior glazing process for the mint green bowl. Celadon glazes work beautifully here as they pool slightly at the bottom, creating depth. -
Clean the rim:
Use a damp sponge or your finger to wipe the rim slightly if you want a sharp transition, or let the interior glaze slightly overlap the rim for a softer look. -
Check the thickness:
Use a needle tool to check the glaze thickness near the bottom inside. It should be about the thickness of a postcard; too thick and it may crawl.
Step 3: Finishing Touches & Firing
-
Define the rim:
For a rustic touch, I sometimes dip a detail brush in a slightly darker iron-oxide reacting glaze and run a very thin line around the rim. -
Clean the foot:
Even with wax resist, inspect the foot ring. Scrape away any stray drips with a fettling knife or wipe with a sponge to ensure perfectly clean contact with the kiln shelf. -
Final dry:
Let the bowls dry completely for at least 24 hours. The water needs to evaporate fully to prevent steam issues during firing. -
Load the kiln:
Place the bowls in the kiln, ensuring they do not touch each other. Leave about a finger’s width of space between pieces. -
Fire:
Fire the kiln to the temperature recommended by your clay and glaze manufacturer (typically Cone 5 or 6 for stoneware). Follow a medium speed firing schedule. -
Cool and unload:
Allow the kiln to cool naturally until it is under 200°F before opening. Thermal shock can crack your pieces if opened too soon.
Pinholing Issues?
If you see tiny pinholes after firing, try a ‘drop and hold’ firing schedule, holding top temp for 15 mins to smooth out gas bubbles.
Once cooled, these bowls are ready to be stacked on your open shelving or used for your morning yogurt


Pour-Over Glaze for Easy Inside-First Color
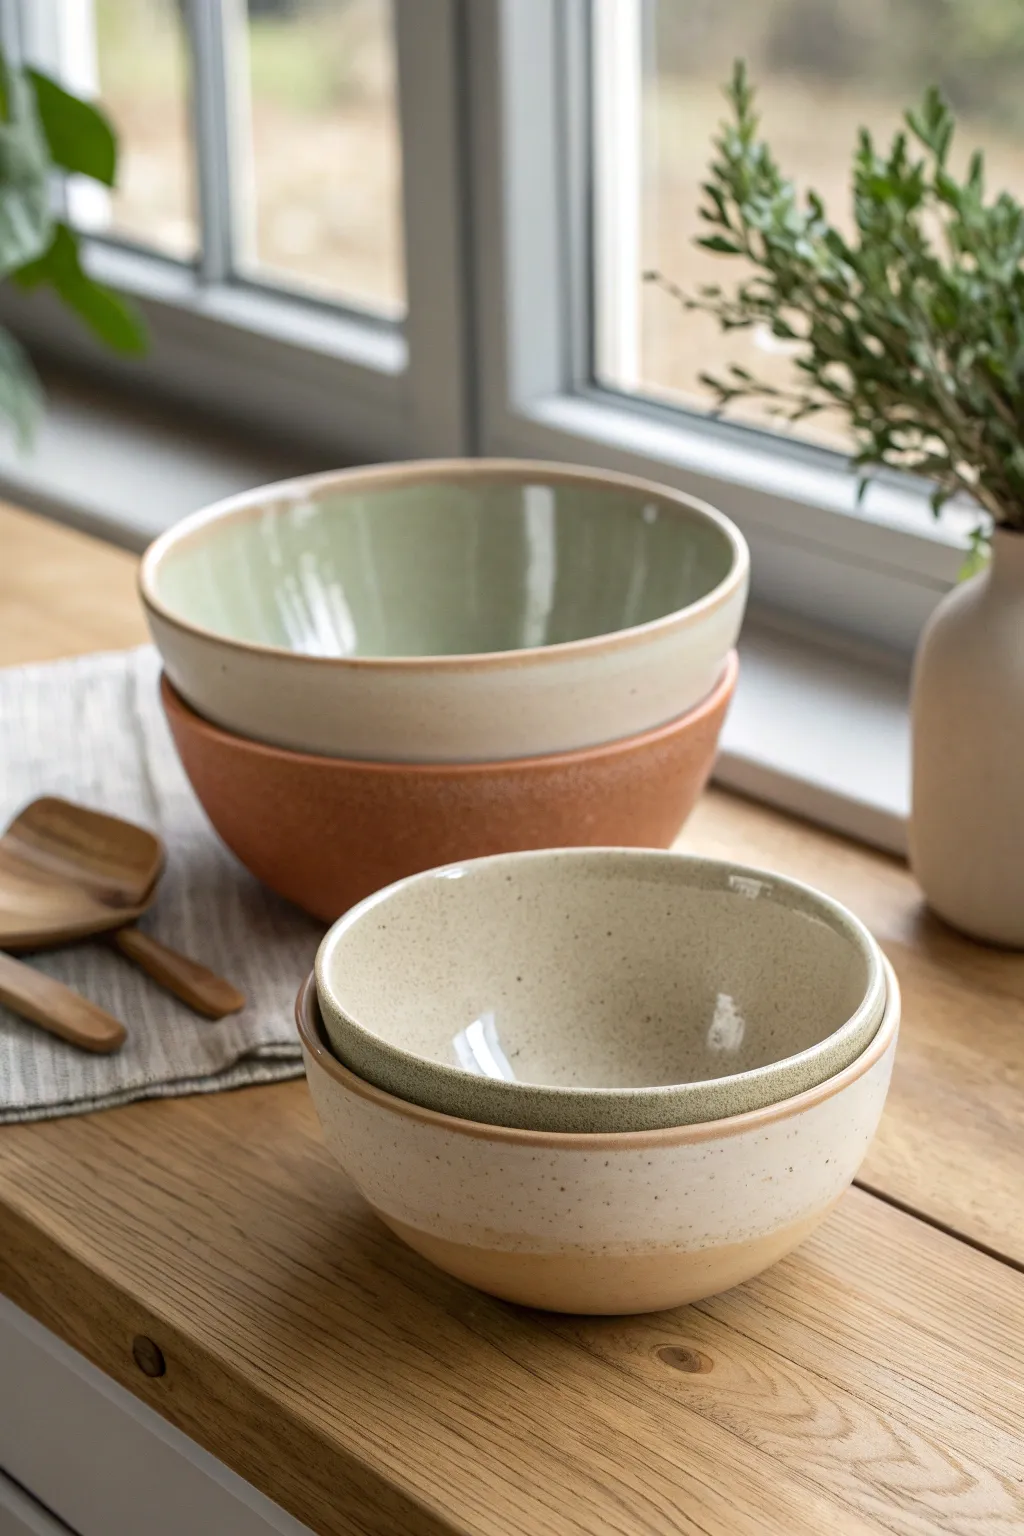
Achieve a stunning contrast between interior and exterior surfaces with this reliable pour-over glazing method. The result is a clean, professional finish that highlights the beauty of both the clay body and your glaze choices.
How-To Guide
Materials
- Bisque-fired ceramic bowls
- Liquid wax resist
- Sponge or brush for wax application
- Sage green dipping glaze
- Cream or speckled white dipping glaze
- Large container or bucket for glaze retrieval
- Glaze tongs (optional)
- Clean sponge
- Bucket of water
Step 1: Deep Cleaning & Preparation
-
Wipe down bisque:
Begin by wiping your bisque-fired bowls thoroughly with a damp sponge. This removes any kiln dust or oils from handling that could repel the glaze. -
Dry time:
Allow the bowls to dry completely after wiping. The clay needs to be thirsty to absorb the glaze properly.
Clean Rim Trick
Apply a thin line of wax resist to the rim after the interior glaze dries but before dipping the exterior. This creates a crisp clay line separating the colors.
Step 2: Technique: The Interior Pour
-
Mix the interior glaze:
Stir your sage green glaze vigorously. Ensure it is the consistency of heavy cream for optimal coverage. -
Pour and swirl:
Pour a generous amount of green glaze directly into the center of the bowl. Quickly rotate the bowl in your hands to coat the entire inner surface. -
Dump the excess:
As the glaze reaches the rim, briskly pour the excess back into your glaze bucket. I find a quick twisting motion helps cut the flow cleanly without drips running down the outside. -
Clean the rim:
Immediately wipe any drips off the rim or exterior using a damp sponge. The rim should be clean bisque at this stage. -
Initial drying:
Let the interior glaze dry until it is powdery to the touch. This usually takes about 15-20 minutes.
Step 3: Waxing & Exterior Glazing
-
Apply wax resist:
Apply liquid wax resist carefully to the very bottom foot of the bowl to prevent glaze from sticking to the kiln shelf. -
Optional partial dip prep:
If you want the raw clay bottom look shown on the smaller bowl, extend the wax resist up the side of the bowl about an inch from the bottom. -
Mix exterior glaze:
Prepare your cream or speckled white glaze. It should be slightly thinner than the interior glaze to avoid a bulky rim. -
The exterior dip:
Hold the bowl by the foot (or use tongs) and dip it straight down into the cream glaze. -
Timing the dip:
Hold the bowl submerged for just 3 seconds. Since the inside is already glazed, the wall can’t absorb as much water, so a quick dip prevents the glaze from getting too thick. -
Leveling the line:
Stop the dip just as the exterior glaze meets the interior glaze at the rim. Lift straight up. -
Shake off excess:
Give the bowl a gentle shake while holding it upside down to remove excess droplets.
Level Up: Texture
For the rustic look on the orange bowl, sponge the exterior glaze on rather than dipping it. This creates uneven thickness and visual texture.
Step 4: Finishing Touches
-
Touch up the rim:
Once the exterior glaze is dry to the touch, gently rub the rim with your finger to smooth the transition between the two colors. -
Clean the foot:
Use a sponge to wipe away any glaze beads that formed on the waxed areas at the bottom. -
Final inspection:
Check for pinholes or cracks in the glaze surface and gently rub them out if found. -
Fire:
Load into the kiln and fire according to your clay and glaze cone specifications.
Unloading the kiln will reveal a beautiful set of bowls ready for your table


Two-Tone Half Dip for Instant Color Blocking
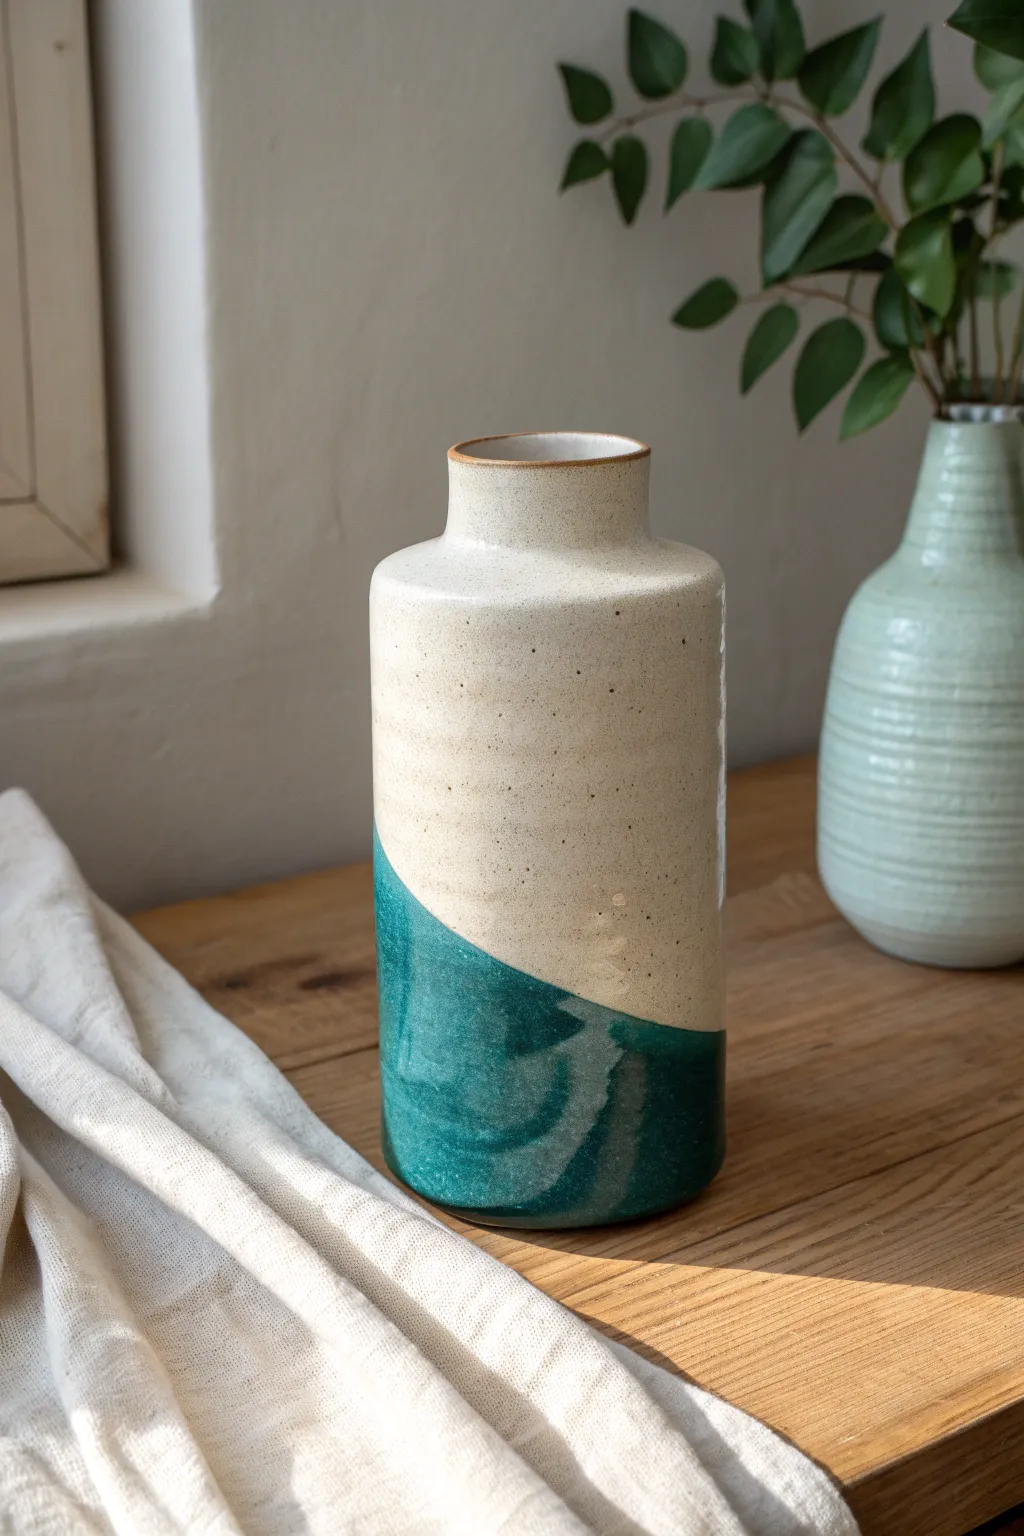
Achieve a striking modern look by combining a speckled matte clay body with a bold, glossy dip of vibrant teal glaze. This two-tone technique uses simple masking and dipping angles to create a dynamic diagonal line that feels both organic and geometric.
Step-by-Step
Materials
- Heightened cylindrical bisque-fired vase (stoneware)
- Speckled buff or oatmeal glaze (matte finish)
- Deep teal or turquoise glaze (glossy finish)
- Large dipping container or bucket
- Wax resist emulsion
- Sponge
- Soft bristle brush
- Whisk or mixing stick
- Kiln
Step 1: Preparation
-
Clean the Bisque:
Start by wiping down your bisque-fired vase with a damp sponge to remove any dust or kiln debris. This ensures the glaze adheres properly without pinholing. -
Wax the Foot:
Apply a generous coat of wax resist to the very bottom foot of the vase and about 1/4 inch up the side. This saves you from having to wipe glaze off later and protects your kiln shelves. -
Mix the Glazes:
Thoroughly mix both your speckled cream glaze and your teal glaze. Use a whisk to ensure all sediment at the bottom is integrated; a consistent specific gravity is key for an even coat.
Step 2: Base Glazing
-
Pour the Interior:
Pour the speckled cream glaze inside the vase, swirl it around quickly to coat the entire interior surface, and pour the excess back into your bucket. -
Dip the Exterior Base:
Holding the vase by the foot (or using dipping tongs if you have a good grip), dip the entire vase into the speckled cream glaze. Submerge it fully for about 3 seconds to get an even thickness. -
Check for Drips:
As you pull the vase out, give it a gentle shake to remove excess droplets. Smooth out any drip marks on the rim with your finger while the glaze is still powdery damp. -
Initial Drying:
Allow this base coat to dry completely. The surface should be room temperature to the touch, not cool, before you attempt the second dip.
Drip Patrol
If the teal glaze section runs too much during the dip, use a stiff brush to gently scrape back the very edge of the glaze line before firing.
Step 3: The Angled Dip
-
Prepare the Dip Angle:
Position your bucket of teal glaze so you have plenty of room to maneuver. You will need to hold the vase at a steep angle. -
Execute the Diagonal Dip:
Hold the vase firmly by the neck. Tilt it at roughly a 45-degree angle and lower the bottom portion into the teal glaze. The angle at which you hold the vase determines the slope of the line. -
Hold and Count:
Keep the vase submerged for a slow count of three. This ensures the second layer is thick enough to develop that rich, glossy color without running excessively. -
Lift and Drain:
Lift the vase out at the same angle you dipped it. Hold it there for a moment to let the excess teal glaze drip off the lowest point, preventing a thick run on one side. -
Clean the Line:
Where the two glazes meet, you might see a slight ridge. If it looks too thick, gently pat it with a clean, dry finger to flatten the transition.
Dual Texture
Try leaving the top section unglazed raw clay instead of the cream glaze. The contrast between rough, bare stone and smooth glass is stunning.
Step 4: Finishing and Firing
-
Clean the Foot Again:
Even with wax resist, double-check the bottom of the vase. Use a damp sponge to wipe away any beads of teal glaze that might have clung to the wax. -
Final Drying:
Let the vase dry completely for at least 24 hours. Layered glazes hold more water, and drying too fast or firing whilst damp can cause crawling. -
Load the Kiln:
Place the vase in the kiln, ensuring it has at least an inch of clearance from other pots, especially on the side with the thicker double glaze. -
Fire to Temperature:
Fire the kiln to the specific cone required by your clay and glaze combination (usually Cone 6 for stoneware). A slow cooling cycle can help matte glazes develop nice micro-crystals.
Unload your kiln to reveal a sophisticated vase where geometry meets organic flow

The Complete Guide to Pottery Troubleshooting
Uncover the most common ceramic mistakes—from cracking clay to failed glazes—and learn how to fix them fast.
Speckled Splatter for Playful, Studio-Style Texture
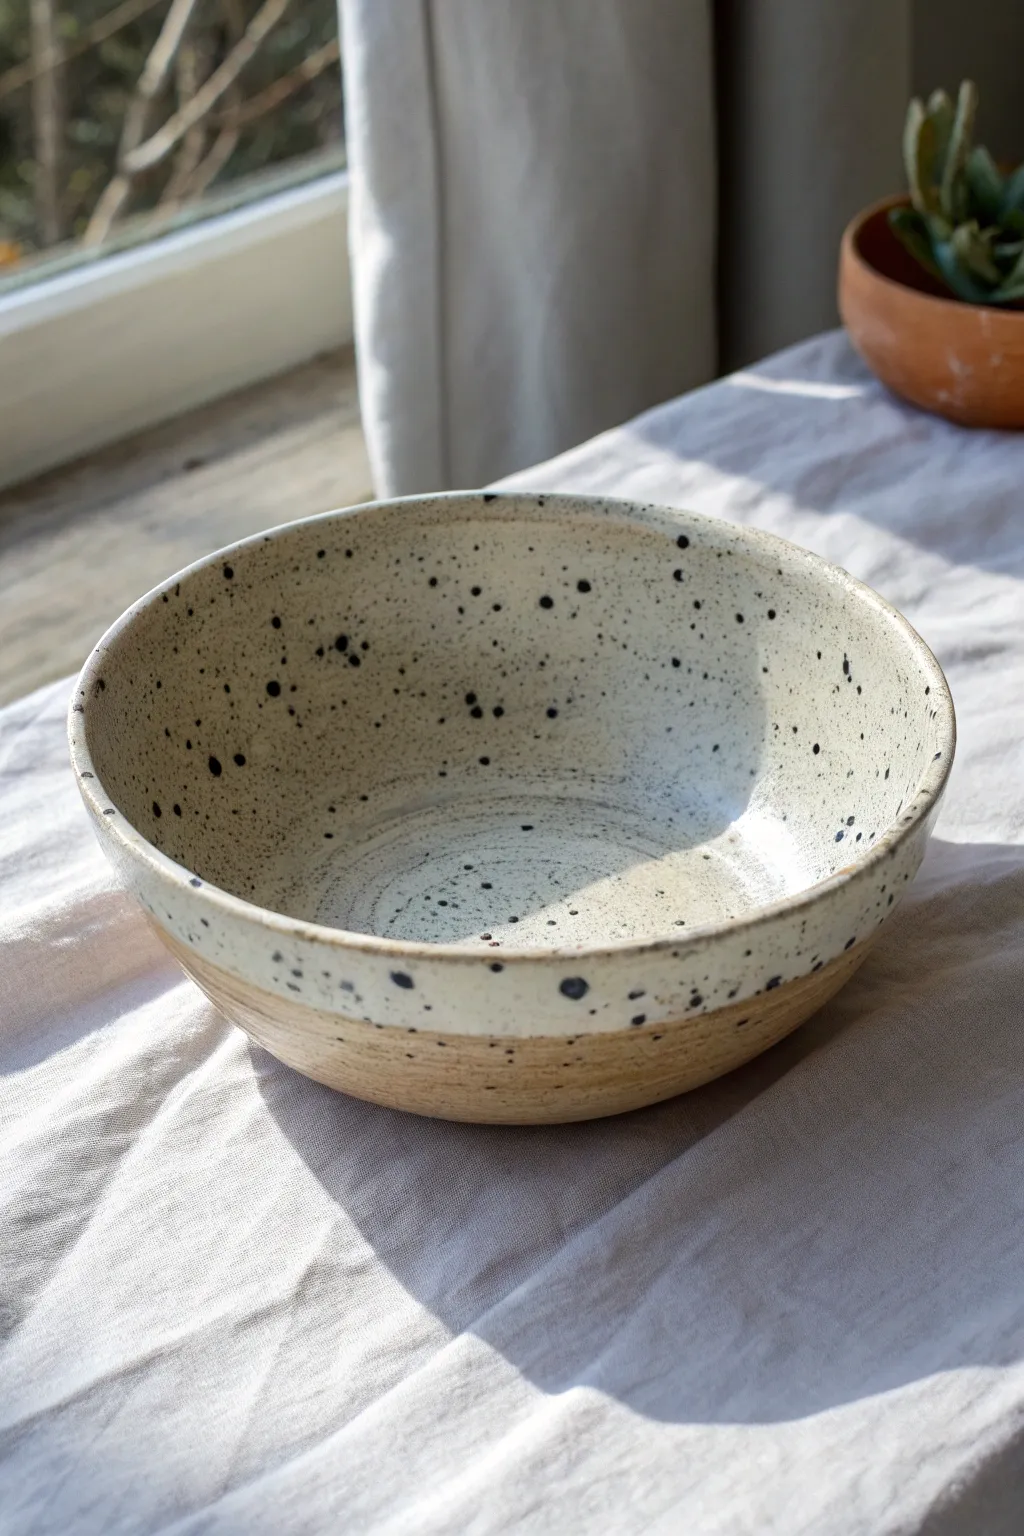
This project captures the essence of modern studio ceramics with a speckled creamy glaze over warm, exposed stoneware. The contrast between the smooth, glossy interior and the raw, sandy exterior creates a tactile experience that begs to be held.
Step-by-Step Tutorial
Materials
- Speckled buff stoneware clay (cone 5-6)
- Pottery wheel (or hand-building tools for coil method)
- Comparison calipers
- Throwing sponge
- Wooden rib tool
- Metal kidney scraper
- Wire cutter
- Trimming tools (pear-shaped and loop)
- Cream or breaking white glaze (cone 5-6 compatible)
- Wax resist emulsion
- Glaze brush or sponge applicator
- Kiln
Step 1: Throwing the Form
-
Center the clay:
Begin with about 1.5 to 2 lbs of speckled buff clay. Wedge it thoroughly to remove air pockets, then slap it onto the wheel head. Center the clay using steady pressure and water for lubrication. -
Open the form:
Press your thumbs into the center of the mound to open it, leaving about a half-inch of clay at the bottom for the foot. Widen the opening gently to establish the floor of your bowl. -
Pull the walls:
Slow the wheel speed slightly. Using your fingers or a sponge, pull up the walls of the cylinder. Focus on keeping an even thickness from bottom to top, aiming for a gentle outward curve. -
Shape the curve:
Use a wooden rib on the outside and your fingers on the inside to push the belly of the bowl meant gently. This creates that classic hemispherical shape. Be careful not to let the rim get too thin or floppy. -
Refine the rim:
Compress the rim with a chamois or your sponge to ensure it is smooth and round. A well-compressed rim prevents cracking later. -
Cut underneath:
Use a wooden tool to undercut the base slightly, removing excess clay near the bat. This makes it easier to wire off later. -
Wire off:
Slide a wire cutter firmly along the bat to separate the bowl. If you are comfortable, lift it off with dry hands; otherwise, let it stiffen slightly on the bat until it reaches leather-hard.
Crawling Glaze?
If the glaze pulls away leaving bare spots, it’s often due to dust or oils on the bisque. Always wipe with a damp sponge and let dry before glazing.
Step 2: Trimming and Bisque
-
Center for trimming:
Once the bowl is leather-hard (firm but still cool to the touch), invert it onto the wheel head. Center it perfectly and use clay lugs to secure it in place. -
Trim the profile:
Use a sharp trimming tool to shave away excess clay from the lower exterior. Follow the curve you established on the inside, aiming for consistent wall thickness. -
Define the foot ring:
Carve out a foot ring at the base. This elevates the bowl and gives it a professional ‘lift.’ Smooth the edges of the foot with a finger to remove sharp burrs. -
Smooth the exterior texture:
I like to take a slightly damp sponge or a soft rib and run it over the trimmed area while the wheel spins slowly. This brings out the groggy texture of the clay body. -
Dry slowly:
Flip the bowl right-side up and allow it to dry completely. Cover it loosely with plastic if the air is very dry to prevent uneven shrinking. -
Bisque fire:
Load the bone-dry bowl into the kiln and bisque fire it to roughly Cone 04. This prepares the clay to accept glaze without disintegrating.
Speckle Boost
Want more speckles? Add 0.5% granular ilmenite or coarse manganese dioxide to a plain white glaze for a custom splatter effect.
Step 3: Glazing
-
Clean the bisque:
Wipe the fired bowl with a damp sponge to remove any kiln dust. Any dust left behind can cause glaze crawling. -
Apply wax resist:
Paint a line of wax resist around the lower third of the bowl’s exterior and coat the entire foot ring. This ensures the clean, straight line between the glazed and unglazed portions seen in the photo. -
Mix the glaze:
Stir your cream speckled glaze thoroughly. If the specks have settled, make sure they are evenly distributed in the suspension. -
Pour the interior:
Pour a generous amount of glaze into the bowl. Roll it around quickly to coat the entire interior surface, then pour the excess back into your bucket. -
Dip the exterior:
Hold the bowl by the foot (which is waxed) and dip the rim into the glaze bucket, submerging it until the glaze meets your wax line. Hold for 3 seconds and lift out. -
Check the drip line:
Once the glaze is dry of to the touch, use a sponge to wipe away any stray droplets that may have beaded up on the waxed area. The line should be crisp. -
Glaze fire:
Load the bowl into the kiln again. Fire to the maturity temperature of your clay and glaze (typically Cone 5 or 6 for stoneware). Allow the kiln to cool naturally before unloading.
Now fill your beautiful new bowl with fruit or soup and admire the interplay of textures
Stippled Glaze for Shaded Ombré Effects
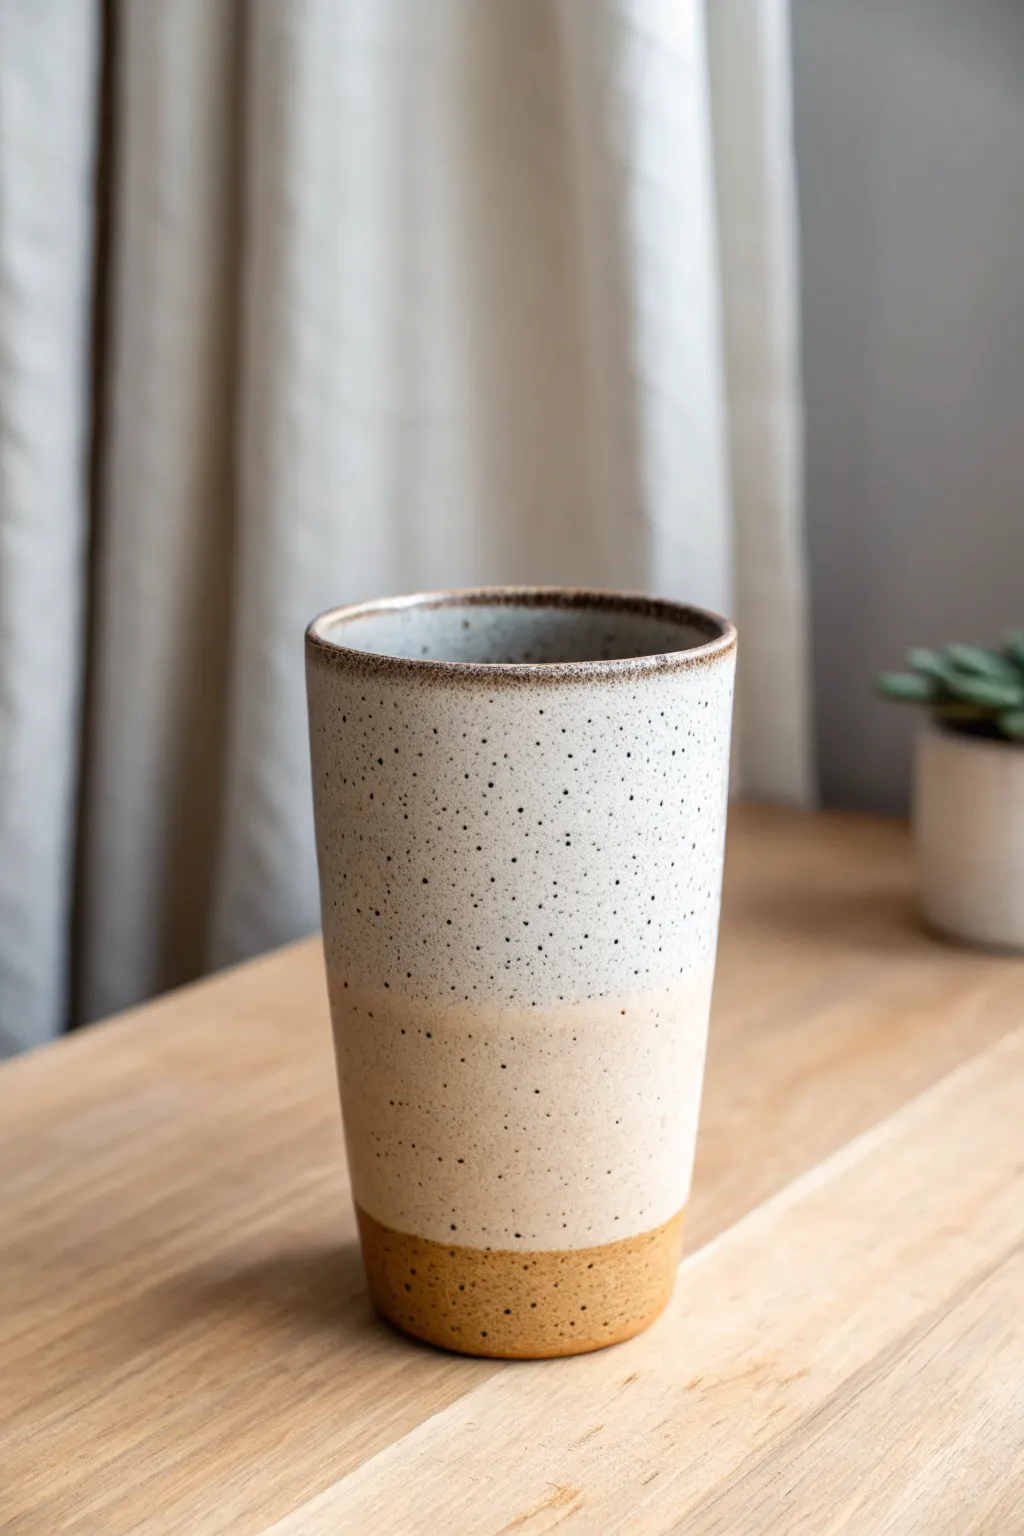
Capture the serene hues of a beachscape with this textured ceramic tumbler that transitions from raw clay to soft sand and creamy white. The key to this look is blending subtle glaze layers while letting a beautifully speckled clay body shine through the finish.
How-To Guide
Materials
- Speckled buff stoneware clay
- Bisque-fired tumbler shape
- Wax resist (liquid)
- Sponge or brush for wax
- Creamy white dipping glaze (gloss or satin)
- Warm sand/beige dipping glaze (gloss or satin)
- Large glazing tongs
- Clean bucket of water
- Fine grit sanding sponge
Step 1: Preparation & Base
-
Clean the bisque:
Begin with your bisque-fired tumbler. Wipe it down thoroughly with a damp sponge to remove any kiln dust or oils from your hands, which can prevent the glaze from adhering properly. -
Wax the foot:
Apply a coat of liquid wax resist to the bottom of the tumbler and roughly 1/4 inch up the side. This ensures the raw clay at the base remains unglazed, creating that grounded, earthy foundation visible in the photo. -
Dry the wax:
Let the wax resist dry completely to the touch. If you rush this, the glaze might stick to the wax or smudge your clean line.
Uneven Glaze Coat?
If you see pinholes or crawling where the glazes overlap, your second dip may have been too long. Brushing a little watered-down glaze into bare spots before refiring can often fix this.
Step 2: Glazing the Interior
-
Pour the liner glaze:
Pour your creamy white glaze inside the tumbler until it is about half full. I find that using a ladle helps control the flow and prevents splashing. -
Rotate and coat:
Rotate the tumbler in your hand while pouring the glaze back out into the bucket. Ensure the entire interior surface is coated evenly without missing spots. -
Clean the rim:
Wipe away any drips that may have run down the outside of the rim immediately with a damp finger or sponge.
Go Matte
Swap the white gloss glaze for a satin matte finish. The texture difference between the raw clay base and the smooth satin top creates an incredible tactile experience.
Step 3: Creating the Ombré Effect
-
First dip: The middle tone:
Using glazing tongs, grip the tumbler firmly. Dip the piece into the beige/sand glaze, submerging it about two-thirds of the way up from the bottom, leaving the top third bare for now. -
Hold and release:
Hold it in the beige glaze for approximately 3 seconds to build opacity, then lift it out smoothly. Let it drip dry for a moment before setting it down. -
Check the line:
If the glaze line seems too sharp, you can very gently dab it with a slightly damp sponge to soften the transition, though the next layer will cover most of it. -
Second dip: The top tone:
Once the first layer is dry to the touch, grasp the tumbler by the foot this time. Invert it and dip the top two-thirds into the creamy white glaze. -
Create the overlap:
Ensure the white glaze overlaps the beige glaze by an inch or two in the middle section. This overlapping is what creates the distinctive third tone in the center of the ombré. -
Clean the base:
The wax resist should have protected the bottom, but beads of glaze will likely sit on top of the wax. Use a sponge to wipe the foot and the bottom band completely clean.
Step 4: Refining & Firing
-
Smooth the drips:
Check the rim and the overlap area for thick drips. Gently rub these down with a finger to level the surface, which prevents crawling during the firing. -
Rim reaction:
Notice the dark brown line on the rim in the example? This happens naturally where the glaze breaks over the sharp edge of the speckled clay. Ensure your rim is wiped clean of excess thickness to allow the clay body to show through. -
Final drying:
Allow the piece to dry completely for at least 24 hours. The glaze should feel powdery and room temperature, not cool to the touch. -
Fire the kiln:
Load the tumbler into the kiln, ensuring it does not touch other pots. Fire to the maturity temperature of your clay and glaze combination (typically Cone 5 or 6 for stoneware). -
Post-fire sanding:
Once fired and cooled, use a fine-grit sanding sponge on the unglazed foot. This smooths out the gritty grog in the raw clay so it won’t scratch your table.
Once the kiln cools, you will have a stunning, functional piece of art ready for your morning coffee


What Really Happens Inside the Kiln
Learn how time and temperature work together inside the kiln to transform clay into durable ceramic.
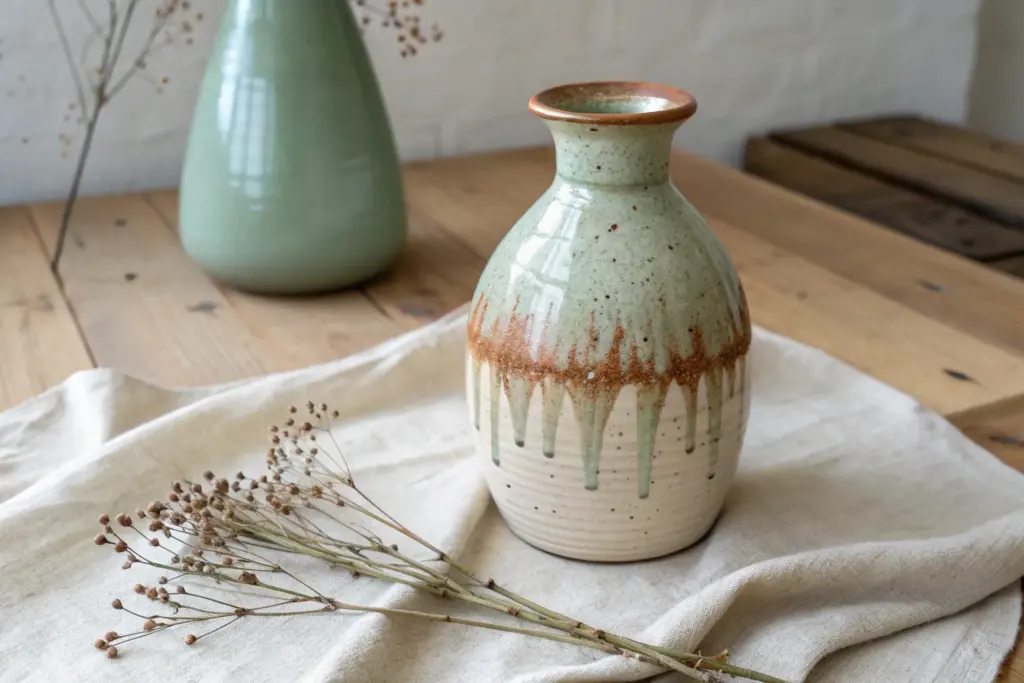
Sprayed Glaze for Velvety Gradients and Misty Transitions
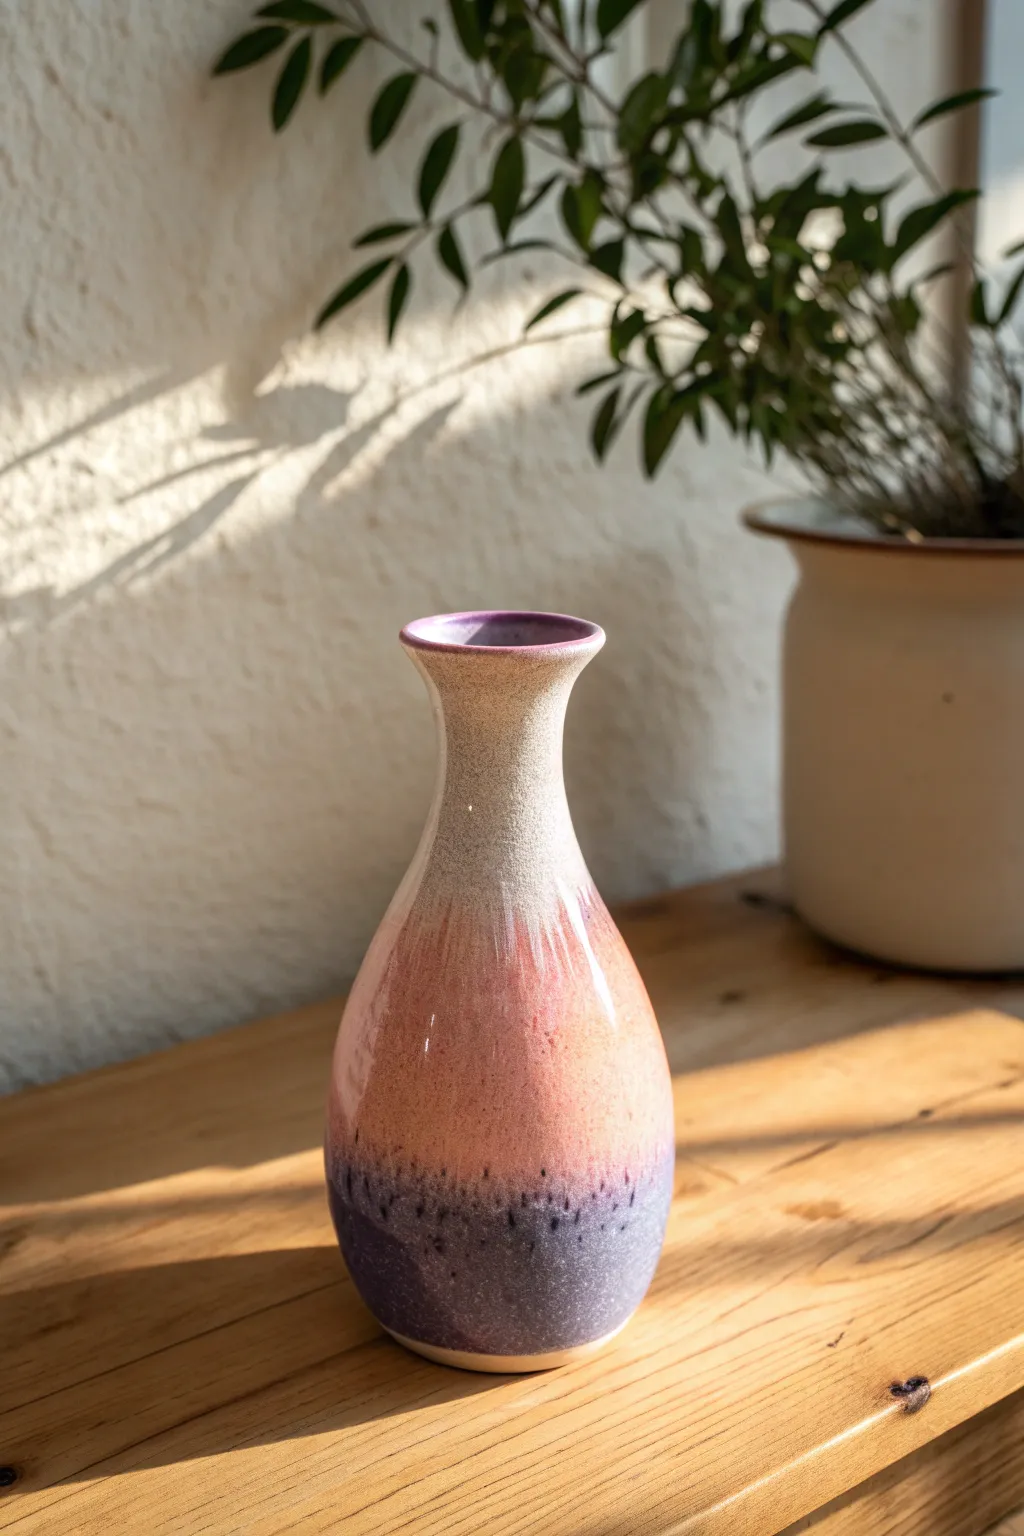
Capture the soft, fleeting colors of twilight on pottery using a spray glazing technique. This project creates a stunning gradient effect where creamy white transitions into peach and settles into a deep violet base.
Step-by-Step
Materials
- Bisque-fired ceramic bud vase
- Creamy matte white glaze
- Peach or coral semi-transparent glaze
- Deep violet or purple glaze
- Glaze spray gun or mouth atomizer
- A manual turntable or banding wheel
- Air compressor (if using a spray gun)
- Respirator mask (P100 rating)
- Spray booth or well-ventilated outdoor area
- Wax resist and sponge
- Kiln
Step 1: Preparation and Protection
-
Clean the bisque:
Wipe down your bisque-fired vase with a damp sponge to remove any dust or oils that could interfere with glaze adhesion. -
Apply wax resist:
Paint a coat of wax resist on the bottom foot of the vase and up about 1/8th of an inch on the side. This saves time on cleanup later. -
Prepare the inside:
Pour the creamy white glaze inside the vase, swirl it around to coat the interior fully, and pour out the excess. Wipe the rim clean immediately. -
Let it dry:
Allow the interior glaze to dry completely before starting the exterior so you don’t smudge it while handling.
Sputtering Nozzle?
If the gun spits large blobs instead of mist, your glaze is too thick or air pressure is too low. Add water or increase PSI.
Step 2: The Base Coat
-
Set up the spray booth:
Place your banding wheel inside your spray booth or protective area. Center the vase on the wheel. -
Load the white glaze:
Fill your spray gun reservoir with the creamy white glaze. Ensure the consistency is like skim milk; strain it if necessary to prevent clogging. -
Spray the top section:
While slowly rotating the banding wheel, spray the top third of the vase, including the neck and rim. Keep the gun moving to avoid drips. -
Fade downwards:
As you move down towards the middle of the vase, pull the spray gun further away to create a lighter, feathery mist of white that fades out. -
Clean the gun:
Thoroughly rinse your spray gun or atomizer with water to prevent color contamination for the next layer.
Speckle Magic
To get the speckled texture seen in the white top, add a teaspoon of granular ilmenite or manganese to your white glaze cup.
Step 3: Creating the Gradient
-
Apply the peach tone:
Load the peach/coral glaze. Aim the nozzle at the middle section of the vase. -
Blend the middle:
Spray the middle band, letting the top edge of the spray mist lightly over the bottom of the white section. This overlap creates the soft transition. -
Extend downwards:
Continue spraying the peach tone down towards the bottom third, but lighten your application as you reach the base area. -
Prepare the violet:
Clean the gun again and load the deep violet glaze. -
Spray the base:
Target the bottom third of the vase. Apply a solid coat at the very bottom, right up to your waxed foot. -
Create the misty transition:
Angle the spray slightly upward or pull back to let the purple mist settle gently over the lower edge of the peach section. I find short bursts help control this delicate blend. -
Check density:
Look closely at the surface. The violet section often needs slightly more glaze to achieve that deep saturation, so give it an extra pass if it looks thin.
Step 4: Firing
-
Clean the foot:
Use a damp sponge to wipe any stray glaze droplets off the waxed foot. The wax helps, but a final wipe ensures no glaze runs onto the kiln shelf. -
Dry thoroughly:
Let the vase dry completely. Sprayed glaze can be powdery, so handle it carefully when moving it to the kiln. -
Fire:
Fire the vase to the recommended cone temperature for your chosen glazes (usually Cone 5 or 6 for this look).
Once cooled, your vase will display a seamless, soft-focus blend of colors perfect for holding a simple branch or flower stem
Layered Drips for That Juicy, Melty Rim Moment
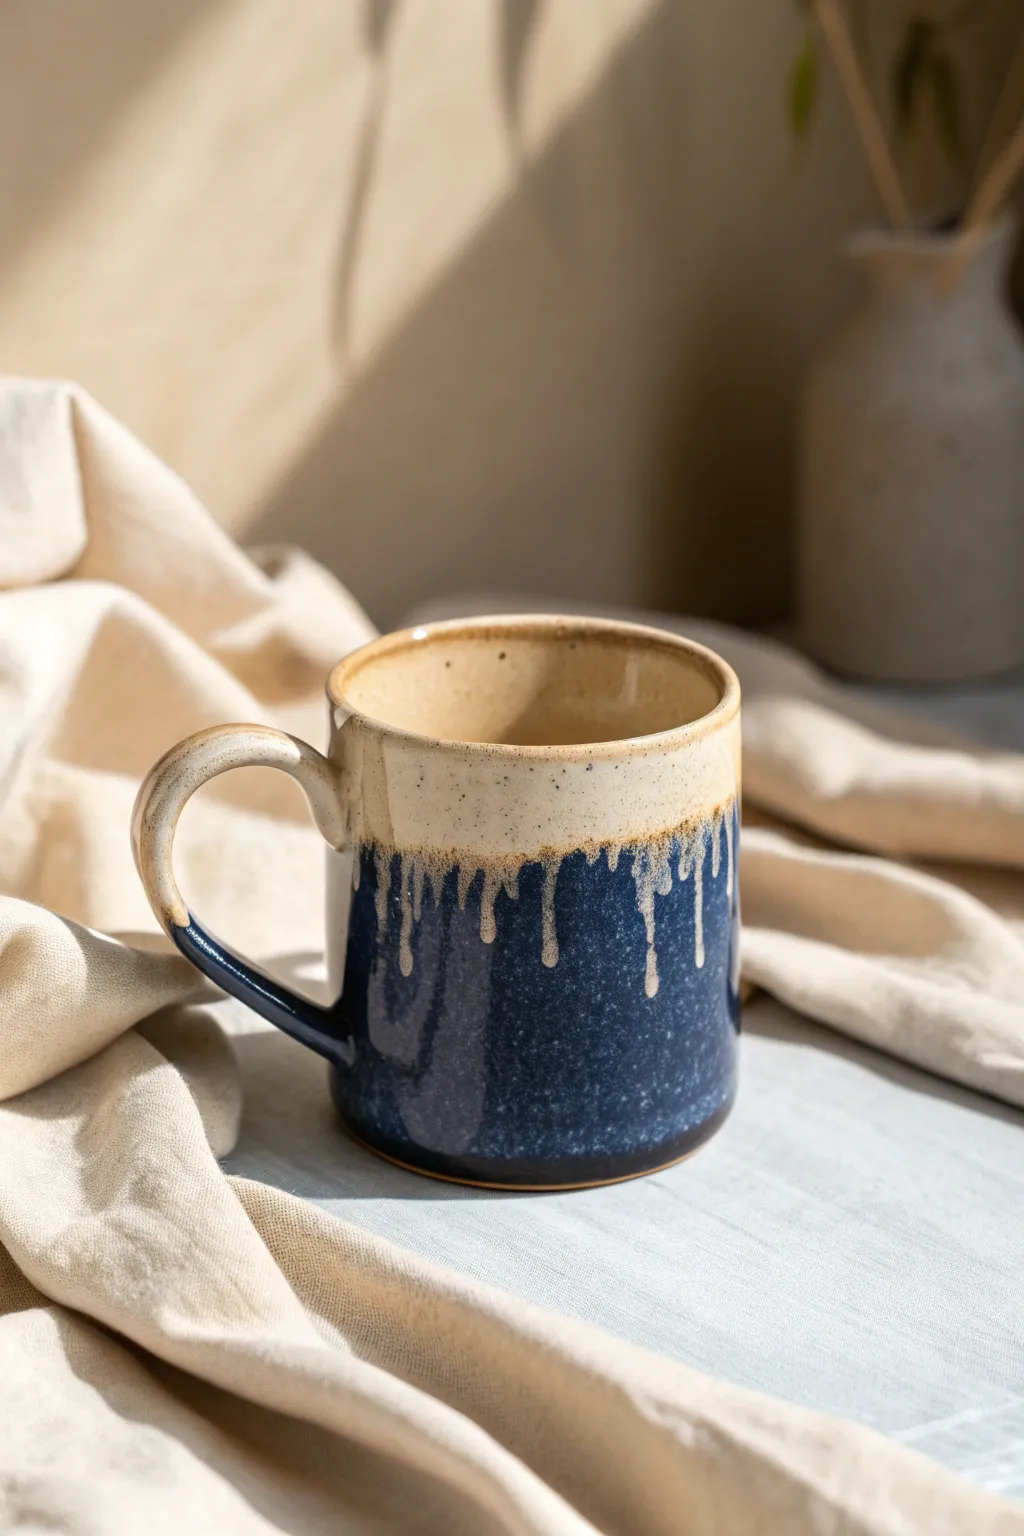
This project captures the essence of a starry night sky meeting a sandy shore, featuring a deep cobalt base overlaid with a creamy, speckled rim. The magic happens where the two glazes meet, creating organic drips and a beautiful melty transition that feels great in the hands.
How-To Guide
Materials
- Bisque-fired ceramic mug (preferably specked clay body)
- Deep cobalt blue high-fire glaze (dipping consistency)
- Rutile-based creamy beige/oatmeal high-fire glaze (dipping consistency)
- Wax resist
- Sponge
- Glaze tongs
- Clean bucket of water
- Kiln firing to Cone 6 or 10 (depending on glaze choice)
Step 1: Preparation & Base Coat
-
Clean the bisque:
Before you begin, use a damp sponge to wipe down your bisque-fired mug. This removes any kiln dust or oils from your hands that might repel the glaze. -
apply wax resist:
Paint a clean line of wax resist along the very bottom foot of the mug and slightly up the side (about 2-3mm). This ensures the intense blue glaze doesn’t run onto the kiln shelf. -
Mix the base glaze:
Stir your deep cobalt blue glaze thoroughly. Use a whisk to ensure all the heavy pigments at the bottom are fully suspended; you want a consistent, dark color. -
Grip the mug:
Using your glaze tongs, grip the mug firmly. I usually find gripping it by the footring provides the most stability, but gripping inside the rim works too if you are careful. -
Full interior dip:
Pour the oatmeal/creamy glaze inside the mug first, swirl it quickly to coat the entire interior, and pour it out. Wipe the rim clean immediately with a damp sponge. -
Dip the exterior base:
Holding the mug by the rim (or using tongs), dip the exterior into the cobalt blue glaze. Submerge it almost to the top, leaving just the handle and rim exposed if you want, or submerge the entire exterior up to the rim. -
Let it dry:
This is crucial: allow the blue base coat to dry completely. It should be powdery to the touch before you attempt the second layer.
Running Too Far?
If your test tile shows the glaze running completely off the pot, try thinning the top glaze slightly with water or dipping for only 1 second instead of 3.
Step 2: The Melty Rim
-
Prepare the second glaze:
Stir your rutile-based oatmeal or creamy beige glaze. For better drips, this glaze should be slightly thicker than usual, like heavy cream. -
Dip the rim:
Turn the mug upside down. Hold it by the foot. Dip the top portion (rim-first) into the creamy glaze, submerging about one-third of the mug deeply. -
Hold the dip:
Keep it submerged for a count of three. This allows the dry clay and the first layer of glaze to absorb a thick layer of the second glaze. -
Pull and twist:
Pull the mug straight up out of the bucket and give it a quick, sharp twist of the wrist to shake off excess drips that hang off the very lip. -
Flip immediately:
Quickly flip the mug right-side up. This reversal uses gravity to encourage that second layer to run down over the blue base. -
Handle check:
Check the handle. If you dipped deep enough to cover the handle join, ensure the glaze isn’t pooling too thickly in the crevices, which can cause crawling. -
Clean the foot again:
Even with wax resist, inspect the bottom. If any blue glaze has run close to the foot due to handling, sponge it back 5mm to be safe.
Enhance the Speckle
Add 1-2% granular ilmenite to your top oatmeal glaze. This creates darker, defined speckles that pop beautifully against the light creamy color.
Step 3: Firing
-
Load the kiln:
Place the mug in the kiln. Because this is a runny combination, give it a little extra space from its neighbors. -
Cookie protection:
I recommend placing the mug on a ‘cookie’ or a small slab of scrap clay with kiln wash. This safeguards your shelf if the drips get too enthusiastic. -
Fire to temperature:
Fire the kiln to the maturity temperature of your clay and glazes (typically Cone 6 or Cone 10). A slow cool-down can help develop micro-crystals in the blue glaze.
Unload your kiln carefully and enjoy your new favorite mug for morning coffee

TRACK YOUR CERAMIC JOURNEY
Capture glaze tests, firing details, and creative progress—all in one simple printable. Make your projects easier to repeat and improve.
Break-and-Pool Glazes That Celebrate Texture
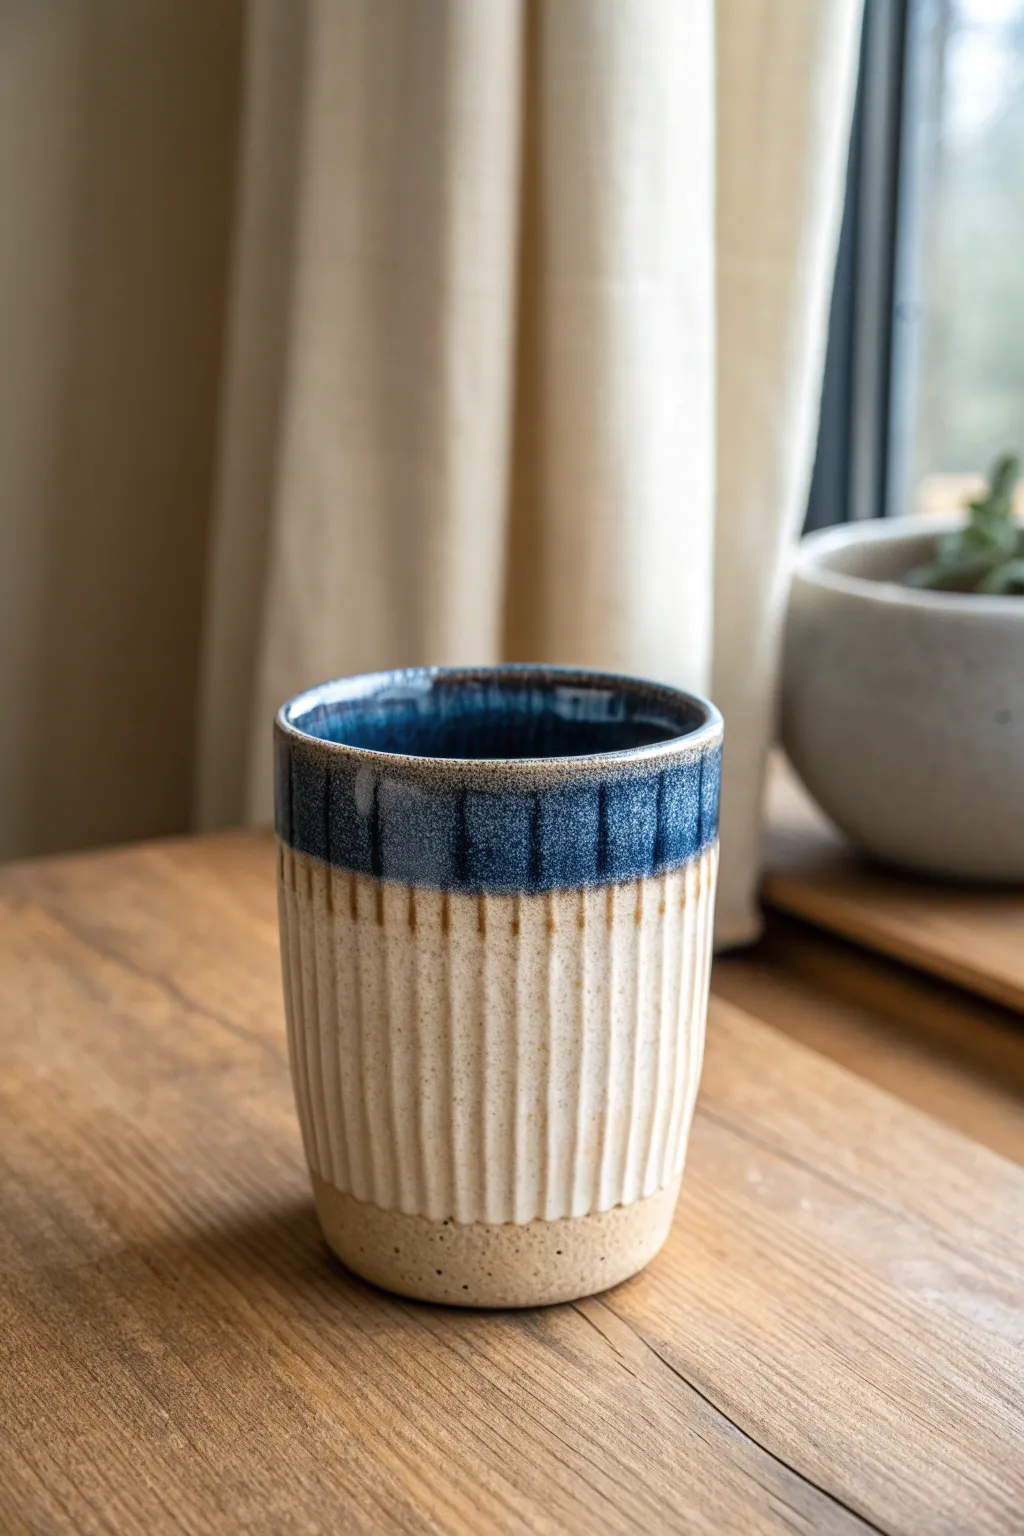
This elegant tumbler captures the essence of a distant horizon line, where deep blue waters meet sandy shores. By combining carved texture with a strategic glaze overlap, you’ll create a piece where the glaze breaks beautifully over ridges and pools in the depths.
Step-by-Step Guide
Materials
- Stoneware clay body (speckled buff recommended)
- Pottery wheel
- Throwing tools (sponge, wire, rib)
- Fluting tool or loop tool
- Bisque firing kiln
- Glaze firing kiln (Cone 6)
- Glossy white or cream reactive glaze
- Floating blue or rutile blue glaze
- Wax resist
- Glaze tongs
Step 1: Forming the Base
-
Throw the cylinder:
Begin by centering about 1 pound of speckled stoneware clay on the wheel. Open and pull the walls to create a tall, straight-sided cylinder approximately 5 inches high. -
Refine the shape:
Use a metal rib to compress the walls and remove throwing lines. Ensure the walls are slightly thicker than usual—about 1/4 inch—to accommodate the carving you’ll be doing later. -
Create the foot:
Undercut the base slightly with a wooden knife to create a shadow line and definition for the foot. -
Drying to leather hard:
Allow the piece to dry slowly until it reaches a leather-hard state. It should be firm enough to handle without deforming but soft enough to carve smoothly.
Breaks and Pools
Choose glazes labeled ‘translucent’ or ‘breaking’ for the base. Opaques will hide your beautiful carving.
Step 2: Carving Texture
-
Mark your guidelines:
Place the tumbler upside down on a banding wheel. You may want to lightly mark vertical lines to ensure spacing, though freehand carving adds organic charm. -
Execute the fluting:
Using a U-shaped loop tool or fluting tool, carve vertical channels from the rim down toward the foot. Apply steady pressure to create consistent depth. -
Stop before the bottom:
End your carving stroke about 1 inch from the bottom edge. This leaves a smooth band of uncarved clay at the base, which creates a lovely visual anchor. -
Smooth the ridges:
Once carved, I like to gently run a damp sponge or finger over the sharp ridges. This prevents the glaze from becoming too thin on the high points during firing. -
Bisque fire:
Let the tumbler dry completely to bone dry, then load it into the kiln for a bisque firing.
Step 3: Applying the Glaze
-
Wax the foot:
Apply wax resist to the bottom of the foot and up the side about 1/4 inch to ensure a clean line where the raw clay meets the glazed area. -
Dip the base coat:
Using glaze tongs, dip the entire cup (up to your wax line) into a glossy cream or white glaze. Hold for 3 seconds and remove. -
Clean the rim:
Let the base coat dry to the touch. If any drips formed on the ridges, gently smooth them with a finger. -
Dip the top color:
Invert the cup and dip just the top 1.5 inches into your floating blue glaze. This double-dip creates the beautiful chemical reaction at the overlap. -
Glaze the interior:
Pour the blue glaze inside, swirl to coat, and pour out. Alternatively, you can use the cream glaze for the interior if you prefer a lighter look. -
Final cleanup and fire:
Sponge off any glaze that may have touched the waxed foot area. Load into the kiln and fire to Cone 6 (or your clay body’s maturation temperature).
Rim Variation
Try dipping the rim at a slight angle for a wavy, organic horizon line rather than a straight stripe.
Unload your kiln to reveal how the heat has transformed your carving into a tactile masterpiece for your morning coffee
Matte Outside, Glossy Inside for a Modern Contrast
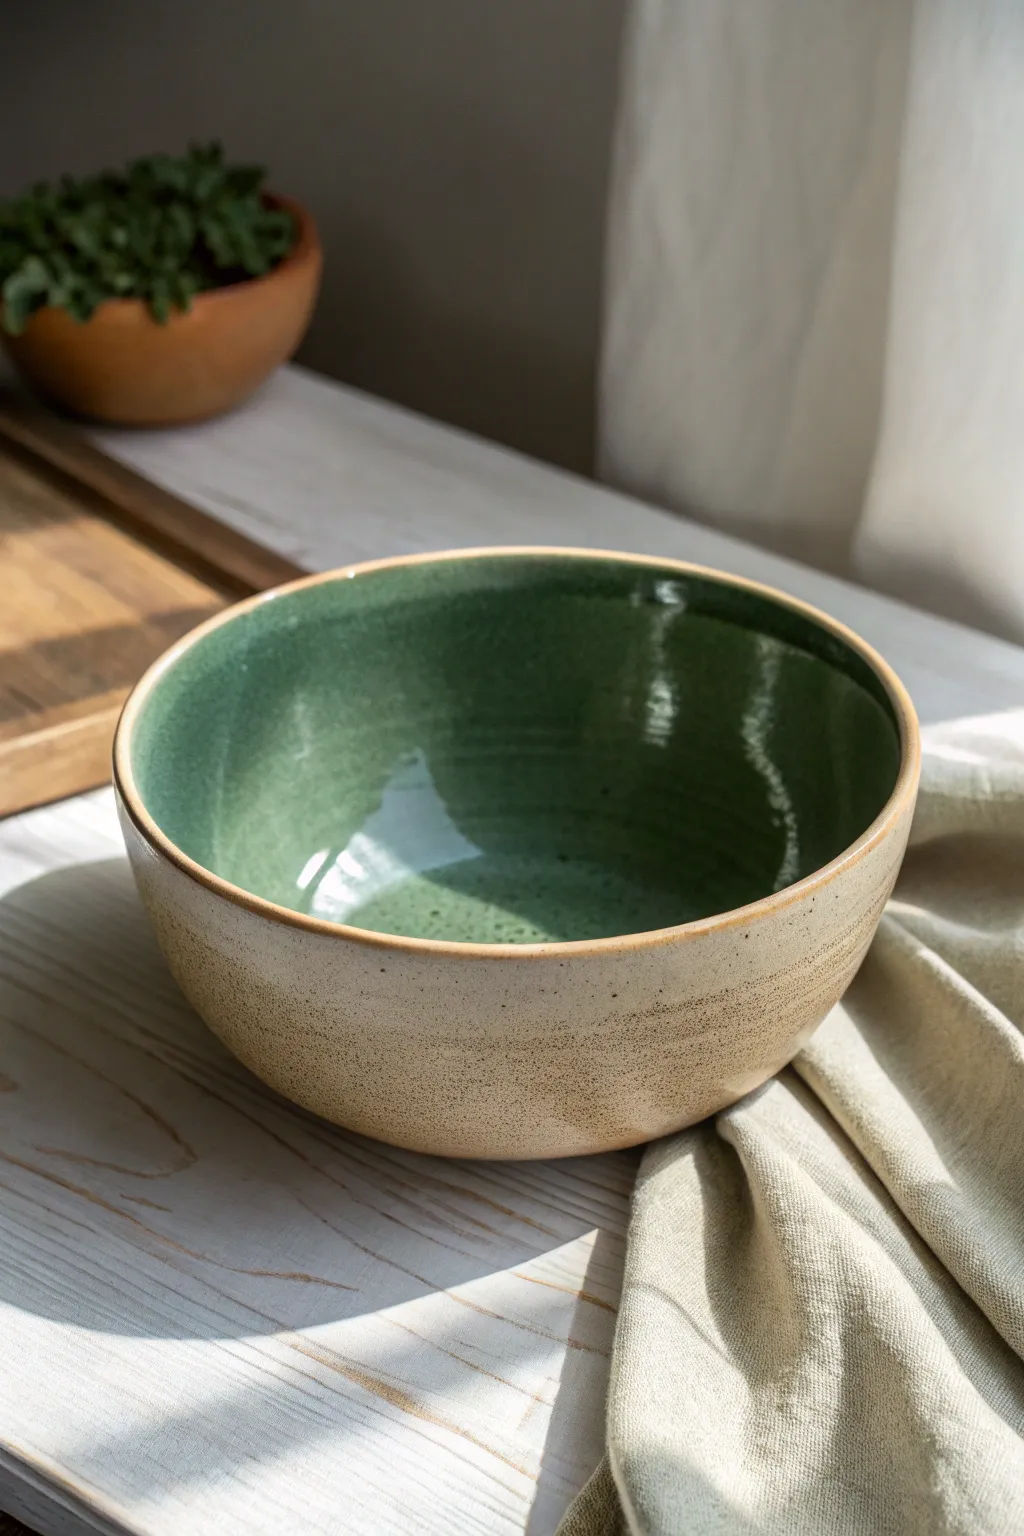
This tutorial guides you through throwing, trimming, and dual-glazing a beautiful stoneware bowl that features a tactile, speckled matte exterior and a lush, reflective forest green interior. The deceptively simple design relies on the contrast between the raw, earthy clay body and the pooled depth of the glossy liner glaze.
Step-by-Step Tutorial
Materials
- Speckled buff stoneware clay (approx 2-3 lbs)
- Potter’s wheel
- Throwing sponge
- Wire cutter
- Needle tool
- Wooden or metal rib
- Trimming tools (loop tool)
- Cone 5-6 Forest Green/Celadon glossy glaze
- Clear matte glaze (optional, for exterior)
- Wax resist
- Designated wax brush
- Large ladle or pouring jug
- Damp sponge for cleanup
Step 1: Throwing the Form
-
Preparation:
Begin by wedging your speckled buff clay thoroughly to remove air bubbles. This clay body is crucial for the final look, as the iron speckles will burn through the glaze. -
Centering:
Center your clay on the wheel head. This bowl has a substantial feel, so ensure your base is wide and stable before opening the center. -
Opening the Well:
Drop the hole and open the floor of the bowl. Aim for a curved interior floor rather than a flat one, as this allows the liquid glaze to pool beautifully at the bottom later. -
Pulling the Walls:
Pull the walls up and outward. For this modern shape, you want a steep, fairly vertical rise at the bottom that gently curves into a wider rim. Keep the walls consistently thick—about 1/4 inch. -
Refining the Curve:
Use a rib on the interior to compress the clay and define that smooth, continuous internal curve. This step is vital for a glossy glaze to flow properly. -
Finishing the Rim:
Compress the rim with a chamois or your sponge. A slightly rounded rim feels better on the lips and durably holds the glaze break.
Clean Rim Trick
Use a fettling knife to lightly scrape the rim after glazing. This removes micro-drips and creates a crisp, professional separation between the interior gloss and exterior matte.
Step 2: Trimming & Bisque
-
Drying:
Allow the bowl to dry to a leather-hard state. It should be firm enough to handle without deforming but still cool to the touch. -
Trimming the Foot:
Secure the bowl upside down on the wheel. Trim away excess weight from the base, creating a defined foot ring. This creates a shadow line that makes the bowl look elegant sitting on a table. -
Smooth the Exterior:
While spinning, use the smooth side of a metal rib to burnish the exterior wall slightly. This enhances the tactile stone feel of the unglazed portions. -
Bisque Fire:
Once fully bone dry, fire the piece to Cone 04 (or your clay body’s bisque temperature).
Step 3: The Dual-Glaze Technique
-
Cleaning:
Wipe the bisque-fired bowl with a damp sponge to remove any dust, which can cause glaze crawling. -
Waxing the Rim:
Applying wax is the trickiest part. Carefully paint a line of wax resist along the very top edge of the rim if you want a sharp line, or skip this if you want the interior glaze to slightly interact with the exterior. -
Pouring the Interior:
Mix your Forest Green glossy glaze well. Pour a generous amount into the bowl, swirl it quickly to coat the entire interior up to the rim, and pour the excess back into your bucket. -
Wiping the Edge:
Immediately wipe away any drips that went over the rim onto the exterior. The transition needs to be clean for that modern look. -
Glazing the Exterior (Optional):
You have two choices for the outside: leave it raw clay (as seen in the photo) for maximum texture, or dip the exterior in a very thin matte clear glaze to seal it without losing the speckled character. -
Final Cleanup:
Ensure the foot ring is completely free of glaze. I always double-check the bottom centimeter of the wall too, just to prevent shelf fusion. -
Glaze Firing:
Fire to Cone 5 or 6, depending on your clay and glaze specifications. A slow cool down can sometimes help matte glazes or raw clay bodies develop nicer colors.
Iron Speckle Boost
If your clay isn’t speckled enough, mix a small amount of granular ilmenite or iron oxide into the clay body before throwing to force those dark spots to appear.
Once cooled, your bowl is ready to bring a touch of earthy elegance to your table setting
Toasty Rim Dip for Rustic, Dinnerware-Friendly Warmth
Evoke the cozy feeling of a country kitchen with these inviting bowls, featuring a classic oatmeal speckle and a rich, burnt-umber rim. This technique relies on the interaction between a stable base glaze and an iron-rich rim dip to create that beautiful, toasted transition.
Step-by-Step
Materials
- Stoneware clay body (speckled or buff preferred)
- Pottery wheel and throwing tools
- Trimming tools
- Bisque firing kiln access
- Glaze firing kiln access (Cone 6 oxidation)
- Oatmeal/Cream speckled matte glaze (dipping consistency)
- Iron oxide wash or Rutile/Iron blend glaze
- Wax resist
- Sponge and bucket of water
- Soft fan brush (for rim application)
Step 1: Throwing and Shaping
-
Center and open:
Start with about 1-1.5 lbs of speckled stoneware clay. Center it firmly on the wheel and open the form wide, keeping the floor flat for a stable bowl base. -
Pull the walls:
Pull the walls upward and outward into a gentle curve. Aim for a medium thickness; these rustic bowls look best when they aren’t razor-thin. -
Add texture:
Before your final shaping pull, use a metal rib or your fingertips to leave subtle horizontal throwing lines on the exterior. This texture will catch the glaze later. -
Refine the rim:
Compress the rim with a chamois or sponge. Slightly thicken the rim or round it off well, as a substantial lip holds the rim glaze better than a sharp edge. -
Trim a foot:
Once leather hard, trim a defined foot ring. This elevates the bowl and gives the glaze a distinct stopping point at the bottom. -
Bisque fire:
Let the bowls dry slowly and completely before loading them into the kiln for a bisque fire (usually Cone 04 or 06).
Step 2: Base Glazing
-
Clean the bisque:
Wipe down the bisque-fired bowl with a damp sponge to remove any dust that might resist the glaze. -
Wax the foot:
Apply wax resist carefully to the foot ring and the very bottom of the bowl to prevent glaze from sticking to the kiln shelf. -
Mix the base glaze:
Stir your oatmeal or cream speckled matte glaze thoroughly. It should be the consistency of heavy cream. -
Dip the interior:
Pour the glaze inside the bowl, swirl it quickly to coat the entire inner surface, and pour the excess out immediately. -
Dip the exterior:
Using glazing tongs or a firm grip on the foot, submerge the exterior of the bowl into the bucket. Hold for 3 seconds and lift. I like to give a little shake to remove drips. -
Clean up:
Once the glaze is dry to the touch, rub away any stray droplets on the waxed foot with a sponge.
Running Rim?
If the rim glaze runs too much down the side, your rim dip was too thick or held too long. Thin out the iron mixture with water or dip faster.
Step 3: Creating the Toasty Rim
-
Prepare the rim accent:
You can use a saturated iron oxide wash or a specific ‘Tenmoku’ or ‘Iron luster’ glaze. If using a wash, mix iron oxide with water and a touch of frit. -
Dip the rim:
Invert the bowl and strictly dip just the top 1/4 inch of the rim into the iron mixture. Hold for only a second. -
Review the interaction:
Check the overlap. If you want more bleeding or movement, you can slightly overwet the rim dip, but be careful of running. -
Clean the line:
If the dip is uneven, you can very gently tidy the line with a damp brush, though a slightly organic, uneven line adds to the rustic charm.
Enhanced Speckle
Use a clay body with heavy manganese speckles. The iron rim will interact with surface speckles for a deeper, more complex texture.
Step 4: Final Firing
-
Load the kiln:
Place the bowls in the kiln, ensuring they don’t touch. Leave a little extra space between them in case the iron in the rim fumes slightly. -
Fire to Cone 6:
Fire the kiln to Cone 6 (approx. 2232°F / 1222°C) in an oxidation atmosphere. A slow cool down can help develop the micro-crystals in the matte glaze. -
Sand the foot:
After unloading, use wet sandpaper or a grinding stone to smooth the unglazed foot ring so it won’t scratch your table.
Stack your finished bowls near a window to let the natural light highlight that beautiful, earthy transition.
Celadon-Inspired Transparent Glaze That Pools Like Water
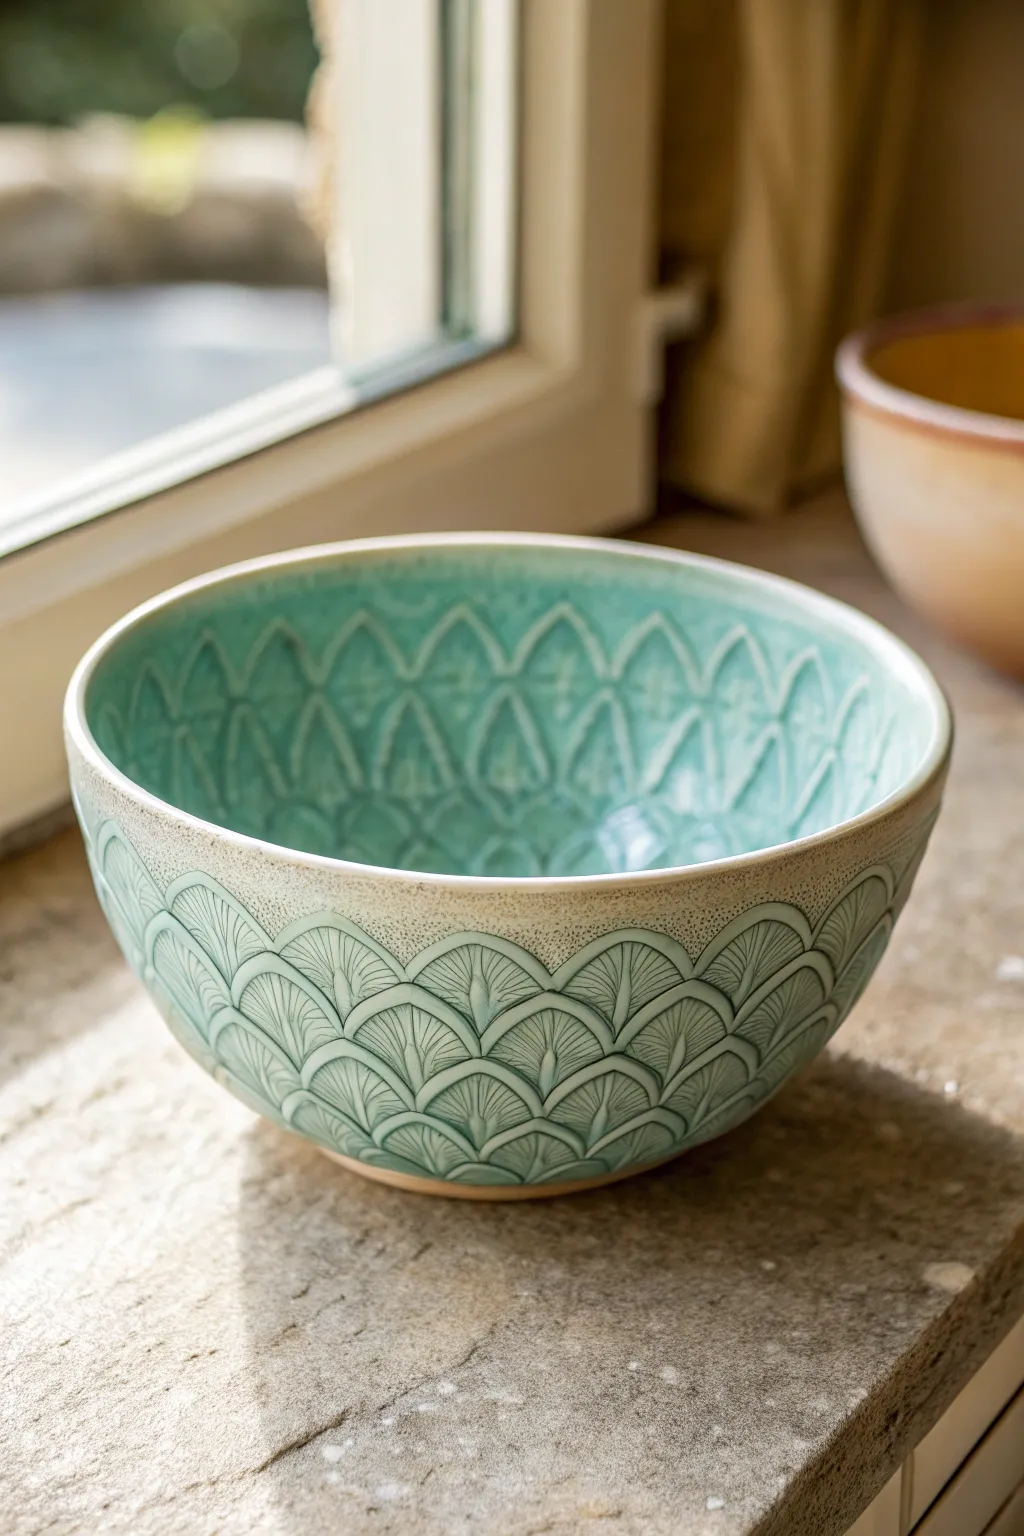
This stunning bowl captures the essence of ocean waves using a deeply carved scale pattern that creates natural reservoirs for the glaze. The pooling celadon effect highlights the texture, creating a beautiful interplay between the dark, thick gloss in the crevices and the pale, translucent body.
How-To Guide
Materials
- Light-colored stoneware or porcelain clay body (cone 6-10)
- Pottery wheel
- Trimming tools (large loop tool, metal rib)
- Small U-shaped carving tool or fluting tool
- Sponge
- Bucket of water
- Celadon glaze (transparent teal or aqua)
- Clean glazing brush or dipping tongs
- Kiln
Step 1: Throwing and Shaping
-
Center the clay:
Begin with about 2-3 pounds of well-wedged porcelain or white stoneware on your wheel. Center it firmly, ensuring a wide enough base to support an open bowl shape. -
Open and pull:
Open the clay and pull the walls up and out. Aim for a distinct V-shape or a deep curve rather than a flat bottom. Keep the walls slightly thicker than usual (about 1/4 inch or slightly more) to allow depth for the carving stage later. -
Refine the rim:
Compress the rim with a shammy or sponge to prevent cracking. Give the rim a slight inward taper to frame the interior texture you will create. -
Dry to leather hard:
Wire the bowl off the bat and let it dry slowly to a firm leather-hard stage. The clay needs to be stiff enough to handle carving without warping, but soft enough to cut cleanly.
Depth Perception
Make your carving deeper at the edges of each scale and shallower in the center. This specific gradation maximizes the pooling variations of transparent glazes.
Step 2: Trimming and Carving
-
Trim the foot:
Place the bowl upside down on the wheel. Trim the exterior to a smooth, consistent curve and create a distinct foot ring that visually lifts the bowl off the table. -
Map the pattern:
Lightly sketch a horizontal guide line around the exterior using a needle tool if you need help keeping your rows straight. I like to freehand this for a more organic look, but guidelines help beginners immensely. -
Carve the bottom row:
Using your U-shaped fluting tool, start at the bottom near the foot. Carve upward strokes to create the first row of ‘scales.’ The top of each stroke should be rounded, like an inverted U. -
Layer the scales:
Start the second row of scales so that the center of the new scale creates a point between the two scales below it. This imbricated or ‘fish scale’ overlap is crucial for the fluid look. -
Continue upward:
Work your way up the exterior of the bowl, rowing by row. As the bowl widens, you may need to cheat the width of your scales slightly to make them fit around the circumference. -
Carve the interior:
Flip the bowl over and support it on a foam bat. Carefully carve a matching or complementary pattern on the inside walls. Be gentle to avoid pushing through the wall you just carved on the outside. -
Detail the scales:
Go back into each individual scale and carve a central vertical line or small ‘veins’ radiating from the base of the scale. This adds extra texture for the glaze to grab onto. -
Clean up burrs:
Once the carving is complete, let the bowl dry until bone dry. Use a slightly damp sponge or a soft brush to knock off any sharp clay burrs or crumbs from the carving process.
Rim Variation
Instead of a smooth rim, gently press the rim down at the low point of every carved scallop to create a wavy, flower-like edge that matches the texture.
Step 3: Glazing and Firing
-
Bisque fire:
Load the bone-dry bowl into the kiln and bisque fire it to roughly Cone 04 or your clay body’s specifications. -
Clean the bisque:
Wipe down the bisque-fired bowl with a damp sponge to remove any dust, which can cause pinholes in the glaze. -
Apply the glaze:
Dip the entire bowl into a bucket of transparent celadon glaze. If you don’t have a dipping container large enough, pour the glaze inside, swirl and dump, then pour glaze over the exterior. -
Check thickness:
You want the glaze nicely thick in the crevices of the scales but thinner on the high points. If the glaze is too thick overall, the carving will disappear; too thin, and you won’t get the ‘water pooling’ effect. -
Clean the foot:
Thoroughly wax or wipe the foot ring clean so the bowl doesn’t fuse to the kiln shelf. -
Glaze fire:
Fire the bowl to the maturity temperature of your clay and glaze (typically Cone 6 or Cone 10 for true celadons). Allow the kiln to cool naturally.
Place your finished bowl near a window to watch the light play through the translucent glaze pools.
Bold Test-Tile Palettes Turned Into a Matching Mini Set
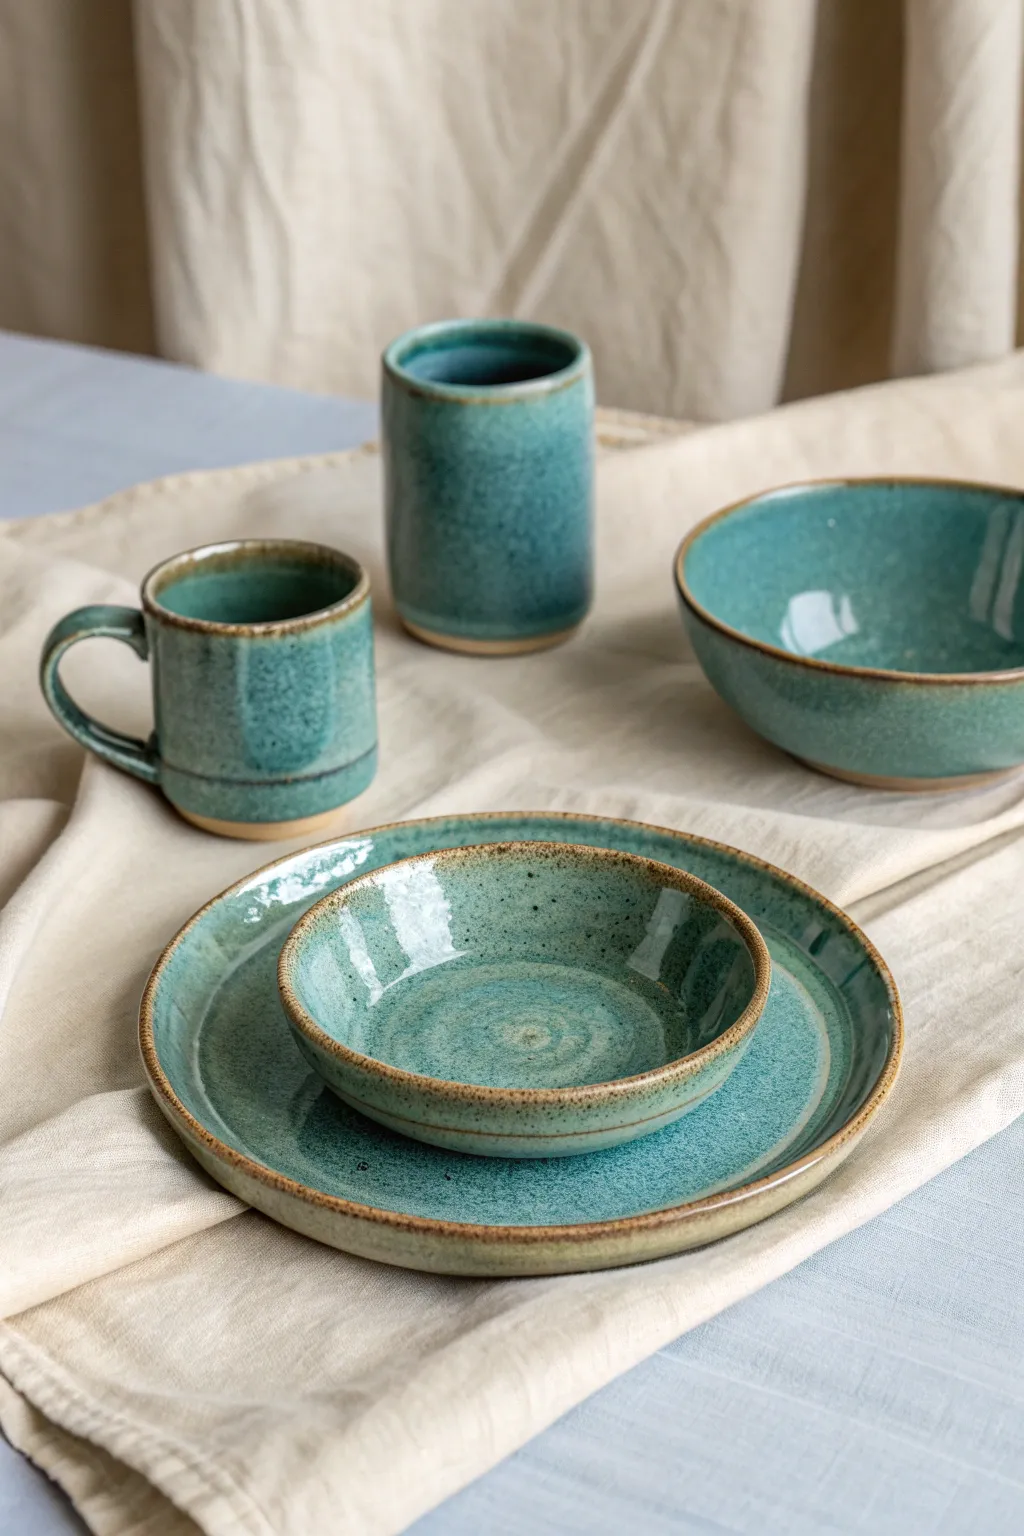
Transform a simple wheel-thrown collection into a cohesive dining set with this stunning reactive glaze finish. The result is a vibrant, glossy turquoise-green that breaks beautifully over raw clay edges, mimicking the look of weathered seaglass and sand.
Step-by-Step Guide
Materials
- Stoneware clay body (buff or speckled buff recommended)
- Pottery wheel and tools
- Bisque firing kiln
- Glaze firing kiln (Cone 5/6)
- Glossy turquoise/teal reactive glaze
- Wax resist emulsion
- Glaze dipping tongs
- Sponge and bucket
- Large glaze bucket for dipping
- Paintbrush for wax application
Step 1: Forming the Vessels
-
Throw the Plate:
Begin by centering about 2-3 lbs of clay for the dinner plate. Throw a wide, flat base, leaving a slightly raised rim to catch sauces. Compress the floor thoroughly to prevent S-cracks during drying. -
Create the Bowls:
Throw two bowl forms: one smaller dessert bowl (approx. 1 lb clay) and a larger serving bowl (approx. 2-3 lbs). Aim for a consistent curve that rises gently from the foot. -
Shape the Drinkware:
Throw two cylinders. For the mug, pull a handle from a separate lug of clay and attach it once the cylinder is leather hard. For the tumbler, keep the walls straight but round the lip comfortably. -
Trimming Feet:
Once all pieces are leather hard, trim a defined foot ring on each piece. This lifts the form and provides a distinct stopping point for the glaze later. -
Focus on the Rims:
While trimming, use a damp chamois or your finger to slightly compress and bevel the top rims of all pieces. This sharpness will help the glaze ‘break’ color effectively. -
Bisque Fire:
Let all pieces bone dry completely before loading them into the kiln. Fire to cone 04 (or your clay body’s bisque temperature) to prepare them for glazing.
Consistent Cohesion
Use a scale when wedging clay for sets! Weighing identical amounts (e.g., 1.5lbs for every bowl) ensures your finished stack looks uniform.
Step 2: Glazing Technique
-
Clean the Bisqueware:
Wipe down every piece with a clean, damp sponge to remove kiln dust. This ensures the glaze adheres properly without crawling. -
Wax the Feet:
Apply wax resist to the bottom foot ring of every piece. I also like to wax about 1/4 inch up the side of the foot to create a safety margin against running glaze. -
Wax the Rims (Optional):
To achieve the distinct brown lip seen in the image, carefully paint a thin line of wax resist along the very top edge of the rims. Alternatively, you can wipe the glaze off later. -
Mix the Glaze:
Stir your turquoise reactive glaze thoroughly. You want a consistency similar to heavy cream; if it’s too thin, the color won’t be opaque, but too thick and it might run excessively. -
Dip the Interiors:
Pour glaze into the hollow forms (mug, bowls) and swirl quickly to coat the entire interior, then pour out. For the plate, pour a pool in the center and swirl it to the edges. -
Dip the Exteriors:
Using glazing tongs, submerge the mug, tumbler, and bowls into the glaze bucket. Hold for 3 seconds, then lift and shake gently to remove drips. -
Plate Dipping Strategy:
The plate may be too wide for tongs. Hold it by the foot and dip the face in first, then carefully dip the rim while rotating, or pour glaze over the back if your bucket is narrow. -
Reveal the Rims:
If you didn’t wax the rims earlier, use a damp sponge to wipe the glaze off the very top edge of each piece. This exposes the clay body, which will toast to a golden brown. -
Clean the Feet:
Double-check the foot rings. Even with wax resist, beads of glaze can stick. Wipe them completely clean to prevent the pot fusing to the kiln shelf.
Rim Effect
For a more dramatic rim, dip the very edge in a second, darker glaze (like a floating blue or temmoku) instead of wiping it bare.
Step 3: Final Firing
-
Loading the Kiln:
Place pieces on the kiln shelves, ensuring they don’t touch each other. Leave about a finger’s width of space between items. -
Glaze Fire:
Fire to Cone 5 or 6 (approx. 2200°F/1200°C) in an oxidation atmosphere. This temperature allows the speckles in the glaze to melt and the clay body to vitrify fully. -
Cooling Down:
Allow the kiln to cool naturally until it is under 200°F before opening. Opening too early can cause thermal shock and crack your new dinnerware. -
Sanding:
Once cool, check the unglazed foot rings. If they feel rough, sand them lightly with wet-dry sandpaper or a diamond pad to protect your table surfaces.
Set your table with your handmade collection and enjoy the compliments on your craftsmanship.