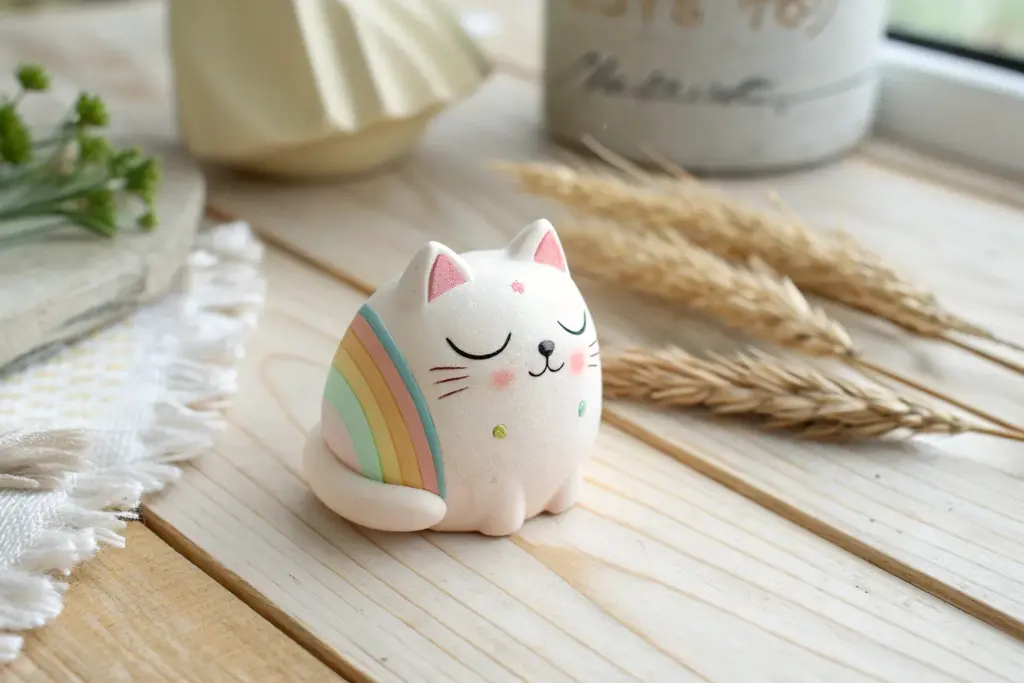
Magic clay is my go-to when I want something cute, colorful, and done in one sitting with that soft air-dry feel. Grab a few colors and let’s make a lineup of beginner-friendly little sculptures that look adorable on a shelf, desk, or keychain.
Blob-Style Baby Chick
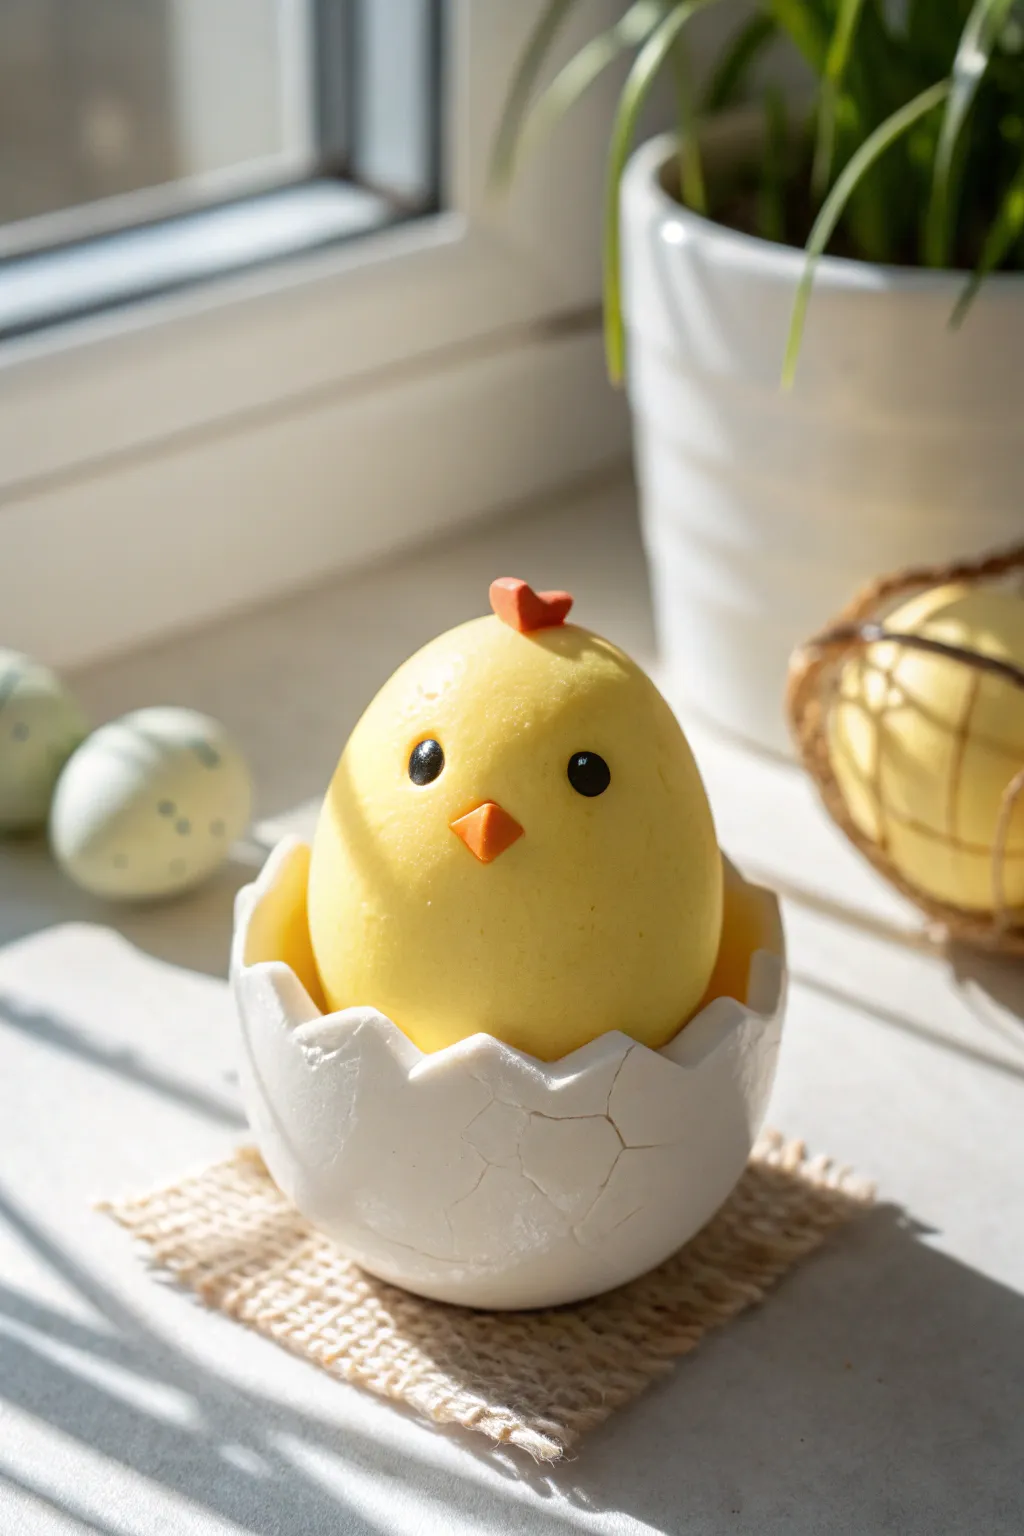
Celebrate new beginnings with this adorable, round baby chick nestled inside its own cracked eggshell. The smooth, minimalist design makes it perfect for beginners, resulting in a charming decoration that captures the essence of spring.
Detailed Instructions
Materials
- Yellow air-dry clay (or magic clay)
- White air-dry clay
- Orange air-dry clay
- Black air-dry clay (or small black beads)
- Sculpting tools (ball tool, needle tool)
- Small square of burlap or textured fabric
- Rolling pin
- Water (for smoothing)
- Gloss varnish (optional)
Step 1: Forming the Chick
-
Roll the body:
Start with a generous sphere of yellow clay. Roll it firmly between your palms to remove any cracks or lines. -
Shape the egg form:
Gently taper the top of the yellow sphere to create an egg-like shape that is slightly wider at the bottom. -
Create the eyes:
Take two tiny pinch-sized pieces of black clay and roll them into small balls. Press them flattened onto the upper half of the face, spacing them wide apart for a cute look. -
Add the gleam:
For extra life, add a microscopic dot of white clay or white paint to the upper corner of each black eye. -
Form the beak:
Roll a small piece of orange clay into a cone or diamond shape. Press it gently between the eyes, ensuring the point faces outward. -
Make the comb:
Create a tiny heart shape or two small teardrops from orange clay. Attach this to the very top of the chick’s head.
Step 2: Sculpting the Eggshell
-
Prepare white clay:
Take a portion of white clay roughly the same volume as your yellow chick. Knead it until soft. -
Create a bowl:
Press your thumb into the center of the white clay ball to create a hollow pinch-pot shape. -
Expand the walls:
Gently pinch and pull the walls of the white bowl upwards and outwards. It needs to be wide enough to cup the bottom half of your yellow chick. -
Cut the jagged edge:
Use a craft knife or a plastic sculpting tool to cut a zigzag, cracked pattern along the top rim of the white bowl. -
Smooth the rim:
Run your finger lightly over the cut edges to soften any sharp burrs while keeping the jagged ‘cracked’ look distinct. -
Add surface cracks:
Using a needle tool or a dull knife, lightly scribe irregular crack lines on the outside of the shell for realistic texture. -
Fit the chick:
Place your yellow chick inside the white shell. If it sits too low, add a small disc of scrap clay inside the shell to boost the height.
Smooth Surface Secret
If your yellow clay holds onto fingerprints, lightly rub a tiny drop of baby oil or lotion onto your hands before rolling the main body shape.
Step 3: Base and Finishing
-
Prepare the base:
Cut a small square of burlap or textured woven fabric to serve as a rustic mat. -
Secure the shell:
Place the eggshell onto the fabric square. I find that pressing it down firmly while the clay is still slightly damp helps it sit flat. -
Add a hidden crack:
For extra detail, you can gently pry one of the scribed cracks on the shell open slightly to make the egg look like it’s actively breaking. -
Final smooth:
Dip your finger in a tiny bit of water and smooth out any fingerprints on the yellow chick’s head. -
Let it dry:
Allow the entire piece to dry completely for 24 hours in a cool, dry place away from direct sunlight.
Make It a Set
Create a whole family by making smaller chicks or varying the shell colors to pastel blues and pinks for a complete Easter basket scene.
Once fully dry, you can display your newly hatched friend on a windowsill to catch the morning light


Round Owl Buddy With Big Eyes

Brighten up your desk with this adorable round owl figurine, featuring oversized eyes and a charming pattern of white plumage. Its smooth yellow body and tiny green ear tufts make for a cheerful, pottery-style companion that fits right in the palm of your hand.
Step-by-Step Guide
Materials
- Air-dry clay or polymer clay (yellow, white, brown, green, orange)
- Ball stylus tool or rounded chopstick end
- Plastic modeling knife or craft blade
- Acrylic rolling pin
- Aluminum foil (optional, for core)
- Gloss varnish or clear nail polish
Step 1: Shaping the Base
-
Prepare the core:
Start by conditioning your yellow clay until it is soft and pliable. If you want to save clay, roll a small ball of aluminum foil and cover it completely with a thick layer of yellow clay. -
Form the body:
Roll the clay into a smooth, slightly egg-shaped oval. Flatten the bottom gently by tapping it on your work surface so the owl stands upright on its own. -
Create the ear tufts:
Pinch the top two corners of the head very slightly to create small nubs, or gently press two small indentations where the ears will go to prepare for the green additions later.
Fixing Cracks
If small cracks appear in the white chest feathers as you flatten them, smooth a tiny drop of water (air-dry) or clay softener (polymer) over the crack with your finger to seal it instantly.
Step 2: The Big Eyes & Face
-
Make eye sockets:
Use your thumb or a large ball tool to press two large, shallow circular indentations into the upper half of the face area. They should be close together but not quite touching. -
Add the eye disks:
Roll two equal balls of white clay and flatten them into thick discs. Press them firmly into the sockets you just created. -
Texture the feathers:
Using a knife tool or a needle, gently score radiating lines around the outer edge of the white discs to mimic facial feathers. -
Add pupils:
Place two smaller black clay circles in the center of the white discs. Add a tiny dot of white clay to each pupil to create a ‘catchlight,’ giving the owl a lifelike expression. -
Attach the beak:
Mold a small piece of orange clay into a tiny cone or diamond shape. Press it vertically between the eyes, ensuring the point faces downward.
Make it a Set
Make a whole family by varying the sizes and body colors! Try a blue owl with yellow eyes or a pink one with grey wings to create a colorful woodland shelf display.
Step 3: Wings & Details
-
Shape the wings:
Create two flat, leaf-shaped pieces from brown clay. These should cover the sides of the owl’s body. -
Wing texture:
Before attaching, use a small u-shaped cutter or draw scalloped ‘U’ shapes onto the brown clay to represent individual feathers. -
Attach the wings:
Press the wings onto the sides of the yellow body, smoothing the edges slightly so they bond well. -
Green ears:
Form two small triangles out of green clay. Attach these to the top of the head where you made the initial pinches, curving the tips slightly.
Step 4: Plumage & Feet
-
Chest feathers:
Roll several tiny teardrop shapes out of white clay. I usually make about 8-10 of these. -
Apply the pattern:
Press these teardrops onto the owl’s yellow belly in staggered rows. Flatten them into the body so they look painted on rather than stuck on. -
Make the feet:
Roll two small balls of orange or light brown clay. Flatten them slightly and use a knife to indent two lines on each to create toes. -
Attach feet:
Place the feet underneath the front edge of the body so they poke out just slightly. -
Final smooth:
Check the whole figure for fingerprints. Wet your finger slightly (for air-dry clay) or use baby oil (for polymer) to buff away any imperfections. -
Dry or Bake:
Follow the instructions for your specific clay. If baking polymer clay, let it cool completely before handling. -
Finish:
Apply a coat of gloss varnish to the eyes and beak to make them shine, or coat the entire owl for a ceramic look.
Place your little owl on a windowsill or near a plant for a perfect nature-inspired touch


Tiny Frogs on Lily Pads
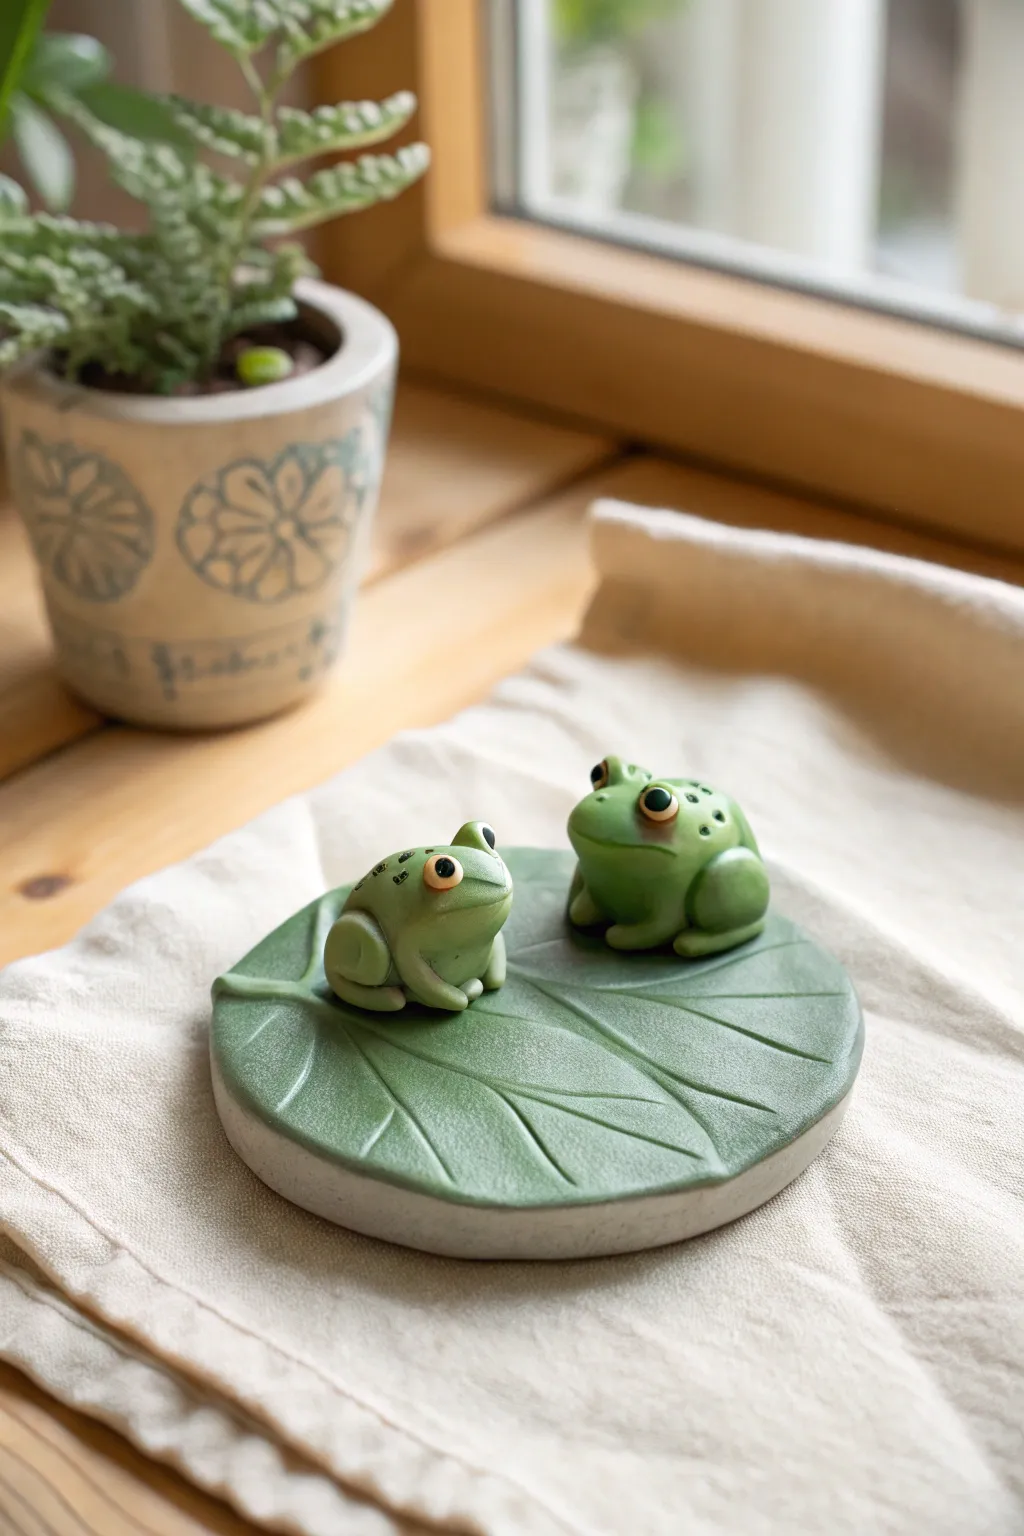
Create a charming little trinket dish featuring two adorable frog friends resting on a textured leaf. This project uses polymer or air-dry clay to form a functional and decorative piece perfect for holding rings or small treasures.
Detailed Instructions
Materials
- Green polymer clay (light and medium shades)
- White polymer clay
- Small amount of black clay
- Rolling pin or pasta machine
- Circle cutter (approx. 3-4 inches)
- Needle tool or clay knife
- Small ball tool
- Sandpaper (fine grit)
- Oven (if using polymer clay) or drying space
- Matte or satin varnish (optional)
Step 1: Creating the Lily Pad Base
-
Condition and Mix:
Start by conditioning your medium green clay until it’s soft and pliable. If you want a more natural look, you can marble in a tiny bit of white or yellow, but keep it subtle. -
Roll the Slab:
Roll the clay out into a smooth, even slab about 1/4 inch thick. It needs to be sturdy enough to hold its shape as a dish. -
Cut the Circle:
Use your circle cutter to punch out a perfect round shape. If you don’t have a cutter, trace a jar lid and cut carefully with a knife. -
Texture the Veins:
With a needle tool or the back of a knife, gently score a central vein line slightly off-center. Then, radiate curved lines outward to create the leaf structure, pressing lightly so you don’t cut all the way through. -
Shape the Leaf:
Make a small V-shaped notch at one edge to give it that classic lily pad silhouette. Smooth the cut edges with your fingertip. -
Form the Dish:
Gently lift the edges of the circle to create a shallow curve. You can rest it inside a slightly larger bowl or on a curved baking surface to help it hold this cupped shape while you work on the frogs.
Smooth Seams
Use a rubber blending tool or a soft paintbrush dipped in baby oil to seamlessly blend the clay where the legs attach to the body.
Step 2: Sculpting the Frogs
-
Body Basics:
Roll two balls of lighter green clay, making one slightly larger than the other. Gently flatten the bottom of each so they sit stable. -
Legs and Thighs:
For the hind legs, roll two small teardrops for each frog. Press them against the sides of the body, wrapping the thinner end toward the front. -
Front Arms:
Roll tiny cylinders for the front arms. attach them vertically under the ‘chin’ area so the frogs look like they are propped up attentively. -
Face Sculpting:
Use a ball tool to make slight indentations where the eyes will go. Use a needle tool to press in a wide, simple horizontal line for the mouth. -
Adding Eyes:
Roll tiny balls of orange or yellow clay and place them in the eye sockets. Add microscopic pupils using black clay. -
Adding Details:
For extra character, add tiny dots of dark green clay to their backs creating a spotted texture. Press them flat so they are flush with the surface. -
Positioning:
Place the frogs onto the lily pad. I find using a dab of liquid clay or ‘bake and bond’ here ensures they won’t pop off later. -
Final Texture:
Look over your piece and smooth out any fingerprints with a drop of baby oil or water.
Step 3: Finishing Touches
-
Baking or Drying:
Follow the instructions for your specific clay. If baking polymer clay, tent it with aluminum foil to prevent scorching the green color. -
Cooling:
Let the piece cool completely inside the oven to prevent cracking from thermal shock. -
Sanding the Rim:
Once hard, check the rim of the white base if you layered it (some artists add a white layer underneath for contrast). Use fine sandpaper to smooth any rough edges. -
Varnish:
Apply a thin coat of matte or satin varnish to protect the surface and give the frogs a slight engaging sheen.
Make it a Pond
Pour a thin layer of UV resin into the bottom of the dish around the frogs to simulate glossy, realistic water.
Now you have a sweet nature-inspired dish ready to decorate your desk or nightstand


Sweet Spiral Snail
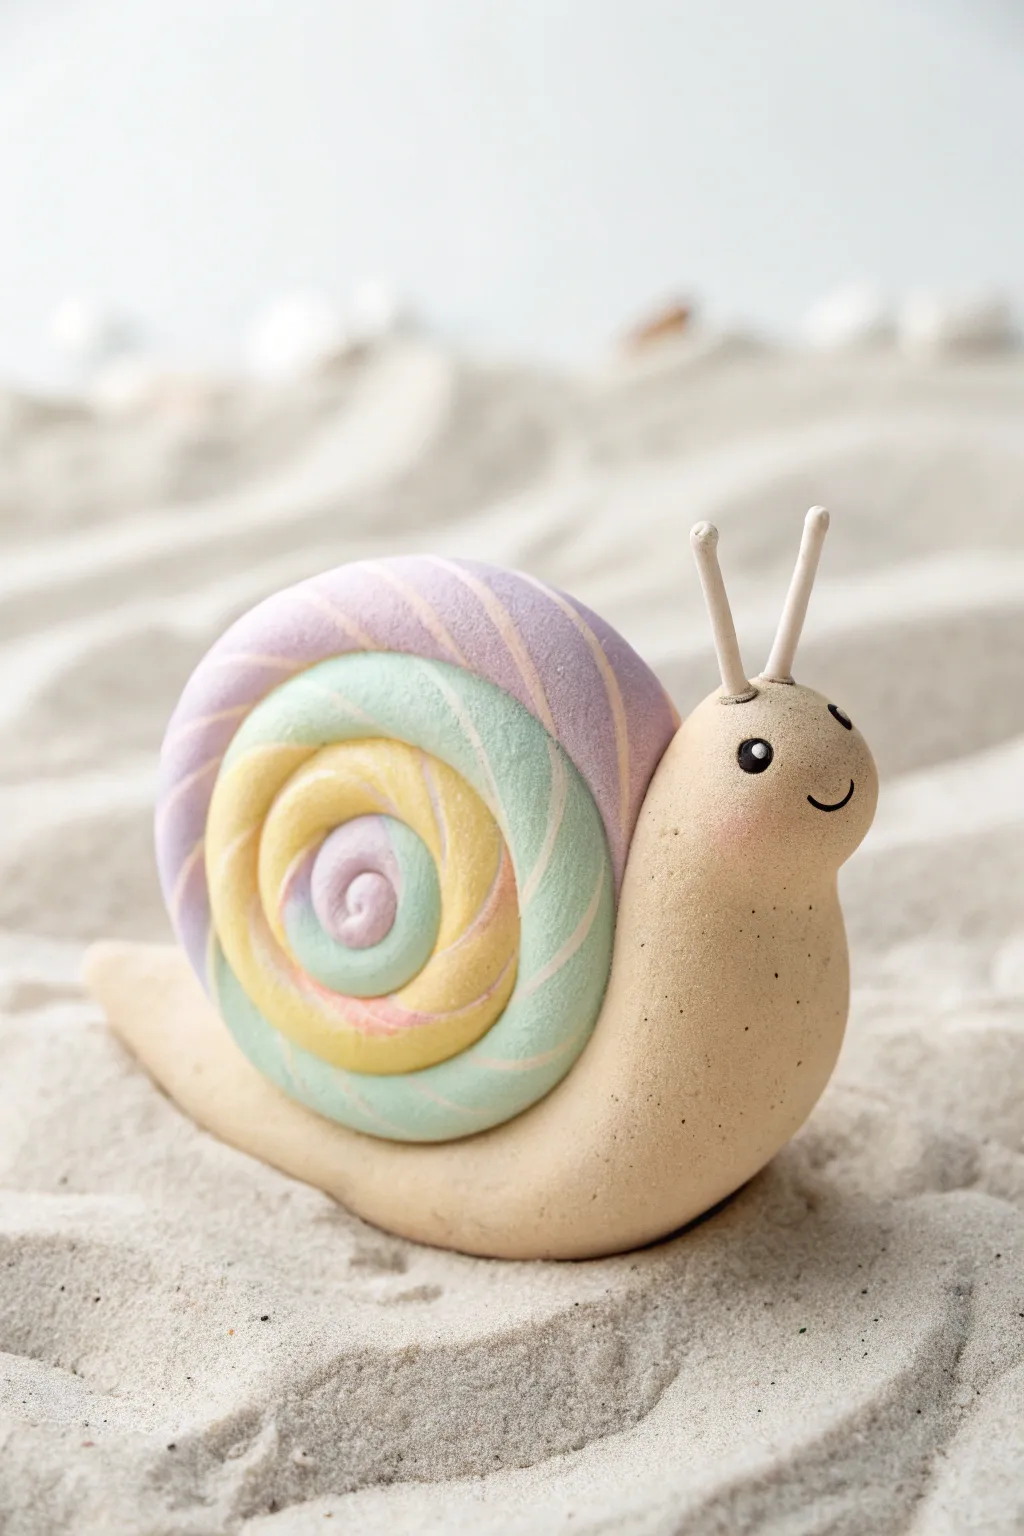
Create an adorable seaside friend with this charming clay snail tutorial, featuring a dreamy pastel swirled shell. The soft matte texture and gentle color palette make this a perfect decorative piece for a nursery or a whimsical desk companion.
Step-by-Step
Materials
- Air-dry clay or polymer clay (beige, white, lilac, mint, pale yellow, baby pink)
- Small black beads or black clay for eyes
- Modeling tools (or a toothpick)
- Soft pastel chalks or blush (for cheeks)
- Small soft brush
- Acrylic rolling pin (optional)
- Clean working surface
Step 1: Shaping the Snail Body
-
Prepare the Base Clay:
Start by conditioning a generous amount of beige clay until it’s soft and pliable. Roll it into a smooth, thick log shape, tapering one end significantly to form the tail. -
Form the Head:
Gently bend the thicker end of your log upwards to create the neck and head. Use your thumbs to round out the head shape, ensuring it blends seamlessly into the neck without a harsh crease. -
Smooth the Base:
Flatten the bottom of the body slightly by pressing it gently onto your work surface. This ensures your snail will sit stable and upright without tipping over. -
Refine the Tail:
Pinch and smooth the tail end into a gentle point. You can curve the tail slightly to the side to give the snail a sense of movement. -
Add Texture:
Using a toothpick or a texture tool, add tiny, sparse dots along the neck and lower body to mimic a natural, sandy skin texture, keeping the face area smooth.
Step 2: Creating the Rainbow Shell
-
Mix Pastel Colors:
Prepare four balls of clay: lilac, mint green, pale yellow, and baby pink. If your colors are too bright, mix in a bit of white clay to achieve that soft, candy-like pastel hue. -
Roll Snakes:
Roll each color into a long, thin snake of equal thickness. Place them side-by-side, pressing them gently together so they stick but don’t blend completely. -
Twist the Colors:
Gently twist the group of clay snakes together into a single, thick rope. This creates the beautiful striated candy effect seen on the shell. -
Roll the Spiral:
Starting from one end of your twisted rope, roll it inward tightly like a cinnamon roll. Keep winding until you have a large, circular shell shape. -
Shape the Shell:
Press the outer edge of the spiral gently to adhere the end. Cup the shell in your palm and gently round the edges so it looks puffy rather than flat. -
Attach to Body:
Place the shell onto the back of the beige body. Press down firmly but carefully to bond the pieces. If using polymer clay, a dab of liquid clay here helps secure it.
Seamless Twists
When twisting your colored clay snakes, roll the final twisted rope on the table gently. This smoothes out the ridges and makes the stripes look painted on.
Step 3: Face and Finishing Touches
-
Insert Eye Sockets:
Use a small ball tool or the end of a paintbrush handle to make two small indentations on the sides of the head where the eyes will go. -
Place the Eyes:
Press tiny black beads or very small balls of black clay into the indentations. Ensure they sit slightly recessed. -
Create the Smile:
Use a needle tool or a sharp toothpick to carve a small, curved smile line just below the eyes. Keep the curve gentle for a sweet expression. -
Make the Antennae:
Roll two small pieces of white or very pale beige clay into thin stalks with rounded tips. These should look like little matchsticks. -
Attach Antennae:
Press the antennae onto the top of the head. I find it helps to pre-poke holes with a needle tool first so the stalks have somewhere to anchor. -
Add Blush:
Using a soft brush and a tiny amount of pink pastel chalk dust or real blush, gently dust round rosy cheeks onto the snail’s face right under the eyes. -
Final Cure or Dry:
Let your project air dry completely for 24-48 hours, or bake it according to your polymer clay package instructions.
Glossy Shell
Once the clay is fully dry or cured, coat only the colored shell with a high-gloss varnish. Leave the body matte for a lovely contrast in textures.
Place your finished snail on a shelf or in a plant pot to add a touch of gentle magic to your room

The Complete Guide to Pottery Troubleshooting
Uncover the most common ceramic mistakes—from cracking clay to failed glazes—and learn how to fix them fast.
Mini Penguin Family
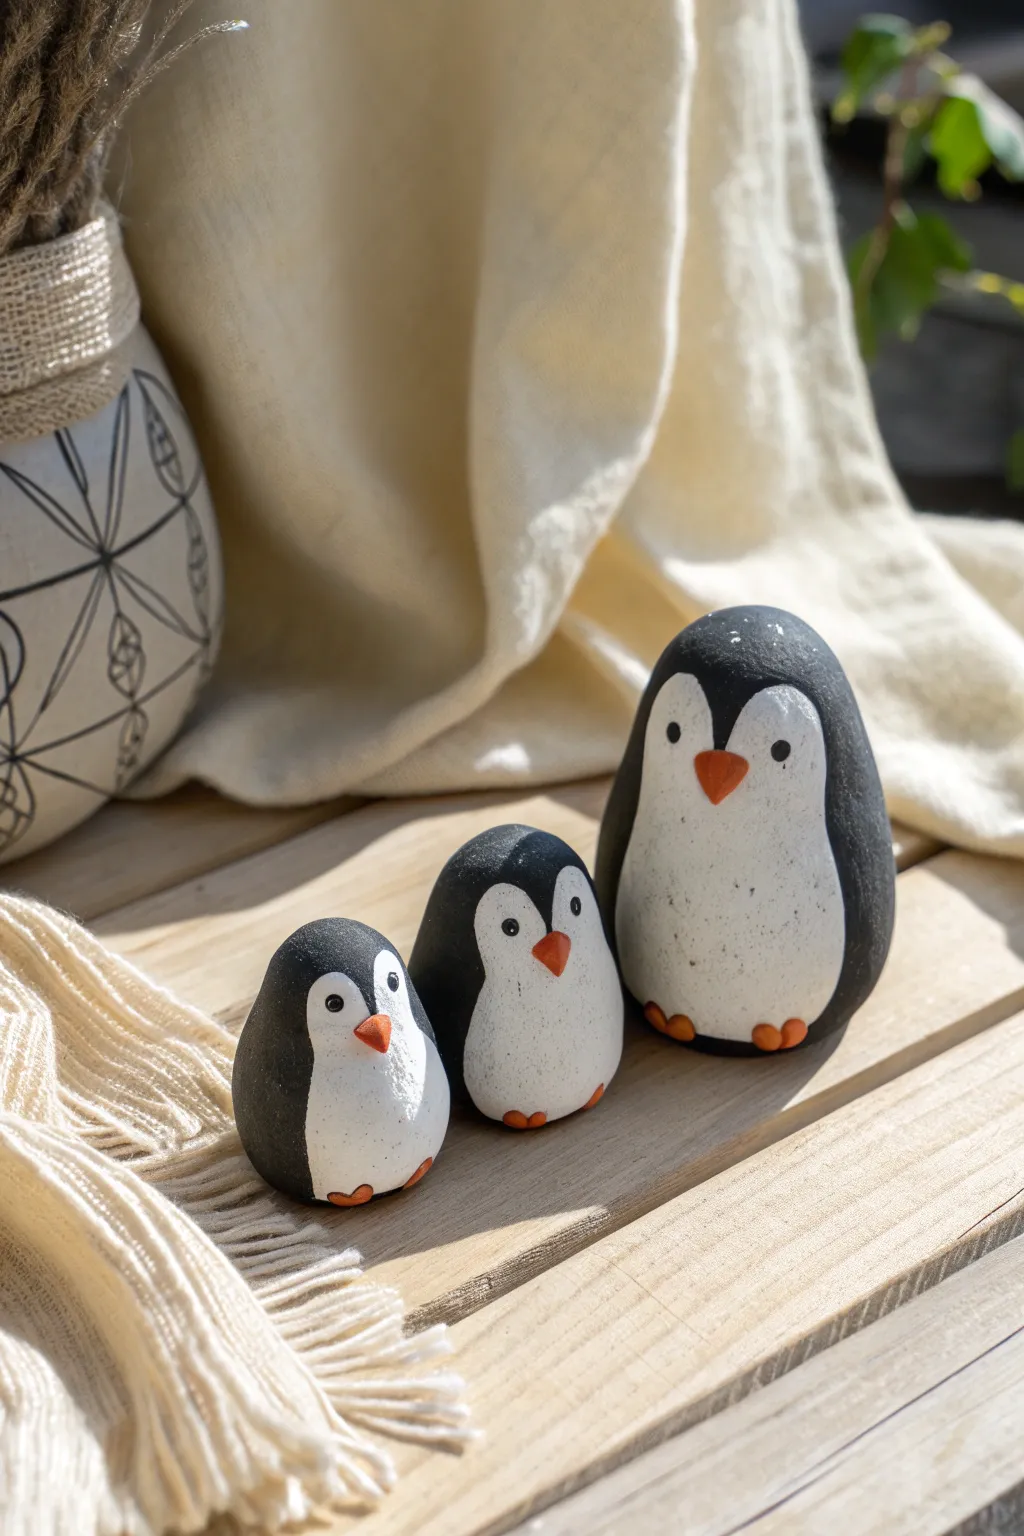
Create this adorable family of three penguins using smooth, rounded forms that mimic river rocks. With their simple black and white design and tiny orange beaks, these clay figures bring a touch of minimalist whimsy to any shelf.
How-To Guide
Materials
- Air-dry clay or polymer clay (white)
- Black acrylic paint
- White acrylic paint
- Orange acrylic paint
- Small round paintbrush
- Fine detail paintbrush
- Smooth work surface
- Water cup (for smoothing)
- Matte varnish (optional)
Step 1: Shaping the Bodies
-
Portion the clay:
Cut your clay into three distinct sizes: a large portion for the parent penguin, a medium piece for the older chick, and a small piece for the baby. -
Roll spheres:
Take the largest piece and roll it firmly between your palms to create a smooth, crack-free ball. -
Form the egg shape:
Gently shape the sphere into an elongated egg or teardrop shape. You want a wide, stable base that tapers slightly toward the head, just like a smooth river stone. -
Flatten the base:
Tap the bottom of the tear-drop shape against your work surface. This creates a flat bottom so the penguin stands upright without wobbling. -
Smooth the surface:
Dip your finger in a tiny bit of water and rub it over the clay to erase any fingerprints or creases. The goal is a super-smooth, rock-like finish. -
Repeat for the family:
Repeat the rolling and shaping process for the medium and small clay pieces. Ensure the shapes are similar so they look like a cohesive set. -
Add the feet (optional):
For 3D feet, you can attach tiny flattened balls of clay near the base, but for the painted look in the image, we will simply paint them later. If you want structural beaks, pinch tiny triangles of clay and attach them now with a bit of water/slip, or wait to paint them on for a flatter finish. The image shows slightly raised beaks, so attach tiny orange clay triangles now if desired. -
Dry completely:
Allow the clay figures to dry fully. For air-dry clay, this might take 24-48 hours depending on thickness. Flip them occasionally to ensure the bottom dries too.
Step 2: Painting the Details
-
Base coat outline:
Using a pencil, very lightly sketch the outline of the white belly and face area. It looks like a tall arch that dips down in the middle of the forehead to form the ‘widow’s peak’ typical of penguins. -
Paint the black coat:
Use your larger brush to paint the back, sides, and top of the head with black acrylic paint. Carefully follow the pencil line you drew, leaving the belly area unpainted for now. -
Refine the edges:
Switch to a smaller brush to tidy up the edge where the black paint meets the unpainted clay. Clean lines are key to this graphic look. -
Paint the white belly:
Fill in the front arch shape with white acrylic paint. Even if your clay is white, painting it ensures the texture matches the black areas. Apply two coats if necessary for solid coverage. -
Add the eyes:
Dip the handle end of a paintbrush into black paint. Dot two eyes onto the white face area. Place them wide apart for a cute, innocent expression. -
Create the beak:
Using orange paint and a fine detail brush, paint a small inverted triangle between the eyes. If you attached a clay beak earlier, simply paint over it. -
Paint the feet:
At the very bottom of the white belly, paint two small orange semi-circles or ovals to represent their feet tucked underneath. -
Add eye highlights:
I like to wait until the black eye dots are totally dry, then use a pin or a needle to place a microscopic dot of white paint in each eye. This brings them to life. -
Seal the project:
Once all paint is dry, apply a coat of matte varnish to protect the paint and give the penguins a unified, stone-like sheen.
Natural Texture
To mimic the speckled stone look in the photo, flick a toothbrush with thinned grey paint lightly over the white belly area before sealing.
Wobbly Penguins?
If your figures won’t stand straight, gently sand the base flat with fine-grit sandpaper after the clay is fully hardened.
Arranged together, this little family brings a heartwarming winter vibe to your home decor
Chibi Unicorn With a Swirled Horn
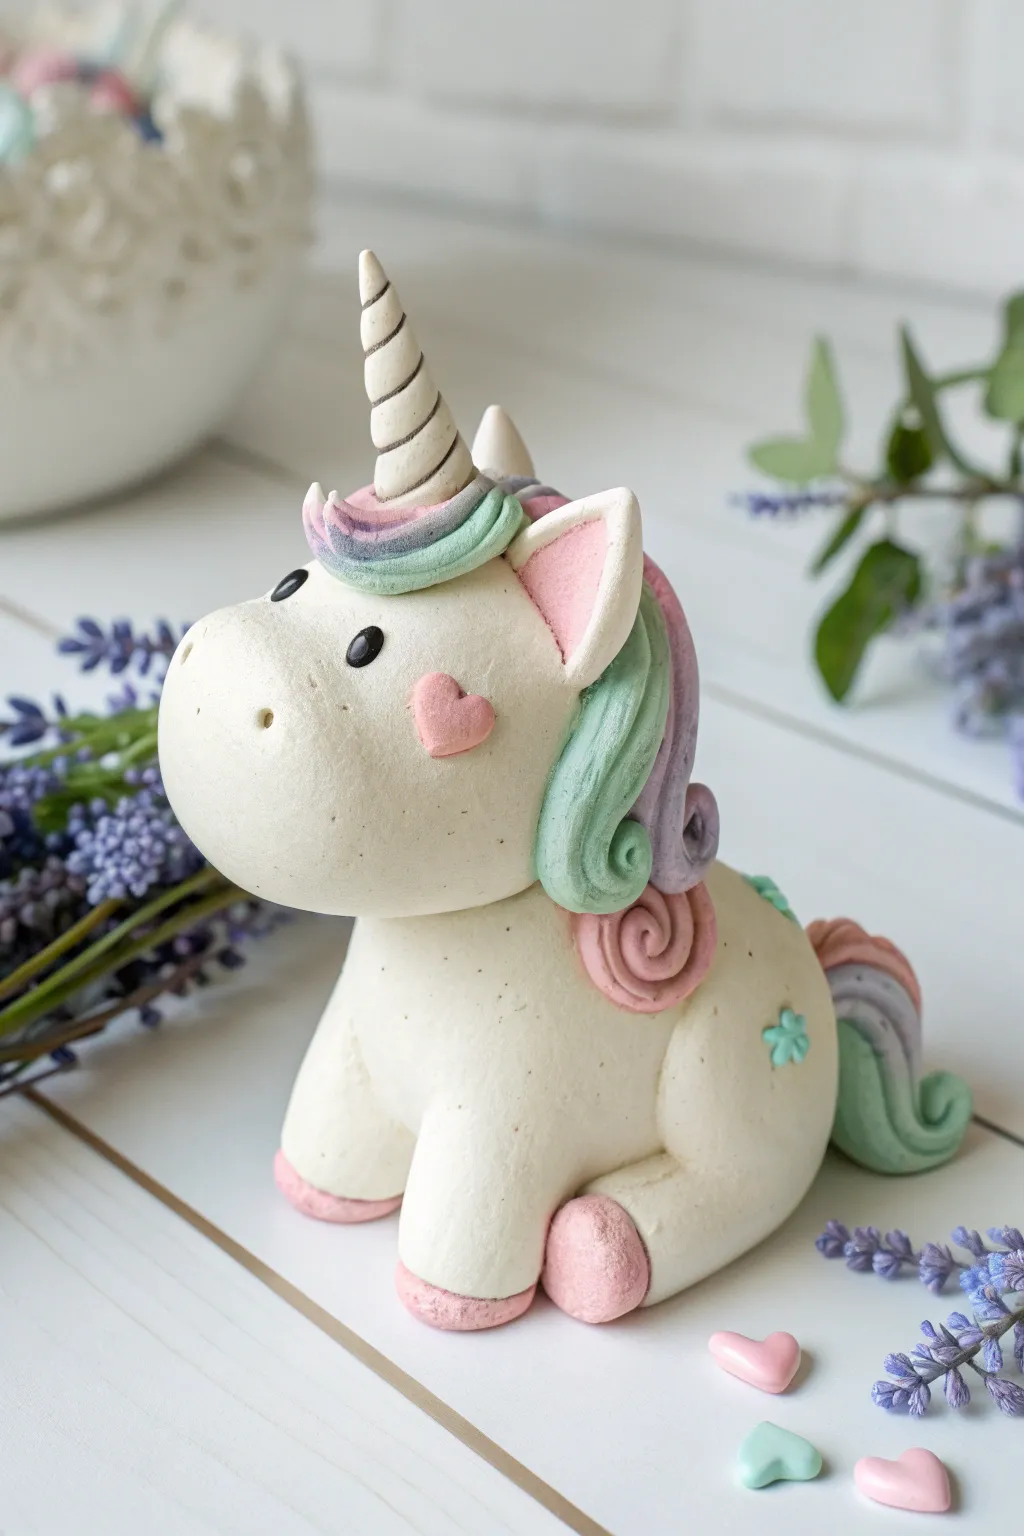
Bring a touch of fantasy to your desk with this adorable, bubbly chibi unicorn figurine. With its soft pastel mane, swirled horn, and sweet heart-shaped cheek, this magic clay project is perfect for beginners looking to practice smooth shapes and seamless attachments.
Step-by-Step Tutorial
Materials
- White airy-dry clay (or polymer clay)
- Pastel colored clay (pink, mint green, lavender)
- Black clay (tiny amount for eyes)
- Clay sculpting tools (needle tool, ball tool)
- Small rolling pin
- Water or liquid clay (for adhesion)
- Toothpick or short wire (for internal stability of the horn)
Step 1: Shaping the Base Body
-
Form the head:
Start with a generous amount of white clay and roll it into a large, smooth sphere. Gently press one side to elongate it slightly into a rounded oval shape for the snout area. -
Create the body:
Roll a second, slightly smaller ball of white clay. Shape it into a rounded gumdrop or pear shape, flattening the bottom so it sits stable on your work surface. -
Attach head to body:
Score the top of the body and the bottom of the head slightly for better grip. Press the head firmly onto the body, blending the clay at the neck seam slightly if you want a seamless look, though a bobblehead style is cute too. -
Make the limbs:
Roll two thick sausages of white clay for the front legs and two smaller balls for the hind legs. Smooth the front legs onto the front of the body and press the hind balls against the sides to look like the unicorn is sitting.
Step 2: Adding Hooves and Ears
-
Create pink hooves:
Take four small balls of pink clay and flatten them into discs. Attach these to the bottom of each leg limb, smoothing the edges upward to create shoes or hooves. -
Shape the ears:
Form two small white triangles. Press a smaller pink triangle into the center of each. Pinch the base of the triangles to give them a curved, organic ear shape. -
Attach the ears:
Adhere the ears to the top of the head, spacing them wide enough to leave room for the horn and mane later. Use a tool to blend the base of the ears into the head.
Troubleshooting: Sagging Head
If the head keeps drooping forward, insert a toothpick (cut to size) halfway into the body and mount the head onto the protruding part for an internal spine.
Step 3: The Magical Horn & Mane
-
Twist the horn:
Roll a thin snake of white clay that tapers at one end. Carefully twist this tapered snake around a toothpick or just twist it upon itself to create a spiral cone shape. -
Mount the horn:
Insert the toothpick end (if used) into the forehead, or score and press the clay horn directly between the ears. -
Prepare mane strands:
Roll out several tapered snakes of your pastel clays: mint green, lavender, and pink. Vary the lengths slightly. -
Apply the forelock:
Take shorter strands of green, pink, and purple, and swoop them across the forehead, right in front of the ears and around the base of the horn. -
Build the back mane:
Layer longer strands of the pastel colors down the back of the unicorn’s head and neck. I like to curl the very tips of these strands into little spirals for extra whimsy. -
Add the tail:
Combine three snakes of differing pastel colors (pink, green, purple) at one end. Twist them loosely together and attach the bundle to the unicorn’s rear, curling the end upward.
Pro Tip: Swirl Definition
To make the horn spiral pop, lightly dust the grooves with grey or brown pastel powder/eyeshadow before sealing. It adds instant depth and realism.
Step 4: Facial Details
-
Place the eyes:
Roll two tiny balls of black clay and press them firmly into the face, spacing them wide apart for that classic kawaii look. You can flatten them slightly with a finger. -
Add nostrils:
Use a small ball tool or the end of a paintbrush to indent two nostrils near the front of the snout. -
The heart cheek:
Shape a tiny piece of pink clay into a heart. Press this onto the unicorn’s cheek, just below the eye. This little detail really brings the personality to life. -
Optional star detail:
If you have extra clay, tiny shapes like a star or flower can be pressed onto the unicorn’s flank for a ‘cutie mark’ effect. -
Final smooth:
Gently check over your unicorn for any fingerprints. Lightly brush with water (if using water-based clay) or baby oil (if polymer) to smooth them out before drying.
Now you have a charming little companion ready to guard your desk or bookshelf


What Really Happens Inside the Kiln
Learn how time and temperature work together inside the kiln to transform clay into durable ceramic.
Pocket Dragon With Tiny Wings
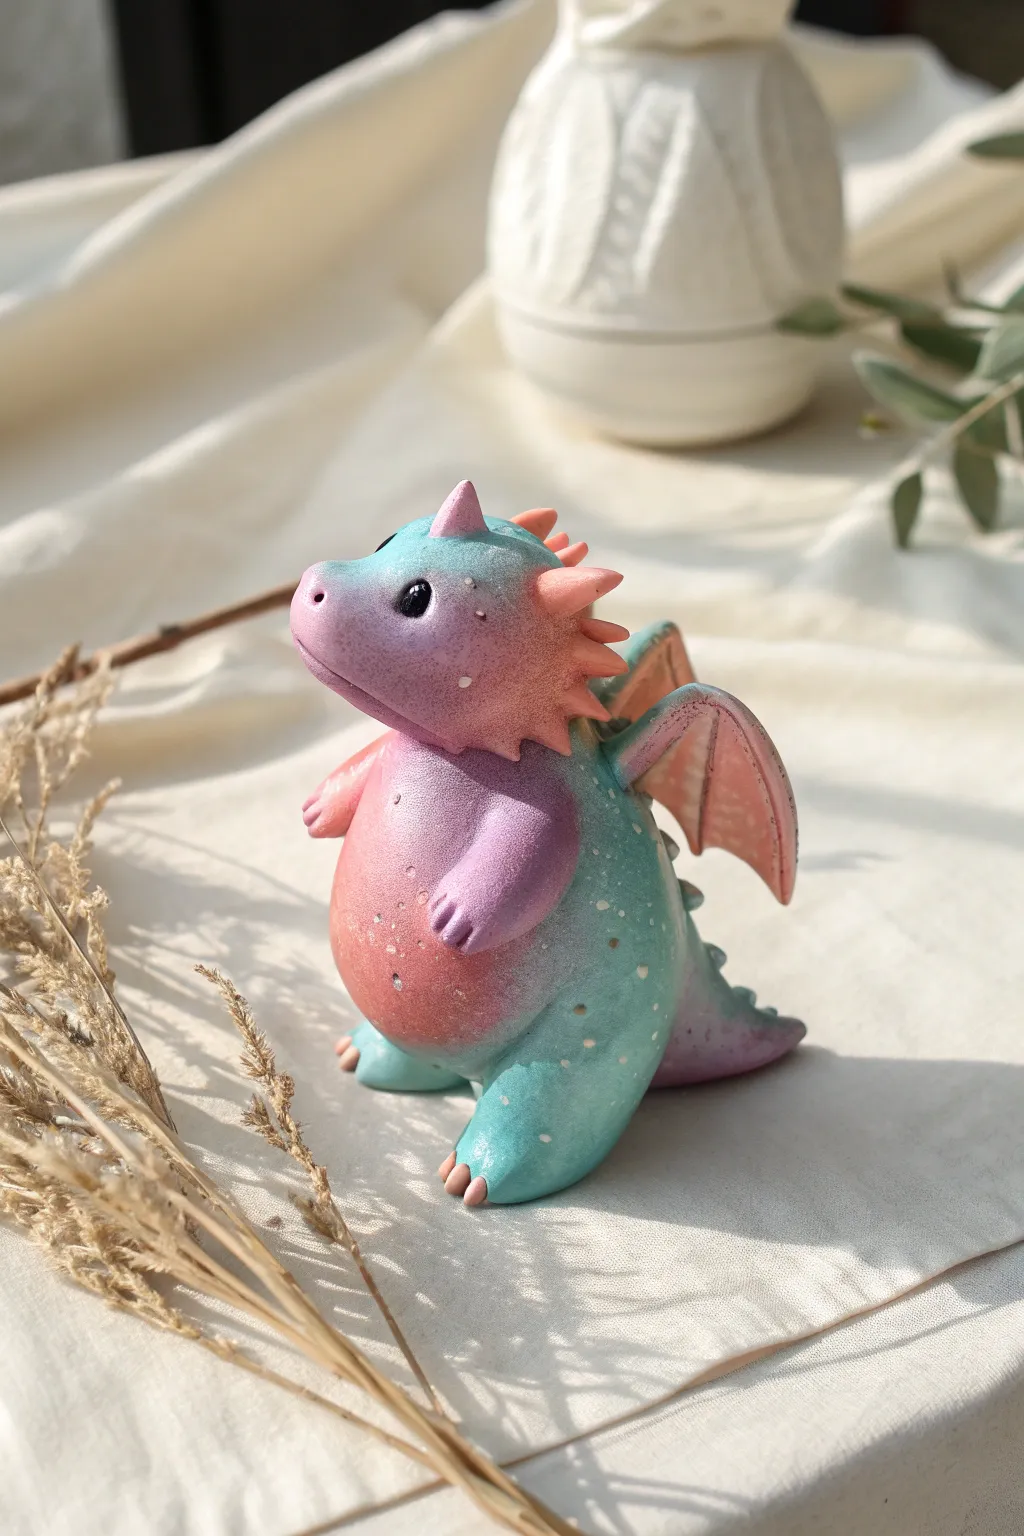
Sculpt a chubby, enchanting little companion with a breathtaking teal-to-pink gradient. This gentle-looking dragon features soft spines, tiny wings, and magical speckled details that make it look like a fairytale come to life.
Step-by-Step
Materials
- Polymer clay (white base)
- Soft pastel chalks (teal, purple, pink)
- Black glass beads or clay for eyes
- Sculpting tools (ball styluses, needle tool)
- Soft paintbrushes for dusting
- White acrylic paint
- Liquid clay (optional)
- Rubbing alcohol
- Gloss glaze (optional)
Step 1: Shaping the Gradient Body
-
Prepare the Base Clay:
Start with a clean ball of white polymer clay about the size of a golf ball. Condition it well until it is soft and pliable, ensuring there are no air bubbles trapped inside. -
Color with Pastel Dust:
Before sculpting, shave your pastel chalks into fine powders. I prefer to dust the raw clay with the powders now for a softer gradient. Apply pink to the top third, purple in the middle, and teal at the bottom, blending the transition zones with your finger. -
Form the Torso:
Roll the colored clay into a smooth pear shape. The wider bottom half will be the belly and legs, while the slightly narrower top will support the head. Flatten the bottom gently so the dragon stands securely. -
Sculpt the Head:
Create a second, smaller rounded shape for the head. Apply pink pastel dust primarily to the snout area. Press this gently onto the top of the body, blending the clay at the neck seam so it’s seamless and sturdy.
Clean Those Seams
Can’t hide the connection points? Use a rubber-tipped sculpting tool dipped in a tiny bit of baby oil. It drags clay across the seam more smoothly than a metal tool can.
Step 2: Adding Dragon Features
-
Create the Legs:
Roll two thick, short logs of clay for the back legs. Dust them with the teal pastel powder. Attach them to the lower sides of the body, smoothing the seams completely so they look like part of the main form. -
Form the Tiny Arms:
Roll two much smaller teardrop shapes for the arms. Dust these with purple fading into pink. Attach them higher up on the body, just below the neck area. -
Face Details:
Use a ball tool to make two indentations for eye sockets. Press two small black glass beads (or balls of black clay) into the sockets. Add a tiny white dot of clay to each eye for a highlight. Use a needle tool to mark two small nostrils on the snout. -
The Main Horn:
Form a small cone of white clay, dust the tip pink, and attach it to the center of the forehead above the eyes.
Glitter Gradient
Mix fine iridescent glitter directly into your white clay before sculpting. When you bake it, the glitter will shine through the pastel layer for a built-in magical sparkle.
Step 3: Wings, Spines, and Textures
-
Craft the Wings:
Flatten two triangles of clay. Use a needle tool to impress lines for the wing structure. Dust the membranes with pink and the outer ridges with teal. Attach these to the back of the dragon. -
Add Back Spines:
Roll a very thin snake of clay and cut it into tiny triangles. Attach a row of these spikes running from the top of the head, down the back, to the tail. Dust them lightly with pink chalk. -
Create the Tail:
Add a short, thick cone of teal-dusted clay to the lower back to form a tail that rests on the ground, helping balance the figure. -
Texture the Toes:
Use a needle tool or small knife to make three indentations on the end of each foot and hand to suggest claws or toes. -
Smooth with Alcohol:
Lightly brush the entire sculpture with a little rubbing alcohol. This removes fingerprints and helps blend the pastel powders into the clay surface even better.
Step 4: The Magical Finish
-
Speckling Effect:
Before baking, load an old toothbrush or stiff brush with watered-down white acrylic paint. Flick the bristles to spray tiny white speckles over the dragon, concentrating on the belly and sides for a starry look. -
Bake the Piece:
Bake your dragon according to your clay package instructions (usually 275°F/130°C for 15-30 minutes). Let it cool completely in the oven to prevent cracking. -
Final Touches:
Once cool, you can add a touch of gloss glaze to the eyes and the horn to make them shine and look wet.
Place your finished dragon on a shelf or desk where its peaceful expression can brighten your day
Little Space Explorer Characters
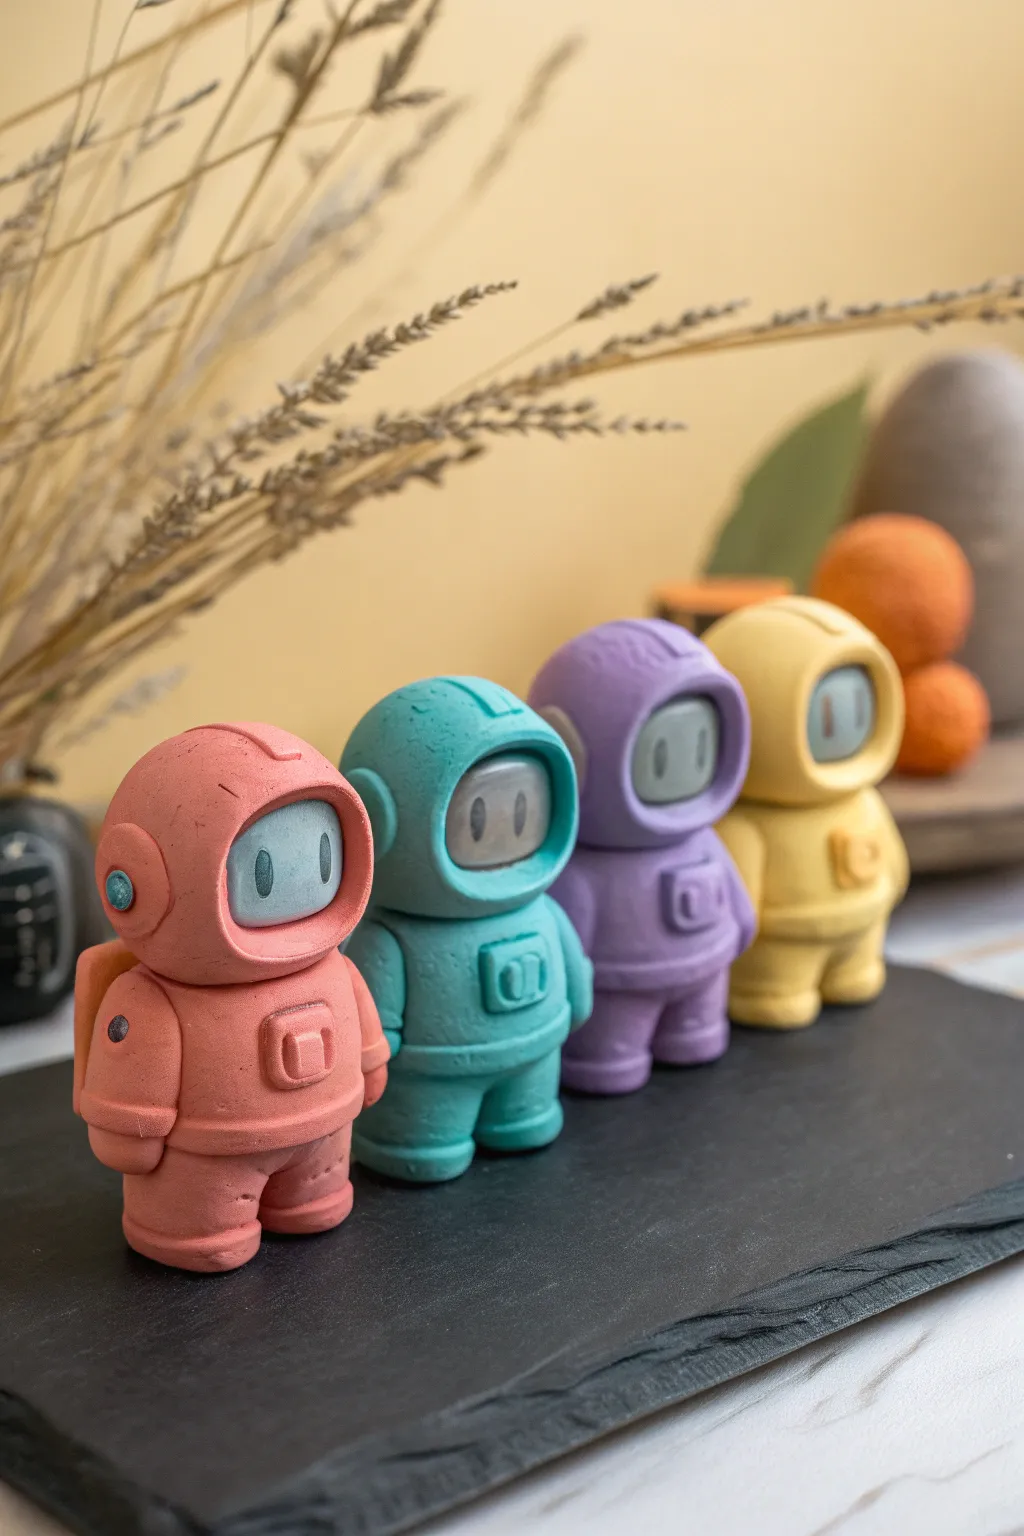
Blast off into creativity with these charming, minimalist space explorers sculpted from air-dry magic clay. Their soft matte finish and stubby, adorable proportions make them perfect little desk companions or decorations for a space-themed shelf.
Step-by-Step Tutorial
Materials
- Air-dry clay or polymer clay (Pink, Teal, Purple, Yellow)
- Light gray clay (for visors)
- Dark grey or black clay (for details)
- Clay sculpting tools (needle tool, small ball tool)
- Rolling pin
- Small circle cutter (optional)
- Matte sealant spray (optional)
- Acrylic paint (optional alternate for colors)
Step 1: Sculpting the Body Base
-
Form the torso:
Start by taking a chunk of your colored clay (e.g., pink) and rolling it into a smooth, thick cylinder. This will be the main body. Flatten the bottom slightly so it stands upright on your work surface. -
Create the legs:
Cut a small notch or groove into the bottom center of your cylinder to define the two legs. Use a smoothing tool to round off the edges of the cut so the legs look distinct but chunky. -
Detail the feet:
Use a needle tool or the edge of a ruler to press horizontal indents near the bottom of each leg to create the look of boot cuffs. -
Add the belt:
Roll a very thin snake of the same body color clay and wrap it around the waist area. Blend the seam at the back so it looks like a continuous piece of the suit.
Head Keeps Drooping?
If the head feels too heavy for the soft body, insert a toothpick or a small piece of dry spaghetti through the neck and into the body to act as an internal armature.
Step 2: The Helmet and Head
-
Shape the helmet:
Roll a ball of clay slightly larger than the width of the body. Press your thumb gently into the front to create a deep, wide indentation for the visor area. -
Refine the visor opening:
Smooth the edges of your thumb-press crater so the rim of the helmet is even and round. The opening should look like a large oval. -
Insert the visor:
Take a small amount of light gray clay and flatten it into an oval shape. Place this inside the helmet indentation you just made, pressing it in gently so it sits flush. -
Add visor reflection:
For a stylized look, press two tiny vertical lines into the gray visor using a blade or needle tool to simulate reflections on the glass. -
Attach the head:
Place the finished head onto the body cylinder. I usually add a small dab of water or liquid clay here to ensure a strong bond between the two heavy pieces.
Step 3: Details & Assembly
-
Add the arms:
Roll two small sausage shapes for arms. Attach them to the sides of the body, just below the helmet. Angle them slightly forward or let them hang straight down. -
Sculpt the backpack:
Create a rectangular block of clay for the life-support backpack. Attach this to the back of the figure, smoothing the connection points. -
Create the chest control:
Make a tiny square of the body color clay and stick it to the center of the chest. Press a small square indentation into the middle of it for detail. -
Ear comms:
Roll two tiny circles of the main color and flatten them slightly. Stick one on each side of the helmet where ears would be. -
Final accents:
Add tiny contrasting dots of blue or silver clay to the center of the ear pieces and perhaps a small dot on the backpack for a ‘power light’ effect. -
Add texture:
Before the clay dries, gently tap the surface with a toothbrush or textured sponge to give the suit that matte, fabric-like finish seen in the original artwork. -
Drying time:
Let your little astronaut sit undisturbed for 24-48 hours depending on the clay brand.
Cosmic Display Base
Make a moon surface base! Roll out gray clay, texture it with a rock or foil ball, and press the astronaut’s feet into it before it dries.
Once fully dry, these colorful explorers are ready to discover new worlds on your bookshelf or desk

TRACK YOUR CERAMIC JOURNEY
Capture glaze tests, firing details, and creative progress—all in one simple printable. Make your projects easier to repeat and improve.
Watermelon and Citrus Slice Canes
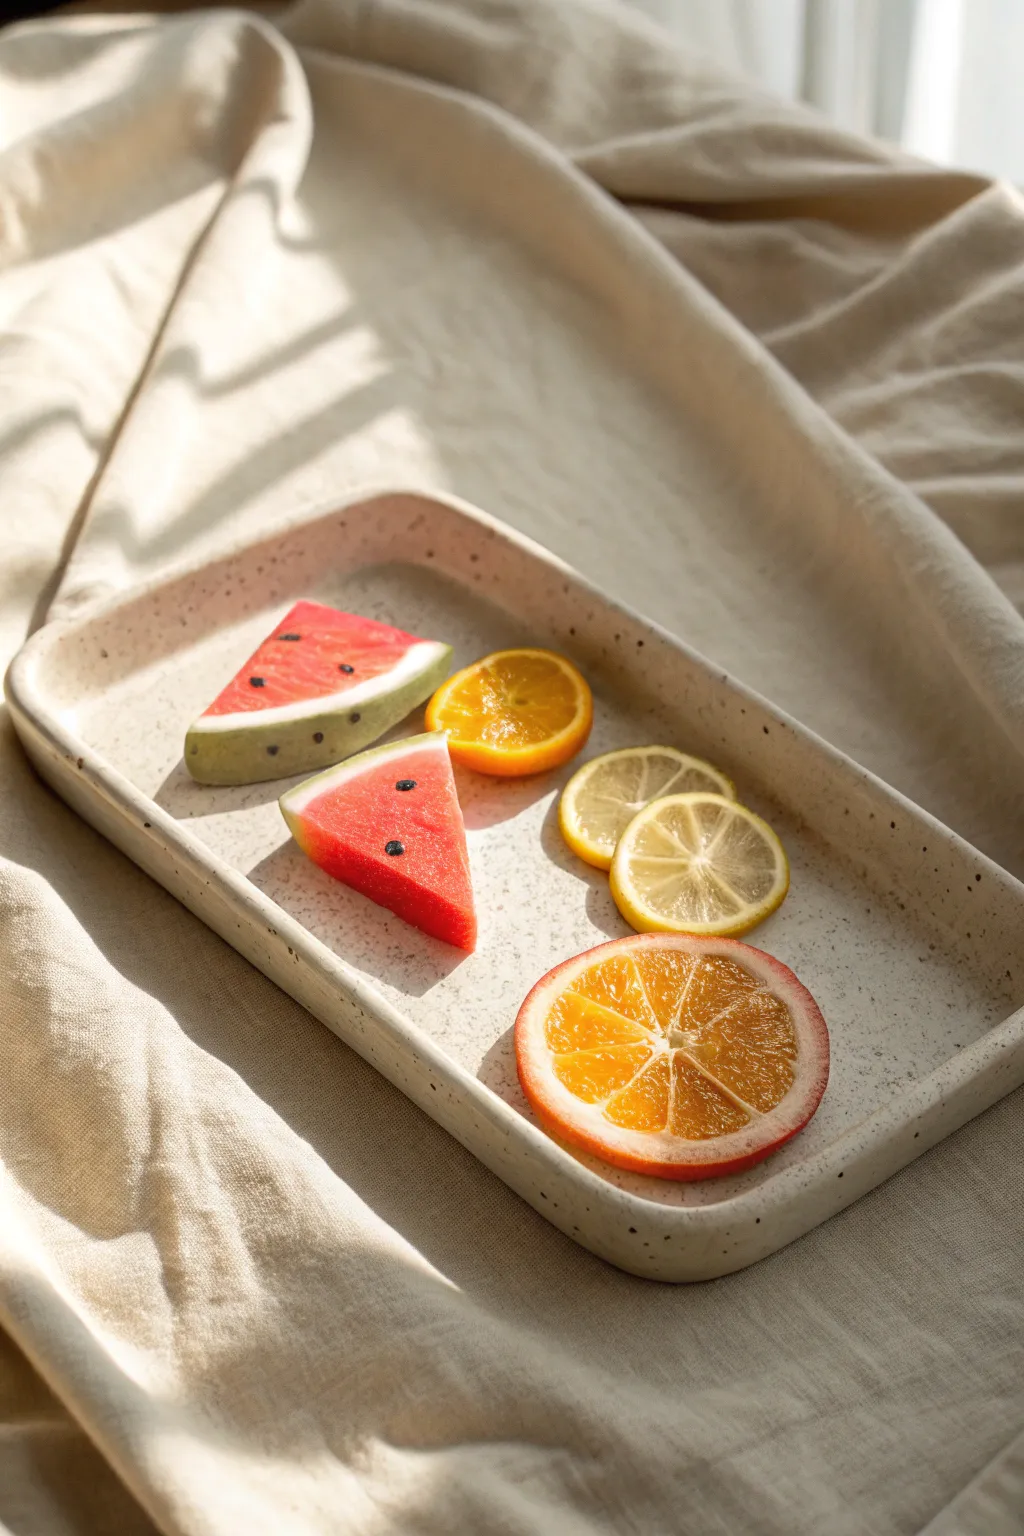
Capture the endless feeling of summer with these incredibly realistic polymer clay fruit slices. By mastering simple cane techniques and texturing methods, you can create juicy watermelon wedges and translucent citrus rounds that look good enough to eat.
Detailed Instructions
Materials
- Polymer clay (translucent, white, red, deep green, light green, orange, yellow)
- Liquid polymer clay (translucent)
- Acrylic rolling pin
- Tissue blade or sharp craft knife
- Needle tool or toothpick
- Small round cutter (approx. 2 inches)
- Black acrylic paint
- Fine detail brush
- Gloss varnish or UV resin
- Sandpaper (various grits up to 1000)
Step 1: Creating the Watermelon Cane
-
Mix the flesh color:
Start by mixing translucent clay with a small amount of red clay. You want a semi-transparent ‘juicy’ look, not a solid opaque red. Knead until fully conditioned. -
Form the center log:
Roll your red mixture into a thick, short cylinder. This will be the main fruit flesh. -
Prepare the rind layers:
Roll out a sheet of white clay and a sheet of light green clay on a thin setting. Roll a sheet of deep green clay slightly thicker. -
Wrap the log:
Wrap the white sheet around the red cylinder first, trimming any meaningful overlap to keep the layer even. Smooth the seam with your finger. -
Add the green skin:
Wrap the light green sheet over the white layer, followed by the dark green sheet. This gradient mimics the natural rind transition. -
Reduce the cane:
Gently squeeze and roll the cylinder to reduce its diameter and lengthen it. I like to start from the middle and push outward to avoid trapping air pockets. -
Slice and shape:
Once reduced to your desired size (about 1.5 inches thick), cut the log into thick disks. Cut each disk in half to create wedges. Gently pinch the corners to sharpen the wedge shape.
Smudged Colors?
If your cane layers are smudging while cutting, the clay is too warm. Pop the cane in the fridge for 15 minutes before slicing for crisp, clean lines.
Step 2: Building the Citrus Slices
-
Create the segments:
Mix translucent clay with a tiny bit of orange (or yellow for lemon) clay. Form a log and pinch one side to create a teardrop cross-section. -
Wrap segments:
Roll a very thin sheet of white clay. Wrap your long teardrop log in this white sheet to create the pith lines. -
Assemble the fruit wheel:
Cut the wrapped teardrop log into 8-10 equal lengths. Arrange them in a circle, points facing inward, to form the segmented interior of the citrus. -
Wrap the rind:
Wrap the assembled circle with a layer of white clay, followed by a layer of the colored skin clay (orange, yellow, or pinkish-orange for grapefruit). -
Reduce and slice:
Compress the large cane to eliminate air gaps, then roll to reduce it. Slice into thin rounds with your tissue blade.
Jewelry Twist
Before baking, pierce a small hole near the rind of your fruit slices. Add jump rings after baking to turn them into summery earrings or pendants.
Step 3: Adding Texture and Detail
-
Texture the citrus:
Take your needle tool and gently poke and drag the translucent clay inside the segments. This disturbs the smooth surface and mimics juice vesicles. -
Create watermelon seeds:
Use a needle tool to create small indentations on the surface of your watermelon wedges where seeds would naturally sit. -
Bake the pieces:
Place your slices on a ceramic tile or cardstock. Bake according to your brand of polymer clay instructions (usually 275°F/130°C for 15-30 minutes per 1/4 inch thickness). -
Paint the seeds:
Once cooled, dilute a tiny drop of black acrylic paint. Carefully paint inside the indentations on the watermelon to create seeds. -
Clean up the rind:
If the paint strayed, or if the edges are sharp, lightly sand the pieces under running water using fine-grit sandpaper. -
Glazing for juiciness:
Apply a coat of gloss varnish or UV resin. This is the secret step that makes the translucent clay ‘pop’ and look wet and fresh.
Arranging your freshly baked fruit slices on a tray brings a permanent splash of sunshine to any room.
Strawberry Charms With Seed Texture
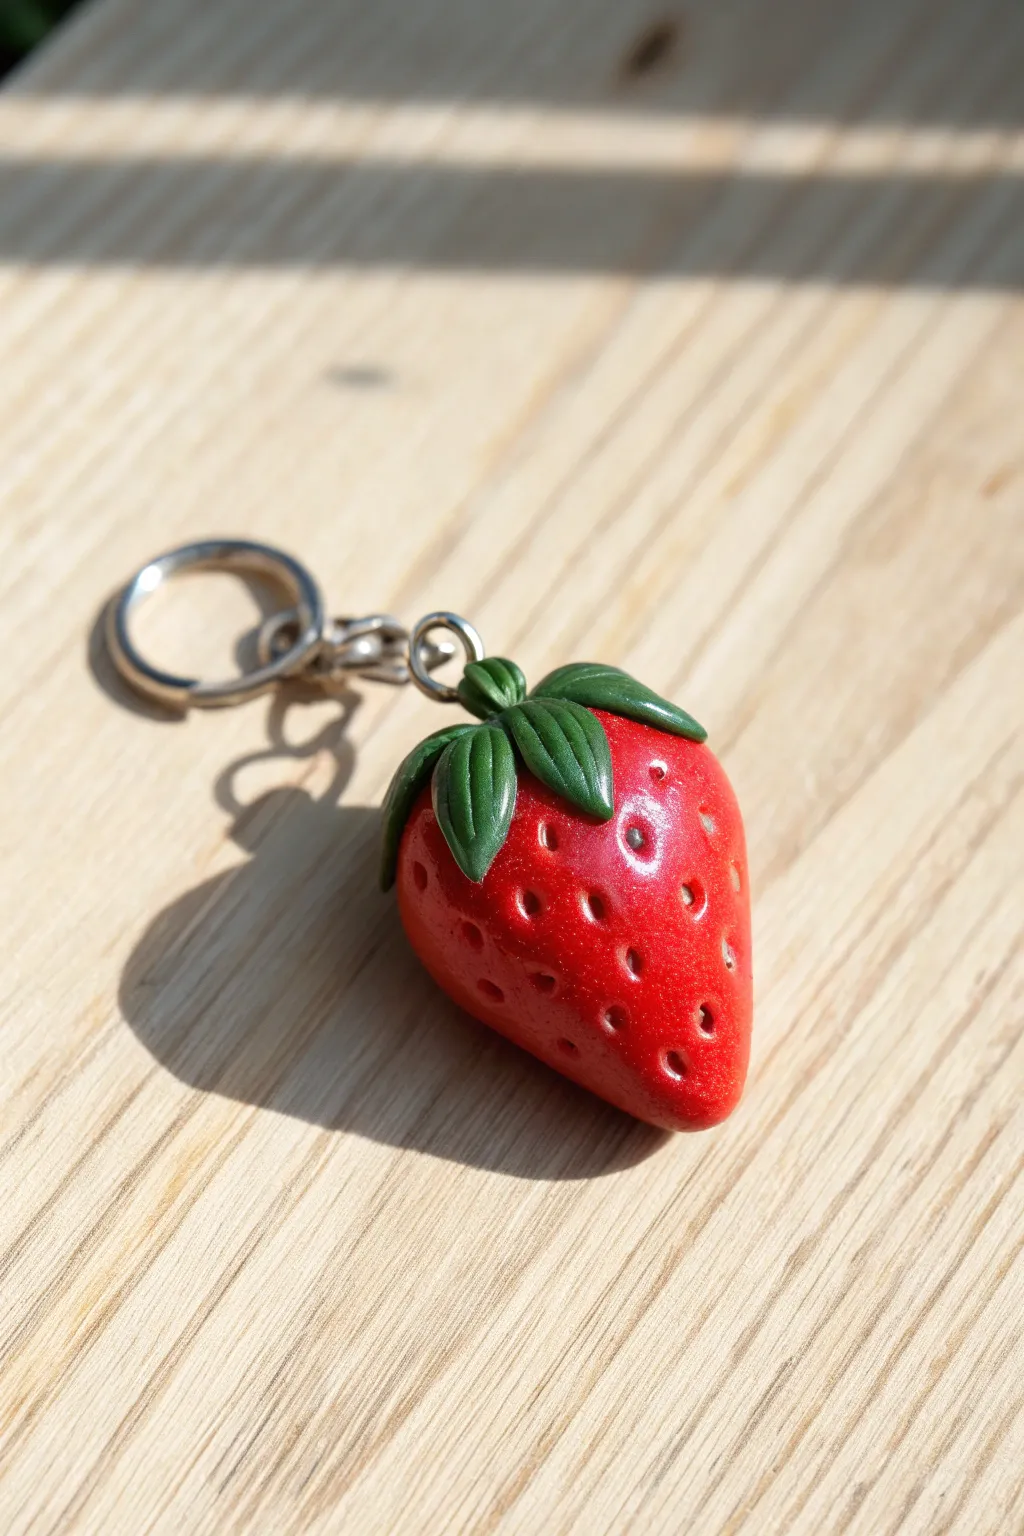
Capture the sweetness of summer with this delightfully realistic strawberry charm made from polymer clay. The key to its charm lies in the detailed seed texture and vibrant, glossy finish.
Step-by-Step Guide
Materials
- Red polymer clay
- Green polymer clay
- Sculpting tools (needle tool or toothpick)
- Eye pin
- Keyring hardware
- Gloss glaze or varnish
- Brush for glazing
- Oven for baking
Step 1: Forming the Berry
-
Condition the clay:
Start by thoroughly conditioning a small amount of red polymer clay until it is soft and pliable. Warm hands make this process much easier. -
Shape the base:
Roll the clay into a smooth ball about the size of a large marble, ensuring there are no cracks or air bubbles. -
Refine the form:
Gently taper one end of the ball to create a rounded cone shape, mimicking the natural silhouette of a strawberry. Flatten the top slightly where the leaves will sit.
Seed Realism
For extra realism, you can gently rub a tiny bit of yellow or light green chalk pastel powder into the seed indentations before baking.
Step 2: Adding Texture
-
Create seed indentations:
Using a needle tool or a fine-point dotting tool, press small indentations all over the surface of the red cone. I find staggering the rows creates a more organic look. -
Deepen the texture:
Make sure the indentations are deep enough to catch the light but not so deep that they distort the overall shape of the berry. -
Smooth the surface:
If handling the clay has left fingerprints, gently buff them out with a tiny bit of baby oil on your finger, being careful not to erase your seed texture.
fingerprints?
If you can’t smooth out fingerprints with just your hands, try lightly brushing the unbaked clay with a soft brush dipped in a tiny amount of rubbing alcohol.
Step 3: Creating the Leaves
-
Prepare green clay:
Condition a small piece of green clay. You want a deep, leafy green color for realism. -
Form teardrops:
Divide the green clay into five or six tiny, equal-sized pieces. Roll each piece into a small teardrop shape. -
Flatten the leaves:
Press each teardrop flat between your fingers to create thin leaf shapes. -
Add leaf details:
Use a craft knife or needle tool to gently score a vein down the center of each leaf for added detail. -
Attach the calyx:
Arrange the leaves in a star pattern on the flattened top of your strawberry. Press them gently onto the red clay so they adhere securely. -
Curving the tips:
Gently curl the tips of a few leaves upward or downward to give the calyx a natural, wind-swept appearance.
Step 4: Assembly and Finish
-
Insert hardware:
Trim an eye pin to the correct length and inserting it into the center of the leaves, pushing it down into the body of the strawberry. -
Secure the pin:
You can add a tiny dab of liquid clay or bake-and-bond to the pin shaft before insertion to ensure it stays put after baking. -
Bake the charm:
Bake the charm according to your clay manufacturer’s instructions. Usually, this is around 275°F (130°C) for 15-30 minutes depending on thickness. -
Cool down:
Allow the strawberry to cool completely before handling. It will be slightly soft when hot but hardens as it cools. -
Apply glaze:
Brush a coat of gloss glaze over the red part of the strawberry to make it look juicy. You can leave the leaves matte for contrast or glaze them too. -
Attach keyring:
Once the glaze is dry, use pliers to open the jump ring on your keyring hardware and attach it to the eye pin loop.
Now you have a freshly picked, durable accessory to brighten up your keys or bag
Stacked Sphere Tree Sculpture
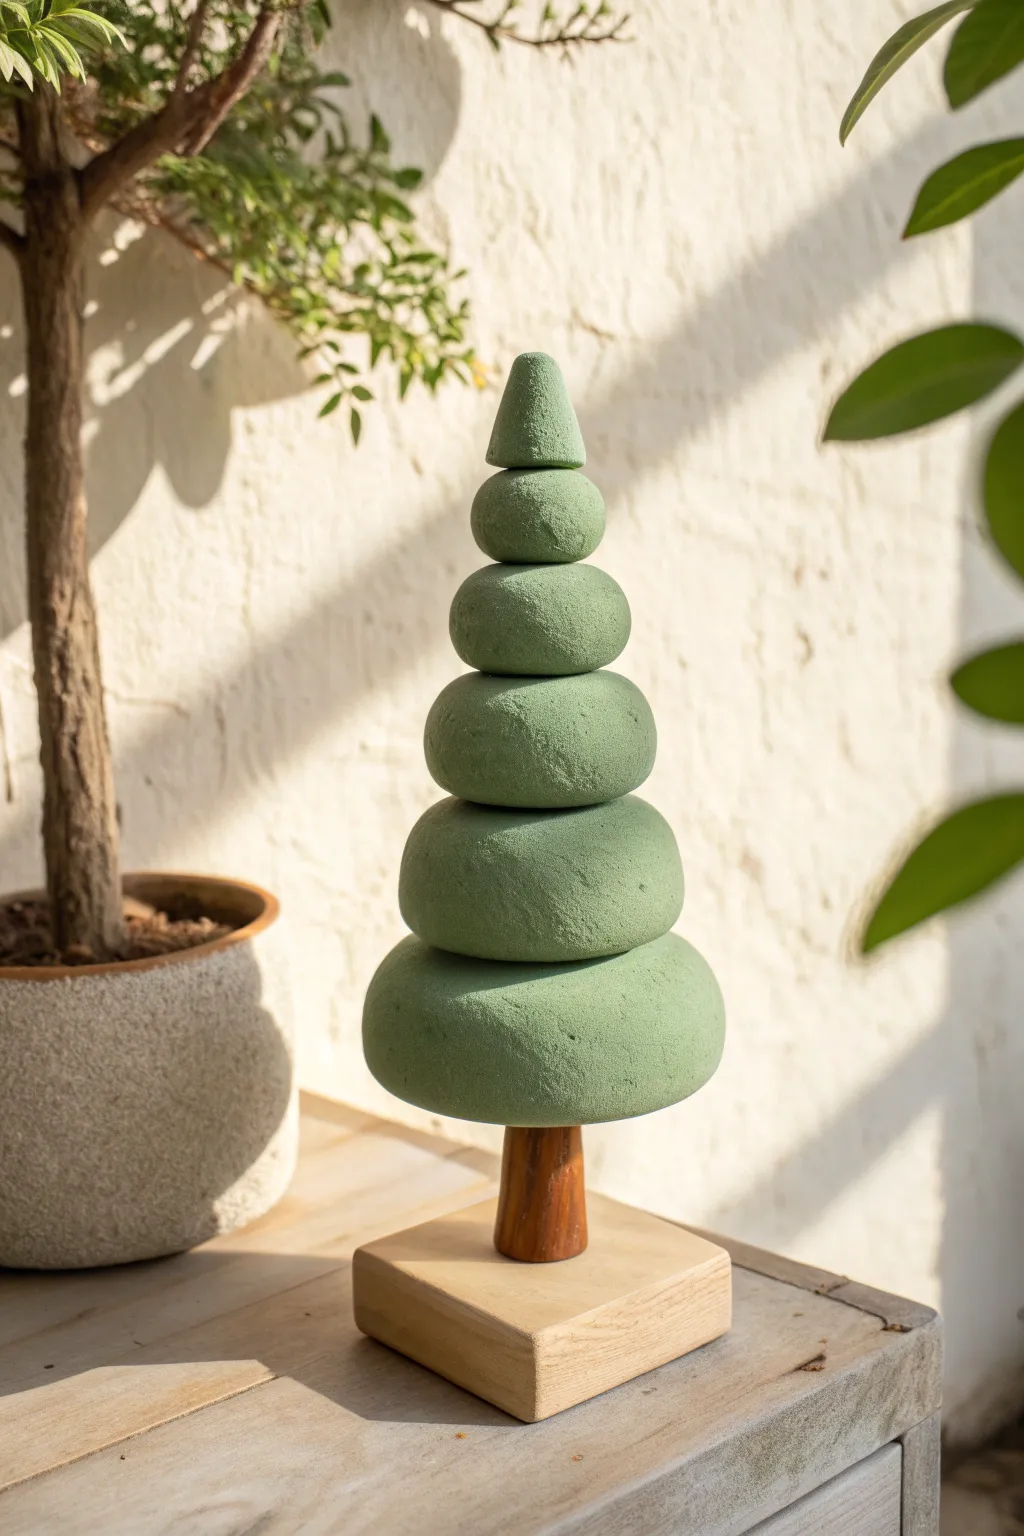
Bring a touch of modern minimalism to your decor with this charming stacked tree sculpture. Its soothing green hue and organic, stone-like texture create a peaceful, nature-inspired accent perfect for any shelf.
How-To Guide
Materials
- Green magic clay (air-dry or polymer)
- Small wooden dowel (approx. 3-4 inches long)
- Wooden square base block
- Wood glue or strong craft adhesive
- Texture sponge or stiff bristle brush
- Rolling tool (optional)
- Wood stain (walnut or similar warm tone)
- Sandpaper (fine grit)
- Sculpting tool or toothpick
Step 1: Base Preparation
-
Prep the wooden stand:
Begin by sanding your wooden square base and the small dowel to ensure they are smooth and free of splinters. This helps the adhesive bond later. -
Stain the wood:
Apply a coat of walnut wood stain to the base and the dowel. Wipe away any excess with a rag and let it dry completely according to the manufacturer’s instructions. -
Assemble the stand:
Once dry, apply a dab of wood glue to the center of the wooden square. Press the dowel firmly onto the glue spot, holding it upright for a moment to ensure it sets straight. Allow this to cure fully before adding weight.
Wobbly Tree?
If your tiers slide or tilt while stacking, use small balls of scrap clay as spacers between the layers to keep them level while the glue sets.
Step 2: Shaping the Tiers
-
Portion the clay:
Take your green magic clay and divide it into six portions. You need strictly graduating sizes—start with a large fist-sized ball for the bottom and decrease the volume significantly for each subsequent piece. -
Form the bottom tier:
Take the largest portion and roll it into a smooth sphere. Gently press it down onto your work surface to flatten it into a thick, rounded disc shape, resembling a river stone. -
Add texture:
Before the clay hardens, tap the surface all over with a texture sponge or a stiff brush. This stippling effect mimics the natural, mossy look seen in the photo. -
Pierce the center:
Using a sculpting tool or a spare dowel of the same diameter as your stand, create a vertical hole through the center of this bottom shape. This will help it slide onto the trunk later. -
Shape the middle tiers:
Repeat the rolling, flattening, and texturing process for the next four sizes of clay balls. Each disc should be slightly smaller and rounder than the one below it. -
Create the topper:
For the smallest, final piece of clay, roll it into a cone shape rather than a disc. Texture it gently, keeping the point relatively sharp to serve as the tree’s peak. -
Dry the components:
Lay all six components flat on a clean surface. I prefer to rotate them occasionally during the drying process to prevent flat spots from forming on the bottom.
Step 3: Assembly & Finishing
-
Test the fit:
Once the clay pieces are firm but not fully cured (if using air dry), or before baking (if polymer), test slide them onto the dowel to ensure the holes align. Adjust if necessary. -
Secure the bottom tier:
Apply a small ring of adhesive around the dowel, about an inch up from the wooden base. Slide the largest clay disc down until it meets the glue. -
Stack upwards:
Apply a small dab of glue on top of the first disc’s center. Slide the second largest disc down the dowel to rest on top. Repeat this for all subsequent disc shapes. -
Attach the peak:
Finally, glue the cone-shaped topper onto the very top of the exposed dowel/stack. Press down gently to secure the entire vertical alignment. -
Final touches:
Inspect the tree for any scuffs. If you missed any texture spots, you can lightly dab them now. Let the entire sculpture sit undisturbed until the adhesive and clay represent a solid unit.
Seasonal Sparkle
Brush a tiny bit of white acrylic paint on the edges of the tiers and sprinkle with ultra-fine glitter while wet for a snowy, frosted winter look.
Place your finished sculpture near a sunny window to let the shadows play across the textured tiers