I’m always amazed how a tiny pinch of clay can turn into something that makes you grin. Here are my favorite cute little clay ideas—simple minis with kawaii-style faces that feel totally doable, even if you’re just getting started.
Tiny Fruit Charms With Cute Faces

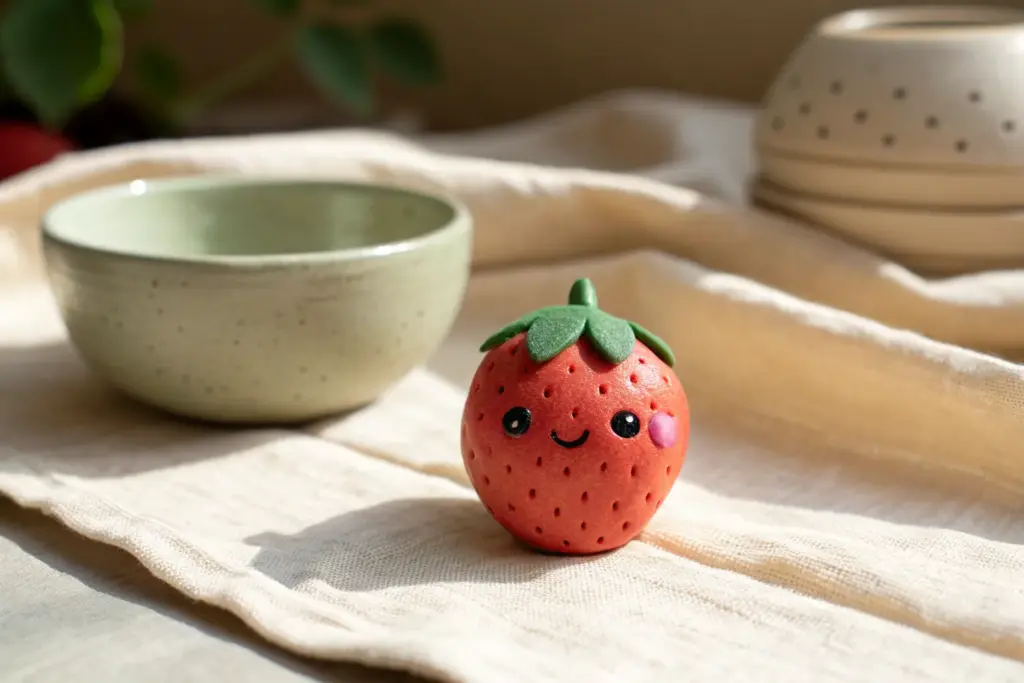
Brighten up your bag or keychain with these incredibly cheerful polymer clay fruit friends. This project features a sweet strawberry, a zesty orange slice, and a lovable avocado, all sporting signature kawaii faces.
Step-by-Step Tutorial
Materials
- Polymer clay (red, bright orange, white, lime green, dark green, brown, black)
- Clay roller or pasta machine
- Small round cutter (approx. 1 inch)
- Needle tool or toothpick
- Ball stylus tool
- Metal jump rings and lobster clasps
- Eye pins or screw eyes
- Gloss glaze or UV resin (optional for shine)
- Clay blade or craft knife
- Oven for baking
Step 1: Sculpting the Orange Slice
-
Prepare the rind:
Start by rolling a small ball of bright orange clay and flattening it gently. Roll a separate, very thin strip of white clay. -
Create the segments:
Shape a small disk of orange clay and cut it into six or eight equal triangular segments using your blade. -
Assemble the cane effect:
Wrap the very thin white strip around each orange triangle segment, then press them back together into a circle to reform the fruit’s interior. -
Wrap the exterior:
Wrap a thin sheet of white clay around the circle of segments, followed by a slightly thicker sheet of the rindy orange clay. Roll gently to smooth the seams. -
Slice and texture:
Cut a thick slice from your cane. Use a needle tool to gently poke texture into the rind area for a realistic citrus skin look. -
Add the face:
Roll two tiny specks of black clay for eyes and press them onto the fruit flesh. Add a tiny black snake of clay for a smile between them.
Clay Cleanliness Pro-Tip
Keep baby wipes or hand sanitizer nearby. Clean your hands thoroughly when switching from dark colors (like the avocado skin) to light colors (like the orange pith) to avoid smudging.
Step 2: Crafting the Strawberry
-
Shape the berry:
Roll a ball of red clay and gently taper one end to create a soft, rounded triangular strawberry shape. Flatten it slightly so it isn’t too spherical. -
Create the leafy top:
Flatten a small piece of green clay. Use a small cutter or blade to cut out a star or flower shape, then press this onto the wide top of the berry. -
Texture the leaves:
Use your needle tool to press a central line into each leaf segment for detail. -
Add seeds and face:
First, place the face near the bottom tip—two black dots for eyes and a tiny smile. Then, use a needle tool to poke small indentations all over the red surface, adding tiny black specks of clay into some holes for seeds.
Level Up: Scented Charms
Mix a tiny drop of essential oil—sweet orange or strawberry fragrance—into the clay before shaping. Your charms will smell as sweet as they look.
Step 3: Forming the Avocado
-
Shape the body:
Mix lime green clay with a tiny bit of yellow for the flesh color. Shape it into a classic pear silhouette and flatten it into a thick slab. -
Add the skin:
Roll a thin strip of dark green clay. Wrap this carefully around the entire perimeter of your light green pear shape to create the skin. -
Place the pit:
Roll a ball of brown clay and flatten it into a dome. Press this firmly into the lower, wider part of the avocado. -
Create the expression:
For this charm, place the eyes and smile directly onto the light green flesh, just above the pit. I find placing the face lower gives it a sweeter look.
Step 4: Finishing Touches
-
Highlight the eyes:
Using the tip of a needle or a very small ball tool, place a microscopic dot of white paint or clay on each black eye to create a ‘sparkle’ reflection. -
Attach hardware:
Insert an eye pin or screw eye into the top center of each fruit charm. Ensure it goes deep enough to be secure. -
Bake:
Bake the charms according to your clay manufacturer’s instructions (usually 275°F/135°C for 15-30 minutes). Let them cool completely. -
Glaze and assemble:
Once cool, coat the charms in a gloss glaze or clear UV resin for a durable, shiny finish. Finally, attach jump rings and lobster clasps to the eye pins.
Now you have a trio of fruity companions ready to hang on your zippers or keys


Mini Animal Keychains in Chibi Shapes
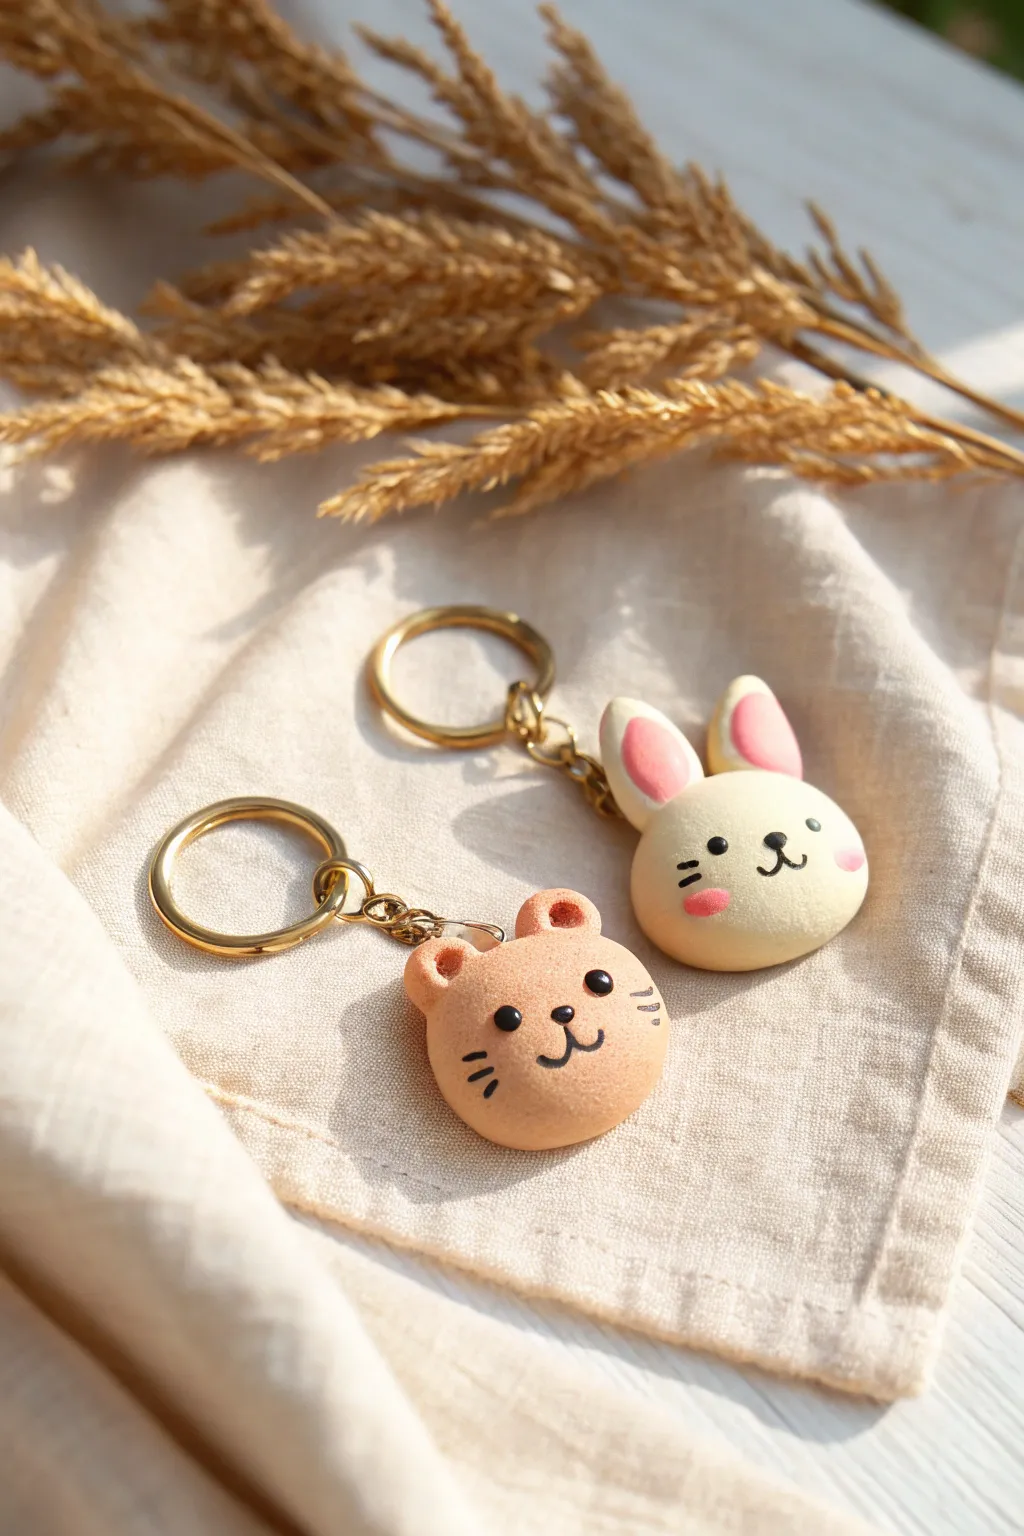
These adorable animal keychains feature a soft, toasted cookie texture and sweet, minimalist faces that make them perfect for gifting. Whether you choose the gentle bear or the cheerful bunny, the result is a durable and charming accessory.
Step-by-Step
Materials
- Polymer clay (tan/beige and cream/white)
- Black polymer clay or black acrylic paint
- Pink soft pastel chalk (for cheeks)
- Pink polymer clay (for bunny ears)
- Gold keychain findings with screw-eye pins
- Pointed sculpting tool or toothpick
- Soft paintbrush
- Old toothbrush or stiff bristle brush
- Oven (for baking)
- Gloss glaze (optional for eyes)
Step 1: Shaping the Base
-
Condition the clay:
Start by kneading your tan clay (for the bear) or cream clay (for the bunny) until it is soft and pliable. This prevents cracks during baking. -
Form the head:
Roll a sphere of clay regarding the size of a walnut, then gently press it onto your work surface to flatten the back slightly. You want a smooth, domed shape like a cookie. -
Texture the surface:
Take an old toothbrush or a stiff bristle brush and gently tap it all over the surface of the dome. This creates that lovely ‘baked cookie’ texture visible in the photo.
Step 2: Adding Ears
-
Create bear ears:
For the bear, roll two tiny balls of the same tan clay. Press them gently onto the top corners of the head. -
Indent the bear ears:
Use a ball tool or the rounded end of a paintbrush handle to press an indentation into the center of each bear ear. -
Form bunny ears:
For the bunny, roll two small logs of cream clay and taper the ends. Flatten them slightly to create long petal shapes. -
Add pink inner ears:
Roll tiny amounts of pink clay into smaller teardrops and press them onto the cream bunny ears. Attach the ears securely to the top of the head. -
Blend the seams:
Use a sculpting tool to gently smooth the clay where the ears join the head so they don’t pop off later. Re-texture these areas with your toothbrush if they get too smooth.
Stay Clean
Keep baby wipes nearby when switching clay colors. White clay picks up dust easily, so wipe your hands and tools before handling the cream bunny.
Step 3: Hardware & Baking
-
Insert the eye pin:
Take a screw-eye pin and twist it carefully into the precise top center of the head. I find removing it, adding a tiny dot of liquid clay or glue, and re-inserting it makes it extra secure. -
Bake the pieces:
Place your animals on a baking sheet lined with parchment paper. Bake according to the manufacturer’s instructions on your clay package (usually 275°F/135°C for 15-30 minutes). -
Cool completely:
Let the pieces cool down fully before painting. Painting on hot clay can make the paint dry clumpily.
Make It a Charm
Before baking, add a tiny extra clay flower or a miniature clay bowtie to the bottom of the bear’s neck for extra personality.
Step 4: Bringing the Face to Life
-
Paint the eyes:
Using a very fine detail brush and black acrylic paint (or a black paint pen), make two small, solid black circles for the eyes. Space them widely apart for that cute ‘chibi’ look. -
Draw the nose and mouth:
Paint a tiny nose between the eyes, then draw a ‘3’ shape (sideways) or a simple anchor shape downwards to create the mouth. -
Add whiskers:
With an extremely light touch, paint two or three short, horizontal lines on each cheek for whiskers. -
Apply blush:
Scrape a little powder from a pink soft pastel chalk stick. Use a soft, dry paintbrush to dust this pink powder onto the cheeks for a soft, airbrushed blush effect. -
Add highlights:
Dip the tip of a toothpick into white paint and add a tiny dot to the upper corner of each black eye to give them a sparkle. -
Seal the eyes:
Once the paint is totally dry, apply a tiny drop of gloss glaze just to the black eyes and nose to make them look wet and shiny. -
Attach the hardware:
Using two pairs of pliers, open the jump ring on your gold keychain finding, loop it through the eye pin on the animal’s head, and close it securely.
With your new little friends complete, attach them to your bag or keys and enjoy their cheerful company


Cute Little Mushroom Buddies
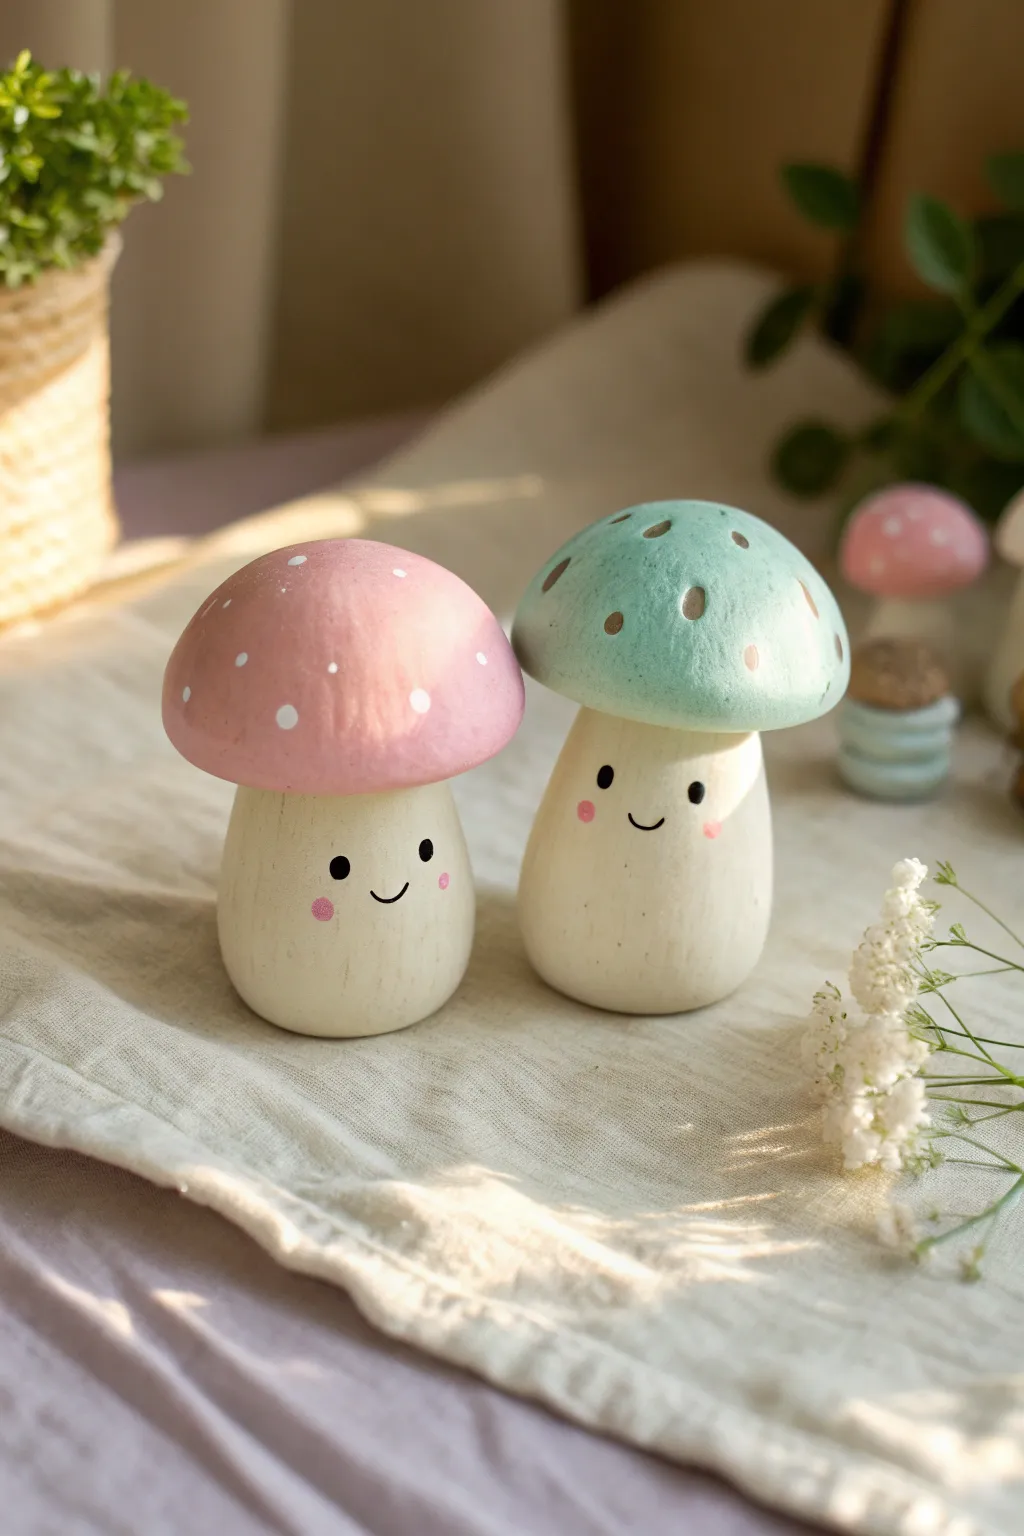
These adorable desktop companions bring a touch of woodland magic to any space, featuring soft pastel caps and endearing hand-painted smiles. Crafted from simple wooden shapes, these mushroom buddies are a delightful beginner project that combines basic painting with sweet character design.
Detailed Instructions
Materials
- Unfinished wooden mushroom shapes (approx. 3-4 inches tall)
- Acrylic craft paint (pastel pink, mint green, cream/off-white, black, rose pink, white)
- Flat paintbrush (medium size)
- Fine detail paintbrush (size 0 or 00)
- Dotting tool or toothpick
- Fine-grit sandpaper (optional)
- Matte finish clear sealant spray or varnish
- Palette or small dish for mixing
Step 1: Preparing the Base
-
Inspect and smooth:
Begin by examining your wooden mushroom shapes for any rough patches or splinters. If needed, give them a quick rub with fine-grit sandpaper to ensure a smooth canvas for your paint. -
Wipe clean:
Use a dry cloth or tack cloth to remove any sawdust created during sanding so it doesn’t get trapped in your paint layers. -
Mix the stalk color:
Create a warm, creamy beige color for the mushroom stalks. Mix a generous amount of white acrylic paint with a tiny drop of brown or yellow ochre to get that natural wood look. -
Paint the stalks:
Using your flat medium brush, apply the cream color to the entire stem of the mushroom, stopping just under the cap. Don’t worry about being perfect near the top seam; we will cover that later. -
Dry and repeat:
Let this first coat dry completely for about 15-20 minutes. Apply a second coat to ensure the wood grain is fully covered and the finish is opaque.
Uneven Lines?
If your hand shakes while painting the smile, try resting your pinky finger on the dried mushroom cap for stability. You can also use a fine-tip black paint pen instead.
Step 2: Adding the Colorful Caps
-
Paint the pink cap:
Select your first mushroom and paint the rounded top with a soft pastel pink. Use smooth strokes starting from the top center and working down toward the rim. -
Clean up the edge:
Carefully paint the underside lip of the cap where it meets the stalk. You might need to switch to a smaller brush here to keep a clean line without getting pink on the cream stalk. -
Paint the mint cap:
Take the second mushroom and repeat the process using a lovely mint green shade. I find putting the mushroom on a jar lid elevates it, making it easier to rotate while painting perfectly round edges. -
Let the caps cure:
Allow both mushroom caps to fully dry. Acrylic heavy body paints may take up to 30 minutes to be touch-dry.
Texture Trick
To mimic the slight texture seen in the photo, use a sponge to dab on the final coat of the stalk paint rather than brushing it. This creates a soft, organic finish.
Step 3: Bringing Them to Life
-
Dot the pink mushroom:
Dip a dotting tool or the back end of a paintbrush into white paint. Gently press random dots all over the pink cap, varying the spacing for a natural look. -
Dot the mint mushroom:
For the green mushroom, use a contrasting color like a dark beige, gold, or soft brown. Apply these dots similarly to the pink one. -
Draft the faces:
Once the stalks are completely dry, very lightly use a pencil to mark where the eyes and mouth will go. Keep them low on the stalk for that extra cute aesthetic. -
Paint the eyes:
Using your finest detail brush and black paint, create two small oval or round eyes. To get really clean edges, reload your brush frequently. -
Add the smile:
Paint a tiny, thin U-shape between the eyes. A swift, confident stroke usually results in a smoother line than trying to go slowly. -
Blush the cheeks:
Mix a diluted rose pink paint or use a tiny bit of dry brush technique. Dab two soft pink circles just below and outside the eyes to give them rosy cheeks. -
Final highlights:
For an extra sparkle, add a microscopic white dot inside the black of the eyes if you like, though the simple black look is also charming. -
Seal the deal:
Once absolutely everything is dry (give it an hour just to be safe), take your mushrooms outside and spray them with a matte clear coat to protect the paint.
Set your new little friends on a shelf or desk where they can beam their tiny smiles at you all day long


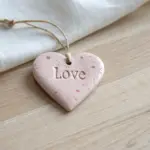
Little Heart Pocket Tokens With Blushing Faces
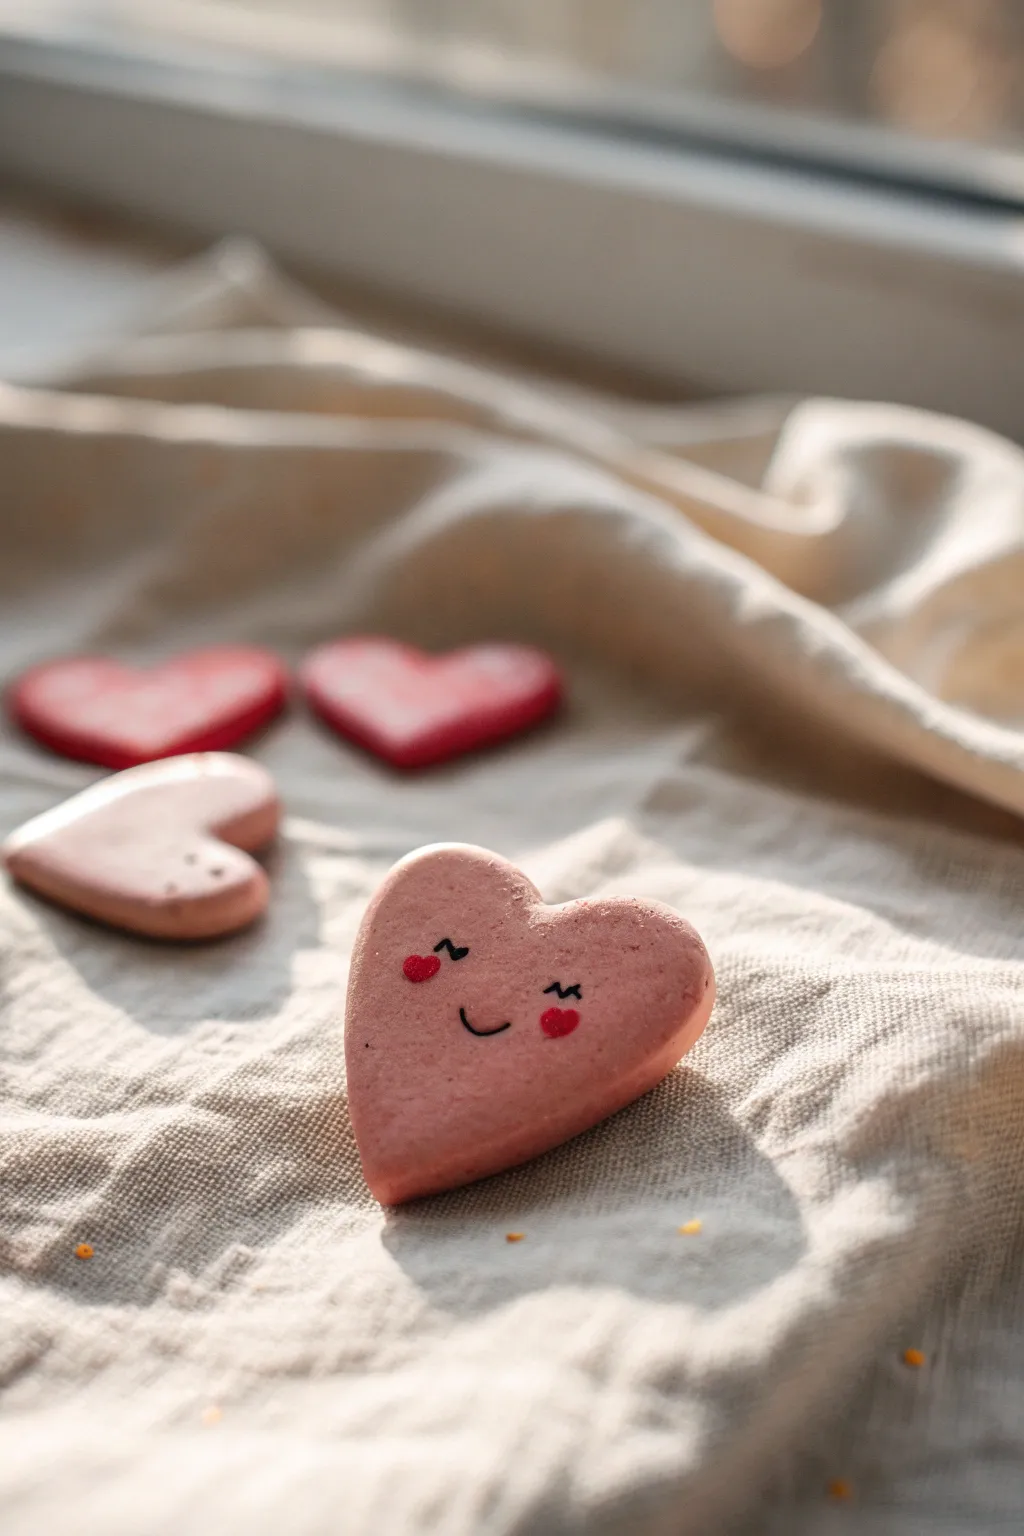
These sweet little pocket tokens are perfect for gifting to loved ones as a tiny reminder of your affection. Crafted with soft pink clay and finished with adorable hand-painted expressions, they have a smooth, matte texture that feels lovely to hold.
How-To Guide
Materials
- Polymer clay (soft pink or dusty rose)
- Heart-shaped cookie cutter (approx. 1-1.5 inches)
- Rolling pin (acrylic or glass works best)
- Parchment paper or baking tile
- Fine-grit sandpaper (400-600 grit)
- Black fine-tip acrylic paint pen or permanent marker
- Red acrylic paint
- Small dotting tool or toothpick
- Matte varnish or sealant (optional)
Step 1: Shaping the Hearts
-
Condition the clay:
Begin by warming the pink polymer clay in your hands. Knead and squish it repeatedly until it becomes soft, pliable, and free of any crumbly texture. -
Roll it out:
Place the ball of clay onto your parchment paper or work surface. Use your rolling pin to flatten it into an even sheet. Aim for a thickness of about 1/4 inch (6mm) so the hearts feel substantial and durable. -
Cut the shapes:
Press your heart-shaped cutter firmly into the clay sheet. Wiggle it slightly before lifting to ensure a clean cut. -
Smooth the edges:
Gently pop the heart out of the cutter. Use the pad of your finger to delicately smooth the sharp edges created by the cutter, giving the heart a softer, more pillowy look. -
Inspect surfaces:
Check the front surface for any fingerprints. If you see any, lightly brush over them with a little baby oil or cornstarch on your finger to buff them away.
Step 2: Baking and Refining
-
Bake the pieces:
Arrange your hearts on a baking sheet lined with parchment paper. Bake according to the specific temperature and time instructions on your package of polymer clay (usually around 275°F/135°C for 15-30 minutes per 1/4 inch). -
Let them cool:
Once the baking time is up, remove the tray from the oven. Do not touch the hearts yet; let them cool completely on the tray to harden properly. -
Sand for smoothness:
If there are any rough spots or fingerprints left after baking, wet your fine-grit sandpaper and gently sand the heart in a circular motion under running water. -
Dry thoroughly:
Pat the sanding residue off with a soft cloth and let the hearts dry completely before moving to the decoration phase.
Clean Clay Tip
Keep baby wipes nearby while working. Dust and dark lint love sticking to light pink clay, so wipe your hands and tools often to keep the color pure.
Step 3: Adding Personality
-
Plan the face:
Visualize where you want the face to go. Placing the features slightly lower on the heart often makes it look cuter and more ‘chibi’ style. -
Draw the eyes:
Using your fine-tip black marker or paint pen, draw two small, curved lines for closed, happy eyes. You can add tiny eyelashes at the outer corners for extra charm. -
Add the smile:
Draw a small, simple ‘U’ shape right between the eyes for the mouth. Keep the line weight consistent with the eyes. -
Mix the blush color:
Squeeze a tiny dot of red acrylic paint onto a palette. You ideally want a vibrant red that stands out against the dusty pink clay. -
Apply the cheeks:
Dip your dotting tool or the tip of a toothpick into the red paint. Gently stamp a small heart or oval shape on each cheek, just below the outer corners of the eyes. -
Let paint dry:
Allow the painted features to dry completely. Acrylic paint dries fast, but give it at least 20 minutes to be safe. -
Seal the token:
To protect the face from rubbing off in a pocket, apply a thin coat of matte varnish over the entire heart. I usually do one side, let it dry, and then flip it to do the other.
Smudged Marker?
If you mess up the drawing, don’t panic. Put a little rubbing alcohol on a Q-tip and gently wipe the ink away. Let it dry, then try drawing the face again.
Now you have a handful of smiling hearts ready to brighten someone’s day

The Complete Guide to Pottery Troubleshooting
Uncover the most common ceramic mistakes—from cracking clay to failed glazes—and learn how to fix them fast.
Mini Cat Paw Trinket Dishes With a Smiling Bean Pad
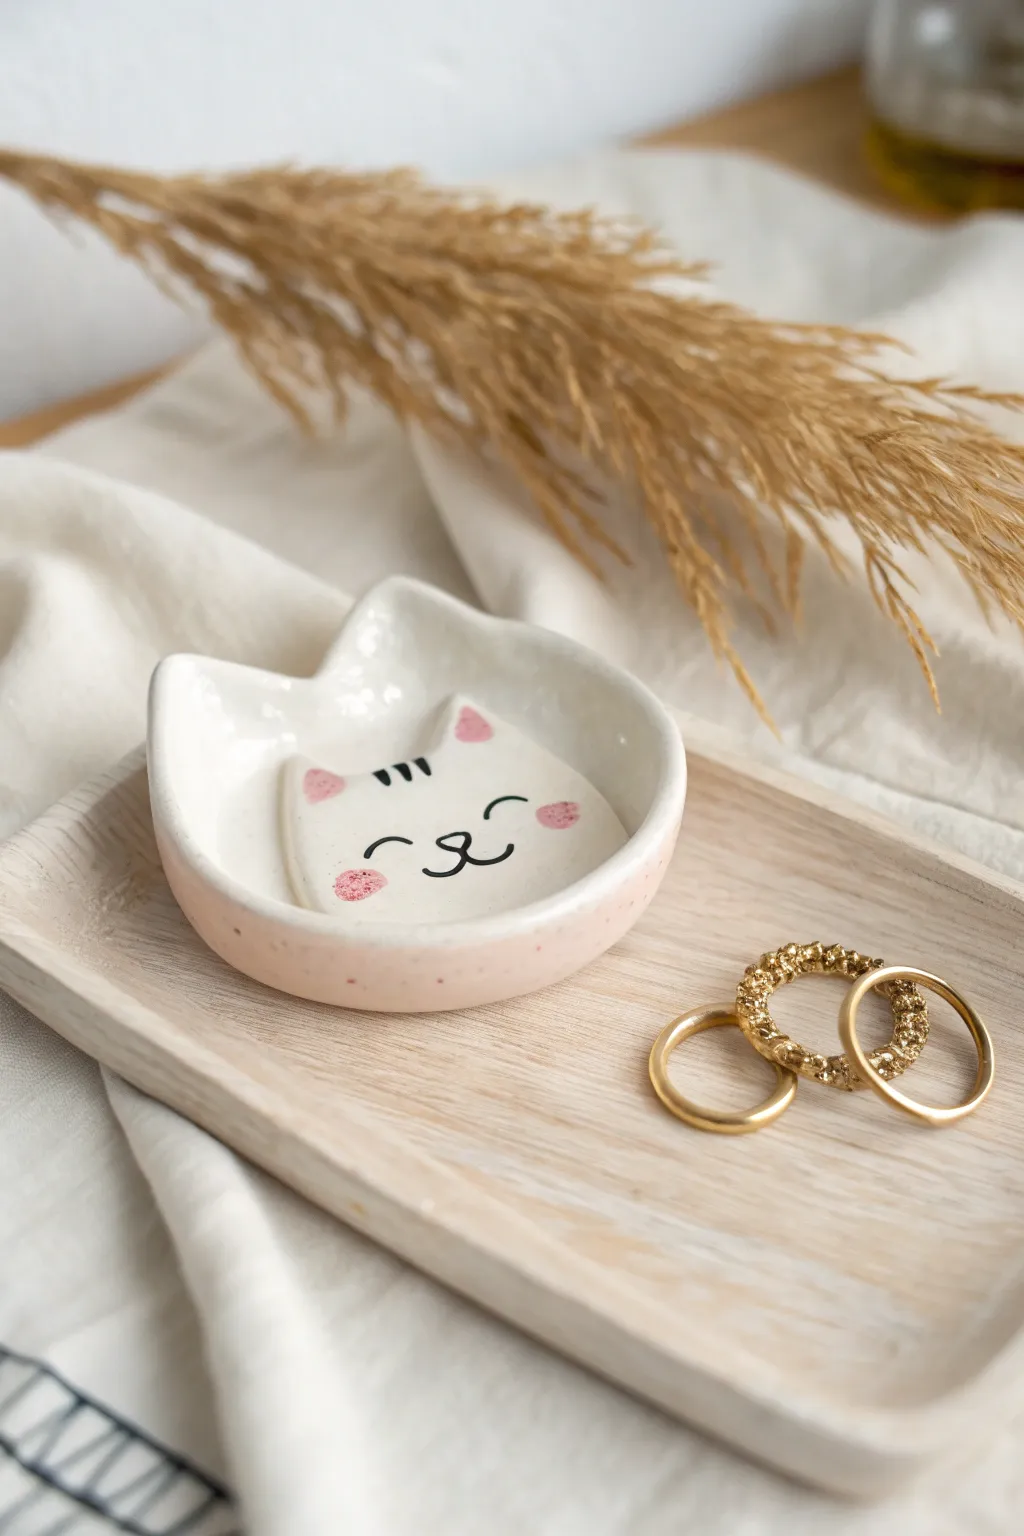
This adorable trinket dish features a gentle cat silhouette with a sweet, raised face inside, perfect for holding your favorite rings. Its soft pink speckled exterior and glossy white interior give it a modern, handmade ceramic charm.
Step-by-Step Tutorial
Materials
- White air-dry clay or polymer clay
- Rolling pin
- X-Acto knife or clay craft knife
- Small bowl or sponge for shaping
- Water (for smoothing)
- Sandpaper (fine grit)
- Acrylic paints (White, Pale Pink, Black used here)
- Fine detail paintbrush
- Medium flat paintbrush
- Gloss varnish or resin (for the ceramic look)
- Toothbrush (for speckling)
- Small round cutter (optional, for the face)
Step 1: Shaping the Base
-
Roll the clay:
Begin by conditioning your white clay until it is soft and pliable. Roll it out into a smooth, even slab that is approximately 1/4 inch thick to ensure durability. -
Cut the silhouette:
Using a needle tool or an X-Acto knife, freehand cut a rounded shape with two triangular ears at the top. You can sketch this on paper first to use as a template if you want perfect symmetry. -
Form the curve:
Gently lift the clay slab and press it into a shallow bowl or cup a soft sponge underneath it to create a concave dish shape. Smooth out the edges with a bit of water on your finger to remove any harsh cuts. -
Refine the ears:
While curving the dish, make sure the ears remain distinct. Pinch them slightly at the peaks to ensure they don’t get lost in the curvature of the bowl/rim.
Smooth Seams
Use a barely damp paintbrush to smooth the seam where the raised face meets the bowl. It acts like a tiny eraser for joining distinct clay connection lines.
Step 2: Adding the Face Detail
-
Create the face pad:
Roll out a smaller, thinner piece of clay. Cut out a shape that mirrors the main cat silhouette but smaller—essentially a rounded face shape with ears. -
Attach the face:
Score the back of this small piece and the center of your dish (scratch cross-hatch marks). Apply a tiny bit of water or slip (clay paste) and press the face piece firmly into the center of the dish. -
Blend the edges:
To make it look like one cohesive ceramic piece, use a modeling tool or your finger to gently smooth the bottom edge of the face pad into the dish, leaving the top edges slightly raised for dimension. -
Dry completely:
Let the piece dry fully according to your clay’s instructions. For air-dry clay, I usually leave it for 24-48 hours, flipping it occasionally so the bottom dries too. -
Sand until smooth:
Once bone dry, take fine-grit sandpaper and gently sand the rim and surface. You want to eliminate any fingerprints or rough textures to mimic the smoothness of fired porcelain.
Step 3: Painting and Glazing
-
Base coat interior:
Paint the entire interior of the dish, including the raised face, with a creamy white acrylic paint. You may need two thin coats for opaque coverage. -
Paint the exterior:
Mix a very pale, soft pink shade. Paint the outside and the top rim of the dish with this color. -
Add speckles:
Dilute a slightly darker pink or reddish-brown paint with a drop of water. Dip an old toothbrush into it and flick the bristles with your thumb to spray tiny speckles onto the pink exterior. -
Paint facial features:
Using your finest detail brush and black paint, carefully draw the closed eyes, nose, mouth, and forehead stripes on the raised face pad. -
Add blush and ears:
Use a diluted pink paint to add soft rosy cheeks and fill in the inner triangles of the ears on the raised face section. -
Seal for shine:
Finish by applying a high-gloss varnish or a thin layer of UV resin over the entire piece. This is the secret to making air-dry clay look like glazed kiln-fired ceramic.
Warped Drying?
If the clay dish starts to curl oddly while drying, weigh down the center gently with a small bag of rice or sand to keep the bottom flat.
Place this sweet little dish on your vanity to keep your smallest treasures safe and sound
Smiley Cloud and Star Fridge Magnets
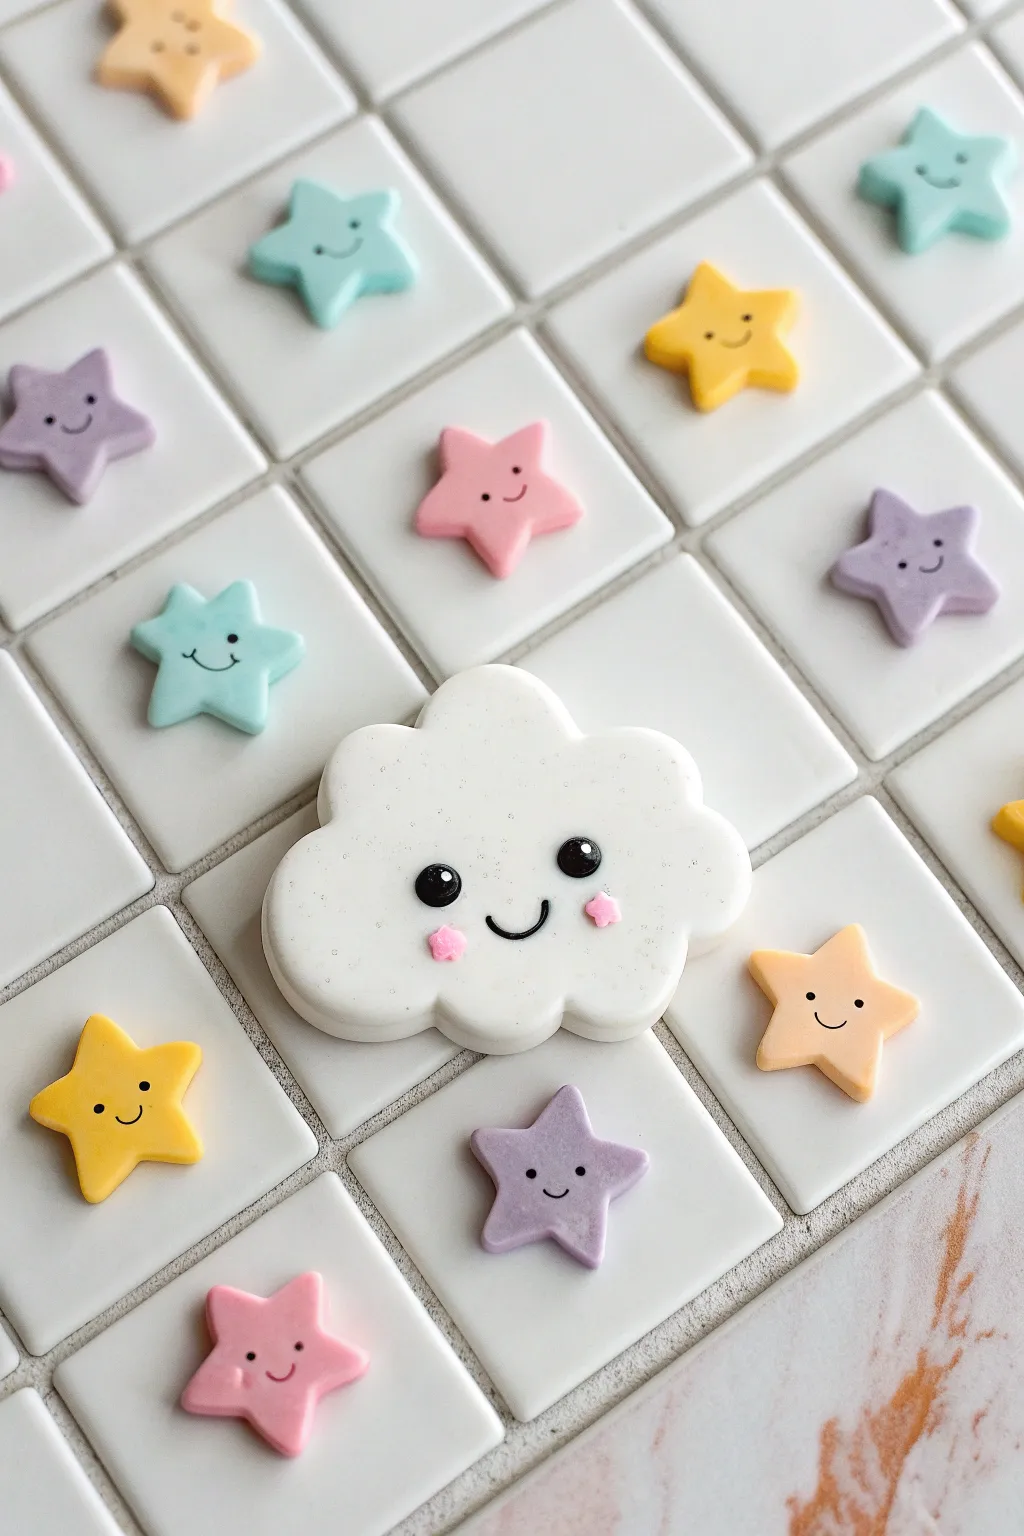
Brighten up your fridge or magnetic board with this adorable set featuring a centerpiece happy cloud and a constellation of pastel stars. The smooth, matte finish and kawaii expressions make these simple shapes irresistibly cute.
Step-by-Step
Materials
- Polymer clay (white, pastel pink, pastel purple, pastel yellow, mint green, black)
- Clay roller or pasta machine
- Cloud cookie cutter (approx. 2.5 inches)
- Small star cookie cutter (approx. 1 inch)
- Needle modeling tool or toothpick
- Small ball tool
- Dotting tool or pinhead
- Baking sheet with parchment paper
- Oven
- Strong craft glue or E6000
- Round ferrite or neodymium magnets
- Gloss glaze (optional for eyes)
Step 1: Shaping the Cloud
-
Condition the white clay:
Begin by kneading your white polymer clay until it is soft and pliable, ensuring there are no air bubbles trapped inside. -
Roll out the slab:
Roll the clay out onto a clean work surface to a thickness of about 1/4 inch (6mm). You want it substantial enough to look puffy. -
Cut the shape:
Press your cloud cookie cutter firmly into the clay. Give it a little wiggle before lifting to get a clean cut. -
Soften the edges:
Gently run your finger along the cut edges of the cloud to round them off slightly, removing that sharp ‘cookie cutter’ look for a softer, pillowy appearance.
Step 2: Creating the Stars
-
Prepare pastel colors:
Condition your pastel yellow, pink, purple, and mint green clays. If you only have primary colors, mix them with a large amount of white to achieve soft candy hues. -
Cut the stars:
Roll each color out to the same 1/4 inch thickness as the cloud. Cut several stars from each color using the small star cutter. -
smooth the points:
Like the cloud, gently tap the points of each star with your finger to slightly round them, making them look friendlier and less sharp.
Clean Clay Tip
Keep baby wipes nearby! Clean your hands and tools thoroughly between colors, especially before touching the white cloud, to prevent color transfer.
Step 3: Adding Faces & Details
-
Mark eye placement:
Use your needle tool to lightly mark two dots where you want the eyes to go on the cloud and all the stars. -
Create eye sockets:
Press a small ball tool into the marked spots to create shallow indents. This creates a cozy seat for the black clay eyes. -
Insert the eyes:
Roll tiny balls of black clay. Place them into the sockets and gently flatten them so they are flush with the surface but slightly rounded. -
Add the smiles:
Roll extremely thin ‘snakes’ of black clay. Cut tiny segments and carefully curve them into U-shapes, pressing them onto the clay below the eyes. -
Cloud cheeks:
For the cloud, take two tiny balls of pink clay. Flatten them into tiny star shapes using a needle tool or knife, and press them onto the cheeks. -
Star blush:
The stars have simpler details; just use the needle tool to indent small smile lines at the corners of their mouths for extra expression. -
Texture finishes:
Here I like to inspect the surfaces for fingerprints and gently buff them away with a drop of baby oil on a finger before baking.
Glittery Skies
Mix translucent clay with white glitter and use it for the cloud to create a subtle, magical shimmer that catches the light.
Step 4: Baking & Assembly
-
Bake the clay:
Arranged your pieces on parchment paper and bake according to your clay manufacturer’s instructions (usually 275°F/135°C for 15-30 minutes depending on thickness). -
Cool down:
Let the pieces cool completely inside the oven with the door open to prevent thermal shock cracks. -
Highlight the eyes:
Once cool, add a tiny dot of white paint or a drop of gloss glaze to the black eyes to give them a lively sparkle. -
Attach magnets:
Turn the pieces over. Apply a dab of strong craft glue to the back center of each piece and press a magnet firmly into the glue. -
Final cure:
Allow the glue to cure fully (usually 24 hours) before sticking your new friends to the fridge.
Now you have a cheerful sky scene ready to hold up your important notes and photos


What Really Happens Inside the Kiln
Learn how time and temperature work together inside the kiln to transform clay into durable ceramic.
Friendly Little Ghost Figurines
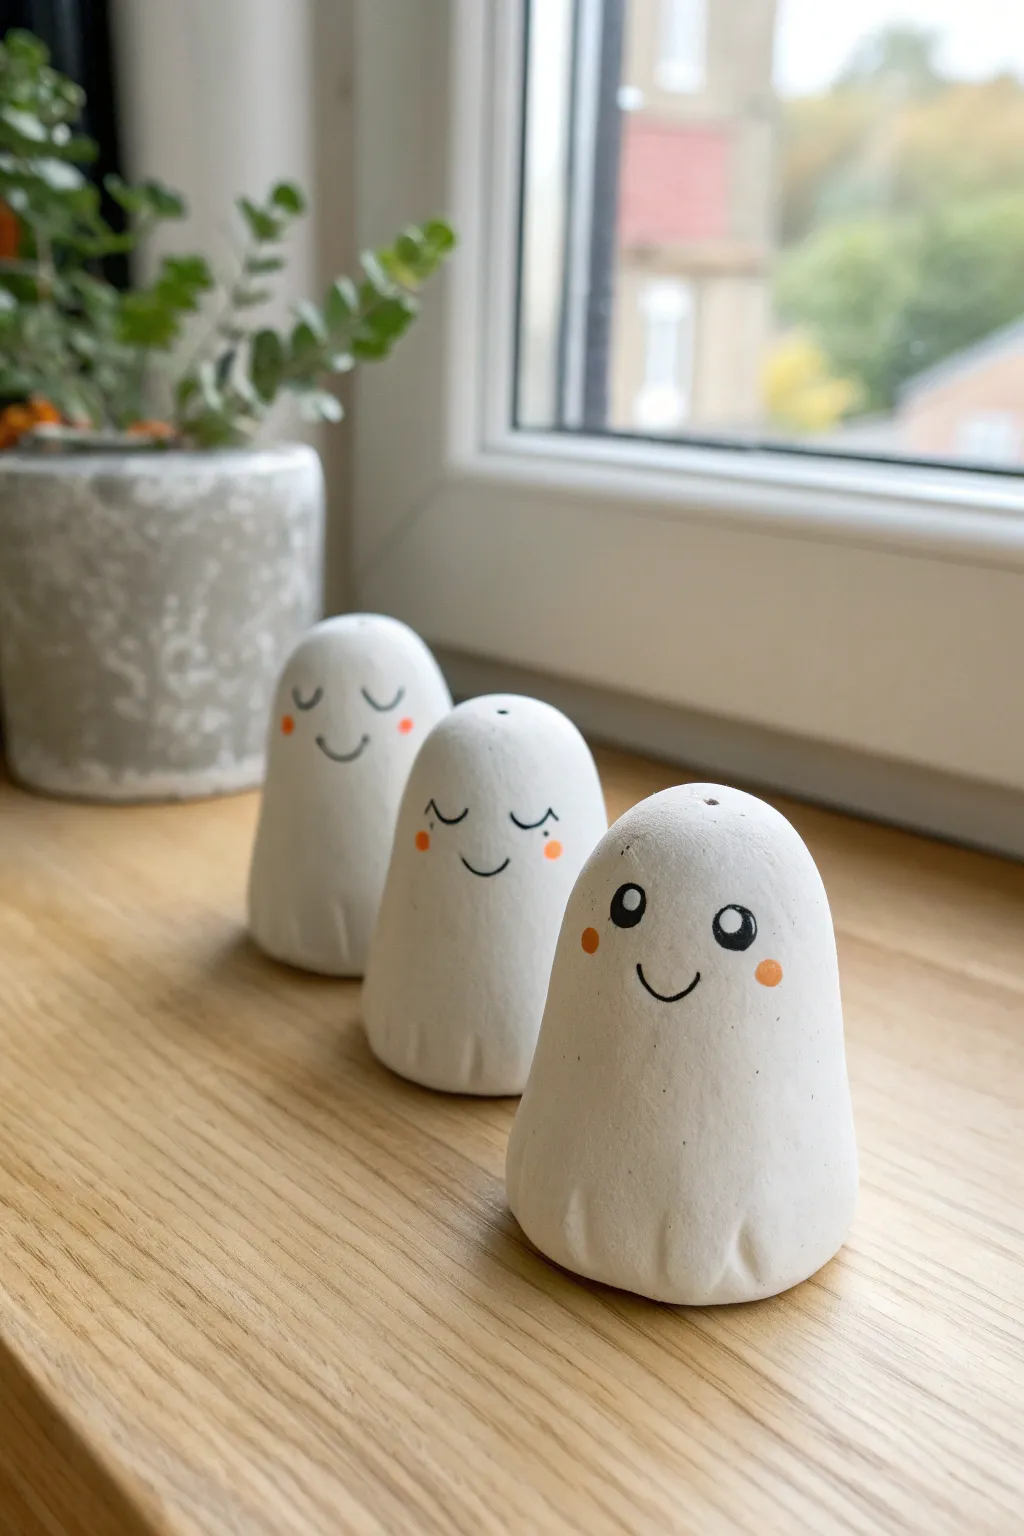
These charming, palm-sized poltergeists are the perfect introductory project for working with air-dry or polymer clay. Their minimal, rounded shapes and sweet expressions make for a spooky-cute addition to any windowsill or shelf.
Step-by-Step Guide
Materials
- White sculpting clay (air-dry or white polymer)
- Acrylic rolling pin
- Small round sculpting tool or spoon handle
- Sandpaper (fine grit)
- Black acrylic paint or fine-tip paint pen
- Orange acrylic paint or marker
- Small detail paintbrush
- Water cup and paper towel
Step 1: Shaping the Bodies
-
Prepare the clay:
Start by conditioning your clay. If you are using polymer clay, knead it in your hands until it becomes soft and pliable. For air-dry clay, ensure it is moist and free of cracks. -
Divide portions:
Separate your clay into three equal portions, each about the size of a golf ball. Roll each piece into a smooth sphere between your palms to remove any initial seams. -
Form the cylinder:
Gently roll one sphere on your work surface into a stout cylinder. You want the base to be slightly wider than the top, creating a subtle taper. -
Round the head:
Smooth over the top of the cylinder with your thumb to create a nice, rounded dome shape. This will be the ghost’s head. -
Flatten the base:
Tap the bottom of the ghost firmly against your table to create a flat, stable base so the figurine stands upright without wobbling. -
Create the ruffled hem:
Using a small sculpting tool or the rounded handle of a spoon, press vertical indentations around the very bottom edge of the ghost. These little grooves mimic the folds of a sheet. -
Smooth the surface:
Dip your finger in a tiny bit of water (for air-dry clay) or baby oil (for polymer) and run it over the entire surface to eliminate fingerprints and imperfections. -
Repeat the process:
Repeat these shaping steps for the remaining two ghosts. Try varying the height or tilt slightly to give each one a unique personality.
Step 2: Drying and Refining
-
Let them cure:
If using air-dry clay, leave the ghosts to dry for 24-48 hours in a cool, dry place. For polymer clay, bake according to the manufacturer’s instructions on the packet. -
Check for hardness:
Once fully cured or cooled, the clay should be hard to the touch. I like to tap them gently with a fingernail; a solid ‘click’ sound usually means they are ready. -
Sand imperfections:
Inspect your ghosts for any rough spots or bumps. Lightly sand these areas with fine-grit sandpaper until the surface is buttery smooth. -
Dust off:
Wipe the figurines down with a slightly damp cloth to remove any sanding dust before you begin painting.
Smooth Operator
Keep a small bowl of water nearby while sculpting. Wetting your fingers slightly helps smooth out cracks instantly before the clay begins to dry.
Step 3: Painting the Faces
-
Plan the expressions:
Decide on the expressions for each ghost. The photo shows one with open eyes, and two with sleepy, closed eyes. You can sketch lightly with a pencil first if you’re nervous. -
Paint the eyes:
Using a fine-tip black paint pen or a thin brush, draw two small circles for open eyes, or two distinct ‘U’ shapes for sleeping eyes. -
Add detail:
For the ghost with open eyes, leave a tiny white dot unpainted inside the black circle for a ‘glint’ of light, or dot it with white paint afterwards. -
Paint the mouths:
Draw a small, simple curve for the smile. Place it centered between, but slightly lower than, the eyes. -
Add rosy cheeks:
Dip the back end of a paintbrush into orange paint. Dab it gently on either side of the smile to create perfect circular blushing cheeks. -
Seal (Optional):
Once the paint is completely dry, you can apply a thin coat of matte varnish to protect your new friends from dust and handling.
Glow Up Idea
Use glow-in-the-dark polymer clay for the bodies, so your little trio lights up at night for an extra spooky surprise.
Set your new spectral friends on a sunny windowsill and enjoy their cheerful company
Chibi Dinosaur Desk Buddies in Pastel Colors
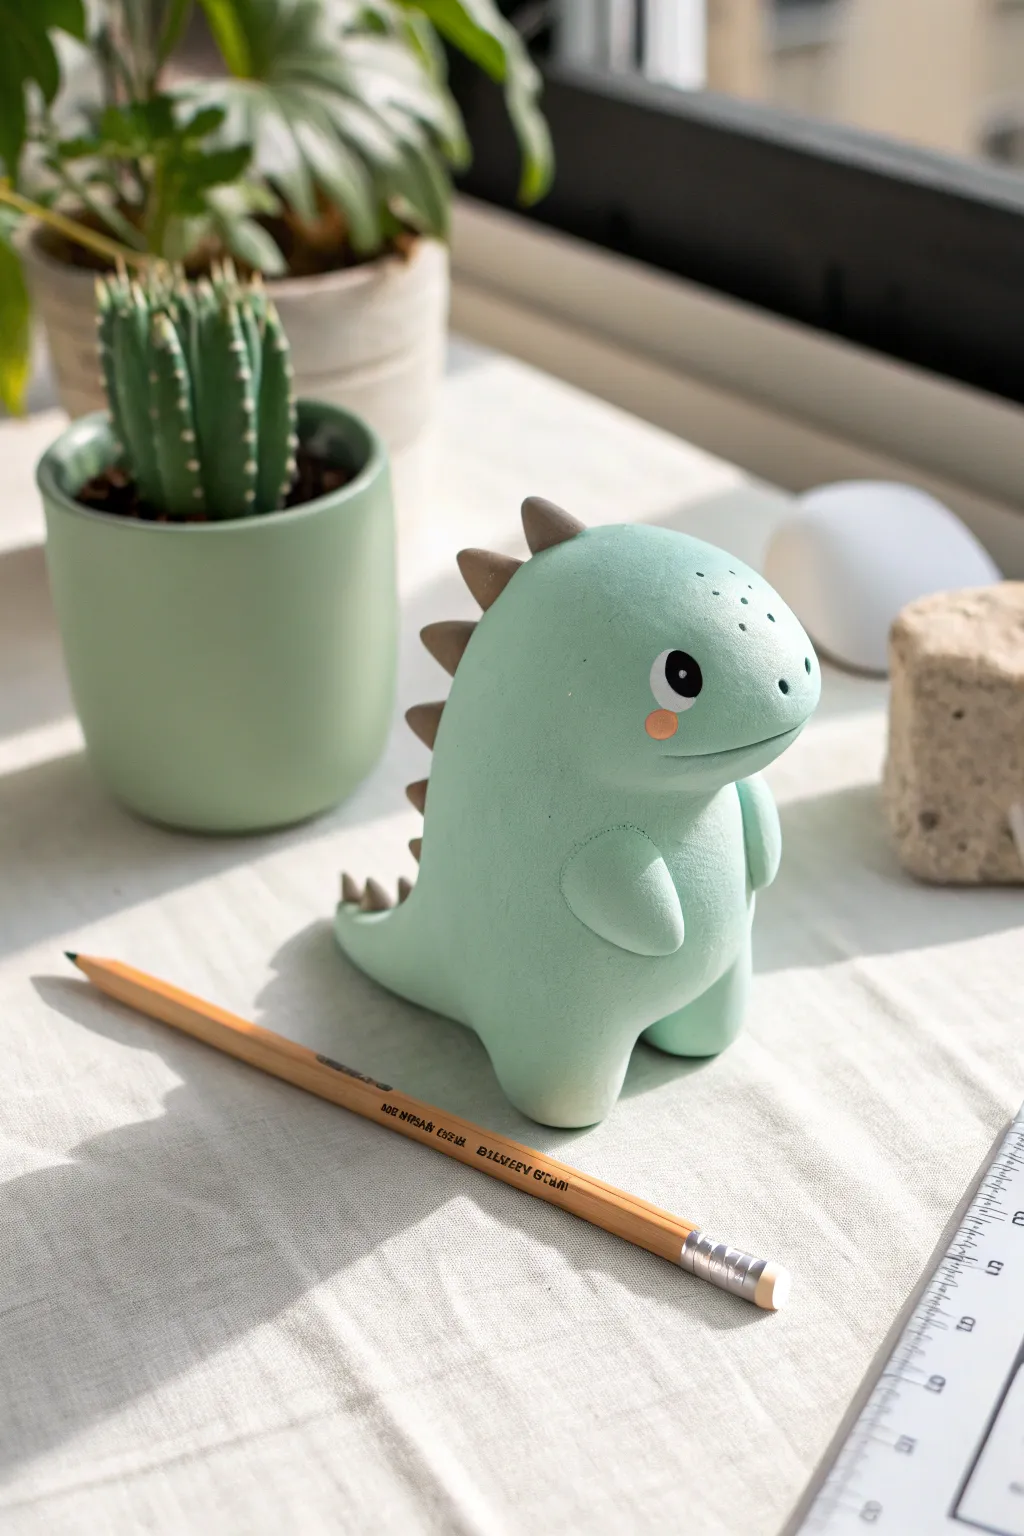
This adorable desk companion features a smooth, matte finish and charming pastel tones that make it perfect for brightening up your workspace. With its simple, rounded shapes and distinct chibi proportions, this little dino is a fantastic project for mastering clean joins and smooth clay textures.
Step-by-Step Tutorial
Materials
- Polymer clay in mint green, light grey-brown, white, and black
- Soft pastel chalk in pink or coral (for cheeks)
- Clay sculpting tools (needle tool, ball stylus)
- Acrylic roller or pasta machine
- Small paintbrush
- Rubbing alcohol and cotton swabs (for smoothing)
- Needle tool or toothpick
- Oven and baking tray
Step 1: Shaping the Base Body
-
Mix your base color:
Start by conditioning your mint green clay until it is soft and pliable. If the green is too saturated, mix in a generous amount of white clay to achieve that soft, pastel mint shade seen in the photo. -
Form the main shape:
Roll a large ball of the mint clay and then gently elongate it into a pear shape. This single piece will serve as both the head and body to ensure a seamless look. -
Refine the posture:
Gently press the wider bottom of the pear shape onto your work surface to create a flat base so the dino creates a stable standing posture. The top should remain rounded and bulbous for the oversized chibi head effect. -
Add the tail:
Pull a small amount of clay from the back bottom section to form a stubby tail, or attach a small cone of clay and blend the seams completely until invisible.
Step 2: Adding Limbs & Details
-
Create the legs:
Roll two small balls of mint clay for the legs. Press them firmly against the lower front of the body, blending the upper edges into the torso while keeping the bottom rounded and distinct. -
Attach the arms:
Roll two smaller teardrop shapes for the arms. Flatten them slightly and attach them mid-body, just below where the ‘head’ area would begin. Angle them slightly inward for a cute, shy pose. -
Blend the seams:
Use a silicone tool or your finger to smooth the seams of the arms and legs. We want them to look integrated but still maintain their rounded volume. -
Smooth the surface:
Before adding tiny details, I like to lightly brush the entire figure with a little cornstarch or baby oil (sparingly) to remove any fingerprints.
Clean Clay Pro-Tip
Keep a pack of wet wipes or baby wipes nearby. Clean your hands thoroughly when switching between dark colors (like the eyes) and the light mint body to avoid staining.
Step 3: Facial Features & Spines
-
Prepare the spines:
Condition your light grey-brown clay. Roll a thin snake and cut it into small, equal segments. Roll each segment into a ball and pinch one side to create triangular spikes. -
Attach the spines:
Starting from the top of the head and working down to the tail, press the spikes onto the center of the back. Gently blend the base of each spike into the mint body so they don’t fall off during baking. -
Sculpt the mouth:
Use a needle tool or a thin blade to carefully press a horizontal curve into the face area for the mouth. Keep the line shallow and soft. -
Add the eyes:
Roll tiny balls of black clay and flatten them onto the face. Add a tiny speck of white clay to the upper right corner of each pupil for the ‘catchlight’ or sparkle. -
Create the nostrils:
Use a small needle tool to poke two tiny holes near the front of the snout. Around these, you can add a few extra decorative freckle dots using the very tip of your needle tool. -
Blushing cheeks:
Scrape a little pigment from your pink pastel chalk. Use a soft, small brush to gently dust rosy circles onto the cheeks, just below the eyes.
Level Up: Texture
Before baking, gently dab a clean toothbrush over the mint green skin areas. This imparts a subtle, stone-like texture that mimics the matte finish in the photo.
Step 4: Finishing Touches
-
Final smooth:
Inspect your dino for any lint or dust. A cotton swab dipped in a tiny bit of rubbing alcohol works wonders to clean the surface before baking. -
Bake carefully:
Bake the figure according to your clay manufacturer’s instructions, typically around 275°F (130°C). Prop the tail with a bit of polyester batting if needed to prevent sagging. -
Cool down:
Allow the figure to cool completely in the oven before moving it. This prevents cracking due to thermal shock.
Place your new prehistoric pal next to a potted plant for the ultimate cute desk setup

TRACK YOUR CERAMIC JOURNEY
Capture glaze tests, firing details, and creative progress—all in one simple printable. Make your projects easier to repeat and improve.
Mini Octopus Couple With Matching Blush Cheeks
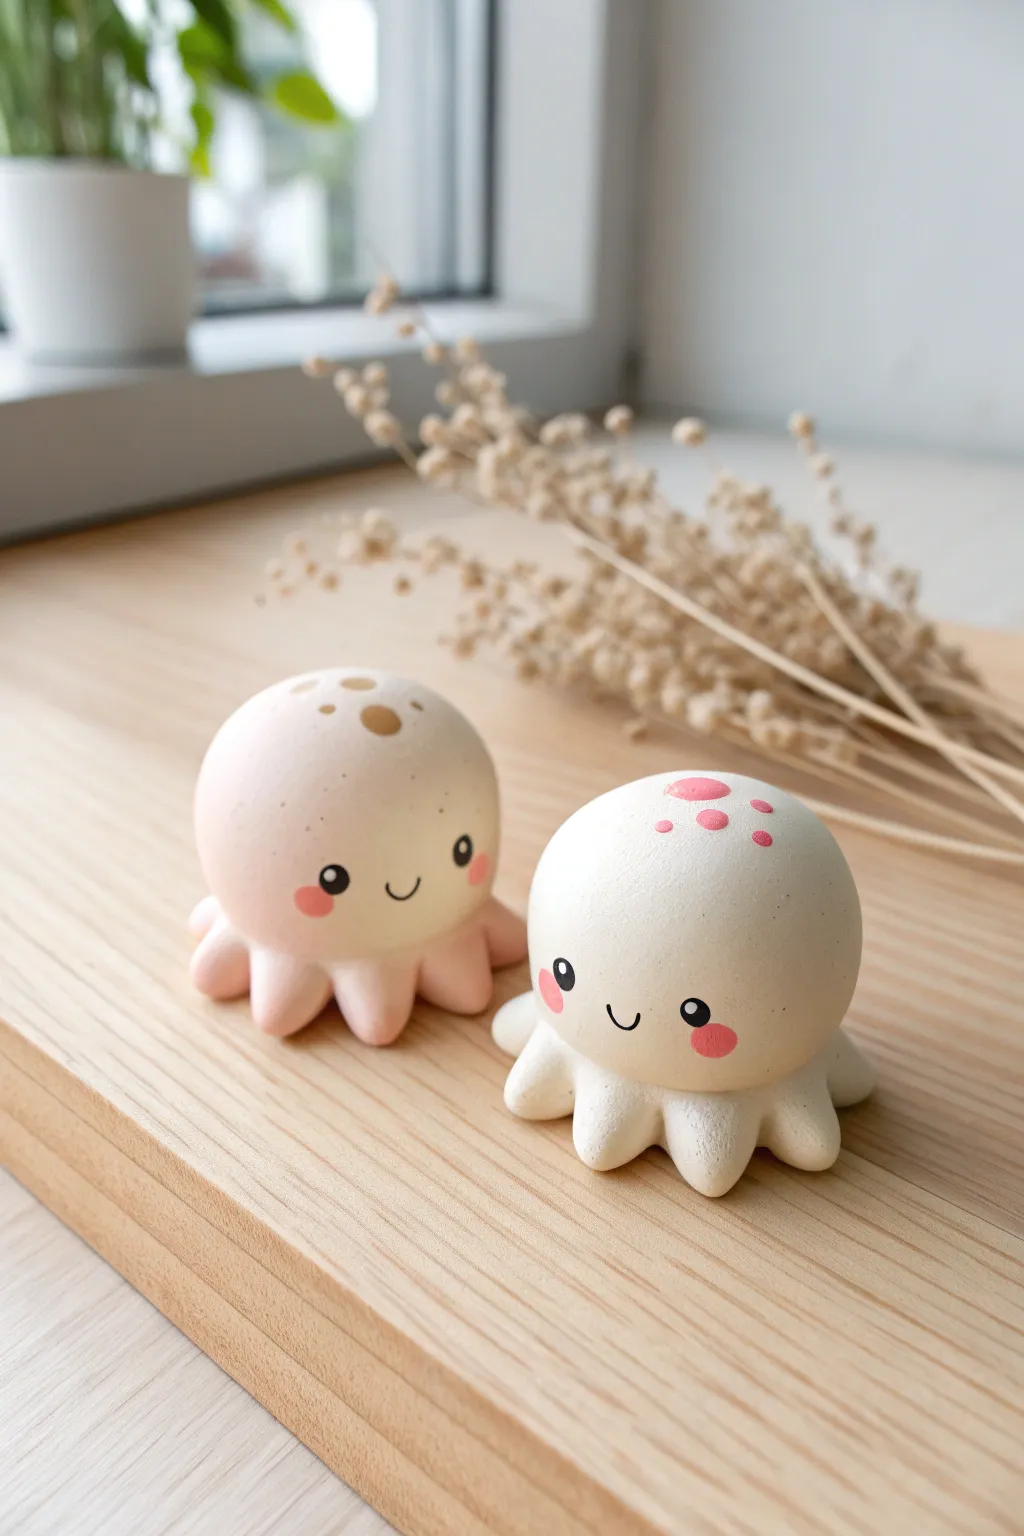
Sculpt this adorable duo of round, happy octopuses with minimal tools and simple shapes. Their matching rosy cheeks and gentle smiles make them perfect as small desk companions or a sweet little gift for a friend.
Detailed Instructions
Materials
- Polymer clay (white and soft peach/light pink)
- Acrylic paint (black and pink)
- Small dotting tool or toothpick
- Fine detail paintbrush
- Rolling pin or smooth round object
- Clay sculpting tool or butter knife
Step 1: Sculpting the Bodies
-
Prepare the Clay:
Begin by conditioning your polymer clay in your hands until it becomes soft and pliable. You will need a ball of white clay about the size of a ping-pong ball, and a slightly smaller amount of peach or light pink clay for the second octopus. -
Form the Base Shape:
Roll each piece of clay into a smooth, perfect sphere. Verify that there are no cracks or visible seams by gently rolling it between your palms repeatedly. -
Flatten Slightly:
Once you have two smooth spheres, gently press the bottom of each ball against your work surface. You want to create a stable, flat bottom so they sit upright, but keep the top very round and dome-like.
Step 2: Creating the Tentacles
-
Make Small Clay Balls:
For the tentacles, roll six to eight tiny balls of clay for each octopus. These should be quite small, roughly the size of a green pea, matching the color of the main body. -
Shape the Teardrops:
Take each small pea-sized ball and gently roll one side of it to form a slight teardrop or cone shape. The wider end will be the foot, and the tapered end will attach to the body. -
Attach Tentacles:
Press the tapered end of these small shapes underneath the bottom edge of your main sphere. Arrange them in a circle so they flare out slightly, creating a skirt of little rounded legs. -
Blend the Seams:
Using a blending tool or your fingertip, carefully smooth the clay where the tentacle meets the body on the underside. I find using a silicone tool helps here to keep fingerprints off the main dome. -
Final Shaping:
Gently press the tips of the tentacles down so they sit flat on the surface, giving the octopus a grounded, cute posture.
Dust Bunny Prevention
White clay attracts everything! Wipe your hands and work surface with a baby wipe before starting, and again before switching to the white clay to keep it pristine.
Step 3: Baking and Painting Details
-
Bake the Pieces:
Place your octopuses on a baking sheet or ceramic tile. Bake them according to the temperature and time instructions on your specific package of polymer clay. Let them cool completely before painting. -
Paint the Eyes:
Dip a small dotting tool (or the end of a paintbrush handle) into black acrylic paint. Carefully dot two wider-set eyes onto the face area. They should sit fairly low on the dome. -
Add Highlights:
Once the black dots are dry, use a much smaller tool or a toothpick to add a tiny white fleck in the upper corner of each eye. This brings them to life instantly. -
Draw the Mouth:
Using your finest detail brush and black paint, draw a very small, thin ‘U’ shape between the eyes for a smile. Keep the line weight delicate. -
Apply the Blush:
Mix a soft pink paint or use the pink straight from the tube. Using a clean dotting tool, place oval-shaped blush marks directly under the eyes. -
Add Head Markings:
Finally, add distinctive spots to the top of their heads. For the peach octopus, use a darker brown or tan paint to make a few random dots. For the white octopus, use bright pink dots to match the blush. -
Let Dry:
Allow the paint to dry fully. You can seal the painted areas with a matte varnish if you want extra durability.
Smooth Operator
If you leave fingerprints while attaching the legs, lightly brush the clay with a tiny amount of baby oil or clay softener before baking to smooth them out completely.
Now you have a charming pair of clay critters ready to brighten up your shelf
Little Blob Creature Toothbrush Holder
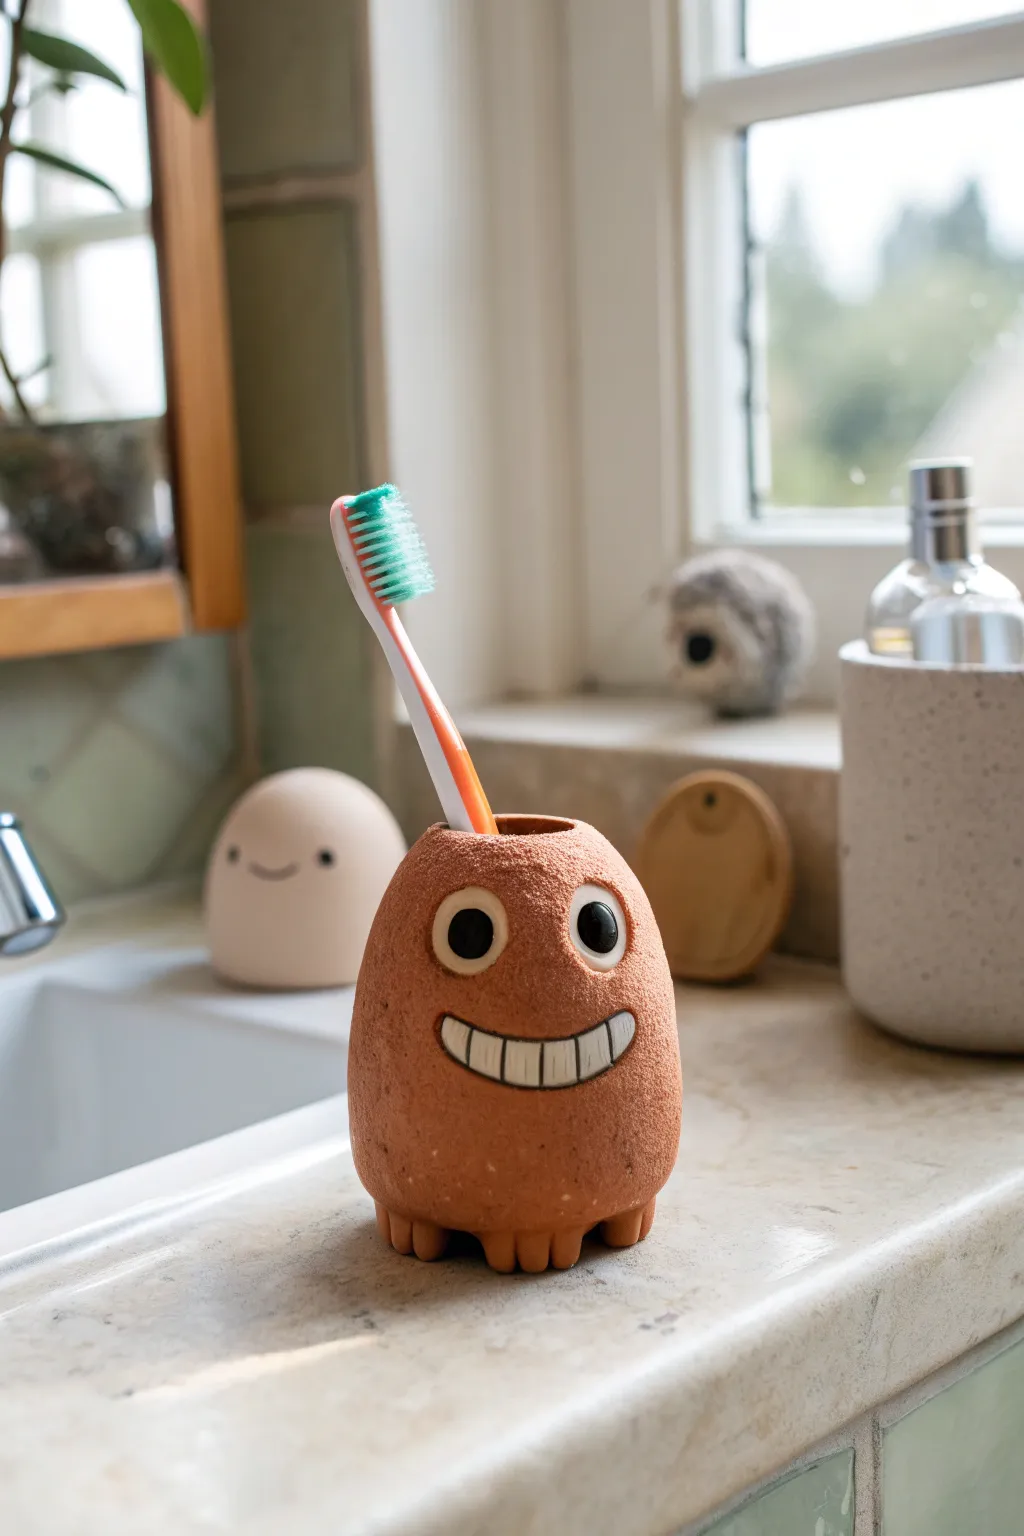
Bring a smile to your morning routine with this utterly charming little clay blob creature. With its textured terracotta finish, wide grin, and tiny feet, this toothbrush holder is both practical and full of personality.
Step-by-Step Guide
Materials
- Terracotta-colored polymer clay (or air-dry clay)
- White polymer clay
- Black polymer clay
- Basic sculpting tools (needle tool, ball stylus)
- Texturing tool (stiff bristle brush or sandpaper)
- Aluminum foil
- Rolling pin
- Craft knife
- Liquid clay or ‘bake and bond’ (optional but recommended)
Step 1: Forming the Base Body
-
Core construction:
Start by creating a core from tightly scrunched aluminum foil. Shape it into a slightly tapered egg or gumdrop shape, ensuring the bottom is flat so it stands upright. -
Conditioning clay:
Take your terracotta-colored clay and knead it thoroughly until it is soft and pliable. I find this step crucial for preventing cracks later on. -
Creating a slab:
Roll the terracotta clay into a sheet about 1/4 inch thick using your rolling pin. -
Covering the core:
Wrap the clay sheet around your foil core, smoothing the seams together with your fingers until they disappear completely. The shape should resemble a rounded potato. -
Making the opening:
Press a toothbrush handle or a similarly sized dowel into the top center of the shape to create the well where the toothbrush will sit. Wiggle it slightly to ensure the opening is wide enough. -
Adding feet:
Roll six to eight small balls of terracotta clay. Flatten them slightly and attach them in a ring around the bottom edge of the body to form little nubby toes. -
Texturing the surface:
Using a stiff bristle brush, a piece of sandpaper, or a texturing sponge, gently tap the entire surface of the orange clay to give it a rough, stone-like texture.
Pro Tip: Clean Lines
Before applying white clay eyes or teeth, wipe your hands with a baby wipe. Terracotta pigment transfers easily and can stain the white parts pink.
Step 2: Sculpting the Face
-
Forming the eye sockets:
Use a large ball tool or your thumb to press two shallow indentations where you want the eyes to go. This helps the eyes sit integrated into the face rather than just sticking out. -
Making the whites of the eyes:
Roll two balls of white clay and flatten them into discs. Press these firmly into the indentations you just made. -
Adding pupils:
Roll two much smaller balls of black clay. Press these onto the white discs, positioning them slightly toward the center to give him a goofy, friendly expression. -
Creating the mouth cavity:
Use a sculpting tool to carve out a wide, curved sausage shape for the mouth. You want this area slightly recessed. -
Filling the smile:
Roll a snake of white clay that fits the recessed mouth shape. Flatten it and press it into the cavity. -
Refining the teeth:
Take a craft knife or needle tool and gently score vertical lines across the white mouth strip to interpret the individual teeth. -
Outlining the features:
Roll extremely thin snakes of black or dark brown clay. Carefully outline the white mouth section to make the smile pop. -
Adding the eyelids:
Create two small arched snakes of the terracotta clay. Place these over the top edge of the eyes to create eyelids, blending the top edge into the head. -
Re-texturing:
Go back over any areas you smoothed out while adding the face, like the eyelids, and re-apply that rough stone texture so everything matches.
Level Up: Family Set
Make a whole family by varying the shapes—try tall skinny cylinders or wide blobs—and give them different expressions for each family member.
Step 3: Finishing Up
-
Double checking stability:
Set the creature on a flat surface to ensure the feet are level and it doesn’t wobble. Adjust gently if needed. -
Baking:
Bake the piece according to your clay manufacturer’s instructions. Usually, this is around 275°F (135°C) for 15-30 minutes per 1/4 inch of thickness. -
Cooling:
Let the piece cool completely in the oven with the door cracked open to prevent thermal shock. -
Sealing (Optional):
If using air dry clay, seal with a waterproof varnish. For polymer clay, a matte varnish can protect the surface, especially in a humid bathroom environment.
Place your new little buddy by the sink and enjoy his cheerful greeting every time you brush your teeth
Mini Desk Photo Holders Shaped Like Smiley Animals
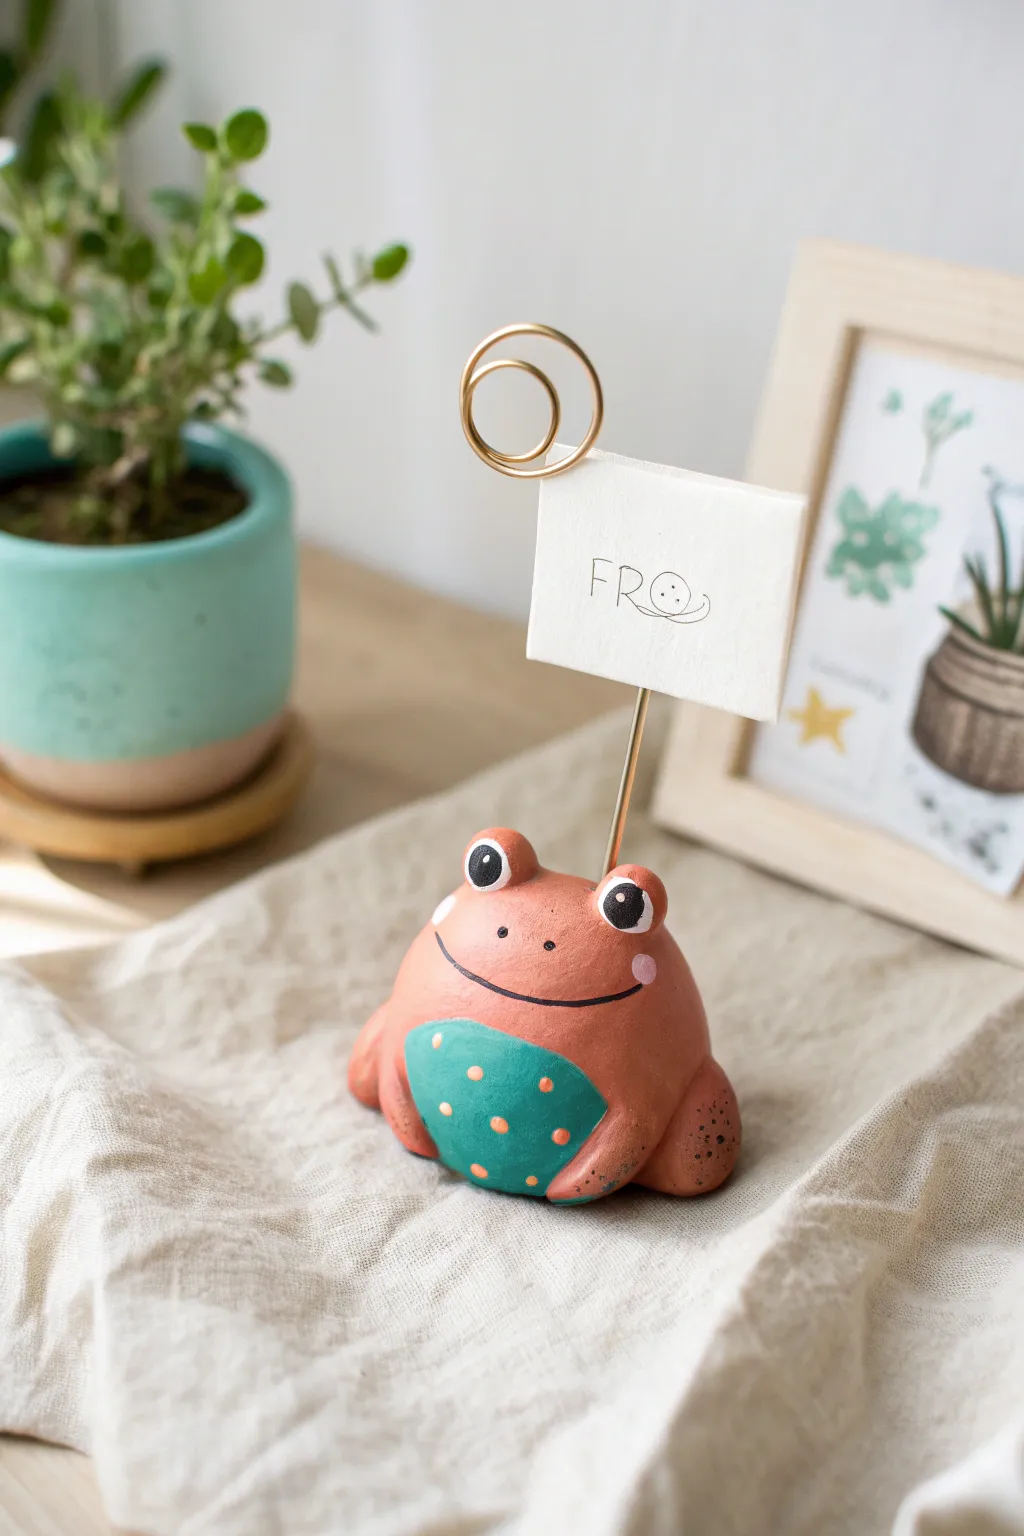
Brighten up your workspace with this charming terracotta-colored frog that doubles as a memo holder. Featuring a sweet hand-painted belly and a sturdy spiral wire, this little amphibian is perfect for displaying favorite photos or daily affirmations.
Step-by-Step
Materials
- Air-dry clay (or polymer clay)
- Acrylic paints (terracotta orange, teal/turquoise, black, white, pink)
- Gold craft wire (16 or 18 gauge)
- Wire cutters
- Needle-nose pliers
- Small paintbrush (round tip)
- Dotting tool or toothpick
- Water cup for smoothing
- Sealer or varnish (matte or satin finish)
Step 1: Shaping the Base
-
Form the Body:
Start with a ball of clay roughly the size of a tangerine. Roll it until smooth, then gently press the bottom against your work surface to create a flat, stable base while keeping the top rounded and domed. -
Create the Legs:
Take two smaller pieces of clay and roll them into thick, elongated teardrop shapes. Press these onto the sides of the main body, blending the clay at the back so they look integrated, creating the appearance of folded hind legs. -
Add the Eyes:
Roll two small spheres for the eyes. Attach them firmly to the top of the head, spacing them slightly apart. Use a little water (for air-dry clay) to smooth out the seams where they join the head. -
Smooth Imperfections:
Dip your finger in a bit of water and gently rub over the entire surface of the frog. This removes fingerprints and creates a professional, smooth finish before drying.
Wire Wobbling?
If the wire feels loose after the clay dries, remove it, put a drop of superglue into the hole, and re-insert the wire. Hold it steady for a few seconds.
Step 2: Creating the Hardware
-
Cut the Wire:
Cut a piece of gold craft wire approximately 6-8 inches long. You’ll need extra length to create the spiral at the top. -
Form the Spiral:
Using needle-nose pliers, grip one end of the wire and gently curl it inward to start a spiral. Continue wrapping the wire around itself by hand or with pliers until you have two or three concentric loops. -
Insert the Holder:
While the clay is still wet, carefully insert the straight end of the wire into the center of the frog’s back. Push it deep enough (about halfway) to ensure stability. -
Dry the Clay:
Allow the clay to dry completely according to the package instructions. If using air-dry clay, this usually takes 24-48 hours. Keep it away from direct heat to prevent cracking.
Step 3: Painting and Details
-
Base Coat:
Paint the entire frog with a terracotta or warm orange acrylic paint. Depending on your paint’s opacity, you might need two coats for solid coverage. Let this base dry fully. -
Paint the Belly:
Using a teal or turquoise paint, carefully outline a semi-circle shape on the frog’s front stomach area. Fill this shape in completely. -
Belly Details:
Once the teal paint is dry, use a dotting tool or the back of a paintbrush dipped in the orange base color to add small polka dots across the belly patch. -
Paint the Eyes:
Paint large black circles onto the protruding eye sculpts. I find it helpful to steady my hand against the table for this precision step. -
Add Eye Highlights:
Dip a toothpick or fine uneven brush into white paint. Add a small white dot to the upper right area of each black pupil to give the frog a spark of life. -
Draw the Face:
Using a very fine liner brush and thin black paint (or an acrylic paint pen), draw a wide, shallow ‘U’ shape for the smile connecting the cheeks. Add two tiny dots for nostrils. -
Cheeks and Legs:
Add small pink blush circles at the corners of the mouth. For a textured look on the legs, lightly stipple some black dots or speckles on the side of the hind legs. -
Seal the piece:
Once all paint is thoroughly dry, apply a coat of matte or satin varnish to protect your work and give the colors a unified finish.
Customize It
Try modeling other simple round animals like a bear or cat using this same base shape—just change the ear shapes and paint colors to match.
Now your happy little frog is ready to hold your favorite memories on your desk
Cute Little Page Openers With a Tiny Face
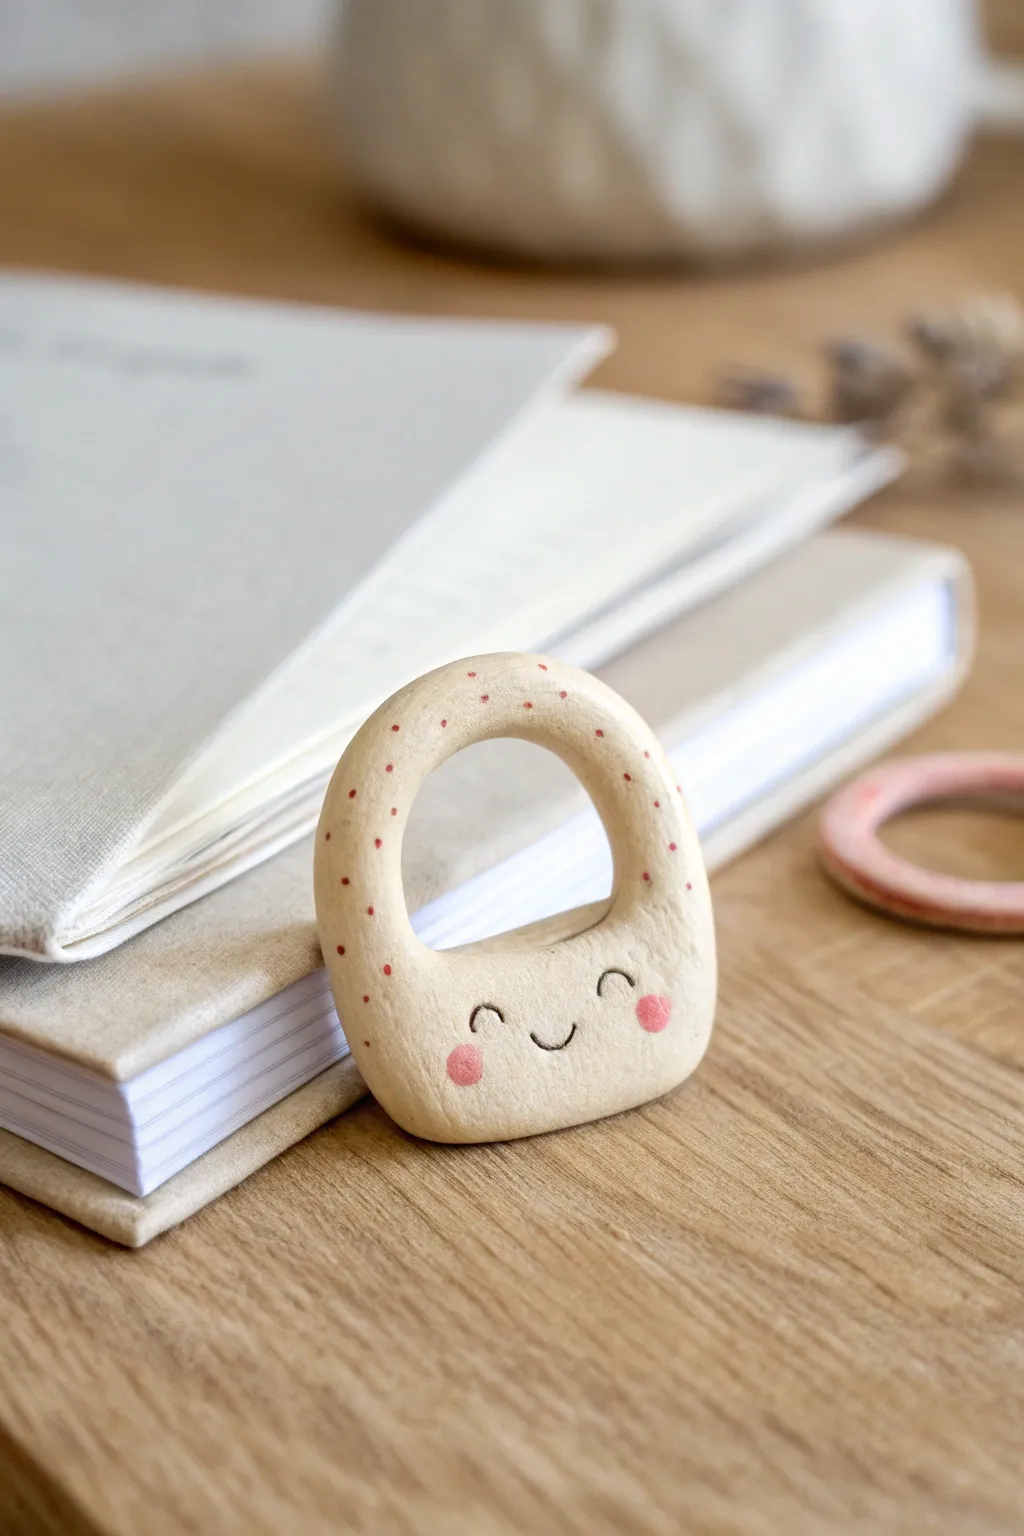
This adorable little tool fits snugly over your thumb, making one-handed reading a breeze while adding a touch of personality to your bookshelf. With its subtle speckled texture and sweet minimalist face, this clay page holder is as functional as it is charming.
Step-by-Step Guide
Materials
- White or beige air-dry clay (or polymer clay)
- Acrylic rolling pin
- Small craft knife or clay sculpting tool
- Fine-grit sandpaper (around 400 grit)
- Black fine-point permanent marker or acrylic paint
- Soft pink acrylic paint
- Reddish-brown acrylic paint
- Small detail paintbrush
- Matte varnish or sealant
- Water for smoothing
Step 1: Shaping the Form
-
Condition the clay:
Start by taking a walnut-sized ball of clay and kneading it in your hands until it becomes warm, soft, and pliable, which prevents cracking later. -
Roll a thick slab:
Using your rolling pin, flatten the ball into a thick slab, approximately 1/4 to 1/3 inch thick. You want it sturdy enough to hold pages back. -
Cut the outline:
Use your craft knife to cut out a rounded, slightly tapered rectangle shape. The bottom should be wider than the top, somewhat like a very squat teardrop or a rounded padlock shape. -
Create the thumb hole:
Use a small circular cutter or carefully cut a circle near the top center of your shape. Make sure the hole is large enough for your thumb to fit comfortably, with a little wiggle room. -
Soften the edges:
Dip your finger in a little bit of water and gently run it over all the cut edges—both around the outside perimeter and inside the thumb hole—to round them off. -
Dry thoroughly:
Set the piece aside on a flat surface to dry completely. For air-dry clay, this usually takes 24-48 hours. I like to flip it halfway through to ensure even drying.
Step 2: Refining and Painting
-
Sand for smoothness:
Once bone dry, take your fine-grit sandpaper and gently buff the surface. Focus on the inside of the thumb hole so it will be comfortable against your skin. -
Dust off debris:
Wipe the piece down with a slightly damp cloth or a dry soft brush to remove any clay dust before you start painting. -
mix the base tone:
If your clay isn’t already the perfect beige, mix a tiny bit of yellow ochre into white paint and apply a thin wash to create that natural, stony look. -
Paint the cheeks:
Dip your detail brush (or the back of a brush handle) into the soft pink paint. Dab two small circles on the lower, wider part of the shape for the rosy cheeks. -
Draw the face:
Using a fine-point black marker or a very thin brush with black paint, draw two small upward curves for closed eyes and a simple U-shape for the smile right between the cheeks. -
Add freckles:
Load a toothpick or a very fine brush with the reddish-brown paint. Gently dot small speckles evenly around the top arch of the piece, framing the thumb hole. -
Let the paint set:
Allow all the painted details to dry completely so you don’t smudge the fine lines during the sealing process. -
Seal the piece:
Apply a coat of matte varnish over the entire page opener. This protects the clay from skin oils and keeps the paint from chipping during use.
Fixing Cracks
If small cracks appear as the clay dries, mix a tiny amount of fresh clay with water to make a paste (slip) and fill them in gently.
Double Sided
Paint a different expression on the reverse side—maybe a sleeping face or a winking one—so your reading buddy has two moods.
Slide this little friend onto your thumb and enjoy your next reading adventure with ease