When kids get their hands into air dry clay, it’s like flipping on a creativity switch—simple shapes suddenly become tiny treasures. I pulled together these easy air dry clay ideas for kids that feel playful, low-stress, and totally doable at the kitchen table.
Pinch Pot Treasure Bowls
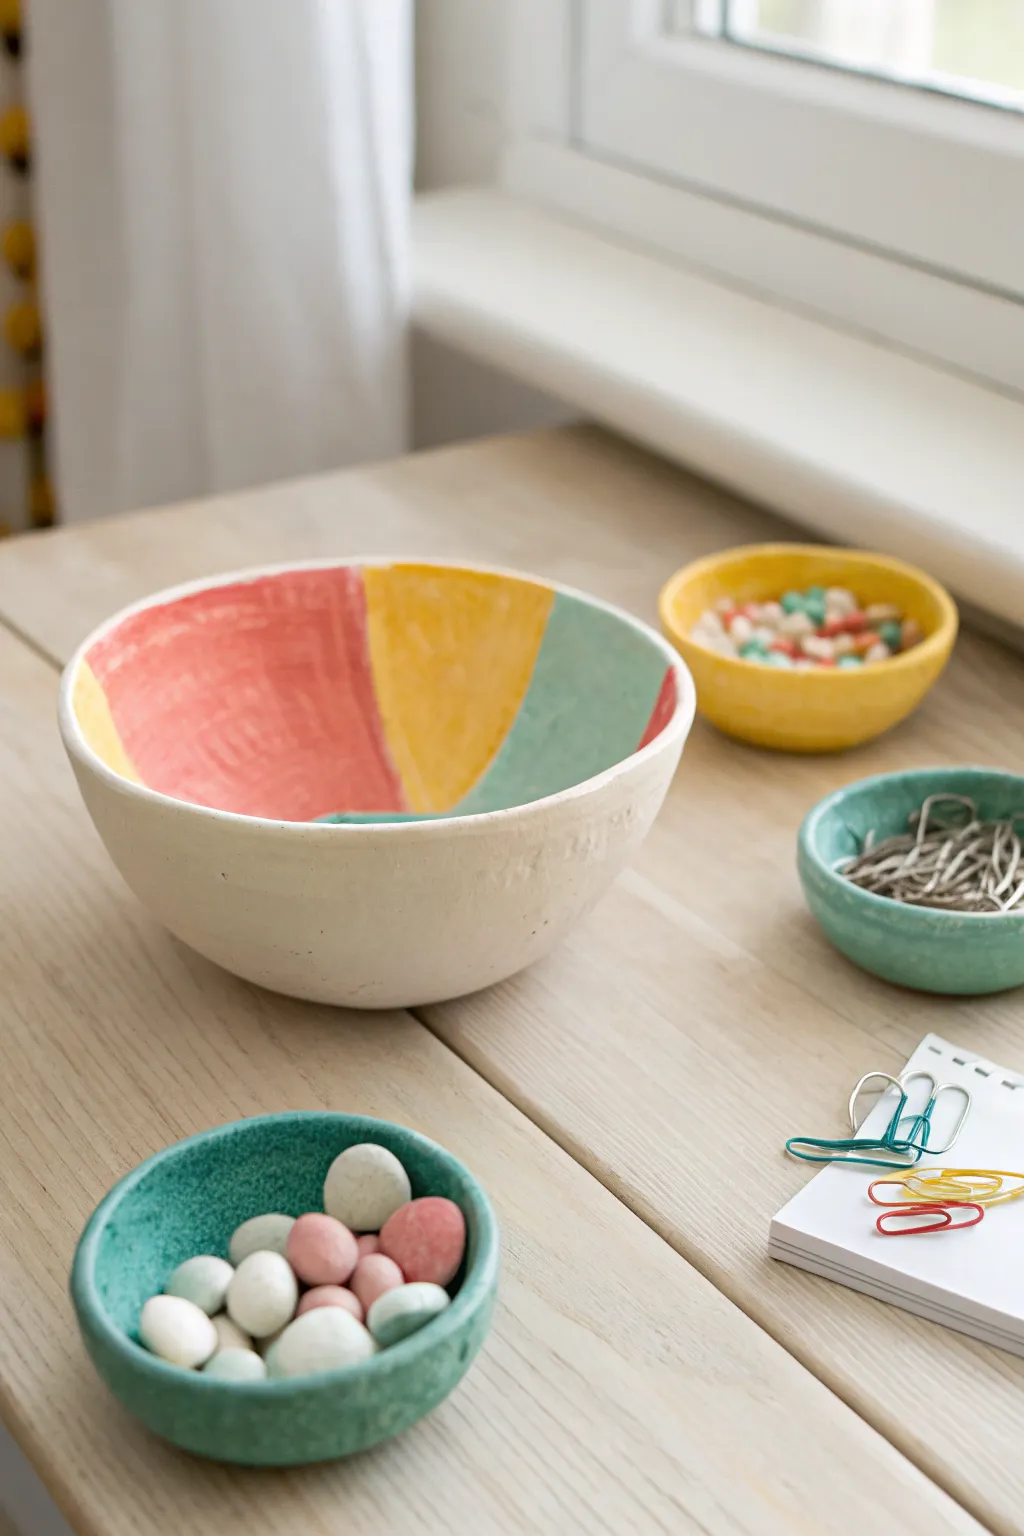
These charming handmade bowls turn simple lumps of clay into functional treasures perfect for holding beads, clips, or sweets. The centerpiece features a natural exterior with a cheerful, color-blocked interior that creates a lovely surprise when you peek inside.
Step-by-Step
Materials
- White beautiful air dry clay
- Rolling pin (optional)
- Small cup of water
- Acrylic paints (coral red, sunny yellow, teal green)
- Medium flat paintbrush
- Fine grit sandpaper
- Clear acrylic sealer or varnish (matte or gloss)
- Sponge
Step 1: Shaping the Bowls
-
Prepare the clay:
Start by pulling off a chunk of air dry clay about the size of a tennis ball for the large bowl, and golf ball sizes for the smaller treasure dishes. -
Form a sphere:
Roll the clay firmly between your palms to create a smooth, tight ball. You want to eliminate as many cracks as possible at this stage. -
Start the pinch:
Hold the ball in one hand and gently press your thumb into the center, going about three-quarters of the way down—be careful not to push all the way through the bottom. -
Widen the walls:
Using a pinching motion with your thumb inside and fingers outside, slowly rotate the ball while gently squeezing the clay walls to thin them out and widen the opening. -
Even it out:
Work your way around the bowl, trying to keep the thickness consistent from the base to the rim. Aim for walls about a quarter-inch thick for sturdiness. -
Smooth the surfaces:
Dip your finger in a tiny bit of water and run it over the clay to smooth out any fingerprints or small cracks. Don’t use too much water or the clay will get mushy. -
Create a flat base:
Gently tap the bottom of the bowl on your table surface to flatten it slightly so it sits stable without wobbling. -
Replicate for smaller bowls:
Repeat this pinching process for your smaller bowls, making them shallow and wide like little saucers. -
Let them dry:
Set your creations in a safe, dry spot for 24-48 hours. They will turn opaque white and feel hard when fully dry. I find flipping them upside down halfway through helps the bottom dry evenly.
Step 2: Painting and Finishing
-
Sand for smoothness:
Once fully dry, take a piece of fine-grit sandpaper and gently buff the rim and outside of the bowl to remove any rough ridges or sharp edges. -
Dust it off:
Wipe the bowl with a dry cloth or paper towel to remove all the clay dust before painting. -
Plan the segments:
For the large bowl, visualize the interior divided into three or four large pie slices. You can sketch these lightly with a pencil if you need a guide. -
Paint the first colored section:
Load your brush with coral red acrylic paint and fill in one ‘slice’ of the bowl’s interior, painting from the center bottom up to the rim. -
Add the yellow section:
Rinse your brush well, then paint a sunny yellow section right next to the red one. Don’t worry if the line between them isn’t mathematically perfect; the handmade look is part of the charm. -
Complete with teal:
Finish the interior by painting the remaining section with teal green. Ensure you get nice coverage right up to the lip of the bowl. -
Leave the exterior natural:
To match the look in the photo, leave the outside of the large bowl unpainted, showing off the natural white clay texture. -
Paint the small bowls:
For the tiny dishes, paint the entire interior a solid color—solid yellow for one and solid teal for the other. -
Seal the deal:
Protect your paint job by applying a coat of clear acrylic sealer or specific clay varnish over the painted areas once they are completely dry.
Fixing Cracks
If cracks appear while drying, mix a tiny bit of fresh wet clay with water to make a paste (slip) and fill the cracks, then smooth over.
Use a Sponge
For a smoother finish on the raw clay, wipe the semi-dry clay with a slightly damp sponge to erase fingerprints before the final drying stage.
Fill your new handmade dishes with colorful treasures and enjoy the pop of color on your desk


Leaf and Flower Nature Imprint Tiles

Capture the delicate beauty of a garden on a permanent canvas with this lovely clay project. This smooth, round tile features gently embossed leaves and stems painted in soft, muted greens and dusty pinks for a botanical illustration effect.
How-To Guide
Materials
- White creative paper clay or fine air-dry clay
- Rolling pin
- Circle cookie cutter (approx. 4 inches) or a glass
- Fine grit sandpaper (220 or higher)
- Acrylic paints (Sage green, forest green, dusty rose, brownish-red)
- Very fine detail paintbrush (size 0 or 00)
- Small cup of water
- Paper plate or palette
- Mod Podge or matte varnish sealant
- Wax paper or parchment paper
Step 1: Shaping the Canvas
-
Prepare the workspace:
Lay down a sheet of wax paper or parchment paper to work on. This prevents the clay from sticking to your table and makes it easier to move later. -
Knead the clay:
Take a handful of your white air-dry clay and knead it in your hands for about a minute. The warmth of your hands will make it pliable and smooth out any internal air bubbles. -
Roll it out:
Place the clay on the paper and use your rolling pin to flatten it into a pancake. Aim for an even thickness of about 1/4 inch; too thin and it might crack, too thick and it will take forever to dry. -
Cut the circle:
Press your circle cutter or the rim of a glass firmly into the clay. Lift the excess clay away from the outside of the circle, then gently lift the cutter to reveal your perfect disc. -
Smooth the edges:
Dip your finger in a tiny bit of water and run it along the cut edge of the circle. This rounds it off nicely and removes any sharp ridges created by the cutter.
Clay Curling?
If the edges lift while drying, gently weigh the center down with a light book over a piece of paper towel once the surface is no longer tacky.
Step 2: Creating the Botanical Relief
-
Sketching the design:
Instead of pressing real plants into the clay, which can be messy, we are going to sculpt the pattern slightly. Use the rounded end of a paintbrush handle or a stylus tool to gently impress the stems for your plants directly into the wet clay. -
Adding leafy texture:
For the leaves, start by gently pressing small indentations where you want them to sit. I find that using a small sculpting tool or even a dull toothpick helps create the shape of the leaf without tearing the surface. -
Embossing details:
Once the main leaf shapes are indented, use a needle tool or toothpick to gently scratch in tiny veins or textures inside the indented leaf areas. Keep the pressure light. -
The berry clusters:
For the floral elements at the top, press tiny dots into the clay using the tip of a stylus or a dull pencil point. Arranging them in small clusters mimics the look of baby’s breath or berry sprigs. -
Let it dry:
Set the disc aside in a safe, dry place away from direct sunlight. It needs to dry completely, which usually takes 24 to 48 hours depending on humidity. Flip it over halfway through the drying process to ensure the bottom dries evenly.
Pro Tip: Watercolor Look
Water down your acrylics significantly to use them like a wash. The paint will pool naturally in the impressed textures, creating lovely depth.
Step 3: Painting and Finishing
-
Sand for smoothness:
Once the disc is bone dry, take your fine-grit sandpaper and very gently buff the surface. This removes any rough bits and makes the clay feel like smooth stone. -
Mixing greens:
Squeeze out a pea-sized amount of sage green and forest green paint. If the colors feel too bright, mix in a tiny pinprick of brown or red to mute them. -
Painting the leaves:
Using your finest detail brush, carefully fill in the indented leaf shapes with your green tones. Try varying the shades slightly between different stems for a natural look. -
Adding stems:
With the tip of your brush and slightly watered-down brown-green paint, re-trace the indented stem lines. The thinner consistency helps the paint flow smoothly into the groove. -
Painting the berries:
Clean your brush and pick up the dusty rose color. Dot the paint carefully into the small texture clusters you created earlier. -
Sealing the work:
Wait for the paint to dry completely. Finish by applying a thin coat of matte varnish or Mod Podge over the entire top surface to protect the paint and give it a finished sheen.
Place your beautiful botanic tile on a shelf or use it as a coaster to bring a touch of nature indoors


Heart Trinket Trays
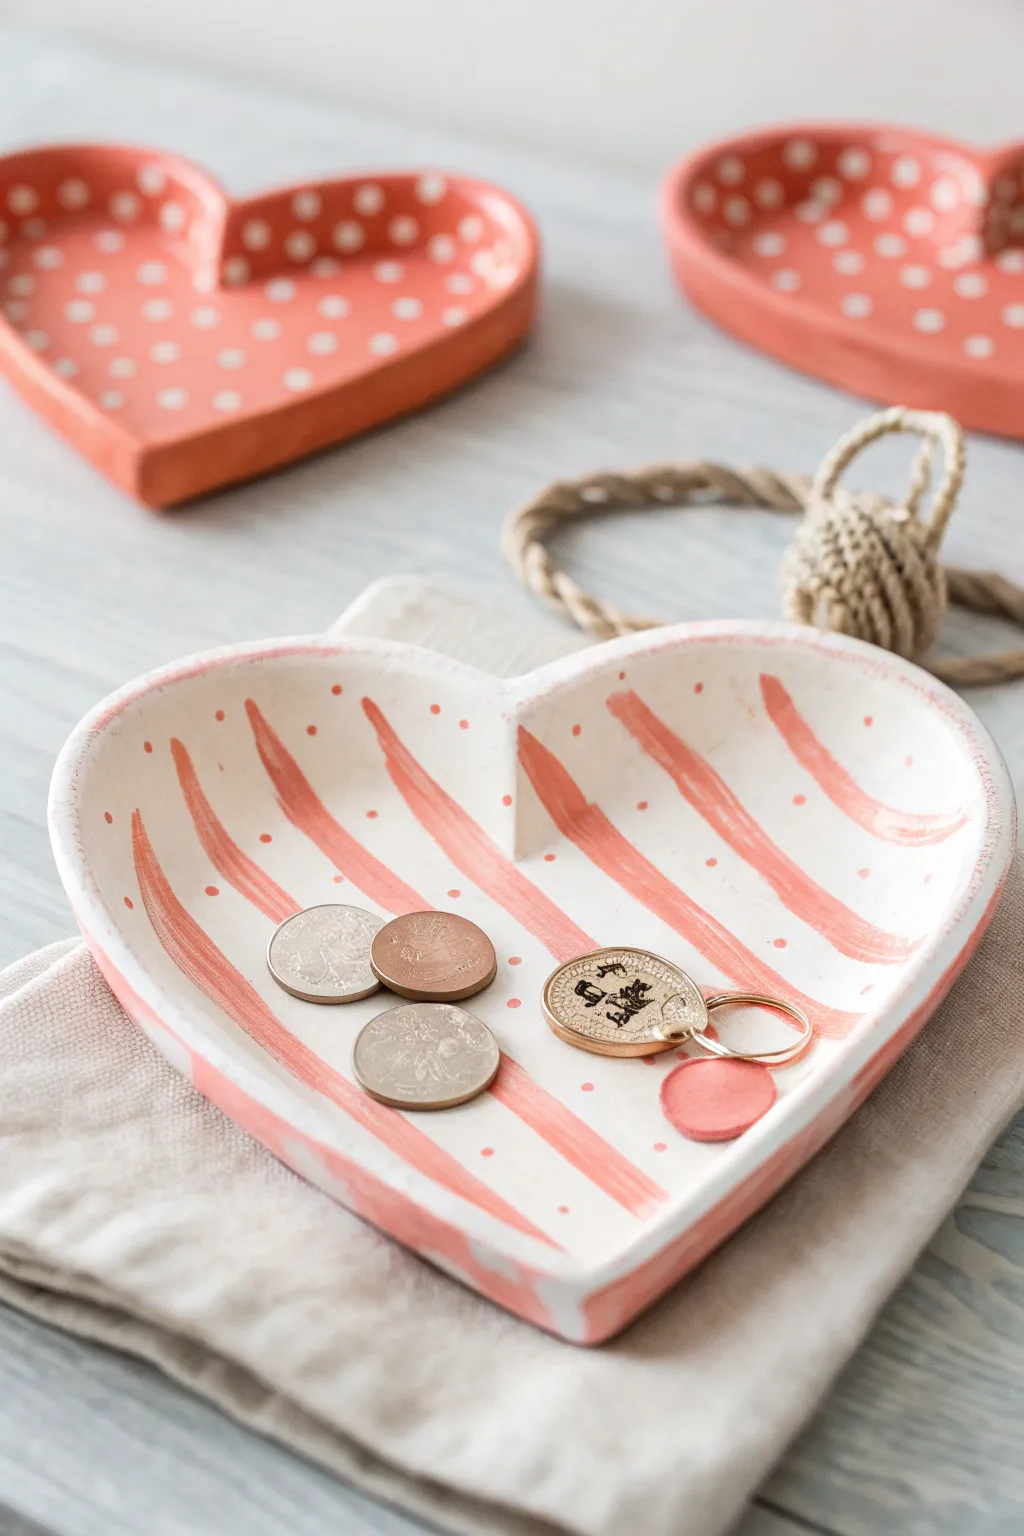
These lovely heart-shaped trinket trays are the perfect beginner project for working with air dry clay. With a sweet hand-painted pattern of pink stripes and dots, they make a charming spot to hold coins, jewelry, or keys.
Detailed Instructions
Materials
- White or terracotta air dry clay
- Rolling pin
- Heart-shaped cookie cutter (large) or paper template
- Craft knife or plastic clay tool
- Small bowl of water
- Fine-grit sandpaper (optional)
- White acrylic paint
- Salmon pink or coral acrylic paint
- Flat paintbrush
- Small round paintbrush (for dots)
- Glossy varnish or Mod Podge
Step 1: Shaping the Clay
-
Prepare the Clay:
Take a handful of air dry clay and knead it gently in your hands to warm it up and make it pliable. -
Roll it Out:
On a clean, flat surface, roll the clay out evenly until it is about 1/4 inch thick. Aim for a smooth, consistent thickness so the tray dries evenly. -
Cut the Shape:
Press a large heart-shaped cookie cutter firmly into the clay. If you don’t have a cutter, place a paper template on the clay and carefully trace around it with a craft knife. -
Smooth the Edges:
Dip your finger in a little bit of water and run it along the cut edges of the heart to smooth out any roughness or jagged bits. -
Create the Lip:
Gently curb up the edges of the heart with your fingertips to create a shallow rim. I find pinching the clay slightly upwards helps define the shape better. -
Refine the Form:
Go around the rim one more time with a damp finger to ensure the raised edge is smooth and flows nicely into the center of the dish. -
Let it Dry:
Place the tray in a dry, safe spot for 24-48 hours. Flip it over halfway through the drying process to ensure the bottom dries thoroughly as well.
Cracks Appearing?
If small cracks form while drying, mix a tiny bit of fresh clay with water to make a paste and smooth it over the crack with your finger.
Step 2: Decorating
-
Sand Imperfections:
Once fully dry, check for any rough spots. You can lightly sand the edges or surface with fine-grit sandpaper for a professional finish. -
Base Coat:
Paint the entire inside and outside of the tray with white acrylic paint. You may need two coats to get a solid, opaque finish. -
Dry simple:
Allow the white base coat to dry completely before moving on to the pattern. -
Mix Your Color:
Prepare your salmon pink or coral color on a palette. If the pink is too bright, mix in a tiny dot of white to soften it. -
Paint Stripes:
Using a flat paintbrush, paint broad, diagonal stripes across the heart. Don’t worry about making them perfectly straight; the hand-painted look adds charm. -
Add Dots:
Dip the end of a small round paintbrush or the handle of a brush into the same pink paint. Gently press dots into the white spaces between the stripes. -
Rim Detail:
For a cohesive look, you can carefully paint the very top edge of the rim in white or extend the pink stripes over the edge. -
Seal the Dish:
Once all paint is completely dry, apply a coat of glossy varnish or Mod Podge to protect the clay and give it a nice shine.
Pro Tip: Drying Shape
To give the tray a more curved, bowl-like shape, let the clay dry while resting inside a larger shallow bowl lined with plastic wrap.
Enjoy using your beautiful handmade dish to organize your favorite little treasures


Clay Bead Bracelets and Necklaces
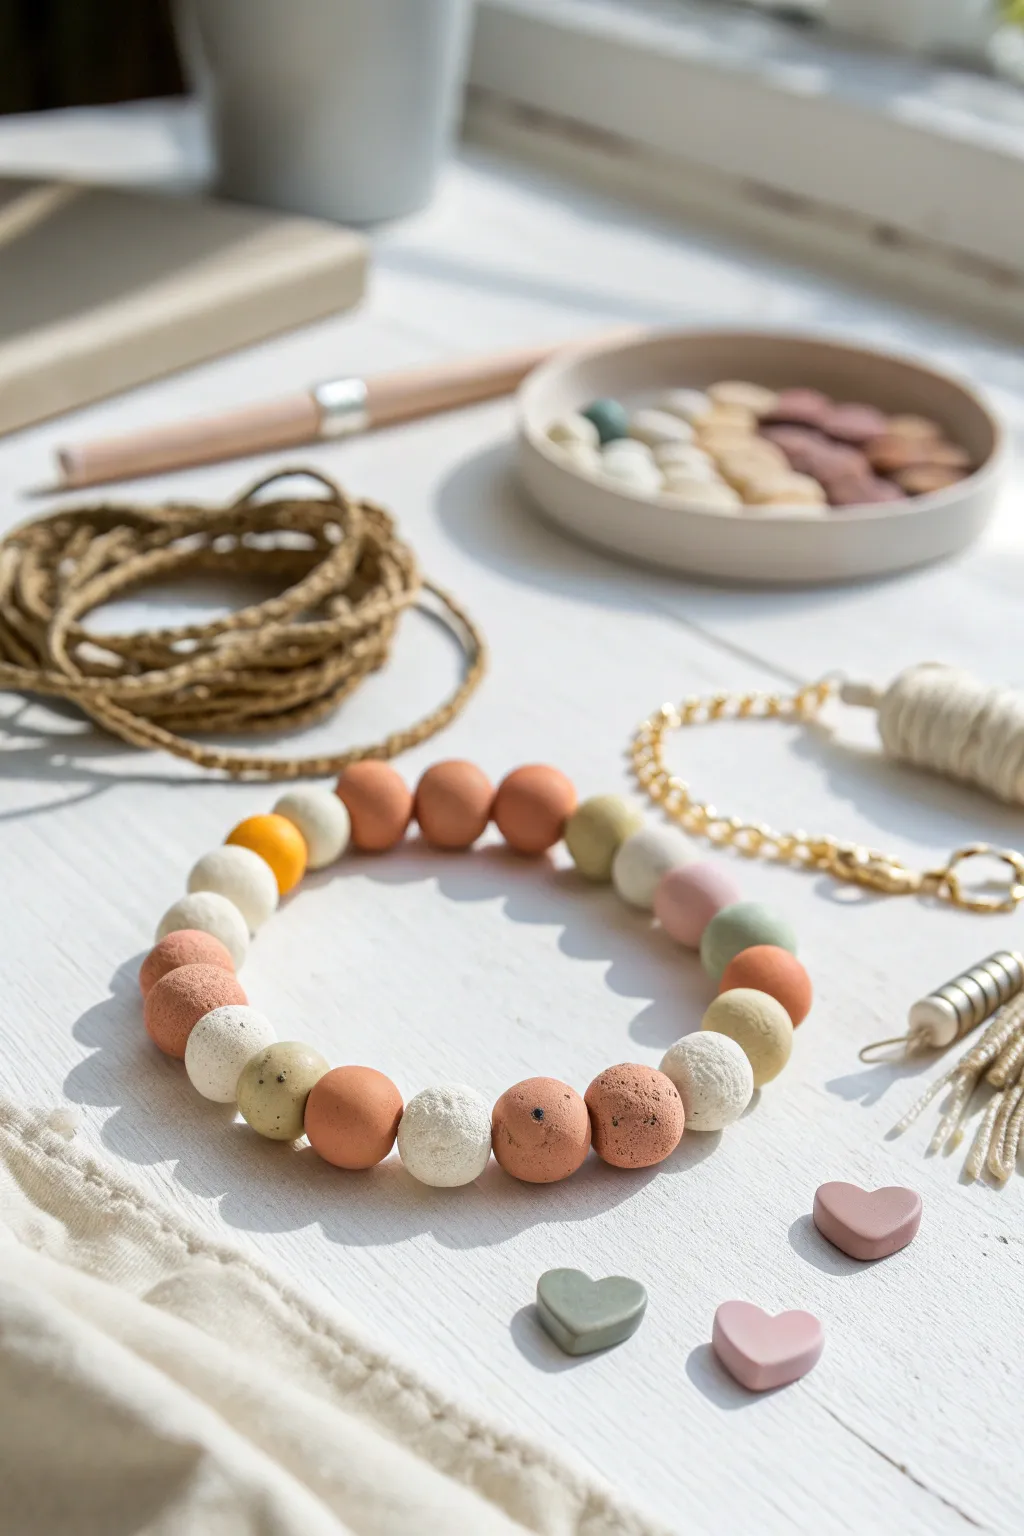
Create a stunningly simple piece of jewelry with these textured, earth-toned beads that look like they came from a high-end boutique. This project transforms basic air-dry clay into wearable art featuring a beautiful matte finish and a soothing, natural color palette.
How-To Guide
Materials
- White air-dry clay
- Acrylic paints (terracotta/burnt sienna, sage green, mustard yellow, pale pink)
- Wooden skewer or toothpick
- Elastic cord (0.8mm or 1mm)
- Fine-grit sandpaper (optional)
- Matte texturizing medium or baking soda (to mix with paint)
- Small paintbrush
- Scissors
- Drying rack or foam block
Step 1: Shaping the Beads
-
Portion the clay:
Pinch off small pieces of air-dry clay, aiming for chunks about the size of a marble. You will need approximately 20-25 beads for an adult-sized bracelet. -
Roll into spheres:
Roll each piece of clay between your palms to create a smooth, round sphere. Don’t worry if they aren’t perfectly identical; a little variation adds to the organic look. -
Create the holes:
While the clay is still soft, gently pierce the center of each bead with a wooden skewer or toothpick. Twist the tool as you push through to prevent deforming the bead shape. -
Widen the openings:
Wiggle the skewer slightly inside the hole to ensure it’s wide enough for your elastic cord, keeping in mind that clay sometimes shrinks slightly as it dries. -
Let them dry:
Slide the beads onto a skewer or place them on a drying rack. Allow them to dry completely according to your clay package instructions, usually 24-48 hours.
Pro Tip: Smoother Holes
As the clay dries, gently rotate the beads on the skewer every few hours. This prevents them from sticking to the wood and keeps the holes perfectly round and clean.
Step 2: Adding Color & Texture
-
Prepare the textured paint:
To achieve that stony, matte look seen in the photo, mix a small pinch of baking soda or cornstarch into your acrylic paints. -
Mix your palette:
Prepare your colors: a warm terracotta, a muted sage green, a soft mustard, and a dusty pink. Leave some white paint plain or tinted slightly cream. -
Paint the terracotta beads:
Paint a few beads with the terracotta mixture. Dab the paint on rather than stroking it to enhance the textured, stone-like appearance. -
Paint the accent colors:
Paint selected beads in sage green, mustard, and dusty pink. I like to keep the majority in warm earth tones like terracotta and cream to anchor the design. -
Create the speckled look:
For the cream and green beads, you can flick a tiny bit of dark brown paint from a stiff brush onto them to create subtle speckles, mimicking natural stone. -
Dry the beads:
Place the painted beads back on skewers to dry fully. The baking soda mix dries quite matte and fast.
Step 3: Assembly
-
Measure the cord:
Cut a length of elastic cord about 10-12 inches long. This gives you plenty of slack for tying the knot later. -
Pre-stretch the elastic:
Gently pull on the elastic cord near the middle a few times. This prevents the bracelet from stretching out and becoming loose after you wear it. -
Plan your pattern:
Lay your dried beads out on a table to design your pattern. Try alternating the terracotta beads with the lighter cream and colored accents for visual balance. -
String the beads:
Thread the beads onto the elastic cord one by one, following the pattern you laid out. -
Check the fit:
Wrap the strung beads around your wrist to check the size. Add or remove beads until it sits comfortably without gaps. -
Tie the knot:
Tie a strong surgeon’s knot (right over left, left over right) and pull it tight. You can add a tiny dab of superglue to the knot for extra security. -
Hide the knot:
Trim the excess elastic cord close to the knot, then gently pull the knot inside one of the adjacent beads to hide it completely.
Level Up: Scent Diffuser
Leave the cream-colored clay beads unpainted and untreated. These porous beads can absorb essential oils, turning your bracelet into a portable aromatherapy diffuser.
Enjoy wearing your handcrafted, earthy jewelry that adds a touch of nature to any outfit

The Complete Guide to Pottery Troubleshooting
Uncover the most common ceramic mistakes—from cracking clay to failed glazes—and learn how to fix them fast.
Cute Animal Mini Figures From Basic Shapes
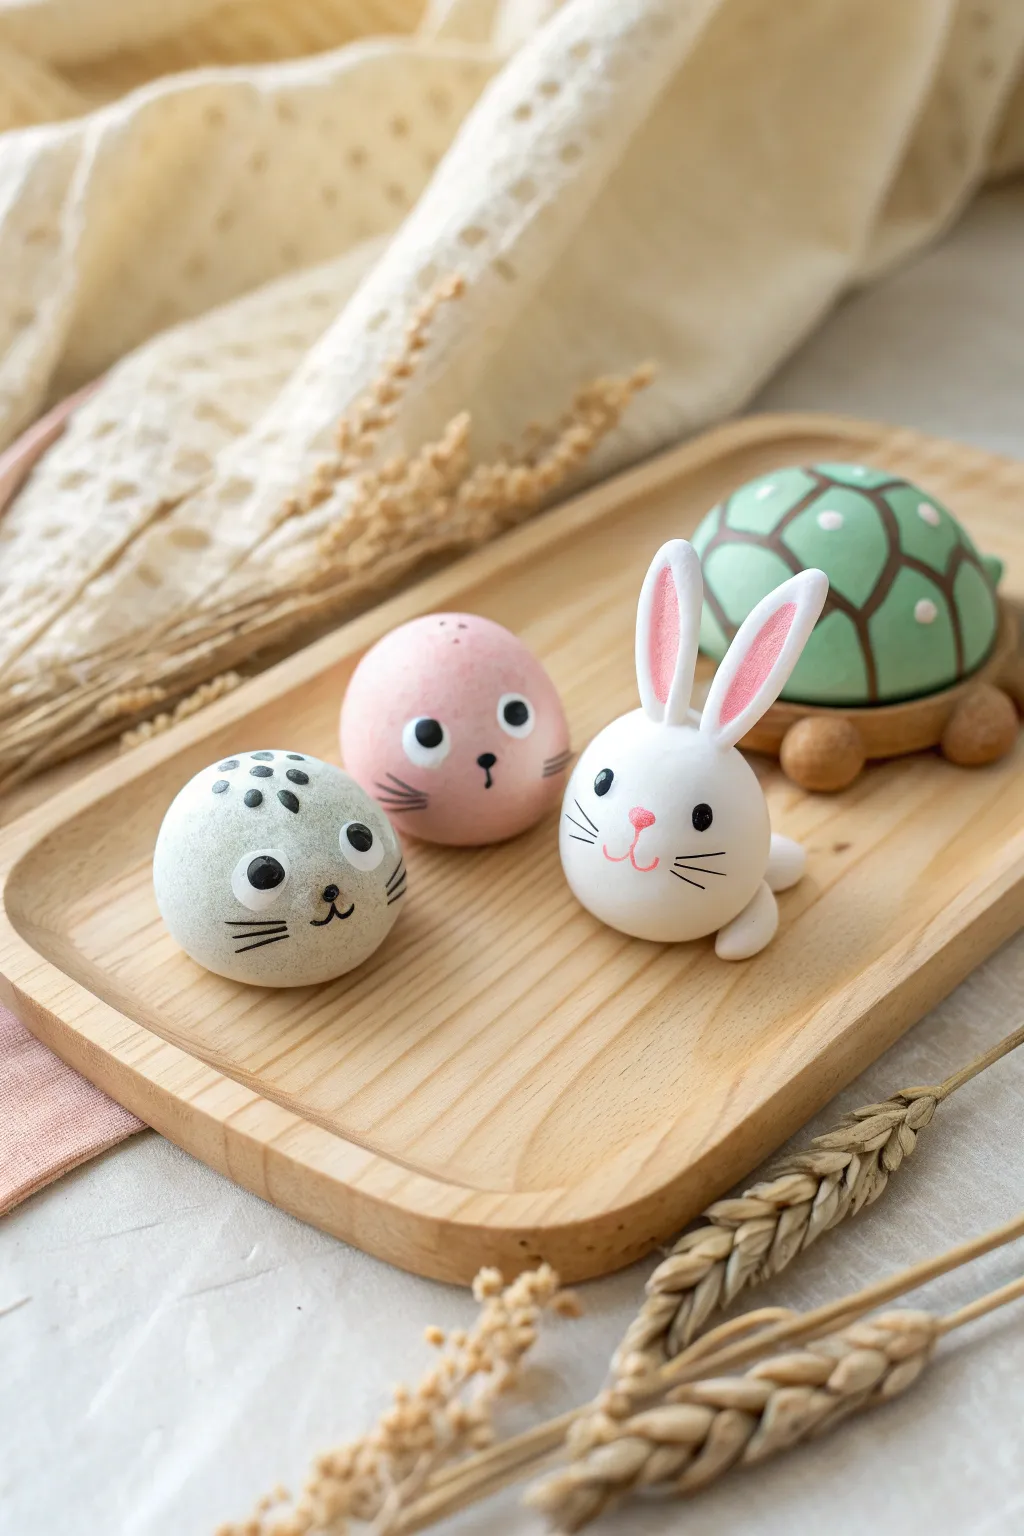
These adorable mini animal figures are the perfect project to master simple shapes, transforming basic spheres into a delightful menagerie. With smooth surfaces and sweet painted faces, this set includes a baby seal, an otter, a bunny, and a friendly turtle.
Step-by-Step Guide
Materials
- White air dry clay (lightweight or paper clay recommended)
- Acrylic paints (pastel pink, soft grey, mint green, brown, black)
- Set of small round-tip paintbrushes
- Fine-point black permanent marker or detail paint pen
- Small ball tool or toothpicks for sculpting
- Water cup for smoothing
- Palette for mixing colors
Step 1: Prepping the Dough
-
Tinting the clay:
Before sculpting, tint three separate balls of white clay. Knead a tiny drop of grey paint into one, pink into another, and keep one plain white. This ensures the color is uniform and smooth. -
Creating the base shapes:
Roll each colored piece of clay into a smooth, perfect sphere about the size of a golf ball. These will be the bodies for the seal, otter, and bunny. -
Smoothing imperfections:
Dip your finger in a tiny bit of water and gently rub the surface of the spheres to remove any cracks or fingerprints.
Crackle Prevention
Work the clay in your warm hands for a full minute before starting. Warm, conditioned clay cracks less as it dries than cold clay fresh from the package.
Step 2: Sculpting the Bunny
-
Shaping the ears:
Take two small pieces of white clay and roll them into elongated teardrops. Flatten them slightly to create the ears. -
Attaching the ears:
Press the wider bottom of the ears onto the top of the white sphere. Use a damp tool to blend the seams so they don’t fall off. -
Adding feet and tail:
Roll two small white balls for feet and attach them to the front base of the body. Add a tiny round ball to the back for a fluffy tail. -
Pink details:
Paint the inner part of the ears with a soft pink. I find a small flat brush works best here to keep the edges clean.
Step 3: Making the Turtle
-
Creating the shell:
Take a ball of clay and tint it mint green. Roll it into a sphere, then flatten the bottom against the table to make a dome shape. -
Making the body parts:
Using brown clay (or painting white clay brown afterward), roll four small balls for legs, a slightly larger ball for the head, and a tiny pointed tail. -
Assembling:
Position the four leg balls under the edge of the green shell. Attach the head at the front and tail at the back, blending slightly underneath for security. -
Painting the shell pattern:
Once the green clay is dry to the touch, use brown paint and a thin brush to draw a hexagonal pattern across the shell. -
Adding dots:
Finish the shell by using the back of a paintbrush handle dipped in white paint to stamp a small dot in the center of each shell segment.
Glossy Coats
To make your animals look like durable ceramic figurines, brush on a coat of Mod Podge or clear acrylic varnish once the paint is completely dry.
Step 4: Bringing Faces to Life
-
Base eyes:
For the bunny and two seals, paint solid black circles for eyes. Place them fairly wide apart to increase the cuteness factor. -
Adding highlights:
Once the black paint is fully dry, add a tiny white dot to the upper corner of each eye. This ‘catchlight’ is crucial for making them look alive. -
Seals’ whiskers and noses:
Use a fine-point black maker or a very thin brush to draw three whiskers on each cheek for the grey and pink seals. Add small upside-down triangle noses and little mouth lines. -
Bunny face details:
Paint a small pink nose on the bunny. Use the black marker to draw wide whiskers and a happy mouth connecting to the nose. -
Spotted seal details:
For the grey seal character, add little dark grey spots on the top his head using the very tip of your brush.
Set your new little friends on a shelf to dry completely and admire their sweet faces
Silly Clay Monsters With Big Eyes

These quirky little creatures are bursting with personality, featuring goofy smiles, prominent horns, and a forest of bumps and spikes. Their chunky, rounded bodies and oversized eyes make them an approachable and delightful protect for sculptors of all ages.
Detailed Instructions
Materials
- Air dry clay (white or pre-colored)
- Acrylic paints (red/coral, teal, dark blue, white, black, orange)
- Small paintbrushes (detail and flat)
- Smoothing tool or spoon back
- Toothpicks (for support)
- Water cup
- Clear matte varnish (optional)
Step 1: Sculpting the Body
-
Form the base:
Start with a handful of clay roughly the size of a tennis ball. Roll it into a smooth sphere to remove any cracks, using a drop of water on your finger if needed. -
Shape the monster:
Gently roll the sphere into an elongated egg or capsule shape. Tap the bottom flat against your work surface so the monster stands up sturdily on its own. -
Pinch the feet:
At the very bottom of the shape, gently pinch out three or four small, rounded nubs to act as feet. Blend the clay upwards into the body so there are no seams.
Step 2: Adding Features
-
Create the eyes:
Roll two medium-sized balls of white clay for the eyes. They should be quite large relative to the body for that cartoonish look. -
Attach the eyes:
Press the eye balls firmly onto the upper half of the face. To ensure a permanent bond, I recommend scratching the contact points with a toothpick and adding a dab of water before pressing them together. -
Make the horns:
Roll two small cones of clay for horns. Attach these to the very top of the head, blending the base of the clay slightly to secure them. -
Add texture bumps:
Roll many tiny little balls of clay. Press these randomly all over the monster’s body to create a bumpy, uneven texture, leaving the face area smooth. -
Carve the mouth:
Use a clay tool or the edge of a popsicle stick to gently press a curved line for the mouth just below the eyes. -
Sculpt teeth:
Roll a very thin snake of clay and flatten it slightly. Cut small triangles from it and press them along the top edge of the mouth line to create a jagged row of teeth. -
Drying time:
Let your monster dry completely. Depending on the humidity and brand of clay, this usually takes 24 to 48 hours.
Cracking Clay?
If small cracks appear while the clay dries, simply mix a tiny bit of fresh clay with water to make a paste and fill in the gaps like spackle.
Step 3: Painting & Details
-
Base coat:
Paint the entire body of the monster with your chosen color (like the coral red shown), carefully painting around the white eyes and teeth. You may need two coats for full coverage. -
Paint the horns:
Use a contrasting color, like bright orange, to paint the horns. A small detail brush works best here to avoid getting orange on the body. -
Whiten the eyes:
Even if you used white clay, give the eyeballs and teeth a coat of white acrylic paint. This makes them pop and look much cleaner against the colorful body. -
Add pupils:
Using black paint and a small round brush (or the back of a paintbrush handle), stamp large black circles in the center of the white eyes. -
Highlight the eyes:
Once the black pupil is dry, add a tiny white dot near the top edge of the black circle. This ‘catchlight’ gives the monster life. -
Outline the mouth:
Use a very thin liner brush with black paint to carefully outline the smile and define the row of teeth. -
Seal the work:
After the paint is fully dry, apply a thin layer of matte varnish to protect the paint and give the monster a finished professional look.
Mix & Match Features
Try giving your monster different pupil shapes, like squares or slits, or swap horns for antennae to create a whole unique alien family.
Set your trio of monsters on a shelf to keep watch over your room


What Really Happens Inside the Kiln
Learn how time and temperature work together inside the kiln to transform clay into durable ceramic.
Smiley Face Fridge Magnets
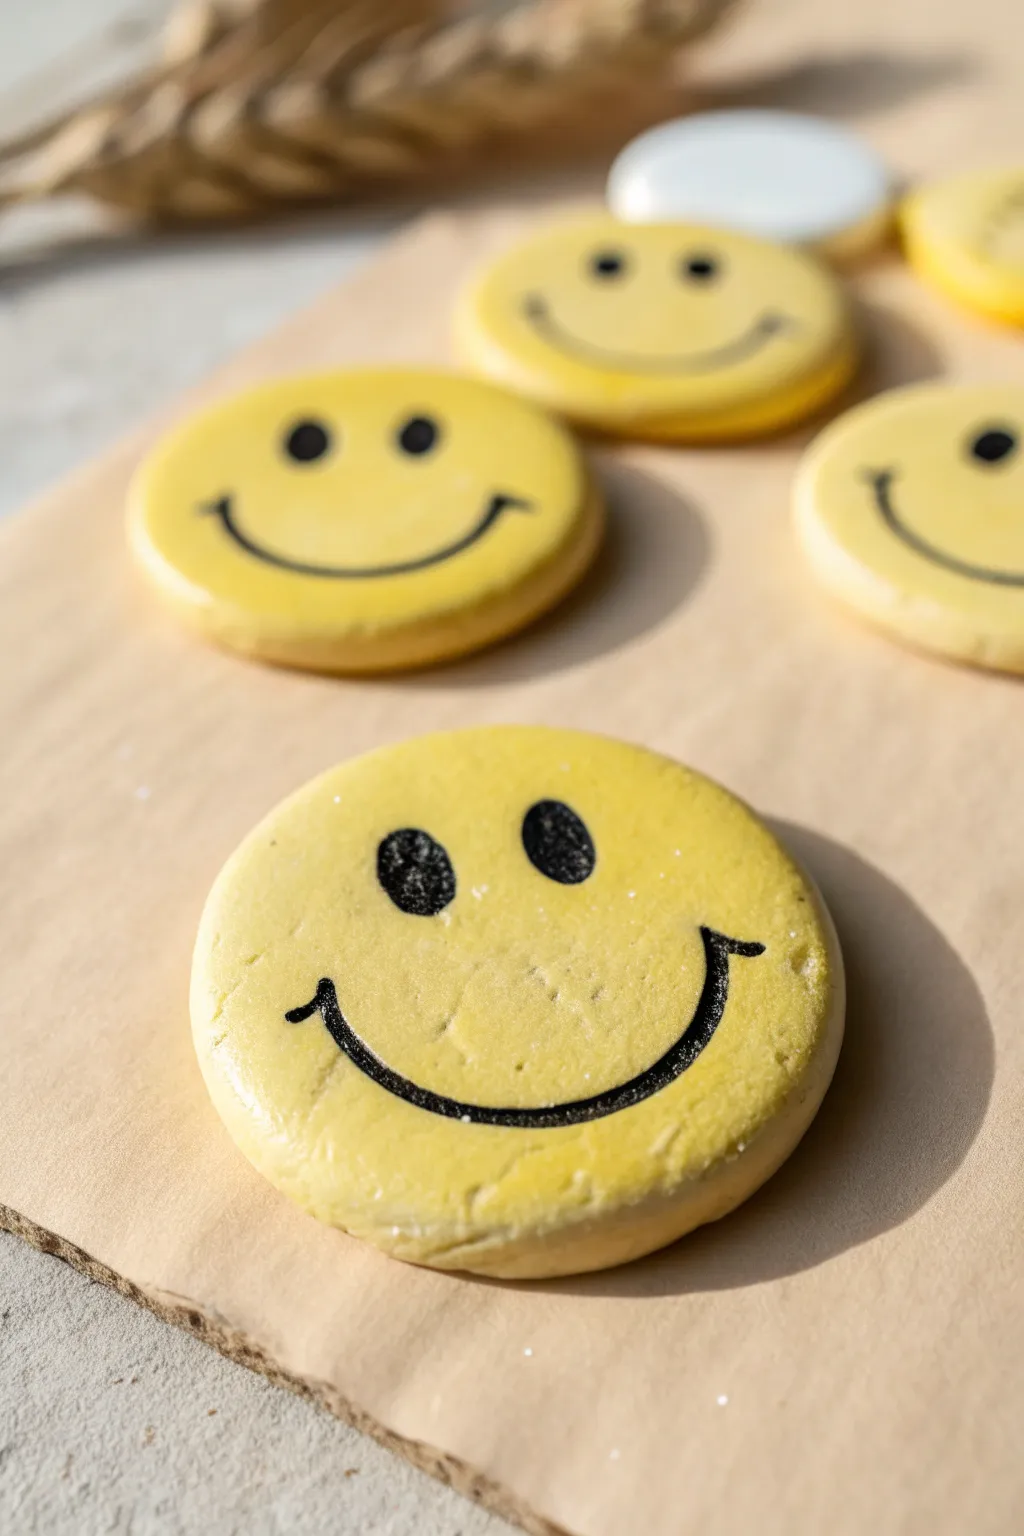
These cheerful yellow magnets are a guaranteed way to brighten up your kitchen decor and bring a smile to your face every time you reach for the milk. With their smooth, bright finish and classic happy expressions, they have a charmingly nostalgic vibe that is incredibly simple to achieve.
Step-by-Step Tutorial
Materials
- White air dry clay
- Rolling pin
- Round cookie cutter or small glass
- Sandpaper (fine grit)
- Small round magnets
- Strong craft glue (e.g., E6000 or super glue)
- Yellow acrylic paint
- Black acrylic paint or black permanent marker
- Fine detail paintbrush
- Mod Podge or clear sealant (glossy or matte)
- Parchment paper or craft mat
Step 1: Shaping the Base
-
Prepare your clay:
Start by taking a handful of white air dry clay. Knead it in your hands for a minute until it feels soft, warm, and pliable. This conditioning step helps prevent cracks later on. -
Roll it out:
Place the clay on a sheet of parchment paper or a craft mat to prevent sticking. Use your rolling pin to flatten the clay into an even slab. -
Check the thickness:
Aim for a thickness of about 1/4 inch (approx. 5-6mm). You want them thick enough to be sturdy but not so heavy that they slide down the fridge. -
Cut the circles:
Press your round cookie cutter or the rim of a small glass firmly into the clay. Give it a little wiggle before lifting to ensure a clean cut. -
Smooth the edges:
Carefully remove the excess clay. Dip your finger in a tiny bit of water and run it around the cut edges of your circles to smooth out any roughness or stray bits of clay. -
Dry completely:
Lay your clay circles on a clean, flat surface to dry. Flipping them over halfway through the drying process helps them dry evenly and stay flat. This usually takes 24-48 hours depending on humidity.
Uneven Surface?
If your dried clay surface feels too rough for painting, apply a thin layer of diluted white glue or gesso first. It acts as a primer, filling tiny pores for a smoother paint job.
Step 2: Adding Color & Character
-
Sand for perfection:
Once fully dry, the clay will be hard and white. If there are any bumpy spots or sharp edges, gently buff them away with fine-grit sandpaper for a professional finish. -
Base coat painting:
Squeeze out some bright yellow acrylic paint. I like to use a soft, flat brush for this part to minimize stroke marks. Paint the entire front and sides of each circle. -
Second coat:
Let the first layer dry to the touch (about 10-15 minutes), then apply a second coat of yellow for a solid, opaque coverage. Let this dry completely. -
Draft the face:
Before committing with paint, lightly sketch your smiley face design onto the yellow surface with a pencil. Draw two oval eyes and a wide, U-shaped smile. -
Paint the eyes:
Using a very fine detail brush and black acrylic paint, carefully fill in the oval eye shapes. Alternatively, a black permanent marker gives you great control here. -
Paint the smile:
Trace over your pencil smile line with the black paint or marker. Add little perpendicular tick marks at the ends of the smile for that classic vintage look. -
Seal the deal:
Once the face is totally dry, apply a coat of clear sealant or Mod Podge. This protects the paint from chipping and gives the magnet a finished sheen. -
Attach the magnet:
Flip your smiley face over. Apply a dab of strong craft glue to the back center of the disc and press your magnet firmly into it. -
Final cure:
Let the glue cure according to the package instructions (usually overnight) before sticking them to your fridge.
Emotion Variations
Don’t stop at smiles! Create a whole set of ‘mood magnets’ by painting different emojis like winking, confused, or heart-eyes faces to match your daily vibe.
Your fridge is now ready to greet you with a happy face every single morning
Mini Photo and Note Holders
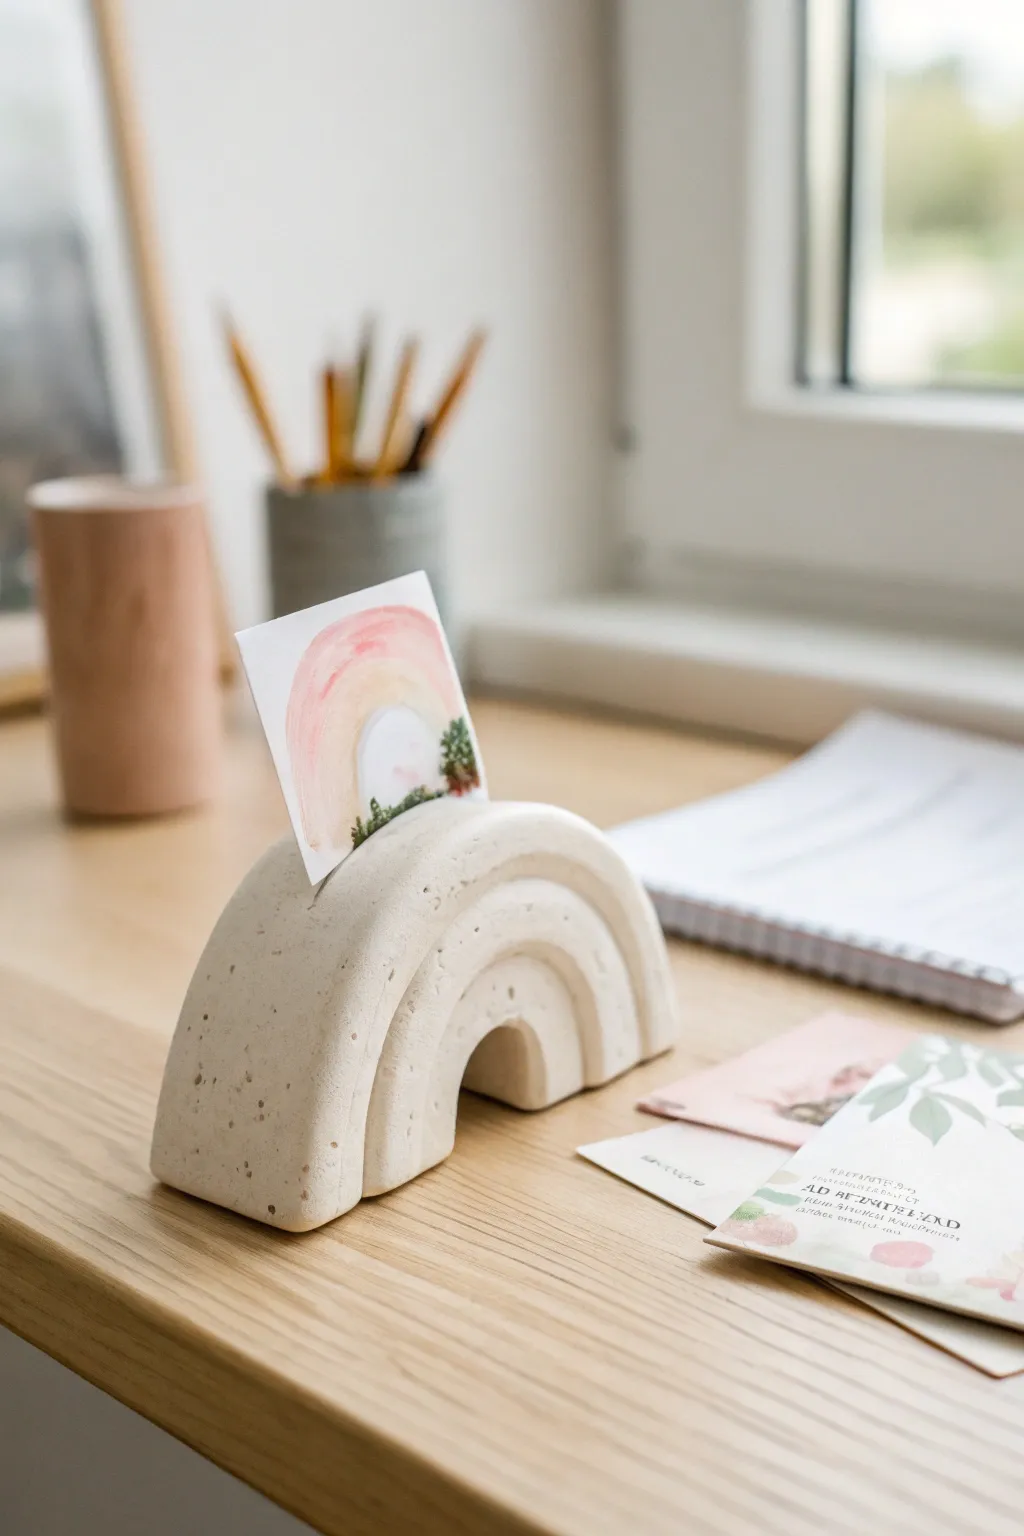
Keep your favorite mini-prints, notes, or watercolor doodles on display with this minimalist, arch-shaped card holder. Its textured, speckled finish gives it a trendy terrazzo look without needing concrete, making it a perfect, manageable project for an afternoon crafting session.
Detailed Instructions
Materials
- White air-dry clay (approx. 200-300g)
- Faux stone spray paint (granite or beige speckle effect)
- Rolling pin
- Craft knife or clay cutting tool
- Ruler
- Small bowl or cup (for cutting curves)
- Sandpaper (fine grit)
- Water in a small dish
- Plastic placemat or parchment paper
Step 1: Shaping the Rainbow
-
Condition the clay:
Begin by kneading a good handful of white air-dry clay until it feels soft, warm, and pliable. This step is crucial to prevent internal cracks later. -
Roll it out:
Place the clay on your parchment paper or smooth work surface. Use the rolling pin to flatten it into an even slab about 3/4 of an inch (1.5-2 cm) thick. We want this chunky to help it stand upright. -
Cut the base:
Use your ruler and knife to cut a rectangle from the slab. A good size is roughly 4 inches wide and 2.5 inches tall, but you can adjust based on how large you want your rainbow. -
Create the arch:
Find a round object like a bowl or cup that matches the width of your rectangle. Place it at the top edge and use it as a guide to trim the top corners into a smooth, perfect semicircle. -
Cut the inner arch:
Using a smaller circular object or freehanding with your knife, cut a smaller semicircle out of the bottom center to create the legs of the rainbow. -
Refine the edges:
Dip your finger in a little water and run it along all the cut edges to smooth out any jagged bits or roughness.
Step 2: Adding Dimension
-
Mark the bands:
Take a carving tool, a dull pencil, or the back of your knife. Gently press curved lines into the front face of the clay to mimic the separate bands of a rainbow. -
Define the grooves:
Go over these lines a second time, pressing slightly deeper to ensure the grooves remain visible even after sanding and painting. I find creating a V-shaped groove highlights the separation best. -
Create the slot:
Using the ruler or the dull side of a knife, press a straight line deeply into the very top center of the arch. Wiggle it slightly to widen the gap just enough to hold a piece of cardstock. -
Final smoothing:
Give the entire piece one last check for fingerprints. Smooth them away with a barely damp finger or a soft, damp sponge.
Clean Slit Tip
To keep the card slot from closing up as the clay shrinks during drying, insert a folded piece of wax paper into the groove and leave it there until the clay is 90% dry.
Step 3: Finishing Touches
-
Let it dry completely:
Place the rainbow on a wire rack or clean flat surface. Allow it to dry for at least 24-48 hours. Turn it over halfway through so the back dries evenly. -
Sand for perfection:
Once fully dry and hard, use fine-grit sandpaper to buff away any remaining sharp edges or uneven textures on the surface. -
Apply texture spray:
Take the project to a well-ventilated area. Shake your faux stone spray paint vigorously. Apply a light, even coat over the entire piece to get that speckled, concrete look. -
Dry and repeat:
Let the first coat dry according to the can’s instructions. If you want a heavier stone texture, apply a second coat. -
Seal (Optional):
If you plan to handle the holder often, a quick spray of matte clear sealer will keep the stone texture from flaking off over time.
Make it Real Terrazzo
Instead of spray paint, knead tiny chunks of dried colored clay or colored sand directly into your white wet clay before rolling it out for an authentic stone effect.
Pop in a favorite photo or a tiny watercolor painting to instantly brighten up your workspace

TRACK YOUR CERAMIC JOURNEY
Capture glaze tests, firing details, and creative progress—all in one simple printable. Make your projects easier to repeat and improve.
Textured Pattern Stamps Using Household Finds
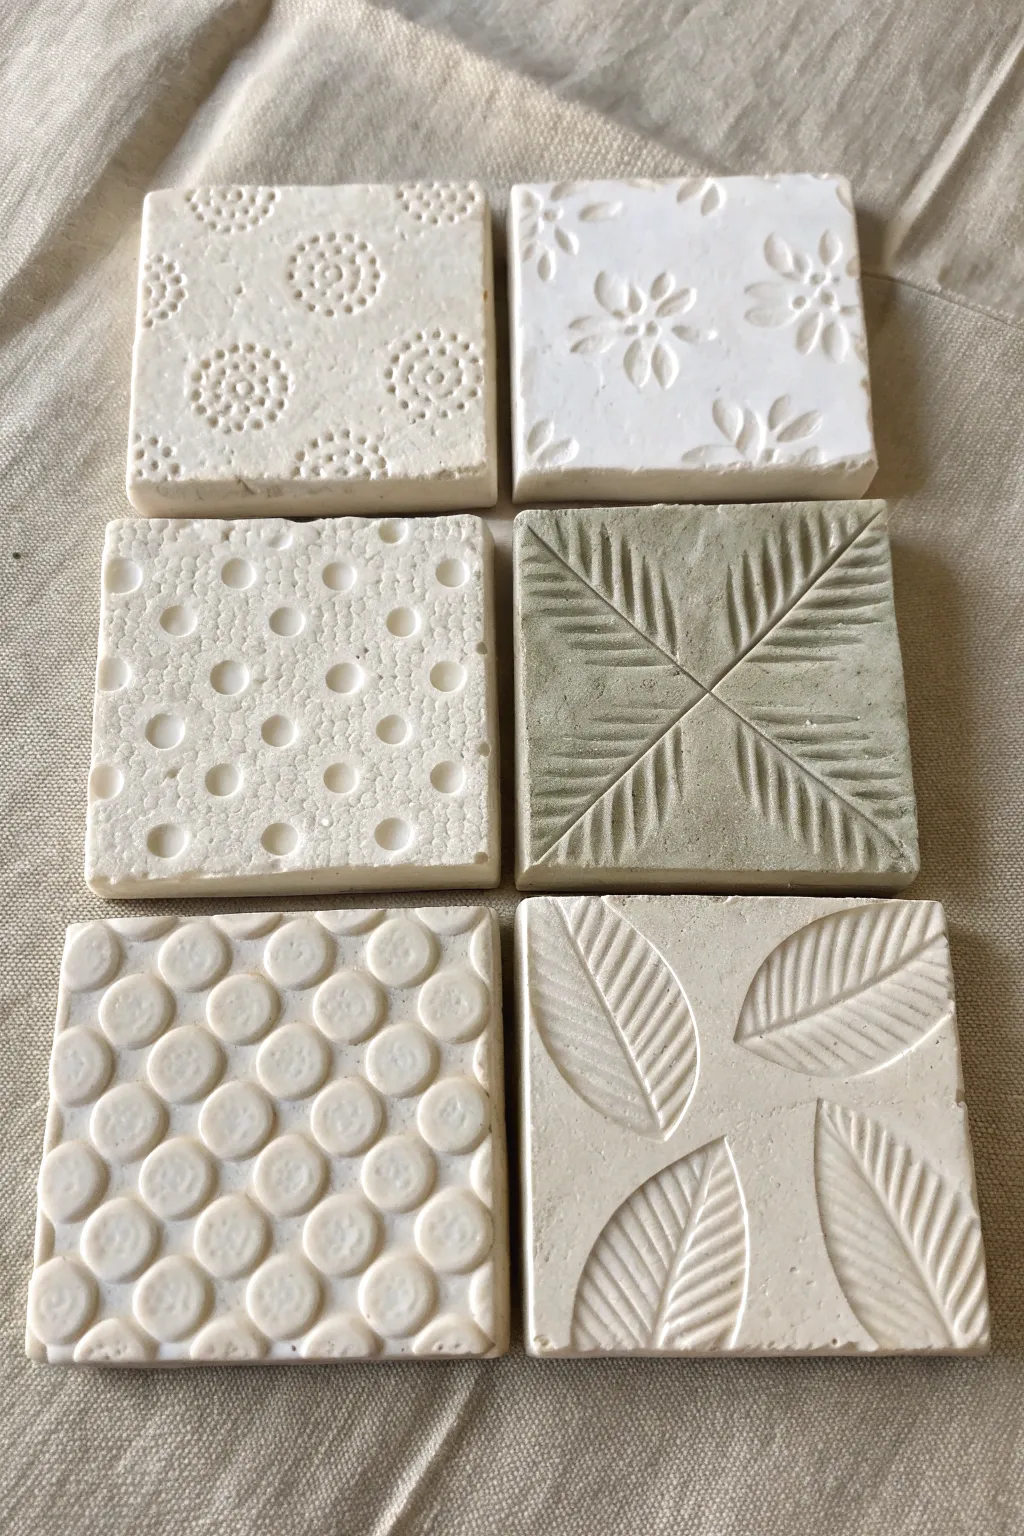
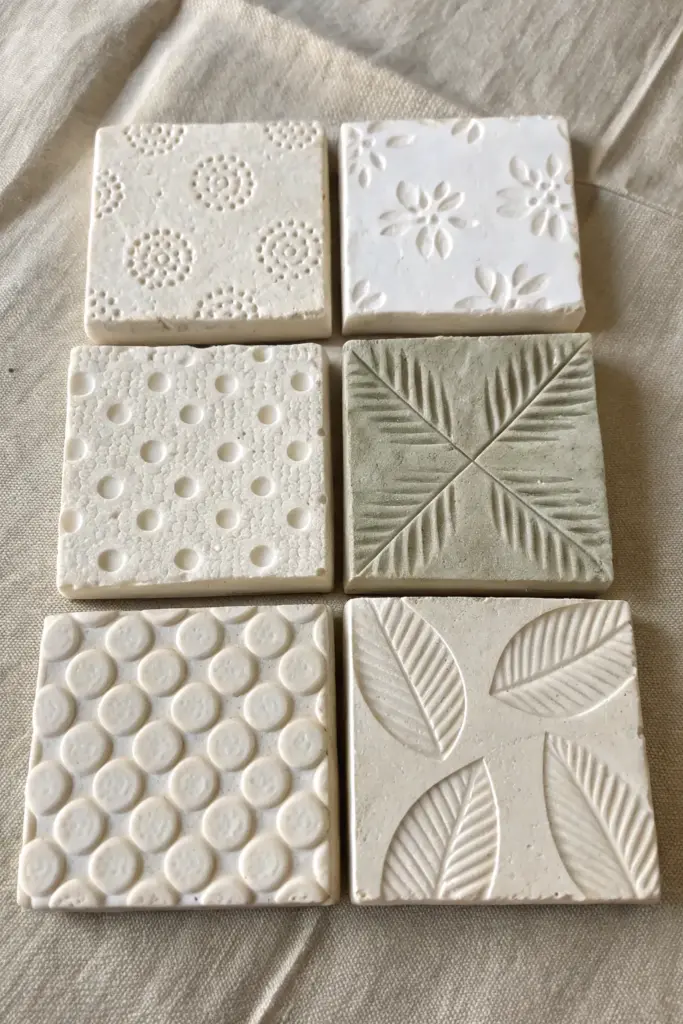
Transform a simple block of air dry clay into a stunning gallery of tactile art using everyday objects and textures found in nature. These six distinct tiles capture everything from fern fronds to bubble wrap patterns, creating a beautiful monochromatic display.
How-To Guide
Materials
- White or light gray air dry clay (approx. 1kg)
- Rolling pin or smooth glass jar
- Square cookie cutter (approx. 3-4 inches) or ruler and knife
- Wax paper or canvas mat (for a non-stick surface)
- Bowl of water
- Sponge
- Sandpaper (fine grit)
- Texture Tool 1: Small circular object (pen cap or drinking straw)
- Texture Tool 2: Bubble wrap
- Texture Tool 3: Fern leaf or faux greenery
- Texture Tool 4: Marker cap end or dowel
- Texture Tool 5: Carving tool or toothpick (for hand-drawn leaves)
- Texture Tool 6: Spiral or button stamp
Step 1: Preparation & Shaping
-
Prepare your workspace:
Lay down your canvas mat or a sheet of wax paper to prevent the clay from sticking to your table. If using canvas, it adds a lovely subtle texture to the back of your tiles. -
Condition the clay:
Take a generous handful of air dry clay and knead it until it is soft, warm, and pliable. This step is crucial for preventing cracks later on. -
Roll out the slab:
Using your rolling pin, flatten the clay to an even thickness of about 1/2 to 3/4 inch. You want these to be substantial and sturdy, not thin and brittle. -
Cut the squares:
Press your square cookie cutter firmly into the clay to cut out six identical squares. If you don’t have a cutter, I usually just measure with a ruler and slice cleanly with a craft knife. -
Smooth the edges:
Dip your finger in a little water and gently run it along the cut edges of each square to soften any sharp corners.
Step 2: Creating the Textures
-
Tile 1: Dotted Circles:
For the top-left style, use a small hollow tube like a pen cap. Press it gently into the clay to create rings, arranging them in clusters to form larger circular patterns across the surface. -
Tile 2: Floral Relief:
For the top-right style, use a pre-made floral stamp or the end of a detailed marker cap. Press firmly in random orientations to create a scattered flower garden effect. -
Tile 3: Inverted Bubbles:
For the middle-left tile, take a piece of bubble wrap and press it bubble-side down into the clay. Roll over it once with the rolling pin to get a deep impression of the orderly dots. -
Tile 4: The Fern Impression:
For the middle-right tile, lay a fern frond or faux leaf diagonally across the square. Press it firmly into the clay, ensuring the stem and veins make contact, then carefully peel it away. -
Tile 5: Spiral Relief:
For the bottom-left tile, use a tool with a convex spiral or rounded pattern (like a decorative button or clay tool). Press deeply in rows to create raised, puffy-looking spiral mounds. -
Tile 6: Carved Leaves:
For the final bottom-right tile, use a carving tool or wooden skewer to hand-draw large leaf shapes. Press deeper for the outline and more lightly for the diagonal veins inside each leaf.
Clean Impressions
If your stamp or leaf is sticking to the clay, lightly dust the object with cornstarch or baby powder before pressing it down. This acts as a release agent for a crisp print.
Step 3: Finishing Touches
-
Final smoothing:
Check the edges of your embossed patterns. If the clay has pushed up and created sharp ridges, gently tap them down with a finger. -
Allow to dry:
Place the tiles on a wire rack to ensure air circulation underneath. Let them dry for at least 24-48 hours until they turn a chalky white and are hard to the touch. -
Sand imperfections:
Once fully dry, take a piece of fine-grit sandpaper and lightly buff the edges and surface to remove any rough spots or fingerprints. -
Optional sealing:
To protect your work, you can apply a layer of matte acrylic sealer or Mod Podge, though leaving them raw maintains that beautiful stonelike matte finish.
Add an Antique Look
Once dry, dilute some brown acrylic paint with water (a wash). Brush it over the textures and immediately wipe the surface with a rag. The dark color will stay in the grooves.
Arrange your finished tiles in a grid on the wall or use them as unique, handcrafted coasters