When I’m craving a creative win without a kiln, I reach for air dry clay—it’s the fastest way to turn a little lump into something you can actually use or display. Here are my favorite air dry clay art ideas, starting with the classics and ending with a few studio-style curveballs that still feel totally doable at home.
Classic Trinket Dish With an Easy Pinch Rim
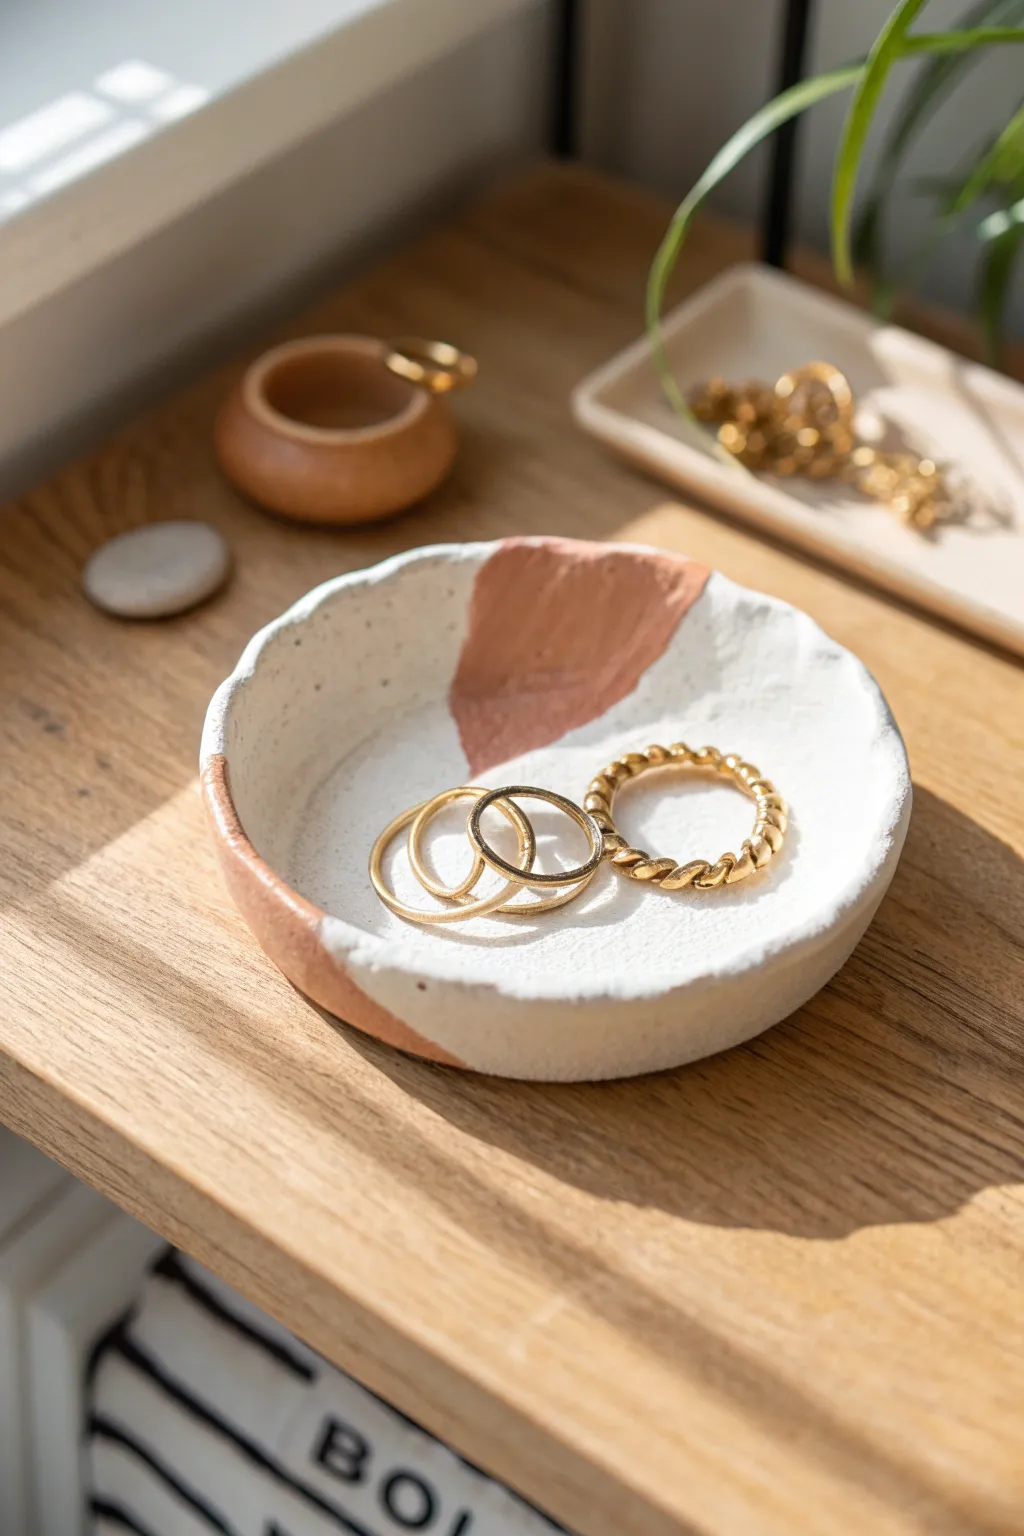
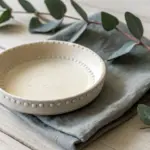
Embrace the beauty of imperfection with this lovely speckled trinket dish. Featuring organic, hand-pinched edges and a striking terracotta accent, it’s the perfect modern home for your favorite rings or dainty jewelry.
Step-by-Step
Materials
- White or cream air dry clay
- Rolling pin
- Small bowl (approx. 4 inches) for tracing
- Craft knife or clay tool
- Fine-grit sandpaper
- Terracotta or burnt orange acrylic paint
- Small paintbrush
- Sealant (matte or gloss varnish)
- Small bowl of water
- Sponge or paper towel
Step 1: Shaping the Clay
-
Prepare the workspace:
Lay down a non-stick mat or parchment paper to protect your surface and prevent the clay from sticking. -
Condition the clay:
Take a handful of air dry clay and knead it briefly in your hands until it feels soft, pliable, and free of cracks. -
Roll it out:
Use your rolling pin to flatten the clay ball into an even slab, aiming for a consistent thickness of about 1/4 inch. -
Cut the circle:
Place your small bowl upside down on the flattened clay as a template. Use a craft knife to trace around the rim and cut out a perfect circle. -
Begin forming the rim:
Gently lift the edges of the clay circle upwards with your fingers to create a shallow bowl shape. -
Pinch the edges:
Using your thumb and forefinger, pinch along the rim to thin it out slightly. Don’t aim for perfection here; the irregular, wavy look adds to the organic charm. -
Smooth the surface:
Dip your finger into a little water and run it over any cracks or rough spots on the inside and outside of the dish to smooth them away. -
Final shaping check:
Set the dish down and check that the bottom is flat so it won’t wobble. Gently press the center down if needed. -
Let it dry:
Place the dish in a dry, safe spot. Allow it to air dry completely for 24-48 hours, flipping it over halfway through to ensure the bottom dries evenly.
Smooth Operator
Keep a small bowl of water nearby while shaping. A damp finger is the best tool for erasing fingerprints or tiny cracks instantly.
Step 2: Decorating and Finishing
-
Check for dryness:
Ensure the clay is bone dry. It should feel hard, room temperature (not cold), and lighter in colour. -
Sand the edges:
Take your fine-grit sandpaper and gently sand the rim and any rough patches. This creates a professional, finished feel. -
Wipe away dust:
Use a slightly damp sponge or cloth to wipe away all the clay dust from sanding before you start painting. -
Paint the accent:
Dip your brush into the terracotta acrylic paint. Paint a large, abstract color block that starts inside the bowl and wraps over the rim onto the outside. -
Refine the shape:
I like to give the painted patch a slightly organic, curved edge rather than a straight line to match the casual vibe of the bowl. -
Add speckles (optional):
To mimic the speckled stoneware look in the photo, dilute a tiny bit of brown or black paint and flick it onto the white areas using a toothbrush or stiff brush. -
Dry the paint:
Allow the acrylic paint to dry completely, which usually takes about 20-30 minutes. -
Seal the dish:
Apply a coat of varnish or sealant over the entire dish. This protects the clay from moisture and gives it a durable finish. -
Final cure:
Let the varnish cure according to the manufacturer’s instructions before placing any jewelry inside.
Speckled Style
Mix black pepper or used coffee grounds directly into the wet clay before rolling to create an authentic ‘stoneware’ speckled texture.
Now your chic, handmade dish is ready to organize your jewelry in style


Stamped Texture Coasters You Can Make in an Afternoon

These minimalist coasters combine sleek design with handmade charm, featuring playful stamped patterns like geometric diamonds, soft waves, and dotted circles. The smooth finish and subtle earthy tones make them a perfect addition to any modern coffee table or a thoughtful handmade gift.
How-To Guide
Materials
- White air dry clay
- Terracotta or peach tinted air dry clay (optional for variation)
- Rolling pin
- Circle cookie cutter (approx. 3.5-4 inches diameter)
- Textured stamps or household objects (forks, bottle caps, lace)
- Sandpaper (fine grit)
- Small bowl of water
- Sealant (varnish or Mod Podge)
- Parchment paper or non-stick mat
Step 1: Preparing the clay base
-
Condition the clay:
Start by taking a handful of white air dry clay and kneading it in your hands until it becomes soft, pliable, and free of cracks. -
Roll it out:
Place the clay on a sheet of parchment paper or a non-stick mat. Using a rolling pin, flatten the clay to an even thickness of about 1/4 inch. A consistent thickness ensures they dry evenly without warping. -
Cut the shapes:
Press your circle cutter firmly into the clay to create your coaster rounds. Lift the excess clay away carefully so you don’t distort the perfect circles. -
Smooth the edges:
Dip your finger into a small bowl of water and gently run it along the cut edges of the circle to smooth out any roughness or sharp lines left by the cutter. -
Check surface quality:
Before texturing, ensure the top surface is completely smooth. If there are fingerprints, use a tiny bit of water to buff them out lightly.
Step 2: Adding the textures
-
Design the wave pattern:
For the wavy coaster, use a blunt modeling tool or the handle of a spoon. Press gently into the clay and drag it in a fluid, curved motion across the surface to create parallel wave lines. -
Create the geometric diamond pattern:
For the diamond design, use a ruler or straight edge to lightly impress a grid of triangles. Then, use a smaller tool to press lines and dots inside alternating triangles to build depth. -
Make the dotted circle design:
For the circular pattern, use a skewer or toothpick to poke small holes in concentric rings. Start from the outer edge and work inward. -
Add a center accent:
In the center of the dotted coaster, use a small textured stamp or the head of a screw to press a unique focal point pattern right in the middle. -
Experiment with edges:
If you want the stacked look shown in the darker coasters, use the side of a fork or a specialized ribbing tool to press a continuous texture along the vertical edge of the round. -
Final smoothing check:
Look over your designs one last time. If any bits of clay were pushed up while stamping, gently tap them down with a flat finger.
Stamp trick
Don’t have professional stamps? Look in your kitchen drawer. A meat tenderizer, bottom of a crystal glass, or even a citrus reamer can create amazing textures.
Step 3: Drying and finishing
-
Begin the drying process:
Place your coasters on a clean sheet of parchment paper in a cool, dry place away from direct sunlight. -
Flip frequently:
To prevent curling, I find it essential to flip the coasters over every few hours during the first day of drying. This allows moisture to escape evenly from both sides. -
Wait for full cure:
Allow the coasters to dry completely for 24 to 48 hours. The clay will turn from a cool gray-white to a bone-white color when fully dry. -
Sand the imperfections:
Once fully dry, take a piece of fine-grit sandpaper and gently sand the edges and flat surfaces to remove any remaining rough spots or sharp burrs. -
Dust off:
Wipe the coasters with a slightly damp cloth or a dry soft brush to remove all the sanding dust before sealing. -
Apply sealant:
Apply a thin layer of waterproof varnish or sealant. This is crucial for coasters, as unsealed air dry clay will dissolve if it gets wet from condensation. -
Dry the sealant:
Let the first coat dry completely, then add a second coat for extra durability. Ensure the sides are capable of repelling water.
Two-tone effect
Mix a small amount of acrylic paint into a ball of white clay before rolling. Blend it partially for a marble effect or fully for a solid pastel color.
Now you have a stunning set of custom coasters ready to protect your surfaces with style


Ring Cone and Jewelry Catch Set

Elevate your vanity with this minimalist yet textured jewelry display that mimics the look of natural sandstone. This two-piece set features a classic ring dish and a matching cone, all finished with a distinctive speckled effect that adds artisanal charm.
Step-by-Step Guide
Materials
- Air dry clay (white or natural stone color)
- Acrylic rolling pin
- Rolling guides or wooden slats (approx. 1/4 inch)
- Circle cutter or small bowl (approx. 4-5 inches)
- Craft knife or clay needle tool
- Small bowl of water
- Sponge
- Fine grit sandpaper
- Coarse ground black pepper or dried coffee grounds (for texture)
- Beige or sand-colored acrylic paint
- Old toothbrush (for splattering)
- Dark brown acrylic paint
- Matte spray varnish or sealant
Step 1: Prepping the Clay & Base Dish
-
Condition the Clay:
Begin by taking a generous amount of air dry clay and kneading it in your hands to warm it up. This conditioning process prevents cracks later on. -
Add Texture:
While kneading, sprinkle in a teaspoon of coarse black pepper or dry coffee grounds. Fold the clay over itself repeatedly until the speckles are evenly distributed throughout the mass. -
Roll It Out:
Place your clay onto a clean mat or canvas cloth. Use your rolling guides and pin to roll the clay into an even slab, about 1/4 inch thick. -
Cut the Base:
Press your circle cutter or a small inverted bowl into the clay to cut out a perfect circle. Remove the excess clay but keep it nearby for the cone. -
Form the Rim:
Gently pinch the outer edge of your clay circle upwards to create a raised rim. You can use a damp finger to smooth out any fingerprints as you go. -
Create the Lip:
For that defined edge seen in the photo, roll a very thin snake of clay and adhere it to the top of your pinched rim using a bit of water (slip) to glue it down. -
Smooth Everything:
Using a slightly damp sponge, gently wipe the entire surface of the dish to blend the rim seam and smooth the texture, ensuring the pepper/coffee speckles are still visible.
Uneven Rim?
If your dish rim won’t stand up, drape the clay circle inside a small bowl lined with plastic wrap. Let it dry there for a few hours to hold the curved shape.
Step 2: Sculpting the Cone
-
Form a Shape:
Take the remaining clay ball and roll it between your palms to create a thick cylinder or log shape. -
Refine the Cone:
Place the cylinder on your work surface. Uses the flat part of your palm to roll the clay back and forth, pressing harder on one side than the other to taper it into a cone shape. -
Check the Height:
Stand the cone up to check its stability. If it’s too tall or wobbly, gently tap the base on the table to flatten it and create a sturdy foundation. -
Round the Tip:
The tip shouldn’t be dangerously sharp. Soften the point with your finger so it’s rounded and smooth, perfect for sliding rings onto. -
Final Smooth:
Give the cone a wipe with your damp sponge to match the finish of the dish, removing any handling marks.
Step 3: Finishing Touches
-
Let it Dry:
Place both pieces in a dry area away from direct sunlight. I like to flip the dish over carefully after about 12 hours to ensure the bottom dries evenly. -
Sand for Perfection:
Once fully dry (usually 24-48 hours), use fine-grit sandpaper to buff away any rough edges on the rim or the base of the cone. -
Apply Base Color:
Dilute your beige paint slightly with water to create a wash. Paint the entire surface of both pieces; the wash allows the embedded texture to show through while unifying the color. -
Prepare Splatter:
Mix a small amount of dark brown paint with water until it’s quite runny. -
Create Speckles:
Dip an old toothbrush into the brown mixture. Hold it over your clay pieces and run your thumb across the bristles to flick tiny speckles of paint onto the surface. -
Seal the Deal:
After the paint is completely dry, take the set outside and apply two light coats of matte spray varnish to protect the finish without making it too shiny.
Pro Tip: Natural Texture
Don’t over-sand the surface. Leaving a slight texture from the rolling process mimics real stone much better than a perfectly smooth, manufactured look.
Now you have a stunning, boutique-style jewelry set ready to display your favorite treasures


Mini Planter for Succulents With Simple Painted Shapes
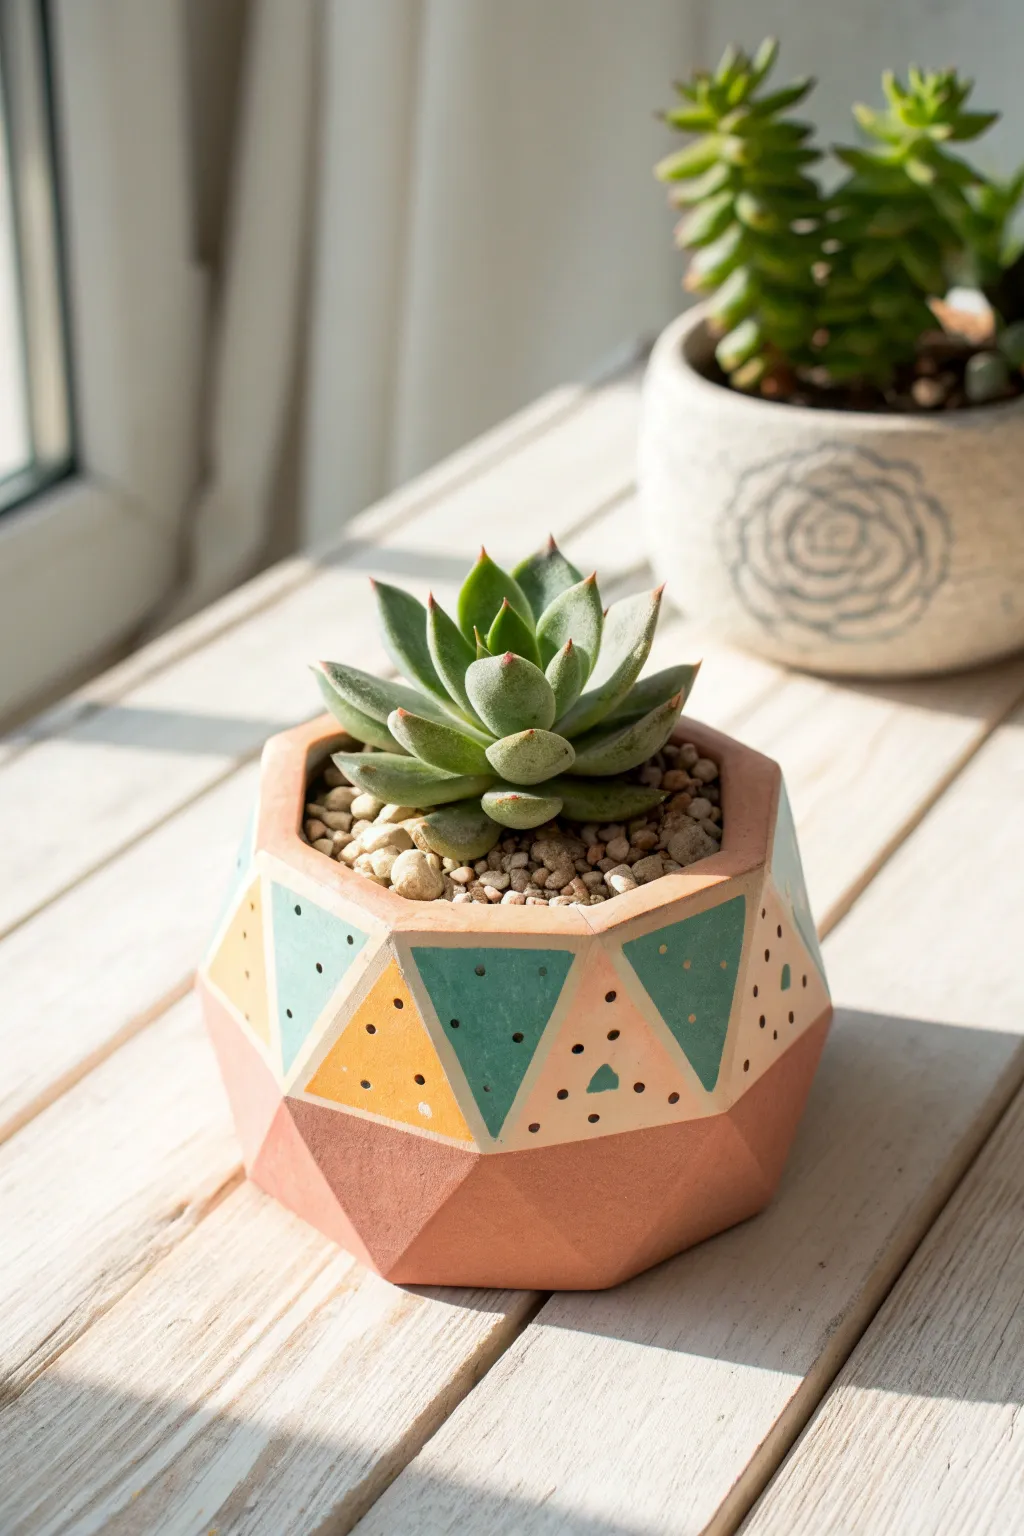
Give your tiny succulents a modern home with this chic, geometric planter made entirely from air-dry clay. Its faceted sides create a stylish canvas for simple painted triangles and playful dots, adding a pop of color to any windowsill.
How-To Guide
Materials
- White air-dry clay (approx. 500g)
- Rolling pin
- Craft knife or clay cutting tool
- Measuring ruler
- Small bowl relative to your desired pot size (to use as a slump mold)
- Plastic wrap
- Sandpaper (fine grit)
- Acrylic paints (terracotta, teal/green, sunny yellow, light pink/beige)
- Small detail paintbrush
- Flat shader paintbrush
- Varnish or sealant (matte or satin)
- Water bonding slip (clay mixed with water)
Step 1: Shaping the Geometric Form
-
Prepare the Clay:
Start by kneading a substantial chunk of air-dry clay until it is warm, pliable, and free of air bubbles. Roll it out into a smooth slab about 1/4 inch thick. -
Cut the Base:
Using your craft knife, cut out a hexagon or octagon shape for the base. It doesn’t need to be perfect, but keeping the sides relatively equal helps with the symmetry later. -
Create the Walls:
Cut a long, rectangular strip of clay from your slab. The width of the strip will determine the height of your pot (around 2-3 inches is usually good for succulents). The length should be enough to wrap around your base. -
Attach Walls to Base:
Score the edges of your base and the bottom edge of your clay strip. Apply a little water or slip, then wrap the strip around the base, pressing firmly to join them. Trim any excess length and join the vertical seam. -
Smooth the Seams:
Use your fingers or a modeling tool to smooth the seams on both the inside and outside so the pot looks like one solid piece. Ensure the connection is strong. -
Faceting the Sides:
This is the crucial step for the geometric look. While the clay is still workable but slightly firm, use a sharp blade to slice away thin sections of the exterior clay at angles. Create flat ‘planes’ or triangles all around the curve. -
Refine the Rim:
Slice the top rim horizontally to make it flat and even. You can also bevel the inner edge slightly if you prefer a thinner look at the top. -
Drainage Hole:
Don’t forget to poke a hole in the center of the bottom using a straw or tool, essential for succulent health. -
Dry Completely:
Set the pot aside in a safe spot to dry. This usually takes 24-48 hours depending on humidity. Rotate it occasionally for even drying.
Step 2: Sanding and Painting
-
Sand for Smoothness:
Once fully dry and chalky white, use fine-grit sandpaper to smooth out any rough fingerprints or sharp edges on your facets. Wipe away the dust with a barely damp cloth. -
Paint the Base Coat:
Mix a warm terracotta or salmon-pink color. Paint the bottom third of the pot, following the faceted geometric lines you carved earlier to create a jagged, mountain-like boundary. -
Paint the Triangles:
Using a flat brush, paint specific triangular facets on the upper section. Alternate between a muted teal green and a sunny yellow, leaving some facets the natural clay color or painting them a very pale beige. -
Add Polka Dots:
Switch to your smallest detail brush. Dip it into black or dark grey paint and arguably add tiny dots to specific triangles. I like to vary the pattern—three vertical dots on one, scattered dots on another. -
Refine Edges:
If your lines between colors got messy, use a small brush with the appropriate color to touch up and create crisp, straight divisions between the geometric shapes. -
Seal the Pot:
Since air-dry clay is not waterproof, apply two to three coats of varnish or sealant inside and out. Ensure the inside is heavily sealed to protect the clay from moisture when watering. -
Final Cure:
Let the sealant cure completely according to the manufacturer’s instructions before adding soil and your succulent.
Clean Lines Hack
Use thin washi tape or painter’s tape to mask off the geometric shapes before painting. It guarantees crisp, straight lines between your color blocks.
Faux Glaze Finish
Use a high-gloss spray varnish or mod podge specifically on the painted triangles to mimic the look of glazed ceramic against the matte raw clay.
Place your favorite little succulent inside and enjoy the modern, handcrafted charm it brings to your space

What Really Happens Inside the Kiln
Learn how time and temperature work together inside the kiln to transform clay into durable ceramic.
Leaf-Imprint Botanical Tray With Natural Texture
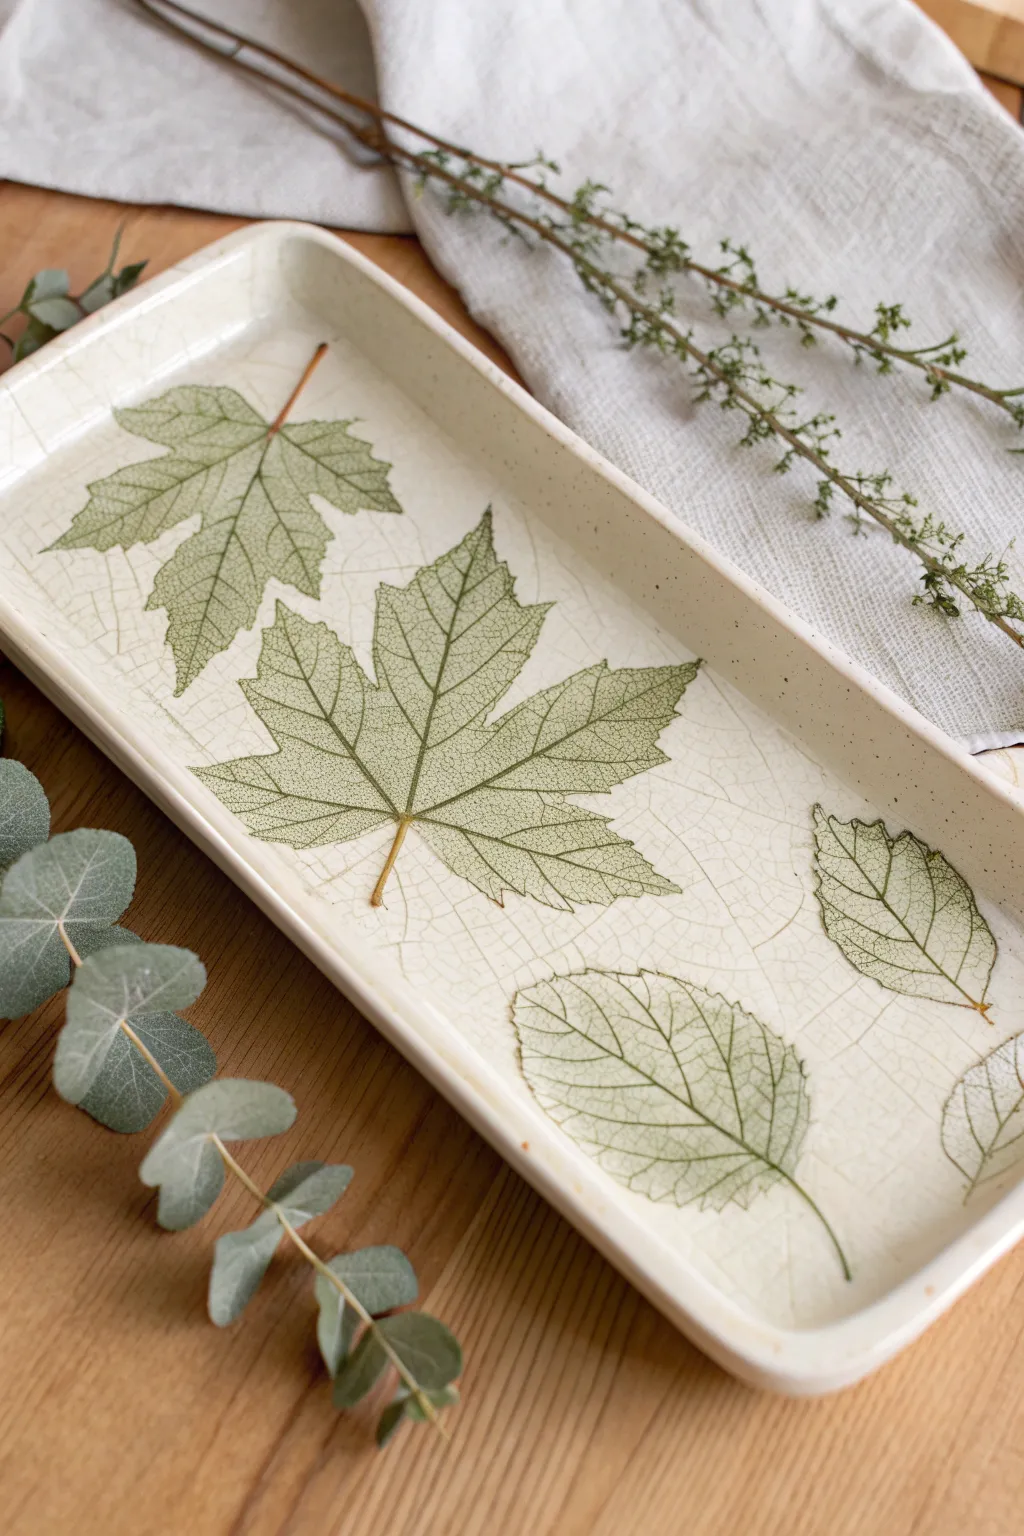
Capture the delicate beauty of fallen foliage with this sophisticated rectangular tray that looks like high-end ceramic. By combining real leaf impressions with a faux crackle finish, you’ll create an organic, textural centerpiece perfect for holding trinkets or keys.
Step-by-Step Guide
Materials
- High-quality white air dry clay
- Rolling pin
- Rectangular template (cardboard or sturdy paper)
- Craft knife or clay cutter
- Fresh, veiny leaves (maple, elm, or similar)
- Small bowl of water
- Sponge
- Fine grit sandpaper
- Watercolors or acrylic inks (sap green and olive green)
- Fine paintbrush
- Glossy varnish or decoupage medium (Mod Podge Gloss)
- Crackle medium (optional, for enhancing texture)
- Dark brown acrylic paint (watered down) or antique wax
Step 1: Shaping the Base
-
Prepare the clay slab:
Begin by conditioning your air dry clay until it is smooth and pliable. Roll it out on a non-stick surface or canvas cloth to an even thickness of about 1/4 inch (6mm). Ensure the surface is large enough for your rectangular template. -
Cut the rectangle:
Place your rectangular template onto the rolled clay. Using a sharp craft knife, cut carefully around the template to create a clean, straight-edged slab. Save the excess clay for repairs or other small projects. -
Create the raised rim:
To form the tray’s edges, measure a 1/2 inch border around the rectangle. Score this line lightly. Carefully fold the edges up to creating a 90-degree angle. If the clay resists, create separate long strips of clay and attach them to the base using the ‘score and slip’ method (scratching both surfaces and adding a bit of water). -
Smooth the connections:
Dip your finger or a small sponge in water and run it along the inside and outside seams where the wall meets the base. Smooth out the clay so it looks like one seamless piece. Round off the top edges of the rim slightly for a softer, ceramic look.
Step 2: Impressing the Botanicals
-
Select and place leaves:
Choose fresh leaves with prominent veins; dried leaves are too brittle for this step. Arrange them face-down on the clay surface. I prefer placing larger maple leaves near the center and smaller oval leaves toward the edges for balance. -
Roll the impressions:
Using your rolling pin, gently but firmly roll over the leaves to press them into the damp clay. You want them flush with the surface but not pushed all the way through. -
Remove the leaves:
Carefully find the stem of each leaf and peel it back slowly to reveal the detailed impression. If any organic matter sticks, use tweezers to pick it out. -
Drying phase:
Let the tray dry completely. This usually takes 24-48 hours depending on humidity. Flip the tray carefully halfway through the drying process to ensure the bottom dries evenly and to prevent warping. -
Sand and refine:
Once fully dry and hard, use fine-grit sandpaper to smooth any rough edges on the rim or the back of the tray. Wipe away all dust.
Sticky Situation?
If leaves stick to your rolling pin, place a sheet of wax paper or parchment paper over the leaves before rolling. This prevents tearing and keeps the clay clean.
Step 3: Painting and Finishing
-
Highlight the veins:
Mix a watery wash of sap green watercolor or acrylic ink. Using a fine brush, paint delicately inside the leaf impressions. The pigment will naturally pool in the deeper veins, highlighting the texture automatically. -
Add depth:
While the green is still slightly damp, dab a tiny bit of darker olive or brown near the stems and central veins to create a realistic, dried-leaf gradient. -
Apply the crackle effect (Step 1):
To achieve the aged texture seen in the photo, you can use a two-step crackle medium. Apply the base coat of the crackle medium over the entire white surface of the tray (avoiding the painted leaves if desired, or going over them for a full aged look). -
Apply the crackle effect (Step 2):
Once the base coat is tacky (follow manufacturer instructions), apply the top coat. As it dries, cracks will form. If you don’t have crackle medium, simply painting a layer of white glue, letting it get tacky, and painting white acrylic over it can simulate this effect. -
Antique the cracks:
Once the crackle layer is fully dry, mix a very watery dark brown paint or use antique wax. Rub this over the cracks and immediately wipe it back with a slightly damp cloth. The dark color will stay trapped in the cracks, revealing the ‘broken glaze’ pattern. -
Final seal:
Finish the piece with a coat of high-gloss varnish. This mimics the look of fired ceramic glaze and protects the air dry clay from minor moisture.
Prevent Warping
Air dry clay often curls up at the edges while drying. Weigh the center of your tray down with a small bag of rice or beans placed on a paper towel during the first 12 hours of drying.
Place your finished tray on a console table or vanity to bring a permanent touch of autumn elegance to your decor
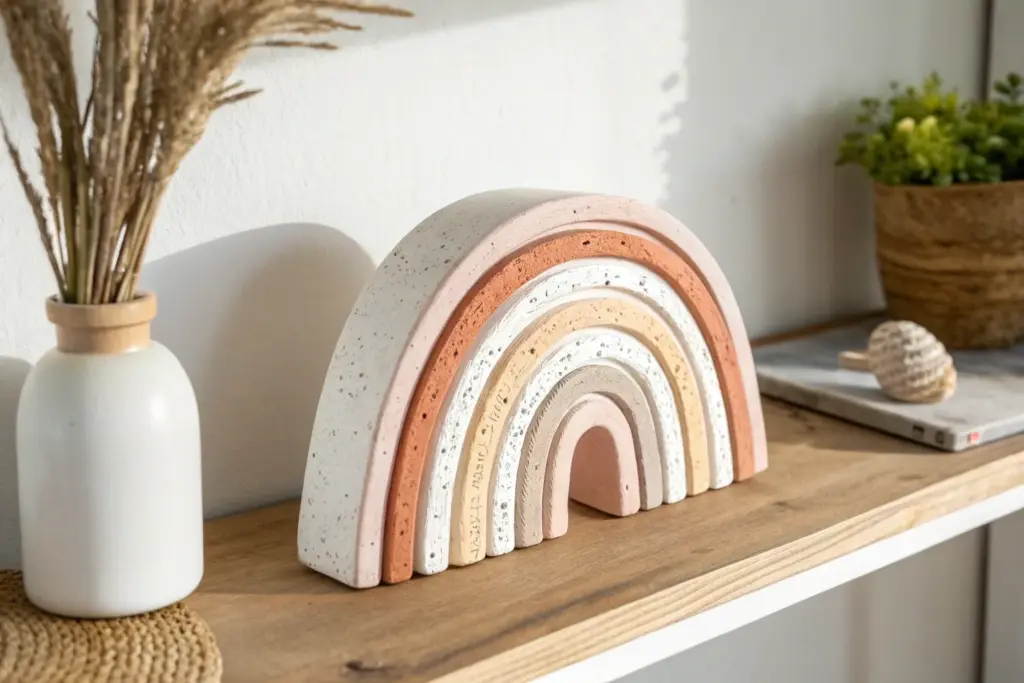
Rainbow Arch Wall Hanging With a Clean Modern Look
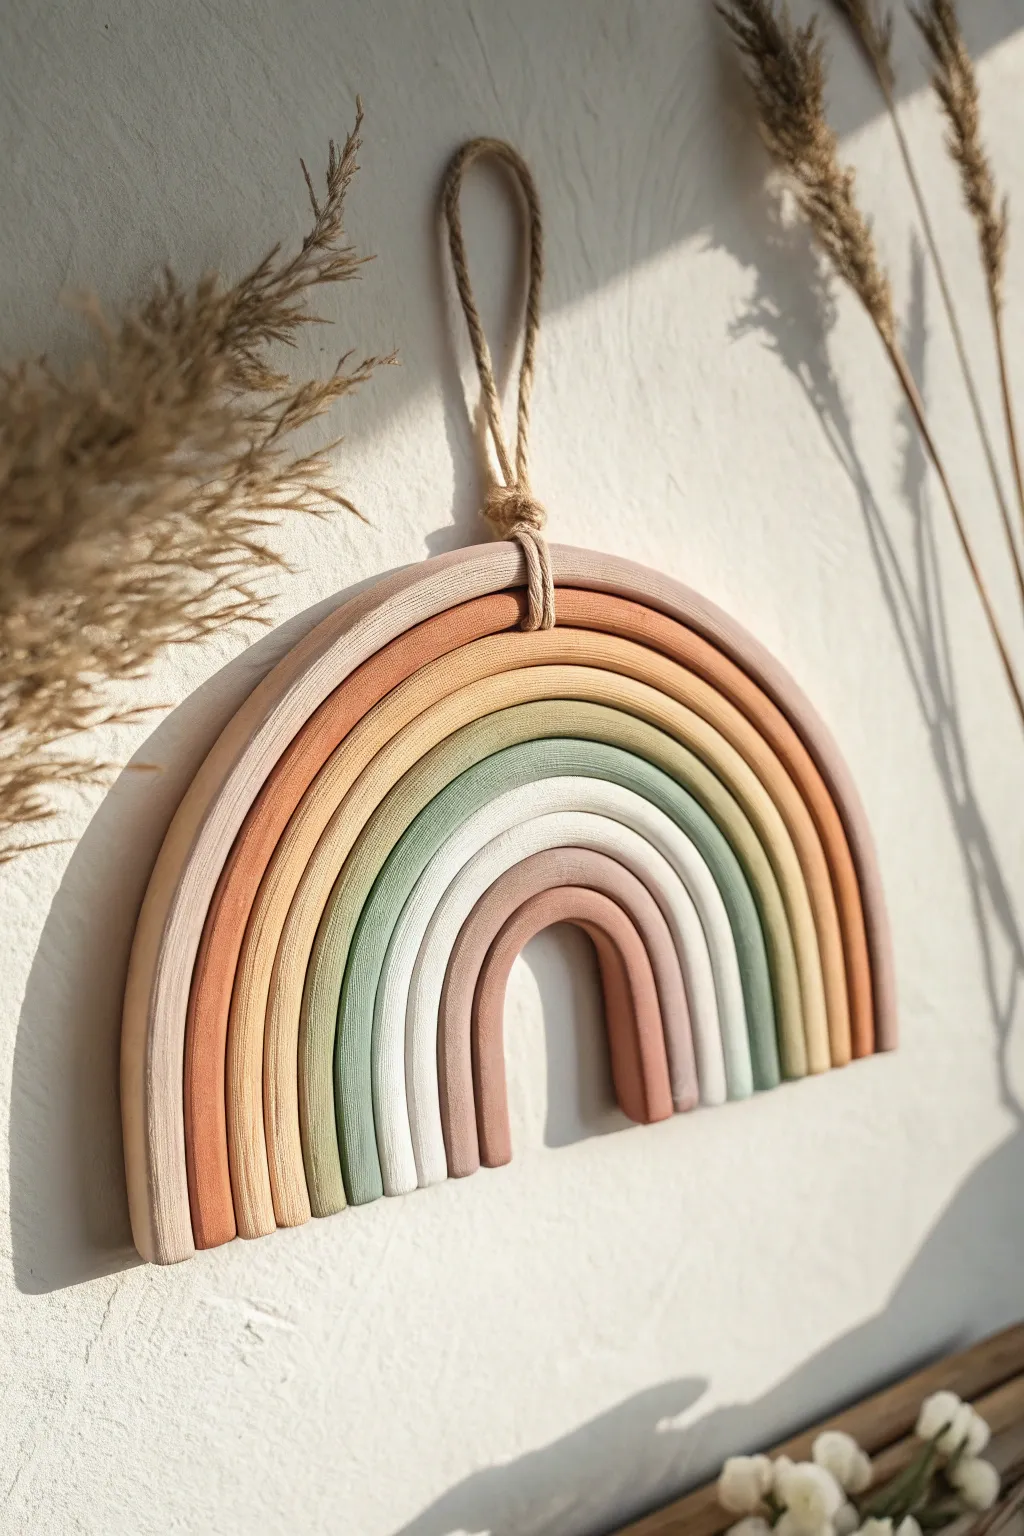
Forget the traditional macramé rainbow for a moment; this sleek, solid air dry clay version brings a sophisticated, sculptural touch to any wall. With its muted earth tones and clean lines, it offers a modern look that feels both warm and structured.
Step-by-Step
Materials
- Air dry clay (white)
- Acrylic paints (terracotta, peach, beige, sage green, dusty teal, grey-white)
- Rolling pin
- Jute twine
- Rolling guides or two pencils (optional)
- Clay knife or craft knife
- Fine-grit sandpaper (220-400 grit)
- Parchment paper or silicone mat
- Paintbrushes (flat and small detail)
- Strong craft glue or E6000
- Small bowl of water
- Sponge
Step 1: Planning and Rolling
-
Divide your clay:
Cut your bulk clay block into 7 or 8 roughly equal portions. It’s better to have slightly too much clay for each strand than too little. -
Roll the first snake:
Take the first portion and roll it into a long, even coil (snake) using the palms of your hands. Aim for a thickness of about 1/2 inch (1.25 cm). -
Check consistency:
As you roll, ensure the snake is uniform from end to end. If the clay feels dry or cracks, dampen your hands slightly with water and keep rolling to smooth it out. -
Form the inner arch:
Gently curve this first coil into a tight U-shape on your parchment paper. This will be the smallest, innermost arch of your rainbow. -
Roll subsequent coils:
Repeat the rolling process for the remaining colors. Each snake needs to be slightly longer than the previous one to wrap around the growing arch. -
Assemble the stack:
Nestle each new coil snugly against the previous one while the clay is still wet. Gently press them together so they touch, but don’t squish the round profile.
Step 2: Shaping and Refining
-
Create the hanging hole:
Using a knitting needle, straw, or the end of a paintbrush, poke a clean hole through the very center top of the outermost arch. Ensure it’s large enough for your twine. -
Trim the bottom:
Place a ruler across the bottom of the rainbow where the legs end. Use your clay knife to cut a straight, clean line across all coils so the rainbow stands flush. -
Smooth the imperfections:
Dip your finger or a small sponge in water and run it over the clay to smooth out any fingerprints or tiny cracks. -
Separate for drying:
I find it best to gently separate the arches slightly before drying if you want perfectly crisp paint lines later, though keeping them together works if you intend to glue them after drying. For this look, keep them touching but not fused. -
Let it cure:
Allow the clay to dry completely on a flat surface. This usually takes 24 to 48 hours depending on humidity. Flip the pieces halfway through to ensure even drying. -
Sand for smoothness:
Once fully dry and hard, use fine-grit sandpaper to buff away any burrs or rough spots, especially on the cut bottom edges and the back.
Smooth Rolling Hack
Place two wooden rulers or dowels of equal thickness on either side of your clay while rolling. This acts as a guide to ensure your clay snake is perfectly even thickness from end to end.
Step 3: Painting and Assembly
-
Mix your palette:
Prepare your acrylics. You want a gradient of earth tones: start with a dark terracotta, move to lighter peach, then ochre, sage, dusty blue, and finally a soft grey-white. -
Apply base coats:
Paint each arch its designated color. Use a flat brush for the main surfaces. You may need 2-3 thin coats for full opacity, letting each coat dry in between. -
Detail the edges:
Use a smaller brush to carefully paint the sides of each coil so no white clay shows between the cracks when assembled. -
Seal (Optional):
If you want a matte finish like the photo, you can skip a glossy varnish. A spray matte sealant can protect the paint without adding shine. -
Glue the structure:
If your arches separated during drying, run a thin bead of strong craft glue along the inner curve of each arch and press them firmly back together. Let the glue set. -
Attach the hanger:
Cut a length of jute twine. Fold it in half to create a loop, feed the looped end through the hole at the top, and pull the tails through the loop (lark’s head knot) or simply knot it securely.
Add Texture
Before the clay dries, gently press a piece of canvas or linen fabric onto the surface of specific arches. This imitates a woven texture that contrasts beautifully with the smooth painted finish.
Hang your muted masterpiece in a sunny spot and enjoy the calm, earthy vibes it adds to your space


The Complete Guide to Pottery Troubleshooting
Uncover the most common ceramic mistakes—from cracking clay to failed glazes—and learn how to fix them fast.
Simple Photo and Card Holders With Sculptural Shapes
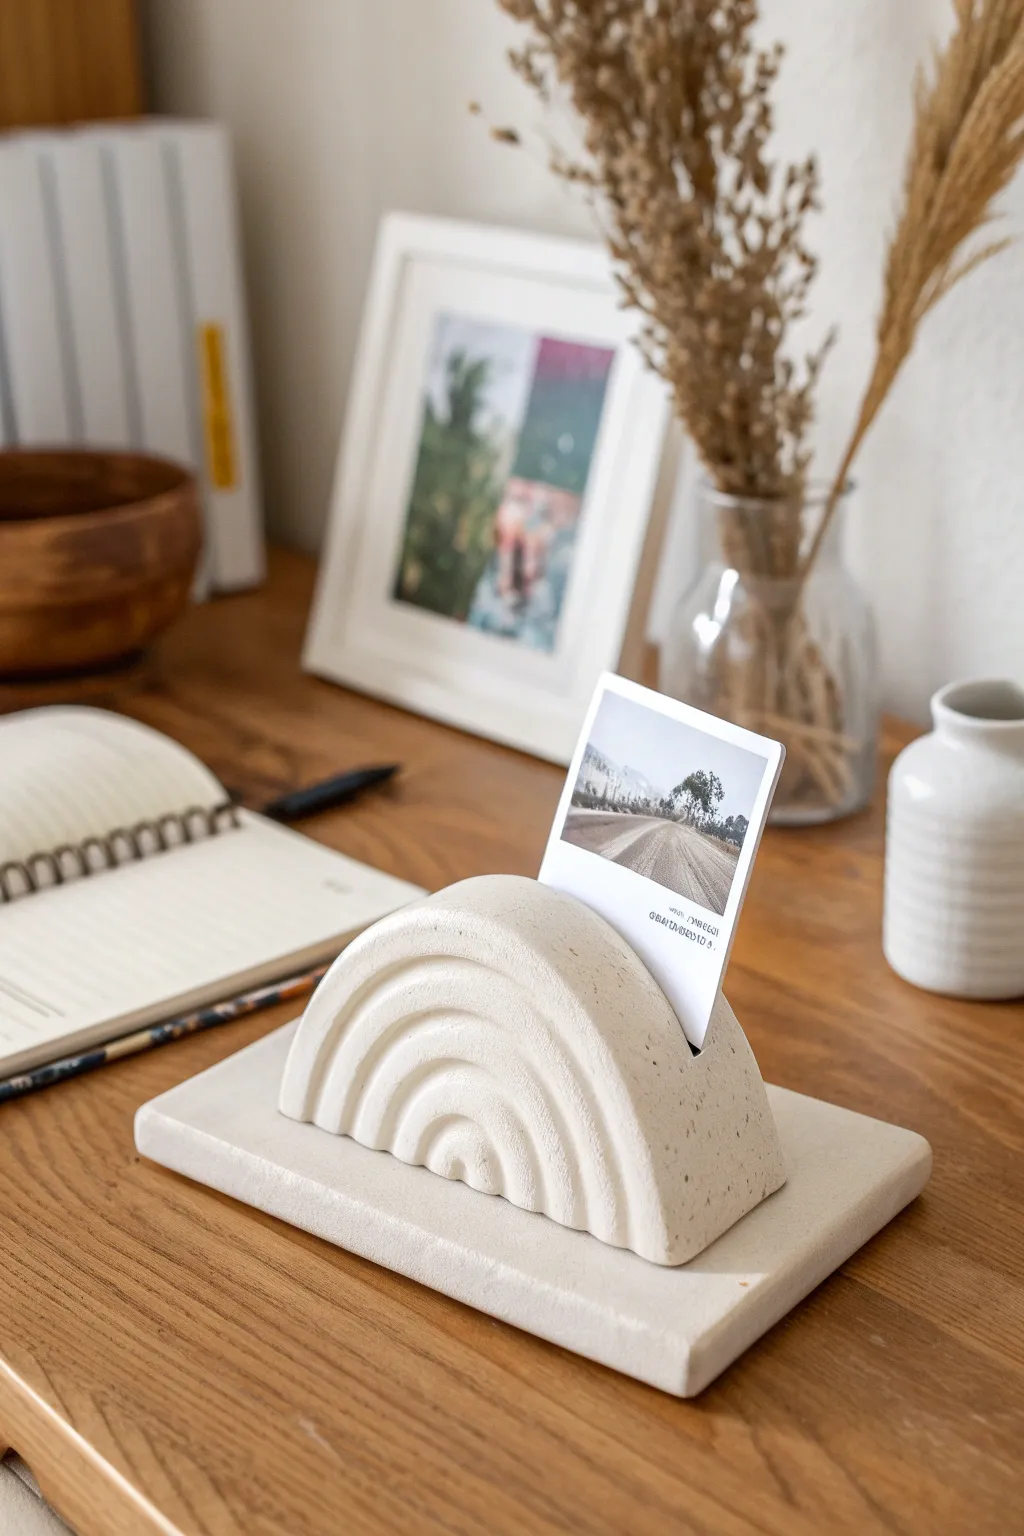
Bring a touch of modern sculptural elegance to your desk with this two-piece card holder. Its clean lines and subtle arch design offer a sophisticated way to display cherished Polaroids or postcards.
Detailed Instructions
Materials
- White air dry clay
- Rolling pin
- Sharp craft knife or clay blade
- Ruler
- Sponge
- Water cup
- Fine-grit sandpaper
- Sculpting loop tool (small)
- Parchment paper or non-stick mat
Step 1: Creating the Base
-
Roll the Slab:
Begin by conditioning a chunk of clay in your hands until it is pliable. Roll it out on your parchment paper into a slab that is roughly 1/4 inch thick. -
Cut the Rectangle:
Using your ruler and craft knife, cut a neat rectangle measuring approximately 4 inches wide by 6 inches long. This will act as the plinth for your arch. -
Smooth the Edges:
Dip your finger in a little water and run it along the cut edges of the rectangle to soften any sharpness. You want a clean, geometric look, but not razor-sharp corners. -
Set Aside:
Place the rectangular base on a flat board to dry slightly while you work on the main arch component.
Step 2: Sculpting the Arch
-
Form the Block:
Take a larger ball of clay and shape it into a thick semi-circle log shape. It should be about 2 inches deep and roughly 4 inches wide at the bottom. -
Refine the Shape:
Tap the flat bottom of the semi-circle against your work surface to ensure it stands completely stable. Smooth the curved top with a damp sponge. -
Carve the Grooves:
Use your small loop tool to carve three concentric arches into the face of the semi-circle. Start with the smallest, innermost arch and work your way outward to ensure even spacing. -
Smooth the Grooves:
Dip a small brush or your finger in water and gently run it inside the carved grooves to remove any clay crumbs and smooth the texture. -
Create the Slot:
Use your ruler or a thin blade to press a deep slot into the very top center of the arch. Wiggle it slightly to ensure the opening is wide enough to hold a photo card.
Clean Lines Hack
To get perfectly even depth when carving the rainbow arches, wrap a piece of masking tape around your loop tool to mark a stopping point so you don’t dig too deep.
Step 3: Finishing Touches
-
Dry Completely:
Allow both pieces to dry for 24-48 hours. I like to flip the pieces over halfway through the drying process to ensure the bottoms dry evenly. -
Sand for Perfection:
Once bone dry, take fine-grit sandpaper and gently sand all flat surfaces to remove any fingerprints or uneven bumps. -
Dust Off:
Wipe away all sanding dust with a dry cloth or a fluffy brush. -
Optional Speckle Effect:
To mimic the stone look in the photo, you can flick a toothbrush loaded with watered-down grey or brown paint across the surface for a subtle speckled finish. -
Assembly:
You can leave the pieces separate for a modular look, or use a strong craft glue to permanently attach the arch to the center of the rectangular base.
Make it Granite
Knead roughly ground black pepper or dried tea leaves directly into the wet white clay before sculpting to create an authentic, faux-stone texture throughout.
Place your favorite memory in the slot and enjoy your new functional art piece
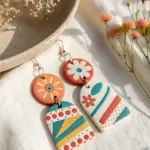
Lightweight Earrings and Pendants With Cutout Details
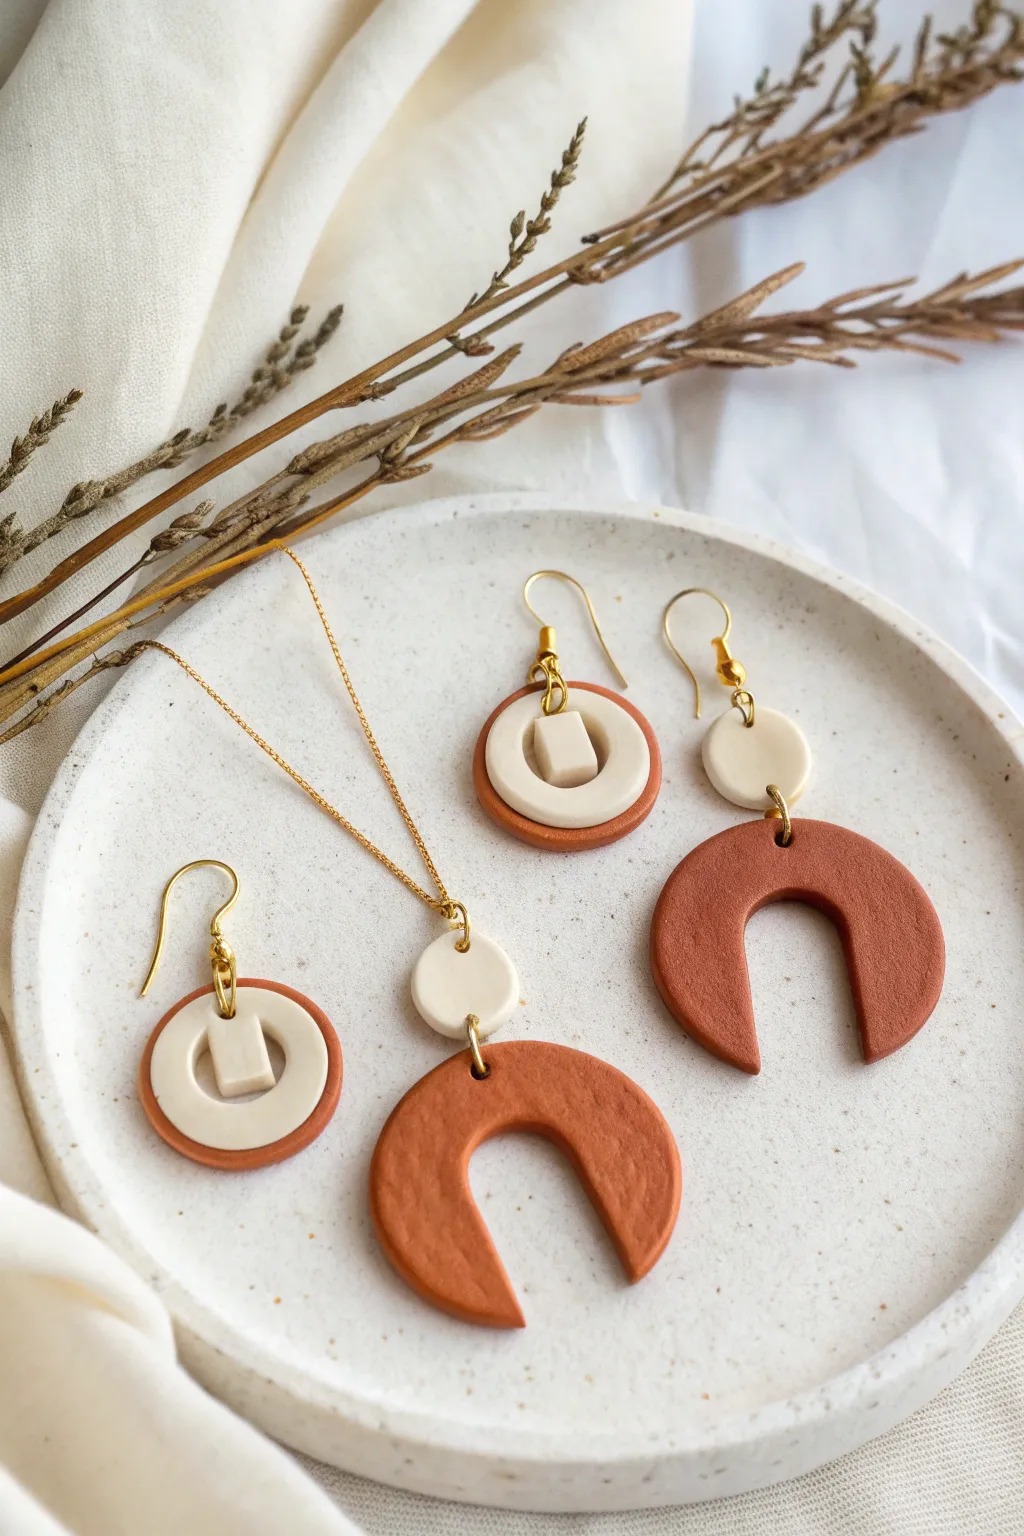
Embrace earthy warm tones and modern minimalist shapes with this stunning DIY jewelry set. Featuring a pendant necklace and two unique earring designs, these pieces combine terracotta and cream air-dry clay for a chic, lightweight accessory collection.
Detailed Instructions
Materials
- Air dry clay (terracotta color)
- Air dry clay (white or cream color)
- Acrylic rolling pin
- Circle cutters (various sizes: approx. 3cm, 2cm, and 1cm)
- Small square cutter (approx. 0.5cm)
- Sharp crafting blade or X-Acto knife
- Sandpaper (fine grit, 400-600)
- Hand drill or pin vibe with small bit
- Gold jewelry findings: earring hooks, jump rings (6mm and 4mm), necklace chain
Step 1: Prepping and Cutting Shapes
-
Condition the clay:
Begin by kneading your terracotta clay until it is soft, pliable, and free of cracks. Do the same separately for the cream clay, ensuring your hands are clean so colors don’t transfer. -
Roll out slabs:
Using your acrylic rolling pin, roll both clay colors out into even slabs, roughly 3mm thick. If you have depth guides, use them to ensure uniform thickness. -
Cut the terracotta bases:
For the circular earrings, use a medium circle cutter (approx. 2.5cm) to punch out two terracotta discs. For the arch pieces (pendant and dangle earrings), use a larger circle cutter (approx. 3.5cm) to cut three circles. -
Transform circles into arches:
Take the three large terracotta circles intended for arches. Use a smaller circle cutter to remove the center of each, creating donut shapes. Then, use your blade to slice the bottom third off each donut to create the open ‘U’ arch shape. -
Cut the cream accents:
From the cream slab, cut two medium donut shapes for the stud earrings (using two sizes of circle cutters to create the ring). Also cut three small solid circles for the arch connectors. -
Create the tiny squares:
Cut two tiny squares from the leftover cream clay. These will sit inside the donut shapes on the circular earrings.
Cracking Up?
If small cracks appear as the clay dries, mix a tiny bit of fresh clay with water to make a paste and fill the gaps. Smooth it over with a finger and let dry again.
Step 2: Assembly and Drying
-
Layer the circular earrings:
Take the two solid terracotta discs you cut first. Lightly score the surface and apply a tiny dab of water or liquid clay slip. -
Attach cream details:
Place the cream donut shape directly onto the terracotta disc. Then, place the tiny cream square exactly in the center of the negative space. Press gently to bond them without distorting the shapes. -
Smooth the edges:
Dip your finger in a little water and gently run it along any rough cut edges to smooth them before drying. This saves sanding time later. -
Pierce holes:
Using a needle tool or toothpick, carefully poke holes for your jump rings. For the arches, you need a hole at the very top center. For the circular earrings, place the hole near the top edge. -
Let them dry:
Place all pieces on a flat surface lined with parchment paper. Let them dry for at least 24-48 hours until completely hard. Flip them halfway through so the backs dry evenly.
Step 3: Finishing Touches
-
Sand for perfection:
Once fully dry, take your fine-grit sandpaper and gently buff the edges of all pieces to remove any sharp burrs or irregularities. -
Dust off:
Wipe the pieces down with a slightly damp cloth or a soft brush to remove all sanding dust. -
Assemble the arch earrings:
Using pliers, open a jump ring and connect the terracotta arch to the small cream circle. Attach an earring hook to the top of the cream circle. -
Assemble the pendant:
Similarly, connect the pendant arch to its cream connector circle with a jump ring. Attach a larger jump ring to the top of the cream circle and thread your necklace chain through it. -
Assemble the circular studs:
Attach earring hooks directly to the top hole of your layered terracotta and cream circular pieces using jump rings.
Pro Tip: Clean Cuts
Place a piece of plastic wrap over your clay slab before pressing down with your cutters. This creates a lovely, rounded beveled edge that looks professional without sanding.
Now you have a cohesive set of handmade jewelry perfect for gifting or wearing yourself

TRACK YOUR CERAMIC JOURNEY
Capture glaze tests, firing details, and creative progress—all in one simple printable. Make your projects easier to repeat and improve.
Geometric Tea Light Holders With Carved Patterns
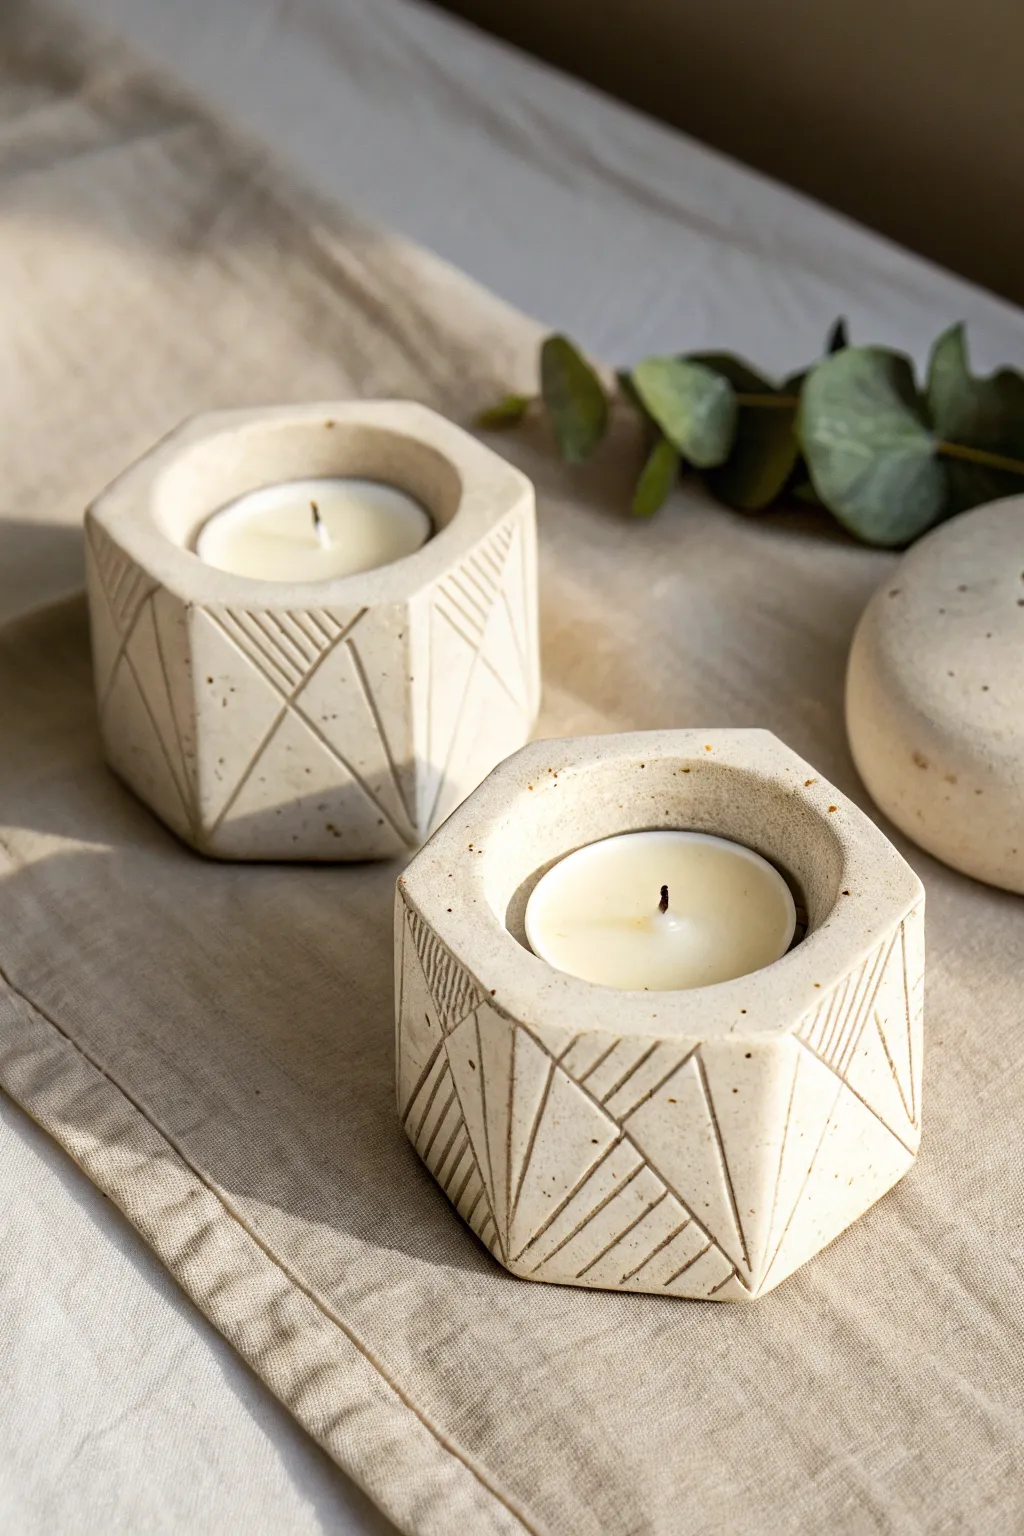
Bring modern, minimalist charm to your table setting with these handcrafted tea light holders featuring crisp hexagonal shapes and intricate carved details. The unpainted, neutral finish highlights the raw texture of the clay, creating a sophisticated and grounded aesthetic.
Step-by-Step
Materials
- High-quality white or light grey air dry clay
- Rolling pin
- 2 small guide sticks (about 3/4 inch thick) or a rolling guide
- Hexagon cookie cutter (approx. 3-4 inches wide) or a printed paper template
- Tea light candle (metal shell) to use as a sizing tool
- Craft knife or scalpel
- Needle tool or a sharp toothpick
- Small carving loop tool or linoleum cutter
- Fine grit sandpaper (200-400 grit)
- Small bowl of water
- Fingertip sponge or soft brush
- Matte varnish or sealant
Step 1: Shaping the Base
-
Prepare the Clay Slab:
Begin by kneading a substantial chunk of air dry clay to warm it up and remove air bubbles. Place your guide sticks on either side of the clay and roll it out into a thick, even slab. You want this quite chunky—at least 3/4 to 1 inch thick—to accommodate the depth of the candle. -
Cut the Hexagon:
Position your hexagon cutter firmly on the slab and press down evenly to cut the main shape. If you are using a paper template, trace around it carefully with your craft knife, keeping the blade vertical for straight walls. -
Smooth the Edges:
Before the clay starts to dry, dip your finger in a little water and gently run it along the sharp cut edges to round them slightly. Smooth out any drag marks or unevenness on the six side walls. -
Create the Candle Well:
Take a standard tea light candle (keep it in its metal casing) and press it gently into the exact center of your hexagon. Push down until the top of the candle is flush with or just slightly below the clay surface. -
Remove the Candle:
Carefully wiggle the tea light to loosen it and pull it out. If the suction is strong, you can gently pierce the bottom of the clay inside the hole with a needle to releas air, then patch that tiny hole later. -
Refine the Opening:
The candle might have distorted the hexagon shape slightly. Gently reshape the exterior walls with your hands or a flat tool to ensure the lines remain crisp and straight.
Step 2: Carving the Design
-
Map Out the Pattern:
Allow the clay to dry until it is ‘leather hard’—firm to the touch but still cold and able to be carved without squishing. Using a needle tool, very lightly sketch your geometric design onto the side panels. The design shown uses intersecting triangles and parallel lines. -
Carve Main Lines:
Using a linoleum cutter or a small loop tool, carefully carve out the main structural lines of your sketched triangles. Apply steady, gentle pressure to remove a clean strip of clay rather than dragging it. -
Add Texture Details:
Fill in specific triangular sections with parallel hatching lines. I find it easiest to rotate the piece so I’m always pulling the tool toward myself for better control over these fine details. -
Clean Up Burrs:
Carving often leaves little crumbs or ‘burrs’ of clay. Wait for them to dry completely before brushing them away with a soft, dry paintbrush. Trying to wipe them while damp can smear the pattern. -
Final Surface Check:
Look over the piece for any accidental fingernail marks or rough spots on the top rim. Smooth these out with a barely damp sponge, being careful not to get water into your freshly carved grooves.
Clean Carving
If your carving tool is dragging or tearing the clay, the clay is too wet. Let it sit for another hour. If it chips or crumbles, it’s too dry—dampen the surface slightly with a sponge.
Step 3: Finishing Touches
-
Full Drying Process:
Let the holders dry completely. Because they are thick blocks, this stage is crucial. Leave them in a cool, dry place for at least 48 hours, turning them occasionally to let the bottom breathe. -
Sanding:
Once bone dry, take your fine-grit sandpaper and gently polish the flat surfaces and the sharp corners. This gives that professional, stone-like finish seen in the image. -
Dusting Off:
Wipe the entire piece with a dry cloth or use a soft brush to remove all fine sanding dust from the carved crevices. -
Sealing:
Apply a coat of matte varnish or sealant. This protects the clay from humidity and makes it easier to wipe clean if any candle wax spills later. A matte finish is key to keeping the raw, organic look.
Stone Effect
Mix a small amount of used coffee grounds or fine grit sand into your clay before rolling it out. This adds speckles and texture that mimics real stone or concrete effortlessly.
Place your new holders on a linen runner and enjoy the warm, geometric glow they cast
Tiny Magnet Bud Vases for Fridge-Top Florals
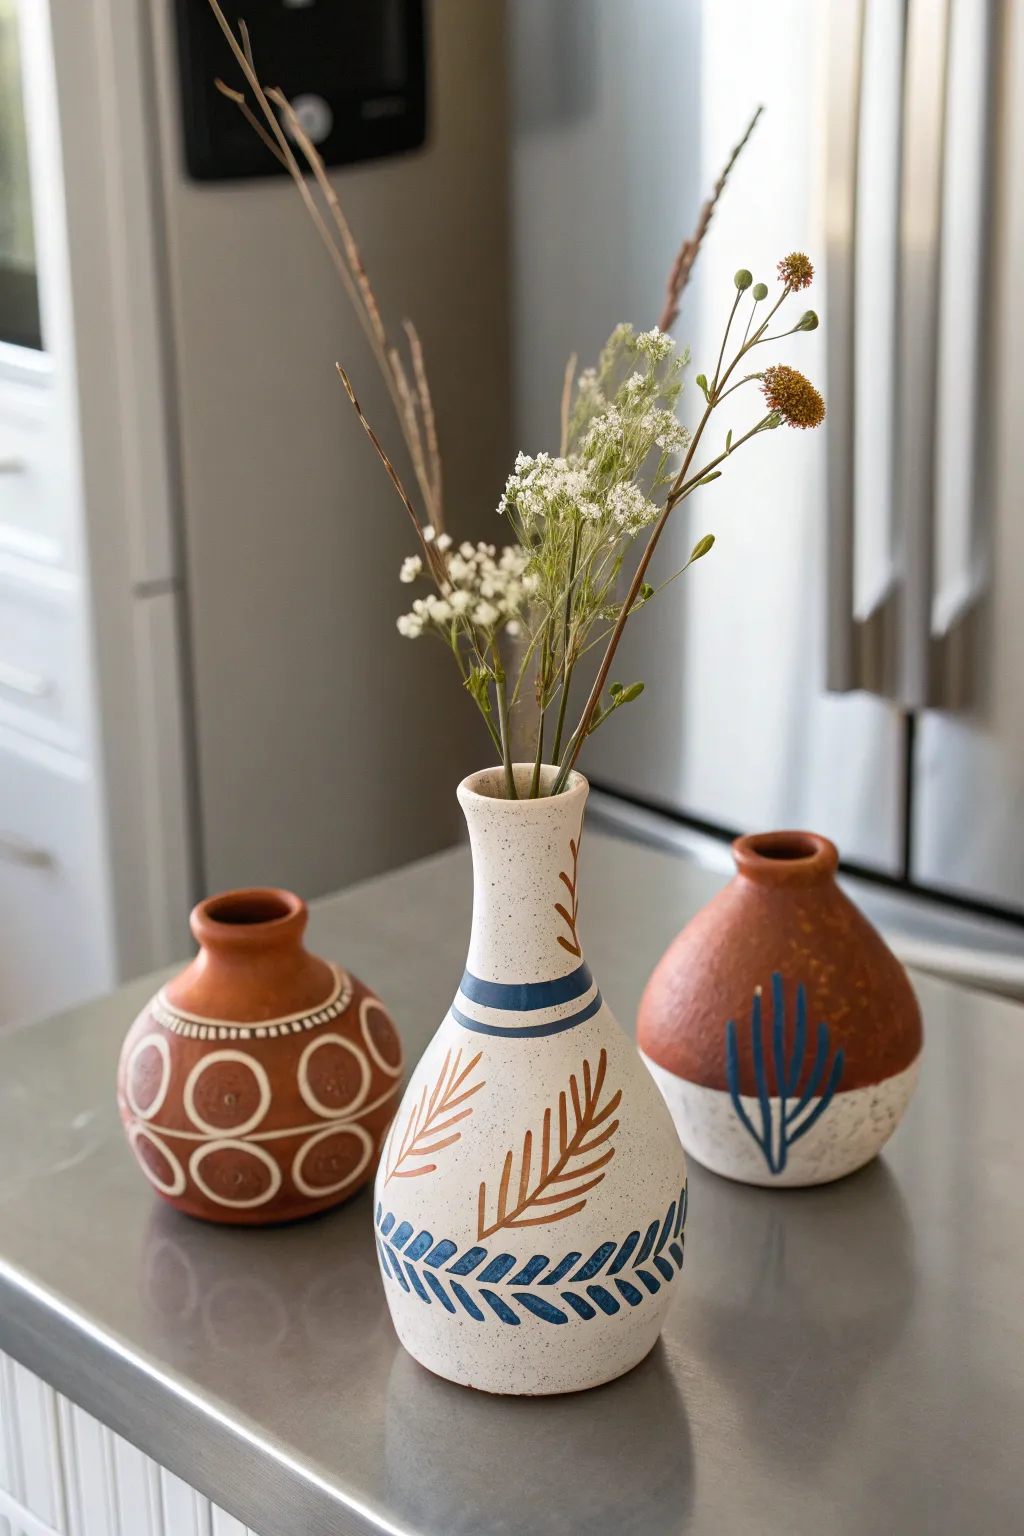
These charming, miniature bud vases bring a touch of rustic elegance to your refrigerator door with their earthy tones and geometric patterns. Crafted from air-dry clay and painted with delicate botanical and tribal-inspired designs, they are perfect for displaying dried sprigs or wildflowers.
Step-by-Step Tutorial
Materials
- Air-dry clay (terra cotta and white/stone color)
- Small magnets (heavy-duty neodymium recommended)
- Acrylic paints (white, navy blue, ochre/burnt orange)
- Fine detail paintbrushes (sizes 0 and 00)
- Clay sculpting tools or a butter knife
- Small rolling pin
- Sandpaper (fine grit)
- Water and sponge for smoothing
- Gloss or matte varnish spray
- Strong craft glue (E6000 or similar)
Step 1: Sculpting the Forms
-
Prepare the clay:
Start by conditioning your air-dry clay. Knead a golf-ball-sized amount of terra cotta clay for two vases and a slightly larger amount of white clay for the central vase until soft and pliable. -
Shape the spherical bases:
Roll each piece into a smooth ball. For the shorter vases, gently flatten the bottom on your work surface to create a stable base, keeping the overall shape round and bulbous. -
Create the openings:
Use your thumb or a round modeling tool to press a deep indentation into the top center of each ball. Gently pinch and pull the clay upwards to form the neck of the vase. For the tall central vase, elongate this neck significantly so it tapers elegantly. -
Refine the rims:
Smooth the opening of each vase. For the terra cotta vases, flare the rim slightly outwards. For the white vase, keep the rim subtle and organic. -
Embed the magnet:
Before the clay dries, press your strong magnet firmly into the back of each vase to create a specific indentation. Remove the magnet—we will glue it in later to ensure a secure bond. -
Smooth the surfaces:
Dip your finger or a small sponge in water and run it over the clay to remove any fingerprints or cracks. Ensure the transition from the neck to the body is seamless. -
Drying time:
Set the vases aside to dry completely. This usually takes 24-48 hours depending on humidity. Rotate them occasionally so the bottoms dry evenly.
Magnet Slippage?
If the vases slide down the fridge once filled, the magnet isn’t strong enough. Add a second magnet directly on top of the first one to double the magnetic pull without altering the vase.
Step 2: Painting and Finishing
-
Sand for perfection:
Once fully dry and hard, use fine-grit sandpaper to gently buff away any remaining bumps or rough spots, focusing on the rims and bases. -
Base coat touches:
For the vase on the right, paint the top half with a burnt orange or mix ochre with brown to mimic a dipped terra cotta look, leaving the bottom natural white clay exposed. Let this dry. -
Geometric circles (Left Vase):
Using a fine brush and white acrylic paint, draw a horizontal band of dashed lines around the neck. Below this, paint large, bold circles around the belly of the vase. Add a smaller dot inside each circle for detail. -
Botanical lines (Center Vase):
On the tall white vase, mix a deep navy blue paint. Carefully paint two parallel bands around the neck. At the base, paint a stylized leaf pattern wrapping around the bottom. -
Accent leaves (Center Vase):
Switch to an ochre or rust-colored paint. Paint sweeping, fern-like fronds rising from the center of the vase, positioned between the blue bands and the bottom pattern. -
Abstract flora (Right Vase):
Using the navy blue paint again, add a simple, cactus-like abstract plant shape to the front of the third vase. Allow the blue lines to cross over the boundary between the painted top and raw bottom for visual interest. -
Seal the work:
I prefer to apply a coat of matte varnish spray to protect the paint and seal the clay without making it look too plastic. Allow the varnish to cure fully. -
Attach the magnets:
Apply a dab of strong craft glue into the indentations you made earlier. Press the magnets into place and let the glue cure for the time recommended on the package. -
Final arrangement:
Once everything is solid, place your dried baby’s breath or dried grass stems into the vases before attaching them to your fridge.
Smooth Operator
To get that perfectly smooth finish on the white clay before painting, lightly burnish the almost-dry clay with the back of a spoon. It compresses the surface for a professional ceramic look.
Now you have a trio of handcrafted mini vases ready to brighten up your kitchen space
Modern Desk Organizer With Simple Built-In Compartments

Achieve the high-end look of cast concrete with the ease of air dry clay in this sleek desk organizer project. Featuring three distinct compartments for optimal sorting, its smooth matte finish and rounded corners bring a calming, modern aesthetic to any workspace.
Step-by-Step Guide
Materials
- White or stone-effect air dry clay (approx. 1kg)
- Non-stick rolling pin
- sharp craft knife or clay blade
- Ruler
- Two long wooden guide strips (approx. 5-7mm thick) for even rolling
- Slip (clay mixed with water into a paste)
- Sandpaper (medium and fine grit)
- Small bowl of water
- Sponge
- Matte acrylic varnish (optional)
Step 1: Base and Wall Preparation
-
Prepare the clay:
Begin by conditioning your clay, kneading it until it’s pliable and smooth. Stone-effect clay works beautifully here, but standard white clay is also perfect. -
Roll the slab:
Place your wooden guide strips on either side of your clay. Roll the clay out into a long, even slab. The guides ensure your walls maintain a consistent thickness, which is crucial for structural integrity. -
Cut the base:
Using your ruler and knife, cut a rectangle for the base. For the size shown, aim for approximately 20cm x 8cm. Keep the excess clay wrapped to prevent drying. -
Cut the outer walls:
Cut a long strip of clay for the outer wall. It needs to be long enough to wrap around the entire perimeter of your base plus a little extra for joining. Aim for a height of about 6-7cm. -
Cut the dividers:
Cut two smaller rectangular pieces to serve as the internal dividers. These should match the height of your outer wall and the width of the base exactly.
Cracks Appearing?
If hairline cracks appear while drying, mix a small amount of ‘paper clay paste’ (clay + water + toilet paper pulp) and fill the cracks. Sand smooth once dry.
Step 2: Assembly
-
Score and slip:
Score the edges of the base where the walls will sit using your knife or a needle tool. Apply a generous amount of slip to these roughed-up areas. -
Attach the main wall:
Carefully wrap the long wall strip around the base. I find it easiest to start at the center of a long side to hide the seam, though a corner seam works too. Press firmly to adhere. -
Seal the seams:
On the inside and outside, use your finger or a modeling tool to smudge the clay from the wall down onto the base, eliminating any visible gap. Reinforce the spot where the two ends of the wall meet. -
Insert the dividers:
Decide on your compartment spacing. Score and slip the interior walls and the edges of your divider pieces. slide them into place, pressing them firmly against the side walls and floor. -
Smooth the interior:
Use a slightly damp sponge or brush to smooth the interior corners where the dividers meet the walls. This creates that seamless, cast look.
Pro Tip: Weighted Walls
To keep straight walls from bowing inward while drying, place a light object (like a small empty box wrapped in plastic) inside the compartments as minimal support.
Step 3: Refining and Finishing
-
Round the corners:
While the clay is still leather-hard, gently press and smooth the outer corners with wet fingers to create a soft, rounded radius rather than a sharp edge. -
Level the rim:
Check the top rim of the organizer. If it’s uneven, use your blade to slice off any high points, then smooth it flat with a little water. -
Slow drying:
Cover the piece loosely with plastic wrap for the first 24 hours to prevent the outer walls from drying faster than the connections. Then, remove the plastic and let it dry completely (24-48 hours). -
Sanding:
Once bone dry, use medium grit sandpaper to level out any bumps on the surface. Switch to fine grit to achieve a buttery smooth finish. -
Dust removal:
Wipe away all sanding dust with a slightly damp cloth or a dry tack cloth. -
Sealing:
To protect against stains from pencils or pens, apply a coat of matte varnish. This preserves the natural stone look while adding durability.
Now you have a beautifully organized home for your best stationery.
Chunky Color-Block Bookends That Feel Like Mini Sculptures
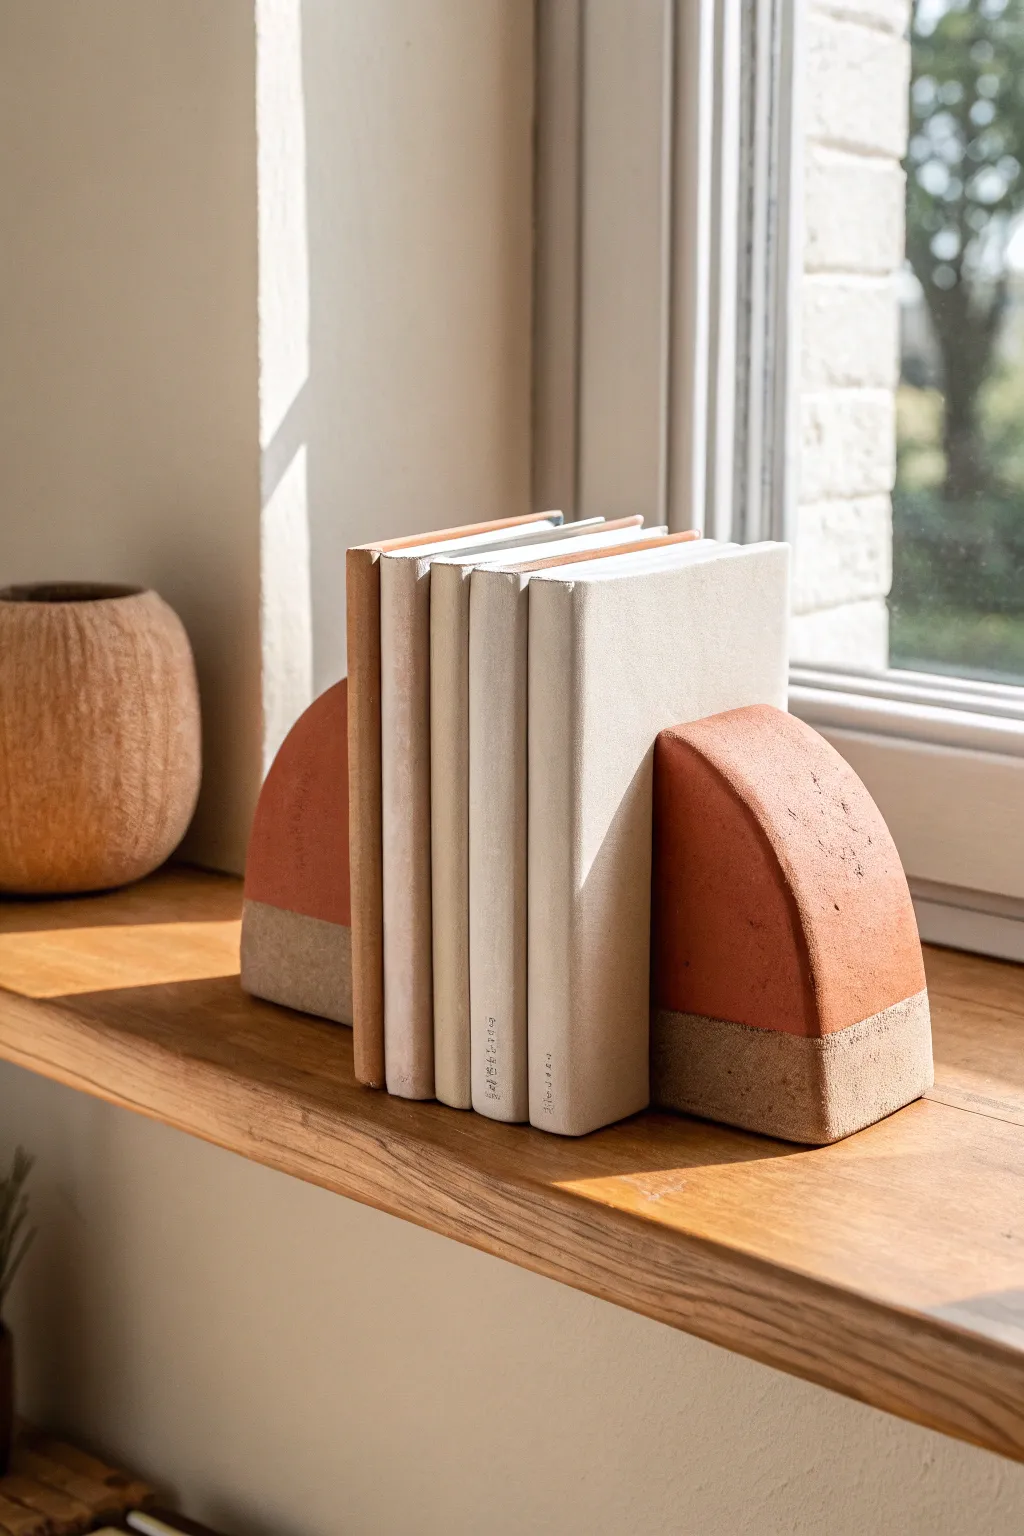
These substantial, sculptural bookends merge minimalist design with organic texture, featuring a warm terracotta tone layered over a speckled, sandy base. The heavy, geometric arch shape adds a modern architectural element to your bookshelf while keeping your favorite reads perfectly upright.
Step-by-Step
Materials
- Air dry clay (white or natural stone color)
- Rolling pin or smooth glass jar
- Craft knife or clay wire cutter
- Sandpaper (medium and fine grit)
- Acrylic paint (burnt sienna, rusty orange)
- Masking tape or painter’s tape
- Matte sealant or varnish
- Cardboard or cardstock (for templates)
- Water and sponge
- Basic sculpting tools
- Optional: Weighted filler (small clean stones or heavy beads)
Step 1: Planning and Basic Shaping
-
Create your template:
Sketch a semi-circle arch shape onto a piece of cardboard to serve as your guide. Aim for a base width of about 5-6 inches and a height of roughly 7 inches to ensure it’s substantial enough to hold books. -
Prepare the clay block:
Begin with a large block of air dry clay. Knead it thoroughly to remove air bubbles, then slam it onto your work surface a few times to compact it. You want a very dense, thick block—forming a slab that is approximately 2.5 to 3 inches thick. -
Cut the arch form:
Place your cardboard template against the thick slab of clay. Using a sharp craft knife or wire cutter, slice straight down through the clay to cut out the arch shape. Keep your cuts as perpendicular to the table as possible for flat sides. -
Duplicate the shape:
Repeat the previous step to create the second bookend. It is crucial to check them against each other now while the clay is wet; stand them up side-by-side and embrace any slight organic differences, but ensure they are roughly the same height. -
Flatten the contact points:
Pay special attention to the bottom and the flat vertical side of each arch. Tap these sides firmly against your table surface to ensure they are perfectly flat and create a true right angle, so the bookends will sit flush against books without wobbling.
Cracking Up?
If deep cracks appear while drying, don’t panic. Fill them with ‘slip’ (clay mush) or wood filler. Sand it down once dry, and the paint will hide the repair completely.
Step 2: Refining and Drying
-
Smooth the surfaces:
Dip your fingers or a sponge in a little water and smooth out the broad sides of the arches. I find that running a damp thumb along the sharp edges helps to slightly soften them, preventing the clay from becoming too brittle later. -
Initial drying phase:
Place the bookends on a wire rack or a piece of wood to dry. Air dry clay this thick requires patience; let them sit for at least 24-48 hours. Rotate them occasionally to ensure even airflow and prevent warping. -
Check for cracks:
As thick clay dries, small surface cracks often appear. Mix a small amount of fresh clay with water to create a paste (slip) and fill in any fissures that have formed, smoothing it over with your finger. -
Final cure:
Allow the pieces to dry completely for another 2-3 days until they are room temperature to the touch and feel solid and chalky. Do not rush this step, as trapped moisture can ruin the paint finish. -
Sand for texture:
Once fully dry, use medium-grit sandpaper to refine the shape. For the bottom section, leave the texture slightly rougher to mimic stone. Sand the upper section more thoroughly with fine-grit paper for a smoother contrast.
Step 3: Painting and Finishing
-
Tape the horizon line:
Decide where you want your color block to start—usually about one-third of the way up from the base. Apply painter’s tape horizontally across the bookend, pressing down firmly to seal the edge so paint doesn’t bleed underneath. -
Mix the terracotta hue:
Combine burnt sienna with a touch of orange and perhaps a speck of white to get that earthy, warm clay color. Test the shade on a scrap piece of paper first to ensure it dries to the tone you want. -
Apply the color:
Paint the upper section of the arch, covering the top curve and sides down to the tape line. Use vertical brush strokes for a clean look, applying 2-3 coats as needed for full opacity. -
Reveal the line:
Wait until the paint is dry to the touch but not fully cured before carefully peeling back the tape. If there are any jagged edges, you can gently scrape them clean with your craft knife. -
Seal the work:
Coat the entire piece with a matte sealant. This protects the unpainted bottom section from dust and oil while locking in the color on top. -
Add grip:
Once the sealant is dry, stick adhesive felt pads or a strip of non-slip rubber to the bottom of the bookends to protect your shelves and provide extra grip.
Make It Heavier
Hollow out the base while the clay is wet and insert a heavy stone or fishing weights, then seal it back up with clay. This adds invisible heft to hold heavier books.
Now you have a functional piece of art that brings warmth and structure to your favorite reading nook