
Salt dough can absolutely grow up with you—think clean lines, subtle textures, and finishes that feel closer to handmade ceramics than childhood crafts. These salt dough ideas for adults are all about polished results you’ll actually want to display, gift, and keep.
Minimalist Salt Dough Ornaments With Stamped Texture
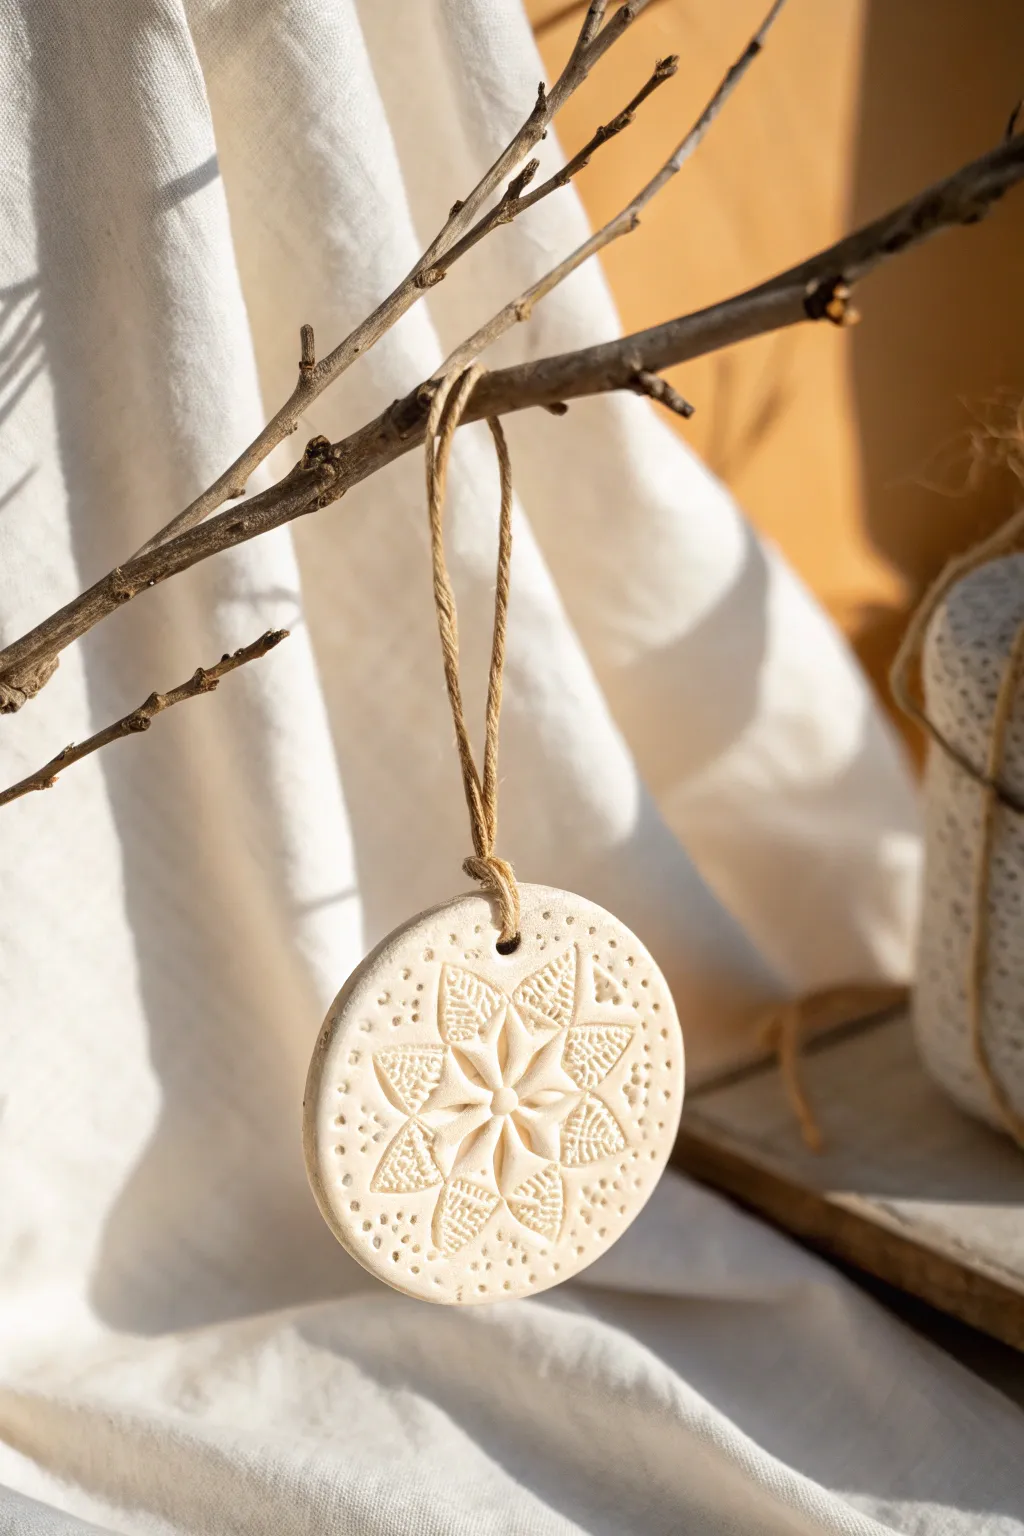
Capture the essence of natural minimalism with these elegant stamped ornaments, featuring a crisp snowflake-like relief pattern. The undyed dough dries to a soft matte cream, perfectly complemented by a rustic jute hanger for a sophisticated, understated holiday look.
Step-by-Step Tutorial
Materials
- All-purpose flour (2 cups)
- Table salt (1 cup)
- Warm water (1 cup)
- Round cookie cutter (approx. 2.5 – 3 inches)
- Texture stamp or embossing tool (mandala or snowflake pattern)
- Rolling pin
- Parchment paper
- Drinking straw or skewer
- Sandpaper (fine grit)
- Jute twine
- Matte finish sealant (optional)
Step 1: Preparing the Dough
-
Mix dry ingredients:
In a large mixing bowl, combine the flour and salt thoroughly. Using a whisk helps distribute the salt evenly, which creates a smoother final surface. -
Add water gradually:
Slowly pour in the warm water while stirring. Don’t dump it all in at once; depending on humidity, you might need slightly less or slightly more water. -
Knead the dough:
Turn the mixture onto a clean surface and knead it firmly for about 10 minutes. This is crucial—you want the dough to feel smooth, pliable, and free of cracks. -
Rest the dough:
Wrap your dough ball in plastic wrap and let it sit for 20 minutes. This allows the gluten to relax, making it easier to roll out without shrinking back.
Preventing Puffiness
If your ornaments are puffing up like pita bread in the oven, your temperature is too high. Lower the heat or leave the oven door slightly ajar.
Step 2: Shaping and Stamping
-
Roll out the base:
Place a portion of dough between two sheets of parchment paper. Roll it out to an even thickness of about 1/4 inch. If it’s too thin, it may crack; too thick, and it won’t dry properly. -
Impress the design:
Take your texture stamp and press it firmly into the rolled dough. Apply even pressure across the entire stamp so the deep relief pattern registers clearly in the center. -
Cut the shape:
Position your round cookie cutter directly over the stamped design. Ensure the pattern is centered before pressing down firmly to cut the circle. -
Create the hole:
Using a drinking straw or a skewer, punch a clean hole near the top edge for hanging. Make sure it isn’t too close to the rim, or the weight of the ornament might break the dough later. -
Smooth the edges:
Dip your finger in a tiny bit of water and run it gently around the cut edge of the circle. This smooths out any jagged bits left by the cutter for a professional finish.
Antique Wash Effect
For a vintage look, dilute brown acrylic paint with water. Brush it over the relief pattern and immediately wipe the surface with a rag, leaving dark paint only in the stamped grooves.
Step 3: Drying and Finishing
-
Air dry first:
Transfer the ornament (still on parchment paper) to a flat surface. I recommend letting it air dry for about 24 hours to prevent puffing in the oven. -
Bake low and slow:
Preheat your oven to its lowest setting (usually around 200°F or 95°C). Bake the ornaments for 2-3 hours, flipping them halfway through to ensure even drying. -
Check hardness:
The ornament is ready when it feels rock hard and makes a hollow sound when tapped. If the center feels soft, give it more time. -
Cool and sand:
Let the ornament cool completely. If there are any rough spots on the back or edges, very lightly buff them away with fine-grit sandpaper. -
Seal (Optional):
To preserve the bright, natural color and prevent moisture absorption, apply a thin coat of matte spray sealant or matte Mod Podge. -
Attach the hanger:
Cut a length of jute twine roughly 8 inches long. Thread one end through the hole. -
Secure the loop:
Make a simple Lark’s Head knot. Fold the twine in half, push the folded loop through the hole, and pull the two loose ends through that loop, tightening it carefully against the dough. -
Tie the top:
Knot the loose ends of the twine together at your desired length to complete the hanging loop.
Hang your finished creations on a branch or tree to enjoy the quiet beauty of their natural texture


Botanical Salt Dough Ornaments With Leaf Impressions
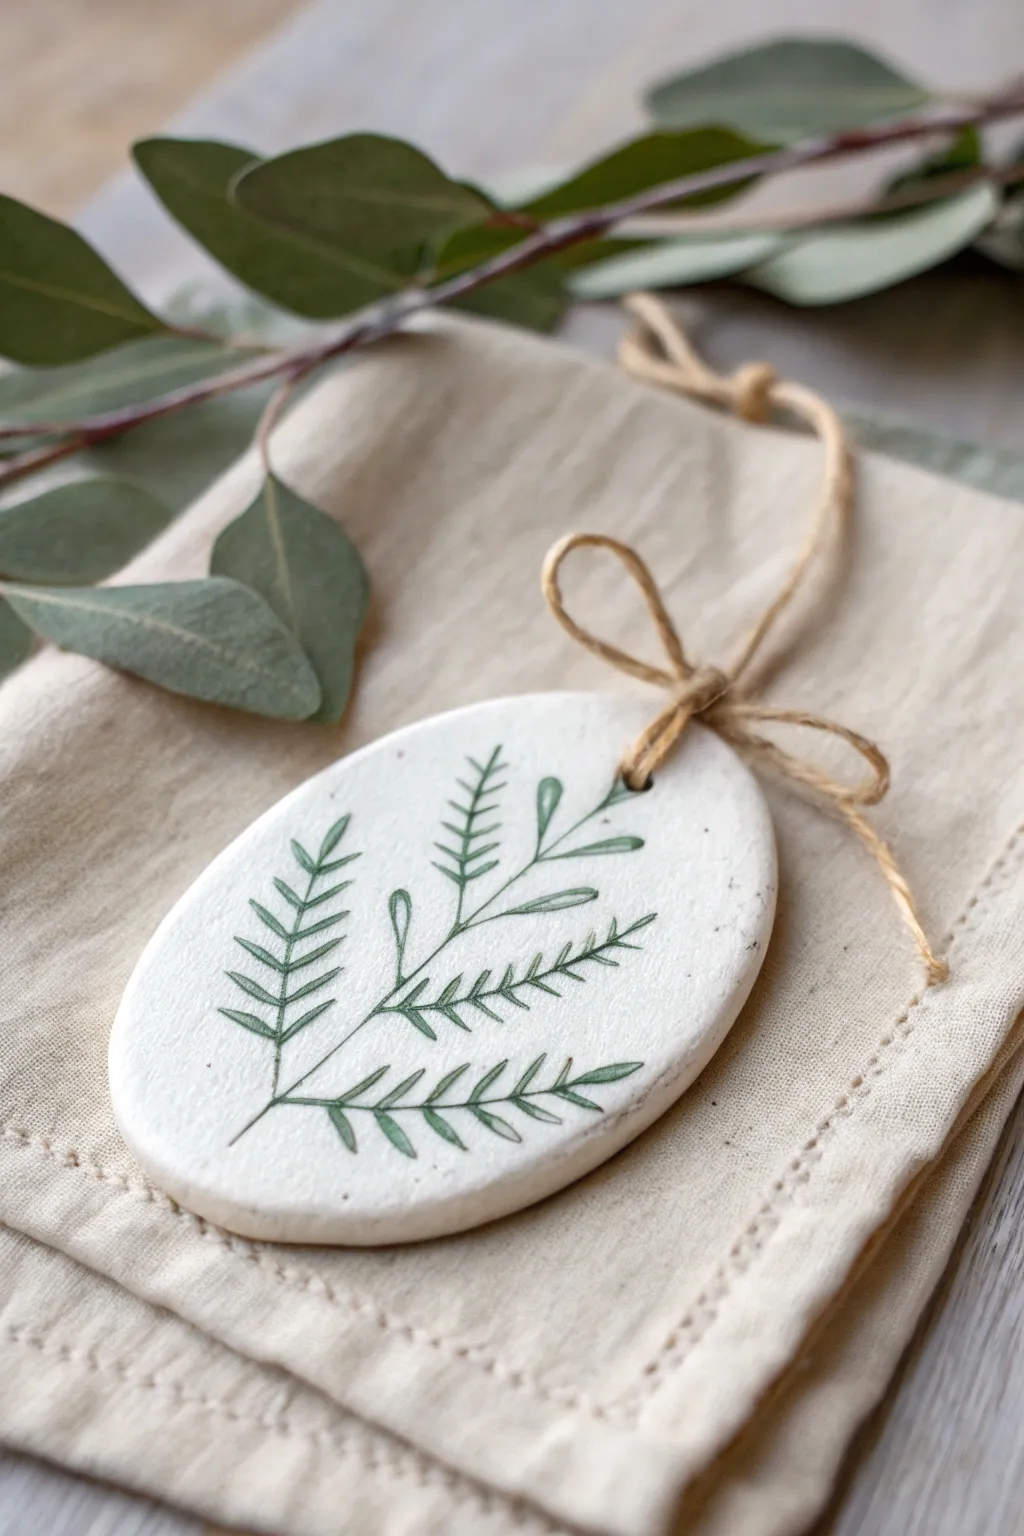
Elevate simple kitchen ingredients into sophisticated decor with these delicate botanical ornaments. The contrast of the stark white dough against the fine green line work creates a modern farmhouse aesthetic that feels both organic and refined.
How-To Guide
Materials
- All-purpose flour
- Table salt
- Warm water
- Rolling pin
- Oval cookie cutter (or a knife and paper template)
- Fine-grit sandpaper (optional)
- White acrylic paint (matte finish)
- Ultra-fine tip permanent marker (green) or detail paintbrush with dark green acrylic ink
- Jute twine
- Straw or skewer (for the hole)
- Baking sheet with parchment paper
- Clear matte sealant spray (optional)
Step 1: Preparing the Dough Base
-
Mix the dry ingredients:
In a large mixing bowl, combine 2 cups of all-purpose flour and 1 cup of table salt. Stir them together until they are evenly distributed. -
Add water gradually:
Slowly pour in up to 1 cup of warm water, mixing constantly. Stop adding water once the dough starts coming together; you want a firm consistency, not a sticky mess. -
Knead the dough:
Turn the dough onto a lightly floured surface and knead for at least 5-10 minutes. This is crucial for smoothing out the salt crystals and creating a silky surface for painting later. -
Roll out the slab:
Using your rolling pin, flatten the dough to an even thickness of about 1/4 inch. If you go too thin, the ornaments might crack; too thick, and they take forever to dry. -
Cut the shapes:
Press your oval cutter into the dough to create your tag shapes. If you don’t have an oval cutter, lightly trace a paper template with a knife. -
Create the hanging hole:
Use a drinking straw or a wooden skewer to poke a hole near the top of the oval. Give the straw a little twist as you pull it out to ensure a clean opening. -
Smooth the edges:
Dip your finger in a little water and gently run it along the cut edges of the oval to smooth down any rough clay burrs.
Step 2: Baking and Priming
-
Bake carefully:
Place the ornaments on a parchment-lined baking sheet. Bake in a low oven at 200°F (93°C) for roughly 2-3 hours. You want to dry them out, not cook them brown. -
Flip occasionally:
I usually flip the ornaments every 30-45 minutes during baking to ensure the backs dry as evenly as the fronts. -
Cool completely:
Remove them from the oven and let them cool fully on a wire rack. They must be room temperature before you apply any paint. -
Sand for perfection:
If there are any bumps or uneven spots, lightly buff the surface with fine-grit sandpaper for a professional finish. -
Apply the white base:
Paint the entire surface of the ornament with matte white acrylic paint. You may need two coats to achieve that solid, clean ceramic look seen in the photo.
Ultra-Smooth Surface
For a porcelain-like finish, dissolve the salt in hot water first before mixing with flour. This eliminates grainy salt crystals entirely.
Step 3: Detailed Illustration & Assembly
-
Sketch the stem:
Once the white paint is bone dry, use your fine-tip green marker or ink pen to draw a single, slightly curved central stem line starting from the bottom left. -
Add the branches:
Draw shorter lines branching off the main stem, alternating sides as you move upward toward the hole. -
Draw the leaves:
Add small, delicate leaves to the branches. For the fern-like look shown, keep the leaves narrow and pointed, drawing small strokes rather than filling in large shapes. -
Vary the pressure:
Try to vary your pen pressure slightly—lighter at the tips of the leaves and firmer near the stem—to give the drawing a natural, hand-sketched movement. -
Seal the artwork:
To protect your drawing from moisture, give the ornament a light coat of clear matte sealant spray. This prevents the ink from bleeding over time. -
Attach the hanger:
Cut a length of jute twine. Fold it in half, push the loop through the hole, and pull the tails through the loop to secure it (a lark’s head knot). -
Tie the bow:
Use the loose ends of the twine to tie a neat, small bow just above the top of the ornament secure the knot tightly.
Puffing Up?
If your dough puffs up like a pita bread while baking, your oven is too hot. Lower the temp immediately and prop the oven door open slightly.
These minimalist botanical tags make beautiful personalized gift toppers or natural additions to a holiday tree


Terrazzo-Style Salt Dough Coasters
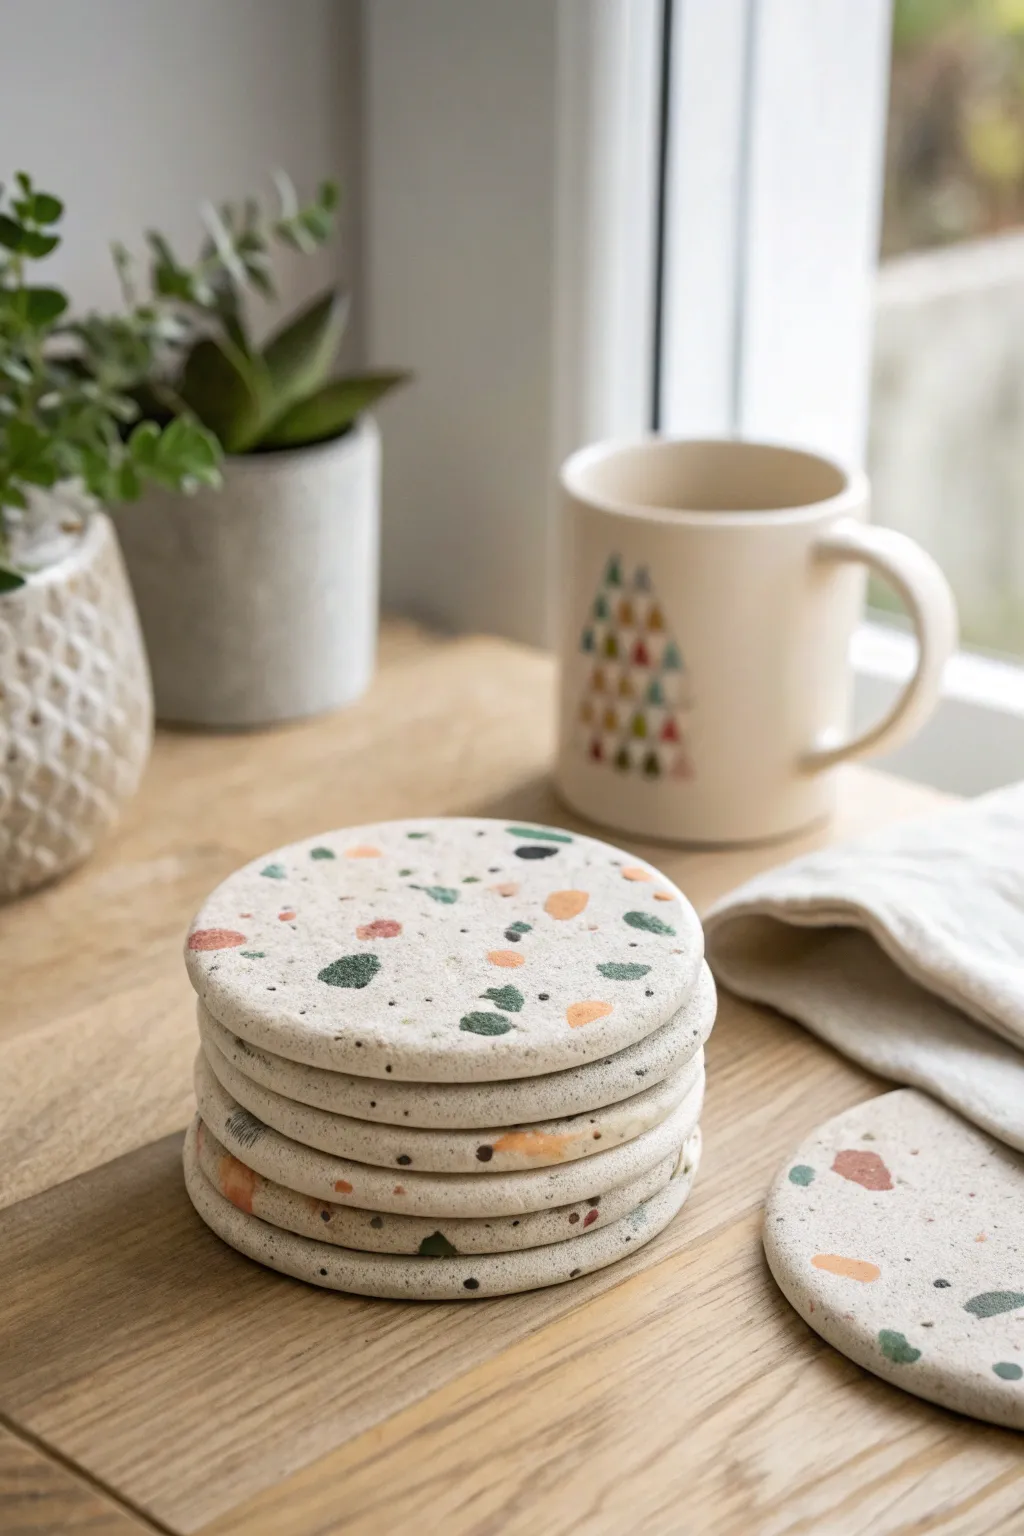
Bring a touch of modern design to your coffee table with these charming, speckled coasters that mimic the high-end look of terrazzo stone. Using simple salt dough and colored chips, you can create a surprisingly durable and chic set of home accessories.
Step-by-Step Guide
Materials
- 2 cups All-purpose flour
- 1 cup Salt (fine table salt works best)
- 1 cup Water (warm)
- Acrylic paints (terracotta orange, forest green, muted teal, black)
- Rolling pin
- Round cookie cutter (approx. 4 inches) or a glass
- Parchment paper
- Sharp knife or craft blade
- Baking sheet
- Matte sealant or Mod Podge
- Sandpaper (fine grit)
Step 1: Creating the Base Dough
-
Mix dry ingredients:
In a large mixing bowl, combine the two cups of flour and one cup of salt. Stir them together until the salt is evenly distributed throughout the flour. -
Add water gradually:
Slowly pour in the warm water while stirring. You may not need the full cup, or you might need a splash more, so add it gradually until a dough begins to form. -
Knead the dough:
Turn the mixture onto a clean surface and knead for about 5-10 minutes. The goal is a smooth, pliable dough that isn’t sticky. It should feel similar to modeling clay.
Pro Tip: Brighter Colors
Mix white acrylic paint into your plain dough base before rolling. This makes the background a bright, pure white rather than the natural off-white of flour, making the color chips pop.
Step 2: Making the Terrazzo Chips
-
Separate small portions:
Pinch off four small balls of dough, roughly the size of a walnut. These will become your colored ‘stones’ for the terrazzo effect. -
Color the portions:
Add a drop of acrylic paint to each small ball—one distinct color per ball (orange, green, teal, black). Knead the color into the dough until fully saturated and uniform. Wear gloves if you want to avoid stained fingers. -
Flatten the colored dough:
Press these colored balls flat into very thin pancakes. They don’t need to be perfect shapes; thinness is the key here so they integrate well. -
Create the chips:
Using your fingers or a craft knife, tear or cut the colored dough into tiny, irregular fragments. Aim for a variety of sizes, from specks to small chunks, to create a natural stone look.
Troubleshooting: Puffing Up
If your coasters puff up like pita bread, your oven was likely too hot. Poke the underside with a needle to release air and lower the temp immediately.
Step 3: Assembling and Baking
-
Prepare the main dough:
Take your remaining large batch of plain white dough and flatten it slightly on a piece of parchment paper. -
Embed the chips:
Scatter your colored dough fragments over the white dough. Press them down gently so they stick to the surface. -
Roll it out:
Use your rolling pin to roll the dough out to about a 1/4 inch thickness. The rolling action will embed the colored chips flush into the white base, creating that signature terrazzo surface. -
Cut the shapes:
Use your round cookie cutter or the rim of a wide glass to cut out your coaster circles. Lift away the excess dough carefully. -
Smooth the edges:
Dip your finger in a little water and run it around the rim of each coaster to smooth out any rough cuts or jagged edges before baking. -
Initial air dry:
I find it helpful to let the coasters sit at room temperature for an hour or so before baking; this helps prevent puffing in the oven. -
Bake slowly:
Place the coasters on a parchment-lined baking sheet. Bake in a low oven at 250°F (120°C) for roughly 2 to 3 hours. You want to dry them out, not cook them, so low and slow is essential. -
Cool completely:
Remove from the oven. The coasters should feel hard and solid. Let them cool completely on a wire rack.
Step 4: Finishing Touches
-
Sand for smoothness:
Once fully cool, use fine-grit sandpaper to lightly buff the surface. This reveals the crisp edges of your colored chips and makes the surface feels like polished stone. -
Wipe clean:
Use a slightly damp cloth or dry brush to remove all dust from the sanding process. -
Seal the coasters:
Apply a coat of matte sealant or Mod Podge. Since salt dough attracts moisture, sealing is crucial to prevent them from getting soggy when holding a cold drink.
Stack your new creations on the coffee table and enjoy a handmade touch with your morning tea


Pressed Flower Salt Dough Wall Medallions
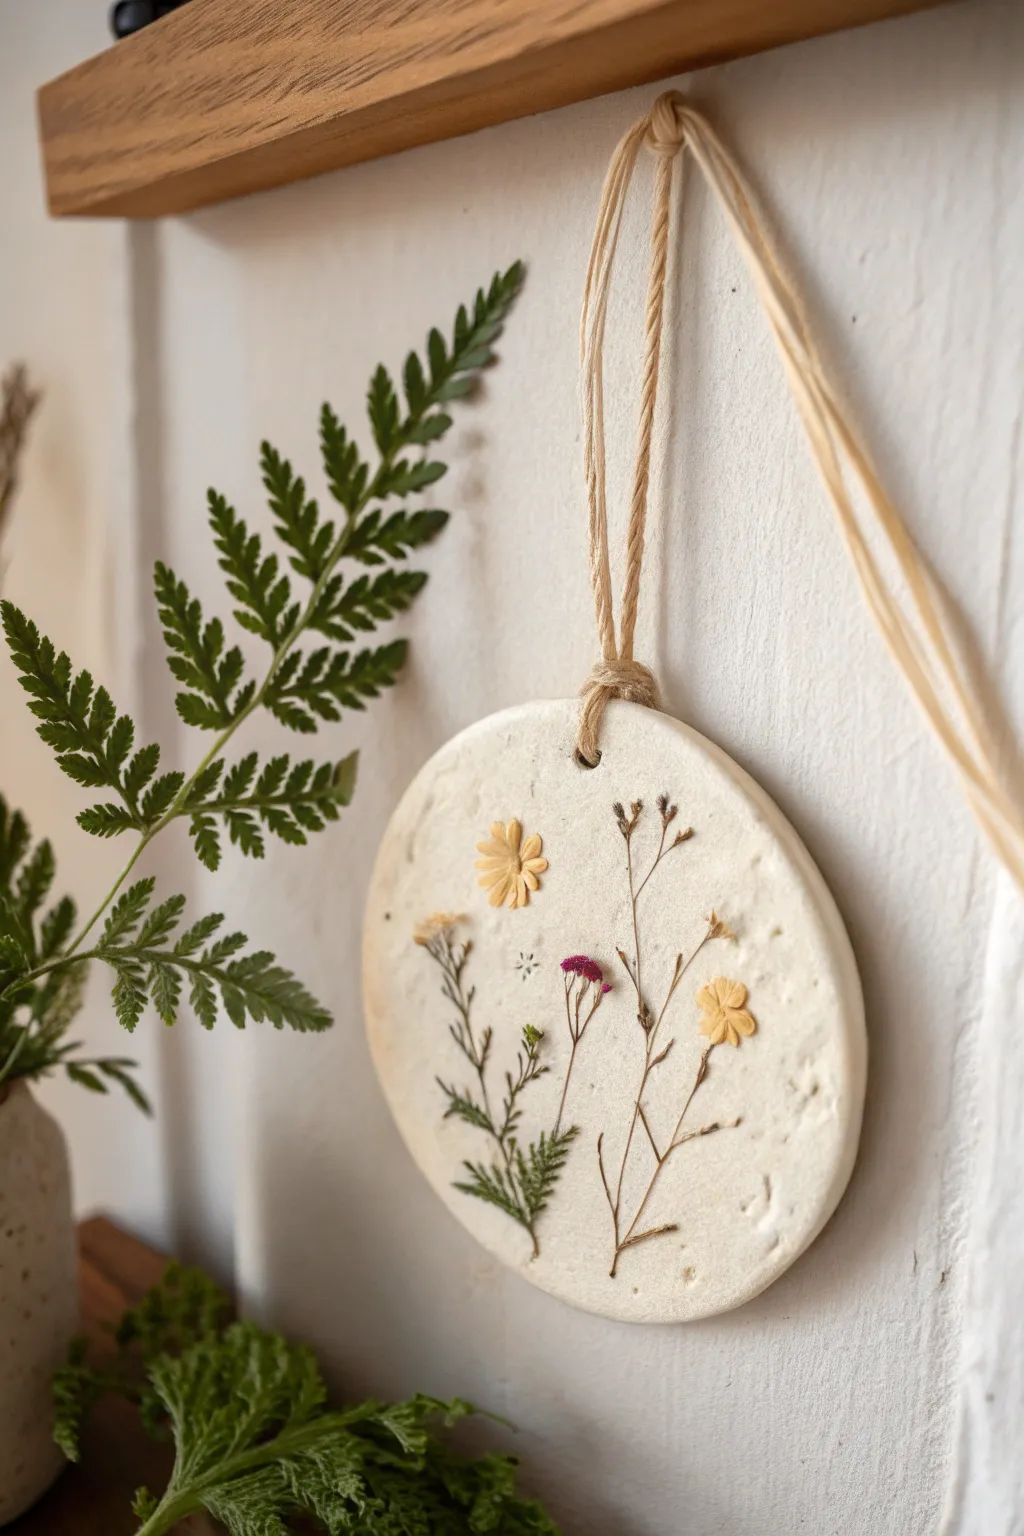
Preserve the delicate geometry of wildflowers in a timeless, rustic display with these pressed flower salt dough medallions. The soft, matte finish of the dough provides a perfect neutral canvas that lets the vibrant petals and intricate fern fronds take center stage.
Step-by-Step
Materials
- 2 cups all-purpose flour
- 1 cup fine table salt
- 1 cup warm water
- Rolling pin
- Round cookie cutter (approx. 4-5 inches) or a bowl rim
- Parchment paper
- Drinking straw or skewer
- Assorted dried pressed flowers and leaves (ferns, daisies, lavender)
- White acrylic paint (optional, for a cleaner finish)
- Matte Mod Podge or clear matte sealant
- Soft paintbrush
- Natural jute twine or raffia ribbon
- Baking sheet
Step 1: Mixing and Shaping the Dough
-
Combine dry ingredients:
In a large mixing bowl, whisk together the flour and salt until they are evenly distributed. Breaking up any salt clumps now ensures a smoother surface later. -
Add water gradually:
Slowly pour in the warm water while stirring. You may not need every drop, or you might need a tiny splash more. Aim for a consistency similar to playdough—pliable but not sticky. -
Knead the dough:
Turn the dough onto a clean surface and knead for at least 5-7 minutes. This step is crucial for developing a smooth texture that won’t crack easily during baking. -
Roll it out:
Place a ball of dough onto a sheet of parchment paper. Use your rolling pin to flatten it to a uniform thickness of about 1/4 inch. If it’s too thin, it may warp; too thick, and it will take ages to dry. -
Cut the shape:
Press your round cutter or the rim of a bowl firmly into the dough to create a perfect circle. Peel away the excess dough from the edges. -
Create the hanging hole:
Use a drinking straw to punch a clean hole near the top edge of the circle. Position it about half an inch down from the rim to ensure the dough is strong enough to support the hanging weight.
Puffing Up?
If your dough puffs up while baking, your oven is likely too hot. Reduce heat immediately. You can gently press it back down with a spoon if caught early.
Step 2: Embedding and Drying
-
Arrange the botanicals:
Before attaching anything, lay your dried flowers gently on top of the dough to test your composition. I try to vary the heights and angles to mimic a natural meadow look. -
Press flowers into dough:
Once happy with the layout, gently press each stem and petal into the soft dough. You can use the back of a spoon or your finger to ensure they are slightly embedded flush with the surface. -
Initial bake:
preheat your oven to its lowest setting (usually around 200°F or 95°C). Place the parchment paper with the medallions onto a baking sheet. -
Slow drying process:
Bake for approximately 2-3 hours. Check on them periodically; you want them to dry out completely and become hard, but not brown or burn. -
Identifying doneness:
The medallion is ready when it feels rock-hard to the touch and the center bottom is no longer damp. Remove from the oven and let cool completely on a wire rack.
Step 3: Finishing Touches
-
Optional painting:
If your salt dough looks a bit beige or uneven after baking, you can carefully paint around the flowers with white acrylic paint diluted with a little water for a whitewashed look. -
Seal the artwork:
To prevent the dough from re-absorbing moisture from the air, apply a thin, even coat of matte Mod Podge or sealant over the entire front surface, covering the flowers gently. -
Seal the back:
Once the front is dry, flip the medallion over and seal the back side as well. This full encapsulation ensures longevity. -
Prepare the hanger:
Cut a length of natural jute twine or raffia, roughly 12 inches long. Fold it in half to create a loop. -
Attach the twine:
Push the folded end of the twine through the hole in the medallion from front to back. Pull the loose ends through the loop and tighten to create a lark’s head knot. -
Final knotting:
Tie the loose ends of the twine together in a simple knot at your desired hanging length and trim any excess.
Scented Dough
Knead a few drops of essential oil (like lavender or cedarwood) into the dough before rolling to make your wall hanging double as a subtle air freshener.
Hang your botanical creation in a sunlit spot where the organic textures can catch the light

The Complete Guide to Pottery Troubleshooting
Uncover the most common ceramic mistakes—from cracking clay to failed glazes—and learn how to fix them fast.
Salt Dough Incense Holders With Clean Lines
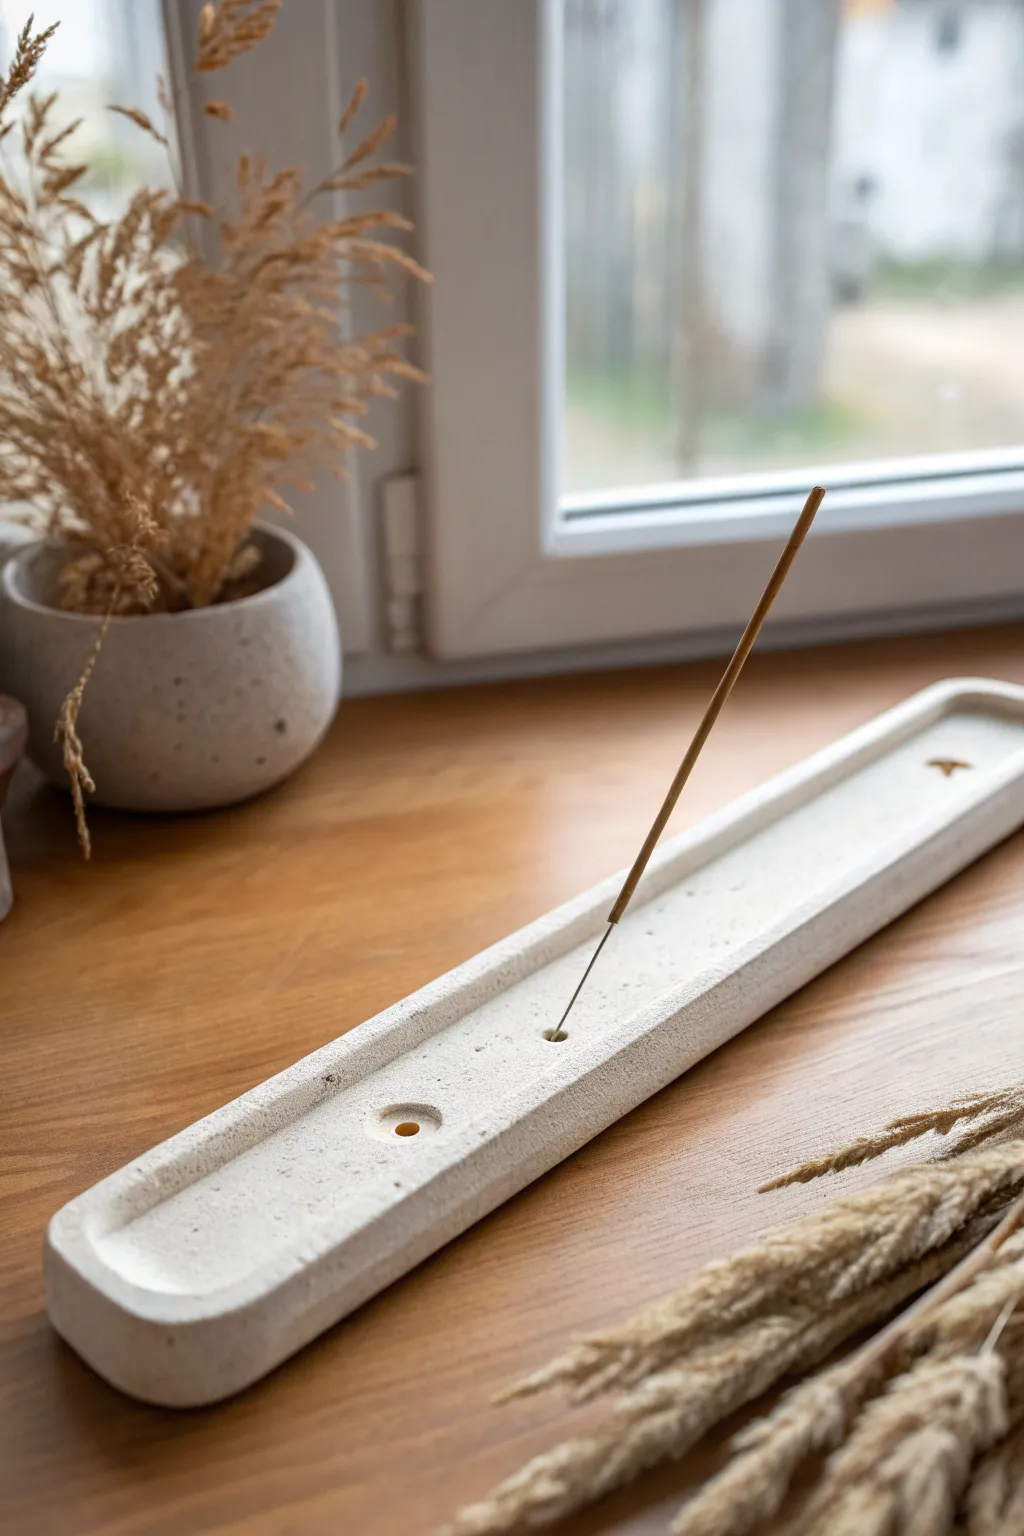
Achieve the high-end look of cast concrete or white stone using simple salt dough to create this sleek incense holder. Its clean lines and subtle texture make it a sophisticated addition to any windowsill or meditation space.
Step-by-Step Tutorial
Materials
- 2 cups all-purpose flour
- 1 cup table salt (fine grain)
- 1 cup lukewarm water
- Rolling pin
- Sharp knife or bench scraper
- Ruler
- Sandpaper (medium and fine grit)
- Bamboo skewer or toothpick
- Wine cork or dowel (for larger impression)
- White acrylic paint (matte)
- Baking soda (optional, for texture)
- Clear matte sealant spray
- Mixing bowl
Step 1: Mixing and Shaping the Base
-
Prepare the dough:
Combine your flour and salt in a large mixing bowl. Slowly add the water while stirring until a firm dough forms. Knead it on a floured surface for about 10 minutes until it’s smooth and pliable. -
Initial rolling:
Roll out a portion of the dough into a long, thick slab. You want this base to be substantial, roughly 1/2 inch to 3/4 inch thick to prevent warping during baking. -
Cut the rectangle:
Use a ruler and a sharp knife or bench scraper to cut a perfect rectangle. Aim for dimensions around 10 inches long by 2 inches wide to match the elongated look in the photo. -
Smooth the edges:
Dip your finger in a little water and run it along the cut edges to smooth out any sharpness or crumbs from the cutting process.
Stone Texture Trick
Add black pepper or used coffee grounds directly into the raw dough mix. When sanded later, these specs will look exactly like granite or speckled pottery.
Step 2: Creating the Channel and Features
-
Form the inner channel:
To create the raised rim effect, you need to depress the center. Use a slightly smaller rectangular object (like a small ruler wrapped in plastic wrap) or your thumbs to press down the center of the rectangle, leaving a 1/4 inch border raised all around. -
Refine the interior walls:
Use the flat edge of your knife or a sculpting tool to sharpen the interior angles described in the previous step, ensuring the ‘tray’ part is flat and the walls are vertical. -
Create the incense hole:
Find the exact center of your tray length-wise. Insert a bamboo skewer or toothpick at a slight angle (about 45 degrees) pointing towards the long end of the tray. This ensures the ash falls into the channel. -
Add the decorative divot:
Press a small circular object, like the end of a wine cork or a large dowel, into the dough near one end of the channel to create the shallow circular impression seen in the design. -
Double-check the fit:
Wiggle your skewer slightly to ensure the hole is fully open and won’t close up during baking. I find it helpful to make the hole just a hair larger than the incense stick to account for shrinkage.
Make It Marble
Before rolling, mix a drop of black paint into a small ball of dough, then gently twist it into your main white batch for a swirled marble effect.
Step 3: Baking and Refining
-
Low and slow baking:
Place your holder on a parchment-lined baking sheet. Bake at a very low temperature, around 200°F (95°C), for 3-4 hours. Flip it gently halfway through to ensure the bottom dries evenly. -
Test for dryness:
The piece is done when it sounds hollow upon tapping and feels hard throughout. If the center feels soft, bake for longer increments. -
Cool completely:
Remove from the oven and let the piece cool completely on a wire rack before attempting to sand or paint. -
Sanding for stone effect:
Take your sandpaper to the edges and flat surfaces. Sanding the salt dough exposes the grain of the salt crystals, which mimics the speckled look of stone or concrete.
Step 4: Finishing Touches
-
Paint preparation:
Mix a small amount of baking soda into your white acrylic paint. This creates a textured, chalky finish that looks more like ceramic or stone than plastic. -
Apply the finish:
Paint the entire holder with your textured white mixture. You might need two thin coats for full coverage. -
Distress slightly (optional):
Once the paint is dry, lightly scuff the edges again with fine-grit sandpaper to reveal just a hint of the raw material underneath, enhancing the organic feel. -
Seal the piece:
Spray the holder with a clear matte sealant. This is crucial for salt dough as it prevents moisture absorption and protects the finish from burning incense ash.
Place your favorite scent in the holder and enjoy the serene atmosphere you have crafted by hand
Scented Salt Dough Ornaments With Citrus and Spices
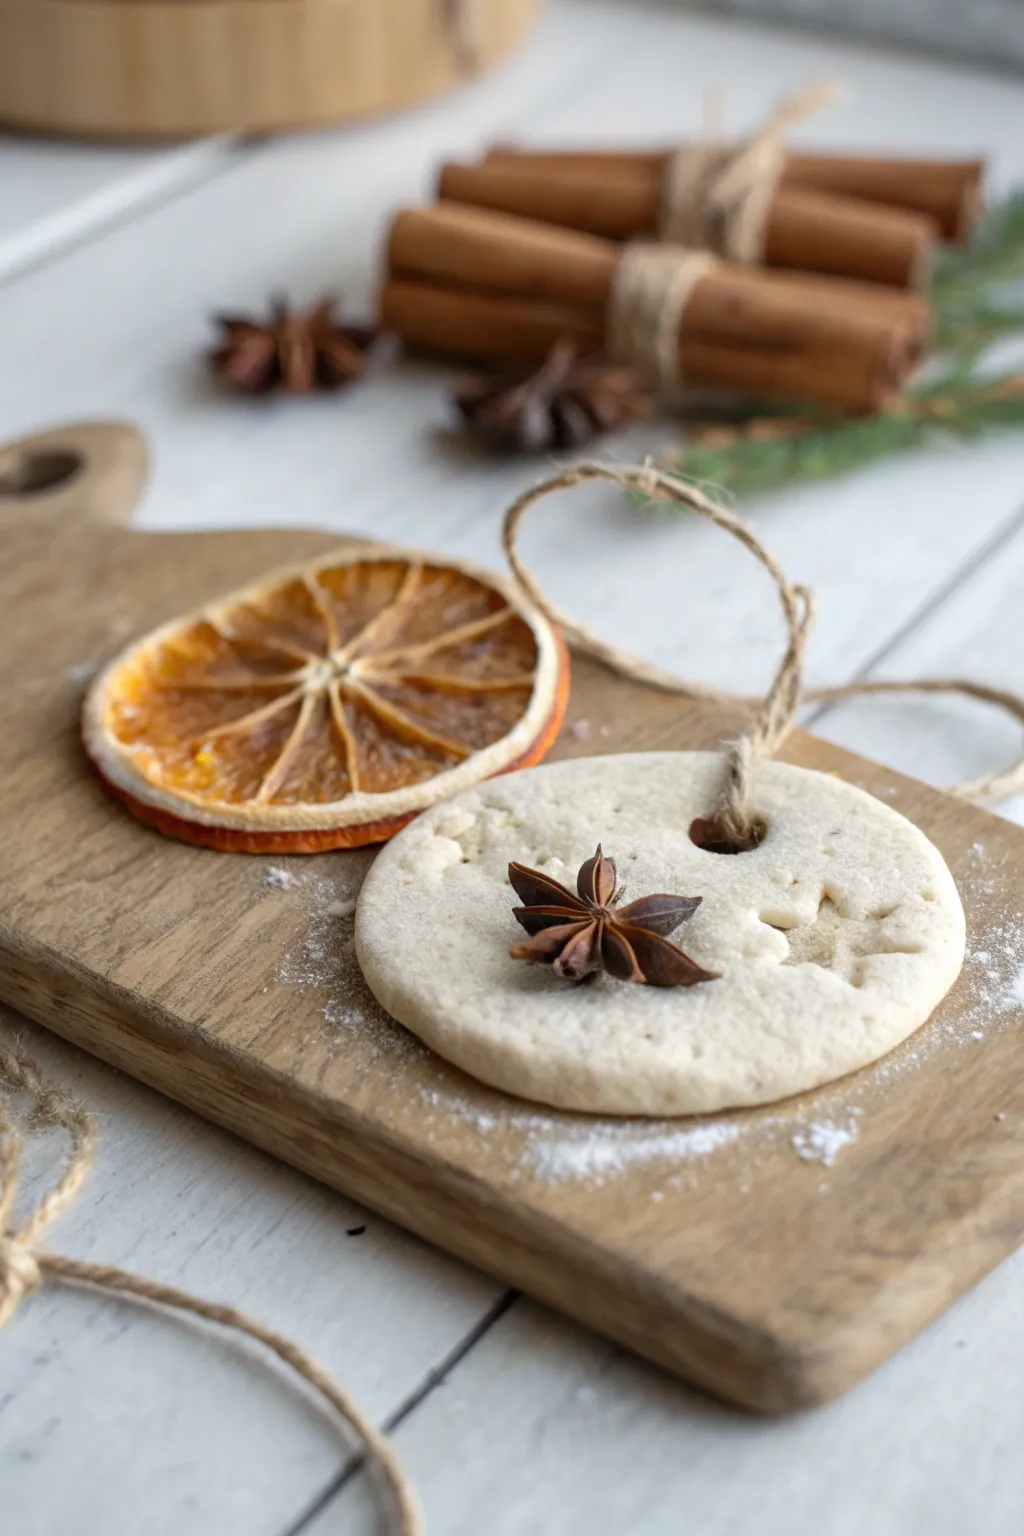
Bring the cozy warmth of winter into your crafting with these elegant, scented salt dough ornaments. Combining the rich aroma of spices with dried citrus creates a natural, minimalist decoration perfect for holiday gifts or rustic tree decor.
Detailed Instructions
Materials
- All-purpose flour
- Table salt
- Warm water
- Ground Cinnamon (optional for dough scent)
- Whole star anise
- Dried orange slices
- Rolling pin
- Round cookie cutter or biscuit cutter
- Small star-shaped cookie cutter (mini)
- Straw or skewer (for hole punching)
- Jute twine or rustic string
- Baking sheet with parchment paper
- Sandpaper (fine grit, optional)
Step 1: Preparing the Dough Base
-
Mix dry ingredients:
In a large mixing bowl, combine 2 cups of all-purpose flour and 1 cup of salt. If you want the dough itself to carry a scent, whisk in a tablespoon of ground cinnamon or nutmeg at this stage. -
Add water gradually:
Slowly pour in up to 1 cup of warm water while stirring. Don’t add it all at once; stop when the dough starts coming together but isn’t sticky. -
Knead until smooth:
Turn the dough onto a clean surface and knead for about 5-10 minutes. You want a very smooth, pliable consistency similar to playdough. If it cracks, add a drop more water; if sticky, add flour. -
Roll out the dough:
Roll your dough out to a thickness of about 1/4 inch. Keep it relatively thick to support the spices you’ll be pressing in later.
Puffy Dough?
If your ornaments are puffing up like pita bread, your oven is likely too hot. Reduce the temp to 200°F and bake longer to dry them evenly without rising.
Step 2: Creating the Ornament Design
-
Cut the primary shape:
Using your large round cookie cutter, cut out neat circles from the rolled dough. Transfer these carefully to your parchment-lined baking sheet before decorating so you don’t distort the shape later. -
Add the star impression:
Take your mini star cutter and gently press it into the side of the dough circle. Do not cut all the way through; imply the shape by pressing down about halfway to create a relief effect. -
Embed the star anise:
Select a whole, aesthetically pleasing star anise. Press it firmly into the center of the dough circle. You need to push it deep enough that the dough hugs the spice slightly, securing it as it bakes. -
Create the hanging hole:
Use a straw to punch a clean hole near the top of the ornament. Make sure it isn’t too close to the edge to prevent tearing when you hang it. -
Optional texture:
For a rustic look like the example, I sometimes lightly dust a tiny pinch of flour over the surface before baking, gives it a matte, stone-like finish.
Step 3: Drying and Assembly
-
Bake low and slow:
Place the baking sheet in an oven preheated to 250°F (120°C). Bake for 2-3 hours. The goal is to dry them out, not cook them brown. -
Check for hardness:
Flip the ornaments halfway through baking (be careful with the star anise side). They are done when they feel hard and sound hollow when tapped. -
Cool completely:
Let the ornaments cool on a wire rack. Don’t rush this, as trapped heat can cause softness. -
Sand rough edges:
If the edges of your circle look a bit ragged, gently smooth them with fine-grit sandpaper for a polished look. -
Cut the twine:
Cut a length of jute twine, about 8 inches long. -
Loop the twine:
Fold the twine in half and push the loop end through the hole from front to back. -
Secure the hanger:
Thread the loose ends of the twine through the loop and pull tight to create a lark’s head knot directly on the ornament. -
Tie off the ends:
Tie the two loose ends of the twine together in a simple overhand knot to close the hanger loop. -
Pair with citrus:
These look beautiful displayed alongside dried orange slices, or you can even string a dried slice onto the same piece of twine for a layered effect.
Add Subtle Sparkle
Before baking, lightly brush the surface with water and sprinkle a tiny amount of crystal sugar or iridescent glitter for a frosty, winter-morning effect.
Now you have a set of earthy, beautiful ornaments ready to hang or gift to a friend


What Really Happens Inside the Kiln
Learn how time and temperature work together inside the kiln to transform clay into durable ceramic.
Geometric Salt Dough Hanging Mobiles for Calm Decor
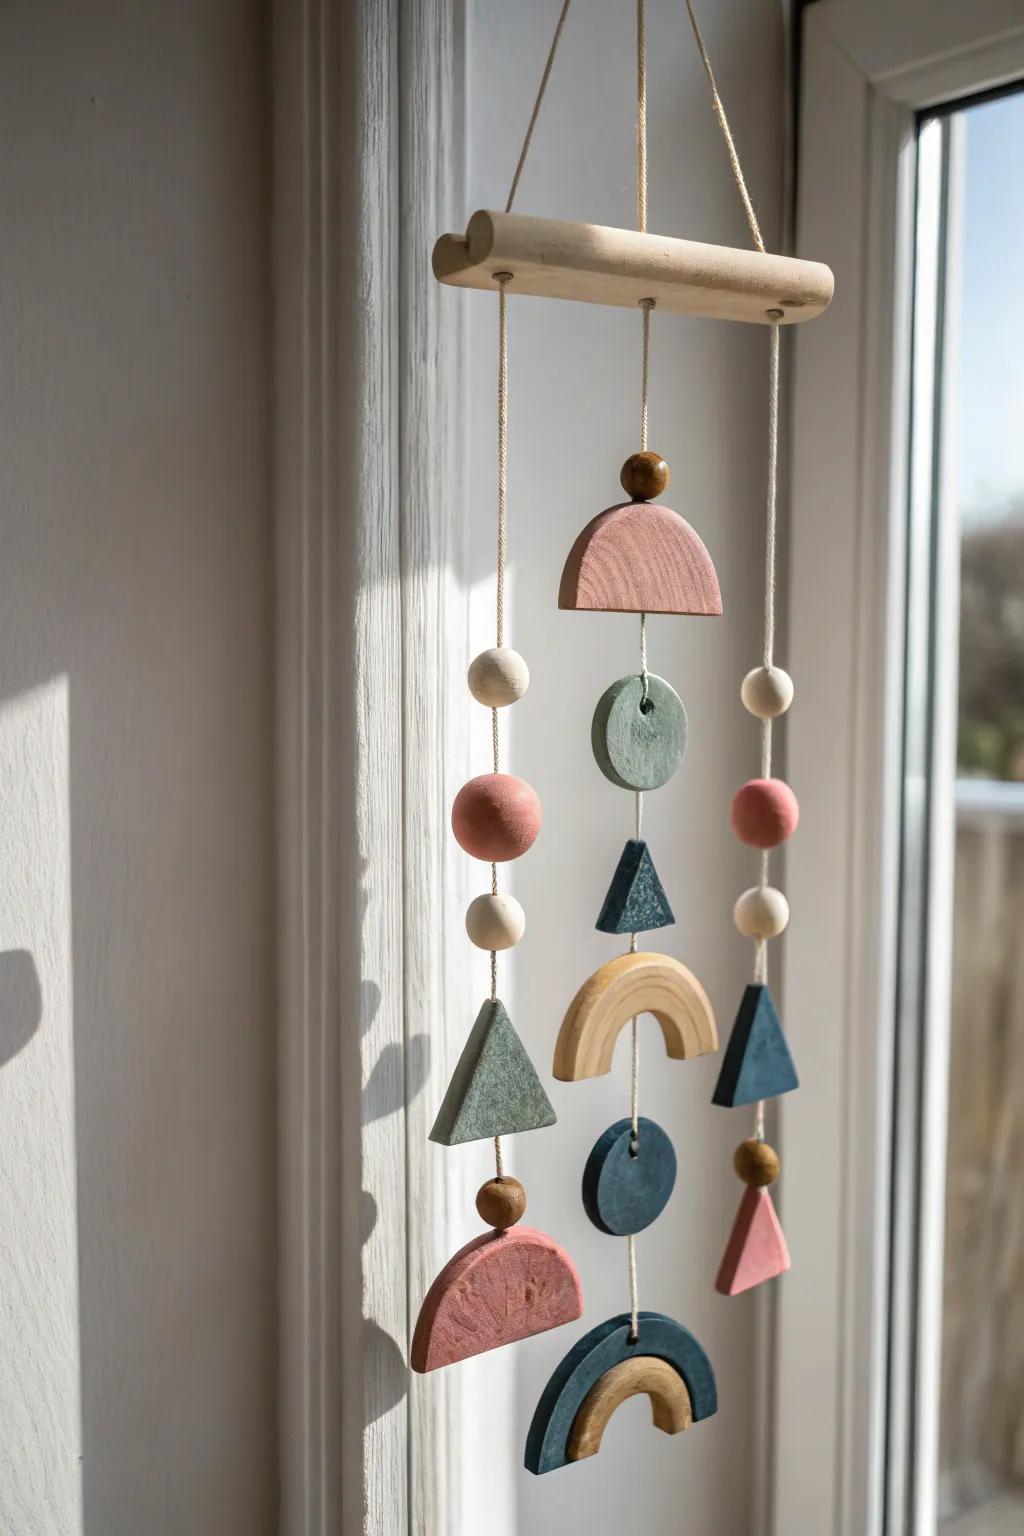
Bring a sense of balance and calm to your space with this earthy, geometric mobile crafted from simple salt dough and string. Its muted palette of terracotta, teal, and sage creates a soothing aesthetic that looks beautifully high-end despite the humble materials.
Step-by-Step
Materials
- All-purpose flour (2 cups)
- Table salt (1 cup)
- Warm water (1 cup)
- Rolling pin
- Cookie cutters (circles, semicircles, triangles, arches)
- Sharp knife or clay cutting tool
- Drinking straw or skewer (for making holes)
- Baking sheet and parchment paper
- Acrylic paints (terracotta, sage green, teal, cream/white, gold/bronze)
- Paintbrushes (flat and fine tip)
- Wooden beads (assorted sizes, natural and painted)
- Driftwood piece or wooden dowel (approx. 6-8 inches)
- Cotton twine or heavy-duty thread
- Clear sealant spray (matte finish)
Step 1: Shaping the Elements
-
Mix the Dough:
Combine flour and salt in a large bowl. Gradually add warm water while stirring until a dough forms. Knead on a lightly floured surface for about 5-10 minutes until smooth and pliable. -
Roll It Out:
Roll your dough out to an even thickness of about 1/4 inch. If the dough gets sticky, lightly dust your rolling pin with flour. -
Cut Main Shapes:
Using cookie cutters or a template and knife, cut out your primary shapes. You’ll need three distinct vertical strands, so aim for a mix: 2-3 triangles, 2 semi-circles, 2 circular discs, and 2 rainbow arch shapes. -
Create Smaller Beads:
Reserve some dough to hand-roll spherical beads if you don’t want to use wooden ones exclusively. Roll small balls about the size of a marble. -
Punch Holes:
This is crucial: before baking, use a straw or skewer to poke holes through every piece. For flat shapes, poke a hole at the top and bottom center so they can connect vertically. For the bottom-most pieces, only one top hole is needed. -
Refine Edges:
Dip your finger in a little water and gently smooth out any rough or jagged edges on your cut shapes to ensure a professional finish once dry.
Puffing Up?
If your dough puffs up while baking, your oven might be too hot. Reduce heat immediately. You can also press them flat gently with a clean towel while they are still warm.
Step 2: Baking and Decorating
-
Bake Low and Slow:
Place all pieces on a parchment-lined baking sheet. Bake at 200°F (95°C) for 2-3 hours. Flip the pieces halfway through to ensure even drying. They are done when rock hard. -
Cool and Sand:
Let the pieces cool completely. If there are still rough spots, I prefer to use a fine-grit sandpaper to buff them smooth before painting. -
Apply Base Colors:
Paint your shapes in a coordinated palette. Use terracotta pink for the semi-circles, a deep teal for triangles and lower discs, and sage green/grey for the middle accents. Leave the arches natural unpainted dough or paint them a sandy beige. -
Add Textural Details:
For the flat circles or triangles, you can dab a sponge with a slightly lighter paint shade to create a stone-like texture. Paint the small wooden connecting beads in contrasting or matching tones, or perhaps a metallic gold. -
Seal the Work:
Once the paint is fully dry, spray all sides with a matte clear sealant. This protects the salt dough from moisture and gives the mobile a finished look.
Step 3: Assembly
-
Prepare the Hanger:
Take your wooden dowel or driftwood. Drill three small holes through it (left, center, right) or simply prepare three long strands of twine to tie securely around it. -
String the Center Strand:
Cut a long piece of twine. Tie a large knot or use a bead at the bottom to secure the lowest piece (a teal disc). Thread upward, adding a spacer bead, then a wooden arch, another bead, a triangle, and so on, tying knots under pieces if necessary to keep spacing consistent. -
Assemble Side Strands:
Repeat the process for the left and right strands. Vary the order of shapes (e.g., put a semi-circle at the top of one and a circle on another) to create visual interest and balance. -
Attach to Dowel:
Feed the top of each string through the holes in your dowel (or tie around it). Adjust lengths so the strands hang at pleasing, slightly staggered heights. -
Final Balancing:
Attach a master string to the two ends of the dowel for hanging. Hold it up to test the balance; if it tilts, adjust the position of the strings on the dowel slightly.
Pro Design Tip
Mix a tiny amount of cinnamon or nutmeg into the dough before baking. It gives the unpainted ‘natural’ pieces a beautiful speckled look and a subtle scent.
Hang your new mobile near a window where the light can catch the different angles and enjoy the peaceful movement it brings to your room
Abstract Salt Dough Sculptures as Bookshelf Objects
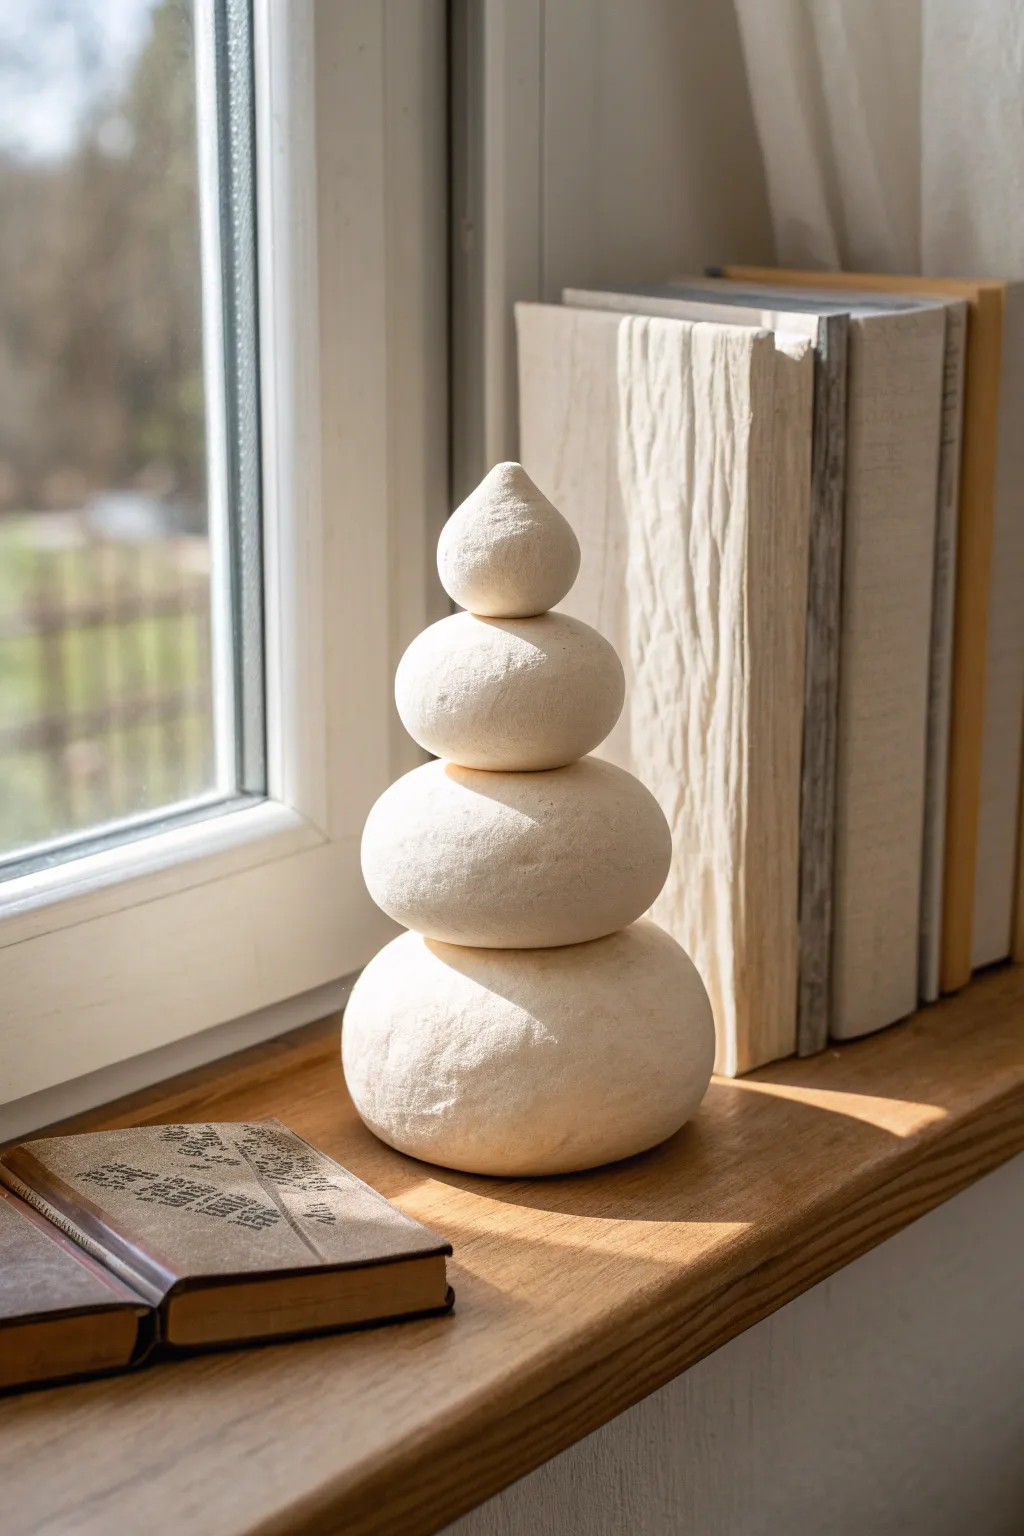
Embrace minimalism with this organic, stacked sculpture that mimics the look of smoothed river stones or cairns found in nature. The textured off-white finish gives it a sophisticated, ceramic-like quality perfectly suited for modern bookshelf styling.
Detailed Instructions
Materials
- 2 cups all-purpose flour
- 1 cup table salt
- 1 cup warm water
- Baking sheet
- Parchment paper
- Sandpaper (medium and fine grit)
- White acrylic paint (matte)
- Beige or cream acrylic paint (optional for tinting)
- Strong craft glue or epoxy
- Foam paint brush or kitchen sponge
- Aluminum foil (for armature core)
Step 1: Mixing and Shaping
-
Prepare the Dough:
Mix the flour and salt together in a large bowl. Gradually add the warm water while stirring until a stiff dough forms. -
Knead Thoroughly:
Turn the dough onto a clean surface and knead it for at least 5-10 minutes. You want a very smooth, pliable consistency to minimize surface cracks later. -
Create Foil Cores:
To ensure even baking and reduce weight, crumple aluminum foil into four tight balls of graduating sizes. The largest should be the base, getting progressively smaller for the top. -
Cover the Base Stone:
Take a portion of dough and flatten it out. Wrap it completely around your largest foil ball, smoothing the seams together invisibly. -
Shape the Base:
Roll the covered ball on the table to smooth it, then gently press down to flatten it into an oblate spheroid (a squashed sphere). It needs a flat bottom for stability and a slightly flat top for the next stone to sit on. -
Cover the Middle Stones:
Repeat the covering process for the next two smaller foil balls. Shape them similarly to the base, ensuring they look like natural, water-worn river stones. -
Shape the Top Stone:
For the smallest top piece, shape the dough into a teardrop or droplet form rather than a flat stone, giving the stack a distinct peak. -
Check Compatibility:
Before baking, stack the raw dough pieces gently to ensure they balance effectively. If one creates a tilt, gently press the connection points to flatten them slightly.
Cracking Up?
If cracks appear during baking, mix a small paste of flour, water, and glue. Fill the cracks, smooth with a wet finger, let dry, then sand flush.
Step 2: Baking and Finishing
-
Separate and Bake:
Unstack the stones and place them separately on a parchment-lined baking sheet. Bake at 200°F (95°C) for 3-4 hours. -
Check for Doneness:
The stones are ready when they feel hard and sound hollow when tapped. If the bottoms are still damp, flip them over and bake for another 30 minutes. -
Cool Completely:
Let the stones cool entirely on a wire rack. Don’t rush this, as painting warm dough can cause the paint to crack. -
Smooth the Surface:
Use medium-grit sandpaper to remove any major bumps or sharp ridges. Follow up with fine-grit sandpaper for a smoother, stone-like feel. -
Apply Base Coat:
Mix a tiny drop of beige paint into your white acrylic to create a natural ‘off-white’ stone color. Paint the entire surface of each stone. -
Add Texture:
Once the first coat is dry, dab a second layer of thick paint using a sponge rather than a brush. This stippling motion creates the realistic, grainy texture seen in the photo. -
Dry and Assemble:
Allow the paint to cure completely. Apply a strong adhesive like epoxy or heavy-duty craft glue to the center of the base stone. -
Glue the Stack:
Press the second largest stone onto the base. Continue gluing and stacking upward, finishing with the teardrop shape on top. -
Final Cure:
Let the glue set according to the manufacturer’s instructions before moving your new sculpture to the windowsill.
Faux Stone Finish
Mix baking soda into your acrylic paint before applying. It creates a gritty, realistic limestone texture that looks incredible on minimalist pieces.
Place your sculpture near a window where the natural light can highlight the beautiful textures you created