There’s something extra magical about making a tiny clay house—it’s like building a whole little world you can hold in your hands. Here are my favorite clay house ideas to spark your next cozy, whimsical mini build, whether you’re using air dry clay, polymer clay, or traditional clay.
Classic Tealight Clay House Luminary
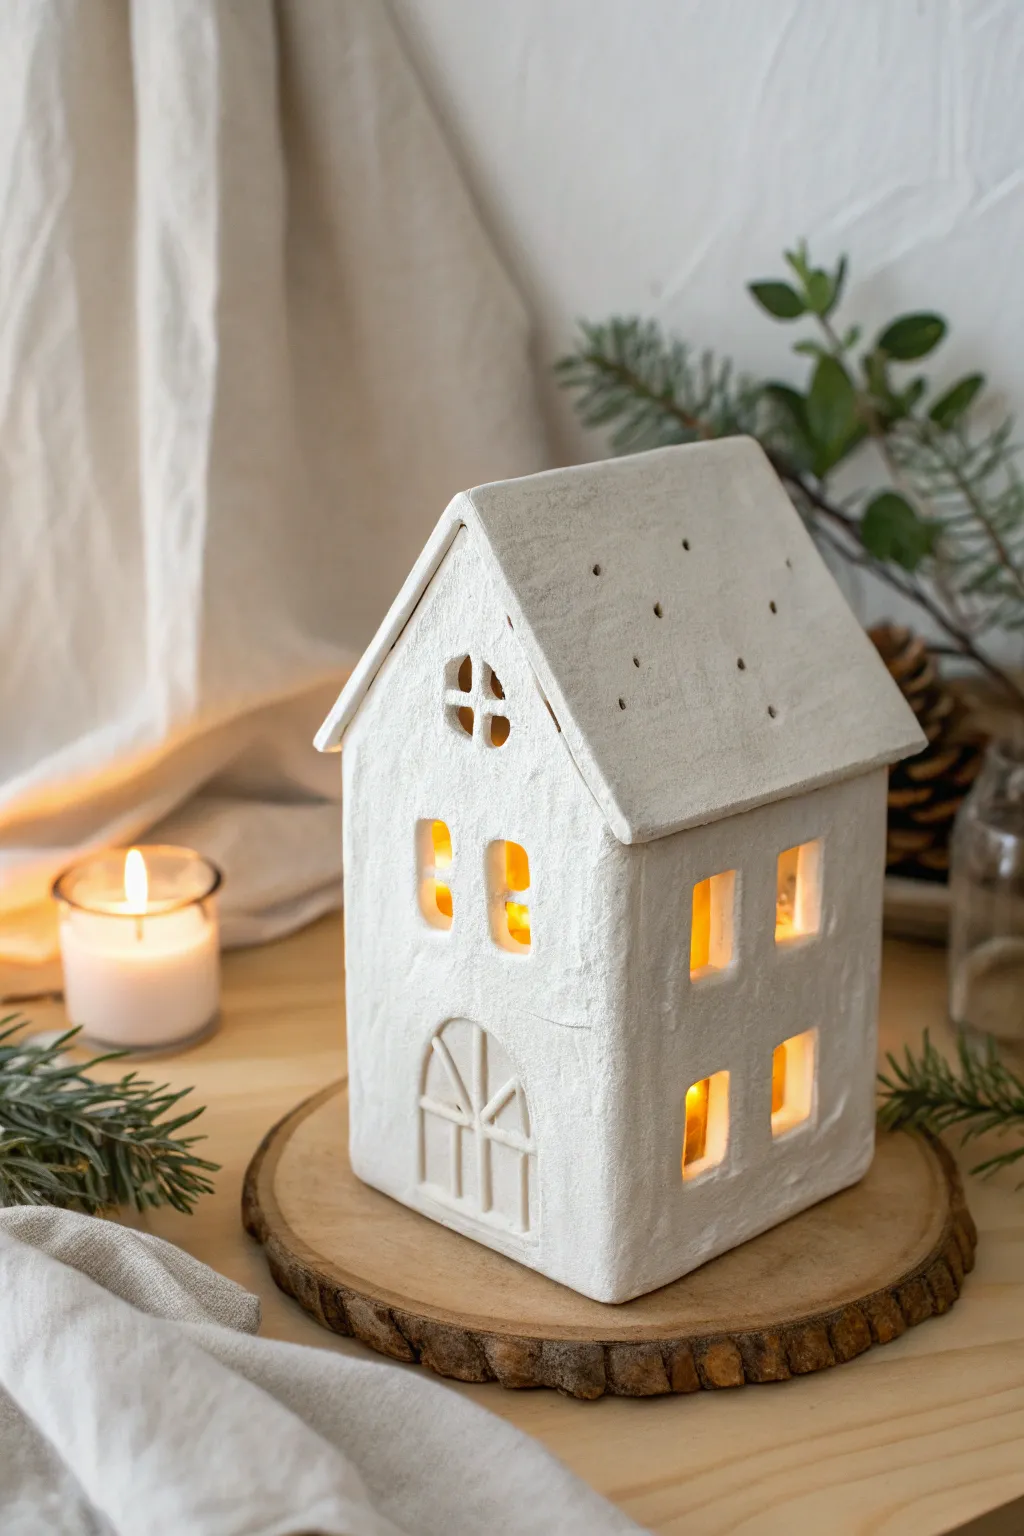
Embrace the cozy simplicity of Scandinavian design with this charming, white clay luminary. Its textured finish and warm, flickering glow transform any corner into a serene winter village scene.
Step-by-Step
Materials
- Air-dry clay (white) or polymer oven-bake clay (white)
- Rolling pin
- Parchment paper or smooth work mat
- Craft knife or scalpel (X-Acto)
- Ruler (preferably clear acrylic)
- Needle tool or toothpick
- Slip (clay mixed with water) or scoring tool
- Fine-grit sandpaper (optional)
- Small paintbrush
- White acrylic paint (optional, for finish)
- Matte varnish or sealant
- Template paper and pencil
Step 1: Preparation & Cutting
-
Design your template:
Sketch the house pieces on paper first. You’ll need two gable ends (the peaked front and back) and two rectangular side walls. For the roof, create two rectangles slightly longer and wider than the house base to allow for overhang. -
Roll the slab:
Knead your white clay until it is pliable and smooth. Roll it out on parchment paper to an even thickness of about 1/4 inch (6mm). Using guide sticks on either side of your roller can ensure perfect uniformity. -
Cut the shapes:
Lay your paper templates gently onto the clay slab. Using a sharp craft knife and a ruler for straight edges, carefully cut out all four walls and the two roof pieces. -
Detail the windows:
On the front panel, cut out two small arched windows and a four-pane circular window near the peak. On the side walls, cut simple rectangular windows. Save the clay scraps from these cutouts. -
Sculpt the door:
Instead of cutting the door completely out, gently press the outline of an arched door into the clay with your needle tool. Carefully carve out the negative space between the door ‘frames’ to create a recessed, paneled look without making a hole.
Clean Cuts Pro-Tip
When cutting window holes, let the clay dry slightly (15 mins) first. It cuts cleaner and distorts less than fresh, wet clay.
Step 2: Assembly
-
Partially dry the walls:
Let the flat pieces sit for about 30-60 minutes. They should be ‘leather hard’—firm enough to stand up without slumping, but soft enough to join. -
Score the edges:
Use a needle tool to scratch up the side edges of the walls where they will connect. Apply a small amount of slip (or water if using air-dry clay) to these scored areas to act as glue. -
Connect the walls:
Stand the front gable and one side wall up, pressing the scored edges together firmly. I find it helpful to reinforce the inside corner with a thin coil of fresh clay, smoothed down with a finger. -
Complete the base structure:
Attach the remaining walls, ensuring all corners are 90 degrees. Smooth the exterior seams with your finger or a modeling tool until they disappear. -
Prepare the roof:
Before attaching the roof panels, poke small ventilation holes in a random pattern using a toothpick. This mimics starry night skies and lets heat escape. -
Attach the roof:
Score and slip the top edges of the walls. Place the roof panels on top, joining them at the peak first, then pressing them gently onto the walls. Ensure there is a slight overhang.
Step 3: Finishing
-
Add texture:
Take a stiff-bristled brush or a crumpled ball of aluminum foil and gently tap it all over the exterior surfaces. This creates that lovely, rustic stucco texture seen in the photo. -
Refine the openings:
Check your windows and door details. If the textured step blurred any lines, use your craft knife to carefully clean up the edges and corners. -
Dry thoroughly:
Allow the house to dry completely. For air-dry clay, this takes 24-48 hours. If using polymer clay, bake according to the package instructions. -
Top coat:
If you want an ultra-white, snowy look, paint the dried house with a coat of white acrylic paint. This hides any grayness from the raw clay. -
Seal the piece:
Finish with a matte varnish to protect the surface without making it glossy. Once dry, place an LED tealight inside to bring your cottage to life.
Level Up: Snowy Roof
Mix baking soda with white acrylic paint to create a fluffy ‘snow’ paste. Dab it onto the roof peak and window sills for texture.
Place your finished house on a wooden slice or mantle and enjoy the soft, welcoming glow it casts on winter evenings


Simple Cottage With Cutout Door and Windows
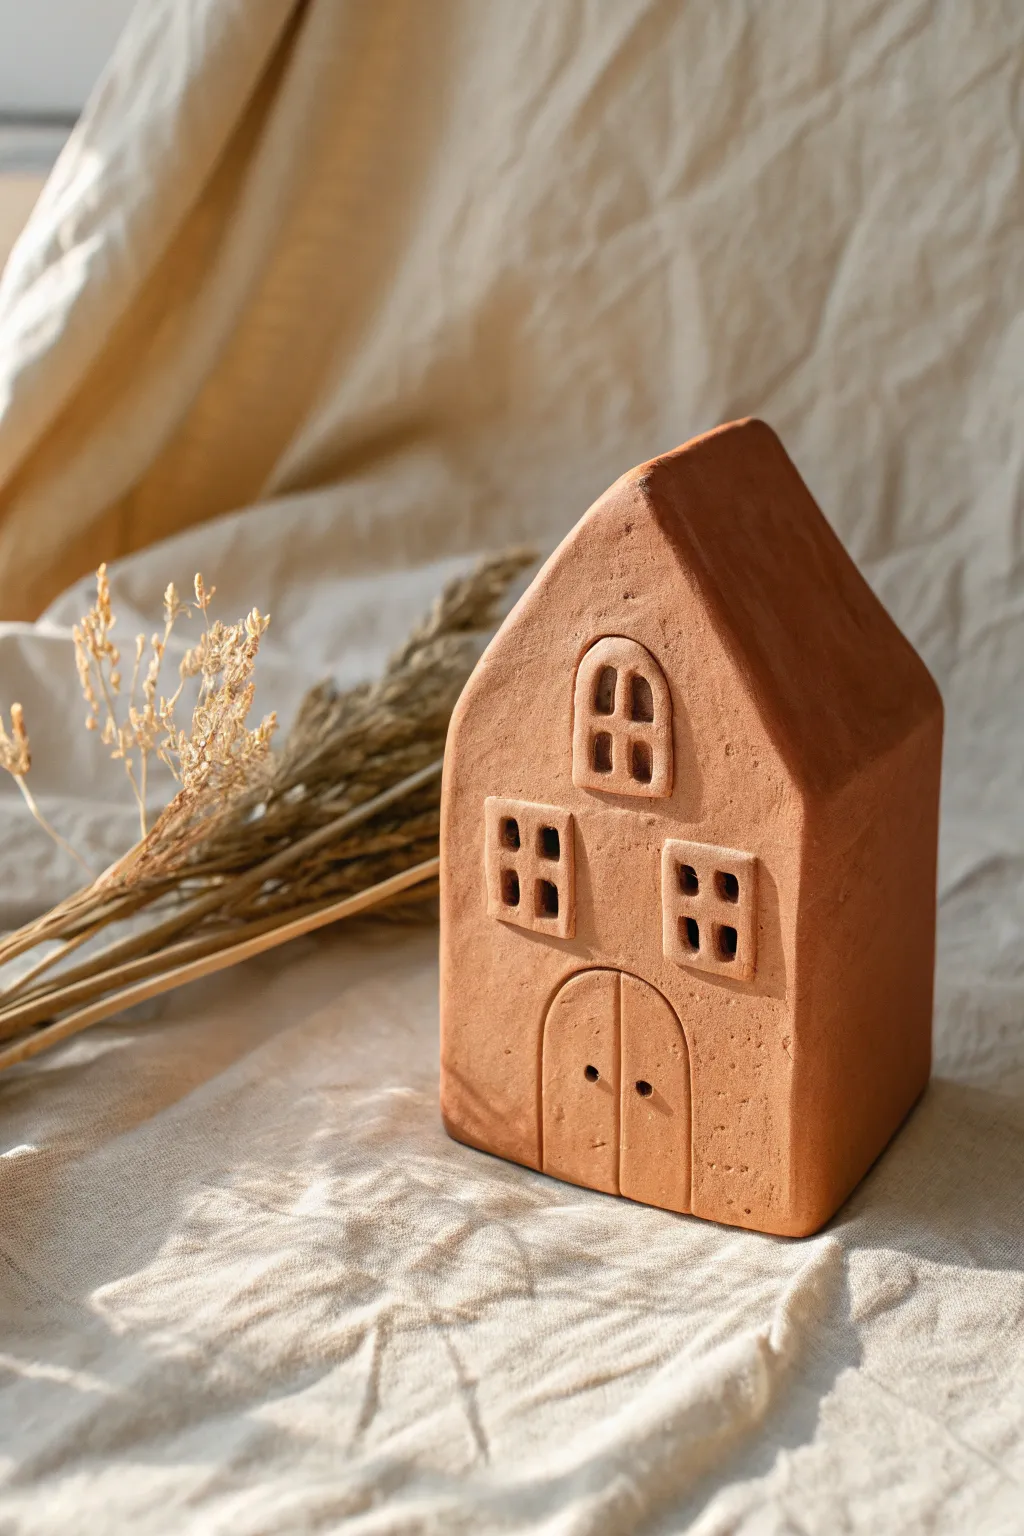
This charming little house captures the essence of a simple countryside cottage with its warm terracotta tone and minimalist design. The project focuses on slab-building basics, making it perfect for creating a cozy, handcrafted decorative piece.
Detailed Instructions
Materials
- Terracotta-colored air-dry clay or earthenware clay
- Rolling pin with guide rings (approx. 1/4 inch thickness)
- Fettling knife or X-Acto knife
- Ruler
- Paper template (optional but recommended)
- Small square cookie cutter (optional)
- Needle tool
- Loop tool or small carving tool
- Slip (clay and water mixture) or water for joining
- Sponge
Step 1: Planning and Cutting
-
Prepare your clay slab:
Begin by wedging your clay to remove air bubbles, then roll it out into an even slab. Aim for a thickness of about 1/4 inch to ensure the walls are sturdy enough to stand but not too heavy. -
Cut the walls:
Cut out four rectangular pieces. Two will be the side walls (shorter rectangles), and two will be the front and back pieces. For the front and back, cut the tops into a triangular peak to support the roof. -
Cut the roof panels:
Measure the length of the slope on your peaked walls. Cut two rectangular roof slabs that are slightly longer than the house length to allow for a small overhang if desired, though this specific design has flush edges. -
Refine the edges:
Before assembly, smooth the cut edges with a damp sponge or your finger. Rough edges can become sharp once dried, so I prefer to soften them now.
Wall Wobble?
If walls sag during assembly, prop the inside corners with crumpled paper towels or cut a temporary cardboard box frame to support the clay structure until it stiffens up.
Step 2: Assembly
-
Score and slip the connections:
On the vertical edges of your side walls and the corresponding contact points on the front/back walls, create texture by scoring cross-hatch marks with a needle tool. Apply a dab of water or clay slip. -
Build the box:
Stand up the walls and press the scored edges together firmly. Use a small coil of clay on the interior seams to reinforce the joints, smoothing it down with your thumb. -
Add the roof:
Score and slip the top sloped edges of the house walls. Place your roof panels on top, ensuring they meet cleanly at the ridge line. Ideally, miter the top edge where the two roof panels meet for a seamless join. -
Smooth the exterior seams:
Gently work over the exterior joints where the walls meet. You want the house to look like a solid block, so blend the clay from one wall to the next until the seam line disappears.
Pro Tip: Clean Cuts
Let the clay slab stiffen to a ‘leather hard’ state (firm but cool/damp) before cutting the windows. The lines will be much crisper and the walls won’t distort.
Step 3: Detailing and Carving
-
Outline the windows:
Using a needle tool, lightly sketch the placement of the windows. Place two square windows evenly spaced on the lower half, and one arched window centered in the gable area above them. -
Outline the door:
Sketch a large arched doorway centered at the very bottom between the two square windows. -
Carve the window recesses:
Instead of cutting all the way through, use a loop tool to dig out the clay inside your window outlines. Create a recessed ‘shadow box’ effect for depth. -
Add window panes:
Roll tiny, thin snakes of clay. Place them inside the recessed window squares to form a cross shape (four panes), and add a vertical line and an arch inside the top window. Press them in gently to secure. -
Detail the door:
Use your needle tool to incise a deep line down the center of the door arch to separate the two doors. Add two small dot indentations for door handles. -
Add texture:
To mimic the rustic stone or stucco look in the photo, gently tap the surface of the clay with a stiff-bristled brush or a balled-up piece of foil. Avoid texturing the frames of the windows to keep them distinct.
Step 4: Finishing
-
Final smoothing check:
Look over the piece for any unwanted fingerprints. Use a slightly damp sponge to clean up the roof ridge and corners. -
Dry slowly:
Place the house away from direct heat or drafts. Cover it loosely with plastic for the first day to ensure even drying and prevent warping. -
Optional firing or sealing:
If using ceramic clay, fire according to instructions. If using air-dry clay, wait until fully cured (24-72 hours) and then seal with a matte acrylic varnish to protect the surface.
Place your finished cottage on a shelf where it can catch the afternoon light for a cozy display


Mini Village Set of Matching Clay Houses
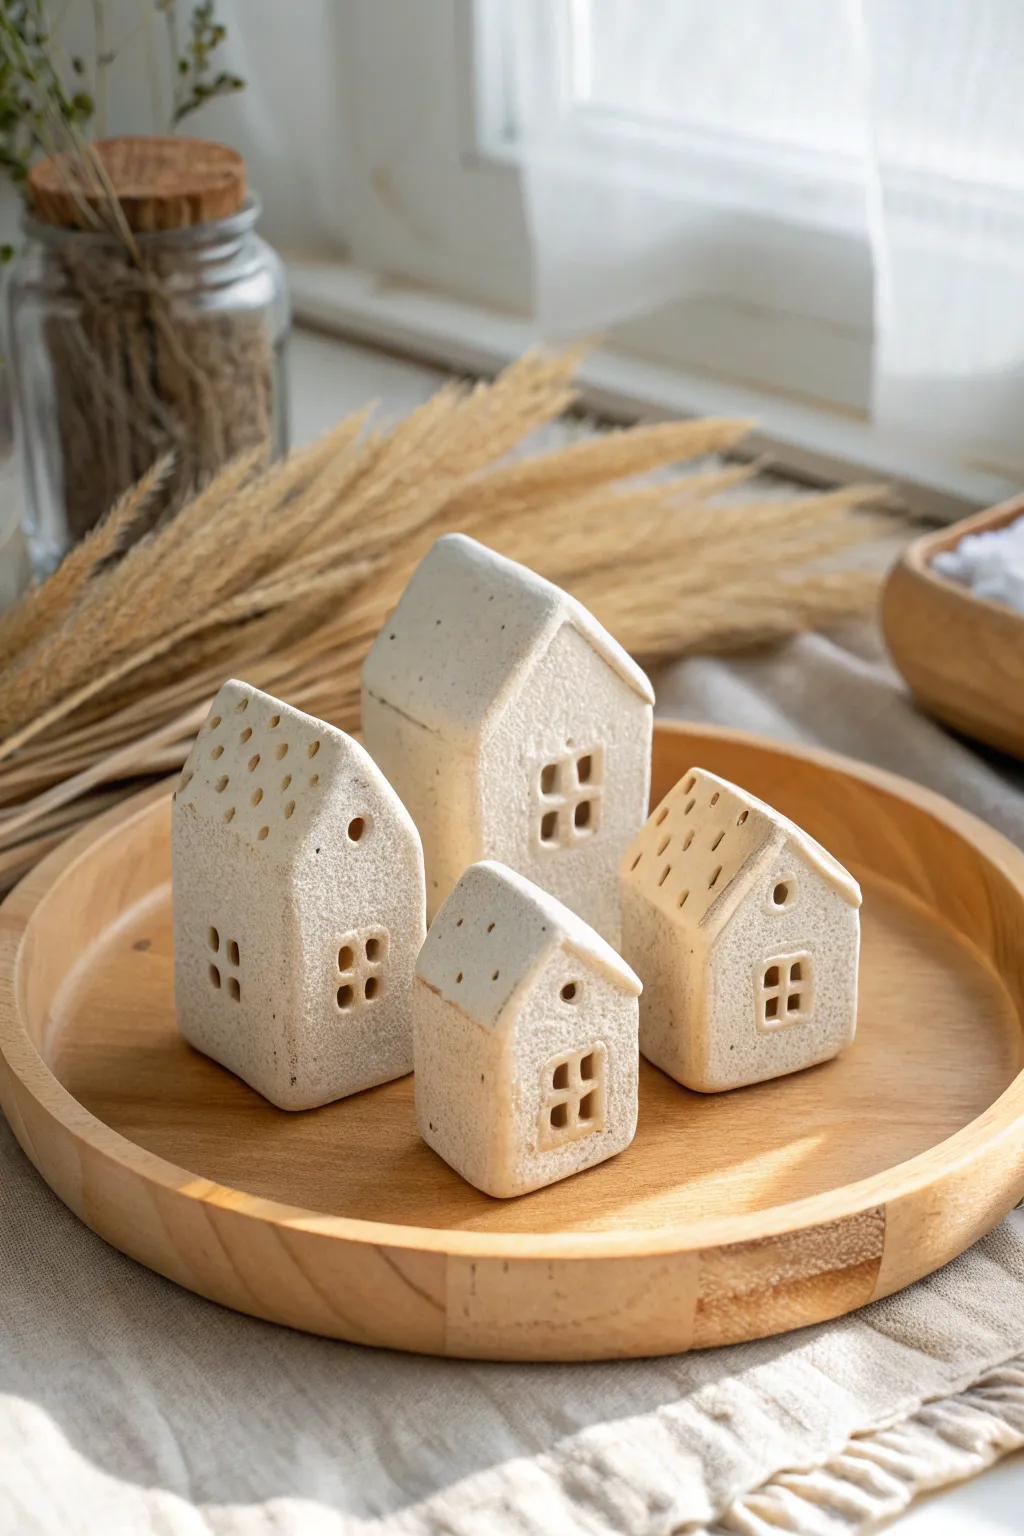
Create a charming minimalist village with these textured clay houses that look like they were carved from sandstone. The speckled finish and organic shapes give them a warm, modern rustic feel perfect for a windowsill display.
How-To Guide
Materials
- White or cream air-dry clay (or polymer clay)
- Fine sand or decorative grit (preferably tan or brown)
- Black pepper or used coffee grounds (for speckling)
- Rolling pin
- Sharp crafting knife or X-Acto blade
- Ruler
- Sandpaper (medium and fine grit)
- Small square cutter (optional, for windows)
- Wooden skewer or toothpick
- Water and slip (if using air-dry clay)
Step 1: Preparing the Clay
-
Mix texture ins:
Begin by flattening your clay in your hands. Sprinkle a generous amount of fine sand and a pinch of black pepper or dry coffee grounds into the center. -
Knead thoroughly:
Fold the clay over the inclusions and knead repeatedly until the specks and texture are evenly distributed throughout the batch. The goal is a faux-stone look. -
Roll slab:
Roll out the prepared clay into a thick slab, approximately 1/4 inch to 1/2 inch thick depending on how chunky you want the houses to feel.
Sagging Roofs?
If the roof sags while the clay is wet, ball up some paper towel or foil and stuff it inside the house structure to support the roof slabs until they stiffen up.
Step 2: Constructing the Forms
-
Cut facade shapes:
Using your knife and ruler, cut out the front facades of your houses. Vary the heights and roof angles—some tall and narrow, others shorter and wider—to create visual interest in your village. -
Match the backs:
Use the cut front facades as templates to cut matching back pieces for each house. -
Cut side walls:
Measure and cut rectangular strips for the side walls. Ensure the height matches the vertical side of your house facades. -
Cut roof panels:
Cut rectangular slabs for the roof pieces. They should be slightly longer than the slope of the roof to allow for a tiny overhang if desired, or flush for a modern look. -
Assemble walls:
Score the edges (scratch cross-hatching patterns) and apply a little water or liquid clay to the seams. Join the side walls to the front facade first, smoothing the inside seam with your finger. -
Close the structure:
Attach the back wall, ensuring the structure is square and standing straight. Smooth the outer seams gently with a damp finger so the corners look soft but distinct.
Step 3: Adding Details & Roof
-
Attach roof slabs:
Score the top edges of the walls and the underside of the roof pieces. Press the roof slabs firmly into place, joining them at the peak. -
Blend the peak:
Use a little extra soft clay to fill the gap at the roof’s peak if necessary, blending it smooth so it looks like one solid piece. -
Carve windows:
Using a small square cutter or a steady hand with a knife, carefully cut out window shapes. Create a four-pane window by leaving a cross of clay in the center, or just cut a squarespace. -
Add roof texture:
For the specific look in the photo, use a toothpick or skewer to poke small, random holes along the roof slopes. This mimics a thatched or rustic texture. -
Smooth edges:
Do a final pass over the whole house with a slightly damp sponge or finger to soften any sharp cutting marks, enhancing the stone effect.
Make it Glow
Cut a large hole in the bottom/base of each house before drying. This allows you to place them over battery-operated LED tea lights for a glowing village scene.
Step 4: Finishing
-
Slow drying:
Place the houses on a flat board away from direct heat to dry slowly. This prevents warping or cracking. -
Sanding:
Once fully dry (usually 24-48 hours), use sandpaper to gently smooth out any unevenness on the walls, but be careful not to sand away your roof texture. -
Seal (Optional):
If you want to protect the finish, apply a very matte varnish. Using a gloss would ruin the stone effect, so stick to ultra-matte sprays.
Arrange your finished stone-look houses on a wooden tray for a cozy, handcrafted display


Fairy Cottage With Round Windows and Curved Walls
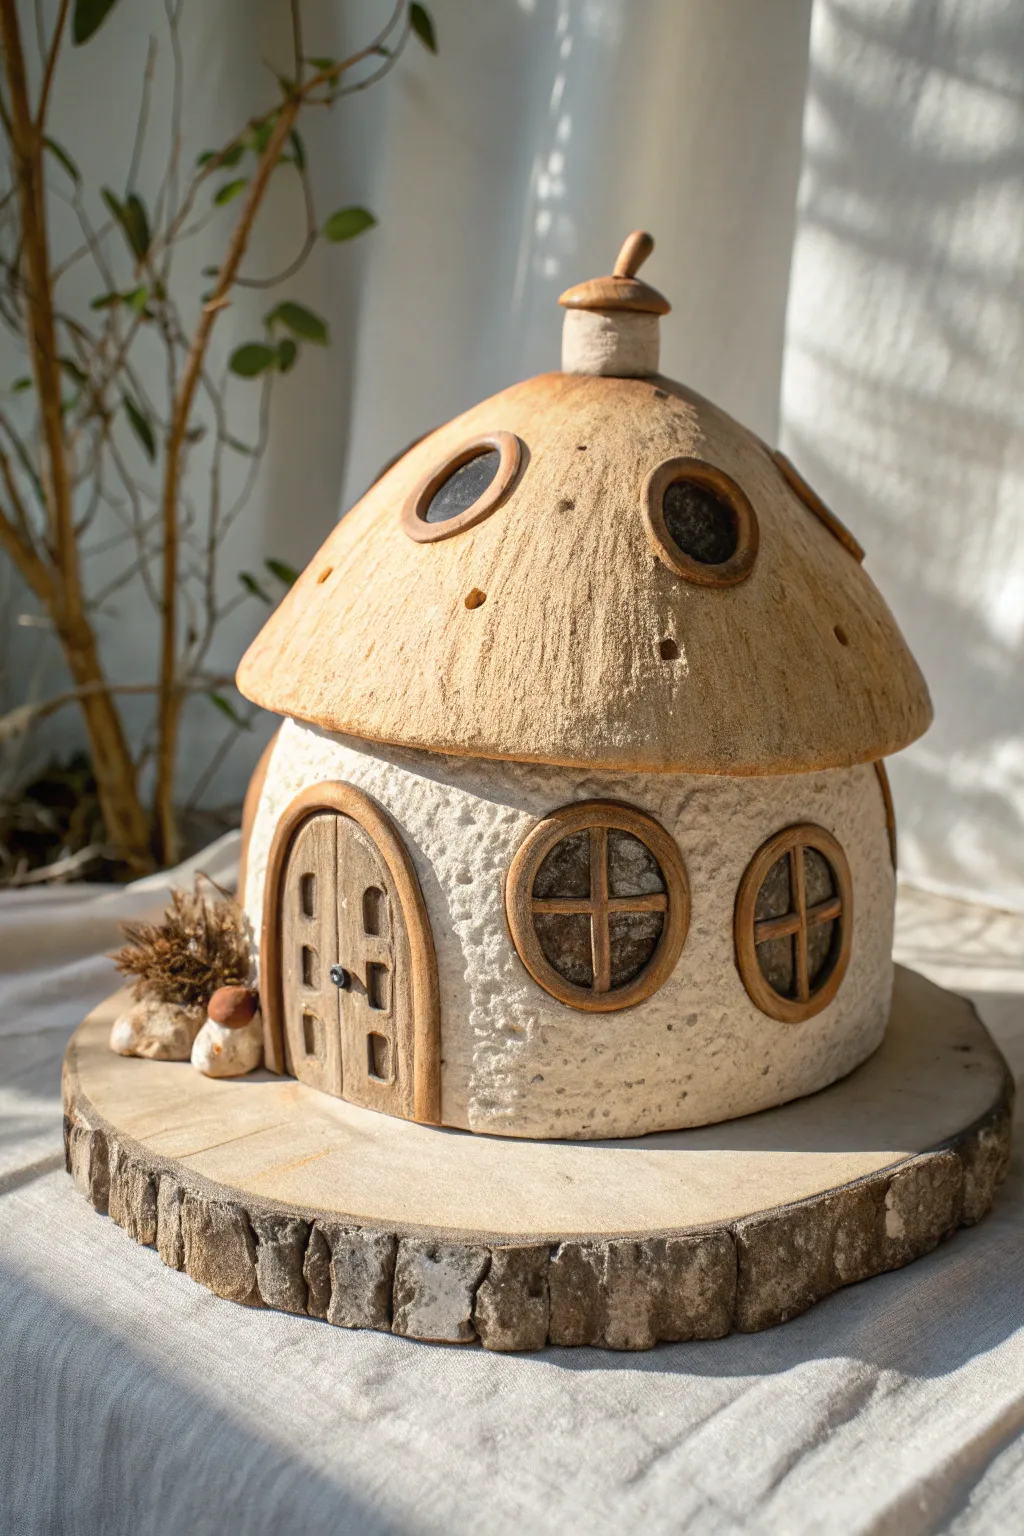
This whimsical fairy cottage brings woodland magic indoors with its textured white walls and warm, organic roof. The sturdy round shape and playful windows create an inviting little sanctuary perfect for a windowsill display.
Step-by-Step Tutorial
Materials
- Stoneware clay (one white/buff body, one grogged terra cotta or brown body)
- Pottery wheel (optional) or rolling pin and slab mat
- Fettling knife
- Needle tool
- Wooden modeling tools
- Circle cutters (various sizes)
- Slip and scoring tool
- White underglaze or slip (if using non-white clay for base)
- Clear matte glaze (optional)
- Sponge
Step 1: Forming the Base
-
Establish the curve:
Begin with a ball of white stoneware clay. If throwing on a wheel, pull a cylinder that gently bellies out in the middle and tapers slightly inward at the top rim. If hand-building, create a long slab, curve it into a cylinder, and paddle the walls to create a rounded, pot-bellied shape. -
Create the texture:
While the clay is still soft but holding its shape, take a rough sponge or a stiff-bristled brush. Dab and press it firmly all over the exterior surface to create a stucco-like, rocky texture. Leave the interior smooth. -
Cut the openings:
Determine where your door and windows will go. Use a large arch template to cut the doorway. For the windows, use appropriate circle cutters to remove clay, placing two on the side and perhaps one on the back for cross-ventilation. -
Sculpt the door frame:
Switch to a darker clay body (or stain your white clay brown). Roll a thin coil and flatten it slightly. Score and slip this around the door opening to create a raised arch frame. -
Add window details:
Roll smaller coils of the brown clay. Frame the circular windows similarly to the door. To make the cross-panes, cut very small strips of clay and join them in a ‘plus’ sign inside the window circle, adhering them to the back of the frame. -
Construct the door:
Roll a slab of brown clay to fit inside your door frame. Use a needle tool to incise vertical wood grain lines. Add two tiny squares for hinges and a small bead for a doorknob, then attach the door into the frame so it looks slightly recessed.
Step 2: Crafting the Roof
-
Shape the mushroom cap:
Using a sandy or grogged clay body that fires to a warm toast color, formation a large, shallow bowl shape. This should be wider than the base of the cottage to create an overhang. -
Refine the surface:
Turn the roof upside down to trim out excess weight if it feels too heavy. On the exterior, use a metal rib to smooth the clay, but allow some natural drag marks to remain for an organic feel. -
Add roof windows:
Cut small circular holes into the roof slope. Frame them with thick clay washers made from the same clay body to give them a protruding, porthole look. -
Texture the thatch:
Using a wire brush or a fine needle tool, drag vertical lines from the top center of the roof down to the rim. I find that varying the pressure here creates a realistic, twig-like thatch texture. -
Build the chimney:
Form a small cylinder for the chimney stack and attach it to the very peak of the roof. Add a tiny, separate ‘lid’ or cap to the chimney with a curved stem handle, resembling the top of an acorn. -
Ventilation check:
Poke a few discreet holes near the rim or under the eaves of the roof to ensure air doesn’t get trapped during firing, which can prevent cracks.
Texturing Tip
Use a real rock or a piece of rough coral to impress texture into the white walls. Natural objects create much more random and realistic patterns than plastic tools.
Step 3: Finishing Touches
-
Dry fitting:
Once both pieces are leather hard, gently place the roof onto the base to ensure a good fit. The roof should sit securely without sliding off. -
Bisque firing:
Let the pieces dry slowly and completely before bisque firing them according to your clay’s specifications. -
Glazing technique:
For this natural look, you might skip a glossy glaze. Instead, wash a dark oxide (like iron oxide) over the textured roof and wipe it back to highlight the scratching. Leave the white base unglazed or coat with a very matte white finish. -
Final assembly:
Fire the pieces a second time. Once cool, place the roof on top. You can display it on a slice of wood or add small dried moss tufts near the base for extra atmosphere.
Sizing Trouble
If your roof shrinks more than the base and won’t fit, don’t panic. Use a Dremel tool with a sanding bit after firing to gently grind the inside rim of the roof for a better fit.
Enjoy the cozy atmosphere your handcrafted cottage brings to your space

The Complete Guide to Pottery Troubleshooting
Uncover the most common ceramic mistakes—from cracking clay to failed glazes—and learn how to fix them fast.
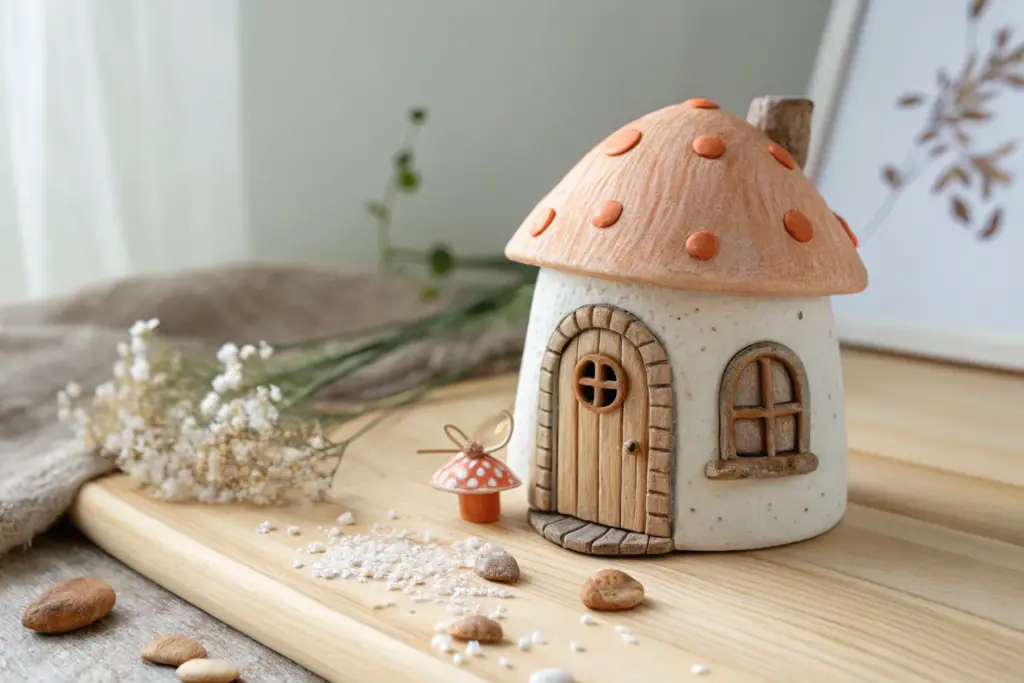
Mushroom House With Spotted Cap Roof

Bring a touch of fairy-tale magic to your shelves with this adorable toadstool dwelling. Featuring a textured white base, arched windows, and a classic red cap with raised polka dots, this project is perfect for beginners working with air-dry or polymer clay.
Step-by-Step
Materials
- Air-dry clay (white) or polymer clay
- Aluminum foil (for armature)
- Acrylic paints (red, white, brown, beige, black)
- Small rolling pin
- Sculpting tools (needle tool, small spatula)
- Paintbrushes (fine detail and medium flat)
- Water cup (for smoothing)
- Clear matte varnish or sealant
Step 1: Sculpting the Base
-
Form the foil core:
Crumple a piece of aluminum foil into a cylinder shape that flares slightly at the bottom. This saves clay and keeps the structure lightweight. -
Cover with clay:
Roll out a slab of white clay to about 1/4 inch thickness. Wrap this around your foil cylinder, blending the seam with your fingers and a bit of water until smooth. -
Shape the stalk:
Gently mold the clay against the foil so it creates a slightly tapered, organic trunk shape. Ensure the bottom is flat so it stands securely. -
Add surface texture:
Instead of smoothing it perfectly, use a stiff brush or a crumpled ball of foil to dab the surface gently, creating a stucco-like texture.
Step 2: Adding Architectural Details
-
Create the door:
Roll a small oval of clay and flatten it. Use a needle tool to score vertical lines to mimic wood planks. Press this onto the front lower section of the base. -
Frame the door:
Roll a very thin snake of clay. Press it around the arch of the door. Use your needle tool to indent lines across this strip, creating a brick or stone archway effect. -
Make the windows:
Form two small arch shapes from flattened clay for the windows. Press them onto the sides of the stalk, slightly higher than the door. -
Add window panes:
Roll extremely thin threads of clay. Cross them over the window openings to create the pane dividers and press them gently to adhere. -
Create door knobs:
Roll two tiny spheres of clay and attach them to the center of the door as handles.
Use Toothpicks for Strength
Insert a toothpick halfway into the top of the stalk before adding the cap. This acts as an internal dowel, preventing the heavy head from sliding off while drying.
Step 3: Sculpting the Mushroom Cap
-
Form the cap armature:
Crumple another piece of foil into a shallow bowl or dome shape. I like to test the fit on the stalk now to ensure the proportions look right. -
Cover the cap:
Roll a round slab of clay and drape it over the foil dome. Smooth the clay down the sides and tuck the excess underneath, creating a clean rim. -
Add the spots:
Roll several small balls of clay in varying sizes. Press them onto the red cap, flattening them slightly so they look like raised bumps rather than painted dots. -
Texture the cap:
Take a texture tool or a toothbrush and gently stipple the surface of the cap between the dots to give it a porous, organic look. -
Final assembly:
Score the top of the stalk and the underside of the cap. Apply a little water or slip (liquid clay) and press the cap firmly onto the base. Let the entire piece dry completely (24-48 hours depending on humidity).
Fixing Cracks
If small cracks appear as the clay dries, mix a tiny bit of fresh clay with water to make a paste. Fill the cracks, smooth with a wet finger, and let dry again.
Step 4: Painting and Finishing
-
Paint the cap:
Using bright red acrylic paint, carefully paint the main area of the mushroom cap, working around the raised white dots. -
Paint the spots:
Use clean white paint to coat the raised spots. You may need two coats to keep them opaque and bright. -
Detail the door:
Paint the door planks a warm medium brown. Once dry, dry-brush a lighter beige over the raised areas to highlight the wood grain texture. -
Color the windows:
Paint the window interiors with black or dark grey paint behind the pane dividers. Use a fine brush to paint the frames a contrasting brown or clay color. -
Antique the walls:
Mix a very watery wash of light brown or beige paint. Brush it over the white stalk and immediately wipe it off with a paper towel, leaving color only in the textured crevices.
Once the paint is fully dry, seal your miniature house with a matte varnish to protect it for years to come
Pumpkin House With Carved Rib Texture
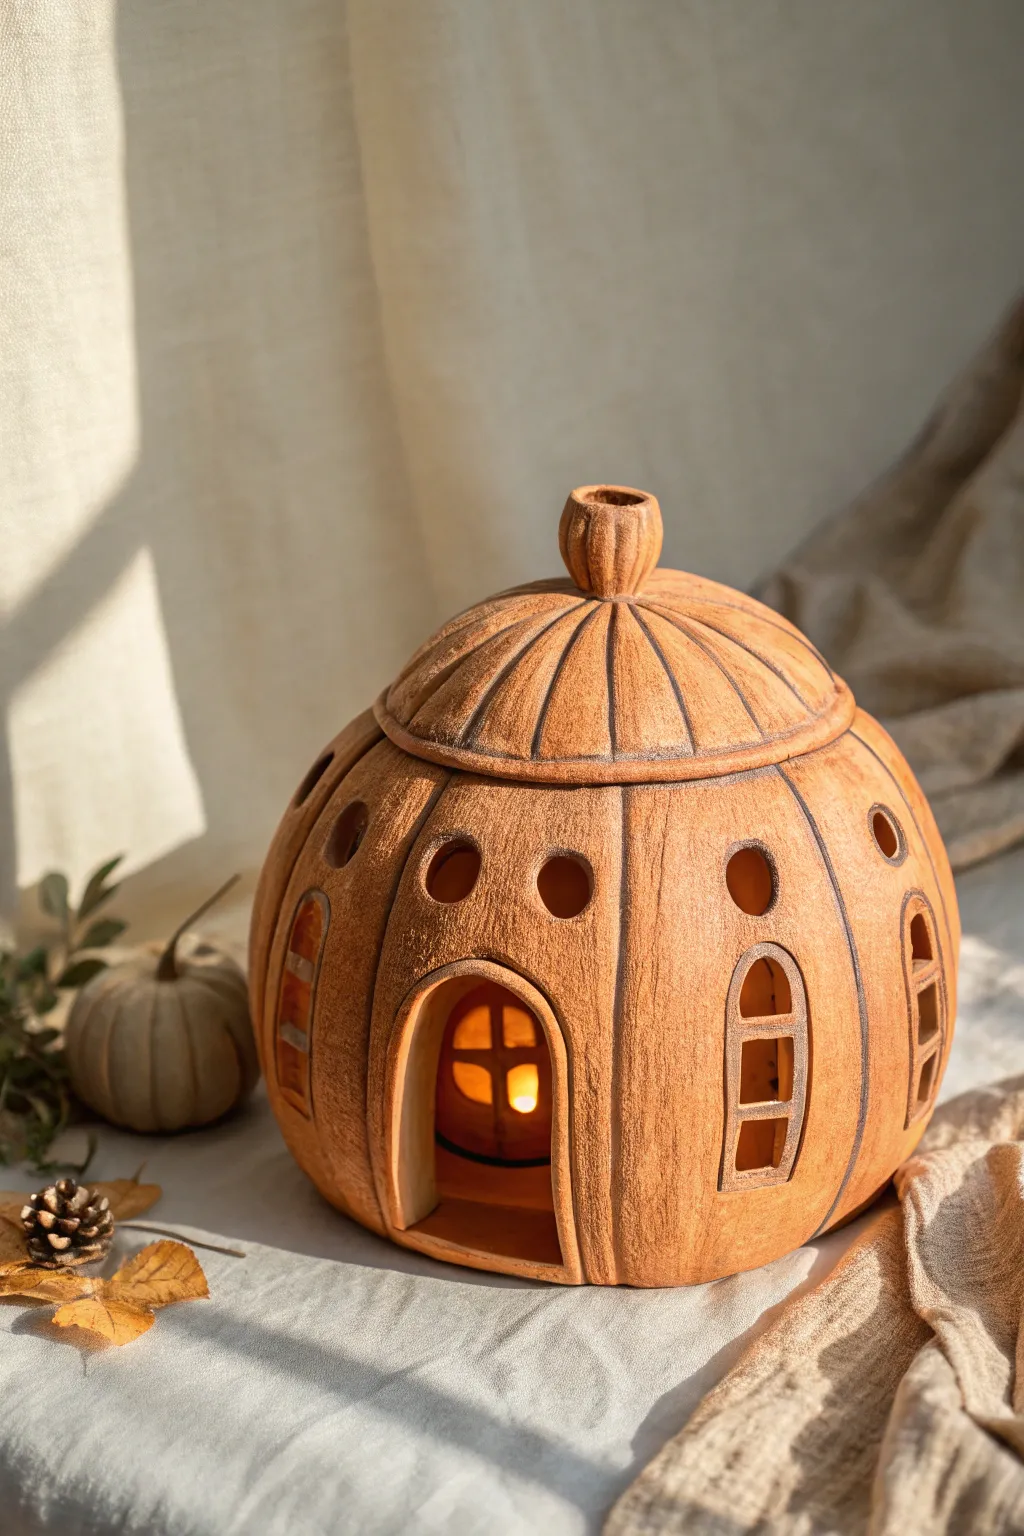
Transform a simple sphere of clay into a whimsical, glowing cottage with this pumpkin house project. Its grooved texture and arched windows give it an enchanting forest-floor feel that looks wonderful lit from within.
Step-by-Step Tutorial
Materials
- Stoneware or earthenware clay (terracotta color recommended)
- Pottery wheel (optional) or rolling pin and slump mold
- Fettling knife
- Loop carving tools (varied sizes)
- Needle tool
- Rib tool (wooden or silicone)
- Sponge
- Slip and scoring tool
- Black underglaze (optional, for aging lines)
- Matte clear glaze provided via kiln firing (or leave unglazed for texture)
Step 1: Forming the Base Structure
-
Create main sphere:
Begin by forming a hollow sphere. If throwing on the wheel, throw a closed form or a bulbous vase shape. If hand-building, create two pinch pots or slump slabs into bowls and join them together securely, ensuring the walls are about 1/4 inch thick throughout. -
Separate the lid:
Once the sphere is leather hard—firm enough to hold its shape but soft enough to cut—use a needle tool to slice off the top section. Cut at an angle so the lid will have a natural ‘seat’ and won’t slide off later. -
Shape the stem:
Roll a thick coil of clay and attach it to the center of your lid. Use your thumb to flair the top slightly and add vertical grooves with a modeling tool to mimic a pumpkin stem’s texture.
Step 2: Carving Details and Texture
-
Mark the segments:
Lightly sketch vertical lines from the top center of the lid down to the bottom of the base using a needle tool. Spacing them evenly creates the classic pumpkin ‘ribs’ effect. -
Deepen the grooves:
Using a loop tool or the edge of a triangular modeling tool, carve along your sketched lines. I like to make these grooves quite deep and rounded to emphasize the plumpness of each section. -
Smooth the ribs:
Use a damp sponge or your finger to smooth the sharp edges of your carved grooves, rounding them off so the transitions between segments feel soft and organic. -
Outline the openings:
Sketch your door and window placements. For this design, create a large arched doorway on one panel and smaller arched windows on alternating panels around the perimeter. -
Cut the openings:
Carefully cut out the window and door shapes with a sharp fettling knife. Save the clay from the door cutout if you wish to add details later. -
Frame the windows:
Roll very thin coils of clay to create mullions (the crossbars) for the windows. Score and slip them into place inside the window frames to create a paneled look. -
Detail the door:
Bevel the inner edge of the doorway slightly inward to give the walls visual weight. You can also press a texture tool gently into the darker recessed area to suggest a wooden interior door frame. -
Add upper ventilation:
Use a small circular hole cutter or a drill bit tool to create small round holes near the top of the base walls. This adds decoration and provides essential airflow for the candle.
Clean Cuts Pro-Tip
Wait until the clay is stiff leather-hard before cutting windows. If the clay is too soft, the knife will drag and warp the delicate window frames.
Step 3: Finishing Touches
-
Refine surface texture:
To achieve the sandstone-like finish shown, gently dab the entire exterior surface with a stiff-bristled brush or a scouring pad. This removes smooth fingerprints and adds an earthy grain. -
Accentuate lines:
For depth, you can dilute a small amount of black or dark brown underglaze and paint it into the deep vertical grooves. Wipe away the excess on the surface with a sponge, leaving the color only in the cracks. -
Dry slowly:
Place the lid back on the base (with a piece of paper towel in between to prevent sticking) and wrap the piece loosely in plastic. Let it dry very slowly to prevent the round shape from warping. -
Bisque fire:
Once bone dry, fire the piece to bisque temperature (usually Cone 04). This hardens the clay and prepares it for the final stage. -
Final firing:
Apply a clear matte glaze if you want the clay color to show through while sealing the surface. Alternatively, leave the outside unglazed for a raw terracotta look and fire to maturity.
Level Up: Inner Glow
Paint the interior walls with a bright yellow or gold underglaze before the second firing. When lit, the candlelight will bounce off the color for a warmer glow.
Place a tea light inside your new pumpkin cottage and enjoy the warm atmosphere it creates


What Really Happens Inside the Kiln
Learn how time and temperature work together inside the kiln to transform clay into durable ceramic.
Stone Cottage With Faux Masonry Texture
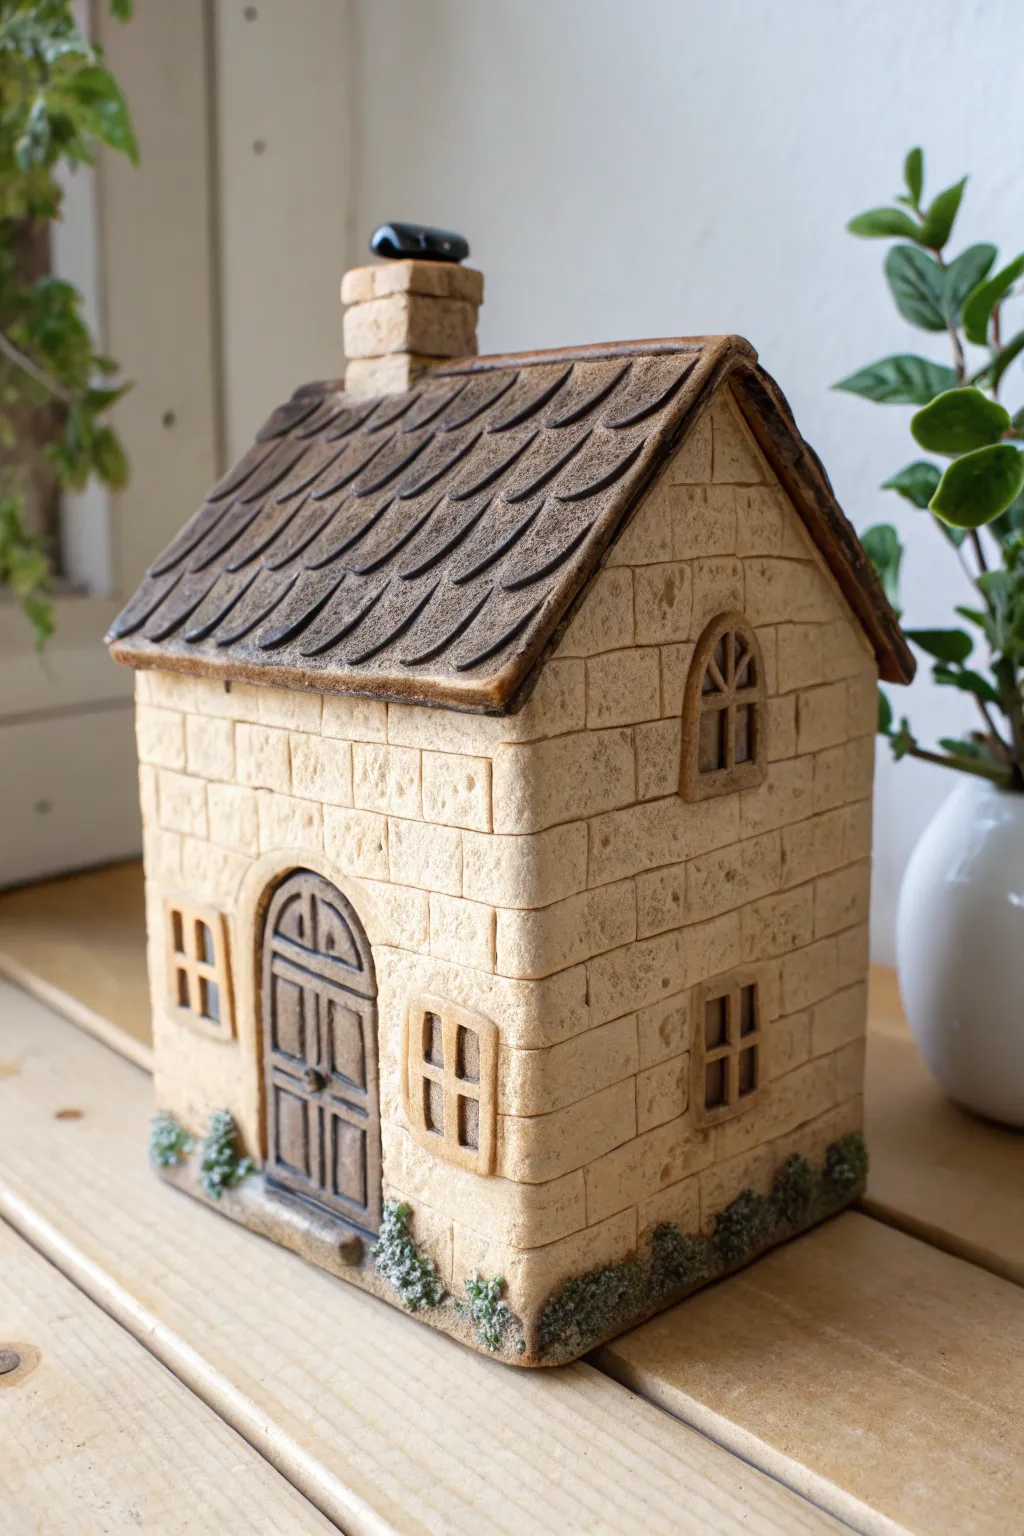
Bring a touch of old-world charm to your shelf with this textured clay cottage, featuring realistic faux stone walls and a cozy tiled roof. This project uses simple sculpting techniques to transform plain clay into a weathered, rustic home straight out of a fairytale.
Step-by-Step
Materials
- Air-dry clay or polymer clay (champagne or cream color)
- Rolling pin
- Craft knife or scalpel
- Cardboard or foam core (for internal structure)
- PVA glue or liquid clay
- Texture tools (needle tool, small ball stylus, old toothbrush)
- Acrylic paints (dark brown, black, cream, grey)
- Fine grit sandpaper
- Matte varnish
- Faux moss or dried herbs (optional)
Step 1: Building the Structure
-
Prepare the base:
Begin by creating a simple armature for your house using cardboard or foam core. Construct a rectangular box with a triangular prism on top for the roof shape to ensure your walls stay straight and support the clay. -
Roll the clay:
Roll out your clay to a consistent thickness of about 1/4 inch. I find using guide sticks or a pasta machine helps keep everything perfectly even. -
Cover the walls:
Cut panels of clay to match your cardboard walls. Apply a thin layer of PVA glue (or liquid clay if using polymer) to the armature and press the clay panels firmly onto the sides, smoothing the seams at the corners so they disappear.
Natural Texture
Press a real stone or piece of rough bark into the clay walls before cutting your brick lines. This transfers authentic organic patterns instantly.
Step 2: Creating the Stonework
-
Mark the grid:
Use the back of a knife or a ruler to lightly impress horizontal lines across the walls. These will guide your stone rows. Stagger the vertical lines in between the horizontals to create a classic running bond brick pattern. -
Deepen the grout lines:
Go back over your impressed grid with a sculpting tool or a dull pencil to deepen the grooves, making them look like mortar joints between individual stones. -
Texture the stone:
To make the stones look weathered, gently press a piece of crumpled aluminum foil or a coarse sandpaper sheet against the clay surface. You can also tap an old toothbrush over specific bricks to vary the pitting.
Step 3: Adding Architectural Details
-
Form the door and windows:
Roll out a small slab of clay and cut out an arched door shape and several small rectangular windows. Press these onto the house surface. -
Frame the openings:
Roll very thin snakes of clay and outline the door arch and window frames to give them depth. Add a tiny grid inside the arched window on the side for panes. -
Detail the door:
Use a needle tool to score vertical wood grain lines into the door. Press a tiny ball of clay in the center for a doorknob.
Light Up
Cut out the window interiors before backing them with clay, and leave the bottom of the house open. You can place an LED tea light inside for a warm glow.
Step 4: Roofing and Chimney
-
Create roof tiles:
Roll a dark sheet of clay for the roof. Instead of individual tiles, cut strips of clay with a scalloped bottom edge. -
Layer the roof:
Starting at the bottom edge of the roofline, layer the scalloped strips upward, overlapping them slightly as you go to mimic slate shingles. -
Texture the tiles:
Scratch the surface of the roof tiles with a wire brush or needle tool to simulate the rough grain of slate or wood shakes. -
Install the chimney:
Form a small rectangular tube of clay. Recreate the same brick texture you used on the walls, and attach it to the roof peak. Top it with a small, flat clay cap.
Step 5: Finishing Touches
-
Dry or bake:
Allow your house to dry completely (24-48 hours for air-dry) or bake according to your polymer manufacturer’s instructions. -
Apply a wash:
Mix dark brown or diluted black acrylic paint with water. Brush this wash over the entire piece, letting it settle deep into the grout lines and textures. -
Wipe back:
Before the paint dries, wipe the surface with a damp cloth or sponge. This leaves the dark color in the cracks while revealing the lighter stone color on the high points. -
Paint details:
Paint the door a dark wood color and use a darker grey or brown for the roof to distinguish it from the walls. Add a touch of black to the chimney top. -
Add moss:
Apply tiny dabs of glue along the base of the house and sprinkle faux moss or dried herbs to create a garden effect.
Place your finished cottage near a plant to create a charming miniature garden scene
Log Cabin Clay House With Wood Grain Details

Capture the cozy essence of woodland living with this incredibly detailed clay log cabin project. By focusing on realistic texturing techniques, you can transform simple clay coils into what looks like aged, weathered timber.
Step-by-Step Tutorial
Materials
- Polymer clay or air-dry clay (terracotta or wood-brown tone)
- Clay slab or cork sheet for the base
- Rolling pin
- Needle tool or toothpick
- Wire texture brush or stiff toothbrush
- Clay knife or X-Acto blade
- Liquid clay (TLS) or slip/water for joining
- Acrylic paints (dark brown, ochre, black)
- Small paintbrush
Step 1: Building the Foundation
-
Prepare the base:
Start by cutting a rectangular slab of clay about 1/4 inch thick to serve as your foundation, beveling the edges slightly for a clean look, or use a pre-cut cork sheet if preferred. -
Texture the base:
If using clay for the base, firmly press a piece of coarse sandpaper or a stiff brush into the surface to give it an earthy, ground-like texture. -
Roll your logs:
Condition your brown clay and roll out several long, even snakes (coils) approximately 1/4 inch in diameter to serve as the logs. -
Add wood grain:
Before assembling, lightly drag a wire texture tool or a needle tool lengthwise down each coil to create deep, realistic wood grain grooves.
Step 2: Raising the Walls
-
Lay the first course:
Cut your textured logs to size for the four walls and attach the first layer to the base using a small amount of liquid clay or slip. -
Notch the corners:
For a true log cabin look, use your knife to slightly flatten the ends of the logs where they overlap at the corners, allowing them to nestle together snugly. -
Build upward:
Continue stacking the logs layer by layer, alternating the overlapping corners, until you successfully reach the top of the door height. -
Create the door frame:
Leave a gap in the front wall for the door, cutting shorter log segments to fit on either side of the opening. -
Construct the gables:
Once the main walls are built, lay shorter and shorter logs on the front and back walls to form triangular peaks (gables) that will support the roof.
Grain Master Tip
Twist the clay coils slightly while rolling them before you texture them. This creates a spiral grain that mimics natural timber knots and growth patterns.
Step 3: Roof and Details
-
Form the roof base:
Roll out a flat slab of clay and cut two rectangles that are large enough to overhang the walls and gables slightly. -
Texture the roof planks:
Use a straight edge to impress vertical lines into the roof slabs to simulate individual wooden planks, then scratch wood grain into each plank. -
Attach the roof:
Carefully place the two roof panels onto the gables, joining them at the center ridge with liquid clay or slip; I find pressing gently along the ridge helps seal it. -
Add the chimney:
Form a small rectangular block for the chimney, texture it with tiny brick patterns using a needle tool, and attach it to the roof slope. -
Install the door:
Cut a flat rectangle to fit the door opening, score vertical plank lines into it, create a tiny clay doorknob, and press it into place. -
Frame the windows:
Roll very thin snakes of clay to create square frames and crossbars for the windows, pressing them firmly onto the side walls.
Level Up: Mossy Details
After painting, glue tiny bits of dried green tea leaves or green flocking powder into the crevices of the roof and base to simulate moss growth.
Step 4: Finishing Touches
-
Reinforce texture:
Check the entire piece for any fingerprints and brush over them with your texture tool to ensure every surface looks like wood or stone. -
Bake or dry:
Follow your clay package instructions to bake or air-dry your cabin completely before moving to the painting stage. -
Apply a wash:
Mix a dark brown or black acrylic paint with water to create a thin wash and brush it over the entire house, letting it settle into the cracks. -
Wipe back:
Immediately wipe the high points with a damp cloth or paper towel, leaving the dark paint in the crevices to highlight the incredible wood texture you created.
Place your finished cabin on a shelf where the light can catch those deep textures and enjoy your miniature architectural masterpiece

TRACK YOUR CERAMIC JOURNEY
Capture glaze tests, firing details, and creative progress—all in one simple printable. Make your projects easier to repeat and improve.
Thatched Roof Clay House With Scored Straw Look
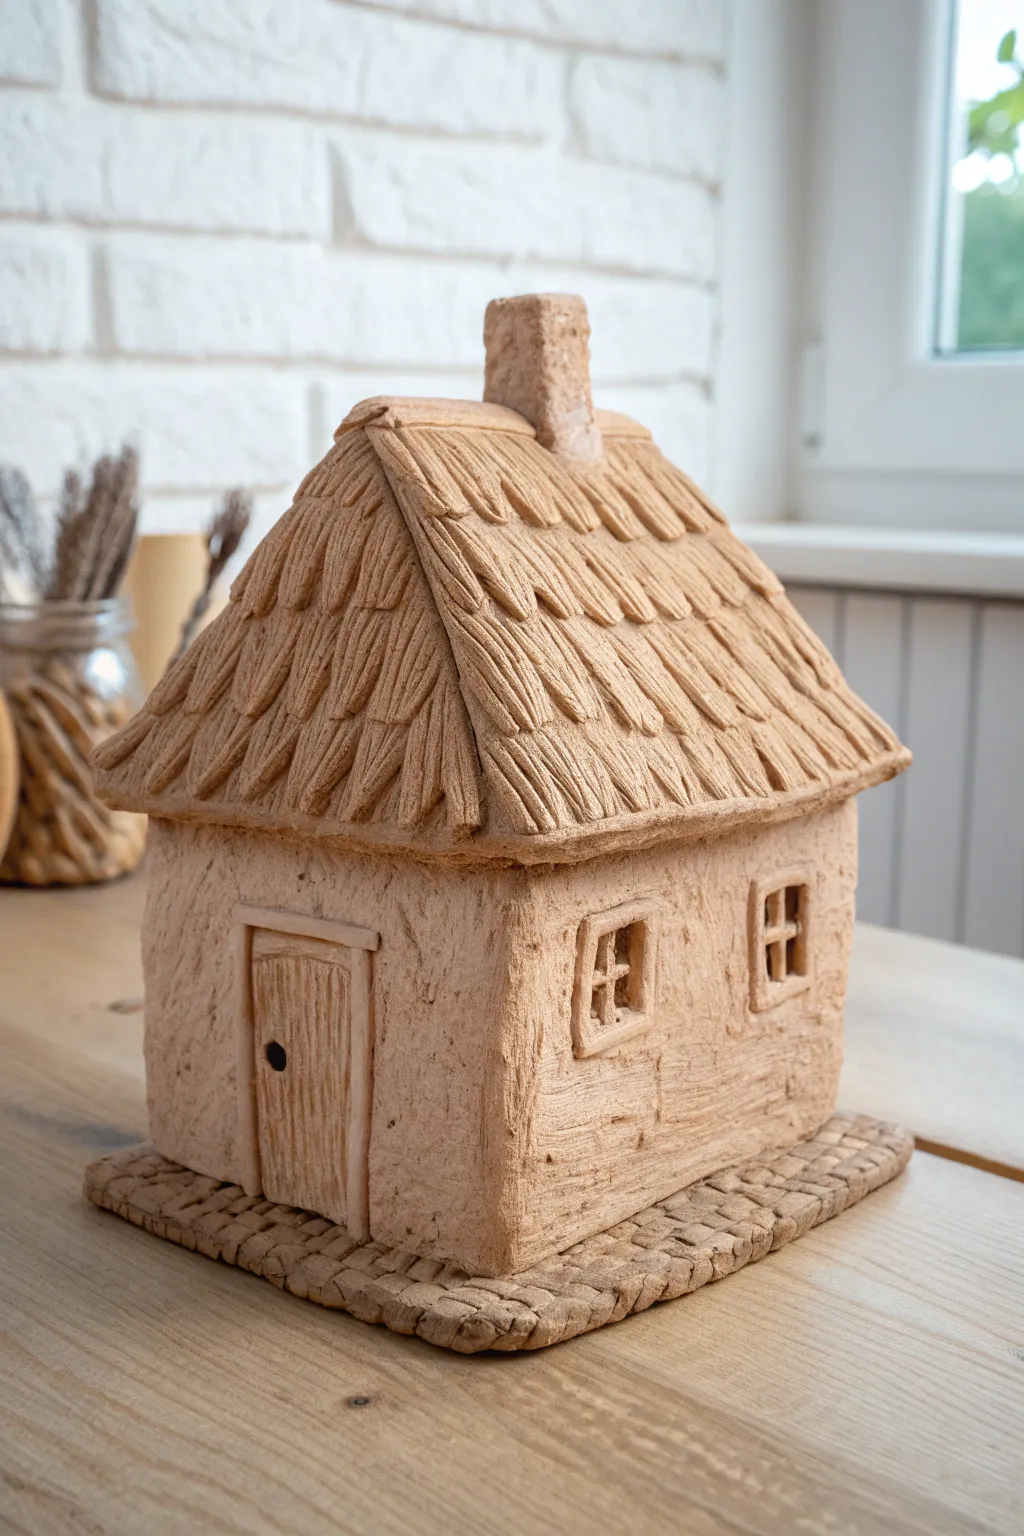
This project captures the charm of a countryside dwelling with a focus on creating realistic textures using simple tools. You will learn to sculpt a convincing thatched roof and mud-plastered walls to create a warm, earthy architectural piece.
Step-by-Step
Materials
- Air-dry clay or ceramic clay (terracotta color recommended)
- Rolling pin
- Fettling knife or craft knife
- Needle tool
- Slip and scoring tool (or water if using air-dry clay)
- Stiff bristle brush (like an old toothbrush)
- Ruler
Step 1: Foundation and Structure
-
Prepare the base slab:
Roll out a slab of clay approximately 1/4 inch thick to serve as your foundation. Cut it into a square or rectangle slightly larger than your intended house footprint. -
Texture the foundation:
Using a modeling tool or a small flat-head screwdriver, press a basket-weave pattern into the base slab to mimic a cobblestone or paved path texture. -
Cut the walls:
Roll out more clay for the walls. You will need two rectangular side walls and two walls with triangular peaks (gables) for the front and back to support the roof. -
Assemble the shell:
Score the edges of your wall pieces and apply slip (or water). Press the walls together to form the house box, reinforcing the inside seams with a small coil of clay for stability. -
Attach to base:
Score the bottom of the wall structure and the center of your textured base, then firmly press the house onto the foundation. -
Create the mud-wall texture:
To achieve that rustic, stucco look on the walls, take a stiff bristle brush or a crumpled ball of aluminum foil and tap it repeatedly over the exterior wall surfaces.
Pro Tip: Layering Thatch
When texturing the roof, work from the bottom row up to the top. This way, the upper layers of ‘straw’ will naturally appear to overlap the lower ones, just like real roofing.
Step 2: Sculpting the Thatched Roof
-
Form the roof slabs:
Roll out two rectangular slabs for the roof. They should be thick enough to allow for deep carving later—about 3/8 inch creates a nice bulky thatch look. -
Attach the roof:
Score the tops of your gable walls and place the roof slabs on top, pressing them gently together at the peak ridge and ensuring there is an overhang on the sides. -
Define the thatch layers:
Using a knife, lightly mark horizontal guidelines across the roof to define three or four overlapping tiers of straw. -
Score the straw texture:
Starting from the bottom tier, use a needle tool to drag deep, vertical lines through the clay. Vary the angles slightly to make the ‘straw’ look natural and bundled. -
Refine the bundles:
I like to use a modeling tool to deepen the grooves between specific groups of scratches, creating the illusion of distinct separate bundles of reed or straw. -
Detail the ridge:
Add a thin coil of clay along the very top ridge where the roof slabs meet and texture it with short vertical strokes to cap off the thatch.
Step 3: Architectural Details
-
Install the chimney:
Shape a small rectangular block of clay for the chimney. Cut the bottom at an angle to match the roof slope, attach it, and texture it with tiny dots or a rough stone look. -
Add the door:
Roll a small flat rectangle for the door. Use your needle tool to carve vertical wood grain lines and a tiny hole for the handle. -
Attach door frame:
Roll thin snakes of clay to create a frame around the door slab and attach the entire assembly to the front of the house. -
Create windows:
Form small square frames using thin clay strips. Attach them to the walls and add a small cross inside each to represent window panes. -
Final clean up:
Check over your work for any sharp burrs of clay or unintentional fingerprints, smoothing them out gently without ruining your beautiful textures.
Level Up: Glow Inside
Before attaching the roof, carefully cut out the clay inside the window frames. Once dry, you can place an LED tea light underneath the hollow house to make the windows glow.
Allow your cottage to dry completely before displaying it as a charming piece of rustic decor.
Shingled Roof Clay House With Layered Tiles
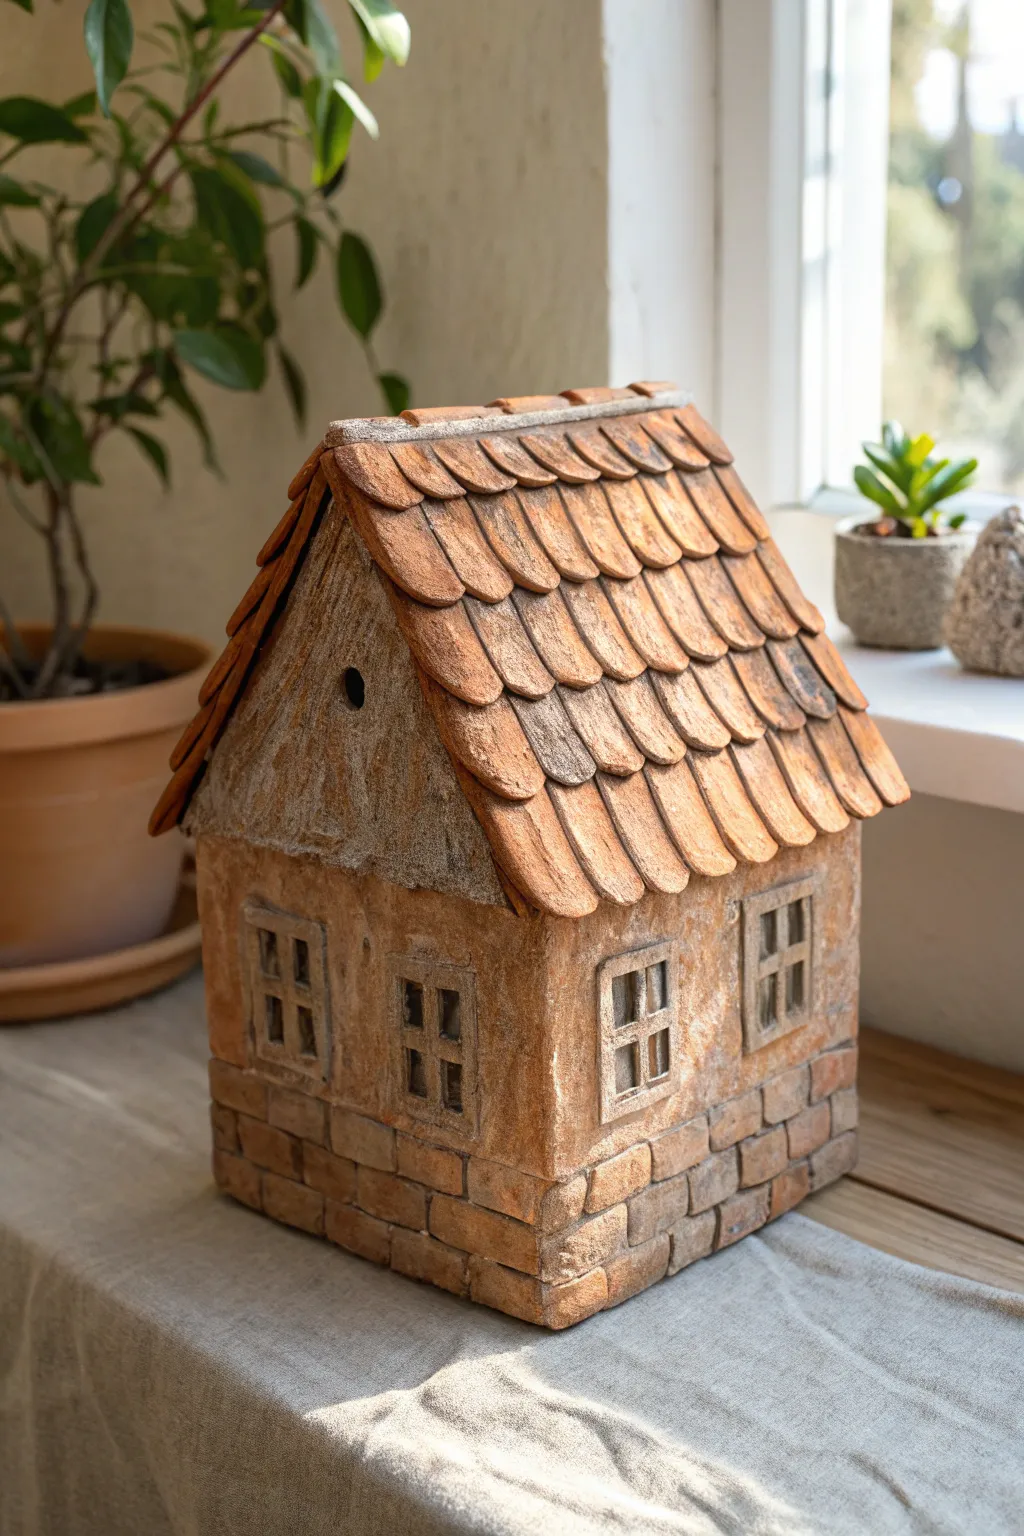
Bring the charm of the countryside into your home with this ceramic cottage, reminiscent of old-world European architecture. Featuring individually layered roof tiles and a textured brick base, this piece combines warm terracotta tones with a weathered, antique finish.
Detailed Instructions
Materials
- Terracotta or stoneware clay (low fire)
- Rolling pin with guide sticks (approx. 1/4 inch)
- Clay knife or fettling knife
- Slab roller (optional)
- Slip and scoring tool
- Small rectangular clay cutter (for windows)
- Circular cutter (for roof vent)
- Texture tools (wire brush, sandpaper, or sponge)
- Underglaze (dark brown, ochre, white)
- Clear matte glaze (optional)
- Kiln
Step 1: Building the Structure
-
Roll and cut the walls:
Start by rolling out a clay slab to about 1/4 inch thickness. Cut out four walls: two rectangular side walls and two peaked gable walls. Measure carefully to ensure the side walls match the height of the gable walls’ rectangular sections. -
Create the base texture:
Before assembling, tackle the brickwork. Use a ruler and a modeling tool to firmly impress horizontal lines along the bottom third of all four wall pieces. Then, add vertical lines to create a staggered brick pattern. -
Cut windows and vents:
While the slabs are flat, use your rectangular cutter or a steady hand with a knife to cut out the window openings. I like to cut a small circular hole near the peak of one gable for a decorative vent and better airflow during firing. -
Assemble the walls:
Wait until the slabs are leather-hard so they can support their own weight. Bevel the vertical edges at a 45-degree angle, score the contact points deeply, and apply slip. Press the walls together firmly to create a box, smoothing the inside seams with a coil for reinforcement.
Warping Walls?
If your walls are bowing inwards, your clay was likely too wet during assembly. Allow slabs to dry to a true ‘leather hard’ state—firm like cheddar cheese—before joining them.
Step 2: Roofing and Detailing
-
Add the roof support:
Roll out two rectangular slabs for the roof. These should be large enough to overhang the walls slightly. Attach them to the peaked walls using the score and slip method, ensuring they meet perfectly at the ridge. -
Prepare the shingles:
Roll a thinner slab of clay and cut numerous small, rounded tongue-shaped tiles. You’ll need quite a few, so consistency is key here. -
Layer the shingles:
Starting at the bottom edge of the roof, attach a row of shingles using a tiny bit of slip. Place the next row slightly above, overlapping the first significantly to cover the seams. Continue this all the way to the ridge. -
Cap the roof ridge:
To finish the roof peak, create a long, narrow strip or individual curved tiles to lay over the very top joint, sealing the gap where the two roof sides meet. -
Add window frames:
Roll tiny, thin coils or strips of clay. Border each window opening with these strips to create a raised frame. Add a vertical and horizontal strip inside each opening to form the window panes.
Level Up: Interior Glow
Make the bottom of the house open or cut a large hole in the base. This allows you to place an LED tea light inside, illuminating the cottage through the windows.
Step 3: Finishing and Surface Treatment
-
Weather the facade:
To achieve that aged stucco look above the brick line, dab the smooth clay walls with a coarse sponge or a wire brush. This creates a pitted texture that will hold the glaze beautifully later. -
Refine the brickwork:
Go back over your brick lines to deepen them if they were smudged during assembly. Gently round the edges of individual bricks with a damp sponge to make them look eroded. -
Apply wash:
Once the piece is bone dry and bisque fired, apply a watered-down dark brown underglaze over the entire house. Immediately wipe it back with a damp sponge, leaving the dark color only in the crevices of the shingles and brick mortar lines. -
Highlight the roof:
Dry brush a mix of terracotta and ochre underglaze onto the roof tiles to enhance their warmth and create variation. -
Whiten the walls:
For the upper walls, sponge on a thin layer of white or cream underglaze, allowing the rough texture of the darker clay to show through for a distressed plaster effect. -
Final Fire:
Fire the piece according to your clay body’s instructions. A matte finish usually looks best for this rustic style, so you can often skip a glossy clear glaze.
Place your finished cottage on a sunny windowsill where the natural light can highlight the textures you worked so hard to create
Adobe-Inspired Clay House With Rounded Corners
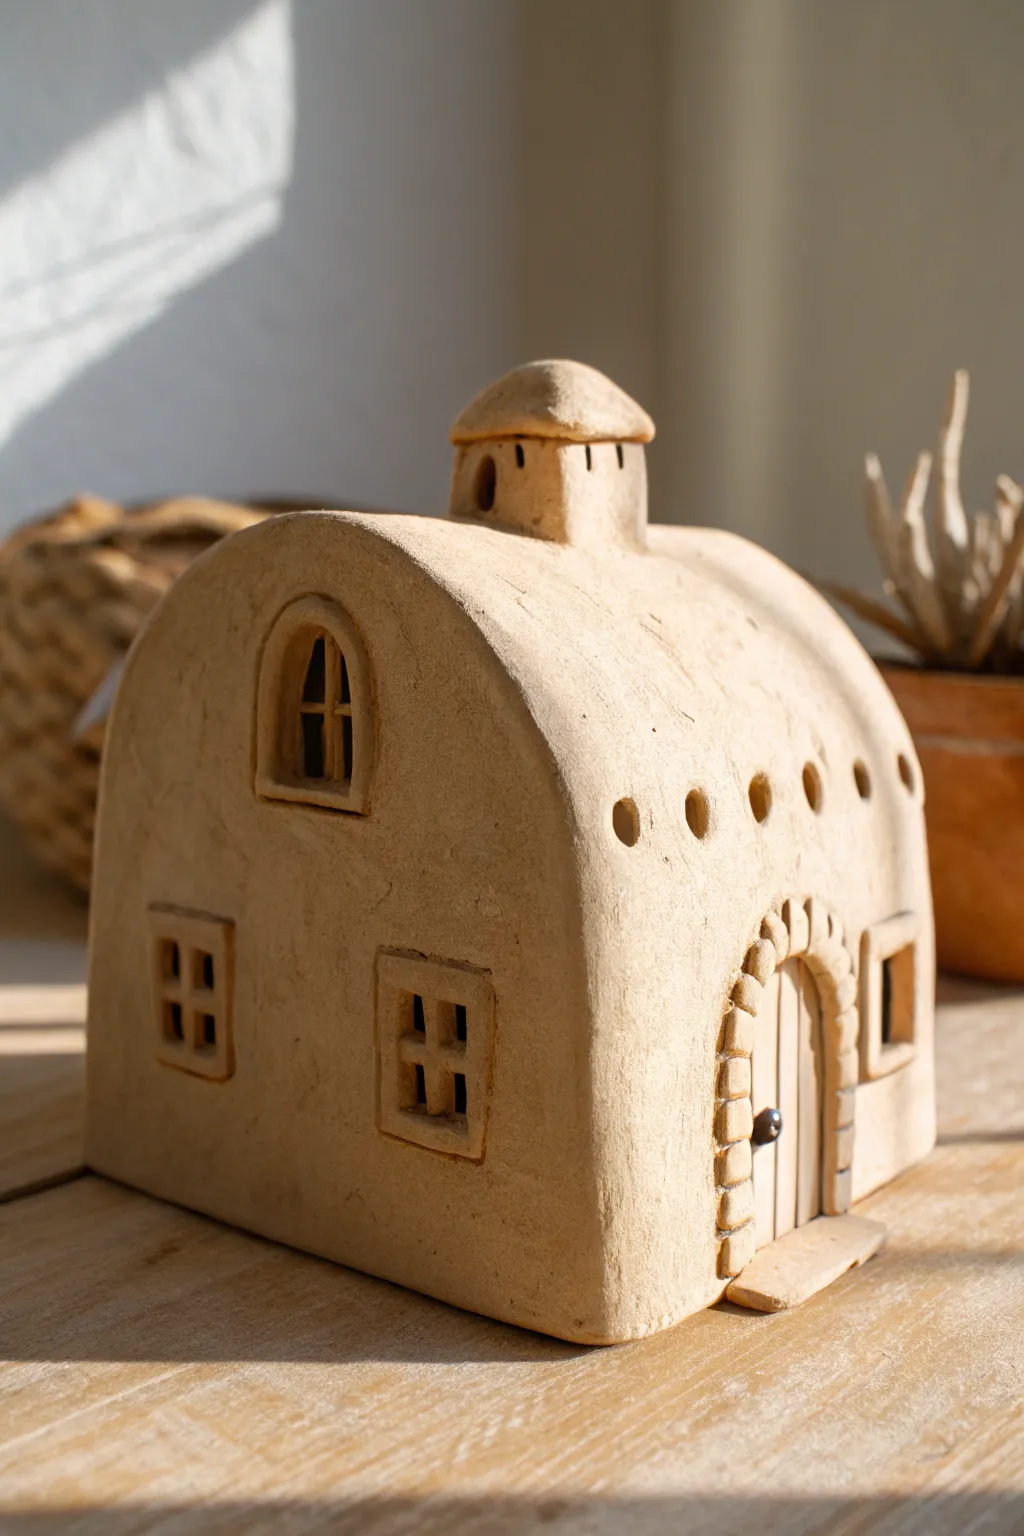
This charming clay house captures the warmth of Mediterranean architecture with its smooth, rounded corners and textured adobe finish. The arched roof and delicate window details make it a delightful, timeless piece for any shelf or windowsill.
How-To Guide
Materials
- Air-dry clay or polymer clay (terracotta or buff/crème color)
- Dough roller or rolling pin
- Sharp crafting knife (X-Acto)
- Clay sculpting tools (needle tool, small loop tool)
- Small square cookie cutter (optional)
- Cardboard or cardstock for templates
- Water and a slip brush (for joining)
- Sponge or textured foam
Step 1: Shaping the Structure
-
Prepare your templates:
Before touching the clay, sketch and cut out cardstock templates for the front/back walls and the side walls. The front/back should have a straight bottom and sides that curve gently into a rounded arch at the top. -
Roll the slabs:
Roll your clay out to a consistent thickness, about 1/4 inch thick. Aim for a smooth, even surface, but don’t worry about perfection; a little texture adds character. -
Cut the walls:
Place your templates onto the clay slabs and trace around them with your craft knife. You will need two arched pieces (front and back) and two rectangular pieces (sides). Save the excess clay for details. -
Assemble the box:
Score the edges where the walls will meet with a needle tool, dab with a little water or slip, and press the four walls together. Smooth the exterior seams with your finger or a modeling tool so they disappear completely. -
Form the roof:
Roll a long, rectangular slab for the roof. Drape it over the arched walls, allowing it to curve naturally. Trim the excess so it sits flush with the front and back faces, then blend the seams for a unified look.
Internal Support Tip
If your roof starts to sag during assembly, lightly stuff the inside of the house with crumpled newspaper or paper towels to hold the shape while the clay dries.
Step 2: Refining and detailing
-
Round the corners:
Using a slightly damp sponge or your fingers, gently rub all the sharp edges of the house. The goal is to create that soft, eroded adobe look, so eliminate any crisp 90-degree angles. -
Carve the windows:
Use a square cutter or knife to cut out window openings on the front and side. For the upper attic window, cut a small arched opening. -
Add window frames:
Roll very thin snakes of clay. frame the window openings to create raised sills and lintels. Use a tiny bit of slip to attach them securely. -
Create window panes:
Cut very small strips of clay to form the cross-bars inside the windows. Carefully insert them into the openings, pressing the ends into the interior frame. -
Construct the door arch:
Roll a coil of clay and press it around the planned door area to form an arch. Use a tool to indent lines across the coil, mimicking individual stones. -
Sculpt the door:
Cut a slab slightly larger than the door opening and score vertical lines into it to resemble wood planks. Place this ‘door’ behind the stone arch from the inside, or press it into the surface. -
Make the chimney:
Form a small hollow cylinder and a tiny domed cap. Attach the cylinder to the peak of the roof. Cut tiny slits in the cylinder for vents before placing the cap on top. -
Texture the surface:
Take a stiff bristle brush, a textured stone, or crumpled foil and gently press it all over the exterior walls. This gives the piece that weathered, stucco feels. -
Ventilation holes:
Using the back of a paintbrush or a specialized circular cutter, punch a row of small, clean holes along the side of the house, just under the roofline. -
Final smooth:
Do a final pass with a barely damp sponge to soften any harsh tool marks while leaving the intentional texture intact. Let the piece dry slowly away from direct heat.
Cracking Seams?
If seams crack while drying, mix a tiny bit of clay with water to make a thick paste (slip). Fill the crack, smooth it over, and let it dry again.
Once fully dry, your little adobe sanctuary is ready to bring a touch of rustic warmth to your home decor
Mediterranean-Style Clay House With Arched Windows
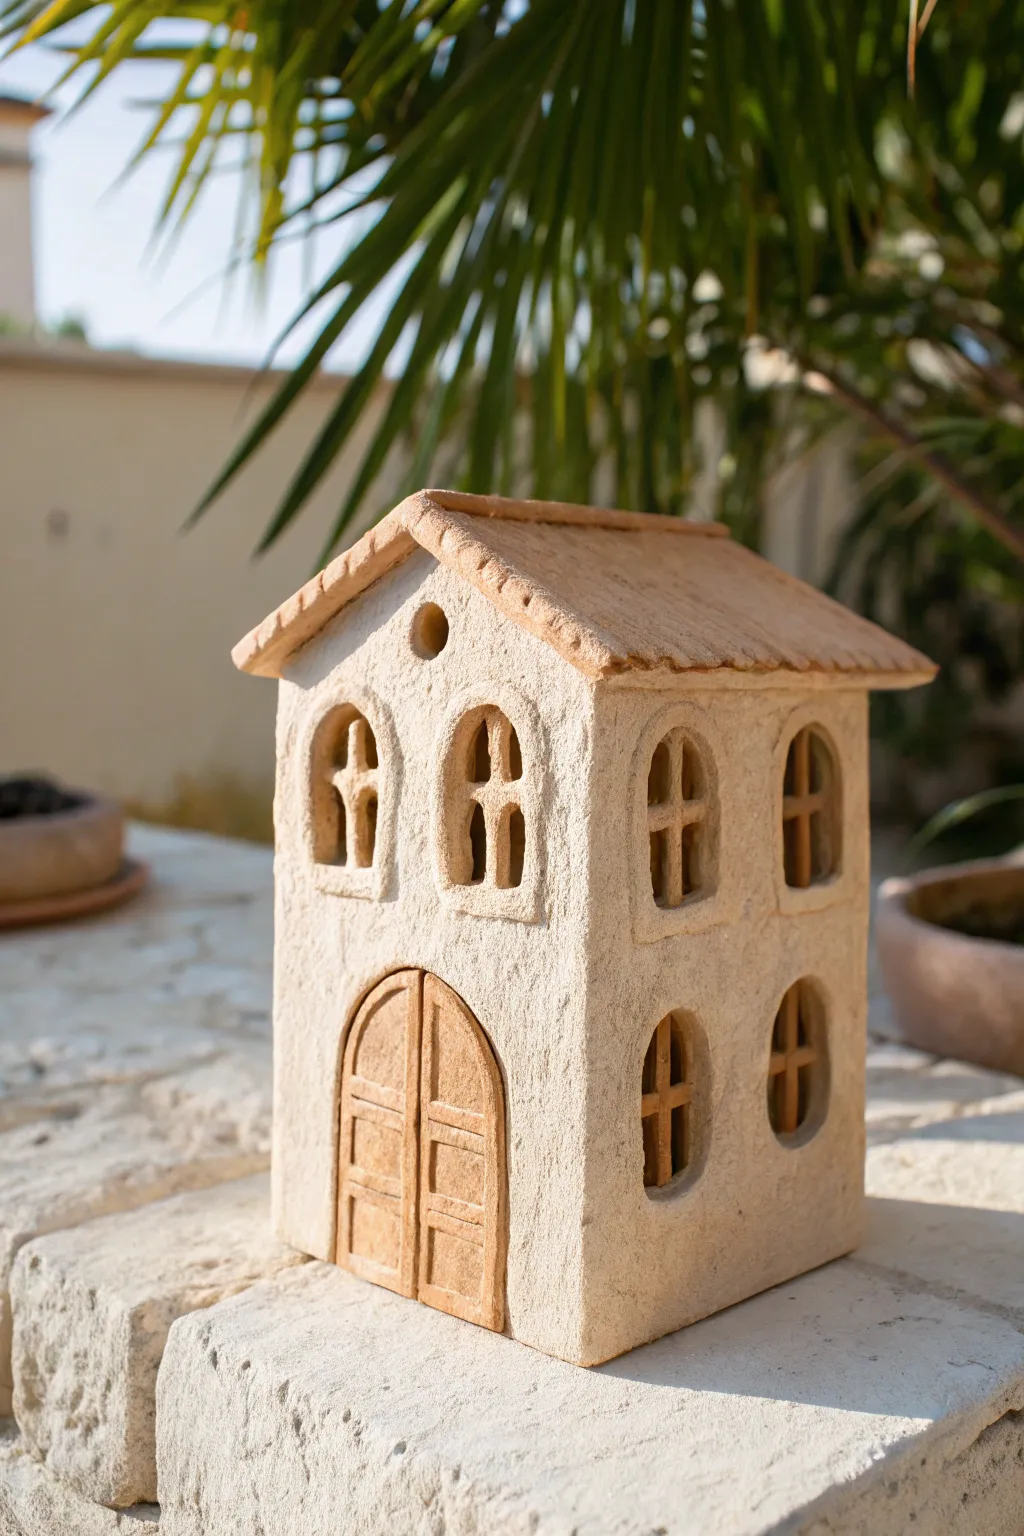
Transport yourself to a sun-drenched coast with this charming miniature house project. Featuring textured, limestone-like walls and classic arched windows, this hand-built clay structure captures the essence of Mediterranean architecture in a delightful tabletop size.
Step-by-Step Guide
Materials
- White or speckled stoneware clay (approx. 3-4 lbs)
- Terracotta clay (small amount for roof and door accents) or underglaze
- Rolling pin and guide sticks (1/4 inch thickness)
- Fettling knife or X-Acto knife
- Pointed clay tool or needle tool
- Small square wooden dowels (for window mullions)
- Slip and scoring tool (fork or serrated rib)
- Paper, ruler, and pencil for templates
- Sponge and water
- Coarse texture tool (stiff brush or toothbrush)
Step 1: Preparation and Slab Rollout
-
Design your templates:
Sketch the dimensions on paper first. You’ll need two rectangular side walls, a front wall with a peaked gable, a matching back wall, and two roof rectangles. Cut these paper templates out to use as guides. -
Roll the main slabs:
Using guide sticks to ensure even thickness, roll out your white stoneware clay into a large, consistent slab about 1/4 inch thick. Compress the clay on both sides with a rib to prevent warping later. -
Cut the components:
Lay your paper templates onto the slab. Trace lightly around them with a needle tool, then cut cleanly through the clay using your fettling knife. Let these slabs stiffen to a ‘leather-hard’ state so they can stand upright without slumping. -
Texture the walls:
Before assembly, use a stiff brush, toothbrush, or even a crumpled ball of foil to pat the surface of the walls. This creates that authentic, stucco-like limestone texture seen in the photo.
Clean Cuts Pro-Tip
When cutting out the windows, let the clay firm up to almost leather-hard first. If the clay is too soft, the walls will drag and deform; drier clay cuts like butter.
Step 2: Constructing the Core Structure
-
Cut the openings:
Identify where your windows and door will go on the leather-hard slabs. Carefully cut out the arched shapes for the windows on the upper level and the large arched doorway on the ground floor. -
Miter the edges:
For cleaner corners, cut the vertical edges of your walls at a 45-degree angle. This allows them to join seamlessly, hiding the seam better than a butt joint. -
Score and slip:
Rough up the edges you plan to join using a serrated rib or fork. Apply a generous amount of clay slip (liquid clay) to these scored areas to act as glue. -
Assemble the walls:
Stand the walls up and press the scored edges together firmly. I find it helpful to reach inside the structure and smooth the inner seam with a coil of clay for extra stability. -
Refine the seams:
On the outside, blend the corner seams together until they disappear. Re-apply your texture tool over the corners so the ‘stucco’ look is continuous around the entire building.
Step 3: Adding the Roof and Doors
-
Prepare the roof slab:
Roll out a slab of terracotta clay (or stain your white clay with iron oxide). Cut the two roof panels slightly larger than the house footprint to create an overhang. -
Create roof tiles:
Instead of individual tiles, you can simulate tiles by carving horizontal lines across the roof slab, then gently pressing vertical indentations to suggest overlapping rows. -
Attach the roof:
Score the top edges of the wall gables and the underside of the roof pieces. Place them on top, joining the two roof panels at the peak. Smooth the peak seam well. -
Sculpt the door:
Roll a small slab of clay (terracotta or stained) to fit inside the door arch. Use a needle tool to carve rectangular panel details and a vertical line to separate the double doors. Score and press this gently into the door frame.
Sagging Roof Fix
If the roof pitch begins to sag in the middle while drying, gently stuff the inside of the attic space with crumpled newspaper to simplistic support the weight until stiff.
Step 4: Window Details and Finishing
-
Make the circular window:
Punch a small hole near the peak of the front gable using a small circular cutter or the back of a paintbrush to create the attic vent. -
Add window mullions:
Roll very thin coils or cut tiny strips of clay. Carefully insert them into your arched window openings to create the cross-shaped frames. Use a dab of slip to secure them to the inside edge of the window frame. -
Final texture check:
Inspect the house for any smooth spots caused by handling. Touch up the texture with your brush and smooth any sharp burrs on the window edges with a slightly damp sponge. -
Drying:
Cover the finished house loosely with plastic for the first day to let the moisture even out, then uncover and let it dry slowly to prevent the roof from warping. -
Firing:
Bisque fire the piece according to your clay’s specifications. Since the clay bodies already have color contrast, you can either leave it unglazed for a raw matte finish or apply a clear matte glaze to seal it.
Once fired, place a small LED candle inside to see warm light spill through the arched windows
Flat-Roof Courtyard Clay House With Tiny Patio
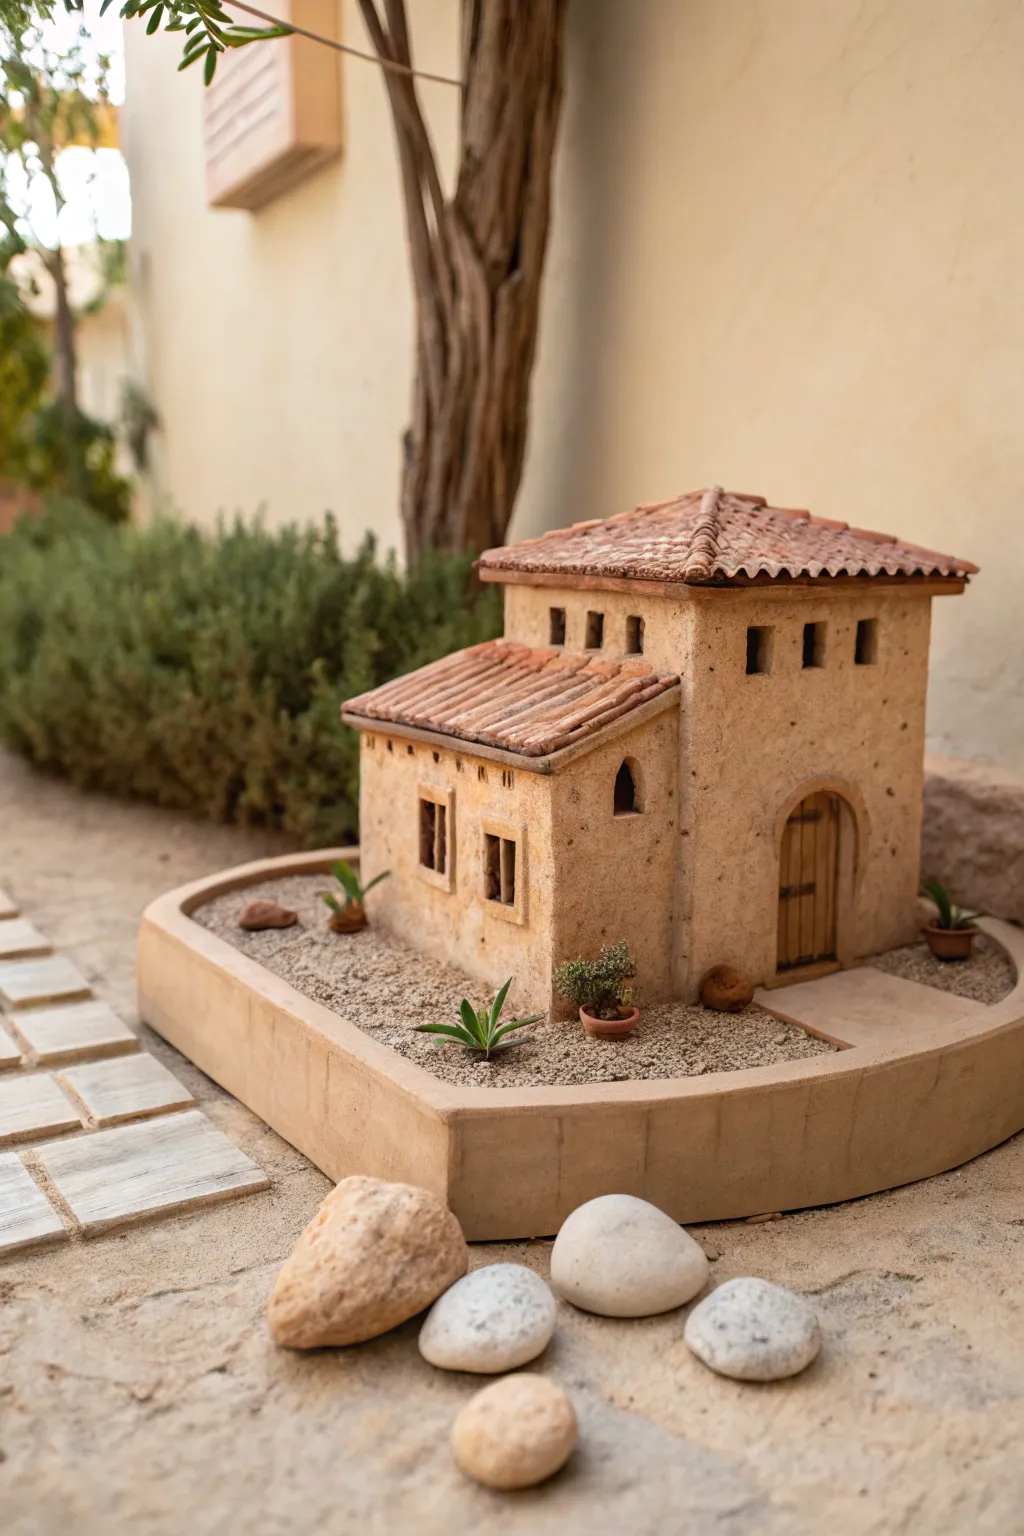
Transport yourself to a sunny cliffside with this charming miniature villa, complete with tiled roofs, arched doorways, and a textured stone finish. This project features a unified base that creates the illusion of a tiny, enclosed courtyard garden perfect for displaying small succulents.
Step-by-Step Tutorial
Materials
- Air-dry clay or polymer clay (terracotta or white)
- Clay rolling pin and thickness guides
- Modeling tools (knife, needle tool, smoothing tool)
- Texture sponge or stiff bristle brush
- Acrylic paints (sand, beige, terracotta, dark brown)
- Fine grit sandpaper
- PVA glue or strong craft glue
- Miniature wooden dowels or balsa wood strips (for door/lintels)
- Small pebbles, sand, and tiny artificial or dried plants
- Cardboard or foam core (for internal structure support)
Step 1: Base and Structure Assembly
-
Form the foundational base:
Roll out a large slab of clay approximately 1/4 inch thick. Cut out a rounded L-shape or irregular curve to serve as the patio and foundation. Smooth the edges with a wet finger to create a soft, rounded lip around the perimeter. -
Create the walls:
Cut four walls for the main two-story tower and four smaller walls for the single-story extension. If you want extra stability, I find it helpful to build a simple cardboard core first and clad it with clay slabs. -
Assemble the structure:
Join the walls together on the base using the score-and-slip method (scratching the joining surfaces and adding water or liquid clay). Blend the seams thoroughly so the house looks like continuous stucco. -
Cut window and door openings:
While the clay is still workable, use a sharp craft knife to cut out square windows and an arched doorway. Save the cut-out clay for later details.
Fixing Cracks
If clay cracks while drying, mix a small amount of fresh clay with water to make a paste (spackle). Fill the cracks, smooth over, and let dry before painting.
Step 2: Architectural Details and Texture
-
Add dimension to the windows:
Roll thin snakes of clay to create raised frames around the windows. Press them gently onto the walls and blend the outer edges for a built-in look. -
Install the wooden door:
Cut balsa wood strips to fit inside the arched doorway. Glue them vertically to a backing piece, stain them dark brown, and insert the assembly into the archway for a realistic timber door. -
Texture the exterior walls:
Take a rough sponge or a stiff brush and tap it all over the exterior walls. This stippling effect mimics the look of aged plaster or stucco found in Mediterranean architecture. -
Create the roof tiles:
Roll a thin sheet of clay and cut many small rectangles. Gently curve each one over a thin dowel to create a ‘C’ shape. Layer these overlapping tiles onto the roof sections, starting from the bottom edge and working upward. -
Add ventilation details:
For the upper tower, cut small, deep rectangular recesses near the roofline to mimic ventilation windows or dovecote holes.
Step 3: Painting and Landscaping
-
Base coat the structure:
Once fully dry, paint the walls with a mixture of sand and beige acrylics. Don’t make it too uniform; a patchy application looks more aged and realistic. -
Weather the house:
Use a diluted dark brown wash (paint mixed with lots of water) and brush it over the textured walls. Wipe it off quickly with a paper towel, leaving the dark pigment inside the texture pits and corners. -
Paint the roof:
Paint the roof tiles in shades of terracotta and burnt orange. Dry-brush a little light beige over the raised curves of the tiles to simulate sun-bleached clay. -
Prepare the courtyard ground:
Apply a layer of PVA glue to the open area of the base. Sprinkle fine sand and very small grit evenly over the glue to create the patio surface. -
Install miniature planting:
Glue tiny individual pebbles around the base of the house. Create small ‘planters’ using tiny terracotta-colored clay rings and glue dried moss or tiny plastic succulent tips inside them. -
Final touches:
Add a few larger, smooth river stones outside the base area to frame the piece and give it a sense of scale.
Realistic Stucco
Mix a small amount of baking soda or fine sand directly into your beige acrylic paint. This creates a gritty texture that looks exactly like real stone walls.
Now you have a peaceful little architectural escape to display on your shelf or desk
A-Frame Clay House With Tall Triangle Front
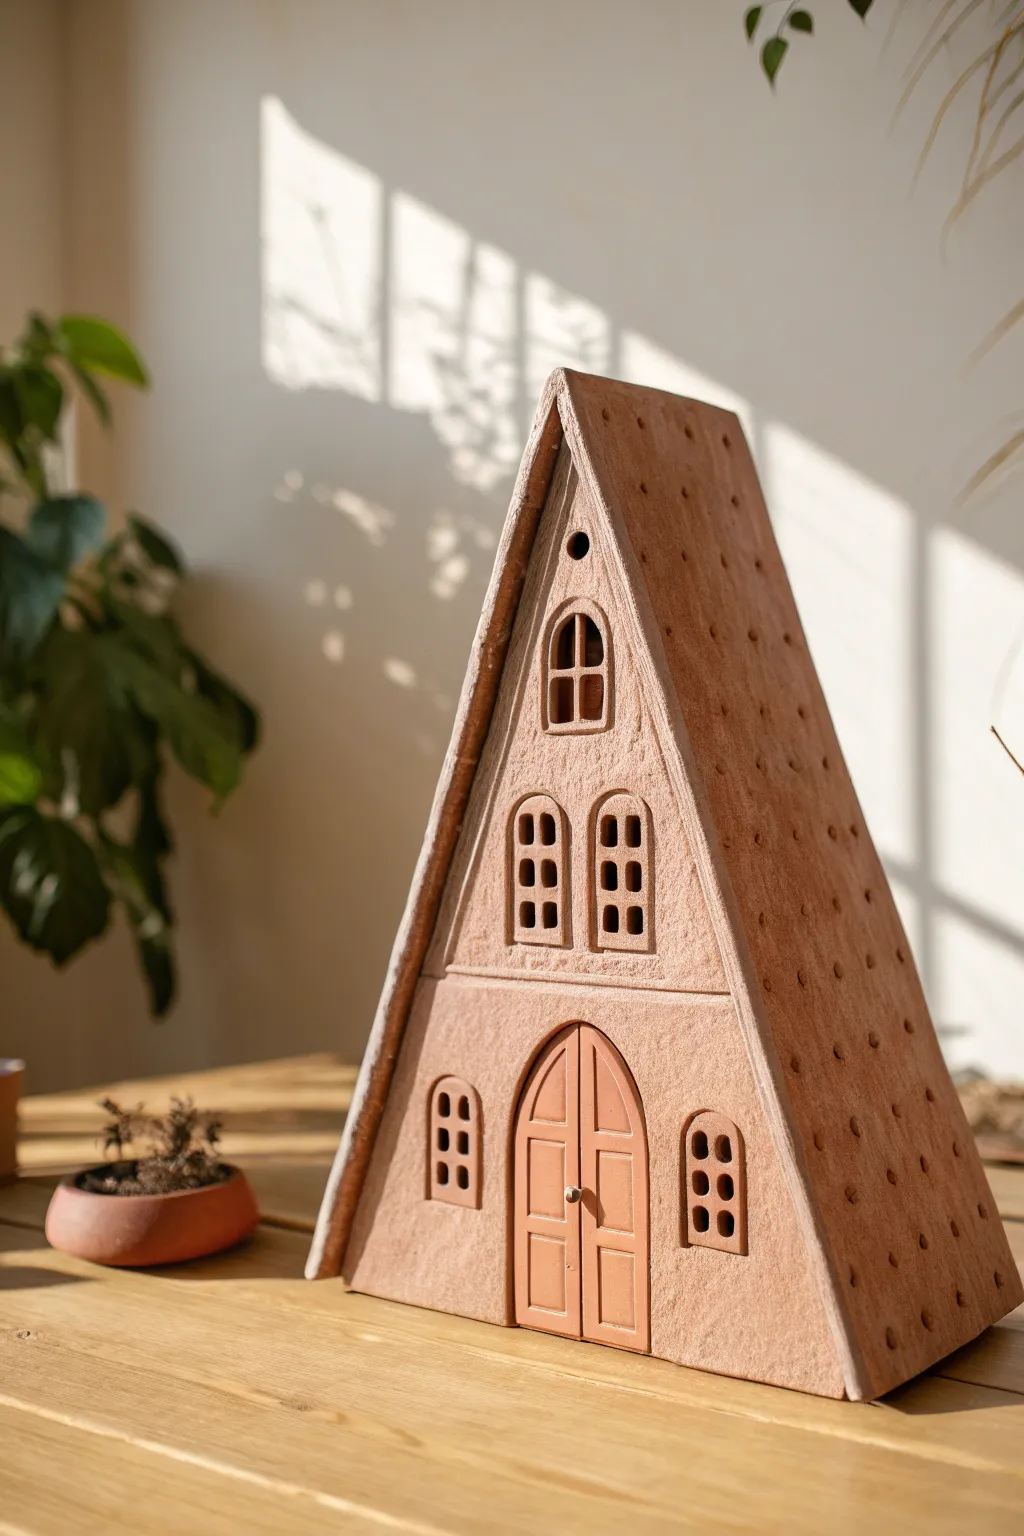
Standing tall with rustic charm, this striking A-frame clay house captures the cozy spirit of minimal architecture. Its steep roofline and textured surfaces create a stunning focal piece, perfect for housing an LED tea light or simply admiring on a sunlit shelf.
Step-by-Step
Materials
- Terracotta-colored air-dry clay or kiln-fire earthenware
- Rolling pin with guide rings (approx. 5mm thickness)
- Clay slab building templates (tall triangle, rectangular roof panels)
- Clay knife or fettling knife
- Needle tool
- Small circle cutter
- Clay adhesive (slip or vinegar depending on clay type)
- Small paintbrush (for slip application)
- Modeling tool with a blunt point (for roof texture)
- Ruler
- Sandpaper (fine grit)
Step 1: Preparation & Wall Construction
-
Prepare your workspace:
Begin by rolling out a large slab of your terracotta clay on a canvas or cloth surface to prevent sticking. Aim for a consistent thickness of about 5mm to ensure structural stability for the tall walls. -
Cut the front façade:
Using your knife and a ruler, cut a tall, narrow isosceles triangle for the front wall. The base should be wide enough to support the height; a ratio of roughly 1:2.5 (width to height) works well for this look. -
Create the horizontal division:
Lightly score a horizontal line across the front triangle, about one-third of the way up from the base. This visual separation mimics a second floor or beam. -
Cut the window openings:
Carefully cut out the window shapes. You’ll need two arched windows side-by-side in the middle section, and one arched window near the peak. Use a needle tool or small clay knife for clean edges. -
Add the door details:
Cut a large arched doorway at the bottom center. Instead of removing the clay completely, you can cut a separate slab for the doors, detail them with panel lines, and attach them slightly recessed or flush, adding a tiny clay ball for a doorknob. -
Construct the lower windows:
Cut two small arched windows flanking the door on the ground floor level. Smooth the interior edges of all cutouts with a damp finger or soft brush. -
Add window panes:
Roll thin coils of clay and place them inside the window openings to create the pane divisions—a cross shape for the upper window and vertical bars for the middle ones.
Roof Sagging?
If the long roof slabs sag inward during assembly, temporarily stuff the inside of the house with crumpled newspaper or foam to support the clay until it stiffens up.
Step 2: Roofing & Assembly
-
Cut the roof slabs:
Cut two long rectangular slabs for the roof. These need to be slightly longer than the side of your front triangle to create an overhang. -
Create the roof texture:
Before assembling, texture the roof slabs. Use a blunt tool to press small indentations in uneven rows across the entire surface specifically to mimic a hammered or pitted look. -
Bevel the edges:
Cut 45-degree angles (bevels) on the long edges of the roof slabs where they will meet at the peak, and along the sides of the front triangle wall to ensure a tight seam. -
Score and slip:
Aggressively score (scratch) all joining edges and apply your clay adhesive (slip or vinegar). I find using plenty of slip here prevents cracks later. -
Initial assembly:
Stand the front triangle up. Attach one roof slab, pressing firmly along the seam. Support this structure while attaching the second roof slab, ensuring they meet perfectly at the peak. -
Reinforce the interior:
Reach inside and run a thin coil of clay along the interior seams where the walls meet the roof. Smooth this coil down to mechanically lock the joints together. -
Final detailing:
Add a small circular ventilation hole near the very top peak using a tiny circle cutter or straw.
Light it Up
Cut a large hole in the back wall or leave the back completely open. This allows you to easily place an LED candle inside, casting warm light through the windows.
Step 3: Finishing Touches
-
Smooth and refine:
Check the exterior seams. Some makers like visible join lines, but for this project, smooth the roof-to-wall connection so it looks seamless, blending the clay with a rib tool. -
Dry slowly:
Place the house away from direct drafts or heat. Loosely cover it with plastic for the first day to ensure the tall roof doesn’t warp while drying. -
Sanding:
Once bone dry (if firing) or fully hardened (if air dry), use fine-grit sandpaper to soften any sharp edges on the window frames or base. -
Clear coat (Optional):
If you used air-dry clay, apply a matte varnish to protect the surface while keeping that raw, earthy appearance.
Enjoy the cozy atmosphere your handcrafted architectural piece brings to your space
Tiny Clay House Ornament for Hanging
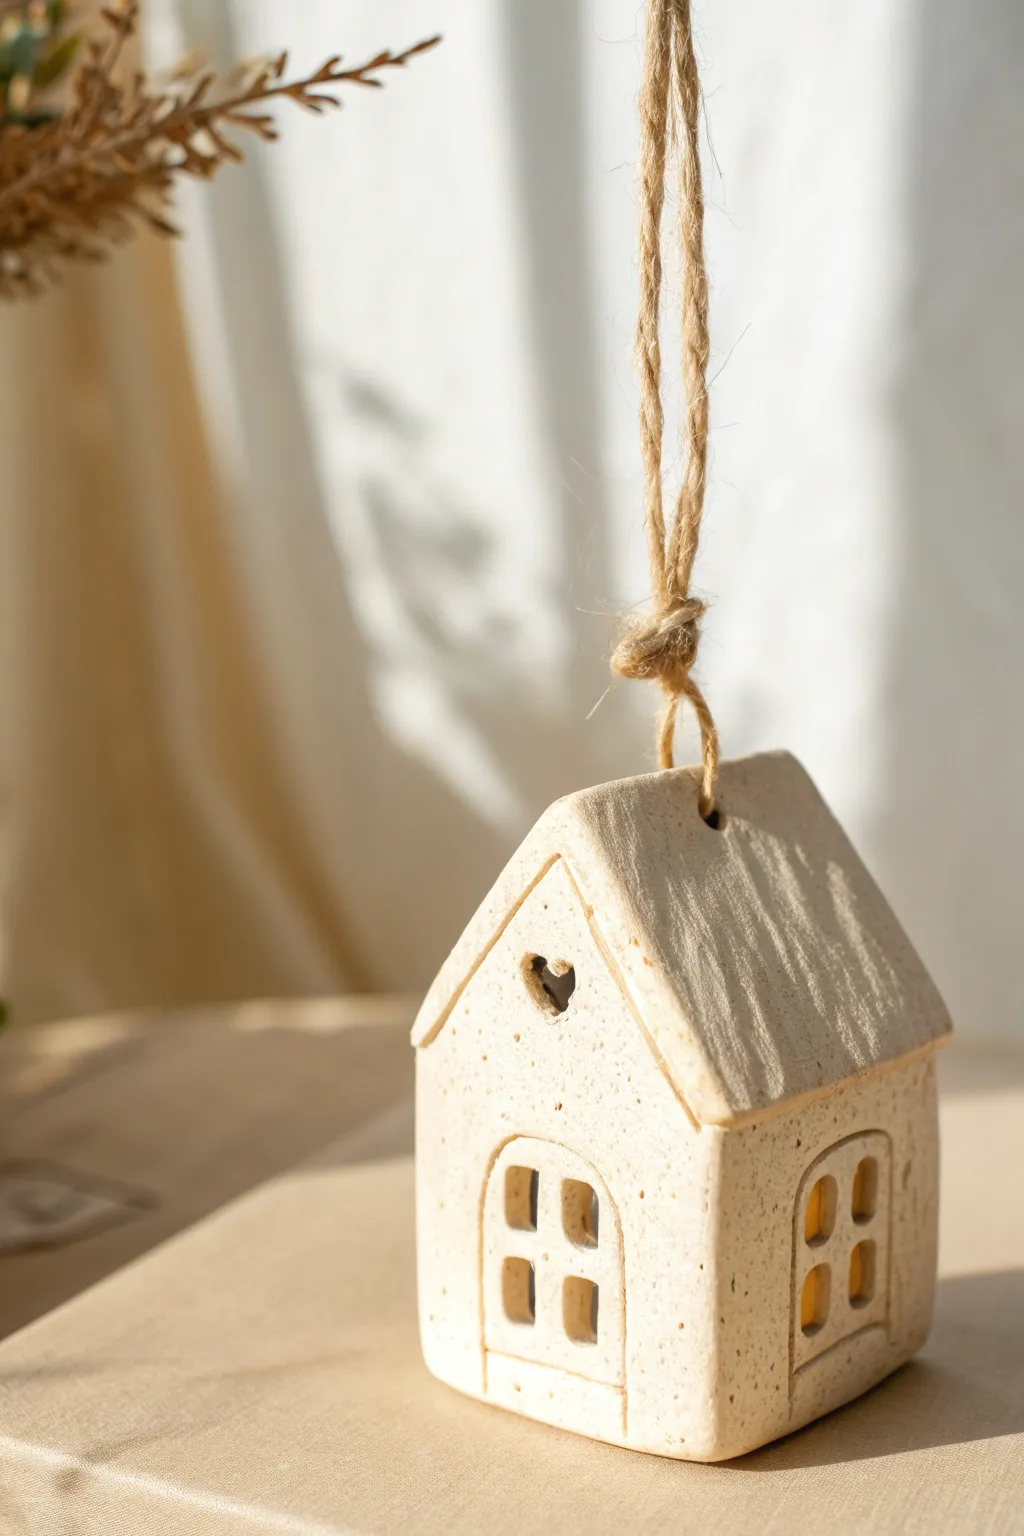
This charming little clay house brings a touch of warmth to any corner with its textured roof and sweet heart cutout. Suspended by rustic jute twine, the speckled cream finish gives it a lovely, handcrafted stone appearance perfect for year-round decor.
Detailed Instructions
Materials
- Air-dry clay (stone or speckled effect preferred) or polymer clay in beige
- Rolling pin
- Sharp craft knife or scalpel
- Ruler
- Small heart-shaped cutter (or needle tool)
- Square cutter (optional, for windows)
- Needle tool
- Slip (water mixed with clay bits)
- Toothbrush or texture tool
- Jute twine
- Fine-grit sandpaper
- Matte varnish (optional)
Step 1: Shaping the Walls
-
Roll the Slabs:
Begin by conditioning your clay until it is soft and pliable. Roll it out to a uniform thickness of about 4-5mm on a flat surface. -
Cut the Front and Back:
Using your knife and ruler, cut out two identical pentagon shapes. These will be the front and back gables. A width of 6cm and total height of 8cm makes a good ornament size. -
Cut the Side Walls:
Cut two rectangles for the side walls. Their height must match the straight vertical sides of your gable pieces, and the width determines how deep the house is. -
Detail the Windows:
On the front and side wall slabs, lightly sketch an arched window shape. Carefully cut out the four negative spaces to create the window panes, leaving a cross in the middle. -
Add the Heart:
Center your small heart cutter on the upper triangle of the front gable piece and press through. If you don’t have a cutter, I find freehanding it with a needle tool works just as well with a steady hand.
Step 2: Assembly and Roofing
-
Score and Slip:
Score the edges of all your wall pieces with a needle tool creating a rough texture. Apply a dab of slip/water to these roughened edges. -
Construct the Base:
Stand the walls up and press the scored joints together to form the house box. Smooth the seams on the inside with your finger or a modeling tool for stability. -
Prepare the Roof Panels:
Roll out a fresh slab for the roof. Cut two rectangles that are slightly wider than the house (to create an overhang) and long enough to meet at the peak. -
Texture the Roof:
Before attaching, drag a wire brush or stiff toothbrush vertically down the roof panels to create a striated, thatch-like texture. -
Attach the Roof:
Score the top edges of the wall structure. Place the roof panels on top, joining them at the peak. Smooth the peak seam thoroughly so it doesn’t split later. -
Drill the Hanging Hole:
Use a straw or a tool with a circular tube to punch a clean hole through the roof ridge. Ensure it goes through both roof panels securely.
Cracks appearing?
If hairline cracks appear while drying, mix a tiny amount of fresh clay with water to make a thick paste and fill them in immediately, then smooth.
Step 3: Finishing Touches
-
Refine the surface:
Look over the house for any fingerprints. Gently dampen your finger and smooth the main walls to keep that clean, matte look. -
Dry Completely:
Let the house dry entirely. For air-dry clay, this usually takes 24-48 hours. Turn it occasionally so the bottom dries too. -
Sand and Seal:
Once bone dry, lightly sand any rough edges, especially around the window cutouts. Apply a matte varnish if you want extra durability without shine. -
Thread the Twine:
Cut a length of rustic jute twine. Thread it through the hole in the roof. -
Secure the Knot:
Tie a chunky knot near the base of the loop to keep it secure against the roof peak, trimming any excess ends.
Make it glow
Leave the bottom of the house open (floorless). Once dry, you can place the ornament over a battery-operated LED tea light for a warm glow.
Hang your little ceramic cottage in a window or on a branch to enjoy its simple, rustic charm
Planter Clay House With a Little Succulent Roof
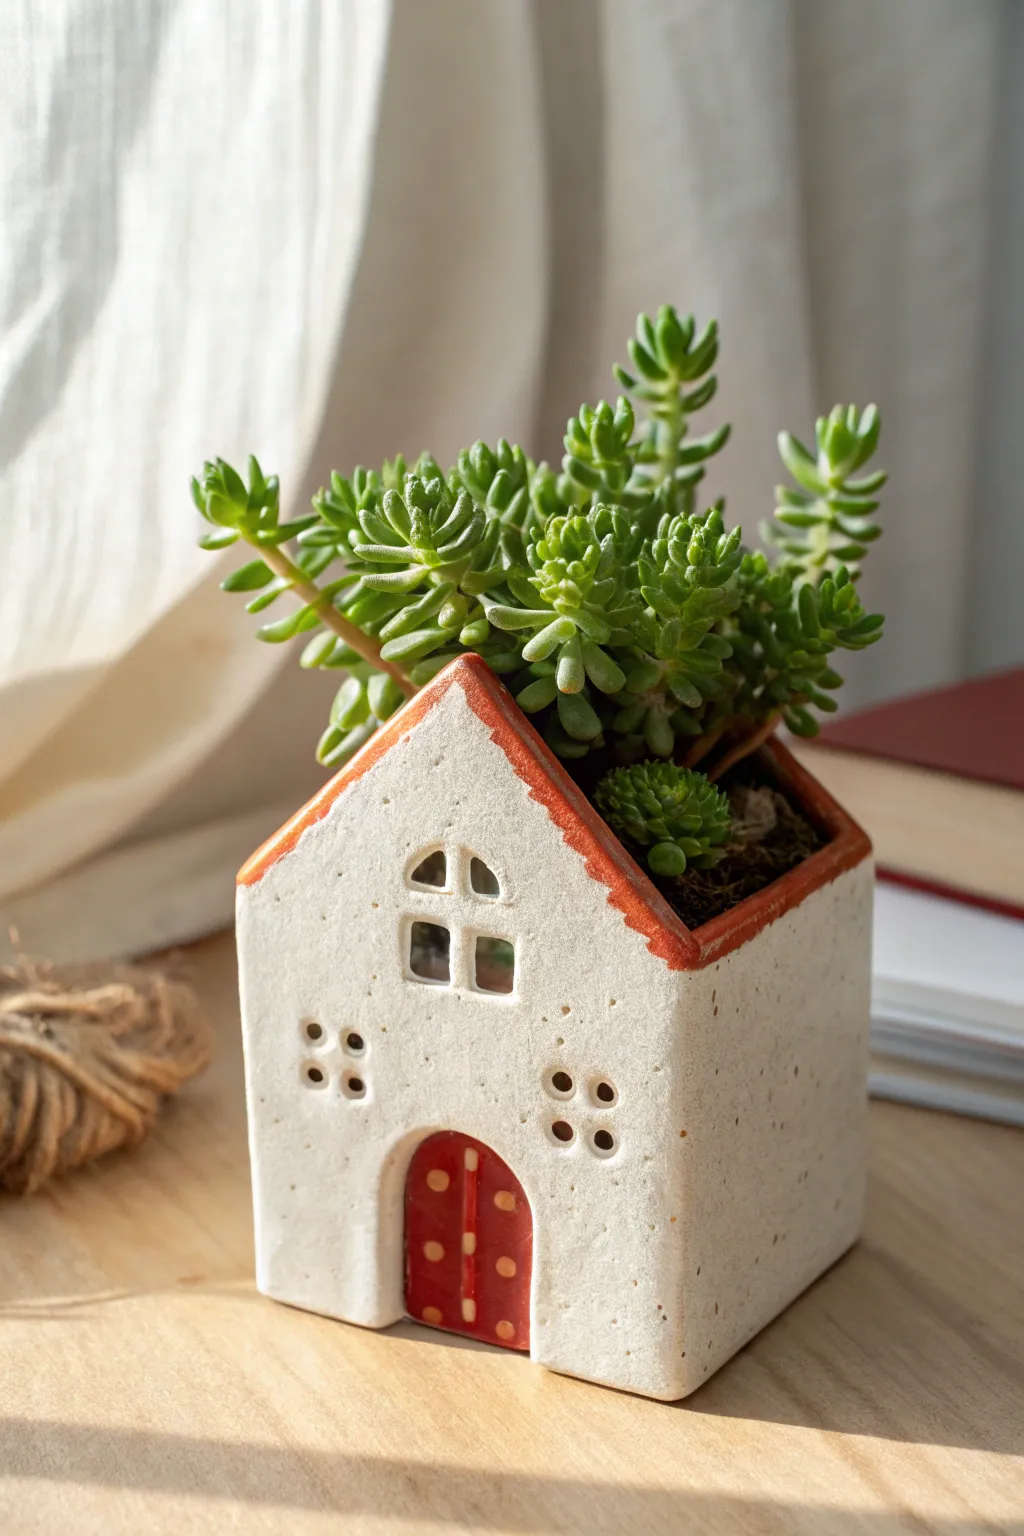
Transform a simple slab of clay into a charming, storybook cottage that doubles as a home for your favorite succulent. With its textured white walls, cheerful red door, and ‘living roof’, this petite planter brings a touch of whimsy to any sunny windowsill.
Step-by-Step Tutorial
Materials
- White low-fire earthenware or polymer clay (approx. 1lb)
- Rolling pin
- Canvas or mat for rolling
- Craft knife or scalpel
- Ruler
- Clay slip or liquid clay (adhesive)
- Small round piping tip or straw (for windows)
- Flat shader brush and fine detail brush
- Terracotta/Brick Red acrylic paint or underglaze
- Clear matte varnish or glaze
- Succulent plant (Sedum makinoi or similar)
- Potting soil
Step 1: Shaping the Structure
-
Roll the Slabs:
Begin by rolling out your clay to an even thickness of about 1/4 inch. I like to use guide sticks on either side of the rolling pin to ensure the walls are perfectly uniform, which makes assembly much easier later. -
Cut Wall Panels:
Using a ruler and craft knife, cut four rectangular pieces for the walls. Two should be slightly wider for the front and back, and two narrower for the sides. Check the image for proportions; the structure is roughly a cube. -
Create the Gables:
On the two wider wall pieces, cut a triangular peak at the top to form the roof line. Ensure the angle of the peak is identical on both pieces so the roof sits flat. -
Cut the Doorway:
On the front gable piece, carefully cut out a small arched opening at the bottom center. Save this cutout piece—it will become the door later. -
Add Window Details:
For the attic window, use a craft knife to cut a small arched shape near the peak. You can leave the vertical and horizontal mullions (crossbars) by cutting out four tiny separate shapes, or cut one hole and add thin clay strips later. -
Create Ventilation Holes:
Use a small circular cutter, like the end of a straw or a piping tip, to punch four symmetric holes on either side of the door area. These add decorative charm and airflow. -
Texture the Walls:
Gently gently press a piece of rough sandpaper or a stiff bristle brush against the leather-hard clay surface. This gives the walls that rustic, stucco-like texture seen in the photo.
Uneven Walls?
If your walls are warping during assembly, cut a temporary cardboard square to place inside the house to hold the shape square while the clay sets.
Step 2: Assembly & Finishing
-
Score and Slip:
Score the side edges of all wall panels with a needle tool or serrated rib. Apply clay slip (or liquid clay if using polymer) to these roughed-up areas. -
Construct the Box:
Stand the walls up and press the scored edges together. Smooth the interior seams with a modeling tool or your finger to reinforce the bond. -
Form the Door:
Take the reserved door cutout and flatten it slightly so it sits recessed within the frame. Score vertical lines into it to mimic wood planks. Attach it inside the archway, positioned slightly back from the main wall face. -
Add the Roof Trim:
Instead of a full roof, roll two thin strips of clay. Attach these to the top angled edges of the varying walls to create a defined rim. This frames the planter opening and will be painted later. -
Fire or Bake:
Allow the clay to dry completely according to your material’s instructions. Once bone dry, fire the piece in a kiln or bake it in the oven based on the manufacturer’s directions.
Level Up: Cobblestone
Before assembling, use a small loop tool to carve irregular pebble shapes around the base of the walls for a textured stone foundation effect.
Step 3: Painting & Planting
-
Paint the Accents:
Using a small flat brush, paint the roof trim in a warm terracotta or brick red color to mimic clay tiles. Maintain a slightly uneven edge for a hand-painted look. -
Detail the Door:
Paint the recessed door with the same red hue. Once dry, use a very fine brush or a toothpick to add tiny unpainted or yellow dots in a vertical line for the handle or decorative studs. -
Seal:
Apply a coat of clear matte varnish or glaze effectively to the inside and outside. This protects the finish from water damage during watering. -
Prepare the Base:
Fill the bottom of the house with a small amount of gravel for drainage, followed by cactus or succulent potting mix, filling it almost to the roofline. -
Install the Living Roof:
Gently nestle a cluster of trailing sedum or burro’s tail succulents into the top opening. Arrange the stems so they spill slightly over the edges, creating the illusion of a green, growing roof.
Place your little cottage in a bright spot and enjoy watching your architectural garden grow
Book Nook Clay Townhouse Row on a Base
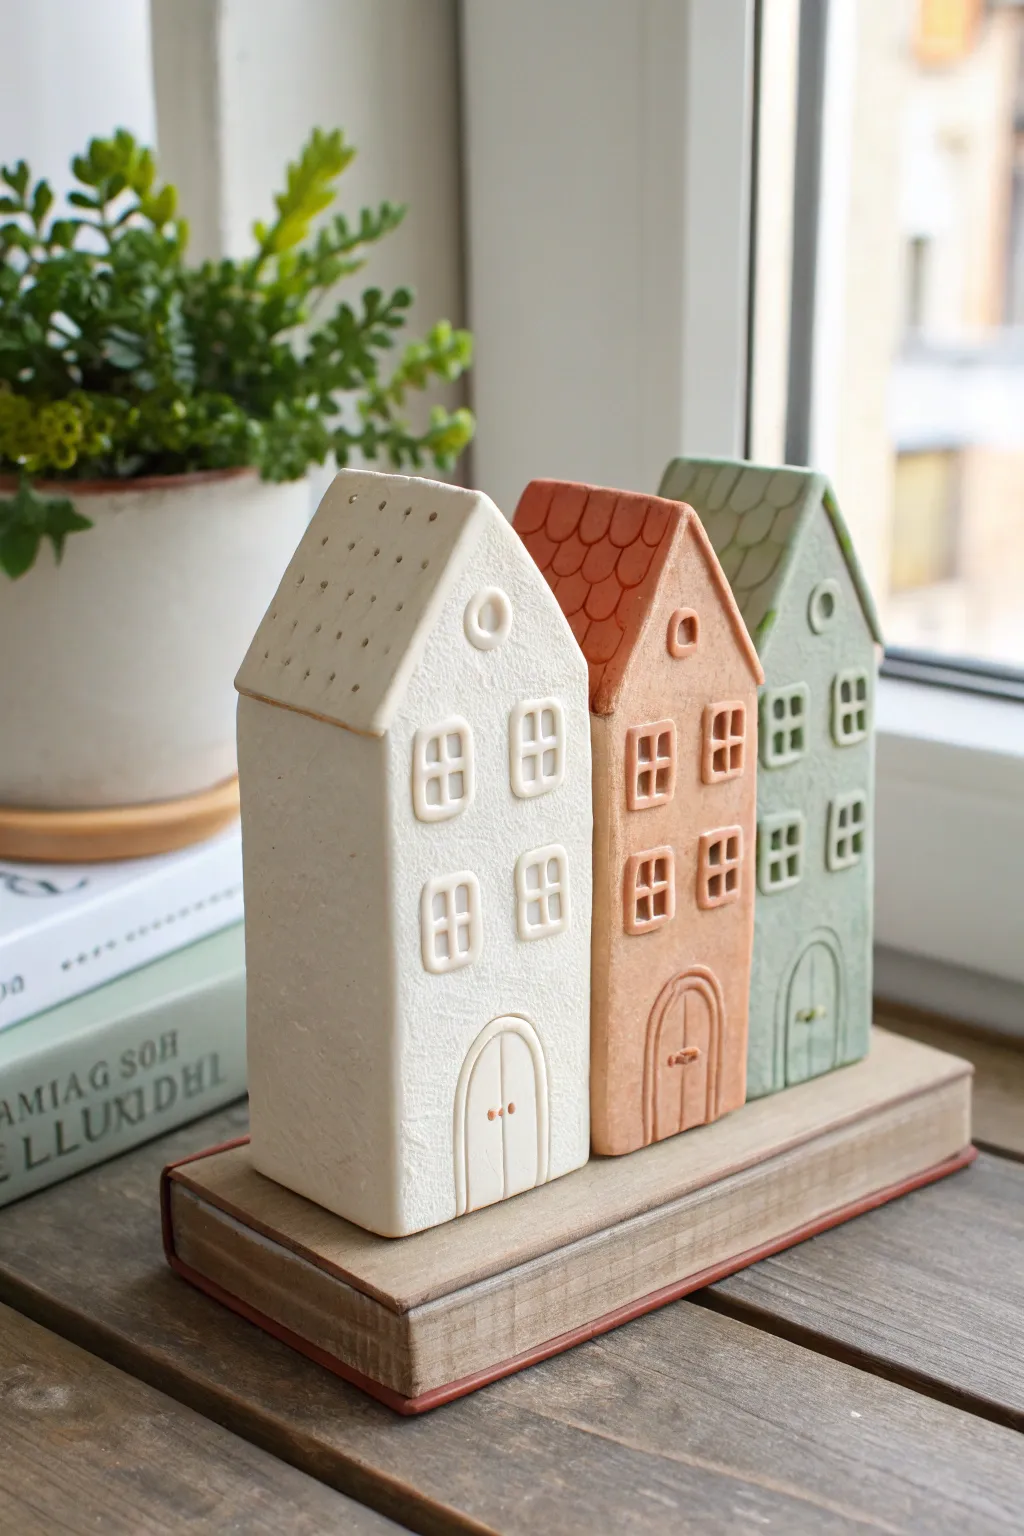
Create a charming trio of miniature townhouses that brings a touch of Scandinavian hygge to your bookshelf or windowsill. These textured, pastel-toned structures are crafted from clay and mounted on a faux-book base, making them perfect for book nooks or seasonal displays.
How-To Guide
Materials
- White air-dry clay or polymer clay
- Rolling pin with guides (approx. 5mm thickness)
- Craft knife or clay blade
- Ruler
- Small square cookie cutters (for windows)
- Needle tool or toothpick
- Acrylic paints (Terracotta, Sage Green, White)
- Pottery sponge
- Sanding block or fine-grit sandpaper
- Strong craft glue (e.g., E6000)
- Hardcover book (old/thrifted) or wood block for the base
Step 1: Shaping the House Structures
-
Prepare the Clay Slabs:
Condition your clay until soft and pliable, then roll it out to a uniform thickness of about 5mm (1/4 inch). I find that using rolling guides helps keep the walls perfectly even for stable construction. -
Cut the Walls:
For each house, cut four rectangular strips for the walls. The front and back pieces should have a pointed triangular top for the roofline. Vary the heights slightly so your row looks organic—make the center house a bit shorter or narrower than its neighbors. -
Assemble the Body:
Score the edges where the walls will meet (scratching cross-hatch patterns) and apply a tiny bit of slip (water mixed with clay) or liquid clay. Press the four walls together to form a hollow rectangular prism, smoothing the seams gently with your finger or a clay tool. -
Add the Roof:
Roll out two rectangular slabs for the roof panels. They should be just wide enough to overhang the walls slightly. Attach them to the peaks of your wall structure using the score-and-slip method.
Step 2: Detailed Texture & Features
-
Texture the Walls:
Before the clay hardens, gently dab the exterior surfaces with a pottery sponge or a crumpled ball of aluminum foil. This gives the houses a rustic, stone-like stucco texture rather than a perfectly smooth finish. -
Create Window Frames:
Roll a thin snake of clay and cut it into small segments. Form these into four-pane window frames. You can do this directly on the house face or form them on your work surface and gently press them onto the walls. -
Add Doors:
Cut arched shapes from a thin slab of clay for the doors. Press these onto the bottom center of each house front. Use a needle tool to draw vertical wood planks and tiny circles for doorknobs. -
Roof Details:
Customize each roof. For the white house, use a needle tool to poke a grid of small dots. For the terracotta house, press a U-shaped tool or straw tip repeatedly to create a scalloped shingle pattern. For the green house, scribe a diamond or cross-hatch pattern. -
Adding Gable Accents:
Roll tiny balls of clay and flatten them into donut shapes or small emblems. Attach these near the peak of the gables on the front and back for extra architectural charm. -
Drying Phase:
Allow the houses to dry completely. For air-dry clay, this usually takes 24-48 hours. Turn them occasionally to ensure even drying and prevent warping.
Texturing Trick
Use an old toothbrush to stipple the wet clay surface. It creates a perfect simulated limestone texture that catches paint shadows beautifully.
Step 3: Painting & Finishing
-
Sanding:
Once fully dry, lightly sand any sharp corners or rough seams with a fine-grit sanding block to ensure a professional look. -
Base Coat:
Paint the first house entirely in a matte white. For the others, mix your acrylics to get a dusky terracotta orange and a muted sage green. -
Applying Color:
Apply the colored paint to the respective houses. You may need two thin coats for opaque coverage. Keep the paint fairly matte to mimic the look of unglazed ceramic. -
Highlighting Details:
Use a fine detail brush to carefully paint the window frames. For the white house, paint the frames white (or leave them unpainted if the clay is white). For the colored houses, you can paint the frames a slightly lighter shade of the house color for subtle contrast. -
Preparing the Base:
Take your thrifted hardcover book or a wooden block cut to size. If using a book, glue the pages together so it acts as a solid block. -
Mounting the Village:
Arrange your three houses on the spine of the book base. Once happy with the spacing, apply strong craft glue to the bottom of each house and press firmly onto the base. -
Final Touches:
Let the glue cure completely before moving your new book nook decoration. Place it near a plant for that fresh, organic vibe seen in the inspiration image.
Sagging Roofs?
If the roof sags while drying, stuff the house interior lightly with paper towels or facial tissue to support the clay until it hardens.
Now your shelf has a delightful miniature neighborhood ready to admire
Gingerbread-Inspired Clay House With Icing-Like Details
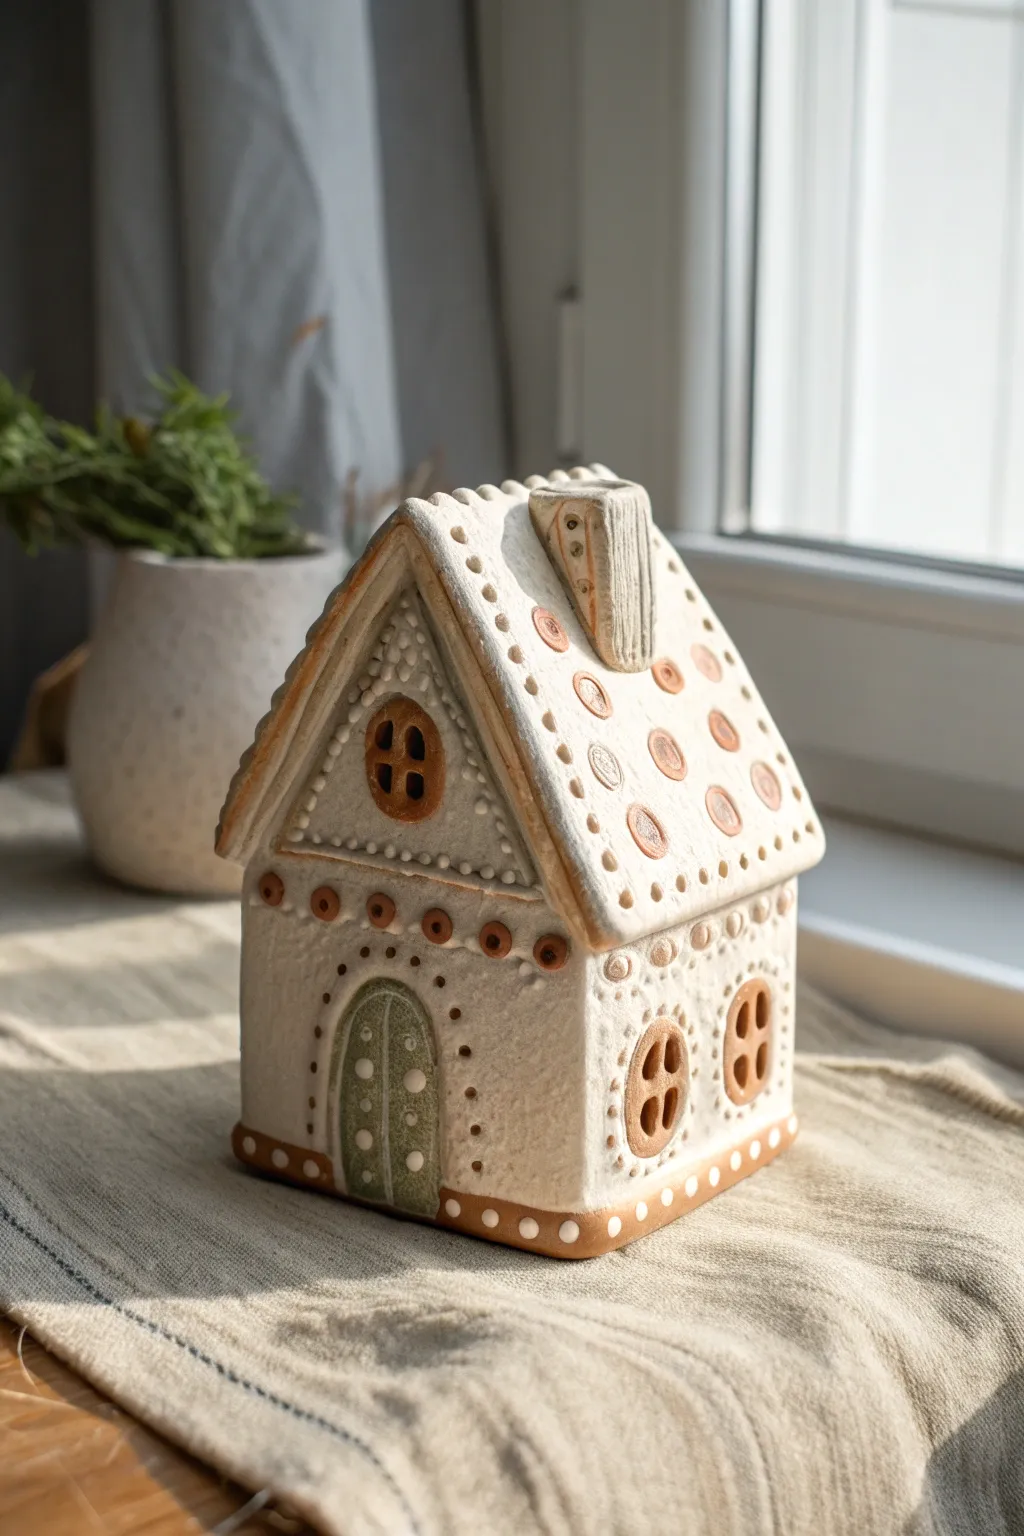
This delightful clay project mimics the cozy aesthetic of a gingerbread house without the baking or the crumbling icing. Featuring textured roof details, faux-icing piping, and a creamy white finish, this sturdy little cottage makes for a perfect mantle decoration that lasts year-round.
Detailed Instructions
Materials
- White sculpture clay (air-dry or kiln-fire depending on preference)
- Rolling pin
- Clay knife or fettling knife
- Needle tool
- Slip (clay and water mixture) and scoring tool
- Small circle cutters (various sizes)
- Small wooden modeling tools
- Acrylic paints (Warm White, Terracotta/Burnt Sienna, Sage Green)
- Matte varnish or sealant
- Rolling guides or wooden slats (approx. 5mm thick)
- Ruler
Step 1: Planning and Construction
-
Prepare the slabs:
Begin by rolling out your clay to an even thickness of about 5mm. Using rolling guides or slats on either side of your clay ensures the walls and roof are uniform and sturdy. -
Cut the components:
Using a ruler and knife, cut out two square side walls, a rectangular front wall with a triangular peak, and a matching back wall. You will also need two rectangular roof panels that are slightly wider than the house frame to allow for overhang. -
Detail the walls:
Before assembly, gently press your circular cutter into the side walls to create window frames. Pierce the centers to open them up. On the front panel, use a needle tool to etch an arched doorway. -
Assemble the base:
Score the edges of your wall pieces and apply a generous amount of slip. Press the walls together to form the box structure, smoothing the internal seams with your finger or a modeling tool to reinforce the join. -
Add the roof:
Score the angled peaks of the front and back walls. Carefully place the roof panels on top, ensuring they meet at the apex. Use a thin coil of clay along the inner ridge to strengthen the connection. -
Install the chimney:
Shape a small rectangular block for the chimney. Cut the bottom at an angle to match the slope of the roof, score, and attach it securely.
Smooth Operator
Keep a damp sponge handy to smooth out fingerprints or rough edges before the clay dries. A little water goes a long way in achieving that polished ceramic look.
Step 2: Texturing and Details
-
Create the roof texture:
Roll out a very thin slab of clay and cut it into scalloped or straight strips to mimic roofing, or simply emboss the flat roof panel with circles. For this specific look, attach small, flat clay discs in a polka-dot pattern across the roof surface using a dab of slip. -
Add the ‘icing’ trim:
Roll thin coils of clay (snakes) and attach them to the edges of the roof and the base of the house. Use a small tool to press gentle indentations along these coils to create a piped icing effect. -
Form the door:
Create a distinct arch shape from a separate piece of clay that fits inside your etched doorway. Press it in slightly so it looks recessed. Use a needle tool to draw vertical wood grain lines. -
Window details:
Roll tiny cross-shapes and insert them into your circular window openings to create panes. Add a small ring of clay around the window exterior for a frame. -
Decorative dotting:
Using tiny balls of clay, add rows of decorative dots along the ‘icing’ trim, around the door frame, and under the roof eaves. This adds that classic gingerbread intricacy. -
Drying:
Allow the house to dry slowly away from direct heat or drafts. If using air-dry clay, this may take 24-48 hours; turn it occasionally to ensure even drying.
Glow Up
Cut a hole in the bottom or back of the house before assembly. Once finished, place a battery-operated tea light inside to create warm, glowing windows.
Step 3: Painting and Finishing
-
Base coat:
Once fully dry (and fired, if using ceramic clay), paint the entire interior and exterior with a warm white acrylic to simulate the cookie dough or sugar cookie base. -
Painting the trim:
Use a terracotta or burnt sienna shade to paint the base trim, roof trim, and the circular accents on the roof. A steady hand is key here. -
The door:
Mix a soft sage green and paint the arched door. I like to dry brush a little white over the texture once the green is dry to highlight the ‘icing’ dots on the door itself. -
Window accents:
Carefully paint the window frames with the terracotta color to match the roof trim. -
White dot details:
Using a very fine detail brush or a dotting tool, dab fresh white paint onto the raised clay dots along the roofline and base trim to make them pop against the brown. -
Seal the piece:
Finish with a coat of matte varnish to protect the paint and give the house a smooth, ceramic-like feel without making it too glossy.
Place your finished cottage on a windowsill or shelf to add a touch of handmade warmth to your home decor
Root Cellar Hillside Clay House Built Into a Mound
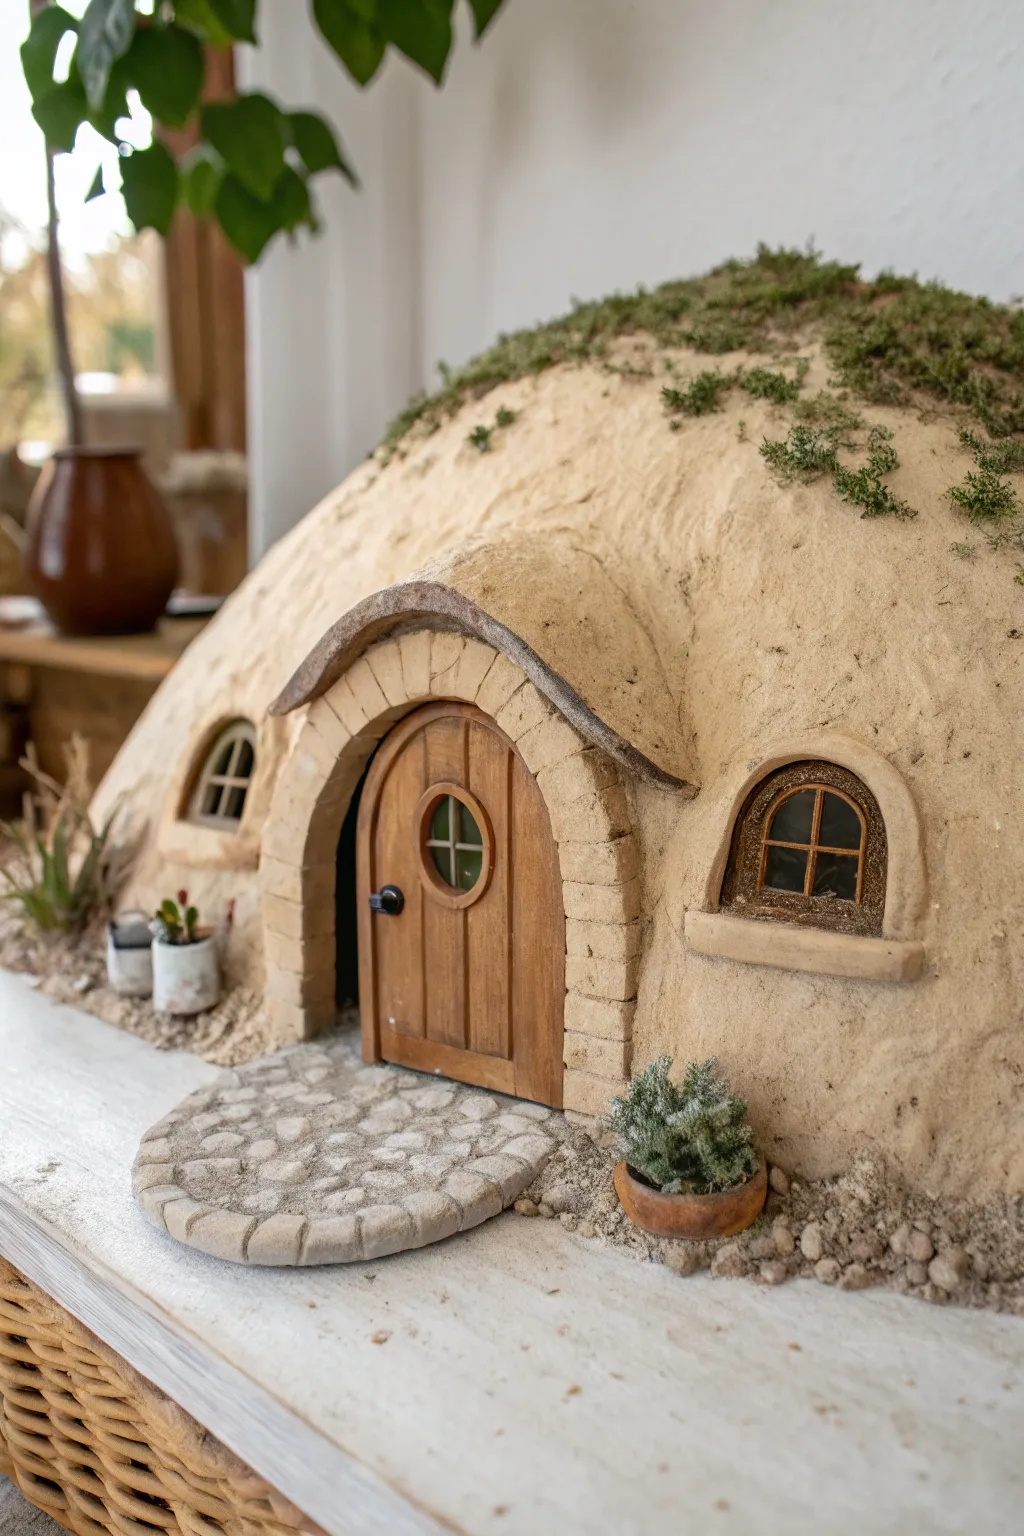
Bring a touch of fantasy to your shelf with this delightful root cellar built directly into a clay mound. This project combines structural sculpting with fine detailing to create a cozy, textured hideaway complete with a weathered wooden door.
Step-by-Step Guide
Materials
- Air-dry clay (stone or terracotta color)
- Aluminum foil
- Cardboard or foam board (for the base)
- Masking tape
- Sculpting tools (needle tool, small spatula)
- Acrylic paints (browns, ochres, greys, greens)
- Texture paste or sand
- PVA glue
- Balsa wood or popsicle sticks
- Dried moss or flocking powder
- Small pebbles or coarse sand
- Clear acetate or plastic sheet (for windows)
Step 1: Building the Core Structure
-
Prepare the Base:
Cut a sturdy piece of cardboard or foam board into a kidney or oval shape to serve as the foundation for your landscape. -
Form the Mound Armature:
Crumple large amounts of aluminum foil into a domed hill shape. Place it on the base, leaving a flat front area where the door will go. -
Secure the Armature:
Use masking tape to wrap the entire foil mound tightly. ensure the bottom is flat and glued securely to your cardboard base. -
Create the Door Cavity:
Press a thumb or a tool handle into the front center of the foil mound to create a slight indentation where the arched entryway will be placed.
Step 2: Clay Application & Sculpting
-
Cover the Mound:
Roll out a large sheet of air-dry clay to about 1/4 inch thickness. Drape this over your foil mound, smoothing it down the sides to meet the base. -
Texture the Surface:
While the clay is wet, use a stiff bristle brush or a crumpled ball of foil to dab the surface, giving it a rough, earthen stucco texture. -
Build the Entry Arch:
Roll a thick snake of clay and form an arch shape. Attach it to the front indentation using slip (water and clay mix). Flatten the front face of the arch. -
Carve the Brickwork:
On the front of the arch, use a needle tool to carve individual brick shapes. I find that pressing slightly harder on the horizontal lines adds realistic depth. -
Add the Roof Overhang:
Create a curved, peaked roof piece from a slab of clay and attach it directly over the brick arch, blending the back edge into the main mound. -
Sculpt Window Frames:
Roll thin coils of clay to create arched window frames on either side of the door. Attach them with slip and smooth the edges into the mound wall.
Cracks in the facade?
If the clay shrinks and cracks while drying, fill the fissures with a mix of fresh clay and white glue. Smooth it over with a damp finger and repaint once dry.
Step 3: Woodwork & Details
-
Construct the Door:
Cut balsa wood strips vertically and glue them side-by-side to fit inside your brick arch. Cut a circle out of the center for the window. -
Add Door Details:
Frame the circular window with a thin clay coil or bendable wood trim. Paint the door with a warm oak brown wash to bring out the grain. -
Assemble the Windows:
Cut small pieces of clear acetate for the glass. Use tiny strips of balsa wood or painted cardstock to create the cross-mullions and glue them behind the clay frames. -
Lay the Stone Path:
Apply a layer of PVA glue on the base in front of the door. Press small, flat pebbles into the glue to create a paved walkway leading to the entrance.
Light it up
Before sealing the foil armature, embed a small battery-operated fairy light inside. Leave a small hole behind the acetate windows so a warm glow shines through.
Step 4: Finishing Touches
-
Base Painting:
Once the clay is fully dry, paint the entire mound in a sandy beige or light ochre color. Dry brush with white to highlight the texture. -
Add Mossy Vegetation:
Apply patches of glue to the top of the mound and press dried moss or green flocking into it to simulate overgrowth on the roof. -
Install Accessories:
Glue the wooden door into place. Position miniature potted plants (made from scraps of clay and tiny faux greens) near the entrance for a lived-in look.
Place your finished mound on a sunny shelf and enjoy the whimsical charm of your handcrafted dwelling
Crystal Cave Clay House With Geode-Inspired Windows
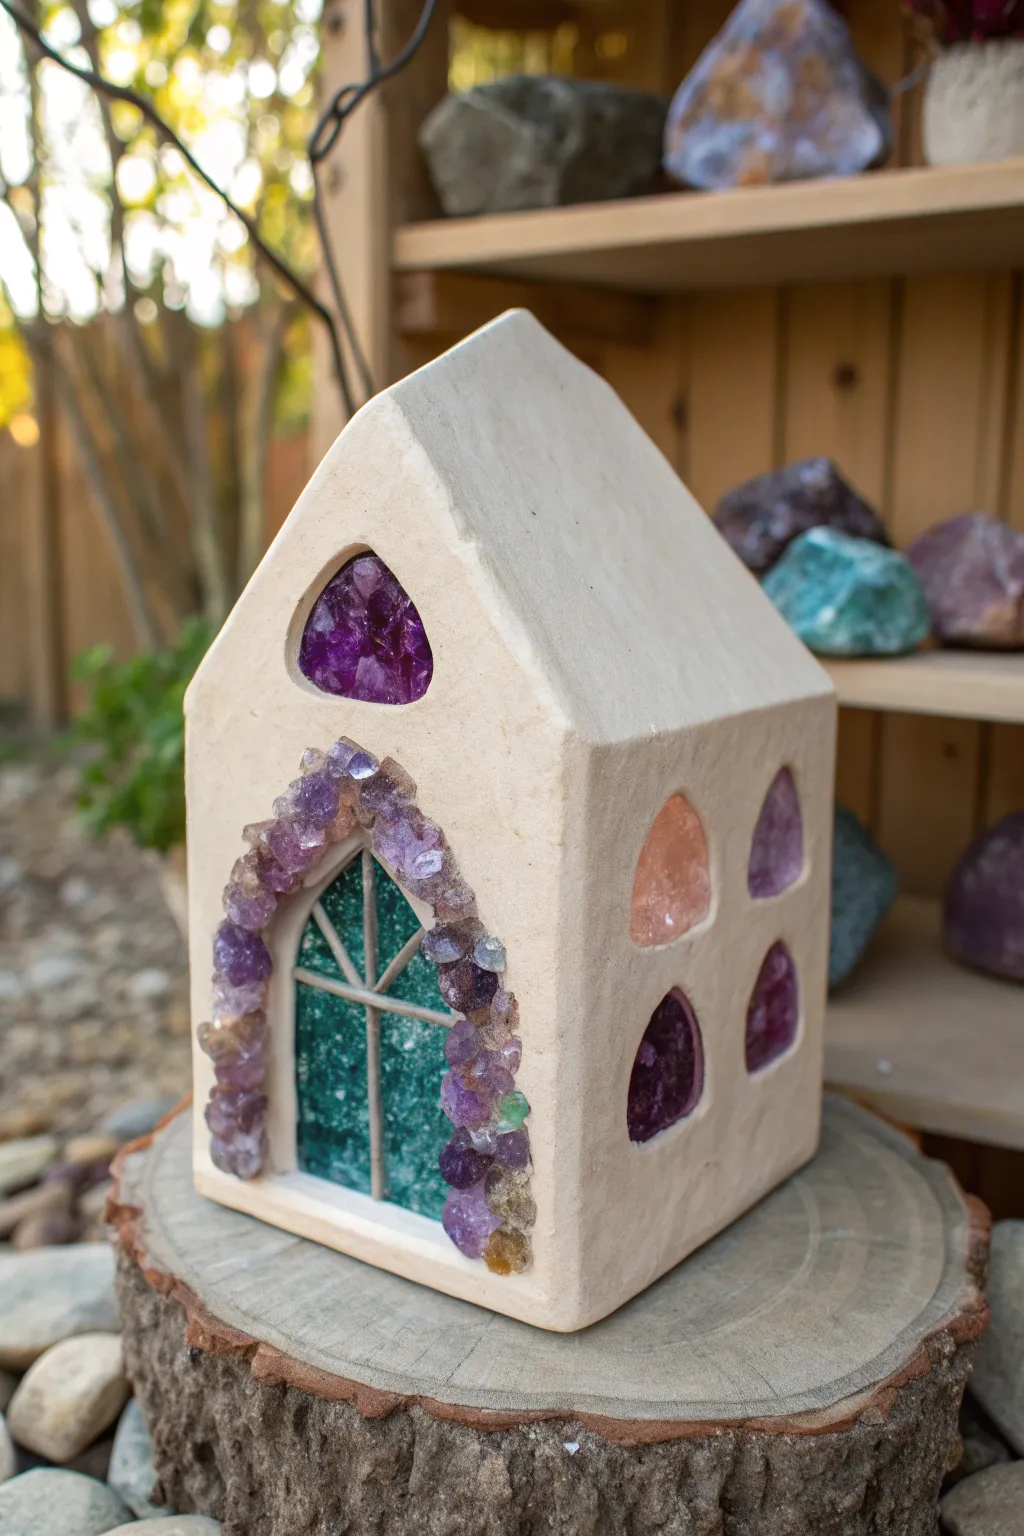
Transform simple polymer or air-dry clay into an enchanting, fairy-like abode that looks as though it’s growing directly from a geode. This project combines sleek, minimalist architecture with the raw, organic beauty of crushed glass and rough crystals to create a stunning glowing lantern effect.
Step-by-Step
Materials
- White polymer clay (approx. 1lb block)
- Dough roller or pasta machine
- Craft knife or scalpel
- Templates (cardstock cut into house wall shapes)
- Rough amethyst chips or raw crystal chunks (small)
- Crushed glass filler (green, purple, clear)
- UV resin or 2-part epoxy resin
- UV lamp (if using UV resin)
- High-tack packing tape
- Liquid clay (white or transparent) or clay adhesive
- Sandpaper (fine grit)
- Thin wooden dowel or toothpick
Step 1: Constructing the Clay Shell
-
Prepare the slabs:
Begin by conditioning your white polymer clay until it is soft and pliable. Roll it out into an even slab, approximately 1/4 inch thick. Ensuring consistent thickness is key here, so use depth guides if you have them. -
Cut the facade:
Place your cardstock templates onto the clay slab. You’ll need two pointed gable ends (front and back) and two rectangular side walls along with two roof panels. Use a sharp craft knife to trace around them for clean edges. -
Carve the openings:
While the pieces are flat, carefully cut out your window and door shapes. For the front, cut a large arch for the door and a smaller teardrop shape near the peak. For the side walls, cut uniform arched windows. Save the clay scraps for later. -
Texture the surface (optional):
If you want a stucco look like the photo, gently dab the surface of the clay with a toothbrush or a ball of crumpled foil. For a smoother, modern finish, leave as is. -
Initial bake (partial):
To make assembly easier, bake the flat wall pieces for about 10–15 minutes at the recommended temperature. This hardens them enough to stand up without sagging but leaves them receptive to bonding. -
Assemble the walls:
Once cool, apply liquid clay along the vertical seams. Join the four walls together to form the box structure. I like to reinforce the inside corners with small snakes of raw clay, smoothed down with a tool to ensure a strong bond.
Don’t Bake the Tape!
Only use the packing tape method for the resin step. Peel it off BEFORE the final bake, or apply resin after the final bake to avoid melting plastic inside your artwork.
Step 2: Creating the Crystal Windows
-
Tape backing:
Apply strips of high-tack packing tape to the *inside* of the house, covering the window openings. The sticky side should be facing out through the windows. Press it firmly against the interior walls to create a seal. -
Fill the windows:
Lay the house on its side so the window openings are horizontal. Pour your crushed glass or crystal chips into the openings. Use green for the door, purple for the upper window, and vary the colors for the side windows. -
Apply resin:
Carefully drip plain UV resin or epoxy over the crushed glass until it is just saturated. Don’t overfill; you want the texture of the stones to remain slightly visible. -
Cure the resin:
Cure with a UV lamp (or let epoxy set) until rock hard. Repeat this process for each side of the house, rotating as you go so the liquid resin doesn’t drip. -
Add door grid details:
Roll extremely thin snakes of raw white clay. Lay them over the cured green resin in the front doorway to create a windowpane grid pattern. A specialized clay extruder makes this much easier if you have one.
Light It Up
Leave the bottom of the house open so you can place it over a battery-operated LED tea light. The light will shine through the resin windows for a magical glow.
Step 3: Finishing Touches
-
Attach the roof:
Apply liquid clay to the top edges of the walls. Place your two roof panels on top, pressing the seam at the peak together. Smooth out the join line with a little extra raw clay and your finger. -
Frame the door:
Apply a generous strip of liquid clay or thick white glue around the exterior arch of the front door. One by one, press your larger rough amethyst chunks into the adhesive to create the stone archway. -
Final bake:
Place the entire assembled house back into the oven for a final, full cure according to your clay manufacturer’s instructions. If you used resin, ensure your oven temperature doesn’t exceed the resin’s heat tolerance (usually safe at standard clay temps around 275°F/130°C). -
Remove tape and clean:
Once completely cool, peel off the packing tape from the inside. If the resin is sticky or cloudy on the inside, you can add a thin coat of clear gloss varnish to restore clarity. -
Sand edges:
Use fine-grit sandpaper to gently smooth any sharp corners on the roof peak or base, giving the house a soft, weathered stone appearance.
Place your crystal cottage on a wood slice or near a window to catch the light and enjoy the magical atmosphere it creates