If you love projects you can finish in one cozy studio session, miniature clay is where the magic happens. These tiny ideas are all about big charm in a small package—perfect for cute decor, tiny gifts, and little keepsakes you can actually hold in your hand.
Tiny Smiling Toast With Butter Drip Details
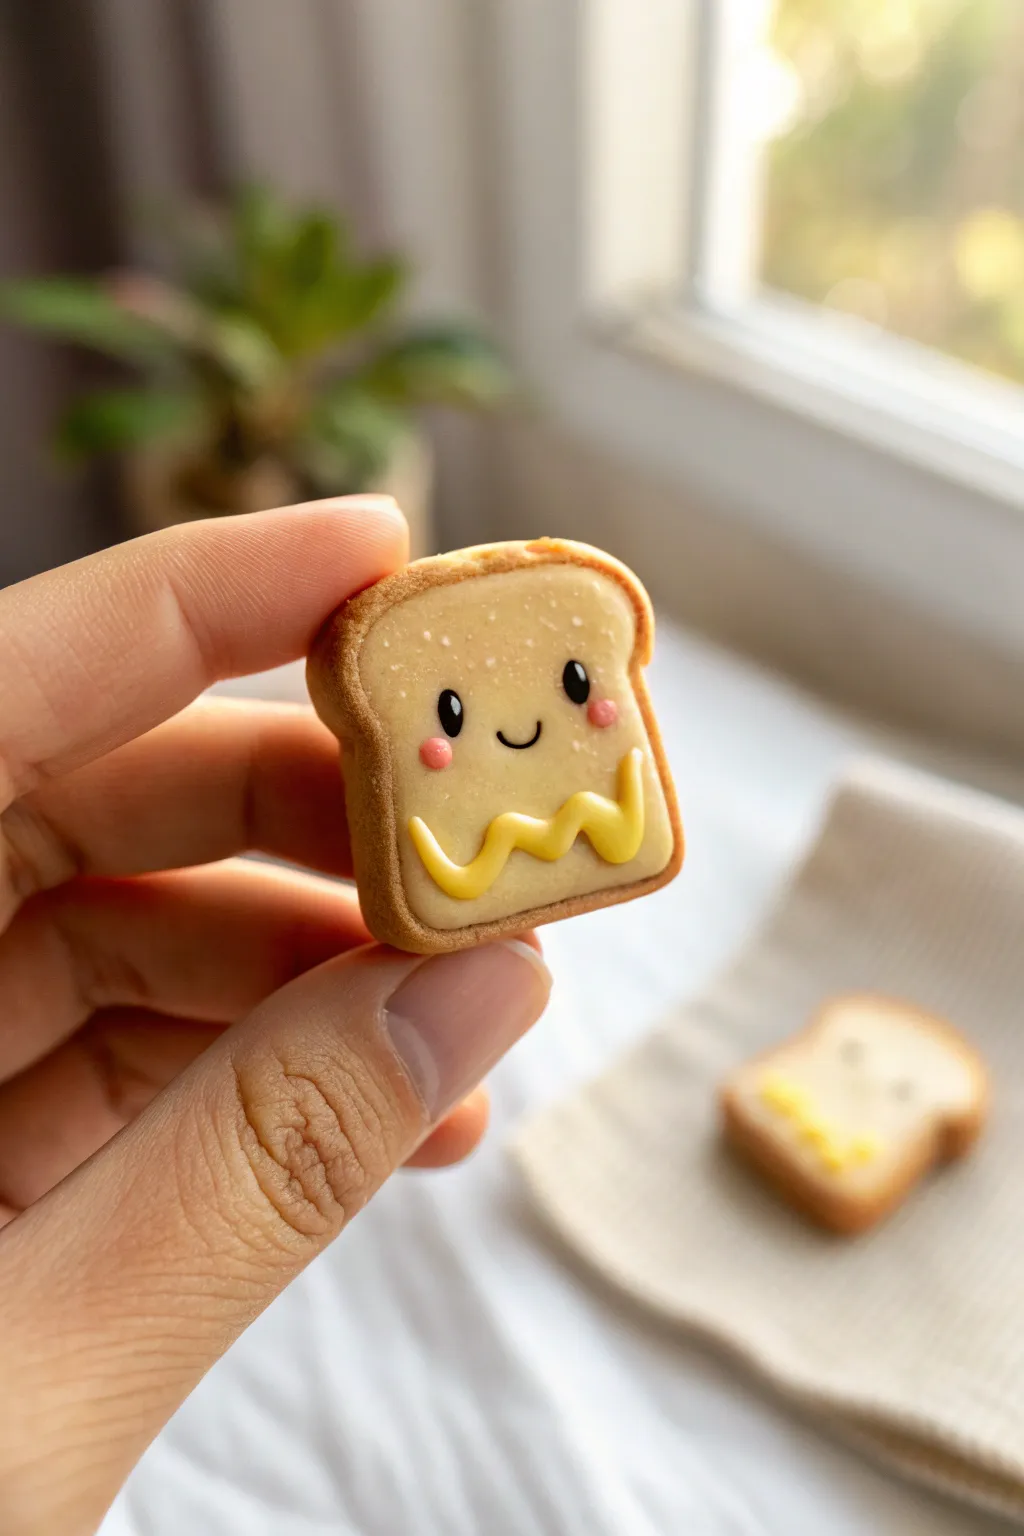
Turn a simple ball of clay into the cutest breakfast companion you’ve ever seen. This tiny toast features a realistic baked texture, a sweet kawaii expression, and a playful drizzle of dimensional ‘butter.’
Step-by-Step Tutorial
Materials
- Polymer clay (white, translucent, yellow, brown, black, pink)
- Liquid polymer clay (translucent)
- Yellow chalk pastel or acrylic paint
- Soft-bristle brush (for shading)
- Texture tools (toothbrush or sandpaper)
- Needle tool or dotting tool
- Craft blade
- Rolling pin
- Oven
Step 1: Baking the Bread Base
-
Mix the dough color:
Start by mixing white polymer clay with a very small amount of yellow and translucent clay. You want a pale, creamy dough color that isn’t stark white. -
Shape the loaf:
Roll the clay into a ball, then flatten it slightly. Pinch the bottom corners to make them square and gently press the top to create that signature rounded loaf hump. -
Add the crust:
Roll out a thin snake of light brown clay. Carefully wrap this strip around the entire perimeter of your toast shape, smoothing the seam where the ends meet. -
Blend the crust:
Using your finger or a silicone tool, gently smudge the clay along the join line so the crust adheres firmly to the white bread center without losing its distinct border. -
Texturize the surface:
Take a clean toothbrush or a piece of coarse sandpaper and tap it repeatedly over the front and back of the toast. This mimics the porous texture of real bread. -
Shade the edges:
Scrape some yellow-brown chalk pastel into a powder. With a soft brush, dust this powder around the very edges of the bread face to give it a toasted, golden glow.
Fixing Smudges
If you get black clay dust on the light bread surface, use a cotton swab dipped in rubbing alcohol or nail polish remover to gently wipe it away before baking.
Step 2: Adding Personality
-
Indent eye sockets:
Use a medium-sized dotting tool to press two small indents where the eyes will go. Placing them wide apart enhances the cute factor. -
Place the eyes:
Roll two tiny balls of black clay and press them firmly into the sockets you just made. Flatten them slightly so they don’t bulge out too much. -
Create the smile:
Roll an incredibly thin thread of black clay. Cut a tiny ‘U’ shape and press it onto the face between the eyes with a needle tool. -
Add rosy cheeks:
Take two minuscule balls of bright pink clay. Flatten them onto the cheeks, just below the eyes, to give your toast a happy flush. -
Initial bake:
Bake the piece for about 10-15 minutes at the temperature recommended on your clay package to set the shape before adding the liquid details.
Step 3: The Buttery Finish
-
Prepare the butter mixture:
Mix liquid translucent clay with a scraping of yellow chalk pastel or a drop of yellow clay softener. The consistency should be like thick syrup. -
Pipe the squiggle:
Using a needle tool or a fine tip applicator, carefully drag a wavy line of the yellow liquid clay across the bottom half of the toast. -
Add dimension:
Go back over your wave to add a little more volume in certain spots, making it look like a generous squeeze of butter or mustard. -
Final bake:
Pop the toast back in the oven for another 10-15 minutes to cure the liquid clay detail. -
Adding highlights:
Once cool, use a toothpick to add a microscopic dot of white acrylic paint to the top corner of each black eye for that sparkling life-like look. -
Seal (Optional):
Finish by brushing a matte varnish over the bread parts and a gloss glaze over the butter detail to make it shine.
Make It a Magnet
Before the final bake, press a small, strong neodymium magnet into the back of the toast. Now your happy breakfast friend can live on your fridge!
Once cooled, your charming little toast is ready to brighten up any desk or shelf with its buttery smile


Mini Avocado Half With a Cute Pit Face
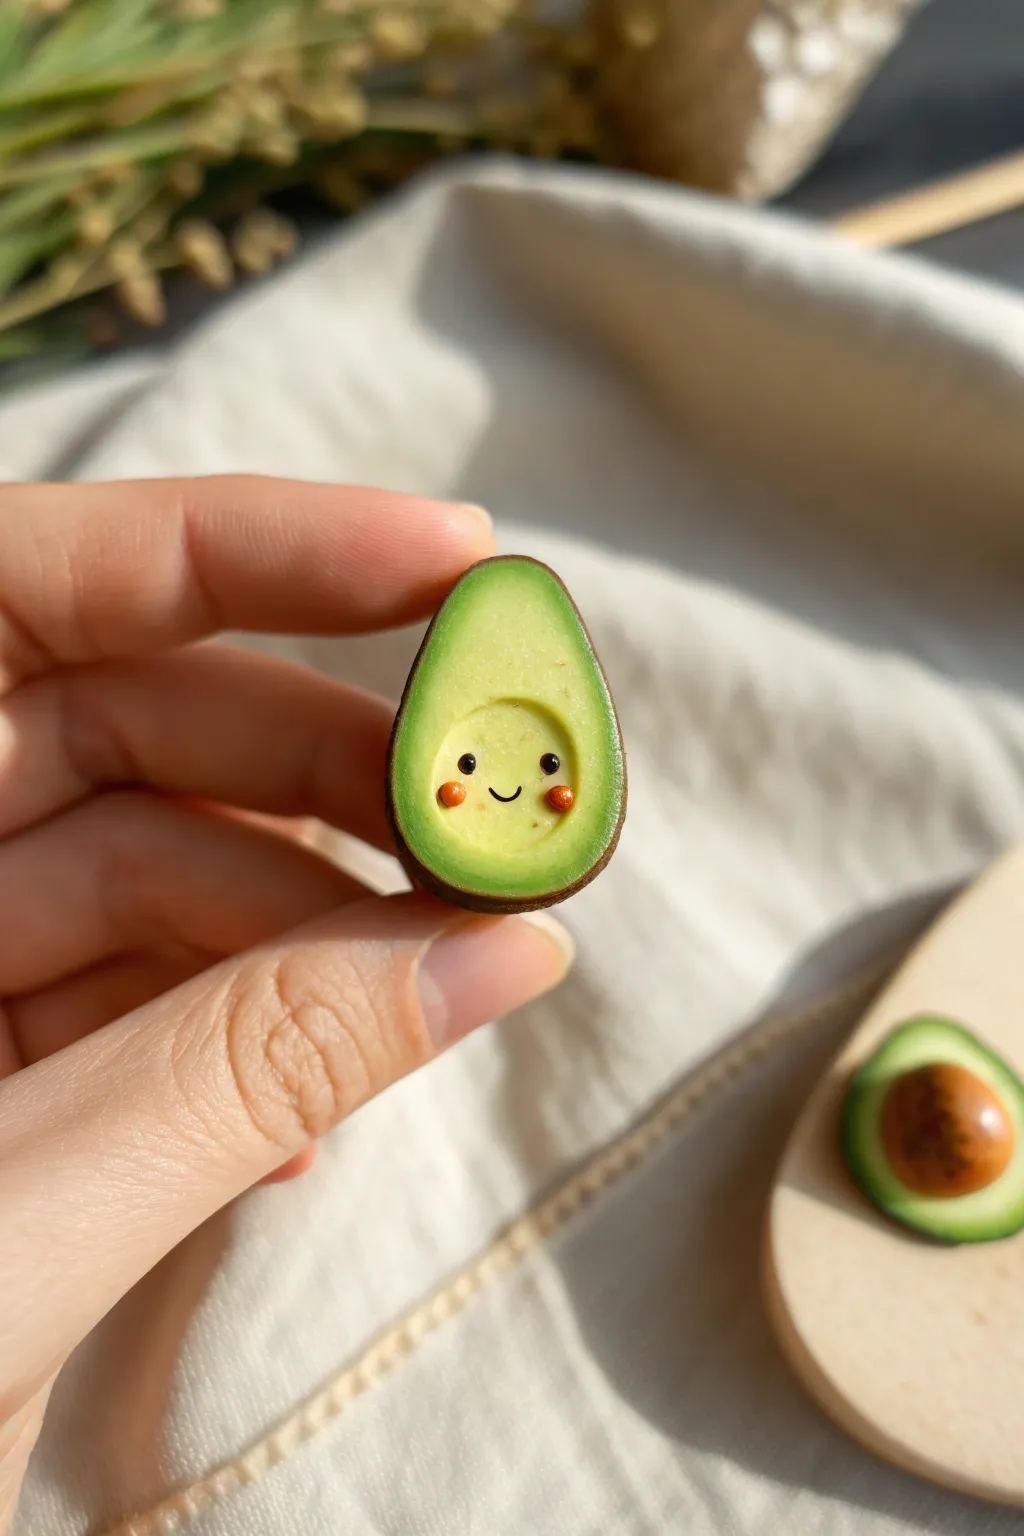
Create an adorable miniature avocado half that fits perfectly on your fingertip. This tiny clay charm features a realistic skin texture and a cheerful little face nestled inside the pit hollow.
Detailed Instructions
Materials
- Polymer clay (dark green, light yellow-green, translucent white, dark brown)
- Chalk pastels (dark green, yellow ochre, brown)
- Needle tool or toothpick
- Soft paintbrush
- Dotting tool or ball stylus
- Black acrylic paint
- Pink or coral acrylic paint (or clay)
- Gloss glaze or UV resin
- Aluminum foil (for texturing)
- Craft knife
Step 1: Mixing & Shaping the Base
-
Create the avocado flesh color:
Begin by mixing a small amount of light yellow-green clay with translucent clay. This helps mimic the waxy, slightly see-through quality of real avocado flesh. -
Form the basic shape:
Roll a small ball of your mixed green clay, about the size of a marble. Gently pinch one side to create a teardrop or pear shape, flattening the front and back slightly. -
Create the pit hollow:
Use a large ball stylus or the rounded end of a paintbrush handle to press an indentation into the lower, wider part of the teardrop. This is where the seed would sit. -
Prepare the skin layer:
Roll out a very thin sheet of dark brown clay. It should be thin enough to handle but thick enough to cover the green shape without tearing. -
Wrap the avocado:
Place your green teardrop onto the dark brown sheet. Carefully wrap the brown clay around the rounded back and sides of the green shape, trimming away excess from the front face with a craft knife. -
Smooth the seams:
Gently blend the dark skin clay so it sits flush with the green face, ensuring there are no gaps. The skin should look like a thin rind.
Texturing Pro-Tip
For ultra-realistic skin, use an old toothbrush to stipple the brown clay before using foil. The combination creates deep, varied pores just like real skin.
Step 2: Texturing & Shading
-
Texture the skin:
Take a crumpled ball of aluminum foil and roll it gently over the dark brown exterior. This creates that bumpy, realistic ‘Hass’ avocado texture. -
Shade the flesh gradient:
Scrape some dark green chalk pastel into a fine powder. Using a soft, dry brush, dust the outer edges of the light green face to create a natural transition from skin to flesh. -
Add warmth to the fresh cut:
Dust a tiny amount of yellow ochre pastel around the center indentation to make the ‘flesh’ look ripe and buttery. -
Detail the pit hollow:
Using a needle tool, lightly scratch subtle concentric circles or texture inside the pit indentation to give it a fibrous look.
Make it a Necklace
Before baking, screw a tiny eye pin into the top of the avocado. Once baked, you can attach jump rings and chain to wear your fuzzy fruit as jewelry.
Step 3: Adding the Face & Finishing
-
Bake the clay:
Place your avocado on a ceramic tile or baking sheet. Bake according to your customized clay manufacturer’s instructions (usually around 275°F/135°C for 15-30 minutes) and let it cool completely. -
Paint the eyes:
Dip a very fine needle tool or the smallest dotting tool into black acrylic paint. Place two tiny dots inside the pit hollow, spaced slightly apart. -
Add the smile:
Using an ultra-fine detail brush or the very tip of a needle, paint a tiny, curved U-shape between the eyes for the smile. -
Create rosy cheeks:
Mix a dab of pink or coral paint. Use a toothpick to apply two small blush marks underneath the eyes, slightly wider than the eyes themselves. -
Seal just the face:
I prefer to apply a tiny drop of UV resin or gloss glaze only inside the hollow area where the face is. This makes the ‘pit’ area look slightly moist, while keeping the rest matte. -
Final matte varnish (Optional):
If you want to protect the chalk shading on the flat surface, apply a thin layer of matte varnish over the green flesh, avoiding the glossy pit area.
Now you have a tiny, smiling companion ready to brighten up your desk or jewelry collection


Mini French Fries in a Carton With Texture Tricks
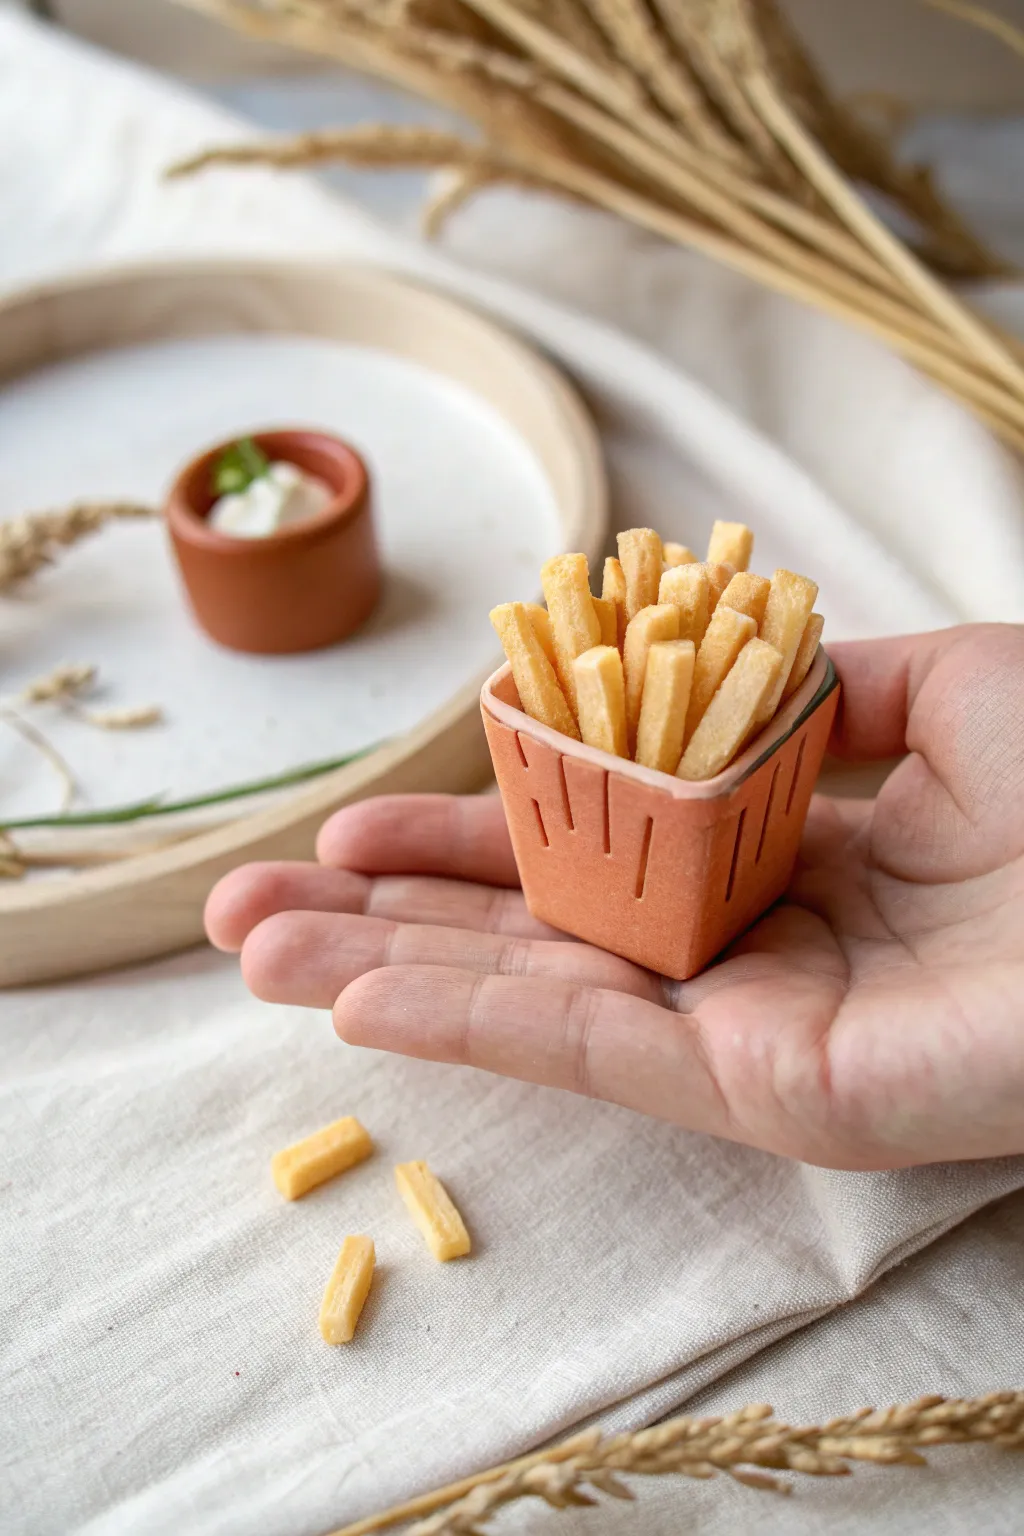
Capture the salty satisfaction of a fast-food favorite with this adorable miniature clay project. You’ll sculpt perfectly textured french fries and build a rustic, terracotta-style carton to hold them all together.
How-To Guide
Materials
- Polymer clay (translucent, white, and yellow)
- Pastel chalks (yellow ochre, brown, and burnt orange)
- Terracotta-colored polymer clay (or mix orange, brown, and white)
- Liquid polymer clay (Fimo liquid or TLS)
- Craft blade or X-Acto knife
- Toothbrush or fine sandpaper (for texturing)
- Needle tool
- Rolling pin or pasta machine
- Small paintbrush
- Gloss varnish (optional)
Step 1: Sculpting the Fries
-
Mix the perfect potato color:
Blend a large portion of translucent clay with a small amount of white and a tiny pinch of yellow. The result should look like raw potato flesh—slightly creamy and off-white rather than stark yellow. -
Create a slab:
Roll your mixed clay out into a thick slab, approximately 3-4mm thick. Ensure the thickness is even, as this determines the width of your fries. -
Texture the surface:
Before cutting, gently tap a clean toothbrush or fine sandpaper over both sides of the clay slab. This creates that authentic, fluffy fried potato texture rather than a smooth plastic look. -
Cut the strips:
Use your craft blade to slice the slab into long strips, then cut those strips into varying lengths to mimic real fries. Keep the edges slightly sharp and rectangular. -
Shade for crispiness:
Shave some yellow ochre and light brown pastel chalk into a powder. Use a soft brush to dust the edges and tips of the unbaked fries, giving them that golden-fried appearance.
Too Pale?
If your fries look undercooked after baking, lightly dry-brush a mix of burnt orange and brown acrylic paint on the edges. Wipe most off immediately for a subtle effect.
Step 2: Building the Terracotta Carton
-
Prepare the carton clay:
Condition your terracotta-colored clay until it’s soft and pliable. Roll it out into a flat, thin sheet, roughly 2mm thick. -
Cut the base shape:
Cut a small square for the base of the carton, approximately 1.5 cm x 1.5 cm. -
Cut the side walls:
Cut four trapezoid shapes for the walls. The bottom edge of each trapezoid should match the length of your base square, while the top edge should be slightly wider to allow the carton to flare out. -
Detail the sides:
Before assembling, use your craft blade to carefully cut three or four short vertical slits into each side panel. This mimics the classic fry container design. -
Texture the carton:
Lightly press a piece of sandpaper or a rough sponge against the clay panels to give them a matte, stone-like texture similar to unglazed pottery. -
Assemble the box:
Attach the four walls to the base square. Use a needle tool to gently blend the seams on the inside so they hold together firmly. -
Join the corners:
Press the side seams together along the corners. Smooth the outside joints carefully with your finger or a tool so the box looks like a single molded piece. -
Refine the rim:
Add a very thin strip of clay around the top rim of the carton if you want a reinforced edge, or simply smooth the top lip for a clean finish. -
Pre-bake:
Bake just the empty carton according to your clay package instructions (usually 15-20 minutes). This ensures it holds its shape while you fill it.
Make it a Salted Snack
Mix fine translucent glitter or white creative sand into your liquid clay or varnish. Dab tiny amounts onto the fries to simulate authentic grains of salt.
Step 3: Assembly and Finishing
-
Prepare the filling:
Once the carton has cooled, add a small amount of scrap clay inside the bottom of the box to act as a filler so you don’t have to fill the entire depth with fries. -
Apply adhesive:
Coat the scrap clay filler and the inside walls with a thin layer of liquid polymer clay. -
Arrange the fries:
Start placing your unbaked fries into the carton. I like to let them stick out at different angles and heights for a natural, slightly messy look. -
Final dusting:
If the handling rubbed off any chalk, apply a tiny bit more brown pastel dust to the very tips of the exposed fries. -
Final bake:
Bake the entire assembled piece again for the full recommended time to set the fries and bond them to the carton. -
Optional gloss:
If you want them to look oily and fresh from the fryer, dab a tiny amount of gloss varnish specifically on the fries, keeping the carton matte.
Now you have a charming basket of fries ready to display in your miniature scene


Mini Animal Blob Charms Made From One Simple Shape
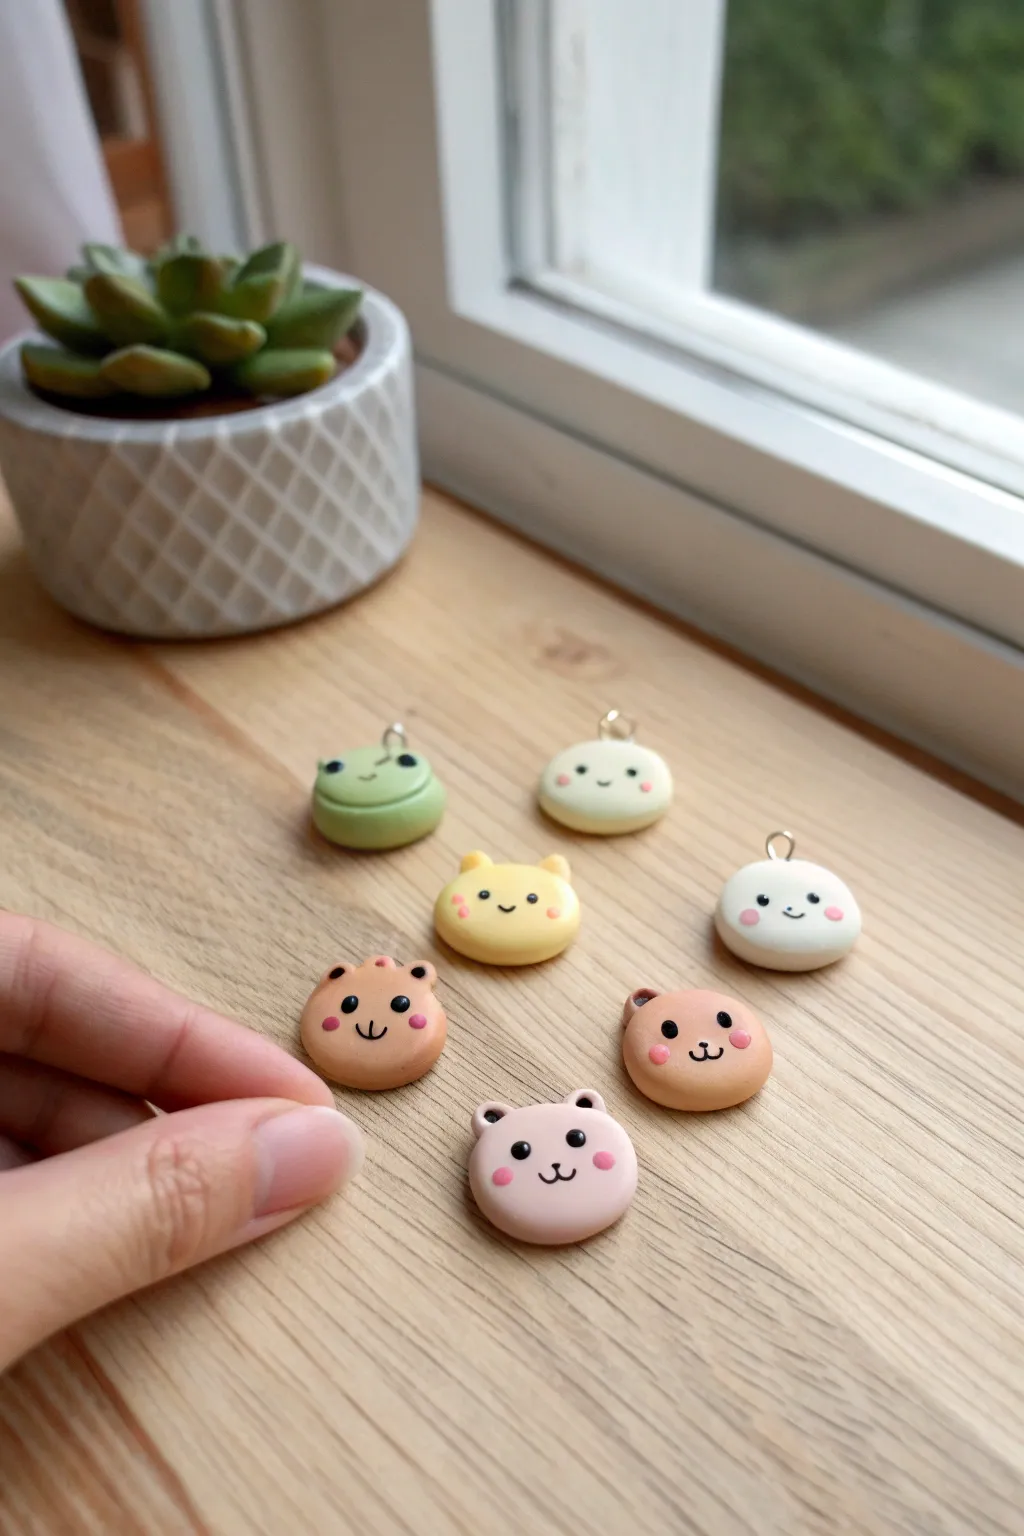
These adorable little charms prove that you only need one simple shape to create a whole menagerie of cute creatures. Perfect for beginners, these round, flattened ‘blobs’ become frogs, bears, and bunnies with just a few tiny additions and a sweet painted face.
Step-by-Step Tutorial
Materials
- Polymer clay in pastel colors (green, cream, yellow, light brown, pink)
- Black polymer clay or black acrylic paint for eyes
- Pink chalk pastel or pink acrylic paint for cheeks
- Small eye screw pins (silver or gold)
- Dotting tool or ball stylus
- Fine detail paintbrush (if painting faces)
- Clay roller or acrylic rolling pin
- Small circle cutter (optional, for uniform sizing)
- Gloss glaze or UV resin (optional for finish)
Step 1: Shaping the Base
-
Condition the clay:
Start by kneading your chosen color of polymer clay until it is soft, pliable, and free of cracks. Warm clay is much easier to smooth later. -
Form a ball:
Roll a small piece of clay into a smooth sphere about the size of a large marble or a grape. Ensure there are no seams. -
Flatten into a disc:
Gently press the ball down against your work surface using your thumb or an acrylic block. You want a thick, rounded disc shape—like a macaroon or a small cookie—rather than a flat pancake. -
Refine the edges:
Use your finger to gently tap around the circumference of the disc to round off any sharp edges created by flattening. It should look like a soft, puffed cushion.
Smooth Surface Secret
Before baking, lightly brush the raw clay with a little baby oil or clay softener. This removes fingerprints and dust specks for a professional finish.
Step 2: Adding Ears & Features
-
Create bear ears:
For the bear or cat shapes, roll two tiny balls of the same base color. They should be very small compared to the head. -
Attach the ears:
Place the tiny balls on the top edge of your base disc. Use a silicone tool or your finger to gently blend the bottom of the ear into the head so they don’t fall off after baking. -
Indent the ears (optional):
For a bear look, use a small ball stylus to press a tiny indentation into the center of each ear. This adds instant dimension. -
Create frog eyes:
If making the green frog, roll two small green balls and place them on top of the head rather than the sides. Don’t flatten them too much; frogs have distinct, protruding eyes. -
Insert the hardware:
Take a small metal eye screw pin. If you want extra security, dab a tiny bit of liquid clay or ‘Bake and Bond’ on the screw threads before twisting it gently into the top center of the charm.
Texture Twist
Before baking, gently tap the surface with an old toothbrush or stiff brush to give your animal charms a fuzzy, flocked texture instead of a smooth one.
Step 3: The Cute Face
-
Make the blush:
Shave a little pink chalk pastel into a powder. Use a soft brush or a cotton swab to dab two rosy cheeks onto the raw clay. I find applying blush before baking gives it a softer, more ingrained look. -
Bake the charms:
Place your creations on a baking sheet lined with parchment paper. Bake according to your polymer clay package instructions (usually around 275°F or 130°C for 15-30 minutes depending on thickness). -
Cool down:
Let the charms cool completely before handling. Polymer clay is fragile when warm and hardens fully as it cools. -
Paint the eyes:
Using a dotting tool dipped in black acrylic paint, place two small dots for eyes. Ideally, place them widely apart and in line with the cheeks for maximum cuteness. -
Paint the mouth:
Use a very fine detail brush or even a toothpick to paint a tiny ‘w’ shape or a simple curved smile between the eyes. -
Add highlights:
Once the black paint is dry, use a pin or the smallest dotting tool to add a tiny spec of white paint to the eyes. This ‘sparkle’ brings the character to life. -
Seal the piece:
To protect the surface paint, apply a thin coat of water-based polyurethane varnish or a layer of UV resin if you want a glassy, durable finish.
Now you have a handful of tiny friends ready to be turned into stitch markers, earrings, or keychain companions

The Complete Guide to Pottery Troubleshooting
Uncover the most common ceramic mistakes—from cracking clay to failed glazes—and learn how to fix them fast.
Tiny Paw Print Magnets for a Cute Fridge Corner
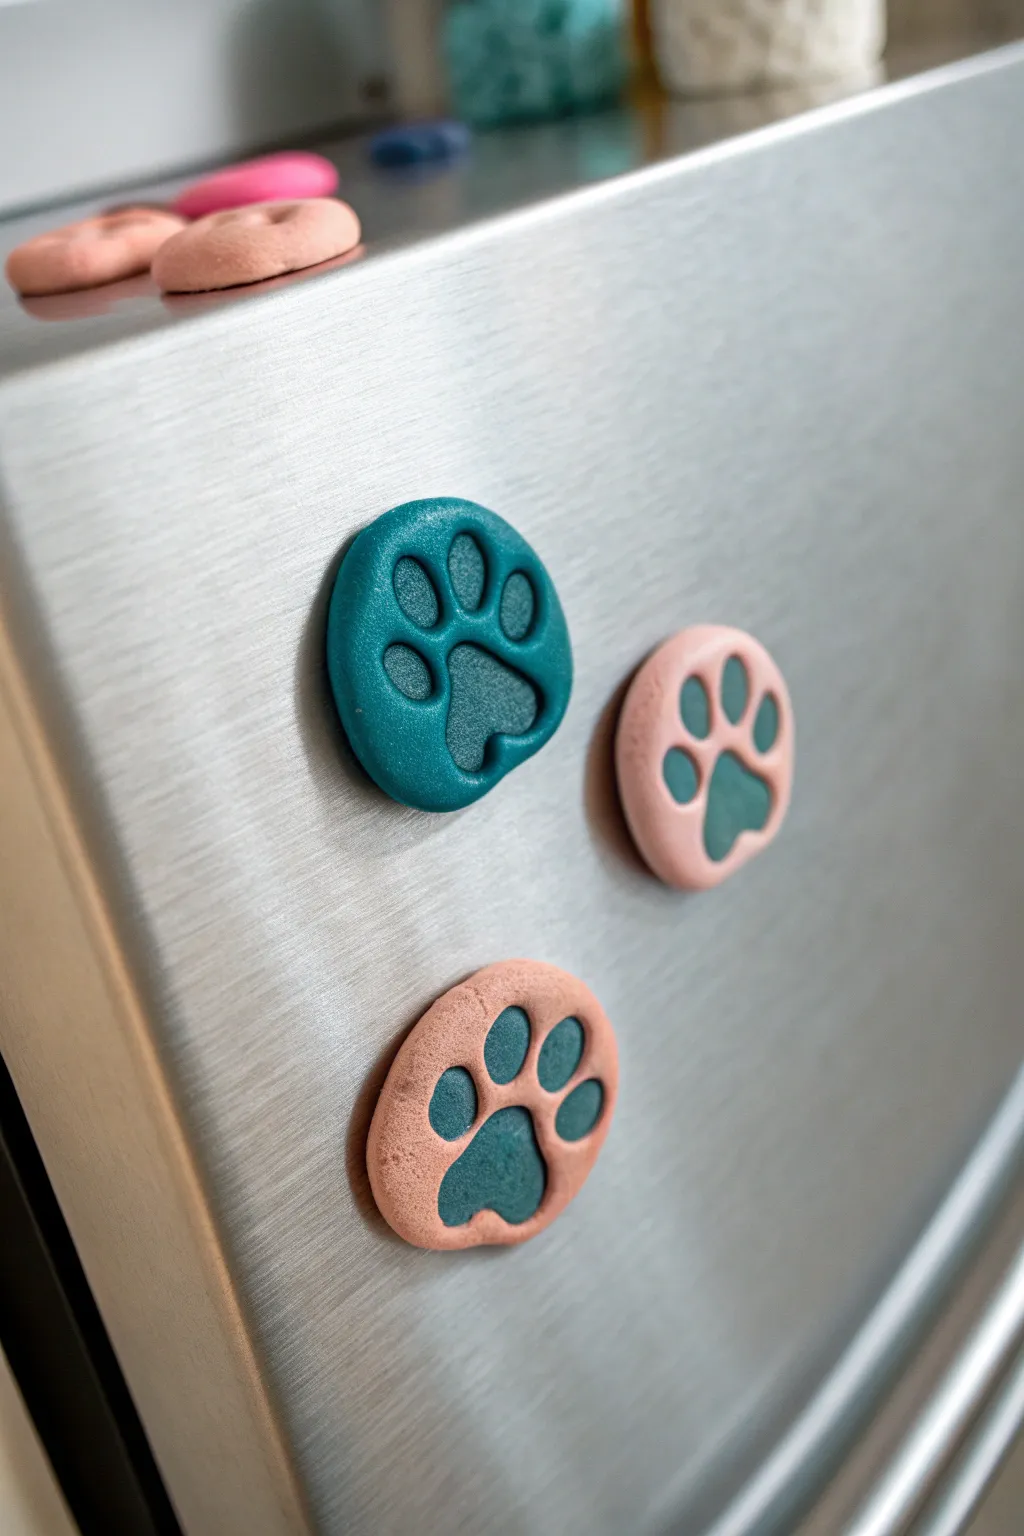
Add a touch of whimsy to your refrigerator with these adorable, miniature clay paw print magnets. Whether you choose a simple indented look or a two-toned inlaid design, these custom creations are perfect for pet lovers and easy to make in an afternoon.
Step-by-Step Guide
Materials
- Polymer clay (teal, pink, and peach colors)
- Small round clay cutter (approx. 1 inch diameter)
- Small ball stylus tool or dotting tool
- Rolling pin or pasta machine for clay
- Strong neodymium magnets (round disc shape)
- Superglue or E6000 adhesive
- Parchment paper or silicone baking mat
- Home oven or toaster oven dedicated to crafts
Step 1: Preparation and Base Shape
-
Condition the Clay:
Begin by kneading your chosen colors of polymer clay until they are soft and pliable. This prevents cracking later on. -
Roll Out the Base:
Roll your main color (for example, the teal or pink) into a sheet about 1/4 inch thick. You want it substantial enough to hold the magnet but not too heavy. -
Cut the Rounds:
Use your small round cutter to punch out circles. If you don’t have a cutter, I find rolling a ball and flattening it gently with the bottom of a glass works just fine. -
Shape into Ovals:
Gently squeeze the circle slightly to create a softer, more organic oval shape, resembling the pad of a paw. -
Smooth the Edges:
Run your finger lightly around the rim of the clay to smooth out any sharp edges left by the cutter.
Step 2: Creating the Paw Design
-
Mark the Main Pad:
Using the larger end of a ball stylus or your thumb, press a large, upside-down heart shape into the bottom center of the clay disc. -
Add Toe Beans:
Above the main pad, press four smaller indentations using a smaller ball tool to create the toes. Arrange them in an arc. -
Option 1: The Indented Look:
For the solid-colored teal magnet shown, simply refine the indents to ensure they are clean and deep enough, then proceed to baking. No extra clay is needed here. -
Option 2: The Inlaid Look:
For the two-toned magnets, roll out a contrasting color (like teal) into a very thin snake. -
Fill the Toes:
Cut tiny segments of the contrasting snake, roll them into balls, and place them into the toe indentations of your base piece. -
Fill the Main Pad:
Shape a small triangle of the contrasting clay, round the edges to look like a heart, and press it firmly into the large main pad indentation. -
Flatten the Surface:
Once filled, gently roll your roller over the top one final time to make the inlay flush with the base surface.
Clean Prints
To remove fingerprints before baking, lightly brush the raw clay with a little baby oil or cornstarch. This leaves a wonderfully smooth professional finish.
Step 3: Baking and Assembly
-
Bake the Clay:
Place your paw prints on a parchment-lined baking sheet. Bake according to your polymer clay package instructions (usually 275°F for 15 minutes per 1/4 inch of thickness). -
Cool Completely:
Let the pieces cool fully on the baking sheet. They will harden as they cool. -
Prepare the Back:
Flip the cooled paw prints over. If the back is slightly uneven, give it a quick sand with fine-grit sandpaper so the magnet sits flat. -
Attach the Magnet:
Apply a small dot of strong adhesive to the center of the back of the clay piece. -
Press and Set:
Press the neodymium magnet firmly into the glue. Let it cure undisturbed for the time recommended on your glue bottle.
Make it Sparkle
For a magical touch, mix fine glitter or mica powder into the toe bean clay before inlaying it. It adds a subtle shimmer that catches the light beautifully.
Now your fridge is decorated with a set of personalized paws that are ready to hold up your favorite photos and notes
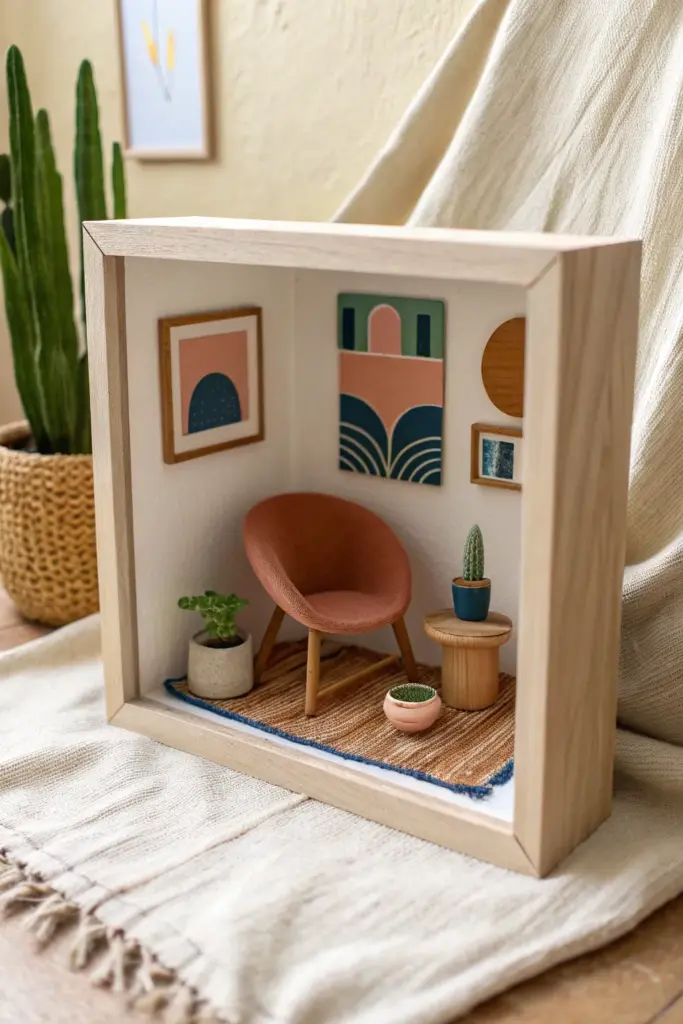
Pocket-Size Room Diorama in a Tiny Shadow Box

Transform a simple wood frame into a sophisticated, mid-century modern sanctuary small enough to fit in your hand. This diorama combines tiny clay sculpting with papercraft to create a surprisingly realistic interior scene complete with trendy houseplants and a statement chair.
Step-by-Step
Materials
- Small square wooden shadow box (approx. 5×5 inches)
- White acrylic paint
- Polymer clay (terracotta, green, brown, tan, blue)
- Balsa wood scraps or popsicle sticks
- Textured fabric scrap (coarse weave for the rug)
- Cardstock or thick paper
- Fine-grit sandpaper
- Tacky glue or super glue
- Acrylic paints (various colors for art)
- Fine liner brush
- Sculpting tools (needle tool, ball stylus)
- Baking sheet and oven (for clay)
Step 1: Preparing the Room Shell
-
Prime the walls:
Begin by dismantling your shadow box if it has glass (set the glass aside, you likely won’t need it). Paint the interior back and side walls with two coats of white acrylic paint to simulate clean plaster walls. -
Install the flooring:
While the walls dry, cut a piece of cardstock to fit the ‘floor’ of your box perfectly. You can paint this to look like wood or leave it white for a gallery look before gluing it into place.
Pro Tip: Realistic Texture
Before baking the chair, gently press piece of real fabric against the clay surface. This imitates upholstery texture instantly without needing difficult flocking powder.
Step 2: Sculpting the Furniture
-
Shape the chair bowl:
Knead terracotta-colored polymer clay until soft. Roll a sphere about the size of a large marble, then press your thumb into the center to create a hollow bowl shape. Pinch and smooth the edges to keep them rounded but thin. -
Create chair legs:
Roll thin snakes of tan or light brown clay for the legs. You’ll need four tapered legs. I like to pre-bake the bowl for 5 minutes first so it holds its shape while I attach the raw clay legs underneath with a drop of liquid clay or by blending seams carefully. -
Construct the side table:
Form a small cylinder from light brown clay for the table base. For the top, flatten a disc of clay slightly wider than the base. Press the disc onto the cylinder. Use a needle tool to scratch delicate vertical lines into the base for wood grain texture. -
Bake the furniture pieces:
Place your chair and table on a parchment-lined baking sheet. Bake according to your polymer clay package instructions (usually 275°F for 15-20 minutes). Let them cool completely.
Level Up: Lighting the Scene
Drill a tiny hole in the ceiling of the box and thread a single warm-white LED wire light through it to create a functioning pendant lamp or ceiling fixture.
Step 3: Crafting the Greenery
-
Pot the tall cactus:
Make a tiny cylinder pot from teal or navy blue clay. Roll a small sausage of green clay for the cactus, texture it with a needle tool to create ribs, and press it into the pot. -
Create the low succulent:
Form a small, shallow bowl from light grey or speckled beige clay. Fill it with tiny balls of green clay, pressing them together to look like a cluster of succulents or sedum. -
Make the floor planter:
Roll a slightly larger cylinder from stone-colored clay. Add a leafy plant by flattening tiny teardrops of green clay and arranging them in a rosette shape on top of the pot. Bake all plant pieces.
Step 4: Decor and Assembly
-
Weave the rug:
Cut a rectangular piece of coarse woven fabric (like burlap or thick linen). Fray the short edges slightly to create fringe. Paint a blue border on the short ends if desired for extra detail. -
Create the wall art:
Cut tiny rectangles from balsa wood to serve as frames. On small pieces of white cardstock that fit inside these frames, paint simple abstract shapes using muted pinks, teals, and navy blues. Glue the paper inside the balsa frames. -
Mount the artwork:
Plan your gallery wall layout on the left and back walls. Use tiny dots of tacky glue to secure the framed art and the unframed abstract piece (which can be made from painted cardstock directly). -
Arrange the scene:
Glue the rug down first, angling it slightly for a casual look. Glue the chair and side table onto the rug. Place the tall cactus on the table and the other planters on the floor near the chair. -
Final touches:
Check for any visible glue strings or unstable pieces. If the chair feels wobbly, add a tiny bit of clear-drying glue to the bottom of the legs.
Place your miniature room on a bookshelf and enjoy your tiny slice of interior design heaven