If you’re craving air dry clay projects that look calm, polished, and totally display-worthy, you’re in the right headspace. I’m sharing my favorite aesthetic ideas that lean minimalist, soft-toned, and practical enough to actually use around your space.
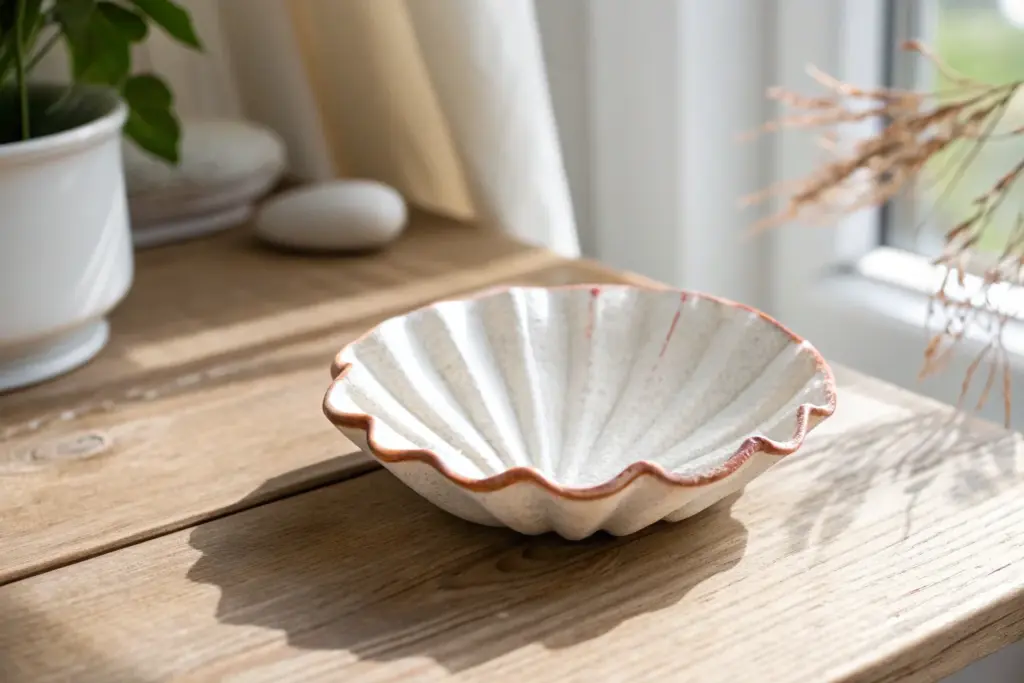
Organic Trinket Dish for Rings and Studs
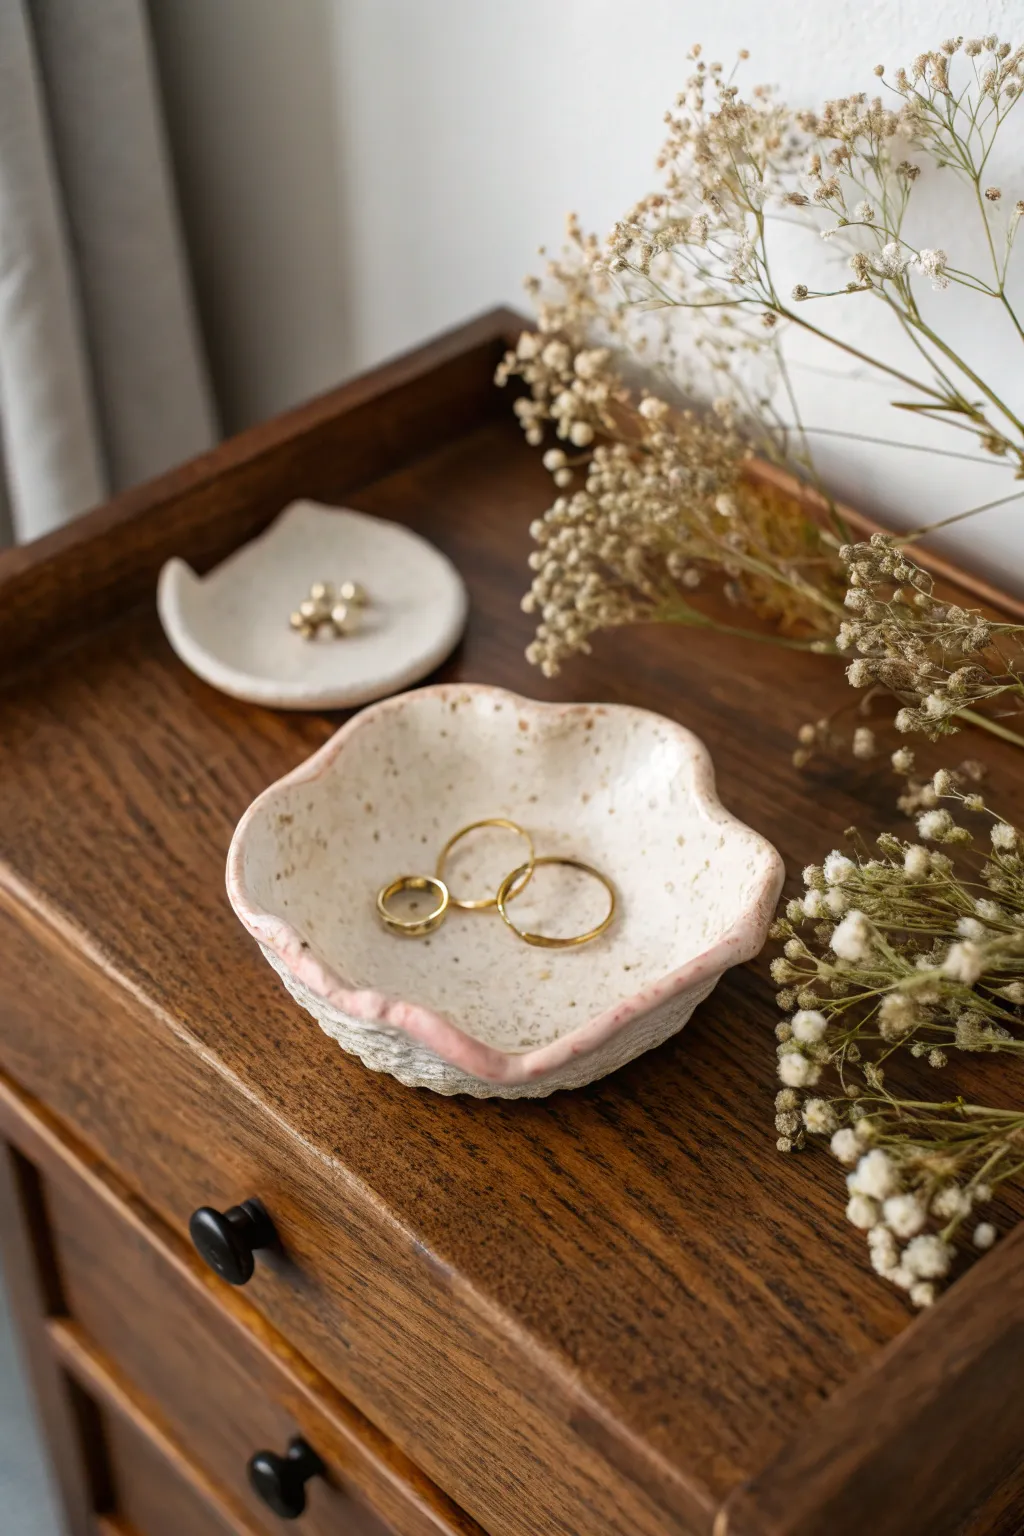
Embrace the beauty of imperfection with these charming, organically shaped jewelry dishes. Featuring delicate, wavy rims painted with a soft blush pink and a natural speckled finish, they are perfect for holding your favorite rings and studs.
Step-by-Step Tutorial
Materials
- White air-dry clay
- Rolling pin or smooth glass jar
- Small bowl or cookie cutter (for circle template)
- Craft knife or clay needle tool
- Small sponge
- Water dish
- Sandpaper (fine grit)
- Acrylic paints: Blush pink, light brown/tan
- Old toothbrush or stiff bristle brush
- Clear sealant (matte or satin varnish)
Step 1: Shaping the Clay
-
Prepare the Clay:
Start by pinching off a ball of white air-dry clay roughly the size of a golf ball. Knead it in your hands for a minute to warm it up and ensure it’s pliable and free of air bubbles. -
Roll it Out:
Using your rolling pin, flatten the ball into an even slab about 1/4 inch thick. Since we’re going for an organic look, don’t worry if the edges get a little ragged, but try to keep the thickness consistent. -
Cut the Base Shape:
Place a small guide—like a cookie cutter or the rim of a small glass—lightly onto the clay to mark a circle. Use your craft knife to cut around this shape freely; let your hand wobble intendedly to create a natural, non-perfect circle. -
Form the Dish:
Gently lift the clay circle. Using your thumbs, press the center down slightly while curling the edges upward to create a shallow bowl shape. -
Create the Petal Rims:
To achieve that wavy, flower-like rim, pinch the edges at irregular intervals. Push out gently from the inside with one finger while supporting the outside with two fingers to create soft undulations. -
Smoothing:
Dip your finger or a small sponge into a little water and run it over the entire surface. Smooth out any harsh cracks or fingerprints, paying special attention to softening the rim you just shaped.
Crack Control
If tiny cracks appear while drying, don’t panic. Mix a tiny bit of fresh clay with water to make a paste (slip) and fill the cracks, then smooth over.
Step 2: Adding Texture and Drying
-
Surface Texture:
Before the clay dries completely, you can gently pat parts of the exterior with a crumpled piece of aluminum foil or a textured sponge to give it a stone-like feel, though keeping it smooth is also lovely. -
Drying Time:
Set your dish aside in a safe, dry spot. Let it air dry for at least 24-48 hours. I find flipping it over halfway through the drying process helps the bottom dry evenly without warping. -
Sanding:
Once fully cured and hard, use fine-grit sandpaper to buff away any rough spots on the rim or underside. Wipe away the dust with a slightly damp cloth.
Step 3: Painting and Finishing
-
The Speckled Effect:
Mix a small amount of light brown acrylic paint with a drop of water to thin it. Dip an old toothbrush into the mixture. -
Flicking the Paint:
Hold the brush over the dish and run your thumb across the bristles to flick tiny speckles onto the clay. Test this on a scrap piece of paper first to control the spray. -
Painting the Rim:
Mix a soft blush pink color. Using a fine detail brush, paint just the very top edge of the wavy rim. Allow the paint to bleed slightly down the sides for a watercolor effect, or keep it crisp depending on your preference. -
Sealing:
Allow all paint to dry completely. Finally, apply a coat of clear matte or satin varnish to the entire dish to protect it and give it a finished ceramic look.
Leaf Impressions
Before drying, press a real leaf into the wet clay deeply, then peel it away. This leaves gorgeous natural veins in the base of your dish.
Place your new creation on your nightstand to hold your daily treasures


Leaf-Imprint Ring Dish in Earth Tones
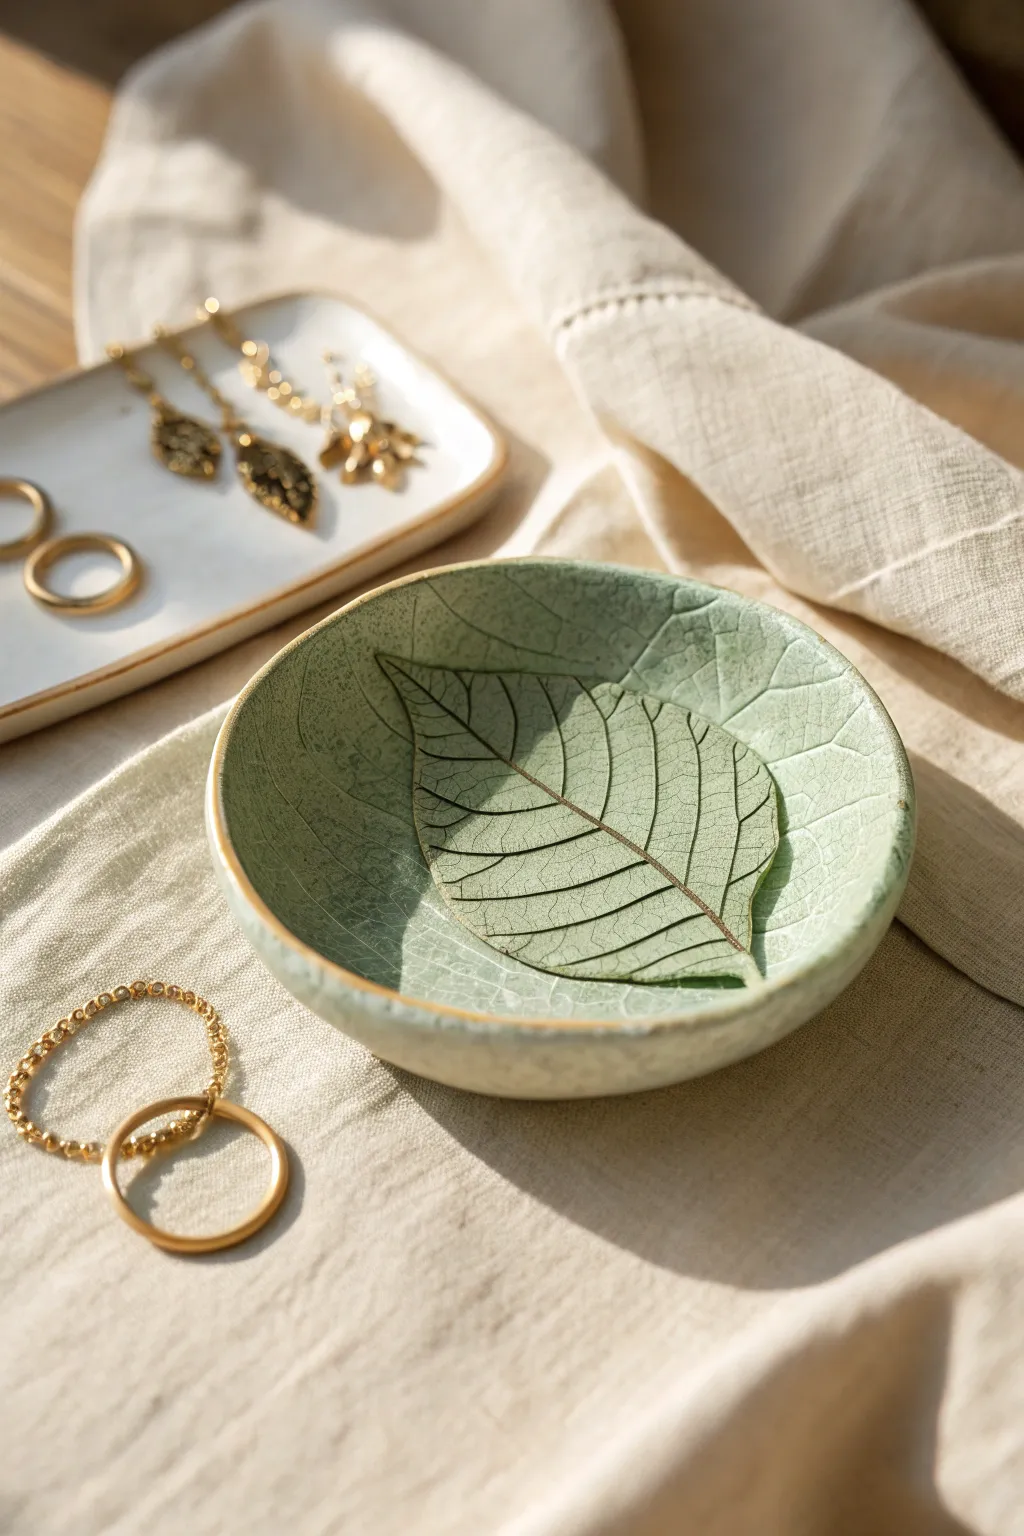
Create a serene resting place for your favorite rings with this botanical-inspired clay dish. The delicate leaf impression and crackled sage glaze work together to give this piece an organic, earthen heirloom quality.
Step-by-Step Guide
Materials
- White air-dry clay
- Rolling pin
- Small bowl (for use as a mold)
- Fresh leaf with prominent veins (like hydrangea or rose)
- Craft knife or cookie cutter (round)
- Sandpaper (fine grit)
- Sage green acrylic paint
- Glazing medium or water for thinning paint
- Medium bristled paintbrush
- Clear glossy varnish or sealer
- Paper towels
Step 1: Shaping the Base
-
Condition the clay:
Begin with a ball of air-dry clay about the size of a tangerine. Knead it in your hands until it’s warm and pliable to prevent cracking later on. -
Roll it out:
Using your rolling pin, flatten the ball into an even slab approximately 1/4 inch thick. Aim for a consistent thickness so it dries evenly. -
Select your leaf:
Choose a fresh leaf that is slightly smaller than your intended dish size. Leaves with thick, raised veins on the back work best for a deep impression. -
Press the leaf:
Place the leaf vein-side down onto the center of your clay slab. Use the rolling pin to firmly roll over the leaf once or twice, embedding it into the clay. -
Cut the shape:
Place a round cookie cutter or a small bowl upside down over the leaf imprint to act as a guide. Cut around it with a craft knife to create a perfect circle. -
Remove the leaf:
Carefully peel the leaf away by its stem to reveal the detailed impression underneath. If any tiny bits of leaf remain, pick them out gently with a toothpick. -
Form the curve:
Lift your clay circle and gently place it inside a small bowl to give it a curved dish shape. Press lightly so it conforms to the bowl’s bottom without distorting the leaf design. -
Smooth the edges:
Dip your finger in a little water and run it along the rim of the dish to smooth out any sharp cuts or roughness. -
Let it dry:
Allow the clay to dry completely in the bowl for 24-48 hours. I find that rotating the dish occasionally helps air reach all sides.
Step 2: Painting and Finishing
-
Sand imperfections:
Once fully dry, remove the dish from the mold. Use fine-grit sandpaper to gently smooth the rim and any rough patches on the bottom. -
Prepare the wash:
Mix a small amount of sage green acrylic paint with water (about a 1:1 ratio) to create a semi-transparent wash rather than an opaque coat. -
Apply the color:
Brush the wash over the entire inside of the dish, ensuring the liquid pools into the deep veins of the leaf imprint. -
Wipe back technique:
Before the paint dries completely, use a slightly damp paper towel to wipe the surface gently. This removes paint from the high points but leaves the darker green in the veins and cracks, highlighting the texture. -
Add rim detail:
For a refined look, use a small brush with slightly thicker paint (or gold paint for contrast) to carefully paint just the very edge of the rim. -
Seal the dish:
Once the paint is bone dry, apply a coat of clear glossy varnish. This mimics the look of ceramic glaze seen in the photo and protects the clay from moisture.
Pro Tip: Crackle Effect
To mimic the subtle crackle seen in the photo, gently flex the dried clay before painting to create micro-fissures, then let dark paint settle into them.
Level Up: Gold Veins
After the green wash dries, use a tiny detailing bursh to highlight just the main stem of the leaf imprint with liquid gold leaf for a luxe touch.
Now you have a beautifully organic dish that brings a touch of nature indoors


Wavy Edge Coasters in Soft Pastels
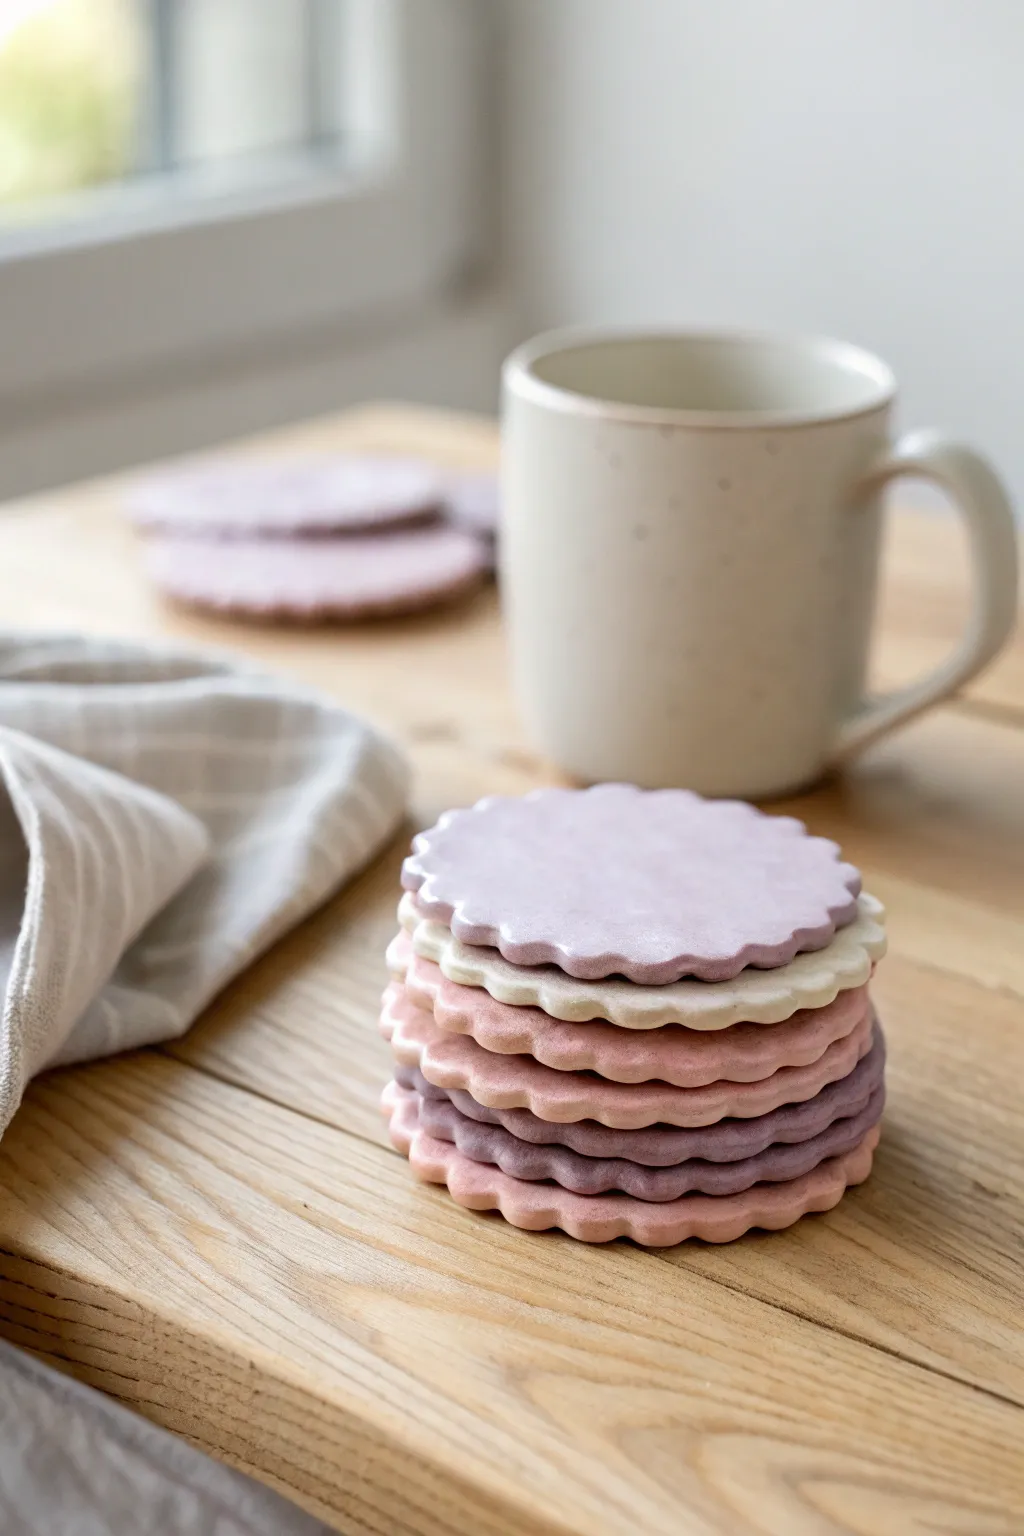
These simple yet elegant coasters feature gentle scalloped edges and a soothing palette of muted pastels. Perfect for protecting your surfaces in style, this project uses smooth air dry clay to create a functional set that looks lovely stacked or spread out.
Step-by-Step Tutorial
Materials
- White smooth air dry clay (250g roughly)
- Acrylic rolling pin
- Rolling guides or slat guides (5mm thickness)
- Circle cookie cutter (approx. 9-10mm diameter)
- Round scalloped cookie cutter (approx. 10cm diameter) OR a knife and template
- Fine grit sandpaper (200-400 grit)
- Acrylic paints (Lilac, Blush Pink, Cream, Muted Plum)
- Paintbrushes (flat soft bristle)
- Matte spray varnish or sealant
- Bowl of water and sponge
Step 1: Preparation & Shaping
-
Condition the clay:
Begin by taking a chunk of air dry clay and kneading it in your hands until it feels warm and pliable. This conditioning step removes air pockets and ensures the clay won’t crack as easily while drying. -
Roll out the slab:
Place your clay on a smooth, non-stick surface or a mat. Set up your rolling guides on either side to ensure an even thickness. I find that 5mm is the sweet spot for coasters—sturdy but not clunky. Roll the clay out flat. -
Cut the shapes:
Using a large scalloped cookie cutter, press firmly into the clay slab to cut out your coaster shape. If you don’t have a cutter this specific shape, you can print a wavy circle template on paper, place it on the clay, and carefully trace around it with a craft knife. -
Smooth the edges:
Dip your finger into a little water and run it gently along the cut edges. The goal is to soften the sharp angles left by the cutter, rounding them off slightly for a more polished look. -
Smooth the surface:
Check the top surface for any fingerprints or dust. Use a slightly damp sponge to completely smooth out the face of the coaster. Repeat the cutting and smoothing process until you have 4-6 coasters.
Step 2: Drying & Refinement
-
Initial drying:
Place your clay rounds on a clean wire rack or a piece of parchment paper. Let them sit in a cool, dry place away from direct sunlight to prevent warping. -
Flip regularly:
Every few hours during the first day, flip the coasters over. This ensures even airflow to both sides, which is the best defense against curling edges. -
Full cure:
Allow the coasters to dry completely for 24 to 48 hours. The clay should turn a uniform white and feel room temperature to the touch, not cold. -
Sand for perfection:
Once fully dry, take your fine-grit sandpaper and gently buff the edges of the scallops. Focus on removing any tiny burrs or uneven spots to get that professional finish shown in the photo. -
Wipe down:
Use a dry cloth or a tack cloth to remove all sanding dust. You need a completely dust-free surface before painting.
Fixing Warped Coasters
If a coaster curls while drying, dampen the concave side slightly with a sponge and weigh it down under a heavy book between parchment paper overnight to flatten it back out.
Step 3: Painting & Sealing
-
Mix your palette:
Prepare your acrylic paints. Aim for soft, muted tones. To achieve the pastel look, mix a large amount of white into your base colors (purple, pink, brown) until they are pale and creamy. -
First coat:
Paint the top surface and the wavy edges of each coaster in a different pastel shade. Apply the paint in thin, even strokes to avoid brush marks. -
Second coat:
Let the first layer dry completely, then add a second coat for full opacity. Don’t forget to paint the bottom if you want a fully finished look, though leaving it raw is also fine for grip. -
Matte finish:
To mimic the stone-like texture in the image, use a matte varnish. Spray or brush a thin layer of sealant over the entire coaster. This protects the paint from moisture without making it shiny. -
Waterproofing (Optional):
For extra durability against cup condensation, apply a second coat of sealant after the first has dried. Let everything cure for 24 hours before using.
Create a Speckled Effect
Mix dried coffee grounds or cracked pepper into the wet clay before rolling. This creates a natural, speckled stone texture that looks incredible under the pastel paint.
Stack your new creations on your coffee table and enjoy the soft pop of color they bring to your morning routine


Speckled Mini Bud Vase for Dried Stems
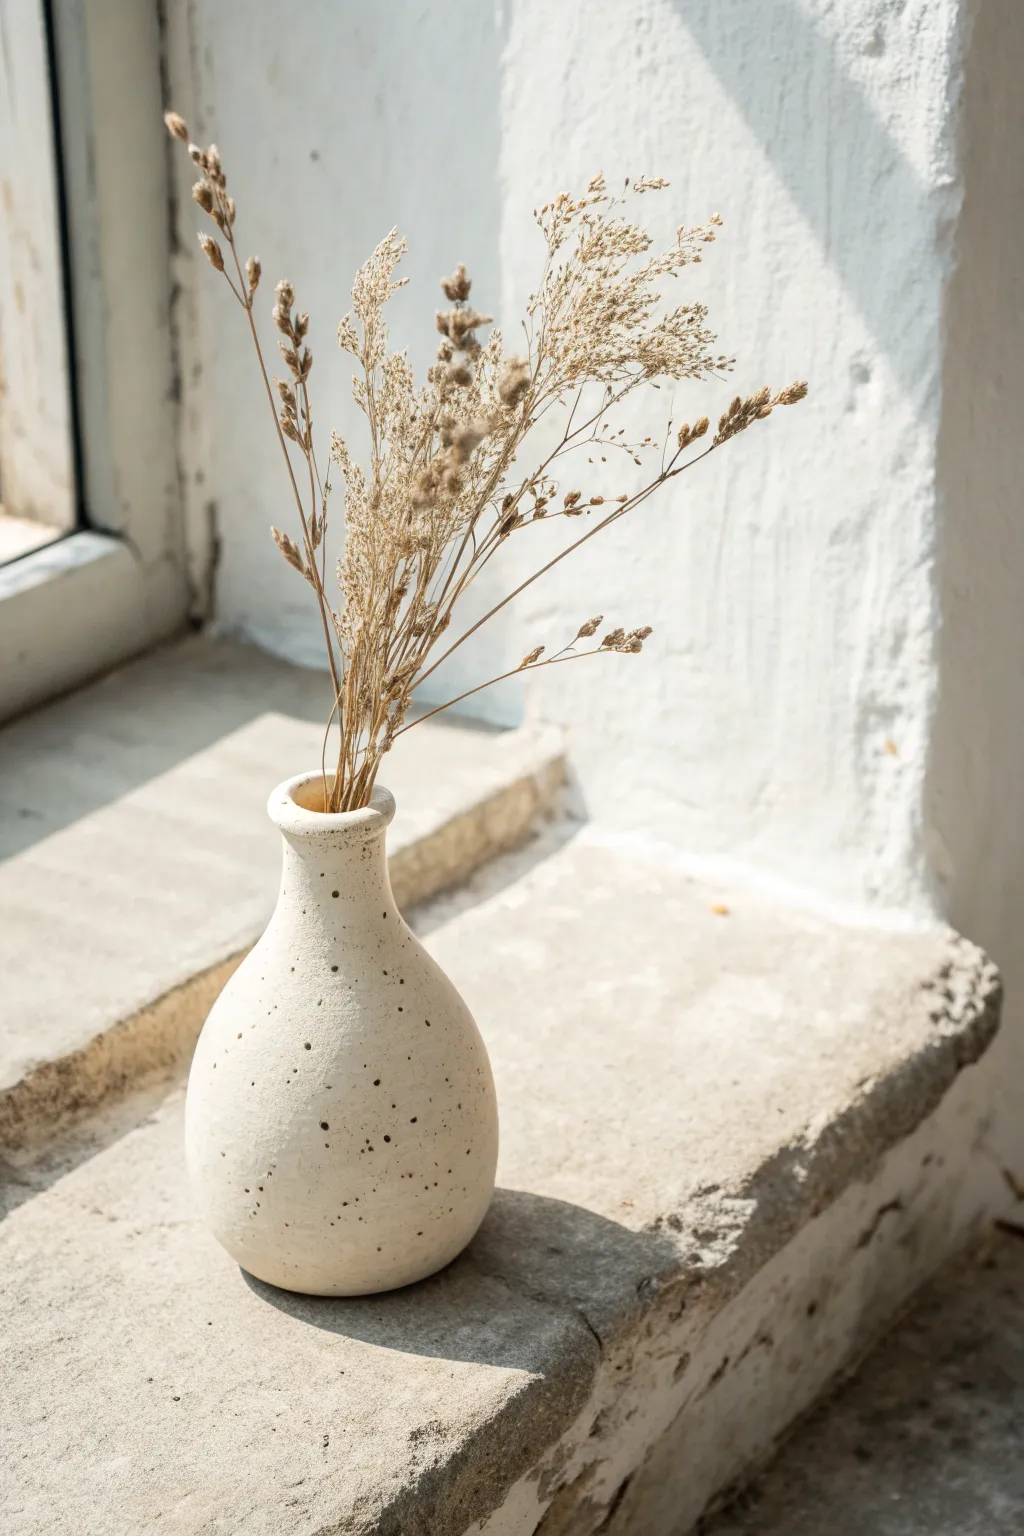
Capture the serene beauty of sunlit simplicity with this handcrafted mini bud vase. Featuring a charmingly imperfect form and faux ceramic speckles, this piece is designed specifically to hold delicate dried grasses and stems.
Detailed Instructions
Materials
- White air-dry clay (approximately 1/2 lb)
- Small cup of water
- Sponge
- Mod Podge or satin varnish
- Acrylic paint (black or dark brown)
- Old toothbrush
- Rolling pin
- Fine-grit sandpaper (around 220 grit)
- Clay sculpting tools (optional)
Step 1: Shaping the Form
-
Condition the clay:
Start by taking a chunk of air-dry clay about the size of a fist. Knead it in your hands for a few minutes until it’s pliable and smooth, removing any potential air bubbles. -
Form the base sphere:
Roll the clay into a smooth ball. Gently flatten the bottom on your work surface just enough so it sits stably without rolling away. -
Create the opening:
Press your thumb into the center of the ball, pushing down about halfway. Be careful not to breach the bottom of the vessel. -
Pinch the walls:
Using your thumb and forefinger, gently pinch and rotate the clay, working the walls upward and thinning them out. Aim for a consistent thickness of roughly 1/4 inch. -
Shape the belly:
As you pinch, gently push the walls outward from the inside to create a bulbous, rounded bottom section. Keep the top opening slightly narrower than the belly.
Keep it Clean
Before flicking paint for the speckles, place the vase inside a cardboard box. This catches the overspray and keeps your furniture speckle-free.
Step 2: Refining the Neck
-
Create a coil:
Roll a separate small snake of clay about the thickness of a pencil. This will become the neck of your vase. -
Attach the coil:
Score the top rim of your base and the bottom of your coil with a tool or toothpick. Apply a dab of water (slip) and press the coil onto the rim. -
Blend the join:
Use your thumb or a modeling tool to smooth the clay downward on the outside and upward on the inside, completely blending the seam so the neck looks like a seamless extension of the body. -
Narrow the neck:
Gently squeeze the neck with your fingers to taper it inward. I like to wet my fingers slightly here for a smoother glide. -
Flare the lip:
At the very top of the neck, gently press your finger outward against the rim to create a slight flare. Smooth the very top edge with a damp sponge. -
Smooth the surface:
Use a barely damp sponge to wipe down the entire exterior, smoothing out fingerprints and heavy tool marks. Leave some texture if you want a more rustic look.
Faux Glaze Effect
For a high-end ceramic look, apply a thick coat of high-gloss varnish instead of satin. It mimics the shiny finish of kiln-fired pottery perfectly.
Step 3: Finishing Touches
-
Let it dry completely:
Allow the vase to dry for 24-48 hours. Place it away from direct heat to prevent cracking. It should turn a chalky white when fully dry. -
Sand imperfections:
Once bone dry, take your fine-grit sandpaper and gently buff away any sharp ridges or rough patches. Wipe away dust with a dry cloth. -
Prepare the speckle mix:
Dilute a small amount of black or dark brown acrylic paint with water until it’s quite runny/inky. -
Apply the speckles:
Dip an old toothbrush into the paint mixture. Hold the brush near the vase and run your thumb across the bristles to flick tiny droplets onto the surface. Rotate the vase to cover all sides. -
Seal the vase:
Once the paint is dry, apply a coat of satin varnish or Mod Podge to protect the clay and give it a finished sheen. Remember, air-dry clay isn’t waterproof, so use this only for dried botanicals.
Place a few stems of dried wheat or bunny tails in your new vase to complete the tranquil aesthetic

What Really Happens Inside the Kiln
Learn how time and temperature work together inside the kiln to transform clay into durable ceramic.
Boho Moon and Sun Wall Hanging in Neutral Tones
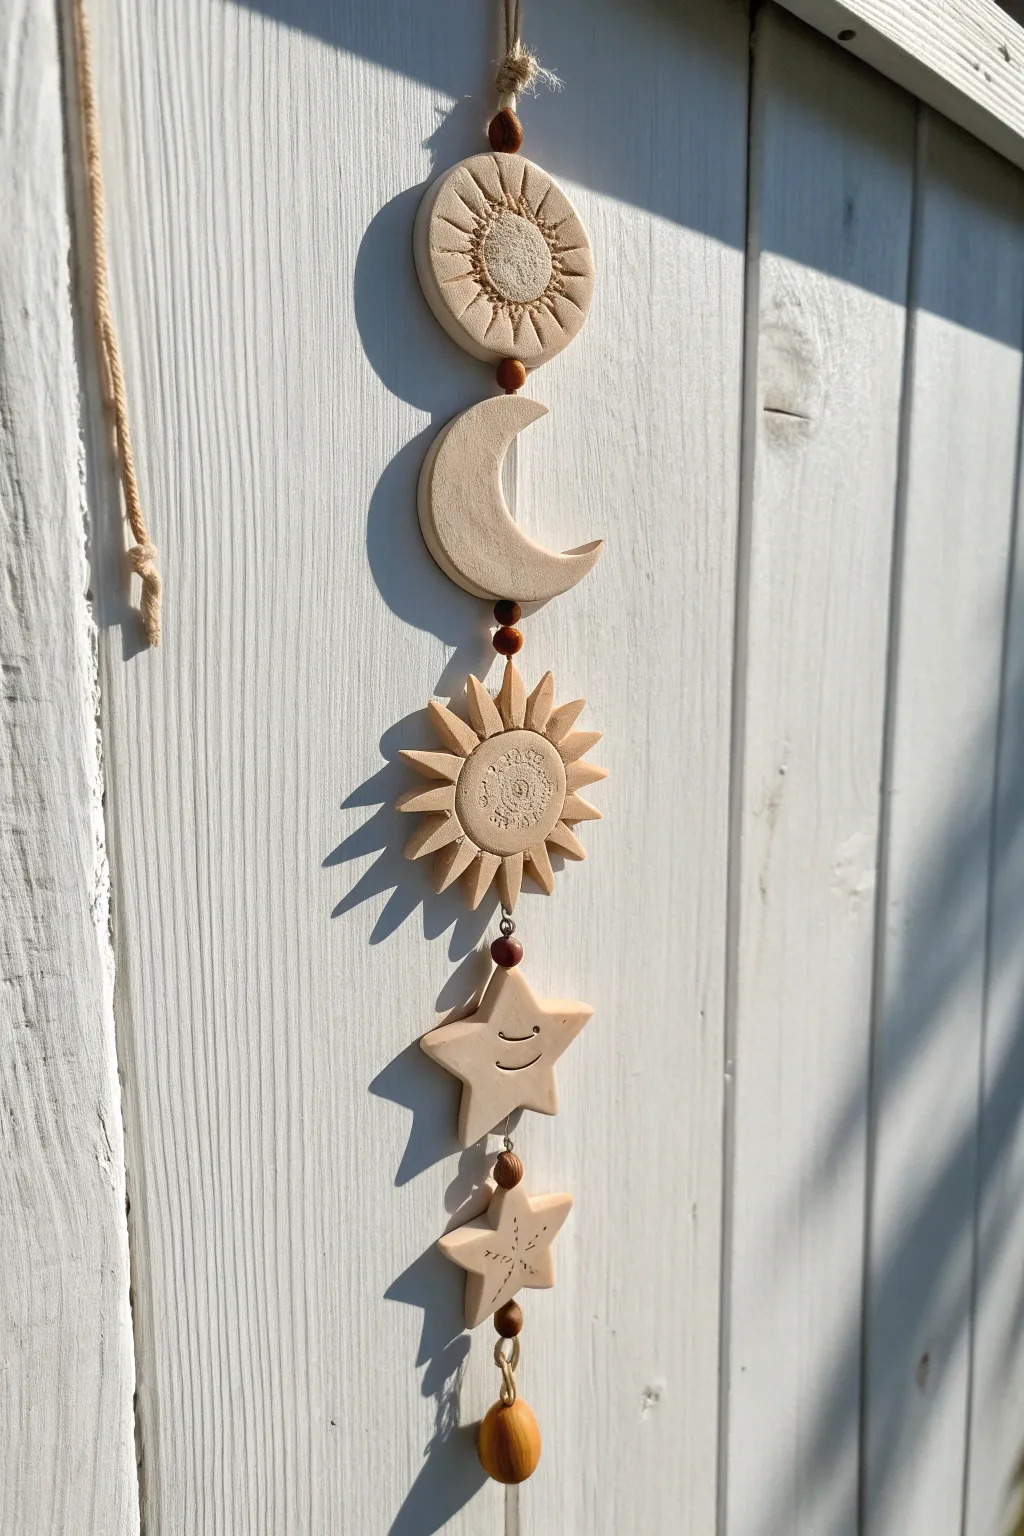
Bring a touch of cosmic calm to your space with this vertical mobile featuring suns, moons, and stars in soft, earthy neutrals. This air dry clay project perfectly captures the bohemian aesthetic with its textured details and natural wood accents.
How-To Guide
Materials
- White or natural air dry clay
- Rolling pin
- Cookie cutters (circle, crescent moon, star)
- Clay sculpting tools or a knife
- Texturing tools (lace, stamps, or household items)
- Wooden beads (dark brown or natural)
- Jute twine or hemp cord
- Straw or skewer (for holes)
- Fine grit sandpaper
- Matte acrylic varnish (optional)
Step 1: Sculpting the Shapes
-
Prepare the clay:
Begin by conditioning your air dry clay, kneading it until it is smooth and pliable. Roll it out on a flat surface to an even thickness of about 1/4 inch. -
Cut the top sun disc:
Use a round cookie cutter to cut the top circle. To create the sun rays, gently press a smaller circle stamp or lid into the absolute center, then use a sculpting tool to carve radiating lines from that center circle out to the edge. -
Texture the sun center:
For the center of the top sun, press a piece of textured fabric, sandpaper, or sponge into the inner circle to create a stippled, rough effect that contrasts with the smooth rays. -
Form the crescent moon:
Cut out a crescent shape using a moon cutter. If you don’t have one, cut a circle first, then use the same circle cutter to slice a bite out of the side to form the crescent. Smooth the sharp edges with a little water on your finger. -
Sculpt the radiant sun:
For the middle sun, start with a small central circle. Hand-sculpt small triangles of clay and score-and-slip them around the perimeter to create the sun’s rays. Alternatively, cut a starburst shape if you have a cutter. -
Add spiral details:
Press a stamp with a spiral or mandala pattern into the center of your radiant sun piece. This adds that intricate boho detail seen in the reference image. -
Create the character star:
Cut out a standard five-point star. Use a needle tool or small knife to carve two curved lines for eyes and a gentle upward curve for a smile. Keep the expression simple and sweet. -
Make the bottom star:
Cut a slightly smaller star for the bottom element. Use a needle tool to scratch a simple snowflake or cross-hatch starburst pattern into the center. -
Punch the holes:
Using a straw or skewer, carefully poke holes for stringing. The top sun needs a hole at the top and bottom. The moon, radiant sun, and big star need vertical holes running through them (top to bottom). The bottom star needs a top and bottom hole.
Step 2: Finishing and Assembly
-
Dry thoroughly:
Place all your clay pieces on a wire rack or parchment paper. Let them dry for at least 24-48 hours, flipping them occasionally to ensure they dry flat and don’t curl. -
Sand and smooth:
Once fully dry, take your fine-grit sandpaper and gently buff the edges of each piece to remove any rough spots or burrs from the cutting process. -
Prepare the cord:
Cut a long length of jute twine, roughly 3 to 4 feet depending on how spaced out you want your pieces. Tie a loop at the very top for hanging. -
String the top sun:
Thread the twine through a wooden bead, then down through the top hole of the first round sun and out the bottom hole. -
Add spacers:
Add a wooden bead below the sun to act as a spacer. I like to tie a small knot under the bead to keep it in place before adding the next clay piece. -
Attach the moon:
Thread the string through the top of the crescent moon and out the bottom. Add another spacer bead below it. -
String the remaining pieces:
Continue this pattern: bead, clay piece, bead. Next is the radiant sun, then the smiling star, then another bead, and finally the small textured star. -
Add the final weight:
After the last small star, thread one final wooden bead on the twine. Just below that, tie a large, decorative wooden bead or a teardrop-shaped bead to act as a weight at the very bottom. -
Secure the end:
Tie a sturdy double knot below the final weighted bead and trim any excess twine for a clean finish.
Crack Prevention
To prevent cracking while drying, drape a slightly damp paper towel over your shapes for the first 12 hours. This slows evaporation for a stronger finish.
Golden Hour Glow
Once the clay is dry, mix a tiny amount of gold mica powder or metallic paint with water and wash it over the textured areas to catch the light.
Now you have a serene, hand-sculpted piece of art ready to catch the light in your favorite corner
Matte Pastel Hair Clips With Clean Geometric Shapes
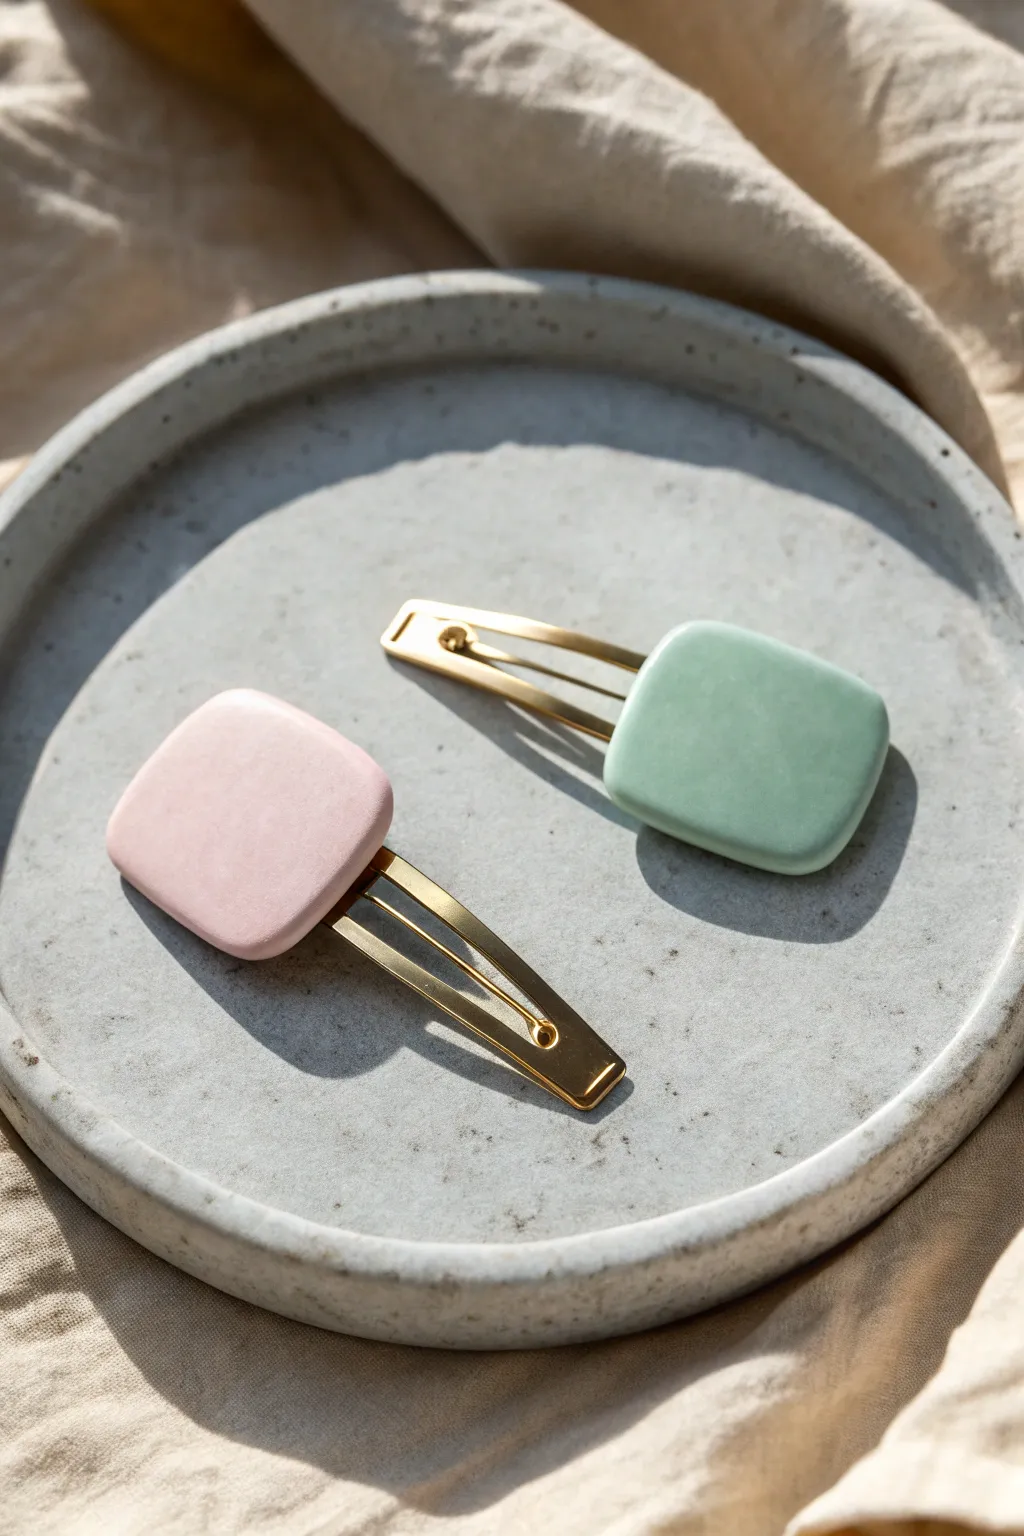
These minimalist hair clips combine soft pastel hues with sleek gold hardware for an effortlessly chic accessory. The matte finish and clean, rounded square shapes give them a modern, high-end feel that is surprisingly simple to achieve at home.
Step-by-Step Tutorial
Materials
- White air dry clay
- Pastel acrylic paints (soft pink, sage green)
- Gold alligator hair clips (flat top)
- Rolling pin
- Square cookie cutter (approx. 1 inch)
- Sandpaper (fine grit, 400-600)
- E6000 glue or strong super glue
- Matte varnish or sealant
- Parchment paper
- Small paintbrush
Step 1: Shaping the Clay
-
Condition the clay:
Start by taking a small portion of white air dry clay and kneading it in your hands until it becomes soft, pliable, and free of cracks. -
Roll it out:
Place the clay on a sheet of parchment paper to prevent sticking. Use your rolling pin to flatten the clay to an even thickness of about 4-5mm. I find that using two craft sticks as guides on either side helps keep the thickness perfectly uniform. -
Cut the shapes:
Use your square cookie cutter to stamp out your shapes. If you don’t have a cutter, you can use a sharp craft knife and a ruler to cut 1-inch squares. -
Soften the edges:
Dip your finger in a tiny bit of water and run it gently along the sharp cut edges of the fresh clay. You want to round them off slightly to achieve that pillowy, organic look seen in the photo. -
Let it dry completely:
Leave your clay squares on the parchment paper to dry. This typically takes 24-48 hours. Flip them over halfway through the drying process to ensure the bottom dries evenly and doesn’t curl.
Smooth Surface Trick
Before painting, lightly brush a tiny amount of water over the dry clay to ‘re-wet’ the surface slightly. It helps the first layer of acrylic paint glide on incredibly smoothly.
Step 2: Refining and Coloring
-
Sand for smoothness:
Once fully dry and hard, use fine-grit sandpaper to buff the surface. Focus on the sides and corners to remove any stray texture or sharp points. -
Dust off:
Wipe the clay pieces with a slightly damp cloth or a dry brush to remove all sanding dust before painting. -
Mix your colors:
Prepare your acrylic paints. For the sage green, mix a customized green with a touch of white and a tiny dot of grey. For the pink, mix red with plenty of white and a hint of yellow for warmth. -
Apply the first coat:
Paint the top and sides of each clay square. Don’t worry about the bottom just yet. Let this coat dry for about 20 minutes. -
Add subsequent coats:
Apply 1-2 more coats of paint until the color is solid and opaque. Thin layers are better than thick ones to avoid brush strokes. -
Paint the bottom:
Flip the pieces over and paint the underside so the finish looks professional from all angles. Let this dry completely.
Step 3: Finishing Touches
-
Apply matte sealant:
To lock in that velvety look, apply a thin layer of matte varnish over the painted clay. This protects the piece from moisture without adding unwanted shine. -
Prepare the glue:
Squeeze a small amount of strong adhesive, like E6000, onto a disposable surface. Or apply directly to the clip if you have a precision nozzle. -
Attach the hardware:
Apply the glue to the flat pad of the gold alligator clip. Press the clip firmly onto the center of the painted clay back. -
Cure time:
Allow the glue to cure according to the manufacturer’s instructions (usually 24 hours for maximum hold) before using the clip.
Warping Woes?
If your clay squares start curling up at the corners while drying, gently weigh them down with a flat book (place parchment paper in between) during the final stages of drying.
Now you have a set of custom, boutique-style hair clips ready to elevate your everyday hairstyle


The Complete Guide to Pottery Troubleshooting
Uncover the most common ceramic mistakes—from cracking clay to failed glazes—and learn how to fix them fast.
Abstract Arch Earrings for a Soft Girl Palette
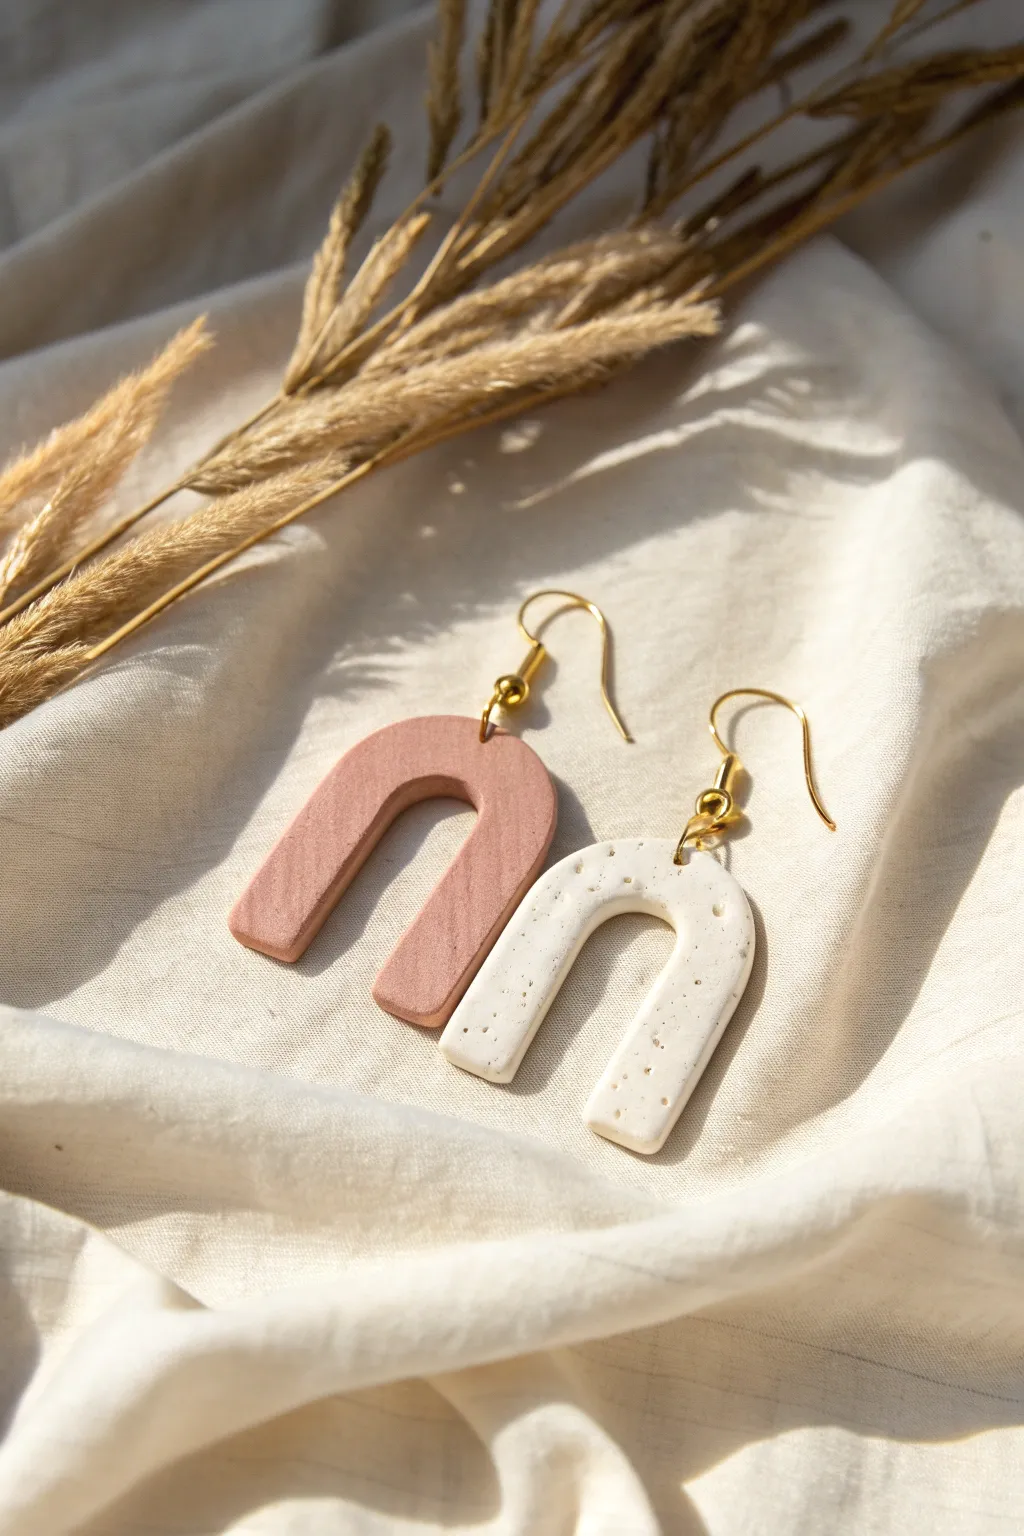
These minimalist arch earrings capture a dreamy, soft-girl aesthetic with their muted terracotta and speckled cream tones. They are surprisingly simple to shape by hand, making them a perfect beginner project for anyone looking to create custom, lightweight jewelry.
Step-by-Step Guide
Materials
- White air dry clay
- Terracotta or soft pink acrylic paint (to mix into clay)
- Black pepper or dried coffee grounds (for speckles)
- Gold earring hooks
- Gold jump rings (4-6mm)
- Rolling pin or smooth glass bottle
- X-acto knife or clay blade
- U-shaped clay cutter (optional, can freehand)
- Needle tool or toothpick
- Fine grit sandpaper (400-600 grit)
- Matte varnish or sealant
- Jewelry pliers
Step 1: Preparing the Clay
-
Condition the clay:
Start with a small ball of white air dry clay, kneading it in your hands until it becomes warm, pliable, and free of cracks. -
Split the batch:
Divide your conditioned clay into two equal portions. One will be for the terracotta arch and one for the speckled cream arch. -
Color mixing:
Take the first portion and add a tiny drop of terracotta or dusty pink acrylic paint. Fold the clay over the paint repeatedly to mix it in. Keep kneading until you have a solid, uniform color without streaks. -
Adding texture:
For the second white portion, sprinkle in a pinch of ground black pepper or dried coffee grounds. Knead this thoroughly to distribute the specs evenly, creating a stone-like effect.
Step 2: Shaping the Arches
-
Roll it out:
On a smooth, non-stick surface, roll out your colored clay to an even thickness of about 3-4mm. I find that using two popsicle sticks as depth guides on either side of the roller ensures perfectly even thickness. -
Cutting the strips:
Use your X-acto knife or blade to cut a long, clean strip of clay, approximately 1cm wide. Repeat this for the speckled clay. -
Forming the U-shape:
Gently pick up the strip and bend it carefully into a ‘U’ or arch shape. Don’t worry if it cracks slightly; just smooth it over with a slightly damp finger. -
Trimming the ends:
Place your arch back onto your work surface. Use your blade to trim the bottom of the legs straight across so the earring stands evenly. -
Refining the edges:
Dip your finger in a little water and very gently smooth the edges of the arch to soften the sharp cuts from the blade, giving it that rounded, organic look. -
Pierce the hole:
Use a needle tool or toothpick to poke a hole at the very top center of the arch. Make sure the hole is big enough for your jump ring to slide through later, and wiggle the tool slightly to ensure a clean opening.
Smooth Operator
Use a tiny amount of water on your fingertip to smooth out imperfections while the clay is wet. This saves you tons of sanding time later.
Step 3: Finishing Up
-
Drying:
Place your formed arches on a clean piece of paper or a drying rack. Let them dry for at least 24-48 hours. Flip them over halfway through to ensure the back dries evenly. -
Sanding:
Once fully dry and hard, take your fine-grit sandpaper and gently sand the edges and flat surfaces. This removes any fingerprints or rough spots. -
Dusting off:
Wipe the pieces down with a dry cloth or soft brush to remove all the sanding dust before sealing. -
Sealing:
Apply a thin coat of matte varnish to protect the clay from moisture and everyday wear. Let the varnish dry completely according to the bottle instructions. -
Assembly prep:
Using two pairs of jewelry pliers (or your fingers and one pair), twist open a jump ring. Remember to twist the ring ends away from each other sideways, rather than pulling them apart, to maintain the circle shape. -
Attaching the hook:
Slide the open jump ring through the hole in your clay arch, then loop the earring hook onto the jump ring as well. -
Closing:
Use your pliers to twist the jump ring closed again, ensuring the ends meet perfectly so the hook doesn’t slip off.
Cracking Up?
If you see cracks forming while bending the arch, your clay is too dry. Add a drop of water and knead again, or apply water directly to the crack and smooth it.
Now you have a stunning pair of aesthetic earrings ready to wear or gift
Minimal Keychain Tags With Stamped Texture
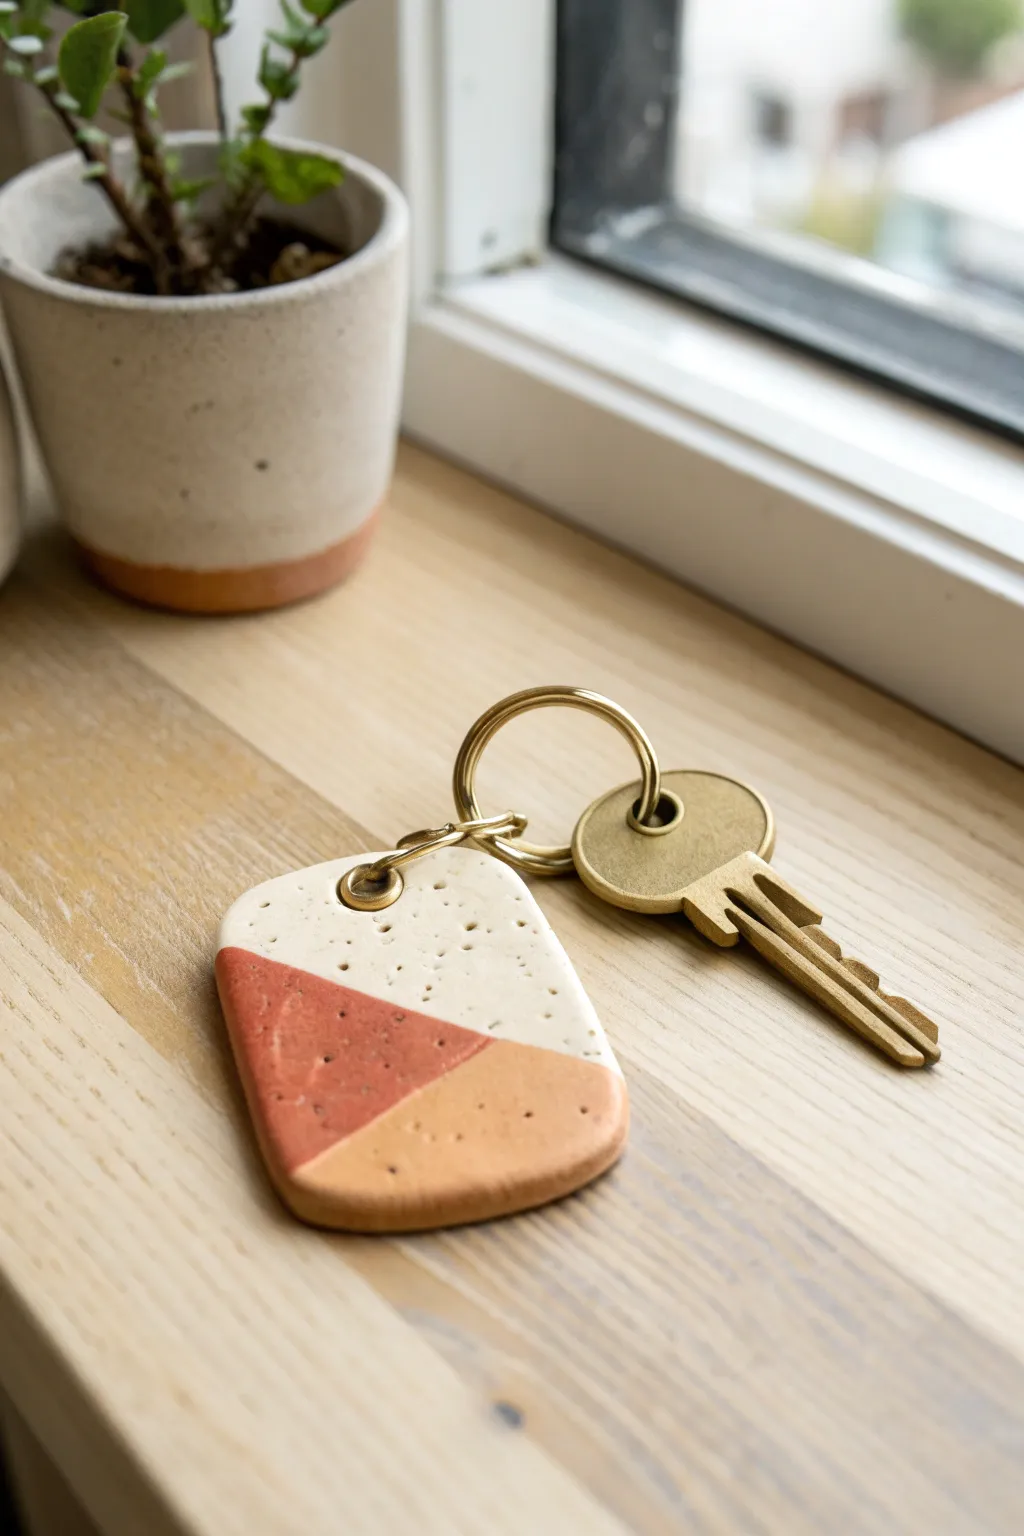
Elevate your everyday carry with this sleek, minimalist keychain tag that mimics the look of modern terrazzo. Combining earthy tones of cream, terracotta, and soft tan in a crisp geometric layout, this project proves that small accessories can make a big visual impact.
How-To Guide
Materials
- White or cream air dry clay
- Terracotta or rust-colored air dry clay (or acrylic paint)
- Tan or beige air dry clay (or acrylic paint)
- Rolling pin or smooth glass jar
- Craft knife or clay blade
- Used coffee grounds or black pepper (for texture)
- Small round cutter or straw (for the hole)
- Eyelet kit (brass, optional but recommended)
- Sandpaper (fine grit)
- Matte sealant or varnish
- Brass jump ring and key ring
Step 1: Preparing the Clay
-
Condition the base:
Start by taking a chunk of your white or cream air dry clay. Knead it in your hands until it becomes warm, soft, and pliable to prevent cracking later. -
Tinting custom colors:
If you don’t have pre-colored clay, take two smaller balls of white clay. Mix a drop of terracotta acrylic paint into one and tan paint into the other, kneading thoroughly until the color is solid and streak-free. -
Adding the speckle:
To achieve that organic, stone-like texture, sprinkle a tiny pinch of used (dried) coffee grounds or coarse black pepper into each ball of clay. Knead each color again to distribute the specks evenly throughout the material.
Pro Tip: Seamless Bond
Score the edges (scratch distinct tiny lines) where the colors meet and add a tiny dab of water before pressing them together to create a super strong bond.
Step 2: Assembling the Design
-
Roll the main slab:
Roll out a portion of your cream clay on a clean, flat surface to a thickness of about 4-5mm. This will serve as the top section of your tag. -
Create the geometric inserts:
Roll out your terracotta and tan clays to the exact same thickness as the cream slab. This ensures a smooth surface where the colors meet. -
Cutting the shapes:
Using a sharp craft knife or rigid blade, cut a clean diagonal line across your cream piece where you want the color split to happen. Do the same for your colored pieces to create triangles that fit together like a puzzle. -
Joining the seams:
Gently press the cut edges of the different colored clays together on your work surface. I like to gently push them horizontally toward each other first to bond the clay without distorting the shape. -
Smoothing the join:
Place a piece of wax paper or parchment over the joined clay slab and roll over it gently with your rolling pin. This will flatten the seams and adhere the pieces into one solid sheet.
Troubleshooting: Curling
If the tag starts curling up at the edges while drying, place a lightweight book or flat board on top of it after the first few hours of drying time.
Step 3: Shaping and Refining
-
Cut the final tag:
Once your multicolored slab is unified, use a rectangular cutter or your craft knife to cut the final tag shape. Aim for a rectangle about 1.5 inches wide with slightly rounded corners. -
Soften edges:
Dip your finger in a little water and run it along the cut edges of the rectangle to smooth out any sharpness or roughness left by the blade. -
Punch the hole:
Use a straw or a small circular cutter to punch a hole near the top center of the cream section. Make sure the hole is large enough to accommodate your jump ring or eyelet. -
Let it dry:
Place the tag on a clean wire rack or a piece of parchment paper. Let it dry completely for 24-48 hours, flipping it occasionally to ensure both sides dry evenly.
Step 4: Recycling and Finishing
-
Sand for perfection:
Once fully cured and hard, use fine-grit sandpaper to gently buff the surface and edges. This will reveal more of the speckled texture and ensure the color transitions are perfectly flush. -
Seal the piece:
Apply a thin coat of matte varnish or sealant to protect the clay from moisture and dirt without making it look plasticky. -
Set the eyelet:
If using a brass eyelet for a professional finish, insert it into the hole now and secure it using your eyelet setting tool or pliers. -
Attach hardware:
Open a sturdy brass jump ring with pliers, loop it through the eyelet, and attach your main key ring. Close the jump ring securely.
Now you have a chic, custom accessory that keeps your keys organized in style

TRACK YOUR CERAMIC JOURNEY
Capture glaze tests, firing details, and creative progress—all in one simple printable. Make your projects easier to repeat and improve.
Scandinavian-Style Desk Organizer Tray Set
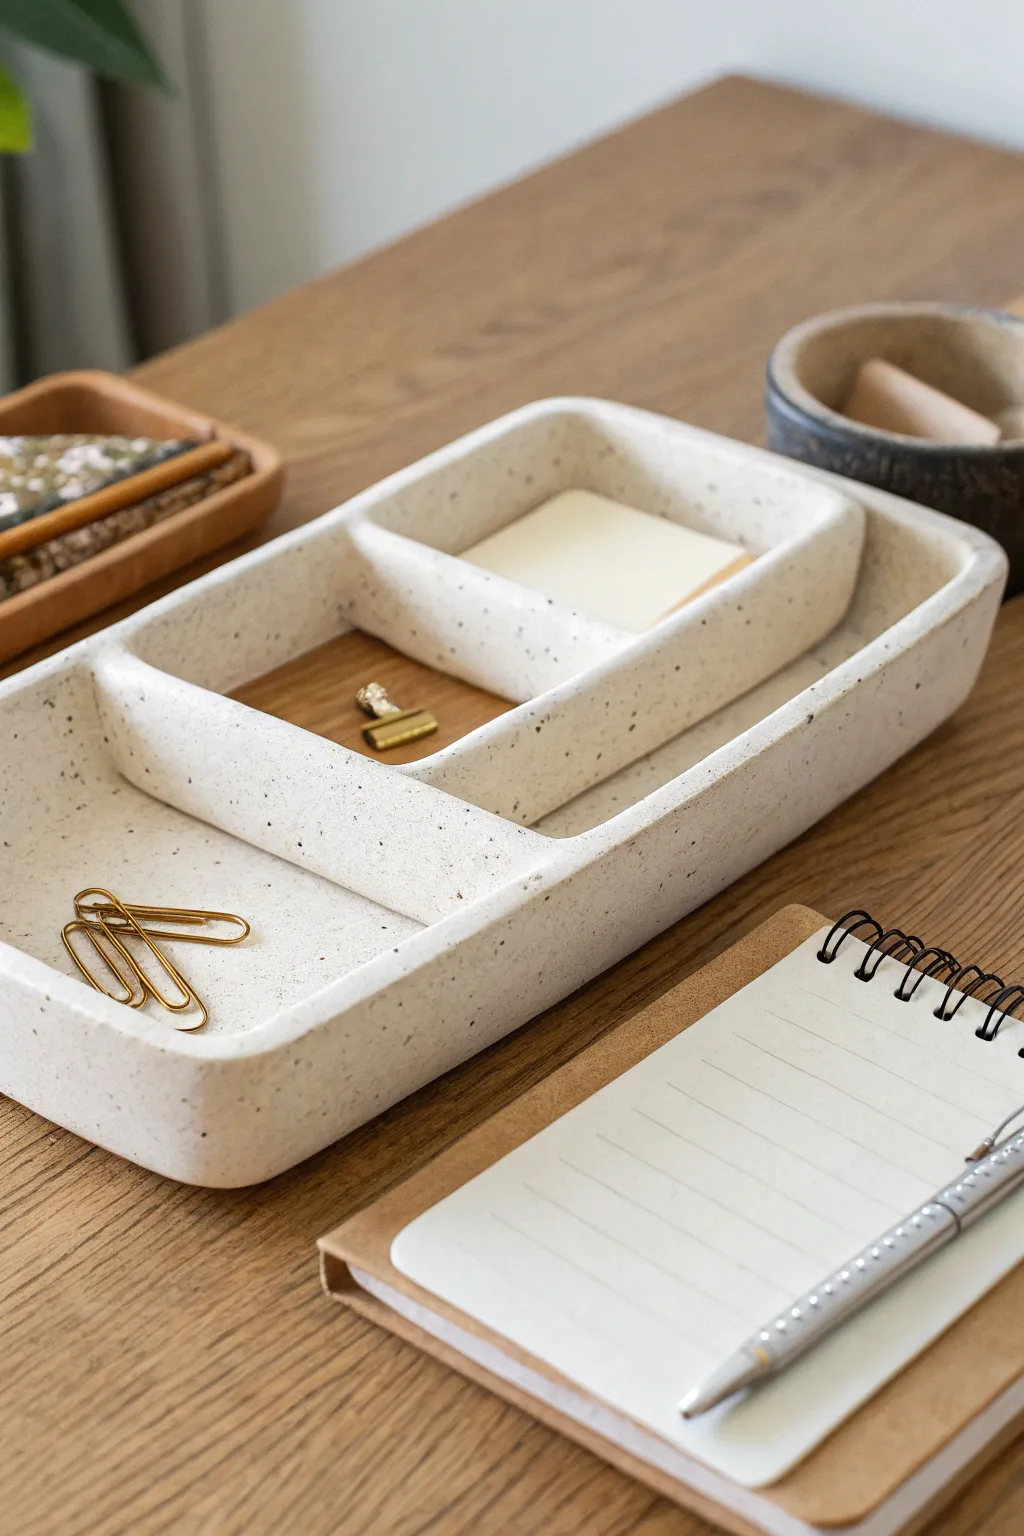
Bring minimalist order to your workspace with this chic, modular desk organizer set, featuring a clever nesting design that looks custom-made. The subtle speckled finish mimics the high-end look of ceramic stoneware without needing a kiln.
Step-by-Step
Materials
- White air dry clay (approx. 1kg)
- Rolling pin
- Craft knife or clay cutter
- Ruler
- Sandpaper (medium and fine grit)
- Small bowl of water
- Acrylic paint (cream/off-white)
- Acrylic paint (dark brown or black)
- Old toothbrush
- Matte varnish or sealant
- Cardboard or cardstock (for templates)
Step 1: Planning & Base
-
Draft your templates:
Before touching the clay, decide on the dimensions for your main tray and the smaller insert. Cut a rectangle from cardstock for the large tray base (e.g., 25cm x 12cm) and a smaller rectangle that will fit inside it (e.g., 10cm x 8cm). Keep about a 5mm allowance for wall thickness. -
Condition the clay:
Take a large chunk of clay and warm it up in your hands, kneading until it is smooth and pliable. This prevents internal air bubbles and makes rolling much easier. -
Roll the main slab:
Roll out the clay to a consistent thickness of about 5-6mm. Use guide sticks or two stacks of playing cards on either side of your rolling pin to ensure the slab is perfectly even. -
Cut the bases:
Place your cardstock templates onto the rolled clay. Use a sharp craft knife or blade to cut around them cleanly. You will need one large base rectangle and one smaller base rectangle.
Smooth Seams Tip
Use a barely damp makeup sponge to wipe over your clay whilst wet. It acts like a potter’s chamois, smoothing out rough texture without leaving brush marks.
Step 2: Constructing the Trays
-
Prepare the walls:
Gather your remaining clay and re-roll it to the same 5-6mm thickness. Using a ruler, cut long strips for the walls. Calculate the height you want (around 3-4cm usually looks good) and ensure all strips are uniform. -
Score the edges:
Using a needle tool or the tip of your knife, gently scratch cross-hatching marks (scoring) along the perimeter of your base slabs and the bottom edge of your wall strips. -
Apply slip:
Dip your finger into water and dab it onto the scored areas to create a ‘slip’ glue. This bond is crucial for durability. -
Attach the main walls:
Position the wall strips onto the large base. Gently press them down to adhere. Where two wall strips meet at a corner, cut them at a 45-degree angle for a sharp mitered joint, or simply butt them together and blend. -
Blend the seams:
Use a modeling tool or your thumb to drag a little clay from the wall down onto the base, smoothing the seam until it disappears completely on both the inside and outside. I find using a slightly damp sponge here helps erase fingerprints. -
Build the interior partition:
For the divider seen in the smaller tray, cut a strip of clay to fit the width of the small base. Score, slip, and attach it across the center to create two compartments. -
Add the insert tray walls:
Repeat the wall attachment process for the smaller insert tray. Ensure its total width is slightly less than the interior width of the large tray so it can nest comfortably. -
Refine the rims:
Once constructed, run a damp finger along the top rims of both trays to round them off gently, removing any sharp cutting marks.
Warping Fix
If the base starts curling up while drying, gently weigh it down with a small book or coaster (place parchment paper in between) during the leather-hard stage.
Step 3: Finishing Touches
-
Slow drying phase:
Place your trays in a cool area away from direct sunlight. Let them dry slowly for 24-48 hours. Rotate them occasionally to ensure even airflow and minimize warping. -
Sand for perfection:
Once fully dry and bone-white, use medium-grit sandpaper to level out any bumps. Switch to fine-grit paper to make the surface incredibly smooth to the touch. -
Base coat painting:
Apply two coats of cream or off-white acrylic paint to the entire surface. Allow the first coat to dry completely before applying the second for opaque coverage. -
Create the speckle effect:
Dilute a small amount of dark brown paint with water. Dip an old toothbrush into the mixture, aim it at the tray, and run your thumb across the bristles to flick tiny specks of paint onto the surface. -
Control the splatter:
Practice on a piece of paper first to get the density right. I like to do a light pass, let it dry, and then add a second layer for depth. -
Seal and protect:
Finish with a layer of matte varnish. This seals the porous clay, protects the paint job, and gives it that professional ‘stoneware’ feel.
Once sealed, slide your insert into the main tray and start organizing your favorite stationery in style
Terrazzo-Style Catchall Bowl in Muted Neutrals
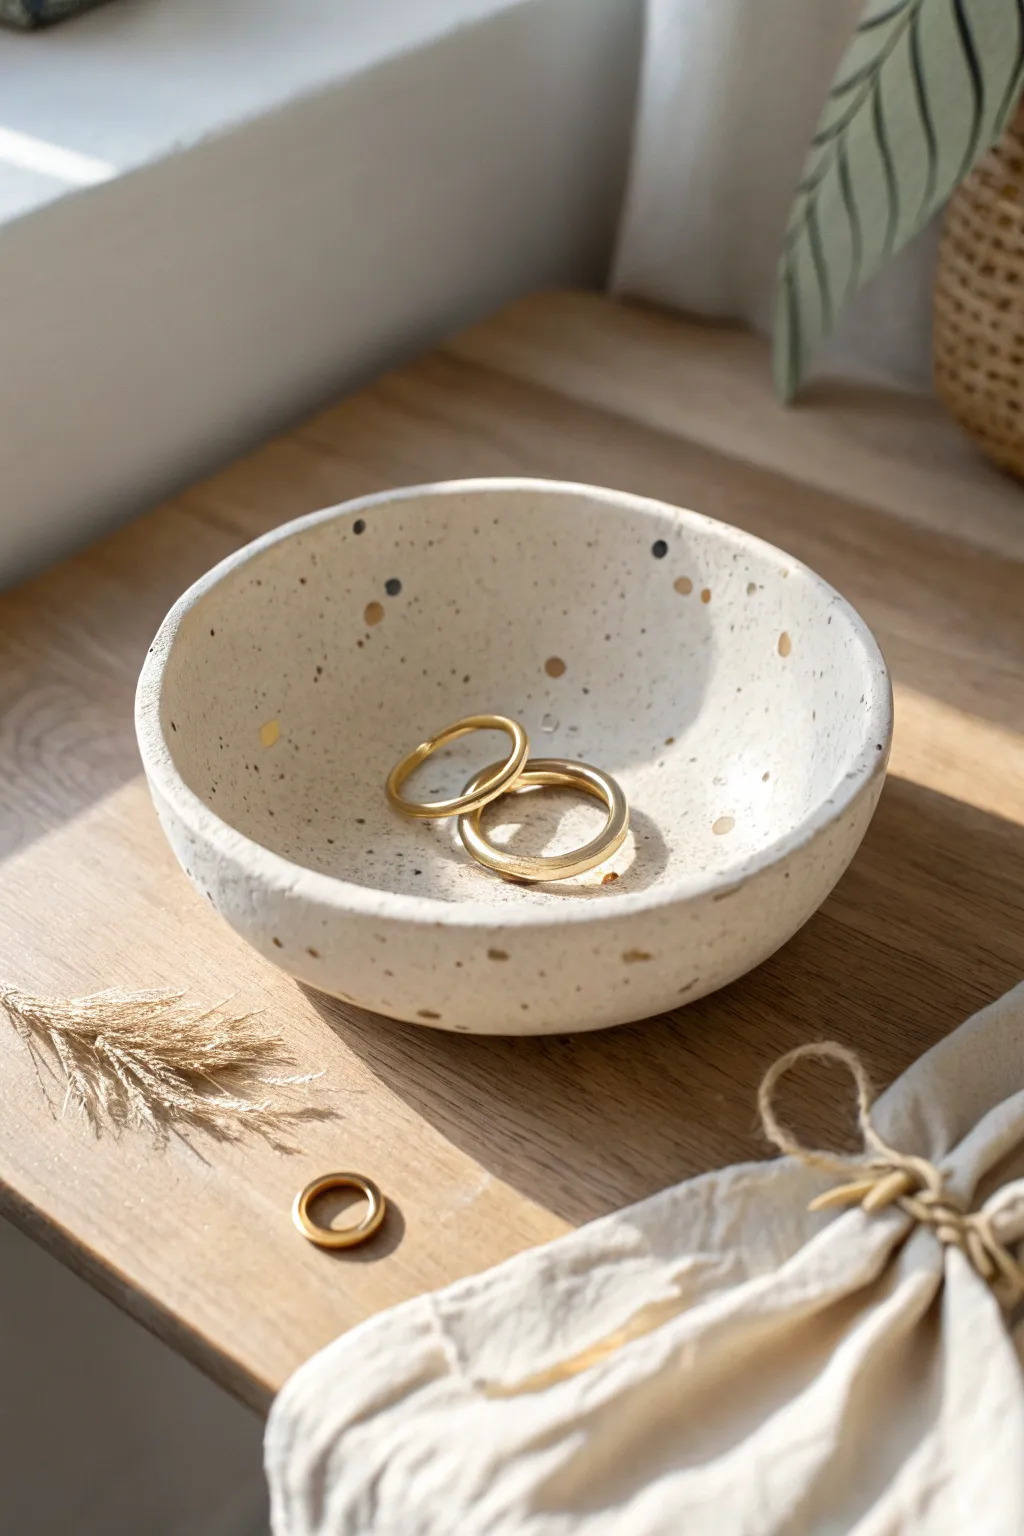
This elegant catchall bowl brings the trendy terrazzo look to your vanity with soft, muted neutrals. The speckled finish mimics stone pottery, creating a sophisticated spot to keep your everyday jewelry safe.
Step-by-Step Guide
Materials
- White or cream air-dry clay
- Rolling pin
- Small bowl (to use as a mold)
- Acrylic paints (black, metallic gold, muted taupe)
- Small paintbrush (fine tip)
- Old toothbrush (optional)
- Sandpaper (fine grit)
- Gloss or satin varnish/sealant
- Small sponge or water for smoothing
- Release agent (oil or plastic wrap)
Step 1: Shaping the Bowl
-
Condition the clay:
Start by taking a handful of white air-dry clay and kneading it in your hands until it becomes warm, soft, and pliable. This prevents cracking later on. -
Roll out the slab:
Place the clay on a smooth surface and use a rolling pin to flatten it into an even circle. Aim for a thickness of about 1/4 inch (approx. 6mm) to ensure durability. -
Cut the circle:
Find a circular object slightly larger than your mold, such as a large mug or bowl rim. Press it into the clay to cut a perfect circle, removing the excess clay around the edges. -
Prepare the mold:
Take the small bowl you’ve chosen as a mold. To prevent sticking, you can either lightly oil the inside or line it with plastic wrap. -
Form the shape:
Gently lift your clay circle and press it into the mold. Work from the center outwards, ensuring the clay conforms to the bowl’s curve without trapping air bubbles. -
Smooth the edges:
Dip your finger or a small sponge in water and run it along the rim of the clay bowl. Smooth out any roughness or cracks for a clean, professional finish. -
Initial drying:
Let the clay sit in the mold for about 24 hours until it holds its shape firmly but isn’t bone dry. -
Remove and complete drying:
Carefully pop the clay form out of the mold. Place it upside down on a drying rack to allow air to circulate underneath. Let it dry completely for another 24-48 hours until it turns chalky white.
Cracks while drying?
Mix a tiny amount of fresh clay with water to create a paste (slip). Fill the crack, smooth it over with a wet finger, and let it dry again away from direct heat.
Step 2: Finishing and Painting
-
Sand imperfections:
Once fully dry, take a piece of fine-grit sandpaper and gently gently buff away any sharp edges on the rim or bumps on the surface. Wipe away the dust with a barely damp cloth. -
Mix colors:
Prepare your palette with small amounts of black, metallic gold, and muted taupe acrylic paint. You may want to water them down slightly for easier application. -
Paint larger spots:
Using a fine-tip brush, dab random, irregular shapes of the gold and taupe onto the bowl. Keep them sparse and vary the sizes to mimic natural stone chips. -
Add fine speckles:
Dip an old toothbrush into watered-down black paint. Run your thumb across the bristles to flick tiny specks of paint onto the bowl. This creates that authentic gritty stone texture. -
Detail work:
Go back in with your fine brush and add a few larger, deliberate dots of black or dark grey to balance the composition. I like to concentrate a few clusters near the rim. -
Dry the paint:
Allow all paint layers to dry completely, which should only take about 15-20 minutes since acrylic dries fast. -
Seal the piece:
Apply a coat of gloss or satin varnish over the entire bowl, inside and out. This mimics the sheen of polished terrazzo and protects the clay from moisture. -
Final cure:
Let the varnish cure according to the manufacturer’s instructions before placing any jewelry inside.
Pro Tip: Liquid Chips
Instead of painting, you can mix dried, colored clay chips directly into the wet white clay before rolling. Sanding later reveals the embedded colors.
Now you have a chic, speckled dish ready to display your favorite accessories
Sculptural Pebble Bookends With a Matte Stone Look
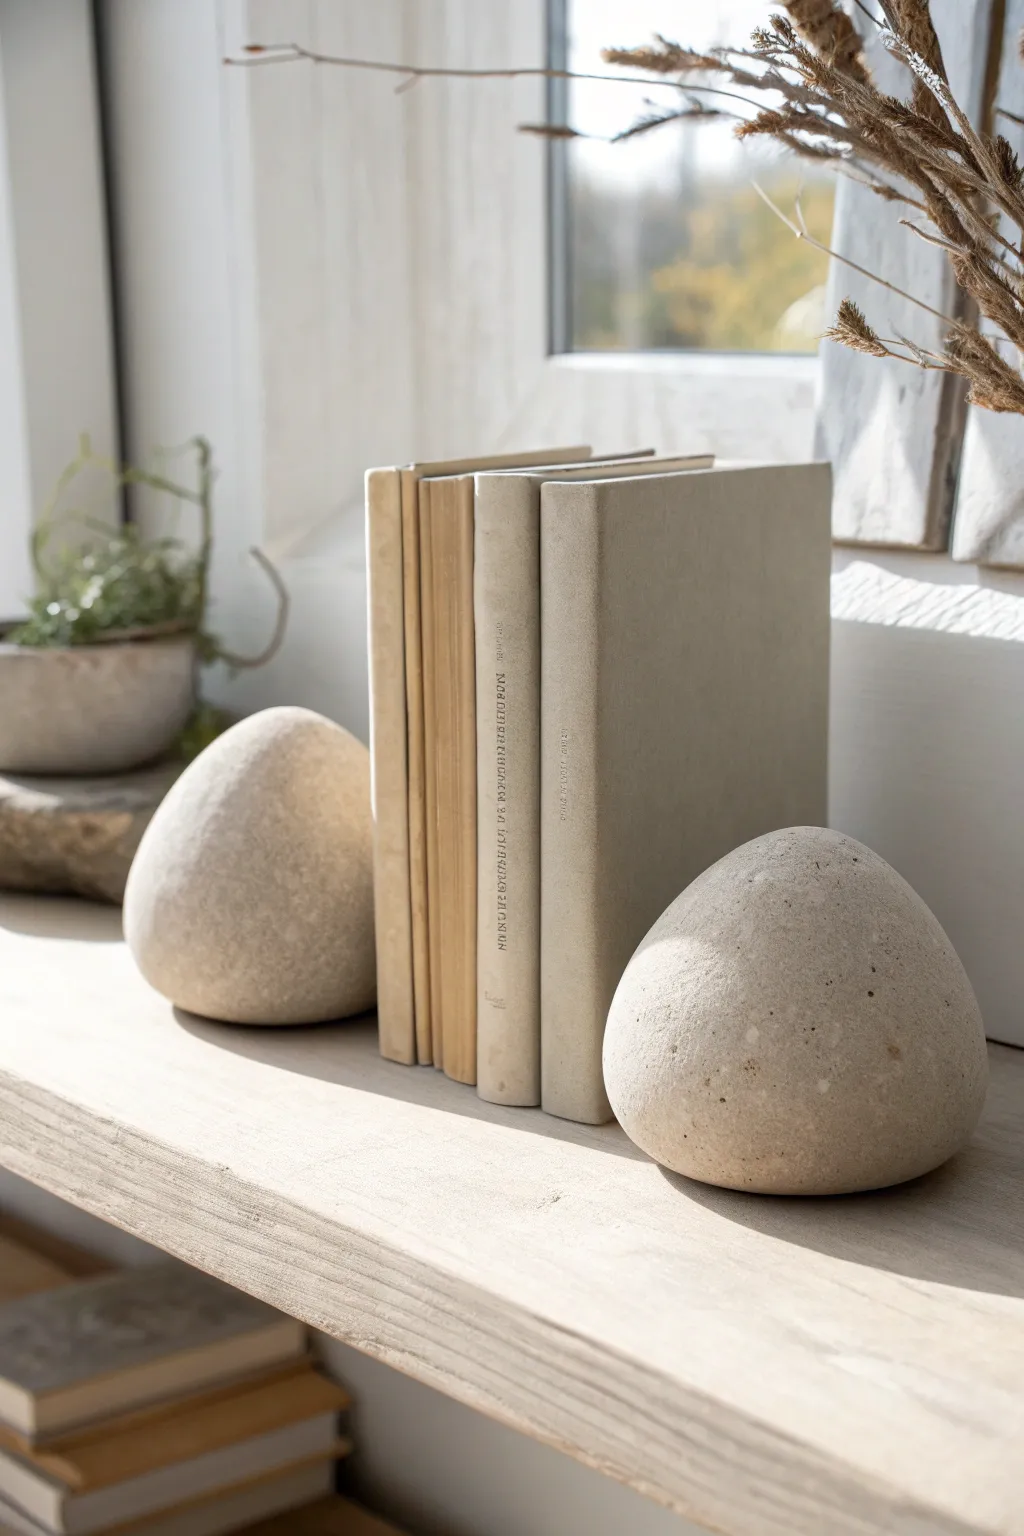
Bring a touch of organic serenity to your shelves with these deceptively simple bookends that mimic the weight and texture of river stones. They look heavy and expensive, but are actually crafted from lightweight air-dry clay and clever painting techniques.
Step-by-Step Guide
Materials
- Air dry clay (white or grey)
- Aluminum foil
- Masking tape
- Dried beans or small weights (for internal weight)
- Small cardboard box or plastic bag (for the core)
- Acrylic paints (beige, warm grey, white, black/brown speckles)
- Old toothbrush (for speckling)
- Sponge or sea sponge
- Matte clear sealant spray
- Fine-grit sandpaper
- Water in a spray bottle
- Felt pads (for the bottom)
Step 1: Building the Weighted Structure
-
Create the heavy core:
Since air dry clay is light, you need heft to hold books. Fill a small resealable bag or a small improvised cardboard box with dried beans, clean sand, or small weights. Tape it up tight so it’s a solid, heavy lump. -
Shape the armature:
Crumple aluminum foil around your weighted core. Build it up until you have a rough, organic shape that resembles a large river rock. It should be slightly smaller than your desired final size. -
Flatten the base and side:
Press the foil ball firmly against a table to create a flat bottom. Then, press one vertical side flat against a wall or box—this vertical flat spot is crucial for sitting flush against your books. -
Secure the form:
Wrap the entire foil structure in masking tape. This smooths out sharp foil edges and gives the clay something better to grip onto than smooth metal.
Step 2: Sculpting the Form
-
Condition your clay:
Knead a large block of air dry clay until it’s pliable and smooth. Roll it out into a large slab, about 1/4 to 1/2 inch thick. -
Wrap the armature:
Drape the clay slab over your taped armature. Gently press and massage the clay so it adheres to the form, trimming away large excess chunks with a knife or wire tool. -
Smooth the seams:
Dip your fingers in water and blend any seams where the clay pieces join. Since this is an organic stone shape, slight irregularities are fine, but you want a generally continuous surface. -
Refine the flat surfaces:
Turn the sculpture over and verify the bottom is perfectly flat so it won’t wobble. Stand it up and press the book-facing side against a flat board again to ensure a crisp 90-degree angle. -
Final smoothing:
Use a slightly damp sponge to wipe over the entire surface, removing fingerprints and creating that distinctively smooth river-stone texture. Let this dry thoroughly for 24-48 hours.
Cracking Clay?
Minor cracks are normal as clay shrinks. Mix a ‘slurry’ of clay and water into a paste, fill the crack, smooth it with a finger, and let it dry again before sanding.
Step 3: Creating the Stone Finish
-
Sand imperfections:
Once fully dry, use fine-grit sandpaper to buff away any unintentional bumps or cracks. Wipe away the dust with a dry cloth. -
Apply base coat:
Mix a warm beige or light grey acrylic paint. Apply an opaque coat over the entire Bookend. I like to do two thin coats rather than one thick one for better coverage. -
Sponge texture:
Mix a slightly lighter shade of your base color. Dip a sea sponge into the paint, dab off the excess on paper, and lightly stipple it over the surface to create depth and dimension. -
Adding the speckles:
Dilute a tiny amount of black or dark brown paint with water until it’s runny. Dip an old toothbrush into it. -
Flicking technique:
Hold the toothbrush near the bookend and run your thumb across the bristles to flick tiny splatters of paint onto the surface. Practice on paper first to control the spray. -
Seal:
Once the paint is bone dry, spray the entire piece with a matte clear coat. This protects the paint and maintains that non-shiny, stone-like appearance. -
Add grip:
Cut a piece of adhesive felt to fit the bottom of the bookend. This protects your shelf and adds friction so the heavily weighted bookend doesn’t slide.
Level Up: Color
For a darker granite look, start with a dark grey base, sponge on medium grey, and flick white paint speckles instead of black for high contrast.
Place them on your shelf and enjoy the calm, structured look they bring to your reading collection