Clay containers are basically the perfect little project: small, satisfying, and endlessly customizable. Here are my favorite clay container ideas that feel doable at home but still look like you made something truly special.
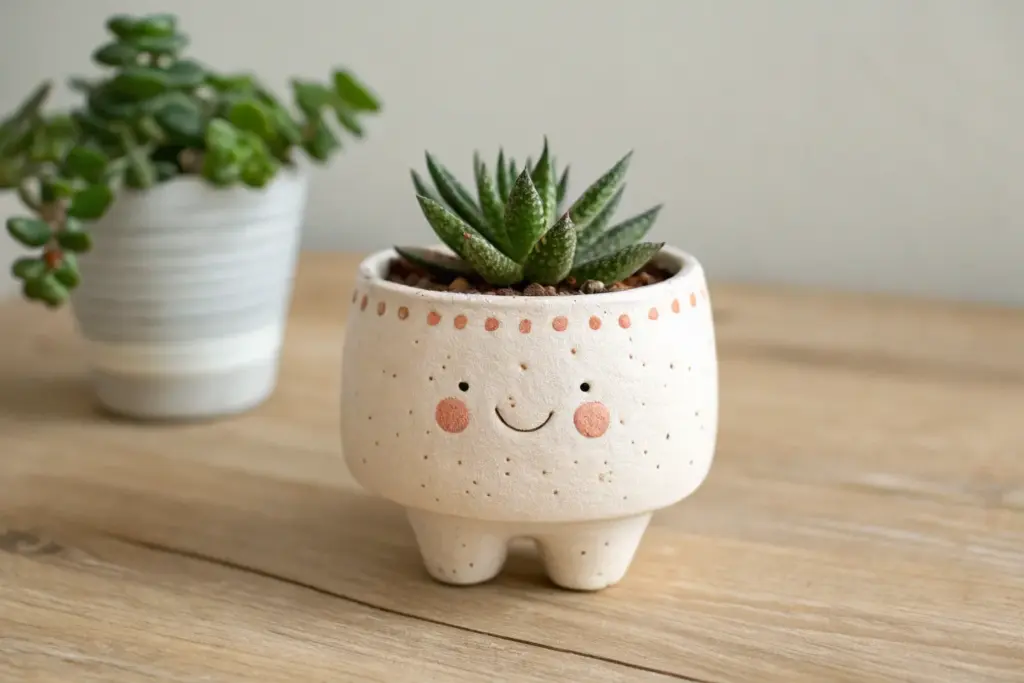
Simple Pinch Pots for Trinkets and Rings
This charming little vessel combines a rugged, earthy exterior with a crisp white rim, perfect for holding paperclips, rings, or desk treasures. Its uneven, organic shape highlights the beauty of handmade pottery without requiring a wheel.
How-To Guide
Materials
- Air-dry clay (white or light grey)
- Small bowl of water
- Sponge
- Sandpaper (fine and medium grit)
- Acrylic paint (warm beige/tan)
- Acrylic paint (white)
- Baking soda (optional, for texture)
- Small paintbrush
- Painter’s tape or washi tape
- Matte sealant spray
Step 1: Forming the Base
-
Prepare the Clay:
Start with a ball of air-dry clay roughly the size of a tennis ball. Knead it in your hands for a minute to warm it up and ensure it’s pliable and free of air bubbles. -
Create the Opening:
Hold the clay ball in one palm and use your other thumb to press gently into the center. Push down until you are about half an inch from the bottom, being careful not to breakthrough. -
Pinch the Walls:
Begin pinching the clay between your thumb (inside) and fingers (outside). Rotate the ball slowly as you pinch, working your way from the bottom up to the rim. -
Shape the Curve:
Aim for an even thickness of about 1/4 inch throughout. Gently curve the walls inward slightly at the top to create a cozy, enclosed bowl shape rather than a wide saucer. -
Create the Flat Bottom:
Once you are happy with the width, gently tap the base of the pot on your work surface to flatten it so it sits stable without wobbling. -
Refine the Rim:
Since we want an organic look, don’t worry about making the rim perfectly level. However, use a damp finger to smooth out any sharp cracks or jagged edges along the top. -
Dry Completely:
Set your pot aside in a safe, dry place. Allow it to dry for 24-48 hours until it turns a chalky white and is hard to the touch.
Smoother Surfaces
Keep a small bowl of water nearby while shaping. Dip your finger in water and run it over the clay to erase cracks instantly.
Step 2: Adding Texture and Color
-
Sand Imperfections:
Lightly sand the exterior to remove any unintentional sharp ridges, but leave the general bumps and fingerprints to maintain that handmade character. -
Mix Texture Paint:
Mix your warm beige acrylic paint. To replicate the rough, stone-like texture seen in the photo, stir in a pinch of baking soda into the paint until it feels slightly gritty. -
Paint the Base:
Apply the textured beige paint to the bottom two-thirds of the bowl’s exterior. Use dabbing motions rather than long strokes to build up that stippled, earthy dimension. -
Create the Dividing Line:
You don’t need tape for this if you contain a steady hand; painting freehand adds to the organic charm. If you prefer a crisp line, you can apply painter’s tape around the circumference once the base coat is 100% dry. -
Paint the Upper Section:
Using plain white acrylic paint (no baking soda), paint the upper third of the exterior and the entire interior of the bowl. This contrast between the smooth white and rough beige is key. -
Refine the Interior:
Apply a second coat of white inside the bowl to ensure full coverage, making sure no raw clay shows through. -
Blend the Transition:
If the transition line feels too harsh, you can lightly stipple a tiny bit of white over the very edge of the beige while it’s still tacky, softening the boundary. -
Detailed Rim Work:
Ensure the very top edge of the rim is solid white. This highlights the thickness of the pot and gives it a finished look. -
Seal the Project:
Once all paint is fully dry, take the pot outside and apply a light coat of matte sealant spray. This protects the finish and prevents the paint from chipping.
Speckled Effect
Flick diluted black or brown paint onto the dry white interior using an old toothbrush for a trendy ceramic speckled look.
Enjoy styling your new handmade vessel on your desk or vanity knowing you crafted it from scratch


Mini Succulent Planters With Drainage-Free Liners
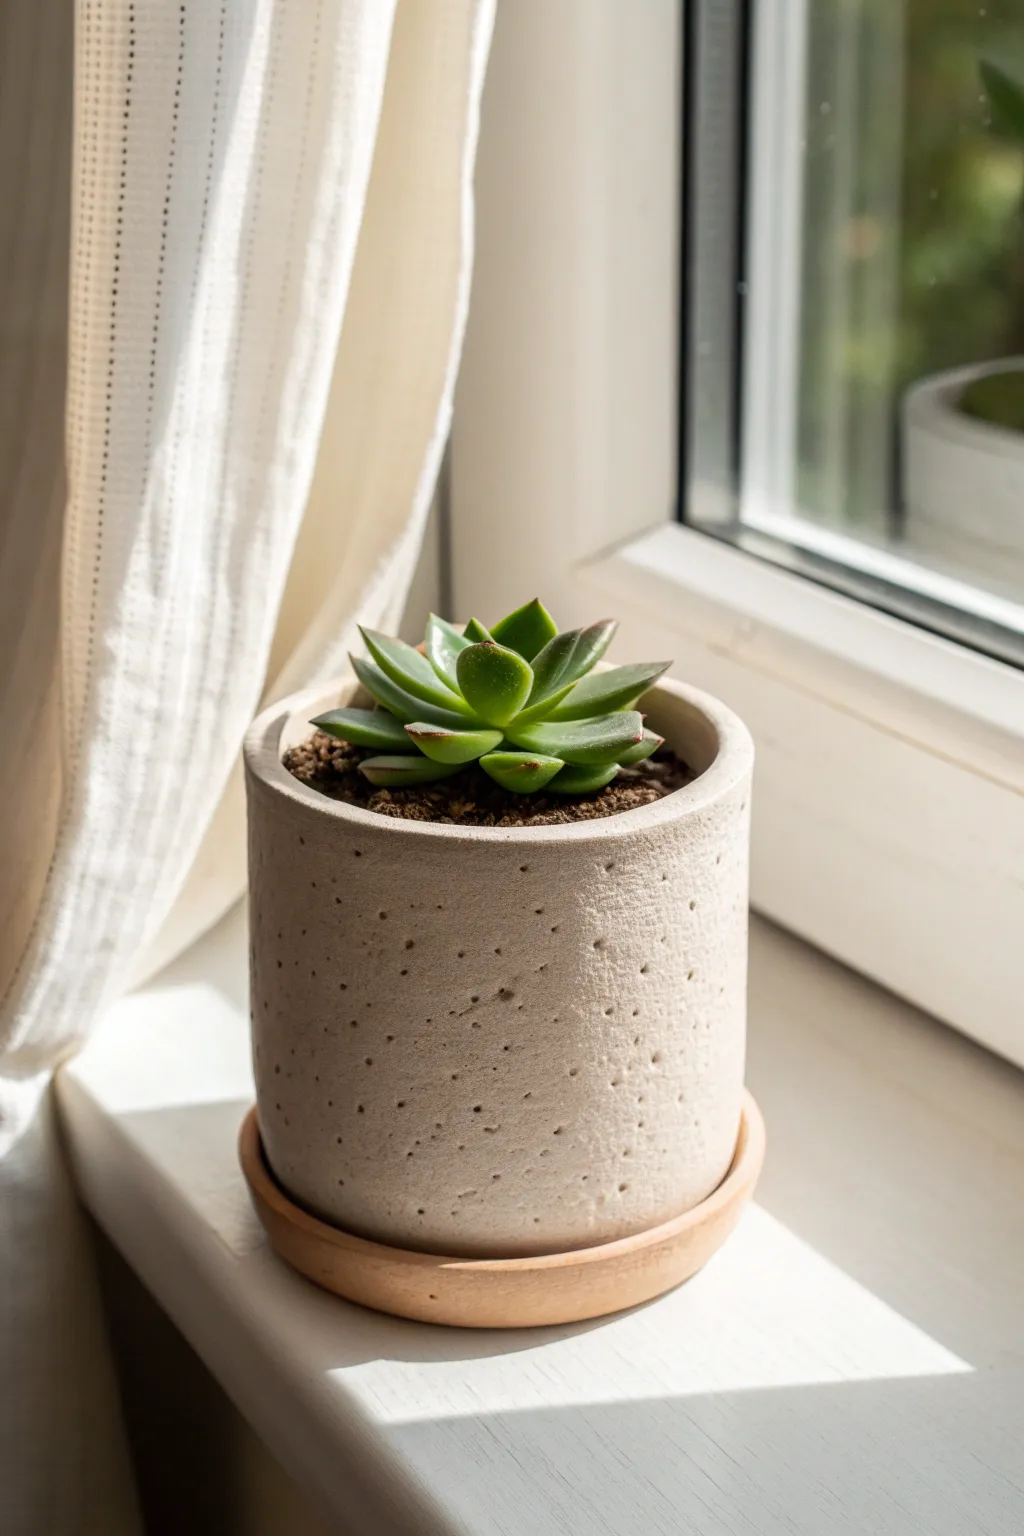
Recreate the charm of weathered stone with this simple clay project that transforms smooth polymer or air-dry clay into a textured, organic vessel. The result is a minimalist, speckled planter perfect for highlighting the geometric beauty of small succulents.
Detailed Instructions
Materials
- White or light beige polymer clay (or air-dry clay)
- Small rolling pin or acrylic roller
- Cylindrical mold (like a soda can or glass jar)
- Parchment paper
- Craft knife
- Coarse sea salt or craft sand (for texturing)
- Small terracotta saucer (store-bought or handmade)
- Needle tool or toothpick
- Sandpaper (fine grit)
- Matte varnish (optional)
- Small succulent and potting soil
Step 1: Preparing the Base
-
Condition the clay:
Begin by conditioning your block of white or beige clay until it is soft and pliable. If you want a more natural, stony look, you can mix in a tiny pinch of black or brown clay to create subtle marbling, though a solid color works beautifully too. -
Roll out a slab:
Roll the clay out into a long rectangular strip, aiming for a consistent thickness of about 1/4 inch. This thickness ensures the walls of your pot will be sturdy enough to hold soil without cracking. -
Cut to size:
Measure the circumference and height of your chosen cylindrical mold. Use a craft knife to trim the clay slab into a precise rectangle that will wrap around the mold with just a slight overlap for the seam. -
Prepare the mold:
Wrap your cylindrical mold in a layer of parchment paper. This is a crucial step to prevent the clay from sticking permanently to your form later on.
Step 2: Building and Texturing
-
Wrap the walls:
Carefully lift your clay rectangle and wrap it around the parchment-covered mold. Bring the two short ends together. -
Seamless join:
Gently press the seam together. Use your fingers or a smoothing tool to blend the clay across the join line until it disappears completely. The goal is a continuous, seamless cylinder. -
Create the base:
Roll a smaller piece of clay and cut out a circle that matches the diameter of your cylinder. Place the mold (with the clay wall) on top of this circle. -
Blend the bottom:
Using a modeling tool or your thumb, blend the bottom edge of the cylinder walls downward into the circular base to seal the pot. Ensure this connection is watertight and strong. -
Apply texture:
Now for the fun part: creating the stone effect. Take a needle tool or toothpick and gently poke random, shallow holes all over the exterior surface. Vary the depth and spacing. -
Enhance the texture:
I like to press some coarse salt or sand into the clay surface gently and then brush it off. This creates tinier, more natural-looking pits alongside the larger tool marks. -
Refine the rim:
Check the top rim of your pot. It doesn’t need to be perfect—a slightly organic, uneven edge adds to the handmade charm—but smooth out any sharp or jagged bits with your finger.
Fixing Cracks
If you see hairline cracks after drying, mix a small amount of fresh clay with water (or liquid clay for polymer) to make a paste. Fill the cracks, smooth, and dry again.
Step 3: Finishing Touches
-
First bake or dry:
If using polymer clay, bake the pot (still on the mold if it’s oven-safe, or carefully remove if stiff enough) according to package instructions. If using air-dry clay, let it sit in a cool, dry place for 24-48 hours. -
Remove the mold:
Once the clay has hardened slightly (or fully baked and cooled), slide the cylindrical mold out. Peel away the parchment paper carefully. -
Sanding:
Take a fine-grit sandpaper and lightly buff the exterior. This knocks down any sharp ridges from the texturing process and gives the piece a soft, stone-like matte finish. -
Sealing (Optional):
If you used air-dry clay, apply a waterproof sealer to the inside of the pot to protect it from moisture. For polymer clay, this isn’t strictly necessary but a matte varnish can protect the finish. -
Pairing:
Place your finished white pot onto a small terracotta saucer. The contrast between the cool, textured white clay and the warm, smooth terracotta creates a professional aesthetic. -
Planting:
Fill your new planter with a gritty succulent mix and nestle your small plant inside. Brush off any stray soil from the textured exterior.
Speckled Stone Look
Knead black pepper or dried tea leaves into your white clay before rolling. These tiny flecks will bake right in, creating a realistic granite or speckled ceramic effect.
Place your new textured planter on a sunny windowsill and enjoy the modern, organic vibe it brings to your space


Slab-Built Rectangular Catchall Trays
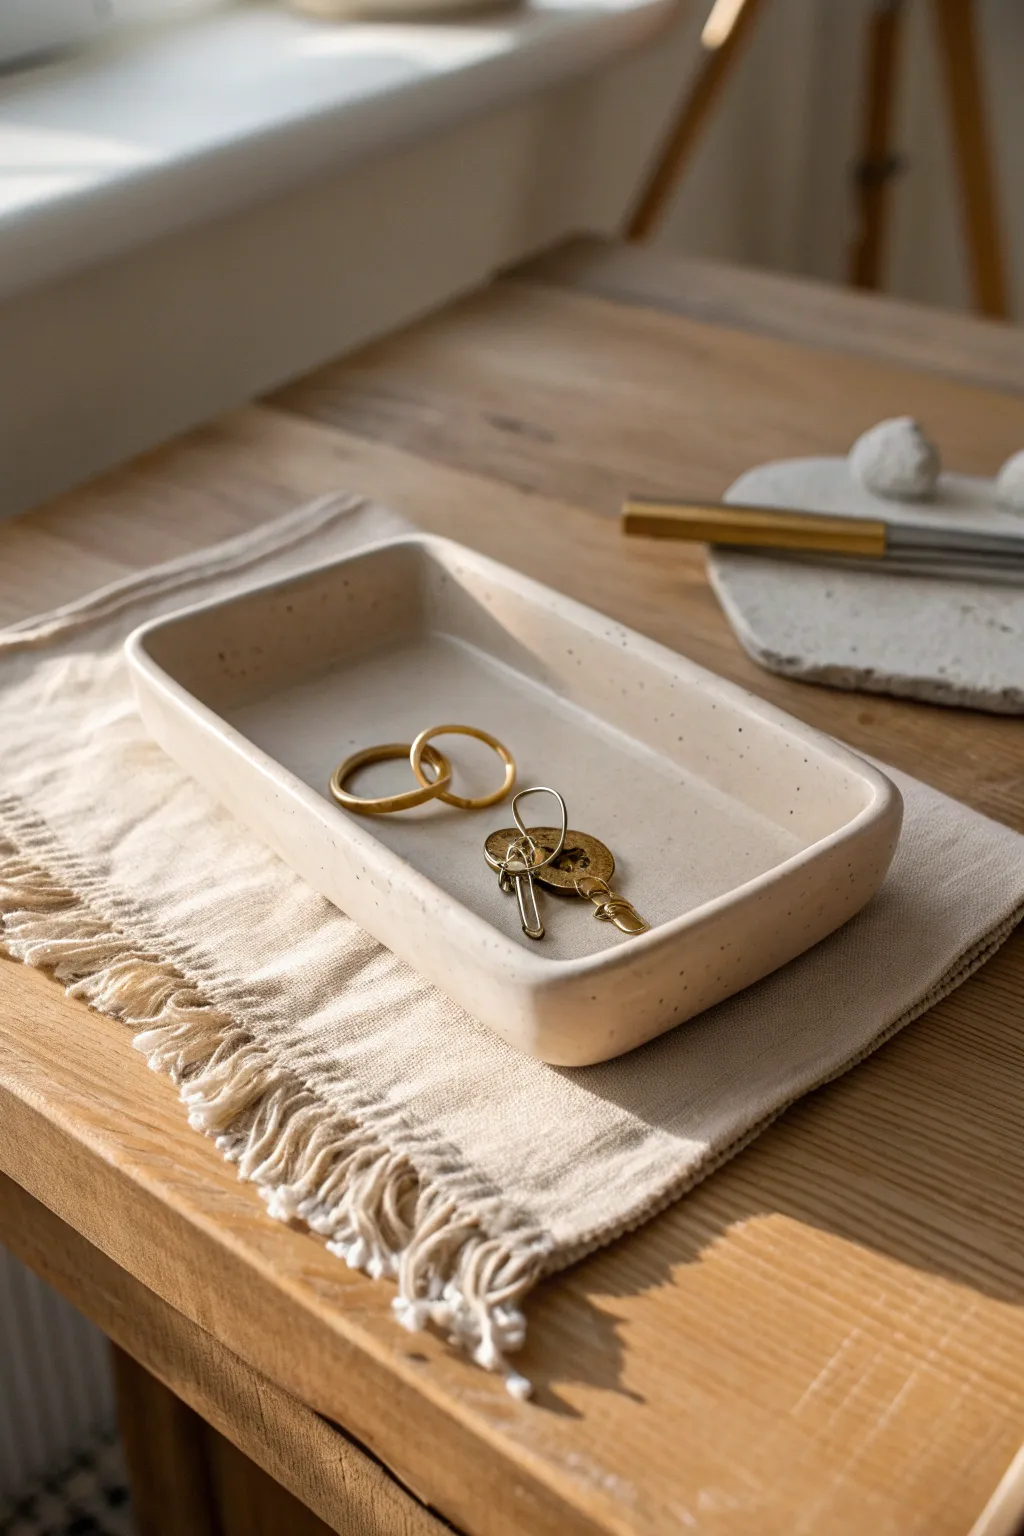
This minimalist, slab-built tray features soft rounded corners and a gentle speckled cream finish, making it the perfect home for your daily essentials. Its low profile and smooth, continuous rim offer a modern, understated elegance that complements any tabletop.
Step-by-Step Guide
Materials
- Speckled buff stoneware clay
- Rolling pin
- Two wood slat guides (1/4 inch thickness)
- Rectangular paper template (approx. 4″ x 7″)
- Needle tool or fettling knife
- Rib tool (rubber or silicone)
- Sponge
- Scoring tool (or serrated rib)
- Slip (clay mixed with water)
- Clear or transparent white glaze
- Kiln
Step 1: Preparing the Slab
-
Wedging:
Begin by thoroughly wedging a ball of speckled buff clay to remove air bubbles and ensure particle alignment, which prevents warping later. -
Rolling:
Place your clay between two 1/4 inch wooden slat guides. Roll the clay out into a smooth, even slab, flipping the clay over once or twice to ensure it doesn’t stick to your work surface. -
Compressing:
Using a rubber rib, firmly compress the clay slab on both sides. This aligns the clay particles, smooths the canvas texture, and is crucial for preventing cracks during drying.
Smooth Seams Tip
When joining the wall ends, cut them at a 45-degree angle (beveled cut). This increases surface area for the join and makes the seam much easier to hide than a blunt butt joint.
Step 2: Cutting and Forming
-
Base Template:
Lay your rectangular paper template onto the slab. Using a needle tool, cut out the base shape. I like to gently round the corners of the template beforehand so the cut is clean. -
Cutting Walls:
From the remaining slab, cut a long strip for the walls. Calculate the length by measuring the perimeter of your base (plus slight overlap) and make it about 1 inch tall. -
Scoring:
Score the top edge of your base piece and one long edge of your wall strip. Be generous with the scoring to create a rough texture for bonding. -
Applying Slip:
Apply a good amount of slip to the scored areas on both the base and the wall strip. It should look wet and muddy but not runny. -
Attaching Walls:
Place the wall strip onto the base. If your strip isn’t long enough to go all the way around in one piece, you can use two pieces, but try to join them on the straight sides rather than the corners.
Level Up: Texture
Before assembling, press a piece of linen or canvas deeply into the exterior side of the slab. This adds a subtle, tactile woven texture to the outside while keeping the inside smooth.
Step 3: Refining and Shaping
-
Blending Seams:
Use a small wooden modeling tool or your finger to firmly drag clay from the wall down onto the base on the inside, and from the base up onto the wall on the outside. The seam should disappear completely. -
Reinforcing Corners:
Pay special attention to the rounded corners. Gently press a thin coil of soft clay into the interior seam if it feels too thin, blending it out until smooth. -
Smoothing:
Run a damp sponge along the top rim to round it off comfortably. The rim should look soft, not sharp. -
Ribbing:
Use the rubber rib to smooth the interior floor and walls again, removing any fingerprints or tool marks. This final smoothing gives the tray its professional, finished look. -
Drying:
Cover the piece loosely with plastic for the first 24 hours to let moisture equalize, then uncover and allow to dry slowly to the bone-dry stage.
Step 4: Firing and Glazing
-
Bisque Fire:
Fire the bone-dry piece in the kiln to a bisque temperature (usually Cone 04) to prepare it for glazing. -
Cleaning:
Wipe the bisque-fired tray with a damp sponge to remove any kiln dust, which can prevent glaze from adhering properly. -
Glazing:
Dip or brush on a clear or semi-transparent milky white glaze. This allows the natural speckles of the clay body to show through. -
Glaze Firing:
Fire the piece again to the final glaze temperature appropriate for your clay body (likely Cone 5 or 6). Ensure the bottom is wiped clean of glaze before firing.
Once cool, your versatile tray is ready to organize jewelry or keep your keys safe near the door


Coil-Built Desk Pencil Cups
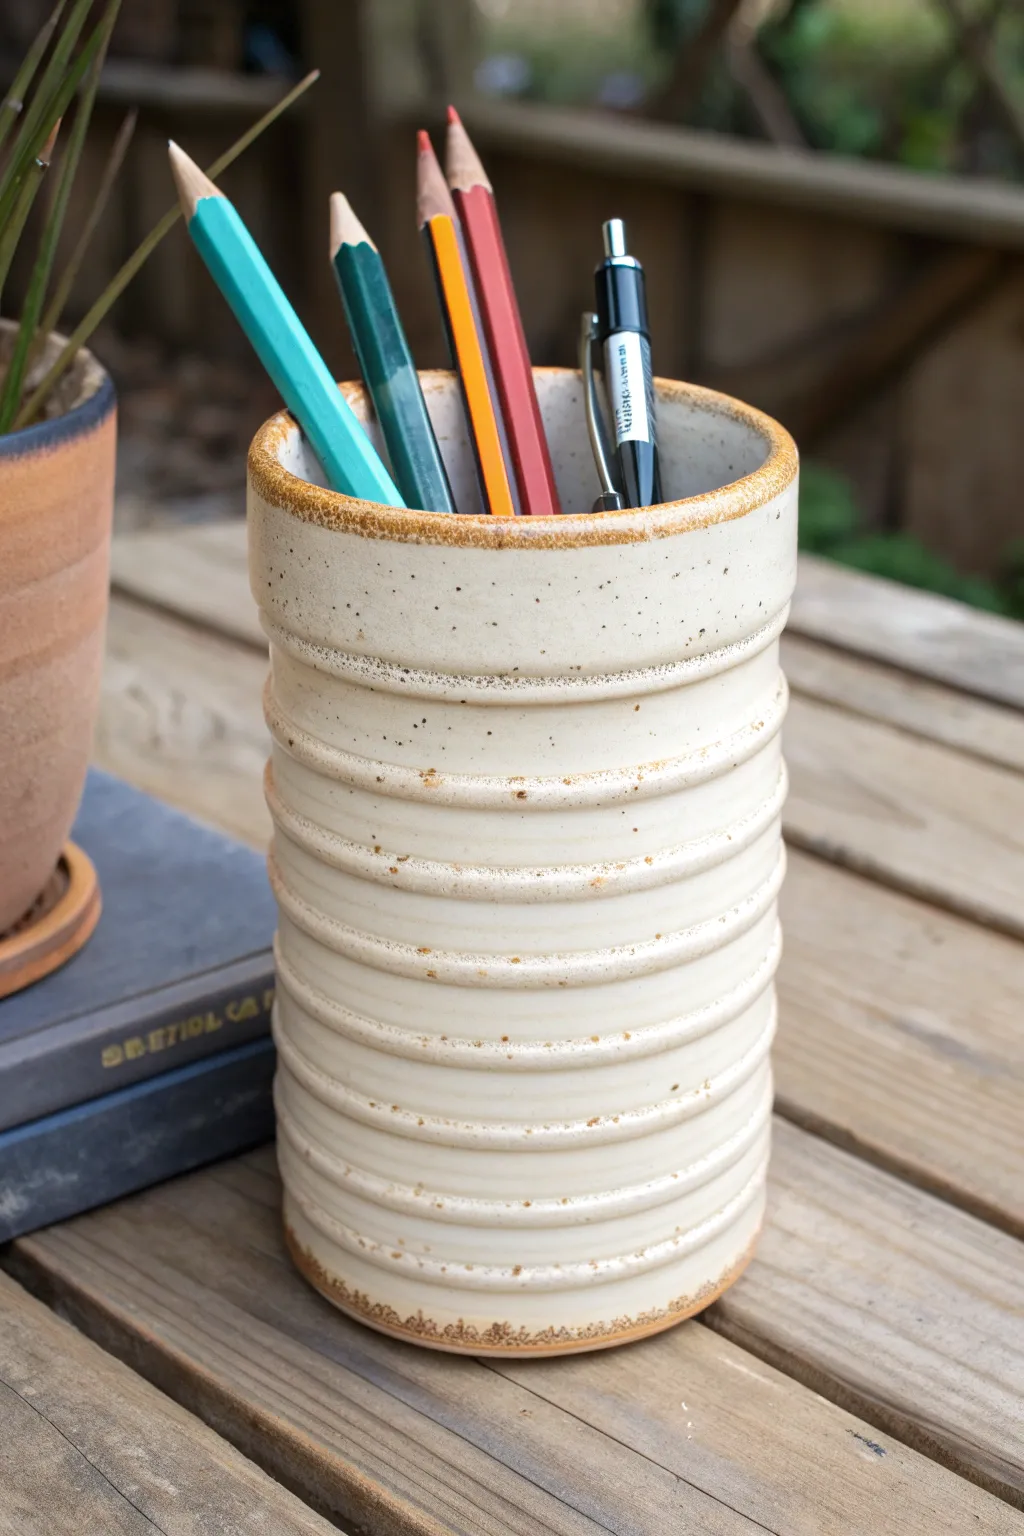
Elevate your desk organization with this clean, coil-built pencil cup featuring a distinctive rhythmic texture. The cream-white glaze with subtle speckling and warm rust edges gives it a professional, modern ceramic studo look.
Step-by-Step
Materials
- Speckled stoneware clay (approx. 1-2 lbs)
- Pottery wheel (or banding wheel for hand-building)
- Needle tool
- Wire cutter
- Wooden modeling tool or chamois
- Medium soft sponge
- Satin cream/white glaze
- Clear glaze (optional)
- Kiln access
Step 1: Forming the Base Cylinder
-
Prepare your clay:
Begin by wedging your stoneware clay thoroughly to remove any air bubbles. Form it into a smooth, even ball. -
Center and open:
Throw the ball onto your wheel head. Center the clay, then use your thumbs to open the center, leaving about a 1/2-inch floor thickness. -
Pull the walls:
Pull the walls up vertically to form a straight cylinder. Aim for a height of about 5-6 inches and a width of roughly 3-4 inches. -
Compress the lip:
As you reach the top, use your fingers or a chamois to gently compress the rim, ensuring it’s smooth and rounded. -
Define the shape:
Use a straight metal rib on the inside to ensure the interior walls are perfectly vertical, while keeping the exterior accessible for texturing.
Uneven Ridges?
If your horizontal ridges look wobbly, your wheel speed was too slow or your hand wasn’t braced. Keep your elbows tucked in tightly to your body for stability.
Step 2: Creating the Ribbed Texture
-
Establish the rhythm:
With the wheel spinning at a medium-slow speed, press your index finger or a rounded wooden tool gently into the clay near the base to create the first groove. -
Work upwards:
I like to move steadily upward, creating evenly spaced horizontal rings up the entire height of the cup. The pressure should be consistent to make the ridges uniform. -
Refine the ridges:
Go back over the ridges with a soft, damp sponge to soften any sharp edges, giving them that smooth, rounded profile seen in the photo. -
Trim the base:
Use a wooden modeling tool to undercut the very bottom edge slightly, creating a slight shadow gap where the cup meets the table. -
Wire off:
Run a wire cutter underneath the pot to separate it from the wheel head.
Step 3: Drying and Firing
-
Initial drying:
Cover the piece loosely with plastic and let it dry slowly to the leather-hard stage. -
Trimming (optional):
If hand-built or thrown with excess clay at the bottom, flip the leather-hard piece and trim the foot visually clean. -
Bisque fire:
Allow the piece to become bone dry, then bisque fire it in your kiln according to your clay body’s specifications (usually Cone 04 or 06). -
Glazing strategy:
Dip the entire piece into a satin cream or white glaze. Shake off excess to ensure the glaze doesn’t pool too thickly in the decorative grooves. -
Creating the break:
The rust-colored rim and groove details naturally happen where the glaze ‘breaks’ (thins out) over sharp edges on speckled clay. To enhance this, you can gently wipe the rim with a damp sponge to thin the glaze there. -
Glaze fire:
Fire the piece to maturity (likely Cone 5 or 6 depending on your stoneware). This higher temperature brings out the iron speckles.
Two-Tone Effect
Dip the top third in a second, contrasting glaze color that interacts with the cream base. A floating blue over white creates beautiful movement.
Once cooled, your durable new cup is ready to organize your creative tools

The Complete Guide to Pottery Troubleshooting
Uncover the most common ceramic mistakes—from cracking clay to failed glazes—and learn how to fix them fast.
Lidded Trinket Jars With Easy Knob Handles
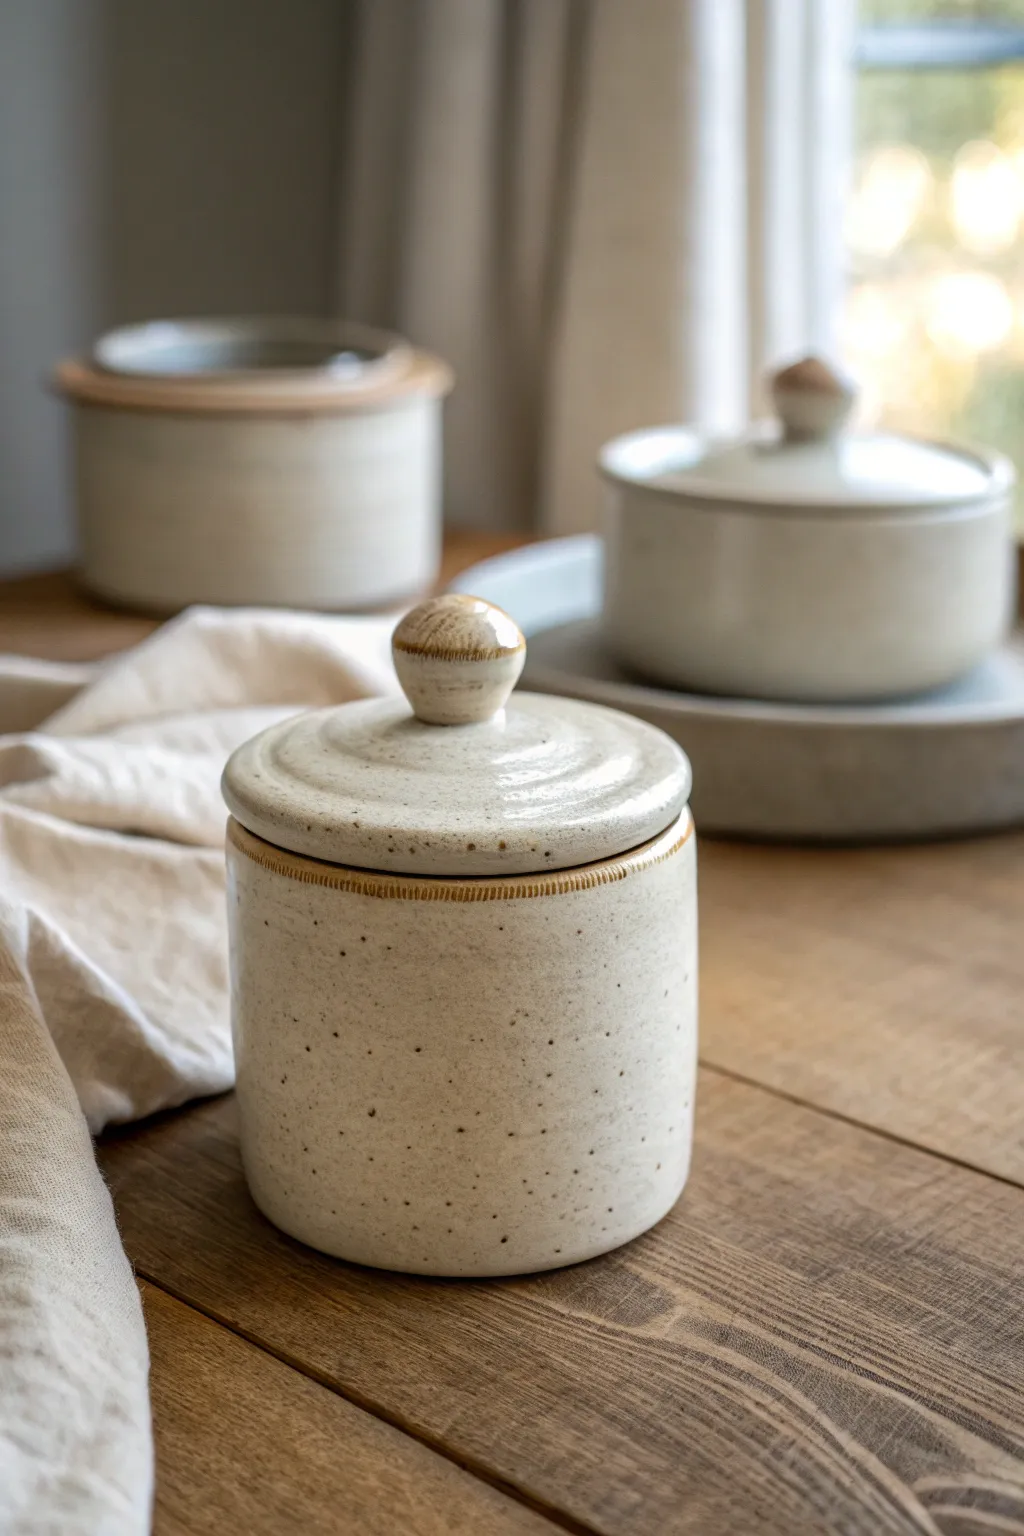
This charming lidded vessel features a cozy, speckled cream glaze and a spherical knob for an inviting, rustic feel. Perfect for beginners, this project relies on basic slab and coil techniques to create a functional and stylish storage solution.
How-To Guide
Materials
- Speckled stoneware clay body
- Rolling pin and guide sticks (approx. 1/4 inch)
- Needle tool
- Scoring tool or serrated rib
- Clay slip
- Cylindrical form or template (for jar diameter)
- Fettling knife
- Sponge
- Pottery wheel (optional, for trimming)
- Loop tool for trimming
- Glossy white or cream dipping glaze
Step 1: Forming the Body
-
Roll the Slab:
Begin by rolling out your speckled stoneware clay into an even slab, using guide sticks to maintain a thickness of about 1/4 inch. -
Cut the Base and Walls:
Using your cylindrical template, cut a circle for the base. Then, measure the circumference of your base and cut a rectangle for the pot’s walls, ensuring it is slightly longer than the circumference to allow for a joint overlap. -
Score and Slip:
Score the edges of the base and the bottom edge of the wall rectangle. Apply slip generously to the scored areas. -
Assemble the Cylinder:
Wrap the rectangular slab around the base. Join the vertical seam first by overlapping the ends, cutting through both layers at an angle (bevel cut), and then scoring and slipping the new edges together. -
Finalize the Shape:
Press the cylinder walls firmly onto the base. Blend the clay on the inside and outside seams using your thumb or a wooden tool until the join is invisible.
Pro Tip: Perfect The Fit
Dry the lid *on* the jar. This ensures that if the jar warps slightly while drying, the lid will warp with it, maintaining a perfect fit after firing.
Step 2: Creating the Lid
-
Measure the Lid Diameter:
Measure the outer diameter of your jar’s rim. Roll out a fresh slab of clay and cut a circle slightly larger than this diameter to account for shrinkage and overhang. -
Add a Flange:
To keep the lid secure, roll a small coil of clay. Score a circle on the *underside* of your lid that matches the *inner* diameter of the jar. Attach the coil here so it fits snugly inside the jar rim. -
Refine the Lid Edge:
Smooth the edges of the lid with a damp sponge. You can slightly dome the lid by gently pressing it over a curved mold or simply manipulating it with your fingers for a soft curve.
Level Up: Mixed Materials
Instead of a clay knob, leave a hole in the lid center. After firing, attach a wooden bead, leather loop, or brass hardware for a modern mixed-media look.
Step 3: Detailing and Knob
-
Create the Knob:
Roll a small ball of clay between your palms to create a spherical knob. You can gently pinch the bottom to create a small pedestal or neck for the knob. -
Attach the Knob:
Score the center of the lid top and the bottom of your knob. Add slip and press the knob firmly into place, blending the clay around the connection point for strength. -
Add Texture:
Using a serrated tool or a fork, gently press a textured ring around the upper rim of the jar body or the edge of the lid for that subtle, rustic detail seen in the photo. -
Dry Slowly:
Place the lid on the jar with a piece of paper towel in between to prevent sticking. Wrap the entire piece loosely in plastic to let it dry slowly and evenly to the leather-hard stage.
Step 4: Glazing and Finishing
-
Bisque Fire:
Once bone dry, fire the piece in the kiln to cone 04 (or your clay’s specific bisque temperature). -
Wax Resist:
Apply wax resist to the bottom of the jar and the contact points where the lid meets the jar (the flange) to prevent them from fusing together during the glaze firing. -
Dip Glazing:
Dip the entire jar and lid into a glossy cream or soft white glaze. Allow the excess to drip off before turning it upright. -
Revealing Detail:
I like to gently wipe the glaze off the textured ring and the very top of the knob with a damp sponge. This exposes the raw toasted clay color, creating the beautiful contrast shown in the example. -
Final Firing:
Fire the piece to cone 6 (or your clay’s maturity temperature). The iron speckles in the clay will bleed through the cream glaze, creating the signature spotted look.
Once cooled, your speckled jar is ready to hold tea, sugar, or jewelry on your counter
Terra-Cotta Pot Makeovers With Painted Patterns
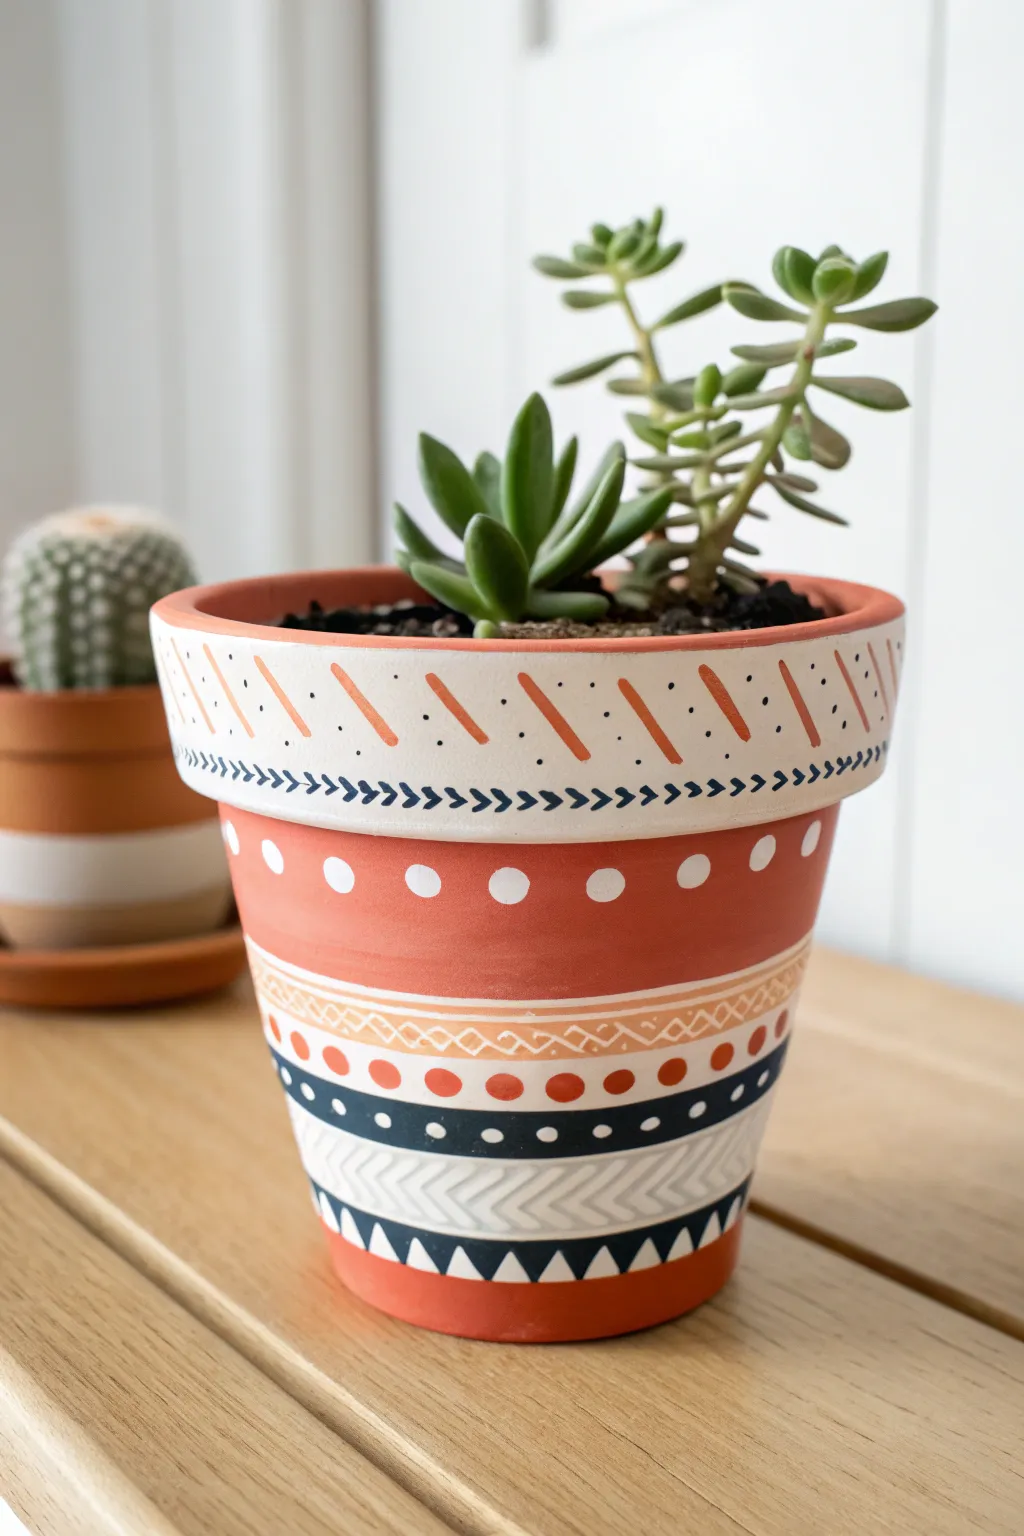
Transform a standard clay planter into a stylish accent piece with this detailed geometric design. Combining classic terracotta warmth with crisp cream, navy, and copper accents creates a modern bohemian look perfect for succulents.
Detailed Instructions
Materials
- Standard terracotta pot (cleaned)
- Acrylic craft paints (Cream/Off-White, Navy Blue, Copper/Terracotta, Soft Peach)
- Flat shader brushes (medium and small)
- Fine liner brush (size 0 or 00)
- Pencil and eraser
- Ruler or soft tape measure
- Cotton swabs or dotting tools
- Matte or satin clear sealant spray
Step 1: Base Preparation and Rim
-
Clean surface:
Ensure your terracotta pot is completely clean and dry. Wipe it down with a damp cloth to remove any dust that might interfere with paint adhesion. -
Base coat rim:
Load a medium flat brush with cream or off-white acrylic paint. Paint the entire outer rim of the pot. You will likely need 2-3 coats for solid coverage, letting each coat dry for about 15 minutes in between. -
Lower white band:
Paint a wide band of the same cream color near the bottom third of the pot. This will serve as the background for the lower geometric patterns. Aim for a belt about 1.5 inches wide.
Uneven Lines?
If your horizontal stripes look shaky, place the pot on a lazy Susan or turntable. Hold your brush steady in one spot and slowly rotate the base for perfect bands.
Step 2: Upper Rim Details
-
Mark diagonals:
Once the rim is fully dry, lightly sketch diagonal lines spaced evenly apart using a pencil. These will guide your dash marks. -
Paint dashes:
Using a small flat brush and copper or terracotta-colored paint, create firm diagonal strokes over your pencil marks. Keep the pressure consistent. -
Add rim dots:
Dip the very tip of a fine liner brush or a toothpick into black paint. Place three tiny dots vertically between each diagonal copper dash. -
Create arrow divider:
At the very bottom edge of the rim, paint a continuous row of small, sideways ‘V’ shapes (chevrons) using navy blue paint and a liner brush. Connect them tip-to-tail to form a jagged line.
Make It Pop
Mix a tiny bit of baking soda into your cream paint for the bottom herringbone section. This adds a slight texture that mimics embossed ceramic.
Step 3: Body Patterns
-
Main polka dots:
Below the rim, on the unpainted terracotta visual band, create a row of medium-sized white polka dots. Using the back end of a paintbrush dipped in white paint makes this much easier and more uniform. -
Peach detail band:
Moving down to the top of your lower white section, paint two thin horizontal lines in soft peach about a quarter-inch apart. -
Cross-hatch pattern:
Inside the peach lines, paint a row of small ‘X’ shapes or a zigzag line to create a woven look. I find a liner brush works best for this delicate work. -
Secondary dot row:
Below the peach band, add a row of terracotta or copper-colored dots. These should be slightly larger than the black rim dots but smaller than the main white ones. -
Navy stripe:
Paint a solid, thick horizontal band of navy blue below the copper dots. -
White dots on navy:
Once the navy stripe is dry to the touch, add small white dots centered along the stripe.
Step 4: Lower Design and Finish
-
Herringbone section:
Below the navy band, leave a section of the cream background exposed. Fill this space with a light grey or diluted tan herringbone pattern (nested V-shapes) using a fine brush. -
Bottom triangles:
Finish the design near the base with a row of navy blue triangles pointing upward. Keep the spacing tight so the bases of the triangles almost touch. -
Erase guides:
Check the pot for any visible pencil lines. If the paint is fully cured (give it a few hours), gently erase any remaining visible graphite. -
Seal the pot:
To protect your work from water damage, spray the entire exterior with a clear matte sealant. Apply two light coats rather than one heavy one to prevent drips.
Now just add some potting soil and your favorite succulent to enjoy your handiwork


What Really Happens Inside the Kiln
Learn how time and temperature work together inside the kiln to transform clay into durable ceramic.
Stamped Texture Containers Using Household Patterns
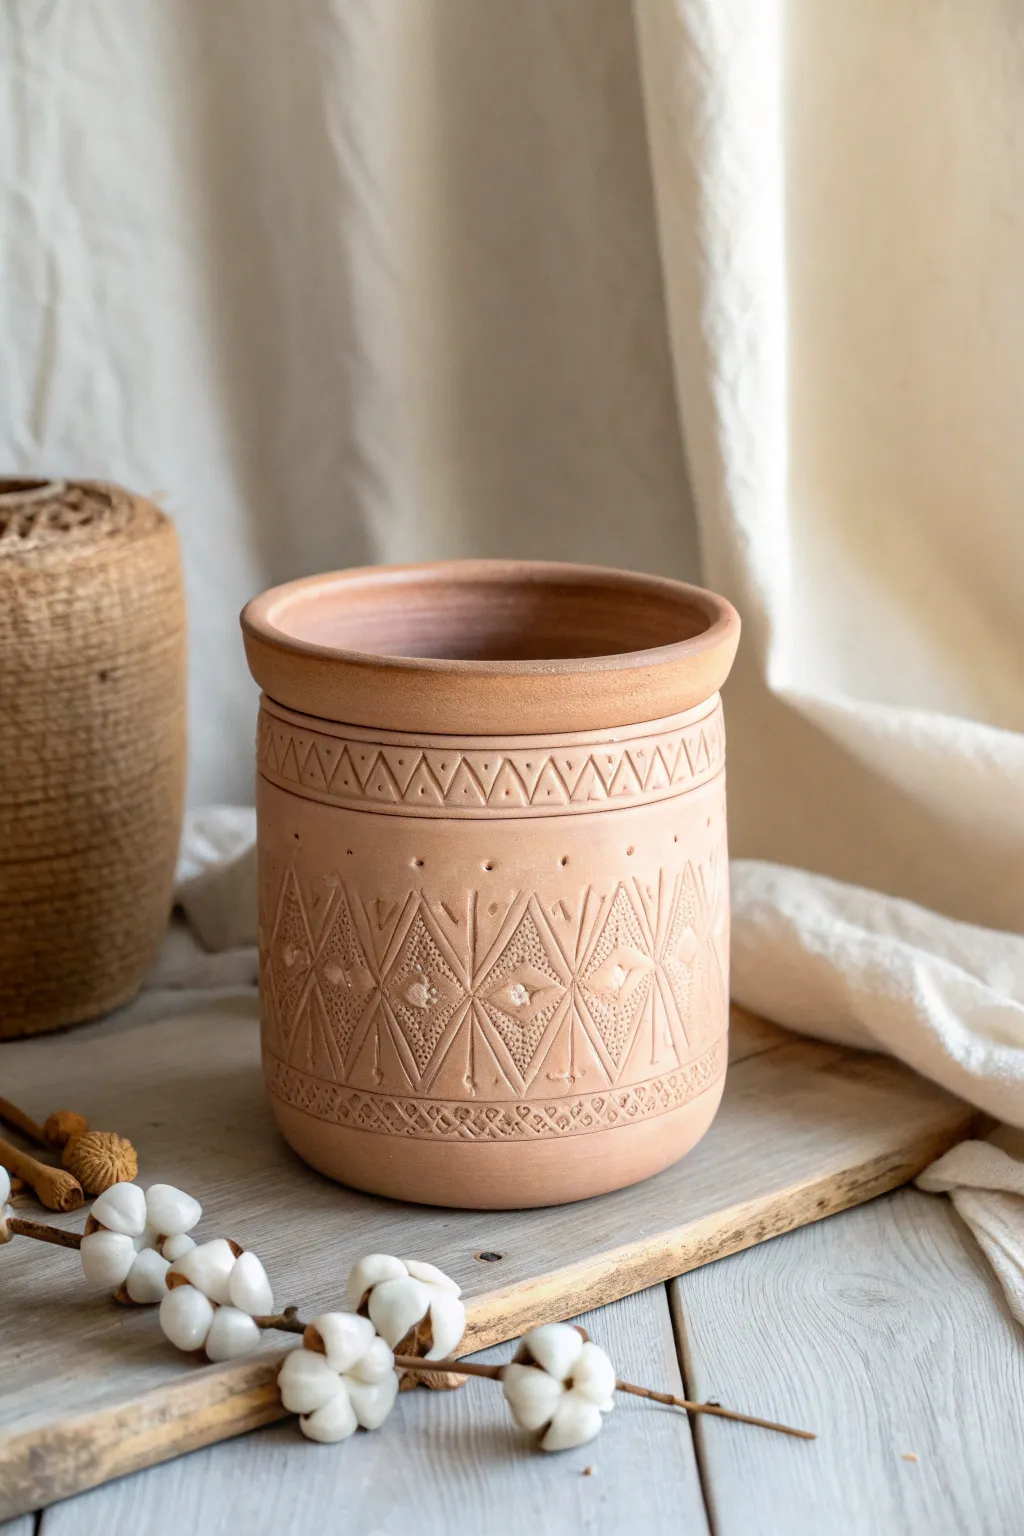
This earthy, bohemian-style container brings warmth to any space with its rich terra-cotta tones and intricate, rhythmic patterns. By using simple carving tools and household items to stamp texture, you can transform a basic clay cylinder into a customized piece of functional art.
How-To Guide
Materials
- Terra-cotta clay (or air-dry clay)
- Rolling pin
- Canvas mat or slab roller
- Fettling knife
- Needle tool
- Ruler
- Slip and scoring tool (toothbrush works well)
- Wooden modeling tool with a flat edge
- Loop tool (small)
- Sponge
- Stamping object (like a triangular block or custom cutout)
Step 1: Forming the Base Cylinder
-
Roll the slab:
Begin by rolling out a consistent slab of terra-cotta clay to about 1/4 inch thickness. I like to flip the clay over occasionally while rolling to prevent it from sticking to the canvas mat. -
Cut the rectangle:
Using your ruler and fettling knife, cut a long rectangle. The height determines your pot’s depth, and the length determines the circumference. Save the excess clay for the base. -
Score and slip:
Bevel the short ends of your rectangle at a 45-degree angle. Score the beveled edges thoroughly and apply clay slip. -
Join the cylinder:
Stand the rectangle up and curve it into a cylinder, overlapping the beveled edges. Press them firmly together, supporting the wall from the inside with one hand. -
Blend the seam:
Use a wooden modeling tool to smooth the seam on both the inside and outside until the join is invisible. -
Attach the base:
Place your cylinder on the remaining slab and trace a circle around the bottom. Cut out the circle, score and slip the contact points, and press the base firmly onto the cylinder.
Cracks Appearing?
If small cracks form at the seams while working, your clay is too dry. Score the crack deeper, add slip, and compress the area firmly with a wood tool.
Step 2: Creating the Collar and Lines
-
Smooth the lip:
Use a damp sponge to round off the top rim of the pot so it feels pleasant to the touch. -
Define the collar area:
Using a needle tool while rotating the pot (a banding wheel is helpful here), scribe two parallel horizontal lines near the top rim to create a distinctive ‘collar’ band. -
Carve the collar detail:
Inside this upper band, carve a repeating zig-zag pattern. Use a tool with a slightly wider tip than a needle to make the lines stand out. -
Add lower definition:
Create a similar, thinner horizontal band near the very bottom of the pot to frame the main design area.
Pro Tip: Depth Control
When carving geometric lines, wrap a piece of tape around your needle tool as a depth gauge. This ensures all your carved lines have consistent visual weight.
Step 3: Stamping and Carving the Main Texture
-
Map out vertical guides:
Lightly mark vertical lines around the main body of the pot to ensure your diamond patterns stay evenly spaced. You can smooth these away later. -
Carve the diamonds:
Using a sharp carving tool, etch large diamond shapes around the center of the pot. Ensure the top and bottom points of the diamonds align vertically. -
Add textural dots:
Poke small holes or divots above the top point of each diamond using a blunt tool tip for added visual interest. -
Texture the diamonds:
Press a textured object or small stamp into the center of each diamond. This creates the rough, tactile surface contrast seen in the reference image. -
Carve the rays:
Between the large diamonds, carve vertical lines and inverted ‘V’ shapes that radiate outward, filling the negative space with linear energy. -
Detail the bottom band:
Return to the bottom horizontal band and fill it with a dense cross-hatching or lattice pattern using your needle tool. -
Clean up burrs:
Let the clay dry to a leather-hard state. Once firm, gently brush away any clay crumbs or sharp burrs left from the carving process.
Step 4: Finishing
-
Final sponge:
Wipe the entire piece with a very slightly damp sponge to soften the edges without washing away your crisp details. -
Dry and fire:
Allow the pot to dry slowly under loose plastic to prevent cracking. Once bone dry, fire it in a kiln according to your clay body’s specifications (usually bisque then glaze or left raw).
Enjoy the rhythmic process of carving these patterns and watching your plain cylinder transform.
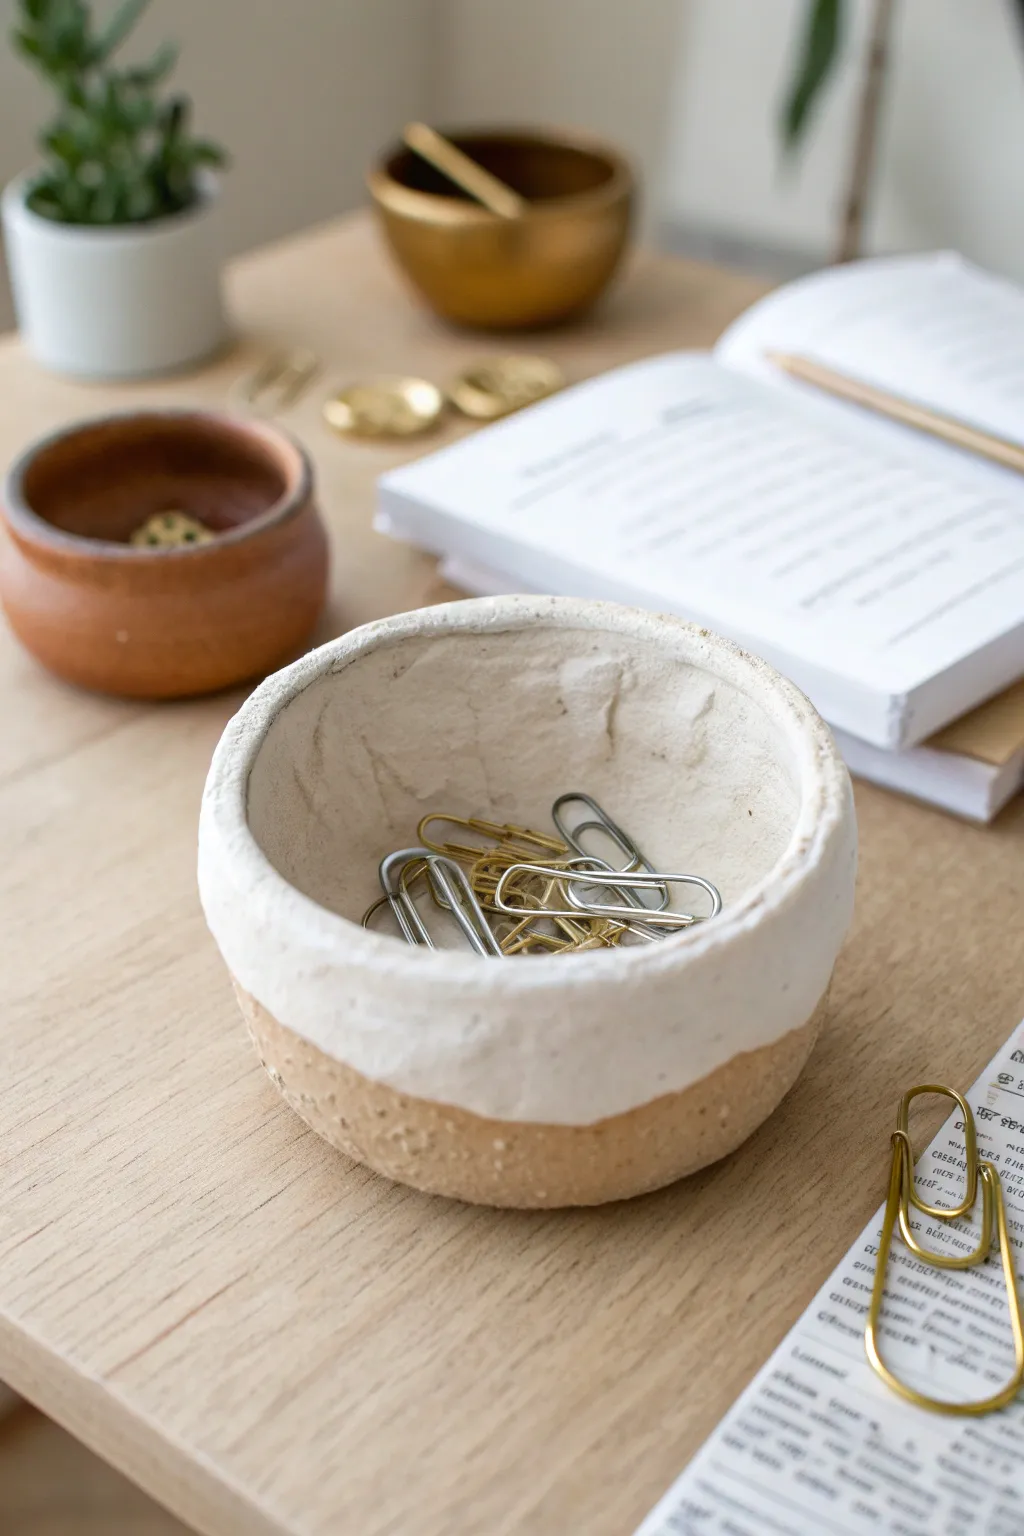
Two-Tone Dip-Painted Clay Containers
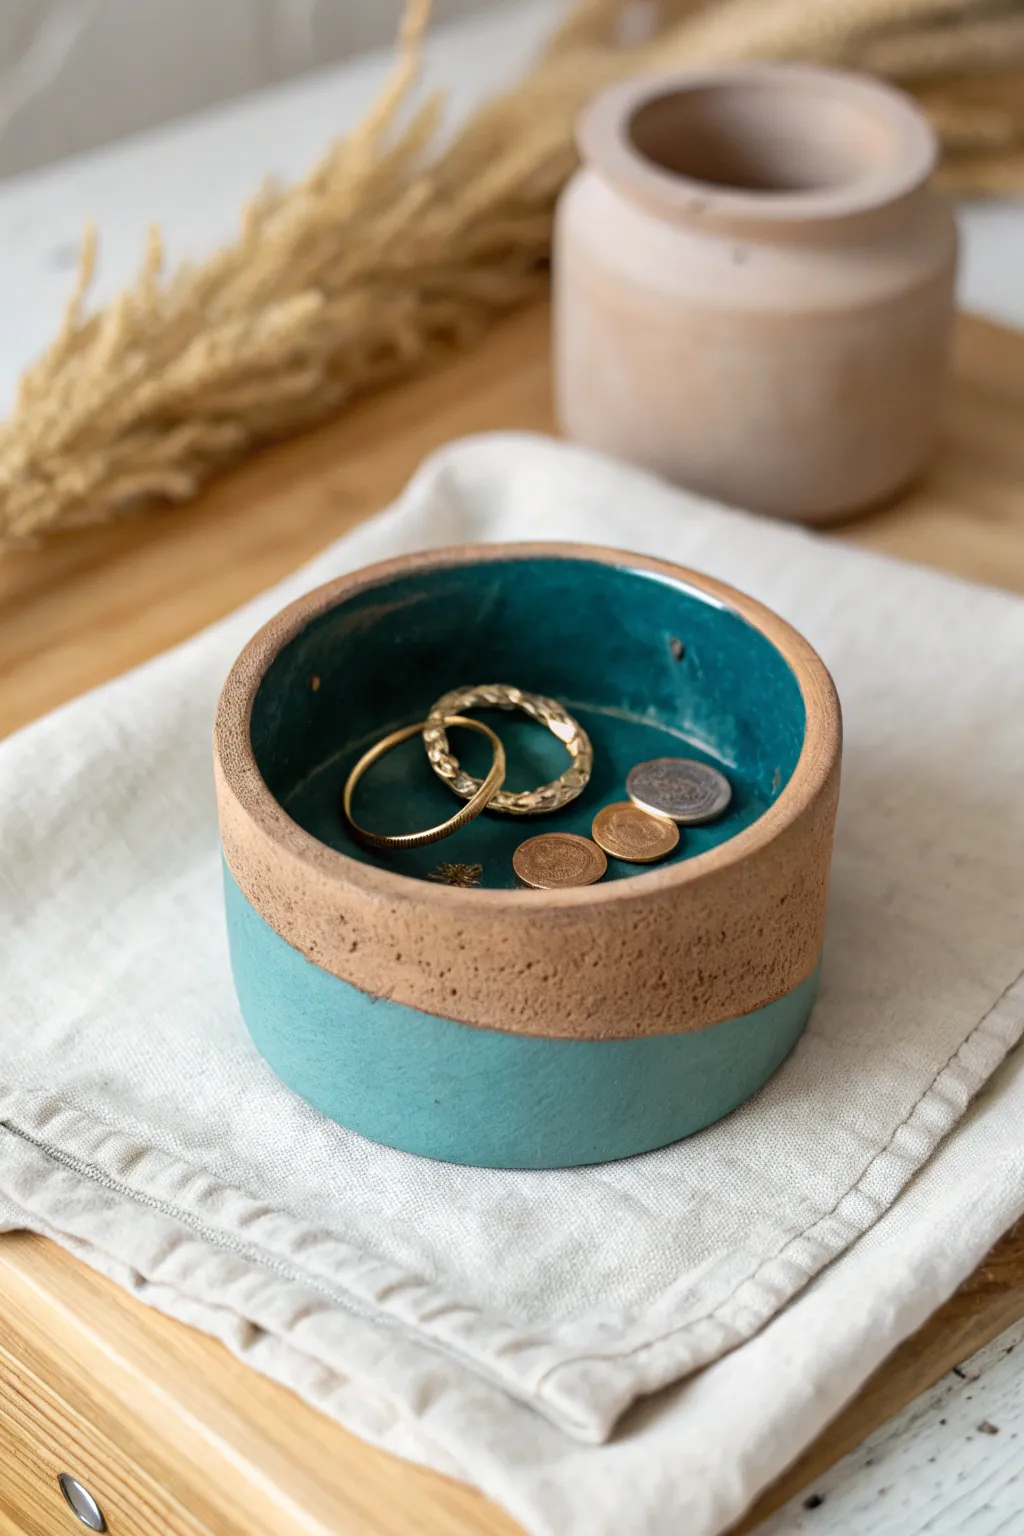
This charming trinket bowl combines the raw, earthy texture of unglazed clay with a splash of vibrant teal for a modern contrast. It is the perfect size for catching rings, coins, or keys on your entryway table.
Step-by-Step Guide
Materials
- Air-dry clay (terra cotta or white, paint will cover it)
- Acrylic paint (Deep Teal or Peacock Green)
- Matte sealant or varnish
- Rolling pin
- Circle cutter or a small bowl (approx. 4-5 inches)
- Craft knife
- Small sponge or fine-grit sandpaper
- Painter’s tape or washi tape
- Paintbrushes (one wide flat, one detail)
- Water and slip (clay mixed with water)
Step 1: Forming the Base
-
Prepare the clay slab:
Begin by kneading a generous handful of air-dry clay to warm it up. Roll it out on a flat surface to an even thickness of about 1/4 inch. If the clay sticks, you can use a bit of wax paper underneath. -
Cut the base:
Use your circle cutter or place a small bowl upside down on the clay slab as a template. Cut around it with a craft knife to create a perfect circle for the base of your container. -
Create the walls:
Roll out a long rectangular strip of clay from the remaining slab. This strip should be the same thickness as the base (1/4 inch) and long enough to wrap around the circumference of your circle base. Trim the edges to make them straight. -
Score and slip:
Take a needle tool or a toothpick and rough up the outer edge of the circle base and one long edge of your rectangular strip. Dab a little water or ‘slip’ onto these roughed-up areas to act as glue. -
Assemble the container:
Gently wrap the strip around the base, pressing the scored edges together firmly. Where the two ends of the wall meet, score and slip them as well, blending the seam with your finger or a modeling tool so it disappears. -
Smooth the interior:
Use a slightly damp sponge or your finger to smooth the inside seam where the wall meets the floor. This ensures a strong bond and a clean look for the interior. -
Create exterior texture:
Instead of smoothing the outside perfectly, dab it lightly with a dry sponge or a crumpled piece of foil. This creates that lovely organic, stony texture seen in the photo. -
Let it cure:
Set the pot aside in a safe, dry place. Allow it to air dry completely for at least 24-48 hours. The clay will lighten significantly in color when it is fully dry.
Step 2: Painting and Finishing
-
Sand the rim:
Once dry, check the top rim. If it’s too sharp or uneven, gently sand it flat with fine-grit sandpaper, wiping away any dust with a damp cloth afterward. -
Create the paint line:
Measure about halfway up the exterior wall of the bowl. Apply a strip of painter’s tape or washi tape horizontally around the circumference. Press the edges of the tape down firmly to prevent paint bleed. -
Paint the bottom section:
Using your teal acrylic paint, coat the bottom half of the exterior (below the tape line). Be generous but avoid globs. I like to brush horizontally to match the direction of the bowl. -
Paint the specific interior:
Paint the entire interior of the bowl with the same teal color. You’ll likely need two coats here to get that rich, opaque coverage that hides the clay color beneath. -
Remove the tape:
Carefully peel off the painter’s tape while the paint is still slightly tacky—don’t wait for it to be bone dry, or it might chip the paint edge. Reveal the crisp line between the painted bottom and the raw top. -
Paint the bottom base:
Flip the bowl over and paint the underside teal as well, connecting it to the sides for a seamless dipped look. -
Touch up edges:
If any paint seeped under the tape, or if the rim needs definition, use a very small detail brush to clean up the lines. The top rim itself should remain raw clay color. -
Seal the piece:
Apply a matte varnish specifically over the painted teal areas to protect the color from chipping. You can leave the raw clay section unvarnished to maintain the textural contrast.
Clean Lines Hack
Before painting the main teal color, paint a thin layer of clear matte medium or sealant over the tape edge. This seals the gap, so any bleeding is clear, leaving a razor-sharp teal line later.
Cracks Appearing?
If small cracks appear as the clay dries, don’t panic. Mix a tiny amount of fresh clay with water to make a paste and fill the crack. Smooth it over and let it dry again before painting.
Now you have a stylish, functional piece of decor ready to organize your small treasures

TRACK YOUR CERAMIC JOURNEY
Capture glaze tests, firing details, and creative progress—all in one simple printable. Make your projects easier to repeat and improve.
Face Planters With Minimal Line Features
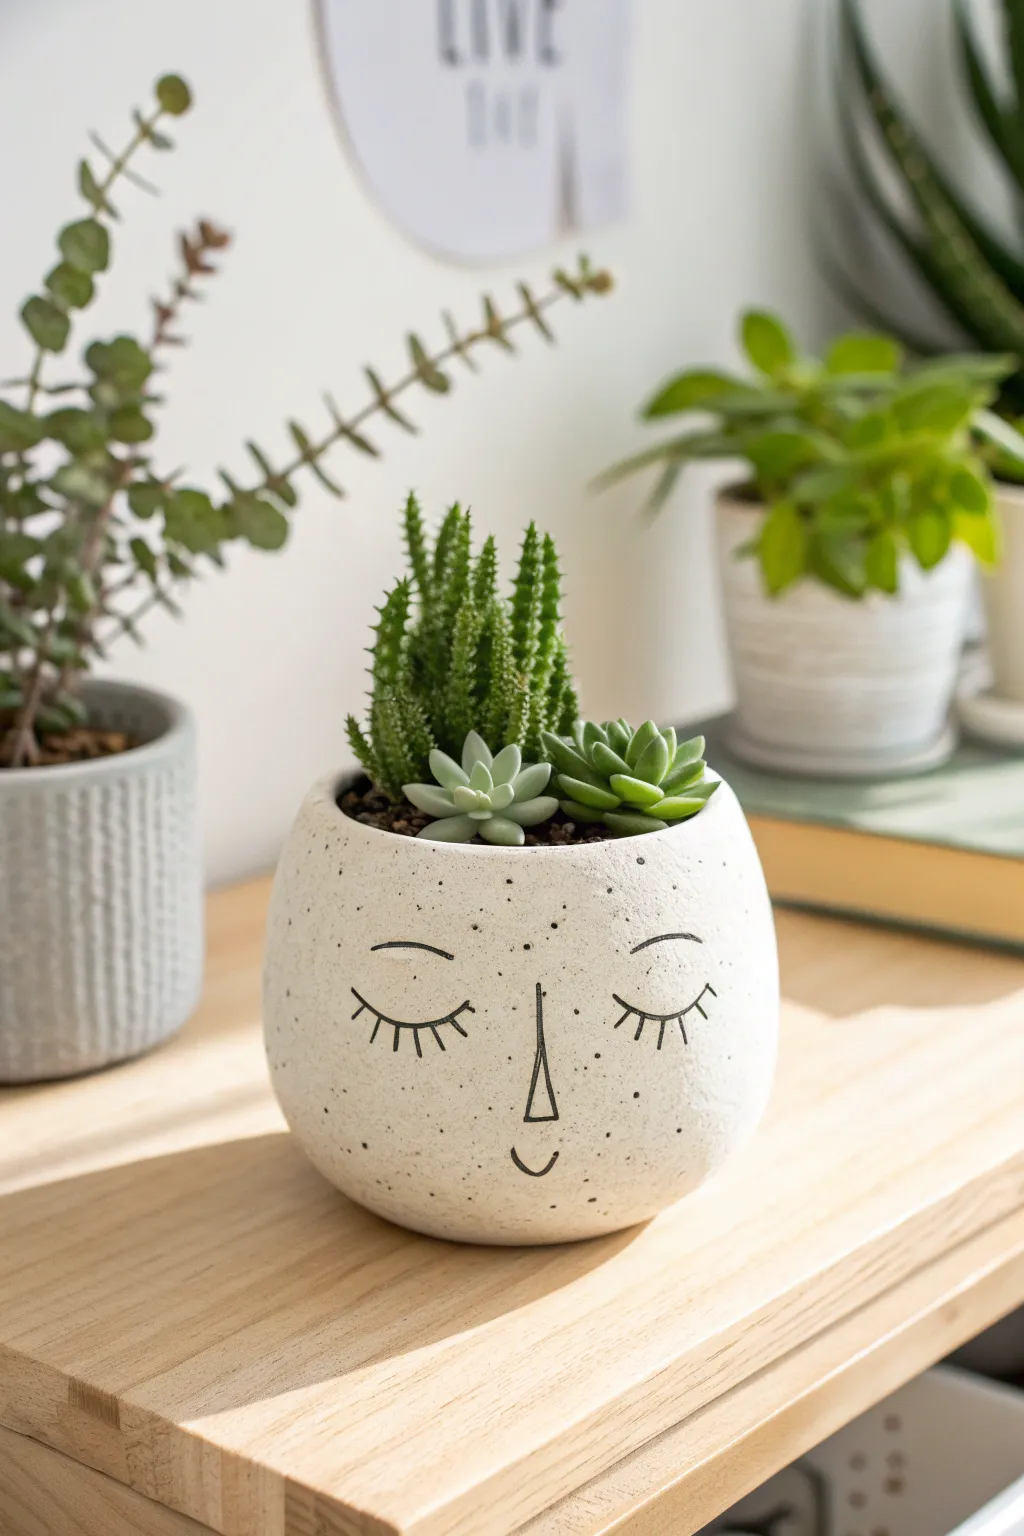
Bring a sense of calm to your plant collection with this adorable sleeping face planter. Using simple air-dry clay and minimal line art, you can create a modern, speckled vessel that looks like high-end boutique decor.
Step-by-Step
Materials
- White air-dry clay (approximately 1-2 lbs)
- Spherical mold (like a small ball or balloon)
- Rolling pin
- Fettling knife or craft knife
- Small bowl of water
- Sponge
- Fine-grit sandpaper
- Black acrylic paint pen (fine tip)
- Black acrylic paint (liquid)
- Old toothbrush
- Matte spray varnish or sealant
- Assorted succulents and potting mix
Step 1: Sculpting the Vessel
-
Prepare the Clay:
Start by kneading your white air-dry clay until it is pliable and smooth. This warms up the material and removes air bubbles that could cause cracks later. -
Roll the Slab:
Roll out the clay on a flat surface to an even thickness of about 1/4 inch. If you notice the clay sticking, I like to lightly dust the surface with a little cornstarch. -
Form the Base:
Cut a circle from the slab to serve as the bottom of your pot. It should be roughly 3 inches in diameter to provide a stable foundation. -
Shape the Body:
Drape the remaining rolled slab over your chosen spherical mold to create the rounded cup shape. If using a balloon, be gentle; if using a ball, cover it with plastic wrap first for easy release. -
Join the Base:
Attach the round base to the bottom of your draped clay form. Score both surfaces with a needle tool, dab with a little water, and press them firmly together. -
Smooth the Seams:
Use your fingers and a damp sponge to blend the seam where the base meets the walls until it’s invisible. Smooth the entire outer surface to remove fingerprints. -
Create the Opening:
Trim the top opening of the pot with your fettling knife to create a clean, even rim. You want the opening wide enough to comfortably fit your plants.
Uneven Speckles?
Practice your toothbrush flicking technique on a piece of scrap paper first. If blobs appear too big, your paint is likely too watery or the brush is overloaded.
Step 2: Refining and Decorating
-
Dry Completely:
Allow the pot to dry fully. This can take 24-48 hours depending on humidity. Don’t rush this step, as damp clay won’t take ink well. -
Sand for Finish:
Once bone dry, gently sand the exterior with fine-grit sandpaper. Focus on the rim and any uneven spots to achieve that smooth, ceramic-like texture. -
Speckle Effect:
Dip an old toothbrush into diluted black acrylic paint. Run your thumb over the bristles to flick tiny speckles across the entire surface of the pot for a stone-ware look. -
Draft the Face:
Lightly sketch the facial features with a pencil. Draw two downward curves for closed eyes, vertical lashes, a simple triangle nose, and a small curve for the mouth. -
Inking the Features:
Trace over your pencil lines carefully with a fine-tip black paint pen. Keep your hand steady and maintain a consistent line width for that minimalist aesthetic. -
Seal the Work:
Spray the entire planter with a matte varnish. This protects the clay from moisture and prevents the ink from smudging. -
Adding Greenery:
Fill the bottom with a layer of small pebbles for drainage, then add cactus soil. Nestle your chosen succulents—a tall textural one and a rosette shape work best—into the new home.
Use a Template
Draw the face on paper first and cut it out. Tape this stencil to the curved pot and trace around it to ensure the features are perfectly symmetrical.
Place your charming new planter in a sunny spot and enjoy the peaceful vibe it adds to the room
Animal Containers With Ears, Paws, or Tails
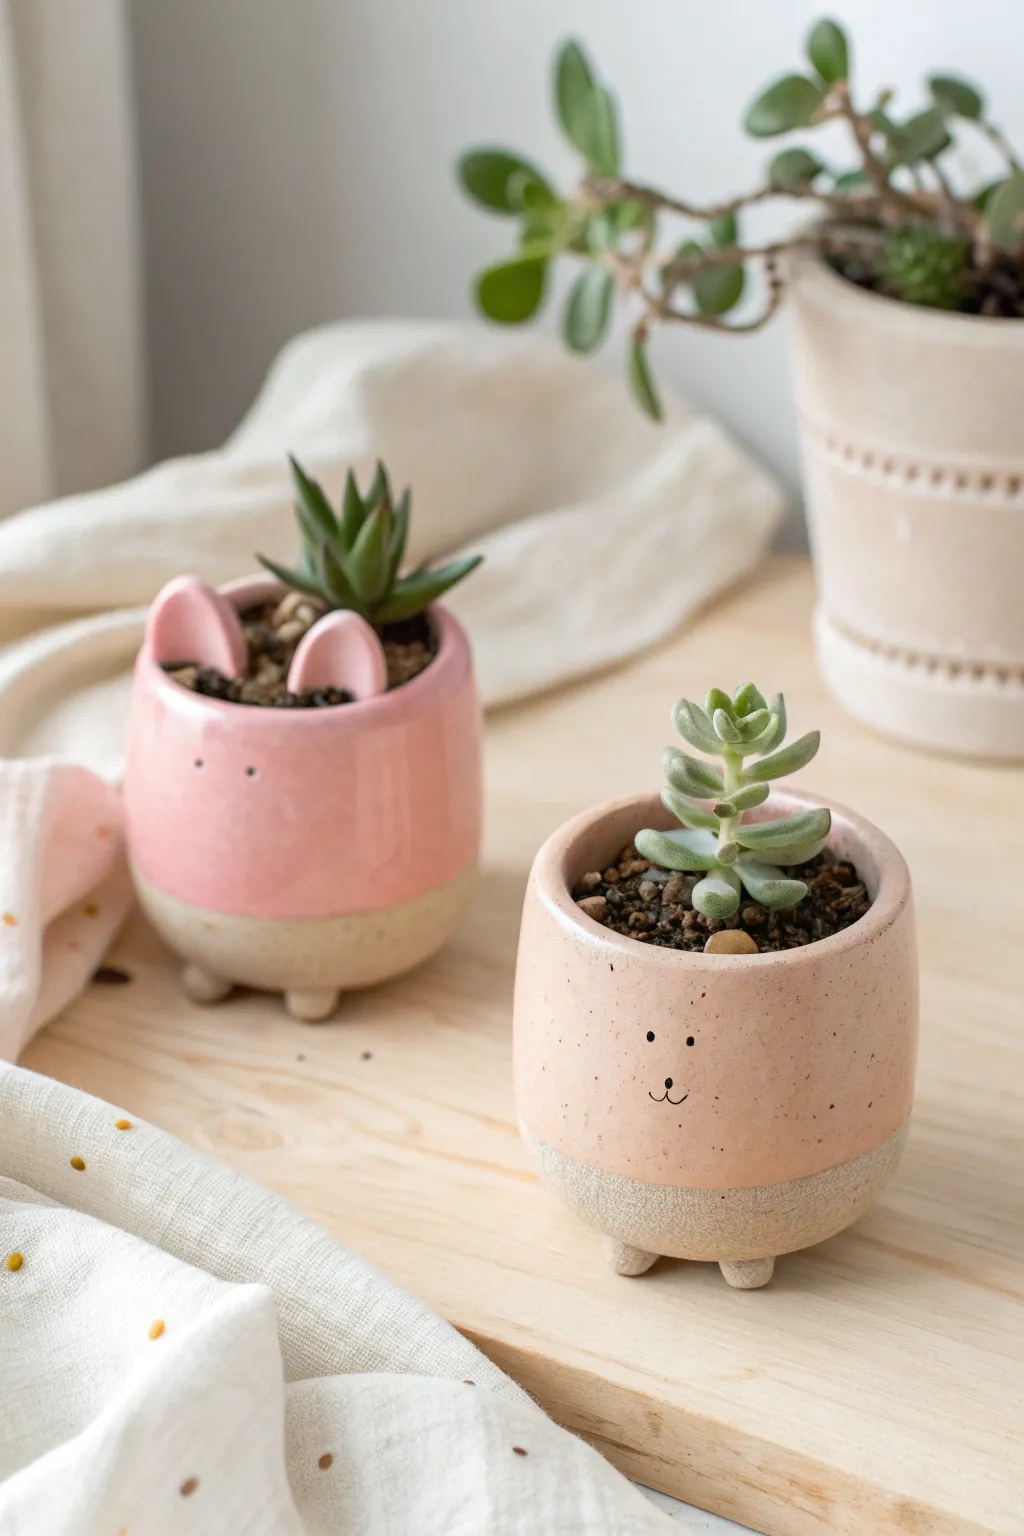
These adorable desktop companions combine the rustic charm of unglazed clay with soft, glossy pastels. Perfect for tiny succulents, these pinch-pot style containers feature minimal animal faces, tiny paw feet, and a distinct dipped aesthetic.
Step-by-Step Guide
Materials
- White or light speckled stoneware clay
- Pottery wheel (optional, can be hand-built)
- Needle tool
- Small sponge
- Scoring tool (or serrated rib)
- Slip (clay and water mixture)
- Rolling pin
- Pink or Peach gloss glaze
- Black underglaze pencil or fine liner bottle
- Clear glaze (optional for inside)
- Kiln access
Step 1: Forming the Base Pots
-
Prepare your clay:
Start with two balls of clay, roughly the size of a tennis ball each. Wedge them thoroughly to remove any air bubbles. -
Create the basic shape:
If throwing on a wheel, center the clay and pull a small cylinder with slightly curved walls. If hand-building, use the pinch pot method: insert your thumb into the center and gently pinch outwards while rotating to create even walls. -
Smooth the surface:
Use a damp sponge or a flexible metal rib to smooth the exterior walls. You want a nice, gentle curve that tapers slightly in at the rim. -
Refine the rim:
Ensure the rim is level. Use a chamois cloth or a wet finger to compress and round the lip of the pot so it isn’t sharp.
Pro Tip: Ear Stability
When attaching ears, score deeply! If the ears are tall, prop them up with a small piece of sponge or paper towel while the clay dries so they don’t slump over before hardening.
Step 2: Adding Animal Features
-
Make the feet:
Roll four tiny balls of clay (about the size of blueberries) for each pot. These will be the stubby little feet. -
Attach the feet:
Flip your leather-hard pot upside down. Score the bottom of the pot and your tiny clay balls. Apply a dab of slip, press the feet firmly in place, and smooth the seams with a modeling tool so they look integrated. -
Create bunny ears:
For the pink pot, roll a small coil and flatten it slightly. Cut two triangular shapes with rounded tips. Gently curve them to give them dimension. -
Attach the ears:
Score the interior rim where the ears will go. Add slip and press the ears securely onto the inner rim, blending the clay downwards into the pot wall for strength. -
Dry slowly:
Cover the pots loosely with plastic to let them dry slowly to the bone-dry stage. This prevents cracking at the attachment points.
Step 3: Bisque and Glazing
-
Bisque fire:
Once completely bone dry, fire the pieces in the kiln to cone 04 (or your clay’s specific bisque temperature). -
Clean the bisque:
Wipe the fired pots down with a damp sponge to remove any kiln dust, which can prevent glaze from sticking. -
Apply the face:
Using a black underglaze pencil or a fine-tip applicator bottle with black underglaze, draw tiny minimalistic eyes. For the bear (peach pot), add a small nose and mouth. Keep the features small and centered. -
Prepare the glaze line:
To get that crisp two-tone look, use wax resist. Brush a line of wax around the bottom third of the pot (including the feet). I like to let this dry briefly until it’s tacky. -
Dip the pink pot:
Dip the bunny pot upside down into a pink gloss glaze. Hold it there for about 3 seconds, then lift straight up. The wax will prevent glaze from covering the bottom, creating the speckled sand texture visibility. -
Dip the bear pot:
Repeat the dipping process with the second pot using a peach or soft beige gloss glaze. Shake gently to remove drips before turning right-side up. -
Clean up:
Use a sponge to wipe away any tiny beads of glaze that might be sitting on top of the waxed bottom section. -
Final Fire:
Place the pots in the kiln for the final glaze firing (usually cone 5 or 6 depending on your stoneware). Since the feet are unglazed, no stilts are needed.
Troubleshooting: Smudged Face
If you mess up the underglaze face, don’t panic. Bisque ware is porous; you can gently sand the mistake off with fine-grit sandpaper, wipe clean, and redraw before glazing.
Once cooled, fill your new friends with potting soil and your favorite hardy succulents
Strawberry Containers With Seed Dots in Relief
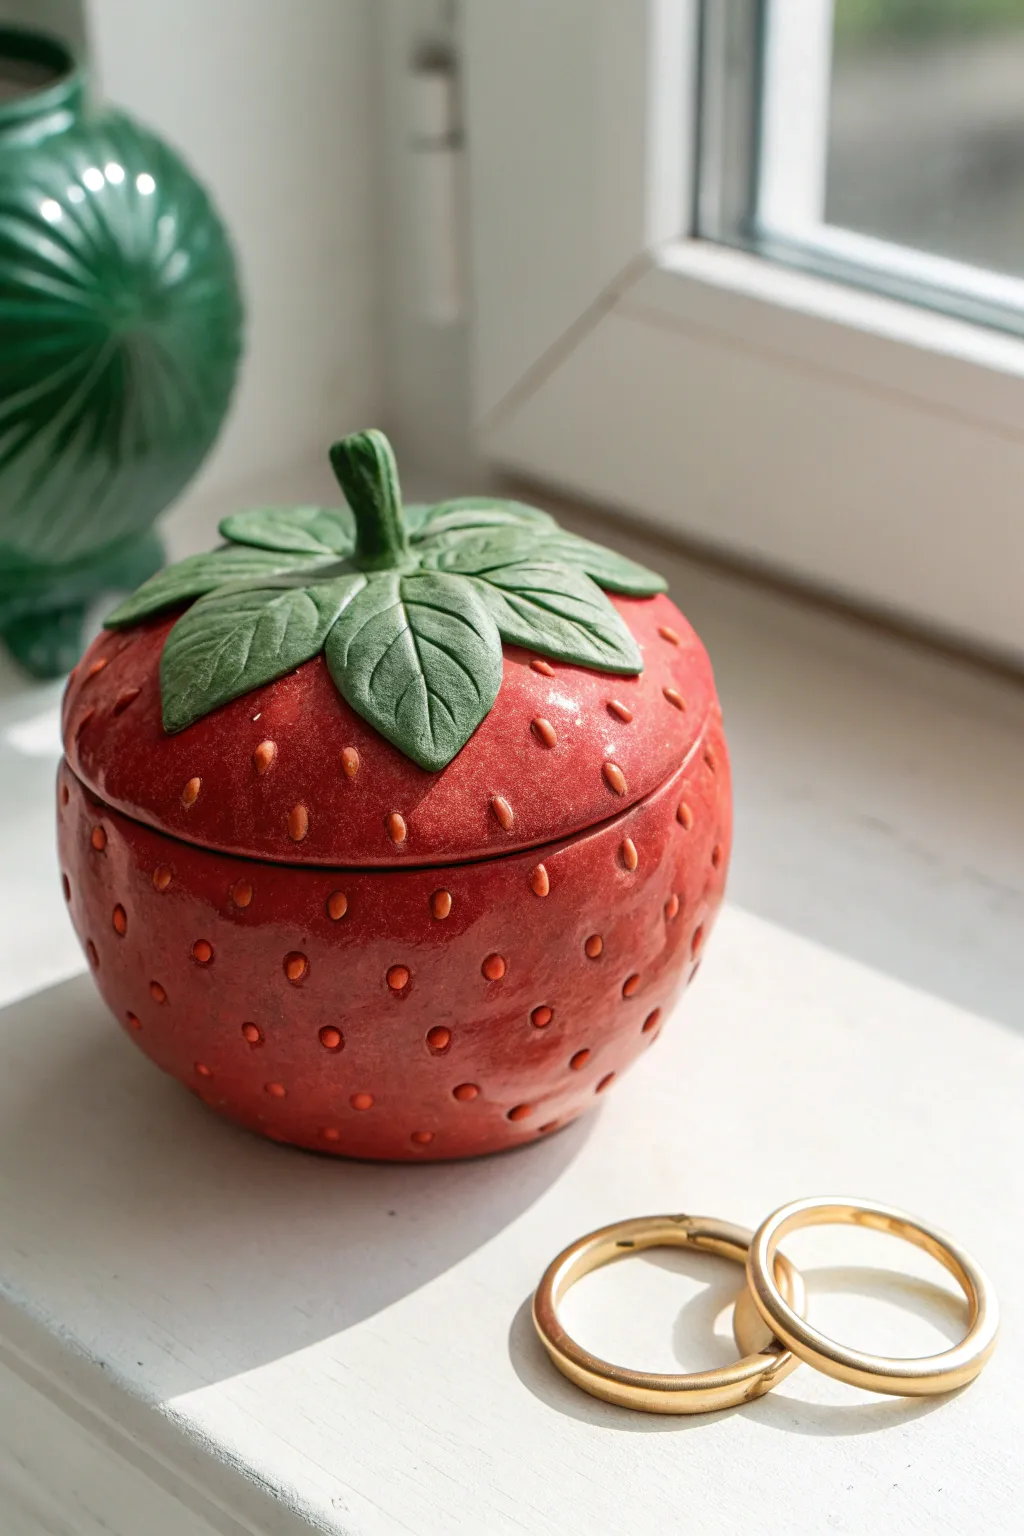
Capture the charm of summer with this delightful ceramic strawberry container featuring a removable leafy lid. The tactile surface relies on individually sculpted seeds and leaves to create a functional piece that feels just as good as it looks.
Step-by-Step
Materials
- Earthenware or stoneware clay (white or light-colored recommended)
- Two pinch pottery bowls (one slightly larger)
- Scoring tool or serrated rib
- Slip (clay mixed with water)
- Needle tool
- Small loop tool or carving tool
- Modeling tool (wooden or plastic)
- Rolling pin
- Red underglaze
- Green underglaze
- Clear glaze
- Kiln access
Step 1: Forming the Berry Base
-
Create two pinch pots:
Start by forming two pinch pots from balls of clay. One should be slightly wider to serve as the lid. Ensure the walls are an even thickness, roughly 1/4 inch throughout. -
Refine the shape:
Gently paddle the exterior of the bottom pot to taper the base slightly, mimicking the shape of a strawberry. The top pot (the lid) should be rounded but flatter than a perfect hemisphere. -
Check the fit:
Place the lid pot upside down onto the rim of the base pot. The rims should match up closely. If they don’t, manipulate the clay gently until they sit flush against each other. -
Create a gallery:
Roll a small coil of clay. Attach this coil to the *inside* rim of the bottom pot using the score and slip method. Smooth it upwards so it extends about a half-inch above the rim; this flange will hold the lid in place.
Step 2: Sculpting the Details
-
Mark seed placement:
Using a needle tool, lightly mark a grid of small dots across the entire exterior surface of both the base and the lid to plan your seed distribution. -
Form the seeds:
Roll dozens of tiny, rice-grain-sized bits of clay. I find it meditative to make a huge pile of these first before attaching them. -
Attach the seeds:
Score each marked spot and press a clay ‘seed’ into the indentation. Use a small tool to smooth the edges slightly so they look embedded rather than just stuck on. -
Make the leaves:
Roll out a slab of clay to about 1/8 inch thick. Cut out 5-6 leaf shapes using a needle tool. Vary the sizes slightly for a natural look. -
Attach the foliage:
Score and slip the top of the lid. Arrange the leaves in a starburst pattern, draping them slightly over the curve of the lid. Overlap them near the center. -
Texture the leaves:
Use a needle tool or knife to gently draw veins onto each leaf. Press lightly to create relief without cutting all the way through. -
Add the stem:
Roll a thicker coil for the stem. Attach it firmly to the center where the leaves meet. Give it a slight twist or curve to add character.
Seed Slip-Up?
If seeds keep popping off as the clay dries, your clay was likely too dry during attachment. Use a drop of vinegar in your slip for a stronger bond.
Step 3: Glazing and Firing
-
Bisque fire:
Allow the piece to dry slowly and completely before firing it in the kiln to the bisque temperature appropriate for your clay body. -
Apply red underglaze:
Paint the main body of the strawberry and the exposed parts of the lid with 2-3 coats of bright red underglaze. Avoid getting red on the leaves. -
Highlight the seeds:
Carefully wipe the very tips of the raised seeds with a damp sponge to reveal a bit of the clay color underneath, or paint them individually with a lighter orange/yellow underglaze. -
Apply green underglaze:
Paint the leaves and stem with a rich green underglaze. You can add a darker green wash into the vein crevices for depth. -
Clear glaze:
Once the underglaze is dry, dip or brush the entire piece in clear glaze. -
Final fire:
Fire the piece again to the glaze temperature. Make sure to wipe the bottom of the foot and the contact points of the lid flange so they don’t fuse together.
Go Gold
For a luxe look, apply gold luster overglaze to just the seeds after the final glaze firing. You’ll need a third, low-temperature firing for this effect.
Now you have a charming vessel perfect for holding small treasures or serving sugar
Citrus Slice Trinket Dishes and Tiny Cups
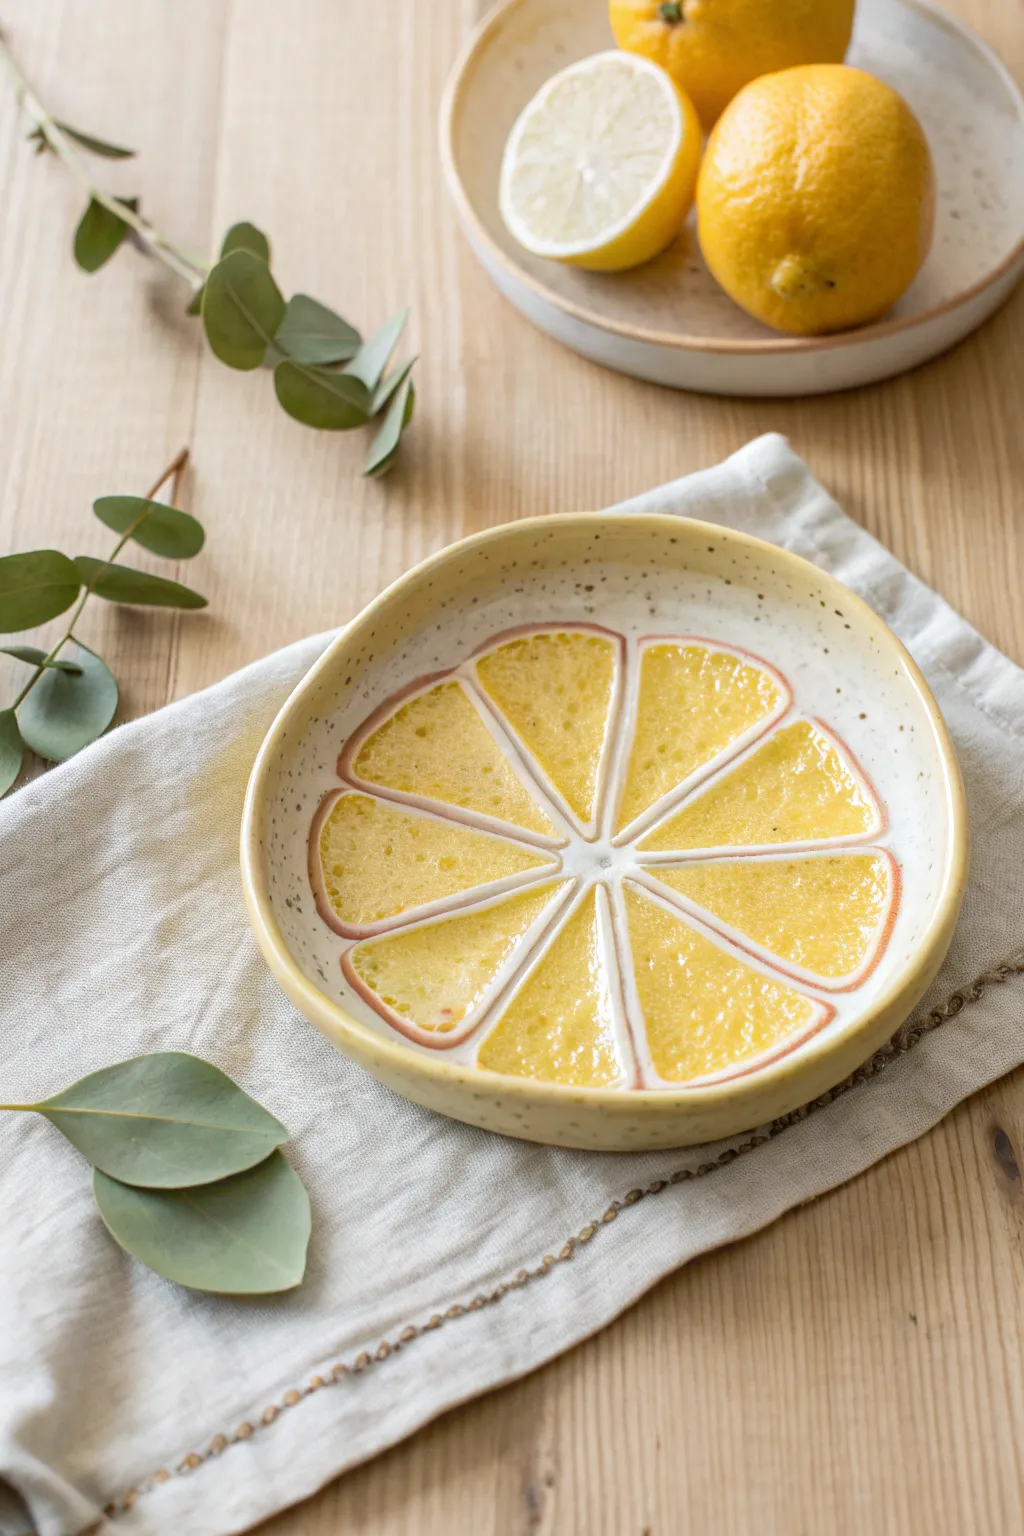
Bring a burst of citrus sunshine to your tabletops with this delightful lemon slice trinket dish, featuring a warm speckle tone and juicy yellow segments separated by raised white pith lines. Perfect for holding jewelry or simply brightening up a shelf, this project combines simple slab building with careful glazing techniques.
How-To Guide
Materials
- Speckled Stoneware Clay (cone 5/6)
- Rolling pin and guide sticks (about 3/8 inch thickness)
- Circular template or bowl (approx. 6-7 inches diameter)
- Needle tool or fettling knife
- Rib tool (flexible metal or rubber)
- Sponge
- Carving loop tool (small)
- Small round bristle brush
- Fine liner brush
- Underglaze: bright lemon yellow
- Underglaze: pure white
- Underglaze: pale pink/coral (optional for rim)
- Clear glossy glaze (food safe)
Step 1: Shaping the Form
-
Roll the slab:
Begin by wedging your speckled stoneware clay to remove air bubbles. Roll it out into an even slab using your guide sticks to maintain a consistent thickness of roughly 3/8 of an inch. -
Cut the circle:
Place your circular template or an inverted bowl onto the slab. Trace around it with a needle tool to cut out your base shape, then peel away the excess clay. -
Lift the edges:
Gently lift the edges of the clay circle upwards to create a shallow bowl shape. I find cupping the clay in my hands and rotating it slowly helps create a natural, organic curve without sharp creases. -
Smooth the form:
Use a damp sponge or a flexible rib to smooth the interior and exterior surfaces, softening the rim so it feels round and comfortable to the touch. -
Draft the segments:
With the needle tool, lightly sketch a small circle in the very center of the dish. From there, lightly draw 10 radiating lines out toward the rim to map out your lemon wedges.
Juicy Texture Trick
When texturing the fruit segments, press plastic wrap onto the clay and tap through it with a brush handle. This creates softer, organic dimples that look more like liquid-filled cells.
Step 2: Carving and Detailing
-
Define the pith lines:
Using a small loop tool, carefully carve away a thin layer of clay *inside* each triangular wedge segment you sketched. Leave the sketched lines raised—these raised ridges will become the white pith separating the fruit. -
Create texture:
Inside the recessed areas you just carved, use a stiff bristle brush or a stippling tool to tap the clay gently. This creates a pitted texture that mimics the juice sacs of a real lemon. -
Refine the ridges:
Go back over your raised ridges (the pith lines) and the central hub with a slightly damp finger or soft brush to smooth them down, ensuring they look intentional and clean rather than sharp. -
Slow drying:
Cover the piece loosely with plastic and allow it to dry slowly to the bone-dry stage. This prevents warping, especially with the raised rim. -
Bisque fire:
Once completely dry, fire the piece to bisque temperature (usually Cone 04) to prepare it for glazing.
Level Up: Full Fruit Bowl
Create a whole set by varying the sizes and glaze colors to make limes (green), oranges (orange), and grapefruits (pink/ruby). Stack them for a stunning centerpiece display.
Step 3: Glazing and Finishing
-
Paint the pith:
Using a fine liner brush and pure white underglaze, carefully paint the raised ridges between the segments and the small central circle. You may need two coats for opaque coverage. -
Fill the segments:
Switch to a round brush and fill the recessed, textured segments with bright lemon yellow underglaze. Apply 2-3 coats, letting each dry in between, for a vibrant, juicy color. -
Rim detail:
For a subtle realistic touch, mix a tiny bit of pink or coral underglaze with white, or use a very pale pink, to paint a thin line around the very outer rim of the rind section. -
Wax resist (optional):
If you want the speckled clay body to remain raw on the outside, apply wax resist to the bottom and exterior walls, or simply leave them unglazed. -
Clear glaze application:
Once the underglaze is fully dry, dip the entire piece into a clear glossy glaze. This will seal the clay and make that lemon yellow pop with a wet, fruity shine. -
Final firing:
Fire the piece to the maturation temperature of your clay and glaze (likely Cone 5 or 6). Allow the kiln to cool completely before removing your fresh citrus slice.
Once cooled, your ceramic slice is ready to hold everyday treasures or shine as a standalone piece of art.
Nested Container Sets That Fit Like Matryoshka Shapes
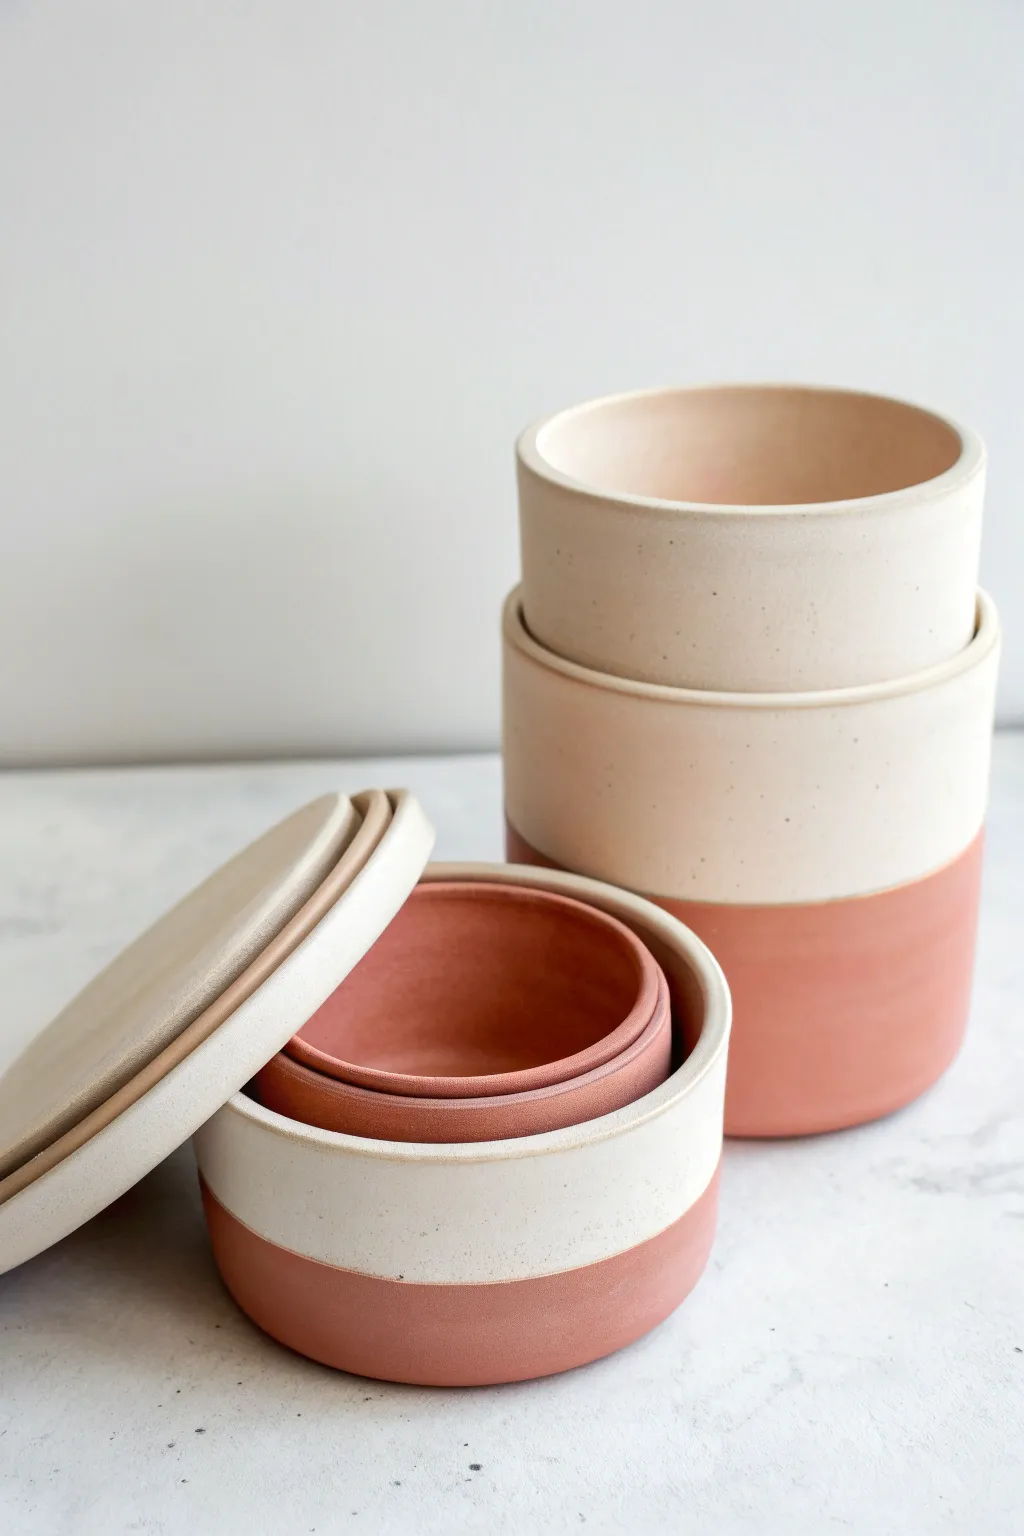
These sleek, cylindrical nesting bowls combine the warmth of raw terracotta with the clean elegance of a creamy white glaze. Perfect for organizing small treasures or serving dry snacks, this set fits together seamlessly like a Russian doll for compact storage.
How-To Guide
Materials
- White stoneware clay or porcelain
- Pottery wheel
- Needle tool
- Rib tool (wooden or metal)
- Wire cutter
- Trimming tools
- Terracotta underglaze or colored slip
- Creamy matte white glaze
- Sponge
- Calipers
- Kiln
Step 1: Throwing the nesting set
-
Calculate measurements:
Before touching clay, sketch out your three sizes. The largest bowl needs an inner diameter slightly larger than the middle bowl’s outer diameter, and so mostly for the smallest. Factor in roughly 12% shrinkage for drying and firing. -
Center the clay:
Start with the largest vessel. Secure a ball of white stoneware clay onto the wheel head and center it perfectly using firm pressure and water. -
Open the form:
Press your thumbs into the center to open the floor. Ensure the floor is flat and not too thick, creating a strict 90-degree angle where the wall meets the floor for a true cylinder shape. -
Pull the walls:
Pull the walls straight up to create a tall, vertical cylinder. Maintain a consistent thickness from bottom to top to ensure even drying. -
Check the diameter:
Use calipers to measure the outer diameter. Write this down immediately so you can size the subsequent bowls correctly. -
Refine the rim:
Compress the rim with a chamois or sponge to keep it smooth and durable. A slight inward bevel can help lids sit better if you choose to make them. -
Repeat for smaller sizes:
Throw the middle and small bowls. I find it helpful to throw these ‘off the hump’ if you are comfortable with that technique, or just weigh out smaller balls of clay. Constantly check diameters against your caliper measurements.
Warped Walls?
If your cylinders are warping in the kiln, your walls might be uneven. Ensure consistent thickness during the pull, and dry the pieces slowly upside down to maintain circularity.
Step 2: Trimming and surface design
-
Drying to leather hard:
Allow the pieces to dry slowly until they are leather hard. They should be firm enough to handle without warping but soft enough to carve. -
Trim the foot:
Place the largest bowl upside down on the wheel. Secure it with clay lugs. Trim away excess clay at the base to create a clean, sharp bottom edge. -
Test the fit:
Gently place the smaller leather-hard bowls inside the larger ones to check the nesting fit. If one is too tight, trim a bit more clay from the exterior wall of the inner bowl. -
Smoothing:
Use a damp sponge to smooth out any trimming marks. The surface needs to be pristine for the two-tone effect to look intentional.
Step 3: Glazing and firing
-
Bisque fire:
Load your bone-dry greenware into the kiln for a bisque firing (usually Cone 04 or 06). This prepares the clay to accept glaze. -
Masking the line:
Once cooled, measure a line horizontally around the cylinder, about one-third up from the bottom. You can use wax resist below this line if you want raw clay, or prepare for dipping. -
Apply terracotta color:
Dip the bottom third of each vessel into a terracotta-colored underglaze or slip. Create a crisp, straight horizon line. Let this layer dry completely. -
Glaze the interior:
Pour your creamy white glaze inside each vessel, swirl to coat, and pour out. Wipe any drips off the rim immediately. -
Glaze the top exterior:
Hold the vessel by the foot and dip the top two-thirds into the white glaze, overlapping the terracotta section slightly or meeting it perfectly depending on your preference. -
Clean the foot:
Wipe the very bottom of the foot ring with a damp sponge to prevent it from sticking to the kiln shelf. -
Final firing:
Fire the pieces to the maturity temperature of your clay body (likely Cone 5 or 6). Allow the kiln to cool naturally before unloading to avoid thermal shock.
Matching Lids
Create flat, galley-style lids for each canister. Throw them upside down on the wheel as flat disks with a small inner flange that fits snugly inside the container rim.
Now you have a stunning set of functional decor that looks beautiful stacked or separated
Hanging Wall Pocket Containers for Air Plants
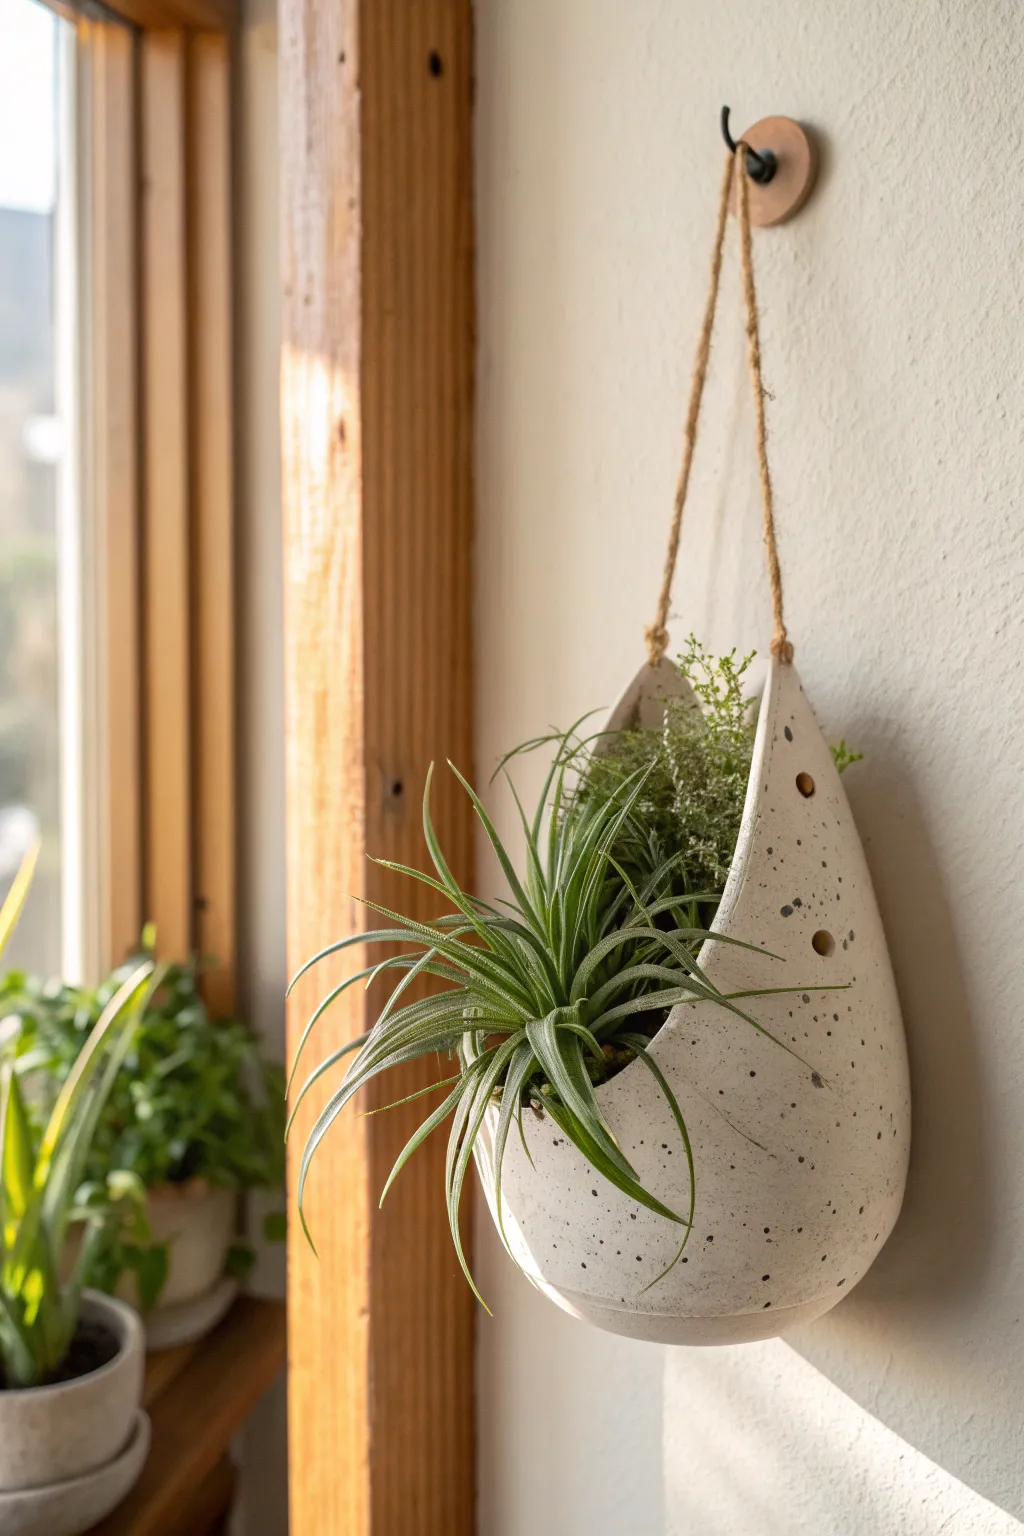
This minimalist teardrop-shaped planter combines the rustic charm of speckled clay with a sleek, modern silhouette. Perfect for cradling air plants or small succulents, its unique asymmetrical opening adds an artistic flair to any sunlit wall.
Step-by-Step Guide
Materials
- White or cream-colored polymer clay or air-dry potters clay
- Rolling pin
- Aluminum foil (for creating the form)
- Masking tape
- Craft knife or scalpel
- Small circular clay cutter or drinking straw (for holes)
- Black acrylic paint
- Old toothbrush or stiff bristle brush
- Fine-grit sandpaper
- Twine or jute rope
- Gloss or matte varnish (optional)
- Water and sponge (for smoothing)
Step 1: Creating the Mold
-
Form the armature:
Since this planter has a specific bulbous shape, create a custom core using aluminum foil. Crumple the foil into a large teardrop or pear shape, roughly the size of a large grapefruit at the bottom tapering to a point. -
Smooth the surface:
Pack the foil tightly to remove sharp peaks. Wrap the entire foil form in masking tape to create a smoother surface for the clay to rest against; this also helps you remove the core later.
Core Removal Tip
If you struggle to remove the foil core after curing, use needle-nose pliers to grab the foil inside and twist. It will crush inward, pulling away from the clay walls easily.
Step 2: Shaping the Clay
-
Condition the clay:
Knead your white clay until it is soft and pliable. If using polymer clay, ensure it’s warm enough to prevent cracking. -
Roll out the slab:
Use your rolling pin to flatten the clay into a large, even slab about 1/4 inch thick. Aim for a consistent thickness to ensure sturdy walls. -
Drape the clay:
Gently drape the clay slab over your foil form. I like to start from the front face and wrap it around to the back, smoothing it down gently to avoid trapping air bubbles. -
Create the seam:
Where the clay meets at the back of the form, cut away excess material with a craft knife. Join the edges by scoring and slipping (if using air-dry clay) or blending the seam together with a modeling tool until invisible (if using polymer). -
Cut the opening:
While the clay is still on the form, use your craft knife to carefully cut the large, swooping asymmetrical opening on the front face. Remove the excess cutout clay. -
Refine the edges:
Dip your finger in a little water (or baby oil for polymer) and smooth the cut rim of the opening to ensure it’s rounded and not sharp. -
Add hanging holes:
Using a small circular cutter or a straw, punch two holes near the top pointed section of the teardrop. Make sure they are even on both sides to ensure the planter hangs straight. -
Add ventilation holes (optional):
Punch two or three smaller decorative holes along the side or back for extra airflow, mimicking the design in the photo.
Step 3: Finishing and Assembly
-
Dry or Bake:
Follow the instructions for your specific clay. If baking polymer clay, you can leave the foil core in. If using air-dry clay, let it firm up slightly, then carefully remove the core before letting it dry completely to prevent cracking. -
Sand the surface:
Once fully cured and hard, use fine-grit sandpaper to buff away any fingerprints or rough spots on the exterior. -
Create the speckles:
Dilute a small dab of black acrylic paint with water. Dip an old toothbrush into the mixture, then run your thumb across the bristles to flick tiny splatters of paint onto the planter surface. -
Seal the piece:
Once the paint speckles are dry, apply a coat of matte or satin varnish to protect the clay, especially if you plan to mist your plants while they are inside. -
Prepare the twine:
Cut a length of jute twine or rope, roughly 24 inches long, depending on how low you want the planter to hang. -
Knot the hangers:
Feed one end of the twine through one of the top holes from the outside in. Tie a sturdy double knot on the inside so the knot remains hidden within the planter. -
Secure the second side:
Repeat the process on the other side, adjusting the length so the loop is even before tightening the final knot.
Cracking Clay?
If using air-dry clay and you see cracks forming during drying, mix a tiny bit of fresh clay with water to make a paste and fill the cracks, then sand smooth once dry.
Hang your new creation near a window and nestle your air plant inside for an instant touch of organic greenery
Stacked Totem Containers With Twist-Off Sections
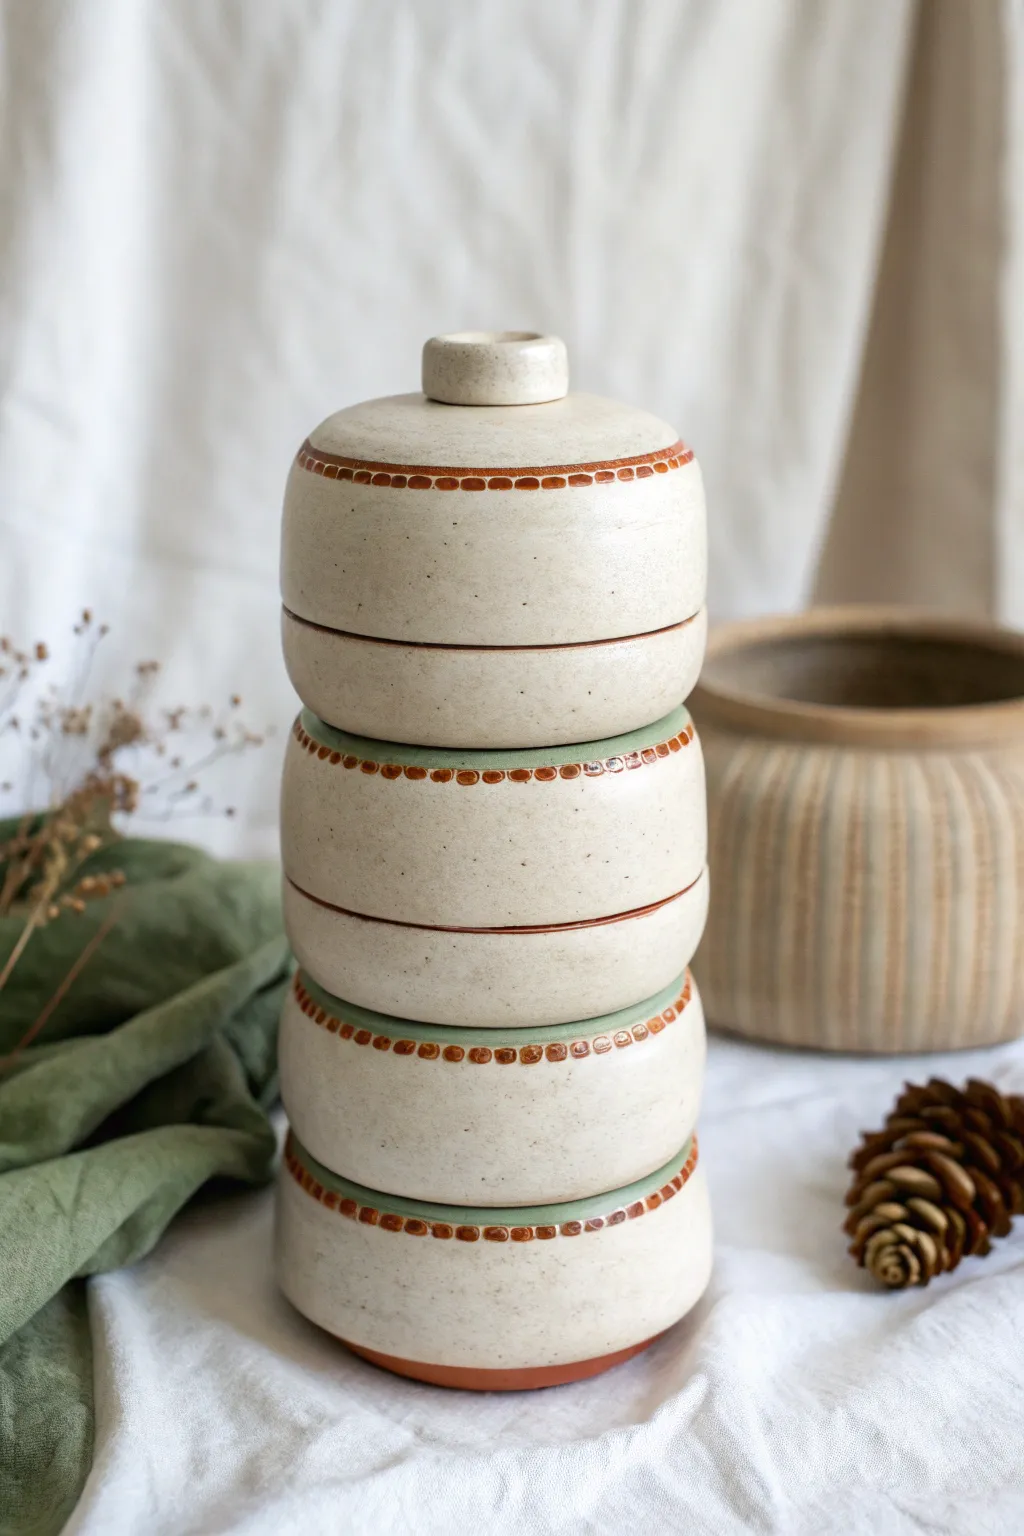
This elegant ceramic project transforms simple clay cylinders into a unified, functional sculpture perfect for organizing small treasures. The design relies on precise wheel-throwing and consistent sizing to create three modular compartments that nest securely atop one another.
Step-by-Step Tutorial
Materials
- Stoneware clay (speckled or flecked body recommended)
- Pottery wheel
- Throwing tools (sponge, rib, wire cutter)
- Calipers
- Trimming tools
- Needle tool
- Slip and scoring tool
- Underglaze (terracotta/red-brown)
- Glaze (transparent matte or satin)
- Small round paintbrush
- Green glaze or underglaze (optional accents)
Step 1: Planning and Throwing the Sections
-
Wedging and Dividing:
Begin by thoroughly wedging about 3-4 pounds of speckled clay. Divide the clay into four equal balls: three for the container bodies and one slightly smaller ball for the lid. -
Throwing the Bottom Cylinder:
Center your first ball of clay on the wheel. Open it up and pull the walls to form a short, wide cylinder with a flat rim. Aim for a distinct wall thickness that can support weight. -
Note the Measurements:
Once the first cylinder is shaped (roughly 4-5 inches wide and 2.5 inches tall), use your calipers to measure the outer diameter of the rim. -
Creating the Gallery:
Since this is the bottom piece, it only needs a gallery (a recessed ledge) on the top rim to hold the section above it. Use a wooden tool to press the inner rim down and out slightly to create this seat. -
Throwing the Middle Section:
Throw the second cylinder. This one is tricky because it needs a different bottom structure. Instead of a flat bottom, trim the exterior later to fit into the gallery you measured. -
Throwing the Top Section:
Throw the third cylinder identical to the middle one. Ensure the top rim has a gallery to accept the lid. -
Making the Lid:
Throw a small, flat domed shape for the lid. Measure it against the top cylinder’s gallery to ensure a snug fit. Throw a small, solid knob directly on top or attach one later.
Wobbly Stack?
If the dried pieces wobble when stacked, the galleries or feet aren’t level. Before firing, rub the meeting points gently against a flat surface with fine sandpaper to level them.
Step 2: Trimming and Fitting
-
Leather Hard Stage:
Allow all pieces to dry to a leather-hard state. They should be firm enough to handle without warping but soft enough to carve. -
Trimming the Bottoms:
Invert the middle and top cylinders on the wheel (using a chuck or clay lugs). Trim the foot of each piece specifically to slot into the gallery of the piece beneath it. Test the fit frequently—step by step is safer than rushing. -
Refining the Shape:
Trim the exterior walls to create a subtle curve, removing excess weight. I like to smooth the surface with a metal rib to burnish the speckled clay slightly.
Step 3: Decoration and Glazing
-
Carving the Texture Band:
Near the top rim of each section, use a small carving tool to remove a thin horizontal strip of clay, creating a shallow channel for your decoration. -
Applying Underglaze Dots:
Take your terracotta-colored underglaze. Using a fine brush, carefully paint a row of small squares or dots inside that carved channel. This creates the ‘stitched’ look. -
Adding the Green Line:
If desired, paint a very fine line of green underglaze or glaze just below the dotted band to define the separation between the body and the rim. -
Bisque Firing:
Once bone dry, load the stack into the kiln for a bisque fire (usually cone 04 or 06). You can stack them or fire them separately. -
Glazing:
Dip or brush a clear matte glaze over the entire piece (except the fitting galleries and feet—always wax these areas!). The clear glaze will let the natural clay speckles shine through. -
The Final Fire:
Fire the kiln to the maturity temperature of your clay body (likely cone 5 or 6). Ensure the pieces are NOT stacked during the glaze firing or they will fuse together forever.
Mix & Match Function
Make the sections different heights! A tall bottom section could hold brushes, while shallower top sections hold jewelry or paperclips, increasing versatility.
Once cooled, stack your creation and enjoy the clean lines of your new sectional storage vessel