High school clay projects should feel doable in one or two class periods, but still look like you meant it. Here are my favorite easy clay sculpture ideas that let you show personality, try real handbuilding, and end up with something you’ll actually want to keep.
Pinch Pot Animal Totem
This charming garden decoration features a stack of round, stone-like forms with whimsical owl personalities carved directly into the clay. It uses simple pinch pot techniques combined to create a sturdy, textured totem pole perfect for a shelf or outdoor nook.
Step-by-Step
Materials
- Speckled stoneware clay or polymer clay (granite effect)
- Needle tool
- Small loop tool
- Scoring tool (or fork)
- Slip (clay glue)
- Small rolling pin
- Orange and black underglaze (or acrylic paint)
- Fine detail brush
- Sponge
Step 1: Forming the Base Spheres
-
Prepare your clay portions:
Cut four lumps of clay in descending sizes. The bottom piece should be the largest (about the size of a grapefruit), getting slightly smaller as you go up, with the top head being the smallest. -
Create the first pinch pot:
Starting with the largest lump, roll it into a sphere. Press your thumb into the center and gently pinch the walls while rotating the clay to create a bowl shape. -
Close the form:
Instead of leaving it as an open bowl, gently collar the rim inward until it closes up completely to form a hollow sphere. Trapping air inside keeps it round and supportive. -
Repeat for the stack:
Repeat this process for the remaining three clay lumps. You should now have four hollow spheres of graduating sizes. Gently tap them on a table to create flat spots where they will connect. -
Refine the surface:
Use a metal rib or your fingers to smooth out any lumpy pinch marks. I like to keep a little texture to mimic natural stone, so don’t make it too perfectly smooth.
Step 2: Stacking and Assembling
-
Establish the base:
Take your largest sphere (the bottom owl) and flatten the very bottom slightly so it stands without wobbling. -
Score and slip:
Score (scratch) the top of the base sphere and the bottom of the second sphere (the blank spacer). Apply slip to both scored areas. -
Connect the first levels:
Press the second sphere firmly onto the base. Wiggle it slightly to lock the clay particles together. Smooth the seam if you want a continuous look, or leave a slight indentation to show they are separate stones. -
Complete the tower:
Continue scoring, slipping, and stacking the third sphere and finally the smallest top head. Ensure the tower is balanced and not leaning too far in any direction. -
Vent the hollows:
If you are firing this in a kiln, use a needle tool to poke a tiny, discreet hole in each sphere (usually near the connection points) to let hot air escape.
Pro Tip: Hidden Strength
Before sealing your hollow spheres, put a crumpled ball of newspaper inside. It supports the shape while you stack them and burns away harmlessly in the kiln.
Step 3: Sculpting the Faces
-
Carve the bottom owl:
On the lowest sphere, use a needle tool to lightly sketch a large oval for the face/wing area. Carve this line deeper with a loop tool to create relief. -
Add bottom details:
Press two small circles for eyes into the carved oval. Attach a tiny triangle of clay for the beak. Use the needle tool to scratch ‘v’ shapes for feathers on the chest. -
Sculpt the middle face:
The third sphere up is a simpler owl face. Make two deep indentations for eye sockets and attach a small, pointed cone of clay for a protruding beak. -
Form the top owl:
For the top head, pinch two small triangles of clay at the very top to create ear tufts. Smooth them onto the main head form. -
Detail the top eyes:
Roll two flat discs of clay and attach them for large glasses-like eyes. Poke a hole in the center of each pupil. Add a small beak between them. -
Add final texture:
Use a stiff bristled brush or a toothbrush to gently tap the entire surface of the sculpture. This enhances the speckled, stone-like appearance.
Level Up: Garden Glow
Cut larger holes in the back of the totem and place battery-operated tea lights inside each section to turn your sculpture into a tiered garden lantern.
Step 4: Finishing Touches
-
Paint the details:
Using a fine detail brush, paint the beaks a bright orange. Use black for the pupils on the middle and top owls. -
Dry and fire:
Allow the sculpture to dry slowly under plastic to prevent the stack from cracking. Once bone dry, bisque fire the piece. -
Clear coat (optional):
Since the clay itself is decorative, you only need a matte clear glaze or a simple wax finish to seal the surface without making it too shiny.
Place your finished totem in a garden bed or on a windowsill where the natural light can highlight the stone texture


Abstract Hand Sculpture That Holds Notes
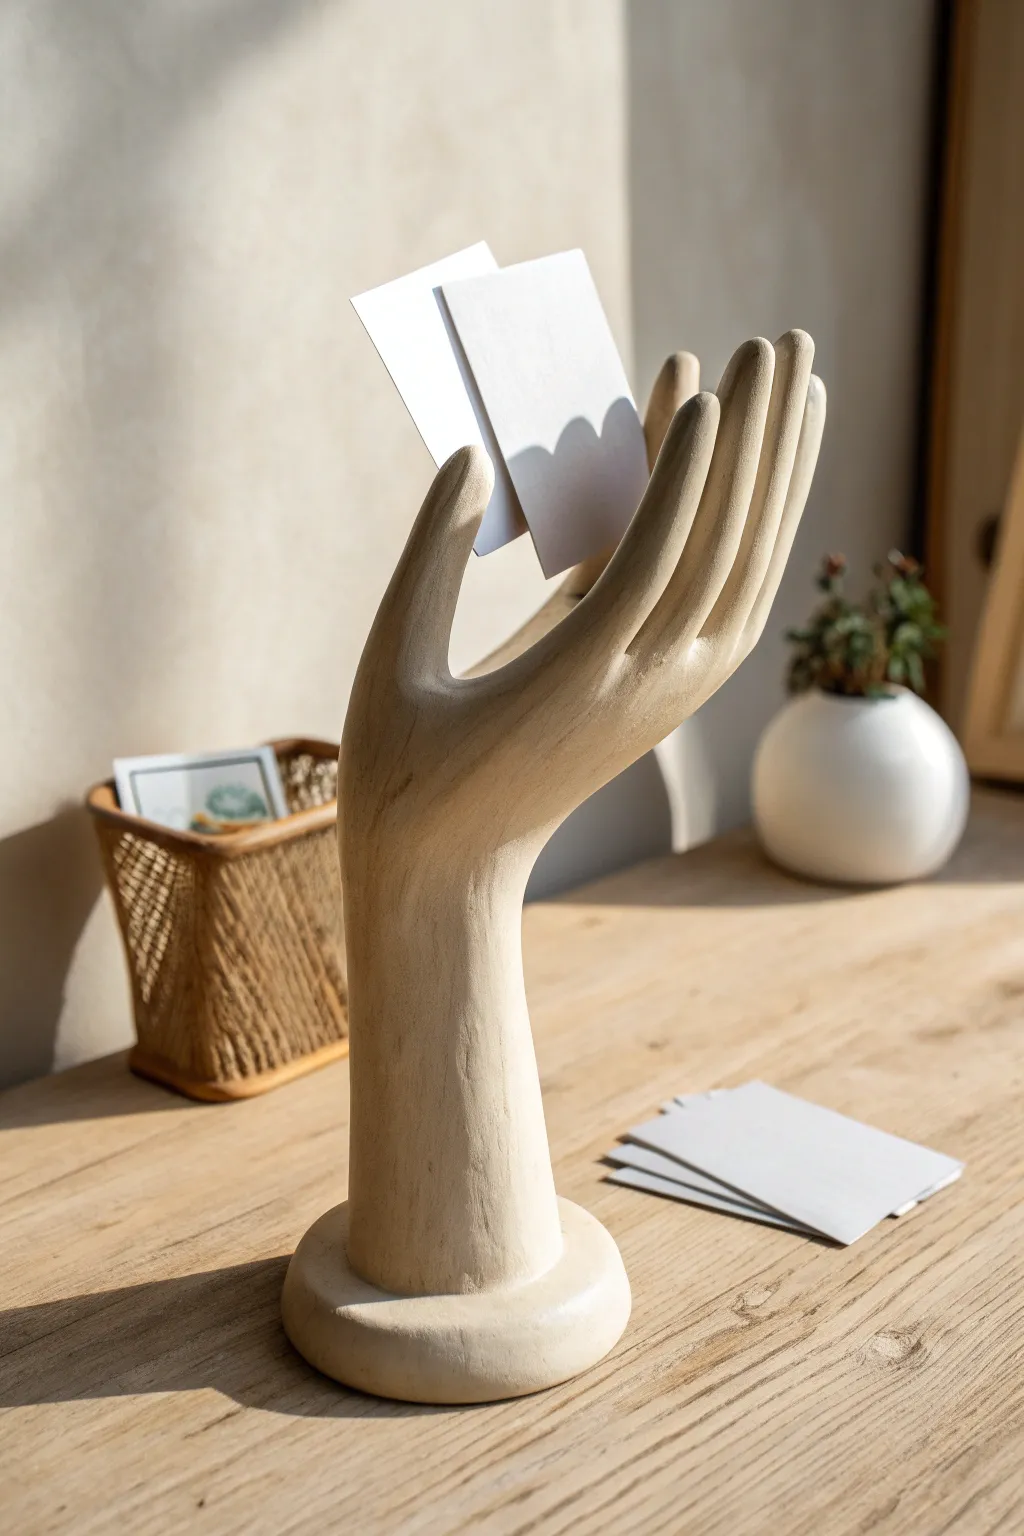
Blend function with form by crafting this elegant hand sculpture designed to hold your notes, business cards, or favorite photos. With its smooth, monochromatic finish and elongated fingers, it serves as both a practical desk accessory and a striking piece of modern clay art.
How-To Guide
Materials
- Air-dry clay (white or light grey)
- Armature wire (aluminum, 12-16 gauge)
- Wooden dowel (optional, for main support)
- Basic sculpting tools (loop tool, wooden modeling tool)
- Sponge and water bowl
- Sandpaper (medium and fine grit)
- Rolling pin
- Aluminum foil
- Base material (small round wooden plaque or clay)
- Acrylic paint (bone, cream, or light beige)
- Matte varnish or sealant
Step 1: Building the Armature
-
Establish the Core:
Begin by twisting your armature wire to form the basic skeleton of a hand and wrist. You want a long central stem for the wrist and forearm, branching out into five wires for the fingers. -
Strengthen the Base:
If you are making the sculpture tall, attach a wooden dowel to the ‘forearm’ section of your wire skeleton using masking tape to handle the weight of the clay. -
Bulk Up:
Wrap aluminum foil tightly around the wire and dowel structure. This saves clay and makes the sculpture lighter. Crumple it firmly to shape the palm and the general thickness of the wrist. -
Create the Plinth:
If you are using clay for the base (as shown in the image), form a thick, sturdy disc of clay now. Embed the bottom of your wire armature into this disc securely.
Pro Tip: Seamless Segments
Don’t sculpt fingernails or joint wrinkles. This style relies on abstraction, so keep the finger tips rounded and the skin completely smooth for a modern look.
Step 2: Applying the Clay
-
Roll and Wrap:
Roll out a slab of clay to about 1/4 inch thickness. Wrap this around the wrist and forearm area first, smoothing the seam where the clay meets. -
Form the Palm:
Add chunks of clay to the palm area, pressing firmly to ensure it adheres to the foil underneath. Use your thumbs to start defining the cup shape of the hand. -
Shape the Fingers:
Roll five coils of clay for the fingers. Carefully slip these over the wire fingers. The wires serve as a guide, so pinch and roll the clay until the wire is completely hidden in the center. -
Blend the Joints:
Use a wooden modeling tool to drag clay from the fingers down into the palm, eliminating any seams. The transition should be fluid and seamless, without realistic wrinkle lines.
Step 3: Positon and Refine
-
Set the Pose:
While the clay is still pliable, gently bend the fingers into a graceful curve. Ensure the gaps between the fingers are tight enough to eventually grip a piece of paper. -
Test the Grip:
I find it helpful to insert a scrap piece of cardstock between the fingers now to ensure the spacing is correct, but remove it before drying so it doesn’t get stuck. -
Smoothing:
Dip a sponge in water and wring it out almost completely. Wipe down the entire surface of the sculpture to remove fingerprints and tool marks. -
Let it Dry:
Allow the sculpture to dry completely. This usually takes 24-48 hours depending on thickness. Rotate it occasionally so all sides get air exposure.
Troubleshooting: Cracking Clay
If cracks appear while drying, don’t panic. Mix a small amount of dry clay dust with white glue to make a paste, fill the crack, and sand it smooth once dry.
Step 4: Finishing Touches
-
Sanding:
Once bone dry, use medium grit sandpaper to knock down any bumps. switch to fine grit to achieve a buttery smooth surface. -
Base Coat:
Apply a base coat of acrylic paint. -
Texture and Color:
Paint the entire hand in a solid, neutral tone like cream or light beige. For the look in the photo, avoid glossy finishes; keep it matte and stony. -
Dry Brushing (Optional):
To enhance the texture, lightly dry brush a slightly lighter shade of cream over the raised areas like the knuckles and fingertips. -
Seal:
Finish with a spray of matte varnish to protect the paint and give it a professional, ceramic-like appearance.
Place this on your desk to hold your most important reminders in a truly artistic fashion


Easy Bobblehead Character Sculpture

This charming, stylized character combines simple geometric shapes with a warm, folk-art aesthetic for an easy yet impressive sculpture. With its sweet expression and vibrant color-blocked outfit, creating this little friend is all about stacking forms and careful painting.
Detailed Instructions
Materials
- Polymer clay (white or beige is best for painting)
- Aluminum foil (for armature/core)
- Acrylic paints (Red, Teal, Mustard Yellow, Cream/Flesh, Black, Pink)
- Small geometric clay cutters or a craft knife
- Pointed sculpting tool or toothpick
- Fine-grit sandpaper
- Matte varnish or sealant
- Wooden circular base (craft slice)
- Strong craft glue (E6000 or similar)
- Fine detail paintbrushes
Step 1: Forming the Body Structure
-
Create the core:
Start by scrunching a piece of aluminum foil into a tight, elongated teardrop shape. This will be the armature for the main body to save on clay and reduce baking time. -
Wrap the body:
Condition your clay until it is soft and pliable, then flatten a sheet of it. Wrap this sheet around the bottom two-thirds of your foil teardrop, smoothing the seams completely to create a clean, slightly flared cone shape for the torso and skirt. -
Define the segments:
Use a sculpting tool or the back of a knife to gently impress horizontal lines around the body. You want one line separating the ‘shirt’ from the ‘skirt’ and another near the bottom to create a hem. Don’t cut through; just indent. -
Add the arms:
Roll two thin snakes of clay, tapering them slightly at one end to form hands. Attach these to the sides of the upper torso, blending the clay at the shoulder joint so they look seamless.
Step 2: Sculpting the Head and Details
-
Shape the head:
Roll a smooth, slightly flattened ball of clay for the head. It should be proportional to the body—a bit oversized adds to the cute factor. Press it gently onto the top of the neck area. -
Form the hat:
Roll a cone of clay that is tall and pointy. Hollow out the base slightly with your thumb so it sits snugly on top of the round head like a cap. -
Attach the ears:
Roll two tiny spheres of clay and press them onto the sides of the head, just below the hat line. Use a creating tool or the end of a paintbrush to make a small indentation in the center of each ear. -
Make the feet:
Create two very small triangles or teardrops for feet. You can either bake these separately and glue them later, or gently press them onto the bottom of the body now if the balance is stable. -
Add texture details:
Using a needle tool or toothpick, poke three tiny vertical holes down the center of the shirt area to mimic buttons. -
Bake the sculpture:
Bake your piece according to the polymer clay manufacturer’s instructions. Usually, this is around 275°F (135°C) for 15-30 minutes depending on thickness. Let it cool completely.
Head Stability
Before baking, insert a piece of toothpick or thick wire halfway into the body and halfway into the head. This hidden internal spine prevents the head from falling off later.
Step 3: Painting and Finishing
-
Sand for smoothness:
Once cool, use fine-grit sandpaper to gently smooth out any fingerprints or rough bumps on the surface. Wipe away the dust with a damp cloth. -
Base coat the face:
Paint the face and ears with a creamy flesh tone. You may need two thin coats for opaque coverage. Let this dry fully before moving on. -
Paint the outfit:
Use a teal or turquoise paint for the shirt section, careful to paint around the tiny button indentations. Paint the middle skirt section a warm mustard yellow, and the bottom hem a soft red. -
Color the hat:
Paint the tall cone hat in a striking red that matches or complements the bottom hem. I like to keep my brushstrokes vertical here to emphasize the height. -
Add facial features:
Using your smallest detail brush or a dotting tool, dab two black dots for eyes. Paint a very thin, small curved line for a smile. Add rosy cheeks by dry-brushing a tiny amount of pink paint. -
Highlight the buttons:
Dip a toothpick in yellow or gold paint and carefully fill inside the tiny button holes you poked earlier. -
Seal the work:
Apply a coat of matte varnish to the entire figure to protect the paint and give it that soft, ceramic-like finish visible in the photo. -
Mount to base:
Apply a strong adhesive like E6000 to the bottom of the feet (and the skirt hem if it touches) and press firming onto the center of your wooden slice.
Create a Springy Neck
Make it a real bobblehead! Bake the head and body separately. Once cooled, connect them with a small, strong craft spring glued into hollows carved in the neck and head base.
Place your finished gnome on a shelf or desk for a cheerful, handcrafted companion


Monster Mouth Wall Plaque
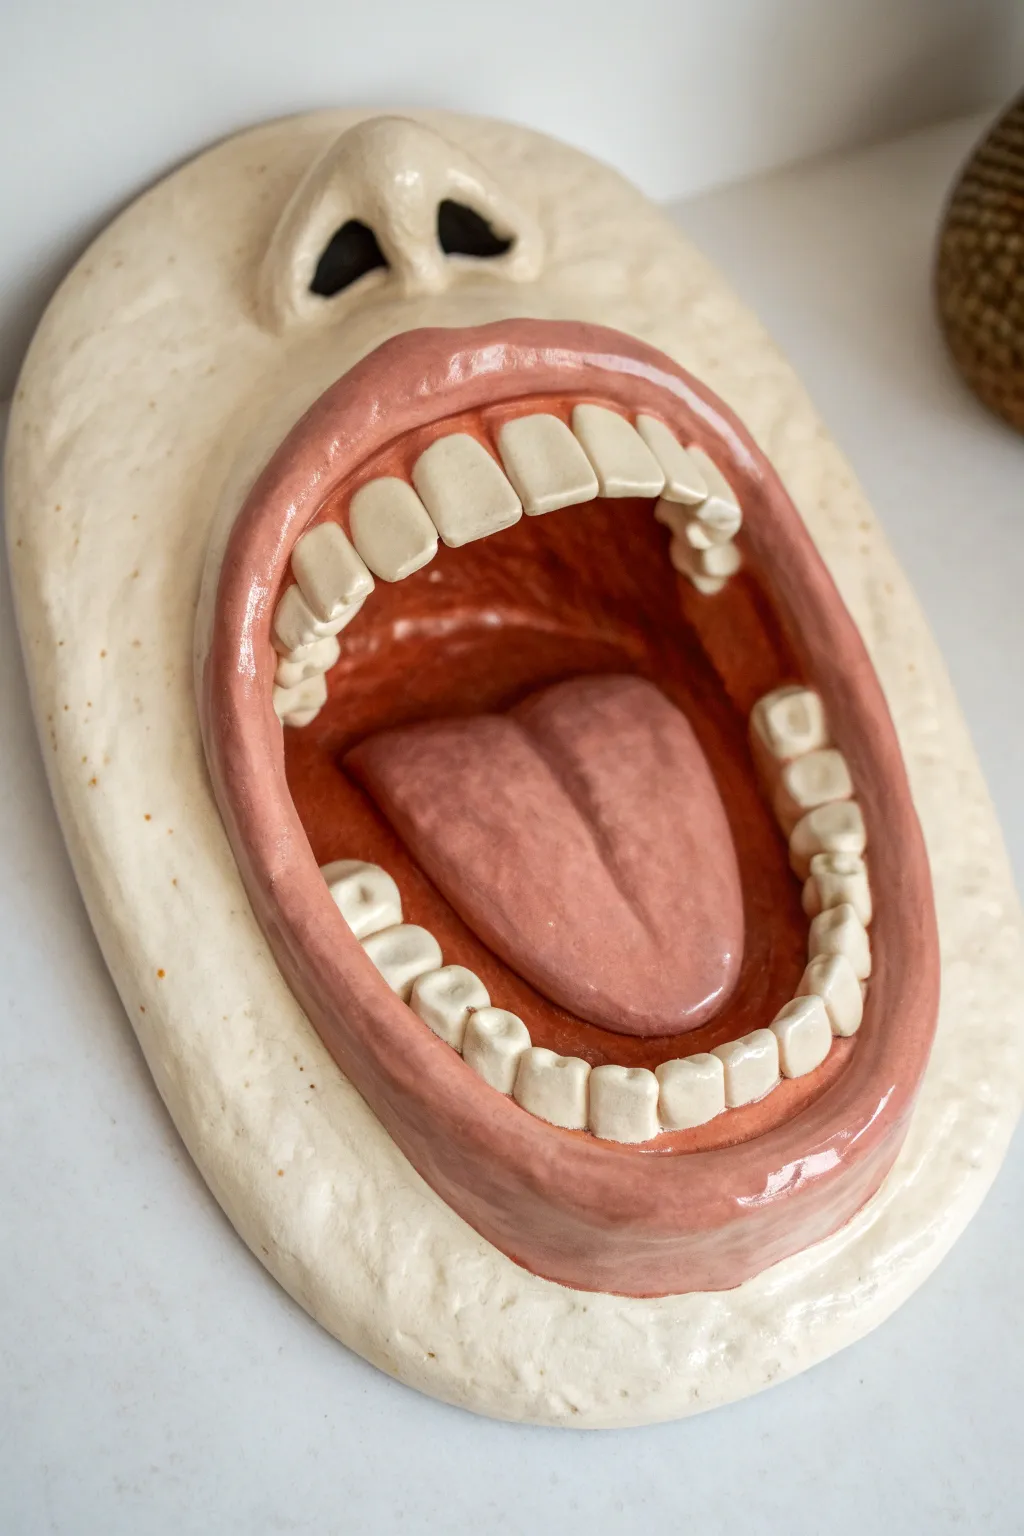
This whimsical wall sculpture features a gaping mouth complete with tongue, teeth, and a nose, all set on an oval plaque. It’s a fantastic study in anatomy exaggeration and glaze combinations, perfect for adding a touch of obscure humor to any room.
How-To Guide
Materials
- Stoneware or Earthenware clay (white or buff)
- Clay rolling pin
- Fettling knife
- Scoring tool (or fork)
- Slip (clay mixed with water)
- Modeling tools (wooden and metal)
- Sponge
- Underglazes (Pink, Red, Black)
- Glossy clear glaze (or specific colored gloss glazes)
- Kiln for firing (if using ceramic clay)
Step 1: Forming the Base
-
Roll the slab:
Begin by rolling out a slab of clay to about 3/8 inch thickness. This will serve as the background plaque for your sculpture. -
Cut the oval shape:
Using a needle tool or fettling knife, cut out a large oval shape. It doesn’t need to be geometrically perfect; a slightly organic, asymmetrical shape adds character. -
Smooth the edges:
Run a damp sponge along the cut edges of the oval to soften them. You want a rounded, organic rim rather than a sharp, cut angle.
Make It Wet
For an extra realistic saliva effect, apply a thicker layer of clear gloss glaze specifically to the tongue and corners of the mouth.
Step 2: Building the Facial Features
-
Mark placement:
Lightly sketch the position of the mouth and nose directly onto the clay slab using a needle tool so you know where your coil walls need to go. -
Build the mouth wall:
Roll a thick coil of clay and attach it in a large oval shape to define the lips. Score and slip thoroughly to join it to the base slab. -
Add volume to the lips:
Blend the coil onto the base on the outside edge, but keep the inside edge distinct. Add smaller coils on top if needed to build height, shaping them into a thick, protruding lip structure. -
Form the nose:
Create a small mound of clay above the lips for the nose. Shape two distinct nostrils by pressing your thumbs or a large ball tool deep into the clay mound. -
Refine the interior:
Inside the mouth cavity, smooth the clay where the lips meet the background slab to create a seamless transition for the inner mouth walls.
Level Up: Texture
Before glazing, use a stiff bristle brush to stipple the ‘skin’ area of the plaque. This creates a porous texture that contrasts great with the smooth, glossy teeth.
Step 3: Adding Details
-
Create the tongue:
Form a large, flat teardrop shape from a separate piece of clay. Place it inside the bottom of the mouth. I like to score the underside slightly so it sticks securely to the background. -
Detail the tongue:
Use a modeling tool to press a center line down the tongue, giving it a realistic, fleshy appearance. -
Sculpt the teeth:
Roll small balls of clay and shape them into rectangles or chiclets for the teeth. You will need larger ones for the front and slightly smaller ones for the back. -
Attach the teeth:
Score and slip each tooth before pressing it into the inner gum line of the lips. Arrange them in a neat row, embedding them slightly so they look rooted in the gums. -
Check connections:
Go over all attachments, especially the teeth, to ensure they are secure. A loose tooth might pop off during drying or firing. -
Final smoothing:
Use a slightly damp sponge to smooth out fingerprints on the ‘skin’ area of the plaque and the lips. Leave a little texture if you want a more rugged look. -
Create a hanging mechanism:
Before the clay dries, create two small holes or a keyhole slot on the back of the plaque for wall mounting.
Step 4: Glazing and Finishing
-
Bisque fire:
Allow the piece to dry slowly and completely before bisque firing it in the kiln according to your clay’s specifications. -
Apply base colors:
Paint the lips and gums with a pink or salmon-colored underglaze. Use a darker red or reddish-brown for the deep interior of the mouth to create depth. -
Paint the tongue:
Use a slightly different shade of pink or dusty rose for the tongue to distinguish it from the gums. -
Glaze the rest:
Leave the teeth unpainted if your clay fires white, or paint them with white underglaze. Apply a cream or off-white glaze to the surrounding face/plaque area. -
Final gloss coat:
Apply a clear gloss glaze over the entire mouth area (lips, teeth, tongue, gums) to make it look wet and saliva-covered. You can leave the skin matte or make it glossy too, depending on preference. -
Glaze fire:
Fire the piece a second time to mature the glazes and seal the ceramic surface.
Once fired, hang your sculpture up to surprise anyone looking for a regular portrait

The Complete Guide to Pottery Troubleshooting
Uncover the most common ceramic mistakes—from cracking clay to failed glazes—and learn how to fix them fast.
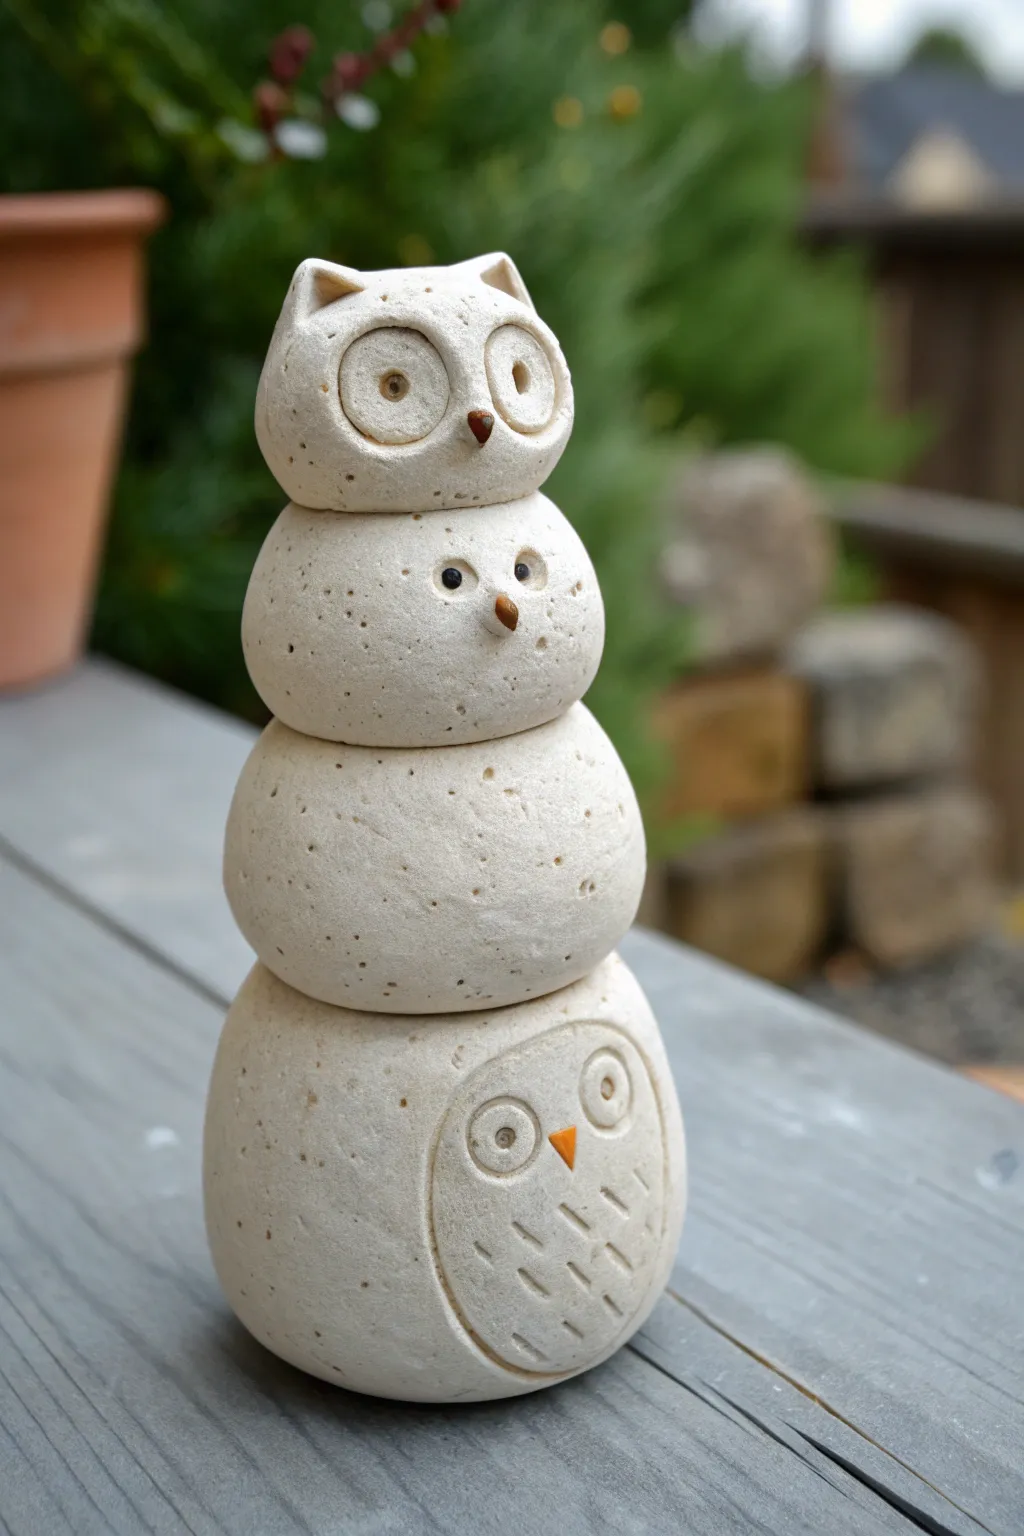
Pinch Pot Whistle Creature
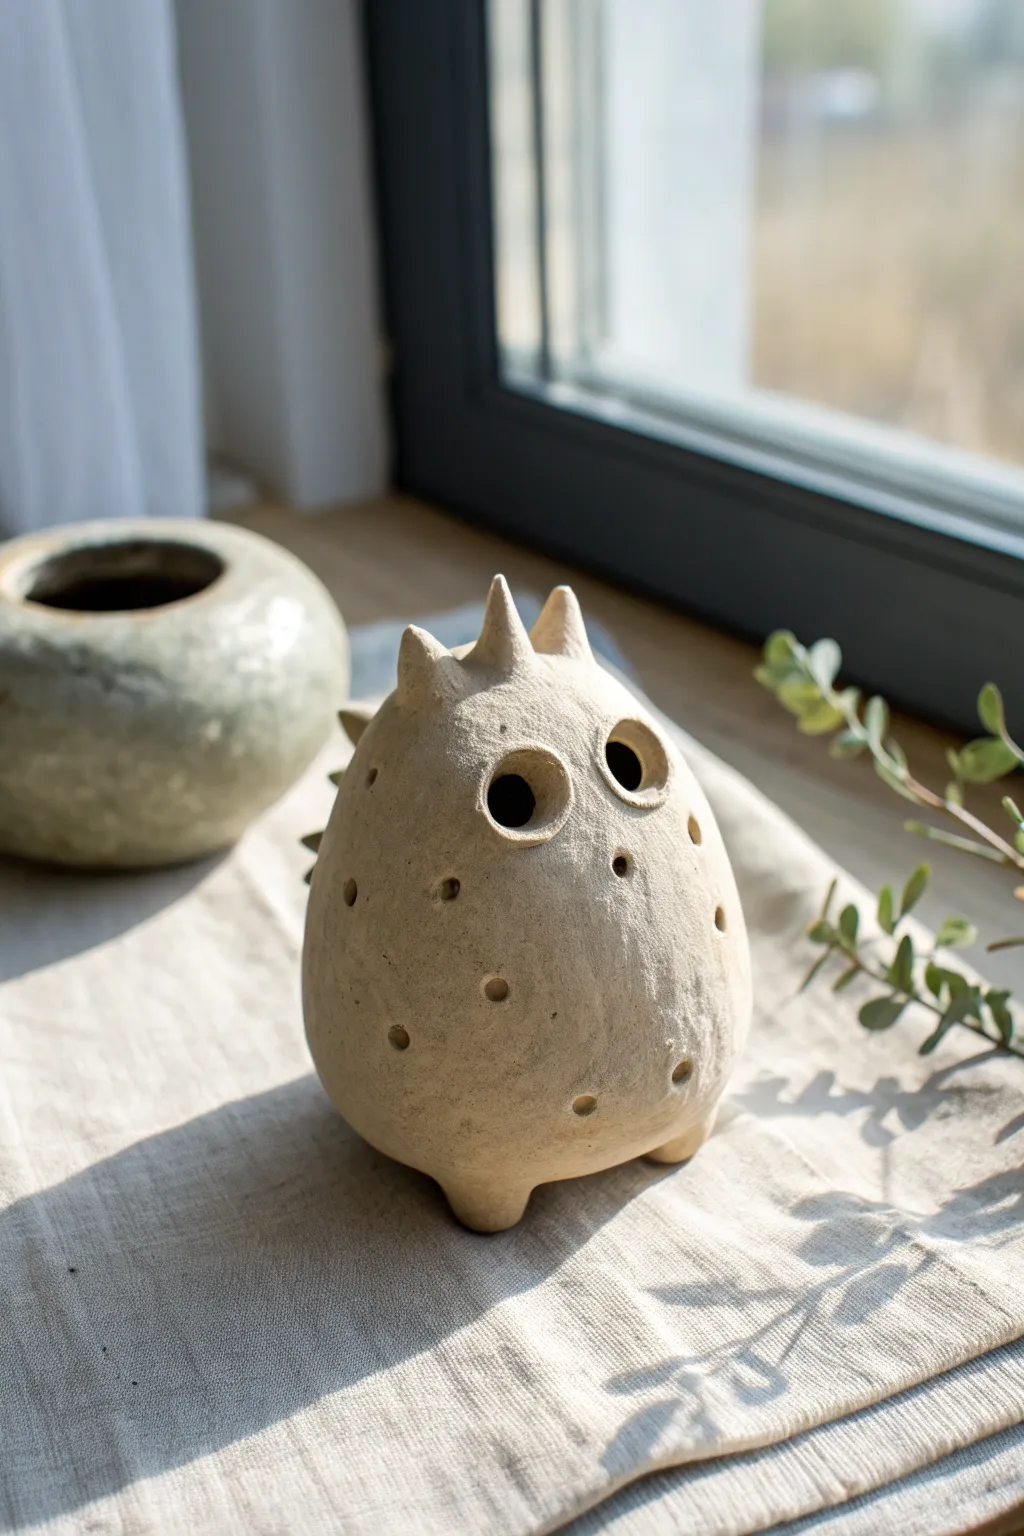
This charming little clay creature combines the ancient technique of pinch pottery with a playful, character-driven design. Its hollow body isn’t just for show—it functions as a working whistle or ocarina, with a speckled, organic texture that gives it a rustic, earth-spirit vibe.
Step-by-Step Tutorial
Materials
- Stoneware clay (smooth or groggy)
- Small wooden modeling tool
- Popsicle stick or fettling knife
- Needle tool
- Slip (clay and water mixture)
- Small sponge
- Loop tool (for hollowing, optional)
Step 1: Forming the Body
-
Pinch the base:
Start with a ball of clay roughly the size of a tennis ball. Insert your thumb into the center and begin pinching the walls evenly while rotating the ball in your hand to create a simple pinch pot. -
Close the form:
Once the pot walls are an even thickness, gently collar the rim inwards until it closes completely, trapping air inside to create a hollow sphere or egg shape. -
Shape the creature:
Roll the hollow form on your work surface to smooth out any lumps. Gently tap the bottom against the table to create a flat base so it sits upright, and slightly taper the top to give it an egg-like silhouette. -
Add the feet:
Create two very small balls of clay. Score and slip the bottom of your creature, then attach these balls to form tiny, nubby legs. Smooth the seams so they look integrated into the body.
Clear The Airway
If your whistle stops making sound while you work, re-insert the popsicle stick gently. Often, small crumbs of clay fall into the airway and block the sound.
Step 2: Creating the Whistle Mechanism
-
Make the mouthpiece:
On the back or side of the creature, add a small, rectangular block of clay. This will become the mouthpiece for the whistle. -
Cut the air channel:
Insert a flat popsicle stick horizontally into the mouthpiece to create the airway. Then, use a needle tool or knife to cut a triangular notch (the fipple) on the body just below where the stick enters the main chamber. -
Refine the sound:
Carefully angle the ramp of the notch so the air splits against the sharp edge of the clay. I find this part takes patience—blow gently through the mouthpiece and adjust the angle until you get a clear tone.
Make it an Ocarina
Drill a few extra holes on the sides of the body after tuning the main whistle. Covering and uncovering these holes while blowing will allow you to play different notes.
Step 3: Sculpting the Character
-
Create the eyes:
Roll two small rings of clay. Score and slip the front of the creature’s face and attach the rings. Smooth the outer edges into the body but keep the centers sharp and defined. -
Hollow the gaze:
Using a small loop tool or the back of a paintbrush, gently press into the center of the eye rings to create deep, dark hollows, giving the creature its curious expression. -
Add the crest:
Form chree small cones of clay. Attach them to the very top of the head in a row to act as ears or a spiky crest. Blend the base of each spike thoroughly so they won’t pop off. -
Spine details:
Add a few smaller spikes running down the back of the creature, following the curve of the spine, blending them just as you did the head crest.
Step 4: adding Texture and Finishing
-
Poke the pattern:
Using the blunt end of a small paintbrush or a wooden tool, press random indentations all over the body. Vary the pressure slightly for an organic, spotted look. -
Smoothing:
Take a slightly damp sponge and gently wipe down the entire surface. This softens the sharp edges of your added spikes and removes any small clay crumbs or fingerprints. -
Slow drying:
Cover the creature loosely with plastic for the first day to let the moisture redistribute evenly, preventing cracks around the added features. -
Bisque firing:
Once bone dry, fire the piece to bisque temperature (usually Cone 04). -
Final Surface:
Leave the raw clay unglazed for a natural stone look, or apply a very thin wash of iron oxide to highlight the textures before the final firing.
Once fired, you’ll have a charming desk companion that sings when you need a break
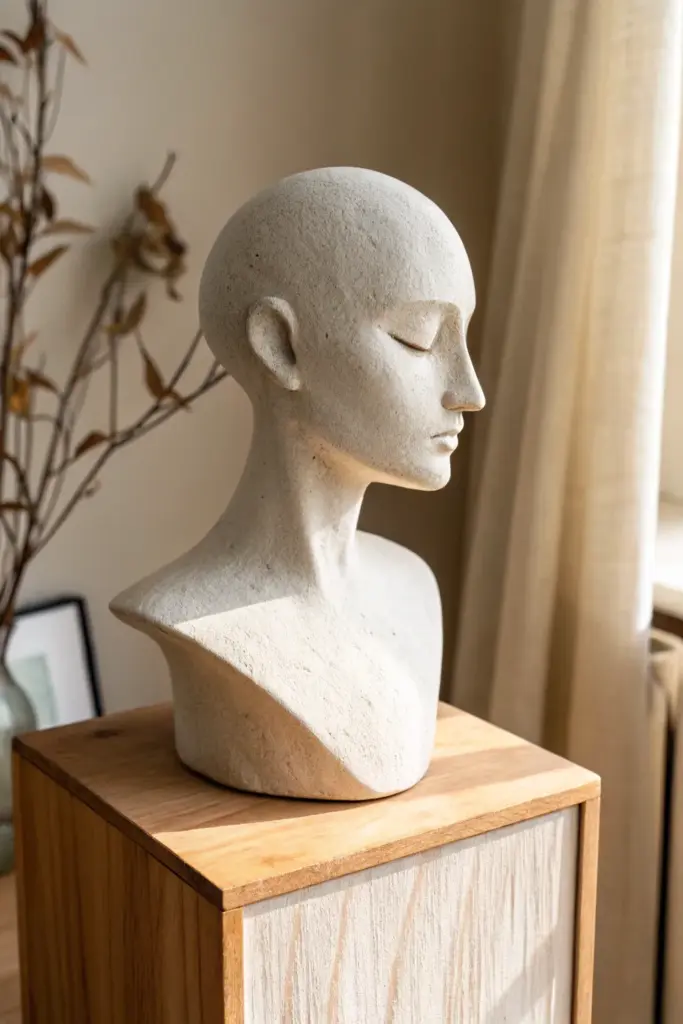
Stylized Bust With No Face Details

Capture a sense of calm contemplation with this elegant, minimalist bust sculpture. The smooth, simplified features and faux-stone finish give it a timeless, museum-quality appearance that is perfect for developing facial anatomy skills without the pressure of hyper-realism.
Step-by-Step Guide
Materials
- Air-dry clay (white or light grey)
- Armature wire (aluminum, approx. 3mm thick)
- Wooden base or scrap wood block
- Aluminum foil for bulking
- Sculpting tools (loop tool, wood modeling tool, needle tool)
- Sponge and water
- Fine-grit sandpaper
- Acrylic paint (cream, beige, off-white)
- Textured stone spray paint (optional)
- Matte sealant spray
Step 1: Building the Armature
-
Create the support:
Begin by securing a heavy aluminum wire into your wooden base. It should stand vertically about 10-12 inches high. Bend the top 3 inches into a loop to support the head, and create a slight ‘shoulder’ crossbar about 4 inches below that loop. -
Bulk up the core:
Crumple aluminum foil tightly around the wire structure. Create an egg shape for the head and a thick column for the neck, flaring out slightly at the bottom for the shoulders. This saves clay and sets the basic proportions early. -
Apply the first layer:
Flatten chunks of clay into pancakes and wrap them over the foil core. Press firmly to ensure the clay adheres to itself and the foil, aiming for a consistent coverage of about half an inch.
Step 2: Sculpting the Form
-
Define the head shape:
Using a wooden paddle or your hands, smooth the clay into a elongated egg shape. Focus on the profile view first—the back of the skull should round out, and the chin needs to be distinct but soft. -
Extend the neck:
Build up the neck cylinder. It should be relatively long and slender for this stylized look. Ensure it transitions smoothly into the shoulders, which should be cut off abruptly in a classic bust style. -
Establish facial planes:
Mark the halfway point of the face for the eyes. Press your thumbs in to create the eye sockets. Add a small wedge of clay for the nose and a rounded mound for the chin. -
Sculpt the nose:
Refine the nose shape. Keep it straight and elegant. Since this is stylized, you don’t need detailed nostrils; just focus on the bridge and the tip’s silhouette. -
Form the closed eyes:
Instead of carving open eyes, add smooth, crescent-shaped pieces of clay into the sockets. Blend the edges perfectly into the face so the eyelids look soft and heavy, evoking a sleeping state. -
Shape the mouth:
Keep the mouth simple. A small horizontal incision with a subtle downward curve creates a neutral expression. Soften the lips above and below this line; the upper lip should slightly overhang the lower one. -
Add the ears:
Form two small C-shapes of clay. Attach them to the sides of the head, roughly aligning the top with the eyes and the bottom with the nose tip. Keep the details minimal—just the general suggestion of the ear’s curve. -
Smooth the surface:
With a damp sponge, go over the entire sculpture. Erase tool marks and fingerprints. I find that using circular motions helps polish the ‘skin’ to a very smooth finish.
Cracks happen!
If hairline cracks appear while drying, mix a small amount of clay with water to make a paste (slip). Fill the cracks with this paste, smooth it over, and let it dry again.
Step 3: Refining and Finishing
-
Initial drying:
Let the sculpture dry slowly away from direct heat or sunlight. Cover it loosely with a plastic bag for the first 24 hours to prevent cracking. -
Sanding:
Once fully cured and bone-dry, use fine-grit sandpaper to remove any remaining bumps. Pay attention to the curve of the skull and the neck muscles. -
Base coat using paint:
Mix a warm stone color using beige and white acrylics. Apply a solid base coat to the entire sculpture. Dab the paint on rather than stroking it to create a slight texture. -
Adding stone texture:
To mimic the speckled look in the photo, you can flick a toothbrush loaded with slightly darker diluted grey paint over the surface. Alternatively, a light mist of textured limestone spray paint works wonders. -
Dry brushing highlights:
Take a nearly dry brush with pure white or cream paint and lightly graze it over the high points—the nose bridge, brow bone, and chin. This emphasizes the form. -
Seal the work:
Finish with a matte spray sealant to protect the paint and give the piece a unified, professional sheen that looks like carved plaster or stone.
Level Up: Antique Look
Make a wash of water and brown paint. Brush it over the entire piece and immediately wipe it off with a rag. The dark pigment stays in the crevices, aging the sculpture instantly.
Place your finished bust near a window where natural light can play across the subtle facial features