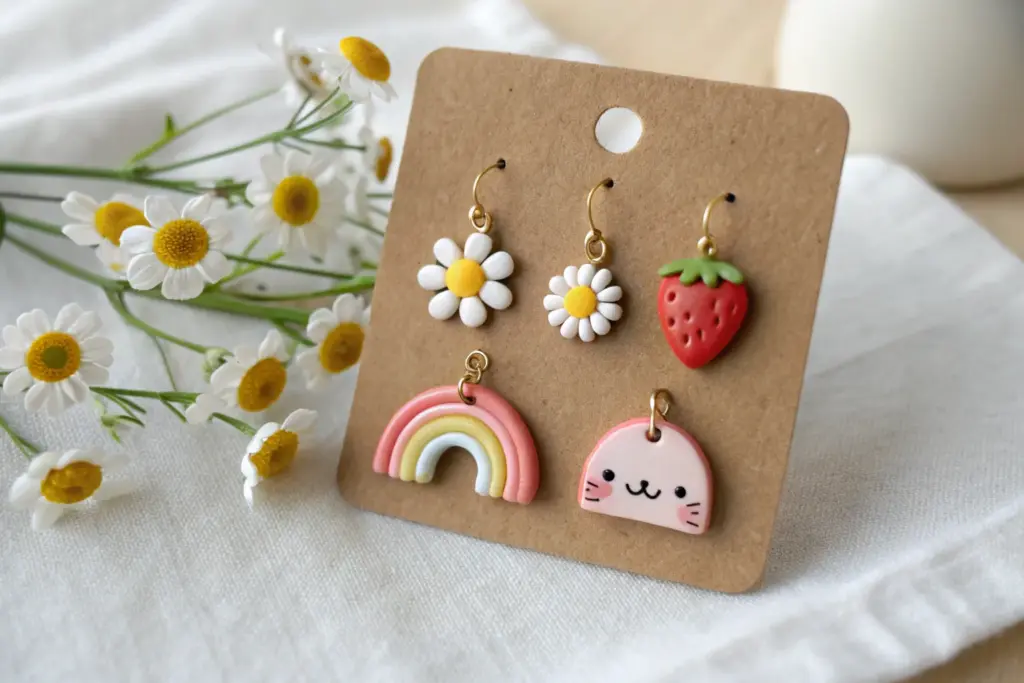
If you’re in the mood to make something tiny, cheerful, and totally wearable, cute clay earrings are my favorite kind of studio day. Here are 20 ideas that range from classic sweet shapes to quirky little statement pairs you’ll actually want to put on right away.
Pastel Arch Dangles With Tiny Dot Accents
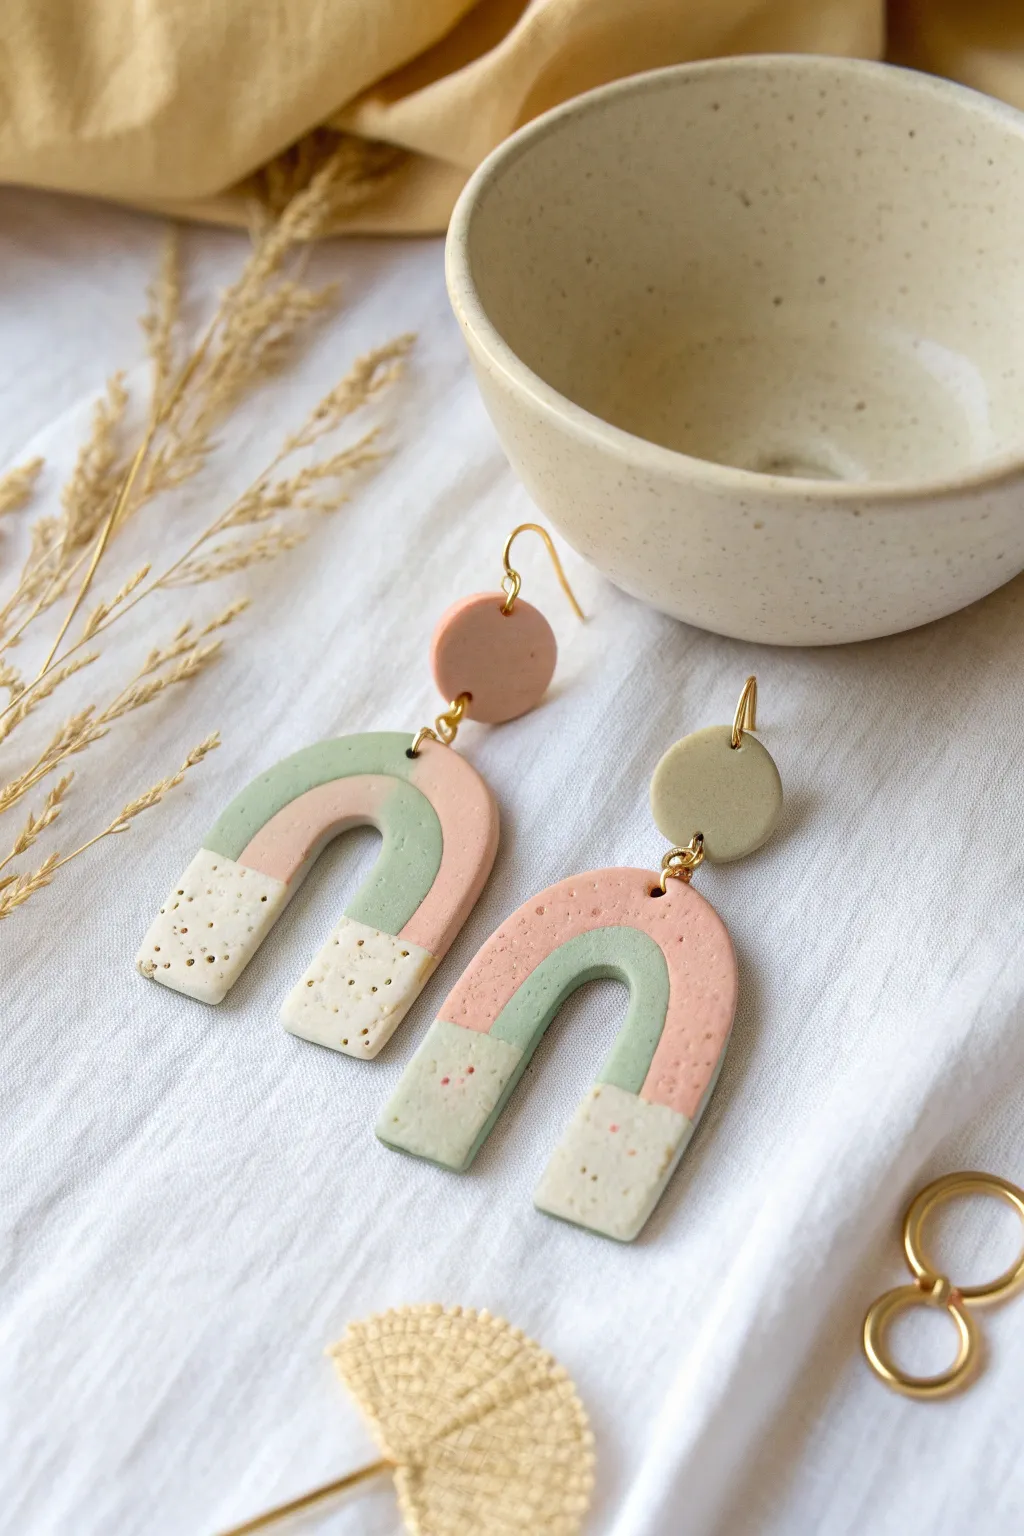
These charming polymer clay dangles combine soft pastel hues with a delightful speckled texture for a modern, earthy look. The geometric arch shape paired with the playful multi-colored segments makes them a versatile accessory for any season.
Detailed Instructions
Materials
- Polymer clay in peach/coral, sage green, and white
- Speckled clay (or black pepper to mix in)
- Acrylic rolling pin
- U-shaped clay cutter (medium size)
- Small round circle cutter (approx. 10-12mm)
- Craft knife or tissue blade
- Texture tool or toothbrush (optional)
- Needle tool or small drill bit
- Gold plated jump rings (4mm and 6mm)
- French hook ear wires
- Jewelry pliers (flat nose and round nose)
- Baking sheet and parchment paper
- Fine grit sandpaper (optional)
Step 1: Prepping the Clay
-
Mix your colors:
Begin by conditioning your clay. You’ll need three main tones: a soft peach/coral, a muted sage green, and a speckled cream. If you don’t have pre-speckled clay, simply mix a pinch of ground black pepper or dried vanilla bean specks into white or translucent clay. -
Create the speckled peach:
For the top circle of the left earring, you’ll need a solid peach tone. However, notice the bottom sections have tiny speckles. Mix a very small amount of your speckled clay into portions of your peach and green clay to achieve that subtle stone-like texture seen in the finished pieces. -
Roll out slabs:
Roll out each color of conditioned clay into even slabs. Aim for a thickness of about 3mm so the earrings are sturdy but not too heavy. Use depth guides or playing cards stacked on either side of your roller to ensure an even surface.
Uneven Seams?
If the clay seams separate during baking, use a tiny amount of liquid polymer day (Bake & Bond) on the edges before pressing colors together next time.
Step 2: Constructing the Arch
-
Cut the arch base:
Using your U-shaped cutter, punch out two arch shapes. You can do this on a scratch piece of clay first if you want to practice your placement, but generally, you will cut the specific colored sections next and assemble them. -
Sectioning the colors:
This design uses a ‘slab patchwork’ technique. Cut a strip of your peach clay, your green clay, and your white speckled clay. Lay them side-by-side on your work surface to visualize the pattern shown in the photo: one earring has peach tips and a green top, the other is reversed. -
Slicing the joins:
Use your sharp tissue blade to cut straight diagonal or horizontal lines across your colored strips where you want the colors to change. For the left earring, cut the bottom third off a green slab and replace it with white speckled clay. -
Assembling the slab:
Gently press the cut edges of the different colored clays together. I find using a piece of parchment paper over the top and gently burnishing with a finger or roller helps the seams fuse without distorting the shape too much. -
Cutting the final shape:
Once your multi-colored mini-slab is fused, position your U-shaped cutter so it captures the color transitions exactly where you want them. Press down firmly to cut your final arch. Repeat for the second earring with the alternate color placements. -
Adding texture:
If you want extra texture resembling stone, gently tap the surface with a toothbrush or a crumpled ball of aluminum foil. This step is subtle but adds lovely dimension. -
Cut the stud toppers:
use your small round cutter to punch out two circles for the top component. In the photo, one is solid peach and the other is a muted sage green. Make sure these are the same thickness as your arches.
Pro Tip: Clean Cuts
Place a piece of cling wrap over the clay before using your cutters. This creates a beautifully rounded, domed edge rather than a sharp, flat one.
Step 3: Baking and Assembly
-
Pierce the holes:
Before baking, use a needle tool to create holes for your jump rings. You need a hole at the very top center of each arch, and a corresponding hole at the bottom of each circle topper. Double-check that they align. -
Bake the pieces:
Arrange all pieces on a parchment-lined baking sheet. Bake according to your brand of polymer clay instructions (usually 275°F/135°C for 30 minutes). Tent with foil if you are worried about the white clay scorching. -
Cool and sand:
Let the pieces cool completely. If there are any rough edges on the sides of your arches, gently smooth them out with fine-grit sandpaper or a buffing tool. -
Open the jump rings:
Using two pairs of pliers, twist your jump rings open laterally (don’t pull them apart). Connect the top circle to the bottom arch using a 6mm jump ring. -
Attach ear wires:
Finally, attach the French hook ear wire to the top of the circle piece using a smaller 4mm jump ring or by opening the loop on the ear wire itself. -
Final check:
Verify that all rings are closed tightly and the earrings hang straight. Your pastel arches are now ready to wear.
Now you have a stunning pair of geometric dangles perfect for adding a pop of art to your outfit.


Sweet Heart Studs With Soft Texture
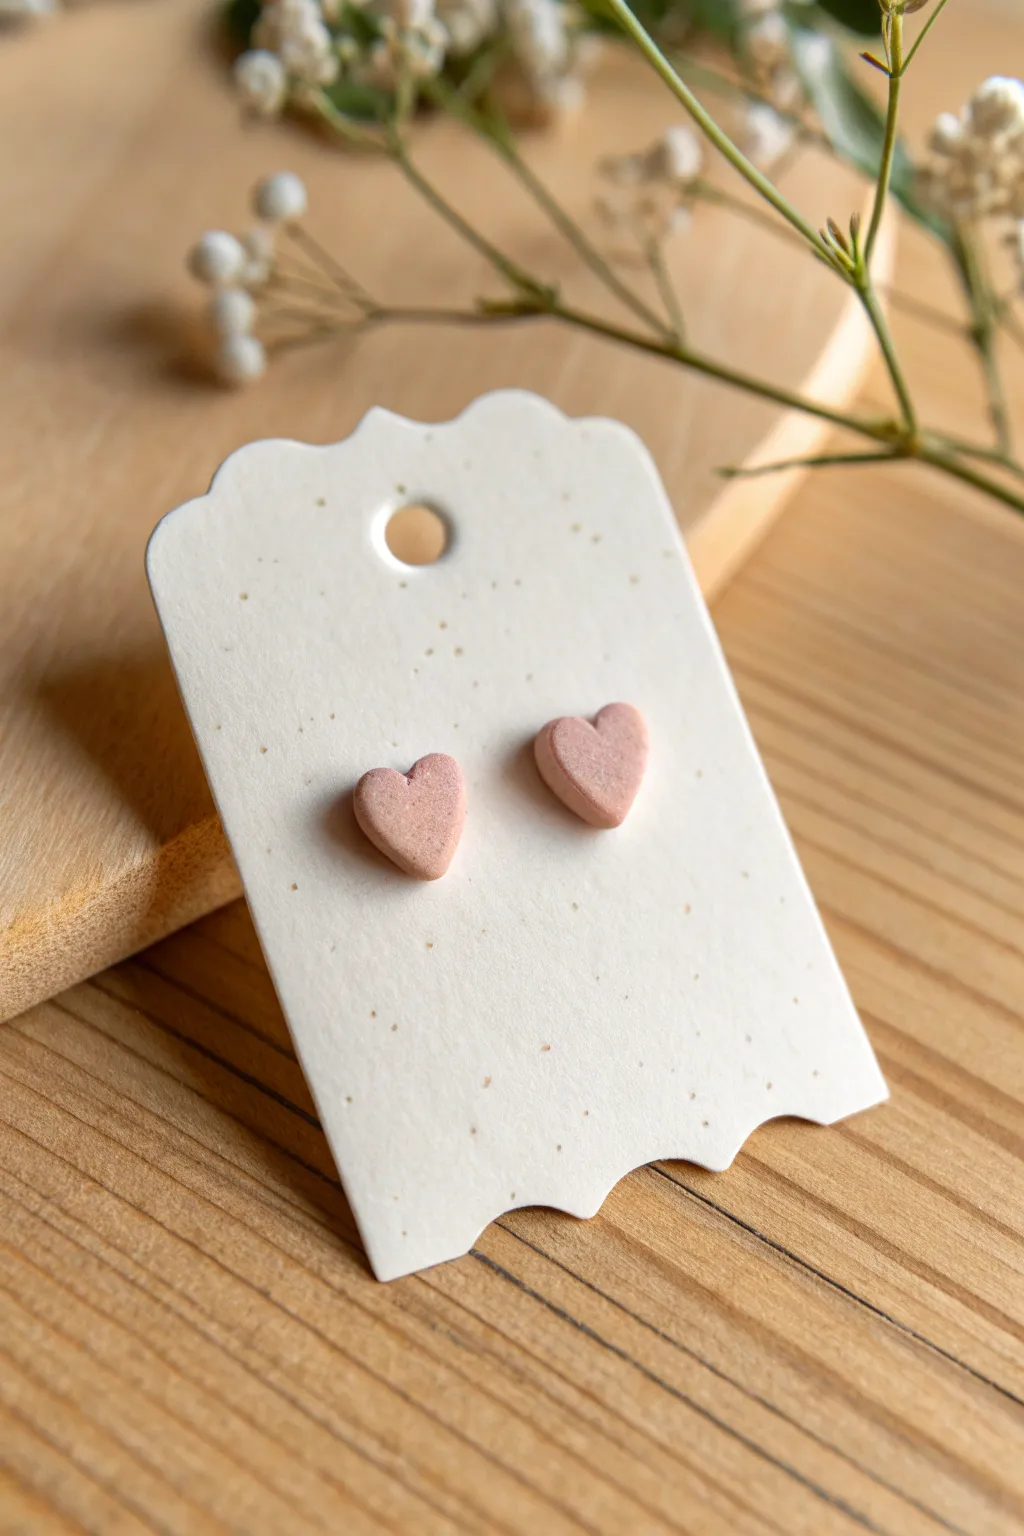
These charming little studs feature a subtle speckled texture and a soft dusty rose hue that perfects the minimal aesthetic. They are incredibly beginner-friendly but yield a professional, polished result ideal for gifting or everyday wear.
Step-by-Step
Materials
- Polymer clay (dusty rose or muted pink color)
- Faux granite or speckled polymer clay (translucent or white base)
- Small heart-shaped clay cutter (approx. 0.5 inch)
- Acryllic roller or pasta machine
- Ceramic tile or glass work surface
- Earring posts (surgical steel or sterling silver)
- Jewelry glue (E6000 or similar)
- Small sanding sponge or fine-grit sandpaper
- Liquid polymer clay (optional, for bonding)
- Needle tool or toothpick
Step 1: Preparing the Clay
-
Condition the base color:
Begin by taking your dusty rose polymer clay and kneading it in your hands until it becomes soft, pliable, and warm. This conditioning step is crucial to prevent cracking later. -
Create the speckled mix:
To achieve that subtle texture seen in the photo, take a very small amount of speckled or ‘granite’ effect clay. You want a ratio of about 10 parts pink to 1 part speckled. -
Combine the clays:
Mix the two clays together thoroughly until the speckles are evenly distributed throughout the pink base. Ensure complete marbling so the color is uniform. -
Roll out the slab:
Using your acrylic roller or pasta machine, roll the clay out to a consistent thickness. Aim for about 3mm to 4mm—thick enough to be sturdy but light enough for ears.
Fixing Rough Edges
If your edges are jagged after baking, don’t worry. Dip a Q-tip in acetone and gently rub the edges, or use fine-grit sandpaper to buff them smooth
Step 2: Cutting and Shaping
-
Clean your surface:
Before cutting, wipe down your work surface and cutter to ensure no dust particles get stuck to your fresh clay slab. -
Cut the shapes:
Press your small heart-shaped cutter firmly into the clay slab. Give it a tiny wiggle to ensure it cuts all the way through to the surface below. -
Remove excess clay:
Lift the excess clay away from the cut shapes rather than trying to dig the shapes out. This preserves the clean edges of the hearts. -
Smooth the edges:
Gently pick up each heart using a flexible blade. I like to lightly tap the edges with my finger to soften the sharp cut line, giving it that pillowy, soft look. -
Final inspection:
Check the surface for any fingerprints. If you find any, gently buff them out with a tiny drop of baby oil or by lightly rolling a piece of paper over the top.
Level Up: Resin Coating
For a high-gloss, ceramic look, add a thin layer of UV resin to the top of the baked hearts and cure under a UV lamp for a durable, shiny finish
Step 3: Baking and Assembly
-
Prepare for baking:
Place your clay hearts on a ceramic tile or a baking sheet lined with plain printer paper to prevent shiny spots on the back. -
Bake the pieces:
Bake according to your clay manufacturer’s instructions (usually around 275°F or 130°C) for 30 minutes. Do not underbake, as this makes the clay brittle. -
Cool down:
Allow the clay hearts to cool completely before determining which side looks best to be the front. -
Attach the posts:
Place a small dab of strong jewelry glue (like E6000) on the flat pad of the earring post. -
Secure the post:
Press the glued post onto the back of the clay heart, positioning it slightly toward the top so the heart hangs correctly on the ear lobe. -
Reinforce (Optional):
For extra durability, you can cover the earring post pad with a small smear of liquid clay and bake again briefly, but high-quality glue is usually sufficient. -
Let it cure:
Allow the glue to cure fully—wait at least 24 hours before wearing them to ensure the bond is permanent.
Enjoy styling these sweet, subtle accessories with your favorite outfit


Tiny Strawberry Drops With Seed Details
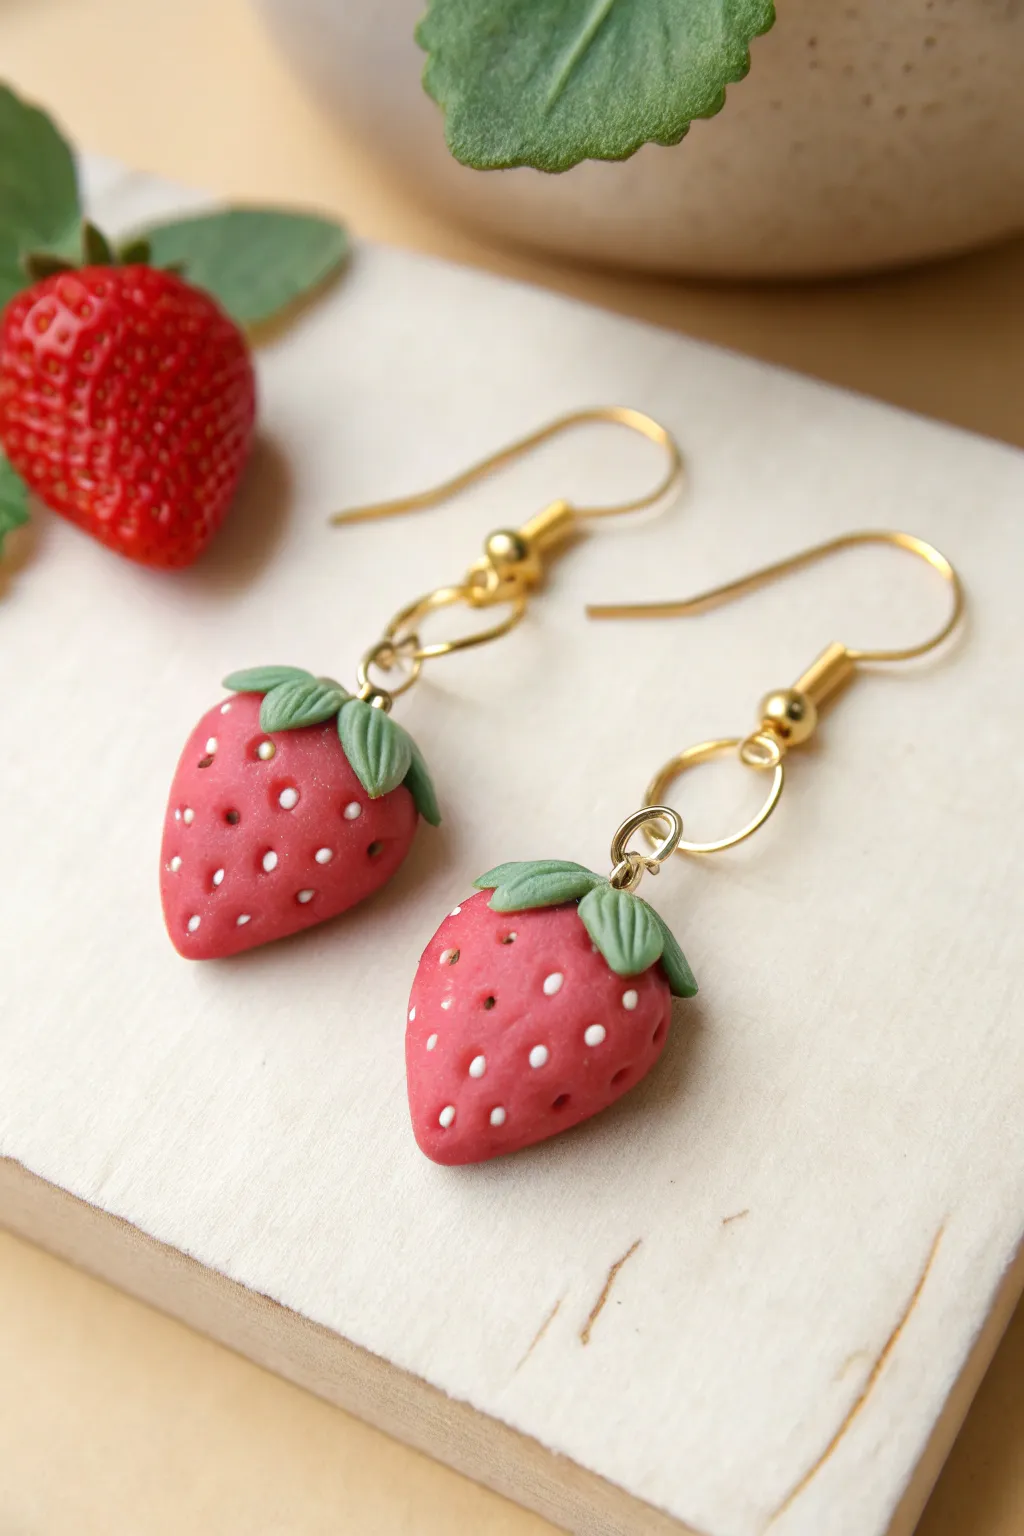
Capture the sweetness of summer with these miniature strawberry earrings that look good enough to eat. Hand-sculpted from polymer clay, these charms feature realistic seed textures and delicate leafy caps, dangling elegantly from gold-tone hardware.
Step-by-Step Guide
Materials
- Red polymer clay (e.g., Fimo Soft or Premo)
- Green polymer clay (a leafy, muted shade)
- White acrylic paint
- Gold-tone earring hooks (French style)
- Gold-tone jump rings (4mm and 6mm)
- Gold-tone screw eye pins
- Needle tool or toothpick
- Fine detail paintbrush
- Clay blade or craft knife
- Jewelry pliers (round nose and flat nose)
- Gloss glaze (optional)
Step 1: Sculpting the Berries
-
Condition the clay:
Begin by kneading your red polymer clay until it is soft, pliable, and free of any air bubbles. -
Shape the base:
Divide the red clay into two equal pea-sized balls. Roll each ball between your palms to smooth it out, then gently pinch one end to create a tapered teardrop shape. -
Flatten the top:
Press the wider end of the teardrop slightly against your work surface to create a flat area where the leaves will eventually sit. -
Create seed indentations:
Using a needle tool or the tip of a toothpick, press tiny holes all over the surface of the strawberry. I find it looks most natural if you stagger the rows rather than aligning them perfectly. -
Insert hardware:
Carefully screw a gold eye pin into the center of the flat top of each berry. Ensure it goes in straight and feels secure.
Seed Realism Trick
Instead of painting seeds white later, you can embrace a natural look by pressing tiny white clay balls into the indentations before baking.
Step 2: Adding the Foliage
-
Prepare the leaves:
Roll out a very thin sheet of green clay. Using a small star cutter or a craft knife, cut out two small stars or flower shapes for the calyx (the leafy cap). -
Texture the leaves:
Use your needle tool to draw a central vein down the middle of each tiny leaf point to add realism. -
Attach the cap:
Thread the green clay shape onto the eye pin and press it gently onto the top of the strawberry. Use your tool to curve the leaf tips slightly downward so they hug the fruit. -
Bake the pieces:
Preheat your oven according to the clay manufacturer’s instructions (usually around 230°F to 275°F). Bake the strawberries on a tile or parchment-lined tray for roughly 15-20 minutes. -
Cool down:
Allow the pieces to cool completely before handling them. The clay hardens fully as it returns to room temperature.
Make it a Necklace
Create a slightly larger strawberry pendant and thread it onto a delicate gold chain to make a matching jewelry set.
Step 3: Painting and Assembly
-
Highlight the seeds:
Dip a fine detail brush into white acrylic paint. Carefully dab a tiny amount of paint into selected seed indentations. You don’t need to fill every single hole; leaving some bare adds depth. -
Clean up excess:
If paint gets on the red surface, quickly wipe it away with a damp paper towel so the white remains only inside the recessed dots. -
Seal the piece (Optional):
If you want a juicy, shiny look, apply a thin coat of gloss glaze over the red part of the strawberry, avoiding the green leaves for a matte contrast. -
Open the jump rings:
Using two pairs of pliers, twist a jump ring open sideways (never pull it apart). Hook it through the eye pin loop on top of a strawberry. -
Connect to hook:
Add the loop of the earring hook onto the open jump ring, then use your pliers to twist the ring securely shut. -
Final check:
Give the hardware a gentle tug to ensure everything is tight and secure, then repeat the assembly process for the second earring.
Enjoy wearing these sweet little berries as a fresh accent to your favorite outfit


Cherry Pair Dangles With Leaf Tops
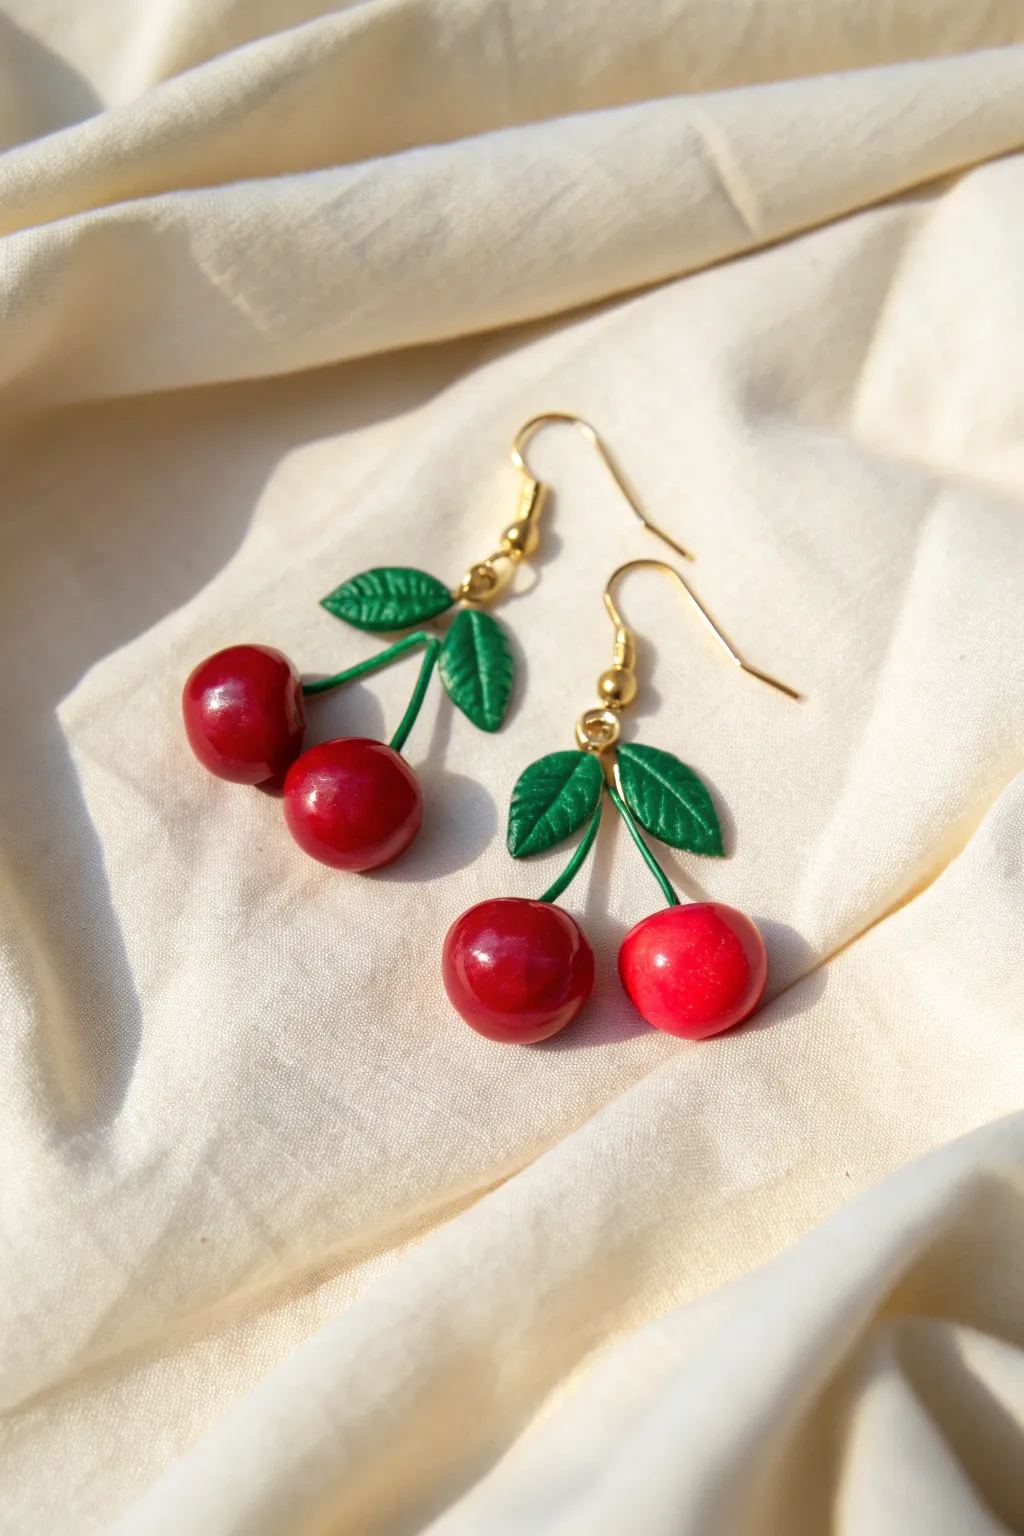
Capture the sweetness of summer with these vibrant cherry dangle earrings featuring realistic stems and textured leaves. The glossy red finish makes them look juicy enough to eat, adding a perfect pop of color to any outfit.
Step-by-Step
Materials
- Red polymer clay (translucent or solid)
- Green polymer clay
- Green jewelry wire (24 or 26 gauge)
- Gold earring hooks
- Gold jump rings
- Needle tool or toothpick
- Gloss glaze (polyurethane or resin)
- Wire cutters
- Round nose pliers
- Super glue (gel based recommended)
- Small paintbrush
Step 1: Creating the Stems and Leaves
-
Prepare the wire:
Cut two pieces of green jewelry wire, each about 2 inches long. These will form the stems for your cherry pairs. -
Bend the V-shape:
Take one piece of wire and bend it gently in the middle to create a ‘V’ shape. Using round nose pliers, twist a small loop at the very vertex of the V. This loop is where the jump ring will attach later. -
Shape the leaves:
From your green polymer clay, condition a small amount and pinch off two pea-sized balls for the leaves. -
Flatten leaf shapes:
Roll the green balls into teardrop shapes, then flatten them gently between your fingers to create the basic leaf silhouette. -
Add leaf texture:
Using a needle tool, carefully press a central vein down the middle of each leaf. Then, add tiny diagonal hatch marks on either side of the vein to mimic realistic leaf texture. -
Attach leaves to stems:
Place the leaves at the top of the V-shaped wire stem, right near the loop. Press the clay firmly onto the wire so it bonds well during baking. Repeat this entire process for the second earring.
Sticky Situation?
If fingerprints are ruining your glossy cherry surface before baking, lightly brush the raw clay with a little cornstarch or baby oil to smooth them out.
Step 2: Forming the Cherries
-
Roll the cherries:
Condition your red polymer clay well. Roll four equal-sized balls, roughly 1cm in diameter each. Try to make them as smooth and round as possible. -
Dimple the tops:
Use the rounded end of a paintbrush or a ball tool to press a small indentation into the top of each red sphere. This creates that classic cherry shape. -
Insert the stems:
Take your prepared green wire stems. Insert one end of the ‘V’ wire into the indentation of a red cherry ball. -
Secure the connection:
Gently mold the red clay around the wire insertion point to ensure it grips the wire. Be careful not to squash your perfect sphere. -
Complete the pairs:
Repeat for the other side of the V-shape, and then for the second pair of earrings, so you have two full cherry sets ready.
Step 3: Baking and Assembly
-
Bake the clay:
Arrange your earrings on a baking sheet or tile. Bake according to your clay manufacturer’s instructions (usually 275°F/135°C for 15-30 minutes). -
Cool down:
Let the pieces cool completely before handling. I like to let them sit for an hour to ensure the clay hardens fully. -
Reinforce stems:
If the wire feels loose inside the cherry, apply a tiny drop of super glue at the insertion point for extra durability. -
Apply gloss glaze:
Using a soft brush, coat just the red cherry parts with a high-gloss glaze or UV resin. This gives them that juicy, realistic shine. -
Dry the glaze:
Allow the glaze to dry or cure completely. A second coat can make them look even glassier if desired. -
Attach hardware:
Open a gold jump ring using your pliers. Thread it through the loop at the top of your green stem. -
Finish assembly:
Add the earring hook onto the jump ring before closing the ring securely. Give it a gentle shake to make sure everything swings freely.
Level Up: Color Depth
Mix a tiny bit of translucent clay into your red, or use a dark red alcohol ink wash before glazing to give the cherries a deeper, ripened look.
Now you have a freshly picked pair of accessories ready to wear or gift

The Complete Guide to Pottery Troubleshooting
Uncover the most common ceramic mistakes—from cracking clay to failed glazes—and learn how to fix them fast.
Smiley Face Discs in Soft Sorbet Colors
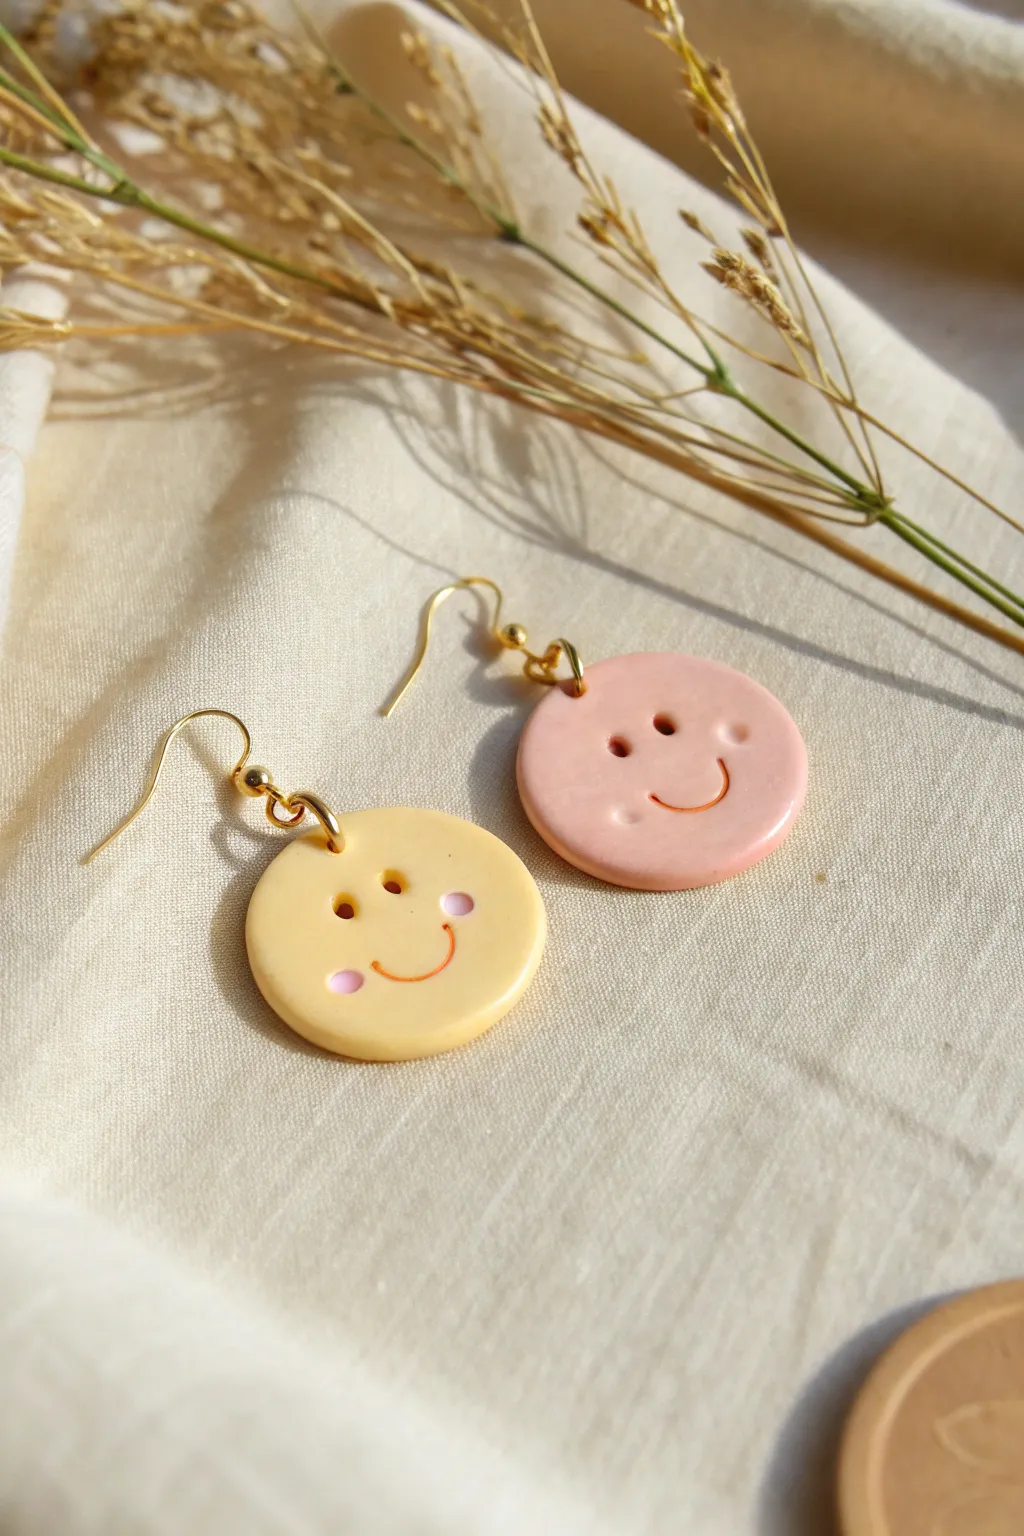
Brighten your jewelry collection with these optimistic, candy-colored dangles that are guaranteed to turn a frown upside down. Featuring soft pink and yellow polymer clay discs with simple indented expressions, they offer a playful pop of pastel charm.
Step-by-Step Tutorial
Materials
- Polymer clay in pastel pink and pastel yellow
- Small amount of white polymer clay (optional for pastel mixing)
- Round circle cutter (approx. 1 inch / 2.5cm)
- Small ball stylus tool or dotting tool
- Needle tool or toothpick
- Acrylic rolling pin
- Parchment paper or ceramic tile
- 2 Gold-tone fishhook earring wires
- 4 Gold-tone jump rings (6mm or 7mm)
- Jewelry pliers (round nose and flat nose)
- Small hand drill or piercing pin
- Oven for baking
Step 1: Prepping and Shaping
-
Condition the clay:
Begin by kneading your pink and yellow polymer clay separately until they are soft and pliable. If your colors feel too vibrant, mix in a tiny pinch of white clay to achieve that soft, milky sorbet hue. -
Roll out the slab:
Place the clay on a smooth surface like a ceramic tile or parchment paper. Use your acrylic roller to flatten the clay to an even thickness of about 3mm—thick enough to be sturdy but light enough for ears. -
Cut the circles:
Press your round circle cutter firmly into the clay to create two perfect discs. Gently lift away the excess clay scrap, leaving your circles undisturbed on the work surface. -
Smooth the edges:
Dip your finger in a tiny bit of water or cornstarch and very gently run it along the cut edge of the circles to soften any sharp ridges left by the cutter.
Step 2: Creating the Faces
-
Mark the eyes:
Take your ball stylus tool (or the rounded end of a paintbrush) and press firmly into the clay to create two eye indentations. Position them slightly higher than the center line for a cuter look. -
Indent the cheeks (optional):
If you want the blushing look seen on the yellow earring, press shallower, smaller indents near the outer edges of the cheeks. You can fill these later with a tiny speck of pink clay or paint. -
Carve the smile:
Using a needle tool or a very thin U-shaped cutter, press a simple curved smile line beneath the eyes. I find a gentle rocking motion helps create a clean line without dragging the clay. -
Pierce the hardware hole:
Use a needle tool or toothpick to poke a hole at the very top of each disc. Ensure the hole is large enough for your jump ring to pass through freely.
Oops! Fingerprints?
If you see fingerprints on your raw clay, lightly brush them with a little baby oil or cornstarch before baking to smooth the surface perfectly.
Step 3: Baking and Assembly
-
Bake the pieces:
Transfer your tile or parchment to a baking sheet. Bake according to your specific clay brand’s instructions (usually around 275°F/135°C for 15-30 minutes). Let them cool completely before handling. -
Highlight the smile (optional):
If you want the mouth to stand out, take a tiny bit of orange or pink acrylic paint, brush it into the groove, and immediately wipe the surface clean with a damp cloth, leaving paint only in the recess. -
Open the jump rings:
Using your two pairs of pliers, grip a jump ring on either side of the split. Twist one hand forward and one back—never pull them apart horizontally—to open the ring. -
Attach the first ring:
Thread the open jump ring through the hole you pierced in the clay disc. Close the ring using the same twisting motion so the ends meet perfectly flush. -
Add the hardware:
Open a second jump ring. Loop it through the first jump ring you just attached, and then slide on the loop of the fishhook earring wire. -
Secure the closure:
Close this second jump ring securely. Using two rings allows the smiley face to hang facing forward rather than twisting to the side. -
Repeat for the second earring:
Follow the same assembly steps for the second disc to complete your mismatched cheerful pair.
Cheery Cheeks
For rosy cheeks, brush a tiny bit of real powdered blush or scraped pastel chalk onto the raw clay cheeks before baking deeply into the surface.
Now you have a delightfully happy accessory to wear whenever you need a little extra sunshine
Mini Mushroom Duos for Cozy Cottage Vibes
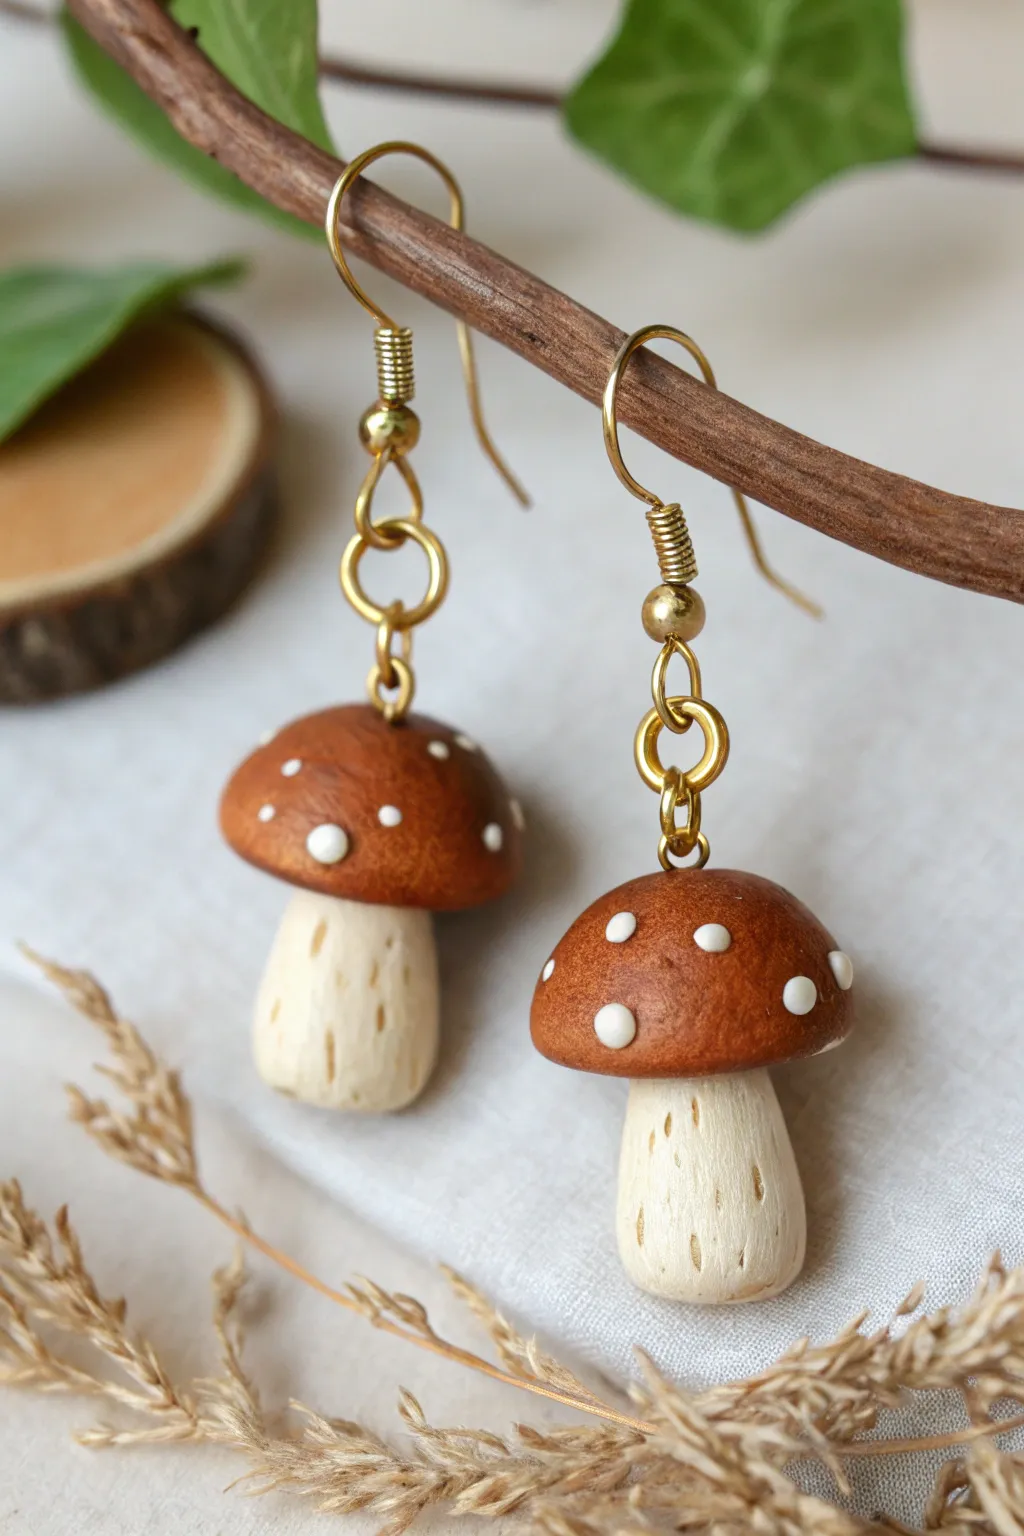
Capture the magic of an autumnal forest floor with these incredibly realistic yet adorable mushroom earrings. Made with polymer clay and finished with warm gold findings, these little fungi feature textured stems and a classic brown cap design.
How-To Guide
Materials
- Polymer clay (white or beige, and warm brown)
- White acrylic paint
- Brown acrylic paint (for antiquing)
- Sculpting tools (needle tool/blade)
- Small dotting tool or toothpick
- Soft paintbrush
- Earring findings (gold French hooks and jump rings)
- Eye pins (gold)
- Round nose pliers and wire cutters
- Liquid polymer clay or strong glue
- Clay oven or baking source
Step 1: Shaping the Stems
-
Prepare the base:
Start by conditioning a small amount of white or beige polymer clay. Roll it into two identical balls, roughly the size of a pea. -
Form the cylinder:
Gently roll each ball between your fingers to elongate it into a thick cylinder shape. Slightly taper one end to create the base of the mushroom stem. -
Flatten the top:
Tap the wider end of the cylinder on your work surface to create a flat top where the cap will eventually sit. -
Add texture:
Using a needle tool, scratch vertical lines up and down the stem. Vary the length and depth of these lines to mimic the fibrous texture of a real mushroom stalk. -
Antique the grooves:
Lightly brush a tiny amount of diluted brown acrylic paint into these grooves, then wipe away the excess with a paper towel so the darker color only remains in the recessed lines.
Natural Texture
For a woody texture, mix translucent clay into your white stem clay. After baking, the scratches will look deeper and more organic.
Step 2: Sculpting the Caps
-
Create the caps:
Condition your warm brown polymer clay. Roll two balls slightly larger than your stems, then press them into a domed shape using your thumb. -
Hollow the underside:
Use a ball tool or your pinky finger to create a slight indentation on the flat underside of the brown dome. This helps the cap sit securely on the stem. -
Insert the eye pin:
Take a gold eye pin and trim it to the appropriate length. Insert it through the center top of the brown cap until the loop rests flush against the clay. -
Secure the pin:
For extra security, bend the very end of the wire into a tiny hook before fully pressing the clay around it. This prevents the wire from pulling out after baking.
Make it Mossy!
Mix finely chopped dried moss or green flocking powder with liquid clay. Dab slight patches onto the stem’s base for a forest-found look.
Step 3: Assembly and Baking
-
Join the parts:
Apply a drop of liquid polymer clay (or liquid Bake & Bond) to the top of the white stem. Press the brown cap firmly onto the stem. -
Smooth the seam:
Use a silicone tool or your finger to gently blend the underside of the cap to the stem to ensure a strong bond, though the distinct separation is part of the charm. -
Bake the clay:
Place your mushrooms upright on a baking sheet. I like to bake mine on a bed of cornstarch to prevent flat spots. Follow the temperature instructions on your clay package, baking for about 20–30 minutes. -
Cool down:
Allow the clay to cool completely inside the oven before removing. This tempering process makes the clay stronger.
Step 4: Finishing Touches
-
Add the spots:
Once cool, dip a small dotting tool or toothpick into white acrylic paint. Carefully dab varying sizes of dots onto the brown caps. -
Create a pattern:
Scatter the dots randomly—some larger, some tiny—concentrating a few near the edges for a natural look. -
Let paint dry:
Allow the white paint to dry completely. A quick coat of matte or satin varnish can protect the paint if desired. -
Attach the hardware:
Open a gold jump ring using your pliers. Connect it to the eye pin loop on top of the mushroom. -
Complete the earring:
Slide the loop of your French hook earring wire onto the jump ring before closing the ring securely.
Wear your new woodland treasures on your next nature walk or gift them to a fellow cottagecore enthusiast


What Really Happens Inside the Kiln
Learn how time and temperature work together inside the kiln to transform clay into durable ceramic.
Cloud and Raindrop Mix-and-Match Set
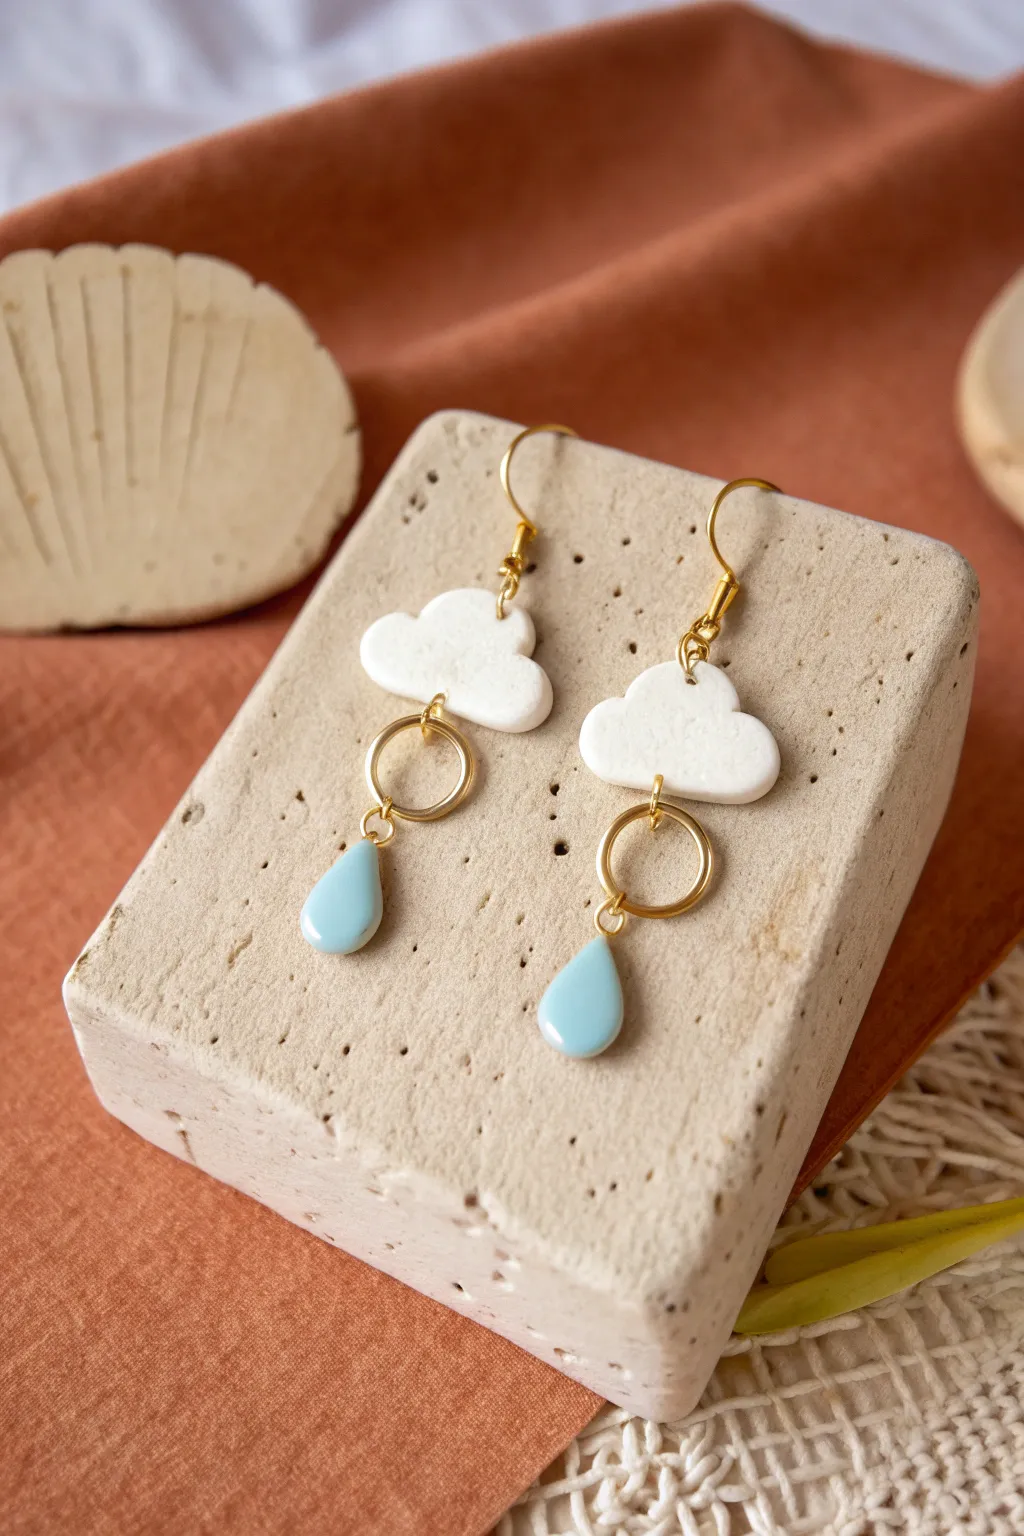
Capture the charm of a rainy day with these adorable dangle earrings, featuring soft white clouds and striking blue raindrops. The gold hardware connecting the elements adds a touch of modern elegance, making them perfect for brightening up any outfit.
Step-by-Step Guide
Materials
- White polymer clay
- Light blue polymer clay
- Clay roller or pasta machine
- Small cloud shaped clay cutter (approx. 2cm)
- Small teardrop shaped clay cutter (approx. 1cm)
- Medium-sized gold jump rings (approx. 8-10mm)
- Small gold jump rings (4mm)
- Gold earring hooks (French hooks)
- Hand drill or needle tool
- Jewelry pliers (round nose and flat nose)
- Parchment paper and baking tray
- Fine grit sandpaper (optional)
Step 1: Shaping the Elements
-
Condition the white clay:
Start by warming the white polymer clay in your hands, kneading it until it is soft and pliable. This conditioning step is crucial to prevent cracking later. -
Roll out the white slab:
Using your roller or a pasta machine on a medium setting, roll the white clay into an even slab. Aim for a thickness of about 3mm so the clouds feel substantial but not heavy. -
Cut the clouds:
Press your cloud cutter firmly into the white slab. Wiggle it slightly before lifting to get a clean cut. You will need two clouds for one pair of earrings. -
Smoothen the edges:
Gently tap the edges of the raw clay clouds with your fingertip to soften any sharp ridges left by the cutter, giving them a puffy, organic look. -
Prepare the blue clay:
Clean your hands or wear gloves to avoid transferring white lint, then condition the light blue clay just like you did the white. -
Create the raindrops:
Roll the blue clay into a slab of similar thickness (3mm) and use the teardrop cutter to punch out two raindrop shapes. -
Refine the drops:
Inspect your raindrops. If the tips are too sharp, gently blunt them with a light tap so they look like soft water droplets.
Uneven Surfaces?
If your clay creates fingerprints, lightly brush the raw clay with a tiny amount of cornstarch or baby oil before baking to smooth it out instantly.
Step 2: Drilling and Baking
-
Mark hole placement:
Using a needle tool, make a small indentation where you want your jump rings to go. The clouds need a hole at the very top (center) and the very bottom (center). The raindrops only need one hole at the thin top tip. -
Pierce the holes:
Carefully push your needle tool or a small hand drill through the marked spots. Ensure the holes are large enough to accommodate your jump rings comfortably. -
Bake the pieces:
Arrange your clay pieces on a parchment-lined baking tray. Bake according to the manufacturer’s instructions on your clay package (usually around 275°F/135°C for 15-30 minutes). -
Cool down:
Let the pieces cool completely on the tray before handling them. Warm clay is fragile and can warp easily. -
Optional sanding:
If there are any rough spots on the edges after baking, I like to lightly buff them with fine-grit sandpaper for a professional finish.
Make it Sparkle
Before baking, brush a thin layer of liquid clay onto the raindrops and sprinkle with superfine iridescent glitter for a shimmering, wet look.
Step 3: Assembly
-
Attach the middle ring:
Pick up a medium-sized (8-10mm) gold jump ring. Using two pairs of pliers, twist it open sideways. Loop it through the bottom hole of a white cloud. -
Connect the raindrop:
Before closing that large ring, slip on a small 4mm jump ring. Then, loop the raindrop onto that small jump ring. This double-ring structure allows the raindrop to swing freely. -
Secure the connections:
Twist the large jump ring closed securely so there is no gap. Do the same for the small jump ring holding the raindrop. -
Add the earring hook:
Open the loop on your gold earring hook (or use another small jump ring if needed). Thread it through the top hole of the cloud. -
Final check:
Close the earring hook loop securely. Repeat the entire assembly process for the second earring and double-check that all jump rings are flush.
Now you have a charming accessory to wear whenever you want to celebrate the beauty of nature
Cute Cat Paw Prints With Blush Pads
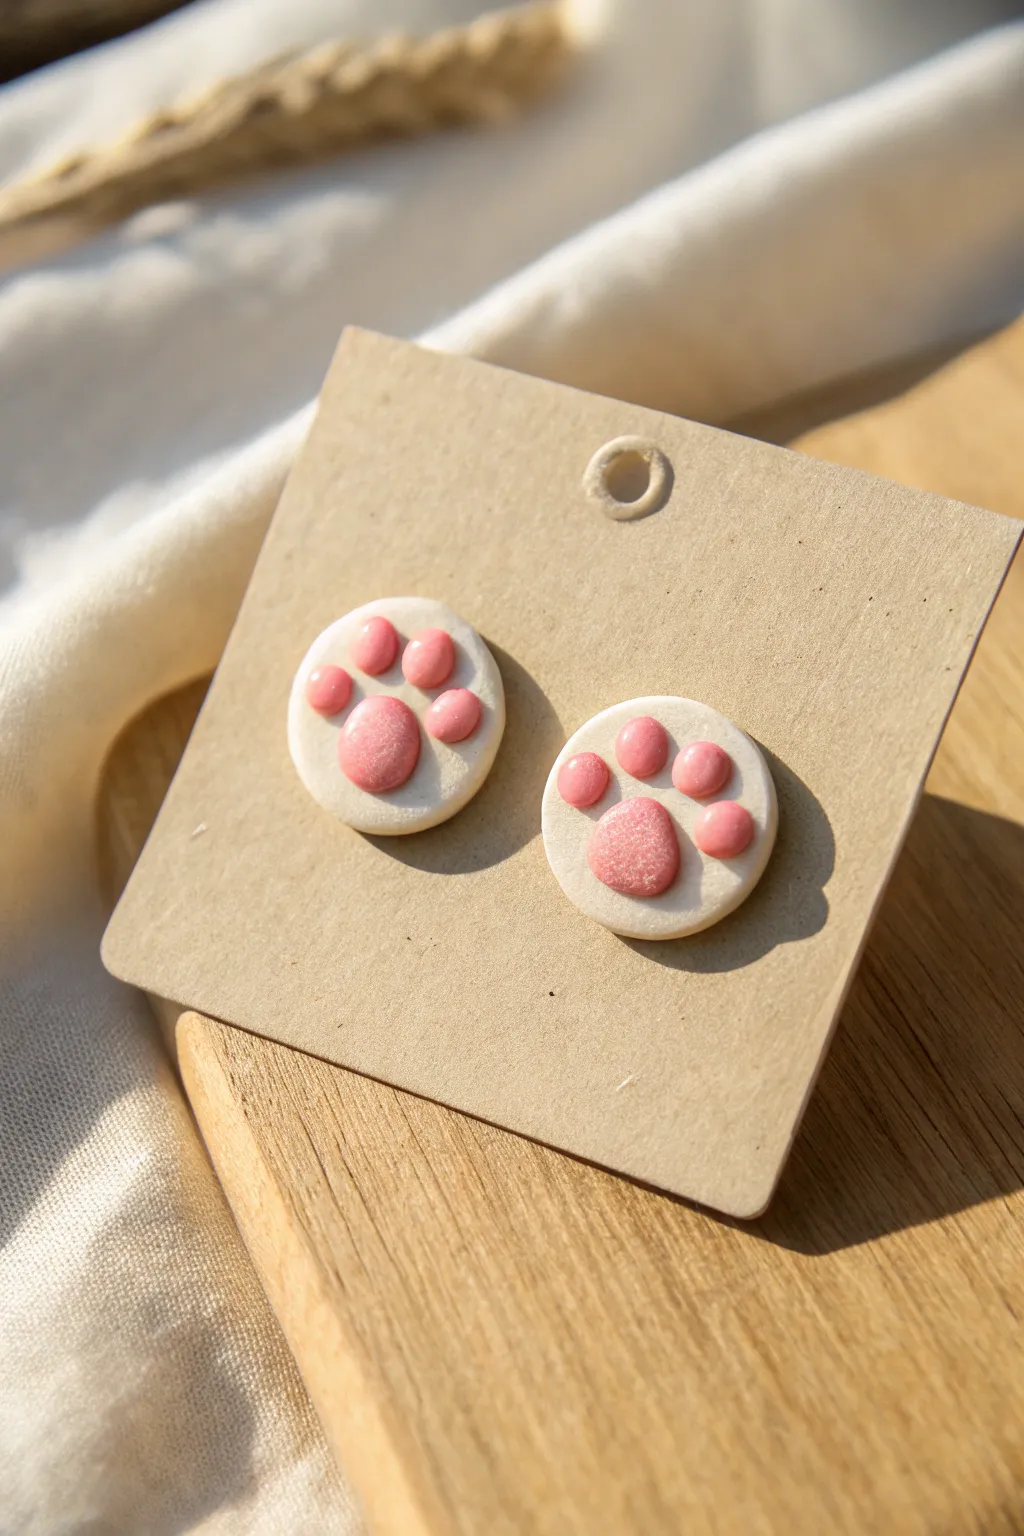
These adorable stud earrings capture the sweetness of a cat’s paw with soft white clay and delicate pink pads. The slightly textured finish gives them a lovely, handmade charm that feels both cozy and playful.
Step-by-Step Tutorial
Materials
- White polymer clay
- Soft pink polymer clay
- Translucent liquid clay or bake and bond
- Small round cutter (approx. 10-12mm)
- Tiny ball stylus tool
- Needle tool
- Flat earring posts
- Superglue or heavy-duty jewelry glue
- Gloss glaze (optional for paw pads)
- Soft paintbrush
- Rolling pin or pasta machine
- Baking tile or parchment paper
Step 1: Shaping the Base
-
Condition the white clay:
Begin by conditioning your white polymer clay until it is soft and pliable. Warm clay is much easier to work with. -
Roll it out:
Roll the white clay into a slab that is roughly 3mm thick. You want it substantial enough to hold the posts but not too heavy for ears. -
Cut the circles:
Use your small round cutter to punch out two identical circles. These will be the main body of the paws. -
Soften the edges:
Gently tap the edges of the circles with your finger to round them off slightly, removing the sharp cut line for a softer look. -
Add texture:
To mimic the slightly organic feel seen in the photo, you can gently dab the surface with a clean toothbrush or leave it slightly matte rather than perfectly smooth.
Clean & Crisp
Before baking, wipe the white clay gently with a Q-tip dipped in rubbing alcohol. This removes fingerprints and any stray dust lint.
Step 2: Adding the Pink Beans
-
Prep the pink clay:
Condition a very small amount of pink clay. Roll it into a thin log or snake. -
Cut tiny segments:
Cut two larger segments for the main pads and eight tiny segments for the toes. -
Roll the main pads:
Roll the two larger segments into balls, then flatten them slightly into ovals. -
Place the main pad:
Position the large oval near the bottom center of the white circle. Press it down gently to adhere. -
Create the toe beans:
Roll the eight tiny segments into small balls. These should be significantly smaller than the main pad. -
Arrange the toes:
Place four toe beans in an arc above the main pad on each earring. Make sure they are spaced evenly. -
Secure the pads:
If the clay feels dry, I like to use a tiny dot of liquid clay under each pink piece to ensure they bond permanently during baking. -
Flatten gently:
Use your finger or a flat tool to gently press the pink pads down so they aren’t too bulbous, creating a nice integration with the white base.
Step 3: Baking and Assembly
-
Bake the pieces:
Place the clay paws on a baking tile. Bake according to your brand’s specific temperature and time instructions (usually around 275°F for 15-30 minutes). -
Cool down:
Allow the pieces to cool completely before moving them. Hot clay is fragile. -
Optional glazing:
For a ‘wet nose’ look, carefully paint a thin layer of gloss glaze only on the pink pads, leaving the white clay matte. -
Attach posts:
Apply a drop of strong jewelry glue to the flat pad of an earring post. -
Secure the back:
Press the post firmly onto the center back of the clay paw. Let the glue cure fully (usually 24 hours) for the strongest hold.
Glittery Toes
Mix a tiny pinch of fine iridescent glitter into the pink clay before shaping the pads. It adds a subtle sparkle that catches the light.
Now you have a charming accessory to show off your love for felines

TRACK YOUR CERAMIC JOURNEY
Capture glaze tests, firing details, and creative progress—all in one simple printable. Make your projects easier to repeat and improve.
Simple Cow Face Studs With Tiny Spots
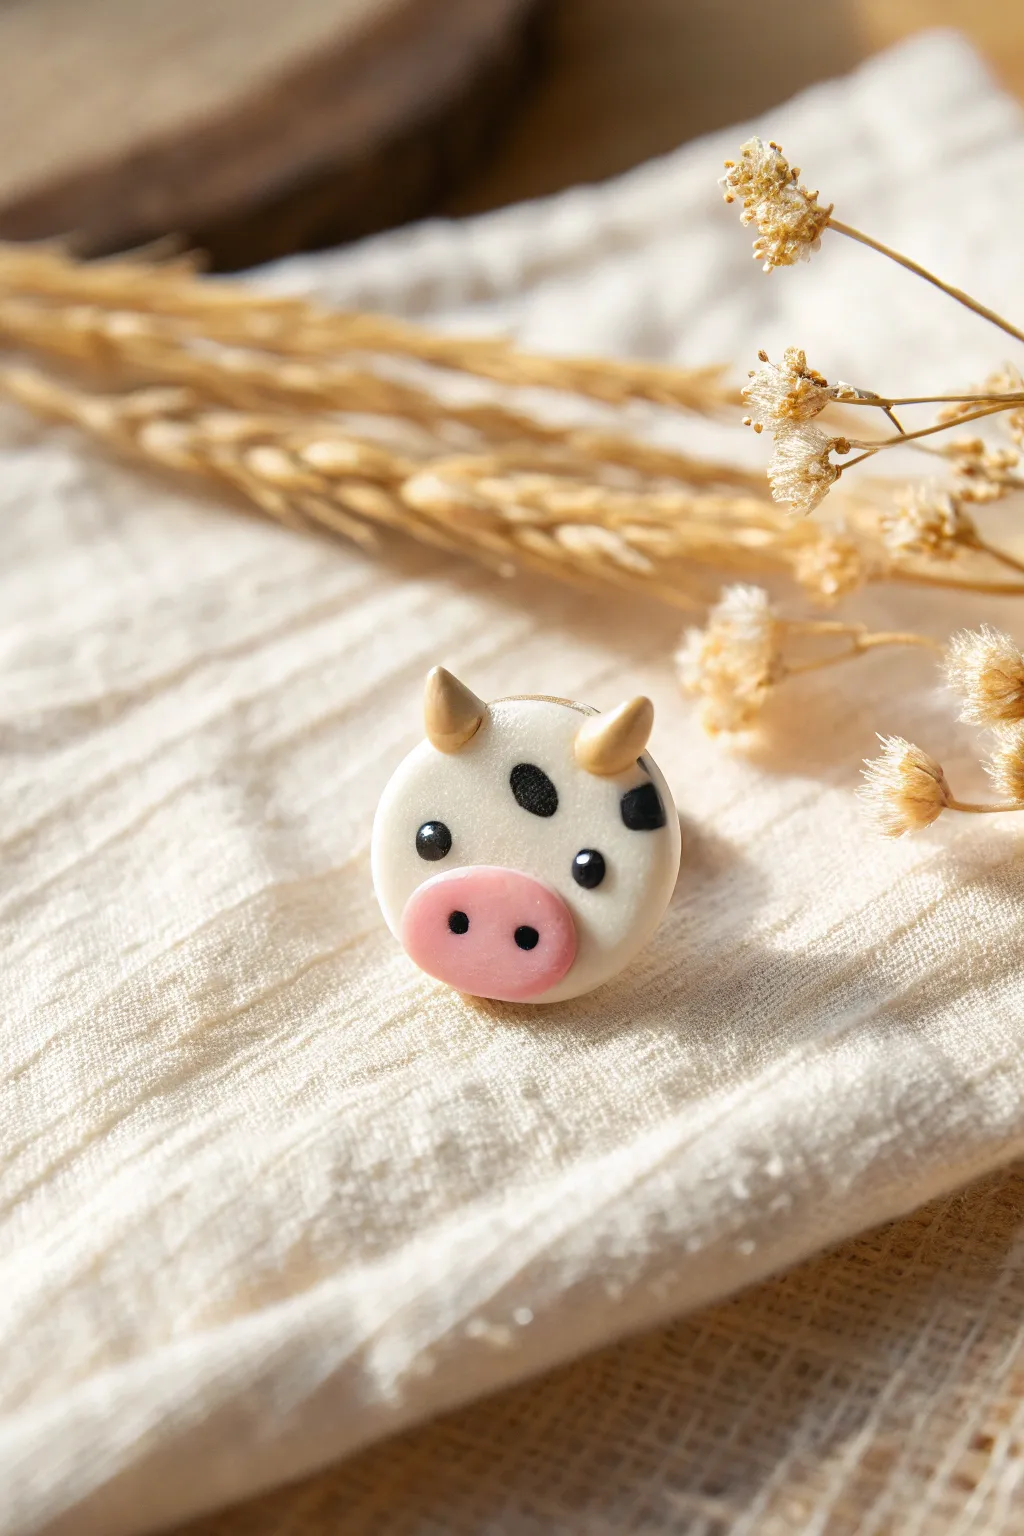
These adorable cow face earrings are bursting with personality, featuring tiny horns and a sweet pink snout. The simple round design makes them perfect for beginners, while the delicate details give them a professional, polished finish.
Detailed Instructions
Materials
- White polymer clay
- Bubblegum pink polymer clay
- Pastel gold or light brown polymer clay
- Black polymer clay
- Small circle cutter (approx. 1cm diameter)
- Dotting tool or ball stylus
- Needle tool
- Gloss glaze or UV resin
- Earring posts and backs
- Superglue or liquid clay
- Oven for baking
Step 1: Faping the Base
-
Condition the white clay:
Begin by conditioning your white polymer clay until it is soft and pliable. Roll it into a smooth ball to ensure there are no air bubbles trapped inside. -
Flatten the slab:
Roll or press the clay into a thick, even slab. For stud earrings like these, a thickness of about 3-4mm works best to ensure durability without being too heavy. -
Cut the circle:
Use your small circle cutter to punch out a clean shape. Make two of these for a matching pair of earrings. -
Soften the edges:
Gently tap the edges of the circle with your fingertip to round them off slightly, removing the harsh cut mark from the tool.
Clean Clay Tip
Keep baby wipes or rubbing alcohol nearby. Clean your hands and tools before touching the white clay to prevent dust or lint from ruining the pure white finish.
Step 2: Adding Facial Features
-
Create the snout:
Take a very small amount of pink clay and roll it into an oval shape. Flatten it slightly so it looks like a jellybean. -
Attach the snout:
Press the pink oval onto the lower third of the white circle face. Ensure it bonds well by applying gentle pressure. -
Indent the nostrils:
Using a small ball tool or the tip of a needle tool, create two small indentations on the pink snout for the nostrils. -
Fill the nostrils:
Roll two microscopic balls of black clay. Carefully place them into the nostril indentations you just made, pressing them flat. -
Shape the horns:
Roll two tiny cone shapes from the gold or light brown clay. I find it easier to roll a small snake first and cut the ends to get equal sizes. -
Attach the horns:
Place the horns on the top outer curve of the white circle. You may need a tiny dab of liquid clay to help them stick securely before baking. -
Form the eyes:
Roll two small balls of black clay for the eyes. Position them just above the pink snout, spaced widely apart for a cute look. -
Add the cow spots:
Take irregular, tiny pieces of black clay and flatten them. Press these onto the white face around the eyes or forehead to create random spots. -
Smooth the seams:
Gently rub your finger over the spots to ensure they are flush with the white surface, creating a smooth transition.
Make It a Set
Use the same technique to make a slightly larger cow face and attach a jump ring to the top before baking to create a matching pendant necklace.
Step 3: Baking and Finishing
-
Bake the pieces:
Place your cows on a tile or parchment paper and bake according to your clay package instructions. Usually, this is around 275°F (130°C) for 15-30 minutes. -
Cool down:
Let the pieces cool completely before handling them. This step is crucial as hot clay is fragile. -
Attach the posts:
Turn the cows over. Apply a drop of superglue or use a small pad of fresh clay with liquid clay to secure the metal earring posts to the back. -
Seal the deal:
If you used fresh clay to attach the posts, return the earrings to the oven for a short re-bake to harden the backing. -
Apply glaze:
For that shiny, ceramic-like finish visible in the photo, coat the front of the cow face with a layer of gloss glaze or UV resin. -
Final cure:
Let the glaze air dry or cure the UV resin under a lamp until it is hard and non-tacky.
Now you have a charming pair of bovine buddies ready to wear or gift to a friend
Frog Friends Holding Tiny Flowers

These asymmetric drop earrings feature a cheerful little frog face on one side and a blooming daisy lily pad on the other. Their soft, matte finish and subtle blush details give them a sweet, cottagecore charm perfect for spring.
Step-by-Step
Materials
- Polymer clay (moss green, white, yellow, black, pink)
- Round clay cutter (approx. 2cm / 0.75 inch)
- Dotting tool or ball stylus
- Pointed detailing tool or needle tool
- Gold-plated earring hooks (kidney wire style)
- Jump rings (4-5mm, gold)
- Pliers (round nose and flat nose)
- Hand drill or pin vibe
- Liquid clay or bake-and-bond
- Tiny brush for detailing (optional)
Step 1: Creating the Bases
-
Mix your perfect green:
Start by conditioning your moss green clay. If the green feels too bright, mix in a tiny pinch of white or beige to achieve that earthy, muted tone seen in the photo. -
Roll it out:
Roll the green clay into a slab that is approximately 3mm thick. You want it sturdy enough to hold hardware but light enough for ears. -
Cut the circles:
Using your small round cutter, punch out two identical green circles. Use your finger to gently soften the sharp edges created by the cutter so they look more like organic discs.
Clean Prints
Fingerprints showing on your matte clay? Dip a Q-tip in a small amount of rubbing alcohol or acetone and gently wipe the surface of the unbaked clay to smooth them out.
Step 2: Sculpting the Frog Face
-
Add the eyes:
Roll two very small balls of white clay. Press them onto the top edge of one green disc, flattening them slightly so they bulge up like frog eyes. -
Pupil placement:
Roll two even tinier balls of black clay. Press these into the center of the white eye mounds. I like to place them slightly wide apart to create a goofy, friendly expression. -
Carve the smile:
Use a needle tool to gently impress a wide, U-shaped mouth into the center of the face. Press deeply enough to hold the paint later, or roll a microscopic snake of black clay and press it into this groove for a 3D line. -
Blushing cheeks:
Take a rough tool, like a piece of sandpaper or a stiff brush, and texture two tiny spots of pink clay. Carefully press these textured pink patches onto the cheeks for a rosy effect.
Level Up: UV Resin
For a ‘wet’ amphibian look, apply a thin coat of UV resin just to the frog’s eyes and the center of the daisy after baking. Cure with a UV lamp for a glossy pop.
Step 3: Building the Lily Pad
-
Petal formation:
Roll 7-8 small elongated teardrops of white clay. These will be your daisy petals. -
Arrange the flower:
Place the petals in a circle on the center of the second green disc. Use your dotting tool to gently press the inner tips of the petals down into the green base to secure them. -
Flower center:
Roll a small ball of yellow clay. Flatten it slightly and place it in the center of the petals. -
Texturing the center:
Use a needle tool or stiff brush to stipple the yellow center, giving it a pollen-like texture. -
Add highlights:
If desired, add a tiny dot of white or a lighter yellow mix to the very center or side of the yellow ball for dimension.
Step 4: Baking and Assembly
-
Pre-drill (Optional):
If you don’t have a hand drill for later, you can carefully poke a hole at the very top of each charm now with a needle tool. -
Bake:
Bake the pieces according to your clay manufacturer’s instructions (usually around 275°F/130°C for 15-30 minutes). Let them cool completely. -
Drill holes:
If you didn’t make holes before baking, use a pin vise or hand drill to carefully bore a hole about 2mm from the top edge of each charm. -
Attach hardware:
Open a jump ring by twisting it sideways with pliers. Thread it through the hole in the clay charm. -
Connect the hook:
Before closing the jump ring, slide on the loop of your kidney-wire earring hook. -
Close and secure:
Use the pliers to twist the jump ring back into a closed circle. Ensure there is no gap where the hook could slip out.
Now you have a charming mismatched set ready to wear on your next garden adventure
Color-Blocked Mini Rainbow Stacks

Elevate your polymer clay game with these stunning, tiered rainbow dangles featuring two distinct color palettes connected by elegant gold hardware. The juxtaposition of cool blues and warm pinks creates a sophisticated yet playful accessory perfect for any season.
How-To Guide
Materials
- Polymer clay (Teal, Sage Green, Mustard Yellow, Coral/Terracotta, Light Pink, Cream, Deep Pink)
- Clay roller or pasta machine
- Extruder with small circular disc (or create snakes by hand)
- Rigid tissue blade or craft knife
- Ceramic tile or baking surface
- Needle tool or small drill bit
- Jewelry pliers (flat nose and round nose)
- Gold jump rings (6mm and 4mm)
- Gold fishhook earring wires
- Oven for baking
Step 1: Forming the Arches
-
Condition the Clay:
Begin by thoroughly conditioning each color of clay until it is soft and malleable. This prevents cracking later on. -
Roll the Snakes:
Create long, even snakes of clay for each color. For the most consistent results, I recommend using a clay extruder with a small round disc, but you can also carefully roll them by hand on a flat surface to about 3mm thickness. -
Create the Top Rainbow:
Start with the top tier (cool tones). Take your smallest snake (Terracotta/Coral) and curve it into a tight U-shape on your ceramic tile. -
Layer the Cool Tones:
Snugly fit the Mustard Yellow snake around the first arch, followed by the Sage Green, and finally the Teal Blue on the outside. Gently press them together so they adhere without smashing the rounded profile. -
Create the Bottom Rainbow:
Repeat the process for the bottom tier (warm tones). Form a tight U-shape with the Deep Pink/Berry snake first. -
Layer the Warm Tones:
Wrap the Cream/Light Pink snake around the center, followed by the outer Light Coral/Pink snake. Press these layers gently together just like the first set.
Sticky Situation?
If clay sticks to your work surface while curving the arches, try working on a ceramic tile or placing a piece of parchment paper underneath.
Step 2: Trimming and Assembly Prep
-
Trim the Bases:
Using a rigid tissue blade, cut straight across the bottom of both rainbow stacks to create a clean, flat edge. -
Add Holes to Top Tier:
For the top rainbow (cool tones), pierce a hole at the very apex of the outer Teal arch for the earring hook. Then, pierce two holes at the bottom—one through the yellow/terracotta area on the left, and one on the right. -
Add Holes to Bottom Tier:
For the bottom rainbow (warm tones), pierce one central hole at the apex of the outer pink arch. This will connect to the chain later. -
Double Check Alignment:
Ensure your holes are large enough to fit your jump rings but not so close to the edge that the clay creates a weak point. -
Bake:
Bake the pieces on your tile according to the clay manufacturer’s instructions. Usually, this is around 275°F (130°C) for 15-30 minutes.
Step 3: Assembly
-
Cool and Drill:
Let the pieces cool completely. If your holes shrank during baking, gently re-drill or widen them carefully with a small hand drill. -
Create the Chain Link:
To connect the two pieces, attach a larger jump ring to the top loop of the bottom rainbow. -
Connect the Chain:
Attach two smaller jump rings to the bottom holes of the top rainbow. Connect both of these small rings to the single large ring on the bottom rainbow, creating a flexible hinge. -
Attach Earring Hook:
Open a small jump ring and thread it through the top hole of the cool-toned rainbow. Add your fishhook ear wire and close the jump ring securely using your pliers. -
Final Polish:
If desired, you can lightly sand any rough edges with high-grit sandpaper.
Seamless Smoothness
Before baking, lightly brush the clay with a tiny amount of baby oil or cornstarch to smooth out any fingerprints for a professional finish.
Now you have a sophisticated pair of statement earrings ready to wear or gift
Terrazzo Confetti Ovals for Playful Neutrals
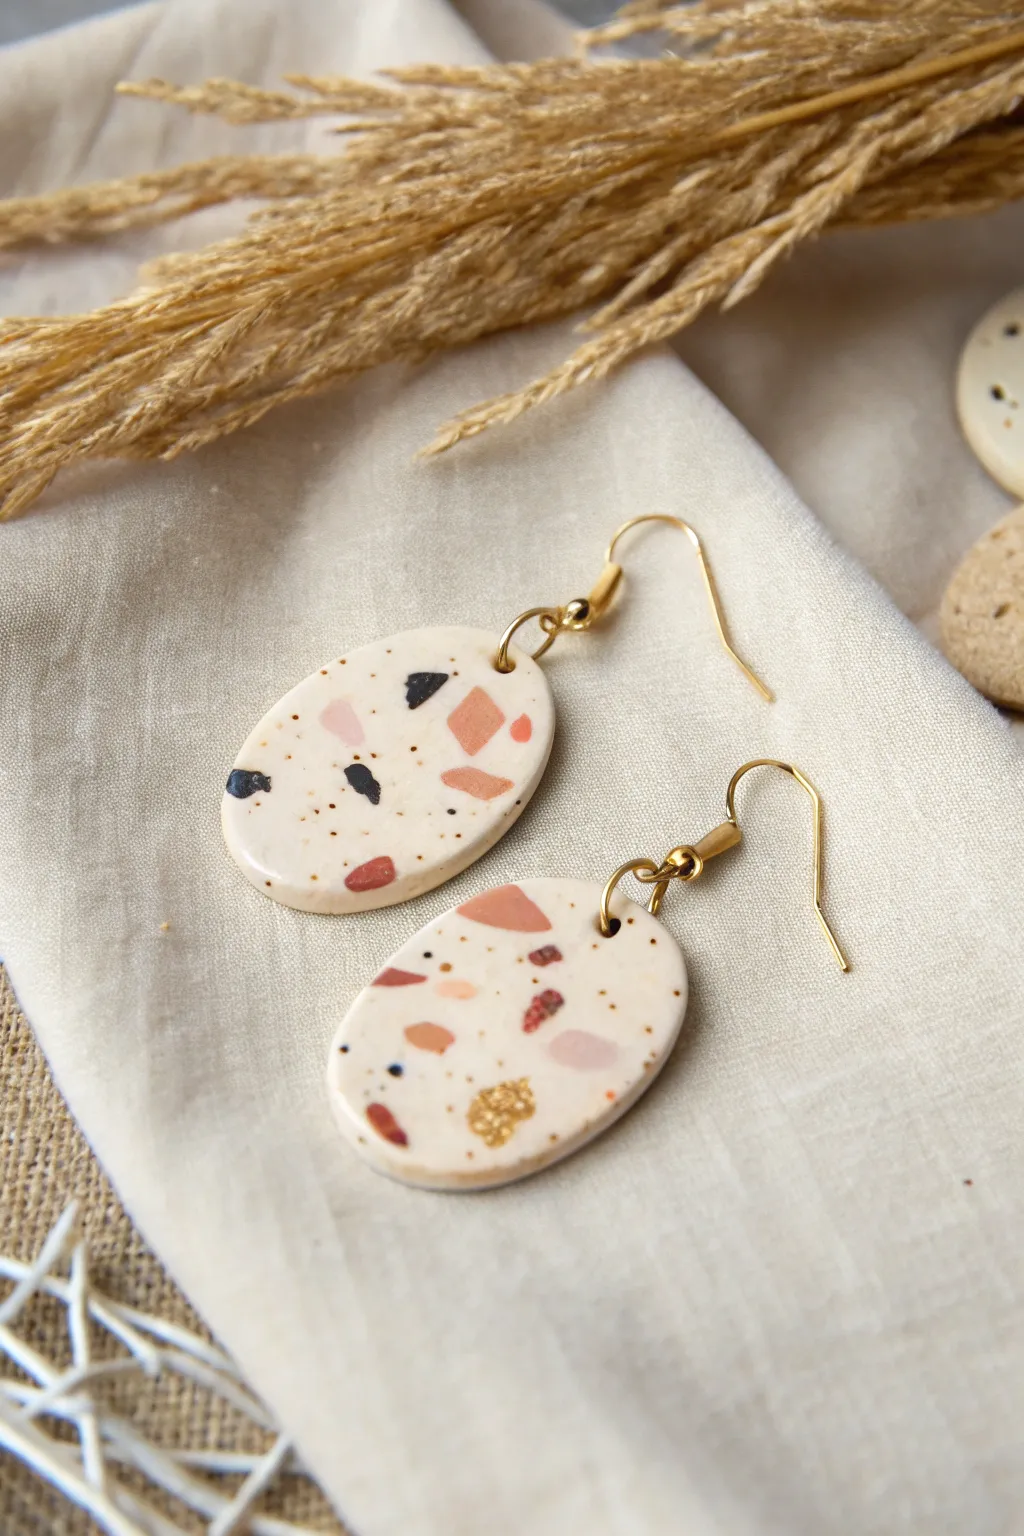
These charming oval earrings blend a creamy, speckled base with earthy terrazzo fragments for a look that is both modern and grounded. With pops of rust, blush pink, and subtle gold leaf, they add a touch of playful sophistication to any neutral outfit.
Step-by-Step
Materials
- Polymer clay (cream or ecru, translucent, rust, terracotta, soft pink, black)
- Black pepper or ground vanilla bean (optional for speckles)
- Gold leaf flakes
- Acrylic rolling pin
- Oval clay cutter (medium size)
- Tissue blade or sharp craft knife
- Dremel tool or hand drill with small bit
- Gold jump rings (6mm)
- Gold ear wires
- Jewelry pliers (flat nose and round nose)
- Baking sheet with parchment paper
- Fine grit sandpaper (400-1000 grit) or buffing tool
- Gloss glaze or UV resin (optional for shine)
Step 1: Preparing the Clay Slab
-
Condition the base:
Begin by thoroughly conditioning your cream or ecru polymer clay until it is soft and pliable. This prevents cracking later. -
Create the speckle effect:
If your clay isn’t pre-speckled, mix in a tiny pinch of black pepper or ground vanilla bean to the cream clay. Knead it well until the specks are evenly distributed. -
Roll the base slab:
Use your acrylic rolling pin to flatten the cream clay into a slab roughly 3mm thick. Ensure the surface is smooth and free of air bubbles.
Smudged Colors?
If your terrazzo chips are smearing into the white base, your clay is too warm or soft. Pop the slab in the fridge for 10 minutes before rolling.
Step 2: Making Terrazzo Chips
-
Sheet out colored clays:
Take small amounts of your accent colors—rust, terracotta, soft pink, black—and roll them out very thinly on your work surface. -
Bake the thin sheets (optional technique):
I sometimes flash-bake these thin sheets for 5-10 minutes to make them easier to chop into sharp shards, but raw clay works too for a softer, integrated look. -
Chop the clay:
Use your tissue blade to chop the accent clays into tiny, irregular angular fragments. Keep them varied in size for a natural stone look. -
Add gold leaf:
Tear off small flecks of gold leaf and set them aside with your clay chips.
Make it Shine
Coat finished pieces with UV resin and cure under a UV lamp to create a glass-like dome that makes the gold leaf really sparkle.
Step 3: Assembling and Cutting
-
Apply the pattern:
Sprinkle the colored clay chips and gold flakes randomly onto your cream base slab. Don’t overthink placement; random organic spacing looks best. -
Embed the chips:
Place a piece of parchment paper over the slab and use your rolling pin to gently press the chips into the base until the surface is flush and smooth. -
Cut the shapes:
Press your oval cutter firmly into the slab to cut out two shapes. Try to capture a nice variety of colors within each oval boundary. -
Smooth the edges:
Gently lift the ovals and smooth the raw edges with your finger to remove any stray clay bits or fingerprints. -
Drill holes:
Use a small tool or toothpick to poke a hole near the top of each oval before baking, or wait to drill after baking for cleaner precision.
Step 4: Finishing Up
-
Bake the pieces:
Place your ovals on a parchment-lined baking sheet and bake according to your clay package instructions (usually around 275°F/130°C for 30 minutes). -
Cool and sand:
Let the pieces cool completely. If needed, sand the edges or surface under water with fine-grit sandpaper to reveal the terrazzo pattern more clearly. -
Buff or glaze:
Buff the surface with a soft cloth for a matte finish, or apply a thin layer of gloss glaze if you prefer a shiny, ceramic-like look. -
Attach hardware:
Use your pliers to twist open a jump ring. Thread it through the hole in the clay oval and loop on the ear wire. -
Close the rings:
Twist the jump ring closed securely, ensuring the ends meet perfectly so the charm doesn’t slip off.
You now have a wonderfully artistic pair of earrings that look like tiny pieces of modern art for your ears
Swirly Marble “Kidney Bean” Shapes

These sophisticated earrings feature a mesmerizing marble effect, blending warm terracotta, cool dusty blue, and crisp white into an organic swirl. The classic oval shape gives the pattern plenty of room to shine, creating a statement piece that feels both earthy and modern.
Detailed Instructions
Materials
- Polymer clay (terracotta/copper, dusty blue, white)
- Clay roller or pasta machine
- Oval shape cutter (approx. 1.5 inches)
- X-acto knife or clay blade
- Needle tool or small drill bit
- Gold jump rings (6mm)
- Gold earring hooks (French style)
- Jewelry pliers (flat nose and round nose)
- Fine grit sandpaper (400-1000 grit)
- UV resin or gloss glaze (optional)
Step 1: Creating the Marble Slab
-
Condition the clay:
Start by kneading each color of polymer clay—white, terracotta, and blue—separately until they are soft and pliable. This step creates the foundation for a smooth, crack-free finish. -
Form logs:
Roll each color into a long, thin log or ‘snake’ shape. Aim for the white log to be slightly thicker if you want it to be the dominant background color, as seen in the photo. -
Twist together:
Gather your three logs and twist them together into one large rope. Continue twisting until the colors resemble a candy cane. -
Fold and roll:
Fold the twisted rope in half, then roll it out to lengthen it again. Repeat this twisting and folding process two or three times. Be careful not to over-mix, or the distinct colors will turn muddy. -
Ball it up:
Once the colors look streaky, roll the entire rope into a smooth ball. This helps combine the seams. -
Flatten the slab:
Using your acrylic roller or pasta machine, flatten the ball into a sheet approximately 3mm thick. I prefer to roll in different directions to stretch the pattern organically.
Muddy Colors?
If your colors are blending into brown instead of distinct swirls, you are over-mixing. Stop twisting sooner! You want distinct lines, not a homogeneous mix.
Step 2: Cutting and Baking
-
Find the best spots:
Move your oval cutter over the slab to find the most pleasing swirls. Look for areas where all three colors interact nicely. -
Cut the shapes:
Press the oval cutter firmly into the clay. Give it a tiny wiggle before lifting to ensure a clean cut, then gently remove the surrounding excess clay. -
Smooth the edges:
Before baking, gently run your finger along the cut edges to smooth out any harsh lines or clay burrs. This saves sanding time later. -
Pierce holes:
Use a needle tool to poke a hole near the top of each oval. Make sure the hole is large enough for your jump rings but not too close to the edge to prevent tearing. -
Bake:
Place the ovals on a parchment-lined baking sheet or ceramic tile. Bake according to your brand’s specific package instructions (usually 275°F for 15-30 minutes per 1/4 inch of thickness). -
Cool down:
Let the pieces cool completely inside the oven or on a wire rack. Polymer clay is fragile while hot and hardens fully as it cools.
Step 3: Finishing Touches
-
Sand and buff:
If there are any rough spots or fingerprints, wet-sand the edges and surface lightly with fine-grit sandpaper. Buff with a soft cloth for a matte sheen. -
Add a gloss coat (optional):
To achieve a shiny, ceramic-like look, brush on a thin layer of UV resin or polymer clay glaze and cure or dry as directed. -
Open jump rings:
Using two pairs of pliers, twist a gold jump ring open sideways (never pull it apart). -
Assemble the finding:
Slide the open jump ring through the hole in the clay oval. Before closing it, add the loop of the French earring hook. -
Secure closure:
Twist the jump ring closed until the ends meet flush, ensuring there is no gap for the hook to slip out.
Add Sparkle
Mix a pinch of gold leaf flakes into the translucent or white clay before twisting your logs. The metallic flecks will appear randomly suspended in the marble.
Enjoy wearing these elegant, modern pieces that look like polished stone
Mini Book Charms With Painted Spines
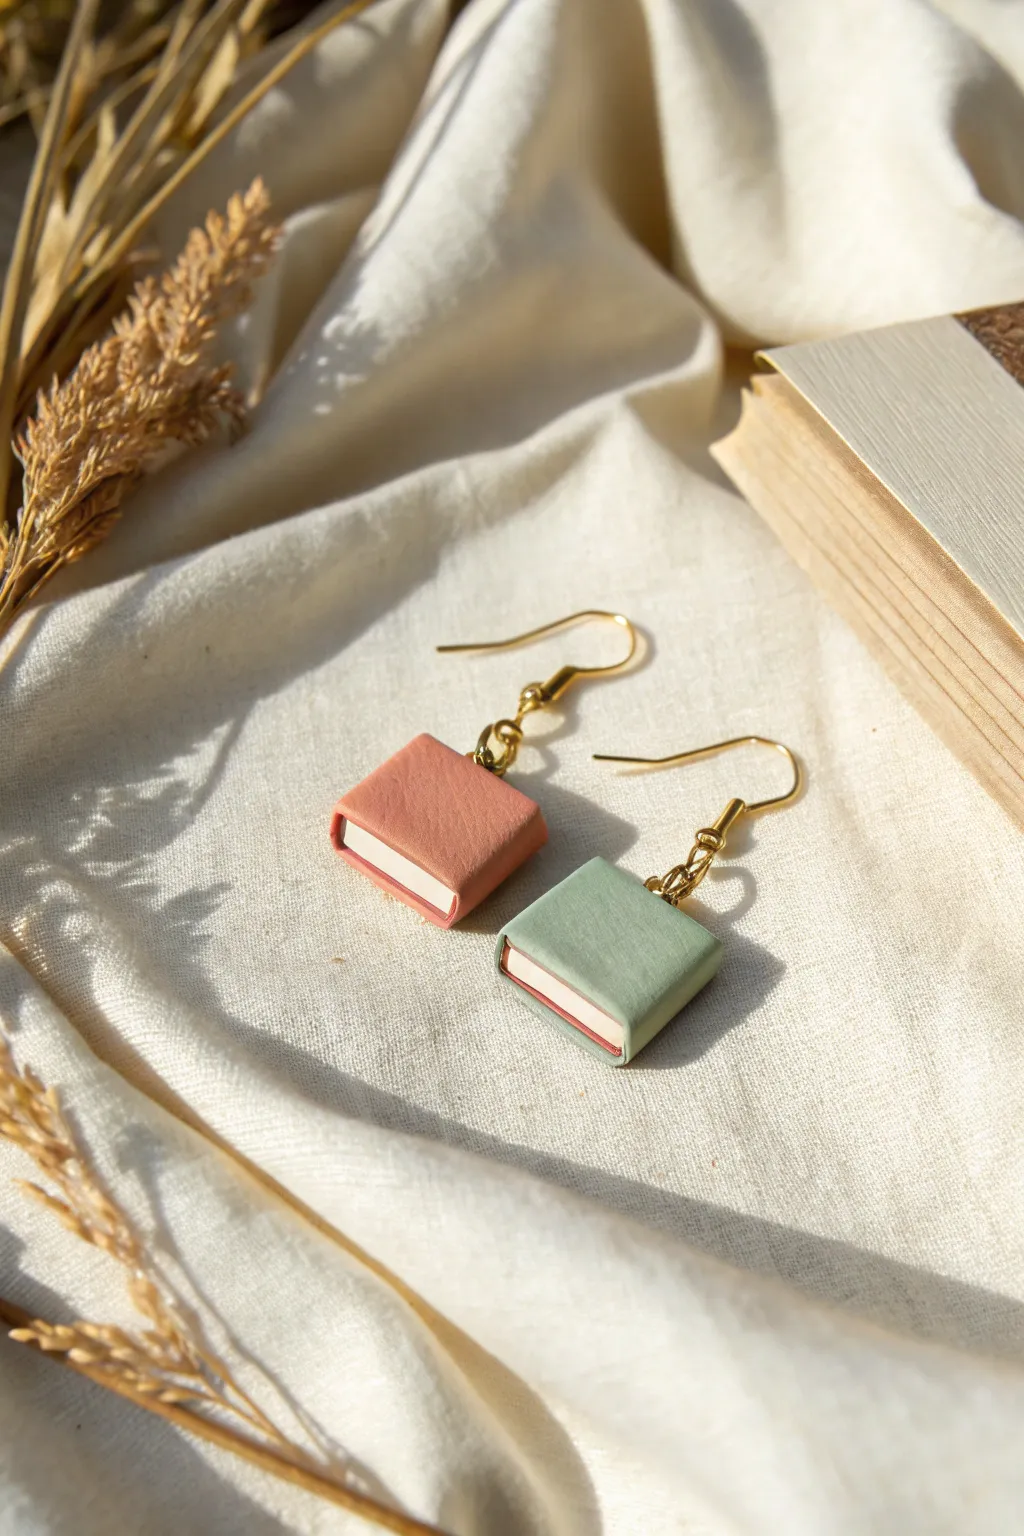
Carry your love of literature right on your ears with these charming miniature book earrings. Featuring realistic textures and soft pastel covers, this project transforms simple block shapes into a tiny, wearable library.
Step-by-Step Guide
Materials
- Polymer clay in coral pink and sage green (or your chosen cover colors)
- White or cream polymer clay (for pages)
- X-acto knife or flexible clay blade
- Detail needle tool or toothpick
- Rolling pin or pasta machine
- Eye pins (gold)
- Jump rings (gold)
- Earring hooks (gold)
- Liquid clay (TLS) or strong craft glue
- Jewelry pliers (round nose and flat nose)
- Fine-grit sandpaper (optional)
- Matte varnish (optional)
Step 1: Forming the Book Block
-
Condition the white clay:
Begin by thoroughly conditioning your white or cream clay until it is soft and pliable. This will form the pages of your books so you want it free of air bubbles. -
Shape the page block:
Roll the white clay into a thick slab, approximately 1/4 inch thick. Using your blade, cut out two identical rectangles. These should be slightly smaller than your desired final book size, roughly 1.5 cm by 1 cm. -
Create page textures:
Take your needle tool or the dull side of your blade and gently score straight, parallel lines along three sides of the white rectangles. This mimics the look of individual stacked pages. Leave the fourth long side smooth, as this will be covered by the spine. -
Pre-bake the pages (Optional):
I find it helpful to bake these white blocks for about 10-15 minutes at the temperature recommended on your clay package. This makes them rigid and easier to wrap the cover around without squishing the page details.
Step 2: Creating the Covers
-
Roll out cover colors:
Condition your pink and sage green clays. Roll them out into thin sheets, roughly 1-2mm thick. You want them thin enough to look like a cover but thick enough not to tear. -
Measure the wrap:
Place one of your page blocks onto the colored sheet to estimate the size. You need a rectangle large enough to cover the front, the spine, and the back, with a tiny bit of overhang on the edges. -
Cut the cover rectangle:
Cut a clean rectangle from the colored clay. It should be slightly taller than your page block and more than twice as wide. -
Attach the cover:
Apply a tiny drop of liquid clay to the spine (the smooth side) of your page block. Center the page block on the colored strip and gently fold the front and back covers up to sandwich the pages. -
Secure the bond:
Press the colored clay gently against the white block. Ensure the spine is flat and the overhang is even on all three open sides. -
Add spine detail:
use a blunt tool to gently press indentation vertical lines near the spine on the front and back covers, creating that classic \”hinge\” look hardbound books have.
Clean Lines Pro-Tip
Work with the white clay first and wash your hands thoroughly before switching to colors. Red or green clay residue can stain your pristine white pages very easily.
Step 3: Assembly and Baking
-
Insert eye pins:
Trim your eye pins so the stem is shorter than the book’s height. Push the pin straight down into the center of the book’s top spine. If the clay is soft, you can do this directly; if you pre-baked the pages, you might need a small drill bit or to insert it carefully between the cover and page block. -
Secure hardware:
For extra durability, you can pull the pin back out, dip it in a little liquid clay or glue, and reinsert it. -
Final texture check:
Inspect your book for fingerprints. If you see any, lightly buff them away with a bit of cornstarch or baby oil on your finger. -
Full bake:
Bake the finished books according to your clay manufacturer’s instructions (usually 275°F/135°C for 30 minutes). Let them cool completely before handling. -
Varnish (Optional):
If you want to protect the finish or add a leather-like sheen, apply a thin coat of matte or satin varnish to the colored covers. -
Attach jewelry findings:
Open a jump ring with your pliers by twisting sideways. Loop it through the eye pin on the book and the loop on your earring hook. -
Close the ring:
Twist the jump ring closed securely so there is no gap. Repeat for the second earring to complete the set.
Level Up: Vintage Gold
Before baking, gently rub a tiny amount of gold mica powder or gold acrylic paint onto the page edges to simulate gold-gilded pages found in antique hardcovers.
Enjoy wearing your literary masterpieces or gift them to your favorite bookworm.
Artist Palette and Brush Mismatched Pair
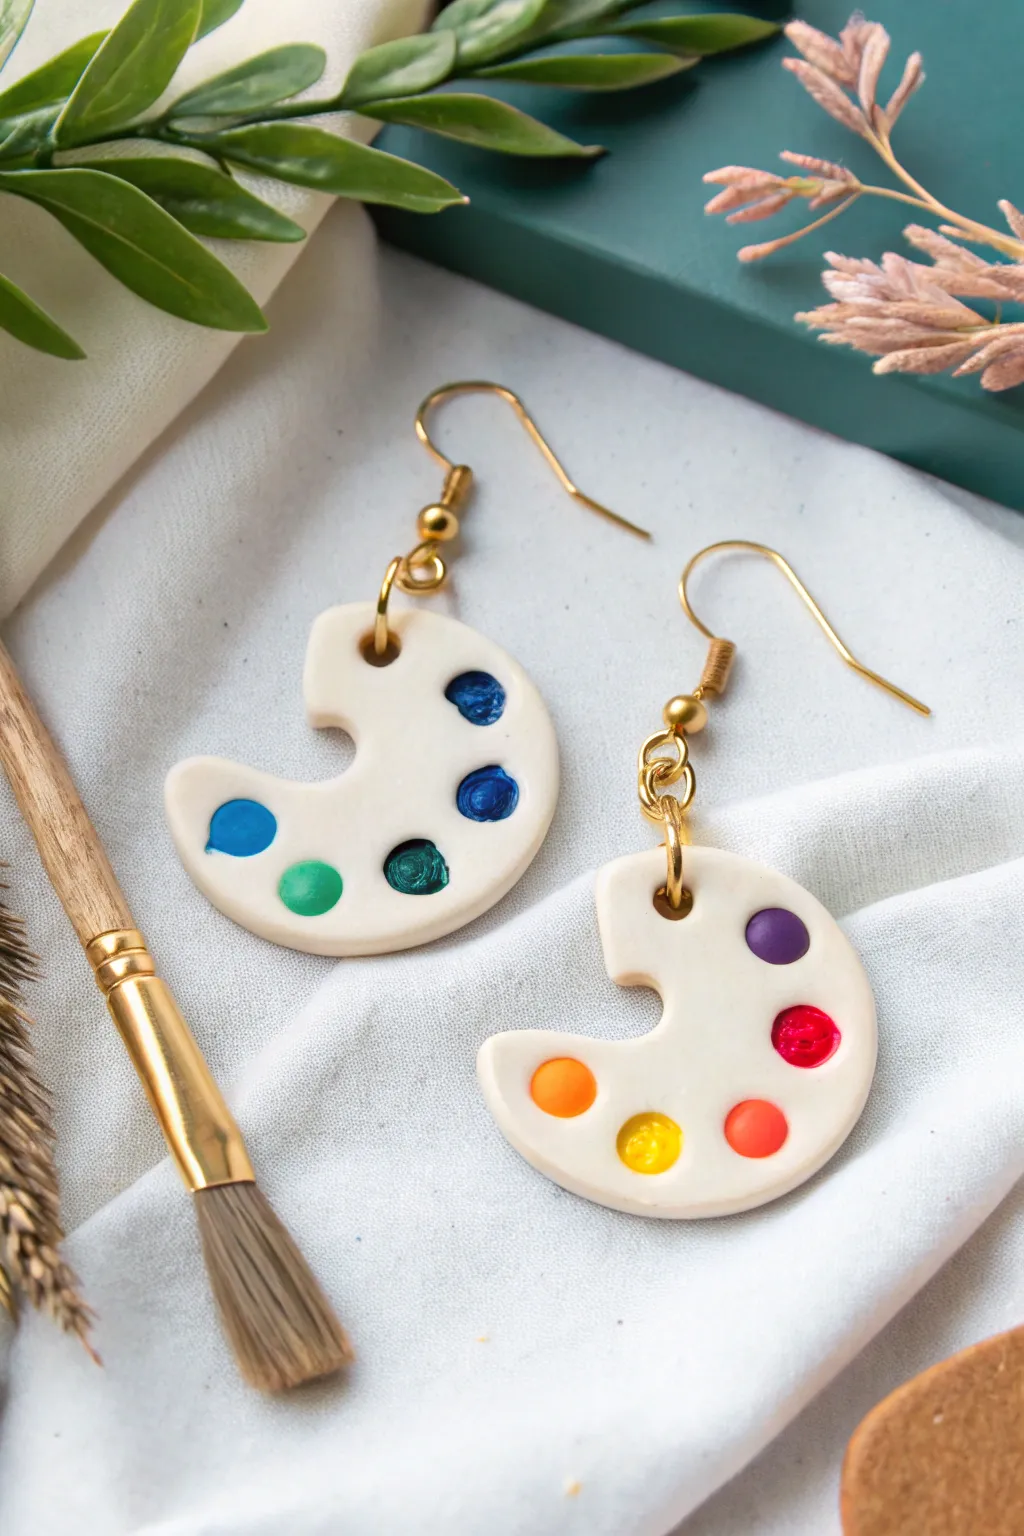
These charming artist palette earrings are the perfect accessory for creatives, featuring tiny, glossy blobs of paint on a classic white base. The design is simple yet strikingly colorful, making them a fun project for beginners and seasoned clay artists alike.
Step-by-Step
Materials
- White paint polymer clay
- Liquid polymer clay (various colors) OR tiny bits of colored solid clay
- UV resin or gloss glaze
- Rolling pin
- Small round cutter (approx. 1 inch)
- Small circle cutter or straw (for the thumb hole)
- Blade or X-Acto knife
- Needle tool or dotting tool
- Gold plated earring hooks
- Jump rings
- Jewelry pliers
Step 1: Shaping the Palette Base
-
Condition the Crystal White:
Begin by taking a chunk of white polymer clay and conditioning it in your hands until it becomes soft and pliable. This prevents cracking later on. -
Roll to Thickness:
Roll out the white clay on a clean, flat surface to a thickness of about 3mm to 4mm. You want it sturdy enough to hold the hardware but light enough for ears. -
Cut the Circles:
Use your main round cutter to punch out two identical circles. These will be the foundations of your palettes. -
Create the Traditional Curve:
To get that kidney-bean palette shape, use the same round cutter to nip a small, curved section out of the side of each circle. -
Add the Thumb Hole:
Using a tiny circle cutter or a sturdy straw, punch a hole near the indentation you just made. This mimics the thumb grip on a real artist’s palette. -
Pierce for Hardware:
Use a needle tool to create a small hole at the very top of the shape for your jump rings. Ensure it’s not too close to the edge to prevent tearing. -
Smooth the Edges:
Gently run your finger around the cut edges to soften any sharp corners for a professional finish.
Step 2: Adding the Color & Assembly
-
Select Your Colors:
Choose 5-6 distinct colors for your paint blobs. Rainbow order works beautifully, or stick to cool tones on one and warm tones on the other. -
Create the Paint Blobs:
Roll tiny balls of colored clay and press them gently onto the white base. Alternatively, you can use tinted liquid clay for a more fluid look. -
Texture the Paint:
I like to take a needle tool and gently swirl the center of each colored blob to give it that realistic, freshly squeezed paint texture. -
Final Bake:
Place your pieces on a baking tile or parchment paper. Bake according to your specific brand of clay’s instructions (usually 275°F for 15-30 minutes). -
Cool Down:
Let the pieces cool completely before handling. Polymer clay is strongest once it has returned to room temperature. -
Add Gloss (Optional):
For a ‘wet paint’ look, apply a drop of UV resin or high-gloss glaze just to the colored dots and cure. -
Open Jump Rings:
Use your jewelry pliers to twist open two jump rings. Never pull them apart; always twist sideways to maintain the circle shape. -
Attach Hardware:
Thread the jump ring through the top hole of the clay palette, then loop on the earring hook. -
Close and Secure:
Twist the jump ring closed securely with your pliers, ensuring there are no gaps where the hook could slip out.
Clean Clay Tip
White clay picks up dust easily. Wipe your workspace, tools, and hands with a baby wipe or alcohol before rolling the white base.
Make it a Set
Instead of two palettes, make one earring a miniature paintbrush using wood-effect clay and silver wire for the ferrule.
Now you have a colorful pair of earrings ready to inspire your next masterpiece
Moon and Stars Danglers With Dreamy Pastels
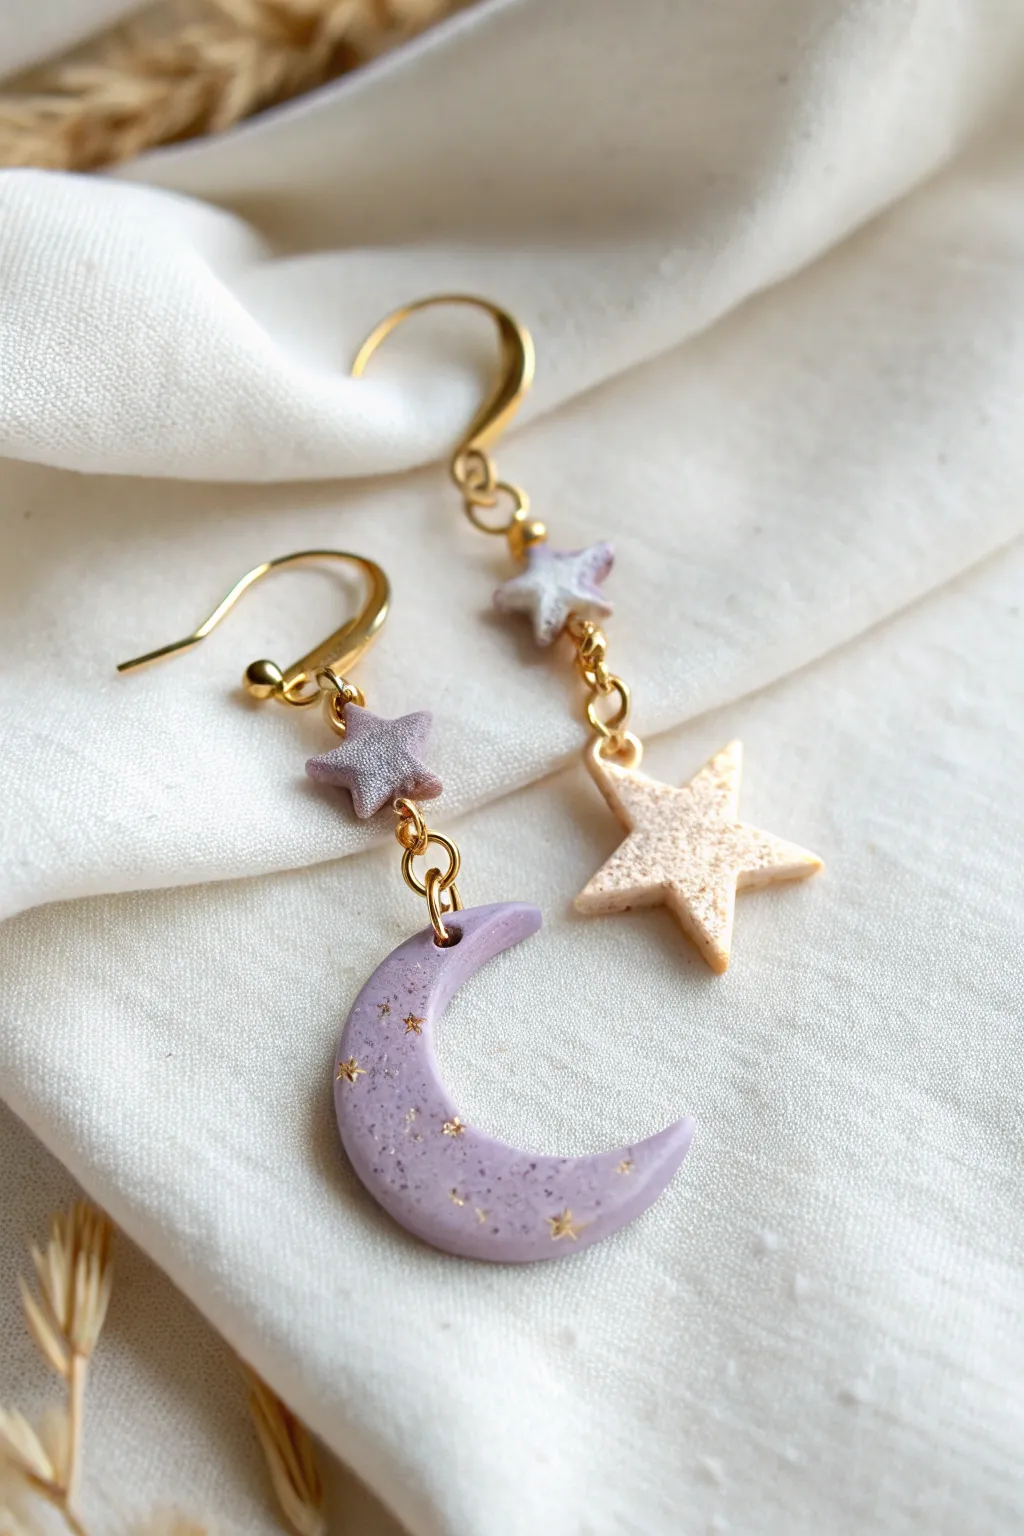
Capture the magic of a twilight sky with these enchanting dangle earrings featuring soft lavender moons and creamy stardust accents. The delicate gold foils and miniature star inlays add a subtle shimmer that catches the light beautifully when worn.
How-To Guide
Materials
- Polymer clay in pastel lavender
- Polymer clay in cream or pearlescent white
- Polymer clay in glittery silver or purple (for the small top stars)
- Gold leaf flakes or fine gold glitter
- Tiny star-shaped gold confetti or sequins
- Rolling pin or pasta machine
- Crescent moon clay cutter (approx. 1 inch)
- Star clay cutters (two sizes: approx. 0.75 inch and 0.25 inch)
- Hand drill or needle tool
- Gold jump rings (4mm and 6mm)
- Gold fishhook earring wires
- Needle-nose jewelry pliers
- Gloss glaze or UV resin (optional)
- Parchment paper and baking tray
Step 1: Preparing the Galaxy Clay
-
Condition the base clay:
Start by warming the lavender clay in your hands, kneading it until it is soft and pliable. Do the same for the cream colored clay. -
Add the shimmer:
Flatten the lavender clay slightly and sprinkle a very small amount of fine gold glitter or tiny torn pieces of gold leaf onto it. -
Mix for effect:
Fold the clay over and roll it again. Repeat this just enough to distribute the specks throughout the clay without completely blending them into the color; you want visible flecks of ‘stardust’. -
Prepare the cream clay:
Repeat the glittering process with your cream or white clay so both main colors have a matching sparkly texture. -
Roll out the slab:
Using an acrylic roller or pasta machine, roll both the lavender and cream clays out to an even thickness, generally around 3mm thick.
Step 2: Cutting and Embellishing
-
Cut the moon shape:
Press your crescent moon cutter firmly into the lavender slab to create the main focal piece for the first earring. -
Cut the large star:
Use the larger star cutter on the cream slab to create the focal piece for the second, mismatched earring. -
Create the connector stars:
Using a contrasting clay—like a glittery silver or a darker purple—roll out a small scrap and cut two tiny stars using your smallest cutter. These will sit at the top near the ear wire. -
Embed the gold stars:
Gently press the tiny gold star sequins into the surface of the raw clay moon. I like to use the back of a needle tool to push them flush with the surface so they adhere well. -
Texture the cream star:
For the cream star, you can add texture by lightly pressing a piece of sandpaper or a toothbrush onto the surface, or leave it smooth and add gold leaf flecks. -
Smooth the edges:
Before baking, gently run your finger along the cut edges of all shapes to soften any sharp ridges or loose bits of clay. -
Drill the holes:
Use a needle tool to poke holes for the jump rings. The moon needs a hole at the top tip. The large star needs a hole at one point. The tiny stars need holes at both the top and vertical bottom points.
Clean Edges Trick
Place a piece of plastic wrap or cling film over your clay slab before pressing the cutters down. This creates a pillowy, rounded edge that requires zero sanding later.
Step 3: Baking and Assembly
-
Bake the pieces:
Arrange your pieces on a parchment-lined baking sheet and bake according to your clay package instructions (usually 275°F for 15-30 minutes). -
Cool and finish:
Allow the clay to cool completely. If desired, coat the pieces with a thin layer of gloss glaze or UV resin to seal the glitter and add shine. -
Connect the moon earring:
Open a jump ring with your pliers. Attach the top of the lavender moon to the bottom of one tiny star. Close the ring securely. -
Connect the star earring:
Using another jump ring, attach the cream star component to the bottom of the second tiny star. -
Attach ear wires:
Finally, open the loop on your fishhook ear wires and attach them to the top hole of each tiny connector star. -
Final check:
Double-check that all jump rings are fully closed so your celestial pieces don’t slip off while you’re wearing them.
Add Dimension
Before baking, lightly dust the edges of the moon with soft pastel chalk using a dry brush to create a subtle shading effect that makes the shape pop.
Enjoy wearing your dreamy celestial creations under the sun or the moon
Glow-Accented Outline Earrings for a Secret Surprise
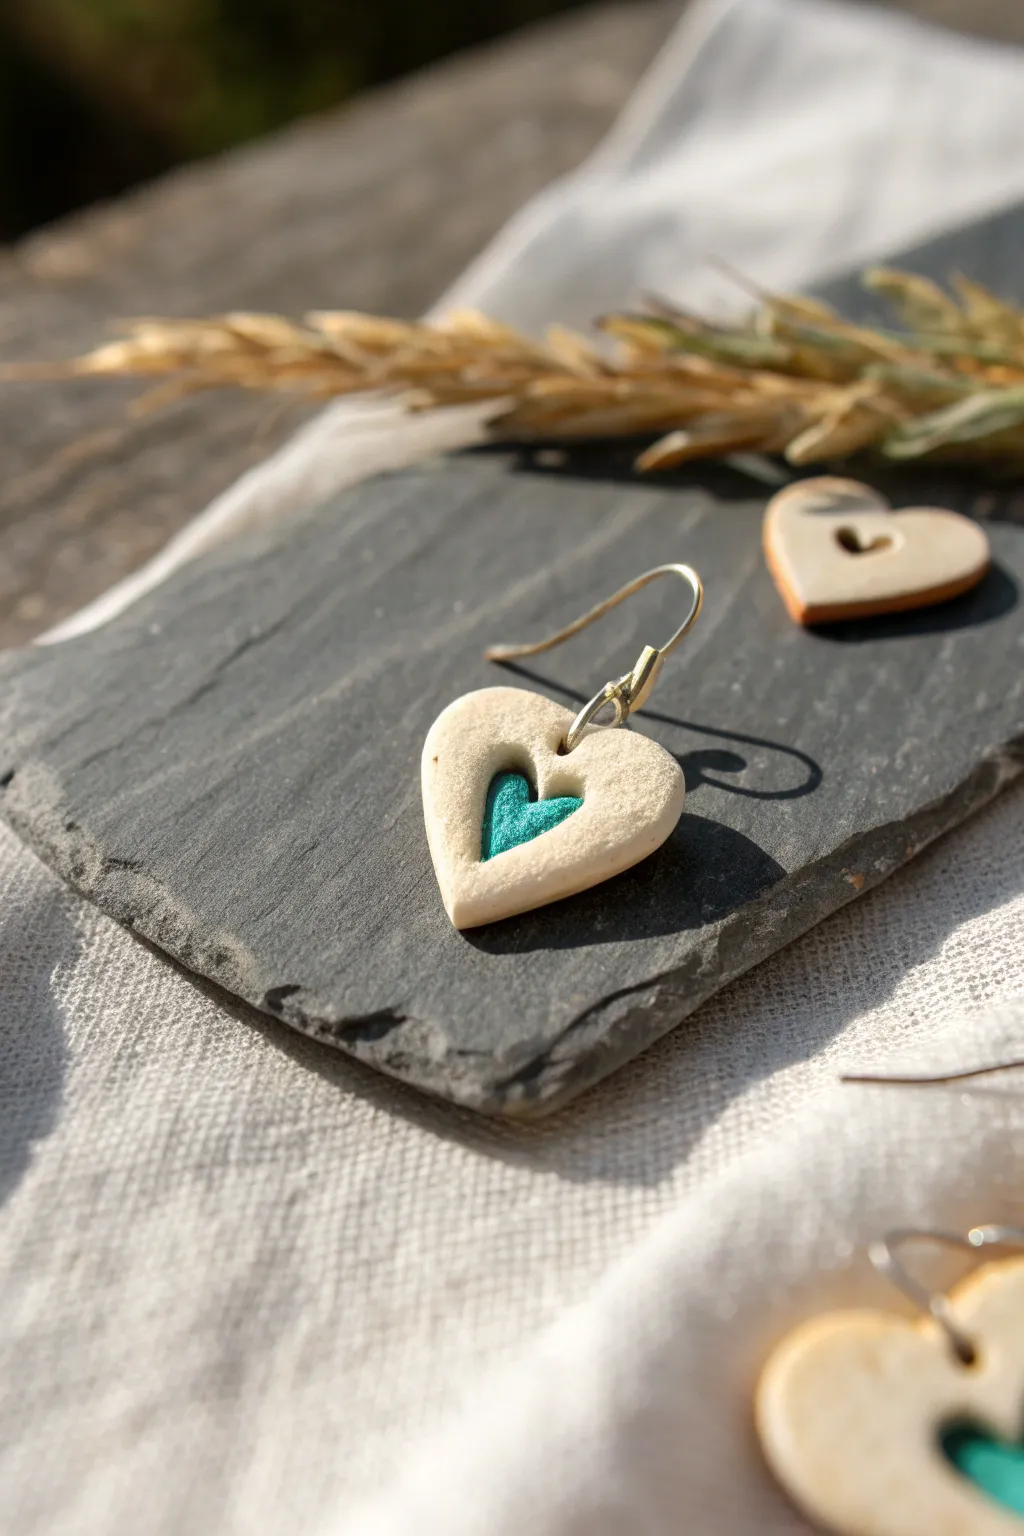
These charming heart earrings feature a minimalist stone-effect exterior that reveals a vibrant secret inside. The cutout design showcases a stunning metallic teal edge that catches the light beautifully as you move.
Step-by-Step Guide
Materials
- Polymer clay (in beige or granite)
- Small heart-shaped cutter
- Tiny heart-shaped cutter (for the center)
- Metallic teal mica powder or acrylic paint
- Small paintbrush
- Sandpaper (fine grit)
- Jump rings (gold or silver)
- Earring hooks (French hooks)
- Needle tool or jewelry drill
- Rolling pin or pasta machine
- Pliers
- Oven
Step 1: Shaping the Clay
-
Condition the Clay:
Begin by warming the beige polymer clay in your hands, kneading it until it is soft and pliable. If you want that speckled stone look, you can mix in a pinch of black pepper or use a granite-effect clay. -
Roll It Out:
Roll your conditioned clay into a smooth slab. Aim for a thickness of about 3 to 4 millimeters nice and substantial so the inner edge is clearly visible later. -
Cut the Main Shape:
Use your larger heart-shaped cutter to punch out two identical heart shapes from the slab. Lift them carefully to avoid distorting the form. -
Create the Cutout:
Take the tiny heart cutter and center it perfectly inside one of the larger clay hearts. Press down firmly to remove the center, leaving a thick outline. Repeat for the second earring. -
Smooth the Edges:
Gently tap the edges with your finger to soften any sharp ridges left by the cutters. The goal is a slightly organic, handmade feel rather than factory perfection. -
Pierce the Hole:
Use a needle tool to poke a hole at the very top center of each heart frame. Ensure the hole is large enough for your jump ring to pass through freely.
Step 2: Adding the Sparkle
-
Apply the Mica Powder:
This is the secret trick: Dip a small, dry brush into the metallic teal mica powder. Carefully brush this powder only onto the *inner* vertical walls of the heart cutout. -
Clean Up Excess:
If any powder gets on the front face of the earring, use a piece of tape or a damp cotton bud to gently lift it off immediately. You want the face to remain plain beige. -
Alternative: Painting:
If you don’t have mica powder, you can skip the powder step now and paint the inner edges with metallic acrylic paint after baking instead. I find mica powder gives a softer glow, though. -
Texture the Surface:
For a rustic look, lightly dab the front surface with an old toothbrush or a piece of crumpled foil to give it a stone-like texture. -
Bake:
Place the hearts on a parchment-lined baking sheet. Bake according to your customized clay package instructions (usually 275°F/135°C for 15-30 minutes). -
Cool Down:
Allow the pieces to cool completely in the oven or on a wire rack before handling them, as warm clay is fragile.
Uneven Edges?
If your inner cutout looks messy or jagged, wait until after baking. Use a rolled-up piece of sandpaper or a small needle file to smooth the inner curve.
Step 3: Assembly
-
Sanding:
Once cool, use fine-grit sandpaper to lightly buff the back and outer edges of the hearts. This removes any fingerprints or rough spots. -
Rinse and Dry:
Wash off any clay dust with water and dry thoroughly. This essentially reveals the clean contrast between the matte beige and the sparkling teal center. -
Open Jump Rings:
Using two pairs of pliers, twist a jump ring open sideways (never pull it apart). Hook it through the hole you pierced earlier. -
Attach the Hook:
Slide the loop of your earring hook onto the open jump ring. Make sure the hook faces the correct direction so the heart hangs flat. -
Close the Rings:
Twist the jump ring closed again until the ends meet flush. Give it a tiny wiggle to ensure it’s secure.
Color Pop
Make the inner color really sing by sealing just that inner edge with a touch of high-gloss varnish. Leave the rest of the heart matte for contrast.
Enjoy wearing your subtle yet sparkling heart earrings on your next day out