Whenever I’m stuck, I like to remember that creative ceramics aren’t about perfect forms—they’re about playful choices that make a piece feel totally yours. Here are my go-to creative ceramic ideas that’ll keep your hands busy and your imagination wide awake.
Handbuilt Mugs With Sculptural Handles
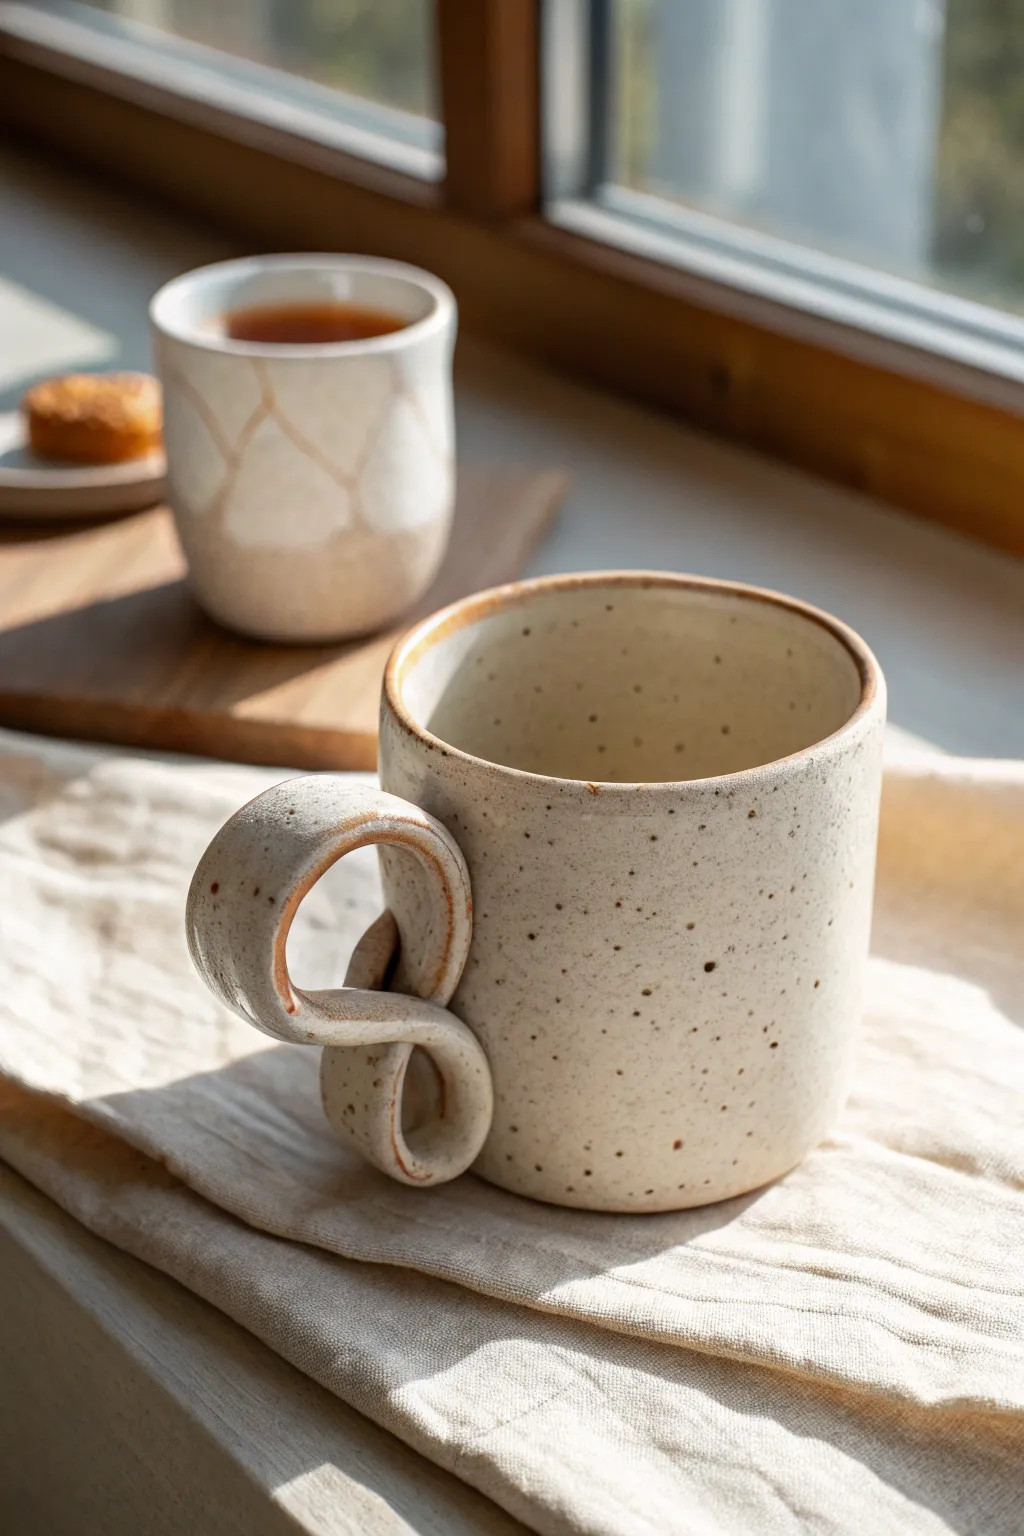
Elevate your morning coffee ritual with this charming handbuilt mug featuring a distinctive infinity-style looped handle. The speckled stoneware clay adds a rustic warmth, whilst the unique sculptural handle turns a simple cylinder into a modern piece of functional art.
Step-by-Step Guide
Materials
- Speckled stoneware clay (mid-fire)
- Rolling pin with guide strips (approx. 1/4 inch)
- Rectangular template (approx. 10×4 inches for the body)
- Fettling knife or craft knife
- Scoring tool or serrated rib
- Slip (clay and water mixture)
- Wooden modeling tool
- Sponge
- Transparent or glossy white glaze
Step 1: Forming the Body
-
Prepare the slab:
Begin by rolling out your speckled stoneware clay into a smooth, even slab. Aim for a thickness of about 1/4 inch, ensuring there are no air bubbles trapped inside. -
Cut the rectangle:
Place your rectangular template onto the slab and carefully cut around it with your fettling knife. This strip will form the vertical walls of your mug. -
Bevel the edges:
On the short ends of your rectangle, cut a 45-degree bevel angle. Cut one bevel facing up and the opposite end facing down; this creates an overlapping joint that is stronger and seamless. -
Shape the cylinder:
Score the beveled edges thoroughly and apply a generous amount of slip. Gently curve the slab into a cylinder, pressing the beveled ends together firmly to create a bond. -
Attach the base:
Roll out a small piece of clay for the base. Place your cylinder on top, trace around it lightly, score and slip both contact areas, and press the cylinder onto the base. -
Trim and smooth:
Cut away the excess clay from the base. Use a wooden tool to compress the seam where the wall meets the floor on both the inside and outside, then smooth everything with a damp sponge.
Handle sagging?
If the handle droops while attaching, prop it up with small sponges or crumpled paper towels. Leave these props in place until the clay becomes leather-hard.
Step 2: Sculpting the Handle
-
Extrude or roll a coil:
For the handle, roll a thick coil of clay—roughly the thickness of your index finger. I prefer to roll it slightly tapered at the ends for a more elegant look. -
Create the loop:
Gently bend the coil into a loop shape that folds back on itself, resembling a stylized lowercase ‘g’ or an abstract knot. Play with the shape until it feels comfortable to grip. -
Dry fit the handle:
Hold the looped coil against the mug body to check proportions. The top of the loop should attach near the rim, and the bottom tail should curl back to touch the mug lower down. -
Score and attach:
Mark the attachment points on the mug body. Score both the mug surface and the handle ends deeply, apply slip, and press the handle firmly into place. -
Reinforce the joints:
Use a small coil or just your modeling tool to blend the clay from the handle onto the mug body. A strong connection here is crucial since this supports the cup’s weight.
Step 3: Finishing Touches
-
Refine the rim:
Check the drinking rim of the mug. If it feels sharp or uneven, use a chamois cloth or a slightly wet sponge to round it off for a comfortable mouthfeel. -
Slow drying:
Cover the mug loosely with plastic to allow the handle and body to dry at the same rate. This prevents the handle from cracking away as it shrinks. -
Bisque fire:
Once bone dry, load the mug into the kiln for a bisque fire followed by your clay manufacturer’s instructions. -
Apply glaze:
Dip or brush your transparent or glossy white glaze over the mug. Ensure the speckles will show through by not applying it too thickly. -
Glaze fire:
Fire the mug a second time to the glaze temperature (usually Cone 5 or 6 for stoneware) to finish the piece.
Make it yours
Try leaving the raw clay exposed on the lower half of the exterior for a nice textural contrast between the smooth glaze and the gritty stoneware.
Now you have a beautifully handmade vessel ready for your favorite hot beverage


Animal-Inspired Planters That Peek Over the Rim
Bring a touch of whimsical charm to your indoor garden with this adorable, minimalist cat face planter. Crafted from speckled clay and featuring a sweet, hand-drawn expression, this ceramic pot is perfect for housing small succulents or trailing vines.
How-To Guide
Materials
- Speckled stoneware clay (white or buff base)
- Pottery wheel (or rolling pin for slab building)
- Needle tool
- Rib tool (metal or rubber)
- Sponge
- Small loop tool
- Black underglaze
- Brown underglaze
- Fine detail brush
- Clear matte glaze
- Kiln
Step 1: Forming the Base
-
Prepare the Clay:
Begin by wedging about 1 to 1.5 pounds of speckled stoneware clay. Ensure there are no air bubbles, as this will help keep your walls even during throwing. -
Throw a Cylinder:
Center your clay on the wheel and open it up. Pull the walls up to form a cylinder roughly 4-5 inches wide and just as tall, keeping the walls slightly thicker at the rim to support the ears later. -
Shape the Belly:
Using a rib tool on the inside, gently push the belly of the pot outward to create a rounded, chubby shape. Collar the rim in slightly so the opening is narrower than the widest part of the pot. -
Smooth and Trim:
Compress the rim with a chamois or sponge. Use a wood tool to undercut the base slightly, making it easier to wire off later. Allow the piece to dry to a soft leather-hard stage.
Fixing Smudges
If you smudge underglaze while painting, don’t wipe it wet! Let it dry completely, then gently scratch the mistake off with a needle tool or stiff brush.
Step 2: Sculpting the Features
-
Mark Ear Placement:
Look at your pot and decide where the ‘front’ will be. Use a needle tool to faintly mark two small arched shapes directly on the rim where the ears will sit. -
Cut the Rim:
Carefully slice away the clay between the ear marks, lowering the rim height slightly so the ears appear to poke up. I prefer to use a sharp fettling knife for a clean cut, smoothing the new rim edge immediately with a damp sponge. -
Refine the Ears:
Pinch and smooth the remaining raised sections into rounded ear shapes. They should look seamless, as if they grew naturally from the pot’s wall. -
Trim the Foot:
Once the pot is leather hard, flip it over and trim a neat foot ring. This elevates the form and gives it a professional finish.
Step 3: Decorating and Glazing
-
Plan the Face:
Lightly sketch the sleeping eyes, nose, mouth, and whiskers with a pencil directly onto the clay. Don’t worry about mistakes; the pencil lead will burn off in the kiln. -
Paint the Nose:
Using a small detail brush, paint the inverted triangle nose with a rich brown underglaze. Apply two to three coats for solid opacity. -
Line Work:
Switch to a very fine liner brush and black underglaze. Carefully trace your pencil lines for the ‘U’ shaped eyes, the small vertical line for the mouth, the smile, and three whiskers on each cheek. -
Bisque Fire:
Let the pot dry completely to the bone-dry stage. Load it into the kiln for a bisque firing (usually around cone 04). -
Glaze Application:
Wipe the bisque-fired pot with a damp sponge to remove dust. Dip the entire pot into a clear matte glaze. Make sure the glaze isn’t too thick, or it might cloud your underglaze details. -
Wipe the Foot:
Clean the glaze off the bottom foot ring with a sponge to prevent it from sticking to the kiln shelf. -
Final Firing:
Fire the piece again to the maturation temperature of your clay and glaze (typically cone 5 or 6 for stoneware).
Level Up: Tail Handle
Add a small, curved coil to the back of the pot to act as a ‘tail.’ It adds character and can function as a tiny handle for lifting the pot.
Now you have a charming little planter ready to hold your favorite green friend


Footed Trinket Dishes With Playful Texture
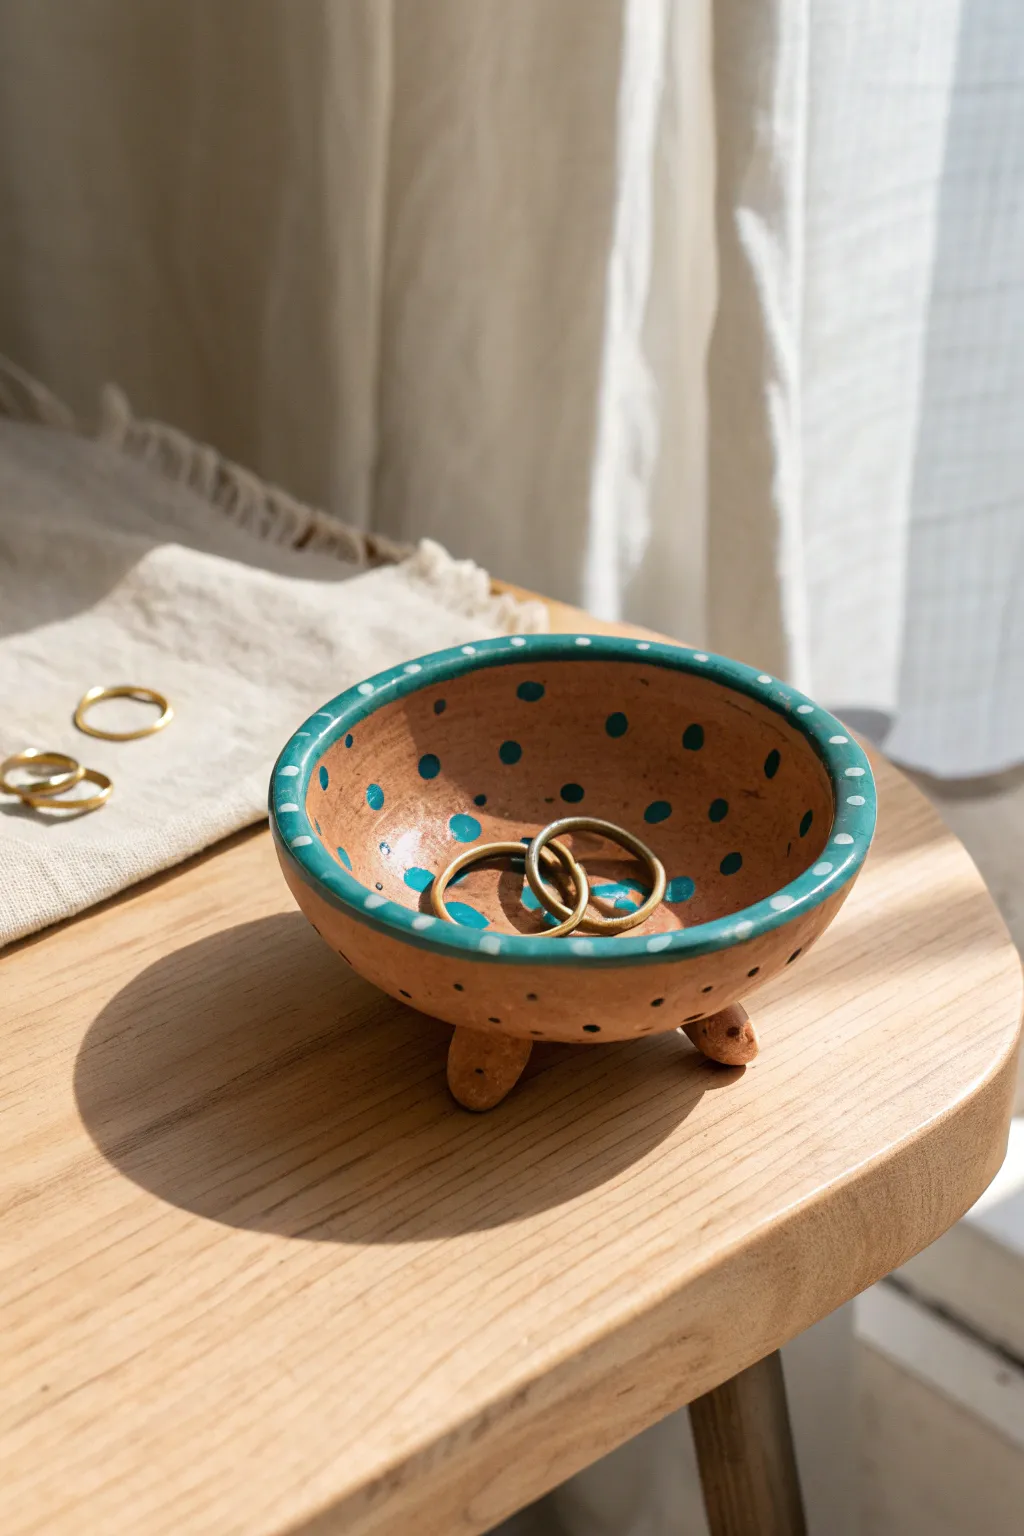
This charming footed dish combines the warmth of red clay with playful teal accents, perfect for holding your favorite rings. The simple pinch pot form sits atop three tiny feet, offering a delightful elevation to a classic hand-built project.
Detailed Instructions
Materials
- Red earthenware or terracotta clay (low fire)
- Small sponge
- Pin tool or needle tool
- Scoring rib or old toothbrush
- Teal underglaze (opaque)
- White underglaze
- Fine detail brush
- Small flat brush
- Clear transparent glaze
- Bowl of water
- Clay wire cutter
Step 1: Forming the Bowl
-
Prepare the Clay:
Cut a piece of red clay about the size of a tangerine. Wedge it thoroughly to remove air bubbles and ensure the consistency is uniform, creating a smooth ball. -
Open the Pinch Pot:
Hold the ball in one hand and press your thumb into the center, stopping about a half-inch from the bottom. This establishes your base thickness. -
Pinch the Walls:
Gently rotate the ball while pinching the clay between your thumb and fingers. Work from the bottom up, thinning the walls evenly until they are roughly 1/4 inch thick. -
Shape the Curve:
As you pinch, gently push the walls outward to create a shallow, open bowl shape rather than a tall cup. Smooth the rim with your finger to keep it rounded. -
Smooth the Surface:
Use a slightly damp sponge to wipe the interior and exterior surfaces. This removes fingerprints and creates a canvas for your future glaze work.
Dotting Perfection
For perfectly round dots, don’t use the bristles—dip the back handle of a paintbrush into the glaze and stamp it onto the clay.
Step 2: Adding Feet
-
Create the Feet:
Roll three small balls of clay, each about the size of a marble or large pea. Tap them gently on your work surface to create a tiny flat spot for attachment. -
Mark Placement:
Flip your bowl upside down. lightly mark three equidistant spots in a triangle formation on the bottom where the feet will go. -
Score and Slip:
Use your pin tool or an old toothbrush to scratch cross-hatch marks (scoring) onto both the marked spots on the bowl and the flat spots of the feet. Add a drop of water or slip. -
Attach firmly:
Press the feet onto the scored areas with a slight wiggle motion to lock them in. Smooth the seam where the foot meets the bowl with a modeling tool or your finger so they look integrated. -
Level Check:
Flip the bowl right-side up and gently tap it on the table to ensure it sits level on all three legs. Adjust height if it wobbles.
Step 3: Decoration & Glazing
-
Bisque Fire:
Allow the piece to dry completely to the bone-dry stage. Fire it in a kiln to bisque temperature (usually cone 04) to prepare it for glazing. -
Base Rim Color:
Using a small flat brush, apply 2-3 coats of teal underglaze along the rim of the bowl. Extend the band slightly into the interior and exterior to create a solid border. -
Painting Interior Dots:
Dip a fine detail brush or the handle end of a paintbrush into the teal underglaze. Dot the interior of the bowl randomly with large teal spots, leaving the clay body visible between them. -
Adding Exterior Details:
Add smaller teal dots around the lower exterior of the bowl, near the feet. Keep the pattern loose and organic rather than grid-like. -
White Dot Accents:
Once the teal rim is dry to the touch, use a very fine brush or dotting tool to apply tiny white dots along the center of the teal rim band for a delicate pattern. -
Clear Glaze Application:
Once all underglaze is dry, dip the entire piece into a clear transparent glaze, or brush on three even coats. This will make the red clay rich and the colors pop. -
Clean the Feet:
Wipe the bottom of the three feet with a damp sponge to remove all glaze. This prevents the pot from sticking to the kiln shelf. -
Final Firing:
Fire the piece again to the glaze temperature appropriate for your clay and glaze (likely cone 05 or 06).
Go Geometric
Instead of polka dots, try painting small triangles or dashes in white over the raw clay for a modern, mud-cloth inspired look.
Your finished dish is now ready to cradle your most precious trinkets on a bedside table or vanity


Stamped Pattern Bowls Using Found Textures
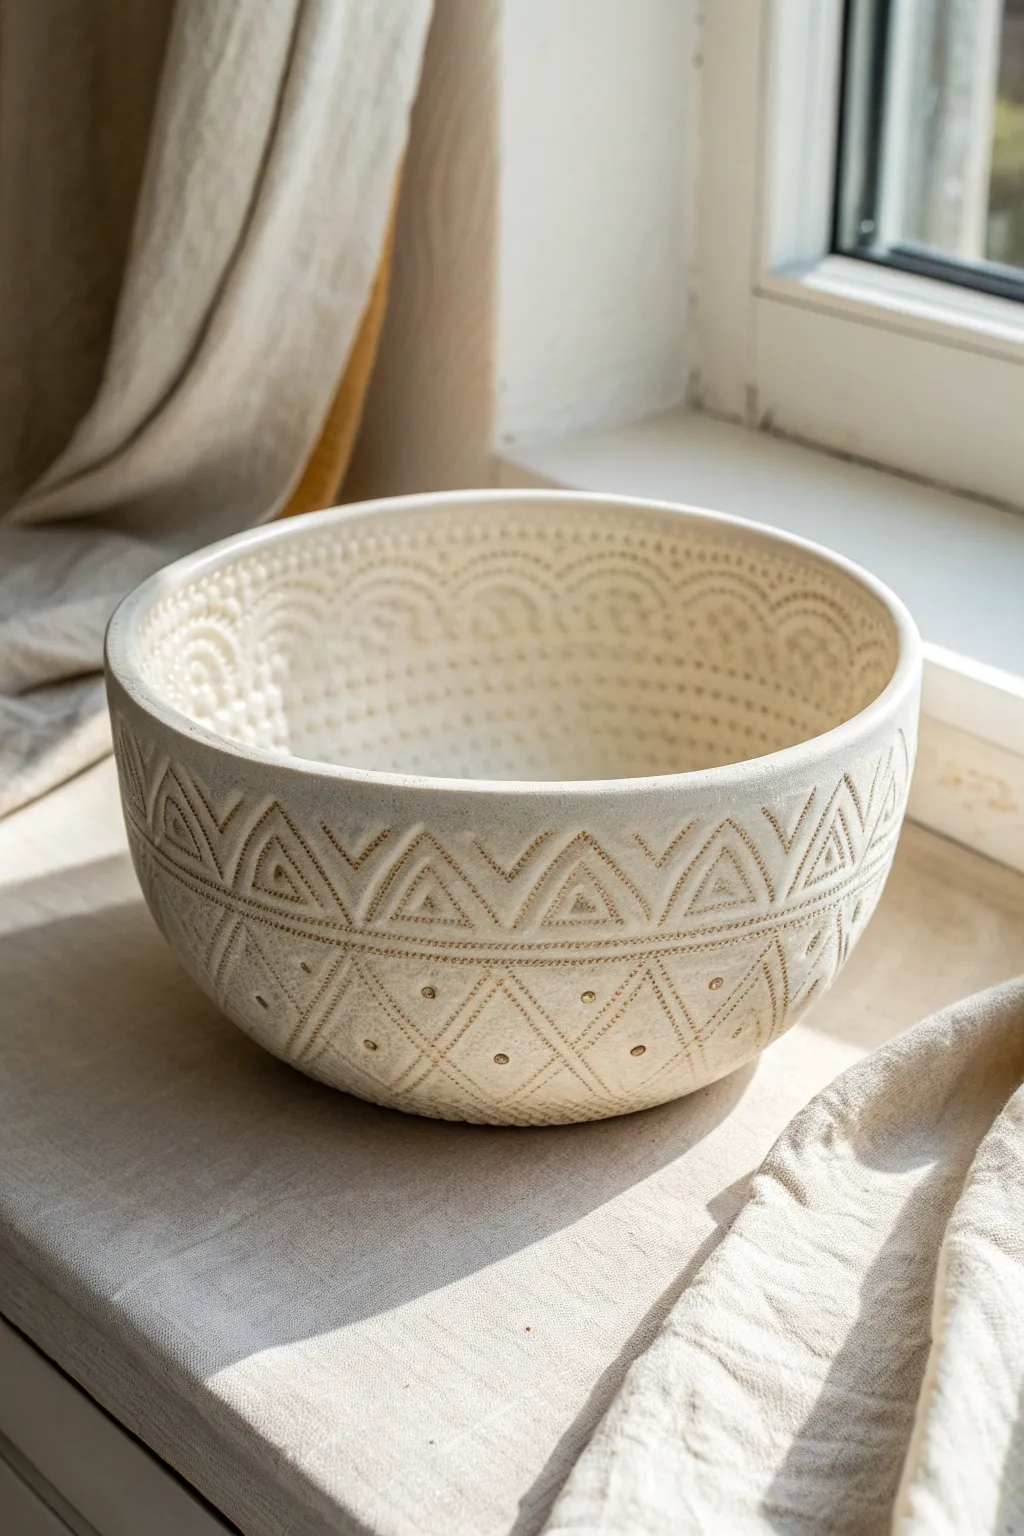
Transform a simple slab of clay into a stunning vessel featuring intricate geometric bands and interior scalloping. This project balances rustic charm with precise detailing, using found objects or simple tools to create a deep, tactile pattern.
Detailed Instructions
Materials
- White or speckled stoneware clay
- Rolling pin
- Canvas mat or cloth
- Large mixing bowl (as a slump mold or hump mold)
- Needle tool
- Rib tool (wood or rubber)
- Fettling knife
- Triangle stamp (or carved linoleum block)
- Small circular object (like a pen cap or drill bit) for dot accents
- Scoring tool (serrated rib)
- Sponge
- Slip (clay water slurry)
Step 1: Preparing the Slab
-
Roll the clay:
Begin by rolling out your clay slab on a canvas mat. Aim for an even thickness of about 3/8 inch. You want it sturdy enough to hold the deep impressions without tearing. -
Compress the slab:
Use a rubber rib to smooth and compress the clay on both sides. This aligns the clay particles, preventing future cracking and giving you a pristine canvas for your texture. -
Cut the rough shape:
Place your bowl mold upside down on the slab to approximate the size, then cut a large circle about 2 inches wider than the mold rim to account for the depth of the bowl.
Uneven Impressions?
If one side of the pattern is deeper than the other, try rolling a small rolling pin over your stamps as you press them, ensuring equal pressure across the entire tool face.
Step 2: Stamping the Texture
-
Mark your guidelines:
Before stamping, lightly trace horizontal bands around the slab with a needle tool while it is still flat. This ensures your pattern stays straight once the bowl is formed. -
Create the interior arches:
On what will be the *inside* face of the slab, use a needle tool or small stamp to press rows of dotted arches. Start near the top edge and work your way inward. -
Press deeper dots:
Inside the arches, press deeper singular dots using a blunt tool to create contrast against the finer dotted lines. -
Flip and prep for exterior:
Carefully flip the slab over onto a clean board. Re-smooth the surface with your rib if the texture from the mat transferred too heavily. -
Stamp the triangle band:
Using a triangle stamp (or a tool carved from an eraser), press a continuous row of triangles along the upper third of the slab. Alternate upright and inverted triangles if desired, or keep them uniform. -
Detail the triangles:
Add texture within the triangles using a smaller tool to create concentric lines or small divots inside the main shape. -
Add lower diamond patterns:
Below the main band, use the needle tool to lightly scratch in a diamond grid. Press small holes at the intersections and centers of these diamonds using a tool with a small circular tip.
Use an Oxide Wash
Before the final glaze, wipe a dark oxide wash (like iron oxide) into the stamped grooves and sponge off the high points to make the geometric pattern pop dramatically.
Step 3: Forming the Bowl
-
mold application:
Determine if you are using a slump mold (inside a bowl) or hump mold (over a bowl). For this deep shape, slumping inside a mold often preserves the exterior texture better. -
Slump the clay:
Gently lift your textured slab and lower it into your form. I recommend placing a thin sheet of plastic wrap or cheesecloth in the mold first to prevent sticking. -
Secure the shape:
Press the slab firmly against the mold walls, being careful not to smudge your fresh exterior stamping. Use a damp sponge to smooth the rim. -
Refine the rim:
Trim any excess clay from the top edge with a fettling knife or needle tool to create a level rim. Smooth this cut edge with a chamois or wet finger. -
Dry slowly:
Let the bowl dry to a leather-hard state while still in the mold. This is crucial for maintaining that deep, round curve.
Step 4: Finishing Touches
-
Remove from mold:
Once leather hard, carefully remove the bowl. The clay should be firm enough to hold its shape but soft enough to refine. -
Touch up texture:
Inspect your patterns. If any stamped areas got flattened during forming, re-press them gently with your tools now. -
Smooth the foot:
Turn the bowl over and smooth the bottom. You can trim a foot ring now if you satisfy, or simply smooth the bottom flat for a modern look. -
Bisque fire:
Allow the piece to bone dry completely before firing it in a bisque kiln to prepare it for glazing. -
Glaze application:
Apply a clear or translucent matte glaze. A glaze that ‘breaks’ over texture is best here, as it will pool in the stamped depressions and highlight the pattern.
Enjoy the interplay of shadow and light on your new textured vessel

The Complete Guide to Pottery Troubleshooting
Uncover the most common ceramic mistakes—from cracking clay to failed glazes—and learn how to fix them fast.
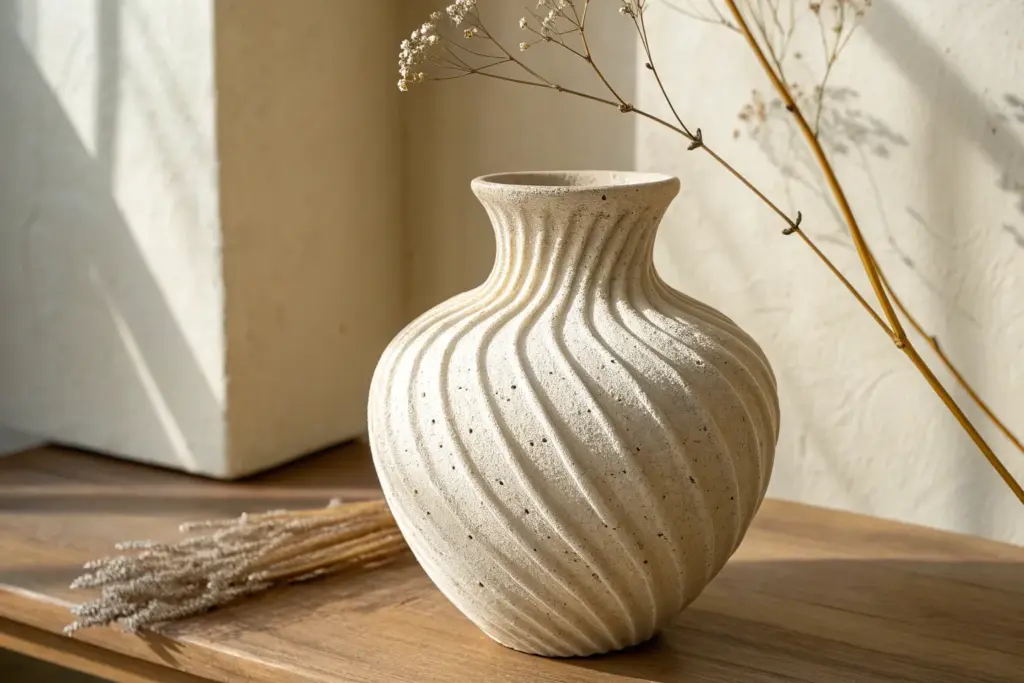
Sculptural Vase Wraps With Tentacles, Vines, or Waves
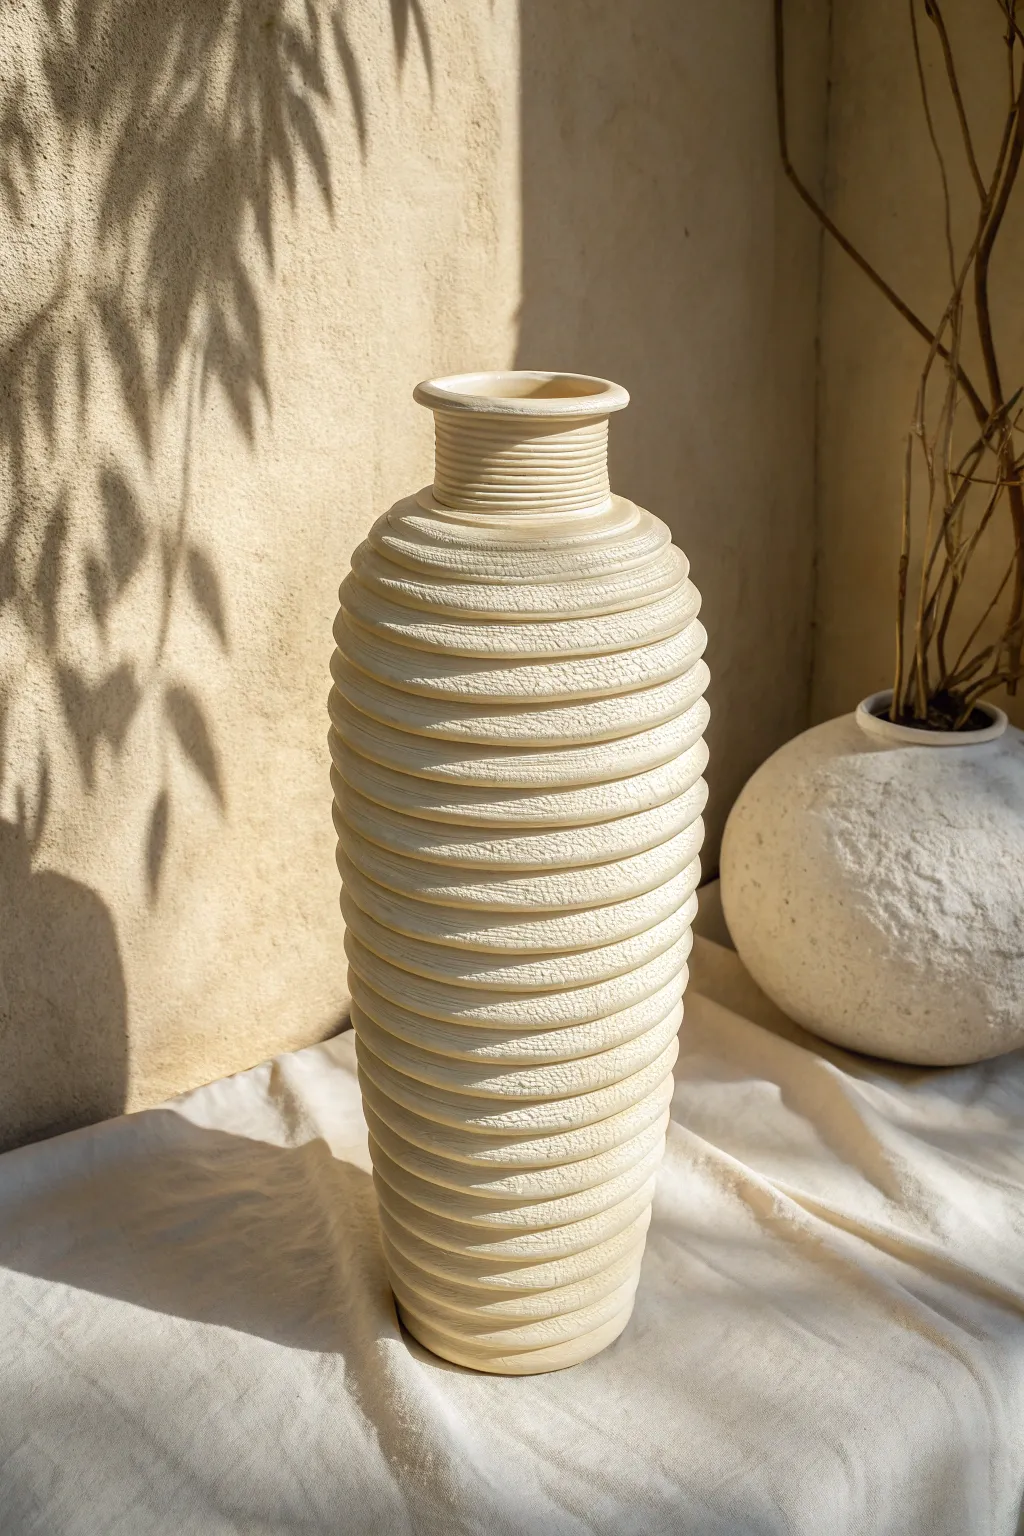
Create a stunning focal point for any room with this textured, coil-built inspired vase that mimics the organic rhythm of desert sands. This project focuses on building distinct horizontal ribs to achieve a modern, tactile silhouette that plays beautifully with light and shadow.
How-To Guide
Materials
- High-fire stoneware clay (white or buff)
- Pottery wheel (or turntable for coil building)
- Wooden rib tool (squared edge)
- Needle tool
- Serrated metal rib (for texture)
- Sponge
- Wire clay cutter
- Spray bottle with water
- Kiln
- Matte white or cream glaze
Step 1: Throwing the Base Form
-
Center and open:
Begin with a generous amount of prepared clay (roughly 4-6 lbs depending on desired height). Center it on the wheel head and open the clay to create the floor of your vase, keeping it about half an inch thick. -
Pull the cylinder:
Perform your initial pulls to raise the walls into a tall, straight cylinder. Maintain a slightly thicker wall than usual (about 3/8 inch) because you will need extra clay to push out and define the deep ribs later. -
Shape the silhouette:
Gently collar the top third of the cylinder inward to create the tapered shoulder and narrow neck. Use a sponge to compress the rim to prevent cracking. -
Smooth the surface:
Before adding texture, use a metal rib to remove slip and create a clean, uniform canvas on the cylinder’s exterior. This ensures your ridges will be sharp and intentional.
Slumping Walls?
If the walls buckle while pressing the grooves, your clay is too wet or walls are too thin. Use a heat gun to stiffen the clay slightly before texturing.
Step 2: Sculpting the Ribs
-
Mark the spiral guide:
With the wheel spinning slowly, use your needle tool to lightly score a continuous spiral or a series of horizontal lines from the bottom to the top. This acts as a map for your deep grooves. -
Define the first groove:
Starting at the base, press the squared corner of a wooden rib tool into the clay wall while the wheel turns. Push firmly enough to create a deep indentation but support the inner wall with your other hand to prevent collapse. -
Work upwards:
Move your wooden tool gradually up the vessel, creating parallel grooves. Aim for consistent spacing, leaving a rounded ‘bump’ of clay between each groove to form the protruding ribs. -
Shape the ribs:
Once the grooves are cut, go back over the protruding sections. Use your finger or a soft rubber rib to slightly round over the edges of each ridge so they look organic rather than sharp and mechanical. -
Refine the neck:
The neck ribbing is tighter and more delicate. Switch to a smaller modeling tool to create finer, closer-spaced grooves around the collar and rim area.
Pro Tip: Coil Method
No wheel? Build this by stacking coils. Leave the coils rounded on the outside instead of smoothing them flat to naturally create the ribbed profile.
Step 3: Adding Texture & Finishing
-
Apply surface texture:
To get that weathered, stone-like look seen in the photo, take a serrated metal rib or a rough sponge. Gently drag it horizontally across the rounded tops of the ribs as the wheel spins very slowly. -
Dry slowly:
Because the walls vary in thickness due to the ribbing, uneven drying is a risk. I prefer to cover the piece loosely with plastic for the first day to let the moisture equalize. -
Bisque fire:
Once bone dry, fire the piece to bisque temperature (usually cone 04 or 06) to prepare it for glazing. -
Glaze application:
Pour a matte cream or warm white glaze inside the vase first and pour it out. For the exterior, spray application is best to ensure the glaze gets into the deep grooves without pooling too thickly. -
Wipe back (optional):
If your glaze is thick, gently wipe the tops of the texture with a damp sponge. This exposes the raw clay texture slightly, enhancing the ‘relic’ aesthetic. -
Final firing:
Fire the vase to the maturity temperature of your clay body (likely cone 5/6 or 10).
Once fired, place your vase near a window where shadows can play across the rhythmic ridges throughout the day
Extruded Squiggle Vases With 3D Appliqué Lines
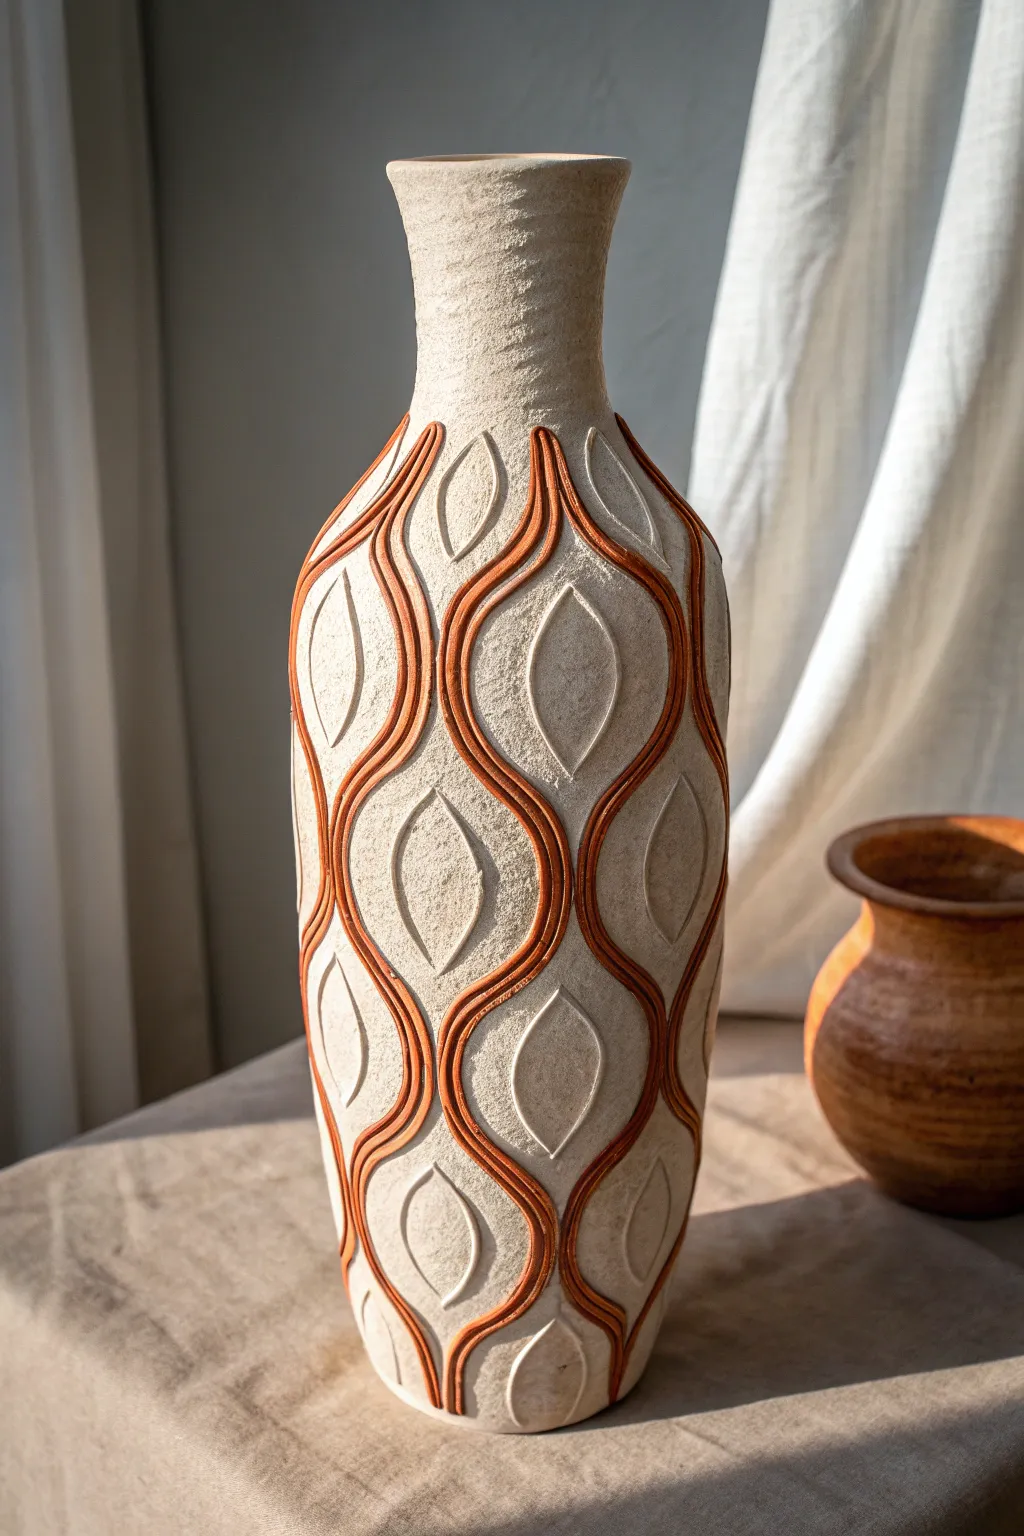
This elegant vessel combines clean vertical forms with organic, flowing ornamentation. By using extruded coils to create rhythmic waves and carving delicate leaf shapes in the negative space, you’ll achieve a sophisticated look that feels both modern and timeless.
Step-by-Step
Materials
- Stoneware clay (light color with fine grog)
- Red iron oxide wash or terra cotta slip
- Handheld clay extruder with small round dye
- Pin tool or needle tool
- Small loop carving tool
- Ribs (metal and soft rubber)
- Sponge
- Scoring tool
- Slip
- Pottery wheel (or coil building supplies)
- Matte finish clear glaze (optional)
Step 1: Forming the Vessel
-
Throw the cylinder:
Begin by centering your clay on the wheel and opening it up. Pull the walls up to create a tall, slender cylinder, aiming for an even thickness throughout the height. Keep the form relatively straight for now. -
Shape the neck:
Collar in the top third of the cylinder to create a graceful, narrowing neck. Flare the rim slightly outward for a classic finish. Use a metal rib to smooth the exterior walls, removing throwing lines to create a blank canvas for your design. -
Dry to leather hard:
Allow the vase to dry slowly until it reaches a sturdy leather-hard stage. It needs to be firm enough to handle the pressure of applying coils without warping, but moist enough to accept attachments. -
Trim the foot:
Turn the piece over and trim a clean, defined foot ring. Smooth out any trimming marks with a damp sponge.
Clean Lines
Use a small, damp paintbrush to clean up excess slip or oxide around the coils immediately. It’s much harder to fix smudges once the clay is bone dry.
Step 2: Applying the Design
-
Map your grid:
Lightly sketch vertical guidelines around the vessel using a needle tool. Decide how many wave repeats you want; four to six usually work well for a vase of this diameter. -
Prepare the extruder:
Load your handheld extruder with the same clay body. If you want the distinctive red lines shown in the photo, you have two options: use terra cotta clay in the extruder, or use the base clay and paint it later. For this guide, we’ll extrude the base clay. -
Extrude coils:
Squeeze out several long, thin ropes of clay. Keep them covered under plastic so they don’t dry out before you can attach them. -
Create the wave pattern:
Take two extruded strands. Place them side-by-side, touching, to create a double track. Arrange them in a vertical sinusoidal (wave) wave pattern on the vase surface. -
Attach the waves:
Once you are happy with the flow of the curves, mark their position. Remove them, score the path and the back of the coils, apply slip, and press the double-coils firmly back onto the vase. -
Refine the connections:
Where the wave patterns meet or interact, ensure the clay is well-blended. Run a damp finger or a small modeling tool along the edges of the coils to seal them without flattening their rounded profile.
Step 3: Carving & Surface Treatment
-
Outline the negative space:
Look at the spaces created between the waving lines. These almond-shaped areas will become your leaf motifs. -
Carve the leaves:
Using a sharp needle tool or a very small v-tip carving tool, incise a deep leaf shape centered inside each open area of the wave pattern. -
Add texture:
I find that texture adds depth here. Within the carved leaf shape (or the background around it, depending on preference), gently tap the clay with a stiff brush or a texture tool to create a pitted, organic surface contrast. -
Apply oxide to the coils:
Carefully paint red iron oxide wash or terra cotta slip onto the raised double-coils. Use a steady hand and a fine brush to keep the color strictly on the raised lines, wiping away any drips immediately. -
Bisque fire:
Let the vase dry completely. Fire it to bisque temperature (usually Cone 04 or 06). -
Glazing:
To maintain the raw, earthy look of the image, apply a thin matte clear glaze over the entire piece, or simply wipe back a white glaze so it stays only in the textures. Wipe the bottom clean. -
Final firing:
Fire the kiln to the maturity temperature of your clay body (likely Cone 5 or 6 for stoneware). Allow to cool slowly.
Color Contrast
Instead of red iron oxide, try using a black stain on the raised coils for a graphic, high-contrast modern look against white clay.
Place your finished vase near a window where the light can catch the texture of the carving and the depth of the waves