
When I’m craving something cute and quick, air dry foam clay is my go-to because it’s lightweight, comfy to shape, and dries into that soft matte finish. Here are my favorite kawaii foam clay ideas—all small-scale, beginner-friendly, and seriously hard not to love.
Simple Chibi Bunny Figurines
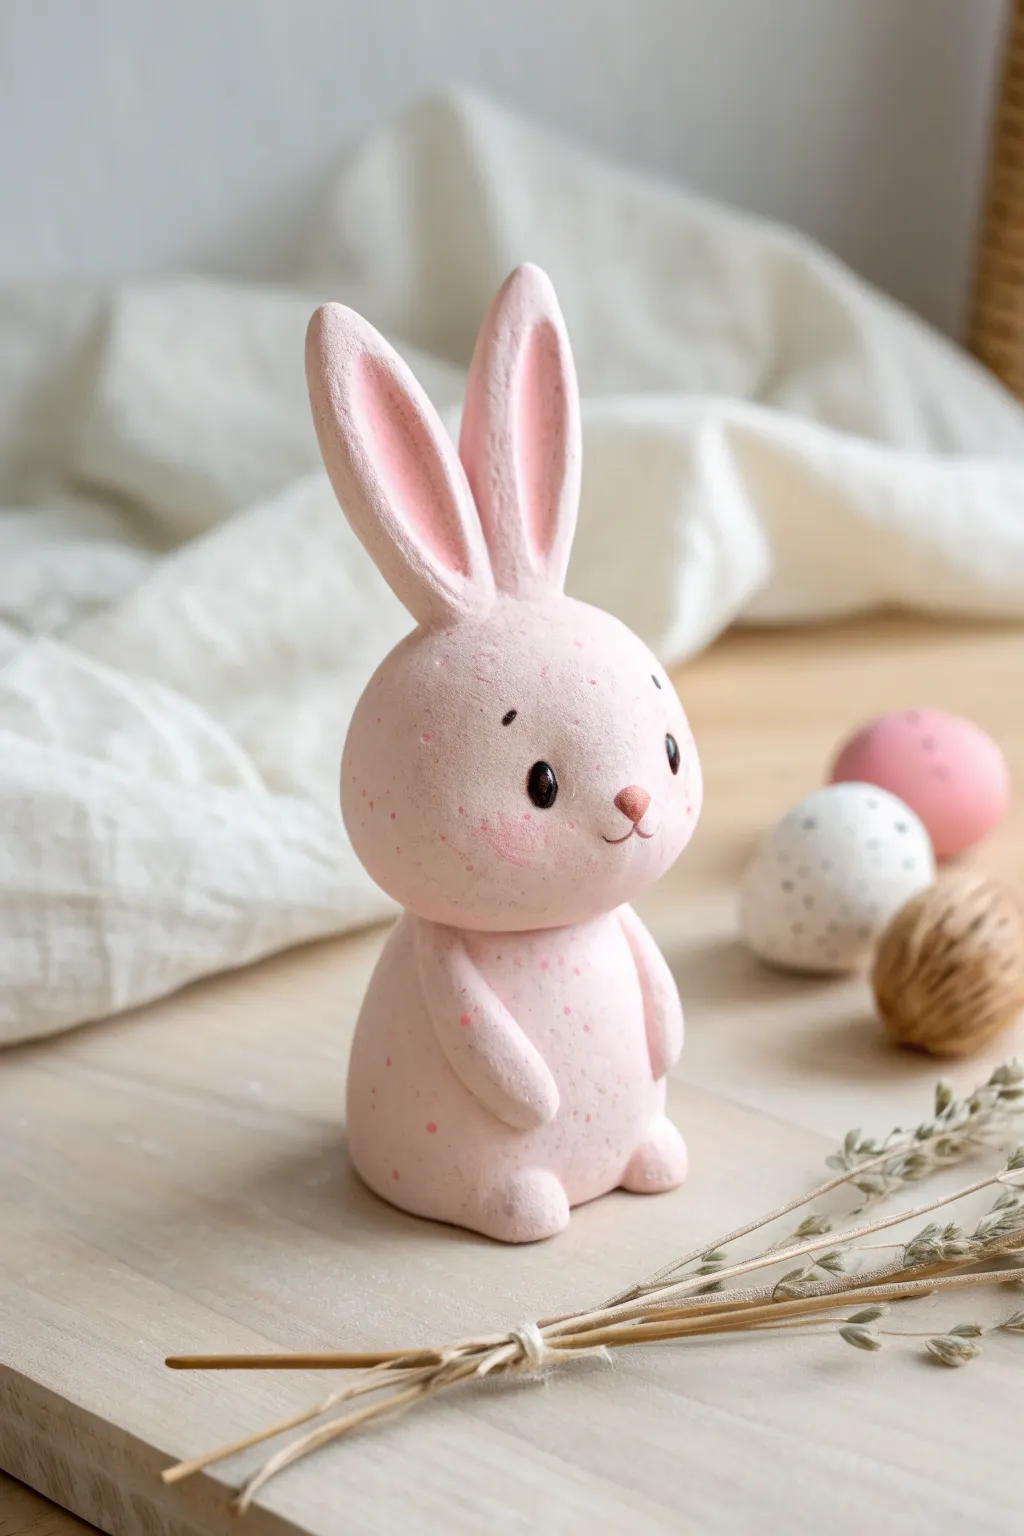
Create this adorable, soft-touch bunny figurine using the unique texture of air dry foam clay. Its simple, rounded shapes and speckled finish give it a charming, rustic pottery look without the need for a kiln.
How-To Guide
Materials
- Pink air dry foam clay
- White air dry foam clay (to lighten the pink if needed)
- Set of clay sculpting tools (ball tool, needle tool)
- Black acrylic paint or Posca pen (for eyes)
- Dark pink or terracotta acrylic paint (for nose and freckles)
- Small stiff paintbrush or old toothbrush
- Creating mat or parchment paper
- Water
- Glue (optional, for extra security)
Step 1: Shaping the Base
-
Mix your base color:
Start by conditioning your pink foam clay. If the pink is too vibrant, knead in a small amount of white clay until you achieve a soft, pastel marshmallow pink tone. -
Form the body:
Take a generous lump of clay and roll it into a smooth ball. Gently taper the top slightly to create a very subtle pear shape, flattening the bottom so it sits sturdily on your work surface. -
Roll the head:
Roll a second ball of pink clay, slightly smaller than the body. It should be spherical but just a tiny bit wider than it is tall for that cute chibi look. -
Connect the parts:
Press the head firmly onto the top of the body. Since foam clay adheres well to itself while fresh, you usually don’t need glue, but you can dampen the contact points slightly with water if the clay feels dry.
Seamless Smoothness
To remove fingerprints from foam clay before it dries, dip your finger in a tiny bit of water and gently rub the surface in circular motions.
Step 2: Sculpting the Features
-
Create the ears:
Roll two equal-sized logs of pink clay. Taper both ends of each log to create long, elongated tear-drop shapes. -
Indent the inner ears:
Using a modeling tool or your pinky finger, gently press down the center of each ear to create a groove. This adds depth and mimics the inner ear structure. -
Attach the ears:
Press the wide bottom of the ears onto the top of the head. I like to angle them slightly outward to give the bunny a curious expression. Smooth the seam where the ear meets the head using a clay tool. -
Make the arms:
Roll two small sausage shapes for the arms. Flatten one end slightly and press them onto the sides of the body, angling them downwards so they rest gently against the tummy. -
Add tiny feet:
Roll two very small balls of clay for the feet. Press them underneath the front of the body, just peeking out, to complete the seated posture.
Cracked Clay?
If cracks appear as the clay dries, mix a tiny bit of fresh clay with water to make a paste and fill the cracks, smoothing it out with your finger.
Step 3: Detailing and Painting
-
Let it dry:
Allow your bunny to dry completely. Foam clay can take 24-48 hours depending on thickness. It will feel lightweight and firm when ready. -
Paint the nose:
Using a fine brush and terracotta or dark pink paint, carefully paint a small, rounded triangle nose in the center of the face. -
Draw the mouth:
Paint a very thin, vertical line downwards from the nose, splitting into a tiny ‘w’ shape to form the mouth. -
Add the eyes:
With black paint or a Posca marker, draw two oval eyes. Add a tiny white dot in each eye as a highlight to bring the character to life. -
Create the speckled texture:
Dilute a small amount of dark pink or reddish-brown paint with water. Dip a stiff brush (or toothbrush) into the mixture, then run your thumb across the bristles to flick tiny speckles over the bunny’s surface. -
Blush the cheeks:
Use a dry brush technique or a cotton swab with a tiny amount of pink paint or pastel dust to gently rosy up the cheeks right under the eyes. -
Detail the eyebrows:
Add two tiny floating eyebrows above the eyes specifically to give it that worried or sweet expression shown in the photo.
Now you have a sweet little foam friend to sit on your shelf or gift to someone special


Tiny Frog Heads With Blush Cheeks
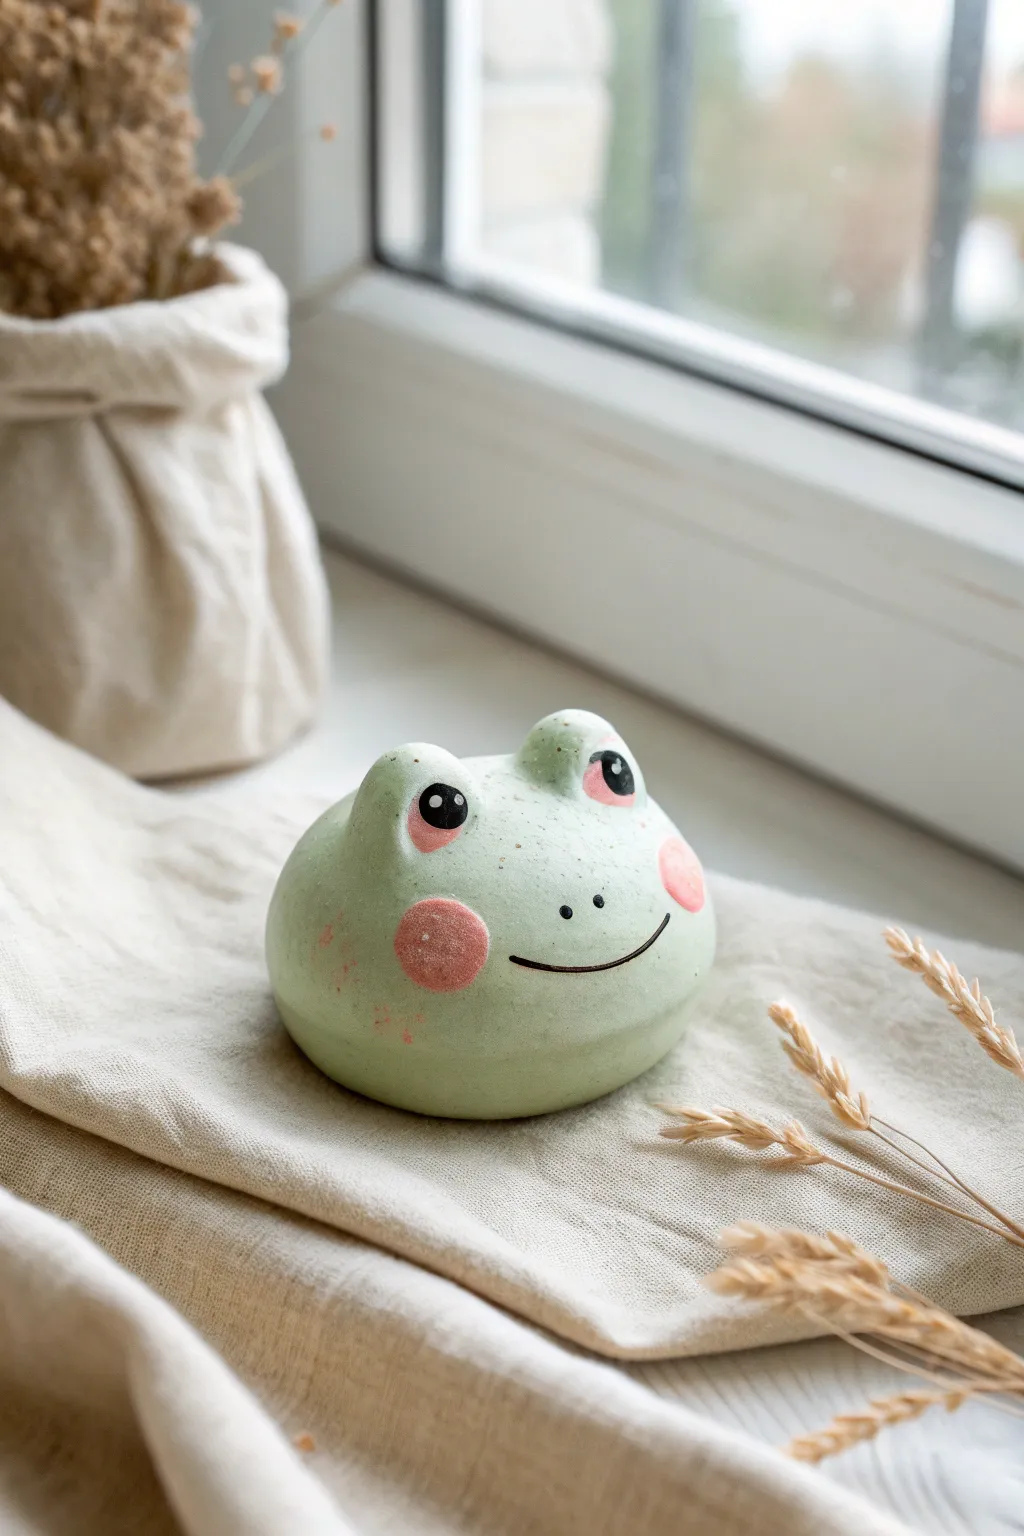
These delightfully round frog companions bring a touch of woodland charm to any windowsill or desk. With their soft matte finish, rosy cheeks, and simple smiling faces, they are the perfect beginner-friendly project for mastering basic spherical sculpting.
Step-by-Step
Materials
- Light green air dry foam clay (or white clay mixed with green pigment)
- Black acrylic paint or Posca marker
- Pink acrylic paint or Posca marker
- Soft pink pastel chalk (for the blush)
- Small fluffy paintbrush
- Fine detail paintbrush or dotting tool
- Fine grit sandpaper or sanding sponge
- Matte sealant spray (optional)
- Water in a small cup
Step 1: Sculpting the Base
-
Condition the Clay:
Start by kneading a golf-ball-sized amount of pale green foam clay until it feels warm and completely smooth. -
Form the Sphere:
Roll the clay firmly between your palms to create a perfect sphere. Keep rolling until any visible seams or cracks disappear. -
Flatten the Base:
Gently press the sphere onto your work surface to create a flat bottom. This ensures your frog sits stably without rolling away. -
Shape the Eye Mounds:
Take two smaller, pea-sized balls of green clay for the eyes. These will be the protruding bumps on top of the head. -
Attach the Eyes:
Place the two small balls on top of the main sphere, positioning them slightly towards the front face but spaced apart. -
Blend the Seams:
Using a sculpting tool or your fingertip with a tiny drop of water, smooth the clay where the eye bumps meet the head so they look like one seamless piece. -
Refine the Shape:
Check the symmetry of the head. Gently tap down on the eye mounds if they are too pointy; you want a soft, rounded look. -
Initial Drying:
Let the sculpture sit undisturbed for at least 24 hours. Foam clay needs to dry completely through to the center before you paint it.
Cracked Clay?
If small cracks appear while the clay dries, mix a tiny bit of fresh clay with water to make a paste. Fill the cracks, let dry, and sand smooth.
Step 2: Sanding and Smoothing
-
Check for Imperfections:
Once fully dry, inspect the surface for any bumps, fingerprints, or uneven areas. -
Sand the Surface:
Gently buff the surface with fine-grit sandpaper or a sanding sponge. This is crucial for achieving that powdery, soft matte look seen in the photo. -
Dust Off:
Wipe the frog down with a clean, dry cloth to remove any clay dust generated by sanding.
Try a Toadstool
Create a little mushroom cap out of red clay to place on top of your frog’s head, turning it into a magical forest guardian.
Step 3: Painting the Features
-
Paint the Eye Sockets:
Using pink paint or a marker, draw a small semi-circle or oval shape on the side of each eye mound, acting as the eyelid or eye socket shading. -
Draw the Pupils:
With black paint and a fine detail brush (or a Posca pen), draw large, solid black circles inside the pink areas for the eyes. -
Add Highlights:
Dip the very tip of a toothpick or detail brush into white paint and add a tiny dot to the upper right corner of each pupil to bring the frog to life. -
Create the Smile:
Draw a very thin, wide ‘U’ shape for the mouth using black ink. I find using a fine-liner pen gives deeper control than a brush here. -
Add Nostrils:
Place two tiny black dots just above the smile line, centred between the eyes. -
Apply the Blush:
Scrape a little bit of pink pastel chalk into a powder. Pick it up with a dry fluffy brush. -
Buff Cheeks:
Gently buff the pink powder onto the cheeks in circular motions. Build the color up slowly for that soft, airbrushed effect. -
Freckle Detail:
For texture, you can dip an old toothbrush in watered-down rusty brown paint and flick it lightly over the frog for faint speckles. -
Seal (Optional):
To protect the pastel blush from smudging, apply a light coat of matte spray sealant.
Your little amphibian friend is now ready to brighten up your workspace


Puffy Cat Paw Magnets
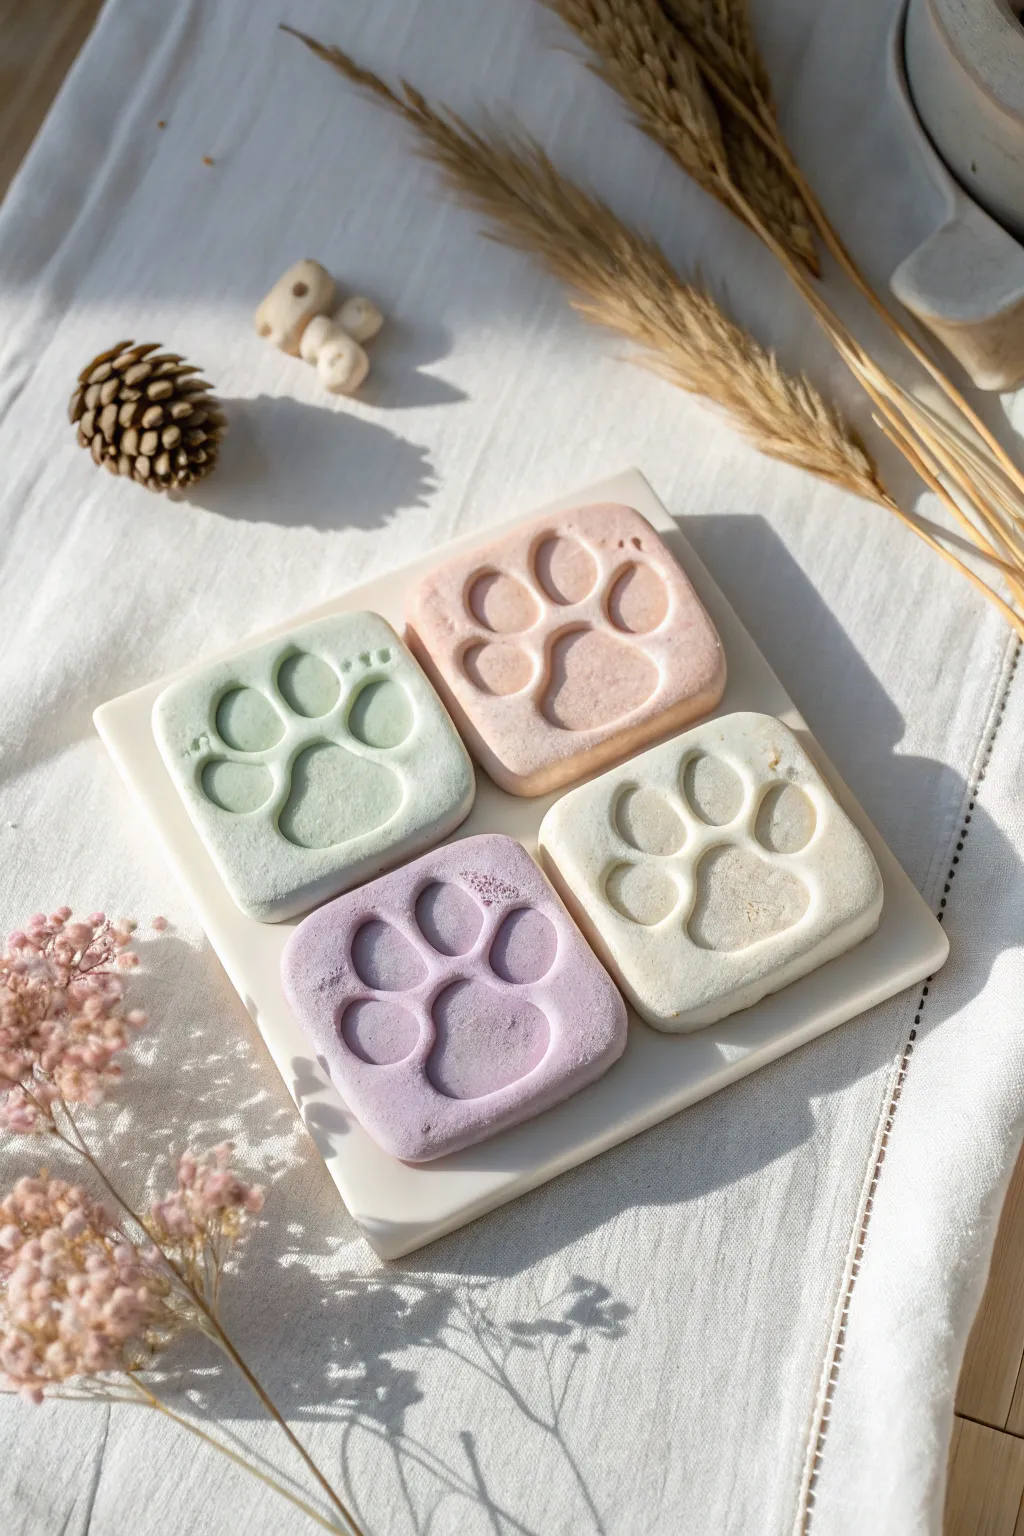
Capture the cuteness of toe beans with these soft, matte-finish paw print magnets made from air-dry foam clay. Their gentle pastel hues and smooth, depressed relief design make them a charming addition to any fridge or magnetic board.
Step-by-Step Guide
Materials
- White air-dry foam clay
- Acrylic paints (pastel pink, sage green, lavender, cream)
- Square cookie cutter (approx. 2-3 inches, rounded corners)
- Rolling pin (acrylic or non-stick)
- Parchment paper or non-stick craft mat
- Ball stylus tools (large and medium sizes)
- Small round magnets
- Strong craft glue (E6000 or super glue)
- Gloss varnish (optional, for the paw pads only)
Step 1: Prepping the Clay
-
Divide and conquer:
Start with a large chunk of white foam clay and divide it into four equal portions. Keep the portions you aren’t currently using inside an airtight bag or container to prevent them from drying out prematurely. -
Tinting the clay:
Take your first portion of white clay and add a tiny drop of pastel acrylic paint right into the center. Knead the clay thoroughly until the color is completely uniform. Repeat this for all four colors: pink, green, lavender, and a warm cream. -
Achieving the right tone:
Foam clay dries darker than it looks when wet. Aim for a very pale, milky shade while mixing; if the color looks too vibrant now, add more white clay to soften it back to a pastel hue.
Sticky Situation?
If the clay sticks to your ball tool when making indentations, dip the tool in a tiny bit of water or baby oil before pressing. This creates a smooth release without tearing the foam.
Step 2: Shaping the Base
-
Roll it out:
Place a ball of tinted clay onto your parchment paper. Using the rolling pin, flatten it into a slab that is approximately 1/4 to 1/2 inch thick. You want it relatively thick so the deep paw impressions won’t break through the back. -
Cut the square:
Press your square cookie cutter firmly into the rolled clay. Wiggle it slightly to ensure a clean cut, then remove the excess clay from around the edges before lifting the cutter. -
Soften the edges:
Once released from the cutter, the edges might be sharp or slightly ragged. Gently tap each side and corner with your fingertip to round them off, giving the piece a soft, stone-like appearance.
Step 3: Creating the Impressions
-
Marking general placement:
Lightly touch the surface of the clay to visualize where the main pad and the four toe beans will go. You want the main pad slightly lower than center, with toes arced above it. -
The main pad:
Using the largest ball stylus tool (or the rounded end of a dedicated clay tool), press firmly into the lower center of the square. don’t just push down; rock the tool slightly in a triangular motion to create that classic heart-like paw pad shape. -
Adding the toes:
Switch to a slightly smaller ball tool for the toes. Press four deep, oval indentations in an arch above the main pad. Make sure they are deep enough to create a nice shadow contrast. -
Refining the shape:
If the clay bulged out the sides while pressing, gently push the square sides back inward to maintain the uniform shape. Smooth out any fingerprints on the surface with a tiny bit of water.
Make Them Sparkle
Mix a pinch of fine white glitter into the clay before rolling it out. It adds a subtle shimmer that mimics snow or sugar without changing the matte texture.
Step 4: Finishing Up
-
Drying time:
Lay the squares flat on a clean sheet of parchment paper. Let them dry undisturbed for at least 24-48 hours. I find flipping them over halfway through the drying process helps the back dry evenly. -
Adding texture (optional):
If you want that slightly powdery, stone-like look visible in the photo, you can lightly dust the surface with cornstarch before it’s fully dry, or sand it very lightly with fine-grit sandpaper once hardened. -
Attaching the magnet:
Once the clay is completely lightweight and hardened, flip the squares over. Apply a dot of strong craft glue to the back and press your magnet into place. Let the glue cure completely.
Your adorable paw prints are now ready to hold up your favorite photos and notes on the fridge


Mini Mushroom Friends
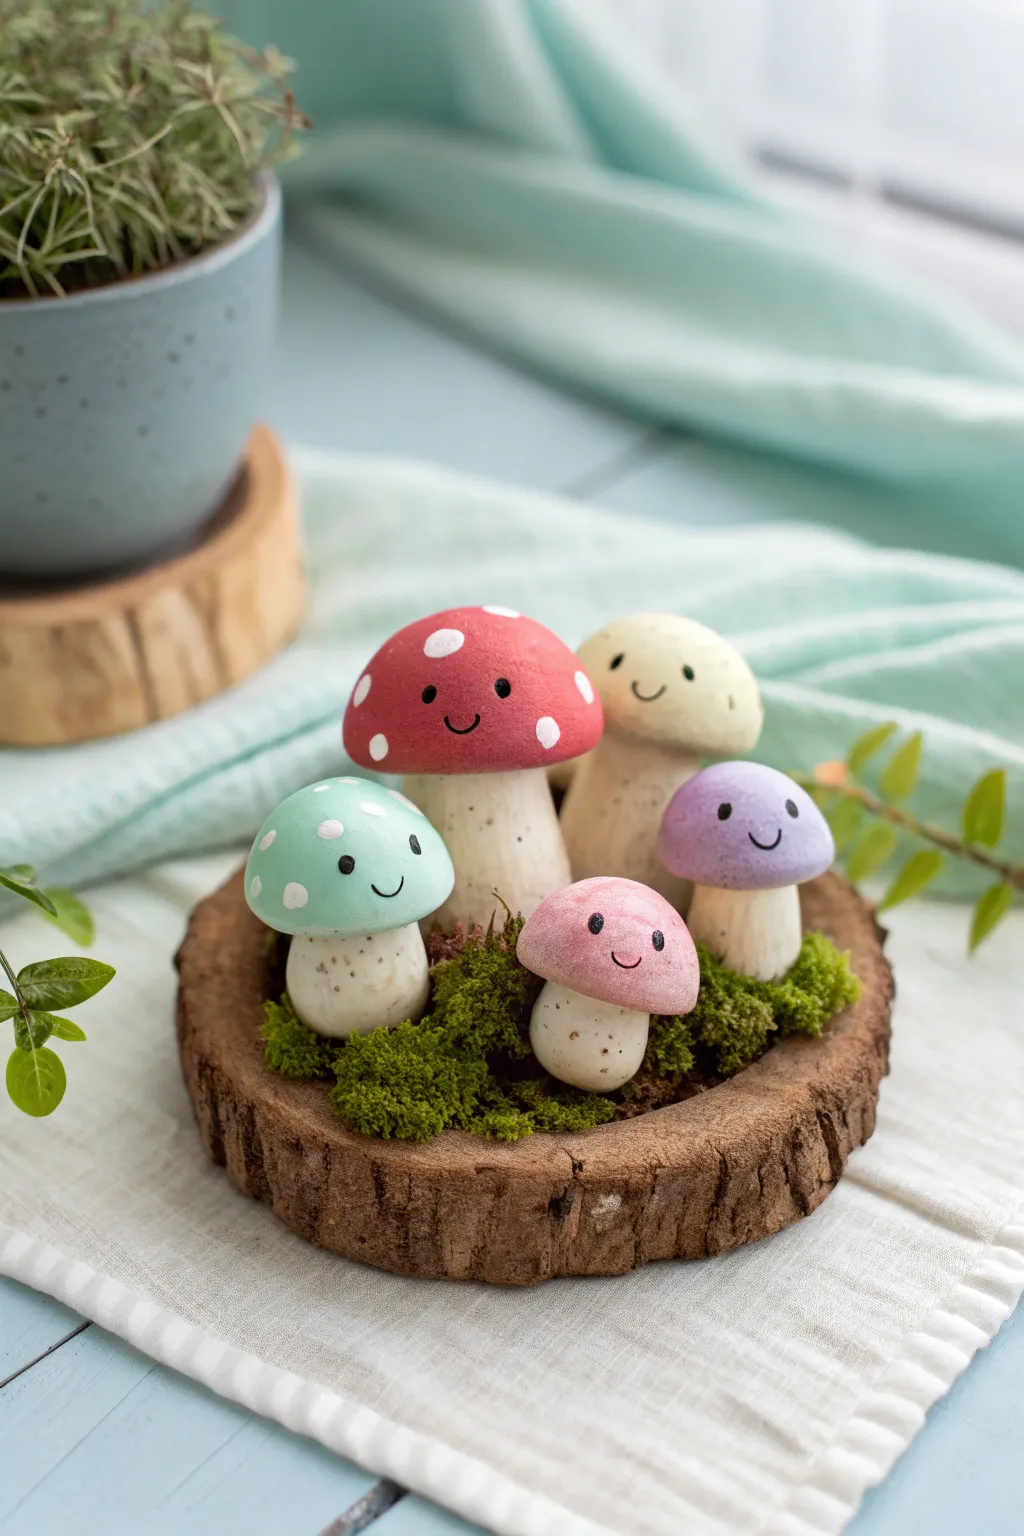
Create a tiny, enchanted forest scene with these delightful foam clay mushrooms, each sporting a friendly smile and pastel cap. This charming display piece brings a touch of nature indoors and makes for a perfect desk companion or shelf accent.
Detailed Instructions
Materials
- Air dry foam clay (white, red, teal, yellow, purple, pink)
- Small wood slice (approx. 4-6 inches diameter)
- Dried sphagnum or reindeer moss (green)
- Acrylic paint (black for eyes/mouths, brown for speckling)
- Fine detail paintbrush or dotting tool
- Old toothbrush (for texture)
- Craft glue or hot glue gun
- Sculpting tool or needle tool
Step 1: Sculpting the Shapes
-
Prepare the stems:
Start by pinching off balls of white or cream foam clay to create the mushroom stalks. You will need five distinct stems. -
Shape the stalks:
Roll each ball into a thick cylinder, making the base slightly wider than the top so they stand sturdily. Vary the heights and thicknesses to give each mushroom character. -
Form the caps:
Take your colored clay (red for the big one, then teal, cream, purple, and pink) and roll them into balls sized appropriately for your stems. -
Mold the domes:
Gently press your thumb into the bottom of each colored ball to create a domed cap shape. Smooth the edges so they are rounded and soft. -
Join the pieces:
Press the caps firmly onto the tops of the stems. Since foam clay is slightly sticky while fresh, they should bond easily, but a tiny dab of water can help secure them if needed.
Smoother Surfaces
If your foam clay has cracks after rolling, dip your finger in a tiny drop of water and smooth it over the surface. Don’t use too much water or the clay will get slimy.
Step 2: Adding Personality and Detail
-
Add white spots:
For the red and teal mushrooms, roll tiny, flat circles of white clay and press them randomly onto the caps to create classic toadstool spots. -
Texture the stems:
Using an old toothbrush, gently tap the white stems to give them a slightly organic, earthy texture rather than leaving them perfectly smooth. -
Speckle the clay:
Dip an old toothbrush into watered-down brown acrylic paint. Run your thumb across the bristles to flick tiny specks of paint onto the lower parts of the stems for a realistic, dirt-dusted look. -
Paint the faces:
Using a very fine detail brush or a dotting tool dipped in black acrylic paint, add two small eyes and a simple U-shaped smile to each stem. -
Let them dry:
Allow your little mushroom family to dry completely for at least 24 hours. They will harden into a lightweight, durable foam.
Glow Up
Mix glow-in-the-dark powder into the white clay spots on the red and teal mushrooms. Your little forest friends will softly illuminate tightly at night.
Step 3: Assembling the Scene
-
Prepare the base:
Plan the arrangement of your mushrooms on the wood slice before gluing. I like to group the tallest ones in the back to create depth. -
Glue the mushrooms:
Apply a strong craft glue or hot glue to the bottom of each stem and press them firmly onto the wood slice in your chosen formation. -
Add the greenery:
Apply glue to the exposed wood surface around the base of the mushrooms. -
Tuck in the moss:
Press clumps of preserved green moss into the glue, filling in all the gaps between the mushrooms to make them look like they are sprouting from a forest floor. -
Final touches:
Check for any loose moss pieces and gently brush away any stray specks from the mushroom caps to finish your display.
Now you have a sweet little mushroom family to brighten up any corner of your home

What Really Happens Inside the Kiln
Learn how time and temperature work together inside the kiln to transform clay into durable ceramic.
Star And Cloud Bag Charms
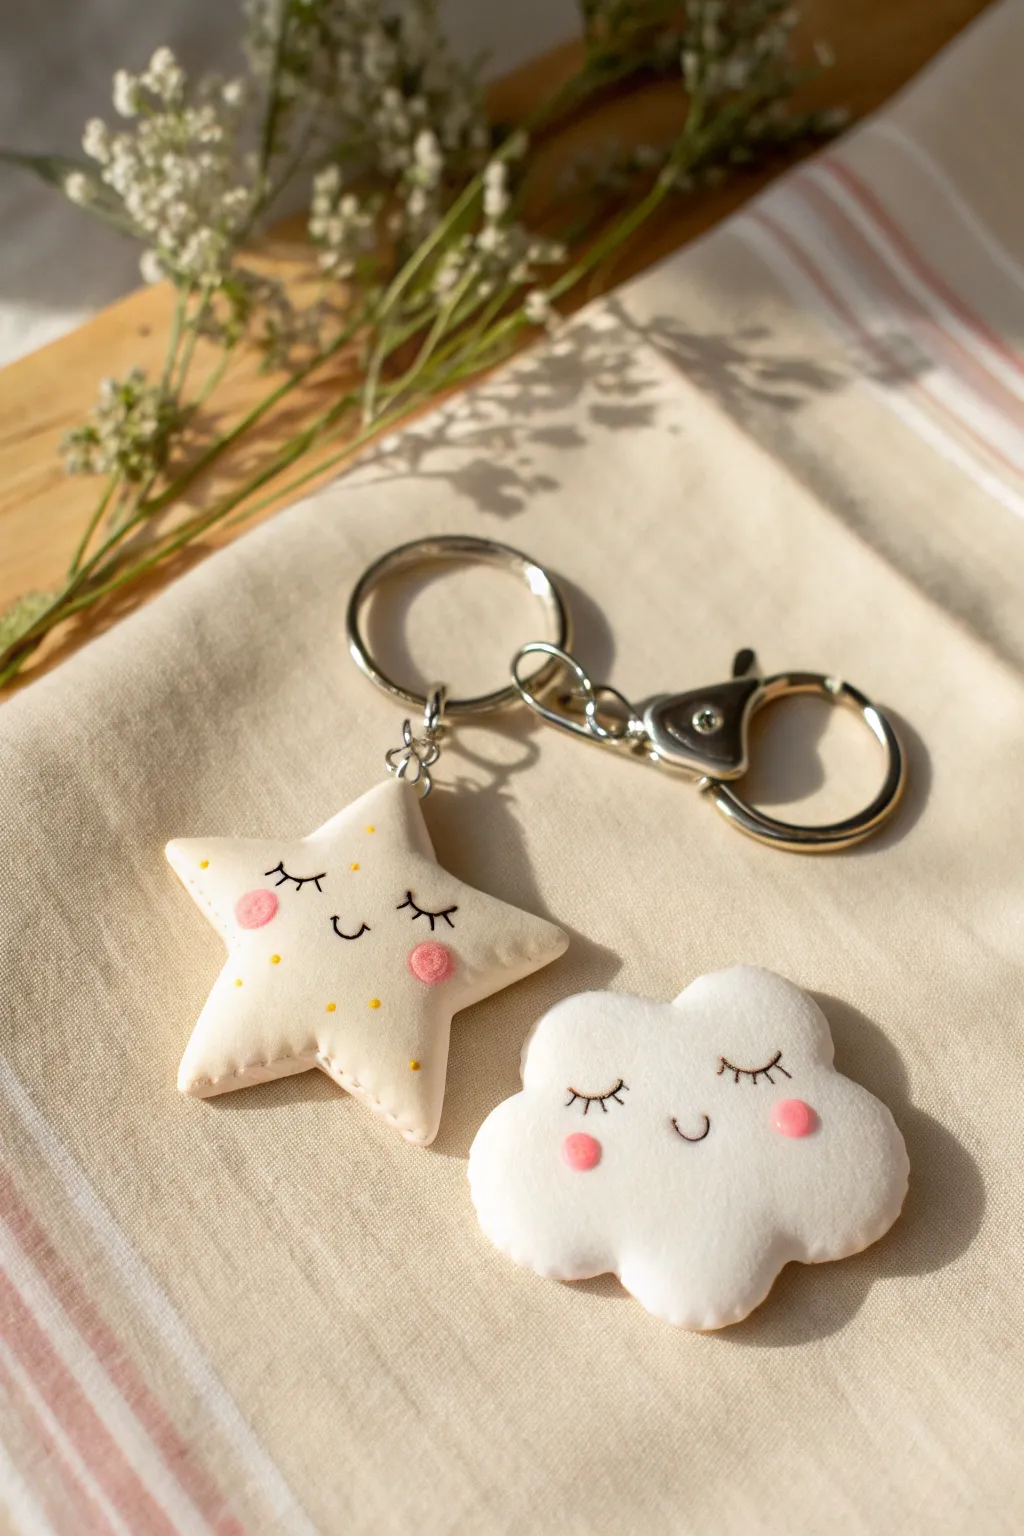
Create a pair of sweet, sleeping celestial friends to accessorize your favorite tote or backpack. These puffy, soft-focus charms are made from lightweight foam clay, giving them a delightful squishy texture and a gentle, handcrafted look.
Step-by-Step
Materials
- White extra-light foam clay (air dry)
- Small rolling pin or smooth acrylic marker
- Star cookie cutter (approx. 2-3 inches)
- Cloud cookie cutter (approx. 2-3 inches)
- Craft knife or plastic clay tool
- Black fine-point pigment liner or acrylic paint pen
- Pink soft pastel chalk (or pink powdered blush)
- Small, soft paintbrush or cotton swab
- Yellow acrylic paint or paint pen (for star details)
- Eye screw pins (silver)
- Keyring hardware with lobster clasp
- Jump rings
- Pliers
- High-gloss varnish or UV resin (optional, for eye highlights)
- Clear drying craft glue
Step 1: Shaping the Star
-
Condition the clay:
Begin by taking a generous ball of white foam clay. Knead and stretch it thoroughly in your hands to warm it up and remove any air pockets, ensuring a smooth, crack-free surface. -
Roll it out:
On a non-stick surface, roll the clay out to a thickness of about 1/4 to 1/2 inch. You want these to be relatively thick and puffy, resembling a soft pillow rather than a flat cookie. -
Cut the shape:
Press your star cookie cutter firmly into the rolled clay. If the clay sticks to the cutter, gently push it out from the back, being careful not to dent the surface. -
Soften the edges:
Once cut, the edges might look a bit sharp or square. Use your finger to gently tap and smooth the perimeter, rounding off the corners slightly to give it that soft, inflated look. -
Insert hardware:
While the clay is still wet, take a silver eye screw pin. dip the threaded end into a tiny dab of craft glue and insert it carefully into the top point of the star. Ensure it goes in straight and feels secure.
Wrinkle Rescue
If the clay surface wrinkles while drying, dip your finger in a tiny bit of water and gently rub the area in a circular motion to smooth it back out.
Step 2: Crafting the Cloud
-
Prepare the second batch:
Take another portion of white foam clay, conditioning it just like before until it’s pliable and smooth. -
Create the cloud form:
Roll this batch to the same thickness as your star. Use your cloud cutter to stamp out the shape. If you don’t have a cutter, you can hand-sculpt a flat oval and punch out semi-circles using a small round cap. -
Refine the border:
Run your fingertip along the scalloped edges of the cloud. I find that gently pinching the curves helps define them while keeping that signature puffy aesthetic. -
Initial Drying:
Lay both the star and the cloud on a clean sheet of parchment paper. Let them surface-dry for about 2-3 hours so the outside forms a ‘skin’ which makes drawing easier, though the inside will still be soft.
Step 3: Adding Faces and Details
-
Draw the eyes:
Using a fine-point black pigment liner, carefully draw two closed eyelids with eyelashes on key shapes. Aim for the center-lower portion of the clay to make them look cute and sleepy. -
Add the smile:
directly between the eyes, draw a tiny, simple ‘U’ shape for the smiling mouth. Keep the line thin and delicate. -
Prepare the blush:
Scrape a small amount of pink soft pastel chalk into a powder using a craft knife. If you don’t have pastels, real powder blush works in a pinch. -
Apply rosy cheeks:
Dip a soft brush or cotton swab into the pink powder. Dab off the excess, then gently apply circular spots of blush to the clay just below the eyes on both charms. -
Decorate the star:
For the star charm specifically, use a yellow paint pen or a toothpick dipped in yellow acrylic paint to add tiny dots scattered across the face for a magical twinkle effect. -
Add highlights:
To make the cheeks pop, you can add a tiny dot of white paint or a drop of UV resin/gloss glaze directly onto the pink blush spots for a shiny finish. -
Full cure time:
Allow the clay to dry completely. Foam clay can take 24-48 hours to fully harden all the way through depending on humidity and thickness.
Pastel Pro Tip
Apply the pastel blush while the clay is still slightly damp (but not wet). The pigment bonds better with the moist foam, creating a softer gradient effect.
Step 4: Final Assembly
-
Connect the star:
Open a jump ring using two pairs of pliers (twist side-to-side, don’t pull apart). Thread it through the eye screw on the star and attach it to the keychain hardware. -
Attach the cloud (Optional):
The image shows the cloud as a separate decorative element. You can either glue a flat magnet to the back, or if you inserted an eye pin earlier, attach it to the same keyring alongside the star. -
Secure the links:
Close the jump rings tightly with your pliers, ensuring there is no gap for the charm to slip through.
Your adorable sleepy sky friends are now ready to add a touch of whimsy to your day
Kawaii Name Tags With Puffy Letters

Create this delightfully tactile accessory that mimics the look of a soft, oversized button on your bag. With its smooth matte finish and engraved details, this pastel pink charm adds a touch of kawaii sweetness to any zipper pull.
Step-by-Step Guide
Materials
- Pastel pink air-dry foam clay
- Rolling pin or smooth round marker
- Round cookie cutter (approx. 2-3 inches)
- Small sculpting tools or a dull needle tool
- Ball stylus tool (various sizes)
- Metal jump ring (large)
- Lobster clasp keychain hardware
- Needle nose pliers
- Clear matte varnish (optional)
Step 1: Shaping the Base
-
Condition the clay:
Start by taking a golf-ball-sized amount of pastoral pink foam clay. Knead and stretch it in your hands for about 30 seconds to warm it up and ensure the texture is completely smooth and free of air bubbles. -
Roll it out:
Place the ball on a non-stick surface or silicon mat. Using a rolling pin, flatten the clay until it is an even slab, approximately 1/4 inch (6mm) thick. You want it substantial enough to hold the hardware securely. -
Cut the circle:
Press your round cookie cutter firmly into the clay slab. Give it a gentle twist before lifting the cutter away to ensure a clean edge. -
Smooth the edges:
Dip your finger in a tiny bit of water and gently run it around the circumference of your clay circle. This softens the sharp cut edge into a nice, rounded finish mimicking a stone or candy.
Cracking Clay?
If you see tiny cracks forming while carving, dip your tool in water. The moisture helps the tool glide through foam clay without tearing or dragging the surface.
Step 2: Adding Details
-
Punch the hardware hole:
While the clay is still wet, use a straw or a large sculpting tool to punch a clean hole near the top edge. Ensure there is at least 5mm of clay between the hole and the edge for strength. -
Outline the border:
Using a small ball stylus, gently press a ring of dots around the outer perimeter of the circle. Keep the spacing somewhat random for a playful, hand-drawn look. -
Carve the heart:
In the center-left area, use a needle tool or fine sculpting point to carve a simple heart outline. Press deep enough to create a shadow but not all the way through the clay. -
Create raised bumps:
Take tiny pinches of leftover clay and roll them into small balls. Press these onto the surface of the charm gently so they adhere but remain dimensional, creating ‘puffy’ dots. -
Add swirling textures:
Use your needle tool to sketch small swirls and organic shapes in the negative space. I find that vary the pressure creates a more interesting, engraved effect. -
Personalize text:
If desired, carefully etch a name or word into the bottom right section using the very tip of your tool. Keep the letters blocky and simple.
Add a Pop of Color
Before sealing, lightly brush pastel chalk dust into the etched grooves (like the heart lines). This highlights the carving and adds visual depth to the monochrome clay.
Step 3: Assembly & Finishing
-
Let it cure:
Place the charm on a flat surface to dry. Foam clay typically needs 24-48 hours to fully harden depending on humidity. Flip it over halfway through the drying time to ensure the back dries evenly. -
Seal the surface:
Once bone dry, apply a thin coat of clear matte varnish if you want to protect the etched details from dirt, though raw foam clay has a lovely texture on its own. -
Open the jump ring:
Using two pairs of pliers, twist the large jump ring open. Do not pull the ends apart; twist them laterally to maintain the circle shape. -
Attach to clay:
Slide the open jump ring through the hole you created in the dried clay charm. -
Connect the clasp:
Add the bottom loop of your lobster clasp keychain assembly onto the jump ring. -
Close the ring:
Use your pliers to twist the jump ring back shut, ensuring the two ends meet perfectly flush so the charm doesn’t slip off. -
Final check:
Give the hardware a gentle tug to test security before attaching it to your backpack zipper.
Clip this adorable charm onto your favorite bag and enjoy the satisfying squish of the foam texture


The Complete Guide to Pottery Troubleshooting
Uncover the most common ceramic mistakes—from cracking clay to failed glazes—and learn how to fix them fast.
Foam Clay “Sprinkle” Trinket Dish Rim
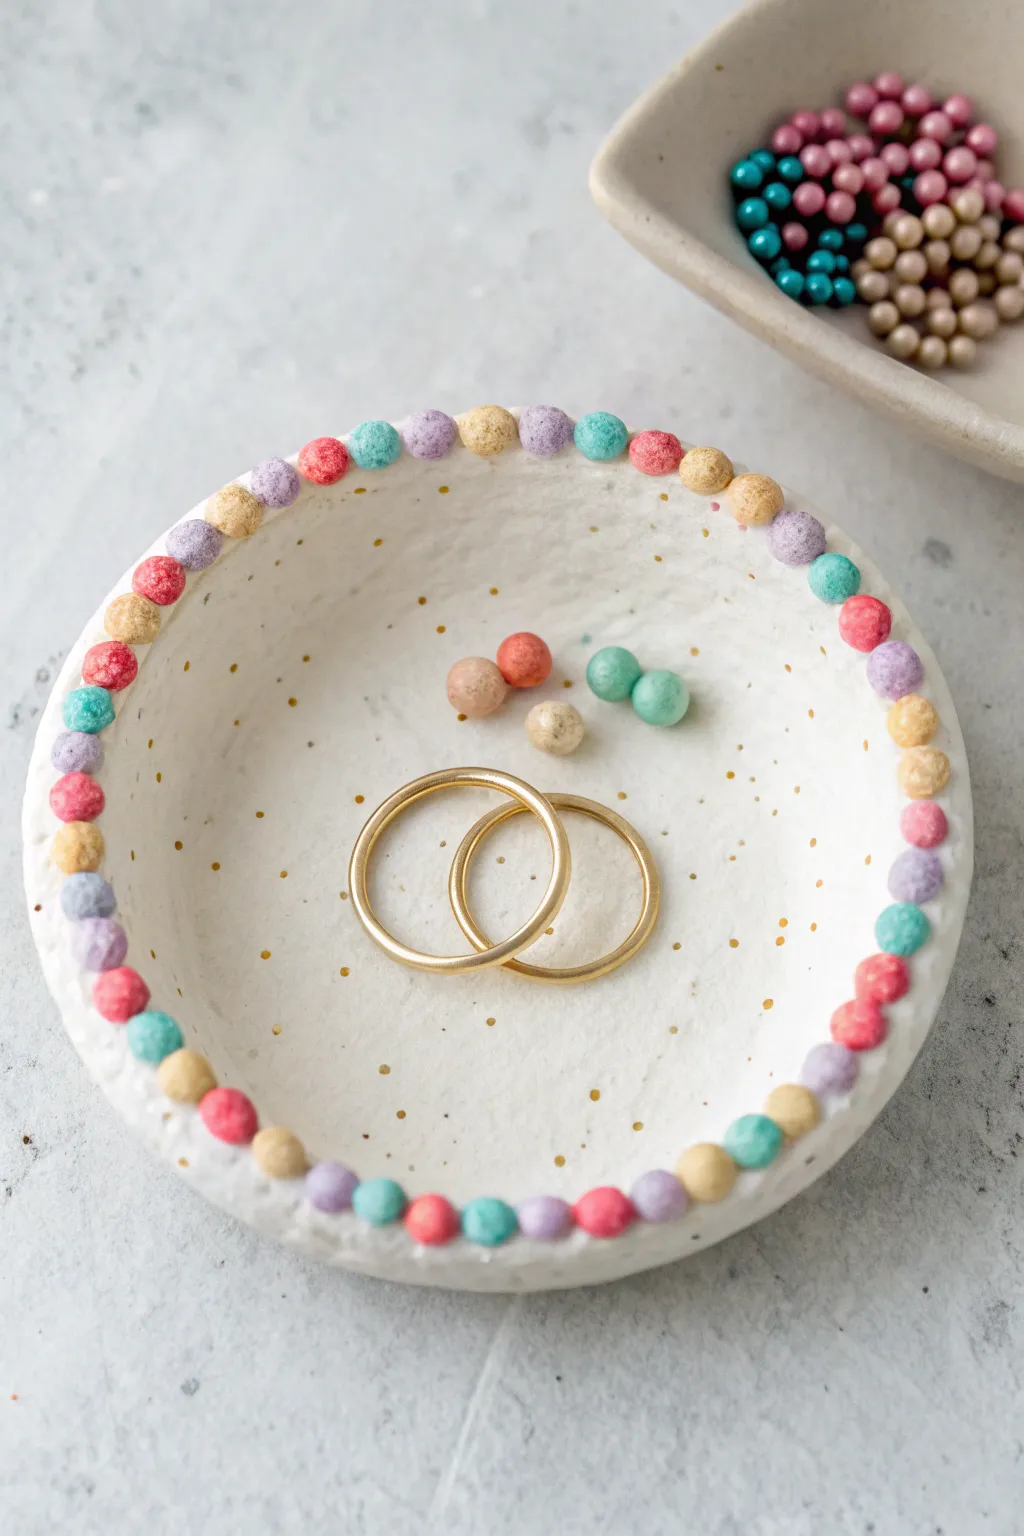
Transform plain air dry clay into a sweet, confetti-inspired catch-all with this simple yet charming project. The delicate speckled texture and cheerful foam clay rim create a perfect resting spot for your favorite rings or dainty jewelry.
How-To Guide
Materials
- White air dry clay
- Foam clay in pastel colors (blue, pink, purple, yellow, coral)
- Small bowl (to use as a mold)
- Rolling pin
- Sandpaper (fine grit)
- Craft knife or clay trimming tool
- Gold acrylic paint
- Stiff bristle toothbrush or splatter brush
- Clear matte varnish (optional)
- Parchment paper
Step 1: Shaping the Base
-
Prepare your workspace:
Lay down a sheet of parchment paper to prevent sticking. Take a handful of white air dry clay and knead it briefly until it is pliable and smooth. -
Roll the slab:
Use your rolling pin to flatten the clay into an even slab, aiming for a thickness of about 1/4 inch. Try to keep the thickness consistent so the dish dries evenly. -
Cut the circle:
Place your bowl upside down on the clay slab as a stencil or use a circular cookie cutter. Trace around the edge with a craft knife to cut out a perfect circle. -
Form the dish:
Gently lift your clay circle and place it inside your bowl mold. Press it down lightly to take the shape of the bowl’s curve. -
Smooth the edges:
Dip your finger in a little water and run it along the rim of the clay to smooth out any rough cuts or cracks. -
Create the rim indentation:
Using your thumb or the back of a spoon, gently press down along the very top edge of the clay to create a slightly flattened or indented surface. This is where your ‘sprinkles’ will sit. -
Let it dry:
Allow the clay to dry completely inside the mold. This usually takes 24-48 hours depending on humidity. I like to flip it carefully halfway through to let the bottom breathe.
Sprinkle Texture Tip
Let the tiny foam balls sit for about 5 minutes before attaching. Slightly dried foam clay holds its round shape better and won’t flatten when you press it onto the rim.
Step 2: Adding the Speckles
-
Refine the surface:
Once fully dry, remove the dish from the mold. Use fine-grit sandpaper to gently smooth out any bumps on the rim or interior. -
Prepare the splatter:
Mix a small amount of gold acrylic paint with a few drops of water to create a thin, ink-like consistency. -
Apply the gold speckles:
Dip a toothbrush into the thinned gold paint. Hold the brush over the dish and run your thumb across the bristles to flick tiny speckles onto the white surface. -
Let paint set:
Allow the gold speckles to dry completely, which should only take about 15-20 minutes.
Try a New Shape
Make matching oblong shapes out of the foam clay instead of spheres to mimic ‘jimmies’ sprinkles, or twist two colors together for marbleized candy beads.
Step 3: Creating the Sprinkle Rim
-
Roll foam clay balls:
Open your colored foam clay tubs. Pinch off tiny amounts of each color (blue, pink, purple, yellow, coral) and roll them between your fingers into small, uniform spheres about the size of a peppercorn. -
Create a stock:
Continue rolling balls until you have a colorful pile large enough to circle the entire rim of your dish. -
Check sizing:
Hold a few balls against the rim to ensure they aren’t too large or heavy for the delicate edge. -
Attach the first sprinkle:
Foam clay often sticks to porous surfaces on its own, but for a secure hold, dab a tiny dot of white glue on the rim before pressing the first ball in place. -
Build the pattern:
Continue gluing the foam balls along the rim, alternating colors in a random or repeating pattern. Press them gently so they adhere to the rim and to their neighbors. -
Complete the circle:
Work your way all around until the rim is fully covered. If the last space is too tight, you might need to squish the final ball slightly to fit it in snug. -
Final cure:
Let the foam clay balls air dry fully. They will harden into a firm, lightweight foam texture. -
Seal (optional):
For extra durability, you can brush a coat of clear matte varnish over the interior of the dish, avoiding the foam rim to keep its texture soft.
Now you have a delightful, color-trimmed vessel ready to hold your smallest treasures
Pocket “Worry Stars” With Soft Matte Finish
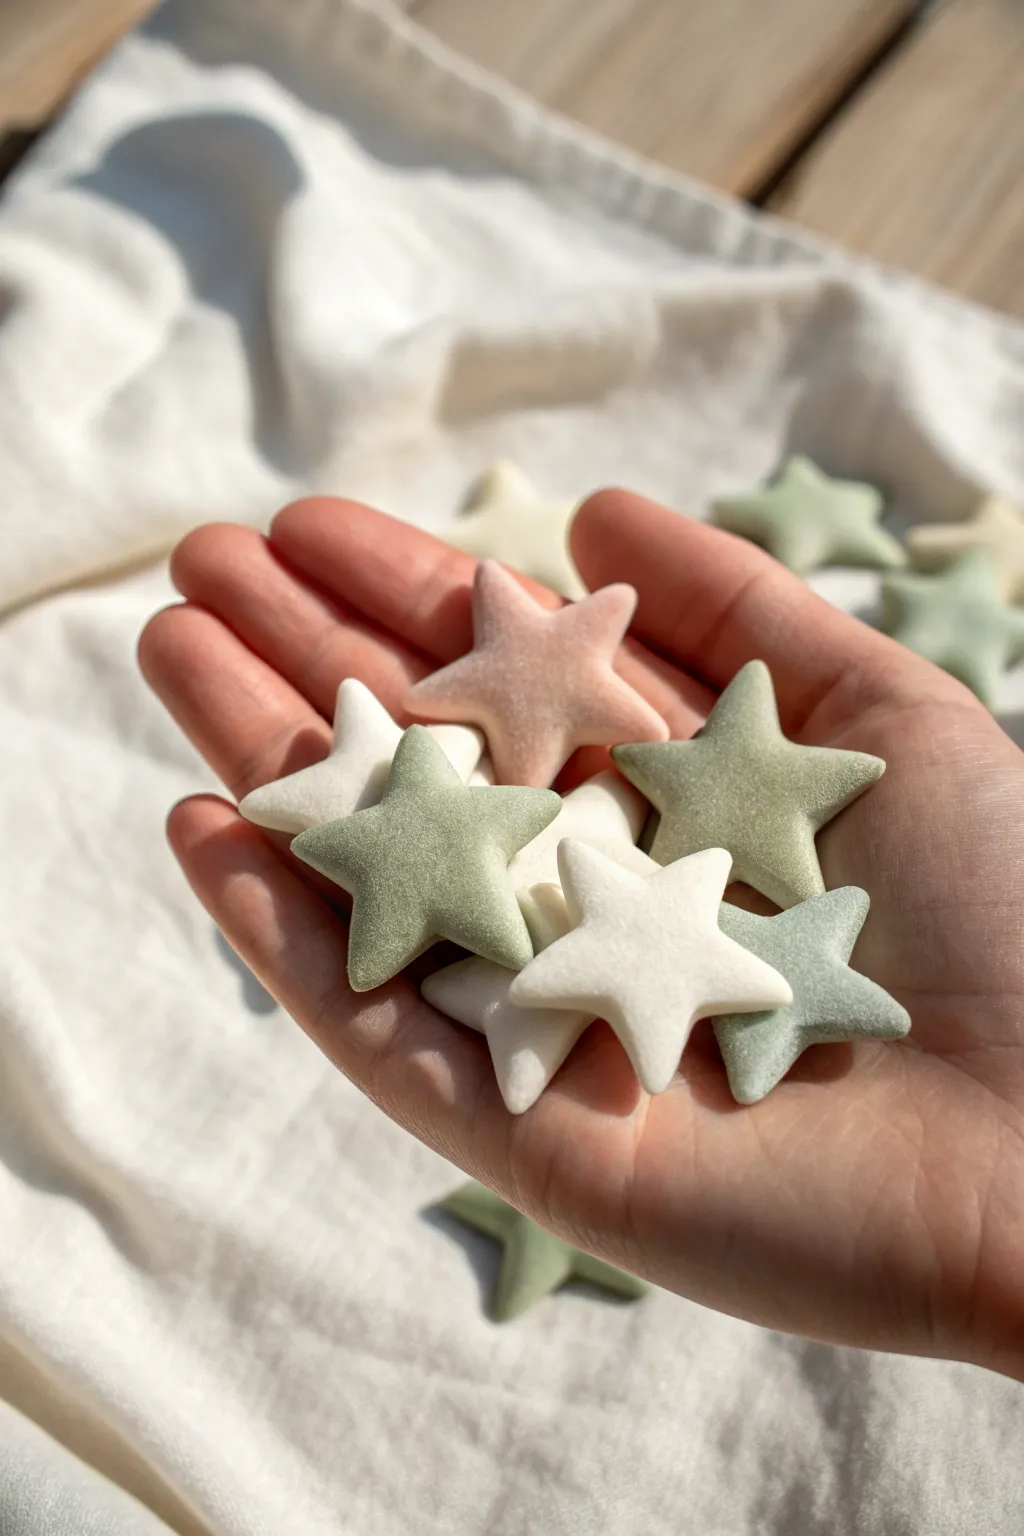
Create a handful of soothing, tactile worry stones in the shape of soft, puffy stars. These air-dry foam clay creations feature a velvety matte finish and gentle pastel hues like sage, blush, and cream, making them perfect for anxiety relief or sensory play.
How-To Guide
Materials
- White airy-dry foam clay
- Acrylic paints (Sage Green, Blush Pink, Cream/Titanium White)
- Small star-shaped cookie cutter (approx. 1.5 inches wide/point-to-point)
- Rolling pin or smooth acrylic roller
- Non-stick surface or silicone mat
- Cornstarch (optional, for dusting)
- Fine-grit sandpaper (300-400 grit)
- Matte finish spray sealant (optional)
- Soft brush
Step 1: Coloring the Clay
-
Prepare the base:
Start with a large ball of white foam clay. Divide it into three equal sections to create your color palette. -
Mix the sage green:
Take the first section and flatten it slightly. Add a tiny drop of sage green acrylic paint into the center. Fold the clay over the paint to enclose it. -
Knead thoroughly:
Stretch and pull the clay repeatedly like taffy until the color is completely uniform. If the color is too pale, add another minuscule drop of paint, but keep it light for that pastel look. -
Create the blush tone:
Repeat the mixing process with the second section of clay, using a small drop of blush pink paint. Knead until smooth and streak-free. -
Refresh the white:
For the third section, you can leave it plain white, but I sometimes mix in a tiny dot of cream or titanium white paint to make it more opaque and velvety.
Sticky Situation?
If the clay is sticking to your cutter, dip the cutter edges into a little cornstarch before pressing down. This helps it release cleanly without pulling.
Step 2: Shaping the Stars
-
Roll it out:
Take one colored ball of clay and place it on your non-stick mat. Use the rolling pin to flatten it into a slab. -
Check thickness:
Aim for a thickness of about 1/2 inch (roughly 1.2 cm). You want these to be puffy and substantial to hold, not thin and wafer-like. -
Cut the shapes:
Press your star-shaped cookie cutter firmly into the clay. Give it a little wiggle before lifting it up to ensure clean edges. -
Release the stars:
Gently push the clay star out of the cutter. Because foam clay is sticky, do this slowly to avoid warping the points. -
Soften the edges:
Immediately after cutting, use your fingertip to gently tap fast around the sharp cut edges. This rounds them off slightly, giving that ‘puffed pillow’ look seen in the photo. -
Repeat the process:
Continue rolling and cutting with all your clay colors until you have a pile of soft stars. Gather scraps and re-roll them to minimize waste.
Step 3: Drying and Finishing
-
Initial dry time:
Place the stars on a clean sheet of parchment paper. Let them air dry undisturbed for at least 24 hours. Don’t touch them too early or you might leave fingerprints. -
Flip them over:
After the first day, flip the stars over to ensure the bottom side dries evenly. Let them sit for another 12-24 hours until fully hardened but still lightweight. -
Sand for texture:
Once fully dry, take a piece of fine-grit sandpaper and very gently buff the surface and edges. This removes any tiny imperfections and enhances the velvety, matte texture. -
Dust off residue:
Use a soft brush to whisk away any sanding dust. The surface should feel incredibly smooth and soft to the touch. -
Optional sealing:
If these will be handled frequently as worry stones, apply a very light coat of matte spray sealant to protect them from dirt without adding shine.
Scented Stars
Knead a drop of essential oil (like lavender or chamomile) into the clay during the mixing phase to turn these into calming aromatherapy tools.
Keep a star in your pocket for a moment of calm whenever you need it