Glaze is where a good pot turns into a “wait, you made that?” pot. Here are my favorite cool ceramic glaze ideas that create movement, depth, and those delicious kiln surprises—without needing anything fussy.
Classic Two-Dip Layered Glazes
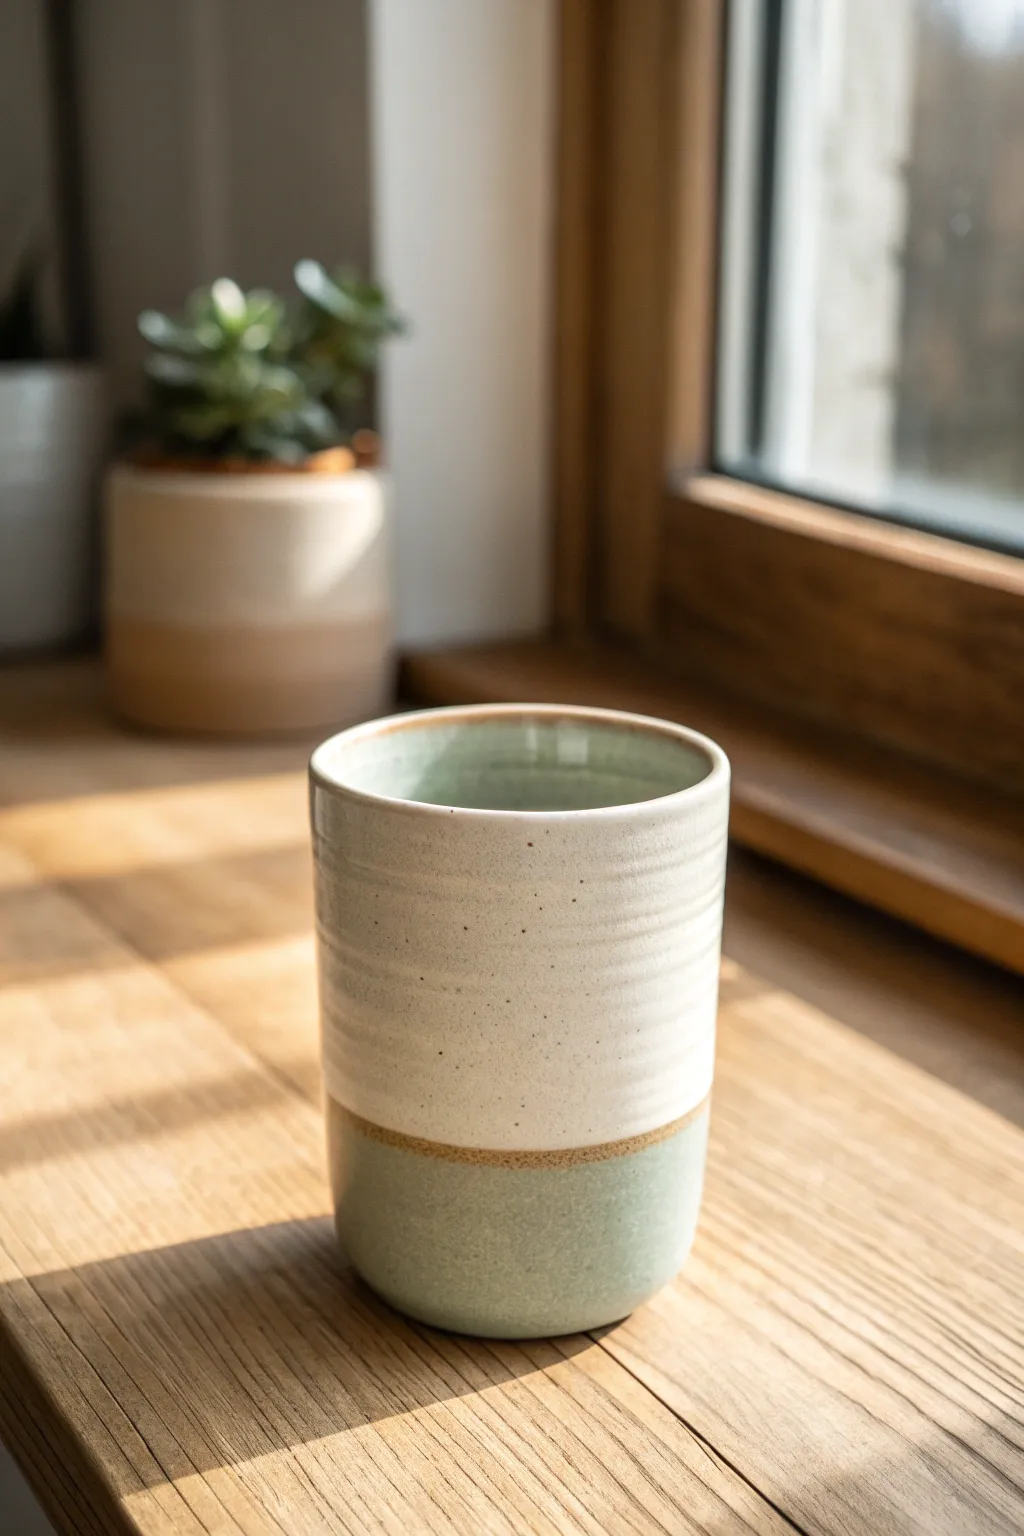
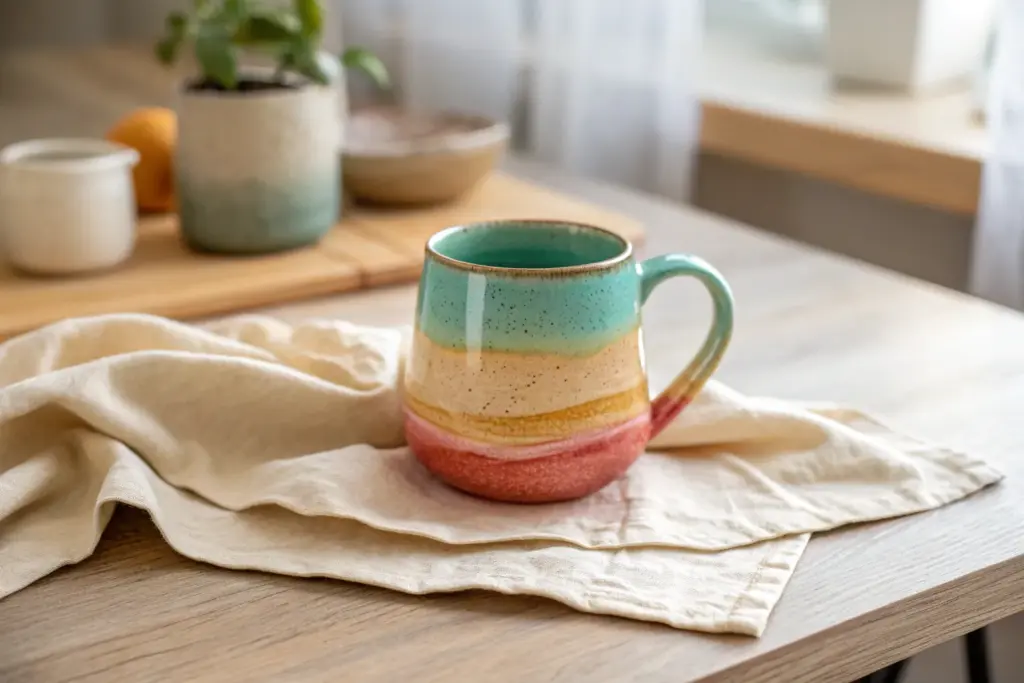
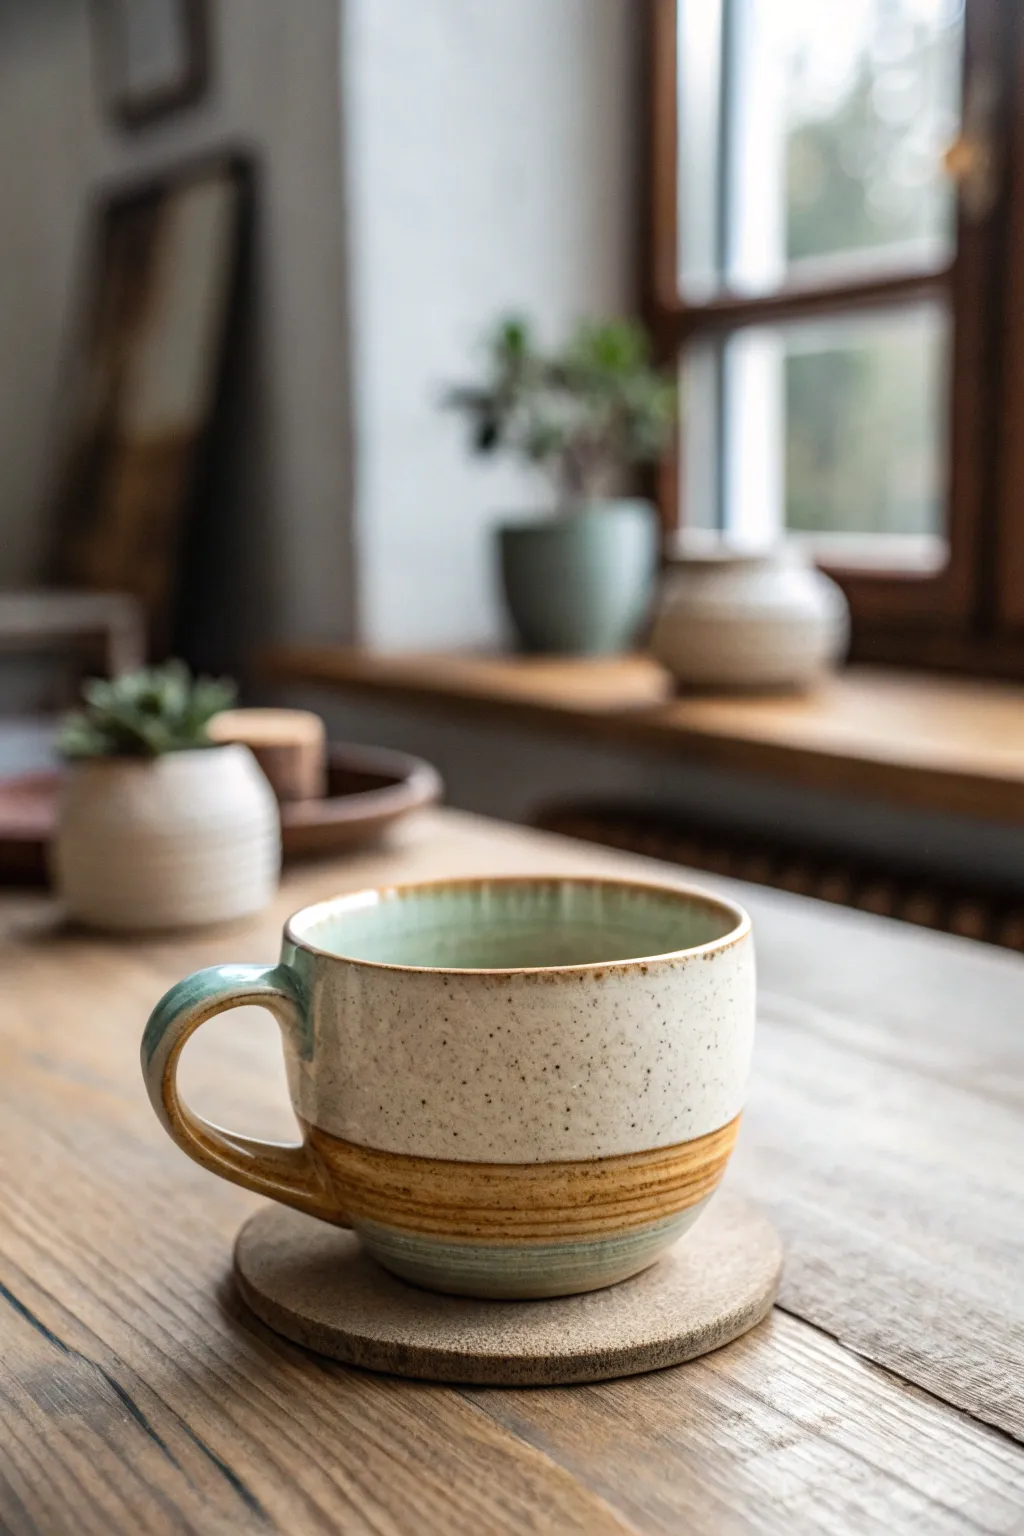
This project showcases the timeless elegance of dipping, creating a distinct horizon line between a speckled cream upper and a soothing sage green base. The result is a tactile, earthy tumbler that brings a touch of nature into your morning coffee ritual.
Detailed Instructions
Materials
- Bisque-fired ceramic tumbler (stoneware clay body recommended)
- Speckled oatmeal or cream glaze (gloss finish)
- Sage green or seafoam celadon glaze (gloss finish)
- Glaze tongs
- Wax resist (liquid emulsion)
- Sponge
- Bucket of clear water
- Soft fan brush
- Clean towel or rag
Step 1: Preparation
-
Clean the Bisque:
Start by wiping down your bisque-fired tumbler with a barely damp sponge. This removes any dust that could prevent the glaze from adhering properly. -
Wax the Foot:
Apply a coat of wax resist to the very bottom foot ring of the cup. This saves you from having to wipe glaze off the bottom later and protects your kiln shelves. -
Mix Glazes Thoroughly:
Stir both your cream and sage green glazes vigorously. If they have been sitting, use a whisk or immersion blender to ensure all heavy particles are suspended evenly.
Clean Lines
For a razor-sharp transition like the photo, dip the top cream layer, let it dry, then apply a band of wax resist over the cream edge before dipping the green bottom.
Step 2: Glazing the Interior
-
Pour the Green:
Pour a generous amount of the sage green glaze into the interior of the cup for the liner glaze. -
Roll and Coat:
Quickly roll the cup in your hand to ensure the liquid coats the entire inner wall evenly up to the rim. -
Pour Out Excess:
Pour the remaining glaze back into your bucket while rotating the cup as the last drips exit to get a clean, even coating right at the rim. -
Rim Cleanup:
Use a slightly damp sponge to tidy up any drips that may have run down the outside of the cup, but leave the rim itself coated.
Step 3: The Double Dip Technique
-
Dip the Top Half:
Hold the cup upside down by its base. Submerge the top two-thirds of the cup into the speckled cream glaze. -
Hold and Count:
Hold it submerged for about 3 seconds to get good coverage, then lift straight up. Give it a gentle shake to break the surface tension and prevent a drip from forming on the rim. -
Dry the Layer:
Set the cup down and let this cream layer dry until it is powdery to the touch. I usually wait about 15-20 minutes here to prevent the layers from blurring. -
Prep the Bottom Dip:
Now, hold the cup by the rim (or use glaze tongs if you are careful not to chip the cream glaze). -
Dip the Base:
Dip the bottom third of the cup into the sage green glaze. Try to dip just far enough so the green meets the cream glaze, creating a slight overlap or a ‘kiss’ between the two. -
Lift and Drain:
Pull the cup out and hold it vertically to let excess green glaze drain off the bottom.
Crawling Glaze?
If the glazes separate at the overlap line (crawling), your second dip was likely too thick or the first layer wasn’t dry enough. Thin the glazes slightly with water next time.
Step 4: Finishing Touches
-
Check the Overlap:
Inspect the line where the two glazes meet. If the overlap is too thick, gently tap it with a finger to smooth the ridge, which helps prevent crawling during firing. -
Clean the Foot Again:
Even with wax resist, double-check the bottom. Use a sponge to wipe away any stubborn beads of glaze on the foot ring. -
Final Dry:
Let the piece dry completely for at least 24 hours before loading it into the kiln. Moisture trapped in the clay can cause issues during firing. -
Fire to Temperature:
Load your kiln and fire to the maturity temperature of your clay and glaze (typically Cone 6 or Cone 10 for stoneware).
Once cooled, you will have a beautifully modern, two-toned vessel ready for use


Breaking Glaze Over Carved Texture
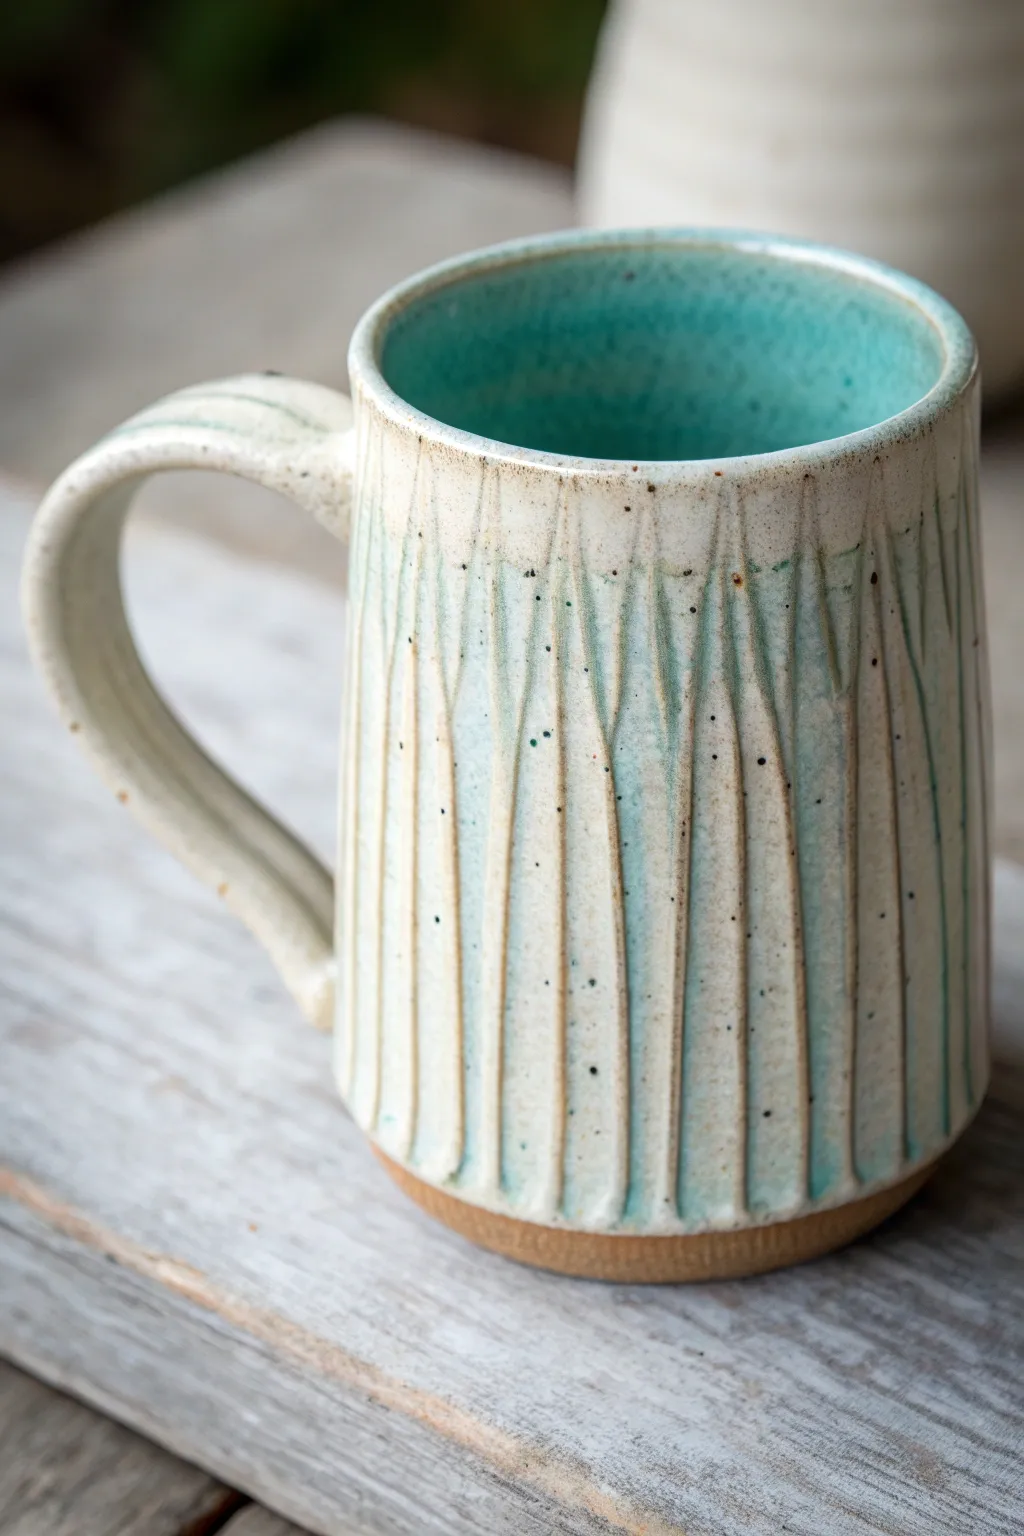
This mug showcases the stunning effect of a breaking glaze flowing over texture, where a teal celadon pools in the recesses while highlighting the white stoneware ridges. The rhythmic carving creates a tactile surface that feels wonderful in the hand and transforms a simple cylinder into a piece of art.
How-To Guide
Materials
- Speckled buff stoneware clay
- Pottery wheel
- Throwing tools (sponge, ribs, wire tool)
- Small loop tool or carving tool
- Fettling knife
- Serrated rib (for scoring)
- Slip
- Teal or aqua celadon glaze (translucent)
- White or cream breaking glaze (optional for layering)
- Wax resist
- Kiln
Step 1: Throwing and Trimming
-
Center and throw:
Start with about 1 lb of speckled buff clay. Center it on the wheel and open up the floor to about 3 inches wide. Pull the walls into a tall, straight cylinder, aiming for a consistent thickness of about 1/4 inch to allow depth for carving later. -
Refine the shape:
Using a metal kidney rib, compress and smooth the outside of the cylinder to remove any throwing lines. This creates a blank canvas for your carving. Slightly taper the rim inward for a comfortable drinking edge. -
Leather hard drying:
Allow the cylinder to dry to a sturdy leather-hard stage. It should be firm enough to handle without deforming but soft enough to carve into cleanly. -
Trim the foot:
Invert the mug on the wheel and trim a clean foot ring. Define where the glaze will stop near the bottom, leaving a small area of bare clay.
Step 2: Carving the Texture
-
Plan your spacing:
Lightly mark vertical guidelines around the mug if you want precise spacing, or trust your eye for a more organic feel. I usually just eyeball it for a natural rhythm. -
Execute vertical cuts:
Using a small, sharp loop tool, start a cut about an inch below the rim. Drag the tool downward in a straight vertical line, lifting pressure as you near the foot to taper the mark off. -
Create the pattern:
Repeat this vertical cut around the entire circumference. Leave a narrow ridge of original surface clay between each carved channel. The variation in depth is key for the glaze interaction. -
Smooth the ridges:
Once carved, run a damp finger or a soft sponge lightly over the ridges to remove any sharp burrs or clay crumbs. Don’t smooth too much or you’ll lose the definition.
Glaze too uniform?
If your glaze isn’t ‘breaking’ (showing the ridges), it’s likely too thick. Add a little water to thin your glaze bucket before dipping, or sponge the ridges lightly after dipping.
Step 3: Handle and Bisque
-
Pull a handle:
Pull a strap handle from a lug of clay. Give it a slight central groove with your thumb to echo the vertical lines of the mug body. -
Attach the handle:
Score and slip the attachment points on the mug and handle. Attach firmly, blending the clay smooth. Ensure the handle curve is generous enough for fingers. -
Slow drying:
Cover the mug loosely with plastic to dry slowly, equalizing the moisture between the thick handle and the carved body to prevent cracking. -
Bisque fire:
Once bone dry, fire the piece to cone 04 (or your clay’s bisque temperature).
Dual-Tone Effect
After the main dip dries, lightly sponge the glaze OFF the high ridges. This forces the brown clay body to show through strongly, emphasizing the vertical stripes.
Step 4: Glazing
-
Wax the foot:
Apply wax resist to the bottom foot ring and slightly up the side of the wall to create a clean termination line for the glaze. -
Pour the liner:
Pour your teal celadon glaze inside the mug, roll it around to coat the interior thoroughly, and pour out the excess. Wipe any drips off the rim immediately. -
Dip the exterior:
Using glazing tongs, dip the entire exterior of the mug into the same teal celadon glaze. Hold for about 3 seconds to ensure a good coating thickness. -
Check the break:
The glaze should naturally be thinner on the raised ridges (showing the clay color) and thicker in the carved valleys (showing the deep teal). If the glaze is too thick, it won’t break; if too thin, it won’t pool. -
Optional rim dip:
For extra visual interest, dip just the top 1/2 inch of the rim into a second glaze, like a flowy white or rutile blue, to create a blended gradient at the lip. -
Cleanup:
Sponge off any glaze droplets on the waxed foot area to ensure the mug doesn’t stick to the kiln shelf.
Step 5: Final Firing
-
Glaze fire:
Fire to cone 6 (approx. 2232°F) in an electric kiln. This temperature vitrifies the stoneware and allows the celadon to become glassy and translucent. -
Cooling:
Allow the kiln to cool naturally before unloading. Opening too early can craze the glaze or crack the ware due to thermal shock.
Now you have a beautifully textured mug perfect for your morning coffee routine


Rutile-Style Floating Blue Depth
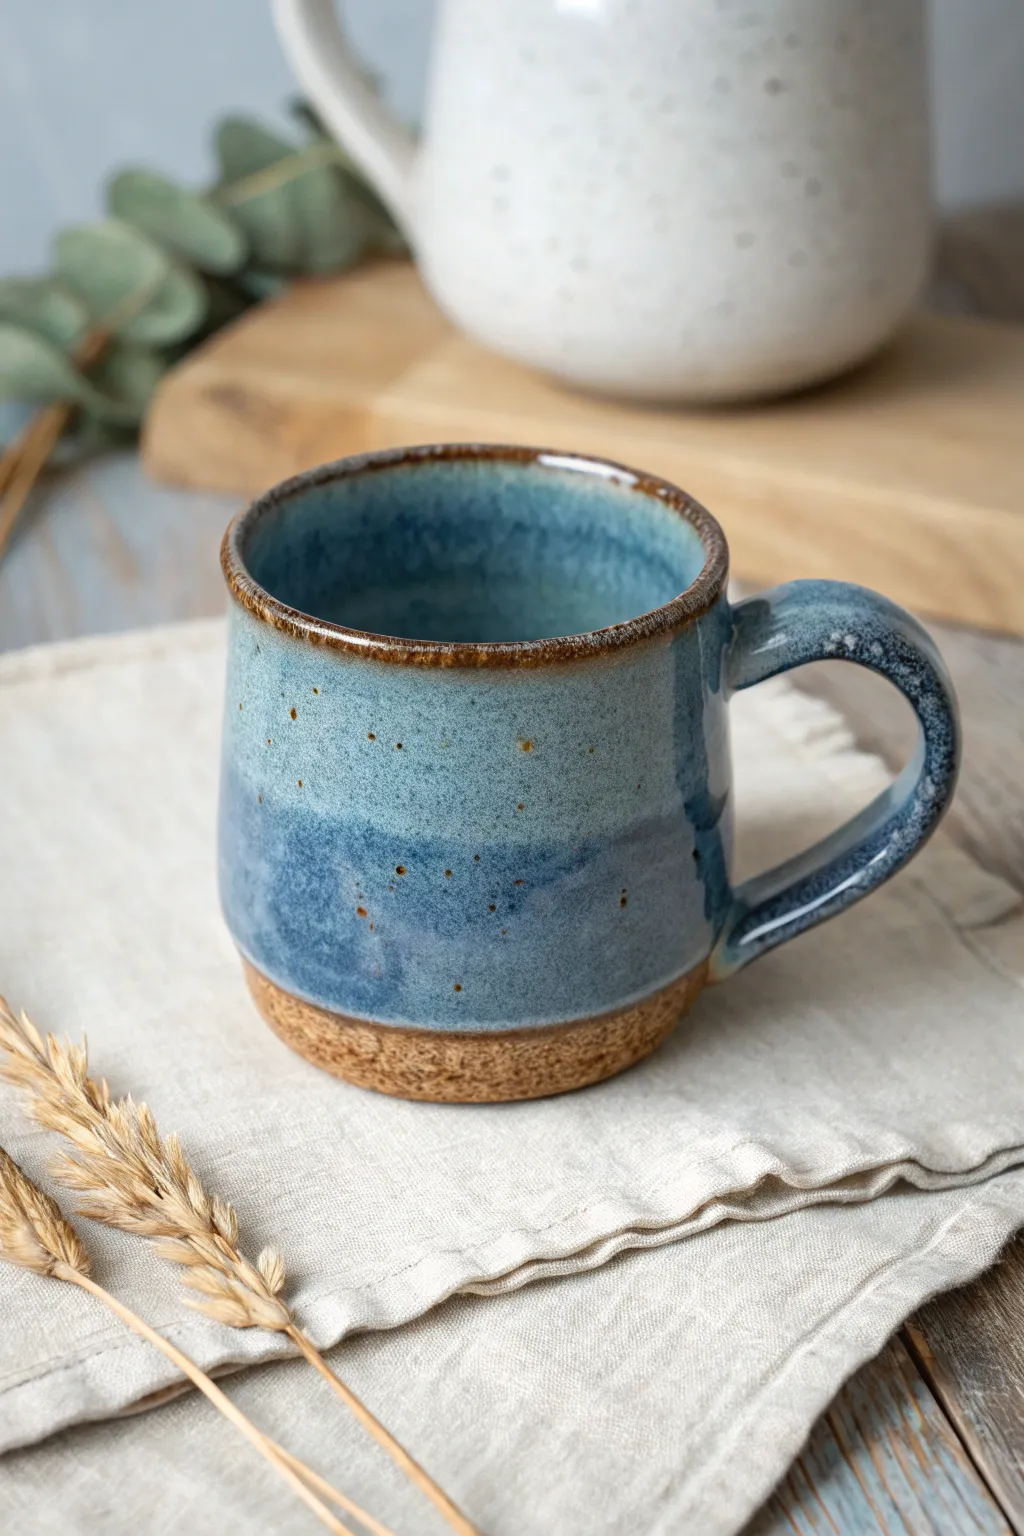
Achieve a stunning, ethereal look with this ceramic glazing project that features deep blues, soft specks, and a warm, toasted rim. This rutile-style effect creates visual movement and depth, turning a simple wheel-thrown form into a captivating piece of art.
Detailed Instructions
Materials
- Bisque-fired stoneware or porcelain mug (smooth light buff clay recommended)
- Rutile blue glaze (such as ‘Floating Blue’ or similar cone 5/6 recipe)
- Iron wash or dark brown underglaze
- Wax resist
- Synthetic sponge
- Sponge brush or fan brush
- Glaze tongs
- Clean water bucket
- Kiln capable of firing to Cone 6
Step 1: Preparation & Wax Lines
-
Wipe the surface:
Before anything else, take a slightly damp sponge and gently wipe down your entire bisque-fired mug to remove any kiln dust or oils from handling. This ensures the glaze adheres perfectly. -
Define the base:
Determine how much of the raw clay body you want to show at the bottom. Looking at the photo, aim for a band about 1.5 cm high from the foot. -
Apply wax resist:
Using a sponge brush, carefully apply a smooth, even coat of wax resist to the bottom foot and up the side wall to create your defined unglazed line. Be precise here, as the glaze will stop exactly where the wax begins. -
Let it dry:
Allow the wax resist to dry completely, which usually usually takes about 15 to 20 minutes, until it’s no longer tacky to the touch.
Glaze Crawling?
If the glaze pulls back from the surface leaving bare spots, your bisque might have been dusty or oily. Always wash hands before glazing and wipe the bisque with a clean, damp sponge first.
Step 2: Main Glaze Application
-
Mix the glaze:
Thoroughly mix your rutile blue glaze. This type of glaze relies heavily on suspension; ensure all heavy particles at the bottom of the bucket are fully incorporated. -
Check specific gravity:
For that floating quality, the glaze shouldn’t be too thick. If it feels like heavy cream, add a splash of water until it resembles whole milk. -
Dip the interior:
Hold the mug by the foot and pour glaze inside, quickly rolling it around to coat the entire inner surface, then pour the excess back out. Wipe the rim immediately with a sponge if any drops linger there. -
Prepare for dipping:
Attach your glaze tongs securely to the mug. If you don’t have tongs, you can use your hand inside the mug, but be very careful not to distort the rim. -
The main dip:
Submerge the mug into the glaze bucket straight down, stopping just as the glaze hits your wax line. Hold for three seconds to build up a nice layer. -
Lift and shake:
Pull the mug out vertically and give it a firm shake to remove excess glaze. I like to hold it upside down for a moment to prevent a thick drip from forming near the waxed edge. -
Clean the foot:
Once the glaze is dry to the touch, use a damp sponge to wipe any tiny beads of glaze off the waxed area at the bottom. The line should be crisp and clean.
Step 3: Creating the Rim & Firing
-
Inspect the rim:
Check the rim of the mug. The glaze tends to thin out on sharp edges, which is good, but we want to accentuate that. -
Apply iron wash:
Dip a small sponge or brush into your iron wash or oxide mixture. You want it watery, not thick like paint. -
Dab the edge:
Gently sponge the iron wash onto the very rim of the mug. You don’t need a perfect line; a slight unevenness adds to the organic, rustic feel. -
Add speckles (optional):
If your base glaze doesn’t have rutile specks naturally, flick a stiff-bristled toothbrush dipped in the iron wash towards the mug to add tiny brown speckles. -
Final dry:
Let the mug dry completely for at least 24 hours. Any moisture trapped in the clay can cause issues during the firing. -
Load the kiln:
Place the mug on a kiln shelf. Since this style of glaze can be mobile (runny), ensure there is space around it. -
Fire to temperature:
Fire the kiln to Cone 6 (approx. 2232°F / 1222°C). A slow cool down program helps the rutile crystals develop that milky blue depth seen in the inspiration image.
Enhance the Depth
Layer a light coat of a transparent flux glaze over the rutile blue on just the top third of the mug. This encourages the colors to run slightly and intermingle for deeper visual texture.
Unload your kiln to discover a piece that captures the depth of the ocean in your hands


Celadon-Style Pooling In Incised Lines
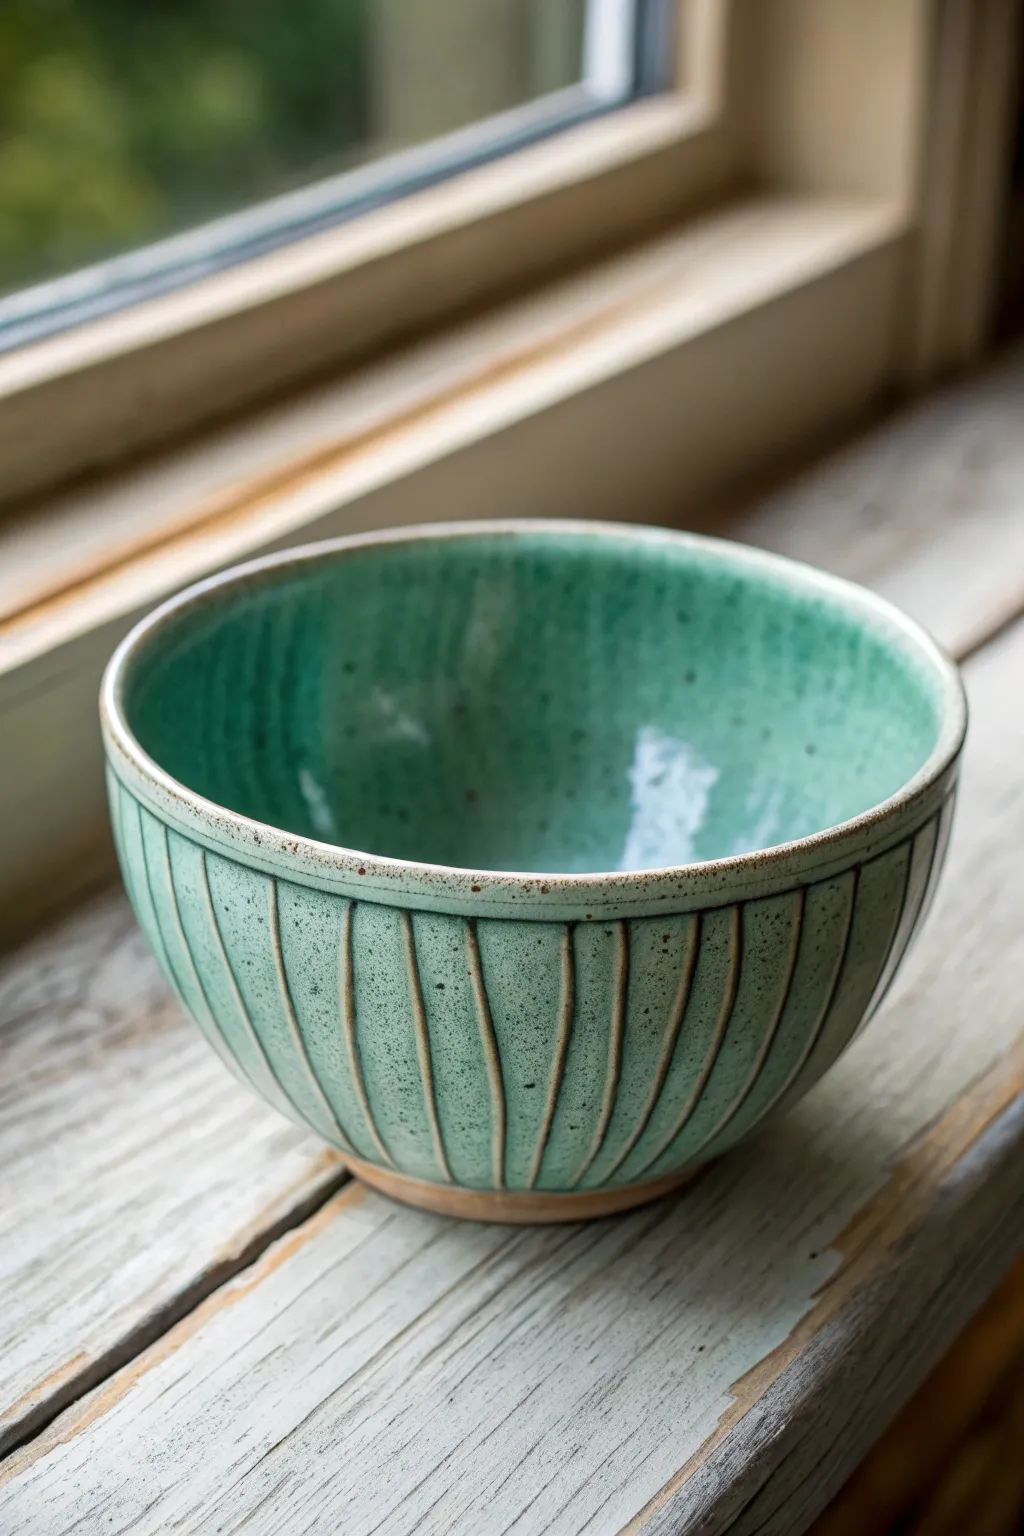
Achieve the timeless elegance of classic pottery with this incised bowl project, where a translucent turquoise-green glaze highlights structure through subtle pooling. The vertical fluting creates natural reservoirs for the glaze, resulting in varied depth and a beautiful, jeweled surface texture.
Step-by-Step Guide
Materials
- Stoneware clay body (buff or speckle recommended)
- Pottery wheel
- Throwing tools (sponge, ribs, wire cutter)
- Loop tool or carving tool (U-shape tip)
- Trimming tools
- Celadon-style ceramic glaze (translucent green/turquoise)
- Soft fan brush
- Kiln
- Wax resist (optional)
Step 1: Throwing and Shaping
-
Center the clay:
Start with a well-wedged ball of stoneware clay. Center it firmly on the wheel head, ensuring there is no wobble before opening. -
Open and pull the walls:
Open the clay and pull the walls into a simple, hemispherical bowl shape. Aim for a slightly thicker wall than usual (about 1/4 to 3/8 inch) to accommodate the carving later without piercing through. -
Refine the curve:
Use a flexible rib (metal or rubber) to smooth the interior curve and remove throwing lines. The smoother the interior, the better the final glaze will look. -
Define the rim:
Compress the rim with a chamois or your finger. A slightly rounded rim complements the soft nature of the celadon glaze. -
Dry to leather hard:
Wire the pot off the bat and let it dry slowly to a sturdy leather-hard stage. It should be firm enough to handle without deforming but soft enough to carve easily.
Step 2: Trimming and Carving
-
Trim the foot:
Center the bowl upside down on the wheel. Trim a clean foot ring that lifts the curve off the table, giving the bowl a floating appearance. -
Mark vertical guides:
Before carving, you can lightly mark vertical lines around the exterior to ensure even spacing, though freehanding yields a more organic, handmade feel. -
Carve the first flutes:
Using a U-shaped loop tool, start near the rim (leaving a small uncarved band at the top) and drag the tool downward toward the foot. -
Vary the pressure:
Apply consistent pressure to create a deep enough groove for the glaze to pool, but taper off gently as you reach the foot ring. -
Repeat around the circumference:
Continue carving parallel vertical lines around the entire bowl. Don’t worry if the spacing varies slightly; this adds character. -
Clean up burrs:
Once the carving is complete, gently wipe the surface with a barely damp sponge to smooth out any sharp clay burrs or crumbs left by the tool. -
Bisque fire:
Allow the bowl to dry completely to the bone-dry stage, then bisque fire it to Cone 04 (or your clay body’s specification).
Glaze Crawling?
If glaze pulls away from the grooves, you likely had dust in them or applied the glaze too thick. Wipe bisque thoroughly and thin your glaze slightly.
Step 3: Glazing and Finishing
-
Wipe the bisque:
Wipe the bisque-fired bowl with a damp sponge to remove any kiln dust, which can cause pinholing in the glaze. -
Wax the foot:
Apply wax resist to the bottom of the foot ring and a few millimeters up the side to manage glaze drips. -
Pour the interior:
Pour the celadon glaze into the bowl, swirl it quickly to coat the entire interior, and pour out the excess. I prefer to do the inside first to prevent handling marks on the outside later. -
Apply exterior coats:
Using a soft fan brush, apply the first coat of glaze to the exterior. Brush vertically, following the direction of the carved lines. -
Enhance the pooling:
Apply a second (and potentially third) coat. The glaze needs to be thick enough to settle into the grooves and create that darker intensity, but not so thick that it runs off the pot. -
Clean the rim:
If the glaze looks too thick on the rim, gently sponge it back slightly so the clay body color breaks through the glaze color after firing. -
Glaze fire:
Fire the bowl to the maturity temperature of your clay and glaze (typically Cone 5 or 6). A slower cooling cycle can sometimes enhance the clarity of celadon-style glazes.
Line Variance
Vary pressure while carving: deeper cuts = darker pooling stripes. Shallow cuts = subtle shadows. Mix depths for a dynamic rhythm around the bowl.
Once cooled, hold your bowl up to the light to admire the gem-like depth created by the glaze settling into your carving lines

The Complete Guide to Pottery Troubleshooting
Uncover the most common ceramic mistakes—from cracking clay to failed glazes—and learn how to fix them fast.
Iron-Rich Tenmoku With Oil-Spot Speckles
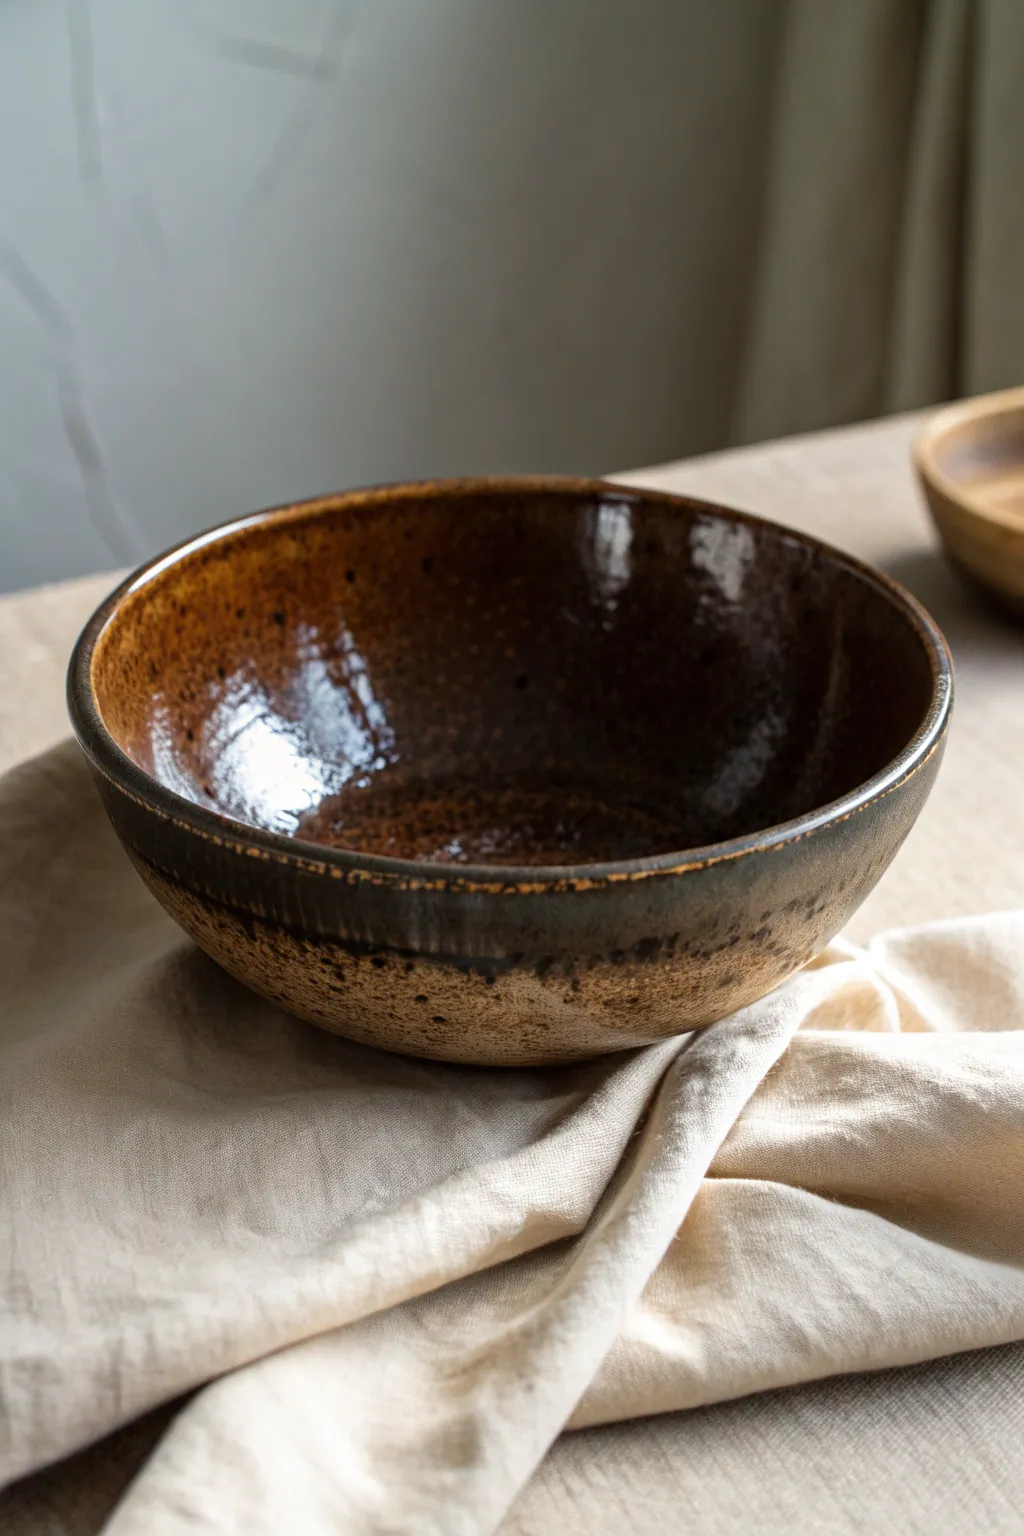
This project explores the rich depth of iron saturation, creating a bowl with a glossy, oil-spot interior reminiscent of obsidian and amber. The contrast between the glassy inside and the raw, earthy exterior highlights the tactile beauty of stoneware.
Step-by-Step
Materials
- High-fire stoneware clay (buff or speckled)
- Pottery wheel and throwing tools
- Rib tool (metal and rubber)
- Trimming tools
- Bisque firing kiln access
- Iron-saturated Tenmoku glaze (Recipe: usually 8-10% Red Iron Oxide)
- Wax resist emulsion
- Sponge and bucket
- Cone 10 reduction kiln (preferred for best oil -spot effects)
Step 1: Throwing and Shaping
-
Center the clay:
Start with about 2-3 lbs of wedged stoneware clay. Slam it onto the wheel head and center it firmly, ensuring the base is wide enough to support a generous bowl shape. -
Open and pull the floor:
Open the centered mound, focusing on creating a continuous curve for the interior. Avoid leaving a sharp corner at the bottom; a smooth transition is key for the glaze to pool naturally. -
Establish the curve:
Pull the walls up and outward. For this form, aim for a hemispherical shape that flares gently at the rim. Keep the rim slightly thickened to prevent warping later. -
Refine the interior:
Use a flexible metal or rubber rib to compress the inside curve. I find this step crucial for removing throwing lines, which creates that perfect, undisturbed surface for the Tenmoku to glass over. -
Finish the lip:
Chamois or lightly sponge the rim to ensure it is smooth and rounded. Cut the pot from the bat with a wire tool.
Why Are There Blisters?
Blistering in Tenmoku often means the glaze was too thick or the firing climbed too fast at the end. Try a slightly thinner application or a soak at top temp to smooth it out.
Step 2: Trimming and Bisque
-
Leather-hard drying:
Allow the bowl to dry to a leather-hard state. It should be firm enough to handle without deforming but soft enough to carve ribbon-like shavings. -
Trim the foot:
Invert the bowl on the wheel. Trim a clean, defined foot ring. Remove excess weight from the lower walls, matching the exterior curve to the interior volume. -
Texture the exterior:
Leave the lower exterior slightly rough or minimally trimmed to contrast with the smooth interior. You can lightly sponge it to expose the grog or sand of the clay body. -
Dry and bisque:
Let the bowl dry completely to the bone-dry stage. Fire it in a bisque kiln (usually Cone 04-06) to prepare it for glazing.
Step 3: Glazing Application
-
Clean the bisque:
Wipe down the entire bisque-fired bowl with a damp sponge to remove any kiln dust, which can cause pinholing in the glaze. -
Wax the exterior design:
This style features a specific glaze line. Paint wax resist on the bottom third of the exterior and the entire foot ring. Alternatively, you can rely on dipping technique, but wax ensures a sharper line. -
Mix the Tenmoku:
Thoroughly mix your iron-rich glaze. It needs to be suspended well; if it’s too thin, you won’t get the black depth. If it’s too thick, it might run off the pot. -
Pour the interior:
Pour a generous amount of glaze into the bowl. Roll it around quickly to coat the entire interior surface evenly, then pour the excess out while rotating the bowl to clear the rim. -
Dip the rim:
Wait for the interior to dry slightly. Hold the bowl by the foot and dip the top two-thirds of the exterior into the bucket, creating that overlapping darker band near the rim. -
Check the thickness:
Tenmoku relies on thickness for the ‘breaking’ effect (where it turns amber/brown on edges). Ensure the rim is coated but not dripping excessively. -
Clean the foot:
Even with wax resist, inspect the foot ring. Wipe away any stray droplets of glaze with a damp sponge to save your kiln shelves.
Variant: The Hare’s Fur
To get ‘hare’s fur’ streaks instead of spots, try the same glaze on a steeper, vertical side wall. Gravity pulls the iron crystals down into long, beautiful streaks during the melt.
Step 4: Firing
-
Load the kiln:
Place the bowl in the kiln. If you are firing in a gas kiln (reduction), ensure there is space for airflow around the piece. -
Fire to temperature:
Fire to high stoneware temperatures (Cone 10, approx 2350°F / 1285°C). The reduction atmosphere is what transforms the red iron oxide into the deep black and metallic browns seen in the photo. -
Cool slowly:
Allow the kiln to cool naturally. The slow cooling helps the iron crystals form those beautiful silvery or golden ‘oil spots’ suspended in the dark glass.
The finished piece offers a stunning contrast that begs to be held and used for your favorite meals
Shino-Style Warm Blush And Carbon Trap

This project captures the organic warmth of traditional Shino glazing with a contemporary twist on a classic bottle form. The result features a creamy, speckled surface interrupted by soft bands of toasted orange blush and subtle carbon trapping effects.
Step-by-Step Guide
Materials
- Stoneware clay body (speckled buff recommended)
- Pottery wheel
- Throwing tools (sponge, rib, wire cutter)
- Trimming tools
- Carbon Trap Shino glaze
- Rutile wash or iron oxide wash
- Wax resist
- Clean sponge
- Glaze tongs
- Kiln (gas reduction preferred, but electric simulation possible)
Step 1: Throwing the Form
-
Center and open:
Start with about 3-4 pounds of speckled stoneware clay. Center it firmly on the wheel head and open the clay, keeping a sturdy floor thickness. -
Pull the cylinder:
Begin pulling the walls upward. Aim for height initially, keeping the walls even but leaving slightly more thickness at the base and the rim to support the shape. -
Belly out the form:
Using a rib tool on the inside and your hand on the outside, gently push the clay outward to form a wide, spherical belly. Move slowly to maintain structural integrity. -
Collar the neck:
Once the belly is established, wet your hands and gently collar the top third of the clay inward. Do this in several passes to prevent buckling. -
Refine the lip:
Pull the neck upward and flare the rim slightly. Use a chamois or sponge to compress and smooth the lip for a professional finish. -
Dry slightly:
Undercut the base with a wood knife and wire the pot off the wheel. Allow it to dry to a leather-hard state before handling.
Crawling Glaze?
Shino glazes can crawl (separate) if applied too thickly or on dusty bisque. Sponge your pot well before glazing and keep the application layer consistent, not gloppy.
Step 2: Trimming and Bisque
-
Secure the pot:
Place the leather-hard vase upside down on the wheel. Secure it using a chuck or large clay lugs to avoid damaging the delicate neck. -
Trim the foot:
Trim away excess weight from the lower curve to match the interior profile. Carve a clean, defined foot ring. -
Smooth the surface:
I like to run a soft, damp sponge or a smooth metal rib over the entire surface after trimming to expose the clay’s grog and remove tool marks. -
First firng:
Bisque fire the piece to cone 04 or 06, depending on your clay body specifications.
Step 3: Glazing Technique
-
Clean and wax:
Wipe the bisque ware with a damp sponge to remove dust. Apply wax resist to the bottom of the foot ring and 1/4 inch up the side. -
Apply base glaze:
Pour a Carbon Trap Shino glaze inside the vase, swirl to coat, and pour out. Dip the exterior of the vase into the same glaze for a full, even coat. -
Create the blush band:
Using a soft fan brush, apply a band of rutile wash or iron oxide wash around the shoulder of the pot. Keep the application loose and uneven for a natural look. -
Add lower definition:
Apply a second, heavier band of the oxide wash near the bottom third of the pot. Allow this to be thick enough to encourage vertical movement. -
Encourage drips:
Dab extra oxide wash or a slightly runnier brownish glaze at the very bottom edge of your painted band to create the beautiful vertical drip lines seen in the finished piece. -
Clean up:
Carefully sponge away any glaze beads that may have run onto the waxed foot to prevent kiln shelf damage.
Carbon Trap Secret
To maximize carbon trapping effects in a gas kiln, begin heavy reduction early in the firing cycle (around Cone 012) to trap carbon in the porous glaze surface.
Step 4: Firing
-
Load the kiln:
Place the vase in the kiln. If doing a reduction firing, ensure enough space around the piece for airflow. -
Fire to temperature:
Fire to Cone 10 in a reduction atmosphere to fully activate the carbon trapping and rich blush tones of the Shino. If using an electric kiln, use a specialized ‘fake Shino’ glaze formula designed for oxidation. -
Cool slowly:
Allow the kiln to cool naturally. The slow cooling often helps develop the micro-crystals and nuanced colors in the glaze.
Once cooled, your vase will display a unique landscape of warm blushes and organic textures ready for display


What Really Happens Inside the Kiln
Learn how time and temperature work together inside the kiln to transform clay into durable ceramic.
Reactive Over-Under Combos For “Third Color” Magic
Discover the unexpected beauty of layering glazes to create reactive magic where colors meet. This project combines a classic speckled oatmeal glaze with warm iron tones and cool teal accents, resulting in a rich, earthy finish perfect for your favorite morning mug.
Step-by-Step Guide
Materials
- Bisque-fired ceramic mug
- Wax resist (liquid wax)
- Speckled cream or oatmeal glaze (stoneware)
- Iron oxide wash or Rutile glaze (for the mid-tone band)
- Floating blue or reactive teal glaze
- Clean sponge
- Glaze brushes (fan brush and detail brush)
- Fettling knife or clean-up tool
Step 1: Preparation and Base Glazing
-
Clean the bisque:
Start by wiping down your bisque-fired mug with a damp sponge. This removes any dust or oils from handling and ensures the glaze adheres perfectly to the clay body. -
Wax the foot:
Carefully apply wax resist to the bottom foot ring of the mug and up the side about 1/8th of an inch. Let this dry completely to prevent glaze from running onto your kiln shelf. -
Pour the interior:
Pour your reactive teal glaze into the mug, filling it about halfway. Rotate the mug to coat the entire inside, then pour out the excess while twisting the wrist to get a clean edge at the rim. -
Clean the rim:
Immediately wipe any drips off the outside rim with a damp sponge so the exterior surface is smooth for the next steps. -
Let it dry:
Allow the interior glaze to dry until it is powdery to the touch before moving on to the exterior application.
Step 2: Layering the Exterior
-
Apply the iron band:
Using a soft brush, apply a band of Iron Oxide wash or a Rutile-heavy glaze around the bottom third of the mug. Don’t worry about making it perfectly straight; the rustic look benefits from a hand-painted feel. -
Dip the exterior:
Holding the mug by the foot (or using dipping tongs), dip the entire exterior into your speckled oatmeal glaze bucket for about 3 seconds. Lift it out and give it a quick shake to remove drips. -
Check the thickness:
Ensure the oatmeal glaze isn’t too thick, especially over the iron band, as you want that underlying color to break through during firing. -
Reveal the band:
If the oatmeal glaze completely obscured your iron band, you can gently wipe away a thin layer with a sponge to encourage the colors to mingle. -
Create the lower texture:
While the glaze is still slightly damp, use a stiff brush to gently drag horizontally across the iron band area, creating subtle streaks that mimic the wheel-thrown texture.
Flux Test
Make a test tile first! Overlapping glazes can run excessively. If the teal runs too much, apply the rim layer slightly thinner next time.
Step 3: The Reactive Rim
-
Load the brush:
Load a detail brush generously with the same reactive teal glaze you used for the interior. -
Rim application:
Applying a heavy coat, paint the rim of the mug, letting the brush overlap onto the exterior by about half an inch. This is the ‘over’ layer. -
Encourage the drip:
I like to dab a little extra glaze right at the transition point on the handle connection to encourage a slight run or flux where the glazes meet. -
Paint the handle top:
Extend that teal color down the top curve of the handle, feathering it out so it blends naturally into the cream below. -
Clean the foot again:
Double-check the foot ring. Even with wax resist, little beads of glaze can sit on top. Sponge the foot completely clean. -
Final dry:
Let the piece dry thoroughly for at least 24 hours before loading it into the kiln to ensure no moisture remains. -
Fire to temperature:
Fire the mug to cone 6 (or whatever temperature your specific stoneware glazes require). The interaction between the teal rim and the oatmeal body will create that beautiful ‘third color’ melt.
Level Up: Texture
Before bisque firing, use a chattering tool on the lower third of the mug. The iron oxide wash will settle into these grooves for amazing depth.
Now you have a stunning, reactive mug that feels as good in your hands as it looks on the shelf
Intentional Drips And Runs On Vertical Forms

This stunning tall vessel relies on gravity and careful glaze application to create a rustic, organic look that feels both spontaneous and controlled. By layering a stable matte glaze with a fluid, glossy one, you can achieve these striking amber rivulets that seem to freeze in time.
Detailed Instructions
Materials
- Tall, bisqued stoneware cylinder (wheel-thrown or hand-built)
- Wax resist (liquid latex or wax emulsion)
- Sponge
- Cream or oatmeal matte glaze (stable, non-runny)
- Glossy amber or tenmoku glaze (fluid at high temps)
- Glaze tongs or a glazing dowel
- Clean bucket of water
- Heat gun (optional)
Step 1: Preparation & Base Glaze
-
Clean the bisque:
Start by wiping down your bisqued vase with a damp sponge to remove any kiln dust or oils from your hands, ensuring a clean surface for the glaze to adhere to. -
Wax the foot:
Apply a precise band of wax resist to the bottom foot ring and about 1/4 inch up the side wall. This is crucial for preventing the bottom glaze from fusing your pot to the kiln shelf. -
Mix the base glaze:
Stir your cream or oatmeal matte glaze thoroughly. You want a consistent, creamy texture without distinct lumps. If it feels too thick, add a small amount of water. -
Apply the interior glaze:
Pour the cream glaze inside your vessel, swirl it around to coat the entire interior surface, and pour the excess back into your bucket immediately to avoid getting the walls too soggy. -
Dip the exterior body:
Using glaze tongs or by holding the foot, dip the entire exterior of the vase into the cream matte glaze. Hold it for about 3 seconds to get a good thickness. -
Clean the rim:
While the glaze is still damp, check the rim for any sharp drips. Smooth them gently with your fingertip. -
Let it dry completely:
Allow the base coat to dry fully. The pot should feel room temperature to the touch, not cool or damp. I like to give this at least an hour or use a heat gun to speed it up.
Step 2: Creating the Drips
-
Prepare the fluid glaze:
Stir your glossy amber or tenmoku glaze. This glaze needs to be slightly thinner than usual to encouragement movement, but still thick enough to hold color. -
The bottom dip:
Turn the vase upright. Carefully dip just the bottom inch of the vase into the amber glaze. This creates the grounding dark band at the base. -
Clean the transition:
If the line between the cream and amber at the bottom is jagged, you can gently sponge it to create a cleaner horizon line, though an uneven line adds character. -
The top dip:
This is the critical step. Turn the vase upside down. Dip the top rim and neck (about 3-4 inches deep) into the amber glaze. -
Encourage the run:
Immediately flip the vase right-side up. Gravity will pull the wet amber glaze down over the dry matte glaze. Watch the drips form. -
Control the flow:
If a drip is running too fast and threatens to hit the bottom wax line, gently tap it with a dry finger or sponge to stop its progress. -
Add manual drips:
If the dip method didn’t create enough long runners, dip a brush into the amber glaze and dab extra blobs at the top of existing drips to give them more volume and length. -
Final foot cleaning:
Double-check the waxed foot ring. Use a sponge to wipe away any stray droplets of the amber glaze that might understand the wax.
Drips running too far?
If your drips hit the shelf, your secondary glaze is likely too thin or applied too thickly. Next time, try a slightly shorter dip time or thicken the glaze specific-gravity.
Step 3: Firing
-
Cookie protection:
Place a ‘cookie’ (a flat disc of scrap clay with kiln wash) under your vase on the kiln shelf. This is insurance in case those beautiful drips decide to run further than expected during the firing. -
Fire to temperature:
Fire the kiln to the maturity temperature of your clay body and glazes (likely Cone 6 or Cone 10). A slow cool down can sometimes help develop micro-crystals in the amber glaze.
Add surface texture
Before glazing, use a serrated rib or chattering tool on the leather-hard clay. The texture will catch the running glaze, causing it to pool and break in fascinating ways.
Once cooled, you will have a vase that captures the beautiful movement of the kiln heat

TRACK YOUR CERAMIC JOURNEY
Capture glaze tests, firing details, and creative progress—all in one simple printable. Make your projects easier to repeat and improve.
Crawling Glaze For Cracked “Island” Texture
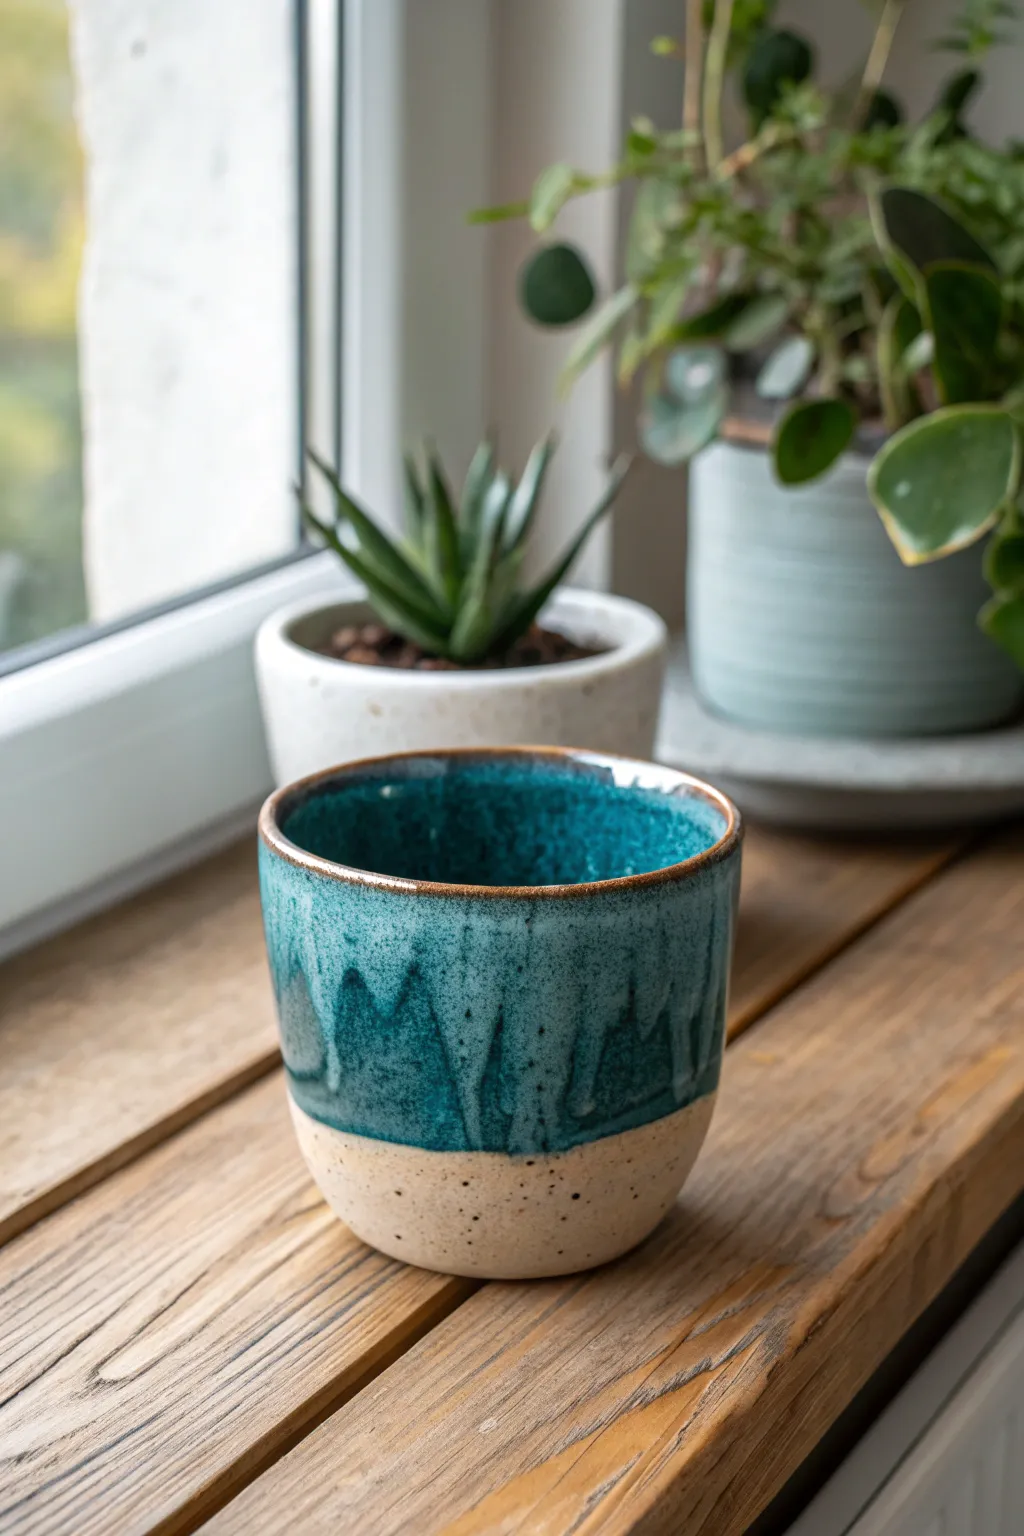
This project captures the essence of a misty forest with deep teal glazes cascading over a speckled clay body. The result is a tactile, organic tumbler that highlights the beauty of fluid glazes meeting raw earth.
Step-by-Step
Materials
- Speckled buff stoneware clay
- Pottery wheel (or slab roller for hand-building)
- Throwing tools (sponge, rib, needle tool)
- Wire cutter
- Trimming tools
- Deep teal reactive glaze (glossy)
- Lighter sea-green or rutile-heavy glaze (for layering)
- Wax resist emulsion
- Glaze brush (fan brush or hake)
- Sponge for cleanup
- Kiln
- Bat for wheel throwing
Step 1: Forming the Tumbler
-
Prepare the Clay:
Begin with about 1 lb of speckled buff stoneware clay. Wedge it thoroughly to remove air pockets and ensure the grog or speckles are evenly distributed, which is crucial for that raw texture later. -
Center and Open:
Secure the clay to the wheel head. Center it firmly, then open the clay to create the floor of your tumbler. Aim for a flat floor about 1/4 inch thick. -
Pull the Walls:
Pull up the walls into a cylinder. For a tumbler shape, gently collar the rim inward slightly during your final pulls to create a slight curve that fits comfortably in the hand. -
Shape and refine:
Use a metal or wooden rib to smooth the outside and remove throwing lines if you want a sleek look, or leave slight finger ridges for the glaze to break over. I find leaving a few subtle ridges helps the drips pool nicely. -
Finish the Rim:
Compress the rim with a chamois or sponge to ensure it is smooth and pleasant to drink from. -
Wire Off:
Run a wire cutter underneath the pot and set it aside to dry to a leather-hard state.
Step 2: Trimming and Bisque
-
Trim the Foot:
Once leather hard, center the pot upside down on the wheel. Trim away excess weight from the bottom, creating a clean curve that transitions into the base. -
Smooth the Base:
Use a damp sponge to smooth any grog that may have been dragged during trimming. This ensures the unglazed portion feels nice to hold. -
Bisque Fire:
Let the cup dry completely to the bone-dry stage. Load it into the kiln and bisque fire to Cone 04 (or your clay body’s recommendation).
Layering Logic
To get that “drippy” look without ruining your kiln shelf, apply the thickest glaze layers at the top rim only. As they melt, they will travel down but stop before hitting the bottom.
Step 3: Glazing Technique
-
Wax the Bottom:
Apply a generous band of wax resist to the bottom third of the tumbler. This exposed clay is a key design element, so make your line crisp or intentionally wavy depending on your preference. -
Inside Glazing:
Pour your deep teal glaze inside the cup, swirl it to coat the entire interior, and pour out the excess. Wipe the rim immediately if any drips occurred. -
First Exterior Dip:
Hold the cup by the foot (or use tongs) and dip the exterior into the teal glaze, stopping just slightly above your wax line so a tiny sliver of ‘margin’ remains. -
Apply Second Layer:
Once the first coat is dry to the touch, brush a heavy band of a lighter sea-green or rutile-based glaze just around the rim and the top inch of the cup. -
Encourage Drips:
While the second layer is still wet, I like to gently tap the ware board or the cup itself to encourage gravity to pull that thicker upper layer downward. -
Clean the Foot:
Even with wax resist, use a damp sponge to wipe any stray glaze droplets off the bare clay bottom. The speckles should be clearly visible.
Glaze Crawling?
If the glaze pulls apart exposing clay where you didn’t want it, your bisque ware might have been dusty or oily. Always wipe bisque with a clean, damp sponge before glazing.
Step 4: Final Firing
-
Load the Kiln:
Place the tumbler in the kiln. If your glaze combo is known to run heavily, place a cookie (a flat piece of scrap clay) underneath the pot to protect your kiln shelf. -
Glaze Fire:
Fire to Cone 6 (approx. 2232°F) in an oxidation atmosphere. A medium speed cooling cycle can often help develop better crystal growth in reactive glazes. -
Check the Rim:
After unloading, inspect the rim. If the glaze broke too thin and feels rough, you can lightly sand it with diamond sandpaper under running water.
Enjoy your morning coffee in a vessel that feels as grounded and natural as the earth it came from