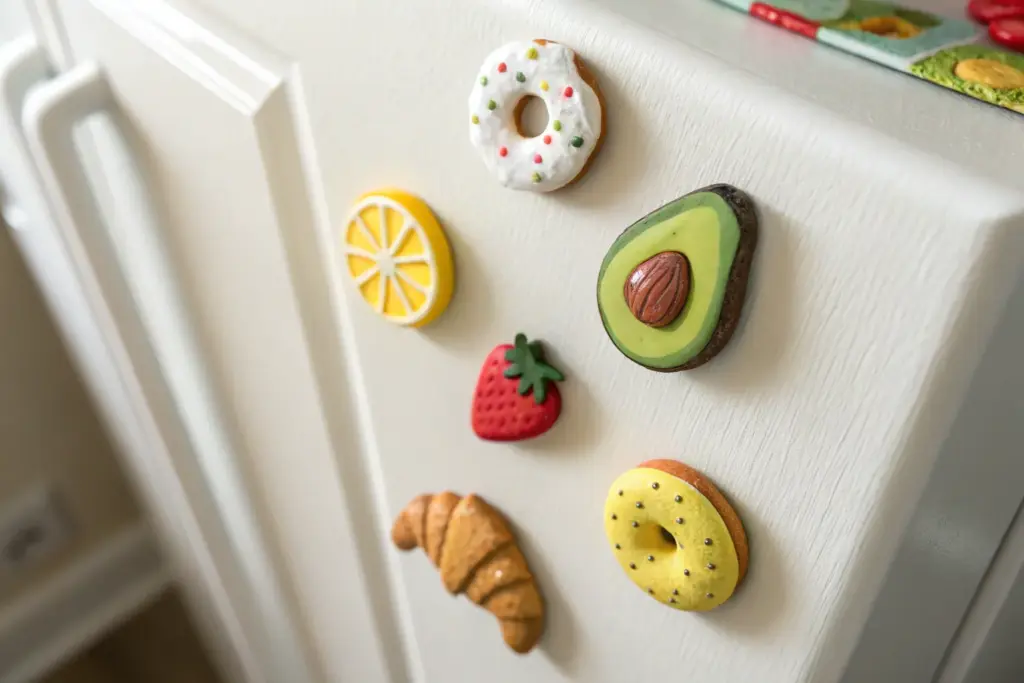
In my studio, I love making air dry clay magnets because they’re quick, cheerful, and you actually get to use them every day. Here are my favorite fridge magnet ideas—starting with the classics and drifting into the delightfully weird stuff I can’t stop making.
Smiley Fruit Slice Magnets
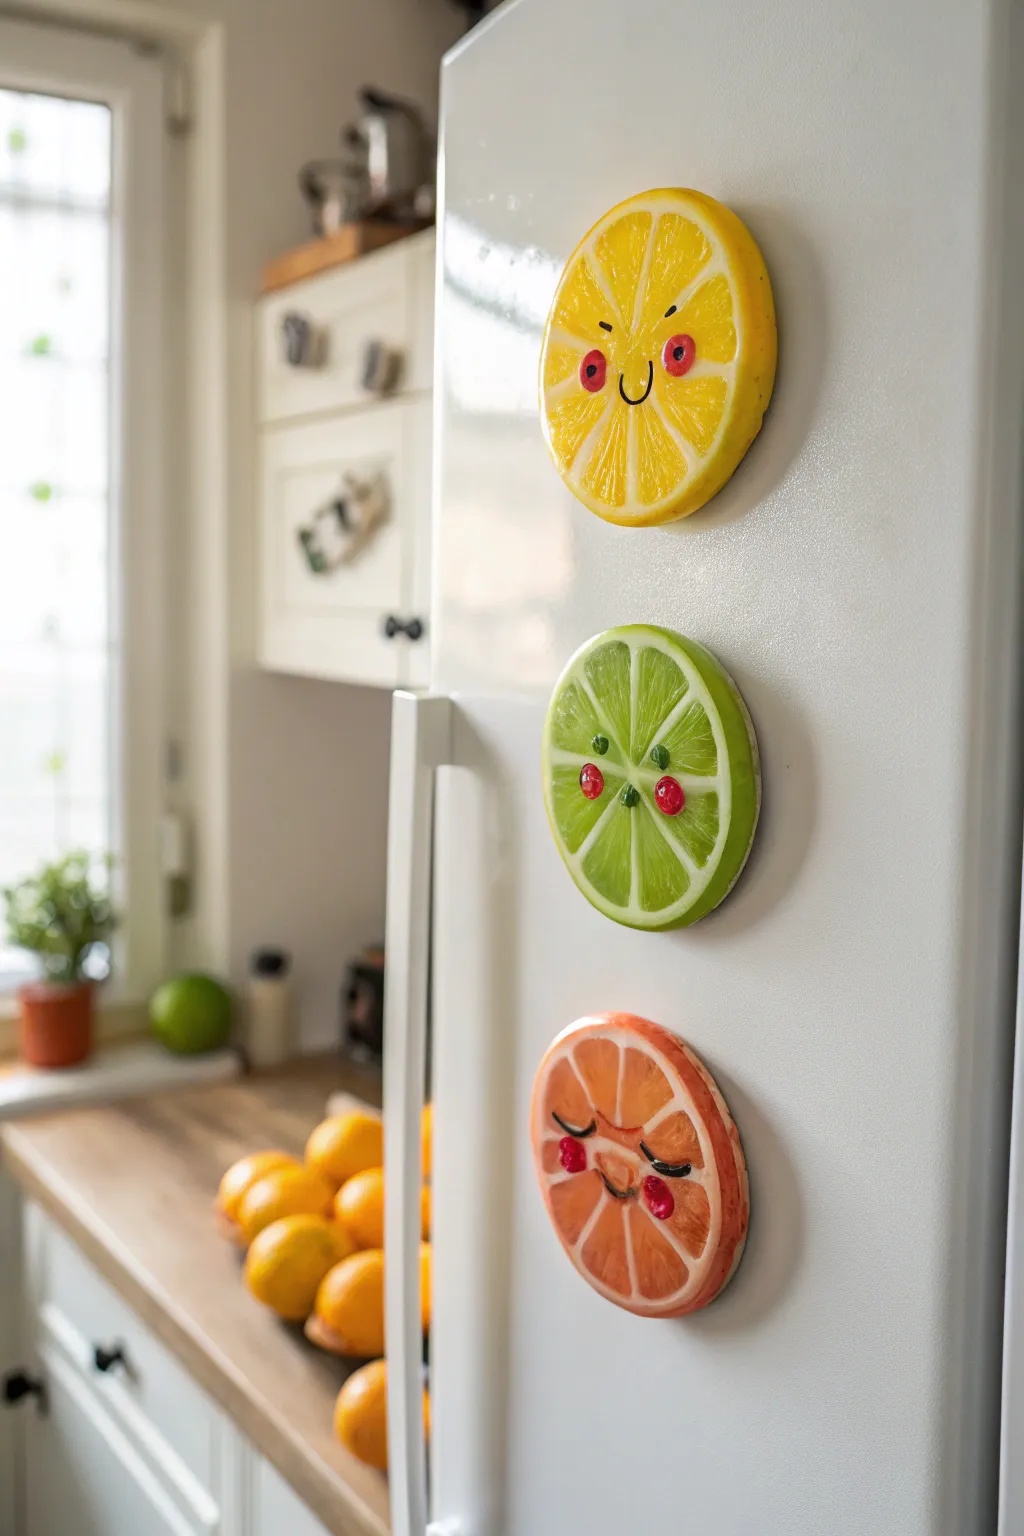
Brighten up your kitchen with these incredibly cheerful fruit slice magnets that beam with personality. These lemon, lime, and orange friends feature realistic pulp textures and adorable painted faces that are sure to make you smile every time you reach for a snack.
How-To Guide
Materials
- White air dry clay
- Rolling pin
- Circle cookie cutter (approx. 2.5 – 3 inches)
- Small craft knife or clay needle tool
- Acrylic paints (yellow, lime green, orange, white, pink, black, red)
- Fine detail paintbrushes
- Flat shader brush
- Mod Podge or gloss varnish
- Strong round magnets
- Super glue or E6000
- Sandpaper (fine grit)
Step 1: Shaping the Slices
-
Roll the clay:
Start by conditioning a chunk of air dry clay until it is smooth and pliable. Roll it out on a non-stick surface to a uniform thickness of about 1/4 inch, ensuring it’s not too thin to hold the texture later. -
Cut the circles:
Use your circle cookie cutter to punch out three perfect rounds. These will become your lemon, lime, and orange characters. -
Smooth the edges:
Dip your finger in a tiny bit of water and run it gently around the cut edges of the circles to soften any sharp ridges or loose bits of clay. -
Mark the segments:
Using the back of a knife or a needle tool, lightly impress—don’t cut all the way through—a pizza-slice pattern onto each circle. Aim for 8 even triangular segments radiating from the center. -
Create the rind:
Use a smaller circular object or lightly sketch a circle about 1/8 inch inside the outer edge to define the rind area. -
Texture the pulp:
This is the secret to realism: take a needle tool or a crumpled ball of aluminum foil and press texture into the triangular ‘fruit flesh’ areas. Leave the rind and the thin lines between segments smooth. -
Dry completely:
Let your clay slices dry for 24-48 hours on a wire rack. I usually flip them halfway through so the bottom dries evenly and doesn’t warp.
Step 2: Painting and Details
-
Base coat:
Once fully dry, paint the entire face of each slice white. This creates a bright primer layer that will make your citrus colors pop vividly. -
Paint the fruit flesh:
Paint the textured triangular segments. Use bright yellow for the lemon, a zest lime green for the lime, and a warm orange for the grapefruit. Keep the thin dividing lines white. -
Paint the rind:
Carefully paint the distinct outer rim of each fruit with its respective color. You can mix a slightly darker shade of the main color for the rind to add depth. -
Add highlights:
Dry brush a tiny amount of white or very pale yellow over the textured pulp areas to catch the raised details and make them look juicy. -
Draft the faces:
Wait for the base colors to dry completely. Lightly sketch the faces with a pencil first—give the lemon widely happy eyes, the lime little round eyes, and the orange adorable sleepy lashes. -
Paint the features:
Using a fine liner brush and black paint, carefully trace your facial features. Add a small smile to the lemon and lime, and a small curved mouth for the orange. -
Add rosy cheeks:
Dip the back end of a paintbrush handle into pink or red paint and dot it onto the cheeks. For the lime, add tiny red dots for cheeks; for the lemon, slightly larger pink circles. -
Eye highlights:
Place a minuscule dot of white paint inside the black eyes of the lemon and lime to bring them to life with a sparkle. -
Seal the fruit:
Apply two coats of gloss varnish or Mod Podge. This not only protects the paint but gives the ‘fruit’ a permanent, fresh-sliced wet look. -
Attach the magnet:
flip the dry fruit slices over. Apply a strong adhesive like E6000 to the back and press your round magnet firmly into the center. Let the glue cure completely before sticking them to the fridge.
Juicy Texture Trick
For ultra-realistic pulp, gently press a clean toothbrush into the wet clay segments. Ideally, wiggle it slightly to avoid perfectly uniform bristle holes.
Correcting Warp
If the slices curl up while drying, lightly dampen the concave side and place them under a heavy book (with wax paper between) for a few hours to flatten.
Pop these fruity friends onto your refrigerator for an instant dose of vitamin C and cheer in your kitchen décor


Mini Breakfast Trio Magnets

Start your day with a serving of cuteness by crafting these hyper-realistic miniature breakfast magnets. This project uses air-dry clay to replicate the textures of perfectly toasted bread, creamy avocado, and sunny-side-up eggs.
Detailed Instructions
Materials
- White air-dry clay (or polymer clay if preferred)
- Acrylic paints (ochre, burnt sienna, white, yellow, deep green, light green, red)
- Fine-grit sandpaper or a clean toothbrush (for texturing)
- Rolling pin or smooth glass jar
- Various sculpting tools (needle tool, ball stylus)
- Small flat brush and detail liner brush
- Gloss varnish or clear nail polish
- Liquid glue
- Strong round magnets
Step 1: Sculpting the Toast Bases
-
Shape the bread slices:
Begin by rolling out a flattened slab of clay about 1/4 inch thick. Use a craft knife to cut out three distinct toast shapes: two traditional squares with rounded tops (the ‘shokupan’ style) and one darker, flatter slice for the avocado toast. Soften the cut edges with your fingertip. -
Add bread texture:
To make the toast look baked, gently press a clean toothbrush or a ball of aluminum foil over the surface and sides of each slice. This creates those tiny air pockets found in real bread. -
Define the crust:
Use a needle tool or the back of a knife to gently indent a line around the perimeter of the slices, separating the soft inner bread from the crust area. -
Initial painting:
Once dry, paint the crusts with a mix of burnt sienna and ochre. For the internal bread part, create a gradient by freely stippling a very diluted wash of ochre in the center, keeping the edges darker to mimic toasting.
Pro Tip: Authentic Toast
Use a dry sponge to dab the ochre paint onto the bread surface. This enhances the rough texture you created with the toothbrush earlier.
Step 2: Creating the Toppings
-
Form the cheese slice:
Roll a very thin piece of clay and cut it into a square slightly smaller than your toast. Place it on one of the toast bases, letting the corners droop naturally as if melted. -
Sculpt the fried eggs:
For the whites, press a small ball of clay flat into an irregular organic shape. For the yolk, roll a tiny ball of clay and press it gently onto the ‘white’. Make two of these—one for the cheese toast and one for the decorative egg toast. -
Avocado slices:
Shape incredible small crescents of clay. Thin out the inner curve slightly. You’ll need about 4-5 slices to fan out on the second piece of toast. -
The avocado half:
Roll a teardrop shape and flatten the top. Use a large ball tool to hollow out the center for the pit. separately, roll a small round ball for the seed itself. -
Lotus root accessories:
For the tiny lotus roots, create small, flattened oval shapes. Use a needle tool to poke several holes in a circular pattern through them to mimic the distinct lotus root structure.
Troubleshooting: Warping
If your flat toast slices start curling up while drying, flip them over halfway through the drying process or weigh them down gently with a book.
Step 3: Painting & Assembly
-
Color the cheese:
Paint the cheese slice a pale, creamy yellow. If you want a more processed slice look, mix in a tiny touch of orange. -
Paint the avocados:
This requires a gradient. Paint the outer rim of the slices dark green, blending into a chartreuse/lime green, and finally a pale yellow-green near the center. Paint the skin of the avocado half blackish-green. -
Detail the toppings:
Paint the egg yolks a rich sunny yellow-orange. For the ‘ketchup’ dots on the egg toast, use small drops of thick red acrylic paint applied with a toothpick. -
Assemble the sandwiches:
Glue the avocado slices in a fanned pattern onto the darker toast. Glue the egg onto the cheese toast. On the third toast, spread a thin layer of white clay to act as a base ‘spread’ before adding the second egg. -
The finishing seasoning:
To mimic pepper or furikake seasoning, use a stiff brush to flick tiny speckles of brown, black, and red paint over the avocado and the eggs. This texture adds immense realism. -
Gloss and shine:
Apply a high-gloss varnish specifically to the egg yolks and the avocado pit to make them look wet and fresh. Keep the bread matte. -
Attach magnets:
Once everything is fully dry and configured to your liking, flip the pieces over and use strong glue to attach a round magnet to the back of each component.
Now you have a charming set of brunch magnets ready to brighten up your refrigerator door


Cute Sushi Friend Magnets
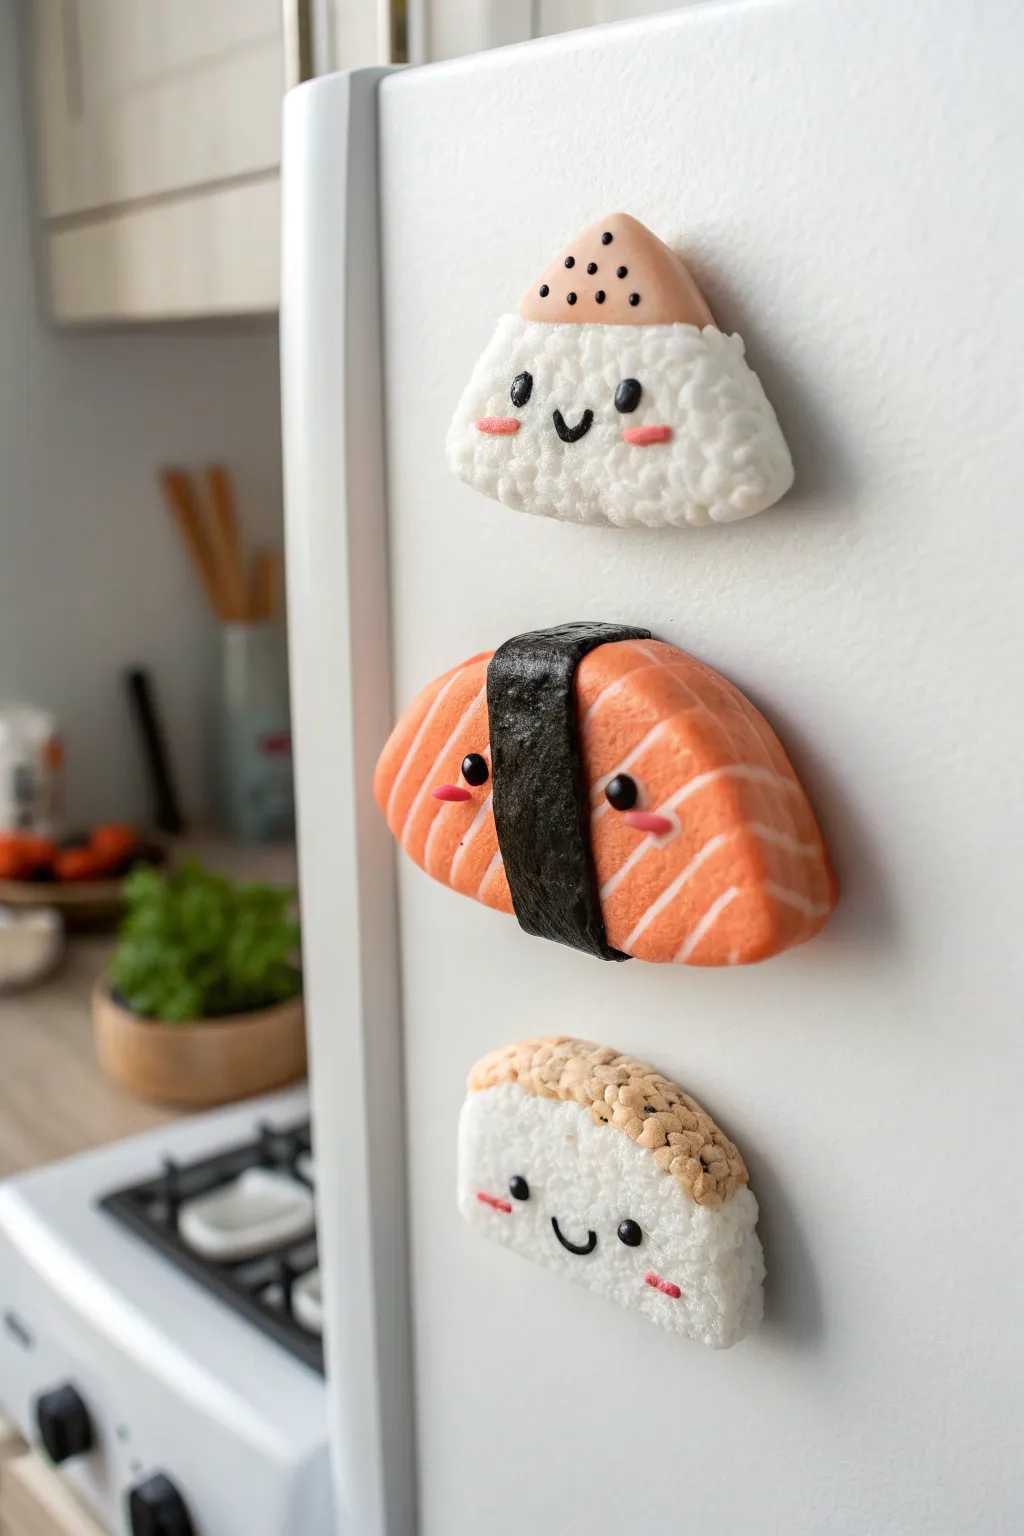
Brighten up your kitchen with these adorable sushi-themed magnets made from air-dry clay. Each piece features a charming little face and textured details that make them look almost good enough to eat.
How-To Guide
Materials
- White air-dry clay (lightweight foam clay recommended)
- Acrylic paints (salmon pink, beige, black, pink)
- Sculpting tools (needle tool, ball tool)
- Toothbrush or textured sponge
- Strong craft glue or E6000
- Round ceramic magnets
- Rolling pin
- Mod Podge or gloss varnish
Step 1: Sculpting the Base Shapes
-
Mix your rice color:
Start with a large chunk of white clay. If you want a warmer tone, mix in a tiny, pinhead-sized amount of yellow or beige paint to create an off-white ‘cooked rice’ color. -
Form the Onigiri:
Take about a third of your clay and roll it into a ball, then flatten it slightly. Pinch the top gently to form a soft triangle shape with rounded bottom corners. -
Create the Nigiri shape:
Take the second portion of clay and roll an elongated oval. Flatten the bottom against your work surface but keep the top domed and high to mimic a mound of rice. -
Shape the sushi roll piece:
With the remaining clay, create a semi-circle shape. Flatten the bottom edge so it looks like half of a cut sushi roll.
Step 2: Adding Texture & Toppings
-
Texture the rice:
This is the most crucial step for realism. Take an old clean toothbrush or a ball tool and firmly stipple the entire surface of the white clay sections. Press repeatedly to create that bumpy, grain-like texture. -
Sculpt the Salmon topping:
Mix orange and a touch of pink paint into a piece of fresh clay to get a salmon color. Roll it flat and cut an oval shape that drapes over your Nigiri mound. -
Apply the Salmon:
Press the salmon piece onto the textured rice mound. Use a knife tool to gently score diagonal lines across the top for the fish texture. -
Create the Nori band:
Mix black paint into a small strip of clay. Roll it very thin and wrap it around the center of the salmon sushi vertically. -
Add the Onigiri topping:
Mix a light beige/pink clay. Shape a small triangle and place it on the tip of your Onigiri rice ball to look like a filling or seasoning cap. -
Top the sushi roll:
For the bottom sushi roll piece, mix a light brown/tan clay color. Add a textured layer to the top curved edge to mimic a crust or sesame coating.
Texture Trouble?
If the clay starts drying too fast while texturing, dip your toothbrush in a tiny bit of water. This softens the surface allows you to create deeper ‘rice grain’ impressions.
Step 3: Painting & Faces
-
Allow to dry:
Let all your sculpted pieces dry completely. Foam clay usually takes 24 hours to cure fully before painting details. -
Paint the fat stripes:
Using a very fine brush and pale pink or white paint, carefully paint thin diagonal lines inside the scored grooves of the salmon topping. -
Add sesame seeds:
Dip the tip of a toothpick into black paint and dot ‘seeds’ onto the beige cap of the top Onigiri. -
Paint the eyes:
Use a ball tool or the end of a paintbrush handle dipped in black paint to stamp two small dots for eyes on each piece. Place them roughly in the center of the rice area. -
Add mouths:
With a thin liner brush or a black fine-tip marker, draw a small ‘U’ shape between the eyes for a smile. -
Apply blush cheeks:
Use a dry brush technique with pink paint, or simply dab a Q-tip with pink pastel chalk, to add rosy cheeks just below the eyes. -
Add highlights:
For that extra sparkle, add a tiny white dot to the top corner of each black eye using a toothpick.
Make it Sparkle
Mix a tiny amount of glitter into your varnish before applying it to the salmon piece only. It creates a dewy, fresh fish look that catches the light beautifully.
Step 4: Finishing Up
-
Seal the work:
Apply a coat of gloss varnish or Mod Podge. This protects the paint and gives the ‘fish’ parts a realistic, fresh sheen. -
Attach magnets:
Once the varnish is dry, flip the pieces over. Apply a generous dab of strong glue to the back and press your ceramic magnet firmly into place.
Stick these friendly little faces on your fridge and enjoy a daily dose of cuteness


Cookie And Milk Pair Magnets
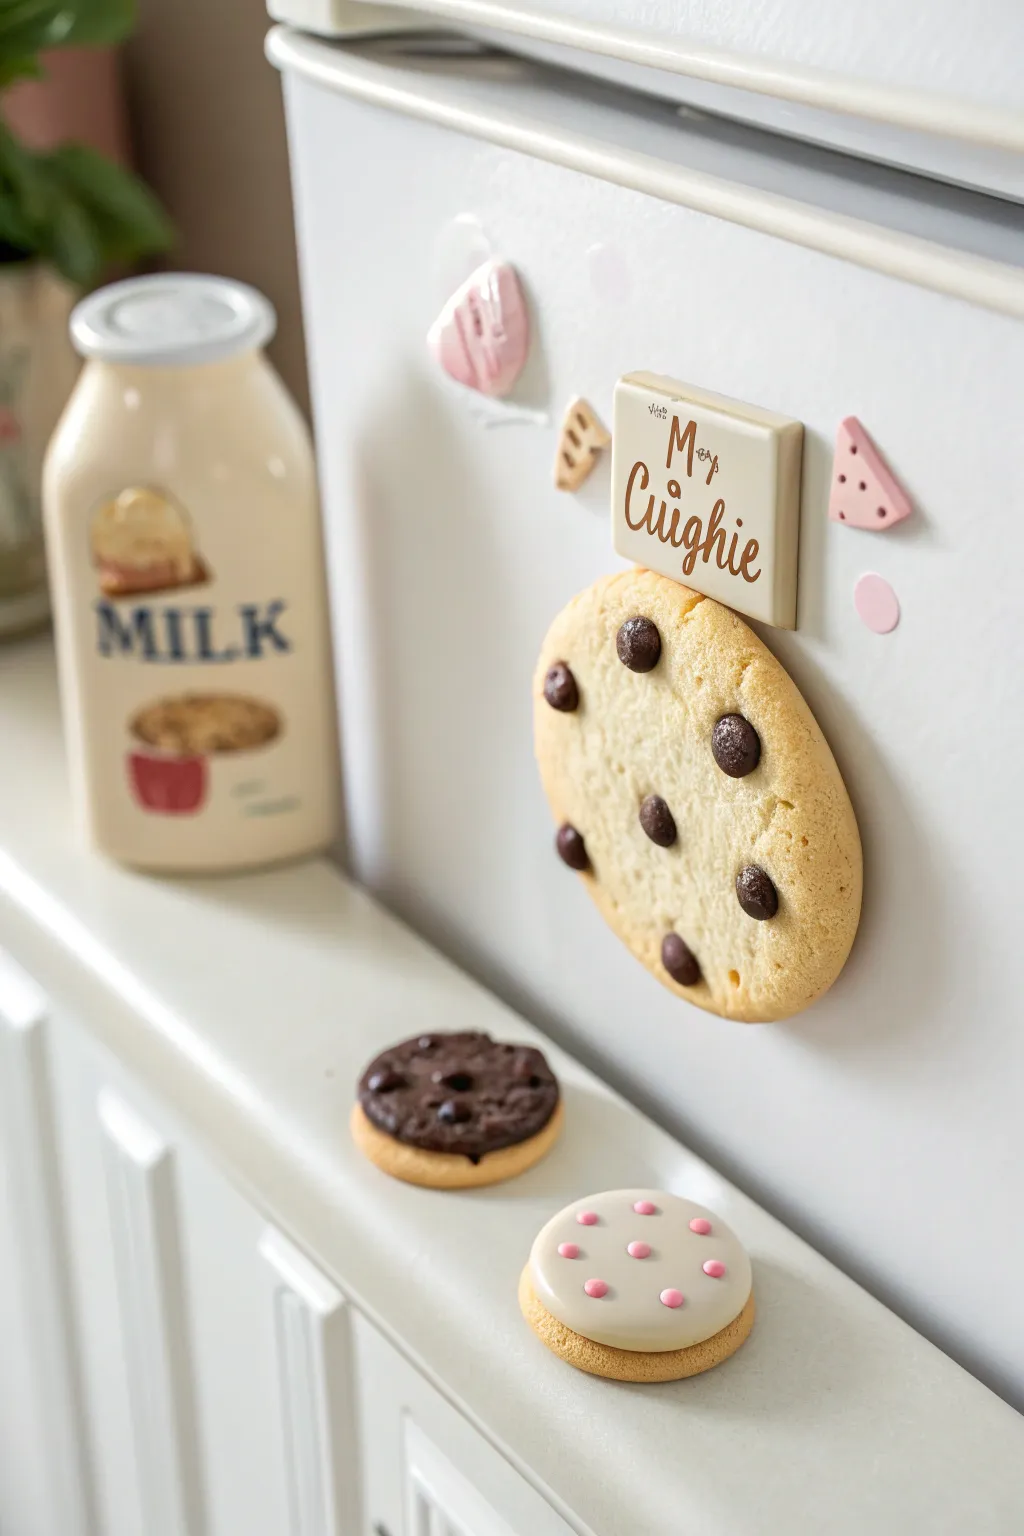
Bring a charming breakfast diner vibe to your kitchen with this delightful set of magnets featuring a realistic chocolate chip cookie and coordinating stylized sweets. The warm biscuit tones and textured details make these faux treats look almost good enough to eat right off the fridge door.
Detailed Instructions
Materials
- White air dry clay
- Acrylic paints (pale yellow, ochre, burnt sienna, dark brown, white, cream, pink)
- Round adhesive magnets or strong magnet disks
- Texturing tools (toothbrush, needle tool, crumpled foil)
- Small rolling pin
- Circle cutters (various sizes)
- Super glue or E6000
- Gloss varnish or clear nail polish
- Fine detail paintbrush
- Sponge for shading
Step 1: Sculpting the Cookie Base
-
Mixing the dough color:
Start by tinting a ball of white air dry clay with a very small amount of yellow ochre and a touch of brown paint. Knead thoroughly until you achieve a consistent, pale cookie dough shade. -
Forming the shape:
Roll the clay into a ball about 2 to 3 inches wide, then flatten it gently with your palm. Don’t use a rolling pin here; you want the edges to be slightly rounded and organic, just like a baked cookie. -
Adding texture:
Here I prefer to use a stiff toothbrush or a ball of crumpled aluminum foil. Press it repeatedly over the entire surface of the cookie to create that distinctive baked crumb texture. -
Making chocolate chips:
Mix dark brown paint into a small amount of fresh clay until it’s a rich chocolate color. Pinch off tiny pieces and roll them into irregular chip shapes. -
Embedding the chips:
Press the chocolate chips firmly into the cookie surface while the clay is still wet. Use a tool to push the surrounding ‘dough’ slightly over the edges of the chips so they look baked-in rather than just sitting on top.
Texturing Trick
Use a real cookie to stamp texture into your clay! Press a hard, store-bought cookie gently into the wet clay surface for an instant, hyper-realistic crumb pattern.
Step 2: Creating the Mini Sweets
-
Sculpting the mini cookie:
For the smaller chocolate-topped cookie sitting on the ledge, flatten a small disk of untinted or light beige clay. Create a second, slightly smaller uneven disk from dark brown clay for the fudge topping. -
Assembling the topped cookie:
Press the dark brown layer onto the beige base. Use a needle tool to dimple the dark layer, mimicking melted chocolate or fudge texture. -
Making the glazed biscuit:
Create another beige disk base. Roll a thin layer of white clay, cut a circle the same size, and drape it over the top to look like white icing. -
Adding sprinkles:
Roll tiny balls of pink clay and press them gently into the white icing layer while it’s still soft. Make sure they adhere well. -
Creating the sign:
Roll out a rectangular slab of white clay. If you want it to look like the image, keep the edges fairly sharp. Let all pieces dry for at least 24-48 hours depending on humidity.
Step 3: Painting & Finishing
-
The golden bake effect:
Once the large cookie is fully dry, use a dry sponge with a mix of burnt sienna and ochre paint. Lightly dab around the edges and on raised areas to mimic golden-brown baking marks. -
Shading the chips:
Paint the chocolate chips with a dark brown acrylic to deepen their color. Adding a tiny dot of white reflection can make them look glossier and more appetizing. -
Painting the sign:
Paint the background of the rectangular sign a creamy off-white. Use a very fine liner brush and brown paint to carefully write ‘My Cookie’ or your chosen phrase in a script font. -
Sealing the work:
Apply a coat of satin or matte varnish to the cookie parts to protect the paint without making them look like plastic. For the chocolate chips and the glazed biscuit, a touch of gloss varnish adds realism. -
Attaching magnets:
Flip all creations over. Apply a strong adhesive like E6000 to the back of each piece and firmly press a magnet into place. -
Final cure:
Allow the glue to cure completely overnight before testing your new magnets on the fridge door.
Scented Clay
Knead a drop of vanilla or chocolate fragrance oil into your clay before sculpting. Each time you pass the fridge, you’ll get a verified whiff of bakery sweetness.
Now your kitchen has a permanent sweet treat that never goes stale

What Really Happens Inside the Kiln
Learn how time and temperature work together inside the kiln to transform clay into durable ceramic.
Strawberry And Peach Blush Magnets
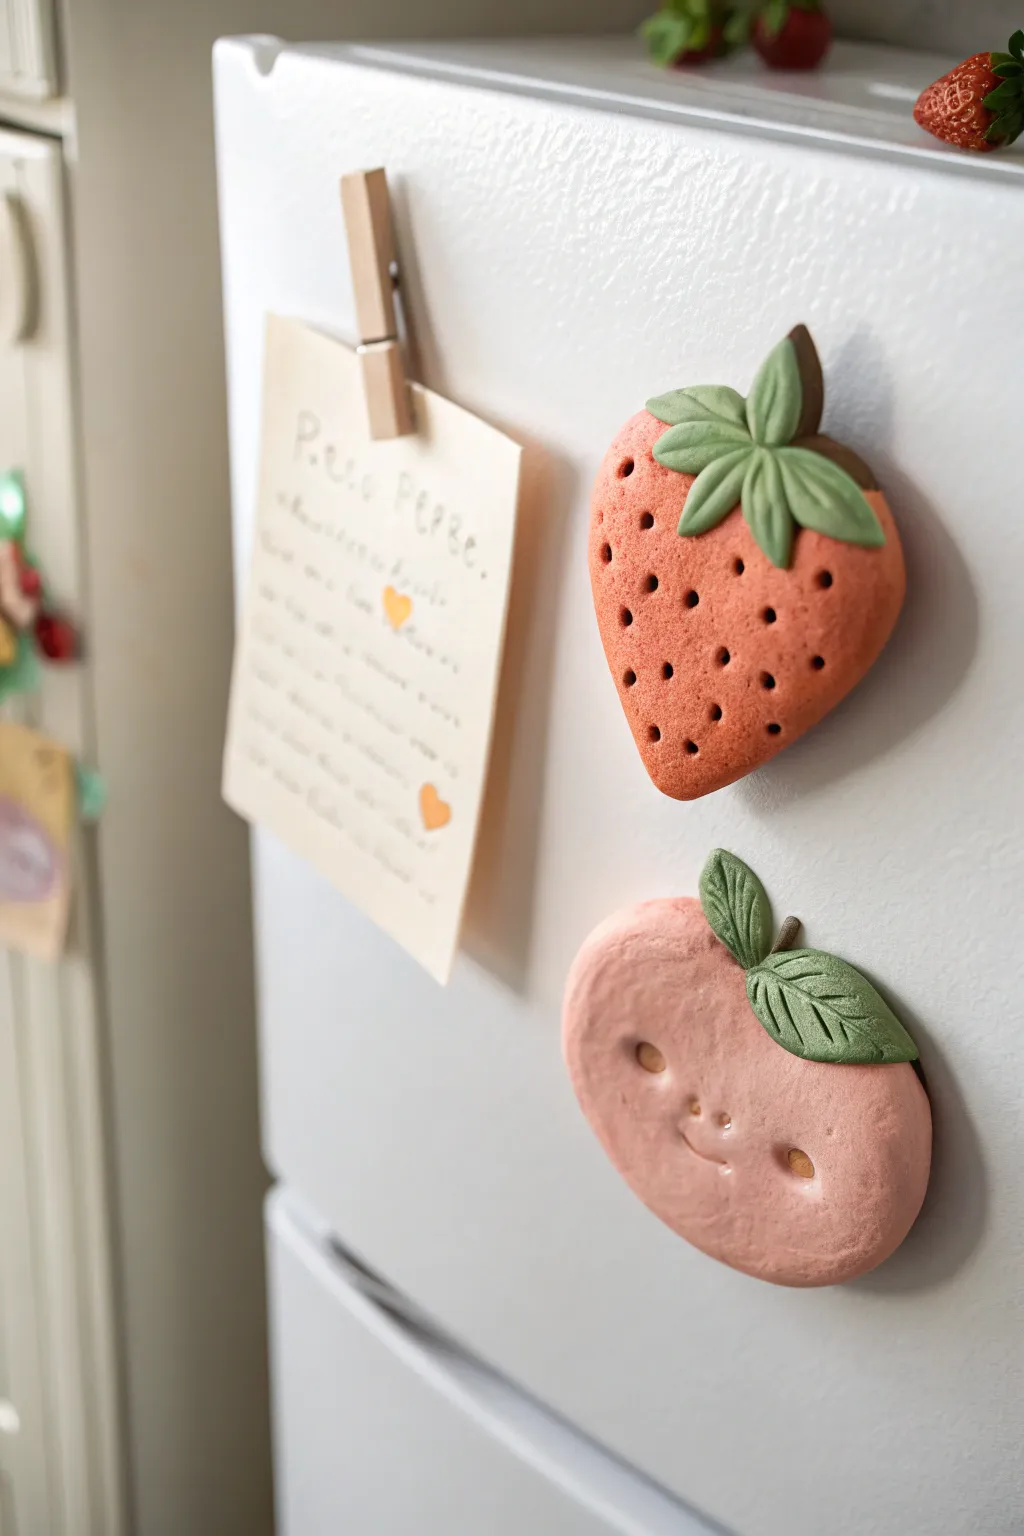
Add a touch of summer sweetness to your fridge with these charming, textured fruit magnets made from air-dry clay. The delightful duo features a seed-speckled strawberry and a blushing peach with a friendly, Kawaii-inspired face.
How-To Guide
Materials
- White air-dry clay
- Acrylic paints: Bright red, pale pink, moss green, brown, black
- Sculpting tools (needle tool, small ball stylus)
- Small magnets (neodymium recommended)
- Strong craft glue (E6000 or superglue)
- Fine-grit sandpaper
- Paintbrushes (detail and small flat)
- Optional: Semi-gloss varnish
Step 1: Sculpting the Base Shapes
-
Prepare the Clay:
Start by kneading a golf-ball-sized amount of air-dry clay until it is smooth and pliable. Divide this into two equal portions. -
Form the Strawberry:
Take the first portion and roll it into a ball, then flatten it slightly against your work surface. Gently pinch the bottom to create a tapered, triangular strawberry shape. -
Form the Peach:
Roll the second portion into a ball and flatten it into a thick disc. Use your finger to press a slight indentation at the top center to create the characteristic heart-like dip of a peach. -
Smooth the Edges:
Dip your finger in a little water and run it along the edges of both fruit shapes to ensure they are smooth and rounded, removing any cracks.
Cracked Clay?
If small cracks appear while the clay dries, mix a tiny bit of fresh clay with water to make a paste and fill in the gaps. Smooth it over with a finger.
Step 2: Adding Texture and Details
-
Texture the Strawberry:
Use a needle tool or a toothpick to poke small, evenly spaced holes across the entire surface of the strawberry shape to mimic seeds. Make these deep enough to be visible after painting. -
Create the Peach Face:
Use a small ball stylus to gently press two sockets for the eyes into the peach. Then, use the needle tool to crave a tiny, curved smile centered below the eyes. -
Sculpt the Leaves:
Roll out a small amount of fresh clay very thinly. Cut out three small teardrop shapes for the strawberry and two larger leaf shapes for the peach. -
Detail the Leaves:
Use a knife tool to gently score a central vein down the middle of each leaf. Attach them to the top of the fruits using a tiny dab of water and gentle pressure. -
Add Stems:
I like to roll tiny cylinders of clay for the stems. Attach one to the center of the strawberry leaves ensuring it looks integrated. -
Drying Time:
Set your creations aside in a dry, safe place. Allow them to dry completely for at least 24-48 hours, flipping them occasionally to ensure the backs dry evenly.
Step 3: Painting and Finishing
-
Base Coat the Strawberry:
Paint the strawberry body with a bright terracotta or strawberry red acrylic paint. You may need two coats for full opacity. -
Shadowing the Seeds:
To make the texture pop, you can lightly dab a darker brownish-red into the seed holes, or simply let the shadow of the indentation do the work. -
Paint the Peach:
Mix a soft, pale pink color and paint the entire peach body. Let it dry completely before moving to the details. -
Paint the Greens:
Use a muted moss green to paint the leaves on both fruits. Use a fine detail brush to keep the edges clean against the fruit color. -
Detail the Peach Face:
Using your finest brush or a toothpick, paint the insides of the eye sockets a warm brown or black to define the expression. -
Add the Stems:
Paint the tiny stems at the very top brown to contrast with the green leaves. -
Seal:
Once the paint is fully cured, apply a thin layer of matte or semi-gloss varnish to protect the surface. -
Attach Magnets:
Flip the dried fruit over. Apply a strong craft glue to the back and press your magnets firmly into place. Let the glue set according to the package instructions.
Smoother Pokes
When making the seed holes on the strawberry, twist the tool slightly as you pull it out to prevent the clay from lifting and creating jagged edges.
Now your fridge has a little extra personality with these adorable handmade fruit companions
Simple Daisy Flower Magnets
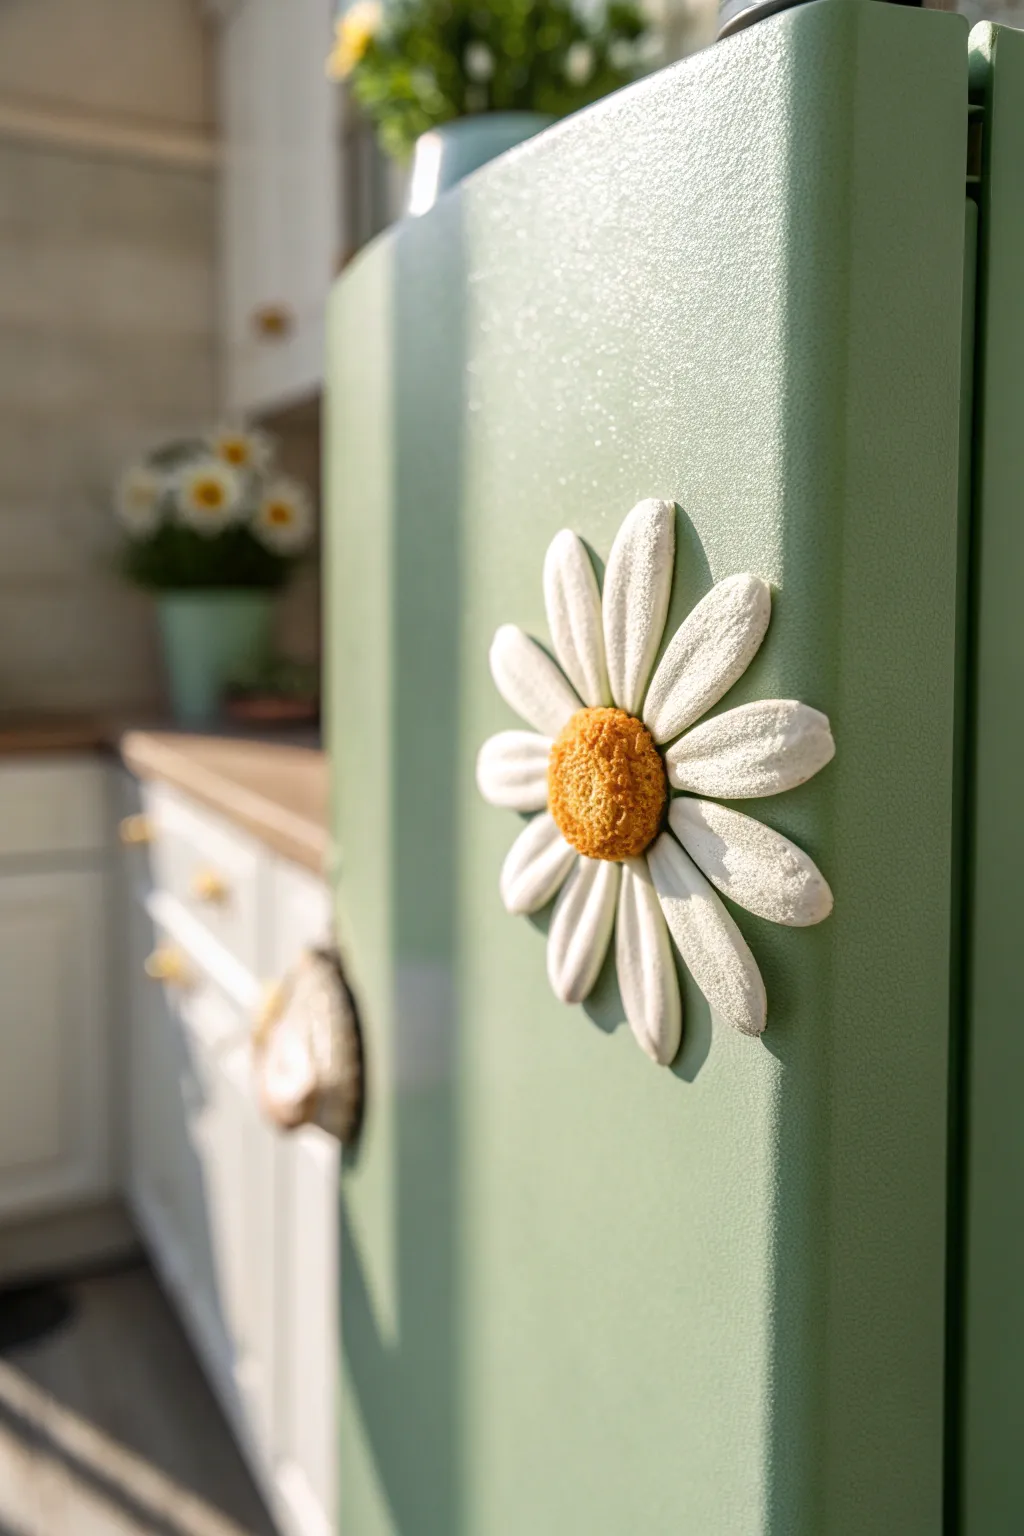
Brighten up your kitchen appliances with this cheerful, oversized daisy magnet that brings a touch of spring indoors. The chunky petals and highly textured center give it a charming, handcrafted look that stands out beautifully against any color.
How-To Guide
Materials
- White air-dry clay
- Acrylic paints (bright yellow, warm orange, white)
- Strong round ceramic or neodymium magnet
- Sculpting tool or toothpick
- Old toothbrush or stiff bristle brush
- Fine-grit sandpaper
- Super glue or E6000
- Rolling pin
- Parchment paper
Step 1: Sculpting the Flower Base
-
Prepare the workspace:
Lay down a sheet of parchment paper to prevent sticking. Knead a ball of white air-dry clay until it is smooth, pliable, and free of cracks. -
Form the petals:
Divide your clay into about 12-14 equal small portions. Roll each portion into a small ball, then elongate them into teardrop shapes. -
Flatten the petals:
Gently press each teardrop flat with your thumb or a rolling pin. They should be relatively thick, about 1/4 inch, to achieve that ‘puffy’ look. -
Assemble the flower:
Arrange the petals in a circle with the pointed ends touching in the center. Press the joined center points together gently so they adhere to one another. -
Create the center base:
Roll a larger ball of clay for the flower’s center. Flatten it slightly into a dome shape. -
Attach the center:
Score the back of the center dome and the junction of the petals. Apply a tiny bit of water as ‘slip’ and press the dome firmly onto the center of your petal ring.
Pro Tip: Seamless Petals
To prevent petals from breaking off, cut a small circle of clay and place it underneath the center junction as a backing support before assembling the petals.
Step 2: Adding Texture and Detail
-
Texture the center:
This step defines the look. Take an old toothbrush or a stiff sculpting tool and rigorously stipple the center dome. Press in repeatedly to create a deep, fuzzy, pollen-like texture. -
Refine the petals:
Use your fingers to smooth the edges of the petals. I like to gently curb the tips inward just a little to give the flower a natural, cupped shape. -
Add petal texture:
Lightly press a piece of sandpaper or a textured cloth onto the surface of the petals to give them a subtle, stone-like grain rather than a perfectly smooth finish. -
Embed the magnet:
Flip the flower over carefully. Press your magnet slightly into the back of the center to create a divot, then remove it. This ensures it sits flush later. -
Drying:
Let the flower dry completely for 24-48 hours. Turn it over halfway through the drying process to ensure the back dries evenly.
Level Up: Scented Clay
Add a few drops of floral essential oil into the clay while kneading. Your fridge will smell like a fresh bouquet every time you open the door
Step 3: Painting and Finishing
-
Base coat the petals:
Once dry, paint the petals with a matte white acrylic paint. Even if the clay is white, painting it seals the surface and gives a consistent finish. -
Paint the center:
Mix a bright yellow with a touch of orange. Dab this generously onto the textured center, ensuring the paint gets into all the little stippled holes. -
Add dimension:
While the yellow is still wet, dab a slightly darker orange just around the bottom edge of the center dome for shadow, and a lighter yellow on the very top for a highlight. -
Highlight the petals:
Dry brush a tiny amount of pure white or very pale cream over the texture of the petals to enhance the grainy effect you created earlier. -
Attach the magnet:
Apply a strong adhesive like E6000 or super glue to the divot on the back. Press the magnet in and let the glue cure completely according to package instructions.
Pop this oversized daisy onto your fridge and enjoy the fresh floral vibe every time you reach for a snack


The Complete Guide to Pottery Troubleshooting
Uncover the most common ceramic mistakes—from cracking clay to failed glazes—and learn how to fix them fast.
Leaf Imprint Botanical Magnets
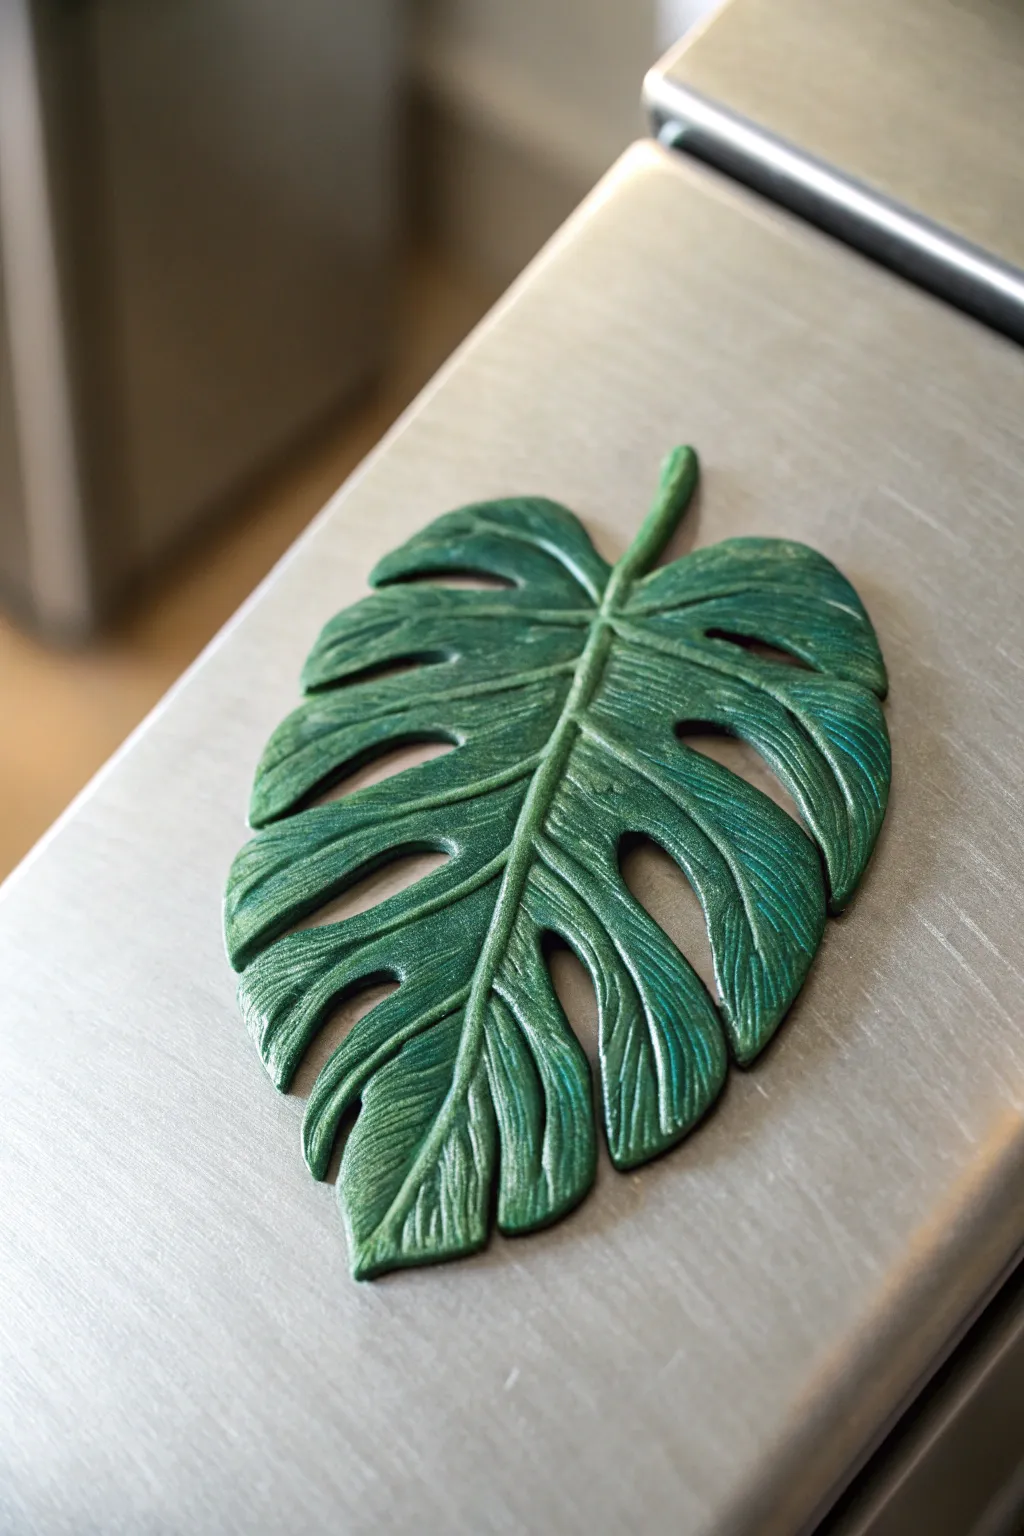
Bring a touch of the tropics to your kitchen with this elegant Monstera leaf magnet. The textured surface and deep green metallic finish give it a sophisticated, sculpted look that transforms a simple lump of clay into a botanical work of art.
Step-by-Step Tutorial
Materials
- Air dry clay (white or terracotta)
- Rolling pin
- Parchment paper or non-stick mat
- Monstera leaf template (printed) or a real leaf
- Craft knife or scalpel
- Needle tool or toothpick
- Modeling tool (spoon-shaped or rounded)
- Acrylic paints (dark green, light green, metallic gold/bronze)
- Small flat paintbrushes
- Strong round magnet
- Superglue or heavy-duty craft glue
- Varnish or sealant (optional)
Step 1: Shaping the Leaf
-
Prepare the workspace:
Lay down a sheet of parchment paper to protect your surface and prevent sticking. Take a ping-pong ball sized amount of air dry clay and knead it until it’s soft and pliable. -
Flatten the clay:
Roll the clay out evenly until it is about 1/4 inch thick. You want it substantial enough to hold texture but light enough for a magnet. -
Trace the shape:
Place your paper template or real leaf lightly onto the clay. Outline the iconic Monstera shape—including the trademark holes and deep notches—using a needle tool or toothpick. -
Cut the silhouette:
Remove the template and carefully cut along your traced lines with a craft knife. Take your time around the curves of the cutout holes to keep them smooth. -
Smooth the edges:
Dip your finger in a tiny bit of water and run it along all the cut edges to remove any jagged bits or crumbs from the clay.
Leaves curling up?
If edges curl too much while drying, place a light book on top (with parchment paper in between) during the first few hours of the drying phase.
Step 2: Adding Texture
-
Mark the center vein:
Use a needle tool to gently draw a curved line down the center of the leaf, extending from the stem to the tip. Don’t cut all the way through; just make an impression. -
Create the ribbing:
Draw curved veins branching out from the center line towards the edges of each leaf section. Keep these lines relatively close together to mimic the natural texture found in the reference image. -
Enhance texturing:
For a more realistic look, go back over your vein lines with a slightly blunter tool to soften them, or add tiny, shallow ticks between veins to create a fibrous appearance. -
Refine the stem:
Roll a very tiny snake of clay and attach it to the top of the leaf to create a distinct, rounded stem if your cutout looks too flat. Blend the seams with a little water. -
Dry partially:
Let the leaf sit for about 30 minutes. Once the surface is slightly firmer, you can gently curl the tip or edges upward for a 3D effect before letting it dry completely. -
Dry completely:
Allow the sculpted leaf to dry for 24-48 hours. Flip it over halfway through the process to ensure the back dries evenly.
Step 3: Painting and Finishing
-
Base coat:
Paint the entire front and sides of the dried leaf with a dark forest green acrylic paint. Ensure you get paint into all the deep texture grooves. -
Dry wash technique:
While the dark green is fully dry, mix a lighter green with a tiny drop of water. Brush this lightly over the raised areas, wiping away excess immediately to highlight the texture. -
Metallic highlighting:
For that subtle sheen seen in the photo, check your dry brush. Dip just the tip into metallic gold or bronze paint, brush most of it off on a paper towel, and lightly dust the raised ridges. -
Seal (optional):
Apply a coat of satin or matte varnish if you want to protect the paint job from kitchen splashes. -
Attach the magnet:
Fip the leaf over. Apply a strong dab of superglue to the center back and press your round magnet firmly into place. -
Final cure:
Let the glue set according to the manufacturer’s instructions before placing your new art on the fridge.
Level Up: Gemstone Effect
For a luxe look, skip the realistic green and paint the leaf entirely in metallic copper or silver, then antique it with black paint in the grooves.
Now your fridge has a permanent touch of greenery that never needs watering
Chubby Cat Face Magnets
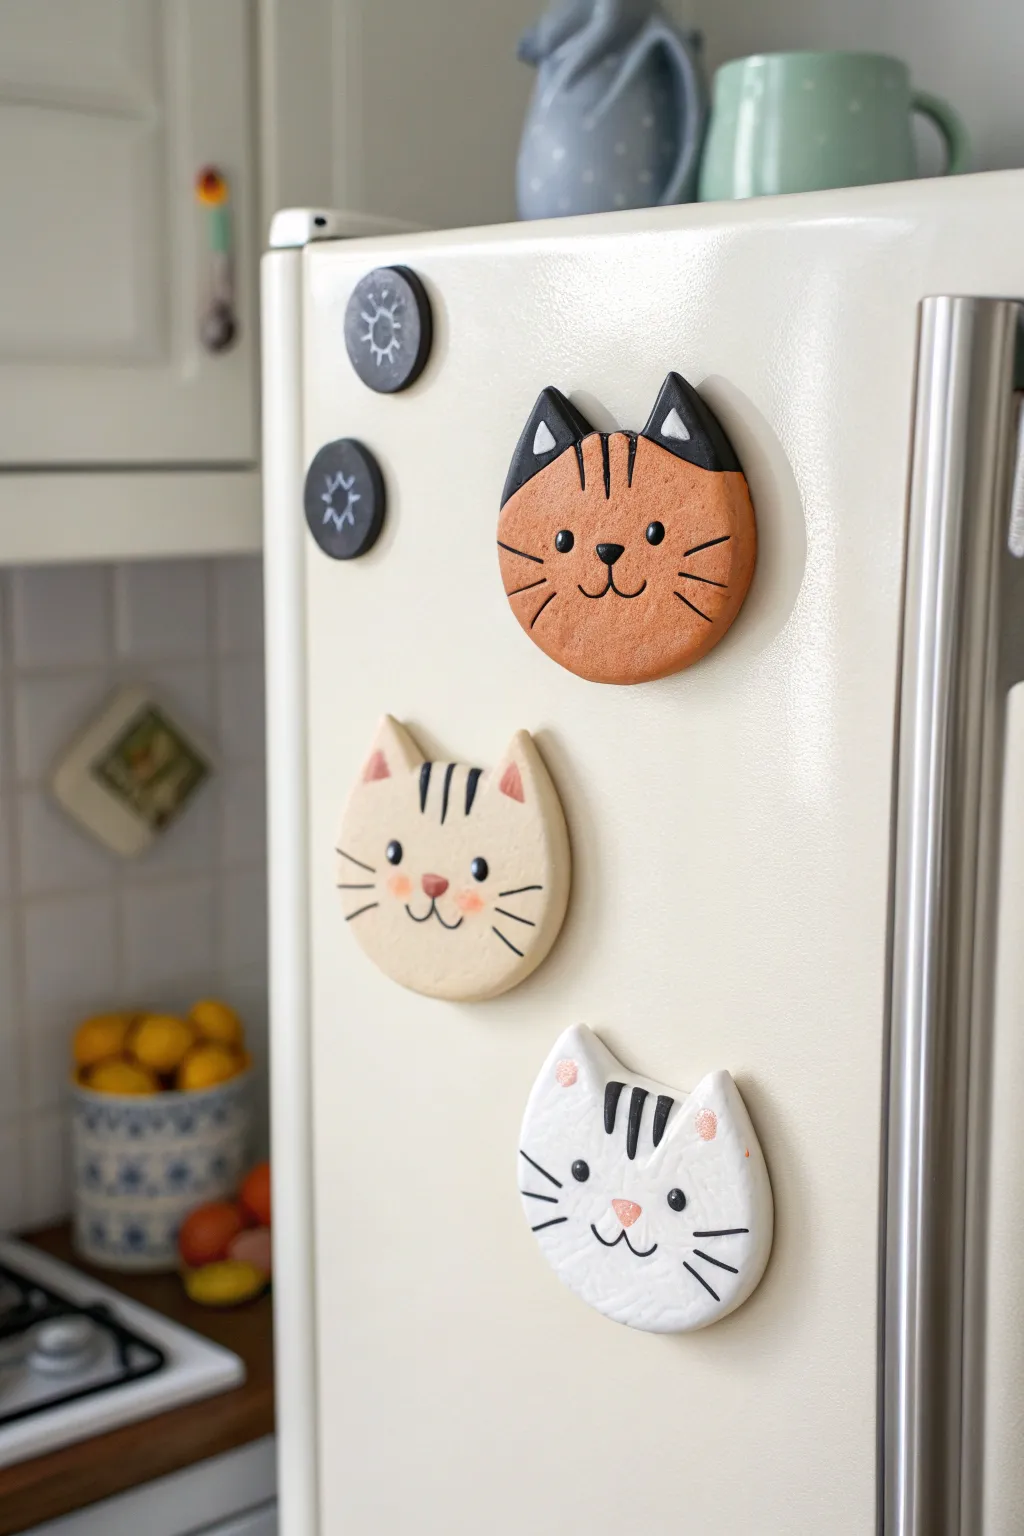
Brighten up your appliance with these endearing chubby cat face magnets, featuring three distinct personalities. Their smooth, rounded forms and simple painted details give them a charming, modern folk-art aesthetic that is surprisingly easy to achieve.
Detailed Instructions
Materials
- Air dry clay (white)
- Acrylic paints (terracotta orange, cream, white, black, pink)
- Rolling pin
- Circle cookie cutter (approx. 2-3 inches)
- x-acto knife or clay cutting tool
- Small bowl or cup of water
- Fine grit sandpaper
- Small round paintbrushes (sizes 0 and 2)
- Strong round magnets
- Strong craft glue (E6000 or similar)
- Matte or satin varnish (optional)
Step 1: Shaping the Base
-
Condition the clay:
Start by taking a handful of white air dry clay and kneading it in your hands until it becomes soft, pliable, and free of cracks. -
Roll it out:
Place the clay on a smooth surface or mat. Using your rolling pin, roll the clay out to an even thickness of about 1/4 inch. Avoid making it too thin, as these magnets look best with a bit of chunky dimension. -
Cut circles:
Press your circle cookie cutter firmly into the clay to cut out three distinct rounds. Remove the excess clay from around the circles. -
Form the ears:
Take the excess clay and pinch off small amounts to form triangles for the ears. You will need two triangles per cat face. Try to keep them slightly rounded at the tips rather than razor-sharp. -
Attach the ears:
Score the bottom of the ear triangles and the top of the circle head with a needle tool or toothpick. Dab a little water on the scored areas and press the ears firmly onto the top of the circle. -
Blend the seams:
Use a modeling tool or just your finger dipped in water to smooth the seam where the ears join the head. The transition should look seamless, like one solid piece of clay. -
Smooth the edges:
Dip your finger in water and run it gently around the entire perimeter of the cat face to soften the sharp cut edges. -
Dry thoroughly:
Place your cat faces on a flat surface lined with parchment paper. Let them dry completely, turning them over occasionally to prevent warping. This usually takes 24-48 hours.
Smoother Seams
If you struggle blending the ears, use the back of a spoon dipped in water. The curve of the spoon helps seamlessly meld the clay pieces together without leaving fingerprints.
Step 2: Painting and Finishing
-
Sand imperfections:
Once bone dry, lightly brisk the surface and edges with fine-grit sandpaper to remove any fingerprints or rough textures. -
Base coat colors:
Paint each cat face entirely in its base color. Paint one terracotta orange, one cream/beige, and leave one white (painting it with white acrylic helps seal it). You may need two coats for full opacity. -
Paint ear details:
Using a small brush, add the inner ear details. For darker cats, use a lighter color or black triangles; for light cats, use soft pink inside the ears. -
Add the stripes:
For the tabby look, paint three small vertical stripes or elongated triangles on the forehead using black paint. I like to keep the brush fairly dry here for crisp lines. -
Paint facial features:
Using your smallest detail brush (size 0), paint two small black dots for eyes and a small inverted triangle for the nose. Connect the nose to a simple ‘w’ shape for the mouth. -
Whiskers and cheeks:
Paint three thin black lines on each cheek for whiskers. If you want rosy cheeks, dilute a tiny drop of pink paint with water and wash it gently onto the cheek area. -
Seal the work:
Protect your paint job with a coat of matte or satin varnish. This prevents the acrylic from chipping and makes the magnets easier to wipe clean. -
Attach the magnet:
Flip the dried faces over. Apply a strong dab of E6000 or heavy-duty craft glue to the back and press your round magnet firmly into the center. Let the glue cure fully before stickig them to your fridge.
3D Texture
Before the clay dries, gently press a small indentation where the nose will go. When painting later, fill this divot with pink paint for a cute, slightly recessed button nose.
Now your fridge has a purr-fectly charming set of guards to watch over your grocery list

TRACK YOUR CERAMIC JOURNEY
Capture glaze tests, firing details, and creative progress—all in one simple printable. Make your projects easier to repeat and improve.
Bunny Head And Paw Magnets
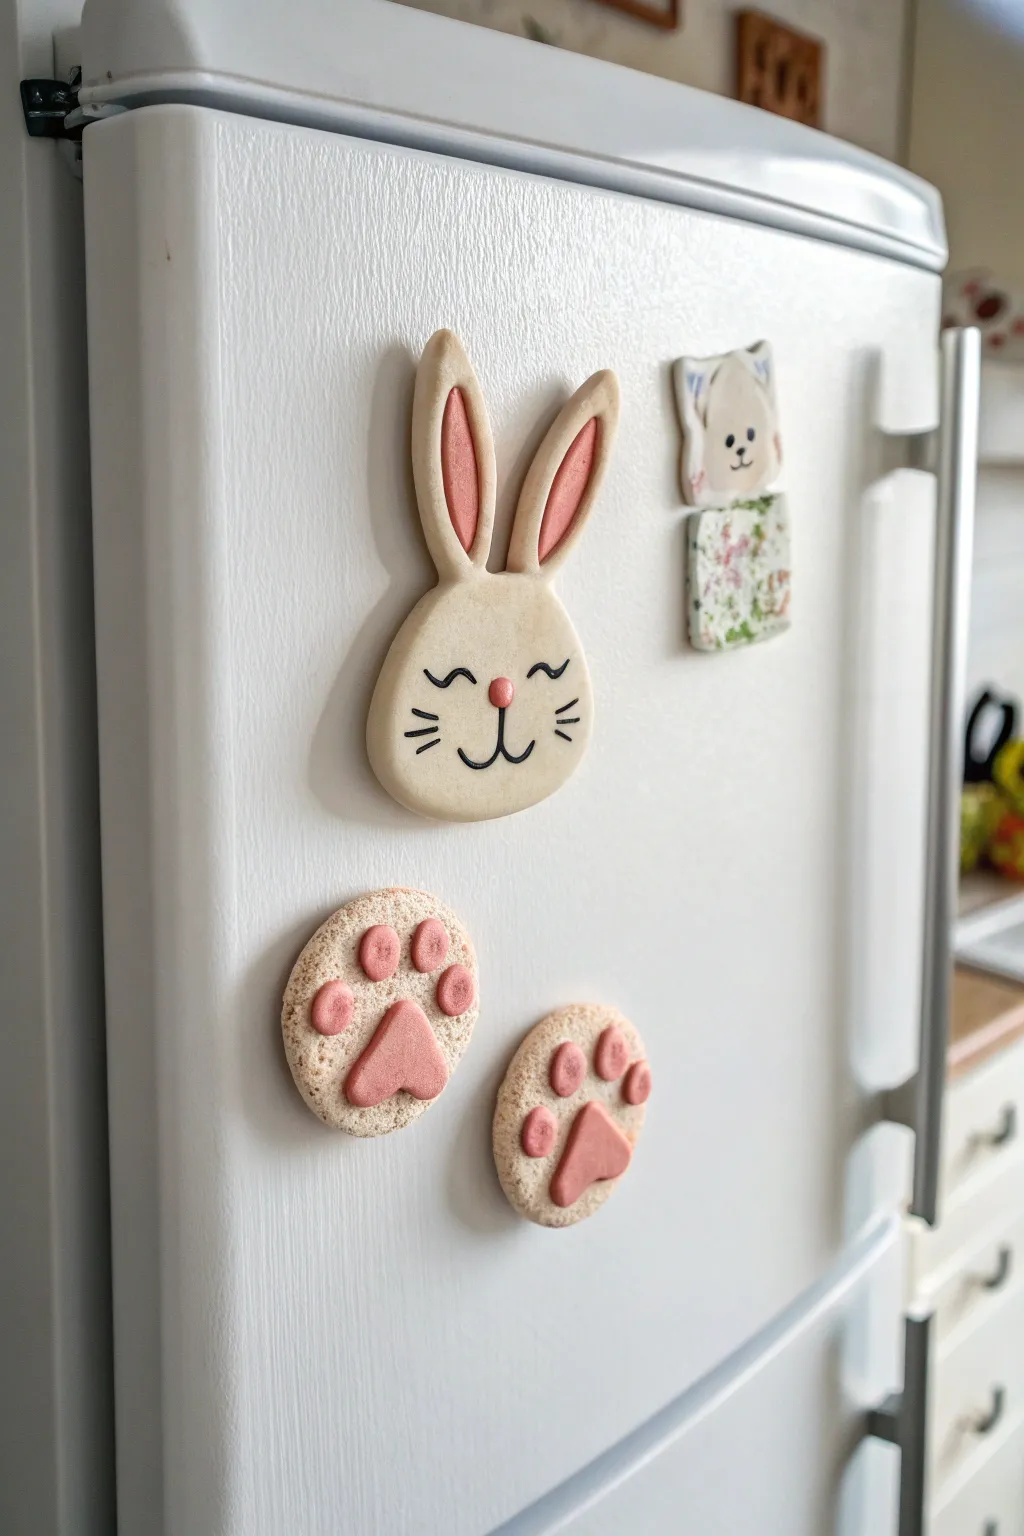
These adorable bunny-themed magnets add a touch of whimsy to any kitchen appliance with their soft cream tones and sweet pink details. The set includes a cheerful bunny face and two matching paw prints, all crafted from simple air dry clay to create a cohesive and charming display.
How-To Guide
Materials
- White air dry clay
- Rolling pin
- X-Acto knife or clay craft knife
- Small round cookie cutter (approx. 1.5 – 2 inches)
- Water in a small cup
- Soft pink acrylic paint
- Black acrylic paint or fine black permanent marker
- Fine detail paintbrush
- Toothbrush or texturing tool
- Strong craft glue (E6000 or similar)
- Round ceramic or neodymium magnets
- Clay smoothing tool or fingertip
- Sandpaper (fine grit, optional)
- Matte varnish (optional)
Step 1: Shaping the Bunny Head
-
Condition the clay:
Begin by taking a chunk of air dry clay and kneading it in your hands until it becomes warm, pliable, and free of cracks. -
Roll the base:
Roll the clay out on a clean surface to an even thickness of about 1/4 inch. Creating a slightly thicker piece helps ensure the magnet is durable once dry. -
Cut the face shape:
Use your craft knife to cut out a rounded, slightly flattened oval shape for the bunny’s head. Smooth the edges with a wet finger to remove any sharp cut marks. -
Form the ears:
Roll two small sausage shapes of clay, tapering them at the top. Flatten them gently to create the long ear shapes. They should be proportional to the head size you just cut. -
Attach the ears:
Score the bottom of the ears and the top of the head where they will join. Add a tiny dab of water or slip, press the ears firmly in place, and blend the seam on the back so it’s seamless. -
Create inner ear indents:
Use a modeling tool or the handle of a paintbrush to gently press an indentation into the center of each ear. This creates the space we will later paint pink.
Cracks Appearing?
If you see small cracks forming while the clay dries, mix a tiny amount of fresh clay with water to make a paste and fill them in immediately.
Step 2: Creating the Paws
-
Cut the paw bases:
Using your small round cookie cutter, punch out two circles from your rolled clay slab. -
Add texture:
This step gives the paws a cookie-like look. Take a clean toothbrush and gently tap it all over the surface of the round discs to create a stippled, furry texture. -
Form the toe beans:
Roll six tiny balls of clay for the toes and two slightly larger, heart-shaped triangles for the main pads. Flatten them slightly. -
Attach the pads:
Score and slip the back of these small pink pads and press them firmly onto the textured round bases. I prefer to press them down enough that they look integrated, not just sitting on top.
Step 3: Refining and Drying
-
Smooth imperfections:
Do a final check of all three pieces. Use a tiny bit of water to smooth out any fingerprints or unwanted bumps, especially on the bunny’s smooth face. -
Let it dry:
Place your pieces on a wire rack or parchment paper. Allow them to dry completely for 24-48 hours, flipping them occasionally to ensure even drying. -
Sand edges:
Once bone dry, very gently sand the edges if they are rough. Be careful not to sand off the texture on the paws.
Pro Tip: Cheeky Details
Mix a tiny drop of pink paint with a lot of water to create a wash. Use this to dab subtle rosy cheeks onto the bunny face for extra cuteness.
Step 4: Painting and Assembly
-
Paint the pink details:
Using a fine brush and soft pink acrylic paint, carefully fill in the indentations of the bunny’s ears. Paint the raised paw pads and toe beans with the same pink shade. -
Paint the nose:
Paint a small, rounded triangle in the center of the bunny’s face for the nose. -
Draw the face:
Using a very fine brush with black paint, or a permanent marker, draw the sleepy eyes (two curved lines with lashes), the whiskers, and the mouth anchoring from the nose. -
Seal (optional):
If you want extra protection, coat the front of the magnets with a matte varnish and let it dry. -
Attach the magnets:
Flip the clay pieces over. Apply a strong dab of E6000 glue to your magnets and press them firmly onto the back of the clay. Let the glue cure fully before stickig them to the fridge.
Now you have a charming set of handmade magnets to brighten up your kitchen organization
Sweet Sea Turtle Magnets
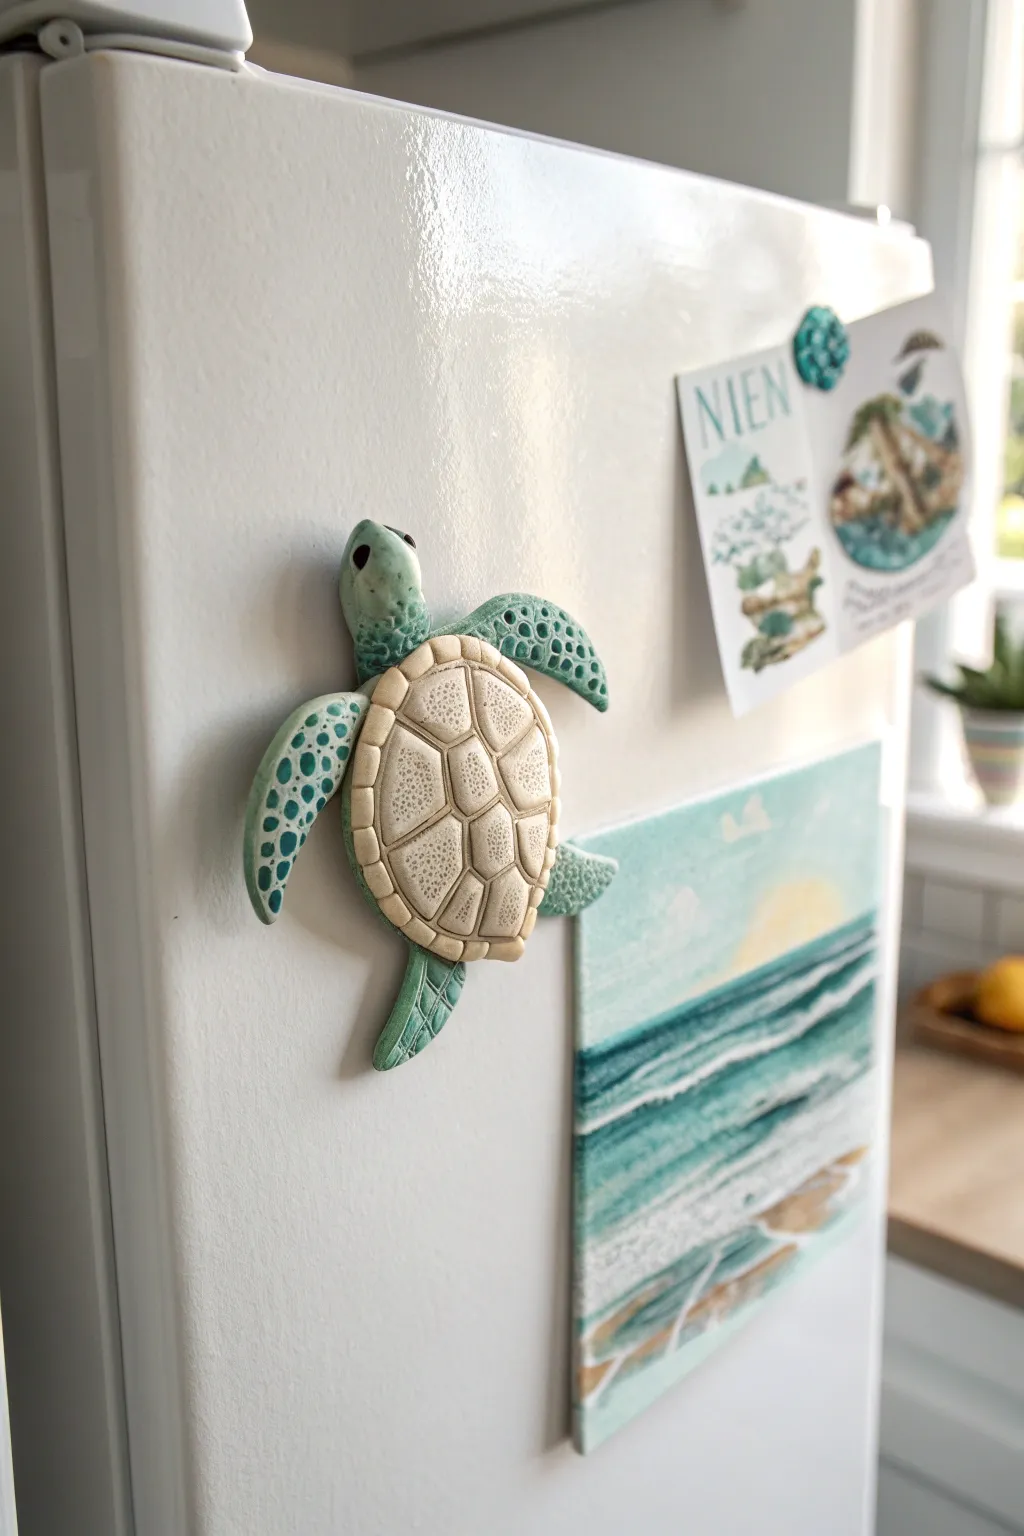
Bring a touch of ocean calm to your kitchen with this beautifully textured sea turtle magnet. Using simple air-dry clay techniques, you’ll sculpt a gentle swimmer featuring a speckled shell and distinct paddle-like flippers.
Step-by-Step
Materials
- White polymer or air-dry clay
- Teal or seafoam green acrylic paint
- Beige or off-white acrylic paint
- Black acrylic paint (tiny amount)
- Clay sculpting tools (needle tool, small ball tool)
- Strong round magnet
- Super glue or E6000
- Rolling pin
- Fine-point paintbrush
- Matte or satin varnish (optional)
Step 1: Sculpting the Body
-
Shape the torso:
Begin by rolling a small ball of clay about the size of a walnut, then flatten it slightly into an oval to create the main body base. -
Form the head:
Roll a smaller piece of clay into a teardrop shape and attach the wider end to the top of your oval body, smoothing the seam with your finger or a clay tool so it looks seamless. -
Create the front flippers:
Shape two medium-sized pieces of clay into long, curved teardrops. These should be substantial, as they are the main swimming limbs. Flatten them gently and attach them to the upper sides of the body. -
Add rear flippers:
Repeat the process with slightly smaller pieces of clay for the back legs, angling them downwards to simulate a swimming motion. -
Sculpt the shell:
Roll a new ball of clay for the top shell (carapace), press it flat but keep it slightly domed, and layer it directly on top of the body base. -
Texture the carapace:
Using a needle tool or a small knife, gently press a central hexagon pattern onto the shell, followed by a ring of surrounding pentagons to mimic the scute plates. -
Add surface detail:
Take a stiff bristle brush or a piece of crumpled foil and gently tap it over the shell’s surface to create a realistic, pitted limestone texture. -
Define the eyes:
Use a small ball tool to make indentations on either side of the head where the eyes will go.
Glue Woes?
If the magnet pops off after drying, score marks into the back of the clay and the magnet surface with sandpaper to give the glue more ‘tooth’ to grab onto.
Step 2: Painting and Assembly
-
Dry thoroughly:
Let your turtle dry completely according to your clay package’s instructions; this usually takes 24-48 hours depending on humidity. -
Base coat the skin:
Paint the head and all four flippers with a solid coat of seafoam green or teal paint. I find two thin coats look better than one thick one. -
Paint the shell:
Carefully paint the shell area with a creamy beige or off-white color, being careful not to get paint on the green skin areas. -
Detail the flippers:
Once the green base is dry, use a lighter teal or white paint to add small, irregular spots along the edges of the flippers for that classic sea turtle pattern. -
Highlight the shell:
Mix a tiny drop of brown into your beige paint and outline the engraved lines of the shell scutes to make the segments pop. -
Add the eyes:
Dip a toothpick or fine brush into black paint and fill the eye indentations you made earlier. -
Seal the work:
Protect your painting with a layer of matte or satin varnish to prevent the acrylics from scratching against the fridge. -
Attach the magnet:
Flip the turtle over and glue a strong magnet to the center of the underside using E6000 or super glue, pressing firmly for a few seconds.
Add Some Sparkle
Mix a tiny amount of pearlescent powder or glitter into your varnish before applying it to the shell to give it a wet, just-out-of-the-ocean shimmer.
Now your little ocean voyager is ready to hold up your most important notes and photos
Kawaii Cloud And Rainbow Magnets
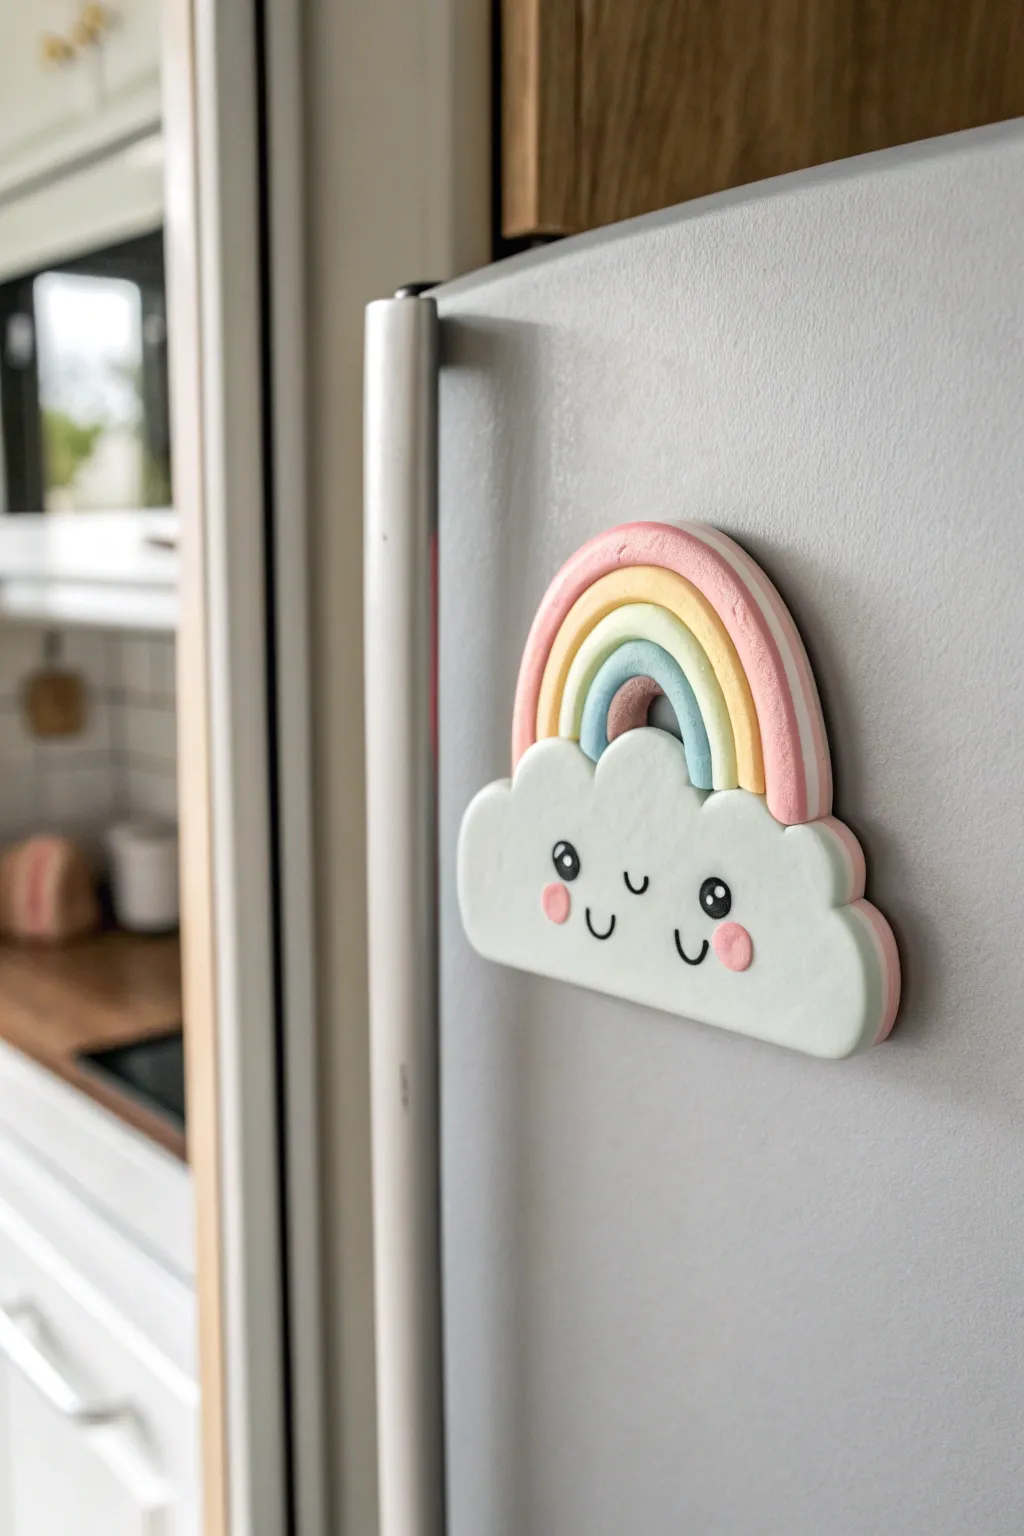
Bring a little sunshine into your kitchen with this adorable, pastel-colored magnet. Featuring a soft-hued rainbow arching over a smiling cloud, this project is perfect for adding a touch of sweetness to any magnetic surface.
Step-by-Step Guide
Materials
- White air dry clay
- Acrylic paints (pastel pink, soft yellow, light blue, black)
- Rolling pin or smooth bottle
- Clay knife or craft knife
- Small round magnet
- Superglue or heavy-duty craft glue
- Fine-grit sandpaper
- Water (for smoothing)
- Dotting tool or toothpick
- Matte varnish (optional)
Step 1: Fomring the Rainbow Arches
-
Prepare your clay:
Start by taking a medium-sized ball of white air dry clay and kneading it until it is soft and pliable. If the clay feels too dry, dip your fingers in water and work it in. -
Mix your colors:
Separate three small portions of clay. Mix a tiny drop of pink paint into one, yellow into another, and blue into the third. Knead fully until you have uniform, pastel-colored clay. -
Roll the coils:
Take the blue clay and roll it into a thin, even snake. Repeat this process for the yellow and pink clay portions, trying to keep the thickness consistent across all three colors. -
Shape the inner arch:
Bend the blue coil into a tight U-shape to form the smallest, innermost arch of the rainbow. -
Stack the layers:
Place the yellow coil snugly over the blue arch, gently pressing them together so they adhere without smashing the round shape. Repeat with the pink coil on the outside. -
Trim the base:
Use your craft knife to slice straight across the bottom of the rainbow legs so they are perfectly flush and creating a flat surface for the cloud to attach to.
Smooth Seams
Use a tiny amount of water on your finger to ‘erase’ the seam where different clay colors touch. This blends the clay fibers for a stronger bond.
Step 2: Creating the Cloud Base
-
Roll out the cloud:
Take a larger ball of plain white clay and flatten it to about 1/4 inch thickness. You want it slightly thicker than the rainbow arches for stability. -
Cut the shape:
Using your knife or a cloud-shaped cutter, cut out a fluffy cloud shape. Ensure the top edge is wide enough to support the rainbow you just made. -
Smooth the edges:
Dip your finger in a little water and run it along the cut edges of the cloud to soften any sharp corners for that puffy, soft look. -
Attach the rainbow:
Score the top edge of the cloud and the bottom of the rainbow slightly. Add a dab of water or liquid clay (slip) and press the rainbow firmly onto the top of the cloud. -
Add a backing layer:
For extra durability, I like to roll a very thin layer of white clay and smooth it over the entire back seam where the rainbow meets the cloud to lock them together.
Sparkle Upgrade
Brush a layer of glitter glaze over just the rainbow arches after they dry. It adds a magical shimmer while keeping the fluffy cloud matte.
Step 3: Adding Details & Finishing
-
Create the cheeks:
Take two tiny pinch of pink clay, roll them into balls, and flatten them onto the cloud face for rosy cheeks. -
Paint the face:
Once the surface is dry to the touch, use a fine detail brush and black paint to draw two wide-set eyes and a small ‘U’ mouth. Add tiny white dots to the eyes for sparkle. -
Dry completely:
Allow the entire piece to dry for 24 to 48 hours. Turn it over halfway through the drying process to ensure the back dries evenly. -
Sand imperfections:
Once fully cured, use fine-grit sandpaper to gently smooth out any fingerprints or rough edges on the sides. -
Seal the piece:
Apply a coat of matte varnish to protect the clay from moisture and dirt, giving it a professional finish. -
Attach the magnet:
Apply a strong dab of superglue to the back of the cloud and press your magnet firmly into place. Let the glue set completely before putting it on your fridge.
Now your fridge has a cheerful new friend helping to hold up your important notes
Evil Eye Symbol Charm Magnets
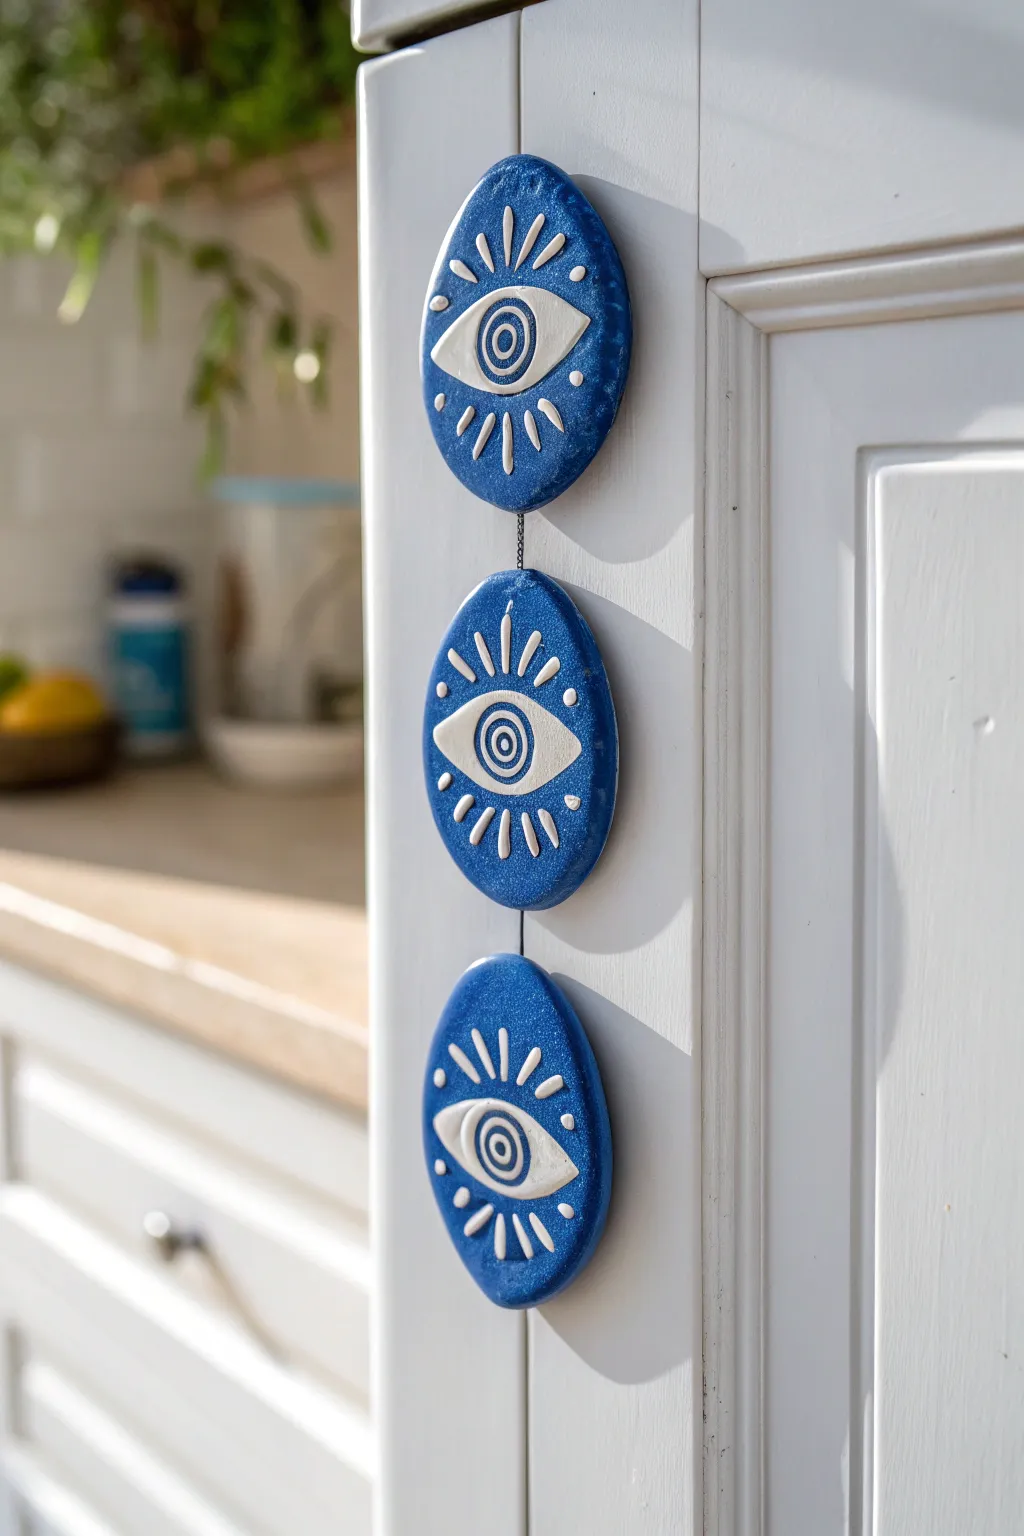
Ward off bad vibes with these striking deep blue oval magnets, featuring the ancient protective Evil Eye symbol carved in relief. The design combines a rich, sparkly cobalt base with crisp white linework for a modern, high-contrast look that pops against any fridge or magnetic surface.
How-To Guide
Materials
- Air dry clay (white)
- Acrylic paint (cobalt blue, white)
- Fine glitter (silver or iridescent) or metallic mixing medium
- Rolling pin
- Oval cookie cutter (or a knife and oval template)
- Clay sculpting needle or toothpick
- Small eye screws (if linking them vertically)
- Jump rings or small black chain links
- Strong craft magnets
- E6000 glue or superglue gel
- Fine detail paintbrush
- Gloss varnish or sealant
Step 1: Shaping the Clay Base
-
Condition the clay:
Begin by taking a handful of air dry clay and kneading it in your hands until it is warm, pliable, and free of cracks. -
Roll it out:
Use a rolling pin to flatten the clay to a consistent thickness of about 1/4 inch (6mm). If you want them to be very sturdy, go slightly thicker. -
Cut the shapes:
Press your oval cutter into the clay to create three identical shapes. If hand-cutting, trace a paper oval template with a craft knife for clean edges. -
Smooth the edges:
Dip your finger in a tiny bit of water and run it along the cut edges of the ovals to smooth out any roughness or burrs.
Step 2: Carving the Symbol
-
Outline the eye:
Using a needle tool or toothpick, lightly sketch the almond shape of the eye in the center of each oval. Don’t press deep yet; just mark your placement. -
Add the iris and pupil:
Draw a circle in the center of the eye shape, and a smaller circle inside that for the pupil. Add a tiny concentric ring inside the pupil if you want that extra detail seen in the photo. -
Create the lashes:
Radiating outward from the eye outline, sketch straight lines for the upper and lower lashes. Alternate between longer and shorter strokes for visual interest. -
Carve the relief:
Now, go over your sketch lines with firmer pressure. Carve slightly into the clay to create grooves. Widen the grooves slightly so they can hold paint later. -
Add connecting holes:
If you plan to hang them in a chain as shown, insert small eye screws into the top and bottom edges now while the clay is wet. Alternatively, poke vertical holes through the clay itself. -
Let it dry:
Place the pieces on a piece of parchment paper and let them dry completely, usually 24-48 hours depending on humidity. Flip them halfway through to ensure even drying.
Clean Carving Lines
Wait about an hour after rolling the clay before carving. ‘Leather hard’ clay holds detail better and creates fewer jagged crumbs than freshly rolled soft clay.
Step 3: Painting and Assembly
-
Mix the blue base:
Mix your cobalt blue acrylic paint with a pinch of fine silver glitter or a drop of metallic medium to replicate that subtle shimmer seen in the reference. -
Apply the base coat:
Paint the entire front and sides of the ovals with the blue mixture. Don’t worry if paint gets into the carved grooves for now. -
Paint the details:
Once the blue is dry, use a fine detail brush loaded with opaque white paint. Carefully fill in the carved grooves of the eye, pupil, and lashes. -
Clean up lines:
If you slip outside the lines, wait for the white to dry, then touch it up with the blue mixture. This creates the sharpest contrast. -
Seal the surface:
Apply a coat of gloss varnish over the front. This protects the paint and gives it that ceramic-like shine. -
Attach the hardware:
If you used eye screws, open small jump rings with pliers and connect the bottom of one oval to the top of the next. -
Affix the magnets:
Flip the assembly over. Apply a dot of strong glue (like E6000) to the back of each oval and press a magnet firmly into place. -
Final cure:
Allow the glue to cure fully according to the manufacturer’s instructions before placing your new talisman on the fridge.
Level Up: Wall hanging
Skip the magnets and attach a loop of velvet ribbon or leather cord to the top loop. Now you have a hanging wall charm perfect for a narrow entryway space.
Hang your new protective charms and enjoy the mystical touch they add to your kitchen decor
Tiny Speech Bubble Note Magnets
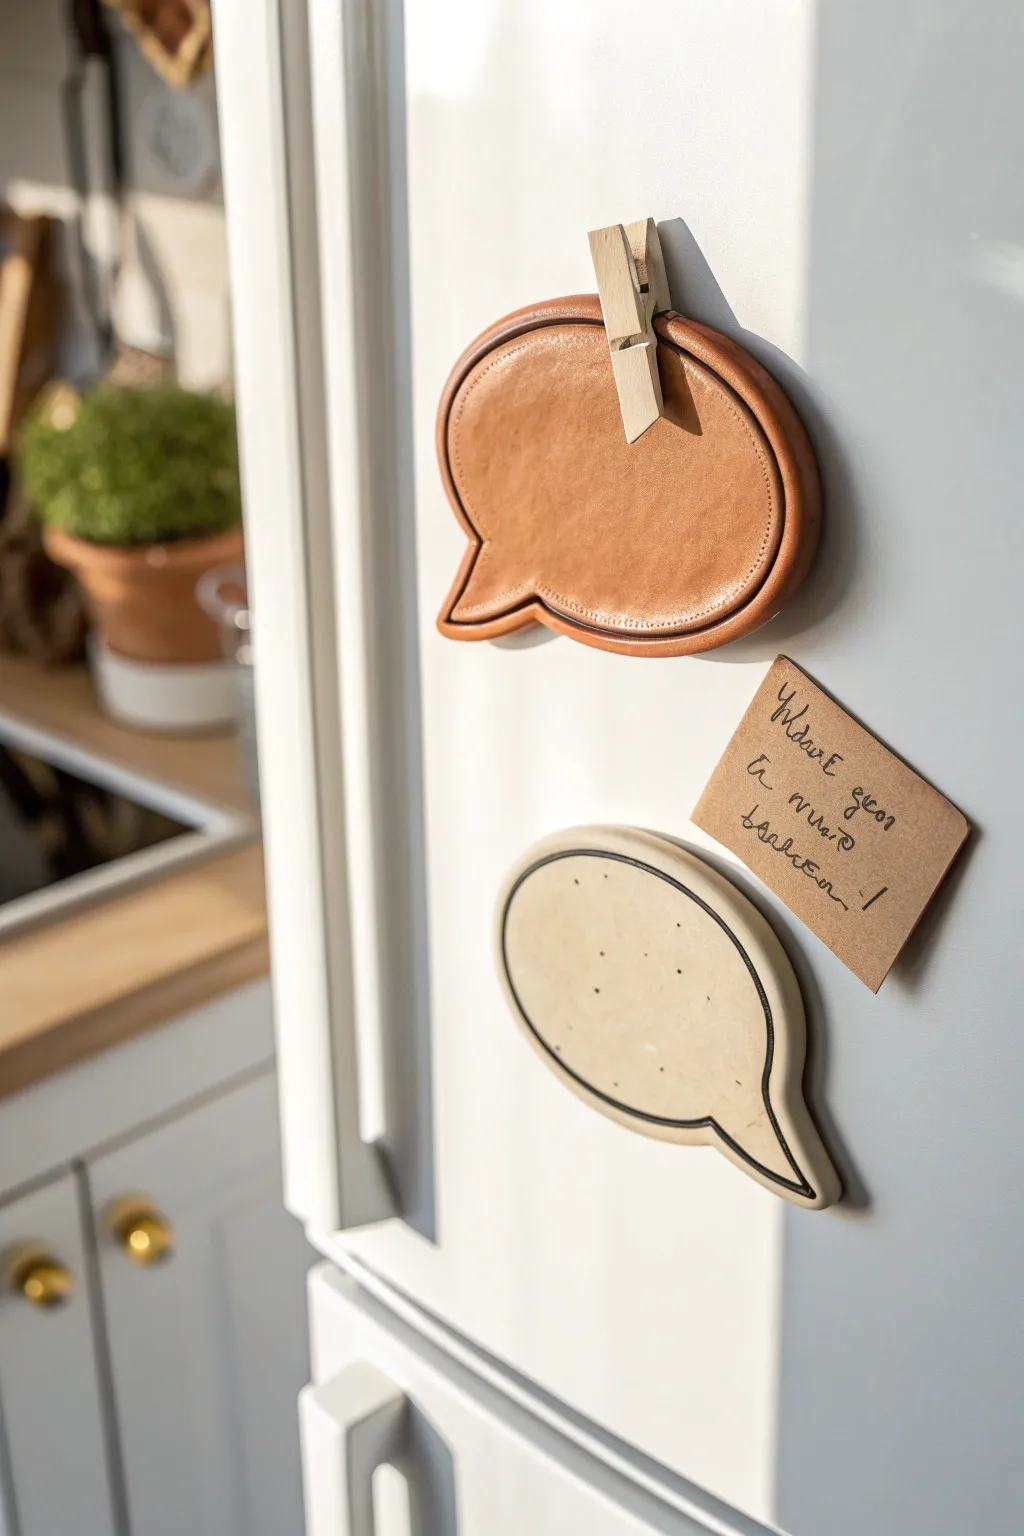
Using common air-dry clay, you can mimic the sophisticated texture of stitched leather and smooth ceramic to create these whimsical speech bubble magnets. They feature a clever built-in clothespin for gripping notes, adding both style and utility to your refrigerator door.
Step-by-Step
Materials
- Air dry clay (terracotta color and white/cream color)
- Rolling pin
- Speech bubble cookie cutters (or a craft knife and template)
- Mini wooden clothespins
- Strong craft glue (E6000 or similar)
- Round magnets
- Needle, awl, or stitching wheel tool
- Black acrylic paint or black fine-tip marker
- Fine grit sandpaper
- Clear matte varnish (optional)
Step 1: Shaping the Clay
-
Roll the clay:
Begin by conditioning your terracotta-colored air dry clay until it is pliable. Roll it out on a non-stick surface to a thickness of about 1/4 inch (6mm). Aim for a uniform slab to ensure the magnet sits flat later. -
Cut the shapes:
Press your speech bubble cookie cutter firmly into the clay. If you don’t have a cutter, print a small speech bubble shape on paper, cut it out, place it on the clay, and trace around it with a craft knife. -
Smooth the edges:
Dip your finger in a little water and gently run it along the cut edges of your clay shape. This rounds off any sharp corners or clay burrs left by the cutting tool for a cleaner, more finished look. -
Embed the clip:
Take a mini clothespin and identify where you want it to sit—usually angled like a gleeful exclamation. Press it gently into the wet clay just enough to make an indentation, then remove it. This creates a nesting spot for later gluing so it doesn’t protrude too much.
Leather Texture Trick
Before cutting your shapes, gently press a crumpled ball of aluminum foil onto the terracotta clay slab. This transfers a realistic, organic leather grain texture to the surface instantly.
Step 2: Creating the Leather Effect
-
Add the border line:
To simulate the edge of leather goods, use a modeling tool or the back of a butter knife to impress a continuous groove about 1/8 inch from the edge of the speech bubble. -
Stitch the faux seam:
Using a needle, awl, or a specialized stitching wheel, carefully poke evenly spaced holes directly inside the groove you just created. This mimics the look of heavy-duty stitching found on leather patches. -
Dry completely:
Place your clay pieces on a wire rack to dry. Depending on humidity and thickness, this usually takes 24 to 48 hours. Rotate them occasionally to prevent curling.
Step 3: Finishing and Assembly
-
Sand for smoothness:
Once fully cured, use fine-grit sandpaper to lightly buff the surface and edges. The goal isn’t to remove texture, but to ensure the ‘leather’ surface feels soft and worn. -
Highlight the stitching:
To make the details pop, dilute a tiny drop of black or dark brown acrylic paint with water. Paint it over the stitching holes and quickly wipe the surface with a damp paper towel. The paint will remain in the recesses, creating depth. -
Alternative: The ceramic look:
For the white version shown in the photo, roll out white clay and skip the stitching holes. Instead, after drying, use a fine-tip black marker to draw a simple outline border that mimics a cartoon sketch. -
Speckle the surface:
To give the white bubble a stone-like appearance, you can flick a toothbrush loaded with diluted grey paint over the surface for subtle speckling. -
Seal the surface:
Protect your work with a coat of clear matte varnish. This seals the clay and deepens the terracotta color to look even more like real tanned leather. -
Attach the hardware:
Apply a strong adhesive to the groove you made earlier for the clothespin and press the wooden clip into place. Let the glue set according to the manufacturer’s instructions. -
Add the magnet:
Flip the speech bubble over. Apply a generous dab of glue to the center of the back and press a strong round magnet onto it. I prefer using ceramic magnets for heavier clay pieces to ensure they don’t slide down the fridge.
Chalkboard Surface
Paint the center of the speech bubble with black chalkboard paint instead of leaving it plain. This lets you write changing messages directly on the bubble itself with chalk or a chalk marker.
Now your fridge has a voice and a practical way to hold onto those important reminders
Terrazzo-Style Chip Magnets

Bring a pop of modern design to your fridge with these chic terrazzo-style magnets. The speckled, stone-like effect is surprisingly easy to achieve using scraps of air dry clay, resulting in a sophisticated matte finish.
How-To Guide
Materials
- White air dry clay
- Colored air dry clay (red, blue, green, orange, yellow)
- Acrylic rolling pin
- Round cookie cutter (approx. 2-3 inches)
- Sandpaper (fine grit)
- Strong craft glue (E6000 or similar)
- Round ceramic magnets
- Parchment paper or silicone mat
- Clay knife or craft blade
- Gloss varnish (optional, for a shiny look)
Step 1: Making the Color Chips
-
Prepare colored clay:
Start by gathering small amounts of your colored clays. If you only have white clay, you can knead in small dabs of acrylic paint to create custom colors before rolling. -
Roll thin sheets:
Roll each color out into a very thin, flat sheet, roughly the thickness of cardstock or a heavy business card. -
Let colors dry:
Allow these thin colored sheets to dry completely. Since they are so thin, this usually takes about 30 to 60 minutes. -
Create the chips:
Once hardened, break the colored sheets into small, irregular shards. Aim for variety in size and shape to mimic real terrazzo stone fragments.
Step 2: Forming the Base
-
Prepare the base:
Condition a larger block of white air dry clay by kneading it until it is soft, pliable, and free of cracks. -
Initial rolling:
Roll the white clay out into a slab that is slightly thicker than your desired final magnet thickness, about 1/4 inch. -
Add the chips:
Scatter your previously made colored clay chips onto the surface of the wet white slab. I like to press them down gently with my fingers first to just barely set them in place. -
Embed the chips:
Take your rolling pin and roll over the slab again firmly. This forces the hard colored chips into the soft white base, making the surface level. -
Check thickness:
Ensure the chips are fully embedded and flush with the white clay. The slab should now be your final desired thickness.
Chips falling out?
If chips pop out while sanding, the base clay was too dry when you embedded them. Next time, mist the white slab lightly with water before sprinkling on the chips to help them bond.
Step 3: Cutting and Finishing
-
Cut the shapes:
Position your round cookie cutter over an area of the slab with a nice distribution of color chips and press down firmly to cut your circle. -
Smooth the edges:
Gently lift the circle and use a tiny bit of water on your finger to smooth down any rough edges left by the cutter. -
Dry thoroughly:
Place the cut circles on parchment paper to dry. Flip them over carefully halfway through the drying process to prevent curling. This usually takes 24-48 hours. -
Sand the surface:
Once fully cured, use fine-grit sandpaper to sand the top surface. This removes the thin layer of white clay film over the colored chips, making the colors pop vibrantly. -
Clean dust:
Wipe away the sanding dust with a slightly damp cloth or paper towel to reveal the clean pattern. -
Attach the magnet:
Apply a dab of strong craft glue to the back of the clay circle and press your round ceramic magnet firmly into the center. -
Final cure:
Let the glue cure according to the manufacturer’s instructions before placing your new art on the fridge.
Add Metallic Flair
Mix in small flakes of gold leaf along with your colored clay chips. When you roll them into the white base, the gold will embed smoothly, adding a touch of luxury to the stone look.
Now your fridge is dressed up with a set of custom, artful magnets that look just like real stone