Whenever I want a low-pressure creative win, I reach for air dry clay—it’s the quickest way to turn a simple lump into something genuinely cute and useful. Here are my go-to air dry clay craft ideas, starting with the classics and ending with a few playful curveballs.
Minimalist Air Dry Clay Trinket Dishes
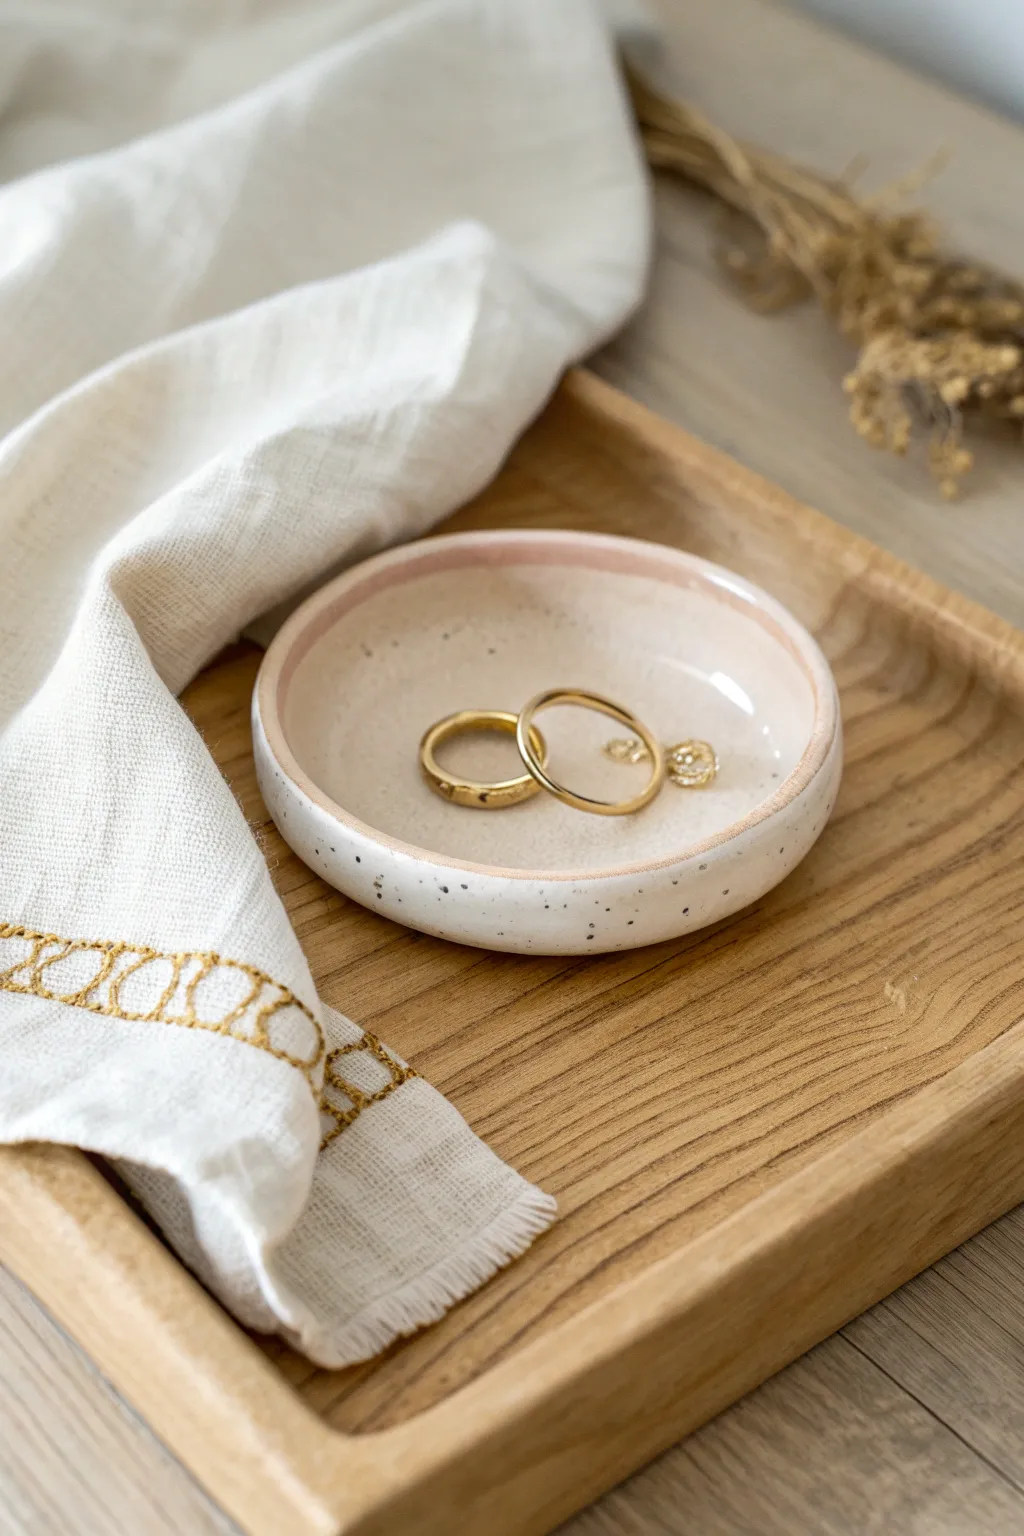
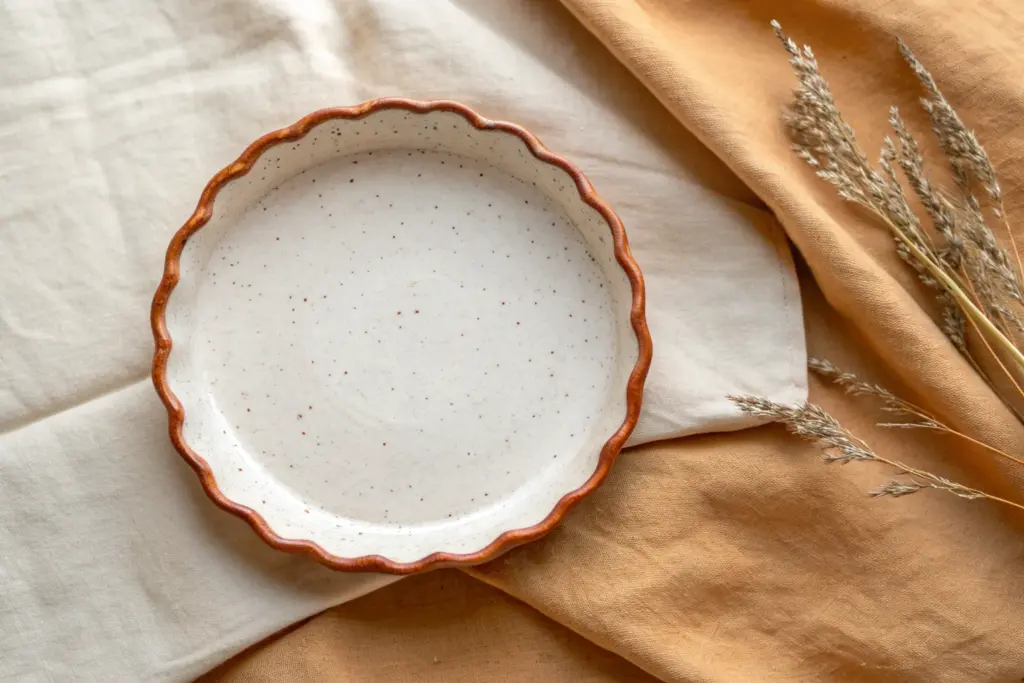
Achieve the high-end look of wheel-thrown pottery without a kiln using this simple air dry clay technique. This minimalist dish features a gentle organic shape, a faux-speckle finish, and a soft blush rim perfect for holding your favorite jewelry.
Step-by-Step
Materials
- White air dry clay
- Rolling pin
- Circular cookie cutter or bowl (approx. 4-5 inches)
- Small bowl (for shaping)
- Sandpaper (fine grit)
- White acrylic paint
- Pale blush pink acrylic paint
- Black acrylic paint
- Old toothbrush
- Soft paintbrushes
- Glossy varnish or sealant (Mod Podge or spray acrylic)
- Small cup of water
Step 1: Shaping the Clay Base
-
Condition the clay:
Start by taking a handful of white air dry clay and kneading it in your hands until it becomes warm and pliable. This conditioning step prevents cracking later on. -
Roll it out:
Place the clay on a smooth surface or canvas mat. Use your rolling pin to flatten it into an even sheet, aiming for a consistent thickness of about 1/4 inch. -
Cut the circle:
Press your circular cutter or an inverted bowl firmly into the clay to cut out a perfect circle. Remove the excess clay around the edges. -
Smooth the edges:
Dip your finger into a little water and gently run it along the cut edge of the circle. Smooth out any roughness or sharp creates created by the cutter. -
Form the curve:
Pick up your clay circle and gently drape it inside your shaping bowl. Press it lightly so it takes the curve of the bowl’s bottom, creating a shallow dish shape. -
Refine the shape:
While it’s in the bowl, use a wet finger to smooth the interior surface again. Ensure the rim is even and slightly rounded for that pottery look.
Smooth Operator
To get a flawlessly smooth surface before painting, lightly dip your finger in water and ‘polish’ the raw clay just as it begins to dry.
Step 2: Drying and Refining
-
Let it dry:
Allow the dish to dry completely inside the bowl for at24 to 48 hours. Keep it away from direct heat sources to prevent warping. -
Check for dryness:
The clay should turn pure white and feel room temperature (not cold) to the touch when it is fully dry. -
Sand the surface:
Once dry, gently pop the clay out of the bowl. Use fine-grit sandpaper to buff away any fingerprints or uneven spots on the rim and surface until it feels smooth. -
Wipe it down:
Use a slightly damp cloth or paper towel to wipe away all the sanding dust. A clean surface is crucial for a smooth paint job.
Step 3: Painting the Faux-Ceramic Finish
-
Apply base coat:
Paint the entire dish (front and back) with white acrylic paint. You may need two thin coats for full coverage, letting it dry between layers. -
Create the splatter:
Dilute a tiny drop of black paint with water. Dip an old toothbrush into the mixture, point it at the dish, and run your thumb across the bristles to flick tiny black speckles over the white surface. -
Paint the rim:
Mix a soft, pale blush pink color. Carefully paint a stripe along the inside upper edge of the dish, about a half-inch wide, blurring the bottom edge slightly for a watercolor effect. -
Let paint cure:
Allow all paint layers to dry completely. I usually give this a good hour so the speckles don’t smear during sealing. -
Seal the piece:
Apply two coats of glossy varnish or sealant. This mimics the shine of glazed ceramic and protects your clay from moisture and scratches. -
Final cure:
Let the varnish cure according to the manufacturer’s instructions before placing any jewelry inside.
Make it Luxe
Instead of the pink rim, use liquid gold leaf paint on the very edge of the rim for a chic, metallic mid-century modern vibe.
Place your new dish on your nightstand to keep your daily treasures organized and beautiful


Pressed-Texture Air Dry Clay Coasters
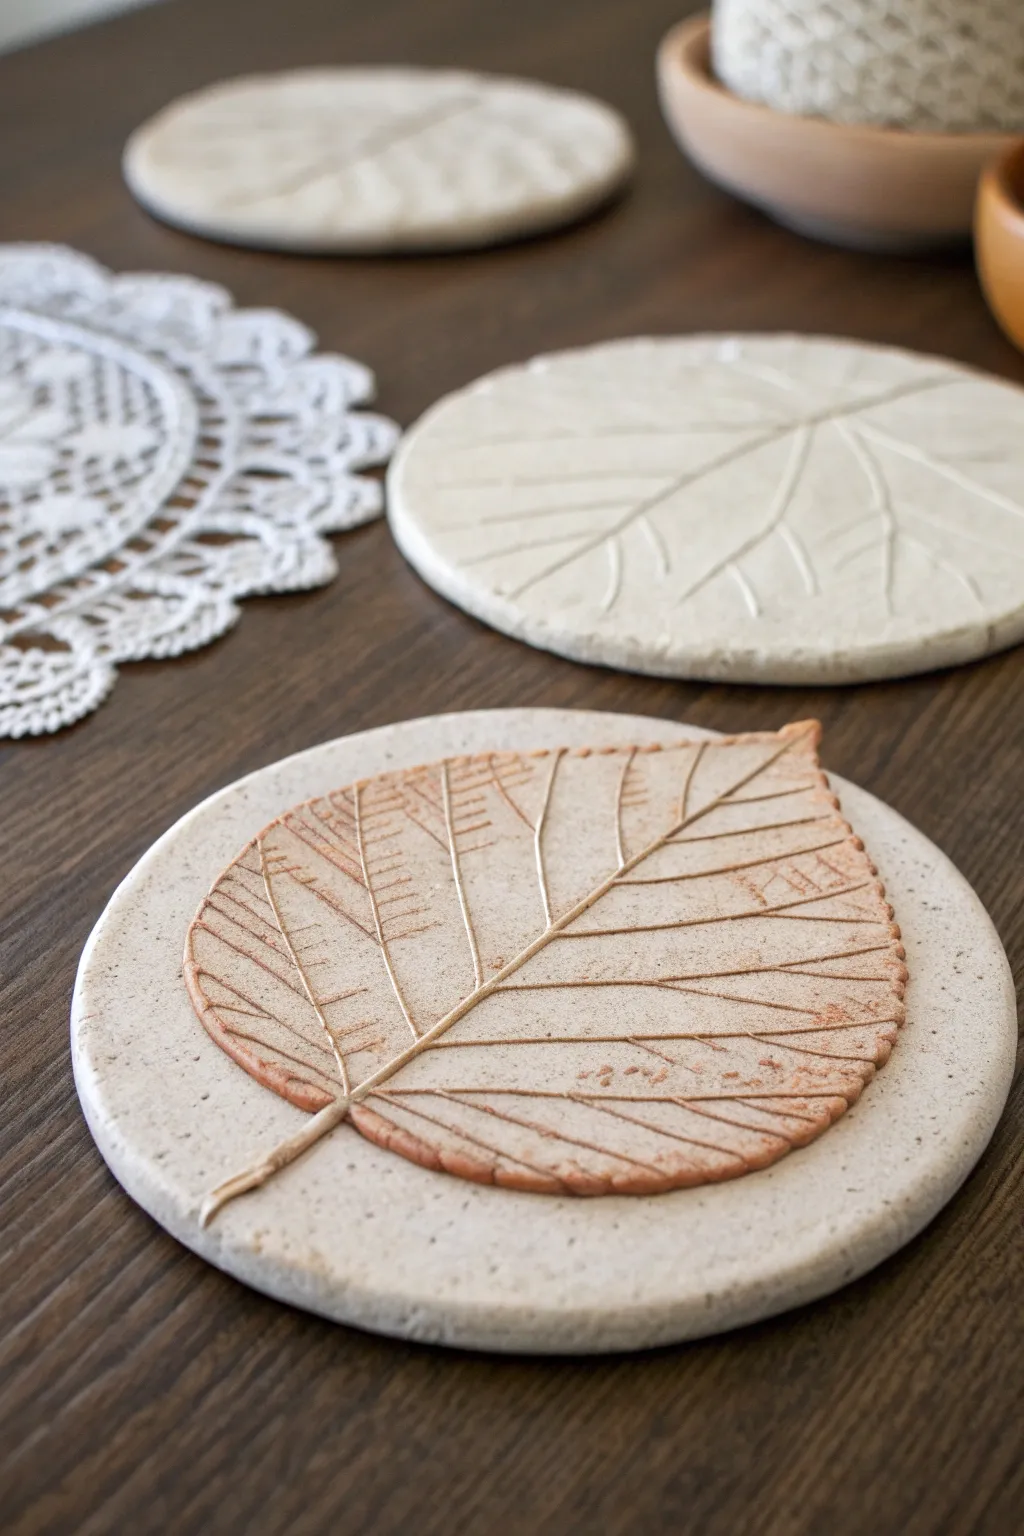
Capture the delicate beauty of nature with these sophisticated air dry clay coasters, featuring deep leaf impressions and a rustic, two-tone finish. This project creates durable, functional art pieces that perfectly preserve the intricate veins of your favorite foliage.
Step-by-Step Tutorial
Materials
- White air dry clay
- Rolling pin or acrylic roller
- Fresh leaves with prominent veins (like birch, beech, or hydrangea)
- Round cookie cutter (approx. 4 inches) or a bowl and craft knife
- Canvas mat or parchment paper
- Water and a small sponge
- Fine-grit sandpaper (220 grit)
- Acrylic paint (terracotta or reddish-brown)
- Small paintbrush
- Matte spray sealant or clear varnish
Step 1: Preparation & Rolling
-
Clay conditioning:
Begin by taking a handful of air dry clay and kneading it thoroughly in your hands. You want the clay to be warm, pliable, and free of any air bubbles before you start working. -
Rolling the slab:
Place your clay on a canvas mat or between two sheets of parchment paper to prevent sticking. Roll it out into an even slab that is roughly 1/4 inch thick. Try to keep the thickness consistent so the coaster sits flat later. -
Selecting the leaf:
Choose a fresh leaf that is slightly smaller than your desired coaster size. Ensure the leaf is not dried or brittle, as you need it to be flexible enough to withstand pressure.
Cracked Edges?
If edges crack while drying, mix a tiny bit of clay with water to make a paste (‘slip’) and fill the cracks, then sand smooth once dry.
Step 2: Creating the Impression
-
Placing the leaf:
Lay the leaf vein-side down onto your rolled clay slab. The back of the leaf usually has the most prominent veins, which will give you the clearest, crispest impression. -
Pressing the texture:
Using your rolling pin, roll firmly over the leaf one or two times. Don’t roll back and forth repeatedly, as this might shift the leaf and create a double image. Commit to one strong pass. -
Revealing the print:
Carefully lift the stem of the leaf and peel it away from the clay to reveal the botanical imprint. If any small pieces of leaf stick, use tweezers to gently remove them. -
Cutting the shape:
Center your round cookie cutter or bowl over the leaf imprint. Press down firmly to cut the circle shape. If using a bowl as a template, trace around it carefully with a craft knife. -
Smoothing edges:
Dip your finger in a little bit of water and gently run it along the cut edge of the circle. This smooths out any sharpness or roughness left by the cutter.
Step 3: Drying & Refining
-
Initial drying:
Transfer the coaster to a wire rack or a clean sheet of parchment paper. Let it dry for 24 to 48 hours. I find flipping the coaster over halfway through the drying process helps prevent it from curling at the edges. -
Sanding:
Once the coaster is bone dry, take your fine-grit sandpaper and lightly sand the edges to make them perfectly smooth. Wipe away any clay dust with a damp cloth.
Color Pop
Instead of natural brown, try using a metallic gold or copper paint for the vein inlay to give the coasters a modern, glamorous look.
Step 4: Decoration & Sealing
-
Planning the color:
To mimic the look in the photo, you will only apply paint to the leaf impression itself, leaving the background clay its natural white color. -
Applying the wash:
Mix a small amount of terracotta or reddish-brown acrylic paint with a drop of water to create a thin wash. Using a fine brush, innovative paint into the deep grooves of the leaf veins. -
Wiping back:
Immediately after painting, use a slightly damp paper towel or sponge to wipe across the surface of the leaf. This removes paint from the raised areas but leaves the color settled deep in the veins. -
Final drying:
Allow the paint to dry completely, which should only take about 15-20 minutes since the clay is porous. -
Applying sealant:
To protect your coaster from moisture, spray the entire piece with a matte spray sealant or brush on a clear varnish. Apply two thin coats for the best durability.
Place your new botanic coasters on your coffee table and enjoy the touch of organic elegance they bring to your space


Air Dry Clay Ring Cones and Holders
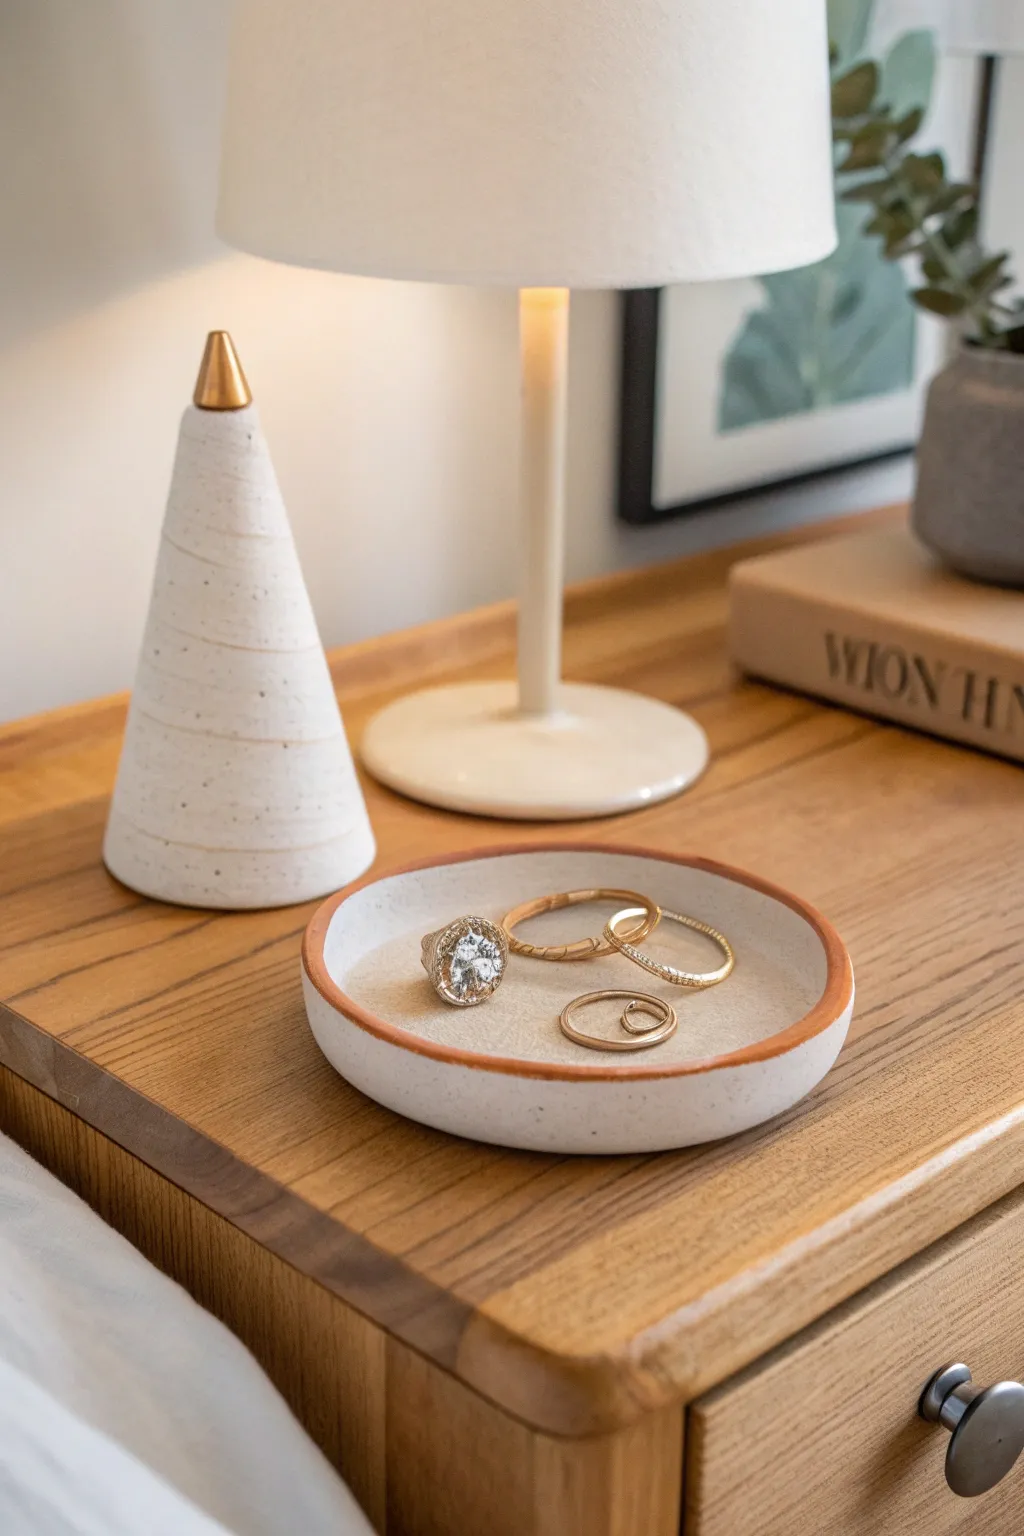
Create a sleek, modern bedside accessory set featuring a tall, speckled ring cone and a matching shallow trinket dish. This duo uses a clever combination of white air dry clay and terracotta accents to achieve an upscale, boutique look for standard crafting costs.
How-To Guide
Materials
- White air dry clay (Das or Crayola recommended)
- Small amount of terracotta-colored air dry clay (or terracotta acrylic paint)
- Gold acrylic paint
- Rolling pin
- Craft knife or clay cutter
- Sandpaper (medium and fine grit)
- Small bowl or round cookie cutter (approx. 4-5 inches)
- Cone form (paper or cardboard) or just your hands
- Fine detail paintbrush
- Gloss or matte varnish (sealant)
- Water and sponge
- Toothpick or needle tool
Step 1: Sculpting the Ring Cone
-
Condition the clay:
Start by taking a fist-sized ball of white air dry clay and kneading it in your hands until it becomes warm, soft, and pliable. This prevents cracks later on. -
Form the base cone:
Roll the clay into a thick snake, then manipulate it into a cone shape. Roll the cone gently on your work surface to smooth out the sides, tapering it until you have a sharp point at the top and a flat, wide base. -
Add the spiral texture:
While the clay is still damp, take a needle tool or toothpick. Starting from the bottom, slowly spin the cone while gently pressing the tool into the surface to create a thin, continuous spiral groove that travels all the way to the tip. -
Flatten the base:
Tap the bottom of the cone firmly on your table to ensure it stands completely straight. Use a little water on your finger to smooth out any rough edges on the base circumference. -
Dry the cone:
Set the cone aside in a safe, dry spot. Let it air dry for at least 24-48 hours until it turns a chalky white and feels room temperature to the touch.
Step 2: Creating the Trinket Dish
-
Roll out the clay:
Take a new portion of white clay and roll it out into a slab about 1/4 inch thick. Aim for an even thickness throughout to ensure uniform drying. -
Cut the circle:
Place your small bowl upside down or use a large round cookie cutter to stamp out a perfect circle from the slab. -
Create the rim:
Instead of pinching the edges up, we will add a separate rim. Roll a long, thin snake of clay. If you have terracotta-colored clay, use it here for the natural two-tone look. If not, use white clay and we will paint it later. -
Attach the rim:
Score the outer edge of your base circle and the underside of your clay snake with diagonal hatch marks. Apply a little water or ‘slip’ (clay paste) to the scored areas. -
Blend the seam:
Place the snake onto the edge of the base. Use your thumb or a modeling tool to blend the inside seam completely so it looks like one piece. Leave the outside seam slightly visible or smooth it too, depending on your preference. -
Dry the dish:
Allow the dish to dry alongside the cone. If the center puffs up while drying, weigh it down gently with a small bag of rice or sand during the first few hours.
Flick with care
When doing the speckle effect, practice flicking the paint on a piece of scrap paper first. This helps you gauge the distance and pressure needed for fine, convincing spots rather than big globs.
Step 3: Sanding and Finishing
-
Sand imperfections:
Once fully cured, use medium-grit sandpaper to remove any large bumps or uneven spots on both pieces. Switch to fine-grit paper for a silky smooth finish. -
Wipe clean:
Use a slightly damp sponge or cloth to wipe away all the clay dust. The surface needs to be totally clean before painting. -
Paint the details:
Using a fine brush and gold acrylic paint, carefully paint just the very tip of the ring cone. I find resting my hand on the table helps keep the line steady. -
Add the terracotta rim (optional):
If you used white clay for the dish rim, mix a terracotta acrylic shade (burnt orange/brown) and paint the rim now. If you used colored clay, you can skip this step. -
Create the speckle effect:
Dilute a tiny amount of black or dark brown acrylic paint with water. Dip a stiff brush (like an old toothbrush) into it, and flick the bristles with your thumb to spray fine specks across both pieces for a stone-like texture. -
Seal:
Finish by applying thin coats of matte or gloss varnish to protect the clay from moisture and scratches. Let dry completely before displaying jewelry.
Preventing warping
Flat pieces like the dish base tend to curl upward as they dry. Flip the dish over every few hours during the drying process to ensure both sides lose moisture evenly.
Now you have a chic, functional display for your favorite rings that looks like it came straight from a pottery studio


Cute Air Dry Clay Succulent Planters
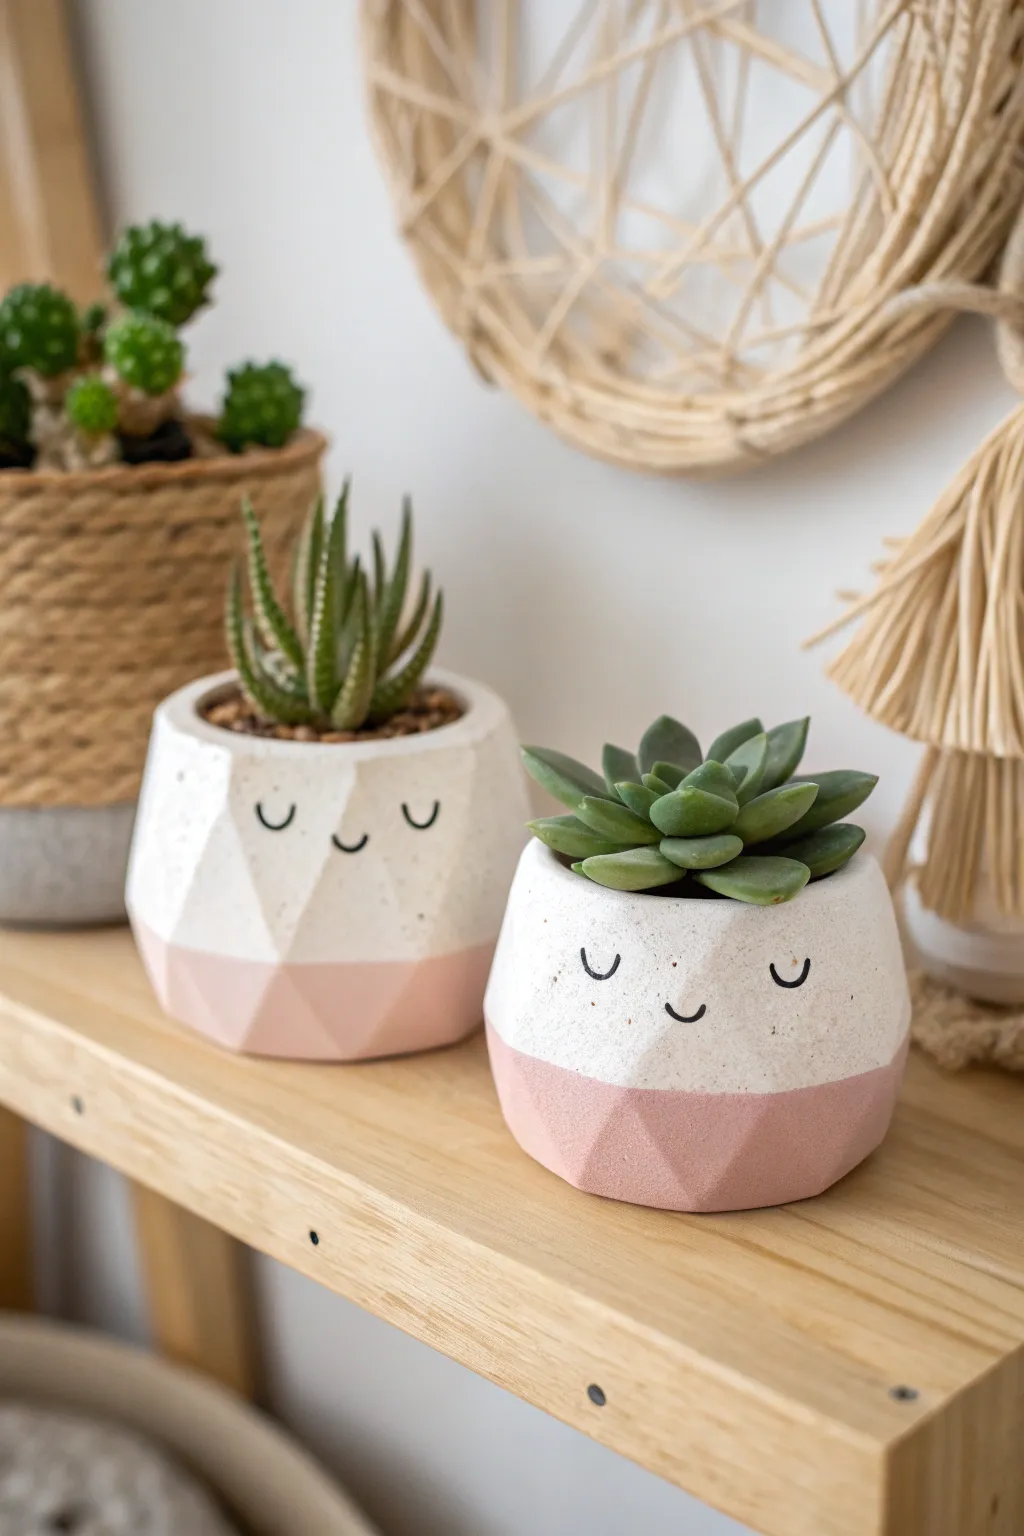
Give your tiny succulents the sweetest home with these faceted, sleepy-faced planters. Their modern geometric angles are softened by the charming hand-painted expressions and a dip-dyed pink aesthetic.
Step-by-Step Tutorial
Materials
- White air dry clay (approx. 500g)
- Small rolling pin
- Craft knife or clay loop tool
- Small succulent pots (for sizing)
- Water and sponge
- Sandpaper (fine grit)
- Pastel pink acrylic paint
- Black fine-tip paint pen or sharpie
- Matte spray varnish or clay sealant
- Ruler
Step 1: Shaping the Base
-
Prepare your clay:
Start by kneading a manageable chunk of air dry clay until it is warm and pliable. This helps prevent cracking later. Roll it into a smooth ball about the size of a large orange. -
Form the initial shape:
Press your thumb into the center of the ball and begin pinching the walls up to create a bowl shape. You want the walls to be fairly thick at this stage, roughly 1/2 to 3/4 inch. -
Size the interior:
Occasionally place your plastic nursery pot inside your clay bowl to ensure the internal space is large enough. The clay pot should be slightly larger than the nursery pot to account for shrinkage as it dries. -
Flatten the bottom:
Gently tap the base of your pot on your work surface to create a flat, stable bottom so it won’t wobble.
Smooth Seams
Use a damp sponge to smooth the clay facets immediately after cutting. This removes knife drag marks and saves you sanding time later.
Step 2: Carving the Facets
-
Begin slicing:
While the clay is still damp but holds its shape, take your craft knife. Slice off a thin layer of clay from the side at an angle to create a flat facet. -
Create the geometric pattern:
Continue cutting flat planes all around the exterior of the pot. Vary the angles slightly to create that distinct diamond-like, faceted look seen in the photo. -
Refine the rim:
Slice the top rim so it is flat and even. You can leave the rim slightly thicker than a standard pot to maintain the chunky, modern aesthetic. -
Smooth the edges:
Dip your finger in a little water and gently run it over the sharp ridges between your facets. You want defined lines, but softening them slightly makes the finished piece friendlier to hold. -
Initial drying:
Let the pots sit for 24-48 hours until completely bone dry. Keep them away from direct heat sources to prevent uneven drying and cracks.
Step 3: Decorating & Finishing
-
Sand for perfection:
Once fully dry, use fine-grit sandpaper to smooth out any rough texture on the clay surface. Wipe away the dust with a slightly damp cloth. -
Mark the paint line:
Using a ruler and a pencil, lightly mark a straight line around the bottom third of the pot. This guide will help you create the clean ‘dipped’ look. -
Paint the base:
Paint the area below your pencil line with the pastel pink acrylic paint. Use a flat brush to get a crisp, straight upper edge. You sit this upside down to dry to avoid smudging the rim. -
Pencil the face:
Lightly sketch the sleepy face in the center of the white section. Draw two ‘U’ shapes for closed eyes and a small curved mouth. -
Ink the features:
Trace over your pencil sketch with a black fine-tip paint pen or Sharpie. Keep your hand steady to get clean, minimal lines. -
Seal the deal:
Spray the entire pot (inside and out) with a matte varnish or sealant. This is crucial for air dry clay to protect it from moisture. -
Add your plant:
Since air dry clay isn’t waterproof, place your succulent (still in its plastic nursery pot) inside your new creation rather than planting directly into the clay.
Waterproof Hack
If you want to plant directly, coat the *inside* with a thick layer of dishwasher-safe Mod Podge or resin to make it truly water-resistant.
Watching these sweet little faces smile back at you is the perfect reward for your crafting time

What Really Happens Inside the Kiln
Learn how time and temperature work together inside the kiln to transform clay into durable ceramic.
Boho Air Dry Clay Wall Hanging
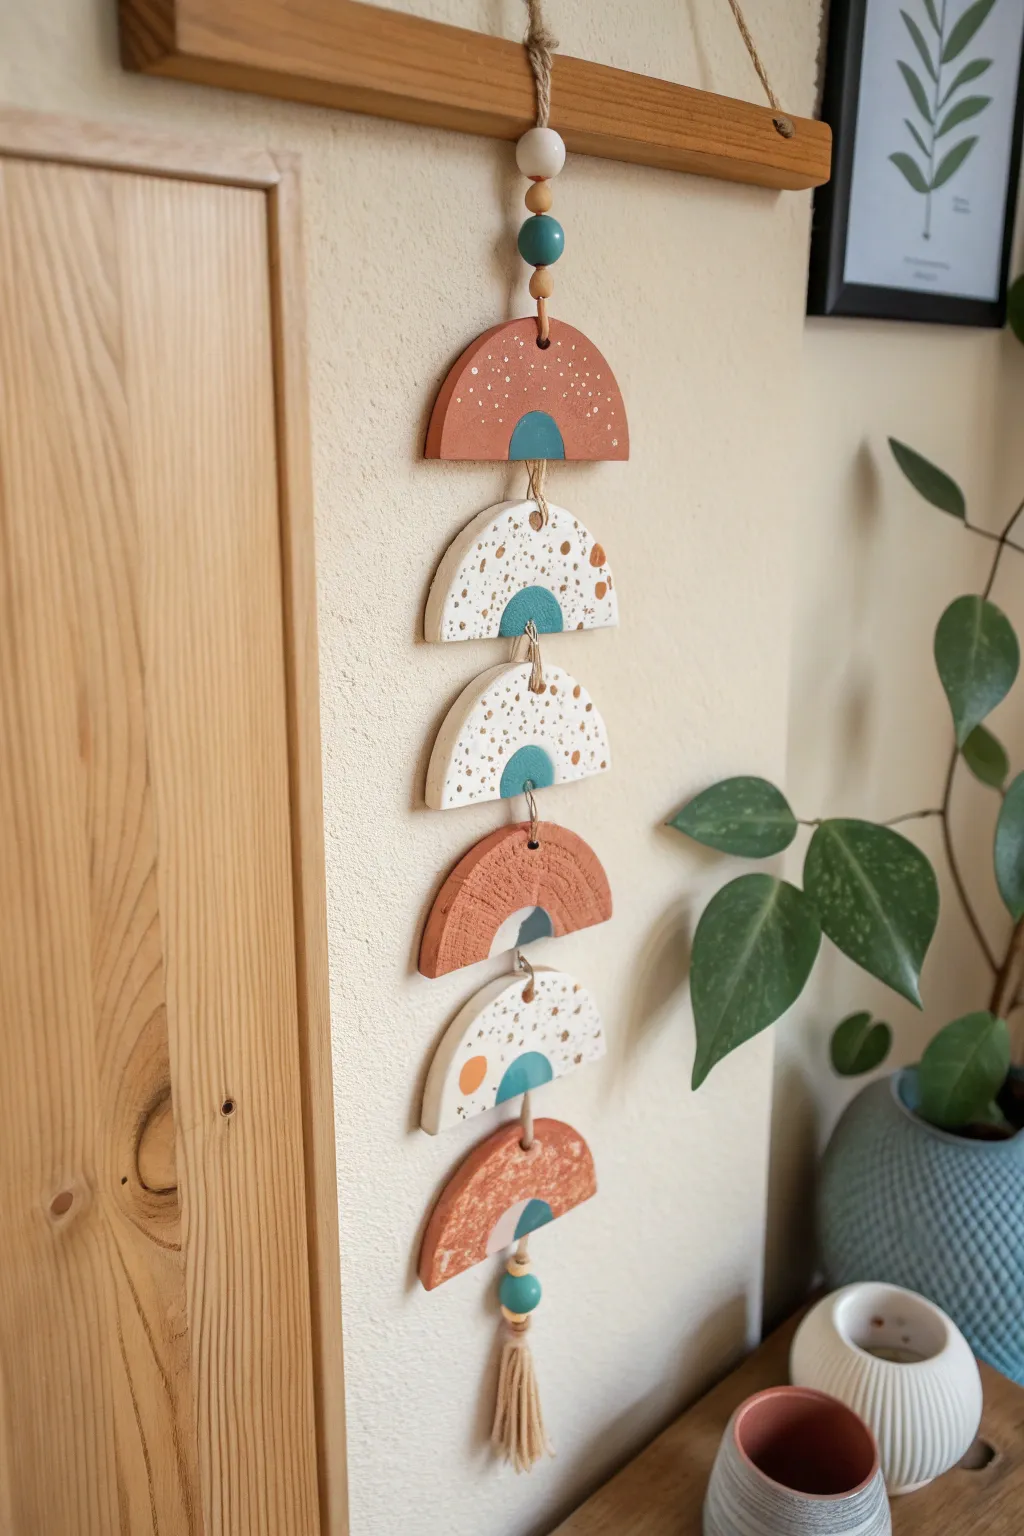
Bring an earthy, artistic touch to your walls with this stacked geometric mobile. Featuring alternating arches of terracotta and speckled white clay, accented with teal details and natural wood beads, this project creates a stunning vertical focal point.
Step-by-Step
Materials
- Air dry clay (white)
- Acrylic paint (terracotta/burnt orange, teal, gold/mustard yellow)
- Rolling pin
- Circle cutters (large and small) or round objects to trace
- Knife or clay cutting tool
- Straw or skewer (for poking holes)
- Sandpaper (fine grit)
- Paintbrushes (flat and fine tip)
- Twine or jute cord
- Wooden beads (assorted sizes, some painted teal)
- Wooden slat or dowel for hanging
- Clear matte sealant (optional)
Step 1: Shaping the Clay Components
-
Roll out the clay:
Begin by conditioning your air dry clay until it’s pliable. Roll it out on a smooth surface to an even thickness of about 1/4 inch. Use guides or rulers on the sides to ensure the thickness is uniform. -
Cut the primary circles:
Using a large circle cutter or a bowl as a template, cut out three large circles. These will become your six semi-circles, as you’ll be slicing them in half. -
Create the semi-circles:
Take your knife and carefully slice each large circle directly down the center to create two perfect semi-circles. You will need six semi-circles in total for this design. -
Pierce the holes:
While the clay is still wet, use a straw or skewer to poke holes for the twine. Each semi-circle needs a hole at the top center of the arch and the bottom center of the flat edge. Ensure the holes are large enough for your twine to pass through easily. -
Smooth the edges:
Dip your finger in a little water and run it along the cut edges of your shapes to smooth out any roughness or stray clay bits. -
Allow to dry:
Place your clay pieces on a wire rack or parchment paper to dry. This usually takes 24-48 hours depending on humidity. Flip them occasionally to prevent curling.
Step 2: Painting and Finishing
-
Sand imperfections:
Once fully dry, gently sand the edges and surfaces with fine-grit sandpaper to create a professional finish. -
Base coat the terracotta pieces:
Select three of your semi-circles (top, middle, bottom) and paint them entirely with your terracotta or burnt orange acrylic paint. Apply two coats for solid coverage. -
Create the speckled effect:
Leave the remaining three semi-circles white. To get the speckled look, dip a toothbrush or stiff brush into watered-down brown or gold paint and flick the bristles to splatter tiny dots across the white surface. -
Add geometric details:
Using a small circle template or freehand, paint a small semi-circle in the center bottom of each clay piece. Use teal paint for this detail on all pieces. On the white speckled pieces, you might add a small gold accent dot as seen in the photo. -
Seal the pieces:
Create a durable finish by applying a layer of matte clear varnish to all your clay shapes. This protects the paint and gives the clay a finished look. -
Bead preparation:
While the sealant dries, paint a few of your wooden beads to match your color scheme—teal works beautifully here—or keep them natural.
Keep it Flat
To prevent your semi-circles from curling up at the edges while drying, place a lightweight book or flat board on top of them after they have been drying for about an hour.
Step 3: Assembly
-
Create the tassel:
Wrap twine around your hand about 15-20 times. Tie a piece of twine through the top loop, enter a bead, and cut the bottom loops to form a tassel. This will anchor the bottom of your hanging. -
Begin threading:
Thread a long piece of twine through the bottom hole of your lowest semi-circle (a terracotta one). Tie it securely to your tassel assembly. -
Stack the pieces:
Thread the twine up through the top hole of the bottom piece, then add a knot or a small bead as a spacer if you want gaps. Continue threading through the bottom hole of the next piece (white speckled), pulling the twine through to the top. -
Connect the series:
Repeat this alternating pattern—terracotta, then white—until all six pieces are connected vertically. I find that leaving a small uniform gap of twine between pieces helps them hang straighter than tying them tightly together. -
Add top beads:
Once the top semi-circle is threaded, add your decorative wooden beads (a mix of natural and painted teal) to the twine extending from the top arch. -
Attach to the mount:
Tie the top of the twine securely around the center of your wooden slat or dowel. Add a separate loop of twine to the ends of the wooden slat for hanging on the wall.
Add Texture
Before the clay dries, gently press a piece of rough fabric or canvas onto the surface of the ‘terracotta’ pieces to give them a realistic, earthy texture.
Hang your new mobile in a bright corner where the organic shapes can catch the light
Air Dry Clay Photo and Card Stands
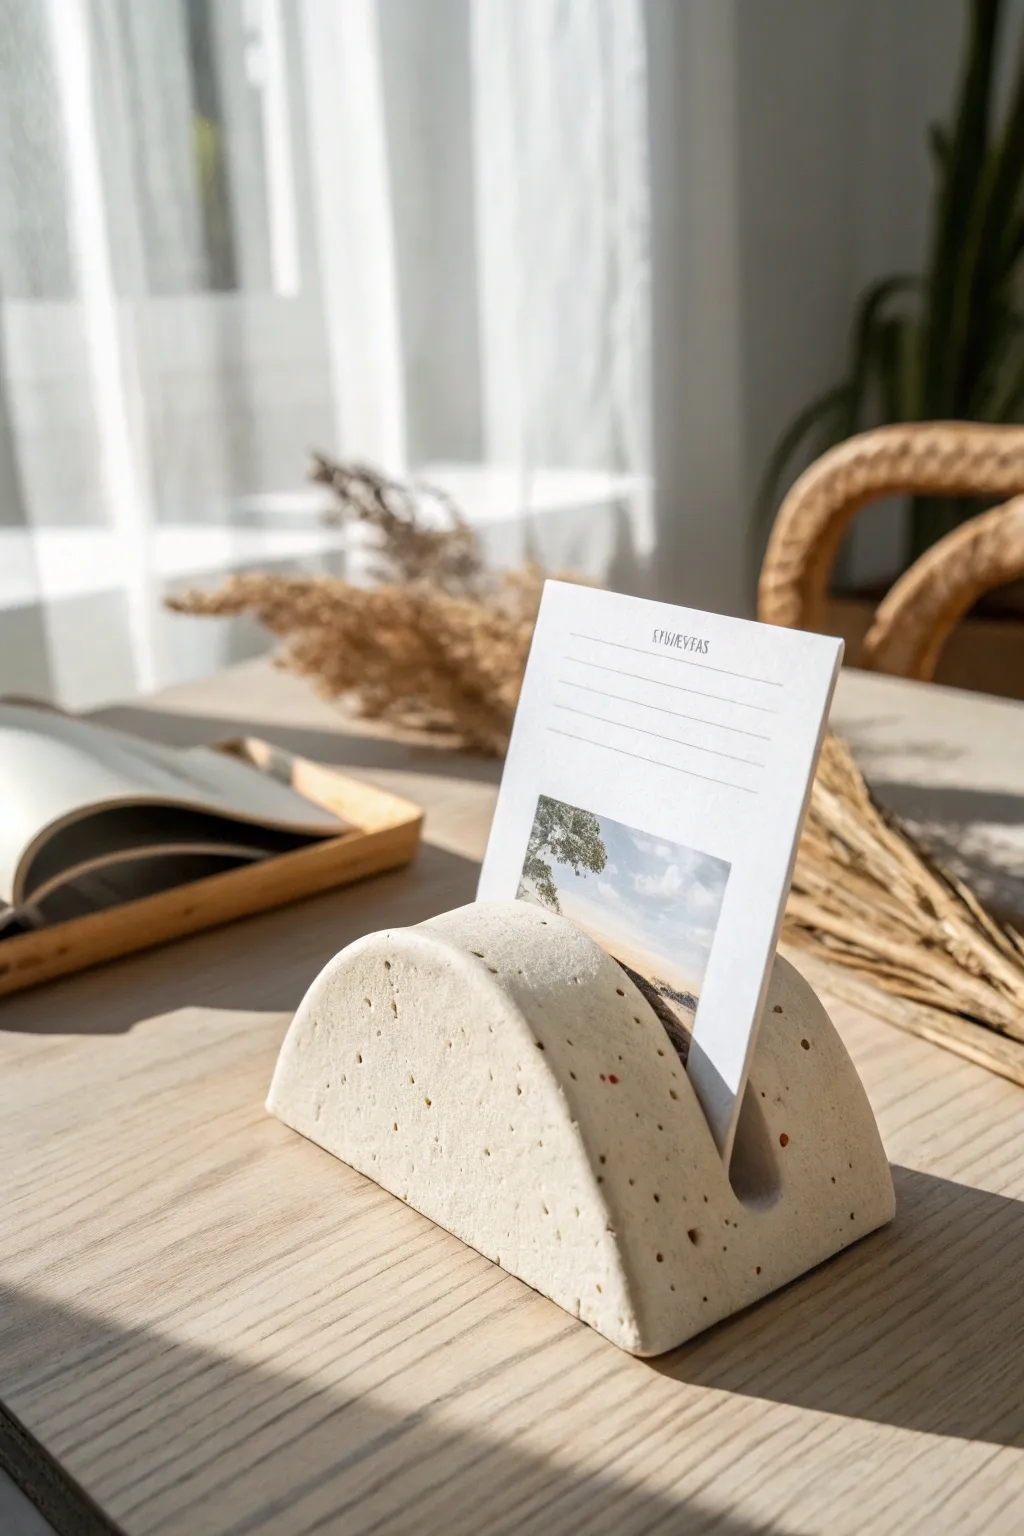
This minimalist card holder mimics the heavy, textured look of stone or concrete while being lightweight and simple to shape. The arched profile and subtle speckled finish create a modern, grounded display for your favorite photos or important notes.
Detailed Instructions
Materials
- White air dry clay (approx. 300g)
- Acrylic rolling pin
- Circle cutter or a round bowl (approx. 4-5 inch diameter)
- Craft knife or clay blade
- Ruler
- Dried tea leaves, coarse pepper, or colored sand (for texture)
- Sandpaper (medium and fine grit)
- Matte sealant or varnish
Step 1: Preparing the Clay
-
Condition the clay:
Begin by kneading your block of air dry clay until it is warm, pliable, and smooth. This prevents cracks from forming later. -
Add texture:
To achieve the speckled, stone-like appearance seen in the photo, flatten your clay slightly and sprinkle in your chosen texturizing agent. I like using dried tea leaves for a natural, earthy look. -
Mix thoroughly:
Fold the clay over the inclusions and knead repeatedly until the specks are evenly distributed throughout the entire ball of clay.
Stone Effect Secret
Mix in different sizes of inclusions—like combining fine pepper with larger tea leaves—to create a more realistic, organic terrazzo variation.
Step 2: Shaping the Arch
-
Roll it out:
Using your acrylic roller, roll the clay into a slab that is roughly 1 inch (2.5 cm) thick. It needs to be quite substantial to stand upright stably. -
Cut the primary shape:
Use a large circle cutter or trace around a bowl to cut a perfect circle from your thick slab. -
Create the heavy base:
Cut the circle exactly in half using your craft knife or clay blade. You now have two semi-circles; you will only need one for a single holder. -
Refine the form:
Stand the semi-circle on its cut edge. Gently tap it on your work surface to flatten the bottom further, ensuring it sits perfectly level without wobbling. -
Smooth the edges:
Dip your finger in a little water and run it along the curved edge and the flat sides to smooth out any sharp cutting lines or fingerprints.
Step 3: Creating the Slot
-
Mark the center:
Use your ruler to find the exact center of the arch’s top curve. Proper centering is crucial for the balance of the final piece. -
Making the incision:
Ideally, use a rigid tool like a thick ruler or a piece of heavy cardstock to press the slot into the clay rather than cutting it. -
Deepen the groove:
Press your tool straight down into the top of the arch, going about 3/4 of an inch deep. Wiggle it very slightly front-to-back to widen the gap just enough for a thick card. -
Check the angle:
Inspect the slot from the side to ensure it is vertical or angled slightly backward, depending on how you want your photo to sit.
Slanted Display
Instead of a vertical cut, press your slot tool in at a slight 15-degree angle backwards. This helps taller photos or cards lean back naturally and stay balanced.
Step 4: Finishing Touches
-
Initial drying:
Place the holder on a wire rack or a clean piece of paper to dry. Let it sit undisturbed for at least 24 hours. -
Flip and dry:
After the first day, turn the piece on its side to allow air to reach the bottom surface. This thick shape may take 2-3 days to dry completely white. -
Sanding:
Once bone dry, use medium-grit sandpaper to remove any major bumps. Follow up with fine-grit sandpaper to reveal the embedded specks clearly and soften the surface texture. -
Clean dust:
Wipe the entire piece down with a slightly damp cloth or a soft brush to remove all sanding dust from the pores. -
Seal:
Apply a coat of matte varnish to protect the clay and deepen the contrast of the speckles without adding unwanted shine.
Place your favorite memory in the slot and enjoy the earthy, handmade vibe it brings to your desk


The Complete Guide to Pottery Troubleshooting
Uncover the most common ceramic mistakes—from cracking clay to failed glazes—and learn how to fix them fast.
Playful Air Dry Clay Fridge Magnets
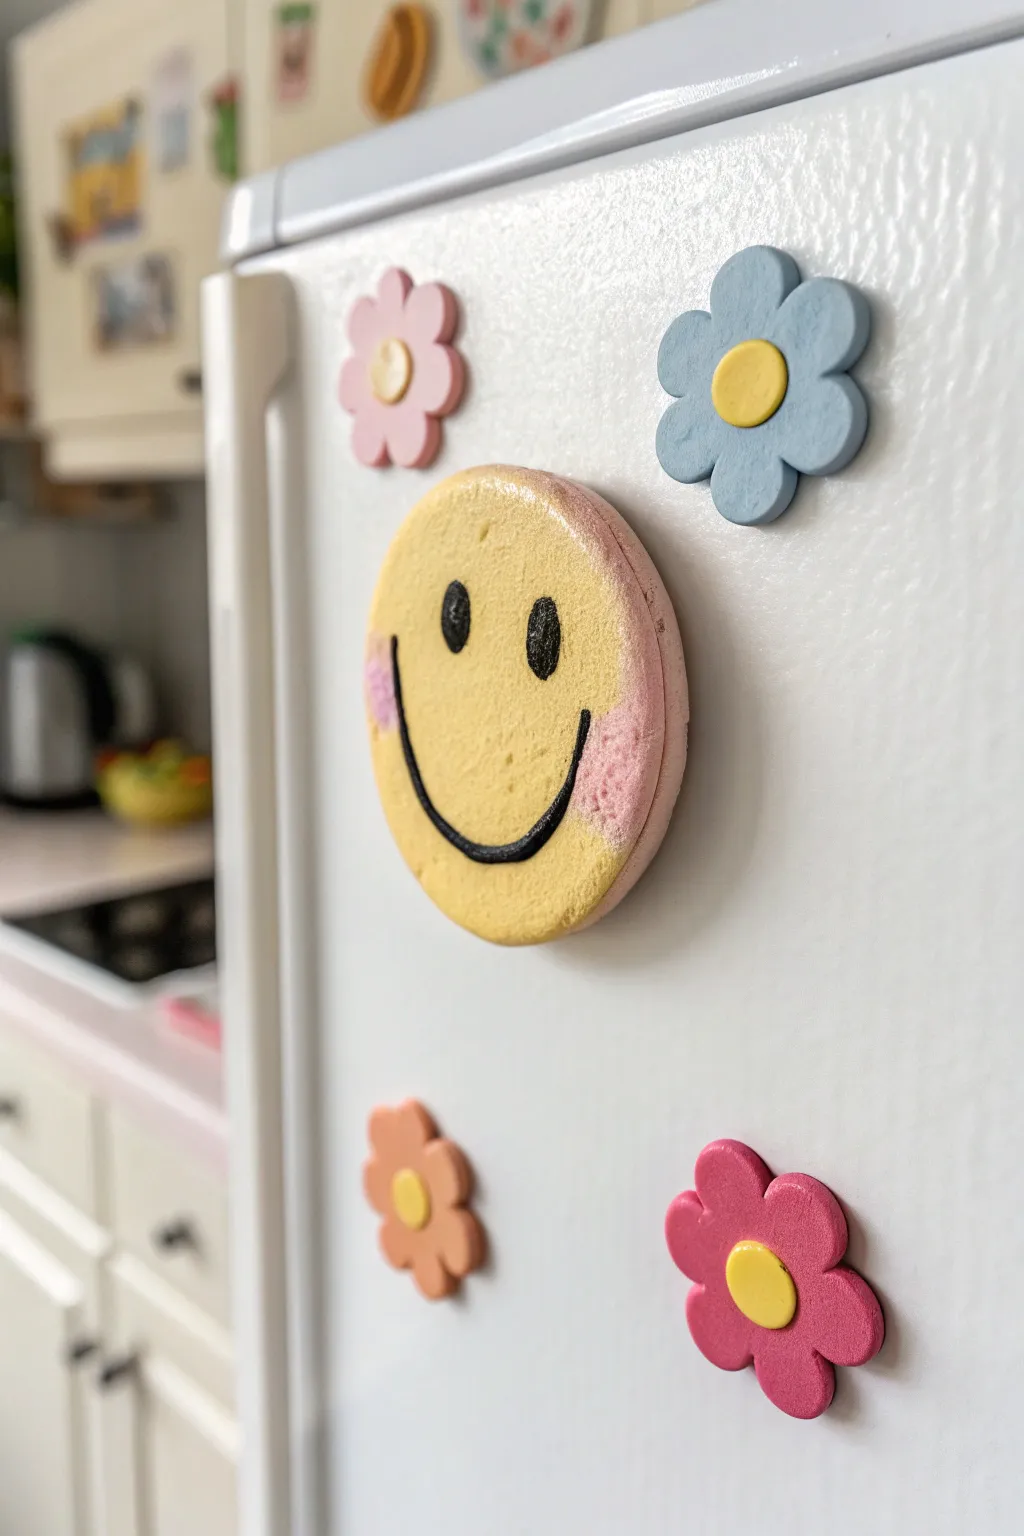
Brighten up your kitchen with these chunky, textured magnets that channel a nostalgic 90s vibe. The slightly rough texture of the clay adds a wonderful handmade charm to the classic smiley face and daisy shapes.
Step-by-Step Tutorial
Materials
- Air dry clay (white)
- Acrylic paints (bright yellow, pastel pink, baby blue, light orange, black)
- Round cookie cutters (one large approx. 3-inch, one small approx. 1-inch)
- Flower shaped cookie cutter (approx. 1.5-inch)
- Rolling pin
- Parchment paper or silicone mat
- Fine grit sandpaper
- Small round paintbrushes
- Fine tip black paint marker or detail brush
- Strong round craft magnets
- Super glue or E6000 adhesive
- Gloss or matte varnish (optional)
Step 1: Shaping the Clay Base
-
Prepare your workspace:
Lay down parchment paper or a silicone mat to prevent sticking. Knead a large ball of air dry clay until it feels pliable and warm in your hands. -
Roll out the slab:
Using a rolling pin, flatten the clay to a uniform thickness of about 1/4 inch (6mm). You want these magnets to look chunky and substantial, so avoid rolling it too thin. -
Cut the smiley circle:
Press your large round cookie cutter firmly into the clay to create the base for the smiley face. Wiggle it slightly before lifting to ensure a clean cut. -
Cut the flower shapes:
Use the flower-shaped cutter to punch out three or four blossoms. -
Create flower centers:
Roll a small snake of clay and slice off tiny pieces. Roll these into small balls, then flatten them slightly into discs. Attach these to the center of each flower using a drop of water and gentle pressure. -
Smooth the edges:
Dip your finger in a little water and run it along the cut edges of all shapes to smooth out any roughness or stray clay bits. -
Allow to dry:
Place all pieces on a flat surface away from direct heat. Flip them over halfway through the drying process (usually after 24 hours) to prevent curling. Let them cure for 48 hours total.
Smooth Surface Hack
To get a buttery smooth top surface before cutting, lay a sheet of plastic wrap over the clay. Press the cutter down *through* the plastic for rounded, pillowy edges.
Step 2: Painting & Finishing
-
Sand imperfections:
Once fully dry, lightly sand any sharp edges or uneven bumps with fine-grit sandpaper for a cleaner look. -
Base coat the smiley:
Paint the front face of the large circle with bright yellow acrylic paint. You may need two coats for full opacity. -
Paint the smiley edges:
For that cute two-tone look seen in the photo, paint the sides (the thickness of the magnet) and the back rim with pastel pink paint. -
Add smiley details:
Use a fine paintbrush or a black paint marker to draw two vertical oval eyes and a wide, U-shaped smile. Keep the lines relatively thick. -
Add rosy cheeks:
Dip a dry brush into a tiny amount of pink paint and dab off the excess on a paper towel. Gently stumble pink circles onto the cheeks of the yellow face. -
Paint the flowers:
Paint the petals of your flowers in alternating pastel shades—blue, pink, and light orange. Paint the raised centers a bright yellow. -
Seal the work:
After the paint is completely dry, apply a layer of varnish if you want to protect the finish from kitchen grease or moisture. -
Attach the magnets:
Flip the pieces over. Apply a dab of strong adhesive like E6000 or super glue to the back of a magnet and press it firmly onto the center of the clay piece. -
Final cure time:
Let the glue set according to the manufacturer’s instructions before sticking them to your fridge.
Fixing Cracks
Create a ‘slip’ by mixing a small chunk of dry clay with water until it’s a paste. Fill any hairline cracks that appear during drying with this mixture, then sand smooth.
Now you have a cheerful set of magnets ready to hold your favorite photos and grocery lists
Bold Air Dry Clay Statement Earrings

Channel warm, earthy vibes with these intricate sunburst earrings that look far more expensive than they are. Featuring a tiered fan design with delicate ray details, these statement pieces swing beautifully and add a touch of artisanal flair to any outfit.
Step-by-Step
Materials
- Air dry clay (terracotta, dusty pink, and dark grey/brown colors)
- Acrylic rolling pin
- Circle cutters (approx. 1cm for top stud, 2.5cm and 3cm for fans)
- Craft knife or tissue blade
- Needle tool or tapestry needle
- Sandpaper (fine grit)
- Gold jump rings (6mm and 8mm)
- Earring hooks (gold)
- Jewelry pliers (flat nose and round nose)
- Small hand drill or pin vise (if not pre-punching holes)
- Gloss varnish or sealant (optional)
Step 1: Shaping the Clay Base
-
Condition and Roll:
Start by taking a small amount of your terracotta or rust-colored clay. Knead it in your hands until it is pliable and smooth, then use your acrylic rolling pin to flatten it into an even sheet, roughly 3mm thick. -
Cut the Circles:
Using your smallest circle cutter, punch out two circles for the top studs. For the middle tier, use a medium-sized cutter to punch out two circles, then cut these circles in half using your craft knife to create semi-circles. -
Create the Bottom Tier:
Repeat the rolling process with your dusty pink or lighter terracotta clay. Use your largest cutter to make two circles, and again, slice them perfectly in half to create the large bottom fans. -
Smooth the Edges:
Gently run your finger dipped in a tiny bit of water along the cut edges of your semi-circles to soften any sharp corners.
Pro Tip: Clean Lines
Wipe your blade with a baby wipe between cuts. This prevents clay residue from dragging and keeps your fan edges sharp and professional.
Step 2: Detailing the Sunbursts
-
Mark the Center:
Take your middle and bottom semi-circles. Use the smallest circle cutter again, but don’t cut through intended pieces; instead, gently press the edge of the cutter into the straight bottom edge of the semi-circle to create a curved indentation representing the sun’s center. -
Incise the Rays:
Using a craft knife or a needle tool, carefully draw straight lines radiating outward from that central curve to the outer edge of the semi-circle. Press firmly enough to leave a groove but not cut through. -
Add Texture:
For extra detail, use a needle tool to add tiny dots or hatch marks inside the central curved area at the base of your rays. -
Pierce the Holes:
While the clay is still wet, use a needle tool or toothpick to poke holes for assembly. The top circle needs one hole at the bottom. The middle semi-circle needs a hole at the top (curved) edge and one at the bottom (flat) edge. The bottom semi-circle needs just one hole at the top edge. -
Dry Time:
Lay your pieces on a flat surface lined with parchment paper. Let them dry completely according to your clay package instructions, usually 24-48 hours. I like to flip them halfway through to ensure even drying.
Troubleshooting: Curling Clay
If your flat pieces start curling up while drying, place a lightweight book on top of them (with parchment paper in between) once they are semi-dry.
Step 3: Refining and Assembly
-
Sand and Smooth:
Once fully dry, check the edges for any roughness. Use fine-grit sandpaper to gently buff the sides until they feel smooth to the touch. -
Optional Sealant:
If you want a glossy finish or extra durability, brush on a thin layer of sealant or varnish now and let it dry. -
Open Jump Rings:
Using your flat nose and round nose pliers, twist open your jump rings. Remember to twist the ends away from each other (front to back) rather than pulling them apart horizontally. -
Link the Tiers:
Thread a jump ring through the bottom hole of the top circle and the top hole of the middle semi-circle. Close the ring securely. -
Attach Bottom Tier:
Repeat the process to connect the bottom of the middle semi-circle to the top of the large bottom semi-circle using another jump ring. -
Add Earring Hooks:
Finally, open the loop on your earring hook (or use a small jump ring if needed) and attach it to the top hole of your stud circle.
Now you have a stunning, lightweight pair of handmade earrings perfect for gifting or keeping for yourself

TRACK YOUR CERAMIC JOURNEY
Capture glaze tests, firing details, and creative progress—all in one simple printable. Make your projects easier to repeat and improve.
Air Dry Clay Pendant Charms and Key Tags
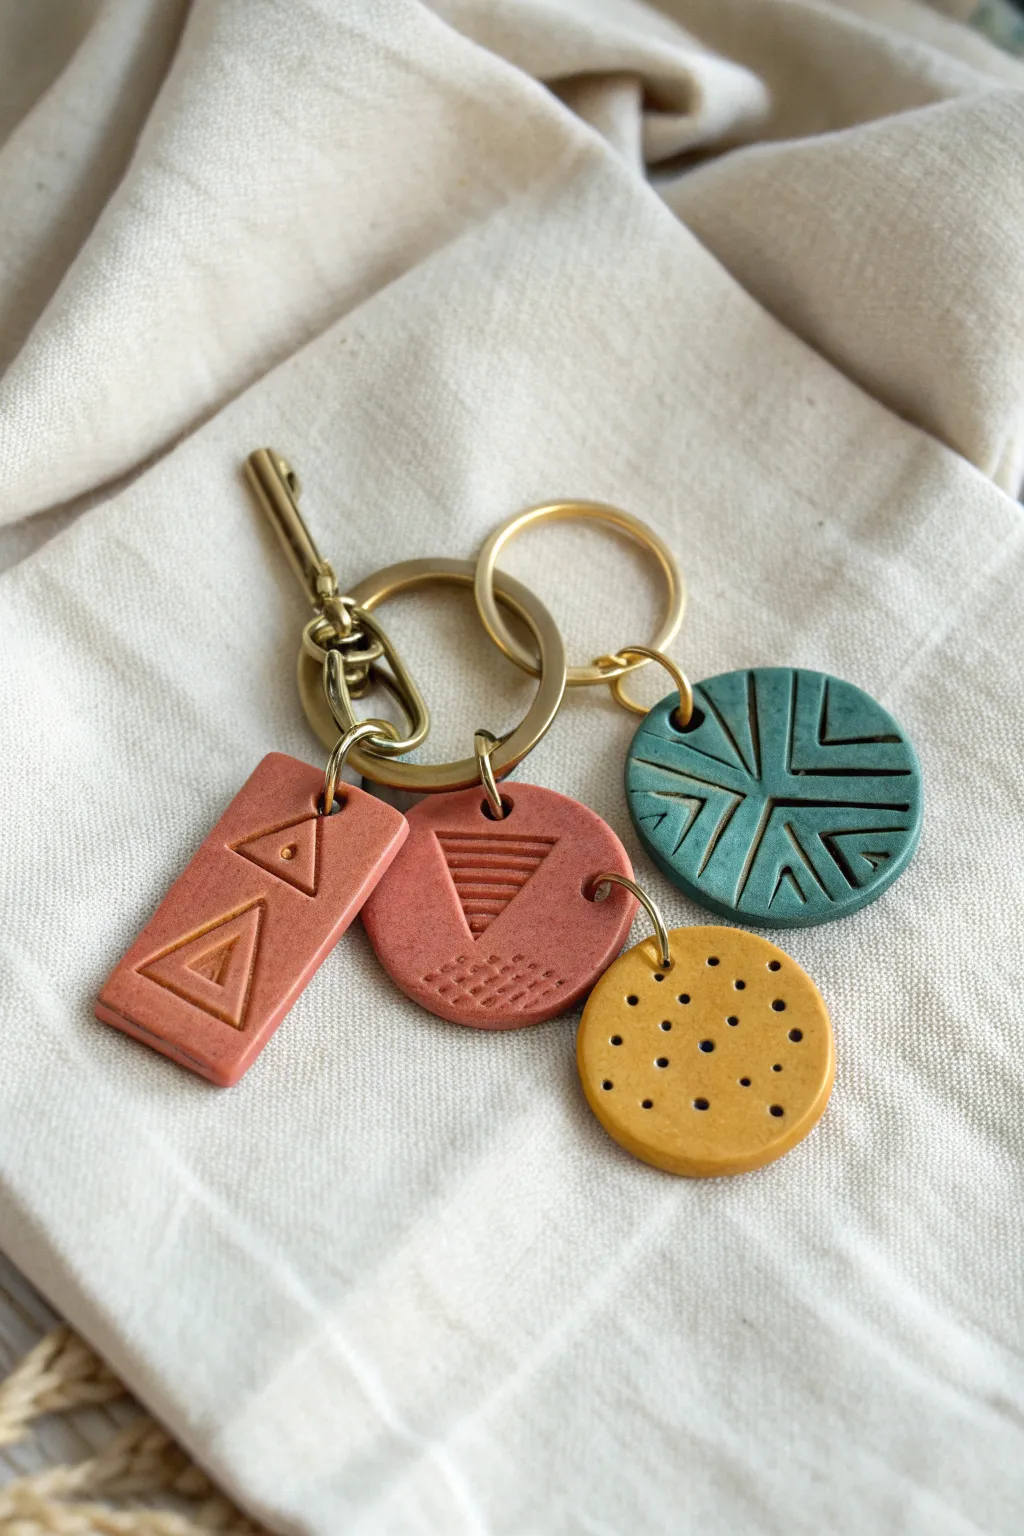
Elevate your everyday carry with these earthy, geometrically inspired clay charms. Combining muted terracotta, mustard, and teal tones with simple stamped patterns creates a sophisticated bohemian look that feels both modern and handmade.
Detailed Instructions
Materials
- Air dry clay (white or terracotta)
- Acrylic paints (terracotta, mustard yellow, teal green)
- Clay roller or rolling pin
- X-acto knife or clay cutting tool
- Small circular cookie cutters (approx. 1-1.5 inch)
- Ruler
- Needle tool or toothpick
- Small jump rings (gold)
- Large split key rings and clasp hardware (gold)
- Jewelry pliers
- Fine grit sandpaper
- Matte spray varnish or Mod Podge
Step 1: Shaping the Clay Base
-
Condition the clay:
Begin by kneading a handful of air dry clay until it is soft, pliable, and free of cracks. This ensures a smooth surface for your stamping later. -
Roll it out:
Roll your clay out on a flat, non-stick surface to an even thickness of about 1/4 inch (6mm). You want them sturdy enough to handle daily use as a keychain. -
Cut the shapes:
Use your circular cutter to punch out three circles. Then, use a ruler and knife to cut one rectangular tag shape, approximately 1 inch by 2 inches. -
Smooth the edges:
Dip your finger in a little water and gently run it along the cut edges of each shape to soften any sharpness or irregularities.
Uneven Drying?
If your flat clay pieces start curling up at the edges while drying, gently place a heavy book on top of them (sandwich them between parchment paper first) once they are leather-hard to flatten them back out.
Step 2: Adding Texture & Design
-
Create the rectangle design:
For the rectangular tag, use a clay tool or a small triangular object to impress two triangle outlines vertically. Press a small dot into the center of the top triangle using a needle tool. -
Texture the first circle:
On one circular charm, use your knife or a straight-edge tool to gently press horizontal lines, forming an inverted triangle shape. Below this, poke rows of tiny dots to create a textured bottom section. -
Design the teal charm:
For the second circle, you’ll be carving deeply. Use a needle tool or knife to carve radiating lines that look like a burst or a star pattern, dividing the circle into quadrants. -
Design the yellow charm:
For the final circle, keep it simple. Use the blunt end of a small paintbrush or a dotting tool to press random, evenly spaced indentations all over the surface. -
Pierce the holes:
Use a straw or a tool slightly larger than your jump rings to punch a clean hole near the top edge of each charm. Make sure not to get too close to the edge to prevent breaking. -
Allow to dry:
Place your pieces on a wire rack or parchment paper. Let them dry completely for 24-48 hours, flipping them occasionally to ensure even drying.
Step 3: Finishing Touches
-
Sand imperfections:
Once fully dry, lightly sand the edges with fine-grit sandpaper to remove any burrs or rough spots. -
Paint the charms:
Apply acrylic paint to your charms. Paint the rectangle and the triangle-patterned circle in a muted terracotta. Paint the starburst circle a deep teal, and the dotted circle a warm mustard yellow. -
Refine the paint job:
I like to do two thin coats for opaque coverage. For the carved teal charm, make sure paint gets into the grooves—you can wipe the surface lightly with a damp cloth if you want the clay color to show through the lines, or paint it solid. -
Seal the surface:
Protect your work with a matte spray varnish or a coat of matte Mod Podge. This is crucial for keychains that will get bumped around in a bag. -
Attach hardware:
Open your gold jump rings with pliers. Loop a ring through the hole of each clay charm. -
Assemble the keychain:
Slide the jump rings onto your large main split ring. You can attach smaller rings to the main loop first to stagger the lengths, creating a clustered look.
Add Gold Accents
After the paint dries, rub a tiny amount of gold lustre wax or use a gold paint pen to highlight the impressed patterns and grooves for a luxe, gilded finish.
Now you have a stylish, custom accessory to organize your keys or gift to a friend
Personalized Air Dry Clay Gift Tags
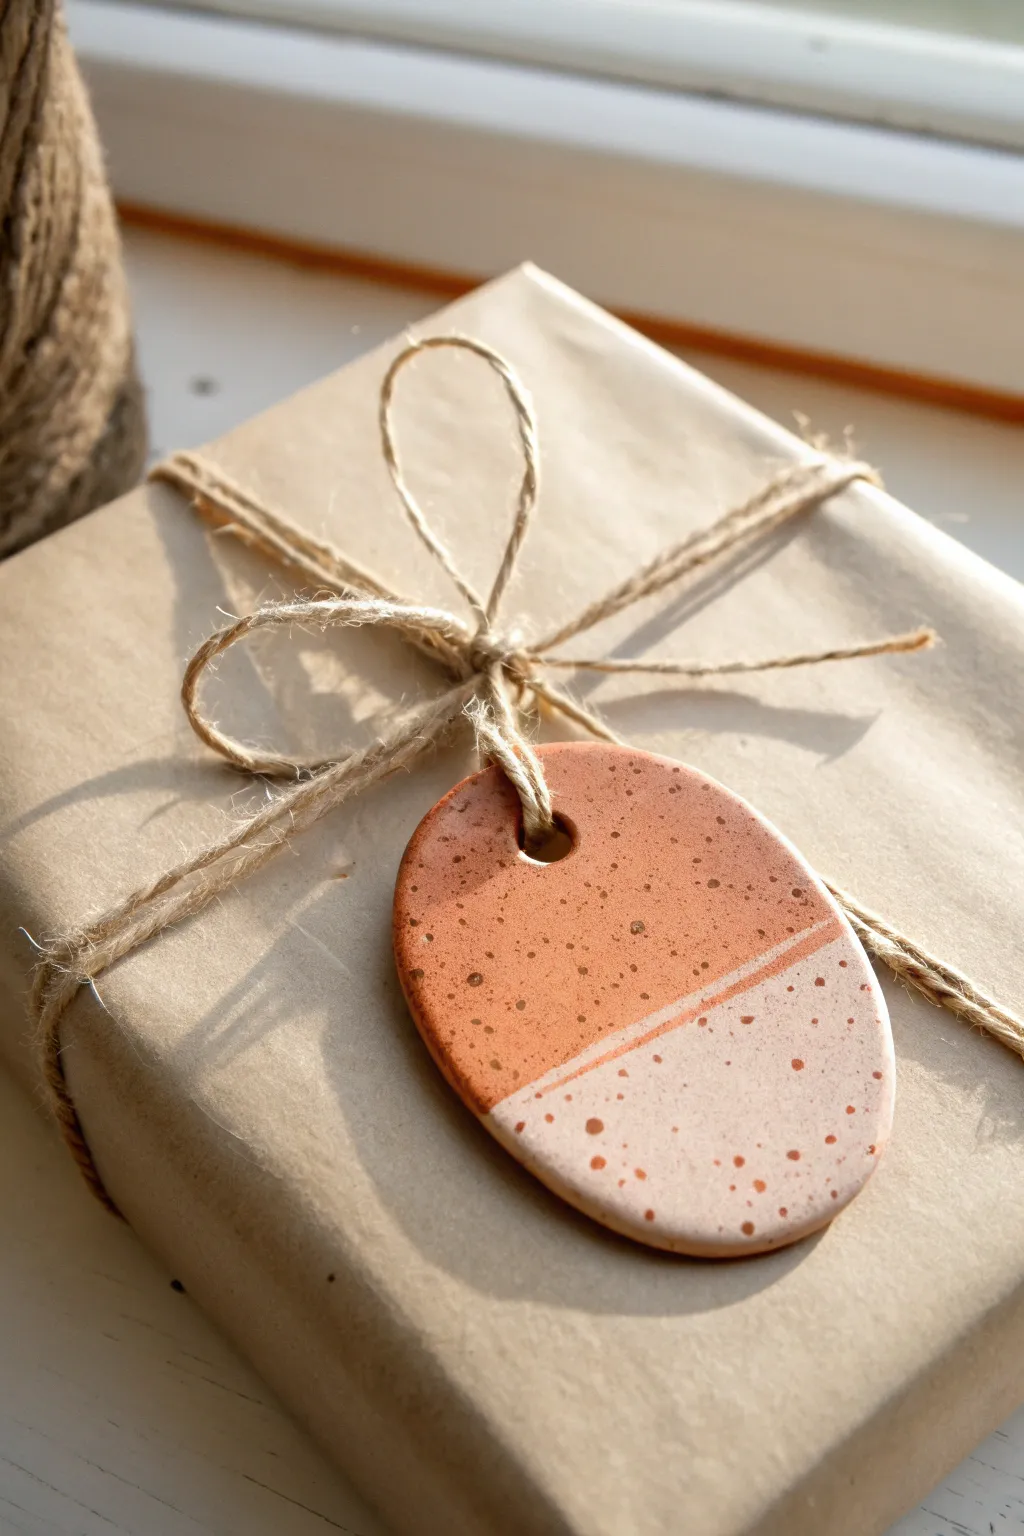
Elevate your gift wrapping with these charming oval gift tags made from air dry clay. This project features a modern two-tone design with a playful speckled finish that mimics the look of high-end ceramic stoneware.
Step-by-Step
Materials
- White air dry clay
- Rolling pin
- Oval cookie cutter (or a knife and paper template)
- Straw or small circular cutter (for the hole)
- Sandpaper (fine grit)
- Acrylic paints (Terra cotta/burnt sienna and cream/off-white)
- Old toothbrush
- Brown acrylic paint (for speckling)
- Washi tape or painter’s tape
- Glossy varnish or Mod Podge
- Small paintbrush
- Jute twine
Step 1: Shaping the Clay Base
-
Roll out the clay:
Begin by taking a chunk of white air dry clay and conditioning it in your hands until soft. Roll it out on a smooth surface to an even thickness of about 1/4 inch (5-6mm). -
Cut the shape:
Use your oval cookie cutter to stamp out the tag shape. If you don’t have a cutter, lightly trace an oval template onto the clay and carefully cut around it with a craft knife. -
Create the hanging hole:
While the clay is still wet, use a plastic straw or a small circular tool to punch a hole near the top of the oval. Make sure it’s not too close to the edge to prevent tearing later. -
Smooth the edges:
Dip your finger in a tiny bit of water and run it gently around the cut edges of the clay to soften any harsh lines or jagged bits. -
Let it dry entirely:
Place your tag on a flat surface or a wire rack to dry. flips the tag over halfway through the drying process to prevent curling. Allow 24-48 hours depending on humidity. -
Sand for smoothness:
Once fully cured and hard, use fine-grit sandpaper to buff the surface and edges until they are perfectly smooth to the touch.
Fixing curling edges
If your clay starts curling while drying, place a heavy book on top of it once it’s mostly dry but still slightly flexible to flatten it back out.
Step 2: Painting and Finishing
-
Tape off the design:
Place a strip of washi tape or painter’s tape across the lower third of the tag at a slight angle. Press the edges down firmly to stop paint from bleeding underneath. -
Paint the top section:
Paint the exposed top portion of the tag with your terra cotta or burnt sienna acrylic paint. You may need two coats for opaque coverage. -
Reveal the line:
Carefully peel away the tape while the paint is still slightly tacky to ensure a crisp line. -
Paint the bottom section:
Using a steady hand and a small brush, paint the bottom section cream or off-white, leaving a thin strip of unpainted white raw clay between the two colors to define the separation. -
Create the speckles:
Mix a small amount of dark brown paint with a drop of water to thin it slightly. Dip an old toothbrush into the mixture. -
Apply the splatter:
Hold the toothbrush over the tag and run your thumb across the bristles to flick tiny specks of paint onto the surface. I suggest testing this on scrap paper first to control the spray. -
Seal with varnish:
Allow all paint to dry completely. Apply a coat of glossy varnish or Mod Podge over the entire front and sides of the tag to give it that ceramic-like shine and protect the paint. -
Attach the twine:
Cut a length of jute twine. Fold it in half, push the loop through the hole, and pull the tails through the loop to secure it to the tag. -
Wrap your gift:
Tie the finished tag onto your gift wrapped in kraft paper for a rustic, personalized presentation.
Add texture
Before the clay dries, gently press a piece of lace or a textured fabric into the bottom section for a tactile, imprinted design.
Your beautifully handcrafted tags are now ready to make someone’s gift extra special
Chunky Air Dry Clay Bookends
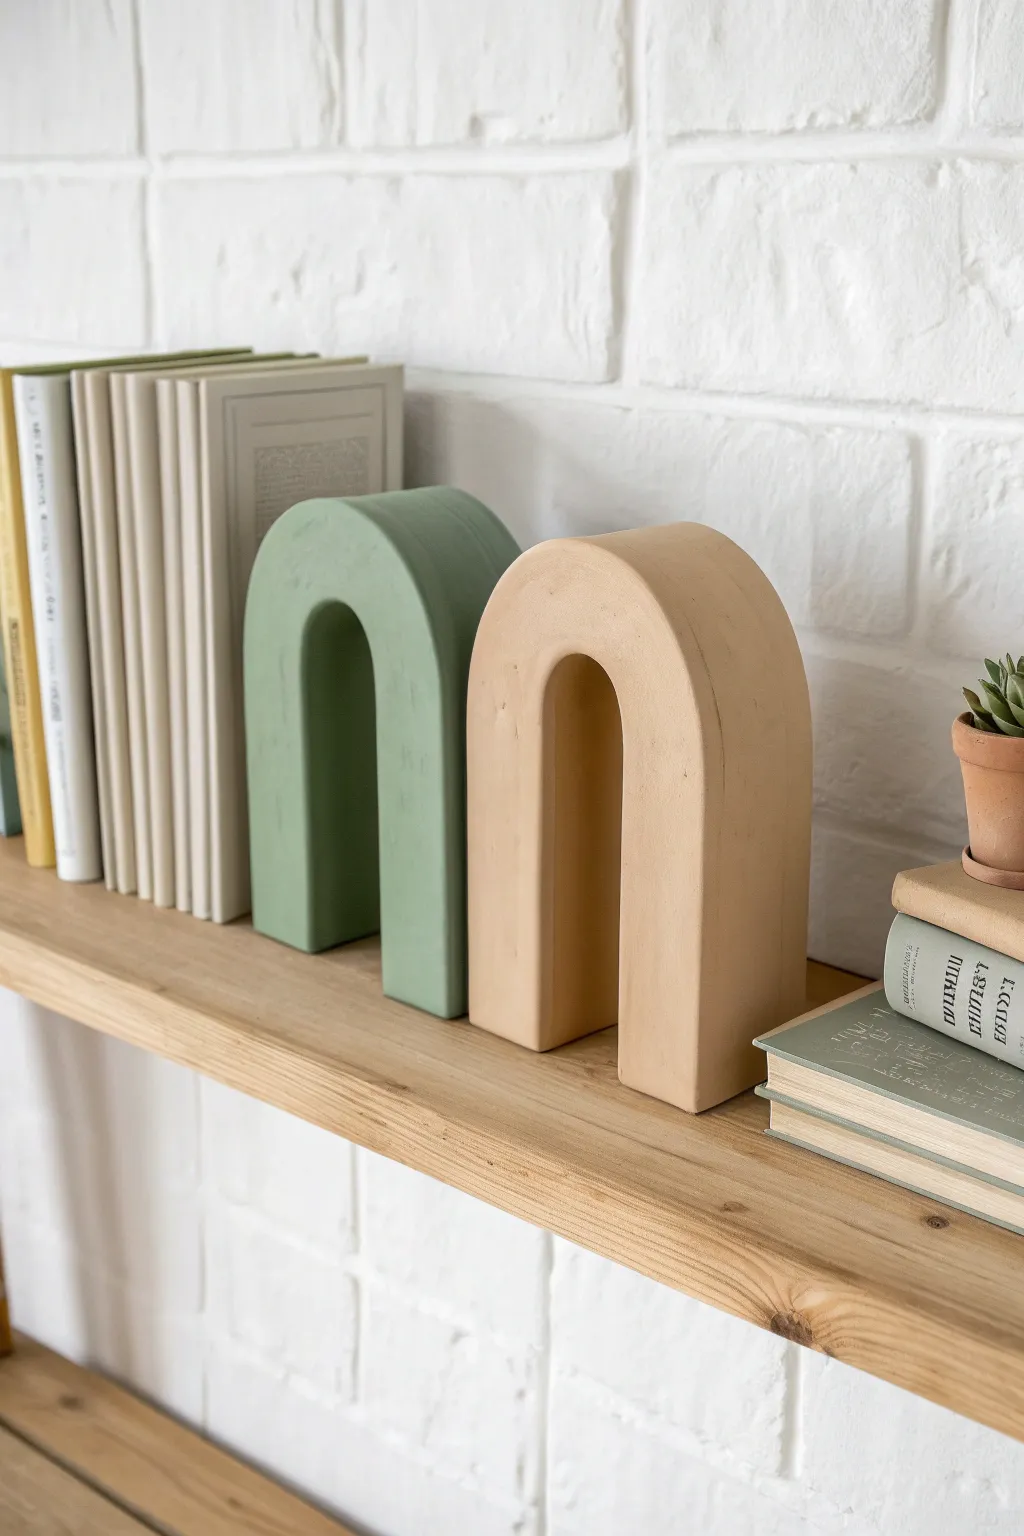
These substantial, minimalist bookends act as functional sculptures for your shelf, combining organic textures with clean architectural lines. Their satisfyingly chunky shape gives them just enough weight to keep your favorite paperbacks in check while adding a touch of muted color to your décor.
Step-by-Step Guide
Materials
- Air dry clay (approx. 2kg per bookend)
- Cardboard or foam board (for the internal structure)
- Masking tape
- Rolling pin
- Craft knife
- Bowl of water
- Sandpaper (medium and fine grit)
- Acrylic paints (sage green and light terracotta)
- Matte sealant spray or Mod Podge
- Ruler
- Pencil
Step 1: Building the internal armature
-
Plan the dimensions:
Since air dry clay is heavy and thick blocks take forever to dry, we need a core. Sketch an arch shape on your cardboard about 1 inch smaller on all sides than your desired final size. Aim for an arch roughly 6 inches tall and 4 inches wide. -
Cut the profiles:
Cut out two identical arch shapes for each bookend from your cardboard or foam board using a sharp craft knife. -
Create the depth strips:
Cut long strips of cardboard that are roughly 2 to 2.5 inches wide. These will determine the thickness of your bookend. You can gently bend the strips to make them flexible for the curved top. -
Assemble the core:
Tape the strips between the two arch faces to create a 3D hollow arch. Use plenty of masking tape to secure everything tightly; you don’t want the structure to collapse under the weight of the clay.
Cracks happen!
If small cracks appear during drying, mix a small amount of fresh clay with water to create a paste (slip). Fill the cracks, smooth over, and let dry again.
Step 2: Sculpting the clay
-
Prepare the clay:
Knead your air dry clay until it is soft and conditioned. Roll out a large slab that is roughly 1/4 to 1/2 inch thick on a smooth surface. -
Wrap the faces:
Cut pieces from your slab to cover the front and back flat faces of your cardboard armature first. Press them firmly onto the cardboard, scoring the back of the clay lightly for better adhesion if needed. -
Cover the curves:
Roll out a long strip for the outer curve and the inner arch. Apply these strips to the sides, overlapping the edges of the front and back pieces slightly. -
Blend the seams:
This is the most crucial part for that seamless look. Dip your finger in a little water and smooth all the joints where the clay pieces meet. The goal is to make the seams disappear entirely so it looks like one solid block. -
Refine the shape:
Use a flat tool or a ruler to gently tap the flat sides and bottom. This helps square off the edges and ensures the bookend will sit perfectly flat on a shelf. -
Smooth the surface:
Run a slightly damp sponge over the entire piece to remove fingerprints and bumps. I like to spend extra time here because it saves sanding time later. -
Dry completely:
Let the bookends dry. Because they are thick, this creates a slow drying process. Rotate them every 12 hours so air reaches all sides. Expect this to take 48-72 hours.
Weight Hack
Before sealing your cardboard armature, fill the hollow bottom section with dry rice or small pebbles. This adds extra weight to hold heavy books upright.
Step 3: Refining and finishing
-
Sand for smoothness:
Once fully dry and white, use medium grit sandpaper to level out any large bumps. Switch to fine grit to get a velvety smooth finish. -
Dust off:
Wipe the bookends down with a dry cloth to remove all sanding dust before painting. -
Base coat:
Apply a base coat of white acrylic paint if your clay is grey or off-white, as this helps the final colors pop. -
Apply color:
Mix your sage green and terracotta colors. Apply 2-3 coats of acrylic paint, letting each layer dry fully in between to avoid streaking. -
Seal the work:
Finish with a clear matte sealant spray. This protects the paint from chipping and makes the bookends easier to dust later without creating unwanted shine.
Place your new architectural pieces on the shelf and enjoy the modern vibe they bring to your reading collection
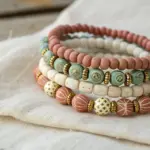
Terrazzo-Style Air Dry Clay Catchall Tray
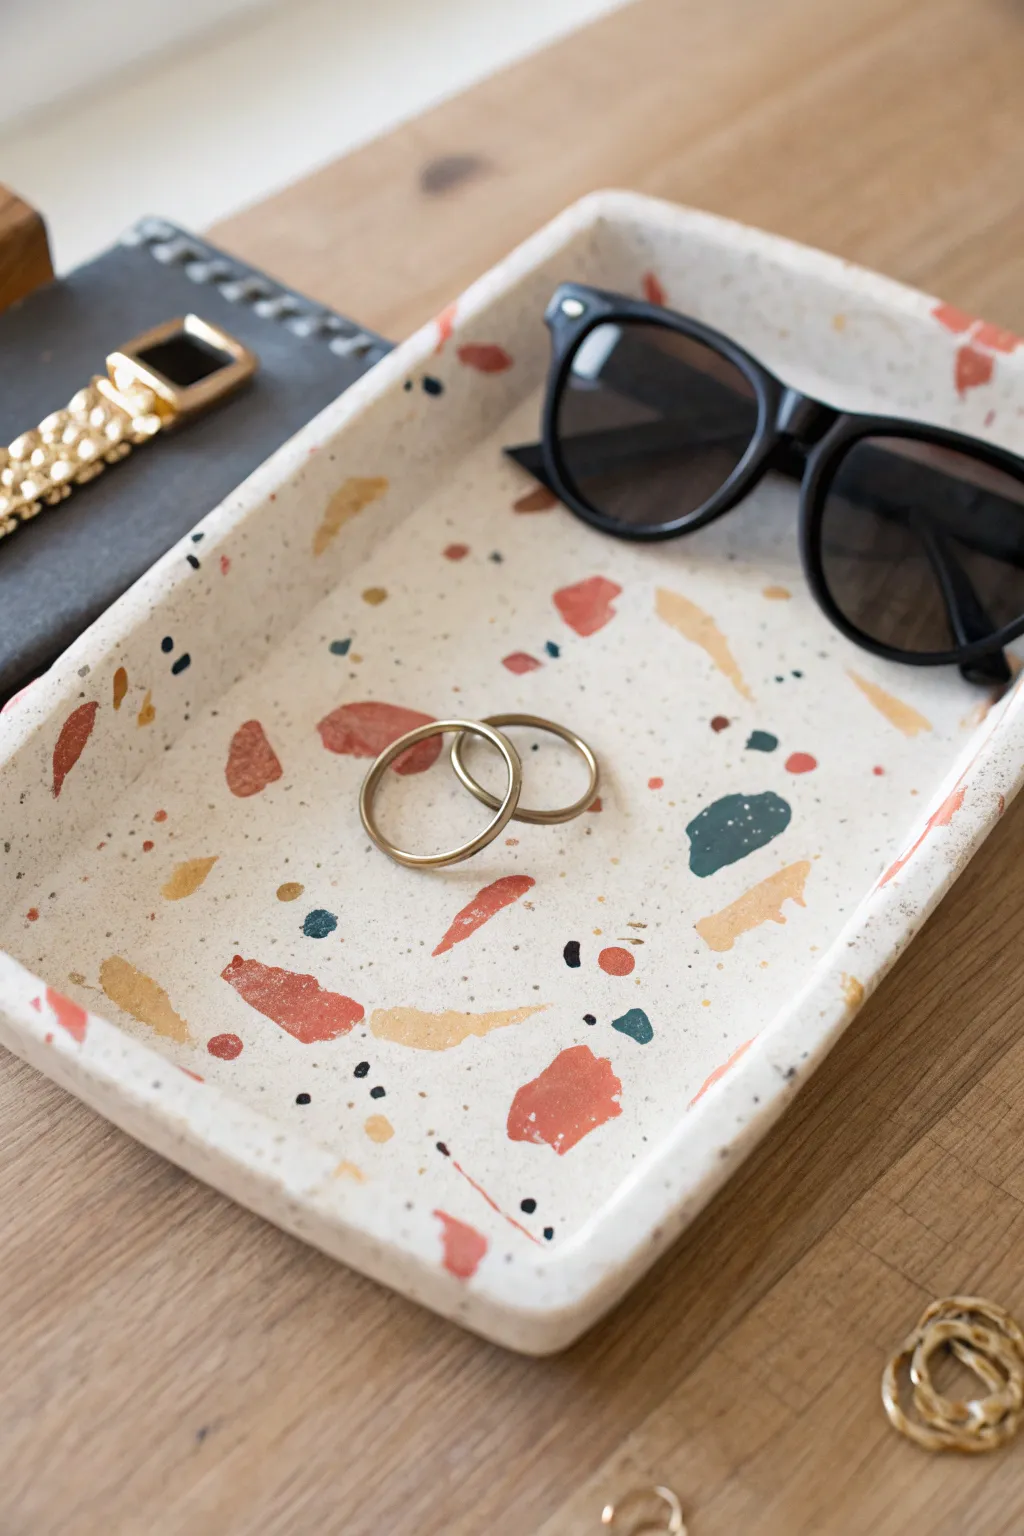
Bring the trendy look of terrazzo into your home with this surprisingly simple air dry clay project. By kneading colored clay chips into a white base, you can achieve that high-end speckled stone effect for a fraction of the cost.
Detailed Instructions
Materials
- White air dry clay (approx. 500g)
- Acrylic paints (terracotta/rust, ochre/mustard yellow, teal/dark green, black)
- Rolling pin
- Sharp craft knife or X-Acto blade
- Ruler
- Sandpaper (fine and extra-fine grit)
- Glossy varnish or sealant (Mod Podge or polyurethane)
- Small paintbrush
- Plastic placemat or non-stick surface
- Bowl with water
Step 1: Creating the Chips
-
Prepare Colored Clay:
Pinch off four small walnut-sized balls of white air dry clay. Keep the main block of clay wrapped tightly to prevent drying. -
Mix Custom Colors:
Add a drop or two of acrylic paint to each small ball—one rust, one mustard, one teal, and one black. Fold and knead the clay continuously until the pigment is fully incorporated and the color is solid. -
Flatten Color Sheets:
Roll each colored ball out very thinly on your work surface. They don’t need to be neat or uniform; you’re looking for thin, uneven sheets. -
Dry and Crumble:
Let these thin colored sheets sit for about 15-20 minutes until they are semi-dry and leathery. Then, tear them into small, irregular jagged chips of varying sizes. Mixing tiny specks with larger chunks makes the texture look more authentic.
Step 2: Forming the Tray
-
Prepare the Base:
Take a large chunk of fresh white clay and flatten it slightly with your palm. Sprinkle about two-thirds of your colored clay chips onto the white slab. -
Integrate the Chips:
Gently roll over the clay to press the chips in. Fold the clay over on itself and roll again. Repeat this folding and rolling process a few times so the chips are distributed throughout the inside of the clay, not just on top. -
Final Roll Out:
Roll the clay slab out to a uniform thickness of about 1/4 inch (6mm). If the surface looks too white, press the remaining colored chips firmly into the top surface and roll once more to embed them flush. -
Cut the Shape:
Using a ruler and a sharp craft knife, cut out a clean rectangle. For the tray in the photo, aim for roughly 5 inches by 7 inches. -
Create the Lip:
Roll a long, thin snake of white clay. Place this coil around the perimeter of your rectangle base to create the walls. -
Blend the Seams:
Use a little water on your finger or a modeling tool to smooth the coil onto the base. Smear the clay downwards on the inside and outside until the seam disappears and the walls stand up straight. -
Detail the Corners:
Pinch the corners gently to square them off. I like to use the flat side of my ruler to gently tap the walls straight so they aren’t wavy. -
Embed Surface Chips:
If your walls look plain white after blending, press a few extra colored chips into the damp clay walls and smooth them flat with your finger.
Prevent cracking
If you notice tiny hairline cracks while the clay dries, smooth them over instantly with a tiny bit of water and fresh clay paste (slip) to patch them up before sanding.
Step 3: Finishing Touches
-
Slow Drying:
Place the tray in a cool, dry spot away from direct sunlight. Let it dry for at least 24-48 hours. Turn it over gently halfway through to ensure the bottom dries evenly. -
The Reveal (Sanding):
Once fully hard, take your sandpaper to the surface. This is the crucial step—sanding removes the top thin layer of white clay to vividly reveal the colored chips beneath. Sand until the surface is smooth and the colors pop. -
Clean Up:
Wipe away all the clay dust with a slightly damp cloth or a dry brush. Ensure no powder remains in the corners. -
Seal and Protect:
Apply a coat of glossy varnish or sealant. This deepens the contrast of the colors and gives the tray that polished, ceramic-like sheen seen in the photo.
Gilded edge
For an upscale look, paint the very top rim of the tray with liquid gold leaf or metallic gold acrylic paint after the final sanding but before sealing.
Now you have a chic spot to drop your keys and sunglasses that looks like real stone