If you’re new to clay, I’ve got you—beginner ceramics can be simple, useful, and ridiculously satisfying. These are the low-stress projects I start my students on when we want quick wins, clean shapes, and plenty of room to play with easy decoration.
Pinch Pot Trinket Bowl
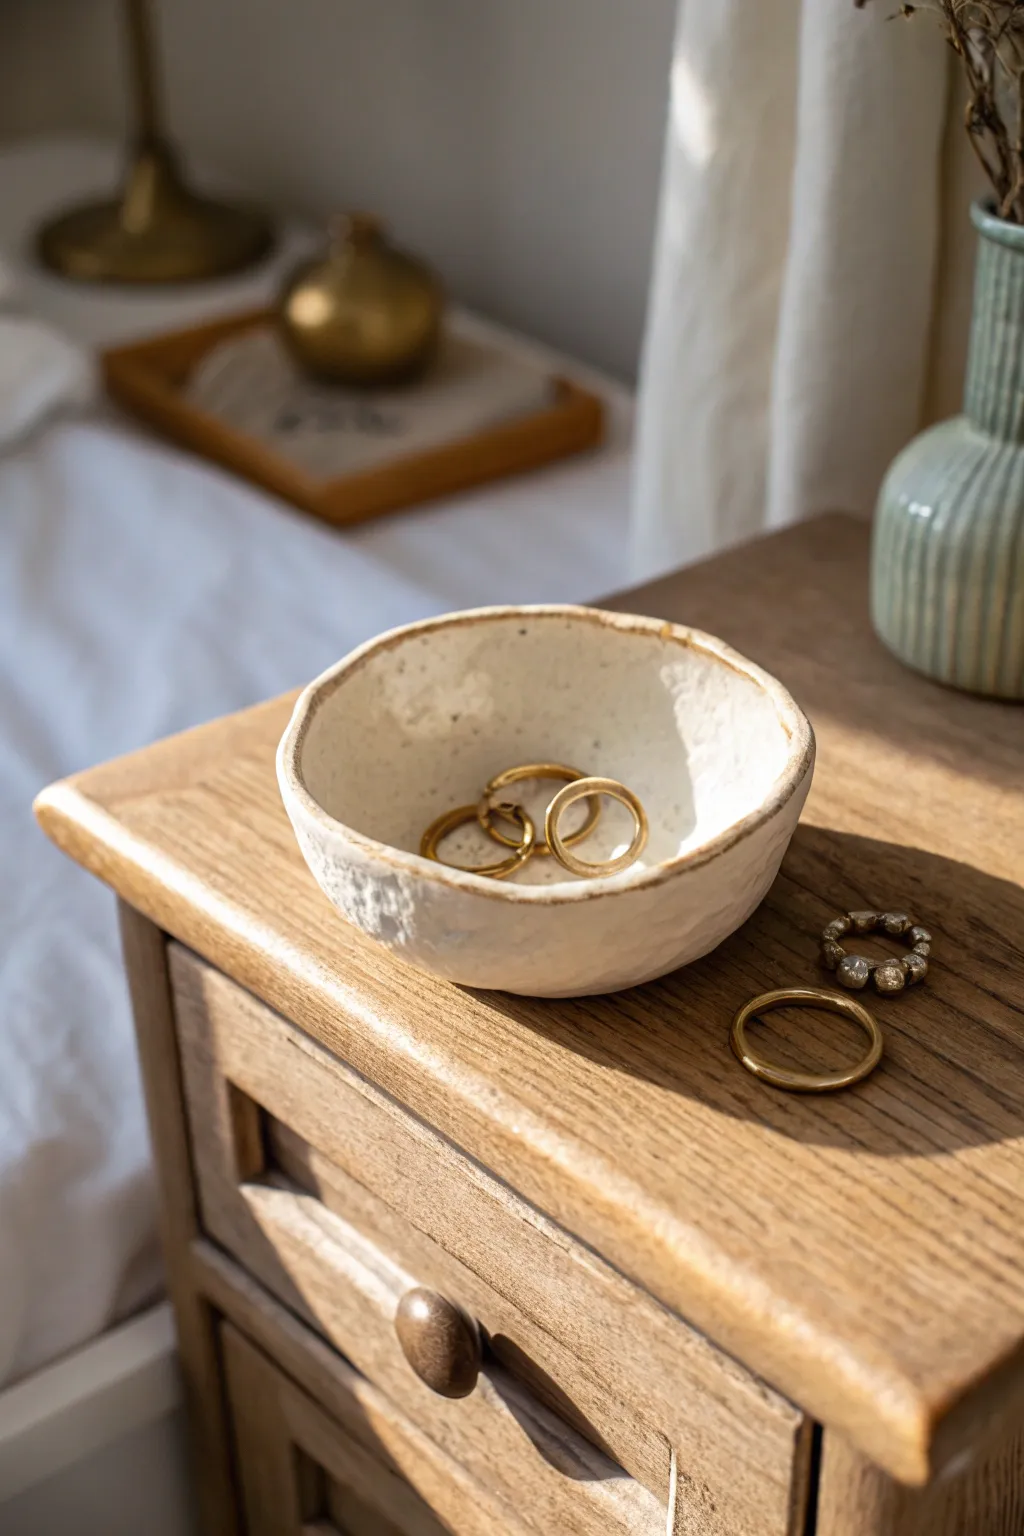
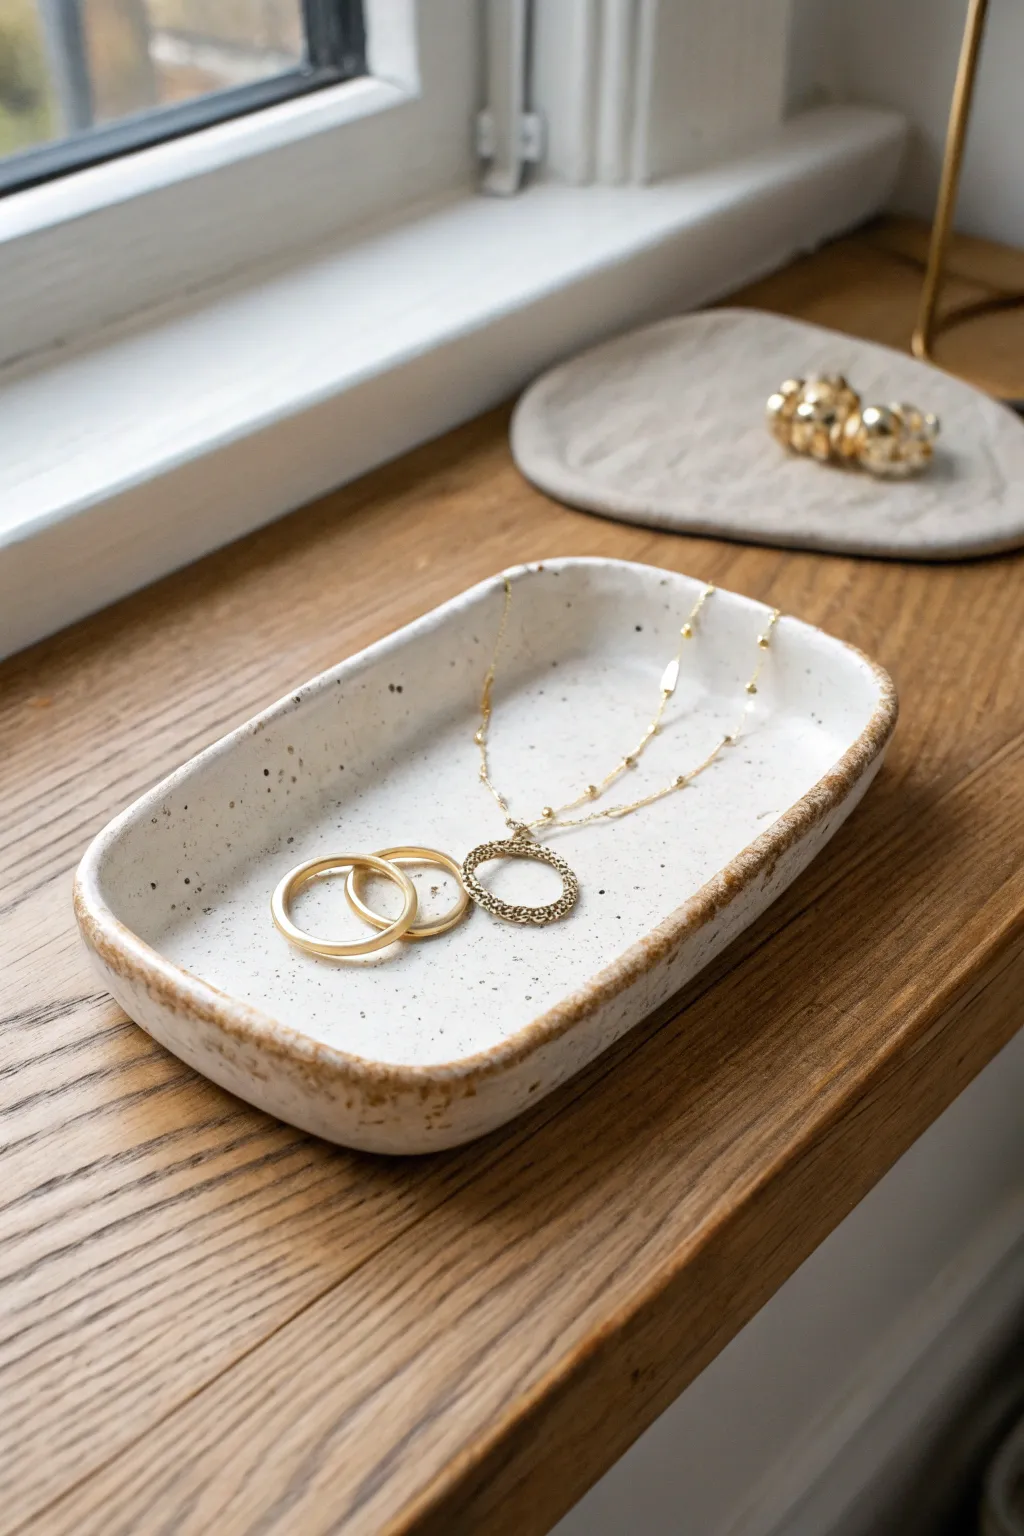
This charming, hand-formed bowl features a delightfully rugged texture and a purposefully uneven rim that highlights the beauty of raw clay. The speckled white glaze finish creates a minimalist, earthy vessel perfect for catching your everyday jewelry on a bedside table.
Step-by-Step
Materials
- Low-fire white stoneware clay (smooth or with grog)
- Small wooden paddle or wooden spoon
- Pin tool or needle tool
- Sponge
- Speckled cream or matte white glaze
- Clear glaze (optional for rim)
- Kiln access
- Small bowl of water
Step 1: Forming the Pinch Pot
-
Prepare your clay ball:
Start with a ball of clay roughly the size of a tangerine. Pat it firmly between your palms to compress the particles and create a smooth, round sphere without any air pockets. -
Open the center:
Hold the ball in your non-dominant hand. Press your thumb gently into the center of the sphere, stopping about a half-inch from the bottom to ensure you have a sturdy base. -
Pinch the walls:
Using your thumb on the inside and fingers on the outside, begin to pinch the clay walls gently. Rotate the ball slightly after each pinch, working your way from the bottom up to the rim. -
Expand the shape:
Continue pinching and rotating until the walls are about 1/4 inch thick. Aim for a wide, open bowl shape rather than a tall cup; gently pull the walls outward as you pinch to create that open expanse. -
Flatten the base:
Place the pot onto your work surface and press down gently on the interior bottom to flatten the base, ensuring the bowl will sit stable and not rock.
Cracking at the Rim?
If you see small cracks forming on the rim while shaping, your clay is getting too dry. Dip your fingers in water and compress the rim immediately to heal the split.
Step 2: Adding Texture & Refining
-
Create the texture:
Instead of smoothing the outside perfectly, use a wooden paddle or the back of a wooden spoon to gently tap the exterior walls. This simple action creates the faceted, rock-like texture seen in the photo. -
Shape the rim:
Leave the rim slightly uneven. Depending on the rustic look you want, you can gentle tap the rim down in random spots to vary the height, avoiding a perfectly level line. -
Smooth the interior:
Take a slightly damp sponge and run it smoothly over the *inside* of the bowl only. You want the interior to be snag-free for jewelry, while the outside remains textured. -
Refine the lip:
Run a damp finger along the very edge of the rim to round it off slightly. It shouldn’t be sharp, but keep the wavering, organic flow intact. -
Let it dry:
Allow the piece to dry slowly to the bone-dry stage. Cover it loosely with plastic for the first day if your environment is very dry, then uncover until it is room temperature to the touch.
Step 3: Glazing & Firing
-
Bisque fire:
Fire the bone-dry piece in the kiln to cone 04 (or according to your clay body’s specifications). This turns the fragile clay into durable ceramic ready for glazing. -
Wite down and wax:
Wipe the bisque ware with a damp sponge to remove dust. Apply wax resist to the bottom foot of the bowl so it doesn’t stick to the kiln shelf. -
Apply the glaze:
Pour a speckled cream or matte white glaze into the bowl, swirl it to coat the interior, and pour out the excess. For the exterior, I prefer to dip the bowl to ensure that the glaze settles nicely into the textured paddle marks. -
Highlight the rim:
Once the base glaze is dry, wipe the very edge of the rim slightly with a damp sponge to thin the glaze there. This allows the clay body color, often a warm brownish tone, to peek through after firing. -
Glaze fire:
Fire the piece again to the maturation temperature of your glaze (usually cone 5 or 6 for stoneware). Let the kiln cool completely before opening.
The Raw Rim Look
To get the exact look in the photo, wipe the glaze completely off the very top edge of the rim before firing. The bare clay creates a lovely brown halo effect.
Place your new creation on your nightstand and enjoy the simple, handmade beauty it brings to your daily routine.


Coil-Built Beginner Bowl
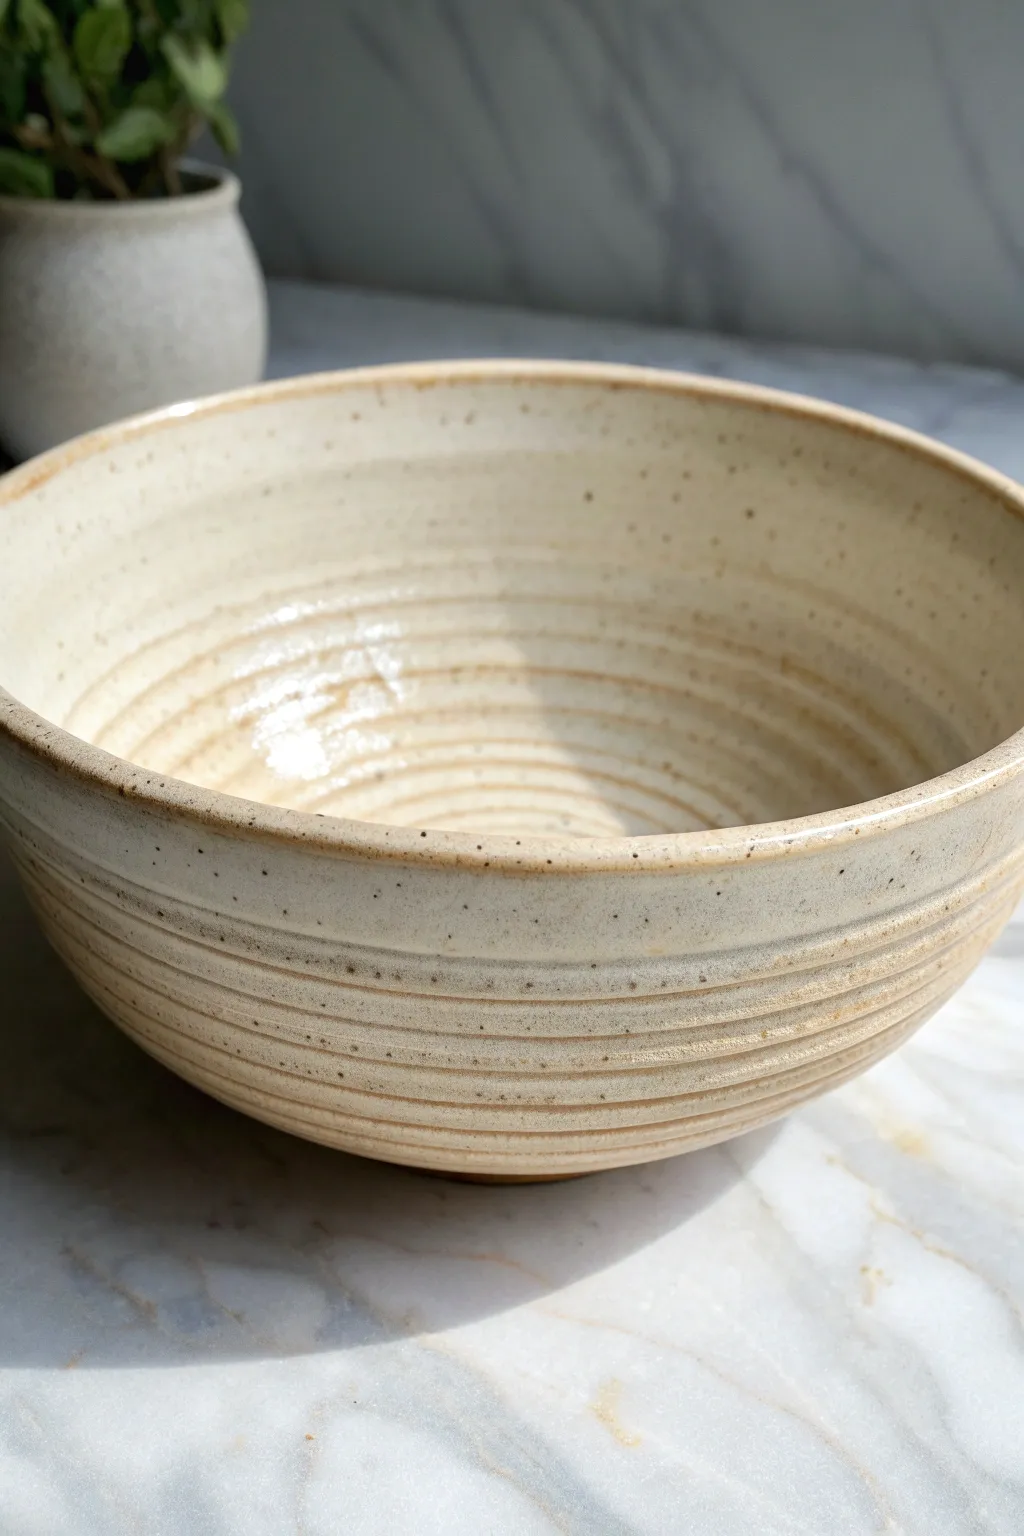
This charming, speckled cream bowl features prominent horizontal ridges that highlight the handmade process, adding tactile warmth to your tableware collection. Its gentle, open shape and glossy interior glaze make it perfect for serving soups or salads while showcasing natural clay textures.
Step-by-Step Tutorial
Materials
- Speckled stoneware clay (mid-fire)
- Scoring tool (serrated rib or needle tool)
- Slip (clay slurry)
- Wooden rib tool
- Metal rib tool
- Loop tool (for trimming)
- Sponge
- Banding wheel (optional but recommended)
- Transparent or cream glossy glaze
Step 1: Building the Base and Walls
-
Prepare the base:
Begin by rolling out a slab of clay about 1/4 inch thick. Cut a circle roughly 4 inches in diameter to serve as the foot of your bowl. Place this on a bat or banding wheel. -
Roll your coils:
Roll out several long, even snakes of clay, aiming for a consistent thickness of about 1/2 inch. Keep them covered with plastic so they don’t dry out while you work. -
Attach the first coil:
Score the outer edge of your base circle and apply a generous amount of slip. Lay your first coil on top of the scored area, pressing it down gently but firmly to secure it. -
Build upward:
Continue adding coils, stacking them directly on top of the previous one for vertical height, or slightly outward solely if you want a wider flare. For this bowl, aim for a gentle outward curve. -
Join the coils internally:
As you stack, use your thumb or a wooden tool to smudge the clay from the top coil down into the coil below on the *inside* surface only. This bonds the structure while keeping the exterior ridges visible. -
Smooth the interior:
Once you have built up about 3-4 inches of height, take a flexible metal or rubber rib and completely smooth the inside walls. You want a seamless surface for food safety and cleaning. -
Refine the exterior ridges:
On the outside, use a damp sponge or your finger to gently soften the valleys between the coils. Do not smooth them flat; the goal is to keep that distinct ribbed texture visible. -
Check the rim:
Finish the top rim by gently compressing it with a piece of chamois or a wet sponge to ensure it is rounded and pleasant to drink from.
Don’t Smudge the Outside
To keep those beautiful horizontal lines, be very careful not to smear the exterior coils when joining the interior. Support the outside wall gently with your palm.
Step 2: Finishing and Glazing
-
Slow drying:
Loosely cover the bowl with plastic to let it dry slowly to a leather-hard state. This prevents the coils from cracking apart due to uneven shrinkage. -
Trim the foot:
Flip the leather-hard bowl over. Using a loop tool, trim a small recessed ring into the bottom base to create a defined foot, giving the bowl a little lift. -
Bisque fire:
Once fully bone dry, fire the piece in the kiln to bisque temperature (usually cone 04) to prepare it for glazing. -
Wax the foot:
Apply wax resist to the bottom foot ring to prevent glaze from sticking to the kiln shelf during the final firing. -
Glaze application:
Dip the entire bowl into a transparent or light cream glaze. The glaze should naturally pool slightly in the ridges, accentuating the texture. -
Wipe the rim (optional):
For a bit of contrast, you can gently wipe the glazed rim with a damp sponge to thin the glaze there, allowing the speckled clay body to show through more clearly. -
Final smooth:
Check the exterior for any drips that might run during firing and gently sand them down with a finger. -
Glaze fire:
Fire the bowl to the maturity temperature of your clay and glaze (typically cone 5 or 6 for stoneware). Let the kiln cool completely before opening.
Cracks Between Coils?
If gaps appear between coils while drying, it means your scoring and slipping wasn’t aggressive enough. Score deeper next time and use plenty of slip.
Enjoy your customized bowl filled with your favorite soup or display it proudly on a shelf


Slab-Built Jewelry Dish
This elegant rectangular tray combines a minimalist form with a rustic, speckled finish that makes gold jewelry pop. It’s an ideal beginner project because it relies on simple slab-building techniques rather than the wheel.
How-To Guide
Materials
- Speckled stoneware clay (mid-fire)
- Rolling pin
- Two wooden guide strips (approx. 1/4 inch thick)
- Canvas or heavy cloth (to roll on)
- Rectangle paper template (approx. 4″ x 6″)
- Features/needle tool
- Potter’s knife or fettling tool
- Small elevated slab mold or a block of wood covered in plastic
- Sponge
- Stiff bristled brush (for the rim)
- Clear glaze
- Iron oxide wash (optional, for the rim)
Step 1: Preparing the Slab
-
Wedge the clay:
Start by wedging a softball-sized amount of speckled clay to remove air bubbles. This ensures your final piece won’t crack in the kiln. -
Set up your station:
Place your canvas on the table to prevent sticking. Lay your wooden guide strips parallel to each other, slightly wider than your desired dish width. -
Roll the slab:
Place the clay ball between the strips. Using the rolling pin, roll the clay out until the pin rests on the wooden guides, creating an even thickness of about 1/4 inch. -
Smooth the surface:
Take a rubber rib or a slightly damp sponge and compress the clay surface on both sides. This removes the canvas texture and aligns the clay particles for strength.
Rim Texture
Don’t over-smooth the rim! The beauty of this piece comes from the contrast between the smooth interior and the rough, organic edge.
Step 2: Shaping the Form
-
Cut the rectangle:
Lay your paper template onto the slab. Using your needle tool or knife, cut straight down around the template. Avoid dragging the knife, which can warp the clay. -
Round the corners:
Use your knife or a cookie cutter to gently round off the four sharp corners of the rectangle for a softer, organic look. -
Lift the edges:
Place the slab onto a slightly smaller rectangular mold (a block of wood covered in plastic works well). Let the edges of the clay droop slightly over the sides to create the rim. -
Refine the rim:
While the clay is still soft, gently use your fingers to curl the very edge of the rim upward, creating a slight lip that will hold jewelry securely. -
Stiffen the form:
Allow the clay to dry to a ‘leather-hard’ state on the mold. This usually takes a few hours depending on humidity; the clay should be firm but still cool to the touch.
Step 3: Finishing Touches & Fire
-
Smooth the edges:
Once leather-hard, remove the dish from the mold. Take a damp sponge and run it along the rim to soften any sharp cutting marks. -
Texture the rim:
To mimic the rustic edge in the photo, take a stiff bristled brush or a scoring tool and gently tap the very top edge of the rim to create a rough, pitted texture. -
Bisque fire:
Let the piece dry completely (bone dry) for several days. Fire it in the kiln to cone 04 (or your clay’s specific bisque temperature). -
Wax the bottom:
Apply wax resist to the bottom foot of the dish to prevent glaze from sticking to the kiln shelf. -
Apply the oxide (optional):
If you want that toasted brown edge, brush a little iron oxide wash onto the textured rim and wipe away the excess with a sponge, leaving darkness only in the crevices. -
Glaze application:
Dip the entire piece into a glossy clear glaze or a speckled white glaze. Shake off excess drips carefully. -
Final wipe:
Double-check that the bottom (where it touches the shelf) is completely clean of glaze. -
Glaze fire:
Fire the piece again to the maturity temperature of your clay (typically Cone 5 or 6 for stoneware) to achieve that glassy, durable finish.
Add Gold Luster
For a luxe upgrade, apply gold luster to the textured rim after the glaze firing and fire a third time at a lower temp (Cone 018).
Now you have a chic, handmade spot to keep your favorite rings and necklaces safe


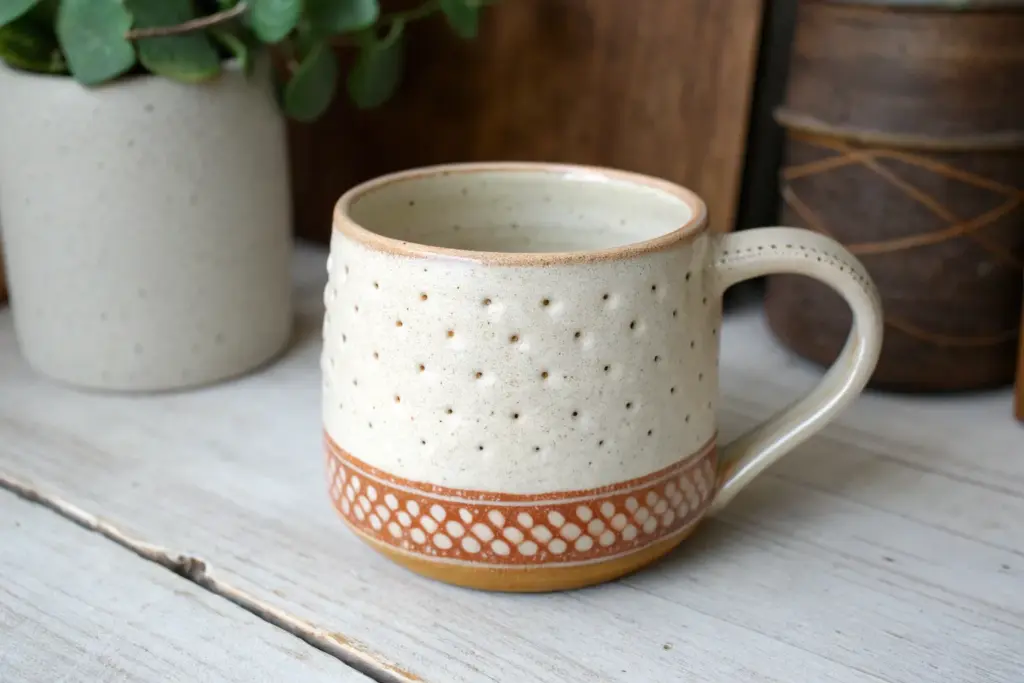
Your First Real Mug
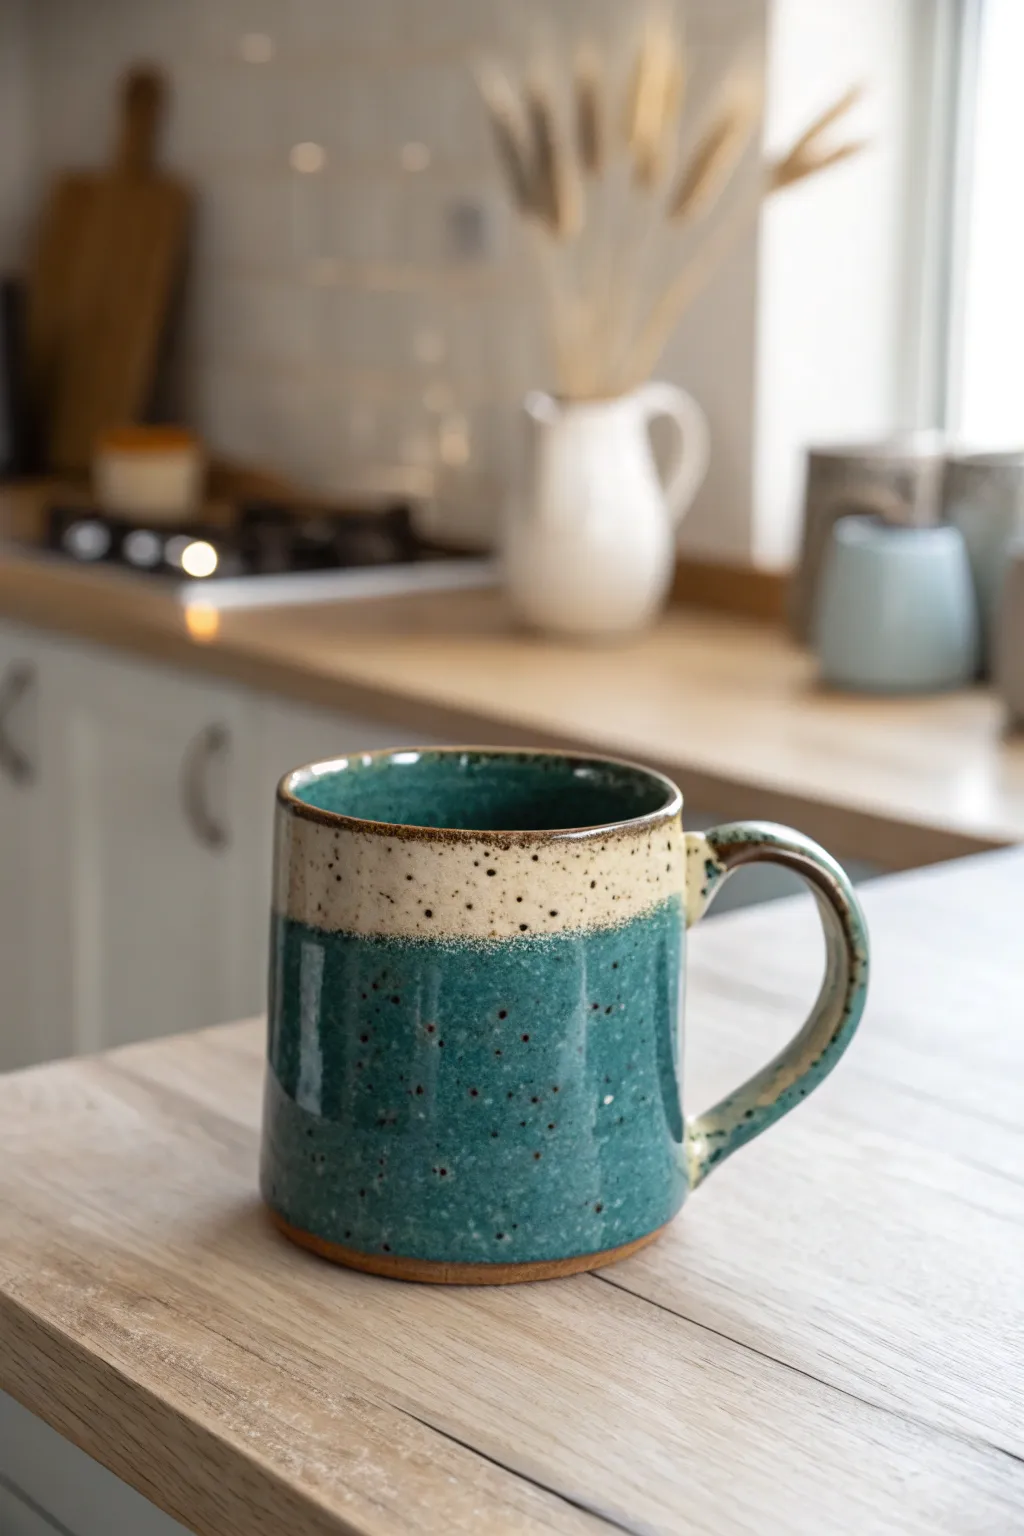
This hardy stoneware mug combines a rustic, speckled clay body with a stunning two-tone glaze effect that feels like a walk in the woods. The deep teal base contrasts beautifully with a creamy oat rim, creating a cozy vessel perfect for your morning brew.
Step-by-Step
Materials
- Speckled stoneware clay (e.g., lagunna speckled buff)
- Pottery wheel
- Throwing sponge
- Needle tool
- Wire cutter
- Rib tool (wooden or metal)
- Loop trimming tools
- Bucket of water
- Serrated rib or scoring tool
- Slip (clay mixed with water)
- Teal/Forest Green reactive glaze
- Oatmeal/Cream dipping glaze
- Wax resist
Step 1: Throwing the Cylinder
-
Center the clay:
Start with a ball of clay roughly the size of a grapefruit (about 1-1.5 lbs). Wedge it well to remove air bubbles. Slam it onto the center of your wheel head and use water and firm hand pressure to center the clay until it spins smoothly without wobble. -
Open the form:
Push your thumbs into the center of the hump, leaving about a half-inch of clay at the bottom for the floor. Gently pull the clay outward to establish the interior width of your mug. -
Pull the walls:
Using your sponge on the outside and fingertips on the inside, gently squeeze and lift the clay upward. Aim for straight, even walls. Perform 3-4 pulls to get the height you want. -
Shape the belly:
For this particular mug, apply gentle pressure from the inside to push the belly out slightly, keeping the rim just a bit narrower than the base for that classic sturdy look. -
Compress the rim:
Use a chamois or your sponge to gently smooth and round the rim. This strengthens the drinking edge and prevents future cracking. -
Cut:
Run a wire cutter underneath the pot and set the bat aside to let the clay firm up to a ‘leather hard’ state.
Step 2: Trimming and Handling
-
Trimming the foot:
Once leather hard, center the mug upside down on the wheel. Use a loop tool to trim away excess clay from the bottom, creating a distinct foot ring. -
Pulling a handle:
Take a carrot-sized lump of clay. Wet your hand and stroke the clay downward, elongating it into a strap. Aim for a comfortable thickness that tapers slightly. -
Attach the handle:
Cut the handle to size. Score (scratch) the mug body and the handle ends where they will join. Apply slip to both scored areas. -
Secure the join:
Press the handle firmly onto the mug. Use your thumb to smooth the clay from the handle onto the mug body, blending the seam so it disappears perfectly. -
Slow drying:
Cover the mug loosely with plastic. Uneven drying causes handle cracks, so let it dry slowly over a few days before bisque firing.
S-Cracks on bottom?
If you find S-shaped cracks on the bottom after firing, you likely didn’t compress the floor enough. During throwing, run your finger back and forth over the floor 3-4 times.
Step 3: Glazing
-
Bisque fire:
Fire the mug to cone 04 (or your clay’s specified bisque temperature). Once cool, wipe it down with a damp sponge to remove dust. -
Wax the foot:
Paint a layer of wax resist on the very bottom foot ring and about 1/4 inch up the side to prevent glaze from sticking to the kiln shelf. -
Dip the top:
Hold the mug by the foot and dip the top third (the rim area) into the Oatmeal/Cream glaze. Hold for 3 seconds, then remove and let dry for minute. -
Dip the base:
Hold the mug by the rim (carefully touching only the unglazed interior or using tongs). Dip the bottom two-thirds into the Teal glaze, slightly overlapping the cream glaze. -
Clean uph:
Sponge off any glaze droplets on the waxed foot. Double-check the overlap line to ensure a nice blend. -
Final fire:
Glaze fire to cone 6 (or your clay/glaze specific temp). The overlapping section will create that beautiful interaction between the two colors.
Get Better Speckles
To enhance the iron speckles in the clay, try holding the kiln at its top temperature for an extra 15 minutes (a ‘soak’). This draws out the minerals through the glaze.
Now you have a sturdy, handcrafted vessel ready for your favorite hot drink

The Complete Guide to Pottery Troubleshooting
Uncover the most common ceramic mistakes—from cracking clay to failed glazes—and learn how to fix them fast.
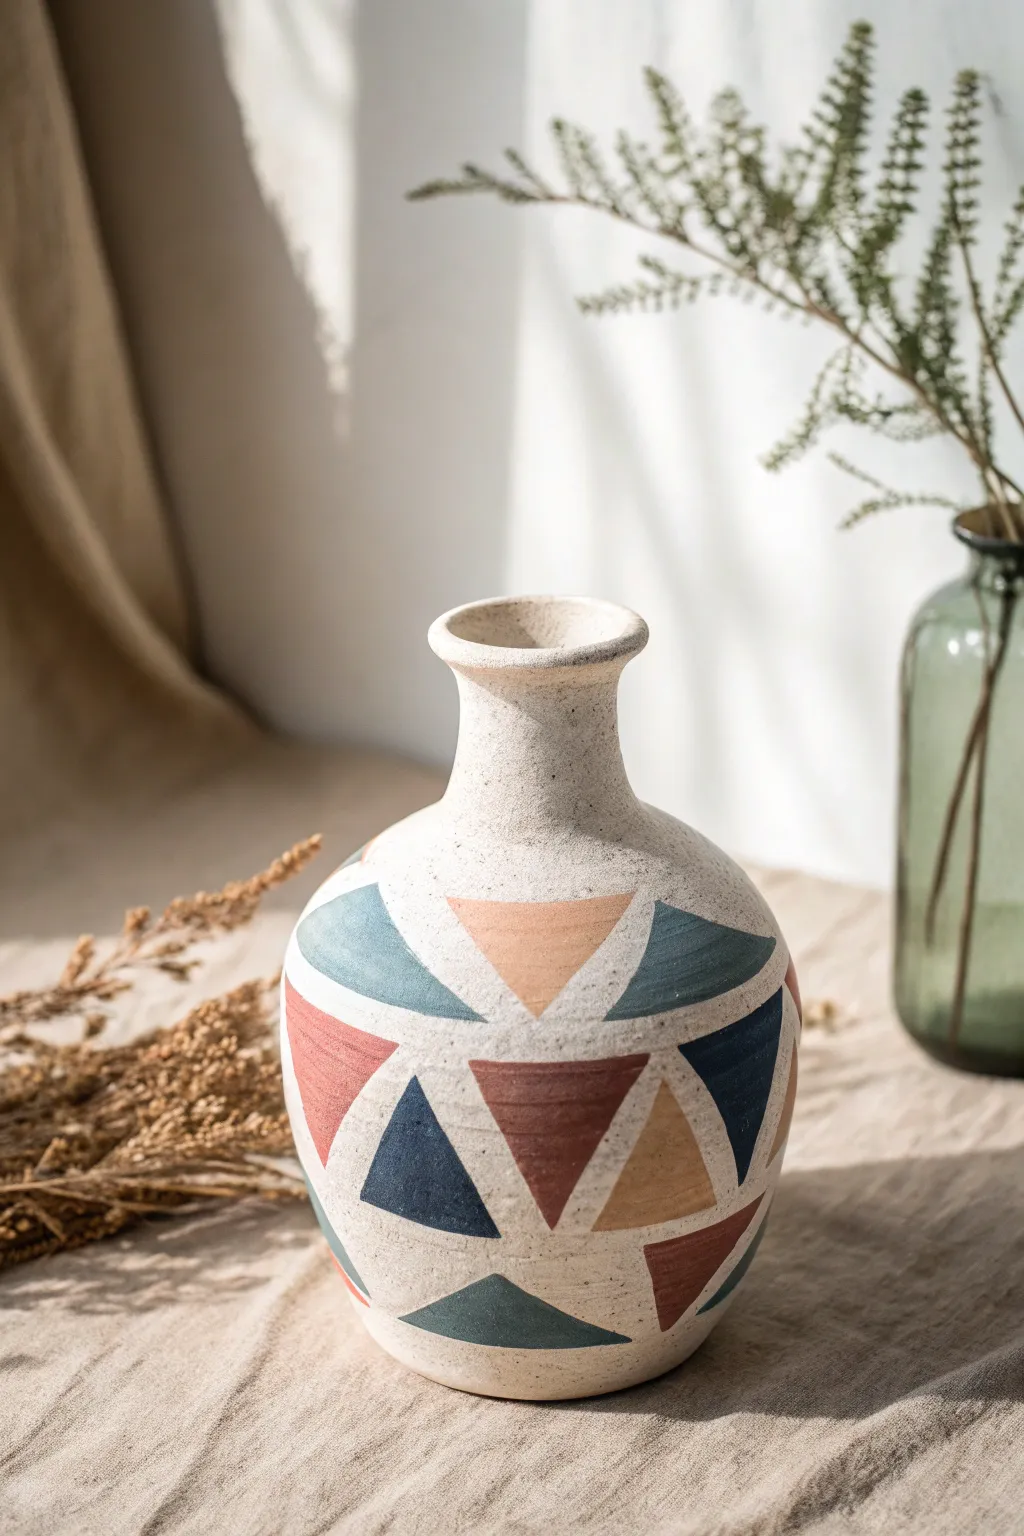
Mini Bud Vase Trio
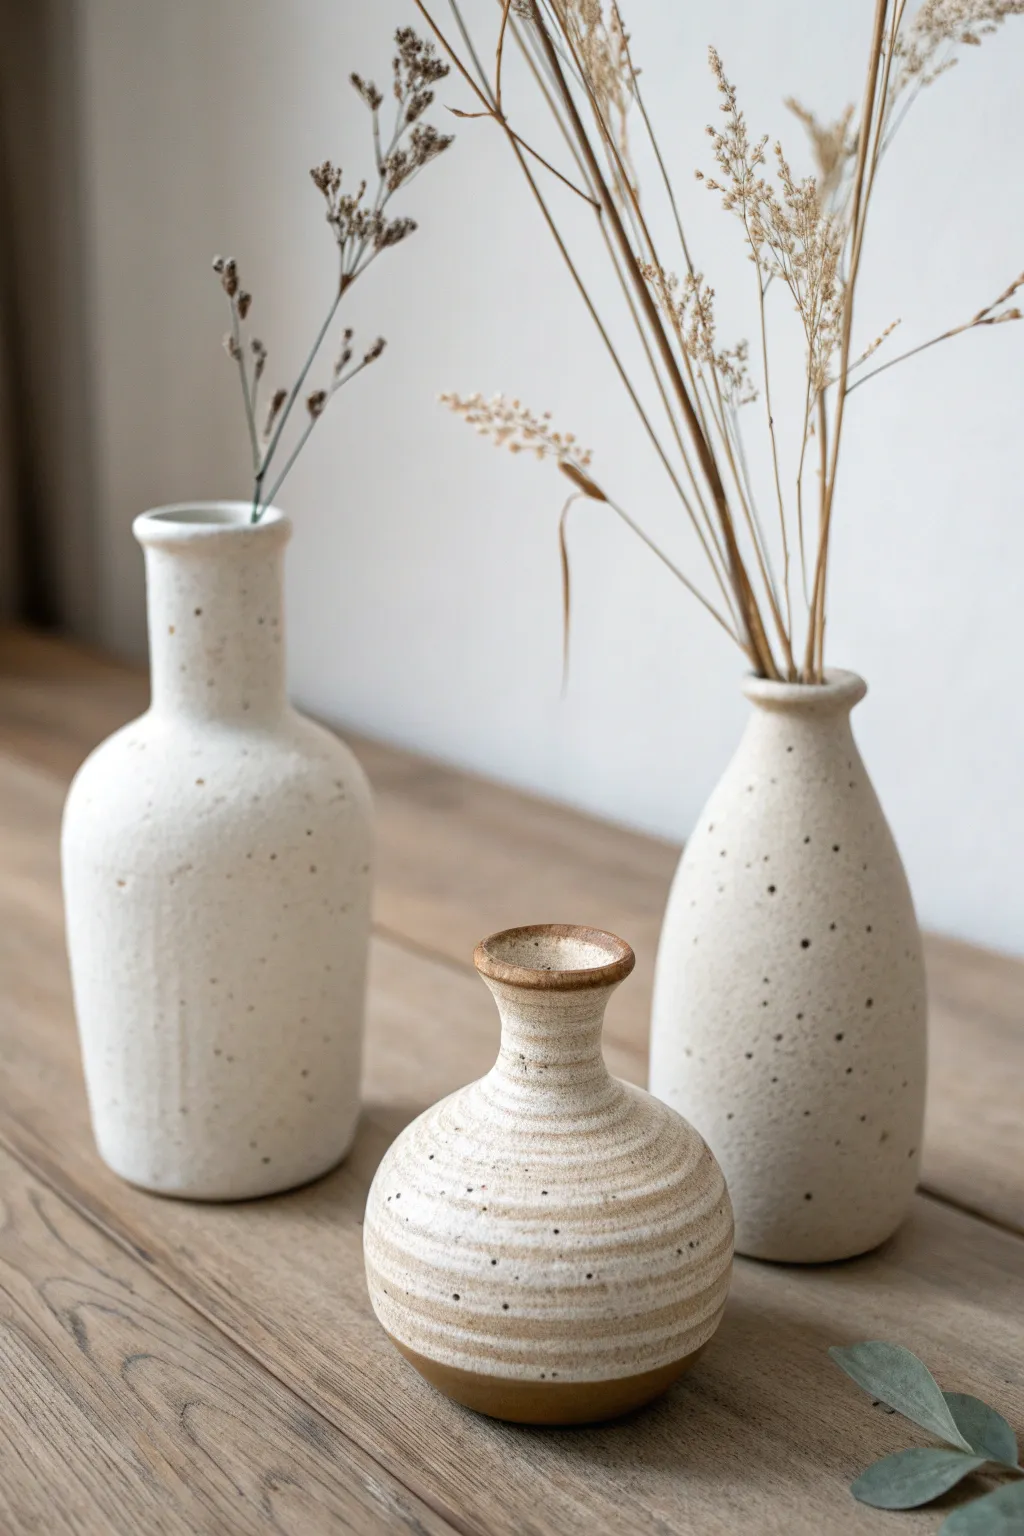
Create a charming set of three miniature vases that celebrate the natural beauty of clay with distinct, organic silhouettes. This project focuses on throwing or hand-building small forms featuring a raw, speckled stoneware aesthetic perfect for displaying dried grasses.
Step-by-Step Tutorial
Materials
- Speckled stoneware clay (approx. 2 lbs total)
- Potter’s wheel (or hand-building tools: rolling pin, slat guides)
- Small throwing sponge
- Wooden modeling tool
- Wire cutter
- Metal kidney rib
- Needle tool
- Trimming tools (loop tool)
- Matte white glaze (optional for full coverage)
- Clear matte glaze (alternative to white)
- Sanding pad (fine grit)
Step 1: Preparation & Throwing (Tall Vases)
-
Wedge the clay:
Start by thoroughly wedging your speckled stoneware clay to remove air bubbles. Divide the clay into three unequal balls: two larger ones (about 3/4 lb each) for the tall vases and a smaller one (about 1/2 lb) for the round vase. -
Center the first ball:
Secure one of the larger balls onto the wheel head. Use water and firm pressure to center the clay until it spins perfectly smooth without wobbling. -
Open and pull the cylinder:
Open the centered, clay leaving a base about 1/4 inch thick. Compress the bottom, then pull the walls upward into a tall, narrow cylinder. Aim for a height of about 5-6 inches. -
Shape the bottle neck:
Collar the top third of the cylinder inward slowly to create a bottle shape. Use wet hands to gently squeeze the clay in, supporting the wall from the inside with a finger or tool if possible. -
Refine the rim:
Use a chamois or sponge to smooth the rim, slightly flaring it outwards for a classic bottle finish. Repeat these steps for the second tall vase, perhaps varying the shoulder slope slightly to make them distinct cousins rather than twins.
Collaring Collapse?
If the neck twists or collapses while narrowing, you are likely squeezing too hard or the clay is too dry. Use plenty of water and move your hands upward faster than the wheel rotation.
Step 2: Throwing the Round Vase
-
Center the small ball:
Place the smallest ball of clay on the wheel and center it low and wide. -
Form the belly:
Open the clay and pull the walls out rather than just up, creating a bulbous, spherical shape. Use a rib on the outside to define that nice round curve. -
Constrict the neck:
Aggressively collar the top inward to form a very narrow neck, similar to the taller vases but sitting atop the round body. -
Add texture:
While the wheel is spinning slowly, take a wooden tool and gently press into the side to create horizontal ridges or grooves that spiral up the form. I find this subtle texture really catches the glaze later. -
Wire off:
Use your wire cutter to slice all three vases from the wheel head and set them aside on a ware board until they reach leather-hard stage.
Enhancing the Specks
To get those beautiful dark spots, choose a clay body specifically labeled ‘speckled’ or ‘flecked.’ A simple translucent satin matte glaze is the best way to let those natural iron spots shine through.
Step 3: Trimming & Refining
-
Trim the bases:
Once leather hard, place each vase back on the wheel (either centered directly or in a chuck). Trim the excess clay from the bottom to create a foot ring or a clean, flat bottom. -
Smooth the surface:
For the two taller vases, use a metal kidney rib to scrape away any throwing lines if you want that smooth, stone-like appearance shown in the example. -
Bisque fire:
Let the pieces dry completely, which may take several days. Fire them in the kiln to cone 04 (or your clay’s specific bisque temperature).
Step 4: Glazing & Final Fire
-
Wax the bottoms:
Apply wax resist to the very bottom of each vase and about 1/4 inch up the side to prevent glaze from sticking to the kiln shelf. -
Apply glaze:
Pour a matte white glaze into the interior of each vase, swirl, and pour out. For the exterior, you can either dip them in the same white glaze or, for the textured round vase, gently wipe the glaze back with a sponge so the raw clay ridges show through. -
Clean up specks:
If your glaze is opaque, the natural specks in the clay might be hidden. To mimic the photo, consider using a semi-transparent glaze or a clay body with heavy iron flecks that bleed through. -
Final firing:
Fire the vases to the maturity temperature of your clay and glaze (typically Cone 5 or 6 for stoneware). Allow the kiln to cool naturally before unloading. -
Sanding:
Check the bottoms for any rough patches. Use a fine-grit sanding pad to smooth the unglazed foot so it won’t scratch your furniture.
Arranged together, these vases create a harmonious display that looks effortlessly curated
Small Succulent Planter
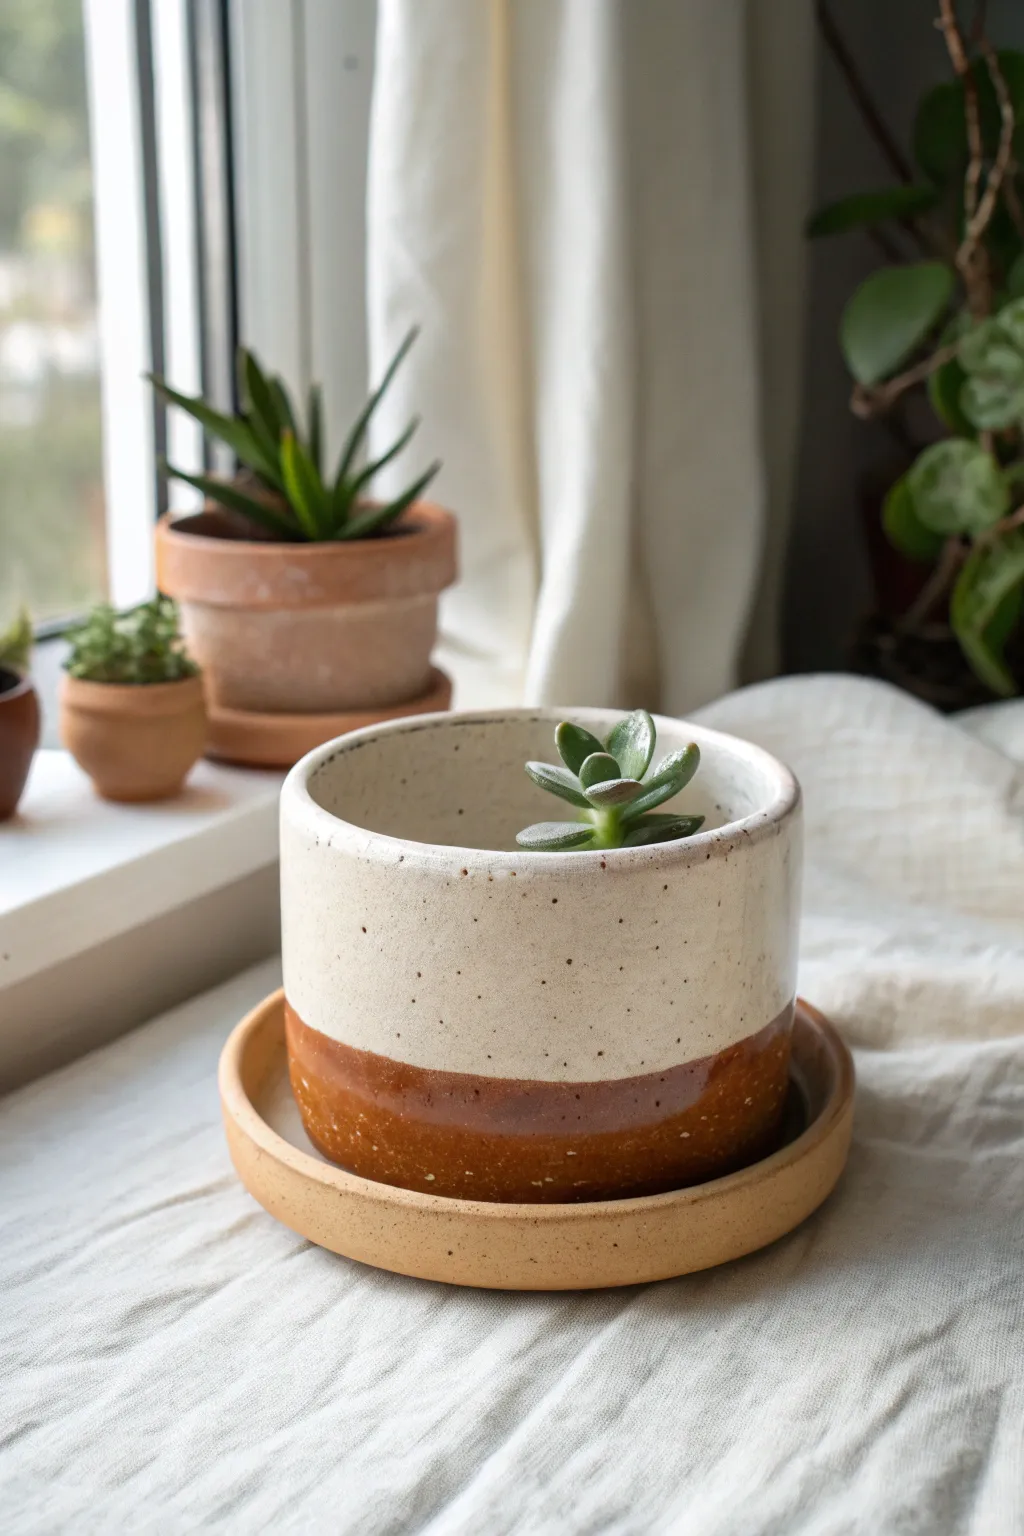
This minimalist succulent planter features a clean cylindrical form with a charming two-tone glaze effect. Its simple silhouette is elevated by the contrast between the creamy, speckled white upper body and the rich, glossy amber base.
Step-by-Step Guide
Materials
- Stoneware clay (speckled or buff)
- Pottery wheel (or slab roller/rolling pin for hand-building)
- Needle tool
- Rib tool (metal or wood)
- Sponge
- Wire cutter
- Trimming tools
- Speckled Cream glaze (matte or satin)
- Amber/Caramel glaze (glossy)
- Wax resist
- Kiln
Step 1: Throwing the Cylinder
-
Prepare the Clay:
Begin by wedging about 1 to 1.5 pounds of speckled stoneware clay until it is free of air bubbles. Form it into a tight, consistent ball. -
Center and Open:
Throw the ball onto the wheel head and center it using water and firm pressure. Open the clay, creating a flat internal floor rather than a bowl curve, aiming for a base about 3-4 inches wide. -
Pull the Walls:
Pull the walls straight up to create a vertical cylinder. Keep your pulls even to ensure consistent thickness from bottom to top. It should be roughly 3-4 inches tall. -
Refine the Shape:
Use a rib tool on the exterior while supporting the interior with your hand to straighten the walls perfectly. The sides should be perpendicular to the wheel head, not flared. -
Clean the Rim:
Compress the rim with a piece of chamois or your sponge to round it off slightly; this prevents chipping later. -
Cut and Dry:
Run a wire cutter underneath the pot to separate it. Carefully lift it off and set it aside until it reaches leather-hard consistency.
Uneven Glaze Line?
If the line between the two glazes is too messy, use a steady hand and a damp sponge to wipe a clean horizon line before the second dip dries completely.
Step 2: Creating the Saucer
-
Throw the Saucer:
With a smaller lump of clay (about 0.5 lbs), center and flatten it into a wide disk. Turn up the edges slightly to create a low rim, ensuring the saucer’s diameter is about 0.5 inches wider than your pot. -
Smooth the Surface:
Running a smooth rib over the interior of the saucer is something I always do to make cleaning easier later. Cut it from the wheel and let it dry to leather-hard.
Try Texture
Before the clay dries, press a piece of coarse linen or burlap against the exterior wall to give the cream glaze a subtle fabric texture.
Step 3: Trimming & Bisque
-
Trim the Planter:
Once leather-hard, center the pot upside down on the wheel. Trim away excess weight from the bottom and carve a neat foot ring. Don’t forget to add a drainage hole in the center. -
Trim the Saucer:
Trim the saucer’s underside to have a clean, flat bottom or a very shallow foot ring. -
Bisque Fire:
Allow both pieces to dry completely until they are bone dry. Fire them in a bisque kiln (usually Cone 04 or 06) to prepare them for glazing.
Step 4: Glazing the Design
-
Wax the Bottoms:
Apply wax resist to the foot ring of the planter and the entire underside of the saucer to prevent glaze from fusing them to the kiln shelf. -
Dip the Interior:
Pour the Speckled Cream glaze into the interior of the pot, swirl it quickly to coat, and pour it out. Wipe any drips off the rim. -
First Exterior Dip:
Hold the pot by the foot and dip the entire exterior into the Speckled Cream glaze. Shake gently to remove excess and let it dry until it’s powdery to the touch. -
The Second Dip:
This is the crucial aesthetic step: hold the pot upside down and dip just the bottom third (the rim, now facing down) into the Amber glaze. Wait… actually, hold it right-side up and dip the *bottom* third into the Amber glaze to achieve the look in the photo. -
Glaze the Saucer:
For the saucer shown, you can choose to either glaze it entirely in the Amber color or leave the raw clay exposed on the outside for a matte texture, glazing only the interior for water resistance. -
Clean Up:
Use a damp sponge to wipe back any glaze that may have run onto the foot ring or waxed areas. The line between the cream and amber glazes naturally blurs slightly during firing. -
Glaze Fire:
Fire the pieces to the maturity temperature of your clay and glazes (typically Cone 5 or 6 for stoneware). Let the kiln cool completely before opening.
Once cooled, pot your favorite succulent and enjoy the beautiful contrast of your handmade vessel


What Really Happens Inside the Kiln
Learn how time and temperature work together inside the kiln to transform clay into durable ceramic.
Easy Soap Dish With Drain Holes
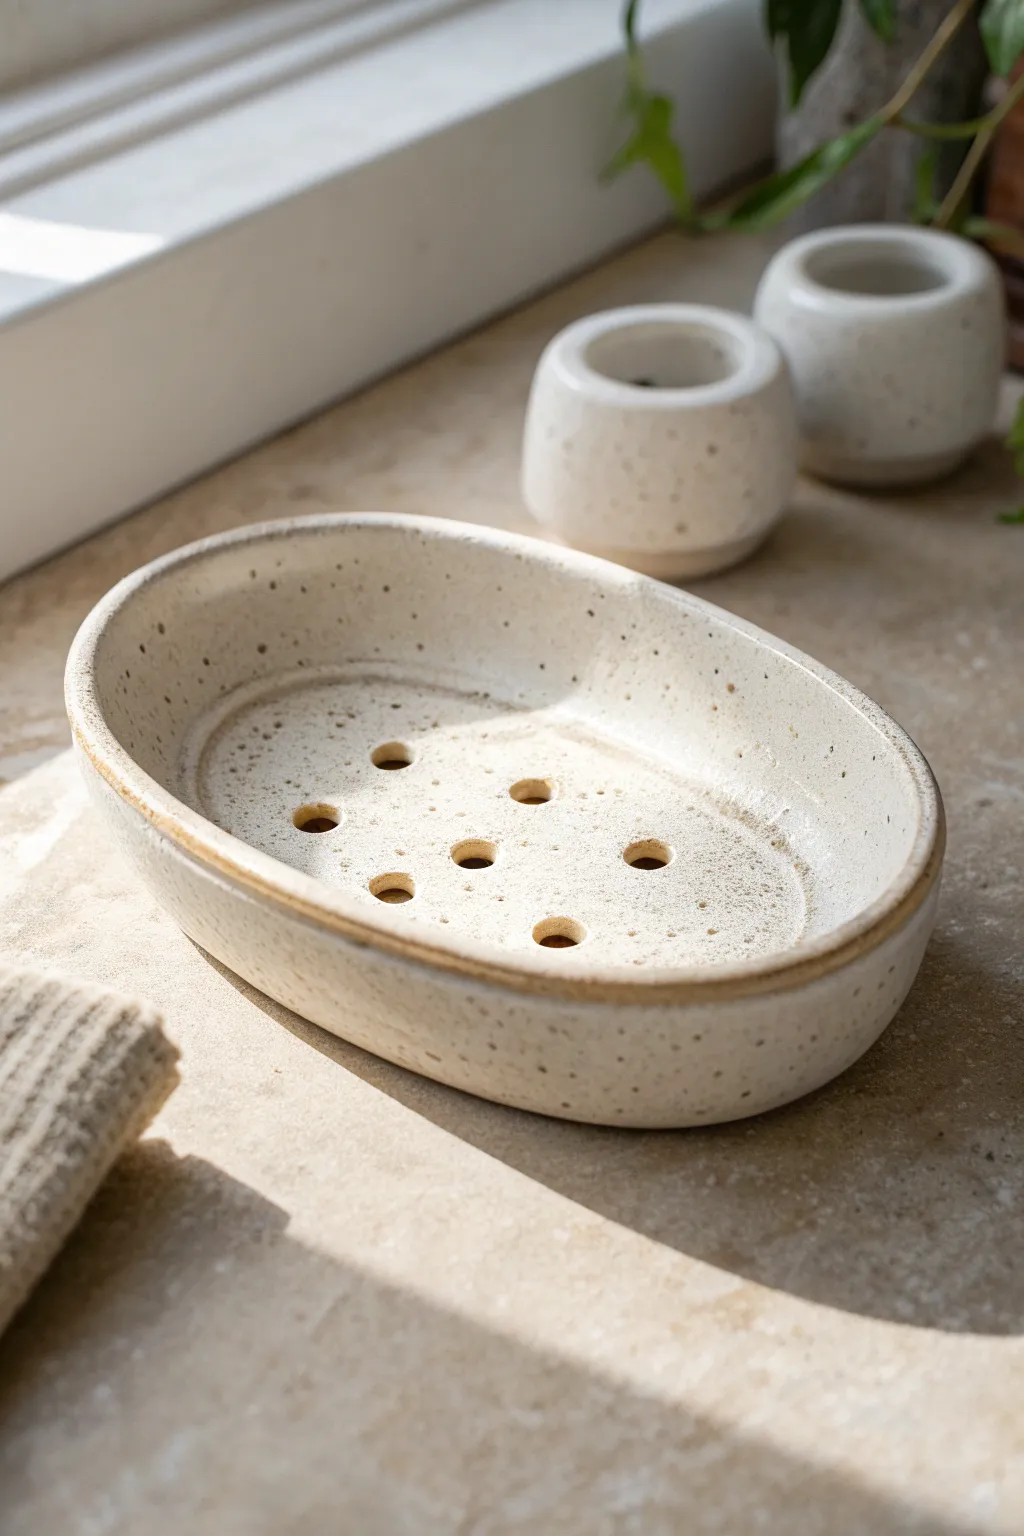
This charming, organically shaped soap dish features a classic oval silhouette with practical drainage holes to keep your soap dry. The speckled cream glaze finish gives it a warm, rustic modern feel that adds instant texture to any bathroom countertop.
Detailed Instructions
Materials
- White stoneware clay (preferably with grog/speckles)
- Rolling pin
- Wooden guide strips (approx. 1/4 inch thick)
- Oval paper template or cookie cutter
- Needle tool
- Fettling knife
- Small circular clay punch or straw
- Pottery sponge
- Rib tool (rubber or wood)
- Speckled cream or oatmeal glaze
- Kiln
Step 1: Prepping the Slab
-
Wedge the Clay:
Begin by thoroughly wedging a ball of white stoneware clay. This removes air bubbles and ensures the clay particles are aligned for easier rolling. -
Set Up Guides:
Place your wooden guide strips on either side of your canvas work surface. These will help you roll a perfectly even slab. -
Roll the Slab:
Working from the center outward, roll the clay between the guides until the rolling pin rests flat on the wooden strips, creating a uniform thickness of about 1/4 inch. -
Compress the Surface:
Use a rubber rib to smooth and compress the surface of the slab. I like to do this in multiple directions to prevent warping later during the firing process.
Rim Aesthetic Tip
When glazing, wipe the very edge of the rim slightly with a sponge. This thins the glaze there, allowing the warm clay body color to peek through and highlight the oval shape.
Step 2: Forming the Shape
-
Cut the Base:
Place your oval template onto the slab. Using a needle tool held vertically, trace around the template to cut out the base shape. -
Prepare the Wall Strip:
From the remaining slab, cut a long strip of clay approximately 1 to 1.5 inches wide. This will become the raised wall of the dish. -
Score the Edges:
Take a serrated rib or needle tool and rough up (score) the outer perimeter of the oval base and one long edge of your wall strip. -
Apply Slip:
Dab a small amount of water or vinegar slip onto the scored areas to act as glue. -
Attach the Wall:
Carefully place the strip onto the edge of the base, pressing it down firmly. Ensure the seam where the two ends of the wall meet is cut at a bevel for a stronger connection. -
Blend the Seams:
Using a wooden modeling tool or your finger, blend the clay from the wall down into the base on both the inside and outside to create a seamless transition.
Add Raised Feet
Attach 3 or 4 small balls of clay to the underside as ‘feet’ before drying. This lifts the dish off the counter, improving air circulation and drainage efficiency.
Step 3: Refining and Detail
-
Shape the Curve:
Gently flare the walls outward slightly with your fingers to create that soft, open curve seen in the photo. -
Smooth the Rim:
Take a damp sponge and run it over the top rim to round off any sharp edges. This is crucial for a comfortable feel and a professional look. -
Add Drainage Holes:
Using a small hole punch tool or a straw, punch a pattern of 6-7 holes in the center of the dish. I prefer a staggered pattern to ensure water drains from all areas. -
Clean Up Holes:
Once the clay stiffens slightly to leather hard, go back and clean up any little burrs of clay around the drainage holes with a semi-dry sponge. -
Dry Slowly:
Cover the dish loosely with plastic and allow it to dry slowly to the bone-dry stage. This prevents the base from curling up.
Step 4: Glazing and Firing
-
Bisque Fire:
Fire the piece in the kiln to cone 04 (or your clay body’s bisque temperature). -
Wax the Bottom:
Apply wax resist to the bottom foot of the dish to prevent glaze from sticking to your kiln shelf. -
Dip in Glaze:
Dip the entire piece into a speckled cream or oatmeal glaze. Hold it for 3-4 seconds to get good coverage, then shake gently to remove excess drips. -
Check Holes:
Before the glaze dries completely, check that the drainage holes aren’t clogged. If they are, clear them gently with a needle tool. -
Glaze Fire:
Fire the piece again to the final temperature recommended for your specific glaze and clay body (usually cone 5 or 6 for stoneware).
Place your finished dish by the sink and enjoy the custom touch it adds to your daily routine
Tea Light Holder With Cutouts
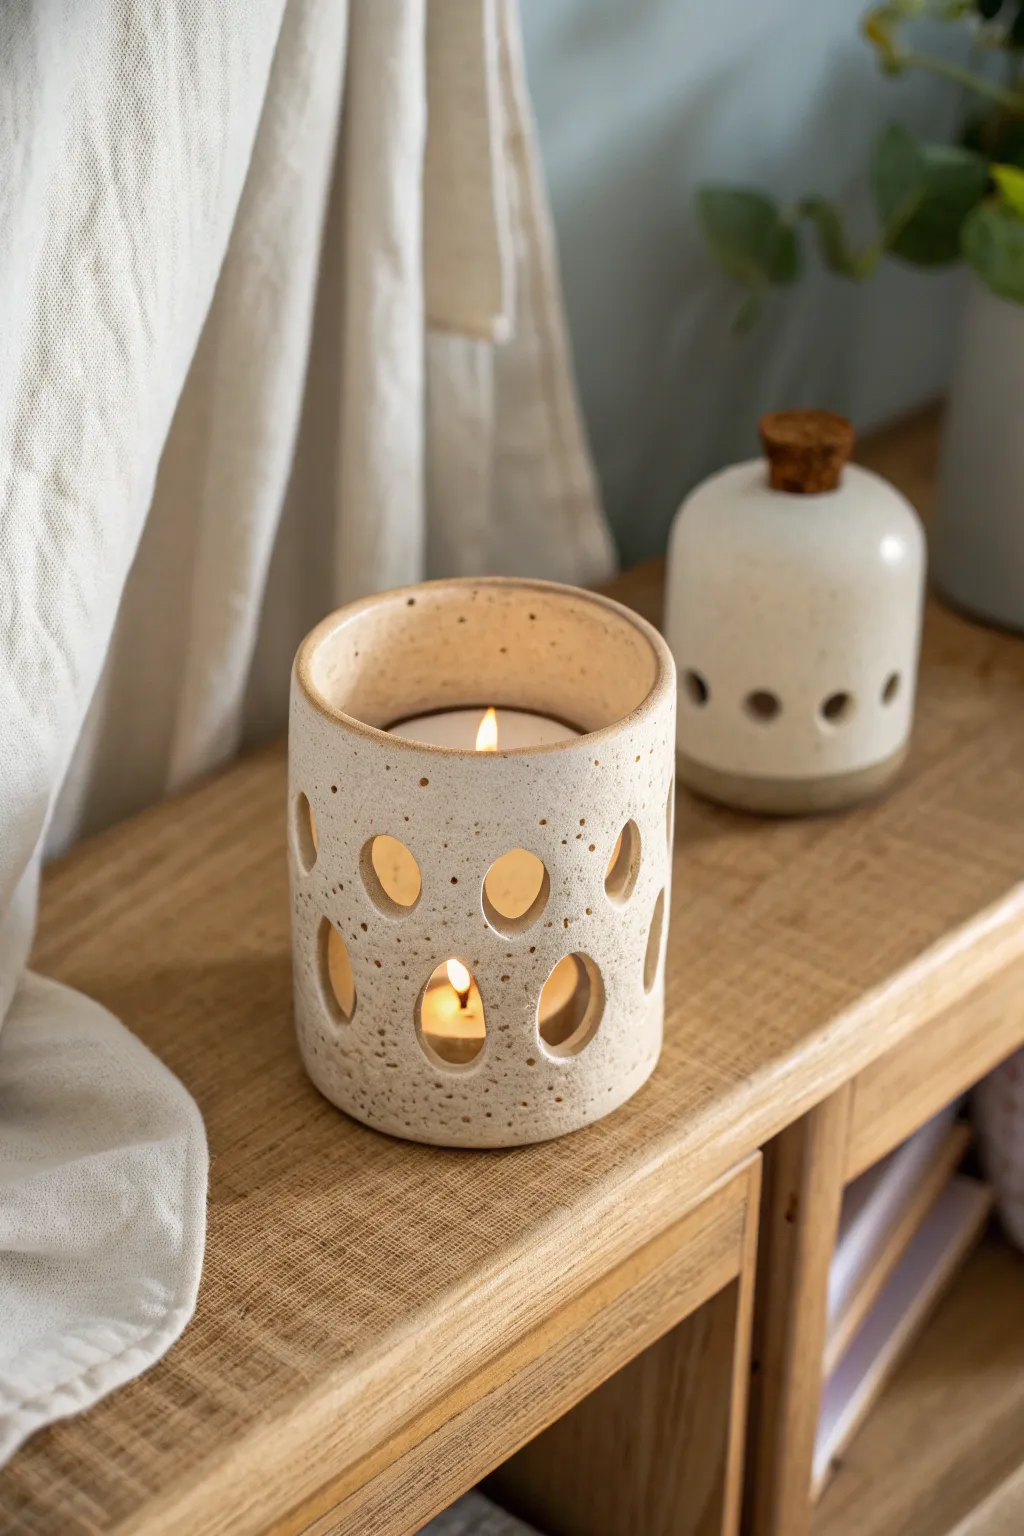
This rustic, speckled tealight holder features organic oval cutouts that cast a warm, dancing pattern of light when a candle burns inside. Its simple cylindrical form and textural stoneware finish make it a perfect beginner project to practice slab building and subtractive design.
Step-by-Step Tutorial
Materials
- Speckled stoneware clay (approx. 1 lb)
- Rolling pin
- Canvas mat or wooden board
- Fettling knife or needle tool
- Ruler
- Cylindrical form for measuring (like a soda can or PVC pipe)
- Slip (clay scraps mixed with water)
- Scoring tool (or serrated kidney)
- Small oval cookie cutter (optional)
- X-acto knife
- Sponge
- Clear matte glaze
Step 1: Preparing the Slab
-
Wedge the clay:
Begin by thoroughly wedging your speckled stoneware clay to remove any air pockets and ensure an even consistency. A well-wedged ball of clay is crucial for preventing cracks during firing. -
Roll out the slab:
Place the clay on your canvas mat. Using a rolling pin, roll the clay out into a long rectangular slab. Aim for an even thickness of about 1/4 inch throughout the piece. -
Measure and cut:
Using a ruler and your fettling knife, cut a clean rectangle. For a standard tealight holder, a rectangle approximately 10 inches long and 4-5 inches tall works well, but you can adjust based on your desired circumference. -
Create the base:
From the remaining slab scraps, cut a circle that matches the diameter of the cylinder you are about to form. You can trace around your cylindrical form or use a circular cookie cutter to get this perfect.
Step 2: Assembling the Cylinder
-
Bevel the edges:
On the short ends of your rectangle, cut the edges at a 45-degree angle. One end should be beveled inward and the other outward, creating an overlapping joint that fits together seamlessly. -
Score and slip:
Rough up the beveled edges and the outer edge of your circular base using a scoring tool. Apply a generous amount of slip to these scored areas to act as glue. -
Form the wall:
Gently curve the rectangular slab into a cylinder. Press the scored beveled ends together firmly. Supports the wall from the inside with one hand while pressing from the outside to seal the seam. -
Attach the base:
Place the cylinder onto the scored circular base. Use a modeling tool or your finger to smooth the clay from the wall down onto the base, ensuring a tight bond all the way around. -
Smooth the seams:
Take a slightly damp sponge or a soft rib tool and smooth over the vertical seam and the bottom connection point until they are invisible. The cylinder should look like one continuous piece of clay.
Slumping Walls?
If your cylinder walls won’t stand up, the clay is too wet. Let the slab stiffen on the canvas for 20-30 minutes before assembling. It should hold its shape but not crack when bent.
Step 3: Designing the Cutouts
-
Plan the pattern:
Before cutting, you might want to lightly sketch your oval shapes onto the clay surface with a needle tool. I find a staggered pattern—like brickwork—looks particularly nice with these organic shapes. -
Make the cuts:
When the clay is slightly leather-hard (stiff but still cool to the touch), use an X-acto knife or a small oval cutter to remove the clay pieces. If using a knife, aim for ovals about 1 inch wide. -
Bevel the cutouts:
After removing the clay ovals, use a damp sponge or your finger to gently round off the sharp edges of each hole. This gives the piece a professional, finished look rather than a sharp, raw edge. -
Clean up interior:
Check the inside of the cylinder for any burrs or rough bits of clay pushed through during cutting. Smooth these away carefully so the interior is just as neat as the exterior.
Make it a Set
Create a matching diffuser bottle (seen in the background) by narrowing the top of a taller cylinder and adding a cork stopper. Use the same cutouts near the base for airflow.
Step 4: Firing and Glazing
-
Dry slowly:
Loosely cover your piece with plastic and let it dry slowly over a few days. Uneven drying can warp the cylinder, turning your circle into an oval. -
Bisque fire:
Once bone dry, fire the piece in a kiln to bisque temperature (usually cone 04). This sets the shape and prepares it for glazing. -
Apply glaze:
Dip the piece into a clear matte glaze, or brush on three even coats. The clear glaze allows the natural iron speckles of the clay body to show through, creating that lovely spotted texture. -
Final wipe:
Use a damp sponge to wipe any glaze off the very bottom of the piece so it doesn’t fuse to the kiln shelf during the final firing. -
Glaze fire:
Fire the piece again to the maturity temperature of your clay (likely cone 5 or 6 for stoneware). Once cooled, your lantern is ready for a candle.
Light a tealight inside and enjoy the cozy atmosphere your handcrafted pottery brings to the room

TRACK YOUR CERAMIC JOURNEY
Capture glaze tests, firing details, and creative progress—all in one simple printable. Make your projects easier to repeat and improve.
Wavy-Rim Snack Plate
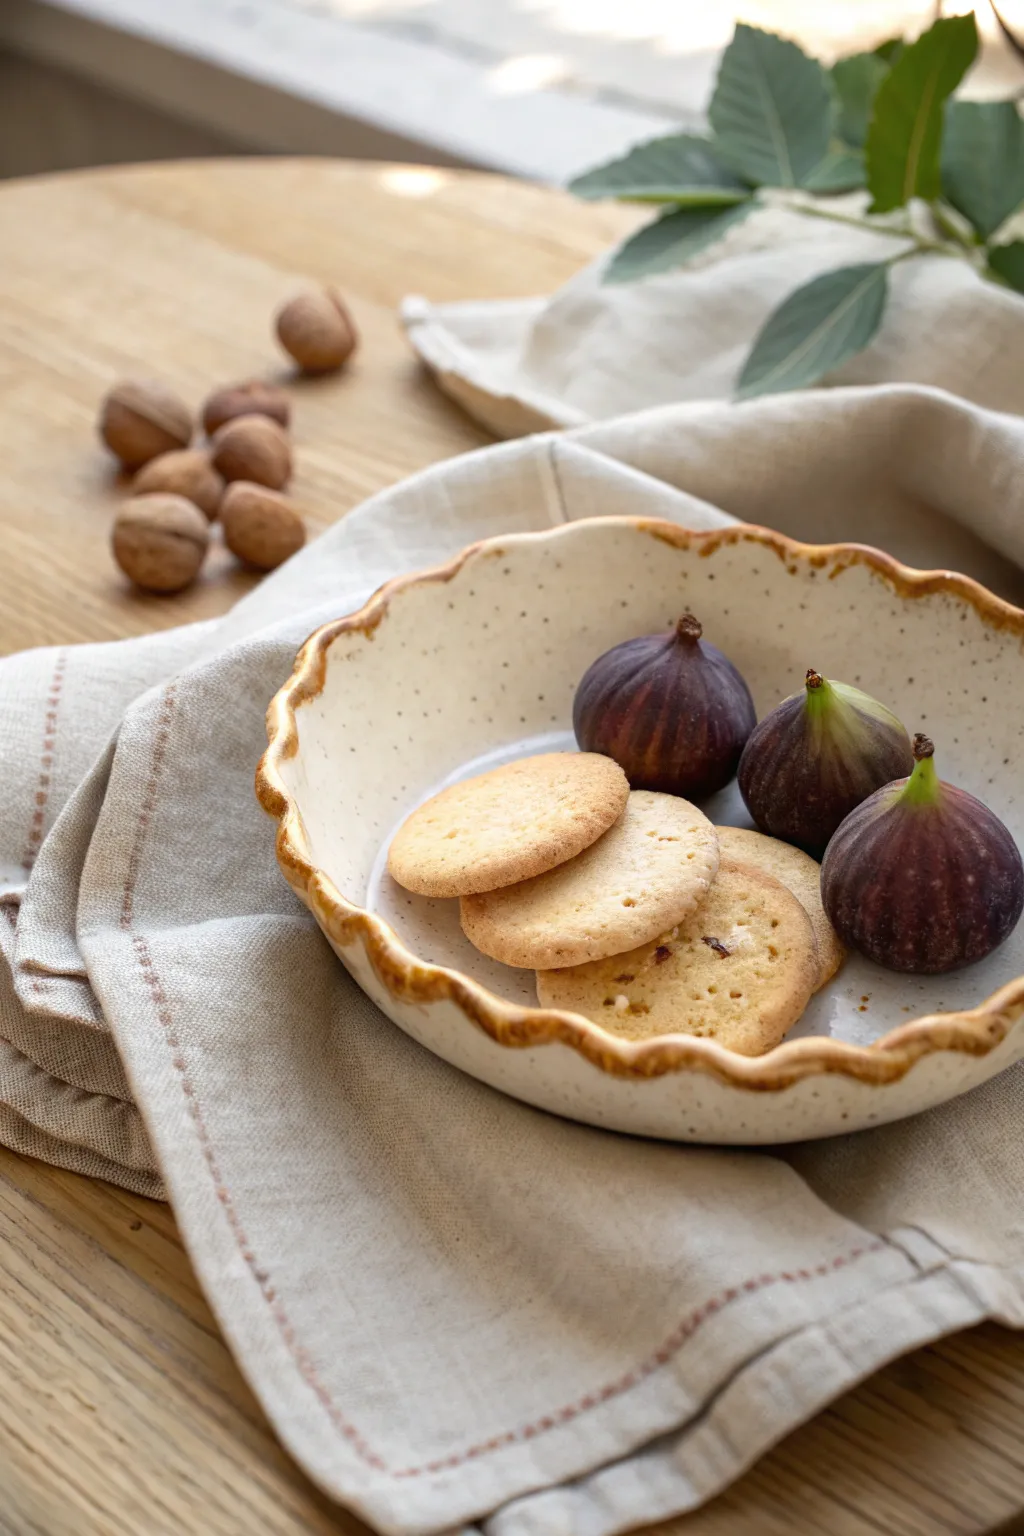
This charming, shallow bowl features a playfully undulating rim that frames your snacks like a picture. The creamy speckled glaze and warm brown edge highlight the handmade nature of the piece, making it a perfect beginner project.
Step-by-Step
Materials
- Speckled buff stoneware clay
- Rolling pin
- Guide sticks (approx. 1/4 inch thickness)
- Rib tool (smooth metal or rubber)
- Sponge
- Fettling knife or needle tool
- Circular template (around 8 inches) or a bowl to trace
- Small bowl or slump mold for shaping
- Cream matte glaze
- Iron oxide wash or dark brown underglaze
- Small paintbrush
Step 1: Forming the Slab
-
Prepare the Clay:
Begin by wedging a ball of speckled buff stoneware clay. Wedging removes air bubbles and ensures the clay has a consistent texture, which is crucial for slab building. -
Roll the Slab:
Place the clay on a canvas board between two guide sticks. Roll the clay out firmly until the rolling pin rests on the sticks, creating a perfectly even slab about 1/4 inch thick. -
Compress the Surface:
Take your rib tool and gently compress the clay slab. Drag the rib across the surface in overlapping strokes to align the clay particles, which helps prevent warping later. -
Cut the Circle:
Lay your circular template or an overturned bowl onto the slab. Using a needle tool or fettling knife, trace around the edge to cut out your base circle. -
Smooth the Edges:
Dip your sponge in water, wring it out well, and run it along the cut edge of the circle. This softens the sharp cut line and gives the rim a more finished look.
Uneven Waves?
If your waves look irregular, mark the rim lightly with a needle tool at 12, 3, 6, and 9 o’clock before pinching. Use these marks as anchors to space the undulations evenly.
Step 2: Shaping the Wave
-
Slump the Form:
Gently lift your clay circle and place it inside a shallow slump mold or a slightly larger bowl lined with paper or plastic. Allow the clay to take the curve of the mold. -
Create the Waves:
With the clay in the mold, use your thumb and forefinger to gently pinch the rim at regular intervals. Push down slightly with your index finger while supporting underneath with your thumb to create the undulations. -
Refine the Undulations:
Walk around the rim and adjust the waves. I like to use a damp sponge here to smooth out any fingerprints left from the pinching process, ensuring the curves look organic but tidy. -
Dry Slowly:
Let the bowl dry to a leather-hard state while still in the mold to maintain its shape. Once it can hold its form, remove it and cover it loosely with plastic to dry completely.
Step 3: Glazing and Finishing
-
Bisque Fire:
Fire the completely dry piece in a kiln to cone 04 (or your clay’s specific bisque temperature). This transforms the fragile clay into durable ceramic ready for glazing. -
Wax the Bottom:
Apply wax resist to the foot or bottom surface of the bowl. This prevents glaze from sticking to the bottom and ruining your kiln shelf. -
Apply Base Glaze:
Dip the bowl into a cream matte glaze. Hold it for about three seconds to get an even coat, then shake off the excess gently. If you don’t have a dip tank, brushing on three even coats works too. -
Highlight the Rim:
Once the base glaze is dry to the touch, use a small paintbrush to carefully apply iron oxide wash or a dark brown underglaze along the very edge of the wavy rim. -
Soften the Rim Edge:
The oxide should bleed slightly during firing for that rustic look, but ensure the line is relatively consistent in thickness as you follow the curves. -
Glaze Fire:
Load the piece into the kiln for the final glaze firing, typically to cone 5 or 6 depending on your clay and glaze specifications.
Enhance the Speckle
If using plain white clay instead of speckled buff, mix a small amount of granular ilmenite into your white glaze. It mimics the natural iron spots perfectly.
Now you have a beautiful, organic bowl ready to hold your favorite afternoon treats
Tiny Egg Cup
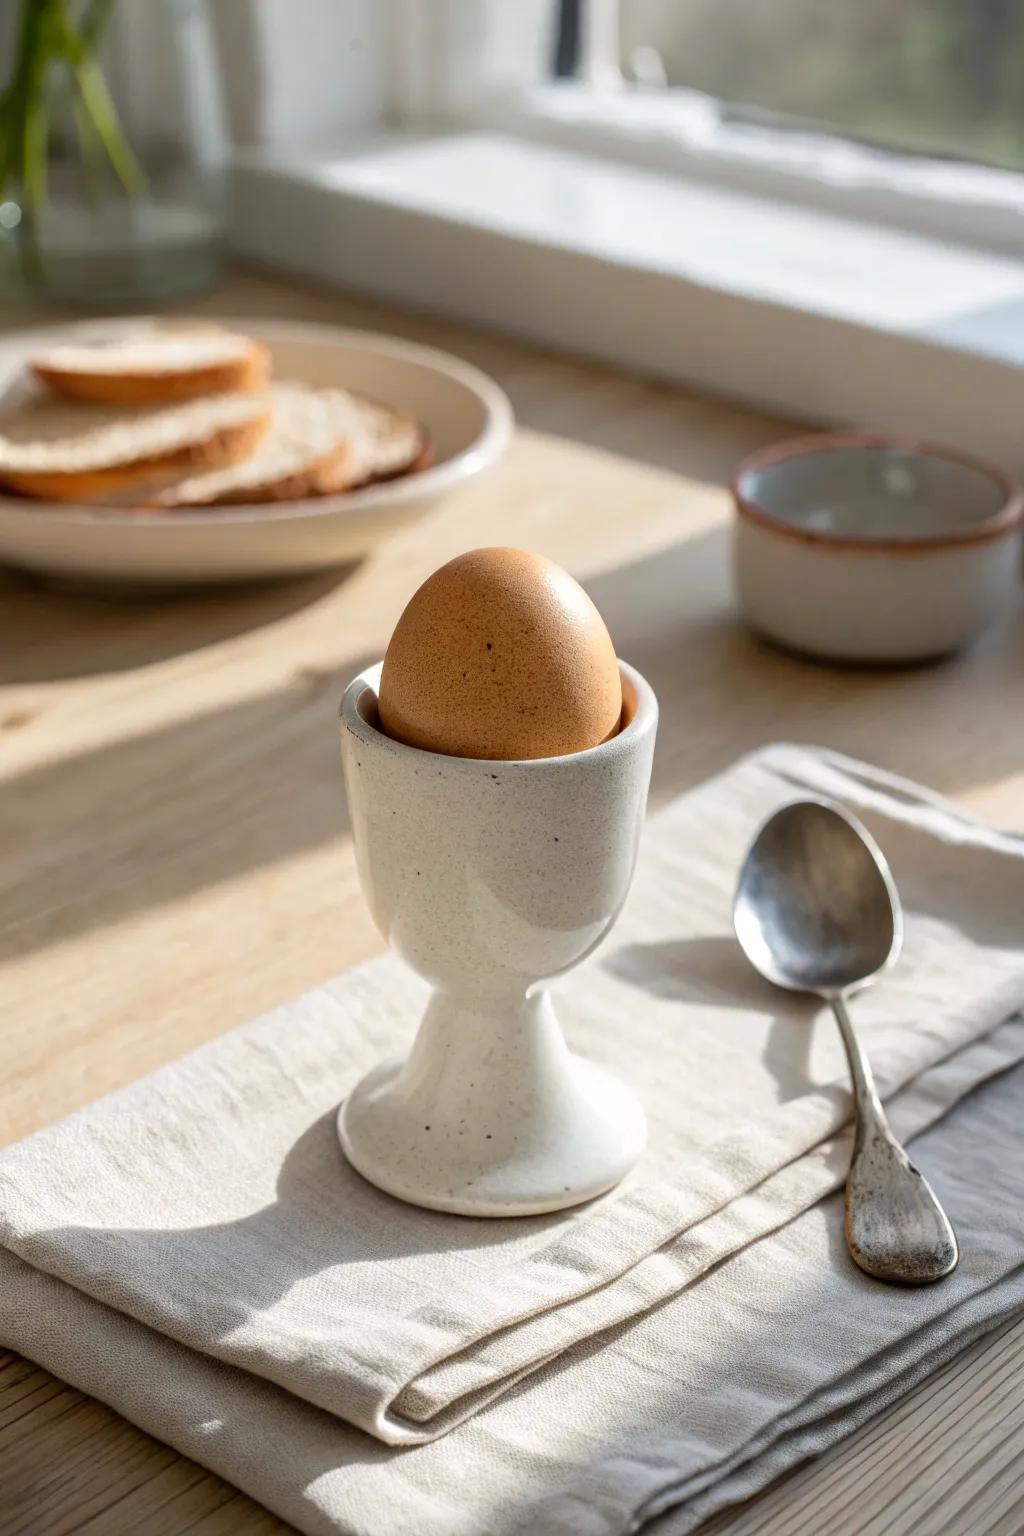
Elevate your Sunday breakfast with this elegant, goblet-style egg cup finished in a creamy speckled glaze. It features a gentle curve to cradle the egg, supported by a sturdy stem and flared foot, making it a perfect beginner project for mastering small forms.
Step-by-Step Tutorial
Materials
- Stoneware clay (smooth or fine grog)
- Pottery wheel (or can be hand-built using pinch/coil method)
- Sponge
- Pin tool
- Wire cutter
- Ribs (wooden and metal)
- Loop trimming tools
- Creamy white speckled glaze (cone 5/6)
- Kiln
Step 1: Throwing the Form
-
Center the clay:
Start with a small ball of clay, roughly the size of a tangerine (about 300g). Center it firmly on the wheel head, keeping your base relatively narrow since we are making a stemmed piece. -
Open the clay:
Create an opening in the center, but don’t go too deep yet. You need to leave a significant amount of clay at the bottom—at least an inch—to carve out the stem and foot later. -
Establish the cup shape:
Pull the walls up gently. You are aiming for a small bowl shape on top of a thick column of clay. The bowl section should be sized to hold a standard egg, so keep checking the diameter; about 1.75 inches across the rim is standard. -
Define the rim:
Compress the rim with a chamois or your sponge to make it smooth and rounded providing a comfortable resting place for the egg. -
Shape the exterior:
Using a wooden rib or your fingers, shape the exterior of the ‘cup’ part so it curves inwards slightly at the bottom, distinguishing it from the thick clay column beneath. -
Cut from the hump:
If you threw this ‘off the hump,’ use a needle tool or wire to cut the piece off, leaving plenty of extra clay at the base for the stem. If thrown directly on the bat, wire it off and set it aside to reach leather-hard consistency.
Egg Sizing Woes
Is your cup too wide for the egg? Don’t panic. During the glazing phase, add an extra thick drip of glaze inside the rim to narrow the opening slightly.
Step 2: Trimming & Shaping
-
Center for trimming:
Once the clay is leather hard (firm but not dry), place the egg cup upside down on the wheel head. Secure it with small soft coils of clay (lugs). -
Rough out the stem:
Using a large loop tool, remove the excess clay from the bottom chunk to reveal the stem. I prefer to work gradually here, moving from the foot area up towards the cup. -
Refine the curve:
Switch to a smaller, sharper trimming tool. Create a smooth transition where the cup meets the stem. The stem should flare out gently at the bottom to form a stable foot. -
Define the foot ring:
Carve a shallow concave area underneath the base so the cup sits on a defined ring rather than a flat bottom. This ensures stability on the table. -
Smooth the surface:
Use a slightly damp sponge or a rubber rib to smooth out any trimming marks or grog that was dragged up during the carving process. You want a sleek, modern finish.
Double Dip Design
Dip the rim in a second, contrasting glaze color like oatmeal or bronze. The layers will interact in the kiln for a beautiful cascading effect.
Step 3: Glazing & Firing
-
Bisque fire:
Once bone dry, fire the piece to a bisque temperature (usually cone 04 or 06) to prepare it for glazing. -
Wax the foot:
Apply wax resist to the very bottom of the foot ring. This prevents glaze from sticking to the kiln shelf during the final firing. -
Dip the glaze:
Stir your creamy white speckled glaze thoroughly. Create a consistent coating by dipping the entire cup in a swift, fluid motion, holding it by the waxed foot. -
Clean the drip:
Immediately shake off the excess gently. Once the glaze is dry to the touch, use a sponge to wipe any stray droplets off the waxed foot ring. -
Final fire:
Fire the piece to the glaze’s recommended temperature (typically cone 5 or 6). Allow the kiln to cool completely before removing your new breakfast companion.
Enjoy the simple pleasure of using your handmade ceramics every morning
Set of Salt Pinch Bowls
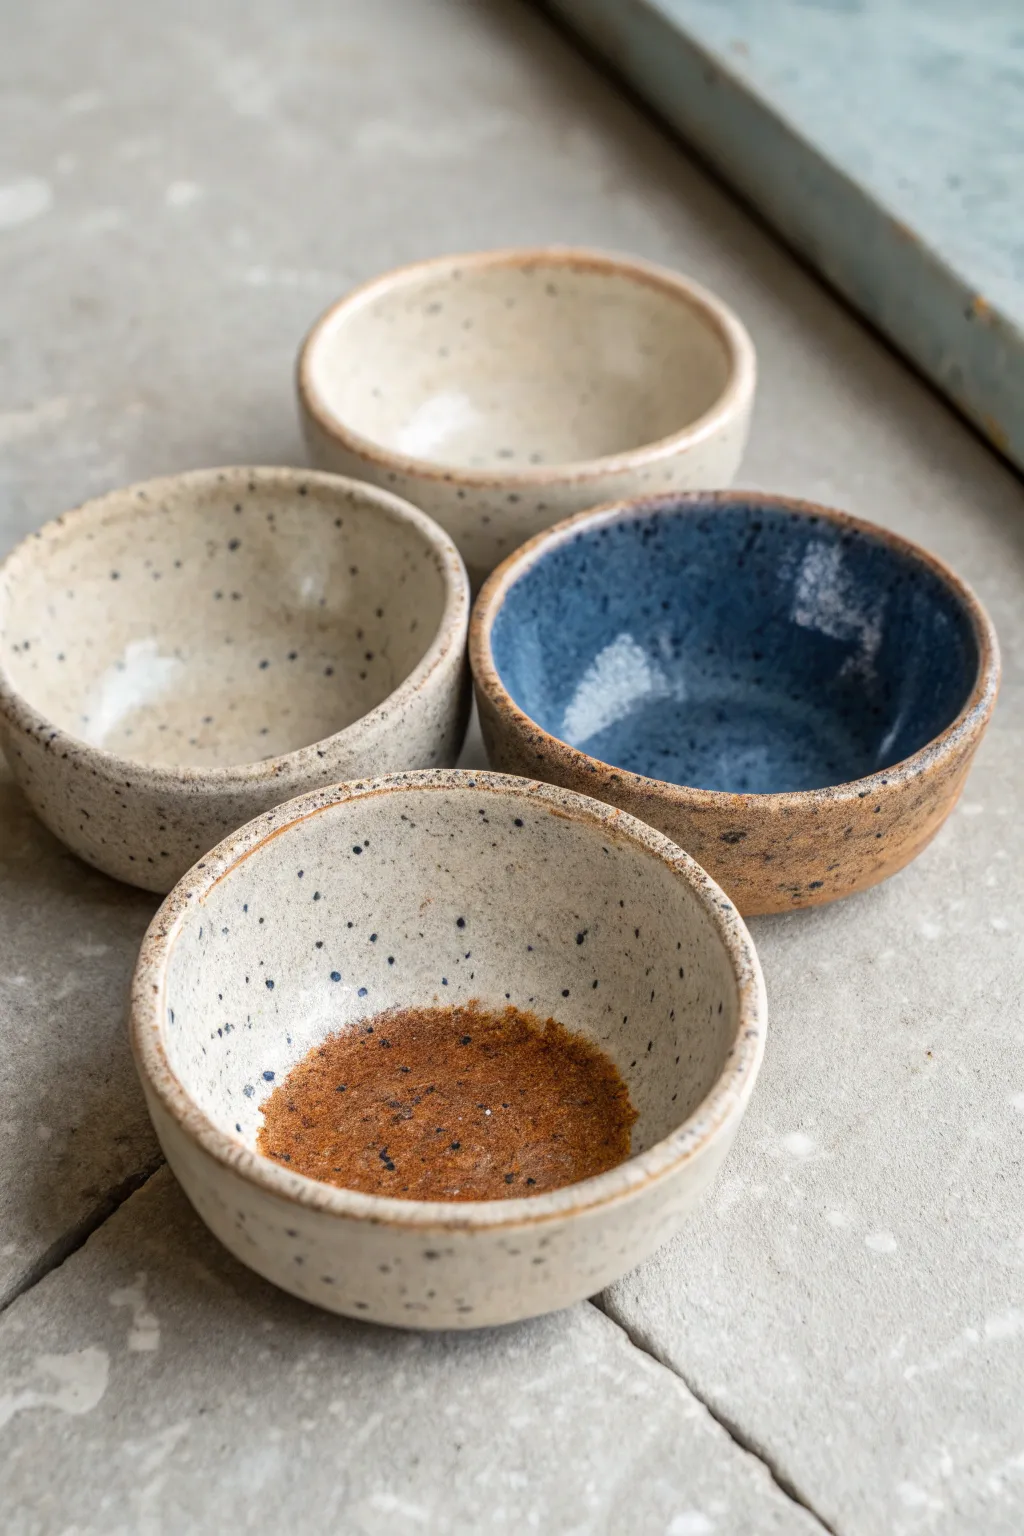
These charming, rustic bowls rely on the speckled nature of a specific clay body and simple glazing techniques to create a cohesive yet varied set. Their small size makes them an ideal first project for learning the pinch method, resulting in perfect vessels for salt, spices, or dipping sauces.
Step-by-Step
Materials
- Speckled Stoneware Clay (e.g., Laguna Speckled Buff)
- Pottery sponge
- Pin tool or needle tool
- Rib tool (wooden or rubber)
- Clear Glaze (high gloss)
- Blue Glaze (e.g., a floating blue or rich cobalt)
- Brown Glaze (iron-rich)
- Kiln
- Wire cutter
- Small basin of water
Step 1: Forming the Pinch Pots
-
Prepare the clay:
Start by wedging your speckled clay well to remove air bubbles. Cut off a chunk and divide it into four equal pieces, each roughly the size of a golf ball or a large lime. -
Shape the balls:
Roll each piece between your palms to create a smooth, round sphere. The smoother the ball is now, the more even your rim will be later. -
Start the opening:
Hold a clay ball in your non-dominant hand. With your dominant thumb, press gently into the center of the ball. Push down until you are about a quarter-inch from the bottom, being careful not to push all the way through. -
Pinch the walls:
With your thumb still inside and your fingers supporting the outside, begin to gently pinch and rotate the clay. Work your way from the bottom up to the rim in a spiral motion. -
Refine the thickness:
Aim for an even thickness of about 1/4 inch throughout the wall. I find it helpful to close my eyes for a moment here to feel thick or thin spots rather than just looking. -
Smooth the shape:
Once the basic bowl shape is formed, dampen your sponge slightly and wipe the rim and walls to smooth out any fingerprints or cracks. -
Flatten the bottom:
Gently tap the bowl on your table surface to create a small, flat foot. This ensures the bowl sits stably without needing to trim a foot ring later. -
Repeat the process:
Repeat these steps for the remaining three balls of clay. Don’t worry about making them identical twins; they should look like sisters with slightly distinct personalities.
Step 2: Drying and Bisque Firing
-
Slow drying:
Cover the bowls loosely with plastic and let them dry slowly to the leather-hard stage, then uncover to let them become bone dry. This usually takes 2-4 days depending on humidity. -
Check for sharp edges:
Before firing, run your finger lightly over the rim. If there are any sharp burrs, smooth them away gently with a scouring pad or your finger. -
Bisque fire:
Load the bone-dry greenware into the kiln and fire to Bisque temperature (usually Cone 04). This hardens the clay and prepares it for glazing.
Cracked Rims?
If the rim splits while pinching, your clay might be too dry. Dip your fingers in water (don’t soak the clay) or compress the rim downward with your thumb to heal the split.
Step 3: Glazing
-
Clean the bisque:
Wipe each bisqued bowl with a damp sponge to remove any dust, which can prevent glaze from adhering properly. -
Glaze the interiors:
For two of the bowls, pour a clear glaze inside, swirl it to coat the entire inner surface, and pour out the excess. This allows the natural speckles of the clay to shine through. -
Apply the blue interior:
For the third bowl, pour a rich blue glaze into the interior, coat evenly, and pour out the excess. -
Apply the brown interior:
For the fourth bowl, use an iron-rich brown glaze on the inside. You can achieve the look in the photo by applying a thinner coat or by brushing it on to let the clay texture show through the dark color. -
Glaze the exteriors:
To recreate the look in the image, leave the exteriors of the clear-interior bowls unglazed (raw clay). For the blue and brown bowls, brush a clear coat on the exterior to deepen the sandy color, or leave them raw for a matte finish. -
Wipe the bottoms:
Using a clean, damp sponge, meticulously wipe any glaze off the bottom foot of every bowl. Glaze on the bottom will fuse your pot to the kiln shelf. -
Glaze fire:
Fire the bowls again, this time to the maturity temperature of your clay body (likely Cone 5 or 6). This final firing melts the glaze and vitrifies the clay.
Pro Tip: The Spear
Make sure your clay body specifically says ‘Speckled’ on the label. Standard buff clay won’t develop those lovely dark spots (pyrite) that push through the glaze.
Once cooled, fill your new set with various salts and spices to see how beautiful they look in use
Textured Ceramic Coasters
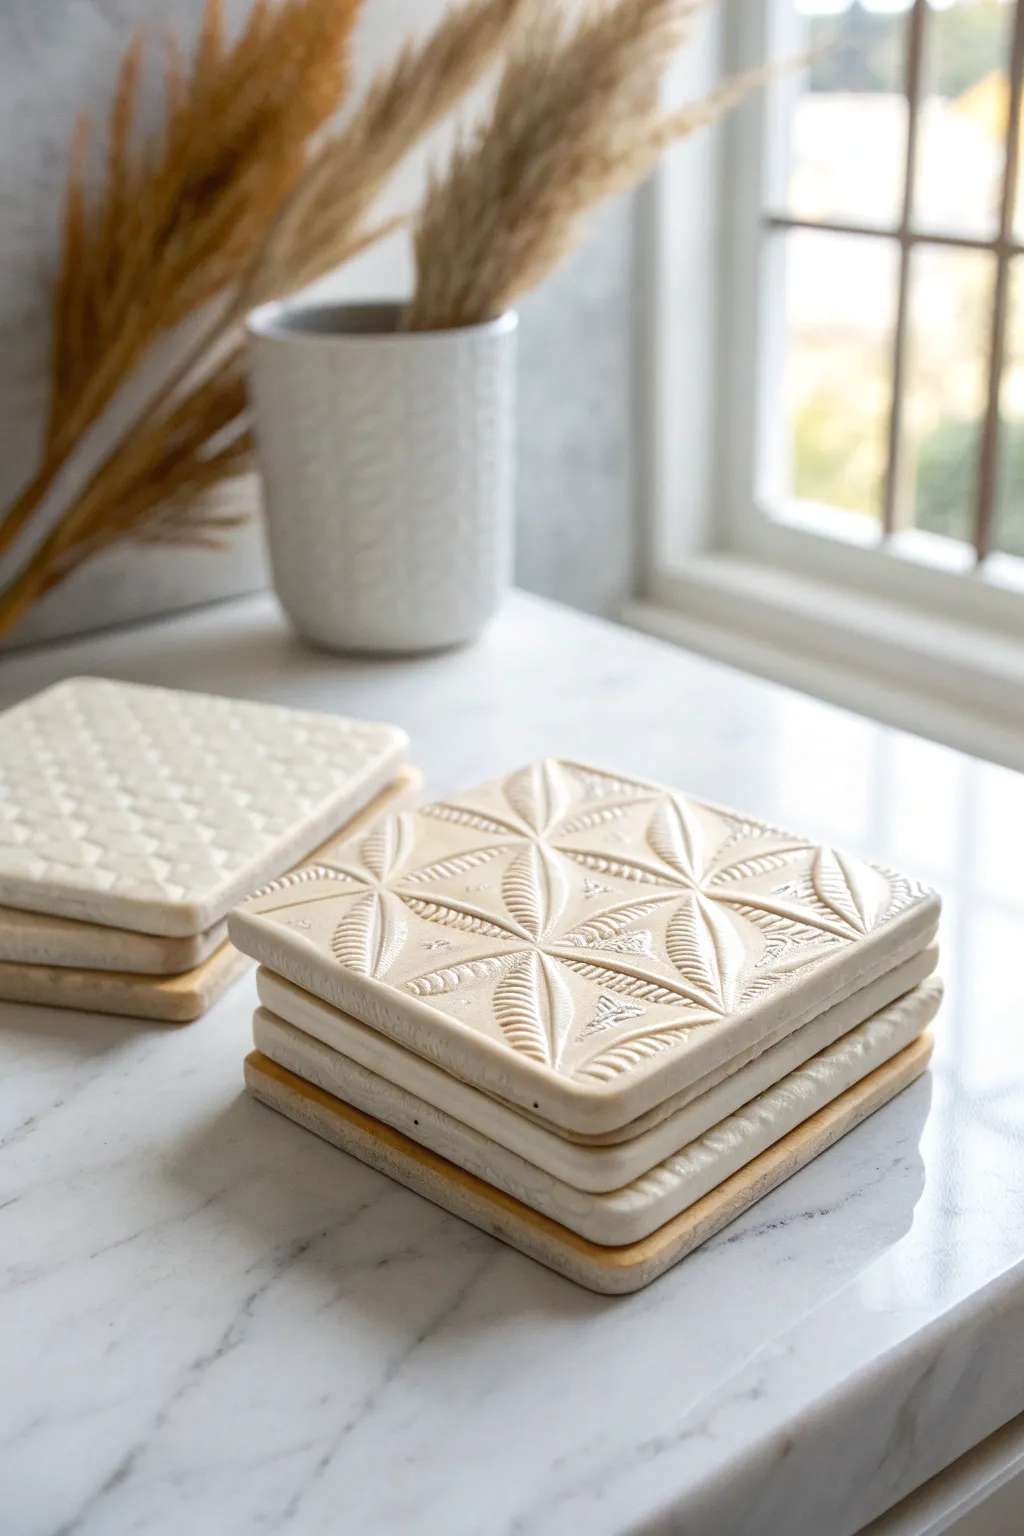
These elegant coasters combine the natural, organic look of untreated ceramic with sophisticated geometric patterns. With their soft, embossed surfaces and durable design, they bring a touch of artisanal charm to your coffee table while protecting your surfaces.
Step-by-Step Tutorial
Materials
- White stoneware or porcelain clay body (low-grog for smoother texture)
- Rolling pin
- Two wooden guide slats (approx. 5-7mm thick) or a slab roller
- Square cookie cutter (approx. 4 inches) or a knife and ruler
- Deep-texture wooden stamps or geometric texture mats
- Cornstarch (for dusting)
- Fettling knife
- Smoothing sponge
- Cork backing sheets or adhesive felt pads
- Clear matte glaze (optional)
- Kiln access
Step 1: Preparing the Slab
-
Wedge the Clay:
Begin by thoroughly wedging your white stoneware clay to remove any air bubbles. This is crucial for flat pieces like coasters, as trapped air can cause warping or explosions in the kiln. -
Set Up Guides:
Place your wooden guide slats on either side of your clay ball on a canvas-covered work surface. These will ensure your slab is a perfectly even thickness. -
Roll Out the Slab:
Use your rolling pin to flatten the clay, rolling back and forth until the pin rests on the guide slats. Flip the clay occasionally to prevent it from sticking to the canvas. -
Smooth the Surface:
Take a damp rib tool or a lightly moist sponge and compress the surface of the slab. This removes the canvas texture and prepares a pristine canvas for your stamping.
Warp-Free Drying
Flat objects love to curl up. Dry your coasters sandwiched between two porous boards (like drywall) to keep them perfectly flat as moisture evaporates.
Step 2: Texturing and Cutting
-
Dust the Tools:
Lightly dust your geometric texture mat or wooden stamp with a pinch of cornstarch. This acts as a resist so the tool doesn’t pull the clay up when you remove it. -
Apply the Texture:
Press the stamp firmly and evenly into the clay slab. I like to stand up for this part to use my body weight for a deeper, more consistent impression. -
Check the Impression:
Carefully peel back one corner of the stamp or mat to ensure the design is crisp before removing it completely. If it’s too shallow, realign carefully and press again. -
Cut the Shapes:
Position your square cutter over the textured area. Press down swiftly and cleanly to cut the coaster shape. If using a knife, use a ruler to cut 4×4 inch squares. -
Release the Clay:
Gently wiggle the cutter to release the square, or lift the surrounding scrap clay away first to make moving the coaster easier.
Two-Tone Effect
Before the final firing, rub a dark iron oxide wash into the textured grooves and sponge off the high points to make the geometric pattern pop.
Step 3: Refining and Firing
-
Clean the Edges:
Once the clay has stiffened slightly to a leather-hard state, gently rub the edges with a finger or a slightly damp sponge to remove any sharp burrs left by the cutter. -
Dry Slowly:
Place the coasters on a ware board. To prevent warping—the enemy of flat coasters—place a sheet of drywall or a weighted board on top of them while they dry. -
Bisque Fire:
Once bone dry, load the coasters into the kiln for a bisque fire (usually Cone 04). Stack them carefully if needed, but flat is best. -
Glazing (Optional):
For the look in the photo, you can leave the clay raw or apply a very thin coat of clear matte glaze. Wipe the glaze back with a sponge so it stays only in the deep crevices, highlighting the pattern. -
Glaze Fire:
Fire the pieces again to the maturity temperature of your specific clay body (often Cone 5 or 6 for stoneware). -
Sand the Base:
After the final firing, briefly sand the bottom of the coaster with high-grit sandpaper to ensure it won’t scratch any tables. -
Add Backing:
Cut a square of adhesive cork backing or apply felt pads to the underside of the coaster. This adds a professional finish and protects distinct surfaces.
Now you have a stunning set of custom textured coasters ready to gift or keep for your own home
Pressed Nature Imprint Tiles
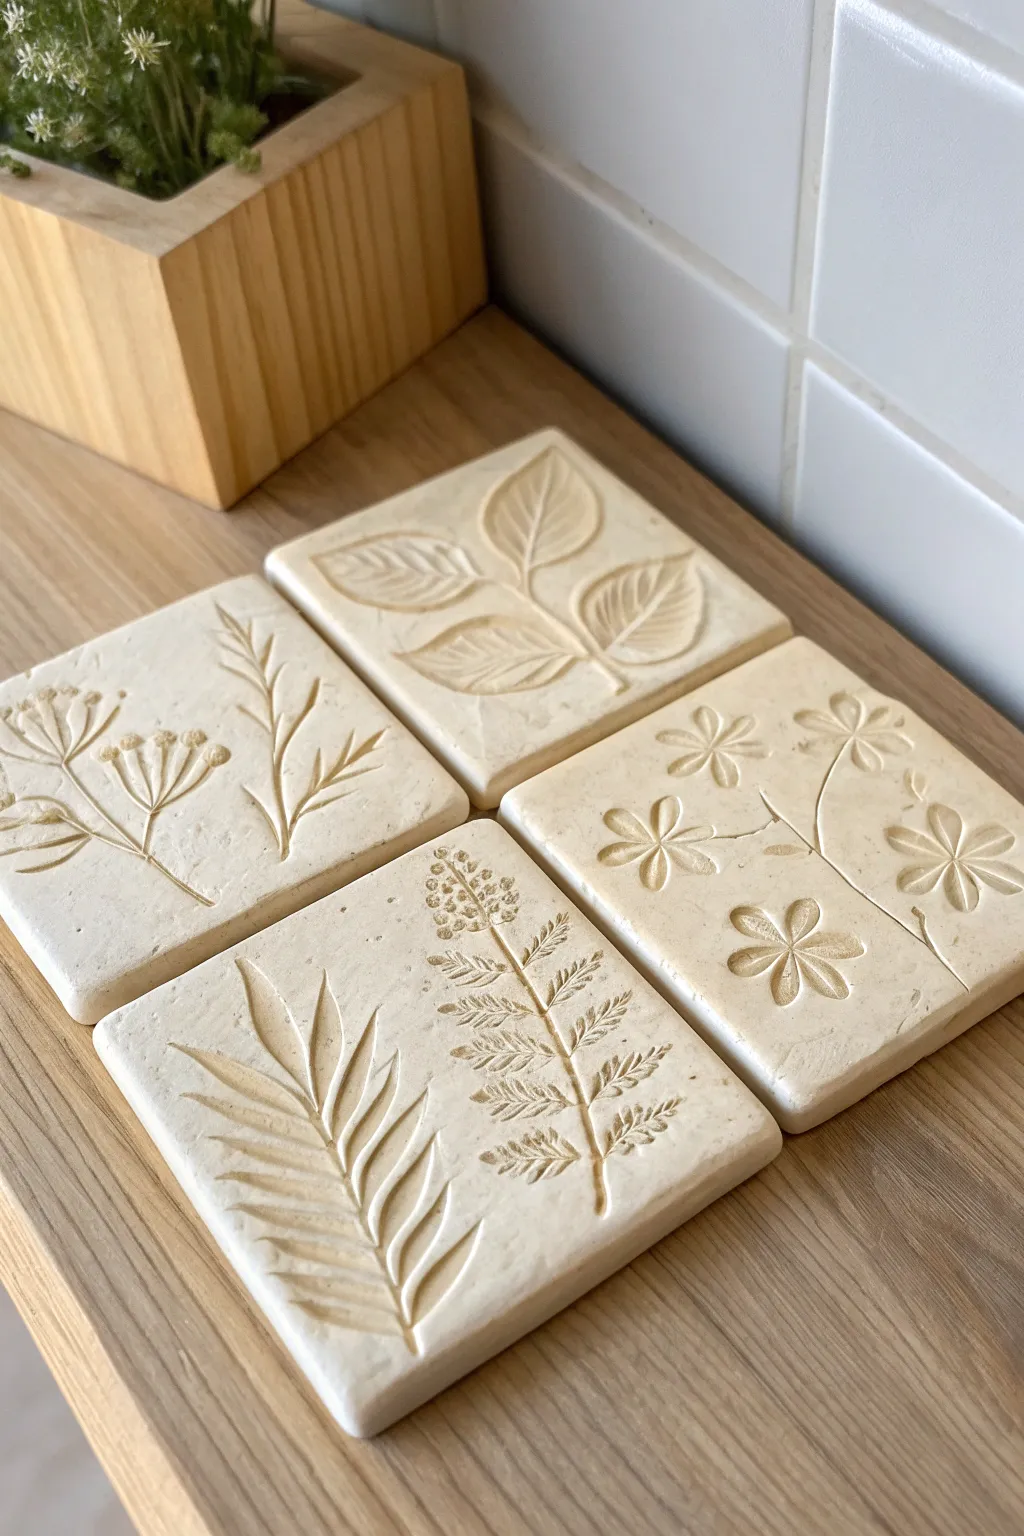
These elegant, creamy-white tiles capture the delicate veins and organic shapes of nature permanently in clay. By pressing real leaves and flowers into soft slabs, you create subtle, fossil-like reliefs that work beautifully as decorative coasters or wall art.
Step-by-Step Guide
Materials
- White stoneware clay or high-quality air-dry clay
- Rolling pin
- Two wooden guide strips (approx. 0.5 cm thick)
- Canvas mat or heavy cloth (to prevent sticking)
- Fresh or flexible dried leaves, ferns, and wildflowers
- Fettling knife or clay cutter
- Square cookie cutter (approx. 10x10cm) or a cardstock template
- Small sponge
- Sandpaper (fine grit)
- Clear matte acrylic sealer (for air-dry) or transparent glaze (for kiln fire)
Step 1: Preparation & Rolling
-
Original Plant Selection:
Gather your botanical materials. Look for plants with strong, distinct veins and sturdy stems. Ferns, sage leaves, and small wildflowers with defined petals work best. If using fresh cuttings, let them wilt slightly for an hour so they don’t crack when pressed. -
Prepare the Workspace:
Lay down your canvas mat on a flat surface. This texture will impress onto the back of your coasters, preventing them from sliding around on tables later. -
Roll the Slab:
Take a handful of clay and knead it briefly to remove air bubbles. Place it between your two wooden guide strips on the canvas. These strips ensure your slab is perfectly even—typically about 0.5 cm to 1 cm thick. -
Smooth the Surface:
Once rolled, use a damp sponge or a rubber rib tool to wipe the surface of the clay smooth. You want a pristine, blank canvas without canvas texture on the top side.
Step 2: Impressing Nature
-
Arrange the Botanicals:
Gently place your leaves and flowers onto the clay slab. Think about composition—you can center a single large leaf or create a pattern with two different stems like the wildflower tile in the example. -
The Initial Press:
Use your fingers to lightly tack the plants down so they don’t shift. This is just to hold them in place for the rolling pin. -
Deep Impression:
Take your rolling pin and roll firmly over the vegetation one single time. Do not roll back and forth, as this creates ‘ghost’ images. Apply enough pressure to embed the plant flush with the clay surface. -
Reveal the Details:
Carefully lift the edge of a stem using a needle tool or your fingernail. Slowly peel the plant matter away from the clay to reveal the crisp, negative imprint left behind.
Uneven Impressions?
If the leaf didn’t press deep enough, don’t re-roll. It ruins the detail. Instead, lay a piece of paper over the leaf and rub firmly with the back of a spoon to deepen specific areas.
Step 3: Cutting & Refining
-
Cut the Tiles:
Place your square cutter or template over the imprinted design. Frame the botanical image exactly how you want it, then press the cutter down firmly to slice through the clay. -
Clean the Edges:
Remove the excess clay from around the square. I find that running a slightly damp finger along the cut edges now saves a lot of sanding time later. -
Check for Flatness:
Carefully transfer the tiles to a drying board. If any corners have curled up during lifting, gently tap them back down so the coaster sits flat. -
Slow Drying:
Cover the tiles loosely with a plastic sheet to let them dry slowly. This prevents warping, which is crucial for coasters. Let them dry for 24-48 hours until bone dry.
Add an Antique Wash
Dilute brown acrylic paint (or underglaze) with water. Brush it over the textured imprint, then wipe the surface clean with a sponge. The dark color stays in the veins, popping the detail.
Step 4: Finishing Touches
-
Sanding:
Once dry (and before firing if using a kiln), inspect the edges. Use fine-grit sandpaper to smooth away any sharp burrs or roughness on the corners. -
Cleaning Dust:
Wipe the tile with a barely damp sponge to remove clay dust from the sanding process, ensuring it doesn’t clog the fine veins of your imprint. -
Sealing or Firing:
For air-dry clay, apply two coats of clear matte acrylic sealer to water-resist the surface. For ceramic clay, bisque fire the pieces, then apply a clear matte glaze and fire again to make them food-safe and durable.
Once sealed and cured, these nature-inspired tiles bring a calm, organic touch to your coffee table
Beginner Painted Pattern Cups
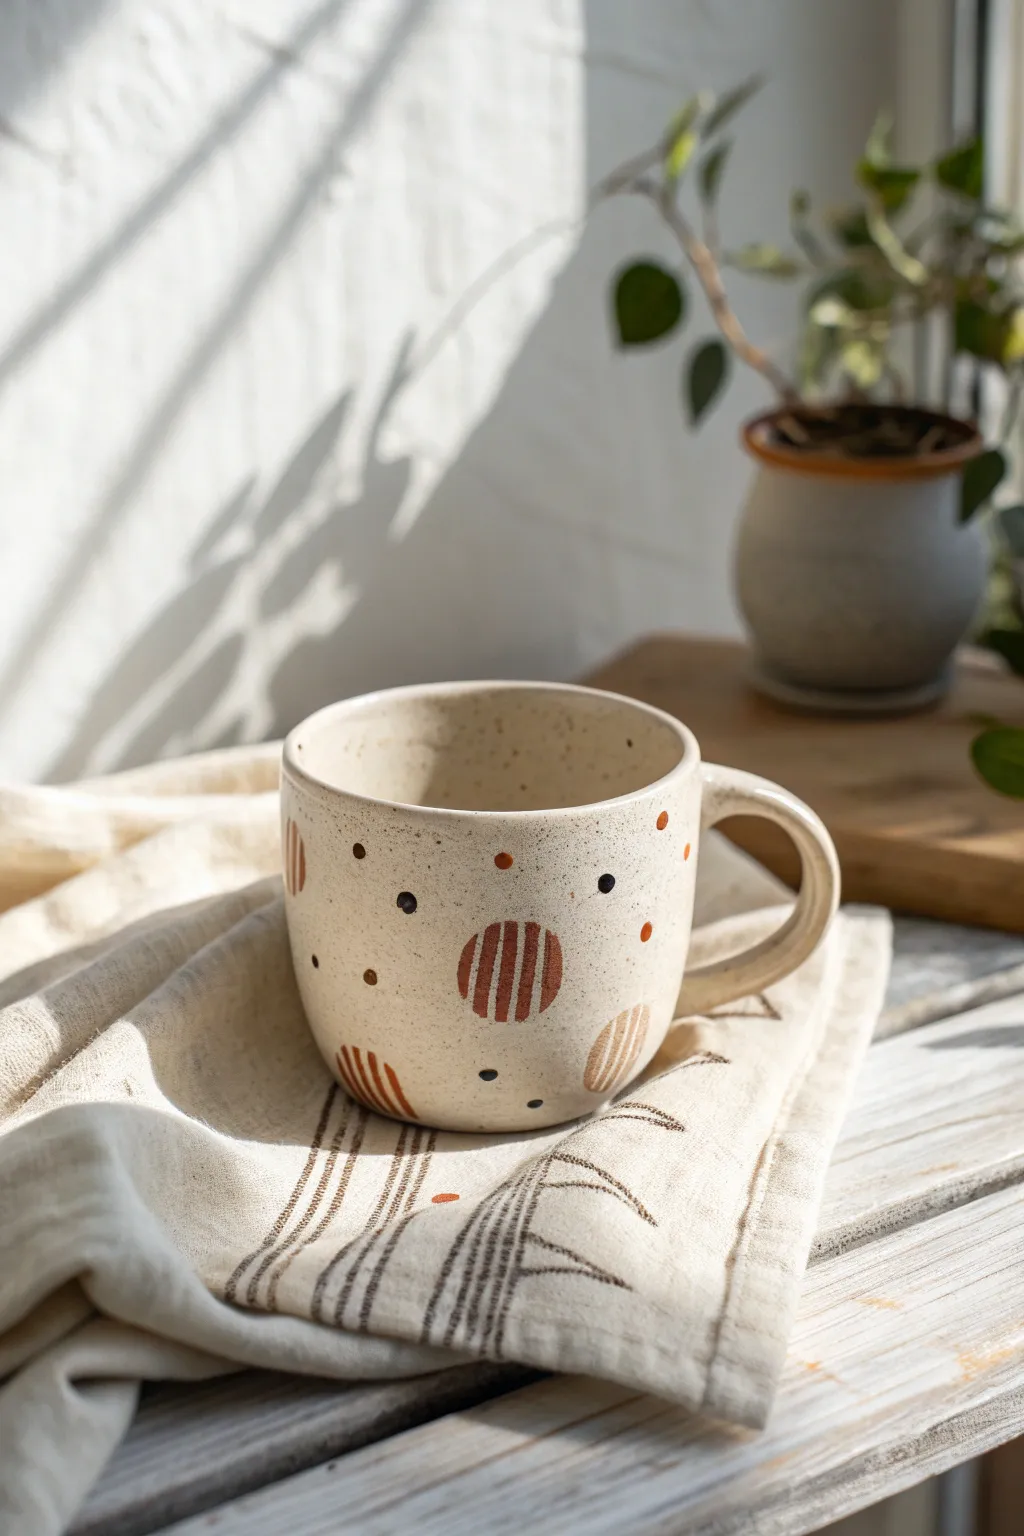
For this project, we’ll transform a simple mug into a modern, earthy masterpiece using geometric designs. The combination of creamy speckled glaze and warm rust-toned patterns creates a cozy, artisanal feel that looks much harder to achieve than it actually is.
How-To Guide
Materials
- Bisque-fired ceramic mug (wheel-thrown or slip-cast)
- Speckled cream or oatmeal stoneware glaze (brush-on)
- Underglaze in ‘Rust’ or ‘Terra Cotta’
- Underglaze in ‘Black’
- Underglaze in ‘Coffee Brown’
- Soft fan brush (for glaze application)
- Detail brush (size 0 or 1 round)
- Flat shader brush (small size)
- Pencil (HB or lighter)
- Damp sponge
- Clear transparent glaze (optional, if your base glaze isn’t glossy enough)
Step 1: Preparation & Base Glaze
-
Clean the bisque:
Start by wiping down your bisque-fired mug with a damp sponge. This removes any kiln dust or oils from handling that might resist the glaze. -
Stir the glaze:
Thoroughly mix your speckled cream glaze. The specks tend to settle at the bottom, so ensure they are well distributed for that even, vanilla-bean look. -
Apply the first coat:
Using a soft fan brush, apply a smooth coat of the speckled cream glaze to the interior of the mug first. Pouring glaze inside and swirling it out is also a great method for even coverage. -
Glaze the exterior:
Apply the base glaze to the exterior and handle. Brush in long, even strokes to minimize texture. Let this coat dry until it’s chalky and cool to the touch. -
Apply subsequent coats:
Apply 2-3 more coats of the speckled glaze, allowing each layer to dry completely in between. Check your specific glaze manufacturer’s instructions for the ideal thickness, but usually, three coats provide solid opacity.
Step 2: Painting the Patterns
-
Plan the layout:
Once the base glaze is dry and stable, lightly sketch your circle placements with a pencil. Don’t worry about marks; the graphite will burn off in the kiln. -
Paint the rust circles:
Load your flat shader brush with the Rust or Terra Cotta underglaze. Paint solid circles, varying their placement around the mug’s body. -
Add stripe details:
While the rust circles are drying, some can be turned into striped motifs. Instead of a solid fill, paint vertical stripes of rust within a circular boundary using your detail brush. -
Layer the stripes:
I find that adding a second coat of underglaze to these stripes makes the color pop significantly after firing. Carefully re-trace your vertical lines. -
Create variation:
Mix a tiny bit of the Coffee Brown into your Rust underglaze to create a slightly darker shade. Use this to paint a few vertical stripes in select circles for subtle tonal depth. -
Add brown dots:
Dip the handle tip of your paintbrush (or a dotting tool) into the Coffee Brown underglaze. Press gentle dots randomly around the empty ivory spaces. -
Add rust accents:
Clean your brush handle and repeat the dotting process with the original Rust color. Keep the spacing organic; avoiding perfect symmetry helps the handmade look. -
Incorporate black dots:
Using a very fine detail brush or a smaller dotting tool, add tiny Black underglaze accents. These provide high contrast and ground the warmer tones.
Fixing Smudges
If you smudge an underglaze dot, wait for it to dry completely. Then, gently scratch it off with a needle tool or stiff brush rather than wiping, which spreads color.
Step 3: Finishing Touches
-
Clean the foot:
Use a damp sponge to carefully wipe any glaze off the very bottom (foot ring) of the mug. If you leave glaze here, it will fuse to the kiln shelf. -
Final inspection:
Check for any pinholes or thick drips in your base glaze. You can gently smooth these down with a clean, dry finger if the glaze is powdery enough. -
Firing:
Place your mug in the kiln for a glaze firing (typically cone 5 or 6 for stoneware). Follow the firing schedule recommended for your specific clay body and glaze.
Mix & Match Shapes
Swap the circles for ovals or triangles while keeping the same rust and cream palette. Using wax resist over the stripes before the final dip creates crisp lines.
Enjoy your morning coffee in a mug that feels as warm and inviting as the drink inside
Tape-Resist Style Geometrics
This project combines the rustic charm of speckled stoneware with clean, modern geometry. Using simple masking techniques, you can create a striking pattern of triangles in a muted earthy palette that highlights the raw beauty of the clay underneath.
Detailed Instructions
Materials
- Bisque-fired ceramic vase (speckled clay body preferred)
- Painter’s tape or graphic art tape (1/4 inch width)
- Underglazes (terracotta, navy blue, teal, mustard yellow)
- Small flat synthetic brushes
- Clear matte glaze (optional, for interior)
- Sponge
- Scissors or craft knife
- Pencil
Step 1: Preparation and Planning
-
Clean surface:
Begin by wiping down your bisque-fired vase with a damp sponge. This removes any kiln dust or oils from your hands that might prevent the underglaze from adhering properly. -
Rough sketch:
Lightly sketch a few horizontal guidelines around the circumference of the vase using a pencil. These don’t need to be perfect, as the fire will burn the graphite away, but they help keep your geometric rows somewhat level. -
Tape horizontal lines:
Apply strips of painter’s tape along your pencil guidelines. Press down firmly to create a seal, ensuring the tape goes all the way around the vase. -
Create triangle outlines:
Cut smaller strips of tape to form the diagonal sides of your triangles. Connect these diagonal pieces between your horizontal tape lines to create a zig-zag pattern. -
Seal edges:
Go over every piece of tape with your fingernail or a soft rib tool. Creating a tight seal is crucial to getting those crisp lines, especially on a textured clay body.
Crisp Lines Hack
Before painting color, paint a layer of clear glaze or slip over the tape edges. This seals the tape, so any bleeding is invisible, keeping your colored lines razor-sharp.
Step 2: Painting the Pattern
-
Select color palette:
Pour out small amounts of your chosen underglazes. For this earthy look, we are using a deep navy, a washed-out teal, a warm terracotta, and a mustard yellow. -
First coat application:
Using a small flat brush, apply your first color to a specific triangle. I like to paint away from the tape edge inward to avoid forcing paint under the adhesive. -
Rotate colors:
Continue painting triangles, alternating colors randomly or in a set pattern. Leave some triangles unpainted if you want the raw speckled clay to show through as a design element. -
Let dry:
Allow the first coat to dry until it’s chalky and matte to the touch. This usually takes about 10-15 minutes depending on humidity. -
Apply second coat:
Apply a second layer of underglaze to each painted section to ensure opacity and solid color coverage. Three coats may be necessary for lighter colors like the yellow. -
Detail check:
Inspect your work for any thin spots or brush strokes that need smoothing out while the underglaze is still damp.
Step 3: Finishing Touches
-
Peel tape:
Once the underglaze is dry to the touch but before firing, carefully peel back the tape. Pull the tape slowly at a 45-degree angle to ensure clean lines without chipping the paint. -
Clean up:
If any underglaze bled under the tape, use a stiff brush dampened with water or a specialized clean-up tool to gently scrape or wipe away the mistake. -
Interior glazing:
Pour a clear glaze into the inside of the vase, swirl it around to coat the entire interior, and pour out the excess. This makes the vase functional and water-tight. -
Exterior consideration:
For the exterior, you can leave it unglazed for a raw, matte texture as shown in the photo. Alternatively, apply a thin coat of clear matte glaze if you want stain protection. -
Final fire:
Fire the piece in the kiln according to the clay and glaze specifications (usually Cone 5 or 6 for stoneware) to set the colors permanently.
Add Dimension
After peeling the tape, carve fine lines into the raw clay spaces between the triangles (sgraffito style) to add physical texture that contrasts with the smooth triangles.
Enjoy styling your new handmade vase with dried florals or fresh greens to complement those earthy tones
Simple Sgraffito Lines and Florals

This project combines the rustic warmth of red clay with crisp, carved white lines for a stunning contrast. Using the sgraffito technique, you’ll scratch away layers of underglaze to reveal a whimsical leaf and scallop design beneath.
How-To Guide
Materials
- Red stoneware clay or terra cotta
- Pottery wheel (or materials for hand-building a bowl)
- White underglaze
- Soft fan brush
- Sgraffito tool (small loop tool or needle tool)
- Pencil
- Clear transparent glaze
- Carving sponge or soft ribs
- Kiln
Step 1: Forming and Prepping the Bowl
-
Throw the base form:
Center your red clay on the pottery wheel and throw a simple, medium-sized bowl. Aim for a smooth, gentle curve from the foot to the rim, keeping the walls relatively even to make carving easier later. -
Refine the surface:
Once the bowl has dried to a leather-hard state, trim the foot and clean up the surface. Use a soft rib to compress the exterior, ensuring it is perfectly smooth and free of grog or debris that might interfere with your carving. -
Apply the exterior underglaze:
Holding the bowl upside down (or placing it back on a banding wheel), apply 2-3 coats of white underglaze to the top two-thirds of the exterior. You want to leave the bottom third and the foot exposed as raw red clay. -
Apply the interior underglaze:
Paint or pour white underglaze to cover the entire interior of the bowl. Since we won’t be carving the inside, you can make this coat slightly thicker for a solid, opaque creamy finish. -
Wait for the underglaze to set:
Allow the underglaze to dry to the touch but not bone dry. It should feel cool and firm, not tacky. If it’s too wet, your tool will gouge; too dry, and it will chip.
Moisture Matters
Work at the “leather-hard” stage. If the clay is too dry, the white underglaze will chip jaggedly rather than carving smoothly. Mist lightly if needed.
Step 2: Carving the Design
-
Create the upper border:
Using your sgraffito tool, carve a horizontal line around the circumference of the bowl, roughly half an inch below the rim. This defines the top boundary of your design space. -
Define the negative space:
This step is the inverse of typical drawing. Instead of drawing the leaves, you are going to carve away the background around them. Lightly sketch your leaf shapes with a pencil first if you need a guide. -
Carve the background:
Begin carving away the large sections of white underglaze *outside* of your leaf shapes. You want to reveal the red clay body to create a solid red background band around the middle of the bowl. -
Detail the leaves:
Now that you have white leaf silhouettes against a red background, use a finer point tool to scratch in the veins of the leaves. Cut through the remaining white slip to expose thin red lines for the stems and veins. -
Carve the bottom border:
Carve a second horizontal line below your leaf band. This creates a clean separation between the main botanical motif and the pattern below. -
Add the scallop pattern:
In the white band remaining below your leaves, carve a series of semi-circles or rainbows. Outline the scallops first, then fill them with concentric curved lines, scratching through to the red clay. -
Clean up the crumbs:
Gently brush away the clay burrs and underglaze crumbs with a soft, dry brush. Be careful not to smudge any remaining white areas.
Step 3: Finishing and Firing
-
Bisque fire:
Once the bowl is bone dry, load it into the kiln for a bisque firing (usually Cone 04 or 06). This sets the underglaze permanently and prepares the piece for glazing. -
Apply clear glaze:
After the bowl comes out of the bisque firing, wipe it down with a damp sponge to remove dust. I like to dip the entire piece in a clear transparent glaze to seal it and make it food safe. -
Wipe the foot:
Even though the bottom is unpatterned, ensure no glaze remains on the very bottom of the foot ring so it doesn’t stick to the kiln shelf. -
Glaze fire:
Fire the bowl a second time to the maturation temperature of your clay body (likely Cone 5 or 6). The clear glaze will turn glossy, making the red clay rich and the white underglaze bright.
Mix Up the Motif
Try reversing the sgraffito! Instead of carving the background away, leave the background white and just carve the outlines of the leaves for a subtler look.
Now you have a beautifully contrasted bowl ready for your morning cereal or shelf display
Kintsugi-Inspired “Beautiful Mistakes” Dish
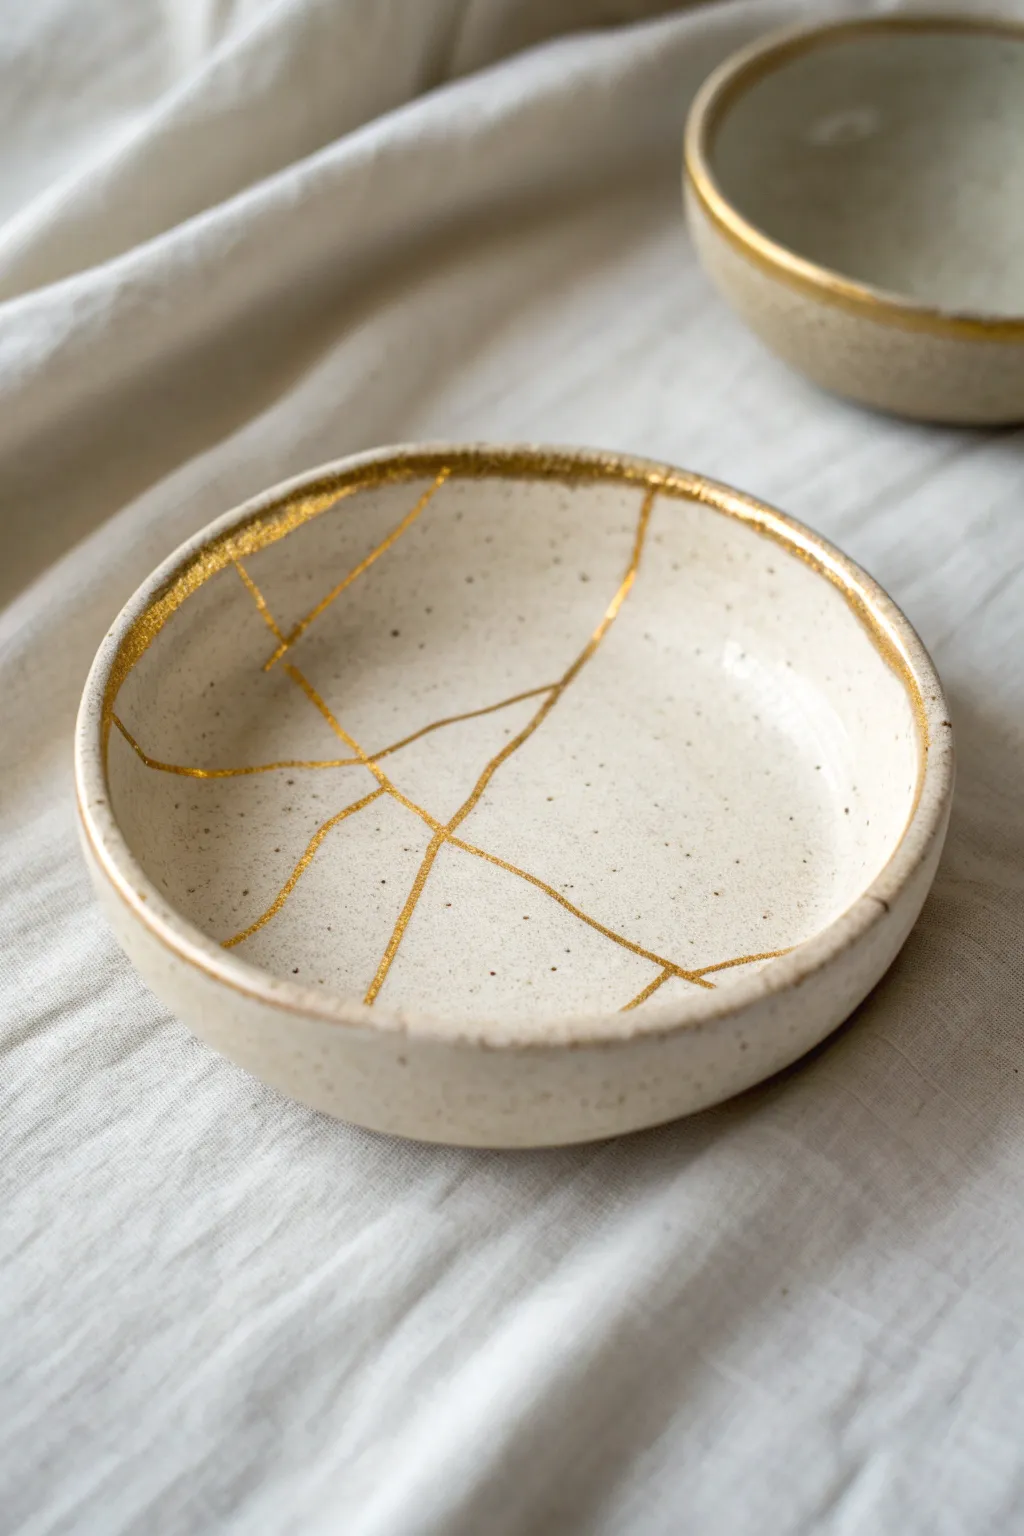
Embrace the beauty of imperfection with this beginner-friendly ceramic project inspired by the Japanese art of Kintsugi. You will transform a simple speckled clay bowl into a stunning piece of art by highlighting intentional ‘cracks’ with radiant gold luster.
Step-by-Step
Materials
- Speckled stoneware clay (approx. 1 lb)
- Potter’s wheel (or hand-building tools if preferred)
- Needle tool
- Rib tool (metal or rubber)
- Sponge
- White or clear matte glaze
- Gold luster (overglaze)
- Small fine-point liner brush
- Kiln
- Respirator/mask (for luster application)
Step 1: Forming the Bowl
-
Center the clay:
Begin by wedging your speckled stoneware clay to remove air bubbles. Place it firmly on the wheel head and center it using steady pressure and water for lubrication. -
Open the form:
Press your thumbs into the center to open the clay, leaving about a half-inch of thickness at the base for trimming later. -
Pull the walls:
Gently pull the walls upward and outward to create a shallow, open bowl shape. Aim for a smooth curve from the floor to the rim. -
Refine the rim:
Using a shammy or a small piece of plastic, compress the rim to make it smooth and rounded. This will be an important surface for the gold later. -
Dry to leather hard:
Remove the bowl from the wheel and let it dry slowly until it reaches a leather-hard state, where it is firm but still cold to the touch. -
Trim the foot:
Place the bowl upside down on the wheel, center it again, and use a trimming tool to carve out a neat foot ring at the base.
Step 2: Creating the ‘Cracks’
-
Plan your lines:
Before carving, lightly visualize where you want your ‘broken’ lines to go. A jagged, asymmetrical pattern mimics natural breakage best. -
Carve the fissures:
Using a needle tool, carve shallow, irregular lines into the interior surface of the bowl. Vary the pressure slightly to create a natural, organic feel. -
Clean the burrs:
Gently smooth away any sharp clay crumbs or burrs created by the needle tool using a soft, slightly damp sponge, but ensure the grooves remain distinct. -
Bisque fire:
Place the bowl in the kiln for a bisque firing (usually around Cone 04) to prepare it for glazing.
Gold Running?
If your gold lines look runny or blurry after firing, you likely applied the luster too heavily. Use a very small amount on the brush—it goes a long way.
Step 3: Glazing and Gold Application
-
Apply base glaze:
Dip or brush your white or clear matte glaze over the entire piece. Wipe the foot ring clean with a sponge. -
Glaze fire:
Fire the piece again to the maturation temperature of your clay and glaze (often Cone 5 or 6). Let the piece cool completely. -
Prepare the gold luster:
Work in a well-ventilated area and wear your respirator. Gold luster has strong fumes. Dip your fine liner brush into the luster. -
Paint the fissures:
Carefully trace the carved lines inside the bowl with the gold. Allow the brush to glide in the grooves; I find steadier hands come from resting my pinky on the bowl’s edge. -
Gild the rim:
Apply a slightly thicker band of gold luster around the entire top rim of the bowl to frame the interior design. -
Connect the lines:
Where your interior lines meet the rim, gently stroke the gold up and over the edge to create a seamless connection. -
Initial dry:
Let the luster dry for a few hours until it is no longer tacky before moving it to the kiln. -
Luster fire:
Fire the bowl a third time to much lower temperature (usually between Cone 018 and 020) to fuse the gold to the glaze surface.
Try Handbuilding
Don’t have a wheel? Use the pinch pot method to create an organic, uneven shape. The intentional finger marks pair beautifully with the gold lines.
Now you have a piece that celebrates history and resilience with a luxurious golden finish