When I’m teaching beginner-friendly sculpting, I always start with projects that use simple shapes—balls, coils, and little pinch forms—because they’re almost impossible to mess up. Here are my favorite easy clay sculpture ideas that look super cute on a shelf (and feel totally doable, even if it’s your first time touching air-dry clay or polymer clay).
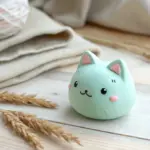
Pinch Pot Mini Cat
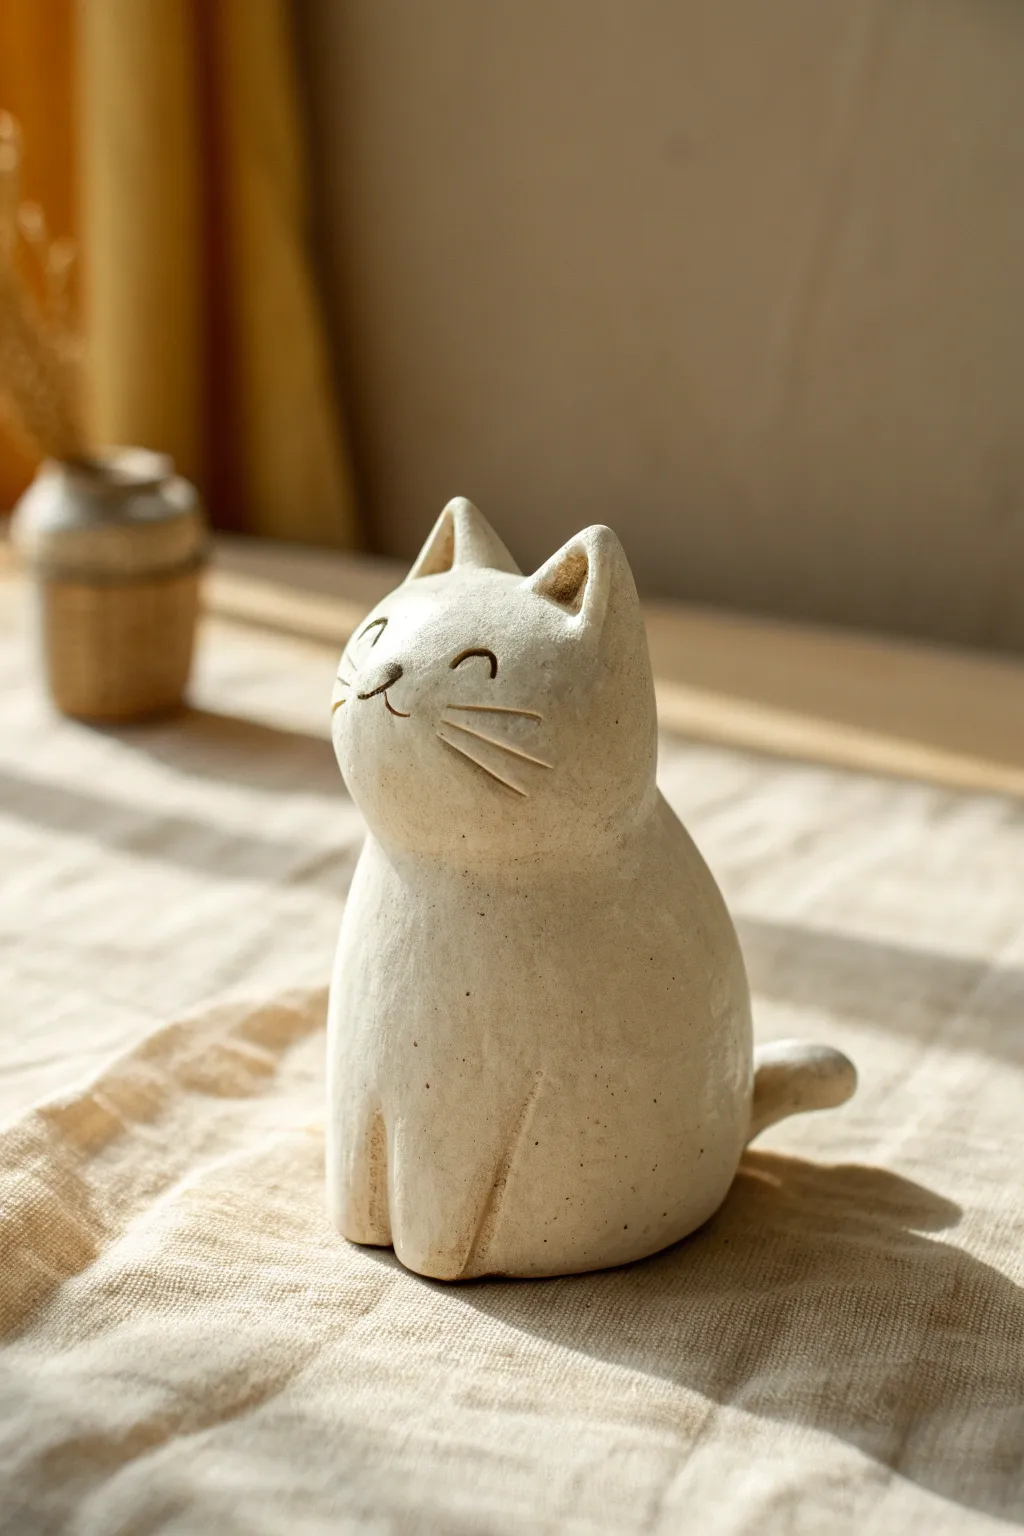
This charming little feline starts life as a simple ball of clay and transforms into a minimalist masterpiece with just a few gentle pinches. Its smooth, rounded form and serene expression make it a perfect first project for learning how to join clay securely and create expressive textures.
Step-by-Step Guide
Materials
- Air-dry clay or polymer clay (white or cream)
- Small cup of water (for slip)
- Needle tool or toothpick
- Small wooden modeling tool or spoon back
- Fine-grit sandpaper (optional)
- Clear matte varnish (optional)
Step 1: Forming the Body
-
Create the base:
Start by rolling a medium-sized ball of clay, roughly the size of a tangerine. Ensure it is smooth and free of major cracks. -
Shape the pinch pot:
Insert your thumb into the center of the ball and gently pinch the walls while rotating the clay. Keep the walls thick—about half an inch—as this will form the sturdy body of the cat. -
Close the form:
Instead of leaving the pot open like a bowl, gently curve the upper edges inward until they meet, trapping air inside to help hold the shape. Smooth over the join line completely to create a hollow, enclosed egg shape. -
Flatten the bottom:
Tap the wider end of your egg shape onto your work surface firmly. This creates a flat base so your cat will sit upright without wobble.
Cracks Appearing?
If you see cracks forming while shaping, your clay is too dry. Dip your finger in water and smooth the crack immediately, or blend in a tiny fresh piece of soft clay.
Step 2: Adding the Head and Ears
-
Form the head:
Roll a second, smaller ball of clay for the head. It should be slightly oval-shaped to give the cat a sweet, chubby-cheeked look. -
Score and slip:
Using your needle tool, scratch cross-hatching marks onto the top of the body and the bottom of the head. Dab a little water (or liquid clay if using polymer) onto the scratched areas. -
Join the pieces:
Press the head firmly onto the body. Use your thumb or a modeling tool to smudge the clay from the neck down onto the shoulders, blending the seam until it disappears completely. -
Make the ears:
Roll two small pea-sized balls and pinch them into triangles. Gently curve them slightly to mimic the natural cupping of a cat’s ear. -
Attach the ears:
Score and slip the bottom of the ears and the top of the head. Press them on securely, blending the clay at the back of the ears into the head for a seamless transition.
Speckled Stone Look
To mimic the ceramic stoneware look in the photo, mix some coarse black pepper or dried tea leaves into your white clay before you start sculpting.
Step 3: Adding Details and Texture
-
Create the tail:
Roll a short, tapered coil of clay. Attach it to the lower back of the body, curving it upwards slightly so it rests against the side of the cat. -
Refine the surface:
Dip your finger in a tiny bit of water and rub it over the entire sculpture to smooth out fingerprints and bumps. The goal is a stone-like, matte finish. -
Carve the face:
Using your needle tool or a sharp toothpick, carefully carve two upward-curving arches for the happy, closed eyes. Add a small ‘V’ or triangle for the nose. -
Detail the whiskers:
Carve three distinct lines on each cheek for whiskers. Make these incisions fairly deep so they remain visible if you decide to glaze or paint the piece later. -
Define the legs:
Use the needle tool to draw vertical lines at the bottom front of the body to suggest front legs. I find that keeping these lines subtle maintains the minimalist aesthetic. -
Dry and finish:
Allow the clay to dry completely (24-48 hours for air-dry clay). Once dry, you can lightly sand any rough spots and apply a matte varnish to protect that raw, ceramic look.
Now you have a serene little companion to sit on your desk or shelf


Simple Turtle With Dome Shell
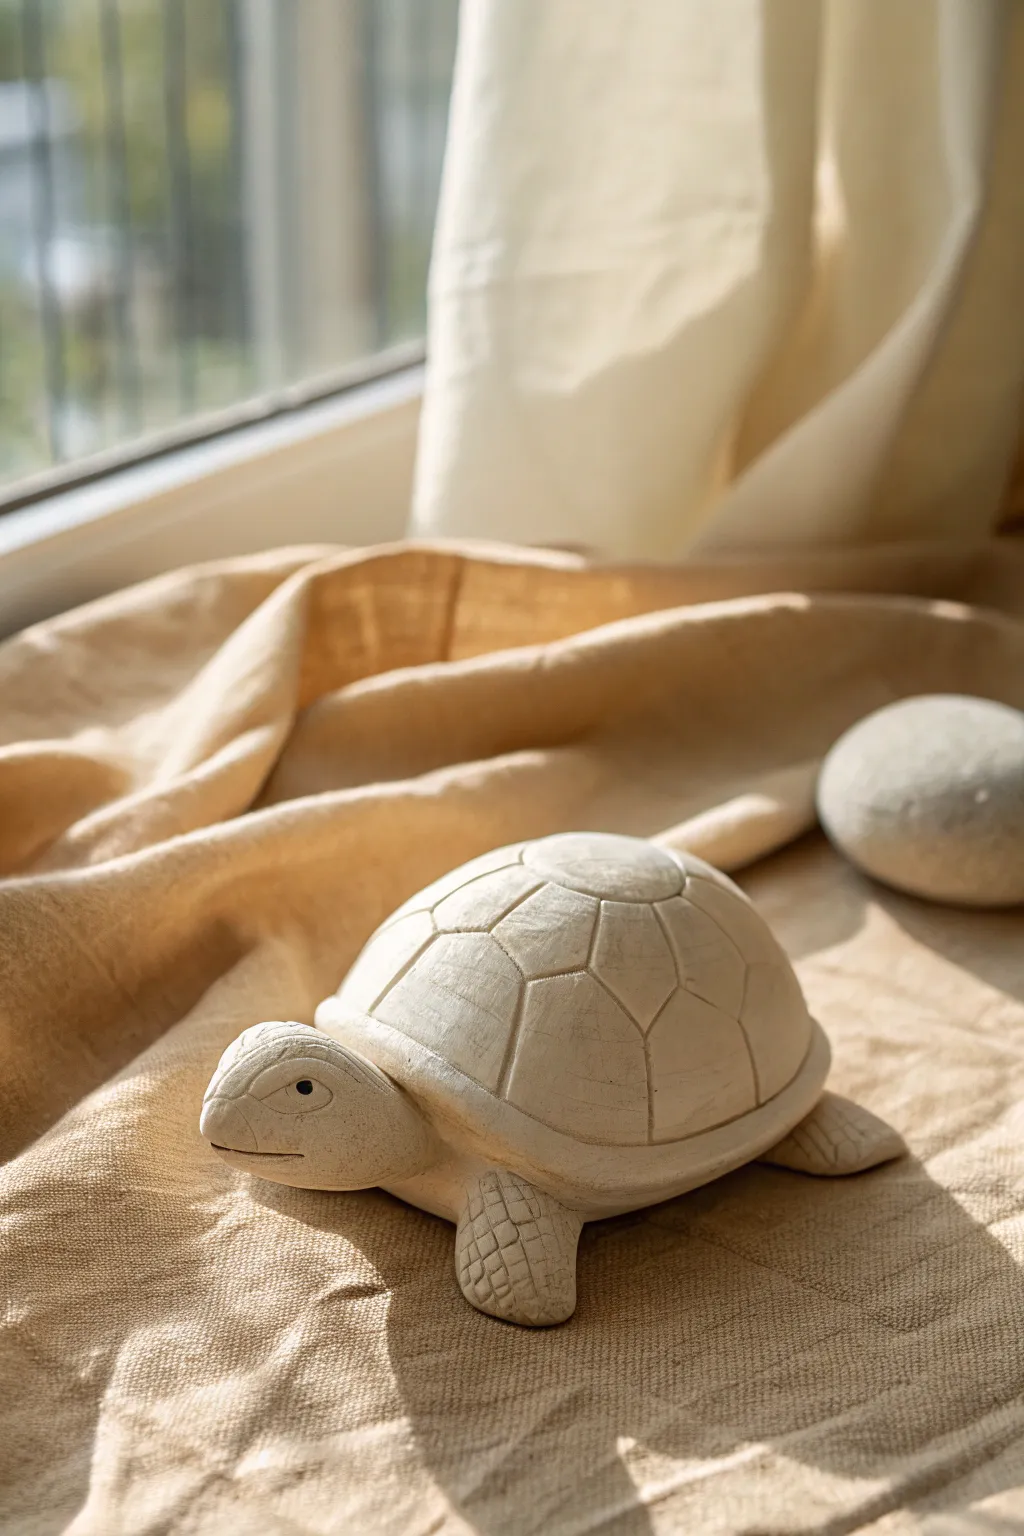
This peaceful project captures the charm of a slow-moving friend using basic shapes and effective scoring techniques. The finished piece has a lovely, smooth dome shell and a textured head and legs that resemble carved sandstone.
Step-by-Step
Materials
- Air-dry clay (white or stone color)
- Small rolling pin
- Pin tool or toothpick
- Modeling tool with a small spoon end
- Fettling knife or plastic blade
- Small bowl or sphere (for shell support, optional)
- Black bead or small clay bit (for eye)
- Sponge and water
Step 1: Forming the Base Structure
-
Create the shell dome:
Start with a large ball of clay about the size of an orange. Flatten it slightly against your work surface or drape a rolled slab over a small bowl to create a perfect hollow dome shape. -
Smooth the shell:
Using a slightly damp sponge, smooth out the entire surface of your dome. You want this main area to be pristine before adding details. -
Shape the underbelly:
Roll a flat slab of clay for the plastron (the bottom shell). Cut it into an oval that matches the footprint of your dome shell. -
Attach the body parts:
Before sealing the shell, shape four stout, rounded cylinders for legs and a slightly longer, tapered cylinder for the head. Position these on the flat oval slab so they stick out appropriately. -
Seal the shell:
Score the edges of the dome and the base slab. Apply a little water or slip, then press the dome onto the base, trapping the limb connections inside for a seamless look. -
Refine the seams:
Use your fingers or a modeling tool to smooth the seam where the top shell meets the bottom, ensuring the legs and head look like they are emerging naturally from slightly underneath the rim.
Step 2: Detailing and Texture
-
Define the shell rim:
Using your knife tool, gently press a continuous line around the bottom edge of the dome, about 1/4 inch up, to create the distinct rim of the carapace. -
Map the scutes:
Lightly sketch the shell pattern with a needle tool. Start with a central hexagon at the very top, then draw lines radiating out to create the surrounding polygon shapes. -
Deepen the shell lines:
Once you are happy with the pattern, go over the lines with a specialized carving tool or the edge of a credit card to make the grooves deep and distinct. -
Round the scutes:
Gently press down on the edges of each individual shell segment (scute) to make them look slightly puffed and dimensional, rather than just drawn on. -
Texture the neck:
Add subtle wrinkles to the neck area where it meets the shell using a spoon tool, mimicking folded skin. -
Detail the flippers:
Use your knife or needle tool to press a cross-hatch or scale pattern onto the front flippers. Keep the lines close together for a realistic reptile skin texture. -
Shape the face:
Refine the head shape, pressing distinct indentations for the eye sockets. Use a knife to carve a simple, horizontal line for the mouth, curving slightly at the corner. -
Add the eyes:
Press a small black bead into the eye socket for a sharp gaze, or roll a tiny ball of clay and press a hole in the center for a Pupil preparation. -
Final smoothing:
Do a final pass with a barely damp fingertip to soften any sharp burrs of clay created during the carving process. I find this step crucial for getting that stone-carved aesthetic.
Cracks while drying?
If the dome cracks as it dries, mix a small amount of fresh clay with water to make a paste (slip) and fill the crack. Smooth it over and let it dry slowly away from direct heat.
Hollow or Solid?
For a lighter turtle, keep the shell hollow. If you want a heavy paperweight feel, fill the inside with crumpled foil before sealing the bottom slab.
Let your turtle dry completely before displaying it as a calm companion on your desk


Tiny Whale With a Curved Tail
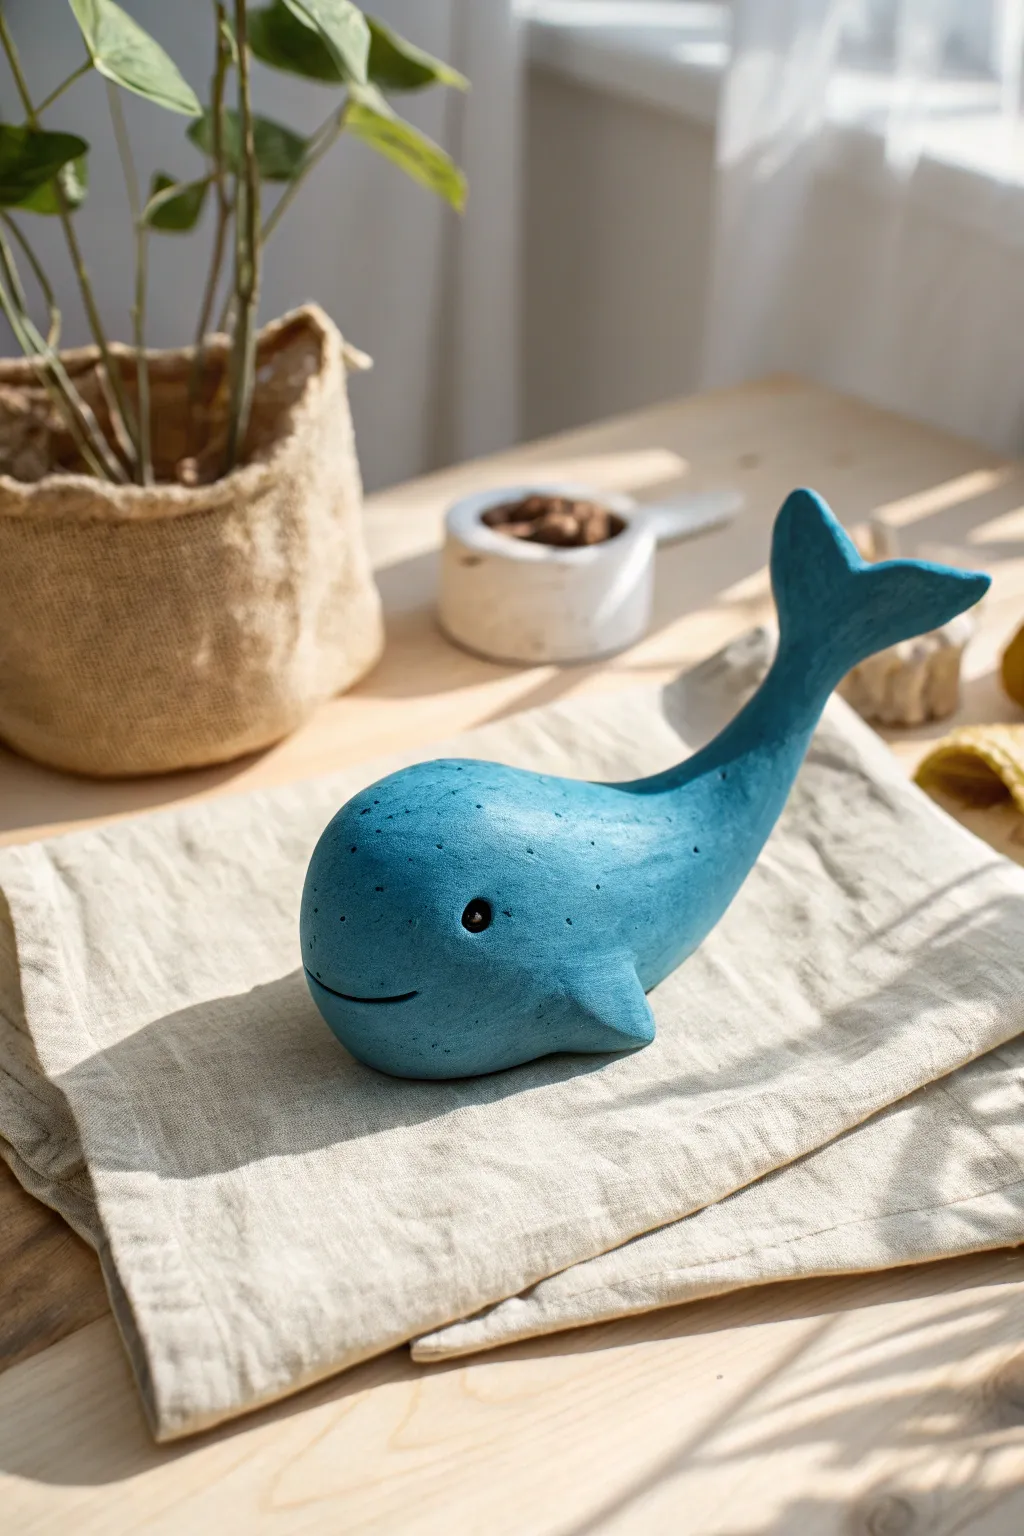
Dive into the world of clay sculpting with this charming, swimming blue whale that seems to be happily breaching the surface. With its gentle curves and signature speckled texture, this friendly figure makes for a perfect desk companion or nursery decoration.
Detailed Instructions
Materials
- Air-dry clay (white or grey) or polymer clay
- Acrylic paints (Teal/Cyan Blue, Black, White)
- Fine-grit sandpaper (220-400 grit)
- Sculpting tools (needle tool and a curved smoothing tool)
- Small round paintbrush
- Old toothbrush (for spattering)
- Water cup (for smoothing)
- Matte spray varnish
Step 1: Forming the Body
-
Create the base shape:
Start with a fist-sized ball of clay. Roll it between your palms to warm it up and create a smooth sphere, ensuring there are no air bubbles trapped inside. -
Elongate into a teardrop:
Begin rolling one side of the sphere against your work surface to taper it. You want a thick, bulbous head on one end and a gradually thinning tail on the other, resembling a large teardrop. -
Curve the spine:
Gently bend the tapered tail end upwards. This gives the whale a sense of movement, like it’s about to dive or jump. I like to continuously smooth the clay with a damp finger while bending to prevent cracking. -
Flatten the belly:
Press the bottom of the main body section gently onto the table. This creates a stable base so your whale won’t roll over once it’s finished.
Smooth Operator Tip
Keep a small sponge damp with water nearby. Lightly wiping the clay before it dries removes fingerprints much better than just using your fingers.
Step 2: Adding Fins and Flukes
-
Shape the tail flukes:
Take a small grape-sized piece of clay and flatten it into a triangle. Use a tool or your finger to make an indentation in the wide center, creating the classic ‘V’ shape of the tail flukes. -
Attach the tail:
Score (scratch) the tip of the whale’s body and the base of the tail flukes. Apply a tiny bit of water or slip (clay slurry) to the scored areas and press them together firmly. -
Blend the seams:
Using a smoothing tool or your finger, drag clay from the tail flukes down onto the body until the seam disappears completely. The transition should be seamless and graceful. -
Create the side fins:
Roll two smaller balls of clay and flatten them into rounded triangles. These will be the pectoral fins. -
Attach pectoral fins:
Position the fins on the lower sides of the body, just behind where the head would end. Score, slip, and blend them onto the body just like you did with the tail. -
Detail the mouth:
Use a needle tool or a thin blade to carve a long, gentle curve for the smile. I suggest pressing slightly deeper at the corners to emphasize the friendly expression. -
Add eye sockets:
Press the rounded end of a paintbrush handle into the clay to create small, indented sockets for the eyes. This adds depth before painting. -
Dry and refine:
Allow the sculpture to dry completely (24-48 hours for air-dry clay). Once dry, gently sand any rough fingerprints or bumps with fine-grit sandpaper for a professional finish.
Step 3: Painting and Finishing
-
Base coat application:
Paint the entire whale with an opaque layer of teal or cyan blue acrylic paint. You may need two coats to get full, solid coverage without streaks. -
Add texture with speckling:
Dilute a tiny bit of black paint with water. Dip an old toothbrush into it, and running your thumb deeply across the bristles, flick a fine mist of speckles over the whale’s back to create that stone-like texture. -
Paint the eyes:
Using a fine-tip brush, fill the eye sockets with solid black paint. Add a tiny white dot in the upper corner of each eye to create a lively reflection. -
Define the mouth:
Take a very thin brush with watered-down black paint (almost like an ink) and carefully trace the carved smile line to make it pop against the blue body. -
Seal the piece:
Finish by spraying the sculpture with a matte varnish. This protects the paint and unifies the sheen, giving it that soft, completed look shown in the photo.
Blowhole Realism
Before the clay dries, use a small straw or tool to poke a tiny ‘blowhole’ on the very top of the head. Add a tiny water spout made of wire!
Place your finished whale on a shelf or desk where its soothing blue color can bring a touch of ocean calm to your day


Coiled Snail With Spiral Shell

Capture the slow, peaceful charm of nature with this minimalist clay snail sculpture. Featuring a stylized spiral shell and a speckled beige finish, this project sits beautifully as a decorative accent on a sunny windowsill.
Step-by-Step
Materials
- Speckled beige stoneware clay or polymer clay (granite or sandstone effect)
- Clay carving tools (needle tool, modeling tool)
- Small sponge
- Water slip (if using ceramic clay) or liquid polymer clay (if using polymer)
- Rolling pin
- Clear matte varnish or glaze (optional)
Step 1: Sculpting the Base and Body
-
Prepare the Base:
Start by flattening a ball of clay into an oval slab about 1/4 inch thick. This will serve as the stand for your snail. -
Smooth the Edges:
Use a damp sponge or your finger to smooth the edges of the oval slab, ensuring it looks intentional and finished rather than rough. -
Form the Body:
Roll a thick, tapered sausage shape of clay. One end should be wider and blunter (the head), and it should taper down to a point (the tail). -
Initial Shaping:
Bend the wide end slightly upward to suggest the snail lifting its head. Flatten the bottom of this body piece slightly so it sits flush against the base later. -
Attach Body to Base:
Score and apply slip to the bottom of the snail body and the center of the oval base. Press the body firmly onto the base to secure it.
Fixing Cracks
If you see tiny cracks forming as you coil the shell, your clay is too dry. Dip your finger in water (or clay softener) and smooth the crack immediately before continuing.
Step 2: Creating the Spiral Shell
-
Roll the Coil:
Roll a long, even snake of clay. It should be thickest at one end and gradually taper to a smaller point at the other end. -
Create the Spiral:
Starting with the thinnest end, roll the clay tightly inward upon itself to form a snail shell shape. Keep the coil tight so there are no gaps. -
Refine the Shape:
Once coiled, gently press the spiral flat on one side so it’s not too spherical; you want a somewhat flattened disc shape typical of snail shells. -
Blend the Coil Seams:
On the back side of the shell (the side that won’t be as visible), I like to blend the clay coils together slightly with a modeling tool to ensure structural integrity. -
Mount the Shell:
Score the back of the snail’s body and the bottom edge of your shell spiral. Apply slip and press the shell vertically onto the back of the body. -
Smooth the Connection:
Use a small tool to blend the clay where the shell meets the body, ensuring a seamless transition underneath the shell’s edge.
Texture Trick
To enhance the speckled look if your clay is plain, try mixing in coarse black pepper or used dried coffee grounds into the clay body before sculpting.
Step 3: Detailing and Finishing
-
Make the Eye Stalks:
Roll two small, thin logs of clay. Add tiny balls to the very tips to create the classic eye stalk appearance. -
Attach the Stalks:
Create two small holes on the top of the head using a needle tool. Insert the stalks, blending the clay at the base carefully so they don’t break off. -
Sculpt the Eyes:
For the main eyes on the side of the head, roll two small flattened discs of clay and press them onto the cheeks. -
Add Pupils:
Use a small loop tool or the end of a paintbrush to impress a circle into the center of the eye discs, outlining the pupil. -
Refine the Surface:
Go over the entire sculpture with a slightly damp sponge to remove fingerprints and smooth out any accidental nicks. -
Final Adjustments:
Check the balance of the piece. If the shell is heavy, ensure the snail is securely attached to the oval base to prevent tipping. -
Dry or Bake:
If using ceramic clay, allow to dry slowly under plastic before firing. If using polymer clay, bake according to the package instructions.
Place your finished snail near a window to enjoy how the light catches the curves of the shell

The Complete Guide to Pottery Troubleshooting
Uncover the most common ceramic mistakes—from cracking clay to failed glazes—and learn how to fix them fast.
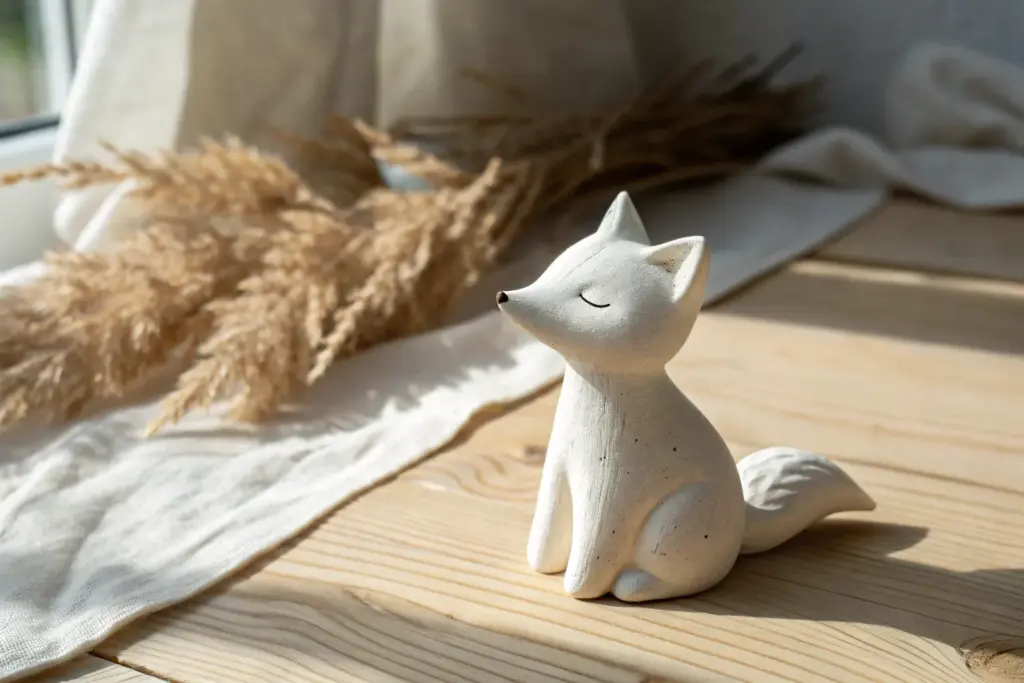
Sleepy Fox With Folded Tail
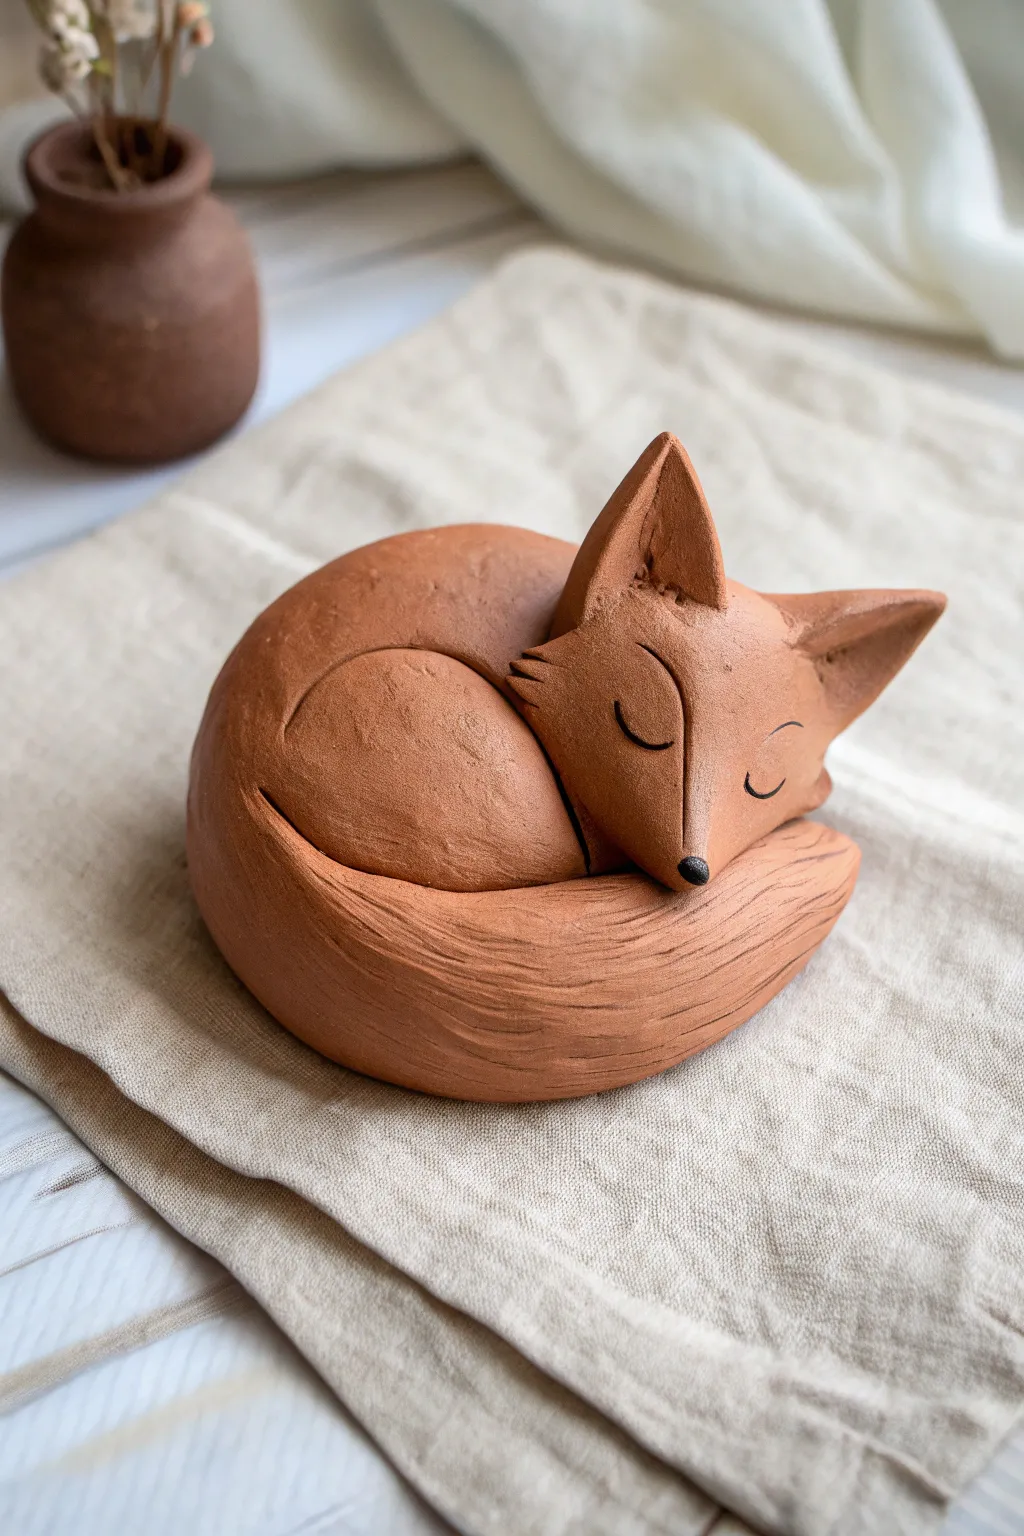
This charming, terracotta-colored fox captures a peaceful moment of rest with its tail wrapped snugly around its body. The smooth, rounded shapes make it a perfect beginner project that emphasizes simple forms and gentle texturing.
How-To Guide
Materials
- Terracotta-colored polymer clay or air-dry clay
- Rolling pin or smooth round object
- Needle tool or toothpick
- Small ball stylus or blending tool
- Black acrylic paint
- Fine detail paintbrush
- Texture sponge or stiff bristle brush (optional)
Step 1: Forming the Body and Head
-
Create the base:
Start with a large ball of clay about the size of a tangerine. Gently press it down onto your work surface to create a rounded, slightly flattened dome shape for the main body. -
Define the leg section:
Using your thumb or a modeling tool, create a deep, curved indentation on the left side of the dome. This separates the hind leg area from the main body mass. -
Shape the head:
Roll a smaller ball of clay into a teardrop or pear shape. Flatten the wider end slightly where it will attach to the body. -
Attach the head:
Score the surface of the body and the back of the head piece where they will join. Press the head firmly onto the right side of the body, angling the pointed nose downward. -
Blend the seams:
Use a blending tool or your finger to smooth the clay where the neck meets the body, ensuring a strong bond and a seamless look.
Cracking Clay?
If using air-dry clay and cracks appear while drying, mix a tiny bit of fresh clay with water to make a paste and fill the cracks, then smooth over.
Step 2: Adding the Tail and Ears
-
Roll the tail:
Create a long, tapered snake of clay. It should be thickest in the middle and taper off towards the tip. -
Position the tail:
Wrap the tail around the front of the fox, curling it so it hugs the bottom curve of the body. Tuck the tip under the chin slightly. -
Texture the tail:
Using a needle tool, scratch long, flowing lines along the length of the tail to simulate fur texture. I find that curving the lines slightly adds more realism. -
Shape the ears:
Form two small triangles of clay. Pinch them slightly to give them a concave shape, creating the inner ear. -
Attach the ears:
Place the ears on top of the head. Use your blending tool to smooth the base of the ears into the head, keeping the triangular shapes distinct.
Level It Up
Before baking, use a toothbrush to gently stipple the tail area for a fluffier texture, contrasting it with the smooth body.
Step 3: Refining Details
-
Sculpt the face:
Use a needle tool or knife to gently carve a line down the center of the face, starting between the ears and stopping just before the nose. -
Add whisker hints:
Make small, shallow cuts on the cheeks to suggest tufts of fur. -
Create the eyes:
With the needle tool, press two curved semi-circles into the face for the sleeping eyes. Make sure they curve downwards for a peaceful expression -
Refine the surface:
Check the smooth areas of the body (the back and leg) for fingerprints. Gently rub them out with a tiny bit of water or baby oil. -
Bake or dry:
If using polymer clay, bake according to package instructions. For air-dry clay, let it sit undisturbed for 24-48 hours until fully hardened. -
Paint the nose:
Dip a fine detail brush into black acrylic paint. Carefully paint a small, rounded triangle on the very tip of the snout. -
Define the eyes:
Using the very tip of your brush or a toothpick dipped in black paint, trace inside the indented eye lines to make them pop.
Now you have a peaceful woodland friend to sit on your desk or shelf
Mini Bird on a Pebble Base
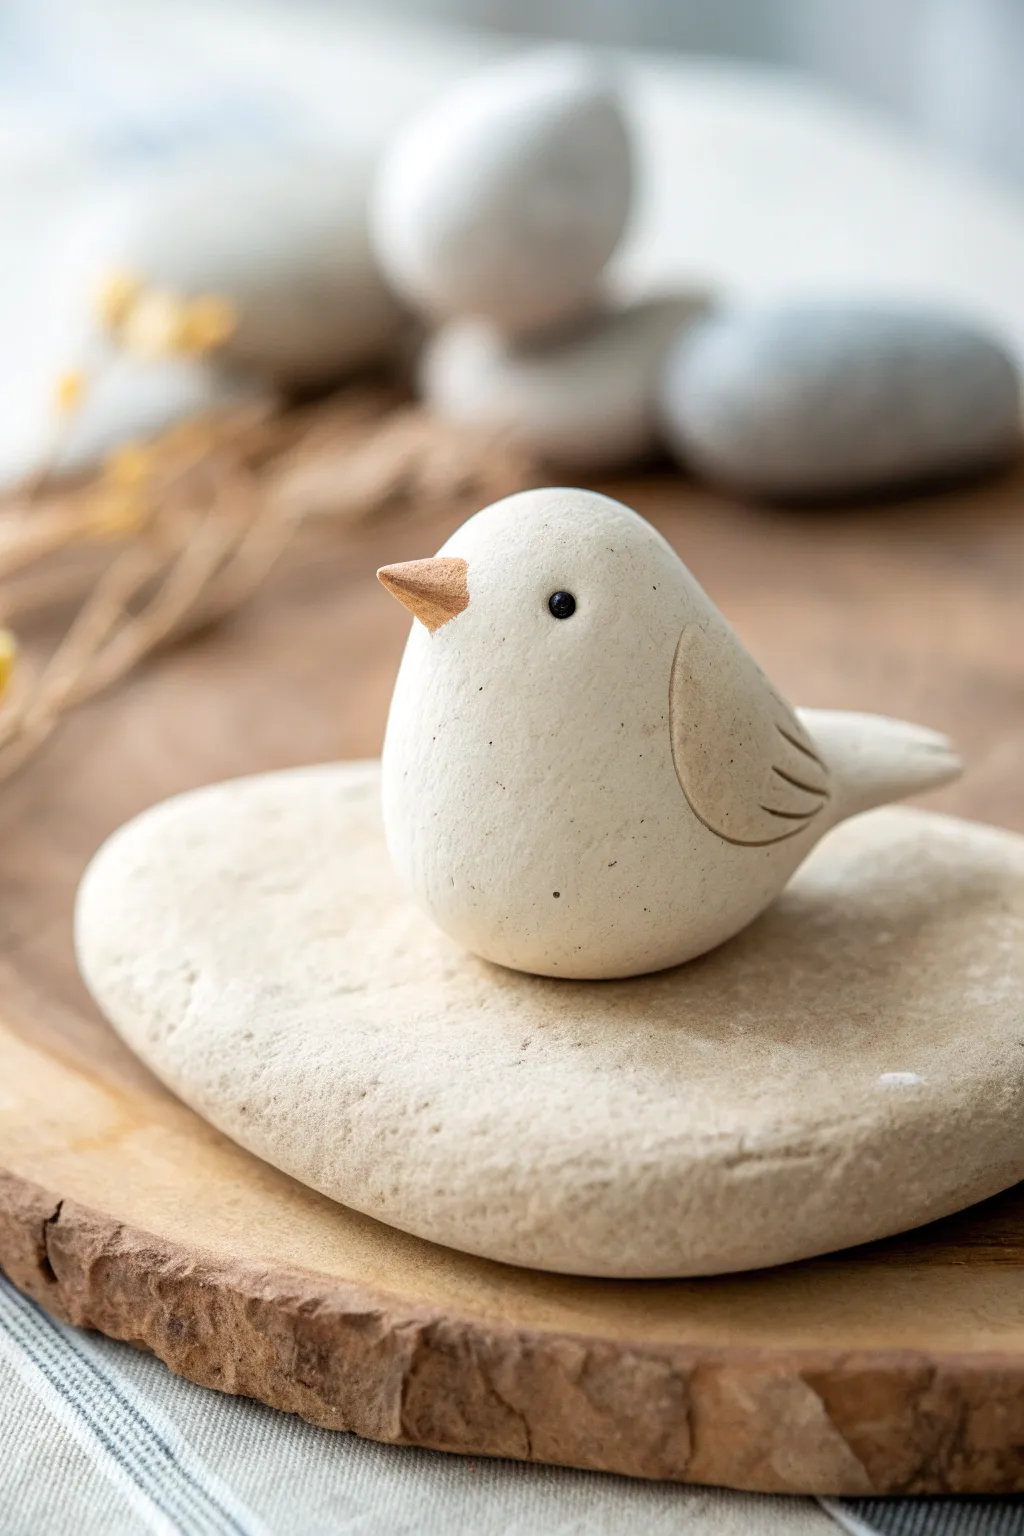
Embrace the beauty of simplicity with this charming, minimalist bird sculpture perched on a natural garden stone. The textured, speckled clay body and delicate wooden beak create a rustic yet modern accent piece perfect for any shelf.
Step-by-Step
Materials
- White or cream air-dry clay (preferably with a speckled or stone texture)
- Small natural river stone (palm-sized, flat top)
- Small piece of balsa wood or a wooden toothpick
- Small black bead or black acrylic paint (for eyes)
- Modeling tools (needle tool and smoothing sponge)
- Fine-grit sandpaper
- Strong craft glue or epoxy
- Matte spray varnish
Step 1: Shaping the Bird Body
-
Condition the clay:
Begin by taking a chunk of your speckled air-dry clay roughly the size of a golf ball or slightly larger. Knead it thoroughly in your hands to warm it up and remove any trapped air bubbles. -
Form the teardrop shape:
Roll the clay into a smooth ball first, then gently begin to taper one end to create a fat teardrop shape. This tapered end will become the tail feathers. -
Define the head:
Instead of separating a distinct head, gently press and smooth the rounded (front) end of the teardrop to slope slightly upwards. The goal is a seamless, continuous curve from forehead to back. -
Flatten the base:
Press the bottom of the bird firmly against your work surface or the actual stone base you intend to use. This creates a stable, flat bottom so the bird sits securely without tipping.
Fixing Cracks
If small hairline cracks appear during drying, create a ‘slip’ paste by mixing a tiny bit of clay with water. Smear this into the crack, smooth it over, and let it dry again.
Step 2: Handling the Details
-
Sculpt the wings:
Roll two smaller balls of clay and flatten them into teardrop leaf shapes. Gently press these onto the sides of the body. -
Blend the seams:
Using a smoothing tool or your finger dipped in a little water, blend the top and front edges of the wings into the body, leaving the back and bottom edges slightly raised for definition. -
Add wing texture:
Take a needle tool or a dull knife edge and gently impress three curved lines onto the back edge of each wing to suggest primary feathers. -
Refine the tail:
Pinch the tapered tail end slightly to flatten it horizontally. Use your needle tool to add a few subtle definition lines on the top of the tail. -
Smooth the surface:
I prefer to use a slightly damp sponge at this stage to wipe over the entire piece, removing fingerprints and ensuring that characteristic smooth, matte finish.
Make a Pair
Make a second bird in a slightly different size and position them facing each other on the stone. Tilt one head slightly up and one down to create an interaction.
Step 3: Features and Assembly
-
Create the beak opening:
Using the tip of a toothpick or needle tool, poke a small, shallow hole in the center of the face where the beak will go. -
Carve the wooden beak:
Take a small scrap of balsa wood or the thick end of a wooden toothpick. Whittle or sand it into a tiny cone shape. Test the fit in the hole you made; it should be snug. -
Install the eyes:
Press two tiny black beads into the clay on either side of the head. If you don’t have beads, you can use the end of a paintbrush handle to make divots and paint them black later. -
Drying time:
Allow the clay bird to dry completely. Depending on humidity and clay thickness, this usually takes 24 to 48 hours. Keep it away from direct heat to prevent cracking. -
Sand and finish:
Once bone dry, lightly sand any rough spots with fine-grit sandpaper. Glue the wooden beak into place. -
Final assembly:
Apply a strong adhesive or epoxy to the flat bottom of the bird and press it firmly onto your chosen river stone. -
Sealing:
Finish the sculpture with a light coat of matte spray varnish to protect the clay while keeping that natural look.
Place your finished sculpture near a window or plant to enjoy its peaceful presence


What Really Happens Inside the Kiln
Learn how time and temperature work together inside the kiln to transform clay into durable ceramic.
Duck With Flat Paddle Feet

This charming little duck brings a touch of countryside warmth to any shelf with its pleasantly rounded form and distinctive paddle feet. The project features a lovely matte, weathered finish that makes it look like a vintage garden find.
Step-by-Step Tutorial
Materials
- Air-dry clay or polymer clay (white or beige)
- Acrylic paints (creamy white, burnt orange, mustard yellow, black, brown)
- Clay sculpting tools (needle tool, smooth rib)
- Water and a small sponge for smoothing
- Aluminum foil for armature (optional but recommended)
- Fine-grit sandpaper
- Matte sealant or varnish
- Small stiff paintbrush for dry brushing
Step 1: Shaping the Base Form
-
Form the body:
Start by rolling a large ball of clay into a smooth pear shape. This will be the main body of the duck. Gently tap the bottom on your work surface to flatten it slightly so the duck sits stably. -
Create the head:
Roll a smaller ball of clay for the head. It shouldn’t be perfectly round; elongate it slightly towards the front where the beak will attach. -
Attach head to body:
Place the head atop the narrower part of the pear-shaped body. Use your thumb or a modeling tool to smear the clay downward from the neck onto the body, blending the seam until it disappears completely. -
Refine the neck:
Smooth out the transition area. You want a distinct s-curve shape, so gently press inward at the front of the neck and push the chest area out slightly. -
Shape the tail:
At the rear of the body, pinch and pull the clay upwards to form a perky, pointed tail. Smooth the sides so it flows naturally from the back.
Unstable Duck?
If the head is heavy and the duck tips forward, press a small ball of clay into the tail area before it dries to act as a counterweight, or flatten the feet further.
Step 2: Adding Details & Feet
-
Sculpt the beak:
Form a small, flattened cone shape for the beak. Press it onto the front of the face, blending the seams carefully. Use your fingers to curve the top surface slightly upwards for a happy expression. -
Add the smile:
Use a needle tool or a thin blade to carefully slice a mouth line into the side of the beak, extending it slightly into the cheek area to create a permanent smile. -
Create the wings:
Roll two teardrop shapes of clay and flatten them. Attach one to each side of the body. Instead of blending the edges seamlessly, leave the outline distinct to look like folded wings. -
Carve wing details:
Using a curved tool or the end of a paintbrush handle, impress shallow, curved lines into the wing pads to suggest large primary feathers. -
Make the paddle feet:
Create two flat, triangular wedges for feet. They should be quite large and oversized for stability and style. Press the duck body firmly onto these pads so they bond, or score and slip if using ceramic clay. -
Detail the feet:
Use a knife tool to press a single straight line down the center of each foot web to create the toe separation. -
Add the eyes:
Use a small ball stylus or the back of a paintbrush to make indentations on either side of the head for the eyes.
Step 3: Finishing & Painting
-
Dry and sand:
Allow the clay to dry completely (this may take 24-48 hours depending on thickness). Once hard, lightly sand any finger marks or rough bumps with fine-grit sandpaper. -
Base coat:
Paint the entire body with a creamy off-white color. It doesn’t need to be perfect; a little streakiness adds texture. -
Paint the beak and feet:
Paint the beak a soft burnt orange and the feet a rich mustard yellow. I find that mixing a tiny bit of brown into the yellow makes it look more natural and less plastic. -
Paint the eyes:
Carefully dot black paint into the eye indentations. Once dry, you can add a microscopic dot of white for a highlight. -
Antiquing wash:
Mix a very watery brown paint. Brush it over the entire duck, focusing on the crevices like the wing lines and neck. Immediately wipe almost all of it off with a paper towel or rag, leaving the dark pigment only in the textures. -
Seal:
Finish with a matte spray sealant or varnish to protect the paint without making the duck look shiny.
Rustic Texture Trick
Before the clay dries, gently dab the surface with a tough bristle brush or a crumpled ball of aluminum foil. This creates a pitted texture that grabs the antique wash later.
Place your new feathered friend in a sunny spot to enjoy his charming personality all day long
Mushroom Cluster Sculptures

This charming cluster of mushrooms rests on a matching ceramic plate, creating a minimalist yet organic centerpiece. The textured, speckled clay gives the piece a natural, earthy feel that looks beautiful on any shelf.
Step-by-Step
Materials
- White polymer clay or air-dry clay (preferably with speckles)
- Small rolling pin
- Clay sculpting tools or a butter knife
- Small bowl of water (if using air-dry clay)
- Needle tool or toothpick
- Aluminum foil
- Sandpaper (fine grit)
- Matte sealant or varnish
Step 1: Forming the Dish Base
-
Roll the base:
Begin by rolling out a ball of clay into a flat circle, about 1/4 inch thick. This will be the foundational plate for your mushroom cluster. -
Shape the rim:
Gently curve the outer edges of the circle upward to create a shallow rim. Smooth out any finger marks with a little water or by gently rubbing the clay. -
Texture the surface:
Lightly tap the surface of the dish with a stiff brush or a textured sponge to give it that organic, stone-like appearance seen in the photo.
Step 2: Sculpting the Mushroom Stems
-
Prepare the foil armature:
For the largest mushroom, crumple a piece of aluminum foil into a cylinder shape. This saves clay and keeps the stem lightweight. -
Cover with clay:
Roll out a sheet of clay and wrap it around your foil cylinder. Smooth the seam completely so it disappears. -
Shape the large stem:
Create a tapered look by rolling the cylinder gently on your work surface, making it slightly wider at the bottom and narrower at the top. -
Create smaller stems:
Repeat the process for the medium and small mushrooms. For the smallest one, you might not even need a foil core; solid clay works fine for tiny pieces. -
Add texture:
Using a needle tool, poke tiny, random holes and scratches into the stems to mimic the natural imperfections found on real fungi.
Natural Texture Hack
Mix dried coffee grounds or black pepper into your white clay before sculpting. This creates a realistic speckled stone effect instantly.
Step 3: Forming the Caps
-
Roll the cap balls:
Roll three balls of clay corresponding to the size of your stems: large, medium, and small. -
Shape the domes:
Press your thumb into the center of each ball and gently pinch around the edges to form a smooth dome shape. Keep the edges thick and rounded rather than sharp. -
Attach caps to stems:
Score (scratch) the top of a stem and the underside of a matching cap. Apply a dab of water or liquid clay, then press them together firmly. -
Smooth the connection:
Use a modeling tool to blend the clay slightly under the cap so the connection is secure.
Collapsing Stems?
If the caps are too heavy and the stems slouch, insert a toothpick through the center of the stem and into the cap for internal support.
Step 4: Assembly and Finishing
-
Arrange the cluster:
Place the three mushrooms onto the clay dish base. I usually position them slightly off-center for a more dynamic look. -
Secure the mushrooms:
Score the bottom of each stem and the spot on the dish where it will sit. Using slip (clay mud) or liquid clay, press them down firmly to bond them to the base. -
Blend the bases:
Use a small tool to smooth the clay from the bottom of the stem onto the dish so they look like they grew right out of the plate. -
Final texturing:
Check for any fingerprints and smooth them away. Re-apply the speckled texture to any areas that got smoothed out during assembly. -
Dry or Bake:
Follow the instructions for your specific clay. If baking, ensure the foil cores stay inside during the process. -
Seal:
Once fully cured and cooled, brush on a coat of matte vending to protect the finish without making it look plastic and shiny.
Now you have a serene little forest sculpture to bring some calm to your desk

TRACK YOUR CERAMIC JOURNEY
Capture glaze tests, firing details, and creative progress—all in one simple printable. Make your projects easier to repeat and improve.
Mini Monster Head Charm
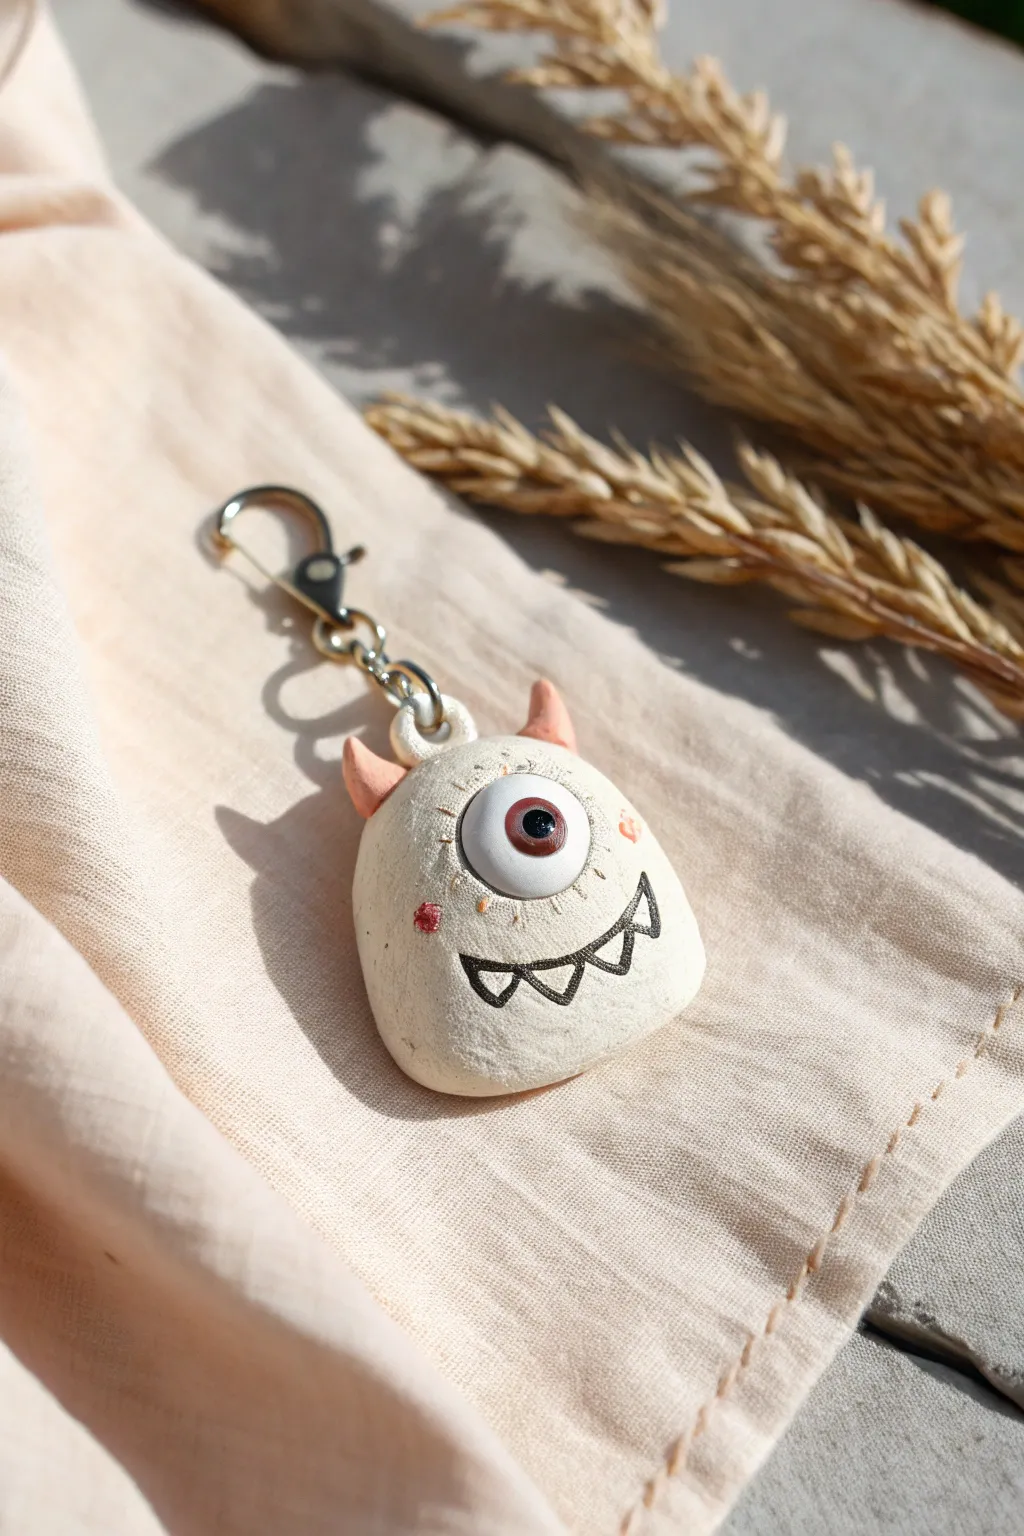
Sculpt a quirky, one-eyed monster companion with this beginner-friendly clay project. The finished piece features a textured, stone-like skin and a charmingly goofy smile, perfect for hanging on a backpack or keyring.
Step-by-Step
Materials
- White polymer clay (or air-dry clay)
- Small amount of reddish-pink clay
- Small amount of brown and black clay (or acrylic paints)
- Texturing tool (stiff toothbrush or crumpled foil)
- Fine-point black permanent marker or detail paintbrush
- Metal eyepin
- Jump ring and lobster clasp fixtures
- Gloss glaze (optional)
Step 1: Shaping the Base
-
Condition the clay:
Begin by taking a chunk of white clay about the size of a walnut. Knead it in your hands until it becomes soft, pliable, and warm, which prevents cracks later on. -
Form the head shape:
Roll the clay into a smooth ball first, then gently flatten it slightly into a rounded gumdrop or rounded triangular shape. The base should be wider than the top. -
Insert the hardware:
Take your metal eyepin. If the stem is too long, trim it with wire cutters. Push the straight end down into the center of the top of the head until only the loop is visible. -
Add texture:
To get that speckled, organic look, gently press a clean, stiff toothbrush or a ball of crumpled aluminum foil over the entire surface of the white clay. Don’t press too hard; you just want a subtle stippled effect.
Step 2: Creating the Eye
-
Make the eyeball:
Roll a smaller ball of smooth white clay (about pea-sized) and flatten it into a disc. Press this firmly into the center of the monster’s face. -
Add the iris:
Create a tiny ball of brown clay, flatten it, and place it in the center of the white eye disc. -
Add the pupil:
Take an even tinier speck of black clay, roll it into a ball, and press it into the center of the brown iris. -
Add the highlight:
For that spark of life, take a microscopic dot of white clay and place it near the edge of the black pupil. This reflection makes the eye look wet and real. -
Sculpt the eyelids:
Roll two very thin snakes of white clay. Place one curve over the top of the eye and one under the bottom to frame it, blending the outer edges into the main head shape with a modeling tool or your finger.
Loose Eyepin?
If the metal pin pulls out after baking, pull it all the way out, add a drop of superglue to the stem, and slide it back into the existing hole.
Step 3: Adding Details & Baking
-
Attach the horns:
Take two small pieces of reddish-pink clay and roll them into tiny cones. Press these onto the top corners of the head to form little horns. -
Add cheek blushes:
With the same pink clay, push two tiny, flattened dots onto the cheeks for a cute blush effect. I like to texture these slightly with the toothbrush again to integrate them. -
Bake the clay:
Follow the baking instructions on your specific package of polymer clay (usually 275°F/135°C for 15-30 minutes). If using air-dry clay, let it sit for 24-48 hours. -
Cool down:
Allow the piece to cool completely before moving to the decoration phase. Warm clay is fragile.
Level Up: Galaxy Skin
Mix blue and purple clay with glitter before shaping the head for a cosmic monster variant. Use silver paint for the teeth and details.
Step 4: Finishing Touches
-
Draw the mouth:
Using a fine-point permanent marker or a very fine brush with black acrylic paint, draw a curved smile line below the eye. -
Draw the teeth:
Add small triangles hanging down from the smile line to create pointed teeth. Fill in the gaps if you want a bolder look. -
Add eye details:
Carefully draw short, dashed lines radiating out around the white eyeball to create emphasis and add to the ‘sketchy’ aesthetic. -
Glaze the eye:
Apply a drop of gloss glaze or clear nail polish specifically to the eyeball area. This contrasts with the matte textured skin and makes the eye pop. -
Attach the keychain:
Use pliers to open a jump ring, slide it through the eyepin loop on the monster’s head, attach your lobster clasp assembly, and twist the ring closed.
Now you have a silly little guardian ready to watch over your keys