Whenever I need a quick creative win, I make tiny clay charms—they’re small, cute, and ridiculously satisfying to finish in one sitting. Here are my favorite kawaii charm ideas you can mix and match for jewelry, keychains, and all those little accessories you love to personalize.
Smiley Fruit Slice Charms
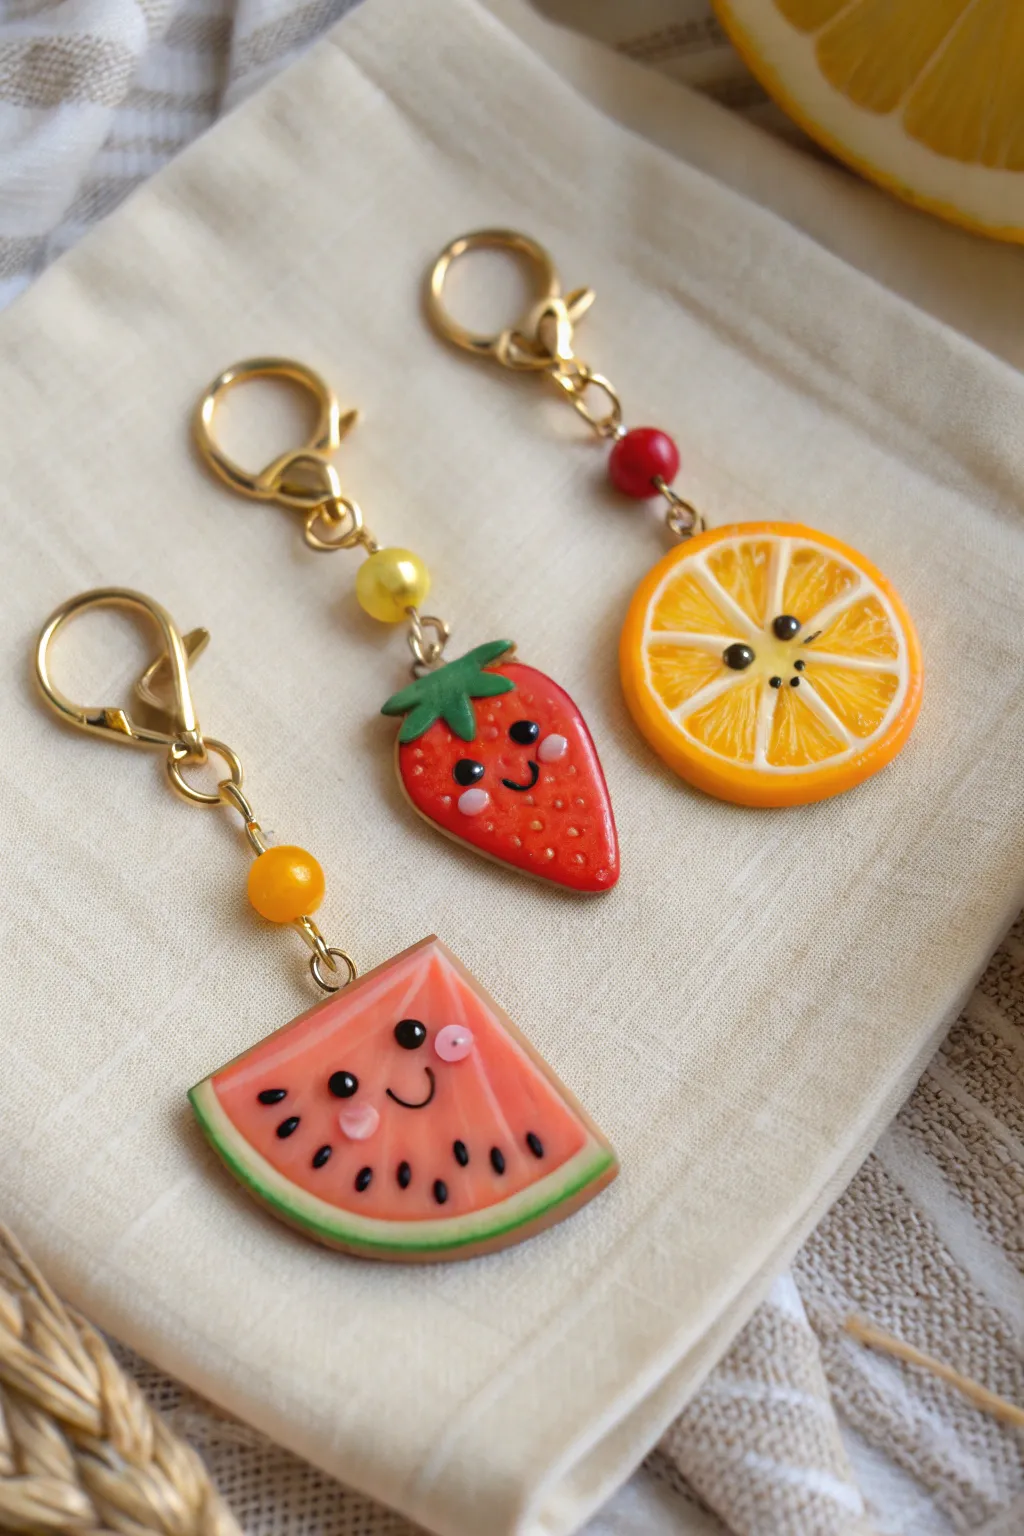
Brighten up your keys or bags with this adorable set of smiling fruit slice charms. These cheerful polymer clay creations feature glistening finishes and sweet expressions that are sure to spark joy wherever you go.
Step-by-Step Guide
Materials
- Polymer clay (red, pink, orange, white, yellow, green, black)
- Translucent liquid clay or gloss glaze
- Rolling pin or pasta machine
- Small circle cutter
- Needle tool and dotting tools
- Blade tissue cutter
- Eye pins (gold)
- Gold keychain clasp findings
- Jump rings and chain segments
- Beads (yellow, red, orange)
- Pliers (round nose and flat nose)
- Oven
Step 1: Shaping the Fruit Bases
-
Mix your colors:
Start by conditioning your clay. For the watermelon, mix pink with a tiny bit of red for a ripe melon shade. For the orange, you need a bright citrus orange. The strawberry needs a classic deep red. -
Form the orange slice:
Create an orange cane. Roll a sausage of orange clay and wrap it in a thin sheet of white clay. Reduce this log and cut it into 8 small triangular wedges. Arrange these wedges in a circle around a thin center snake of white clay to form the segments. -
Wrap the orange:
Wrap the segmented circle in a final layer of white clay, followed by a slightly thicker layer of orange clay for the rind. Slice a disk from this cane to create your charm base. -
Shape the strawberry:
Form a ball of red clay and gently press it into a rounded triangular strawberry shape. Flatten it slightly, but keep it puffy and rounded for dimension. -
Create the watermelon slice:
Take your pink clay and shape a semicircle. Roll a thin snake of white clay and wrap it around the curved edge. Follow this with a snake of green clay for the outer rind, smoothing the seams gently so they bond.
Step 2: Adding Details & Faces
-
Texture the strawberry:
Use a needle tool to poke small seeds all over the strawberry’s surface. At the top, add a small starfish shape of green clay for the leaves (calyx) and texture slightly. -
Add watermelon seeds:
Roll tiny teardrops of black clay. Press these flat onto the pink section of the watermelon to create the seeds. -
Sculpt the faces:
This is the most crucial part for personality. For all three fruits, use a small ball tool to indent sockets for the eyes. Roll tiny balls of black clay and press them into the sockets. -
Create the smiles:
Roll extremely thin threads of black clay for the mouths. Gently curve them into ‘U’ shapes and press them onto the faces using your needle tool. -
Add the sparkle:
Place microscopic dots of white clay on the black eyes to create the ‘catchlights’—this brings them to life. Use tiny flattened discs of pale pink clay for the cheeks. -
Insert hardware:
Carefully insert a gold eye pin into the top of each fruit charm. I find adding a dab of liquid clay to the pin shaft helps it bond permanently during baking.
Sticky Fingerprints?
To remove fingerprints before baking, lightly brush the raw clay with a little baby oil or cornstarch. This smooths the surface without ruining the shape.
Step 3: Baking & Assembly
-
Bake carefully:
Bake the charms according to your clay manufacturer’s instructions (usually around 275°F/130°C for 15-30 minutes). Tent with foil to prevent scorching the light colors. -
Glaze for shine:
Once cooled, apply a coat of gloss glaze or UV resin to the fruit surfaces. This mimics the juicy look of real fruit and protects the tiny facial details. -
Prepare the beaded links:
Take an eye pin and thread a coordinating bead onto it (yellow for strawberry, orange for watermelon, red for orange slice). Trim the excess wire and use round nose pliers to create a loop at the other end. -
Assemble the chain:
Using jump rings, attach the fruit charm to the bottom loop of your beaded link. Attach the top loop of the beaded link to the gold lobster clasp keychain.
Pro Tip: Better Rinds
For realistic rinds, use a toothbrush to gently texture the outer green skin of the watermelon or the orange skin before baking.
Clip your new fruity friends onto your backpack and enjoy their sunny smiles all year round


Tiny Strawberry Whole Fruit Charms
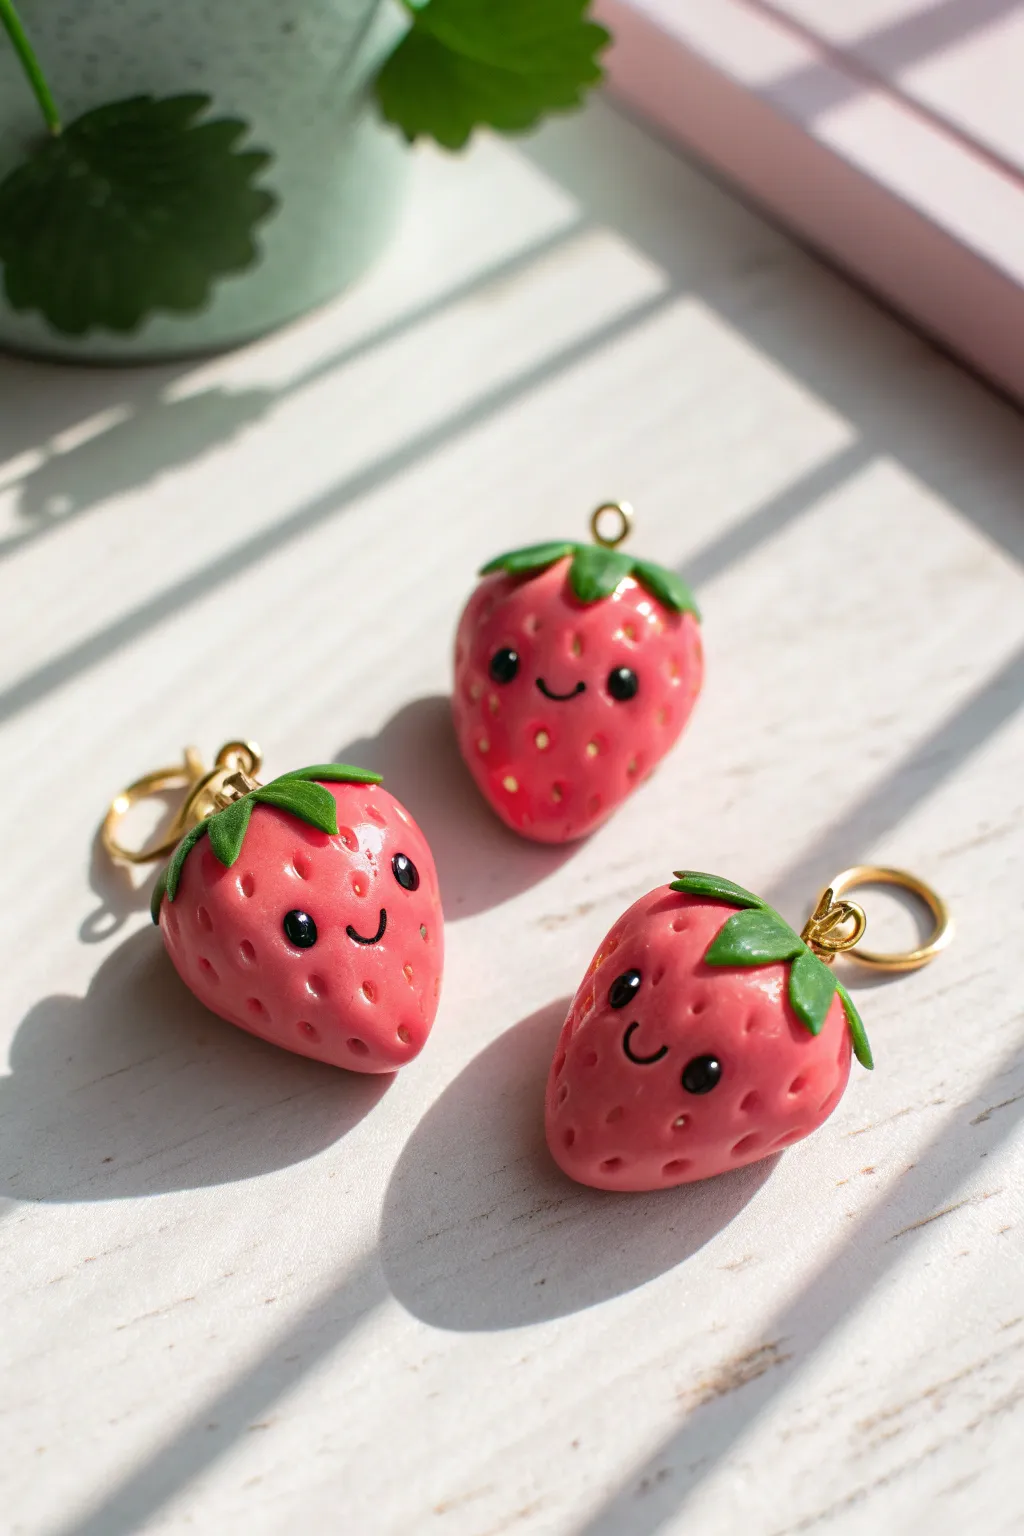
These adorable blushing strawberries strike the perfect balance between realistic fruit texture and sweet character design. With their glossy finish and friendly smiles, they make delightful pendants or zipper pulls.
Step-by-Step Tutorial
Materials
- Polymer clay (Strawberry Pink or Red)
- Polymer clay (Leaf Green)
- Polymer clay (Black)
- Needle tool or toothpick
- Ball stylus tool (small)
- Eye pins or screw eyes (gold)
- Gold jump rings
- Gloss glaze or UV resin
- Liquid clay (optional)
- Baking tile or parchment paper
Step 1: Shaping the Berry
-
Condition the clay:
Begin by conditioning your pink or red clay until it is soft and pliable. Use your hands to warm it up so it doesn’t crack while shaping. -
Form the base shape:
Roll a small ball of clay, roughly the size of a marble. Gently roll one side between your fingers to taper it into a rounded cone or teardrop shape, flattening the wider top slightly. -
Add texture:
Using a needle tool, gently poke small indentations all over the surface of the strawberry to mimic seed pockets. Be careful not to warp the overall shape as you press.
Uneven Seeds?
If your seed holes look messy, lightly roll the strawberry on your work surface after texturing but before adding the face. This softens the sharp edges of the holes.
Step 2: Adding the Face
-
Create eye sockets:
Choose a clear spot on the wider part of the berry for the face. Use a small ball stylus to press two shallow divots where the eyes will go. -
Insert the eyes:
Roll two incredibly tiny specks of black clay into balls. Place them into the divots you just made and press gently to secure them so they don’t protrude too much. -
Create the smile:
Roll a microscopically thin snake of black clay. Cut a tiny segment and carefully curve it into a ‘U’ shape using your needle tool, then press it onto the clay between the eyes.
Level Up: Berry Gradient
Brush a tiny amount of white chalk pastel on the very top of the berry before adding leaves to create a realistic ‘unripe’ gradient at the stem.
Step 3: Building the Calyx
-
Prepare the green clay:
Condition a small amount of green clay. Flatten it into a thin pancake on your work surface. -
Cut the leaves:
Using your needle tool or a small craft knife, cut out a star shape with roughly five or six points to act as the leafy top (calyx). -
Attach the greenery:
Place the green star on the flat top of your strawberry. Gently curve the points of the star down over the rounded ‘shoulders’ of the berry. I like to lift one or two tips slightly for a natural look. -
Secure the hardware:
Take a gold eye pin or screw eye. A tiny dab of liquid clay on the end adds extra security before you push it firmly into the center of the green leaves.
Step 4: Finishing Touches
-
Bake the charms:
Place your strawberries on a baking tile. Bake according to your specific polymer clay manufacturer’s instructions (usually around 275°F/135°C for 15-30 minutes). -
Cool down:
Let the pieces cool completely before handling. Polymer clay is slightly soft when hot and hardens as it cools. -
Glaze for shine:
Apply a coat of gloss glaze or UV resin to the entire berry to give it that juicy, fresh-picked sheen shown in the photo. Cure or dry as required. -
Attach the ring:
Once the finish is dry, open a gold jump ring using two pliers. Loop it through the eye pin and close it securely.
Now you have a handful of sweet strawberries ready to be worn or shared


Happy Mushroom Cap Charms
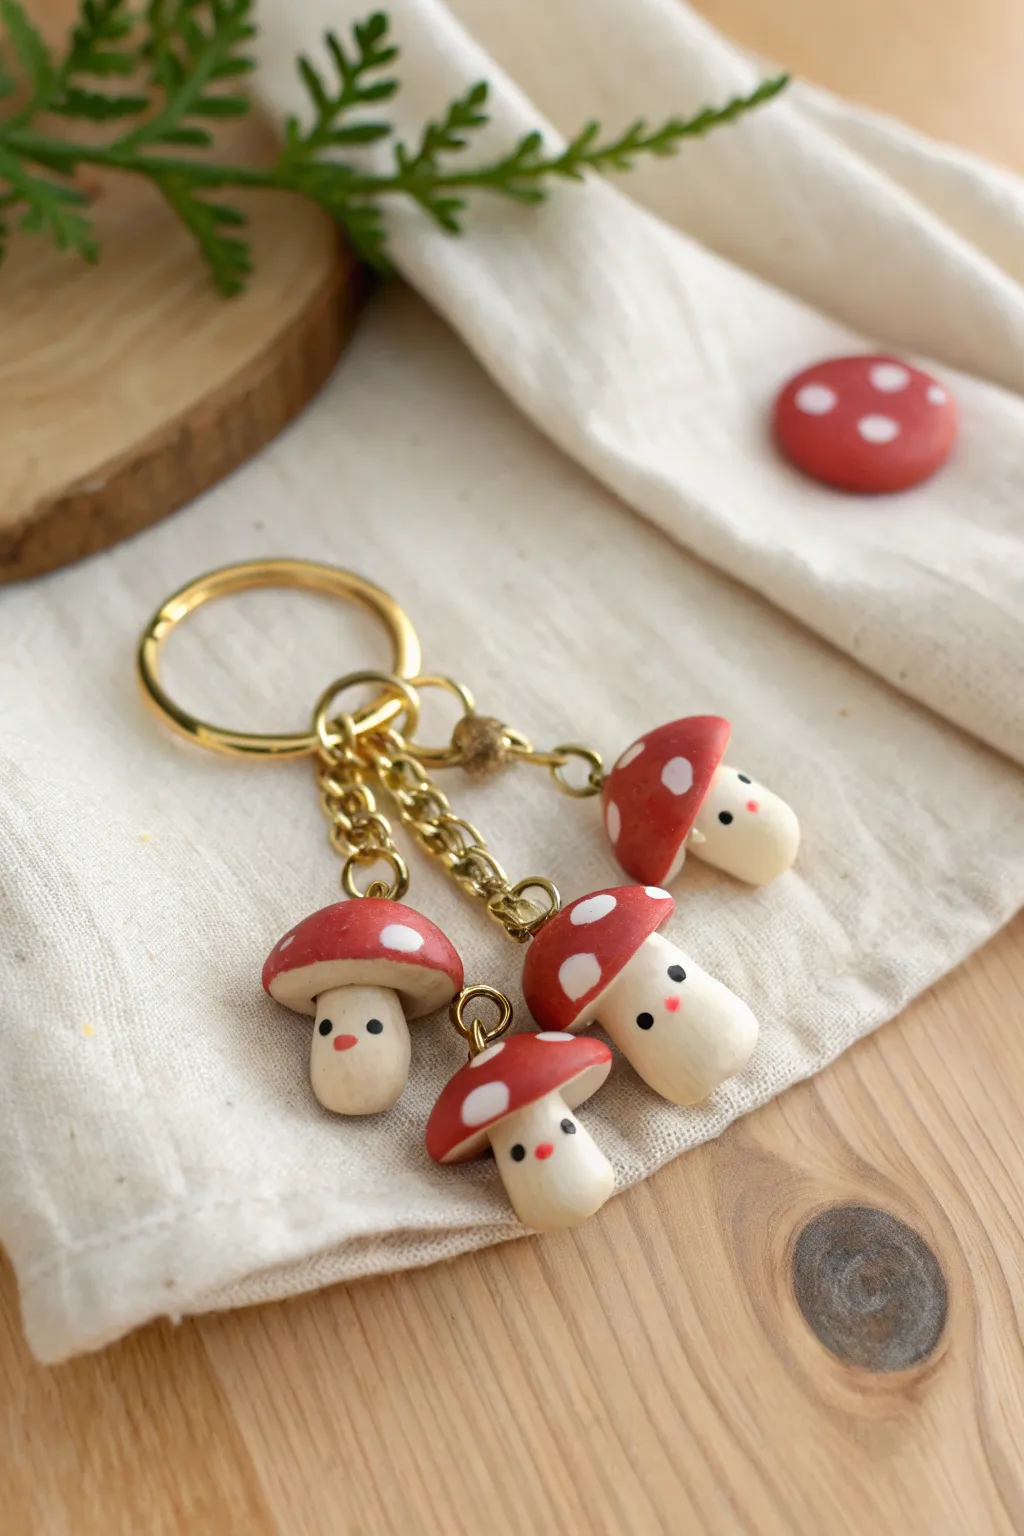
These adorable little toadstools bring a touch of woodland whimsy to your keys or bag. With their cheerful faces and classic red-and-white caps, they are a simple yet delightful polymer clay project perfect for beginners.
How-To Guide
Materials
- Polymer clay (red, beige/cream, white)
- Black acrylic paint or fine-tip marker
- Pink acrylic paint or clay
- Gold screw eye pins (small)
- Gold keychain ring with chain links (and jump rings)
- Needle tool or toothpick
- Dotting tool or small ball stylus
- Polymer clay glaze (gloss or satin)
- Small paintbrush
- Baking sheet and parchment paper
- Pliers (jewelry round-nose and flat-nose)
Step 1: Shaping the Mushrooms
-
Prepare the stems:
Start by conditioning the beige clay until it’s soft and pliable. Roll four small balls of clay, roughly the size of a pea, and shape each one into a thick, slightly tapered cylinder to form the mushroom stalks. Flatten the bottom gently so they can stand upright. -
Create the caps:
Condition the red clay and roll four balls slightly larger than the stem pieces. Gently press each ball with your thumb to create a dome shape, curving the edges downward like a little umbrella. -
Hollow the underside:
Use your thumb or a rounded tool to create a slight indentation on the underside of each red cap. This ensures a snug fit when placing it onto the stem. -
Assemble the mushrooms:
Press a red cap onto each beige stem. You don’t need glue yet; just firm pressure to bond the raw clay. Smooth the seam where they meet underneath if necessary, or leave it distinct for a cartoonish look. -
Add the hardware:
Take a small gold screw eye pin for each mushroom. Insert it into the very top center of the red cap, twisting gently as you push down to secure it deep into the clay without distorting the shape.
Smooth Seams Tip
To bond the cap and stem seamlessly without smushing the shapes, use a tiny bit of liquid polymer clay as ‘glue’ between the raw pieces before baking.
Step 2: Adding Details & Baking
-
Add the spots:
Roll tiny, almost microscopic balls of white clay. Press these randomly onto the red caps to create the iconic polka dots. Flatten them gently so they become flush with the curve of the cap. -
Pre-bake inspection:
Check your fingerprints. Before baking, I like to lightly brush the surface with a tiny bit of baby oil or use a soft brush to smooth away any prints. -
Bake the charms:
Place your mushrooms on a parchment-lined baking sheet. Bake according to your specific clay brand’s instructions (usually around 275°F or 135°C for 15-30 minutes). Let them cool completely before handling. -
Secure the pin:
Once cool, test the eye pin. If it feels loose, gently unscrew it, add a tiny drop of super glue to the threads, and screw it back in for permanent hold.
Step 3: Painting & Finishing
-
Paint the face:
Using a very fine dotting tool or a toothpick, dip into black acrylic paint to make two tiny eyes on the stem. Add a tiny pink dot between and slightly below the eyes for the nose/mouth. -
Allow to dry:
Let the paint dry completely. This is crucial before glazing to prevent smearing your cute faces. -
Glaze the charms:
Apply a thin coat of gloss glaze over the mushrooms to protect the paint and give them a finished, ceramic-like shine. Let this dry fully according to the bottle instructions. -
Prepare the keychain:
Grab your gold keychain ring. If it has a long chain, you might want to create varied lengths by attaching jump rings at different intervals or using separate chain segments. -
Attach the charms:
Using two pairs of pliers, twist open a jump ring (don’t pull it apart). Hook it through the eye pin of a mushroom and then onto a link of the keychain. -
Close the rings:
Twist the jump ring back closed until the ends meet perfectly. Repeat this for all four mushrooms, spacing them out so they cluster nicely when hung.
Loose Eye Pins?
If the eye pin pulls out after baking, don’t panic. Just add a drop of super glue or E6000 to the pin’s shaft and insert it back into the hole.
Now you have a handful of happy little fungi ready to brighten up your daily adventures


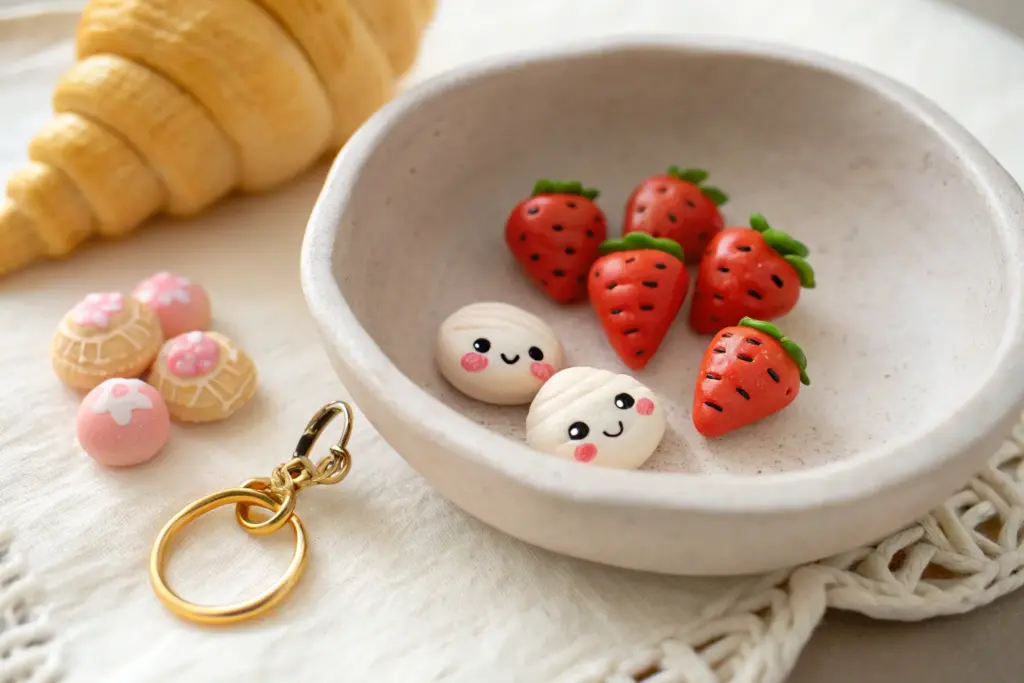
Cloud and Raindrop Charm Pair

Bring a little sunshine to your crafting bag with this adorable set of weather-themed stitch markers or zipper pulls. The smiling cloud and dangling raindrops are sculpted from polymer clay and finished with a durable, glossy shine.
Step-by-Step
Materials
- White polymer clay
- Light blue polymer clay
- Beige or tan polymer clay
- Translucent liquid clay or bake-and-bond
- Black acrylic paint
- Pink soft pastel chalk (for cheeks)
- UV resin or glossy glaze
- Gold findings: 12mm lobster clasps, 4mm and 6mm jump rings, eye pins
- Needle tool or toothpick
- Dotting tool or ball stylus
- Sandpaper (fine grit)
- Clay roller
- Round cutters (small) or Exacto knife
Step 1: Sculpting the Cloud
-
Condition the white clay:
Start by kneading the white polymer clay until it is soft and pliable. Roll it into a smooth ball to remove any trapped air bubbles. -
Form the cloud base:
Flatten the ball into a thick disc, about 4-5mm thick. You can use an acrylic roller for an even surface. -
Shape the fluff:
Using a small round cutter or simply your fingers, gently indent the edges to create a scalloped ‘fluffy’ cloud shape. Smooth the edges with your finger so they are rounded, not sharp. -
Add the smile:
Roll an incredibly thin snake of black clay—thread-thin. Cut a tiny curved piece for the smile and two tiny dots for eyes. Gently press them onto the cloud face. Alternatively, you can paint these details after baking, which I often find gives cleaner results. -
Apply blush:
Scrape a little pink pastel chalk into dust. Dip a dry brush or cotton swab into the dust and gently dab rosy cheeks onto the raw clay. -
Insert hardware:
Screw a small eye pin into the top center of the cloud. Remove it, add a dab of liquid clay to the threads, and screw it back in for a secure hold.
Step 2: Creating the Raindrops
-
Mix the rain color:
Condition your light blue clay. To get the speckled effect seen in the photo, mix in a tiny pinch of black pepper or dark blue embossing powder, or simply use a granite-effect clay. -
Shape the droplets:
Divide the blue clay into three equal pea-sized balls. Roll each into a teardrop shape, flattening them slightly so they aren’t fully round. -
Create connector beads:
Roll three tiny balls of beige/tan clay. These act as the decorative connectors between the hardware and the raindrops. -
Insert eye pins:
Trim your eye pins short. Push an eye pin into the top of each blue raindrop and through each beige bead. Applying a touch of liquid clay to the pin shaft before insertion ensures they won’t pull out later. -
Bake the pieces:
Arrange all your clay pieces on a tile or parchment-lined baking sheet. Bake according to your clay package instructions (usually 275°F/135°C for 15-30 minutes). Let them cool completely.
Clean Clay Pro-Tip
White clay attracts dust like a magnet. Before starting the cloud, wipe your hands, tools, and work surface with a baby wipe or rubbing alcohol to keep the white pristine.
Step 3: Finishing and Assembly
-
Paint the face (optional):
If you didn’t use clay for the face details earlier, use a fine detail brush and black acrylic paint to draw the eyes and smile now. Let the paint dry fully. -
Glaze the pieces:
Apply a coat of UV resin to the front and back of the cloud and raindrops for a glass-like finish. Cure under a UV lamp for 2-3 minutes. If using water-based glaze, apply two thin coats, letting it dry between layers. -
Assemble the cloud:
Use pliers to open a large jump ring. Loop it through the eye pin on the cloud and attach a large gold lobster clasp. Close the ring securely. -
Link rain chain 1:
For the first raindrop charm: Connect one blue drop to one beige bead using a small jump ring. Then, attach the beige bead to a large lobster clasp using another jump ring. -
Link rain chain 2:
For the double raindrop charm: Connect one blue drop to a beige bead. Connect a second blue drop to its own beige bead. Attach both beige bead units to a single jump ring, and attach that ring to a lobster clasp.
Level Up: Glitter Storm
Mix fine iridescent glitter or opal flakes into the blue raindrop clay before shaping. When glazed, the drops will shimmer like they are catching the sunlight.
Clip these sweet charms onto your planners or knitting projects to keep the skies clear and happy

The Complete Guide to Pottery Troubleshooting
Uncover the most common ceramic mistakes—from cracking clay to failed glazes—and learn how to fix them fast.
Crescent Moon Sleepy Face Charms
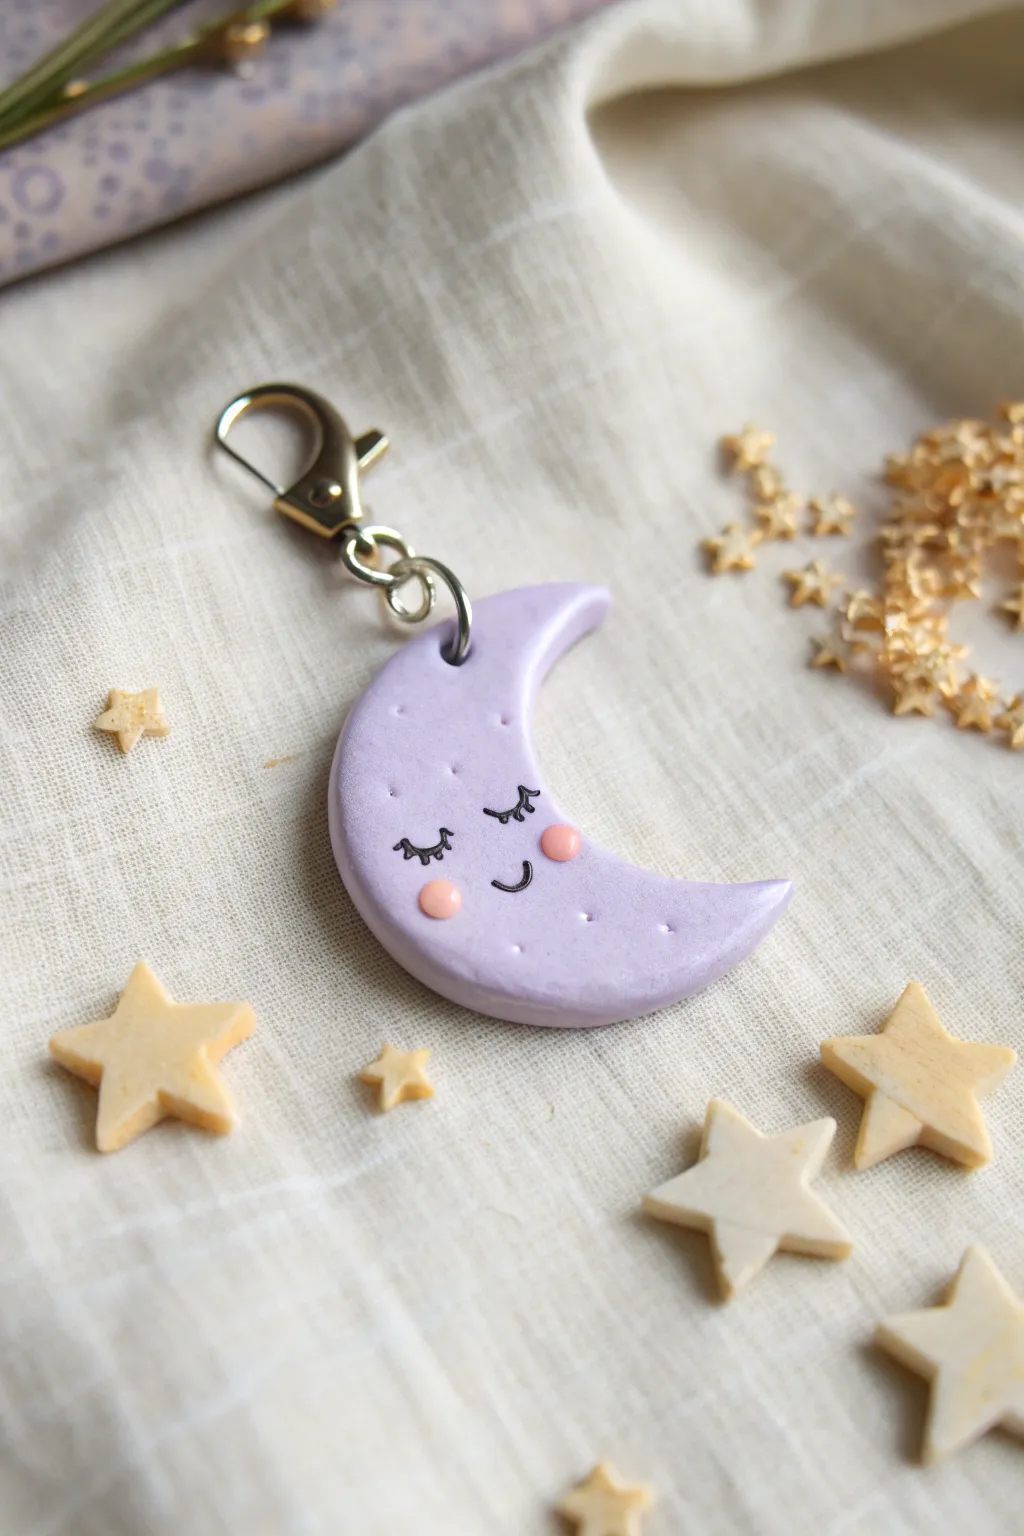
This whimsical crescent moon charm features a soft lilac hue and an irresistibly cute sleepy expression. It is perfect for hanging on a zipper, bag, or keychain to add a touch of celestial magic to your day.
Step-by-Step Tutorial
Materials
- Polymer clay (lilac or light purple)
- Polymer clay (pale pink for cheeks)
- Black acrylic paint or a fine-tip black paint pen
- Rolling pin or pasta machine
- Crescent moon cookie cutter (small) or X-Acto knife
- Ball stylus tool (small)
- Eye pin or screw eye pin
- Gold or bronze jump rings
- Lobster clasp keychain attachment
- Gloss or matte glaze (optional)
- Needle tool or toothpick
- Clay oven or toaster oven for baking
Step 1: Shaping the Moon
-
Condition the lilac clay:
Start by warming up your lilac polymer clay in your hands. Knead it thoroughly until it is soft, pliable, and free of any cracks or air bubbles. -
Roll out the slab:
Using your rolling pin, flatten the clay into a smooth slab. Aim for a thickness of about 1/4 inch (6mm) so the charm is sturdy but not too heavy. -
Cut the crescent shape:
Press your crescent moon cutter firmly into the clay. If you don’t have a cutter, print a small moon template on paper, place it over the clay, and carefully trace around it with an X-Acto knife. -
Smooth the edges:
Gently lift the clay shape. Use your fingertip to lightly rub along the raw cut edges to soften them, removing any sharp corners or loose bits of clay.
Clean Clay Tip
Keep separate baby wipes nearby. Wipe your hands and tools thoroughly between colors, especially before handling the light lilac clay, to avoid transferring dark lint or dust.
Step 2: Adding Details and Hardware
-
Texture the surface:
Take a small ball stylus or a blunt tool and gently press random, shallow divots into the surface of the moon to mimic craters. Keep them subtle for a smooth look. -
Create the cheeks:
Pinch off two tiny specs of pale pink clay. Roll them into minuscule balls and press them onto the moon where the cheeks should be, flattening them slightly so they adhere. -
Insert the hardware:
Insert a screw eye pin or straight eye pin into the top tip of the crescent. I find that dipping the end in a tiny bit of liquid clay or translucent bake-and-bond helps secure it permanently. -
Bake the charm:
Place your moon on a ceramic tile or baking sheet lined with parchment paper. Bake according to your specific clay package instructions (usually around 275°F/135°C for 15-30 minutes). -
Cool completely:
Allow the charm to cool down fully before handling. Polymer clay is slightly soft when hot and achieves its final hardness only after cooling.
Step 3: Finishing Touches
-
Paint the face:
Using a very fine detail brush and black acrylic paint, or a fine-tip paint pen, draw two curved lines for the sleeping eyes. -
Add lashes and smile:
Carefully add three tiny lashes to each closed eye and a small ‘u’ shape between the pink cheeks for the smile. -
Seal the charm:
If you want extra protection for the paint, apply a thin coat of polyurethane varnish or glaze over the entire piece. Let this dry completely according to the bottle’s instructions. -
Attach rings:
Using two pairs of jewelry pliers, twist open a jump ring (don’t pull it apart) and loop it through the eye pin on your moon. -
Connect the clasp:
Before closing that first jump ring, add a second jump ring or directly attach the lobster clasp assembly. Twist the jump ring closed securely so there is no gap.
Make it Sparkle
Mix ultra-fine holographic glitter into the lilac clay before rolling it out, or dust the raw clay with pearlescent mica powder for a dreamy, galaxy-inspired shimmer.
Now your sleepy moon is ready to act as a peaceful companion on your travels
Chubby Frog Face Charms
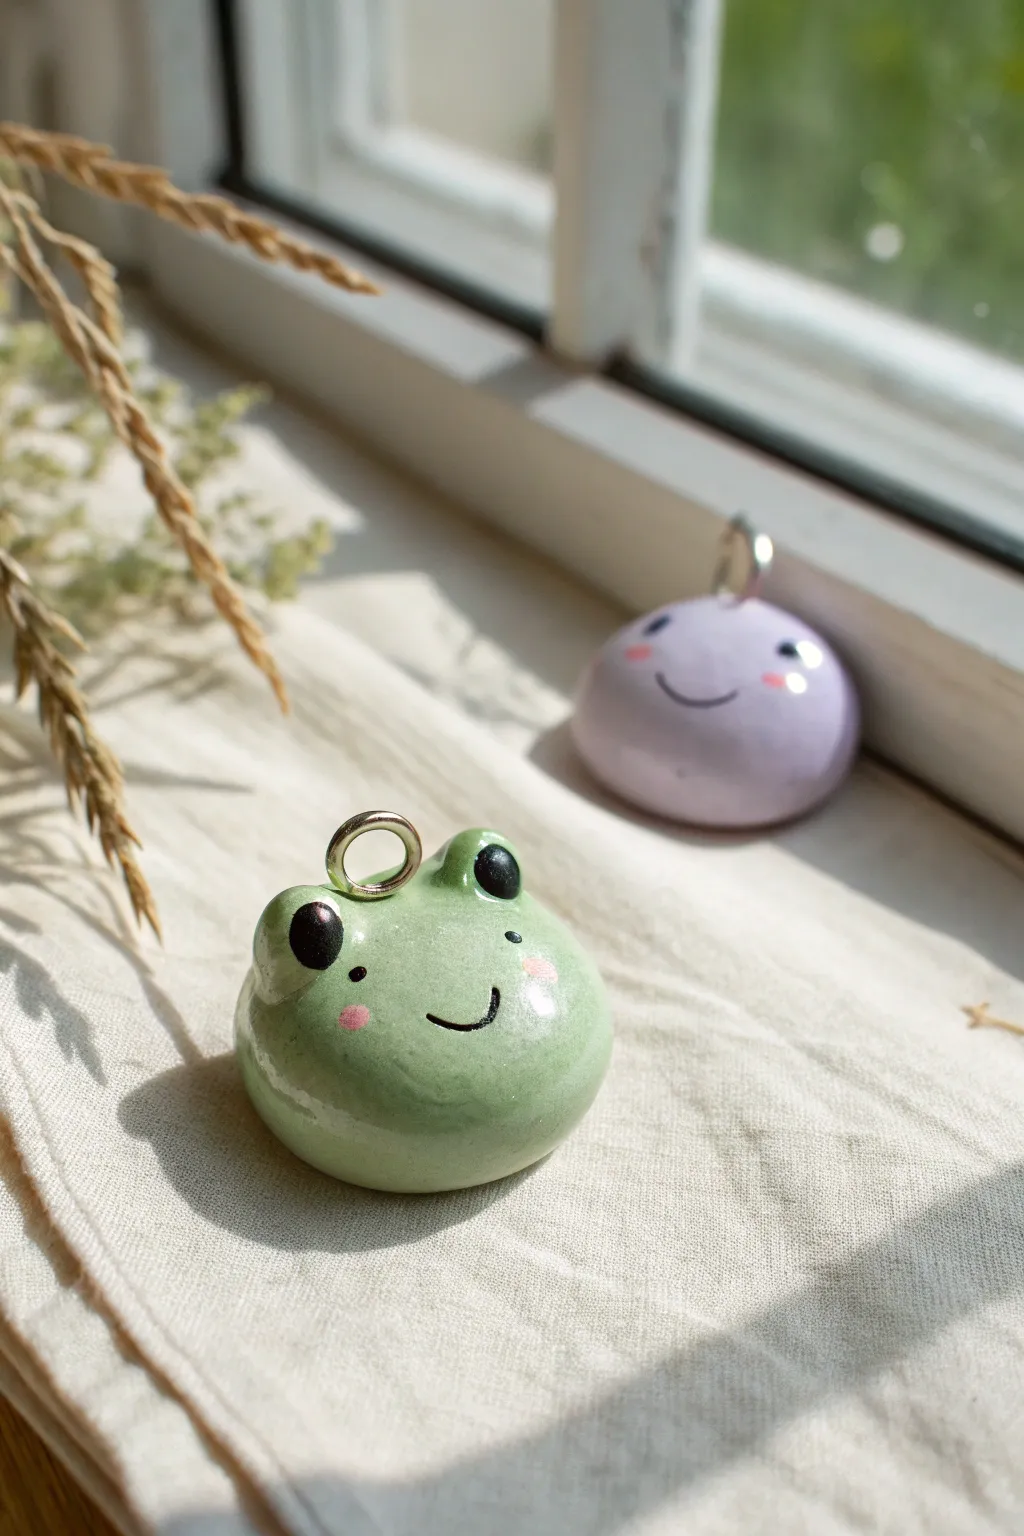
These delightfully chubby frog charms are the perfect blend of simplicity and cuteness. With their smooth, rounded shape and glossy finish, they make adorable additions to keychains or necklaces.
Step-by-Step
Materials
- Polymer clay (light sage green, black, pink)
- Clean work surface or ceramic tile
- Balling tools or dotting tools
- Small metal jump ring
- Liquid polymer clay or bake-and-bond (optional)
- Glossy polyurethane varnish or UV resin
- Small paintbrush
- Oven for baking
Step 1: Shaping the Base
-
Condition the clay:
Start by kneading your light green polymer clay until it is soft and pliable. This conditioning step is crucial to prevent cracks later on. -
Form the main body:
Roll a piece of the green clay into a smooth ball, roughly the size of a large grape. -
Flatten deeply:
Gently press the ball down onto your work surface using your palm. You want a thick, flattened dome shape rather than a pancake—think ‘chubby bun’ shape. -
Smooth the edges:
Run your finger around the perimeter to ensure the dome is even and there are no sharp edges or fingerprints.
Keep it Clean
Keep baby wipes nearby. Clean your hands thoroughly between handling the black clay and the light green clay to avoid dark smudges.
Step 2: Adding the Features
-
Create eye sockets:
Roll two very small balls of green clay for the eye bumps. Press them gently onto the top-left and top-right sections of the head. -
Blend the seams:
Use a silicone tool or your finger to smooth the bottom seam of the eye bumps so they look like they are rising naturally from the head. -
Make the actual eyes:
Roll two tiny balls of black clay. Flatten them slightly and press them onto the front of the green eye bumps you just made. -
Add the jump ring:
Take your metal jump ring and press it firmly into the center top of the head, between the eyes. I like to add a tiny drop of liquid clay to the ring base for extra security before inserting it. -
Paint the smile:
Roll an incredibly thin snake of black clay for the smile. Curve it into a ‘U’ shape and press it gently onto the face. -
Clean up the smile:
Alternatively, you can paint the smile on after baking using black acrylic paint and a fine liner brush if handling tiny clay snakes is too difficult. -
Add rosy cheeks:
Roll two minuscule balls of pink clay. Flatten them into discs and place them just below the eyes on either side of the smile. -
Final smooth:
Check the entire piece for dust or lint. You can gently wipe it with a bit of baby oil on a finger to smooth out any last imperfections.
Loose Jump Ring?
If the ring falls out after baking, pull it out completely, add a dab of superglue to the end, and push it back into the existing hole.
Step 3: Baking and Finishing
-
Bake the charm:
Place your frog on a tile or parchment-lined tray. Bake according to your brand of clay’s instructions (usually around 275°F/130°C for 15-30 minutes). -
Cool down:
Let the charm cool completely inside the oven or on the counter. Do not touch it while hot as the clay is still fragile. -
Select your glaze:
Prepare your glossy varnish or UV resin. This step gives the frog that wet, shiny amphibian look seen in the photo. -
Apply the gloss:
Brush a generous, even coat of varnish over the entire charm especially focusing on the eyes to make them pop. Avoid letting it pool around the jump ring. -
Cure or Dry:
Let the varnish dry fully according to the bottle instructions, or cure under a UV lamp if you used resin.
Now you have a glossy little friend ready to hang on your bag or keyring


What Really Happens Inside the Kiln
Learn how time and temperature work together inside the kiln to transform clay into durable ceramic.
Bunny Head With Long Ears Charm
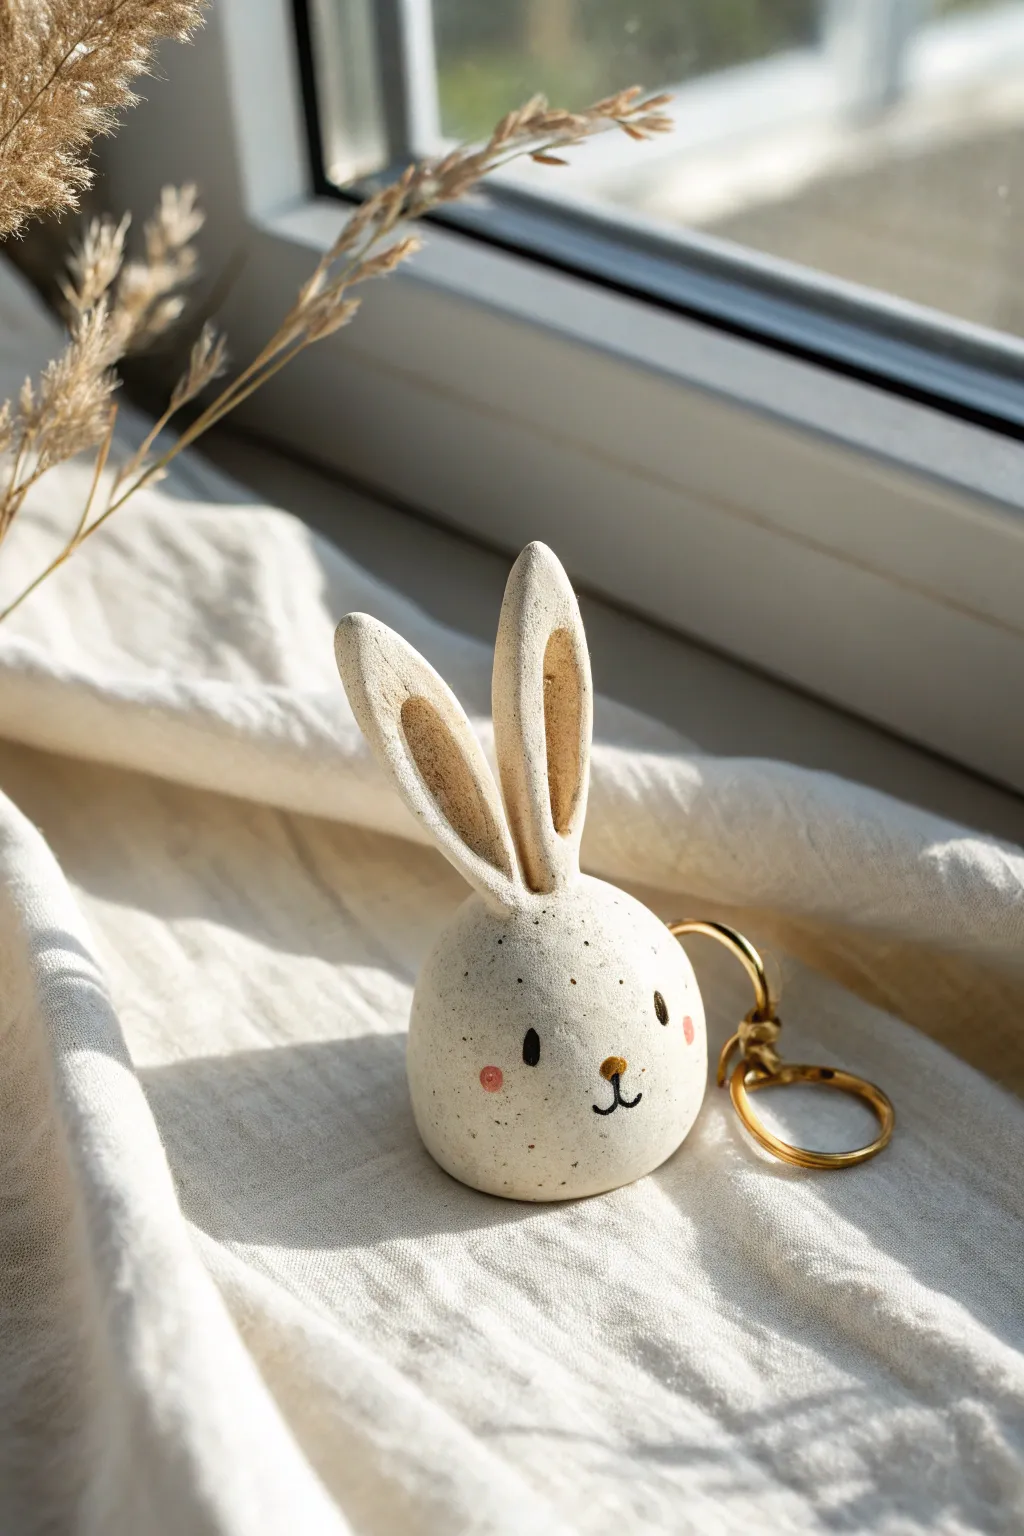
This adorable bunny charm features a round, speckled body and tall, expressive ears that add tons of personality. With its minimalist painted face and natural clay texture, it makes for a sweet keychain or a charming little desk companion.
Detailed Instructions
Materials
- White polymer clay or air-dry clay
- Acrylic rolling pin
- Modeling tools (or a toothpick)
- Black acrylic paint
- Pink acrylic paint
- Brown acrylic paint
- Fine detail paintbrush
- Old toothbrush (for speckling)
- Eye screw pin
- Gold keyring hardware
- Gloss varnish (optional)
Step 1: Shaping the Head and Ears
-
Prepare the clay:
Start by conditioning your white clay until it is soft and pliable. Roll it into a smooth, seamless ball about the size of a large gumball or walnut. This will form the main head of the bunny. -
Shape the base:
Gently tap the bottom of the ball against your work surface to flatten it slightly so the bunny can sit upright without rolling away. -
Create the ears:
Take two smaller equal pieces of clay and roll them into elongated logs. Taper one end of each log to a rounded point and flatten them slightly to create a petal-like ear shape. -
Detail the ears:
I like to use a small modeling tool or the back of a paintbrush to gently press a long indentation down the center of each ear, giving them dimension and a cupped look. -
Attach the ears:
Firmly press the wider base of the ears onto the top of the head. Use a clay shaper or your finger to blend the seams where the ears meet the head so they are securely attached and look seamless. -
Insert hardware:
While the clay is still soft, carefully screw an eye pin into the top of the head, positioning it slightly behind the ears or between them depending on how you want it to hang.
Clean Seams
Use a tiny amount of baby oil or clay softener on your finger to smooth the join where the ears meet the head. It makes the connection invisible and stronger.
Step 2: Adding Texture and Baking
-
Create the speckles:
Dilute a tiny amount of brown or black acrylic paint with water. Load an old toothbrush with the mixture and test it on a paper towel first. -
Splatter effect:
Gently run your thumb across the toothbrush bristles to flick fine speckles over the entire surface of the raw clay bunny. This mimics a natural ceramic or stone pottery look. -
Clean up:
If any speckles land too heavily, dab them gently with a cotton swab or tissue to soften them before they dry. -
Bake or dry:
Bake the charm according to your polymer clay package instructions, or let it air dry completely for 24-48 hours if using air-dry clay.
Floral Crown Twist
Before baking, twist tiny worms of green clay around the ears to make a crown, or glue on dried miniature flowers after baking for a cottagecore vibe.
Step 3: Painting and Finishing
-
Paint the eyes:
Once the charm is cool and dry, use your finest detail brush and black acrylic paint to make two small vertical ovals for the eyes. Space them widely apart for a cute, innocent look. -
Add the nose:
Paint a small, soft triangle or oval shape in brown paint right between the eyes, slightly lower down. -
Draw the mouth:
Using the very tip of your brush and black paint, draw a classic ‘w’ shape extending down from the nose to create the bunny’s smiling mouth. -
Blush the cheeks:
Dip the end of a toothpick or a small dotting tool into pink paint and gently tap it onto the cheeks to create rosy spots on either side of the face. -
Add highlights:
For extra life, add a tiny white dot to the top corner of each black eye. This reflection makes the expression pop. -
Assembly:
Attach your gold keyring to the eye screw using jump rings and pliers, ensuring the closure is tight. -
Seal:
Protect your paint job with a coat of matte or gloss varnish if desired, focusing especially on the painted face area.
Now you have a sweet, speckled bunny to guard your keys or brighten up your shelf
Mini Cow Face Charms
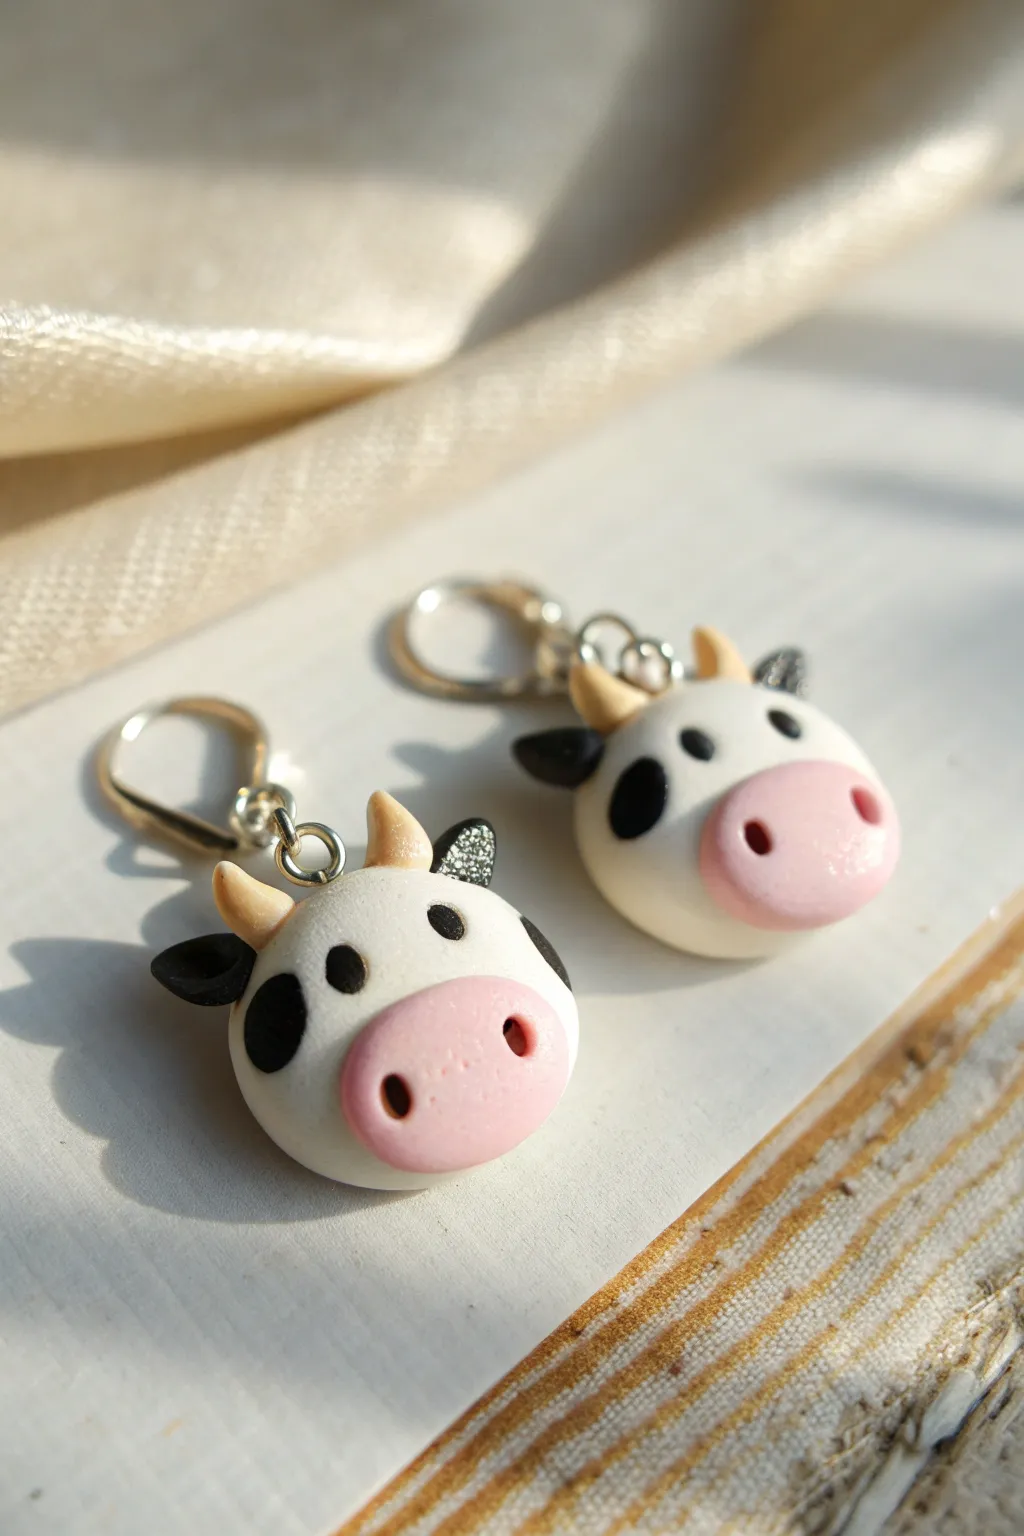
These sweet little cow face charms are perfect for earrings or stitch markers, featuring a simple round design with endearing pink snouts. Their whimsical expressions are created with just a few carefully placed pieces of polymer clay, making them an ideal afternoon project.
Step-by-Step Tutorial
Materials
- White polymer clay
- Light pink polymer clay
- Black polymer clay
- Light tan or beige polymer clay
- Two silver eye pins
- Two earring hooks (leverback style shown)
- Dotting tool or small ball stylus
- Needle tool or toothpick
- Craft knife or tissue blade
- Gloss glaze (optional)
Step 1: Forming the Base
-
Condition the clay:
Begin by conditioning your white clay until it is soft and pliable. This prevents cracks during baking. Roll two equal-sized balls, roughly 1.5 cm in diameter, to form the cow heads. -
Flatten the heads:
Gently press each white ball onto your work surface to flatten the back slightly, creating a domed shape rather than a full sphere. Smooth out any fingerprints. -
Insert the eye pins:
Prepare your eye pins by trimming them if they are too long. Insert one straight down into the top center of each white head. I like to add a tiny dab of liquid clay or bake-and-bond on the wire for extra security.
Clean Clay Tip
White clay picks up dust easily. Keep a pack of baby wipes nearby and clean your hands and tools specifically before handling the white clay base.
Step 2: Adding the Facial Features
-
Create the snout:
Condition a small amount of light pink clay. Roll two small ovals, flatten them gently, and press them onto the lower half of each white face. -
Detail the nostrils:
Using a medium-sized dotting tool, press two indentations into the pink snout to create the nostrils. Place them slightly wide apart for a cuter look. -
Make the eyes:
Roll two very tiny balls of black clay for each cow. Flatten them into small discs and press them onto the white face just above the snout. -
Add signature spots:
Create irregular black spots by flattening tiny blobs of black clay. Press one large spot on the side of the face (cheek area) for that classic dairy cow pattern. Smooth the edges so the spot looks flush with the white skin.
Add a Little Sparkle
For a magical touch, use glittery black clay for the ears or spots, or brush a tiny amount of pearl mica powder over the white clay before baking.
Step 3: Ears and Horns
-
Shape the ears:
Roll small teardrop shapes from black clay. You’ll need two per cow. Flatten them slightly and attach them to the sides of the head near the top. -
Refine ear shape:
Use a needle tool or the tip of your finger to curve the ears slightly forward, giving them a bit of dimension. -
Form the horns:
Using the light tan clay, roll tiny cones. These should be quite small to maintain the ‘calf’ look. Attach them to the top of the head, just inside where the ears are placed. -
Double check symmetry:
Look at both charms side-by-side to ensure the horn and ear placement is roughly symmetrical, though slight variations add character.
Step 4: Finishing Touches
-
Smooth fingerprints:
Before baking, do a final sweep with a little baby oil on your finger or a soft brush to remove dust and fingerprints from the white clay. -
Bake carefully:
Bake the charms according to your clay manufacturer’s instructions (usually around 230°F to 275°F for 15-30 minutes). I suggest tenting them with foil to prevent the white clay from yellowing. -
Cool down:
Let the charms cool completely before handling them, as hot clay creates fragile bonds. -
Glaze (optional):
For a finished look like the photo, apply a thin coat of satin or matte glaze. Avoid high gloss if you want a natural soft look, though a little gloss on the snout can look wet and cute. -
Assembly:
Once dry, use jump rings or pliers to attach your leverback earring hooks to the eye pins.
Now you have a charming pair of bovine buddies ready to wear or gift

TRACK YOUR CERAMIC JOURNEY
Capture glaze tests, firing details, and creative progress—all in one simple printable. Make your projects easier to repeat and improve.
Pastel Rainbow Star Charms
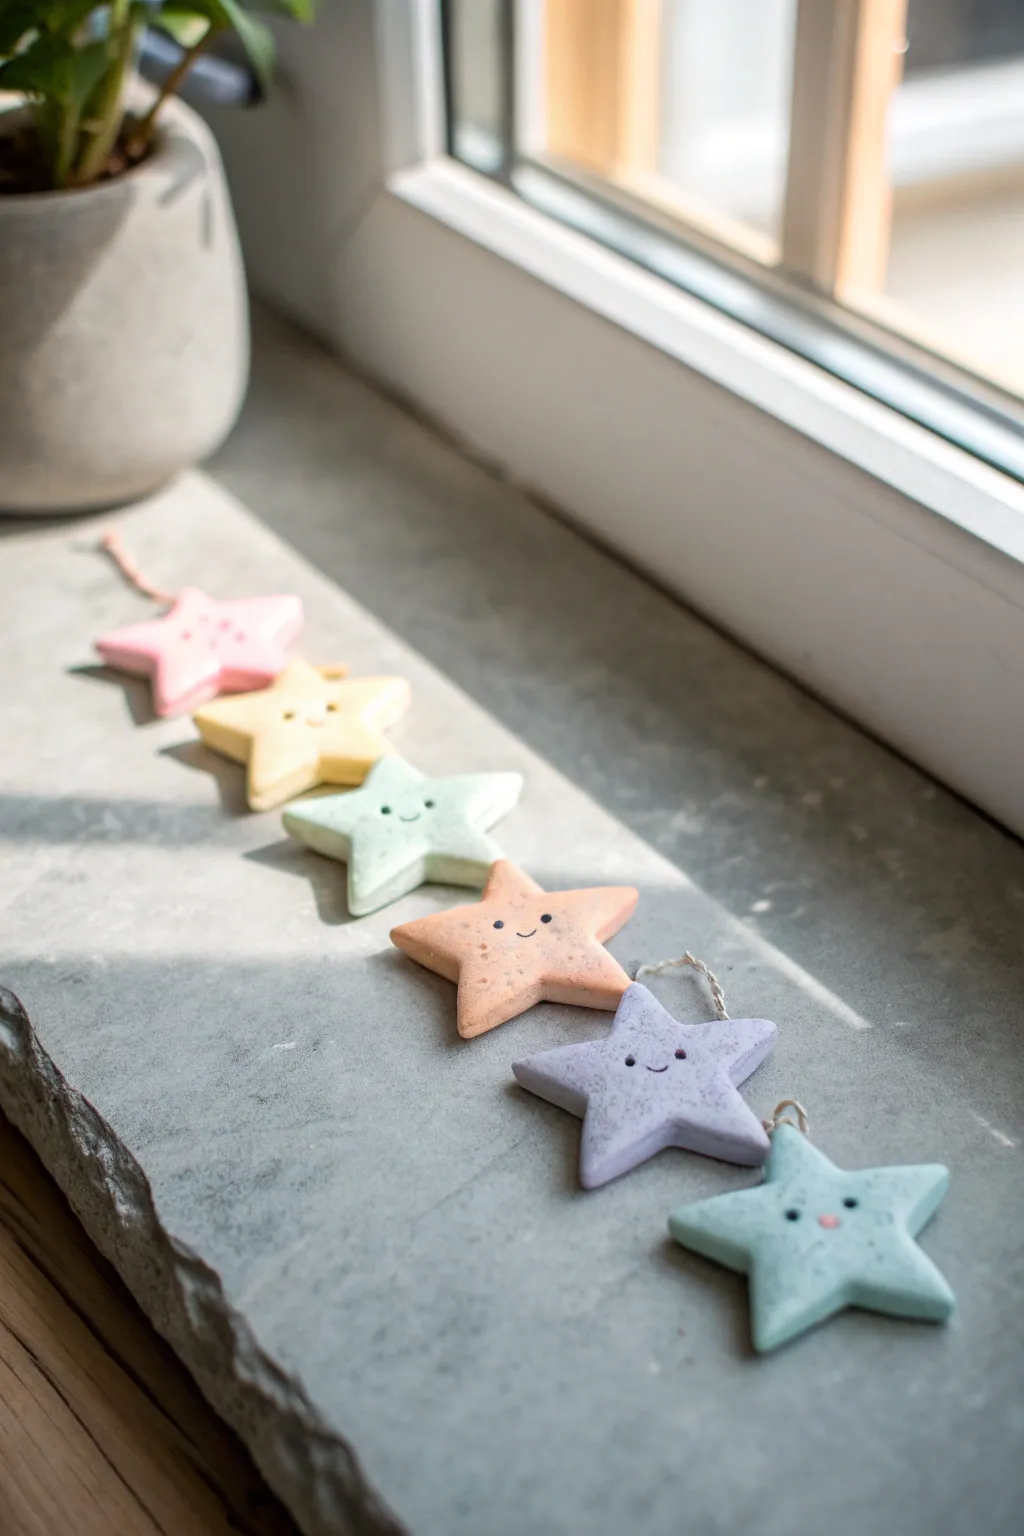
Bring a touch of whimsy to your windowsill or keyring with these adorable, matte pastel star charms. Each one features a uniquely sweet expression and a soft, textured finish that feels wonderful to the touch.
Detailed Instructions
Materials
- Polymer clay or air-dry clay (white base)
- Acrylic paints (pastel pink, yellow, mint, peach, lavender, teal)
- Small star-shaped cookie cutter (approx. 1.5 – 2 inches)
- Rolling pin or smooth glass jar
- Sandpaper or nail file (fine grit)
- Toothpick or needle tool
- Black fine-point permanent marker or black acrylic paint
- Small detail paintbrush
- Jute twine or embroidery thread for hanging
- Matte varnish or sealant (optional)
Step 1: Preparing the Clay Base
-
Condition the Clay:
Begin by kneading your white clay until it is soft, pliable, and free of cracks. If using polymer clay, the warmth of your hands is essential here. -
Roll Out a Slab:
Use your rolling pin to flatten the clay into an even slab. Aim for a thickness of about 1/4 inch (6mm) so the stars feel substantial and durable. -
Cut the Shapes:
Press your star-shaped cutter firmly into the clay. Give it a tiny wiggle before lifting to ensure clean edges. Cut out as many stars as you’d like for your rainbow set. -
Create a Hanging Hole:
While the clay is still wet or raw, take a toothpick or skewer to poke a hole through the top point of the star. Wiggle the tool slightly to make the hole prominent enough for twine later. -
Smooth the Edges:
Dip your finger in a little water (for air-dry clay) or baby oil (for polymer) and gently smooth any rough edges left by the cutter. -
Dry or Bake:
Follow your clay manufacturer’s instructions to cure the pieces. For air-dry clay, let them sit for 24-48 hours; for polymer, bake at the recommended temperature.
Step 2: Adding Color & Character
-
Sand for Texture:
Once fully cured and cool, lightly sand the surface and edges of each star. This gives them that lovely matte, stone-like texture visible in the photo. -
Mix Pastel Shades:
Prepare your palette with soft pastel colors. If you only have bright primary colors, mix them with plenty of white acrylic paint to achieve those muted, milky tones (pink, yellow, green, peach, purple, blue). -
Apply Base Color:
Paint each star a different solid pastel color. I find that applying two thin coats gives a smoother finish than one thick gloopy one. Let the first coat dry completely before adding the second. -
Create the Speckled Effect:
To mimic the stone-like look, you can dip an old toothbrush into slightly darker paint, wipe most of it off, and flick tiny speckles onto the stars. This step is subtle but adds great depth. -
Draw the Eyes:
Using a fine-point black marker or the very tip of a detail brush with black paint, place two small dots for eyes. Keep them widely spaced for a cute ‘kawaii’ look. -
Add the Smile:
Draw a small, curved line between the eyes for the mouth. Vary the expressions slightly—some can be smaller smiles, others wider—to give each star personality. -
Paint Rosy Cheeks:
Dip the back end of a paintbrush into pink paint and gently stamp small dots under the eyes for cheeks. Alternatively, use a tiny amount of dry pastel dust for a softer blush. -
Seal the Charm:
Apply a coat of matte varnish to protect the paint without making it shiny. A matte finish is key to maintaining the soft, earthy look of these specific charms.
Uneven Surfaces?
If your stars warped while drying, gently sand the back flat against a piece of sandpaper on a table. This creates a flush surface for sticking magnets on later.
Step 3: Assembly
-
Thread the Twine:
Cut a length of jute twine or embroidery thread (about 4 inches long). Fold it in half and thread the loop through the hole you made earlier. -
Secure the Loop:
Pull the loose ends through the loop and tighten gently to create a lark’s head knot, or simply tie a standard knot at the top to create a hanger.
Clean Edges Pro-Tip
Place a piece of plastic wrap over the clay before pressing down your cutter. This creates a beautiful, rounded ‘pillow’ edge rather than a sharp, harsh cut.
Now you have a charming string of stars ready to brighten up any corner of your home
Tiny Book or Journal Face Charms
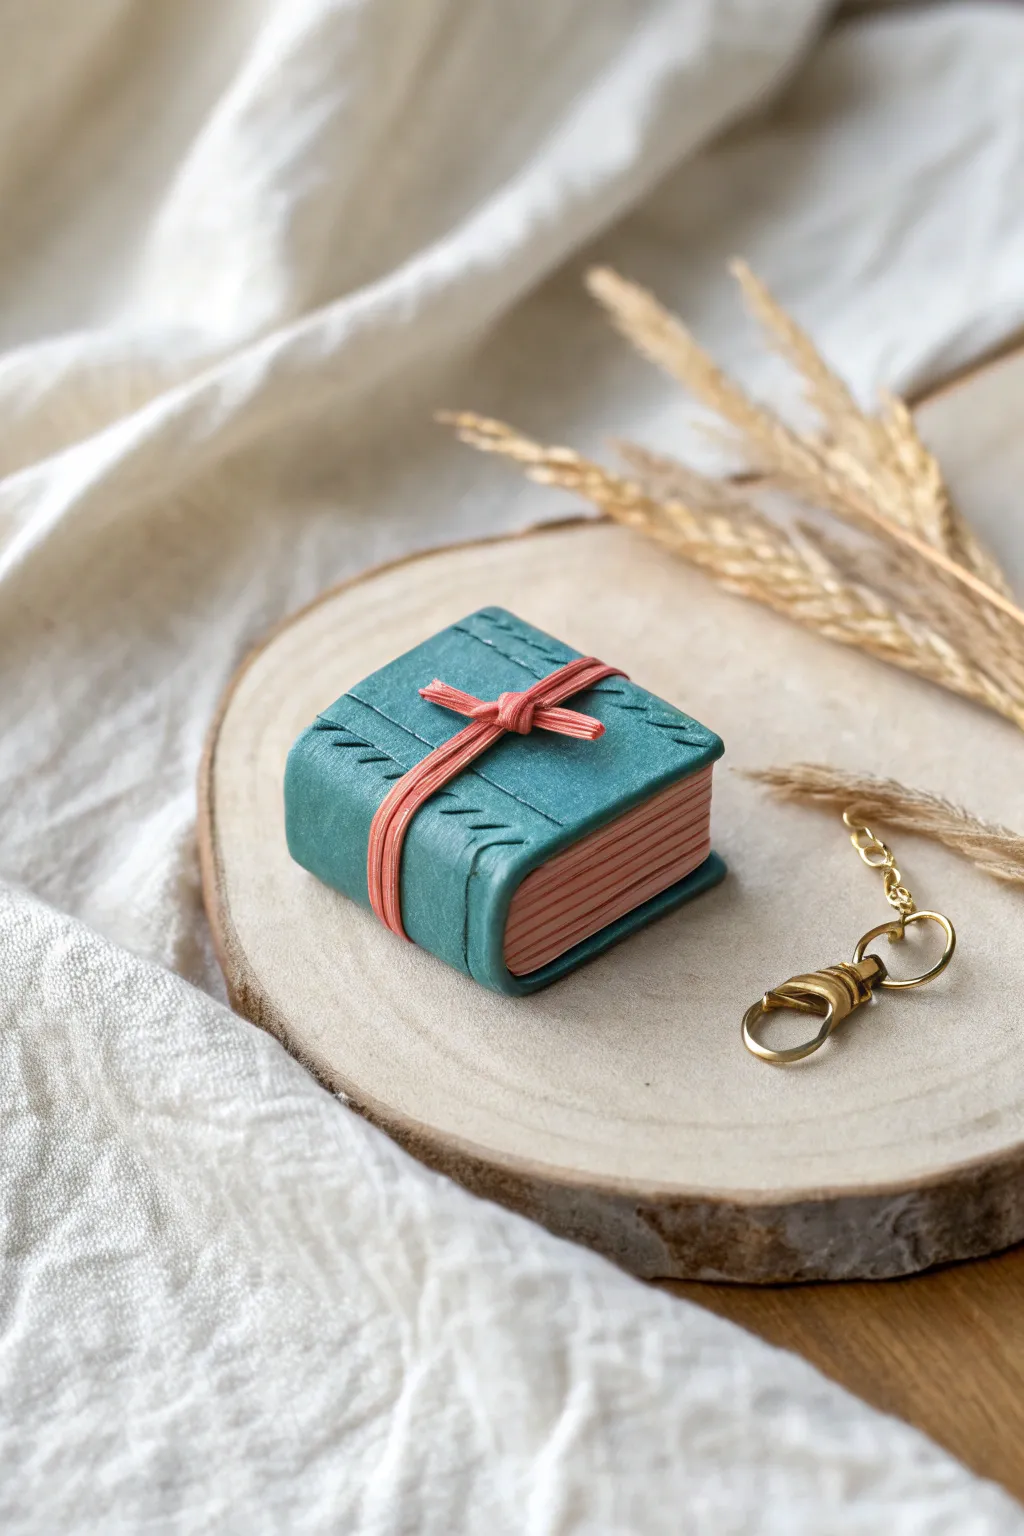
Capture the magic of storytelling in miniature with this enchanting little book charm. Crafted from polymer clay and finished with delicate cord details, this tiny tome features realistic page textures and a soft, matte finish perfect for keychains or necklaces.
Step-by-Step Guide
Materials
- Teal or sea-green polymer clay
- White or beige polymer clay (for pages)
- Thin reddish-pink cord or embroidery floss
- Rolling pin or pasta machine
- Tissue blade or X-Acto knife
- Needle tool or toothpick
- Small eye pin
- Super glue (cyanoacrylate)
- Matte varnish (optional)
Step 1: Creating the Pages
-
Condition clay:
Start by conditioning your white or beige clay until it is soft and pliable. This ensures the pages won’t crack during shaping. -
Form the block:
Shape the clay into a small, thick rectangular block. This will serve as the inner text block of your book. -
Texture the pages:
Using your tissue blade or a needle tool, gently score parallel horizontal lines along three sides of the block. These lines mimic the look of stacked paper pages. -
Refine the shape:
Lightly press the block to ensure it holds a sharp rectangular form, being careful not to smudge your texturing.
Clean Lines Pro Tip
Chill your clay in the fridge for 10 minutes before cutting the pages or cover. The firmer clay allows for much sharper, cleaner cuts without squishing.
Step 2: Crafting the Cover
-
Roll the cover clay:
Roll out your teal polymer clay into a thin, even sheet. Aim for a thickness of about 1-2mm so it doesn’t look too bulky. -
Cut the strip:
Measure the width of your page block. Cut a strip of the teal clay that is slightly wider than the block and long enough to wrap around the front, spine, and back. -
Assemble the book:
Place the page block in the center of the teal strip. Gently fold the strip up to cover the front and back of the ‘pages’, creating the book covers. -
Trim excess:
Carefully trim any excess teal clay so it’s flush with the page block edges, or leave a tiny overhang for a realistic hardcover look. -
Smooth the spine:
Gently smooth the clay along the spine with your finger to round it slightly depending on the style of binding you want to emulate.
Step 3: Adding Details
-
Create cover texture:
Using a needle tool, press small diagonal or V-shaped tick marks along the top and bottom edges of the spine area to simulate binding stitches or decorative tooling. -
Add gentle aging:
I like to lightly tap the cover with a sandpaper texture sheet or a stiff brush to give it a worn, leathery appearance rather than leaving it perfectly smooth. -
Insert hardware:
If you plan to hang this charm, insert a small eye pin into the center of the spine at the top. You can add a dab of liquid clay or translucent liquid sculpey to the pin for extra security.
Sticky Textures?
If your needle tool is dragging or pulling up bits of clay while texturing, dip the tip in a little water or cornstarch before pressing it into the clay.
Step 4: Baking and Finishing
-
Bake the charm:
Bake the piece according to your specific polymer clay manufacturer’s instructions (usually around 275°F or 130°C for 15-30 minutes). -
Cool down:
Allow the book to cool completely before handling to prevent any distortion while the clay is still warm. -
Secure the pin:
Once cool, gently pull the eye pin to check stability. If it’s loose, remove it, add a drop of super glue, and reinsert it immediately. -
Tie the binding:
Take your thin reddish-pink cord and wrap it once around the book horizontally and once vertically, crossing in the center. -
Secure the knot:
Tie a small, tight knot or bow on the front cover. Trim the ends of the cord neatly. A tiny dot of glue under the knot will keep it permanently in place. -
Seal:
Brush on a thin layer of matte varnish to protect the surface and remove any fingerprints, giving the book a finished, professional look.
Now you have a library of one to carry with you wherever you go
Micro Scene Box Diorama Charms
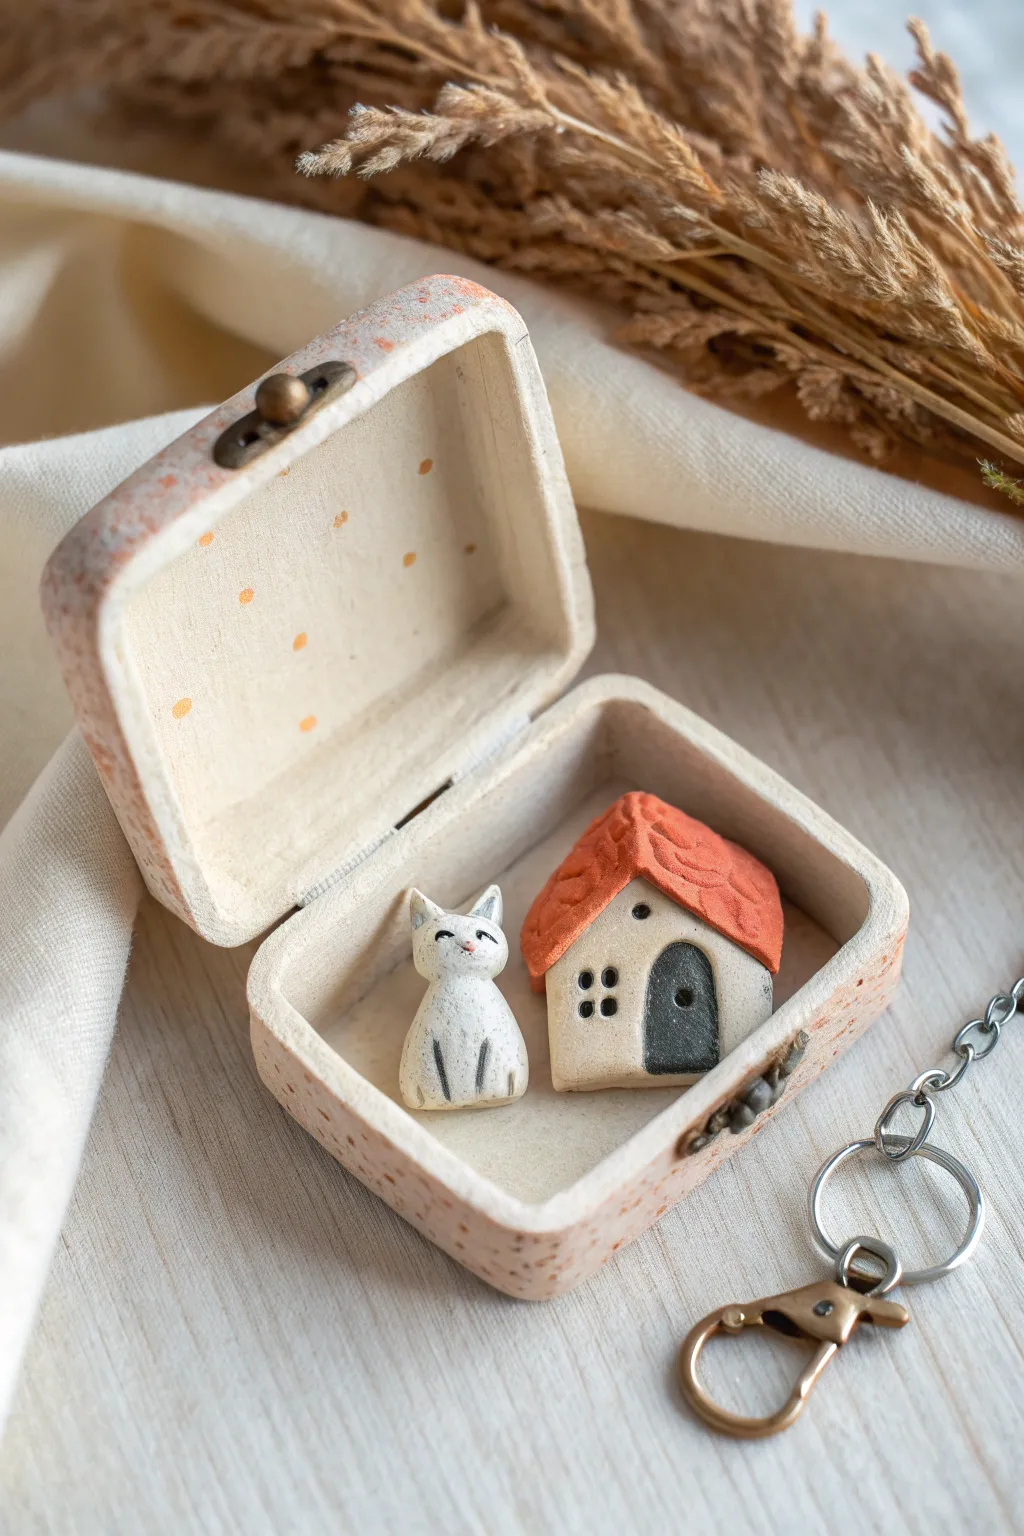
This whimsical project captures a cozy world inside a miniature suitcase box, perfect for keeping a little bit of home with you wherever you go. The rustic finish and adorable sculpted figures make it a charming conversation starter or a heartfelt gift.
Step-by-Step Tutorial
Materials
- White air-dry clay or polymer clay
- Small wooden hinged box (approx. 2 inches wide)
- Acrylic paints (terracotta orange, black, white, cream/beige)
- Fine grit sandpaper
- Detail paintbrushes (size 0 and 00)
- Small sponge or foam dabber
- Sculpting tools (needle tool, small spatula)
- Strong craft glue or E6000
- Matte varnish or sealant
- Keychain hardware (jump rings, swivel clasp)
- Hand drill or pin vibe (if adding keychain hardware)
Step 1: Preparing the Tiny Suitcase
-
Base Coating:
Begin by removing any existing hardware from your wooden box if possible, or tape it off. Paint the entire exterior with a cream or off-white acrylic paint. Two thin coats are better than one thick one for a smooth finish. -
Adding Texture:
Once the base coat is dry, take a small sponge and dab a mixture of terracotta and beige paint lightly onto the corners and edges. This stippling effect mimics a vintage, worn stone texture. -
Interior Decor:
Paint the interior of the box a solid cream color. Using the back of a paintbrush handle or a dotting tool, create small, evenly spaced polka dots with a diluted orange paint for a wallpaper effect.
Step 2: Sculpting the Residents
-
Shaping the Cat:
Roll a small ball of white clay about the size of a pea for the body, flattening the bottom so it sits upright. Roll a slightly smaller ball for the head and press it gently onto the body. -
Cat Details:
Pinch two tiny triangles of clay and attach them for ears. Use your needle tool to gently scribe vertical lines for the front legs, ensuring they look tucked in comfortably. -
House Structure:
Form a small cube of clay into a simple house shape with a peaked roof. Keep the edges slightly rounded for a softer, handmade look. -
Roof Texture:
Roll a flat piece of clay and drape it over the peak of the house. Use a small spatula tool/knife to press overlapping scallop shapes into the roof clay to simulate shingles. -
Drying or Baking:
If using polymer clay, bake the figures according to package directions. If using air-dry clay, set them aside in a dry area for at least 24 hours until fully hardened.
Smoother Surfaces
Before painting your clay figures, dip your finger in water (for air-dry) or baby oil (for polymer) and gently rub the surface to remove fingerprints.
Step 3: Bringing it to Life
-
Painting the House:
Paint the walls of the house a warm beige. Paint the roof a vibrant terracotta orange to contrast with the box interior. -
Refining the Details:
Use your finest brush (size 00) and black paint to draw a rounded door and a small four-pane window on the house. I find holding my breath for a second helps steady my hand for these tiny lines. -
Painting the Cat:
Keep the cat mostly white, but use a very dry brush with grey paint to add subtle texture. Use the fine black brush to add two small eyes, a nose, and whisker dots. -
Sealing:
Apply a coat of matte varnish to both clay pieces and the wooden box. This protects the paint from chipping and gives everything a unified finish.
Go Seasonal
Change the theme by painting the roof white for winter and adding a tiny clay presents, or pink for spring with miniature flower pots.
Step 4: Assembly & Finishing
-
Placement check:
Do a dry run by placing the figures in the box to ensure the lid can still close without hitting the roof or the cat’s ears. Sand the bottom of the figures if they are too tall. -
Gluing Down:
Apply a small dot of strong glue to the base of the cat and the house. Press them firmly into the bottom half of the painted box. -
Attaching Hardware:
If turning this into a keychain, drill a small hole into the side or top corner of the wooden box. Screw in a small eye hook. -
Final Connection:
Using pliers, open a jump ring and connect your keychain clasp to the eye hook. Ensure the jump ring is closed tightly so your diorama stays secure.
Now you have a tiny world in your pocket to brighten your day