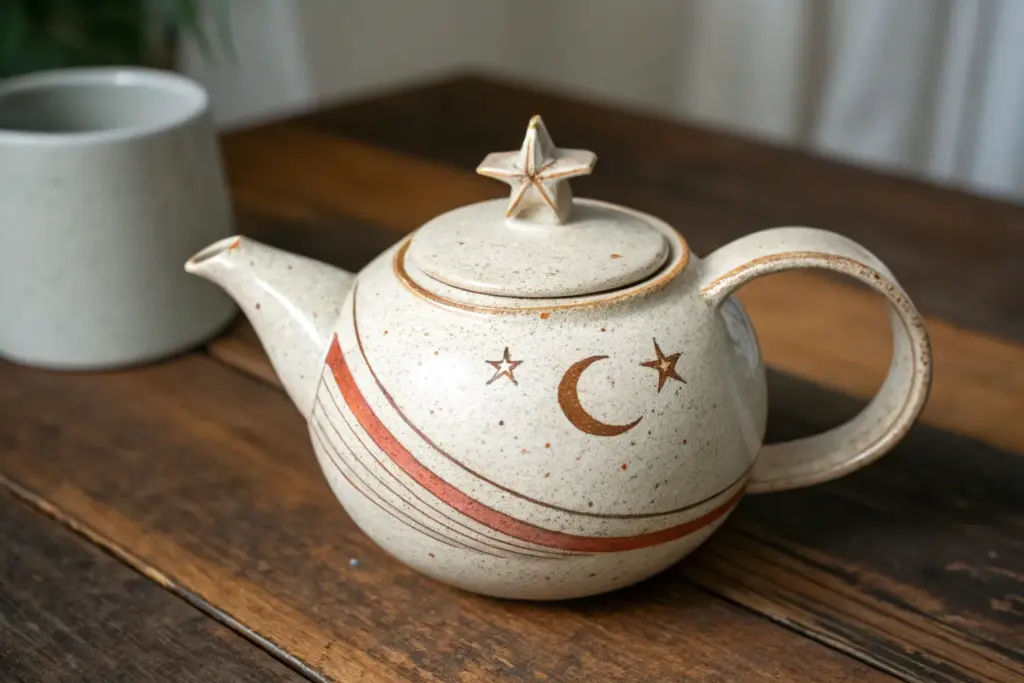
If you’ve ever looked at a basic teapot and thought, “I can make this way more interesting,” you’re my kind of maker. Here are my favorite creative clay teapot ideas—starting with the classics and sliding into the wonderfully weird—so you can turn a functional form into a little story you can pour from.
Classic Cottagecore Garden Teapot
Embrace the cottagecore aesthetic with this charming sage green teapot, featuring delicate raised daisy motifs and a soft speckle finish. This wheel-thrown project combines classic functional pottery with hand-built sculptural elements for a piece that feels both rustic and refined.
Step-by-Step
Materials
- Stoneware clay (speckled or light buff)
- Pottery wheel
- Throwing tools (sponge, rib, wire cutter)
- Needle tool
- Loop tool for trimming
- Scoring tool (serrated rib)
- Slip (clay slurry)
- Small wooden modeling tool
- Soft detail brush
- Sage green satin matte glaze
- Kiln
Step 1: Throwing the Body and Lid
-
Center the clay:
Start with about 2-3 lbs of well-wedged clay on the wheel. Center it firmly, ensuring a wide enough base for a stable teapot belly. -
Open and pull the walls:
Open the interior floor, leaving it slightly thicker than a mug to support trimming later. Pull the walls upward, aiming for a cylinder first, then gently collar the top inward. -
Shape the belly:
Using a rib on the outside and your hand inside, push the clay outward to create a round, bulbous ‘belly’ shape, leaving a distinct rim at the top for the lid gallery. -
Measure the gallery:
Use calipers to measure the diameter of your lid gallery (the seat where the lid rests) before cutting the pot off the bat. -
Throw the lid:
Using a smaller amount of clay (about 0.5-0.75 lbs), throw a domed lid upside down or right-side up (off the hump), measuring constantly to ensure it fits the caliper measurement taken earlier. -
Throw the spout and handle:
Throw a small, tapered cylinder for the spout. For the handle, you can either pull a strap of clay directly or throw a thicker ring that will be cut apart later. Allow all components to dry to leather-hard.
Spout Pouring Issues?
If the spout drips, the lip might need sharpness. After attaching, run a finger under the spout rim to create a crisp, sharp edge that ‘cuts’ the flow of water.
Step 2: Trimming and Assembly
-
Trim the body and lid:
Once leather hard, center the teapot body upside down and trim the foot ring. Clean up the shape of the lid and add a small knob if you didn’t throw one integrally. -
Fit the lid:
Check the fit of the lid on the body. It should sit snugly but have a tiny bit of wiggle room to account for glaze thickness later. -
Attach the spout:
Cut the thrown spout at an angle. Hold it to the pot to check the profile. Trace the attachment point, drill holes for the sieve (strainer) inside the drawn area, score both surfaces, apply slip, and press the spout firmly into place. -
Attach the handle:
Score and slip the contact points for your handle. Attach it opposite the spout, smoothing the seams so it looks like it grew seamlessly from the body.
Step 3: Sculpting the Floral Details
-
Outline the design:
Lightly sketch your flower placement directly onto the leather-hard clay using a needle tool. Spacing three large daisies evenly around the belly works well. -
Add volume for flowers:
Roll tiny balls of fresh soft clay. Score the sketched areas, add a dab of water or slip, and press the balls onto the surface to create raised pads for the flower centers and petals. -
Sculpt the petals:
Use a wooden modeling tool to flatten and shape the petals. Press into the center of each petal to give it dimension, blending the edges slightly into the teapot body. -
Create stems and leaves:
Roll very thin coils for the stems and small ovals for leaves. Attach these below the flowers using slip. I like to use the side of a needle tool to impress a central vein into each leaf. -
Detail the centers:
Use the tip of your needle tool or a small stamp to create a textured, seeded look in the center of each daisy. -
Dry slowly:
Loosely cover the teapot with plastic to let it dry very slowly. This prevents the added relief work from cracking away from the body.
Level Up: Painted Centers
Use a tiny amount of yellow underglaze on the flower centers before the final glazing step. It adds a subtle pop of color under a translucent sage glaze.
Step 4: Glazing and Firing
-
Bisque fire:
Once bone dry, fire the piece to cone 04/06 (depending on your clay body) for the bisque firing. -
Apply glaze:
Dip or spray the teapot with a semi-opaque sage green glaze. A satin finish works best to highlight the relief without obscuring the details with high gloss. -
Wipe back (optional):
If your glaze is very thick, you can gently wipe the high points of the flowers with a damp sponge to thin the glaze there, accentuating the sculpted texture. -
Glaze fire:
Fire to the maturity temperature of your clay and glaze (typically Cone 5 or 6 for stoneware). Let the kiln cool completely before unloading.
Brew a warm cup of herbal tea and enjoy the serene beauty of your handmade creation


Charming Animal-Shaped Teapot
Transform a lump of clay into this adorable, sleepy fox companion for your tea time. This wheel-thrown and hand-built project features a warm speckled beige glaze, delicate facial details, and a cozy rounded form perfect for steeping your favorite blends.
Step-by-Step Guide
Materials
- Stoneware clay (preferably speckled)
- Pottery wheel
- Throwing tools (sponge, rib, wire cutter)
- Trimming tools
- Needle tool
- Serrated rib or scoring tool
- Slip
- Underglaze (black and rust/orange)
- Clear or transparent glossy glaze
- Small detail brushes
- Wax resist
Step 1: Throwing the Body and Lid
-
Center and open:
Begin with about 1.5 to 2 lbs of wedged clay on the wheel. Center it low and wide to support a rounded belly shape. Open the clay, leaving a floor thickness of about a quarter-inch. -
Pull the walls:
Pull the walls up, keeping them slightly thicker at the bottom for stability. Aim for a height of about 5-6 inches. As you pull, gently bell the belly out to create that plump, round fox shape shown in the image. -
Collar the neck:
Slowly collar the neck inward to create a seat for the lid. Use your fingers or a caliper to measure the opening size so you can throw a matching lid. -
Throw the lid:
Using a smaller ball of clay (about 0.5 lb), throw a simple domed lid. Ensure the flange underneath fits the measurement of your teapot’s gallery. Pull a small, solid knob at the very top center while throwing. -
Trim the pieces:
Once leather hard, trim the bottom of the teapot to create a clean foot ring. Trim the lid to refine the curve and ensure it fits snugly into the pot’s gallery.
Clean Pour Tip
When shaping the spout, ensure the lip has a sharp, defined edge rather than a rounded one. This sharp break cuts the flow of liquid and prevents annoying drips after pouring.
Step 2: Sculpting the Features
-
Form the spout:
Roll a slab of clay or throw a small cylinder for the spout. Taper it slightly and cut it at an angle to fit the curve of the pot’s belly. Hold it up to the pot to check the angle; the tip should be level with the rim. -
Attach the spout:
Score the attachment site on the pot and the base of the spout. Apply slip and press firmly. Smooth the join with a modeling tool or your finger to make it seamless. Don’t forget to poke strainer holes inside the pot wall before attaching. -
Pull the handle:
Pull a strap handle from a lug of clay. It should be sturdy but comfortable to hold. Attach it opposite the spout, creating a nice C-curve that mimics the roundness of the pot. -
Carve the face outline:
Using a needle tool, very lightly sketch the heart-shaped face line that dips down to the nose. This curved line defines the fox’s cheeks and separates the face from the rest of the head. -
Incise the details:
Once satisfied with the placement, go over your sketch lines with a carving tool to create shallow grooves. Carve the two triangular ears near the top rim, ensuring they look symmetrical. -
Add the nose:
Roll a tiny, triangular bit of clay for the nose. Score and slip it onto the point where the face lines meet.
Forest Theme Twist
Instead of a plain handle, sculpt it to look like a fluffy fox tail curling up the back of the pot. You can even texture it with a wire brush for a furry effect.
Step 3: Decoration and Glazing
-
Bisque fire:
Allow the teapot to dry slowly and completely to avoid cracking, then bisque fire it to cone 04 (or your clay body’s specifications). -
Paint the details:
Using a fine brush and black underglaze, carefully paint the sleeping eye curves, eyelashes, and whiskers. Fill in the small nose heavily with black. I find that steadying my hand against the table helps with these fine lines. -
Add ear color:
Paint the inside triangles of the ears with a rust or orange underglaze to give the fox a pop of warmth. -
Wax resist:
Apply wax resist to the bottom foot ring and the gallery where the lid sits to prevent the lid from fusing to the pot during firing. -
Glaze application:
Dip the entire teapot into a clear or transparent cream glaze. If your clay isn’t naturally speckled, choose a glaze that has suspended speckles (like a ‘speckled buff’ glaze) to achieve the organic look. -
Final fire:
Fire the piece to maturity (typically cone 5 or 6 for stoneware). Once cool, sand the bottom foot if necessary to ensure it won’t scratch your table.
Now brew a pot of herbal tea and enjoy the cozy charm of your handmade creation


Simple Geometric Faceted Teapot
This tutorial guides you through sculpting a modern, geometric teapot characterized by sharp, deliberate facets and a clean, sandy matte glaze. The beauty lies in the interplay of light and shadow created by the angular planes, transforming a functional vessel into a structural work of art.
How-To Guide
Materials
- Stoneware clay (smooth or fine grog)
- Pottery wheel (optional, but recommended for base form)
- Fettling knife or wire clay cutter
- Surform rasp or cheese grater tool
- Metal kidney rib
- Rubber smoothers
- Scoring tool and slip
- Wooden sculpting tools
- Sponge
- Cream or beige matte glaze
Step 1: Throwing and Shaping the Base Body
-
Throw the Main Body:
Begin by centering about 2-3 pounds of stoneware clay on the wheel. Throw a thick-walled cylinder, gradually bellying it out into a rounded sphere shape. -
Ensuring Wall Thickness:
Keep the walls significantly thicker than a standard pot—aim for nearly 3/4 inch thickness. We need this excess clay to carve away the deep facets later without cutting through to the interior. -
Close the Form:
Collar the neck in tightly, leaving a small opening for the lid gallery. Refine the shape with a rib to ensure a smooth, symmetrical bulb before cutting it off the wheel. -
Create the Spout and Lid:
Throw a sturdy, thick spout and a small, solid puck of clay for the lid. Like the body, keep these components thick to allow for aggressive carving later. -
Leather Hard Stage:
Set all pieces aside under plastic to dry slowly until they reach a firm leather-hard state. The clay must be stiff enough to hold a sharp edge when sliced.
Step 2: Carving the Facets
-
Marking Guidelines:
I like to lightly sketch a geometric grid on the leather-hard pot with a needle tool to plan where my vertices will meet. This ensures the facets remain balanced. -
First Major Cuts:
Using a sharp fettling knife or wire cheese cutter, slice away the first plane of clay from the belly of the pot. Make confident, single-motion cuts for the cleanest surface. -
Building the Geometry:
Continue slicing adjacent planes. Aim for triangular or trapezoidal shapes that meet at distinct ridges. Vary the angle of your cuts to create the 3D ‘low poly’ look seen in the reference. -
Faceting the Spout:
Carve the spout into a hexagonal or octagonal prism shape. Ensure the tip is cut at a sharp angle for a clean pour. -
Sculpting the Lid:
Carve the lid into a flattened pyramid shape with radiating facets. Create a small, geometric finial (knob) on top, perhaps hexagonal, to mirror the spout.
Clean Cuts
For the sharpest facets, use a wire cheese slicer or a very taught harp tool. Slice quickly and confidently; hesitation causes wobbly surfaces that are hard to fix.
Step 3: Assembly and Refining
-
Attaching the Spout:
Hold the faceted spout against the faceted body to find a flush fit. You may need to trim the attachment point to match a specific flat plane. Score, slip, and firmly press it into place. -
Forming the Handle:
Pull a traditional handle but flatten it slightly to match the aesthetic. While still pliable, attach it to the rear of the pot, creating a high, sweeping arch. -
Smoothing and Sharpening:
Once assembled, use a barely damp sponge to smooth sharp burrs on the edges, but be careful not to round over your crisp facet lines. -
Burnishing (Optional):
For an extra smooth finish, gently rub the flat planes with the back of a spoon or a polished stone to compress the clay surface. -
Dry and Bisque Fire:
Allow the teapot to dry very slowly to prevent cracking at the thick attachment points. Bisque fire to your clay body’s specifications (usually Cone 06).
Add Color Depth
Use a light speckle clay body or add a tiny amount of iron oxide wash to the edges before glazing. This subtle darkness will emphasize the geometric structure.
Step 4: Glazing
-
Glaze Selection:
Choose a satin or matte cream glaze. Avoid high-gloss glazes, as they can pool in the valleys and obscure the sharpness of your facets. -
Application:
Dip the teapot or spray the glaze for an even coat. If brushing, apply three distinct layers, alternating direction to avoid brushstrokes. -
Final Firing:
Fire correctly to Cone 5/6 (or your clay’s maturity). A matte glaze will break beautifully over the sharp edges, highlighting the geometry.
Once fired, sit your teapot in the morning sun to watch how the shadows play across its beautiful new angles


Stamped Texture Teapot With Found Patterns
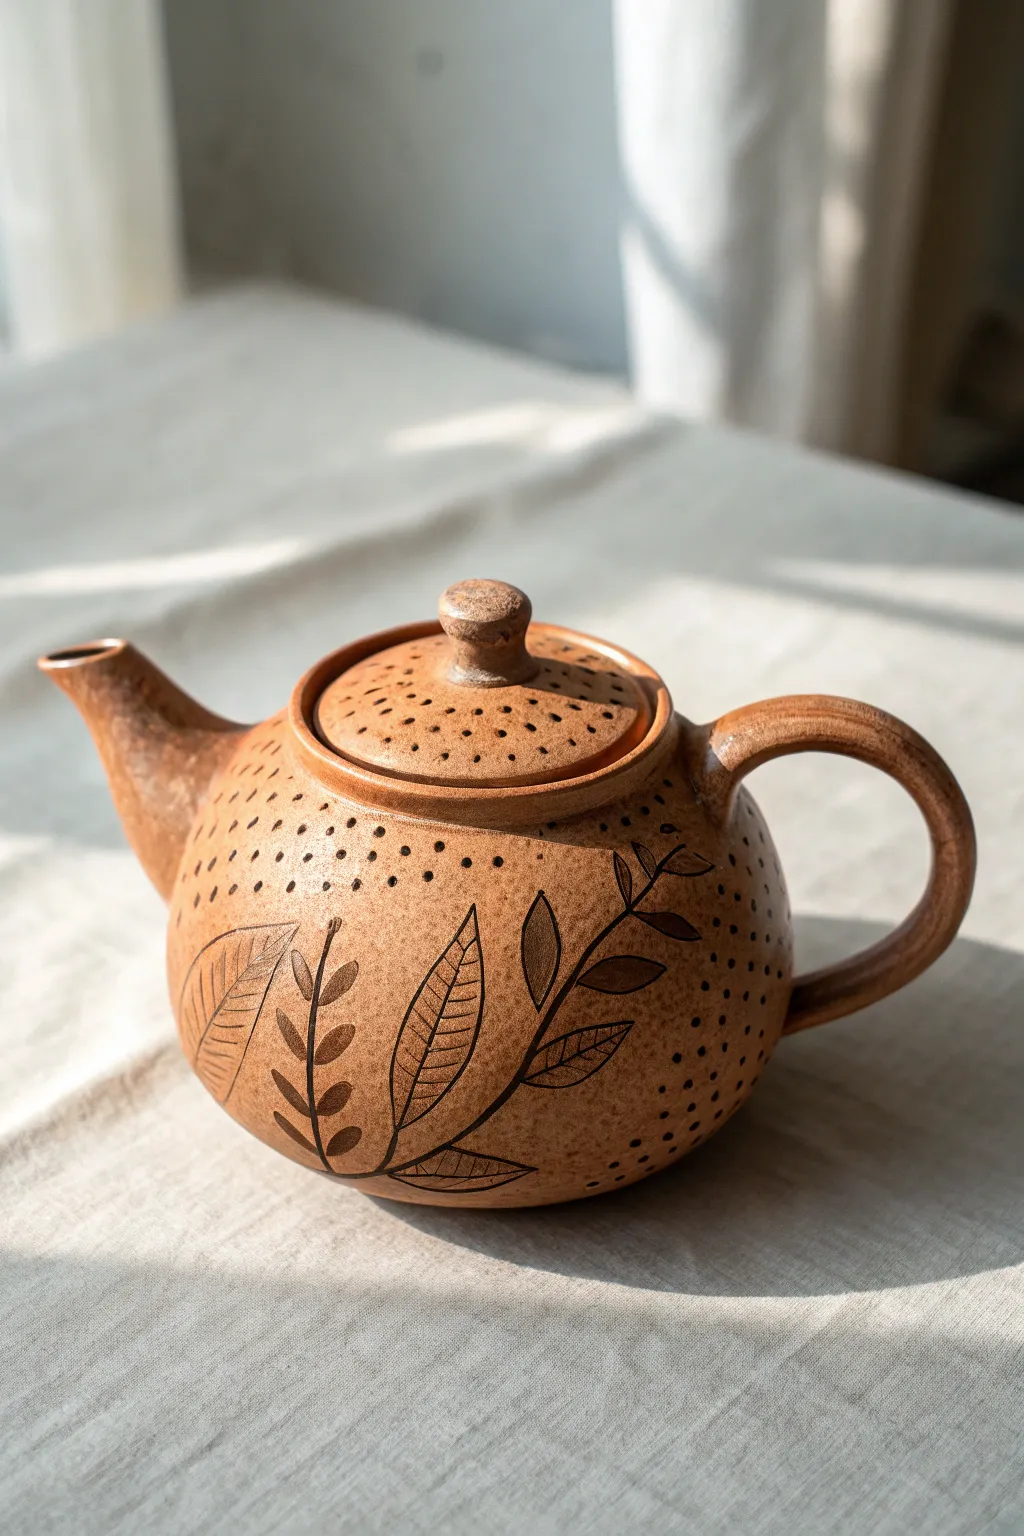
This charming teapot combines simple stamped textures with delicate sgraffito-style leaf illustrations for a natural, rustic aesthetic. The warm, speckled clay body serves as the perfect canvas for a design that feels both modern and timelessly handcrafted.
Step-by-Step Guide
Materials
- Red stoneware or terracotta clay (groggy texture preferred)
- Pottery wheel (or coil/slab tools for handbuilding)
- Small wooden throwing rib
- Needle tool
- Small round tool for dots (e.g., end of a paintbrush or drill bit)
- Black underglaze (or dark brown)
- Fine detail brush
- Sponge
- Clear matte glaze on the interior (optional for exterior)
- Wire cutter
- Trimming tools
Step 1: Forming the Body and Components
-
Throw the body:
Begin by centering about 1.5 to 2 pounds of red stoneware clay on the wheel. Open the mound and pull the walls up, shaping them into a bulbous, spherical form. Collar the neck in significantly to create a flange that will hold the lid. -
Refine the shape:
Use a wooden rib to smooth the exterior curve, removing finger marks and compressing the clay. Ensure the curve is consistent, as this will be your canvas later. -
Create the lid:
Throw a small, flat-domed lid using a caliper to measure the teapot’s opening precisely. Pull a small knob from the center of the hump while throwing, keeping it simple and ergonomic. -
Make the spout and handle:
Throw a small spout, tapering it slightly. For the handle, pull a strip of clay directly from a lump or roll a coil, shaping it into a ‘C’ curve. Set all components aside to firm up to leather-hard.
Cracking Handles?
Handles often dry faster than the body, causing cracks. Wrap the handle tightly in plastic or wax the varying thicknesses to slow drying.
Step 2: Assembly and Decoration Base
-
Trim the foot:
Once leather-hard, center the teapot body inverted on the wheel. Trim a clean, defined foot ring to give the pot visual lift. -
Attach the spout:
Cut the spout at an angle to fit the curve of the body. Score and slip both contact surfaces, then press firmly to attach. Ensure the tip of the spout is level with the lid opening to prevent spills. -
Attach the handle:
Score and slip the opposite side of the pot. Attach the handle, ensuring the curve mimics the roundness of the pot for harmony. Smooth the joints with a modeling tool or your finger. -
Plan the zones:
Lightly trace a faint line halfway down the pot if you need a guide, or simply eyeball the division. The top half and lid will receive the texture, while the bottom gets the botanical drawing.
Step 3: Stamping and Illustration
-
create the stippled texture:
Using the blunt end of a small drill bit or the back of a paintbrush, press small, random dots into the clay. Focus on the upper shoulder of the pot and the entire surface of the lid. -
Fade the texture:
As you move down the side of the pot towards the midline, space the dots further apart to create a gradient effect, transitioning from dense texture to smooth clay. -
Sketch the leaves:
Using a needle tool, very lightly scratch the outline of your leaf branches onto the smooth lower section. Draw sweeping, organic curves that wrap around the belly of the pot. -
Apply underglaze:
Paint the leaf sketches with black or dark brown underglaze using a fine detail brush. I find that going over the lines twice ensures a crisp, dark finish after firing. -
Carve the details:
Once the underglaze is dry to the touch, use a sharp sgraffito tool or needle to carve fine veins inside the painted leaves, revealing the red clay body underneath the black line work. -
Clean up:
Gently brush away any clay crumbs from the carving. If you smudged underglaze, scrape it away carefully with a knife edge. -
Final drying and firing:
Let the teapot dry slowly under plastic to equalise moisture, preventing cracks at the handle or spout. Bisque fire, then apply a food-safe clear glaze to the interior (and exterior if desired) before the final glaze firing.
Variation Idea
Try inlaying white slip into the stamped dots before the first firing. Scrape the surface flush to create bright white speckles against the red clay.
Pour yourself a cup of tea and admire how the tactile dots feel under your fingertips as you use your new creation

The Complete Guide to Pottery Troubleshooting
Uncover the most common ceramic mistakes—from cracking clay to failed glazes—and learn how to fix them fast.
Slip-Trailed Swirl Teapot
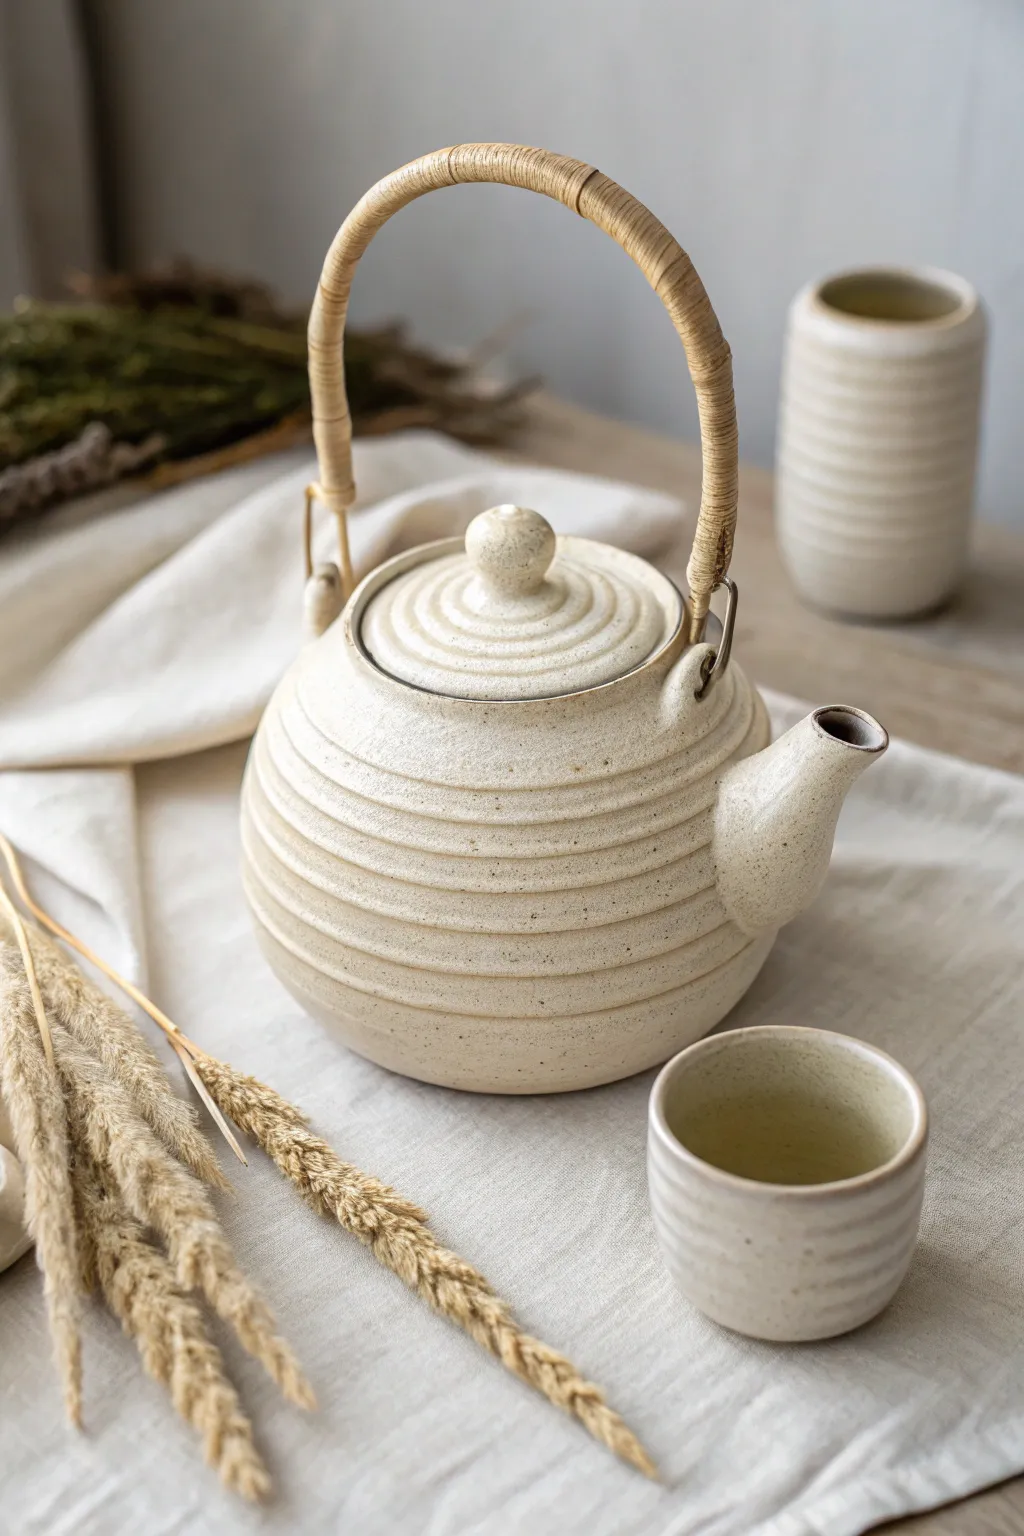
This project captures the essence of earthy elegance with a wheel-thrown teapot featuring satisfying horizontal grooves and a speckled cream finish. The combination of textured clay and a woven natural handle creates a timeless vessel perfect for slow, cozy mornings.
How-To Guide
Materials
- Speckled stoneware clay (approx. 3-4 lbs)
- Pottery wheel
- Throwing sponge and bucket
- Rib tool (wooden or metal)
- Needle tool
- Wire cutter
- Trimming tools
- Serrated rib or texture tool (optional)
- Cream or oatmeal speckled glaze
- Cane or rattan handle kit
- Drill bit (sizes to match handle attachment)
- Kiln
Step 1: Throwing the Body & Lid
-
Center the clay:
Begin with about 2.5 lbs of wedged speckled clay on the wheel. Center it into a low mound, ensuring the base is wide enough to support a globular shape. -
Open and pull:
Open the clay and pull the walls up and slightly outward to form a rounded belly. Keep the rim slightly thicker to support the lid gallery later. -
Collar the neck:
Gradually collar the rim inward to create the teapot’s shoulder. I like to keep the opening relatively wide for easier cleaning, but ensure it’s proportional to the body. -
Create the texture:
While the wheel is spinning at a medium pace, use the rounded end of a wooden tool or your finger to press horizontal grooves into the clay. Start from the bottom and work your way up to create a continuous spiraling ridge effect. -
Form the gallery:
At the rim, use a throwing stick or your finger to split the clay, creating an internal ledge (gallery) where the lid will sit. -
Throw the lid:
Using a smaller ball of clay, throw a lid ‘off the hump’ or on a bat. Measure your gallery carefully with calipers first. Add matching spiral grooves to the top surface of the lid for continuity. -
Add a knob:
Pull a small knob directly from the center of the lid while throwing, or attach a small ball of clay later. Shape it into a soft, rounded point.
Spout Dripping?
If your test pour dribbles, the sharp edge of the spout might be too rounded. Use sandpaper or a diamond file on the fired spout tip to sharpen the edge for a cleaner cut-off.
Step 2: Spout, Lug & Assembly
-
Throw the spout:
Throw a small, tapered cylinder for the spout. Ensure the base is wide enough to attach to the body and the tip is sharp for a clean pour. Bend it slightly while soft if you want a curve. -
Trim the pieces:
Once leather hard, trim the bottom of the teapot to create a defined foot ring. Trim the underside of the lid to remove excess weight and ensure it fits the gallery perfectly. -
Attach the spout:
Hold the spout up to the body to determine placement. Trace the outline, score the area, and drill several strainer holes inside the traced circle. Score and slip the spout, attaching it firmly and blending the seams. -
Create handle lugs:
Roll two small coils or slabs of clay to form loops (lugs). Attach these securely to the shoulder of the teapot on opposite sides. These will hold the cane handle later. -
Clean and dry:
Smooth out any rough edges with a damp sponge. Allow the entire piece to dry slowly under plastic to prevent the spout or handle lugs from cracking.
Make a Set
Throw matching handle-less tea bowls using the same grooved technique. Use the leftover clay to create a unified set perfect for serving guests.
Step 3: Glazing & Finishing
-
Bisque fire:
Load the bone-dry teapot and lid into the kiln and bisque fire to Cone 04 (or your clay’s specific temperature). -
Wax the contact points:
Apply wax resist to the foot ring, the gallery ledge, and the rim of the lid where it touches the pot to prevent the lid from fusing shut during firing. -
Glaze application:
Dip the teapot and lid into a creamy, semi-opaque glaze. The glaze should break over the ridges, highlighting the texture you created earlier. -
Glaze fire:
Fire the pieces to the final maturity temperature (typically Cone 5 or 6 for stoneware). Let the kiln cool completely before unloading to avoid thermal shock. -
Attach the handle:
Once the pot is cool, take your cane handle. Flex it gently to fit the wire ends into the ceramic lugs. Use pliers to bend the wire tips upward and twist to secure them permanently.
Brew your favorite tea and enjoy the warmth of your handmade vessel
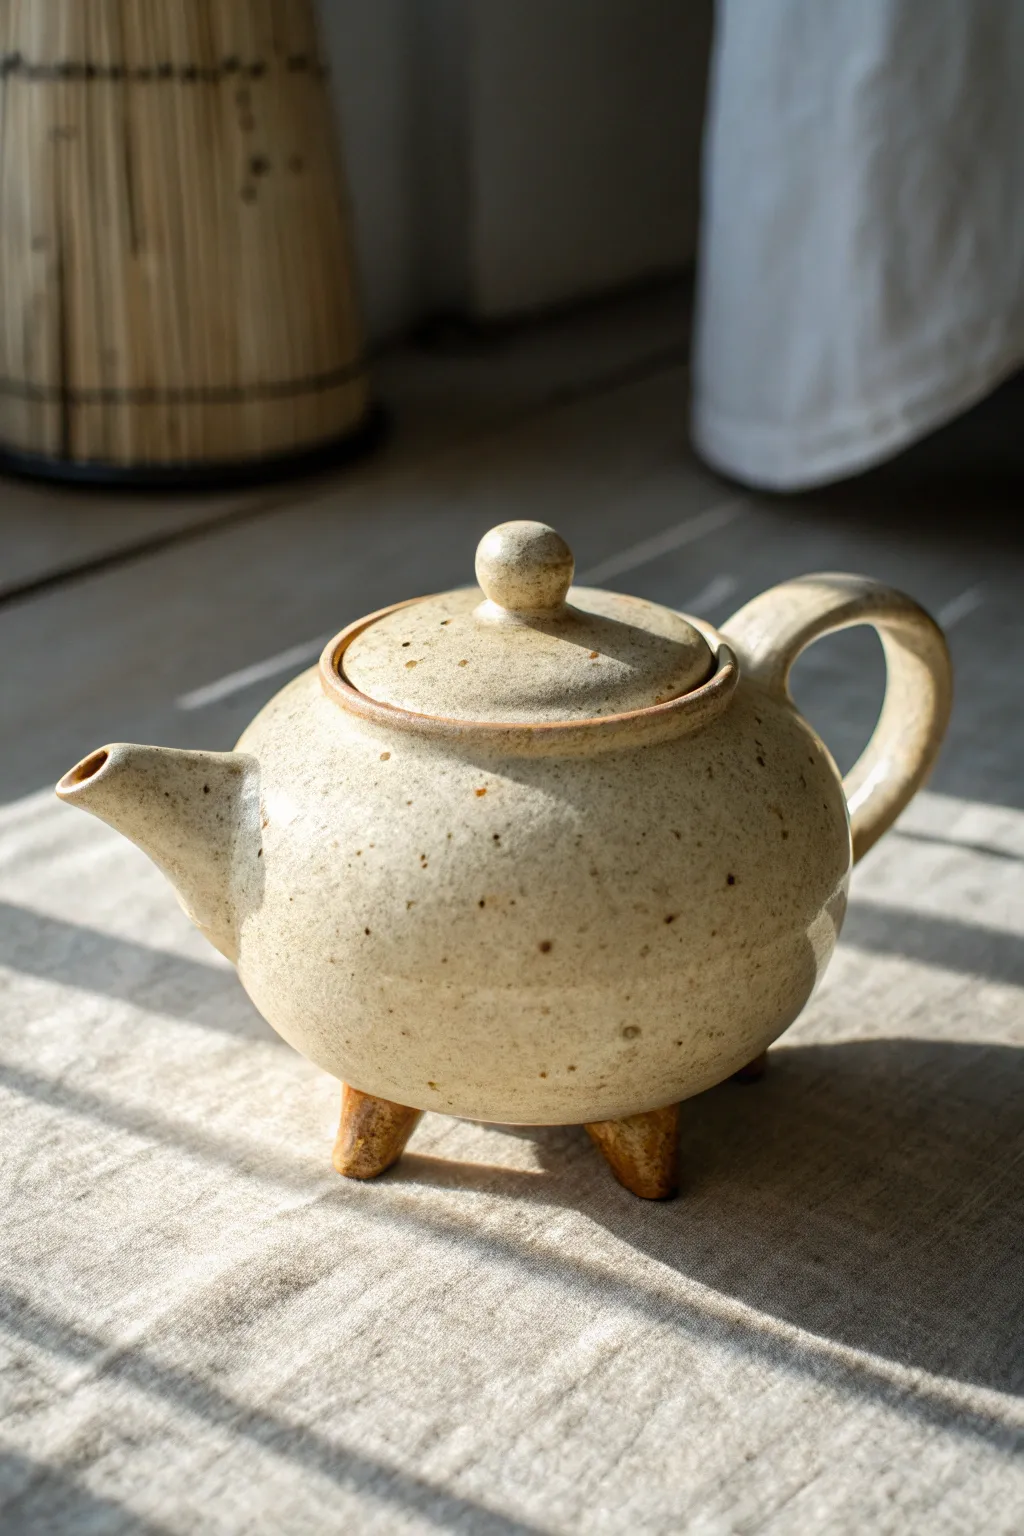
Playfully Asymmetrical Wonky Teapot
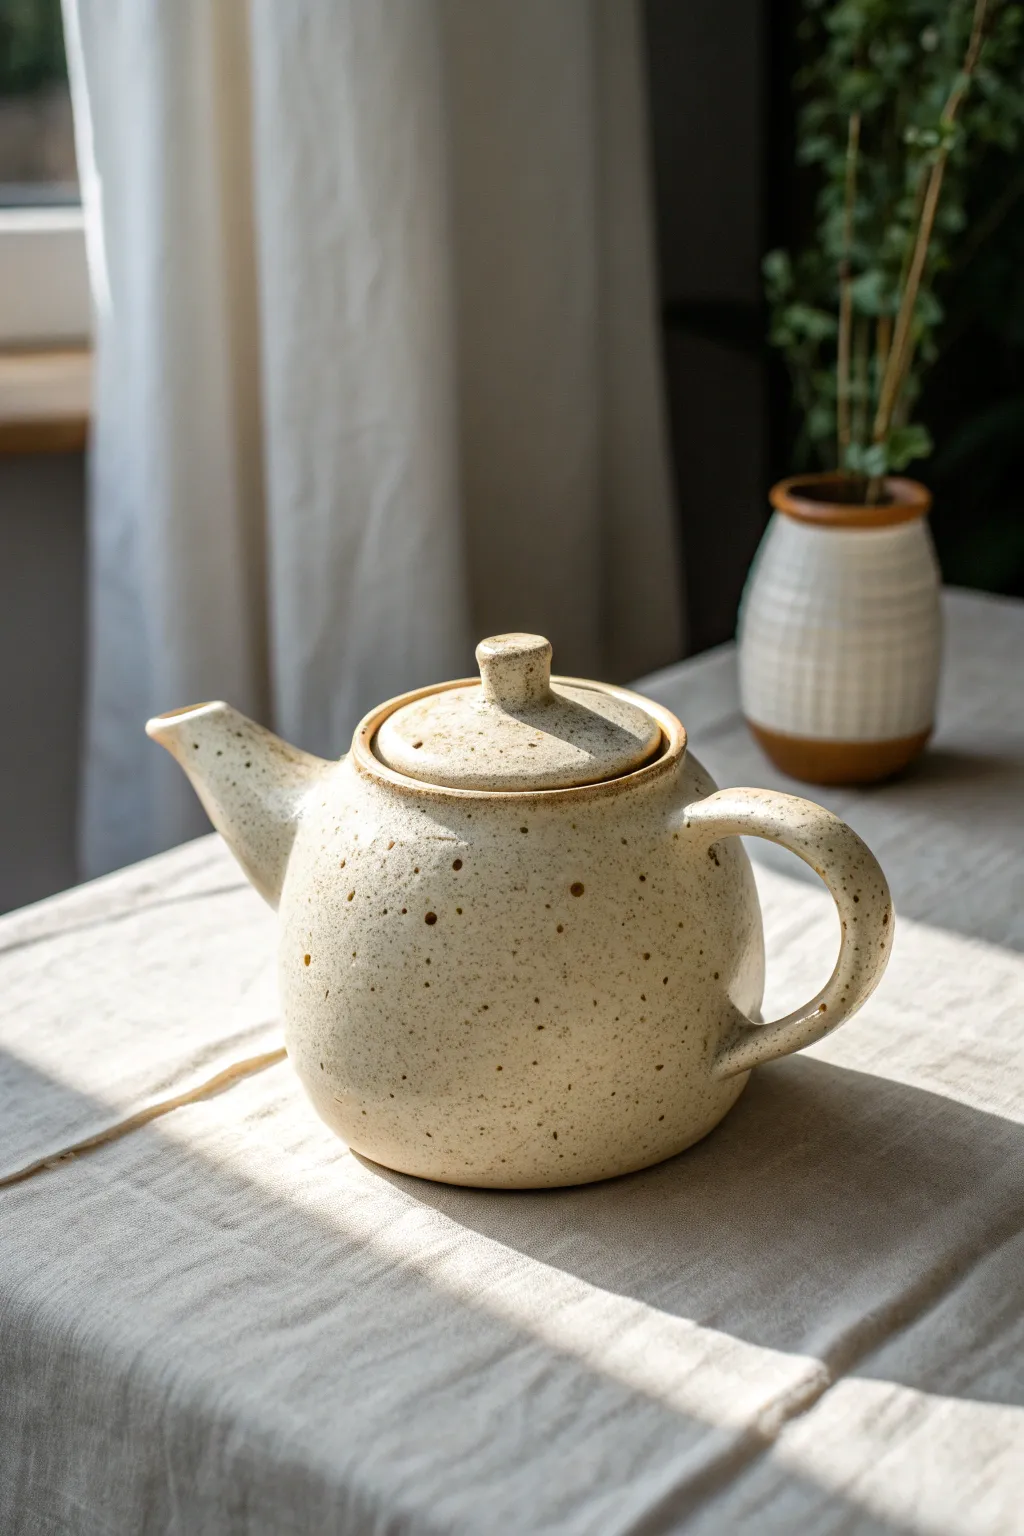
This project guides you through creating a bulbous, comforting teapot with a serene cream glaze and distinctive speckling. The form focuses on generous curves and a sturdy silhouette, perfect for cozy afternoon tea sessions or as a centerpiece for your kitchen table.
Detailed Instructions
Materials
- Speckled stoneware clay (approx. 3-4 lbs)
- Pottery wheel
- Throwing tools (sponge, needle tool, rib, wooden knife)
- Wire cutter
- Trimming tools
- Serrated rib or scoring tool
- Slip
- Cream/Oatmeal Satin Matte Glaze
- Kiln
Step 1: Throwing the Body
-
Center and open:
Start with about 2 pounds of well-wedged speckled clay. Center it on the wheel head and open up the clay, establishing a floor that is roughly 3-4 inches wide to support the bulbous shape. -
Pull the walls:
Pull the walls upward into a cylinder first. Ensure the walls are even, slightly thicker at the bottom to support the eventual curve. -
Belly the form:
Using a rib on the inside and a sponge on the outside, gently push the clay outward while the wheel spins to create a round, spherical belly. Be careful not to let the walls get too thin at the widest point. -
Collar the neck:
As you reach the top third, collar the clay inward to create the gallery and rim. Use a gallery tool or your fingers to create a distinct ledge (gallery) for the lid to sit on. -
Refine and cut:
Refine the curve with a finishing rib to remove throwing lines if you want a smooth surface. Cut the pot from the wheel with a wire tool.
Step 2: Creating Components
-
Throw the lid:
Using a smaller ball of clay (about 1 lb), throw the lid. Measure the gallery of your teapot body with calipers first to ensure a precise fit. Throw the lid upside down or right-side up depending on your preference, remembering to pull a small knob. -
Throw the spout:
Throw a tall, tapered cone for the spout. I like to throw this slightly taller than needed so I can cut it to the perfect angle later. Keep the base wide enough to attach to the belly. -
Pull the handle:
Pull a strap of clay for the handle directly from a lug of clay or roll a coil and flatten it slightly. Curve it into a ‘C’ shape and set it aside to stiffen until leather hard.
Dribble Prevention
To stop the spout from dripping, make sure the very edge of the lip is sharp, not rounded. A sharp edge cuts the water flow cleanly when you stop pouring.
Step 3: Assembly and Trimming
-
Trim the body:
Once the body is leather hard, center it upside down on the wheel and trim the foot. Create a defined foot ring that lifts the visual weight of the round belly. -
Cut the spout:
Cut the base of the spout at an angle that allows it to sit flush against the rounded belly of the pot. Holding it up to the pot frequently helps get the angle right. -
Attach the spout:
Hold the spout in place and trace the outline on the pot. Score the area inside the line and drill several strainer holes with a distinct pattern. Score and slip both surfaces and attach firmly. -
Attach the handle:
Score and slip the attachment points for the handle, placing the top attachment near the rim and the bottom attachment near the belly’s widest point. Smooth the seams for a seamless look. -
Dry slowly:
Put the lid on the pot (with a piece of paper or plastic in between to prevent sticking) and wrap the whole piece loosely in plastic. Drying slowly is crucial to prevent the spout or handle from cracking.
Lid Fit Trick
Make the lid slightly larger than you think you need. It’s much easier to trim a fired lid that is too big than to fix one that falls inside the pot.
Step 4: Glazing
-
Bisque fire:
Fire the completely dry piece to cone 04 (or your clay’s specific bisque temperature). -
Wax the foot:
Apply wax resist to the foot ring and the gallery rim where the lid sits to prevent the lid from fusing to the pot. -
Apply glaze:
Dip or pour a cream or oatmeal satin glaze over the entire piece. The speckled clay underneath will bleed through slightly, creating the texture seen in the photo. -
Final fire:
Glaze fire to cone 5/6 (oxidation) to achieve the warm, speckled finish.
Now brew a batch of your favorite tea and enjoy pouring from your handmade creation


What Really Happens Inside the Kiln
Learn how time and temperature work together inside the kiln to transform clay into durable ceramic.
Mini Single-Serve Teapot
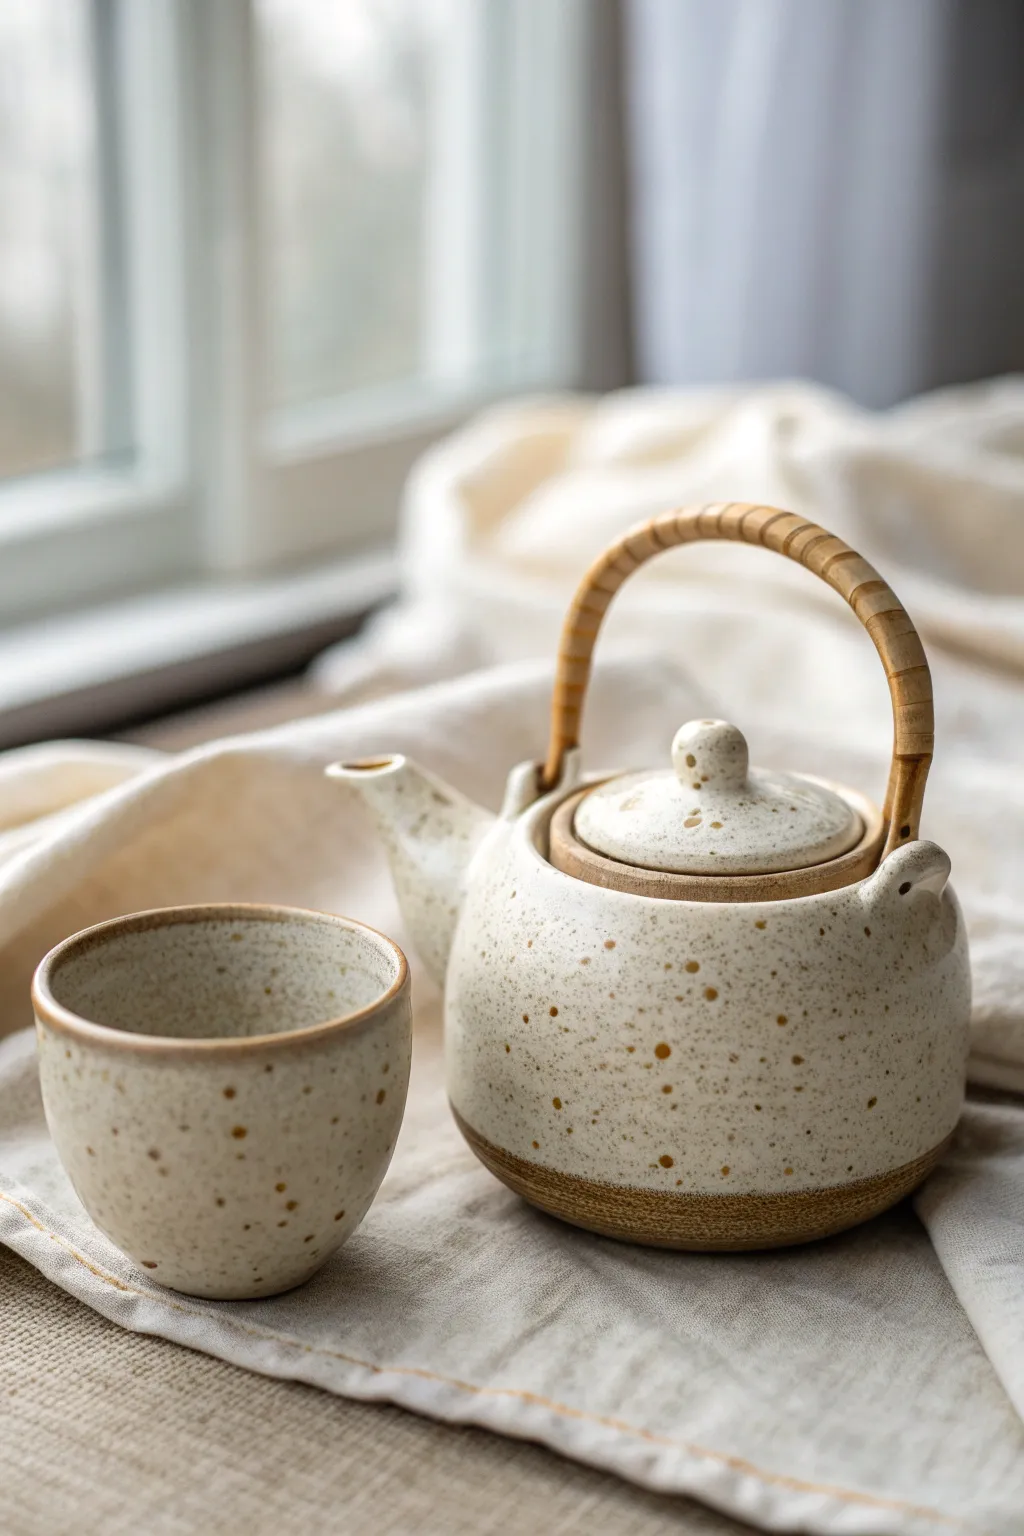
This rustic, nature-inspired tea set features a creamy, speckled glaze over warm, exposed stoneware clay. The unique bamboo-wrapped handle adds an organic touch to the cozy, rounded form, making it the perfect companion for quiet afternoon breaks.
Step-by-Step Guide
Materials
- Speckled stoneware clay (approx 2 lbs)
- Pottery wheel (or hand-building tools if preferred)
- Ribs (kidney and metal)
- Needle tool
- Wire cutter
- Trimming tools
- Bamboo or rattan handle (pre-made or strips for wrapping)
- Heavy gauge wire (for handle attachment)
- White or cream satin glaze (opaque)
- Sponge
- Modeling tool (wooden)
Step 1: Throwing the Forms
-
Center the clay:
Start with two balls of clay: a larger one (approx 1.25 lbs) for the teapot body and lid, and a smaller one (approx 0.75 lbs) for the matching cup. Secure the larger ball on the wheel head and center it thoroughly. -
Open the teapot body:
Open the form, keeping the base somewhat narrow to achieve that rounded, bulbous belly shown in the image. Pull up the walls, angling them outward initially to create volume. -
Shape the belly:
Using a rib on the inside, push the clay outward while supporting the outside to create a nice, full curve. Bring the neck in significantly at the top, leaving an opening just wide enough for your lid gallery. -
Form the gallery:
Use a wooden modeling tool or your finger to split the rim, creating a small internal shelf (gallery) where the lid will sit. Ensure this area is smooth and level. -
Throw the spout and lid:
With remaining clay, throw a small, tapered spout and a simple doomed lid that fits your gallery measurements. Don’t forget to pull a tiny knob for the lid. -
Throw the tea bowl:
Center the smaller clay ball. Pull a simple cylinder with slightly curved walls, keeping the rim un-tapered for a modern look. This should feel comfortable in the hand, like a Japanese yunomi.
Step 2: Trimming and Assembly
-
Trim the bases:
Once leather hard, trim a clean foot ring on the tea bowl. For the teapot, I prefer to trim the bottom round so the curve continues underneath, adding a small foot ring for stability. -
Expose the texture:
While trimming, use a slightly rougher tool or a stiff brush on the lower quarter of the pots to enhance the raw clay texture that will remain unglazed later. -
Attach the spout:
Cut the base of your spout at an angle to fit the curve of the pot. Score and slip both surfaces, then attach firmly. Check the alignment—the spout tip should be level with the rim. -
Create handle lugs:
instead of pulling a clay handle, fashion two small loops or ‘lugs’ from clay coils. Attach these on the shoulder of the pot—one near the spout, one opposite—to hold the bamboo handle later. -
Dry and bisque:
Let all pieces dry slowly under plastic to prevent warping, especially the lid fit. Once bone dry, fire them to bisque temperature (usually cone 04).
Spout Drip issues?
If your teapot dribbles, checking the spout edge is key. The edge needs to be sharp, not rounded. Use a knife to slightly undercut the excessively round lip before firing.
Step 3: Glazing and Finishing
-
Wax the bottoms:
Apply wax resist to the bottom inch of both the teapot and the cup. This creates that distinct line where the glaze ends and the raw, toasted clay begins. -
Dip in glaze:
Dip the pieces into a milky white or cream satin glaze that allows iron specks from the clay to bleed through. If your clay isn’t naturally speckled, mix a few granules of manganese or granular ilmenite into the glaze. -
Clean the lugs:
Ensure the holes in your handle lugs are free of glaze so they don’t seal shut during firing. A small drill bit twist works well here. -
Glaze fire:
Fire the pieces to maturity (likely cone 5 or 6 depending on your clay body). The heat will turn the unglazed bottom a warm, toasty brown. -
Prepare the handle:
Use a pre-made bamboo handle or soak rattan reed until pliable. If using a pre-made handle, you may need heavy gauge wire to create the hooks. -
Attach handle:
Thread the wire hooks through the clay lugs and bend them securely upward. If wrapping your own, loop the reed through the lugs and bind tightly with finer cane.
Clean Lines
For a super crisp line between the glazed and unglazed sections, use automotive detailing tape instead of just wax resist. Peel it off right after dipping.
Once the handle is secure, brew a test pot to celebrate your beautiful new handmade set
Heart-Inspired Teapot Details
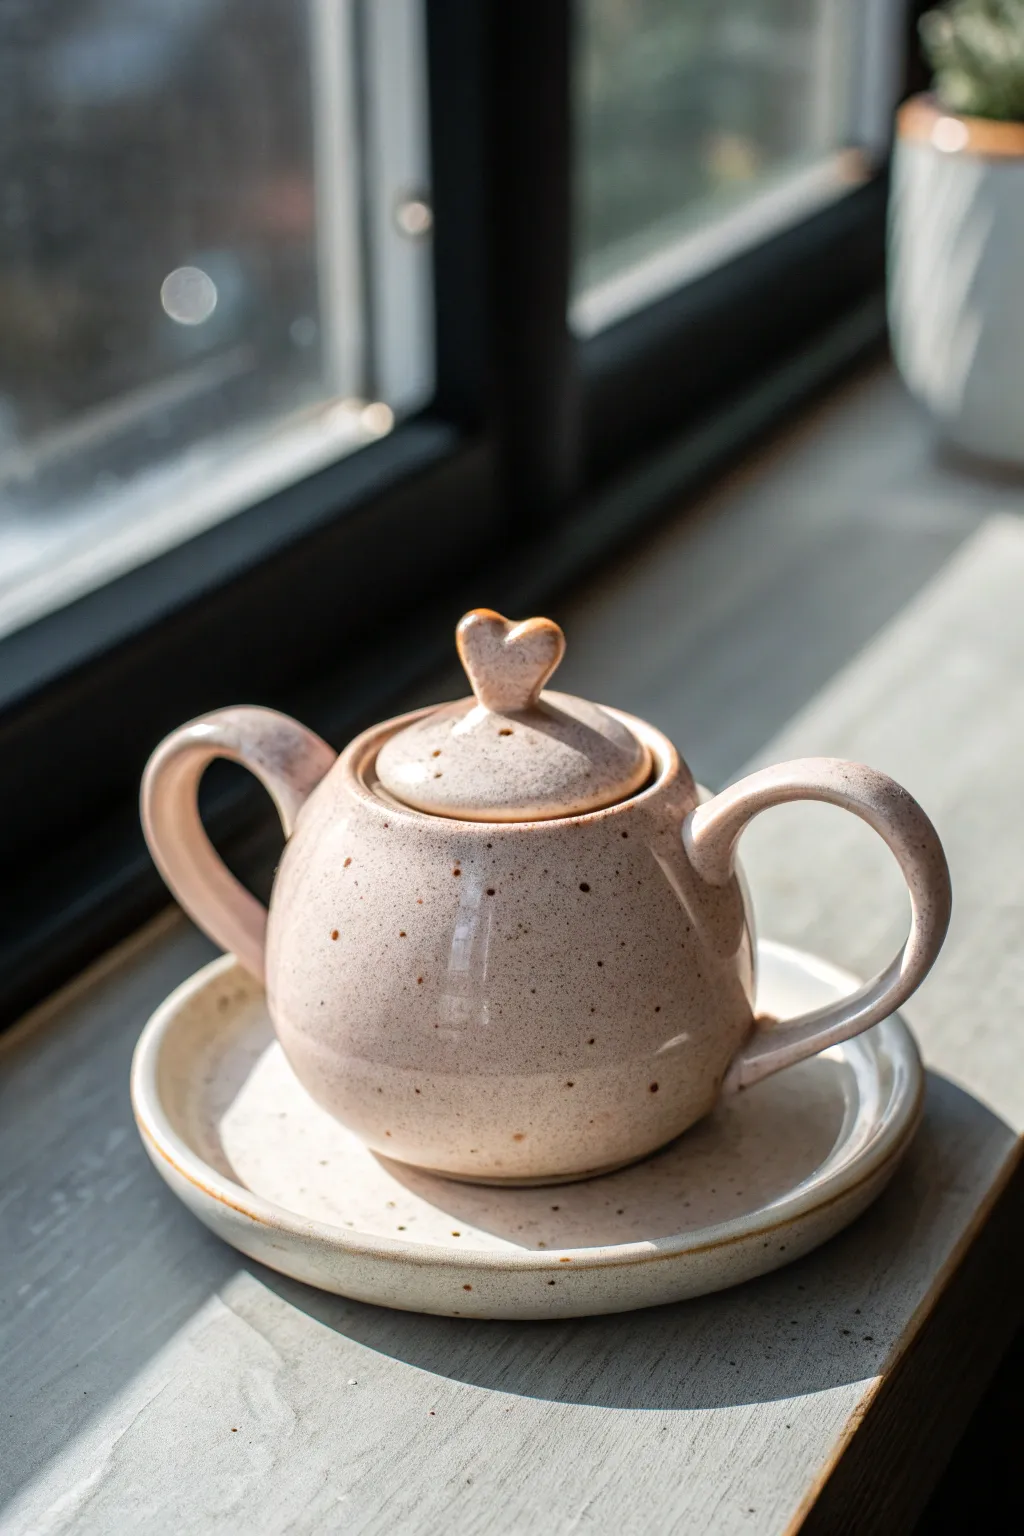
This charming, double-handled sugar bowl or petite teapot features a creamy, speckled pink glaze and a delightful heart-shaped knob. Its symmetrical design and warm, earthy finish make it a cozy addition to any morning tea ritual.
Step-by-Step Tutorial
Materials
- Speckled clay body (or buff clay with iron oxide additions)
- Pottery wheel
- Throwing tools (sponge, rib, wire cutter)
- Needle tool
- Loop tool for trimming
- Scoring tool or serrated rib
- Slip
- Transparent or semi-opaque creamy pink glaze
- Kiln
Step 1: Throwing the Body and Lid
-
Center the clay:
Start with about 1-1.5 lbs of speckled clay. Center it firmly on the wheel head, ensuring no wobbles before opening. -
Create the enclosed form:
Open the clay and pull the walls into a rounded, bulbous shape. Instead of leaving the top open, collar the neck in significantly until only a small opening remains, creating a gallery for the lid. -
Shape the belly:
Use a kidney rib on the inside to push the belly out, giving it a nice, spherical volume while refining the profile. -
Throw the lid:
Using a smaller ball of clay (a few ounces), throw a small, domed lid upside down or off the hump. Ensure the flange measurement matches the gallery of your pot precisely. -
Throw the saucer:
Center a flat disk of clay and pull up a shallow rim to create the matching saucer. Smooth the floor with a sponge to ensure it sits flat.
Iron Speckle Hack
If you don’t have speckled clay, wedge granular iron oxide or manganese into plain buff clay. Wear gloves and a mask when mixing.
Step 2: Trimming and Handles
-
Trim the foot:
Once leather hard, flip the pot and trim a clean, defined foot ring. This lifts the form visually and gives it elegance. -
Pull the handles:
Pull two identical strap handles from a lug of clay. They should be relatively thin and curve into a distinct ‘C’ or ear shape. -
Attach handles symmetrically:
Score and slip the attachment points on opposite sides of the pot. Attach the handles, blending the clay smoothly into the body so the transition is seamless. -
Sculpt the heart knob:
Hand-build a small, thick heart shape from a scrap of clay. Pinch the bottom to create a small stalk for attachment. -
Attach the knob:
Score the center of the lid and the base of the heart. Press them together firmly, cleaning up any excess slip with a small brush.
Add Gold Luster
For extra luxury, apply a genuine gold overglaze to the heart knob and handle rims after the glaze firing, then re-fire to cone 018.
Step 3: Glazing and Firing
-
Bisque fire:
Allow all pieces to bone dry slowly to prevent cracking, especially at the handle joints. Fire to cone 04 (or your clay’s bisque temperature). -
Wax the contact points:
Wax the foot ring of the pot, the rim of the lid, the gallery of the pot, and the bottom of the saucer to prevent fusing. -
Dip into glaze:
Dip the pieces into a semi-opaque creamy pink glaze. I find a 3-second dip usually gives the perfect thickness without hiding the speckles. -
Clean the edges:
Wipe back any glaze that may have dripped onto the waxed areas or rim with a damp sponge. -
Glaze fire:
Fire the kiln to the maturity temperature of your clay and glaze (likely cone 5 or 6). Let the kiln cool naturally to promote a smooth, glossy surface.
Now you have a heartwarming set perfect for serving sugar or brewing a personal cup of tea

TRACK YOUR CERAMIC JOURNEY
Capture glaze tests, firing details, and creative progress—all in one simple printable. Make your projects easier to repeat and improve.
Teapot With Built-In Loose-Leaf Infuser
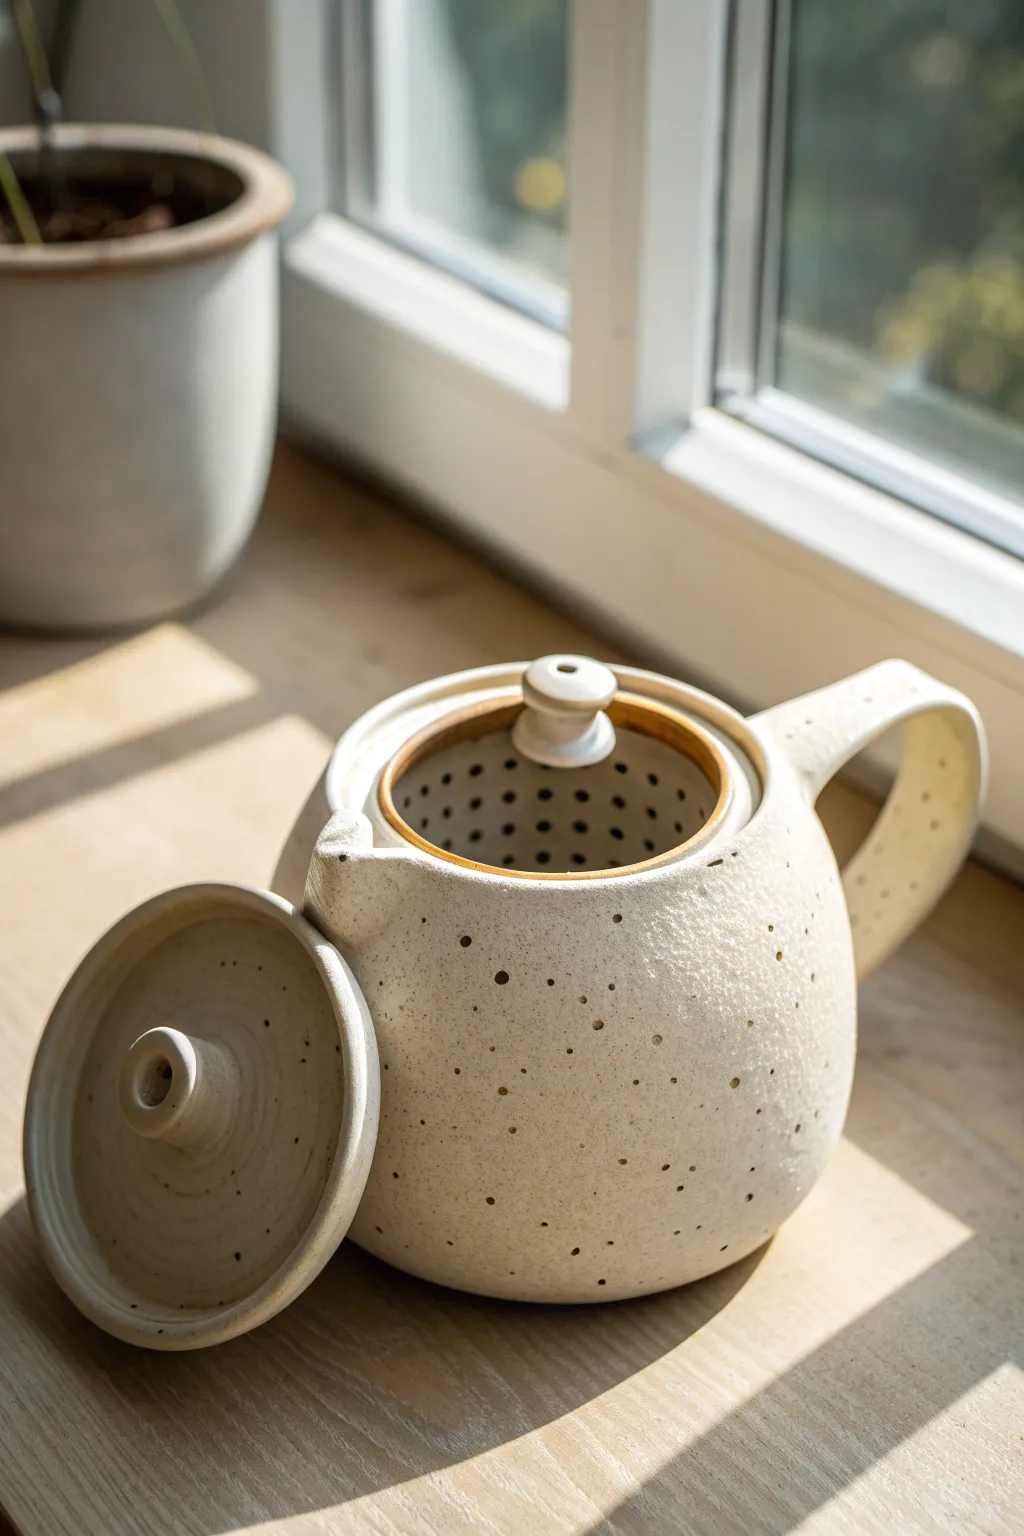
This charming, rustic teapot features a warm, speckled clay body and a clever built-in strainer basket for loose-leaf enthusiasts. The matte cream glaze allows the natural iron spots of the clay to shine through, creating a cozy and organic aesthetic perfect for slow mornings.
Detailed Instructions
Materials
- Speckled Stoneware Clay (mid-fire)
- Pottery Wheel (optional, can be hand-built)
- Rib tool (metal and rubber)
- Needle tool
- Wire cutter
- Sponge
- Drill tool or Hole cutter (small diameter)
- Calipers
- Scoring tool or serrated rib
- Slip
- Matte White/Cream Glaze
Step 1: Forming the Main Vessel
-
Throwing the body:
Begin by centering about 1.5 to 2 lbs of speckled clay on the wheel. Open the clay and pull the walls up and out to create a rounded, bulbous belly, tapering slightly inward at the top to form a gallery for the lid. -
Measuring for the strainer:
Before removing the pot from the wheel, use calipers to measure the exact inner diameter of the gallery rim. This measurement is crucial for fitting the internal strainer basket later. -
Refining the shape:
Use a flexible metal kidney or rubber rib to smooth the outside curve, removing throwing lines if you want a clean surface, and compressing the clay. -
Trimming the foot:
Once the body is leather hard, trim a clean, flat bottom or a modest foot ring to give the pot a slight lift.
Stuck Lid?
Glaze fusing the lid? Always wax resist the rim of the pot, the underside of the strainer lip, and the lid gallery. This ensures the parts separate easily after firing.
Step 2: Creating the Infuser Basket
-
Sizing the strainer:
Throw a small cylinder without a floor (or with a floor that you will perforate). The rim of this cylinder must flare out slightly to rest on the teapot’s gallery, matching your caliper measurements perfectly. -
Drilling the holes:
Wait until the basket is leather hard. Using a small hole cutter or drill tool, carefully punch a grid of holes around the sides and bottom. Space them evenly to ensure good water flow without weakening the structure. -
Smoothing the perforations:
After drilling, gently wipe the inside and outside with a damp sponge or finger to remove any sharp clay burrs created by the hole cutter.
Step 3: Spout, Handle, and Lid
-
Creating the spout:
Throw or hand-build a short, stout spout. Cut it at an angle to fit the curve of the pot’s belly. -
Attaching the spout:
Hold the spout up to the pot to check the angle. Score and slip both surfaces, then press firmly to attach. Blend the seam seamlessly with a wooden tool. -
Pulling the handle:
Pull a strap handle that is wide and flat. Attach it opposite the spout, ensuring the arch leaves enough room for your hand. I find a slightly oversized handle loop balances the visual weight of this pot nicely. -
Making the lid:
Throw a simple lid that fits inside the strainer basket’s rim. Add a small, solid knob on top for easy lifting.
Make it Match
Create a cohesive set by making two handle-less tea bowls using the same speckled clay. Trim them to have the same rounded bottom curve as the teapot.
Step 4: Surface Treatment and Firing
-
Texture application:
If your clay isn’t naturally speckled enough, you can gently flick iron oxide wash or a dark slip across the surface with a stiff brush to mimic the speckles shown in the image. -
Incising details:
Use a needle tool to add faint, random pinpricks or dots across the exterior surface for added tactile interest, mirroring the strainer holes. -
Bisque firing:
Once bone dry, fire all three pieces (body, strainer, lid) to bisque temperature (usually Cone 06/04). -
Glazing:
Apply a matte cream or warm white glaze. Pour glaze inside the body and spout. Dip the exterior. For the strainer, carefully brush glaze on, ensuring the holes don’t clog. If they do, blow through them gently while the glaze is wet. -
Final wipe:
Wipe the foot of the teapot and the contact points where the strainer rests on the gallery to prevent them fusing together. -
Glaze firing:
Fire to the maturity of your clay and glaze (likely Cone 5/6 for stoneware). Allow the kiln to cool completely before removing your new set.
Brew a pot of your favorite herbal tea and enjoy the warmth of your handmade creation
Carved Sgraffito Pattern Teapot
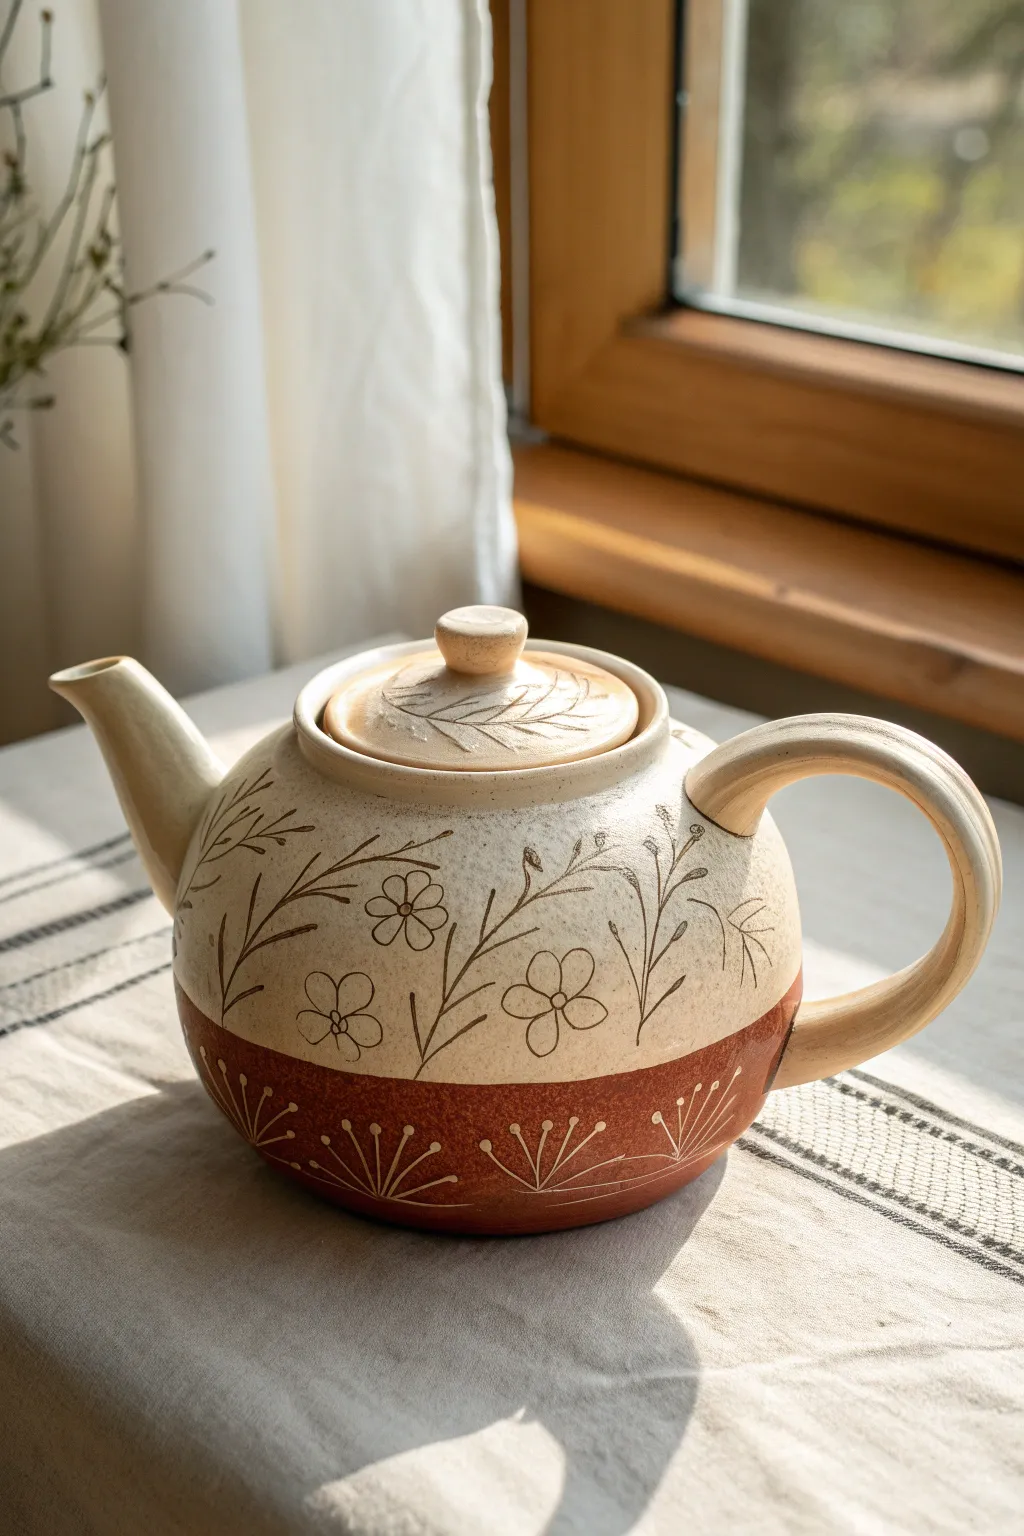
This charming teapot combines wheel-thrown precision with the rustic warmth of hand-carved details. Featuring a creamy upper body adorned with etched wildflowers and a rich terracotta base, it uses the sgraffito technique to reveal contrasting clay layers for a timeless, organic look.
How-To Guide
Materials
- Stoneware clay (smooth, light-bodied)
- Terra cotta slip or underglaze
- Cream/White slip or underglaze
- Pottery wheel and tools (ribs, sponge, wire cutter)
- Needle tool
- Sgraffito carving tools (small loops or styling tools)
- Clear matte glaze
- Kiln
Step 1: Throwing the Form
-
Center and open:
Begin with about 2-3 lbs of wedged stoneware clay on the wheel. Center it firmly and open the mound to create a flat internal floor for the teapot body, leaving about a half-inch of thickness at the bottom. -
Pull the walls:
Pull the clay up into a cylinder first, keeping the walls even. Once you have height, gently belly out the form from the inside to create that rounded, classic teapot shape. Collar the neck in slightly to fit a future lid. -
Refine the surface:
Use a smooth metal or rubber rib to compress the exterior walls, removing throwing lines and creating a perfect canvas for your carving later. -
Throw the spout and lid:
From smaller amounts of clay, throw a tapered spout and a lid that fits your teapot’s gallery. The lid should have a simple knob handle thrown directly on top. -
Pull a handle:
Pull a strap handle from a lug of clay. Curve it to match the rounded aesthetic of the pot and set it aside until it reaches leather-hard consistency.
Clean Lines
If your sgraffito lines look jagged, your clay might be too dry. Try carving when the piece is ‘leather hard’—not soft, but not chalky dry either.
Step 2: Assembly and Surface Prep
-
Trim the base:
Once leather hard, trim the bottom of the teapot to create a clean foot ring. This defines the shape and gives the pot visual lift. -
Attach components:
Score and slip the spout and handle onto the body. Ensure the spout tip is level with the lid opening to prevent dripping. Smooth all connection points for a seamless look. -
Apply the base color:
Paint a thick band of terra cotta slip or underglaze around the bottom third of the teapot. I like to apply 2-3 coats to ensure the color is solid and opaque. -
Apply the upper color:
Cover the top two-thirds of the teapot, the spout, and the handle with a cream or white slip. Where the colors meet, creating a clean, straight horizon line produces the neatest result. -
Coat the lid:
Apply the cream slip to the lid as well, ensuring it matches the upper body tone.
Step 3: Sgraffito Carving
-
Plan the design:
Lightly sketch your floral design onto the cream slip using a soft pencil. The pencil lines will burn off in the kiln. -
Carve the wildflowers:
Using a sharp sgraffito tool, gently scratch through the cream layer to reveal the darker stoneware body beneath. Focus on creating thin stems and simple five-petal flowers. -
Add detail to the leaves:
For the foliage, scratch outline shapes rather than solid blocks, keeping the lines delicate to mimic wild grasses. -
Carve the bottom band:
On the terra cotta section, switch to a slightly wider tool. Carve stylized seed-head shapes (fan-like lines with dots at the tips) to reveal the lighter clay body underneath. -
Detail the lid:
Add a simple branch or leaf motif on the lid to tie it visually to the main pot. -
Clean up burrs:
Once the carving is done and the pot is bone dry, lightly brush away any clay crumbs or burrs with a soft, dry brush. Avoid rubbing, as this can smear the colors.
Depth Control
Don’t dig too deep! You only need to scratch off the very top layer of colored slip. Grazing the surface prevents creating grooves that can trap glaze too thickly.
Step 4: Firing and Glazing
-
Bisque fire:
Load the bone-dry greenware into the kiln for a bisque fire (typically cone 04 or 06). This hardens the clay and sets the underglaze design. -
Glaze application:
After cooling, wipe the pot with a damp sponge. Dip or brush a clear matte glaze over the entire exterior and interior. A matte finish preserves the earthy texture better than a gloss finish. -
Final firing:
Fire the glazed piece to the maturity temperature of your clay (likely Cone 5 or 6 for stoneware). Allow the kiln to cool completely before unloading.
Pour yourself a hot cup of tea and enjoy the tactile beauty of your hand-carved creation
Botanical Appliqué Teapot With Flowers and Vines
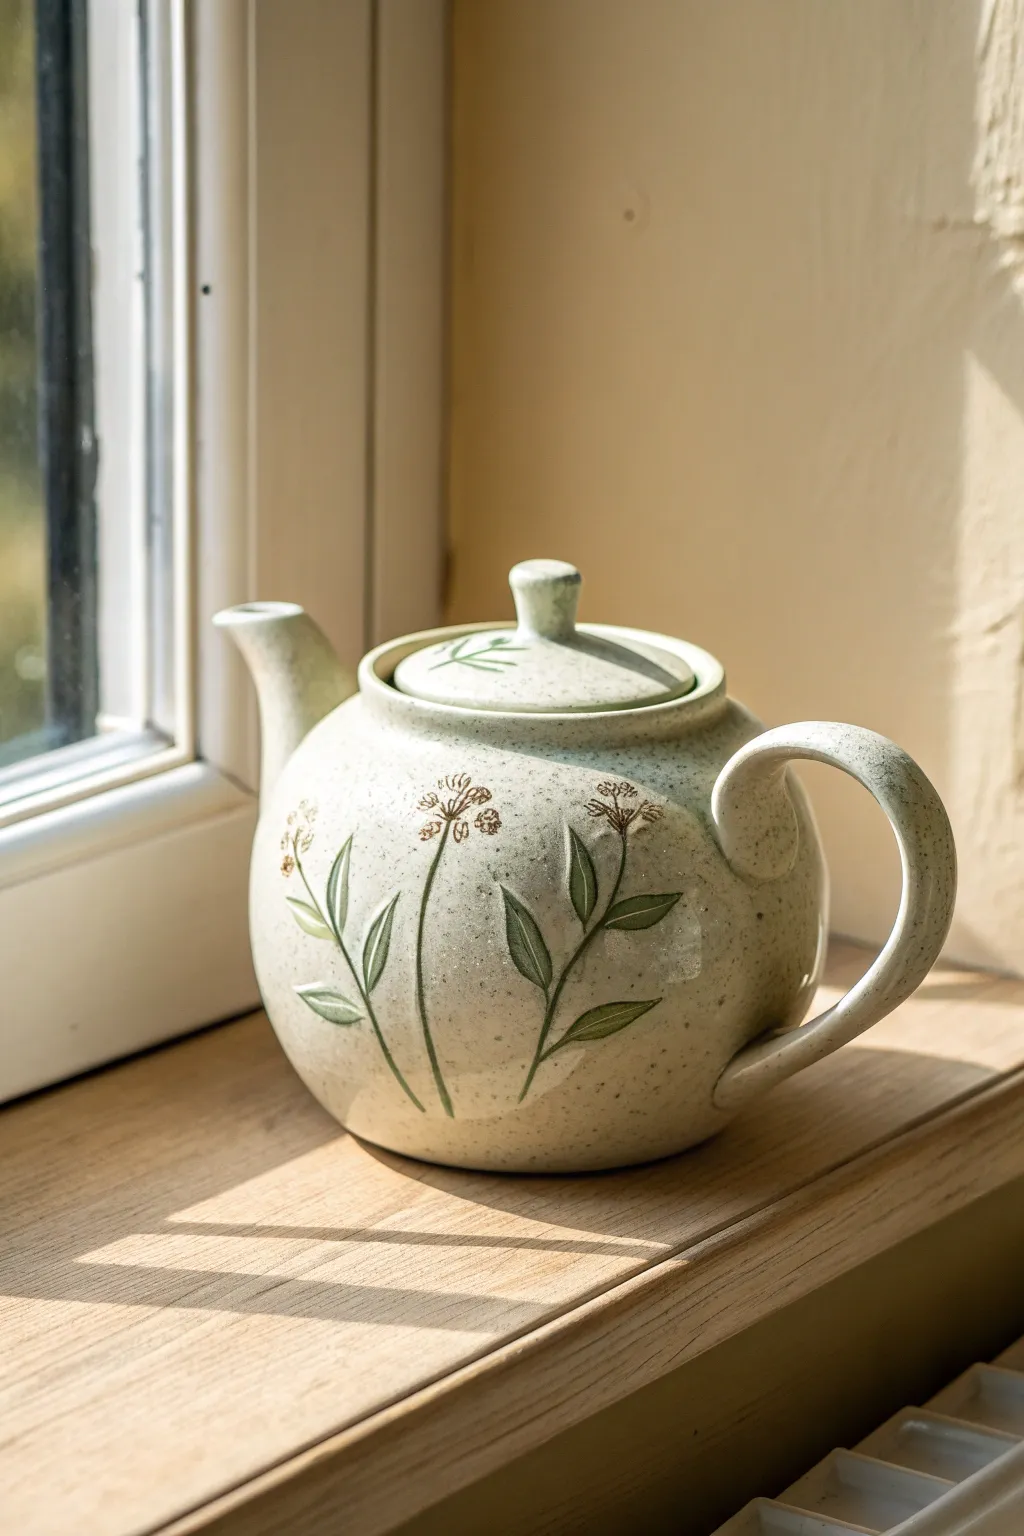
Bring the serene beauty of a wild meadow into your kitchen with this handcrafted ceramic teapot. Featuring a speckled clay body and delicate hand-painted fennel and leaf motifs, this piece combines rustic charm with elegant, natural forms.
Step-by-Step Tutorial
Materials
- Speckled stoneware clay (mid-fire)
- Pottery wheel
- Throwing tools (ribs, sponge, wire cutter)
- Trimming tools
- Teapot spout maker or hole cutter tool
- Scoring tool and slip
- Underglaze (olive green, brownish-green)
- Fine liner brushes (size 0 and 1)
- Clear gloss or satin glaze (cone 5/6)
- Wax resist
Step 1: Throwing the Components
-
Center and open:
Begin with about 2-3 lbs of speckled clay. Center it on the wheel and open it wide enough to create a generous internal volume, leaving the floor about ½ inch thick for trimming later. -
Pull the body:
Pull the walls into a rounded, bulbous shape. Angle your pulls inward as you reach the top to create a gallery ledge for the lid. Use a metal rib to smooth the exterior curve and refine the silhouette. -
Throw the spout and lid:
From smaller lumps of clay, throw a tapered spout and a lid. Measure the lid carefully with calipers to ensure it fits the gallery of your teapot body perfectly. -
Pull the handle:
Pull a strap handle directly from a lump of clay or use the traditional pulling method with a carrot-shaped piece. Create a subtle curve that will complement the roundness of the pot and set it aside to stiffen.
Clean Spout Pour
Run a finger under the very tip of the spout immediately after throwing or attaching. This sharp edge breaks surface tension and prevents dripping.
Step 2: Assembly & Trimming
-
Trim the base:
Once leather hard, center the teapot body inverted on the wheel. Trim a clean, defined foot ring that lifts the pot slightly. -
Trim the lid:
Trim the underside of the lid to remove excess weight. Attach a small, hand-rolled knob to the top center of the lid using slip and score marks. -
Attach the spout:
Cut the spout at an angle to fit the body curve. Hold it up to the pot to check the angle; the tip should be level with the rim. Score the attachment area, drill strainer holes into the body, and firmly attach the spout with slip. -
Attach the handle:
Score and slip the contact points for the handle opposite the spout. Attach the top first, arching it gracefully, then secure the bottom. Smooth all seams with a damp sponge or modeling tool.
Carved Texture
Before painting, use a needle tool to gently sgraffito outline the leaves. The glaze will pool slightly in the grooves, adding depth to the illustration.
Step 3: Decoration & Glazing
-
Sketch the design:
With the pot at a bone-dry greenware stage, lightly sketch your botanical layout using a pencil. The graphite will burn off in the kiln. -
Paint the stems:
Using a fine liner brush and olive green underglaze, paint long, fluid lines for the stems. Vary the pressure to create natural taper, allowing the lines to curve with the form of the pot. -
Add the leaves:
Paint the lance-shaped leaves branching off the stems. I find it helpful to load the brush fully and press down at the base of the leaf, lifting as I pull outward to create a sharp point. -
Detail the blossoms:
Switch to a brownish-green underglaze for the flower heads. Use tiny stippling motions or small clusters of dots to mimic the texture of fennel or dill umbels. -
Bisque fire:
Once the underglaze is completely dry, bisque fire the teapot to cone 04. -
Wax and glaze:
Apply wax resist to the foot ring and the gallery where the lid sits. Dip or pour a clear gloss or satin glaze over the entire piece. The clear glaze will allow the natural clay speckles and your painting to show through clearly. -
Final firing:
Fire the glazed piece to cone 5 or 6 (depending on your clay body specifications) to vitrify the stoneware.
Now brew your favorite loose-leaf tea and enjoy the peaceful atmosphere this beautiful vessel creates
Teapot With Sculptural Feet or Tripod Legs
Elevate your tea ritual with this charming handmade teapot featuring sturdy tripod legs and a warm, speckled finish. The rounded belly and lifted stance give it a playful yet grounded character perfect for cozy afternoons.
Step-by-Step Guide
Materials
- Speckled stoneware clay (mid-fire)
- Pottery wheel
- Ribs (wooden and metal)
- Needle tool
- Wire cutter
- Trimming tools
- Score and slip tool (serrated rib)
- Sponge
- Clear or transparent amber glaze
- Kiln
Step 1: Throwing the Body and Lid
-
Center and open:
Begin with about 1.5 to 2 lbs of speckled stoneware clay. Center it firmly on the wheel head and open it up, leaving the floor slightly thicker than usual to support the eventual curve. -
Shape the belly:
Pull up the walls into a cylinder first, then gently belly out the form from the inside using a rib. Aim for a distinct, rounded globe shape that curves back inward at the top. -
Form the gallery:
At the rim, use a wooden tool or your finger to split the clay, creating a recessed gallery where the lid will sit. Ensure this ledge is sharp and clean. -
Throw the lid:
Using a smaller ball of clay (about 0.5 lbs), throw a shallow bowl shape upside down or throw it right-side up using a caliper to measure against your teapot’s gallery. Include a small solid knob at the center. -
Refine the lid:
Once leather hard, trim the lid so it fits perfectly into the gallery with a little wiggle room to account for glaze thickness later.
Wobbly Pot?
If the tripod legs are uneven after attaching, gently tap the pot down onto a flat wooden board while the clay is still soft to level them out instantly.
Step 2: Creating Attachments
-
Pull the spout:
Throw a small spout on the wheel, tapering it upwards. Alternatively, hand-build a cone shape. Gently bend the tip while the clay is plastic to create a good pouring angle. -
Pull the handle:
Pull a strap of clay for the handle. I prefer to let this stiffen into a curve on a table before attaching, matching the roundness of the pot’s body. -
Form the tripod feet:
Roll three equal-sized balls of clay. Shape them into thick, tapered cones or stubby cylinders. These should look sturdy enough to hold the weight of a full pot.
Step 3: Assembly and Finishing
-
Trim the base:
Once the body prevents a fingerprint impression, flip it over and trim the bottom round. Since we are adding legs, you don’t need a foot ring, just a smooth, curved bottom. -
Mark leg positions:
Divide the bottom into thirds. Mark the spots where the tripod legs will go to ensure the pot sits level. -
Attach the feet:
Score and slip the contact points heavily. Press the feet onto the bottom, blending the clay seams smoothly so they look like they grew out of the pot. Flip it over gently to check for levelness. -
Attach handle and spout:
Score and slip the spout and handle onto the leather-hard body. Ensure the spout tip is level with or slightly higher than the rim to prevent overflowing. -
Clean and bisque:
Smooth all attachment points with a damp sponge. Let the teapot dry slowly under plastic to prevent cracking, then bisque fire to cone 04. -
Glaze application:
Pour a transparent or light amber glaze inside the pot first, pouring it back out. Then dip or brush the exterior. The transparency is key to letting the clay’s natural iron speckles shine through. -
Wipe feet and fire:
Carefully wipe the glaze off the bottom of the three feet so they don’t stick to the kiln shelf. Glaze fire to the maturation temperature of your clay (likely cone 5 or 6).
Make it Rustic
Before glazing, lightly sponge away some iron specks on the rim or handle edges to create a ‘toasted’ effect where the raw clay meets the glaze.
Now brew your favorite loose-leaf blend and enjoy the balanced beauty of your new creation
Teapot That Looks Like a Tiny House
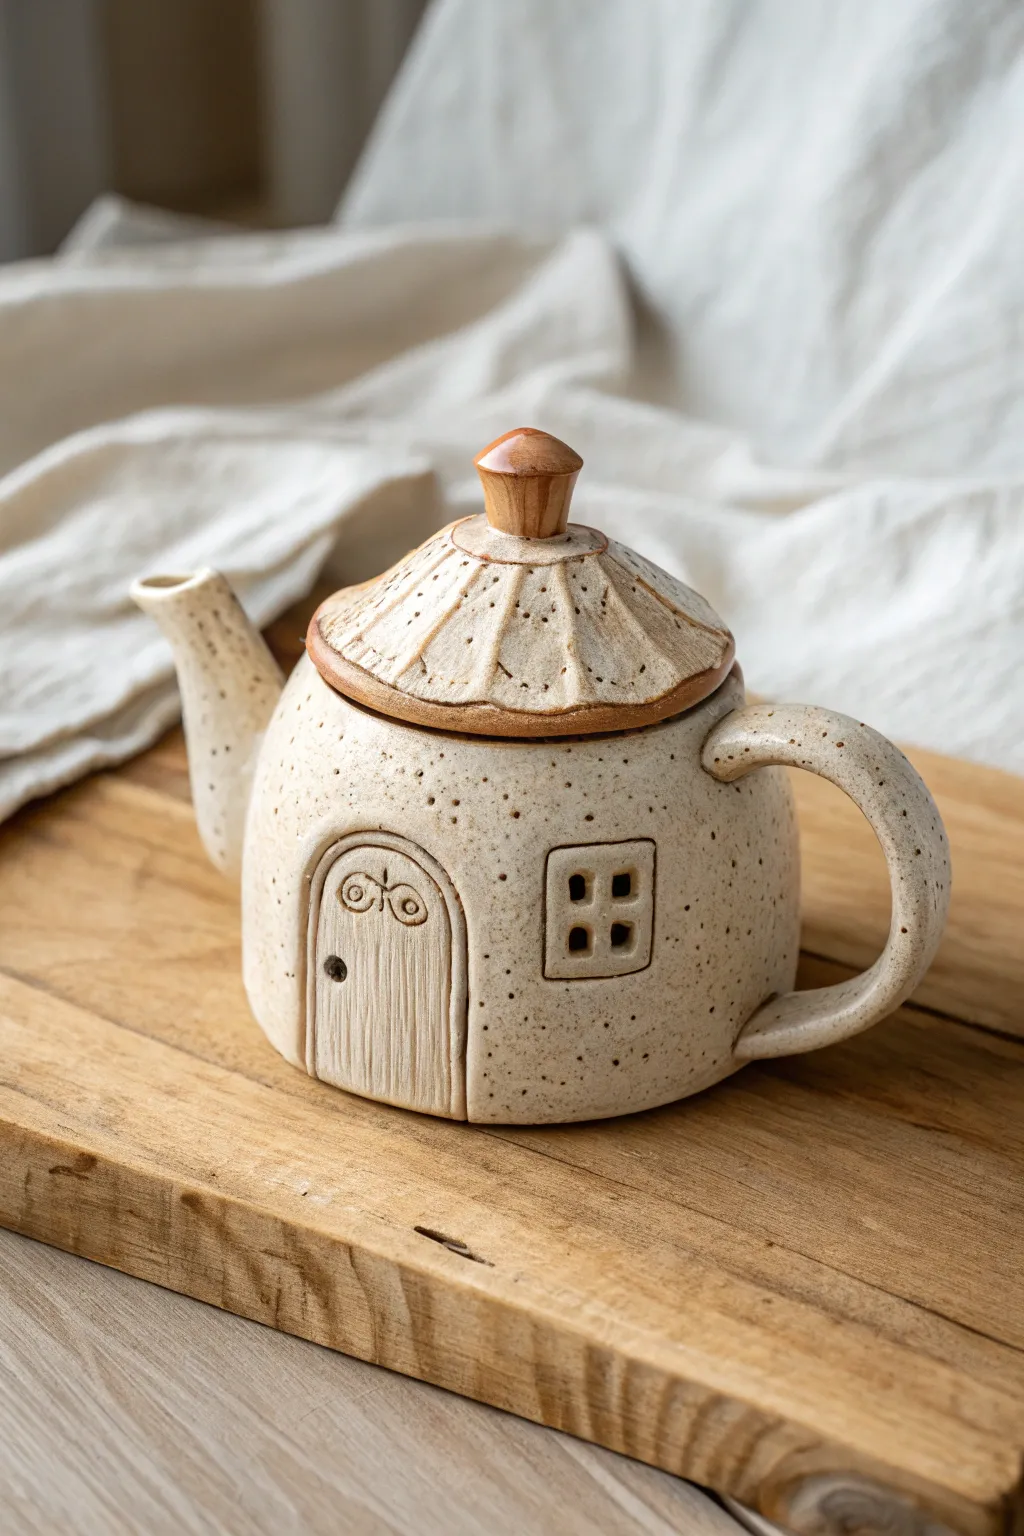
Transform a simple lump of clay into a charming functional sculpture with this tiny house teapot project. Featuring a speckled finish, a textured roof lid, and adorable architectural details like a wood-grain door, this piece brings a storybook feel to your tea time.
Detailed Instructions
Materials
- Speckled stoneware clay (mid-fire)
- Pottery wheel (optional, can be hand-built)
- Needle tool
- Scoring tool or serrated rib
- Slip (clay mixed with water)
- Wooden modeling tools
- Sponge
- Clay knife or fettling knife
- Clear matte glaze
- Brown underglaze or oxide wash (for accents)
- Kiln
Step 1: Forming the Body and Lid
-
Create the base form:
Begin by throwing a closed, rounded dome shape on the wheel to form the main body of the cottage. If you are hand-building, create two pinch pots and join them together, smoothing the exterior into a uniform, rounded squat cylinder. -
Open the gallery:
Carefully cut a circular opening at the very top of your dome. Use a caliper to measure this opening precisely, as this is where your lid will sit. Keep the cut-out clay to use for the lid or pull fresh clay. -
Shape the roof lid:
Throw or pinch a matching conical shape that is slightly wider than your opening. It should have a flange underneath that fits snugly inside the teapot’s rim. The top should slope gently like a roof. -
Add the knob:
Attach a small, tapered cylinder to the very center of the lid to act as a chimney knob. I prefer to define the top edge sharply so it looks like a chimney cap. -
Texture the roof:
Using a wooden tool or needle tool, carve radiating lines from the chimney down to the edge of the lid. Add horizontal dashes or slight indentations to mimic thatch or shingles.
Lid Fit Issues?
If the lid rattles or doesn’t fit after the bisque fire, use a grinding stone or sandpaper to gently sand the flange until it sits flush. Always wear a mask when sanding fired clay.
Step 2: Adding the Appendages
-
Pull the handle:
Pull a medium-thick strap of clay for the handle. Allow it to curve into a ‘C’ shape and let it stiffen slightly until it holds its form without sagging. -
Form the spout:
Roll a tapered coil or throw a small spout on the wheel. Cut the attaching end at an angle so it fits flush against the round body of the pot towards the upper third. -
Attach handle and spout:
Score and slip the attachment points on the body, the handle, and the spout. Press them firmly into place, blending the clay seams until invisible. Ensure the spout tip is level with the top opening. -
Clear the spout:
Use a hole cutter or needle tool to pierce multiple strainer holes throught the body wall where the spout attaches. This ensures tea leaves stay in the pot while pouring.
Step 3: Sculpting the Details
-
Add the door slab:
Roll a small, thin slab of clay into an arched shape. Score the body of the teapot where you want the entrance and attach this slab. It should protrude slightly to look like a frame. -
Detail the door:
Using a sharp needle tool, lightly draw vertical wood grain lines on the door slab. Add a tiny ball of clay for the doorknob and incise decorative swirls at the top of the arch. -
Construct the window:
Cut a small square slab and attach it to the side of the pot. Use a square-ended tool to press four deep indentations into this slab to create the window panes, leaving a cross-shape raised in the center. -
Clean and refinement:
Go over the entire piece with a damp sponge to remove sharp burrs or rough crumbs of clay, especially around the carved roof lines and window edges.
Make it Cozy
Before the final glaze fire, add tiny dabs of transparent yellow glaze inside the window depressions. This will make it look like there is a warm light glowing inside the cottage.
Step 4: Glazing and Firing
-
Bisque fire:
Once bone dry, fire the piece to cone 04 (or your clay’s specific bisque temperature). This hardens the clay for glazing. -
Highlight the roof:
Apply a wash of brown underglaze or iron oxide to the lid, the chimney knob, and potentially the door details. Wipe it back with a sponge so the color stays only in the recesses of the texture. -
Apply main glaze:
Dip or brush the entire teapot (except the bottom) in a clear matte glaze. The speckles in the clay body will show through, giving it that stone-like texture. -
Glaze fire:
Fire the teapot to the maturation temperature of your clay (likely Cone 5 or 6 for stoneware). Allow the kiln to cool completely before removing your finished house.
Brew your favorite tea and enjoy the warmth of your handmade home.
Walking Teapot With Long Sculptural Legs
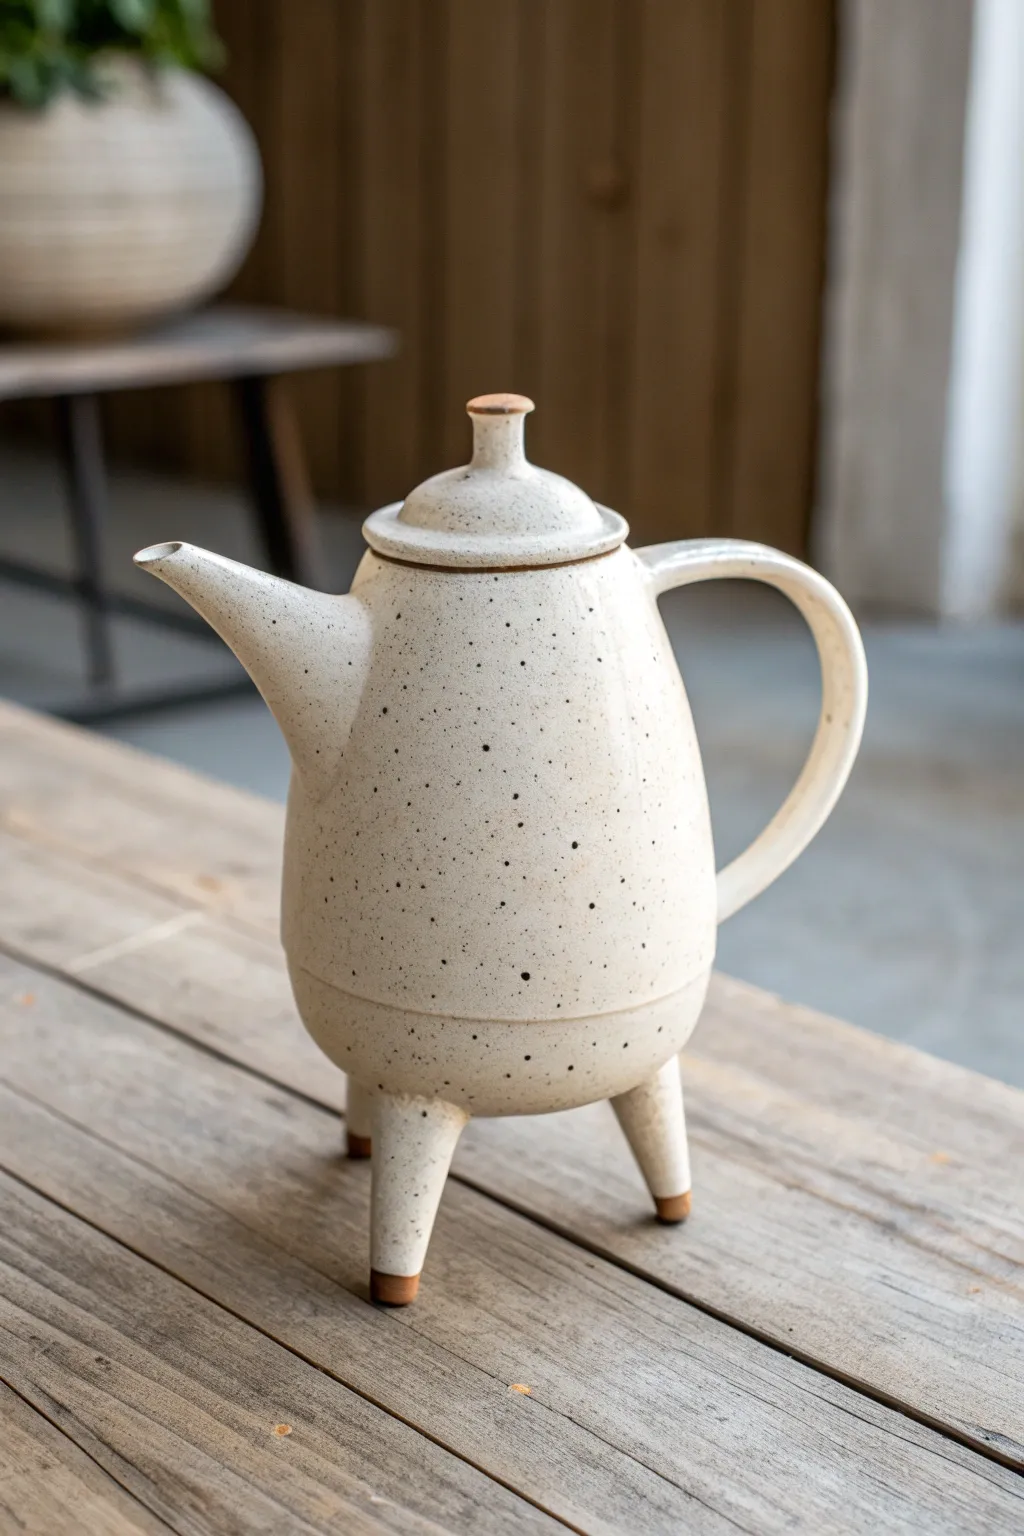
Elevate your tea ritual literally and figuratively with this whimsical yet sophisticated vessel. The design features a smooth, speckled glaze body standing tall on three tapered legs, giving it a playful character that almost looks ready to walk away.
Step-by-Step
Materials
- White stoneware clay with speckles (or standard stoneware with grog)
- Pottery wheel
- Throwing tools (sponge, wire cutter, ribs)
- Trimming tools
- Serrated rib or scoring tool
- Slip
- Fettling knife
- Glossy white glaze (transparent or semi-opaque based on preference)
- Wax resist
- Kiln
Step 1: Throwing the Body & Components
-
Throw the main vessel:
Begin with about 2-3 lbs of clay centered on the wheel. Throw a tall, slightly conical cylinder that bellies out gently near the bottom before tapering slightly inward at the rim. Aim for a distinct, sharp angle near the base where the body will transition to the legs. -
Form the gallery:
At the rim, use a wooden tool or your fingers to create an inset gallery. This ledge is crucial for the lid to sit securely inside rather than just resting on top. -
Create the lid:
Using a smaller ball of clay (approx. 0.5 lb), throw a dome-shaped lid that fits your gallery measurement. Pull a small, solid knob directly from the center of the hump while throwing. -
Pull the spout and handle:
You can either pull a handle directly from a lug of clay or throw a small, tapered spout shape on the wheel. For this design, a wheel-thrown spout often matches the geometric body better. Ensure the spout tapers to a sharp pouring edge. -
Throw the legs:
Throw three identical small cones off the hump. These should be sturdy and thick enough to support the finished pot but tapered elegantly toward the bottom. Measure them carefully with calipers to ensure consistency.
Step 2: Assembly & Sculpting
-
Trim the base:
Once the body is leather hard, trim the bottom. Instead of a standard foot ring, trim the base into a smooth, rounded curve that will visually flow into the legs. -
Attach the legs:
Mark three equidistant points on the rounded base. deeply score and slip both the attachment points and the tops of your three leg cones. Press them firmly into place, smoothing the clay connection with a modeling tool so the seam disappears completely. -
Check for balance:
Stand the pot up carefully. Adjust the angle of the legs while the clay is still malleable to ensure the pot stands level and the ‘walking’ stance looks perky rather than splayed. -
Prepare the spout:
Cut the attachment angle on your spout. Hold it up to the pot body to check the placement; the tip of the spout should be level with or slightly taller than the rim of the pot to prevent overflow. -
Drill strainer holes:
Once you are happy with the spout placement, outline the attachment area on the body. Drill a pattern of small holes inside this area to act as a built-in tea strainer. -
Attach handle and spout:
Score and slip the spout and handle into place. For the handle, create a classic ‘ear’ shape that balances the visual weight of the spout. Reinforce all joints with tiny coils of clay if needed, blending them smooth.
Wobbly Walker?
If the legs warp during firing and the pot rocks, use a diamond sanding pad or wet sandpaper on a flat surface to gently grind down the longest leg until it sits flat.
Step 3: Finishing Touches
-
Clean and refine:
Use a damp sponge to smooth out any finger marks or rough transitions. Pay special attention to the rim of the spout; I like to sharpen this edge slightly with a chamois to ensure a clean pour without dripping. -
Bisque fire:
Allow the teapot to dry slowly and evenly, perhaps under loose plastic, to prevent the legs from cracking at the joints. Bisque fire to your clay body’s recommended temperature (usually Cone 04 or 06). -
Apply wax resist:
This is key to the look: apply wax resist to the very bottom tips of the three legs, the rim of the lid’s knob, and the gallery rim where the lid sits. This will leave raw, toasted clay exposed after firing. -
Glaze application:
Pour a glossy white glaze inside the pot first and swirl to coat. Then, dip the exterior or pour the glaze over it. The wax will repel the glaze on the feet and details. -
Final firing:
Clean up any glaze drips on the waxed areas carefully with a sponge. Glaze fire the piece to maturity (often Cone 6 or 10). The heat will interact with the iron speckles in the clay, bleeding them through the white glaze.
Level Up: Surface Texture
Before the clay dries, gently paddle the main body with a texturing tool to create subtle facets. The glaze will break beautifully over these edges, adding depth.
Once cooled, brew a fresh pot of tea and enjoy the way your new creation confidently struts across the table