Whenever my studio table gets cluttered with rings, earbuds, and tiny treasures, a handmade clay dish is the cutest little fix. Here are my go-to clay dish ideas—from classic trinket shapes to playful statement pieces you can totally make your own.
Classic Round Trinket Dish
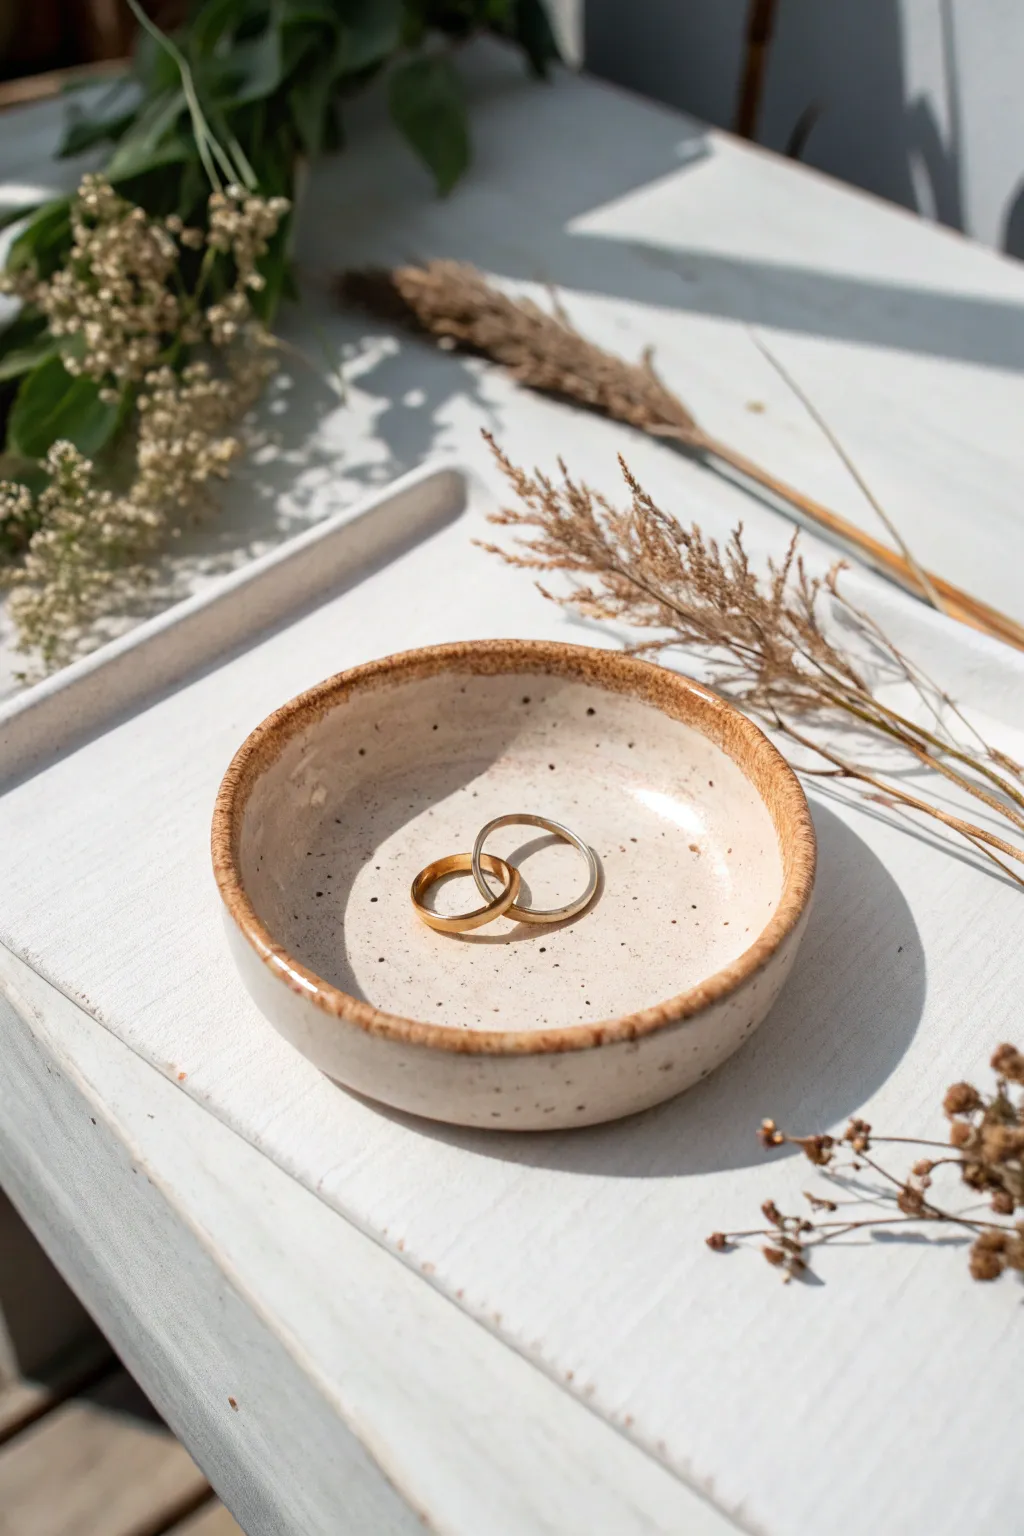
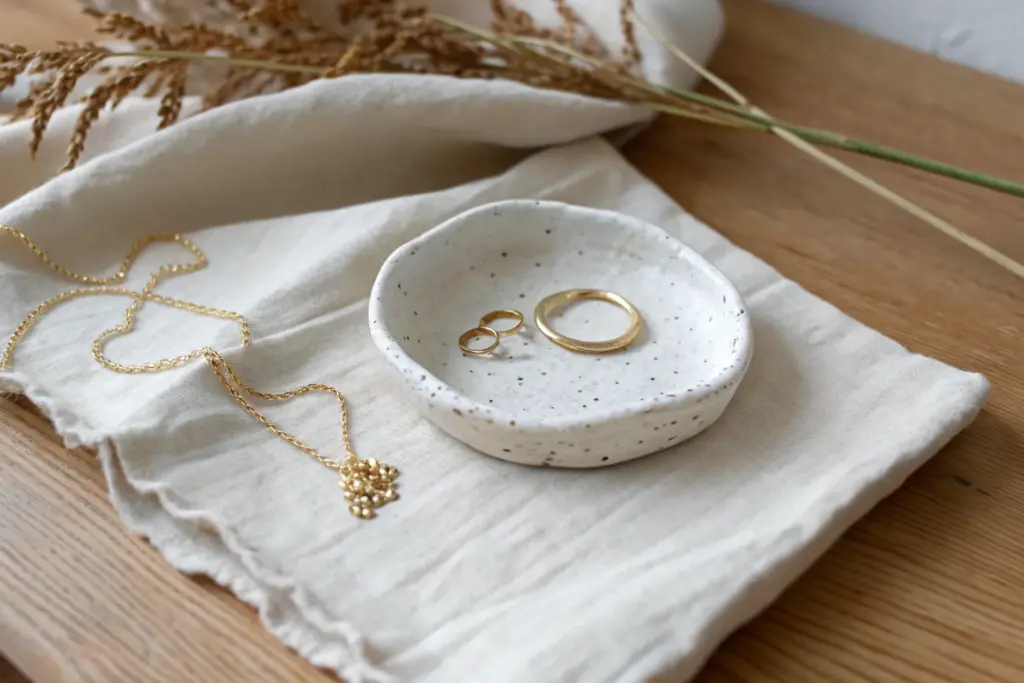
This charming, earthy trinket dish features a classic round shape with a creamy, speckled glaze and a warm, toasted rim. It is the perfect size for keeping wedding bands safe or holding delicate earrings on a bedside table.
Step-by-Step Guide
Materials
- White or speckled stoneware clay
- Rolling pin
- Canvas mat or cloth
- Circular cookie cutter or jar lid (approx. 3-4 inches)
- Small sponge
- Pottery rib tool or old credit card
- Creamy white speckled glaze
- Iron oxide wash (or a specific brown glaze for the rim)
- Kiln (or access to a firing service)
Step 1: Shaping the Clay
-
Prepare the slab:
Begin by wedging a small ball of stoneware clay to remove air bubbles. Place it on your canvas mat and roll it out evenly until it is about 1/4 inch thick. Consistency in thickness is key for even drying. -
Cut the circle:
Use your circular cookie cutter or a jar lid to press a perfect circle into the clay slab. Remove the excess clay from around the edges so you are left with just the round disc. -
Smooth the edges:
Dip your finger in a tiny bit of water and run it gently along the cut edge of the circle. This softens the sharp angle left by the cutter, giving the finished piece a more organic feel. -
Form the curve:
Place the clay circle in the palm of your hand. Gently cup your hand to encourage the clay to slump slightly. Alternatively, press the clay gently into a shallow foam mold or a small bowl lined with plastic wrap. -
Refine the shape:
Use a damp sponge to smooth the interior curve. You want a gentle, shallow basin rather than steep walls. I like to smooth outwards from the center to ensure the transition is seamless. -
Refine the rim:
While the clay is soft, slightly pinch the rim between your thumb and forefinger to create a defined lip. This adds that subtle, hand-thrown aesthetic even though it is hand-built. -
Dry to leather hard:
Set the dish aside to dry slowly. Cover it loosely with plastic if you are in a dry environment. Wait until it reaches the leather-hard stage, where it provides resistance but isn’t brittle. -
Sponge finish:
Once leather hard, take a barely damp sponge and do a final pass over the entire surface, ensuring any tiny imperfections or fingerprints are buffed away.
Rim Texture
For a more rustic rim, tap the edge with the side of a toothbrush before bisque firing. The tiny indentations will catch the iron oxide wash beautifully.
Step 2: Glazing and Firing
-
Bisque fire:
Load the bone-dry dish into the kiln for the bisque firing (usually Cone 04). This hardens the clay and prepares it to accept the glaze. -
Clean the bisque:
After the firing, wipe the piece down with a damp sponge to remove any kiln dust. This prevents the glaze from crawling or spotting unintentionally. -
Apply the main glaze:
Pour your creamy white speckled glaze into the dish, swirl it to coat the entire interior, and pour out the excess. Dip the exterior or brush it on, leaving the very bottom unglazed if desired. -
Wipe the rim:
Use a clean, damp sponge to carefully wipe the glaze off the very top edge of the rim. You want to expose the raw clay body or prepare this area for a contrasting color. -
Apply the rim accent:
Dip a small brush into an iron oxide wash or a toasted brown glaze. Carefully paint the exposed rim where you just wiped away the white glaze. Let the brush naturally waiver slightly for an organic look. -
Clean the foot:
Ensure the bottom of the dish simply has no glaze on it so it won’t stick to the kiln shelf. Wipe away any drips near the base. -
Glaze fire:
Place the dish back in the kiln for the final glaze firing (temperature depends on your specific clay and glaze, typically Cone 5 or 6 for stoneware). -
Cool and inspect:
Allow the kiln to cool completely before removing your piece. The iron oxide rim should have interacted with the glaze to create that warm, rustic brown edge.
Try Gold Lustre
For a luxe upgrade, apply a thin line of real gold lustre over the brown rim after the glaze firing. Refire at a lower temperature (Cone 018) for a metallic shine.
Once cooled, your dish is ready to hold your most precious jewelry in style


Pinch-Pot Jewelry Catchall
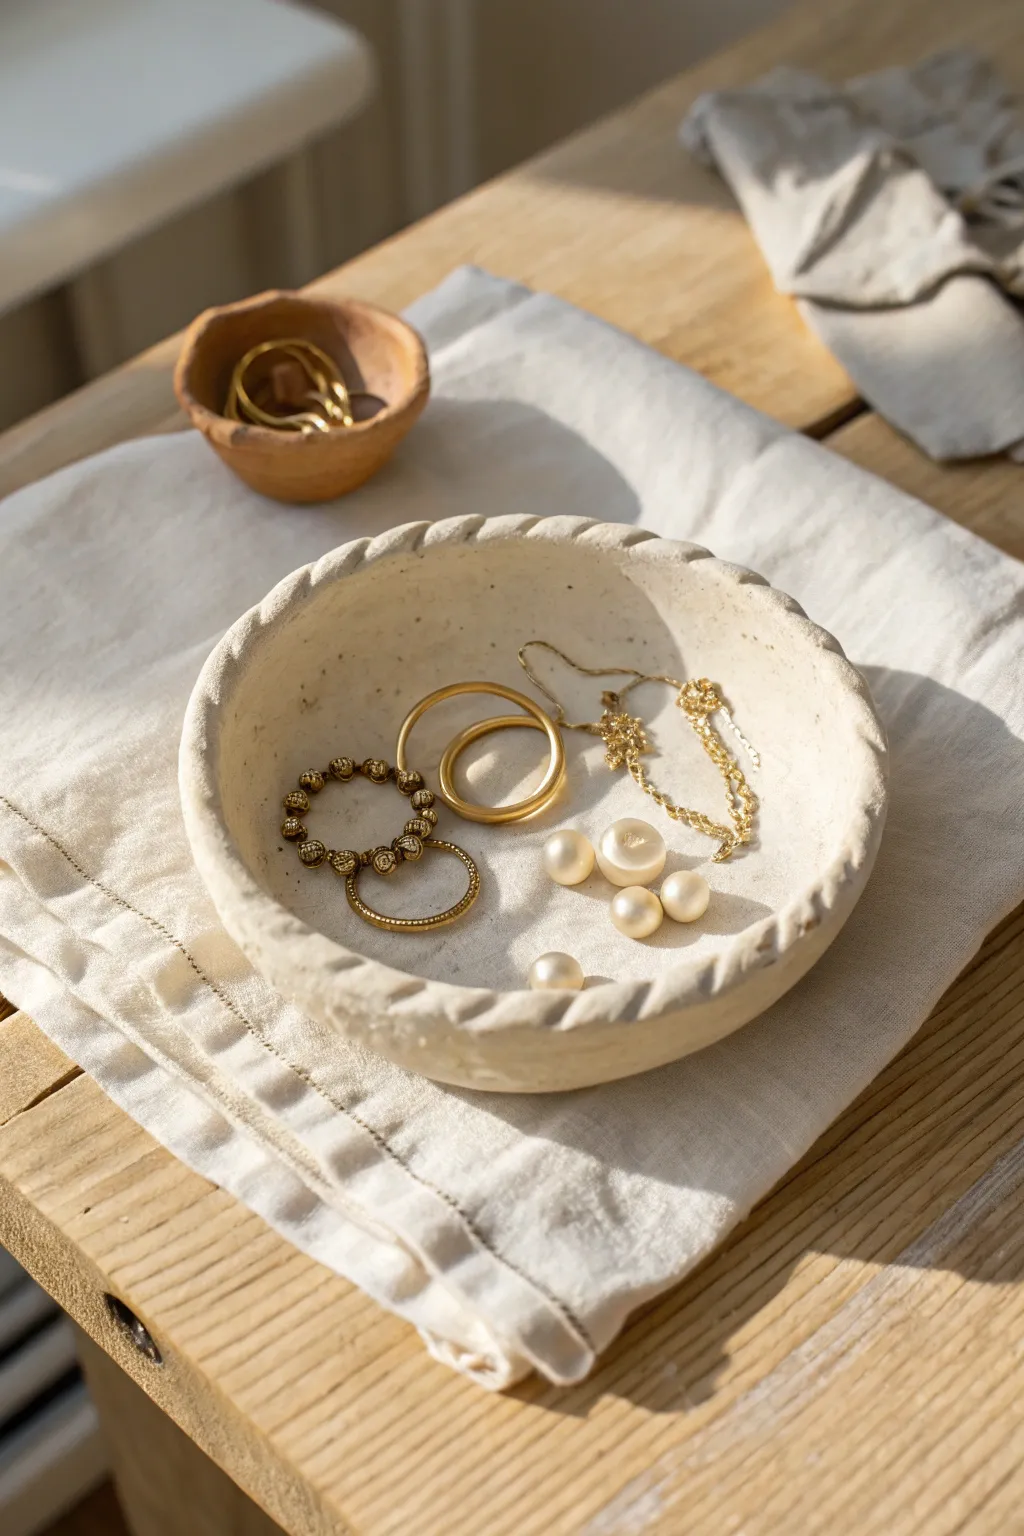
This rustic, elegant catchall features a beautifully textured rim that mimics a rope or twisted braid, perfect for holding your favorite rings and pearls. The natural, matte finish gives it a handcrafted pottery vibe without needing a kiln.
Step-by-Step
Materials
- White or cream air-dry clay
- Rolling pin
- Sponge
- Bowl of water
- Clay knife or fettling knife
- Needle tool or toothpick
- Fine-grit sandpaper (220 grit)
- Small bowl (to use as a slump mold)
- Plastic wrap
- Matte acrylic varnish (optional)
Step 1: Prepping and Shaping the Base
-
Prepare the clay:
Start by taking a handful of air-dry clay, roughly the size of a tennis ball. Knead it well in your hands to warm it up and remove any air bubbles, ensuring it is pliable and smooth. -
Roll out the slab:
Place the clay on a clean, flat surface. Use a rolling pin to flatten it into an even slab, aiming for a thickness of about 1/4 inch. If the clay sticks, you can dust a little cornstarch on your surface. -
Cut the circle:
Place a bowl or a circular template (about 4-5 inches wide) onto the clay slab. -
Refine the edge:
Use your clay knife to trace around the template and cut out a perfect circle. Remove the excess clay and smooth the raw edge gently with a slightly damp finger. -
Form the curve:
Find a small bowl to use as a mold. Line the inside with plastic wrap to prevent sticking, then gently press your clay circle into the bowl so it takes on a shallow, curved shape.
Step 2: Creating the Braided Rim
-
Roll a coil:
Take the excess clay scraps and roll them into a long, thin snake (coil). Aim for it to be slightly thicker than a pencil and long enough to wrap around the entire circumference of your bowl. -
Twist the rope:
This is the trick to the texture: gently twist the clay snake as you lay it down on your work surface, or manually pinch diagonal grooves into it to simulate a twisted rope effect. -
Score and slip:
Take a needle tool and scratch up (score) the rim of your bowl inside the mold. Do the same to the underside of your twisted coil. Dab a little water (‘slip’) on the scored areas to act as glue. -
Attach the rim:
Press the twisted coil onto the rim of the bowl. Make sure to press firmly enough to adhere, but gently enough not to crush the lovely twisted texture. -
Refining the pattern:
Once attached, use a modeling tool or the side of a toothpick to deepen the diagonal grooves on the rim. Press down at an angle every half-inch to emphasize that ‘rope’ look seen in the photo. -
Blend the seam:
On the inside of the bowl, use your thumb or a tool to gently smooth the bottom edge of the coil into the bowl wall so the transition is seamless.
Secret Texture Trick
Instead of hand-twisting, roll two thinner coils and actually braid or twist them together before attaching. This creates a hyper-realistic rope effect.
Step 3: Finishing Touches
-
Smoothing the surface:
Dip a small sponge in water and wring it out almost completely. Gently wipe the inside of the bowl to remove fingerprints and create a unifying texture akin to smooth stone. -
Initial drying:
Let the bowl sit in the mold for about 24 hours so it holds its shape while the clay begins to firm up. -
Remove and dry:
Carefully lift the bowl out of the mold using the plastic wrap. Remove the plastic and let the bowl air dry completely on a wire rack for another 24-48 hours. I like to flip it occasionally for even airflow. -
Sanding:
Once bone dry and white, use fine-grit sandpaper to gently buff away any sharp edges on the rim or rough spots on the curve. -
Sealing:
To protect your jewelry dish, brush on a thin coat of matte acrylic varnish. This preserves the raw, clay look while preventing stains.
Cracking Issues?
If you see hairline cracks appearing as it dries, mix a tiny bit of clay with water to make a paste and fill them in immediately, then smooth with a wet finger.
Now you have a chic, minimalist spot to keep your daily treasures organized


Gold-Rimmed Minimal Dish
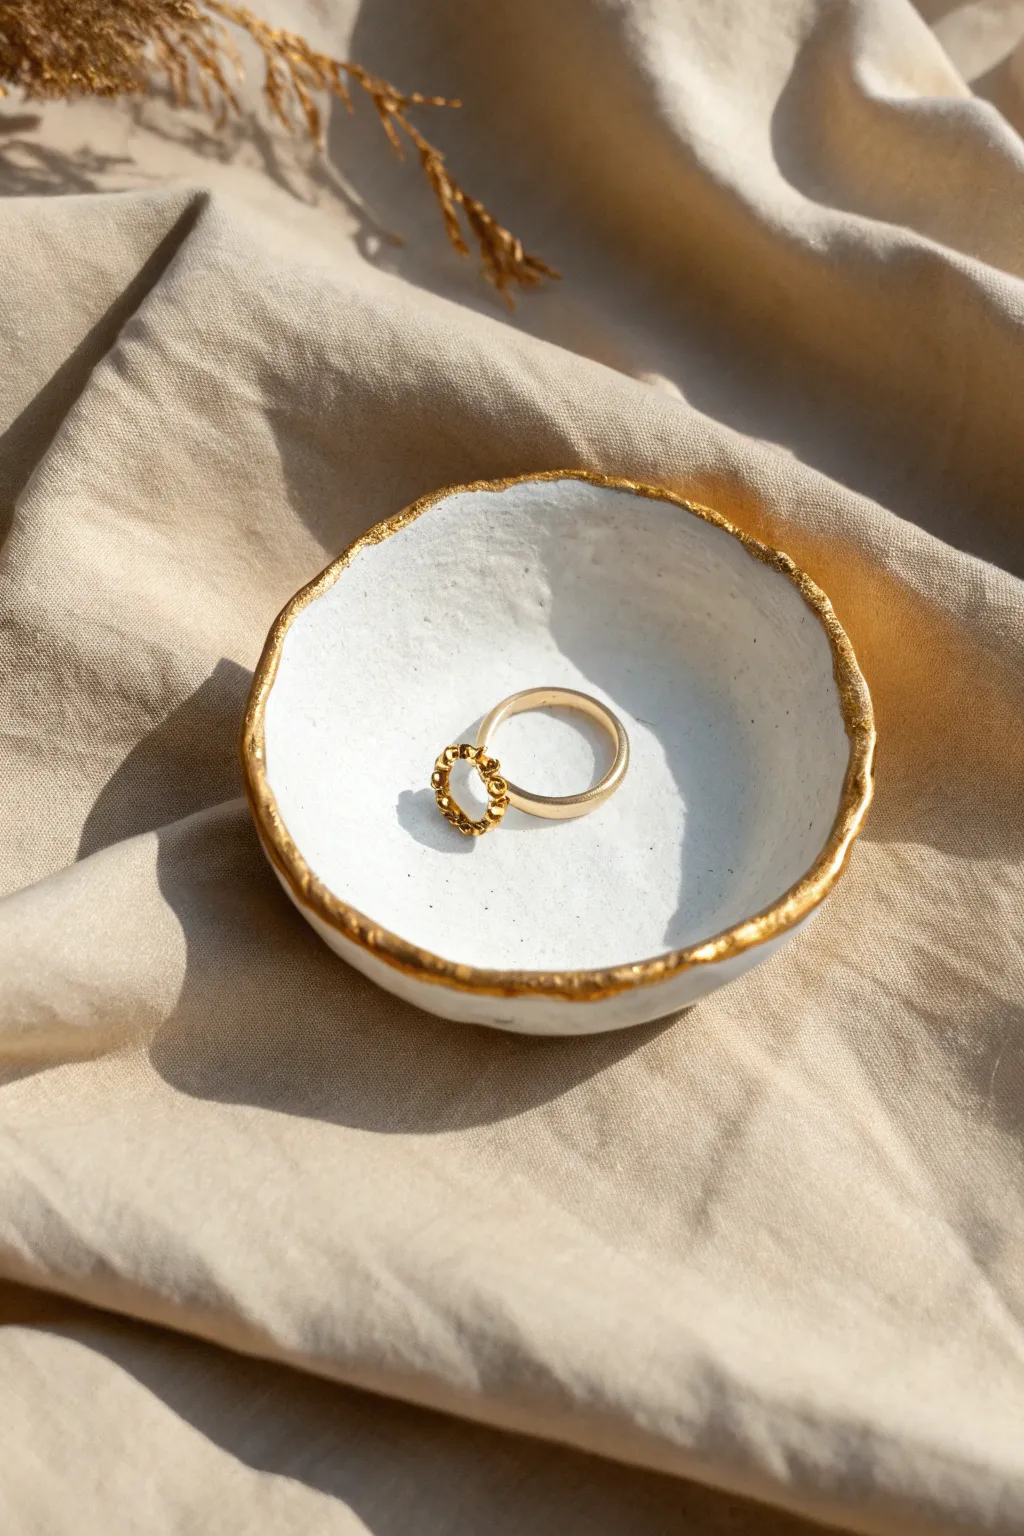
This diminutive jewelry holder combines the raw, uneven beauty of hand-pinched clay with a touch of luxury. The simple white finish allows the textured gold rim to shine, creating a perfect resting spot for your favorite rings.
Detailed Instructions
Materials
- White air-dry clay (or polymer clay)
- Small rolling pin or glass jar
- Sandpaper (fine grit)
- White acrylic paint (matte finish)
- Liquid gilding paint or gold leaf pen
- Small, fine-tip paintbrush
- Gloss varnish or sealant
- Small bowl or sphere (for shaping)
- Water
- Parchment paper
Step 1: Shaping the Base
-
Prepare the Clay:
Start by pinching off a ball of white clay roughly the size of a golf ball. Knead it in your warm hands for a minute until it feels pliable and smooth, removing any potential air bubbles. -
Flatten It Out:
Place your clay ball on a sheet of parchment paper. Using your rolling pin, gently flatten it into a rough circle about 1/4 inch thick. Don’t worry about making it perfectly round; natural irregularities add character. -
Impress the Texture:
For a subtle handmade feel, I sometimes gently press a piece of canvas or linen onto the surface before shaping, though you can keep it smooth for a modern look. -
Create the Curve:
Lift the flat circle and gently drape it into a small bowl or curve it over a sphere to create a shallow dish shape. Press gently to establish the depth. -
Refine the Edges:
Using your fingertips and a tiny bit of water, smooth out any cracks on the rim. However, intentionally leave the edge slightly wavy and uneven—this ‘wabi-sabi’ aesthetic is key to the final look. -
Double Check Thickness:
Ensure the center isn’t too thin compared to the edges. A consistent thickness helps prevent cracking during the drying phase. -
Initial Drying:
Set the dish aside in a cool, dry place. Let it air dry completely according to package instructions, which usually takes 24-48 hours. Rotate it occasionally so the bottom dries evenly.
Pro Tip: Liquid Gold
For the brightest shine, choose solvent-based liquid gilding rather than standard metallic acrylic paint. The reflection is much more intense and resembles real metal.
Step 2: Finishing and Gilding
-
Smooth the Surface:
Once bone dry, take your fine-grit sandpaper and very gently buff the surface. Focus on any sharp jagged bits on the rim or rough spots in the center, wiping away the dust with a barely damp cloth. -
Apply the Base Coat:
Even if your clay is white, painting it creates a uniform, professional finish. Apply two thin coats of matte white acrylic paint, letting the first layer dry completely before adding the second. -
Seal the White:
Protect the white paint with a layer of matte varnish. This step is crucial because it stops the porous clay from absorbing the gold paint too quickly later. -
Prepare the Gold:
Shake your liquid gilding paint well. Dip a fine-tip brush in, ensuring you don’t overload it. You want control for the rim. -
Paint the Rim:
Carefully trace the very edge of the dish with the gold paint. Allow the brush to naturally follow the bumps and dips you created earlier. -
Thicken the Gold Line:
Go back over the rim, letting the gold paint spill slightly over onto the inner and outer lip of the dish. This irregular thickness mimics the look of gold leaf. -
Let the Gold Set:
Allow the metallic paint to cure fully. Liquid gilding often has strong fumes, so ensure you represent working in a well-ventilated area for this step. -
Final Sealant:
Apply a final coat of gloss varnish over the entire dish to protect it from tarnishing and give it a finished, ceramic-like sheen.
Troubleshooting Cracks
If small cracks appear as the clay dries, mix a tiny amount of fresh clay with water to make a paste (slip) and fill the cracks. Sand smooth once dry.
Place this lovely little dish on your nightstand to add a sparkle of handmade charm to your daily routine


Soft Marble Swirl Dish
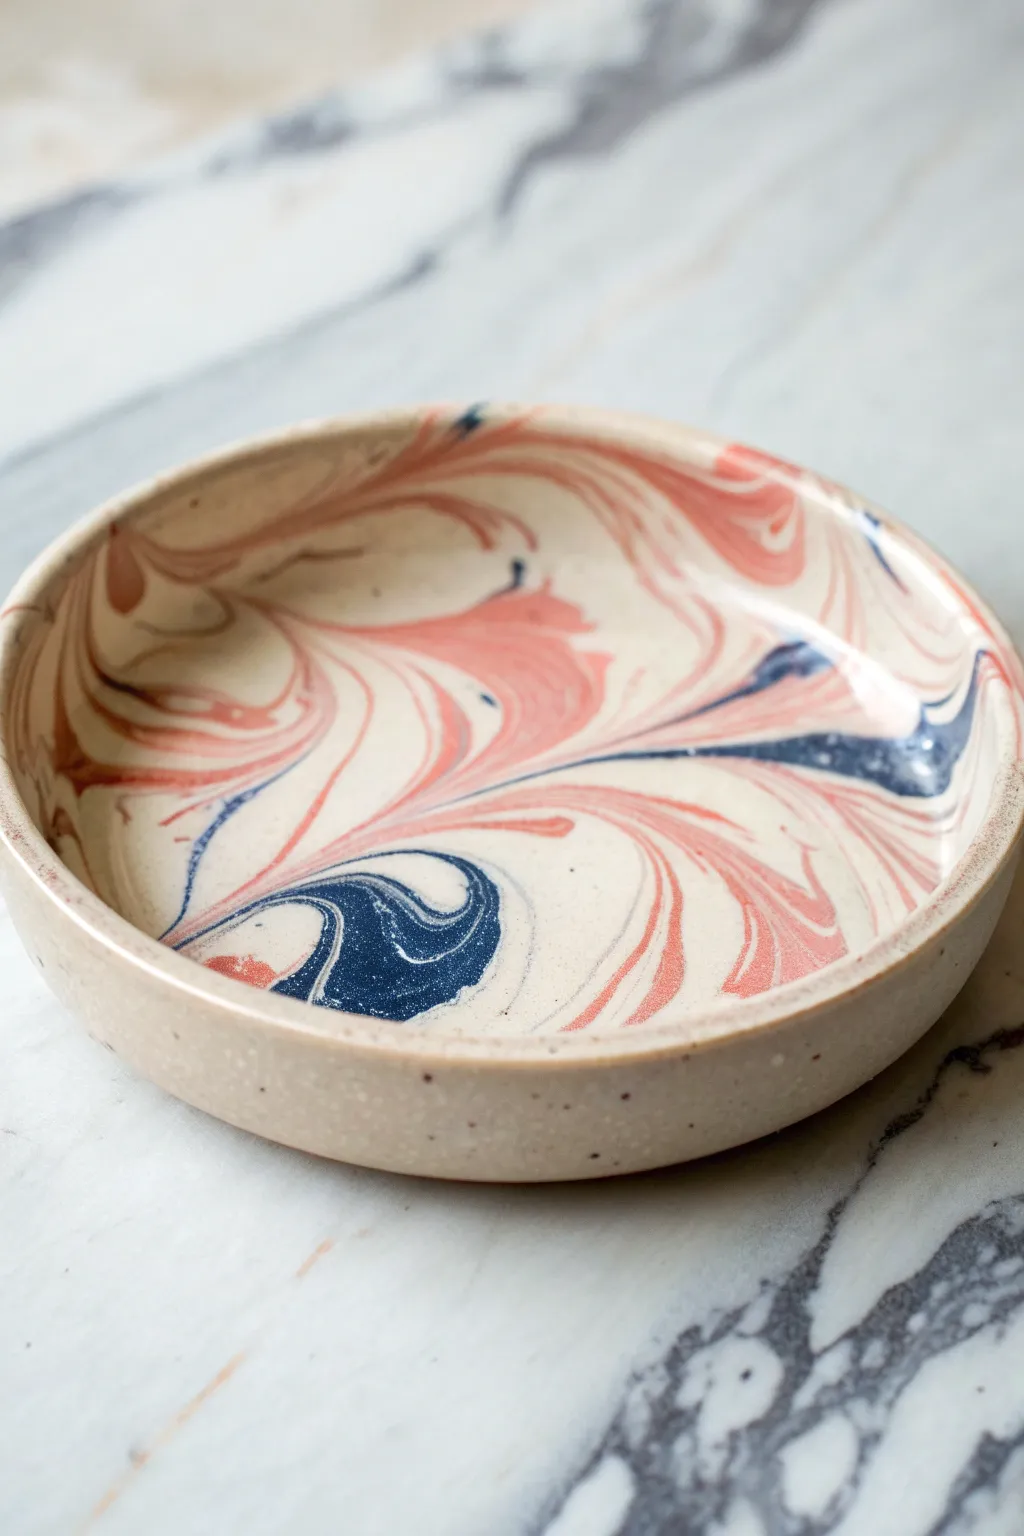
This elegant shallow dish combines creamy stoneware with swirls of coral and navy for a sophisticated, modern look. The distinctive marbling effect is created by blending discrete colors of clay together before shaping, ensuring the pattern runs deep through the finished piece.
Step-by-Step Tutorial
Materials
- White polymer clay or air-dry clay (2 oz)
- Coral/pink polymer clay or air-dry clay (0.5 oz)
- Navy blue polymer clay or air-dry clay (0.5 oz)
- Rolling pin or acrylic roller
- Round cookie cutter or bowl (approx. 4-5 inches diameter)
- Small bowl (for shaping)
- Craft knife
- Sandpaper (fine grit)
- Gloss varnish or resin (optional)
Step 1: Prepping the Clay
-
Condition the white base:
Start by kneading the white clay thoroughly until it is soft, pliable, and free of cracks. This will be the bulk of your dish, so make sure it’s warmed up well. -
Prepare accent colors:
Roll the coral and navy blue clays into long, thin snakes. You don’t need too much; the white should remain the dominant color to achieve that airy, marbled look. -
Combine the ropes:
Roll the white clay into a thicker log. Take your colored snakes and twist them spirally around the white log, almost like a candy cane pattern. -
Twist and fold:
Gently roll the combined log on your work surface to smooth the ropes into the base. Twist the entire log tightly, then fold it in half. Repeat this twist-and-fold motion 2 or 3 times—but stop before the colors muddy together.
Clean Swirls
Wash your hands or wipe your roller between colors! Dark blue pigment can transfer easily to the white clay, smudging the clean, crisp background you want.
Step 2: Creating the Pattern
-
Form a ball:
Squish your twisted clay log into a compact ball. Locate the side that has the most interesting color swirls; this will become the top face of your dish. -
Roll it out:
Place the ball on a smooth surface and use your roller to flatten it into a slab about 1/4 inch thick. Roll in different directions to stretch the marble pattern organically. -
Check the swirls:
Examine your slab. If you want more dramatic swoops, I sometimes gently stretch the clay with my fingers before giving it a final smoothing roll.
Step 3: Shaping and Finishing
-
Cut the circle:
Use your round cookie cutter or place a bowl upside down on the clay as a template. Cut a clean circle using the craft knife. -
Smooth the edges:
Dip your finger in a little water (for air-dry clay) or baby oil (for polymer) and run it along the cut edge to soften any sharpness. -
Form the rim:
Gently lift the clay circle and place it inside a slightly larger curved bowl to give it form. Alternatively, pinch up the edges manually to create a vertical rim like the dish in the photo. -
Refine the shape:
Press the clay gently against the bottom and sides of your mold to ensure it sits flat. Make sure the rim height is even all the way around. -
Dry or bake:
If using polymer clay, bake according to the package instructions (usually 275°F for 15-30 mins). If using air-dry clay, let it sit in a cool, dry place for 24-48 hours until fully hardened. -
Sand for perfection:
Once fully cured, use fine-grit sandpaper to buff out any fingerprints or rough spots on the rim. Wipe away the dust with a damp cloth. -
Add the shine:
To mimic the glossy glazed look of the original ceramic piece, apply two thin coats of gloss varnish or a layer of resin to the inside of the dish.
Gold Rim Upgrade
After the dish is fully dry or baked, use a fine tip metallic gold paint pen to trace the very top edge of the rim. This adds a luxe finish to the raw clay look.
Now you have a chic, modern catch-all dish perfect for holding rings or keys

The Complete Guide to Pottery Troubleshooting
Uncover the most common ceramic mistakes—from cracking clay to failed glazes—and learn how to fix them fast.
Terrazzo Confetti Dish
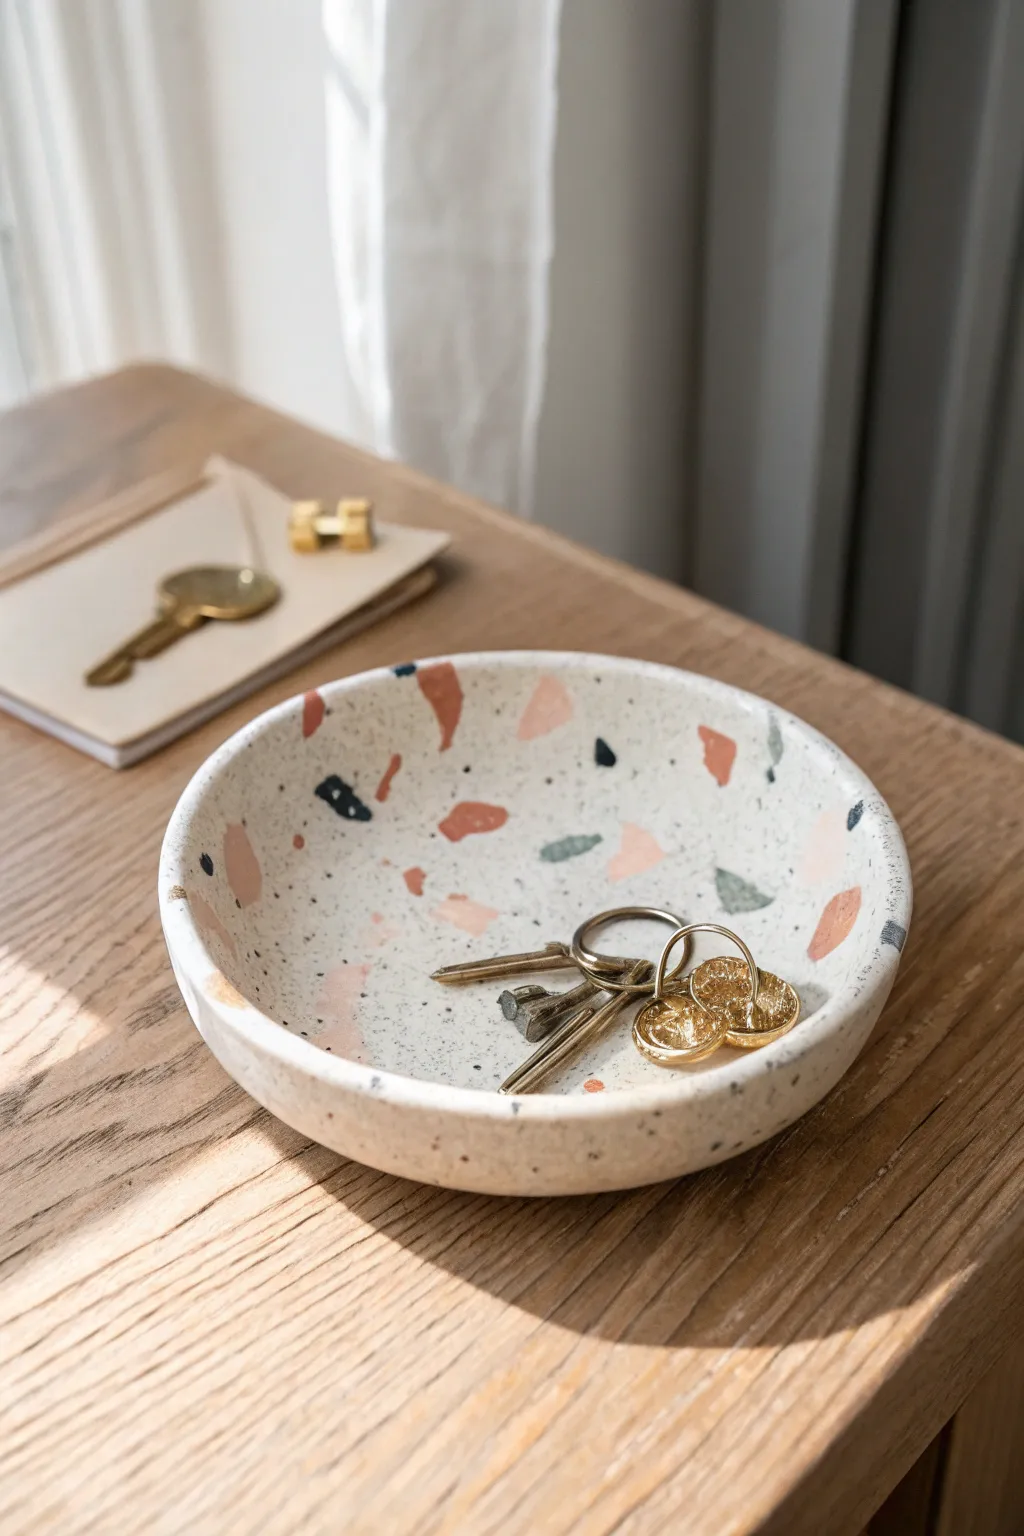
Bring a touch of modern playfulness to your entryway table with this terrazzo-inspired catchall dish. Using polymer clay allows for a lightweight, durable finish that perfectly mimics the random, scattered beauty of traditional stone terrazzo.
Step-by-Step Guide
Materials
- White polymer clay (large block for base)
- Small amounts of polymer clay in terracotta, blush pink, sage green, and dark navy
- Rolling pin or acrylic roller
- Large circular cookie cutter or a bowl (approx. 5-6 inches)
- Oven-safe glass bowl (to use as a mold)
- Craft knife or scalpel
- Fine-grit sandpaper (400 to 1000 grit)
- Parchment paper
- Gloss or matte varnish (optional)
Step 1: Preparing the Confetti
-
Roll out colors:
Begin by taking your colored clays—terracotta, blush, sage, and navy—and rolling each one out into a thin sheet, roughly 1-2mm thick. -
Create the chips:
Using your craft knife, cut these colored sheets into random, irregular shapes. Aim for varied sizes, from tiny specks to larger jagged shards, to mimic real stone chips. -
Set aside:
Keep the different colors slightly separated on a piece of parchment paper so they are easy to grab later.
Wet Sanding Secret
Sanding under water is crucial for the terrazzo look. It reveals the sharp, crisp edges of your colored chips, making them look like embedded stone rather than just surface paint.
Step 2: Forming the Base
-
Condition the white clay:
Thoroughly knead your white polymer clay until it is soft and pliable. This step creates a smooth canvas and prevents cracking later. -
Roll the slab:
Roll the white clay out into a uniform slab, approximately 1/4 inch thick. Make sure it’s wide enough to accommodate your cutting template. -
Apply the confetti:
Scatter your prepared colored chips onto the white slab. Be spontaneous with placement, letting some overlap slightly while leaving open white space in other areas. -
Embed the chips:
Gently run your rolling pin over the slab again. Press firmly enough to flatten the colored chips flush into the white base, creating a single, smooth surface.
Make It Speckled
Add semi-ground black pepper or dried used coffee grounds into your white base clay before rolling. This adds tiny black flecks for a realistic ‘granite’ texture.
Step 3: Shaping and Baking
-
Cut the circle:
Place your circular cutter or an upside-down bowl onto the slab and cut out a perfect circle. -
Smooth the edges:
Run your finger gently around the cut rim to soften the sharp edge created by the cutter. -
Shape the dish:
Carefully lift your clay circle and drape it inside your oven-safe glass bowl. Press it gently to conform to the bowl’s curve, ensuring the bottom is flat. -
Bake:
Place the glass bowl with the clay inside into the oven. Bake according to your specific clay brand’s manufacturer instructions (usually around 275°F/130°C for 15-30 minutes). -
Cool down:
Remove from the oven and let the clay cool completely inside the glass bowl before attempting to pop it out. This prevents warping while the clay is still warm.
Step 4: The Professional Finish
-
Sand the surface:
Once cool, take your sandpaper and gently sand the surface under running water. I find wet sanding keeps dust down and creates a much smoother, stone-like finish. -
Focus on the rim:
Pay extra attention to sanding the rim of the bowl to ensure it feels polished and even to the touch. -
Rinse and dry:
Wash off any sanding residue with soap and water, then dry the bowl thoroughly with a lint-free cloth. -
Seal (optional):
For a protective layer and a slight sheen, apply a thin coat of polymer clay varnish. Let it dry completely before use.
Place your finished dish on a console table or nightstand for a stylish organizational upgrade
Pressed Flower Keepsake Dish
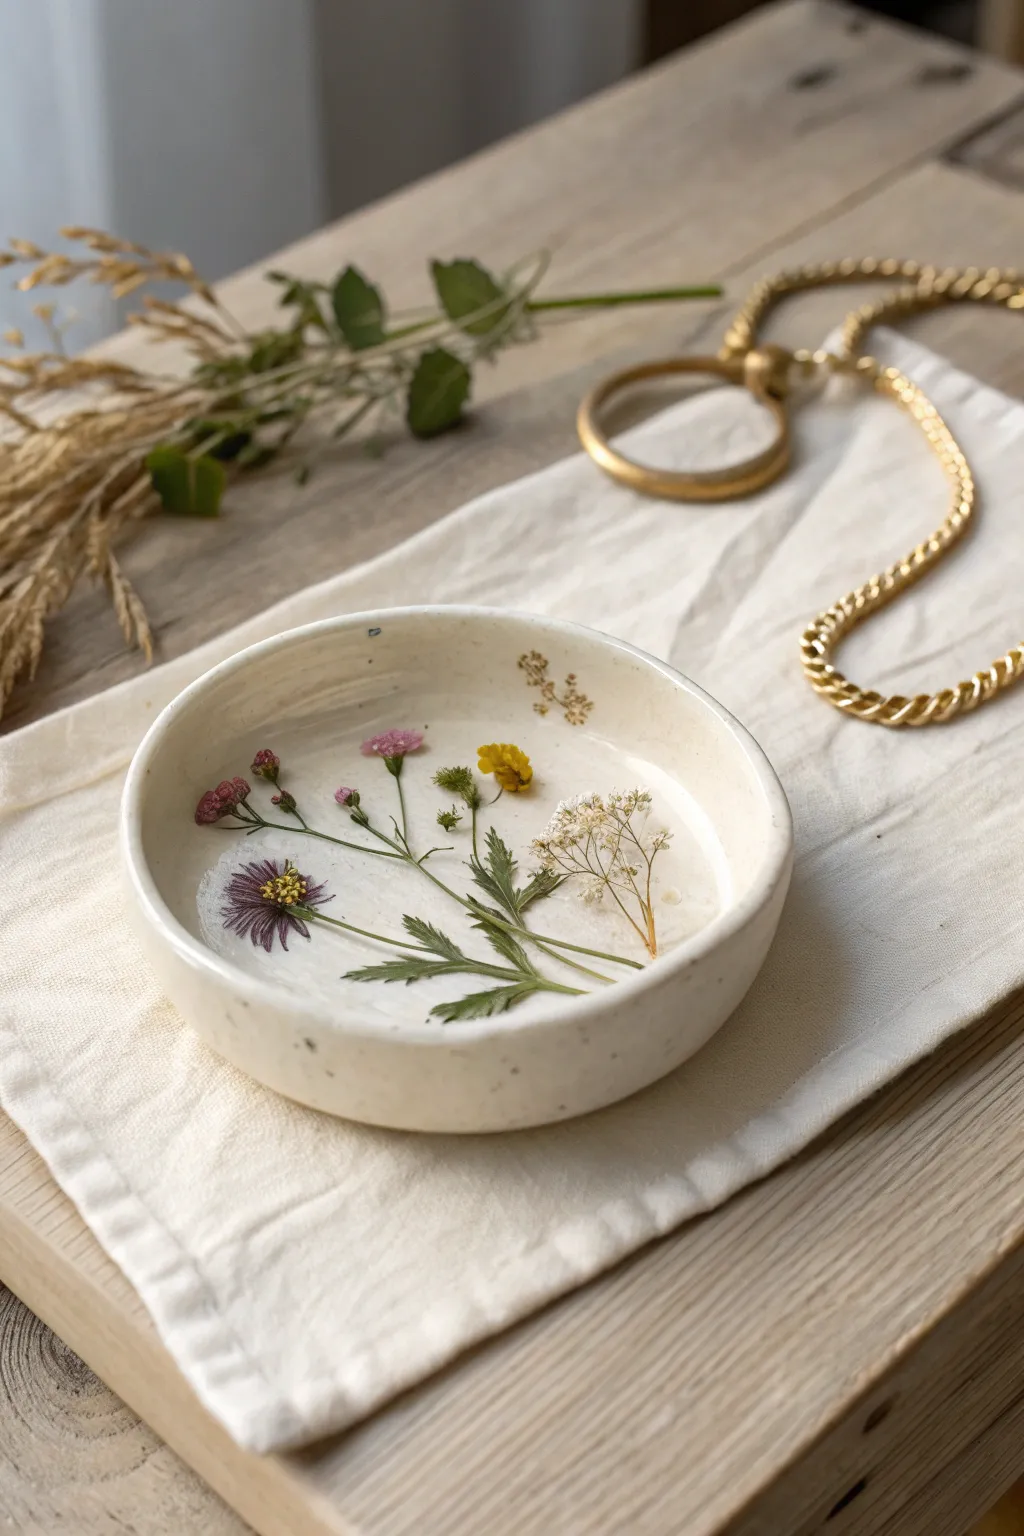
Capture the fleeting beauty of your garden with this delicate keepsake dish featuring real pressed flowers cured into the surface. The creamy, slightly speckled clay serves as a perfect neutral canvas for the vibrant pinks, yellows, and greens of nature.
How-To Guide
Materials
- Air-dry clay (white or cream)
- Pressed dried flowers (small varieties like daisies or baby’s breath)
- Small rolling pin
- Circular cookie cutter or bowl (approx. 4-5 inches)
- Mod Podge or gloss varnish
- Small paintbrush
- Sponge or fine-grit sandpaper
- Water
- Shallow bowl (for molding shape)
- Speckled acrylic paint (optional, for stone effect)
Step 1: Shaping the Base
-
Prepare the clay:
Begin by taking a handful of air-dry clay and kneading it in your hands to warm it up. This makes it more pliable and less prone to cracking as you work. -
Roll out the slab:
Place the clay on a clean, flat surface. Using your rolling pin, roll the clay out evenly until it is about 1/4 inch thick. Aim for a consistent thickness to ensure even drying. -
Cut the circle:
Press your circular cutter or trace around a bowl with a knife to cut out a perfect circle from your rolled slab. Remove the excess clay. -
Create the rim:
Gently pinch up the edges of the circle to create a vertical wall. You want a rim that stands about 1/2 inch to 3/4 inch high. Go around the circle several times to smooth the transition between the base and the wall. -
Smooth the surfaces:
Update the texture by dipping your finger in a little water and running it over any rough edges or fingerprints. The goal is a smooth, handmade finish. -
Add speckles (optional):
To mimic the stone-like look in the photo, you can flick a toothbrush dipped in diluted brown or black paint lightly over the wet clay, or knead in some dried tea leaves or pepper before rolling.
Fixing Lifted Petals
If a dried petal lifts up while varnishing, use a toothpick to dab a tiny dot of glue under it, press down for 30s, then seal over it.
Step 2: Embedding the Botanicals
-
Plan your arrangement:
Before committing, lay your pressed dried flowers gently on top of the wet clay to decide on the composition. I prefer creating a central cluster with stems radiating slightly outward. -
Press the flowers:
Once happy with the placement, gently press each flower and stem into the surface of the clay. You want them to sit flush with the clay surface, not just resting on top. -
Secure the edges:
Use the back of a spoon or your finger to ensure fine details like petal tips and leaves are fully pressed down. If they stick up, they might snag later. -
Initial shaping:
Carefully transfer your clay circle into a shallow bowl that has been lined with plastic wrap. This will help curve the edges upward while it dries, giving it that dish shape. -
Dry completely:
Let the dish sit in a cool, dry place for at least 24-48 hours. The clay will turn opaque and feel hard when fully dry.
Step 3: Sealing and Finishing
-
Sand the edges:
Once fully dry, remove the dish from the molding bowl. Use fine-grit sandpaper to gently smooth the top rim if it feels sharp or rough. -
Apply base sealant:
Using a soft brush, apply a thin layer of Mod Podge or varnish over the flowers. Start from the center of the flower and brush outward to prevent petals from lifting. -
Let the first coat set:
Allow this initial sealing layer to dry for about 20 minutes until it is clear and tacky. -
Final gloss coat:
Apply a second, slightly thicker coat of gloss varnish over the entire inside of the dish. This protects the flowers from moisture and gives the piece a finished, ceramic-like shine. -
Seal the exterior:
Don’t forget to flip the dish over and seal the bottom and outer walls with a coat of varnish as well for durability.
Add a Gold Rim
Once the sealer is dry, use a gold leaf pen or metallic acrylic paint to carefully line the top rim for an elegant, vintage finish.
Place your jewelry or trinkets inside and enjoy your beautiful piece of preserved nature


What Really Happens Inside the Kiln
Learn how time and temperature work together inside the kiln to transform clay into durable ceramic.
Leaf-Imprint Botanical Dish
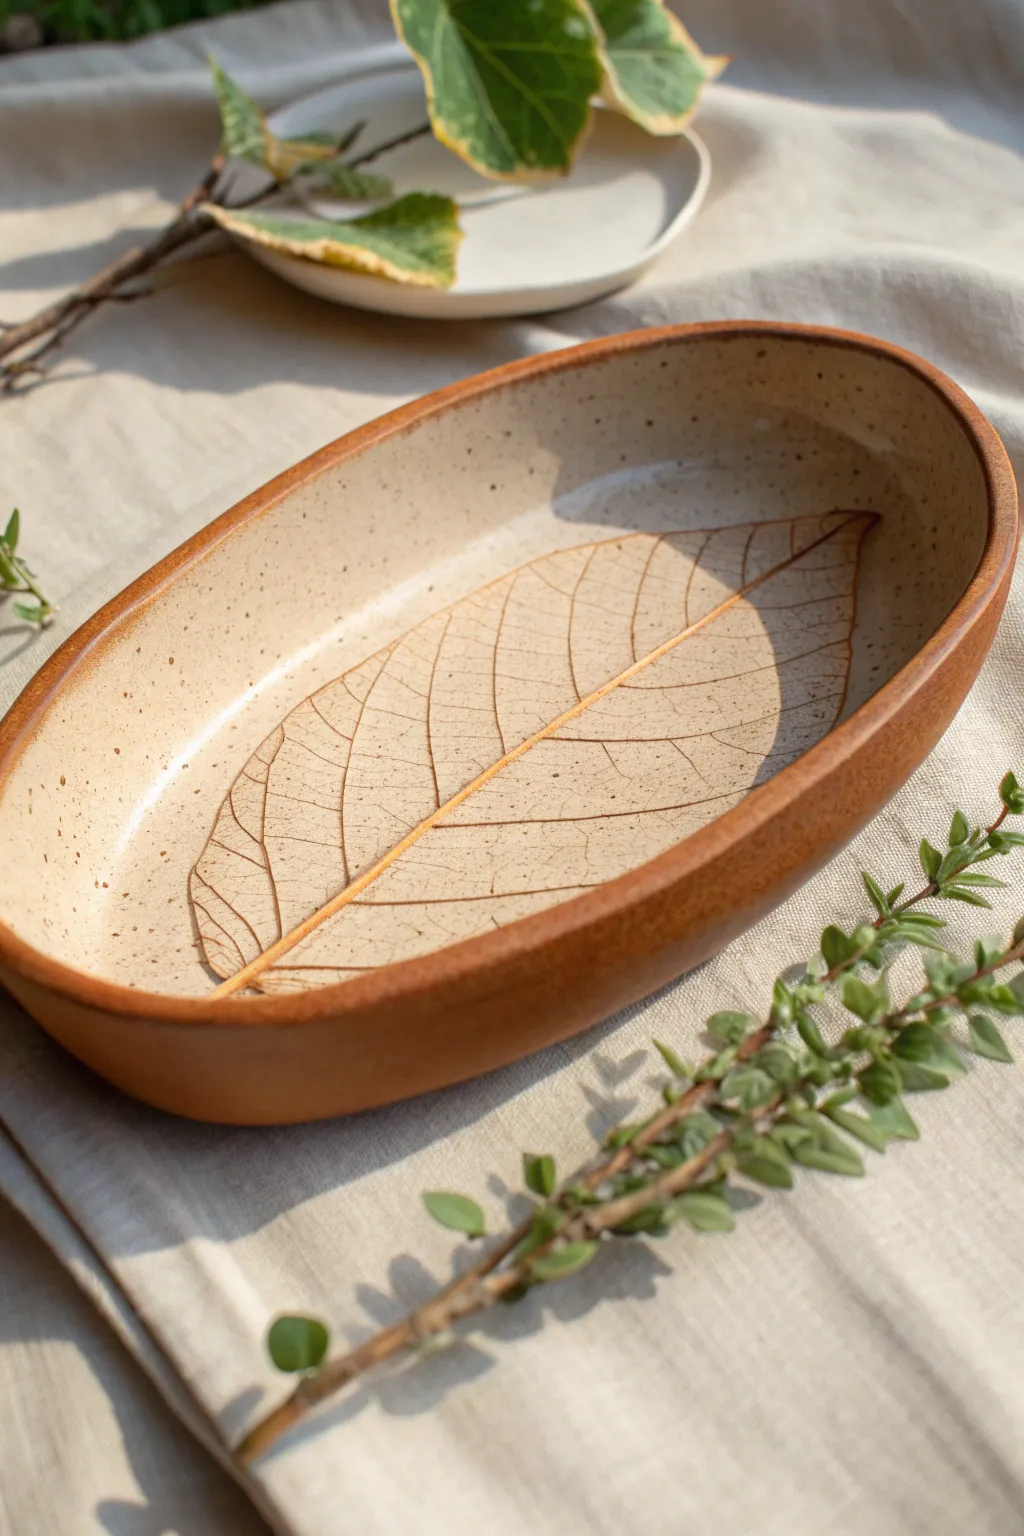
Capture the delicate veins of your favorite botanical specimen in this stunning oval dish. Combining the raw warmth of terracotta clay with a speckled cream glaze, this project highlights the intricate beauty of a skeletal leaf imprint as its centerpiece.
Step-by-Step Guide
Materials
- Red earthenware or terracotta clay
- Rolling pin
- Guide sticks or slats (approx. 1/4 inch thick)
- Kidney scraper (smooth rib tool)
- Large, fresh leaf with prominent veins (like a rubber tree or magnolia leaf)
- Needle tool or fettling knife
- Oval paper template or oval mold
- Sponge
- Cream or oatmeal speckled glaze (stoneware safe)
- Clear matte glaze (optional)
- Paintbrush (fan brush)
- Small shallow bowl or hump mold for shaping
Step 1: Preparing the Slab
-
Center your clay:
Start with a softball-sized lump of red earthenware clay. Wedging it thoroughly is crucial to remove air bubbles, so thump it onto your canvas board a few times to get it ready. -
Roll the slab:
Place your guide sticks on either side of the clay. Using your rolling pin, roll the clay out into a uniform slab approximately 1/4 inch thick. Aim for an oval shape slightly larger than your intended dish. -
Smooth the surface:
Take your kidney scraper (a rubber rib works best here) and gently compress the clay surface. Run it over the slab in long strokes to remove canvas texture and align the clay particles, creating a pristine canvas for our leaf.
Sticky Leaf Syndrome?
If the leaf sticks and tears upon removal, try dusting the underside (vein side) lightly with cornstarch before pressing it into the wet clay.
Step 2: Creating the Botanical Impression
-
Position the leaf:
Select your leaf. A fresh leaf with stiff veins works better than a dried one, which might crumble. Place it vein-side down in the center of your smoothed clay slab. -
Roll the imprint:
Gently roll your rolling pin over the leaf once firmly. You want to press the veins deep into the clay without thinning the slab too much. Do not roll back and forth, as this can create a double image. -
Define the edges:
Place your oval template or mold lightly over the design to frame the leaf. Using a needle tool, cut straight down into the clay along the edge of your template to create the oval shape. -
Refine the rim:
Remove the excess clay. Wet your finger or a small sponge and smooth the cut edge of the oval to round it off slightly. Sharp edges can chip easily after firing, so softness here adds durability. -
Lift the leaf:
Carefully find the stem or a loose edge of the leaf and peel it away to reveal the impression. If any bits stick, use tweezers to gently remove them.
Step 3: Shaping and Drying
-
Form the curve:
Carefully lift your clay oval and place it inside a shallow bowl or atop a hump mold to give it a gentle, upward curve. I prefer using a slightly larger foam form so the curve feels organic. -
Clean the edges again:
Checking the rim one last time while it’s in the form is a good habit. Smooth out any little cracks that appeared during the transfer using a slightly damp sponge. -
Slow drying:
Loosely cover the dish with plastic and let it dry slowly for a few days until it reaches the bone-dry stage. This prevents warping. -
Bisque fire:
Once bone dry, fire the piece in the kiln to cone 04 (or the specific bisque temperature for your clay body).
Pro Glazing Tip
For sharper contrast in the veins, wipe an iron oxide wash into the leaf impression before applying the cream glaze. It darkens the lines significantly.
Step 4: Glazing and Finishing
-
Wax the rim (optional):
To keep the rim raw and unglazed like the photo, carefully apply wax resist along the top edge and the exterior of the dish. This ensures the lovely red clay remains visible. -
Apply the base glaze:
Pour a speckled cream or oatmeal glaze into the interior of the dish. Rotate the dish to coat the entire inner surface evenly, pouring the excess back into your bucket. -
Clean up splashes:
Use a damp sponge to wipe away any glaze that might have dripped onto the exterior or the rim (if you didn’t use wax resist). -
Highlight the veins:
Because the glaze will naturally pool slightly in the deep impressions of the leaf veins, the design will pop automatically. Ensure the glaze isn’t too thick, or it might obscure the fine details. -
Final wipe:
Check the foot of the dish to ensure it is completely free of glaze so it doesn’t stick to the kiln shelf. -
Glaze fire:
Fire the piece again to the maturity temperature of your glaze and clay (likely cone 5 or 6). Allow the kiln to cool completely before opening to prevent thermal shock.
This serene dish brings a permanent touch of the garden into your home, perfect for holding keys or simply admiring
Stamped Name Ring Dish
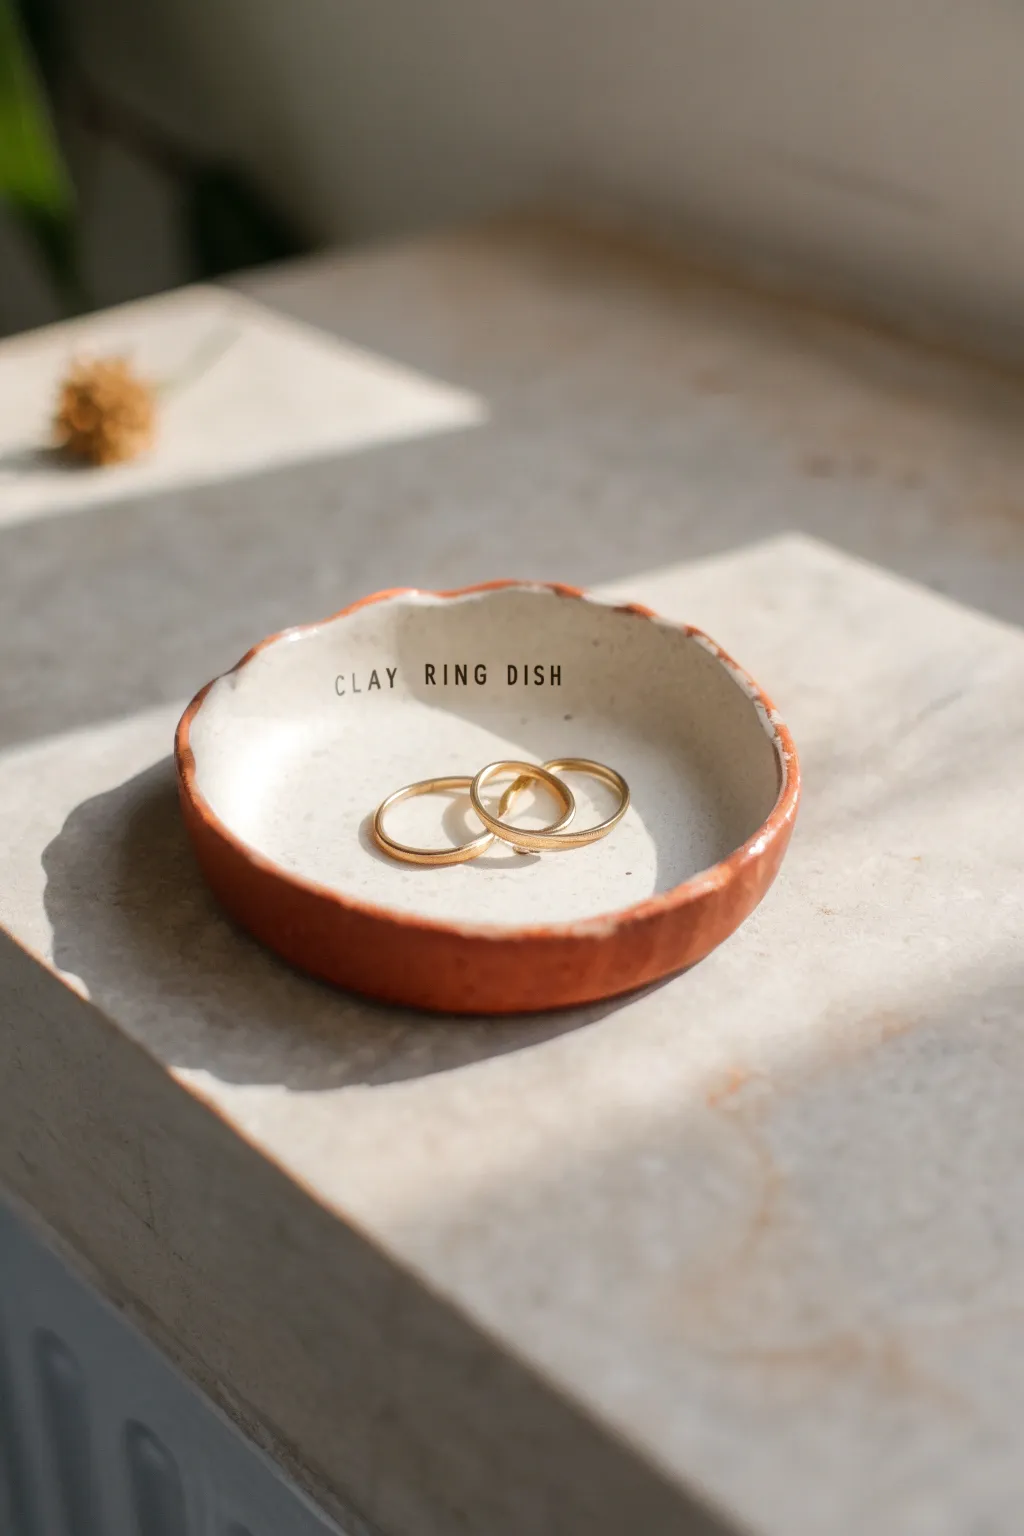
Create a charming home for your precious jewelry with this simple yet elegant stamped ring dish. Featuring a warm terracotta exterior and a creamy glazed interior, this project combines rustic handmade appeal with a personalized touch.
Step-by-Step Tutorial
Materials
- Air-dry clay (terracotta color)
- Acrylic rolling pin
- Small round bowl or cookie cutter (approx 3-4 inches)
- Sponge
- Small bowl of water
- Alphabet stamp set
- White acrylic paint (glossy finish) or white clay glaze
- Fine-grit sandpaper
- Small flat paintbrush
- Black acrylic paint
- Clear varnish or sealant (glossy)
Step 1: Shaping the Clay
-
Prepare your workspace:
Lay down a clean mat or parchment paper to prevent sticking. Grab a handful of terracotta air-dry clay and knead it briefly until it’s pliable and smooth. -
Roll it out:
Roll the clay into a ball, then flatten it with your palm. Use an acrylic rolling pin to roll it out to an even thickness of about 1/4 inch. -
Cut the circle:
Use a round cookie cutter or trace around a small bowl to cut out a perfect circle. Remove the excess clay around the edges. -
Smooth the edges:
Dip your finger in a little water and run it gently along the cut edge of the circle to smooth out any sharpness or roughness. -
Create the curve:
Gently curve the edges of the clay upward to create a shallow dish shape. I like to pinch the sides slightly with my thumb and forefinger to give it that organic, handmade rim seen in the photo. -
Refine the shape:
Run a damp sponge lightly over the interior to ensure the ‘bowl’ part is completely smooth before stamping.
Step 2: Stamping and Drying
-
Prepare your phrase:
Select the letters for ‘CLAY RING DISH’ or your chosen name from your alphabet stamp set. Arrange them in order to make stamping faster. -
Stamp the clay:
Press the stamps firmly into the center of the wet clay. Don’t press so hard that you go through the bottom, but deep enough to leave a clear impression. -
Fix imperfections:
If the stamping process distorted the dish shape, gently reshape the rim with your fingers one last time. -
Let it dry:
Place the dish in a safe, dry spot away from direct heat. Allow it to air dry for 24-48 hours. The clay will lighten significantly in color when fully dry. -
Sand the surface:
Once fully dry, use fine-grit sandpaper to smooth any rough spots on the rim or bottom. Wipe away the dust with a dry cloth.
Cracked Clay?
If small hairline cracks appear while drying, don’t restart. Mix a tiny bit of fresh clay with water to make a paste and smooth it into the cracks.
Step 3: Painting and Finishing
-
Fill the letters:
Using a very fine brush or a toothpick, fill the stamped impressions with black acrylic paint. Don’t worry if you go outside the lines a bit. -
Clean up the text:
While the black paint is still wet, quickly wipe the surface with a damp paper towel. This leaves paint deep in the letters but cleans the surface clay. -
Paint the interior:
Using your flat brush, apply the white glossy paint or glaze to the inside of the dish only. Carefully paint around the letters if you want the clay color to show, or paint over them lightly if the impressions are deep enough. -
Create the ragged edge:
Bring the white paint up to the rim, but let the line prove uneven and organic. Leave the very top edge and the outside unpainted to show the raw terracotta. -
Seal the dish:
Once the paint is completely dry, apply a coat of clear glossy varnish over the entire dish, or just the painted interior for a nice contrast. This protects the clay and gives it a ceramic look.
Pro Tip: Sharper Letters
Before stamping, dust your letter stamps lightly with cornstarch. This prevents them from sticking to the wet clay and pulls up cleaner lines.
Place your favorite rings inside your new custom dish and enjoy the handmade warmth it adds to your dresser

TRACK YOUR CERAMIC JOURNEY
Capture glaze tests, firing details, and creative progress—all in one simple printable. Make your projects easier to repeat and improve.
Scalloped Edge Trinket Dish
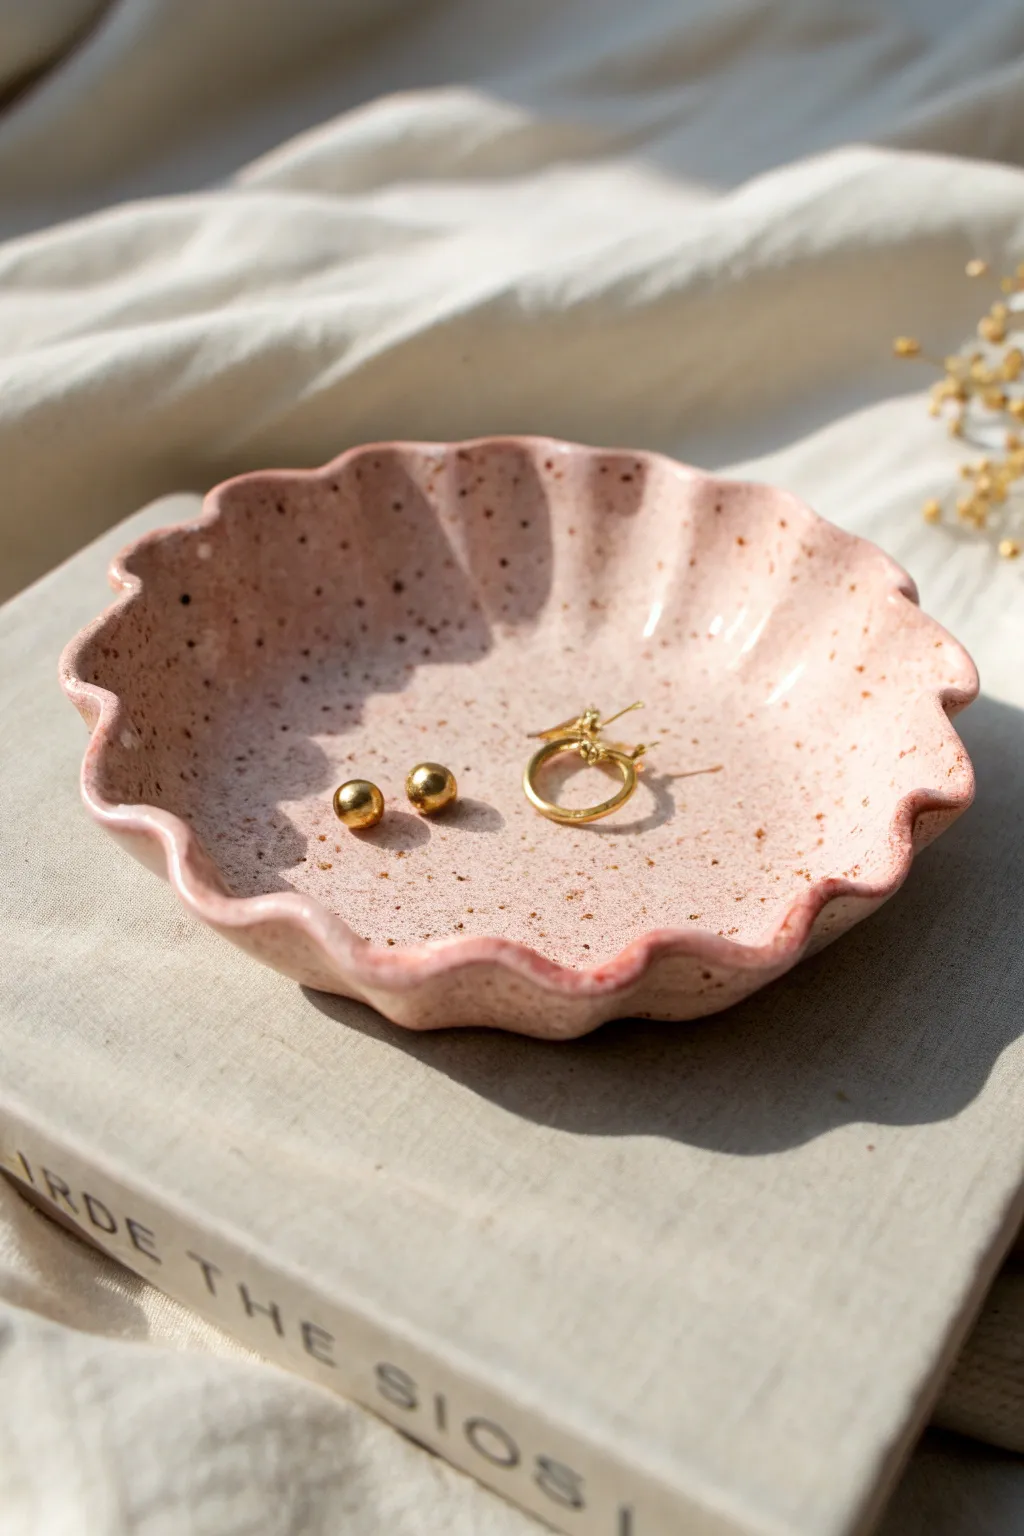
This charming trinket dish features a gentle, wavy rim that evokes the shape of a seashell or flower petal. The soft, dusty pink hue is elevated with subtle speckling, giving it an organic, ceramic-studio feel perfect for holding your favorite delicate jewelry pieces.
Detailed Instructions
Materials
- Polymer clay (dusty pink or terracotta mix)
- Faux granite or speckled polymer clay (translucent or white base)
- Acrylic roller or rolling pin
- Circle cookie cutter (approx. 4-5 inches)
- Small bowl or curved baking form
- Wooden sculpting tool or rounded marker cap
- Sandpaper (fine grit)
- Gloss glaze or varnish (optional)
Step 1: Preparing the Clay Body
-
Conditioning the clay:
Begin by warming up your dusty pink polymer clay in your hands. Knead it until it becomes soft, pliable, and free of any cracks. -
Creating the speckles:
Take a very small amount of the speckled or faux granite clay—you want just enough to add texture without overwhelming the pink. Chop it into tiny, crumb-like bits. -
Mixing the pattern:
Scatter the speckled crumbs over your conditioned pink clay. Fold the clay over itself and knead just a few times to incorporate the speckles throughout the block. -
Rolling it out:
Place the clay on a clean, flat surface. Using your acrylic roller, roll the clay out into an even slab about 1/4 inch thick. I find turning the slab over occasionally helps prevent it from sticking.
Pepper Hack
No speckled clay? Mix actual ground black pepper or dried used coffee grounds into your pink clay before rolling. It mimics the ceramic look perfectly during baking.
Step 2: Shaping the Piece
-
Cutting the circle:
Use your large circle cutter to punch out a perfect round shape from the slab. Alternatively, use a paper template and a craft knife if you lack a cutter. -
Starting the scallops:
Gently lift the clay circle. Using your thumb and forefinger, begin to pinch the edge gently at regular intervals to create the initial wave pattern. -
Defining the curves:
To make the scallops uniform, lay the handle of a wooden spoon or a sculpting tool against the edge of the clay and gently mold the clay around the curve. -
Refining the rim:
Go around the entire circumference, ensuring you have deeper indentations alternating with outward curves to match the fluted look in the photo. -
Smoothing the edges:
Dip your finger in a little bit of water (or baby oil if using polymer clay) and run it along the rim to smooth out any fingerprints or sharp tooling marks.
Step 3: Final Form and Finishing
-
Setting the shape:
Place your clay circle into a shallow, oven-safe bowl. Gently press the center down so it takes on a concave, dish-like form. -
Adjusting the waves:
While it sits in the bowl, check your scalloped edges again. Gravity might flatten them, so gently perk up the waves to ensure they hold their shape during baking. -
Baking:
Bake the clay according to the manufacturer’s specific instructions for temperature and time, usually around 275°F (135°C) for 15-30 minutes depending on thickness. -
Cooling down:
Allow the dish to cool completely inside the oven-safe bowl. Taking it out while hot can cause warping. -
Sanding:
Once cool, use a fine-grit sandpaper to buff the rim and the bottom of the dish for a professional, smooth sensation. -
Adding specks (optional):
If your clay didn’t have enough speckle, you can flick a toothbrush dipped in brown watered-down acrylic paint over the surface now. -
Sealing:
For a glossy finish like ceramic, apply a thin coat of glaze or varnish. If you prefer a matte, stone-like look, you can skip this step entirely.
Drooping Edges?
If the clay gets too soft and the scallops won’t hold shape, pop the unbaked piece in the fridge for 10 minutes to firm it up before final shaping.
Now you have a stunning, salon-worthy piece to display your daily earrings
Geometric Triangle Catchall Dish
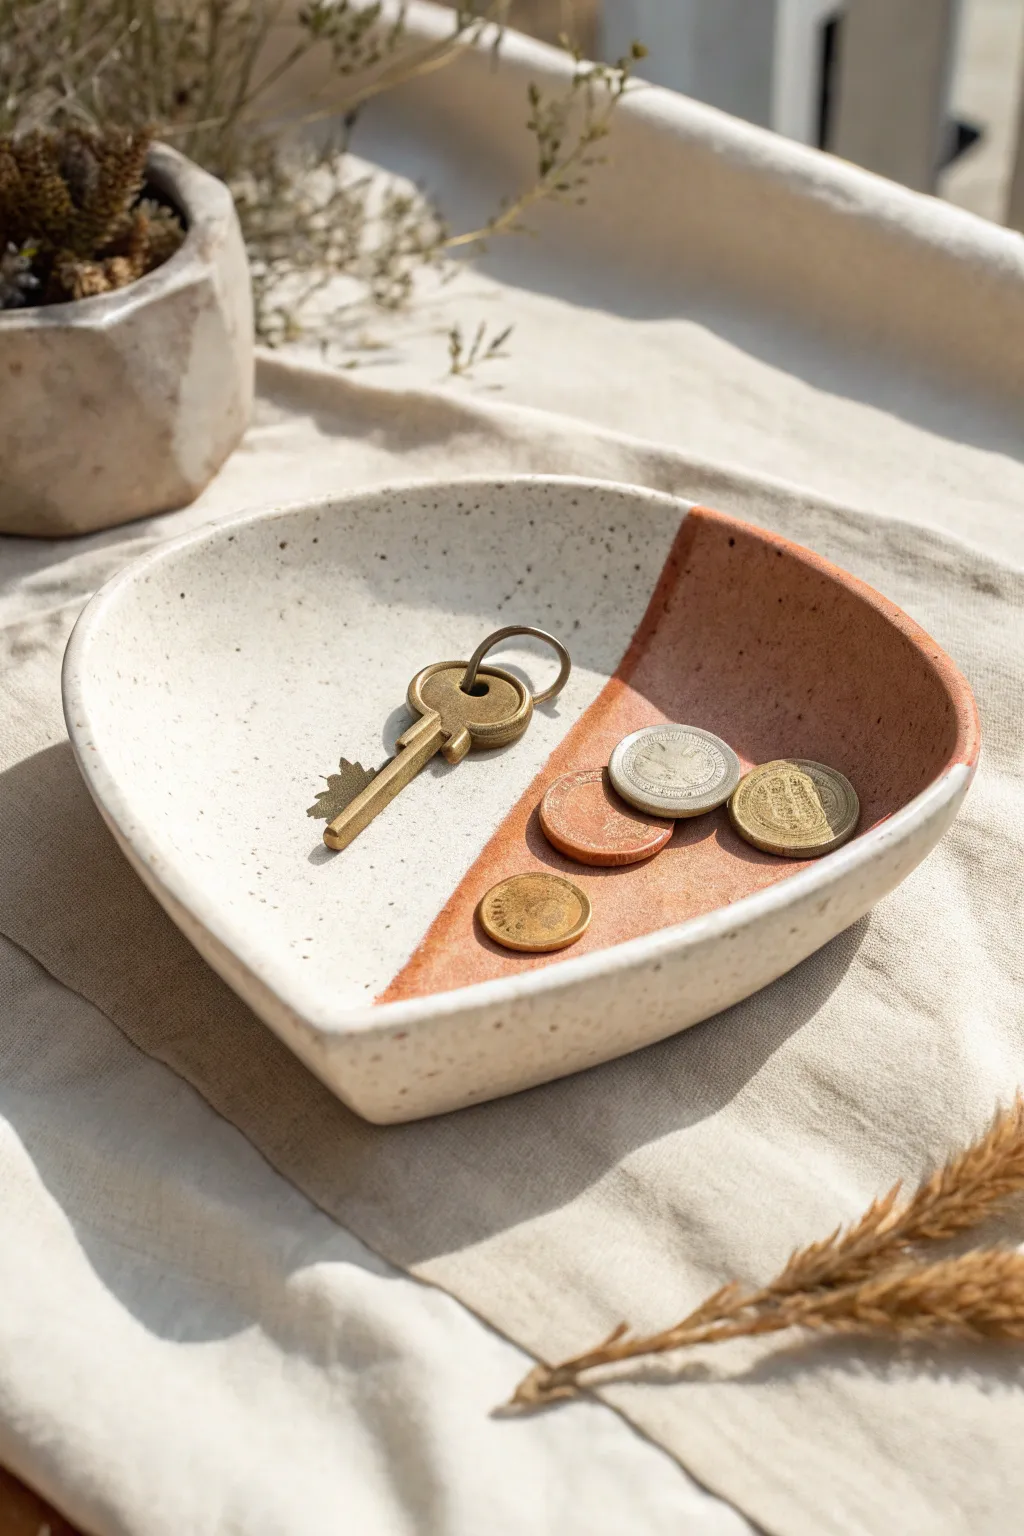
This modern geometric dish combines the raw warmth of exposed clay well with a glossy, speckled cream glaze for a stunning contrast. Its soft triangular shape and rounded edges make it the perfect minimalist home for your keys and loose change.
Step-by-Step Tutorial
Materials
- Speckled buff stoneware clay or terracotta clay
- Rolling pin
- Guide strips or slab roller (approx. 1/4 inch thickness)
- Needle tool or fettling knife
- Paper template (equilateral triangle with rounded corners)
- Soft sponge
- Slab mold or a shallow bowl for shaping
- Wax resist emulsion
- Speckled cream or white stoneware glaze
- Small paintbrush (for wax application)
- Kiln (or access to a firing service)
Step 1: Forming the Shape
-
Roll the slab:
Begin by wedging your clay to remove air bubbles, then roll it out into a smooth, even slab. Aim for a thickness of about 1/4 inch using guide strips to keep it consistent. -
Smooth the surface:
Before cutting, take a rib tool or a slightly damp sponge and compress the surface of the slab. This removes canvas texture and aligns the clay particles which prevents warping later. -
Cut the triangle:
Place your rounded-triangle paper template onto the slab. Using your needle tool or fettling knife, cut cleanly around the perimeter. Keep the knife vertical for a straight edge. -
Soften the rim:
Once cut, run your finger or a damp chamois strip along the sharp cut edges to round them off. This makes the finished piece much more pleasant to touch. -
Shape the dish:
Gently lift your clay triangle and drape it into a shallow slump mold or a curved bowl lined with plastic wrap. This gives the flat slab its concave, dish-like form. -
dry slowly:
Allow the clay to dry to a leather-hard state inside the mold to hold its shape. If you remove it too soon, the walls might slump back down. -
Refine the edges:
Once leather-hard, remove the dish from the mold. Use a damp sponge to do a final pass over the rim and surface, smoothing out any imperfections or fingerprints. -
Bisque fire:
Let the piece dry completely (bone dry) before loading it into the kiln for the bisque firing (usually Cone 04 or 06, depending on your clay).
Clean Lines Pro Tip
For a truly razor-sharp line between raw clay and glaze, apply a strip of masking tape before waxing. Remove the tape immediately after applying the wax resist.
Step 2: Glazing and Finishing
-
Clean surface:
After the bisque fire, wipe the dish down with a clean, damp sponge to remove any kiln dust. This ensures the glaze adheres properly. -
Mark the design:
Use a pencil to lightly mark a diagonal line across the dish. This line will separate the glazed area from the raw clay area. -
Apply wax resist:
Paint liquid wax resist carefully onto the area you want to remain unglazed (the terracotta-colored section). Be precise with your line, as the glaze will not stick where the wax is. -
Wax the bottom:
Don’t forget to apply wax to the foot or bottom of the dish so it doesn’t fuse to the kiln shelf during firing. -
Dip or pour glaze:
Dip the side of the dish intended to be white into your speckled cream glaze. Alternatively, pour the glaze over that section. The wax resist on the other half will repel the glaze. -
Clean the line:
If any beads of glaze are sitting on top of the waxed area, gently wipe them away with a damp sponge so you get a crisp, clean transition line. -
Glaze fire:
Load the piece into the kiln for the final glaze firing (often Cone 5 or 6 for stoneware). Follow the firing schedule specific to your clay and glaze combination. -
Final inspection:
Once the kiln cools, remove your dish. If there are any sharp bits of glaze on the bottom, sand them down lightly with wet sandpaper or a grinding stone.
Warping Woes?
If your dish warps during drying, dry it slower. Cover it loosely with plastic so the moisture evaporates evenly from the rim and the center.
Place your finished dish on an entryway table to instantly organize your daily essentials with style
Speckled Stoneware-Look Dish
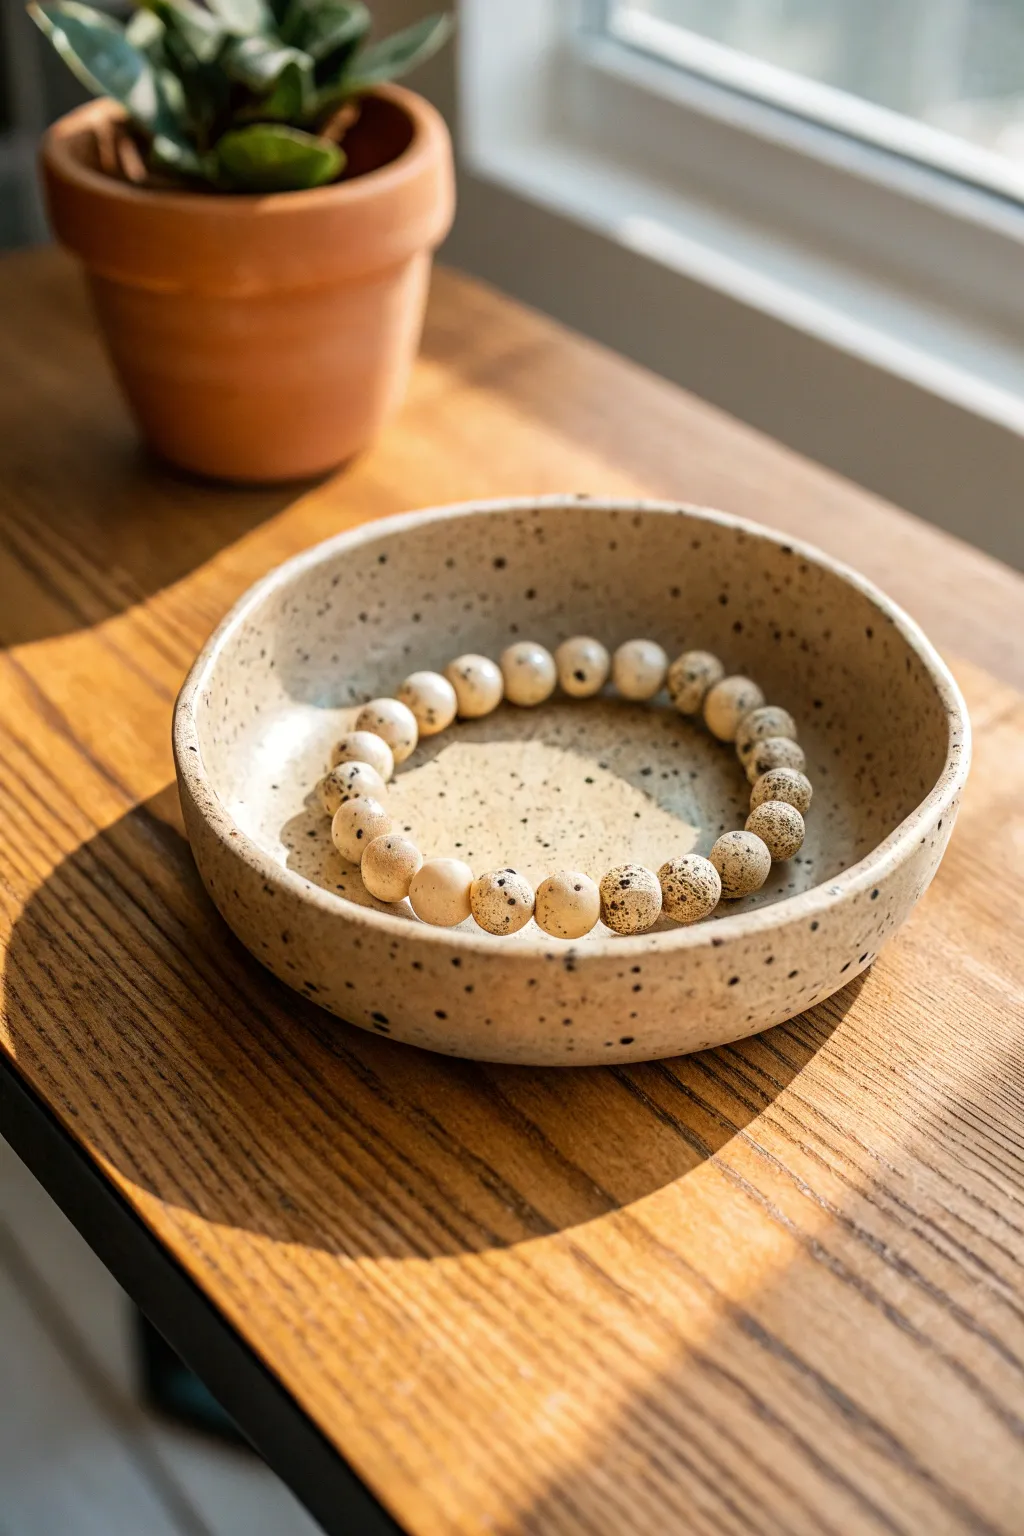
This rustic, charming dish mimics the look of expensive speckled stoneware pottery without needing a kiln. Using air-dry clay and a clever painting technique, you can create a perfectly imperfect catch-all tray for your jewelry or trinkets.
Step-by-Step
Materials
- White or cream air-dry clay (like DAS or Crayola)
- Acrylic paints: Cream/Off-white, Black, Dark Brown
- Stiff bristle toothbrush (an old one works great)
- Small bowl of water
- Fine-grit sandpaper (220-400 grit)
- Matte or satin varnish/sealant
- Rolling pin
- Sponge
- Palette or paper plate
Step 1: Forming the Dish
-
Condition the clay:
Begin by taking a handful of air-dry clay, about the size of a tennis ball. Knead it in your hands for a minute or two until it feels warm, pliable, and free of cracks. -
Create the base slab:
Place the clay on a smooth surface and use a rolling pin to flatten it into an even circle. Aim for a thickness of about 1/4 inch (6mm). If you want a more organic look, you can just press it flat with your palms. -
Shape the walls:
Gently lift the edges of the circle upwards to form the sides of the bowl. Cup the clay in your palm and use your thumb to smooth the inside curve. -
Smooth the surfaces:
Dip your finger in a little water and run it over any cracks or rough spots. Pay special attention to the rim; I like to gently pinch and round it off so it doesn’t look sharp. -
Refine the shape:
Set the dish on the table and gently press down on the bottom interior to ensure it sits flat. Adjust the walls until they are relatively symmetrical, though a little wobble adds to the handmade charm. -
Allow to dry:
Let your dish dry completely in a safe spot away from direct heat. This usually takes 24 to 48 hours. Flip it over halfway through the drying process to ensure the bottom dries evenly.
Splatter Control Tips
Work inside a cardboard box to contain the mess. For bigger, distinct spots, hold the brush closer; for a fine mist, hold it further away.
Step 2: Sanding and Base Coat
-
Sand for smoothness:
Once the clay creates a hollow sound when tapped, it’s dry. Take your fine-grit sandpaper and gently buff the entire surface. Focus on the rim and any bumps on the interior to get that smooth ceramic feel. -
Wipe away dust:
Use a slightly damp sponge or cloth to wipe away all the clay dust. This is crucial so your paint adheres properly. -
Mix your base color:
Squeeze out some cream or off-white acrylic paint. If you only have white, add the tiniest dot of brown or yellow to warm it up so it looks like natural stoneware. -
Apply the first coat:
Paint the entire dish—inside, outside, and bottom. Use smooth, long strokes to minimize brush marks. -
Apply the second coat:
Let the first layer dry for about 20 minutes, then apply a second coat for full, opaque coverage. Let this dry completely before moving to the speckling step.
Step 3: Creating the Speckle Effect
-
Prepare the speckle paint:
Mix a small amount of black acrylic paint with a tiny bit of water. You want a consistency that is fluid like ink but not dripping wet like watercolor. -
Load the toothbrush:
Dip the bristles of your stiff toothbrush into the watered-down black paint. Tap off any large drips on your paper plate first. -
Test the splatter:
Hold the toothbrush over a piece of scrap paper. Run your thumb firmly across the bristles to flick the paint. Practice adjusting the distance to control the size of the specks. -
Speckle the interior:
Hold the brush about 6-8 inches above the dish and flick the paint into the bowl. Rotate the bowl as you go to get random, natural distribution. Less is more to start—you can always add layers. -
Speckle the exterior:
Turn the bowl in your hand or upside down to speckle the outside walls. Don’t forget the rim, as speckles there look particularly authentic. -
Add dimension with brown (Optional):
For extra depth, repeat the splatter process with a dark brown paint. This mimics the mineral impurities found in real clay. -
Dry and seal:
Let the speckles dry fully (about 30 minutes). Finish by applying two thin coats of matte or satin varnish to protect your work and give it a slight sheen.
Go High-End
Mix baking soda into your base coat of paint. This adds a gritty, sandy texture that feels incredibly realistic, just like unglazed ceramic.
Place your favorite beaded bracelet inside your new creation to admire the organic contrast.
Ombre Painted Ring Dish
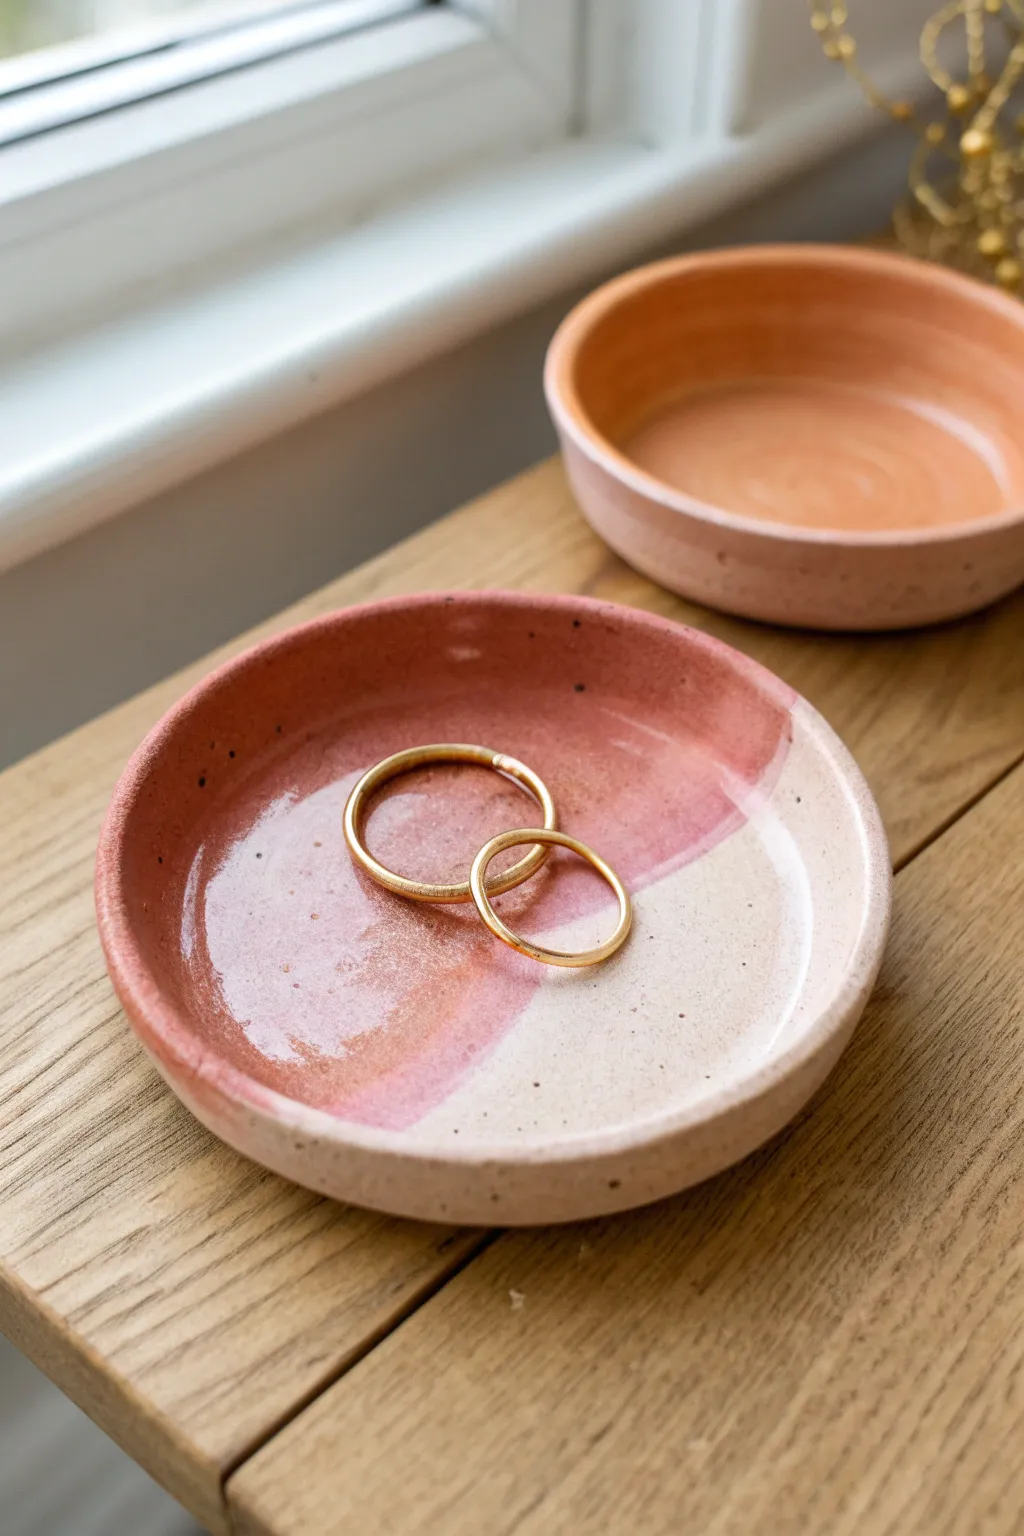
Create a sophisticated resting spot for your jewelry with this two-tone clay dish project. The design features a lovely blend of dusky rose and speckled cream glaze, perfect for adding a handmade touch to your bedside table.
Step-by-Step Tutorial
Materials
- Air-dry clay (white or terracotta)
- Rolling pin
- Circle cutter or small bowl (approx. 4-5 inches diameter)
- Craft knife
- Small bowl for molding
- Fine-grit sandpaper
- Sponge
- Acrylic paints (Dusty Rose, Cream/White, Brown)
- Glazing medium or clear sealant (glossy)
- Paintbrushes (flat shader and fine liner)
- Old toothbrush (optional for speckling)
- Water cup
Step 1: Shaping the Clay
-
Roll out the clay:
Take a handful of air-dry clay and knead it until it is soft and pliable. Roll it out on a flat surface to an even thickness of about 1/4 inch. -
Cut the circle:
Place your circle cutter or a small overturned bowl onto the clay. Press down firmly or trace around the bowl with a craft knife to create a perfect circle. -
Smooth the edges:
Dip your finger in a little water and run it gently along the cut edge of the circle. This removes any harsh lines or crumbs left by the cutting tool. -
Form the shape:
Lift the clay circle carefully and place it inside your molding bowl. Gently press the clay into the bottom curve of the bowl to give it a concave, dish-like shape. -
Refine the rim:
While it sits in the mold, use a damp sponge to smooth out the inner surface and ensure the rim is even all the way around. -
Initial dry:
Let the clay dry inside the bowl for 24 hours. This ensures it holds the curved shape without collapsing. -
Final dry:
Remove the dish from the mold and place it upside down on a drying rack. Allow it to air dry for another 24-48 hours until completely hard and white. -
Sand for smoothness:
Once fully dry, take a piece of fine-grit sandpaper and gently buff the entire surface. Pay special attention to the rim to soften any sharp edges.
Pro Tip: Liquid Gold
For a luxe finish, paint the very rim of the dish with metallic gold leaf paint after the main colors dry. It frames the design beautifully.
Step 2: Painting and Glazing
-
Base coat:
Paint the entire dish with a coat of cream or off-white acrylic paint. This provides a neutral background for the color overlay. -
Mix the ombre color:
Prepare a dusky rose color on your palette. If your pink is too bright, mix in a tiny drop of brown or terracotta to achieve that earthy look shown in the photo. -
Apply the color block:
Load a flat brush with the rose paint. Paint a broad, sweeping curve across about two-thirds of the dish’s interior. Don’t worry about a perfectly hard line; a softer edge looks more organic. -
Blend the transition:
While the paint is still slightly wet, use a clean, slightly damp brush to feather the edge where the pink meets the cream, creating a subtle transition rather than a stark stripe. -
Add speckles:
Dilute a small amount of dark brown paint with water. Dip an old toothbrush or stiff brush into the mixture and flick the bristles with your thumb to spray tiny speckles over the lighter, cream section of the dish. -
Dry the paint:
Allow the paint layers to dry completely. I like to let this sit for an hour to ensure the moisture has evaporated before sealing. -
Sealing the dish:
Apply a coat of glossy glazing medium or clear sealant over the entire dish. This gives it that ceramic-like shine and protects the paint from scratches. -
Second coat:
For extra durability and shine, apply a second coat of sealant once the first is dry to the touch.
Troubleshooting: Warping
If the clay curls while drying, weigh the center down gently with a small bag of rice or beans during the first 12 hours of drying time.
Place your favorite rings in your new dish and enjoy the handmade charm on your dresser
Double-Dip Duo Dish
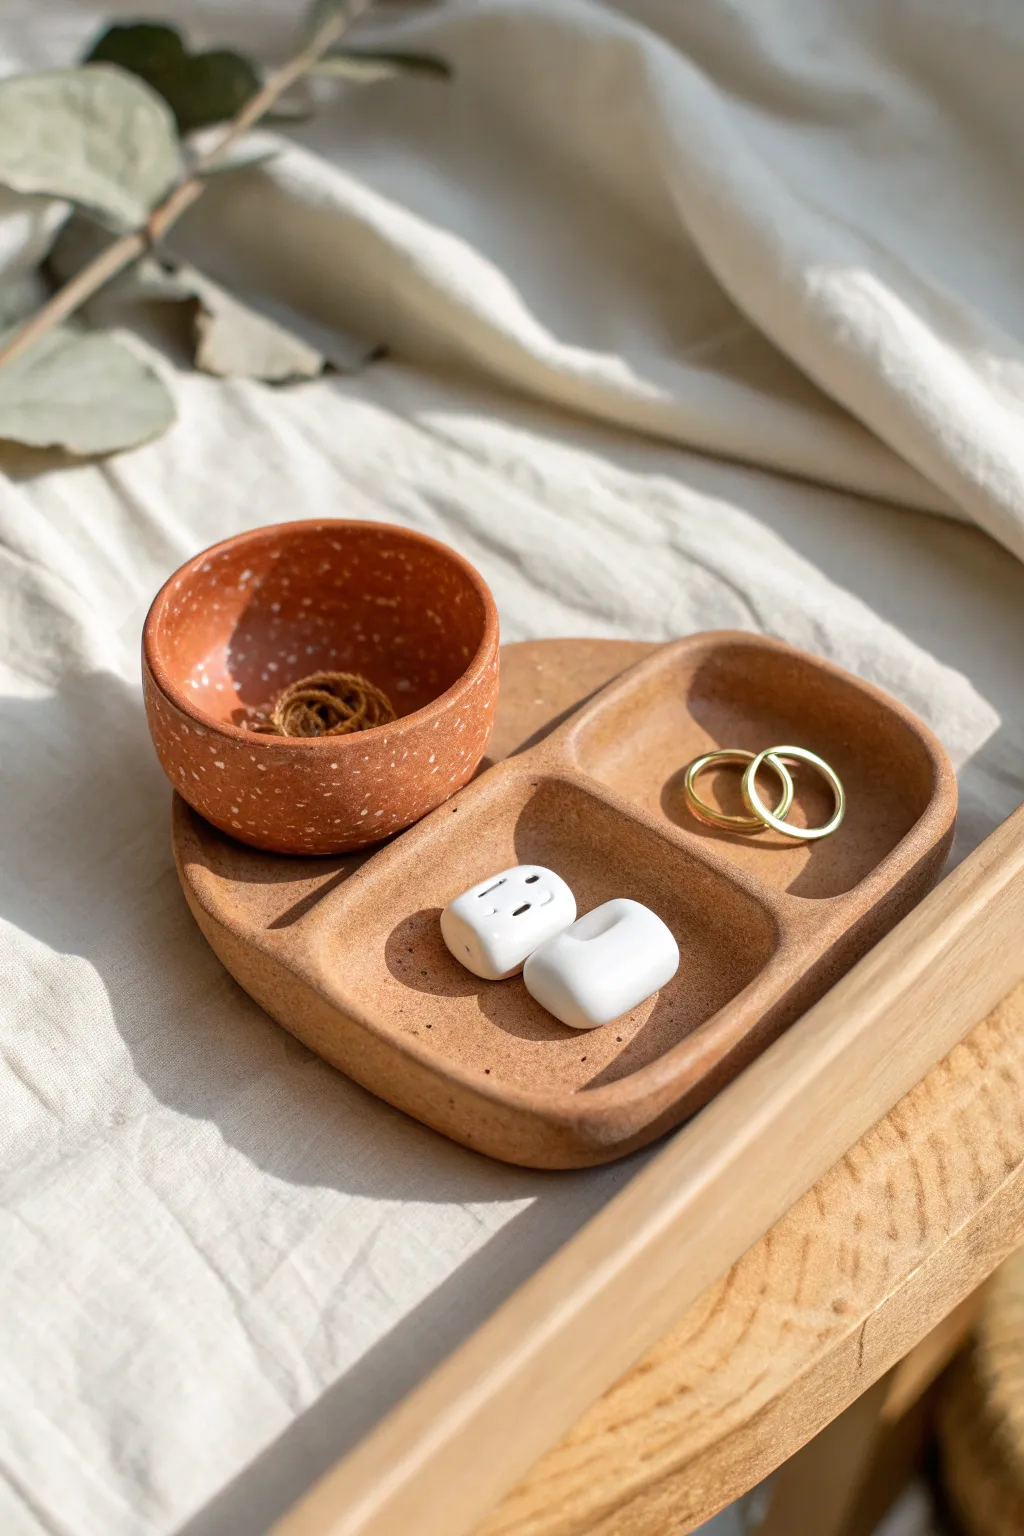
Embrace the natural warmth of terracotta with this clever two-part tray system that combines a speckled pinch pot with a smooth, divided catch-all. The nesting design offers perfect organization for rings, earrings, or desk accessories while adding a touch of rustic modernism to your space.
Detailed Instructions
Materials
- Terracotta colored polymer clay or air-dry clay (approx. 500g)
- White acrylic paint or specialized clay speckle medium
- Rolling pin
- Clay carving tools or a butter knife
- Small sponge for smoothing
- Fine grit sandpaper
- Matte varnish or sealant
- Old toothbrush (for the speckle effect)
- Water cup (if using air-dry clay)
Step 1: Shaping the Base Tray
-
Condition and Roll:
Begin by taking about two-thirds of your terracotta clay block. Knead it thoroughly in your hands until it becomes warm and pliable. Using a rolling pin, flatten the clay into a slab approximately 1/4 inch thick. Aim for a consistent thickness to prevent cracking during drying. -
Cut the Outline:
Using a needle tool or a sharp knife, cut out a rounded, kidney-bean-like shape or an elongated oval. This organic form will serve as the foundation for your divided tray. -
Create the Walls:
Roll a long snake or coil of clay, roughly the thickness of a pencil. Score the edges of your base slab and apply a little water (or liquid clay if using polymer) to help adhesion. Place the coil along the perimeter of the base. -
Blend the Coil:
Use your thumb or a modeling tool to blend the coil downwards into the base slab, ensuring there is no visible seam on the inside or outside. This creates the raised rim of your tray. -
Add the Divider:
Roll a shorter coil of clay to act as the internal divider. Place it across the tray, creating one smaller section and one larger section. Blend this divider into the base and the side walls just as you did with the rim. -
Smooth and Refine:
Dip a small sponge in water and gently rub over the entire piece to remove fingerprints and smooth out any rough edges. Pay special attention to the curved corners where the divider meets the walls.
Step 2: Crafting the Speckled Bowl
-
Prepare the Pinch Pot:
Take the remaining portion of your clay and roll it into a sphere about the size of a golf ball. Hold the sphere in one hand and press your thumb into the center, stopping before you push through the bottom. -
Pinch the Walls:
Gently pinch the clay between your thumb and fingers, rotating the ball as you work. Ideally, you want to coax the walls upwards and thinning them out until you have a small, even bowl shape. -
Check the Fit:
Place your pinch pot onto the larger section of your base tray. I like to press it down very gently just to ensure the bottom flattens slightly for stability, making sure it sits nicely without wobbling. -
Adding Texture:
Dilute a small amount of white acrylic paint with water. Dip an old toothbrush into this mixture. Hold the brush over the pinch pot and run your thumb across the bristles to flick tiny white speckles onto the clay surface. -
Repeat Speckling:
Continue this speckling process until you achieve your desired density. You can choose to speckle just the bowl for contrast, or extend the effect to the base tray for a unified look.
Cracks Appearing?
Make a ‘slip’ paste using scrap dry clay and water. Fill any cracks carefully, let dry again, and sand smooth before sealing.
Step 3: Drying and Finishing
-
Controlled Drying:
If using air-dry clay, set both pieces in a cool, dry place away from direct sunlight. Let them dry slowly for 24-48 hours. If using polymer clay, bake according to the manufacturer’s instructions on the package. -
Sanding:
Once fully dry or cured and cooled, use fine-grit sandpaper to gently smooth the rims and any sharp edges. This step gives the project a professional, finished feel. -
Dusting Off:
Wipe the pieces down with a slightly damp cloth to remove all sanding dust before applying any finish. -
Sealing:
Apply a coat of matte varnish to both the tray and the bowl. This protects the clay from moisture and seals in your speckled paint design. -
Final Cure:
Allow the varnish to dry completely according to the bottle’s instructions. Once dry, stack your bowl on the tray and start organizing your treasures.
Go for Gold
After sealing, paint the very rim of the small bowl with liquid gold leaf for a chic, metallic accent that pops against the terracotta.
Now you have a stylish, custom-made organizer perfect for your bedside table or vanity
Nesting Set of Mini Dishes
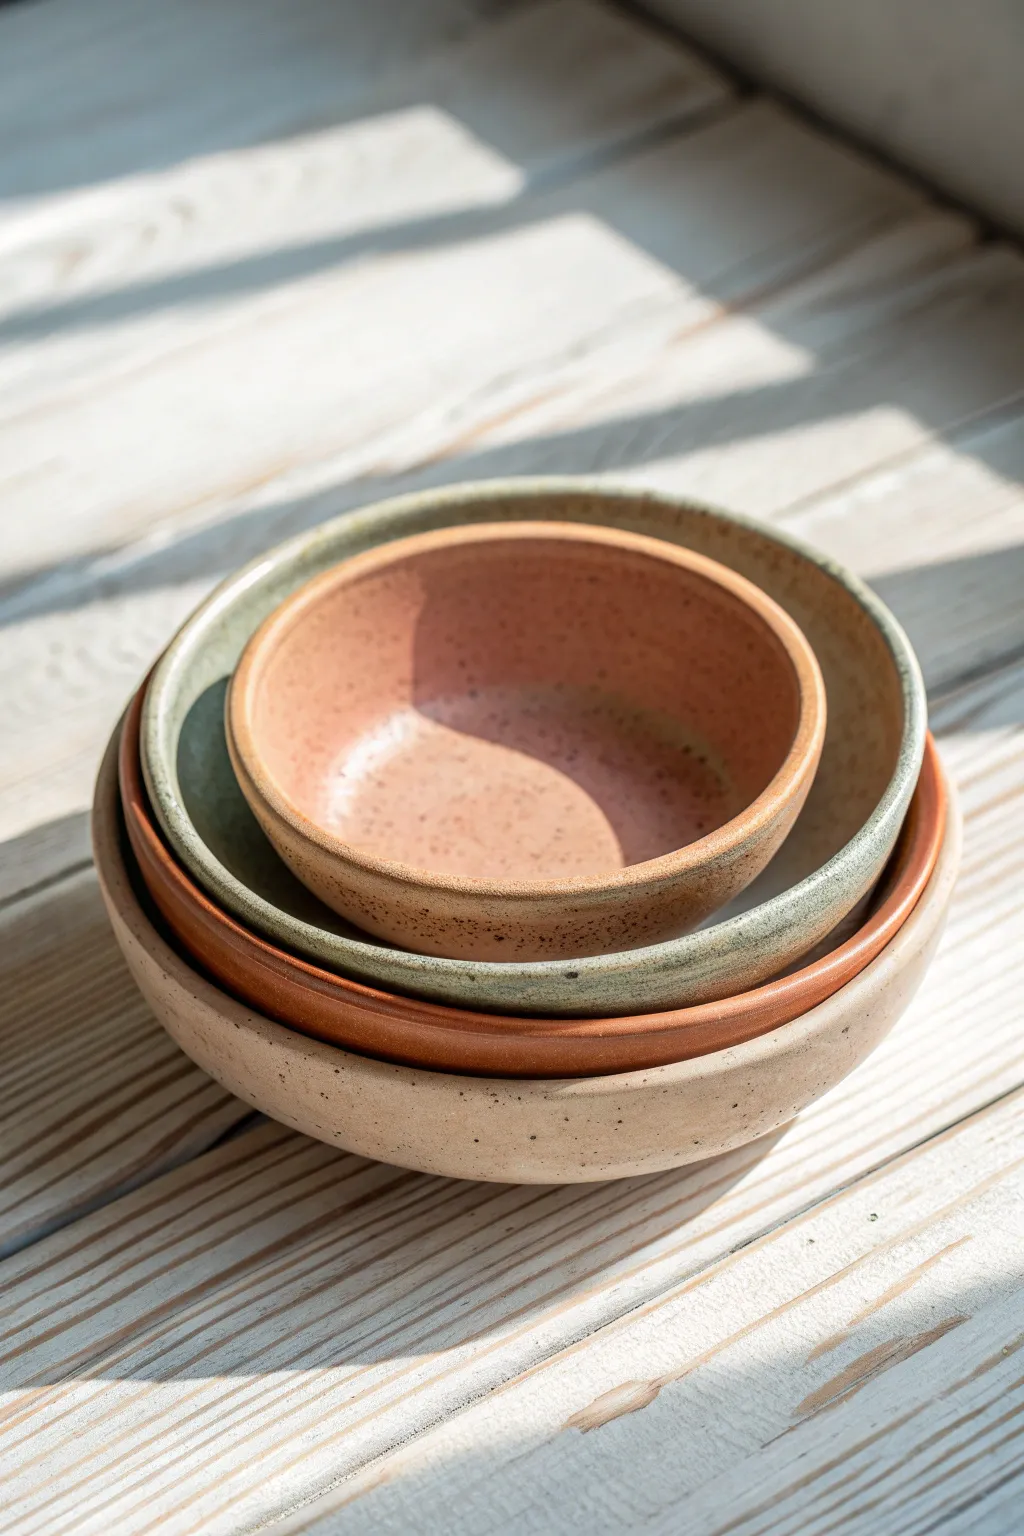
Embrace organic forms and warm, muted tones with this set of four stacking mini dishes. With their charmingly imperfect rims and speckled finish, they bring a touch of rustic modernism to any surface.
Step-by-Step Guide
Materials
- Speckled stoneware clay (mid-fire or air-dry with faux speckles)
- Rolling pin
- Canvas mat or cloth (to prevent sticking)
- Set of circular templates (or various household bowls for molds)
- Needle tool or fettling knife
- Smooth river stone or rib tool
- Sponge
- Matte glazes in oatmeal, sage green, terracotta, and soft rose (if firing)
- Acrylic paints + matte varnish (if using air-dry clay)
- Flat paintbrush
Step 1: Preparing the Forms
-
Wedge the clay:
Begin by taking a generous amount of speckled clay and wedging it thoroughly to remove air bubbles. This ensures your bowls won’t crack later. -
Roll out slabs:
On your canvas mat, roll the clay out into an even slab. Aim for a thickness of about 1/4 inch, keeping it consistent so the bowls nest properly. -
Cut the circles:
You will need four circles of decreasing size. Use your templates or household bowls as guides, cutting around them with a needle tool. Ensure there is about a 1-inch difference in diameter between each circle. -
Smooth the edges:
Dip your finger or a small sponge in water and run it along the cut edges of your clay circles to soften any sharp angles left by the knife.
Step 2: Shaping the Dishes
-
Form the largest bowl:
Take the largest clay circle and gently drape it into a shallow slump mold or a large serving bowl lined with cling film. Press it softly to take the curve without thinning the clay. -
Refine the curve:
Use a flexible rib tool or a smooth damp sponge to compress the inside of the bowl, ensuring a seamless curve from the bottom to the rim. -
Repeat for smaller sizes:
Repeat the slumping process for the remaining three circles, using progressively smaller molds or bowls to support them so the curves match the diameters. -
Detail the rims:
Once formed but still in the mold, gently pinch the rims or tap them slightly with a wooden paddle. I like to leave them slightly uneven to emphasize the handmade aesthetic. -
Stiffen the forms:
Allow the clay to dry to a leather-hard state inside the molds. This usually takes a few hours depending on the humidity. -
Smooth the foot:
Pop the bowls out of the molds. Flip them over and use a rib tool or damp sponge to smooth the bottom where the bowl sat, ensuring it sits flat on a table.
Warped Rim Fix
If a rim warps while drying, place a small weighted bag of rice or beans inside the bowl while it’s in the leather-hard stage to gently hold the shape down.
Step 3: Finishing and Coloring
-
Bisque fire:
If using ceramic clay, let the bowls dry completely (bone dry) and then bisque fire them according to your clay body’s instructions. -
Select your palette:
Choose glazes that mimic the photo: a creamy beige for the large base bowl, a deep terracotta for the second, a muted sage for the third, and a soft pink for the smallest. -
Apply the glaze:
Pour glaze inside the bowl, roll it around to coat, and pour out the excess. For the outside, you can dip or brush. Focus on matte finishes to replicate the stone-like texture. -
Enhance the rim:
If you want that defined edge seen in the sage bowl, carefully wipe a tiny bit of glaze off the very top rim with a damp sponge to let the raw speckled clay show through. -
Glaze fire:
Fire the bowls again to the temperature required by your specific glaze and clay combination. -
Alternative for air-dry clay:
If painting air-dry clay, mix acrylics in the same earth tones. Splatter a slightly darker, watered-down brown paint over the dried base coat to mimic ceramic speckles. -
Seal the surface:
For air-dry projects, finish with a matte varnish to protect the paint while maintaining the non-glossy, natural look.
Pro Tip: Consistent Depth
To ensure they nest perfectly, check that the curve depth is similar on all slump molds. Using a single brand of nesting kitchen bowls as molds is the easiest hack.
Stack your finished creation on a coffee table or shelf to enjoy the satisfying progression of earthy colors
Heart-Shaped Trinket Dish
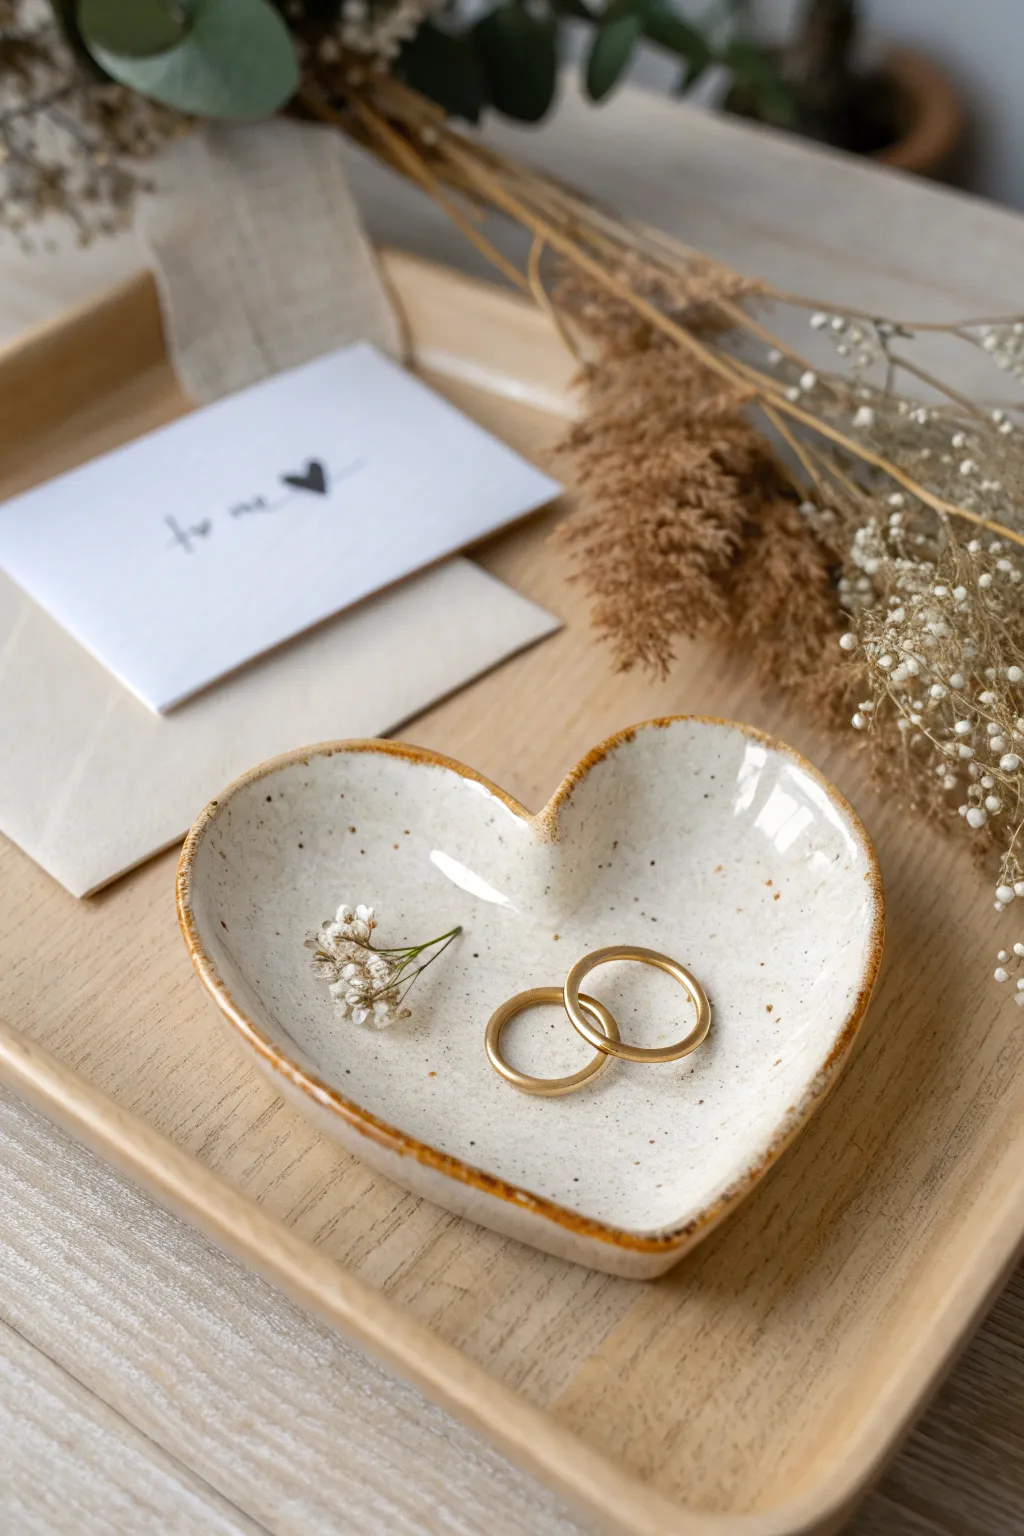
This charming, rustic heart dish features a warm, speckled cream glaze and a delicate burned-orange rim that mimics the look of vintage stoneware. It is perfect for holding your most precious rings or serving as a sweet keepsake gift.
How-To Guide
Materials
- Air-dry clay (white or cream) or polymer clay
- Rolling pin
- Heart-shaped cookie cutter (approx. 4-5 inches)
- Small bowl for sponge (water)
- Fine-grit sandpaper
- Acrylic paints: warm cream/off-white, dark brown (for speckling), burnt sienna (for rim)
- Gloss varnish or sealant
- Paintbrushes (flat shader and a stiff bristle brush)
- Toothbrush (for speckling)
- Sponge
Step 1: Shaping the Clay
-
Condition the clay:
Begin by kneading a ball of white air-dry clay in your hands until it becomes soft, pliable, and free of cracks. -
Roll it out:
Using a rolling pin on a smooth surface, roll the clay out to an even thickness of about 1/4 inch. Ensure the thickness is uniform to prevent cracking during drying. -
Cut the heart:
Press a heart-shaped cookie cutter firmly into the rolled clay. If you don’t have a cutter, you can sketch a heart on paper, cut it out, place it on the clay, and trace around it with a craft knife. -
Soften the edges:
Dip your finger or a small sponge into a little water and gently run it along the cut edges of the heart to smooth out any sharpness or roughness. -
Create the curvature:
To give the dish its upward curve, gently lift the edges of the clay heart with your fingers, cupping it slightly. I like to let this rest inside a slightly larger bowl to help it hold its concave shape while drying. -
Refine the form:
While it sits in the drying form, use a slightly damp sponge to smooth out the interior surface again, ensuring there are no fingerprints left behind. -
Dry completely:
Allow the clay to dry according to the package instructions. This usually takes 24-48 hours. Flip it occasionally to ensure air reaches the bottom.
Step 2: Painting and Finishing
-
Sand the imperfections:
Once the dish is bone dry, take a piece of fine-grit sandpaper and lightly sand the rim and surface to create a perfectly smooth base. -
Apply base coat:
Mix a warm cream or off-white acrylic paint. Apply two to three thin coats to the entire dish, letting each layer dry before applying the next for opaque coverage. -
Create the speckles:
Water down a small amount of dark brown acrylic paint. Dip an old toothbrush into the mixture. -
Flick the paint:
Run your thumb across the toothbrush bristles to flick tiny specks of paint onto the dish. Practice on a paper towel first to control the density of the speckles. -
Paint the rim:
Using a detail brush and burnt sienna (or a rusty orange-brown) paint, carefully paint the very edge of the rim. Don’t worry if the line varies slightly in thickness; this adds to the handmade pottery look. -
Seal the dish:
Once all paint is fully dry, apply a coat of high-gloss varnish to the entire dish. This gives it that ceramic-like shine and protects the paint. -
Add a second coat:
For extra durability and shine, apply a second coat of gloss varnish, ensuring you catch the rim and the underside. -
Final cure:
Let the varnish cure for at least 24 hours before placing any jewelry inside to avoid tackiness.
Cracks happen
If small hairline cracks appear as the clay dries, mix a tiny amount of fresh clay with water to make a paste (slip) and fill the cracks, then sand smooth once dry.
Add a hidden message
Before the clay dries, use small alphabet stamps to press initials or a date into the bottom of the dish for a personalized touch.
Now you have a beautiful, faux-ceramic dish ready to hold your favorite rings
Hand-Shaped Ring Dish
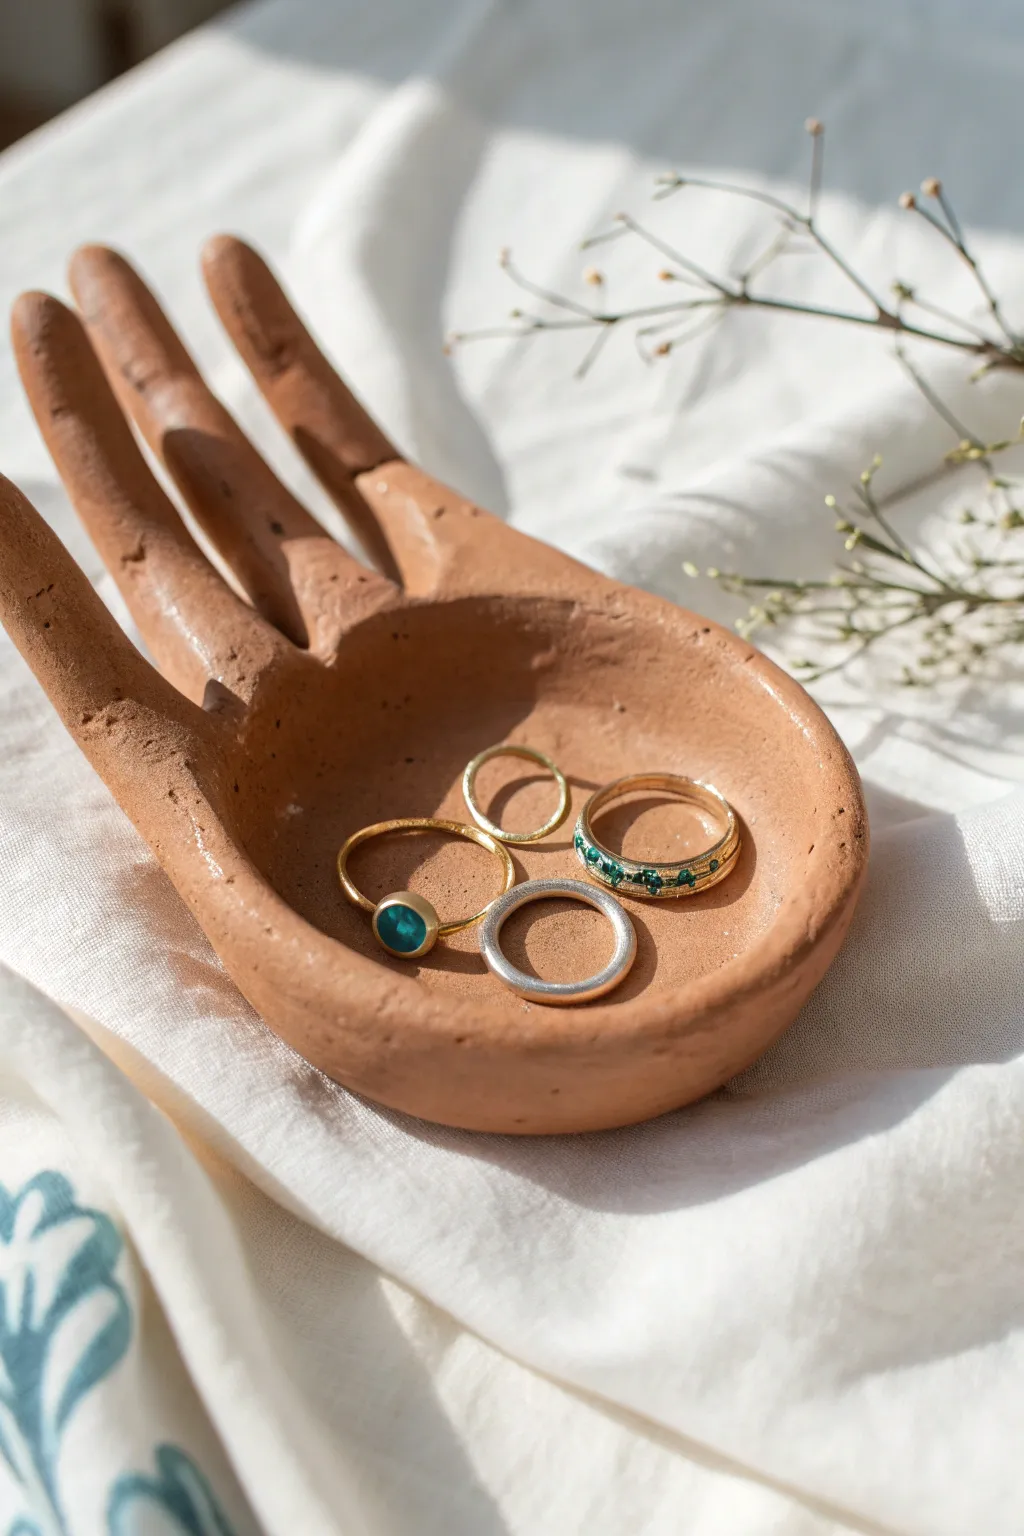
This charming, rustic jewelry dish combines functionality with sculptural beauty, featuring elongated fingers and a deep palm perfect for catching rings. The warm, unglazed terracotta finish gives it an earthy, artisanal feel that looks lovely on any bedside table.
Detailed Instructions
Materials
- Air-dry clay (terracotta color) or polymer clay
- Rolling pin
- X-acto knife or craft scalpel
- Small bowl or sphere (for molding the palm)
- Small cup of water
- Sponge or smoothing tool
- Fine-grit sandpaper (optional)
- Parchment paper or work mat
Step 1: Shaping the Hand
-
Prepare the clay:
Begin by conditioning your clay. If using air-dry clay, knead a fist-sized lump until it is pliable and smooth. If using polymer clay, warm it in your hands until soft. -
Roll out a slab:
Place the clay on parchment paper and use your rolling pin to create a slab about 1/4 to 1/2 inch thick. Keep the thickness consistent to prevent cracking later. -
Outline the hand:
Lightly trace the shape of a hand onto the clay using a dull tool or toothpick. You can trace your own hand for a realistic size, or sketch distinctive elongated fingers like the reference image for a stylized look. -
Cut the shape:
Using your X-acto knife or craft scalpel, carefully cut along the traced outline. Remove the excess clay and set it aside for future use. -
Smooth the edges:
Dip your finger or a small sponge into a little bit of water and run it along the cut edges of the fingers and palm. This rounds off the sharp cuts and gives the piece a finished look.
Cracks Appearing?
If you see hairline cracks while air-drying, mix a tiny bit of fresh clay with water to make a paste (slip). Rub this into the cracks and smooth over immediately.
Step 2: Forming the Dish
-
Mold the palm:
Gently lift the clay hand and drape the palm section over a small bowl or a sphere. Press gently so the center sinks down, creating the ‘cup’ shape needed to hold jewelry. -
Adjust the fingers:
The fingers shouldn’t just lie flat. Curve them slightly upwards or drape them so they feel natural, as if the hand is cupping something. Support the fingers with crumpled paper towels or extra bits of clay underneath so they hold their shape while drying. -
Refine the details:
Look closely at the connection points between the fingers. Use a damp tool to smooth these crevices so they don’t develop stress cracks. -
Initial drying phase:
Let the piece sit in this supported position for about an hour (depending on clay type) until it holds its form on its own but is still slightly workable.
Add Gold Accents
For a luxe upgrade, use liquid gold leaf on just the rim of the palm or the very tips of the fingers once the clay is dry. It pops beautifully against the terracotta.
Step 3: Finishing Touches
-
Remove supports:
Once the clay is firm enough to not sag, carefully remove the bowl and paper propping up the fingers so air can circulate underneath. -
Allow to cure:
Let the dish dry completely. For air-dry clay, this usually takes 24-48 hours. I always like to flip it over gently halfway through the drying time to ensure the bottom dries evenly. -
Sand imperfections:
Once fully bone dry (or baked and cooled if using polymer), inspect for rough spots. Use fine-grit sandpaper to gently smooth out any fingerprints or sharp edges on the rim. -
Dust off debris:
Wipe the dish down with a very slightly damp cloth to remove sanding dust. Be careful not to re-wet air-dry clay too much. -
Seal (Optional):
While the reference image shows a raw, matte finish, you can add a matte varnish or sealant if you want to protect the clay from moisture and oils over time.
Place your favorite rings in the palm and enjoy your unique piece of handmade decor
Moon Phase Celestial Dish
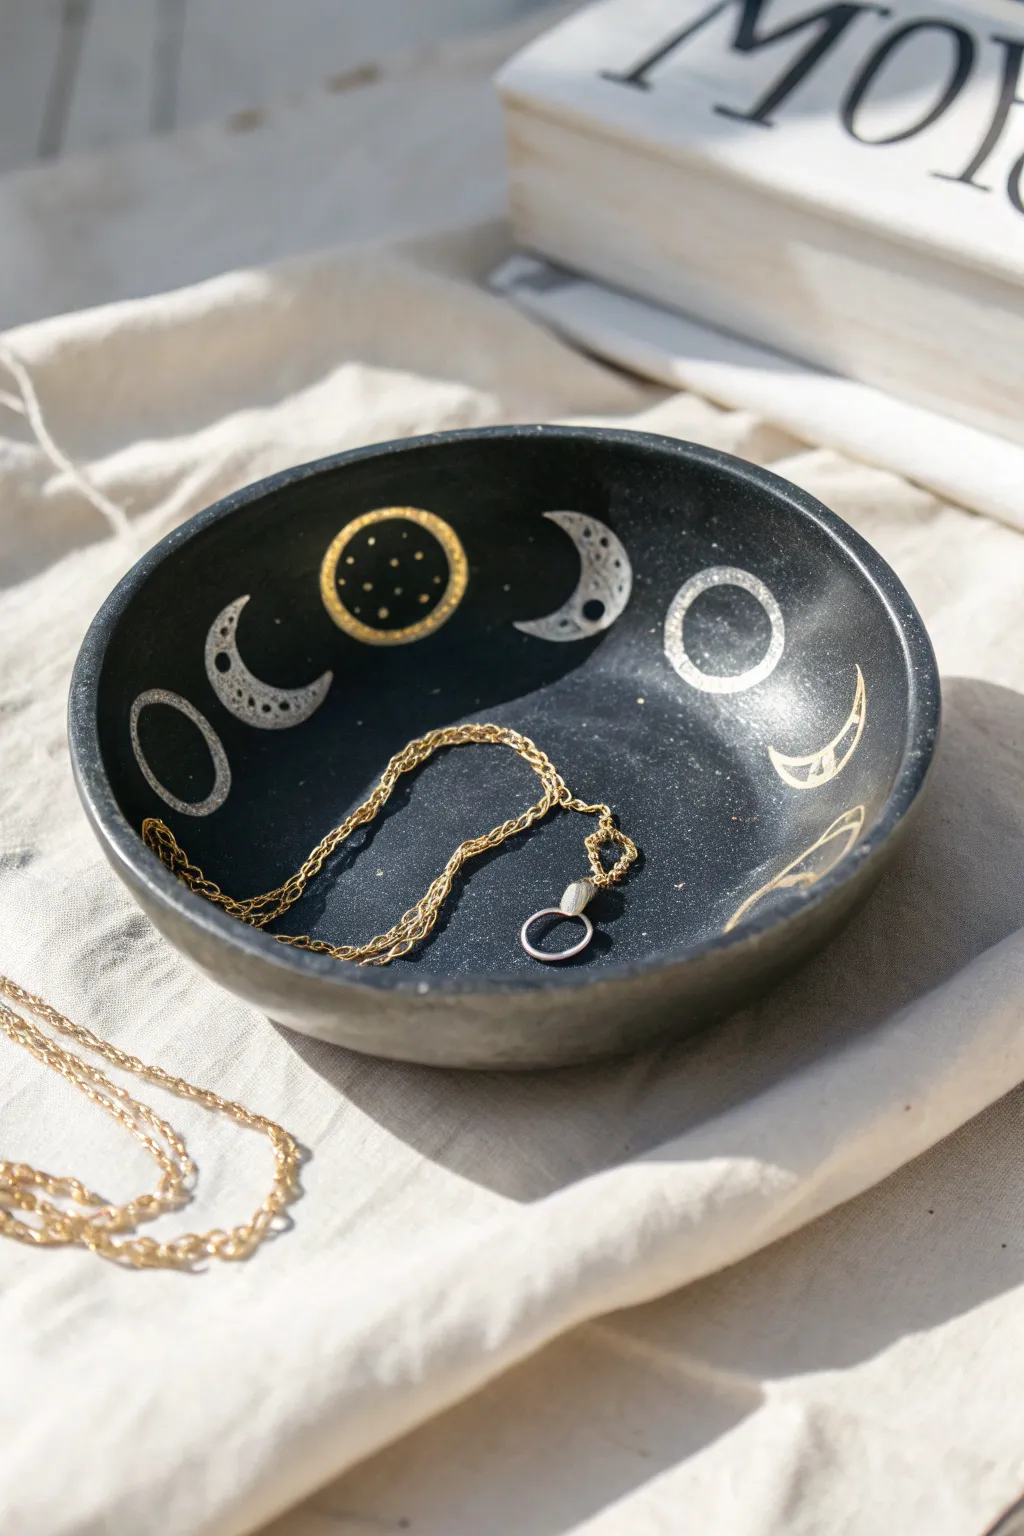
Capture the magic of the night sky with this elegant trinket dish, featuring a deep matte black finish and metallic moon phases. It’s the perfect size for holding delicate chains and rings while adding a touch of mysticism to your bedside table.
Step-by-Step Guide
Materials
- Air-dry clay or polymer clay (black or white)
- Acrylic rolling pin
- Small bowl or dish (to use as a mold)
- Craft knife or clay cutter
- Sandpaper (fine grit)
- Black acrylic paint (matte finish)
- Gold and silver metallic paint pens or fine brushes
- Glossy varnish or sealant
- Soft paintbrush
- Water cup and paper towels
Step 1: Shaping the Clay Base
-
Rolling the clay:
Start by conditioning your clay in your hands until it is pliable and smooth. Roll it out on a flat surface using your acrylic rolling pin until you achieve an even thickness of about 1/4 inch. -
Cutting the circle:
Place a bowl or a circular template onto the rolled clay. Use your craft knife to trace around the edge, cutting out a perfect circle. -
Forming the shape:
Gently lift your clay circle and drape it inside your mold bowl. Press it lightly against the bottom and sides to take the shape, smoothing out any wrinkles or air bubbles with your fingers. -
Refining the rim:
While the clay is still soft, run a slightly damp finger along the top rim to smooth out any sharp edges left from cutting. -
Drying process:
Allow the clay to dry completely according to the package instructions. If using air-dry clay, turning it out of the mold halfway through the drying time helps the bottom dry evenly.
Uneven Moon Shapes?
If freehand drawing is tricky, use circle stickers or a stencil to map out your moons. You can paint over the sticker for a negative space effect or trace the inside.
Step 2: Creating the Night Sky
-
Sanding imperfections:
Once fully cured or dry, gently sand any rough spots, especially around the rim, to ensure a professional finish. Wipe away all dust with a damp cloth. -
Applying the base coat:
Paint the entire dish, inside and out, with matte black acrylic paint. You may need two to three thin coats to get a solid, opaque coverage without brushstrokes. -
Drying the base:
I like to let the black paint dry overnight to ensure the metallic pens don’t scratch through the surface later. -
Marking the layout:
Lightly mark four equidistant points (North, South, East, West) inside the rim with a white charcoal pencil or very light chalk to guide your moon placement.
Step 3: Painting the Phases
-
Drawing the full moon:
At the top position (inside the bowl), used a gold paint pen or brush to draw a solid circle. Add tiny stippled dots inside using the tip of the pen to create texture. -
Adding the new moon:
Directly opposite the full moon, draw an empty circle outline in silver to represent the new moon phase. -
Creating crescent moons:
Draw crescent shapes on the remaining marked spots. Alternate between gold and silver for visual interest, making sure the curves of the crescents face the correct direction relative to the full moon. -
Filling the gibbous phases:
Fille in the spaces between your main points with gibbous or quarter moons, maintaining the alternating metallic color scheme. -
Detailing:
Go back over your metallic shapes to add texture. Use tiny dots for craters or faint lines to give the moons an ancient, celestial look.
Sparkle Upgrade
While the varnish is wet, sprinkle a tiny pinch of ultra-fine holographic glitter into the black ‘sky’ areas to mimic distant stars caught in the light.
Step 4: Sealing and Finishing
-
Cleaning up:
If any chalk or pencil guidelines are still visible, gently wipe them away with a damp cotton swab once the metallic paint is completely dry. -
Sealing the interior:
Apply a coat of varnish to the inside of the bowl. A glossy finish makes the black look deeper and protects the metallic designs from scratching when you toss in your keys or jewelry. -
Sealing the exterior:
flip the bowl over and seal the outside. This step is crucial for durability, especially if you used air-dry clay. -
Final cure:
Let the varnish cure for at least 24 hours before placing any jewelry inside to prevent sticking.
Now your jewelry has a mystical resting place that looks beautiful even when empty
Desert Sun Boho Dish
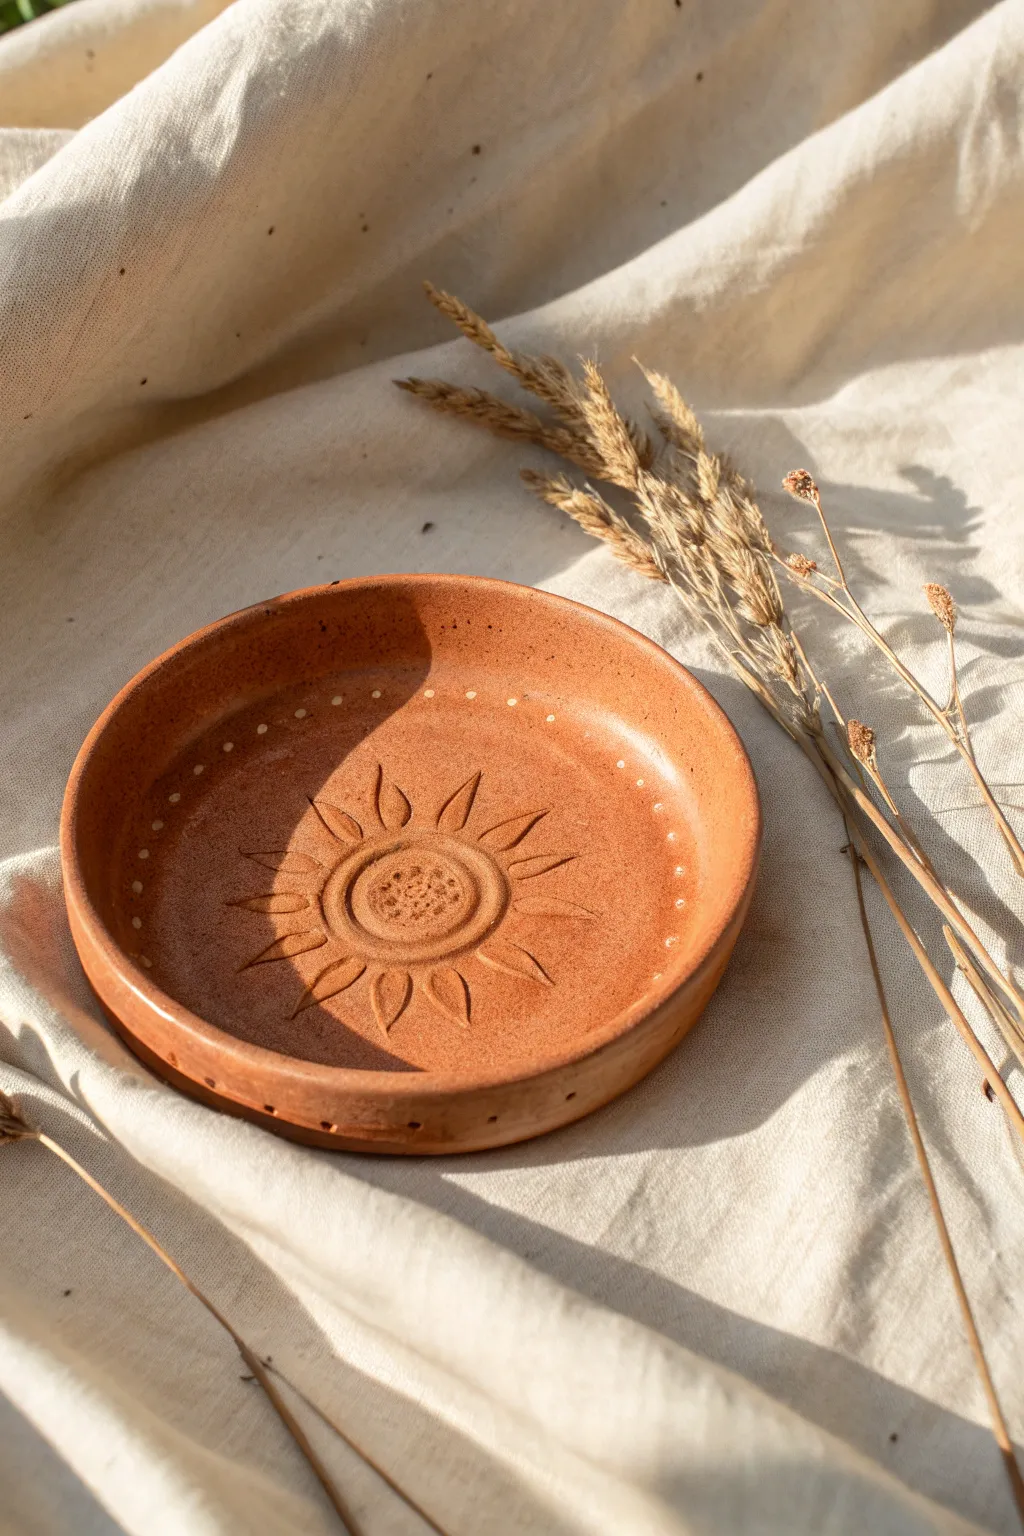
Capture the warmth of a desert afternoon with this rustic terracotta dish featuring a carved sunburst design. Its earthy tones and simple geometric patterns make it a perfect catch-all for jewelry or a standalone decorative accent.
How-To Guide
Materials
- Terracotta air-dry clay or kiln-fire clay
- Rolling pin
- Circle clay cutter or a small bowl (approx. 4-5 inches diameter)
- Needle tool or toothpick
- Small carving loop tool
- Sponge
- Small cup of water
- White underglaze (for kiln clay) or white acrylic paint (for air-dry)
- Fine-point paintbrush
- Matte varnish (optional for air-dry clay)
Step 1: Shaping the Base
-
Prepare the Clay:
Begin by taking a handful of terracotta clay and kneading it briefly to warm it up. Roll it into a smooth ball, ensuring there are no air bubbles trapped inside. -
Roll the Slab:
Use your rolling pin to flatten the ball into an even slab. Aim for a thickness of about 1/4 inch; you don’t want it too thin or the rim might crack later. -
Cut the Circle:
Press your circle cutter or place a small bowl upside down on the slab and trace around it with a needle tool to cut out a perfect circle. -
Smooth the Edges:
Dip your finger in a little water and run it along the cut edge to soften any sharpness. This is a small detail that makes the finished piece look much more professional. -
Form the Dish:
Gently curve the outer edge of the circle upward to create a rim. Use your thumbs to press the center down slightly while pulling the edges up, creating a shallow bowl shape.
Crumbly Carving?
If the clay drags or crumbles while carving, it’s too dry. Mist it lightly with water, cover with plastic for 30 minutes to rehydrate, then try again.
Step 2: Carving the Sun Design
-
Mark the Center:
Find the approximate center of your dish. Lightly press a small bottle cap or coin into the clay to create an impression for the sun’s central circle. -
Detail the Core:
Inside that central circle, use your needle tool to stipple small dots, creating a textured, seed-like center for your sun. -
Define the Center Ring:
Carve a second ring around the stippled center using a loop tool or needle tool, giving the sun’s core a layered, distinct border. -
Draft the Rays:
Lightly sketch the triangular rays radiating outward from the center circle. Try to space them relatively evenly, but don’t worry about perfection; organic spacing adds to the boho charm. -
Carve the Rays:
Use your carving tool to deepen the lines of the sun rays. Carve slightly deeper in the middle of each ray petal to give them a concave, leaf-like appearance. -
Add Decorative Lines:
Draw single, straight lines extending from the tips of the sun rays toward the rim, or add small veins inside the petal shapes for extra detail. -
Clean Up Crumbs:
Use a soft, dry brush or a barely damp sponge to gently sweep away any little clay crumbs created by the carving process.
Step 3: Finishing Touches
-
Add Rim Details:
Dip the back end of a paintbrush into white underglaze (or acrylic paint if the clay is dry). Dot a ring of white spots around the inner wall of the rim. -
Dot the Floor:
Add a second, wider circle of white dots on the flat floor of the dish, creating a border pattern that frames your central sun carving. -
Dry Slowly:
Place the dish in a cool, draft-free spot. I find that covering it loosely with plastic for the first day helps prevent the rim from warping as it dries. -
Final Surface:
Once fully bone dry (or fired, if using kiln clay), inspect the surface. If you used air-dry clay, apply a coat of matte varnish now to seal the terracotta color and protect the paint.
Pro Tip: Depth Contrast
After carving, dab a tiny bit of water into the grooves to smooth them. This deepens the color slightly, making the design pop even before sealing.
Allow your new dish to fully cure before filling it with rings or dried botanicals
Napkin-Pattern Decoupage Dish
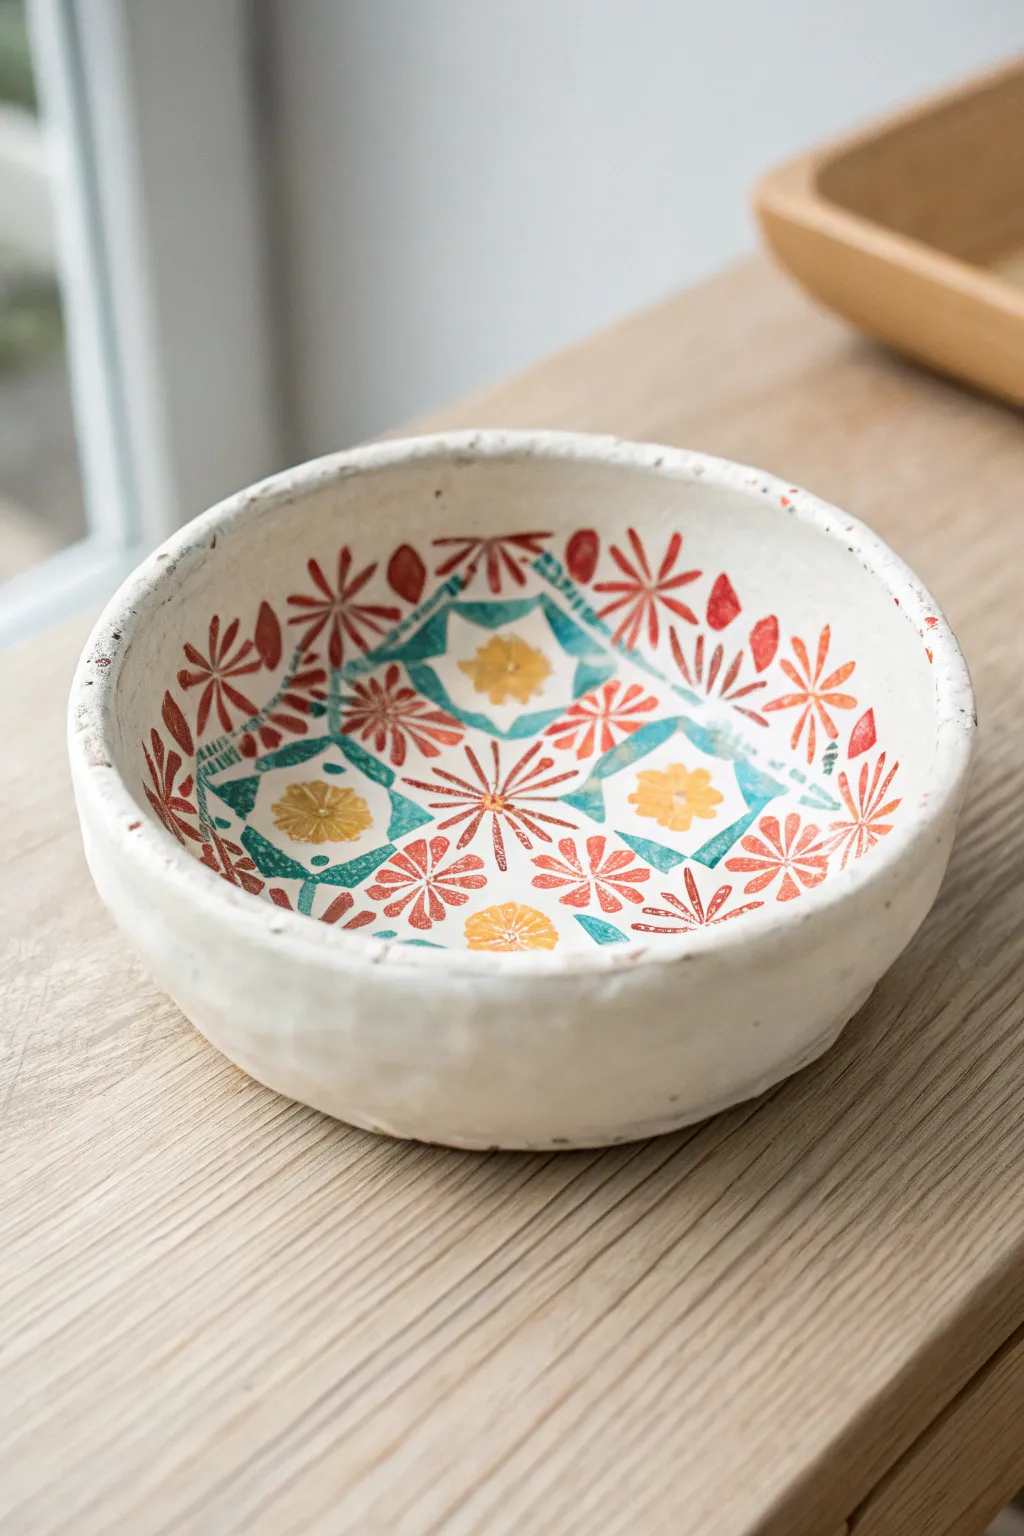
Transform a simple paper napkin into a high-end ceramic lookalike with this clever decoupage technique. The resulting dish features a rustic, textured terracotta vibe on the outside and a vibrant, intricate pattern on the inside.
Detailed Instructions
Materials
- Air-dry clay (white or light grey)
- Small bowl (to use as a mold)
- Decorative paper napkin with a radial or tile pattern
- Rolling pin
- Mod Podge or decoupage glue
- White acrylic paint
- Soft flat paintbrush
- Scissors
- Fine-grit sandpaper
- Clear matte varnish or sealant
- Plastic wrap
- Sponge (optional for distressing)
Step 1: Shaping the Base
-
Prepare your clay:
Cut off a generous chunk of air-dry clay and knead it in your hands until it becomes soft, pliable, and free of cracks. -
Roll it out:
On a clean, flat surface, roll the clay out to an even thickness of about 1/4 inch. Aim for a circle slightly larger than the bowl you intend to use as a mold. -
Prepare the mold:
Take your existing kitchen bowl and wrap the outside of it tightly with plastic wrap. This ensures the clay won’t stick and releases easily later. -
Form the shape:
Drape the rolled clay circle over the upside-down bowl. Gently press the clay down against the sides, smoothing it with your palms to remove air pockets. -
Refine the edges:
Using a knife or a potter’s needle tool, trim the excess clay around the rim to create an even edge. For a more organic, handmade look like the photo, you can soften this edge with a damp finger rather than cutting it perfectly sharp. -
Let it cure:
Allow the clay to dry on the mold for at least 24 hours. Once the outside feels firm, gently pop it off the mold and remove the plastic wrap. -
Finish drying:
Let the bowl dry completely on its own, usually another 24-48 hours. Flip it occasionally so the inside bottom dries thoroughly.
Easy Smoothing
Use a ball of scrap clay to smooth out fingerprints on your wet project. It works like an eraser and keeps textures consistent.
Step 2: Applying the Design
-
Sand for smoothness:
Once bone dry, take your fine-grit sandpaper and gently smooth the rim and any rough bumps on the interior surface. Wipe away all dust with a slightly damp cloth. -
Prime the surface:
Paint the entire bowl—inside and out—with a coat of white acrylic paint. This creates a bright base that will make the napkin pattern pop. -
Prepare the napkin:
Separate the plies of your paper napkin. You only want the very top, single printed layer. The white backing layers must be removed or they will bubble later. -
Size the design:
Place your napkin inside the bowl to gauge the fit. Cut the napkin into a rough circle larger than the interior, or carefully cut darts (slits) toward the center so the flat paper can conform to the curved bowl without massive wrinkles. -
Apply the glue:
Brush a thin, even layer of Mod Podge or decoupage glue all over the interior of the clay bowl. -
Position the paper:
Gently lay the napkin into the bowl, starting from the center and working outward. Use your soft brush or fingers to smooth it down. -
Smooth out bubbles:
Very gently press the paper into the curve. Because the paper is delicate when wet, use a piece of plastic wrap over your finger to glide over wrinkles without tearing the design. -
Trim the excess:
Once the inside is covered, you can either wrap the paper slightly over the rim or use sandpaper in a downward motion along the edge to “cut” the excess paper off cleanly right at the rim.
Step 3: Finishing Touches
-
Distress the rim:
To mimic the worn look in the photo, dip a sponge lightly in brown or grey paint (or use watered-down paint) and dab it sporadically along the rim and the exterior. Sanding spots of the rim reveals the white clay underneath for extra texture. -
Seal the artwork:
Apply a top coat of Mod Podge over the napkin to seal it. Let this dry completely. -
Final varnish:
Finish with a clear matte varnish or sealant over the entire dish to protect it from moisture and give it a completed, professional feel.
Wrinkle Rescue
If big wrinkles appear in the napkin, don’t panic. Gently lift the edge while the glue is wet and snip a tiny slit to overlap the paper flat.
Place your beautiful new dish on a console table to hold keys or jewelry