Halloween is basically the perfect excuse to play in clay and make a little mess on purpose. These Halloween air dry clay ideas are all about that sweet spot between cute and spooky, with projects you can totally pull off at the kitchen table.
Classic Sheet Ghost Figurines

Capture the nostalgic charm of a classic bedsheet costume with this minimalist air dry clay ghost. Its gentle folds and simple smiling face make it a perfect, non-scary addition to a cozy autumn window display or bookshelf.
Step-by-Step
Materials
- White air dry clay
- Rolling pin
- Aluminum foil
- Clay knife or craft knife
- Small cup of water
- Fine grit sandpaper
- Black acrylic paint
- Fine detail paintbrush
- Parchment paper or non-stick mat
- Matte spray varnish (optional)
Step 1: Shaping the Core
-
Prepare the armature:
Crumple a piece of aluminum foil into a tall, domed cone shape. This will act as the supportive core for your ghost so you don’t use solid clay, which helps it dry evenly. -
Refine the foil shape:
Make sure the top of your foil cone is completely smooth and rounded, like a classic ghost head. It should be slightly taller and thinner than your desired final result to allow for the clay drape. -
Condition the clay:
Take a generous handful of white air dry clay and knead it in your hands until it becomes warm, pliable, and free of cracks.
Pro Tip: Draping
To get softer folds without fingerprints, place a layer of plastic wrap over the clay before draping it. Shape the folds through the plastic, then peel it off gently.
Step 2: Creating the Sheet Effect
-
Roll out the slab:
On a piece of parchment paper, roll your conditioned clay into a large, even circle. Aim for a thickness of about 1/4 inch (6mm)—too thin and it might crack; too thick and it won’t drape naturally. -
Smooth the surface:
Dip your finger in a little water and gently run it over the surface of your clay circle to remove any rolling pin textures or small imperfections. -
First drape:
Carefully lift your clay circle and center it over your foil armature. Allow the sides to fall naturally towards the table. -
Forming the folds:
Gently pinch and guide the hanging clay to create vertical folds that mimic fabric. The ghost in the photo has soft, deep pleats at the bottom, so encourage the material to wave in and out. -
Refine the hem:
Using your clay knife, trim the bottom edge of the ‘sheet’ if it’s too long or uneven. I usually like to curve the cuts slightly to follow the flow of the fabric folds, giving the hem a hovering appearance. -
Smooth the transition:
Using a wet finger, smooth the very top of the head so the clay sits flush against the armature without a visible point or lump. -
Add character details:
If you want slightly more defined ripples, use the handle of a paintbrush to gently press indents into the folds, reinforcing the fabric look.
Level Up: Hidden Glow
Make the ghost hollow by removing the foil after drying. Place a battery-operated tea light underneath to make him glow eerily at night.
Step 3: Finishing Touches
-
Allow to dry:
Let the ghost dry completely in a safe spot away from direct heat. This usually takes 24 to 48 hours depending on humidity. Rotate it occasionally so all sides dry evenly. -
Remove armature (optional):
Once fully dry, you can gently carefully remove the foil from underneath, though keeping it inside adds nice weight and stability. -
Sand imperfections:
Check your dried ghost for rough spots. Use fine grit sandpaper to lightly buff the surface until it feels smooth and fabric-like resembling the photo. -
Paint the eyes:
Using a fine detail brush and black acrylic paint, create two small, vertical ovals for the eyes. Place them fairly high up on the ‘head’ area. -
Paint the smile:
Paint a simple, thin U-shaped curve directly beneath the eyes. Keep the line weight consistent for that minimal, illustrative style shown in the example. -
Seal the piece:
To protect your ghost and give it a finished look, apply a light coat of matte spray varnish. This prevents the raw clay from absorbing moisture over time.
Place your finished ghost on a wooden sill or shelf to enjoy its quiet, friendly presence throughout the season


Ghost Tea Light Luminary Covers
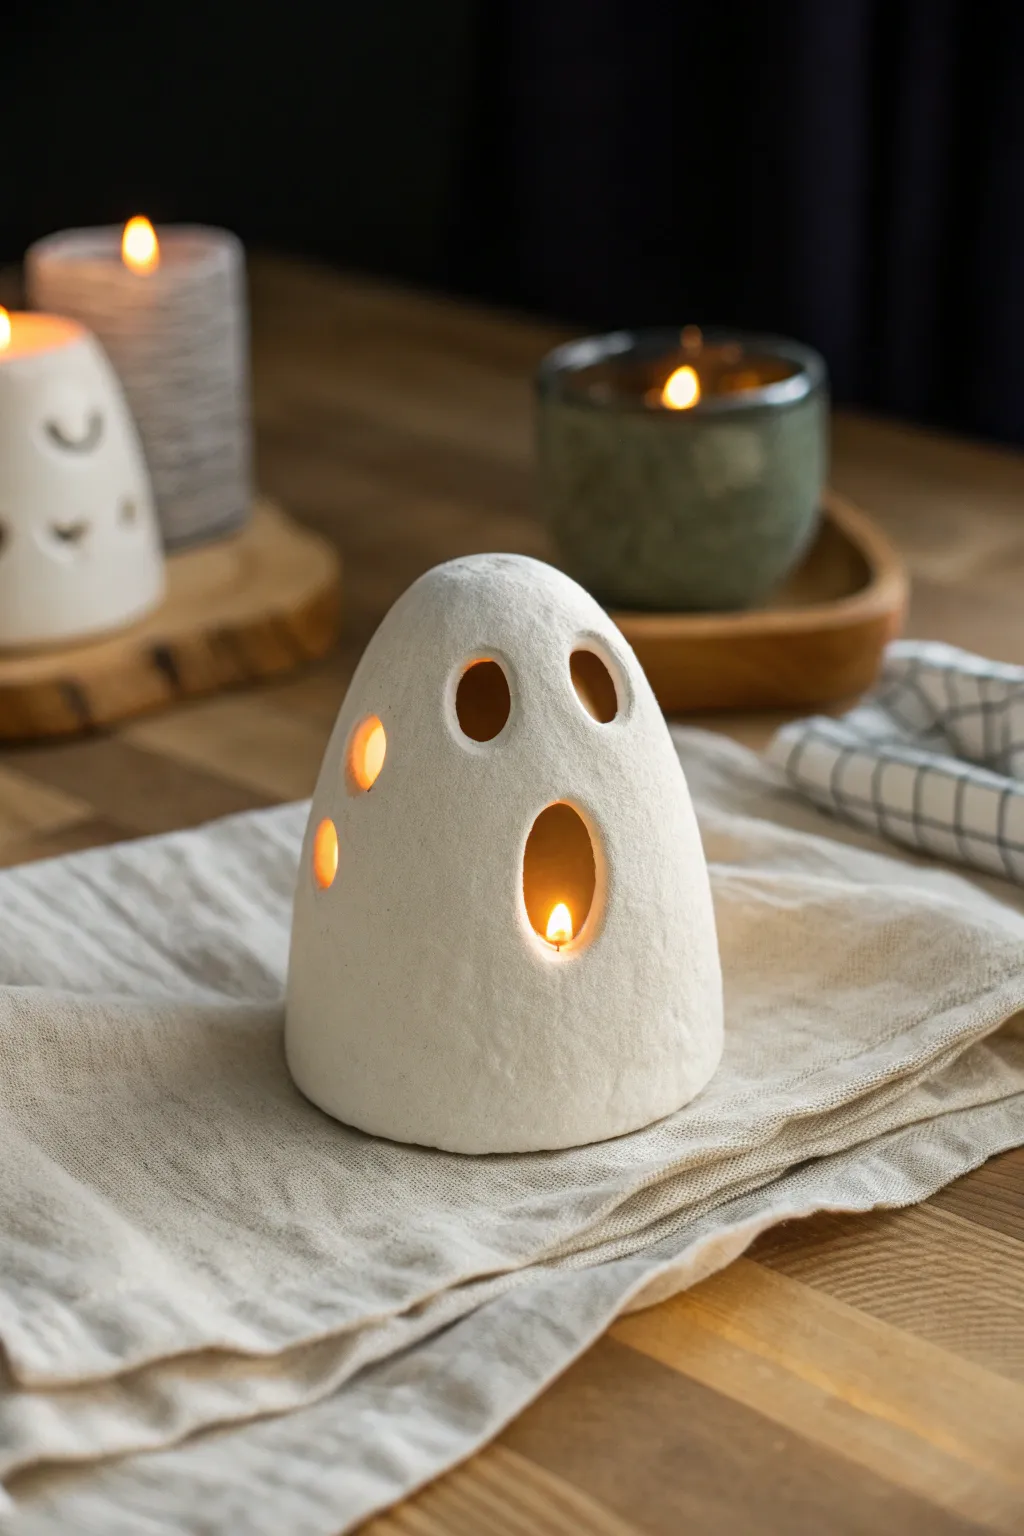
These charming, minimalist ghost luminaries bring a cozy rather than spooky vibe to your Halloween decor. Crafted from air-dry clay with a soft, matte finish, they glow warmly when placed over a tea light, creating playful shadows through their circular cutouts.
How-To Guide
Materials
- White or light stone air-dry clay
- Rolling pin
- Rolling guides or wooden slats (approx. 5mm thick)
- Small circular clay cutters or piping tips (various sizes)
- Small knife or clay scalpel
- Small bowl or cup (for shaping support)
- Sponge
- Water
- Fine-grit sandpaper (220-400 grit)
- Battery-operated tea light
Step 1: Shaping the Ghost Body
-
Prepare the clay:
Begin by kneading a generous handful of air-dry clay until it is warm and pliable. This conditioning step is crucial to prevent internal air bubbles and cracks later on. -
Roll out a slab:
Using rolling guides to ensure an even thickness, roll the clay out into a flat slab about 4-5mm thick. If you don’t have guides, try to keep the pressure consistent so one side isn’t thinner than the other. -
Create a cone blank:
Cut a semi-circle shape from your slab. The size of the semi-circle will determine the height and width of your ghost, so aim for a radius of about 5-6 inches for a standard tea light cover. -
Form the basic cone:
Gently curve the semi-circle around to join the straight edges together, forming a cone. Slip and score the edges—scratching them up and adding a little water—to create a strong bond where they overlap. -
Blend the seam:
Use your fingers or a modeling tool to smooth the seam completely on both the inside and outside. You want the join to disappear so the ghost looks like one solid piece. -
Round the top:
The cone will likely have a pointy tip currently. Gently press and mold the top with your palm to round it off into a smooth, dome-like head typical of a classic cartoon ghost.
Fixing Cracks
If small hairline cracks appear while drying, mix a tiny bit of fresh clay with water to make a paste (slip) and fill in the crack, then sand smooth once dry.
Step 2: Adding Features and Drying
-
Mark the face:
Before cutting, lightly plan out where you want the eyes and mouth to be. For the specific look in the photo, place the eyes slightly higher up and include an elongated oval mouth lower down. -
Cut the facial features:
Use your clay knife or small oval cutters to remove the clay for the eyes and mouth. Make the mouth larger and taller than the eyes to create that classic howling expression. -
Add side details:
To mimic the image, add a few smaller circular decorative holes on the left side of the ghost’s body using a small piping tip or straw. I find this creates extra light vents that look great when illuminated. -
Smooth the edges:
Dip your finger in a little water and run it around the raw edges of your cutouts. This softens the look and removes any sharp crumbs of clay. -
Refine the base:
Check the bottom rim of the ghost. If it’s uneven, trim it carefully with your knife or gently tap the ghost on the table to level it out so it sits flat. -
Sponge finish:
Wring out a sponge so it is barely damp and wipe the entire surface of the ghost. This smooths out fingerprints and gives it that uniform, matte texture seen in the photo. -
Initial dry:
Place the ghost in a safe, dry spot away from direct sunlight. To help it keep its rounded shape, you can lightly drape it over a small crumpled ball of paper or foil, but ensure air can still circulate inside. -
Turning:
After about 12 hours, turn the ghost or lift it off its support to let the inside dry. Depending on humidity, full drying can take 24 to 48 hours. -
Sanding:
Once bone dry, use fine-grit sandpaper to gently buff away any remaining uneven spots or rough edges around the eye holes.
Make it Shimmer
For a magical twist, mix a tiny amount of fine, white eco-glitter into your clay before rolling, or brush the inside with pearl acrylic paint for a soft glow.
Pop a battery-operated tea light underneath and watch your little ghost friend come to life with a warm flicker


Pumpkin Tea Light Holders
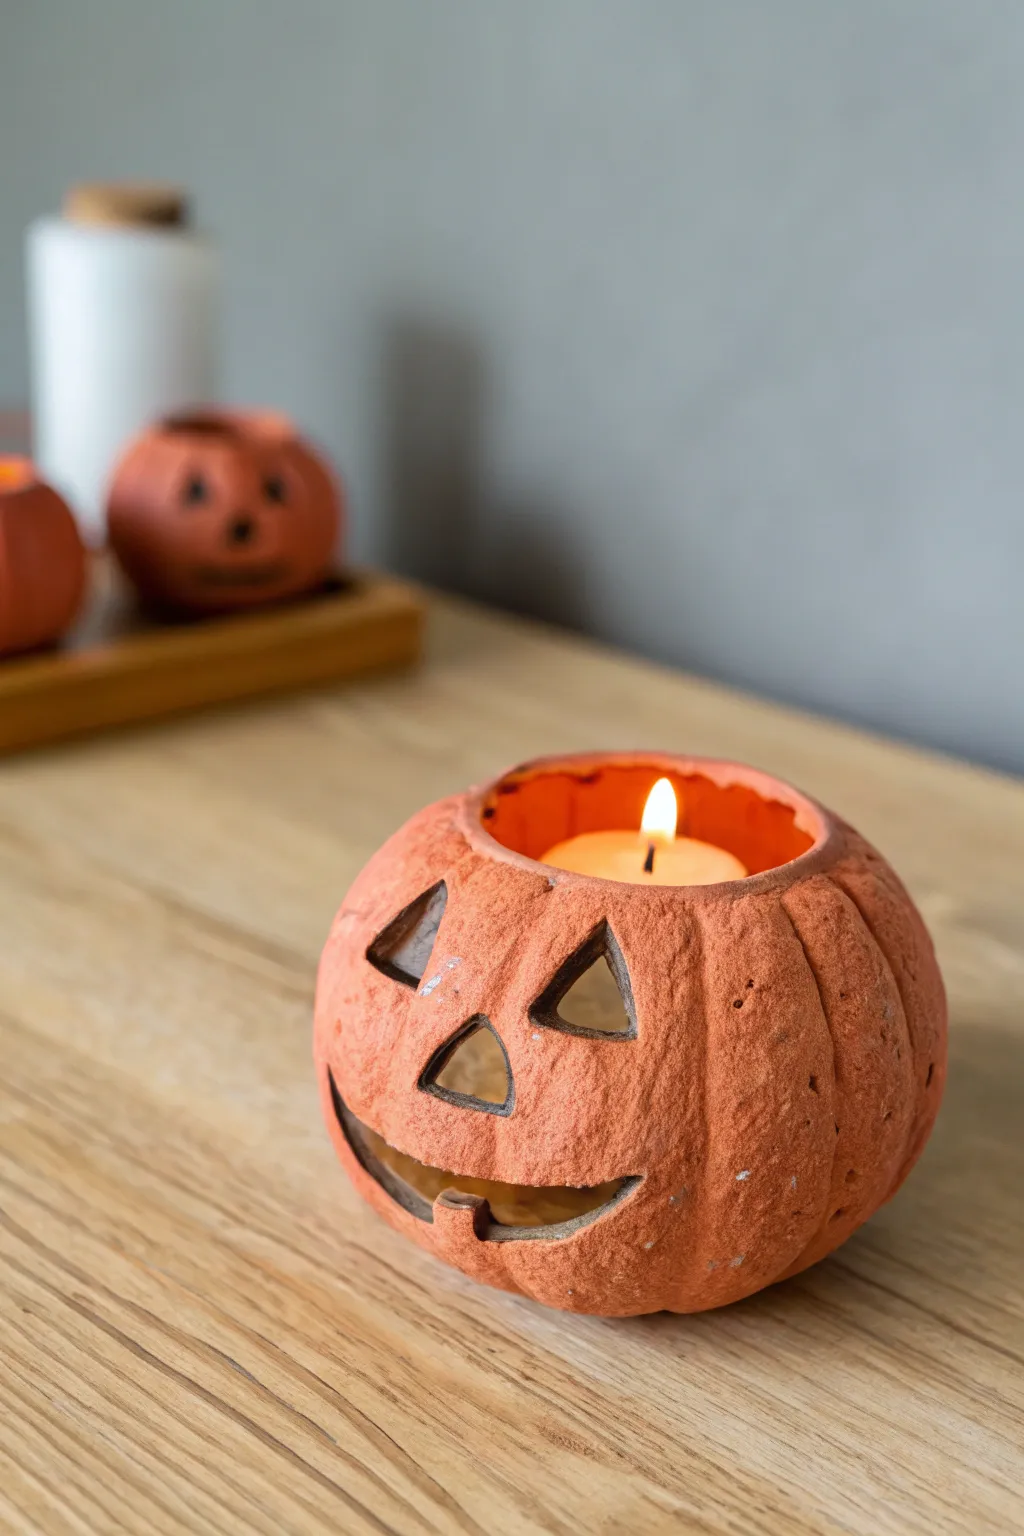
Create a rustic, textured pumpkin tea light holder that brings a cozy warmth to your Halloween decor. This air-dry clay project features a classic carved grin and a charmingly imperfect, porous finish that mimics the look of real terracotta or aged stone.
Step-by-Step Tutorial
Materials
- Terracotta-colored air-dry clay (or white clay and orange acrylic paint)
- Small rolling pin
- Modeling tools (or a butter knife)
- Small circular cookie cutter (optional)
- Tea light candle (for sizing)
- Texture sponge or toothbrush
- Small bowl of water
- Sandpaper (fine grit)
- Varnish or sealant (matte)
Step 1: Shaping the Base
-
Prepare the Clay:
Start with a ball of clay roughly the size of a tennis ball. Knead it well to ensure it is pliable and free of air bubbles. -
Form the Pumpkin:
Roll the clay into a smooth sphere between your palms. Gently press it down onto your work surface to flatten the bottom slightly so it stands stable. -
Create the Opening:
Use your thumb to press into the center of the sphere, creating a pinch-pot style opening. You want the walls to be roughly 1/4 inch thick uniformly. Widen the hole until a tea light can easily drop in with room to spare. -
Shape the Shoulders:
Gently curb the top rim inwards slightly, making the opening narrower than the widest part of the pumpkin belly. This gives it that plump, round pumpkin silhouette.
Collapsing Pumpkin?
If the clay is too soft and the pumpkin sags, crumple a small ball of aluminum foil or paper towel and place it inside the hollow center while you work on the outside texture.
Step 2: Adding Details & Texture
-
Mark Vertical Grooves:
Using the side of a modeling tool or a toothpick, press vertical lines from the top rim down to the base. I prefer to curve these lines slightly to follow the roundness of the form. -
Soften the Ridges:
Dip your finger in a little water and smooth over the distinct grooves you just made. You want them to look like natural segments of a gourd, not sharp cuts. -
Texturizing the Surface:
To achieve that pitted, stone-like texture seen in the photo, take a rough sponge or an old toothbrush and dab it firmly all over the exterior surface. Don’t smooth this out. -
Refine the Rim:
Ensure the top opening is relatively smooth but keep the edge slightly uneven to maintain the organic, rustic aesthetic.
Level Up: Spotted Effect
Mix some coffee grounds or coarse black pepper into your clay before sculpting. This creates natural speckles that mimic real stone or aged pottery once dried.
Step 3: Carving the Face
-
Outline the Face:
Lightly trace your desired Jack-o’-Lantern face onto the clay using a needle tool. Traditional triangles for eyes and a toothy grin work best for this scale. -
Cut the Eyes:
Using a small, sharp craft knife, carefully cut out the eye triangles through the clay wall. Push from the inside to pop the cut pieces out cleanly. -
Carve the Nose:
Cut a small triangle for the nose. Be gentle, as the clay structure is delicate now that holes have been introduced. -
Sculpt the Mouth:
Carefully slice along your mouth outline. If creating teeth, take your time cutting around the square shapes to avoid breaking them off. -
Clean the Edges:
Dip a small brush or your finger in water and smooth the raw cut edges of the eyes, nose, and mouth so they aren’t sharp or ragged.
Step 4: Finishing Up
-
Drying:
Set the pumpkin aside in a cool, dry place. Let it air dry for at least 24-48 hours. Turn it occasionally to ensure even drying. -
Sanding:
Once fully dry and hard, use fine-grit sandpaper to gently remove any unwanted burrs, but be careful not to sand away your sponge texture. -
Painting (Optional):
If you used white clay, mix orange and a touch of brown acrylic paint to get a terracotta shade. Sponge the paint on rather than brushing for better texture. -
Sealing:
Apply a coat of matte varnish or sealant to protect the clay. -
Final Check:
Place an LED tea light inside to test the glow through the carved features.
Enjoy the gentle flicker of light shining through your handmade pumpkin’s grin


Candy Corn Charms and Ornaments
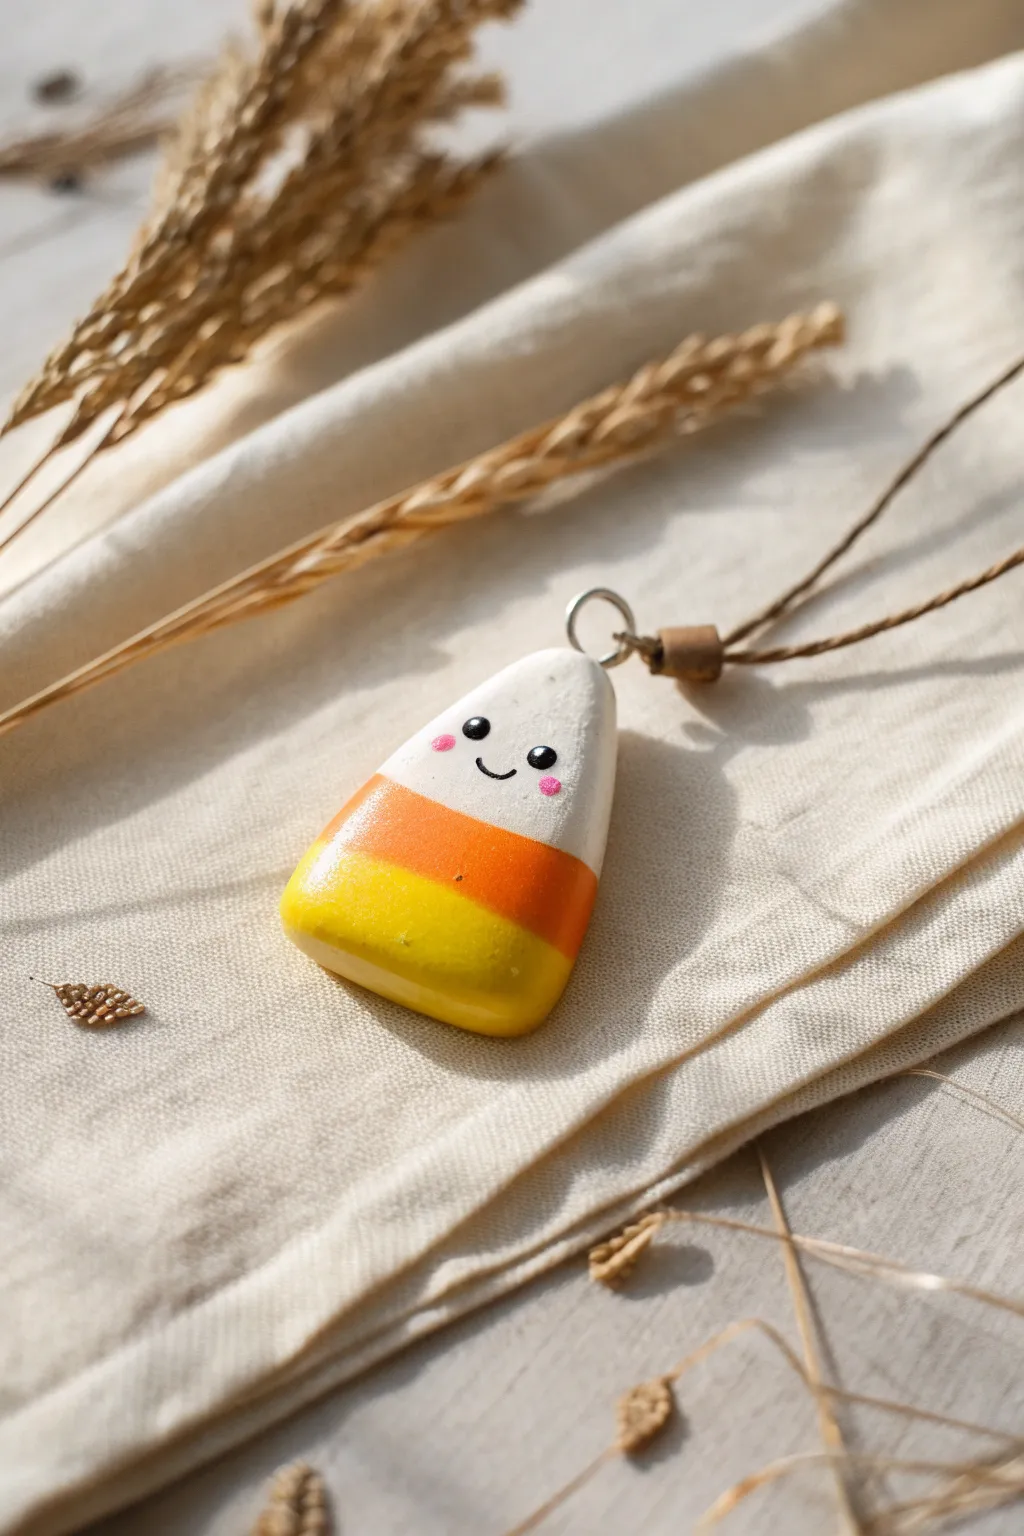
This adorable candy corn charm features the classic tri-color layers and a sweet little face that adds personality to any Halloween jewelry. The smooth, triangle shape is beginner-friendly and perfect for turning into necklaces or festive ornaments.
Step-by-Step Guide
Materials
- Air dry clay (white)
- Acrylic paints (primary yellow, orange, black, pink)
- Small rolling pin
- Clay knife or craft blade
- Fine grit sandpaper
- Fine detail paintbrush (size 0 or 00)
- Medium flat paintbrush
- Dotting tool or toothpick
- Eye pin or screw eye hook
- Glossy varnish or sealant (Mod Podge or resin)
- Brown cord for hanging
- Water cup
Step 1: Shaping the Candy
-
Condition the clay:
Start with a walnut-sized ball of air dry clay. Knead it in your hands until it is smooth, pliable, and free of cracks. -
Roll the slab:
Using your rolling pin, flatten the clay ball on a smooth surface until it is about 1/4 inch thick. Try to keep the thickness even across the slab. -
Cut the triangle:
Use your craft knife to cut out a rounded triangle shape. The base should be slightly wider than the top, imitating a classic candy corn kernel. -
Soften the edges:
Take a little water on your fingertip and gently rub around the sharp cut edges to round them off. The charm should look soft and puffy, like a real candy. -
Insert hardware:
While the clay is still wet, carefully push a metal eye pin or screw eye into the center of the top (narrow end) of the triangle. Ensure it goes in straight. -
Dry completely:
Set the charm aside to dry for 24-48 hours. I find turning it over halfway through helps both sides dry evenly.
Straight Lines Made Easy
Struggle with messy paint lines? Use thin strips of washi tape or painter’s tape to mask off sections of the dry clay. Paint, let it dry slightly, and peel for a crisp edge.
Step 2: Painting the Layers
-
Sand imperfections:
Once fully dry, check for any rough spots. Gently buff the surface with fine-grit sandpaper until it feels perfectly smooth to the touch. -
Base coat (optional):
If your clay isn’t bright white, apply a thin coat of white acrylic paint over the entire piece to make the subsequent colors pop. -
Paint the tip:
Leave the top third of the triangle white. If you did a base coat, you are already done with this step; otherwise, paint the top section white. -
Paint the middle:
Using the flat brush, paint the middle section a vibrant orange. Try to keep the line between the white and orange as straight as possible. -
Paint the base:
Fill in the bottom third of the triangle with bright yellow paint. Let the paint dry completely before moving to the details.
Loose Eye Pin?
If your eye pin feels loose after the clay dries, pull it out gently, add a drop of super glue to the stem, and slide it back into the hole for a permanent hold.
Step 3: Detailing and Finishing
-
Draw the eyes:
Use a dotting tool or the back of a paintbrush dipped in black paint to create two small, round eyes in the upper white section. -
Add the smile:
With your finest detail brush and black paint, carefully paint a tiny, curved ‘U’ shape between the eyes for a smile. -
Add cheeks:
Dip a toothpick or small dotting tool into pink paint and dab two tiny spots on the outer corners of the smile for rosy cheeks. -
Highlight the eyes:
Once the black eye paint is dry, add a tiny white dot to the upper right corner of each pupil to give it that sparkling, kawaii look. -
Varnish:
Apply a thick coat of glossy varnish over the entire front and back. This protects the paint and gives it that hard candy shine. -
Attach the cord:
Once the varnish is cured, thread a brown cord through the eye pin loop and tie it off to finish your necklace or ornament.
Wear your sweet new charm confidently or hang it up to spread some spooky cheer

The Complete Guide to Pottery Troubleshooting
Uncover the most common ceramic mistakes—from cracking clay to failed glazes—and learn how to fix them fast.
Witch Hat Mini Toppers
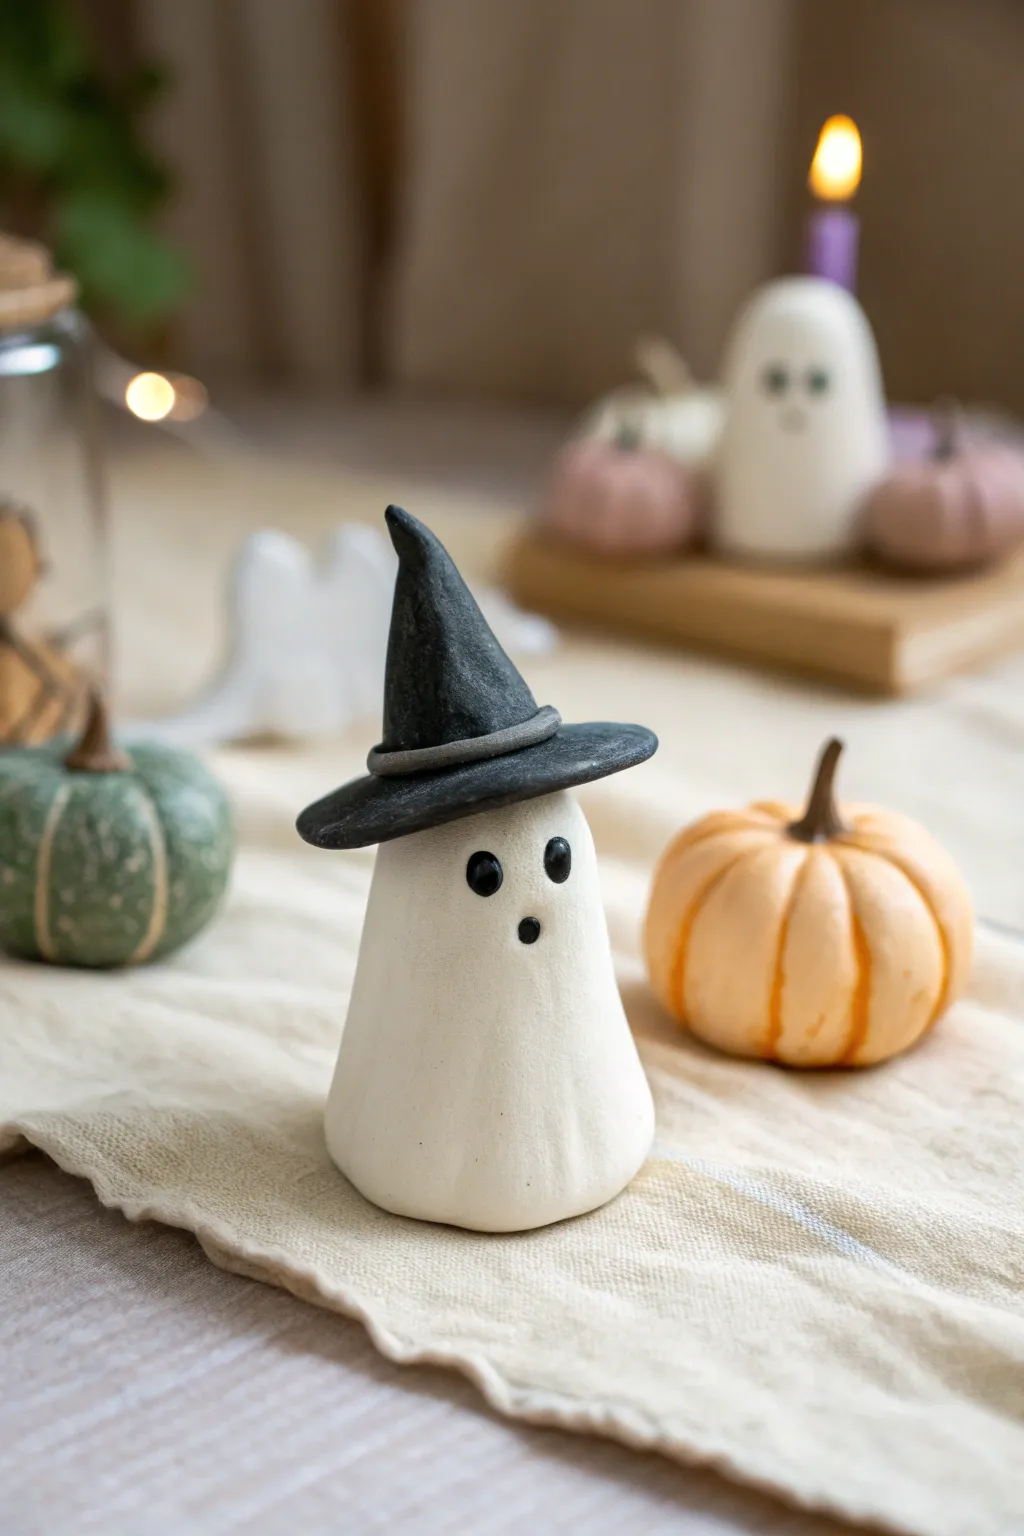
This adorable miniature ghost, complete with a jaunty black witch hat, makes for a charmingly spooky addition to any Halloween display. With its simple form and expressive face, this air-dry clay project is perfect for beginners looking to add a touch of handcrafted magic to their seasonal decor.
Detailed Instructions
Materials
- White creative paperclay or other smooth air-dry clay
- Black acrylic paint
- Small paintbrush (round tip for details)
- Small cup of water
- Rolling pin
- Mod Podge or matte varnish
- Clay sculpting tool or toothpick
- Smooth work surface
Step 1: Forming the Ghost Base
-
Condition the clay:
Begin by taking a chunk of white air-dry clay about the size of a golf ball. Knead it in your hands until it feels warm, pliable, and free of cracks. -
Create the rough shape:
Roll your conditioned clay into a smooth ball between your palms, then gently elongate it into a thick, rounded cylinder. -
Define the body:
Set the cylinder on your work surface. Gently press down on the base to flatten it so the ghost stands upright independently. -
Shape the drape:
Using your thumb and forefinger, softly pinch and pull the bottom edges of the cylinder outward to create a flowing, skirt-like shape resembling a sheet. -
Smooth the surface:
Dip your finger in a tiny bit of water and rub it over the clay to smooth out any fingerprints or join lines. The surface should look porcelain-smooth.
Cracks Appearing?
If small cracks appear while drying, mix a tiny bit of fresh clay with water to make a paste. Fill the cracks, smooth with a finger, and let dry again.
Step 2: Crafting the Witch Hat
-
Shape the brim:
Take a smaller piece of fresh clay and flatten it into a thin disk about the size of a large coin. You can use your rolling pin here for an even thickness. -
Form the cone:
Roll a small cone shape separately for the top of the hat. I find it helpful to twist the tip slightly to give the hat character and movement. -
Assemble the hat:
Score (scratch) the bottom of the cone and the center of the brim. Add a drop of water or liquid clay slip to join them securely together. -
Add the hat band:
Roll a very thin snake of clay and wrap it around the base of the cone where it meets the brim. This hides the seam and adds detail. -
Attach to the ghost:
Place the hat onto the ghost’s head. You can either gently press it on to fuse the clay or let both pieces dry separately and glue them later for a cleaner paint job.
Step 3: Adding Personality
-
Create the face:
While the clay is still soft, use a small dotting tool or the back of a paintbrush to gently indent where the eyes and mouth will go. -
Dry completely:
Let your sculpture sit in a dry, room-temperature area for 24-48 hours. Turn it occasionally to ensure the bottom dries evenly. -
Paint the hat:
Paint the entire hat structure with matte black acrylic paint. You may need two thin coats for full coverage. -
Paint the band:
Mix a tiny amount of white into your black paint to create a dark grey. Carefully paint the hat band to make it stand out against the black cone. -
Detail the face:
Using your finest brush, fill in the indented eyes and mouth with solid black paint. The slight indentation helps keep the paint circle neat. -
Seal the piece:
Once all paint is dry, apply a coat of matte varnish or Mod Podge to protect the clay and give it a finished, professional look.
Add a Glow
Before drying, use a straw to poke a hole in the bottom. Once dry, place the ghost over a battery-operated tea light for a glowing decoration.
Your spooky little friend is now ready to haunt your table setting or mantle
Bat Silhouette Hanging Decor
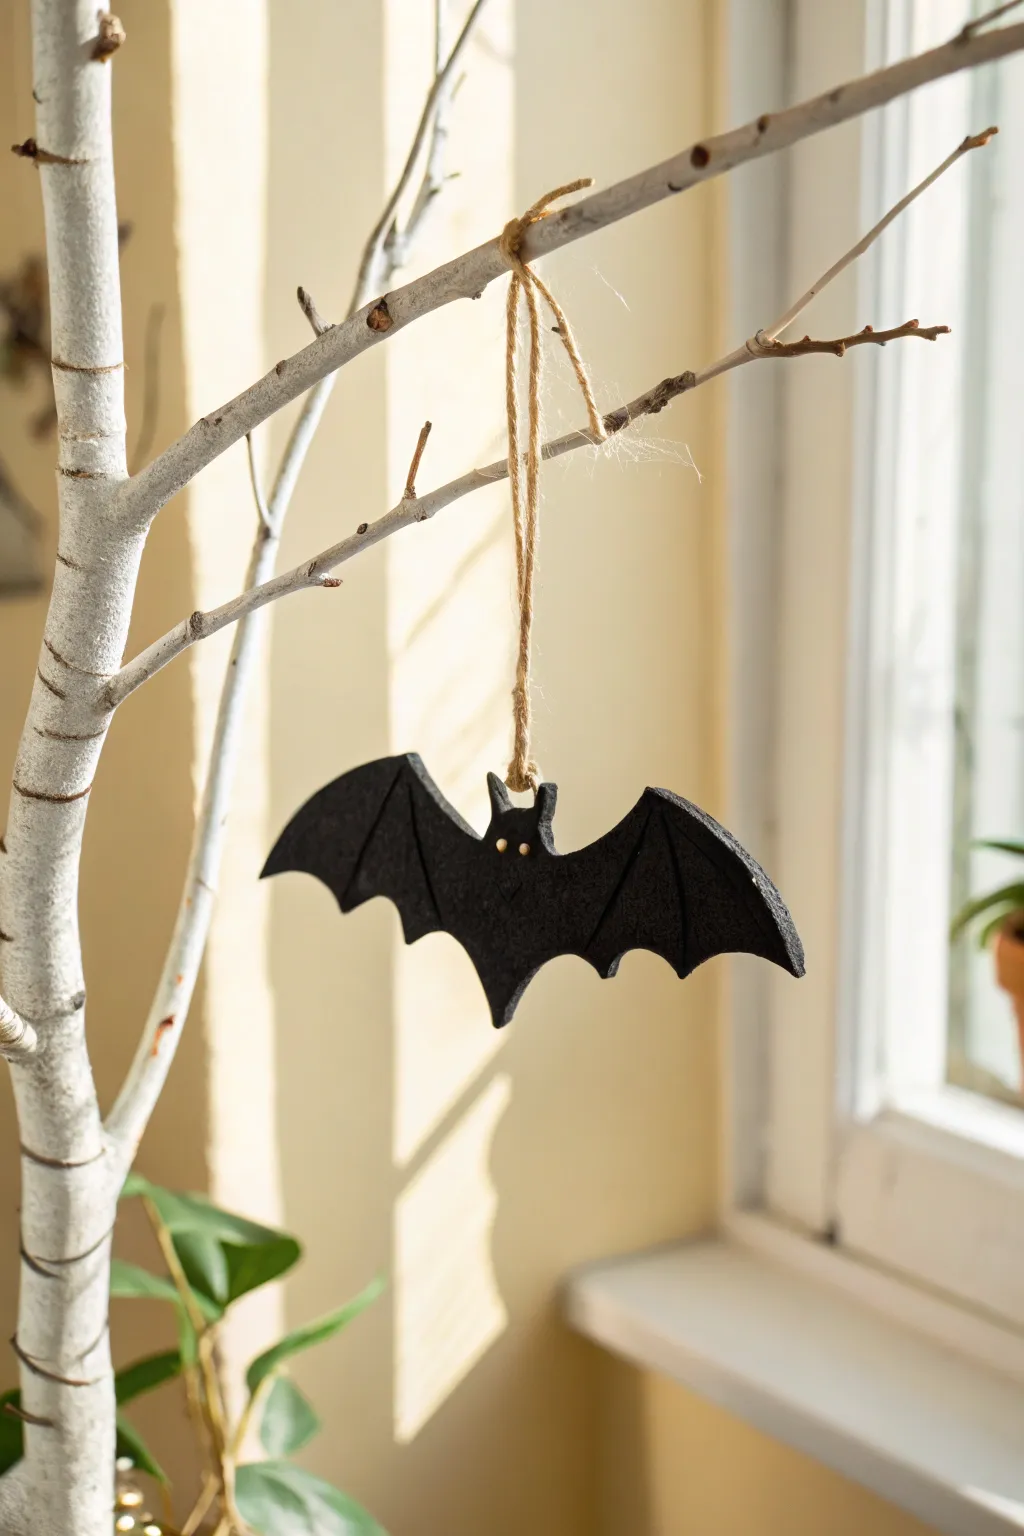
Embrace the eerie beauty of Halloween with this minimalist hanging bat ornament, featuring a rich, textured matte black finish. This simple silhouette adds a ghostly elegance to any autumn branch display or window corner.
Step-by-Step
Materials
- Black air-dry clay (or white clay + black acrylic paint)
- Small rolling pin
- Bat silhouette template (paper or cardstock)
- Craft knife or clay cutting tool
- Modeling tool or toothpick
- Small straw or skewer
- Sandpaper (fine grit)
- Matte black acrylic paint (if not using colored clay)
- Gold or yellow paint pen/fine brush (for eyes)
- Jute twine
- Scissors
Step 1: Shaping the Bat
-
Prepare the workspace:
Lay down a piece of parchment paper or a silicone mat to prevent the clay from sticking to your table. Have a small cup of water nearby to smooth out any cracks. -
Prep the clay:
Take a handful of air-dry clay and knead it in your hands until it becomes soft and pliable. If the clay feels dry, I like to dip my finger in water and work it in. -
Roll it out:
Use your rolling pin to flatten the clay to an even thickness of about 1/4 inch. Try to keep the surface relatively smooth, though a little texture adds character. -
Position the template:
Place your paper bat template gently onto the rolled clay. Lightly trace around the outline with a toothpick if you want a guide before cutting. -
Cut the silhouette:
Using a craft knife, carefully cut through the clay following the bat shape. Work the blade straight down rather than dragging it to keep the edges clean. -
Refine the edges:
Dip your finger or a smoothing tool in a tiny bit of water and run it along the cut edges to soften any sharpness or stray clay bits. -
Add wing details:
Using a modeling tool or the dull side of a knife, gently press indentations into the wings to simulate the bone structure of a bat’s wing. Don’t cut all the way through; just create depressed lines. -
Create the hanging hole:
Using a small straw or skewer, punch a hole directly in the center of the bat’s head or slightly lower between the ears. Ensure the hole is clean on both sides.
Sticky Situation?
If your clay shape keeps warping as you lift it, let it sit on the parchment for 15 minutes to firm up slightly before moving it to the drying area.
Step 2: Finishing Touches
-
Drying time:
Move the bat (still on the parchment paper) to a safe spot. Allow it to air dry for at least 24-48 hours. Flip it over halfway through the process to ensure even drying and prevent curling. -
Sanding:
Once fully hardened, use fine-grit sandpaper to gently smooth out any rough spots on the edges or surface. -
Painting base coat:
If you used white clay, paint the entire bat (front, back, and sides) with matte black acrylic paint. You may need two coats for full opacity. -
Texture enhancement:
To get the stone-like texture seen in the photo, dab a sponge with black paint lightly over the surface rather than brushing it. This creates a stippled, matte effect. -
Adding the eyes:
Using a fine-tip paintbrush or a paint pen, add two tiny dots of gold or yellow for the eyes. This small detail brings the silhouette to life. -
Attach the twine:
Cut a length of jute twine. Fold it in half to create a loop, thread the folded end through the hole in the bat, and pull the tails through the loop to secure it with a lark’s head knot. -
Tie the top:
Tie the two loose ends of the twine together at the top to create a hanger for your branch or hook.
Add Some Sparkle
Before the black paint dries completely, sprinkle a tiny pinch of black or fine silver glitter on the wings for a subtle, magical shimmer.
Hang your new winged friend on a decorative branch and enjoy the shadowy vibes


What Really Happens Inside the Kiln
Learn how time and temperature work together inside the kiln to transform clay into durable ceramic.
Cute Spider Trinket Dishes
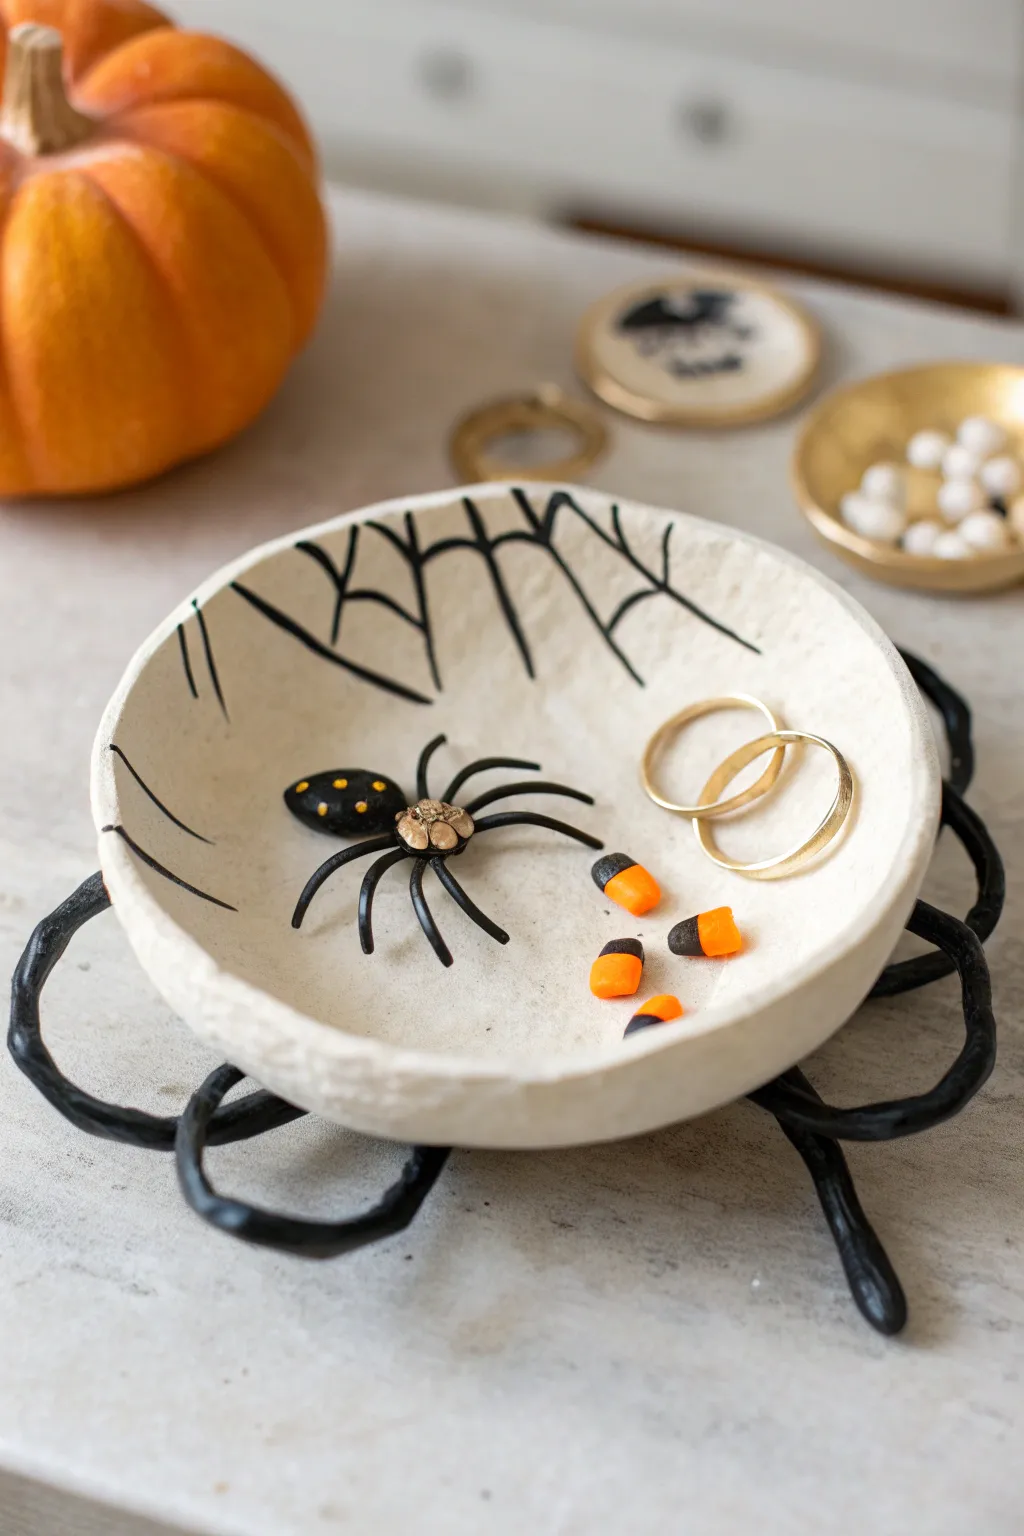
This whimsical catch-all dish features a handmade spider web design resting on quirky, spindly legs for a perfect Halloween touch. It combines a simple white clay bowl with a contrasting black base, making it ideal for holding jewelry, candy corn, or tiny festive trinkets.
Detailed Instructions
Materials
- Air dry clay (white)
- Rolling pin
- Small bowl (for use as a mold)
- Craft knife or clay tools
- Sandpaper (fine grit)
- Black acrylic paint
- Fine-point paintbrush
- Strong craft glue or epoxy
- Clear matte sealant or varnish
- Wire (optional, for leg armature)
Step 1: Shaping the Bowl
-
Roll the clay:
Start by conditioning a ball of white air dry clay until it’s pliable. Use your rolling pin to flatten it into an even sheet, aiming for about 1/4 inch thickness so the dish feels substantial but not heavy. -
Cut the circle:
Place your bowl mold upside down on the clay sheet and trace around it with a craft knife to get a perfect circle. You can gently smooth the cut edges with a damp finger to remove any sharpness. -
Form the curve:
Lift the clay circle and gently drape it *inside* your bowl mold. Press it lightly against the sides to verify it takes the shape, but don’t squish it too hard or it will stick. Let this sit until it’s leather-hard. -
Create the rough texture:
I like to gently dab the surface with a crumpled piece of aluminum foil or a stiff brush while the clay is still slightly damp. This gives the bowl that organic, hand-formed stone look seen in the photo.
Fragile Legs?
If your clay rope legs keep breaking, try wrapping the clay around a core of florist wire or aluminum foil. This acts as an armature, providing internal strength while you shape the loops.
Step 2: Sculpting the Spider Legs
-
Roll clay snakes:
While the bowl dries, roll out several long, thin ropes (snakes) of clay. You will need roughly 3-4 long pieces to form the looping leg base. -
Form the loops:
Bend the ropes into irregular, organic loops. Imagine them as spindly spider legs sprawling out. Connect the loops in the center where they will eventually support the bowl, creating a flat central platform. -
Dry properly:
Allow the leg structure to dry completely on a flat surface. Because these pieces are thin, turning them over halfway through the drying process helps prevent warping. -
Sand and smooth:
Once both the bowl and leg stand are bone dry, use fine-grit sandpaper to smooth out any unintentional bumps, primarily focusing on the rim of the bowl and the bottom of the legs.
Pro Tip: Release Agent
To prevent your clay bowl from sticking to the mold, place a layer of plastic wrap inside the bowl before pressing the clay in, or lightly dust the mold with cornstarch.
Step 3: Assembly and Decoration
-
Attach the base:
Use a strong craft glue or two-part epoxy to adhere the bottom of the white bowl to the center of your leg structure. Hold it in place firmly or use painters tape to secure it while the glue cures. -
Paint the legs:
Using black acrylic paint, carefully paint the entire leg structure. A smaller brush helps you get into the tight nooks where the clay loops connect without accidentally smudging black paint onto the white bowl. -
Draw the web:
Dip a fine-point brush into the black paint (slightly thinned with water helps flow). Paint simple, jagged lines extending from the rim down into the bowl to represent spider silk. -
Add cross-lines:
Connect your vertical web lines with curved horizontal strokes. Don’t worry about perfect symmetry; the slightly shaky, uneven lines add to the spooky aesthetic. -
Seal the piece:
Finish by applying a coat of clear matte varnish over the entire project. This protects the clay from moisture and gives the painted legs a finished, professional look.
Once fully dry, your spooky dish is ready to hold all your favorite haunting accessories
Black Cat Halloween Figurines
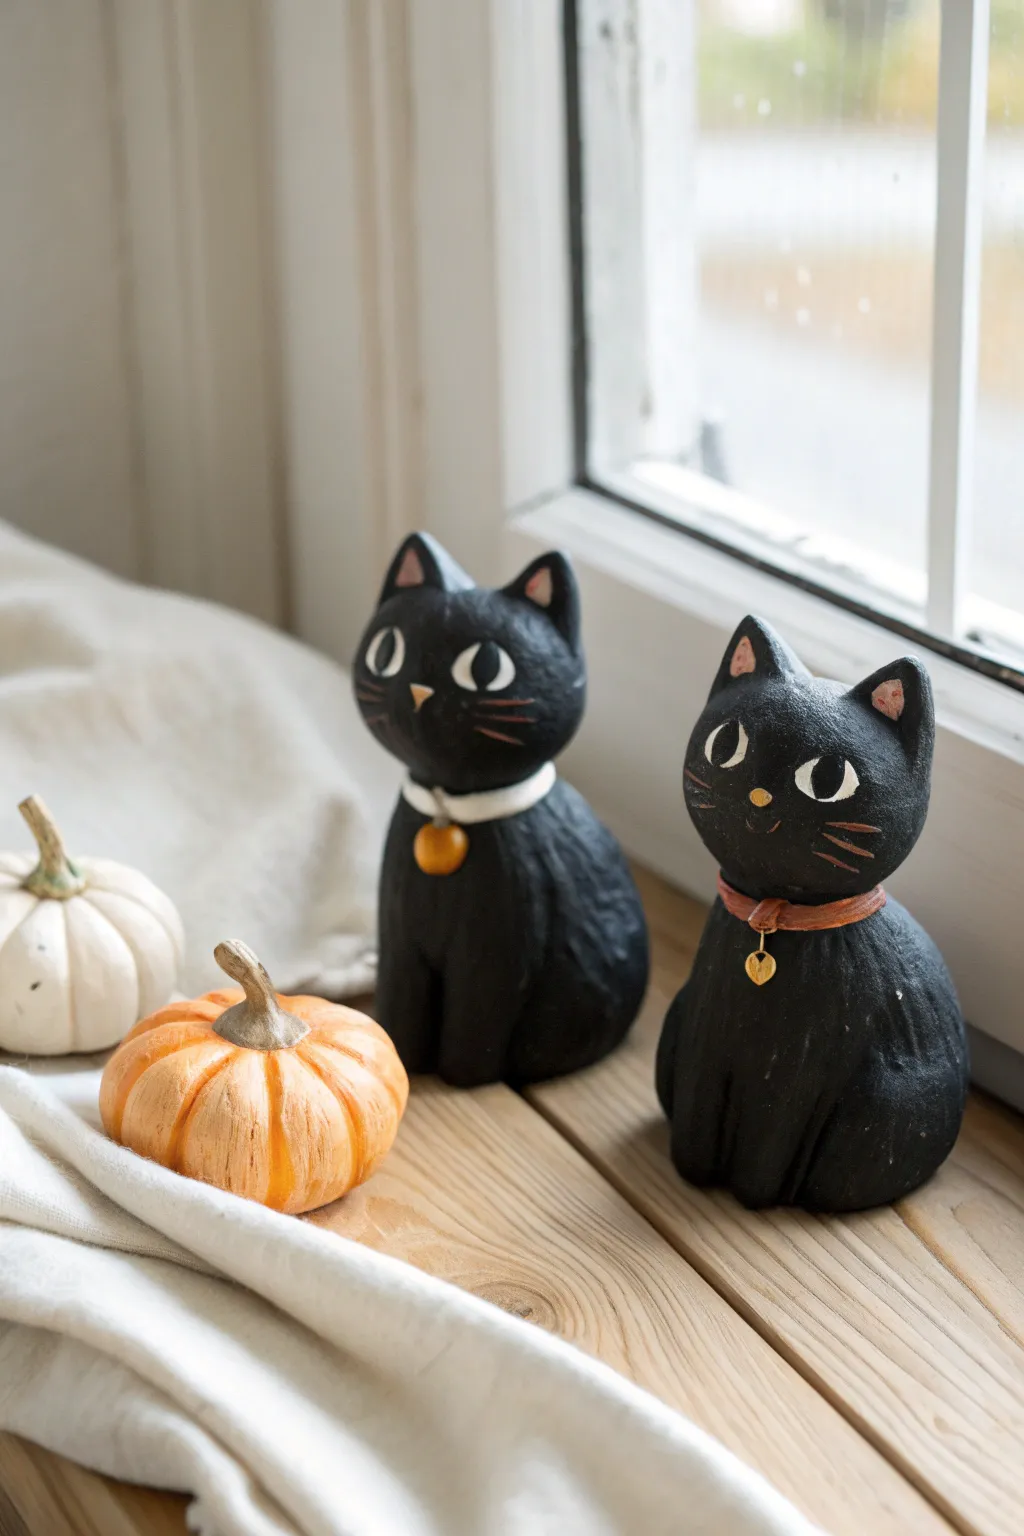
These charming black cat figurines, with their bright yellow eyes and festive collars, are the perfect blend of spooky and sweet for your Halloween decor. Sculpted from simple air dry clay, their rounded forms and expressive faces make them a delightful beginner-friendly sculpting project.
How-To Guide
Materials
- Air dry clay (white or terracotta)
- Acrylic paints (black, white, gold/yellow, copper/orange, pink)
- Sculpting tools (needle tool, small ball tool)
- Small paintbrushes (flat shader and fine detail liner)
- Water cup
- Aluminum foil (for armature core)
- Varnish or sealant (matte or satin)
- Sandpaper (fine grit)
Step 1: Sculpting the Base Forms
-
Create the foil core:
To save clay and reduce drying time, crumple a small piece of aluminum foil into a rough egg shape for the cat’s body. It should be slightly smaller than the final size you want. -
Cover the body:
Roll out a sheet of air dry clay and wrap it completely around the foil egg. Smooth the seams with a little water on your finger until you have a seamless, rounded teardrop shape. -
Form the head:
Roll a separate sphere of clay for the head. It should be proportional to the body but slightly oversized for that cute, illustrative look. Flatten the bottom slightly where it will join the body. -
Attach head to body:
Score the top of the body and the bottom of the head with a needle tool (cross-hatching). Add a dab of water or clay slip, press them together firmly, and blend the clay at the neck seam for a strong bond.
Cracks happen!
If small cracks appear as the clay dries, mix a tiny amount of fresh clay with water to make a paste (slip) and fill them in before painting.
Step 2: Adding Details
-
Shape the ears:
Form two small triangles of clay. Gently curve them forward and attach them to the top of the head. Use a small tool to blend the base of the ears seamlessly into the skull. -
Sculpt the front legs:
Roll two small sausage shapes for the front legs. Attach them vertically to the front of the body, merging the top of the leg into the chest to make them look integrated. -
Define the paws:
Use a needle tool or knife to press shallow vertical lines into the bottom of the front legs to create individual toes. -
Add the tail:
Roll a tapered coils of clay. Wrap it around the side or back of the curved body, blending it smoothly so it doesn’t look like it was just stuck on. -
Create collar details:
Roll a very thin snake of clay. Wrap it around the neck to form a collar. Create a tiny ball or flattened disc to hang from it as a bell or tag. -
Facial features:
For the nose, attach a minuscule triangle of clay. I find it helpful just to press this gently into place without too much water. Add a tiny muzzle curve if desired. -
Texture and dry:
Use a stiff bristle brush to tap gently over the surface if you want a fur-like texture, or leave it smooth. Let the figurines dry completely for 24-48 hours.
Step 3: Painting and Finishing
-
Sand imperfections:
Once fully dry, lightly sand any rough fingerprints or bumps with fine-grit sandpaper. Wipe away the dust with a slightly damp cloth. -
Base coat:
Paint the entire sculpture with black acrylic paint. You may need two thin coats to get solid, opaque coverage. -
Paint the eyes:
Use a fine detail brush to paint two large white ovals for the eyes. Let this dry completely before adding the pupils. -
Pupils and nose:
Paint vertical black slits inside the white eye ovals. Paint a tiny pink triangle for the nose. -
Color the collar:
Paint the collar band in copper, rust, or white (as seen in the photo). Paint the bell or tag in bright gold yellow. -
Whiskers and highlights:
Using a very steady hand or a paint pen, draw fine copper or brown lines for whiskers. Add tiny dots of light pink inside the ears. -
Seal the work:
Finish with a coat of matte or satin varnish to protect the paint and give the clay a professional sheen.
Make it spooky
Make a matching pumpkin companion! Use a ball of clay, press vertical lines for ribs, and twist a small stem on top to create a mini jack-o’-lantern.
Place your new feline friends on a windowsill to guard your home this Halloween season

TRACK YOUR CERAMIC JOURNEY
Capture glaze tests, firing details, and creative progress—all in one simple printable. Make your projects easier to repeat and improve.
Friendly Skeleton Mini Figures

This charming, smiling skeleton figure brings a friendly rather than spooky vibe to your Halloween decor. Modeled from air dry clay and painted with a warm, folk-art inspired palette, this little character sits perfectly on a shelf or book stack.
Detailed Instructions
Materials
- White air dry clay
- Rolling pin
- Clay sculpting tools (needle tool, smoother)
- Water in a small cup
- Aluminum foil (for armature)
- Acrylic paints (bone white, terracotta orange, sage green, black)
- Small fine-tipped paintbrushes
- Medium flat paintbrush
- Matte finish clear sealant or varnish
Step 1: Sculpting the Base Form
-
Create the core:
Crumple a small piece of aluminum foil into a ball about the size of a walnut for the head, followed by a slightly larger, elongated oval for the torso. This foil core keeps the figure lightweight and helps the clay dry evenly. -
Cover the head:
Roll out a sheet of clay to about 1/4 inch thickness. Wrap the foil head completely, smoothing the seams with a little water on your finger until perfectly round. -
Form the body:
Cover the foil torso with clay similarly to the head. Gently flatten the bottom so it can sit securely without wobbling. -
Connect the parts:
Score the bottom of the head and the top of the body with a needle tool. Add a dab of water or slip (clay mixed with water) and press them firmly together, blending the clay at the neck slightly for strength. -
Shape the limbs:
Roll four sausages of clay for the arms and legs. I like to make the legs slightly thicker at the bottom to suggest feet. -
Attach the limbs:
Score and slip the attachment points. Press the legs onto the front of the body in a seated v-shape. Attach the arms to the shoulders, gently curving them so the hands rest near the hips or lap. -
Smooth everything out:
Use a damp sponge or your finger to smooth out any fingerprints or cracks. Let the figure dry completely for at least 24-48 hours until it’s hard and white.
Step 2: Painting the Details
-
Base coat:
Paint the head and hands with a warm, bone-white or cream color. Paint the torso and arms (the ‘shirt’ area) with terracotta orange, and the legs with a soft sage green. -
Initial drying:
Let this base layer dry completely before moving on to the finer details to prevent colors from muddying. -
Draw the ribcage:
Using a fine liner brush and bone-white paint, block out a simple vertical sternum line down the orange chest, followed by horizontal ribs. -
Paint leg bones:
Paint a simple bone shape on each green leg using the same white paint to mimic the femurs. -
Facial features:
With black paint and a steady hand, paint two large oval eyes and an upside-down heart for the nose. Paint a wide, straight mouth line with vertical hatch marks for teeth. -
Outline the bones:
Once the white bone details are dry, use a very thin brush and black paint to outline the ribs and leg bones to make them pop against the colored background. -
Add folk art details:
Paint a small, simple flower or starburst on the forehead using orange and black for a decorative touch. -
Weathering:
For a vintage look, create a very watery wash of brown paint. Quickly brush it over the dried figure and immediately wipe most of it off with a paper towel, leaving pigment only in the crevices. -
Seal the piece:
Protect your work with a coat of matte varnish to eliminate any tackiness and preserve the paint job for years to come.
Cracks happen
If you see cracks forming as the clay dries, don’t panic. Mix a small amount of fresh clay with water to make a paste and fill the cracks, then smooth over.
Make it a set
Sculpt two smaller skeletons with slight variations in arm placement or leg crossing to create a little family set for your mantle display.
This little skeleton is now ready to bring some folk-art charm to your Halloween setup
Monster Face Wall Tokens
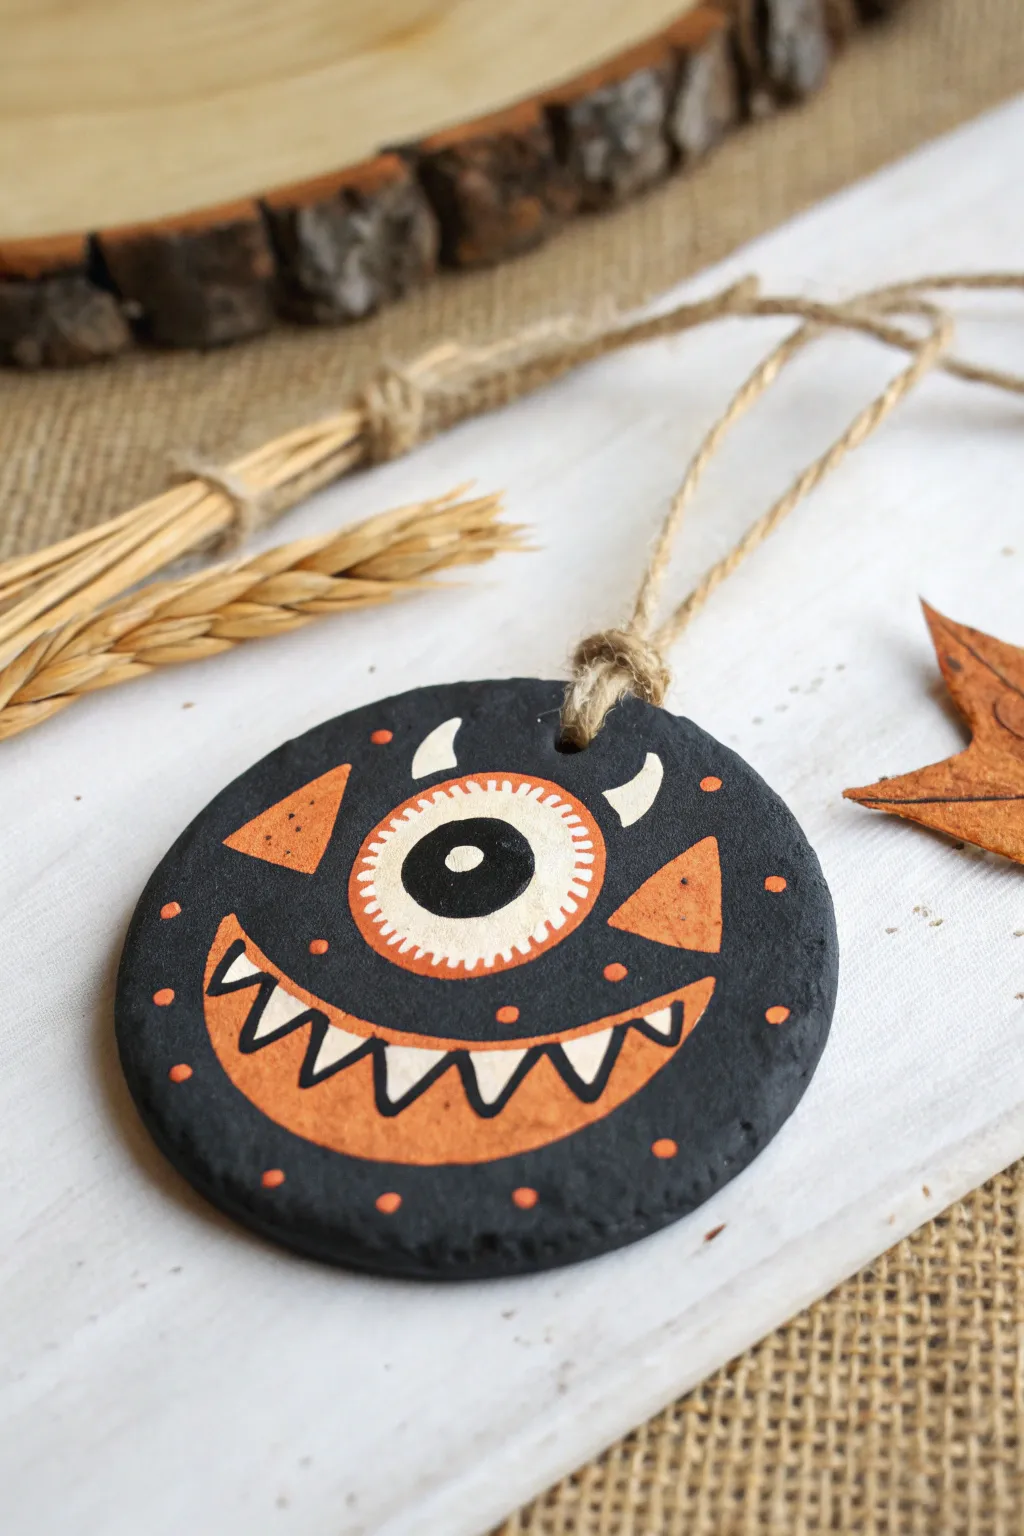
These quirky monster face tokens bring a rustic, folk-art vibe to your Halloween decor with their textured black base and striking orange details. This simple one-eyed cyclops design is perfect for beginners, combining basic clay shaping with bold, graphic painting.
Step-by-Step Guide
Materials
- Air dry clay (white or terracotta)
- Circle cookie cutter (approx. 3-4 inches) or a round glass
- Rolling pin
- Black acrylic paint (matte finish)
- Orange acrylic paint
- White acrylic paint
- Fine detail paintbrush (size 0 or 00)
- Small flat paintbrush
- Stylus tool, toothpick, or skewer
- Jute twine
- Sandpaper (fine grit)
- Matte varnish or sealant (optional)
Step 1: Shaping the Base
-
Roll out the clay:
Begin by taking a handful of air dry clay and kneading it until soft and pliable. Roll it out on a smooth surface to an even thickness of about 1/4 inch. If the clay sticks, you can put down a piece of parchment paper first. -
Cut the circle:
Using your circle cutter or the rim of a glass, press firmly into the clay to create a clean round shape. Gently peel away the excess clay from the outside edges. -
Smooth the edges:
Dip your finger in a little water and run it along the cut edge of the circle to smooth out any roughness or sharpness left by the cutter. This gives the token a more finished, intentional look. -
Punch the hanging hole:
Use a straw or the blunt end of a skewer to poke a hole near the top edge of the circle. Make sure the hole is big enough for your twine to pass through, and wiggle the tool slightly to ensure the opening is clean. -
Let it dry completely:
Place your clay circle on a wire rack or a flat, dry surface. Allow it to air dry for 24-48 hours, flipping it over halfway through the process to ensure both sides dry evenly and to prevent warping.
Uneven drying?
If your clay circle curls up at the edges while drying, gently weigh it down with a heavy book (place parchment paper between them) once it is partially dry but still slightly flexible.
Step 2: Base Painting
-
Sand imperfections:
Once the clay is bone dry, lightly sand any rough spots on the surface or edges with fine-grit sandpaper. Wipe away the dust with a barely damp cloth. -
Apply the black base coat:
Using a flat paintbrush, cover the entire front surface and sides of the token with matte black acrylic paint. I find that two thin coats usually provide better coverage than one thick, gloopy coat. -
Dry between coats:
Allow the first coat of black paint to dry for about 15-20 minutes before applying the second. If you plan to hang this where the back is visible, paint the reverse side black as well.
Glow in the dark
Swap the standard white paint for glow-in-the-dark acrylics for the eye and teeth. It looks normal during the day but reveals a spooky, glowing grin when the lights go out.
Step 3: Detailing the Monster
-
Draft the eye:
With the black base fully dry, visualize the center of the token. Using a fine brush and white paint, create a large circle for the eyeball. It doesn’t need to be perfectly round; a slightly organic shape adds character. -
Add the iris ring:
While the white is drying, switch to orange paint. Carefully paint a thick ring around the white eyeball. You can add small tick marks or lines extending outward from this orange ring to give the eye texture. -
Paint the pupil:
Once the white center is dry, paint a bold black pupil in the middle. Leave a tiny white dot (the ‘catchlight’) unpainted, or add a dot of white paint afterward to bring the eye to life. -
Create the smile base:
Below the eye, paint a wide, crescent-moon shape using orange paint for the mouth. Make the ends curve upward dramatically towards the ‘cheeks’. -
Outline the mouth:
Use your finest detail brush and black paint to outline the orange mouth shape. This sharpens the edges and makes the color pop against the dark background. -
Add sharp teeth:
Inside the orange mouth area, paint small white triangles for teeth. Outline these triangles with a very thin black line to define them clearly against the orange background. -
Paint the cheek triangles:
On either side of the eye, paint a small orange triangle pointing inward. Add tiny black dots inside these triangles for texture. -
Add decorative horns and dots:
Paint two small white horns curving upwards above the eye. Finally, use the back of a paintbrush or a stylus dipped in orange paint to dot small freckles around the perimeter of the face.
Step 4: Finishing Touches
-
Seal the artwork:
To protect your painting, apply a thin layer of matte varnish over the entire front face. This will prevent the acrylics from chipping over time. -
String it up:
Cut a length of jute twine, thread it through the hole at the top, and tie a secure knot at the base near the clay. Tie the loose ends together further up to create a hanging loop.
Hang your cheerful little monster on a door knob or wall hook to greet your Halloween guests
Frankenstein-Inspired Mini Busts
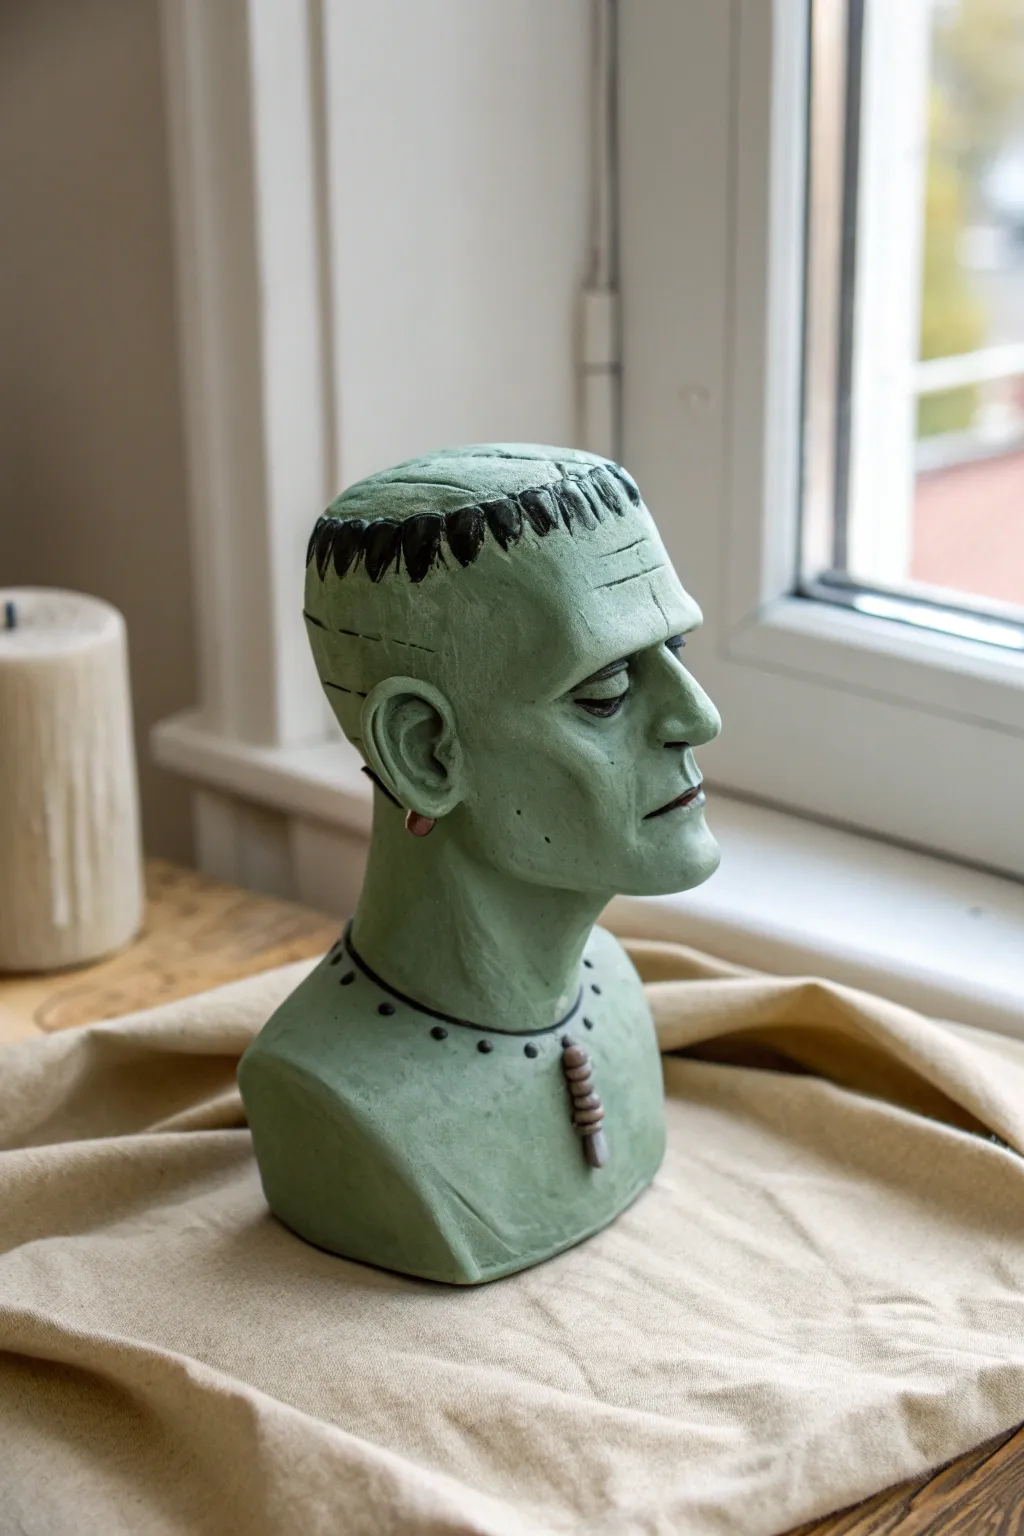
This sophisticated take on Frankenstein’s monster moves away from cartoonish Halloween decor into the realm of sculpture studio art. With its stoic expression, heavy brow ridge, and muted green finish, this air-dry clay bust makes for a striking, permanent addition to your spooky season vignette.
Step-by-Step
Materials
- High-quality air dry clay (white or grey)
- Armature wire and aluminum foil
- Wooden base or dowel for support
- Sculpting tools (loop tool, blending tool, needle tool)
- Acrylic paints (olive green, moss green, black, dark grey, burnt umber)
- Fine grit sandpaper
- Matte varnish or sealant
- Water cup and sponge
- Paintbrushes (flat brush and fine detail brush)
Step 1: Building the Foundation
-
Armature Construction:
Begin by creating a simple T-shape armature using heavy gauge wire to represent the neck and shoulders. Crumple aluminum foil tightly around the top of the wire to form a dense egg shape for the head and a wider block for the chest area. This saves clay and reduces drying time. -
Clay Application:
Roll out thick slabs of air-dry clay and drape them over your foil manual. Press the clay firmly into the foil to eliminate air pockets, smoothing the seams where the sheets meet until you have a unified, rough bust shape. -
Establishing Plane:
Using your palms or a flat wooden paddle, flatten the top of the head significantly. This is the monster’s signature silhouette. Square off the jawline and flatten the forehead area to prepare for the facial features.
Crack Control
If hairline cracks appear during drying, make a ‘slip’ paste by mixing clay scraps with water. Fill the cracks, smooth over, and let dry again.
Step 2: Sculpting the Features
-
Heavy Brow Ridge:
Roll a snake of clay and attach it horizontally across the forehead area, just above where the eyes will go. Blend the top edge seamlessly into the forehead, but leave the bottom edge slightly overhanging to create deep shadows. -
Nose and Cheeks:
Add a wedge of clay for the nose, blending it down from the brow ridge. Unlike a human nose, keep the bridge wide and somewhat blocky. Build up the cheekbones with small balls of clay, blending them outwards towards the ears. -
Sleepy Eyes:
Carve shallow sockets under the brow. Insert small spheres for eyeballs, then lay thick, drooping eyelids over them. The lids should cover the top half of the eye to give that heavy-lidded, somnambulant expression seen in the reference. -
Mouth and Jaw:
Score a horizontal line for the mouth. The lower lip should be slightly fuller, while the upper lip is thin. I prefer to downturn the corners slightly to enhance the solemn mood. Definitive, angular jaw muscles can be added to the sides of the face. -
Ears and Neck:
Attach C-shaped ears low on the head. Inside the ear, sculpt simple whorls. For the neck, ensure it is thick and muscular. Don’t forget the signature bolts—you can sculpt these directly or insert small metal findings later.
Step 3: Details and Refining
-
Hair Texture:
For the hair, add a thin layer of clay to the top and back of the head. Instead of individual strands, carve irregular, jagged ‘bangs’ across the forehead. Use a tool to texture the rest of the hair area slightly, separating it visually from the skin. -
Scars and Sutures:
Use a needle tool or small knife to carve a horizontal scar across the forehead and small vertical dashes to represent stitches. You can also add a decorative ‘necklace’ line of small dots or raised beads around the base of the neck. -
Smooth and Dry:
Dip a sponge in water and gently wipe the entire surface to remove fingerprints and harsh tool marks. Let the sculpture dry completely—this usually takes 48 to 72 hours depending on thickness. Rotate it occasionally for even drying.
Mixed Media Bolts
Instead of clay bolts, push real rusty screws or small wooden dowels into the neck while the clay is wet for an authentic industrial look.
Step 4: Painting and Finishing
-
Sanding:
Once fully cured, use fine-grit sandpaper to gently buff the face, focusing on the cheeks and forehead to achieve a stone-like smoothness. -
Base Coat:
Mix a small amount of grey into your olive green acrylic paint to desaturate it. Apply this murky green as a solid base coat over the entire skin area. -
Contouring:
Water down a darker moss green or brown paint to create a wash. Apply this into the eye sockets, under the nose, under the chin, and into the scars. Wipe away excess with a paper towel, leaving shadow in the recesses. -
Hair and Details:
Paint the hair cap solid black using a flat brush for clean edges. Use a fine liner brush to paint the eyebrows and the suture lines. A tiny dot of burnt umber is used for the earring/bolt detail. -
Dry Brushing:
Load a dry brush with a very light, minty green. Lightly dust it over the nose bridge, brow ridge, and chin to catch the raised textures and mimic light hitting skin. -
Sealant:
Finish the piece with a coat of matte varnish to protect the paint and unweave the clay tone, removing any unwanted acrylic sheen.
Once sealed, place your monster near a window to let natural shadows play across those deeply sculpted features
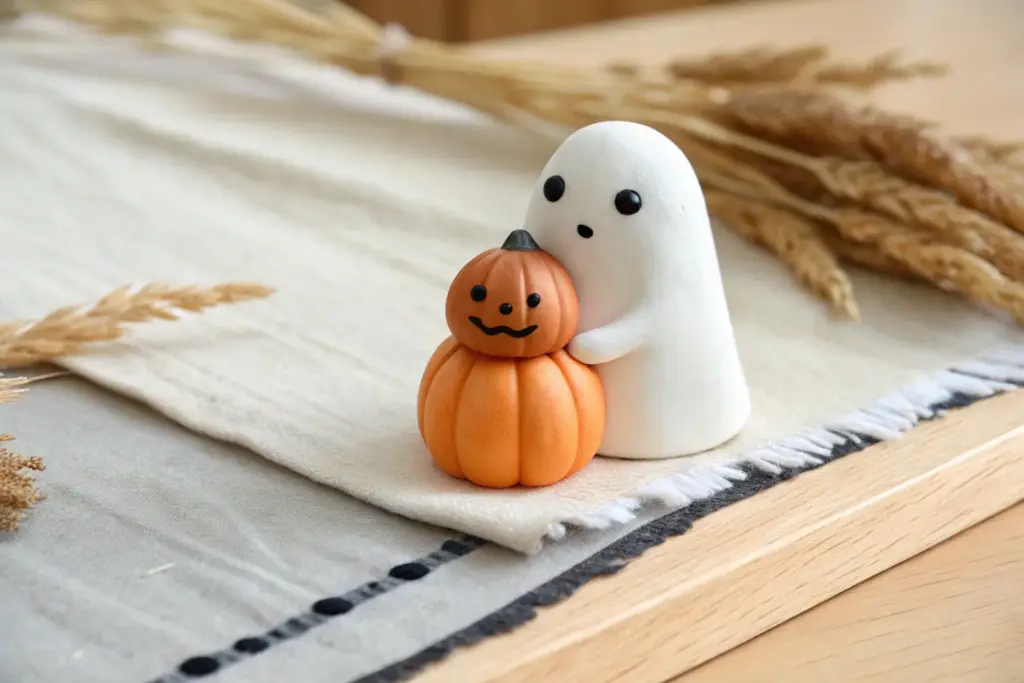
Ghosts Holding Tiny Pumpkins
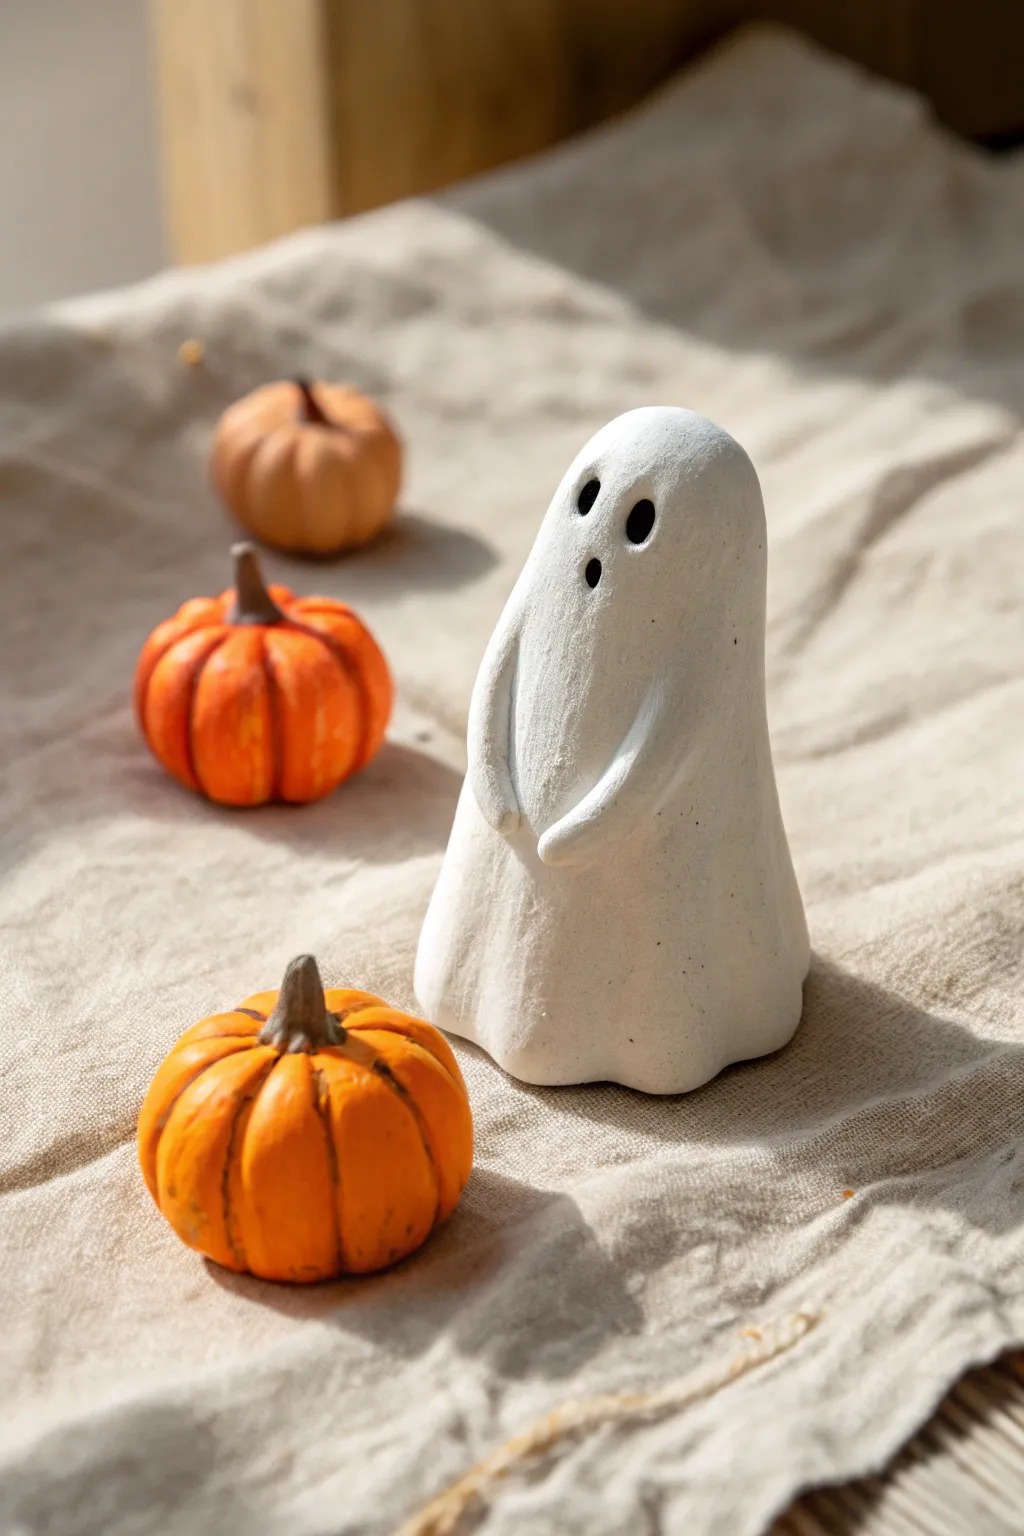
Capture the whimsical spirit of Halloween with this charming standing ghost figurine. Its textured, stone-like finish and expressive little face make it the perfect companion for miniature pumpkins on your mantle.
Step-by-Step Guide
Materials
- White sculpting air-dry clay
- Rolling pin
- Aluminum foil
- Clay sculpting tools (needle tool, ball stylus)
- Water and a small sponge
- Fine-grit sandpaper
- Black acrylic paint
- Fine detail paintbrush
- Matte white acrylic paint (optional)
- Small cup of water
Step 1: Forming the Core
-
Create the armature:
Start by crumpling a sheet of aluminum foil into a cone shape. This will be the core of your ghost, saving clay and reducing drying time. Aim for a height of about 3 to 4 inches. -
Prepare the clay:
Knead a generous handful of air-dry clay until it’s pliable and smooth. Conditioning the clay prevents cracks later on. -
Roll a sheet:
Roll out the clay into a flat, even sheet, roughly 1/4 inch thick. Make sure it’s large enough to drape over your foil cone. -
Cover the armature:
Drape the clay sheet over the foil cone. Gently press and smooth the clay down the sides, ensuring no foil is visible. Trim away excess clay at the bottom with a knife or sculpting tool.
Step 2: Sculpting the Ghost
-
Shape the head:
Smooth out the top of the cone to create a nice, rounded head. You want a seamless dome shape, so use a little water on your fintertip to blend any creases. -
Add movement:
Gently gently pinch and pull the clay at the bottom edge to create folds, mimicking a flowing sheet. This gives the ghost a sense of weight and fabric-like drape. -
Make the arms:
Roll two small, sausage-shaped logs of clay for the arms. They should be slightly thicker at the shoulder end and taper towards the ‘hands’. -
Attach the arms:
Score the sides of the ghost’s body and the back of the arms with a needle tool. Apply a dab of water (slip) to the scored areas and press the arms onto the body. -
Position the hands:
Curve the arms forward so they meet in the middle of the chest. It looks friendliest if the ends of the arms just barely touch or overlap slightly. -
Blend the seams:
Use a modeling tool or your finger to blend the clay at the shoulders into the main body so the arms look seamless and attached, not just stuck on. -
Refine the surface:
Wipe the entire sculpture with a slightly damp sponge. This smooths out fingerprints and gives it that consistent texture seen in the photo. -
Create the drying base:
Press the ghost gently onto a flat surface to flatten the bottom so it stands securely. Let it dry completely, ideally for 24-48 hours depending on humidity.
Cracking Up?
If hairline cracks appear while drying, mix a small amount of fresh clay with water to make a paste (slip). Fill the cracks with this mixture and smooth it over with your finger.
Step 3: Finishing Touches
-
Sand imperfections:
Once fully dry, use fine-grit sandpaper to gently buff away any rough spots or sharp ridges. -
Enhance the texture:
dry-brushing a very light coat of white matte paint over the ghost can enhance that stone-like, chalky finish if your clay dried too shiny. -
Paint the eyes:
Using a fine detail brush and black acrylic paint, create two small vertical ovals for the eyes. Position them midway down the head. -
Paint the mouth:
Paint a small, round ‘O’ shape centered below the eyes for the mouth. Keep the expression surprised but cute. -
Seal (Optional):
If you plan to keep this outside or handle it often, apply a matte varnish spray to protect the surface without adding shine.
Make It Glow
For a spooky surprise, cut out the eyes and mouth completely before the clay dries. Once finished, place a battery-operated tea light underneath the hollow body to make the face glow.
Enjoy your new ghostly friend as a centerpiece for your spooky season decor
Mushroom-and-Bone Halloween Trinket Tray
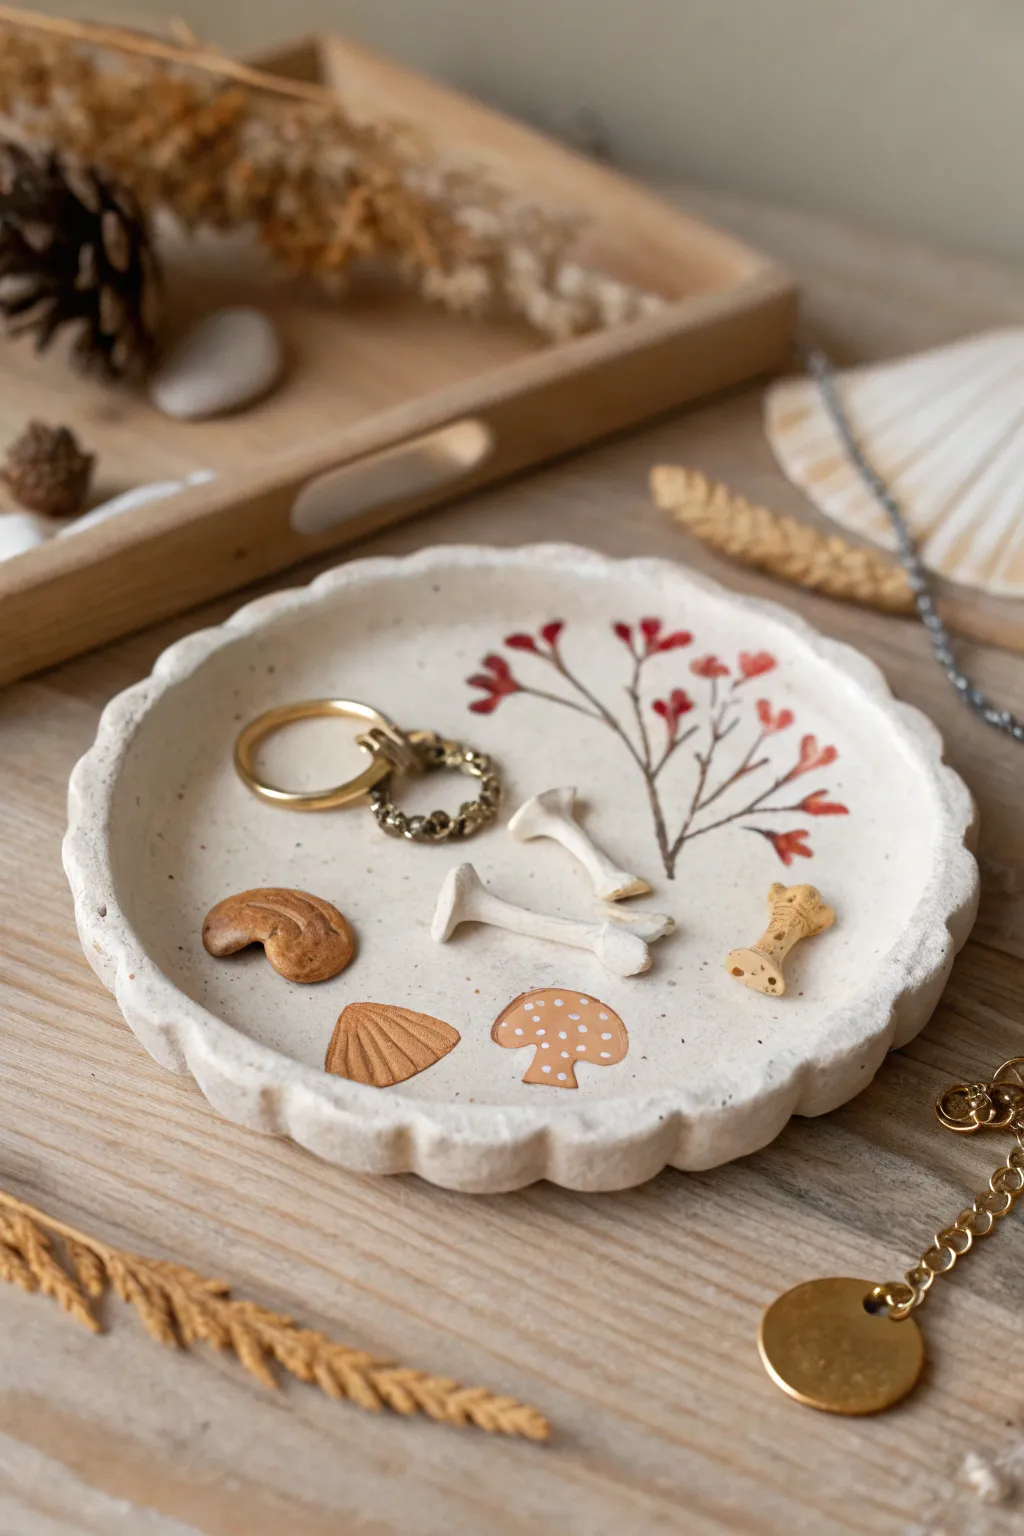
Embrace the cottagecore side of Halloween with this delicate, nature-inspired trinket dish. Featuring hand-painted botanical motifs and sculpted clay accents, this speckled tray is perfect for holding your favorite rings and small treasures.
Step-by-Step Tutorial
Materials
- Air dry clay (white or light grey)
- Acrylic paints (burnt sienna, deep red, beige, white, black)
- Fine detail paintbrush (size 0 or 00)
- Rolling pin
- Round cookie cutter or bowl (approx. 4-5 inches)
- Sculpting tools or a toothpick
- Small sponge for speckling
- Water cup
- Fine grit sandpaper
- Matte varnish or sealant
Step 1: Shaping the Clay Base
-
Roll out the slab:
Begin by taking a handful of air dry clay and kneading it until soft and pliable. Roll it out on a smooth surface to an even thickness of about 1/4 inch. If the clay sticks, you can use a little cornstarch on your roller. -
Cut the circle:
Place your round cookie cutter or a small bowl onto the clay slab and cut out a perfect circle. Remove the excess clay but keep it nearby for the next steps. -
Create the basin:
Gently lift the edges of the circle with your fingers, curving them upward to create a shallow dish shape. Smooth out any cracks that appear on the rim with a drop of water. -
Scallop the edges:
To achieve the fluted look, use your thumb and forefinger to gently pinch the rim at regular intervals. Push inward with your finger while supporting the clay from behind to create soft, undulating waves around the entire perimeter. -
Smooth and refine:
Dip your finger in a tiny bit of water and run it along the rim and the inside of the dish to ensure everything is perfectly smooth. Let the dish dry for 24-48 hours until completely hard.
Smooth Moves
Use a damp sponge instead of sandpaper for final smoothing before drying. It seals the clay pores better and creates less dust.
Step 2: Sculpting Tiny Accents
-
Form the bones:
While the dish dries, take tiny pinches of leftover clay to make the 3D elements. For the bones, roll a thin log of clay, then split the ends with a toothpick and round them off into knobs. Make two of these. -
Creating the mushroom and shell:
Shape a small, flat mushroom cap and a tiny fan-shaped shell. These can be separate loose pieces (like beads) or you can attach them permanently to the tray later using super glue. -
Dry the miniatures:
Set these tiny pieces aside on a flat surface to dry completely. Because they are small, they will dry much faster than the main dish.
Gilded Touch
Add a thin line of gold leaf paint solely to the scalloped rim of the tray to give it a vintage, high-end jewelry dish aesthetic.
Step 3: Painting & Decoration
-
Sand imperfections:
Once the main dish is fully dry, inspect it for rough spots. Use fine-grit sandpaper to gently smooth the edges and the surface. -
Create the speckled base:
Mix a very watery black or dark brown paint. Dip a toothbrush or stiff brush into it, and flick the bristles over the tray to create a subtle, speckled ‘ceramic’ stone effect. -
Paint the botanical branch:
Using your finest brush, paint thin brown stems reaching from the edge toward the center. Add small, heart-shaped or oval leaves using a deep red paint to mimic autumn foliage. -
Paint the flat motifs:
Directly on the clay surface, paint a small brown mushroom cap and a tan seashell shape near the bottom edge. I like to add tiny white dots to the mushroom cap once the brown paint is dry for that classic toadstool look. -
Detail the 3D pieces:
Paint your sculpted loose bones off-white or beige. If you made a loose mushroom or shell, paint those now as well. -
Seal the project:
Apply a coat of matte varnish to the entire tray and the loose pieces. This protects the paint and gives the clay a finished, professional feel.
Place your rings and tiny sculpted bones inside to enjoy a piece of autumn magic all year round.
Mixed Mini Halloween Mantel Set
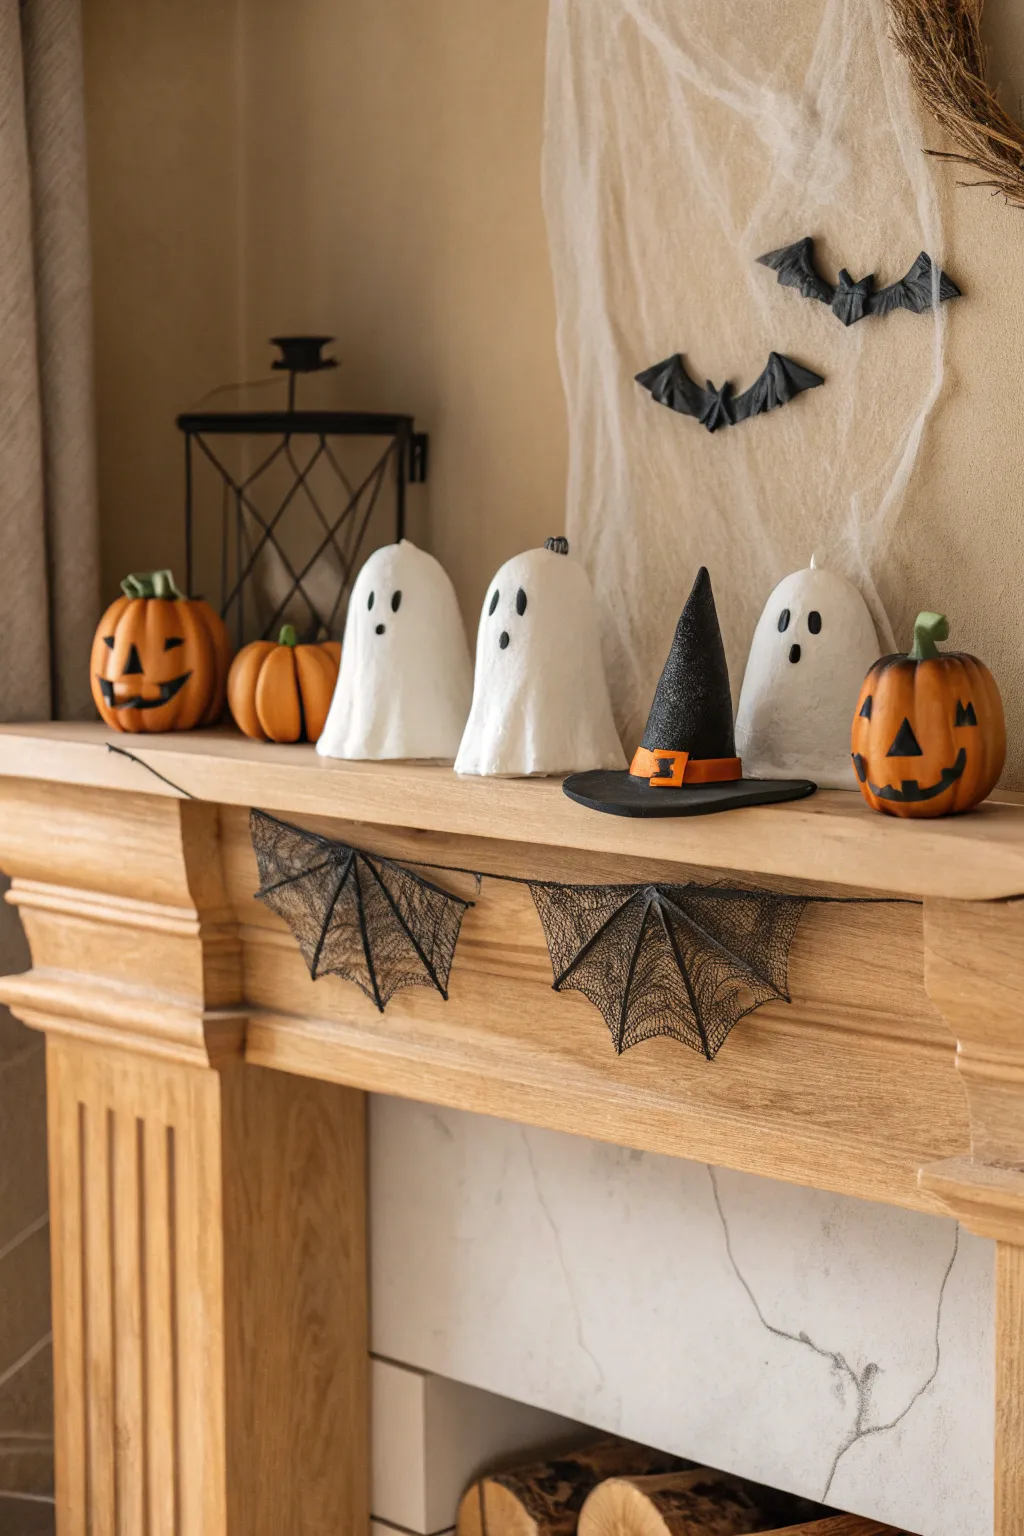
Transform your fireplace into a festive focal point with this charming collection of handmade clay figures. Featuring whimsical ghosts, cheerful jack-o’-lanterns, and a miniature witch’s hat, this set brings a balanced mix of cute and classic Halloween vibes to any shelf.
Step-by-Step
Materials
- Air dry clay (white)
- Acrylic paints (orange, black, deep green, yellow)
- Creating tools (rolling pin, knife, needle tool)
- Witch hat template (paper cone)
- Aluminum foil
- Fine grit sandpaper
- Paintbrushes (detail and medium flat)
- Matte sealant spray or varnish
- Black wire or twine for bat garland (optional add-on)
- Black lace or mesh fabric for bats (optional add-on)
Step 1: Shaping the Ghosts
-
Form the Ghost Core:
Start by creating three balls of aluminum foil, roughly cone-shaped but rounded at the top. These will act as armatures to save clay and keep the ghosts lightweight. Make them slightly different heights for variety. -
Roll the Sheet:
Roll out a slab of white air dry clay to about 1/4 inch thickness. You want it sturdy enough to stand but thin enough to drape naturally. -
Drape and Shape:
Gently lay the clay sheet over your foil armature. Allow the clay to ripple and fold at the bottom, mimicking fabric pooling on the ground. Smooth the top with a bit of water on your finger to remove any cracks. -
Add Features:
While the clay is still soft, use a modeling tool or your thumb to create subtle indentations where the eyes and mouths will go later. This gives the painted face a bit more dimension.
Step 2: Sculpting the Pumpkin Patch
-
Create Spheres:
Roll three balls of clay in varying sizes—one large, one medium, and one small and squat. Lightly tap them on your work surface to create a flat base so they don’t roll away. -
Define the Ribs:
Using a dull knife or a sculpting tool, press vertical lines from the top center down to the base all around each ball. Deepen these grooves to create the classic pumpkin segments. -
Stem Work:
Form small, slightly twisted stems from leftover clay. Score the top of the pumpkins and the bottom of the stems, add a dab of water (slip), and press them firmly onto the pumpkins.
Crack Control
If small cracks appear while drying, don’t panic. Mix a tiny bit of fresh clay with water to make a paste and fill the cracks, then sand smooth once dry.
Step 3: Crafting the Witch Hat
-
Form the Cone:
Roll out a thin amount of clay and wrap experienced around a small paper cone form to establish the hat’s point. Let this set slightly so it holds its shape. -
Cut the Brim:
Cut a circle from your rolled clay slab for the brim. Place the cone in the center, blending the seam where they meet with a sculpting tool and a little water. -
Add the Band:
Cut a thin strip of clay to wrap around the base of the cone as a hatband. Create a tiny square of clay for the buckle and attach it to the front of the band.
Spooky Glow
Hollow out the pumpkins manually before they dry completely to place battery-operated tea lights underneath for a real glowing effect.
Step 4: Painting and Finishing
-
Drying Time:
Allow all your pieces to dry completely. This usually takes 24-48 hours depending on humidity. I like to flip them over halfway through if the bottoms feel damp. -
Sand and Smooth:
Once bone dry, gently sand any rough fingerprints or sharp edges on your ghosts and pumpkins to get a smooth, professional finish. -
Ghost Faces:
Paint two simple black ovals for eyes on the ghosts. giving them varying expressions (surprised, happy, or spooky). Paint the ghost bodies white if the natural clay color is uneven. -
Pumpkin Painting:
Paint the pumpkins a vibrant orange. Use a darker green for the stems. For the Jack-o’-lanterns, paint classic black triangle eyes and toothy grins directly onto the orange surface. -
Witch Hat Details:
Paint the hat black, careful to leave the band area clear. Paint the band a bright orange and the buckle gold or yellow for contrast. -
Final Seal:
Once the paint is fully dry, spray all pieces with a matte sealant. This protects the clay from moisture and gives the paint a unified sheen.
Now you can arrange your spooky village on the mantel for everyone to enjoy