If you can roll a flat slab and cut a straight line, you can make a slab box that looks seriously impressive. Here are my go-to easy clay slab box ideas that keep the build simple but leave tons of room for your own style.
Classic Square Slab Box With Flat Lid
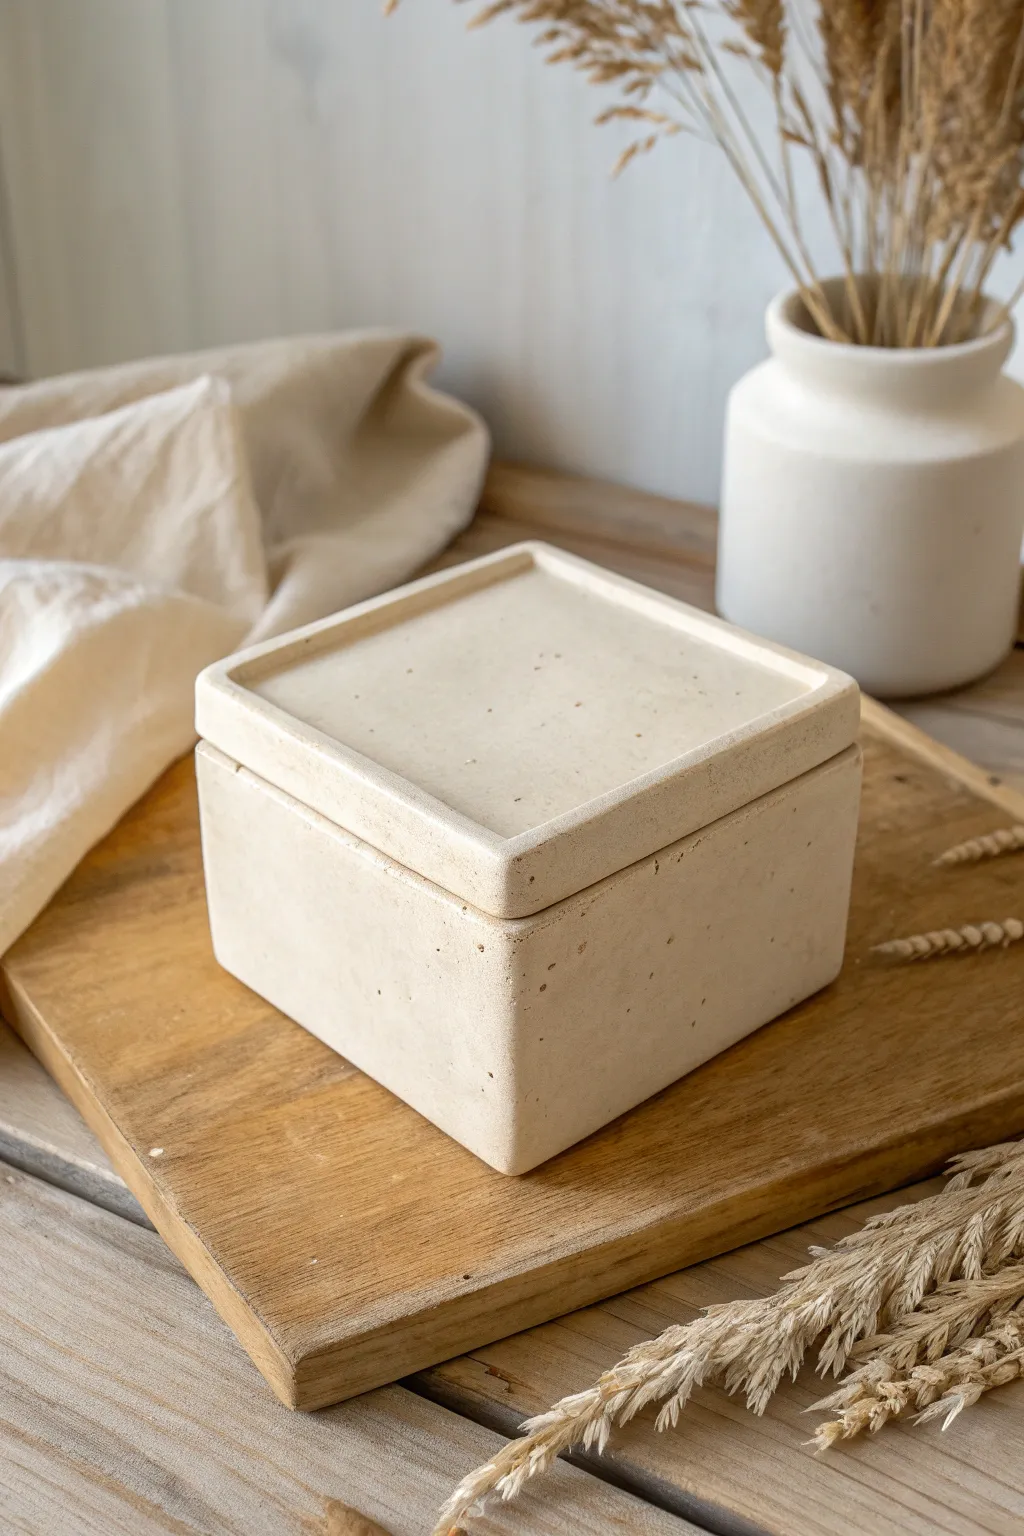
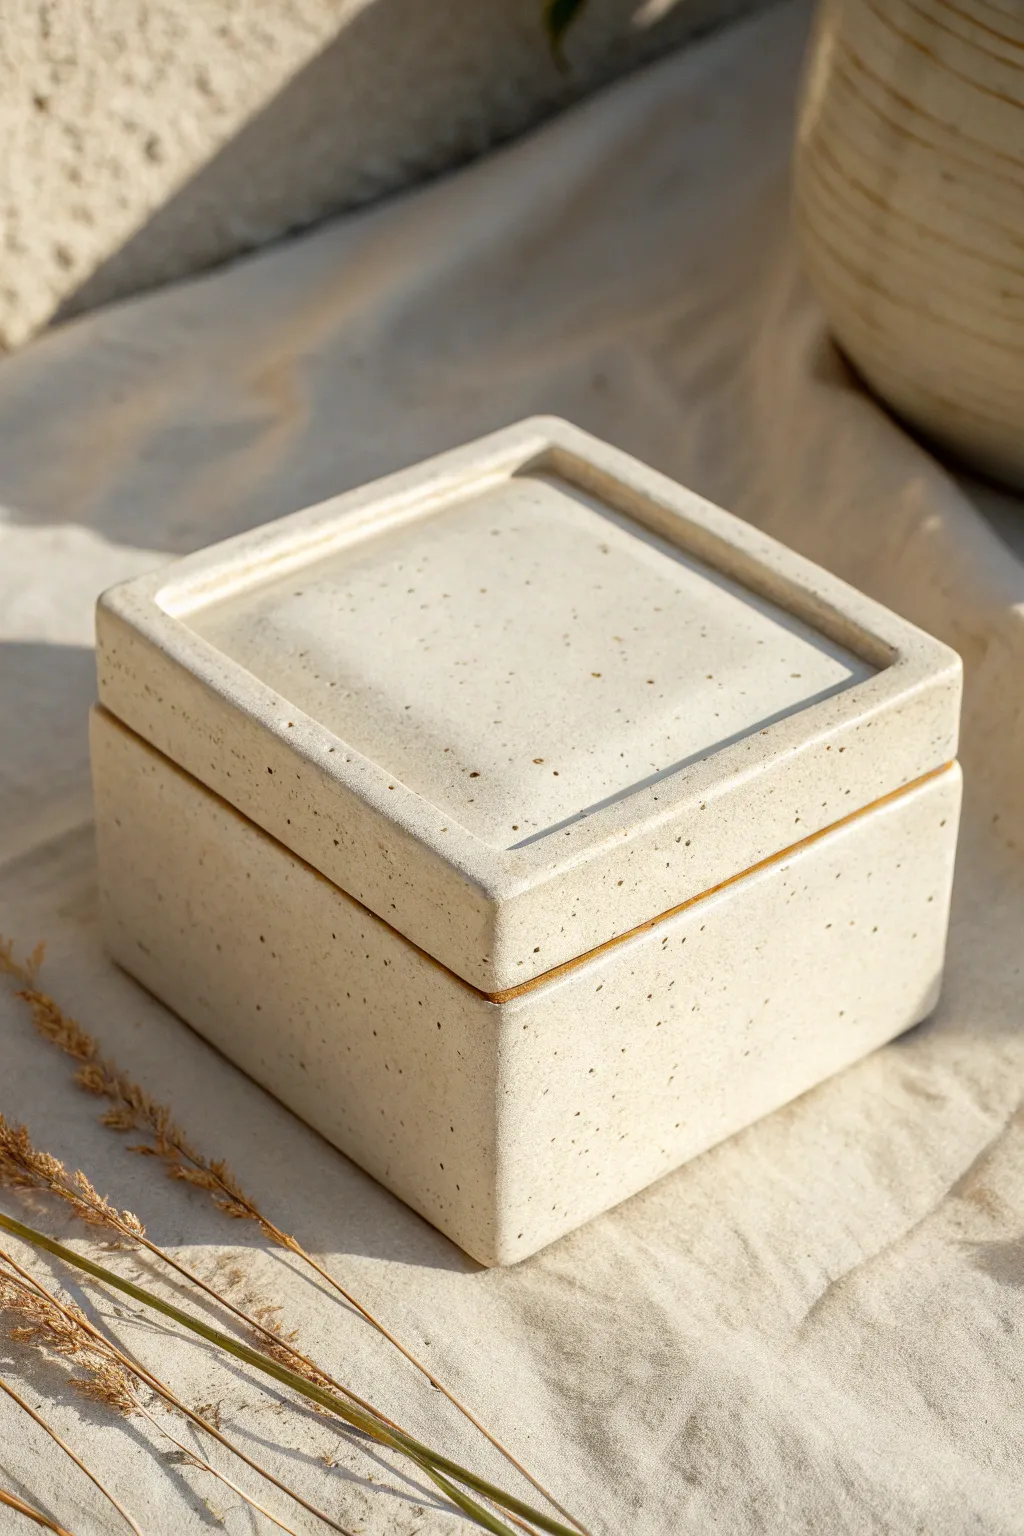
This project leans into the raw, brutalist beauty of unglazed pottery with a clean-lined square box and a perfectly fitted inset lid. The speckled, matte finish mimics the look of limestone or concrete, making it a sophisticated addition to any vanity or desk.
Step-by-Step
Materials
- Speckled buff stoneware clay (or polymer clay with a granite effect)
- Rolling pin with guide rings or thickness slats
- Fettling knife or sharp craft blade
- Heavy-duty ruler or set square
- Scoring tool or serrated rib
- Slip (clay and water slurry)
- Wooden modeling tool
- Smoothing sponge
- Canvas or wooden work board
Step 1: Creating the Slabs
-
Roll out the clay:
Begin by wedging your clay to remove air bubbles, then roll it out into a large, consistent slab. Aim for a thickness of about 1/4 inch (approx 6mm) using guide rings or slats to ensure evenness, which is crucial for structural integrity. -
Let the clay leather-harden:
This step is vital for sharp corners. Allow your slab to dry until it reaches a ‘leather-hard’ state—firm enough to hold its shape without slumping, but soft enough to cut and join. This usually takes 30-60 minutes on a porous surface. -
Measure and cut components:
Using your ruler and knife, cut out your pieces. You will need one square for the base (e.g., 4×4 inches) and four rectangular walls. For the walls, ensure the length accounts for the thickness of the adjoining pieces if you are doing butt joints, or cut 45-degree miters on the ends for a seamless look.
Clean Corner Trick
When smoothing exterior corners, work inwards from the edge toward the center of the wall. Working outwards can drag the clay and distort the sharp 90-degree angle you worked hard to cut.
Step 2: Assembling the Box
-
Score the edges:
Take your scoring tool and roughen up every edge that will be joined. Cross-hatching works best to create texture for the slip to grab onto. -
Apply slip:
Dab a generous amount of slip onto the scored areas. It acts as the glue for your clay ceramic project. -
Attach the first wall:
Press one wall firmly onto the base slab. Use a wooden tool or your finger to smooth a small coil of soft clay into the interior seam to reinforce the joint. -
Construct the perimeter:
Attach the remaining three walls one by one, scoring and slipping the vertical joints between them. Check constantly with a set square to ensure your box remains perfectly cubic and hasn’t warped. -
Refine the seams:
On the exterior, firmly smooth the clay across the join lines so they disappear. I find using a firm rubber rib here helps compress the clay and hide the connection points completely.
Step 3: The Inset Lid
-
Measure the opening:
Wait for the box to firm up slightly more, then precisely measure the interior opening dimensions. -
Cut the lid slab:
Cut a square slab that is about 1/8 inch larger than the *exterior* dimensions of your box. This will be the visual top plate. -
Create the flange:
Cut a second, smaller square slab that fits loosely inside the box opening (about 1/8 inch smaller than the interior measurement). This difference allows for clay shrinkage and glaze later. -
Join the lid parts:
Score and slip the center of the large top plate and the smaller flange piece. Center the smaller square on the bottom of the larger one and press them together firmly to create a single lid unit with a lip.
Top Handle Twist
Add a geometric knob or a small leather loop handle attached with a rivet to the center of the lid. This adds a mixed-media element that contrasts beautifully with the raw stone texture.
Step 4: Finishing Touches
-
Refine the edges:
Once assembled, use a damp sponge to soften the sharp corners slightly. This prevents chipping after firing and gives it that soft ‘stone’ look seen in the photo. -
Surface texture:
If your clay is smooth, you can gently pat the surface with a coarse sponge or a crumpled plastic bag to enhance the organic, limestone texture. -
Final drying:
Place the lid on the box with a thin piece of paper or plastic between them to prevent sticking. Let them dry slowly under plastic to ensure they shrink at the same rate. -
Firing:
Bisque fire the piece. For the finish shown, leave the exterior unglazed to show off the speckled clay body, perhaps using a clear matte glaze only on the interior for functionality.
Enjoy the calm satisfaction of seeing your perfectly fitted lid slide into place


Rectangular Keepsake Slab Box With Snug Lid
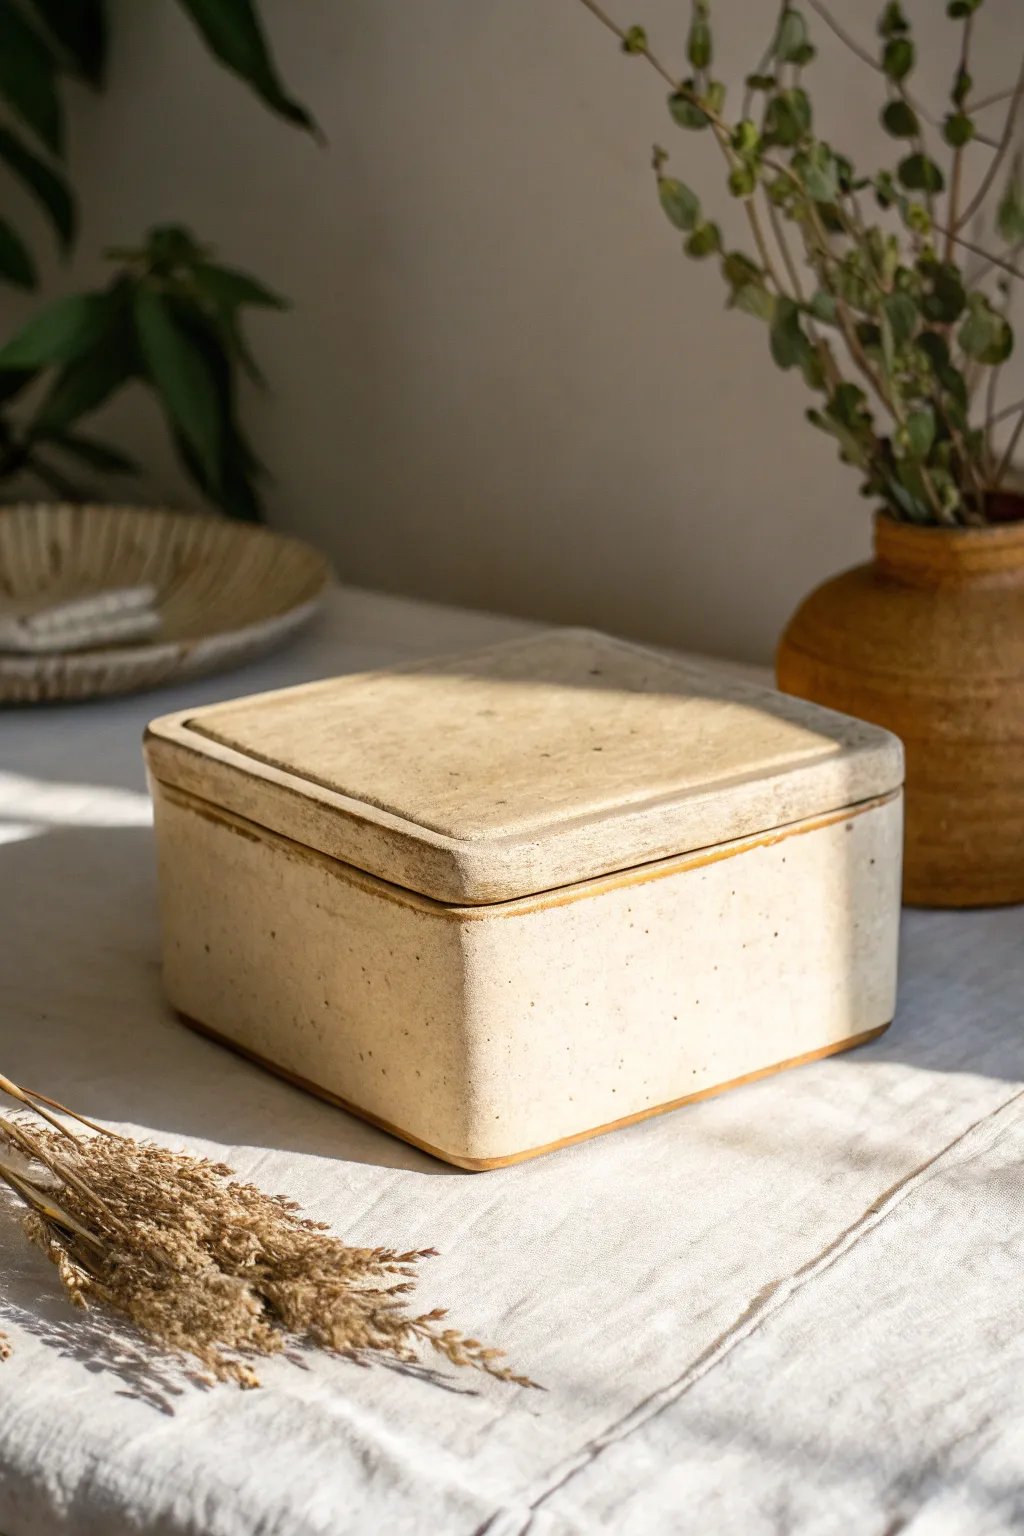
Embrace the beauty of simplicity with this rectangular keepsake box, featuring a creamy speckled finish and a perfectly fitted lid. This project relies on crisp slab-building techniques to achieve clean lines and that satisfying, snug closure.
Step-by-Step Guide
Materials
- Speckled stoneware clay (mid-fire)
- Rolling pin with guides (1/4 inch thick)
- Fettling knife or sharp craft blade
- Ruler/Set square
- Paper templates (base and sides)
- Serrated rib tool
- Slip (clay mixed with water)
- Wooden modeling tool
- Soft sponge
- Matte cream or clear glaze
- Kiln
Step 1: Preparing the Slabs
-
Roll the clay:
Begin by wedging your speckled stoneware clay thoroughly to remove air bubbles. Roll it out into a large, even slab using 1/4 inch guides. Flip the slab occasionally as you roll to prevent it from sticking to your canvas. -
Smooth the surface:
Before cutting, take a soft, slightly damp rib and compress the clay surface on both sides. This aligns the clay particles, reducing warping later, and creates that smooth canvas for the speckles to shine through. -
Cut the components:
Using paper templates and a sharp blade, cut out your pieces: one rectangular base, two long walls, two short walls, and one lid piece that matches the base dimensions perfectly. Keep your knife perpendicular to the table for straight edges. -
Leather hard stage:
Let the cut pieces stiffen up on a ware board until they reach a soft leather-hard state. They should hold their shape when lifted but still be flexible enough to join without cracking.
Warped Lid Fix
If your lid warps during drying, lightly mist the concave side with water and weigh it down on a perfectly flat board with a heavy book or sandbag until it levels out.
Step 2: Assembling the Box
-
Score the edges:
Take your serrated rib and thoroughly score the top perimeter of the base slab and the bottom/side edges of all wall pieces. The texture should look rough and fuzzy. -
Apply slip:
Generously apply slip to all scored areas. I like to use a brush for this to ensure the slip gets into all the little grooves. -
Attach the first wall:
Place one long wall onto the base. Apply firm, downward pressure to seat it. Use a wooden tool to blend the clay from the wall down onto the base on the inside seem to reinforce the joint. -
Complete the walls:
Attach the remaining walls, scoring and slipping the vertical joints where the corners meet. Check your angles with a set square to ensure the box is perfectly rectangular. -
Add a support coil:
Roll a very thin coil of soft clay and press it into the interior bottom seams. Smooth this out with your finger or a tool to create a seamless transition and prevent bottom cracking.
Pro Tip: Paper Resist
Place a strip of newspaper between the lid and box while drying. This lets you dry them together so they keep the same shape without the clay fusing together.
Step 3: Creating the Lid Flange
-
Measure the opening:
Measure the precise interior dimensions of your assembled box. Cut a new slab rectangle that is slightly smaller (about 1/8 inch less on all sides) than this opening. -
Attach the flange:
Score and slip the center of the underside of your main lid slab. Attach the smaller rectangle you just cut. This will act as the flange, dropping inside the box to keep the lid from sliding off. -
Refine the fit:
Once assembled, test the fit gently. If the flange is too tight, shave off small amounts of clay with a rasp or knife until it drops in smoothly.
Step 4: Refining and Finishing
-
Paddle the form:
Gently paddle the outside walls with a flat wooden paddle. This helps square up the shape, removes finger marks, and compresses the corner joints for strength. -
Soften the edges:
Use a damp sponge to soften the sharp 90-degree edges on both the box rim and the lid. You want a rounded, organic feel similar to the reference photo, not a razor-sharp edge. -
Dry slowly:
Place the lid on the box with a piece of paper or plastic in between to prevent sticking. Wrap the entire piece loosely in plastic to let it dry very slowly; this ensures the lid and box shrink at the same rate. -
Bisque fire:
Once bone dry, fire the piece to bisque temperature (usually vertically cone 04 or 06, depending on your clay body). -
Glaze and final fire:
Apply a thin coat of matte clear or semi-opaque cream glaze. Wipe the bottom of the box and the contact points of the lid flange clean of glaze. Fire to the maturity temperature of your clay (likely Cone 5/6 for stoneware).
Once fired, you will have a durable, heirloom-quality box perfect for storing small treasures or simply admiring on a shelf


Notched Lid Slab Box (No Fuss Fit)
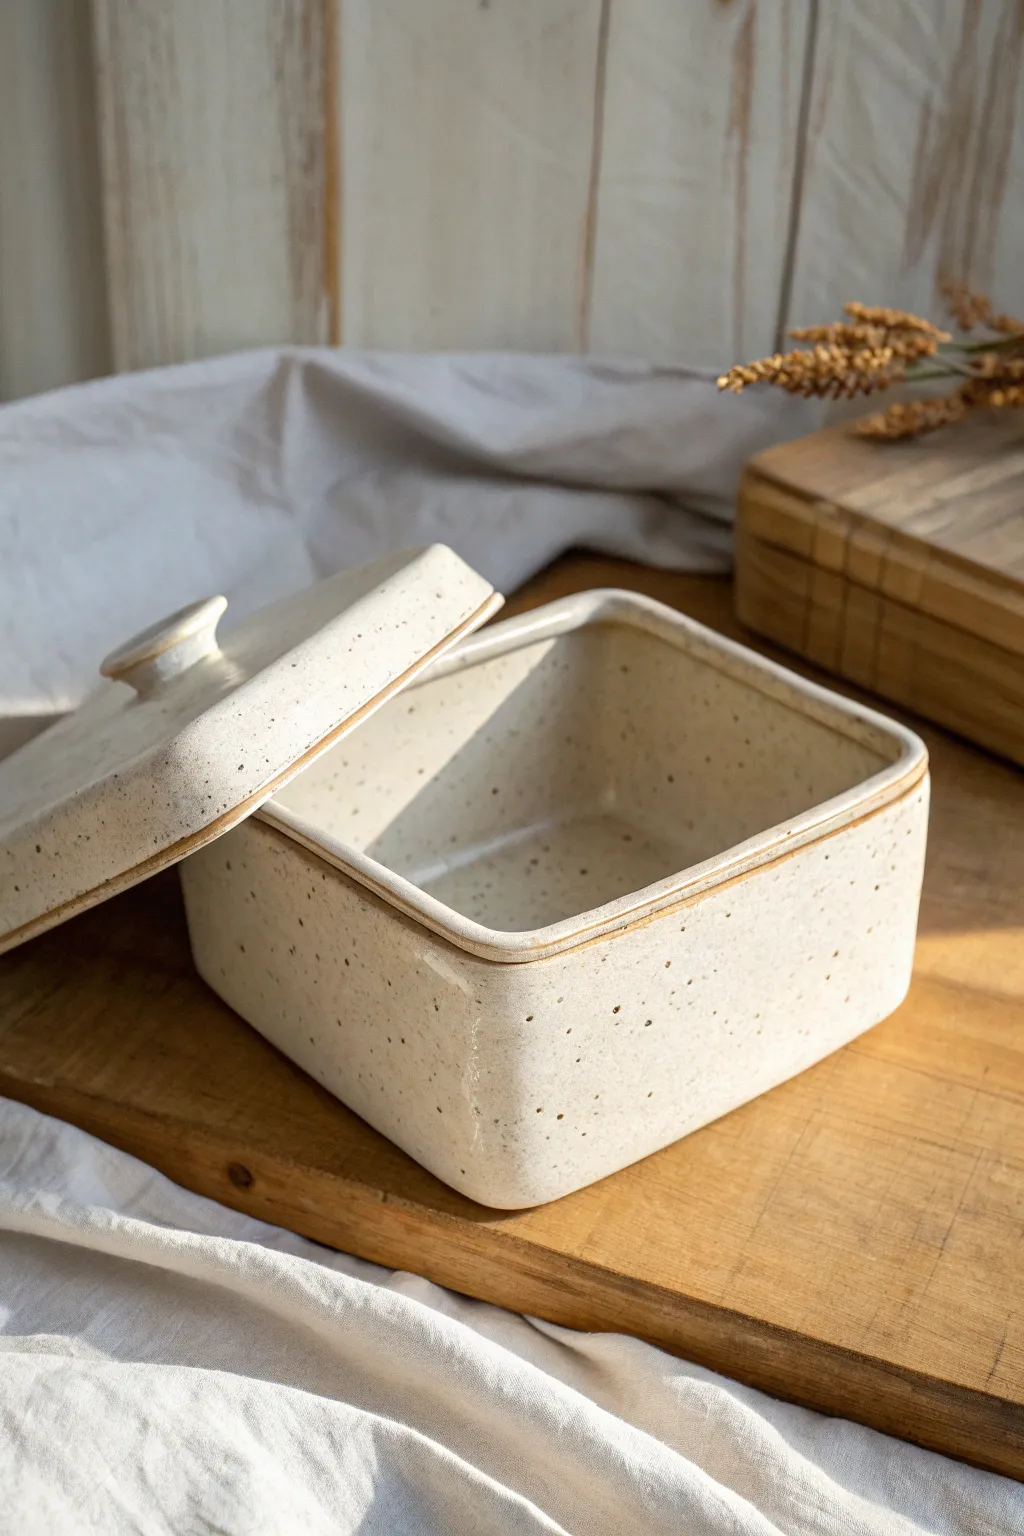
This charming, square ceramic box features a warm, speckled cream glaze and a cleverly designed notched lid that stays perfectly in place. Its simple, rustic aesthetic is created using slab construction techniques, making it an excellent project for refining your hand-building skills.
Step-by-Step Tutorial
Materials
- Speckled clay body (stoneware recommended)
- Dowel or slab sticks (¼ inch thick)
- Rolling pin
- Fettling knife or needle tool
- Serrated rib or flexible metal rib
- Scoring tool (fork or serrated rib)
- Clay slip or vinegar
- Small square template (paper or cardstock)
- Sponge
- Cream glossy glaze
Step 1: Preparing the Slabs
-
Roll out the clay:
Begin by wedging your speckled clay to remove air bubbles. Using your dowels or slab sticks as guides, roll out a consistent slab about ¼ inch thick. A uniform thickness is key for square boxes to ensure walls don’t warp. -
Compress the slab:
Take a flexible metal rib and gently compress the slab on both sides. This aligns the clay particles, reducing the chance of curving or cracking during drying, and also smooths out any canvas texture. -
Cut the components:
Using your square template, cut out a base piece and four identical wall pieces. For the lid, cut a square slightly larger than your base (about ¼ inch wider on all sides). Precision here saves cleanup time later.
Step 2: Constructing the Box
-
Miter the edges (optional):
For super clean corners, you can cut the vertical edges of your wall pieces at a 45-degree angle. If you prefer a butt joint, simply ensure your measurements account for the wall thickness overlap. -
Score and slip:
Rough up the edges of the base and the bottom of the walls with your scoring tool. Apply a generous amount of slip or vinegar to the scored areas. -
Assemble the walls:
Attach the first wall to the base, pressing firmly. Add the adjacent wall, scoring and slipping the vertical seam where they meet. Repeat until all four walls are attached, creating a box. -
Reinforce the seams:
Roll a very thin coil of clay. Press this coil into the interior corners of the box to reinforce the joints. Smooth the coil down flat with a modeling tool or your finger so it disappears into the wall. -
Refine the shape:
Use a flat wooden paddle to gently tap the outside walls. This helps square up the box and ensures the sides are perfectly straight and perpendicular to the base.
Why Cover While Drying?
Drying square objects too fast causes warping. Place a light weight (like a small bag of sand) on the lid rim while it dries to keep corners flat.
Step 3: Creating the Fitted Lid
-
Measure the opening:
Measure the precise interior dimensions of your assembled box opening. -
Create the notch flange:
Roll a thick coil or cut a strip of clay slab that fits just inside those interior measurements. This strip will act as the flange that keeps the lid from sliding off. -
Attach the flange:
Score and slip the underside of your lid slab. Attach the clay strip/flange in a square shape, leaving a tiny bit of wiggle room (about 1/16th inch) so the lid doesn’t stick after glazing. -
Add a handle:
Form a small, organic knob or loop from a scrap of clay. Score the center of the lid top and attach the handle securely. I like to smooth the connection point with a damp brush for a seamless look.
Lid Not Fitting?
If the lid rocks after firing, use wet sanding paper or a diamond sanding pad on the contact points. Grind slowly with water until it sits flush.
Step 4: Finishing and Glazing
-
Dry slowly:
Loosely cover the box with plastic. Place the lid on the box while drying; this ensures they shrink at the same rate and maintain their fit. -
Bisque fire:
Once bone dry, fire the piece to bisque temperature (usually cone 04) according to your clay body’s instructions. -
Glaze the interior:
Pour a cream-colored speckled glaze into the interior, swisting it around to coat, and pouring out the excess immediately. -
Glaze the exterior:
Dip or brush the exterior with the same glaze. Be very careful to wax the flange area on the lid and the rim of the box where they touch, or wipe them completely clean with a sponge to prevent fusing. -
Final firing:
Glaze fire the piece to the recommended temperature for your clay (typically cone 5 or 6 for stoneware). The heat will interact with the clay’s iron spots to create that lovely speckled effect through the cream glaze.
Enjoy the satisfying ‘clink’ of placing the perfectly fitted lid on your new handmade box


Gallery-Lip Slab Box for a Secure Nest
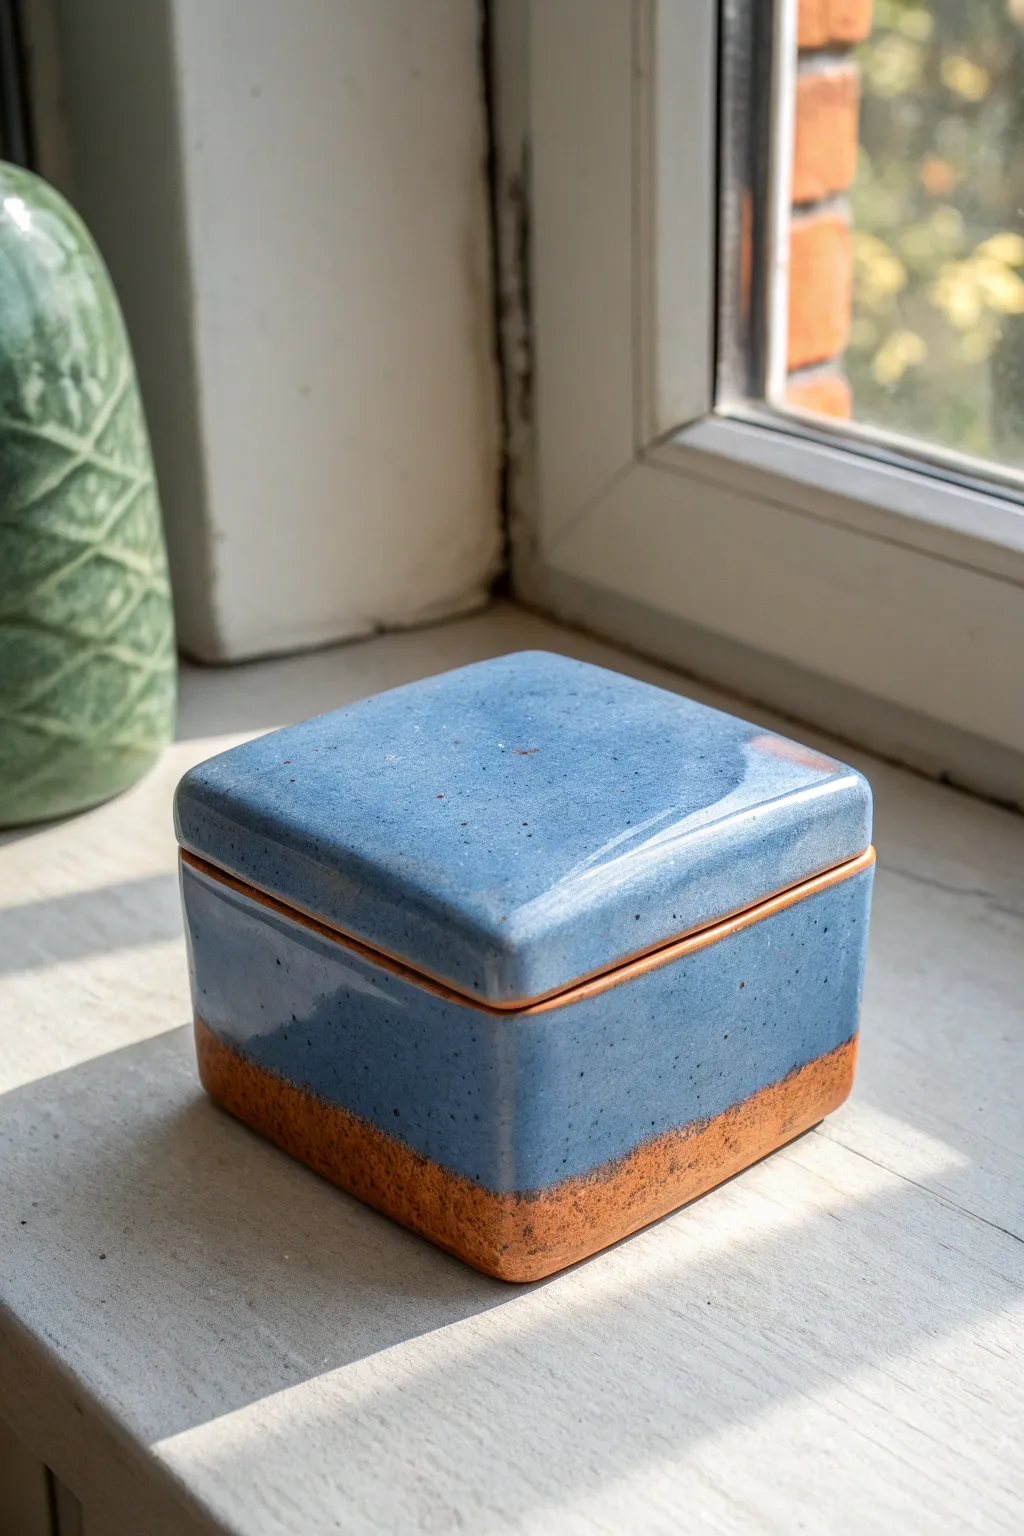
This charming square lidded box features a glossy, speckled blue glaze that contrasts beautifully with a raw, gritty terracotta base. Its snug-fitting gallery lip ensures the lid stays secure, making it perfect for storing small treasures or jewelry.
Step-by-Step
Materials
- Terracotta or stoneware clay slab (approx. 1/4 inch thick)
- Fettling knife or X-Acto blade
- Rolling pin and guides
- Ruler or square template
- Scoring tool (serrated rib or needle tool)
- Slip (clay and water slurry)
- Wooden modeling tool or paddle
- Sponge
- Speckled blue stoneware glaze
- Wax resist
Step 1: Preparing the Slabs
-
Roll the clay:
Start by rolling out your clay into an even slab, approximately 1/4 inch thick. Use wooden guides on either side of your rolling pin to ensure consistent thickness throughout. -
Compress the clay:
Run a rubber rib smoothly over the surface on both sides. This compresses the clay particles, reducing the chance of warping later, and creates a nice smooth canvas for your glaze. -
Cut the components:
Using a ruler or a paper template, cut out your pieces: one bottom square (e.g., 4×4 inches), one top square (same size), and four rectangular side walls. Don’t forget to cut four smaller strips for the inner gallery lip. -
Leather hard stage:
Let all your cut pieces sit out until they reach a ‘leather hard’ state. They should be firm enough to hold their shape without bending but still soft enough to be scored and joined.
Warped Lid Woes?
If your lid rocks after firing, it likely dried unevenly. Next time, dry the lid ON the box with a piece of newspaper between them to help them shrink together.
Step 2: Assembling the Base
-
Miter the edges (optional):
For a cleaner corner, cut the side edges of your walls at a 45-degree angle. Alternatively, use a simple butt joint where one slab overlaps the end of the other. -
Score and slip:
Deeply score the edges of the base slab and the bottom-most edges of your side walls. Apply a generous amount of slip to the scored areas. -
Attach the walls:
Press the first wall firmly onto the base. Repeat with the remaining walls, scoring and slipping the vertical seams where the walls meet each other. -
Reinforce the seams:
Roll a very thin coil of soft clay and press it into the interior corners. Smooth this coil down with your finger or a wooden tool to strengthen the bond. -
Refine the shape:
I like to gently paddle the outside walls with a flat wooden tool at this stage to square up the form and ensure the sides are perfectly straight.
Textured Touch
Before constructing, roll a piece of lace or burlap into the clay slab for the exterior walls. The glaze will break beautifully over the texture.
Step 3: Creating the Gallery Rim
-
Prepare the lid:
Take your top square slab. Flip it over so the underside feels slightly tacky to the touch. -
Measure the inset:
Place your assembled box gently upside down onto the lid slab to lightly mark where the walls hit. This gives you a guide for where the inner lip needs to sit. -
Attach the flange strips:
Score and slip the four smaller strips you cut earlier. Attach them inside the guide marks on the lid, creating a square ‘inner wall’ that will fit inside the box base. -
Test the fit:
Once the seams are cleaned up, gently test the fit on the box. If it’s too tight, shave a little clay off the gallery strips with a rasp; if too loose, gently push the strips outward.
Step 4: Glazing and Finishing
-
Dry and bisque fire:
Allow the piece to dry slowly under loose plastic to prevent warping. Once bone dry, bisque fire it according to your clay body’s specifications. -
Apply wax resist:
To achieve the two-tone look seen in the photo, brush a straight line of wax resist around the bottom third of the box’s exterior and coating the entire bottom. This prevents glaze from adhering to the raw clay. -
Glazing:
Pour the speckled blue glaze inside the box and pour it out. Then, dip the lid and the top two-thirds of the box exterior into the glaze. Wipe away any drips immediately. -
Clean the contact points:
Crucially, sponge off any glaze from the rim of the box and the underside of the lid rim where they touch. If glaze remains here, the lid will fuse to the box permanently during firing. -
Final firing:
Glaze fire the piece to the temperature recommended for your stoneware glaze.
Enjoy the tactile satisfaction of sliding that perfectly fitted lid onto your new ceramic creation

The Complete Guide to Pottery Troubleshooting
Uncover the most common ceramic mistakes—from cracking clay to failed glazes—and learn how to fix them fast.
One-Slab Folded Box (Origami Style)
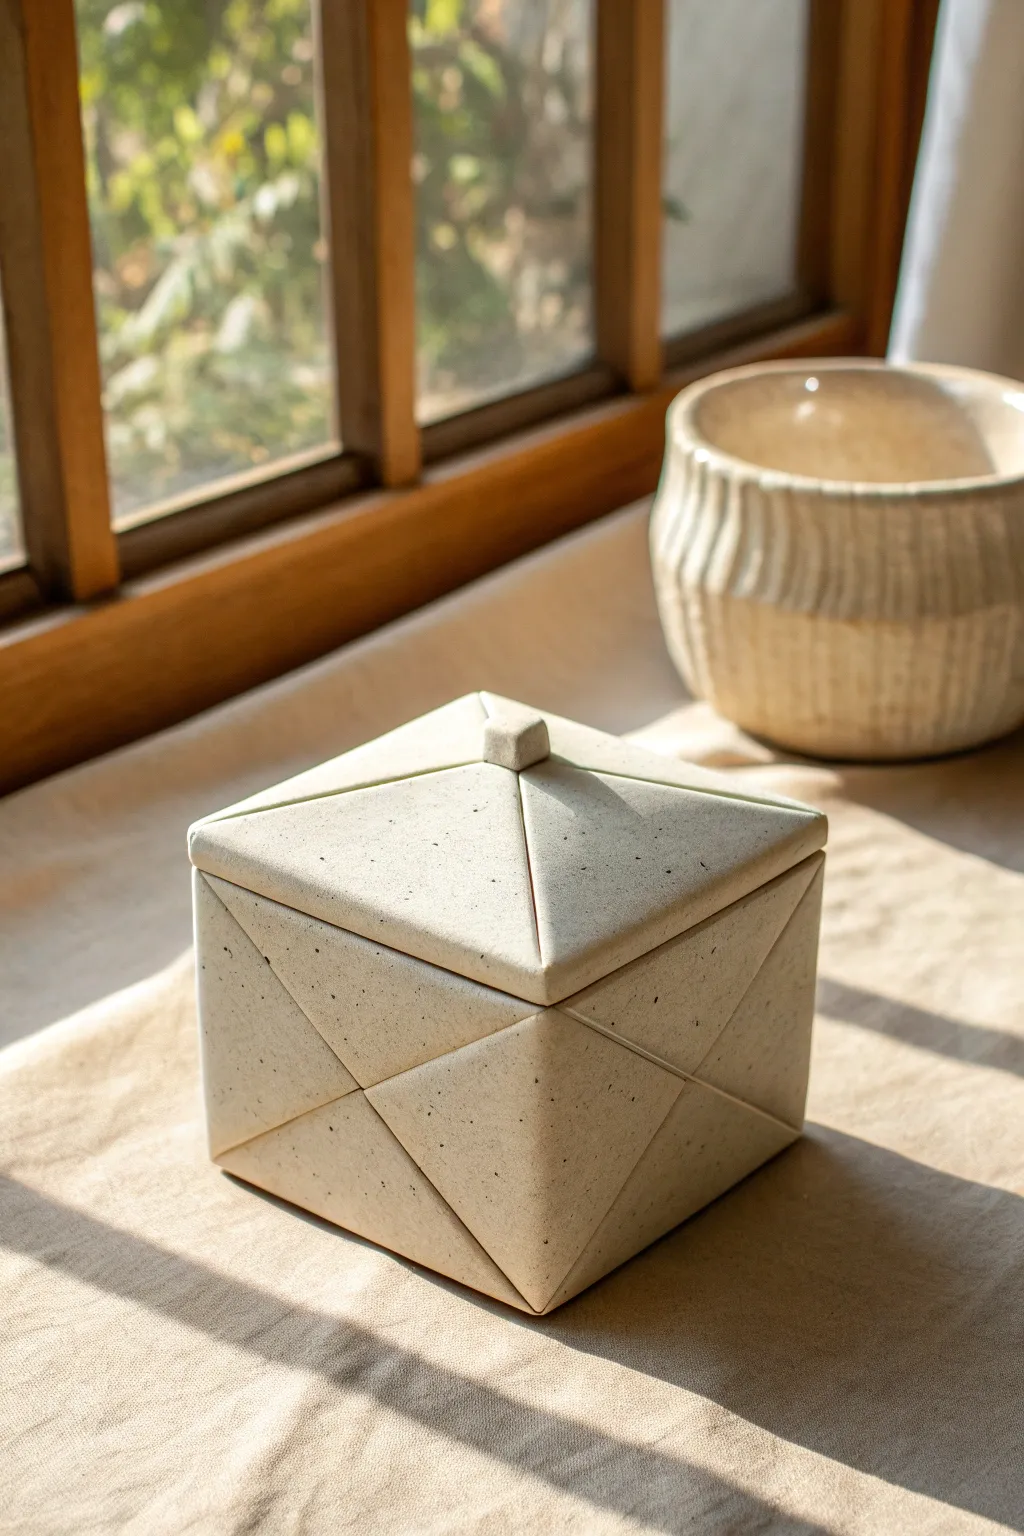
This elegant ceramic box mimics the clean lines and geometric satisfying shapes of paper folding, resulting in a unique container with ‘folded’ triangle motifs on the sides and lid. The speckled beige clay body gives it a warm, natural stone appearance, perfect for holding precious trinkets or serving dry goods.
Step-by-Step Tutorial
Materials
- Speckled buff stoneware clay (or beige clay with grog)
- Slab roller or rolling pin with thickness strips
- Fettling knife or X-Acto blade
- Paper template (square)
- Ruler
- Scoring tool (serrated rib or needle tool)
- Slip (clay and water mixture)
- Smooth wooden rib or rubber kidney
- Sponge
- Clear matte glaze
Step 1: Planning and Preparation
-
Create the Template:
Draft a paper template first to ensure perfect symmetry. You need a large square for the base/sides and a slightly larger square for the lid to account for shrinkage and fit. -
Roll the Slab:
Roll out a consistent slab of speckled clay, approximately 3/8-inch thick. Compressing the slab on both sides with a rib is crucial here to prevent warping later. -
Cut the Main Shape:
Using your template, cut out a perfect square for the box body. Accuracy is key for the geometric look, so measure twice.
Crisp Corners Tip
Use a straight-edge ruler or credit card to compress and sharpen the ‘crease’ lines while the clay is leather-hard. This mimics the sharpness of folded paper.
Step 2: Creating the Folded Detail
-
Mark fold lines:
Lightly trace an X across the square slab (corner to corner) to find the center. Then, mark lines dividing the square into a grid if you are folding up, or measure equal distances for cutting separate triangles to assemble. -
Cut triangular sections:
To achieve the specific ‘envelope’ look in the photo, cut four identical isosceles triangles for the walls. The base of each triangle should match the length of the square base’s side. -
Bevel the edges:
Cut 45-degree angles on the bottom edge of the wall triangles and the four sides of the square base. This allows them to join cleanly at a 90-degree angle. -
Score and slip:
Aggressively score the beveled edges of the base and the wall pieces. Apply a generous amount of slip. -
Assemble the walls:
Attach the four triangles to the base. When you lift them up, their side points will meet in the middle of each wall face, creating that distinctive ‘X’ fold pattern. -
Reinforce the seams:
On the inside of the box, use a small coil of clay to reinforce the corners where the walls meet. Smooth this coil completely so it disappears.
Level Up: Texture
Before assembling, roll a linen texture onto the slab. The fabric weave combined with the origami shape enhances the ‘cloth-turned-stone’ aesthetic.
Step 3: Constructing the Lid
-
Cut the lid base:
Cut a square slab slightly larger than your box opening. Measure the opening of your assembled box to be sure. -
Add geometric relief:
To recreate the raised pyramid look on the lid, cut four smaller triangles that will sit on top of the flat lid slab, meeting in the center. -
Attach lid components:
Score and slip the flat lid base and the backs of your detail triangles. Press them down firmly so no air is trapped. -
Form the knob:
Shape a small, solid cube of clay. I find keeping the knob simple and geometric complements the busy lines of the box perfectly. -
Attach the knob:
Score the exact center of the lid (where the triangle points meet) and attach the cube knob firmly.
Step 4: Refining and Finishing
-
Refine the lines:
Once leather hard, use a slightly damp sponge to sharpen the ‘fold’ lines on the exterior. The deep grooves between the triangular sections define the style. -
Add the flange:
On the underside of the lid, attach a small square coil or strips of clay inset about 1/4 inch from the edge. This flange keeps the lid from sliding off. -
Dry slowly:
Cover the box loosely with plastic to let it dry very slowly. Fast drying will warp the straight walls. -
Bisque fire:
Fire the piece to cone 04 (or your clay’s bisque temperature). -
Glaze application:
Dip or spray a thin layer of clear matte glaze. The goal is to let the natural speckles of the clay shine through without a glossy distraction.
Once fired, you will have a sophisticated geometric vessel that looks deceptively like soft folded material frozen in time
Soft-Rounded Corner Slab Box
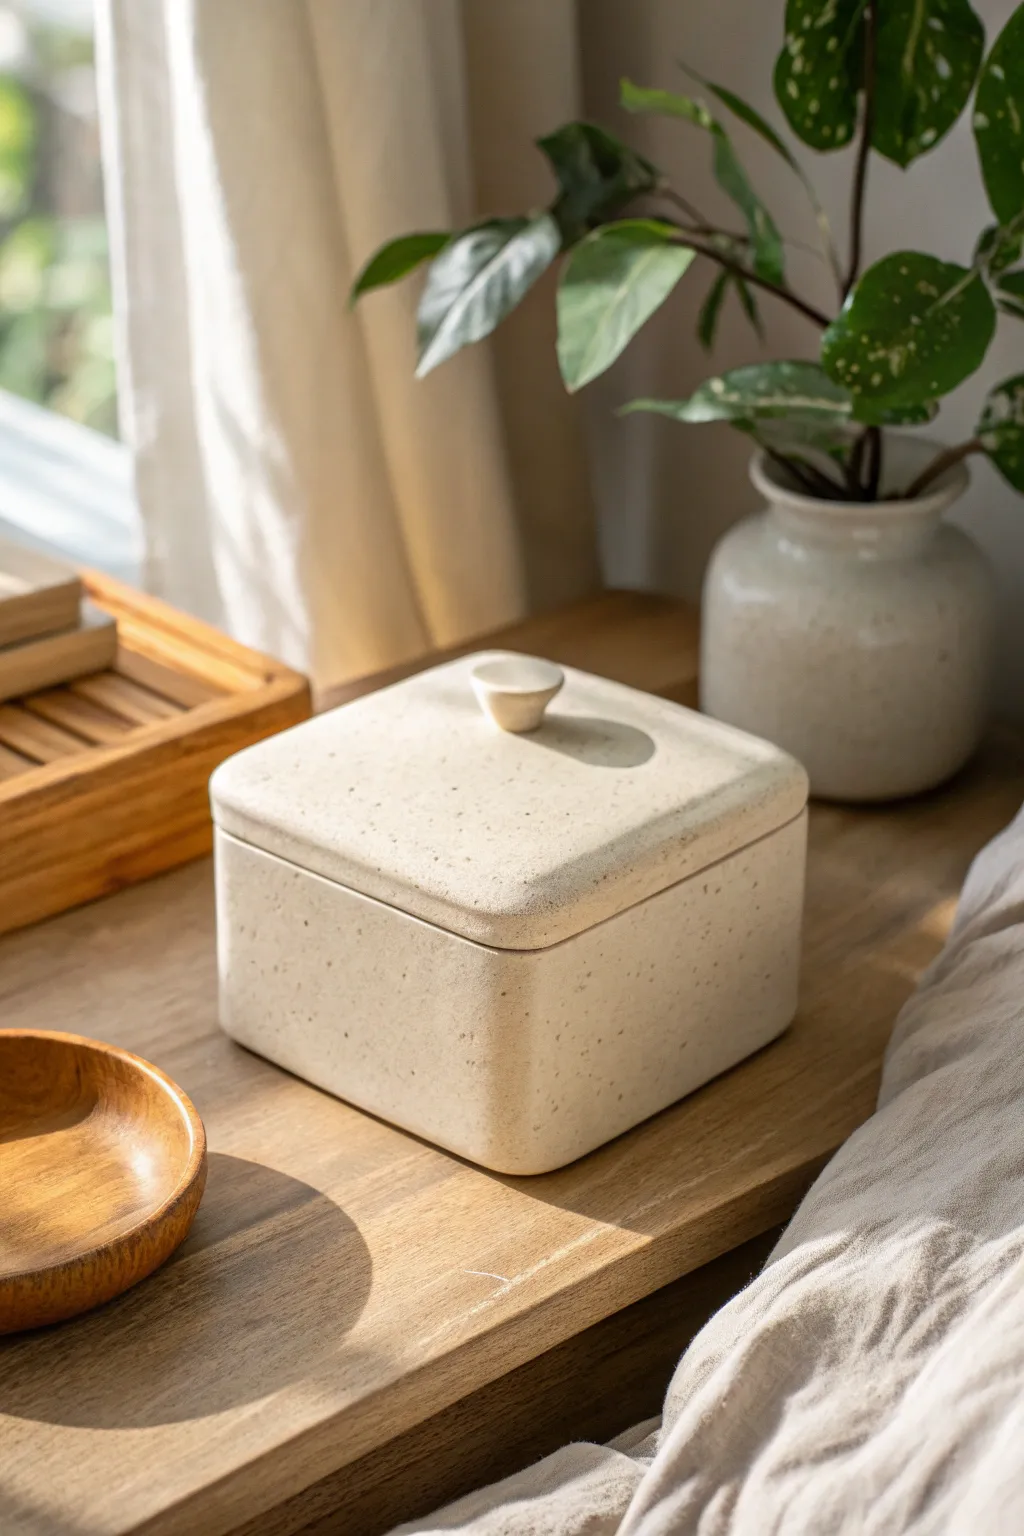
Move beyond sharp edges with this gentle, pillowy slab box that feels as soothing as it looks. The speckled clay body and soft, rounded corners give it a modern artisan vibe, perfect for holding precious keepsakes or tea bags.
How-To Guide
Materials
- Speckled Stoneware Clay (mid-fire)
- Rolling pin
- Guide sticks or slats (approx. 1/4 inch thick)
- Fettling knife or needle tool
- Paper template (square base + 4 rectangular sides)
- Scoring tool (serrated rib)
- Slip or vinegar
- Paddle tool
- Soft rib (red rubber or silicone)
- Sponge
- Matte white or clear glaze
Step 1: Preparing the Slabs
-
Roll out the clay:
Begin by wedging your speckled clay to remove air bubbles. Using guide sticks on either side to ensure even thickness, roll the clay out into a large, consistent slab about 1/4 inch thick. -
Compress the slab:
Take a soft rib and firmly drag it across the surface of the clay in multiple directions. This aligns the clay particles to prevent warping and creates a smooth canvas for those lovely speckles. -
Cut the components:
Place your paper templates onto the slab. You will need two squares (one for the floor, one for the lid) and four rectangles for the walls. Cut around them precisely with a fettling knife. -
Stiffen the slabs:
Let the cut pieces sit on a ware board until they reach a ‘soft leather hard’ state. I find that if they are too floppy, the rounded walls will collapse, so patience is key here.
Step 2: Constructing the Box
-
Bevel the edges:
Cut 45-degree angles on the vertical sides of your wall pieces and along the edges of the base where the walls will attach. This miter joint creates a stronger bond and seamless look. -
Score and slip:
Rough up all the beveled edges with a scoring tool or serrated rib. Apply a generous amount of slip or vinegar to the scratched areas. -
Assemble the walls:
Attach the first wall to the base, pressing firmly. Continue adding the remaining three walls, ensuring the corners meet snugly. Use a coil of clay on the inside seams for reinforcement. -
Shape the corners:
Instead of leaving the corners sharp, gently paddle the outside of the box while supporting the inside wall with your hand. This creates that signature soft, rounded silhouette shown in the photo. -
Smooth the exterior:
Use a soft rib to erase all construction seams on the outside surfaces so the clay looks like one continuous piece.
Clean Seams
When joining walls, offset your seams slightly or wiggle the pieces together until you feel the slip ‘grab’. This suction creates a much stronger bond than just pressing.
Step 3: Lid and Finishing Details
-
Create the lid flange:
Flip your lid slab over. Roll a small coil of clay and attach it in a square shape slightly smaller than the lidded area, so it will sit inside the box walls to keep the lid from sliding off. -
Refine the lid shape:
Place the lid on top of the box. Use your paddle again to gently curve the top edges of the lid downward to match the soft aesthetic of the box body. -
Make the knob:
Form a small, inverted cone shape from a scrap of clay. Hollow the top slightly with your thumb to create a comfortable grip. -
Attach the knob:
Score and slip the center of the lid and the bottom of your knob. Press them together firmly and clean up the attachment point with a damp brush. -
Final smoothing:
Take a damp sponge and wipe down the entire piece to remove any grog or rough spots. Pay special attention to the rim where the lid meets the box. -
Drying and firing:
Dry the box slowly with the lid on to prevent warping. Once bone dry, bisque fire, then apply a thin matte glaze that allows the clay’s natural speckles to show through before the final firing.
Textured Touch
Before assembling, press a linen cloth or canvas onto the moist slab surface. The subtle fabric texture combined with the speckles adds incredible tactile depth.
Now you have a serene, minimalist storage vessel ready to bring a moment of calm to your daily routine


What Really Happens Inside the Kiln
Learn how time and temperature work together inside the kiln to transform clay into durable ceramic.
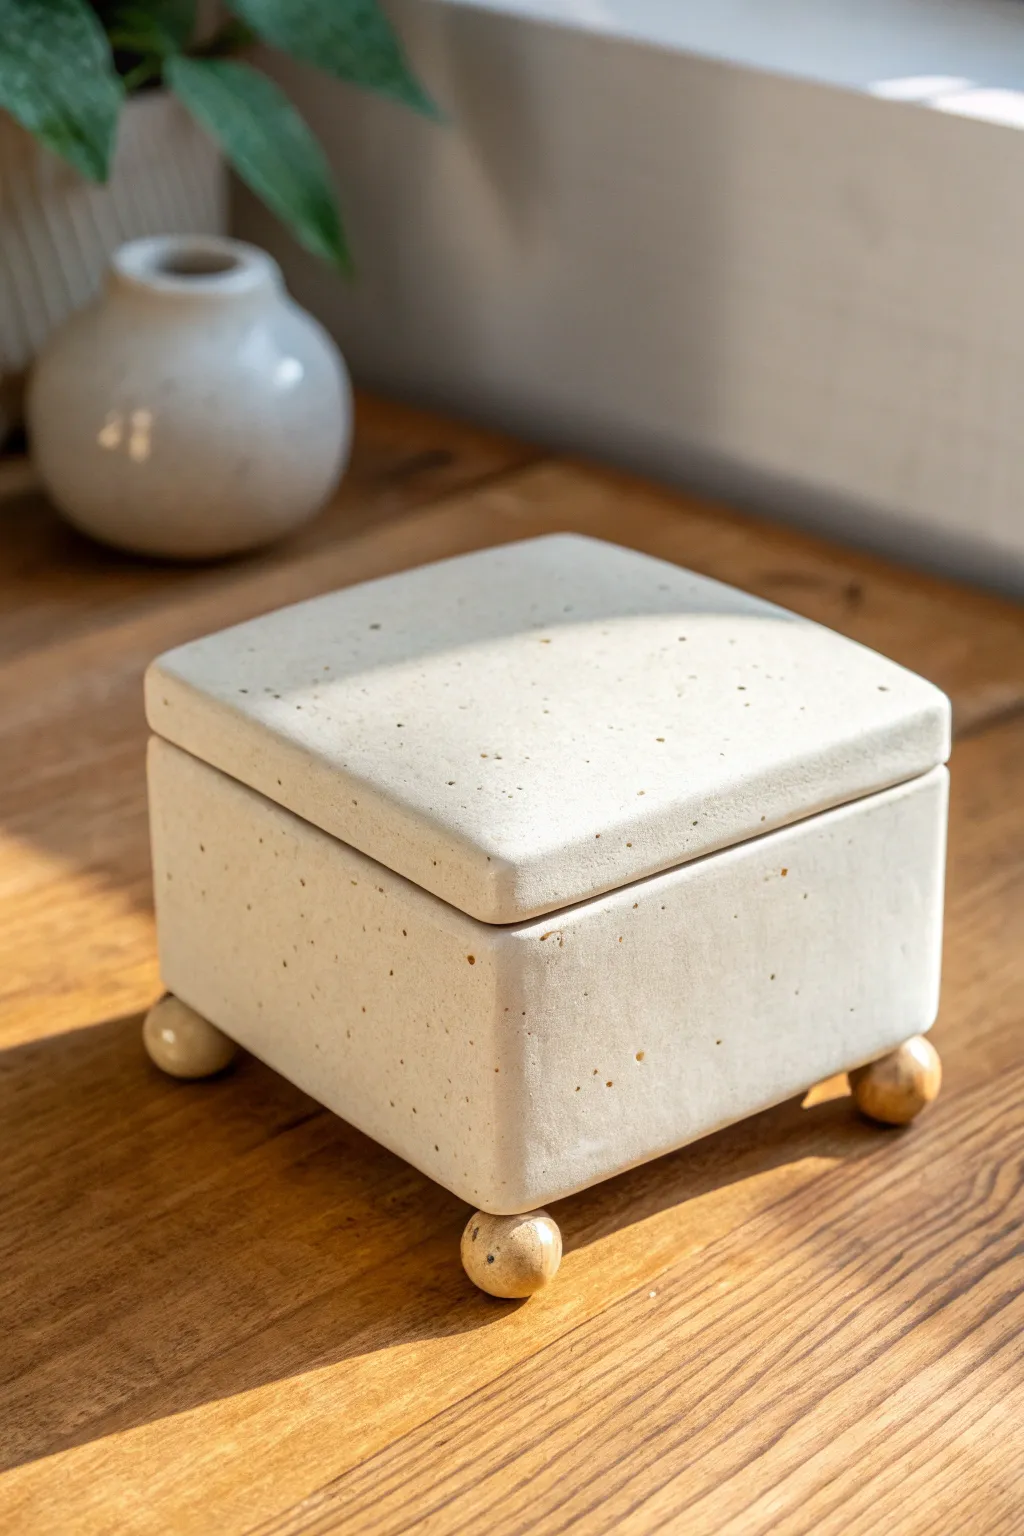
Tiny Trinket Slab Box (Mini Scale)
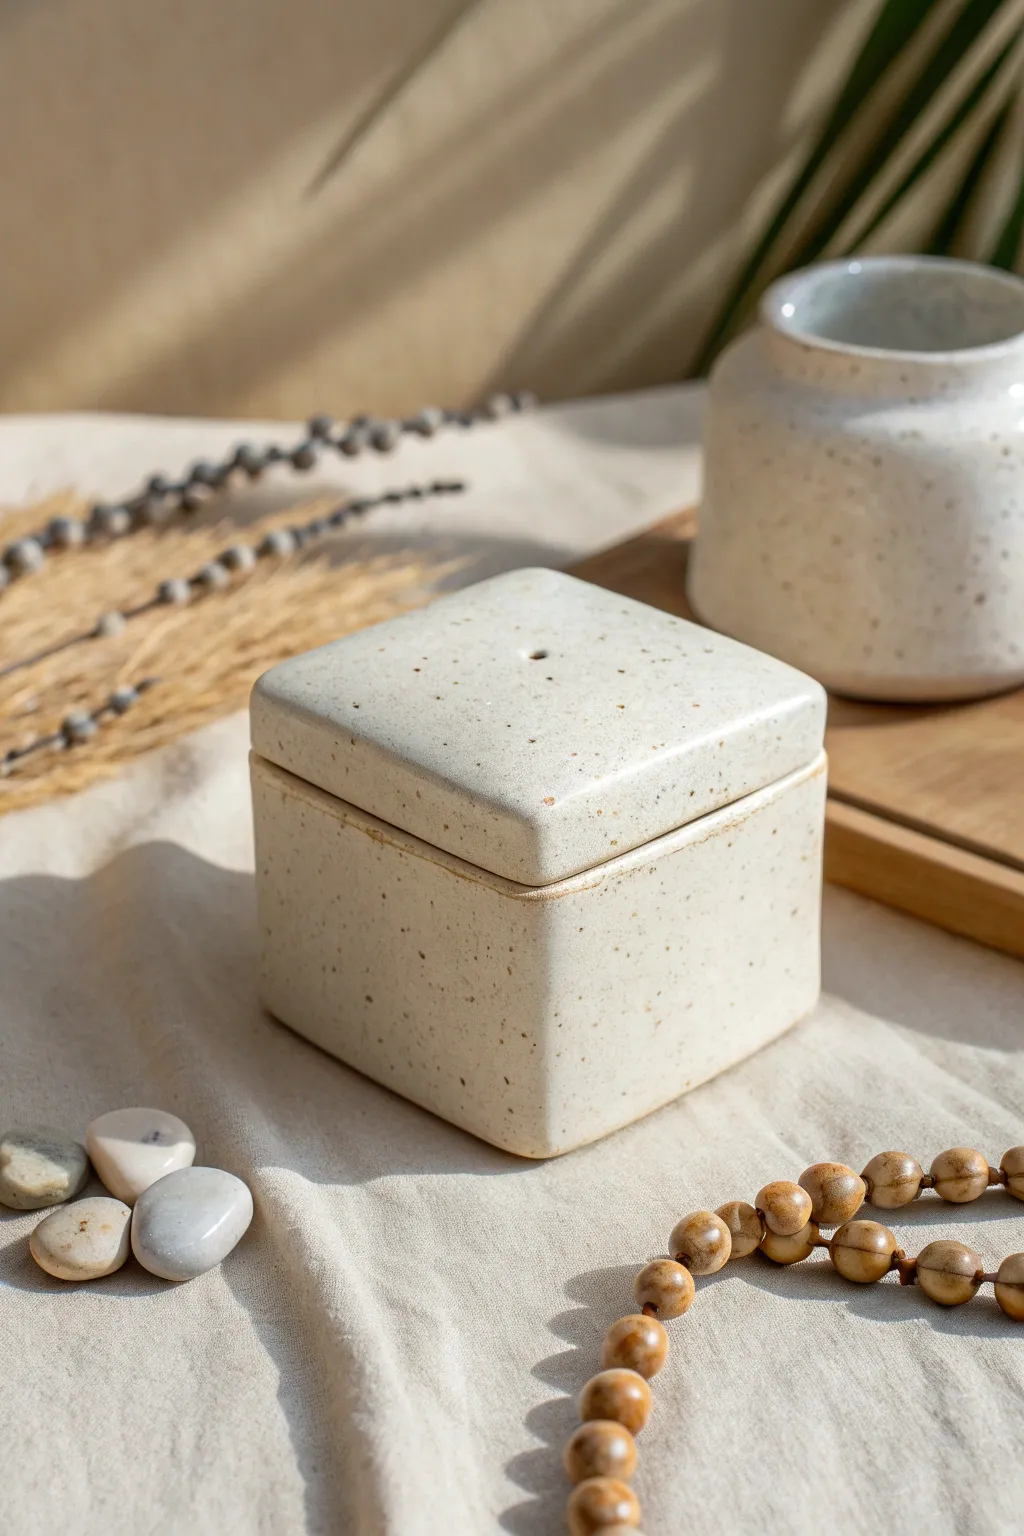
This charming little box brings a touch of minimalist tranquility to your dresser or workspace. Its soft, rounded square shape and delicate speckled glaze give it an organic, handcrafted feel that belies its simple slab construction.
Detailed Instructions
Materials
- Speckled cream stoneware clay (or white clay mixed with grog/speckles)
- Rolling pin
- Two guide sticks (0.5 cm thickness)
- Square template (paper or cardstock, approx. 7cm x 7cm)
- Smaller square template for lid flange (approx. 6.5cm x 6.5cm)
- Needle tool
- Serrated rib or fork (for scoring)
- Slip (clay mixed with water)
- Soft paintbrush
- Sponge
- Wooden paddle or flat wooden spoon
- Clear or transparent glossy glaze
- Kiln (or appropriate finish for air-dry alternatives)
Step 1: Preparing the Slabs
-
Roll the Clay:
Begin by wedging your speckled clay to remove air bubbles. Place your guide sticks on either side of the clay and roll it out into a uniform slab about 0.5 cm thick. -
Smooth the Surface:
Before cutting, take a rubber rib or a slightly damp sponge and compress the clay surface on both sides. This removes canvas texture and strengthens the clay alignment. -
Cut the Base and Walls:
Using your 7cm x 7cm square template and a needle tool, cut out five identical squares. One will be the floor, and four will be the walls. -
Cut the Lid and Flange:
Cut one more 7cm x 7cm square for the lid top. Then, cut a slightly smaller square (around 6.5cm) that will serve as the inner flange to keep the lid from sliding off. -
Leather Hard Stage:
Let all your cut pieces sit until they reach a ‘leather hard’ state. They should be firm enough to hold their shape without bending but still soft enough to join. I prefer to let them sit for about an hour depending on humidity.
Warped Walls?
If walls stay crooked, the clay was too wet during assembly. Instead of forcing it, stuff the wet box with crumpled newspaper or foam to hold the shape while it stiffens.
Step 2: Assembling the Box
-
Bevel the Edges:
For a clean corner connection, cut a 45-degree angle on the vertical edges of your four wall pieces. Do the same for the edges of the base piece where it will meet the walls. -
Score and Slip:
Vigorously score (scratch) all the beveled edges you just created. Apply a generous amount of slip to the scored areas. -
Join the Walls:
Attach the walls to the base first, pressing them firmly into place. Then, bring the vertical wall edges together to form the cube. -
Reinforce Seams:
Roll a very thin coil of wet clay and press it into the interior corners of the box. Smooth this coil out with a modeling tool or your fingertip to reinforce the bond. -
Paddle the Shape:
With the box fully assembled, gently tap the outside walls with a wooden paddle. This helps square up the form and erase the seam lines on the exterior. -
Round the Corners:
Using a slightly damp sponge, run it over the sharp vertical corners and the top rim to soften them. The goal is a gentle, pillowy square look rather than sharp industrial edges.
Pro Tip: Seamless Texture
To emphasize the natural stone look, don’t over-smooth the surface with metal tools. Finish only with a soft, damp sponge to bring the gritty ‘tooth’ of the clay to the surface.
Step 3: Creating the Lid
-
Assemble the Lid:
Center the smaller flange square onto the bottom of the larger lid square. Score and slip the contact surfaces heavily, then press them together firmly to eliminate trapped air. -
Add the Vent Hole:
Using your needle tool or a small drill bit, poke a small hole in the exact center of the lid. This acts as a decorative element and prevents air pressure issues during firing. -
Check the Fit:
Gently place the lid onto the box to ensure the flange fits inside. Don’t leave it on too long if the clay is still wet, or they might stick together. -
Refine Edges:
Smooth the edges of the lid with your sponge, mirroring the softened, rounded aesthetic of the box body.
Step 4: Finishing and Firing
-
Slow Drying:
wrap the box and lid loosely in plastic to let them dry slowly. This prevents warping, which is crucial for a fitted lid. -
Bisque Fire:
Once bone dry, fire the piece to bisque temperature (usually cone 04 or 06) to prepare it for glazing. -
Glazing:
Apply a clear or semi-transparent milky glaze. This type of glaze allows the natural speckles of the clay body to show through beautifully. -
Wipe the Foot:
Use a damp sponge to remove any glaze from the bottom of the box and the rim where the lid sits to prevent them from fusing shut in the kiln. -
Final Fire:
Fire again to the maturity temperature of your clay (likely cone 5 or 6 for stoneware) and let it cool completely before opening.
Once cooled, your durable little box is ready to safeguard your smallest treasures with sturdy elegance
Matchbox-Style Sliding Lid Slab Box
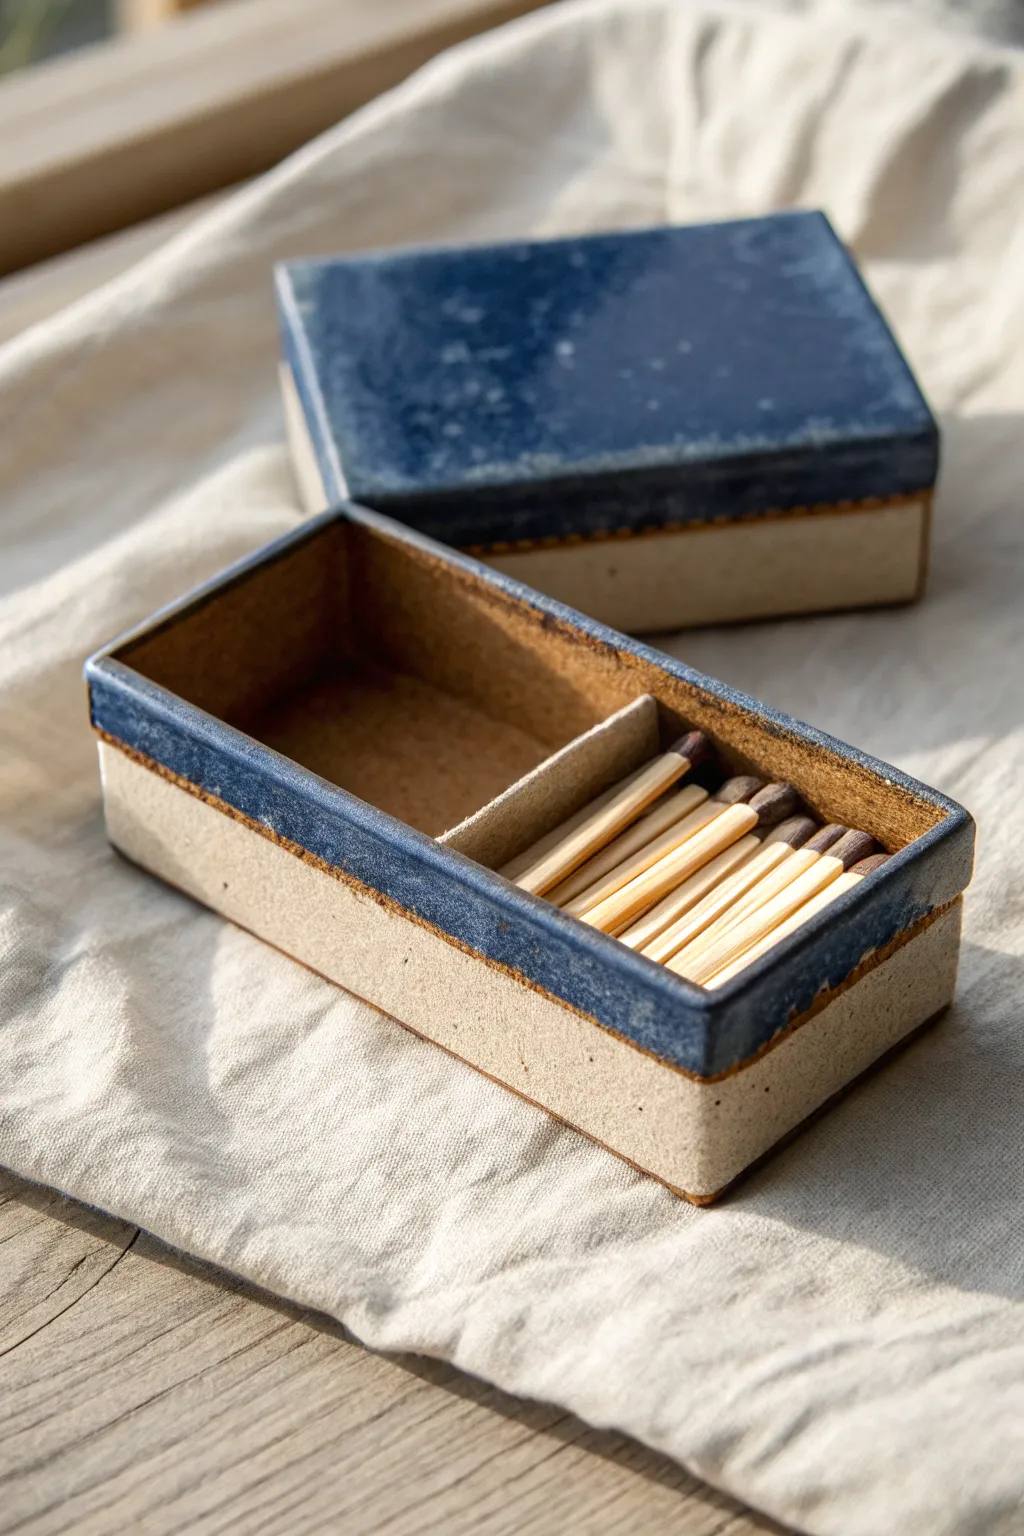
This charming, utilitarian ceramic box mimics the classic proportions of a matchbox but elevates it with durable stoneware and a dual-glaze finish. The clever internal divider keeps small treasures organized, while the raw clay exterior provides a satisfying tactile contrast against the glossy blue rim.
Step-by-Step Tutorial
Materials
- Stoneware clay body (specs)
- Rolling pin and guide strips (approx. 5mm thickness)
- Fettling knife or X-Acto blade
- Serrated rib or scoring tool
- Slip (clay mixed with water)
- Ruler or template guides
- Chamois or sponge
- Wooden modeling tool
- Masking tape or wax resist
- Glossy dark blue glaze
- Small paintbrush for glazing
Step 1: Preparing the Slabs
-
Roll and Compress:
Begin by rolling out your clay on a canvas surface to a consistent thickness of about 5mm. Use a rib to compress the clay on both sides, which aligns the particles and prevents warping later. -
Cut Component Pieces:
Using a ruler and fettling knife, cut out your base rectangle (approx. 4 x 8 cm), two long side walls, and two short end walls. You will also need a lid slab slightly larger than the base, and a small internal divider rectangle. -
Leather Hard Conditioning:
Let these slabs stiffen up to a soft leather-hard stage. This is crucial—if they are too soft, your sharp corners will slump; too dry, and they won’t join securely.
Step 2: Assembling the Base
-
Score and Slip:
Score the edges of your base slab and the bottom edges of your walls aggressively. Apply a generous amount of slip to the scored areas. -
Attach the Walls:
Press the walls onto the base slab. I like to start with one long side and one short side to establish a square corner immediately. -
Reinforce the Seams:
Roll a very thin coil of clay and press it into the interior seams where the walls meet the floor. Smooth this out with a wooden tool for hidden strength. -
Insert the Divider:
Measure where you want your internal compartment. Score the interior walls at that spot and slide your divider piece in, smoothing the connection points so it looks seamless. -
Refine the Top Edge:
Ensure the top rim of the box is perfectly flat by flipping the box upside down gently onto a flat board. This ensures the lid will sit flush.
Warping Woes?
If your lid rocks instead of sitting flat, your clay dried unevenly. Dry slowly under plastic for 3-4 days to keep moisture consistent.
Step 3: Creating the Flanged Lid
-
Construct the Lid:
Take your lid slab and attach a low rim (about 1cm high) around the upper perimeter. This creates the ‘cap’ style seen in the photo. -
Check the Fit:
Once both pieces are leather hard, gently test the fit. The lid should slide or sit over the base with a tiny bit of wiggle room to account for glaze thickness later. -
Smooth and Dry:
Use a damp chamois to smooth all sharp edges, especially the rim where faces touch. Let both pieces dry slowly under plastic to prevent warping.
Clean Lines Pro-Tip
Use automotive detailing tape instead of standard masking tape for the resist line. It creates a much sharper barrier against the glaze.
Step 4: Glazing and Finishing
-
Bisque Fire:
Fire the bone-dry pieces to cone 04 (or your clay’s bisque temperature). -
Apply Resist:
Using wax resist or masking tape, carefully tape off the lower 3/4 of the box exterior. You want a crisp, straight line where the raw clay meets the glazed rim. -
Glazing the Rim and Interior:
Brush or pour a glossy dark blue glaze into the interior of the box and the underside of the lid. Carefully brush the glaze onto the exposed top rim of the exterior, overlapping slightly for that drippy look if desired. -
Glazing the Lid Top:
Glaze the entire top surface and side rims of the lid to match the box’s accent strip. -
Clean Up:
Wipe away any stray glaze drips from the unglazed raw clay section with a damp sponge. -
Glaze Fire:
Fire the piece to maturity (Cone 5/6 for stoneware). If creating a fitted lid, fire the pieces separately, not touching, to prevent them fusing together.
Once fired, fill your custom box with matches or trinkets and enjoy the beautiful contrast between the smooth glaze and the gritty clay

TRACK YOUR CERAMIC JOURNEY
Capture glaze tests, firing details, and creative progress—all in one simple printable. Make your projects easier to repeat and improve.
Stamp-Pattern Slab Box Using Easy Textures
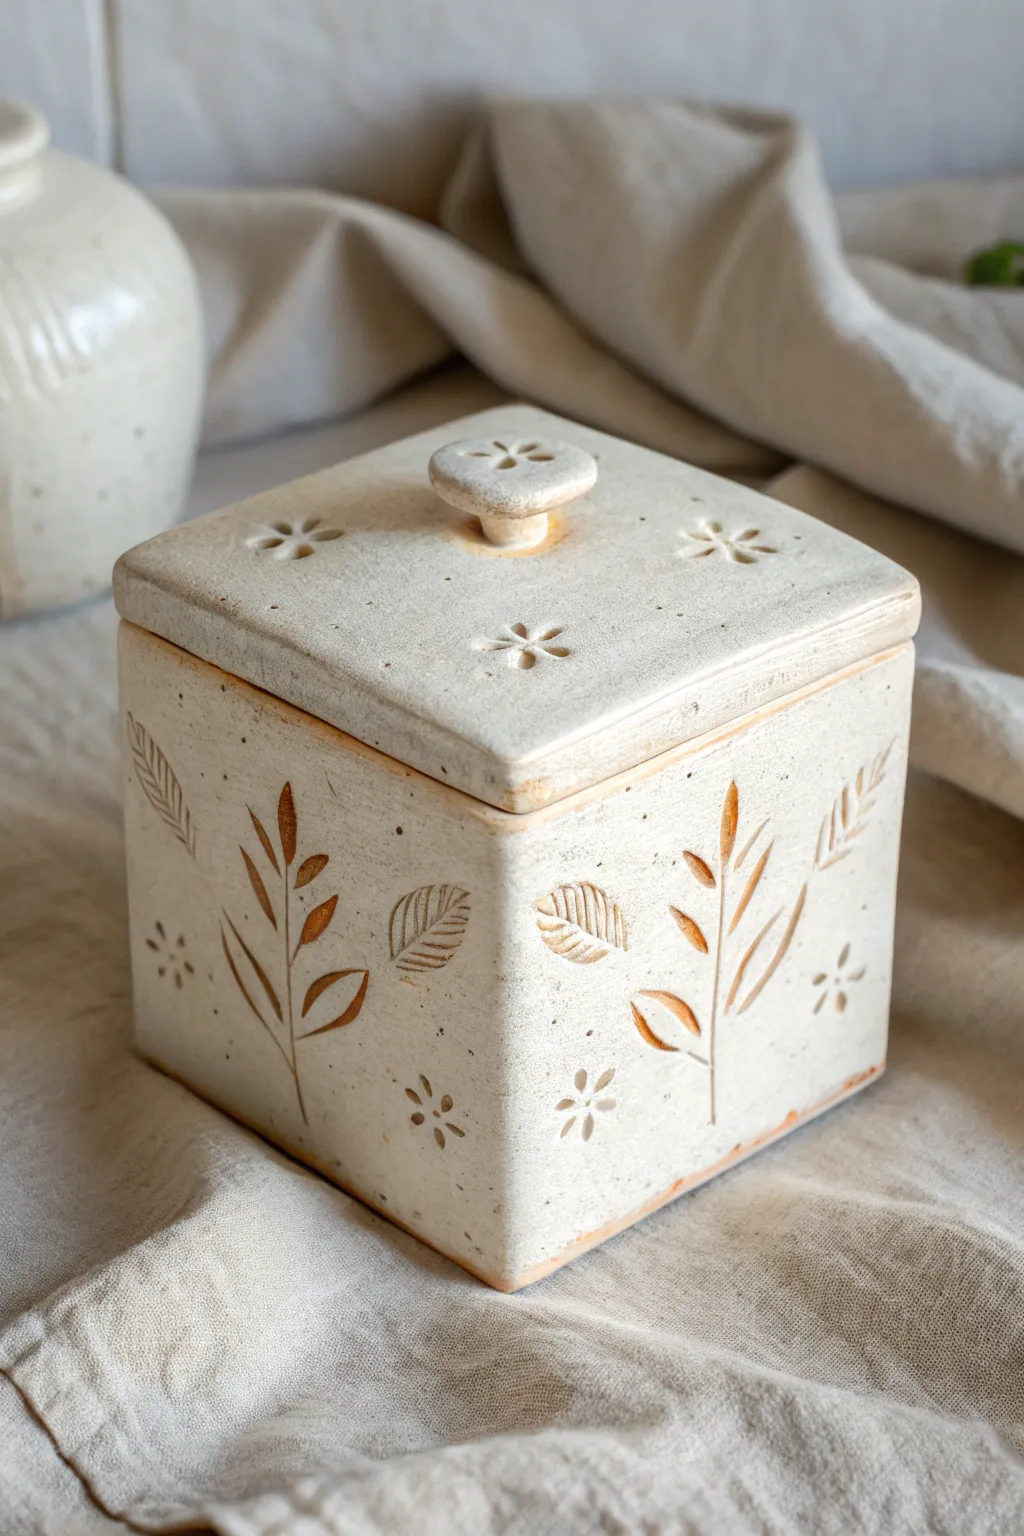
Create a charming, nature-inspired lidded box that highlights surface texture and warm, earthy tones. This slab-building project uses simple leaf stamps and oxide washes to achieve a vintage, farmhouse-style finish that perfectly complements floral impressions.
How-To Guide
Materials
- Speckled stoneware clay (mid-fire)
- Fettling knife or needle tool
- Rolling pin and guide sticks (approx. 1/4 inch)
- Ruler
- Cardboard or paper templates (for sides, base, and lid)
- Leaf and flower stamps (bisque stamps or rubber stamps)
- Scoring tool and slip
- Small tapered wooden tool (for the knob)
- Sponge
- Iron oxide wash or brown underglaze
- Clear or translucent white matte glaze
- Kiln
Step 1: Preparing the Slabs
-
Roll the clay:
Begin by wedging your speckled stoneware clay to remove air bubbles. Roll it out into an even slab using your rolling pin and guide sticks, aiming for a consistent 1/4 inch thickness. -
Smooth the surface:
Use a rib tool or a damp sponge to compress the clay slab on both sides. This removes canvas texture and strengthens the clay particles, preventing warping later. -
Cut the components:
Using your ruler and templates, cut out four square walls, one square base, and one slightly larger square for the lid. Let these pieces stiffen to a ‘soft leather-hard’ state so they can stand up without slumping.
Warping Walls?
If walls bow inward while building, stuff the box with crumpled newspaper or foam to support the shape while it stiffens back to leather-hard.
Step 2: Stamping and Assembling
-
Plan the design:
Before assembling, lay your wall pieces flat. Arrange your stamps—tall leafy branches and small floral accents works great—to visualize the pattern flow. -
Impress the clay:
Firmly press your leaf and flower stamps into the clay walls. Ensure the depth is consistent but don’t press so hard that you deform the slab’s shape. Stamp the lid piece now as well. -
Bevel edges:
Cut the vertical edges of your four wall pieces at a 45-degree angle. This miter joint creates a cleaner corner than a butt joint and increases the surface area for a strong bond. -
Join the walls:
Score the beveled edges aggressively and apply slip. Stand the walls up on the base (which should also be scored where the walls meet it) and press the corners together firmly. -
Reinforce the seams:
On the inside of the box, use a small coil of soft clay to reinforce the corners. Blend this coil smooth so it disappears completely. I find a rounded wooden tool works best for reaching these tight spots. -
Attach the base:
Ensure the walls are securely attached to the separate base slab. Smooth the exterior seam where the wall meets the floor so the connection is invisible.
Step 3: Lid and Finishing
-
Create the flange:
Flip your lid upside down. Score and slip a small square of clay slab or coils onto the underside, inset about 1/4 inch from the edge. This ‘flange’ keeps the lid from sliding off the box. -
Make the knob:
Form a small button shape from clay. Impress the center with a flower stamp to match the box body. Score the center of the lid and the bottom of the knob, then attach it securely. -
Slow drying:
Loosely cover the box with plastic to dry slowly. This is crucial for slab boxes to keep the walls straight. Once bone dry, bisque fire the piece.
Pro Tip: Clean Impressions
Dust your stamps lightly with cornstarch before pressing them into the clay. This acts as a release agent and prevents the stamp from sticking or pulling up texture.
Step 4: Glazing and Decoration
-
Apply oxide wash:
Mix iron oxide with water (or use a watered-down brown underglaze). Brush this generously over all the stamped areas, ensuring it gets into the deep crevices of the leaves and flowers. -
Wipe back:
Using a clean, damp sponge, wipe away the excess oxide from the surface. The color should remain only in the stamped depressions, highlighting the design, while the surface returns to a mostly clean state. -
Dip in glaze:
Dip the entire box and lid into a translucent white or clear matte glaze. The glaze should not be too thick, or it will obscure the oxide detail. -
Final firing:
Fire the box to glaze temperature (typically cone 5 or 6 for stoneware). Ensure the lid is fired separately or with a generous amount of wax resist on the contact points.
Once fired, fill your beautiful new box with trinkets or tea bags to admire your handiwork daily
Carved Border Slab Box With Simple Lines
This project features a clean, architectural lidded box made from speckled cream clay, showcasing a subtle sunken panel design on the lid. The simple form highlights the beautiful natural texture of the clay, creating a modern storage piece perfect for trinkets or jewelry.
Detailed Instructions
Materials
- Speckled cream stoneware clay (e.g., lagunas speckled buff)
- Slab roller or rolling pin with depth guides (1/4 inch thick)
- Fettling knife or X-Acto blade
- Ruler
- Scoring tool or serrated rib
- Slip (clay mixed with water)
- Rubber kidney rib
- Wooden modeling tool
- Sponge
- Kiln and transparent matte glaze (optional)
Step 1: Planning and Rolling
-
Prepare your templates:
Cut paper templates for your box. You will need a square for the base (e.g., 4×4 inches), four rectangular side walls (e.g., 4 inches wide by 3 inches tall), and a lid piece slightly larger than the base to account for shrinking or overhang. -
Roll out the slab:
Roll your speckled clay out to a consistent 1/4-inch thickness. Compress the slab on both sides with a rubber rib to align the clay particles, which helps prevent warping later. -
Cut the components:
Place your templates on the leather-hard slab and cut out your pieces using a fettling knife. For cleaner corners, I prefer to cut straight down rather than dragging the knife. -
Miter the edges:
For a seamless look like the example, bevel the vertical edges of your four wall pieces at a 45-degree angle. This creates strong miter joints where the walls meet.
Warping Woes?
If your lid rocks or won’t sit flat, dry it slowly with a small weight on top (like a bag of rice) to keep it perfectly level.
Step 2: Assembling the Box
-
Score and slip:
Deeply score all connection points—the mitered edges of the walls and the perimeter of the base slab. Apply a generous amount of slip to these rough areas. -
Raise the walls:
Attach the first wall to the base, pressing firmly. Add the second wall, ensuring the mitered corners lock together tightly. Continue until all four walls are attached. -
Reinforce the interior:
Roll a very thin coil of clay and press it into the interior seams where the walls meet the floor. Smooth this out with a wooden tool to create a strong, curved interior transition. -
Smooth the exterior:
Use a rubber kidney rib to smooth the outside corners, blending the clay so the seam disappears completely. The box should look like a solid block.
Elevate It
Add a hidden surprise by glazing the interior with a bright, glossy color like teal or mustard yellow for a pop of contrast when opened.
Step 3: Creating the Lid Detail
-
Form the lid flange:
On the underside of your lid slab, score and attach a smaller square of clay (or four strips) inset about 1/4 inch from the edge. This ‘flange’ will sit inside the box walls to keep the lid from sliding off. -
Mark the top border:
Flip the lid over. Using a ruler, lightly mark a square border on the top surface, about 1/2 inch in from the outer edge. -
Carve the sunken panel:
Using a loop tool or a flat modeling tool, carefully shave away a thin layer of clay from the center square area you just marked. This creates the raised border effect seen in the photo. -
Refine the border profile:
Smooth the transition between the raised border and the sunken center. You can keep it crisp or soften it slightly with a damp sponge for a more organic feel.
Step 4: Finishing Touches
-
Dry fitting:
Once the clay is leather hard, gently place the lid on the box to ensure a good fit. If it’s too tight, sand down the flange slightly. -
Final smoothing:
Go over the entire piece with a barely damp sponge to remove any sharp burrs or fingerprints, paying special attention to the rim. -
Bisque fire:
Allow the piece to dry slowly under plastic to prevent warping, then bisque fire to cone 04 (or your clay’s specification). -
Glazing:
To achieve the look in the image, leave the exterior unglazed (raw clay) to show off the speckles, or apply a very thin, transparent matte glaze. If using glaze, wipe the bottom clean before firing. -
Final firing:
Fire the piece to maturity (usually cone 5 or 6 for speckled stoneware). Sand the bottom smooth after firing if necessary.
Enjoy the calming process of building this piece and watching the speckled texture emerge from the kiln
Sgraffito Doodle Slab Box on Flat Panels
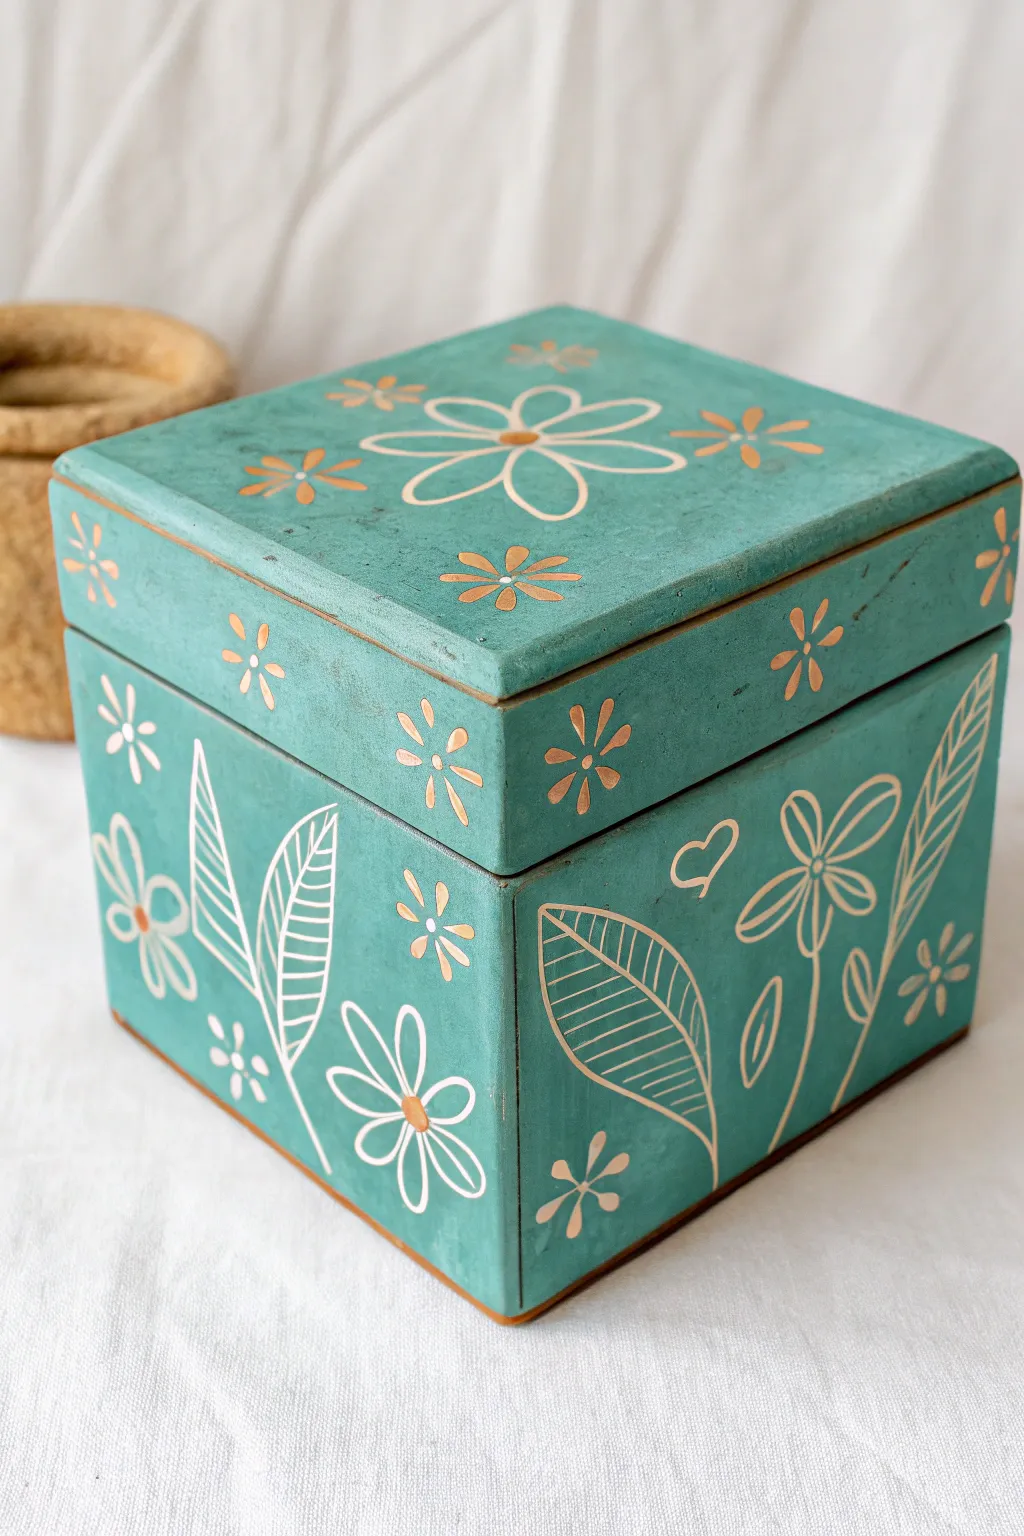
This charming slab-built box features a vibrant turquoise finish adorned with delicate sgraffito floral doodles. The contrast between the matte teal surface and the exposed clay body creates a lovely, folk-art inspired aesthetic perfect for storing treasures.
How-To Guide
Materials
- Stoneware or earthenware clay body (white or buff color is best)
- Slab roller or rolling pin and guide sticks
- Fettling knife or X-Acto knife
- Ruler or square templates
- Teal underglaze (matte or satin finish)
- Slip trailer or soft brush for application
- Sgraffito carving tool (loop tool or needle tool)
- Gold luster or gold acrylic paint (post-firing option)
- Scoring tool (serrated rib)
- Slip or vinegar
- Clear matte glaze (optional)
- Fine grit sandpaper (for greenware)
Step 1: Slab Construction
-
Roll the Slabs:
Begin by rolling out an even slab of clay, approximately 1/4 inch thick. Compress the clay on both sides with a rib to align the particles, which helps prevent warping later. -
Cut the Panels:
Using a ruler or paper templates, cut out your panels. You will need four square walls, one square base (slightly smaller than the outer dimensions), and one square lid (slightly larger than the box opening). Precise measurements here serve you well later. -
Leather Hard Stage:
Let the slabs dry slowly under thin plastic until they reach a leather-hard state. They should be firm enough to stand up without bending but soft enough to score. -
Miter the Edges:
For crisp corners, cut the vertical edges of your four wall panels at a 45-degree angle. This allows them to join seamlessly. -
Score and Slip:
Aggressively score the mitered edges and the perimeter of the base. Apply slip or vinegar to the scratched areas. -
Assemble the Box:
Press the walls together onto the base. Use a small coil on the interior seams to reinforce the joints, blending it smooth with a modeling tool. -
Create the Lid Flange:
To keep the lid from sliding off, attach a smaller square of clay or small coils to the underside of the lid slab, inset just enough to fit inside the box opening.
Uneven Carving?
If your lines look jagged, the clay might be too dry. Try lightly misting the surface and waiting 5 minutes, or use a sharper carving tool to cut cleanly through the dry underglaze.
Step 2: Surface Decoration
-
Apply Underglaze:
Once the assembled box is firm leather-hard, apply 2-3 even coats of teal underglaze to the exterior. I find that brushing in alternate directions between coats gives the most solid coverage. -
Let it Set:
Allow the underglaze to dry until it’s no longer tacky to the touch. This usually takes about 15-30 minutes depending on humidity. -
Sketch the Design:
Lightly scratch your floral and leaf designs into the surface using a very dull pencil or just freehand it if you’re feeling confident. Aim for large blooms on the faces and a central flower on the lid. -
Carve the Sgraffito:
Using a sgraffito tool or a small loop tool, carve through the teal underglaze to reveal the clay body underneath. Vary your line pressure to create thicker stems and delicate petals. -
Add Details:
Don’t forget the smaller details like the little six-petal flowers and leaf veins. These small fillers balance out the larger motifs. -
Clean Up Burrs:
Gently brush away the carved clay crumbs with a soft, dry brush. Be careful not to smudge the surrounding underglaze. -
Bisque Fire:
Once bone dry, bisque fire the piece to the appropriate cone for your clay body (usually Cone 04).
Interior Surprise
Add a contrasting bright color like yellow or coral inside the box for a fun pop of color when opened, or carve a secret hidden message into the underside of the lid.
Step 3: Finishing Touches
-
Glaze Firing:
Interior glazing is recommended for functionality, but leave the outside matte or apply a clear matte glaze if desired. Fire to maturity. -
Apply Gold Accents:
After the final firing, use gold luster (requires a third, lower firing) or gold metallic paint (no firing needed) to fill in specific flower centers and small accents. -
Protect the Gold:
If painting, use a fine detail brush and apply carefully inside the carved lines or on top of specific motifs. Let it cure fully before handling.
Place your finished box on a side table to add a handmade touch to your decor
Lettered Nameplate Slab Box
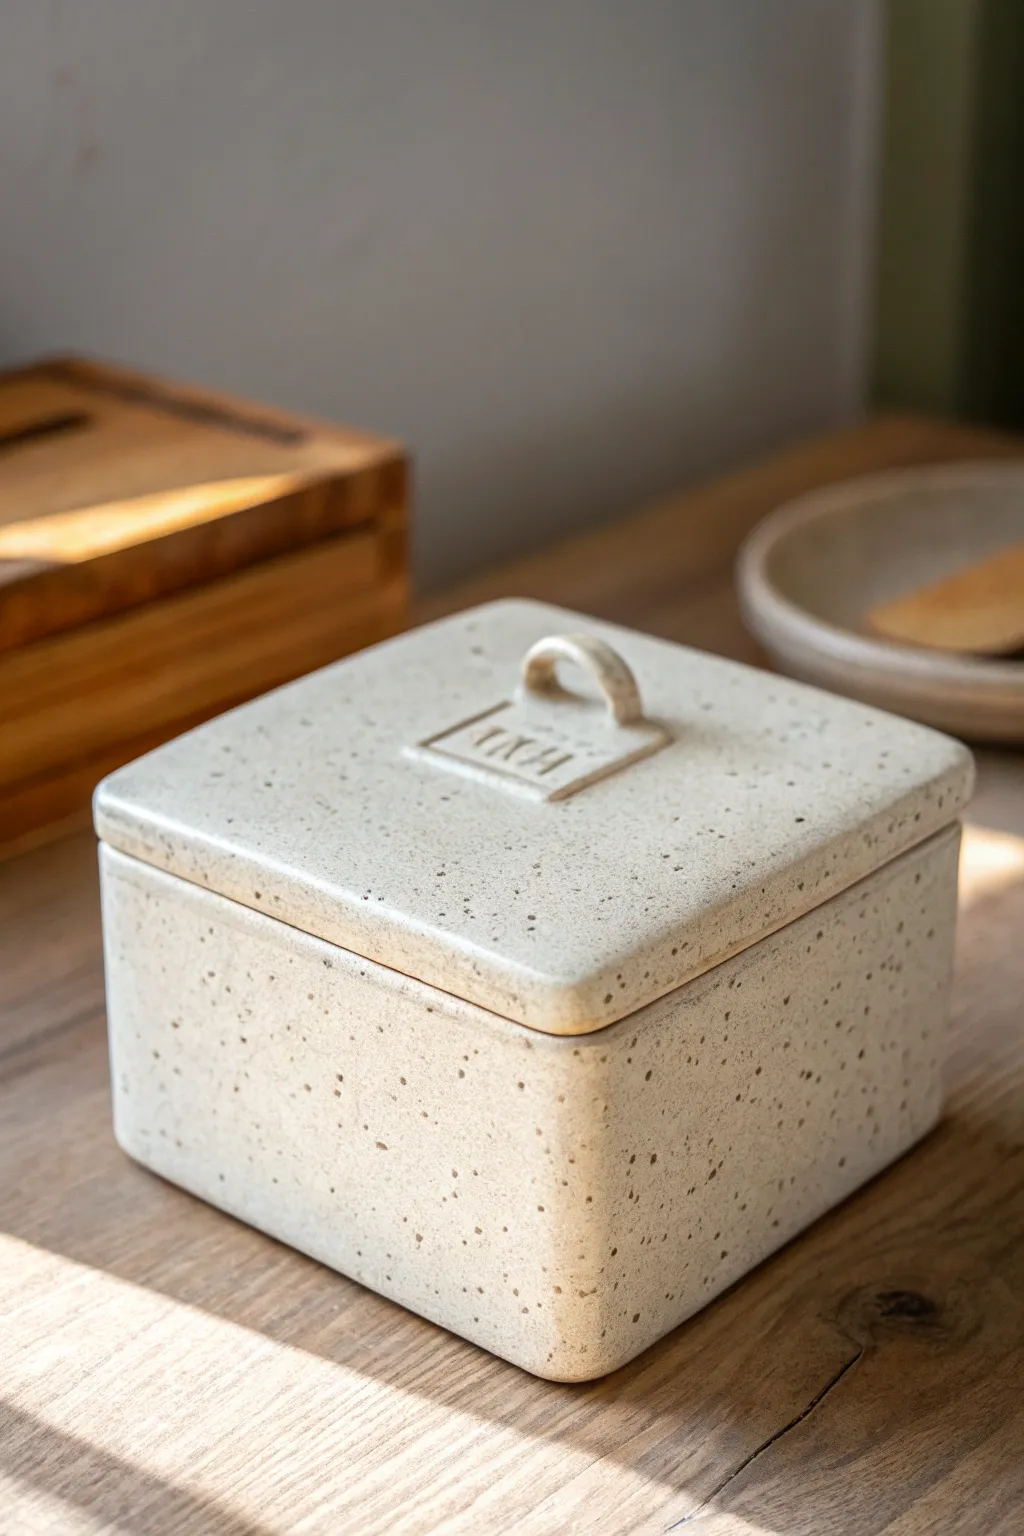
This elegant square box combines clean lines with the organic warmth of speckled clay, featuring a personalized stamped label on the lid. The small loop handle and matte finish give it a modern, artisanal feel perfect for storing teas, jewelry, or keepsakes.
Step-by-Step Guide
Materials
- Speckled stoneware clay (white or cream body with manganese speckles)
- Rolling pin
- Two wooden guide strips (approx. 1/4 inch thick)
- Fettling knife or needle tool
- Ruler or square templates
- Serrated rib or scoring tool
- Slip (clay mixed with water)
- Letter stamps
- Soft sponge
- Clear matte glaze or satin white glaze
Step 1: Preparing the Slabs
-
Roll the clay:
Begin by wedging your speckled clay to remove air bubbles. Flatten it slightly with your palms, then place it between your wooden guide strips. Roll the clay out into a large, even slab. I like to flip the clay over once or twice during rolling to prevent it from sticking to the canvas. -
smooth the surface:
Take a soft, slightly damp sponge or a rubber rib and run it over the surface of your slab. This compresses the clay particles and removes the canvas texture, ensuring that smooth, matte finish later. -
Cut the components:
Using a ruler or paper templates, measure and cut your pieces. You will need: one square for the base (e.g., 4×4 inches), four rectangular side walls (e.g., 4×3 inches), and one slightly larger square for the lid (e.g., 4.25×4.25 inches) to allow for overhang. -
Leather hard stage:
Let all your cut pieces sit out until they reach a ‘leather hard’ state. They should be stiff enough to hold their shape without bending but still dark with moisture. This is crucial for building a crisp, square box.
Warped Lid Woes?
To prevent the lid from warping during the drying phase, dry it while it’s sitting on the box itself. Place a small piece of paper towel between the lid and box so they don’t stick together.
Step 2: Assembling the Box Body
-
Score the edges:
Take your serrated rib or needle tool and rough up (score) the edges of the base and the bottom and side edges of your wall pieces. Apply a generous amount of slip to these scored areas. -
Attach the first wall:
Press your first wall onto the base. Use a small wooden tool or your finger to smooth the seam on the inside. Repeat this for the remaining three walls, scoring and slipping the vertical edges where the walls meet. -
Reinforce the seams:
Roll very thin coils of soft clay. Place these coils into the interior corners and floor seams of the box. Smear them flat with a modeling tool to reinforce the joints and ensure the box is watertight. -
Refine the exterior:
Check that your corners are square. Use a paddle or flat board to gently tap the outside walls to straighten them. Smooth the exterior seams until they disappear completely, maintaining that seamless, monolithic look. -
Add a flange (optional):
If you want the lid to sit securely, you can add small clay lugs or a continuous inner rim (flange) just below the top edge of the box. Alternatively, the lid can simply rest on top if the sizing is precise.
Make It Yours
Instead of a generic clear glaze, try rubbing a black underglaze into the stamped letters and wiping the surface clean before the final glaze firing. This makes the text pop with high contrast.
Step 3: Creating the Lid and Nameplate
-
Prepare the lid slab:
Take your reserved lid square. If it has warped slightly while drying, gently press it flat on a table. Smooth the edges with a damp sponge to round them off slightly, softening the geometry. -
Form the nameplate:
Cut a small rectangle from your remaining clay scraps, roughly 1.5 inches wide. Roll it slightly thinner than the main box. Place it in the center of the lid to check proportions. -
Stamp the letters:
While the nameplate clay is still relatively soft, press your letter stamps into the center. Whether it’s ‘TEA’, ‘SALT’, or initials, apply even pressure. If the clay bulges out, trim the edges again for a sharp rectangle. -
Make the loop handle:
Roll a small strip of clay into a ribbon shape. Curve it into a semi-circle loop. Attach this loop to the top of the nameplate using the score and slip method. -
Attach nameplate to lid:
Score the center of the lid and the back of the nameplate. Apply slip and press the nameplate firmly onto the lid. Clean up any excess slip that squeezes out with a stiff brush.
Step 4: Finishing and firing
-
Wait for bone dry:
Loosely cover the box with plastic for a day to let the moisture equalize, then uncover and let it dry completely to the ‘bone dry’ stage. The clay will become pale and chalky. -
Bisque fire:
Fire the piece in a kiln to bisque temperature (usually cone 04). This hardens the clay and prepares it for glazing. -
Glazing:
Dip the entire box and lid into a clear matte or satin white glaze. This will allow the natural speckles of the clay body to show through while providing a smooth, food-safe surface. Wipe the bottom of the box clean of glaze. -
Final firing:
Fire the piece to the maturity temperature of your clay (likely cone 5 or 6). Once cooled, sand the bottom if necessary to protect your furniture.
Now you have a beautifully bespoke ceramic box that looks right at home on any countertop.
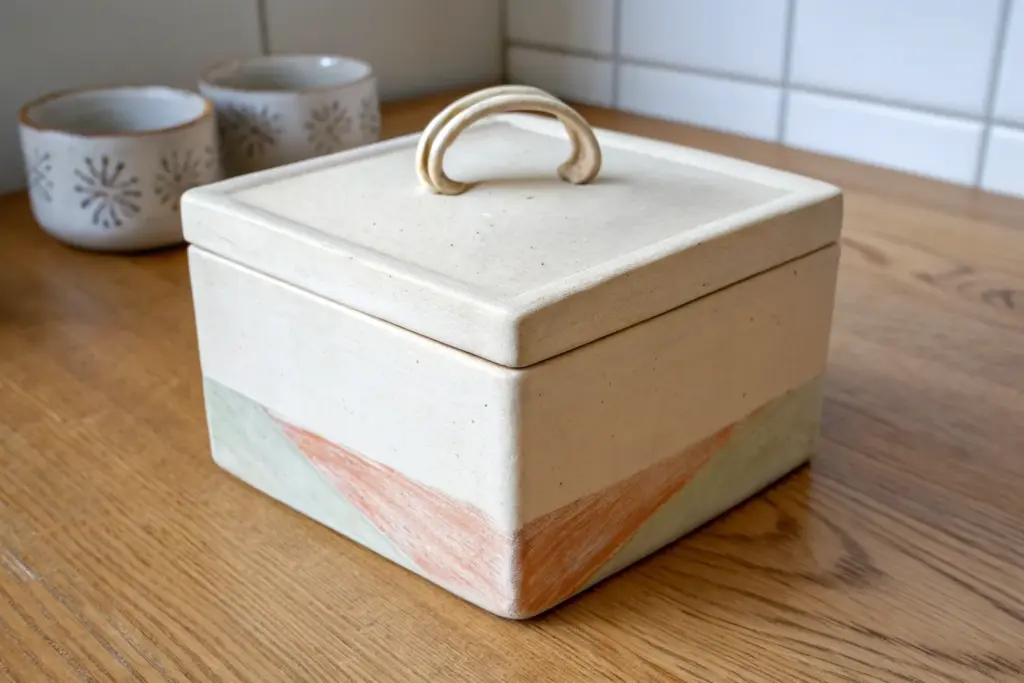
Simple Knob-Lid Slab Box With One Bold Handle
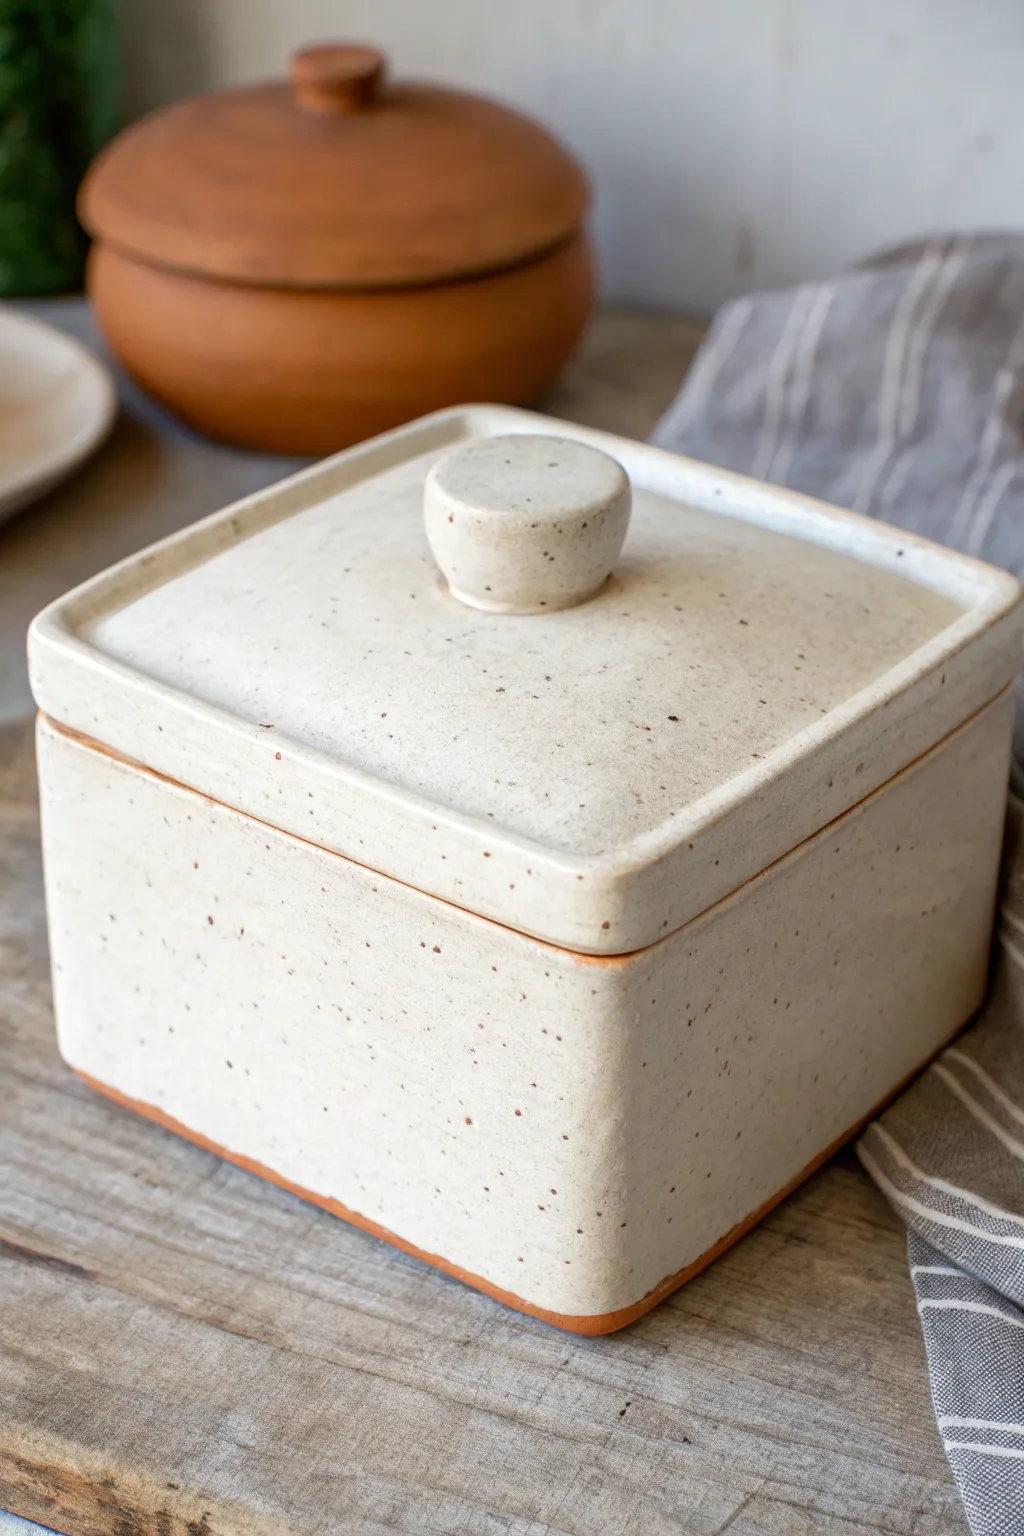
This elegant square box combines clean, architectural lines with the organic warmth of hand-built pottery. Featuring a speckled cream glaze that contrasts beautifully with natural terracotta edges, it makes a perfect container for small treasures or kitchen staples.
Detailed Instructions
Materials
- Speckled stoneware clay (or white clay with grog)
- Rolling pin
- Two 1/4-inch wooden thickness strips
- Fettling knife
- Ruler
- Scoring tool (serrated rib or needle tool)
- Slip (clay slurry)
- Ware board or canvas mat
- Sponge
- Speckled cream or oatmeal glaze
- Wax resist
Step 1: Preparing the Slabs
-
Roll out the clay:
Begin by wedging your clay to remove air bubbles. Place it on your canvas mat between the two wooden thickness strips. Roll the clay out into a large, even sheet, ensuring the rolling pin rides on the strips to maintain a uniform 1/4-inch thickness. -
Compress the slab:
Use a rubber rib to smooth and compress the clay slab on both sides. This aligns the clay particles, reducing the chance of warping later and giving you a nice smooth canvas to work with. -
Measure the components:
Decide on your box size—a 5-inch square is a manageable starting point. Using your ruler, lightly mark out a 5×5 inch square for the base and four side panels that are 5 inches wide by 3.5 inches tall. -
Cut the shapes:
Using a sharp fettling knife and your ruler as a guide, cut out the base and the four wall pieces. For cleaner corners later, you might want to miter the vertical edges of your walls at a 45-degree angle, though straight butt joints work too if scored well. -
Stiffen the slabs:
Let your cut pieces sit on a ware board until they reach a ‘leather-hard’ state. They should be firm enough to hold their shape when stood up, but still flexible enough to be scored and joined without cracking.
Keep it Square
Cut a template from paper or cardstock first. Trace around this template onto your clay rather than measuring directly on the slab to ensure all four walls are identical.
Step 2: Constructing the Box
-
Score the base:
Take your serrated rib or needle tool and thoroughly scratch up the perimeter of the square base where the walls will attach. Do the same to the bottom edges and side edges of your four wall pieces. -
Apply slip:
Generously apply clay slip to the scored areas on the base. I like to be liberal here; you want a good gooey connection. -
Attach the first wall:
Press the first wall firmly onto the base. Use a small wooden tool or your finger to smooth the clay from the wall down onto the base on the inside to seal the seam. -
Assemble remaining walls:
Score and slip the vertical edges of the first wall. Attach the second wall, pressing the corner joint firmly together. Repeat with the remaining walls until the box is closed. -
Reinforce the seams:
Roll very thin coils of soft clay and press them into the interior corners of the box. Smooth these coils out with a modeling tool to create a seamless, rounded interior transition that strengthens the box.
Texture Twist
Before assembling, press a piece of rough linen or lace into your soft slabs. The glaze will break beautifully over the texture, highlighting the pattern.
Step 3: Creating the Lid
-
Cut the lid slab:
Roll another slab slightly thicker than the walls. Cut a square that exactly matches the outer dimensions of your finished box rim. Measure your box carefully, as handling may have shifted its shape slightly. -
Add a flange:
To keep the lid from sliding off, you need a flange. Cut four small strips of clay and attach them to the underside of the lid, inset about 1/4 inch from the edge. These should fit snugly inside the box opening. -
Make the simple knob:
Roll a thick coil or small cylinder of clay. Cut a 1-inch section to serve as the knob. Smooth the cut edges to slightly soften the top and bottom. -
Attach the knob:
Find the exact center of your lid. Score and slip both the underside of the knob and the center spot on the lid. Press the knob down firmly and clean up any excess slip with a damp brush. -
Dry thoroughly:
Place the lid on the box while drying to help them shrink together and maintain fit. Cover loosely with plastic for the first day to dry slowly, then uncover until bone dry.
Step 4: Glazing and Finishing
-
Bisque fire:
Fire the bone-dry piece in a kiln to bisque temperature (usually Cone 04 or 06). This prepares it for glazing. -
Wax the accents:
Apply wax resist to the very bottom rim of the box and the rim where the lid sits if you want that raw clay look shown in the photo. Also can leave the edges unglazed for contrast. -
Apply glaze:
Pour a speckled cream or oatmeal glaze inside the box and swirl to coat. Dip the exterior and the lid. Ensure the flange area is wiped clean of glaze so the lid doesn’t fuse shut during firing. -
Final firing:
Fire the piece to the maturation temperature of your clay and glaze (often Cone 5 or 6). Once cooled, sand the bottom lightly if needed to prevent scratching surfaces.
Enjoy using your sleek new ceramic box for organization or as a thoughtful handmade gift
Flower Knob Slab Box (Super Easy Add-On)
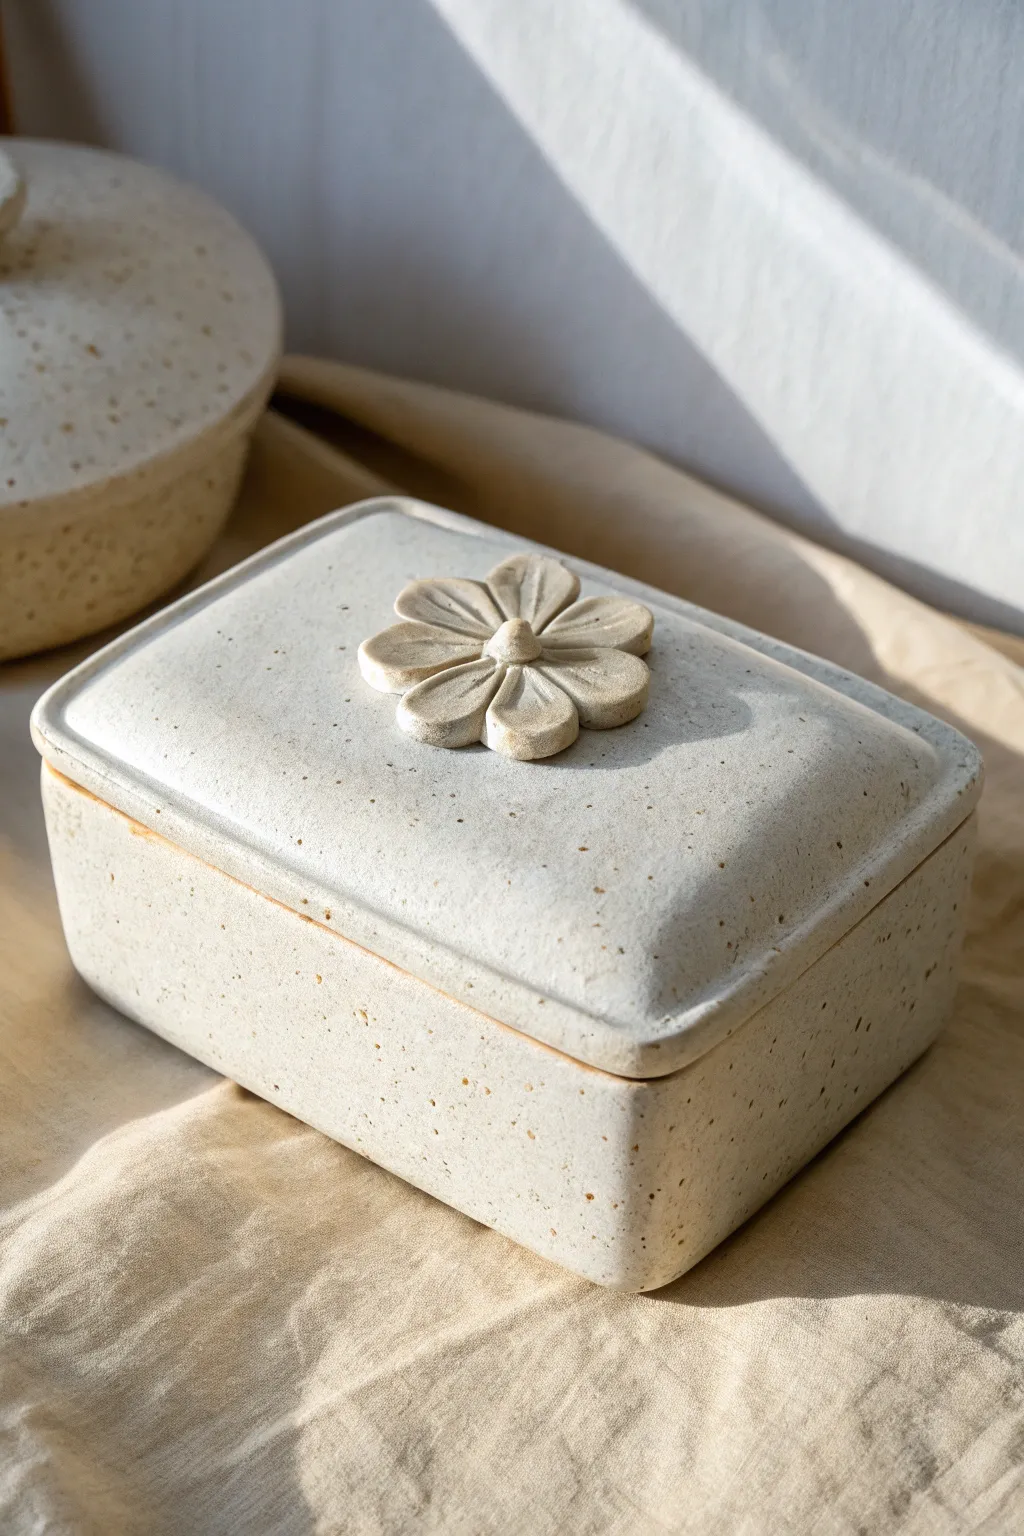
This elegant rectangular trinket box features a soft, sandy speckled clay body and a charming sculpted daisy knob. It’s a perfect beginner-friendly slab project that results in a functional piece of décor with an organic, handcrafted feel.
Step-by-Step Guide
Materials
- Speckled stoneware clay (cream or buff firing)
- Rolling pin with thickness guides (¼ inch)
- Canvas work surface
- Fettling knife or needle tool
- Rectangular paper template (approx. 4″ x 6″)
- Serrated rib or scoring tool
- Slip (clay slurry)
- Wooden modeling tool
- Small sponge
- Ruler or straight edge
- Clear or transparent white glaze
Step 1: Creating the Box Base
-
Roll your slabs:
Begin by wedging your speckled clay to remove air bubbles. Roll it out into a large, even sheet about ¼ inch thick. Using slat guides or guide rings on your rolling pin ensures the walls will be uniform. -
Cut the components:
Using your paper templates, cut out a base rectangle, two long side walls, and two short side walls. Let these pieces stiffen to a ‘soft leather hard’ stage—flexible but sturdy enough to stand up without slumping. -
Miter the edges (optional):
For a cleaner corner joint, cut the vertical edges of your walls at a 45-degree angle. If this feels too tricky, a standard butt joint works perfectly fine too. -
Score and slip:
Rough up all the edges that will join together using your serrated tool. Apply a generous amount of slip to the scored areas. This acts as the glue for your box. -
Assemble the walls:
Attach the walls to the base first, pressing firmly. Then, join the corners of the walls together. Use a wooden tool to blend the clay across the seams on both the inside and outside to ensure a strong bond. -
Refine the shape:
Use a straight edge or paddle gently against the walls to ensure the box is perfectly rectangular. Smooth out any finger marks with a slightly damp sponge, but avoid adding too much water.
Warping Woes?
If your lid rocks or doesn’t sit flat, dry it SLOWLY while sitting *on* the box. Weighting the corners gently with small sandbags during drying helps keep it perfectly straight.
Step 2: Making the Lid & Flower Knob
-
Cut the lid slab:
Cut a rectangle slightly larger than your box opening. You want a bit of overhang. I usually place the box upside down on the clay slab and trace around it, adding about 1/8 inch. -
Add a flange:
To keep the lid from sliding off, roll a small coil or cut thin strips of clay. Score and slip these onto the *underside* of the lid, just inside where the box walls will sit. Measure carefully against your finished box. -
Sculpt the petals:
Roll six small balls of clay and flatten them into teardrop shapes. These will be your flower petals. Arrange them in a circle on the top center of the lid. -
Secure the flower:
Score the underside of each petal and the spot on the lid where they will sit. Apply slip and press them down. Use a modeling tool to press a central line into each petal for detail. -
Add the center:
Roll a small ball of clay for the flower’s center. Score, slip, and press it firmly into the middle of the petals. This creates a functional knob for lifting the lid. -
Dry slowly:
Place the lid on the box with a piece of paper towel in between to prevent sticking. Wrap the whole project loosely in plastic to dry slowly. This prevents warping.
Add Texture
Before assembling, press a piece of lace or linen into your soft clay slabs. The subtle fabric texture combined with the transparent glaze creates a stunning vintage effect.
Step 3: Glazing and Finishing
-
Bisque fire:
Once the piece is bone dry, fire it in the kiln to bisque temperature (usually cone 04). This prepares the clay for glazing. -
Apply glaze:
For the look in the photo, use a semi-transparent white or clear matte glaze. This allows the natural speckles of the clay body to show through beautifully. Dip or brush on two even coats. -
Wipe the flange and foot:
Crucial step: Use a wet sponge to wipe all glaze off the bottom of the box and the meeting points where the lid touches the box (the rim and the flange). If glaze is left here, the lid will fuse to the box permanently. -
Glaze fire:
Load the kiln for your final glaze firing (usually cone 5 or 6 depending on your clay). Place the lid on a separate shelf or distinct spot from the box to ensure they don’t stick.
Once fired, you’ll have a beautiful, durable container ready to hold your jewelry or keepsakes.
Heart-Topped Slab Box for Sweet Storage
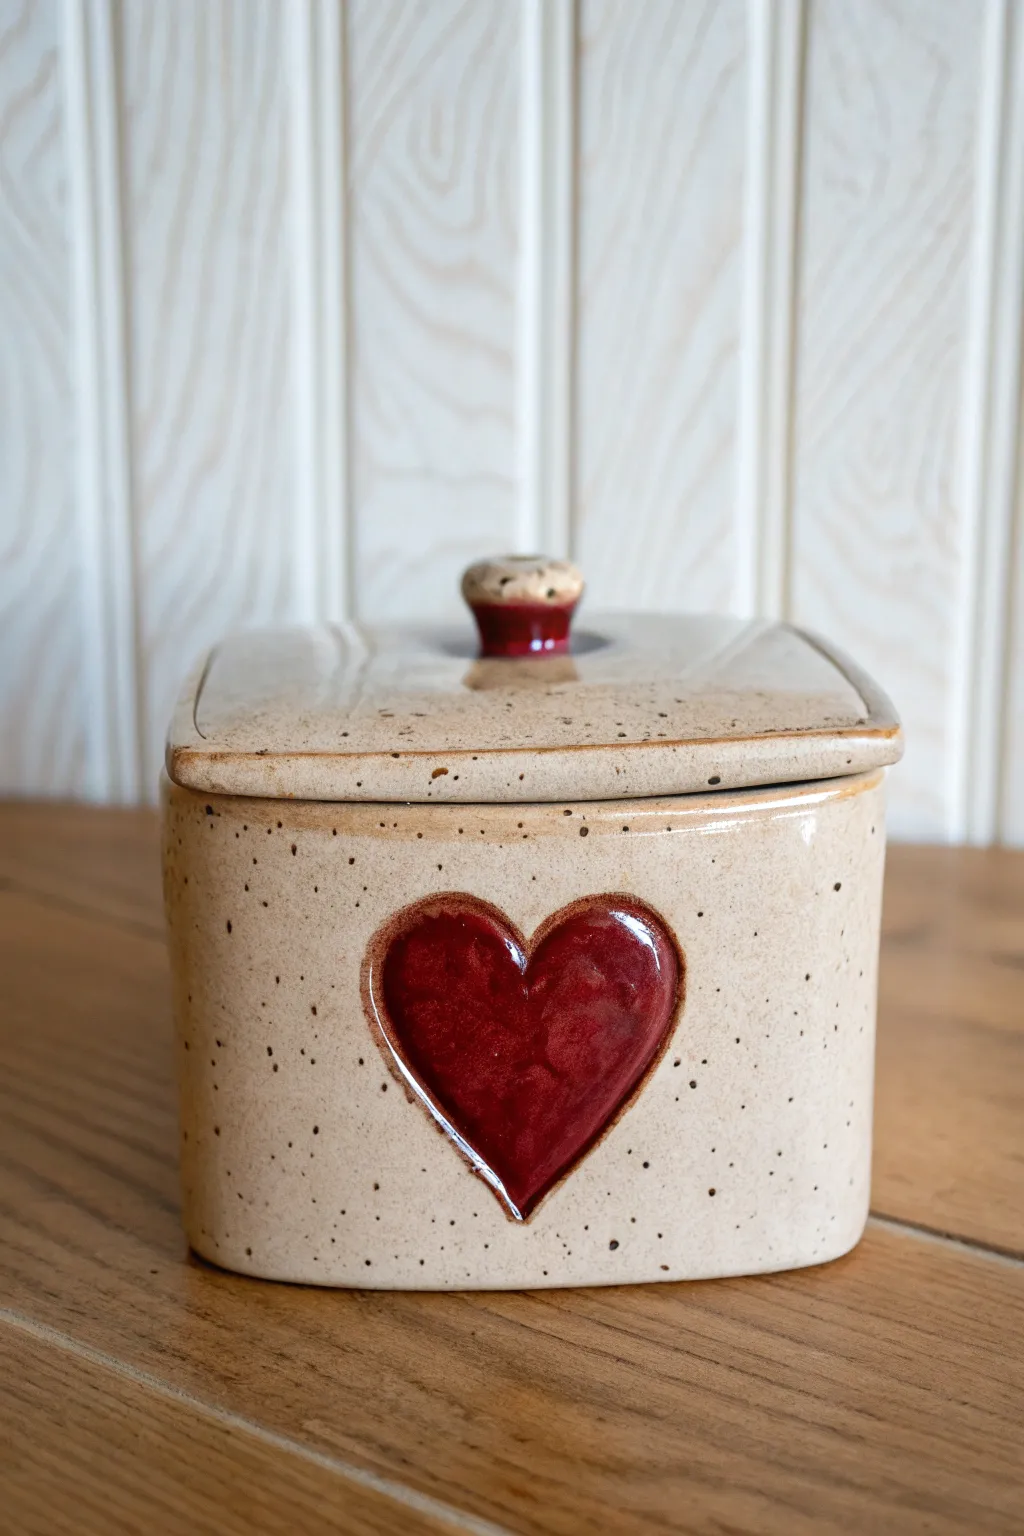
This rustic ceramic box combines form and function with its sturdy slab construction and a charming, deep-red heart motif. The speckled beige glaze gives it a warm, farmhouse feel, making it perfect for storing sweets or trinkets.
How-To Guide
Materials
- Stoneware clay (speckled or buff)
- Rolling pin with guide strips (1/4 inch)
- Clay knife or fettling knife
- Heart-shaped cookie cutter (medium to large)
- Scoring tool or serrated rib
- Slip (clay mixed with water)
- Ruler and square template (paper or cardstock)
- Sponge
- Underglaze (Red)
- Clear glaze or speckled creamy glaze (if not using speckled clay)
- Cornstarch (for release)
- Small paintbrush
Step 1: Creating the Slabs
-
Roll the clay:
Begin by rolling out your clay to an even 1/4 inch thickness. Use guide strips to ensure the clay is perfectly uniform, which is crucial for the box walls to stand straight. -
Cut the templates:
Using a paper template or ruler, cut out four equal rectangles for the walls (e.g., 4 inches wide by 3.5 inches tall) and two squares for the base and lid (e.g., 4.5 inches by 4.5 inches). Allow these slabs to dry to a ‘soft leather hard’ stage so they can support their own weight. -
Prepare the heart:
Before assembling, take one of the wall pieces and gently press a heart-shaped cookie cutter into the center. Don’t cut all the way through; instead, compress the clay inside the heart shape down slightly to create a recessed area, or ’embossed’ effect.
Warping Walls?
If your walls are bowing inward or outward, your clay was likely too soft during assembly. Let slabs stiffen to ‘leather hard’ before joining.
Step 2: Assembling the Box
-
Bevel the edges:
Cut the vertical edges of your four wall pieces at a 45-degree angle. This mitering technique ensures a stronger joint and a cleaner corner. -
Score and slip:
Thoroughly score (scratch) and apply slip to the mitered edges and the perimeter of the base slab where the walls will sit. -
Construct the walls:
Attach the walls to the base and to each other. Press the joints firmly together. I prefer to roll a thin coil of soft clay and press it into the interior seams for reinforcement. -
Soften the shape:
Once the box is assembled, use a damp sponge or your fingers to gently round off the sharp corners, giving the box that puffed, soft look seen in the photo.
Step 3: Lid and Details
-
Fit the lid:
Take your lid square and measure the inside of your box opening. Create a small flange or attach small clay tabs to the underside of the lid so it sits securely without sliding off. -
Add the knob:
Roll a small ball of clay and flatten the top slightly to form a knob. Score and slip to attach it to the center of the lid. -
Refine surfaces:
Smooth over all surfaces with a slightly damp sponge to remove any harsh finger marks or canvas textures. -
Bisque fire:
Allow the piece to dry completely (slowly, to prevent warping) and fire it in the kiln to bisque temperature (usually cone 04).
Pro Tip: Heart Depth
When embossing the heart, smooth the inner edges with a wet paintbrush. This removes burrs and makes glazing the red section much easier later.
Step 4: Glazing
-
Apply red accent:
Carefully paint the recessed heart area and the knob with three coats of deep red underglaze or glaze. Wipe away any drips that get on the surrounding area immediately. -
Glaze the body:
Apply your speckled beige glaze to the rest of the box and lid. If your clay body is naturally speckled, a semi-transparent cream glaze works best to let the iron spots show through. -
Clean the foot:
Wipe the bottom of the box and the rim where the lid touches completely clean of glaze to prevent the pieces from fusing together during firing. -
Final Fire:
Fire the piece again to the maturation temperature of your specific clay and glaze (typically cone 5 or 6 for stoneware).
Once cooled, your box is ready to hold sweet treats or keep kitchen countertops tidy
Ball-Footed Slab Box to Lift the Form
This elegant square box combines the organic feel of speckled clay with a clean, modern silhouette lifted by charming spherical feet. The simple slab-built construction gets an upscale finish from the hidden lid flange and the addition of contrasting wooden legs.
Step-by-Step Tutorial
Materials
- Speckled cream stoneware clay (mid-fire)
- Small wooden balls (approx. 3/4 inch diameter)
- Rolling pin with 1/4 inch guide sticks
- Slab roller (optional)
- Fettling knife or craft knife
- Ruler and square
- Scoring tool or serrated rib
- Slip (clay slurry)
- Clear matte glaze
- High-strength epoxy glue (e.g., E6000)
- Paddle tool
- Fine grit sandpaper
Step 1: Creating the Slabs
-
Roll out the clay:
Begin by rolling out your speckled clay to an even ¼-inch thickness. Compress the slab on both sides with a rib to align the clay particles, which helps prevent warping later. -
Measure and cut:
Using your ruler and square, cut out four identical rectangles for the walls (e.g., 4×3 inches) and two identical squares for the top and bottom (e.g., 4×4 inches). -
Let them firm up:
Allow your cut slabs to dry to a ‘leather hard’ state. They should be firm enough to hold their shape without slumping but still soft enough to score and slip.
Warped Walls?
If your walls curve inward while drying, stuff the leather-hard box gently with crumpled newspaper or foam to brace the sides until they are bone dry.
Step 2: Assembling the Box
-
Bevel the edges:
For the crispest corners, bevel the vertical edges of your wall pieces at a 45-degree angle. Leave the top and bottom edges flat. -
Score and slip:
Thoroughly score the beveled edges and apply a generous amount of slip. Join the four walls together on top of the bottom square base to form an open box. -
Add reinforcement:
Roll a very thin coil of clay and press it into the interior seams of the box. Smooth this out with a modeling tool or your finger to reinforce the join. -
Make the lid gallery:
Take your top square slab (the lid). Roll a small coil or cut a smaller square slab that fits just inside the box opening. Attach this ‘flange’ to the underside of the lid so it sits securely in place without sliding off. -
Refine the shape:
Place the lid on the box. Use a wooden paddle to gently tap the sides, squaring everything up and ensuring the lid aligns perfectly flush with the walls. -
Smooth the surface:
Use a damp sponge to wipe away excess slip and smooth sharp edges. I find that running a finger along the rim softens the look just enough to make it inviting to touch.
Pro Tip: Clean Lines
Use a surfacing tool or a cheese grater (Sureform) on the leather-hard clay edges before assembling. This creates better adhesion than scoring alone.
Step 3: Firing and Finishing
-
Slow drying:
Loosely cover the box with plastic to let it dry very slowly. This is crucial for slab boxes to prevent the walls from pulling apart or warping. -
Bisque fire:
Once bone dry, fire the piece to bisque temperature (usually Cone 04 or 06). -
Glaze application:
Apply a clear matte glaze to the exterior and interior to let those beautiful clay speckles shine through. Wipe the bottom clean and fire to the clay’s maturity temperature (e.g., Cone 5 or 6). -
Prepare the feet:
While the ceramic is firing, take your small wooden balls. If they are unfinished, you can seal them with a light oil or leave them natural. Ensure one side is slightly sanded flat for better adhesion. -
Attach the feet:
Once the ceramic box is fired and cooled, mix your high-strength epoxy. Apply a small dot to the flattened spot on each wooden ball. -
Final assembly:
Press the wooden feet onto the four corners of the box’s underside. Let the glue cure fully according to the manufacturer’s instructions before using.
This simple yet sophisticated box makes a perfect home for jewelry or small treasures on a bedside table
Two-Tone Slip-Decorated Slab Box
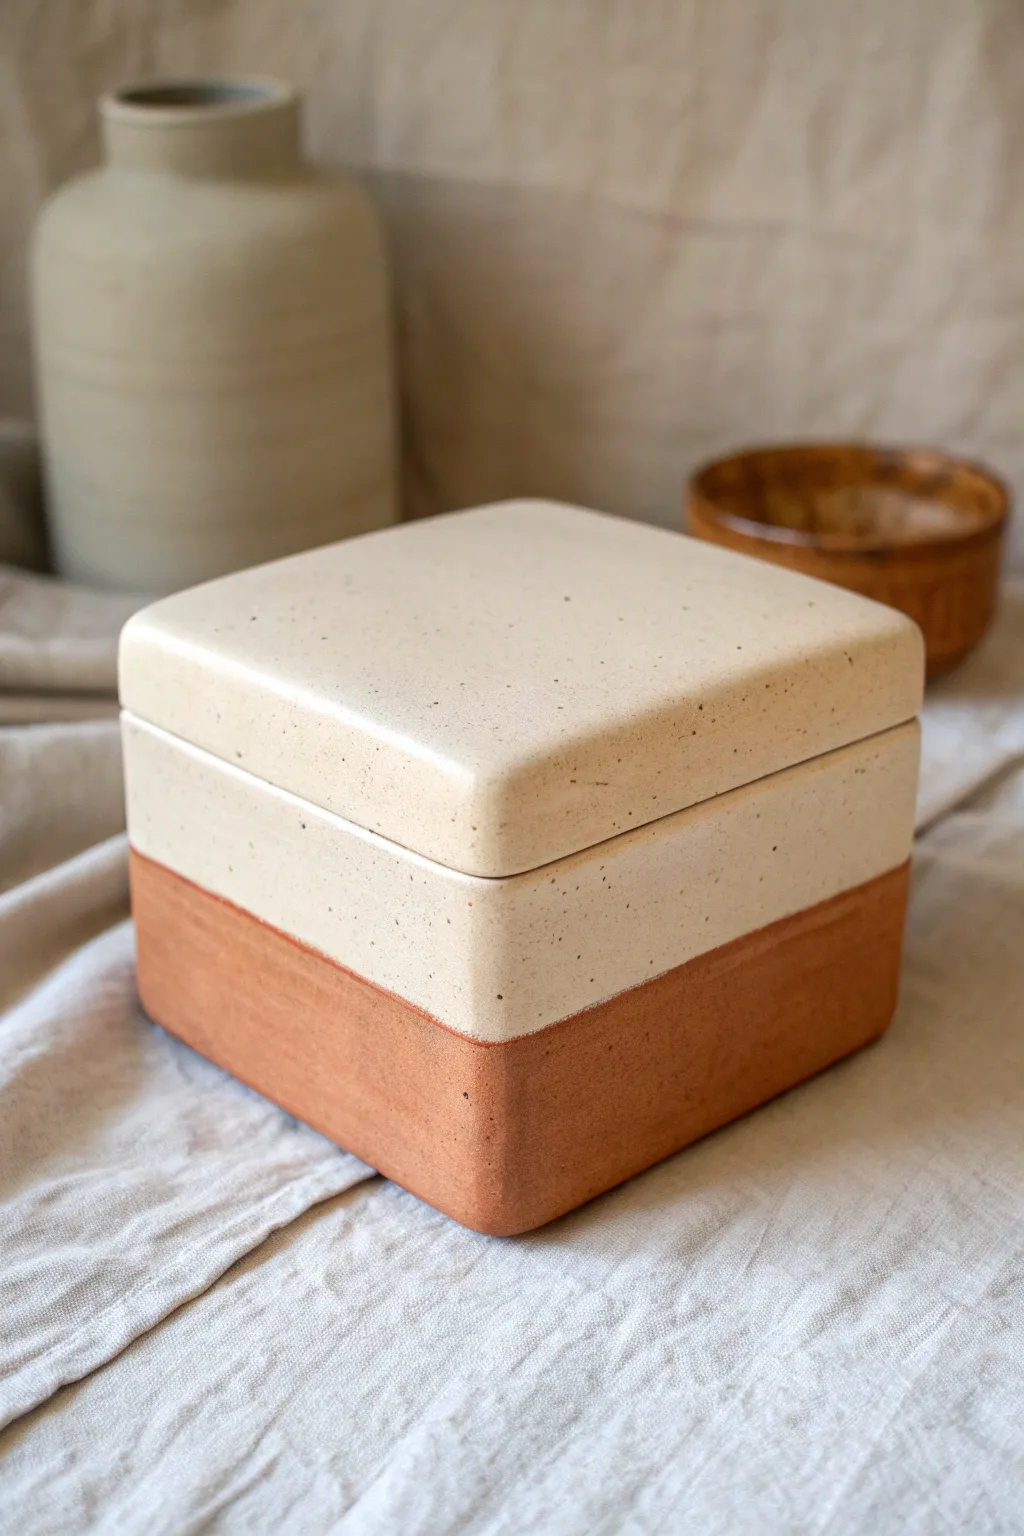
This elegant square lidded box combines the warmth of raw terracotta with a creamy, speckled slip for a modern, grounded aesthetic. The clean lines and soft, rounded corners make it a perfect functional piece for storing small treasures or organizing your desk.
Step-by-Step Guide
Materials
- Red earthenware or terracotta clay (grogged for strength)
- Cream or white ceramic slip (can be made from white clay)
- Rolling pin
- Guide sticks or slats (approx. 1/4 inch thick)
- Fettling knife
- Square paper template (approx. 4×4 inches)
- Serrated rib or scoring tool
- Slip for joining (terracotta)
- Soft sponge
- Clear matte glaze (optional, for liner)
- Painter’s tape (optional)
Step 1: Preparing the Slabs
-
Roll out the clay:
Begin by wedging your terracotta clay thoroughly to remove air pockets. Place the clay between two guide sticks on a canvas board and roll it out into a large, even slab about 1/4 inch thick. -
Compress the surface:
Using a rubber rib, firmly compress the clay slab on both sides. This aligns the clay particles, reducing the chance of warping later, and creates a smooth canvas for your slip. -
Cut the components:
Using your square paper template and a fettling knife, cut out the base and lid pieces (2 squares total). Then, measure and cut four rectangular strips for the walls. The height depends on your preference, but 3-4 inches creates a nice proportion. -
Let stiffen to leather-hard:
Lay your cut pieces on a ware board. I like to let these sit until they are leather-hard—firm enough to hold their shape without bending, but still soft enough to score and join.
Keep it Straight
Dry the lid ON the box. This ensures they shrink together and the fit stays perfect. Put a small square of newspaper between them so they don’t fuse.
Step 2: Assembling the Box
-
Score and mitre:
For clean corners, you can cut the vertical edges of your wall pieces at a 45-degree angle (mitre cut), or simply use butt joints. Score the edges of the base and the bottom of the wall pieces heavily. -
Join the walls:
Apply terracotta slip to the scored areas. Press the first wall firmly onto the base. Repeat with the remaining walls, scoring and slipping the vertical seams where the walls meet. -
Reinforce the seams:
Roll a very thin coil of clay and press it into the interior corners of the box. Smooth this coil down with a modeling tool or your finger to ensure a confident, watertight bond. -
Create the lid gallery:
To keep the lid secure, add a small flange or ‘gallery’ to the underside of the lid slab. This inner square should fit just inside the box opening. Alternatively, add small clay tabs to the inside corners of the lid. -
Refine the form:
Once the box is assembled, use a pony roller or paddle to gently tap the walls straight. Use a damp sponge to round over the sharp corners and edges, mimicking the soft look in the photo.
Make it a Set
Make three boxes in graduating sizes that can nest inside each other. Vary the height of the slip line on each one for a dynamic display.
Step 3: Applying the Two-Tone Finish
-
Mark the slip line:
Decide where you want the color separation. Measuring from the bottom up, lightly mark a consistent line around the exterior of the box. The example shows the raw clay on the bottom third. -
Masking (Optional):
For a super crisp line, apply painter’s tape or wax resist below your marked line. However, free-handing gives it a more organic, handmade feel. -
Apply the white slip:
Using a wide, soft brush, apply 2-3 coats of cream-colored slip to the top two-thirds of the box exterior and the entire lid. Allow the slip to become matte and set between coats. -
Add speckles (if needed):
If your slip isn’t pre-speckled, dip a stiff toothbrush into watered-down iron oxide or dark brown underglaze and flick the bristles to spray fine speckles over the slipped areas. -
Clean up the line:
If you didn’t use tape, carefully wipe away any slip imperfections along the dividing line with a damp brush to expose the rich terracotta below.
Step 4: Firing and Glazing
-
Slow drying:
Place the lid on the box with a piece of paper towel in between to prevent sticking. Wrap the whole piece loosely in plastic to dry slowly for several days. This helps prevent warping. -
Bisque fire:
Once bone dry, fire the piece to bisque temperature (usually cone 04). -
Glaze the interior:
Pour clear glaze inside the box and swirl to coat the interior, pouring out the excess. Leave the exterior matte and unglazed to preserve the raw clay texture, or apply a very thin matte clear coat if preferred. -
Final firing:
Fire lightly to your clay body’s maturity temperature, ensuring the lid travels with the box in the kiln.
Once fired, you will have a strikingly modern yet rustic vessel ready for display
Puffed Slab Box for an Organic Twist
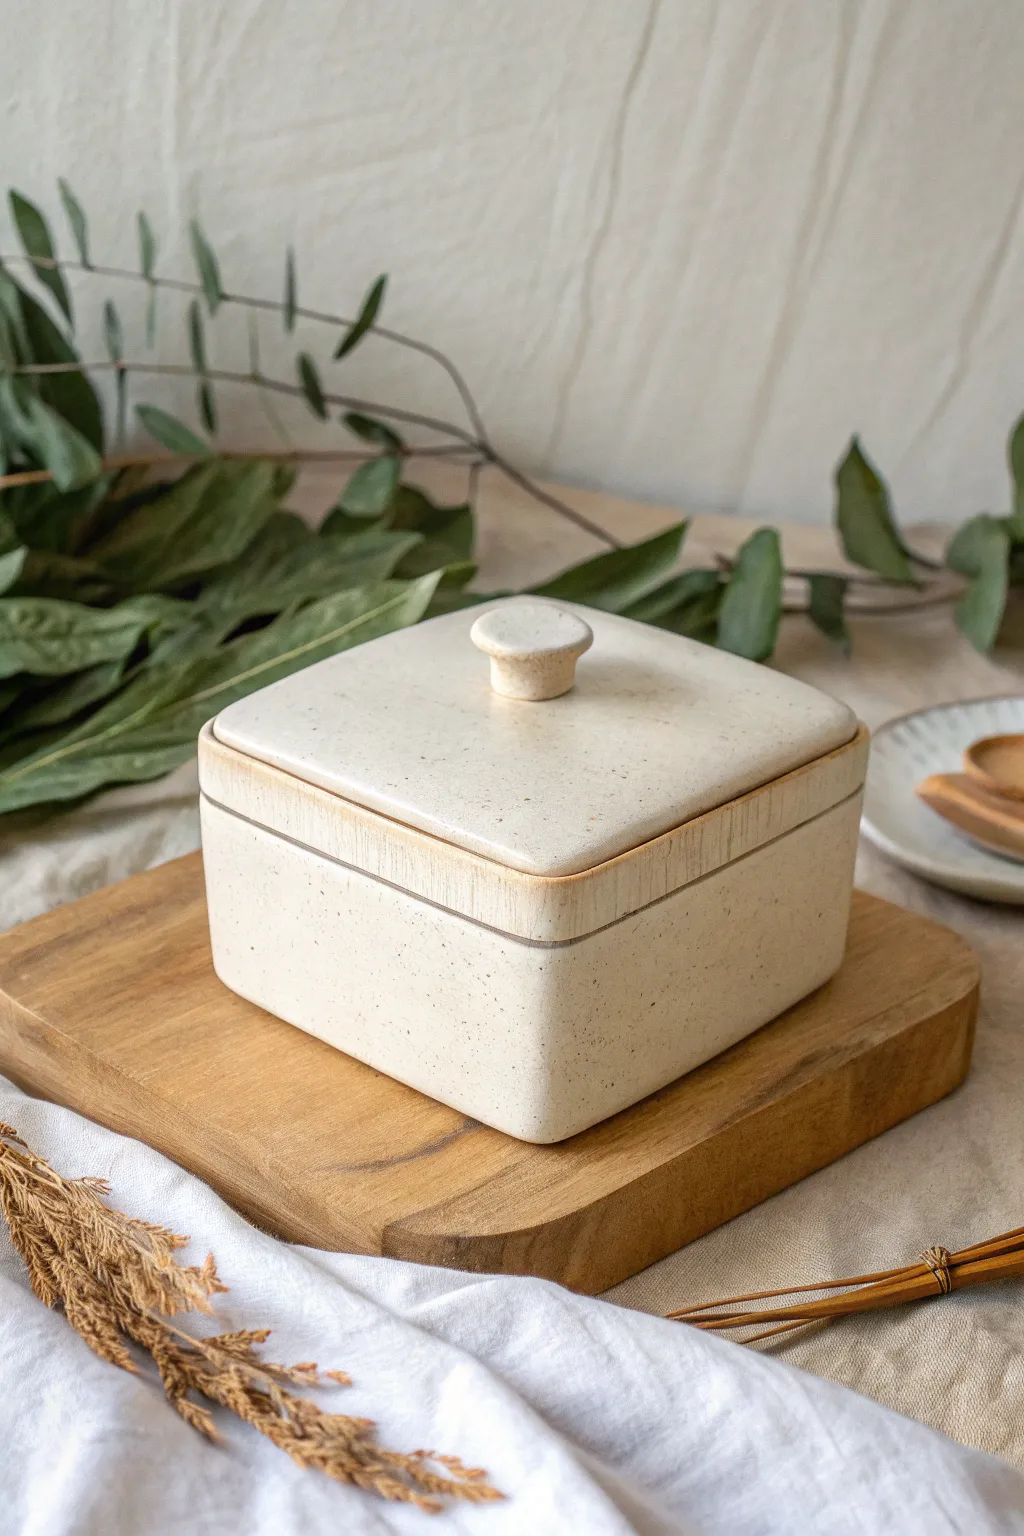
This charming lidded box features gentle, pillowy curves and softer edges that move away from the rigid sharpness of traditional slab building. With its speckled cream finish and simple knob handle, it brings a cozy, organic warmth to any shelf.
How-To Guide
Materials
- Speckled stoneware clay
- Rolling pin
- Guide sticks (approx. 1/4 inch thick)
- Square paper template (approx. 5×5 inches)
- Pottery knife or fettling knife
- Scoring tool or serrated rib
- Slip (clay mixed with water)
- Wooden paddle or flat wooden spoon
- Soft cosmetic sponge
- Small round cutter (for the knob)
- Matte cream/white glaze
Step 1: Preparing the Slabs available
-
Roll out the clay:
Begin by wedgeing your speckled stoneware clay thoroughly to remove air bubbles. Roll it out into a large, even slab using your guide sticks to ensure a consistent thickness of about 1/4 inch. -
Smooth the texture:
Before cutting, take a soft rib or a damp sponge and compress the slab on both sides. This aligns the clay particles and removes any canvas texture from your work surface. -
Cut the components:
Using your square paper template, cut out two squares (one for the base, one for the lid). Then, measure the perimeter of your square and cut a long rectangular strip for the walls, ensuring the height is what you desire for the box depth. -
Leather hard stage:
Let these slabs dry to a stiff leather-hard stage. They need to be firm enough to hold their shape without slumping, but soft enough to be manipulated slightly.
Step 2: Constructing the Box
-
Bevel the edges:
For a strong join, cut 45-degree bevels on the edges of the base square and the bottom edge of your wall strip. This increases the surface area for the connection. -
Form the walls:
Score and slip the edges of the base and the wall strip. Attach the strip to the base, wrapping it around the square. Since we want a ‘soft’ square, don’t make sharp creases at the corners; instead, gently curve the clay around the corners. -
Join the seam:
Where the wall strip ends meet, cut them at an angle to overlap slightly, then score, slip, and compress the seam together firmly so it disappears. -
Puff the walls:
This is the crucial step for the ‘puffed’ look. Gently reach inside the box and push the walls outward slightly with your fingers or a soft rib, creating a subtle convex curve. Be careful not to stretch the clay too thin. -
Add the gallery:
To ensure the lid sits securely, add a small coil or a thin strip of clay to the *interior* rim of the box walls, creating a distinct ledge (gallery) that sits about 1/4 inch below the top edge.
Air Pillow Trick
To get a perfectly puffed lid without dents, trap air between two thin slabs sealed at the edges. Paddle it into a pillow shape, then cut your lid from that ‘balloon’ structure.
Step 3: Lid and Finishing
-
Shape the lid:
Take your second square slab. Like the walls, gently press from the underside to give the lid a slightly domed, pillowy top surface rather than leaving it perfectly flat. -
Create the flange:
Alternatively to an interior gallery, you can add a small downward-facing rim (flange) to the underside of the lid slab that fits just inside the box walls. Ensure a loose fit to account for shrinkage. -
Attach the knob:
Roll a small ball of clay or use a small round cutter to make a thick circle. Shape it into a mushroom-like knob. Score and slip the center of the lid and attach the knob securely. -
Refine the edges:
Once the box is fully assembled and firm, use a damp sponge to soften every sharp corner and rim. The goal is to make the clay look eroded and soft, not machined. -
Bisque fire:
Allow the piece to dry slowly under plastic to prevent warping, then bisque fire it according to your clay body’s specifications. -
Glaze application:
Apply a matte cream or soft white glaze. I find that dipping gives a smoother application than brushing for this style, but ensure the coat isn’t too thick or it might obscure the speckles. -
Final wipe:
Clean the foot of the box and the contact points of the lid carefully with a sponge to prevent the lid from sticking during firing.
Textured Variation
Before assembling, gently press a linen cloth or dried leaves into the damp slab surface. The matte glaze will break beautifully over the subtle organic textures.
Enjoy using your new keepsake box to store treasures or simply as a serene sculptural piece