Whenever I need a low-pressure creative win, I reach for air-dry clay because it turns into something cute and useful without any kiln drama. Here are my go-to air-dry clay ideas—starting with the classics you’ll actually use, then drifting into the playful, extra-fun stuff.
Classic Trinket Dishes
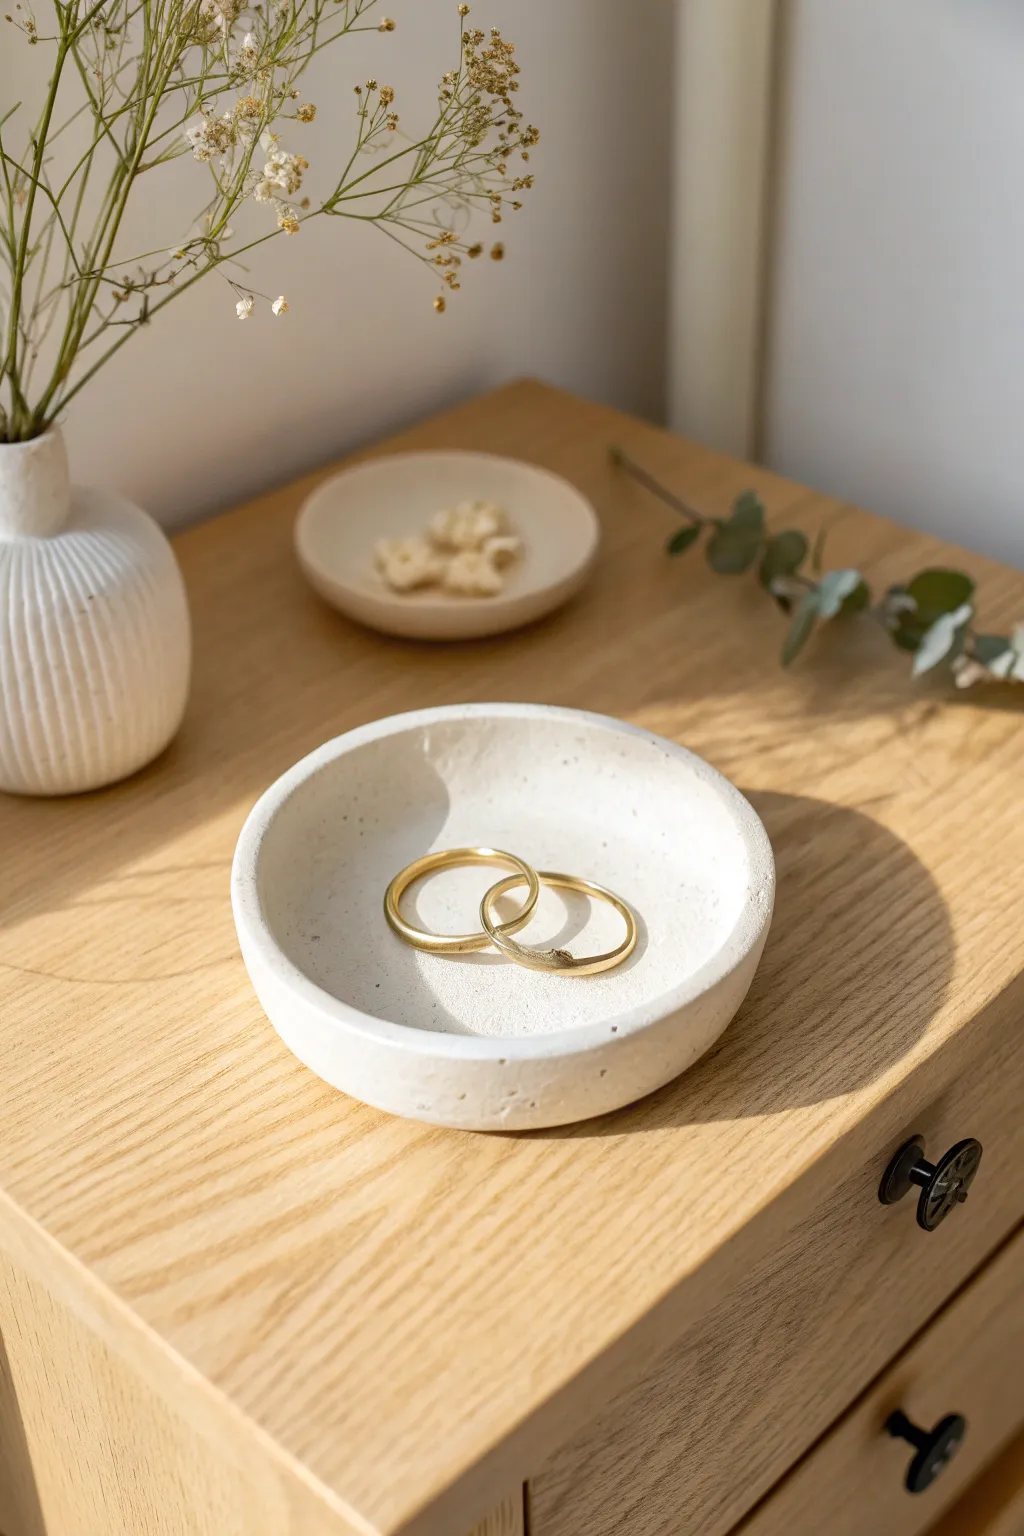
This elegant trinket dish brings a sophisticated, modern touch to any dresser with its clean lines and stone-like texture. Perfect for holding your everyday rings, this project mimics the high-end look of ceramic or concrete using simple air-dry clay.
Detailed Instructions
Materials
- White smooth air-dry clay (approx. 150g)
- Acrylic rolling pin
- Two circle cutters or bowls (one approx. 4 inches, one slightly smaller)
- Craft knife or clay tool
- Small bowl of water
- Sponge
- Fine-grit sandpaper (220 and 400 grit)
- White acrylic paint (matte finish)
- Baking soda (optional, for texture)
- Matte varnish or sealant
- Canvas mat or parchment paper
Step 1: Preparation and Shaping
-
Condition the Clay:
Begin by taking a handful of air-dry clay and kneading it in your hands until it is warm, pliable, and free of air bubbles. -
Roll the Slab:
Place the clay on your canvas mat or parchment paper. Using the acrylic rolling pin, roll the clay out evenly until it is about 1/4 inch thick. Try to keep the thickness consistent for a level base. -
Cut the Base:
Use your larger circle cutter or place a 4-inch bowl upside down on the clay as a template. Cut around it with a craft knife to create a perfect circle for the base of your dish. -
Create the Walls:
Gather the remaining clay scraps and roll them into a long, even coil or ‘snake’ about the thickness of a pencil. -
Flatten the Coil:
Gently flatten this coil with your rolling pin to create a long, rectangular strip. This will form the straight, vertical wall of the dish seen in the photo. -
Score and Slip:
Use a needle tool or knife to scratch cross-hatch marks (scoring) along the outer edge of your circular base and along one long edge of your wall strip. Dab a little water (slip) on these roughed-up areas. -
Attach the Wall:
Wrap the strip around the circular base, standing it upright. Press the scored edges together firmly to join them. -
Seal the Seam:
Where the two ends of the wall strip meet, cut them at an angle for a cleaner join. Score, add water, and press the ends together.
Step 2: Refining and Finish
-
Blend the Clay:
Using your thumb or a modeling tool, drag the clay from the wall down onto the base on the inside of the dish to create a seamless transition. Do the same on the outside, blending the wall downward into the base. -
Smooth the Surface:
Dip a small sponge in water and run it over the entire dish. This helps to erase fingerprints and creates that smooth, uniform look. Keep the rim strictly horizontal and flat. -
Initial Drying:
Let the dish dry for 24-48 hours. I like to flip it over gently halfway through the drying process to ensure the bottom dries evenly and doesn’t warp. -
Sanding:
Once bone dry, use the 220-grit sandpaper to remove any major bumps or uneven edges. Follow up with 400-grit for a super smooth finish. -
Create Texture Mix:
To achieve the stone-like texture shown in the image, mix a small amount of baking soda into your white acrylic paint until it has a slightly grainy consistency. -
Paint the Dish:
Apply the textured paint mixture to the entire dish. Use a dabbing motion with your brush rather than long strokes to enhance the stippled effect. -
Second Coat:
Allow the first coat to dry completely, then add a second layer if needed to ensure solid, opaque white coverage. -
Final Seal:
Finish with a coat of matte varnish. This is crucial for protecting the paint and clay from moisture and gives it that finished, professional quality.
Smooth Seams Trick
Use a little vinegar instead of water when blending raw clay seams. It breaks down the clay slightly better, creating a stronger ‘glue’ and a smoother invisible join.
Fixing Cracks
If hairline cracks appear while drying, mix a tiny bit of fresh clay with water to make a paste. Fill the crack, let it dry, and sand it smooth before painting.
Place your finished dish on a bedside table to keep your favorite jewelry safe and stylishly displayed


Stamped Pattern Ring Bowls
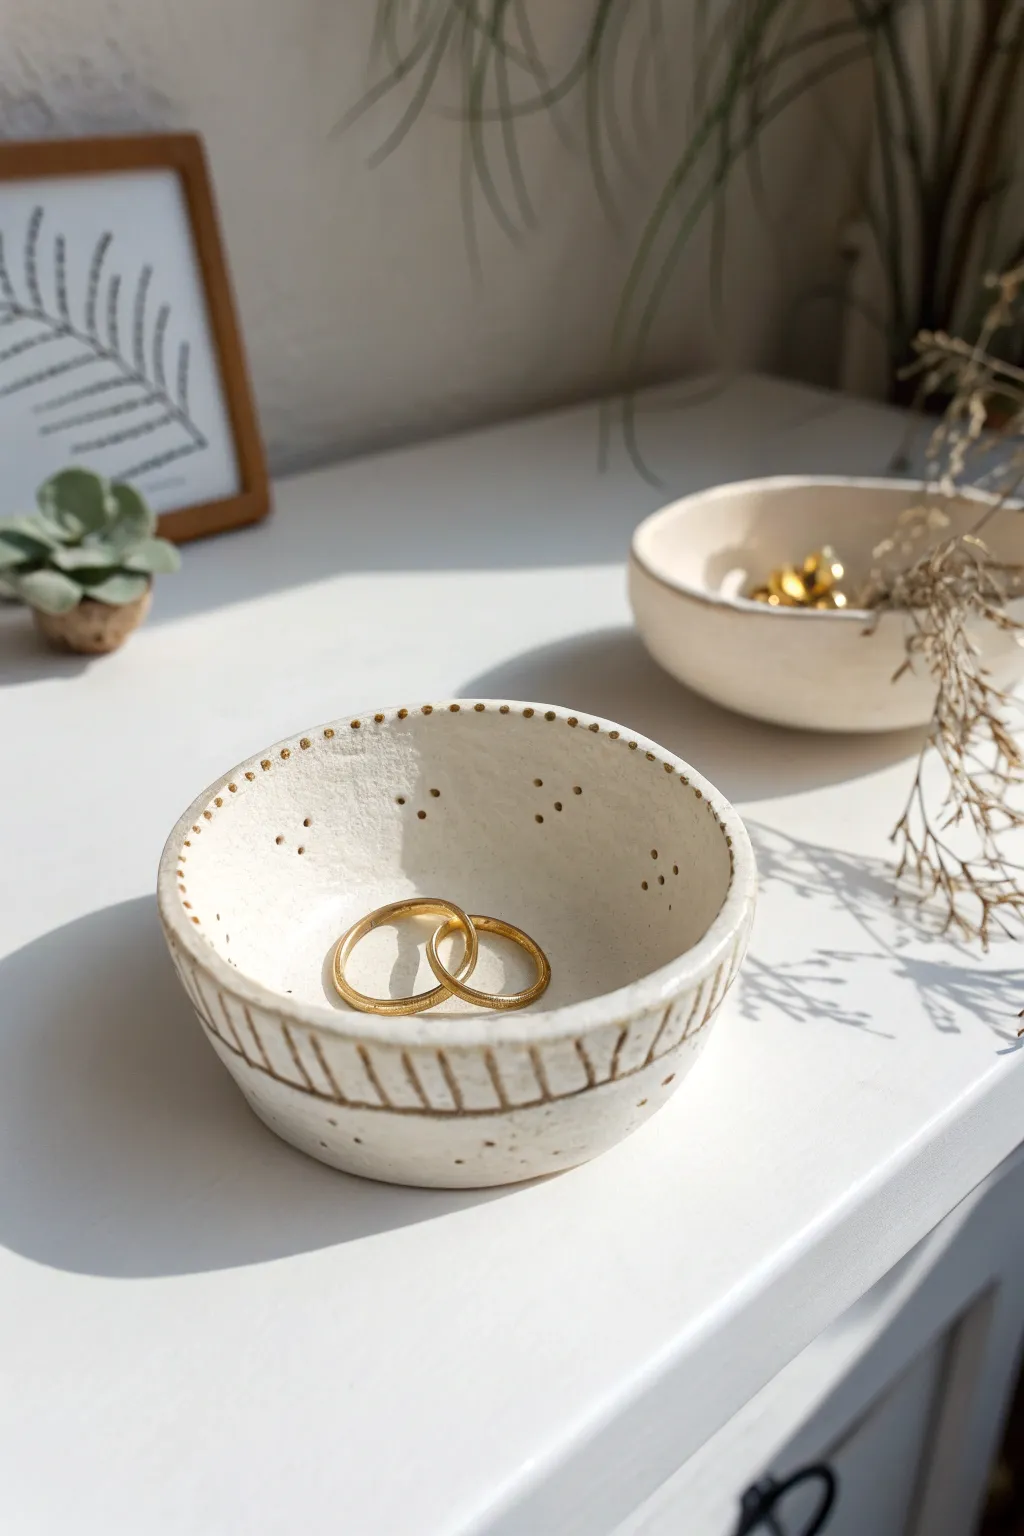
Embrace the beauty of imperfection with these charming and minimalist ring bowls. The organic shape and hand-stamped details give them an artisanal pottery feel without the need for a kiln, making for a sophisticated yet simple project.
Step-by-Step Tutorial
Materials
- White air-dry clay (like DAS or Sculpey Air-Dry)
- Rolling pin or smooth glass jar
- Small bowl or round cutter (approx. 4 inches diameter) for template
- Knife or clay cutting tool
- Small bowl for shaping (to dry the clay in)
- Wooden skewer or toothpick
- Flat carving tool or popsicle stick
- Small sponge and water
- Fine-grit sandpaper
- Brown acrylic paint or antique wax (optional for finish)
- Clear matte varnish or sealant
Step 1: Shaping the Bowl
-
Prepare your workspace:
Start by laying down a non-stick surface, like a silicone mat or wax paper, to prevent the clay from sticking to your table. -
Roll out the clay:
Take a handful of air-dry clay and knead it briefly until it is pliable. Roll it out to an even thickness of about 1/4 inch. If you see air bubbles, pop them and smooth the clay back down. -
Cut the circle:
Place your round template or small bowl upside down on the rolled clay. Use your knife or cutting tool to trace around the edge, cutting out a perfect circle. -
Smoothing the edges:
Dip your finger in a little bit of water and run it along the cut edge of the clay circle to smooth out any roughness or sharp corners. -
Form the shape:
Gently lift your clay circle and place it inside your drying bowl. Press it down lightly so it takes the curved shape, but don’t squish it too thin.
Keep it Clean
To get that crisp white pottery look, keep a pack of wet wipes nearby and clean your hands often. Dust or ink from newsprint can stain raw white clay easily.
Step 2: Adding Texture & Details
-
Create the rim detail:
Using the blunt end of a wooden skewer or a small round tool, gently press into the flat top edge of the rim to create a row of small, evenly spaced indentations all the way around. -
Stamping the interior pattern:
On the inside walls of the bowl, press the tip of your skewer to create clusters of three dots in a triangle formation. I like to space these clusters randomly for an organic look. -
Carving the exterior lines:
While the clay is still in the bowl (or carefully holding it in your palm), use a flat carving tool to press vertical lines into the exterior sides, starting from the bottom and stopping just below the rim. -
Refining the texture:
Check over your patterns. If any clay was displaced during stamping, gently smooth it back with a damp fingertip or slightly damp sponge.
Step 3: Drying and Finishing
-
Initial drying:
Leave the clay inside the shaping bowl for about 24 hours so it holds its curve while the outside hardens. -
flip and dry:
Carefully remove the semi-dry clay from the bowl and flip it upside down on a drying rack. Let it dry for another 24-48 hours until it is completely white and hard. -
Sanding:
Once fully dry, take your fine-grit sandpaper and lightly buff away any uneven spots on the rim or bottom. Wipe away the dust with a dry cloth. -
Antiquing (Optional):
To mimic the look in the photo, mix a tiny drop of brown paint with water to make a wash. Paint it into the grooves and indentations. -
Wipe back:
Immediately wipe the surface with a damp paper towel or sponge. The paint will stay trapped in the textured lines and dots, highlighting the pattern, while the surface returns to white. -
Seal the piece:
Brush on a coat of clear matte varnish to protect your dish from moisture and give it a finished, professional look.
Cracking Up?
If small hairline cracks appear while drying, don’t panic. Mix a tiny bit of fresh clay with water to make a paste (slip) and fill the cracks, then sand smooth once dry.
Now you have a perfect little spot to keep your everyday jewelry safe and stylish


Simple Ring Cone Holders
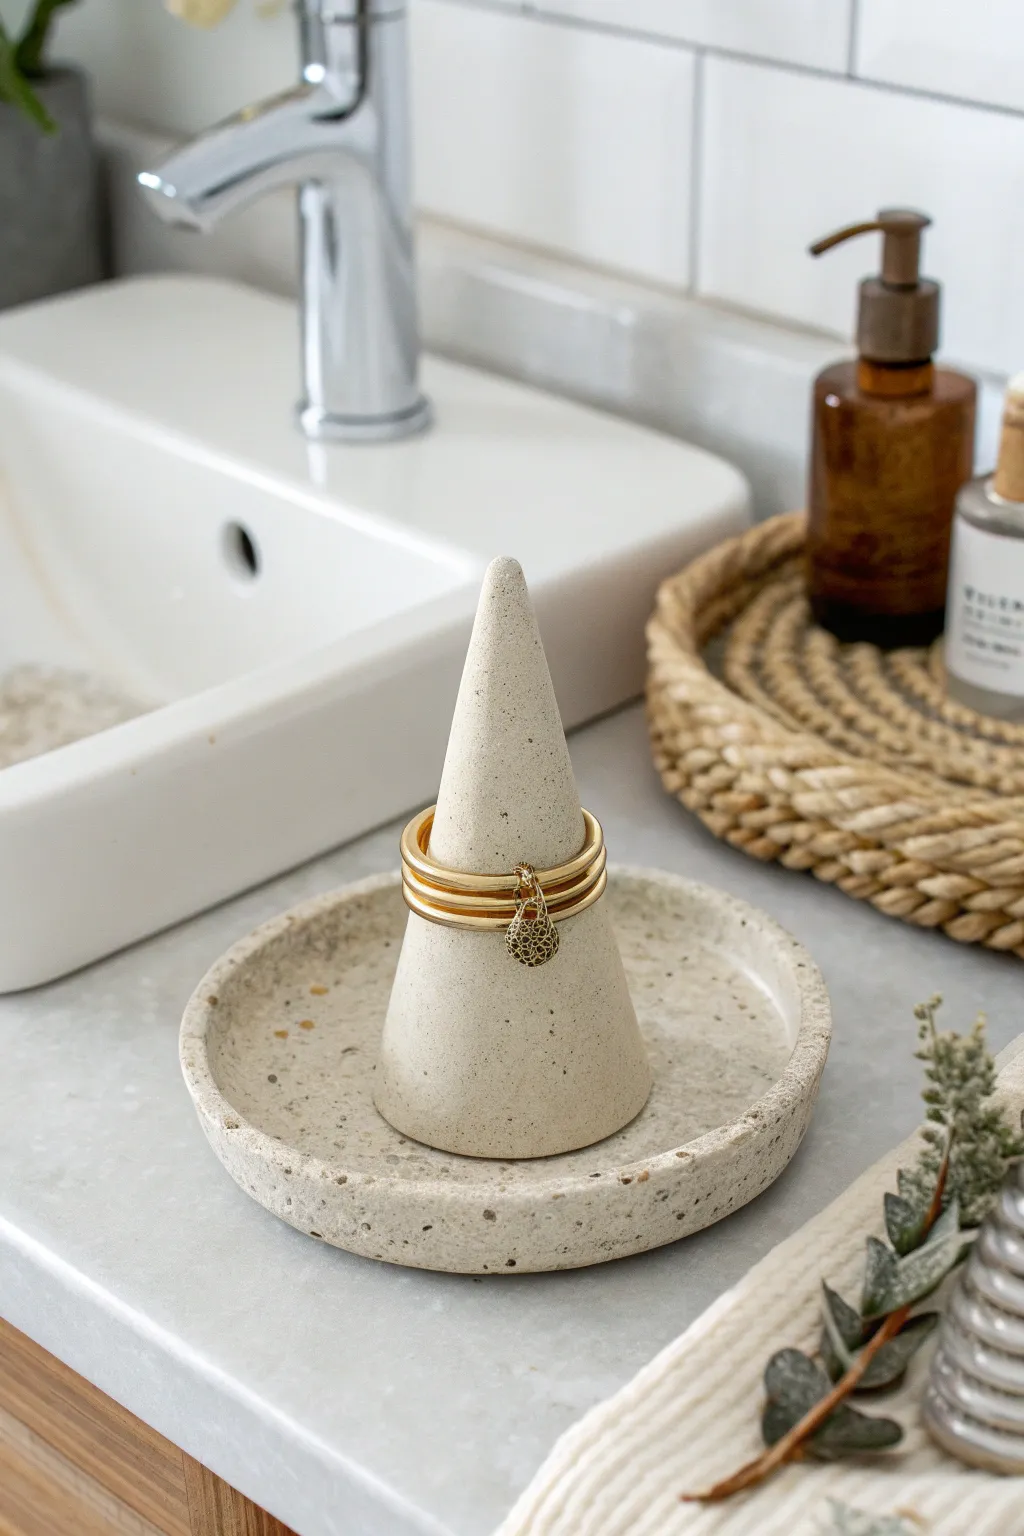
Elevate your ring storage with this minimalist, two-piece jewelry holder that mimics the look of natural speckled stone. The simple conical shape pairs perfectly with a matching catch-all dish, creating a functional yet sculptural addition to your bathroom vanity or nightstand.
Step-by-Step
Materials
- White or cream air-dry clay
- Used coffee grounds or fine black sand (for speckling)
- Small rolling pin
- X-acto knife or clay cutting tool
- Small bowl or jar lid (approx. 4 inches diameter) for use as a template
- Small cup of water
- Fine-grit sandpaper (220-400 grit)
- Matte spray varnish or water-based polyurethane sealant
- Gloss glaze (optional, for water resistance)
- Wax paper or a silicone mat
Step 1: Prepping the Clay
-
Mix in Texture:
Begin by taking a generous handful of white air-dry clay. To recreate the speckled stone look seen in the photo, knead in a small amount of dried coffee grounds or fine black sand. Start with a pinch; you can always add more until the distribution looks natural and stone-like. -
Condition the Clay:
Knead the mixture thoroughly for several minutes. The heat from your hands will make the clay more pliable and ensure the speckles are evenly distributed rather than clumped in one spot.
Stone Effect Pro-Tip
For a varied texture, mix a tiny drop of tan acrylic paint into your white clay before adding the coffee grounds. This warms up the color for a true sandstone appearance.
Step 2: Forming the Cone
-
Shape the Base:
Take a portion of your speckled clay—about the size of a golf ball—and roll it into a smooth sphere between your palms to remove any major seams. -
Create the Cone:
Place the sphere on your work surface. Using the flat of your palm, roll the clay back and forth while applying more pressure to one side. This tapered rolling motion will naturally form a cone shape. -
Refine the Form:
Stand the cone upright. Tap the base gently against the table to flatten it so it stands perfectly straight. Use your fingers to smooth the sides, ensuring the tip is slightly rounded rather than dangerously sharp. -
Check Dimensions:
Test the size by sliding a ring onto it—it should sit comfortably about halfway down. Smooth out any fingerprints with a bit of water on your fingertip.
Step 3: Crafting the Catch-All Tray
-
Roll the Slab:
Take the remaining clay and roll it out into a flat slab, approximately 1/4 inch thick. Aim for an even thickness throughout to prevent warping during drying. -
Cut the Circle:
Place your small bowl or jar lid upside down on the clay slab. Using your knife, trace around the edge to cut a perfect circle. -
Create the Lip:
Moisten your finger and run it along the cut edge to smooth any roughness. Then, gently pinch and lift the very edge of the circle upwards to create a slight rim. This keeps jewelry from sliding off. -
Secure the Base:
For a two-piece set, you can leave the cone separate. If you want them attached, score the bottom of the cone and the center of the tray with a needle tool, add a dab of water (slip), and press them firmly together.
Drying Troubleshooting
If your tray edges start curling up excessively while drying, place a light weight (like a coaster with a small rock on it) in the center to keep the base flat.
Step 4: Finishing Touches
-
Slow Drying:
Place your pieces on a clean surface to dry. I find that turning the tray over halfway through the drying process helps keep the bottom flat. Let them dry for 24-48 hours until fully hardened and light in color. -
Sand for Stone Texture:
Once bone dry, sand the surface gently. This is crucial—it exposes the coffee grounds or sand speckles more clearly, enhancing the faux-stone effect. -
Dust Off:
Wipe the pieces down with a slightly damp cloth or a dry paintbrush to remove all clay dust before sealing. -
Seal and Protect:
Apply a coat of matte spray varnish to maintain the natural, raw stone look. If this will live in a humid bathroom, do two or three light coats for better protection.
Now you have a chic, modern display for your favorite rings that looks like high-end decor without the price tag


Leaf-Imprint Catchall Plates
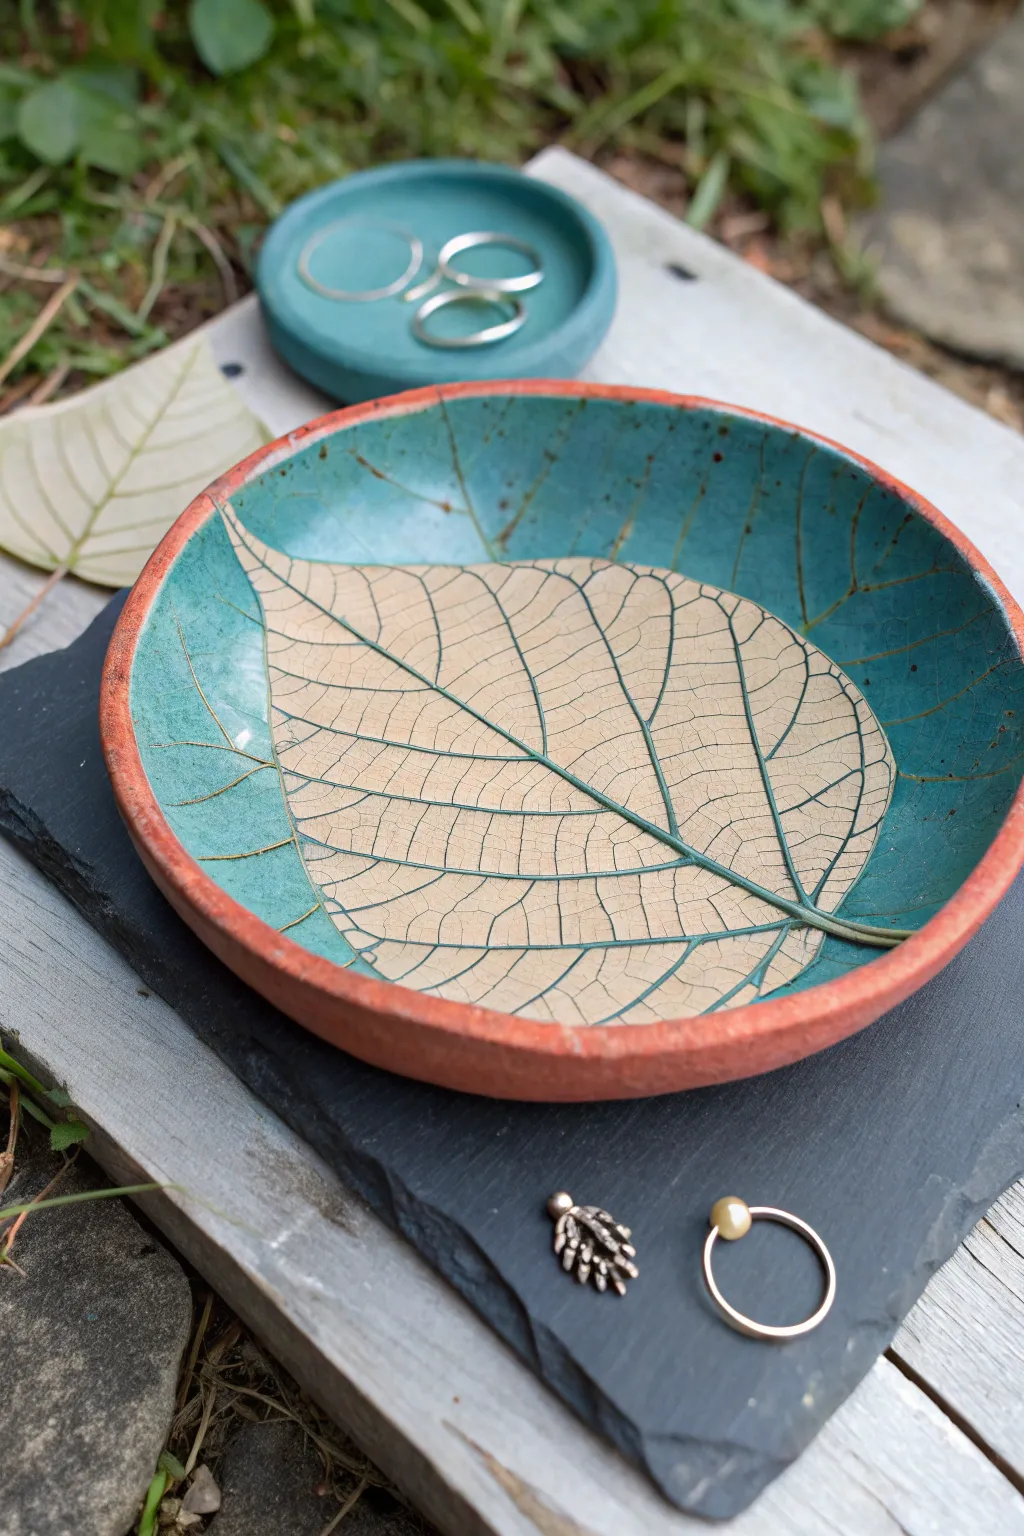
Capturing nature’s intricate details, this stunning catchall dish features a realistic leaf skeleton imprint set against a vibrant turquoise glaze. The contrast between the warm terracotta-toned clay rim and the cool, glassy interior makes it a perfect accent piece for holding jewelry or keepsakes.
How-To Guide
Materials
- Terracotta-colored air-dry clay (or standard white clay mixed with acrylic paint)
- Large, fresh leaf with prominent veins (like a hydrangea or hosta leaf)
- Rolling pin
- Sharp craft knife or clay tool
- Small bowl or curved mold (for shaping)
- Sandpaper (fine grit)
- White acrylic paint or gesso
- Turquoise or teal high-gloss acrylic paint (or ceramic-effect glaze)
- Small flat brush
- Fine detail brush
- Clear gloss varnish (crucial for the ceramic look)
Step 1: Preparation & Impression
-
Prepare the clay:
Begin with a fist-sized ball of terracotta-colored air-dry clay. Knead it until it’s pliable and smooth to remove any air bubbles. If you only have white clay, knead in a generous amount of burnt orange acrylic paint until the color is uniform. -
Roll the slab:
Roll out the clay on a flat surface to a thickness of about 1/4 inch. Aim for a consistent thickness to ensure even drying. -
Position the botanical:
Place your chosen leaf face down onto the clay slab. The underside of the leaf usually has the most prominent veins, which creates the best impression. -
Create the imprint:
Use your rolling pin to firmly roll over the leaf once or twice. Use enough pressure to embed the veins deeply, but be careful not to make the clay too thin. -
Cut the shape:
Place a round template (like a bowl or lid) over the leaf imprint area. Use a sharp craft knife to cut a perfect circle around the template, slicing through both the leaf and clay if necessary. -
Reveal the detail:
Gently peel away the leaf to reveal the intricate skeleton pattern left behind in the clay.
Cracked edges?
If small cracks appear on the rim while drying, make a paste of clay and water (slip). Fill the cracks, smooth with a finger, and let it dry again before sanding.
Step 2: Shaping & Drying
-
Form the curve:
Carefully lift your clay circle and place it inside a shallow bowl or curved mold. Gently press the center down so the clay takes on the concave shape of the bowl. -
Smooth the edges:
Dip your finger in a little water and run it along the cut rim of the plate to smooth out any sharp edges or roughness. -
Dry thoroughly:
Allow the clay to dry completely in a cool, dry place. This usually takes 24-48 hours. Don’t rush this step, or cracks may appear. -
Sand for perfection:
Once fully dry and hard, use fine-grit sandpaper to gently smooth the rim and the underside of the dish.
Step 3: Painting & Glazing
-
Plan the barrier:
The goal is to color the ‘negative space’ teal while keeping the leaf veins and the rim the natural clay color. You can apply a thin layer of wax resist over the veins if you are confident, but painting carefully around them is often safer. -
Base coat the leaf:
Using a fine detail brush, paint the interior of the leaf shape with a creamy off-white or light beige acrylic. This mimics the ‘skeleton’ look shown in the image and provides a base. -
Define the veins:
I like to dilute a tiny bit of brown or dark green paint and wash it over the beige area, then wipe it back. This settles into the deepest vein impressions to highlight them. -
Apply the color:
Paint the rest of the dish interior—around the leaf shape—with your turquoise or teal paint. Use a small flat brush for larger areas and a detail brush to get crisp lines right up to the leaf edge. -
Add texture marks:
The image shows subtle dark speckles and a faux ‘crackle’ effect. Use a toothbrush to lightly flick tiny specks of watered-down brown paint onto the teal areas for that aged pottery look. -
Detail the veins again:
Go back with the teal paint and a very fine brush to paint specifically inside the larger open spaces of the leaf pattern, leaving the raised ‘veins’ the beige color. This requires patience but creates that amazing skeleton effect. -
Seal and finish:
Finish with two coats of high-gloss varnish over the entire painted interior to simulate a fired ceramic glaze. Leave the rim and bottom matte for textural contrast.
Make it Metallic
Swap the beige vein color for liquid gold leaf or metallic copper paint. The metallic shimmer against the matte terracotta creates a luxurious, modern finish.
Now you have a unique, nature-inspired vessel ready to hold your favorite trinkets

What Really Happens Inside the Kiln
Learn how time and temperature work together inside the kiln to transform clay into durable ceramic.
Bubble Texture Coasters
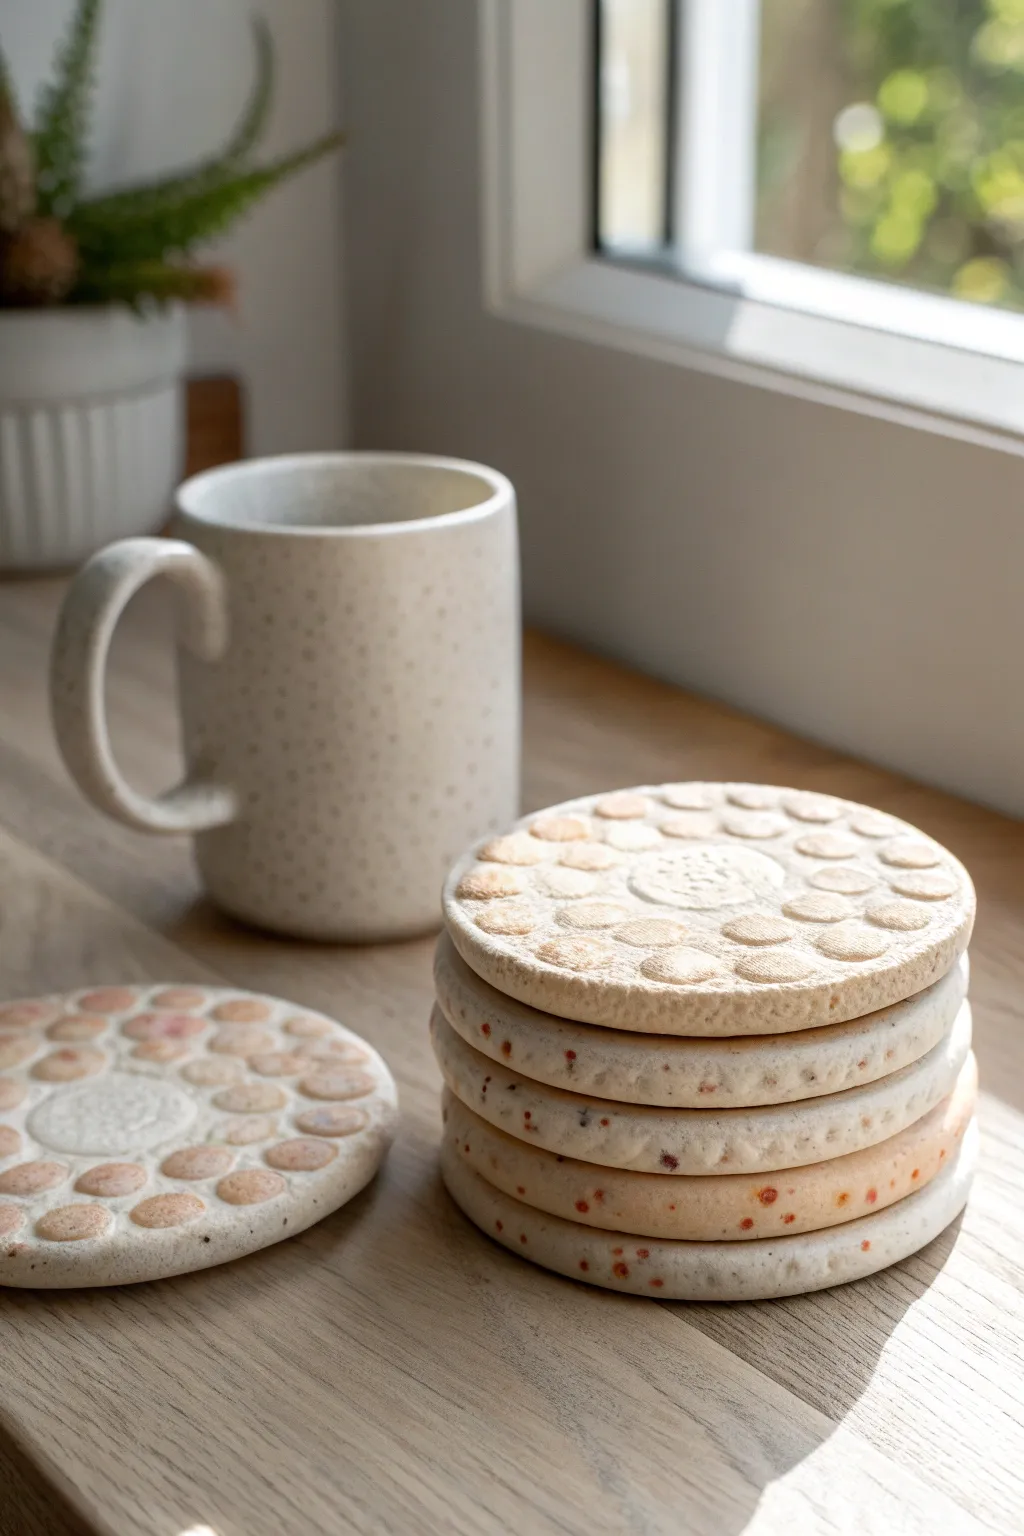
These charming coasters combine a warm, organic feel with a playful tactile surface that mimics the look of foam or biscuits. The speckled clay body and raised circular pattern create a modern, wabi-sabi aesthetic perfect for holding your morning coffee.
Detailed Instructions
Materials
- White or cream air-dry clay (e.g., DAS or Crayola)
- Dried spices or crushed terracotta (for speckles)
- Rolling pin
- Circle cookie cutter (approx. 3.5 – 4 inches)
- Bubble wrap (small bubble size)
- Sandpaper (fine grit)
- Acrylic matte varnish or sealant
- Small rolling tool or brayer (optional)
- Canvas or cloth work mat (to prevent sticking)
Step 1: Preparing the Speckled Clay
-
Condition the Clay:
Start by grabbing a generous handful of white air-dry clay. Knead it thoroughly in your hands to warm it up and make it pliable, smoothing out any initial cracks. -
Add Texture Inclusions:
To achieve that natural, speckled stone look, sprinkle in a teaspoon of dried spices (like coarse pepper or dried herbs) or finely crushed terracotta dust. This is where I like to experiment with different additives for unique colors. -
Incorporate the Speckles:
Fold the clay over the inclusions and knead repeatedly until the specks are evenly distributed throughout the entire ball of clay. The mixture should look consistent, like cookie dough.
Reverse the Texture
For raised bumps instead of dimples, press clay *into* a mold made from bubble wrap, or place the bubble wrap bubble-side up and press the clay down onto it.
Step 2: Forming the Base
-
Roll the Slab:
Place your clay onto a canvas cloth or work mat. Using a rolling pin, roll the clay out to an even thickness of about 1/4 inch (6mm). Ensure it’s not too thin, or the coaster might warp. -
Smooth the Surface:
Check the surface for any uneven bumps or fingernail marks. Run a slightly damp finger or a smooth rib tool over the slab to create a pristine canvas for the texture. -
Apply the Bubble Texture:
Lay a piece of bubble wrap, bubble-side down, directly onto the rolled clay slab. The bubbles should be clean and dry. -
Imprint the Pattern:
Gently roll your rolling pin over the back of the bubble wrap. Apply firm, even pressure to push the plastic bubbles into the clay, creating the characteristic dimpled depressions.
Fixing Warped Clay
If your coaster dries curled, dampen the bottom side slightly with a sponge and place it under a heavy book overnight to flatten it back out.
Step 3: Shaping and Refining
-
Cut the Rounds:
Without removing the bubble wrap yet (if possible), or immediately after peeling it back carefully, press your circle cutter firmly into the textured slab to punch out the coaster shapes. -
Release the Coasters:
Remove the excess clay from around the cutter first, then gently lift the cut circles. If the edges are ragged, smooth them softly with a fingertip dipped in water. -
Add Center Detail (Optional):
If you want a logo or central motif like the example, press a small stamp or coin into the very center of the coaster, slightly flattening the bubble texture in that specific spot. -
Check Flatness:
Place the cut circles on a clean, flat board. Verify they are perfectly flat; if the edges curled up during cutting, gently press them back down.
Step 4: Drying and Finishing
-
Slow Drying:
Let the coasters air dry for 24-48 hours. Turn them over halfway through the process so the bottom creates a skin and dries evenly, which helps prevent curling. -
Sanding Edges:
Once fully bone dry and hard, take your fine-grit sandpaper and gently sand the outer rim of the coaster to remove any sharp burrs or irregularities. -
Highlighting Texture:
For a subtle two-tone effect, you can dry-brush a tiny amount of pale beige or terracotta paint over just the raised ‘bubbles,’ leaving the recessed areas whitish. -
Sealing:
Apply a coat of acrylic matte varnish or a waterproof sealant suitable for clay. This is crucial to protect the coasters from moisture when you use them. -
Final Cure:
Allow the sealant to cure completely according to the manufacturer’s instructions before placing any mugs on them to ensure the surface is durable.
Your speckled bubble coasters are now ready to add a touch of handcrafted warmth to your coffee table
Modern Spoon Rests
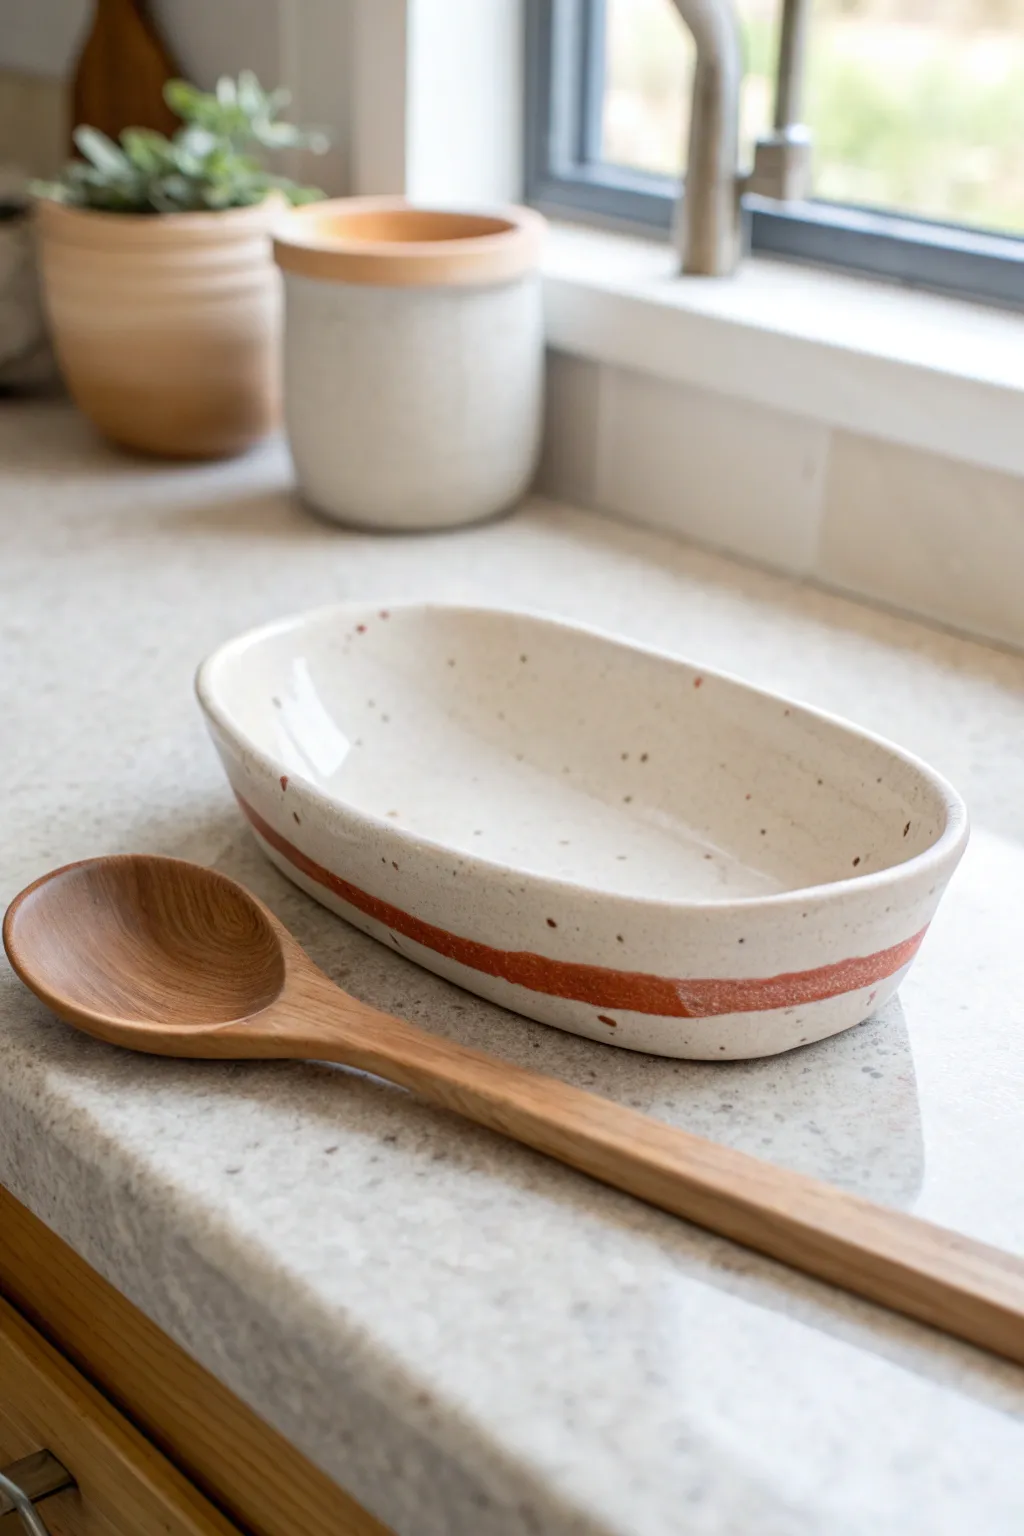
This minimalist spoon rest blends organic textures with clean, modern lines to create a functional piece of art for your kitchen. By mimicking the look of wheel-thrown ceramic with a simple hand-building technique, you’ll achieve a speckled stoneware effect that feels both rustic and refined.
Step-by-Step Tutorial
Materials
- White air-dry clay (approximately 1 lb)
- Dried coffee grounds (used or unused)
- Terracotta or rust-colored acrylic paint
- Rolling pin
- Small bowl relative to your desired spoon rest size
- Plastic wrap
- Sponge
- High-gloss varnish or resin (food-safe if possible)
- Sandpaper (fine grit)
- Masking tape or painter’s tape
- Bowl of water
- Sharp knife or clay tool
Step 1: Preparing the Faux-Speckle Clay
-
Condition the clay:
Begin by kneading your white air-dry clay to warm it up. While kneading, add a teaspoon of water if the clay feels too stiff or prone to cracking. -
Add the speckles:
Flatten the clay slightly and sprinkle roughly a teaspoon of dried coffee grounds onto the surface. Fold the clay over itself to trap the grounds inside. -
Mix thoroughly:
Continue kneading and folding until the coffee grounds are evenly distributed throughout the entire ball of clay. These will create the faux iron-speckled stoneware look. -
Check consistency:
Slice the clay in half to ensure the speckles run deep, then press the halves back together. If you want a heavier texture, add a pinch more grounds now.
Clean Lines Hack
Burnish the edge of your painter’s tape with a spoon before painting. This seals the tape to the clay texture and prevents paint from bleeding underneath.
Step 2: Shaping the Rest
-
Roll out the slab:
Roll your clay out on a smooth surface or canvas cloth to a uniform thickness of about 1/4 inch. Try to keep an even pressure to avoid thin spots. -
Cut the oval:
Using a knife or needle tool, freehand a long oval shape. It should be approximately 8 inches long and 4 inches wide—large enough to cradle a cooking spoon. -
Smooth the edges:
Dip your finger in water and run it along the cut edge of the oval to round it off and remove any sharp burrs left by the knife. -
Create the curve:
Gently lift the flat oval and place it inside a shallow, larger bowl lined with plastic wrap. You don’t want a deep bowl shape, just a gentle curve to catch drips. -
Refine the rim:
While it’s in the mold, gently press the rim to ensure it’s uniform. I like to use a damp sponge here to make the lip perfectly smooth. -
Dry slowly:
Leave the clay in the mold for the first 24 hours to hold its shape. Once firm, remove it from the plastic and flip it over to let the bottom dry completely for another 24 hours.
Warped Clay?
If the oval twists while drying, weigh it down gently with a small bag of rice during the final drying phase to flatten the bottom evenly.
Step 3: Decorating and Sealing
-
Sand for smoothness:
Once fully dry and bone-white, use fine-grit sandpaper to gently smooth any bumps on the rim or surface. Wipe away dust with a barely damp cloth. -
Tape the guide:
Apply a strip of masking tape around the exterior wall of the spoon rest, about half an inch from the bottom edge. This will act as the top border for your stripe. -
Paint the stripe:
Mix your terracotta acrylic paint with a tiny drop of water to improve flow. Paint the exposed strip of clay below the tape line, covering the bottom edge slightly if desired. -
Create imperfect texture:
For a more organic, hand-dipped look, you can sponge the paint on rather than brushing it, or slightly roughen the painted edge once the tape is removed. -
Remove tape:
Peel the tape off while the paint is still slightly tacky to ensure a crisp line, then let the paint dry completely. -
Add accidental speckles:
Dilute a tiny bit of red-brown paint with water on a toothbrush. Run your thumb over the bristles to flick tiny extra specks onto the interior white surface for depth. -
Seal the piece:
Since air-dry clay isn’t waterproof, apply 2-3 coats of a high-gloss varnish or resin. This gives it that glazed ceramic shine and protects it from kitchen spills.
This charming, speckled faux-ceramic piece is now ready to keep your countertops clean with effortless style


The Complete Guide to Pottery Troubleshooting
Uncover the most common ceramic mistakes—from cracking clay to failed glazes—and learn how to fix them fast.
Minimal Incense Holders
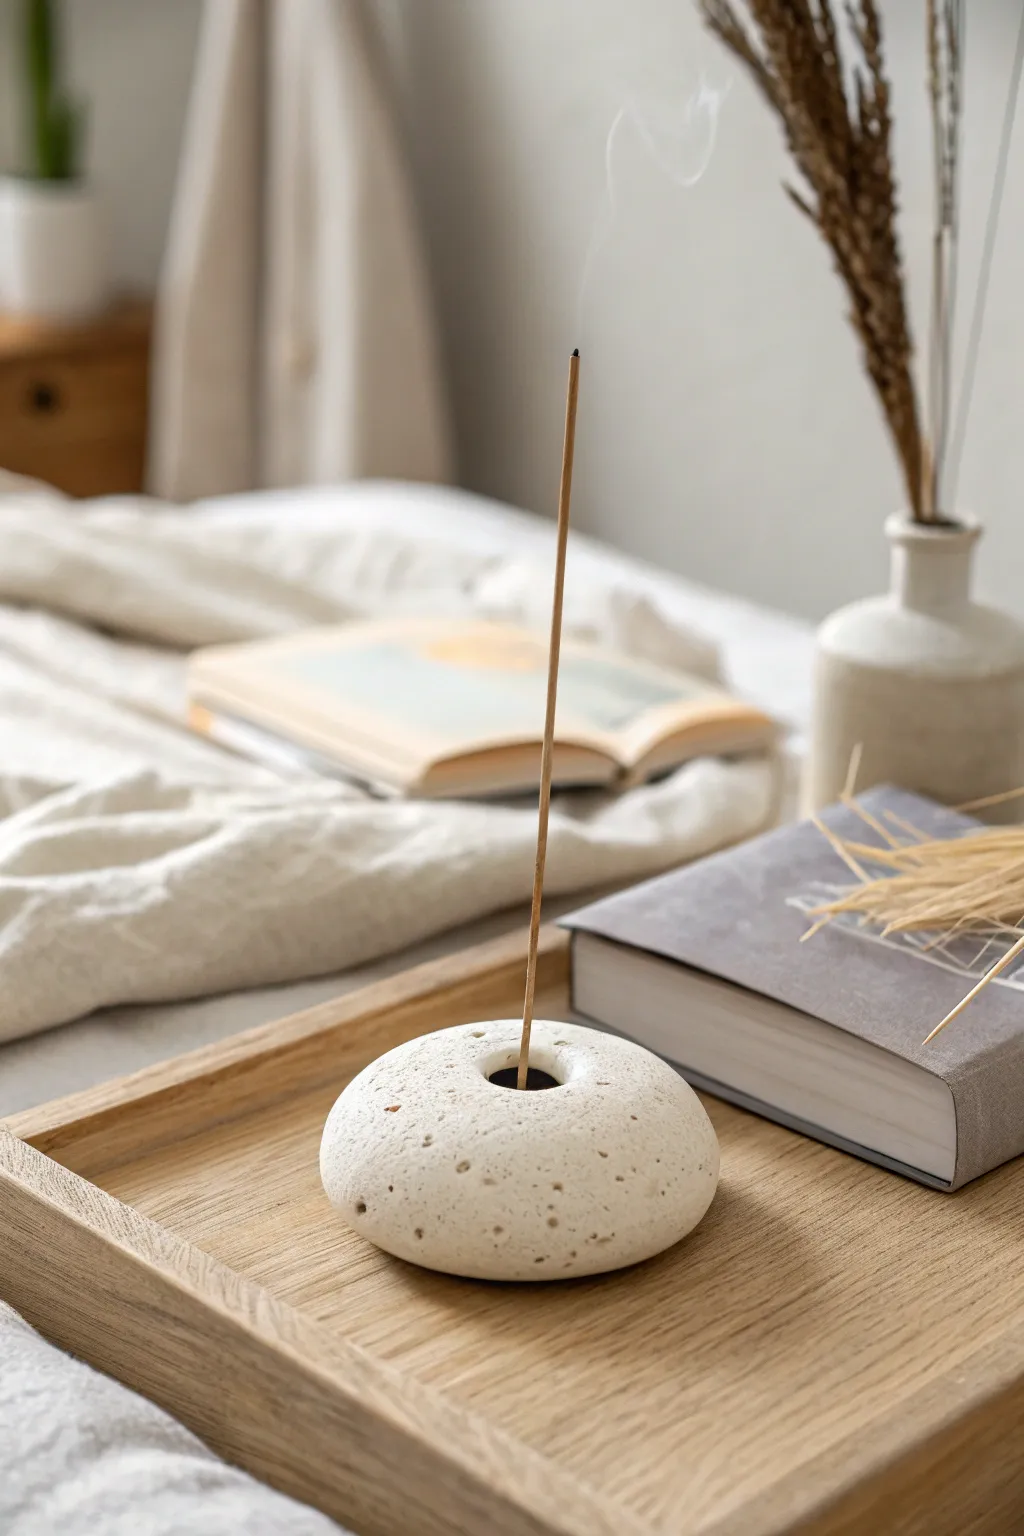
Embrace the beauty of wabi-sabi with this incredibly simple yet elegant incense holder that mimics the look of a weathered river stone. Its organic shape and speckled texture bring a calm, grounding presence to any bedside table or reading nook.
Step-by-Step
Materials
- White or light grey air-dry clay
- Used coffee grounds or fine pepper (for texture)
- Small bowl of water
- Incense stick (for sizing)
- Fine-grit sandpaper (200-400 grit)
- Matte sealant or varnish
- Sponge or soft cloth
- Rolling pin (optional)
- Small drill bit or skewer
Step 1: Preparing the Clay
-
Condition the clay:
Start by taking a handful of air-dry clay, roughly the size of a tennis ball. Knead it thoroughly in your hands to warm it up and remove any air bubbles, which helps prevent cracking later. -
Add the texture:
To achieve that natural, speckled stone look, sprinkle a pinch of dried coffee grounds or cracked black pepper onto the flattened clay. Fold the clay over and knead it again until the specks are evenly distributed throughout the mass. -
Form the base shape:
Roll the clay into a smooth ball between your palms. -
Create the pebble:
Gently press the ball down against your work surface to flatten it into a thick disc. You want it to look like a heavy, smooth river rock, so keep the edges rounded and organic rather than sharp.
Fixing Cracks
If small cracks appear while drying, don’t panic. Mix a tiny bit of fresh clay with water to make a paste (slip) and fill the cracks, then smooth over.
Step 2: Shaping and Refining
-
Smooth the surface:
Dip your finger into a little water and run it over the surface of your pebble. Smooth out any major cracks or fingerprints, paying special attention to the edges. -
Create the crater:
Using your thumb or the rounded handle of a tool, gently press into the center of the pebble to create a shallow, concave depression. This will catch any falling ash. -
Make the holder hole:
take an incense stick (or a skewer of similar thickness) and press it vertically into the center of your depression. Push it about halfway through the clay—don’t go all the way to the bottom. -
Wiggle for clearance:
Give the stick a very gentle wiggle to widen the hole slightly. Clay shrinks as it dries, so the hole needs to be just a hair larger than the incense stick itself. -
Re-smooth:
The piercing action might have raised the clay slightly around the hole. Gently pat this back down with a damp finger to maintain that clean, minimal silhouette. -
Add surface imperfections:
For added realism, you can lightly press a crumpled piece of foil or a stiff-bristled brush against parts of the surface to create tiny divots, mimicking porous stone.
Step 3: Drying and Finishing
-
Let it dry:
Place your finished shape on a clean surface or wire rack. Let it air dry for 24 to 48 hours, turning it over occasionally to ensure the bottom dries evenly. -
Sand the imperfections:
Once bone dry, use fine-grit sandpaper to smooth out any rough patches. I like to focus on the bottom edge to make sure it sits perfectly flat on the table. -
Enhance the texture:
Wipe away the sanding dust with a barely damp sponge. This action often reveals the coffee or pepper specks more clearly, highlighting the stone effect. -
Seal for protection:
Apply a coat of matte varnish or sealant. This is crucial for ash handling and gives the piece a finished, professional look without making it unnaturally shiny. -
Final cure:
Allow the sealant to cure completely according to the manufacturer’s instructions before lighting your first incense stick.
Level Up: Scented Clay
Mix a drop of essential oil into the clay while kneading. Even when not burning incense, the holder will release a faint, pleasant aroma.
Enjoy the peaceful atmosphere your new handmade stone brings to your space
Geometric Candle Holders
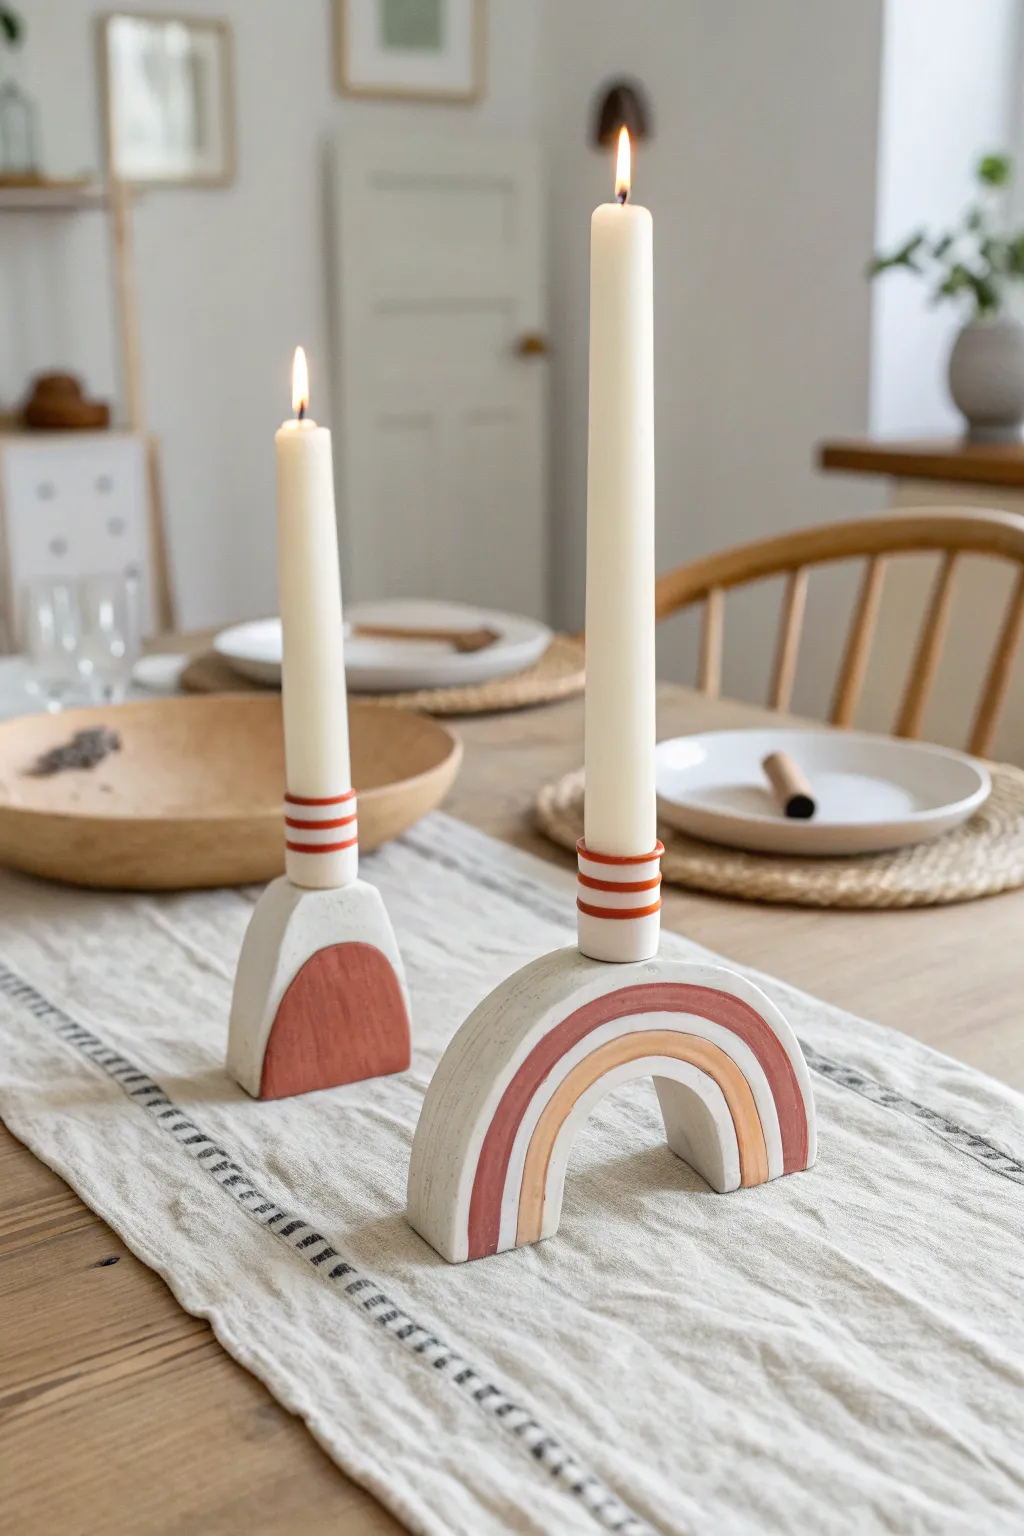
Bring warmth and modern geometric style to your table with these charming air-dry clay candle holders reflecting the soft hues of terracotta and sun-baked clay. This project features two distinct shapes—a classic open rainbow arch and a solid block arch—both featuring carved details and cozy hand-painted accents.
Step-by-Step Tutorial
Materials
- Air-dry clay (white or light grey)
- Rolling pin
- Clay knife or craft knife
- Small bowl of water
- Sponge
- Taper candle (for sizing)
- Acrylic paints (terracotta, mustard yellow/ochre, white)
- Small flat paintbrush
- Fine detail paintbrush
- Fine-grit sandpaper
- Ruler
- Cardboard or cardstock (for templates)
Step 1: Shaping the Rainbow Arch
-
Prep the clay:
Begin by taking a substantial chunk of air-dry clay and kneading it until it is soft and pliable. Use your rolling pin to roll it out into a thick slab, approximately 1 inch (2.5 cm) thick. Since these need to stand upright, distinct thickness is key for stability. -
Cut the arch shape:
Create a simple arch template from cardboard, or freehand the shape directly onto the clay. For the rainbow holder, you need a wide semicircle. Use your craft knife to cut the outer arch shape cleanly. -
Cut out the center:
To create the open rainbow look, use a smaller arch template or a circular object like a cookie cutter to remove the inner section at the bottom center of your large arch. Save the scrap clay for the candle cup. -
Smooth the edges:
Dip your finger or a small sponge in water and gently run it along all cut edges to soften any sharp angles or roughness. You want a smooth, organic finish rather than a sharp, industrial one. -
Create the candle cup:
Roll a separate small ball of clay and press your taper candle into it to create a perfectly sized socket. Shape the outside of this ball into a neat cylinder that is slightly wider than your candle. Wiggle the candle slightly to ensure it won’t get stuck as the clay shrinks. -
Attach the cup:
Score the top center of your arch and the bottom of your cylinder cup using a needle tool or knife. Apply a bit of water or slip (clay mush) to the scored areas and press firmly to attach the cup to the top of the arch. Smooth the seam with your finger until it’s invisible.
Step 2: Forming the Solid Block Holder
-
Cut the block shape:
Roll out another slab of clay, keeping the same 1-inch thickness for uniformity. Cut a smaller, solid arch shape—essentially a rectangle with a rounded top. -
Add the candle cup:
Repeat the previous process: create a small cylindrical cup sized for your candle, score both surfaces, and fuse it securely to the top center of the solid block arch. I like to double-check that the cup is perfectly vertical before moving on. -
Carve the details:
Before the clay hardens, use a carving tool or a toothpick to gently etch the details. For the rainbow arch, carve a curved line following the shape of the arch. For the solid block, carve an internal arch outline on the front face. On both cups, crave two horizontal rings near the base. -
Let it dry:
Set your pieces in a cool, dry place. Allow them to dry for at least 24-48 hours. Turn them over halfway through the drying process to ensure the bottoms dry evenly.
Cracks happen!
If small drying cracks appear, mix a tiny bit of clay with water to make a paste and fill them in. Smooth repeatedly.
Step 3: Finishing Touches
-
Sand for smoothness:
Once fully dry and hard, use fine-grit sandpaper to buff away any remaining fingerprints or rough spots. Wipe away the dust with a barely damp cloth. -
Mix your palette:
Prepare your acrylic paints. You’ll need a warm terracotta rust and a soft mustard yellow. You may need to mix in a little titanium white to soften the colors and get that matte, earthy look. -
Paint the rainbow arch:
Using a small flat brush, paint the outer carved band of the rainbow arch in your rust red color. Switch to the mustard yellow for the inner band area. Leave the base clay color exposed in between the bands for contrast. -
Paint the solid block:
Paint the inner carved arch shape on the solid block with the rust red paint, filling it in completely to create a bold focal point. -
Detail the cups:
Use a fine detail brush to carefully paint the carved horizontal rings on the candle cups with the rust red paint. Keep a steady hand to ensure crisp lines. -
Seal (Optional):
If desired, apply a matte varnish to protect the paint and clay from dust, though leaving them raw adds to the natural aesthetic.
Level Up
Add texture by pressing a linen cloth onto the wet clay slab before cutting out your shapes for a fabric-like finish.
Place your new creations on a linen runner and light the candles for an instant cozy atmosphere

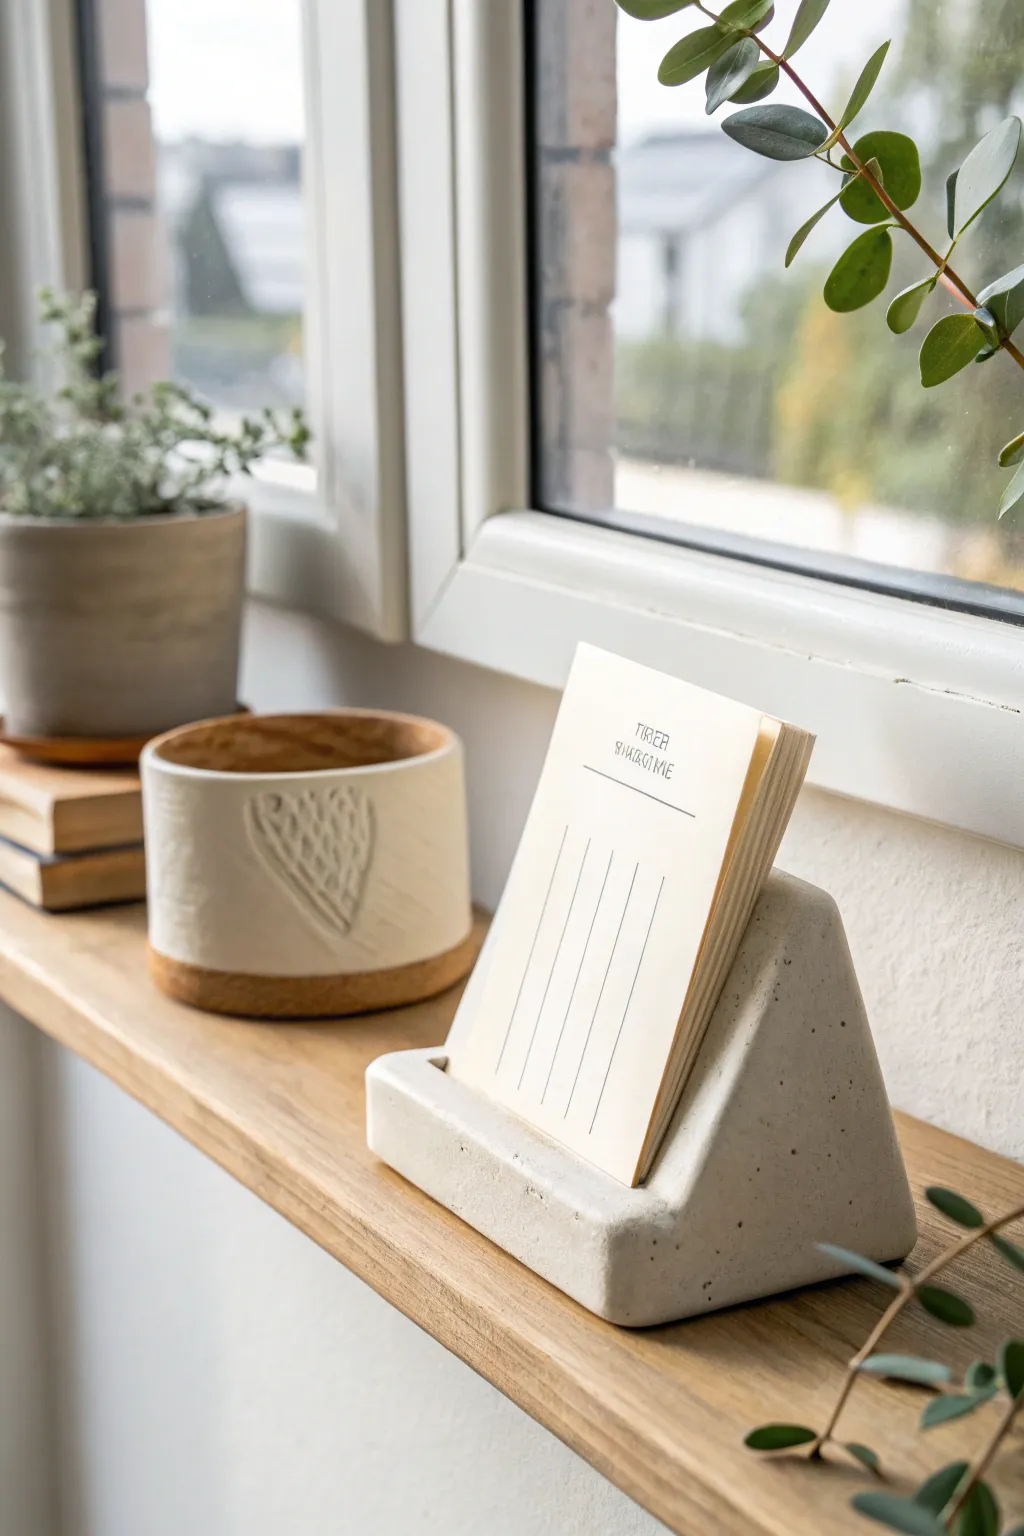
TRACK YOUR CERAMIC JOURNEY
Capture glaze tests, firing details, and creative progress—all in one simple printable. Make your projects easier to repeat and improve.
Stackable Desk Organizer Trays

Achieve the high-end look of terrazzo or speckled stoneware without the kiln using simple air-dry clay. These minimalist, nesting organizers bring a calm, structured elegance to any desk while keeping your small essentials perfectly tidy.
How-To Guide
Materials
- White air-dry clay (approx. 1kg)
- Black pepper or dried coffee grounds (for speckling)
- Rolling pin
- 4mm thickness guides or wooden slats
- Sharp craft knife or clay blade
- Ruler
- Small bowl of water
- Small sponge
- Fine-grit sandpaper (220 and 400 grit)
- Matte acrylic varnish or sealant
Step 1: Preparing the Clay Body
-
Condition the clay:
Begin by taking a large chunk of your white air-dry clay and kneading it thoroughly in your hands to warm it up and remove any trapped air bubbles. -
Add the texture:
Flatten the clay slightly and sprinkle a generous pinch of coarse black pepper or dried used coffee grounds onto the surface. I like to fold the clay over and knead it again to distribute these specks evenly throughout the block. -
Roll it out:
Place your clay on a smooth work surface or canvas mat. Set your 4mm thickness guides on either side to ensure an even slab, then roll the clay out until it is perfectly flat and uniform.
Step 2: Constructing the Bases
-
Measure the large tray:
Using your ruler and craft knife, cut a rectangle for the base of the largest tray. A good size is roughly 15cm x 15cm if you want a square look, or larger for a rectangle. -
Cut the smaller bases:
Cut the bases for the nesting trays. These need to be smaller than the main tray. Measure them so they can sit side-by-side inside the larger one with a little wiggle room—for example, two 6cm x 13cm rectangles. -
Smooth the edges:
Dip your finger in a little water and run it along the cut edges of your base slabs to smooth out any sharpness or drag marks from the knife.
Fixing Cracks
If tiny hairline cracks appear while drying, mix a small paste of fresh clay and water. Fill the crack, smooth it over, and let it dry again before sanding.
Step 3: Building the Walls
-
Cut wall strips:
Re-roll your excess clay to the same 4mm thickness. Cut long strips that represent the height of your trays. A height of 2.5cm to 3cm usually looks proportional. -
Measure strip lengths:
Measure the perimeter of your first base. Cut the strips to match the lengths of the four sides. Cut the ends of each strip at a 45-degree angle for a clean mitered corner, or simply butt join them if you prefer. -
Score and slip:
Using a needle tool or tip of your knife, scratch cross-hatch marks (scoring) along the outer edge of the base and the bottom edge of your wall strips. Dab a little water (slip) onto the scratched areas. -
Attach the walls:
Press the wall strips firmly onto the base. Use a modeling tool or your thumb to drag a little clay from the wall down onto the base on the inside connection to fuse the seam. -
Seal the corners:
Press the corners together firmly. Roll a tiny snake of fresh clay and press it into the inside corners and bottom seams for reinforcement, smoothing it out completely with a wet finger.
Make It Marble
Instead of speckles, twist a small amount of grey or tan clay into your white clay before rolling. Stop before it blends fully for a gorgeous marble swirl.
Step 4: Refining and Finishing
-
Shape the rim:
Use a damp sponge to gently round over the top lip of the trays. They should look soft and organic, not sharp and mechanical. -
Slow drying:
Place the trays on a wire rack away from direct sunlight or heat sources. Let them dry slowly for 24-48 hours. Rotate them occasionally to prevent warping. -
Sanding:
Once bone dry, take your items outside or wear a dust mask. Use 220-grit sandpaper to remove any fingerprints or bumps, then switch to 400-grit for a velvety smooth finish. -
Reveal the speckles:
As you sand, you’ll notice the pepper or coffee grounds becoming more visible on the surface, creating that beautiful terrazzo effect. -
Seal the piece:
Wipe away all dust with a barely damp cloth. Apply two thin coats of matte acrylic varnish to protect the clay and give it a finished, professional look.
Once sealed and cured, fill your new organizers with clips and stationery to admire your handiwork
Photo and Card Holders
This sleek, geometric card holder brings an industrial chic vibe to your desk or shelf with its faux-concrete finish. It’s surprisingly simple to shape and sturdy enough to hold a thick stack of notes, postcards, or your favorite photos.
Step-by-Step Guide
Materials
- Air-dry clay (white or grey)
- Acrylic paint (grey, black, white)
- Rolling pin
- Sharp craft knife or clay blade
- Ruler
- Sandpaper (fine grit)
- Stiff bristle brush (e.g., an old toothbrush)
- Water and sponge
- Clear matte varnish
Step 1: Prepare the Basic Block
-
Condition the Clay:
Start by kneading a generous chunk of air-dry clay until it is warm, pliable, and free of any air pockets. If you want a solid, heavy base, use a solid block of clay; for a lighter piece, you can bulk out the center with a crumpled foil core. -
Initial Shaping:
Form the clay into a rough rectangular block first to ensure you have enough mass. The final piece is roughly a prism shape, so visualize that as you work. -
Create the Triangle Profile:
Place the block on your work surface. Use your hands to press and slope one side downwards, creating a right-angled triangle profile from the side view. The back should be vertical, and the front face should slope down to a short vertical toe at the front. -
Refine the Planes:
Take your ruler or a flat piece of wood and gently tap the sides, back, and sloped front against the flat surface. This helps create sharp, distinct geometric planes rather than organic curves.
Step 2: Add Features & Texture
-
Cut the Slot:
This is the most crucial step. While the clay is still damp but firm, use your ruler to mark a straight line across the sloped face where the cards will sit. This creates the ledge. -
Carve the Ledge:
Use a sharp craft knife to carefully cut downwards into the clay and then horizontally from the front to remove a wedge of clay. You want to create a flat shelf and a vertical backrest for the cards. Ensure the cut is deep enough to hold a stack of papers securely. -
Smooth the Cut:
Dip your finger in a little water and smooth the inside surfaces of the cutout you just made. Sharp corners are good on the outside, but you want the card slot to be smooth so it doesn’t snag paper. -
Texturizing:
To mimic concrete, the surface shouldn’t be perfectly porcelain-smooth. Take a stiff bristle brush or an old toothbrush and gently stipple the surface. I like to focus on the corners to give it that genuinely cast cement look. -
Drying Time:
Set the piece aside in a cool, dry place. Because this is a thick block of clay, let it dry for at least 48 to 72 hours. Rotate it occasionally so all sides get airflow.
Clean Cuts Pro-Tip
For the crispest possible card slot, wrap a credit card in cling film and press it into the damp clay to form the gap, rather than cutting it out freehand.
Step 3: Finishing the Faux Concrete Look
-
Sanding:
Once fully cured, use fine-grit sandpaper to lightly buff the flat sides. If any edges warped slightly during drying, you can sand them back to perfect straightness now. -
Base Coat:
Paint the entire holder with a light grey acrylic paint. Mix a tiny drop of black into white paint if you don’t have a pre-mixed grey. Let this dry completely. -
Adding Speckles:
Dilute a small amount of black or dark grey paint with water on your brush. Using your thumb, flick the bristles of the brush to splatter tiny speckles of paint onto the holder. Repeat this sparingly with white paint to add depth. -
Sealing:
Finish with a coat of clear matte varnish. This protects the paint job and gives the clay a durable finish that feels more like stone.
Level Up: Terrazzo Style
Mix dried, colored clay chips into your wet white clay before shaping. Sand heavily after drying to reveal the colorful fragments for a trendy terrazzo effect.
Now pop a stack of motivational notes or your favorite Polaroid in place and enjoy your stylish new desk accessory
Air Plant and Succulent Planters
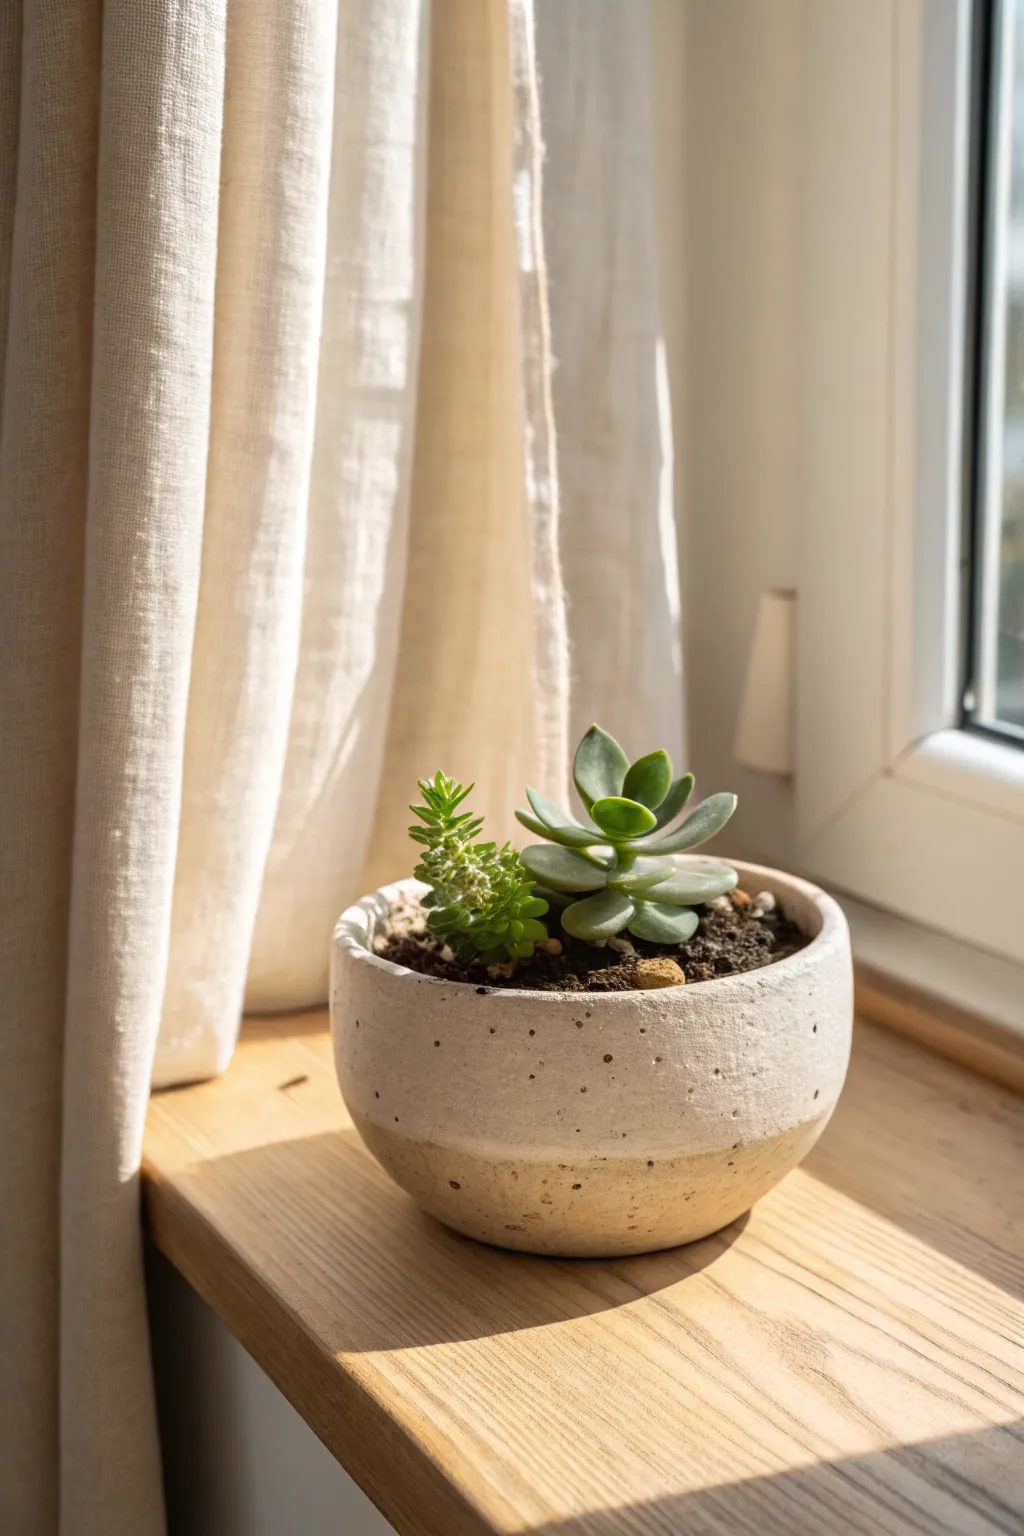
Embrace a minimalist, earthy aesthetic with this charming pinch pot planter. Its speckled texture and subtle two-tone finish give it the look of expensive fired ceramics without needing a kiln.
Step-by-Step Guide
Materials
- White or light gray air-dry clay
- Used coffee grounds (dried)
- Small bowl of water
- Rolling pin
- Craft knife or clay cutter
- Fine-grit sandpaper
- Carving tool or toothpick
- Acrylic sealant (matte finish)
Step 1: Preparing the Clay
-
Condition the clay:
Start by taking a fist-sized ball of air-dry clay and kneading it in your hands until it becomes soft, pliable, and free of cracks. -
Add texture:
Sprinkle a teaspoon of dried coffee grounds onto your work surface and press your clay ball into them. Knead the clay again so the grounds are distributed evenly throughout; this creates that lovely speckled ceramic look. -
Form the base:
Roll the clay back into a smooth ball. Press your thumb into the center to begin the pinch pot method.
Step 2: Shaping the Vessel
-
Pinch the walls:
Gently pinch the clay between your thumb and fingers, rotating the ball as you go. Work from the bottom up to thin the walls evenly. -
Flatten the bottom:
Once the basic bowl shape is formed, tap the pot gently on your table to create a flat, stable base so it won’t wobble on your windowsill. -
Refine the sides:
Smooth the sides upward using wet fingers. Aim for a slightly rounded, bowl-like silhouette rather than a straight cylinder. -
Level the rim:
If the top edge is uneven, use a craft knife to slice off the excess clay, creating a clean, flat rim. Smooth the cut edge with a little water.
Pro Tip: Crack Prevention
Does your clay handle feel dry? Keep a small spritzer bottle of water nearby. Mist your clay lightly while working to prevent surface cracks.
Step 3: Detailing and Drying
-
Mark the two-tone line:
About one-third of the way up from the bottom, use a carving tool or toothpick into the soft clay to lightly etch a horizontal line around the circumference. This will define the textural shift later. -
Add extra texture (optional):
For the bottom section below your line, you can gently dab it with a coarse sponge or a crumpled foil ball to give it a rougher, raw stone appearance compared to the smooth upper section. -
Slow drying:
Place your pot in a cool, dry area away from direct sunlight. Let it dry for 24-48 hours. I find turning it upside down halfway through helps the bottom dry thoroughly. -
Sand the surface:
Once bone dry, use fine-grit sandpaper to smooth the upper two-thirds of the pot. Sand until the surface is silky, but leave the bottom section essentially untouched for contrast. -
Reveal the speckles:
Wipe away the sanding dust with a slightly damp cloth. You’ll notice the sanding process brings the coffee ground speckles to the surface beautifully.
Level Up: Faux Glaze
Paint the upper section with a high-gloss varnish instead of matte. This mimics the look of a glazed ceramic top meeting a raw clay bottom.
Step 4: Finishing Touches
-
Seal the inside:
Because air-dry clay isn’t waterproof, apply 2-3 coats of acrylic sealant to the inside of the pot to protect it from moisture when watering your plants. -
Seal the outside:
Apply a matte sealant to the exterior. This preserves the natural, stone-like look while ensuring the coffee grounds don’t mold or deteriorate over time. -
Final cure:
Let the sealant cure completely according to the manufacturer’s instructions before adding soil. -
Planting:
Fill with cactus soil and nestle your small succulents inside. A layer of small pebbles at the very bottom can help with drainage since there are no holes.
Place your new planter in a sunny spot and enjoy the handmade warmth it brings to your space
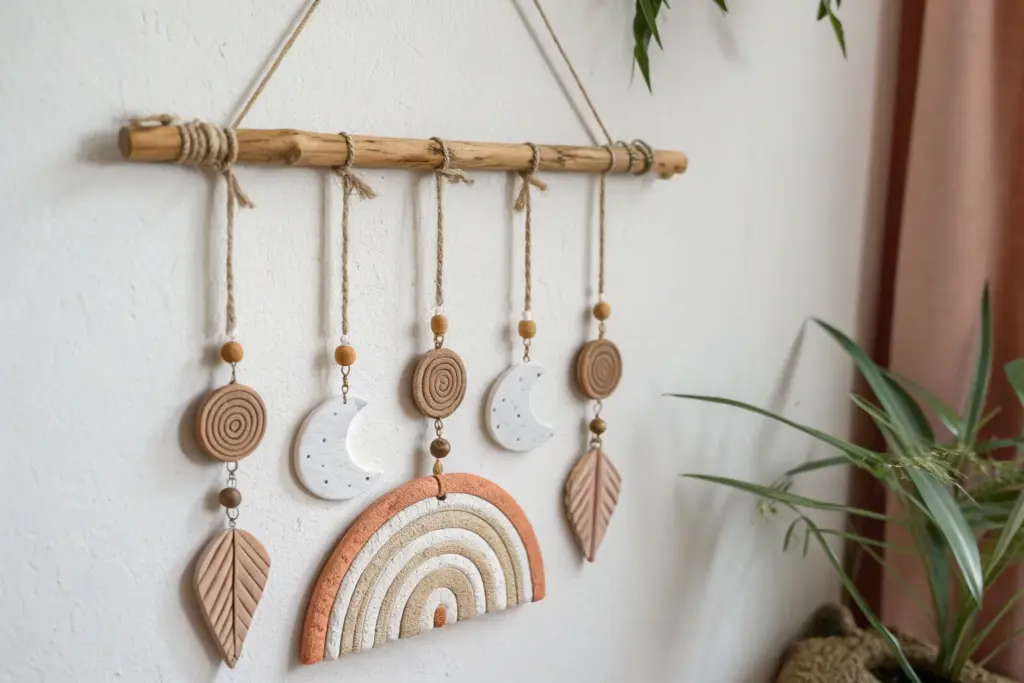
Boho Wall Hanging Shapes
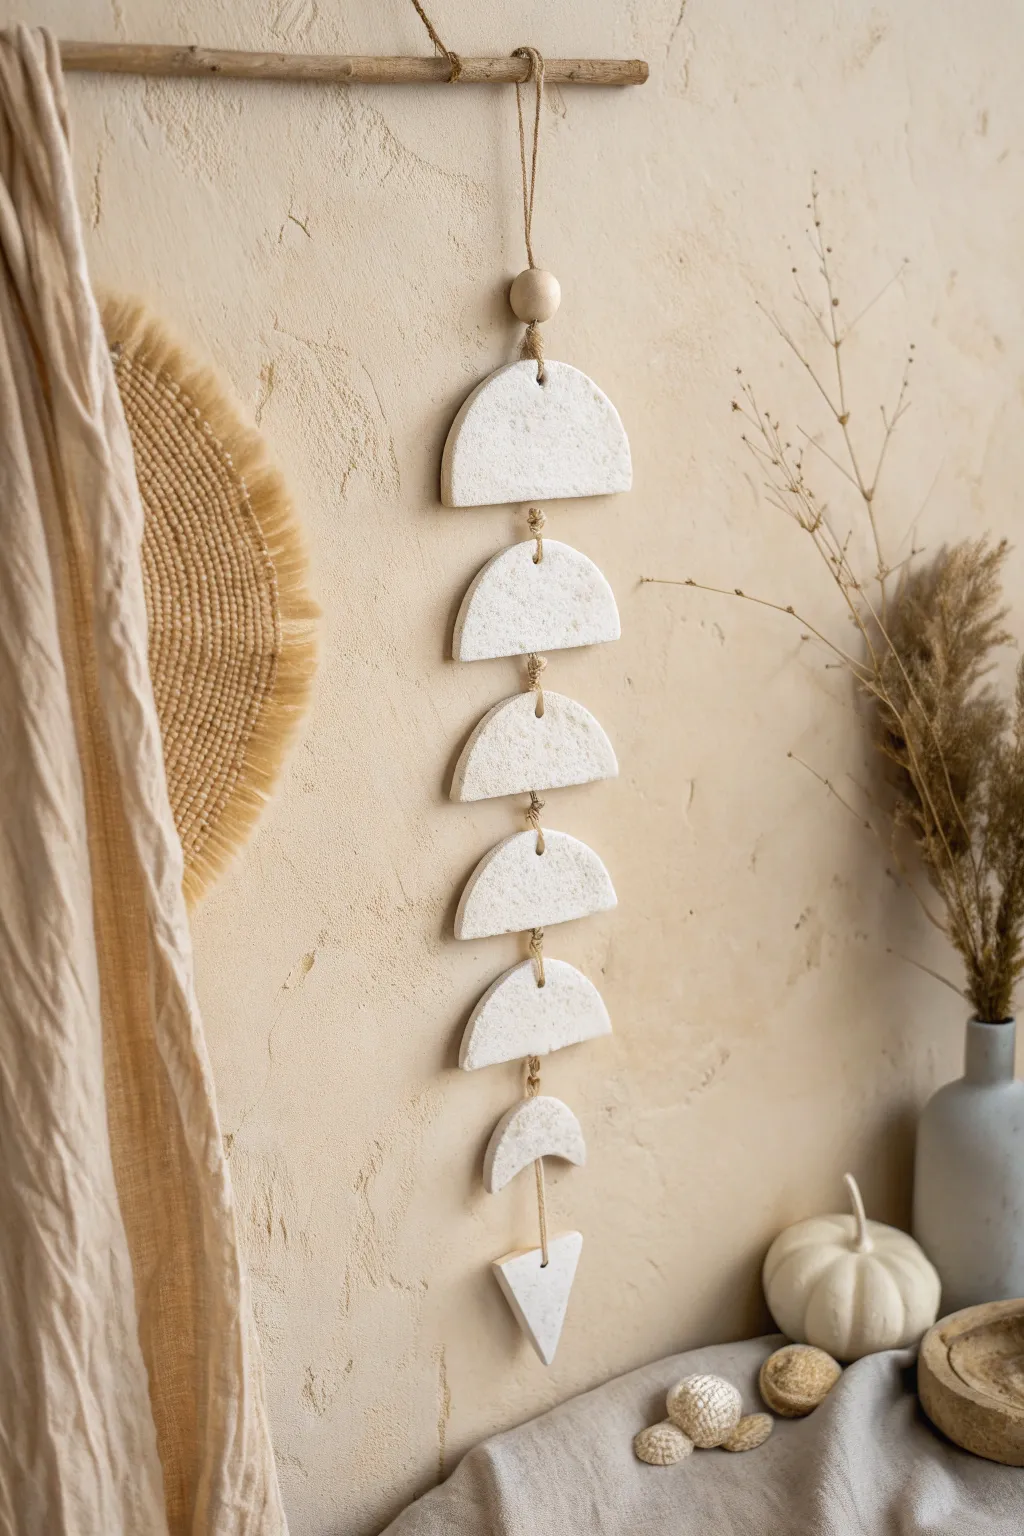
Bring earthy texture and celestial charm to your walls with this rustic air-dry clay mobile. Featuring a cascade of semicircles leading to a crescent moon and inverted triangle, this piece captures the essence of bohemian minimalism perfectly.
How-To Guide
Materials
- White air-dry clay (approximately 1 lb)
- Rolling pin
- Parchment paper or canvas mat
- Round cookie cutter (approx. 3-4 inches diameter) or a bowl to trace
- Sharp craft knife or clay slicing tool
- Straw or small dowel (for piercing holes)
- Natural jute twine
- Unfinished wooden bead (approx. 20mm)
- Driftwood stick or wooden dowel (12-16 inches long)
- Drill with small bit (optional, alternative to tying)
- Fine-grit sandpaper
Step 1: Shaping the Clay Elements
-
Prepare your workspace:
Lay down parchment paper or a canvas mat to prevent sticking. Take a large chunk of white air-dry clay and knead it briefly until it’s pliable and smooth. -
Roll the slab:
Roll out the clay to an even thickness of about 1/4 inch. Try to keep the thickness consistent so all pieces dry at the same rate and hang evenly. -
Cut the circles:
Using your round cutter or by tracing a bowl, cut out three full circles. These will become your five semicircle pieces, with one half left over as a spare. -
Create the semicircles:
Use your craft knife to slice each of the three circles directly in half. You need five perfect semicircles for the main body of the mobile. -
Form the crescent moon:
Roll a small piece of leftover clay. Cut a circle, then use the same cutter to cut an overlapping ‘bite’ out of it, creating a crescent moon shape that matches the width of your semicircles. -
Cut the bottom triangle:
From the remaining clay slab, cut an isosceles triangle. This will hang at the very bottom, pointing downward. -
Smooth the edges:
Dip your finger in a little water and gently run it along the cut edges of every piece to smooth out any roughness or sharpness. -
Texture the surface:
For that stone-like look seen in the photo, gently pat the surface with a crumpled ball of aluminum foil or a stiff-bristled brush. I prefer a natural sponge for a more organic, porous texture. -
Pierce the holes:
Using a straw or small dowel, poke holes for hanging. The five semicircles need a hole at the very top center and bottom center. The crescent moon needs holes at top and bottom center. The triangle only needs one hole at the center of its flat top edge.
Stay Flat
To prevent your clay pieces from warping as they dry, place a lightweight book or a cutting board gently on top of them after they have been drying for about an hour.
Step 2: Drying and Assembly
-
Allow to dry:
Place all pieces on a flat surface away from direct sunlight. Let them dry for 24-48 hours, flipping them halfway through to ensure they dry flat and don’t curl. -
Sand imperfections:
once fully hardened, use fine-grit sandpaper to briefly touch up any jagged edges, focusing especially around the pierced holes. -
Prepare the hanger:
Cut a piece of jute twine about 3 feet long. Tie one end securely to the top of your driftwood stick or dowel. -
Thread the first section:
Tie a knot in the twine, thread it through the top hole of the first semicircle, and tie another knot underneath to secure it in place. -
Connect the pieces:
Thread a short length of twine (about 3 inches) through the bottom hole of the first piece and the top hole of the second piece. Tie knots on the back side of each piece to hide them, leaving a small visible gap of twine between the clay shapes. -
Continue the chain:
Repeat this linking process for all five semicircles, ensuring they all face the same textured side forward. -
Add the final shapes:
Link the crescent moon below the last semicircle, and finally, attach the triangle at the very bottom. -
Create the main suspension:
Attach a long piece of twine to the center of your driftwood stick. Thread a large wooden bead onto this twine before creating the top hanging loop. -
Attach the clay chain:
Tie the top of your clay chain to the center of the driftwood stick. Adjust the knot so the clay hangs straight and centered beneath the wooden bead.
Galaxy Speckle
Before the clay dries, mix in some dried tea leaves or used coffee grounds. This adds gorgeous natural speckles that mimic granite or speckled ceramic stoneware.
Hang your new creation in a sunny spot and enjoy the calm, earthy vibes it brings to your space
Stamped Gift Tags and Ornaments
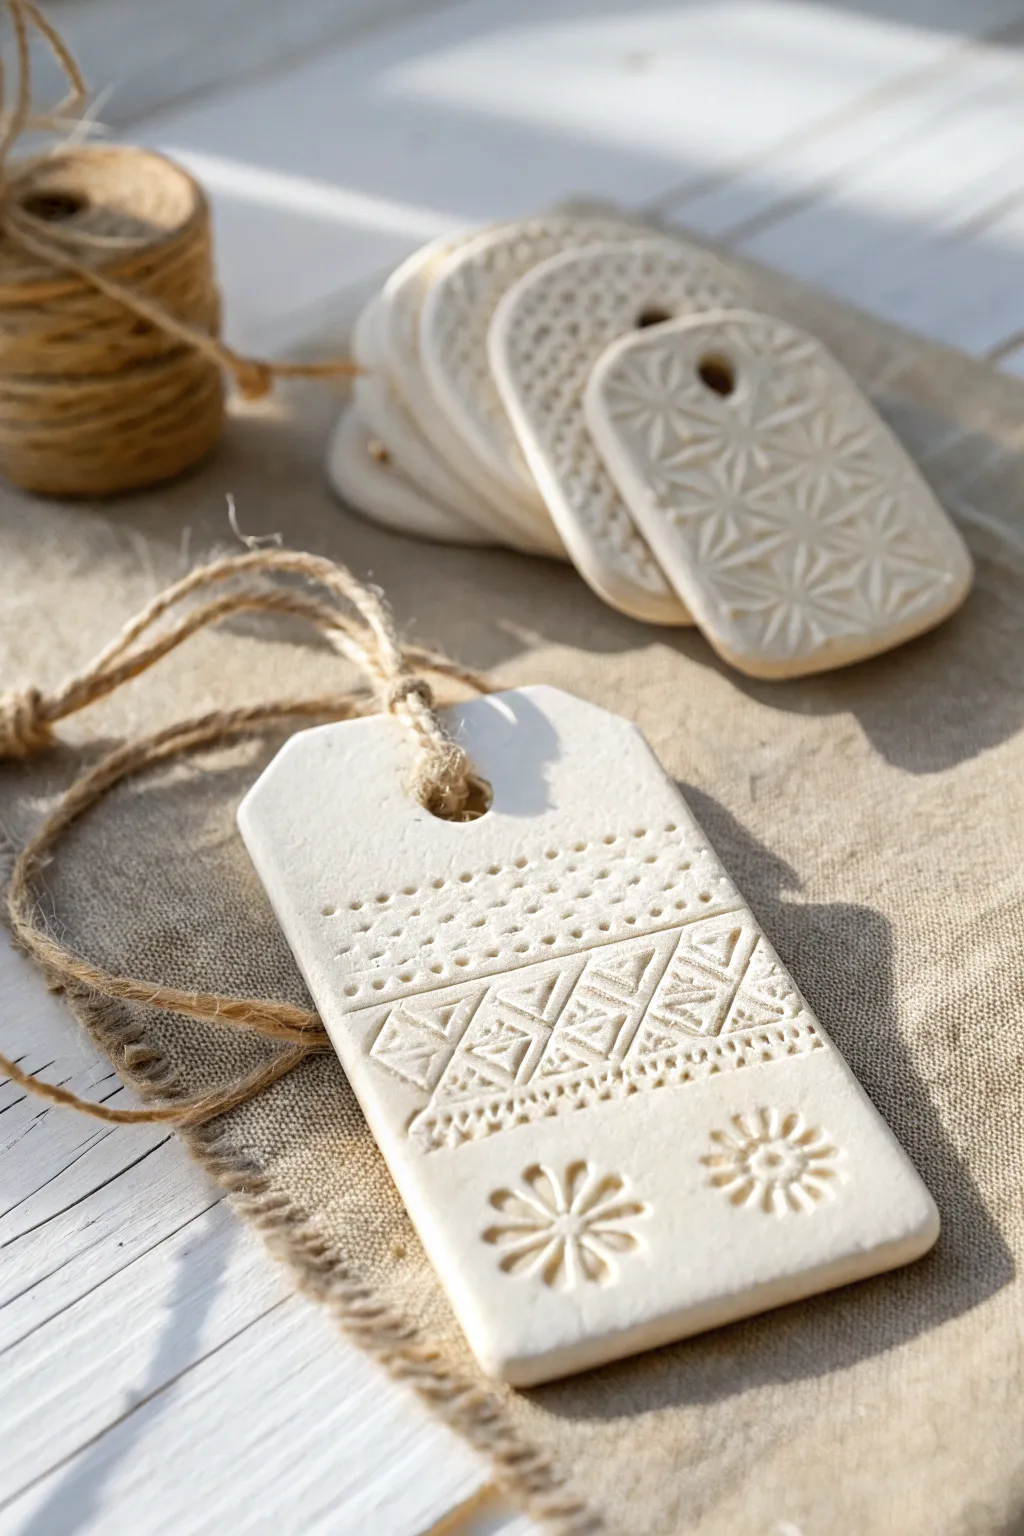
Elevate your gift wrapping with these charming, reusable clay tags that look like artisanal ceramic pieces. The soft white finish and deep, textured impressions create a beautiful, tactile addition to any present or holiday tree.
Detailed Instructions
Materials
- White or cream air-dry clay (e.g., DAS or Crayola)
- Acrylic rolling pin
- Parchment paper or non-stick mat
- Sharp craft knife or dedicated clay cutter tool
- Ruler
- Plastic drinking straw or small round cutter
- Assorted texture stamps (rubber stamps, lace, or clay texture rollers)
- Found objects for stamping (markers caps, pen tips)
- Fine-grit sandpaper
- Bowl of water
- Jute twine or rustic string
Step 1: Preparation and Rolling
-
Wedge the Clay:
Begin by taking a handful of air-dry clay and kneading it in your hands to warm it up. This conditioning helps remove air bubbles and prevents cracks later on. -
Roll it Out:
Place the clay onto a sheet of parchment paper to prevent sticking. Using an acrylic rolling pin, roll the clay out evenly. You want a slab that is approximately 1/4 inch thick—thick enough to be sturdy but thin enough to dry well. -
Check for Consistency:
Run your hand lightly over the surface to ensure it’s smooth and level. If you see any air bubbles, prick them with a needle and smooth over the hole with a wet finger.
Step 2: Cutting and Shaping
-
Cut the Basic Rectangle:
Using a ruler and a craft knife, cut a clean rectangle from your clay slab. A good size is roughly 2 inches by 3.5 inches, but feel free to vary the dimensions. -
Create the Tag Shape:
To get that classic luggage tag look, you need angled corners at the top. Measure about half an inch down from the top left corner and make a diagonal cut to the center top edge. Repeat this on the right side. -
Smooth the Edges:
Dip your finger in a little water and run it along the cut edges of the clay. This softens the sharp cuts and gives the tag a more polished, ceramic-like finish. -
Punch the Hole:
Take a plastic drinking straw and press it into the center of the top of the tag, about half an inch from the edge. Twist the straw slightly and lift to remove a neat core of clay for the string hole.
Preventing Cracks
Cracking happens when clay dries too fast. Don’t put these near a heater! If your room is very dry, lay a loose sheet of plastic wrap over them for the first 12 hours.
Step 3: Adding Texture
-
Plan the Design:
Visualize your pattern before pressing. For the look in the photo, you will need three distinct zones: a dotted top, a geometric middle band, and floral accents at the bottom. -
Create Dotted Rows:
Use a small, blunt tool—like the non-writing end of a small paintbrush or a dedicated dotting tool—to press rows of small dots across the upper section of the tag. -
Stamp the Geometric Band:
Select a stamp with a triangle or Aztec-style pattern. Press it firmly into the clay horizontally across the middle of the tag. If you don’t have a stamp, use a ruler edge to press lines and a knife tip to draw triangles. -
Add Floral Accents:
For the bottom section, press a larger floral stamp or a patterned button into the clay. Place two or three separate impressions to balance out the design. -
Deepen the Impression:
Check your stamped areas. If the clay has sprung back slightly, go over the impressions again to ensure they are deep enough to catch shadows, which highlights the texture.
Sticky Stamps?
If your stamp is sticking to the clay and ruining the detail, dust the stamp surface lightly with cornstarch or baby powder before pressing it down.
Step 4: Drying and Finishing
-
Initial Drying Time:
Leave the tags on the parchment paper to dry in a cool, dry place away from direct sunlight. Let them sit undisturbed for at least 24 hours. -
Flip for Even Drying:
After the first day, carefully flip the tags over. This exposes the back side to air and prevents the edges from curling upward as moisture evaporates. -
Sanding:
Once the clay is completely bone dry and hard (usually 48-72 hours), inspect the edges. Use fine-grit sandpaper to gently buff away any remaining roughness or sharp burrs. -
Clean Up Dust:
Wipe the tag with a slightly damp cloth or a dry soft brush to remove the fine sanding dust from the crevices of your pattern. -
Stringing:
Cut a length of jute twine, roughly 8 inches long. Fold it in half and feed the loop through the hole in the tag. -
Secure the Knot:
Pull the loose ends of the twine through the loop and tighten gently to create a lark’s head knot. This rustic finish perfectly complements the natural clay texture.
Tie these onto a wrapped package or hang them individually for a minimalist decoration.
Faux Ceramic Finish With Paint Effects
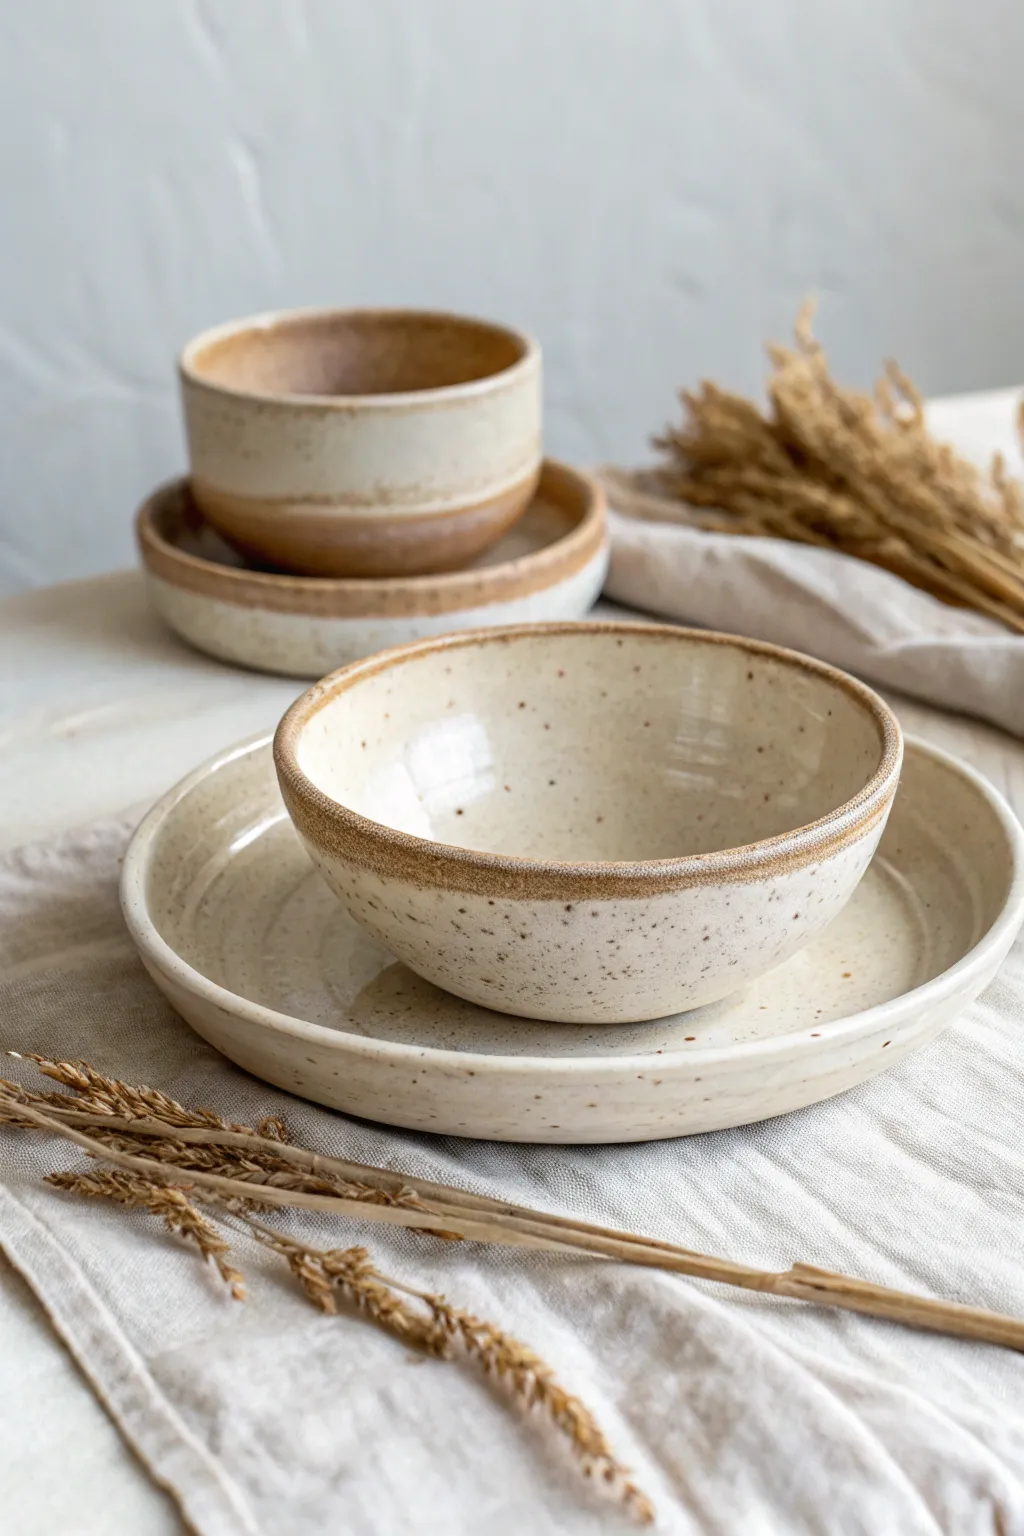
Achieve the high-end look of wheel-thrown stoneware without a kiln using ordinary air-dry clay. This project focuses on layering acrylics and varnishes to create a convincing milky glaze effect, complete with realistic speckling and a rustic toasted rim.
Step-by-Step Tutorial
Materials
- White air-dry clay (approx. 1kg)
- Rolling pin
- Clean bowls or plates (to use as molds)
- Sponge or craft knife
- Sandpaper (medium and fine grit)
- Acrylic paints: Cream/Off-white, Burnt Sienna, Raw Umber, Gloss Medium
- Toothbrush (for spattering)
- Soft synthetic brushes
- High-gloss varnish or epoxy resin (for the faux glaze look)
- Cup of water
Step 1: Shaping the Clay Base
-
Prepare the workspace:
Lay down a canvas cloth or cling film on a flat surface to prevent sticking. Knead your air-dry clay until it is warm, pliable, and free of air bubbles. -
Roll out the slab:
Roll the clay out to a consistent thickness of about 1/4 inch (6mm). Rotate the clay often to ensure it doesn’t stick to the table. -
Mold the shape:
Drape your rolled slab over an upside-down bowl or plate that serves as your mold. Gently press the clay against the form, starting from the center and working outward to avoid trapping air. -
Trim the excess:
Use a craft knife or a needle tool to trim the excess clay around the rim of your mold. You want a clean, even edge. -
Smooth the surfaces:
Dip your finger in a little water and run it along the rim and the surface of the clay to smooth out any imperfections or cracks. I like to really work the rim here to make it look intentionally rounded like thrown pottery. -
Initial drying:
Let the clay sit on the mold for about 24 hours until it stiffens enough to hold its shape. -
Remove and dry completely:
Carefully pop the clay off the mold and place it right-side up. Allow it to air dry for another 24-48 hours until it is bone dry and chalky white. -
Refining the form:
Sand the piece thoroughly. Start with medium grit to fix lumpy areas, then switch to fine grit for a silky smooth finish. Wipe away all dust with a slightly damp cloth.
Cracks happen!
If hairline cracks appear while drying, mix a slurry of clay and water (slip) to fill them in. Let dry, then sand smooth before painting.
Step 2: Faux Glaze Painting
-
Base coat application:
Mix a cream or warm off-white acrylic paint. Apply two solid coats to the entire piece (front and back), letting the paint dry fully between layers. -
Creating the speckled effect:
Dilute a small amount of Raw Umber paint with water until it’s inky. Dip an old toothbrush into this mixture. -
Thump and splatter:
Hold the toothbrush over the bowl and run your thumb across the bristles to flick tiny speckles onto the surface. Practice on a scrap paper first to control the density. -
The toasted rim technique:
Mix Burnt Sienna with a touch of glazing medium or water to make it translucent. Use a small sponge to dab this color gently along the very edge of the rim. -
Blending the rim:
While the rim paint is still wet, use a clean, slightly damp brush to soften the inner edge of the brown line, making it fade naturally into the cream color rather than stop abruptly. -
Adding depth:
Once the rim is dry, go back in with a tiny detail brush and accent a few spots on the rim with undiluted Raw Umber to mimic uneven firing marks. -
Sealing the deal:
To get that ‘wet’ ceramic look, apply 2-3 coats of high-gloss varnish. If you want an ultra-thick glass-like finish, pour a thin layer of resin into the center and brush it up the sides. -
Final cure:
Let the varnish or resin cure completely according to the manufacturer’s instructions before handling.
Pro Tip: Liquid Glaze
Mix your acrylic paint directly into the gloss varnish for the final layers. This creates a semi-transparent, milky depth that looks exactly like real fired glaze.
Now you have a stunning set of decorative bowls that perfectly capture the organic beauty of artisan ceramics