Whenever I’m decorating diyas, I treat each little clay lamp like a tiny canvas that deserves a moment of extra love. These diya decoration ideas are all about bold color, simple details, and that magical glow that makes your whole setup feel festive.
Classic Marigold Ring Diya Setup
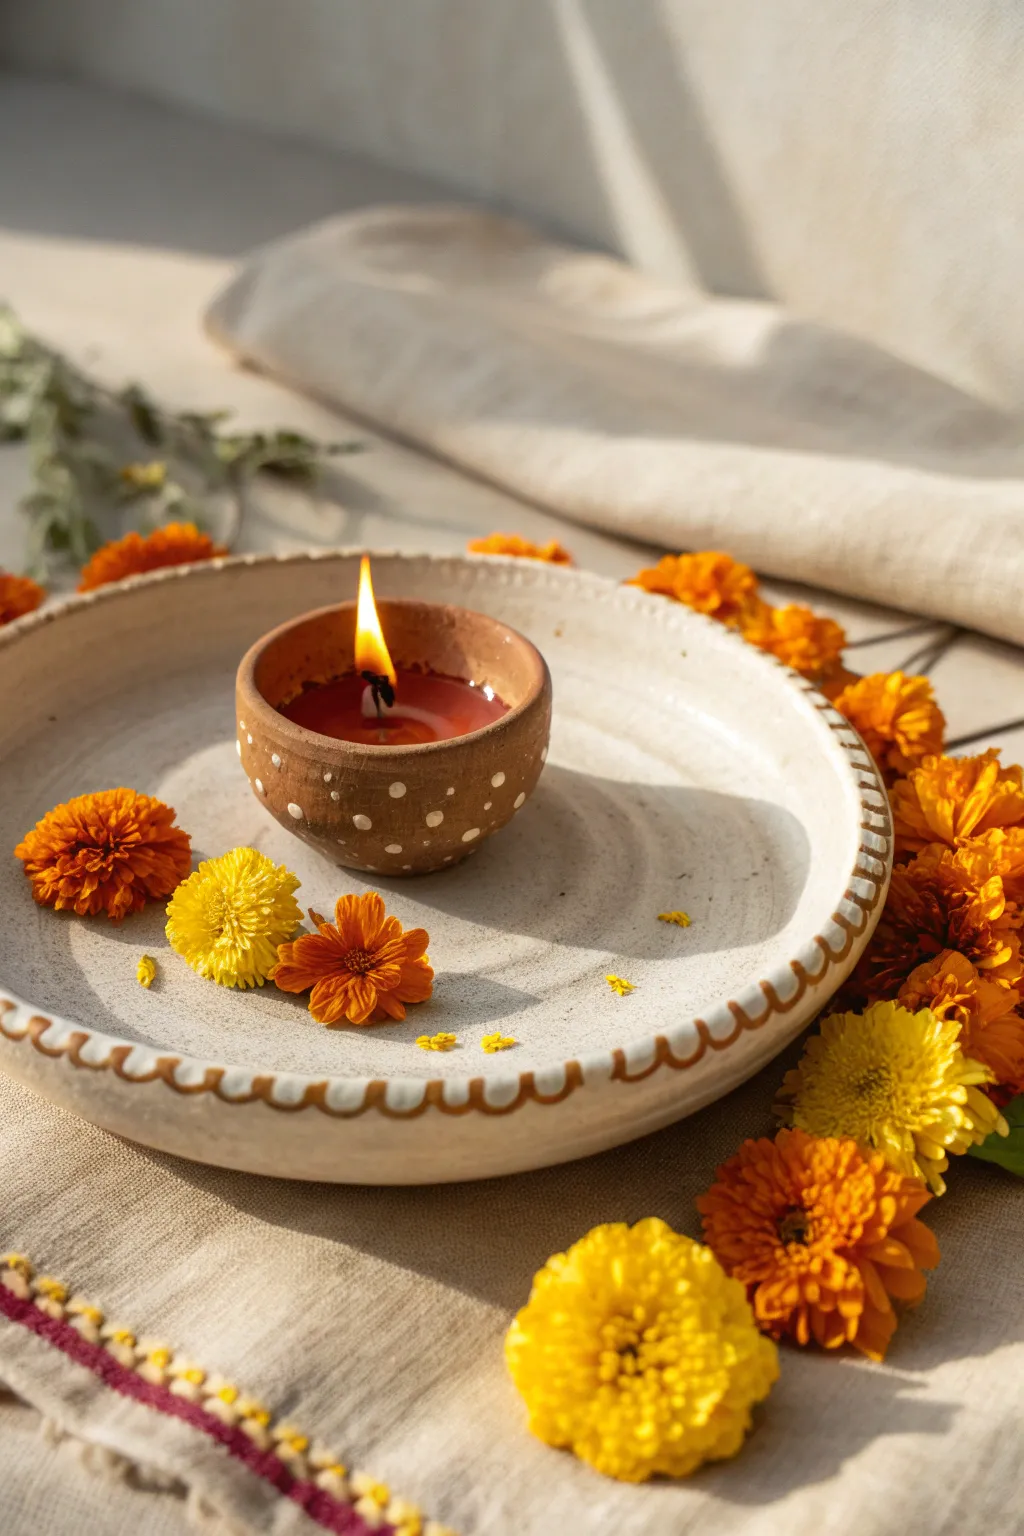
Embrace the warmth of tradition with this serene arrangement centered around a custom-painted clay diya. The combination of rustic earthenware, simple white polka dots, and vibrant marigold blooms creates a glowing focal point perfect for festive corners.
Step-by-Step
Materials
- Small terracotta diya (plain)
- White acrylic paint
- Fine-tip paintbrush or toothpick
- Large, shallow ceramic bowl or plate (off-white/cream)
- Fresh orange and yellow marigold flowers
- Ghee or oil for the lamp
- Cotton wick
- Matchbox or lighter
- Neutral textured table runner or cloth
Step 1: Painting the Diya
-
Select your diya:
Choose a small, traditional terracotta diya with a deep enough well to hold oil for a few hours. Wipe it down with a dry cloth to remove any loose dust. -
Prepare the paint:
Squeeze a tiny amount of white acrylic paint onto a palette. You want the consistency to be thick enough to hold a shape, not runny. -
Apply the dots:
Dip the non-brush end of a paintbrush, a toothpick, or a dotting tool into the white paint. Gently press it onto the exterior of the diya to create small, evenly spaced polka dots. -
Vary the pattern:
I like to create slightly larger dots near the rim and smaller, scattered ones near the base for a whimsical, hand-touched look. Let this dry completely for 15-20 minutes.
Keep it Fresh
To keep the marigolds looking plump for longer, lightly mist them with cold water every few hours. This prevents wilting, especially near the heat of the flame.
Step 2: Setting the Scene
-
Lay the foundation:
Spread out a neutral, textured cloth or table runner. The fabric provides a soft, organic background that contrasts beautifully with the bright flowers. -
Place the main vessel:
Position your large ceramic bowl or plate in the center. Ideally, choose one with a subtle scalloped edge or brown detailing on the rim to echo the color of the terracotta. -
Position the diya:
Once the paint is fully dry, place your decorated diya in the exact center of the ceramic bowl.
Floating Variation
Fill the large ceramic bowl with water before adding the diya. The marigolds will float beautifully, and the water will reflect the flickering candlelight.
Step 3: Floral Arrangement
-
Prepare the blooms:
Gently pluck the heads off several fresh marigolds. You will need both deep orange and bright yellow varieties. -
Create the inner trio:
Inside the bowl, place three flower heads around the diya. Use one yellow bloom and two orange ones, spacing them casually rather than in a rigid triangle. -
Add delicate petals:
Pluck a few individual petals from a yellow flower and scatter them lightly inside the bowl for added texture. -
Build the outer ring:
Arrange the remaining marigold heads around the base of the ceramic bowl on the cloth. Create a semi-circle or a full ring depending on your available space. -
Mix the colors:
Alternate between yellow and orange flowers in the outer ring to keep the visual rhythm lively and festive.
Step 4: Finishing Touches
-
Insert the wick:
Roll a cotton wick between your palms and place it into the diya, with the tip extending slightly over the notched edge. -
Add the fuel:
Carefully pour ghee or oil into the diya until it is about three-quarters full, ensuring the wick is soaked. -
Light the lamp:
Light the wick and watch the flame settle. The warm glow will immediately highlight the white polka dots and the texture of the marigolds.
Enjoy the peaceful ambiance this handmade arrangement brings to your celebration space


Bright Base Coat With Gold Rim
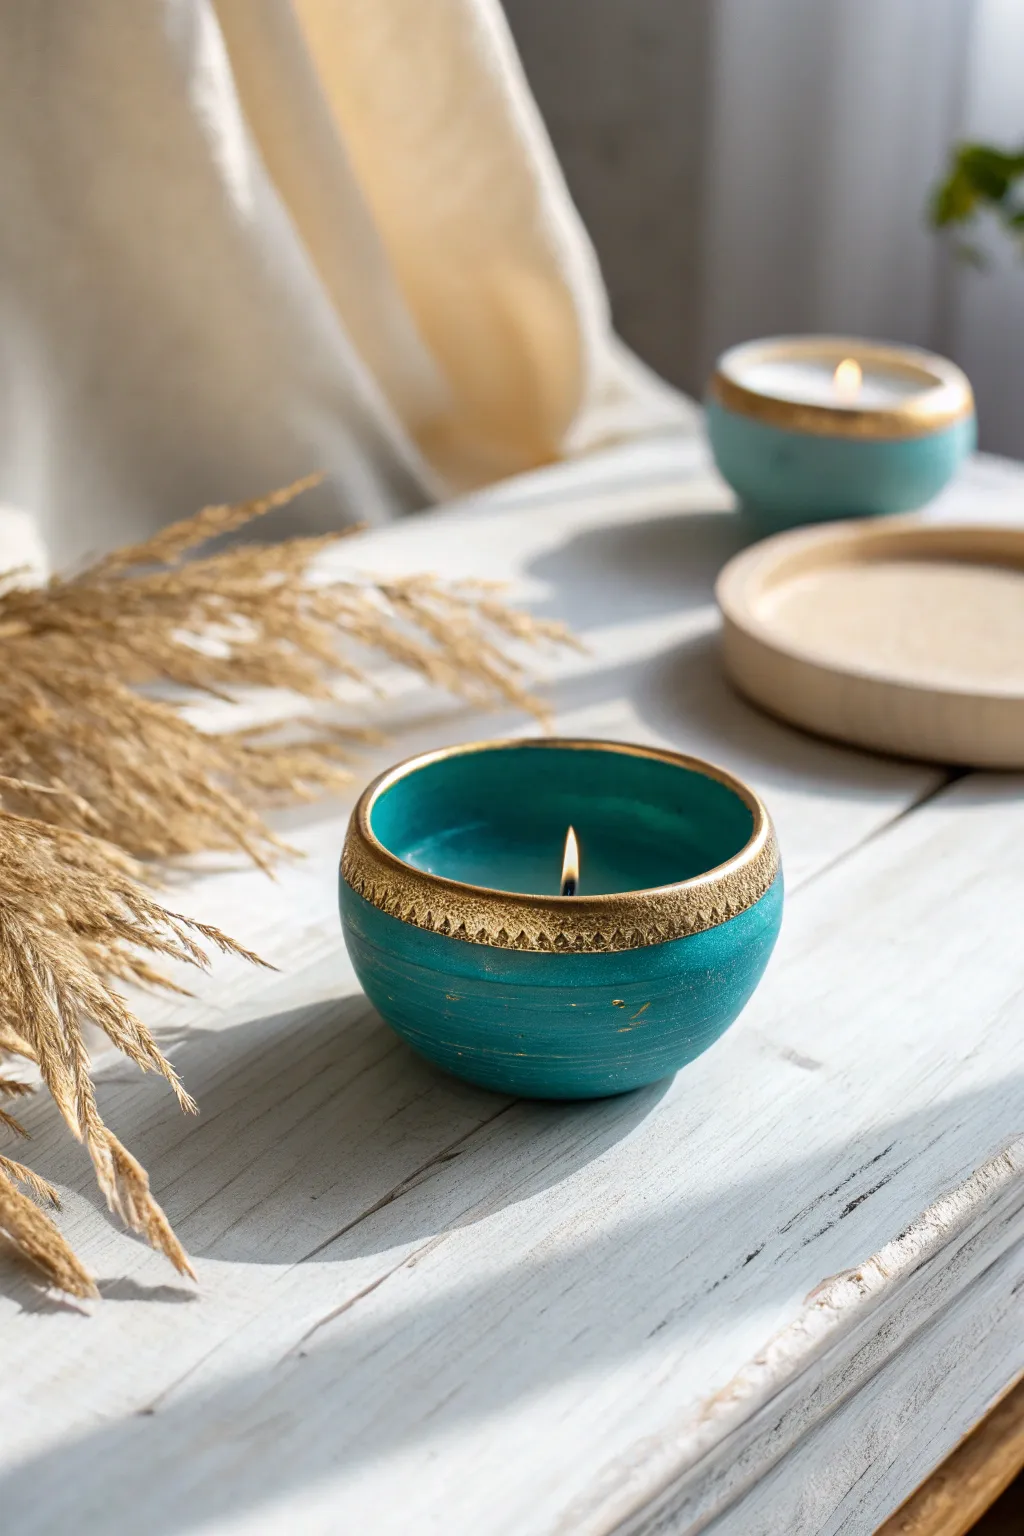
Transform a simple clay diya into a sophisticated piece of decor by pairing a rich, matte teal base with a luxurious metallic gold rim. Ideally suited for festive occasions, this design balances modern minimalism with traditional warmth through its striking color contrast.
Step-by-Step Tutorial
Materials
- Plain clay diya or small ceramic bowl
- Teal acrylic paint (matte finish preferred)
- Metallic gold acrylic paint
- Texture paste or heavy body acrylic gel (optional for detailing)
- Flat paintbrush (medium width)
- Fine liner detail brush
- Sponge dabber or small sponge piece
- Clear matte varnish or sealant spray
- Candle wax and wick (if creating a fresh pour)
- Palette for mixing
Step 1: Base Preparation & Color
-
Clean surface:
Begin by thoroughly wiping down your clay diya with a dry cloth to remove any loose dust or debris. If the surface is rough, a quick pass with fine-grit sandpaper will ensure a smooth painting area. -
Prime the base:
Apply a thin layer of white acrylic paint or gesso as a primer. This step is crucial because clay is porous and will absorb pigment; the white base makes the final teal color pop much more vividly. -
First coat of teal:
Squeeze a generous amount of teal acrylic paint onto your palette. Using a flat paintbrush, cover the entire exterior of the diya using smooth, horizontal strokes to minimize brush marks. -
Dry and repeat:
Allow the first coat to dry completely for about 15-20 minutes. Apply a second coat of teal to achieve full opacity, ensuring no primer shows through. I find that two thin coats always look better than one thick, gloopy one. -
Interior touch-up:
Paint the upper inner rim of the diya with the same teal shade, extending down about half an inch inside, so the clay color doesn’t peek through once the wax is poured. -
Create weather-worn texture:
For the subtle horizontal streaks seen in the image, take a nearly dry brush with a tiny amount of a slightly lighter teal or white paint. Gently drag it horizontally across the dried base coat to create faint, distressed lines.
Sharper Gold Lines
For a super crisp edge between the teal and gold sections, apply a strip of washi tape or painter’s tape around the bowl before painting the gold rim. Peel it off while the paint is still wet.
Step 2: The Golden Rim Detail
-
Define the border area:
Identify the top 1/2 inch of the diya’s exterior rim where the gold band will sit. You can lightly mark this with a pencil or freehand it if you feel confident. -
Apply base gold layer:
Using a smaller flat brush, paint a solid band of metallic gold around the top rim. Don’t worry about texture yet; just aim for solid coverage. -
Add texture paste (optional):
To recreate the embossed look shown in the photo, mix a little texture paste with your gold paint. If you don’t have paste, simply layering heavy body paint works well. -
Stipple the gold:
Using a sponge dabber or a stiff brush, tap the gold mixture onto the rim. This stippling motion creates a rough, vintage metal texture rather than a smooth, manufactured look. -
Paint the distinct pattern:
Once the gold band is dry, load a fine liner brush with slightly darker gold or bronze paint. Carefully paint small triangles or zig-zags along the bottom edge of the gold band to mimic the etched pattern seen in the image. -
Highlight the lip:
Don’t forget the very top edge lip of the diya. Run your gold-loaded brush along this rim to connect the exterior design to the interior. -
Adding gold flecks:
To tie the look together, use a dry brush with a tiny amount of gold paint and lightly whisk it over random parts of the teal base. This subtle distressing makes the piece look cohesive and aged.
Step 3: Finishing Touches
-
Seal the paint:
Once all paint layers are bone dry, apply a coat of clear matte varnish. This protects the paint from heat and handling while preserving the matte aesthetic of the teal. -
Prepare the wick:
If you are filling this yourself, place a pre-tabbed wick in the center of the diya. Use a dab of hot glue or a wick sticker to secure it to the bottom. -
Pour the wax:
Carefully pour melted soy or paraffin wax into the vessel, stopping just below the interior paint line. Let it cool undisturbed until the wax hardens completely.
Paint Peeling Off?
If acrylic paint peels off the clay surface after drying, the clay was likely too dusty or oily. Sand the bare spots gently and re-apply a primer coat before adding color again.
Your elegant teal and gold diya is now ready to add a warm, sophisticated glow to any corner of your home.


Peacock Feather Color Story Diya
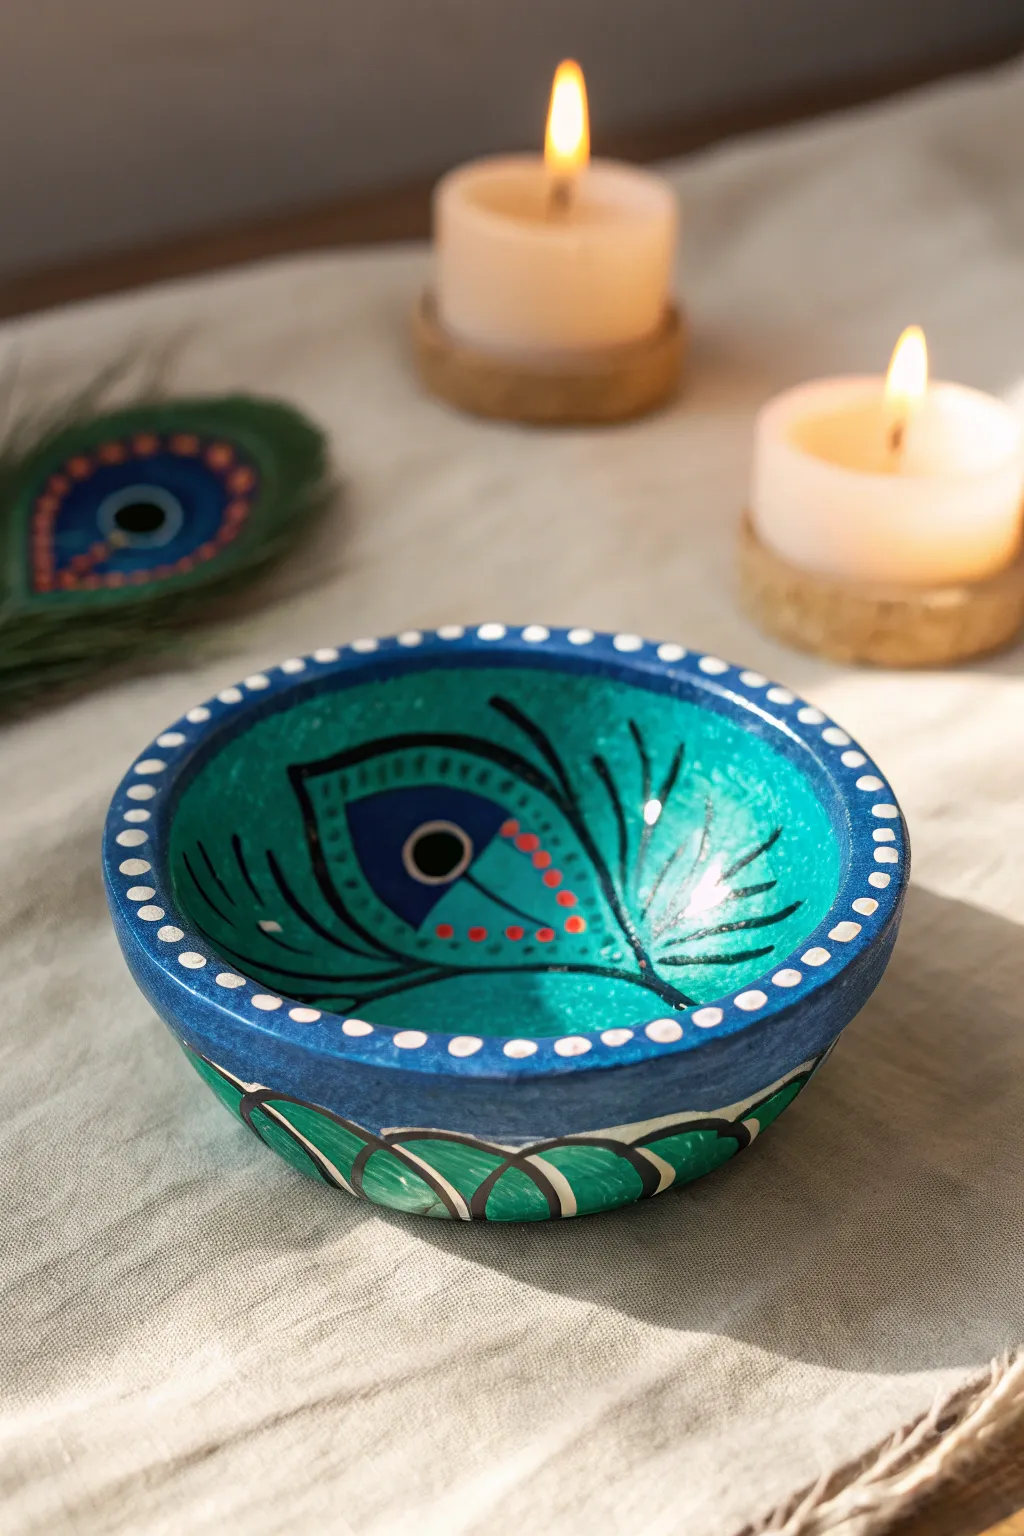
Bring the brilliance of a peacock’s plumage to your festive decor with this stunning hand-painted diya. The vibrant teal interior featuring a stylized feather motif creates a captivating centerpiece for your Diwali celebrations.
Step-by-Step Guide
Materials
- Terracotta or ceramic diya bowl (medium size)
- Acrylic paints (Teal/Turquoise, Dark Blue, Black, White, Red/Orange)
- Fine liner brush (size 0 or 00)
- Small flat brush (size 4 or 6)
- White or clear gesso (optional primer)
- Gloss varnish
- Palette
- Water cup
- Pencil
Step 1: Preparation and Base Coat
-
Clean and Prime:
Before you begin, wipe your diya with a damp cloth to remove any dust or loose clay particles. If you are using raw terracotta, apply a coat of white gesso or a mixture of white glue and water to seal the pores and create a smooth painting surface. -
Mix the Base Color:
Create a rich teal shade by mixing turquoise acrylic paint with a tiny dot of ultramarine blue. You want a vibrant, medium-tone teal that mimics the body of a peacock. -
Paint the Interior:
Using your flat brush, apply the teal paint to the entire interior of the bowl. Ensure you get into the corners at the bottom. Let this coat dry completely, then apply a second coat for opaque, solid coverage. -
Paint the Exterior Rim:
Switch to a darker blue shade, perhaps a royal blue or indigo. Paint the top rim and the upper outer edge of the diya to create a nice frame for the inner design. Allow to dry.
Clean Lines
If your black outlines look shaky, thin your black paint with a drop of water. Inky consistency flows better from liner brushes than thick paint.
Step 2: Painting the Feather Motif
-
Draft the Design:
Lightly sketch the outline of a large peacock feather tear-drop shape in the center of the bowl using a pencil. It doesn’t need to be perfect, just a guide for placement. -
Outline the Eye:
Load your fine liner brush with black acrylic paint. Carefully trace the tear-drop shape you just sketched, slightly thickening the line on one side for a stylized look. -
Fill the Eye Center:
Inside the tear-drop outline, paint a smaller, dark blue almond shape. This forms the distinctive ‘eye’ of the feather. Let current layers dry before moving to the next step so colors don’t muddy. -
Add the Pupil:
Once the blue oval is dry, take the back of your paintbrush handle, dip it in black paint, and stamp a perfect black circle in the center of the blue almond. -
Paint the Barbs:
Using the fine liner brush and black paint again, draw sweeping, curved lines extending outward from the main feather spine. Use quick, flicking motions to make the lines taper naturally at the ends. -
Add Decorative Dots:
Dip a toothpick or a fine dotting tool into bright red or orange paint. Carefully place a row of tiny dots along the inner curve of the feather eye shape for a pop of contrasting color.
Step 3: Exterior and Details
-
Detail the Rim:
Along the flat top edge of the rim that you painted dark blue earlier, add a series of small white dots. Use a small dotting tool or the back of a brush to keep them uniform and evenly spaced. -
Paint the Outer Bowl:
For the lower exterior of the bowl, paint a series of green scallops or petal shapes. Outline these shapes in black to maintain the graphic style of the interior. -
Highlight the Exterior:
Add white accents or lines within the green exterior shapes to mimic the texture found on the rest of the bowl. This ties the outside design to the inside theme. -
Add Final Highlights:
Returning to the interior, I like to add a tiny dot of white inside the black pupil of the feather eye. This ‘catchlight’ brings the design to life. -
Seal the Work:
Once the entire diya is bone dry—ideally leave it overnight—apply a coat of gloss varnish. This protects the paint from heat and gives the ceramic a professional, glazed appearance.
Gilded Touch
Swap the white dots on the rim for metallic gold paint. It adds a traditional festive shimmer that looks incredible under candlelight.
Now your diya is ready to filled with wax or oil to light up your festive evening with elegance


Mirror Tile Diya Border
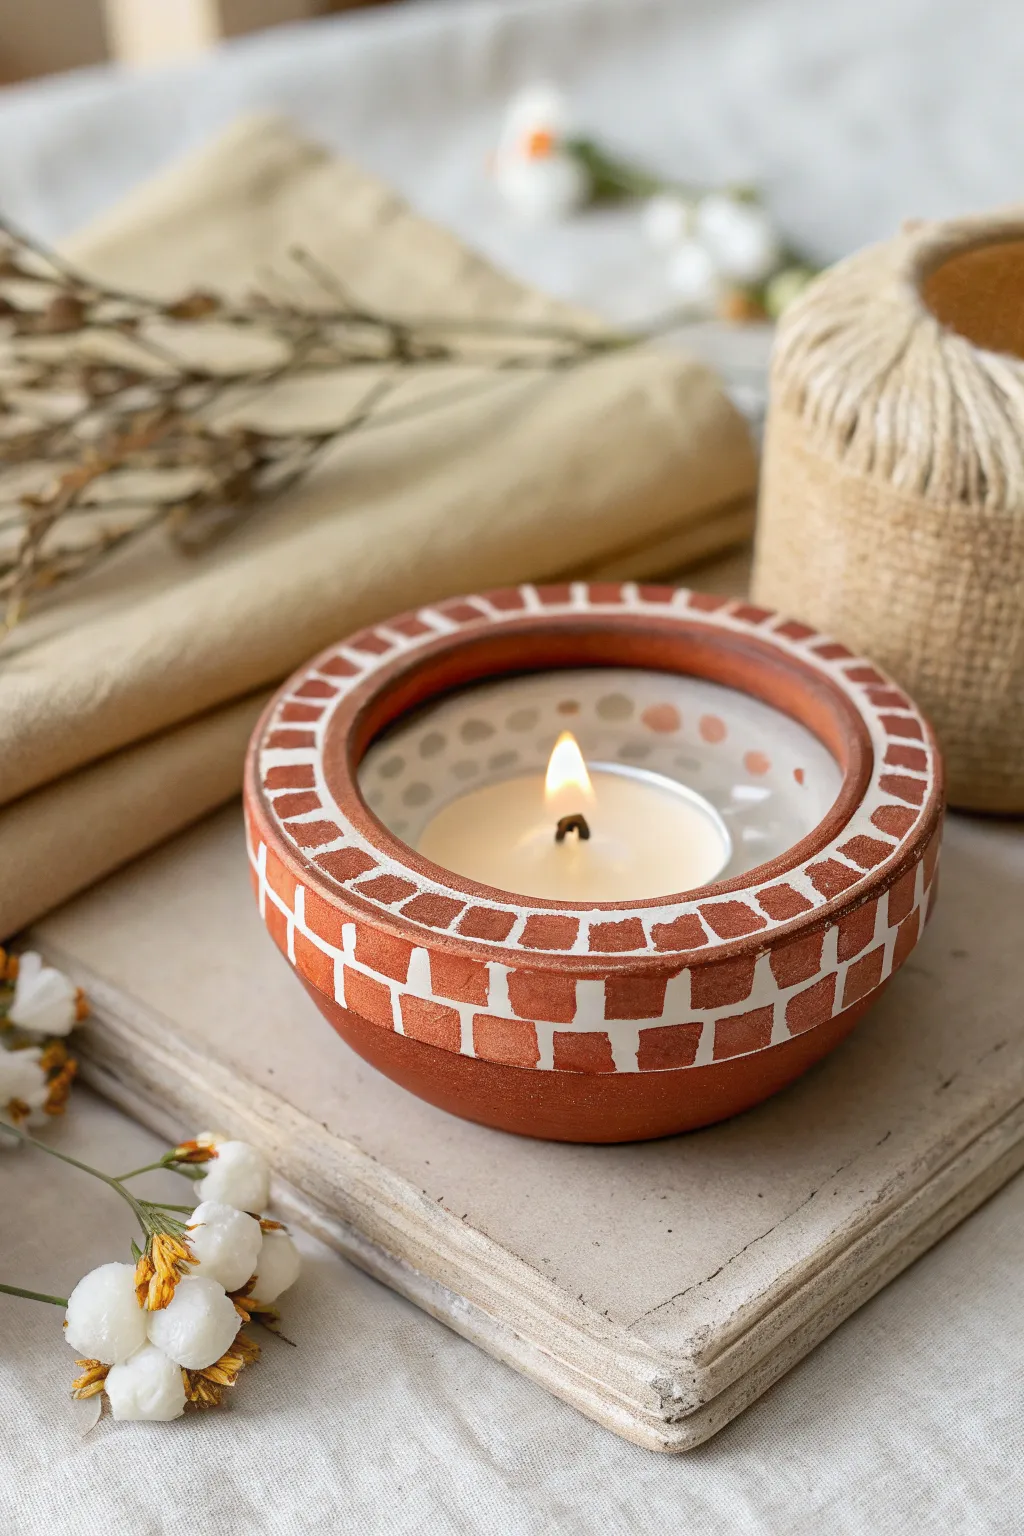
Transform a simple terracotta bowl into an elegant candle holder that mimics the look of inlaid mosaic tiles without any messy grouting. This project uses clever painting techniques to create a structured geometric border that beautifully frames the soft glow of a tealight.
Step-by-Step Guide
Materials
- Small terracotta bowl or shallow pot (approx. 4-5 inches diameter)
- White acrylic paint
- Terracotta or burnt orange acrylic paint
- Light beige or grey acrylic paint (optional for interior)
- Medium flat brush
- Fine detail brush (size 0 or similar)
- White pencil or chalk
- Ruler or measuring tape
- Matte varnish spray
- Tealight candle
Step 1: Base Preparation
-
Clean the surface:
Before starting, wipe down your terracotta bowl with a slightly damp cloth to remove any pottery dust. Let it dry completely so the paint adheres properly. -
Paint the rim:
Using your flat brush, apply a solid coat of terracotta or burnt orange paint to the wide flat rim of the bowl and the upper half of the exterior side. You want a rich, opaque base color here. -
Paint the interior:
Switch to white acrylic paint and coat the entire inside of the bowl. This will reflect the candlelight beautifully. You may need two coats for full coverage. -
Let it cure:
Allow the base layers to dry for at least 30 minutes. The paint needs to be hard enough to sketch on without lifting.
Steady Hand Tip
Rest your painting hand’s pinky finger against the bowl while painting the fine white lines. This anchors your hand and prevents shakiness.
Step 2: Creating the Mosaic Pattern
-
Mark the rings:
Using a white pencil, lightly draw two concentric circles on the flat top rim of the bowl to divide it into an inner and outer track. -
Draft the vertical lines:
Draw small vertical lines across the rim, spacing them about a half-inch apart. Try to stagger them slightly between the inner and outer tracks to create a brick-like effect. -
Extend to the sides:
Continue these vertical lines down the side of the bowl for about an inch to create a second row of faux tiles on the exterior. -
Paint the horizontal grout:
With your fine detail brush and white paint, carefully trace over the circular lines you drew on the rim. Keep your hand steady to create a consistent line width. -
Add vertical grout lines:
Paint the vertical division lines on the rim with white paint. I like to load the brush frequently so the white lines remain crisp against the terracotta background. -
Define the exterior tiles:
Paint a horizontal white line around the exterior of the bowl, just below the vertical marks you made, to close off the bottom of the ’tiles’. -
Fill the side grout:
Connect the rim to this bottom line with vertical white strokes, completing the grid pattern on the side of the bowl.
Level Up: 3D Texture
Use actual white puff paint or 3D liner for the grout lines instead of flat acrylic. This creates raised ridges that feel like real tile gaps.
Step 3: Finishing Touches
-
Decorate the interior:
Mix a very watery wash of light beige or grey paint. Dab small, irregular spots along the upper inside wall of the bowl to mimic natural stone speckling. -
Refine the edges:
Check the edges of your white ‘grout’ lines. If any look too messy, you can tidy them up by carefully painting back over the mistake with your terracotta color. -
Add a protective coat:
Once all paint is totally dry, spray the entire piece with a matte varnish. This seals the terracotta and protects the design from heat and handling. -
Place the candle:
Set a tealight in the center. For safety, ensure the flame doesn’t directly touch the painted sides.
Enjoy the warm, rustic ambiance this custom diya brings to your space

The Complete Guide to Pottery Troubleshooting
Uncover the most common ceramic mistakes—from cracking clay to failed glazes—and learn how to fix them fast.
Rhinestone Sparkle Around the Spout
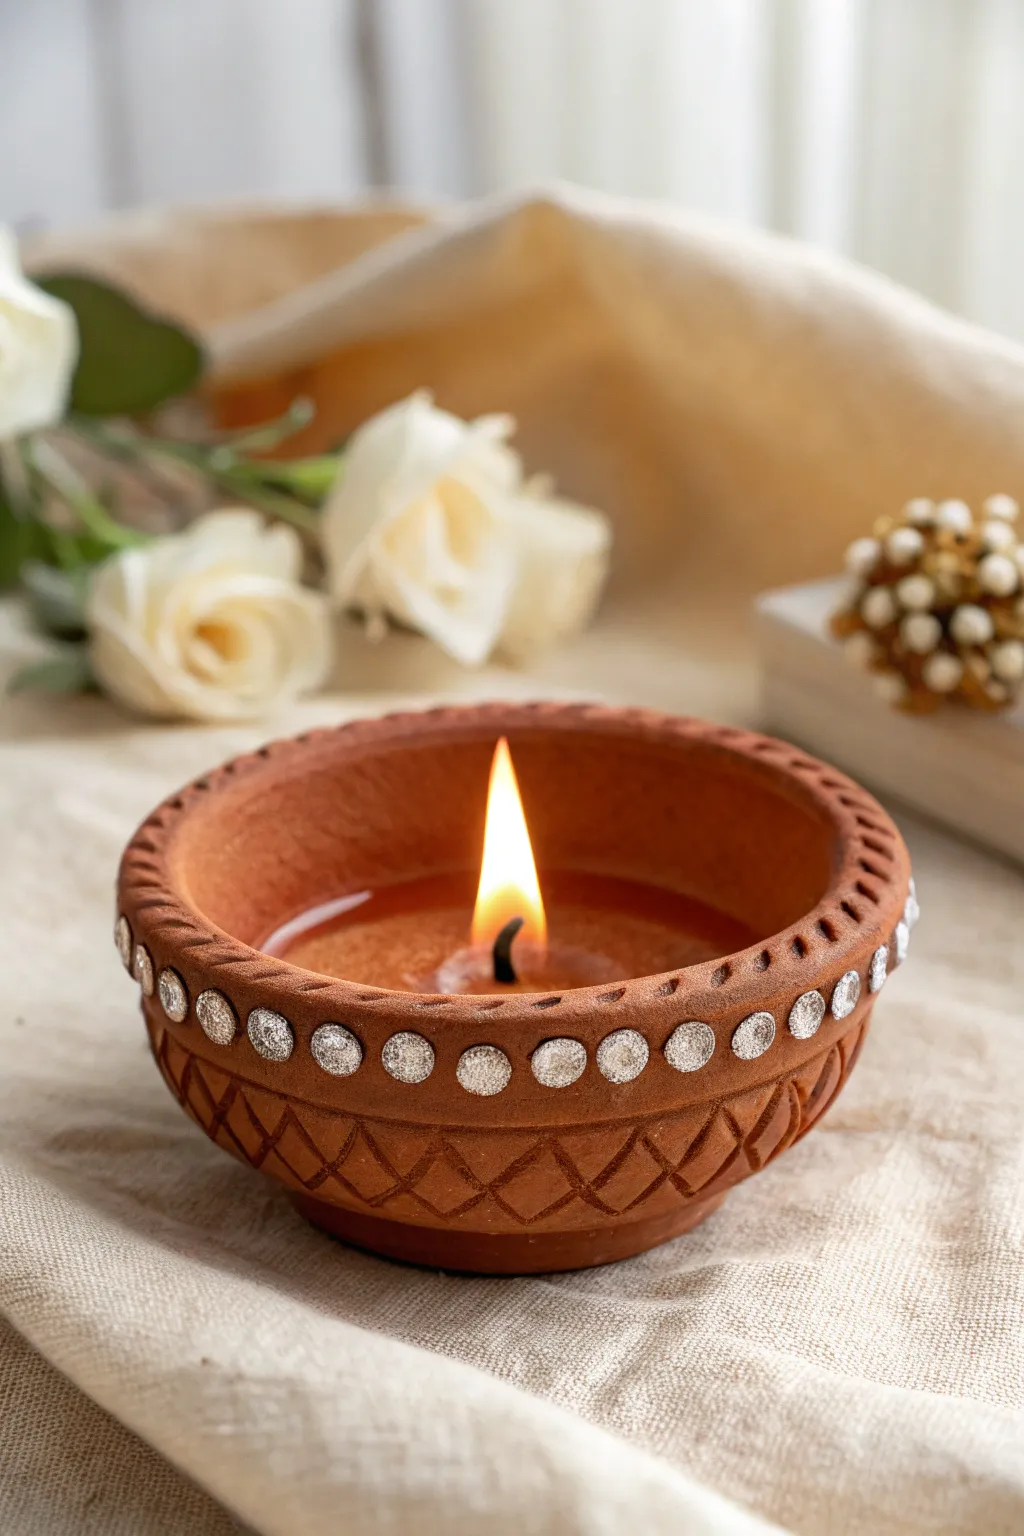
Transform a simple clay diya into a glowing centerpiece with this elegant design featuring a band of glittering silver studs. The combination of natural terracotta warmth with sparkling rhinestone accents creates a sophisticated look perfect for festive evenings.
Step-by-Step
Materials
- Plain terracotta diya (medium size, bowl-shaped)
- Small round silver rhinestones or craft mirrors (approx. 3-4mm)
- Strong craft glue or jewelry adhesive
- Fine-grit sandpaper
- Brown acrylic paint (burnt sienna or similar terracotta shade)
- Small flat paintbrush
- Detail paintbrush or toothpick
- Carving tool or dull pencil (if carving your own texture)
- Clear varnish (matte or satin finish)
- Candle wax or diya oil with wick
- Cotton cloth
Step 1: Preparation and Base
-
Soak the Diya:
If using a brand new terracotta diya, immerse it in a bowl of water for at least an hour. This prevents the clay from soaking up too much oil or paint later. -
Dry Completely:
Remove the diya from the water and let it air dry completely in the sun or a warm spot. It must be bone dry before you apply any adhesive. -
Create Texture (Optional):
If your diya is completely smooth, you can mimic the crisscross texture shown in the image. Use a carving tool or a sharp pencil to gently etch a diamond pattern around the lower bowl of the diya. -
Sand Rough Edges:
Take a piece of fine-grit sandpaper and gently smooth out the rim and any sharp imperfections on the surface. Wipe away the dust with a dry cotton cloth. -
Enhance the Color:
To get that rich, uniform reddish-brown hue, mix a little water with burnt sienna acrylic paint. Apply a thin wash over the entire exterior of the diya. -
Let Paint Set:
Allow this base coat to dry for about 20-30 minutes. The wash should look like stained clay rather than a thick plastic coating.
Placement Pro Tip
Use a white wax pencil or a crayon to lightly mark dot positions before gluing. This ensures your spacing is mathematically perfect before you commit with glue.
Step 2: Adding the Sparkle
-
Plan the Placement:
Before gluing, dry-fit your rhinestones around the rim to ensure you have enough space and materials to complete the full circle. -
Apply Glue Dots:
Using your adhesive nozzle or a toothpick, place a small dot of strong glue on the upper rim of the diya. I find it easier to work in small sections of three or four dots at a time so the glue doesn’t dry out. -
Place First Stone:
Pick up a silver rhinestone using tweezers or a wax-tipped tool. Press it firmly onto the first glue dot. -
Continue the Border:
Continue placing stones side-by-side around the circumference of the rim. Try to keep the spacing consistent, roughly 2-3mm apart for a neat look. -
Check Alignment:
Periodically look at the diya from the side to ensure your line of stones is straight and follows the curve of the rim naturally. -
Clean Excess Glue:
If any glue seeps out from under the stones, wipe it away immediately with a damp toothpick or cloth before it hardens. -
Let Glue Cure:
Allow the decorated diya to sit undisturbed for at least an hour to ensure the rhinestones are securely bond.
Level Up: Golden Glow
Swap the silver rhinestones for gold studs and gently rub a metallic gold wax or dry-brush gold paint over the raised crisscross texture on the bottom for an antique look.
Step 3: Finishing Touches
-
Seal the Design:
Apply a coat of clear varnish over the terracotta areas (avoiding the rhinestones if possible) to protect the clay and give it a subtle sheen. -
Dry Varnish:
Let the varnish or sealant dry completely according to the manufacturer’s instructions. -
Prepare the Interior:
If you plan to use wax like the project image, melt your candle wax safely in a double boiler. Center a wick in the bottom of the diya. -
Fill the Diya:
Carefully pour the melted wax into the cavity, stopping just below the rhinestone rim. Hold the wick steady until the wax begins to cool and solidify. -
Final Polish:
Once everything is set, give the rhinestones a quick buff with a soft cloth to maximize their sparkle before lighting.
Now you have a beautifully embellished diya ready to cast a warm, inviting glow over your home
Floating Diyas in a Water Bowl Centerpiece
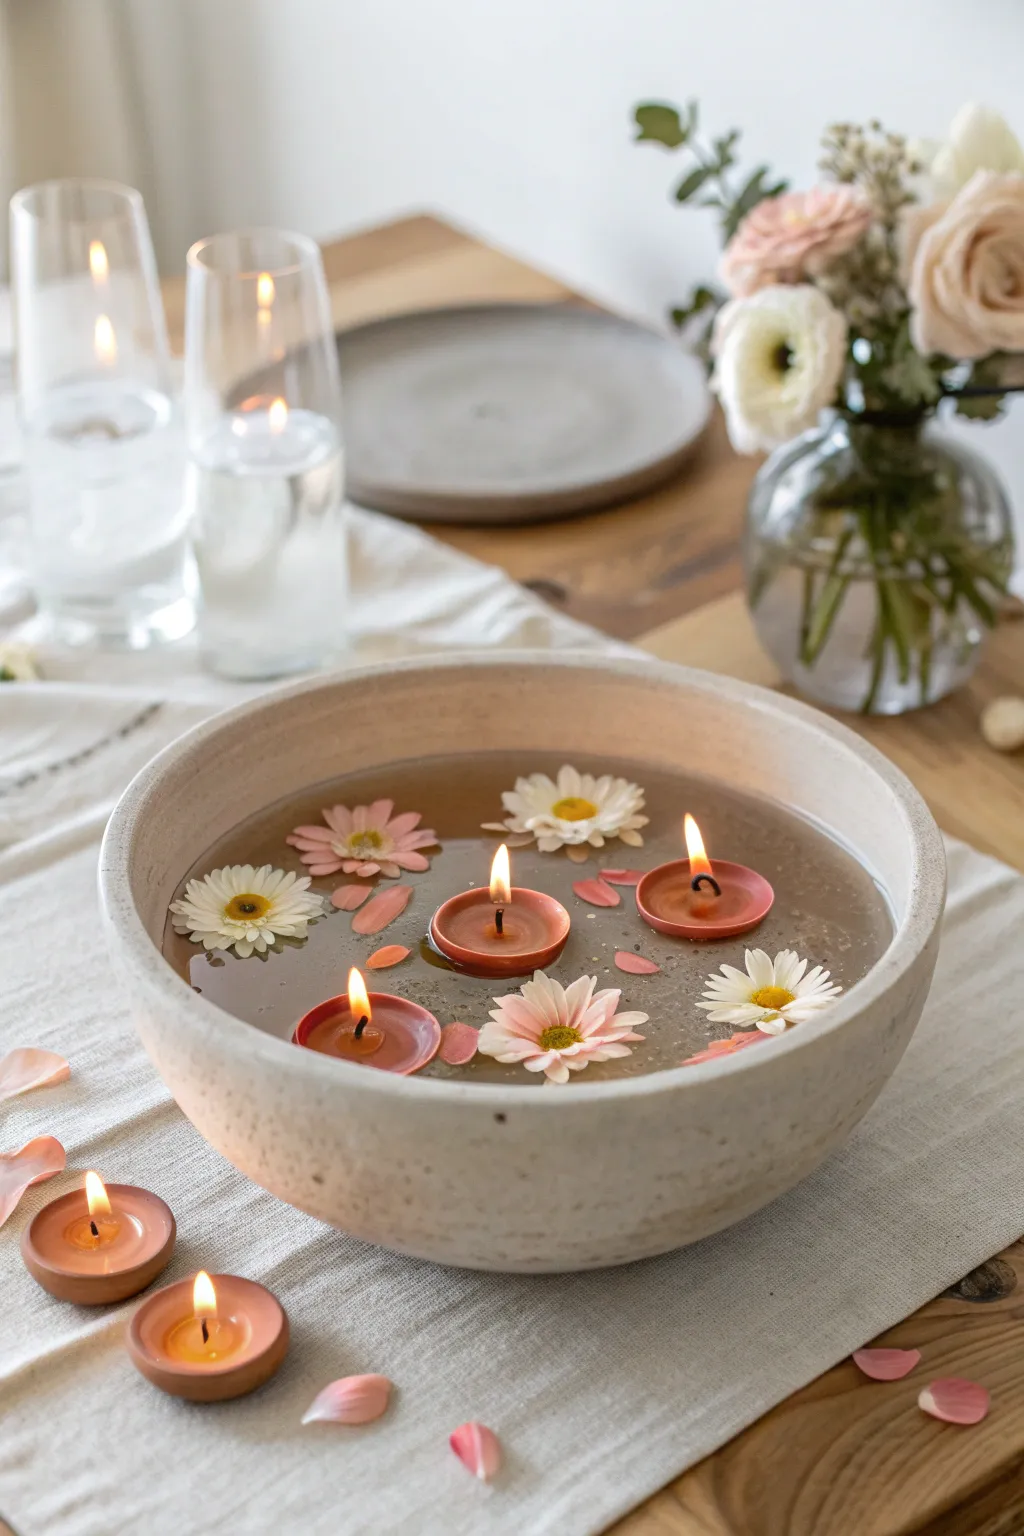
Transform a simple ceramic basin into a tranquil centerpiece that combines the warmth of flickering candlelight with fresh floral beauty. This floating diya arrangement creates an inviting atmosphere perfect for festive gatherings or a quiet evening at home.
Detailed Instructions
Materials
- Large, shallow ceramic bowl (beige or earth-toned)
- 5 terra cotta diya lamps (small, round)
- Water
- Ghee or vegetable oil (for the diyas)
- Cotton wicks
- Fresh daisies or gerbera flower heads (white and pink)
- Loose flower petals (pink)
- Lighter or matches
- Linen table runner
Step 1: Preparation
-
Select the vessel:
Choose a wide, shallow bowl made of stone or ceramic. A speckled beige or off-white finish works best to replicate the natural, earthy aesthetic shown in the photo. -
Prepare the diyas:
Soak your terra cotta diyas in water for about 30 minutes before use. This prevents them from soaking up all the oil later. -
Dry the diyas:
Remove the diyas from the water and pat them completely dry with a cloth. If they are still damp, the oil might sputter. -
Set the scene:
Lay down a textured linen table runner in a neutral cream color. Place your large bowl in the center, ensuring the surface is level so the water line stays even. -
Fill the bowl:
Pour clean room-temperature water into the bowl, filling it about three-quarters of the way up. Leave enough rim space to prevent splashing.
Step 2: Arrangement
-
Prepare the flowers:
Snip the stems off your daisies or small gerberas so only the flower head remains. You’ll want a mix of white and soft pink blooms. -
Add floating blooms:
Gently place 5-6 flower heads onto the water’s surface. Allow them to drift naturally to the edges rather than forcing a strict pattern. -
Scatter petals:
Pluck individual pink petals from a spare flower. Sprinkle these loosely into the gaps between the flower heads for a softer, organic look. -
Fuel the lamps:
Fill three of your prepared diyas with ghee or oil. Don’t overfill them; about half-full is sufficient to keep them light enough to float. -
Insert wicks:
Place a cotton wick into each oil-filled diya. Ensure the tip of the wick is well-saturated with oil before you attempt to light it. -
Float the diyas:
I prefer to place the unlit diyas into the water first to test their balance. Carefully set three diyas into the bowl among the flowers.
Sinking Diyas?
If your diyas occupy too much water and sink, try using tealight candles inside the clay pots instead of oil. They are lighter and have a flat metal base that improves buoyancy.
Step 3: Finishing Touches
-
Table accent lamps:
Take the remaining two terra cotta diyas, fill them with oil and wicks, and place them directly on the table runner near the base of the bowl. -
Scatter table petals:
Take a handful of loose pink petals and scatter them casually around the base of the bowl and near the table diyas to visually connect the centerpiece to the table. -
Light the center:
Using a long lighter or match, carefully ignite the three floating diyas in the bowl. Wait for the flame to stabilize. -
Light the accents:
Light the two diyas sitting on the table runner. -
Adjust positions:
If the floating diyas have drifted too close to the flowers, gently nudge them toward the center with a spoon or your finger to prevent singeing the petals.
Scented Waters
Add a few drops of essential oil like rose or sandalwood to the water bowl. As the candle heat warms the water slightly, it will release a subtle, festive fragrance.
Enjoy the warm glow and peaceful ambiance your handcrafted centerpiece brings to the table


What Really Happens Inside the Kiln
Learn how time and temperature work together inside the kiln to transform clay into durable ceramic.
Diya Tray With Petals and Leaves
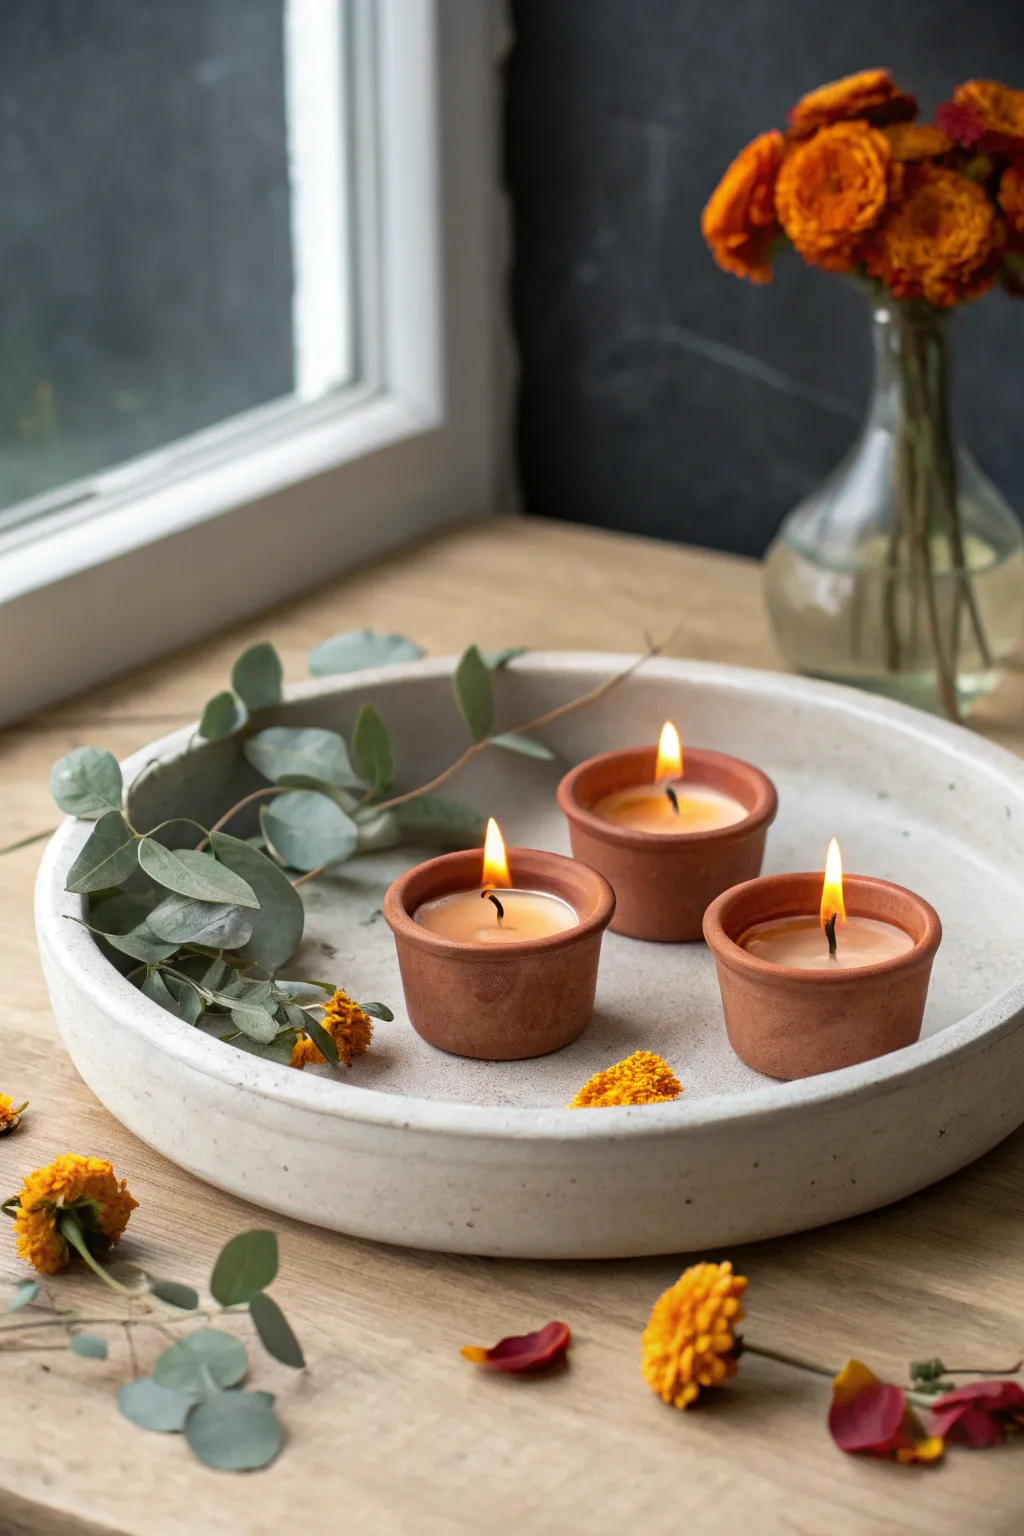
Bring a sense of calm and natural beauty to your festive decor with this understated arrangement. This project combines the rustic charm of terracotta diyas with the cool tones of eucalyptus and vibrant pops of marigold for a sophisticated, modern look.
How-To Guide
Materials
- Shallow concrete or ceramic round tray (speckled white/grey)
- Three terracotta diyas (small clay oil lamps)
- Beeswax or tea light candle wax
- Cotton wicks
- Fresh eucalyptus sprigs (silver dollar or baby blue variety)
- Fresh marigold flowers (orange and yellow)
- Scissors
Step 1: Preparing the Diyas
-
Clean the terracotta:
Begin by wiping down your terracotta diyas with a dry cloth to remove any loose clay dust. If you’ve just bought them, soaking them in water for an hour and letting them dry completely prevents them from soaking up too much oil or wax later. -
Prepare the wicks:
Cut your cotton wicks to size. They should be just long enough to reach the bottom of the diya with about half an inch extending out of the top. -
Melt the wax:
Using a double boiler or a dedicated wax melting pitcher, gently melt your beeswax or candle wax. I prefer beeswax for its natural honey scent, which paires beautifully with the eucalyptus. -
Pour and set:
Center a wick in each terracotta cup. Carefully pour the melted wax until it’s about a quarter inch from the rim. Hold the wick upright for a moment as the wax begins to cool and cloud over. -
Cool completely:
Allow the diyas to sit undisturbed until the wax is fully hardened and cool to the touch.
Fragrance Tip
Add a few drops of citronella or eucalyptus essential oil into the melted wax before pouring. This boosts the scent and helps keep insects away.
Step 2: Arranging the Tray
-
Select the base:
Choose a shallow, round tray. A concrete or matte ceramic tray with a speckled finish works best to mimic the modern, textural look in the photo. -
Clean the surface:
Wipe the tray clean to ensure a pristine surface for your arrangement. -
Position the diyas:
Place the three filled diyas into the tray. Arrange them slightly off-center in a relaxed triangle formation, rather than a perfect line, to keep the composition organic. -
Measure the greenery:
Take a long stem of fresh eucalyptus. Hold it against the curve of the tray to see where it naturally wants to bend. -
Cut the stems:
Trim the eucalyptus stem so it fits comfortably inside the tray’s rim, allowing the leaves to curve around the diyas without overcrowding them. -
Insert the main stem:
Lay the main eucalyptus sprig inside the left side of the tray, letting the leaves drape naturally. Allow the cut end to tuck slightly behind one of the diyas. -
Add foliage accents:
Cut a smaller sprig of eucalyptus and let it trail slightly over the edge of the tray or settle into the negative space between the lamps.
Step 3: Adding Floral Details
-
Prep the marigolds:
Take your fresh marigold flowers. Snip the heads off two or three of them, leaving no stem attached so they can sit flat. -
Place focal flowers:
Nestle one small marigold head inside the tray near the eucalyptus stem. Place another distinct flower head on the table surface just outside the tray for continuity. -
Create petal scatter:
Gently pull a few petals off a separate flower. Scatter two or three individual petals on the table surface to create an ‘undone’ and effortless aesthetic. -
Final adjustment:
Step back and look at the balance. If the eucalyptus is covering a wick, gently tuck that leaf underneath the stem. -
Light the wicks:
Using a long lighter or match, carefully light the three diyas. Ensure the flame is steady and not flickering too wildly near the dry leaves. -
Style the surroundings:
Place the remaining eucalyptus branches loosely on the table around the centerpiece to visually extend the greenery beyond the bowl.
Gold Leaf Accent
Brush a thin layer of liquid gold leaf paint onto the rim of the terracotta diyas or the tray edge for a subtle festive sparkle.
Enjoy the gentle flicker of light and the soothing aroma of eucalyptus in your new centerpiece
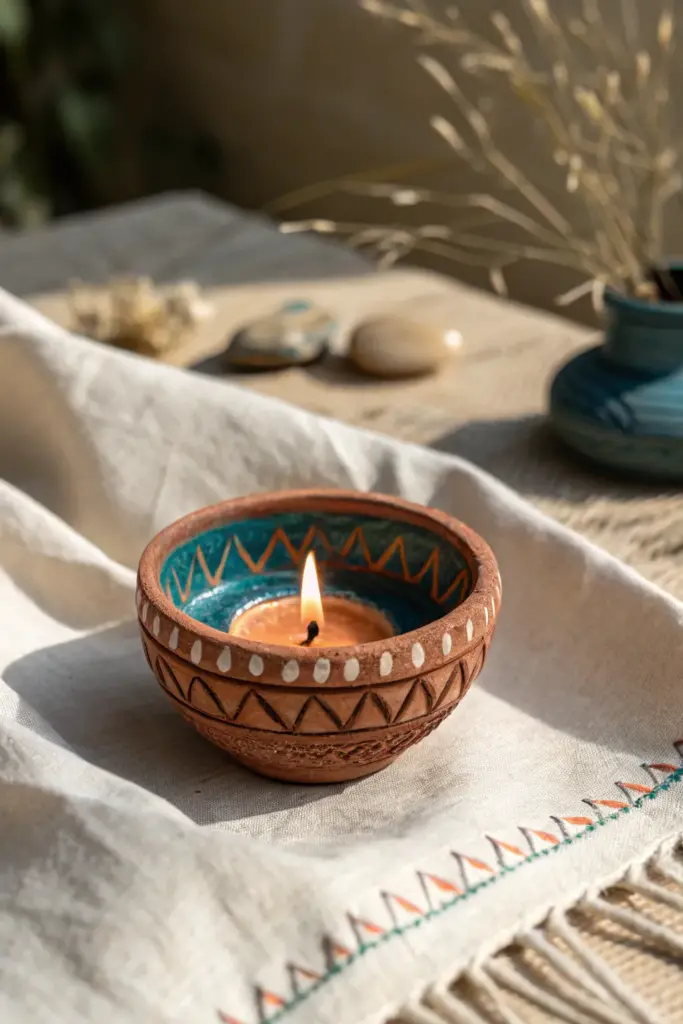
Textured Clay Slip Diya Finishes
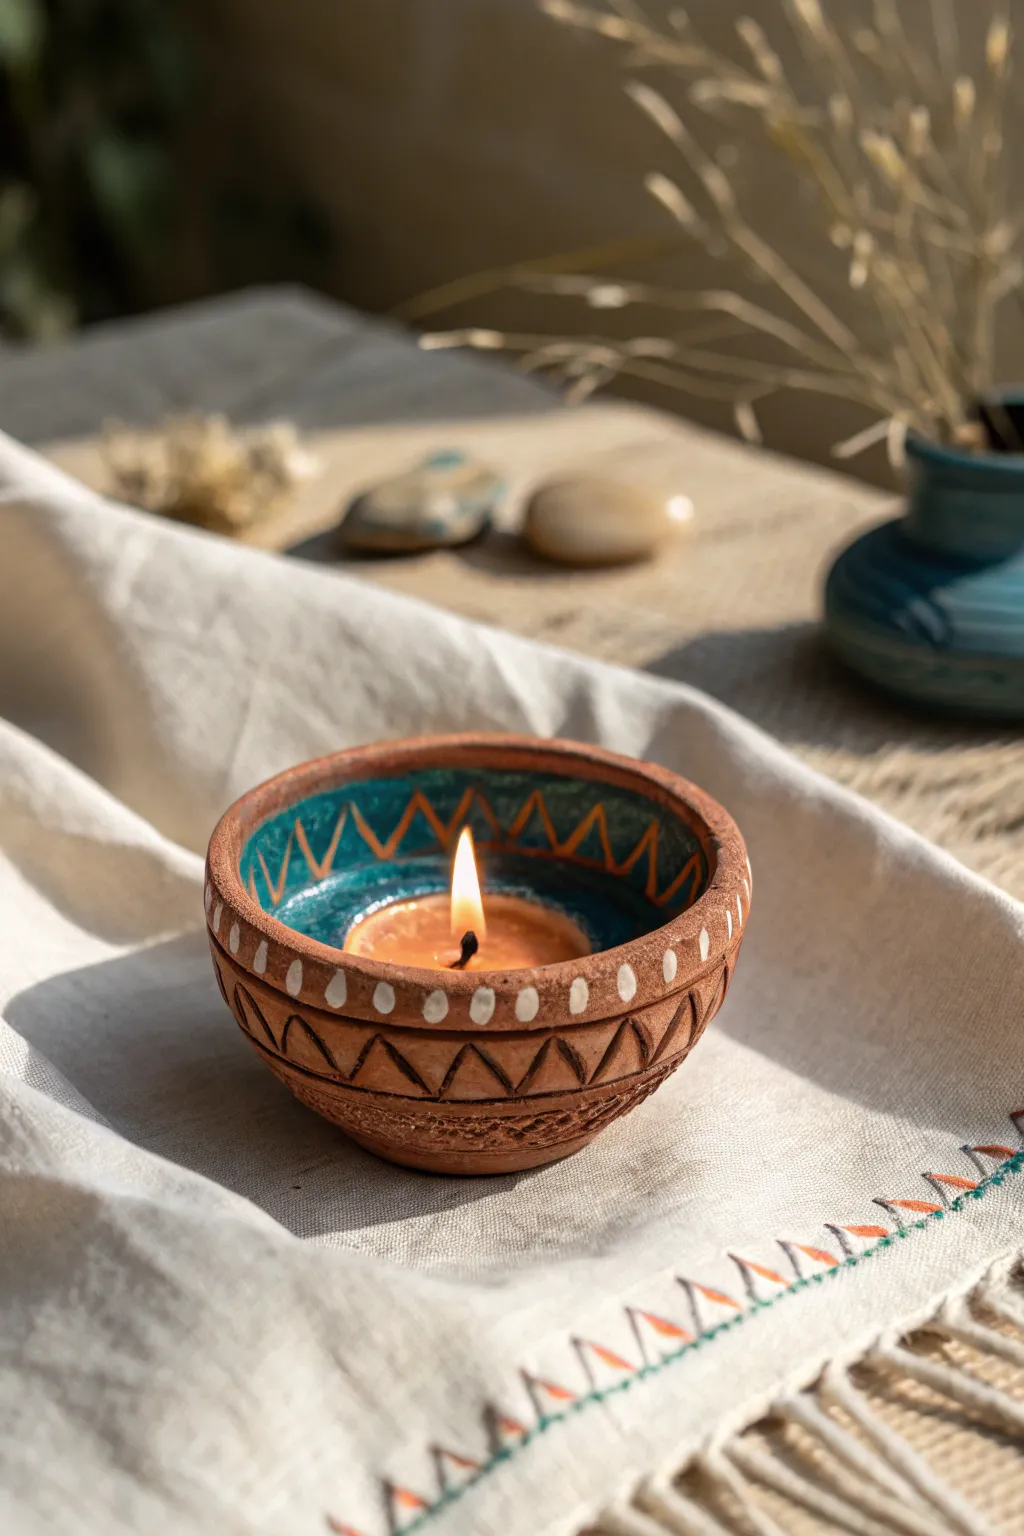
This project combines raw, earthy textures with a vibrant pop of glazed color for a truly artisan feel. The etched geometric patterns and white slip details transform a simple clay bowl into a sophisticated festive centerpiece.
Detailed Instructions
Materials
- Small terracotta bowl or diya (smooth surface)
- Acrylic paints (Teal/Turquoise, Burnt Orange, White)
- Pencil
- Carving tool or linoleum cutter (V-gouge)
- Fine detail paintbrush (00 size)
- Medium flat paintbrush
- Matte sealer or varnish
- Tea light candle
- Damp sponge
Step 1: Preparation & Exterior Carving
-
Clean surface:
Begin by wiping down your terracotta bowl with a slightly damp sponge to remove any kiln dust or oils. Let it dry completely. -
Mark guidelines:
Using a pencil, lightly draw two horizontal rings around the exterior of the bowl—one near the rim and one near the base. These will define your carving zones. -
Sketch the pattern:
Between your two pencil lines, sketch a continuous zigzag pattern all the way around the bowl’s circumference. -
Carve the zigzags:
Take your V-gouge carving tool and careful etch into the clay along your zigzag pencil lines. You want to scratch deep enough to create texture, but not pierce the bowl. -
Add lower texture:
Near the very base of the bowl, below the bottom ring, use the tool to create a rough, cross-hatched texture to add visual weight to the bottom. -
Clean the grooves:
Use a dry, stiff brush to sweep away any clay dust from the carved grooves so the pattern is crisp.
Clean Lines Tip
If you don’t have a carving tool, a metal nail file or the sharp end of a screw can scratch effective grooves into softer terracotta.
Step 2: Painting the Interior
-
Base coat interior:
Using your medium flat brush, paint the entire interior of the bowl with the teal or turquoise acrylic paint. -
Apply second coat:
Allow the first layer to dry until touch-dry, then apply a second coat of teal for a rich, opaque finish that hides the terracotta color underneath. -
Paint interior zigzags:
Once the teal is fully dry, use a fine detail brush and burnt orange paint to create a zigzag distinct pattern just below the inner rim. -
Refine lines:
Go over the orange lines a second time if the teal underneath is showing through too much.
Step 3: Exterior Details & Finishing
-
Paint upper rim:
Mix a small amount of white paint with a drop of water to thin it slightly. Paint a distinct, thin white band right at the top edge of the exterior rim. -
Add dot accents:
Dip the non-brush end (the handle tip) of a paintbrush into the white paint. -
Stamp the pattern:
Press the handle tip onto the exterior clay, just below the white rim band, to create a row of uniform white dots. -
Highlight the carving:
I like to take a very dry brush with a tiny amount of dark brown paint and lightly sweep it over the carved exterior zigzags to accentuate the depth. -
Seal the piece:
Apply a coat of matte varnish over the painted interior areas to protect the design from heat and oil. -
Add light:
Place a standard tea light or a poured wax candle into the center of the completely dried diya.
Metallic Upgrade
Swap the burnt orange interior zigzags for gold leaf paint or metallic copper acrylic to make the inside glow when lit.
Now you have a beautifully textured diya ready to add warmth to your home decor