When you want easy clay pottery ideas, the magic is picking projects that feel forgiving, fun, and totally doable with just your hands and a few simple tools. In my studio, these are the beginner-friendly pieces I always reach for first—quick wins that still feel special when you set them on your shelf.
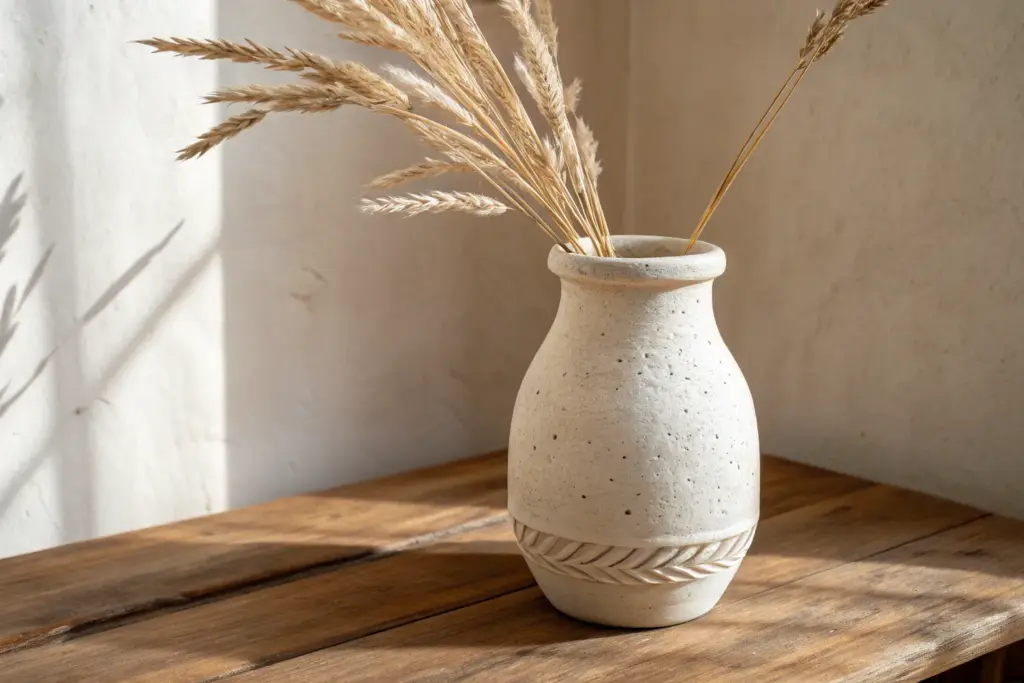
Pinch Pot Snack Bowl
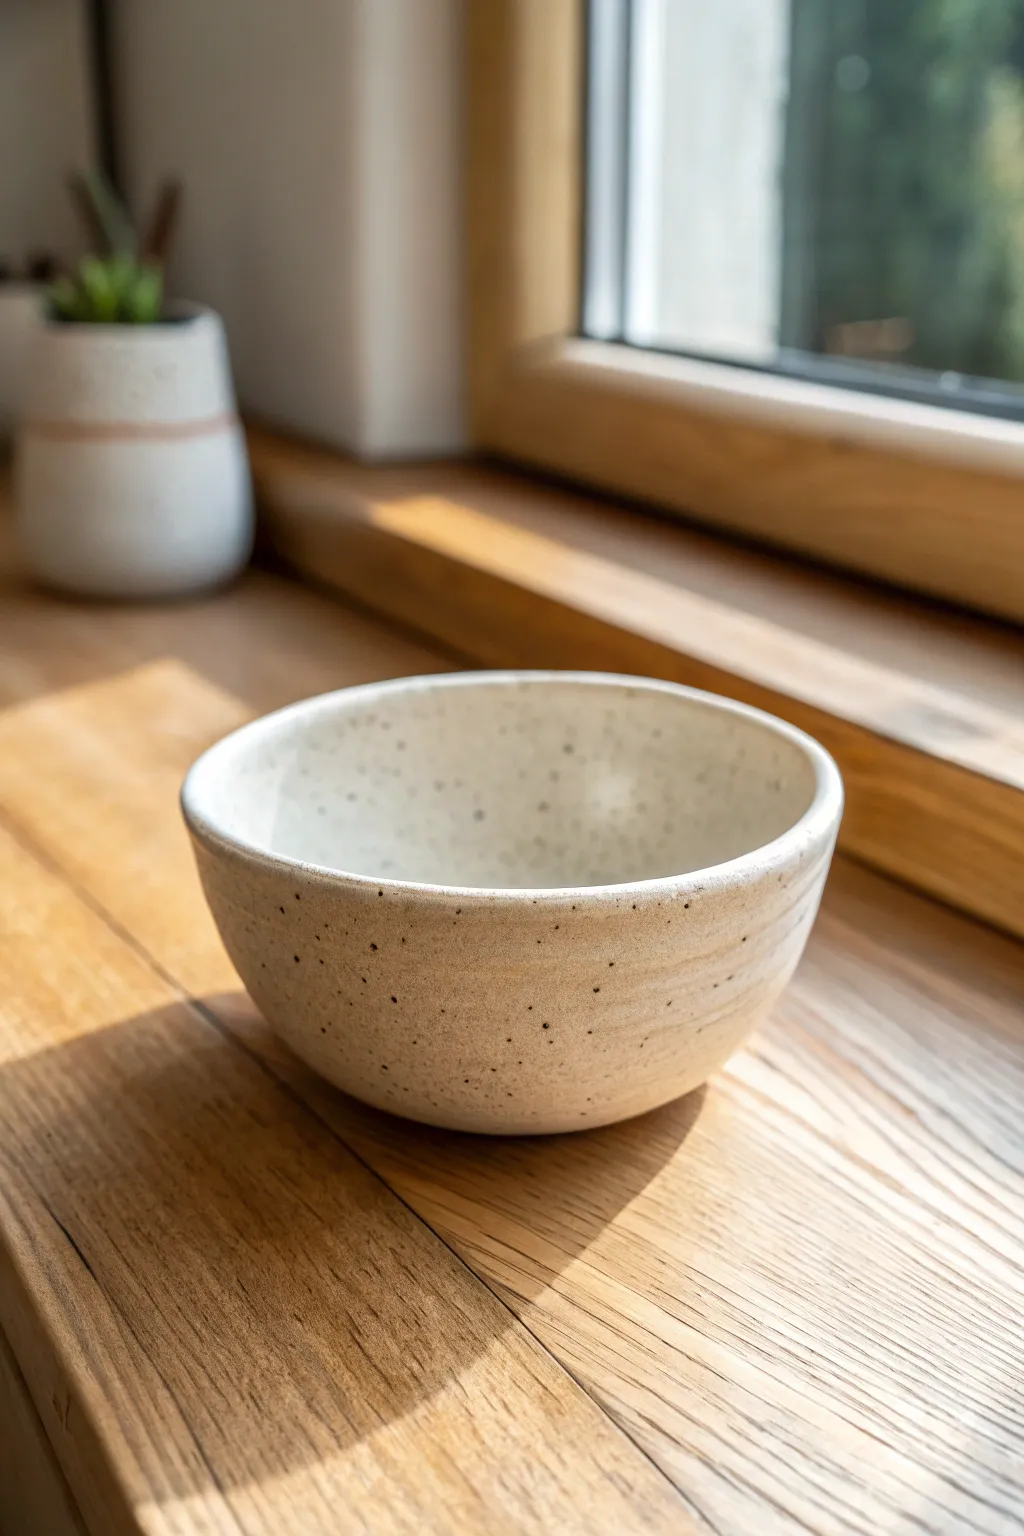
Embrace the simple beauty of handmade ceramics with this speckled pinch pot, perfect for holding nuts or olives on a sunny afternoon. The project features a natural, rustic form with a smooth, matte-speckled glaze that highlights the clay’s earthy character.
Step-by-Step Guide
Materials
- Speckled Stoneware Clay (or white clay with speckles added)
- Potter’s needle tool
- Rib tool (kidney shaped, wood or rubber)
- Sponge
- Water bowl
- Rolling pin (optional, for flattening bottom)
- Clear matte glaze or satin white glaze
- Kiln access
Step 1: Forming the Base
-
Prepare the Clay:
Start with a ball of speckled clay about the size of a tennis ball or slightly larger. Wedge it thoroughly to remove air pockets and ensure an even consistency. -
Shape the Ball:
Roll the clay between your hands until it forms a smooth, round sphere. Pat it gently on your work surface to create a slightly flattened bottom so it won’t roll away. -
Open the Pot:
Hold the clay ball in one hand. With your other hand, push your thumb firmly into the center of the ball, stopping about half an inch from the bottom. -
Begin Pinching:
Keep your thumb inside and your fingers on the outside. Gently pinch the clay between them, rotating the ball in your palm after each pinch. -
Establish Wall Thickness:
Work your way from the bottom up to the rim. Aim for an even thickness of about 1/4 inch throughout the entire bowl.
Step 2: Refining the Shape
-
Widen the Bowl:
As you pinch upward, gently angle your fingers outward to create the open, sloping shape seen in the photo, rather than a vertical cylinder. -
Check the Floor:
Feel the inside bottom of the pot. If it’s too thick, press down gently with your thumbs to flatten and widen the interior floor. -
Smooth the Rim:
The rim in the image is slightly uneven but rounded. Run a damp chamois or your finger along the top edge to compress the clay and prevent future cracking. -
Rib the Exterior:
I like to use a rubber or wooden rib tool on the outside now. Hold it against the exterior while supporting the inside with your hand to smooth out deep fingerprints while keeping that organic, handmade texture. -
Add Texture (Optional):
To match the subtle horizontal lines visible on the bowl’s exterior, gently drag the rib tool or a thumb across the clay horizontally as you rotate the bowl.
Natural Speckles
If you don’t have speckled clay, mix a small amount of granular ilmenite or manganese into plain white clay before wedging.
Step 3: Drying and Finishing
-
Slow Dry:
Loosely cover the bowl with plastic to let it dry slowly to a leather-hard state. This usually takes a day or two depending on humidity. -
Final Smoothing:
Once leather-hard, use a barely damp sponge to wipe away any sharp crumbs or rough patches on the rim and foot. -
Bisque Fire:
Fire the completely bone-dry bowl in a kiln to bisque temperature (usually Cone 04 or 06, depending on your clay body). -
Glaze Application:
Dip the bisque-fired bowl into a clear matter or satin white glaze. If your clay body doesn’t have speckles, choose a glaze that includes iron speckles. -
Wipe the Foot:
Use a wax resist solely on the bottom contact ring, or carefully wipe all glaze off the very bottom with a sponge to prevent it sticking to the kiln shelf. -
Glaze Fire:
Fire the bowl again to the maturation temperature of your specific clay and glaze (often Cone 5 or 6 for stoneware).
Cracked Rims?
Small cracks on the rim mean the clay is drying too fast while you work. Keep a damp sponge nearby and remoisten the lip often.
Once cooled, your bowl is ready to catch the morning light and hold your favorite snacks


Beginner Handbuilt Mug With Simple Handle
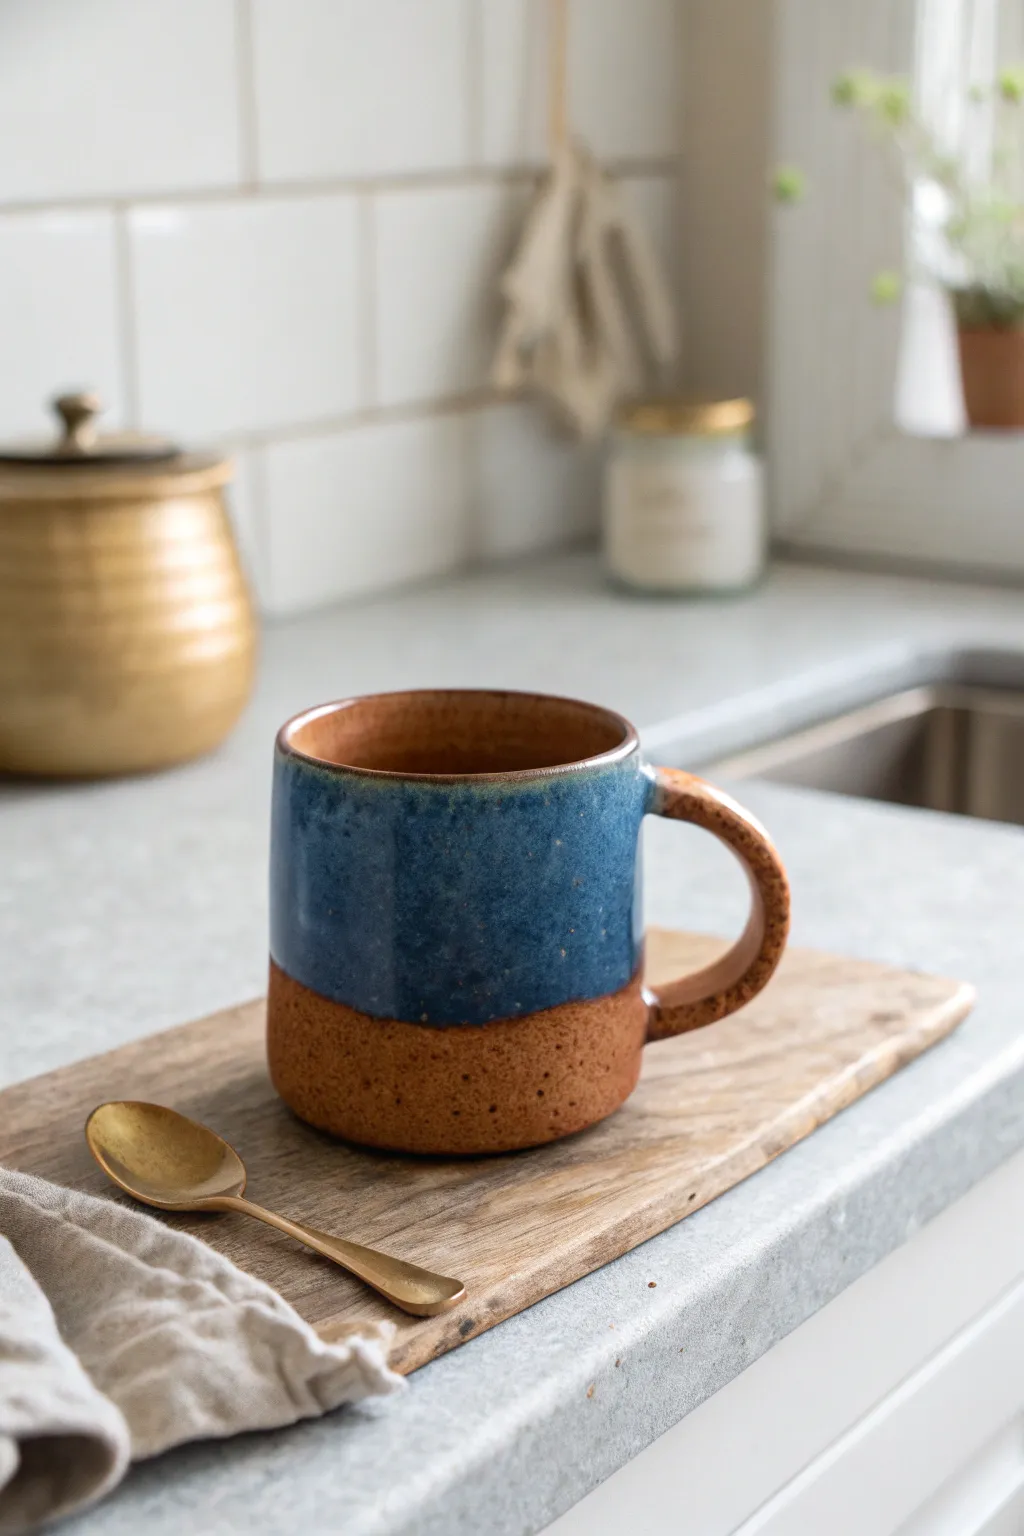
Embrace the natural beauty of clay with this straightforward hand-building project that highlights the contrast between raw earth and glossy color. This cozy mug features a smooth, exposed clay base and a rich blue dipped rim, perfect for your morning coffee ritual.
Step-by-Step
Materials
- Speckled stoneware clay (mid-fire)
- Clay rolling pin
- Canvas mat or cloth
- Needle tool
- Fettling knife
- Scoring tool (or serrated rib)
- Slip (clay mixed with water)
- Sponge
- Ruler
- Blue dipping glaze (stoneware safe)
- Brush (for wax resist)
- Wax resist emulsion
Step 1: Rolling and Cutting
-
Prepare the slab:
Begin by wedging your speckled clay to remove air bubbles, then slam it onto your canvas mat. Roll it out into a consistent slab about 1/4 inch thick, rotating the clay occasionally so it doesn’t stick. -
Measure the body:
Using a ruler and fettling knife, cut a rectangle that will form the cylinder of your mug. A standard size is roughly 11 inches long by 4.5 inches high, but adjust slightly for your desired size. -
Create the base:
Find a circular template (like a cookie cutter or lid) that matches the diameter you want for the mug. Cut a circle out of the remaining slab for the floor of the mug. -
Cut the handle strip:
Slice a narrow strip of clay, about 3/4 inch wide and 5 inches long. Smooth out the sharp edges with a damp sponge so it will be comfortable to hold later.
Step 2: Assembling the Form
-
Score the edges:
Take your rectangular slab and score (scratch up) the two shorter ends. Apply a generous amount of slip to these roughed-up areas. -
Form the cylinder:
Carefully lift the slab and curve it until the scored ends meet. Press them firmly together to create a cylinder. Use your thumb or a wooden tool to smudge the seam inside and out until it becomes invisible. -
Attach the base:
Score the bottom edge of your cylinder and the outer rim of your circular base. Apply slip, then place the cylinder on top of the circle. Gently press down to seal the connection. -
Refine the seams:
Use a modeling tool to blend the clay from the outside wall down onto the base to ensure a watertight seal. I like to smooth this area with a damp sponge afterwards to keep the profile clean. -
Shape the rim:
Run a damp sponge or a piece of chamois leather over the top rim of the mug to round it off perfectly; a smooth rim is crucial for comfortable drinking.
Clean Seams
When joining the cylinder slab, cut the short ends at a 45-degree angle (beveled). This creates a stronger overlap joint that is easier to hide than a simple butt joint.
Step 3: Handle and Finishing
-
Shape the handle:
Curve your previously cut clay strip into a ‘C’ or ear shape. Hold it up to the mug to check the proportions and trim the ends if it looks too large. -
Attach the handle:
Score and slip the attachment points on both the handle and the mug body. Press the handle firmly onto the mug, ensuring it is straight. Use a small coil of clay around the attachment points to reinforce the joint if needed. -
Dry slowly:
Cover the mug loosely with plastic and let it dry slowly over several days to the ‘bone dry’ stage. Once completely dry, bisque fire the piece in a kiln according to your clay’s specifications.
Texture Play
Before rolling the slab into a cylinder, press a piece of lace or burlap into the top half only. The glaze will break beautifully over the textures while keeping the bottom smooth.
Step 4: Glazing
-
Clean the bisque:
Wipe the fired bisque mug with a damp sponge to remove any dust, which can prevent glaze from sticking properly. -
Apply wax resist:
This is the secret to the clean line: Paint a layer of wax resist over the bottom 1/3 of the mug and the underside of the handle. Let the wax dry completely. -
Dip the mug:
Fill a bucket with your blue stoneware glaze. Holding the mug by the base (where the wax is), dip the top 2/3 of the mug into the glaze for 3-4 seconds. -
Clean the line:
As you pull the mug out, the glaze will bead up on the waxed area. Use a damp sponge to wipe away any stray droplets on the wax to ensure a crisp, straight transition line. -
Check the interior:
Make sure the interior is fully coated. If you didn’t dip-fill the inside, pour glaze inside, swirl to coat, and pour out the excess. -
Final Fire:
Once the glaze is dry, fire the mug again to the temperature required by your specific glaze and clay body combination.
Once cooled, your new favorite mug is ready for a warm beverage


Quick Spoon Rest With Thumb Indent
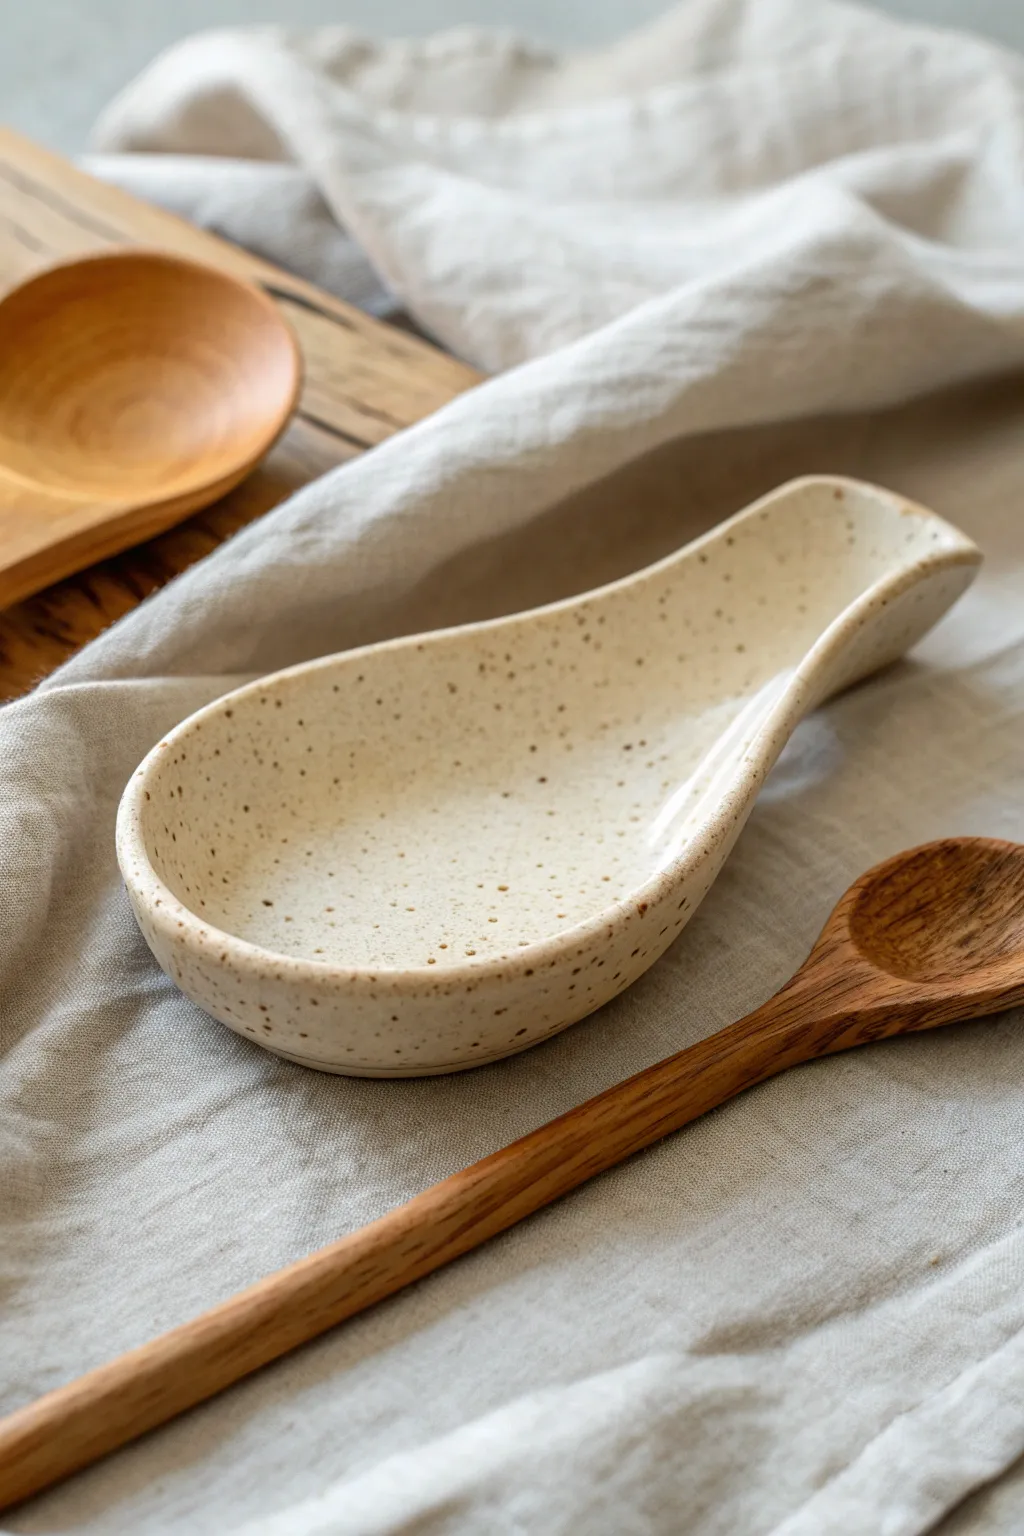
This elegant spoon rest mimics the classic shape of a ladle, providing the perfect cradle for your utensils while you cook. Finished with a speckled oatmeal glaze, its smooth, organic curves and slightly raised handle rest make it both functional and beautiful.
Step-by-Step Guide
Materials
- Stoneware clay (speckled or white)
- Rolling pin
- Guide sticks or slats (approx. 1/4 inch thick)
- Rib tool (wooden or rubber)
- Needle tool or fettling knife
- Sponge
- Small bowl relative to your spoon size
- Sandpaper (for bisque stage)
- Speckled cream or oatmeal glaze
- Kiln
Step 1: Shaping the Form
-
Prepare the slab:
Begin by wedging a softball-sized ball of clay to remove air bubbles. Place it on your canvas or work surface between two guide sticks to ensure an even thickness. -
Roll it out:
Use your rolling pin to flatten the clay into a smooth slab. Check that the surface is even and free of major canvas texture; I like to run a soft rib over it at this stage to compress the clay particles. -
Trace the shape:
You can either sketch a spoon shape directly onto the clay lightly with a needle tool or use a paper template. The shape should be a wide oval for the bowl tapering into a short, wide handle. -
Cut the outline:
With your needle tool held vertically, cut cleanly along your traced line. Remove the excess clay and set it aside for recycling. -
Smooth the edges:
Dip your finger or a small sponge in water and run it along the cut edge. Round it over so it isn’t sharp or square. This makes the final piece feel much better in the hand. -
Create the bowl:
Gently lift the clay slab. Cradle the wide oval section with your palm and gently press your thumb into the center to create a concave depression. You want a distinct bowl shape to catch drips. -
Shape the handle:
Place the piece back on your board. Prop up the handle section slightly using a small coil of spare clay or a rolled-up piece of paper towel underneath it. This creates that elegant upward curve. -
Refine the curve:
Using a wet finger, smooth the transition point where the bowl meets the handle. It should flow seamlessly without a sharp crease. -
Dry slowly:
Loosely cover the piece with plastic. Let it dry slowly to the leather-hard stage to prevent warping, especially at the handle.
Warping Worries?
If the handle droops while drying, support it with a stronger prop like a small wooden block covered in newspaper until the clay is leather-hard.
Step 2: Finishing and Glazing
-
Sponge finish:
Once bone dry, take a slightly damp sponge and wipe down the entire piece one last time to remove any dust or rough spots before the first firing. -
Bisque fire:
Fire the piece in the kiln to cone 04 (or according to your clay body’s instructions) to create bisque ware. -
Sand defects:
Inspect the bisque piece. If there are sharp burrs on the bottom, lightly sand them away. Wipe off the dust with a wet sponge. -
Apply wax resist:
Paint a coating of wax resist on the very bottom foot of the spoon rest to prevent the glaze from adhering where it touches the kiln shelf. -
Dip or brush glaze:
Apply your speckled oatmeal glaze. If dipping, submerge the piece for 3 seconds and lift. If brushing, apply 2-3 even coats, letting each dry in between. -
Clean the foot:
Even with wax resist, check the bottom. Use a damp sponge to wipe away any glaze beads that might have dripped onto the resting surface. -
Glaze fire:
Load the kiln for the final glaze firing, usually cone 5 or 6 for stoneware. Ensure the spoon rest isn’t touching any other pots.
Make it a Set
Create three spoon rests in graduating sizes—small for teaspoons, medium for stirring spoons, and large for ladles—to create a nesting gift set.
Place your finished spoon rest next to the stove and enjoy a cleaner countertop while cooking


Drainage-Groove Soap Dish
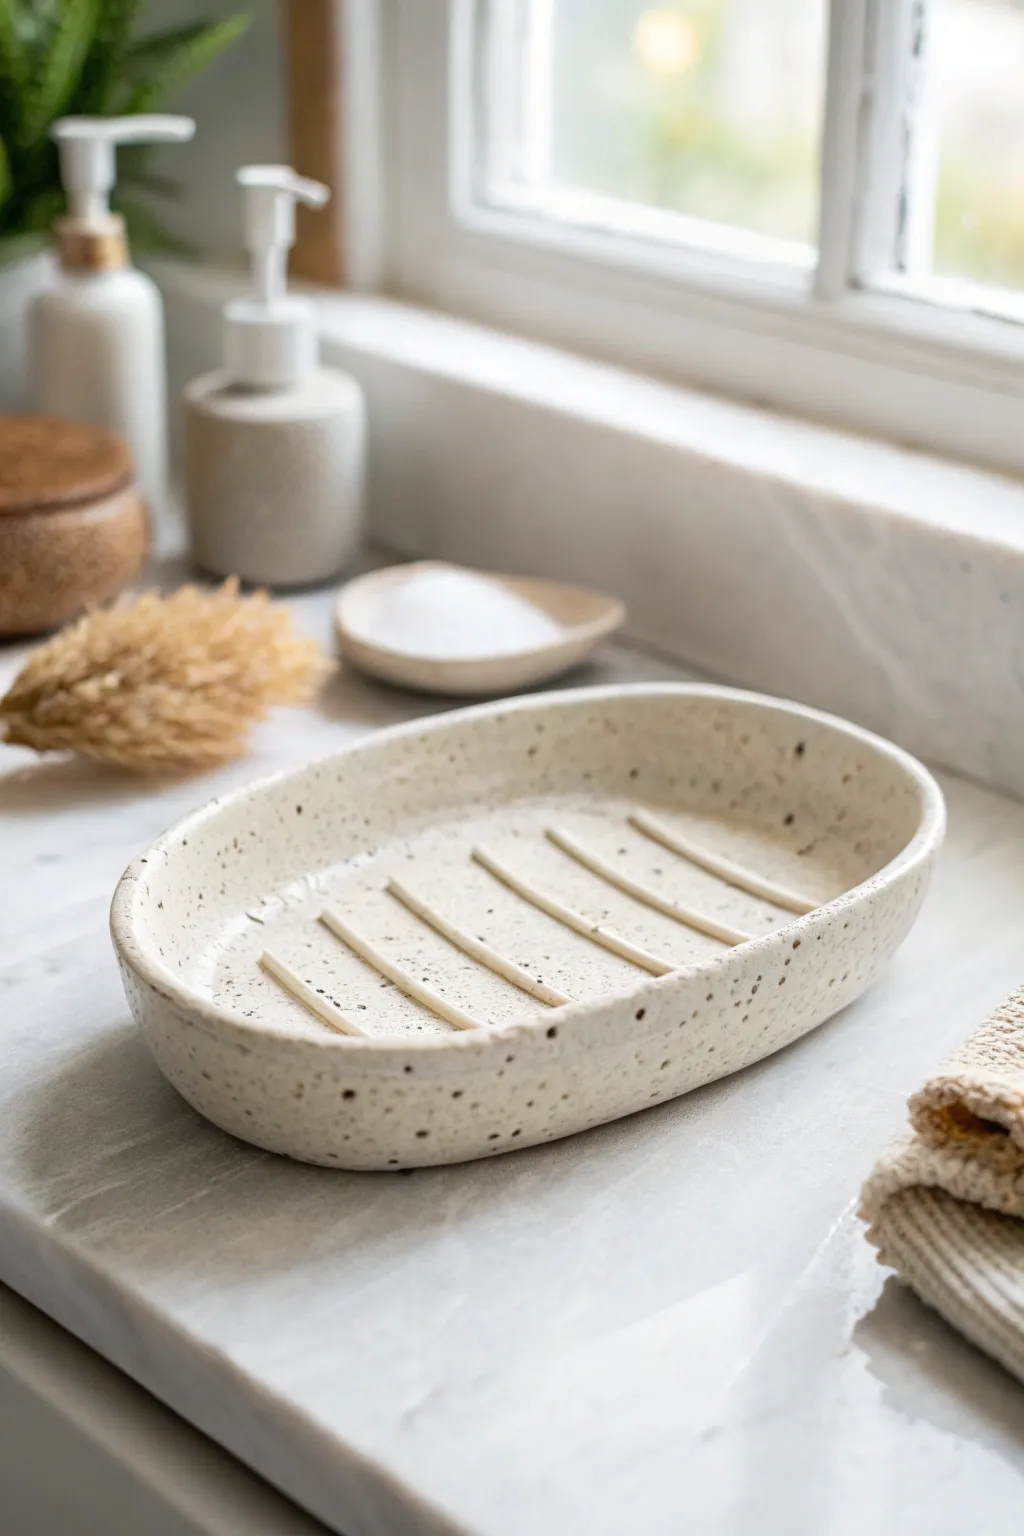
Bring a spa-like feel to your bathroom counter with this beautifully simple ceramic soap dish. The elevated ridges aren’t just a design feature; they keep your favourite soap dry and long-lasting.
Step-by-Step
Materials
- Speckled stoneware clay (white or cream)
- Rolling pin
- Wooden guide strips (approx. 1/4 inch thick)
- Oval template (paper or flexible plastic)
- Needle tool or fettling knife
- Sponge
- Small bowl of water
- Modelling tool or popsicle stick
- Clear glaze (optional)
Step 1: Preparation & Slab Rolling
-
Prepare the clay:
Start by wedging a good-sized ball of your speckled stoneware clay to remove any air bubbles. This ensures the clay is consistent and workable. -
Set up guides:
Place your wooden guide strips on either side of your workspace. These will help you roll a perfectly even slab. -
Roll the slab:
Roll the clay ball into a smooth slab using the rolling pin. Ensure the rolling pin rests on the guide strips so the clay is a uniform thickness, ideally around 1/4 inch. -
Smooth the surface:
Run a rubber rib or a slightly damp sponge over the surface of the slab. This compresses the clay particles and removes any canvas texture from your work surface.
Smooth Seams
For a truly waterproof seal and professional look, roll a tiny, thin ‘snake’ of clay and press it into the interior seam where the wall meets the floor before smoothing it out.
Step 2: Shaping the Base
-
Cut the oval:
Place your oval template onto the smoothed clay slab. Using a needle tool or fettling knife, carefully trace around the template to cut out your base shape. -
Create the walls:
From the remaining scraps of your slab, cut a long strip of clay, about 3/4 inch wide. This will become the standing rim of the dish. -
Score and slip:
Score the outer edge of the oval base and one edge of your long strip. Apply a little water or slip to the scored areas to act as glue. -
Attach the rim:
Gently press the strip onto the edge of the base, working your way around the oval. If the strip isn’t long enough, you can join a second piece; just blend the seams well. -
Blend the seams:
Use a modelling tool or your thumb to blend the clay from the wall down into the base on the inside, and from the base up into the wall on the outside. This creates a strong, seamless bond. -
Smooth the rim:
I find that running a damp sponge over the top edge of the rim right now helps soften it before the clay starts to dry out too much.
Matte vs. Glossy
Consider a matte clear glaze for a raw, stone-like aesthetic, or use a high-gloss clear glaze if you want the speckles to pop and the surface to be easiest to clean.
Step 3: Adding the Ridges
-
Make the coils:
Roll out several thin coils of clay, roughly the thickness of a pencil or a little thinner. These will form the drainage ridges. -
Measure and cut:
Lay the coils inside the dish to gauge length. Cut 4-5 pieces that fit across the width of the oval, leaving a small gap between the coil ends and the dish walls. -
Position the ridges:
Arrange the cut coils inside the dish. Space them evenly apart, ensuring they are parallel to each other. -
Secure the ridges:
Lift one coil at a time, lightly score the spot beneath it, add a dab of water, and press the coil back down firmly. Repeat for all ridges. -
Refine the shape:
Using a slightly wet finger, gently smooth the top of each ridge to flatten it slightly. This makes it more comfortable for the soap to rest on.
Step 4: Finishing Touches
-
Final smoothing:
Do a final pass with a barely damp sponge over the entire piece. smooth out any fingerprints or rough edges on the rim and ridges. -
Slow drying:
Loosely cover the dish with plastic wrap to let it dry slowly for a day or two. This prevents warping as the clay shrinks. -
Firing:
Once bone dry, bisque fire the piece. Apply a clear or transparent glaze to highlight the speckles, then fire again according to your clay’s temperature guidelines.
Place your finished dish by the sink and enjoy the satisfaction of using something handmade every day

The Complete Guide to Pottery Troubleshooting
Uncover the most common ceramic mistakes—from cracking clay to failed glazes—and learn how to fix them fast.
Tiny Bud Vase Trio

Capture the essence of minimalist beauty with this set of three petite bud vases, each featuring a unique shape but unified by a speckled white stoneware body. This trio ranges from a squat, round vessel to a ribbed statement piece and a slender droplet form, perfect for displaying single stems of dried grass.
Detailed Instructions
Materials
- Speckled white stoneware clay (Cone 5/6)
- Potter’s wheel (or hand-building tools if coiling)
- Small sponge
- Wire cutter
- Wooden modeling tool
- Needle tool
- Rib tool (metal or wood)
- Clear matte glaze
- Kiln
Step 1: Prepping the Clay
-
Weigh the clay balls:
Since these are bud vases, you don’t need much material. Measure out three separate balls of clay: one small (approx. 0.5 lb) for the round vase, and two slightly larger ones (approx. 0.75 lb and 1 lb) for the ribbed and tall vases. -
Wedge thoroughly:
Wedge each ball until the consistency is uniform and free of air bubbles. This is crucial for throwing small, narrow necks.
Step 2: Throwing the Squat Round Vase
-
Center the smallest ball:
Secure the smallest ball of clay to the wheel head and center it low and wide. -
Open the form:
Open the clay, keeping the floor narrow as you want a rounded, almost floating appearance at the base. -
Belly out the walls:
Pull the walls up slightly, then use inside pressure to push the belly out into a spherical shape. Be careful not to let the walls get too thin at the widest point. -
Collar the neck:
Gently gently collar the top inward to form a very tight, narrow opening. Use your fingers to create a small vertical rim about half an inch tall.
Fixing a twisted neck
If the narrow neck starts to twist or torque while throwing, slow the wheel down immediately. Cut the uneven top off with a needle tool and re-throw the rim from the remaining clay.
Step 3: Throwing the Ribbed Medium Vase
-
Center and cylinder:
Center the 0.75 lb ball and pull a cylinder that is taller than it is wide. -
Shape the shoulder:
Similar to the first pot, belly out the bottom slightly, but begin tapering inward much sooner to create a high, sloping shoulder. -
Create the texture:
While the wheel is spinning slowly, press the rounded end of a wooden modeling tool or your finger into the clay, moving from the bottom up to create distinct spiral or concentric ridges. -
Refine the neck:
Leave the neck section un-ribbed or create a distinct band at the top, ensuring the rim is smooth and rounded.
Add natural texture
Before the clay dries, gently press a piece of coarse linen or cheesecloth against the ribbed vase to add a subtle fabric texture that complements the ridges.
Step 4: Throwing the Tall Droplet Vase
-
Form a tall cone:
With the largest ball of clay, focus on height. Center the clay into a taller cone before opening. -
Pull height:
Pull the walls up vertically. Keep the base slightly wider for stability, but aim for a smooth, continuous taper. -
Collar aggressively:
Gradually collar the upper two-thirds of the form inward to create a long, slender neck that flows seamlessly from the body. I find using a little extra water here helps the clay slide without twisting. -
Smooth the profile:
Use a flexible metal rib on the outside to remove throwing lines and refine the teardrop silhouette.
Step 5: Finishing and Firing
-
Trim the bases:
Once leather hard, trim the bottoms of all three vases. Give the round vase a small foot ring to lift it slightly. -
Bisque fire:
Load the bone-dry vases into the kiln for a bisque firing. -
Glaze application:
Since the clay body itself is decorative (speckled), use a clear matte glaze. Dip each vase quickly to ensure an even coat without it getting too thick. -
Final firing:
Fire to the temperature required by your clay and glaze (likely Cone 5 or 6). Once cool, sand the bottoms if necessary to protect your furniture.
Arrange your finished trio together with foraged dried grasses for a serene, organic display
Simple Tealight Candle Holder
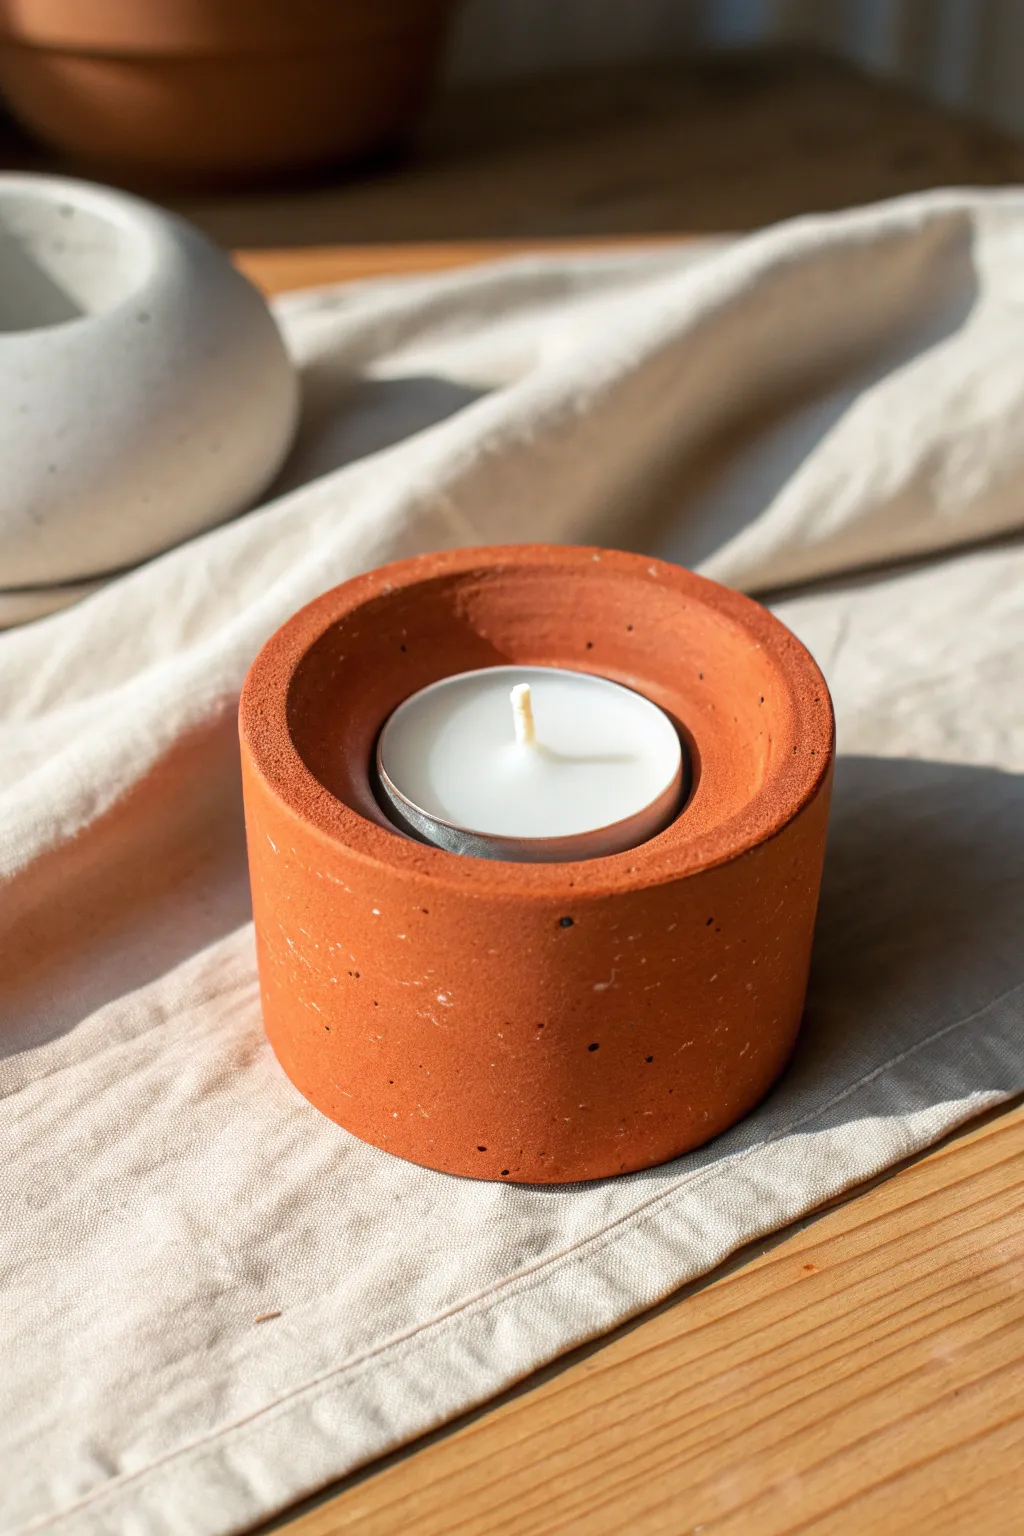
Bring warmth to any corner with this sturdy, minimalist candle holder that mimics the rustic charm of terracotta. Its smooth, cylindrical form and subtle speckled texture make it a modern yet timeless accent piece for your home.
Step-by-Step
Materials
- Fine-grain concrete mix or white cement
- Terracotta pigment powder or acrylic paint (burnt sienna/orange)
- Small plastic cup (for the outer mold, approx. 3-inch diameter)
- Standard tealight candle (for sizing)
- Empty tealight metal casing or a small bottle cap (for the inner mold)
- Cooking spray or petroleum jelly (release agent)
- Mixing bowl and stir stick
- Fine-grit sandpaper (220-400 grit)
- Weights (stones or coins)
- Masking tape
Step 1: Preparing the Molds
-
Clean your containers:
Ensure your main outer mold (the plastic cup) and your inner mold (the empty tealight casing or bottle cap) are clean and dry. -
Apply release agent:
Lightly coat the inside of the outer plastic cup and the outside of the inner mold with cooking spray or a thin layer of petroleum jelly. This ensures the concrete releases easily later. -
Test the fit:
Place your inner mold inside the cup to check the spacing. You want at least half an inch of space all around to create substantial walls for the holder.
Stubborn Bubbles?
If surface pits are too large, fill them with a tiny amount of leftover wet mix, then sand smooth once dry for a perfected finish.
Step 2: Mixing the Concrete
-
Measure dry mix:
Pour about one cup of fine-grain concrete mix into your mixing bowl. If your mix is very coarse, sift it first to remove large pebbles for a smoother finish. -
Add pigment:
If using dry powder pigment, mix a generous amount of terracotta color into the dry cement now. For acrylic paint, mix it into the water in the next step instead. -
Add water gradually:
Slowly stir in water. Aim for a consistency similar to thick pancake batter or peanut butter—pourable but not watery. -
Adjust color intensity:
If the color looks pale, add more pigment. Remember that concrete dries lighter than the wet mix appears, so go a shade darker than your desired result.
Step 3: Casting
-
Pour the base:
Fill the outer plastic cup with the concrete mix until it is about two-thirds full. -
Tap out bubbles:
Gently tap the cup against your work surface repeatedly for about a minute. This brings air bubbles to the surface, creating that characteristic speckled texture without large voids. -
Insert the inner mold:
Press your oiled tealight casing or bottle cap into the center of the wet concrete. Push it down until the concrete rises near the rim of the cup, but ensure you don’t push all the way to the bottom. -
Secure the inner mold:
The inner mold will likely try to float up. Place stones or coins inside it to weigh it down. -
Tape in place:
Use strips of masking tape across the top of the cup to hold the inner mold perfectly centered and level while it cures.
Create a Marble Effect
Don’t mix the pigment completely. Leave streaks of white and orange for a beautiful, swirled marble look.
Step 4: Curing and Finishing
-
Let it set:
Place the project on a flat surface out of direct sunlight. Allow it to cure for at least 24 to 48 hours. Patience here prevents cracking. -
Demold the piece:
Once fully hard, gently squeeze and wiggle the outer plastic cup to pop the concrete cylinder out. Then, carefuly pull out the inner mold with pliers if needed. -
Sand the edges:
Use fine-grit sandpaper to smooth the top rim. I like to sand in circular motions to keep the curve uniform and soften any sharp lips. -
Expose the texture:
Lightly sand the sides of the cylinder if you want to expose more of the aggregate texture, giving it that raw, earthy look shown in the photo. -
Clean up dust:
Wipe the entire piece with a damp cloth to remove sanding dust and reveal the rich terracotta color. -
Final drying time:
Let the piece air dry for another few hours to ensure all internal moisture has evaporated before placing it on delicate surfaces.
Place a fresh tealight inside and enjoy the cozy, modern vibe of your handmade creation


What Really Happens Inside the Kiln
Learn how time and temperature work together inside the kiln to transform clay into durable ceramic.
Mini Planter With Matching Saucer
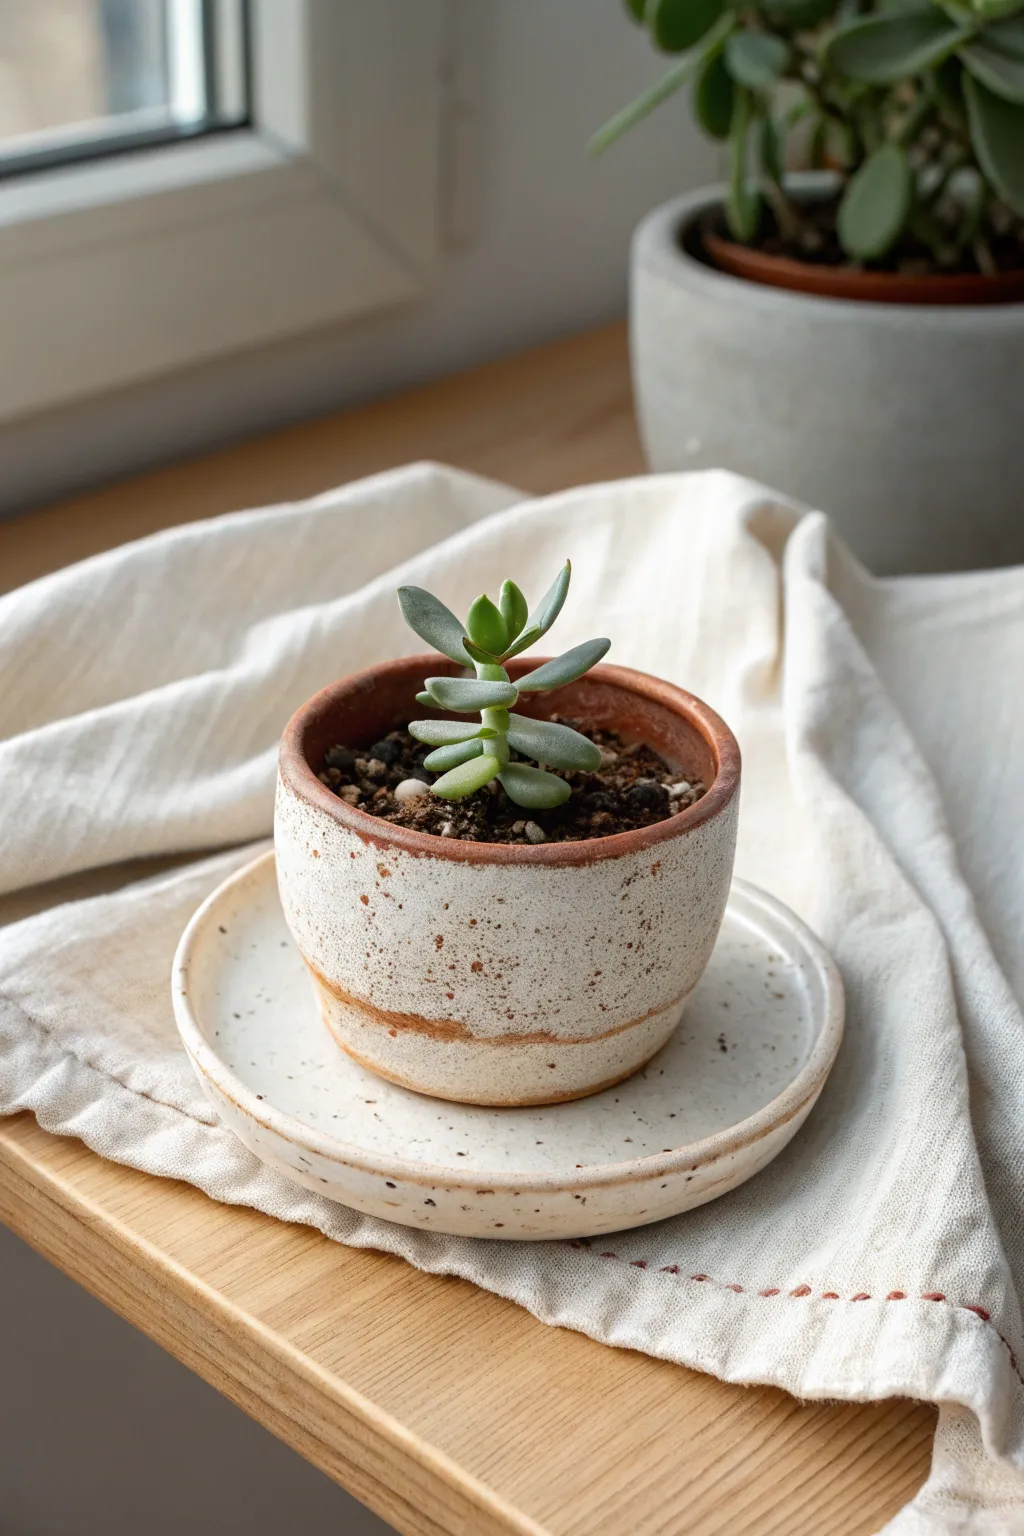
This charming miniature planter features a raw clay warmth peeking through a creamy, speckled glaze finish. Paired with a perfectly fitted saucer, it creates a cozy, minimalist home for your favorite small succulent.
Detailed Instructions
Materials
- Red earth or terracotta-colored stoneware clay
- Rolling pin
- Canvas mat or cloth
- Circular cookie cutters (approx 3″ diameter) or a template
- Potter’s knife or fettling knife
- Scoring tool (or an old fork)
- Slip (clay mixed with water)
- Rib tool (wood or rubber)
- Sponge
- Matte or satin cream glaze (opaque)
- Kiln (or access to a firing service)
Step 1: Forming the Pot
-
Prepare the Base:
Begin by wedging your clay to remove air bubbles. Roll out a slab of clay to an even thickness of about 1/4 inch. Use your circular cutter or a template to cut out the base for your pot. -
Measure the Wall:
Calculate the circumference of your base circle. Roll out a long rectangular strip of clay that is slightly longer than the circumference and about 2.5 inches tall. -
Attach the Wall:
Score the outer edge of your circular base and the bottom long edge of your rectangular strip. Apply slip generously to both scored areas. -
Creating the Cylinder:
Wrap the rectangular strip around the base. Where the two ends of the wall meet, cut them at a 45-degree angle (bevel cut) for a stronger joint. Score, slip, and press these ends together firming from both inside and outside. -
Refine the Seam:
Use your thumb or a wooden tool to smudge the clay across the vertical seam until it disappears. Support the wall from the inside while you do this to maintain the shape. -
Shape the Belly:
With the cylinder formed, gently push the walls outward from the inside using your fingers or a curved rib to create a slightly convex, rounded ‘belly’ shape, rather than perfectly straight sides. -
Drainage Hole:
Don’t forget the drainage hole! Use a small circular cutter or a straw to punch a hole directly in the center of the base.
Uneven Glaze Line?
If wax resist creates a jagged line, skip it. Instead, dip the whole pot, let the glaze dry to a powder, and then use a stiff damp sponge to wipe the rim clean for a sharper edge.
Step 2: Creating the Saucer
-
Cut the Saucer Base:
Roll out another slab of clay, slightly thicker than the pot walls. Cut a circle that is about 1 inch wider in diameter than your pot. -
Lift the Rim:
Instead of adding a separate coil, gently pinch the outer edge of this circle upwards to create a shallow lip. Use a damp sponge to smooth this rim until it curves gently upward. -
Check the Fit:
Place your pot gently onto the damp saucer to ensure the proportions look correct. The saucer should frame the pot with a small margin of space.
Texture Pro-Tip
If your glaze lacks speckles, add ‘ilmenite’ or granular manganese to a plain white glaze. Start with 0.5% and test first to get that perfect peppered look.
Step 3: Finishing Touches & Glazing
-
Smooth and Dry:
Once both pieces are leather hard, use a slightly damp sponge to smooth out any fingerprints or sharp edges on the rims. Let them dry completely to the bone-dry stage. -
Bisque Fire:
Fire the pieces in a kiln to the appropriate bisque temperature (usually somewhere around Cone 04) to make them porous and ready for glazing. -
Wax Resist:
Apply wax resist to the bottom of the saucer and the bottom of the pot. Crucially, apply a band of wax resist to the top rim of the pot to keep that raw clay detail visible. -
Dip Glazing:
Stir your cream speckled glaze thoroughly. Holding the pot by the waxed rim and base, dip it quickly into the glaze. Shake off excess drips immediately. -
Glazing the Saucer:
Dip the saucer similarly, ensuring the wax resist on the bottom does its job. I like to wipe back a little glaze from the saucer’s rim with a sponge if I want it to match the pot’s raw rim. -
Clean Up:
Using a wet sponge, clean any stray droplets of glaze off the waxed areas (the feet and rims). Any glaze left here will stick to the kiln shelf. -
Final Fire:
Fire the pieces again to the maturity temperature of your clay and glaze (often Cone 5 or 6 for stoneware).
Once cooled, pot your tiny plant and enjoy the satisfaction of seeing it thrive in a vessel made by your own hands
Ring Cone Trinket Set
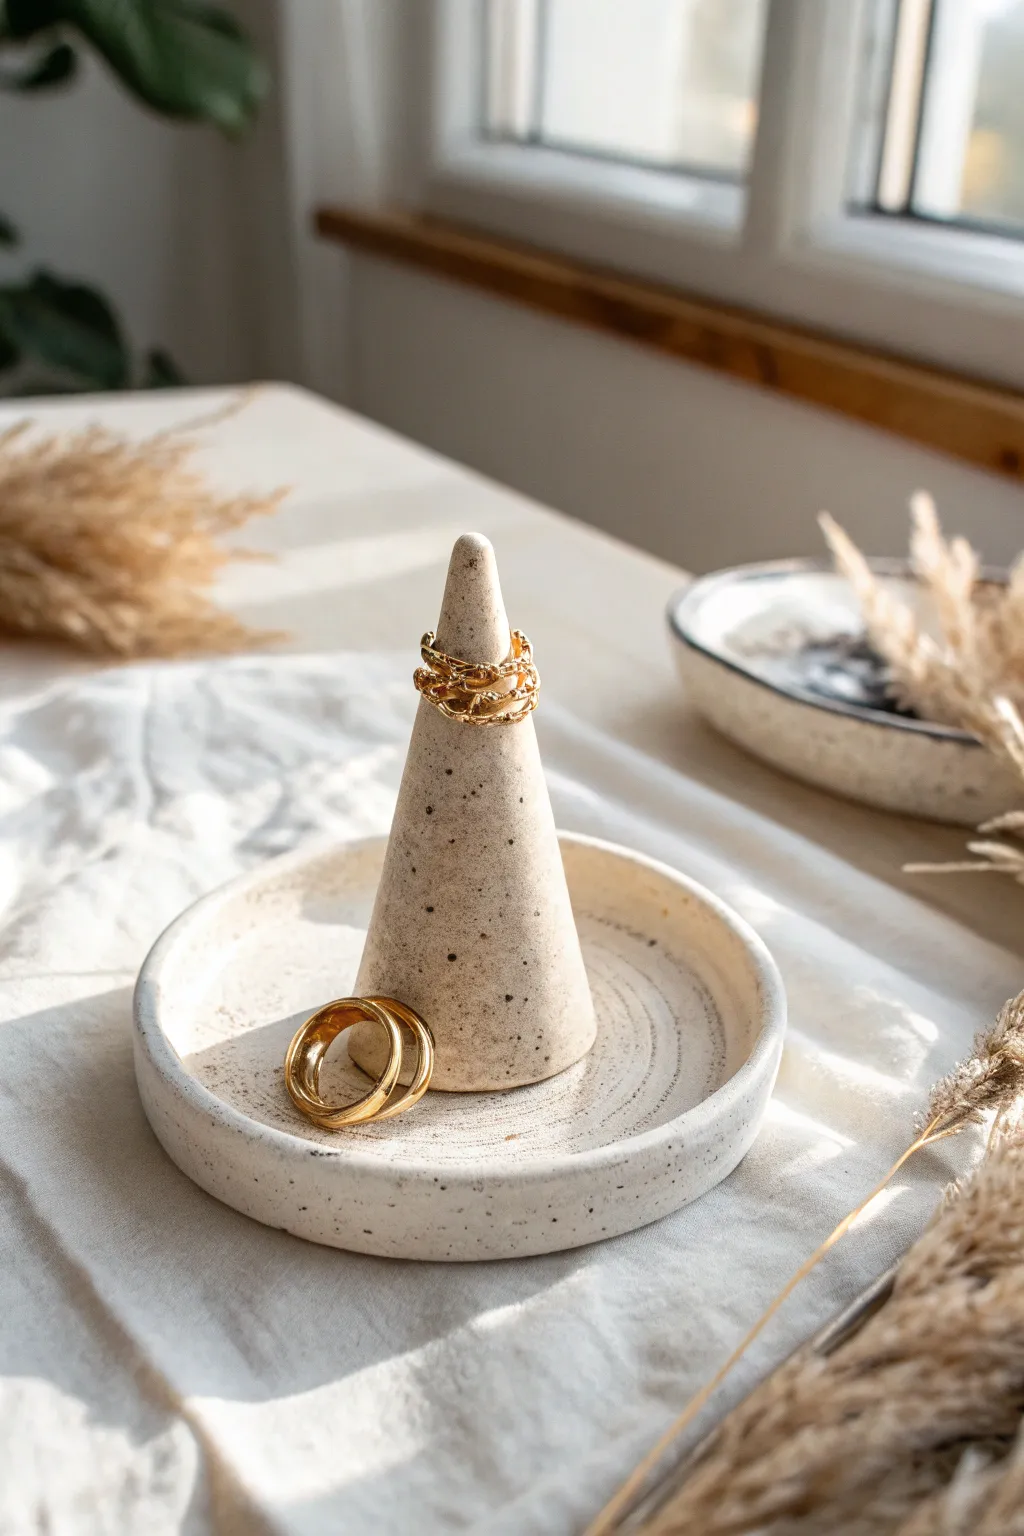
This minimalist jewelry display mimics the look of natural speckled stone with its warm beige tones and delicate flecks. By combining a functional trinket tray with a central cone, it provides a safe home for both bands and loose earrings in one elegant piece.
Step-by-Step
Materials
- Air-dry clay (white or cream)
- Acrylic paint (warm beige/sand color)
- Acrylic paint (black or dark brown)
- Glossy varnish or sealant (water-based)
- Rolling pin
- Small kitchen knife or clay knife
- Old toothbrush
- Cup of water and sponge
- Fine-grit sandpaper
- Small bowl or circle template (approx. 4-5 inches)
- Palette or paper plate
Step 1: Sculpting the Base
-
Roll the slab:
Begin by taking a handful of air-dry clay and rolling it out on a flat surface to a thickness of about 1/4 inch. If the clay sticks, you can lay down a piece of parchment paper first. -
Cut the circle:
Place your bowl or circle template onto the clay and trace around it with your knife to create a perfect disc. Remove the excess clay and set it aside for the cone. -
Create the rim:
Score the outer edge of your clay circle by making small scratch marks. Roll a long, thin snake of clay and gently press it onto the scored edge to form a rim. -
Smooth the transition:
Dip your finger in a little water and smooth the clay snake into the base so the seam disappears completely. The rim should feel like an extension of the base, not a separate piece. -
Refine the shape:
Gently pinch the rim upwards to give it some height, ensuring it is even all the way around. I like to run a damp sponge along the edge to soften any sharp angles.
Rim Cracking?
If small cracks appear on the rim while drying, mix a tiny bit of fresh clay with water to make a paste and fill them in before sanding.
Step 2: Forming the Cone
-
Shape the cone:
Take a walnut-sized ball of the remaining clay and roll it between your hands into a carrot shape. Flat the bottom against the table so it stands upright. -
Adjust the height:
Check the cone against your dish. It should be tall enough to hold rings but proportional to the base. Trim the bottom if it feels too tall. -
Attach to the base:
Score the bottom of the cone and the center of your dish. Add a drop of water to the scored areas (creating ‘slip’) and press the cone firmly into the center of the dish. -
Add texture:
Use a damp sponge or your finger to swirl circular patterns into the bottom of the dish around the cone. This mimics the wheel-thrown look in the inspiration photo. -
Dry completely:
Set the piece aside in a cool, dry place for at least 24-48 hours. Drying it slowly prevents cracking.
Gilded Edge
Add a thin line of liquid gold leaf paint to the very top edge of the rim for a luxurious, high-end finish.
Step 3: Finishing and Painting
-
Sand imperfections:
Once fully bone-dry, lightly sand any rough edges on the rim or the tip of the cone. Wipe away the dust with a barely damp cloth. -
Base coat:
Paint the entire piece with your warm beige or sand-colored acrylic paint. You may need two coats to get a solid, opaque finish. -
Prepare the speckles:
Mix a small amount of black or dark brown paint with a few drops of water to make it runny and ink-like. -
Splatter effect:
Dip an old toothbrush into the watered-down paint. Hold it over the dish and run your thumb across the bristles to flick tiny speckles onto the surface. -
Control the density:
Aim for an even distribution, but don’t overdo it. The goal is mimic natural stone, which has random, sparse flecks. -
Seal the piece:
Let the paint dry completely, then apply a coat of glossy varnish. This gives it that ceramic-glazed shine and protects your jewelry from the rough paint texture.
Place this on your vanity to keep your everyday jewelry organized in style

TRACK YOUR CERAMIC JOURNEY
Capture glaze tests, firing details, and creative progress—all in one simple printable. Make your projects easier to repeat and improve.
Leaf-Imprint Catchall Plate
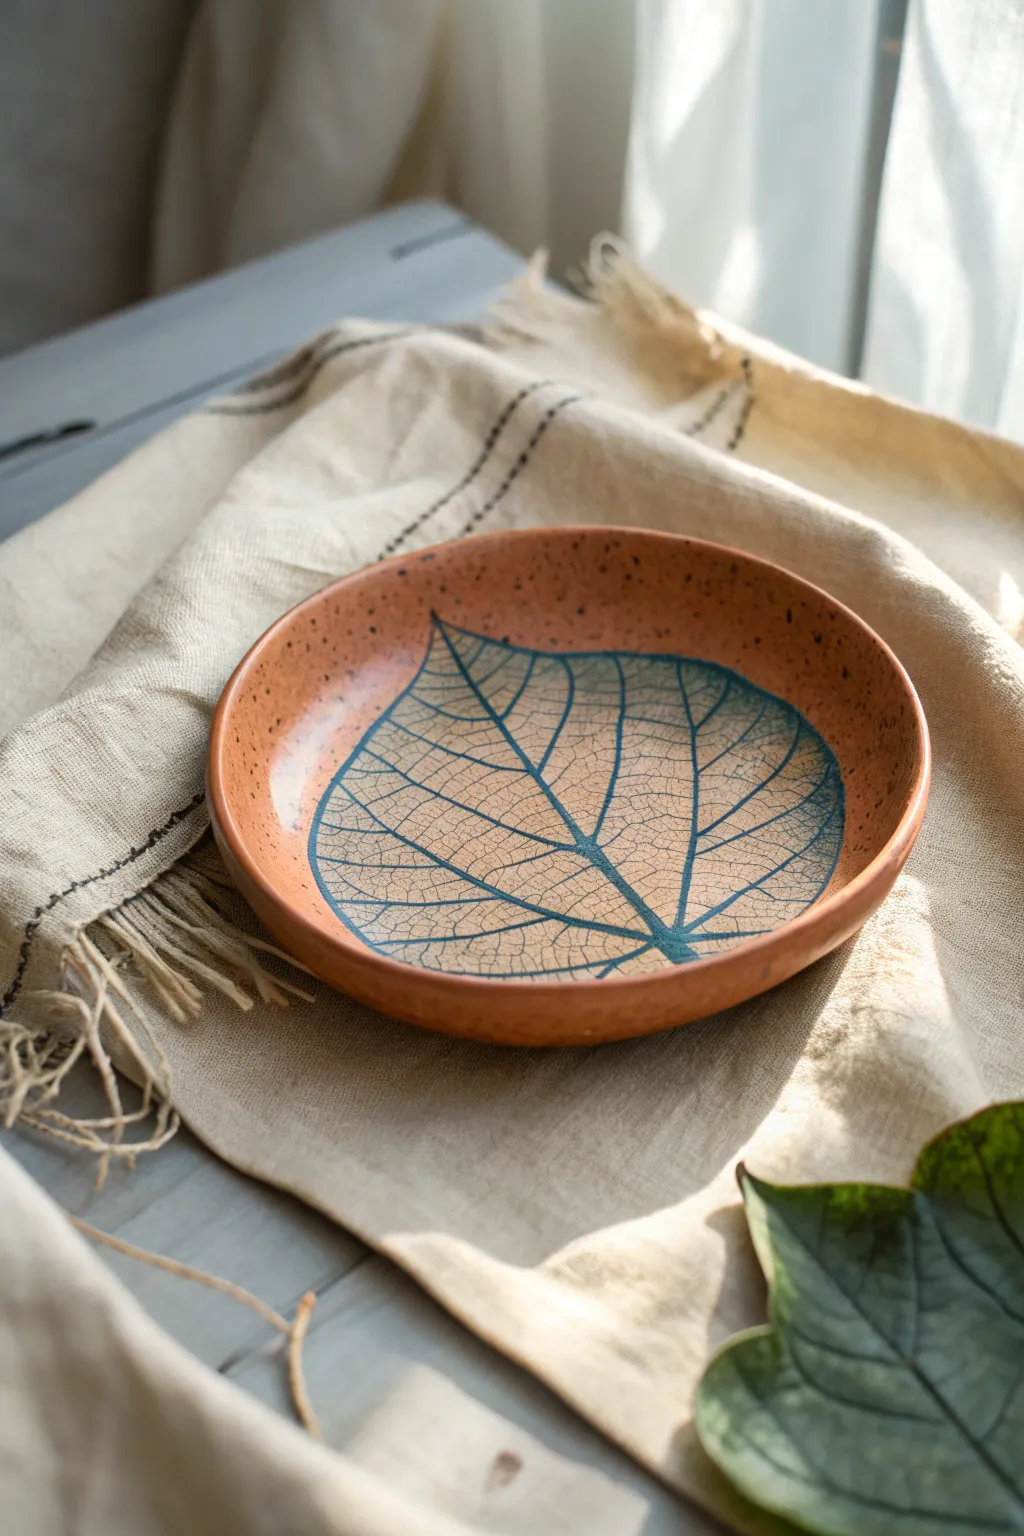
Capture the intricate beauty of nature with this rustic catchall plate. By impressing a real leaf into speckled terracotta clay and highlighting the veins with colored slip or underglaze, you create a functional piece that feels both modern and grounding.
Step-by-Step Guide
Materials
- Terracotta or warm-toned stoneware clay (speckled works best)
- Small rolling pin
- Canvas mat or slab roller
- Large, fresh leaf with prominent veins (like a hydrangea or bodhi leaf)
- Blue underglaze or ceramic engobe
- Needle tool or fettling knife
- Sponge
- Shallow slumped mold or a simple bowl for shaping
- Clear transparent glaze (optional for food safety)
- Small paintbrush
Step 1: Preparing the Slab
-
Wedge the clay:
Start by wedging your clay thoroughly to remove air bubbles. This is crucial for preventing cracks during firing. -
Roll out the slab:
Place your clay on a canvas mat. Using your rolling pin or a slab roller, roll out a smooth, even slab about 1/4 inch thick. Turn the clay periodically to ensure an even thickness. -
Smooth the surface:
Take a slightly damp rib tool or a soft sponge and gently compress the surface of the slab. This removes canvas texture and creates a pristine canvas for your imprint.
Vein Definition
Use a leaf that is still fresh and supple. Dry, brittle leaves will crumble into the clay and create a messy texture rather than a clean, crisp impression.
Step 2: Creating the Impression
-
Select and place your leaf:
Choose a fresh leaf with thick, raised veins on the back. Place it vein-side down onto the center of your clay slab. -
Roll the leaf:
Gently roll over the leaf with your rolling pin. Apply firm, even pressure to press the veins deep into the clay, but be careful not to make the slab to thin. I like to do one confident pass rather than rolling back and forth. -
Remove the leaf:
Carefully lift the stem and peel the leaf away to reveal the detailed impression left behind in the clay.
Add Subtle Texture
Before impressing the leaf, lightly sprinkle the clay slab with coarse sand or dried coffee grounds and roll them in to enhance the speckled, earthy look.
Step 3: Shaping the Plate
-
Cut the shape:
Place a round template or a bowl upside down over the imprint to guide your cut. Use a needle tool to cut a perfect circle around the leaf design. -
Smooth the edges:
Run a damp sponge or your finger along the cut rim to round off distinct sharp edges, giving the piece a finished, professional look. -
Form the curve:
Gently lift your clay circle and place it inside a shallow bowl or slump mold. Press it lightly so it takes on a gentle, upward curve. -
Initial drying:
Allow the clay to dry to a ‘leather-hard’ state inside the mold. This ensures it holds its shape before you move to the decoration phase.
Step 4: Decoration and Firing
-
Apply the color:
Once leather-hard, paint a layer of blue underglaze over the entire leaf impression area. Don’t worry about staying perfectly in the lines. -
The wipe-back technique:
Let the underglaze dry slightly until it’s no longer shiny. Take a damp (not dripping) sponge and gently wipe across the surface. -
Reveal the veins:
As you wipe, the sponge will remove the blue color from the raised surface of the clay while leaving the pigment trapped deep in the impressed veins, creating a high-contrast design. -
Clear glaze application:
After the piece has been bisque fired, apply a clear transparent glaze over the entire bowl if you want it to be food safe and glossy. -
Final firing:
Fire the piece in the kiln according to your specific clay and glaze firing temperature instructions.
Now you have a stunning, nature-inspired decorative plate perfect for holding keys or jewelry
Minimal Wall Hanging Clay Tiles
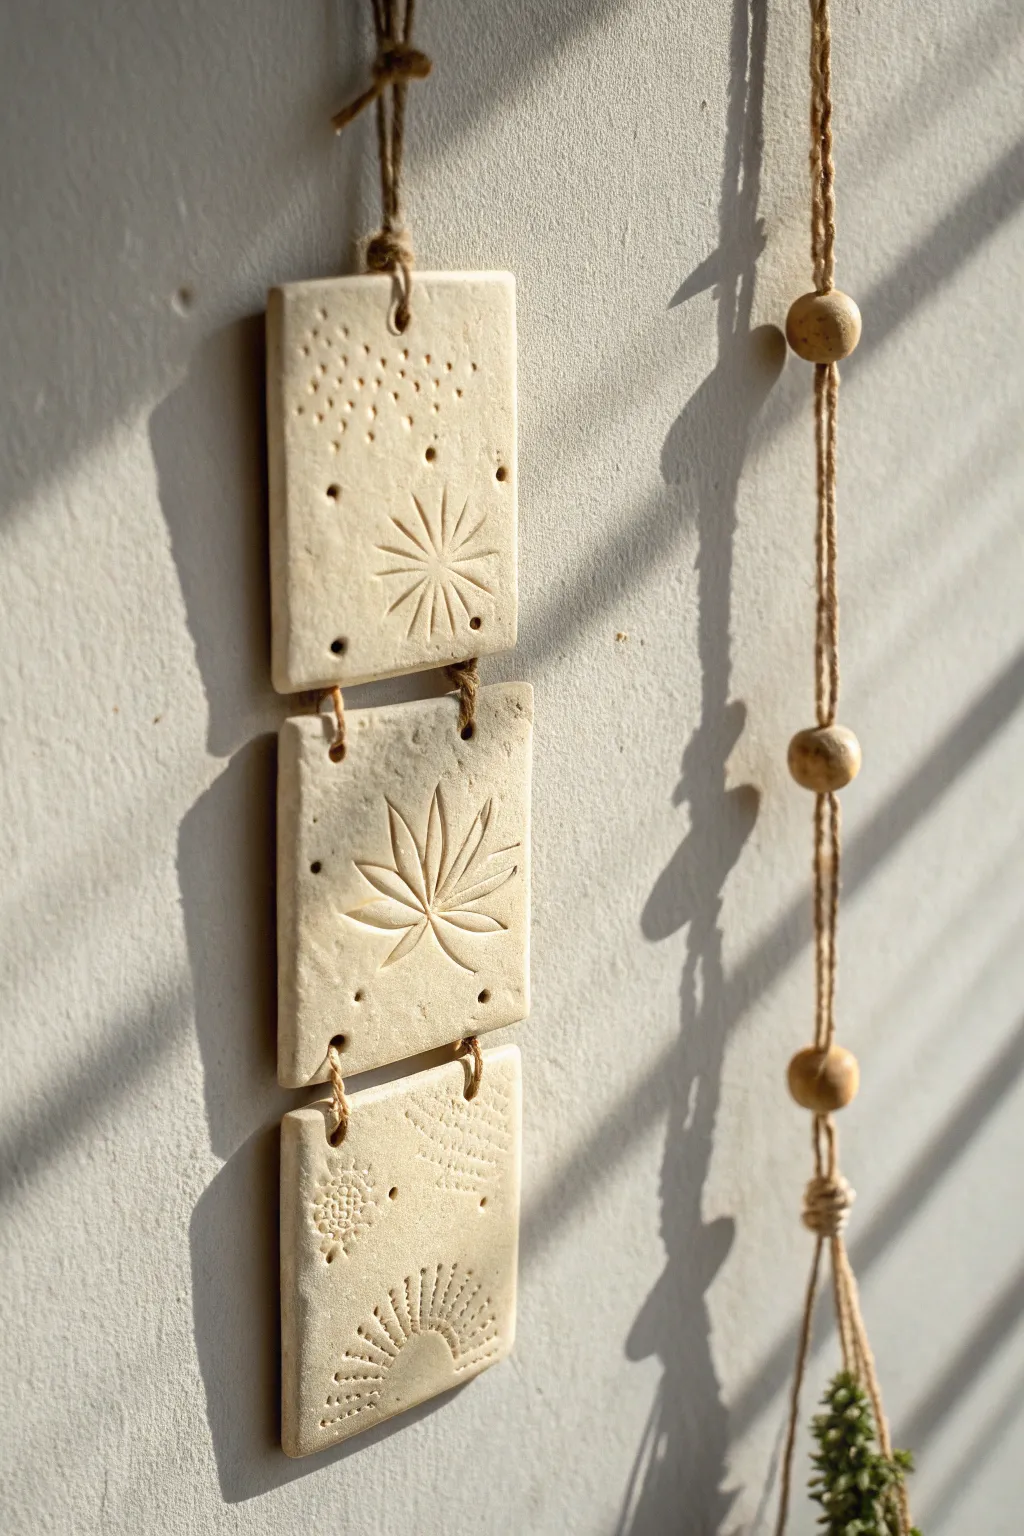
Embrace earthy textures with this vertical wall hanging featuring three interconnected clay tiles. The unfinished, stone-like appearance combined with delicate botanical and geometric imprints creates a calming, minimalist piece perfect for sunny corners.
Detailed Instructions
Materials
- White or stone-colored air-dry clay (or polymer clay)
- Rolling pin
- Square cookie cutter (approx. 3-4 inches) or knife/ruler
- Jute twine or hemp cord
- Wooden beads (assorted sizes)
- Small straw or skewer (for piercing holes)
- Stamping tools: toothpicks, forks, leaves, or clay stamps
- Sandpaper (fine grit)
- Matte varnish (optional)
Step 1: Shaping the Tiles
-
Prepare the clay surface:
Begin by kneading a generous amount of clay until it is pliable and smooth. Roll it out on a flat, non-stick surface to an even thickness of about 1/4 inch. If you want a more rustic look, don’t worry about getting it perfectly smooth. -
Cut the squares:
Using a square cookie cutter or a sharp knife and ruler, cut out three identical squares. Smooth the rough edges slightly with a damp finger to refine the shape without losing the handmade character. -
Create connection points:
Two holes are needed for each tile to connect them vertically. Use a straw or skewer to punch a hole centered near the top edge and another centered near the bottom edge of the first two tiles. For the third (bottom) tile, you only need top holes, though the example shows double holes on all for consistency. -
Add corner holes:
Looking closely at the design, the hanging mechanism actually uses two holes at the top and bottom of each square rather than just one center hole. Pierce two holes spaced about 1.5 inches apart at the top and bottom edges of every tile.
Keep it Flat
Air-dry clay tends to curl while drying. Place a lightweight book or board on top of the tiles once they are semi-dry to ensure they stay perfectly flat.
Step 2: Imprinting Designs
-
Texturize the top tile:
For the top square, use a skewer or needle tool to poke a random cluster of small dots in the upper left corner. In the lower right quadrant, use a clay tool or dull knife to press a starburst pattern—start with a center point and radiate lines outward. -
Design the middle tile:
Center a botanical design on the second tile. You can press a real leaf into the clay and peel it back, or use a carving tool to freehand a leaf shape with veins radiating from a central stem. -
Detail the bottom tile:
On the final tile, press a textured fabric or lace into the upper right corner for a subtle pattern. At the bottom, carve a rising sun or fan shape using short, radiating lines. -
Refine the surface:
Gently embrace the imperfections. If you pressed too hard and warped the square shape, gently push the sides back into alignment before leaving it to dry.
Step 3: Drying and Finishing
-
Let it cure:
Allow the tiles to dry completely according to your clay package instructions. This usually takes 24-48 hours. I find flipping them over halfway through helps them dry flat. -
Smooth the edges:
Once bone dry, take fine-grit sandpaper and lightly sand the edges to remove any sharp burs or crumbs left from cutting. -
Seal (Optional):
If you want to protect the clay from dust or humidity, apply a thin coat of matte varnish. Avoid glossy finishes to maintain the raw, natural aesthetic.
Fixing Cracks
If small cracks appear as the clay dries, mix a tiny bit of fresh clay with water to make a paste and smooth it into the cracks with your finger.
Step 4: Assembly
-
Attach the top loop:
Cut a length of jute twine. Thread it through the two top holes of the first tile, bringing the ends up to meet. Tie a loop at the top for hanging. -
Connect the tiles:
Cut two shorter pieces of twine to connect the top tile to the middle tile. Thread one piece through the left bottom hole of the top tile and the left top hole of the middle tile. Tie distinct knots on the front face of the clay to secure them. -
Repeat connections:
Repeat this tying process for the right side, and then do the same to connect the middle tile to the bottom tile. Ensure all knots are facing the front for a decorative touch. -
Create the decorative side strand:
To mimic the styling in the photo, create a separate long strand of twine. Thread large wooden beads onto it, spacing them out by tying knots below each bead to hold it in place. Hang this alongside your clay piece.
Hang your new creation near a window where the sunlight can highlight the beautiful recessed textures you created
Easy Paint Palette With Wells
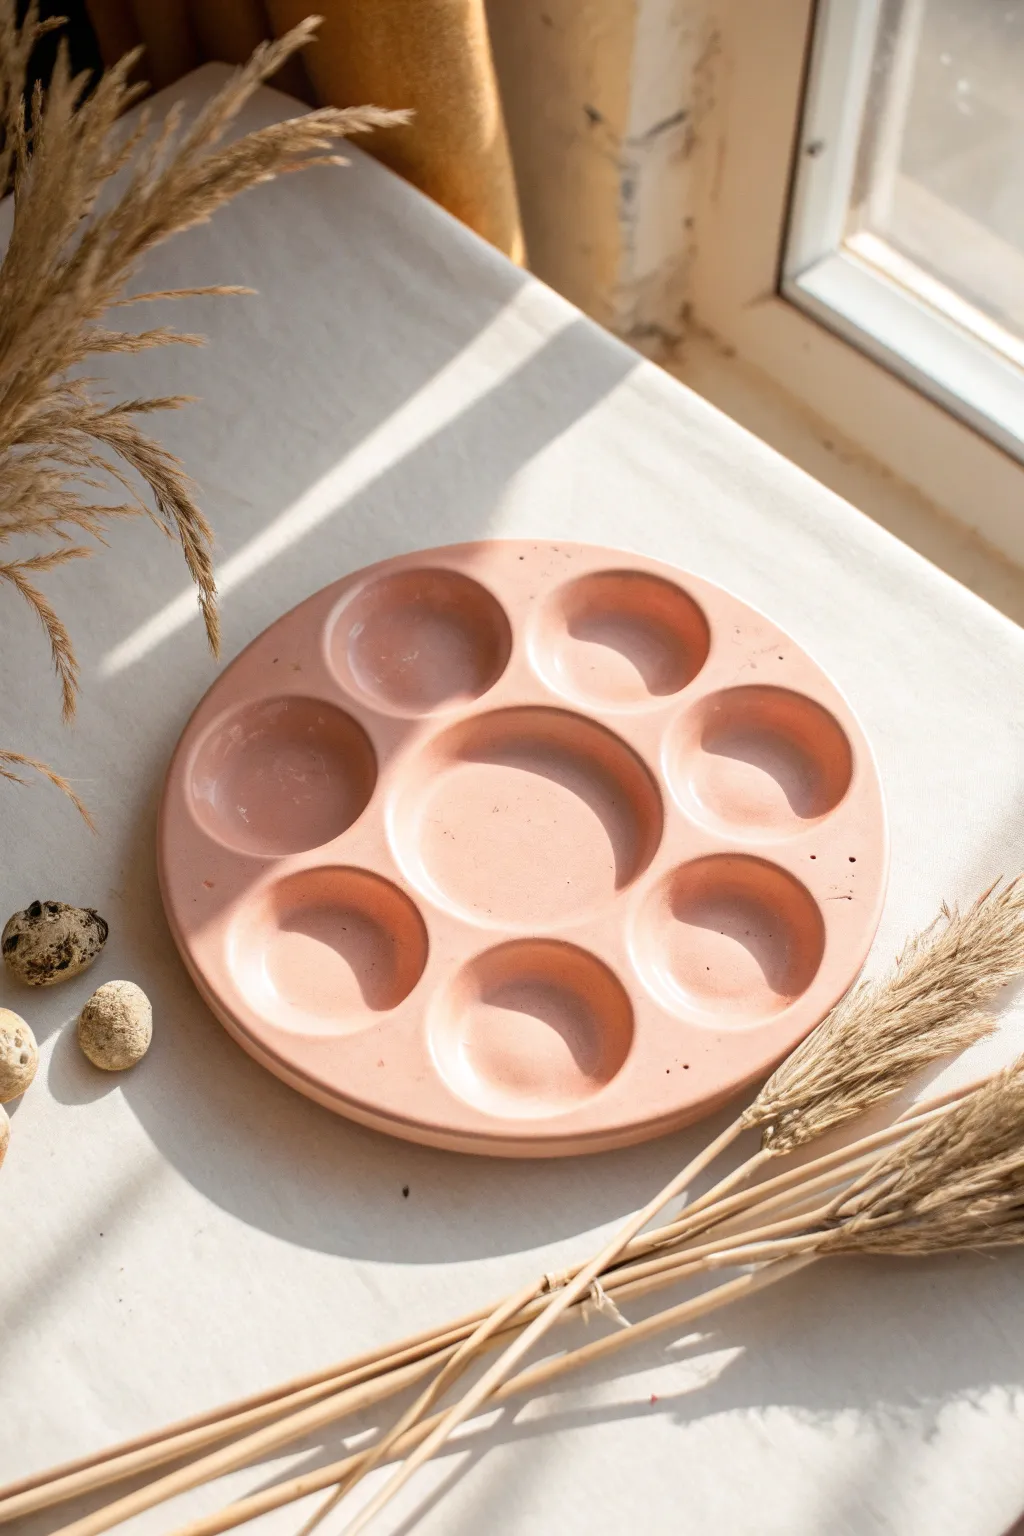
Every artist deserves a beautiful space to mix their colors, and this handmade clay palette is as functional as it is lovely. With its soft pink finish and deep, perfectly round wells, it transforms your painting setup into a work of art itself.
How-To Guide
Materials
- Air-dry clay or polymer clay (white or pre-colored pink)
- Acrylic paint (soft pink or terra cotta if using white clay)
- Rolling pin
- Circle cutter or bowl (approx. 6-7 inches diameter)
- Small sphere tool or a large marble
- Small bowl relative to your main circle (for the center well)
- Measuring spoon (tablespoon size) or small round object
- Cup of water
- Sponge or fine-grit sandpaper
- Gloss or matte varnish (waterproof sealant is crucial)
Step 1: Shaping the Base
-
Prepare your clay:
Start by conditioning your clay. Knead a large ball until it is soft, pliable, and free of any air bubbles. If you are using polymer clay, this might take a little elbow grease to get it smooth. -
Roll out the slab:
On a clean, flat surface, roll your clay out into a slab. You want it to be fairly thick—about a 1/2 inch to 3/4 inch—to accommodate the depth of the wells without poking through the bottom. -
Cut the primary circle:
Place your large circle cutter or an overturned bowl onto the slab. Press down firmly to cut out the main shape of your palette. Remove the excess clay from around the edges. -
Smooth the edges:
Dip your finger in a little water (for air-dry clay) or use baby oil (for polymer) and run it along the cut edge to soften the sharp angle. I like to take my time here to ensure a professional-looking finish.
Use Water Sparingly
When smoothing air-dry clay, avoid using too much water. Excess moisture can cause the clay to crack as it dries or weaken the structure of your thin walls.
Step 2: Creating the Wells
-
Mark the center:
Gently place your smaller bowl or circle cutter in the direct center of the slab just to leave a light impression. Do not press all the way down; this is just a guide for your central mixing area. -
Form the central well:
Using your thumbs or a large sphere tool, gently press into the marked center area. Work in a circular motion to depress the clay, creating a large, shallow basin for mixing paints. -
Position the outer wells:
Visualize the spacing for the surrounding paint wells. You want them evenly spaced around that central hub. You can lightly mark 7 or 8 spots with a toothpick to ensure symmetry before committing. -
Press the outer wells:
Take a rounded tablespoon measure, a large marble, or a specialized bold tool. Press it firmly into your marked spots to create uniform, concave depressions. Push deep enough to hold paint, but be careful not to break through the bottom. -
Refine the shapes:
Go back over each well with a wet finger or a slightly damp sponge. Smooth out any fingerprints, ridges, or uneven textures inside the cups so your paint won’t get stuck in crevices later. -
Clean up the surface:
Check the flat areas between the wells. If the pressure of making the holes distorted the flat surface, gently press it back down or smooth it over with a finishing tool.
Brush Rest Notch
Before drying, use a straw or tool to press a small horizontal groove into the rim. This creates a clever resting spot for your paintbrush so it doesn’t roll away.
Step 3: Finishing Touches
-
Dry or bake:
If using air-dry clay, let the palette sit in a cool, dry place for 24-48 hours until fully hardened. If using polymer clay, bake according to the manufacturer’s instructions on the package. -
Sand for perfection:
Once fully cured, use fine-grit sandpaper to gently buff away any remaining roughness on the edges or inside the wells. Wipe away all dust with a damp cloth. -
Paint (Optional):
If you didn’t use colored clay, now is the time to apply your soft pink acrylic paint. Apply 2-3 thin, even coats, letting each one dry completely before adding the next. -
The crucial seal:
To make your palette usable, it must be waterproof. Apply at least two coats of a high-quality waterproof varnish or resin. Pay special attention to the wells where water will sit. -
Final cure:
Let the varnish cure completely—often longer than just ‘dry to the touch’—before introducing any wet paint to your new tool.
Now you have a charming, custom tool ready to assist in your next masterpiece
Faux Kintsugi Accent Bowl
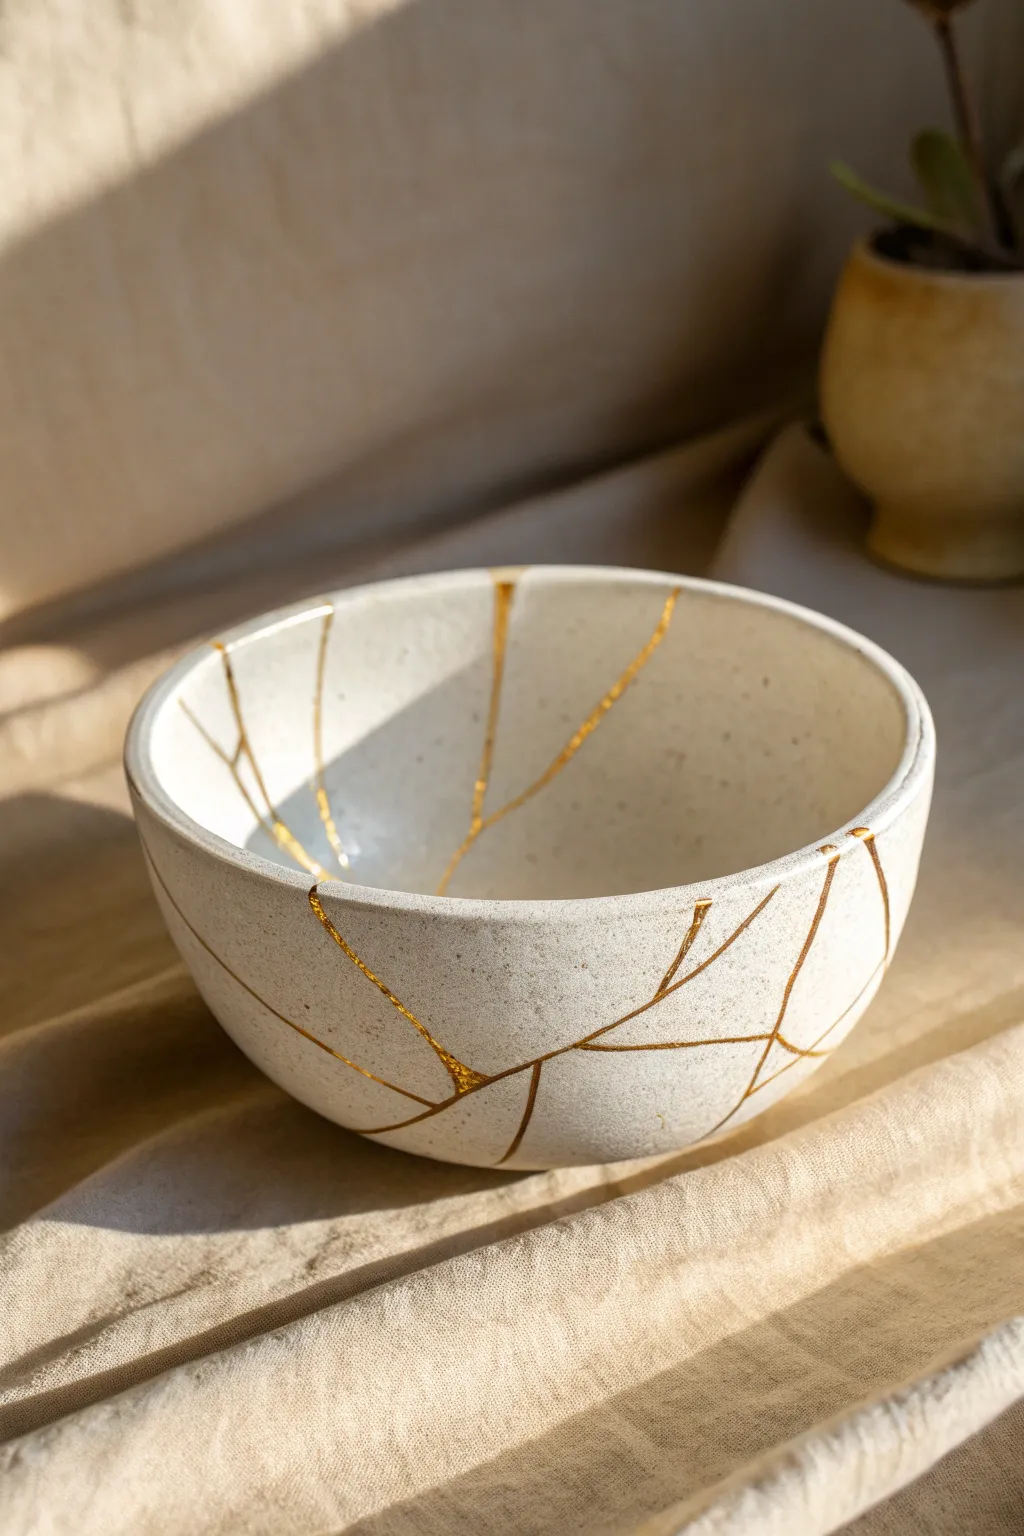
Embrace the Japanese art of finding beauty in imperfection with this stunning faux Kintsugi project. By intentionally adding golden fissure lines to a handmade clay bowl, you create a piece that looks elegantly mended and full of history.
Detailed Instructions
Materials
- Air-dry clay (white or stone finish)
- Acrylic rolling pin
- Bowl for mold (a cereal bowl works well)
- Plastic wrap
- Pottery sponge
- Craft knife or needle tool
- Fine-grit sandpaper (220 grit)
- Gold leaf adhesive size
- Gold leaf sheets or metallic gold powder
- Small soft paintbrushes
- Clear sealant (matte or satin)
- Water cup
Step 1: Shaping the Base Bowl
-
Prepare the Clay:
Start with a large ball of air-dry clay. Knead it in your hands for a minute or two to warm it up and ensure it’s pliable and free of air bubbles. -
Roll the Slab:
Using your acrylic rolling pin, roll the clay out into a smooth, even slab. Aim for a thickness of about 1/4 inch to ensure the bowl is sturdy but not too heavy. -
Prepare the Mold:
Take a standard kitchen bowl to use as your mold. Cover the outside of the bowl tightly with plastic wrap; this prevents sticking and helps release the clay later. -
Form the Bowl:
Gently drape your clay slab over the plastic-covered bottom of the bowl. Press the clay down smoothly against the mold’s shape, working from the center outward to avoid trapping air. -
Trim the Edges:
Use your craft knife or needle tool to trim away the excess clay around the rim. Hold the tool steady and rotate the bowl for a clean, even cut. -
Smooth the Surface:
Dip a pottery sponge lightly in water and run it over the exterior of the clay. Smooth out any fingerprints or rough spots to create a refined, stone-like texture. -
Initial Dry:
Let the clay dry on the mold for about 24 hours until it holds its shape on its own. Carefully pop the clay bowl off the mold and peel away the plastic wrap. -
Carve the Cracks:
While the clay is leather-hard (firm but carveable), use your needle tool to score irregular lines across the surface. These channels will hold the gold later, so make them distinct but random. -
Full Cure:
Allow the bowl to dry completely, usually another 24-48 hours depending on humidity. I always check the color; when the grey turns fully white, it’s ready. -
Sand and Refine:
Once bone dry, take fine-grit sandpaper and gently smooth the rim and any sharp edges. Wipe away all dust with a slightly damp cloth.
Sticky Situation
If gold leaf sticks to unwanted areas, your brush might have been too wet. Wait for it to dry, gently scrape the excess gold off with a exacto knife, and retouch with white paint.
Step 2: Applying the Golden Joinery
-
Map the Gold Adhesive:
Using a very thin paintbrush, carefully paint the gold leaf adhesive size into the carved cracks you created earlier. You want the glue only in the fissures. -
Wait for Tackiness:
Allow the adhesive to sit for 15-20 minutes. It needs to transition from wet to tacky—it should feel sticky but not leave residue on your finger. -
Apply Gold Leaf:
Lay a sheet of gold leaf over the tacky areas or dip a dry brush into gold powder. Press it down firmly into the cracks so it adheres to the glue. -
Brush Away Excess:
Wait a few hours for the gold to fully set. Then, using a clean, soft brush, vigorously sweep away the excess gold leaf from the surface, leaving gold only in the cracks. -
Detail Check:
Inspect your lines. If any spots were missed, dab a tiny bit more adhesive, wait, and re-apply gold to ensure continuous, flowing lines. -
Paint the Rim:
For a cohesive look, paint a very thin line of adhesive along sections of the rim and apply gold leaf there as well, matching the photo’s delicate edge detail. -
Seal the Project:
Protect your work by applying a coat of clear matte sealant over the entire bowl. This prevents the gold from tarnishing and seals the clay surface.
Make it Metallic
Try using liquid gilding paint instead of leaf for a different texture, or mix metallic mica powder with slow-drying epoxy for a raised, 3D repair line effect.
Now you have a stunning centerpiece that celebrates the art of repair without ever breaking a dish