I’m always amazed how a plain terracotta flower pot turns into a little piece of decor with just a few simple design choices. These flower pot design ideas are my go-to favorites when I want big visual impact without fussy, perfection-level work.
Classic Solid-Color Painted Pots
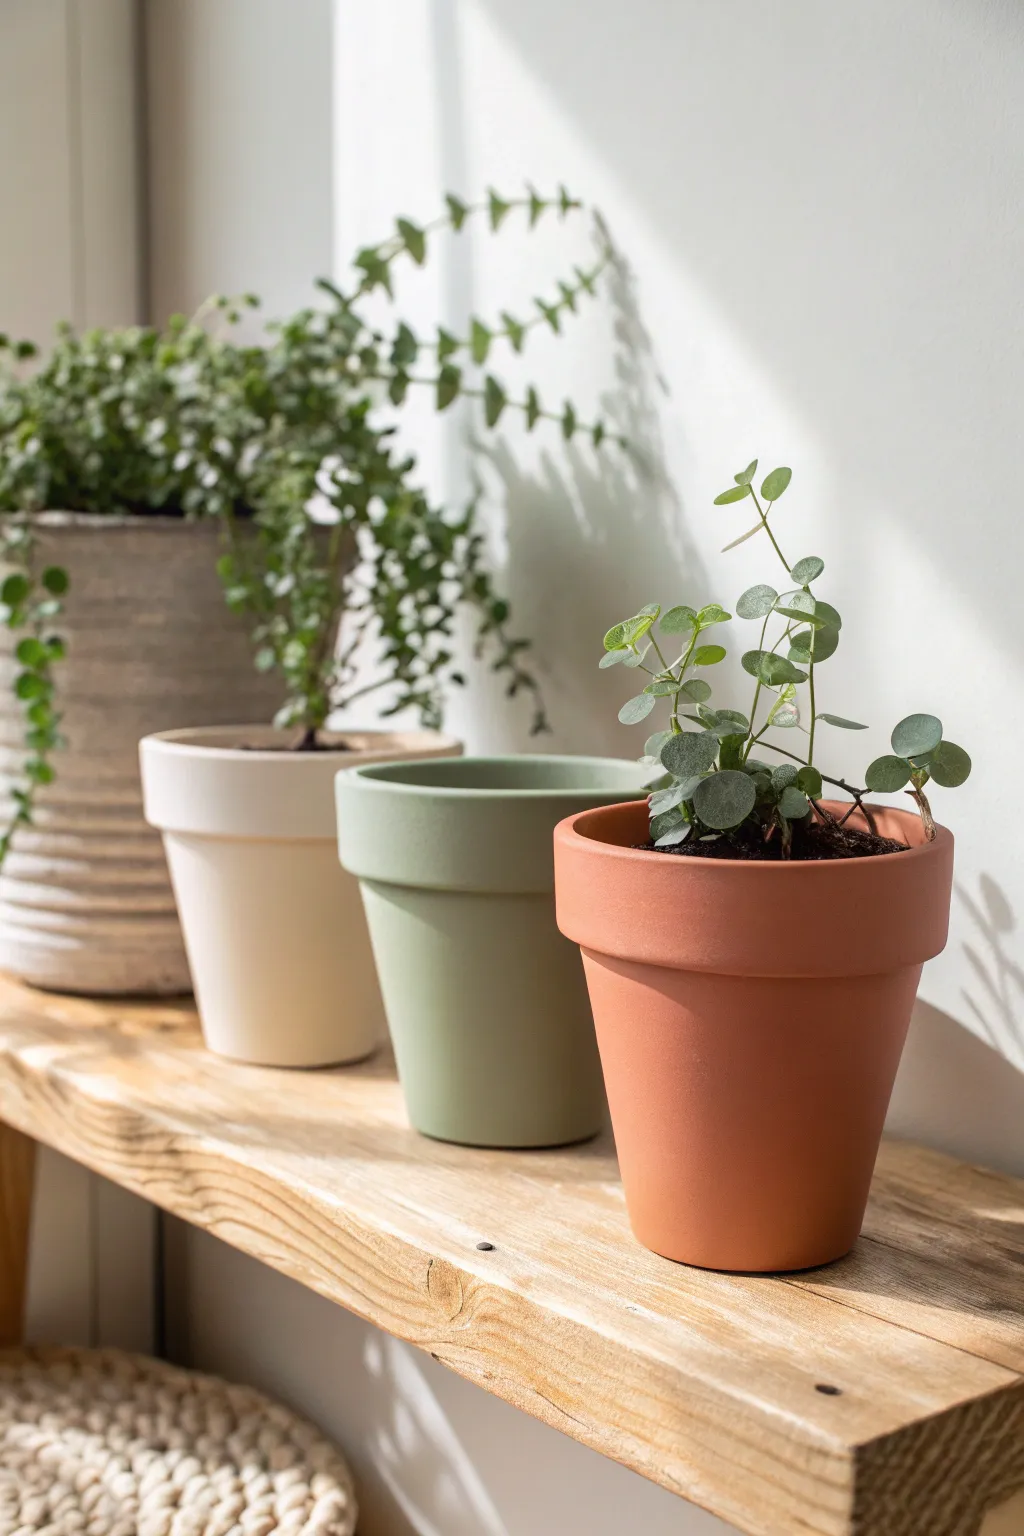
Transform standard terra cotta into modern, minimalist decor with smooth, matte acrylics in soothing earth tones. This project focuses on achieving a flawless, chalky finish that makes simple terracotta look custom-designed.
How-To Guide
Materials
- Three terracotta pots (various sizes)
- Sandpaper (220-grit)
- Damp cloth or sponge
- Primer spray paint (white or grey)
- Matte acrylic craft paints (Cream/Off-white, Sage Green, Terracotta/Burnt Orange)
- Wide flat synthetic brush
- Small foam brush
- Clear matte sealer spray
- Newspaper or drop cloth
Step 1: Preparation & Priming
-
Clean the surface:
Before you begin, ensure your terracotta pots are completely free of dust and stickers. Soak them in warm water if needed to remove stubborn price tags, then let them dry completely overnight. -
Sand for smoothness:
Lightly sand the exterior of each pot using 220-grit sandpaper. You aren’t trying to remove material, just knocking down any rough bumps or clay burrs to ensure a smoother paint application. -
Wipe down:
Use a slightly damp cloth to wipe away all the sanding dust. Any leftover dust will create a gritty texture in your paint, so be thorough here. -
Prime the surface:
Set up your workspace with newspaper. Apply a light, even coat of primer spray paint to the outside of the pots and the inner rim (about 2 inches down). This step is crucial for stopping the clay from soaking up all your acrylic paint. -
Dry the primer:
Allow the primer to dry fully according to the can’s instructions, usually about an hour. It should feel dry to the touch before you move on.
Pro Tip: Moisture Barrier
Terracotta is porous. To prevent paint bubbling, seal the INSIDE of the pot with a clear acrylic spray before planting. This stops water seeping through to your paint.
Step 2: Painting the Colors
-
Mix your cream shade:
For the first pot, pour out your cream or off-white acrylic paint. If the color looks too stark, mix in a tiny drop of brown to warm it up. -
Apply the first cream coat:
Using a wide flat brush, apply the cream paint in horizontal strokes around the pot. Don’t worry if it looks streaky at first; thin layers are better than thick ones. -
Paint the sage green:
For the second pot, use the sage green paint. I like to use a fresh foam brush here to get into the crevice under the rim easily without buildup. -
Refresh the terracotta look:
For the third pot, you might wonder why we paint it terracotta color if it’s already clay. The goal is a uniform, matte perfection that raw clay doesn’t have. Apply your burnt orange acrylic paint for a clean, consistent look. -
Dry completely:
Let all three pots dry for at least 30-45 minutes. They should be matte and dry before the next coat. -
Add second coats:
Repeat the painting process for all three pots. A second coat usually provides full opacity. If you are painting a light color like cream over dark primer, a third coat might be necessary. -
Paint the inner rim:
Don’t forget to paint just inside the top rim of each pot. Since soil won’t fill it to the very brim, this ensures the raw clay doesn’t show through.
Level Up: Texture Play
Before painting, mix a teaspoon of baking soda into your acrylic paint. This creates a trendy, gritty ceramic texture that looks like expensive stoneware.
Step 3: Finishing Touches
-
Inspect for drips:
Look closely at the rims and bases. If you see any dried drips, carefully sand them down with fine-grit sandpaper and touch up the paint. -
Seal the deal:
Take the pots back to your ventilated spray area. Apply a clear matte sealer spray. This protects the paint from water damage when you water your plants but keeps that lovely chalky finish. -
Let cure:
Allow the sealer to cure for at least 24 hours. The paint feels dry quickly, but the chemical bond needs time to harden before handling moisture. -
Plant or stage:
Once fully cured, pot your plants directly or slide a plastic nursery pot inside your updated vessels.
Enjoy the calm atmosphere these soft, matte colors bring to your indoor garden shelf


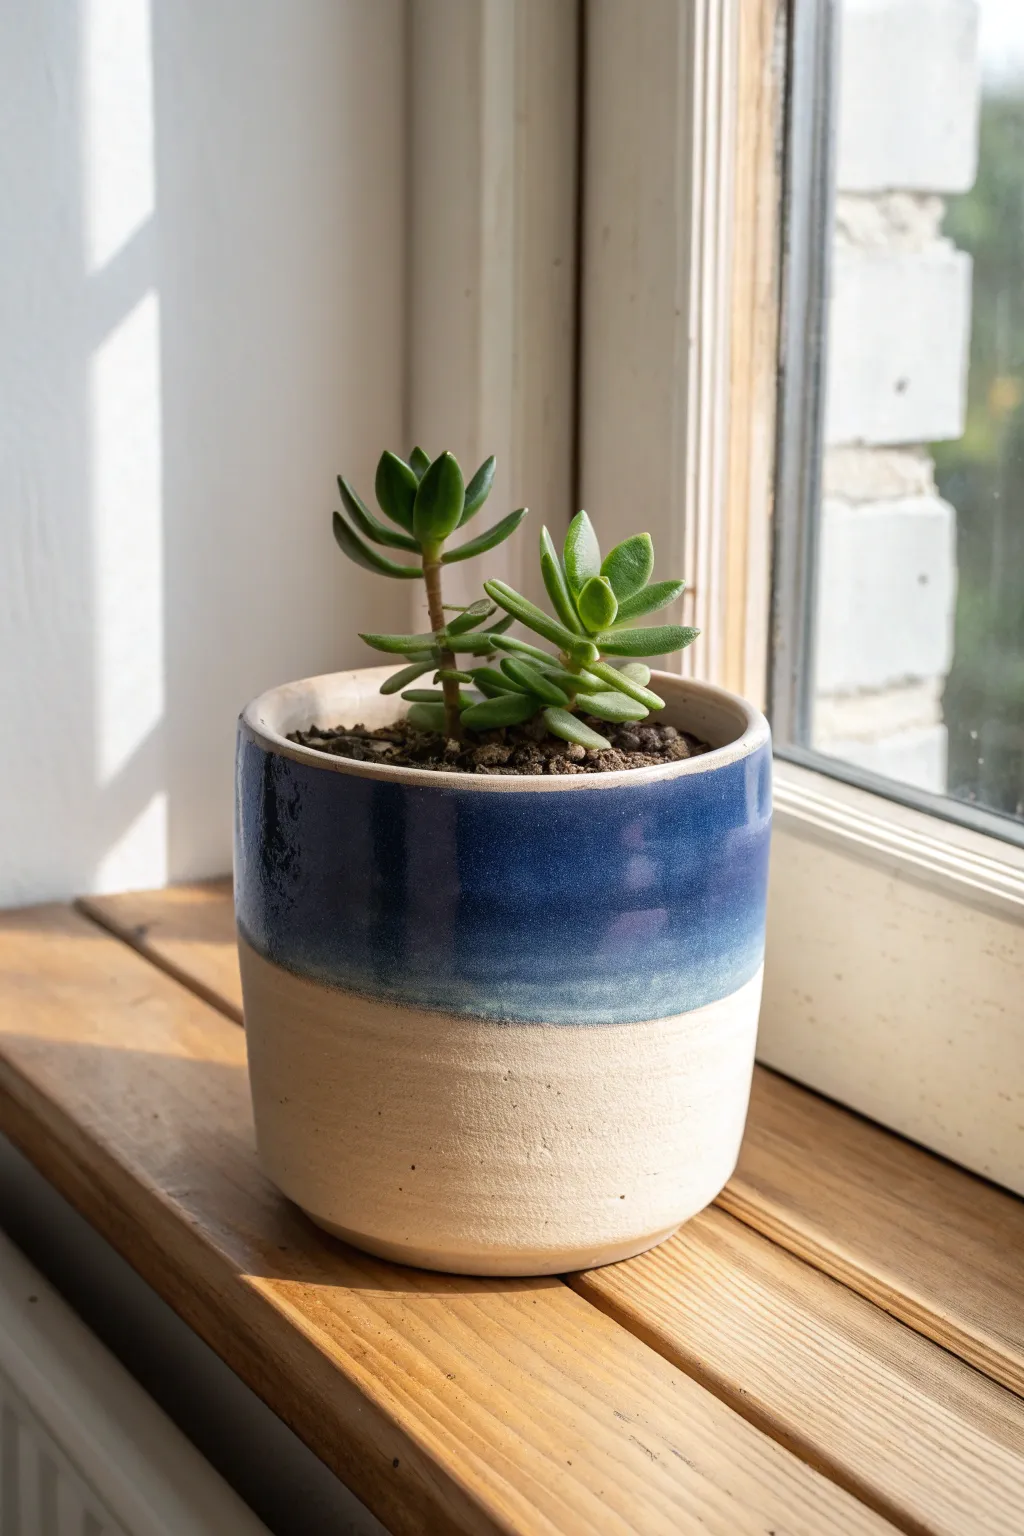
Simple Two-Tone Color Blocking
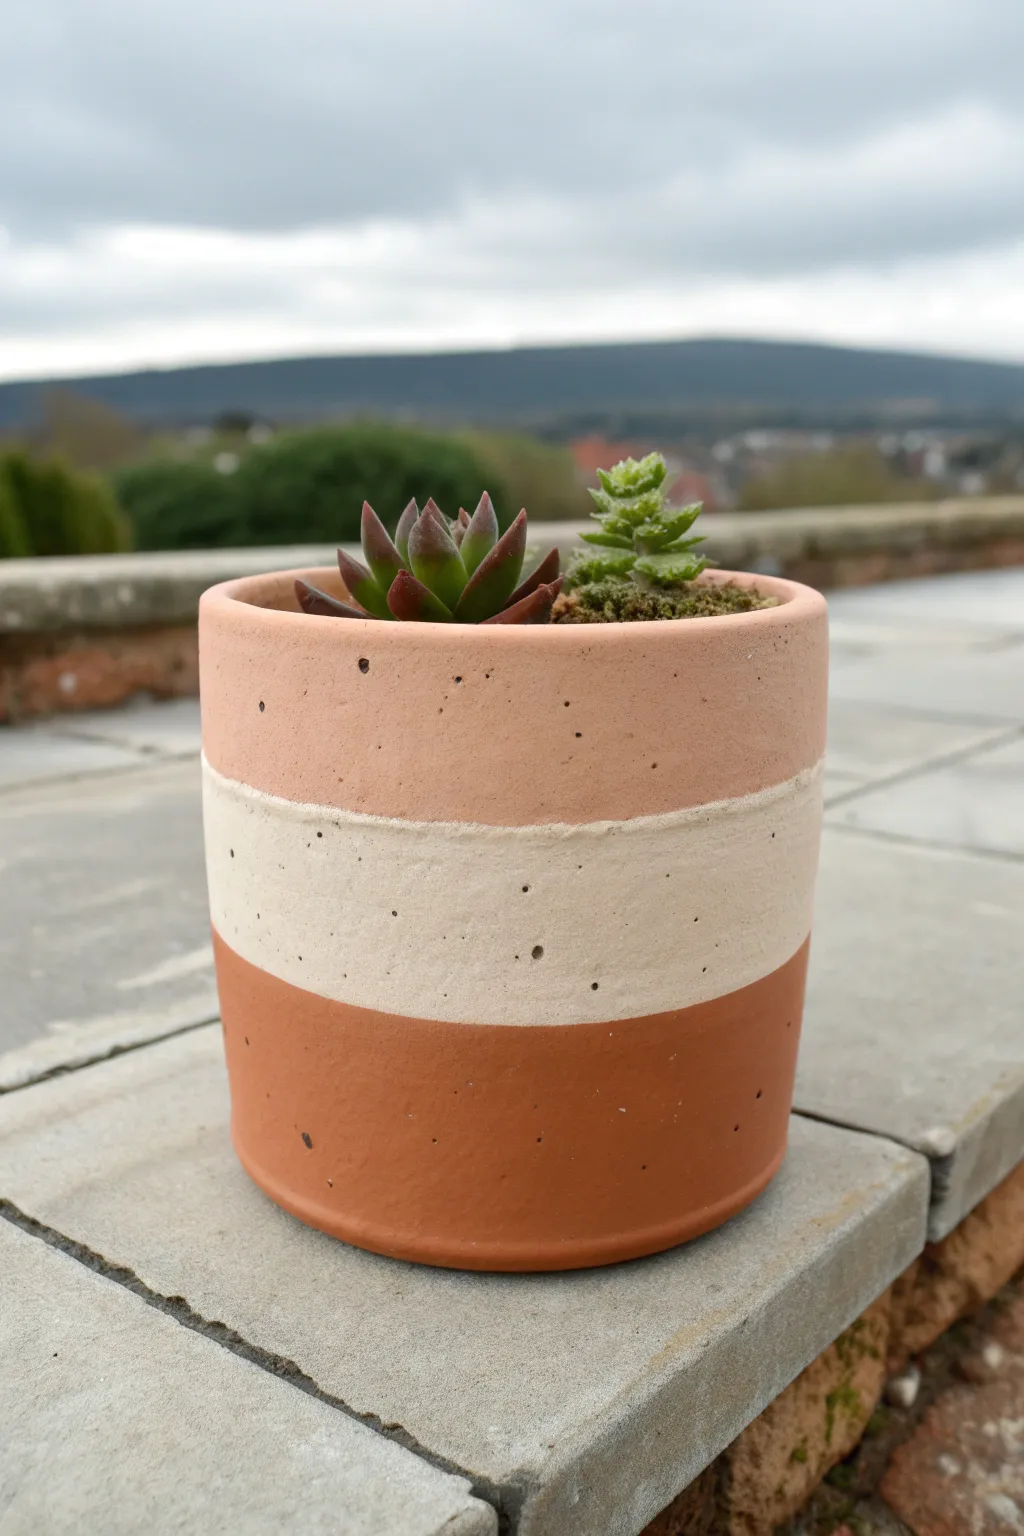
Embrace the beauty of subtle earth tones with this modern take on color blocking. This project transforms a simple cylindrical planter into a chic, tri-colored vessel perfect for showcasing delicate succulents.
Step-by-Step
Materials
- Cylindrical terracotta or concrete pot (clean and dry)
- Painter’s tape (various widths, preferably wider)
- Acrylic craft paints: Terracotta/Rust, Off-White/Cream, and Muted Peach/Blush
- Medium flat paint brush
- Small detail brush (optional for touch-ups)
- Matte finish clear sealant spray
- Newspaper or drop cloth
- Ruler or measuring tape
Step 1: Preparation & Base Layer
-
Clean surface:
Begin by wiping down your pot with a damp cloth to remove any dust or oils. Let it dry completely, as trapped moisture can cause bubbling later. -
Initial measurement:
Measure the total height of your pot. Divide this number by three to determine the approximate height for each of your colored bands. -
Paint bottom section:
Since the bottom third is the darkest color, paint the lower section with the Terracotta/Rust paint. Don’t worry about a perfect top line yet; just ensure you cover slightly more than the bottom third of the pot. -
Dry time:
Allow the bottom layer to dry fully. This usually takes about 20-30 minutes, depending on the thickness of your paint.
Crisp Line Secret
Before painting your stripe color, brush a tiny amount of the *base* color over the tape edge first. This seals the tape so your new color won’t bleed under.
Step 2: Masking & Middle Stripe
-
Mask the bottom:
Once the rust paint is bone dry, use a ruler to mark your first division line. Apply a strip of painter’s tape horizontally around the pot, covering the top edge of your rust paint to create a crisp line. -
Seal the tape:
I like to run my fingernail or a credit card firmly along the edge of the tape to prevent paint bleed. -
Apply middle color:
Paint the middle section with your Off-White/Cream paint. Extend this color slightly higher than where you want the final top band to start. -
Second coat:
Lighter colors often need two coats for opacity. Apply a second layer of cream paint if the underlying pot color is showing through. -
Dry thoroughly:
Wait for the cream section to dry completely. This step is crucial because applying tape to wet paint will ruin your finish.
Step 3: Top Stripe & Finishing
-
Mask the middle:
Measure up from your first line to mark the start of the top section. Apply a new strip of painter’s tape over the cream paint to define the bottom edge of the top band. -
Protect the inside:
If you want a clean rim, apply a small strip of tape just inside the lip of the pot. -
Paint top section:
Apply the Muted Peach/Blush paint to the top third of the pot using your flat brush. Use long, horizontal strokes to minimize texture. -
Remove tape:
Here is the satisfying part. Carefully peel off all strips of painter’s tape while the top paint is still slightly tacky to avoid chipping. -
Touch ups:
Inspect your lines. If any paint bled under the tape, use a small detail brush or a toothpick to gently scrape or paint over the error. -
Seal the project:
Take the pot to a well-ventilated area. Spray it with a matte clear sealant to protect the paint from water damage and UV fading. -
Final cure:
Let the sealant cure for at least 24 hours before adding soil and your plants.
Textured Finish
Mix a teaspoon of baking soda into your acrylic paints before applying. This creates a grainy, ceramic-like texture that mimics elevated stoneware.
Your stylish new planter is ready to add a soft pop of color to your windowsill or patio table


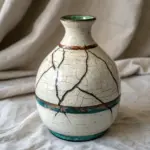
Dip-Dye Ombre Fade
Bring a serene touch to your windowsill with this two-tone ceramic makeover that mimics the meeting of sea and sand. The deep indigo glaze creates a striking contrast against the raw, earthy texture of the base, resulting in a modern yet rustic piece.
Step-by-Step Guide
Materials
- Terracotta or unglazed ceramic pot (clean and dry)
- Deep indigo ceramic glaze or high-gloss craft paint
- Teal or lighter blue glaze/paint (optional for blending)
- Glazing medium (if using acrylics)
- Wide flat paintbrush
- Sponge brush
- Painter’s tape
- Sea sponge (natural)
- Matte sealant spray
- Paper palette
- Water cup
Step 1: Preparation
-
Clean surface:
Ensure your pot is completely free of dust and oils. Wipe it down with a damp cloth and let it dry fully, as moisture can trap bubbles under the paint. -
Tape the boundary:
Apply a strip of painter’s tape horizontally around the pot, dividing it roughly into thirds. Position the tape so that the bottom third remains exposed; this will stay unpainted. -
Seal the edge:
Press the tape edge down firmly with your fingernail. This is crucial for getting a crisp line, though we will eventually soften it for that ombre effect.
Sponge Technique
Always wet your sea sponge and wring it out fully before dipping in paint. A dry sponge absorbs too much paint and creates blobs rather than a mist.
Step 2: Painting the Base Coat
-
Apply the dark blue:
Load your wide flat brush with the deep indigo paint. If you are using acrylics, mix in a little glazing medium to extend the drying time and increase transparency. -
Cover the top section:
Paint the top two-thirds of the pot, covering everything from the rim down to the tape line. Don’t worry about being perfect near the bottom edge yet. -
Inner rim:
Don’t forget to paint the inside rim of the pot creating a finished look, stopping about an inch down where the soil line will be. -
Second coat:
Once the first layer is touch-dry, apply a second coat of indigo to ensure a rich, opaque color at the very top.
Step 3: Creating the Ombre Fade
-
Remove the tape:
Carefully peel off the painter’s tape while the paint is still slightly tacky. You will have a sharp line that separates the blue from the raw base. -
Prepare the transition color:
Mix a small amount of your deep blue with a tiny drop of white or teal, or dilute it significantly with water to create a wash. -
Soften the edge:
dampen a natural sea sponge. Dip just the tip into your lighter mixture and gently dab along the hard paint line. -
Blend downward:
Work carefully, dragging the color slightly downwards onto the raw ceramic, but only by a few millimeters. The goal is to break the hard line, not paint the bottom. -
Feather the transition:
Use a clean, slightly damp brush to lightly sweep horizontal strokes right over the transition area. This blurs the sponge marks into a smooth fade. -
Check density:
Step back and look at the fade. If the blue looks too solid near the transition, dab it with a clean, wet sponge to lift some pigment away, revealing the lighter tones.
Speckled Texture
Flick a toothbrush dipped in diluted black or brown paint over the finished dry pot to create faux ceramic speckles before sealing.
Step 4: Finishing Touches
-
Dry thoroughly:
Allow the pot to dry completely. If you used heavy ceramic glaze, this might take overnight. -
Distress (Optional):
For a more weathered look, take a fine-grit sandpaper and very lightly scuff the transition area. This brings back some of the gritty texture of the pot. -
Seal the deal:
Spray the entire exterior with a matte sealant. This protects the unglazed portion from water stains and locks in your paint job. -
Pot your plant:
Add your gravel and potting soil carefully so you don’t dirty the raw ceramic bottom, then nestle in your succulent.
Now you have a stunning custom coastal planter perfectly suited for your favorite succulent


Easy Geometric Tape Patterns
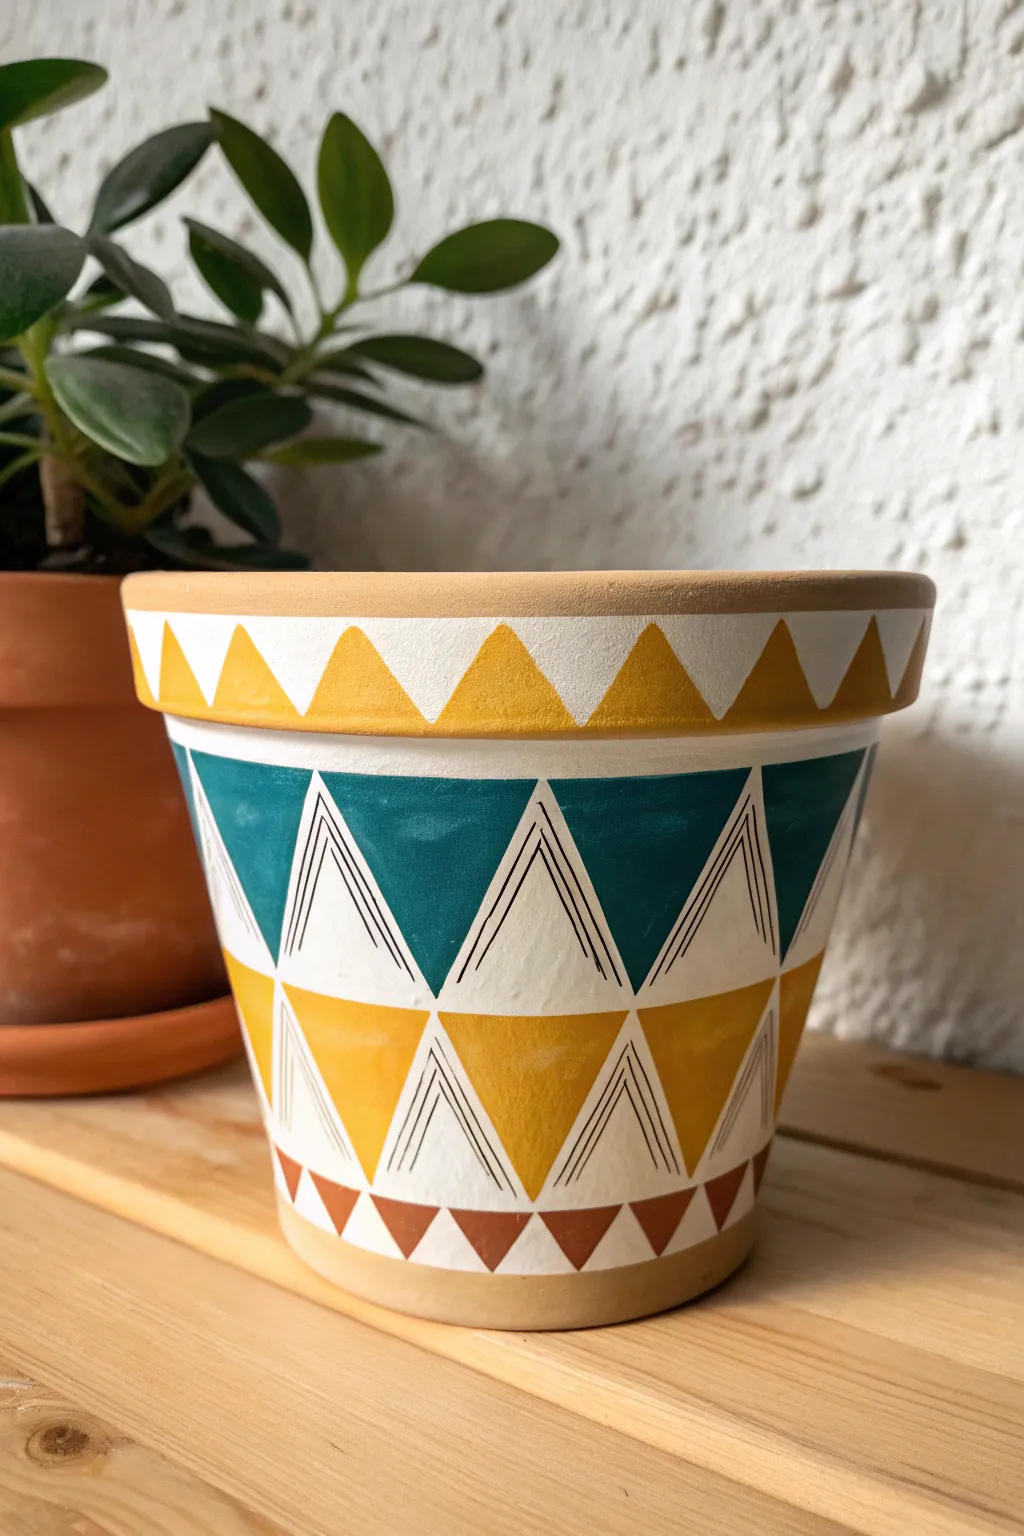
Transform a plain clay planter into a stylish accent piece using bold triangles and crisp lines. The combination of mustard yellow, teal, and rust orange creates a warm, modern aesthetic that looks deceptively intricate.
How-To Guide
Materials
- Clean terracotta pot (standard size)
- Painter’s tape or dedicated masking tape (various widths if available)
- Acrylic paints: White, Mustard Yellow, Teal/Deep Turquoise, Rust/Burnt Sienna
- Pencil
- Ruler or flexible measuring tape
- Fine-point black permanent marker or liner pen
- Paintbrushes: 1 medium flat, 1 small round detail brush
- Clear acrylic sealer (matte or satin spray)
Step 1: Preparation & Base Coat
-
Prep the surface:
Ensure your terracotta pot is completely clean and dry. If it’s an old pot, scrub off any salt deposits or dirt. For a new pot, give it a quick wipe to remove dust. -
Paint the background band:
Mix your white acrylic paint with a tiny drop of water to improve flow without losing opacity. Paint a wide band around the middle of the pot, leaving about an inch of raw terracotta at the bottom and the very top rim unpainted. -
Let it dry completely:
Allow this white layer to dry fully. If the terracotta shows through too much, add a second coat for a crisp, bright background.
Step 2: Designing the Rim
-
Mark the rim spacing:
Using your flexible tape measure, measure the circumference of the rim. Divide by an even number to determine the width of your triangles (e.g., every 1.5 inches) and mark these points with a pencil. -
Draft the triangles:
Sketch a zigzag line connecting your marks to form a row of triangles along the rim. -
Paint the yellow accents:
Using your mustard yellow paint and a small flat brush carefully fill in every other triangle pointing upwards. Keep your hand steady to maintain sharp edges. -
Paint the white accents:
Fill the alternating downward-pointing triangles with white paint to match the body of the pot.
Use a Steady Hand
Rest your pinky finger against the dry part of the pot while painting. It acts as a stabilizer, helping you paint straighter edges without relying solely on tape.
Step 3: The Main Geometric Pattern
-
Establish the grid:
Back on the main white band, use your pencil and ruler to lightly mark a horizontal centerline. Then, mark vertical intervals around the pot to define where your large triangle points will land. -
Draft the main zigzags:
Connect your marks to create a large diamond or zigzag pattern. You want a row of large triangles pointing down and an interlocking row pointing up. -
Paint the teal triangles:
Paint the top row of downward-pointing triangles with your teal or deep turquoise paint. Use tape for the edges if you aren’t confident with freehand lines, but peeling tape off a curved surface can be tricky, so I usually prefer a steady hand. -
Paint the mustard triangles:
Paint the bottom row of upward-pointing triangles with mustard yellow, mirroring the placement of the teal ones above. -
Create the white space:
Leave the triangular spaces between the teal and mustard shapes white. These will become your detailed focal points.
Paint Bleeding?
If you use tape and paint bleeds under it, wait for it to fully dry. Then, use a small detail brush with the background color (white) to carefully correct the line.
Step 4: Adding Details & Finishing
-
Draw the interior lines:
Once the paint is bone dry, take your fine-point black marker or liner pen. Inside the white triangles, draw three nested triangles (chevrons) starting from the bottom corners and meeting at the top point. -
Add vertical lines:
Draw three vertical straight lines inside the smaller inner triangle created by your chevron lines, giving it a distinctive geometric look. -
Create the bottom border:
Paint a small row of tiny triangles along the very bottom edge of the white band using rust/burnt sienna paint. These should be much smaller than the rim pattern. -
Fill the gaps:
Fill the alternate spaces in this bottom border with white paint to complete the pattern. -
Clean up:
Check for any stray pencil marks and gently erase them once you are certain the paint is cured. -
Seal the artwork:
Take the pot outdoors and spray it with a clear acrylic sealer. This is crucial for terracotta, as moisture from the plant can eventually bubble the paint from the inside out.
Pop in your favorite succulent or leafy plant to instantly brighten up your shelf or windowsill

The Complete Guide to Pottery Troubleshooting
Uncover the most common ceramic mistakes—from cracking clay to failed glazes—and learn how to fix them fast.
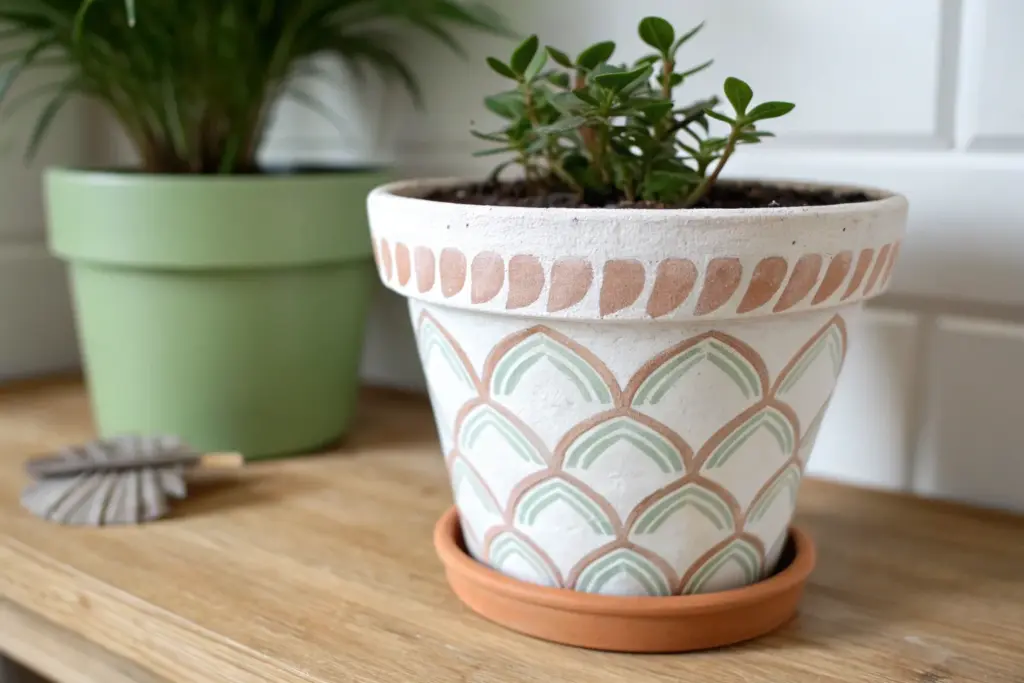
Playful Polka Dots and Spots
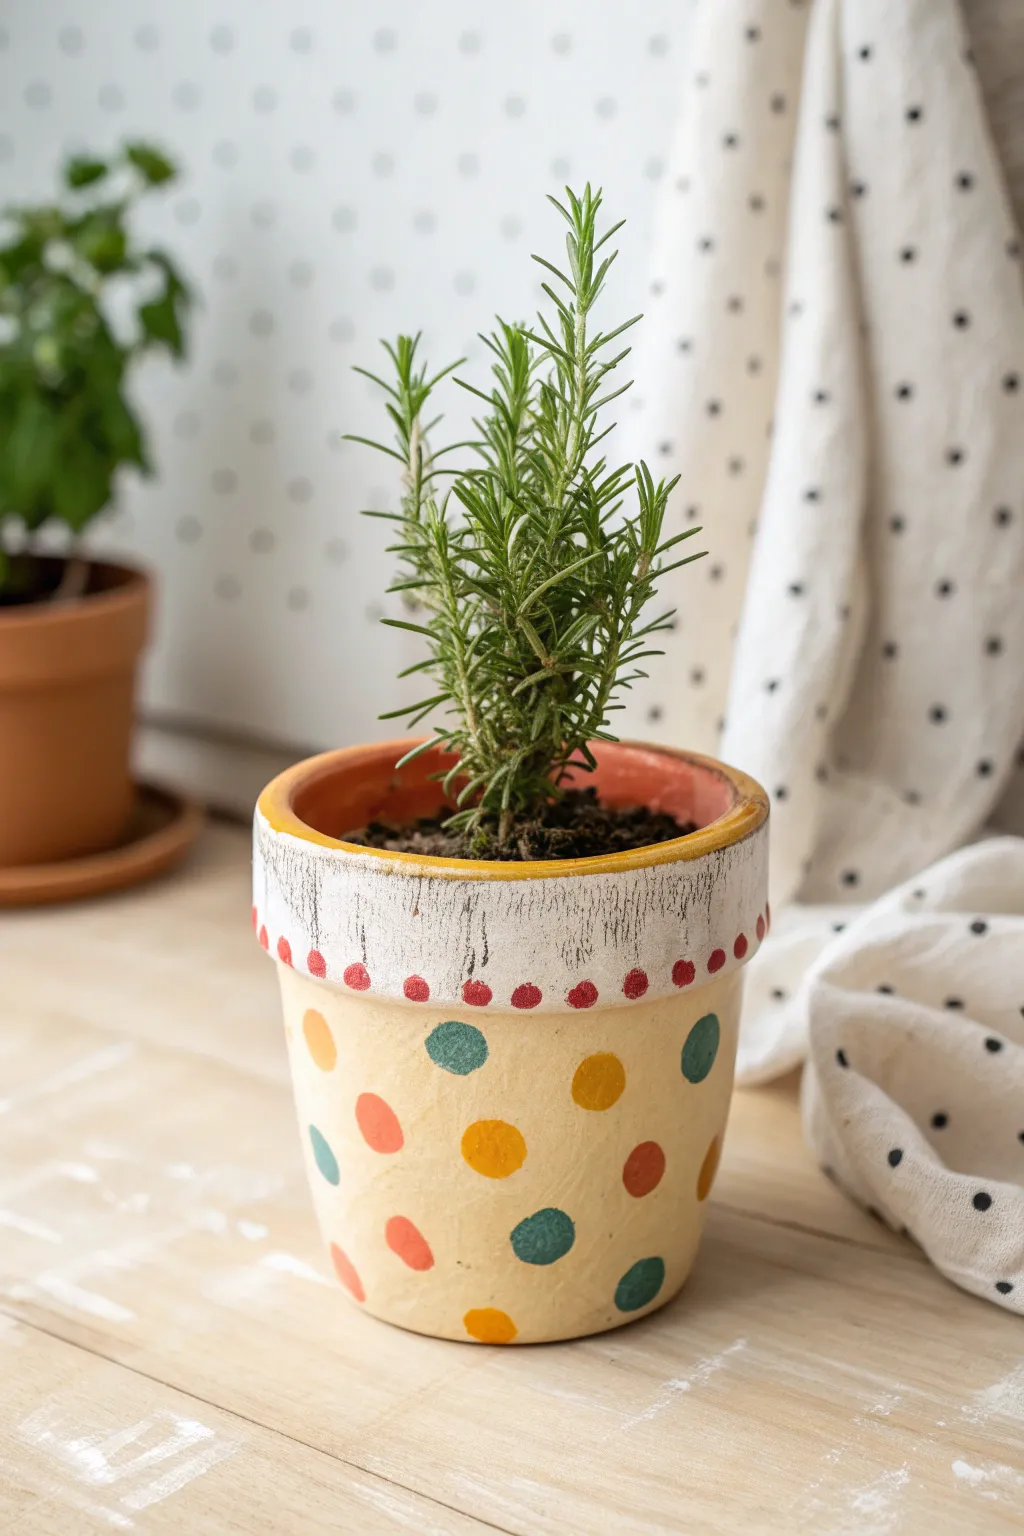
Bring a touch of playful charm to your windowsill with this sunny, polka-dotted flower pot design. The combination of a creamy yellow base, distressed white rim, and colorful spots creates a cheerful home for your favorite herbs like rosemary.
Step-by-Step Guide
Materials
- Terra cotta pot (standard azalea or planter shape)
- Acrylic craft paints: Creamy yellow/beige, white, red, teal, orange, black/dark grey
- Medium flat paintbrush
- Small round paintbrush
- Round sponge pouncers (small size)
- Fine grit sandpaper
- Water cup and paper towels
- Matte clear acrylic sealer spray
Step 1: Base Coating
-
Clean surface:
Begin by wiping down your terra cotta pot with a damp cloth to remove any dust or debris, ensuring a clean surface for the paint to adhere to. -
Paint the base:
Using a medium flat brush, apply a coat of creamy yellow acrylic paint to the main body of the pot, stopping just below the rim. -
Second coat:
Allow the first layer to dry completely, then add a second coat of the cream paint to ensure solid, opaque coverage without streaks. -
Rim base:
Paint the rim of the pot with white acrylic paint. You don’t need to be perfectly neat at the bottom edge, as the next steps will add texture. -
Inside rim:
Extend the white paint or use a contrasting terracotta orange customized mix just inside the top inch of the pot interior for a finished look.
Step 2: Distressing the Rim
-
Dry brushing texture:
Once the white rim is dry, take a nearly dry brush with a tiny amount of black or dark grey paint. Wipe most of the paint off on a paper towel first. -
Applying age lines:
Lightly drag the dry brush vertically down the white rim to create subtle, weathered streaks resembling cracks or age marks. -
Sand for effect:
I like to take a piece of fine-grit sandpaper and gently scuff the white paint on the rim to reveal hints of the terracotta underneath, enhancing the antique vibe.
Perfect Circles Tip
If you don’t have sponge pouncers, use the flat end of a pencil or a cotton swab dipped in paint to stamp perfectly round, uniform dots.
Step 3: Adding the Pattern
-
Polka dot mix:
Prepare your palette with teal, orange, and golden-yellow paint colors for the main body dots. -
Apply teal dots:
Dip a small round sponge pouncer or use a medium round brush to paint teal circles randomly around the cream base. -
Add warm tones:
Clean your brush or switcher pouncers to add equal numbers of orange and golden-yellow dots, spacing them out evenly among the teal ones. -
Detailing the rim:
Switch to a very small round brush and dip it into red acrylic paint. -
Rim border dots:
Carefully paint a creating a row of small, red dots right along the bottom edge of the white rim where it meets the cream body. -
Top rim accents:
Repeat this process along the very top edge of the rim, adding small red dots or a thin line of red to frame the white section perfectly.
Vintage Patina
Mix a tiny drop of brown paint into a glaze medium and wipe it over the dried cream base, then quickly wipe it off for an aged, tea-stained look.
Step 4: Finishing Touches
-
Refining edges:
If any dots look uneven, use a small brush to round them out once the first layer is dry. -
Final dry:
Let the entire pot sit for several hours or overnight to ensure all paint layers are deeply cured. -
Seal protection:
Take the pot to a well-ventilated area and spray it with a clear matte acrylic sealer. This protects the design from water damage during watering.
Pop in your favorite rosemary plant and enjoy the bright, handcrafted feel this pot adds to your space
Clean Stripes Around the Rim
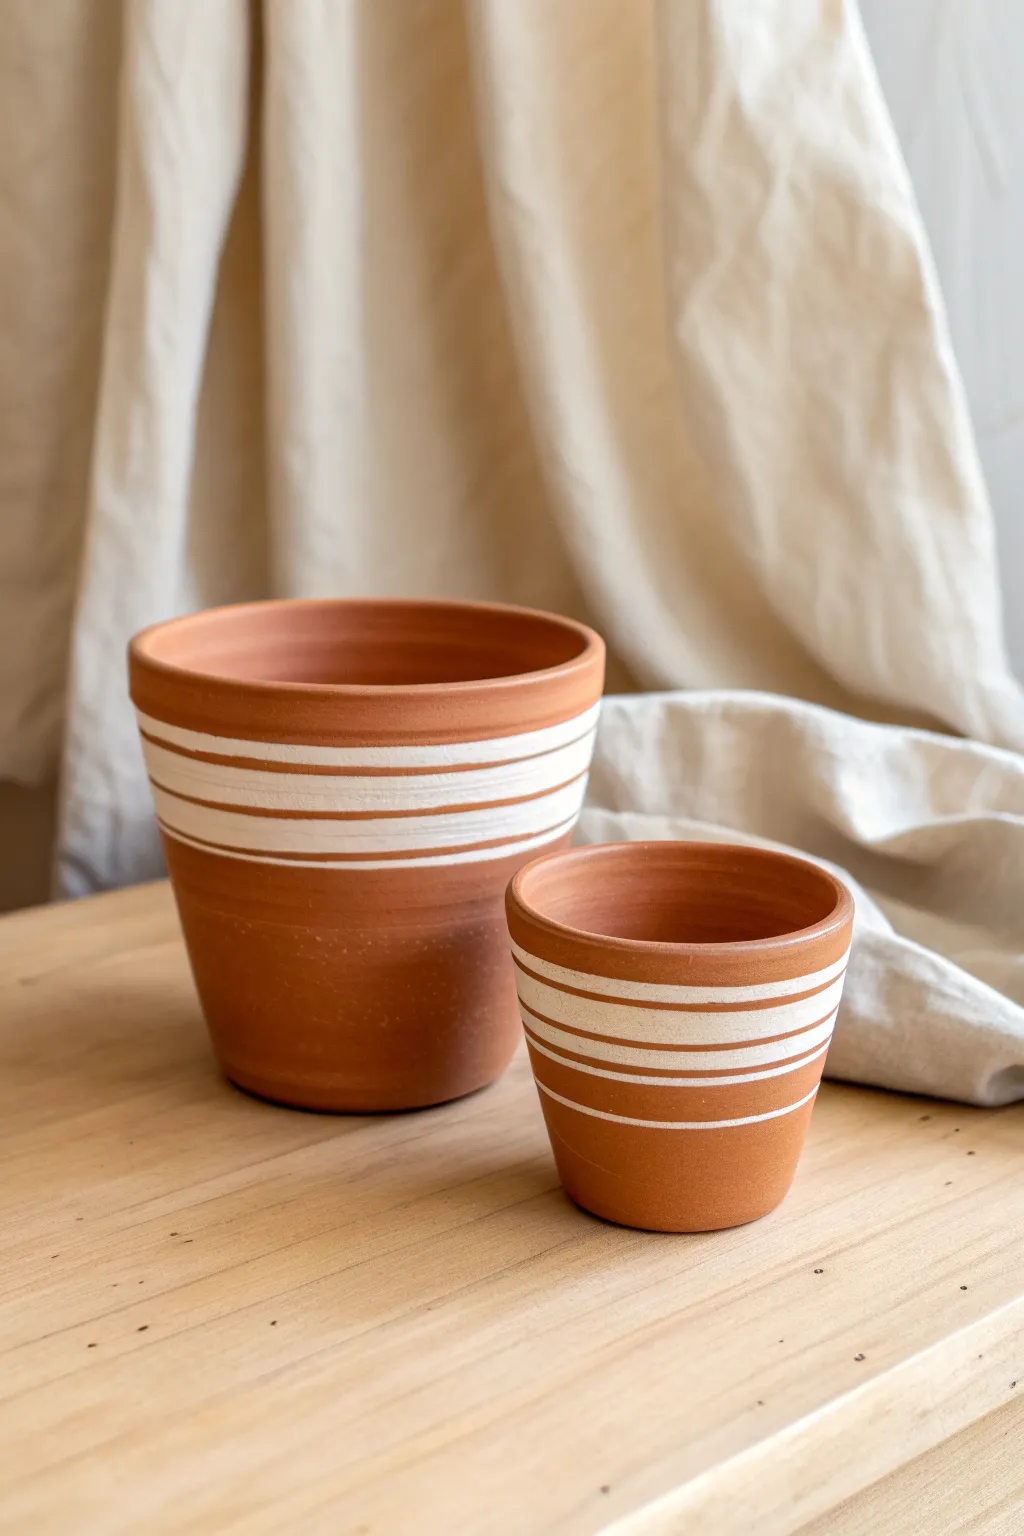
Elevate standard terracotta pots with this crisp and contemporary design featuring banded white stripes. The contrast between the raw, earthy clay and the clean white lines creates a timeless look that fits perfectly in modern or bohemian interiors.
Detailed Instructions
Materials
- Terracotta pots (various sizes)
- White acrylic craft paint (outdoor formula recommended)
- Flat artist brush (medium size)
- Painter’s tape or masking tape (various widths)
- Damp cloth or sponge
- Clear matte sealant spray (optional)
- Small piece of fine-grit sandpaper
Step 1: Preparation
-
Clean the surface:
Begin by thoroughly wiping down your terracotta pots with a damp cloth to remove any dust or loose clay particles. Let them dry completely, as moisture inside the clay will prevent the paint from adhering properly. -
Smooth imperfections:
Check the rim and sides for any rough burrs or bumps. Use a small piece of fine-grit sandpaper to gently smooth these areas, ensuring a nice surface for your stripes.
Seal Tape Edges
Paint a very thin layer of the pot’s base color (or clear matte medium) over the tape edges first. This seals the gap so your white paint won’t bleed underneath.
Step 2: Creating the Design
-
Plan your spacing:
Decide on the pattern of your stripes. The example features a cluster of stripes near the rim, varying in thickness. You can eyeball this for an organic look or use a pencil to mark light guidelines. -
Apply the first tape line:
Using painter’s tape, carefully wrap a strip around the pot about an inch below the rim. Press the edges down firmly with your fingernail to prevent paint bleed. -
Create variable widths:
To achieve the look in the photo, alternate the width of the exposed clay bands. Place a second strip of tape below the first, leaving a narrow gap for a thin white stripe. -
Add wider bands:
Continue taping down the pot. Leave a slightly larger gap for the next stripe to create visual interest. I like to mix very thin pinstripes with slightly bolder lines. -
Seal the tape edges:
A crucial trick is to do a quick pass over the tape edges. You can run a clean, dry finger firmly over every seal to ensure no paint sneaks underneath. -
Tape placement check:
Rotate the pot slowly to ensure your tape lines meet up relatively evenly at the back. Adjust if they start spiraling downwards too much.
Step 3: Painting & Finishing
-
Load your brush:
Dip your flat artist brush into the white acrylic paint. You want enough paint for coverage but not so much that it globs up. -
Apply the first coat:
Paint the exposed clay areas between your tape strips. Use horizontal strokes that follow the direction of the tape. Don’t worry if the coverage looks slightly sheer on the first pass. -
Allow to dry:
Let the first coat dry for about 15-20 minutes. Terracotta absorbs moisture quickly, so this shouldn’t take long. -
Apply the second coat:
Go over the white stripes again for a solid, opaque finish. This second layer ensures the bright white pops against the orange clay. -
Remove tape while damp:
Carefully peel off the painter’s tape while the second coat is still slightly tacky but not wet. Pull slowly at a 45-degree angle to get the crispest lines. -
Touch up edges:
If any paint bled under the tape, use a damp toothpick or a tiny detail brush to gently scrape or paint over the mistake. -
Optional texture:
For a more rustic, hand-thrown feel like the photo, you can lightly sand the painted stripes once fully dry to distress them slightly. -
Seal the design:
If these pots will live outdoors or get wet frequently, spray the entire exterior with a clear matte sealant to protect your handiwork.
Mix Up textures
Instead of plain white paint, mix baking soda into your acrylics for a puffy, ceramic-glaze texture that adds tactile dimension to the stripes.
Now you have a stylish set of custom planters ready to showcase your favorite succulents or herbs


What Really Happens Inside the Kiln
Learn how time and temperature work together inside the kiln to transform clay into durable ceramic.
Botanical Leaf Silhouettes
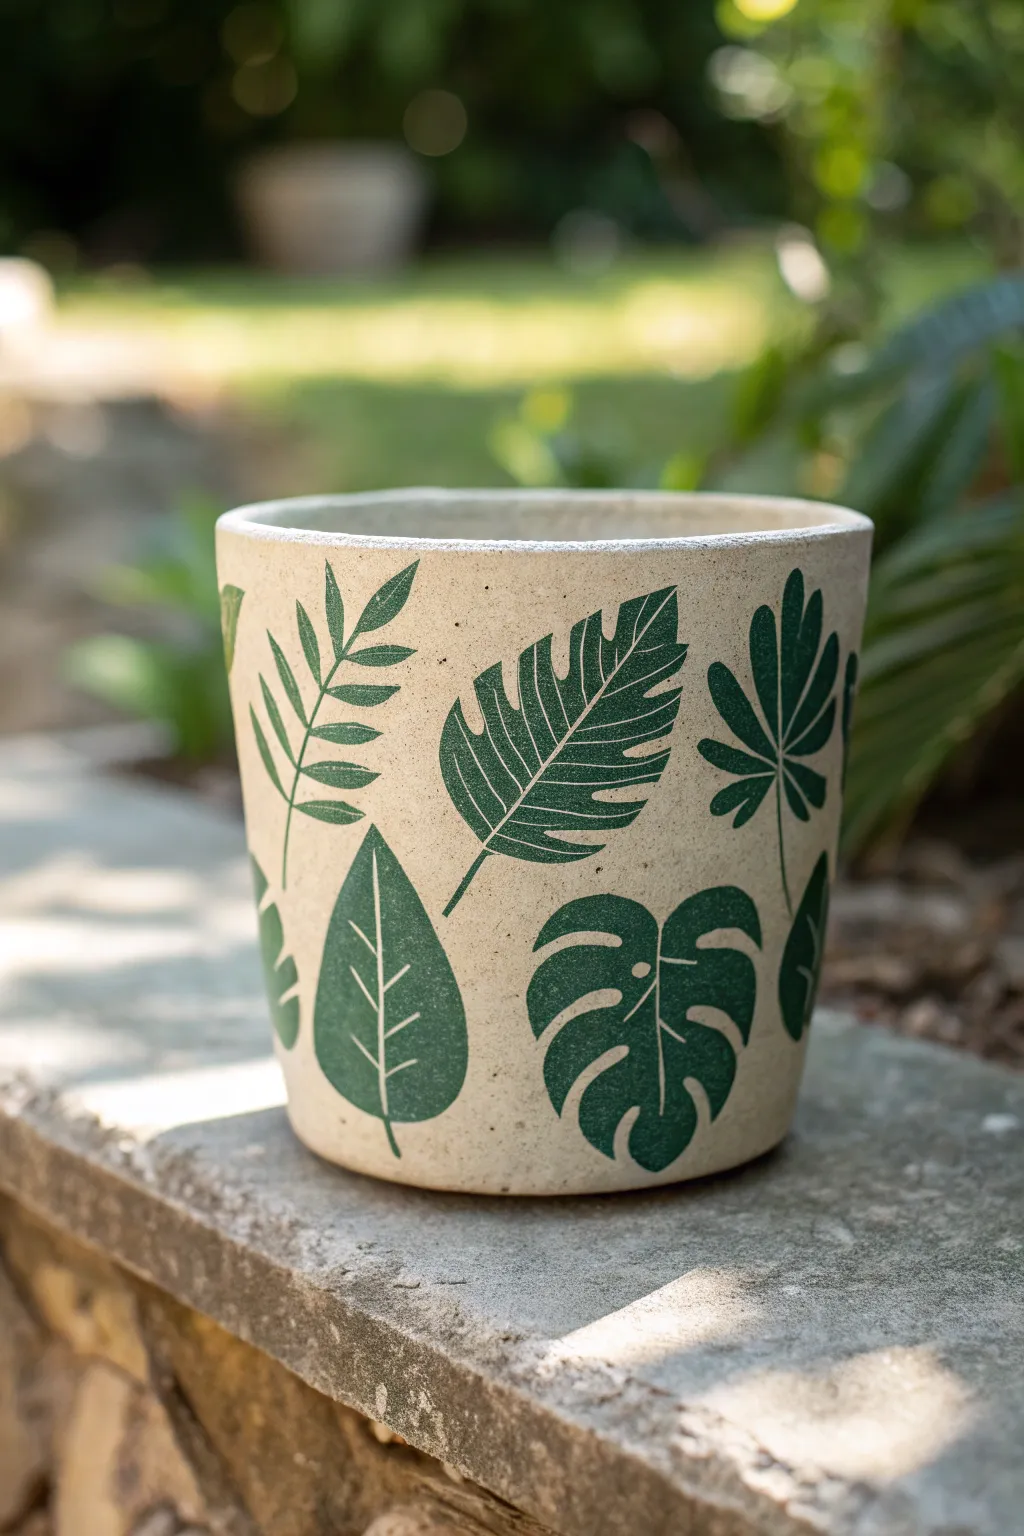
Transform a plain ceramic planter into a modern botanical accent piece with this simple stamping and stenciling project. The cream background creates a lovely contrast against deep green leaf motifs, giving your plant collection a fresh, organic upgrade.
How-To Guide
Materials
- Unfinished ceramic or concrete planter (medium size)
- Cream or off-white chalk paint
- Dark forest green acrylic craft paint
- Leaf stencil set (monstera, palm, fern shapes)
- Small foam pouncer or stencil brush
- Painter’s tape or stencil adhesive spray
- Matte finish spray sealant
- Paper plate or palette
- Paper towels
Step 1: Preparation & Base Coat
-
Clean surface:
Begin by wiping down your planter with a damp cloth to remove any dust or oils. If the pot was previously used, ensure it is completely dry and scrubbed clean. A clean surface is crucial for the paint to adhere properly. -
Apply base color:
Using a wide brush or foam roller, apply a coat of cream or off-white chalk paint to the entire exterior of the pot. Chalk paint works beautifully here because it creates that matte, slightly textured finish seen in the photo. -
Dry and repeat:
Allow the first coat to dry completely, which usually takes about 30 to 60 minutes. Apply a second coat to ensure full, opaque coverage so no terracotta or concrete color peeks through. -
Cure the base:
Let the base coat cure fully for at least a few hours. If the paint feels cool to the touch, it still has moisture trapped inside, so give it a bit more time.
Step 2: Stenciling the Leaves
-
Plan your layout:
Before painting, hold your stencils against the pot to visualize the arrangement. Aim for a mix of different leaf shapes—like ferns, monsteras, and broad tropical leaves—spaced evenly around the circumference. -
Adhere the first stencil:
Select your first leaf design. Spray the back lightly with stencil adhesive or secure the edges with painter’s tape. Position it flat against the curve of the pot to prevent paint from sneaking underneath. -
Load the paint:
Pour a small amount of forest green acrylic paint onto your paper plate. Dip your foam pouncer into the paint. -
Offload excess paint:
This is the most critical step: dab the pouncer onto a paper towel until it is almost ‘dry.’ I find that using too much paint leads to messy edges, so really work that excess off. -
Apply the green:
Using a straight up-and-down dabbing motion (do not brush side-to-side), apply the green paint through the stencil. Build the color up slowly with light tapping layers rather than one heavy, wet glob. -
Remove stencil:
While the paint is still slightly tacky but not wet, carefully peel the stencil away from the pot surface. Lift it straight up rather than dragging it to keep the edges crisp. -
Clean and rotate:
Wipe your stencil clean or grab a different leaf design. Rotate the pot slightly to find the next open space. Vary the height and angle of the leaves to make the pattern look organic and natural. -
Continue the pattern:
Repeat the stenciling process around the entire pot. Be mindful not to smudge the previously painted leaves; you might need to take a break halfway through to let the first batch dry. -
Add partial leaves:
To make the pattern look continuous, stencil a few partial leaves near the top rim or bottom edge, as if the pattern is wrapping around the object.
Clean Stencils = Clean Lines
Wipe stencils immediately after each use with a baby wipe. Buildup on the stencil edges creates ridges that ruin the crisp silhouette effect.
Step 3: Finishing Touches
-
Touch up errors:
Once the green paint is dry, inspect your work. If any green paint bled under the stencil, use a tiny detailed brush dipped in your cream base color to carefully paint over the mistake. -
Add detail lines:
The image shows thin, crisp veins on the leaves. If your stencil wasn’t detailed enough, you can use a very fine liner brush and the cream paint to manually add or sharpen the vein lines on top of the green leaves. -
Final dry time:
Let the leaf designs dry completely, ideally overnight, to ensure the acrylic paint hardens fully. -
Seal the pot:
Take the pot to a well-ventilated area. Apply two light coats of matte finish spray sealant. This protects your artwork from water drips when you water your plants later.
Paint Bleeding?
Paint usually bleeds because the brush is too wet. Offload 90% of the paint onto paper towel before touching the stencil. It should feel almost dry.
Now your custom botanical planter is ready to home your favorite greenery
Cute Expression and Character Pots
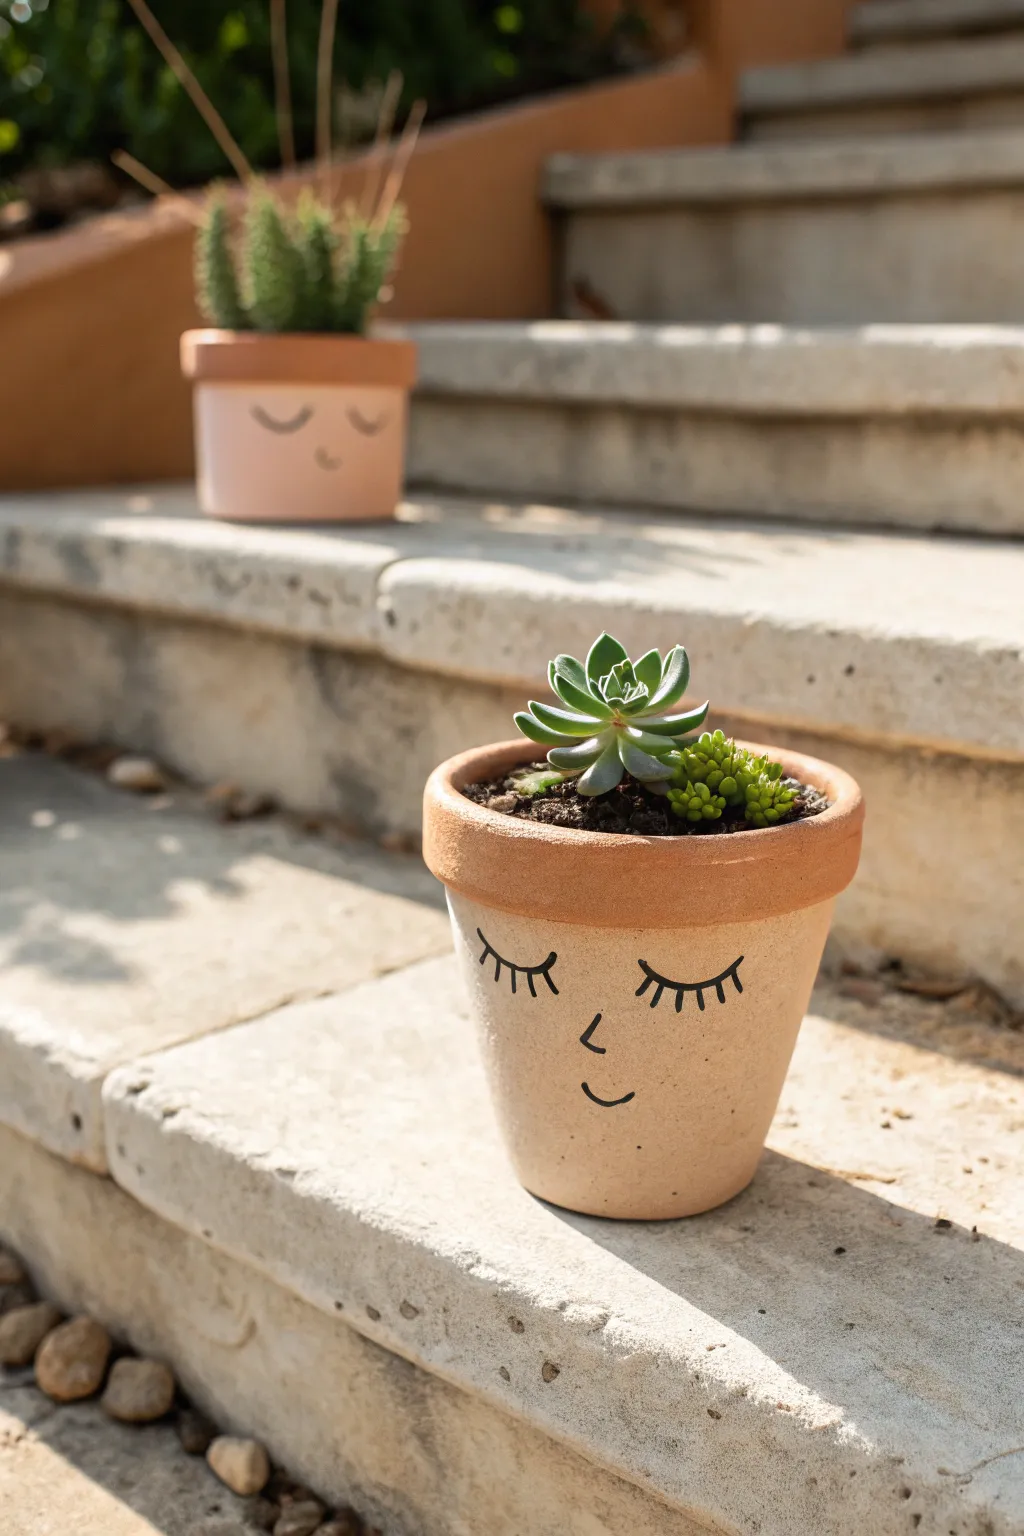
Transform ordinary terracotta pots into charming characters with nothing more than a bit of paint and a steady hand. These sweet, sleepy faces add a touch of whimsy to your succulents and bring a calm, restful vibe to any garden corner.
How-To Guide
Materials
- Small terracotta pots (4 inch diameter)
- Acrylic paint (Light beige/Skin tone)
- Black acrylic paint or a black paint pen (fine tip)
- Flat paintbrush (medium size)
- Fine detail paintbrush (if painting faces by hand)
- Clear matte sealant spray
- Pencil
- Eraser
- Paper towel or cloth
- Water cup
Step 1: Base Preparation
-
Clean the surface:
Begin by wiping down your terracotta pots with a damp cloth to remove any dust or debris from the store shelves. Let them dry completely before applying any paint. -
Define the painting area:
Decide where you want the face color to stop. For the look in the photo, you’ll leave the rugged rim of the pot in its natural terracotta state and only paint the body below it. -
Apply the first coat:
Load your flat brush with the light beige acrylic paint. Apply a smooth, even coat to the body of the pot, painting horizontally around the circumference. Be careful to cut a clean line right under the rim. -
Let it dry:
Allow the first layer to dry for about 15-20 minutes. Terracotta absorbs moisture quickly, so the paint might dry faster than usual, but don’t rush it. -
Apply the second coat:
Once the first layer is dry to the touch, apply a second coat of beige paint to ensure solid opacity. Make sure no orange clay shows through the streaks. I find two coats is usually perfect for this look. -
Touch up the edges:
Inspect the line where the paint meets the unpainted rim. If it looks uneven, carefully use a small brush to tidy up the edge for a crisp finish.
Clean Lines Secret
For a perfectly crisp line under the rim, wrap masking tape or painters tape around the pot just under the lip before you start painting the base color.
Step 2: Creating the Character
-
Sketch the face:
Using a pencil, very lightly sketch the facial features onto the dried beige paint. Draw two curved lines for closed eyes, add vertical dashes for eyelashes, a small ‘L’ shape for the nose, and a simple curve for the smile. -
Check placement:
Step back and look at your pencil marks. Ensure the features are centered and symmetrical. The eyes should be about a third of the way down from the rim to give it that cute proportions. -
Prepare the black paint:
If using a brush, thin your black acrylic paint slightly with a drop of water to help it flow smoothly for line work. If using a paint pen, shake it well and test the flow on a scrap piece of paper first. -
Paint the eyes:
Trace over your pencil lines for the eyelids first. Use confident, sweeping strokes to avoid shaky lines. If using a brush, use the very tip to keep the line thin. -
Add the lashes:
Add the vertical eyelashes. In the reference, they are straight lines extending downward from the eyelid curve. Keep them evenly spaced. -
Draw the nose:
Paint the small ‘L’ shape for the nose. Keep it minimal; a tiny suggestion of a nose often looks cuter than a detailed one. -
Finish the smile:
Trace the smile line at the bottom. Make sure the curve is gentle to maintain the peaceful, sleepy expression. -
Clean up sketch marks:
Once the black paint is 100% dry (give it at least an hour), gently erase any visible pencil marks that weren’t covered by the paint.
Step 3: Finishing Touches
-
Seal the artwork:
Take the pots to a well-ventilated area. Apply a light coat of clear matte sealant spray over the painted area. This protects the face from water damage when you water your plants. -
Pot your plants:
Once the sealer is dry, fill your new character pot with cactus soil and your favorite succulent to complete the hairstyle.
Shaky Hands?
If you struggle with fine brush details, skipped the brush entirely and use a permanent waterproof marker or oil-based paint pen for the facial features.
Now you have a serene little companion ready to brighten up your porch steps or windowsill

TRACK YOUR CERAMIC JOURNEY
Capture glaze tests, firing details, and creative progress—all in one simple printable. Make your projects easier to repeat and improve.
Sun, Moon, and Star Motifs

Bring the magic of the night sky into your home with this stunning deep blue planter featuring hand-painted golden celestial bodies. The contrast between the rich matte navy background and the shimmering metallic gold creates a mystical, high-end look that transforms a simple terracotta pot.
Step-by-Step
Materials
- Terracotta or ceramic flower pot (cleaned and dried)
- Deep navy blue acrylic paint (matte finish)
- Metallic gold acrylic paint or gold leaf pen
- Wide flat paintbrush
- Fine detail paintbrush (sizes 0/0 and 1)
- Pencil
- Ruler or measuring tape
- Matte spray sealer or varnish
- Painter’s tape or a rubber band (optional)
- Small mixing palette
Step 1: Preparing the Base
-
Clean the pot:
Ensure your terracotta or ceramic pot is completely free of dust or grease. Give it a quick wipe with a damp cloth and let it dry fully before starting. -
Apply base coat:
Using a wide flat brush, apply your deep navy blue acrylic paint to the exterior of the pot. Don’t forget to paint about an inch down the inside rim for a finished look. -
Let it dry:
Allow the first coat to dry completely. This usually takes about 20-30 minutes, depending on your paint brand. -
Apply second coat:
Paint a second layer of navy blue to ensure a rich, opaque finish with no terracotta showing through. -
Final drying:
Let the base color cure fully for at least an hour. The surface needs to be perfectly dry so your pencil marks won’t scratch the paint.
Step 2: Planning the Design
-
Mark the horizon line:
Measure about one-third of the way up from the bottom of the pot. Lightly mark points around the circumference. -
Outline the divider:
Connect your marks to create a faint pencil line circling the entire pot. You can use a stretched rubber band as a guide to keep this line straight. -
Sketch the major elements:
In the top section, lightly sketch a large crescent moon shape. I find it helpful to draw the outer curve first, then the inner curve to get the proportions right. -
Add secondary motifs:
In the bottom section, sketch a central sunburst motif directly below the moon, and smaller starbursts spaced evenly around the band. -
Fill in the stars:
In the open spaces of the top section, draw small four-pointed stars and tiny dots to represent distant constellations.
Fixing Wobbly Lines
If your gold lines get messy, wait for them to dry completely. Then, use a small brush with the navy base color to carefully “cut in” and sharpen the edges again.
Step 3: Painting the Gold Details
-
Paint the divider line:
Load your fine detail brush (size 1) with metallic gold paint. Carefully trace the horizontal line separating the top and bottom sections. -
Fill the moon:
Paint the crescent moon shape gold. You might need two layers of gold to make it really opaque against the dark blue. -
Detail the moon:
Once the gold moon base is dry, use a very fine point or a tiny dotting tool to add subtle texture dots in a darker tone or simply leave it smooth. -
Paint the sunburst:
Paint the solid circle for the sun in the bottom section. Add the rays extending outward, alternating between longer and shorter strokes. -
Add the stars:
Using your smallest brush (0/0), paint the four-pointed stars in the upper sky section. Create sharp points by lifting the brush pressure at the end of each stroke. -
Outline stars:
For the hollow stars on the bottom band, carefully outline the star shape with thin gold lines without filling in the center. -
Add star dust:
Dip the tip of a toothpick or the handle end of a brush into gold paint to dot tiny speckles between the larger stars for a magical effect. -
Clean up sketch lines:
If any pencil marks are still visible after the gold dries, very gently erase them with a soft eraser. -
Seal the artwork:
Finish by spraying the entire pot with a clear matte sealer. This protects your design from water drips and fading over time.
Add Crystal Magic
Before sealing, glue tiny flat-back Swarovski crystals or faux rhinestones to the center of the stars for a planter that truly sparkles in the sunlight.
Place your favorite leafy plant inside to create a beautiful contrast against the celestial navy backdrop
Speckled Terrazzo-Style Finish
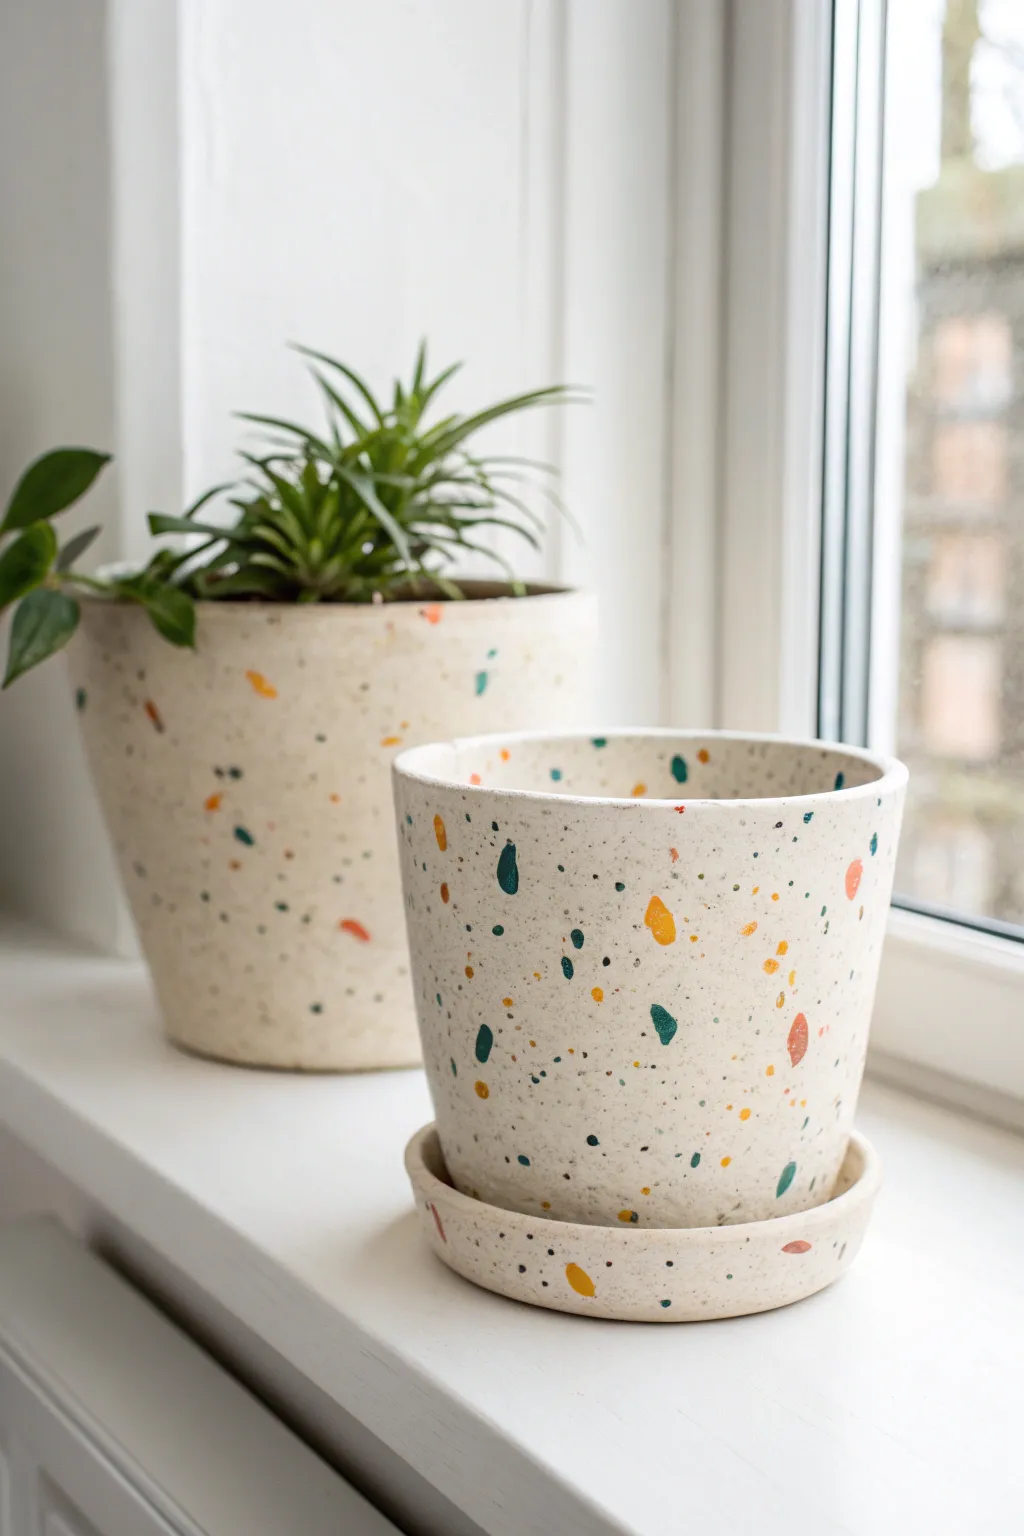
Bring a trendy, modern touch to your windowsill with these delightful faux terrazzo planters. By simply painting playful speckles over a creamy base, you can achieve the high-end look of stone composite without the weight or price tag.
Detailed Instructions
Materials
- Terracotta pots (with saucers)
- White acrylic primer or gesso
- Cream or off-white acrylic paint (matte finish)
- Teal acrylic paint
- Mustard yellow acrylic paint
- Burnt orange acrylic paint
- Black or dark grey acrylic paint
- Flat paintbrush (medium size)
- Small round paintbrush (size 2-4)
- Palette or paper plate
- Matte spray sealer or varnish
Step 1: Base Preparation
-
Clean and Dry:
Begin by thoroughly cleaning your terracotta pots to remove any dust or debris. Wipe them down with a damp cloth and allow them to dry completely. -
Prime the Surface:
Apply a solid coat of white primer or gesso to the exterior of the pot and the saucer. This prevents the porous terracotta from soaking up your colored paint. -
Base Coat Application:
Once the primer is dry, paint the entire exterior surface with your creamy, off-white acrylic paint. Use long, even strokes to minimize brush marks. -
Second Coat:
Let the first coat dry for about 20 minutes, then apply a second layer of the cream paint to ensure fully opaque coverage. Don’t forget the inside rim of the pot, as this will be visible even when filled with soil.
Step 2: Creating the Terrazzo Effect
-
Plan Your Palette:
Squeeze small amounts of teal, mustard yellow, burnt orange, and black paint onto your palette. I like to keep the blobs separate so the colors stay clean. -
Start with Teal Shapes:
Using your small round brush, paint random teal shapes onto the pot. Think ‘imperfect ovals’ or soft triangles rather than perfect dots. Space them out generously. -
Vary sizes:
Make some teal marks slightly larger and others tiny. This variation creates a more convincing stone aggregate look. -
Add Orange Accents:
Clean your brush and switch to the burnt orange paint. Fill in some of the empty spaces with orange shapes, keeping the distribution random but balanced. -
Introduce Yellow:
Repeat the process with the mustard yellow paint. Try to avoid placing two shapes of the same color right next to each other. -
Create Depth:
Allow the larger color shapes to dry slightly. If some look too translucent, quickly dab a second layer of paint over just those spots. -
Apply Black Specs:
Dip the very tip of your brush into black or dark grey paint. Add tiny specks and dots in the remaining negative spaces. These small dark marks act as the ‘grit’ in the terrazzo pattern. -
Check the Spacing:
Step back and look at the pot from a distance. If you see any large empty cream areas, fill them in with a small dot of whatever color is least represented in that spot. -
Paint the Saucer:
Don’t forget to repeat the exact same pattern on the outer rim of the saucer to create a matching set.
Natural Stone Look
Avoid perfect circles! When painting your speckles, wobble your brush slightly to create irregular, jagged edges. This mimics the look of crushed stone chips far better than round polka dots.
Step 3: Finishing Up
-
Full Cure:
Let your beautifully speckled pots sit for at least 24 hours to ensure the paint is fully cured and hardened. -
Sealing:
Ideally, take the pots outside or to a well-ventilated area. Spray the exterior with a clear matte sealer to protect your design from water drips and fading. -
Second Seal:
Apply a second light coat of sealer for extra durability, especially if these pots will be handled frequently.
Bubbling Paint?
If the paint bubbles on the terracotta, the pot might still have moisture inside. Let the raw pot dry in the sun for an hour before priming to ensure all trapped water has evaporated.
Now you have a chic, custom planter ready to display your favorite greenery
Abstract Brushstroke Color Swatches
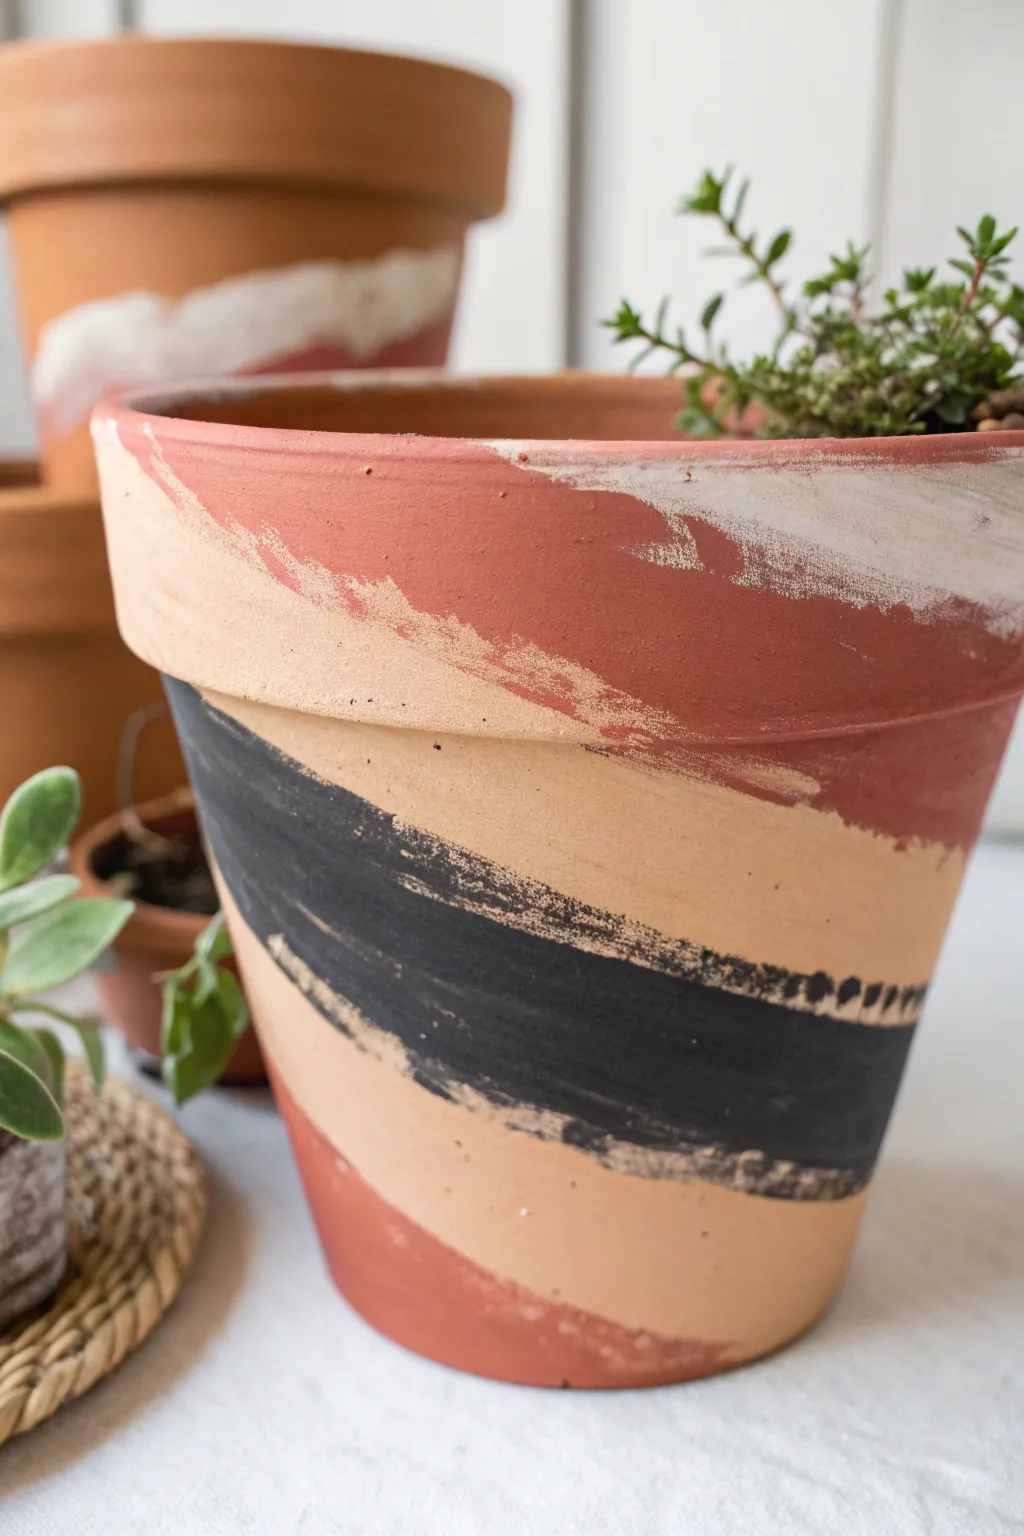
Transform a plain clay planter into a piece of modern art with this simple abstract painting technique. The design embraces the natural warmth of terracotta by leaving negative space, while bold swathes of black, white, and earthy red create a striking, organic pattern.
Step-by-Step
Materials
- Terracotta pots (cleaned and dry)
- Acrylic craft paints (White, Black, Burnt Sienna/Terracotta Red)
- Flat bristle brushes (1 inch width works well)
- Paper plate or palette
- Paper towels
- Water cup
- Clear matte sealer spray (optional)
Step 1: Preparation & Planning
-
Clean surface:
Begin with a clean, dry terracotta pot. If you are reusing an old pot, scrub it thoroughly to remove dirt and salt deposits, then let it dry completely overnight. -
Protect workspace:
Lay down newspaper or a drop cloth to protect your table from paint splatters. -
Load palette:
Squeeze a generous amount of white, black, and burnt sienna paint onto your palette.
Step 2: Painting the Abstract Shapes
-
First white stroke:
Dip your flat brush into the white paint. Offload a little excess paint onto a paper towel if the brush is too gloopy; you want a semi-dry texture. -
Apply white rim detail:
Starting near the top rim, drag the brush horizontally across the clay. Allow the bristles to separate slightly at the end of the stroke to create a ragged, feathered edge. -
Second white layer:
If the white looks too sheer against the orange clay, wait a few minutes and add a second pass over the main part of the stroke to brighten it up. -
Switch to burnt sienna:
Clean your brush thoroughly or switch to a fresh one. Pick up the burnt sienna or terracotta-red paint. -
Create main color block:
Paint a broad, sweeping stroke that intersects or sits just below your white stroke. I like to angle this one slightly downward to give the design some movement. -
Dry brush texture:
As you near the end of the red stroke, lift pressure off the brush so the paint drags across the texture of the clay, leaving little gaps of the original pot color showing through. -
Add black accent:
Once the first two colors are touch-dry (about 5-10 minutes), load a brush with black paint. This will be the boldest element. -
Paint the black stripe:
Place a thick, confident diagonal stroke lower down on the pot. Don’t worry about perfect edges; the charm is in the painterly look. -
Feather the edges:
Use the very tip of a drier brush to feather out the edges of the black paint, mimicking the texture you created with the other colors.
Paint Too Opaque?
If your strokes look solid and blocky rather than textured, your brush is too wet. Dab it firmly on a paper towel before painting to remove moisture and excess pigment.
Step 3: Finishing Touches
-
Review negative space:
Step back and look at the pot. Ensure you have left enough original terracotta showing between the strokes to balance the colors. -
Clean rim:
If any paint accidentally smudged onto the very top lip or inside of the pot where you didn’t want it, wipe it away quickly with a damp cloth. -
Dry time:
Allow the paint to cure fully for at least an hour. -
Sealing (Optional):
To protect your design from water damage when watering plants, spray the exterior with a clear matte acrylic sealer.
Use Chalk Paint
For an ultra-matte, velvety finish that adheres brilliantly to clay, swap standard acrylics for chalk-style paints. They dry faster and layer beautifully.
Now you have a stylish home for your succulents that looks like it came straight from a boutique studio
Paint Drips for a Glazed Look
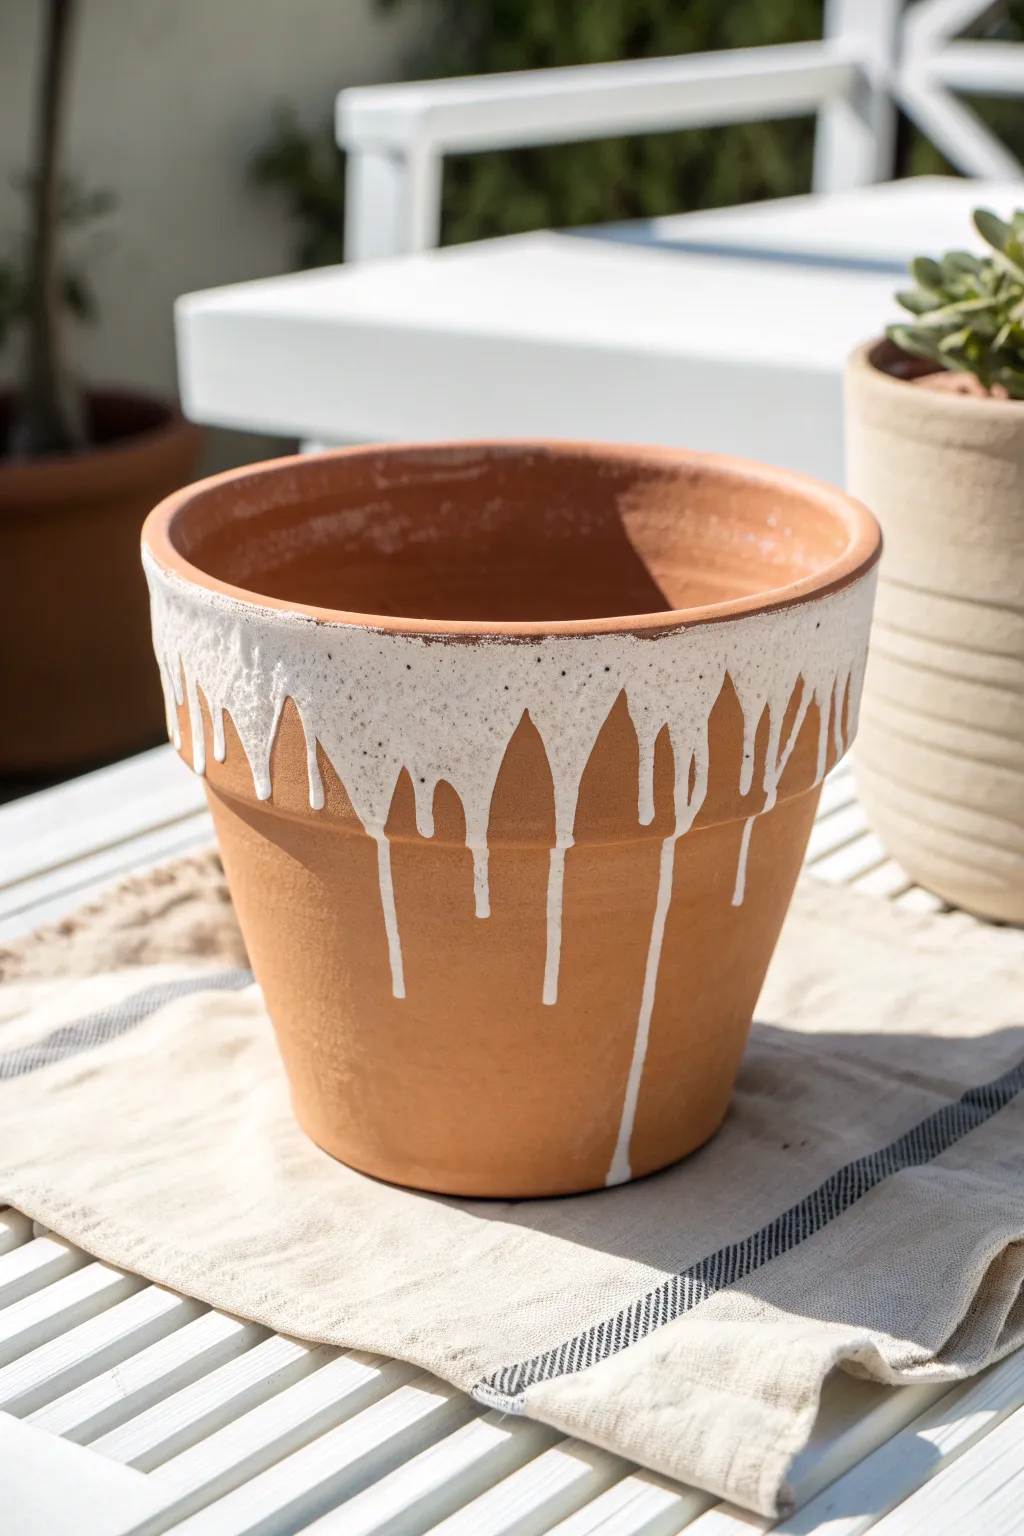
Transform a standard terracotta planter into a chic, ceramic-inspired piece using a simple pour technique. This method captures the organic beauty of thick, dripping pottery glaze without the need for a kiln or expensive finishes.
Detailed Instructions
Materials
- Terracotta pot (clean and dry)
- White acrylic paint (heavy body works best)
- Pouring medium or water (to thin paint)
- Small mixing cup
- Stir stick
- Protective workspace covering (plastic sheet or cardboard)
- Small cup or jar (to elevate the pot)
Step 1: Preparation
-
Clean surface:
Ensure your terracotta pot is completely clean and dry. Any dust or dirt will prevent the paint from adhering properly, so give it a quick wipe with a damp cloth if it’s been sitting in storage. -
Set up workspace:
Cover your work area with plastic or cardboard as this project will get messy. You need a dedicated spot where drips can fall freely without ruining your table. -
Elevate the pot:
Place a small cup, jar, or can upside down on your work surface. Balance the terracotta pot upside down on top of this stand. -
Check clearance:
Make sure the rim of the pot is floating a few inches above the table surface so the paint drips don’t pool at the bottom and stick the pot to the protective sheet.
Step 2: Mixture
-
Pour paint:
Squeeze a generous amount of heavy body white acrylic paint into your mixing cup. -
Add thinner:
Add a small amount of pouring medium to the paint. If you don’t have medium, water works too, but add it very slowly. -
Mix consistency:
Stir well until the texture resembles warm honey or pancake batter. You want it fluid enough to run, but thick enough to hold its shape. -
Test the flow:
Lift your stir stick; the paint should run off in a continuous stream rather than dripping in individual droplets.
Paint Running Too Fast?
If drips are rushing down too quickly, your paint is too thin. Let the mixture sit for 10 minutes to thicken up slightly, or mix in a fresh dollop of heavy paint.
Step 3: Application
-
Initial pour:
Pour the paint mixture slowly onto the bottom of the upside-down pot (which is currently the top). -
Guide the paint:
Let the paint pool and naturally begin to spill over the edges. Use your stir stick to gently push the puddle toward the rim if it’s moving too slowly. -
Create variation:
Vary how much paint goes over the edge at different points. I like to pour a little extra in specific spots to encourage long, dramatic drips. -
Spot check:
Look for areas where the coverage on the rim looks thin and add a tiny bit more paint there to ensure a solid white band around the top. -
Let gravity work:
Step back and allow gravity to pull the drips down the sides. Do not touch them as they fall; imperfections make the faux-glaze look more authentic. -
Monitor drips:
Watch the drips closely for the first few minutes. If one is racing too fast toward the rim (the bottom in this orientation), you can gently catch it with a brush, though usually, the terracotta absorbs moisture quickly enough to stop them naturally.
Add Some Texture
Mix a teaspoon of baking soda into your white paint before pouring. This creates a gritty, stone-like texture that makes the faux ceramic look even more convincing.
Step 4: Finishing
-
Initial drying:
Leave the pot upside down to dry completely. This is crucial; flipping it too soon will cause the drips to run back on themselves and ruin the effect. -
Check dryness:
Wait at least 24 hours, or until the thickest part of the paint is firm to the touch. Heavy acrylic layers take longer to cure than thin coats. -
Flip and inspect:
Once fully dry, remove the pot from the stand and flip it right-side up. -
Clean rim:
If any paint seeped onto the very inside of the rim and looks messy, you can sand it lightly for a cleaner edge, though a rustic look usually fits this style best. -
Seal (Optional):
If this pot will live outdoors, spray the painted area with a clear matte sealant to protect the ‘glaze’ from yellowing or peeling in the sun.
Now you have a stylish, custom planter ready to showcase your favorite succulent or greenery
Raised Clay Flowers Around the Rim

Transform a standard terracotta pot into a charming succulent home by adding a delicate garland of handmade clay flowers. This project combines the rustic warmth of earthenware with the soft, whimsical texture of polymer clay for a unique dimensional effect.
Step-by-Step Tutorial
Materials
- Standard terracotta pot (4-6 inch diameter) and saucer
- Polymer clay in pastel pink, mint green, lavender, and white
- Small flower fondant cutters or clay cutters (daisy shape)
- Ball stylus tool
- Liquid polymer clay (such as Bake & Bond) or strong craft glue
- Ceramic baking tile or parchment-lined baking sheet
- Oven (for curing clay)
- Fine-grit sandpaper (optional)
- Small detailing tool or toothpick
- Succulents and potting soil (for finishing)
Step 1: Preparing the Clay Flowers
-
Condition the polymer clay:
Start by kneading your polymer clay colors individually until they are soft and pliable. If the colors feel too saturated, mix in a little white clay to achieve those soft, muted pastel tones seen in the photo. -
Roll out the clay:
Using a pasta machine or an acrylic roller, roll your clay sheets to a uniform thickness, roughly 1/8 of an inch. You want them thick enough to hold their shape but thin enough to mold slightly against the pot. -
Cut the shapes:
Use your small flower cutters to punch out numerous blossoms in alternating colors. You will need enough to encircle the entire pot, plus a few extras just in case. -
Detail the petals:
Place a clay flower in the palm of your hand or on a foam mat. Using a ball stylus, gently press into the center of the flower to cup the petals slightly upwards, giving them a 3D effect rather than lying flat. -
Add texture:
Take a toothpick or small detailing tool and gently press a tiny dot or indentation into the very center of each flower to mimic the pollen area.
Sticky Situation?
If the unique curve of the pot makes the unbaked flowers slide down, use a strip of low-tack painter’s tape to hold the garland in place while you apply the rest.
Step 2: Attaching the Design
-
Clean the pot surface:
Wipe the rim of your terracotta pot with a damp cloth to remove any dust or debris, then let it dry completely. A clean surface ensures a strong bond. -
Apply the adhesive:
Squeeze a thin, continuous bead of liquid polymer clay (Bake & Bond) around the pot just below the rim. I prefer this over glue for items that will be baked, as it fuses the clay directly to the porous terracotta. -
Position the flowers:
Gently press your clay flowers onto the adhesive strip, arranging them side-by-side. Make sure they touch slightly to create a continuous chain. -
Vary the pattern:
Alternate your colors—pink, white, green, pink—to create a balanced pattern. You can slightly angle some flowers so they don’t look too rigid. -
Secure the edges:
Once all flowers are placed, go back around and gently press the center of each flower again with your ball tool to ensure the back of the clay makes full contact with the terracotta.
Step 3: Baking and Finishing
-
Preheat the oven:
Set your oven to the temperature recommended on your specific brand of polymer clay (usually around 275°F or 130°C). -
Bake the project:
Place the entire terracotta pot with the clay attached into the oven. Pro tip: Terracotta is oven-safe, just ensure it is empty and dry. Bake for approximately 15-20 minutes. -
Cool down slowly:
Turn off the oven and crack the door, allowing the pot to cool down gradually inside. Removing it too quickly can cause the clay to shock and crack. -
Inspect the adhesion:
Once cool, check the flowers. If any popped off during baking, simply reattach them with a dab of strong super glue or E6000. -
Create the faux-succulent filler options:
If you want to match the image precisely with clay succulents inside, sculpt larger versions of your rim flowers using muted greens and purples, building them petal by petal. -
Pot your plants:
Fill your pot with succulent-specific soil. If using real plants, nestle them in tightly. If using clay succulents, arrange them atop a base of floral foam or dried moss.
Color Pop
Brush a tiny amount of pearl mica powder or pastel chalk shavings onto the raw clay flowers before baking to give them a subtle, iridescent shimmer.
Now you have a beautifully customized planter that adds a soft, artistic touch to your succulent garden
Lace-Imprinted Texture Bands
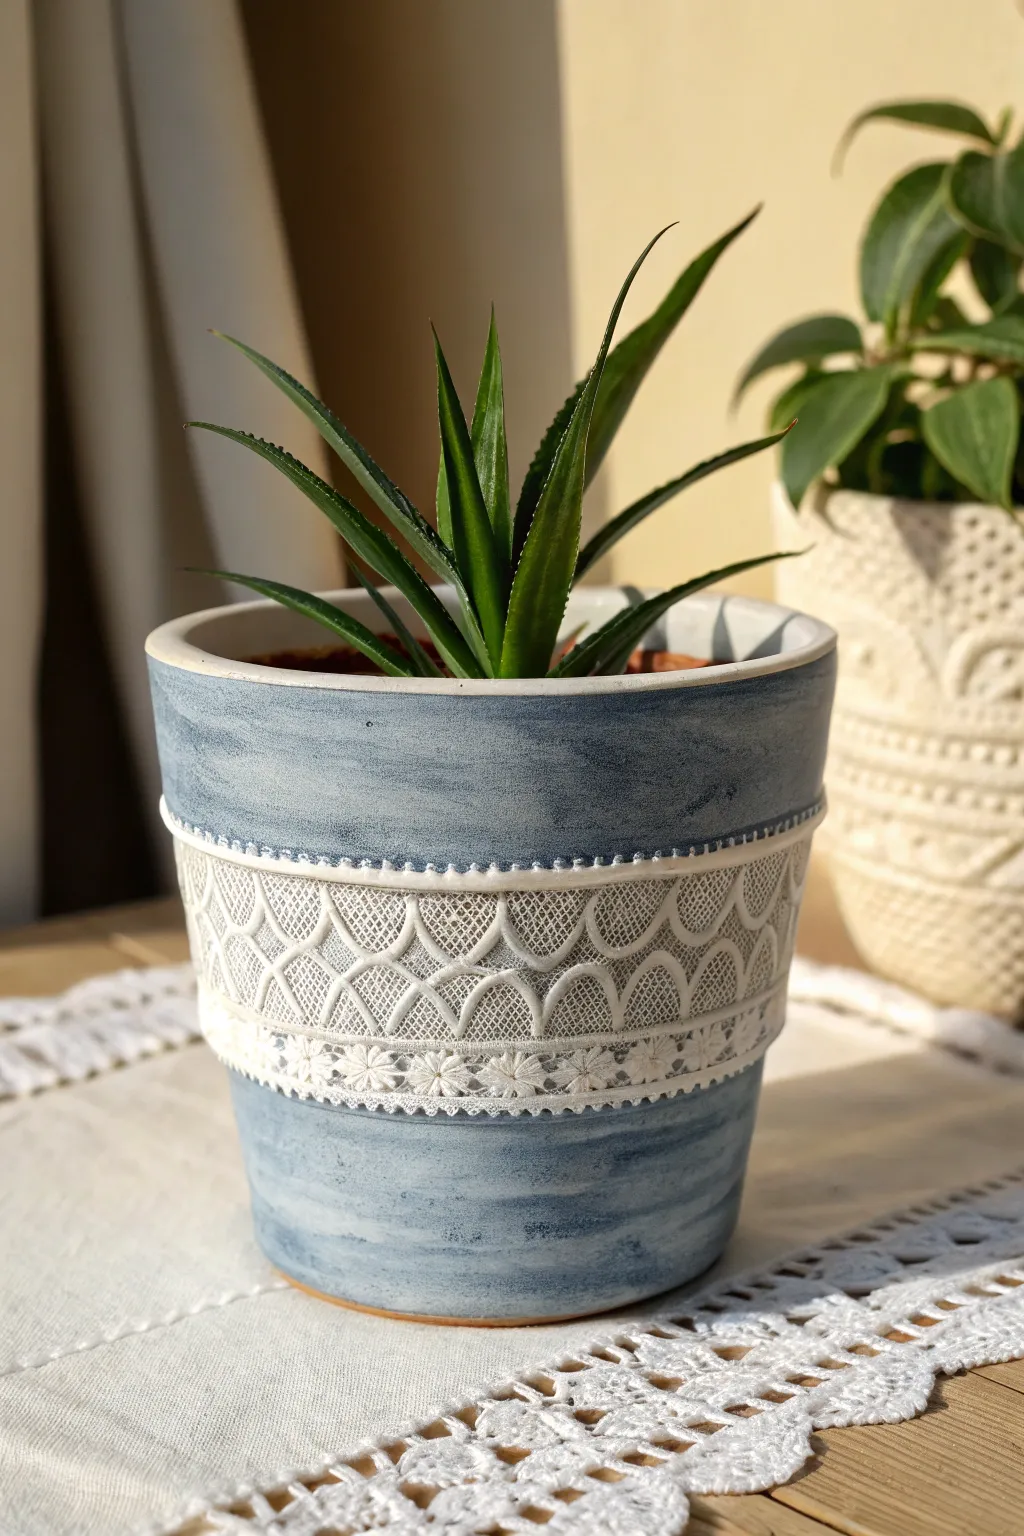
Transform a plain terra cotta pot into a vintage-inspired beauty using a clever texture technique. This project combines soft powder-blue washes with a strikingly realistic white lace relief band wrapped around the center.
How-To Guide
Materials
- Standard terra cotta pot (approx. 6-8 inches)
- Air-dry creative clay or modeling paste
- Cotton lace trim (with a distinct open weave pattern)
- Rolling pin or smooth glass jar
- Craft knife or sculpting tool
- Acrylic paints: White, Slate Blue, and Light Blue
- Medium flat paintbrush
- Small detail brush
- Strong craft glue or heavy gel medium
- Matte clear sealant spray
Step 1: Preparing the Clay Band
-
Condition the clay:
Start by taking a handful of air-dry clay and kneading it until it is smooth and pliable. You want to remove any air bubbles or cracks. -
Roll out a strip:
On a clean, non-stick surface, roll the clay out into a long, flat strip. Aim for a thickness of about 3-4mm. Ensure the strip is long enough to wrap entirely around the circumference of your pot. -
Apply the lace:
Lay your chosen strip of cotton lace directly on top of the smooth clay. Press it down gently with your fingers to hold it in place initially. -
Imprint the texture:
Using your rolling pin, roll firmly over the lace. You need to apply enough pressure to embed the fabric pattern deep into the clay surface without making the clay too thin. -
Reveal the pattern:
Carefully peel back the lace strip. I like to do this slowly to ensure no clay gets pulled up with the fabric. Reveal the intricate imprinted design left behind. -
Trim edges:
Use a craft knife and a ruler to trim the top and bottom edges of the clay strip, creating a clean, straight band that is roughly 2-3 inches wide, depending on your pot size.
Step 2: Attaching and Painting
-
Adhere the band:
Apply a layer of strong craft glue or heavy gel medium to the back of your clay strip. Wrap it carefully around the middle of the terra cotta pot, smoothing the seam where the ends meet so it blends invisibly. -
Create a decorative border:
Roll two very thin snakes of clay. Attach these along the top and bottom edges of your wide texture band to act as a frame. You can press small indentations into these thin rolls with a tool to mimic stitching. -
Dry completely:
Allow the clay to dry fully according to the package instructions. This usually takes about 24 hours. The clay will turn white and harden. -
Base coat the pot:
Paint the exposed terra cotta areas (top rim and bottom base) with a mix of White and Slate Blue acrylic paint. Use horizontal brush strokes to create a slightly streaky, weathered look rather than a solid opaque block. -
Paint the band white:
Paint the textured clay band entirely with pure white acrylic paint. Make sure to get into all the tiny imprinted crevices. -
Add a wash:
Water down a tiny bit of the Slate Blue paint. Lightly brush this wash over the white textured area, then immediately wipe the surface with a paper towel. The blue will settle in the deep recesses, highlighting the lace pattern. -
Highlight the borders:
Using a small detail brush, paint the thin ‘stitched’ borders you added earlier with pure white to make them pop against the blue-washed background. -
Distress the blue:
Go back over the blue sections of the pot with a dry brush dipped in a tiny amount of white paint. Lightly whisk over the surface to create a chalky, rustic texture. -
Seal the work:
Once all paint is bone dry, spray the entire pot with a matte clear sealant. This protects the clay from moisture when you water your plant.
Seamless Finish
To hide the vertical seam where your clay band ends meet, wet your finger slightly and rub the clay together until the line disappears before the clay dries.
Clay Cracking?
If the clay creates small hairline cracks as it dries on the curve, mix a tiny bit of fresh clay with water to make a paste and fill the cracks, then sand smooth.
Place your favorite succulent or leafy plant inside to complete this charming rustic display
Carved Sgraffito Patterned Pots

Capture the rustic beauty of contrasting clay bodies with this stunning sgraffito planter project. By carving through a layer of dark slip to reveal the warm terra cotta underneath, you will create a repeating leaf motif that feels both ancient and modern.
Step-by-Step
Materials
- Leather-hard terra cotta or red stoneware pot (wheel-thrown or hand-built)
- Black underglaze or terra sigillata
- Soft fan brush or hake brush
- Sgraffito loop tool (small)
- Needle tool or fine stylus
- Carving tool (V-tip or U-tip gouge)
- Damp sponge
- Banding wheel (lazy susan)
- Pencil for sketching outlines
- Clear matte glaze (optional)
- Wax resist (for the foot)
Step 1: Preparation & Application
-
Timing is Everything:
Ensure your clay pot is at the perfect leather-hard stage. It should be firm enough to handle without warping but still hold enough moisture to be carved cleanly without chipping. If you made the pot yourself, trim the foot before beginning the decoration process. -
Clean the Surface:
Gently wipe the exterior of the pot with a barely damp sponge. This removes any dust or grog that might interfere with a smooth underglaze application creates a pristine canvas for your work. -
Apply the Dark Layer:
Place your pot on a banding wheel. Using a soft fan brush, apply a coat of black underglaze to the exterior. I like to rotate the wheel steadily while holding the brush against the pot to get an even, seamless coat. -
Layering Up:
Let the first coat dry until it loses its sheen, then apply a second and possibly third coat. You want a solid, opaque black surface with no red clay showing through. Avoid making it too thick, or it might flake off later. -
Wait for the Set:
Allow the underglaze to dry to the touch. This stage is crucial; if it’s too wet, the carving tools will gum up, but if it’s bone dry, the clay will be brittle.
Moisture Management
Work in sections. If the far side of the pot starts drying out while you carve the front, drape a piece of thin plastic wrap over the unfinished areas to keep the moisture level consistent.
Step 2: Designing the Layout
-
Establish Boundaries:
With the pot spinning on the banding wheel, use a needle tool to lightly scribe two horizontal rings around the lower third of the pot. These lines will serve as the border between the leaf pattern area and the base decoration. -
Mark the Rim:
Leave a small, uncarved band of black plain at the very top rim for a clean finish. -
Space the Leaves:
Lightly sketch the outlines of your leaves using a dull pencil. The graphite will burn off later, so don’t worry about marks. Plan for tall, oval-shaped leaves that stand shoulder-to-shoulder around the circumference.
Clean Lines
If your carving tool is dragging or tearing the clay rather than slicing cleanly, your clay is likely too dry. Mist it lightly with water and wrap it in plastic for 30 minutes to rehydrate.
Step 3: Carving the Sgraffito
-
Outline the Leaves:
Using a small loop tool or V-tip gouge, carve the perimeter of each leaf. Apply steady pressure to cut through the black layer and reveal the rich red clay beneath. Keep your lines clean and confident. -
Define the Center:
Carve a vertical line down the center of each leaf to create the main vein. Start slightly below the top point and end just before the bottom curve. -
Add Texture Details:
With a finer carving tool or stylus, etch the angled veins branching out from the center line. Mirror the angle on both sides to give the leaves a symmetric, organic flow. -
Detail the Lower Band:
Return to the lower horizontal rings you marked earlier. Carve out a decorative band below the leaves—diagonal hatch marks work beautifully here to mimic a woven texture. -
Refine the Bottom:
Add a few simple horizontal stripes near the base of the pot to ground the design visually.
Step 4: Finishing Touches
-
Clean Up Burrs:
After carving, small crumbs of clay (burrs) will be left on the surface. Don’t brush them off yet! Let the pot dry a bit more until the crumbs are bone dry, then gently brush them away with a soft dry brush. -
Bisque Fire:
Load your pot into the kiln for a bisque firing (usually cone 04 or 06). This will permanently set the shape and the carving. -
Glazing:
For the interior, apply a functional liner glaze to make it waterproof. For the exterior, you can leave the raw contrast of the clay and underglaze, or apply a very thin coat of clear matte glaze to seal it and enhance the color depth. -
Final Firing:
Fire the piece again to the maturation temperature of your specific clay and glaze combination.
Once fired, the stark contrast between the matte black surface and the warm, excavated clay lines will make this pot a standout piece in your garden collection
Stamped Lettering and Plant Labels
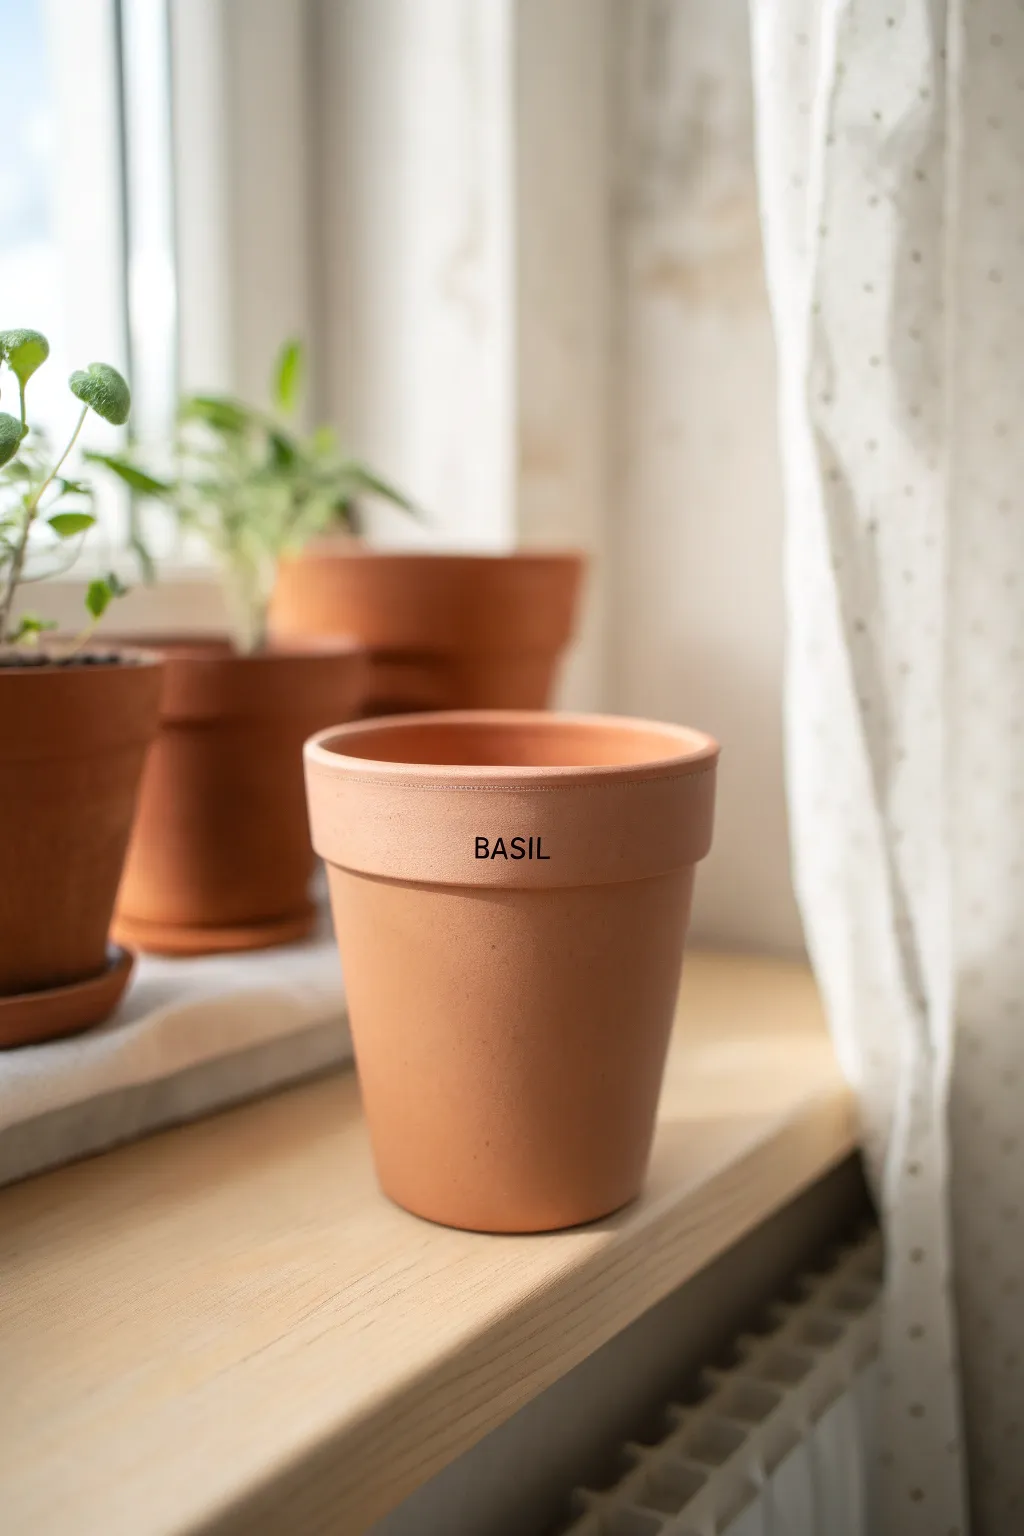
Elevate simple terracotta pots into chic, custom herb planters with this straightforward stamping technique. The crisp black lettering against the warm clay creates a minimalist aesthetic that looks perfect on any sunny windowsill.
Step-by-Step Tutorial
Materials
- Clean terracotta pot (standard rimmed design)
- Black StazOn ink pad (or other solvent-based permanent ink)
- Small alphabet rubber stamp set (sans-serif font)
- Rubbing alcohol
- Cotton pads or clean rag
- Paper scrap for practice
- Painter’s tape or masking tape (optional)
- Pencil (optional)
- Clear matte sealer spray (optional)
Step 1: Preparation
-
Clean surface:
Begin by thoroughly cleaning the rim of your terracotta pot. Terracotta can be dusty, which prevents ink adhesion. -
Degrease area:
Moisten a cotton pad with rubbing alcohol and wipe down the rim where you plan to stamp. Let it dry completely for a few minutes. -
Determine placement:
Decide exactly where you want your label to sit. Centered on the front is classic, but off-center can look modern too. -
Mark a guide:
If you are worried about crooked letters, place a small strip of painter’s tape just below where the letters will go to act as a straight baseline. -
Plan your word:
Arrange your alphabet stamps in order for the word “BASIL” (or your chosen herb) on your work surface to ensure you have all the letters ready.
Smudgy Letters?
Terracotta is porous and sucks up ink fast. If letters look blurry, you’re pressing too hard or the stamp is too wet. Use a lighter touch.
Step 2: Stamping
-
Practice first:
Take a scrap piece of paper and practice stamping the word a few times. This helps you get a feel for how much pressure is needed. -
Ink the first letter:
Firmly press your first letter stamp (usually the middle letter if you are centering by eye, or the first letter if using a tape guide) onto the ink pad. Don’t rock it; just press down. -
Check coverage:
Look at the stamp face to ensure the ink is evenly distributed on the raised letter surface without pooling in the crevices. -
Stamp the surface:
Carefully align the stamp on the pot’s rim. Press straight down firmly onto the curved surface. Since the pot is curved, you may need to gently rock the stamp left to right just a tiny bit to ensure the full letter makes contact. -
Lift carefully:
Lift the stamp straight up and away from the pot to avoid smudging the wet ink. -
Continue lettering:
Repeat the inking and stamping process for the remaining letters. Work slowly to maintain even spacing between each character. -
Let it set:
Allow the ink to dry undisturbed. Solvent inks like StazOn dry relatively quickly, but I like to give it at least 15 minutes to be safe.
Keep it Straight
Instead of tape, lightly draw a pencil line on the rim. You can easily erase it after the ink dries for a perfectly invisible guide.
Step 3: Finishing
-
Remove guide tape:
Once the ink is fully dry, gently peel away any painter’s tape you used as a guide. -
Clean up errors:
If you made a small smudge, dip a Q-tip in rubbing alcohol and carefully try to wipe it away. This works best if done immediately. -
Seal the deal:
For extra durability, especially if the pot will be outdoors or watered frequently, lightly mist the stamped area with a clear matte sealer spray. -
Final cure:
Let the pot sit for 24 hours before filling it with soil and your fresh basil plant to ensure any sealer has fully cured.
Now you have a stylish, labeled home for your herbs that looks straight out of a boutique garden shop
Mosaic Tile and Pebble Wrapped Pots
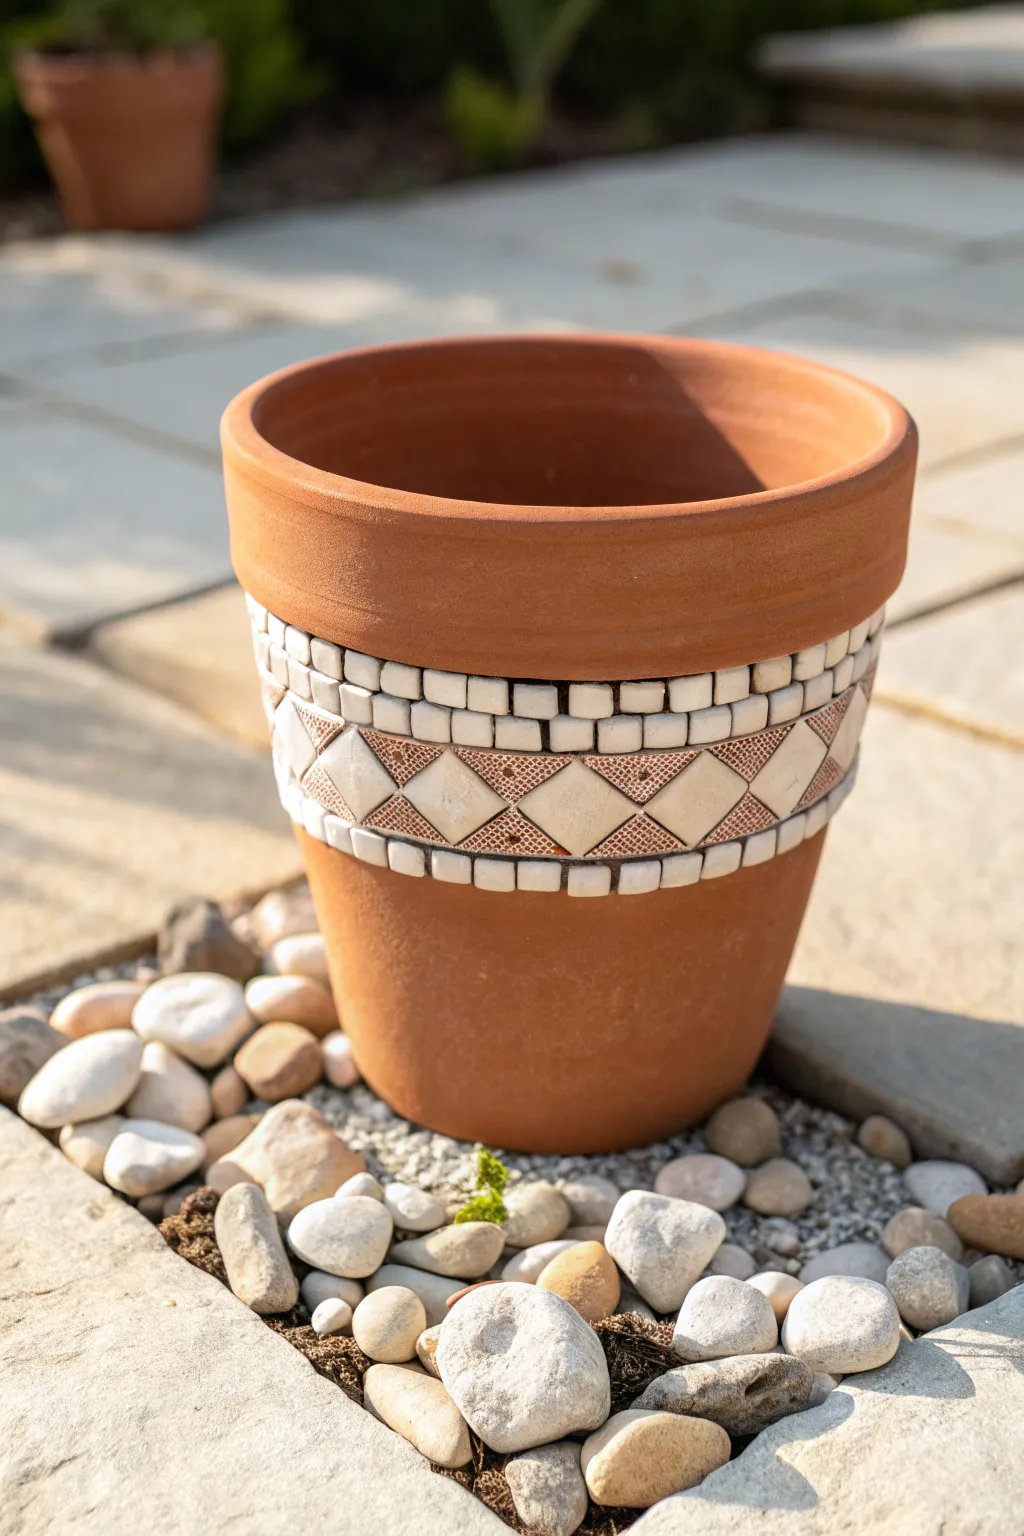
Elevate a standard garden staple into a piece of Mediterranean-inspired art with this simple yet striking mosaic project. By adding a geometric band of tiles to the rim of a terracotta pot, you create texture and interest without overwhelming the classic clay look.
Step-by-Step Guide
Materials
- Standard terracotta pot (medium size)
- Small white square mosaic tiles (approx. 1/2 inch)
- Diamond-shaped ceramic tiles (cream or beige)
- Tile adhesive (waterproof)
- Grout (sanded, tan or terracotta color)
- Grout sponge
- Palette knife or plastic spreader
- Pencil
- Measuring tape
- Clean rags
- Sealer (optional, for the terracotta)
Step 1: Preparation & Planning
-
Clean the surface:
Before starting, ensure your terracotta pot is completely clean and dry. If it’s a new pot, wipe away any clay dust with a damp cloth; if it’s reused, scrub it thoroughly and let it dry in the sun for a few hours. -
Soak the pot (optional):
If your terracotta is extremely dry and porous, I sometimes like to dampen the area where the adhesive will go just slightly with a sponge so it doesn’t suck the moisture out of the glue too fast. -
Mark the band area:
Measure about 1.5 to 2 inches down from the heavily rimmed lip of the pot. Using your measuring tape and pencil, lightly draw a guideline all the way around the circumference where the top edge of your mosaic band will sit. -
Dry fit the design:
Lay out your tiles on a flat surface first to check the spacing. Arrange a row of square tiles, a middle row of diamonds, and a bottom row of squares to ensure the pattern fits comfortably within your desired band width.
Sliding Tiles?
If tiles slip down while drying, wrap a large rubber band or masking tape around the pot to hold the rows in place until the glue grabs hold.
Step 2: Applying the Tiles
-
Apply adhesive for first row:
Using a palette knife, spread a consistent layer of tile adhesive just below the rim of the pot, following your pencil line. Work in sections of about 4-5 inches so the adhesive doesn’t dry out. -
Set the top squares:
Press the small white square tiles into the adhesive, creating the top border of your band. Space them very closely together, leaving just a hair of space for grout later. -
Complete the circumference:
Continue working around the pot until the top row is complete. If the last tile doesn’t fit typically, slightly adjust the gaps between the previous few tiles to make room. -
Start the central pattern:
Apply adhesive for the middle section. Place the diamond tiles horizontally, point-to-point, directly below the square row. Center the top point of each diamond between two of the squares above for a pleasing alignment. -
Add triangular fillers (optional):
If your diamond pattern leaves large triangular gaps and you have varying tile shapes, you can fill these spaces with cut triangles, though leaving the terracotta or grout showing creates a nice rustic look as seen in the photo. -
Place the bottom row:
Apply the final strip of adhesive below the diamonds. Place the second row of white square tiles, mirroring the top row. Ensure this bottom line is straight, as it defines the lower edge of your decoration. -
Clean excess glue:
While the adhesive is still wet, use a toothpick or the edge of your knife to scrape away any glue that squeezed up between the tiles or smeared onto the tile faces. -
Allow to cure:
Let the adhesive dry completely according to the manufacturer’s instructions, usually at least 24 hours. The tiles must be firmly set before you start grouting.
Color Contrast
Use a darker charcoal grout instead of tan. It will make the white squares and cream diamonds pop dramatically for a more modern graphic look.
Step 3: Grouting & Finishing
-
Mix the grout:
Prepare your sanded grout. Aim for a consistency similar to peanut butter—thick enough to hold its shape but spreadable. -
Apply the grout:
Spread the grout over the tiled area using a plastic spreader or your gloved fingers. Push the mixture firmly into all the crevices, especially the triangular gaps between the diamonds and squares. -
Reveal the tiles:
Let the grout set for about 15-20 minutes until it begins to haze over. Dampen your sponge (wring it out well!) and gently wipe diagonally across the tiles to remove excess grout without digging it out of the joints. -
Final polish:
Once the grout is fully dry (another hour or so), take a soft, dry cloth and buff the tiles to remove the remaining haze and make the ceramics shine. -
Seal the pot:
To protect your work from moisture seeping through the clay, apply a clear terracotta sealer to the inside of the pot before planting.
Place your newly decorated pot on a bed of pebbles and enjoy the custom stonework look you created
Stacked Pot Totems With Coordinated Designs
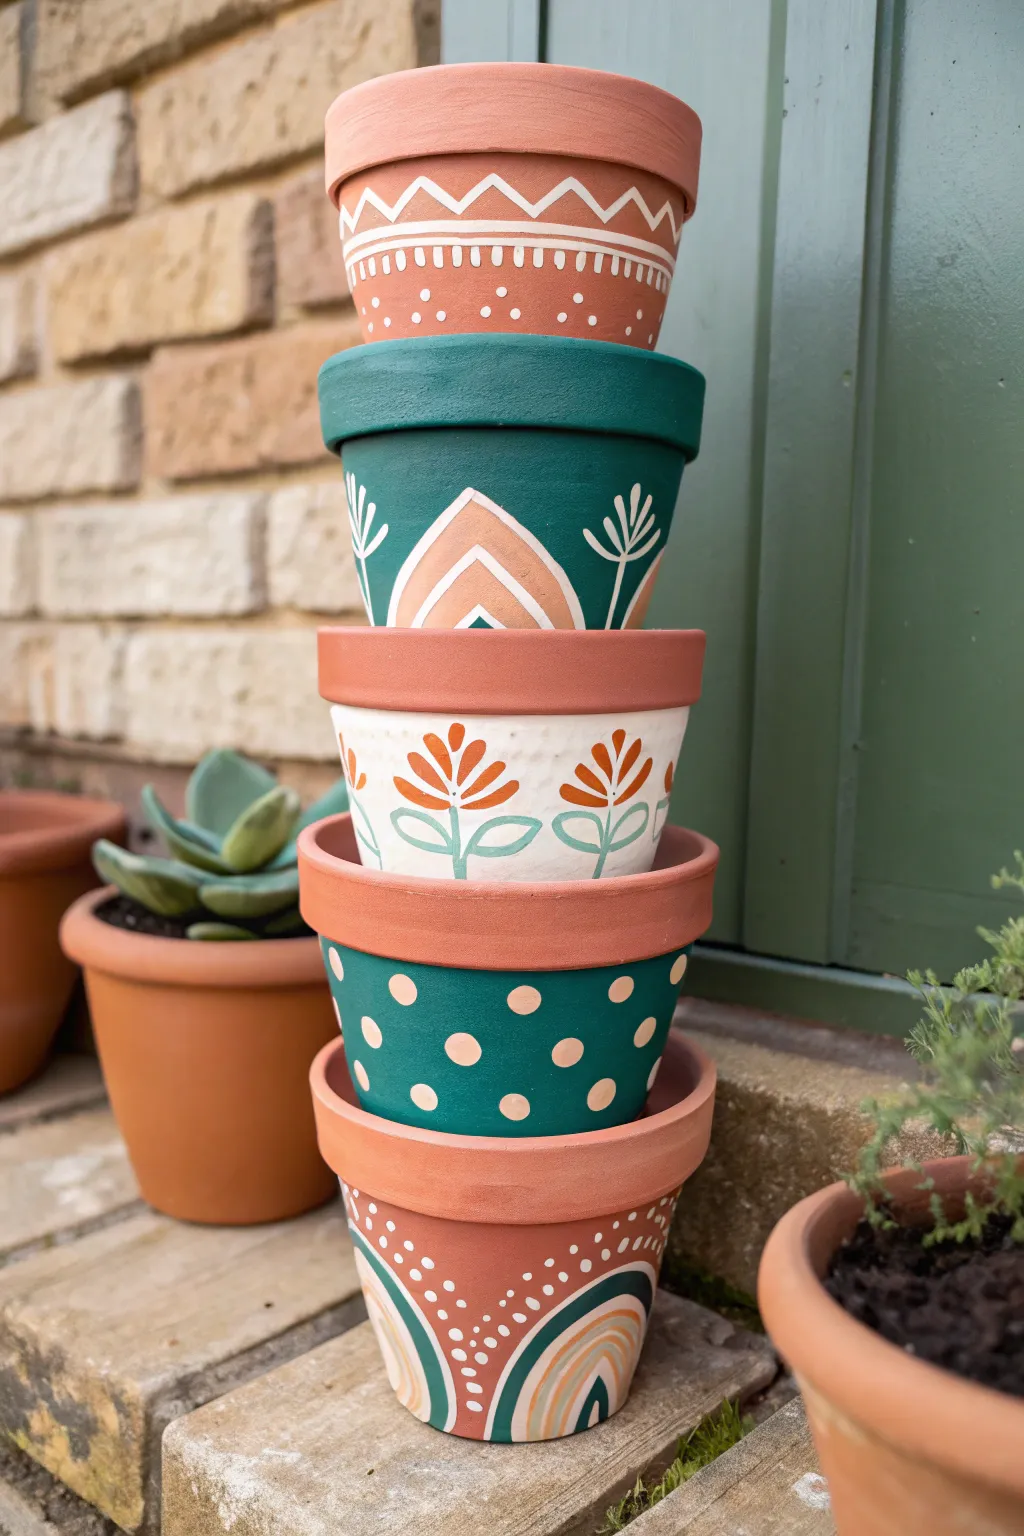
Transform ordinary terracotta pots into a striking garden sculpture with this stacked totem project. Using a cohesive palette of deep forest green, warm terracotta, and crisp white, you will learn to hand-paint unique yet coordinated patterns on five progressively sized vessels.
Step-by-Step
Materials
- 5 terracotta pots in graduated sizes (e.g., 4”, 6”, 8”, 10” and 12” diameter)
- Acrylic craft paints: Forest Green, Titanium White, Terracotta/Burnt Sienna, Beige/Cream
- Assorted paintbrushes: medium flat brush, small round detail brush (size 0-2), liner brush
- Painter’s tape or masking tape
- Pencil and eraser
- Dotting tool or catch-end of a paintbrush
- Clear matte or satin weather-resistant sealant spray
- Strong outdoor adhesive or a central dowel rod (optional for permanent stacking)
Step 1: Preparation & Base Coats
-
Clean the surfaces:
Ensure all terracotta pots are completely clean and dry. Wipe them down with a damp cloth to remove any dust or manufacturing residue, which helps the paint adhere better. -
Paint the rims:
For the bottom and middle pots (pots 1, 3, and 5 counting from the bottom), tape off the area just below the rim. Paint the rims a solid, warm terracotta color to match the natural clay look, or leave them raw if you prefer that texture. -
Base coat the bodies:
Now, tackle the main body colors. For the very bottom pot, paint the body a solid terracotta. For the second pot from the bottom (polka dots), paint the body deep forest green. For the middle pot (flowers), paint the body cream or beige. -
Continue base coating:
Moving up, paint the fourth pot’s body (geometric arches) a deep forest green. Finally, for the small top pot, paint the body terracotta. Let all base coats dry completely, applying a second coat if the color looks streaky. -
Paint the top rim green:
The fourth pot up needs a specific detail: paint its rim the same deep forest green as its body to create a seamless look.
Step 2: Detailing the Lower Stack
-
Draft the bottom arches:
On the largest bottom pot, use a pencil to lightly sketch large, sweeping rainbow arches. Leave space between them for detailing. -
Paint the arches:
Fill in your sketched arches with forest green paint. Once dry, add a thinner internal arch of cream or beige inside the green shapes. -
Add dotted details:
Using your smallest brush or a dotting tool, add rows of tiny white dots following the curve of the arches. I find that dipping the tool freshly for every two dots keeps them consistent. -
Create the polka dot tier:
Move to the second pot (the green one). Dip a medium-sized round brush or a specialized foam dobber into cream paint and press firmly to create evenly spaced large dots across the surface.
Wobbly Lines?
If your painted lines aren’t straight, don’t worry. Once dry, use a damp Q-tip to gently erase acrylic mistakes, or touch up the background color to ‘cut in’ and sharpen the edge.
Step 3: Painting the Middle & Upper Tiers
-
Sketch the florals:
On the cream-colored middle pot, lightly pencil in simple flower shapes. Draw vertical stems with two leaves near the base and a semi-circle bloom at the top. -
Fill the floral colors:
Use a liner brush with pale teal or watered-down green for the stems and leaves to keep them delicate. Paint the petals in a bold orange-terracotta hue. -
Detail the fourth pot:
On the fourth pot (green), sketch a central geometric ‘mountain’ shape. Paint the inside of this shape with a soft terracotta or beige, then outline it with white to make it pop. -
Add botanical accents:
Flanking your central geometric shape on the green pot, use a fine liner brush and white paint to draw simple, thin botanical sprigs or wheat-stalk shapes. -
Decorate the top pot:
freestyle a white zig-zag line around the upper third of the smallest top pot. Below that, paint a horizontal white stripe, and add a row of vertical white dashes hanging from it like fringe. -
Add final dots on top:
Complete the top pot’s design with a sparse scattering of small white dots near the bottom edge.
Pro Tip: Height Trick
If your pots nest too deeply and hide the designs, place a small plastic yogurt cup or block of wood inside the lower pot before stacking the next one to boost its height.
Step 4: Assembly & Finishing
-
Seal the artwork:
Take the pots outside or to a well-ventilated area. Spray two coats of clear matte sealant over the entire surface of each pot. This protects your hard work from sun fading and moisture. -
Stack for stability:
To assemble, place the largest pot upside down. Place the next largest pot upside down on top of it, and repeat until you reach the smallest pot. If you are placing this in a windy area, run a garden stake or dowel through the drainage holes. -
Secure the top:
For the very top pot, you can place it right-side up if you wish to plant flowers in it, as shown in similar totem designs, or keep it upside down for a complete sculptural look.
Now you have a stunning custom totem ready to add artistic flair to your porch or garden corner