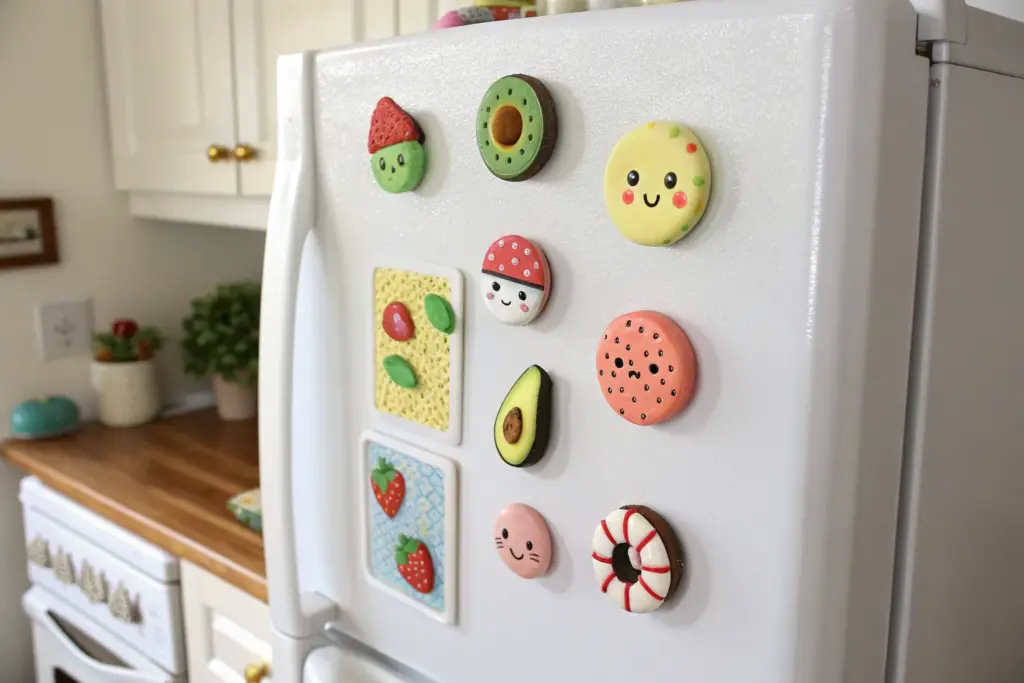
If you’re craving a quick project with maximum charm, cute clay magnets are my favorite little win—you get tiny sculptures and functional decor in one go. I’m sharing a mix of classic kawaii-style favorites and a few unexpected ideas so you can build a whole mini collection that makes you smile every time you walk by.
Smiley Avocado Toast Magnets
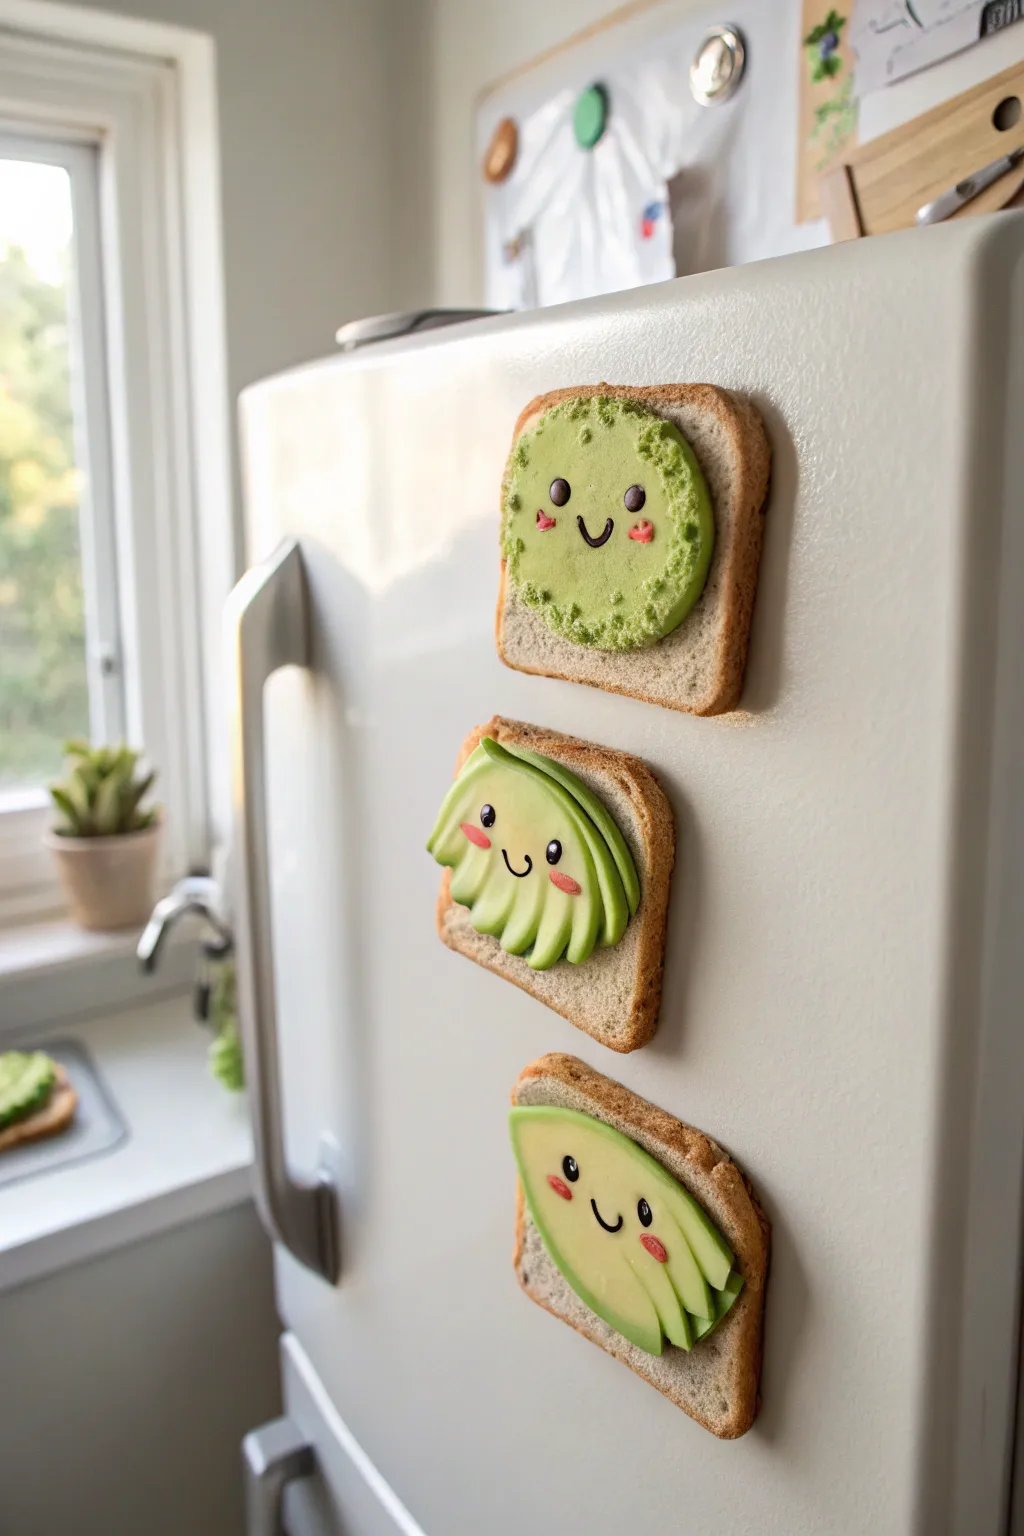
Brighten up your fridge with this adorable set of avocado toast magnets, featuring three distinct variations of everyone’s favorite brunch staple. Each magnet captures a different texture—from creamy mash to elegant slices—all united by sweet, kawaii expressions.
Step-by-Step Guide
Materials
- Polymer clay (white, beige, translucent, light green, dark green, black, pink)
- Texturing tool or toothbrush
- Clay blade or craft knife
- Rolling pin
- Pastel chalks (brown/orange)
- Soft paintbrush
- Needle tool
- Dotting tool
- Strong craft glue or E6000
- Round ceramic or neodymium magnets
- Gloss glaze (optional)
Step 1: Baking the Bread Base
-
Mix the bread color:
Start by mixing white polymer clay with a small amount of beige and a tiny pinch of translucent. You want a realistic, unbaked dough color. -
Shape the slices:
Roll the clay out to about 1/4 inch thickness. Use a blade to cut three square shapes, then round off the top two corners to mimic the classic bread slice silhouette. -
Texture the bread:
Take a clean toothbrush or a dedicated texturing tool and firmly tap it all over the surface of each slice. Pay special attention to the edges to give it that airy, baked texture. -
Create the crust:
Shave some brown and orange pastel chalk into a fine powder. Using a soft dry brush, gently dust the outer edges of the bread shapes to create a toasted crust effect. I like to add a tiny bit to the center for a lightly toasted look.
Avocado Realism
For ultra-realism, mix translucent clay into your green. It mimics the fatty, waxy texture of real avocado better than opaque colors.
Step 2: Designing the Avocado Toppings
-
Mix avocado greens:
Prepare two shades of green clay: a creamy light green for the flesh and a slightly darker green for the skin or outer edges. -
Variation 1: The Mashed Spread:
For the top magnet, flatten a ball of light green clay into a rough circle. Press it onto the first bread slice, leaving a crust border. -
Texture the mash:
Use a needle tool or small ball tool to swirl and poke the green clay extensively, making it look rough and smashed. -
Variation 2: Fanned Slices:
For the middle magnet, create a flat semi-circle of light green clay. Cut it into vertical strips but keep them attached at the top. -
Attach the fan:
Place the fanned shape onto the second bread slice. Gently curve the bottom tips outward to emphasize the sliced look. -
Variation 3: Flat Slices:
For the bottom magnet, roll out light green clay and cut a classic avocado cross-section shape. Add a very thin strip of darker green along the outer curve for the skin. -
Detail the slices:
Use a knife to gently score shallow lines into the flat slice to suggest segments without cutting all the way through.
Spice It Up
Before baking, sprinkle real poppy seeds or tiny specks of black pepper grindings over the avocado to simulate ‘Everything Bagel’ seasoning.
Step 3: Adding Kawaii Expressions
-
Make the eyes:
Roll tiny balls of black clay for the eyes. Place them wide apart on the avocado areas for that cute proportions look. Flatten them gently. -
Add the sparkle:
detailed look requires a tiny speck of white clay placed in the upper corner of each black eye for a highlight. -
Shape the mouths:
Roll an incredibly thin snake of black clay. Cut tiny ‘U’ shapes and carefully position them between the eyes using a needle tool. -
Apply blush:
Use a dotting tool to add small pink clay ovals or circles just under the eyes for cheeks. Alternatively, dust a little pink chalk pastel here.
Step 4: Finishing Touches
-
Bake the clay:
Place your toast trio on a baking sheet or tile. Bake according to your brand of polymer clay instructions (usually 275°F/135°C for 15-30 minutes). -
Cool down:
Allow the pieces to cool completely before handling them, as warm clay is fragile. -
Attach magnets:
Turn the toasts over. Apply a dab of strong glue to the back of each slice and press a magnet firmly into place. Let it cure fully. -
Optional glaze:
If you want the avocado to look moist, brush a little gloss glaze specifically over the green parts, leaving the bread matte.
snap these onto your fridge to keep your grocery list secure and your kitchen looking sweet


Sunny-Side-Up Egg Pals
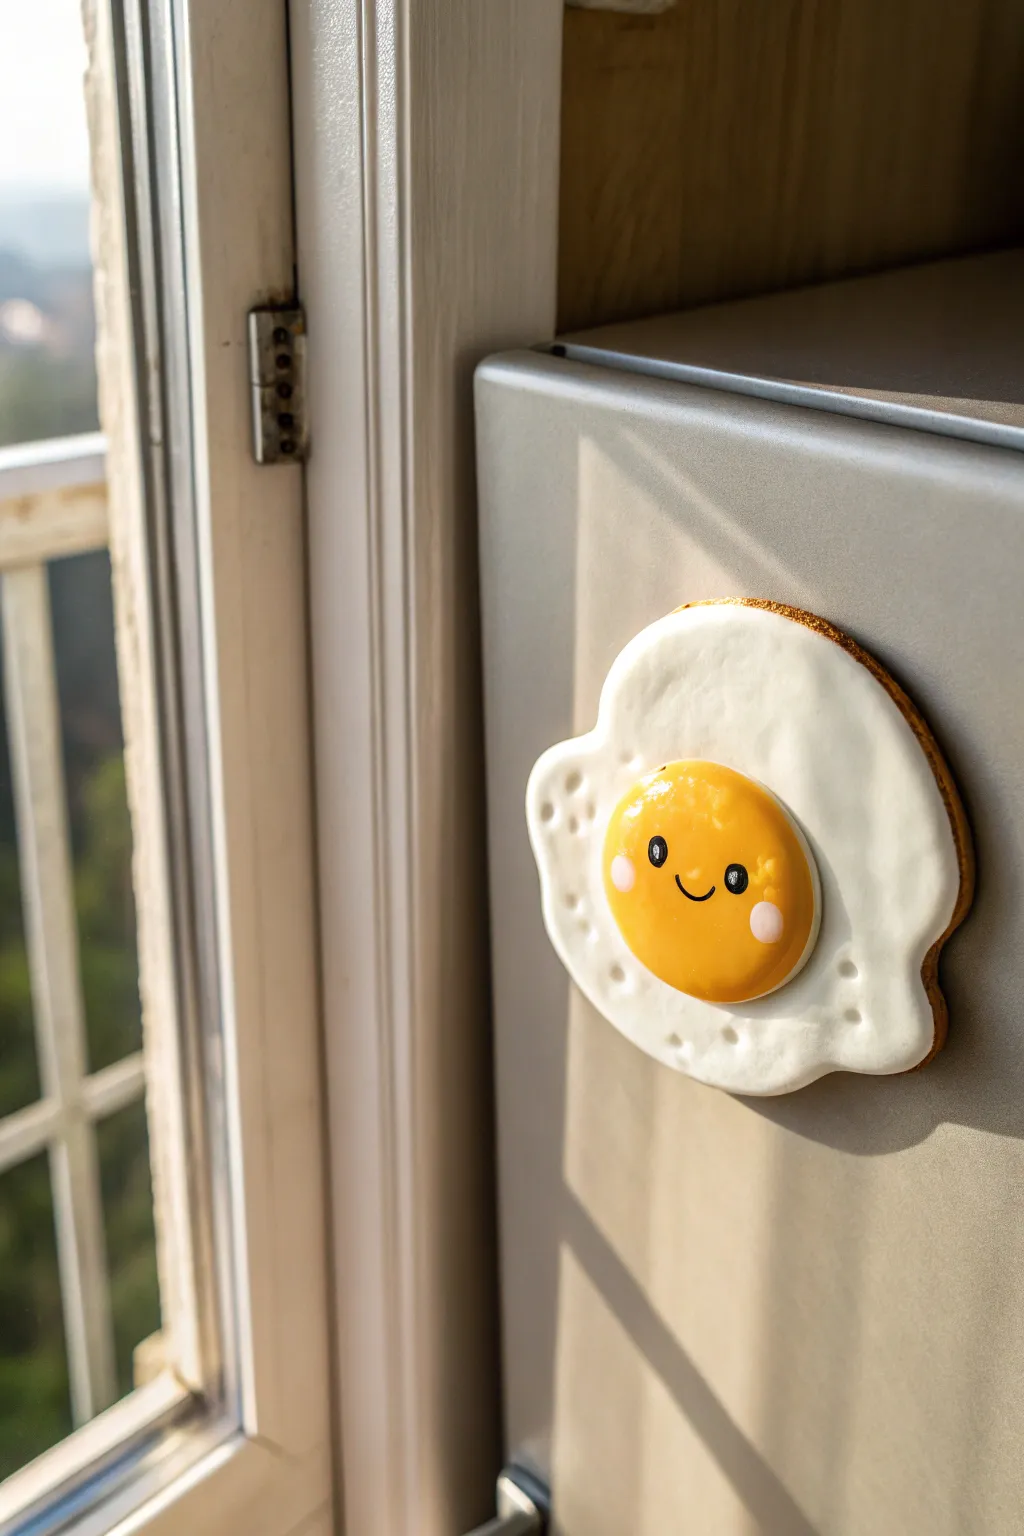
Brighten up your fridge with this adorable sunny-side-up egg magnet that practically smiles back at you. This simple project uses polymer clay to create a smooth, glossy fried egg with a sweet, cartoonish face.
How-To Guide
Materials
- White polymer clay
- Yellow/Orange polymer clay
- Rolling pin or pasta machine
- X-acto knife or clay blade
- Ball stylus tool (medium size)
- Black acrylic paint
- Pink acrylic paint
- White acrylic paint
- Fine detail paintbrush or needle tool
- Gloss glaze (like UV resin or Polyurethane varnish)
- Small round magnet
- Strong adhesive (E6000 or superglue)
Step 1: Shaping the Egg White
-
Condition the white clay:
Start by kneading a chunk of white polymer clay until it is soft and pliable. This prevents cracks later on. -
Roll it out:
Use your rolling pin to flatten the white clay into a sheet about 1/4 inch thick. You want it substantial enough to hold the magnet but not too heavy. -
Cut the organic shape:
With your craft knife, cut out an irregular, wavy shape to mimic a frying egg white. Don’t make it a perfect circle; wobbly edges look more realistic. -
Soften the edges:
Use your fingertip to gently smoothing down the cut edges of the white clay so they look rounded and cooked rather than sharp and freshly cut. -
Add texture:
Take your ball stylus tool and press gentle indents around the perimeter of the egg white. This mimics the bubbling texture of a frying egg.
Clean Clay Tip
Keep baby wipes nearby! Yellow clay can easily pick up dark lint or dust. Wipe your hands and tools before handling the yellow clay to ensure a vibrant, clean yolk.
Step 2: Creating the Yolk
-
Form the yolk ball:
Roll a piece of yellow-orange clay into a smooth, seamless ball. It should be sized proportionally to fit comfortably in the center of your egg white. -
Flatten deeply:
Press the ball gently onto a flat surface to flatten the bottom, creating a dome shape. I find pressing it slightly flatter than a perfect hemisphere helps it adhere better. -
Attach to the white:
Place the yellow dome onto the center of your white clay base. Press down firmly around the edges of the yolk to bond the two clays together without squashing the dome. -
Bake the clay:
Place your assembled egg on a baking sheet lined with parchment paper. Bake according to your specific clay package instructions (usually 275°F for 15-30 minutes) and let it cool completely.
Bumpy Surface?
If you leave fingerprints on the yolk while attaching it, dip your finger in a tiny bit of rubbing alcohol and gently stroke the clay to smooth them away before baking.
Step 3: Adding the Personality
-
Paint the eyes:
Once cool, use a fine detail brush or a needle tool dipped in black acrylic paint to create two small, vertical oval eyes on the yolk. -
Add the smile:
Paint a tiny, thin ‘U’ shape between the eyes for the smile. Keep the line weight very delicate. -
Adding rosy cheeks:
Dip a rounded tool or the back of a paintbrush into pink paint and dab two small circles on the outer edges of the yolk for blushing cheeks. -
The highlight spark:
Using a needle tool and white paint, add tiny white dots inside the black eyes and a small reflection mark on the cheek to bring the character to life. -
Glaze specifically:
Apply a thick coat of gloss glaze or UV resin ONLY to the yellow yolk area. This makes it look uncooked and shiny, contrasting with the matte white. -
Dry the glaze:
Let the glaze cure or dry completely according to the manufacturer’s instructions. -
Attach the magnet:
Flip the egg over and use a strong adhesive to glue a round magnet to the center of the back.
Now your fridge has a cheery new friend to greet you every morning


Sprinkle Donut Cuties
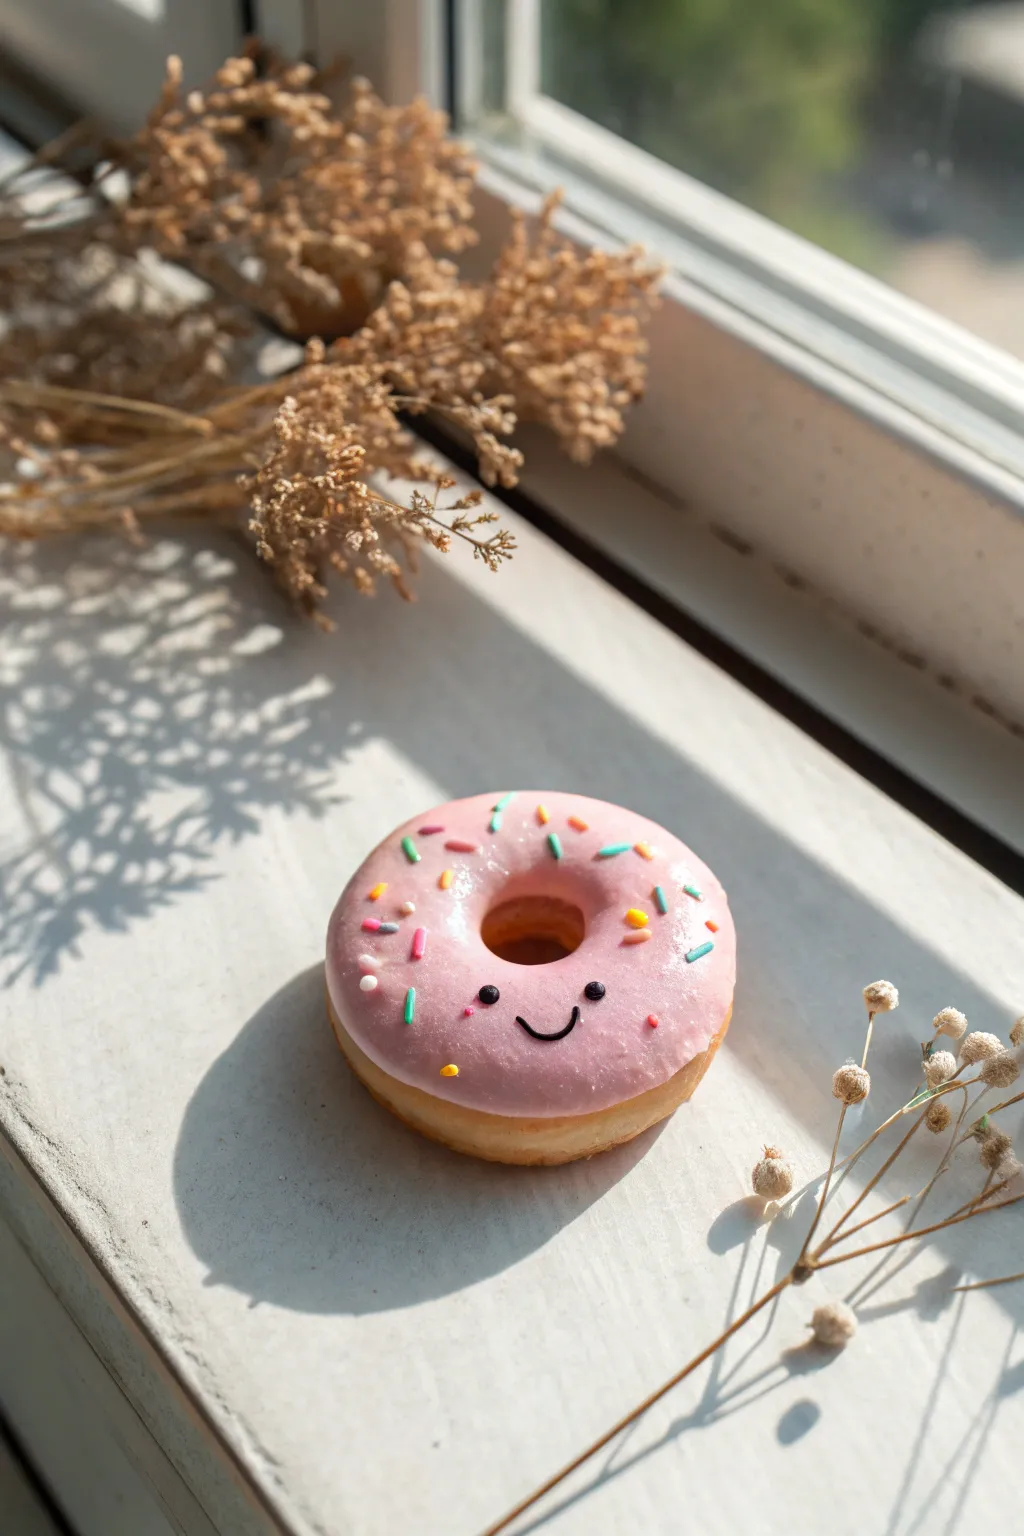
These adorable little donuts bring a sweet touch to any magnetic surface with their realistic golden dough and cheery frosting faces. Their miniature size makes theme perfect for holding up photos or just brightening your day.
Detailed Instructions
Materials
- Polymer clay (pastry/tan color, pink, white, and small scraps of rainbow colors)
- Small round cutter (approx. 1.5 inch)
- Review tool or straw for center hole
- Soft pastel chalks (orange, yellow ochre, brown)
- Paintbrush for shading
- Liquid polymer clay (Fimo Liquid or Sculpey Bake & Bond)
- Needle tool or toothpick
- Black acrylic paint
- Fine detail paintbrush or dotting tool
- Ceramic magnet (0.5 inch round)
- Strong craft glue (E6000)
- Gloss glaze (optional)
Step 1: Shaping the Dough Base
-
Condition the clay:
Begin by taking your pastry or tan-colored polymer clay and kneading it thoroughly in your hands until it becomes soft and pliable. -
Form the basic shape:
Roll the clay into a smooth ball about the size of a walnut, ensuring there are no cracks or visible seams on the surface. -
Flatten deeply:
Gently press the ball down against your work surface until you have a thick disc that resembles a hamburger bun. Keep the edges rounded. -
Create the donut hole:
Use a small straw or the back of a tool handle to punch a hole directly in the center. Don’t remove the core yet; twist the tool slightly to widen the hole. -
Smooth the edges:
Remove the excess clay from the center and use your fingertip to gently smooth the inner rim of the hole so it looks baked and puffy, not sharp. -
Add texture:
Take an old toothbrush or a ball of aluminum foil and lightly tap it all over the surface of the donut to mimic the texture of fried dough.
Step 2: Baking Effect and Frosting
-
Shade the dough:
Scrape some orange, yellow ochre, and brown soft pastels into dust. Use a dry blush brush to dust the color onto the donut, focusing on the edges for a golden-brown ‘baked’ look. -
Mix the frosting:
Mix a small amount of pink polymer clay with liquid clay until you achieve a consistency similar to thick cake batter or toothpaste. -
Apply the icing:
Carefully spread the pink mixture onto the top of your donut using a needle tool or toothpick. Let it drip slightly down the sides organically, just like real glaze. -
Prepare the sprinkles:
Roll tiny snakes of various colored clays (blue, orange, yellow, and green) incredibly thin. Bake these strands for 5 minutes first to harden them, then chop them into tiny bits. -
Decorate:
Using tweezers or your fingers, press the tiny pre-baked sprinkles into the wet liquid clay frosting while it is still sticky.
Frosting Too Runny?
If your liquid clay mix is dripping off the donut too fast, let it sit on a piece of paper for 10 minutes. The paper absorbs excess oil/plasticizer.
Step 3: Giving it Personality
-
Bake the donut:
Place your decorated donut on a tile or baking sheet and bake according to your specific clay brand’s instructions (usually 275°F for 15-20 minutes). -
Cool down completely:
Allow the clay to cool fully before handling. If you paint on warm clay, the paint may dry too fast and crack. -
Paint the eyes:
Dip a fine dotting tool into black acrylic paint and place two small dots on the frosting, spaced somewhat widely apart. -
Add the smile:
Using your finest detail brush, paint a thin, shallow ‘U’ shape between the eyes for a happy little smile. -
Create blush (optional):
I like to add tiny pink chalk dust cheeks right under the eyes with a q-tip for extra sweetness. -
Seal the piece:
For a sugary shine, coat just the frosting area with a gloss glaze, avoiding the textured dough parts so they stay matte. -
Attach the magnet:
Once everything is dry, flip the donut over and use a strong adhesive E6000 to glue the ceramic magnet to the flat back.
Make it scented!
Mix a drop of vanilla or strawberry fragrance oil into the liquid clay frosting before applying it for a scratch-and-sniff experience.
Now you have a sweet little companion to greet you every time you open the fridge


Tiny Sushi Friends
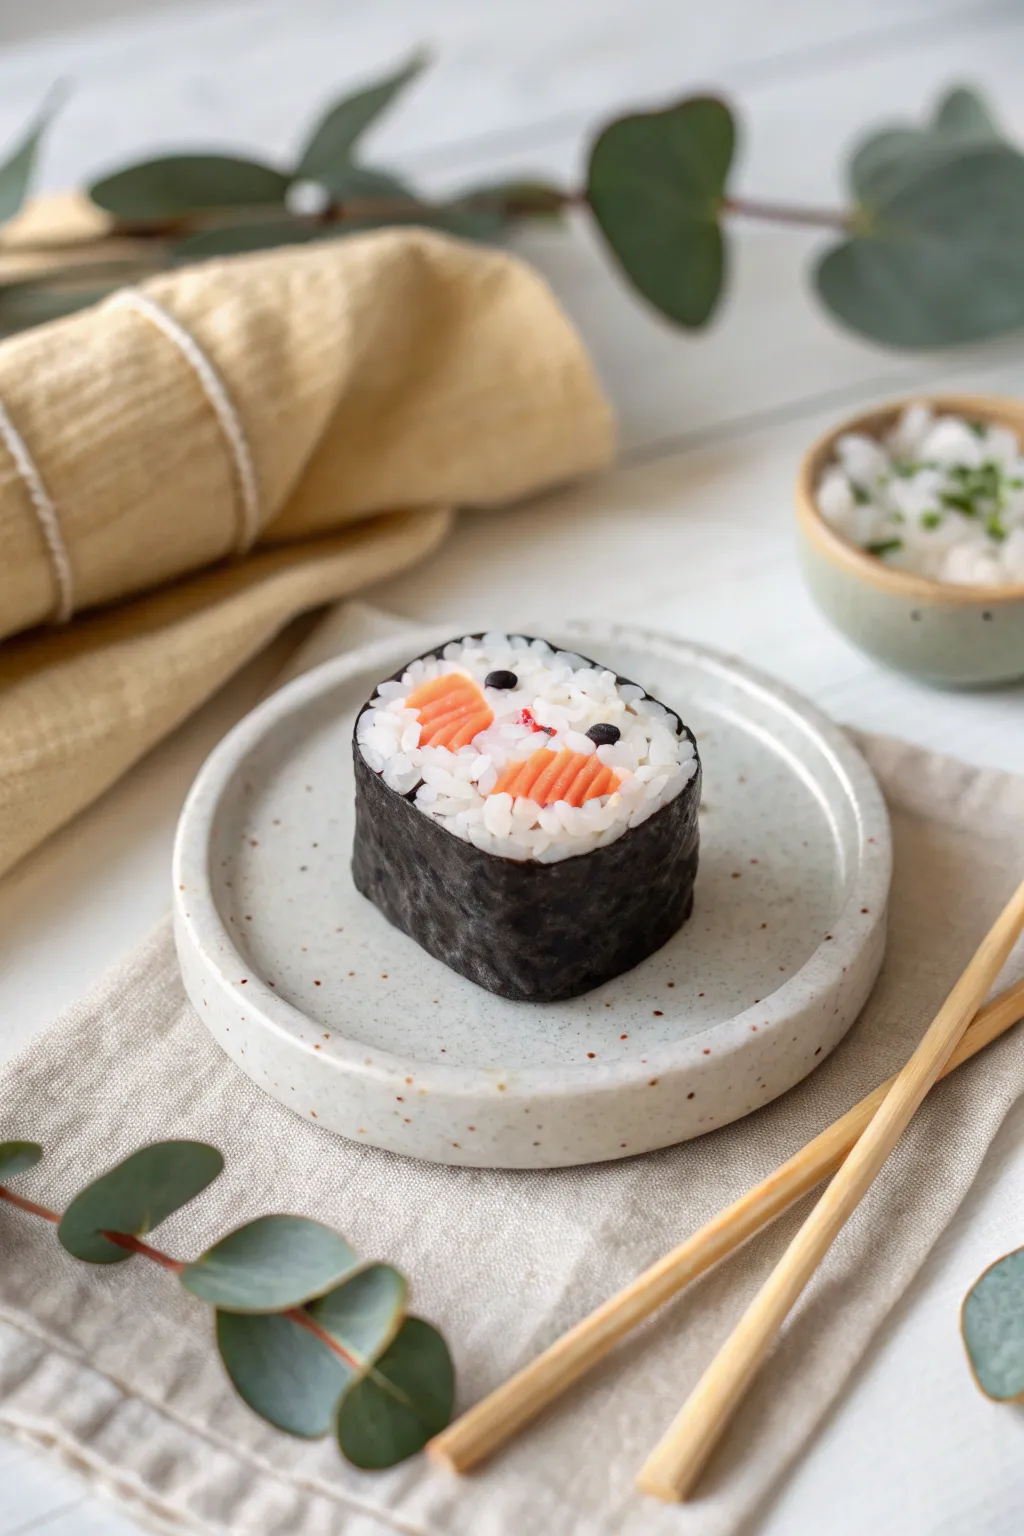
This bite-sized project transforms polymer clay into an incredibly realistic piece of salmon maki that doubles as a cute fridge magnet. The textured rice grains and translucent salmon details make this tiny friend look good enough to eat.
Step-by-Step Tutorial
Materials
- White polymer clay (for rice)
- Translucent polymer clay
- Orange and red polymer clay (for salmon)
- Black polymer clay (for nori)
- Liquid polymer clay (Fimo liquid or TLS)
- Toothbrush or hard bristle brush
- Needs tool or toothpick
- X-acto knife or craft blade
- Rolling pin or pasta machine
- Gloss varnish
- Strong round magnet
- Strong glue (E6000 or similar)
Step 1: Creating the Rice Base
-
Mix the rice color:
Start by mixing a large amount of white polymer clay with a very small amount of translucent clay. This gives the ‘rice’ a realistic cooked look rather than a flat, plastic white. -
Form the core shape:
Roll a ball of your white mixture and flatten it into a thick, rounded rectangle shape. This will be the main body of your sushi roll. -
Create rice grains:
Take the remaining white clay mixture and roll it into a very thin snake. Chop this snake into tiny, rice-sized segments. -
Texture the top:
Apply a thin layer of liquid polymer clay to the top and bottom surfaces of your core shape. Carefully press the tiny rice segments all over these surfaces, randomizing their direction to mimic packed sushi rice.
Rice Texture Tip
Don’t smooth the rice grains down! keep them distinct and bumpy. Real sushi rice is sticky but individual.
Step 2: Making the Fillings
-
Mix salmon color:
Combine translucent clay with a pinch of orange and a speck of red. I find that keeping the mixture quite translucent is the secret to realistic raw fish. -
Create salmon stripes:
Flatten your salmon mixture. Take a tiny bit of white clay and roll extremely thin lines. Layer these white lines onto the salmon sheet to create muscle fat marbling. -
Form the fish pieces:
Cut two small, rough rectangular chunks from your marbled salmon slab. These will act as the ‘cheeks’ of the face. -
Embed the salmon:
Gently press the two salmon chunks into the textured rice top, spacing them apart slightly to leave room for the face features. -
Texture the salmon:
Use a needle tool to gently score lines into the orange clay segments, enhancing the fibrous look of the fish.
Make it a Set
Create different sushi types like tuna (deep red), tamago (yellow egg), or cucumber rolls for a full menu magnet set.
Step 3: Wrapping and Details
-
Prepare the nori:
Roll out black clay into a very thin, long strip. It should be wide enough to cover the height of your rice block. -
Texture the seaweed:
Before wrapping, press a toothbrush or stiff bristle brush firmly against the black strip to give it that rough, dried seaweed texture. -
Wrap the roll:
Wrap the textured black strip around the perimeter of your rice block. Trim the excess at the back and smooth the seam with a clay tool. -
Add eyes:
Roll two tiny balls of black clay. Press them into the white rice area above the salmon cheeks. -
Add the mouth:
Place a minuscule speck of red clay between the salmon pieces to create a tiny mouth.
Step 4: Finishing Up
-
Bake:
Bake the piece according to your clay manufacturer’s instructions, usually at 230°F-275°F (110°C-135°C) for about 30 minutes. -
Cool and varnish:
Let the piece cool completely. Apply a coat of gloss varnish only to the salmon parts and the black eyes to make them look wet and fresh. -
Attach magnet:
Flip the sushi over. Use strong glue to attach a magnet to the flat bottom side.
Now you have an adorable piece of sushi art ready to hold up your grocery list

The Complete Guide to Pottery Troubleshooting
Uncover the most common ceramic mistakes—from cracking clay to failed glazes—and learn how to fix them fast.
Blushing Pizza Slice Magnets
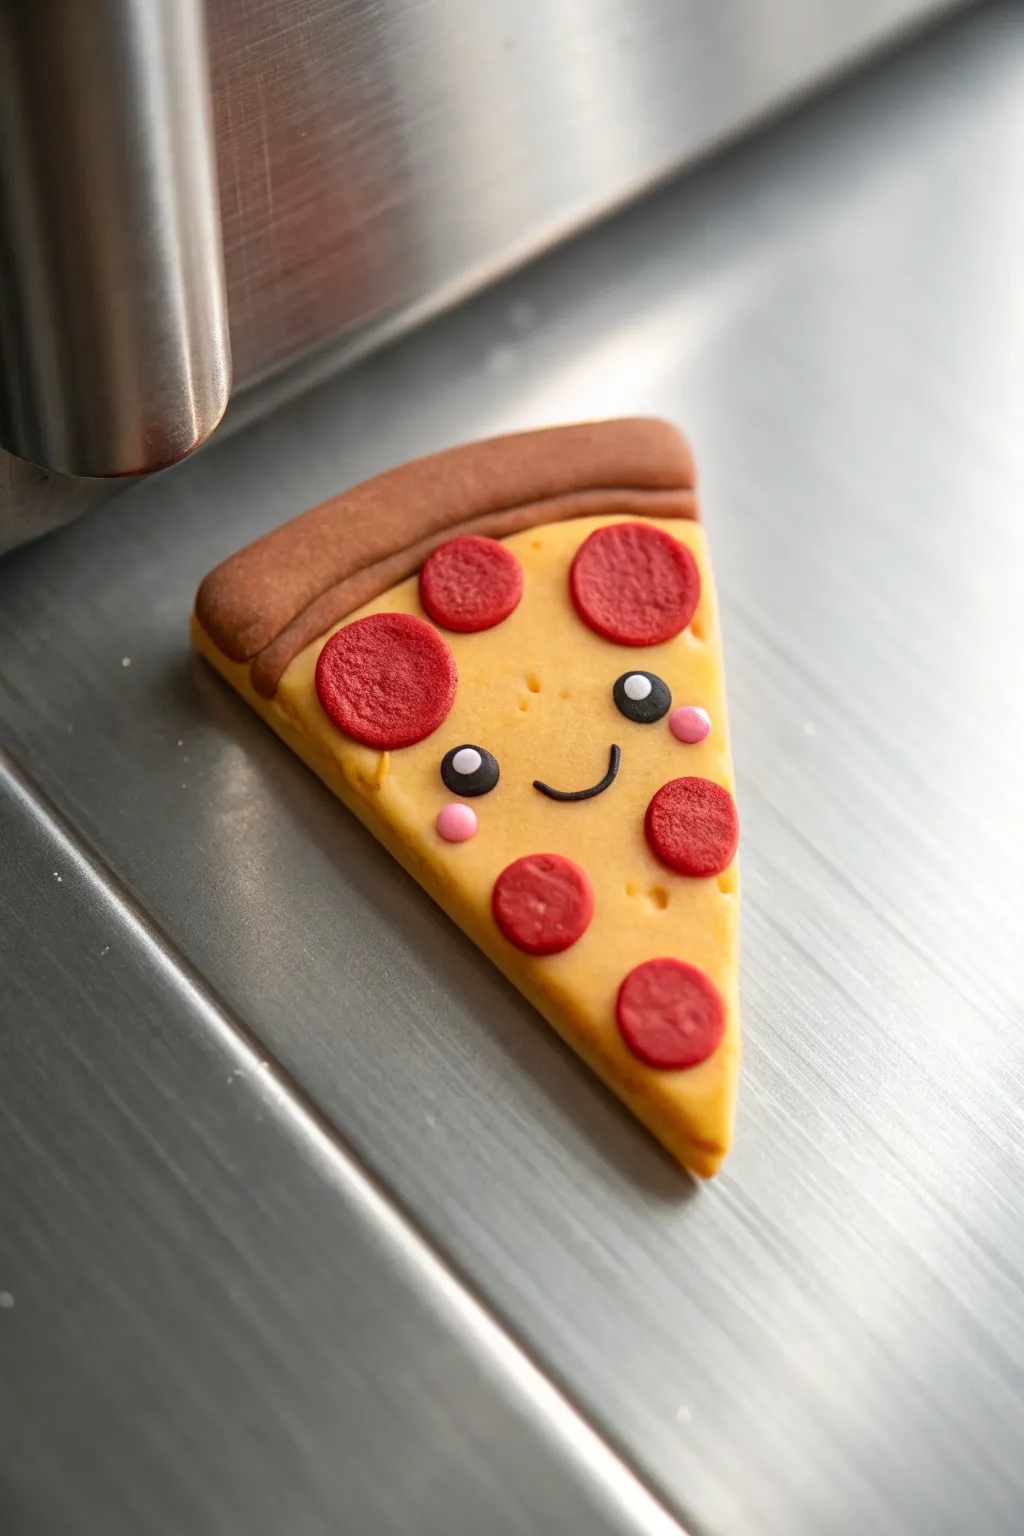
Even if you aren’t hungry, this adorable pizza slice magnet is sure to make you smile with its kawaii expression and perfectly textured crust. It’s a beginner-friendly polymer clay project that turns a favorite comfort food into a sweet fridge companion.
Detailed Instructions
Materials
- Polymer clay (yellow/ochre, terra cotta/brown, red, black, pink)
- Small circle cutter (approx. 1/4 inch)
- Clay knife or craft blade
- Rolling pin or pasta machine
- Ball stylus tool
- Liquid polymer clay (optional, for adhesion)
- Strong round magnet
- Superglue or E6000
- Needle tool or toothpick
- Soft pastel chalks in orange/brown (optional but recommended)
Step 1: Shaping the Base
-
Mix the cheese color:
Start by conditioning your yellow clay. To get that perfect melted cheese shade, I like to mix a standard yellow with a tiny touch of translucent and a speck of orange to make it look warm and inviting. -
Form the triangle:
Roll the yellow clay into a sheet about 1/4 inch thick. Cut out a classic long triangle shape for the slice. Gently soften the straight cut edges with your fingertip so they look slightly rounded and organic. -
Create the crust:
Condition the brown or terra cotta clay. Roll it into a thick rounded log or ‘snake’ that is the same length as the top (wide) part of your yellow triangle. -
Attach the crust:
Press the brown log onto the top of the cheese triangle. Use your thumb to smooth the seam on the back side only, blending the two clays together for strength. -
Indent the rim:
On the front side, use a straight edge or the back of your knife to gently press a line where the crust meets the cheese, creating a defined ‘lip’ like a real baked pizza.
Uneven Pepperoni?
If your pepperoni circles are distorting when you pick them up, let the rolled red clay sheet rest on paper for 15 minutes to stiffen slightly, then cut and lift gently with a blade.
Step 2: Toppings & Texture
-
Texture the surface:
Take an old toothbrush or a crumpled ball of aluminum foil and tap it gently all over the crust area to give it a baked bread texture. -
Shade the cheese:
For realistic depth, brush a tiny amount of shaved orange pastel chalk around the edges of the cheese triangle and near the crust line. -
Make the pepperoni:
Roll out a very thin sheet of red clay. Use your small circle cutter to punch out 6-7 pepperoni slices. If you don’t have a cutter, roll tiny balls and flatten them into discs. -
Texture the meat:
Using your needle tool or a coarse sandpaper, tap the surface of each red disc to give it a rough, meaty texture. -
Apply the toppings:
Arrange the pepperoni slices on the pizza. Place two near the top corners, and stagger the rest down the slice. Press them down firmly so they bond with the yellow clay.
Make it glossy
Glaze just the pepperoni slices with a gloss polymer varnish after baking. This makes them look greasy and sizzling hot compared to the matte crust.
Step 3: Kawaii Face Details
-
Mark the face placement:
Before adding clay, gently mark two small dots for eyes and a curve for the mouth in the center of the slice, ensuring you avoid the pepperoni spots. -
Form the eyes:
Roll two tiny balls of black clay and flatten them gently onto your marked eye spots. They should be just slightly separated. -
Add eye sparkles:
Roll super tiny specs of white clay. Place one on the upper right side of each black eye pupil to give it that sparkling, animated look. -
Create the smile:
Roll an extremely thin snake of black clay. Cut a small segment and curve it into a ‘U’ shape. Place it centered between and slightly below the eyes. -
Add blush cheeks:
Roll two small balls of pink clay. Press them onto the cheeks, just outside the bottom corners of the smile.
Step 4: Baking & Assembly
-
Final inspection:
Check for any lint or fingerprints. Smooth them out carefully with a tiny bit of baby oil on your finger if needed. -
Bake:
Bake the piece according to your specific clay brand’s instructions (usually 275°F/135°C for 15-30 minutes). Let it cool completely. -
Attach the magnet:
Once cool and hard, flip the pizza over. Apply a drop of strong glue to the back center and press your round magnet firmly into place. Let the glue cure fully before sticking it to your fridge.
Now your fridge has a delicious slice of art that will stay fresh forever
Happy Taco Buddy Magnets
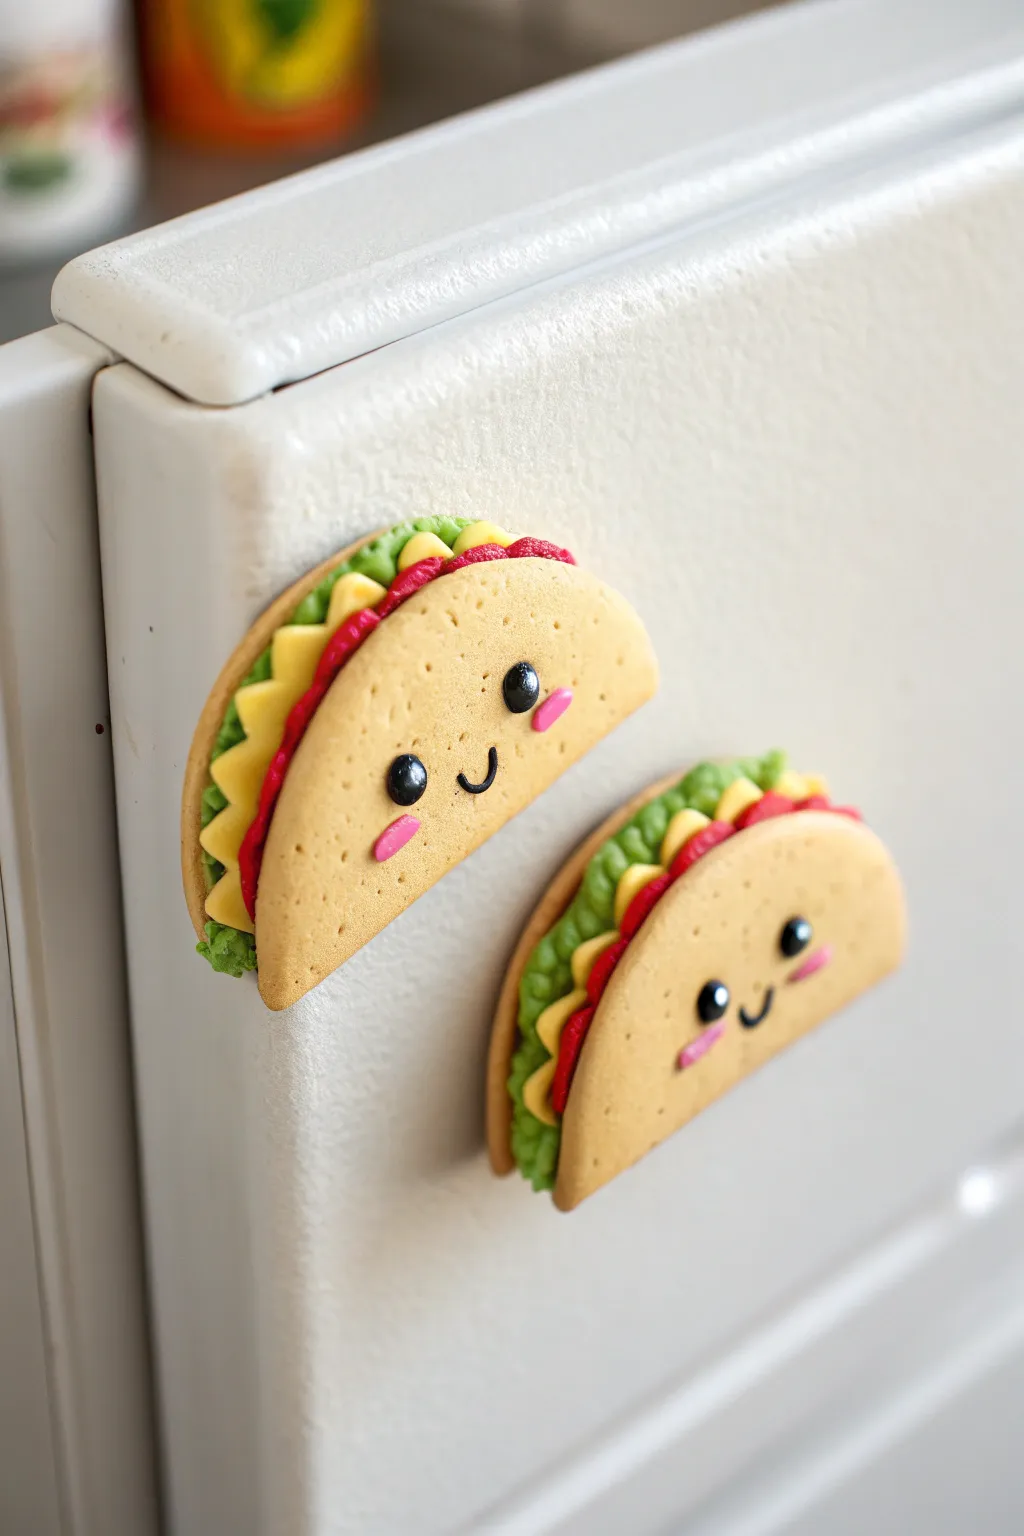
Bring a smile to your kitchen with these adorable taco magnets featuring distinctive kawaii faces. They are surprisingly simple to sculpt from polymer clay, capturing all the classic taco fixings in a charming miniature style.
Step-by-Step
Materials
- Polymer clay (tan/beige, green, yellow, red, white, black, pink)
- Set of small magnets
- Circle cookie cutter (approx. 2-3 inches)
- Texture tool (toothbrush or stiff bristle brush)
- Needle tool or toothpick
- Ball stylus tool
- Liquid polymer clay or bake-and-bond
- Craft knife
- Rolling pin
- Super glue (E6000 or similar)
- Soft pastels (orange/brown) and a brush for shading (optional)
Step 1: Creating the Shell
-
Mix Your Dough:
Start by conditioning your tan polymer clay until it’s soft and pliable. If the color is too dark, mix in a little white clay to achieve a perfect corn tortilla shade. -
Roll and Cut:
Roll the clay out into a thin sheet, about 1/8 inch thick. Use your circle cookie cutter to punch out a perfect round shape for the tortilla. -
Add Texture:
Before folding, gently tap a clean toothbrush or stiff bristle brush over the entire surface of the circle. This stippling effect mimics the rough texture of a real corn tortilla. -
Shade the Edges:
For a realistic baked look, I like to dust the edges of the circle with a little grated orange or light brown soft pastel using a dry paintbrush.
Texturing Tip
Use a crumbled ball of aluminum foil instead of a toothbrush for a deeper, crunchier-looking texture on the taco shell surface.
Step 2: Adding the Filling
-
Prep the Lettuce:
Roll a snake of green clay. Flatten it slightly, then use a needle tool to drag and tear at the edges, creating a ruffled, leafy texture. -
Place the Lettuce:
Place the ruffled green strip across the center diameter of your tortilla circle. This will serve as the base layer for the other fillings. -
Make the Cheese:
Roll out a thin sheet of yellow clay. Cut a strip and use a craft knife or small scissors to cut a zigzag pattern along one edge to represent shredded cheese. -
Layer the Cheese:
Lay the yellow strip on top of the green lettuce layer, ensuring the jagged cheese points are visible. -
Add the Tomatoes:
Roll a thin snake of red clay. Gently tap it with a toothbrush for texture, then lay it on top of the cheese layer to act as salsa or tomato chunks. -
Fold the Taco:
Carefully lift one side of the tortilla and fold it over the fillings, creating that classic half-moon taco shape. Don’t press the folded edge too hard; keep it rounded.
Make it a Fiesta
Make tiny mustaches from dark brown clay or add a miniature sombrero on the corner of the shell for extra personality.
Step 3: Face and Finish
-
Create Eye Sockets:
Use a medium-sized ball tool to verify where you want the face. Gently press two indentations into the front of the taco shell for the eyes. -
Insert Eyes:
Roll two tiny balls of black clay. Place a drop of liquid clay or bake-and-bond into the sockets, then press the black balls in. Flatten them slightly. -
Add Highlights:
Take the tiniest speck of white clay and place it on the upper right side of each black eye to bring them to life. -
Sculpt the Mouth:
Roll a very thin, short snake of black clay. Curve it into a ‘U’ shape and press it gently onto the clay between the eyes using a needle tool. -
Blush Those Cheeks:
Flatten two tiny ovals of pink clay and press them just below and outside the eyes for rosy cheeks. -
Bake:
Bake your tacos according to your clay package instructions (usually 275°F for 15-20 minutes). Let them cool completely. -
Attach Magnet:
Once cool, use a strong adhesive like E6000 to glue a magnet securely to the back of each taco.
Pop these on your fridge and enjoy a daily dose of cuteness every time you reach for a snack


What Really Happens Inside the Kiln
Learn how time and temperature work together inside the kiln to transform clay into durable ceramic.
Mini Burger Stack Magnets
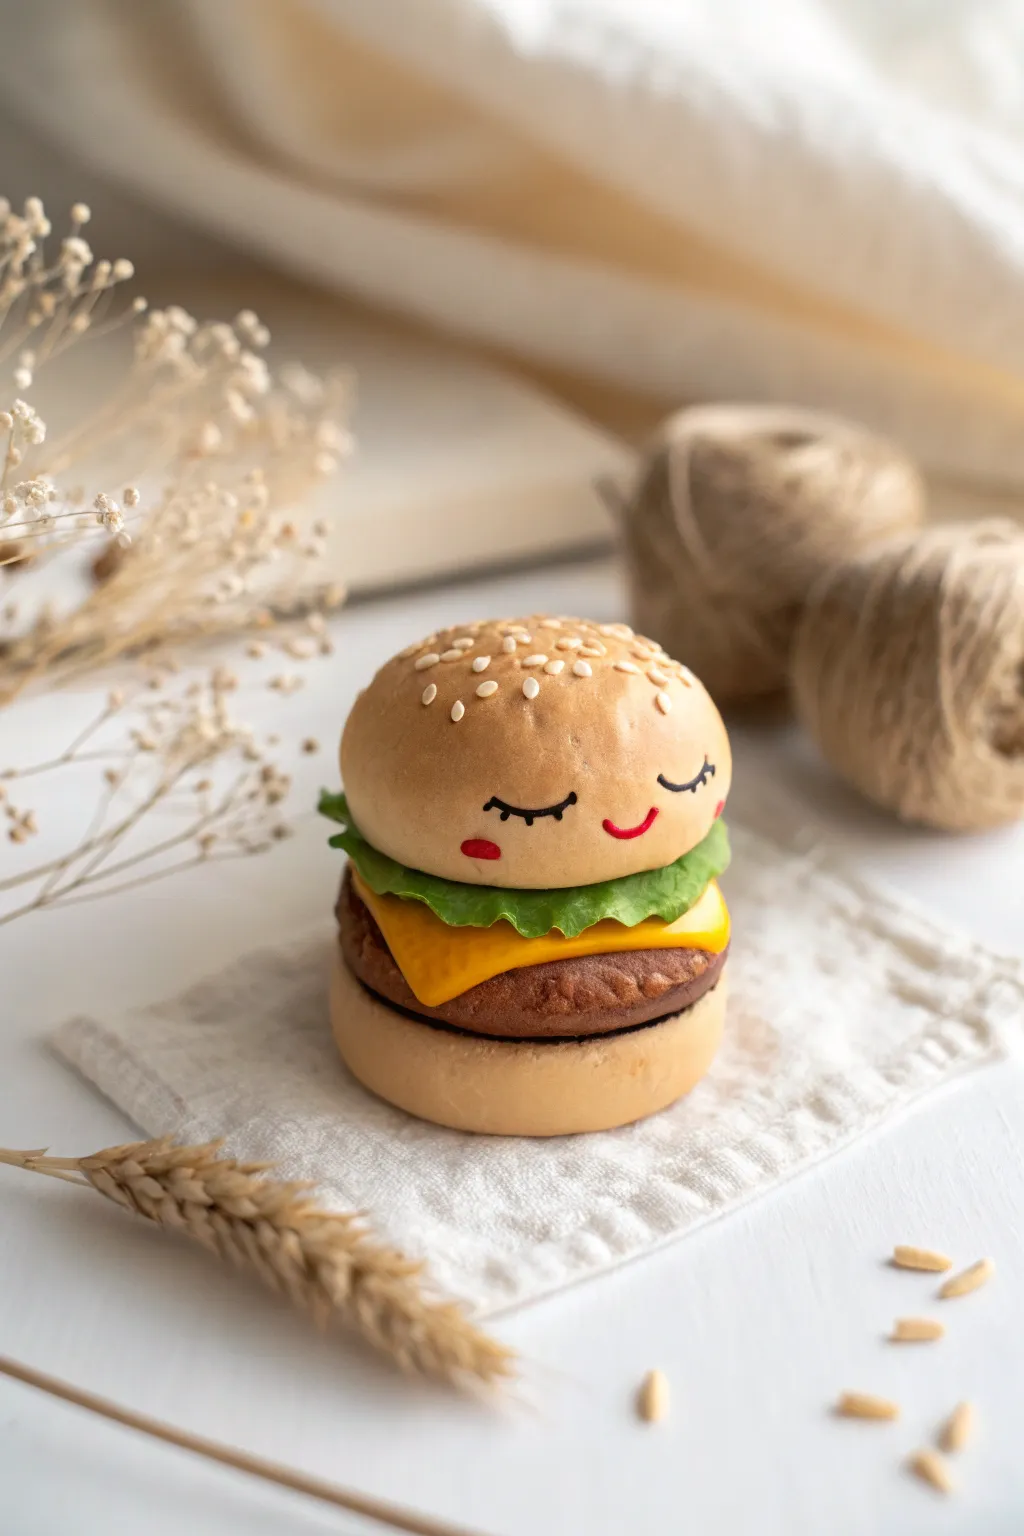
Whip up a delightful, pint-sized companion for your fridge with this kawaii burger magnet tutorial that looks good enough to eat. Featuring a friendly smiling face and realistic textures, it adds a perfect touch of whimsy to any magnetic surface.
Step-by-Step Tutorial
Materials
- Polymer clay: Tan/Ocre (bun), Dark Brown (patty), Bright Yellow (cheese), Translucent Green (lettuce)
- Black and white acrylic paint or fine detail markers
- Pastel chalks (red/pink for blush, light brown for toasted effect)
- Liquid clay or bake-and-bond
- Small round magnet
- Needle tool or toothpick
- Dotting tool
- Texturing tool (aluminum foil ball or toothbrush)
- Soft paintbrush
- Super glue
Step 1: Shaping the Buns
-
Mix the bun color:
Start by conditioning your tan clay. If it’s too pale, mix in a tiny pinhead amount of brown to get that perfect golden dough shade. -
Form the base shapes:
Divide the clay into two balls. Flatten one slightly to form the bottom bun. Keep the top bun more domed and spherical. -
Texture the surface:
Gently tap the surface of both bun halves with a ball of crumpled aluminum foil or a clean toothbrush. This creates a realistic baked bread texture rather than smooth plastic. -
Add a toasted effect:
Use a soft brush to lightly dust the top center of the dome and the edges of the bottom bun with shaved light brown pastel chalk for a freshly baked look.
Sticky Situation?
If your clay gets too soft and sticky while handling, pop it in the fridge for 10 minutes. Cold clay holds its shape better during stacking.
Step 2: Building the Fillings
-
Create the patty:
Roll a ball of dark brown clay slightly larger than the buns and flatten it into a thick disc. Use a needle tool to poke and drag continuously around the sides to mimic the crumbled texture of ground meat. -
Make the cheese:
Roll out bright yellow clay very thinly. Cut a square that is just wide enough for the corners to peek out past the burger patty. -
Drape the cheese:
Place the cheese square onto the patty. Gently press the corners down so they look like they are beginning to melt over the meat. -
Craft the lettuce:
Flatten a piece of translucent green clay until it is paper-thin. Tear the edges roughly with your fingers to create organic, ragged shapes. -
Ruffle the greens:
Use a needle tool to further crimp and wave the edges of the green clay, giving it that crisp lettuce volume.
Step 3: Assembly and Details
-
Stack the layers:
Apply a tiny dab of liquid clay between each layer. Stack: bottom bun, beef patty with cheese, lettuce, and finally the top bun. -
Add sesame seeds:
Roll incredibly tiny teardrops of white or very light tan clay. Press them gently onto the top dome, ensuring they stick securely. -
Embed the magnet:
Turn the entire stack over. Press your magnet firmly into the bottom bun to create an indentation, then remove the magnet before baking. I find this ensures a flush fit later. -
Bake the project:
Bake according to your clay package instructions (usually 275°F/130°C for 15-30 minutes). Let it cool completely.
Secret Sauce Texture
Mix liquid clay with orange pastel chalk and drip it slightly over the side of the patty for a realistic ‘burger sauce’ drip effect.
Step 4: Bringing it to Life
-
Paint the face:
Using a very fine brush and black acrylic paint, draw two small arched U-shapes for sleeping eyes and tiny eyelashes. Add a small red smile. -
Apply blush:
Dip a dry brush or Q-tip into pink pastel chalk dust and gently dab rosy cheeks underneath the eyes. -
Attach the magnet:
Place a drop of super glue into the indentation you made earlier on the bottom bun and press the magnet in place. -
Seal (Optional):
If you want extra durability, coat the face area with a thin layer of matte varnish, but avoid glossy finishes on the bread to keep the texture realistic.
Pop your new decorative friend onto the fridge and enjoy the charming smile every time you reach for a snack
Macaron Smile Sandwiches

These adorable kawaii macaron magnets bring a playful touch to any fridge or magnetic board with their sweet, smiling faces. Using polymer clay, you can replicate the realistic crumb texture of the classic French cookie while adding a whimsical personality.
How-To Guide
Materials
- Polymer clay (light purple, soft pink, coral/peach)
- Black polymer clay or black acrylic paint
- Liquid polymer clay (optional)
- Circle cutters (approx. 1.5 inches)
- Needle tool or toothpick
- Ball stylus tool
- Aluminum foil
- Plastic wrap
- Work surface (tile or mat)
- Strong magnets
- Super glue (E6000 or similar)
- Gloss glaze (optional)
Step 1: Shaping the Shells
-
Condition the Clay:
Begin by thoroughly conditioning your light purple and soft pink clay separately until they are pliable and smooth. Warm clay is much easier to shape without cracking. -
Roll and Cut:
Roll out the purple clay to a thickness of about 1/4 inch or slightly thicker for a nice domed look. Place a sheet of plastic wrap over the clay before cutting; this softens the edges of the cut creating that perfect domed macaron shape without sharp corners. -
Cut the Circles:
Press your circle cutter firmly into the clay through the plastic wrap. Cut two identical circles for the purple macaron. Repeat this process with the pink clay for the second macaron. -
Creating the Feet:
Use your needle tool or a toothpick to gently tease and texture the bottom edge of each shell. This is called the ‘foot’ of the macaron. Poke and drag the clay slightly to create a crumbly, airy texture just along the very bottom rim.
Texture Secret
Use a crumpled ball of aluminum foil to gently tap texture onto the ‘feet’ area for a super realistic baked look.
Step 2: Adding the Filling
-
Prepare the Filling:
Take a contrasting color of clay (coral for the purple macaron, white or light pink for the pink one). Roll it into a thin sheet, slightly thinner than the shells. -
Cut the Filling:
Use the same circle cutter to cut a disc of the filling clay. If you want it to look squished, you can gently press it slightly flatter with your finger so it peeks out the sides. -
Assemble the Sandwich:
Gently stack the bottom shell (textured side up), the filling disc, and the top shell (textured side down). Press them together very lightly just to adhere, being careful not to flatten the domes.
Level Up: Scented Clay
Mix a drop of vanilla or berry fragrance oil into the clay before shaping to make them smell as sweet as they look.
Step 3: Adding the Kawaii Faces
-
Mark Eye Positions:
Decide which side of the top shell will be the face. Use a small ball stylus to make two shallow indentations where the eyes will go. This helps the tiny clay pieces sit securely. -
Create the Eyes:
Roll extremely tiny balls of black clay. Place them into the indentations you made. Press them flat gently so they look like little buttons. -
Add the Sparkle:
For that lively look, add a microscopic dot of white clay (or white paint after baking) to the upper right corner of each black eye. -
Make the Mouth:
Roll a very thin snake of black clay. Cut a tiny u-shape segment and gently press it onto the face between the eyes using your needle tool. Alternatively, simple smiles can be painted on after baking. -
Blushing Cheeks:
Take two tiny bits of red or dark pink clay and flatten them into ovals. Place them under the eyes for cute blushing cheeks.
Step 4: Baking and Finishing
-
Bake:
Preheat your oven according to the clay manufacturer’s instructions (usually around 275°F/130°C). Place your macarons on a baking tile. I like to tent them with foil to prevent scorching light colors. -
Cool Down:
Allow the clay pieces to cool completely inside the oven or on a wire rack before handling. They are fragile while hot. -
Glaze (Optional):
If you want a shiny finish on the eyes for a wet look, apply a tiny drop of gloss glaze just to the black circles. -
Attach Magnet:
Turn the macaron over. Apply a strong dab of E6000 or super glue to the back of the bottom shell and press your magnet firmly into place. -
Final Cure:
Let the glue cure fully (usually 24 hours for best strength) before sticking your new creation onto the fridge.
Enjoy your sweet new fridge decorations that look good enough to eat

TRACK YOUR CERAMIC JOURNEY
Capture glaze tests, firing details, and creative progress—all in one simple printable. Make your projects easier to repeat and improve.
Fruit Slice Face Magnets
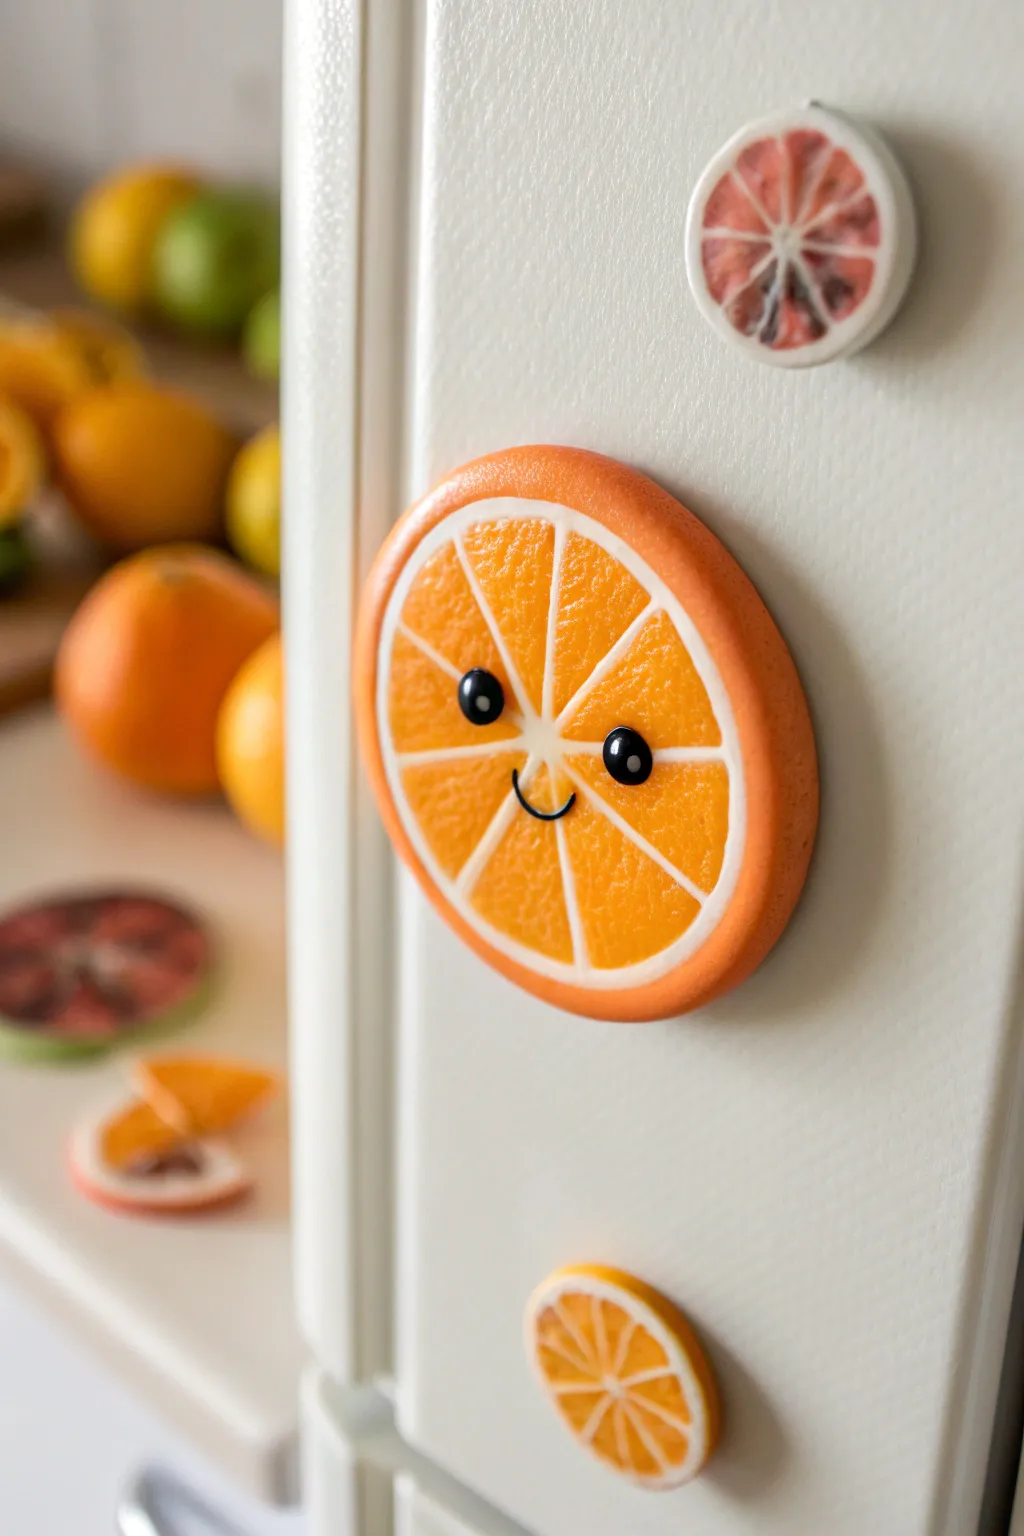
Brighten up your kitchen with this adorable anthropomorphic orange slice magnet made from polymer clay. Its juicy texture, shiny finish, and simple sweet face add a pop of personality to any refrigerator door.
Step-by-Step Tutorial
Materials
- Polymer clay (Bright orange, Translucent white/frost, Black)
- Round cookie cutter (approx. 2-3 inches)
- Small craft knife or scalpel blade
- Acrylic rolling pin
- Texture tool (needle tool, stiff toothbrush, or ball of foil)
- Gloss glaze (polyurethane or UV resin)
- Strong round ceramic or neodymium magnet
- Super glue (cyanoacrylate)
- Sandpaper (fine grit, optional)
- Clean work surface (ceramic tile or glass)
Step 1: Creating the Cane Base
-
Prepare the orange clay:
Condition your bright orange polymer clay until it is soft and pliable. Roll about two-thirds of it into a thick log shape, keeping the rest aside for the outer rind. -
Roll the translucent dividers:
Take your translucent white clay and condition it thoroughly. Roll it out into a thin, even sheet. You can use a pasta machine on a thin setting or a rolling pin with playing cards as guides. -
Assemble the segments:
Cut the orange log lengthwise into 8 equal wedges (like cutting a real pie). These will become your fruit segments. Place a strip of the thin white clay between each orange wedge as you reassemble the log, creating the pith that separates the segments. -
Wrap the core:
Once your segmented log is reassembled, wrap the entire cylinder in another thin sheet of the translucent white clay. This represents the inner pith layer. -
Add the rind:
Roll out the remaining orange clay into a sheet, slightly thicker than the white layers. Wrap this around the outside of your cylinder to form the orange skin. Smooth the seam gently with your finger so it disappears. -
Reduce to size:
If the log is too thick for your desired magnet size, gently roll and squeeze it to reduce the diameter. For a single large magnet like the photo, you can keep the diameter fairly wide, around 2.5 inches.
Smudged Face?
If black clay leaves residue on the orange, clean your hands with baby wipes before handling lighter colors, or use a q-tip dipped in rubbing alcohol to wipe the smudge off raw clay.
Step 2: Slicing and Texturing
-
Slice the magnet base:
Using a very sharp tissue blade or craft knife, cut a clean, straight slice from your cane, approximately 1/4 inch thick. Try not to distort the circle shape as you cut. -
Refine the shape:
If the cut slightly flattened one side, use your round cookie cutter to trim the edges back into a perfect circle, or gently reshape it with your fingers. -
Create the juicy texture:
This is the most important step for realism. Take a needle tool or a small texturing tool and gently scratch and poke the orange segments. Disturbing the smooth surface makes it catch the light like real juice vesicles. Avoid texturing the white pith lines. -
Detail the rind:
Use a toothbrush or a ball of crumpled foil to lightly tap the outer orange ring. This replicates the porous texture of citrus skin.
Step 3: Adding the Personality
-
Form the eyes:
Roll two tiny balls of black clay. They should be quite small relative to the slice to maintain the ‘kawaii’ look. I find placing them slightly wide apart enhances the cuteness. -
Attach the eyes:
Press the black balls firmly onto the textured surface of the orange segments. Placing them across two different segments or near the center pith lines helps ground the face. -
Add the light reflection:
Roll infinitesimally small specks of white clay and place one on the upper right side of each black eye. This ‘catchlight’ brings the character to life. -
Create the smile:
Roll a very thin snake of black clay. Cut a tiny U-shaped segment and press it gently between the eyes to form the smile. Use a needle tool to curve the ends slightly upward.
Citrus Variety Pack
Use the same cane technique with different colors! Try yellow for lemons, pink/red for grapefruit, or green for limes to create a whole fruit salad family for your fridge.
Step 4: Baking and Finishing
-
Bake:
Bake the piece according to your clay manufacturer’s instructions (usually 275°F/135°C for 15-30 minutes). Use an oven thermometer to ensure correct temperature. -
Cool and clean:
Let the clay cool completely. If there are any rough edges on the back or sides, smooth them down gently with fine-grit sandpaper. -
Apply the glaze:
Brush a coat of gloss glaze or UV resin over the front of the slice. This not only seals the clay but makes the textured fruit part look perpetually wet and juicy. -
Attach the magnet:
Apply a dab of super glue to the back of the slice and press your magnet firmly into place. Let it cure fully before sticking it to your fridge.
Now your fridge has a cheerful new friend to greet you every time you reach for a snack
Cupcake With Swirly Frosting

Transform simple polymer clay into an adorable, sweet treat that never expires. This smiling cupcake magnet features realistic frosting textures and a cheerful face that will brighten up any fridge or magnetic board.
Step-by-Step
Materials
- Polymer clay (golden yellow, translucent white, soft pink, red, black)
- Liquid polymer clay (translucent)
- Clay extruder or star piping tip
- Dotting tools or toothpicks
- Thin black paint pen or fine brush with acrylic paint
- Strong round magnet
- Industrial strength glue (e.g., E6000)
- Gloss glaze (optional)
- Wire cutters
- Thin brown wire for cherry stem
Step 1: Forming the Cake Base
-
Mix the batter color:
Start by conditioning your golden yellow clay. For a more realistic baked look, I like to mix in a tiny pinch of brown or translucent clay to give it depth so it doesn’t look too cartoonish. -
Shape the cupcake body:
Roll the clay into a smooth ball, then flatten the top and bottom slightly to form a cylinder that tapers just a bit toward the bottom, mimicking the shape of a cupcake liner. -
Create the liner texture:
To recreate the paper liner look, mix a small amount of white clay with translucent clay. Roll this into a very thin snake and flatten it into a ribbon, or roll a thin sheet and cut a strip. -
Attach the liner:
Wrap this pale strip around the sides of your yellow cylinder. Using the side of a toothpick or a needle tool, press vertical indentations all around the side to simulate the crinkled paper ridges. -
Add the face:
Before baking, use a small ball tool to make two indents for the eyes. Roll two tiny balls of black clay and press them into the sockets. For the smile, you can either indent it now or draw it later—indenting slightly with a curved tool works best for clay.
Frosting Realism
Mix liquid clay with your solid pink clay until it’s the consistency of thick paste. You can then actually pipe it through a real icing bag and tip!
Step 2: Piping the Frosting
-
Prepare the frosting clay:
Condition your soft pink clay until it is extremely pliable. If it’s too stiff, add a few drops of clay softener or baby oil. You need it soft enough to extrude but firm enough to hold its shape. -
Create the swirl:
Roll the pink clay into a long, thin snake. To get the ridges seen in the image, gently twist the snake or, for better results, push the clay through a clay extruder fitted with a star tip. -
Pipe onto the base:
Apply a thin layer of liquid clay to the top of your yellow base to act as glue. Start coiling your textured pink snake from the outer edge, spiraling inward and upward to create a high mountain of frosting. -
Taper the top:
As you reach the peak of the swirl, gently pinch the end of the clay snake to a point and tuck it slightly downward so it looks like a natural piping finish. -
Add texture:
If you didn’t use an extruder, take a needle tool and gently score spiral lines following the flow of the clay snake to mimic piping bag ridges.
Scented Clay
Mix a tiny drop of vanilla or strawberry fragrance oil into the clay before baking to make your magnet smell as sweet as it looks.
Step 3: Details & Assembly
-
Make the cherry:
Roll a small ball of red clay. Press it gently onto the very top of your frosting peak. You can use a dab of liquid clay here to ensure it stays put. -
Add the stem:
Cut a short piece of thin brown wire (about 1 cm). Bend it slightly for a natural look and insert it into the top of the cherry. -
Sprinkle time:
Roll extremely tiny balls of red clay for the sprinkles. Gently press them randomly into the pink frosting ridges. Use a needle tool to pick them up if your fingers are too large for this delicate work. -
Bake the project:
Place your cupcake on a ceramic tile or baking sheet. Bake according to your polymer clay manufacturer’s instructions (usually 275°F/135°C for 15-30 minutes). -
Cool and paint:
Let the piece cool completely. If you didn’t use clay for the smile, use a fine black paint pen to draw a simple, curved line between the eyes now. -
Seal the cherry:
Apply a coat of gloss glaze specifically to the cherry (and sprinkles if you like) to make them look wet and shiny like real maraschino cherries. -
Attach the magnet:
Flip the cupcake over. Apply a generous dab of E6000 glue to the center of the bottom and press your round magnet firmly into place. Let it cure for 24 hours.
Now you have a charming little sweet treat to hold up your grocery lists and photos
Toadstool Mushroom Trio

Bring a touch of the enchanted forest into your kitchen with these adorable mushroom magnets that feature sweet smiling faces. Using polymer clay and clever painting techniques, you’ll create a finish that looks surprisingly like carved wood.
How-To Guide
Materials
- White or beige polymer clay
- Strong round craft magnets (ceramic or neodymium)
- Acrylic paints (burnt umber, cream, red, pink, white, black)
- Small paintbrush (fine tip)
- Toothbrush or stiff bristle brush
- Aluminum foil
- Super glue or E6000
- Gloss or matte varnish (optional)
- Sculpting tools (needle tool, dotting tool)
Step 1: Sculpting the Shapes
-
Create the armature:
Start by scrunching small pieces of aluminum foil into rough mushroom cap and stem shapes. This saves clay and makes the magnets lighter. -
Condition the clay:
Warm up your polymer clay in your hands until it becomes soft and pliable. Roll it out into a thin sheet, about 1/8 inch thick. -
Wrap the caps:
Cover your foil cap armatures with the clay sheet, smoothing out any seams with your fingers until you have a perfect dome shape. -
Form the stems:
Roll a cylinder of clay for the stem, slightly wider at the bottom. Press it onto the underside of the cap, blending the clay where they join so it’s secure. -
Add texture:
This is where the magic happens. Take a stiff toothbrush and gently press it all over the stem vertically to create tiny striations that mimic wood grain. -
Refine the surface:
Smooth the cap surface with a little water or baby oil on your finger to ensure it’s perfectly prepared for painting later. -
Embed the magnet:
Press your chosen magnet firmly into the back of the mushroom cap or stem to create an indentation. Remove the magnet before baking—we will glue it in later. -
Bake:
Bake the clay pieces according to the manufacturer’s instructions on your clay package. Let them cool completely before handling.
Step 2: Painting and Finishing
-
Base coat the stems:
Mix a diluted wash of burnt umber and cream paint. Brush this over the stems, letting it settle into the texture lines you made earlier to enhance the wood effect. -
Paint the caps:
Paint the caps in your chosen colors—a soft ochre, a vibrant red, and a muted pink work beautifully as a set. You might need two thin coats for full coverage. -
Add the spots:
Using a dotting tool or the back of a paintbrush handle, dip into white paint and stamp varied sizes of polka dots onto the caps. -
Draw the faces:
With your finest brush or a black paint pen, carefully draw small, wide-set eyes and a tiny ‘u’ shaped smile halfway up the cap. -
Add character:
I like to add tiny white highlights inside the black eyes to bring them to life. Then, dab the tiniest amount of pink paint on the cheeks for a blush effect. -
Seal the work:
Once fully dry, protect your paint job with a coat of varnish. A matte finish looks more like natural wood, while gloss makes them look like ceramic. -
Attach the magnets:
Place a drop of strong glue into the indentation you made earlier and press the magnet in. Let it cure fully according to the glue instructions.
Natural Wood Texture
For realistic wood grain, drag a needle tool verticaly down the wet clay stem. Vary pressure to create deep and shallow groves before painting.
Seasonal Variations
Swap the classic red colors for deep purples and oranges for Halloween, or use pastels and add tiny clay flower crowns for a spring look.
Now your fridge is home to a cheerful little family of fungi that are sure to make you smile every time you grab a snack
Sleepy Cat Loaf Magnets
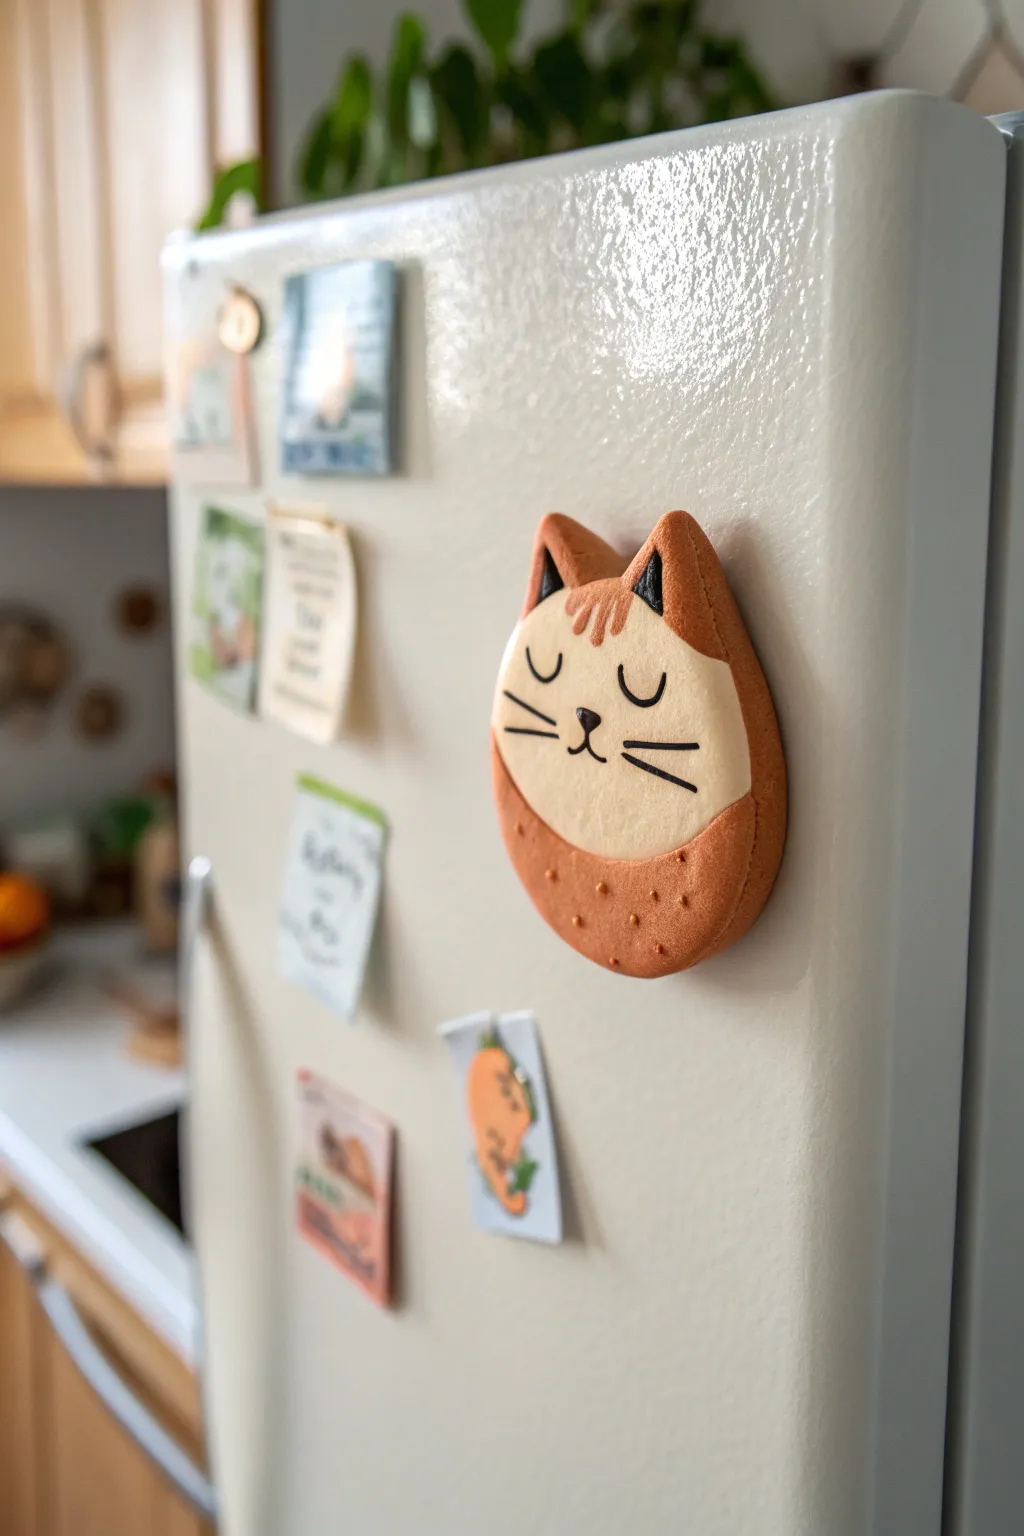
This charming, teardrop-shaped magnet captures the perfect serenity of a snoozing cat in warm, earthy tones. Its smooth matte finish and minimalist painted details give it a modern, almost cookie-like ceramic appearance that adds instant coziness to your fridge door.
Step-by-Step
Materials
- Polymer clay (terra cotta/rust orange)
- Polymer clay (cream/off-white)
- Strong round craft magnet
- Rolling pin or clay roller
- X-acto knife or clay blade
- Needle tool or toothpick
- Black acrylic paint
- Fine detail paintbrush (size 00 or 0)
- Matte varnish or sealant
- Oven for baking
- Strong adhesive (E6000 or super glue)
Step 1: Shaping the Base
-
Condition the clay:
Begin by thoroughly conditioning your terra cotta colored polymer clay. Knead it in your hands until it is warm, soft, and pliable to prevent cracking later. -
Roll the main slab:
Roll the terra cotta clay out into a thick slab, approximately 1/4 inch thick. You want it substantial enough to hold the magnet but not so heavy it slides down the fridge. -
Cut the teardrop shape:
Using your clay blade or knife, cut out a rounded teardrop shape. The bottom should be a wide semi-circle, tapering gently up to a rounded point at the top. Smooth the cut edges with your fingertip. -
Indent the ears:
At the top point of the teardrop, use your knife to make a small V-shaped notch in the center. Gently reform the two resulting points to look like soft, triangular cat ears.
Step 2: Creating the Face
-
Prepare the cream clay:
Condition a smaller amount of cream or off-white clay. Roll this out much thinner than the base, about 1/16 of an inch. -
Cut the face insert:
Cut a shape that matches the top two-thirds of your rust base but is slightly smaller. The bottom edge of this cream piece should be curved like a smile to mimic the cat’s chin line. -
Attach the face:
Gently press the cream clay onto the terra cotta base. I like to start from the center and smooth outward to avoid trapping air bubbles. Ensure the ears line up with the terra cotta backing. -
Blend the seams:
Use your finger or a silicone tool to gently tap the edges of the cream clay so it bonds seamlessly with the rust clay underneath, creating a single smooth surface.
Keeping White Clay Clean
Cream clay acts like a dust magnet. Wash your hands thoroughly after handling the rust-colored clay before touching the cream clay, or use baby wipes to clean your fingers and tools.
Step 3: Adding Texture & Baking
-
Add faux freckles:
Using the needle tool, gently poke small, shallow dots into the exposed terra cotta area at the bottom of the shape. This texture mimics the porosity of a cookie or ceramic ware. -
Clean up debris:
Check the surface for any dust or fingerprints. You can lightly wipe it with a tiny amount of baby oil or rubbing alcohol to smooth imperfections before baking. -
Bake the clay:
Place the cat on a parchment-lined baking sheet. Bake according to your specific brand’s package instructions (usually 275°F for 15-30 minutes). Let it cool completely before moving to the next phase.
Make it a Set
Create a whole clowder of cats by varying the base colors. Try a charcoal grey base with a white face, or a mustard yellow base for a ginger tabby look.
Step 4: Painting & Fishing
-
Paint the closed eyes:
Using black acrylic paint and your finest brush, paint two small ‘U’ shapes in the center of the cream face for the sleepy eyes. -
Add nose and mouth:
Paint a tiny inverted triangle for the nose between the eyes. Draw a small anchor shape extending down from the nose to form the mouth. -
Detail the whiskers:
With a steady hand, paint three horizontal lines on each cheek. Keep the lines thin and tapered at the ends for a delicate look. -
Paint ear details:
Add small black triangles inside the cream ear shapes to give them depth. You can also paint a few tiny vertical dashes on the forehead for markings. -
Seal the piece:
Once the paint is fully dry, brush on a coat of matte varnish. This protects the paint and gives the piece that consistent, manufactured finish seen in the photo. -
Attach the magnet:
Flip the cat over. Apply a dot of strong adhesive to the back and press your round magnet firmly into place. Let it cure for 24 hours to ensure a permanent bond.
Once the glue is fully cured, your sleepy feline is ready to guard your grocery list
Baby Dinosaur Minis
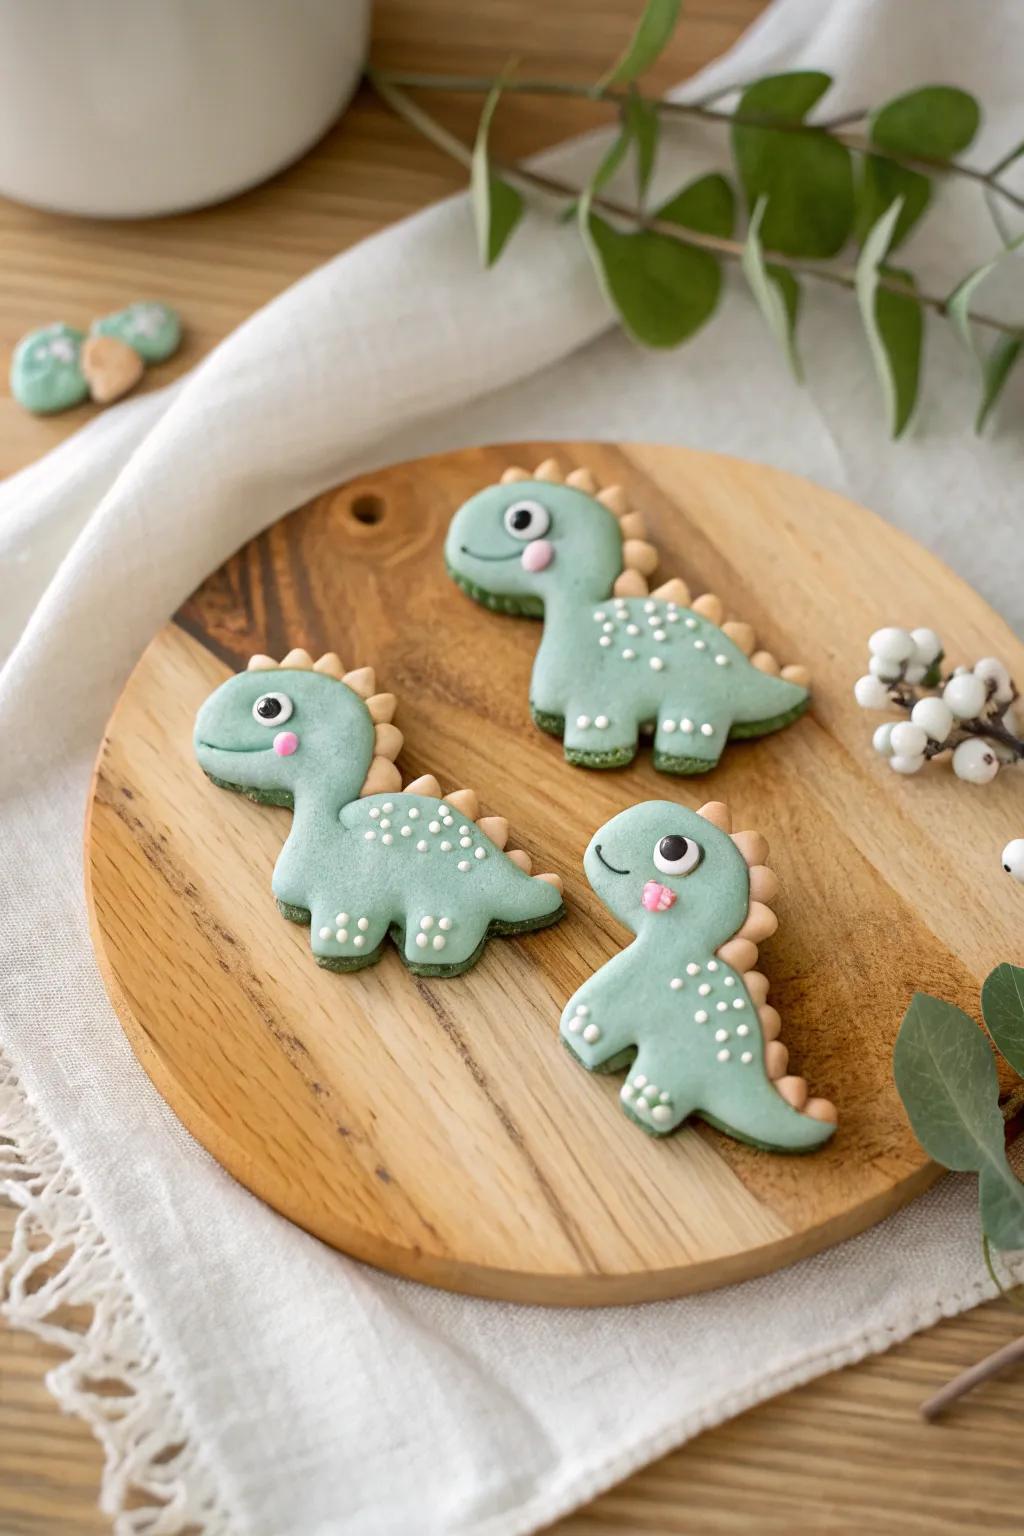
These adorable baby dinosaur magnets bring a playful pop of color to your fridge or workspace, featuring a charming layered design with soft teal bodies and tiny beige spikes. Their sweet, simple expressions and speckled backs make them a delightful weekend crafting project for dinosaur lovers.
Step-by-Step Guide
Materials
- Polymer clay (Teal/Mint Green, Dark Green, Beige, White, Black, Pink)
- Small round magnet per dinosaur
- Rolling pin or clay machine
- Dinosaur cookie cutter (or paper template and craft knife)
- Needle tool or toothpick
- Small dotting tool or ball stylus
- Super glue (cyanoacrylate)
- Baking sheet and parchment paper
- Gloss glaze (optional)
Step 1: Prepping the Base and Body
-
Condition the clays:
Begin by thoroughly kneading your dark green and teal/mint green clays separately until they are soft and pliable. This prevents cracking later. -
Create the dark base layer:
Roll out the dark green clay to about 3mm thickness. Use your dinosaur cutter to stamp out the foundational shape. If you don’t have a cutter, trace a paper template with a craft knife. -
Create the top body layer:
Roll out the teal/mint green clay slightly thicker, perhaps 4-5mm, to give the dinosaur a nice rounded volume. Cut out the same dinosaur shape. -
Soften the edges:
Gently tap the edges of the teal cutout with your finger to round them off so the clay doesn’t look sharp or blocky. I like to smooth it until it looks like a soft cookie. -
Layer the pieces:
Place the teal body directly on top of the dark green base. Press down gently to adhere them without distorting the shape. The dark green should peek out slightly at the bottom, creating a shadow effect.
Fingerprint Fix
Sticky clay leaving fingerprints? Lightly dust your fingertips with cornstarch before smoothing the top layer, or wipe the raw clay gently with baby oil before baking.
Step 2: Adding Spikes and Details
-
Make the spikes:
Roll tiny balls of beige clay. flatten them slightly into triangles or teardrop shapes. -
Attach the spikes:
Press these beige triangles along the dinosaur’s back, tucking them slightly between the dark green base and the teal body layer for a seamless look. -
Texture the feet:
Use a needle tool to gently impress two or three vertical lines at the bottom of the legs to simulate toes. -
Add white spots:
Create very tiny balls of white clay and press them onto the dinosaur’s back in a random pattern for texture. Alternatively, you can paint these on after baking.
Step 3: Face and Finishing
-
Form the eye:
Flatten a small ball of white clay into a disc and press it onto the head. Add a smaller black ball on top for the pupil, positioning it slightly off-center for a cute look. -
Add a highlight:
Place a microscopic dot of white clay onto the black pupil to bring the character to life. -
Create the blush:
Take a tiny amount of pink clay, flatten it into an oval, and press it just below the eye to give the dino rosy cheeks. -
Carve the smile:
Use a needle tool or a small clay sculpting tool to carve a simple curved line for the mouth just under the snout. -
Baking time:
Place your dinos on parchment paper and bake according to your clay manufacturer’s instructions (usually 275°F/135°C for 15-30 minutes). -
Attach the magnet:
Once ample cooling time has passed, use a drop of super glue to attach a strong magnet to the back of the dark green layer.
Textured Dinosaurs
Before baking, gently press a piece of coarse sandpaper or an old toothbrush onto the teal body to give the dinosaur a realistic, bumpy skin texture.
Your little herd of prehistoric friends is now ready to guard your shopping lists and photos
Panda Face Discs

Transform simple white discs into adorable panda faces with this charming clay project. These minimalist magnets feature bold black details and a sweet expression that adds a touch of whimsy to any refrigerator or magnetic board.
Step-by-Step Tutorial
Materials
- White air-dry clay or polymer clay
- Rolling pin
- Circle cookie cutter (approx. 2-3 inches)
- Black acrylic paint
- Fine detail paintbrush
- Small round magnet
- Strong craft glue (e.g., E6000)
- Parchment paper or craft mat
- Water cup (for smoothing)
- Mod Podge or matte varnish (optional)
Step 1: Shaping the Base
-
Prepare the Clay:
Begin by conditioning your white clay in your hands until it is pliable and smooth. If using air-dry clay, keep a small bowl of water nearby to wet your fingers if cracks appear. -
Mix Black Clay (Optional):
If you are using polymer clay, separate a very small marble-sized amount and mix it with black pigment or use pre-colored black clay for the ears. If using air-dry clay, you will shape the ears white and paint them later. -
Roll the Dough:
Place the white clay on a sheet of parchment paper. Use your rolling pin to flatten it to an even thickness of about 1/4 inch (6mm). You want it thick enough to be sturdy but not too heavy for the magnet. -
Cut the Face:
Press your circle cookie cutter firmly into the rolled clay to create a perfect disc. Remove the excess clay from around the cutter before lifting it away. -
Smooth the Edges:
Dip your finger in a tiny bit of water and run it gently around the circumference of the cut circle to soften any sharp edges left by the cutter.
Smooth Operator
Before drying, dip a finger in water and gently rub the clay surface in circular motions. This erases fingerprints and creates that porcelain-smooth finish.
Step 2: Ears and Drying
-
Form the Ears:
Pinch off two pea-sized balls of clay. Roll them between your palms until round, then flatten them slightly into thick discs. -
Attach the Ears:
Press these small discs onto the top edge of your main circle, spaced apart like panda ears. I find it helps to score the touching surfaces slightly with a toothpick and add a dab of water (or liquid clay for polymer) to ensure a strong bond. -
Blend the Seams:
Use a modeling tool or your fingertip to gently smooth the back seam where the ears join the head, keeping the front connection distinct but secure. -
Drying Time:
If using air-dry clay, let the panda face dry on a flat surface for 24-48 hours, flipping occasionally for even drying. If using polymer clay, bake according to the package instructions and let cool completely.
Step 3: Painting the Details
-
Outline the Eyes:
Once dry and hard, load a fine detail brush with black acrylic paint. Paint two large, slightly slanted oval patches for the panda’s eye areas. They should angle slightly inward toward the nose. -
Paint the Ears:
Carefully paint the two ear tabs entirely black. Ensure you cover the sides of the ears, but try to keep a clean line where the ear meets the white face. -
Add the Nose:
Paint a small, inverted triangle or heart shape in the center of the face, slightly below the level of the eye patches, to serve as the nose. -
Smile details:
Using the very tip of your finest brush, draw two small curved lines extending downward and outward from the bottom point of the nose to create the mouth. -
Eye Highlights:
Inside the black eye patches, create the actual eyes. You can leave a negative space circle if you are skilled, or easier yet, wait for the black paint to dry and paint a white circle inside. Then add a smaller black pupil and a tiny white reflection dot.
Uneven Patches?
If your black eye patches look uneven or shaky, use a black Posca paint pen or permanent marker instead of a brush for steadier control.
Step 4: Assembly
-
Seal:
To protect your paint job, apply a thin coat of matte varnish or Mod Podge over the front of the face. This makes it easier to clean later. -
Attach Magnet:
Flip the panda over. Squeeze a generous dot of strong craft glue onto the center of the back. -
Press and Dry:
Press your magnet into the glue. Let the adhesive cure fully (usually overnight) before sticking your new friend to the fridge.
Now your fridge has a friendly new face to greet you every time you reach for a snack
Succulent Pot Cuties
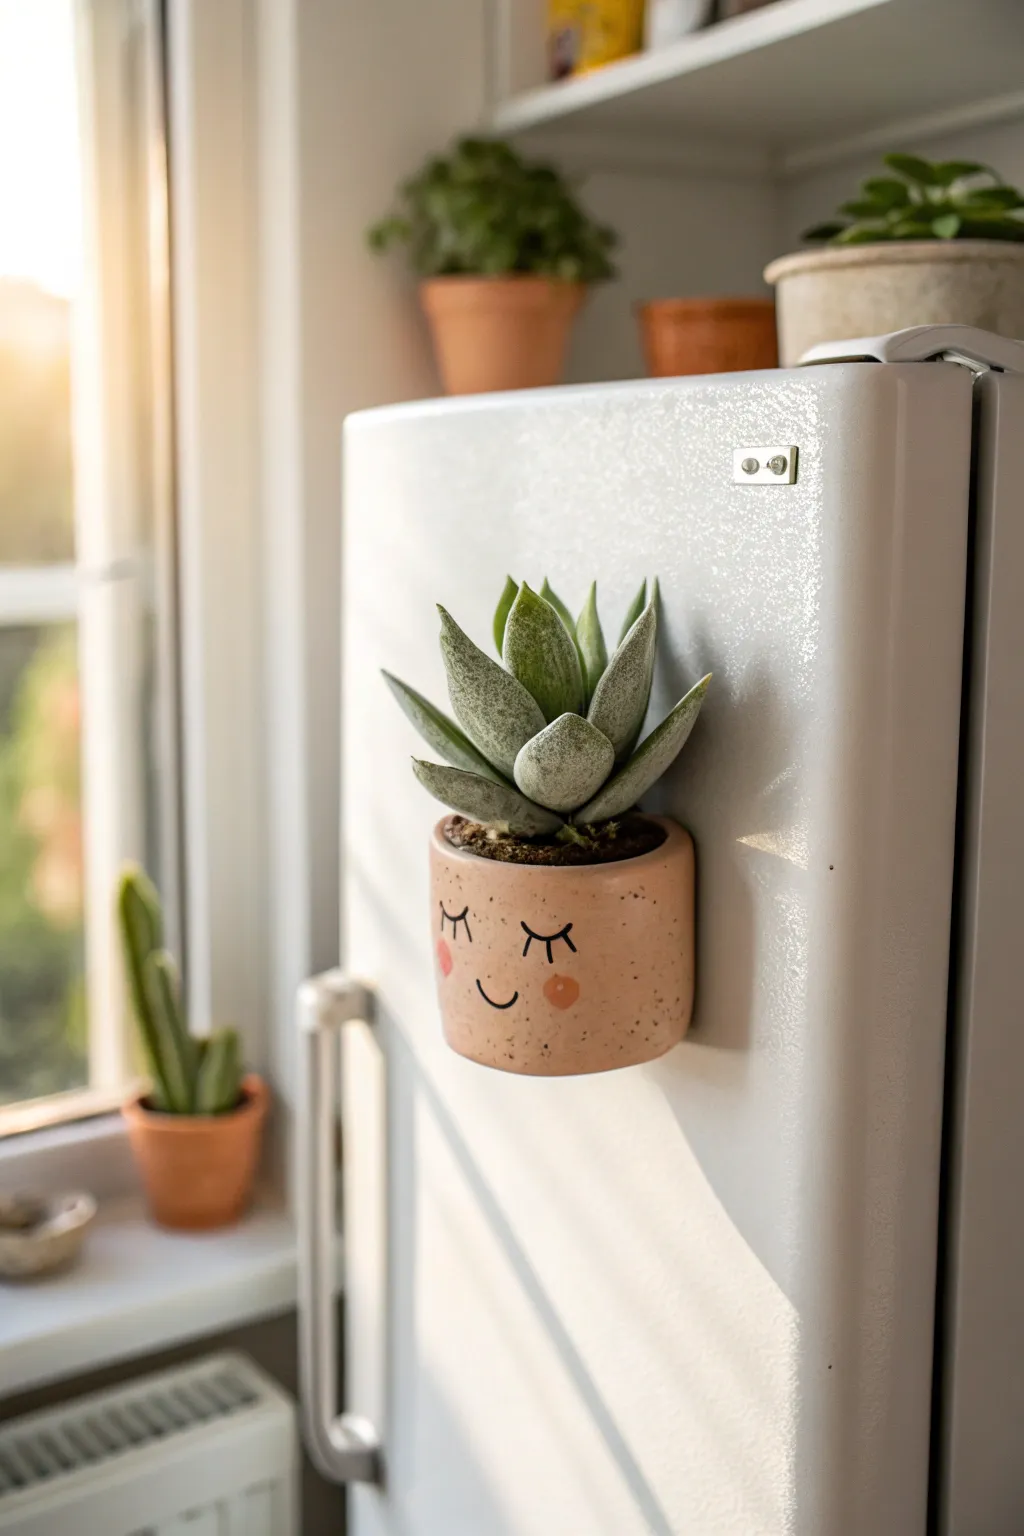
Brighten up your kitchen with this adorable magnetic mini-planter that adds a touch of greenery to your fridge door. Modeled as a tiny, speckled pot with a sweet sleeping face, this clay project is perfect for holding lightweight faux succulents.
Step-by-Step
Materials
- Air-dry clay (white or terra cotta)
- Small rolling pin
- Circle cookie cutter (approx. 2-3 inches)
- Craft knife or clay tool
- Water container and slip brush
- Sandpaper (fine grit)
- Acrylic paints: Peach/Light Terracotta, Black, Pink, Dark Brown
- Old toothbrush (for speckling)
- Paintbrushes: fine detail brush, small flat brush
- Strong neodymium magnets (2-3)
- Strong adhesive (E6000 or heavy-duty super glue)
- Small faux succulent
- Matte varnish or sealant
Step 1: Shaping the Pot
-
Prepare the base:
Roll out a slab of clay to about 1/4 inch thickness. Use your circle cutter to punch out a round base for the pot. -
Create the walls:
Roll out a long, rectangular strip of clay, also 1/4 inch thick. This strip needs to be long enough to wrap around the circumference of your base circle. -
Form the cylinder:
Wrap the rectangular strip around the circular base to form a cylinder. Cut off any excess length with your craft knife, creating a clean vertical seam. -
Seal the seams:
Dip your finger or a tool in water to create a slurry ‘slip.’ Thoroughly smooth the vertical seam where the wall ends meet, and blend the bottom edge of the wall onto the circular base so they become one solid piece. -
Refine the shape:
Gently gently press the walls to ensure the cylinder is even. Smooth out the top rim with a wet finger to get a nice, rounded edge like a real ceramic pot. -
Flatten the back:
Since this will sit against a flat fridge, gently press one side of the cylinder against your work surface to create a slightly flattened area on the back exterior. This increases the surface area for the magnets later. -
Dry completely:
Set the pot aside to air dry for 24-48 hours. Turn it occasionally to ensure even drying.
Pro Tip: Magnet Strength
Clay can be heavy! Use multiple strong neodymium magnets rather than cheap craft magnets. Test the hold before finalizing your glue.
Step 2: Decorating & Painting
-
Sand for smoothness:
Once bone dry, use fine-grit sandpaper to smooth out any bumps, fingerprints, or rough edges on the rim. -
Base coat:
Paint the entire exterior and inner rim with a peach or light terracotta acrylic paint. I usually apply two coats for solid opacity, letting it dry between layers. -
Add the speckles:
Mix a small amount of dark brown paint with a drop of water to thin it. Dip an old toothbrush into this mix, then run your thumb across the bristles to flick tiny speckles onto the pot for that ceramic texture look. -
Paint the face features:
Using your finest detail brush and black paint, carefully draw two curved lines for closed eyes. Add three tiny lashes to the outer corner of each eye. -
Add the smile:
Paint a small, simple ‘u’ shape centered below the eyes for the smile. -
Rosy cheeks:
Dip a small round brush or a cotton swab into pink paint. Dab gently below each eye to create soft, round blushed cheeks. -
Seal the work:
Apply a coat of matte varnish over the entire pot to protect the paint and give it a finished, professional look.
Step 3: Assembly
-
Attach magnets:
Apply a strong adhesive to the flattened back area of the pot. Press two or three neodymium magnets into the glue. Let this cure fully according to the glue instructions (often 24 hours). -
Insert greenery:
Place your faux succulent inside the pot. If it sits too low, you can stuff the bottom with a little tissue paper or floral foam to prop it up.
Level Up: Real Plants
To use a real air plant, seal the inside with waterproof varnish so misting doesn’t degrade the clay over time.
Now stick your smiling creation to the fridge and enjoy a cheerful greeting every time you reach for a snack
Sunflower Smile Magnets
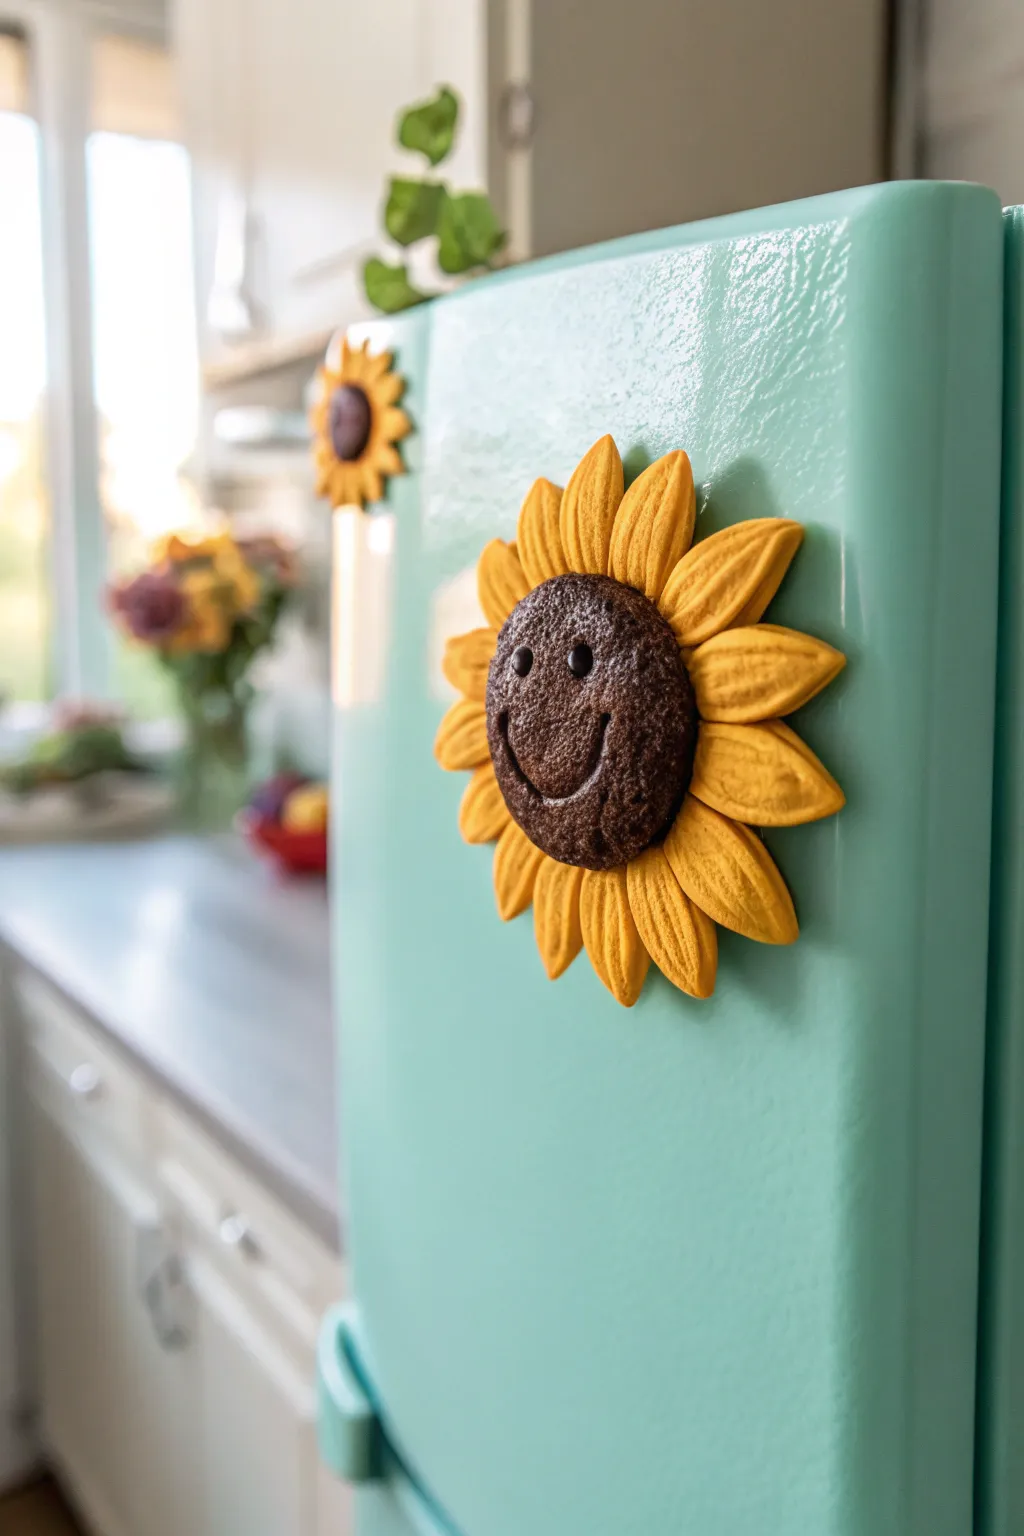
Brighten up your kitchen decor with this cheerful, textured sunflower magnet featuring a sweet, smiling face. The design combines the warm, golden hues of summer with a delightful tactile finish that looks almost like a sugar cookie.
Step-by-Step Tutorial
Materials
- Polymer clay (Yellow/Goldenrod)
- Polymer clay (Dark Chocolate Brown)
- Small rolling pin
- Circle cutter (approx. 1.5 inch)
- Leaf-shaped cutter or teardrop cutter
- Sculpting tools (needle tool and ball tool)
- Texture sponge or stiff toothbrush
- Tiny black beads or black clay for eyes
- Strong craft glue (E6000 recommended)
- Round ceramic or neodymium magnet
- Oven based on clay instructions
- Parchment paper
Step 1: Creating the Center
-
Condition the clay:
Start by warming up your dark chocolate brown clay in your hands. Knead it thoroughly until it is soft, pliable, and easy to shape without cracking. -
Form the base circle:
Roll the brown clay into a smooth ball, then flatten it gently into a thick disc. Use your circle cutter to ensure it is perfectly round, aiming for a thickness of about 1/4 inch. -
Add texture:
Take your texture sponge or a clean, stiff toothbrush and gently press it all over the surface of the brown disc. You want a distinct stippled effect that resembles the seeds of real sunflowers. -
Sculpt the smile:
Using a needle tool or a small curved sculpting tool, carve a wide, U-shaped smile into the lower half of the circle. Press deep enough to create a shadow but be careful not to cut all the way through. -
Place the eyes:
For the friendly gaze, press two small indentations with a ball tool above the smile. Insert two tiny black beads firmly into the clay, or roll two miniscule balls of black clay and press them into place. -
Refine the expression:
Soften the edges of the smile slightly with your fingertip so the expression looks friendly and organic rather than sharp.
Step 2: Forming the Petals
-
Prepare yellow clay:
Condition the goldenrod yellow clay until soft. I find mixing a tiny bit of orange into standard yellow gives it that rich, sun-baked hue seen in the photo. -
Roll out the sheet:
Roll the yellow clay into a sheet approximately 1/8 inch thick. Uniform thickness is key here for consistent petals. -
Cut the shapes:
Use a teardrop or leaf-shaped cutter to punch out 12-15 petals. If you don’t have a cutter, cut elongated ovals and pinch one end to a point. -
Detail the petals:
Take one petal and use a needle tool to score a central vein down the middle. Add lighter scoring marks radiating outward to mimic petal texture. -
Shape the leaves:
Gently pinch the outer tip of each petal to sharpen it, and curve the edges slightly upward to give it a cupped, 3D appearance. -
Create the first layer:
Flip your brown center face-down carefully. Attach a layer of petals around the back perimeter, pressing the base of each petal firmly onto the back of the brown disc. -
Add the second layer:
To make it full and lush, add a second layer of petals behind the first, staggering them so they peek through the gaps of the first layer. -
Secure the back:
Once all petals are attached, smooth the clay on the back where the petals meet the center to ensure a strong bond. You can add a thin disc of yellow clay over the join for extra security.
Texturing Secret
To get that specific ‘cookie-like’ texture on the brown center, try using a crumpled ball of aluminum foil. Roll it gently over the clay for an organic, pitted seed look.
Step 3: Baking and Assembly
-
Clean up:
Before baking, do a final check for fingerprints. A little bit of baby oil on your finger can smooth these away instantly. -
Bake the project:
Place your sunflower on a parchment-lined baking sheet. Bake according to your polymer clay package directions (usually 275°F for 15-30 minutes depending on thickness). -
Cool down:
Let the piece cool completely in the oven with the door slightly ajar. Sudden temperature changes can make the clay brittle. -
Attach the magnet:
Apply a dab of strong adhesive like E6000 to the back of the cooled flower. Press your round magnet into the glue. -
Final dry time:
Allow the glue to cure for at least 24 hours before sticking your new creation onto the fridge to ensure it holds up to daily use.
Fixing Droopy Petals
If your petals droop while sculpting, support them with small bits of polyester fiberfill or paper towel during the baking process to keep their perky, curved shape.
Now your fridge has a sunny disposition, ready to greet you every time you reach for a snack
Tiny Envelope Love Notes
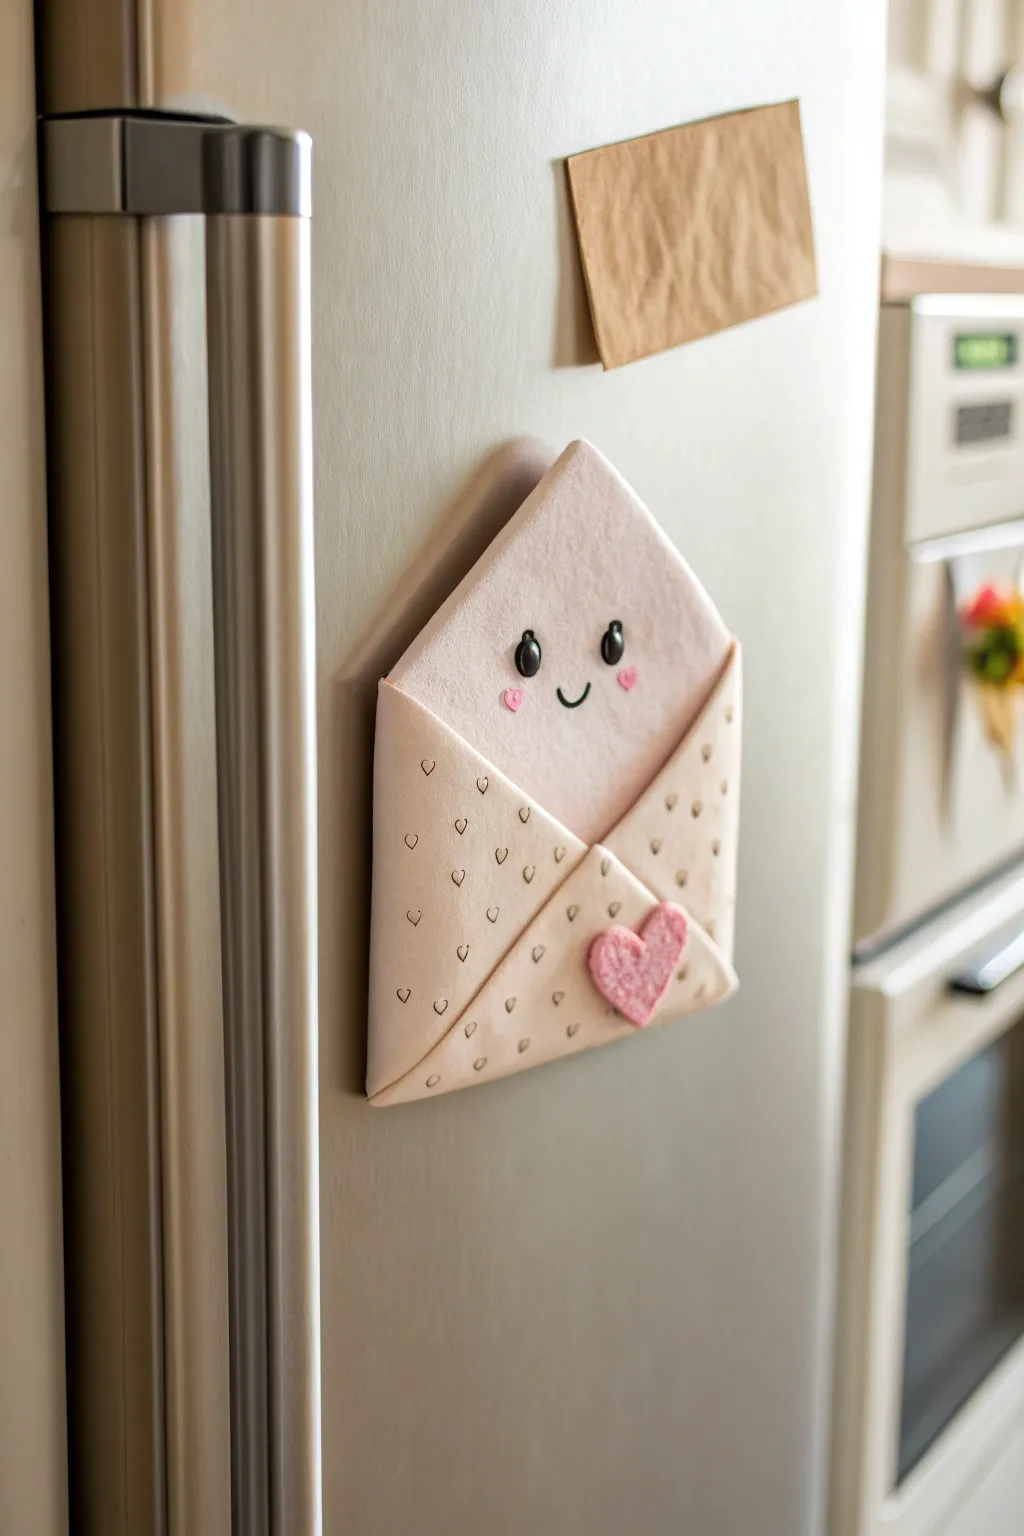
Transform your fridge into a messenger of affection with this adorable kawaii envelope magnet. Crafted from polymer clay to look like a soft, puffy love note, it features a sweet smiling face and delicate heart details that make everyday reminders feel special.
Detailed Instructions
Materials
- Polymer clay (pale pink or beige, bright pink, black)
- Clay rolling pin or acrylic roller
- Craft knife or scalpel
- Small heart-shaped cutter (optional)
- Small dotting tool or toothpick
- Needle tool
- Brown acrylic paint (for the pattern)
- Fine detail paintbrush (000 size)
- Strong craft magnet
- Superglue or E6000
- Oven for baking
Step 1: Shaping the Base
-
Preparation:
Begin by conditioning your pale pink or beige polymer clay until it is soft and pliable. This prevents cracks during the folding process. -
Rolling out:
Roll the clay flat to a thickness of about 1/8th of an inch (3mm). It needs to be thick enough to be sturdy but thin enough to fold without breaking. -
Cutting the square:
Using your craft knife, cut out a perfect square. A 2.5-inch square is a good manageable size for a magnet. -
Rotating to diamond:
Rotate the square so it sits like a diamond shape in front of you, with points at the top and bottom. -
Folding the sides:
Gently fold the left and right corners inward so they meet in the center. Press the seams very lightly just to tack them in place, keeping the rounded ‘puffy’ look on the edges. -
Folding the bottom:
Fold the bottom corner up to meet the center point where the side flaps touch. This creates the classic envelope packet shape. -
Smoothing seams:
Use your finger or a silicone tool to gently smooth the bottom seams where the clay layers overlap, creating a unified piece without squishing the air out of the folds.
Clean Clay Tip
Keep baby wipes nearby to clean your hands especially between colors. White and pale pink clay pick up dust easily, so wipe your work surface and tools frequently.
Step 2: Adding Kawaii Details
-
Creating the eyes:
Roll two tiny balls of black clay. Flatten them slightly into ovals and press them onto the upper triangular flap of the envelope. -
Adding the shine:
Roll two microscopic balls of white clay (or use white paint after baking) and place one on the upper right side of each black eye for a sparkling look. -
Sculpting the smile:
Roll a very thin snake of black clay. Cut a tiny U-shape segment and gently press it between the eyes to create a happy smile. -
Applying rosy cheeks:
Take two tiny bits of bright pink clay, shape them into miniature hearts or circles, and place them just below the eyes. -
Sealing with love:
Ideally, hand-shape a medium-sized heart from textured pink clay (I like using a toothbrush to give this heart a fuzzy texture) and place it right at the junction where the envelope flaps meet to ‘seal’ it.
Secret Message
Before baking, slip a tiny folded piece of paper with a real hidden message inside the clay pocket. It will act as a permanent secret note sealed inside the art.
Step 3: Finishing and Baking
-
Painting the pattern:
Using thin brown acrylic paint and a fine detail brush, paint tiny, scattered outline hearts all over the bottom three sections of the envelope. Keep the top flap plain to let the face stand out. -
Baking:
Place your creation on a ceramic tile or baking sheet. Bake according to your brand of polymer clay instructions (usually 275°F/135°C for 15-30 minutes). -
Cooling:
Let the piece cool completely in the oven with the door slightly ajar to prevent thermal shock cracks. -
Attaching the magnet:
Flip the hardened envelope over. Apply a dab of superglue or E6000 to the back and press your magnet firmly into place. Let it cure for the glue’s recommended time.
Pop this sweet character on your fridge and enjoy the charming smile every time you reach for a snack
Matte-and-Gloss Finish Cute Sets
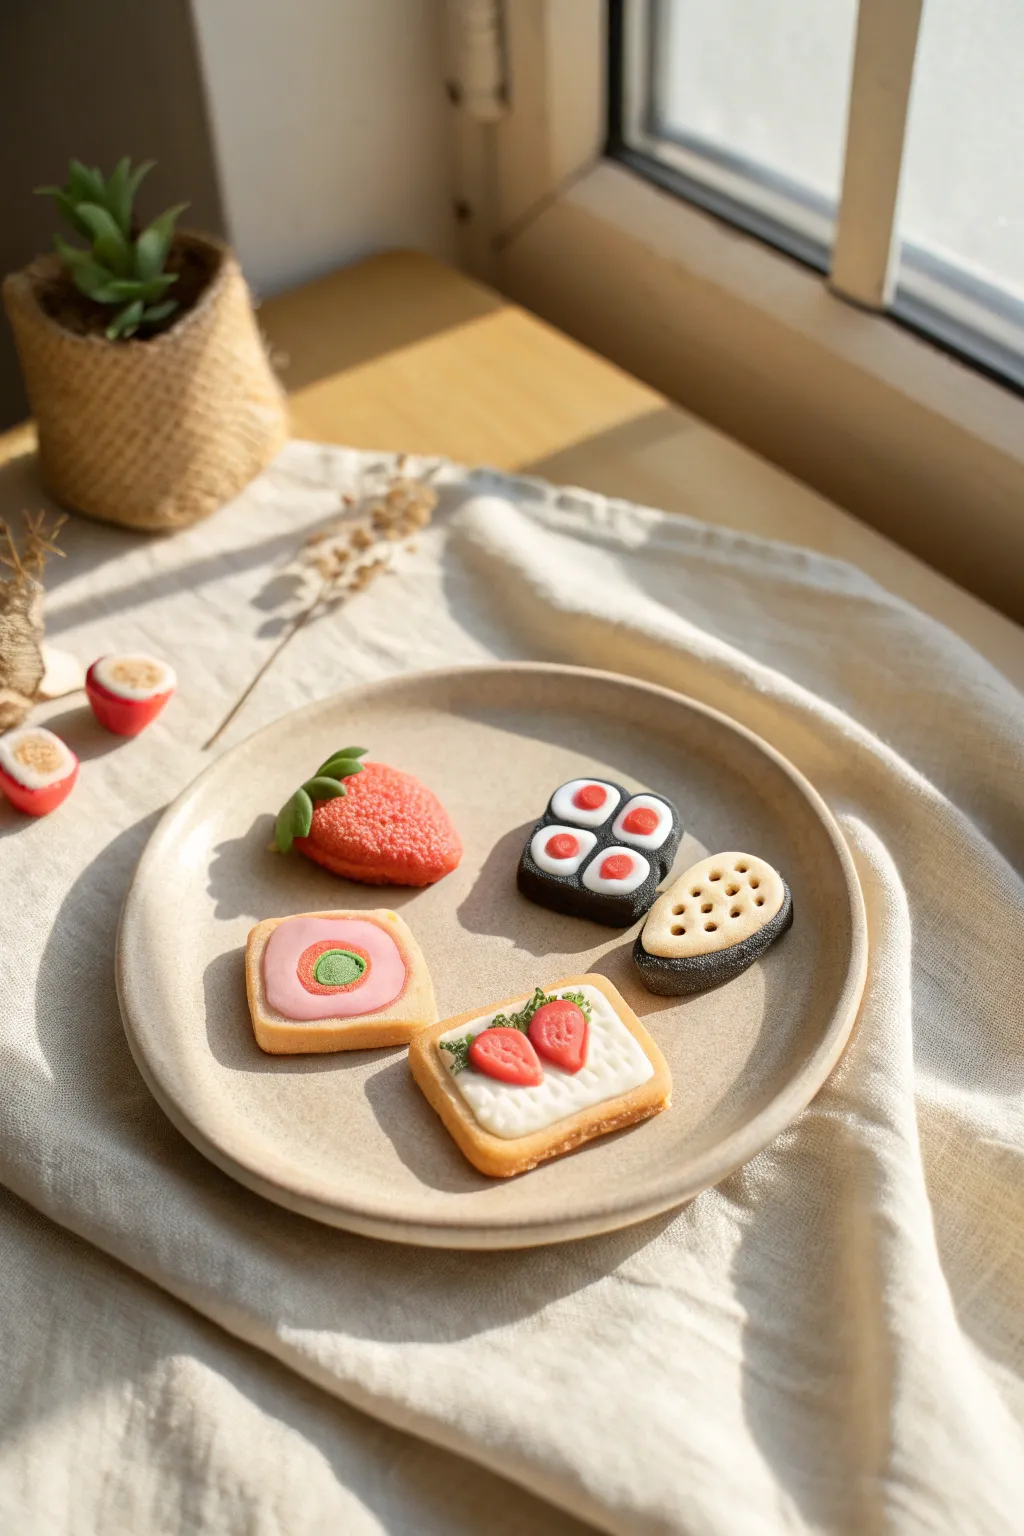
Transform polymer clay into a delightful bento of magnets featuring sweet and savory miniature treats. This project combines sugary textures with realistic matte finishes for a set that looks good enough to eat but is designed for your fridge.
Detailed Instructions
Materials
- Polymer clay (red, white, black, tan, light pink, green)
- Texturing tools (old toothbrush, needle tool, sandpaper)
- Basic clay tools (rolling pin, cutting blade, small circular cutter)
- Liquid polymer clay (white)
- Soft pastels (brown, orange) for shading
- Paintbrush
- Matte glaze
- Gloss glaze
- Strong craft magnets
- Super glue
Step 1: Shaping the Sweet Strawberry
-
Form the base:
Roll a medium-sized ball of red clay and gently pinch the bottom to form a classic strawberry heart shape, flattening the back side slightly so it will sit flush against a magnet. -
Add texture:
Gently stipple the entire surface with an old toothbrush or a ball tool to create the seeded texture of a real berry. -
Create the leaves:
Flatten a small piece of green clay and cut out a small star shape. Place this on top of the red berry, gently curving the tips downward to look like a calyx. -
Add the stem:
Roll a tiny log of green clay and attach it to the center of the leaves, blending the seam slightly with a silicone tool.
Sticky Fingerprints?
If you see fingerprints on your smooth clay parts, dip a Q-tip in rubbing alcohol or acetone and gently wipe the surface before baking.
Step 2: Crafting the Savory Sushi
-
Build the sushi roll:
Create four tiny cylinders of white clay. Wrap a thin strip of black clay around them to simulate the nori seaweed wrapper. -
Add fillings:
Press small red dots into the center of each white cylinder to mimic tuna or fish roe filling. -
Sculpt the lotus root:
Shape a thick oval of tan clay. Wrap the bottom half in a textured black strip to represent the skin. -
Detail the lotus:
Use a needle tool to poke a symmetrical pattern of holes into the tan surface, creating the iconic lotus root appearance.
Step 3: Baking the Bakery Goods
-
Make the toast base:
Cut a square of tan clay. Use a discarded toothbrush to texture the top surface, giving it a bread-like crumb. -
Create the cream:
Mix a small amount of white clay with liquid polymer clay to create a frosting consistency, or simply smear soft white clay onto the toast center. -
Top with fruit:
Form two tiny red teardrops, flatten them, and press them into the cream to look like sliced strawberries. Add tiny green specks for mint leaves if desired. -
Construct the Swiss roll:
Make a square of tan clay for the cake sponge. Create a smaller inner square of pink clay for the filling. -
Assemble the roll:
Embed a small cylinder of green clay in the center of the pink square to represent matcha cream. Flatten the assembly to look like a cut slice.
Realistic Texture
For the most realistic bread texture, use a folded piece of crumpled aluminum foil instead of a toothbrush. It creates deeper, random craters.
Step 4: Finishing Touches
-
Shade the crusts:
Before baking, use a brush to dust shaved brown and orange pastel chalk onto the edges of the toast and Swiss roll for a baked effect. -
Bake the clay:
Bake all pieces according to your clay package instructions, usually at 275°F (130°C) for about 15-20 minutes. -
Apply finishes:
Once cool, apply matte glaze to the bread and sushi rice parts. Use gloss glaze specifically on the strawberry fruit sections to make them look juicy. -
Attach magnets:
flip the hardened pieces over and use a drop of super glue to attach a magnet securely to the back of each item.
Enjoy arranging your tiny culinary masterpieces on your fridge for a touch of daily cuteness