A good clay box with a lid is basically a tiny treasure vault—and somehow it always feels more magical than a regular bowl. Here are my favorite ways to turn a simple slab-built box into something functional, personal, and seriously fun to pick up and open.
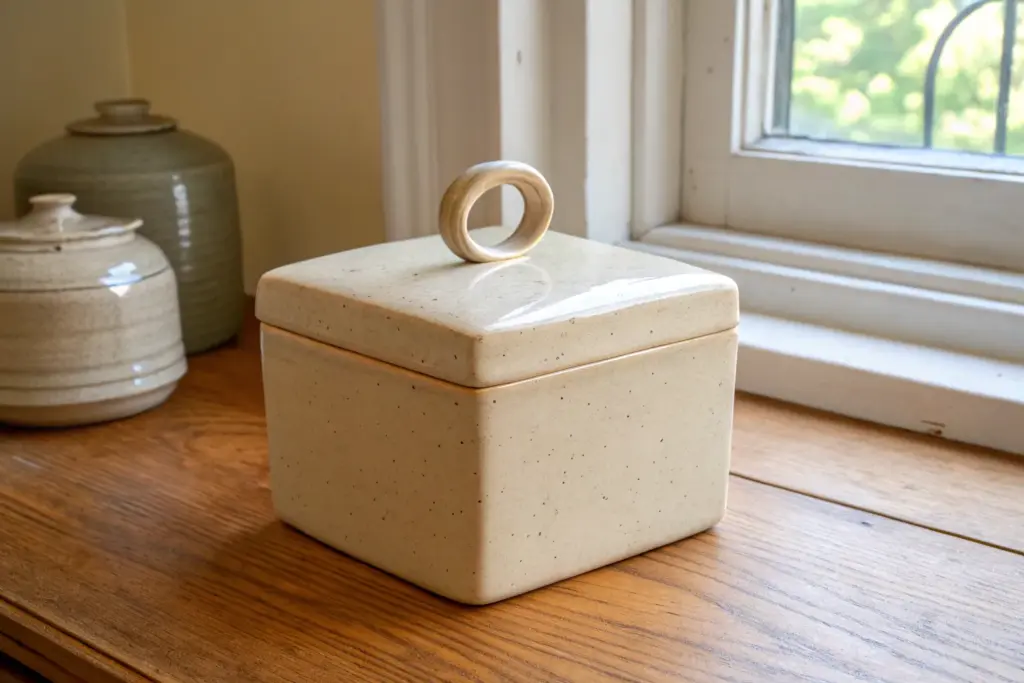
Classic Slab Box With a Clean Lift-Off Lid
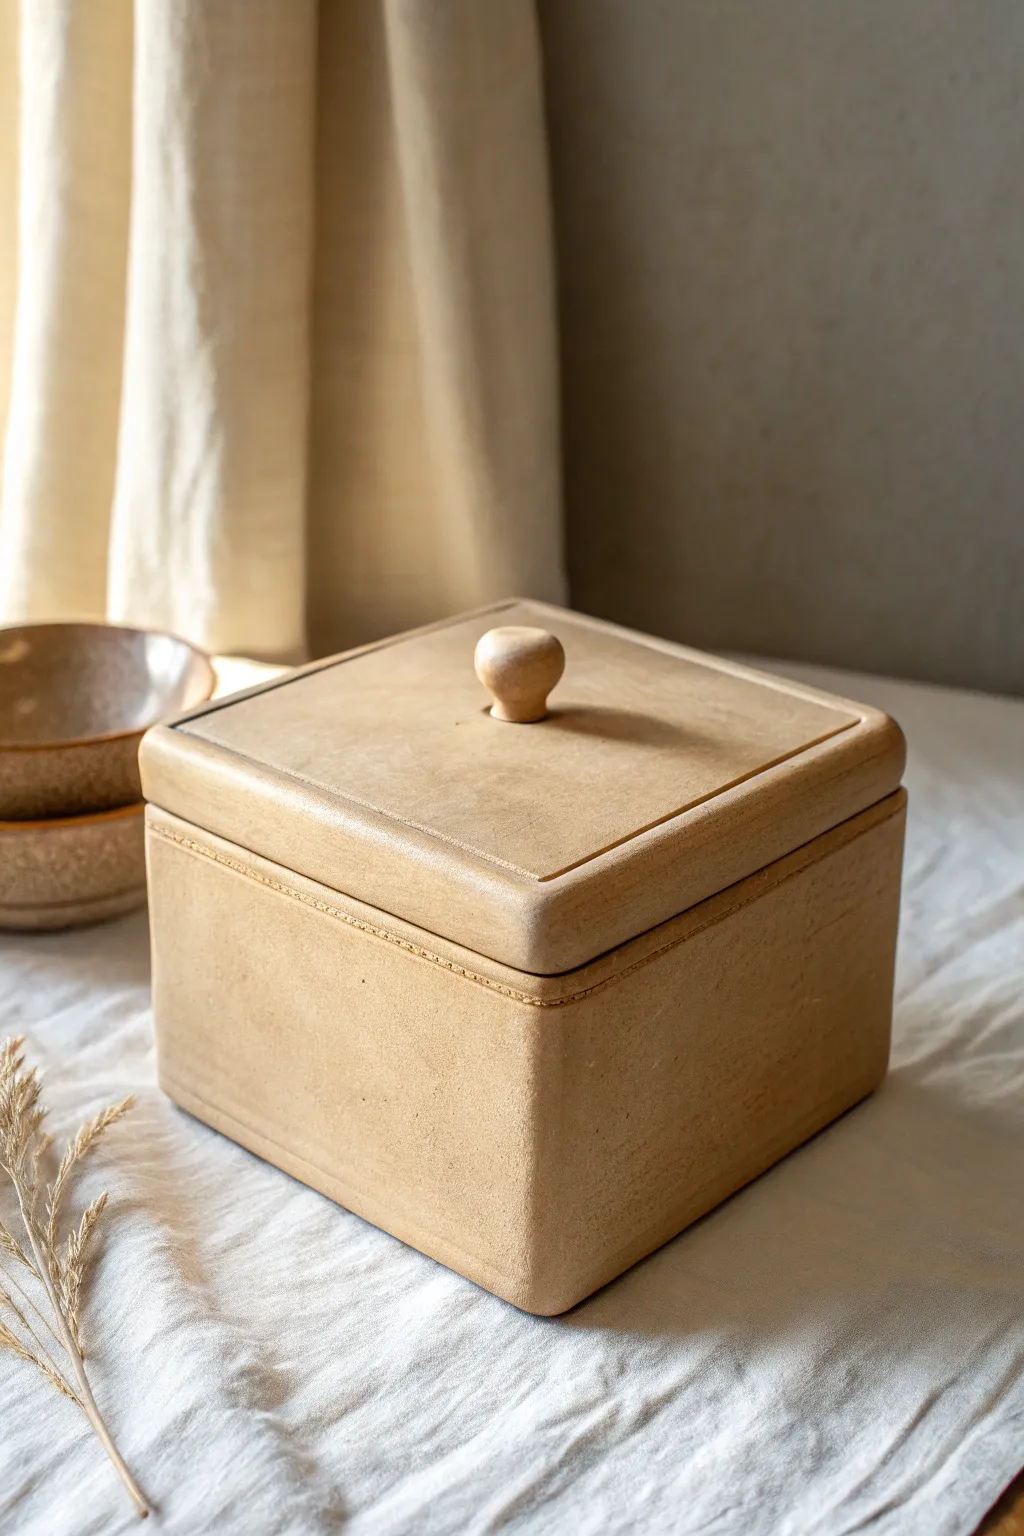
This project captures the essence of understated elegance with a perfectly square, slab-built clay box finished in a warm, sandy tone. The clean lift-off lid features a subtle recessed design and a simple spherical knob, making it a timeless piece for storing trinkets or dry goods.
Detailed Instructions
Materials
- Stoneware clay (buff or speckled)
- Rolling pin
- Guide strips or slab roller (approx. 1/4 inch thickness)
- Fettling knife or needle tool
- Ruler and set square
- Scoring tool (serrated rib or needle tool)
- Slip or vinegar
- Wooden modeling tool
- Sponge
- Cardboard template (optional but recommended)
Step 1: Preparing the Slabs
-
Roll out the clay:
Begin by wedging your clay thoroughly to remove air bubbles. Roll out a large, even slab using guide strips to ensure a uniform thickness of about 1/4 inch. This thickness provides stability without being too heavy. -
Let the slab firm up:
Before cutting, let the slab sit on a ware board until it reaches a ‘leather-hard’ state. This is crucial—if the clay is too soft, your walls will slump; if too dry, they won’t join well. It should hold its shape when lifted but still be flexible. -
Measure and cut components:
Using a ruler and set square, cut out your pieces: one square for the base (e.g., 5×5 inches) and four rectangular walls. For a box this style, the walls should be cut to sit *on top* of the base, so measure their length to match the base sides.
Warping Woes?
If your lid curls up at the corners while drying, flip it over periodically or weight it gently with a small sandbag. Drying slowly is the best defense against warping.
Step 2: Constructing the Box Body
-
Score the edges:
Take your scoring tool and roughen the edges of the base slab where the walls will attach. Do the same for the bottom edges and side edges of your wall pieces. -
Apply slip:
Generously apply slip (clay mixed with water) or vinegar to all scored areas. Vinegar works exceptionally well on drier leather-hard clay as a flocculant. -
Attach the first wall:
Place the first wall on the base. Press it firmly down. Use a wooden modeling tool to smooth the seam on the inside and outside, dragging a little clay from one piece to the other to lock them together. -
Attach remaining walls:
Continue attaching the walls one by one. I like to reinforce each corner with a thin coil of clay pressed into the interior joint, smoothing it out completely until invisible. -
Check for squareness:
Once all walls are up, use your set square or a simple box to gently push the walls into a perfect 90-degree alignment. The aesthetic relies on sharp, clean geometry. -
Refine the rim:
Use a damp sponge or chamois to smooth the top rim of the box. It should be flat and level to ensure the lid sits without rocking.
Step 3: Creating the Interior Flange and Lid
-
Cut the lid slab:
Measure the outer dimensions of your finished box. Cut a square slab exactly that size for the lid. -
Create the flange strips:
Cut four narrow strips of clay (about 1/2 inch wide). These will form a smaller square attached to the *underside* of the lid to keep it from sliding off. -
Attach the flange:
Place the lid upside down. Score and slip the strips into a square shape that fits comfortably *inside* the opening of your box. Leave a tiny bit of wiggle room (about 1/8 inch total gap) to account for shrinkage and movement during firing. -
Add detail to lid top:
Turn the lid right-side up. Using a ruler and a dull modeling tool, gently press a square outline into the top surface, about half an inch from the edge. This creates the decorative recessed look seen in the photo.
Pro Tip: Sharp Corners
After joining walls, let the clay stiffen more, then use a metal rib or paddle to gently tap the exterior corners. This sharpens the edges for that crisp, high-end look.
Step 4: Finishing Touches
-
Form the knob:
Roll a small ball of clay into a smooth sphere or slightly tapered mushroom shape. Flatten the bottom slightly where it will join the lid. -
Attach the knob:
Score the center of the lid and the bottom of the knob. Attach with slip, pressing down firmly. Clean up any excess slip immediately with a brush for a seamless transition. -
Texture the surface:
To achieve that sandy, matte stone look, gently pat the entire exterior with a slightly coarse sponge or canvas cloth. Avoid smoothing it too perfectly with water, which brings fine particles to the/ surface and creates sheen. -
Dry slowly:
Place the lid on the box to dry. This ensures they shrink together and maintain their fit. Cover loosely with plastic for the first day to equalize moisture, then uncover gradually. -
Firing and glazing:
Bisque fire the piece. For the finish shown, apply a matte, dry-finish glaze in a tan or sandstone color, or simply fire high-fire stoneware unglazed if the clay body has a nice natural color.
Once fired, you will have a sturdy, classically beautiful vessel perfect for organizing your workspace or displaying on a shelf


Inner Flange Lid That Actually Stays Put
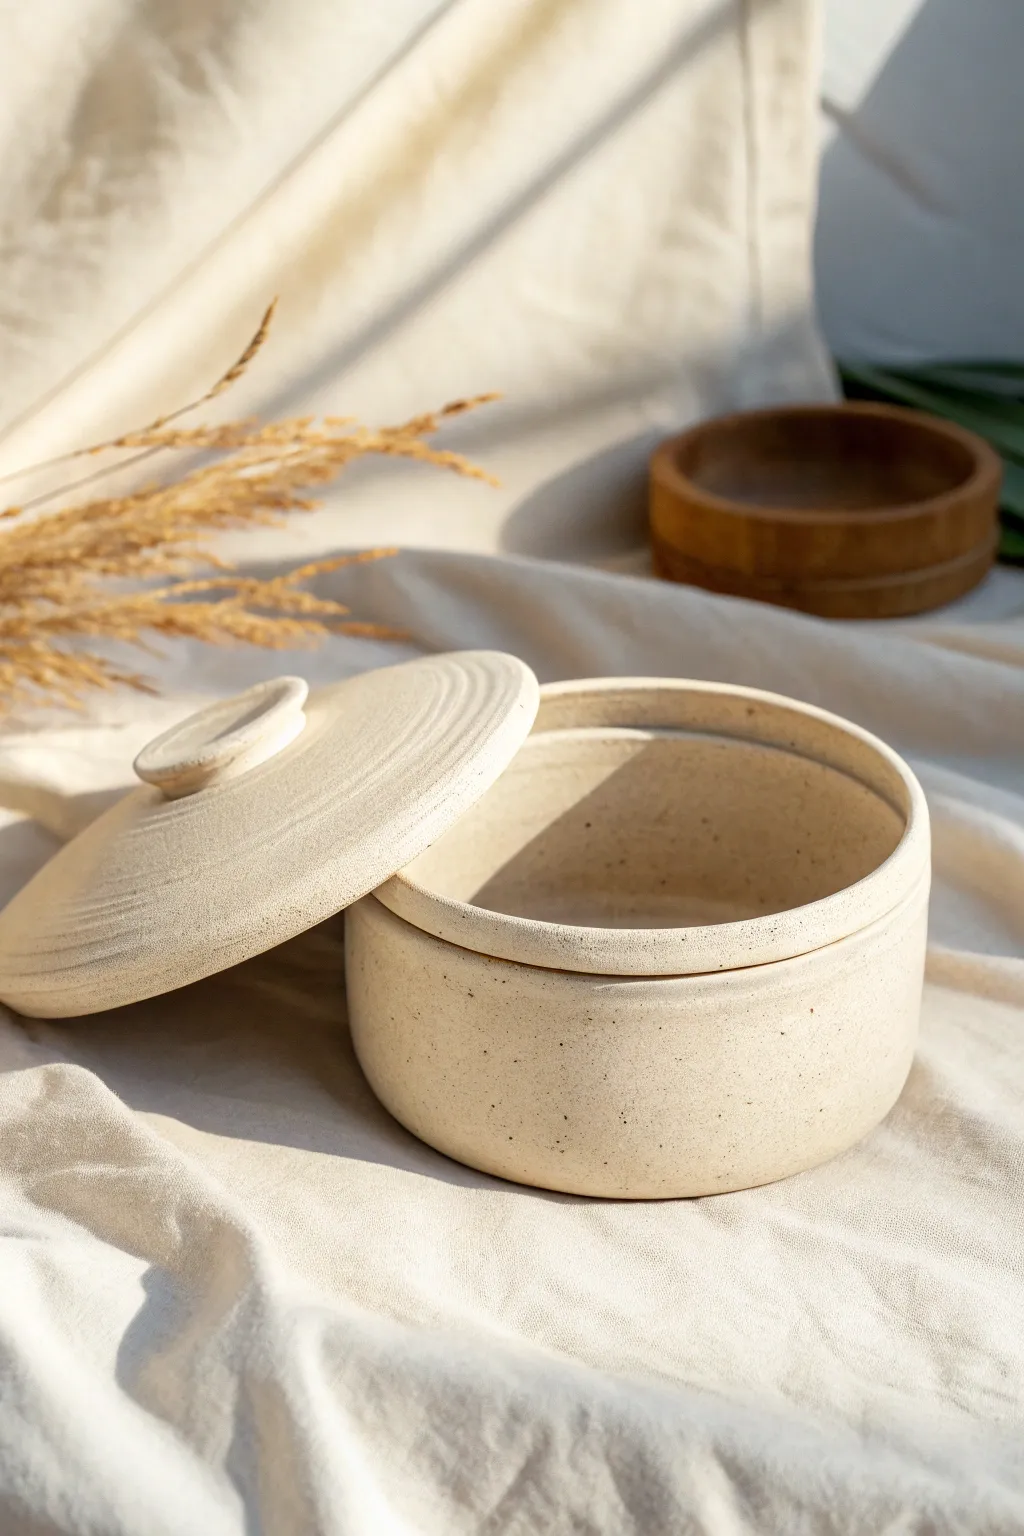
Create a stunningly simple speckled clay box that features a secure, inset lid perfect for storing small treasures or dry goods. This project teaches you how to throw a split-rim vessel that marries form and function with a rustic, minimalist aesthetic.
Step-by-Step Guide
Materials
- Speckled stoneware clay (approx. 2-3 lbs)
- Pottery wheel
- Medium throwing sponge
- Needle tool
- Wooden rib tool
- Wire cutter
- Trimming tools (loop tool)
- Calipers
- Wooden modeling tool
- Matte clear glaze or white glaze (optional)
Step 1: Throwing the Base
-
Center the clay:
Start with about 1.5 lbs of speckled clay. Wedge it thoroughly to remove air pockets, then slap it onto the wheel head. Center the clay using steady pressure, coning up and down if necessary to align the clay particles. -
Open the form:
Open the centered mound to create a flat floor approximately 4 to 5 inches wide. Compress the floor with your sponge or a wooden rib to prevent S-cracks during firing. -
Pull the walls:
Pull the walls up into a straight cylinder. Aim for a height of about 3 inches. Keep the walls even in thickness, perhaps slightly thicker at the rim than usual to accommodate the gallery mechanism. -
Create the gallery seat:
Using a wooden modeling tool or your thumb, gently push the top 1/2 inch of the rim inward slightly, or simply split the rim if you prefer a different style. For this project, we are creating a split rim. Press your needle tool or a wooden knife vertically into the center of the rim wall to split it into an inner and outer wall. -
Form the flange:
Push the inner split wall down gently to create a ledge (the gallery) inside the rim. This internal ledge supports the lid. Refine this ledge with a square-ended wooden tool to make it sharp and 90-degrees. -
Measure with calipers:
Take your calipers and measure the exact width of the inner opening where the lid will sit. Lock the calipers at this measurement—this is crucial for a fitting lid.
Warping Woes
If your lid wobbles after firing, apply a dab of grinding paste to the gallery ledge and spin the lid back and forth manually. This grinds the high spots down for a perfect, rattle-free fit.
Step 2: Throwing the Lid
-
Throw the lid right-side up:
Using the remaining clay, center a low mound on the wheel. Flatten it into a thick pancake shape. -
Check the diameter:
Use the other end of your calipers (or flip them carefully) to ensure the outer diameter of your lid matches the measurement you took earlier. It’s often safer to throw the lid just a hair wider, as you can trim it down later, but you can’t add clay back. -
Shape the dome:
Gently curve the top of the lid using a rib to match the gentle arc seen in the photo. Create varying textural ridges if desired by leaving throwing lines visible. -
Refine the knob:
You can throw a knob directly from the excess clay in the center, or trim one later. In the photo, a simple raised button knob is used. Pinch a small amount of clay in the center to form this low-profile handle. -
Cut off:
Wire the lid off the bat and set both pieces aside to dry to leather-hard consistency.
Step 3: Trimming and Finishing
-
Trim the base:
Once leather hard, center the bottom part of the box upside down on the wheel. Trim excess clay from the bottom edge to create a slight curve, mimicking the soft profile in the image. -
Fit the lid:
Place the lid on the wheel (handle down, perhaps in a chuck or on a foam bat) to trim the underside. Trim the excess bulk away until you have a clean flange that drops perfectly into the gallery of your base. -
Test the fit:
Pause frequently to test the lid on the base. I usually aim for a slightly loose fit at the leather hard stage, as the lid and base might shrink at slightly different rates or distort during firing. -
Smooth the surfaces:
Use a damp sponge to smooth out any sharp trimming lines. If you want the speckled grog to show texture, wipe firmly to expose the grit. -
Bisque fire:
Let both pieces dry slowly and evenly, keeping the lid on the box to prevent warping proper shape retention. Fire to Cone 04 (or your clay’s bisque temperature). -
Glaze application:
For the look in the photo, apply a matte clear or satin white glaze. Alternatively, leave the exterior unglazed if the clay body is fully vitrified at high temperatures, glazing only the interior liner for food safety. -
Final firing:
Fire to the maturation temperature of your clay (likely Cone 5/6 or Cone 10 for stoneware). Ensure no glaze is on the contact points between the lid and the gallery, or they will fuse together.
Level Up: Wax Resist
Apply liquid wax resist delicately to the gallery ledge and the underside rim of the lid before glazing. This ensures absolutely clean contact points and saves you hours of cleanup work.
Enjoy the satisfying ‘clink’ of your perfectly fitted ceramic lid every time you close your box


Stepped Lid for a Satisfying Layered Profile
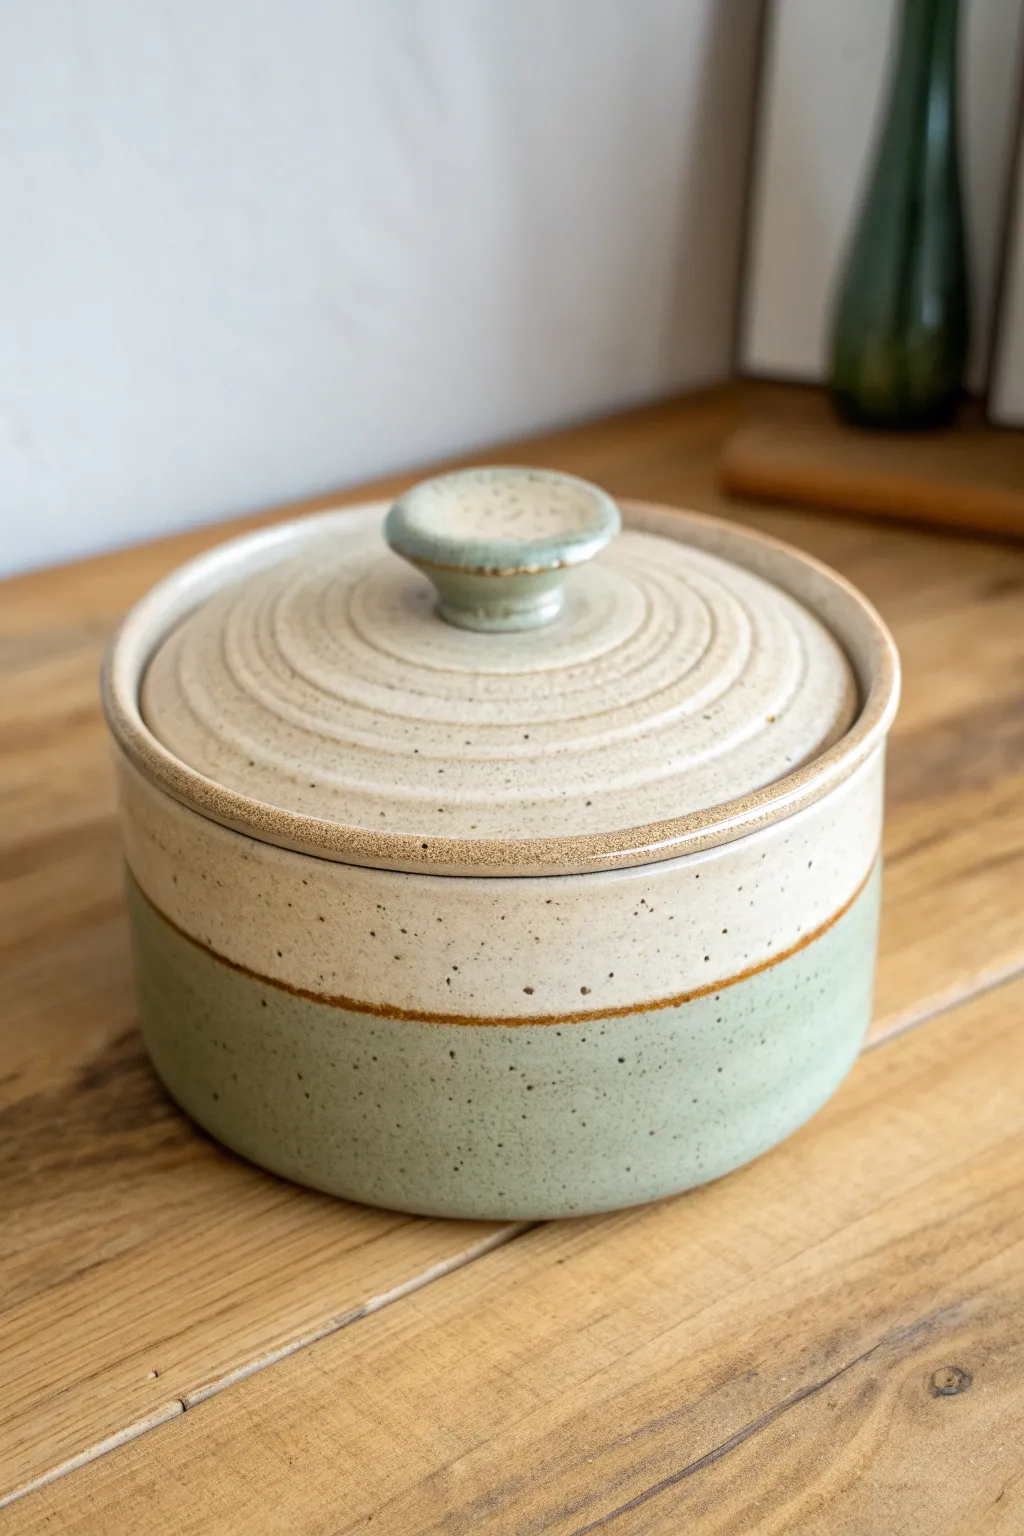
This wheel-thrown lidded box combines practical storage with a calming, tactile aesthetic. The two-tone glaze design highlights the natural clay body, while the lid’s concentric ridges add visual depth and a satisfying layered profile.
Detailed Instructions
Materials
- Stoneware clay body (speckled buff recommended)
- Pottery wheel
- Throwing tools (sponge, wire, rib)
- Trimming tools
- Pin tool or needle tool
- Calipers
- Wax resist
- Sage green stoneware glaze
- Cream or matte white speckled glaze
- Glazing tongs (optional)
- Small glaze brush
Step 1: Throwing the Body
-
Center and open:
Start with about 1.5 to 2 lbs of clay. Center it firmly on the wheel and open it up, creating a flat internal floor rather than a bowl curve. -
Pull the walls:
Pull the walls straight up to create a cylinder. Aim for straight vertical sides without bulging. Compress the rim frequently to keep it strong. -
Create the gallery:
At the rim, use a wooden tool or your thumb to split the thickness, pressing down slightly on the inner half to create a ‘gallery’—this is the shelf where the lid will sit. Ensure it’s level and deep enough (about 4-5mm). -
Refine the shape:
Use a metal or wooden rib on the outside to smooth the surface and ensure the cylinder is perfectly round. Measure the inner diameter of the gallery with your calipers before cutting the pot off the wheel.
Clean Lines
Use automotive detailing tape (pinstripe tape) instead of freehanding the wax resist line. Peel it off before firing for a razor-sharp unglazed divide.
Step 2: Creating the Stepped Lid
-
Measure and center:
Using a smaller ball of clay (about 0.75 lbs), center it low and wide. Use your caliper measurement to guide the width of the lid’s base. -
Throw the flange:
Throw the lid upside down (or right-side up if you prefer trimming later, but throwing right-side up lets you carve the steps immediately). If throwing right-side up, shape the flange underneath to match your gallery measurement. -
Form the steps:
Instead of smoothing the top dome, press firmly with a rib or modeling tool to effect distinct ‘terraces’ or steps rising toward the center. I like to define these ridges while the wheel is spinning slowly to keep them crisp. -
Throw the knob:
Pull a small amount of clay from the absolute center to form a knob. Shape it into a small, flared button shape that mirrors the wider form of the lid.
Step 3: Trimming and Assembly
-
Leather hard stage:
Allow both pieces to dry to a leather-hard state. The lid should be firm enough to handle without warping. -
Trim the base:
Place the canister body upside down on the wheel (use a chuck or secure it with clay lugs). Trim the bottom flat, adding a slight bevel at the edge to give the pot some lift. -
Test the fit:
Check how the lid sits in the gallery. It should have a tiny bit of wiggle room to account for glaze thickness later. If it’s too tight now, trim the lid flange slightly. -
Bisque fire:
Once bone dry, fire both pieces to cone 04 (or your clay body’s bisque temperature).
Add Texture
Before the clay dries, gently tap the lower half with a coarse sponge. This subtle texture will break the green glaze nicely and add tactile contrast.
Step 4: Glazing Technique
-
Apply wax resist:
Paint a thin line of wax resist around the middle of the canister body. This will create the sharp, unglazed brown line. Also wax the gallery shelf and the point of contact on the lid. -
Dip the bottom:
Hold the canister upside down and dip it into the sage green glaze up to the wax line. Wipe away any drips immediately. -
Glaze the interior and top:
Pour the cream glaze inside the container, swirl, and pour out. Then, dip the top rim (down to the wax line) into the cream glaze. -
Glaze the lid:
Dip or spray the entire lid with the cream glaze. The glaze will naturally pool slightly in the concentric grooves, highlighting the stepped texture. -
Final wipe and fire:
Clean any glaze off the foot ring and the waxed contact points with a damp sponge. Fire to cone 6 (or your glaze maturity temperature).
Once fired, fill your new tiered canister with tea leaves or trinkets to enjoy its thoughtful design every day


Ball Feet Box That Feels Extra Special
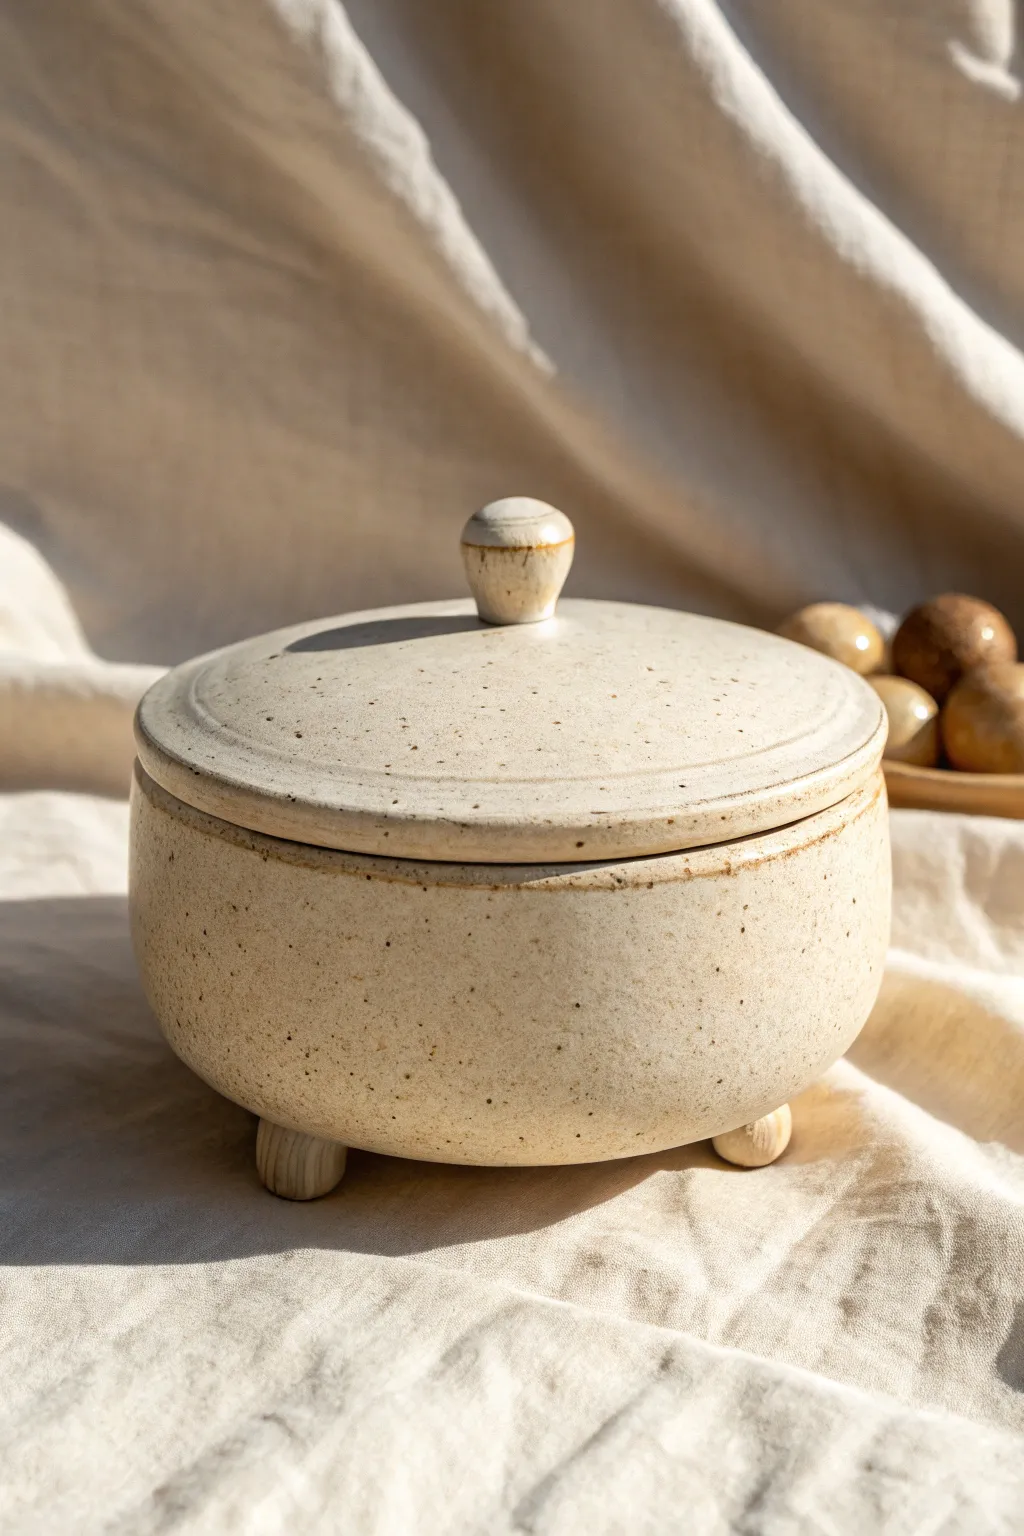
This charming lidded vessel elevates simple pottery storage with its playful little ball feet and a classic mushroom knob. The creamy, speckled glaze gives it a rustic yet refined finish that feels extra special on any shelf.
How-To Guide
Materials
- Stoneware clay (speckled or buff)
- Pottery wheel
- Throwing bats
- Needle tool
- Rib tool (wooden or silicone)
- Trimming tools
- Wire cutter
- Scoring tool (or serrated rib)
- Slip (clay and water mixture)
- Creamy speckled glaze
- Kiln
Step 1: Throwing the Body and Lid
-
Center the Main Clay:
Begin with about 1.5 to 2 pounds of clay for the body. Center it firmly on the wheel, pressing down and coning up to ensure air bubbles are removed. -
Open and Pull Walls:
Open the centered clay to create a flat floor about 4 inches wide. Pull the walls upward to create a cylinder, then gently shape it outward from the inside to create a slight belly. -
Create the Gallery:
This box requires a gallery for the lid to sit in. Instead of thinning the rim all the way, leave the top inch slightly thicker. Use your thumb or a tool to split the rim, pressing the inner half down to form a small shelf. -
Refine and Cut:
Smoothing the interior with a rib creates a clean curve. Once satisfied, undercut the base with a wooden tool and wire the pot off the bat. Set aside to firm up to leather-hard. -
Throw the Lid:
Using a smaller amount of clay (about 0.75 lbs), throw a shallow bowl shape upside down on the bat or throw it right-side up. Measure the diameter often with calipers to ensure it fits the gallery of your main pot. -
Trim the Lid Flange:
Refine the edge of the lid so it is flat and will sit flush against the pot’s gallery. I usually make the lid slightly wider than the opening to account for shrinkage.
Sticky Situation
Use ‘wadding’ (a mix of alumina and clay) under the lid during the glaze firing. This prevents the lid from sticking to the pot if the glaze runs.
Step 2: Adding Feet and Knob
-
Trim the Base:
Once leather-hard, center the main pot upside down on the wheel. Trim away excess weight from the bottom, creating a smooth, rounded curve that transitions seamlessly into the walls. -
Form the Ball Feet:
Roll three or four small balls of clay, roughly the size of large marbles. Ensure they are identical in size so the box sits level. -
Attach the Feet:
Mark three equidistant points on the bottom of the pot. Score both the pot surface and the clay balls, apply slip, and press the feet firmly into place. Smooth the connection point with a small modeling tool. -
Level the Pot:
Flip the pot over and gently press it down onto a flat board. This ensures all feet touch the ground evenly before the clay dries further. -
Create the Knob:
Roll a slightly larger ball of clay for the handle. Shape it into a mushroom or doorknob form by pinching the base to narrow it slightly. -
Attach Knob to Lid:
Find the exact center of the lid. Score and slip beautifully, then attach the knob. Clean up any excess slip with a damp sponge for a crisp join.
Make It Yours
Carve texture into the feet before attaching them, or swap the round knob for a sculpted animal or geometric shape for a personalized touch.
Step 3: Finishing and Glazing
-
Slow Drying:
Loosely cover the assembled pot and lid with plastic to let them dry slowly. Uneven drying forces can cause warping or cracks around the added feet. -
Bisque Fire:
Once bone dry, fire the pieces in the kiln to a bisque temperature (usually cone 04 or 06). This prepares the ceramic for glazing. -
Apply Glaze:
Dip or brush your creamy speckled glaze onto the pot. Be careful to wax resist the bottom of the feet and the gallery where the lid touches to prevent the lid fusing shut. -
High Fire:
Load the kiln carefully and fire to the maturity temperature of your clay and glaze (often cone 5 or 6 for stoneware). Allow to cool completely before unloading.
Now you have a timeless, handcrafted vessel perfect for hiding away gentle treasures or just admiring on your mantle

The Complete Guide to Pottery Troubleshooting
Uncover the most common ceramic mistakes—from cracking clay to failed glazes—and learn how to fix them fast.
Tiny Trinket Box With a Sculpted Knob Handle
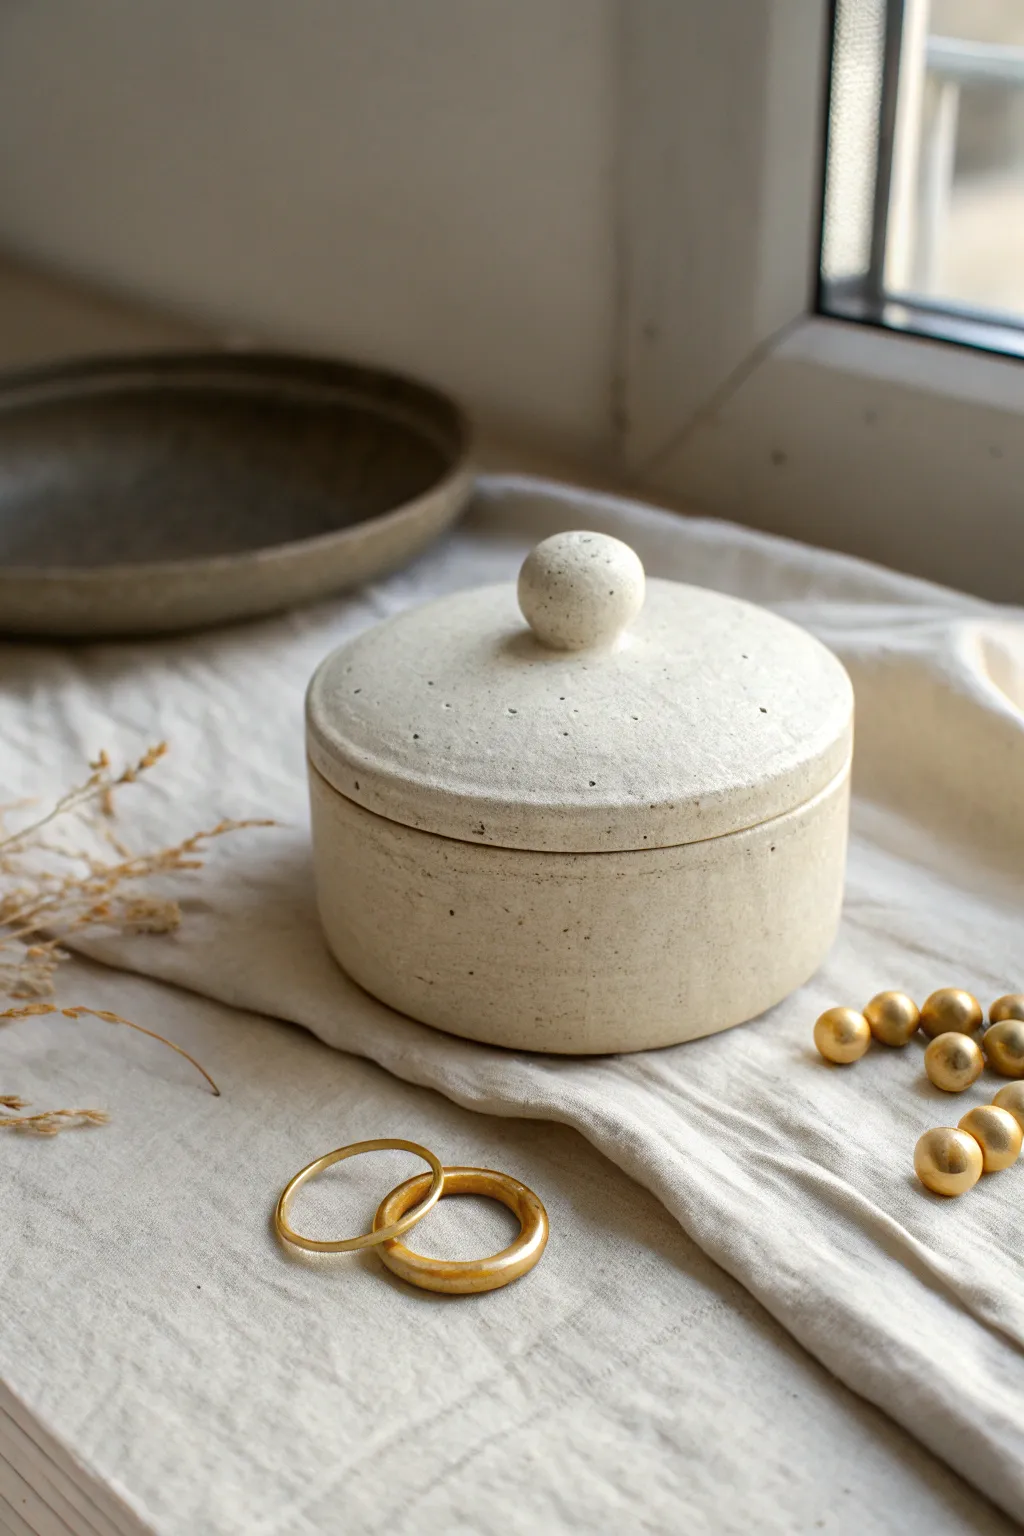
This charming, small-scale ceramic box features a clean cylindrical form and a simple spherical knob, making it perfect for holding rings or small treasures. The speckled creamy clay body gives it a timeless, organic feel that sits beautifully on any vanity.
Step-by-Step
Materials
- Speckled buff stoneware clay
- Rolling pin
- Canvas work surface or ware board
- Circle templates or cookie cutters (approx. 3.5 inches)
- Needle tool
- Scoring tool (serrated rib or needle)
- Slip (clay and water slurry)
- Toothed rib tool
- Smooth rubber or wood rib
- Sponge
- Modelling tool with a flat edge
- Wire cutter
- Matte white or clear glaze (food safe if intended for kitchen use)
Step 1: Forming the Base
-
Roll the slab:
Begin by wedging your speckled buff clay to remove air bubbles. Roll out a slab to an even thickness of about 1/4 inch. I find using wooden guide sticks on either side helps keep the thickness perfectly consistent. -
Cut the components:
Using your circle template, cut out two identical circles from the slab. One will be the floor of the box, and the other will become the lid. Set the lid circle aside under plastic to keep it from drying out. -
Measure the wall:
Measure the circumference of your base circle. Roll out a long rectangular strip for the wall, ensuring it is slightly longer than the circumference you just measured and about 1.5 to 2 inches tall. -
Bevelling the edges:
Cut the short ends of your wall strip at a 45-degree angle. This bevel allow for a stronger, seamless join where the ends meet. -
Attach the wall:
Score the outer edge of the base circle and the bottom edge of your wall strip. Apply slip generously. Place the strip onto the base, wrapping it around until the bevelled ends meet. -
Deepen the join:
Score and slip the bevelled ends of the wall, pressing them firmly together. Use a modeling tool to blend the clay across the seam on both the inside and outside, ensuring the connection is invisible. -
Refine the shape:
Use a smooth rib to compress and smooth the outside walls while supporting the wall from the inside with your other hand. This establishes a perfect circular shape.
Step 2: Creating the Lid and Knob
-
Create the gallery flange:
To make the lid sit securely, roll a thin coil of clay. Score and slip a circle on the *underside* of the lid slab, just inside the perimeter. Attach the coil here so it fits snugly inside the box walls. -
Test the fit:
Once the coil is attached and smoothed, gently test the fit on the box base. It should slide in easily but not rattle around. Adjust by smoothing the flange if needed. -
Form the knob:
Roll a small ball of clay between your palms until it is perfectly spherical. Aim for a size proportional to the lid, roughly the size of a large marble. -
Attach the knob:
Mark the exact center of the lid’s top surface. Score this spot and the bottom of your sphere. Apply slip and press the knob firmly into place. -
Clean the connection:
Use a small brush or modeling tool to clean up any excess slip squeezing out from under the knob, creating a crisp 90-degree angle where the sphere meets the flat lid.
Pro Tip: Warping Prevention
Dry the lid *on* the box. This ensures that if the box shape shifts slightly as it shrinks, the lid shrinks right along with it for a perfect match.
Step 3: Finishing and Firing
-
Slow drying:
Place the lid on the box. Cover the entire piece loosely with plastic. Let it dry slowly for several days to prevent warping, especially around the lid flange. -
Bisque fire:
Once bone dry, fire the piece to a bisque temperature (usually cone 04 or 06, depending on your clay). -
Choosing the glaze:
Select a matte, semi-opaque cream or white glaze. This transparency allows the beautiful iron speckles in the clay body to show through, creating that rustic texture. -
Glaze application:
Dip or brush the glaze onto your bisque ware. Important: Do not glaze the flange on the lid or the interior rim of the box where the lid sits, or they will fuse together in the kiln. -
Final fire:
Fire to the maturation temperature of your clay (typically cone 5 or 6 for stoneware). Once cooled, sand the bottom if necessary to ensure it sits flat.
Level Up: Texture Contrast
Leave the outside of the box bare (unglazed) to highlight the raw, gritty stone texture, glazing only the interior and the smooth knob for a tactile contrast.
Now you have a beautiful, custom vessel ready to organize your smallest valuables
Carved Sgraffito Box With a Patterned Lid
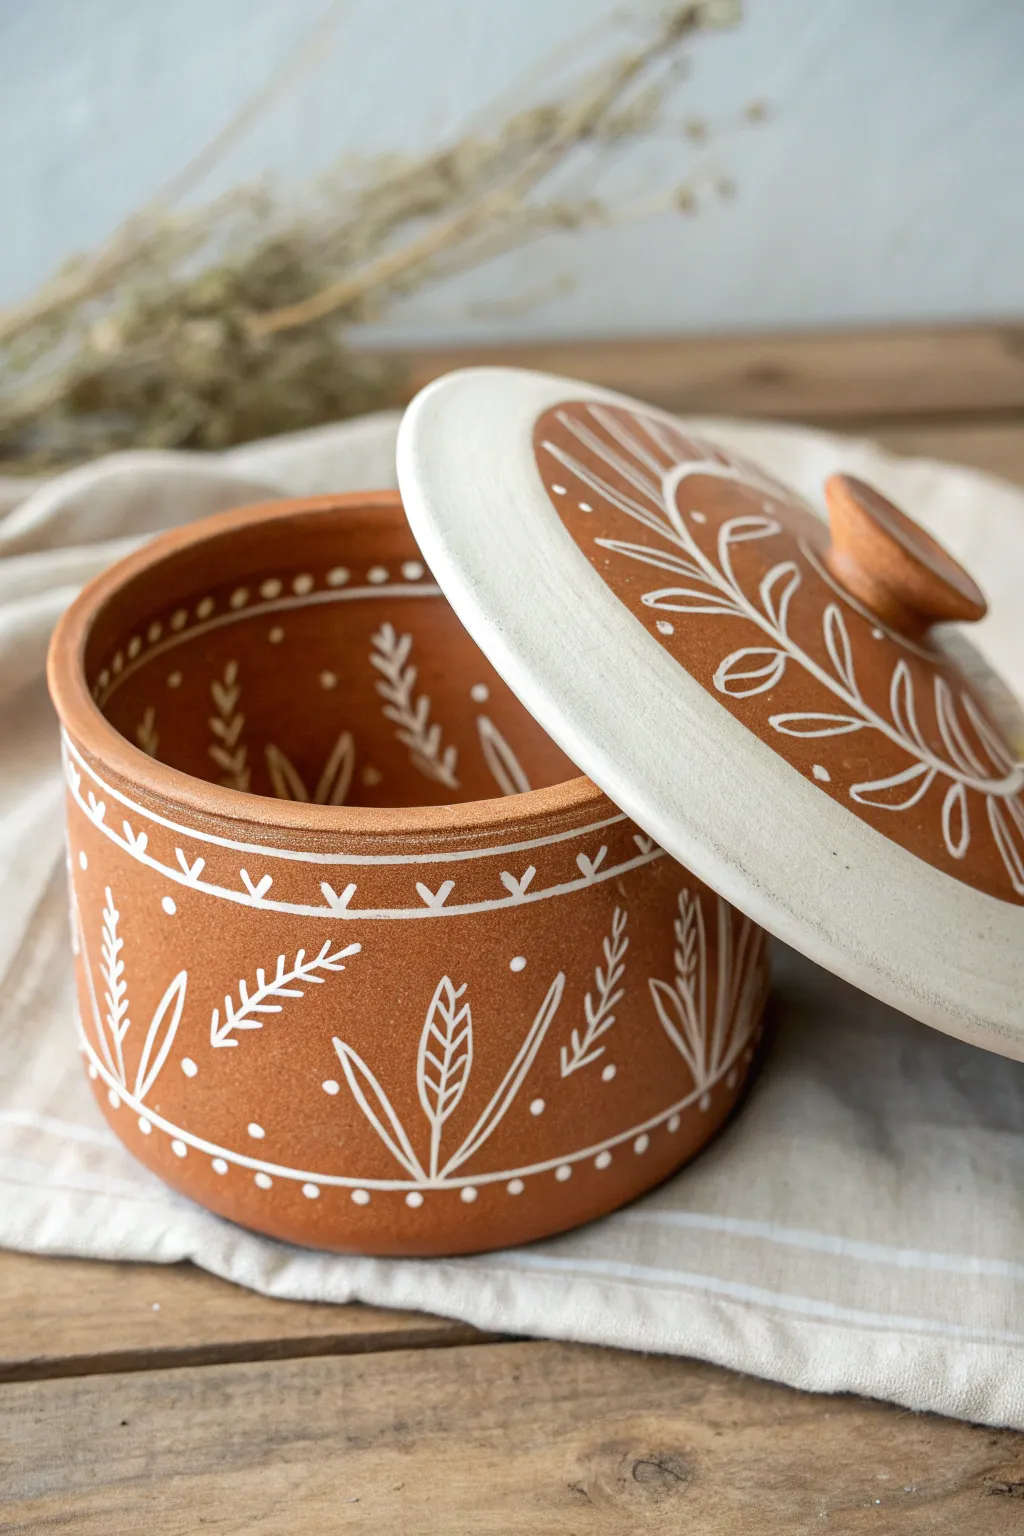
This charming, rustic lidded box combines the warmth of earthy red clay with delicate white botanical illustrations. Using a sgraffito-inspired technique, you’ll create a functional piece of art perfect for storing small treasures or trinkets.
Step-by-Step Tutorial
Materials
- Red earthenware clay (about 2-3 lbs)
- White underglaze or white slip
- Clear transparent glaze (food safe if using for food)
- Pottery wheel (or slab roller/rolling pin for hand-building)
- Rib tool (wood or metal)
- Needle tool
- Wire cutter
- Sponge
- Fine liner brush or slip trailer
- Carving tools (optional, if doing true sgraffito)
- Kiln
Step 1: Forming the Box
-
Throw the Body:
Begin by wedging your red clay thoroughly. Center about 1.5 lbs of clay on the wheel and open it up to create a flat floor. Pull the walls straight up to form a cylinder, aiming for a consistent thickness. -
Shape the Rim:
As you refine the cylinder, use a rib tool to smooth the exterior. Create a dedicated gallery (a small indented shelf) on the inside of the rim; this is where your lid will eventually sit. -
Throw the Lid:
Using the remaining clay, throw a flat lid. Measure the diameter of your box’s gallery carefully with calipers to ensure the lid fits snugly. Add a small knob in the center for lifting. -
Trim and Refine:
Once both pieces are leather-hard (firm enough to handle but not dry), trim the bottom of the box to create a clean foot ring. Clean up the lid’s edges so it sits perfectly in the gallery. -
Smooth the Surface:
Wipe down the entire piece with a slightly damp sponge to remove any grog or rough spots, creating a smooth canvas for your design.
Clean Lines Tip
If your white slip lines look fuzzy, wait until the clay is bone dry. Gently scratch the edges of the painted lines with a needle tool to sharpen them up.
Step 2: Applying the Design
-
Marking Guidelines:
Lightly etch horizontal bands around the top and bottom of the box exterior using a needle tool while slowly spinning the piece on a banding wheel. This defines your main decorative area. -
Drafting the Botanicals:
Sketch your leaf and wheat patterns lightly into the leather-hard clay with a pencil or dull needle tool. Don’t worry about perfection; these are just guides. -
Painting the Exterior White:
Using a fine liner brush loaded with white underglaze, carefully paint over your sketched lines. Create the wheat stalks, fern-like leaves, and simple V-shapes within the border bands. -
The Sgraffito Option:
Alternatively, if you prefer true sgraffito, paint a band of white slip around the pot first, let it stiffen slightly, and then carve through the white layer to reveal the red clay beneath. -
Decorating the Interior:
Don’t forget the inside! Paint simple sprigs of leaves or wheat on the inner walls of the box. I find this creates a lovely surprise when the box is opened. -
Detailing the Lid:
Paint a large, sweeping circular border of white slip on the lid, leaving the center knob and an outer rim of exposed red clay. Add large, bold leaf motifs in white over the red sections. -
Adding Texture:
Use the tip of your brush or a slip trailer to add rows of small white dots along the border lines and scattered between the plant motifs for added texture.
Step 3: Firing and Finishing
-
Bisque Fire:
Allow the box and lid to dry completely. This can take several days depending on humidity. Once bone dry, fire the pieces in the kiln to a bisque temperature (usually cone 04). -
Glazing:
Dip the entire piece into a clear transparent glaze. Ensure you wipe the glaze off the foot ring and the contact points (where the lid touches the box) to prevent them from fusing shut. -
Glaze Fire:
Load the kiln carefully, ensuring the lid is not on the box unless you have waxed the contact points perfectly. Fire to the maturity temperature of your clay and glaze. -
Inspect and Sand:
Once cool, remove from the kiln. If there are any sharp bits of glaze on the bottom, adhere a piece of wet-dry sandpaper to a flat surface and rub the pot bottom in a figure-eight motion to smooth it.
Level Up: Wax Resist
Paint your patterns in wax resist first, then brush a full layer of white slip over everything. The wax repels the slip, leaving red patterns on a white box!
Place your finished box on a sill where the light can catch the subtle gloss of the glaze and highlight your beautiful handiwork


What Really Happens Inside the Kiln
Learn how time and temperature work together inside the kiln to transform clay into durable ceramic.
Stamped Texture Box With a Matching Lid Band
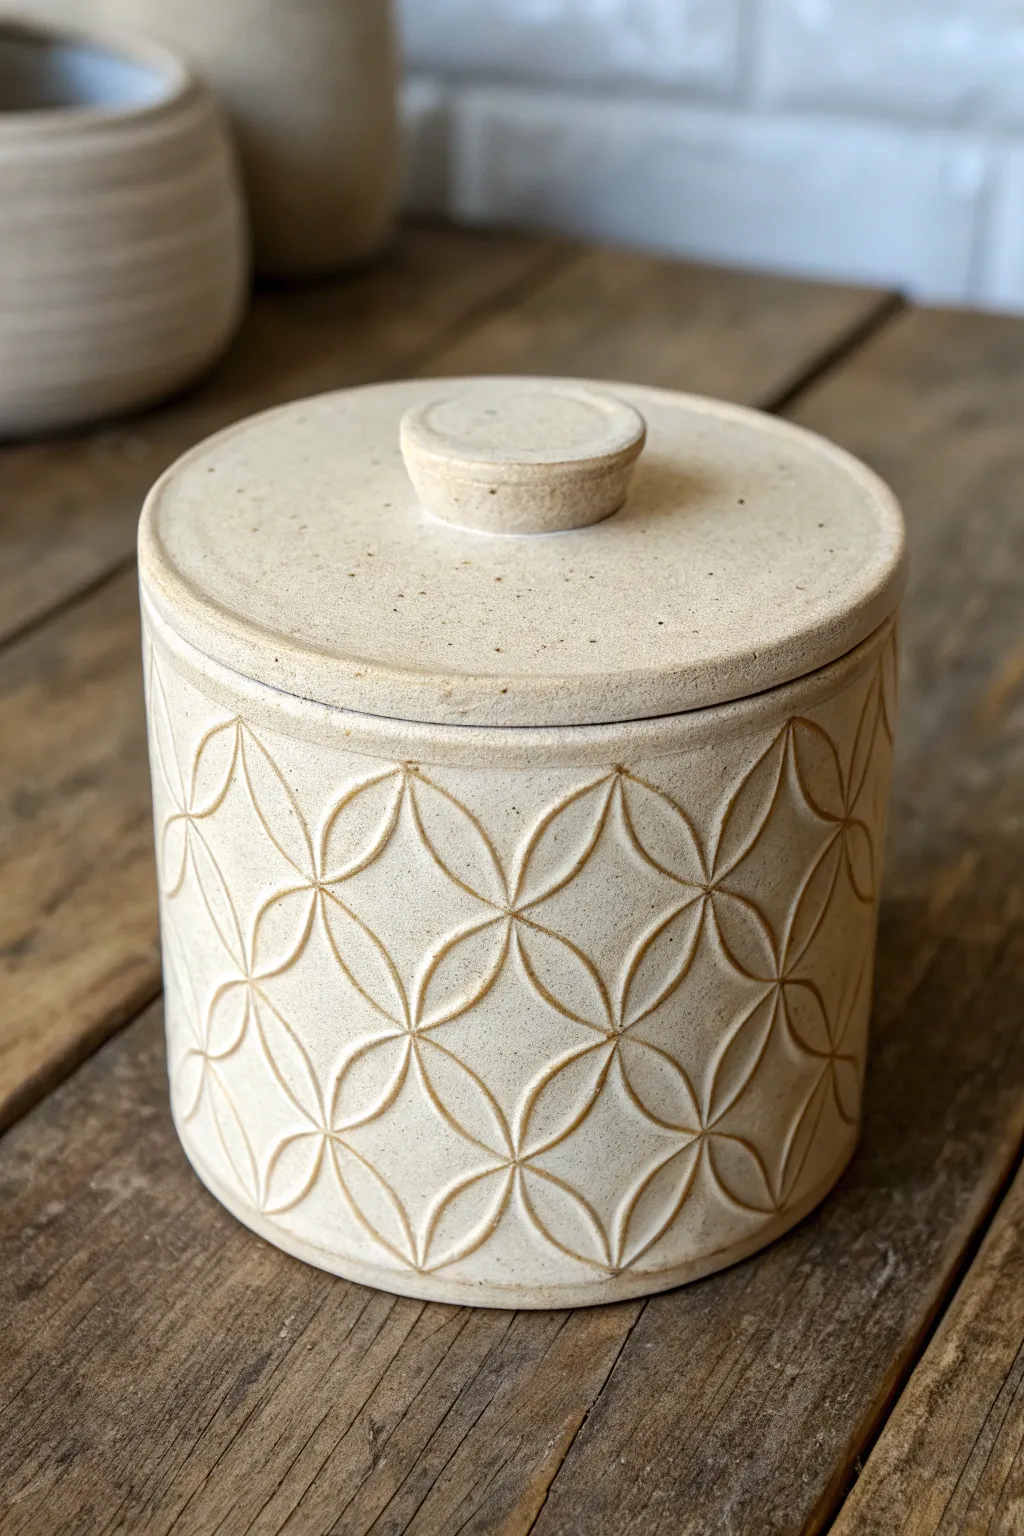
This elegant cylindrical box features a soothing buff stoneware finish and a sophisticated geometric pattern that looks intricately carved but is surprisingly satisfying to create. The repeating interlocking circles create distinct floral motifs that catch the glaze beautifully, making it perfect for storing sugar, tea, or precious trinkets.
Detailed Instructions
Materials
- Buff stoneware clay with speckles (mid-fire)
- Rolling pin
- Guide sticks or slab roller (approx. 1/4 inch thick)
- Circle cutter (4-inch diameter for base and lid)
- Rectangular template (approx. 4 x 13 inches, adjust based on circumference)
- Geometric texture stamp, roller, or carving tool (interlocking circle motif)
- Needle tool
- Scoring tool (serrated rib or needle)
- Slip (clay and water slurry)
- Pottery wheel (optional, for trimming)
- Wood modeling tool
- Sponge
- Matte white or clear glaze
Step 1: Preparing the Slab Body
-
Roll the clay slab:
Begin by rolling out a smooth slab of buff stoneware clay. Use guide sticks to ensure an even thickness of about 1/4 inch across the entire piece, which is crucial for structural integrity. -
Cut the clay rectangle:
Using your rectangular paper template, cut a long strip of clay. This will become the wall of your cylinder. Ensure the edges are cut vertically straight so they join perfectly later. -
Apply the texture:
This is the defining moment for this project. Lay your clay strip flat. Using a texture roller or a large stamp with an interlocking circle or ‘flower of life’ pattern, press firmly and evenly into the clay. If you are carving by hand, lightly trace the grid now and carve the deep lines with a loop tool. -
Bevel the edges:
Cut the short ends of your rectangular strip at a 45-degree angle. This beveling technique creates a stronger seamless joint and prevents the wall from being too thick where the clay overlaps.
Step 2: Assembling the Cylinder
-
Score and slip:
Rough up the beveled edges with your scoring tool and apply a generous amount of slip. This acts as the glue for your clay ceramic body. -
Form the cylinder:
Stand the strip up on its long edge and curl it into a circle, bringing the beveled ends together. Press them firmly to join, supporting the wall from the inside with one hand while smoothing the seam on the outside. -
Reinforce the seam:
Use a wood modeling tool to gently blend the clay across the seam on the interior. On the exterior, try to minimize disruption to your stamped pattern, but smooth away the cut line carefully. -
Cut the base:
Roll a small piece of slab for the base. Place your cylinder on top of it and trace around the bottom edge with a needle tool to get the exact size required. -
Attach the base:
Score and slip the bottom edge of the cylinder and the outer rim of the base circle. Press them together firmly. I like to use a small coil on the inside corner of the bottom seam to ensure it’s watertight.
Dry Fit Check
Always check the lid fit when the clay is leather hard. If it’s too tight, you can carefully trim or sand the flange slightly before it becomes bone dry and brittle.
Step 3: Creating the Lid
-
Measure the lid size:
Measure the outer diameter of your cylinder. Cut a new circle from your slab that matches this diameter exactly so it sits flush with the walls. -
Create the flange:
To keep the lid from sliding off, you need an inner flange. Cut a strip of clay about 1/2 inch tall. Measure the *inner* diameter of your pot and form this strip into a ring that fits snugly just inside the rim. -
Attach the flange:
Score and slip the top face of the flange ring and the underside of your lid circle. Attach the ring to the center of the lid, smoothing the connection points. -
Make the knob:
Form a small, thick disk of clay for the handle. Taper the bottom slightly to create an elegant profile. Attach this to the exact center of the lid’s top surface using slip. -
Clean up edges:
Once the clay is leather hard, smooth the rim of the lid and the knob with a damp sponge. Ensure the knob feels comfortable to grip.
Two-Tone Glazing
Try rubbing a dark oxide wash (like iron oxide) into the textured lines and wiping it back before applying a sheer glaze. This makes the geometric pattern pop dramatically.
Step 4: Finishing and Glazing
-
Bisque fire:
Allow the piece to dry slowly to prevent warping, especially the lid. Once bone dry, bisque fire the canister to cone 04. -
Apply glaze:
Dip or brush a matte white or satin clear glaze over the entire piece. The key here is to let the glaze pool slightly in the stamped recesses while wiping back the high points with a sponge if necessary to accentuate the texture. -
Final wipe:
Ensure the bottom of the canister and the contact points where the lid meets the jar are free of glaze to prevent them fusing shut. -
Glaze fire:
Fire the piece to cone 5/6 (or according to your clay body’s specifications). The high heat will bond the glaze and reveal the beautiful speckles in the stoneware.
Once fired, you will have a durable, beautifully textured canister ready to organize your space with handmade charm
Cottagecore Mushroom Lid Box
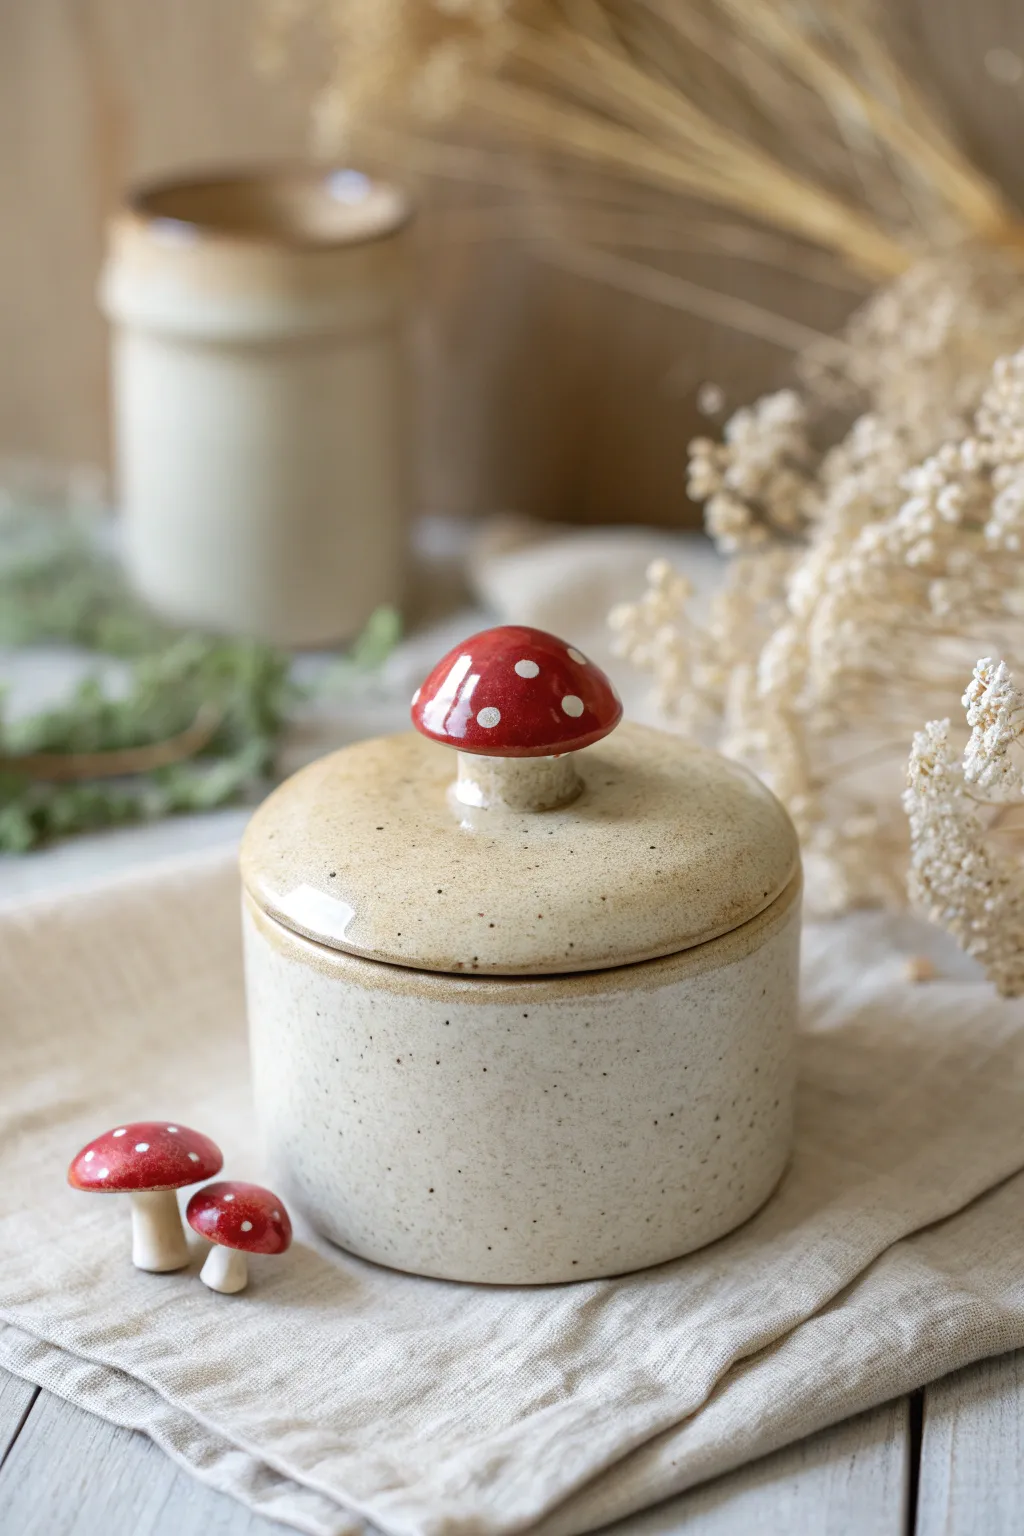
Bring a touch of woodland magic into your home with this ceramic jar featuring a charming fly agaric mushroom handle. This project combines simple wheel-throwing or hand-building techniques with sculptural details to create a cozy, cottagecore storage vessel.
Detailed Instructions
Materials
- Speckled buff stoneware clay
- Pottery wheel (or slab roller/rolling pin for hand-building)
- Throwing tools (sponge, wire cutter, rib tools)
- Trimming tools
- Needle tool
- Scoring tool or serrated rib
- Slip (clay and water mixture)
- Underglaze (bright red and white)
- Clear transparent glaze
- Small liner brushes
- Kiln
Step 1: Forming the Body and Lid
-
Prepare your clay:
Begin by wedging your speckled clay thoroughly to remove air bubbles. Since this is a speckled clay body, the iron spots will show through later, giving that beautiful rustic texture. -
Throw the cylinder:
Center approximately 1-1.5 lbs of clay on the wheel. Open the center and pull up the walls to create a straight-sided cylinder about 3-4 inches high. Keep the rim slightly thick to support the gallery. -
Shape the gallery:
Using a throwing stick or your finger, press into the rim to create a gallery (an inner ledge) where the lid will eventually sit. Compress the rim well to prevent cracking. -
Throw the lid:
Using a smaller amount of clay (about 0.5-0.75 lb), throw a flat, slightly domed lid. Measure it constantly with calipers to ensure it fits the gallery of your cylinder perfectly. -
Dry to leather hard:
Cut both pieces off the wheel and let them dry to a leather-hard state. This usually takes day or so, depending on humidity. -
Trim the pieces:
Center your leather-hard pot upside down on the wheel and trim the bottom for a clean foot. Do the same for the lid, smoothing the top surface where the handle will go.
Clean Lid Fit
Use calipers to measure the wet clay lid and jar opening. Remember clay shrinks! Measure while both are still wet on the wheel.
Step 2: Sculpting the Mushroom
-
Form the stem:
Roll a small coil of clay for the mushroom stem. It should be thick enough to support the cap but taper slightly. Score and slip the center of the lid, then attach the stem firmly. -
Create the cap:
Roll a small ball of clay and flatten it into a dome shape. Hollow it out slightly underneath to reduce weight and prevent explosions in the kiln. I like to smooth the edges with a damp sponge. -
Attach the cap:
Score the top of the stem and the underside of the cap. Apply slip and press them together. Use a modeling tool to blend the seam under the cap so it looks like one organic piece. -
Make mini companions:
With leftover clay scraps, sculpt two tiny standalone mushrooms to accompany your jar. These make adorable photo props or decorative accents. -
Bisque fire:
Allow all pieces to dry completely to the bone-dry stage. Load them into the kiln and bisque fire to cone 04 (or your clay’s specific bisque temperature).
Warping Issues?
If your lid warps during drying, dry it slowly under plastic on a flat board. Weigh it down gently with a small sandbag if needed.
Step 3: Glazing and Finishing
-
Clean the bisque:
Wipe down your bisqueware with a damp sponge to remove any dust that might resist the glaze. -
Apply red underglaze:
Paint the mushroom cap on the lid (and the mini mushrooms) with 2-3 coats of bright red underglaze. Let each coat dry before applying the next for solid opacity. -
Add the dots:
Using a fine-tip brush or a slip trailer, apply small dots of white underglaze onto the red caps. Vary the sizes slightly for a natural look. -
Apply clear glaze:
Dip the main body of the jar and the lid into a clear transparent glaze. This will seal the clay and make the speckles pop while making the surface food-safe and glossy. -
Check the bottom:
Wipe the foot of the jar and the rim where the lid touches perfectly clean of glaze. You can use wax resist beforehand to make this easier. -
Final firing:
Load the kiln for the glaze firing (usually cone 5 or 6 for stoneware). Ensure the lid is not on the jar during firing unless you’ve waxed the contact points perfectly to prevent sticking.
Once cooled, fill your adorable mushroom jar with tea, trinkets, or sweets and enjoy the handmade charm

TRACK YOUR CERAMIC JOURNEY
Capture glaze tests, firing details, and creative progress—all in one simple printable. Make your projects easier to repeat and improve.
Cake Slice Box With Drippy Frosting Lid
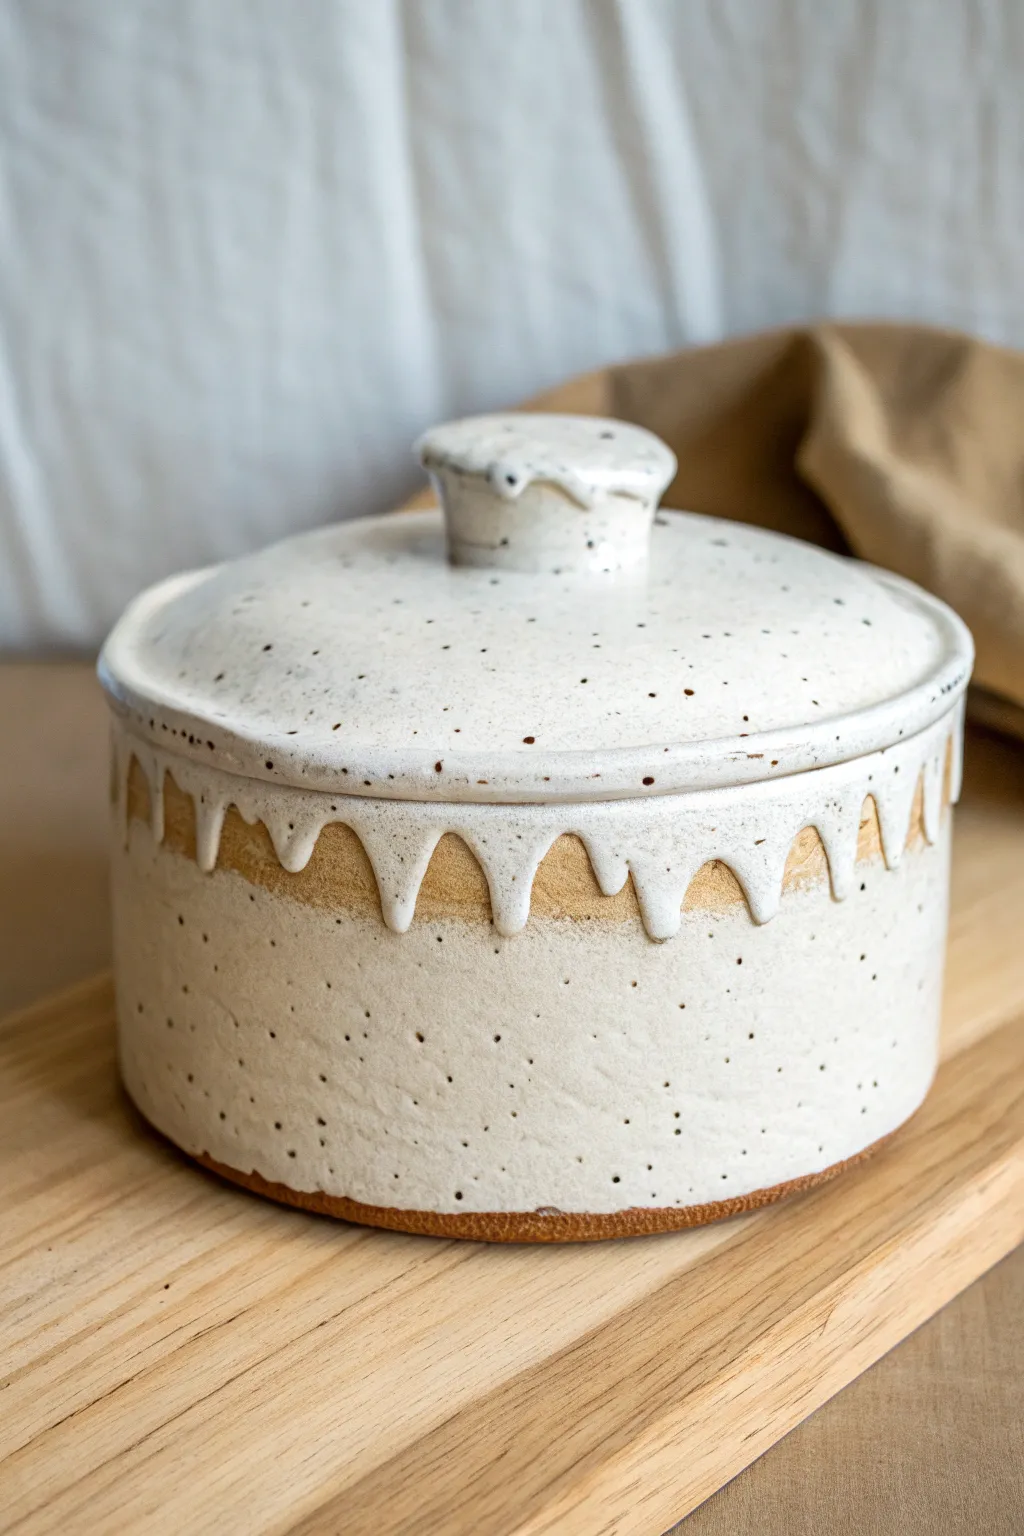
Transform raw clay into this delightful trompe l’oeil container that mimics a rustic cake with drippy icing. Using speckled clay and a clever glazing technique, you’ll create a functional jar perfect for storing trinkets or dry goods.
Step-by-Step Tutorial
Materials
- Speckled stoneware clay (mid-fire)
- Pottery wheel (or slab roller for hand-building)
- Throwing tools (sponge, wooden rib, wire tool)
- Needle tool
- Trimming tools
- Callipers
- Satin white glaze (food safe)
- Wax resist
- Soft fan brush
- Kiln
Step 1: Throwing and Shaping
-
Prepare the Clay:
Wedge about 3-4 lbs of speckled stoneware clay thoroughly to remove air bubbles. Split this into two portions: a larger one for the base (about 2/3) and a smaller one for the lid (about 1/3). -
Center the Base:
Throw the larger ball of clay on the wheel, centering it into a low puck shape rather than a tall cylinder. -
Open the Form:
Open the clay and pull the walls straight up. Aim for a cylindrical shape with straight vertical sides, roughly 4-5 inches wide and 3 inches tall. Keep the rim flat and substantial. -
Create the Gallery:
Use a wooden rib or finger to gently compress the inside of the rim, creating a small inset shelf (gallery) where the lid will eventually sit. -
Measure for the Lid:
Before removing the base from the wheel, measure the diameter of your gallery using calipers. This is crucial for a tight fit. -
Throw the Lid:
Center the smaller clay ball. Flatten it into a disc slightly wider than your measurement. Create a small flange on the underside that matches your caliper measurement to lock into the base. -
Add the Knob:
While the lid is still attached to the hump or bat, pinch and shape a small amount of clay in the center to form a chunky, button-style knob.
Step 2: Trimming and Texture
-
Leather Hard Stage:
Allow both pieces to dry to a leather-hard state. This usually takes a day or two depending on humidity. -
Trim the Base:
Invert the base onto the wheel head and trim the excess weight from the bottom. Create a distinct foot ring, leaving a crisp edge where the wall meets the floor. -
Trim the Lid:
Carefully trim the underside of the lid to refine the fit. Check the fit with the base frequently; it should wiggle slightly to account for glaze thickness later. -
Refine the Knob:
Smooth the knob shape. For that ‘frosted’ look, you can leave the edges slightly soft rather than perfectly sharp. -
Bisque Fire:
Sponge away any sharp burrs and let the piece bone dry completely. Fire in the kiln to bisque temperature (usually cone 04).
Troubleshooting: Stuck Lid?
If you fire with the lid on, use alumina hydrate mixed with wax on the contact points. This powder creates a barrier that prevents the glaze from fusing the lid to the pot.
Step 3: Glazing the ‘Frosting’
-
Wax the Foot:
Apply wax resist to the bottom foot ring of the base and the very rim where the lid touches the gallery. This prevents the lid from fusing shut. -
Glaze the Interior:
Pour your satin white glaze inside the base, swirl to coat, and pour out the excess. Wipe any drips off the exterior immediately. -
Glaze the Base Exterior:
Dip the exterior of the base into the white glaze, but stop about 1/2 inch from the rim. We want a gap of raw clay here to highlight the ‘drip’ effect coming from the lid later. -
Wipe the Speckles:
For the bottom section of the jar, wipe the glaze back gently with a sponge if you want the speckles to show through more prominently, or leave it opaque for a solid frosting look. -
Apply Lid Glaze:
Dip the entire top of the lid into the white glaze. Ensure a thick, even coat. -
Create the Drips:
Using a brush loaded with thick glaze, dab extra globs along the edge of the lid’s rim. Gravity will pull these down during firing, creating the illusion of melting icing. -
Glaze the Knob:
Add a extra dollop of glaze on the knob. I like to let a little drip run down the side of the handle for added realism. -
Final Fire:
Load the kiln, placing the lid on a separate shelf stilt or directly next to the pot—do not fire it on the pot unless you are certain your wax resist is perfect. Fire to cone 5 or 6 depending on your clay body.
Pro Tip: Gravity Check
For better drips, don’t thin your glaze too much. A slightly thicker, yogurt-consistency glaze stays put until the heat hits it, resulting in plump, rounded drips rather than runny streaks.
Once cooled, your ceramic cake box is ready to serve up a stylish storage solution on your counter
Friendly Monster Box With Big Eye Lid Handle
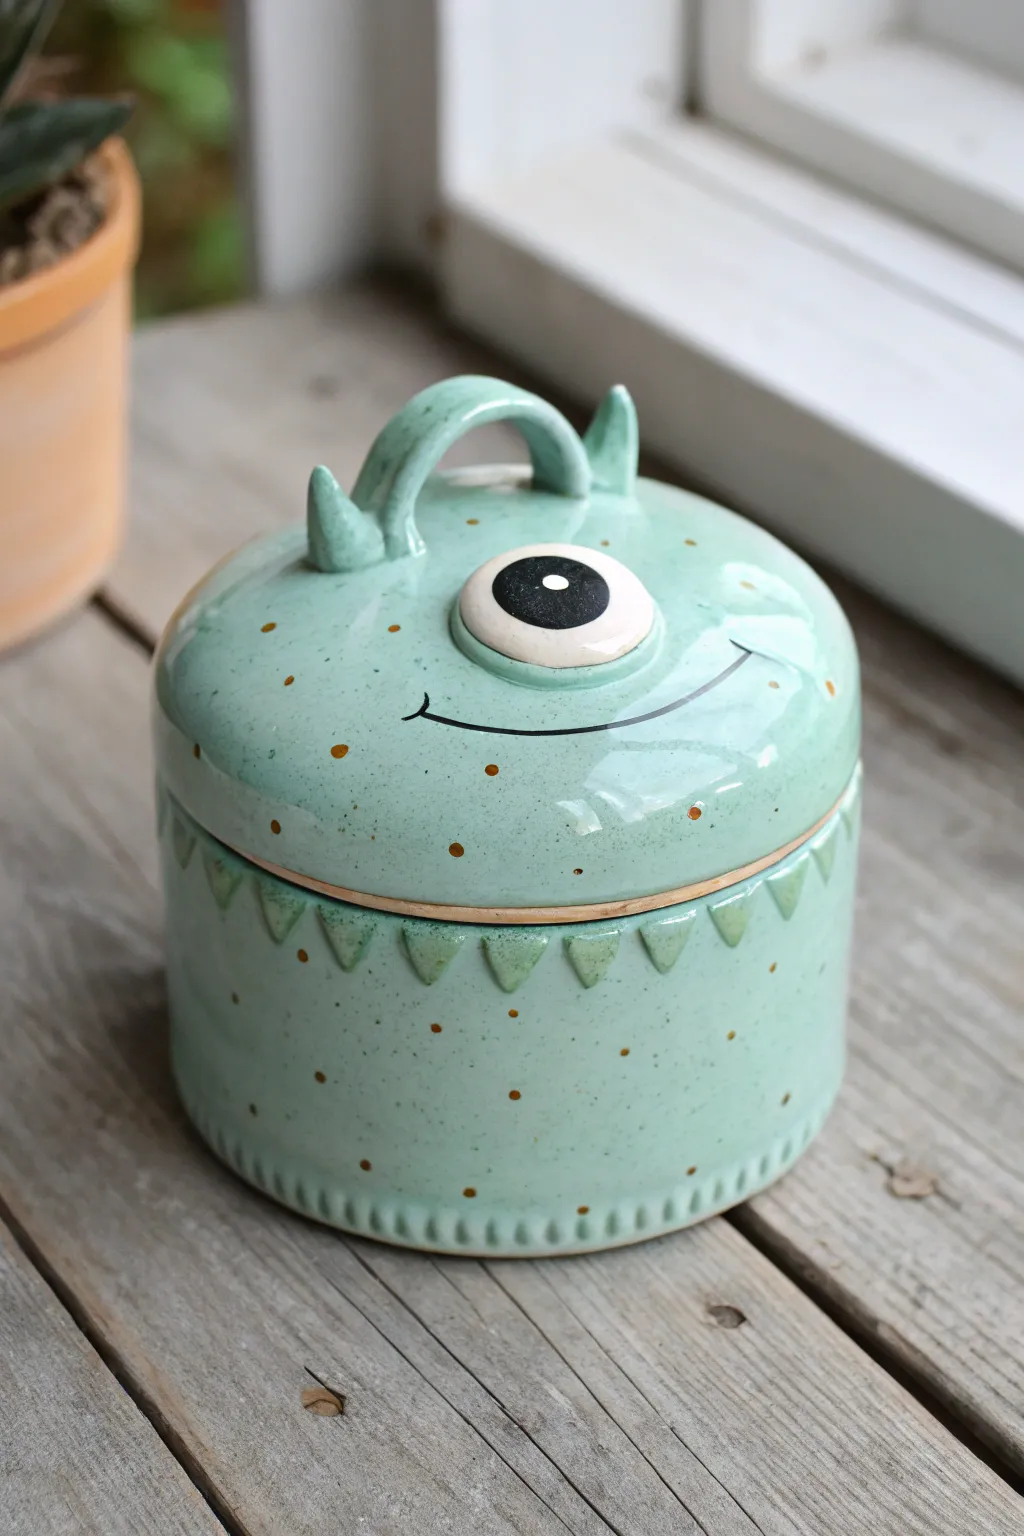
This whimsical ceramic jar brings a friendly face to your storage with a single large eye and a mischievous smile. The design uses slip trailing for texture and a lovely speckled mint glaze to bring the little monster to life.
How-To Guide
Materials
- Stoneware clay body
- Rolling pin
- Canvas work surface
- Circle cutter or template (approx. 4-5 inches)
- Fettling knife
- Scoring tool or serrated rib
- Slip (clay slurry)
- Modeling tools (wooden or rubber)
- Needle tool
- Sponge
- Mint green speckled glaze
- Underglaze pencil or black underglaze
- White underglaze
- Clear glaze (optional)
Step 1: Forming the Base
-
Roll the slab:
Begin by rolling out a consistent slab of stoneware clay to about 1/4 inch thickness. Use guide sticks if you manage to roll it unevenly otherwise. -
Cut the components:
Cut out two identical circles for the base and the lid. Then, measure the circumference of your circle and cut a long rectangular strip for the walls of the box. The strip’s length should be the circumference plus a little extra for overlapping. -
Construct the cylinder:
Score and slip one long edge of the rectangular strip and the outer edge of one clay circle. Wrap the strip around the circle to form a cylinder. -
Seal the seam:
Overlap the ends of the wall strip slightly, cut through both layers at an angle for a bevel join, then score, slip, and compress the seam together. Smooth the joining line inside and out with a rib tool. -
Refine the shape:
Use a damp sponge to smooth rim of the cylinder, ensuring it is level so the lid will sit flat.
Wobbly Lid Syndrome
If the lid rattles or slides, the flange underneath is likely too loose. Add a thin coil to the outside of the flange ring to widen it for a tighter fit.
Step 2: Creating the Monster Lid
-
Form the lid curve:
Take the second clay circle and gently press it into a shallow slump mold or a bowl lined with plastic to give it a slight convex dome shape. Let it stiffen slightly to leather hard. -
Add the flange:
Flip the lid over. Roll a small coil of clay and attach it to the underside of the lid, positioning it so it will fit snugly inside the jar’s rim. Smooth it down securely. -
Sculpt the eye socket:
On the top center of the domed lid, add a small, flat disc of clay to create a raised platform for the eye. Smooth the edges down into the lid surface. -
Attach the horns:
Roll two small cones of clay for horns. Score and slip them onto the lid. I like to place them slightly askew to give the monster more personality. -
Create the handle:
Roll a small coil and arch it between the two horns or just behind them to act as the functional handle for lifting the lid.
Step 3: Texturing and Details
-
Add the teeth:
Roll tiny triangles of clay. Score and slip them in a row around the upper part of the box body, pointing downward, to create a decorative collar of ‘teeth’ or scales. -
Textured rim:
Use a small tool to press indentations around the very bottom edge of the jar, creating a ribbed footing effect. -
Bisque fire:
Allow the piece to dry slowly and completely before firing it in the kiln to cone 04 (or your clay’s specific bisque temperature).
Make it a Set
Vary the sizes and facial expressions to create a whole monster family. Try a tall cylinder with two eyes or a squat jar with three horns!
Step 4: Glazing and Finishing
-
Underglaze the eye:
Paint the raised eye disc with white underglaze. In the center, paint a large black pupil. You can add a tiny white dot for reflection to make it look alive. -
Draw the smile:
Using a black underglaze applicator bottle or a fine brush, draw a wide, simple curved line for the mouth just below the eye. -
Apply the main glaze:
Dip or brush the entire exterior and interior (avoiding the painted eye and the very bottom where it sits on the kiln shelf) with a mint green speckled glaze. Be careful not to obscure the mouth line too much if your glaze is opaque; you might need to wax resist the smile line first. -
Add accent dots:
If your glaze doesn’t have natural speckles, use a fine brush to dab small dots of iron oxide or brown underglaze randomly over the green surface. -
Final firing:
Fire the piece to the maturity temperature of your glaze (typically cone 5 or 6 for stoneware). Let the kiln cool completely before introducing your monster to the world.
Once cooled, fill your new little friend with treats or treasures.