If you’ve got a plain pot and a plant that deserves a little spotlight, these ceramic pot ideas are my favorite ways to make that combo feel intentional and cute. I’m sharing designs you can actually pull off at home, whether you’re painting, adding texture, or going a little whimsical with your planters.
Classic Painted Terra Cotta Upgrade
Transform a standard terra cotta planter into a sleek, modern piece with this simple painting technique. The crisp white body contrasts beautifully with the warm, earthen rim, giving your succulents a clean and contemporary home.
Step-by-Step Tutorial
Materials
- 4-inch standard terra cotta pot with matching saucer
- Matte white acrylic paint or chalk paint
- Soft synthetic flat brush (1 inch)
- Painter’s tape or masking tape
- Fine-grit sandpaper (220 grit)
- Terra cotta sealer (optional but recommended)
- Matte spray varnish
- Small cloth or tack cloth
- Ruler
Step 1: Preparation
-
Clean the surface:
Begin by thoroughly wiping down your terra cotta pot with a damp cloth to remove any dust or orange residue. If the pot is old, give it a good scrub with warm soapy water and let it dry completely for 24 hours. -
Sand for smoothness:
Lightly sand the exterior body of the pot with fine-grit sandpaper. You don’t need to sand the rim if you want to keep that rustic texture, but smoothing the body will help the white paint lay down flat and look more like ceramic. -
Clear the dust:
Wipe away all the sanding dust using a tack cloth or a slightly damp rag. A clean surface is crucial for a smooth paint job. -
Seal the interior:
If you plan to plant directly into the pot, apply a coat of terra cotta sealer to the inside. This prevents moisture from seeping through the clay and bubbling your exterior paint later.
Step 2: Creating the Design
-
Measure the rim:
Decide exactly where you want the white section to start. For this look, we want to preserve the entire rim as natural clay. Place your ruler just below the lip of the rim. -
Apply the tape:
Carefully run a strip of painter’s tape around the circumference of the pot, just under the rim’s overhang. Press the edge of the tape down firmly with your fingernail to prevent paint bleed. -
Protect the saucer:
Since the saucer in our look remains natural brown, set it aside. You won’t be painting it, but you might want to seal it with a clear matte varnish later to protect your furniture.
Paint Peeling?
If your paint bubbles after watering, moisture is seeping through the clay. Always seal the inside of terra cotta pots before planting to stop water from pushing the paint off from behind.
Step 3: Painting
-
First coat application:
Load your flat brush with matte white paint. Holding the pot by the rim or placing it upside down on a jar, apply an even coat to the body of the pot below the tape line. -
Watch your brushstrokes:
Paint in vertical strokes from the tape line down to the bottom. This creates a uniform texture that mimics the look of a manufactured ceramic pot. -
Let it dry:
Allow this first coat to dry completely. Acrylics usually take about 30 minutes, but check your specific paint bottle for timing. -
Check for opacity:
Terra cotta is porous and dark, so one coat is rarely enough. Apply a second coat, and possibly a third, until the orange clay is completely hidden and the white is solid and bright. -
Remove the tape:
Peel off the painter’s tape while the final coat is still slightly tacky, not completely dry. This helps ensure a crisp, clean line without chipping the paint. -
Touch up edges:
If any paint seeped under the tape, use a damp Q-tip or a small detail brush dipped in water to gently wipe it away before it cures.
Add Texture
Mix baking soda into your white acrylic paint before applying. This creates a gritty, ceramic-like texture that makes the pot look like hand-thrown pottery rather than painted clay.
Step 4: Detailing and Finishing
-
Detail the rim (optional):
The pot in the image has a lovely decorative dimpling just under the rim. If your pot is plain, you can mimic this texture by using a small dotting tool to press tiny indentations into the clay if it’s still soft, or simply painting a very thin, dotted line in a slightly darker brown for a faux-textured effect. -
Enhance the rim color:
To get that rich, deep brown on the rim shown in the photo, I sometimes rub a tiny amount of antique wax or a dark wood stain onto just the unpainted terra cotta rim. Buff it off quickly for a subtle contrast. -
Seal the exterior:
Once all paint is fully cured (give it overnight if you can), spray the entire pot—painted and unpainted sections—with a matte spray varnish. This protects the white paint from dirt and gives the whole piece a unified sheen. -
Final assembly:
Place your pot into the unpainted saucer. Pot your succulent using succulent-specific soil, and clean off any stray dirt from the white surface immediately.
Your stylish new pot is ready to bring a touch of brightness to your plant shelf


Modern Color-Blocked Bands
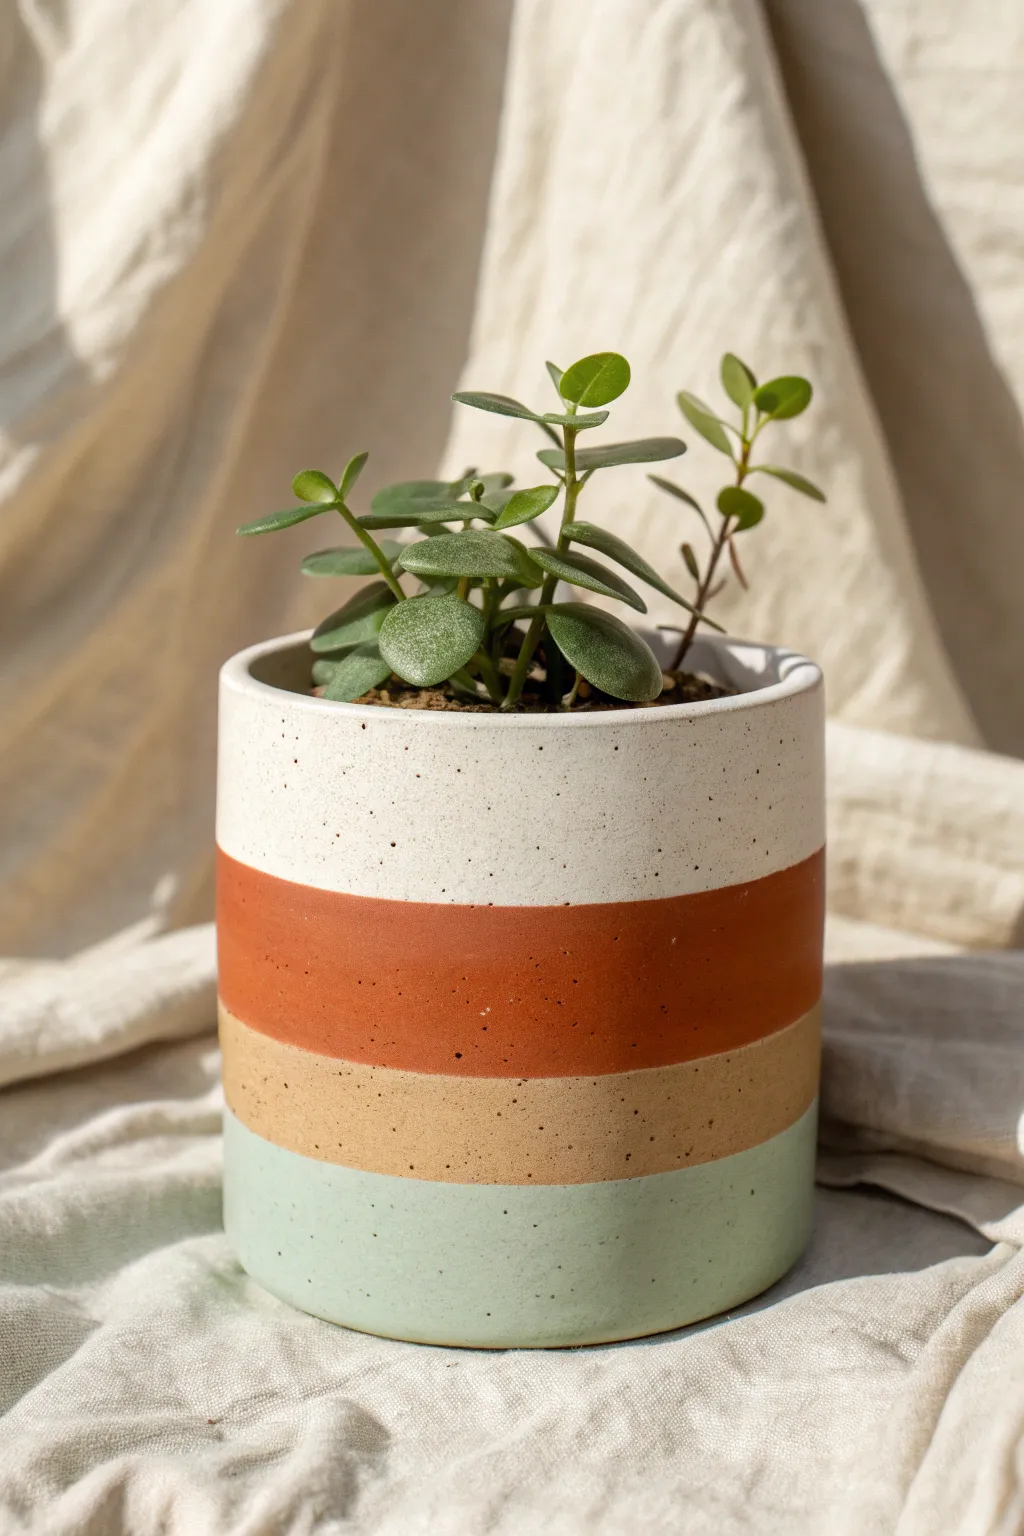
Transform a plain cylindrical planter into a modern statement piece with warm, desert-inspired hues. This tiered design uses crisp lines and speckled textures to mimic the look of high-end ceramic glazing.
Step-by-Step Guide
Materials
- Cylindrical ceramic or terracotta pot (standard white or unglazed)
- Masking tape or painter’s tape (high quality)
- Acrylic paints (Warm White, Burnt Orange/Terracotta, Mustard Tan, Mint Green, Black)
- Matte finish clear sealant spray
- Flat paintbrushes (medium and small)
- Old toothbrush or stiff bristle brush
- Palette or paper plate
- Ruler or measuring tape
- Pencil
Step 1: Preparation & Base Coat
-
Clean the surface:
Wipe down your ceramic pot thoroughly ensuring it creates a dust-free and oil-free surface for the paint to adhere to. -
Apply the base color:
Paint the entire exterior and the inner rim of the pot with a warm white acrylic paint. This will serve as your top band color and ensure the other colors pop. -
Let it dry:
Allow this base coat to dry completely for at least an hour; if the original pot color shows through, apply a second coat and let dry again.
Step 2: Creating the Speckled Effect
-
Prepare the speckle paint:
Dilute a small amount of black acrylic paint with a few drops of water until it reaches an ink-like consistency. -
Flick the paint:
Dip an old toothbrush into the diluted black paint. Hold it near the pot and run your thumb across the bristles to flick tiny specks onto the white surface. -
Control the density:
I prefer to do a test spray on paper first to gauge the splatter size. Aim for an even, random distribution across the whole pot. -
Seal the speckles:
Once the speckles are fully dry, spray a very light coat of matte sealant over the pot to prevent the black dots from smearing during the taping phase.
Seal the Tape Gap
Before painting a color band, paint a thin layer of the *base* color over the tape edge first. This seals the gap, so any bleed is invisible.
Step 3: Painting the Bands
-
Measure the bands:
Decide on the height of your finished bands. Using a ruler and pencil, make small tick marks around the circumference of the pot to guide your tape lines. -
Tape the first line:
Place a strip of painter’s tape horizontally around the pot, creating the boundary for the bottom edge of the top white band. -
Seal the tape edge:
Press the tape down firmly with your fingernail or a credit card to prevent paint bleed. -
Paint the burnt orange band:
Paint the next section below the tape with the burnt orange/terracotta color. Don’t worry about the bottom edge of this band yet. -
Dry and re-tape:
Let the orange paint dry completely. Apply a new line of tape over the bottom edge of the orange section to create a crisp line for the next color. -
Paint the tan band:
Apply the mustard tan color in the next section down. You might need two thin coats to get solid opacity. -
Final taping:
Once the tan band is perfectly dry, apply your final strip of tape over the bottom edge of the tan section. -
Paint the mint base:
Paint the remaining bottom section with the mint green acrylic paint, extending it all the way to the bottom edge of the pot.
Texture Twist
Mix a teaspoon of baking soda into your acrylic paints before applying. This creates a gritty, ceramic-like texture that mimics unglazed pottery.
Step 4: Finishing Touches
-
Remove the tape:
Carefully peel off all tape strips while the final coat is still slightly tacky to ensure clean, crisp lines. -
Touch up:
Use a very fine detail brush to fix any small bleeds or uneven edges where the colors meet. -
Final seal:
For durability, especially if the pot will hold a real plant, apply two coats of matte clear sealant spray over the entire exterior. -
Pot your plant:
Once the sealant has cured for 24 hours, fill with soil and your favorite succulent or jade plant.
Now you have a chic, custom planter ready to brighten up your windowsill


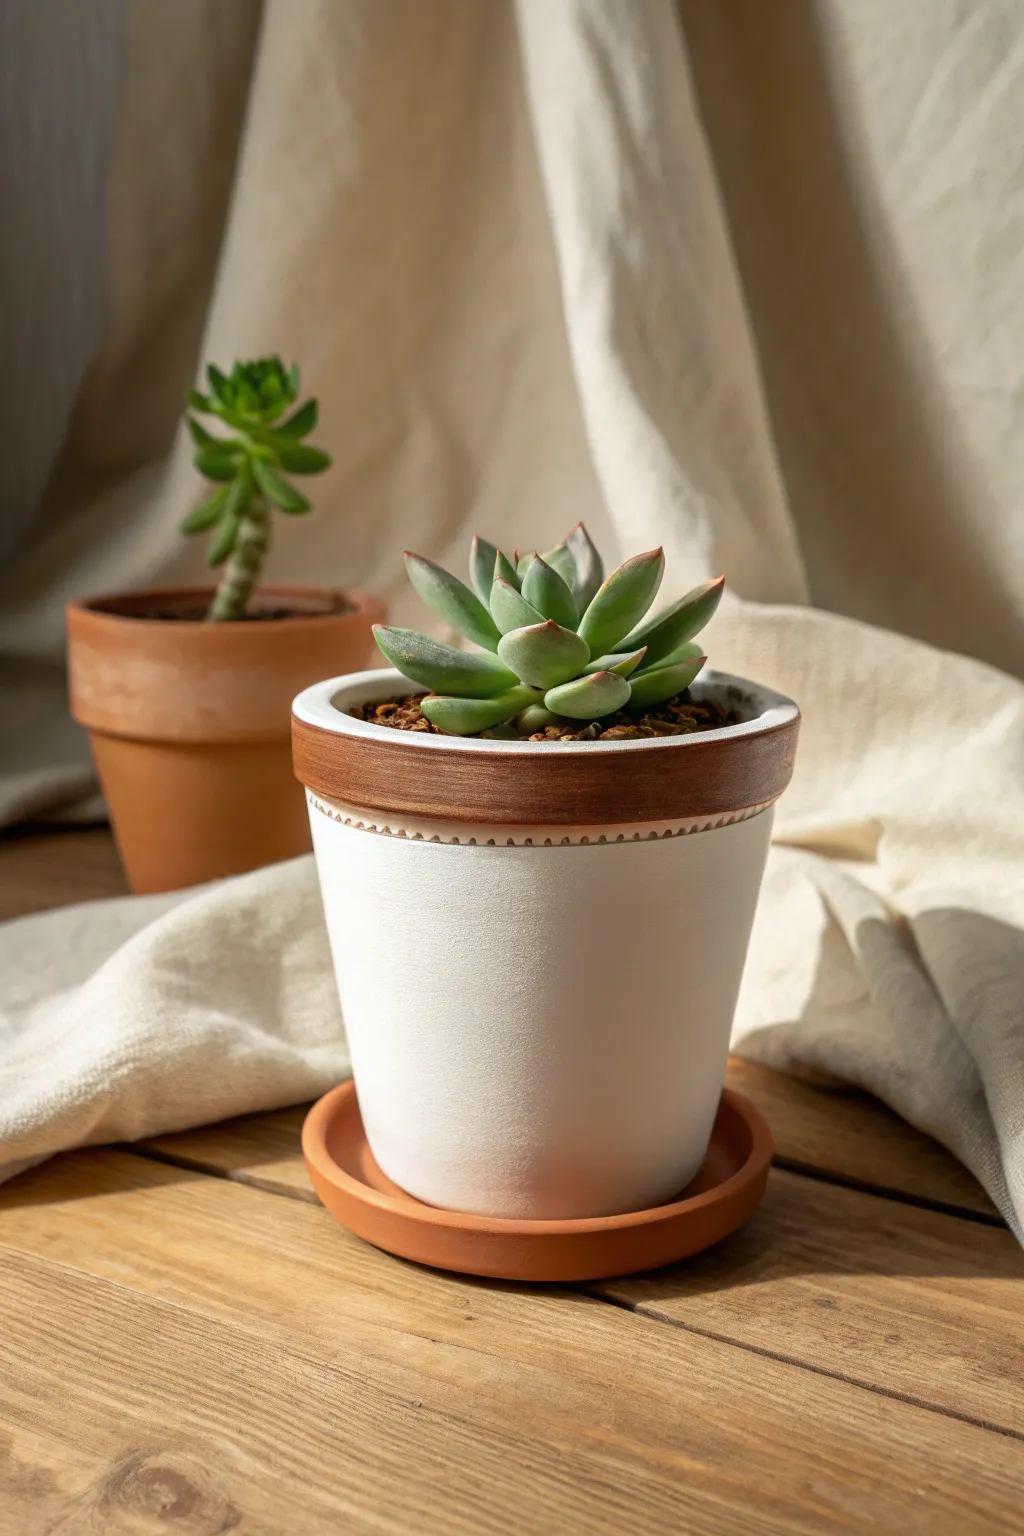
Dipped Two-Tone Look
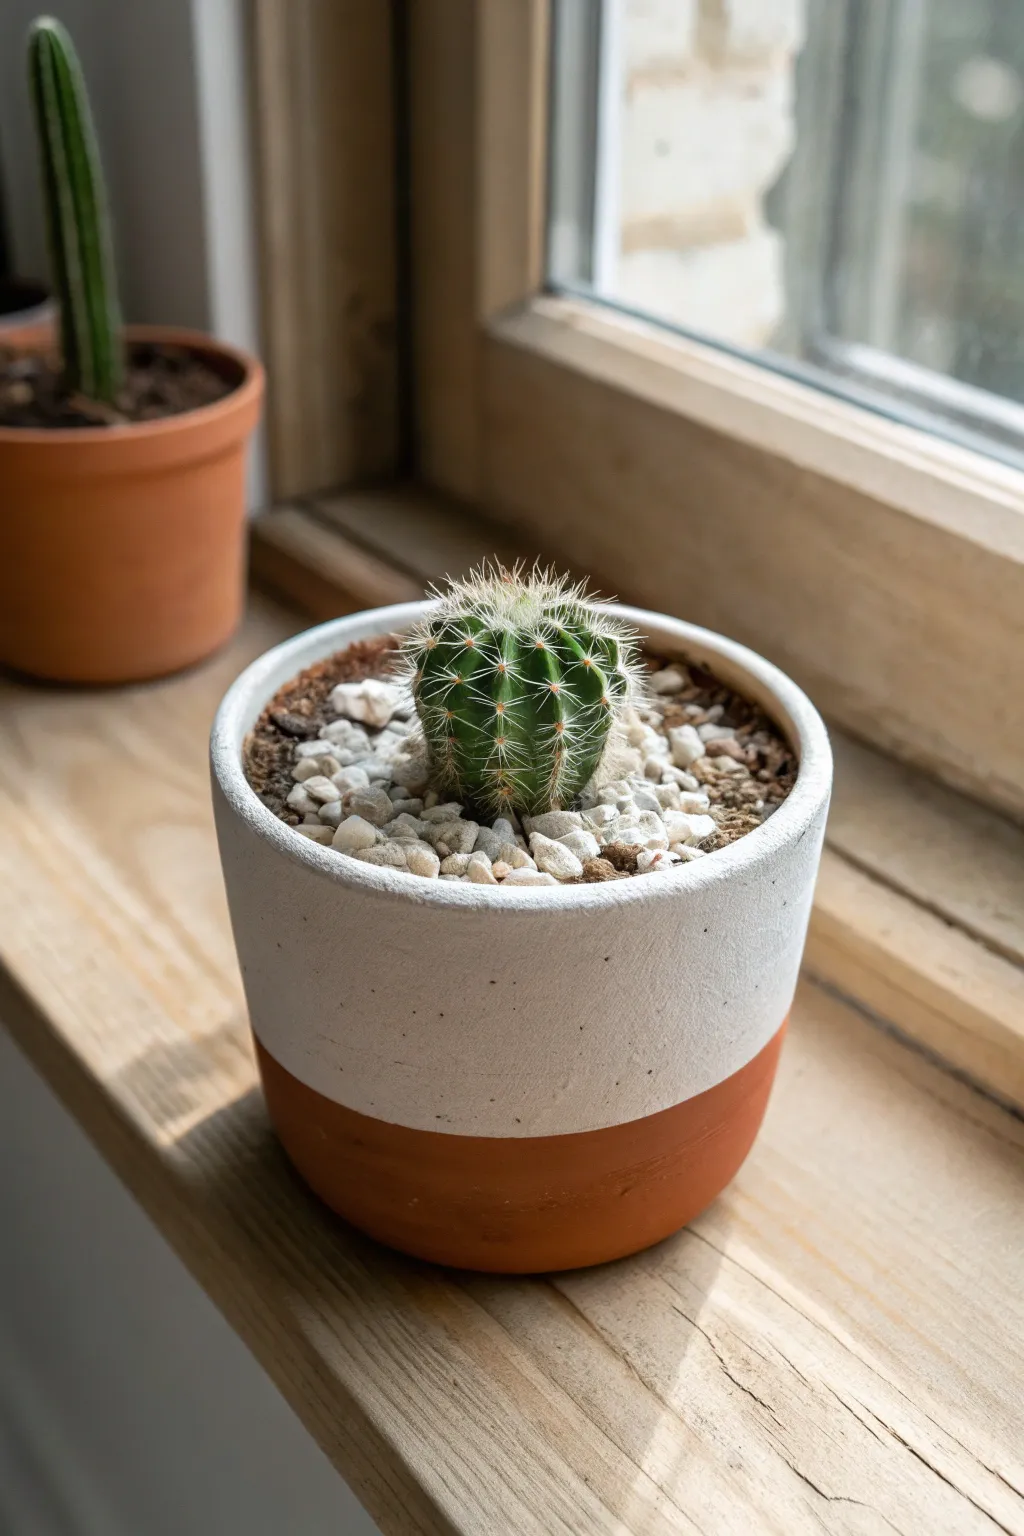
Transform a plain clay planter into a modern statement piece with this easy dip-inspired painting technique. The crisp white top contrasts beautifully against the raw warmth of the terracotta base, creating a clean, two-tone aesthetic that is perfect for showcasing small cacti or succulents.
How-To Guide
Materials
- Small terracotta pot (about 3-4 inches diameter)
- White acrylic paint (matte finish)
- Baking soda (optional, for texture)
- Painter’s tape or masking tape (approx 1 inch wide)
- Flat paintbrush (medium size)
- Palette or small mixing dish
- Pencil
- Ruler
- Paper towels
- Water cup
- Clear matte sealer spray
Step 1: Preparation and Masking
-
Clean the Surface:
Begin by wiping down your terracotta pot with a damp paper towel. These pots can be dusty, and we need a clean surface for the tape to stick properly. -
Dry Completely:
Allow the pot to air dry fully. If the clay retains moisture, the tape won’t seal tight, leading to bleeding lines later. -
Measure the Baseline:
Decide how much terracotta you want exposed. Looking at our inspiration, the unpainted portion is the bottom third. Use a ruler to mark a small dot about 1.5 inches up from the bottom edge. -
Mark the Circumference:
Rotate the pot and make small pencil marks at that same height every inch or so around the entire perimeter. These will serve as your guide for taping. -
Apply the Tape:
Carefully apply your painter’s tape, aligning the *top* edge of the tape with your pencil marks. This covers the bottom section that will remain unpainted. -
Seal the Edge:
Run your fingernail or a credit card firmly along the top edge of the tape. This is the most crucial step for getting that crisp, sharp line we are aiming for.
Bleeding Lines?
If paint bleeds under the tape, wait for it to dry completely. Then, use a fine-grit sandpaper block to gently sand the error away until the terracotta shows through again.
Step 2: Painting and Finishing
-
Prepare the Paint:
Squeeze white acrylic paint onto your palette. To match the slightly textured look of the reference image, I like to mix in a tiny pinch of baking soda here, though plain paint works just fine too. -
Paint the Top Rim:
Start by painting the inside of the rim. You only need to go down about an inch inside—just enough to cover what will be visible above the soil line. -
Apply First Coat:
Paint the exterior of the pot above the tape line. Use long, horizontal strokes to minimize brush marks. -
Paint Over the Tape:
When painting near the tape edge, brush *away* from the tape rather than into it. This helps prevent paint from being forced underneath the adhesive. -
Let Dry and Repeat:
Allow the first coat to dry for about 20 minutes. Apply a second coat to ensure the rich terracotta color is completely hidden and the white is opaque. -
Check for Coverage:
Inspect the pot for any thin spots. A third light coat might be necessary depending on the quality of your acrylics. -
Remove the Tape:
Peel off the tape while the final coat of paint is still slightly tacky, not bone dry. Pull the tape away at a 45-degree angle for the cleanest edge. -
Clean Up Edges:
If any tiny seepages occurred, gently scrape them away with a toothpick or a slightly damp cotton swab while the paint is fresh. -
Seal the Pot:
Once fully dry (give it a few hours), spray the entire exterior with a clear matte sealer. This protects the finish from water damage when you water your plant. -
Final Styling:
Fill with cactus soil and add white stones as a top dressing to complement the painted section.
Add Speckles
To mimic ceramic clay, load an old toothbrush with diluted black or grey paint. Run your thumb over the bristles to flick tiny speckles over the white section before sealing.
Now you have a stylish, modern vessel ready to house your favorite prickly friend


Geometric Triangle Tape Pattern
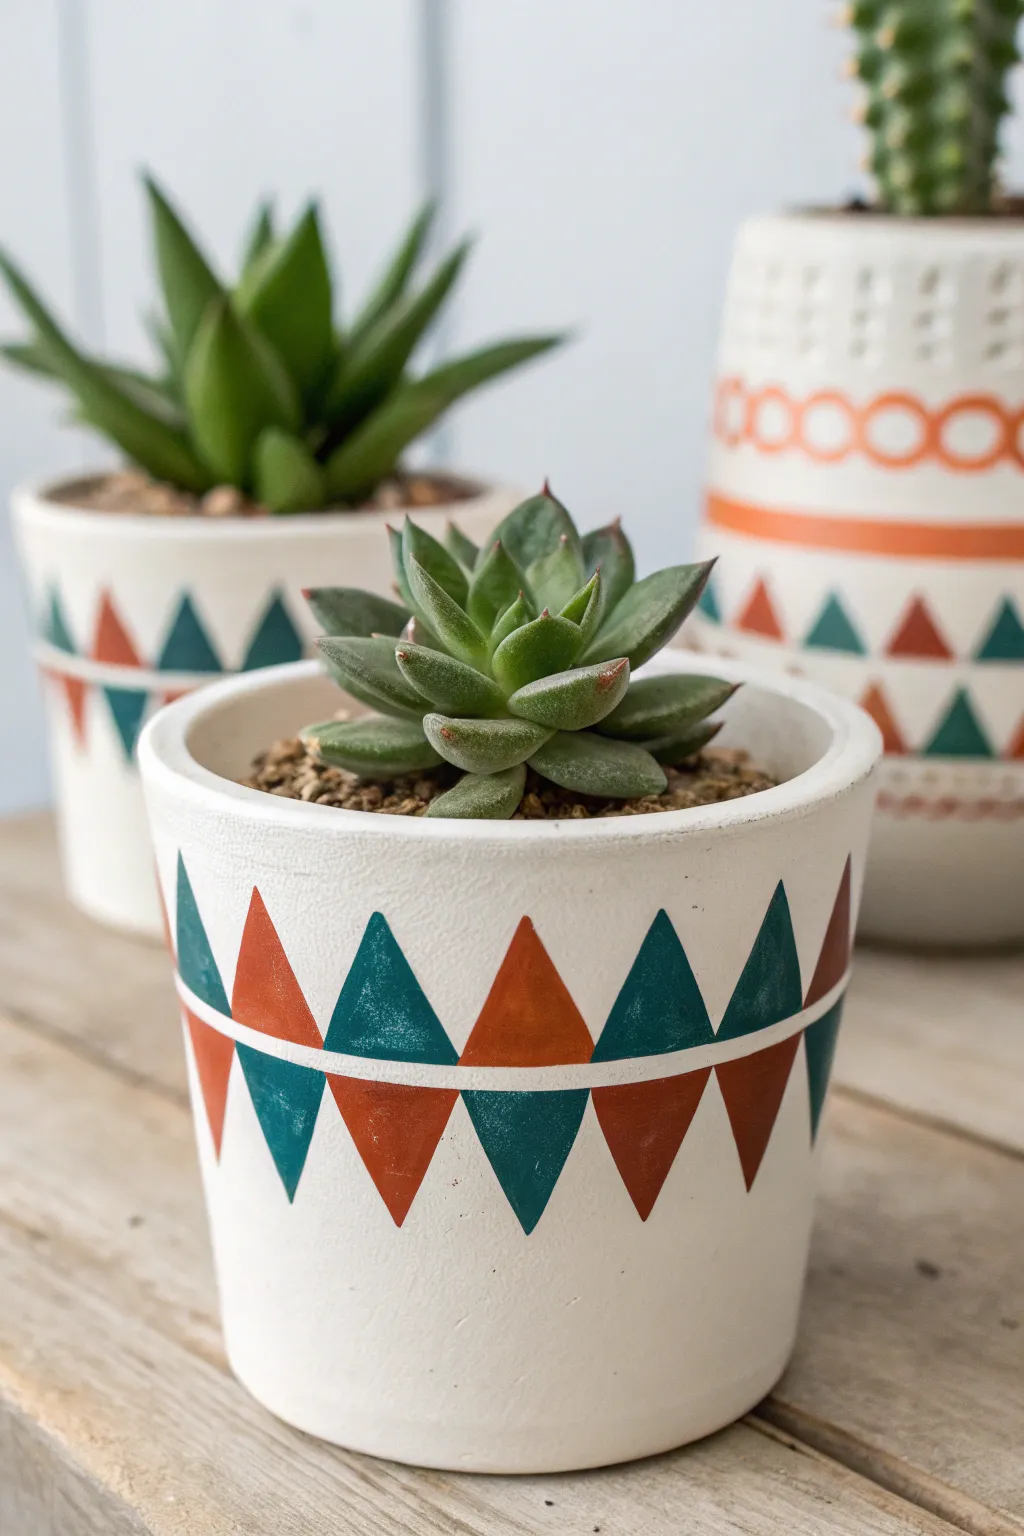
Transform a plain white ceramic pot into a stunning, modern home for your succulents with this crisp geometric triangle design. The alternating teal and rust hues against the white background create a trendy look that is surprisingly simple to achieve with just a bit of tape and patience.
Step-by-Step Tutorial
Materials
- Plain white ceramic pot (cylinder or slightly tapered shape)
- Painter’s tape (low tack)
- Acrylic craft paint (Teal/Dark Turquoise)
- Acrylic craft paint (Rust/Terracotta Orange)
- Small flat tip paintbrush (size 4 or 6)
- Finer detail brush (size 0 or 1)
- Ruler or measuring tape
- Pencil
- Paper plate or palette
- Clear matte acrylic sealer spray (optional)
Step 1: Planning the Grid
-
Clean surface:
Begin by wiping down your ceramic pot with a damp cloth to remove any dust or oils. Let it dry completely to ensure your tape sticks properly. -
Measure circumference:
Measure the circumference of your pot around the middle section where you want the design to sit. Divide this number by an even number (like 8, 10, or 12) to determine how wide each triangle base should be. -
Mark horizontal guides:
Using a pencil, lightly mark a horizontal line all the way around the pot to serve as the centerline between the top and bottom rows of triangles. I find resting my hand on a stack of books while rotating the pot helps keep the line steady. -
Mark triangle points:
along your center line, make small tick marks spaced out according to your calculation from step 2. These marks will be the bases of your triangles. -
Determine height:
Decide on the height of your triangles (e.g., 1.5 inches). Make light marks above and below the center line centered between your base marks to indicate where the tips of the triangles will go.
Bleeding Lines?
If lines aren’t crisp, try painting a thin layer of the *base pot color* (white) over the tape edge first to seal it before adding color.
Step 2: Taping the Design
-
Tape the first set:
Cut small strips of painter’s tape. Apply them to outline every *other* triangle pointing upwards first. You won’t be able to tape touching triangles simultaneously because the tape would overlap the area you need to paint. -
Seal edges:
Press down firmly on the edges of the tape with your fingernail or a credit card like tool. This is crucial to prevent paint bleed and get those sharp geometric lines. -
Tape the bottom row:
Similarly, apply tape to outline the corresponding downward-pointing triangles directly below the ones you just taped, creating an hourglass-like shape in negative space.
Level Up: Texture
Mix a tiny pinch of baking soda into your acrylic paint before applying for a terra-cotta-like, matte textured finish.
Step 3: Painting
-
First color application:
Load your flat brush with the teal paint. Fill in the specific taped-off triangles that correspond to your teal sections. Apply thin, even coats rather than one thick gloppy one. -
Second color application:
Rinse your brush thoroughly and switch to the rust orange paint. Fill in the remaining taped-off triangles intended for this color. -
Remove tape while damp:
Carefully peel back the painter’s tape while the paint is still slightly tacky but not wet. Pulling at a 45-degree angle away from the paint helps keep the edge clean. -
Dry break:
Allow these first painted triangles to dry completely to the touch, usually about 20-30 minutes. -
Tape remaining triangles:
Now apply tape to outline the remaining empty triangle spaces. Since the first batch is dry, it’s safe to place tape gently over the painted areas to create the boundaries for the new ones. -
Paint second batch:
Paint these remaining triangles, alternating your teal and rust colors to complete the pattern. Remember to check your pattern logic so colors don’t clash. -
Final peel:
Remove the final pieces of tape carefully to reveal the full geometric design.
Step 4: Finishing Touches
-
Touch ups:
Inspect your lines. If any paint bled under the tape, use a damp Q-tip to wipe it away quickly, or use your small detail brush and some white paint to tidy up the edges. -
Erase guidelines:
Once the paint is fully cured (give it a few hours), gently erase any visible pencil marks from the initial grid. -
Seal:
If this pot will live outdoors or get wet often, spray a light coat of clear matte acrylic sealer over the painted area to protect your work.
Pop in your favorite succulent and enjoy the modern splash of color on your shelf

The Complete Guide to Pottery Troubleshooting
Uncover the most common ceramic mistakes—from cracking clay to failed glazes—and learn how to fix them fast.
Simple Black-and-White Stripes
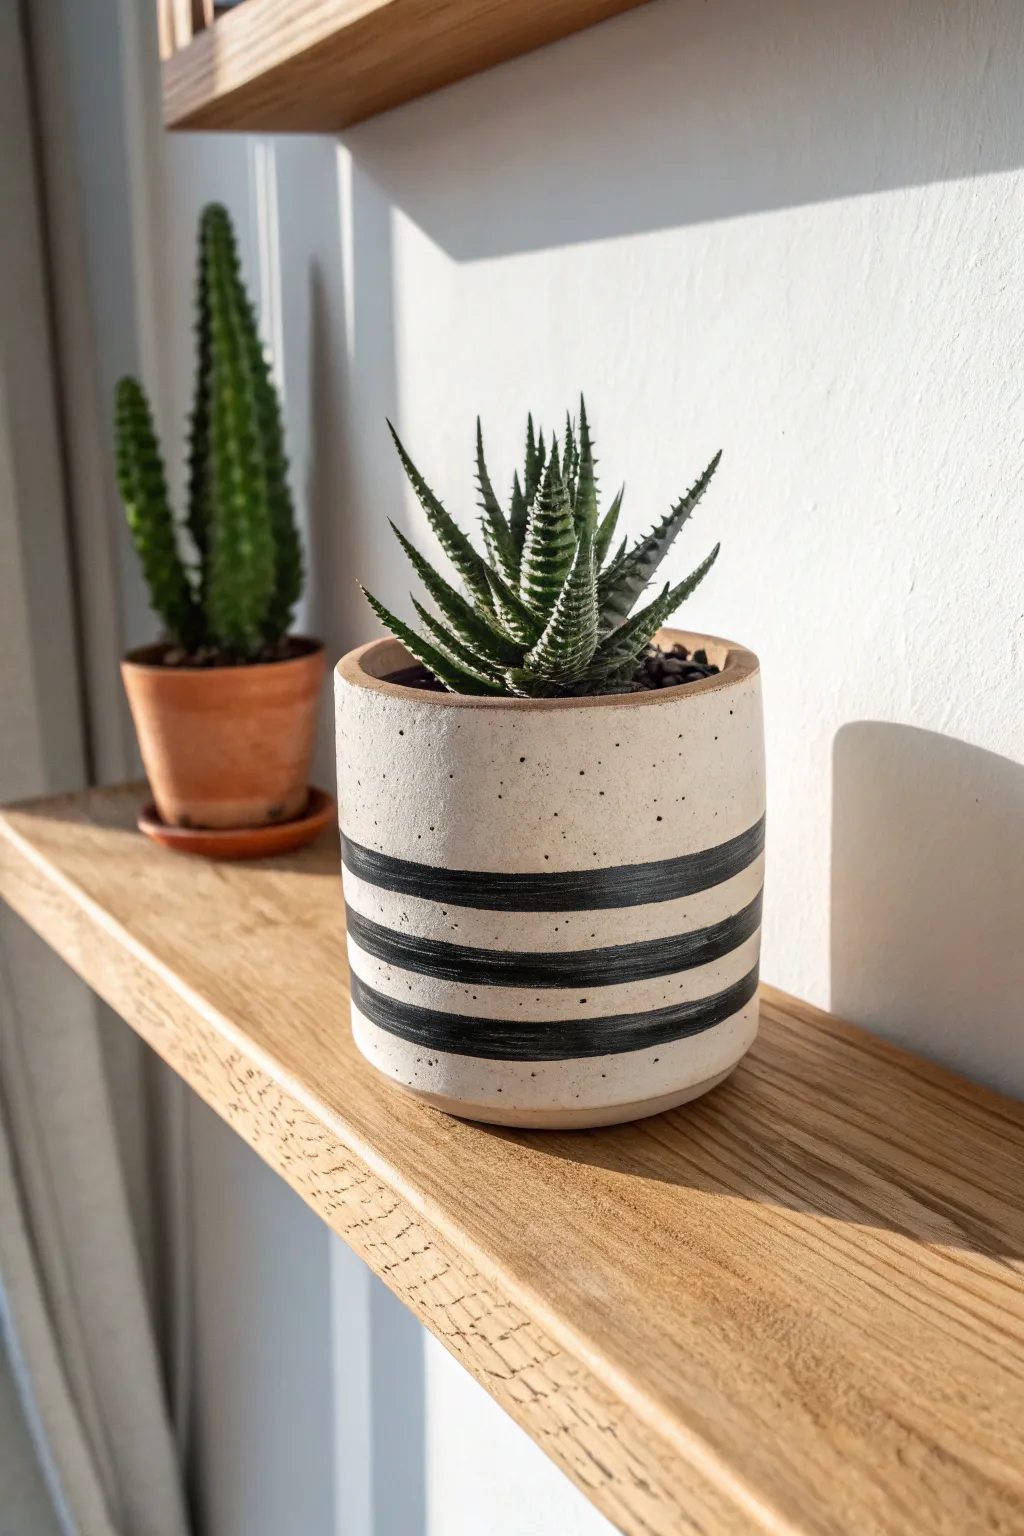
Embrace the beauty of imperfection with this elegantly simple pot design. The charm lies in the organic feel of the horizontal black stripes against a speckled cream background, proving that even basic lines can make a sophisticated statement.
Step-by-Step Guide
Materials
- Bisque-fired ceramic cylinder pot (or a terra cotta pot primed white)
- Speckled cream or oatmeal stoneware glaze (brush-on)
- Black underglaze (or high-heat ceramic stain)
- Medium flat brush (approx. 1/2 inch)
- Small round detail brush (optional for touch-ups)
- Sponge
- Water container
- Clean cloth or towel
- Banding wheel (lazy susan)
- Kiln access (for firing)
Step 1: Preparation and Base Coat
-
Clean the Bisqueware:
Begin by wiping down your bisque-fired pot with a slightly damp sponge. This removes any kiln dust or oils from your hands that might resist the glaze. -
Mix the Glaze:
Stir your speckled cream glaze thoroughly. You want to ensure the suspended speckles are evenly distributed throughout the mixture so the texture appears consistent. -
Apply First Coat:
Using a soft, wide brush, apply the first coat of the cream glaze to the entire exterior of the pot. Ensure smooth, long strokes to minimize brush marks. -
Let it Dry:
Allow the first coat to dry until it is no longer shiny and feels dry to the touch. This usually takes about 10–15 minutes. -
Apply Second Coat:
Apply a second and final coat of the cream glaze. For this specific look, two coats are usually sufficient to provide coverage while letting the clay body’s warmth subtly peek through. -
Clean the Rim:
If you dripped any glaze over the rim, gently wipe it back or smooth it out with your finger so the edge looks intentional and neat.
Wobbly Lines?
If your hand is shaking, rest your pinky finger against the pot (or a stationary stack of books) for stability as the wheel spins.
Step 2: Painting the Stripes
-
Set Up the Banding Wheel:
Place your pot in the absolute center of your banding wheel. Give it a gentle spin to ensure it isn’t wobbling off-center. -
Load the Brush:
Dip your flat brush into the black underglaze. Don’t overload it; you want enough pigment to make a mark but not so much that it drips. -
Position Your Hand:
Anchor your elbow on the table and stabilize your painting hand. Position the brush horizontally against the lower third of the pot. -
Paint the Bottom Stripe:
While holding the brush steady against the surface, slowly rotate the banding wheel with your other hand. Let the rotation of the pot do the work of creating the line. -
Embrace Imperfection:
Don’t stress if the line wavers slightly or varies in thickness. The beauty of this piece is its handcrafted, organic feel rather than machine-made precision. -
Paint the Middle Stripe:
Move your brush slightly higher, leaving a gap of cream glaze roughly equal to the width of your stripe. Repeat the spinning process to create the second line. -
Paint the Top Stripe:
Repeat the process one last time for the third and highest stripe. I usually find that varying the pressure slightly creates charming thin-thick variations. -
Check for Opacity:
If the black looks too washed out or transparent, carefully go over the stripes one more time while spinning the wheel to deepen the color. -
Clean the Foot:
Use a damp sponge to wipe any glaze completely off the bottom foot of the pot to prevent it from sticking to the kiln shelf. -
Final Fire:
Place the pot in the kiln for its final glaze firing according to the temperature guidelines of your specific clay and glaze (usually cone 5 or 6 for stoneware).
Make It Matte
For a sleek, contemporary contrast, leave the black stripes unglazed (raw underglaze) so they remain matte against the glossy cream surface.
Now you have a stunning, modern planter ready to showcase your favorite succulents
Speckled Stoneware-Inspired Finish
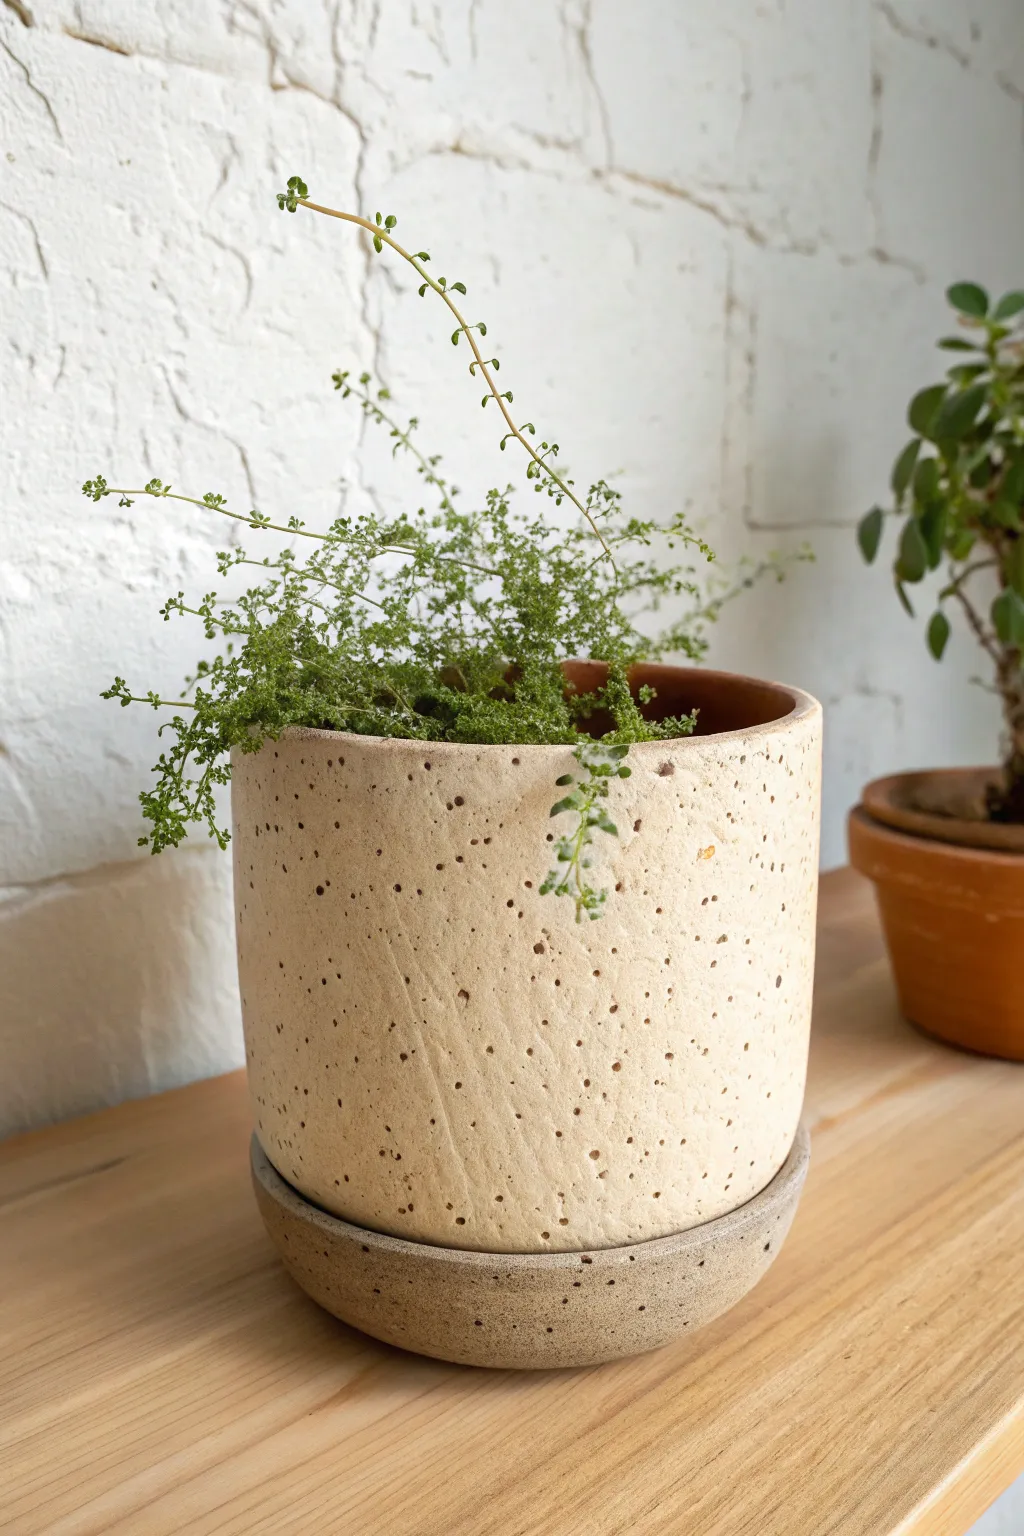
Transform a plain terra cotta or basic ceramic pot into a trendy, high-end stoneware piece with this simple painting technique. The sandy base coat and scattered dark speckles mimic the organic look of kiln-fired clay without the need for a pottery wheel.
Step-by-Step
Materials
- Clean terra cotta pot and saucer
- Sandpaper (medium grit)
- White primer spray paint
- Acrylic paint (warm beige/oatmeal color)
- Acrylic paint (dark brown or espresso)
- Baking soda
- Medium flat paintbrush
- Old toothbrush or stiff bristle brush
- Matte clear sealant spray
- Paper plate or palette
- Drop cloth or cardboard to protect workspace
- Water cup
Step 1: Preparation & Base Coat
-
Prep the surface:
Start by ensuring your pot is completely clean and dry. If using a standard terra cotta pot, give it a quick sanding with medium-grit sandpaper to smooth out any major rough spots, then wipe away the dust with a damp cloth. -
Apply primer:
Take the pot and saucer to a well-ventilated area. Apply an even coat of white primer spray paint. This seals the porous clay and ensures your lighter paint colors will show up true to tone. -
Mix the texture:
Create your textured ‘stoneware’ paint by mixing your warm beige acrylic paint with baking soda. Aim for a ratio of about 1 part baking soda to 2 parts paint. Stir until it has a fluffy, mousse-like consistency. -
Paint the first coat:
Using a flat paintbrush, apply the baking soda mixture to the exterior of the pot. Don’t worry about perfect smoothness; the texture is part of the charm. Brush in semi-random directions to mimic natural clay variations. -
Paint the saucer:
Repeat the painting process for the saucer. If you want to match the image exactly, you can mix a tiny drop of brown or grey into your beige mixture to make the saucer slightly darker than the pot. -
Let it dry completely:
Allow the first coat to dry fully. Because of the baking soda, this might take a little longer than plain acrylics, usually about an hour. -
Apply a second coat:
Apply a second layer of your textured paint mixture to ensure opaque coverage. Pay attention to the rim and just inside the top edge where the soil line will be.
Blob Control
If a large blob of paint lands on your pot while flicking, don’t wipe it! Let it dry completely, then gently dab your base color over it to camouflage the mistake.
Step 2: Creating the Speckle Effect
-
Prepare the speckle paint:
Squeeze a dime-sized amount of dark brown or espresso acrylic paint onto your palette. Add a few drops of water to thin it down until it has an ink-like consistency. -
Load the tool:
Dip the bristles of an old toothbrush into the thinned dark paint. Tap off any excess on a paper towel so it isn’t dripping wet. -
Test your technique:
I always recommend doing a quick test spray on a piece of cardboard first. Hold the toothbrush bristles facing down and run your thumb across them to flick the paint forward. -
Apply fine speckles:
Hold the toothbrush about 6-8 inches away from the pot. flick the bristles to create a fine mist of speckles. Rotate the pot constantly to get even coverage. -
Create variation:
To get those larger, more distinct spots seen in the photo, move the brush slightly closer for a few flicks, or load the brush a bit heavier in certain areas. -
Speckle the saucer:
Repeat the flicking process on the saucer. Don’t forget to hit the rim of the saucer, as this detail helps the illusion of solid stone. -
Dry the specks:
Let the speckles dry completely. Be careful not to verify dryness with a finger touch too early, or you might smudge the dots.
Step 3: Finishing Touches
-
Seal the project:
Once everything is bone dry, spray the entire exterior of the pot and saucer with a matte clear sealant. This protects the baking soda texture from flaking over time. -
Add a second coat of sealant:
Apply one final light coat of sealant for durability, especially if the pot will be kept outdoors or in a humid environment. -
Re-pot your plant:
Once the sealant has cured (check the can instructions), plant your greenery. A trailing plant like the one in the photo looks particularly lovely against the textured surface.
Go Two-Tone
Create a dipped look by taping off the bottom third of the pot and painting it a solid contrasting color like terracotta or slate grey before doing the speckle step.
Your new faux-stoneware pot is ready to add a touch of organic, modern style to your shelf or windowsill


What Really Happens Inside the Kiln
Learn how time and temperature work together inside the kiln to transform clay into durable ceramic.
Terrazzo Confetti Dots
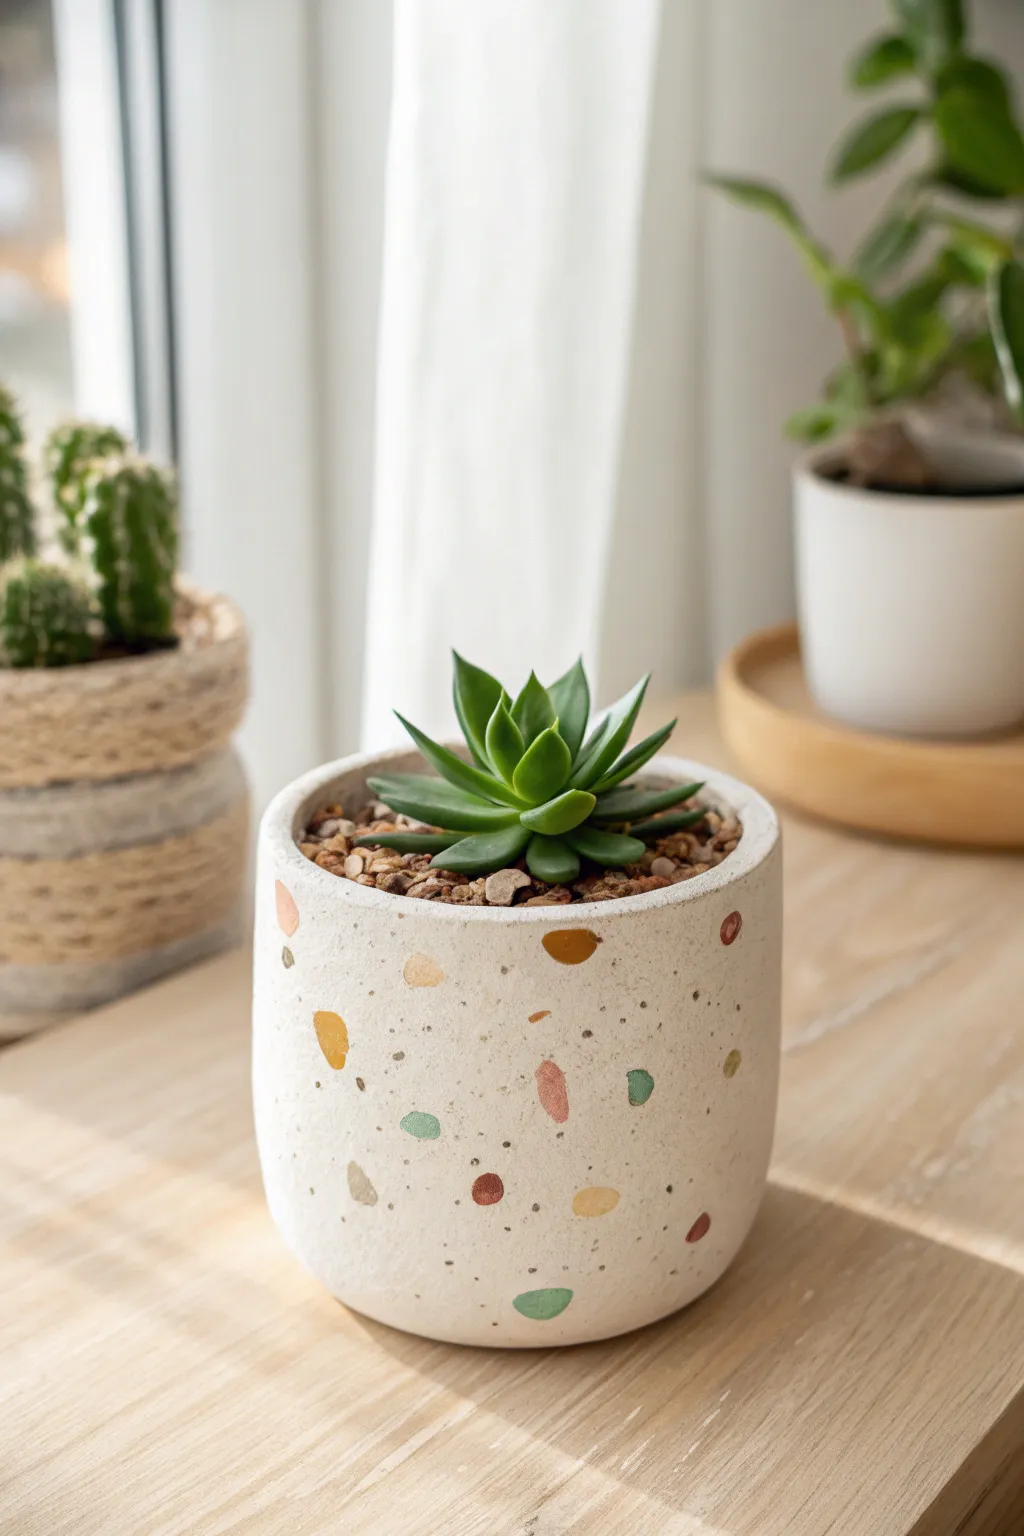
Bring a splash of playful, modern design to your plant collection with this faux-terrazzo ceramic pot. Using simple painting techniques, you can mimic the high-end look of embedded stone chips with colorful, irregular confetti dots on a clean white base.
Step-by-Step Tutorial
Materials
- Plain white ceramic or concrete cylinder pot
- Acrylic paints (terracotta, mustard yellow, sage green, teal, deep red)
- Small flat paintbrush (size 2 or 4)
- Very fine detail brush (size 0 or 00)
- Grey acrylic paint (for speckles)
- Old toothbrush or stiff bristle brush
- Matte clear sealant spray
- Palette or small dishes for mixing
- Paper towels
- Water cup
Step 1: Base Preparation
-
Clean surface:
Begin by wiping down your ceramic or concrete pot with a damp cloth to remove any dust or oils. Let it dry completely. -
Base coat (optional):
If your pot isn’t a crisp white or cream already, apply a base coat of white acrylic paint. Two thin coats are better than one thick one to avoid brush strokes.
Shape Shifting
Real terrazzo chips have sharp, angular edges. Try to paint shapes with corners rather than just round polka dots to get a more authentic stone-chip look.
Step 2: Creating the ‘Chips’
-
Mix the first color:
Start with your mustard yellow paint. Pour a small amount onto your palette. If the paint is very thick, thin it with a tiny drop of water so it flows smoothly. -
Paint yellow forms:
Using the small flat brush, paint random, irregular shapes on the pot. Think of these as broken stone chips—some can be oval, some triangular, and others purely organic blobs. -
Space them out:
Leave plenty of negative white space between your yellow shapes. You need room for the other colors to nestle in. -
Add the sage green:
Clean your brush thoroughly and switch to the sage green paint. Fill in some of the gaps with new irregular shapes, varying the size from small dots to larger shards. -
Introduce terracotta tones:
Next, use the terracotta or rust-orange color. These reddish tones add warmth and contrast nicely with the green. Place these shapes strategically to balance the overall composition. -
Pop in the teal:
Add just a few accents of the teal color. I like to keep the cooler tones slightly more sparse to let the warm earth tones dominate, as seen in the inspiration piece. -
Deep red accents:
Finally, add the smallest shapes using the deep red paint. Use these to fill tiny awkward gaps between larger shapes without touching them. -
Review and refine:
Step back and look at the pot from a distance. If one side looks too empty, add a few more shapes to balance the distribution. -
Let colors dry:
Allow the colorful shapes to dry completely for at least 20 minutes. They must be dry before the next step to prevent smearing.
Step 3: Adding the Grit Texture
-
Prepare splatter paint:
Mix a small amount of grey paint with water until it has an inky, fluid consistency. It should be runny enough to flick easily. -
Load the tool:
Dip an old toothbrush or a stiff-bristled brush into the watery grey paint. Tap off the excess on a paper towel first. -
Test spray:
Practice flicking the bristles with your thumb onto a piece of scrap paper to gauge the size of the droplets. -
Apply speckles:
Hold the brush near the pot and flick the bristles to create a fine mist of grey speckles over the entire surface. This mimics the sandy grit found in real terrazzo. -
Add manual dots:
For a little more definition, use your finest detail brush to manually place tiny grey dots around the colored shapes, integrating the ‘chips’ into the background.
Splatter Control
If you accidentally splatter a large blob of grey paint, quickly dab it gently with a damp Q-tip to lift it before it dries into the other colors.
Step 4: Finishing
-
Final dry:
Let the entire pot dry for at least an hour to ensure the grey speckles are set. -
Seal the work:
Take the pot to a well-ventilated area and spray it with a clear matte sealant. This protects the acrylic from water damage when you water your plant. -
Second coat:
Apply a second light coat of sealant for extra durability, then let it cure according to the can’s instructions before potting your succulent.
Once potted with a cute succulent, this trendy planter adds a handmade artistic touch to any windowsill
Minimal Line-Art Face Planter
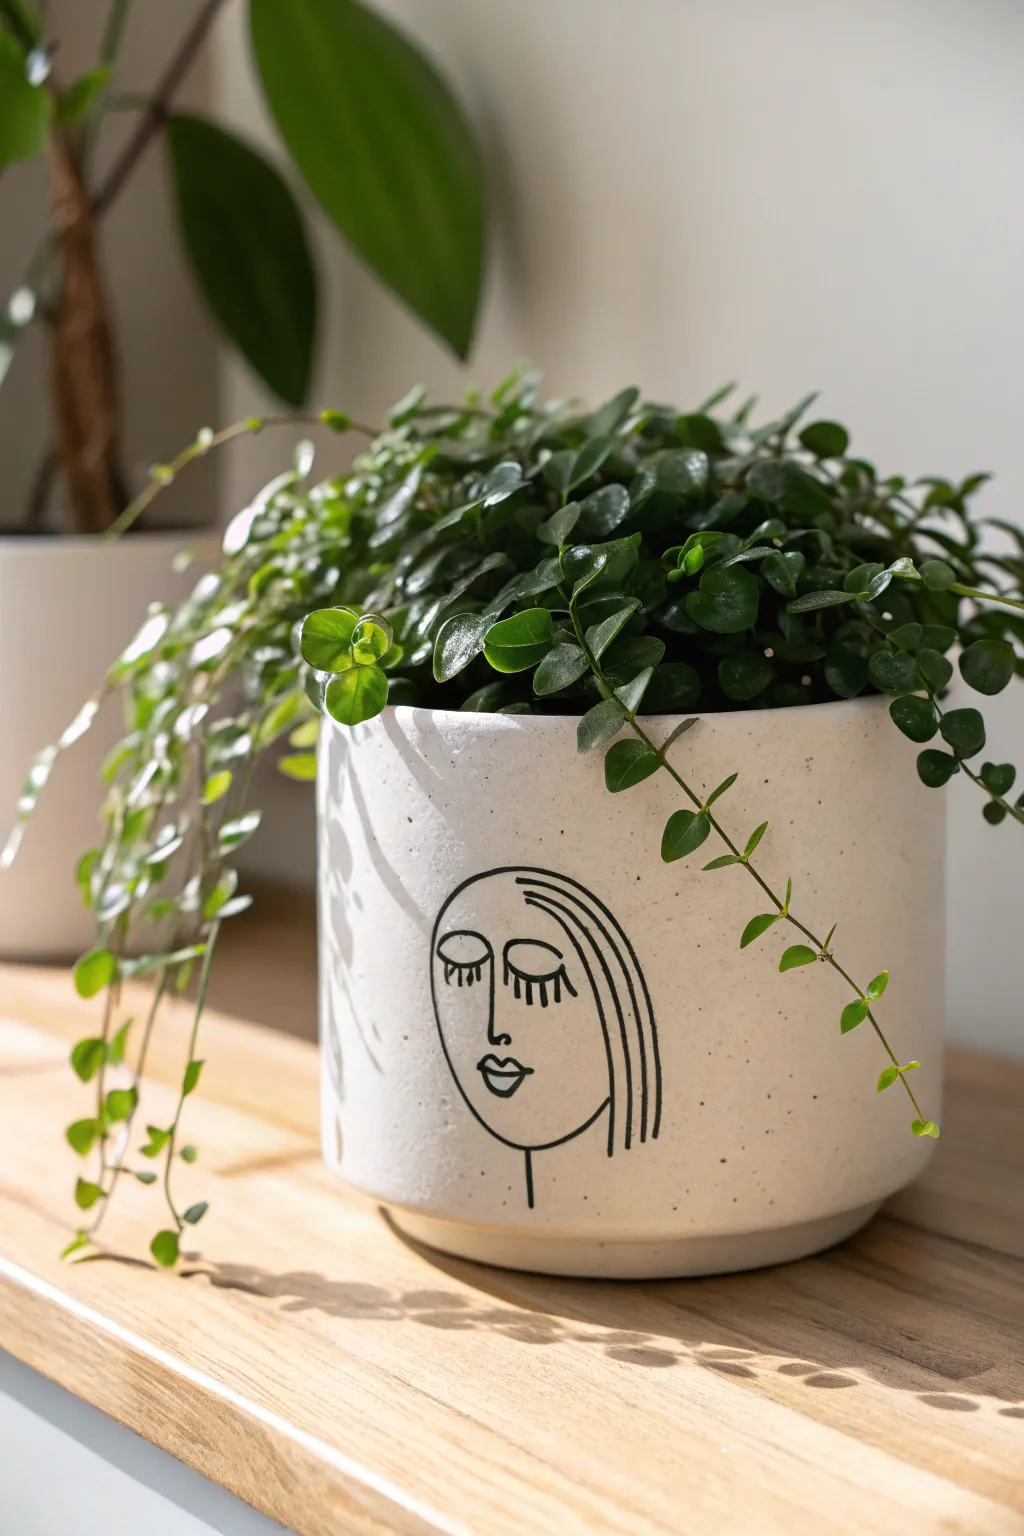
Transform a plain white ceramic pot into a trendy piece of décor with this minimal line-art design. The delicate black strokes create a serene, sleeping face that adds personality without overwhelming your space, perfect for showcasing trailing plants.
How-To Guide
Materials
- White ceramic planter (matte or satin finish preferred)
- Black oil-based paint marker (medium tip)
- Black oil-based paint marker (fine tip)
- Pencil
- Eraser
- Rubbing alcohol
- Cotton pads or paper towel
- Clear spray sealant (matte or satin)
- Scrap paper
- Flexible sewing tape measure
Step 1: Preparation & Planning
-
Clean the surface:
Before you begin, wipe down the entire exterior of your pot with rubbing alcohol and a cotton pad. This removes any oils, dust, or fingerprints that might prevent the paint from adhering properly. -
Practice your sketch:
Grab a piece of scrap paper and practice drawing the face design several times. Focus on the continuous flow of the lines for the nose and chin, and get comfortable with the curved shape of the hair. -
Determine placement:
Hold your pot at eye level to decide where the face should sit. You generally want the eyes to be in the upper third of the pot so the plant leaves can act like ‘hair’ draping over the top. -
Find the center:
Using a flexible sewing tape measure, find the vertical center line of the pot’s front face. Make a tiny, faint pencil mark near the top rim to guide you.
Drawing curves on curves
Drawing straight lines on a curved surface is tricky. Rest your pinky finger against the pot to stabilize your hand as you glide the marker across the surface.
Step 2: Drafting the Design
-
Sketch the nose:
Starting just below the vertical center point you marked, lightly sketch the nose using a pencil. It’s a simple vertical line that curves into a small hook at the bottom. -
Add the lips:
Directly beneath the nose, draw the lips. Start with the Cupid’s bow on top, then the bottom curve. Keep the lines simple—you aren’t shading, just outlining the shape. -
Outline the face shape:
Sketch a U-shaped line for the chin and jawline. Ensure it centers around the nose and mouth you just drew, extending up towards where the ears would be. -
Draw the eyes:
Sketch two downward-curving arcs for the closed eyelids. Place them symmetrically on either side of the nose bridge. Add vertical dashes for the eyelashes. -
Add the hair outline:
Draw the hair on the right side of the face. This is a long, sweeping curve that frames the face shape, with a few internal lines to suggest strands. -
Refine the sketch:
Step back and look at your pencil work. If anything looks lopsided, gently erase and adjust. The pencil lines should be faint enough to cover but visible enough to follow.
Step 3: Inking & Finishing
-
Prepare the marker:
Shake your medium-tip oil-based paint marker well and depress the nib on scrap paper until the ink flows smoothly and evenly. -
Trace the main lines:
Begin tracing over your pencil lines with the medium marker. Use a steady hand and try to complete curves in single, confident strokes rather than short, sketchy ones. -
Detail the eyelashes:
Switch to the fine-tip marker for the delicate eyelashes. Short, quick flicks work best here to keep the lines crisp and not too heavy. -
Fill the hair details:
Use the medium marker again for the long hair strands on the side. I find it helps to rotate the pot physically as I draw these long curves to keep my hand in a comfortable position. -
Let the ink cure:
Allow the paint to dry completely. Oil-based markers can take a bit longer than water-based ones, so leave it alone for at least 2-3 hours to prevent smudging. -
Erase guidelines:
Once you are 100% sure the ink is bone dry, very gently erase any visible pencil marks. Be careful not to scrub too hard over the paint. -
Bake (Optional):
If your pot is oven-safe ceramic, place it in a cool oven, heat to 350°F (175°C), bake for 30 minutes, and let it cool in the oven. This makes the design more permanent. -
Seal the design:
If you didn’t bake, apply a light coat of clear matte spray sealant. Hold the can 12 inches away and do a quick mist to protect your art from water drips.
Make it yours
Add personality by painting the lips a soft pink or adding rosy cheeks with a dab of diluted acrylic paint before you do the final sealing step.
Pop in your favorite trailing plant and enjoy your custom art piece

TRACK YOUR CERAMIC JOURNEY
Capture glaze tests, firing details, and creative progress—all in one simple printable. Make your projects easier to repeat and improve.
Botanical Leaf Silhouettes
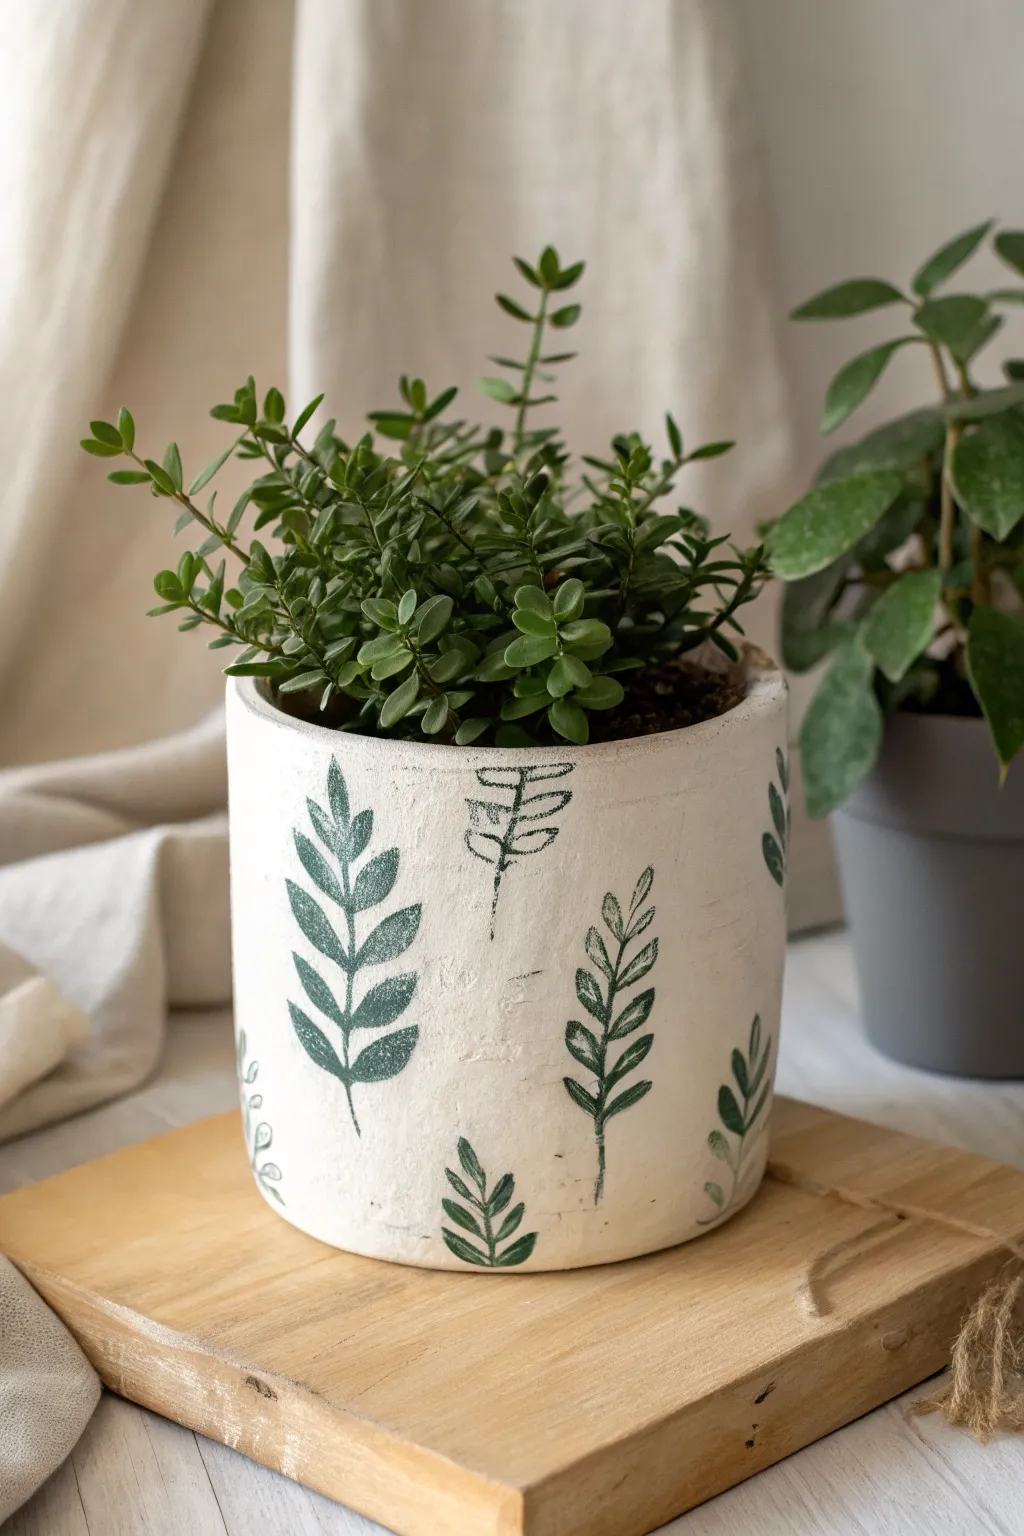
Transform a plain planter into a botanical masterpiece with this simple stamping technique. The minimalist white vessel features delicate, repeating fern fronds in deep forest green that create an organic, airy rhythm around the base.
Step-by-Step Guide
Materials
- Cylindrical ceramic or concrete pot (smooth surface)
- Matte white acrylic paint or chalk paint
- Dark forest green acrylic paint
- Olive green or sage acrylic paint (optional for variety)
- Small foam brush or kitchen sponge
- Rubber stamp carving block or sheet of craft foam
- Linoleum cutter or precision craft knife
- Pencil and paper
- Palette or paper plate
- Matte clear sealant spray
Step 1: Preparing the Base
-
Clean surface:
Begin by wiping down your ceramic pot with a damp cloth to remove any dust or oils. If the pot is terracotta, ensure it is completely dry before proceeding. -
Base coat application:
Apply a coat of matte white acrylic or chalk paint to the exterior. For a textured, concrete-like finish similar to the photo, use a dabbing motion with a sponge rather than smooth brush strokes. -
Second layer:
Once the first coat is dry to the touch, apply a second layer to ensure full opacity. Let this cure completely for at least an hour.
Step 2: Creating the Leaf Stamps
-
Sketch the design:
Sketch a simple fern or leaf shape onto a piece of paper. The design in the image uses a central stem with small, oval-shaped leaves branching off symmetrically. Keep it about 2-3 inches tall. -
Transfer to foam:
Cut a piece of carving block or craft foam to size. Transfer your sketch onto the material. If using craft foam, simply draw firmly with a ballpoint pen to indent the lines. -
Carve the relief:
Using your carving tool or craft knife, carefully cut away the negative space around the leaf shape. You want the leaf pattern to be raised. -
Create a varation:
I like to carve a second, slightly smaller or curved leaf stamp. This adds natural variety so every impression doesn’t look identical.
Stamp Flexibility
For curved pots, use thin craft foam glued to an empty toilet paper roll. This flexible backing will curve with the pot better than a rigid block.
Step 3: Stamping the Pattern
-
Prepare the paint:
Squeeze a small amount of forest green paint onto your palette. If you want a slightly distressed look, mix in a tiny drop of white or olive to soften the color. -
Load the stamp:
Use a foam brush to dab a thin, even layer of paint onto your stamp. Avoid dipping the stamp directly into a puddle of paint, as this causes messy edges. -
Practice first:
Press your stamp onto a scrap piece of paper to test the coverage and pressure needed. The goal is a clean silhouette with a slightly rustic texture. -
First impression:
Choose a spot on the pot. Press the stamp firmly against the curved surface, rocking it very slightly top-to-bottom to ensure the whole image transfers. -
Plan spacing:
Rotate the pot and visualize where the next leaves should go. Vary the height slightly—some lower near the base, some floating higher up. -
Continue stamping:
Stamp your way around the pot. Don’t worry if some impressions are faint or imperfect; this adds to the hand-crafted charm seen in the original project. -
Add detail:
If any stems didn’t transfer clearly, use a very fine detail brush with a tiny bit of green paint to connect the leaf sections or extend the stem line downwards. -
Partial stamps:
Consider adding ‘partial’ leaves coming up from the very bottom edge of the pot to ground the design.
Smudged Edges?
If paint bleeds outside the lines, wait for it to fully dry, then touch it up with a small brush dipped in your white base color.
Step 4: Finishing Touches
-
Dry time:
Allow the green paint to dry completely. Acrylics usually dry fast, but give it 30 minutes to be safe. -
Distressing (Optional):
If the leaves look too perfect, you can lightly sand over them with high-grit sandpaper to reveal a bit of the white background. -
Sealing:
Spray the entire pot with a matte clear sealant. This step is crucial to protect the paint from water drips when you water your plant.
Pop in your favorite succulent or leafy plant and enjoy your new botanical décor piece
Sunny Rainbow Arc Motif
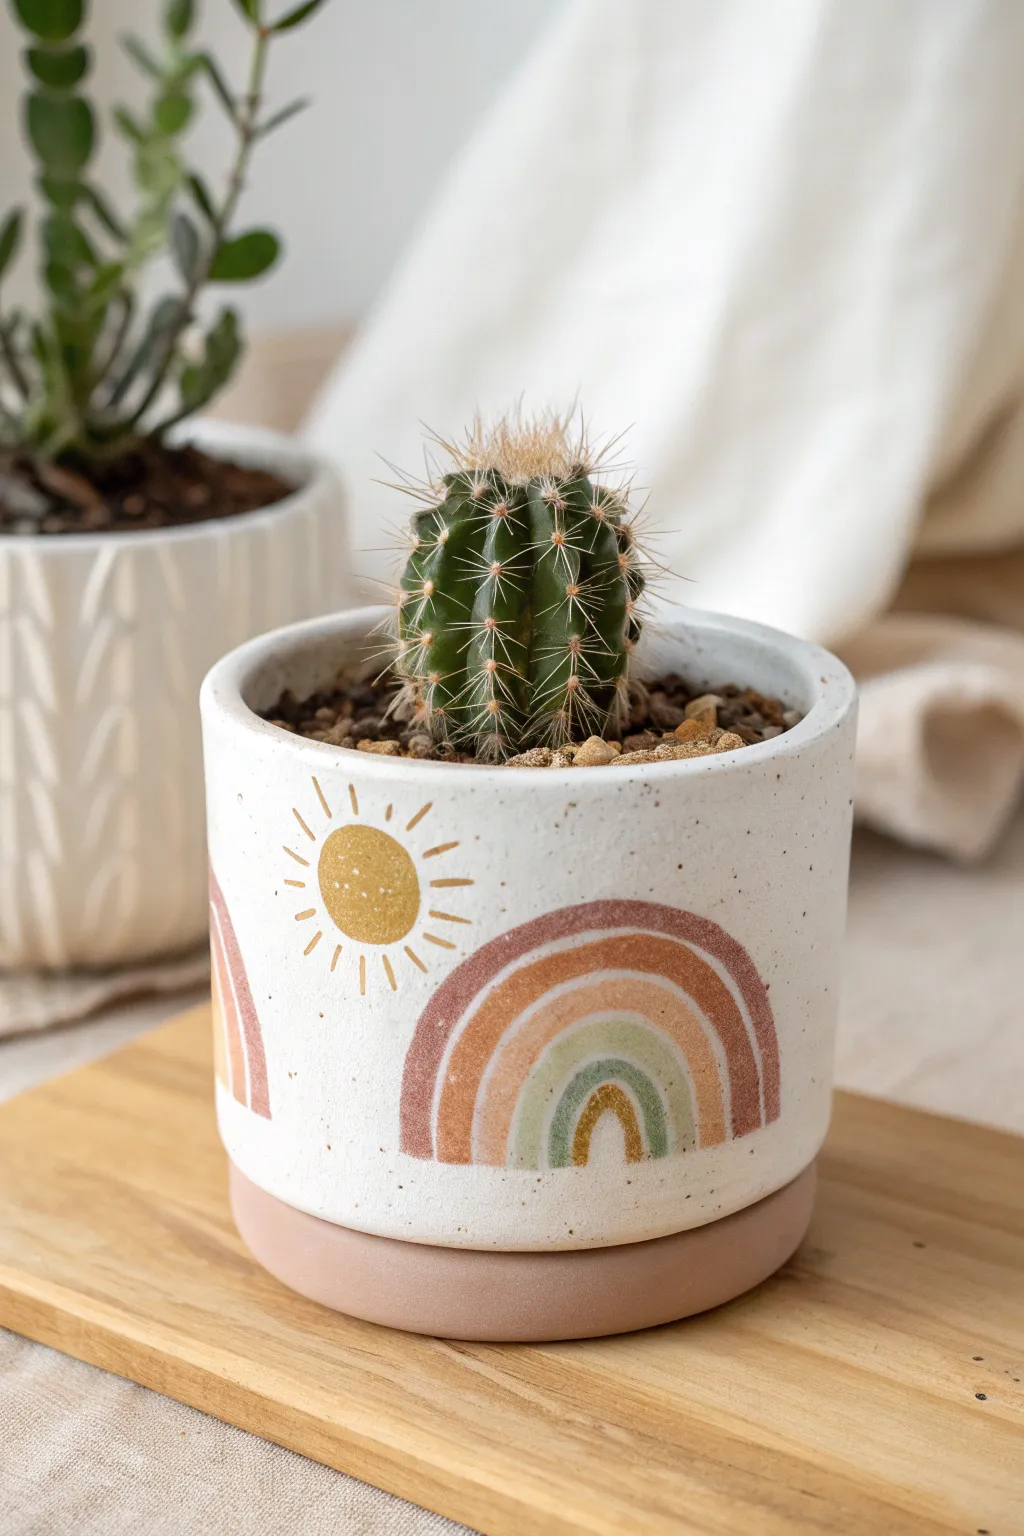
Brighten up your indoor garden with this cheerful, minimalist planter featuring hand-painted rainbows and sunbursts. The earthy color palette of rusty terracotta, sage green, and mustard yellow adds a warm, bohemian touch to a simple white ceramic pot.
Detailed Instructions
Materials
- Small white ceramic planter (preferably matte or unglazed bisque for better adhesion)
- Acrylic paints (Terracotta/Rust, Sage Green, Mustard Yellow, Cream/White)
- Small flat shader brush (size 2 or 4)
- Fine liner brush (size 0 or 00)
- Pencil
- Palette for mixing
- Water cup and paper towels
- Matte clear sealant spray (optional)
- Painter’s tape
Step 1: Preparation and Base
-
Clean surface:
Begin by wiping down your ceramic pot with a damp cloth to remove any dust or oils. Let it dry completely. -
Tape the base:
Apply a strip of painter’s tape horizontally around the bottom of the pot, about half an inch up from the base. This will define the faux-saucer section. -
Paint the bottom trim:
Using the terracotta or rust-colored paint and a flat brush, paint the area below the tape. You may need two coats for full opacity. Peel the tape while the paint is slightly tacky to ensure a crisp line.
Step 2: Sketching the Design
-
Plan placement:
Visualize where you want your rainbows and suns. For a standard 4-inch pot, three large rainbows alternating with suns usually fits perfectly. -
Lightly sketch:
Use a pencil to very lightly sketch the arches of the rainbows. Don’t press too hard, as graphite can sometimes smudge into light paint colors. -
Mark the suns:
Sketch a simple circle for the sun between any rainbow gaps to balance the composition.
Wobbly Arches?
If painting curves is tricky, use a round object (like a coin or bottle cap) to lightly trace the top curve of the rainbow first. This gives you a guide to follow with your brush.
Step 3: Painting the Rainbows
-
Outer arch:
Start with the outermost arch using the terracotta/rust paint. Use the flat shader brush to create a consistent band width. I find steadying my pinky finger on the pot helps keep the curve smooth. -
Middle arch:
Mix a small amount of white into your terracotta paint to create a lighter, peachy tone. Paint the second arch directly inside the first one, leaving a very tiny gap of white space between them if desired, or touching them for a solid look. -
Inner arch:
Switch to the sage green paint. Carefully paint the third arch inside the peach one. This color contrasts beautifully with the warm tones. -
Center arch:
For the smallest, innermost arch, use the mustard yellow paint. This completes the rainbow motif. -
Refine edges:
Go back with your fine liner brush to touch up any wobbly edges on the arches once the main blocks of color are dry.
Make it Textured
Mix a tsp of baking soda into your acrylic paint before applying. This creates a gritty, terra-cotta texture that looks like real clay once dry.
Step 4: Adding the Sunbursts
-
Paint the sun body:
Using the mustard yellow paint and a small round or flat brush, fill in the circle you sketched earlier. You might need a second coat for a solid, sunny look. -
Create rays:
Switch to your fine liner brush. Paint thin, straight lines radiating outward from the sun circle. Keep them relatively short and varied in length for a playful, organic feel. -
Add speckles (optional):
To mimic the speckled stoneware look in the photo, dilute a tiny bit of brown or dark grey paint with water. Dip an old toothbrush in it and run your thumb across the bristles to flick tiny specks onto the white areas of the pot.
Step 5: Finishing Touches
-
Clean up:
If you made any mistakes, you can carefully scratch them off with a toothpick if the paint is dry, or paint over them with a bit of white paint. -
Dry time:
Allow the entire design to dry for at least 24 hours before handling extensively. -
Seal (optional):
For longevity, especially if the pot will be near water, apply a coat of matte clear sealant spray. This protects the acrylic work from scratches and moisture.
Now your plant has a cheerful new home that brings a warm, desert-inspired vibe to your shelf
Soft Ombre Fade Wash
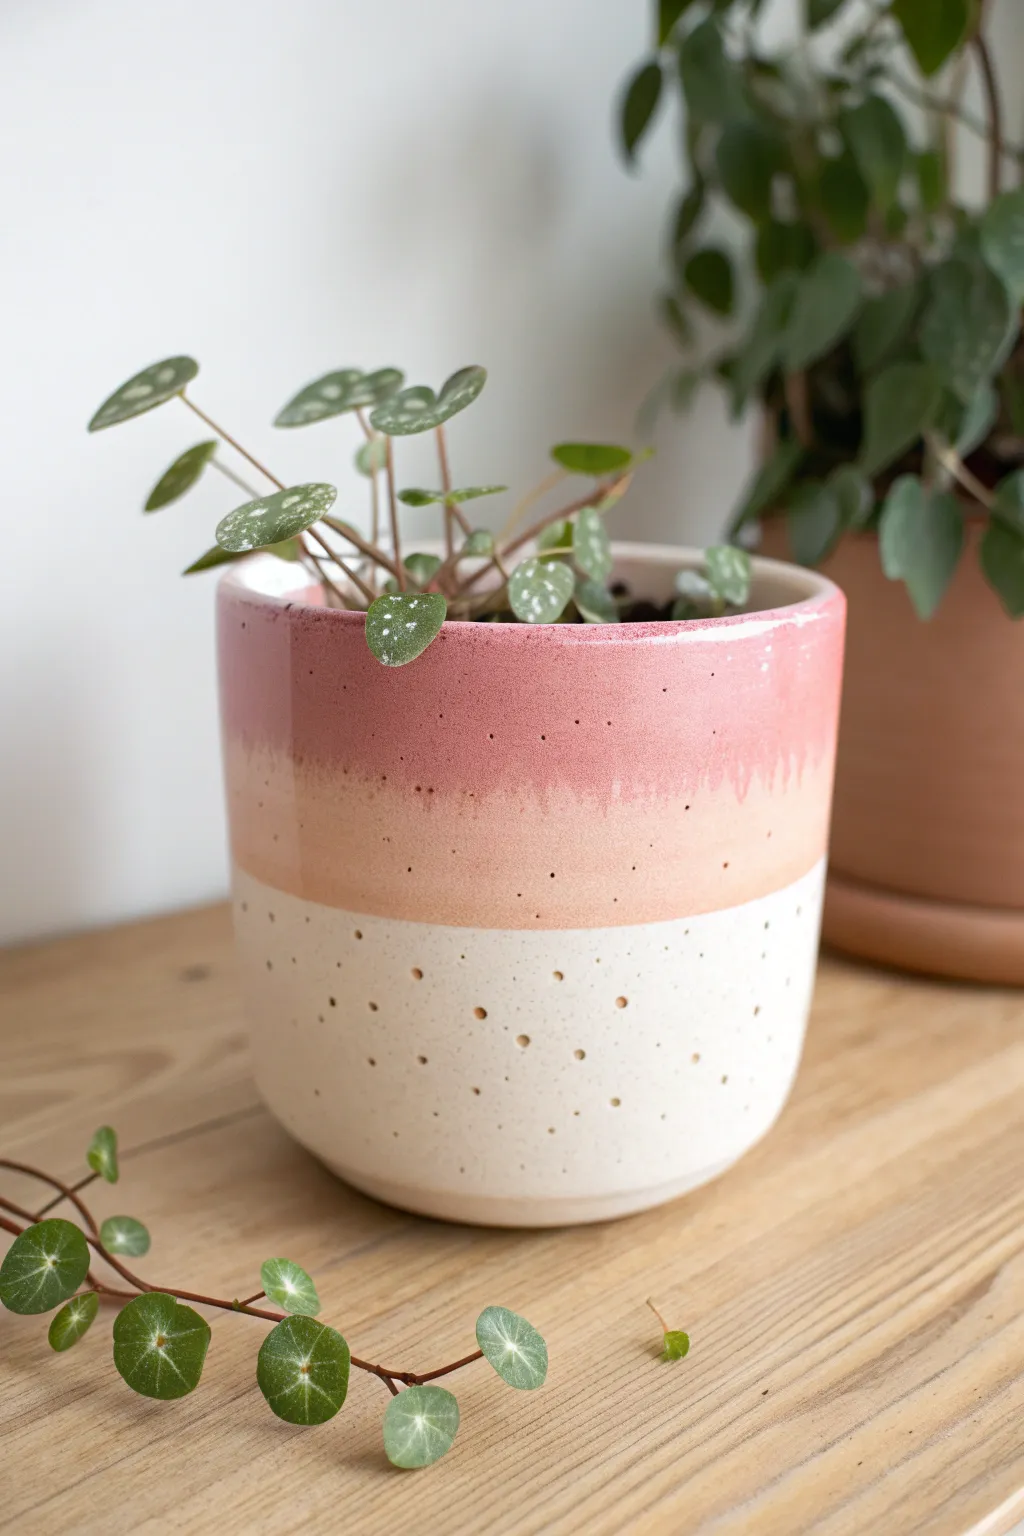
Transform a plain planter into a stunning piece of decor with this soft ombre fade technique. The design features a tactile, speckled base transitioning into warm peach and pink glazes, mimicking the gentle hues of a summer sunset.
How-To Guide
Materials
- Bisque-fired ceramic pot (bowl shape)
- White underglaze or slip (matte finish)
- Peach ceramic glaze (mid-fire)
- Pink ceramic glaze (mid-fire)
- Needle tool or small drill bit tool
- Sponge
- Water bucket
- Clear matte glaze (optional)
- Kiln (or access to a pottery studio)
Step 1: Preparation and Texture
-
Clean the surface:
Start with your bisque-fired pot. Use a slightly damp sponge to wipe away any dust or ceramic debris from the surface to ensure the glaze adheres perfectly. -
Establish the base layer:
Dip the bottom third of the pot into a white matte underglaze or apply it evenly with a soft brush. Keep the line relatively straight but soft. -
Create the texture:
While the white layer is still slightly damp but firm to the touch, use a needle tool to gently poke small, random holes all around the bottom section. Vary the spacing to create a natural, organic speckled look. -
Clean up the texture:
Once the white section is fully dry, gently run your finger over the holes to knock off any sharp burrs created by the needle tool.
Uneven Dips?
If your glaze line is crooked, quickly wipe it off with a wet sponge while fresh, let it dry for 20 minutes, and re-dip. Don’t try to fix a wet dip with a brush or it will look streaky.
Step 2: Applying the Ombre Glaze
-
Prepare the peach glaze:
Stir your peach glaze thoroughly. It should have the consistency of heavy cream. Pour enough into a wide container to dip the middle section of the pot. -
Apply the middle band:
Hold the pot upside down by the foot. Dip the pot into the peach glaze, submerging it past the rim and about halfway down the pot’s body. Hold for 3 seconds. -
Create the fade edge:
As you lift the pot out, do so slowly to let the excess glaze run off smoothly. The bottom edge of this peach layer should overlap slightly with the top of your white textured base. -
Dry the first layer:
Allow the peach glaze to dry completely. This is crucial; if it’s wet, the next dip might wash it away. -
Prepare the pink glaze:
Prepare your pink glaze similarly to the peach one, ensuring no lumps remain. -
Dip the top band:
Dip the pot again, but this time shallower—only submerge the top third of the pot into the pink glaze. This creates the darkest band at the top.
Step 3: Refining and Firing
-
Check the drip lines:
The glazes will naturally interact where they overlap. If a drip looks too heavy, carefully dab it with a sponge, but leaving the natural uneven line adds to the handmade charm. -
Clean the foot:
Use a wet sponge to wipe the very bottom (foot) of the pot completely clean of any glaze. Glaze on the bottom will fuse your pot to the kiln shelf. -
Create separation (optional):
For added definition, I sometimes take a damp brush and lightly feather the transition line between the pink and peach if the dip line is too harsh. -
Final drying:
Let the pot sit for 24 hours to ensure all moisture has evaporated from the clay walls before firing. -
Fire the kiln:
Load the pot into the kiln and fire it according to the specific cone rating of your clay and chosen glazes (likely Cone 5 or 6 for mid-fire). -
Cool down:
Allow the kiln to cool naturally before opening. Removing the pot too early can cause thermal shock and cracking.
Layering Logic
Always dip light colors first closest to the bottom, and darker colors last near the top. This creates better depth as the darker glaze melts slightly downward into the lighter one.
Once fired, fill your new tiered planter with a trailing plant like Pilea glauca to complement the textured design
Scalloped Rim Accent
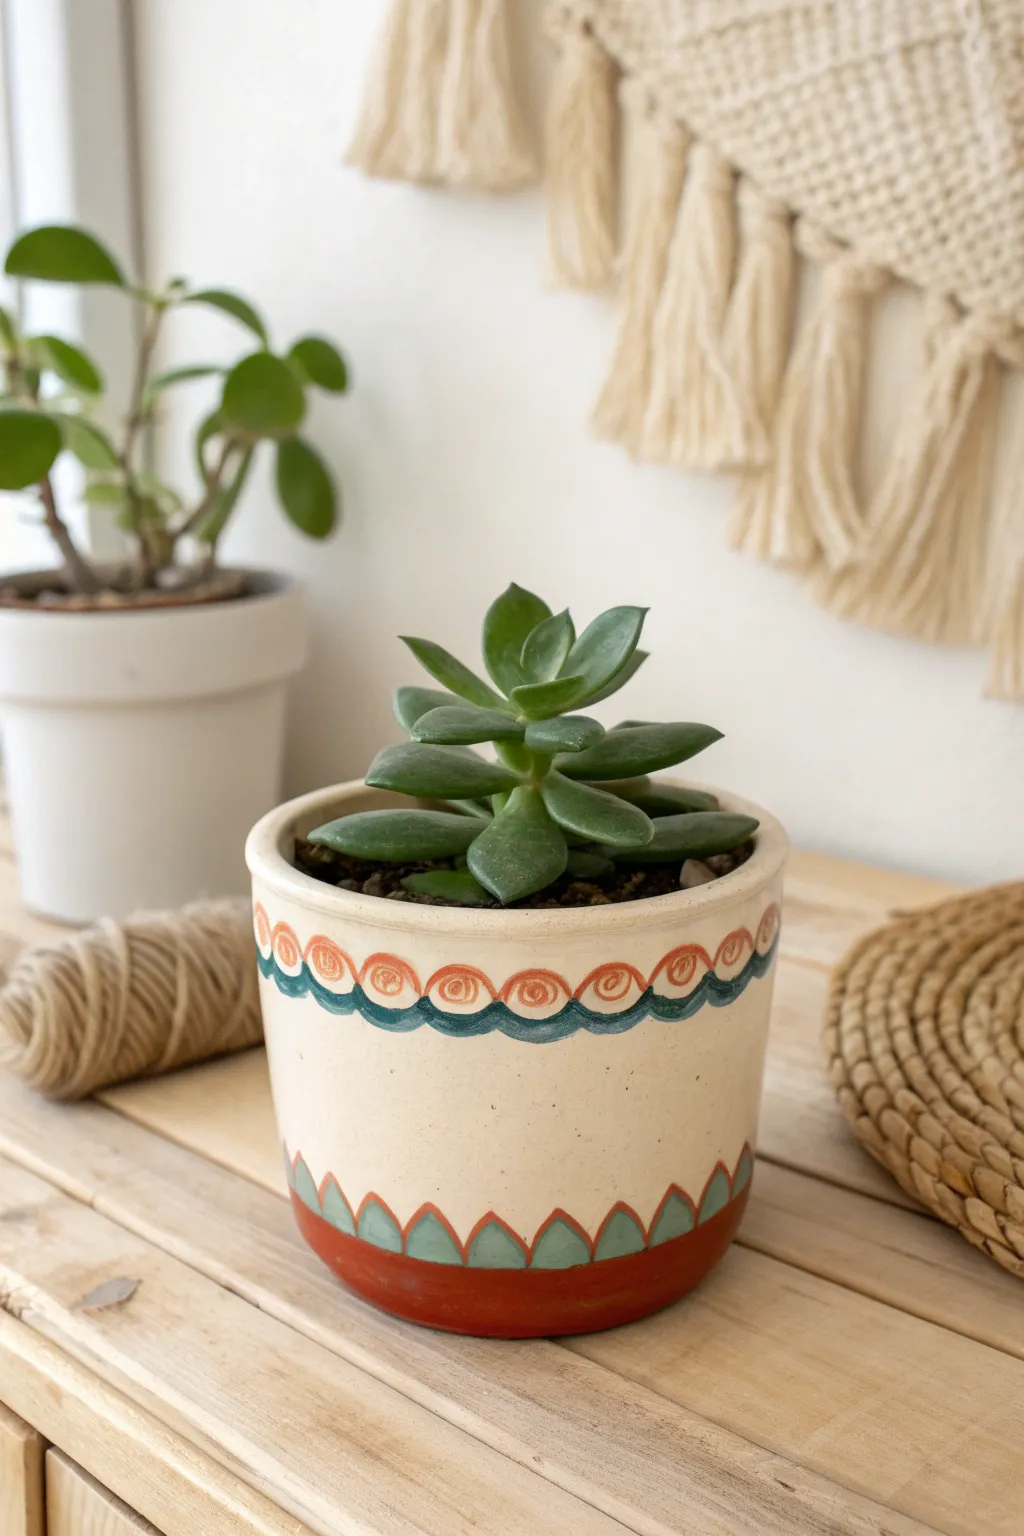
Transform a plain ceramic planter into a bohemian centerpiece with this rhythmic pattern design. Featuring a playful scalloped rim adorned with swirls and a grounding geometric base, this project blends earthy terracotta tones with cool teal accents.
Step-by-Step
Materials
- Plain ceramic planter (cream or off-white glazed finish)
- Acrylic paints (Terracotta Orange, Deep Teal, Cream/Off-White)
- Small round paintbrush (size 2 or 4)
- Detail liner brush (size 0 or 00)
- Flat shader brush (size 8 or 10)
- Pencil for sketching
- Paper towel
- Water cup
- Clear acrylic sealer (matte or satin finish)
Step 1: Preparation & Sketching
-
Clean surface:
Begin by wiping down your ceramic pot with a damp cloth to remove any dust or oils. Let it dry completely to ensure the paint adheres properly. -
Mark rim guideline:
About an inch below the top rim, lightly sketch a horizontal guideline all the way around the pot using your pencil. This will serve as the baseline for your scalloped pattern. -
Sketch scallops:
Draw connected U-shapes (scallops) along your guideline. Try to keep them consistent in width, but don’t worry if they are slightly organic; it adds to the handmade charm. -
Add spirals:
Inside each U-shape curve, lightly sketch a circular spiral motif that fills the space within the scallop. -
Sketch base pattern:
At the bottom of the pot, sketch a series of repeating pointed arches or ‘teeth’ shapes, approximately 1.5 inches tall.
Step 2: Painting the Top Border
-
Paint scallops:
Load your small round brush with Deep Teal paint. Carefully trace over your pencil lines for the connected U-shapes to create the scalloped wave. -
Thicken the line:
Go back over the teal wave to slightly thicken the line weight, giving it a bold presence against the cream background. -
Add second wave:
Using the same teal paint, add a second, thinner scalloped line closely hugging the bottom of the first one. This creates a double-layered look. -
Paint orange spirals:
Clean your brush thoroughly or switch to the detail liner brush. Dip it into the Terracotta Orange paint. -
Execute spirals:
Carefully paint the spiral designs nestled inside each top scallop curve. Start from the center of the spiral and work your way out for better control. -
Add connecting dots:
Using the very tip of your brush with orange paint, place a tiny dot between each scallop peak to connect the design visually.
Uneven Lines?
If your lines look shaky, use a cotton swab dipped in water (or rubbing alcohol for dried acrylics) to gently erase mistakes. Resketch before repainting.
Step 3: Painting the Base Design
-
Fill base color:
Using your larger flat shader brush and Terracotta Orange paint, fill in a solid band around the very bottom edge of the pot, creating a foundation about 0.5 inches high. -
Outline base triangles:
Switch back to the round brush and outline the pointed arches you sketched earlier using the same Terracotta Orange. -
Fill inner triangles:
Clean your brush and pick up the Deep Teal paint. Fill the inside of each pointed arch, leaving a small gap between the teal fill and the orange outline. -
Refine edges:
Use the detail brush to clean up any shaky edges. I find that rotating the pot on a lazy susan or a towel makes maintaining a steady hand much easier during this step. -
Dry completely:
Allow all paint layers to dry fully for at least 2-3 hours. The paint should feel dry to the touch and not tacky. -
Seal the work:
Apply a coat of clear acrylic sealer over the painted areas to protect your design from water and UV fading.
Coordinate Saucer
Paint the rim of a matching saucer with the same teal scallop pattern to create a cohesive set. It ties the whole look together beautifully.
Now your pot is ready to be the stylish new home for your favorite succulent
Playful Polka-Dot Pop
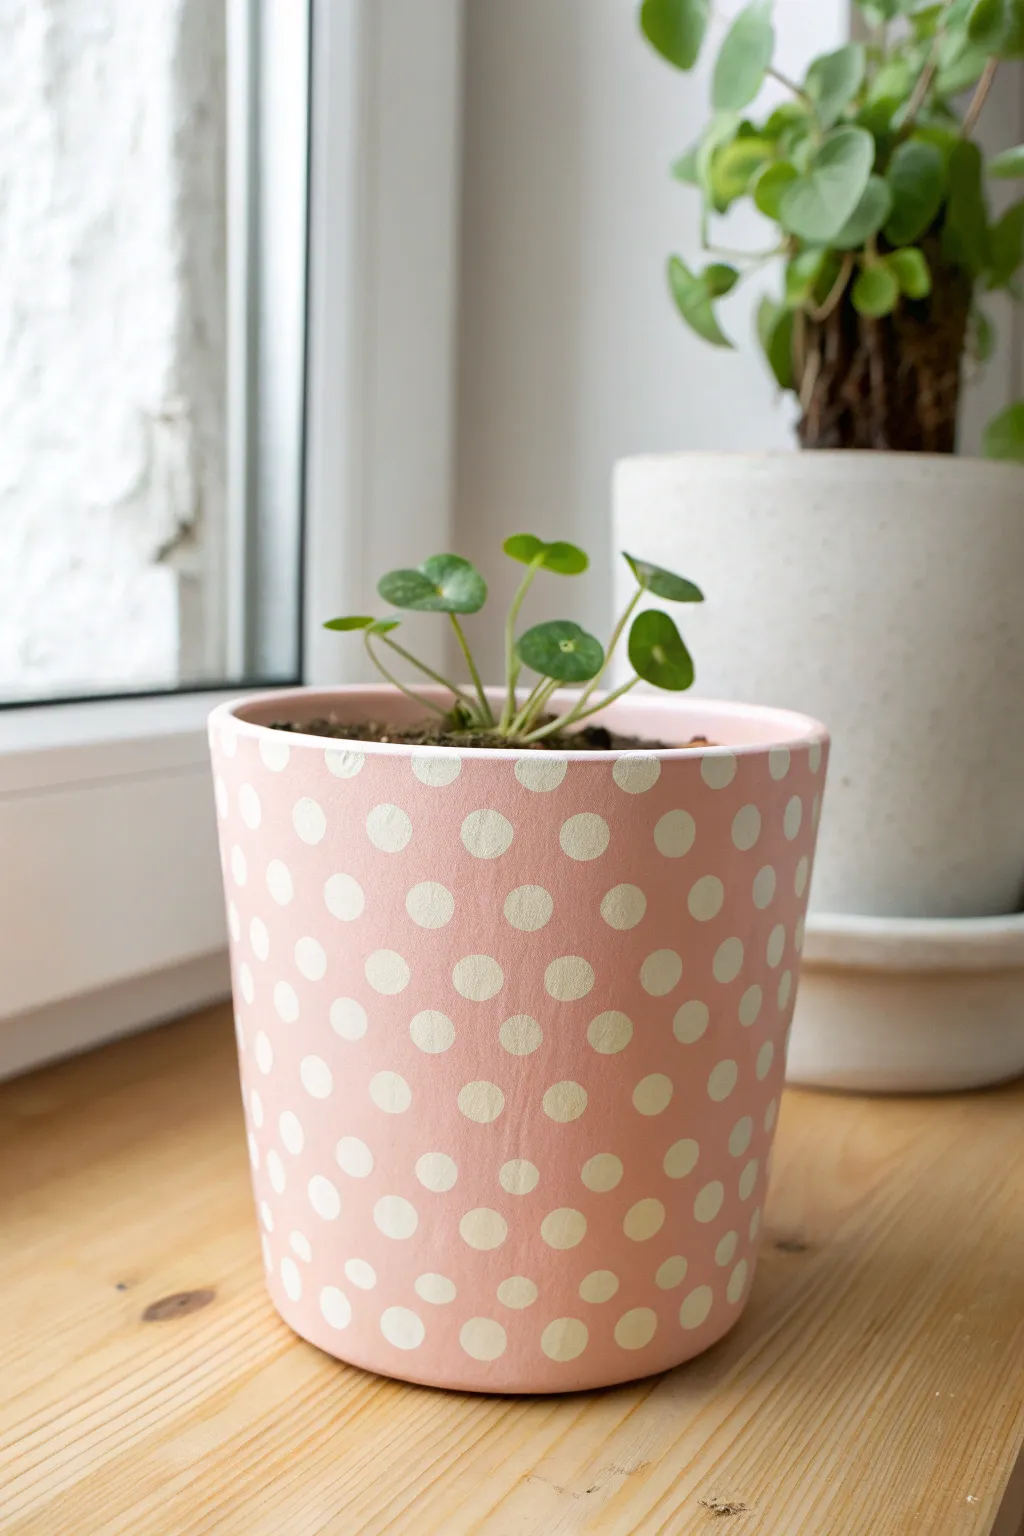
Transform a plain ceramic planter into a sweet statement piece with this pastel pink and white polka-dot design. Its soft matte finish and cheerful pattern make it the perfect home for your favorite small houseplants.
Step-by-Step Guide
Materials
- Clean terracotta or ceramic pot
- Pastel pink acrylic craft paint (matte finish)
- White acrylic craft paint
- Medium flat paintbrush
- Round sponge pouncer (small/medium size) or round stickers
- Painter’s tape (optional for rim)
- Paper plate or palette
- Clear matte sealer spray
Step 1: Preparation and Base Coat
-
Clean surface:
Begin by wiping down your pot with a damp cloth to remove any dust or oils. Let it dry completely before starting. -
Prepare paint:
Squeeze a generous amount of pastel pink acrylic paint onto your palette or paper plate. -
Apply first layer:
Using the flat paintbrush, apply a smooth, even coat of pink paint over the entire exterior of the pot. -
Paint the rim:
Remember to paint the top rim and a few inches inside the pot so the soil line looks neat later. -
Let it dry:
Allow the first coat to dry for about 20-30 minutes. If the terracotta color is still showing through, don’t worry. -
Apply second layer:
Apply a second coat of pink paint to ensure solid, opaque coverage. Brush in the opposite direction of your first coat to minimize texture. -
Invert and dry:
Turn the pot upside down on a scrap piece of paper and let it cure fully for at least an hour.
Sticker Hack
No pouncer? Place round garage sales stickers on the bare pot, paint the whole thing pink, then peel the stickers off to reveal the unpainted ‘dots’ underneath.
Step 2: Creating the Polka Dots
-
Prepare the innovative tool:
For perfectly round dots, I recommend using a round foam pouncer. Pour a puddle of white acrylic paint onto your palette. -
Load the sponge:
Dip the pouncer straight down into the white paint, then dab off the excess on a clean part of the plate to prevent globs. -
Start the top row:
Beginning near the rim, press the sponge gently but firmly against the pot. Lift straight off to leave a crisp circle. -
Space the first row:
Continue around the top, spacing the dots about an inch apart. Try to keep them horizontally aligned. -
Offset the second row:
Start the next row down, positioning these dots in the spaces between the dots above, creating a diamond or honeycomb pattern. -
Continue patterning:
Work your way down the pot, maintaining that offset spacing. As the pot tapers, you may need to adjust spacing slightly to keep the look consistent. -
Touch up:
If any white circles look thin, wait for them to dry and carefully stamp them again in the exact same spot. -
Handle edges:
For dots that hit the bottom edge, let the sponge stamp ‘off’ the pot slightly for a natural, cut-off fabric look. -
Clean edges:
Use a small detail brush dipped in pink paint to tidy up any fuzzy edges around your white dots.
Metallic Twist
Swap the white paint for liquid gold leaf or copper metallic paint for the dots to give your pastel planter a chic, high-end upgrade.
Step 3: Finishing Touches
-
Final cure:
Allow the pattern to dry completely, preferably overnight, to ensure the paint bonds well to the ceramic. -
Seal the deal:
Take the pot to a well-ventilated area and spray it with a clear matte sealer. This protects your work from water drips.
Now you have a charming, custom planter ready to brighten up your windowsill
Vintage Floral Decoupage Wrap
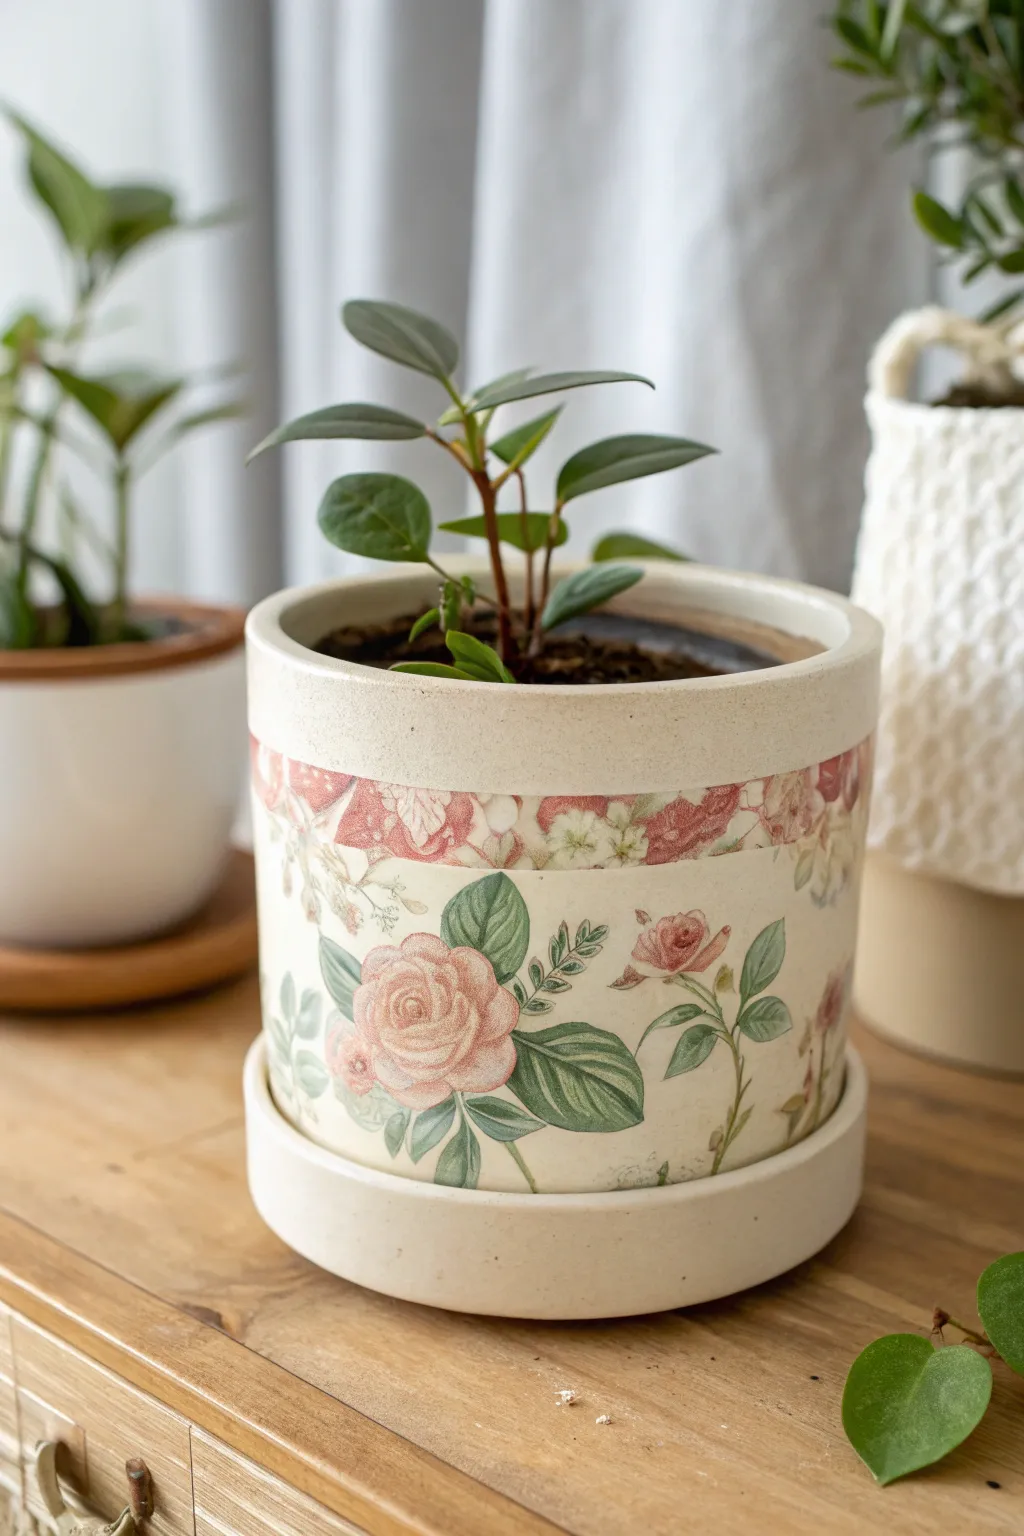
Transform a plain ceramic planter into a piece of romantic cottage decor with this vintage floral decoupage project. Using delicate paper cutouts and a classic wrapping technique, you’ll create a seamless botanical design that looks hand-painted rather than pasted on.
Detailed Instructions
Materials
- Plain white or cream ceramic cylinder pot with matching saucer
- Vintage floral napkins or decoupage paper (pink roses and greenery)
- Decoupage medium (Mod Podge Matte or Satin)
- Soft flat synthetic brush
- Small sharp scissors or precision detail knife
- Rubbing alcohol
- Lint-free cloth
- Plastic wrap or cling film
- Fine-grit sandpaper (optional)
- Clear acrylic sealer spray (matte finish)
Step 1: Preparation
-
Clean surface:
Begin by thoroughly cleaning the outside of your ceramic pot and the rim of the saucer with rubbing alcohol on a lint-free cloth. This removes invisible oils and ensures the best possible adhesion. -
Prepare paper layers:
If using paper napkins, carefully separate the plies. You only want the very top printed layer, which is usually incredibly thin. Discard the white backing layers. -
Isolate the main motifs:
For the bottom section of the pot, use your small scissors to cut out individual large rose blooms and leaf clusters. Cut as close to the design edge as possible so no white background remains. -
Create the top band:
For the decorative rim seen in the image, cut a long, continuous strip of pattern from your paper or napkin. Measure the circumference of your pot first to ensure the strip is long enough to wrap all the way around, or prepare several strips to piece together.
Smoother Finishes
Use a damp sponge brush instead of bristles for the final top coat. This eliminates brush strokes and gives the pot a smooth, professionally fired ceramic look.
Step 2: Planning and Adhesion
-
Dry fit the design:
Before gluing, lay your cutouts on a table or hold them against the pot to plan your arrangement. Place the strip near the top rim and scatter the larger roses below, leaving some negative space for a balanced look. -
Apply medium for the rim:
Brush a thin, even layer of decoupage medium around the top inch of the pot where the border strip will sit. Work in sections if the pot is large so the glue doesn’t dry out. -
Attach the top border:
Gently press the paper strip onto the wet medium. Start from the back of the pot to hide the seam. Use your fingers to lightly tap it into place, being careful not to stretch the delicate paper. -
Smooth the border:
I like to place a piece of plastic wrap over the wet paper and use my finger used to smooth out bubbles over the plastic. This technique prevents the wet paper from tearing under friction. -
Apply the main floral motifs:
Moving to the lower section, apply a spot of decoupage medium where you want your first large rose. Gently lay the cutout onto the glue. -
Adhere leaves and stems:
Continue adding the smaller greenery pieces around the main flowers. For stems that reach the bottom, you can let them run off the edge or trim them flush with the pot’s base. -
Seal the individual pieces:
Once all pieces are placed and smoothed, gently brush a coat of decoupage medium over the top of the papers to seal them. Work from the center of the image outward to push out any remaining air.
Aged Patina
Mix a tiny drop of brown paint into your final glue layer or lightly distress the paper edges with antique wax to give the pot a centuries-old, weathered appearance.
Step 3: Finishing and Sealing
-
Clean the edges:
Inspect the rim and bottom edge. If any paper overhangs, wait until it is fully dry, then use a downwards motion with fine-grit sandpaper to shear off the excess paper cleanly. -
Apply full coat:
Brush a coat of decoupage medium over the entire exterior of the pot, not just the papered areas. This unifies the finish between the paper and the bare ceramic. -
Wait and repeat:
Allow the first full coat to dry for at least 20 minutes until it is clear and dry to the touch. Apply a second coat for durability, using long vertical strokes. -
Seal the saucer:
Don’t forget the saucer. If you added any design to it, seal it now. Even without design, a coat of medium helps the texture match the pot. -
Final waterproofing:
Since this pot will hold moisture, finish the project by spraying the outside with a clear acrylic sealer. This adds a necessary waterproof barrier that decoupage glue alone cannot provide. -
Cure time:
Let the pot sit for at least 24 to 48 hours before placing a plant inside. This curing time ensures the finish won’t stick to other surfaces or turn milky from moisture.
Now you have a charming custom planter ready to showcase your favorite greenery on a sunny windowsill
Carved Sgraffito Pattern Lines
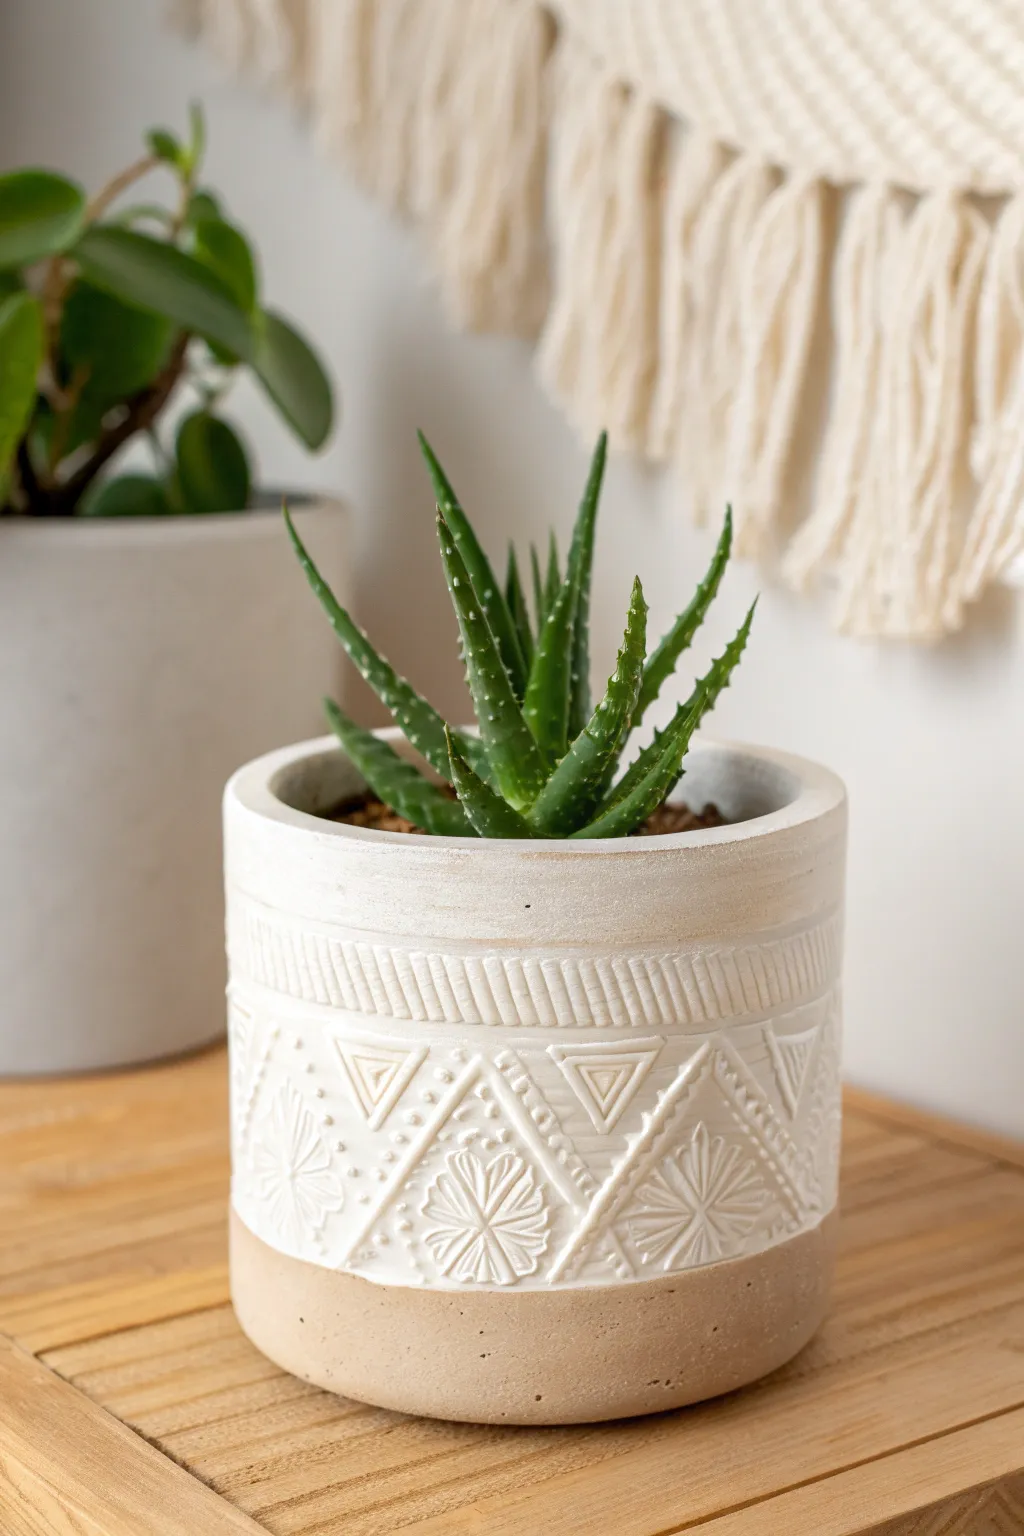
Bring texture and warmth to your indoor garden with this hand-carved ceramic planter featuring intricate geometric motifs. The contrast between the matte white carved surface and the raw clay base creates a modern bohemian aesthetic perfect for succulents.
Step-by-Step Tutorial
Materials
- Wheel-thrown or hand-built cylinder pot (leather hard clay)
- White underglaze or white slip
- Carving tools (loop tool, needle tool, sgraffito tool)
- Small sponge
- Wide soft paintbrush
- Clear matte glaze (optional for interior)
- Kiln access
Step 1: Preparation and Application
-
Shape the vessel:
Create a simple cylindrical pot using a light beige or stoneware clay body. Ensure the walls are even and smooth, aiming for a height of about 5-6 inches. -
Dry to leather hard:
Allow the pot to dry until it reaches a sturdy leather-hard stage. It should be firm enough to handle without warping but soft enough to carve into easily. -
Mask the base:
Using masking tape or a steady hand, define the bottom section that will remain raw clay. This should be the bottom 1.5 inches of the pot. -
Apply white slip:
Using a wide, soft brush, apply 2-3 even coats of white underglaze or slip to the exterior area above your masked line. Let each coat dry slightly before applying the next to ensure opacity. -
Initial drying:
Let the white layer dry until it is no longer tacky to the touch, but do not let the clay broaden into bone dry, or it will chip when carved.
Clean Lines
For crisper lines, wait until the slip is ‘chocolate hard’—firm but cool. If it’s too wet, the clay will drag and create messy edges.
Step 2: Carving the Design
-
Define the borders:
Place the pot on a banding wheel. Using a needle tool, lightly scribe two horizontal parallel lines near the rim to create the top border band. -
Carve the top band:
Use a small loop tool to carve short, diagonal tally marks between yourscribed border lines. Keep the spacing consistent to create a rope-like texture. -
Draft the zigzag:
Lightly sketch a large zigzag or chevron pattern around the main body of the pot using a needle tool. Ensure the points of the triangles meet evenly. -
Carve the triangles:
Inside the upward-pointing triangles, carve smaller concentric triangles. Deepen the lines to reveal the raw beige clay underneath the white slip. -
Add detail dots:
Along the outer lines of the chevron pattern, use a blunt point tool to press small, uniform dots into the clay, creating a beaded border effect. -
Create starbursts:
In the downward-pointing triangular spaces, carve a central stylized flower or starburst. Start with a center point and carve radiating teardrop shapes outward. -
Refine the lines:
Go back over your main structural lines with a slightly wider carving tool to make the geometry pop against the white background.
Step 3: Finishing and Firing
-
Clean the burrs:
Once the carving is complete, gently brush away clay crumbs. I find it helpful to run a slightly damp finger or sponge over the carved areas to smooth down sharp edges. -
Bisque fire:
Allow the pot to dry completely to the bone-dry stage. Load it into the kiln for a bisque firing. -
Glaze the interior:
Pour a clear glaze into the interior of the pot and swirl it to coat, then pour out the excess. This makes the pot watertight. -
Leave exterior matte:
Leave the exterior unglazed to maintain the tactile contrast between the smooth white slip and the rougher raw clay. -
Final firing:
Fire the piece again to the maturation temperature of your specific clay body and glaze.
Flaking Slip?
If the white slip chips off while carving, the pot is too dry. Mist it lightly with water and wrap in plastic for an hour to rehydrate.
Now you have a stunning, custom-carved vessel ready to house your favorite aloe or succulent
Raised Clay Appliqué Flowers
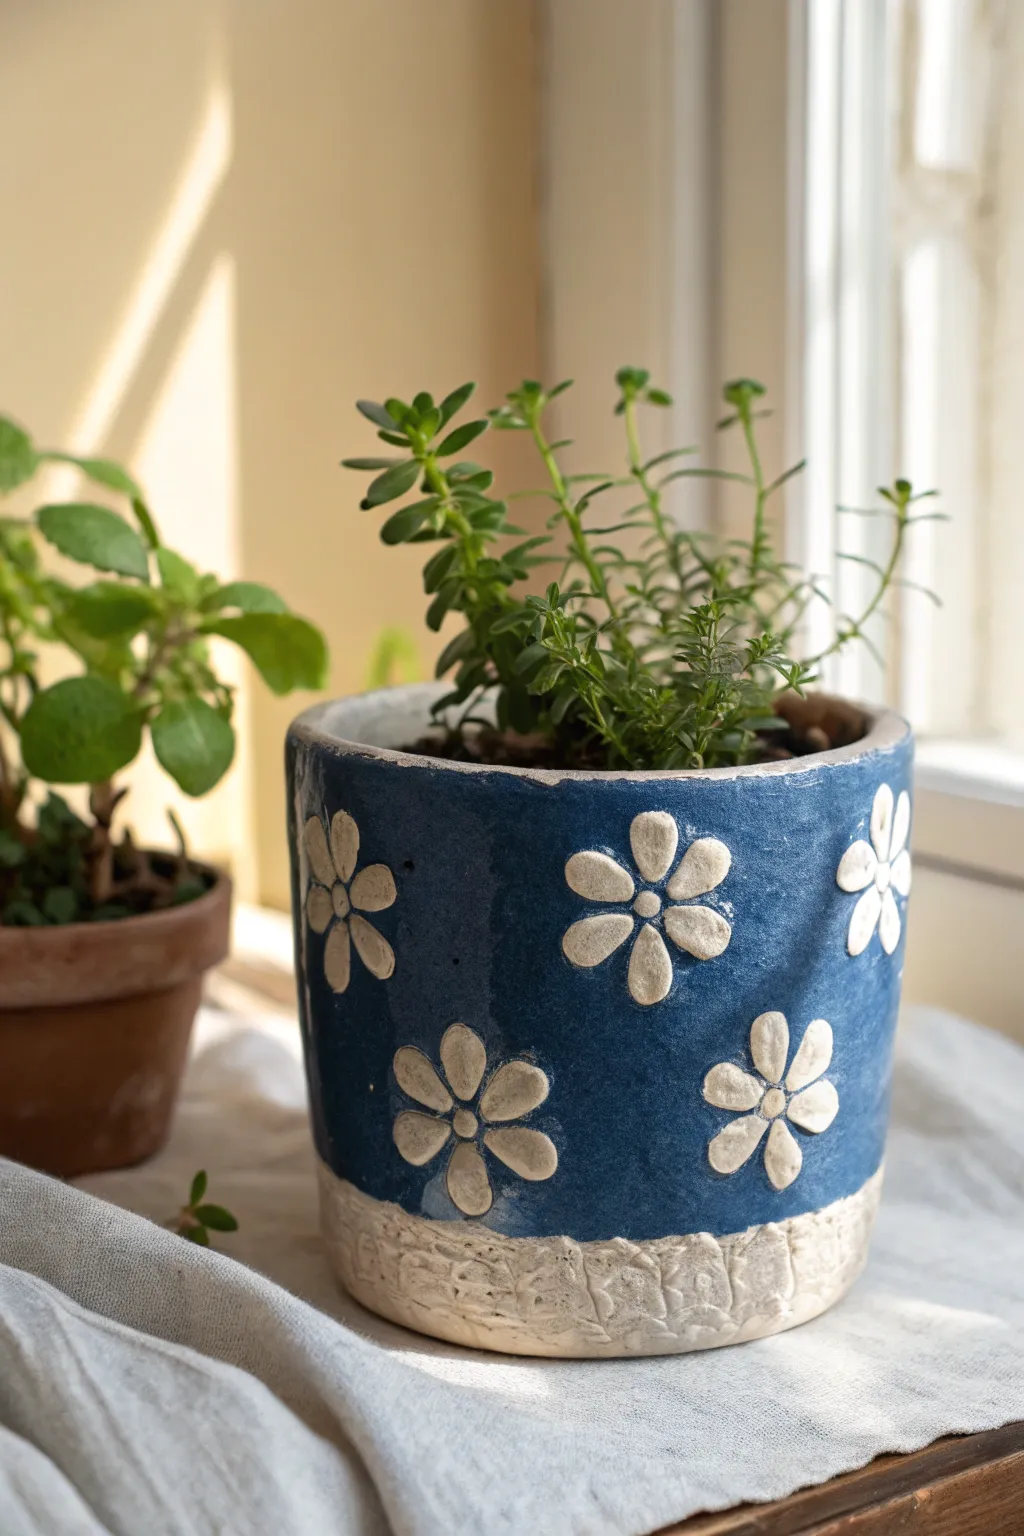
This charming project combines deep blue glazing with the tactile delight of raised clay appliqués for a folk-art feel. The contrasting textures of the smooth blue background against the raw, unglazed clay flowers and base create a planter full of personality and handmade warmth.
How-To Guide
Materials
- Stoneware clay body (white firing)
- Small flower cookie cutter (approx. 1.5 inches)
- Needle tool
- Slip (clay and water mixture)
- Scoring tool or serrated rib
- Cobalt blue underglaze
- Clear transparent glaze (cone 5/6 depending on clay)
- Sponge
- Carving tool or loop tool for texture
- Paintbrush (flat shader)
Step 1: Forming the Base Vessel
-
Throw or Build the Cylinder:
Begin by either wheel-throwing or hand-building a simple cylindrical pot with straight sides. Aim for a height of about 5 inches and a width of 6 inches, keeping the walls relatively even. -
Smooth the Canvas:
While the clay is leather hard, use a metal rib to ensure the upper 3/4 of the pot is perfectly smooth. This will be the area receiving the blue underglaze later, so a clean surface is key. -
Create the Textured Base:
Leave the bottom inch of the pot thicker or add a small coil around the base. Use a carving tool or simple wooden modeling tool to press vertical, slightly irregular indentations into this bottom band to create a rugged, stone-like texture.
Clean Edges Pro Tip
Before firing, re-check the edges of your flowers. Use a slightly damp brush to smooth any jagged clay bits, as these can become incredibly sharp after the final glaze firing.
Step 2: Creating and Attaching Appliqués
-
Roll Out a Slab:
Roll out a small slab of the same white stoneware clay to about 1/4 inch thickness. I find that compressing the slab on both sides with a rib helps prevent warping later. -
Cut Out Flower Shapes:
Using your small flower cookie cutter, punch out 6-8 daisy shapes. If you don’t have a cutter, you can freehand these with a needle tool for a more organic look. -
Refine the Petals:
Smooth the sharp edges of each cut flower with your finger or a damp sponge. Gently press into the center of each petal to give it a slightly concave, cupped dimension. -
Score the Pot:
Plan the placement of your flowers around the smooth upper section of the pot. Score the attachment spots vigorously with your serrated tool. -
Apply Slip:
Dab a generous amount of slip onto the scored areas on the pot and the back of your clay flowers. -
Attach the Flowers:
Press the flowers firmly onto the pot walls. Wiggle them slightly to lock the clay particles together and ensure no air is trapped behind them. -
Add Centers:
Roll tiny balls of clay for the flower centers. Score the middle of each attached flower, add a dot of slip, and press the ball into place, flattening it slightly. -
Clean Up:
Use a small, damp brush to wipe away any excess slip that may have squished out from behind the flowers. Let the pot dry slowly under loose plastic to the bone-dry stage.
Cracking Appliqués?
If flowers crack off during drying, the pot was likely too dry when attaching. Try attaching when the pot is softer leather-hard, or wrap tightly in plastic to equalize moisture.
Step 3: Glazing and Finishing
-
Bisque Fire:
Fire the greenware piece to cone 04 (or your clay’s specific bisque temperature). -
Wax Resist Application:
Carefully paint wax resist over the entirety of the raised flowers (petals and centers) and the textured bottom band of the pot. This will keep them raw and white. -
Apply Blue Underglaze:
Using a soft brush, apply 2-3 coats of deep cobalt blue underglaze to the smooth background areas around the flowers. The wax will repel the color, keeping your designs clean. -
Wipe Back Mistake:
If any blue gets onto the waxed flowers, simply wipe it away with a damp sponge. The wax makes this cleanup incredibly easy. -
Clear Glaze Application:
Once the underglaze is dry, dip or brush a clear transparent glaze over the blue sections. You can glaze over the flowers too if you want them shiny, or leave them unglazed for a matte contrast. -
Protect the Base:
Ensure the bottom textured band remains completely unglazed to maintain that rustic, earthy appearance shown in the image. -
Final Firing:
Fire the pot to cone 5 or 6 (stoneware temperatures). This will melt the glaze into that rich, glossy blue surface while maturing the white clay.
Once fired, fill your new creation with soil and a bright green plant to make those white daisies really pop
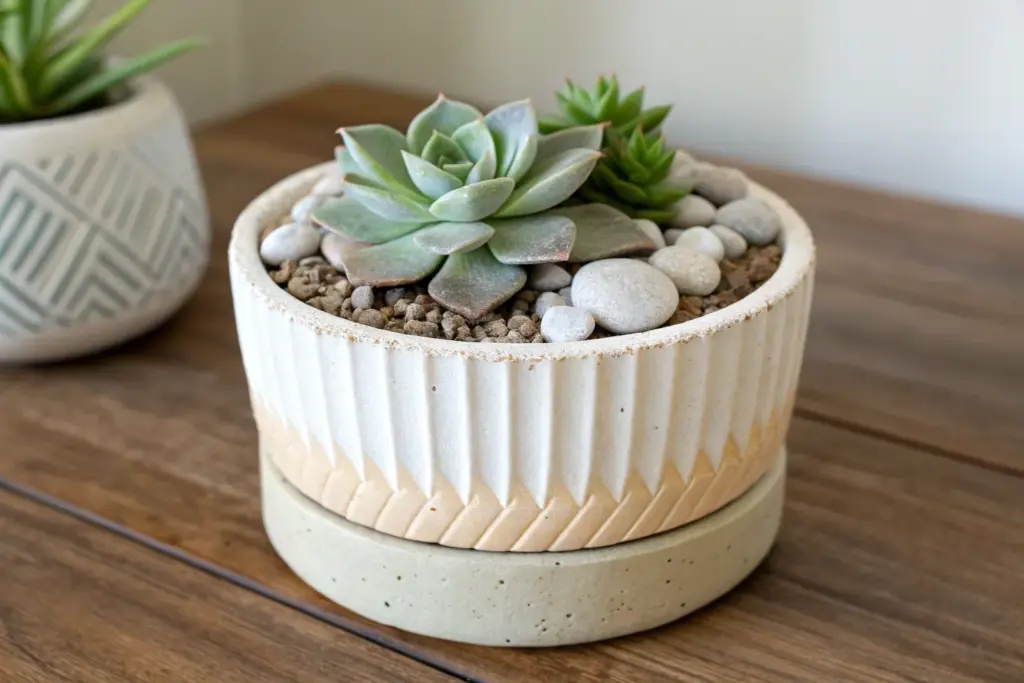
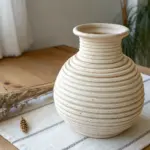
Little Tripod Feet Planter
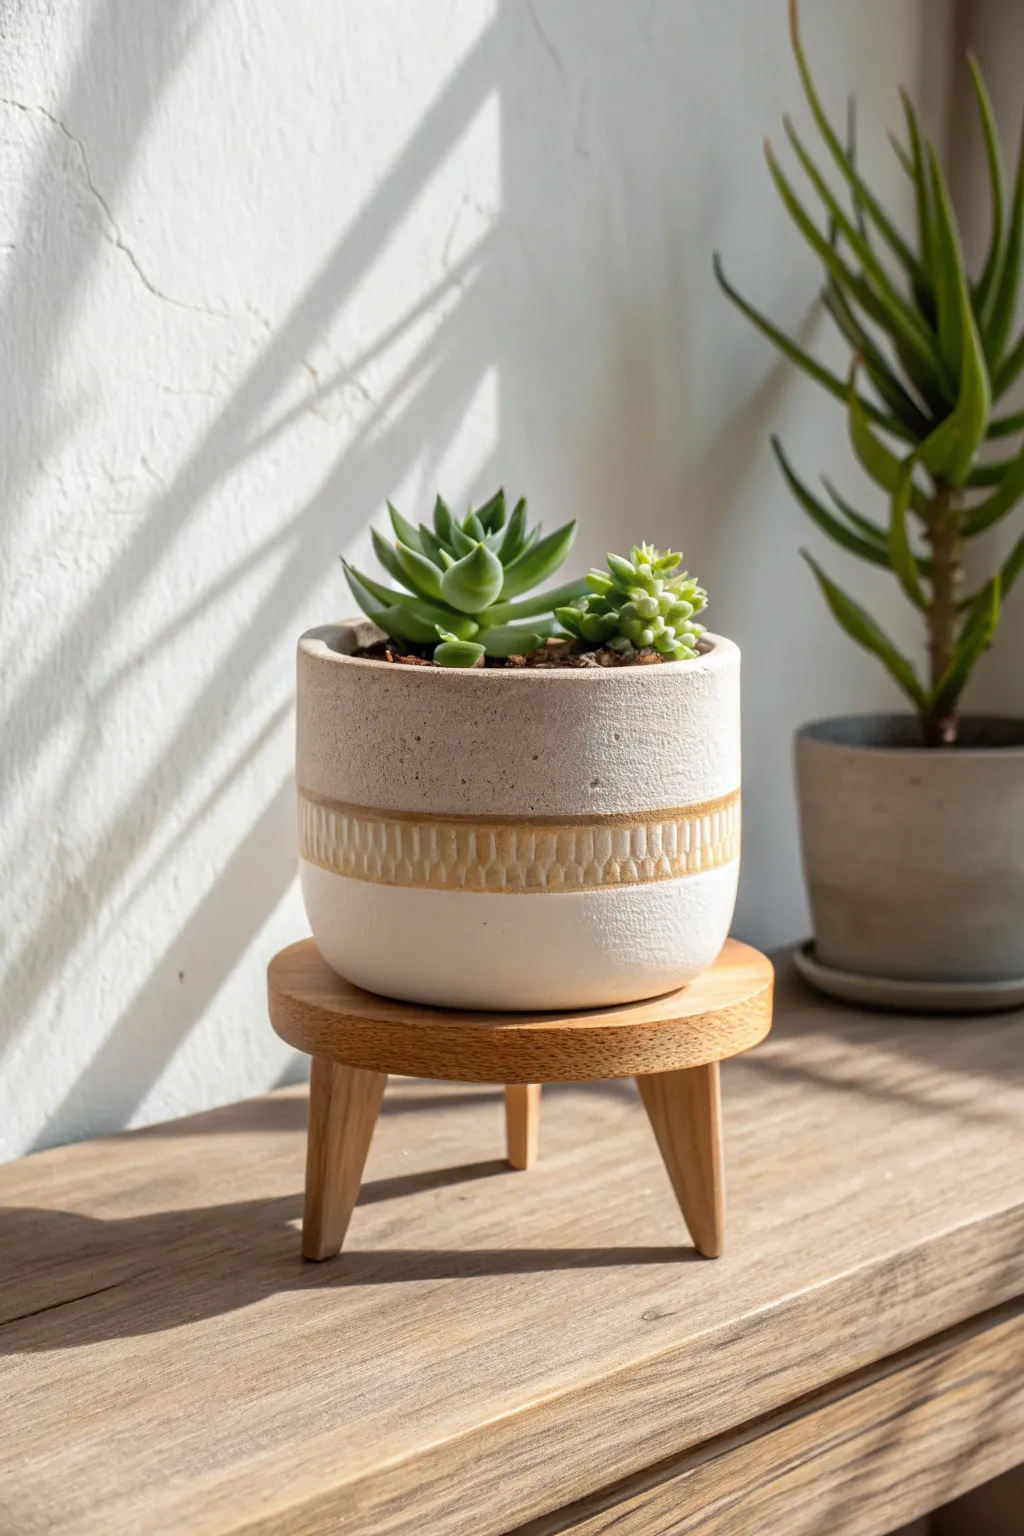
Elevate your favorite succulents, quite literally, with this charming combination of a textured ceramic planter and a bespoke wooden tripod stand. The project fuses organic ceramic warmth with the clean lines of mid-century furniture design for a perfect tabletop accent.
Step-by-Step Guide
Materials
- Small cylindrical ceramic pot (plain bisque or glazed white)
- Air-dry clay or ceramic texturizing medium (if starting with a plain pot)
- Gold or ochre acrylic paint
- Matte white acrylic paint
- Small flat paintbrush
- Detailed carving tool or toothpick
- Round wooden plaque (slightly larger than pot base)
- 3 wooden dowel caps or tapered shaker pegs (approx. 2 inches long)
- Wood glue
- Sandpaper (medium grit)
- Clear matte varnish or sealant
- Pencil and ruler
Step 1: Creating the Textured Pot
-
Prep the Surface:
Clean your ceramic pot thoroughly to remove any dust or grease. If you are recycling an old glazed pot, give it a light sanding to help the new textures adhere better. -
Define the Band:
Using a pencil and a ruler, lightly mark a band around the lower third of the pot. This band should be about an inch wide to mimic the design in the photo. -
Apply Texture Medium:
If your pot is plain, apply a thin layer of air-dry clay or texture paste within the marked band guidelines. Smooth it out so it is relatively flush with the rest of the pot’s surface. -
Carve the Pattern:
While the texture medium is still wet, use a carving tool or a toothpick to press vertical indentations closely together all the way around the band, creating a ribbed effect. -
Dry Completely:
Allow the textured band to dry fully according to the package instructions—usually overnight is best to avoid cracking. -
Base Coat Painting:
Paint the top and bottom sections of the pot with matte white acrylic paint. You might need two coats to get that solid, stone-like finish. -
Painting the Accent:
Carefully paint the textured band with a gold or deep ochre acrylic paint. Using a slightly dry brush helps the color settle into the grooves while highlighting the raised ridges. -
Seal the Pot:
Once all paint is dry, apply a coat of clear matte sealer to protect the finish from moisture.
Wobbly Legs?
If the stand is uneven, tape coarse sandpaper to a flat table. Rub the stand’s feet against it in a circular motion until level.
Step 2: Building the Tripod Stand
-
Sand the Wood Parts:
Take your round wooden plaque and the three tapered wooden legs. I prefer to give them a quick sanding now to ensure they are smooth and ready for assembly. -
Mark Leg Positions:
Flip the wooden plaque upside down. Use a geometric compass or ruler to mark three points in an equilateral triangle formation near the edge of the circle. -
Angle Check:
If your legs are pre-cut at an angle, ensure they are oriented to splay outward slightly. If using straight dowels, you can sand the tops at a slight 10-degree angle for that mid-century look. -
Apply Glue:
Dab a generous amount of strong wood glue onto the top of each leg. -
Attach Legs:
Press the legs firmly onto the marked spots on the underside of the plaque. Wipe away any excess glue squeeze-out immediately with a damp cloth. -
Weight and Set:
Place a heavy book on top of the upside-down stand while the glue cures to ensure a tight bond. Let it sit for several hours. -
Final Finish:
Once the glue is cured, apply a clear matte wood varnish or a light stain to the stand to bring out the grain and protect it from water spills.
Step 3: Assembly
-
Potting Plants:
Add potting soil and your chosen succulents to the ceramic pot. -
Final Placement:
Place the planted pot onto the wooden stand, ensuring it sits centered and stable.
Make it Metallic
Mix a tiny amount of baking soda into your gold paint for the band. This creates a faux-stone texture that mimics unglazed pottery.
Now you have a stylish piece of custom decor that looks like it came straight from a boutique garden shop
Wall Pocket Ceramic Planter
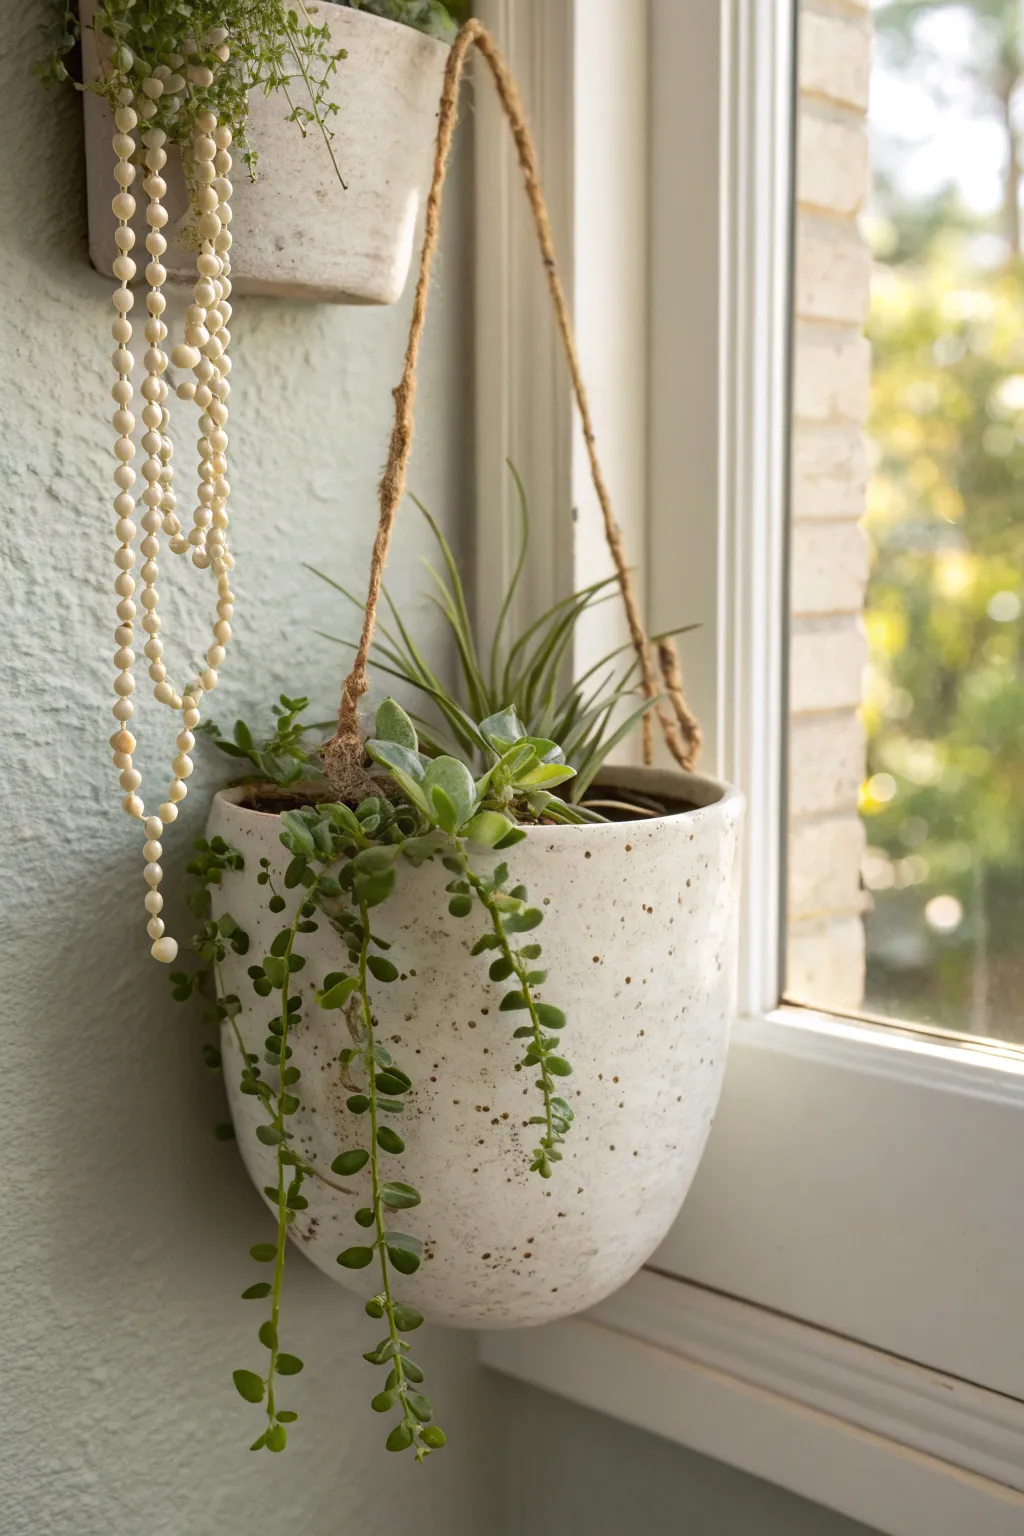
Create a charming home for your succulents with this hand-built ceramic wall pocket, featuring a creamy white glaze and delicate speckling. Its flat back sits flush against the wall, making it a perfect space-saving solution for bringing greenery into tight corners or window frames.
Detailed Instructions
Materials
- Cone 5/6 stoneware clay (white or buff)
- Rolling pin
- Canvas work surface
- Paper template (half-circle shape)
- Needle tool
- Scoring tool (or fork)
- Slip (clay mixed with water)
- Sponge
- Hole cutter or drill bit
- White gloss glaze
- Jute twine or rustic rope
- Kiln access
Step 1: Forming the Pocket
-
Create a template:
Before touching clay, sketch out your shape on cardstock. For this project, you need a large semi-circle for the front (about 8-10 inches wide) and a smaller semi-circle for the back that matches the width of the front piece. -
Roll out the slab:
Roll your stoneware clay out on a canvas surface to a consistent thickness, roughly 1/4 to 3/8 inch thick. Compress the slab on both sides with a rib tool to prevent warping later. -
Cut the shapes:
Lay your paper templates onto the clay slab. Using your needle tool held vertically, trace around them to cut out one back piece and one front piece. -
Form the pocket curve:
Take the larger front piece and gently curve it. I like to drape it over a crumpled newspaper ball or a rounded mold to help it hold a convex shape while it stiffens slightly to leather-hard. -
Score the edges:
Once the pieces are firm enough to handle without flopping, score the curved edge of the back piece and the corresponding side and bottom edges of the front pocket piece. Rough up the clay surface thoroughly. -
Apply slip and join:
Apply a generous amount of slip to the scored areas. Press the front curved piece onto the flat back piece, aligning the edges carefully. The front should bow out, creating the pocket. -
Secure the seam:
Use a modeling tool or your finger to smooth the clay across the seam on the outside, merging the two pieces into one solid unit. Reinforce the inside seam with a thin coil of clay if needed.
Step 2: Refining and Hanging Holes
-
Define the rim:
Smooth the top rim of the planter with a damp sponge. You want a soft, rounded edge that looks finished but retains a handmade feel. -
Pierce holes for hanging:
About 1 inch down from the top rim on the sides of the pocket, use a hole cutter to punch two holes. Make sure they are large enough to accommodate your jute twine—remember clay shrinks in the kiln. -
Clean up edges:
Go over the entire piece with a finishing sponge to remove any sharp bits, burrs, or fingerprints. The surface should be smooth and ready for firing. -
Bisque fire:
Allow the planter to dry slowly and completely (this can take a week). Once bone dry, fire it in the kiln to a bisque temperature (usually cone 04).
Don’t Rush the Dry
Wall pockets are prone to warping because the back is flat and the front is curved. Dry it very slowly under loose plastic for the first few days to keep the back perfectly flat.
Step 3: Glazing and Assembly
-
Prepare the glaze:
Choose a creamy white gloss glaze. If your clay body doesn’t have natural speckles (like a speckled buff clay), add a pinch of granular ilmenite or manganese to the glaze to achieve that peppered look. -
Glaze application:
Dip the bisqued planter into the glaze or brush on 2-3 even coats. Ensure the inside is glazed to make it watertight. -
Wipe the back:
Carefully wipe any glaze off the flat back of the planter and around the hanging holes. This ensures it won’t fuse to the kiln shelf and the rope will sit cleanly. -
Glaze fire:
Fire the piece again to the maturation temperature of your clay and glaze (typically cone 5 or 6). Let the kiln cool completely before opening. -
Attach the hanger:
Cut a length of rustic jute twine. Thread one end through the left hole from the outside in and knot securely on the inside. Repeat on the right side. -
Test the hang:
Before adding soil, hang the empty planter to ensure it sits level. Adjust the knots if it tilts to one side.
Built-in Drainage
To prevent root rot, add a small layer of gravel at the bottom, or punch a third small hole near the bottom of the pocket before firing for direct drainage on outdoor walls.
Now you have a unique, custom-crafted vessel ready to display your favorite trailing plants against any sunny wall
Whimsical Critter Pot With Legs
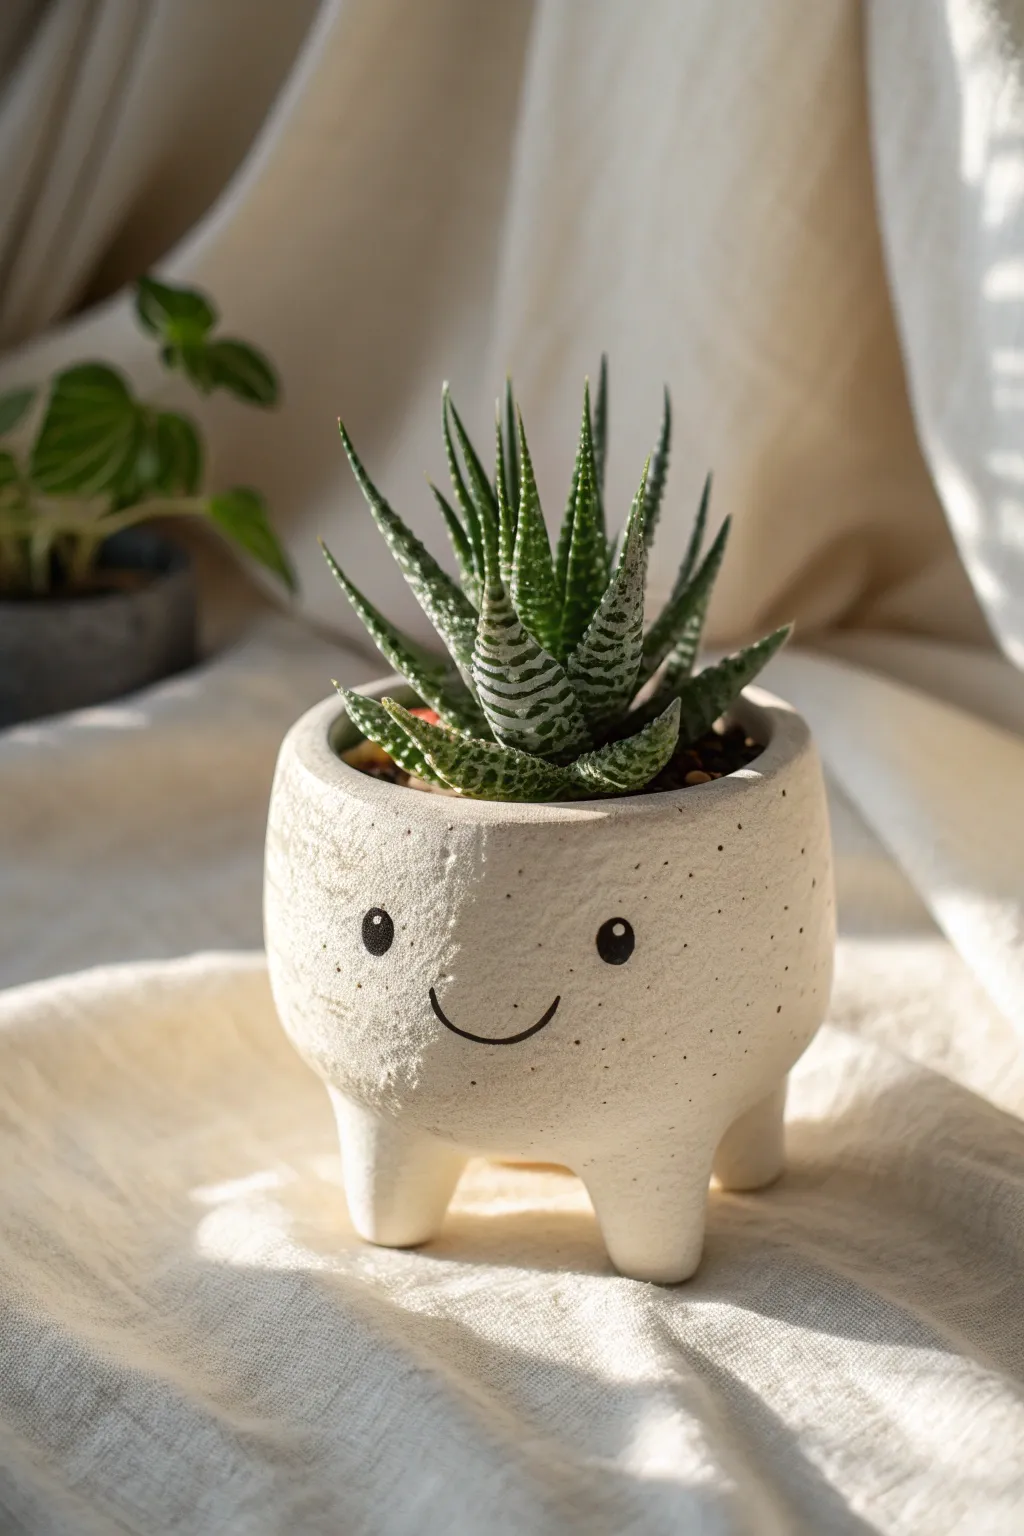
Bring a touch of cheer to your windowsill with this adorable, three-legged ceramic planter. Its charmingly simple face and gentle, speckled texture make it the perfect home for a spiky Haworthia or your favorite small succulent.
Step-by-Step
Materials
- White or speckled stoneware clay (approx. 1 lb)
- Pottery wheel (optional, can be hand-built)
- Wooden modeling tool
- Pin tool
- Rib tool (kidney)
- Sponge
- Black underglaze
- Fine-point paintbrush
- Clear matte glaze
- Kiln
Step 1: Forming the Body
-
Prepare the Clay:
Begin by thoroughly wedging your clay to remove any air bubbles. For a pot this size, a ball of clay roughly the size of a large orange is sufficient. -
Throw or Pinch the Bowl:
If using a wheel, throw a simple, rounded bowl shape with relatively thick walls at the bottom to support the legs later. If hand-building, use the pinch pot method to create a smooth, symmetrical bowl shape. -
Refine the Shape:
Use a rib tool to smooth the exterior walls, creating a gentle curve that tapers slightly inward at the rim. Aim for a diameter suitable for a small plant, about 3-4 inches. -
Dry to Leather Hard:
Set the bowl aside until it reaches a leather-hard state. It should be firm enough to handle without deforming but still hold moisture.
Pro Stabilizer Tip
When shaping the feet, angle them slightly outward rather than straight down. This splayed stance provides better balance for the pot.
Step 2: Adding the Legs
-
Create Support Lugs:
Flip the bowl upside down. Roll out three equal-sized coils or tapered cylinders of clay to serve as legs. They should be sturdy and slightly conical. -
Score and Slip:
Score the attachment points on the bottom of the pot and the tops of the legs. Apply slip generously to both surfaces. -
Attach the Legs:
Press the legs firmly onto the pot base in a tripod formation. This ensures stability. Use your thumb or a wooden tool to blend the clay seams completely so the legs look like extensions of the pot body rather than add-ons. -
Level the Pot:
Turn the pot right-side up and gently tap it on a flat surface. This will flatten the bottoms of the legs slightly and ensure the pot sits level without wobbling. I like to check it from eye level to ensure the stance looks balanced.
Wobbly Pot Fix
If the pot wobbles after attaching legs, place a piece of sandpaper on a flat surface and gently figure-8 the dry pot over it to grind the feet level.
Step 3: Applying the Face
-
Smooth the Surface:
Once the legs are secure, use a slightly damp sponge to smooth out any tool marks or rough fingerprints on the exterior. -
Draft the Face:
Use a dull pencil to very lightly sketch the placement of the eyes and smile. The eyes should be wide-set and the smile simple and curved. -
Paint the Details:
Dip a fine-point brush into black underglaze. Carefully paint two solid circles for eyes. Add a tiny white dot (using white underglaze or leaving a negative space) for the ‘sparkle’ in the eye if desired, though the original uses solid black. -
Add the Smile:
Paint a thin, sweeping U-shape for the smile. Keep the line weight consistent for that clean, modern look. -
Add Texture (Optional):
If your clay body isn’t naturally speckled, you can flick a stiff toothbrush dipped in diluted black or brown underglaze across the surface to create subtle speckles.
Step 4: Firing
-
Bisque Fire:
Allow the piece to bone dry completely, which may take several days depending on humidity. Fire it to cone 04 (or your clay’s specific bisque temperature). -
Glaze Application:
Once bisqued, dip the entire pot into a clear matte glaze. This protects the clay and seals the underglaze design without making it too shiny. -
Wipe the Feet:
Crucially, use a wet sponge to wipe all glaze off the bottom of the three feet to prevent them from fusing to the kiln shelf. -
Glaze Fire:
Fire the kiln again to the maturation temperature of your clay and glaze (typically cone 5 or 6 for stoneware).
Once cooled, fill with cactus soil and your favorite prickly friend for an instant mood booster