If you can roll a ball, pinch a bowl, or twist a coil, you’ve already got the skills for easy clay modelling. These beginner clay projects are the kind I teach when you want quick wins that still feel cute, giftable, and totally doable.
Round-Bodied Mini Animals
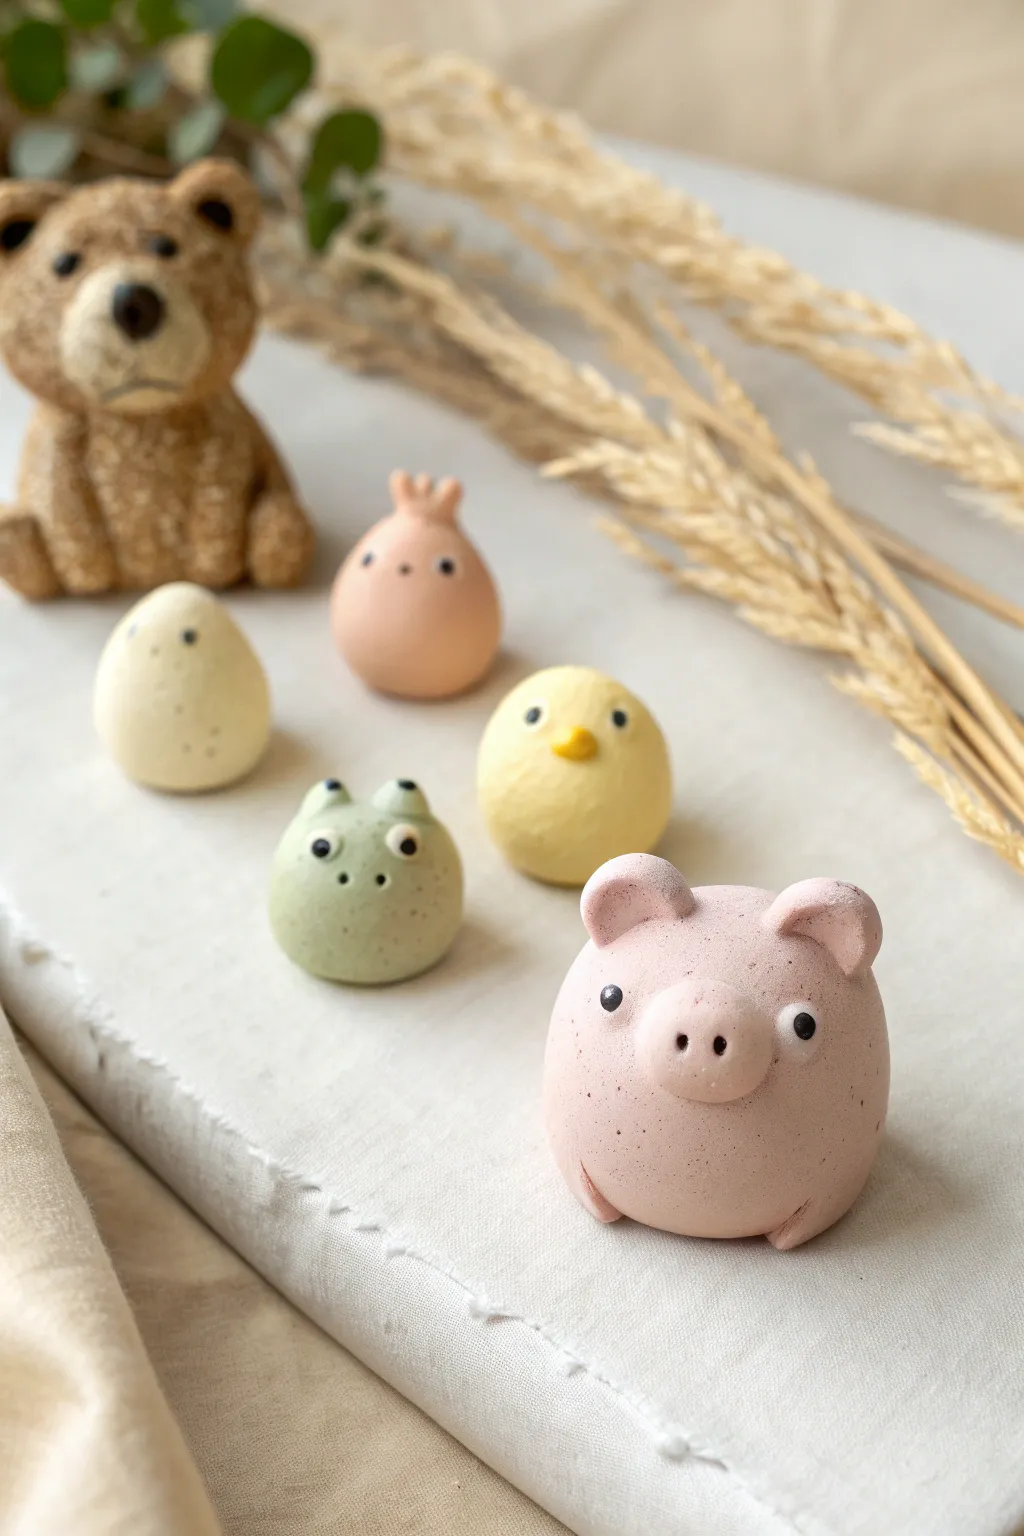
These charmingly chubby animals are all built from simple spheres, making them the perfect introduction to clay modeling. Their soft, matte finish and tiny features give them a modern, whimsical look that brightens up any desk or shelf.
Step-by-Step
Materials
- Air-dry clay or polymer clay (white base)
- Acrylic paints (pastel pink, soft yellow, sage green, peach)
- Black acrylic paint or fine-tip black marker
- Small ball tool or toothpick
- Fine detail paintbrush
- Gloss varnish (optional for eyes)
- Sandpaper (fine grit)
Step 1: Shaping the Base Bodies
-
Prepare the Clay:
Start by conditioning your clay. If using polymer, knead it until soft and pliable. If using air-dry clay, ensure it’s moist but not sticky. -
Roll the Spheres:
Divide your clay into five equal portions. Roll each piece between your palms to create a smooth, perfect sphere about the size of a golf ball or slightly smaller. -
Flatten the Bottoms:
Gently tap the bottom of each sphere against your work surface. You want to create a small flat spot so the animals sit upright without rolling away.
Step 2: Sculpting Specific Features
-
Create the Pig:
For the pig, add a smaller flattened oval of clay to the center of the face for the snout. Use a tool to poke two nostrils. -
Add Ears and Feet:
Form two tiny triangles for ears and attach them to the top of the pig, blending the seams with a tool. Add two tiny flattened balls at the bottom front for trotters. -
Form the Frog:
Take a new sphere. Roll two very small balls of clay and press them onto the top of the head for eyes. Use a tool to indent the center of each eye mound slightly. -
Make the Chick:
For the yellow chick, form a tiny cone shape for the beak and press it firmly into the center of the sphere. -
Sculpt the Monster:
For the peach-colored creature, pinch the top of the head gently to create three small spikes or hair tufts directly from the main body mass. -
Refine the Surfaces:
Before drying, use a slightly damp finger (for air-dry) or baby oil (for polymer) to smooth out any fingerprints or rough seams.
Cracks Appearing?
If air-dry clay cracks while drying, mix a tiny bit of fresh clay with water to make a paste (slip) and fill in the fissures, then sand smooth once dry.
Step 3: Finishing and Painting
-
Dry or Bake:
Follow the manufacturer’s instructions for your specific clay. I usually let air-dry clay sit for 24-48 hours to be safe. -
Sand Imperfections:
Once fully cured, gently sand any rough spots or flat edges with fine-grit sandpaper to get that smooth, stone-like texture shown in the photo. -
Base Colors:
Mix your acrylics with white to achieve soft pastel tones. Paint the pig pink, the frog sage green, the chick pale yellow, and the monster peach. The egg creature can remain off-white or cream. -
Speckling Effect:
To get the speckled texture, dilute a darker shade of paint (like brown or grey) with water. load an old toothbrush and flick the bristles to spray tiny dots over the dried bodies. -
Paint the Details:
Use a tiny brush or a toothpick dipped in black paint to add the small, wide-set eyes. Paint the chick’s beak orange. -
Add Highlights:
For the frog, paint the eye mounds white before adding the black pupils. You can add a tiny white dot to the black eyes for reflection.
Make Them Functional
Press a strong magnet into the back of the spheres while the clay is still wet to create an adorable set of refrigerator magnets.
Arrange your little clay family together for a display that looks deceptively professional


Easy Coil Snake Desk Friend
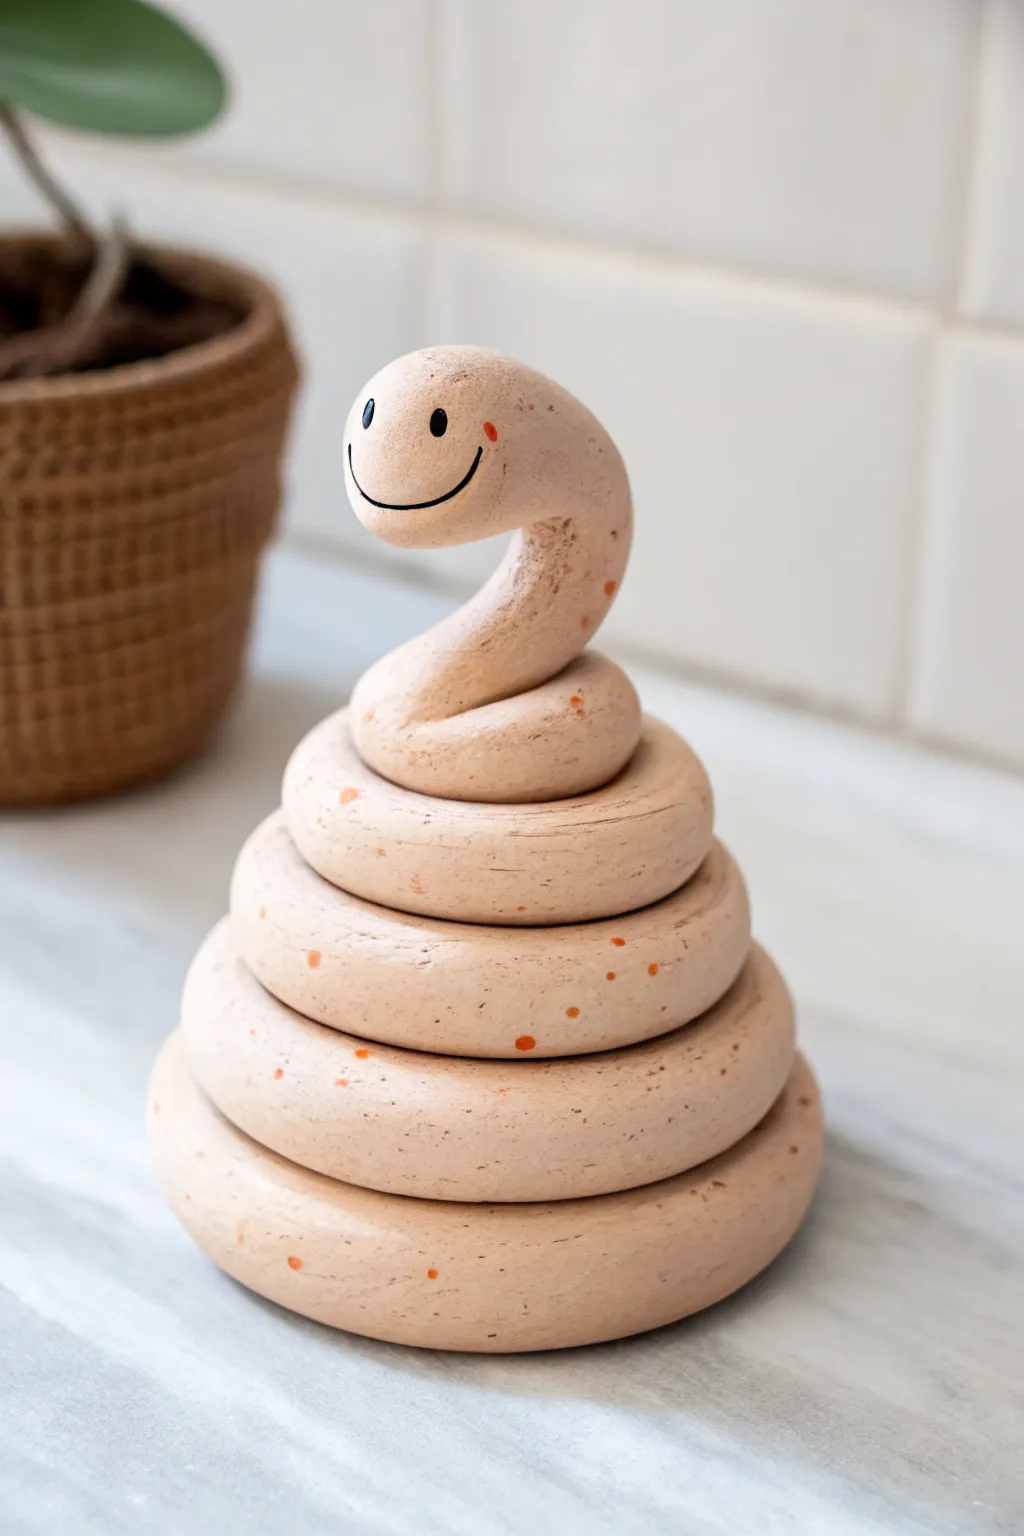
This charming little desk companion is crafted from simple clay coils stacked into a classic snake shape. With its speckled finish and gentle smile, it adds a touch of whimsy to any workspace.
Step-by-Step Tutorial
Materials
- Air-dry clay or polymer clay (soft beige or pale peach color)
- Acrylic paint (black and burnt orange)
- Fine tip paintbrush
- Water bonding slip (for air-dry clay) or liquid clay (for polymer)
- Clay rolling tool or flat surface
- Toothbrush or stipple sponge (optional for texture)
- Matte sealant/varnish
Step 1: Basing the Form
-
Prepare the Clay:
Start by kneading your clay until it is soft, pliable, and free of any air bubbles. If you are using white clay and want a base color, mix in a tiny drop of beige acrylic paint or pastel dust now. -
Roll the Main Coil:
Roll a large portion of clay into a long, consistent snake or rope shape. Aim for a thickness of about 3/4 inch to ensure the sculpture is sturdy. -
Taper the Tail:
At one end of your long rope, gently roll it slightly thinner to create the snake’s tail. This will be the very bottom of the stack. -
Create the Base Loop:
Taking the tapered tail end, curl the clay into a flat circle on your work surface. This loop should be the widest part of the sculpture. -
Begin Stacking:
Continue curling the rope on top of the base loop. Each new layer should sit slightly inward from the one below it, creating a gentle cone or beehive slope. -
Secure the Layers:
As you stack, lightly score and slip the contact points (if using air-dry clay) or press firmly (for polymer) to ensure the coils bond together and won’t separate later. -
Smooth the Transitions:
Check your stacking from all angles. You want the coils to have a defined, rounded look, but the overall structure should feel unified.
Slumping Snake?
If the head droops while sculpting, insert a toothpick or small piece of armature wire down through the neck and into the body coils for hidden structural support.
Step 2: Shaping the Head
-
Position the Neck:
When you reach the top of your coil stack, stop spiraling inward. Guide the remaining clay upwards to form a short, vertical neck section. -
Bulb the Head:
Gently shape the very end of the rope into a larger, rounded bulb shape. Smooth out the clay so the head flows seamlessly from the neck without a sharp break. -
Refine the Face Area:
Flatten the front of the head bulb just slightly with your thumb. This creates a dedicated plane for the facial features later. -
Final Surface Texture:
Before the clay hardens, inspect the surface. For a natural earthenware look, you can gently tap the surface with a toothbrush or leave slight finger marks to avoid a ‘plastic’ finish. -
Dry or Bake:
Follow the manufacturer instructions for your specific clay. If baking polymer clay, support the head with a bit of foil so it doesn’t droop in the heat.
Make it a Holder
Before drying, gently pull the coils slightly apart or leave a larger gap between the head and body to turn this sculpture into a functional photo or note holder.
Step 3: Painting and Finishing
-
Speckling the Skin:
Once fully cured or dry, dip a toothbrush or a stiff bristled brush into watered-down burnt orange paint. Flick the bristles with your thumb to spray tiny speckles across the snake’s body. -
Painting the Eyes:
Using your finest detail brush and black acrylic paint, create two small, vertical oval shapes for the eyes. Place them wide apart for a cuter expression. -
Drawing the Smile:
Paint a thin, wide U-shape connecting the area below the eyes. I find resting my hand on a steady surface helps keep this line smooth and unwavering. -
Adding Blush:
Dip the back end of a paintbrush into the orange paint and dab a single small dot on the cheek area, just at the end of the smile line. -
Seal the Friend:
Protect your paint job with a coat of matte varnish. This unifies the surface sheen and prevents the speckles from rubbing off over time.
Place your new smiling friend on your desk to keep you company during work or study sessions


Simple Cat Face Magnets
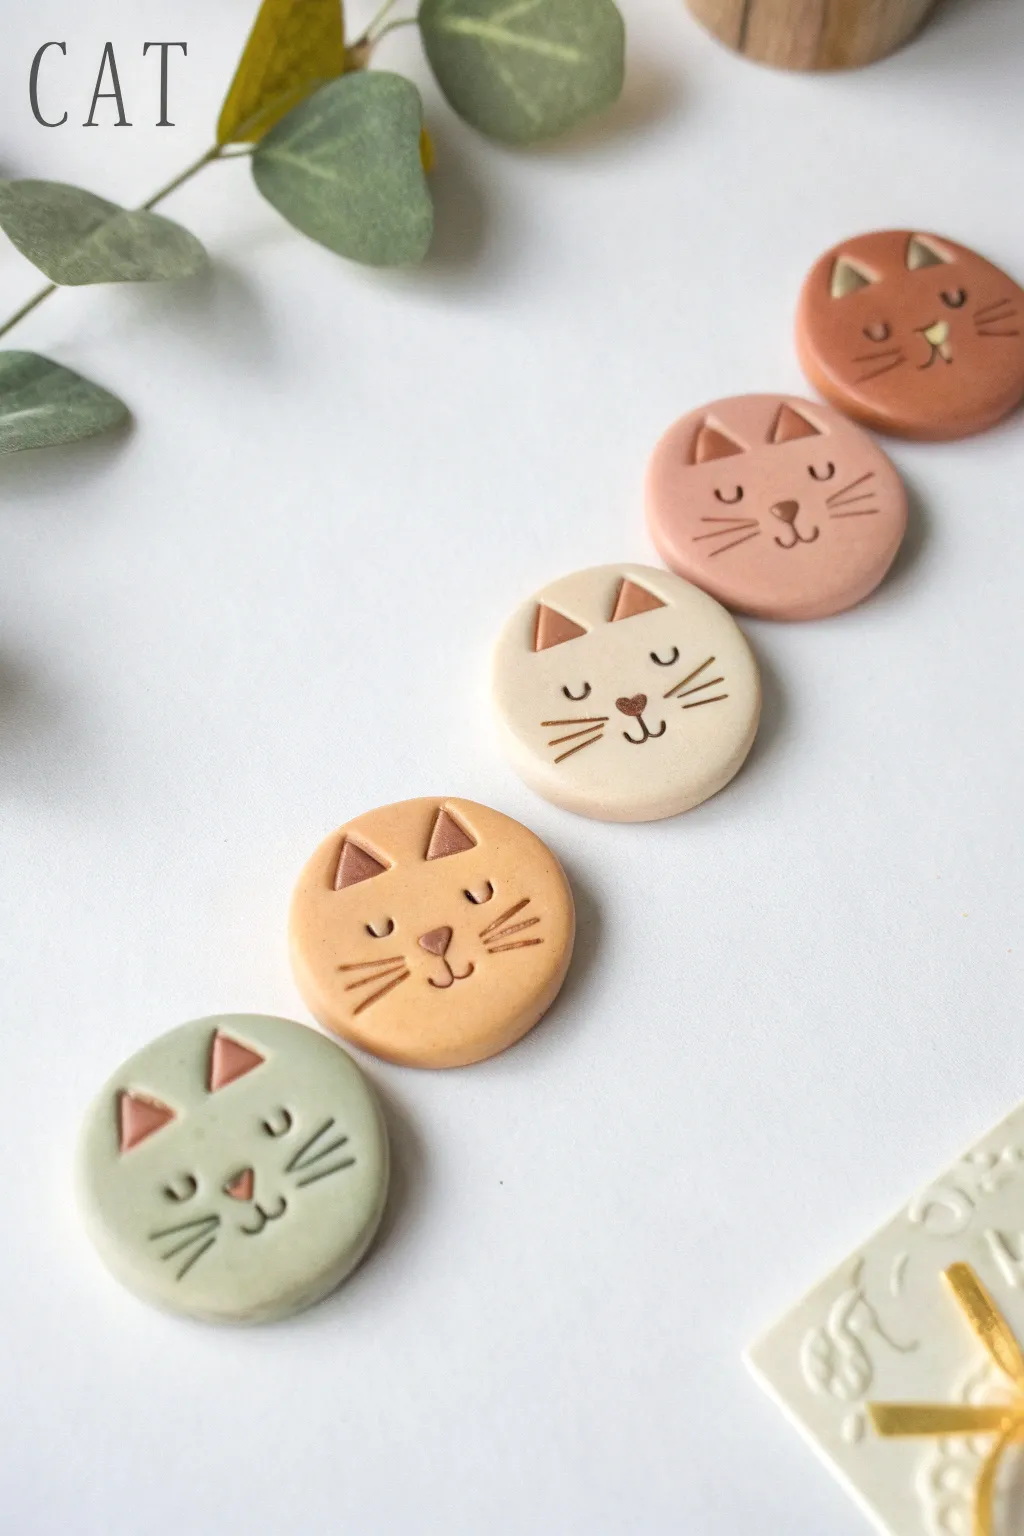
These charmingly simple cat magnets bring a touch of feline whimsy to your fridge or magnetic board. With their smooth, matte finish and minimalist features, they are a perfect beginner project for mastering clean shapes and imprinted details.
Detailed Instructions
Materials
- Polymer clay in various pastel colors (sage green, peach, cream, dusty pink, terracotta)
- Small amount of darker clay (copper or brown) for the inner ears
- Circle cutter (approx. 1.5 – 2 inches)
- Acrylic rolling pin or clay machine
- Needle tool or toothpick
- Small ball stylus tool
- Round magnets (strong hold)
- Strong craft glue (E6000 or similar)
- Parchment paper or ceramic tile for baking
- Oven (for baking polymer clay)
Step 1: Base Preparation
-
Condition the clay:
Begin by taking your chosen main color of polymer clay and kneading it in your hands until it becomes soft, warm, and pliable. This conditioning step is crucial to prevent cracks later on. -
Roll out the slab:
Use your acrylic roller to flatten the clay into an even slab. You want a thickness of about 1/4 inch (6mm) so the face feels substantial but not too heavy for the magnet. -
Cut the circles:
Press your circle cutter firmly into the clay to create the face shape. Twist slightly before lifting to ensure a clean cut. -
Smooth the edges:
Gently run your finger around the circumference of the cut circle to soften any sharp ridges left by the cutter, giving the face a friendly, rounded look.
Step 2: Adding the Ears
-
Make triangular indentations:
Using a dull knife or a specialized clay tool, gently press two triangular shapes into the top of the circle where the ears should go. Don’t cut all the way through; just create a shallow recess. -
Prepare the inner ear color:
Take a very small amount of your contrasting clay (like the copper or darker pink) and roll it into a thin sheet. -
Cut tiny triangles:
Cut small triangles from this contrasting sheet that are slightly smaller than the indentations you made on the face. -
Insert the ears:
Place these tiny contrasting triangles into the recesses on the face. Gently press them down so they sit flush with the surface of the main circle.
Clean Lines Tip
To prevent fingerprints, place a piece of plastic wrap over the clay before using your circle cutter. This creates a lovely domed edge.
Step 3: Creating the Features
-
Imprint the nose:
Position the nose in the center, slightly below the eyes. Use a small, triangular modeling tool or carefully shape a tiny piece of clay and press it onto the surface to create a raised nose effect. -
Mark the eyes:
Use a needle tool or a small curved tool to impress two ‘U’ shapes for the closed, sleeping eyes. Ensure they are symmetrical on either side of the nose. -
Add the mouth:
Directly under the nose, impress a small anchor shape or two curved lines meeting at the center to form the cat’s mouth. -
Draw the whiskers:
With a needle tool, lightly drag three lines radiating outward from each cheek area. Keep the pressure even so the lines are visible but not too deep.
Texture Twist
Before baking, gently press a textured sponge or fabric onto the clay surface to give the cat faces a soft, matte ‘fur-like’ texture.
Step 4: Finishing Touches
-
Final smooth:
Check the surface for any accidental fingerprints. I prefer to lightly brush the surface with a tiny bit of cornstarch or baby oil on my finger to smooth these away before baking. -
Bake the pieces:
Place your cat faces on a parchment-lined baking sheet or ceramic tile. Bake according to your clay manufacturer’s instructions (usually around 275°F/135°C for 15-30 minutes). -
Cool down:
Allow the clay pieces to cool completely in the oven or on a wire rack. They will harden fully as they cool. -
Attach the magnet:
Flip the cooled cat face over. Apply a dab of strong craft glue to the back and press your round magnet firmly into place. -
Dry time:
Let the glue cure for the time recommended on the bottle before sticking your new creation to the fridge.
Now you have a purr-fect set of decorative magnets to organize your notes


Cute Heart Pocket Tokens

These miniature clay hearts are the sweetest little keepsakes to tuck into someone’s pocket or package. With their speckles of pink and gentle smiling expressions, they feel warm and handmade, perfect for a subtle gesture of affection.
Step-by-Step
Materials
- Polymer clay (white and translucent)
- Soft pastels or chalk (pink and red shades)
- Craft blade or clay cutter
- Heart-shaped clay cutter (small)
- Needle tool or toothpick
- Small dotting tool
- Sandpaper (fine grit, optional)
- Oven for baking
- Ceramic tile or baking surface
Step 1: Preparing the Clay
-
Condition the white clay:
Start by taking a small block of white polymer clay. Knead it in your hands until it becomes soft, pliable, and easy to manipulate without cracking. -
Add translucency:
Mix in a very small amount of translucent clay with the white. This isn’t strictly necessary, but I feel it gives the finished heart a slightly softer, less ‘plastic’ look. -
Create the speckled dust:
Take a stick of dark pink or red soft pastel and use your craft blade to scrape fine powder from it onto your work surface. -
Mix in the color:
Press the ball of white clay into the pastel dust. Fold and knead the clay repeatedly to distribute the color. Stop when you have a uniform soft pink, or knead less if you prefer a marbled effect. -
Add heavier speckles:
Scrape a bit more red pastel dust, but this time leave some slightly larger chunks. Fold these into the clay gently without fully blending them, creating those lovely strawberry-like speckles seen in the photo.
Lint Trouble?
White clay loves to attract dust. Keep some acetone or rubbing alcohol handy; a quick wipe with a cotton bud before baking removes trapped lint instantly.
Step 2: Shaping the Token
-
Roll out the slab:
Roll your pink speckled clay into a thick slab, aiming for about 1/4 inch (6mm) thickness. You want it chunky so it feels substantial in the hand. -
Cut the heart:
Use your heart-shaped cutter to punch out the shape. If the clay sticks to the cutter, you can dust it lightly with cornstarch first. -
Soften the edges:
Gently rub the sharp edges of the heart with your fingertip to round them over. The goal is a smooth, pebble-like finish rather than a sharp cookie-cutter look.
Make it a Magnet
Before baking, press a strong neodymium magnet into the back of the heart, then pop it out. Glue the magnet into the indentation after baking for a cute fridge accessory.
Step 3: Adding the Expression
-
Position the eyes:
Use a needle tool to poke two small holes for the eyes. Ideally, place them slightly wide apart to create a ‘kawaii’ aesthetic. -
Carve the smile:
Use the needle tool or a very small curved tool to gently press a smile into the clay between and slightly below the eyes. -
Create the cheeks:
Using a small ball tool or the end of a paintbrush, make slight indentations where the cheeks should be. -
Tint the cheeks and eyes:
Scrape a tiny bit of vibrant red pastel dust. Use a dry, small brush or a Q-tip to dab this concentrated powder into the cheek indentations and very lightly into the smile line.
Step 4: Baking and Finishing
-
Final smooth:
Do a final check for fingerprints. You can brush the surface lightly with a little baby oil on your finger to smooth them away. -
Bake the clay:
Place the heart on a ceramic tile or baking sheet lined with parchment paper. Bake according to your specific clay manufacturer’s instructions (usually 275°F/135°C for 15-30 minutes). -
Cool down:
Let the piece cool completely in the oven with the door cracked open. This helps prevent thermal shock and cracks. -
Sand (optional):
If there are any rough spots on the back or sides after baking, you can gently buff them away with fine-grit sandpaper for a professional feel.
Once cooled, your little heart is ready to bring a smile to someone’s face as a lucky charm or gift topper