
If your rings keep rolling off the nightstand or your earrings are always missing their mate, a cute clay jewelry holder is the kind of fix that feels fun instead of fussy. These ideas are beginner-friendly, super customizable, and made to look just as pretty empty as they do piled with your everyday favorites.
Classic Pinch-Pot Ring Dish
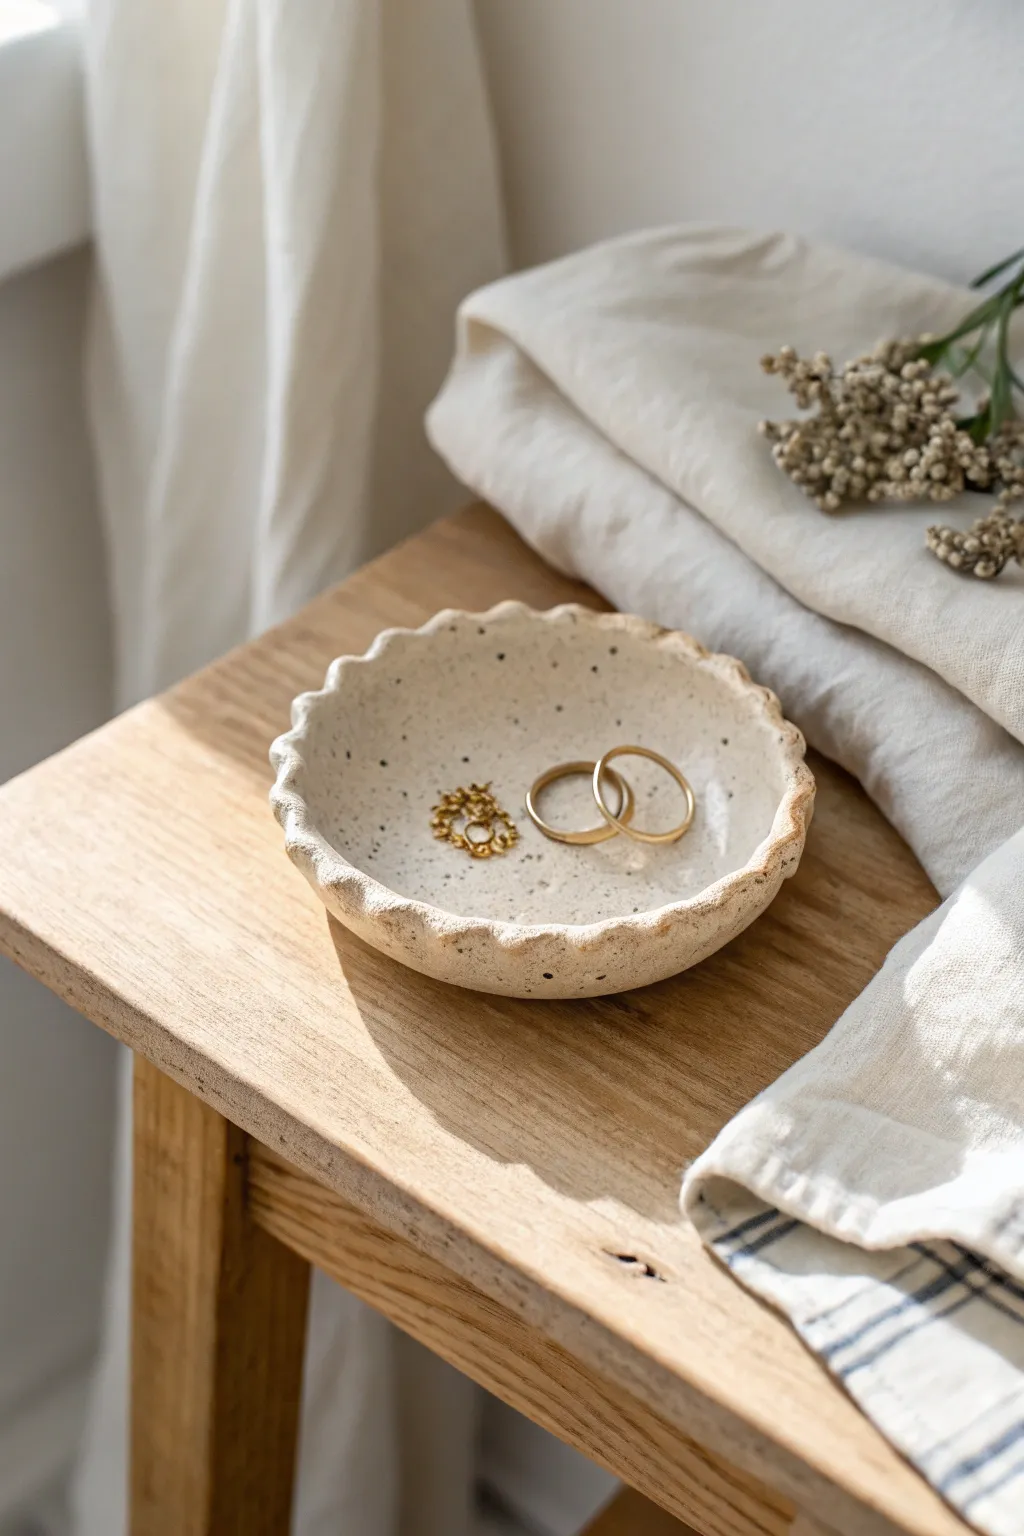
Capture the rustic elegance of handmade pottery with this charming speckled ring dish. Featuring a delicate scalloped edge and a natural, creamy finish, it’s the perfect minimalist catch-all for your favorite daily jewelry.
Step-by-Step
Materials
- Air-dry clay (white or cream)
- Speckled clay addition (dried coffee grounds or black pepper)
- Rolling pin
- Round cookie cutter (approx. 4-5 inches)
- Small bowl for water
- Sponge or smoothing tool
- Acrylic paint (cream/beige)
- Matte or satin varnish
- Paintbrush
- Sandpaper (fine grit)
Step 1: Preparing the Clay Base
-
Create the speckled effect:
Before sculpting, we need to create that lovely faux-stone look. Take a handful of white air-dry clay and knead in a small pinch of dried coffee grounds or coarse black pepper. Knead thoroughly until the specks are evenly distributed throughout the clay body. -
Roll the slab:
Place your clay on a flat working surface. Using a rolling pin, roll the clay out evenly until it is about 1/4 inch thick. Aim for a consistent thickness to prevent cracking during the drying phase. -
Cut the circle:
Press your round cookie cutter firmily into the clay slab to cut out a perfect circle. If you don’t have a cutter, trace around a small bowl with a needle tool or knife. -
Smooth the edges:
Diap your finger into a little water and gently run it along the cut edge of the circle. This removes any sharp angles or burrs left by the cutter, giving the piece a more refined, professional finish.
Keep it Clean
To prevent dust and lint from getting trapped in your light-colored clay while rolling, wipe down your work surface and rolling pin with a baby wipe before starting.
Step 2: Forming and Shaping
-
Lift the edges:
Gently lift the clay circle from your work surface. Place it in the palm of your hand and slowly curve the edges upward to create a shallow bowl shape. Keep the bottom relatively flat so it sits stably. -
Create the scallops:
To form the fluted rim, place your index finger on the inside of the rim and your thumb and middle finger on the outside. Gently press inward with your outside fingers while pushing outward with your index finger. -
Repeat the pattern:
Work your way around the entire circumference of the bowl, repeating this pinching motion. aim for even spacing, but don’t worry about perfection; slight irregularities add to the organic charm shown in the photo. -
Refine the shape:
Once the scallops are formed, set the bowl back down. If the walls have slumped, gently push them back up. Create a slight inward curve at the very top of the rim to mimic the cozy shape of a pinch pot. -
Final smoothing:
Use a slightly damp sponge to wipe away any fingerprints or deep cracks, paying special attention to the valleys between the scallops.
Glazed Look
Want a high-gloss ceramic look without a kiln? Use a glossy dimensional glaze (like Diamond Glaze or triple-thick gloss) for the final coat instead of matte varnish.
Step 3: Finishing Touches
-
Let it dry:
Place the dish in a cool, dry spot away from direct sunlight. Let it air dry completely for 24-48 hours. I like to flip it over halfway through so the bottom dries evenly. -
Sand imperfections:
Once fully dry and hard, use fine-grit sandpaper to gently buff the rim and any rough spots on the surface. Wipe away the dust with a dry cloth. -
Paint a base coat:
Mix a creamy beige acrylic paint. Apply a thin, even layer over the entire dish. This unifies the color while letting some of texture remain visible. -
Highlight the texture:
If your coffee grounds got covered by paint, you can flick a tiny amount of watered-down black or brown paint onto the surface using a stiff brush to re-emphasize the speckled look. -
Add the rim detail:
For that subtle rustic edge seen in the image, use a dry brush with a slightly darker beige paint. Lightly brush just the very top edge of the scallops to accentuate the wave pattern. -
Seal the piece:
Apply two coats of matte or satin varnish to protect the clay from moisture and give it a finished ceramic feel. Allow the varnish to act as a barrier for oils from your jewelry. -
Final cure:
Let the varnish cure according to the bottle instructions before placing your rings inside.
Now you have a serene little spot to keep your treasures safe and organized


Marbled Stone-Look Jewelry Tray
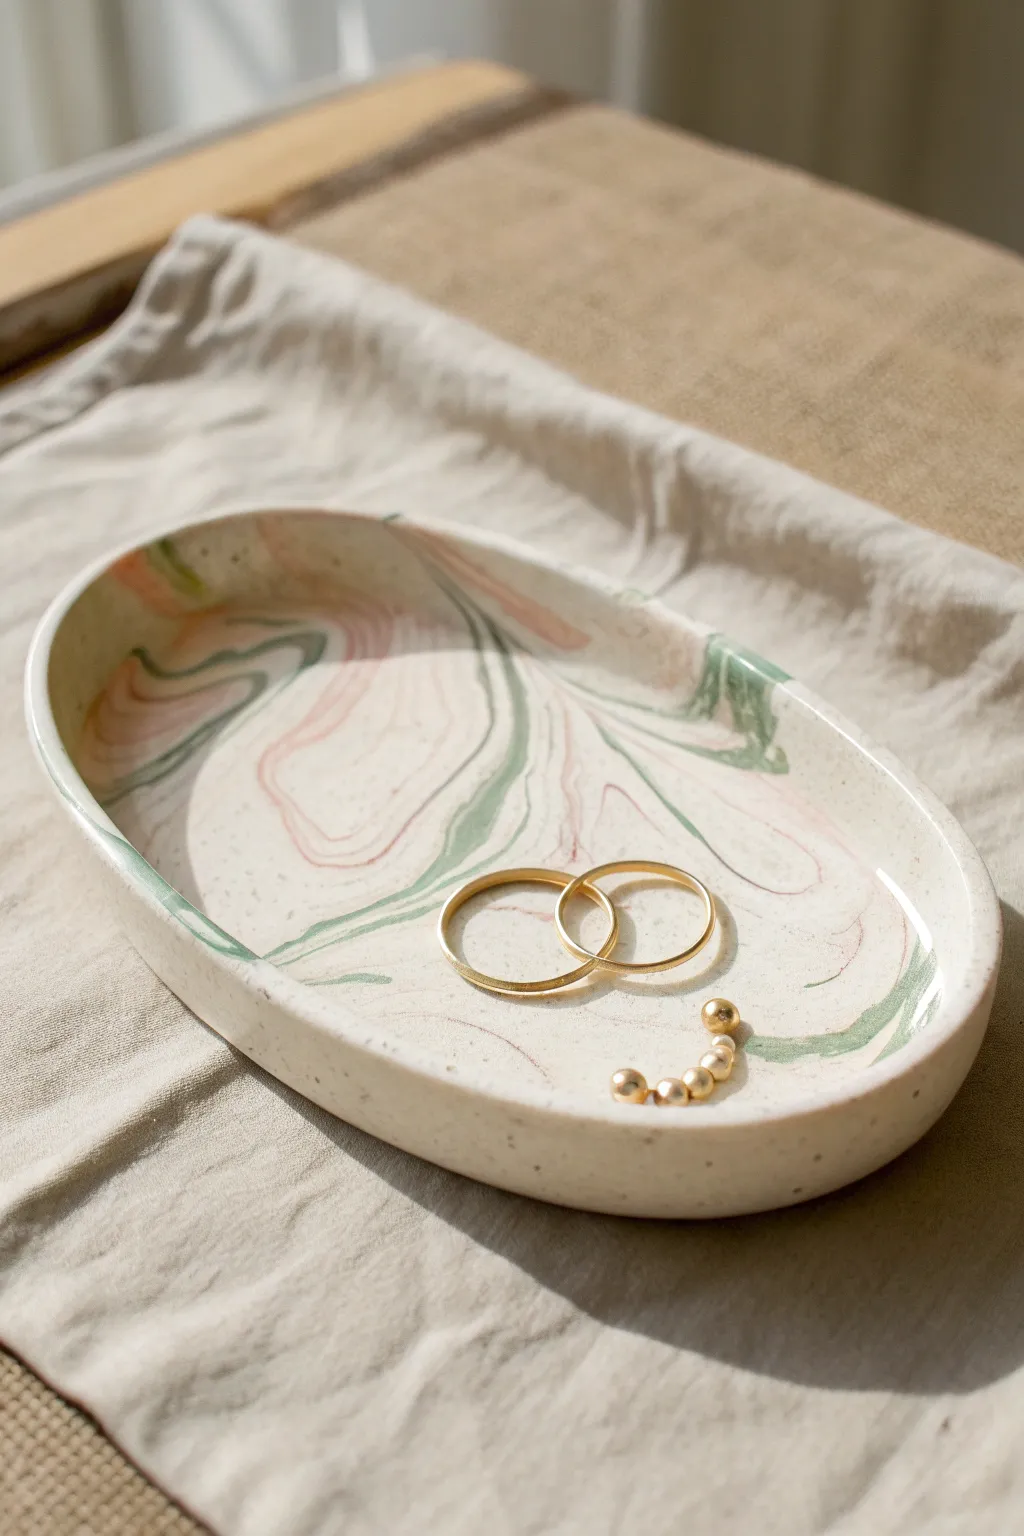
This elegant tray combines the smooth, organic look of polished stone with a soft, pastel palette perfect for displaying gold jewelry. By blending polymer clay with subtle marbling and a speckled finish, you can achieve a high-end ceramic aesthetic right at home.
Step-by-Step
Materials
- White or translucent white polymer clay (base)
- Pastel pink polymer clay
- Sage green polymer clay
- Coarse black pepper or faux granite powder (for speckling)
- Acrylic rolling pin
- Oval cutter or craft knife
- Sandpaper (varying grits: 400, 800, 1000)
- Matte polyurethane varnish or glaze
- Soft paintbrush
- Oven and baking sheet
Step 1: Prepping and Mixing
-
Condition the base clay:
Start by warming up a large block of white clay in your hands. Knead it thoroughly until it is soft, pliable, and free of any cracks. -
Create the speckle effect:
Flatten the white clay slightly and sprinkle a very small amount of ground black pepper or granite powder onto it. Fold the clay over and knead repeatedly until the specks are evenly distributed throughout the white block. This mimics natural stone. -
Prepare accent colors:
Take small amounts of the pastel pink and sage green clay. Condition them separately and roll them into thin snakes or ropes, about 4 inches long. -
Combine the clays:
Roll your large speckled white ball into a thick log. Lay the thin pink and green ropes lengthwise along the white log.
Step 2: Marbling and Shaping
-
Twist and fold:
Twist the entire log candy-cane style to begin blending the colors. Fold the twisted log in half, roll it into a ball, and then roll it back into a log. Repeat this process just once or twice—don’t over-mix, or the distinct veins will turn muddy. -
Roll out the slab:
Place the clay on a clean surface. Using your acrylic rolling pin, roll the clay out to a thickness of about 1/4 inch. Roll in different directions to stretch the marble pattern organically. -
Cut the shape:
Use a large oval cutter to punch out your shape. Alternatively, for a more organic look like the photo, lightly trace an oval with a toothpick and cut it out freehand with a craft knife. -
Smooth the edges:
Dip your finger in a little bit of cornstarch or water and gently run it along the cut edge to soften any sharp angles left by the blade. -
Form the rim:
Gently lift the edges of the oval upward with your thumbs to create a shallow lip. pinch and smooth the rim subtly so it isn’t perfectly uniform, enhancing the handmade ceramic vibe.
Clean Cuts Only
To avoid distortion when lifting your cut shape, roll the clay directly onto a piece of parchment paper, then transfer the paper to your baking sheet.
Step 3: Baking and Finishing
-
Bake the tray:
Place your formed tray on a parchment-lined baking sheet. Bake according to the manufacturer’s instructions for your specific brand of clay (usually around 275°F or 130°C for 15-30 minutes). -
Cool completely:
Let the clay cool fully on the baking sheet. It will be slightly soft when hot but hardens as it cools. -
Sand for stone texture:
Start with lower grit sandpaper (400) to remove any fingerprints or imperfections on the rim. Move up to higher grits (800, then 1000) under running water to polish the surface until it feels like smooth sea glass. -
Dry thoroughly:
Wash off any sanding residue and dry the piece completely with a lint-free cloth. -
Seal the piece:
Apply a thin layer of matte varnish with a soft brush. The matte finish is crucial for recreating the stone look seen in the photo; glossy finishes can look too plastic.
Gilded Edge Upgrade
After baking, paint the very top rim of the tray with liquid gold leaf. The metallic accent pairs beautifully with the sage and pink marble pattern.
Now you have a chic, modern resting place for your favorite rings that looks like it came from a boutique studio


Minimal Arch Ring Stand on Dish Base
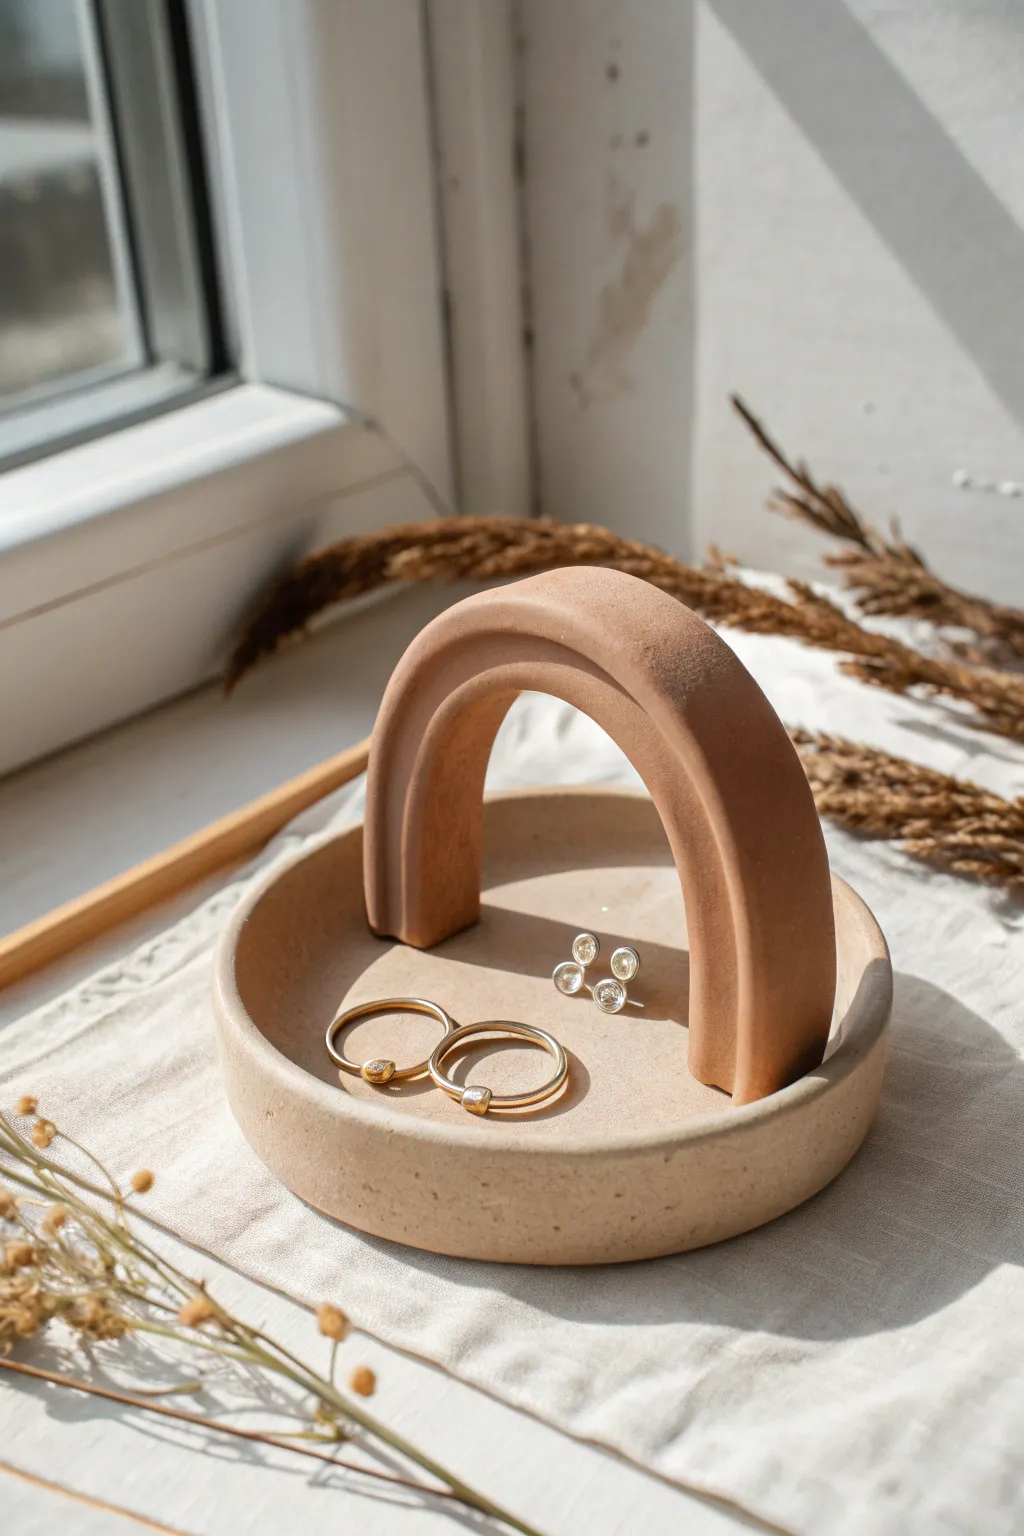
Embrace the beauty of modern simplicity with this terracotta-style jewelry holder, featuring a sturdy arch bridge perfect for stacking rings. The design combines a shallow catch-all tray with a sculptural handle, creating a functional piece of art for your bedside table.
Step-by-Step Guide
Materials
- Polymer clay (terracotta or beige color)
- Speckled clay or faux granite clay (optional for texture)
- Acrylic rolling pin
- Circle cutter (approx. 4-5 inches diameter)
- Craft knife or scalpel blade
- Flexible metal rib or smoothing tool
- Sandpaper (various grits)
- Baking sheet and parchment paper
- Liquid clay or Bake & Bond
Step 1: Preparing the Base
-
Condition the clay:
Start by warming the clay in your hands, kneading it until it is soft and pliable. If you want that speckled stoneware look shown in the photo, mix a small amount of granite-effect clay into your main terracotta color. -
Roll out the slab:
Using your acrylic roller, roll the clay out into an even slab about 1/4 inch thick. Avoid going too thin, as the base needs weight to support the arch. -
Cut the circle:
Press your circle cutter firmly into the slab to create the round base. If you don’t have a cutter large enough, trace around a bowl with your craft knife. -
Create the rim:
Roll a long, thin snake of clay. Place this coil around the perimeter of your clay circle. Gently blend the inside seam of the coil down into the base using your thumb or a smoothing tool, creating a seamless transition. -
Smooth the edges:
Use a little bit of baby oil or clay softener on your finger to smooth out the outer rim and the interior of the dish, removing any fingerprints.
Step 2: Sculpting the Arch
-
Form a thick log:
Roll a thick cylinder of clay for the arch. It should be approximately 3/4 inch thick to match the chunky aesthetic of the reference image. -
Flatten the sides slightly:
Gently press the cylinder down on your work surface to flatten one side slightly, then flip and flatten the opposite side. This creates a rectangular cross-section with rounded corners, rather than a perfect tube. -
Shape the rainbow:
Bend the clay log into a U-shape. Stand it up on your work surface to ensure the legs are even in length. Trim the bottoms with your blade so they are perfectly flat and flush with the table. -
Refine the shape:
Smooth the surface of the arch with your flexible rib tool. Ensure the curve at the top is consistent and not lopsided.
Stone Effect TIp
To mimic the texture in the photo, gently dab the raw clay with a toothbrush or coarse sponge before baking. This removes the plastic shine.
Step 3: Assembly and Finishing
-
Score the connection points:
Place the arch onto the dish to determine placement. Lightly mark the spots, then use a needle tool to scratch up the surface of the dish and the bottom of the arch legs for better adhesion. -
Apply adhesive:
Apply a drop of liquid clay or clay adhesive to the scored areas. -
Attach the arch:
Press the arch firmly onto the base. Use a modeling tool to smooth the clay from the base up onto the legs of the arch, blending the seam so it looks like one solid piece. -
Final smooth:
Give the entire piece one last check for fingerprints or uneven textures. I like to use a brush with a tiny bit of rubbing alcohol here to smooth everything out perfectly. -
Bake:
Place the piece on a parchment-lined baking sheet. Bake according to your clay manufacturer’s instructions (usually 275°F for 15-30 minutes depending on thickness). -
Cool down:
Let the piece cool completely inside the oven if possible to prevent thermal shock cracks. -
Sand for finish:
Once cool, use fine-grit sandpaper under running water to gently sand any sharp edges or bumps, giving it that matte, stone-like feel.
Level Up: Color Block
Make the base one color (like cream) and the arch a contrasting earth tone (like sage or rust) for a modern two-tone aesthetic.
Place your finished stand by a sunny window to let the shadows play off the arch geometry


Leaf-Imprint Jewelry Dish
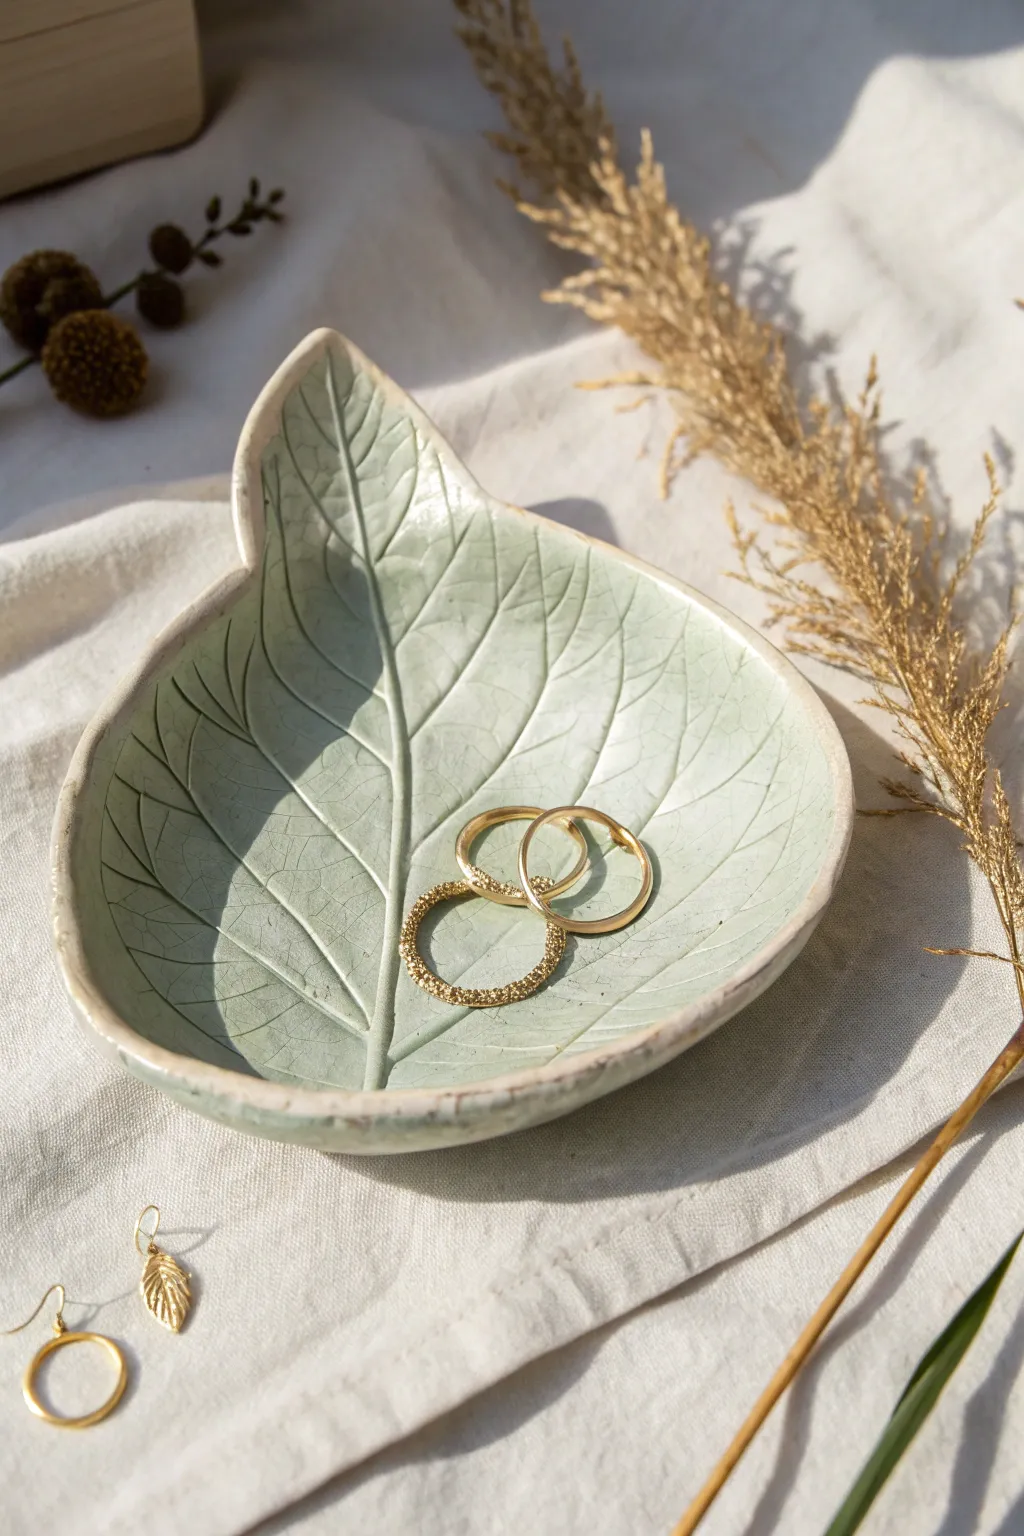
Capture the organic beauty of nature with this delicate jewelry dish, formed directly from a real leaf. The soft celadon green glaze pools beautifully in the veins, creating a stunning contrast that highlights the intricate details of your jewelry.
Step-by-Step Tutorial
Materials
- Air-dry clay or polymer clay (white)
- Small rolling pin or glass jar
- Large, fresh leaf with prominent veins (e.g., Hydrangea or Hosta)
- X-Acto knife or craft scalpel
- Small bowl or curved surface (for drying form)
- Fine-grit sandpaper (220-400 grit)
- Pale celadon green acrylic paint or glaze
- Clear gloss varnish (polyurethane or resin)
- Soft paintbrush
- Palette for mixing
Step 1: Prepping and Impressions
-
Select your leaf:
Begin by foraging for the perfect leaf. Look for a specimen that is relatively flat, roughly the size of your hand, and features deep, prominent veins on the underside, as this will create the sharpest impression. -
Roll out the clay:
Take a ball of white clay roughly the size of a tennis ball. Knead it until soft, then roll it out on a smooth work surface to an even thickness of about 1/4 inch (6mm). -
Position the leaf:
Place your chosen leaf onto the rolled slab, vein-side down. The underside of the leaf always holds the most texture, so pressing this side into the clay is crucial. -
Create the imprint:
Use your rolling pin to gently but firmly roll over the leaf. Press hard enough to embed the veins into the clay, but be careful not to push all the way through the slab. -
Cut the shape:
With the leaf still embedded in the clay, trace around the outer edge using an X-Acto knife or craft scalpel. Hold the blade vertically to ensure a clean, sharp edge. -
Reveal the texture:
Carefully lift a corner of the leaf stem and peel the leaf away from the clay. This is the magic moment where you see the delicate network of veins captured in the surface.
Vein Definition Tip
If the veins aren’t popping enough after the first paint wash, mix a slightly darker green-gray wash and apply it strictly to the center veins with a fine liner brush.
Step 2: Shaping and Refining
-
Smooth the edges:
Dip your finger in a little water and gently run it along the cut edges of your clay leaf. Remove any sharp burrs or jagged bits left by the knife to give it a refined, professional finish. -
Form the curve:
Carefully lift the clay leaf and place it inside a small bowl or on a curved object. Gently press the center down so the leaf takes on a cupped shape. I like to make sure the edges curl up naturally to hold rings securely. -
Allow to dry:
Let the clay dry completely in its form. For air-dry clay, this usually takes 24-48 hours. Ensure it is bone dry and hard before moving to the next step. -
Sand for perfection:
Once fully dry, remove the dish from the form. Use fine-grit sandpaper to smooth out the rim and any rough spots on the underside. Wipe away the dust with a slightly damp cloth or tack cloth.
Step 3: Painting and Glazing
-
Mix the base color:
Prepare a pale, misty green paint color to mimic celadon ceramic glaze. Mix a tiny drop of green and a touch of gray into a large amount of white acrylic paint. -
Apply a wash:
Dilute your paint slightly with water to create a semi-transparent wash. Paint the entire top surface of the dish. The thinner paint will naturally flow into the deep vein crevices, making them appear darker. -
Wipe back:
Before the paint dries completely, take a slightly damp paper towel and very gently wipe the raised surfaces of the leaf. This removes some paint from the ‘high points’ while leaving color in the veins. -
Paint the rim:
Use a detail brush to carefully paint the rim of the dish with an opaque layer of the pale green mix, defining the silhouette clearly. -
Gloss finish:
Apply two to three coats of high-gloss clear varnish or a thin layer of resin. Let each coat dry fully. This gives the piece that shiny, ceramic-like ‘wet’ look seen in the photo. -
Final cure:
Let the final topcoat cure for the time recommended on your product’s bottle before placing any jewelry inside.
Gold Rim Upgrade
For an elegant touch, paint just the very edge of the rim with liquid gold leaf or a metallic acrylic paint after your green base coat has dried completely.
Place your favorite rings in your new botanical dish and enjoy the serene touch of nature on your dresser

The Complete Guide to Pottery Troubleshooting
Uncover the most common ceramic mistakes—from cracking clay to failed glazes—and learn how to fix them fast.
Sea Shell Necklace and Ring Tray
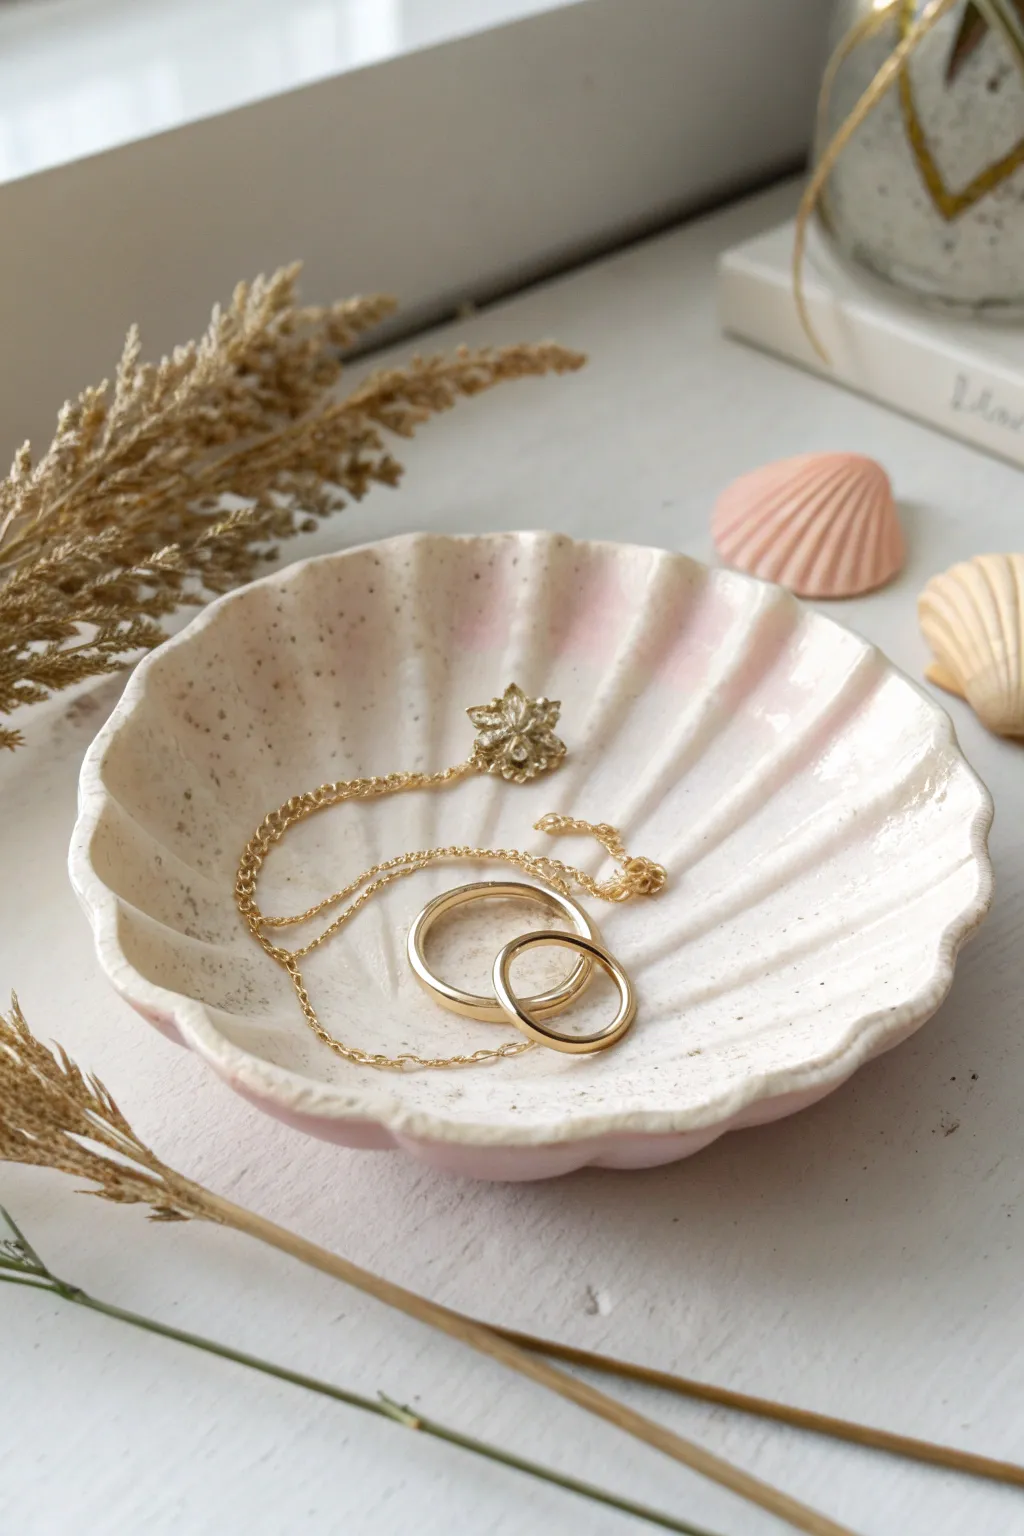
Capture the magic of the ocean with this charming scallop shell jewelry dish, perfect for holding your favorite delicate treasures. The speckled clay body mimics natural sand, while a soft pink blush in the grooves adds a touch of seaside romance.
Detailed Instructions
Materials
- White polymer clay (or granite-effect polymer clay)
- Black pepper or dried tea leaves (if using plain white clay)
- Rolling pin
- Large scallop shell (real or plastic mold)
- X-Acto knife or clay blade
- Soft pastel chalk (pink or peach)
- Small fluffy paintbrush
- Sandpaper (fine grit)
- Gloss glaze or varnish
- Oven (for baking polymer clay)
Step 1: Preparing the Clay Base
-
Condition the clay:
Start by kneading your white polymer clay until it is soft and pliable. If you purchased pre-speckled granite clay, you can skip the mixing step. -
Add the speckles:
To create the organic, stony look shown in the photo, sprinkle a pinch of ground black pepper or loose tea leaves into your white clay. Fold and knead the clay repeatedly until the speckles are evenly distributed throughout the batch. -
Roll out a slab:
Roll the clay into a ball, then flatten it on your work surface using a rolling pin. Aim for a consistent thickness of about 1/4 inch (approx. 5-6mm) to ensure the dish is sturdy but elegant.
Step 2: Shaping the Shell
-
Use a template:
Place your real scallop shell or a shell-shaped template directly onto the rolled clay slab. Gently press it down just enough so it doesn’t slide around. -
Cut the outline:
Using your X-Acto knife or clay blade, carefully trace around the edge of the shell or template. Remove the excess clay and set it aside for future projects. -
Create the ridges:
If you aren’t pressing the clay into a mold, you’ll need to hand-sculpt the ridges. Use the back of your knife or a modeling tool to press lines radiating from the base of the shell to the scalloped edges. Deepen these grooves gradually to mimic the fan shape. -
Curve the form:
Lift the clay cutout carefully. To give it a dish shape, place it inside a small oven-safe bowl or curve the edges upward gently with your fingers. The center should sit lower than the rim to hold your jewelry securely.
Natural Texture
Instead of sculpting grooves by hand, press a real large scallop shell directly into the clay slab to imprint perfect, realistic ridges instantly.
Step 3: Adding Color & Baking
-
Prepare the blush:
Scrape a small amount of pink soft pastel chalk onto a piece of paper to create a fine powder. -
Apply the shading:
Dip a soft fluffy brush into the pink powder. I prefer to tap off the excess first, then gently brush the pigment into the deeper grooves and the center of the shell. This creates that lovely, natural rosy glow seen in the photo. -
Smooth the edges:
Before baking, run a finger dipped in a little baby oil or water along the cut edges to smooth out any sharpness or burrs. -
Bake the piece:
Place your clay shell (still in its support bowl if needed) onto a baking sheet. Bake according to your brand of clay’s specific temperature and time instructions—usually around 275°F (135°C) for 15-30 minutes. -
Cool down:
Allow the piece to cool completely in the oven with the door slightly ajar. Sudden temperature changes can sometimes cause cracking.
Gilded Edge
Paint the very rim of the shell with liquid gold leaf after baking. This adds a luxurious contrast to the rustic speckled clay.
Step 4: Finishing Touches
-
Sand for perfection:
Once cool, check the edges one last time. If there are rough spots, gently wet-sand them with fine-grit sandpaper under running water. -
Glaze application:
Apply a thin coat of gloss glaze or varnish to the entire surface. This seals the pastel powder and gives the shell that wet, freshly-washed-up look. -
Final cure:
Let the varnish dry completely according to the manufacturer’s instructions before placing any jewelry inside.
Your coastal-inspired trinket dish is now ready to cradle your favorite rings and necklaces
Hand-Shaped Ring Holder Dish
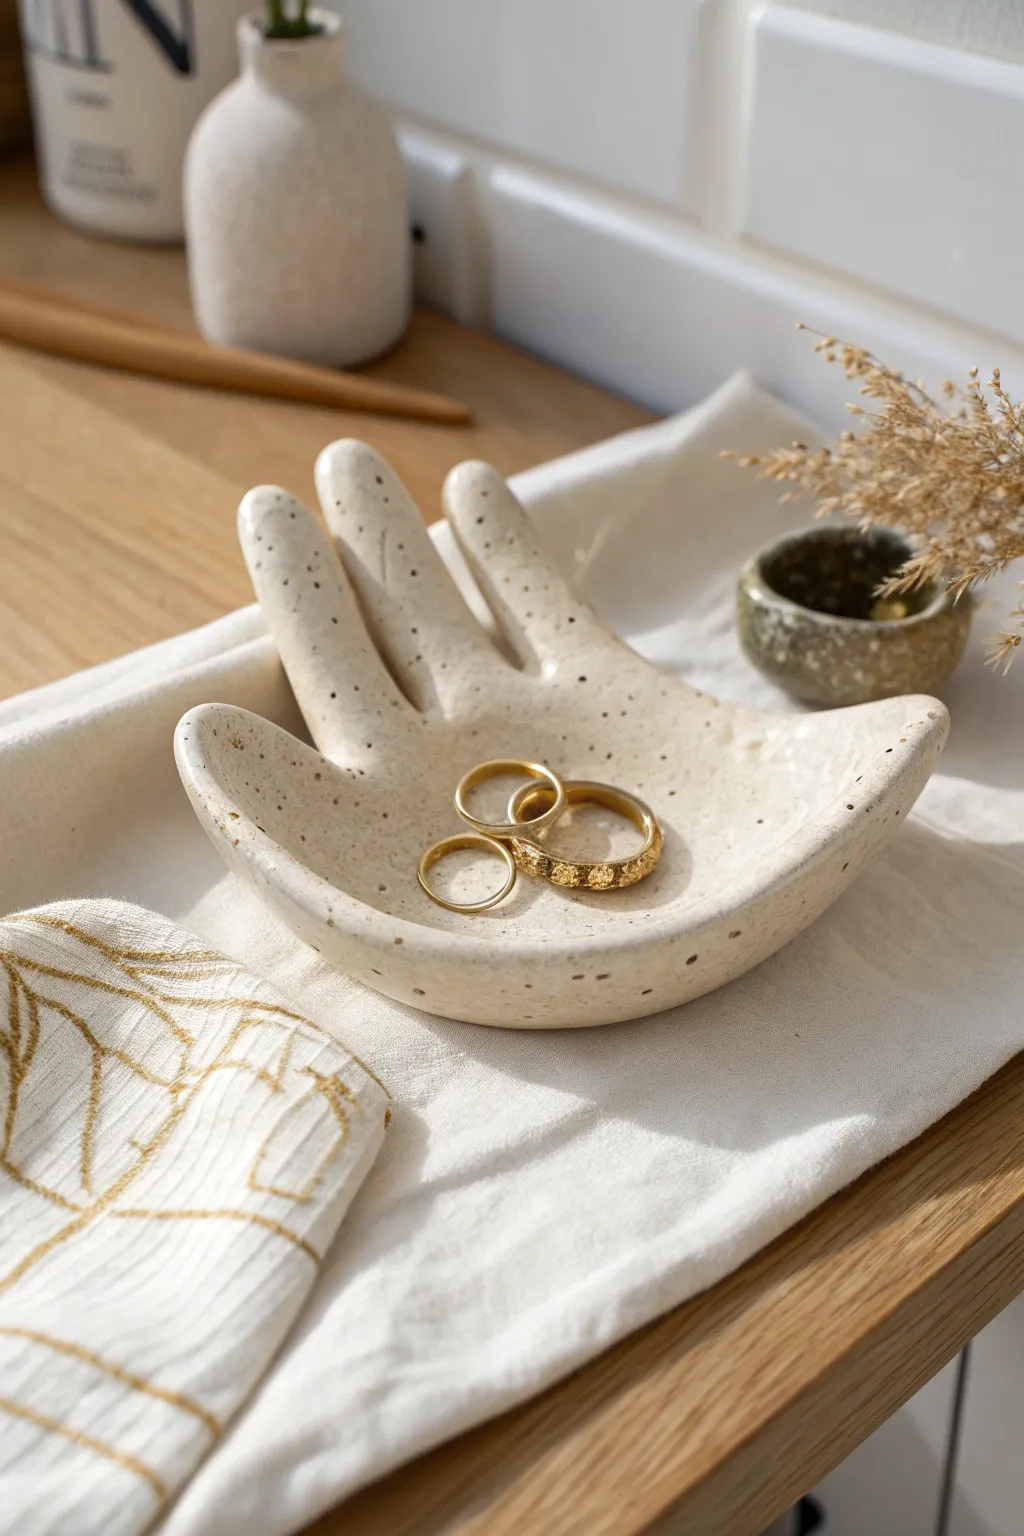
This charming, speckled clay dish combines the functional utility of a catch-all bowl with the personal touch of a hand-shaped sculpture. Its gentle curve and minimalist aesthetic make it perfect for cradling your favorite rings and trinkets.
Step-by-Step
Materials
- Air-dry clay or polymer clay (white or cream base)
- Acrylic rolling pin
- Small bowl or dish (soup bowl size) for shaping
- Craft knife or scalpel
- Needle tool or toothpick
- Fine-grit sandpaper (220-400 grit)
- Brown and black acrylic paint (for speckling)
- Old toothbrush or stiff bristle brush
- Gloss or satin varnish/sealant
- Soft synthetic brush
- Bowl of water
- Paper template of a hand (optional but helpful)
Step 1: Preparation and Shaping
-
Prepare your clay:
Start by conditioning your clay. Knead a generous handful of white or cream clay until it is soft, pliable, and free of cracks. Warm clay is much easier to work with. -
Roll it out:
Using your acrylic rolling pin, roll the clay out onto a smooth work surface. Aim for an even thickness of about 1/4 inch (6mm). If it’s too thin, the fingers might break; too thick, and it will look chunky. -
Place your hand:
Place your own hand gently onto the clay with fingers slightly spread. Relax your hand so it rests naturally. Alternatively, use a paper template if you prefer a stylized look rather than tracing your actual hand. -
Trace the outline:
With a needle tool held perpendicular to the table, carefully trace around your fingers and palm. Don’t worry about being perfectly close to the skin; a slightly wider outline is often sturdier. -
Cut the shape:
Remove your hand. Using a sharp craft knife or scalpel, cut along the traced line cleanly. Remove the excess clay and set it aside for future projects. -
Smooth the edges:
Dip your finger in a little water and run it along the cut edges of the clay hand. This rounds off sharp corners and prevents cracking later. Pay special attention to the areas between the fingers.
Pro Tip: Seamless Texture
To get that truly organic, stone-like look, you can mix actual dried coffee grounds or black pepper directly into the white clay before rolling it out, instead of painting speckles later.
Step 2: Forming the Curve
-
Lift the clay:
carefully slide a blade or spatula under the clay hand to lift it off the work surface without stretching the fingers. -
Create the bowl shape:
Drape the clay hand inside your soup bowl. Allow the palm to sink to the bottom and let the fingers curve gently up the sides of the bowl. This creates that cupped ‘offering’ gesture. -
Adjust the fingers:
Ensure the fingers aren’t too spread out or resting strangely. I like to gently push the thumb and pinky slightly inward to create a deeper cradle for jewelry. -
Smooth imperfections:
While it’s in the bowl, do one final check for fingerprints or unwanted dents. Smooth them away with a barely damp sponge or finger. -
Let it dry:
Allow the clay to dry completely while sitting in the bowl. This usually takes 24-48 hours depending on humidity. Don’t rush this, or the hand may warp.
Step 3: Finishing and Speckling
-
Sand for finish:
Once fully dry and hardened, remove the hand from the bowl. Use fine-grit sandpaper to gently buff away any rough edges or bumps, focusing on the fingertips and the rim of the palm. -
Wipe clean:
Use a dry cloth or soft brush to remove all sanding dust from the surface. The clay needs to be perfectly clean for the sealant to adhere. -
Prepare the speckles:
Mix a small amount of water with brown acrylic paint to create a fluid, ink-like consistency. Do the same with a tiny bit of black for varying tones. -
Apply the splatter:
Dip an old toothbrush into the watered-down paint. Hold it over the clay hand and run your thumb across the bristles to flick tiny droplets onto the surface. Practice on paper first to control the spray. -
Dry the paint:
Let the paint speckles dry completely. Because they are thin acrylics, this should only take about 10-15 minutes. -
Apply first coat of varnish:
Using a soft synthetic brush, apply a coat of gloss or satin varnish to the entire piece. This mimics the glazed look of the ceramic piece in the photo. -
Final cure:
Let the first coat dry according to your product’s instructions, then add a second coat for extra durability and shine, ensuring the jewelry won’t scratch the clay surface.
Troubleshooting: Cracking Fingers
If hairline cracks appear where the fingers meet the palm while drying, mix a tiny bit of wet clay into a paste (slip) and fill the crack immediately, smoothing it over with a damp finger.
Place this on your bedside table or vanity to keep your daily treasures safe and stylishly displayed


What Really Happens Inside the Kiln
Learn how time and temperature work together inside the kiln to transform clay into durable ceramic.
Crescent Moon Earring Catchall
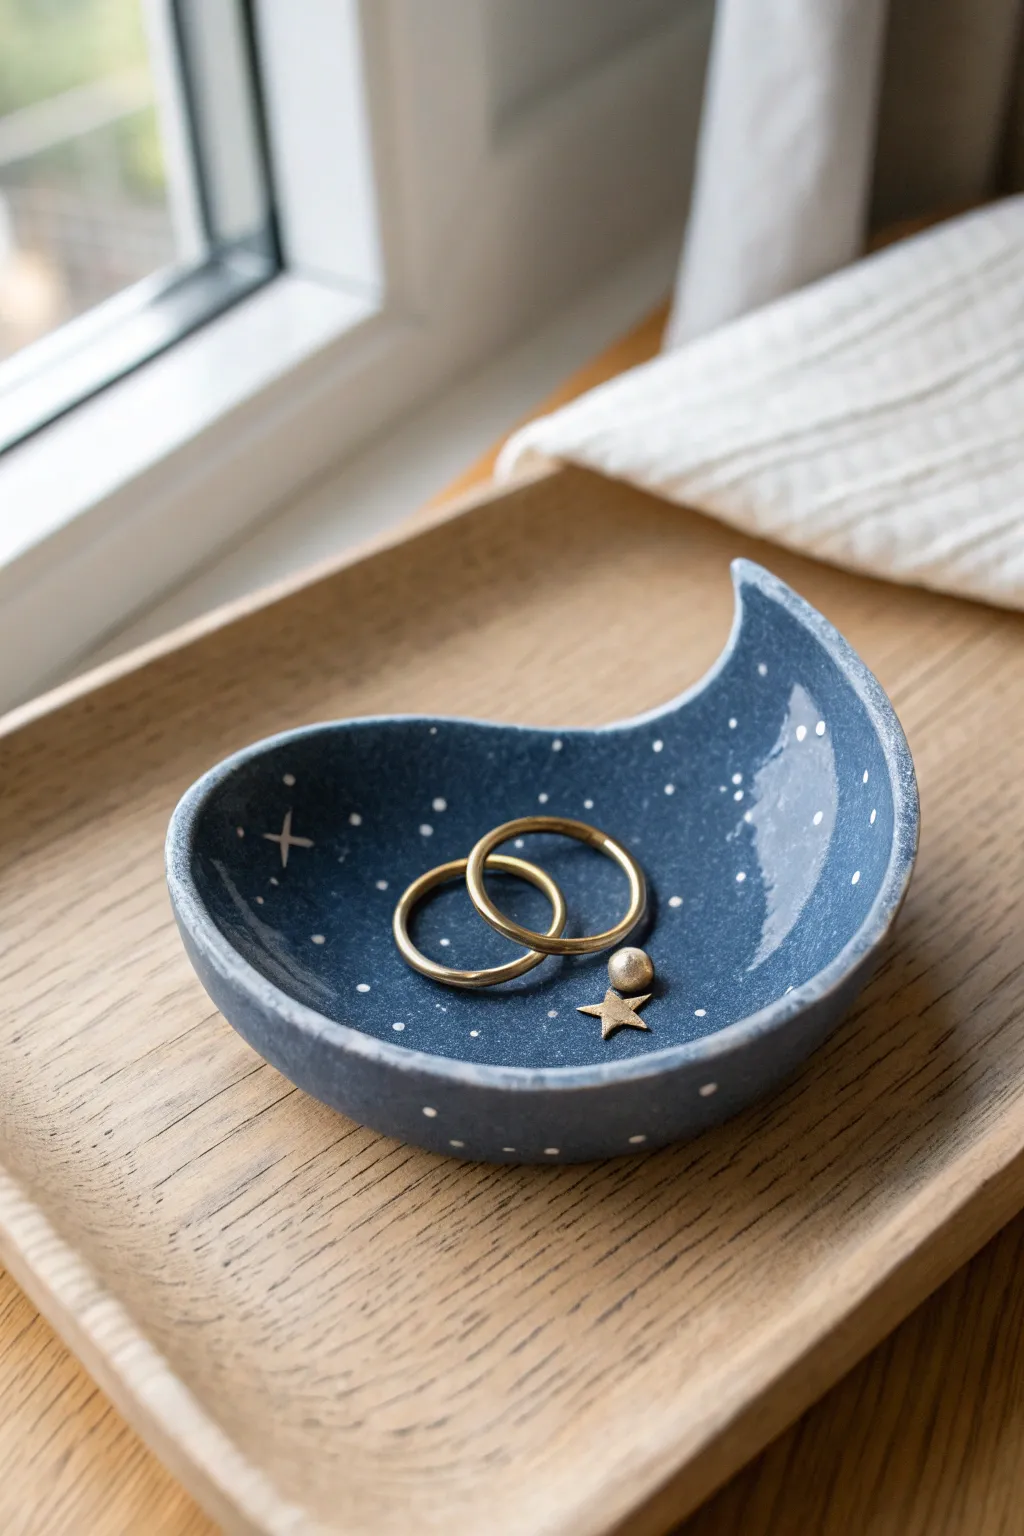
Capture the magic of the night sky with this charming crescent moon catchall. Painted in a deep, dreamy blue and speckled with tiny white stars, it’s the perfect resting place for your favorite rings and studs.
Detailed Instructions
Materials
- Air-dry clay or polymer clay
- Rolling pin
- Circle cookie cutter (approx. 4-5 inches) or a bowl to trace
- Small circle cutter (approx. 2-3 inches)
- Craft knife or clay modeling tool
- Sandpaper (fine grit)
- Acrylic paint: Deep periwinkle blue, Titanium white
- Small paintbrush
- Tiny detail brush or toothpick for stars
- Glossy varnish or sealant
- Bowl of water (for smoothing)
- Sponge
Step 1: Shaping the Moon
-
Prepare the clay:
Begin by conditioning your clay. Knead a ball of clay in your hands until it becomes soft, pliable, and free of cracks. -
Roll it out:
On a clean, flat surface, roll the clay out to an even thickness of about 1/4 inch. If you are using air-dry clay, turning it over occasionally ensures it doesn’t stick to your work surface. -
Cut the base outer circle:
Use your large circle cookie cutter or trace around a small bowl to cut out a perfect circle from your clay slab. -
Create the crescent shape:
Take the smaller circle cutter and position it off-center over your clay circle to “bite” out a section, leaving behind a crescent moon shape. Adjust the position until you are happy with the thickness of the moon’s body before cutting. -
Smooth the edges:
Dip your finger in a little water (for air-dry clay) or baby oil (for polymer) and gently run it along the cut edges. You want to round them off so they aren’t sharp or jagged. -
Form the curve:
Here comes the forming part. Gently lift the edges of the crescent upwards to create a shallow bowl shape. Use your thumbs to press the center down slightly while curling the tips of the moon upward. -
Refine the shape:
Check the symmetry. The tips of the moon should curve up gracefully. I like to smooth the interior curve specifically so small earrings won’t get stuck in a crevice. -
Dry or bake:
If using air-dry clay, let it dry for 24-48 hours. If using polymer clay, bake according to the package instructions (usually 275°F/135°C for 15-30 mins per 1/4 inch).
Paint Peeling?
If your acrylic paint scratches off easily, the clay might have been too dusty after sanding. Wipe the cured piece with a damp cloth or rubbing alcohol before painting to ensure a strong bond.
Step 2: Painting the Night Sky
-
Sand for smoothness:
Once fully cured and cooled, use fine-grit sandpaper to gently buff away any fingerprints or rough spots on the rim. -
Base coat application:
Apply a coat of deep periwinkle or denim blue acrylic paint to the entire surface, inside and out. Let this layer dry completely. -
Second coat:
Add a second coat of blue to ensure opaque, rich coverage. The texture of the clay might naturally create a slightly stone-like look, which adds character. -
Flicking the stars:
To create the smallest stars, dip a stiff brush or a toothbrush into white paint. Run your thumb across the bristles to flick tiny specks of paint onto the blue surface. Test on a paper towel first to control the splatter size. -
Painting larger stars:
Use a very fine detail brush or the tip of a toothpick dipped in white paint. Dot random larger stars specifically on the interior curve. -
Adding the North Star:
Select one spot on the interior wall to paint a four-point cross star for a focal point. Keep the lines thin and delicate. -
Seal and finish:
Once the paint is bone dry, apply a coat of glossy varnish. This not only protects the paint from scratches but gives the piece a ceramic, glazed appearance.
Make it Luxe
Swap the white paint for metallic gold leaf or liquid gold gilding paint for the star accents. This adds an elegant shimmer that looks beautiful against dark blue and matches gold jewelry perfectly.
Place your new celestial dish near a window to let the natural light catch that glossy finish
Butterfly Wing Ring and Earring Dish
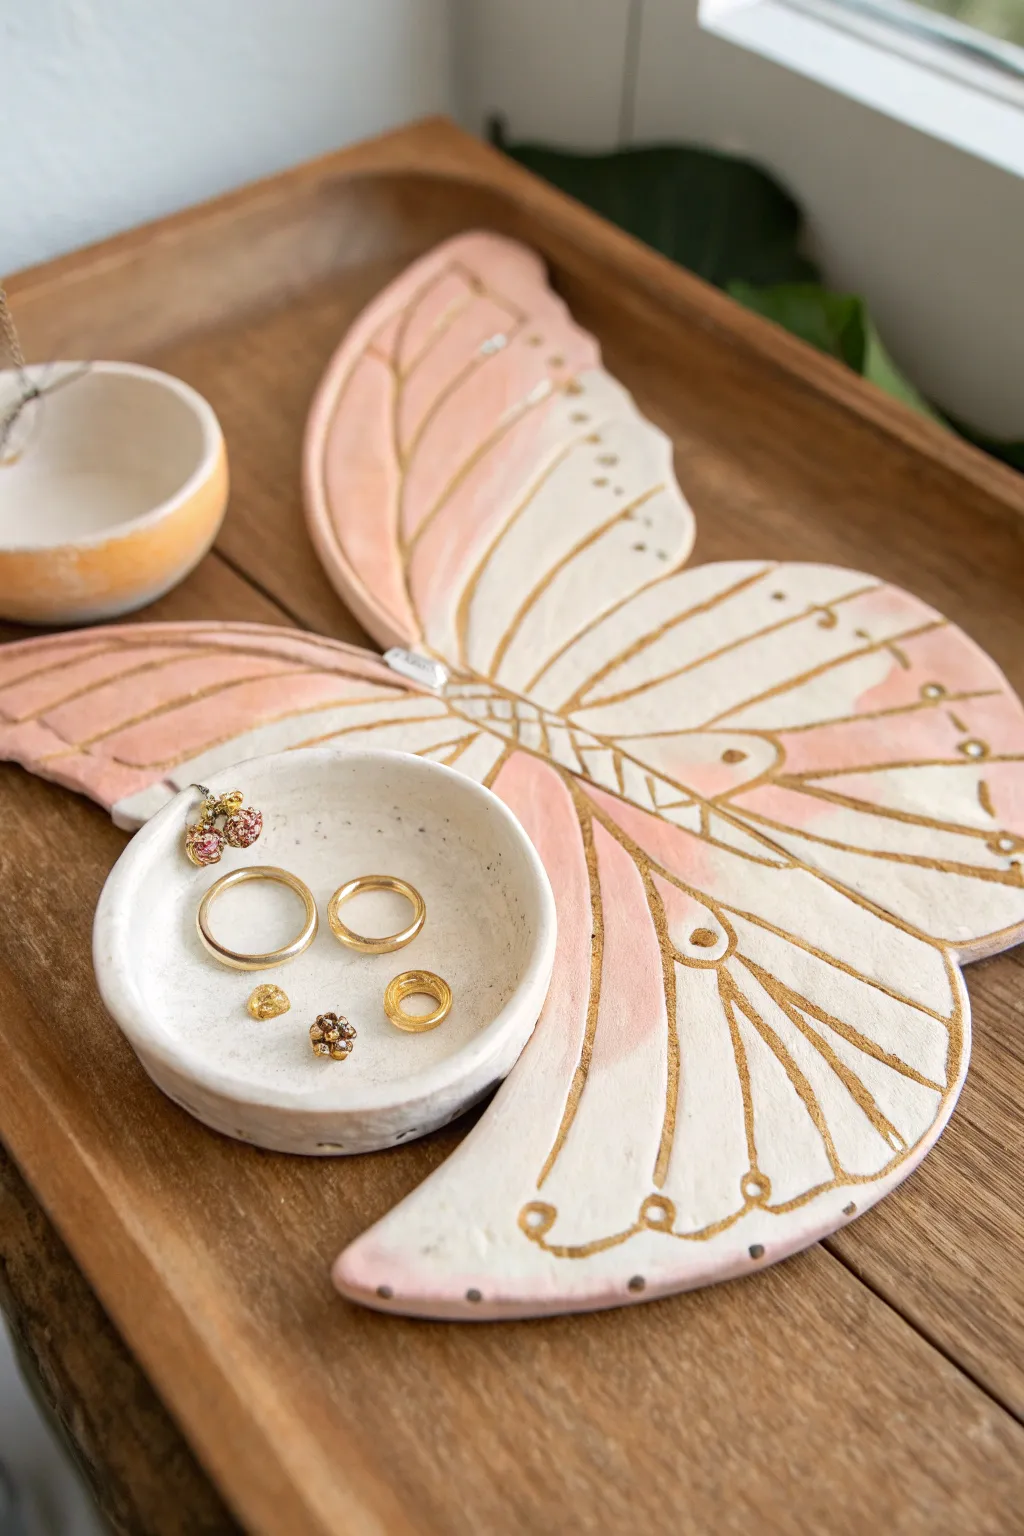
Transform simple clay into an enchanting butterfly-shaped organizer that’s perfect for corralling your smaller treasures. With its soft blush tones and gilded accents, this piece combines sculptural elegance with everyday functionality.
Step-by-Step Tutorial
Materials
- White air-dry clay or polymer clay
- Rolling pin
- Butterfly wing template (printed or hand-drawn)
- Small bowls (for shaping)
- Craft knife or scalpel
- Small circular cookie cutter or bottle cap
- Modeling tools or a spoon
- Water in a small cup
- Sandpaper (fine grit)
- Acrylic paints: Blush pink, White
- Gold paint or gold leaf pen
- Detail brushes
- Clear sealant or gloss varnish
Step 1: Shaping the Base
-
Prepare the Clay:
Begin by kneading a large ball of white clay until it is warm, soft, and pliable. Roll it out on a smooth surface to an even thickness of about 1/4 inch. If the clay sticks, dust your surface lightly with cornstarch. -
Cut the Shape:
Place your butterfly wing template onto the rolled slab. Using a sharp craft knife, carefully trace around the perimeter to cut out the full butterfly shape. Don’t worry about perfect edges just yet; we can smooth those later. -
Smooth the Edges:
Dip your finger in a little water and run it along the cut edges of the wings to remove any sharpness or burrs, creating a soft, rounded finish. -
Create the Bowls:
Roll two smaller balls of clay for the dishes. Flatten them slightly and then gently press your thumb into the center to hollow them out, pinching the sides up to form shallow walls. -
Refine the Bowls:
Use a small circular cutter or the rim of a bottle cap to trim the tops of your small bowls if you want a perfectly uniform rim, but a slightly organic, hand-pinched look works beautifully here too.
Step 2: Assembly and Detail
-
Attach the Bowls:
Score the bottom of one small bowl and a spot on the butterfly wing where you want it to sit. Add a dab of water (or slip) to the scored areas and press the bowl firmly onto the wing. Repeat for the second bowl if desired, or leave one side flat. -
Blend the Seams:
Use a modeling tool to blend the clay from the base of the bowl onto the wing so they look like one seamless piece. Smooth the join with a damp finger. -
Add Surface Texture:
Using a needle tool or a dull pencil, very lightly sketch the interior lines of the butterfly wings into the wet clay. You don’t want to cut through, just create shallow grooves that will guide your painting later. -
Dry the Piece:
To give the wings a slight fluttery lift rather than lying perfectly flat, place loosely crumpled paper towels or angled cardboard under the wing tips. Let the piece dry completely according to package instructions—usually 24 to 48 hours. -
Sand for Smoothness:
Once fully dry and hard, take your fine-grit sandpaper and gently buff the edges, the rims of the bowls, and any surface bumps to ensure a professional finish. Wipe away the dust with a barely damp cloth.
Use Slip for Strength
Make ‘slip’ by mixing clay scraps with water until paste-like. Use this glue to attach the bowls securely so they don’t pop off later.
Step 3: Painting and Finishing
-
Base Coat:
Paint the entire surface with a coat of white acrylic paint to seal the clay and provide a bright background. Let this dry completely before moving on. -
Apply Blush Tones:
Mix a watery wash of blush pink paint. Apply this selectively to sections of the wings, blending it out toward the white areas to create a soft, watercolor-like gradient. -
Gild the Details:
Dip a fine detail brush into gold paint. Carefully trace the indented lines you carved earlier, outlining the wing segments and the central body of the butterfly. -
Add Accents:
Add small gold dots along the outer edges of the wings for extra sparkle. Paint the rim of the attached bowl in gold to tie the elements together. -
Seal the piece:
Protect your work by applying a final coat of clear gloss varnish or sealant. This makes the dish durable and gives the ceramic a beautiful, finished sheen.
Prevent Cupping
If the wing edges curl up too much while drying, weigh the center down gently with a small bag of rice to keep the main body flat.
Now you have a delicate resting place for your favorite rings that doubles as a piece of art

TRACK YOUR CERAMIC JOURNEY
Capture glaze tests, firing details, and creative progress—all in one simple printable. Make your projects easier to repeat and improve.
Two-Tier Clay Jewelry Stand
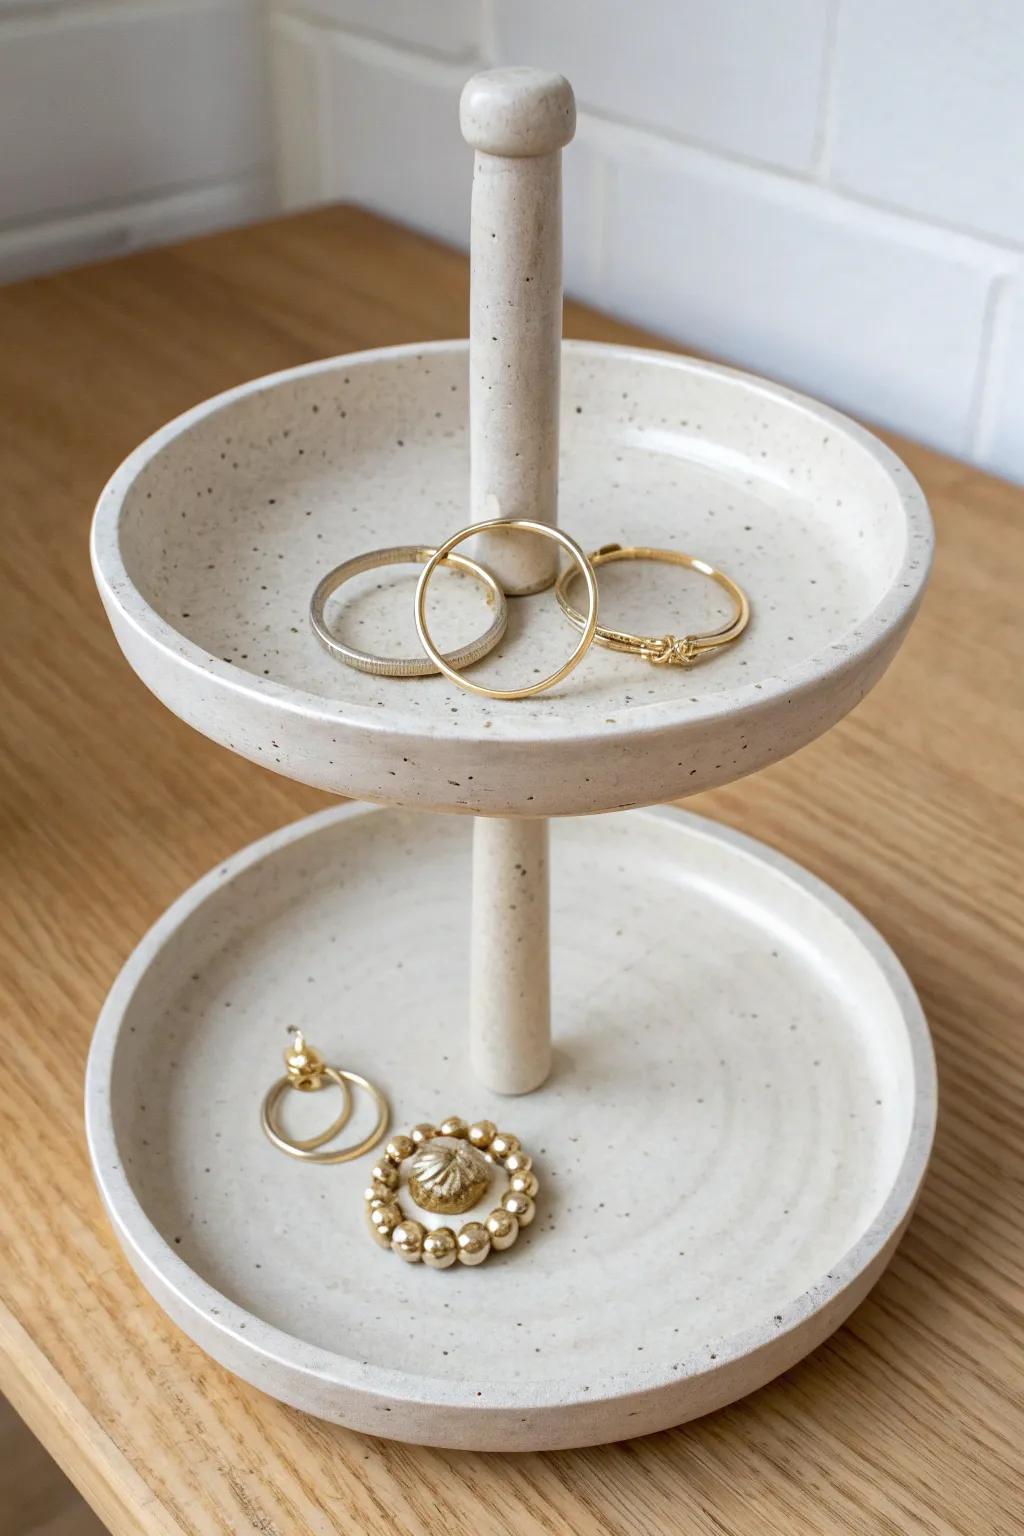
Elevate your vanity with this minimalist two-tier jewelry stand that perfectly mimics the look of high-end speckled stoneware. This functional sculpture features two shallow dishes connected by a sturdy central column, offering a stylish home for your favorite rings and studs.
Step-by-Step Guide
Materials
- Speckled polymer clay (like ‘Granite’ or ‘Sand’)
- Rolling pin or pasta machine
- Two round cutters or bowls (one approx. 4 inches, one approx. 5 inches)
- Wooden dowel (approx. 1/2 inch diameter)
- Craft knife or clay blade
- Liquid polymer clay (Bake & Bond)
- Sandpaper (various grits)
- Oven thermometer
- Aluminum foil
- Baking tile or glossy ceramic tile
Step 1: Creating the Dishes
-
Condition the Clay:
Start by warming up your speckled polymer clay in your hands until it’s pliable and smooth, ensuring there are no air bubbles trapped inside. -
Roll the Slabs:
Roll out two sheets of clay to a thickness of about 1/4 inch (6mm). Using guides or a pasta machine ensures they are perfectly even, which is crucial for a balanced stand. -
Cut the Circles:
Using your larger cutter or a bowl as a template, cut out the base circle. Repeat this process with the smaller cutter for the top tier. -
Form the Rims:
Gently curve the edges of both circles upward to creating a shallow lip. I find using the pad of my thumb to smooth the transition between the base and the rim works best to avoid harsh crease lines. -
Create Center Holes:
Use your wooden dowel to punch a hole directly in the center of both the large and small dish. Keep the cutout from the larger dish; discard the one from the smaller dish. -
Smooth the Edges:
Dip your finger in a tiny bit of water or baby oil and run it along the cut edges of your dishes to refine them before baking.
Step 2: Building the Structure
-
Prep the Central Post:
Roll a snake of clay that is slightly thicker than your wooden dowel. You will need enough length for the distance between tiers plus the top handle. -
Cover the Dowel:
Insert the wooden dowel into the clay snake to act as an armature, or simpler yet, wrap a sheet of clay around the dowel and smooth the seam completely so it looks like a solid cylinder. -
Cut Post Sections:
Cut your clay-covered dowel into two pieces: a longer bottom section (about 3-4 inches) and a shorter top section (about 2 inches). Ensure the cuts are perfectly straight so the structure stands vertical. -
Form the Top Knob:
Roll a small ball of clay and attach it to the top end of the shorter dowel section, blending the clay downward to create a seamless rounded cap. -
First Bake:
Bake the two dishes and the two post sections separately according to your clay package’s instructions. Support the curved rims of the dishes with crumpled aluminum foil so they don’t slump in the heat.
Straighten Up
Is your tower leaning? Before the final bake, prop the structure against a square object (like a baking tin) inside the oven to keep the central post perfectly vertical while it cures.
Step 3: Assembly and Finish
-
Check the Fit:
Once cool, test the assembly. The bottom post should sit on your work surface, the large dish slides down over it (if the hole is tight, sand it slightly), then the top post sits on the large dish, and the small dish sits on top of that. -
Join the Base:
Apply a generous amount of liquid polymer clay to the bottom of the long post. Center it on the large dish (or insert it if designed to go through) and press firmly. -
Attach the Top Tier:
Apply liquid clay to the top of the bottom post. Place the small dish on top. Then, apply liquid clay to the bottom of the short top post and center it inside the small dish. -
Reinforce Seams:
For extra stability, roll very thin snakes of clay and wrap them around the connection points where the posts meet the dishes. Blend these seamlessly with a sculpting tool. -
Final Cure:
Bake the entire assembled structure again. Using an oven thermometer is key here to ensure a strong bond without scorching the light-colored clay. -
Sand and Polish:
After the piece is fully cooled, use wet/dry sandpaper to smooth any rough fingerprints or sharp edges on the rims. A light buffing with a denim cloth gives it that soft sheen seen in the photo.
Make it Glossy
To mimic a glazed ceramic look, coat the finished piece with a thin layer of UV resin or polyurethane gloss varnish. This adds durability and a true pottery-like shine.
Place your new tiered stand on your dresser and enjoy the elegant organization it brings to your daily routine.
Wall-Mounted Clay Peg Jewelry Holder
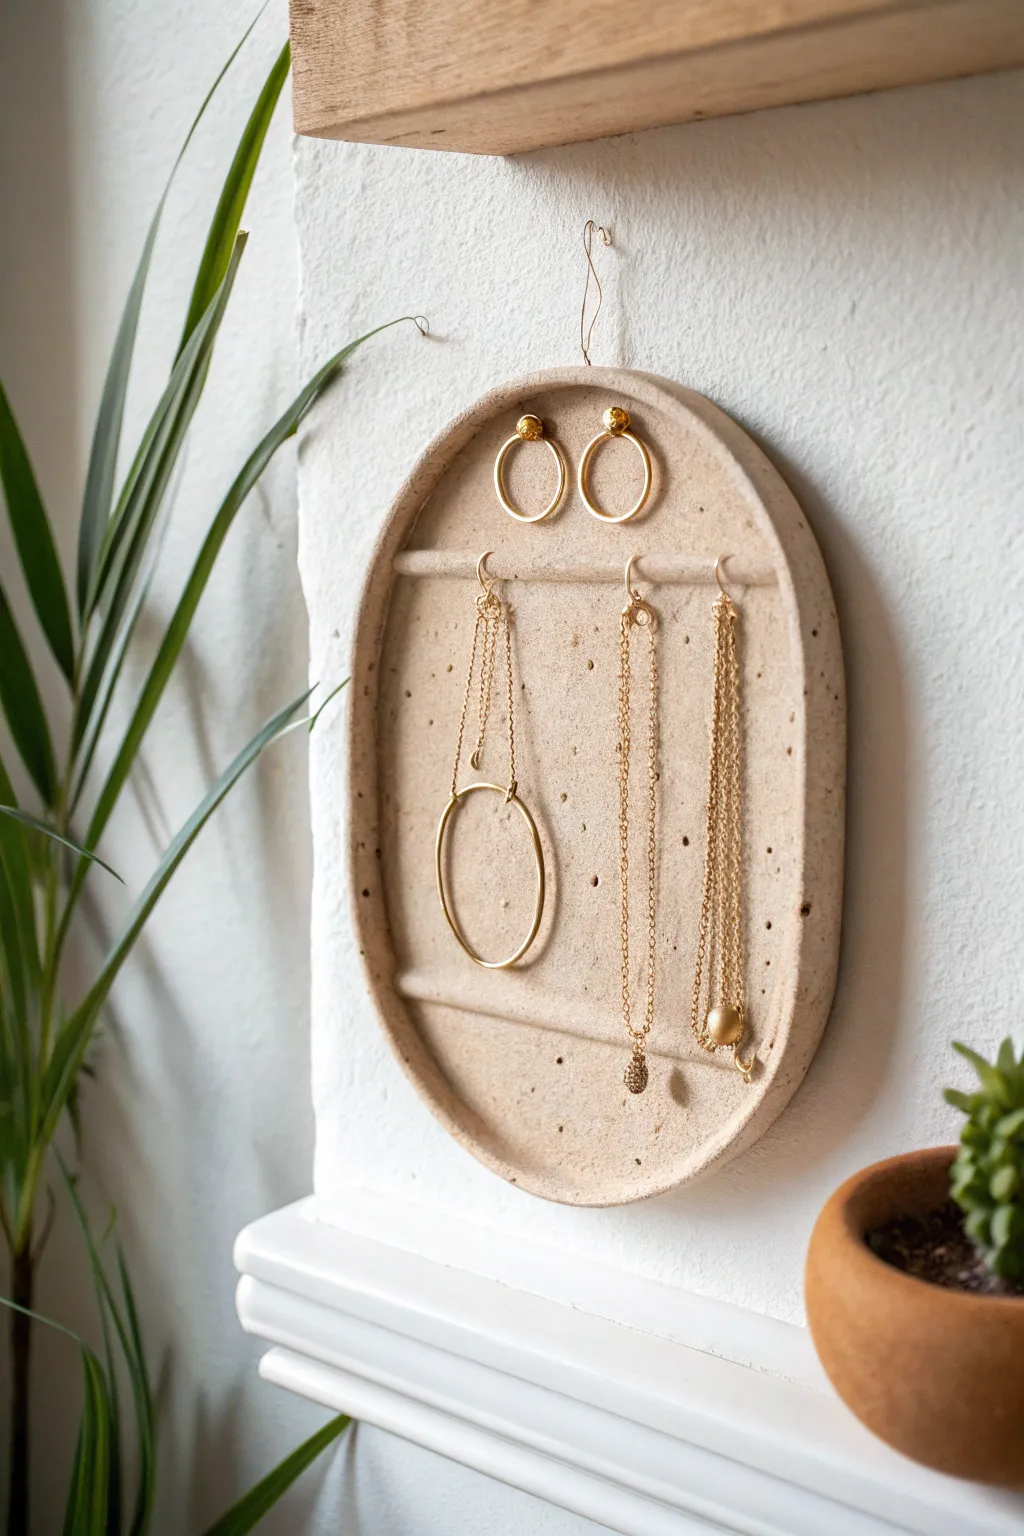
This minimalist wall-mounted jewelry holder combines functionality with organic charm, featuring a speckled stone effect and simple horizontal bars for hanging necklaces. Its oval shape and natural beige tone make it a perfect neutral backdrop for displaying your favorite gold accessories.
Detailed Instructions
Materials
- Air-dry clay (white or cream)
- Speckled clay additive (or coffee grounds/sand/black pepper for faux effect)
- Rolling pin
- Parchment paper or canvas mat
- Craft knife or clay cutter
- Oval paper template
- Two thin wooden dowels (approx. 3-4mm diameter)
- Slip (clay mixed with water)
- Needle tool or toothpick
- Sandpaper (fine grit)
- Matte spray sealant
- Strong craft glue or E6000
- Wire or twine for hanging
Step 1: Preparing the Base
-
Prepare the Clay:
Start by conditioning your air-dry clay. If you are using plain clay and want that speckled look shown in the photo, knead in a small amount of coffee grounds, coarse sand, or cracked black pepper until evenly distributed. -
Roll the Slab:
Roll out the clay on a piece of parchment paper to an even thickness of about 1/4 inch. Ensure the surface is smooth and free of air bubbles. -
Cut the Shape:
Place your oval paper template onto the clay. Trace around it carefully with a craft knife or needle tool to cut out the main body of the holder. Smooth the cut edges with a damp finger to remove any sharpness. -
Create the Rim:
Roll a long, thin snake of clay. Score the outer edge of your oval base and apply a little water or slip. Press the coil along the perimeter to create a raised rim, blending the clay together on the inside seam so it looks seamless.
Cracking Bars?
If the horizontal bars crack while drying, fill the gaps with a paste made of fresh clay and water, then let dry again. Sand smooth.
Step 2: Adding Bars and Details
-
Measure Bar Placement:
Decide where you want your two horizontal hanging bars. Mark the positions lightly on the inside of the rim on both sides. -
Cut the Clay Bars:
Roll two small cylinders of clay that are just slightly longer than the width of the oval at your marked points. You can smooth these slightly to look uniform. -
Attach the Bars:
Score the ends of the clay bars and the corresponding spots on the inner rim. Apply slip and press the bars firmly into place. I like to use a specialized sculpting tool or just a toothpick to blend the clay at the join points for extra strength. -
Create Stud Holes:
Use your needle tool or a small drinking straw to poke two holes near the top of the oval—this is perfect for holding stud earrings like the hoops shown. -
Add Necklace Holes:
For the hanging necklaces, create small holes along the bottom section of the oval backplate. Pierce the clay completely, twisting the tool gently to keep the hole clean. -
Poke Top Hanging Hole:
Make one final hole at the very top center of the rim. This will be used for the wire or twine to hang the finished piece on the wall.
Natural Speckles
Use dried tea leaves instead of pepper for a softer, earthier speckle that mimics expensive stoneware clay.
Step 3: Finishing Touches
-
Initial Drying:
Let the piece dry flat in a cool, dry place. To prevent warping, place a piece of parchment paper on top and weigh it down with a light book for the first few hours. -
Full Cure:
Remove the weight and allow the clay to dry completely for 24-48 hours. It should turn a lighter color and feel hard to the touch. -
Sanding:
Once fully dry, take your fine-grit sandpaper and gently sand any rough spots, particularly around the rim and the holes you poked. -
Seal the piece:
In a well-ventilated area, spray the entire holder with a matte sealant. This protects the clay from moisture and gives it a finished look without making it too glossy. -
Add Suspension Wire:
Cut a short length of gold wire or rustic twine. Thread it through the top hole and twist or tie it securely to create a loop.
Hang your new organizer near your vanity and enjoy easy access to your untangled jewelry.
Tiny Bathtub Ring Tub
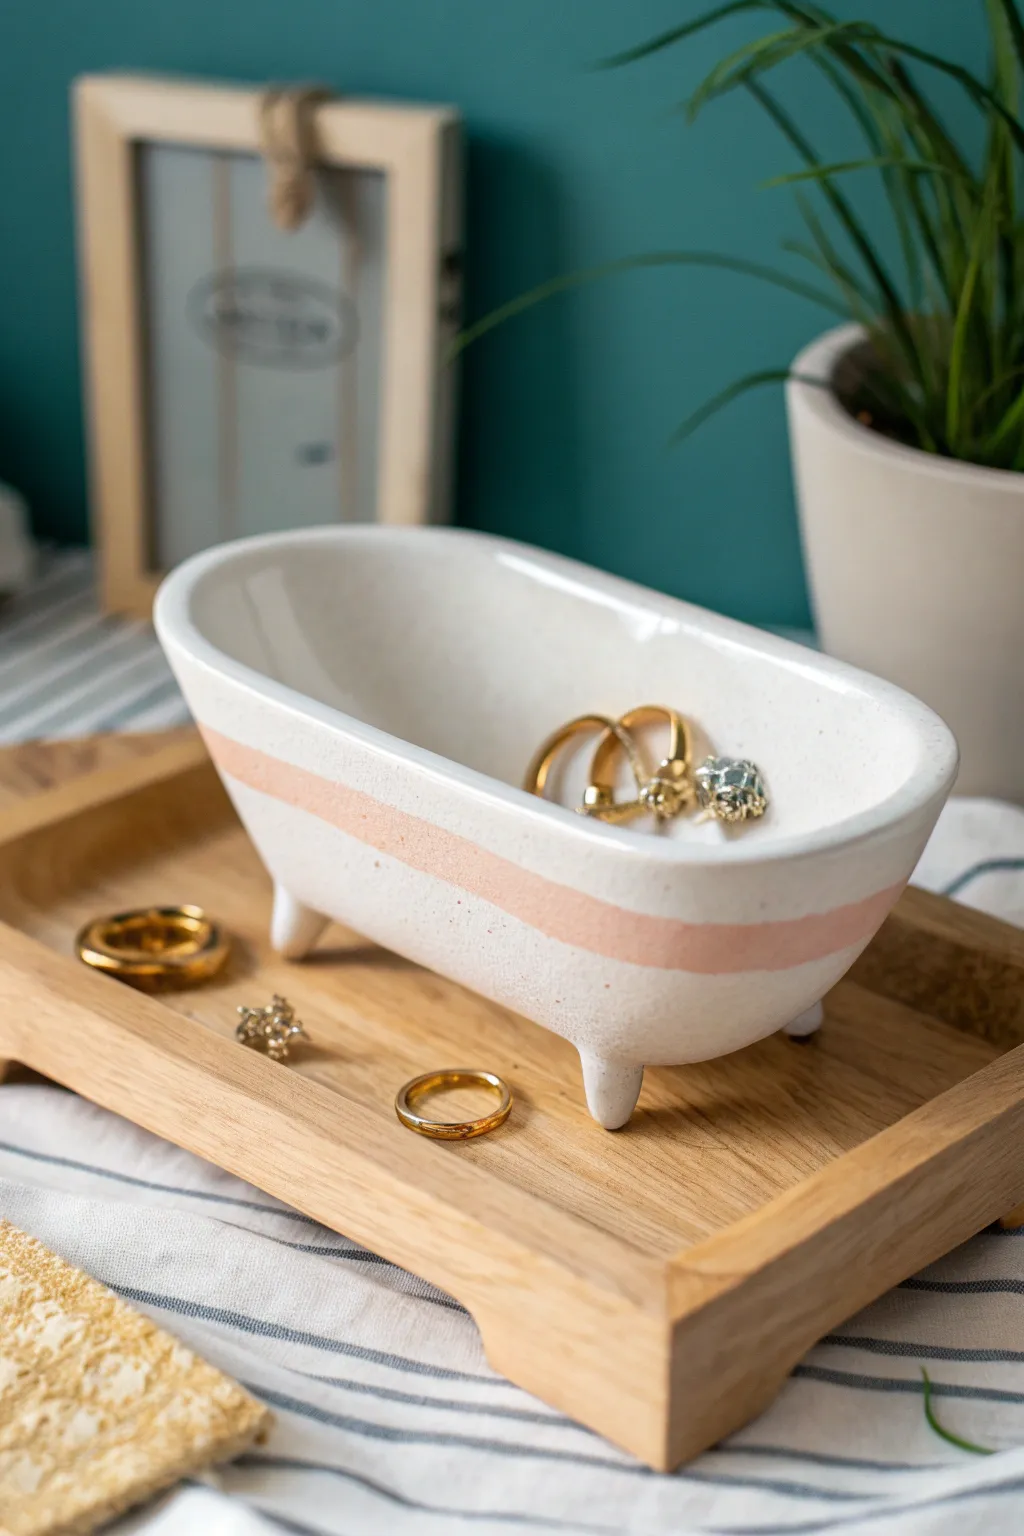
This adorable bathtub-shaped ring holder adds a touch of whimsical spa day charm to your vanity. With its clean white finish and delicate pink accent stripe, it is the perfect spot to act as a catch-all for your favorite jewelry pieces.
Step-by-Step Guide
Materials
- White polymer clay (approx. 2oz block)
- Pastel pink acrylic paint
- Gloss glaze or polyurethane varnish
- Clay rolling pin or acrylic roller
- Craft knife or clay blade
- Small ball stylus or blending tool
- Masking tape or painter’s tape
- Fine grit sandpaper (400-600 grit)
- Small flat paintbrush
- Oven for baking
Step 1: Sculpting the tub shape
-
Condition the clay:
Start by warming the white polymer clay in your hands, kneading it thoroughly until it is soft, pliable, and free of cracks. -
Create the base slab:
Roll out a portion of the clay to about 1/4 inch thickness. Use your craft knife to cut a long oval shape, roughly 3 inches long by 1.5 inches wide, to serve as the bottom of the tub. -
Form the tub walls:
Roll a long, even snake of clay, then flatten it into a long strip about 1.5 inches tall. This strip needs to be long enough to wrap around the entire perimeter of your oval base. -
Attach the walls:
Wrap the strip around the oval base. Gently press the seam where the wall meets the floor on the *inside* of the tub to join them. Smooth this seam completely with a ball stylus or your finger so it becomes one solid piece. -
Join and flare:
Join the two ends of the wall strip at one end of the oval, smoothing vertical seams on both the inside and outside. Gently flare the top rim outward slightly to mimic the rolled edge of a vintage bathtub. -
Add the feet:
Roll four small, equal-sized balls of clay. Slightly taper them into cone shapes. Attach these to the underside of the tub base, positioning two at the front and two at the back for stability. -
Check balance:
Set the tub down on a flat surface to ensure it stands level. If it wobbles, gently press down on the higher corners until all four feet touch the ground evenly.
Wobbly Tub?
If the tub sags during baking, support the walls by lightly stuffing the inside with polyester batting or crumpled tissue paper to hold the shape.
Step 2: Refining and Baking
-
Smooth the surface:
Dip your finger in a tiny bit of water (or baby oil) and run it over the entire surface to smooth out fingerprints and slight imperfections. -
Bake the clay:
Place your tub on a baking sheet lined with parchment paper. Bake according to your clay package instructions (usually 275°F for 15-20 minutes depending on thickness). -
Cool down:
Let the piece cool completely in the oven or on a wire rack before handling. It will be fragile while hot. -
Sand imperfections:
I prefer to lightly wet-sand the cured piece with fine-grit sandpaper to get that porcelain-smooth finish, focusing on the rim and the feet.
Step 3: Painting and Finishing
-
Prepare for the stripe:
Once the sanding dust is wiped away and the piece is dry, apply two strips of masking tape around the exterior of the tub, leaving a gap of about 1/4 inch between them where the pink stripe will go. -
Paint the accent:
Using a small flat brush, paint the exposed clay between the tape lines with pastel pink acrylic paint. Dab the paint on rather than dragging the brush to prevent bleeding under the tape. -
Remove tape:
Peel off the tape carefully while the paint is still slightly tacky to ensure a crisp, clean line. -
Dry and seal:
Allow the paint to dry completely. Finally, coat the entire tub (inside and out) with a high-gloss glaze to give it that shiny, ceramic-like bathtub appearance.
Make it Luxe
Paint the four little feet with metallic gold liquid leaf paint after baking to give it a fancy, vintage claw-foot bathtub look.
Now you have a charming little vessel ready to keep your rings safe near the sink
Sardine-Tin Trinket Box for Jewelry
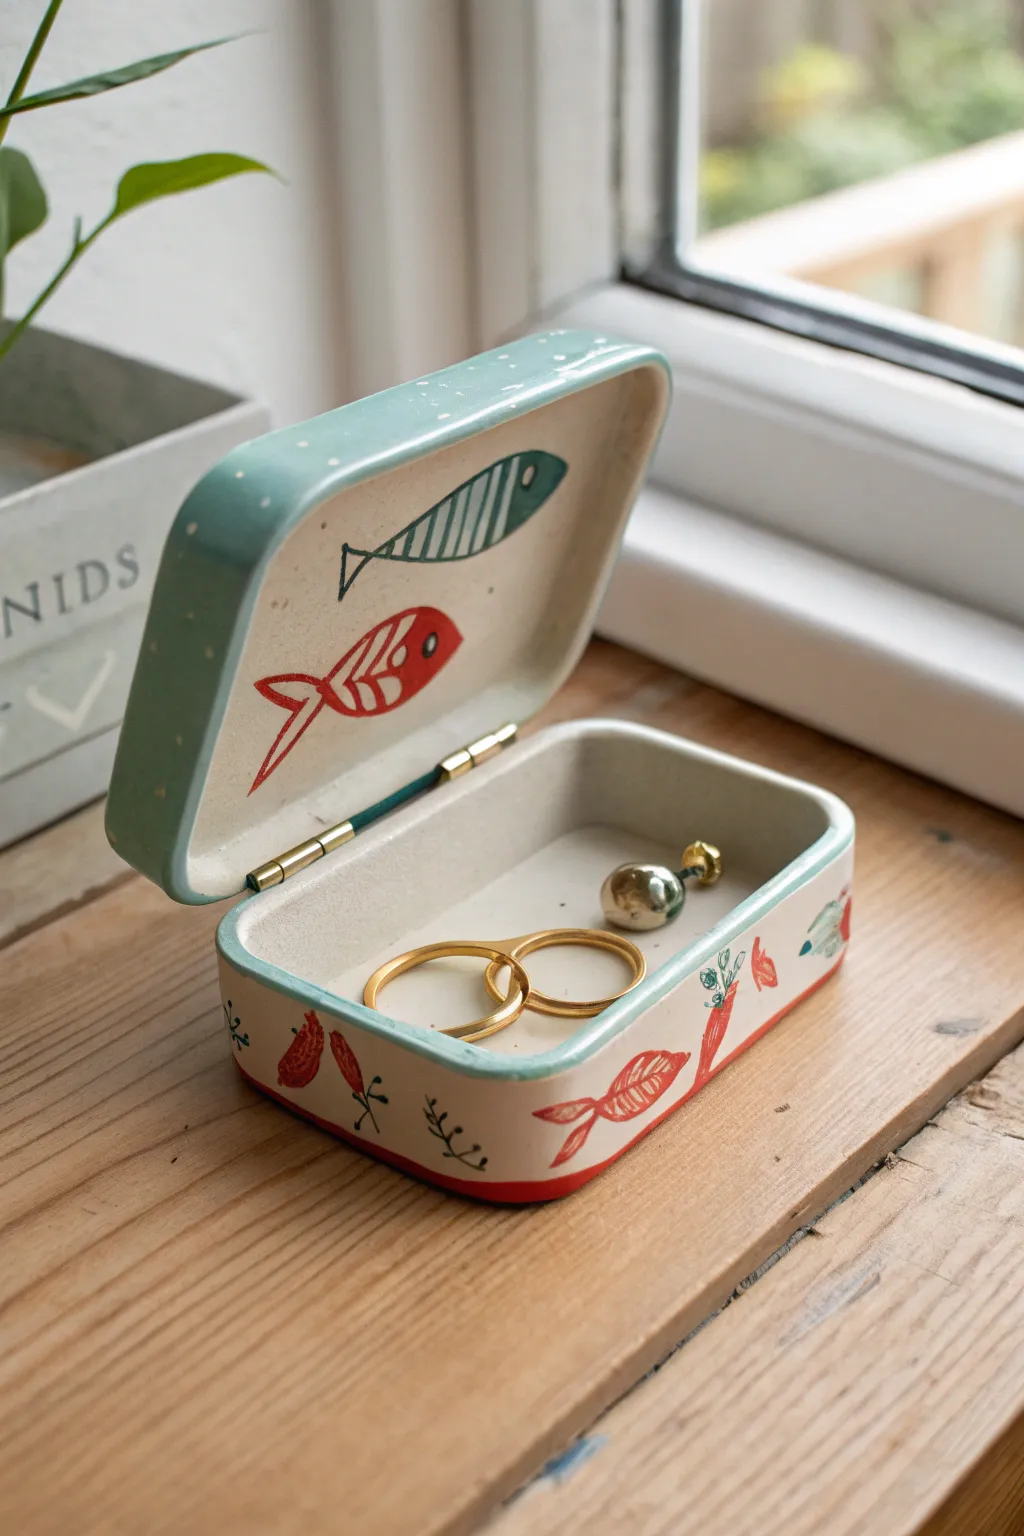
Transform humble clay into a charming, nautical-themed keepsake box inspired by vintage sardine tins. This delightful project combines slab-building techniques with folk-art style painting to create a perfect resting spot for your favorite rings and studs.
Step-by-Step Tutorial
Materials
- Air-dry clay or polymer clay (white or light beige)
- Clay roller or rolling pin
- Craft knife or scalpel
- Rectangular template (cardstock)
- Small metal hinge (approx. 1 inch)
- Super glue or E6000 adhesive
- Acrylic paints (teal blue, bright red, deep green, gold)
- Fine detail paintbrushes (sizes 0 and 2)
- Sandpaper (fine grit)
- Gloss varnish or sealant
- Water and sponge for smoothing
- Ruler
Step 1: Shaping the Tin
-
Prepare the Clay:
Begin by conditioning your clay until it is pliable and smooth. Roll it out to an even thickness of about 1/4 inch (6mm). Using depth guides or playing cards on either side of your roller helps keep the slab perfectly uniform. -
Cut the Bases:
Using a rectangular cardstock template with rounded corners (approximately 3×4 inches), cut two identical shapes from the clay slab. These will serve as the bottom of the box and the top of the lid. -
Create the Walls:
Roll out a long strip of clay, slightly thinner than the bases. Cut two strips that are about 1 inch wide for the bottom box walls, and two strips that are about 0.5 inches wide for the lid walls. Measure the perimeter of your base to ensure the length is sufficient. -
Attach the Walls:
Score the edges of the base pieces and the bottom edge of your wall strips. Apply a little water (or liquid clay if using polymer) to the scored areas. I find using a knitting needle or clay tool helps blend the seams on the inside and outside ensuring a strong bond. -
Smooth and Refine:
Once the walls are attached to both the lid and the base, use a damp sponge or finger to smooth out any seams or fingerprints. Pay special attention to the rounded corners, ensuring the walls stand upright and don’t flare out. -
Dry or Bake:
If using air-dry clay, let the pieces dry slowly for 24-48 hours away from direct heat to prevent warping. If using polymer clay, bake according to the manufacturer’s instructions.
Uneven Lid Fit?
If the lid wobbles, place a sheet of grit sandpaper on a flat table and gently rub the open rim against it in circular motions to level it perfectly.
Step 2: Painting and Decoration
-
Surface Preparation:
Once fully cured or dry, lightly sand any rough edges or uneven spots with fine-grit sandpaper. This ensures your paint glides on smoothly and the box closes neatly. -
Paint the Exterior Lid:
Paint the top and outer sides of the lid with a soft teal blue acrylic paint. You may need two coats for full opacity. Leave the inside of the lid untainted natural clay color for now. -
Add Texture Details:
Using the tip of a toothpick or a very fine brush with white paint, add tiny dots across the teal lid surface to mimic a speckled ceramic glaze or enamelware texture. -
Paint the Interior Motifs:
Inside the lid, paint two stylized fish. Paint one fish using bright red for the body with a visible spine/bone structure, and the other in a deep green with stripes. Keep the shapes simple and folk-art inspired. -
Decorate the Box Base:
On the exterior sides of the bottom box, paint small red radish or vegetable motifs and smaller red fish swimming along the bottom edge. Add small green sprigs or seaweed details between them. -
Rim Detailing:
Carefully paint the rim of the bottom box section with the same teal blue used on the lid. For the very bottom edge of the box, paint a thin red stripe to ground the design.
Step 3: Assembly and Finish
-
Seal the Piece:
Apply a coat of gloss varnish to the entire piece. This not only protects the paint but gives it that shiny, distinctively ceramic look shown in the photo. -
Position the Hinge:
Line up the lid and the base so they sit flush. Mark the position for your small metal hinge on the back of the box. A small dab of super glue holds it in place temporarily while you work. -
Secure the Hinge:
Use a strong adhesive like E6000 to permanently bond the hinge to the painted clay. Allow this to cure fully typically 24 hours before attempting to open and close the box. -
Final Touches:
Place a few rings inside to test the capacity. If the clay feels rough inside, you can glue a small piece of felt to the bottom interior for extra cushioning.
Pro Tip: Vintage Aging
Mix a tiny drop of brown paint into your varnish or glaze. This adds a subtle ‘antique’ patina that makes the tin look like a flea market find.
Now you have a delightful little treasure chest that brings a splash of seaside charm to your dresser