Ceramic wind chimes are one of my favorite ways to turn small clay pieces into something that moves, sings, and makes a space feel lived-in. Here are a bunch of ceramic wind chime ideas you can riff on, whether you love glossy glaze, earthy raw clay, or playful shapes.
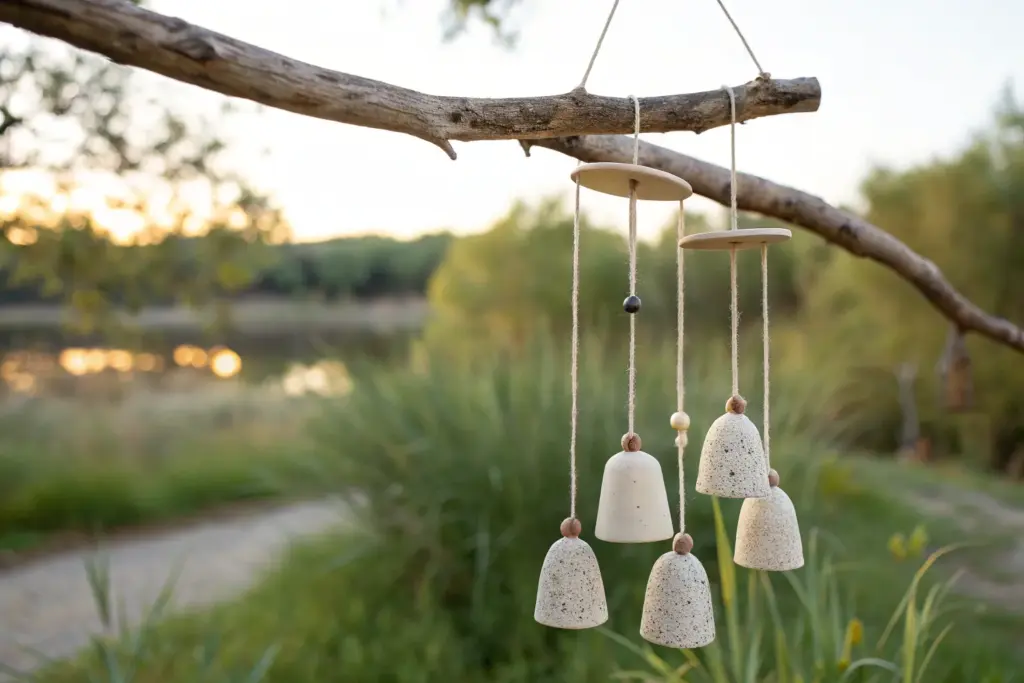
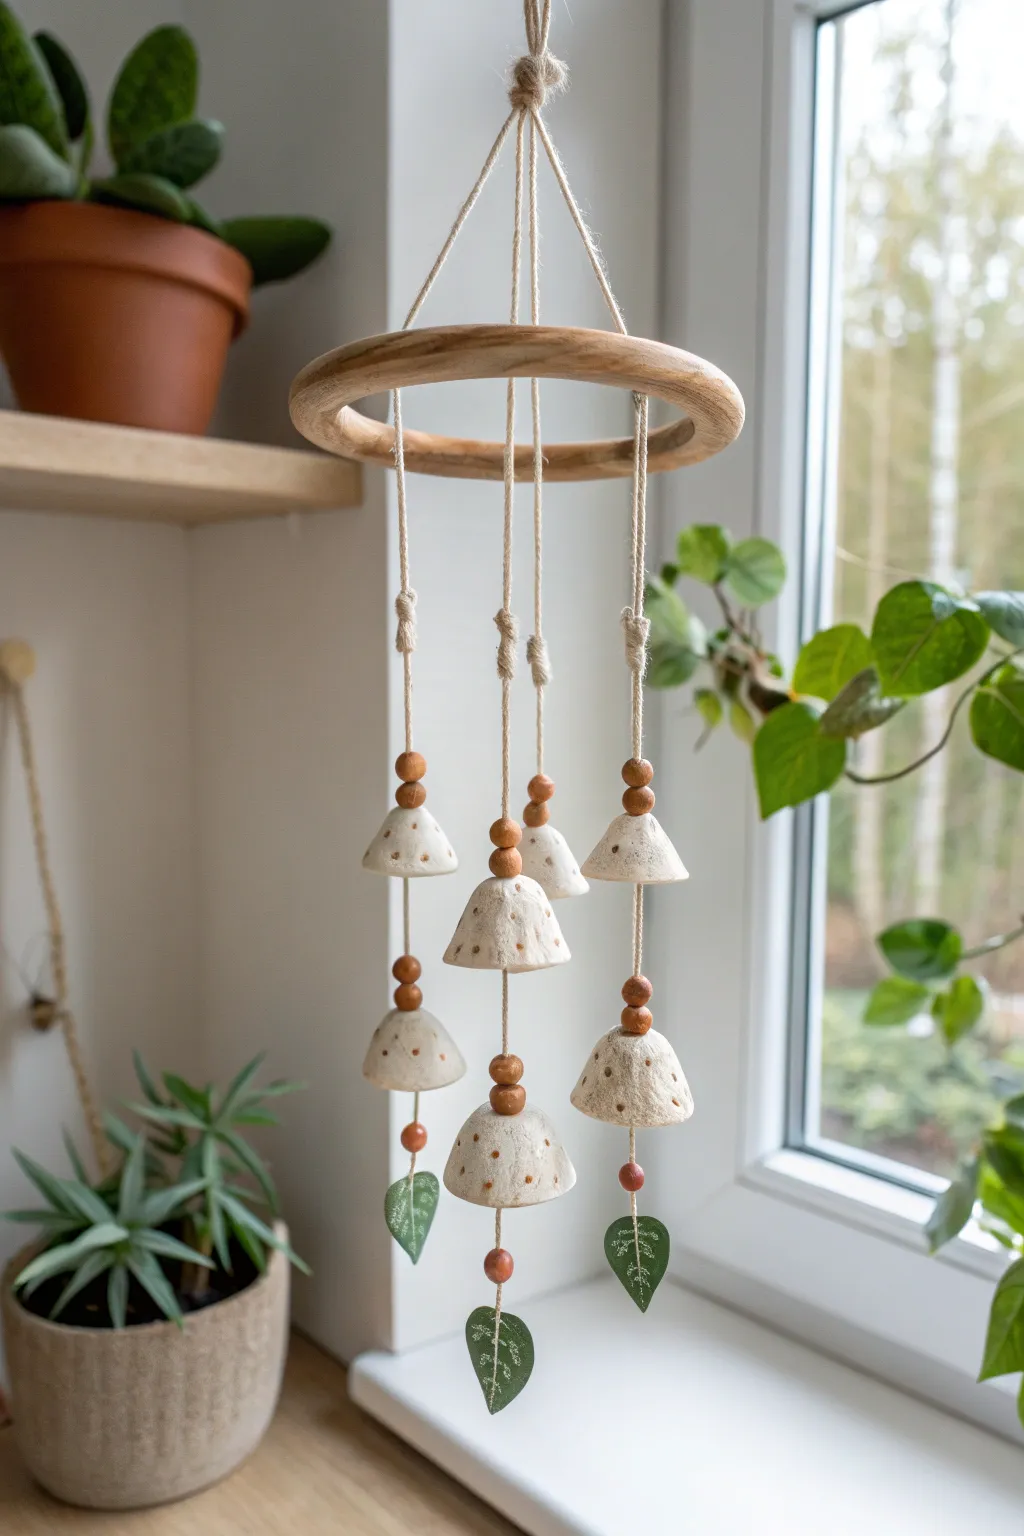
Classic Bell Cup Cluster

Bring a melodic, earthy touch to your window or porch with this elegant vertical wind chime. Featuring smooth, glazed ceramic bells in a calming palette of sage, cream, and rust, this project balances rustic textures with modern simplicity.
How-To Guide
Materials
- White earthenware clay
- Rolling pin and guide sticks (approx. 1/8 inch thick)
- Circle cookie cutters (approx. 3-4 inch diameter)
- Small hole punch tool or straw
- Pottery glazes: Glossy White, Sage Green, Rust/Terra Cotta
- Thick jute or hemp twine
- Wooden dowel or branch (approx. 1-1.5 inch diameter, 8-10 inches long)
- Wooden beads (assorted sizes)
- Kiln access (or use air-dry clay + sealant for a non-fired version)
- Fine grit sandpaper
Step 1: Shaping the Ceramic Bells
-
Roll out the slab:
Begin by rolling out your clay into a smooth, even slab. Using guide sticks helps keep the thickness consistent, which is crucial for the bells to make a clear sound. Aim for about 1/8 inch thickness so they aren’t too heavy. -
Cut the circles:
Press your circle cutters into the clay to create discs. For the look in the image, you will need about 7 or 8 bells total, so cut a few extras just in case. Varying the size slightly adds visual interest, but keeping them uniform works too. -
Form the bell shape:
Gently drape a clay circle over a small form, like a ping-pong ball or a small rounded cup mold, to create the dome shape. Alternatively, you can cut a slit from the center to the edge, overlap the cut edges to form a cone, and smooth the seam completely. -
Pierce the hanging hole:
While the clay is still leather-hard, use a small straw or hole punch tool to create a clean hole at the very apex of each bell. Ensure the hole is large enough for your twine to pass through later, accounting for slight clay shrinkage. -
Smooth the edges:
Dip your finger in water or use a damp sponge to round off the bottom rim of each bell. Sharp edges are prone to chipping, so a rounded rim is both functional and aesthetic.
Muffled Sound?
If the bells thud rather than ring, the walls might be too thick. Sand the interior walls thinner before the final firing to improve resonance.
Step 2: Firing and Glazing
-
Bisque fire:
Allow your bells to dry completely. This usually takes a few days. Once bone dry, load them into the kiln for a bisque firing to harden the clay for glazing. -
Apply the glaze:
Pour your chosen glazes into small containers. Dip each bell to coat it fully. I like to group them by color—maybe three white, two sage, and two rust. Wipe the very bottom rim clean with a sponge if you don’t use stilts, otherwise they will stick to the kiln shelf. -
Glaze fire:
Fire the bells again according to the specific temperature requirements of your glaze. Once cooled, check for any sharp burrs and sand them down if necessary with a diamond pad.
Knot Security
Add a tiny drop of clear craft glue or superglue to the center of each knot on the twine. This prevents them from slipping over time due to the weight.
Step 3: Assembly and Suspension
-
Prepare the wooden bar:
Drill small holes vertically through your wooden dowel or branch. Based on the reference, you’ll need three main strands, but the dowel is hung by a separate loop. -
Cut the suspension lines:
Cut three long lengths of heavy jute twine. The center strand should be the longest, with the two flanking strands slightly shorter for a staggered look. -
Start the first strand:
Tie a large knot at the bottom of your first piece of twine. Thread on a wooden bead, then thread on your first bell (open side down). The bead acts as the clapper and the stopper. -
Add spacing knots:
Decide where you want the next bell to sit—maintain about 3-4 inches of space. Tie a knot at that point, add a wooden bead, and slide the next bell down to rest on it. Repeat until the strand is complete. -
Attach to the bar:
Thread the top of your finished bell strand through the hole in the wooden dowel. Tie a secure knot on the top side of the wood to lock it in place. Repeat for the other two strands. -
Create the hanger:
Cut a final piece of rope for the main hanger. Tie it securely to both ends of the wooden dowel. Ensure the knot is tight and perhaps add a dab of strong glue for extra security before hanging.
Listen to the gentle clinking as your new handmade chime catches the breeze


Driftwood Waterfall Strands
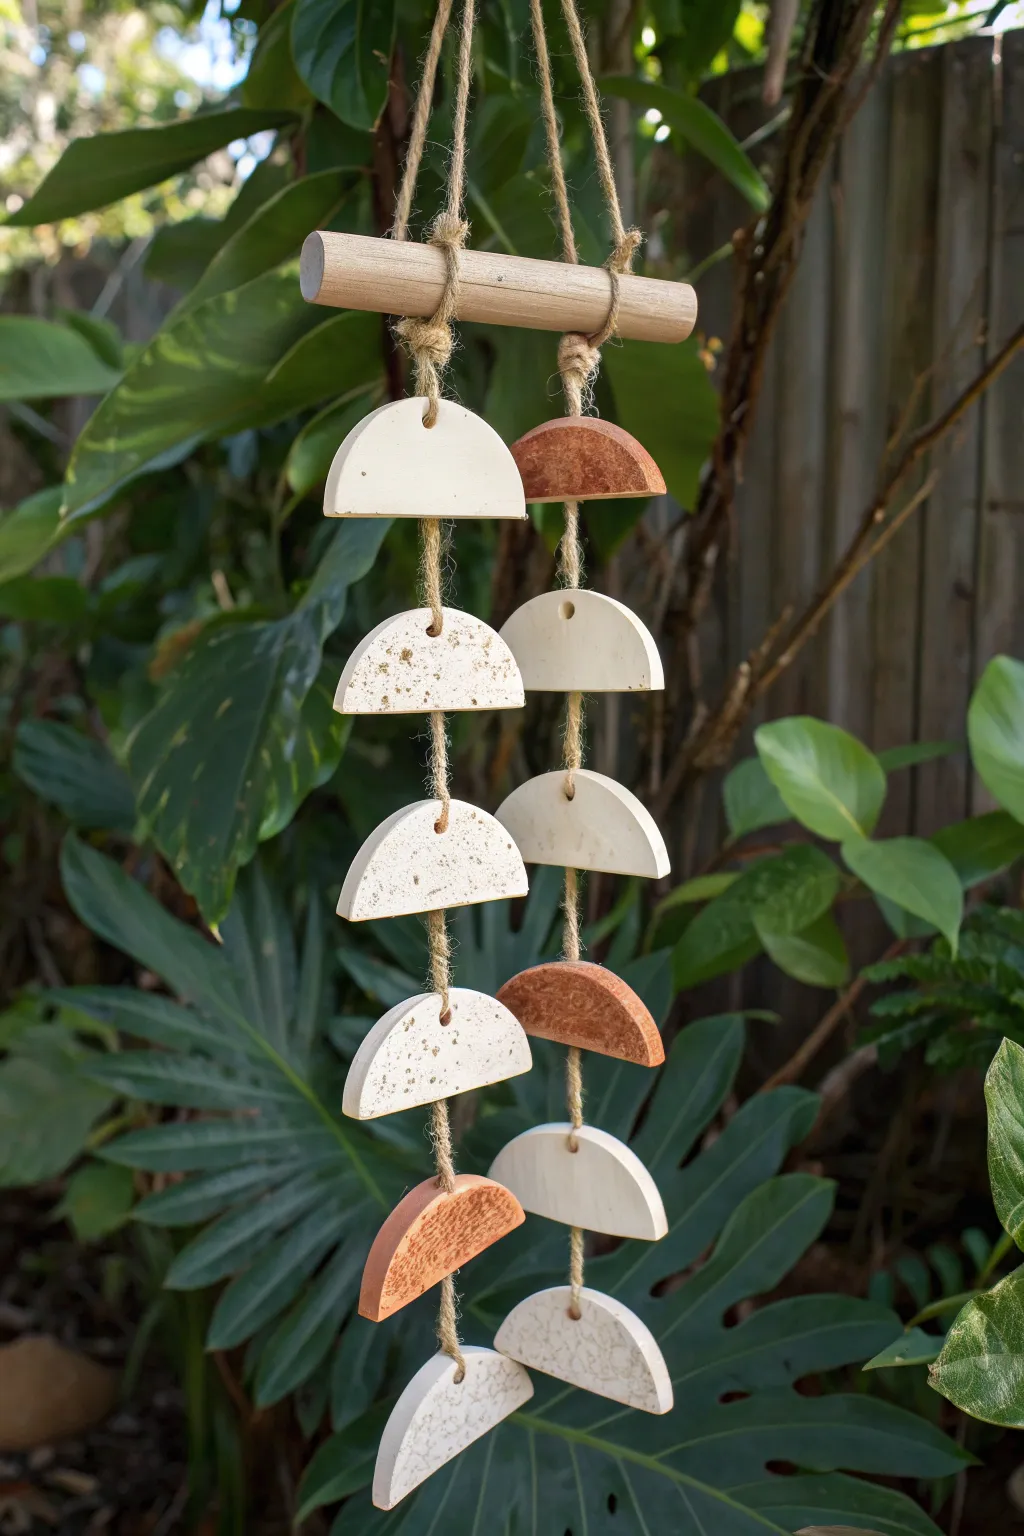
Create a calming, modern mobile using simple geometric shapes and earthy textures. This project combines smooth polymer clay or ceramic pieces in cream, speckled stone, and terracotta tones, suspended from a wooden dowel for a natural, airy aesthetic.
Step-by-Step Guide
Materials
- Polymer clay (white, terracotta, and granite/speckled types)
- Wooden dowel (approx. 6-8 inches long)
- Natural jute twine
- Rolling pin or clay machine
- Circle cookie cutters (approx. 2-3 inches diameter)
- Craft knife or tissue blade
- Dowel or straw for piercing holes
- Baking sheet and parchment paper
- Oven (for baking clay)
- Scissors
- Sandpaper (fine grit)
Step 1: Shaping the Clay Elements
-
Condition the clay:
Start by kneading each color of polymer clay separately until soft and pliable. I find warm hands work best here to get the clay ready for rolling. -
Roll out sheets:
Roll each clay color into a flat sheet about 1/4 inch thick. Aim for a consistent thickness across all sheets so your chimes have a uniform look. -
Cut circles:
Use your circle cookie cutter to punch out several rounds from each color. For the project shown, you’ll need at least three plain white, four speckled, and three terracotta circles. -
Create semicircles:
Using a sharp tissue blade or craft knife, slice each circle exactly in half to create semicircle shapes. Clean cuts are key, so wipe your blade between cuts if it gets sticky. -
Pierce holes:
While the clay is still raw, carefully poke a hole in the center of the straight edge of each semicircle using a small dowel or straw. Make sure the hole is large enough for your jute twine to pass through comfortably. -
Smooth edges:
Gently tap the cut edges with your finger to soften any sharpness or irregularities from the cutting process.
Knot Security Trick
If your knots slip through the clay holes, thread a small wooden bead beneath the clay piece before tying the knot. This adds security and a cute detail.
Step 2: Baking and Finishing
-
Bake the pieces:
Arrange your clay semicircles on a parchment-lined baking sheet. Bake according to the manufacturer’s instructions for your specific brand of clay—usually around 275°F (135°C) for 15-30 minutes. -
Cool down:
Let the pieces cool completely on the baking sheet. They adhere their final hardness only after cooling. -
Sand for perfection:
Once cool, inspect the edges. Use fine-grit sandpaper to smooth out any rough spots or fingerprints, focusing on the curved bottom edge.
Uneven Hanging?
If the semicircles tilt too much, the hole might be off-center. Use a tiny dab of clear superglue where the twine meets the hole to fix the angle permanently.
Step 3: Assembly
-
Cut the support twine:
Cut two long lengths of jute twine, about 24–30 inches each. These will be the vertical strands holding your clay pieces. -
Attach to dowel:
Tie each piece of twine securely to your wooden dowel using a lark’s head knot or a simple double knot. Space them evenly apart, leaving room at the ends of the dowel. -
Create the hanging loop:
Cut a third piece of twine for the hanger. Tie each end to the top of the dowel, just outside where your vertical strands are attached, to create a triangle for hanging. -
String first pieces:
Thread the first clay semicircle onto one vertical strand. Decide your layout first—alternating colors creates a nice rhythm. -
Secure thoroughly:
Tie a sturdy knot in the twine right underneath the clay piece to hold it in place. Ensure the knot is larger than the hole; if not, re-tie it or add a small bead. -
Continue spacing:
Move down the twine about 1.5 to 2 inches and tie another knot. Thread the next semicircle so it rests on this new knot. Repeat this until all pieces are attached. -
Final trim:
Once the bottom pieces are secured, trim any excess twine below the final knot for a neat finish.
Hang your new geometric creation near a window to catch the light and enjoy the earthy vibes


Leaf Silhouette Slab Chime
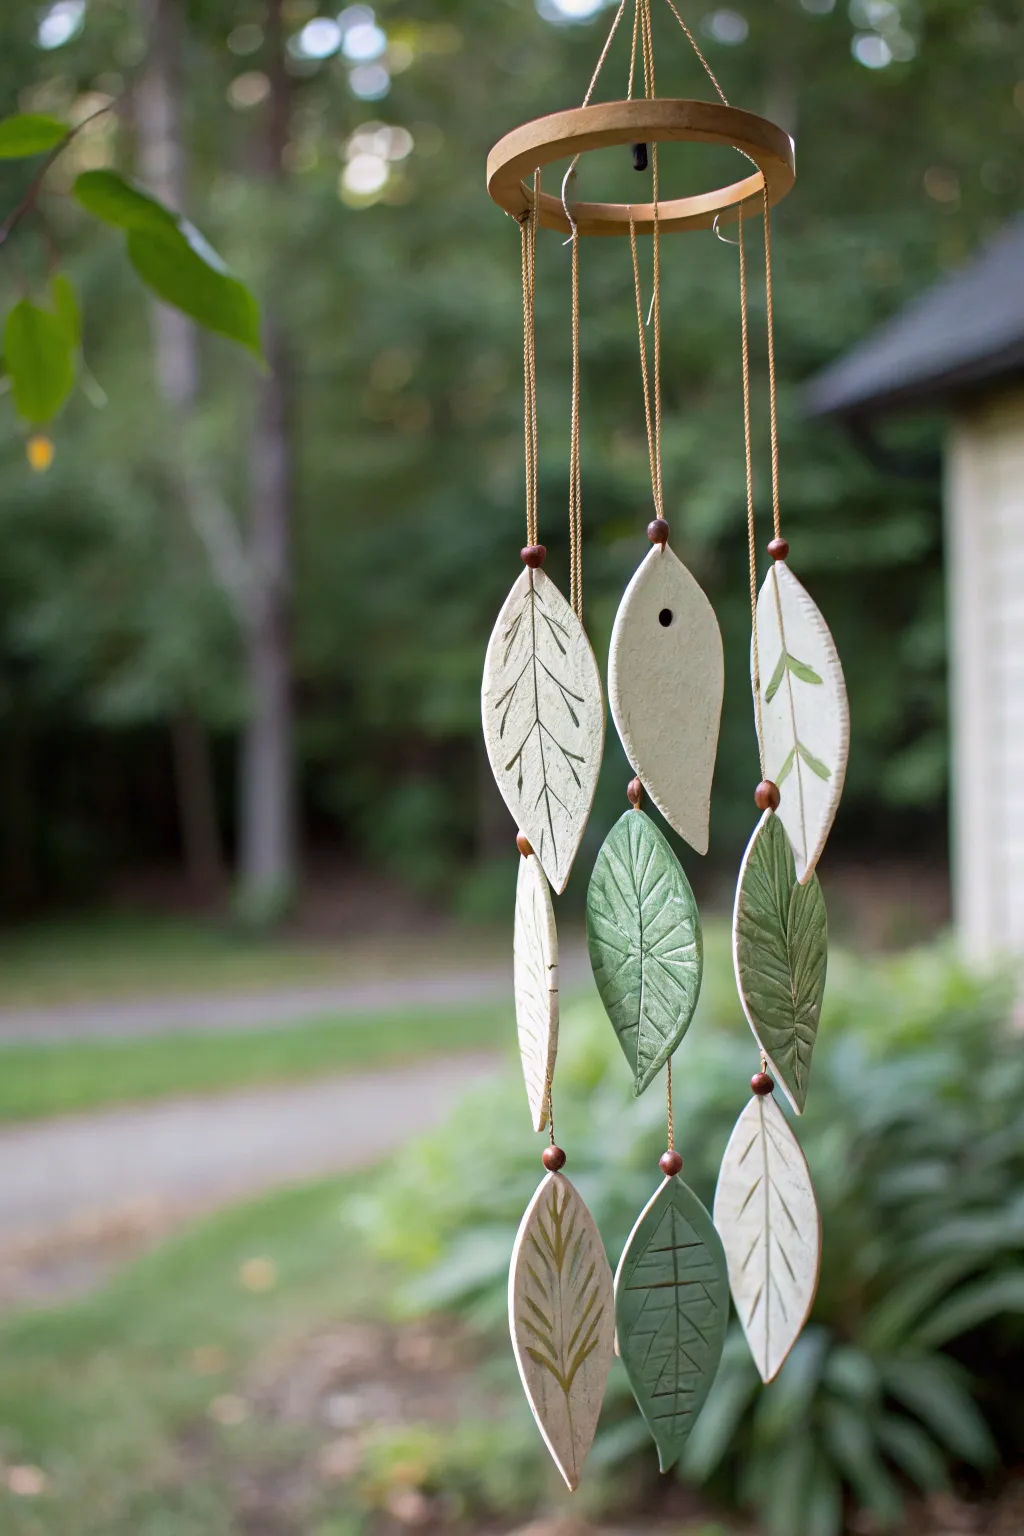
Bring the tranquility of the forest to your porch with this suspended garden of ceramic leaves, featuring soft greens and earthy whites. This slab-built project combines simple botanical shapes with delicate line work for a rustic, handmade aesthetic.
Step-by-Step
Materials
- White low-fire earthenware clay or air-dry clay
- Rolling pin
- Canvas mat or guide strips (c1/4 inch thickness)
- Needle tool or X-Acto knife
- Paper leaf templates (3-4 variations)
- Hole punch or small straw (for piercing)
- Green underglaze or acrylic paint (forest and sage tones)
- Brown underglaze or acrylic paint
- Fine detail paintbrush
- Clear matte glaze (optional)
- Wooden hoop (embroidery hoop inner ring works well)
- Jute twine or hemp cord
- Small wooden beads (brown)
- Scissors
Step 1: Shaping the Leaves
-
Roll the Slab:
Begin by wedging your clay to remove air bubbles. Roll it out on a canvas mat or between thickness guide strips until you have a smooth, even slab about 1/4 inch thick. -
Cut the Shapes:
Place your paper leaf templates onto the clay slab. Using a needle tool, carefully trace around the edges to cut out 9 to 12 individual leaf shapes. Smooth the cut edges with a damp finger or sponge to remove any burrs. -
Pierce Hanging Holes:
While the clay is still soft, use a small straw or hole punch tool to create a hole at the very top of each leaf stem. Make sure the hole is big enough for your twine to pass through after shrinkage. -
Add Texture (Optional):
For the green leaves shown in the middle tier, you can gently carve vein lines into the clay surface now using a needle tool, or wait to paint them later depending on your preferred style. -
Dry and Bisque Fire:
Allow the leaves to dry slowly between two boards or under plastic to prevent warping. Once bone dry, bisque fire them according to your clay’s instructions (usually cone 04). If using air-dry clay, let them cure completely for 24-48 hours.
Natural Curves
Dry your leaves over a curved surface, like a PVC pipe or a rolling pin, rather than flat. This subtle curve catches the wind better and looks more organic.
Step 2: Decorating the Surfaces
-
Base Coat the Green Leaves:
Select about one-third of your leaves to be solid green. Apply 2-3 coats of sage or forest green underglaze (or acrylic if using air-dry clay), letting each coat dry before applying the next. -
Carve the Green Details:
If you didn’t carve the texture earlier, use a sgraffito technique on the painted leaves. Gently scratch through the green layer to reveal the white clay beneath, drawing a central vein and branching lines. -
Paint Line Drawings:
For the white leaves, leave the background natural. Using a fine detail brush and your brown or green pigment, hand-paint simple botanical illustrations—some with fern-like patterns and others with simple veins. -
Final Glaze and Fire:
If using ceramic clay, dip or brush a clear matte glaze over all pieces. Fire again to the recommended temperature. For air-dry clay, seal everything with a matte acrylic varnish to protect against moisture.
Step 3: Assembly
-
Prepare the Hoop:
Drill small holes around your wooden hoop corresponding to the number of strands you plan to hang, or simply plan to tie the strings securely around the ring. -
Cut the Cord:
Cut lengths of jute twine. You will need shorter lengths for the top hanger and long varying lengths for the chime strands. I like to cut them longer than necessary to allow for knotting. -
String the Leaves:
Thread a piece of twine through a leaf. Tie a secure knot above the leaf to hold it in place. Thread a wooden bead onto the string and let it rest on top of the knot. -
Create Tiers:
To create the tiered look, add a second or third leaf to the same string. Tie a knot higher up the string (about 4-5 inches above the bottom leaf), add a bead, and then attach the next leaf. -
Attach to Hoop:
Tie the top of each leaf strand to the wooden hoop, spacing them evenly around the circumference. Vary the heights slightly for a more organic, cascading appearance. -
Create the Hanger:
Attach three or four equal lengths of twine to equal points on the wooden hoop. Gather them together at the top and tie a strong overhand knot to create the main hanging loop.
Driftwood Topper
Instead of a manufactured wooden hoop, forage for a sturdy, interesting branch or piece of driftwood to suspend your leaf strands from for a wilder look.
Hang your new creation in a breezy spot and enjoy the gentle clinking sound of your handmade pottery


Flower Petal Tile Tinklers
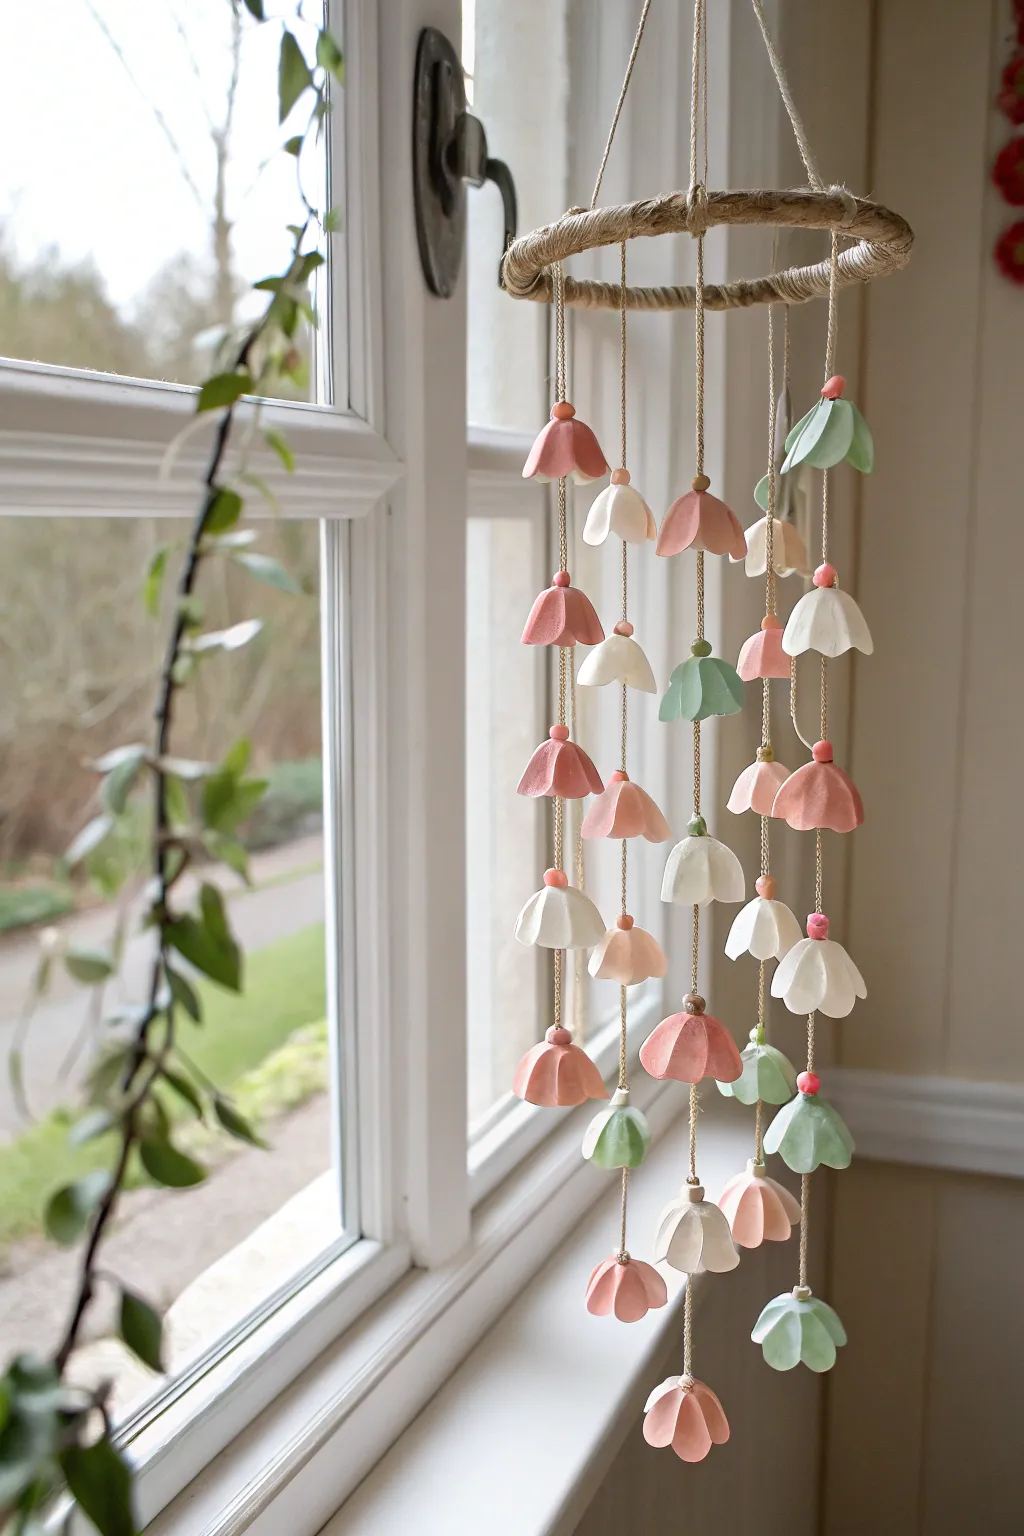
Bring the soft hues of spring indoors with this delicate tiered mobile, featuring cascading strings of handmade ceramic or air-dry clay blossoms. The gentle clinking of the bell-shaped flowers creates a soothing sound while the pink, mint, and white palette adds a vintage cottagecore charm to any window.
How-To Guide
Materials
- Air-dry clay or polymer clay (white)
- Acrylic paints (salmon pink, mint green, cream/white)
- Matte sealant or varnish
- Jute twine or heavy cotton cord
- Wooden or metal floral hoop (6-8 inch diameter)
- Small wooden beads (natural or painted pink)
- Rolling pin
- Small flower cookie cutter or circle cutter
- Sculpting tools or a toothpick
- fine-grit sandpaper
- Scissors
- Hot glue gun
Step 1: Sculpting the Blooms
-
Condition the clay:
Begin by kneading your clay until it is smooth and pliable. If using air-dry clay, keep a small bowl of water nearby to smooth out any cracks that might appear while working. -
Roll and cut:
Roll the clay out to an even thickness of about 1/4 inch. Use a small circle cutter (approx. 2 inches) or a flower-shaped cutter to punch out roughly 30 to 40 shapes. You’ll want extras in case of breakage. -
Form the bell shape:
Take a clay circle and gently drape it over the tip of your thumb or a rounded tool handle. Press the edges down gently to form a cup or bell shape. Pinch the edges slightly to create defined ‘petal’ curves. -
Add the hanging hole:
While the clay is still wet, use a toothpick or a skewer to pierce a hole directly through the center top of each bell. Ensure the hole is wide enough for your twine to pass through easily. -
Dry and refine:
Let the bells dry completely according to the package instructions (usually 24-48 hours for air-dry clay). Once hard, lightly sand any rough edges with fine-grit sandpaper for a polished look.
Uneven Hanging?
If the mobile lists to one side, balance it by gluing a small fishing weight or heavy bead to the inner rim on the lighter side, hidden behind the wrapping.
Step 2: Painting and Prep
-
Apply base colors:
Divide your clay bells into three groups. Paint one group a soft salmon pink, one group a creamy white, and the final group a muted mint green. I find that two thin coats provide smoother coverage than one thick coat. -
Seal the finish:
Once the paint is fully dry, coat each blossom with a matte sealant. This protects the finish and gives the clay a more ceramic-like texture without being overly glossy. -
Prepare the hoop:
Take your embroidery or metal hoop and wrap it entirely with jute twine. Secure the start and end of the twine with a dab of hot glue, wrapping tightly so no part of the hoop shows through.
Step 3: Assembly
-
Cut the suspension strings:
Cut four equal lengths of twine (about 20 inches long) to create the hanger. Tie them evenly spaced around the hoop, bringing them together at the top in a knot or loop for hanging. -
Plan the strands:
Cut 5 to 7 lengths of twine for the chime strands. Vary the lengths slightly so the bottom of the mobile has a naturally staggered, organic appearance. -
Attach the first beads:
Tie a double knot at the very bottom of your first string. Thread a bead onto the string so it rests on the knot, then thread on your first flower bell (open side facing down). The bead acts as the clapper inside the bell. -
Add spacing knots:
Measure up about 2-3 inches from the top of the first flower. Tie a knot at this spot. Slide a small bead down to the knot (optional, but adds detail as seen in the photo), then thread the next flower bell. -
Continue stringing:
Repeat this pattern—knot, bead, flower—until the strand is full. Aim for 4-5 flowers per strand, mixing your colors randomly or in a repeating pattern. -
Secure strands to the hoop:
Tie the top of each finished flower strand securely to the jute-wrapped hoop. Space them evenly around the circumference. -
Add a center strand:
For fullness, add one or two strands attached to a piece of twine spanning across the diameter of the hoop, allowing blooms to hang in the center column of the mobile. -
Final Adjustments:
Trim any excess twine tails near the knots on the hoop. Gently rotate the flowers so they hang straight and give the mobile a little spin to test the movement.
Level Up: Texture
Before shaping the clay bells, press a piece of lace or a textured fabric into the wet clay slab. This leaves a subtle, intricate pattern on the petals.
Hang your new creation in a sunny window and enjoy the gentle movement of your handmade garden

The Complete Guide to Pottery Troubleshooting
Uncover the most common ceramic mistakes—from cracking clay to failed glazes—and learn how to fix them fast.
Cloud And Raindrop Chime
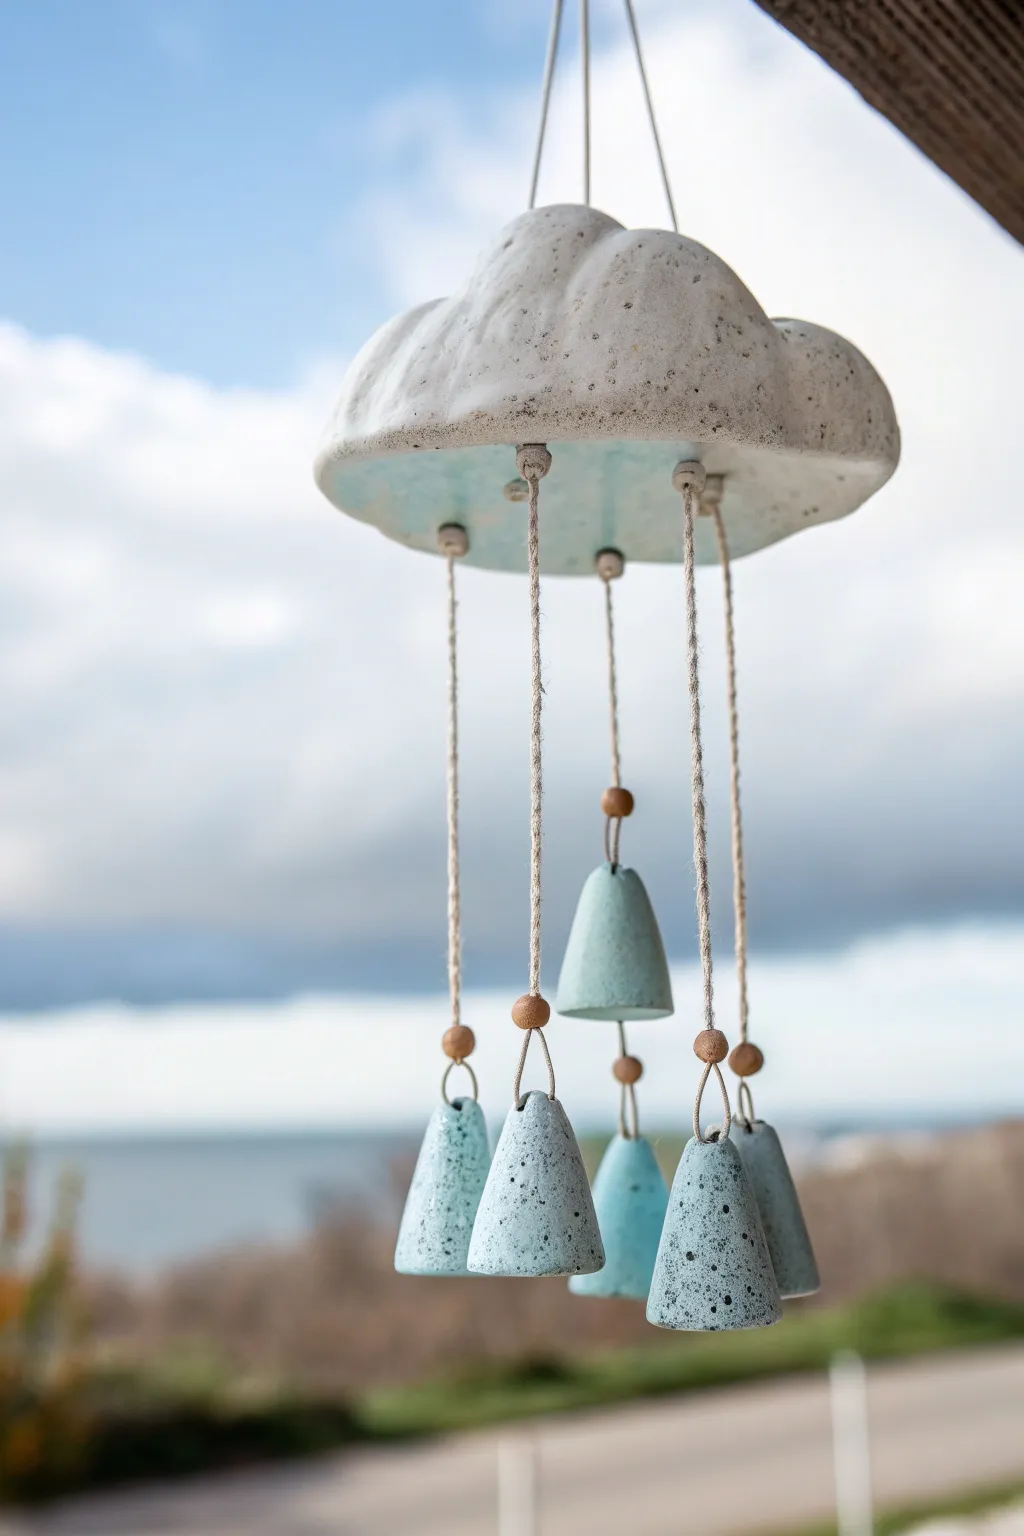
Capture the beauty of a passing storm with this adorable ceramic wind chime featuring a textured white cloud and speckled teal raindrops. This project combines simple pottery hand-building techniques with custom glazing to create a soothing, nature-inspired hanging decoration.
Step-by-Step Guide
Materials
- White earthenware or stoneware clay
- Rolling pin
- Clay knife or needle tool
- Sponge
- Small circle cutter (optional, for cloud curves)
- Wooden skewers or straws (for making holes)
- White matte glaze
- Speckled teal or light turquoise glaze
- Small paintbrush
- Natural jute or hemp twine
- Small wooden beads (approx. 6-8mm)
- Kiln access
Step 1: Sculpting the Cloud
-
Roll the Slab:
Begin by rolling out a medium-sized ball of white clay into a slab approximately 1/4 inch thick. Aim for an oval or kidney bean shape as your base. -
Shape the Cloud Form:
Cut out a rounded, fluffy cloud shape. You can freehand this with a needle tool for an organic look, or use the edge of a circle cutter to create perfectly scalloped edges. -
Add Dimension:
Gently gently pinch and curve the edges of the cloud downwards to create a slight dome shape. This gives the cloud volume so it looks puffy rather than flat. -
Create Texture:
Using a crumpled piece of foil or a textured sponge, thoroughly dab the entire surface of the cloud to create a pitted, organic texture that mimics water vapor. -
Pierce Hanging Holes:
Use a skewer or straw to punch a hole in the center top for hanging. Then, punch 5-7 evenly spaced holes around the perimeter of the underside for the raindrops to attach.
Don’t Rush the Drying
To prevent warping, let the cloud dry upside down on foam or a crumpled bag so it holds its domed shape.
Step 2: Forming the Raindrops
-
Roll Cones:
Create small balls of clay, slightly varying in size. Roll them against your work surface on one side to taper them into cone shapes with flat bottoms. -
Hollow the Bells:
Gently press a tool or your pinky finger into the wide bottom of each cone to hollow it out. Not only does this reduce weight, but it creates the resonance needed for the chime sound. -
Add Attachment loops:
pierce a horizonal hole through the very top tip of each cone. Ensure the hole is large enough for your twine to pass through after firing. -
Smooth the Edges:
Use a slightly damp sponge to smooth out any sharp edges on both the cloud and the raindrops. Let all pieces dry slowly until bone dry. -
Bisque Fire:
Fire the greenware pieces in a kiln to the appropriate cone for your specific clay body (usually Cone 04).
Holes Shrink!
Remember clay shrinks 10-15%. Make your threading holes slightly larger than the twine to accommodate shrinkage.
Step 3: Glazing and Assembly
-
Glaze the Cloud:
Apply 2-3 coats of matte white glaze to the top and sides of the cloud. For the underside, I like to apply a light wash of the teal color to suggest a storm brewing. -
Glaze the Raindrops:
Coat the exterior of the raindrop cones with a speckled teal or turquoise glaze. Leave the interior unglazed or use a clear coat for contrast. -
Glaze Fire:
Return the pieces to the kiln for the final glaze firing, ensuring no glazed surfaces touch the kiln shelf. -
Cut the Twine:
Cut lengths of jute twine: one long piece for the main hanger, and several shorter pieces (varying from 6 to 10 inches) for the raindrops. -
Thread the Drops:
Loop a piece of twine through the top hole of a raindrop. Thread both ends of the twine through a small wooden bead and slide it down to secure the cone. -
Attach to Cloud:
Feed the loose ends of each raindrop string up through the holes in the cloud base. Knot them securely on the top side of the cloud, varying the lengths so the drops hang at different levels. -
Final Hanger:
Thread your main hanging cord through the top center hole of the cloud, knot underneath, and your chime is ready to hang.
Listen to the gentle clinking sound as your handmade cloud moves in the breeze
Butterfly Cutout Mobile Chime
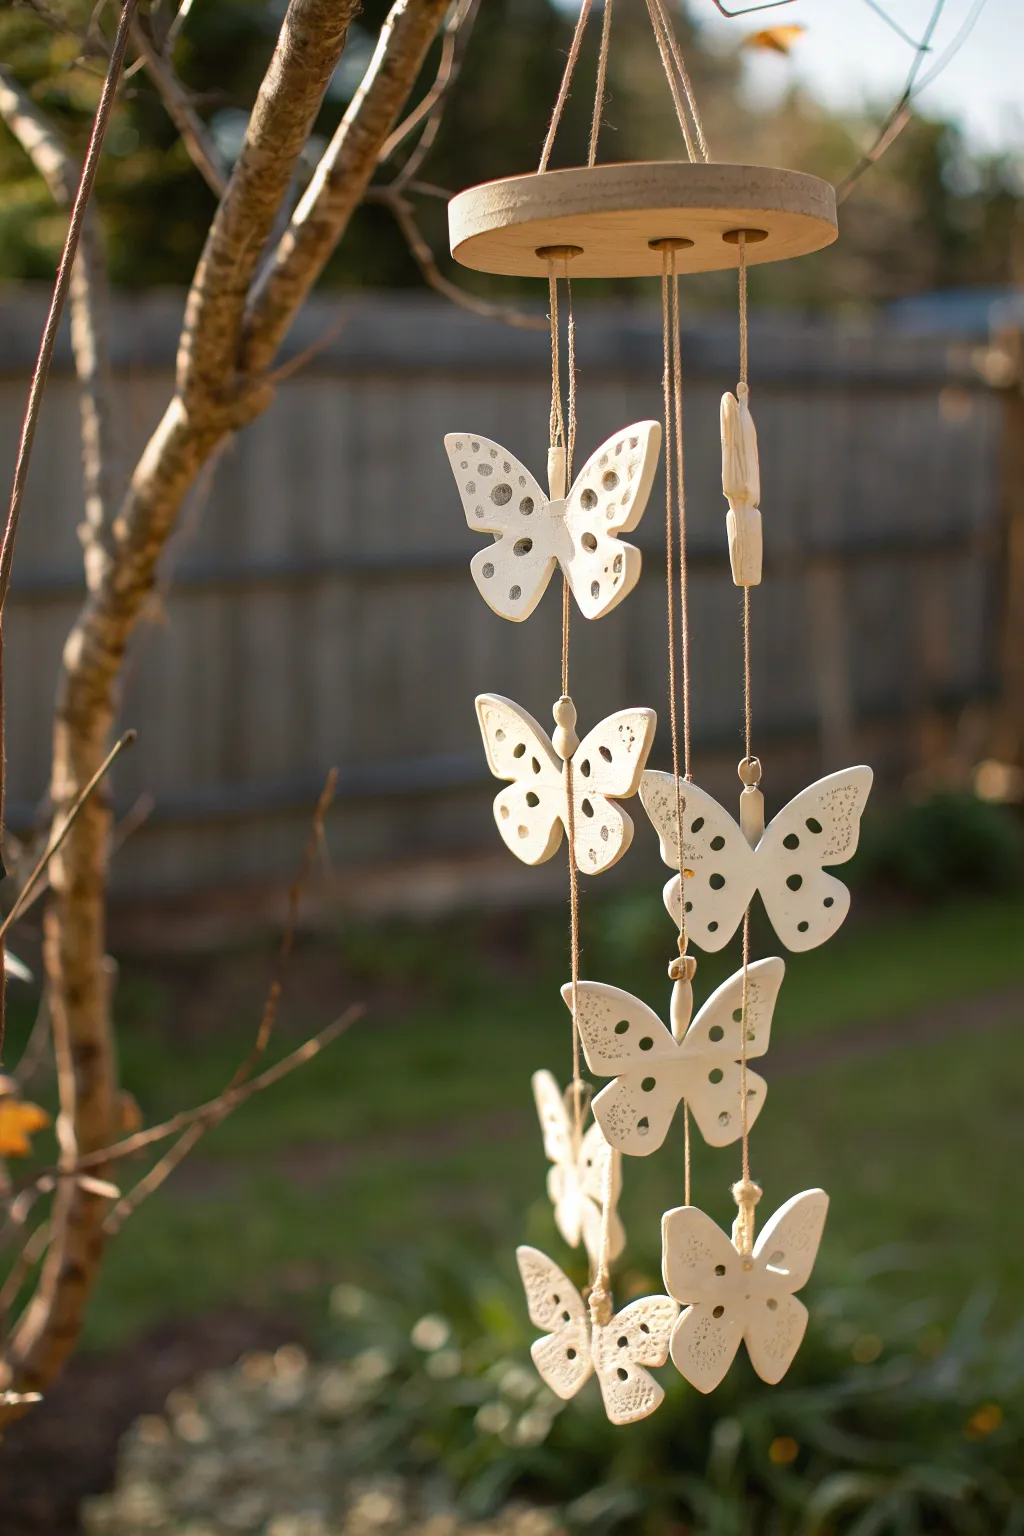
This delicate wind chime features a cascade of textured white clay butterflies suspended from a simple wooden disk. The unglazed finish and natural twine give it a lovely rustic-meets-contemporary aesthetic that catches the light beautifully in a garden or sunroom.
Detailed Instructions
Materials
- White creative paper clay or air-dry clay (smooth texture)
- Rolling pin
- Butterfly cookie cutter (approx. 3-4 inches wide)
- Tools for texturing: straw, toothpick, small round piping tip
- Sandpaper (fine grit)
- Natural jute twine or hemp cord
- Wooden circular plaque (approx. 5 inches diameter)
- Drill with small bit (1/16 or similar)
- Scissors
- Clear matte sealant (optional)
Step 1: Crafting the Butterflies
-
Condition the Clay:
Begin by taking a handful of your white clay and kneading it in your hands until it is pliable and warm. This prevents cracking later on. -
Roll Out the Slab:
On a smooth, clean surface or silicone mat, roll the clay out to an even thickness of about 1/4 inch. Try to keep it uniform so the weights of the butterflies are consistent. -
Cut Out Shapes:
Use your butterfly cookie cutter to stamp out 7 to 9 butterflies. You can gently press the cutter down and wiggle slightly to get a clean edge before lifting. -
Create Texture:
This is the fun part where the design comes to life. Use the small round piping tip to press circles gently into the clay wings, not going all the way through, to create an imprinted pattern. -
Add Decorative Holes:
Using a smaller tool like a drinking straw or a chopstick, poke actual holes through some areas of the wings for light to pass through. Vary the sizes for visual interest. -
Create Suspension Holes:
Crucially, poke a hole through the top center of the butterfly’s head and another at the bottom center of the tail. This allows you to string them together vertically. -
Dry Completely:
Lay the butterflies flat on a wire rack or parchment paper. Let them dry for 24-48 hours, flipping them occasionally to ensure even drying and prevent curling. -
Refine Edges:
Once fully hard, take your fine-grit sandpaper and gently smooth any rough edges left by the cutter or the texture tools.
Smooth Moves
Use a tiny bit of water on your finger to smooth the clay edges immediately after cutting. This saves you significant sanding time later once the clay has hardened.
Step 2: Preparing the Top Disk
-
Mark the Wood:
Take your wooden disk and mark three or four points evenly spaced around the outer edge for the hanging strands, plus three points in a triangle near the center for the main hanger. -
Drill Holes:
Carefully drill through your marked spots. Make sure the holes are large enough to accommodate the thickness of your jute twine. -
Sand the Wood:
Give the wooden disk a quick sanding to remove splinters, especially around the drilled holes.
Step 3: Assembly
-
Cut Twine Lengths:
Cut three long pieces of twine (about 3 feet each) for the butterfly strands and three shorter pieces (about 1 foot each) for the top hanger. -
Start the Strands:
Tie a knot at the end of a long twine piece. Thread the first butterfly on, resting it on the knot. I prefer to start with the bottom-most butterfly and work upward. -
Add More Butterflies:
Tie another knot about 4-6 inches above the first butterfly. Thread a second butterfly onto the twine, letting it rest on this new knot. Repeat until you have 2 or 3 butterflies per strand. -
Attach to Disk:
Thread the top of each butterfly strand up through the outer holes of the wooden disk. Adjust the height so the strands hang at slightly different levels, then knot securely on the top side of the wood. -
Create the Hanger:
Take the three shorter twine pieces, thread them through the center triangle holes of the disk, knotting them underneath. Gather the top ends together and tie them into a strong loop for hanging. -
Final Adjustments:
Check that the mobile balances correctly. If it tilts, you may need to adjust the knot positions or lengths of the hanging strands slightly.
Make Some Noise
For a true chime sound, hang the strands close enough so the butterflies gently collide in the breeze, or add small ceramic beads between them.
Hang your new creation near a window and enjoy the peaceful movement of the butterflies


What Really Happens Inside the Kiln
Learn how time and temperature work together inside the kiln to transform clay into durable ceramic.
Stamped Botanical Texture Chime
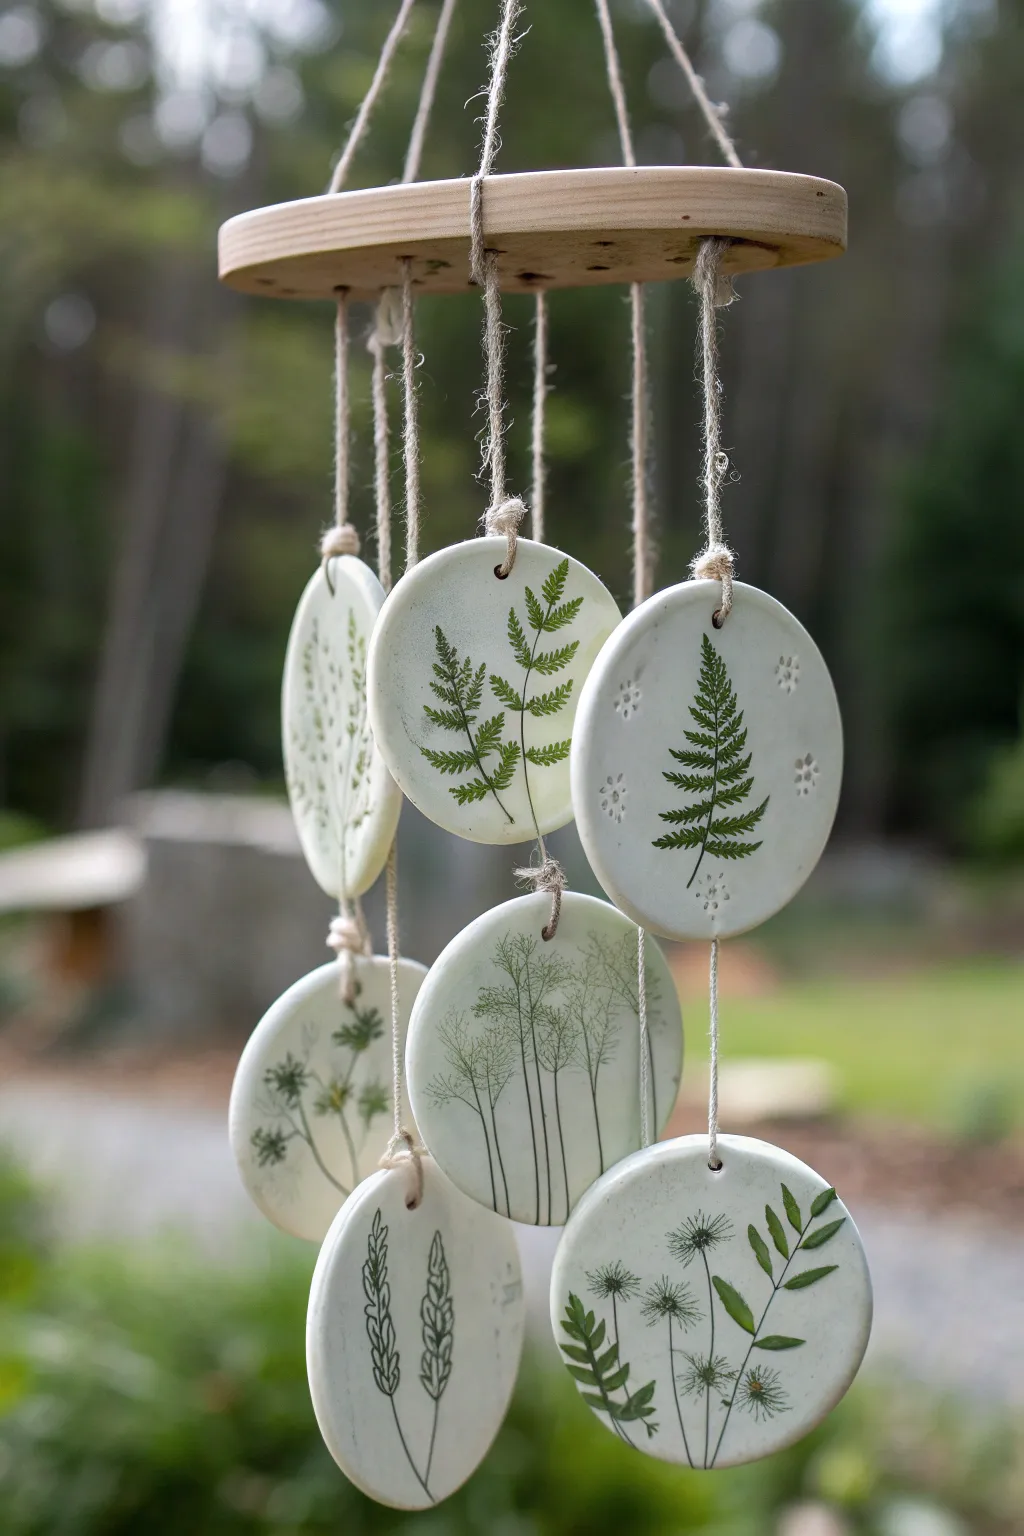
Capture the delicate beauty of a woodland walk with this suspended ceramic mobile. Using real foliage to create intricate impressions, you’ll craft a serene, nature-inspired wind chime that brings an organic elegance to any porch or window.
How-To Guide
Materials
- White air-dry clay or polymer clay (oven-bake)
- Small wooden round plaque or disc (approx. 4-5 inches)
- Jute twine or hemp cord (thin)
- Fresh or pressed botanical clippings (ferns, dill, wild grasses)
- Rolling pin
- Cylinder cookie cutter (approx. 2.5 – 3 inches)
- Straw or small sculpting tool (for poking holes)
- Green acrylic paint or underglaze
- Sponge or small paintbrush
- Fine-grit sandpaper
- Clear matte sealant spray
- Drill with a small bit (for the wooden top)
Step 1: Preparing the Clay Components
-
Condition the clay:
Begin by kneading your white clay until it is soft, pliable, and free of cracks. If using air-dry clay, keeping your hands slightly damp can help prevent it from drying out too quickly. -
Roll out the slab:
Use your rolling pin to flatten the clay into a smooth, even sheet. You want a thickness of about 1/4 inch—thick enough to be sturdy but light enough to sway in the breeze. -
Arrange the botanicals:
Select your leaves and sprigs. Ferns and dill weed work exceptionally well for this because of their intricate veins. Lay them gently on top of the clay slab where you intend to cut your circles. -
Impress the texture:
Gently roll over the botanicals with the rolling pin once more. Press firmly enough to embed the plant material flush with the clay surface, capturing the fine details, but be careful not to distort the slab’s thickness too much. -
Cut the discs:
Position your round cookie cutter over each botanical impression to frame the composition. Press down firmly to cut out your circles. Need about 7-9 discs for a full chime. -
Remove the plants:
Carefully peel the plant material away from the clay. Use a needle tool or tweezers to lift the edges if they are stuck. -
Make suspension holes:
Use a straw or small round tool to punch a hole near the top edge of each disc. Ensure the hole is at least 1/4 inch from the edge to prevent tearing later. -
Smooth the edges:
Dip your finger in a little water and gently run it around the cut edge of each disc to smooth out any roughness or sharp corners.
Clear Impression
For sharper details, place a sheet of parchment paper or cling wrap over the foliage before rolling. This prevents the roller from getting sticky and helps press the plants evenly.
Step 2: Coloring and Firing
-
Add color definition:
Before drying, I like to enhance the texture. Dilute a tiny drop of green acrylic paint or underglaze with water. Dab this wash into the impressed grooves using a sponge or brush. -
Wipe back the excess:
Immediately wipe the surface gently with a damp cloth. The green pigment will remain in the deep veins of the impression while the top surface returns to white, highlighting the design. -
Cure the clay:
Follow the instructions for your specific clay. If using air-dry, let them sit flat for 24-48 hours, flipping occasionally. If using polymer, bake according to the package temperature. -
Sand and seal:
Once fully cured, lightly sand any rough edges with fine-grit sandpaper. Apply a coat of clear matte sealant to protect the finish.
Glaze Accents
Instead of a matte finish, use a high-gloss glaze or resin only inside the leaf impressions. This makes them look like captured morning dew against the matte clay.
Step 3: Assembly
-
Prepare the wooden top:
Take your wooden round disc and drill pairs of small holes around the perimeter—one pair for each clay pendant you made. Add a central hole or hook for the main hanger. -
Cut the suspension cords:
Cut lengths of jute twine. You’ll need varying lengths to create a staggered, tiered look. Cut them longer than you think you need; you can always trim them later. -
Attach the discs:
Thread a piece of twine through the hole in a clay disc and tie a secure knot. For a cleaner look, you can use a lark’s head knot or simply tie a chunky knot that sits behind the clay. -
Connect to the top:
Thread the other end of the twine up through the holes in the wooden disc. Adjust the height so the discs hang at different levels, creating a cascading effect. -
Secure the strands:
Tie knots on the top side of the wooden disc to secure each strand. A drop of glue on these knots ensures they won’t slip over time. -
Add the main hanger:
Create a bridle using three equal lengths of twine attached to the top of the wooden disc, bringing them together in a central loop for hanging.
Hang your new botanical creation near a window and enjoy the gentle movement of your handmade art.
Tiny Bead Spacer Wind Chime
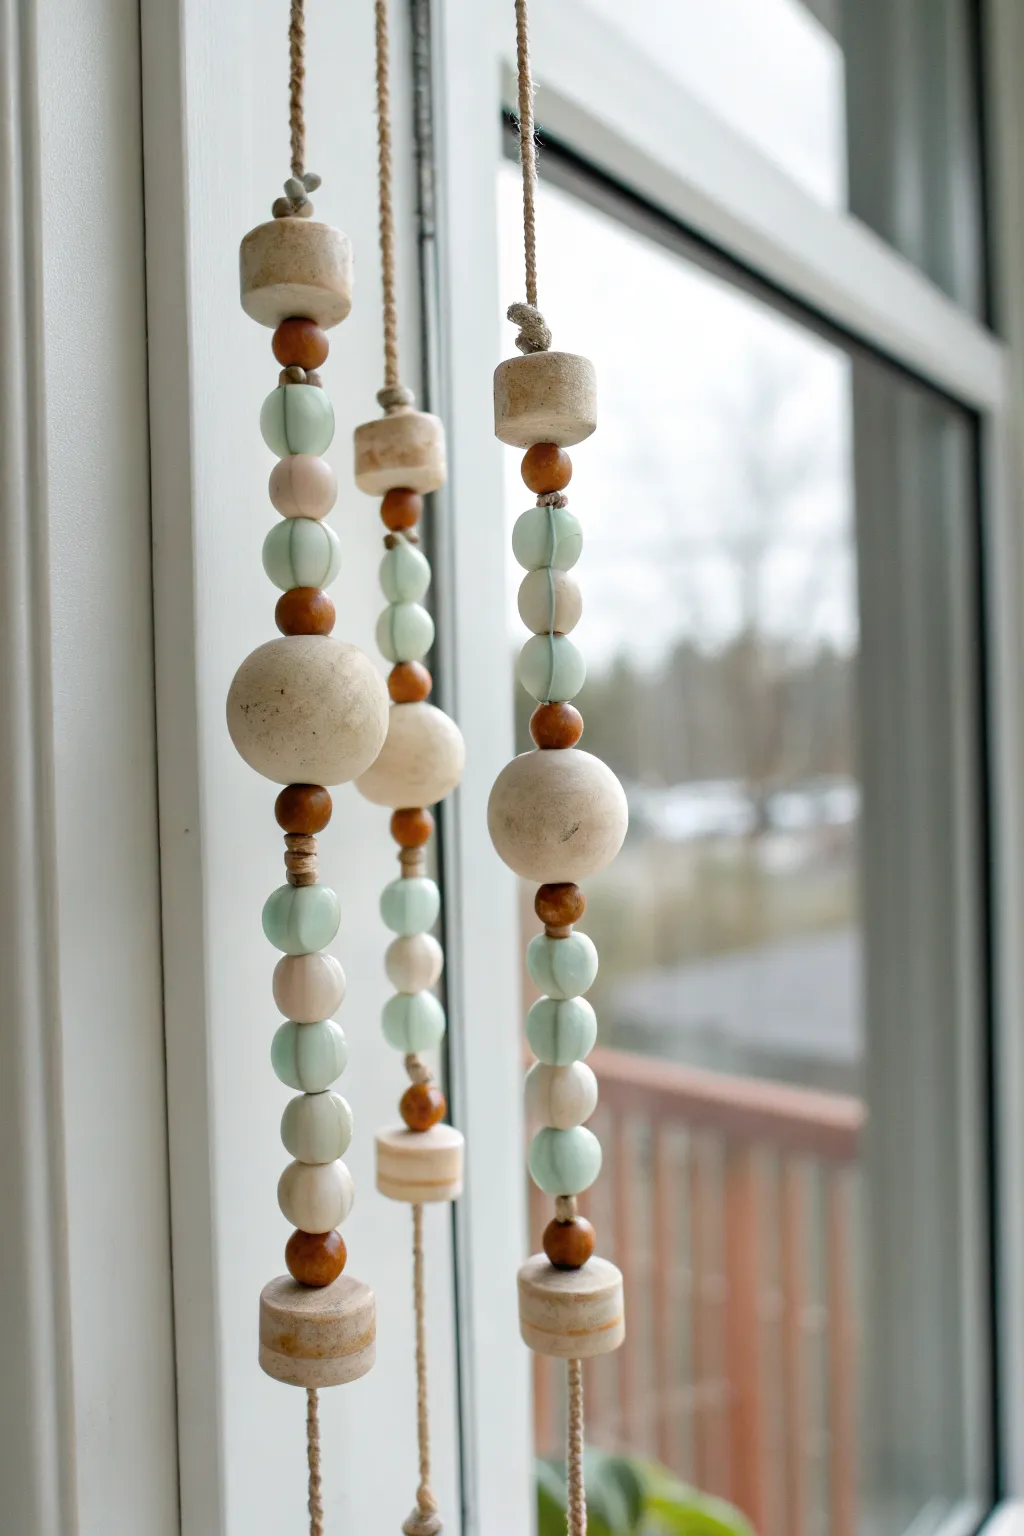
Evoke the calm of a coastal retreat with this simple yet elegant wind chime featuring ceramic beads in soft mint, cream, and rustic brown. The design relies on rhythm and repetition, creating a soothing visual cascade perfect for a sunny window.
How-To Guide
Materials
- Large ceramic sphere beads (cream/natural)
- Medium ceramic round beads (mint green, cream)
- Small wooden or ceramic spacer beads (teak/reddish-brown)
- Ceramic drum/disc beads (speckled cream)
- Hemp twine or jute cord (natural color)
- Scissors
- Measuring tape
- Large-eye craft needle (optional, for threading)
Step 1: Preparation & Planning
-
Design your pattern:
Before cutting any string, lay your beads out on a flat surface to visualize the rhythm. The pattern shown uses a mix of groupings: single small brown spacers to separate sections, and clustered mint and cream rounds. -
The core motif:
Note the standard repeating motif: a small brown spacer, followed by two or three pastel rounds (mint-cream-mint), capped with another brown spacer. -
Selecting the focal points:
Choose a large, textured cream sphere for the center of each strand. This adds weight and visual interest, grounding the lighter beads above and below. -
Cut the cord:
Cut three lengths of hemp twine, each about 30 inches long. This gives you plenty of slack for knotting at the top and bottom.
Step 2: Stringing the Strands
-
Start at the bottom:
Begin by threading a ceramic drum bead onto the bottom of your first string. These cylindrical beads act as the anchor. -
Secure the base:
Tie a double overhand knot directly underneath this bottom drum bead. Make sure the knot is bulky enough so the bead doesn’t slip off. -
Layer the first section:
Thread a small brown spacer bead, followed by a larger cream round bead, and another small spacer. This creates a tiny ‘neck’ for the bottom weight. -
Build the pastel column:
Add three medium pastel beads. I prefer alternating colors like mint, cream, and mint to keep the palette fresh and airy. -
Add structure:
Slide on a small brown spacer, which serves as a visual break before the main focal bead. -
Insert the centerpiece:
Thread the large, textured cream sphere. This is the heaviest element, so ensure your string is sturdy. -
Repeat the pattern upwards:
Above the large sphere, add another brown spacer, followed by a new set of three pastel rounds (mint-cream-mint). -
Top off the strand:
Finish the sequence with a final brown spacer and a top ceramic drum bead, mirroring the bottom of the strand. -
Secure the top:
Tie a sturdy knot just above the top drum bead to hold everything in place. Leave the remaining length of twine for hanging.
Knotting Secret
If a bead hole is too large for a knot, thread a tiny seed bead onto the string first. The knot will catch the seed bead, which then supports the larger ceramic bead above it.
Step 3: Assembly
-
Create the second strand:
Repeat the stringing process for step two. To create the staggered look seen in the photo, you might vary the bead count slightly or simply hang this strand lower later. -
Create the third strand:
Make your third strand identical to the others, or swap the order of the pastel beads (cream-mint-cream) for subtle variety. -
Check for balance:
Hold all three strands up together. Ensure the large focal spheres aren’t hitting each other directly; staggering their heights prevents chipping. -
Attach to a hanger:
Tie the loose ends of your twine to a driftwood branch, a metal ring, or a larger ceramic piece (not shown) to complete the chime structure.
Texture Twist
Before stringing, rub a little dark antique wax or diluted brown acrylic paint into the texture of the white beads and wipe it off to highlight the natural ceramic imperfections.
Hang your new creation in a breezy spot and enjoy the gentle clinking sound of the ceramics

TRACK YOUR CERAMIC JOURNEY
Capture glaze tests, firing details, and creative progress—all in one simple printable. Make your projects easier to repeat and improve.
Ombré Glaze Drop Chime

Capture the calm of a gentle spring shower with this elegant ceramic wind chime featuring teardrop shapes in a stunning blue gradient. The natural wood elements balance the cool tones, creating a modern, minimalist piece that catches the light beautifully in a sunny window.
Detailed Instructions
Materials
- White air-dry clay or polymer clay (approx. 500g)
- Wooden craft ring (approx. 5-6 inches diameter)
- White acrylic paint
- Phthalo Blue or Navy Blue acrylic paint
- High-gloss varnish or glaze medium
- White cotton twine or macramé cord
- Small wooden spacer beads (approx. 8mm)
- Sculpting tools or a smooth butter knife
- Rolling pin
- Fine-grit sandpaper (220 grit)
- Drill with a very small bit (or a toothpick for wet clay)
- Paintbrushes (flat and detail)
- Scissors
Step 1: Sculpting the Raindrops
-
Portion the clay:
Start by dividing your white clay into six equal portions. Each portion should be roughly the size of a golf ball, though you can vary them slightly if you want a more organic look. -
Form the basic shape:
Roll each portion into a smooth ball between your palms to remove any cracks. Then, gently roll one end of the ball back and forth to taper it into a cone, creating a classic teardrop shape. -
Refine the surface:
Smooth out the surface of each teardrop with a little water on your finger if using air-dry clay. Ensure the bottom is rounded and the top is tapered but sturdy. -
Create hanging holes:
While the clay is still soft, use a toothpick or skewer to pierce a hole horizontally through the tapered top of each raindrop. Make sure the hole is wide enough for your twine to pass through. -
Dry and sand:
Allow the clay pieces to dry completely according to the package instructions (usually 24-48 hours). Once fully dry, gently sand any rough spots or fingerprints with fine-grit sandpaper for a professional finish.
Smoother Holes
When piercing the clay with a toothpick, wiggle it delicately to widen the exit hole. This prevents the clay from puckering outward and saves you sanding time later.
Step 2: Painting the Ombré Effect
-
Mix your palette:
Prepare a palette with four distinct shades of blue. Start with your pure dark blue, then mix three progressively lighter shades by adding increasing amounts of white paint to the blue. -
Apply the base coat:
I find it helpful to paint all the teardrops with a thin coat of white first to seal the clay and make the blue pop. Let this dry completely. -
Paint the darkest drops:
Select two teardrops to be your darkest shade. Paint them entirely with the pure dark blue. Use long vertical strokes to mimic the texture of rain. -
Paint the middle tones:
Paint the next two teardrops with your medium-blue mixture. Try to keep the consistency of the paint smooth to avoid brush marks. -
Paint the lightest drops:
Apply your lightest, pale blue mixture to the final two teardrops. You want a distinct difference between the three sets to achieve that ombré gradient. -
Dry brushing (optional):
To add depth, lightly dry-brush a tiny amount of a darker shade onto the lighter drops, or white onto the dark drops, just to give them a textured, ceramic-glaze appearance. -
Varnish:
Once the paint is fully cured, apply a coat of high-gloss varnish. This mimics the look of fired ceramic glaze and protects the paint from fading.
Step 3: Final Assembly
-
Prepare the ring:
Cut three lengths of twine, each about 24 inches long. Fold them in half and loop them through the wooden ring at equal intervals, tying them at the top to create the main hanger. -
Attach the first tier:
Cut three new pieces of twine for the drops. Tie one end to the wooden ring. Thread a small wooden bead, then thread one of the lighter-colored teardrops onto the string. -
Secure the drop:
Tie a knot underneath the teardrop so it hangs securely. Trim any excess string close to the knot for a clean look. -
Attach the lower tier:
For the lower tier, tie a length of string to the loop of the raindrop above (or thread it continuously if you planned for one long string). Add a wooden spacer bead, then attach a darker teardrop below it. -
Check balance:
Repeat the process until all drops are hanging. Hold the chime up by the main hanger and adjust the spacing of the strings on the wooden ring until the mobile hangs level.
Add Subtle Sparkle
Mix a tiny pinch of fine iridescent glitter into your high-gloss varnish. It won’t be obvious, but will catch the sunlight just like real wet raindrops.
Hung in a breezy spot, your new mobile will bring a splash of color and calm movement to your room
Sgraffito Patterned Tile Chime

Bring a touch of organic warmth to your porch or window with this handcrafted ceramic wind chime. Featuring earthy clay tiles adorned with simple sgraffito-inspired carvings of suns and rainbows, this piece creates a gentle, soothing sound and a beautiful silhouette against the light.
Step-by-Step Tutorial
Materials
- White or cream-colored air-dry clay (or polymer clay)
- Rolling pin
- Clay carving tools or a needle tool
- Cookie cutters (square, rectangle, circle) or a craft knife
- Wooden dowel or straw (for piercing holes)
- Natural jute twine or hemp cord
- Wooden beads (natural finish, various sizes)
- Wooden disk or ring (approx. 4-5 inches diameter) for the hanger
- Fine-grit sandpaper
- Matte spray sealant (optional)
- Black acrylic paint or fine-tip black marker (optional for high contrast)
Step 1: Shaping the Tiles
-
Prepare the Clay:
Begin by conditioning your clay. Rolling it in your hands to warm it up makes it pliable and prevents cracking later. Roll it out on a flat surface to a uniform thickness of about 1/4 inch. -
Cut the Shapes:
Using your cookie cutters or a craft knife, cut out a variety of geometric shapes. For this design, you’ll want roughly four distinct shapes per strand—mixing squares, rectangles, and circles works beautifully. -
Smooth the Edges:
Dip your finger in a little water and gently run it along the cut edges of each shape to smooth out sharp corners or jagged bits. -
Pierce Hanging Holes:
Before the clay creates a crust, use a straw or a small wooden dowel to poke a hole at the top and bottom of each tile. Ensure the holes are large enough for your twine to pass through easily.
Step 2: Carving the Designs
-
Sketch Lightly:
Use a very light touch with a needle tool to sketch your designs onto the soft clay. Plan for a mix of motifs: a radiating sun, simple arches for rainbows, and stippled dots for rain or texture. -
Carve the Sun:
For the sun tile, crave a circle in the center. Then, press deeper lines radiating outward to create the sun rays ensuring nice, deep grooves. -
Create Rainbow Arches:
On square tiles, carve nested semicircles. You can create a ‘reflection’ effect by carving arches on both the top and bottom halves of the tile. -
Add Texture:
For texture tiles, simply press the tip of your tool repeatedly into the clay to create a field of small dots. This contrasts nicely with the linear designs. -
Enhance Contrast (Optional):
If you want the high-contrast look shown in some areas, you can fill the carved lines with a wash of diluted black acrylic paint, wiping away the excess from the surface immediately, or simply trace the grooves with a micro-pen after the clay is fully dry. -
Dry Completely:
Allow your clay tiles to dry fully according to the package instructions. This usually takes 24-48 hours. I find flipping them halfway through helps them dry flat.
Clean Lines Pro Tip
Clean your carving tool tip frequently with a damp sponge while working. Clay buildup on the tool drags and creates messy, crumbled edges in your sgraffito lines.
Step 3: Assembly
-
Sand Imperfections:
Once bone dry, take your fine-grit sandpaper and gently gently sand the edges to ensure a professional, smooth finish. -
Cut Twine Lengths:
Cut three or four lengths of jute twine, each about 3 feet long. You will also need lengths for the top hanger. -
Prepare the Top Disk:
Drill small holes into your wooden disk corresponding to the number of strands you are making, plus holes for the hanging loop at the top. -
Start Strung Strands:
Tie a knot at one end of a twine length. Thread a wooden bead, then thread your bottom-most clay tile. Tie a knot above the tile to secure it in place. -
Add Spacers:
Thread a wooden bead onto the twine above the knot. Then, leave a few inches of space before tying the next support knot for the second tile. -
Continue Pattern:
Repeat this process—knot, bead, tile, knot—until you have filled the strand. Vary the order of shapes (square, circle, rectangle) for visual interest. -
Attach to Header:
Thread the top of each completed strand through the holes in your wooden disk. Secure them with strong double knots on the top side of the disk. -
Create Hanger:
Thread twine through the top holes of the wooden disk to create a pyramid shape for hanging. Gather the strings at the top and knot them into a loop.
Level Up: Driftwood
Swap the circular wooden disk header for a rustic piece of driftwood. Drill holes along the branch to hang your strands for a wilder, more coastal aesthetic.
Hang your new ceramic creation near a breezy window and enjoy the gentle clinking sound and earthy vibes
Mushroom Charm Woodland Chime
Bring a touch of forest magic to your window with this enchanting mushroom wind chime. Featuring handcrafted clay caps that mimic spotted toadstools and delicate leaf charms, this project creates a gentle, earthy sound when the breeze passes through.
Step-by-Step Tutorial
Materials
- White polymer clay (approx. 8 oz)
- Wooden embroidery hoop (6-inch diameter, inner ring only) or a wooden craft ring
- Natural jute twine or hemp cord
- Medium-sized wooden beads (approx. 10-12mm, reddish-brown)
- Small artificial green leaves (fabric or paper) or green cardstock
- Accessory: Clay sculpting tools or a toothpick
- Brown acrylic paint (for speckles)
- Small paintbrush
- Mod Podge or satin varnish
- Drill with a small bit (if not baking holes into clay)
- Oven (for baking clay)
- Parchment paper
Step 1: Sculpting the Mushroom Caps
-
Preparing the clay:
Condition your white polymer clay by kneading it in your hands until it becomes soft and pliable. This prevents cracks during baking. -
Creating the base shapes:
Divide the clay into seven equal portions. Roll each portion into a smooth ball about the size of a walnut. -
Forming the cones:
Gently press your thumb into the center of a clay ball while pinching the outside edges to form a wide, shallow cone shape. It should look like a mushroom cap or a small bell. -
Texturing the surface:
Using a toothpick or a small sculpting tool, gently poke random, shallow indents all over the outside of each cap to give it an organic, porous texture. -
Adding the hanging holes:
Use a toothpick to pierce a completely clean hole through the very top center of each mushroom cap. Make sure the hole is wide enough for your twine to pass through later. -
Baking:
Arrange your caps on a parchment-lined baking sheet. Bake according to your polymer clay package instructions (usually 275°F for 15-30 minutes). Let them cool completely.
Sticky Situation
If you struggle to pull thick twine through the clay holes, wrap a piece of tape tightly around the end of the twine to create a stiff ‘needle’ point.
Step 2: Painting and Finishing
-
Applying the speckles:
Dip a fine-point paintbrush into brown acrylic paint. Dab small spots into some of the textured indents you created earlier, giving the mushrooms a natural, speckled look. -
Sealing the clay:
Once the paint is dry, apply a thin coat of satin varnish or Mod Podge to protect the clay and give it a slight ceramic sheen. -
Preparing the leaves:
If using fabric leaves, poke a small hole near the stem. If using cardstock, cut out leaf shapes and punch a hole at the top.
Level Up
Add tiny brass bells inside the mushroom caps. Tie them to the knot that supports the cap so they dangle inside, creating a true tinkling sound.
Step 3: Assembly
-
Cutting the strings:
Cut four lengths of jute twine. One central string should be about 24 inches long, and the three outer strings should be about 20 inches long. -
Structuring the central strand:
Take the longest string and thread a leaf charm onto the bottom, securing it with a double knot. Thread a wooden bead above it. -
Adding the first mushroom:
About 2 inches up from the bottom bead, tie a knot. Thread a mushroom cap (concave side down) onto the string so it rests on the knot, then add a wooden bead immediately above it to lock it in place. -
Building the tiers:
Repeat this process up the central string, adding a second leaf/bead combo and another mushroom cap higher up. I find varying the spacing makes it look more organic. -
Assembling the outer strands:
For the three shorter strings, create a similar pattern: Leaf at the bottom, then a bead, then a mushroom cap secured with a knot below and a bead above. -
Attaching to the hoop:
Tie the top of your three outer strings evenly spaced around the wooden ring. Tie the central string across the middle of the ring (or create a cross-string to hang it from). -
Creating the hanger:
Cut three more equal lengths of twine. Tie them to the wooden ring at equidistant points. Gather the loose ends at the top and knot them together to form a hanging loop. -
Final adjustment:
Hold the chime up and adjust the knots on the ring to ensure the mobile balances evenly and the mushrooms spiral downwards nicely.
Hang your new woodland creation near a sunny window and enjoy the peaceful vibes it brings to your space
Porcelain Whisper Chime
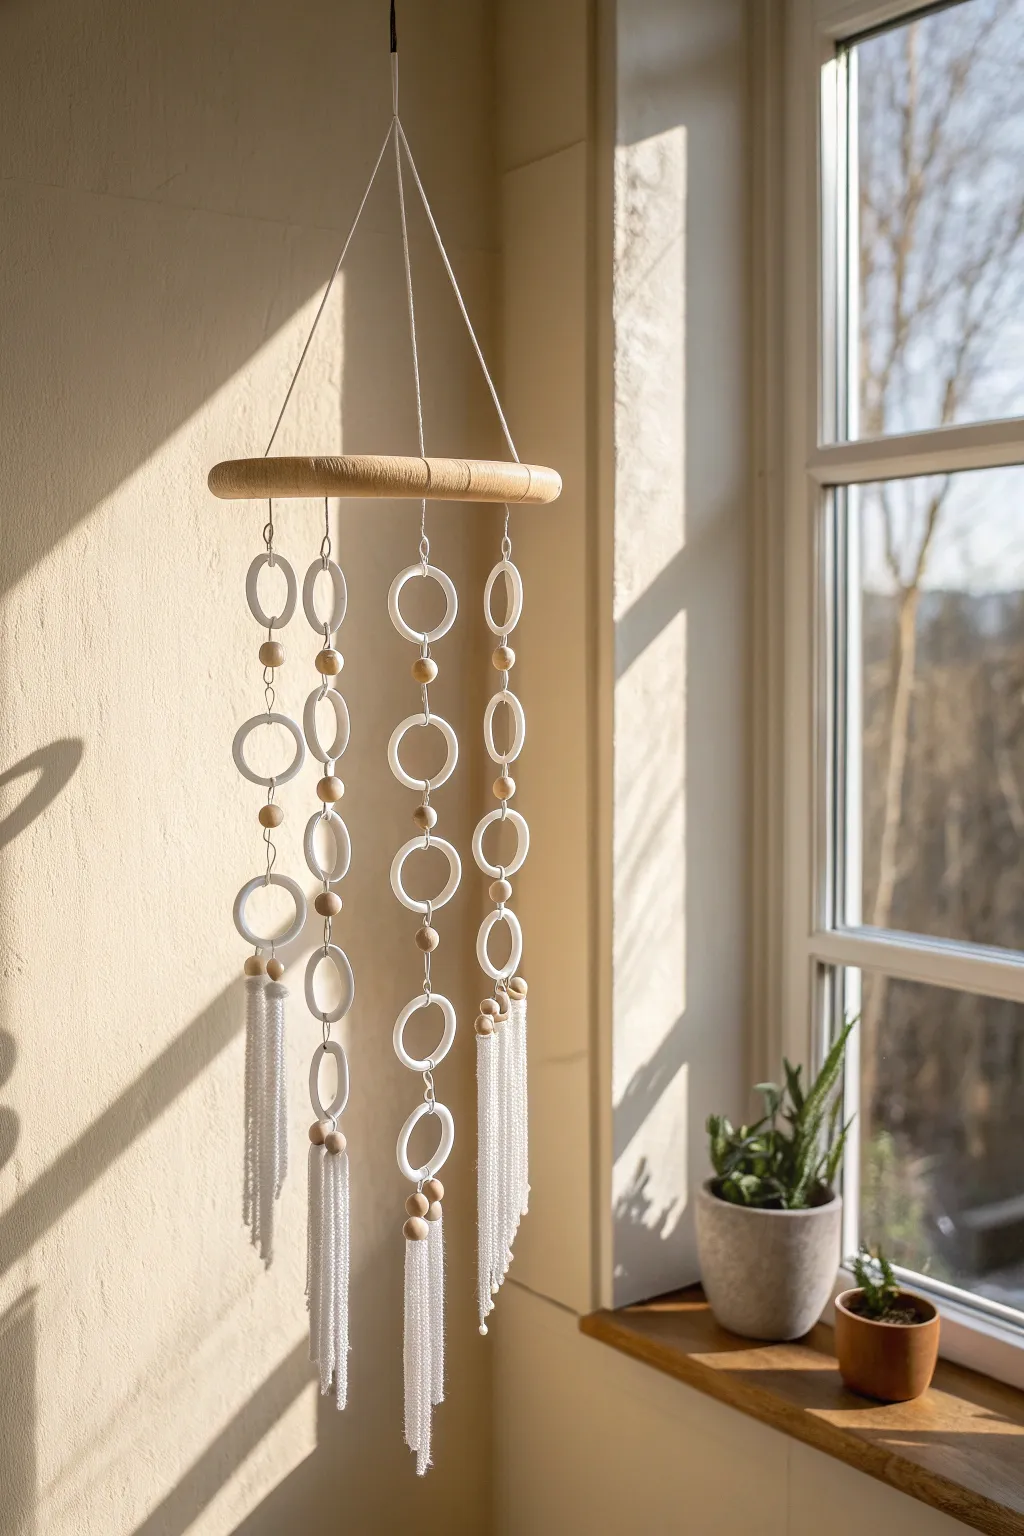
This elegant wind chime combines the crisp, clean look of white ceramic rings with the warmth of natural wood beads and cascading fringe. It serves as both a gentle noise-maker and a stunning piece of modern bohemian decor that catches the light beautifully near a window.
Step-by-Step
Materials
- White porcelain or ceramic rings (assorted sizes: 1.5 inch and 2 inch diameter)
- Wooden embroidery hoop (about 8-10 inches in diameter)
- Natural wood beads (10mm – 12mm size)
- White cotton macrame cord (3mm) or heavy waxed string
- Fishing line or clear jewelry wire (optional for invisible suspension)
- Scissors
- Comb for brushing out tassels
- Hot glue gun or strong craft adhesive (optional for securing knots)
- Ceiling hook for hanging
Step 1: Preparation & Top Assembly
-
Prepare the hoop:
Separate the inner and outer rings of your embroidery hoop. You will only need the inner, solid wooden ring for this project. If the wood is rough, give it a quick sanding. -
Create the hanger:
Cut three lengths of macrame cord, each about 30 inches long. Tie one end of each cord securely to the wooden hoop, spacing them equidistant from each other (imagine a triangle shape). -
Secure the top:
Bring the three loose ends of these cords together at the top. Adjust the knot placements on the hoop until the hoop hangs perfectly level. Tie the top ends together in a strong overhand knot to create the main hanging loop.
Step 2: Assembling the Linear Strands
-
Cut the strand cords:
Cut five long pieces of cord to serve as the base for your chime strands. I suggest making these about 3-4 feet long to ensure you have plenty of room for knotting; you can always trim later. -
Attach the first ring:
Take one cord and loop it through your first ceramic ring. Tie a knot at the top of the ring so it hangs securely. This will be the uppermost element of one strand. -
Add spacing beads:
Thread a wooden bead onto the cord just below the first ceramic ring. Tie a small knot underneath the bead to hold it in place, or let it rest directly on the next knot you create. -
Connect subsequent rings:
Below the bead, tie the cord onto the next ceramic ring. You can create variety by alternating ring sizes or keeping them uniform. -
Repeat for all strands:
Continue this pattern—ring, bead, ring—down the length of the cord until you have 3 or 4 rings per strand. Create five completed strands total. I like to vary the number of rings slightly between strands for a staggered look.
Don’t Have Ceramic Rings?
You can use wooden curtain rings painted with high-gloss white enamel spray paint. Several light coats will mimic the glossy look of ceramic perfectly.
Step 3: Creating the Tassels
-
Cut tassel lengths:
To make the lush fringe at the bottom, cut roughly 20-30 pieces of cord, each about 10 inches long. -
Attach to bottom rings:
Take the bottom-most ceramic ring of one strand. Using a lark’s head knot, attach 4-6 pieces of your pre-cut tassel cord to the bottom edge of that ring. -
Add final beads:
Thread two or three wooden beads onto the central cords of the tassel cluster to weigh it down and add a decorative touch. -
Comb the fringe:
Use a fine-tooth comb to gently brush out the ends of the macrame cord until they are fluffy and separated. -
Trim evenly:
Holding the strand up, trim the bottom of the combed fringe straight across so it looks neat and uniform.
Rings Clanking Too Loudly?
If the ceramic sound is too harsh, wrap a small section of the ring where it impacts its neighbor with white embroidery floss to dampen the noise.
Step 4: Final Assembly
-
Attach strands to hoop:
Tie the top of each completed vertical strand onto the wooden hoop. Space them evenly around the circumference. -
Adjust the height:
Before tightening your final knots, adjust the length of the string connecting the strand to the hoop. Stagger the heights so the rings don’t constantly crash into each other but gently clink. -
Secure the knots:
Once you are happy with the arrangement, tighten the knots on the hoop. A tiny dab of glue here ensures they won’t slide. -
Hang and test:
Hang the chime up and give it a gentle spin. Check if the weight is balanced; if it tilts, adjust the top suspension cords slightly.
Now hang your creation in a sunny spot where the breeze can gently actuate the chimes