
When I want a quick mood boost in the studio, I grab clay and make cute clay sculptures built from simple shapes like balls, teardrops, and little pancakes. Here are my favorite beginner-friendly ideas with kawaii details—big eyes, blushy cheeks, and tiny props you can totally make your own.
Chubby Cat With Big Eyes
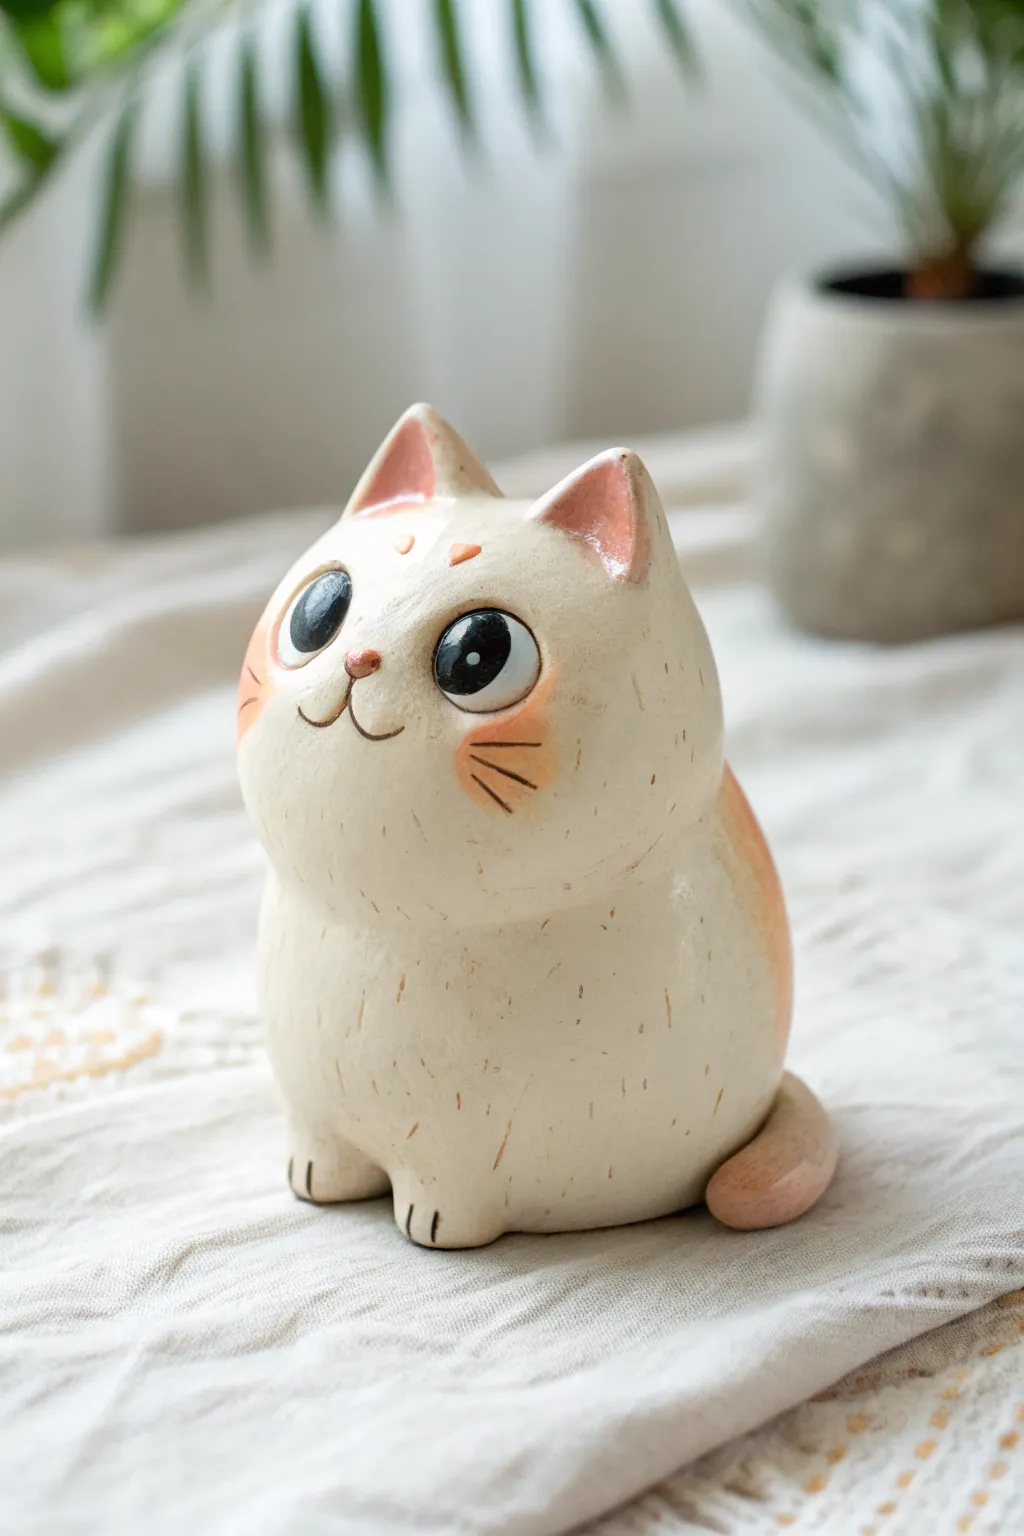
Capture the charm of cartoon innocence with this delightfully round cat sculpture. Featuring an exaggerated chubby form, glossy finish, and impossibly large eyes, this project is perfect for adding a touch of sweetness to any shelf.
Step-by-Step Guide
Materials
- Air-dry clay or polymer clay (white or cream)
- Acrylic paints (black, white, peach/pink, light brown)
- Sculpting tools (needle tool, ball stylus)
- Fine-grit sandpaper
- Glossy varnish or resin
- Small paintbrushes (detail and flat shaders)
- Water and sponge (for smoothing)
- Aluminum foil (for armature core)
Step 1: Sculpting the Base Form
-
Create the core:
Ball up a piece of aluminum foil into a fat egg shape to serve as the core. This saves clay and keeps the sculpture lighter. The shape should be wider at the bottom for that classic chubby look. -
Cover with clay:
Roll out a sheet of your chosen clay relative to the size of your foil core. Wrap the clay completely around the foil, smoothing the seams together until you have a seamless, smooth egg-like shape. -
Define the head:
While the clay is soft, use your fingers to gently pinch and indent the upper third of the egg shape. You don’t want a separate head, just a subtle suggestion of a neck to distinguish the face from the body. -
Form the ears:
Ideally, pinch two triangles directly from the head clay for durability. If adding separate pieces, score the connection points and blend the clay downwards seamlessly so the ears look integrated, not just stuck on.
Step 2: Adding Features and Details
-
Sculpt the tail:
Roll a small sausage of clay, tapering one end. Attach this to the lower back right side of the cat, curling it forward so it rests against the body. Blend the attachment point thoroughly. -
Create tiny feet:
Form two small, flattened balls of clay for the front paws. Press them onto the bottom front of the body. Use a needle tool or knife to gently press two vertical lines into each paw to suggest toes. -
Refine the facial structure:
Use a large ball tool or your thumb to press slight indentations where the eyes will go. This helps the large painted eyes sit naturally rather than bulging out oddly. -
Add texture:
Using a needle tool, create short, random vertical scratches all over the body, avoiding the face. These little dashes mimic a stylized fur texture and add rustic character to the piece. -
Dry and sand:
Allow the clay to dry completely according to package instructions. Once hard, use fine-grit sandpaper to smooth out any fingerprints or rough bumps, particularly around the ears and chin.
Pro Smoothing Tip
Before drying, dip your finger in water (or baby oil for polymer clay) and gently buff the surface to remove fingerprints for a professional finish.
Step 3: Painting and Finishing
-
Apply the base coat:
Paint the entire sculpture with an off-white or cream acrylic paint. You may need two thin coats for full opacity. Let this dry fully before moving on. -
Paint the eyes:
Using black paint, fill in two large circles in the facial indentations you made earlier. Make them quite large to achieve that wide-eyed look. Add a tiny white dot in the upper corner of each eye for a reflection. -
Blush the details:
Mix a soft peach or pink color. Paint the insides of the ears, the tip of the tail, and two round circles on the cheeks. I like to feather the edges of the cheek spots slightly so they look softer. -
Add facial lines:
With a very fine liner brush and brown paint, draw a small ‘Y’ shape for the nose and mouth. Add three whiskers on each cheek over the pink blush areas. -
Accentuate the texture:
create a very watery wash of light brown paint. Brush it over the scratched fur texture, then immediately wipe the surface with a paper towel. The paint will stay in the scratches, making the texture pop. -
Seal the piece:
Finish with a high-gloss varnish. This is crucial for mimicking the ceramic look in the photo. Apply two coats for extra shine, letting it dry between applications.
Level Up: Accessories
Give your kitty personality by sculpting a tiny clay fish, a ball of yarn, or a bow tie to place under one of the front paws before baking or drying.
Enjoy the adorable presence of your new desktop companion once the varnish has cured


Tiny Sitting Bunny With Rosy Cheeks
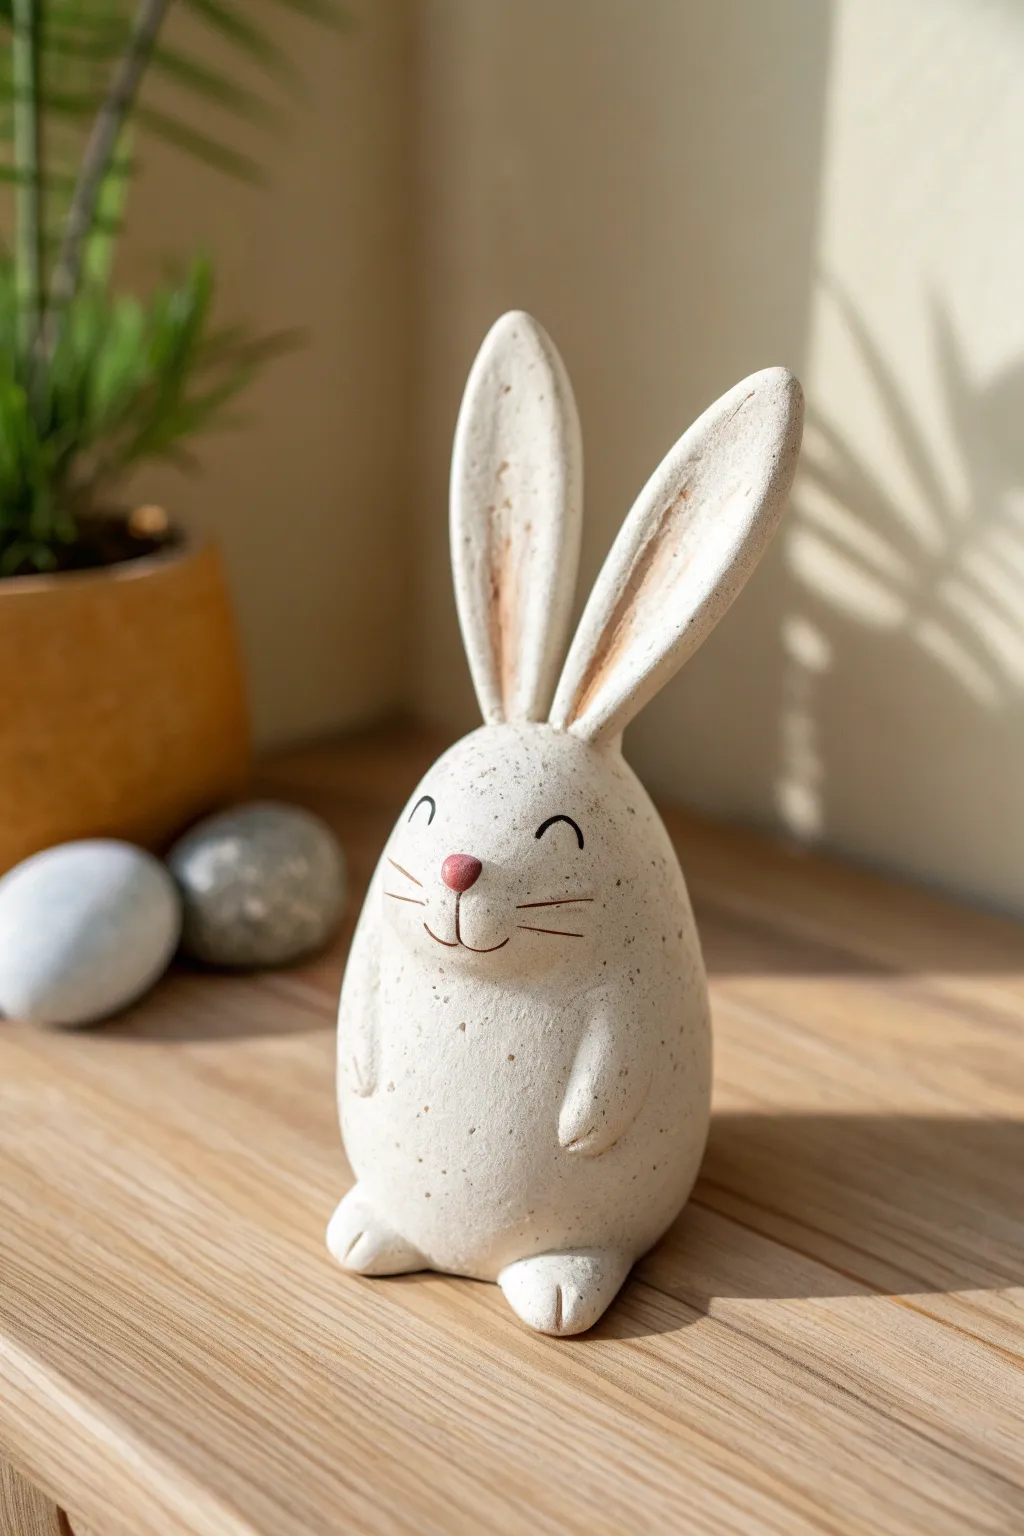
This adorable speckled bunny brings a touch of rustic charm with its creamy finish, simple happy face, and elongated ears. It’s an ideal project for beginners looking to practice basic shaping and subtle detailing.
Step-by-Step Tutorial
Materials
- White air-dry clay or polymer clay
- Rolling pin
- Modeling tools (or a toothpick and a dull knife)
- Acrylic paints (Cream/Off-White, Light Brown, Pink, Black)
- Small stiff-bristled brush (for speckling)
- Fine detail paintbrush
- Water formatting (if using air-dry clay)
- Matte sealant or varnish
Step 1: Body Construction
-
Form the Base:
Start with a ball of clay roughly the size of a tangerine. Roll it between your palms until smooth, then gently elongation it into a rounded teardrop or egg shape. This will be the main body. -
Flatten the Bottom:
Tap the wider end of your teardrop gently on your work surface. You need a flat, stable base so the bunny sits upright without wobbling. -
Create the Head Shape:
The head isn’t a separate piece here. Instead, gently pinch and smooth the upper third of the teardrop to slightly narrow it, differentiating the head area from the rounder belly below. -
Add Little Feet:
Roll two small marble-sized balls of clay. Flatten them slightly into ovals and attach them to the bottom front of the body. Blend the seams at the back of the feet into the body using a modeling tool or your finger. -
Score the Paws:
Use a knife tool or toothpick to press two small indentations into the front of each foot to create toes. -
Form the Arms:
Roll two thin, sausage-like shapes for the arms. They should be quite small and subtle. Attach them to the sides of the belly, blending the top shoulder area seamlessly into the body while leaving the little hands resting on the tummy.
Step 2: Ears & Details
-
Shape the Ears:
Roll two long cylinders of clay, tapering both ends. Flatten them gently with your thumb or a rolling pin until they look like long surfboards or petals. -
Attach the Ears:
Score the top of the head and the bottom of the ears (making scratches for better adhesion). Apply a dab of water or liquid clay. Press the ears firmly onto the head, smoothing the clay downward to merge them seamlessly. -
Create the Inner Ear:
Use a rounded tool to gently press an indentation down the center of each ear, giving them dimension and a place for the pink shading later. -
Make the Nose:
Roll a tiny, lentil-sized ball of clay. Attach it right in the center of the face area for the nose. -
Drying or Baking:
If using polymer clay, bake according to package instructions. For air-dry clay, let it sit in a dry, room-temperature spot for 24-48 hours until completely hard.
Seamless Blending
When attaching clay parts (ears to head), use a tiny amount of water on your finger to smooth the seam until the join line completely disappears.
Step 3: Painting & Finishing
-
Base Coat:
Paint the entire sculpture with a warm cream or off-white acrylic paint. You may need two coats for full coverage. Let dry completely. -
The Speckled Effect:
Dilute a small amount of light brown paint with water. Dip a stiff brush (like an old toothbrush) into the mix and run your thumb across the bristles to flick tiny speckles all over the bunny. I find it helpful to test on paper first to control the spray. -
Adding Warmth:
Mix a very pale pinkish-brown tone. Gently dry-brush this color onto the inner ears to give them a soft shadow. -
Painting the Face:
Paint the little nose button a soft, dusty pink. Using your finest detail brush and black paint, draw two small inverted ‘U’ shapes for smiling eyes. -
Whiskers and Mouth:
With a thin brown or black wash, paint a delicate ‘Y’ shape under the nose for the mouth and three thin, wispy lines on each cheek for whiskers. -
Seal the Work:
Once all paint is totally dry, apply a layer of matte varnish to protect your bunny while keeping that natural, stony look.
Drooping Ears?
If the long ears won’t stay upright while drying, prop them up from behind with a small piece of crumpled aluminum foil or cardboard until they firm up.
Now you have a charming little woodland friend to decorate your shelf or gift to someone special


Round Bear Holding a Little Gift
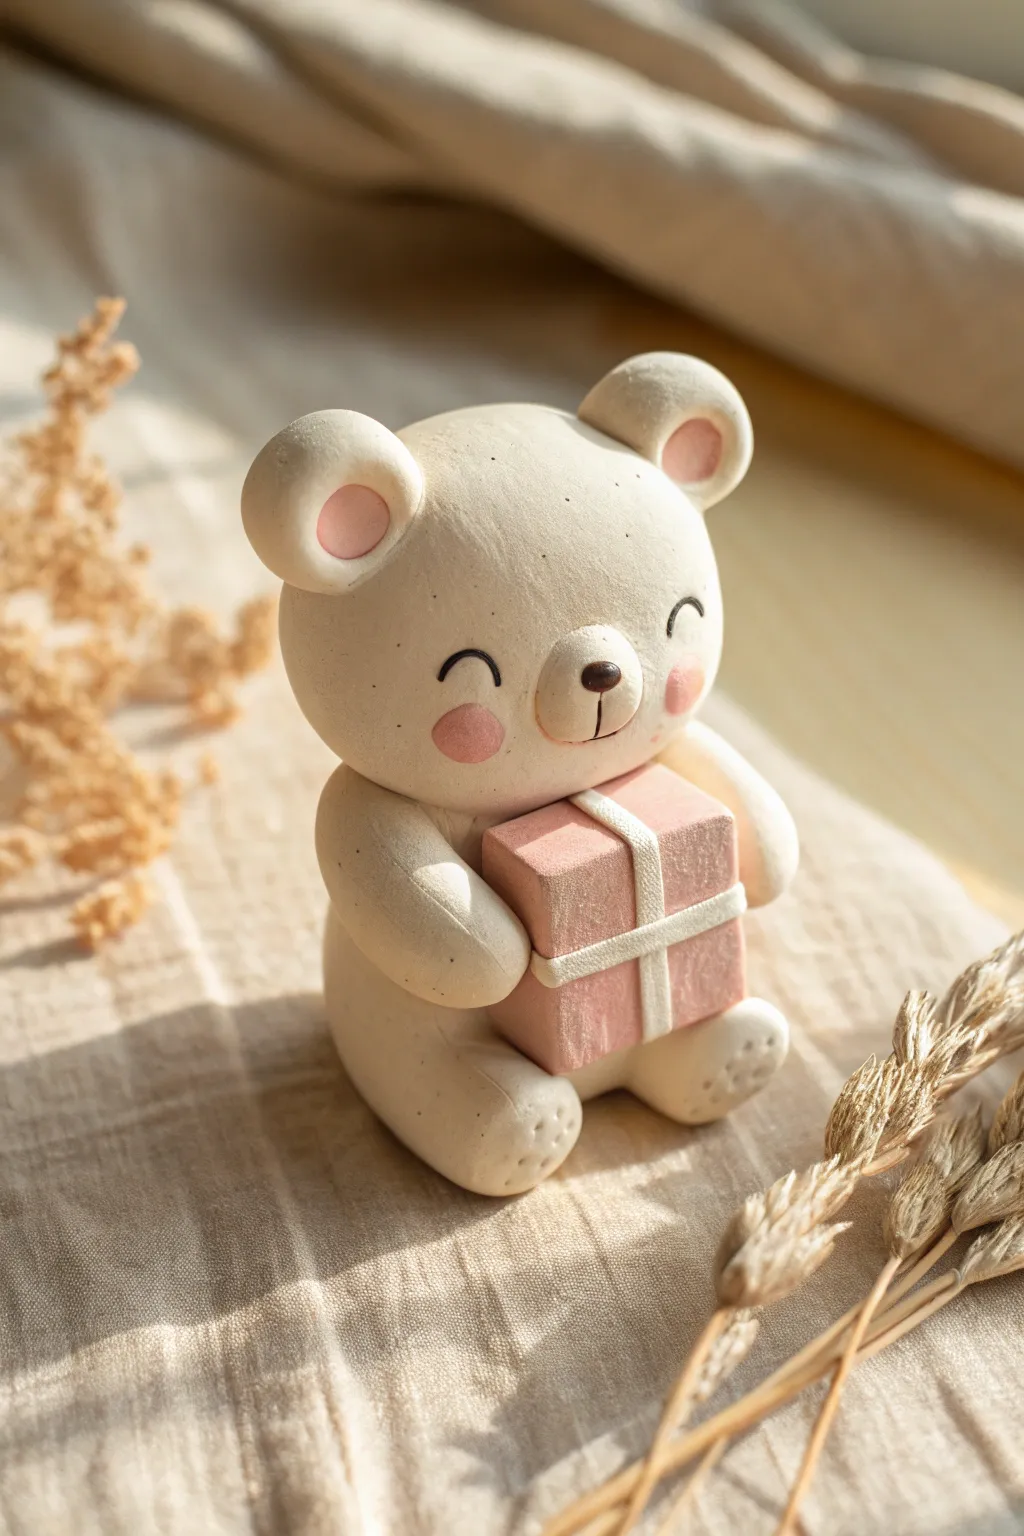
This adorable, chubby bear sculpture brings a touch of warmth with its gentle cream color and sweetly wrapped present. With its simplified, rounded forms and happy expression, it makes for a heartwarming desk companion or a handmade token of affection.
Step-by-Step
Materials
- White or cream polymer clay (or air-dry clay)
- Soft pink polymer clay
- Basic sculpting tools (ball stylus, needle tool)
- Small rolling pin
- Blade or craft knife
- Black acrylic paint
- Fine-point paintbrush or toothpick
- Toothbrush or textured sponge (for texture)
- Oven (if using polymer clay)
Step 1: Sculpting the Body and Head
-
Form the base:
Start by conditioning a large ball of cream-colored clay until it is soft and pliable. Roll it into a smooth, slightly flattened sphere to serve as the bear’s body. -
Shape the head:
Create a second sphere, slightly smaller than the body. Flatten the bottom slightly so it sits securely on top of the body piece. Gently blend the seam where they meet just enough to secure them, whilst keeping the definition between head and tummy distinct. -
Add texture:
Before adding details, gently tap the entire surface with an old toothbrush or a textured sponge. I like to do this early so the finish looks more like stone or unglazed ceramic.
Keeping it clean
White clay picks up dust instantly. Keep a pack of baby wipes or rubbing alcohol nearby to clean your hands and tools often while sculpting.
Step 2: Facial Features
-
Make the snout:
Roll a small, flattened oval of cream clay. Press this onto the lower center of the face. Use a needle tool to impress a small vertical line for the mouth cleft. -
Add the nose:
Take a tiny speck of dark brown or black clay (or paint it later) and roll it into a triangle with rounded corners. Press this into the top of the snout indentation. -
Create the ears:
Roll two small balls of cream clay. Use a ball stylus to press a deep indentation into the center of each. -
Detail the inner ears:
Roll two tiny balls of pink clay, flatten them, and press them into the indentations of the cream ears. Attach the finished ears to the top sides of the head. -
Apply rosy cheeks:
Flatten two small circles of pink clay until they are very thin. Press these onto the face on either side of the snout to create a blushing effect. -
Draw the eyes:
Using a needle tool, carefully etch two curved arches for the closed, smiling eyes. You will fill these with paint later.
Make it a shaker
Before sealing the body, hollow it out slightly and add dried beans or beads inside creates a satisfying rattle sound when the figure is moved.
Step 3: The Gift Box and Limbs
-
Construct the box:
Shape a cube from pink clay. Use your blade to ensure the sides are sharp and flat. -
Add the ribbon:
Roll out a very thin snake or strip of cream clay (or white). Wrap it around the pink cube vertically and horizontally to mimic a tied ribbon. -
Attach the legs:
Roll two generous teardrop shapes from cream clay. Attach them to the bottom front of the body, creating the look of sitting legs. Use a needle tool to distinctively mark three toe indentations on each foot. -
Attach the arms:
Create two sausage shapes for arms. Position them on the sides of the body, curving forward. -
Secure the gift:
Place the pink gift box against the bear’s tummy and gently press the arm ends onto the sides of the box so it looks like the bear is holding it tight.
Step 4: Finishing Touches
-
Final texture check:
Give the piece a look over and lightly re-texture any areas that got smoothed down while attaching limbs, paying attention to the back and sides. -
Bake or dry:
Follow the instructions for your specific clay. If using polymer, bake at the recommended temperature. If using air-dry, let it sit for at least 24-48 hours. -
Paint the details:
Once cool or dry, drop a tiny amount of black acrylic paint into the etched eye lines and wipe away any excess from the surface immediately for a clean look.
Now you have a sweet little bear ready to give a gift of happiness to anyone who sees it


Minimal Duck With Chunky Feet
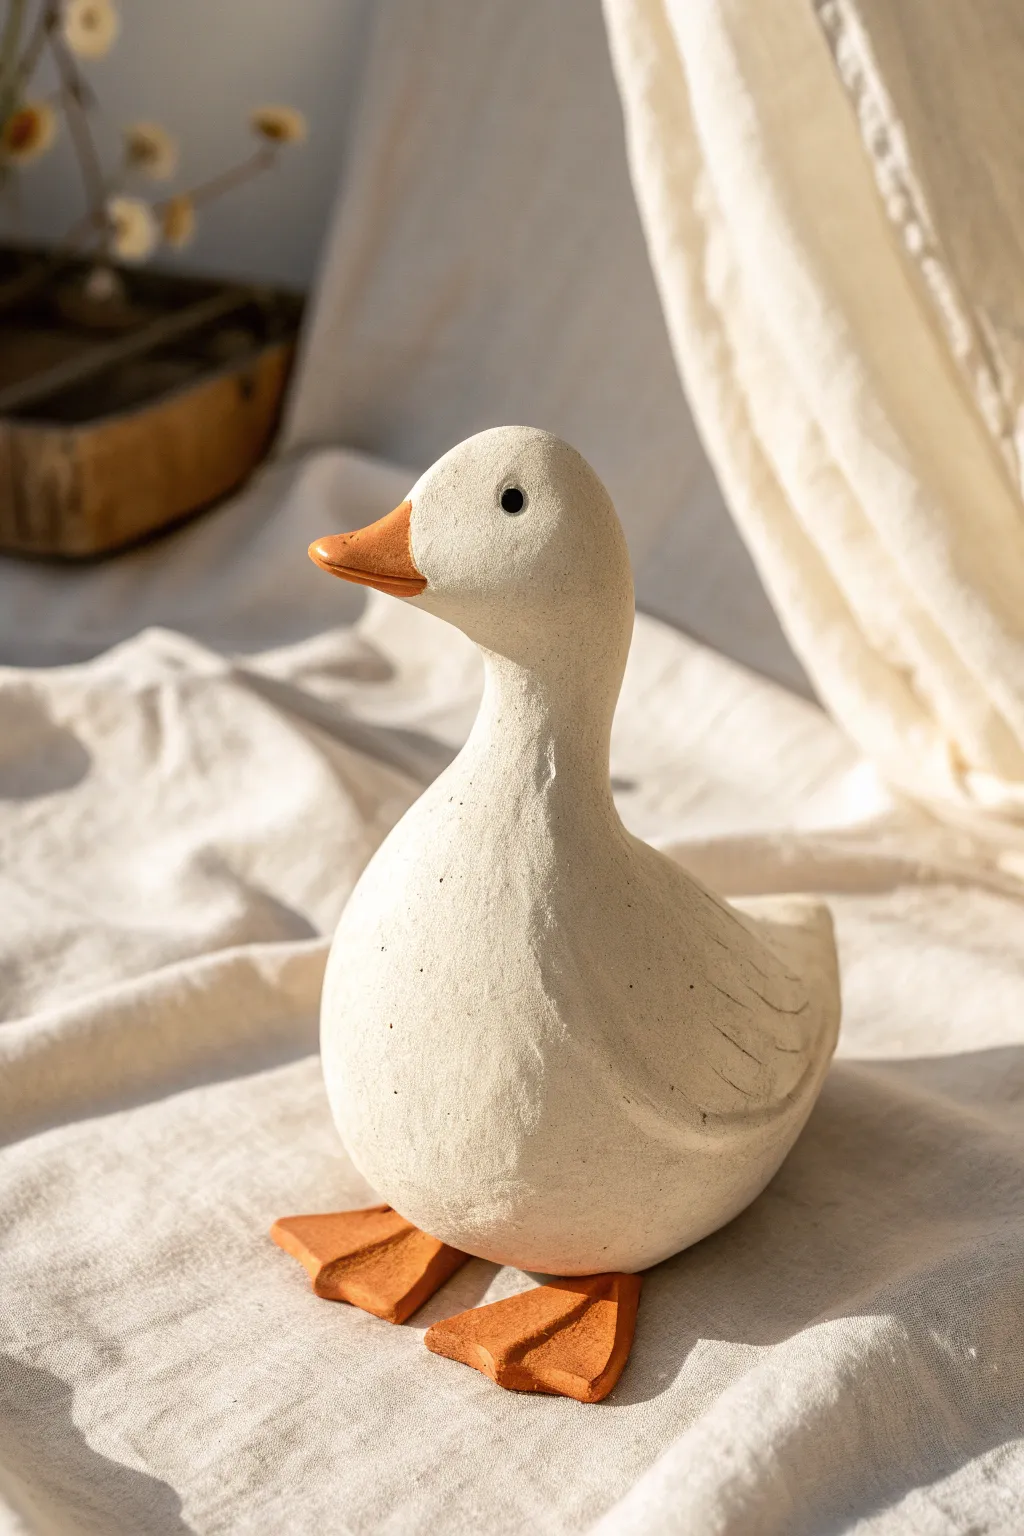
Embrace simplicity with this adorable, minimalist duck sculpture that combines smooth, clean lines with playful, oversized feet. The finished piece has a charming matte texture that feels modern yet handcrafted, perfect for a sunny shelf.
Step-by-Step Guide
Materials
- Air-dry clay or polymer clay (white)
- Acrylic paint (burnt orange, black)
- Fine-grit sandpaper (220-400 grit)
- Small rolling pin
- Sculpting tools (needle tool, smoothing tool)
- Water and sponge (for smoothing)
- Matte varnish or sealant
- Paintbrushes (small detail brush, flat brush)
Step 1: Forming the Body
-
Condition the clay:
Start by kneading a large handful of clay until it is warm, pliable, and free of cracks. If you’re using polymer clay, this might take a few minutes. -
Shape the base:
Roll the clay into a large, smooth ball, then gently pull one side upwards to create a pear shape. This wider bottom will be the body, and the narrower top will become the neck. -
Define the neck:
Using your thumb and forefinger, gently pinch and smooth the clay to elongate the neck area, creating a smooth curve that transitions into the round body. -
Create the head:
At the top of the neck, shape a rounded bulb for the head. Ensure the transition from neck to head is seamless by smoothing the clay with a damp finger or sponge. -
Sculpt the beak:
Pinch a small amount of clay from the front of the face to form a triangular beak shape. Keep the lines soft but distinct from the rest of the head. -
Smooth the surface:
Check the entire form for lumps or fingerprints. Dip your finger in a little water (for air-dry clay) or baby oil (for polymer) and polish the surface until it looks pristine.
Step 2: Wings and Feet
-
Form the wings:
Roll two smaller flattened teardrop shapes of clay. These should be roughly the length of the duck’s body. -
Attach the wings:
Press the wings onto the sides of the body. Blend the edges into the main body using a smoothing tool, but leave the back edge of the wing slightly raised for definition. -
Wing details:
Use a needle tool or a dull knife to gently score horizontal lines across the wings, mimicking feathers. Keep these lines simple and spaced out for that minimal look. -
Create the feet pads:
Roll two medium-sized balls of clay and flatten them into thick, triangular wedges. These will become the chunky feet. -
Shape the webbed toes:
Use a knife tool to cut two notches into the wider front edge of each triangle, creating three distinct toes per foot. -
Final assembly:
Place the body onto the feet to ensure it balances. I prefer to score the bottom of the duck and the top of the feet, adding a bit of water or slip to create a strong bond, before pressing them together firmly.
Tip: Weight Distribution
To prevent tipping, lightly tap the clay duck firmly on your work surface before attaching feet. This creates a flat base for better stability.
Step 3: Finishing Touches
-
Dry or bake:
Allow your sculpture to dry completely (24-48 hours for air-dry) or bake according to your polymer clay package instructions. -
Sand for texture:
Once fully cured, gently sand the white body of the duck. This removes any final imperfections and gives it a lovely, stone-like texture. -
Paint the beak and feet:
Using burnt orange acrylic paint, carefully paint the beak and the large feet. You may need two thin coats for opaque coverage. -
Add the eyes:
Dip the back end of a paintbrush into black acrylic paint and dot it onto the face to create the eyes. A tiny white dot inside the black one can add a spark of life. -
Seal the piece:
Finish by applying a matte varnish over the entire sculpture. This protects the paint and unifies the sheen of the clay.
Cracks while drying?
If hairline cracks appear as air-dry clay cures, mix a tiny bit of fresh clay with water to make a paste and fill the cracks, then sand smooth once dry.
Now you have a charming little companion to brighten up your desk or bookshelf

The Complete Guide to Pottery Troubleshooting
Uncover the most common ceramic mistakes—from cracking clay to failed glazes—and learn how to fix them fast.
Wide-Eyed Frog on a Lily Pad
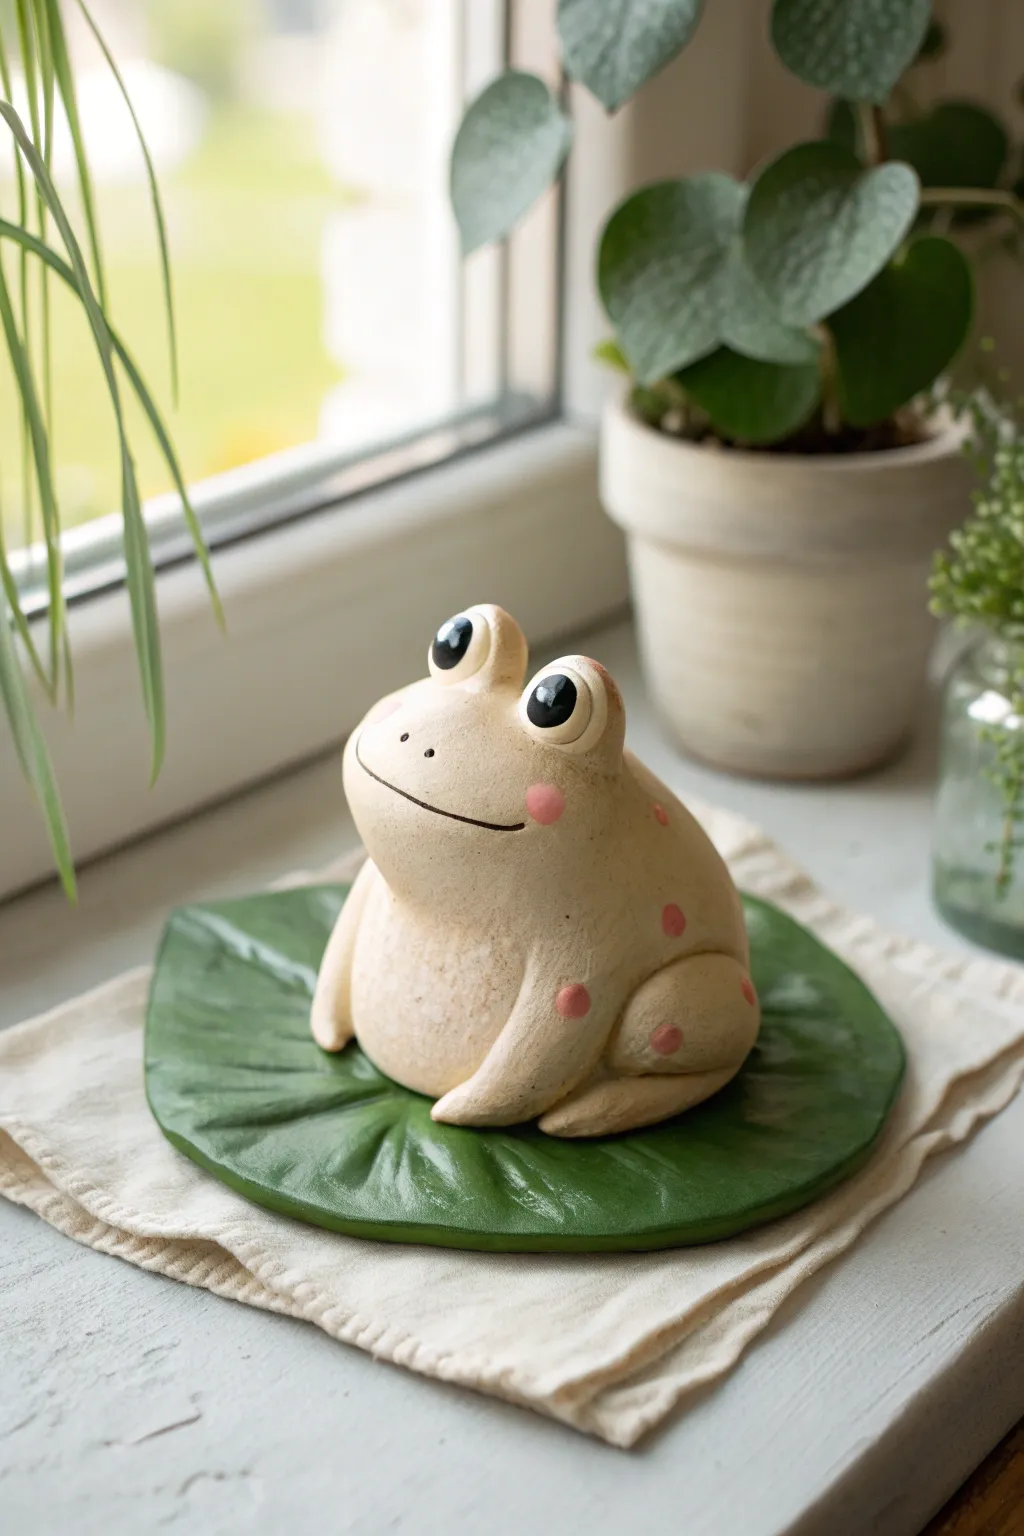
This charming ceramic or air-dry clay friend sits happily on his own custom leaf, bringing a whimsical touch to any windowsill. With his gentle smile and glossy eyes, this project is perfect for practicing smooth, ample shapes and simple character design.
How-To Guide
Materials
- Beige or off-white air-dry clay (or polymer clay)
- Green air-dry clay (or white clay to paint later)
- Acrylic paints: Black, white, soft pink, deep green (if painting the leaf)
- Clay sculpting tools (specifically a needle tool and a smoothing rib)
- Rolling pin
- Small bowl of water (for smoothing)
- Gloss varnish or clear nail polish
- Matte sealant (optional)
- Paintbrushes: Fine detail brush and a flat shader
- Texturing tool or real leaf (optional)
Step 1: Sculpting the Frog Body
-
Form the base:
Start with a large ball of beige clay, roughly the size of a tennis ball. Roll it until it is smooth and crack-free, then gently shape it into a rounded gumdrop or pear shape that is wider at the bottom. -
Define the head:
Using your thumbs, gently press into the upper third of the shape to create a very subtle separation between the head and the body, keeping the overall form continuous and chubby. -
Add the eye mounds:
Roll two smaller balls of the same beige clay. Attach them firmly to the top of the head using a score-and-slip method (scratching the surfaces and adding a drop of water) so they stand tall and prominent. -
Blend the seams:
Use a clay smoothing tool or your finger dipped in a little water to blend the clay from the eye mounds down into the head. The connection should look seamless, as if the eyes grew naturally from the skull. -
Create the legs:
Roll two thick, sausage-like logs for the hind legs. Curve them into a ‘C’ shape and attach them to the sides of the body’s lower half. Blend only the back edge into the main body, leaving the thigh muscle defined. -
Add the front arms:
Roll two shorter logs for the front legs. Attach them vertically under the chin area so they rest on the belly, gently tapering the ends where the ‘hands’ would be. -
Carve the mouth:
Take a needle tool or a thin blade and press a long, curved smile into the face. I like to tilt the corners up slightly to give him a permanently happy expression. -
Refine the surface:
Check the entire sculpture for fingerprints or lumps. Dip your finger in water and smooth everything down until the frog looks soft and polished.
Smooth Surface Secret
For a truly porcelain-like finish on air-dry clay, wipe the semi-dry clay with a damp baby wipe or fine sponge. This removes final imperfections better than fingers alone.
Step 2: Creating the Lily Pad Base
-
Roll out the leaf:
Take a large chunk of green clay (or white clay you intend to paint green) and roll it flat to about a 1/4 inch thickness. Aim for an irregular oval or circle shape. -
Cut the notch:
Use a knife tool to cut a triangular notch out of one side of the circle to create that classic lily pad silhouette. -
Texture the leaf:
Use a needle tool or a sculpting rib to impress radiating veins starting from the center and moving toward the edges. Don’t worry about being perfect; natural leaves are flawed. -
Mount the frog:
While the leaf is still pliable, place your frog in the center. Gently press him down so he nestles into the leaf, ensuring a flat bottom for stability.
Step 3: Painting and Finishing
-
Dry completely:
Allow the sculpture to air dry for 24-48 hours. If using polymer clay, bake according to the package instructions. -
Paint the leaf:
If you used white clay for the base, paint the lily pad a deep, glossy green. You can dry-brush a lighter green over the veins to make the texture pop. -
Paint the eyes:
Paint large black circles inside the sculpted eye mounds. Once the black is dry, add a tiny white dot to the upper corner of each pupil for a sparkly reflection. -
Add rosy cheeks:
Dilute pink acrylic paint with a lot of water to make a glaze, or use a fairly dry brush. Dab soft pink circles onto the cheeks and gently create a few pink spots on the frog’s back/sides for character. -
Detail the nose:
Using your finest brush or a toothpick, add two tiny black dots for nostrils right above the smile line. -
Varnish for shine:
Finish by applying a high-gloss varnish specifically to the eyes to make them look wet. You can leave the body matte or give it a satin finish.
Creative Twist
Instead of a simple green leaf, sculpt a small pink lotus flower and attach it to the lily pad next to the frog to add a pop of color and extra interest.
Place your little amphibian near a sunny window and enjoy his cheerful company
Baby Dino With Soft Spikes
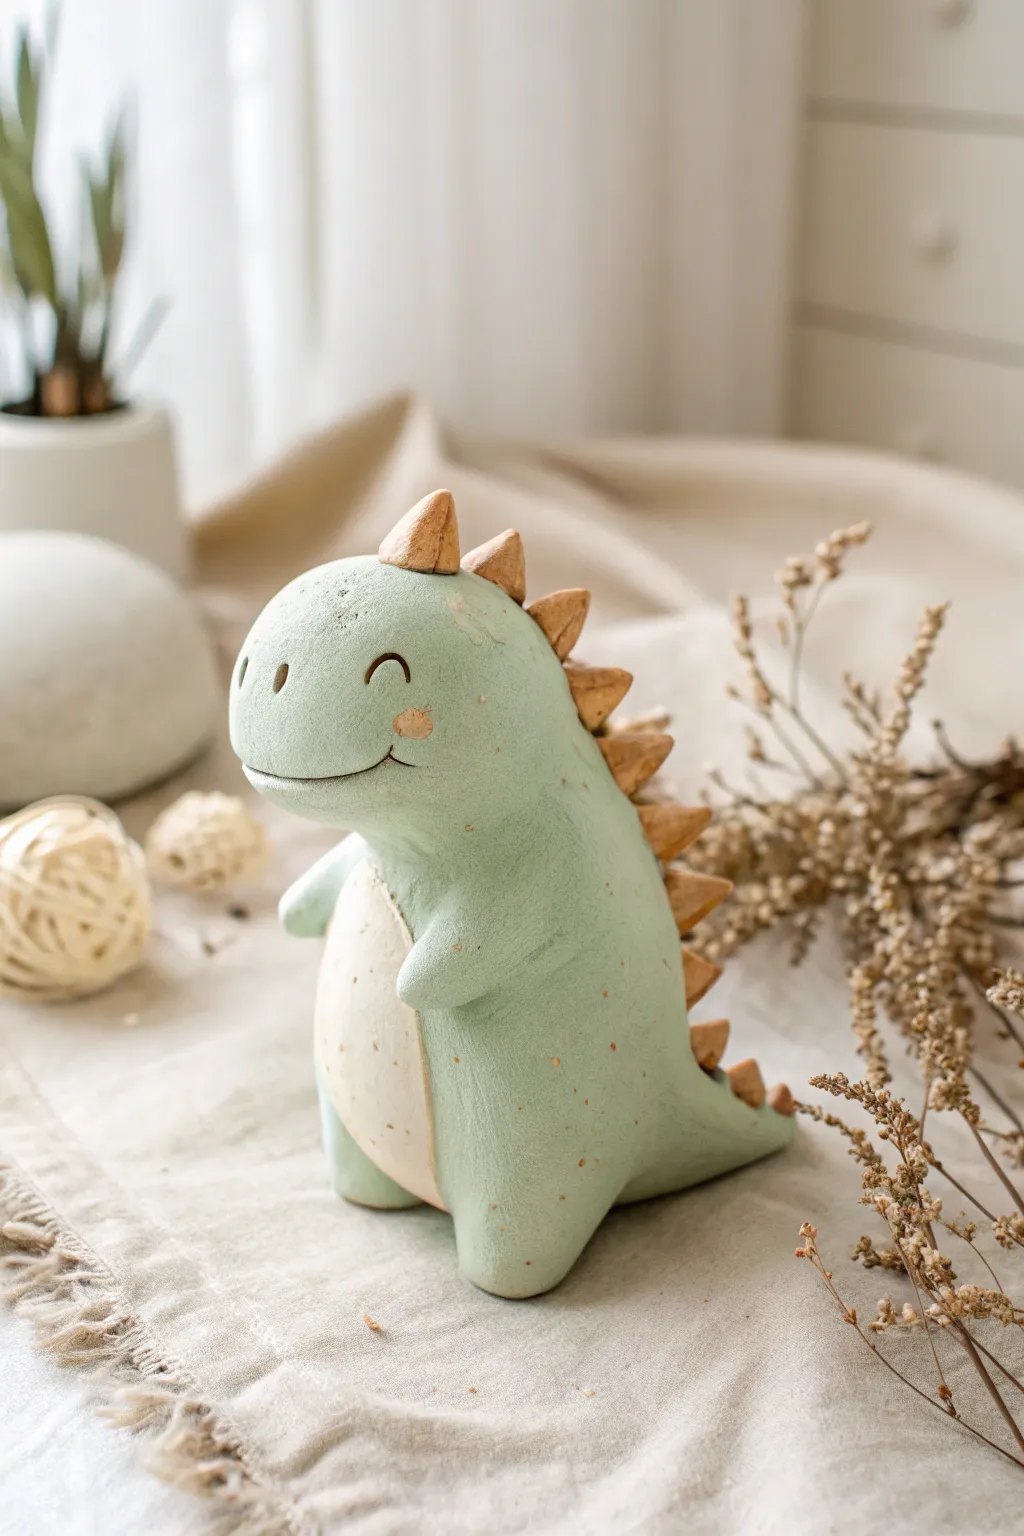
This adorable baby dinosaur sculpture features a soft, matte texture and gentle pastel tones that make it perfect for a nursery or desk companion. With its chubby body and friendly smile, this project is forgiving for beginners while offering satisfying details to sculpt.
Step-by-Step
Materials
- Light green polymer clay (pastel mint)
- Cream or off-white polymer clay
- Light tan or terracotta polymer clay
- Sculpting tools (ball styluses, needle tool)
- Soft bristle toothbrush (for texturing)
- Black acrylic paint
- Fine detail paintbrush
- Pink chalk pastel (optional, for cheeks)
- Aluminum foil (for armature core)
- Oven for baking
Step 1: Forming the Body Base
-
Create the core:
Start by crumpling a piece of aluminum foil into a pear shape. This saves clay and helps the sculpture bake evenly. Make it slightly smaller than you want the finished dinosaur to be. -
Condition the green clay:
Take your mint green clay and knead it thoroughly until it is soft and pliable. Roll it into a smooth sheet about 1/4 inch thick. -
Cover the armature:
Wrap the green clay sheet around your foil pear. Smooth the seams carefully with your thumb until they disappear completely. The top narrower part will become the head and neck, blending seamlessly into the wider body. -
Refine the shape:
Gently press and roll the form on your work surface to flatten the bottom so the dinosaur stands on its own. Use your fingers to round out the head area, giving it a soft, chubby profile.
Cracks in the Clay?
If you see small cracks appearing while smoothing, mix a tiny drop of baby oil or clay softener into the problem area and rub gently until the surface is seamless again.
Step 2: Adding Key Features
-
Attach the legs:
Roll two small, stout logs of green clay for the legs. Press them firmly onto the bottom sides of the body, blending the clay upwards into the torso so there are no visible seams. -
Sculpt the tail:
Form a cone shape from green clay. Attach the wider end to the lower back of the dinosaur. Smooth the clay around the distinct join line so the tail looks like a natural extension of the spine. Curve the tip slightly for movement. -
Add the belly patch:
Roll a very thin oval of cream-colored clay. Press this onto the front of the belly. Use your thumb to gently feather the edges so it sits flush with the green body rather than looking like a sticker on top. -
Create the arms:
Roll two tiny teardrop shapes of green clay. Attach them to the sides of the body just above the belly patch, pointing slightly inward. These little nubby arms add to the cute factor.
Custom Scale Effect
Before baking, press the end of a small straw or round piping tip gently into random spots on the green skin to create raised circular ‘scales’ for extra dimension.
Step 3: Texturing and Details
-
Apply texture:
I find this step transforming: take a clean, soft toothbrush and gently tap it all over the green and cream surfaces. This removes fingerprints and gives the clay that stone-like, matte finish seen in the photo. -
Make the spikes:
Roll small balls of tan or terracotta clay, graduating them in size. Pinch each ball into a triangular pyramid or cone shape. You’ll need about 8-10 spikes depending on your dino’s size. -
Attach the spine:
Place the spikes in a row starting from the top of the head down the back to the tail tip. Start with medium sizes on the head, largest on the back, and smallest on the tail. Press them on firmly. -
Rough up the spikes:
Using a needle tool or stiff brush, scratch vertical lines and texture into the tan spikes so they look bone-like and rugged compared to the soft body.
Step 4: Face and Finishing
-
Carve the mouth:
Use a needle tool or a small curved blade to gently press a wide, U-shaped smile into the face. Add a tiny perpendicular line at the end of the smile for a dimple effect. -
Shape the eyes:
Press two arched indentations for the eyes using a small modeling tool. They should look like happy, closed eyelids. -
Create tonal speckles:
Before baking, you can lightly flick a stiff brush with very diluted brown acrylic paint (or use watered-down clay bits) to create tiny speckles on the green skin for an organic look. -
Flush the cheeks:
Scrape a little pink chalk pastel into a powder. Use a soft dry brush to dust rosy circles onto the cheeks. Do this before baking to set the color. -
Bake the sculpture:
Bake according to your polymer clay package instructions (usually around 275°F/130°C for 15-30 minutes). Let it cool completely in the oven to prevent cracking. -
Paint the face details:
Once cool, use a very fine brush and black acrylic paint to carefully fill in the eye arches and the smile line to make the expression pop.
Place your little dino on a shelf among some potted plants for the perfect prehistoric habitat display


What Really Happens Inside the Kiln
Learn how time and temperature work together inside the kiln to transform clay into durable ceramic.
Sleepy Fox Curled Into a Ball
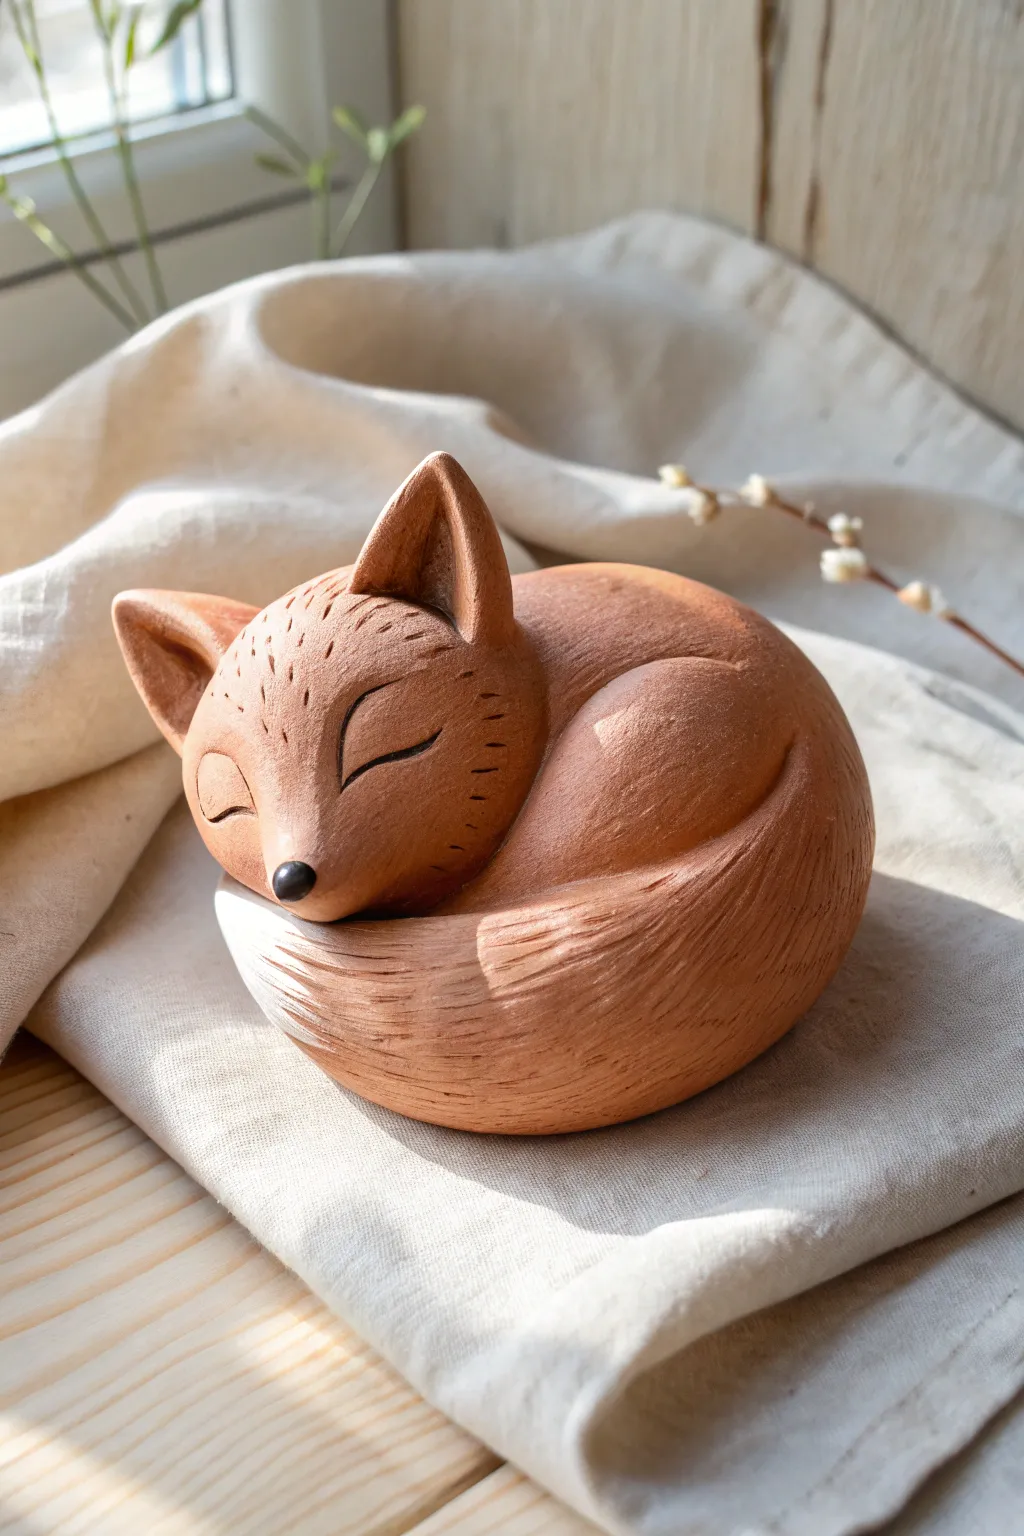
Capture the peaceful essence of a napping woodland creature with this delightful clay project. Using warm terracotta-colored clay, you’ll sculpt a stylized fox curled into a perfect, comforting circle.
Step-by-Step Tutorial
Materials
- Terracotta-colored polymer clay or air-dry clay (approx. 200g)
- Small amount of white acrylic paint (optional dry brushing)
- Black acrylic paint or a tiny ball of black clay
- Sculpting tools with needle point and curve edge
- Wire brush or stiff toothbrush for texturing
- Smooth work surface
- Aluminum foil (for armature core, optional)
Step 1: Forming the Base Shape
-
Condition the clay:
Begin by kneading your terracotta clay thoroughly until it is warm, pliable, and free of cracks. If you are using polymer clay, this step is crucial for ensuring the finished piece doesn’t crack during baking. -
Create the main body mass:
Roll a large ball of clay, roughly the size of a tangerine. Gently press it down onto your work surface to flatten the bottom slightly so it won’t roll away. -
Identify the head area:
Using your thumb, gently pull a portion of the clay from the main ball to one side to start forming the head. You want this to remain attached seamlessly, so avoid tearing the clay. -
Refine the overall oval:
Shape the entire mass into a smooth, rounded oval. The pulled-out section will become the snout and face, while the larger back section will represent the curled body.
Step 2: Sculpting Anatomy
-
Shape the face:
Refine the front section into a soft triangular wedge shape for the fox’s face. Smooth the transition where the neck meets the body so the fox looks tucked in. -
Form the ears:
Make two smaller triangles from fresh clay. Attach them to the top of the head using a blending tool or your finger to smooth the seams completely invisible. -
Detail the ears:
Use a small rounded tool to press indentations into the front of each ear, giving them depth and a realistic cup shape. -
Create the hind leg:
Roll a fat sausage of clay and curve it against the side of the body to form the haunch of the hind leg. Flatten it slightly into the body so it looks like it’s resting under the fur, not just stuck on top. -
Add the tail:
Roll a large, tapered coil for the tail. Wrap it around the front of the body, tucking the tip just under the fox’s chin or near its nose to complete the circle. -
Seamless blending:
Take time to blend the edges of the tail and leg into the main body mass where appropriate. The goal is a cohesive, singular form.
Smoother Blending
Use a rubber-tipped sculpting tool to blend seams between added clay parts (like legs) and the body. It leaves no fingerprints and creates flawless transitions.
Step 3: Texturing and Details
-
Carve the eyes:
Using a needle tool or a very fine blade, carve two gently curving crescent shapes for the closed eyes. I find doing this lightly first allows for corrections before committing to a deeper cut. -
Add the nose:
Take a tiny dot of black clay (or paint it later) and press it firmly onto the very tip of the snout. -
Fur texture on the face:
Use a needle tool to make tiny, shallow dashes on the forehead and cheeks. Keep these marks short and directional, flowing away from the nose. -
Texture the tail:
Use a specialized texture tool or a stiff brush to create longer, sweeping fur lines along the tail’s length. This helps differentiate the fluffy tail from the smoother body. -
Body detailing:
Add subtle texture to the hind leg and back, but keep it smoother than the tail to suggest shorter fur. -
Define the tail tip:
If you plan to paint the tail tip white later, you can carve a subtle zig-zag line now to guide your painting, separating the main tail color from the tip.
Drooping Ears?
If the ears sag while sculpting, prop them up with small pieces of cardstock or toothpick supports until the clay firms up or is baked.
Step 4: Finishing
-
Smooth and check:
Look over the entire sculpture. Gently stroke any accidental fingerprints away with a drop of baby oil (for polymer) or water (for air dry). -
Cure the clay:
Bake or dry your sculpture according to the specific instructions on your package of clay. Ensure it is fully hardened before proceeding. -
Optional painting:
Once cool or dry, you can dry-brush a tiny amount of white paint onto the tail tip and inside the ears to accentuate the textures.
Now you have a serene little companion to keep you company on your desk or shelf
Tiny Otter Holding a Heart
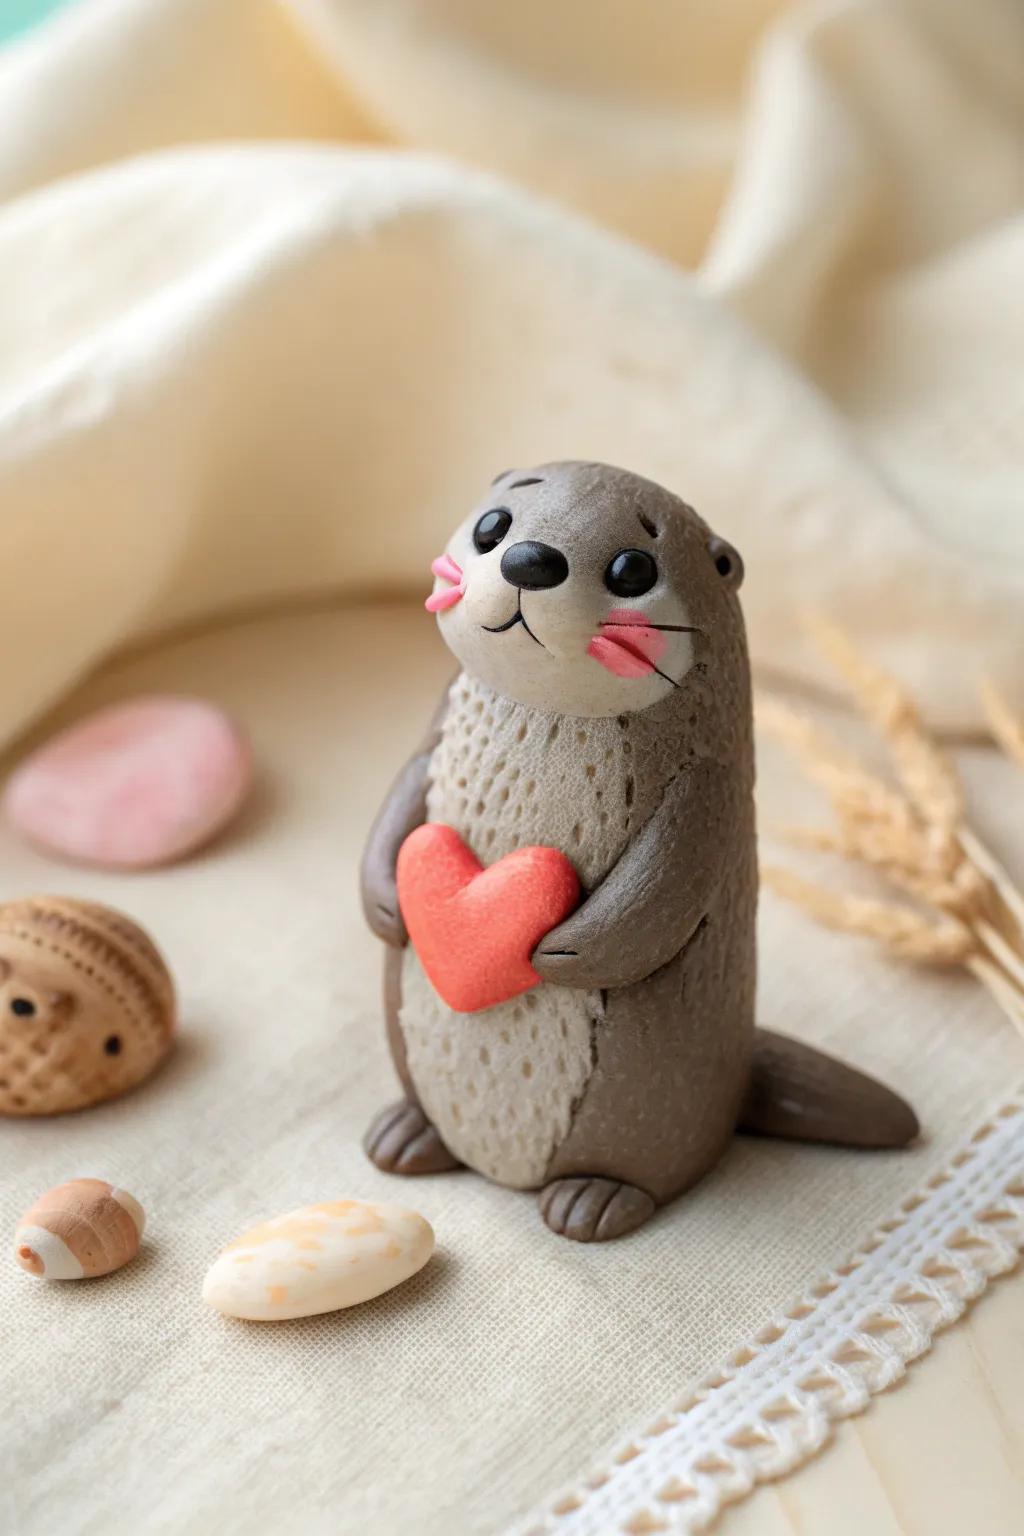
This adorable polymer clay otter is ready to share some love, standing tall with a sweet red heart clutched to its chest. With its textured tummy and rosy cheeks, this little sculpture makes for a perfect desk companion or a heartfelt handmade gift.
How-To Guide
Materials
- Polymer clay (dark taupe/brown, beige/cream, red, black, light pink)
- Clay sculpting tools (needle tool, ball stylus)
- Texture tool (clean toothbrush, stiff bristle brush, or crumpled foil)
- Baking surface (ceramic tile or parchment paper)
- Gloss glaze (optional, for eyes and nose)
- Fine paintbrush
- Oven
Step 1: Shaping the Otter Body
-
Form the base:
Start with a chunk of the dark taupe clay. Roll it into a smooth ball, then gently elongate it into a rounded cylinder shape, slightly wider at the bottom for stability. -
Define the head:
Use your thumb and forefinger to gently pinch the upper third of the cylinder, creating a slight indentation to separate the head area from the body without detaching it. -
Create the belly patch:
Roll a smaller piece of beige clay into an oval. Flatten it so it’s quite thin but opaque. -
Attach the tummy:
Press the beige oval onto the front of the otter’s body, smoothing the edges with your finger so it blends seamlessly into the brown clay. -
Add texture:
To give the otter a furry appearance, gently press a clean toothbrush or crumpled foil all over the body. Pay special attention to the beige belly area to make it look fluffy.
Fingerprint Troubles?
If you see fingerprints on your smooth clay, lightly brush the raw sculpture with a drop of baby oil or clay softener before texturing to smooth them away.
Step 2: Adding Features and Limbs
-
Form the feet:
Roll two small balls of dark taupe clay. Flatten them slightly and press them underneath the body. -
Detail the toes:
Use a needle tool or knife to press three small indentations into each foot to create toes. -
Attach the tail:
Roll a tapered cone of dark taupe clay for the tail. Attach it to the lower back of the otter, blending the seam upwards so it acts as a smooth kickstand for balance. -
Create the arms:
Roll two small sausage shapes from the taupe clay. Attach them to the sides of the body, just below the neck, angling them forward as if reaching out. -
Make the heart:
Take a small amount of red clay and form a teardrop, then flatten it slightly and indent the top to create a classic heart shape. -
Place the heart:
Position the red heart against the otter’s chest. Gently bend the clay arms inward so the hands overlap the edges of the heart, securing it in place.
Make it a Gift
Before baking, insert a small eye-screw into the top of the otter’s head to turn this sculpture into a charming keychain or hanging ornament.
Step 3: Bringing the Face to Life
-
Add the snout:
Take a tiny bit of beige clay, flatter than the belly piece, and press it onto the face area to create a muzzle base. -
Sculpt the nose:
Roll a tiny oval of black clay and press it firmly onto the top center of the beige muzzle. -
Draw the mouth:
Using your needle tool, carefully press a vertical line down from the nose, splitting into a curved ‘W’ shape for the smile. -
Place the eyes:
Use a ball stylus to make two small sockets above the muzzle. Insert two equal-sized balls of black clay and press them down gently so they look embedded, not bulging. -
Add ears:
Create two tiny semi-circles of taupe clay and attach them to the sides of the head. Use a small ball tool to indent the centers. -
Rosy cheeks and whiskers:
Apply two tiny flattened ovals of pink clay to the cheeks. I like to score these gently with a needle tool to mimic whisker lines.
Step 4: Baking and Finishing
-
Bake:
Bake the sculpture according to your clay package instructions (usually around 275°F/135°C for 15-30 minutes per 1/4 inch thickness). -
Cool down:
Let the otter cool completely in the oven with the door cracked open to prevent cracking from thermal shock. -
Glaze:
Once cool, use a fine brush to apply a dot of gloss glaze to the eyes and nose for a permanent ‘wet’ look.
Enjoy your sweet little otter creation on your shelf or gift it to someone special

TRACK YOUR CERAMIC JOURNEY
Capture glaze tests, firing details, and creative progress—all in one simple printable. Make your projects easier to repeat and improve.
Turtle Trinket Box With Lift-Off Shell
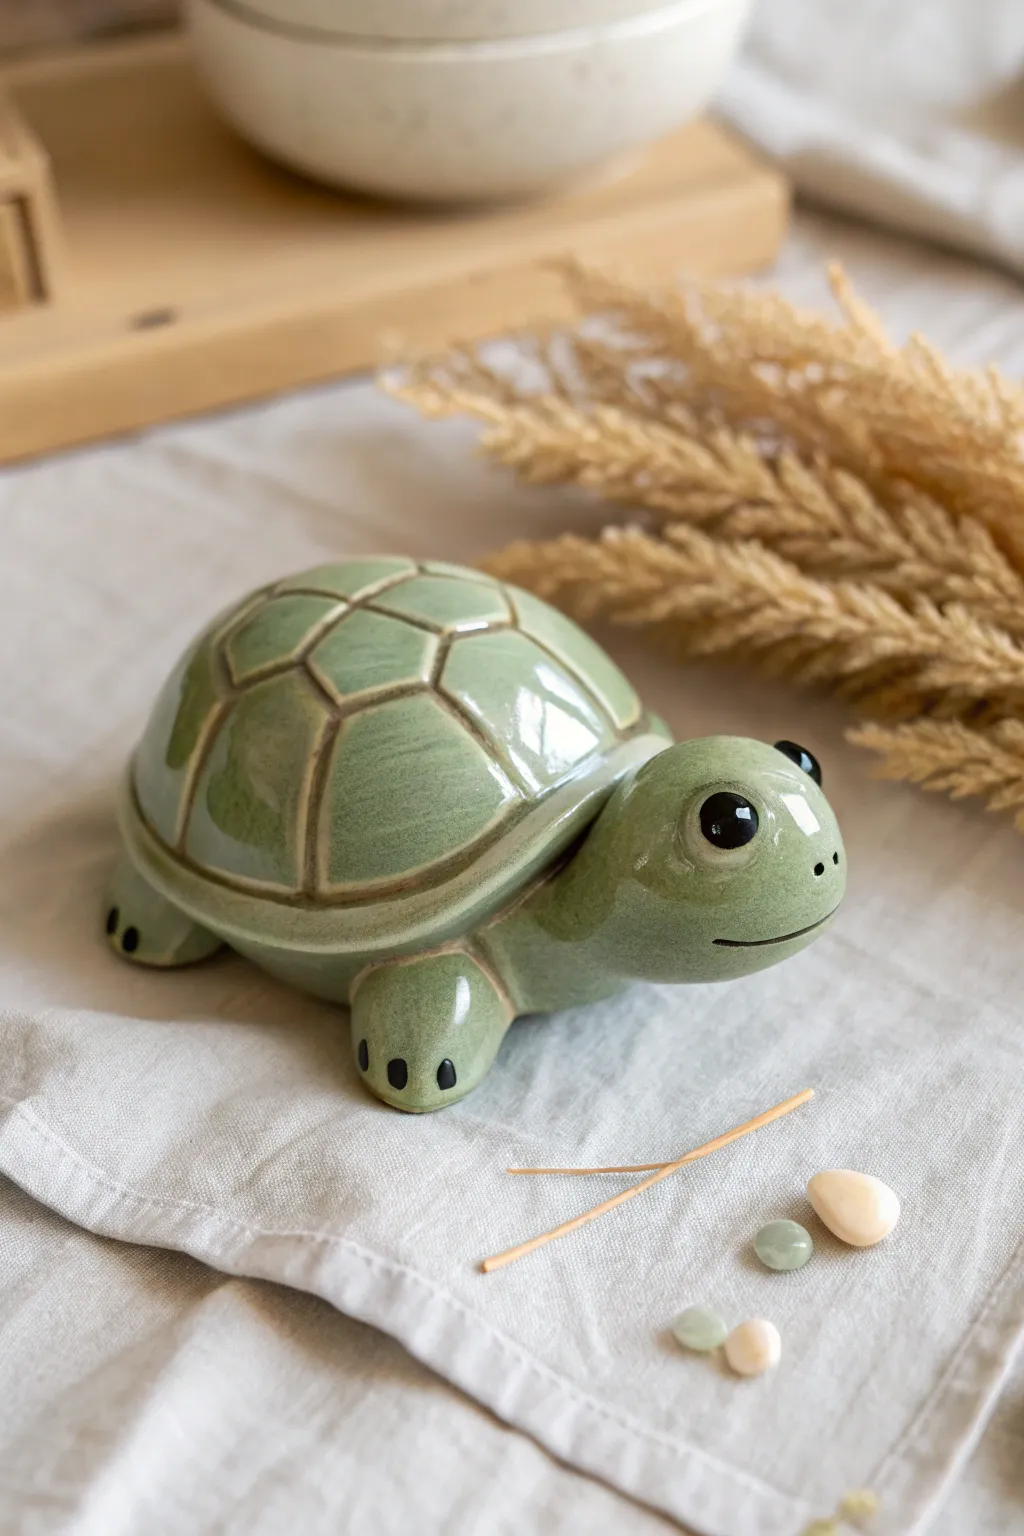
This adorable ceramic turtle isn’t just a friendly face; it’s a secret keeper with a removable shell for storing tiny treasures. With its glossy sea-green glaze and sweet expression, it makes a perfect bedside companion or a thoughtful handmade gift.
Detailed Instructions
Materials
- White earthenware or stoneware clay
- Rolling pin
- Pottery knife or needle tool
- Small bowl or half-sphere mold (for the shell)
- Slip and scoring tool
- Sponge
- Celadon or sage green ceramic glaze (food safe recommended)
- Black underglaze
- Clear transparent glaze (optional, depending on green glaze)
- Kiln (or air-dry clay alternatives if not firing)
Step 1: Forming the Body and Base
-
Roll the base slab:
Start by rolling out a slab of clay to about 1/4 inch thickness. Use a large oval cookie cutter or freehand cut an oval shape that will serve as the turtle’s belly and ‘floor’ of the box. -
Create the walls:
Roll a long coil of clay, roughly the thickness of a pencil. Score and slip the outer edge of your oval base, then attach the coil on top to create a low wall. Smooth the inside and outside seams to make a shallow dish. -
Shape the head:
Form a smooth ball of clay for the head, slightly tapering the neck area. Attach this to one end of the oval base using the score-and-slip method, blending the clay thoroughly so it doesn’t detach later. -
Add the feet and tail:
Create four small, rounded triangular shapes for the flippers and a tiny triangle for the tail. attach these symmetrically around the base, ensuring they stick out enough to be seen under the eventual shell.
Step 2: Sculpting the Removable Shell
-
Mold the shell dome:
Roll another slab of clay. Drape it over a plaster hump mold or a plastic bowl covered in cling film to create a perfect dome shape. Trim the edges so it matches the size of your base oval. -
Create the heavy rim:
Roll a slightly thicker coil and attach it to the bottom rim of your dome. This creates the defined edge of the turtle’s shell seen in the photo. Flatten it slightly so it sits flush against the body. -
Fit the lid:
Place a small coil of plastic wrap on the body rim (to prevent sticking), then gently set the shell on top to check the fit. Adjust the shape while the clay is soft so they marry up perfectly. -
Carve the shell pattern:
Using a needle tool or fettling knife, lightly sketch a hexagonal grid on the shell. Go back over lines with a V-tip carving tool to create deep grooves, imitating the scutes of a turtle shell. -
Detailing the face:
While the shell stiffens, return to the head. Use a modeling tool to press in slight indentations for eye sockets and carve a simple, curved line for the smile. -
Refining the surface:
Once leather hard, use a damp sponge to smooth away any fingerprints or rough crumbs, especially around the carved shell lines. I prefer to use a very fine sponge here to keep the edges crisp.
Rim Security 101
Add a small inner flange (a vertical wall) to the underside of the shell lid. This hidden inner ring prevents the lid from sliding off the base.
Step 3: Glazing and Finishing
-
Bisque fire:
Allow the piece to dry slowly and completely before firing it in the kiln to the appropriate cone for your clay body (usually Cone 04). -
Apply the green glaze:
Brush or dip the entire piece (except the bottom of the feet and the rim where the lid touches) in a glossy sage green glaze. The glaze should pool slightly in the deep shell carvings, creating a lovely darker contrast. -
Paint the details:
Using a fine detail brush and black underglaze, carefully paint the large round eyes, the nostril dots, and the three toes on each foot. A tiny dot of white glaze on the eye adds that spark of life. -
Clear glaze application:
If your green glaze isn’t naturally glossy, apply a clear coat over the entire turtle. Make sure to wipe the contact points (rim and lid underside) clean with a sponge so the lid doesn’t fuse shut. -
Final firing:
Fire the piece again for the glaze fusing. Use stilts if necessary to keep the glazed feet from sticking to the kiln shelf.
Lid Not Fitting?
Clay shrinks as it dries. Always dry the lid sitting ON the base (with a paper towel between them) so they shrink at the same rate and warp together.
Now you have a charming little guardian ready to protect your smallest valuables
Little Monster Ring Holder Sculpture
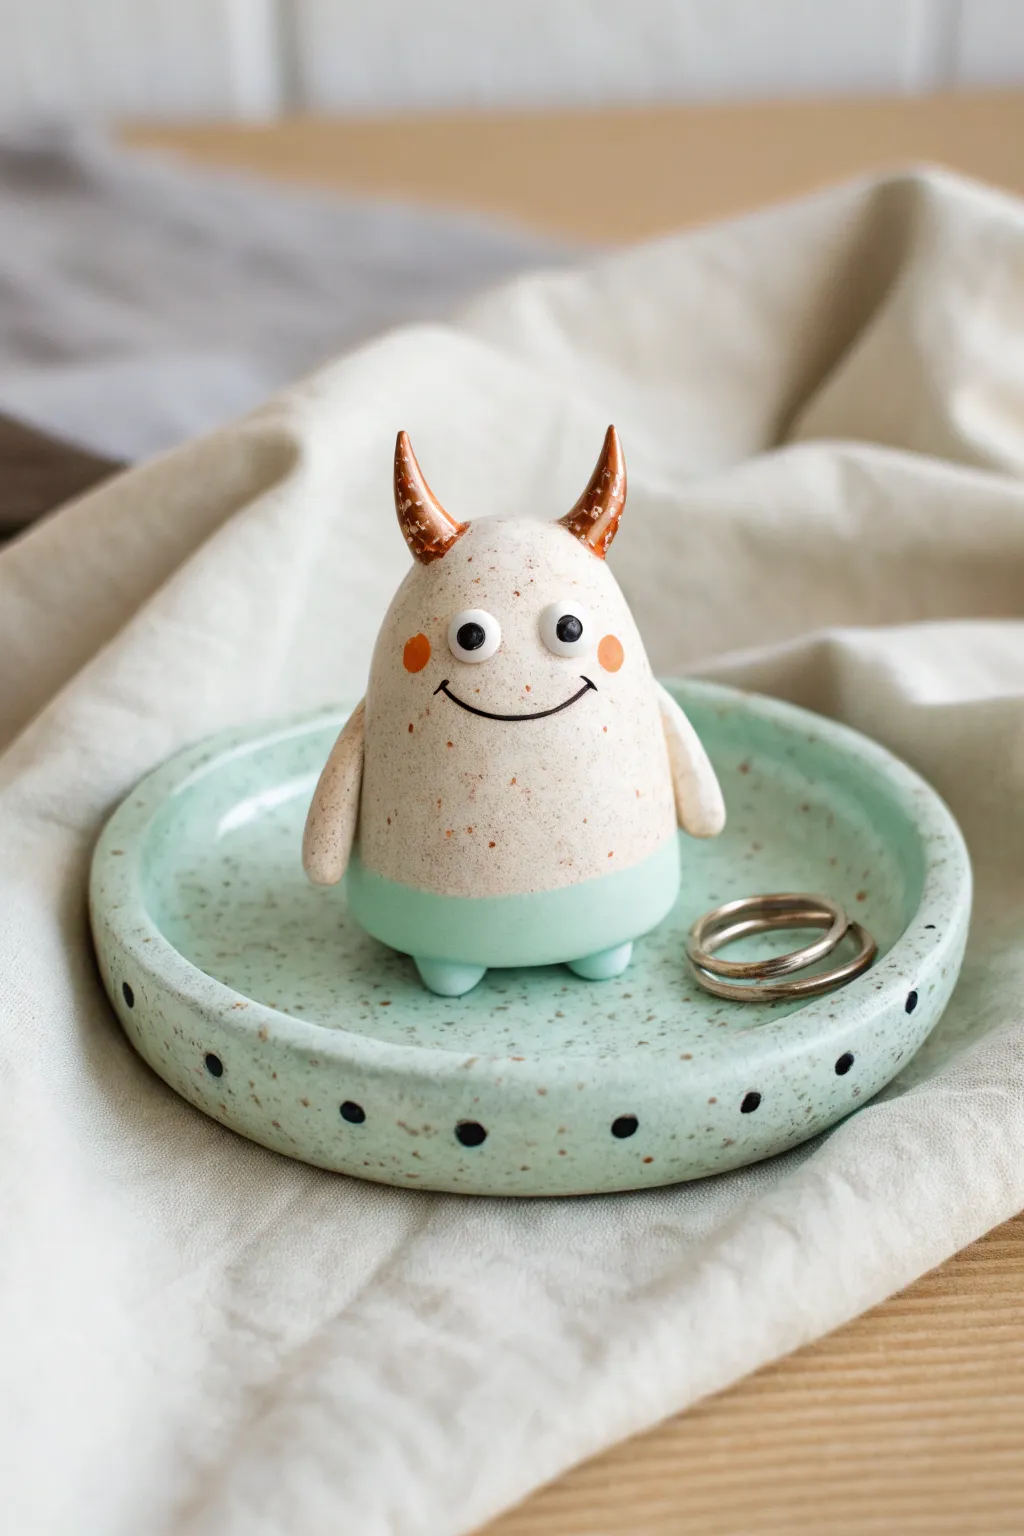
This adorable speckled monster stands guard over your precious jewelry, combining whimsical character design with practical function. With its charming horns, happy smile, and a matching polka-dot tray, this ring holder makes a delightful addition to any nightstand or vanity.
How-To Guide
Materials
- Polymer clay (White, Teal/Mint, Brown)
- Speckled clay effect medium (or coarse sand/pepper/dried tea leaves)
- Black acrylic paint
- Orange acrylic paint
- High-gloss glaze or varnish
- Clay sculpting tools (needle tool, ball tool)
- Rolling pin
- Circle cutter (approx. 4 inches)
- Oven (for baking)
- Fine detail paintbrush
- Super glue (optional)
Step 1: Sculpting the Tray
-
Prepare the speckled clay:
Start by mixing your white clay. To achieve the speckled ceramic look seen in the photo, knead in a small amount of faux granite inclusions, coarse sand, or even cracked pepper into the white clay until evenly distributed. -
Marble the base:
Take a generous amount of your prepared speckled white clay and a smaller amount of teal clay. Lightly knead them together but stop before they fully blend. You want a dominant light teal color with the speckles showing through. -
Form the dish:
Roll your light teal clay into a slab about 1/4 inch thick. Use your large circle cutter to stamp out a perfect round base for the tray. -
Create the rim:
Roll a long snake of the same teal clay. Attach it to the outer edge of your circle base, smoothing the seam on the inside and outside so it looks like one solid piece of ceramic.
Faux Ceramic Look
Mix dried used tea leaves or ground black pepper into white clay to mimic the speckles of stoneware pottery perfectly.
Step 2: Creating the Monster Body
-
Shape the torso:
Take a ball of the speckled white clay and shape it into a smooth egg or pear shape. Flatten the bottom slightly so it stands steadily on its own. -
Add the colored base:
Roll a small amount of solid teal clay into a thin sheet. Cut a strip and wrap it around the bottom third of the monster’s body to look like pants or a dipped ceramic glaze line. Smooth the seam carefully. -
Attach the feet:
Roll two huge pea-sized balls of teal clay. Attach them to the bottom of the teal body section to create little nubby feet. -
Form the arms:
Roll two small sausage shapes from the white speckled clay. Attach them to the sides of the body, angling them slightly outward so they rest naturally against the torso.
Step 3: Adding Details
-
Sculpt the horns:
Form two small cones from brown clay. Curve them slightly at the tips and press them firmly onto the top of the head. -
Create the eyes:
Make two small, flattened discs of white clay and press them onto the face. I find using a small ball tool to make a tiny indentation first helps them sit securely. -
Bake the pieces:
Place both your completed tray and the monster sculpture on a baking sheet. Bake according to your clay manufacturer’s instructions (usually 275°F for 15-30 minutes). -
Cool down:
Allow the pieces to cool completely before moving on to painting. The clay will be slightly soft when hot but hardens as it cools.
Uneven Seams?
If the seam between the white body and teal base is rough, roll the handle of a paintbrush over it to smooth and blend it.
Step 4: Painting and Finishing
-
Paint facial features:
Using a very fine brush and black acrylic paint, add pupils to the white eyes and paint a wide, curved smile across the face. -
Add rosy cheeks:
Dip a round tool or the opposite end of a paintbrush into orange paint and stamp two small circles on the cheeks. -
Decorate the tray:
Use the black paint to add small polka dots evenly spaced around the outer rim of the teal tray. -
Glaze the horns:
Apply a coat of gloss glaze specifically to the brown horns to give them a shiny, polished look. -
Final assembly:
Once all paint is dry, use a strong adhesive or super glue to permanently attach the monster to the center of the tray. -
Seal (optional):
For extra durability, you can apply a matte varnish over the entire piece, keeping the glossy horns as a nice contrast.
Now you have a charming little guardian to keep your rings safe and sound
Animal Toothbrush Holder Buddy
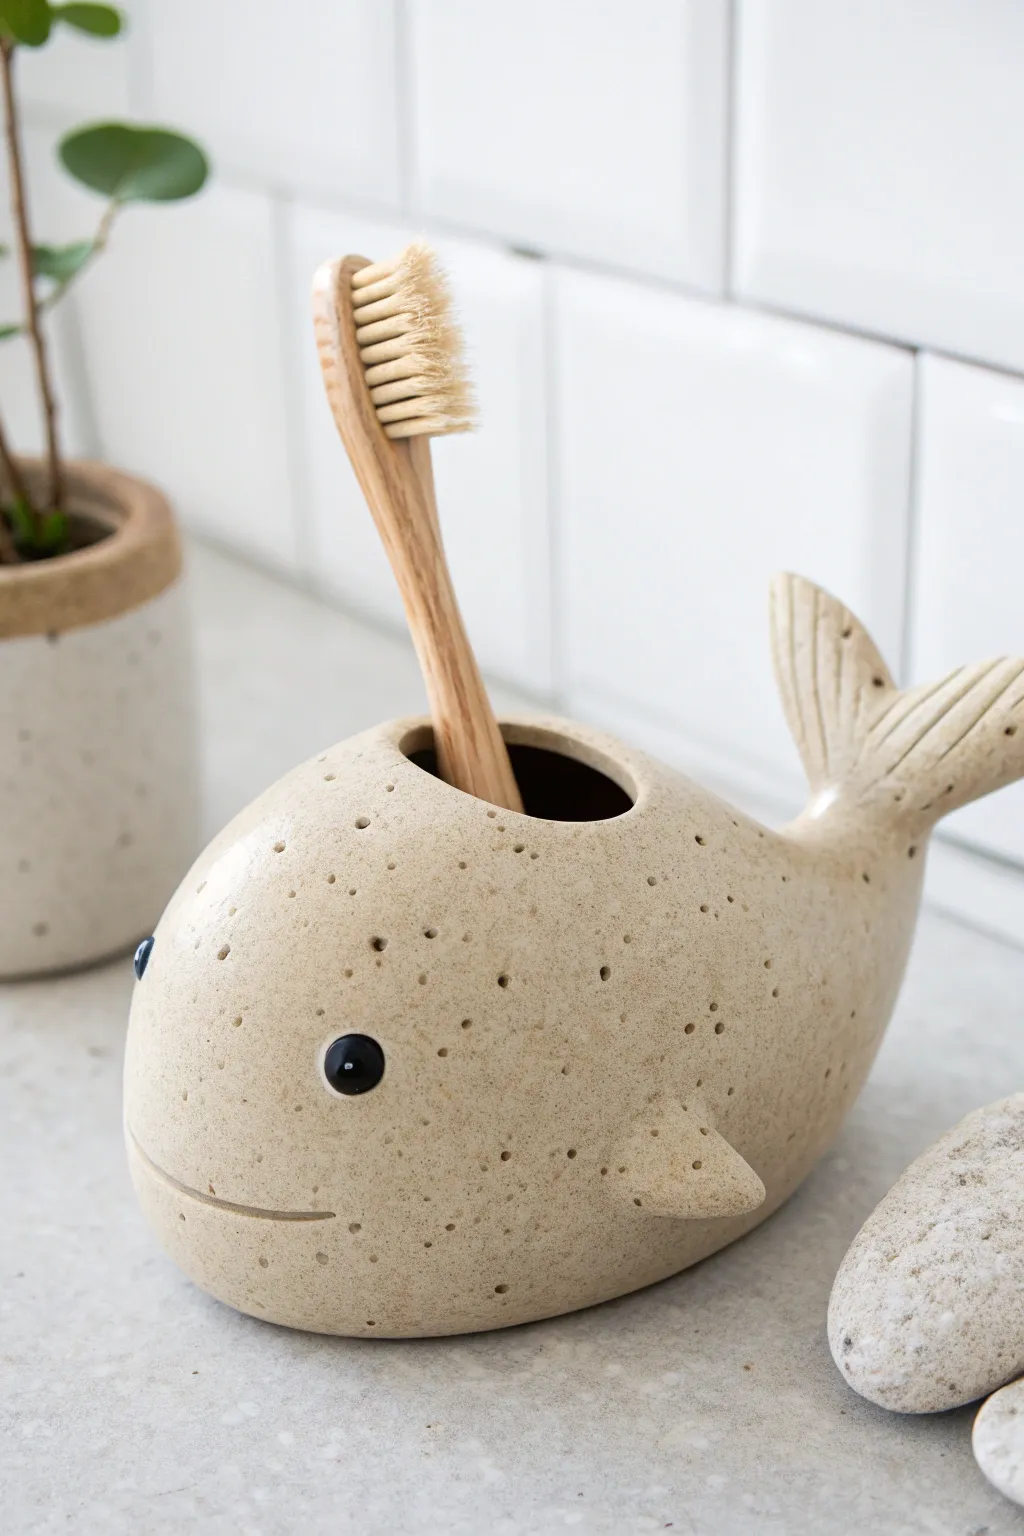
Bring the ocean to your bathroom counter with this adorable speckled ceramic whale. The charming form and subtle texturing give it a timeless, handmade feel while keeping your brush upright and dry.
Detailed Instructions
Materials
- Stoneware clay ( speckled or buff)
- Small rolling pin
- Pottery needle tool
- Small loop tool or carving tool
- Scoring tool (or fork)
- Slip (clay mixed with water)
- Sponge
- Small black ceramic beads or black underglaze
- Clear matte glaze
- Wooden modeling tool
Step 1: Shaping the Base
-
Prepare the clay:
Start with a softball-sized lump of stoneware clay. Wedge it thoroughly to remove air bubbles, which helps prevent cracks during firing. -
Form the body:
Roll the clay into a smooth, elongated oval shape, slightly tapering one end where the tail will eventually attach. -
Flatten the bottom:
Gently tap the oval onto your work surface to create a flat, stable base so your whale won’t roll away. -
Create the opening:
Use your thumb or a large round tool to press a deep hole into the top center of the whale’s back. This needs to be wide and deep enough to hold a toothbrush handle securely. -
Refine the interior:
Smooth the inside walls of the hole with your finger or a slightly damp sponge, ensuring there are no sharp edges.
Clean Connection
When blending the tail and fins, use a wooden tool to drag clay across the seam in both directions before smoothing. This ‘knitting’ ensures the parts won’t pop off.
Step 2: Sculpting Details
-
Shape the tail:
Roll a separate small coil of clay and flatten one end into a ‘Y’ shape to form flukes. Use a modeling tool to press lines into the flukes for texture. -
Attach the tail:
Score the tapered end of the body and the base of the tail. Apply slip to both areas and press them firmly together, smoothing the seam until it’s invisible. -
Make the fins:
Create two small triangular shapes for the side fins. Gently curve them slightly so they look like they are swimming. -
Attach fins:
Position the fins on the lower sides of the body. Score, slip, and blend the clay to attach them securely. -
Carve the mouth:
Using a needle tool or a thin wooden tool, carve a long, curving line across the front lower section for the smile. I like to make it slightly asymmetrical for extra character. -
Add the eyes:
Press two small indentations where the eyes should go. You can either inset small black ceramic beads now or paint small black dots with underglaze later. -
Detail the eyes:
If using beads, press a tiny coil of clay around them to secure them into the socket.
Step 3: Texturing and Finishing
-
Create speckles:
Using a needle tool, gently poke random, shallow holes all over the whale’s surface. Vary the spacing to mimic natural skin texture. -
Smooth the surface:
Run a barely damp sponge over the entire piece to soften any sharp ridges from your carving or texturing tools. -
Check stability:
Set the whale down on a flat surface again to ensure the added weight of the tail hasn’t tipped it off balance. Tap the bottom again if needed. -
Dry slowly:
Loosely cover the whale with plastic and let it dry slowly over several days to the bone-dry stage. -
Bisque fire:
Fire the piece in a kiln to cone 04 (or your clay’s specific bisque temperature). -
Glaze application:
Dip or brush a clear matte glaze over the entire piece. If you used speckled clay, the specks will show through beautifully. -
Final wipe:
Wipe the bottom of the whale clean with a sponge to prevent it from sticking to the kiln shelf. -
Glaze fire:
Fire the final piece to your clay’s maturity temperature (usually cone 5 or 6 for stoneware).
Blowhole Bubbles
For a fun twist, make the top opening slightly wider and add a few tiny clay spheres around the rim to look like splashing water or bubbles.
Once cooled, your little whale is ready to add a splash of playful charm to your daily routine
Mini Animal Face Magnet Set
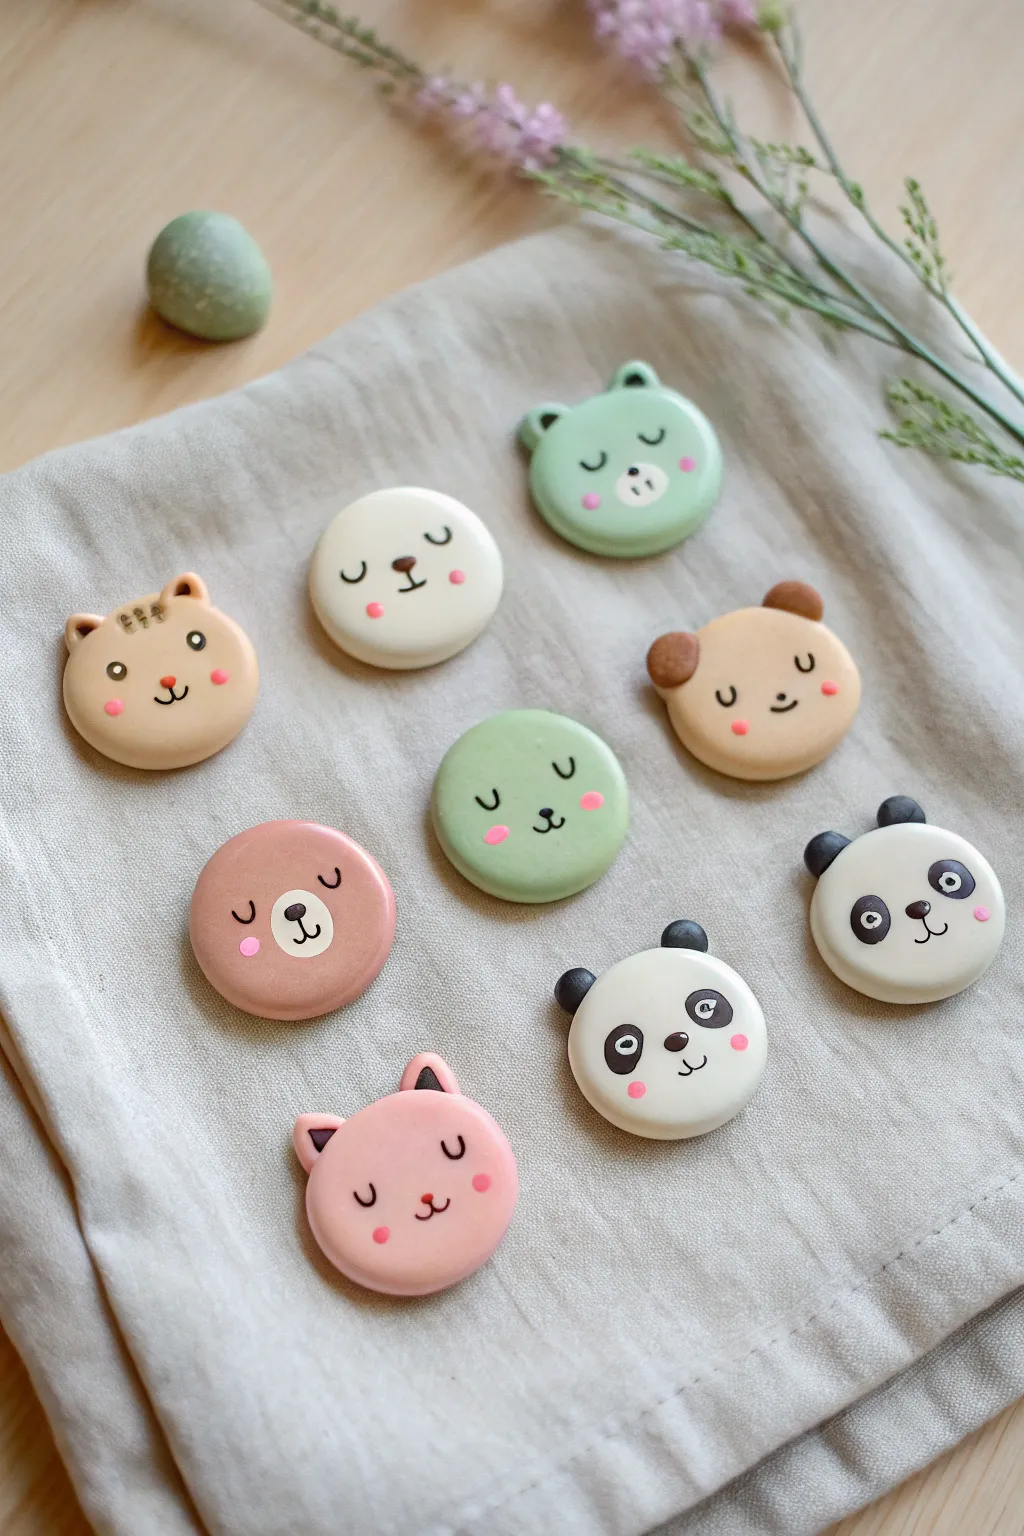
Brighten up your fridge or magnetic board with this adorable collection of pastel animal faces. These smooth, matte-finished magnets feature minimalist designs like pandas, bears, cats, and frogs, making them a perfect beginner-friendly sculpting project.
Step-by-Step Tutorial
Materials
- Polymer clay (white, beige, pink, mint green, brown, black)
- Acrylic rolling pin or pasta machine
- Small round cutter (approx. 1.5 inch diameter)
- Dotting tools or ball stylus (various sizes)
- Small magnets (neodymium recommended)
- Super glue or E6000
- Soft pastel chalks (pink)
- Fine detail paintbrush
- Acrylic paint (black, white)
- Sculpting tools (needle tool, rubber shaper)
- Parchment paper or ceramic tile for baking
- Matte varnish (optional)
Step 1: Base Preparation
-
Condition the Colour:
Begin by conditioning your polymer clay until it is soft and pliable. You will need separate balls for each animal color: mint green for the frog/bear hybrid, creamy beige for the dog and cat, white for the panda, and pastel pink for the cat. -
Roll the Sheets:
Roll out each clay color to a uniform thickness of about 1/4 inch (6mm). Using depth guides or a pasta machine on a medium setting ensures they are all perfectly even. -
Cut the Rounds:
Use your small round cutter to punch out the main face shapes. If the clay sticks to the cutter, gently dip the cutter in cornstarch before pressing down. -
Smooth the Edges:
Gently run your finger around the cut edge of each circle to soften the sharp rim created by the cutter. You want a smooth, slightly rounded ‘cookie’ look.
Smudge Prevention
Dust or lint loves sticking to light clay. Kee baby wipes nearby to clean your hands between colors, and wipe your tools with rubbing alcohol before switching from black to white clay.
Step 2: Sculpting Features
-
Ears for Bears and Frogs:
For the bear and frog shapes, roll tiny balls of matching clay. Attach them to the top of the head and press gently to fuse the clay. Use a dotting tool to create a small indentation in the center of the ear for depth. -
Ears for Cats:
For the kitty magnets, shape small triangles of clay instead of balls. Press these onto the top of the circles and use a rubber sculpting tool to blend the seam so the ears look like a natural extension of the head. -
Panda Components:
For the panda, attach small black semicircle ears. Then, press two small, flattened ovals of black clay onto the face area for the eye patches. Press them flat so they are flush with the white surface. -
Snout Details:
For animals like the brown bear, add a tiny flattened oval of lighter clay near the bottom center to create a muzzle area. Blend the edges very softly.
Step 3: Baking and Assembly
-
Bake the Pieces:
Place all your animal faces on a ceramic tile or parchment-lined baking sheet. Bake according to your clay package instructions (usually 275°F/135°C for 15-30 minutes). -
Cool Down:
Let the clay pieces cool completely in the oven with the door cracked open. This prevents thermal shock and cracking. -
Attach Magnets:
Flip the cooled faces over. Apply a dab of super glue or E6000 to the center of the back and press a magnet firmly into place. Let the glue cure fully.
Level Up: Texture
Before baking, gently dab the surface of the clay with a clean toothbrush or stiff brush. This stippling creates a subtle ‘fuzzy’ texture perfect for animal fur.
Step 4: Painting the Faces
-
Draw the Eyes:
Using a very fine paintbrush and black acrylic paint, add the eyes. For sleepy animals, paint small ‘U’ shapes; for awake animals, paint small black dots. -
Add Noses and Mouths:
Paint tiny inverted triangles or dots for noses. Add a small ‘w’ shape or simple line for the mouth. Keep the lines extremely thin for that delicate ‘kawaii’ aesthetic. -
Cheeky Blush:
Scrape a little pink pastel chalk into a powder. Use a soft brush or a Q-tip to gently dust pink circles onto the cheeks. I find this creates a much softer, sweeter look than paint. -
Highlights:
Once the black paint is dry, dip the tip of a toothpick into white paint and add a tiny sparkle dot to the open eyes and the panda’s eye patches. -
Sealing:
To protect the surface paint and pastel blush, apply a thin coat of matte varnish. Avoid glossy finishes as the matte texture mimics the soft look shown in the photo.
Arrange your new friends on the fridge and enjoy their sweet expressions every time you reach for a snack
Dumpling Animals and Food Hybrids
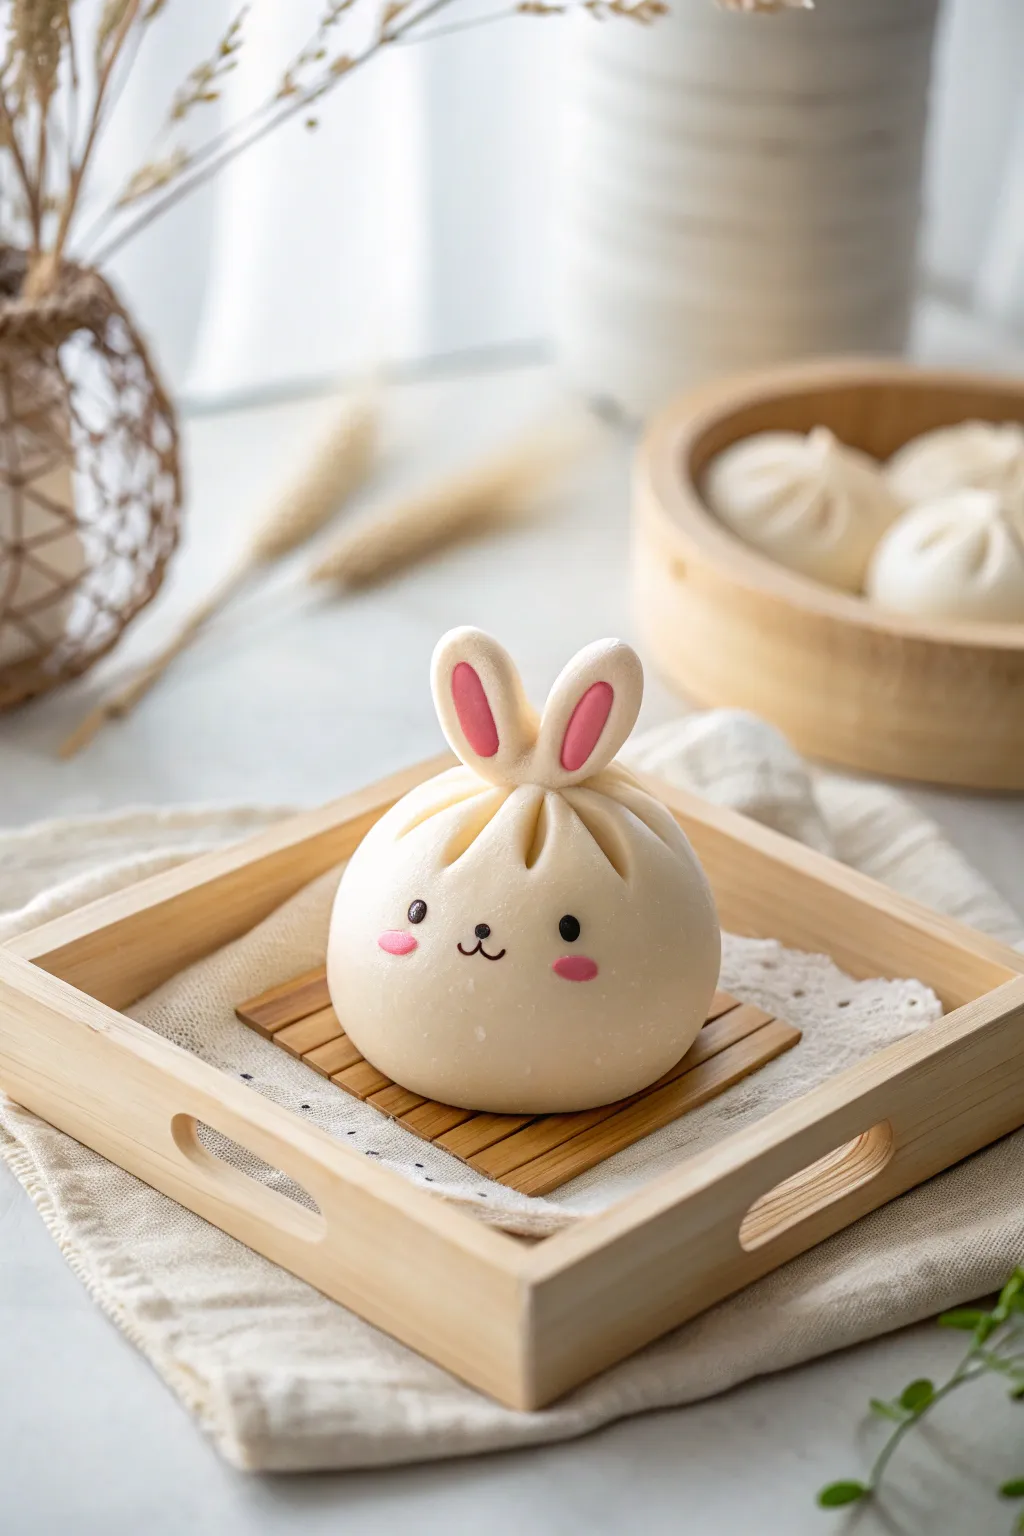
This adorable project combines the pillowy softness of a steamed bun with the charm of a bunny. Perfect for beginners, this sculpture features a smooth, matte finish and simple kawaii details that are impossible to resist.
How-To Guide
Materials
- White polymer clay (or air dry clay)
- Soft pink polymer clay
- Black acrylic paint or clay
- Dark pink acrylic paint or clay (for cheeks)
- Dotting tools or ball stylus
- Needle tool or toothpick
- Clear matte varnish (optional)
- Clay roller
- Smooth work surface
Step 1: Shaping the Bun Base
-
Condition the white clay:
Start by kneading a golf-ball-sized amount of white clay until it is soft and pliable. Warm clay helps prevent cracks. -
Form the main sphere:
Roll the clay into a smooth ball. Then, gently press it down onto your work surface to flatten the bottom slightly so it sits stable without rolling away. -
Soften the shape:
Using the palm of your hand, gently dome the top of the shape so it looks like a puffed-up dumpling rather than a stiff hemisphere.
Step 2: Creating the Dumpling Folds
-
Mark the center:
Find the very top center of your bun shape. This is where all your folds will converge. -
Indent the first folds:
Using a needle tool or the side of a toothpick, press gently from the top center downwards about 1/4 of the way down the bun’s side. Do this twice in a ‘V’ shape. -
Smooth the ridges:
I like to use a silicone tool or my finger to lightly soften the edges of these indents. Use an upward sweeping motion to make the clay look like gathered dough.
Fixing Fingerprints
If your white clay is picking up fingerprints, lightly brush the surface with a little baby oil or cornstarch before baking to smooth them out completely.
Step 3: Sculpting the Ears
-
Form the ear shapes:
Take two small pieces of white clay and roll them into teardrop shapes, roughly 1 inch long. -
Flatten and hollow:
Gently flatten the teardrops. Use a ball stylus to create a shallow mood or indentation down the center of each ear. -
Add the inner pink:
Roll two tiny snakes of soft pink clay. Press these into the indentations you just made, smoothing them down so they are flush with the white clay. -
Attach the ears:
Place the ears at the very top of the bun, right where your fold lines converge. Blend the bottom of the ears into the bun using a blending tool so the connection is seamless.
Texture Play
Before baking, gently dab the surface with a toothbrush or hard bristle brush. This creates a realistic ‘steamed dough’ texture instead of perfect smoothness.
Step 4: Adding the Kawaii Face
-
Position the eyes:
About halfway down the bun vertically, use a small dotting tool dipped in black paint (or tiny balls of black clay) to create two wide-set eyes. -
Create the mouth:
Using a very fine detail brush or a needle tool with black paint, draw a tiny ‘3’ shape or split mouth right between the eyes. -
Paint the nose:
Add a microscopic dot of black just above the mouth junction for the nose. -
Apply rosy cheeks:
Mix a soft pink paint or use pink clay. Apply small oval shapes underneath the eyes, slightly wider than the eye spacing. -
Finishing touches:
If painting, let the face dry completely. If using clay for features, bake according to your clay package instructions. A matte varnish protects the finish without making it look plastic.
Now you have a charming little desk companion that looks good enough to eat
Pocket-Sized Mini World in a Lidded Box
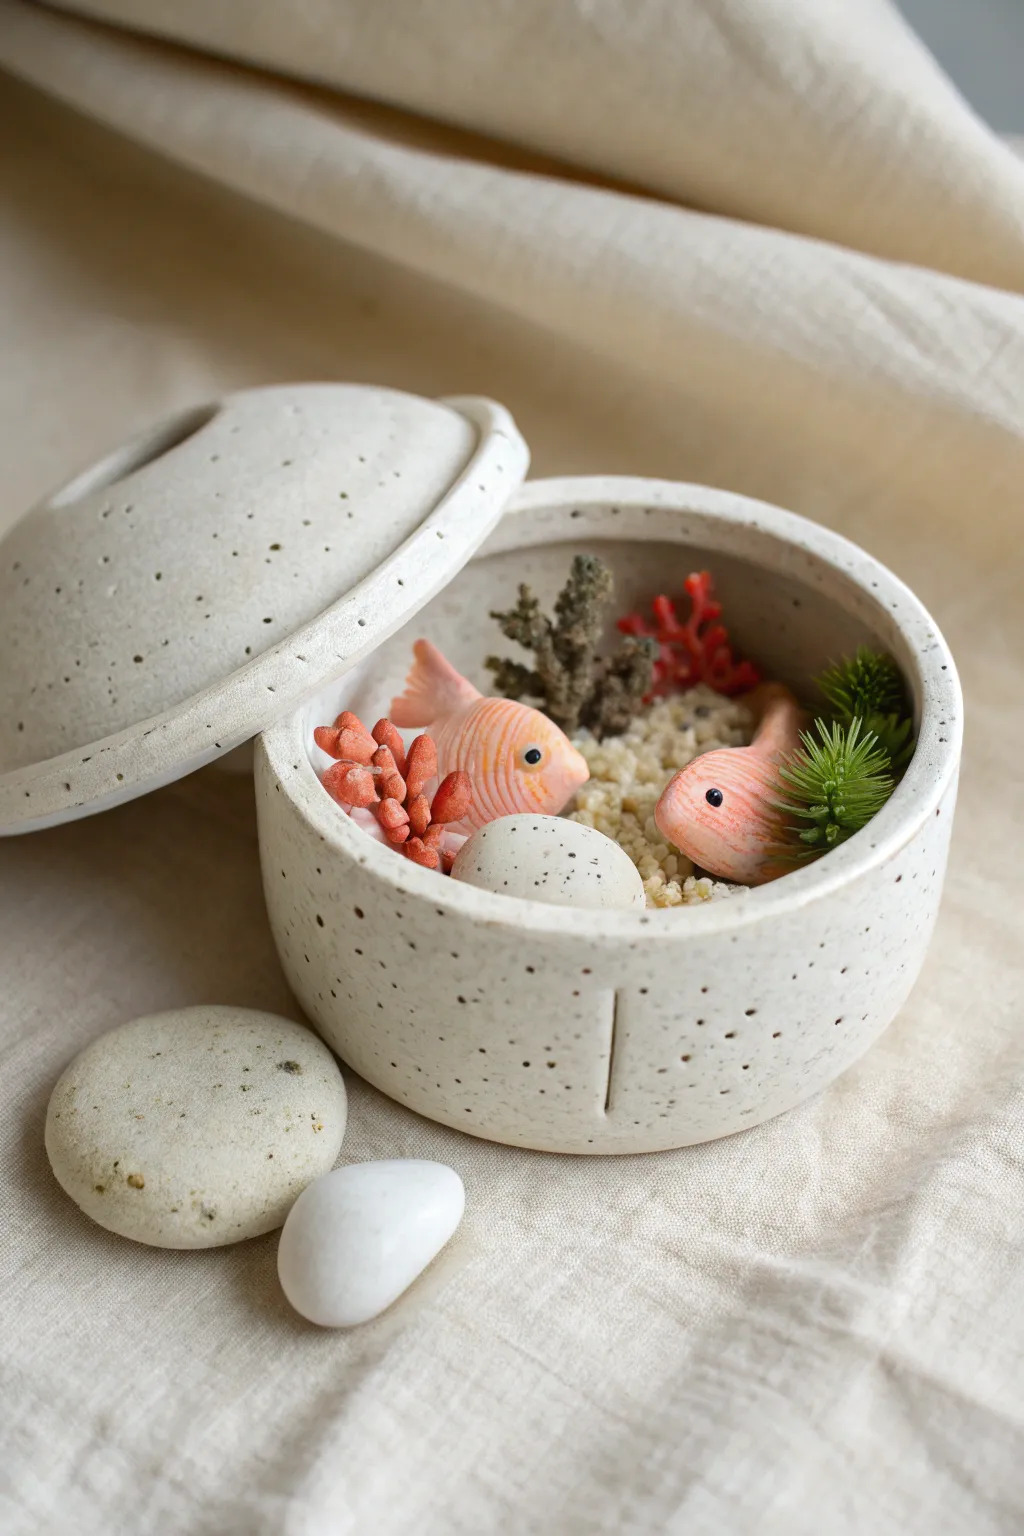
Capture the serenity of an ocean floor in the palm of your hand with this charming polymer clay project. This tutorial guides you through crafting a faux-ceramic speckled vessel that hides a secret, miniature coral reef and happy fish friends inside.
Detailed Instructions
Materials
- White or light beige polymer clay (a large block for the vessel)
- Fimo/Premo clay in pink or peach (for fish and coral)
- Green polymer clay or tiny artificial moss/plastic aquarium plants
- Ground black pepper or dried used coffee grounds (for speckling)
- Small white pebbles or polymer clay rolled into pebbles
- Fine sand or semolina (for the seed floor)
- Liquid polymer clay (Bake & Bond)
- X-Acto knife and needle tool
- A small round jar or cookie cutter (approx 3-4 inches diameter)
- Acrylic rolling pin
- Matte varnish
- Aluminum foil
Step 1: Crafting the Speckled Vessel
-
Prepare the Clay:
Start by conditioning a large amount of white or beige clay. To create that lovely stoneware pottery look, knead in a pinch of ground black pepper or dried coffee grounds until the speckles are evenly distributed throughout the batch. -
Roll the Base:
Roll out a slab of your speckled clay to about 1/4 inch thickness. Use your round cutter or a jar to cut two identical circles—one for the base and one for the lid. -
Form the Lid:
Take one of the circles and gently dome it over a ball of aluminum foil or a small bowl to give it a curved shape. Smooth the edges with your finger so they are rounded and soft. -
Build the Walls:
Roll a long snake of the remaining speckled clay and flatten it into a strip approx 1 inch tall. Wrap this strip around the edge of your flat base circle to form the walls. Blend the seam where the wall meets the base on the inside and outside until invisible. -
Refine the Shape:
Smooth out any fingerprints. I find using a tiny bit of baby oil on my fingertip helps achieve that flawless ceramic finish. Create a small decorative slit or vent near the bottom if desired using your knife. -
Initial Bake:
Bake the base and lid according to your clay package instructions (usually 20-30 mins). Let them cool completely before adding the interior details.
Uneven Lid Fit?
If the lid doesn’t sit flat after baking, place a sheet of coarse sandpaper on a table and gently rub the rim of the bowl against it in a circular motion to level it.
Step 2: Creating the Interior World
-
Prepare the Seabed:
Spread a thin layer of liquid polymer clay inside the cooled vessel. Pour fine sand or semolina over the liquid clay to create a textured, sandy ocean floor. -
Sculpt the Fish:
Shape two small, tadpole-like forms from pink clay. Flatten the tail end and use a needle tool to press in vertical lines for fin texture. Use a tiny black clay bead or paint later for the eyes. -
Make the Coral:
Roll tiny snakes of reddish-pink clay and cluster them together, poking them with a needle tool to create a porous, coral-like texture. Create a second variety using darker grey or green clay for rock formations. -
Add Greenery:
You can sculpt tiny plants from green clay, or for the realistic look in the photo, snip tiny tips off plastic aquarium plants. If using plastic, do not bake them; glue them in after the final bake. -
Arrange the Scene:
Place a few smooth pebbles (real or clay) onto the sand. Nest your fish and coral sculptures into the scene, using a dab of liquid clay to secure them to the sandy base or the pebbles. -
Final Bake:
Bake the bottom vessel again with the clay contents inside for another 15-20 minutes. If you used real stones, they are safe to bake. -
Finishing Touches:
Once cool, glue in any plastic greenery if you chose that route. Coat the fish eyes with a drop of gloss varnish to make them shine, and brush a matte varnish over the outside of the container to protect the speckled finish.
Glow Up Idea
Mix glow-in-the-dark powder into the white clay for the pebbles or the fish bodies. When you open the box in a dim room, your underwater scene will have a magical bioluminescent glow.
Place the lid on your tiny creation and enjoy having a secret ocean escape sitting right on your desk
Stackable Totem of Tiny Critters
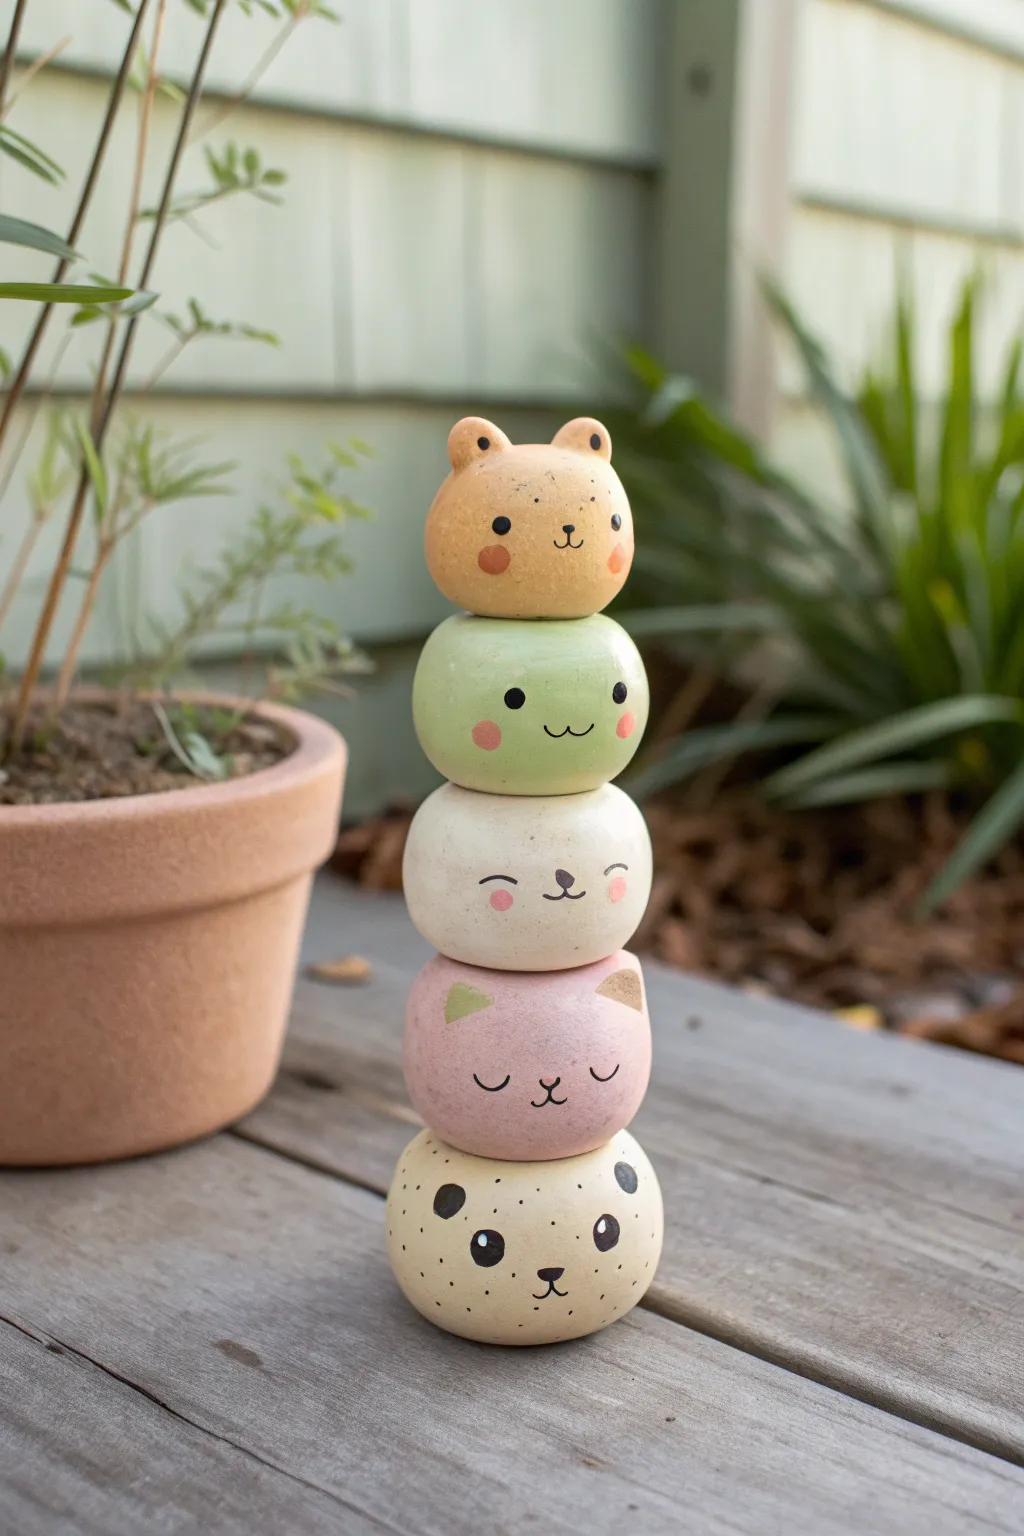
Create a delightful vertical display with these charming, stackable clay friends. This project involves sculpting five distinct animal characters—a bear, frog, white bear, sleeping cat, and dalmatian—that balance perfectly on top of one another for a wobbly, adorable totem.
Step-by-Step Tutorial
Materials
- Polymer clay or air-dry clay (orange, light green, white, pink, beige)
- Acrylic paints (black, pink, brown)
- Fine detail paintbrush (sizes 0 and 00)
- Ball stylus tool or toothpick
- Rolling pin or pasta machine for clay
- Aluminum foil (optional, for armature)
- Matte varnish or sealant
- Smooth work surface
Step 1: Sculpting the Base Shapes
-
Prepare your clay portions:
Begin by conditioning your clay until it is soft and pliable. Separate five equal portions of clay—one for each animal character. aim for balls roughly 1.5 to 2 inches in diameter. -
Form the basic spheres:
Roll each portion of clay into a smooth, tight ball between your palms. Gently press them onto your work surface to flatten the bottom slightly, creating a stable base. -
Create the stacking indentations:
For the bottom four animals, use your thumb or a large ball tool to create a very shallow, gentle depression on the very top of the sphere. This helps the character above it sit securely without rolling off. -
Refine the shapes:
Smooth out any fingerprints or cracks with a tiny bit of water (for air-dry clay) or baby swap (for polymer clay). The shapes should look like slightly flattened marshmallows or mochi balls.
Wobbly Towers?
If your stack keeps falling, use a small dab of poster putty or museum wax between each layer. It secures them invisibly but keeps them re-stackable.
Step 2: Adding Character Details
-
Sculpt the top bear:
Take the orange sphere. Pinch two small triangles of orange clay and attach them to the top for ears. Use a ball tool to make a tiny indentation inside each ear. Smooth the seams well so they don’t pop off. -
Shape the green layer:
For the second character down, keep the green sphere perfectly round and smooth. This character relies entirely on painted details for its look, so focus on getting the surface flawless. -
Form the white middle bear:
Similarly to the green one, keep the white sphere simple. Ensure the top depression is subtle enough that it doesn’t distort the face area. -
Detail the pink cat:
For the pink sphere, pinch two small triangles of clay and attach them for cat ears. Unlike the top bear, these can be slightly sharper and set wider apart. Blend the clay downwards into the head. -
Prepare the bottom dog:
The bottom beige sphere acts as the foundation. Ensure its bottom is the flattest of all for stability. Keep the shape round without extra appendages.
Smoother Surfaces
Before baking or drying, lightly brush your clay with a little baby oil (polymer) or water (air dry). This melts away fingerprints like magic.
Step 3: Baking and Painting
-
Cure the clay:
If using polymer clay, bake the pieces according to the package instructions (usually 275°F for 15-30 minutes). If using air-dry clay, let them dry completely for 24-48 hours. I find letting them dry slowly prevents cracking. -
Paint the top bear’s face:
Using a fine detail brush and black paint, add two small dots for eyes and a small ‘Y’ shape for the nose and mouth. Dip a brush or Q-tip in diluted pink paint to stamp rosy cheeks. -
Detail the green friend:
Paint wide-set black eyes and a simple ‘u’ smile. Add pink blushing cheeks just below the eyes on the outer edges. -
Face the white bear:
Draw squinting eyes (like upside-down ‘u’ shapes) and a small nose. For this one, keep the expression serene and sleepy. -
Paint the pink cat:
Paint two closed, U-shaped eyes with tiny lashes. Add a small nose and mouth. Paint the insides of the sculpted ears with a darker pink or metallic gold paint for contrast. -
Finish the bottom dog:
Paint distinctive black spots randomly around the beige sphere. Add large, bright eyes with white reflection dots, a triangular nose, and tiny freckles on the muzzle area. -
Seal the totem:
Once all paint is completely dry, apply a coat of matte varnish to protect your work and give it a finished, professional look. Let the varnish cure fully before stacking.
Now you have a charming stack of friends to brighten up your desk or shelf