Clay masks are one of my go-to art class projects because they’re fast to start, super expressive, and they make even beginners feel like real sculptors. Here are my favorite clay mask ideas that range from classic face builds to delightfully weird twists you can totally pull off in a classroom.
Classic Expression Face Mask
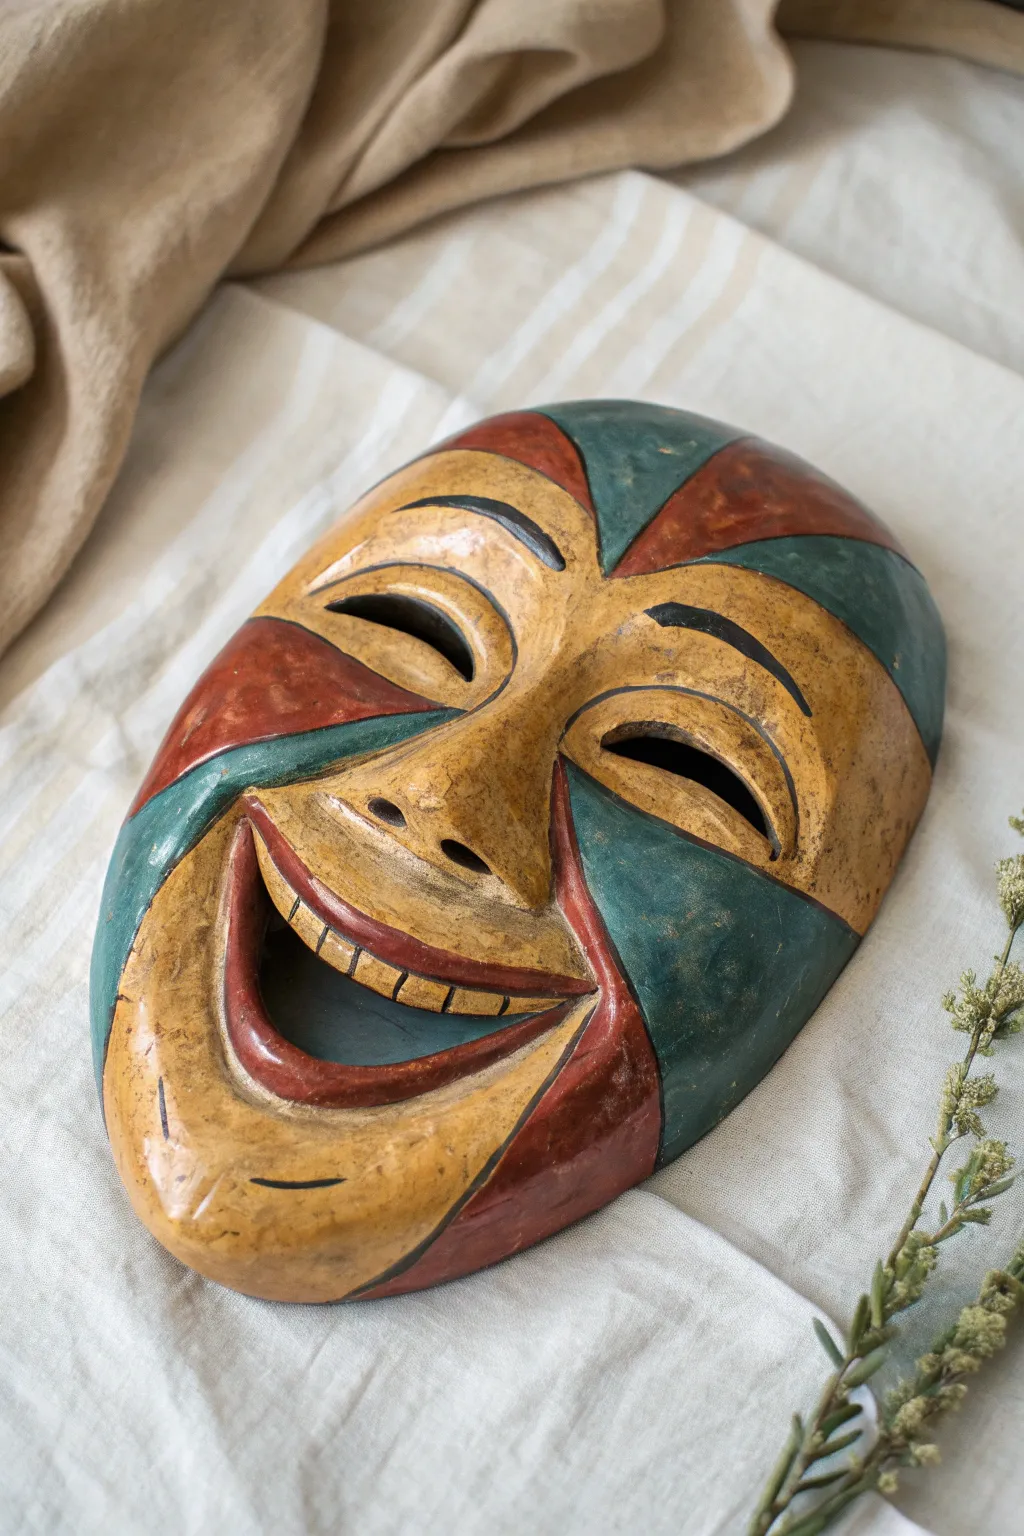
This joyful, expression-filled mask captures the spirit of a classic court jester with its harlequin-patterned face and wide, toothy grin. The project combines sculpting exaggerated facial features with a bold, geometric paint job in muted ochre, brick red, and teal for a vintage feel.
Detailed Instructions
Materials
- Air-dry clay or white earthenware clay
- Rolling pin
- Clay carving tools (needle tool, loop tool)
- Small sponge
- Bowl or mask mold for support
- Acrylic paints (Yellow Ochre, Brick Red, Deep Teal, Black, White)
- Medium and fine detail paintbrushes
- Matte varnish or sealant
- Pencil
- Cup of water
Step 1: Sculpting the Base
-
Roll out the slab:
Begin by rolling out a generous amount of clay into a smooth, even oval slab, roughly 1/4 inch thick. This will be the foundation of your mask. -
Form the curve:
Gently drape your clay slab over a convex mold, like an overturned bowl or a plastic mask form, to give it that necessary facial curvature. Smooth out any cracks that appear during this process with a damp sponge. -
Shape the face outline:
Trim the edges of your clay into a clean oval shape, slightly wider at the top and tapering toward the chin. -
Mark features:
Using a needle tool, lightly sketch where the eyes, nose, and that distinctive wide mouth will go. Keep these guide lines faint so they can be smoothed over later.
Cracking Up?
If small cracks appear while drying, mix a tiny bit of clay with water to make a paste (slip) and fill them in with a finger. Sand smooth once dry.
Step 2: Adding Facial Features
-
Build the nose:
Form a triangular wedge of clay and score both the mask surface and the nose piece. Apply a little water or slip, press the nose firmly into place, and blend the edges seamlessly into the cheeks. -
Define the eye sockets:
Cut out two crescent-shaped openings for the eyes. Unlike realistic eyes, these should arch happily upwards. Use a damp finger to smooth the cut edges so they aren’t sharp. -
Create the heavy lids:
Roll thin coils of clay and attach them above the eye openings to create prominent, arched eyelids. Blend the top edge of the coil into the forehead while leaving the bottom edge defined. -
Open the mouth:
Cut out a large, wide crescent shape for the grinning mouth. This negative space is crucial for the expression. -
Sculpt the lips:
Roll two more coils to frame the mouth opening. Attach them securely to form thick, expressive lips that taper at the corners of the smile. -
Add the teeth:
Inside the mouth opening, adhere a thin strip of clay along the upper lip line. Use your needle tool to incise vertical imperfections to suggest a row of teeth. -
Refine and dry:
Give the entire mask a final smoothing with a damp sponge. Let the clay dry completely according to the package instructions—this usually takes 24 to 48 hours for air-dry clay.
Make it Wearable
Before the clay dries, use a straw to poke holes on both sides near the ears. Once finished, thread a ribbon or leather cord through to hang or wear it.
Step 3: Painting the Harlequin Pattern
-
Base sketch:
Once fully dry, use a pencil to lightly draw the geometric pattern on the face. You want large intersecting curved triangles radiating from the center of the forehead and nose. -
Apply the ochre:
Paint the ‘skin’ sections—the cheeks, chin, nose, and parts of the forehead—with a yellow ochre paint. You may need two coats for opaque coverage. -
Paint the red sections:
Fill in the specific triangular sections on the forehead and the lower jaw with a muted brick red. Use this same color for the lips to make the smile pop. -
Add the teal accents:
Paint the remaining geometric sections—typically flanking the eyes and sides of the head—with a deep teal or forest green color. -
Weather the paint:
To get that vintage look, I like to mix a very watery wash of brown or black paint. Brush it over the dry colors and immediately wipe most of it off with a paper towel, leaving pigment in the crevices. -
Detail the teeth:
Paint the teeth strip with an off-white or cream color. Use a fine liner brush with diluted black paint to re-emphasize the lines between the teeth. -
Final outlines:
Using a fine brush and black paint, carefully line the eyebrows, the crease of the eyelids, and add a small curved line on the chin for emphasis. -
Seal the work:
Protect your masterpiece with a coat of matte varnish. This unifies the sheen and protects the paint from chipping.
Hang your finished jester mask on a wall to bring a touch of theatrical history and color to your room


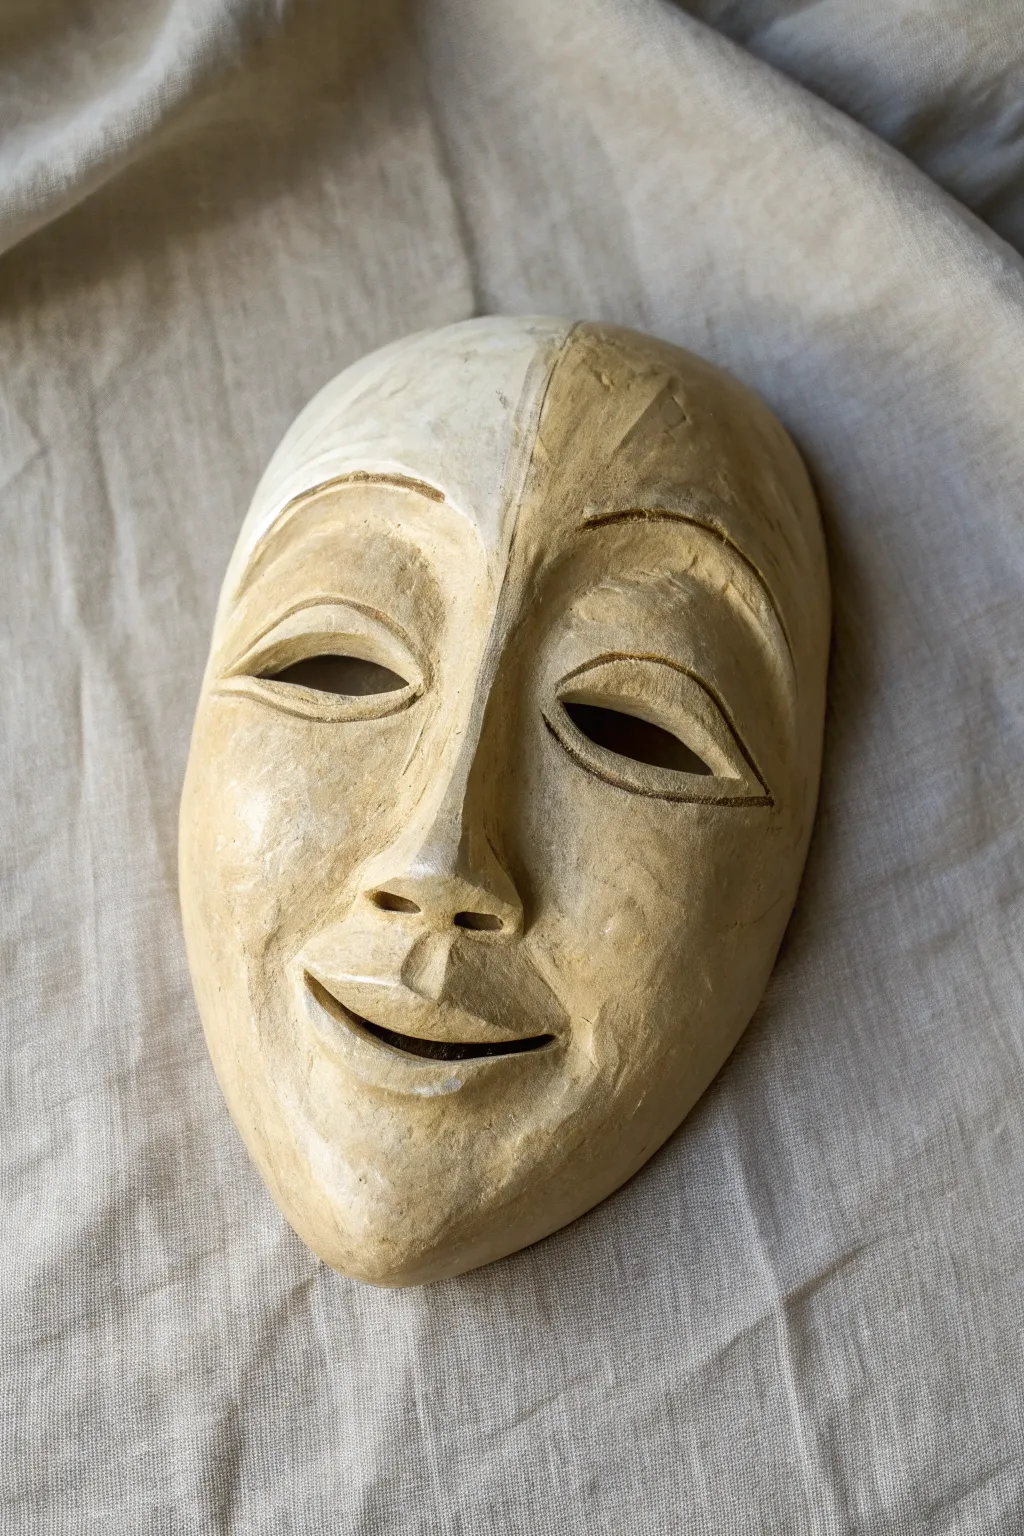
Surprised Wide-Eyes Mask
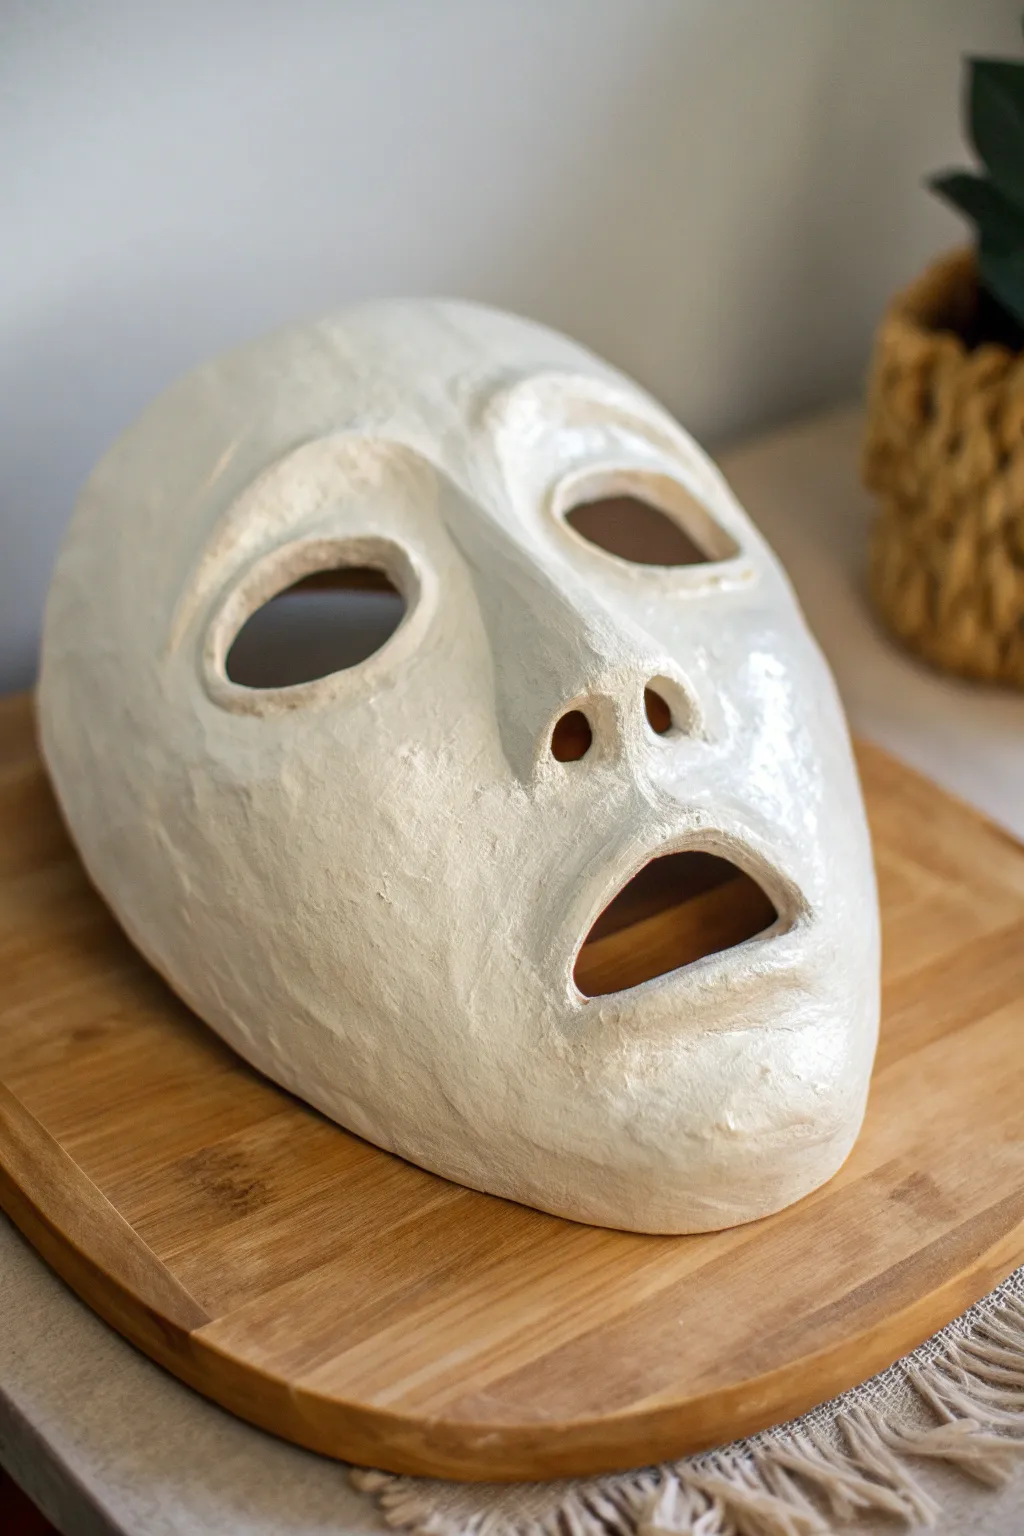
Capture a moment of pure shock with this expressive white clay mask featuring exaggerated wide eyes and a gaping mouth. Its smooth, pale finish highlights the dramatic shadows of the sculpted features, making it a striking study in emotion and form.
Step-by-Step Tutorial
Materials
- Air-dry clay (white) or paper clay
- Plastic face mold or balloon (as a base form)
- Clay sculpting tools (loop tool, modeling tool)
- Bowl of water
- Rolling pin
- Plastic wrap
- Sponge
- Fine-grit sandpaper (220 grit)
- White gesso or white acrylic paint
- Matte spray varnish (optional)
Step 1: Forming the Base
-
Prepare the workspace:
Lay down a protective covering on your table. If using a plastic face mold as a base, cover it tightly with plastic wrap to prevent the clay from sticking. -
Roll out the slab:
Take a large chunk of air-dry clay and knead it briefly to warm it up. Roll it out into an even slab, approximately 1/4 inch thick. Aim for a generous oval shape that covers the face area. -
Drape the clay:
Gently lift your clay slab and drape it over your mold. Press the clay softly against the high points—the forehead, nose, and chin—allowing it to take the general shape of a face. -
Establish the perimeter:
Trim the excess clay from the edges using a knife or loop tool, creating a clean oval outline for the mask.
Creating Smooth Transitions
When attaching added clay pieces (like eyebrows), score both surfaces with a needle tool and add a drop of water (slip) before pressing them together for a seamless blend.
Step 2: Sculpting the Expression
-
Build the nose bridge:
Add a small coil of clay to the nose area to build up the height. Smooth the edges down into the main slab so the nose rises naturally from the face. -
Define the eye sockets:
Use your thumbs to gently press indentations where the eyes will go. Since this is a ‘surprised’ mask, make the brow ridge arch high above these indentations. -
Cut the eye holes:
Using a potter’s knife, carefully cut out two large, almond-shaped eye holes. Keep them wide and open to convey shock. -
Shape the eyebrows:
Roll two small snakes of clay. Attach them above the eye holes in high, arched curves. Blend the top edge of the eyebrow into the forehead, but keep the bottom edge defined to create a sharp shadow. -
Sculpt the mouth:
Cut an open, downturned mouth shape near the chin. It should look like a gasp. Smooth the cut edges with a little water on your finger so they aren’t sharp. -
Refine the lips:
Add a very thin coil of clay around the mouth opening to create lips. Blend the outer edges into the chin and cheeks, leaving the inner rim slightly raised for definition. -
Nose details:
Use a round modeling tool to press deep nostrils into the bottom of the nose shape. Flare the outer nostrils slightly.
Step 3: Smoothing and Finishing
-
Initial smoothing:
Dip a sponge in water and wring it out almost completely. Gently wipe the entire surface of the mask to remove fingerprints and harsh tool marks. -
Drying phase:
Allow the mask to dry completely. This usually takes 24-48 hours depending on humidity. I like to prop it up on a crumpled towel so air can circulate underneath. -
Sanding:
Once fully dry and hard, use fine-grit sandpaper to buff away any remaining bumps or rough textures. Focus on the curves of the cheeks and forehead. -
Priming:
Apply a coat of white gesso to seal the clay. This creates that brilliant, unified white surface seen in the reference image. -
Final coat:
If the gesso isn’t opaque enough, add a layer of white acrylic paint. For a slight sheen like the photo, you can finish with a light mist of semi-gloss sealer, though leaving it matte works too.
Cracking Clay?
If small cracks appear as the clay dries, don’t panic. Mix a small amount of fresh clay with water to make a paste and fill the cracks, then sand smooth once dry.
Now you have a sculpted piece that freezes a dramatic emotion in time, ready to hang or display.


Silly Grin With Big Teeth Mask
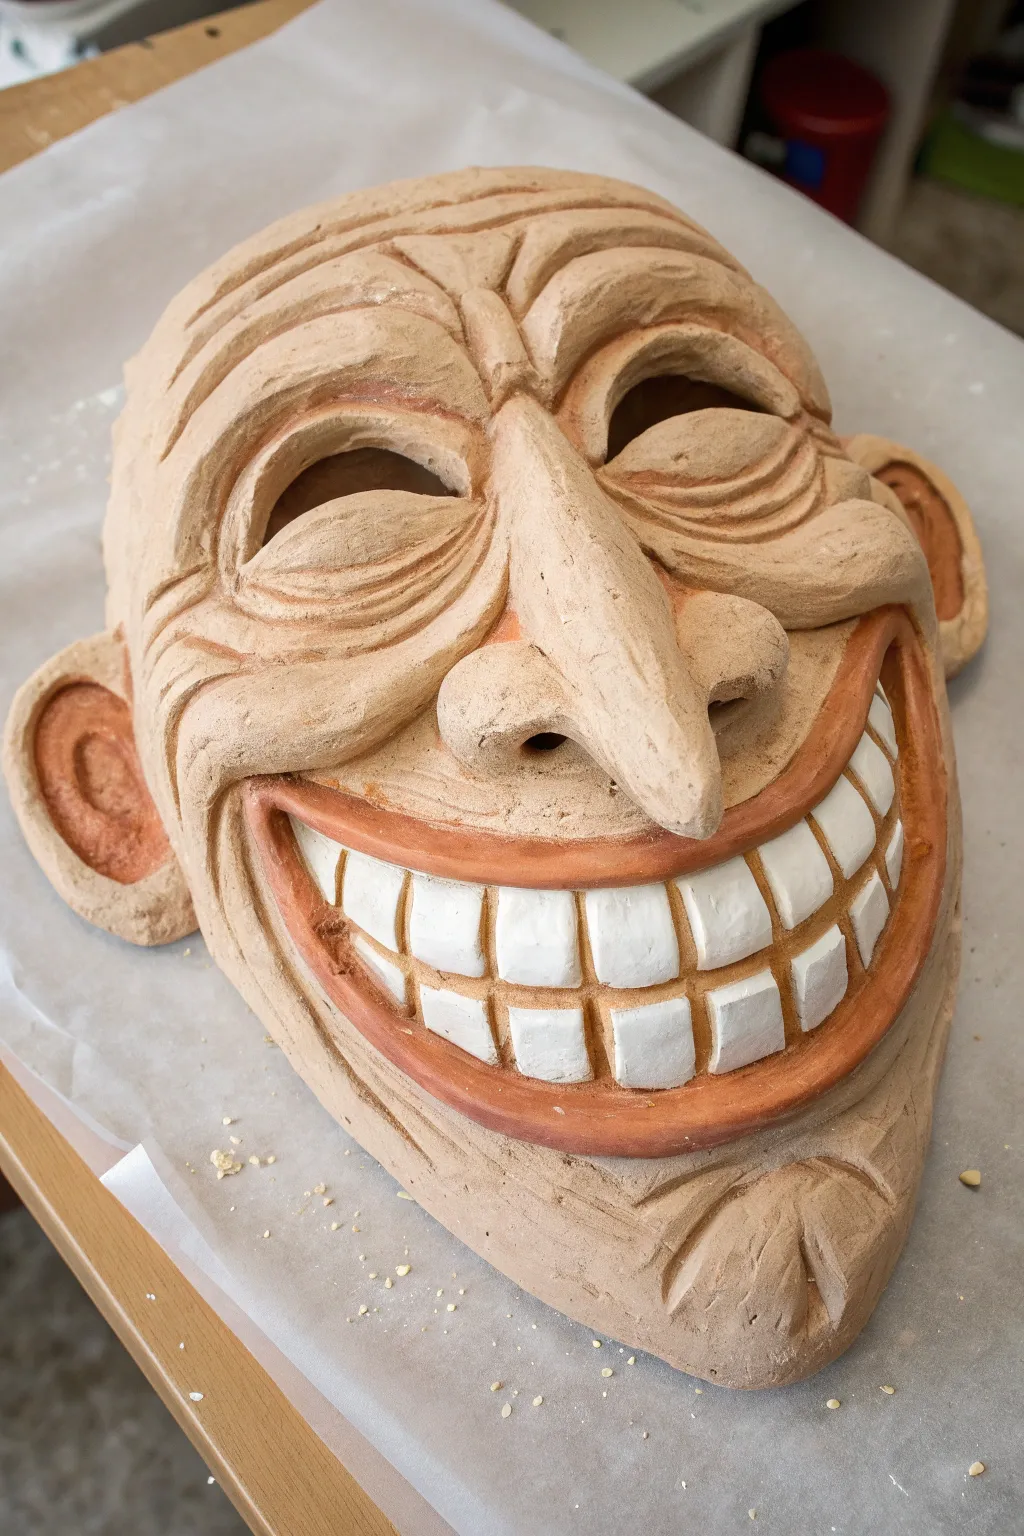
Embrace the mischievous spirit with this expressive clay mask featuring deep wrinkles, a prominent nose, and an oversize, toothy grin. With its cartoonish features and earthy tones, this project is perfect for practicing exaggerated facial anatomy and texture work.
Detailed Instructions
Materials
- Air-dry clay or kiln-fire earthenware clay (approx. 2-3 lbs)
- Clay modeling tools (loop tool, needle tool, wooden rib)
- Rolling pin
- Newsprint or plastic wrap
- Bowl or plastic mold (for the base shape)
- Slip (clay and water slurry)
- Scoring tool or old fork
- White acrylic paint or underglaze
- Red iron oxide wash or watered-down terra cotta acrylic paint
- Small stiff paintbrush
- Sponge
Step 1: Building the Base Structure
-
Form the Slab:
Begin by rolling out a slab of clay to an even thickness of about 1/4 to 1/2 inch. This will be the foundation of your mask. -
Shape over a Mold:
Drape your slab over a hump mold—a crumpled ball of newspaper covered in tape or an upside-down bowl covered in plastic wrap works perfectly—to create the convex face shape. -
Cut the Outline:
Trim the edges of the clay into an oval or egg shape, leaving enough room at the bottom for a long, prominent chin. -
Establish Eye Sockets:
Use your thumbs to gently press indentations where the eyes will go, then cut out almond-shaped holes. Make them curve upwards to emphasize the squinting, laughing expression.
Keep it Light
To reduce weight, hollow out the back of thick added parts like the nose and chin before attaching them. This prevents the mask from sagging or cracking.
Step 2: Sculpting the Features
-
Add the Brow Ridge:
Roll two coils of clay and score and slip them above the eye holes. Blend the clay downwards into the bridge of the nose to create a heavy, protruding brow. -
Form the Nose:
Create a long, carrot-shaped piece of clay for the nose. Score the back of it and the center of the face, attach firmly, and blend the edges. I like to curve the tip slightly downward for extra character. -
Build the Cheeks:
Add flattened balls of clay below the eyes to build up high, laughing cheekbones. Smooth these into the side of the nose. -
Create the Smile Foundation:
Roll a long, thick coil and attach it in a wide U-shape for the upper lip. Repeat for the lower lip, leaving a wide gap between them for the teeth. -
Insert the Teeth:
This is crucial: Shape individual rectangular blocks of clay for the teeth. Score the inside of the mouth area and attach them in two even rows—upper and lower—ensuring they touch. -
Attach the Ears:
Form two C-shaped ears and attach them to the sides of the head at eye level. Press your thumb into the center to create the inner ear depression.
Step 3: Detailing and Texture
-
Carve Wrinkles:
Using a needle tool or wooden modeling tool, carve deep, sweeping lines across the forehead. Follow the curve of the brow to make the wrinkles look natural. -
Crow’s Feet:
Etch radiating lines from the corners of the eyes and around the cheeks to emphasize the intense smiling expression. -
Refine the Lips:
Smooth the clay around the teeth so the lips look like they are stretched tight. Add small creases at the corners of the mouth. -
Surface Smoothing:
Use a damp sponge to smooth out any unwanted fingerprints, but leave the carved lines sharp.
Teeth Falling Out?
If the teeth detach while drying, your scoring wasn’t deep enough. Re-attach them using a generous amount of thick vinegar-slip paste (magic water).
Step 4: Finishing and Painting
-
Drying:
Allow the clay to dry slowly under a loose plastic sheet to prevent cracking. If firing, bisque fire the piece now. -
Highlight the Teeth:
Carefully paint the teeth with bright white acrylic paint or underglaze. Keep the edges clean where the teeth meet the gums. -
Apply the Wash:
Mix a red iron oxide wash or water down some terra cotta acrylic paint. Brush this inside the ears, around the lips (the gums), and deep into the facial wrinkles. -
Wipe Back:
Using a slightly damp sponge, gently wipe the surface of the mask. This removes the paint from the high points but leaves the color settled in the deep crevices and wrinkles, creating instant depth.
Once the paint is dry, your grinning character is ready to add a touch of humor to any wall or shelf


Angry Furrowed Brow Mask
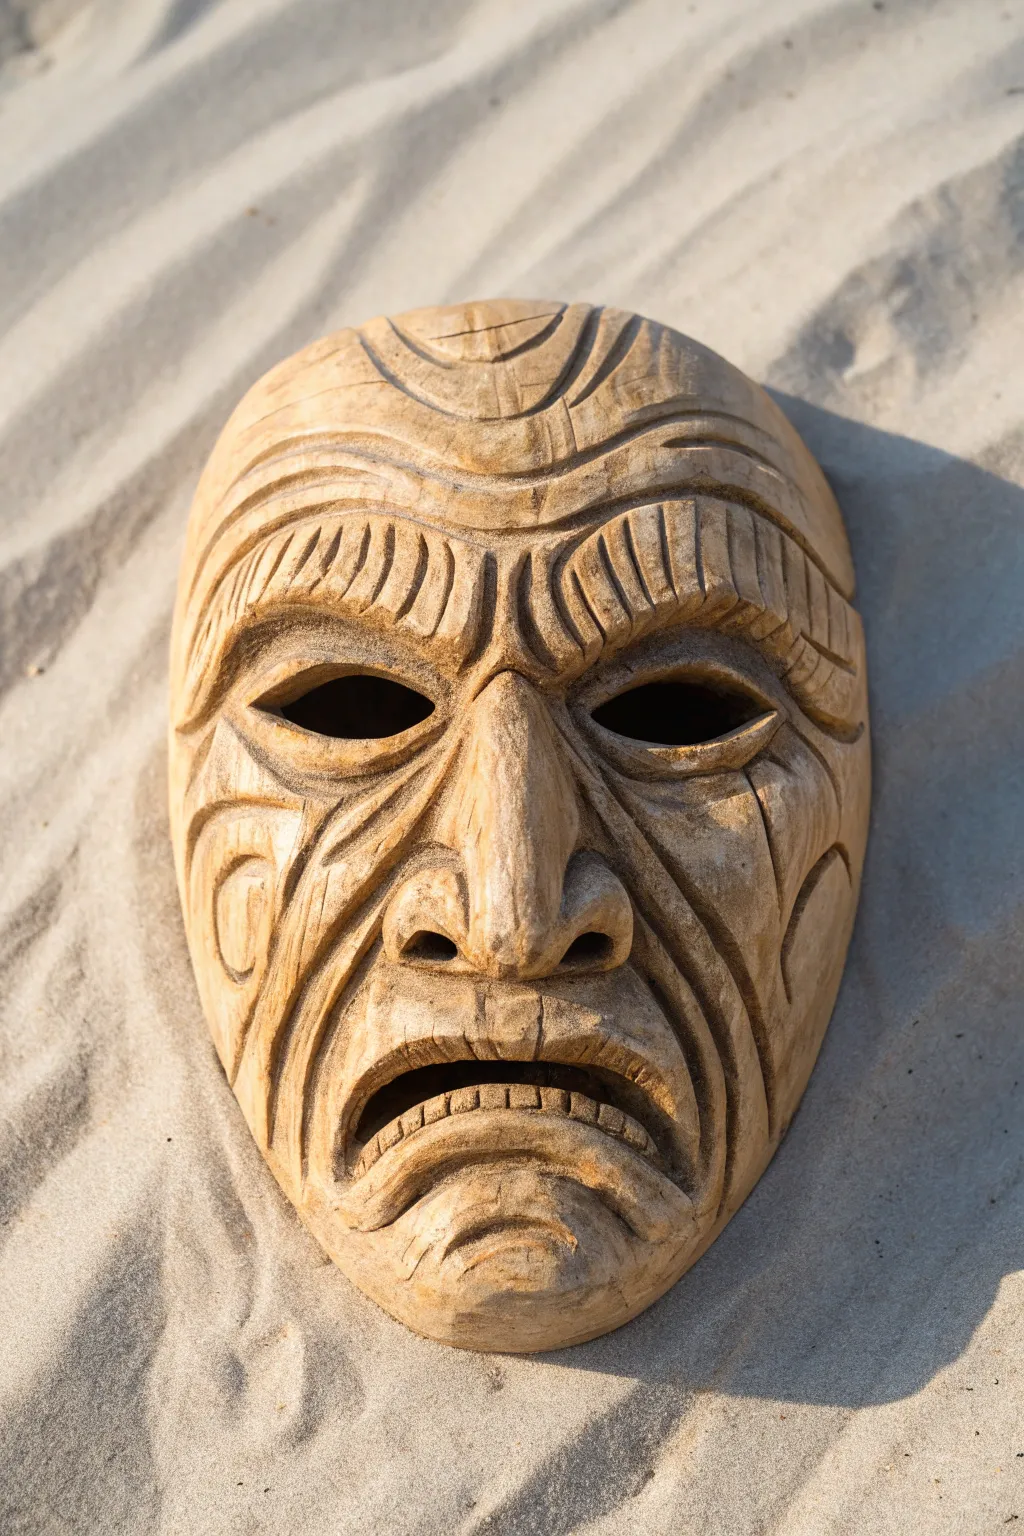
This project transforms simple clay into an ancient-looking artifact that appears to have been carved from driftwood. With deep, dramatic furrows and an intense expression, this mask is a fantastic exercise in texture and exaggeration.
Step-by-Step Guide
Materials
- Air-dry clay or polymer clay (brown or beige base)
- Clay carving tools (loop tool, needle tool)
- Balling tool or spoon back
- Rolling pin
- Aluminum foil (for armature)
- Acrylic paints (dark brown, ochre, black, tan)
- Stiff bristle brush
- Texture sponge or sandpaper
Step 1: Forming the Base Structure
-
Prepare the Armature:
Create a humped, face-like shape using crumpled aluminum foil to support the clay while you work. This ensures the mask retains a curved, convex form rather than lying flat. -
Roll the Slab:
Roll out a slab of clay to about 1/2 inch thickness. It needs to be substantial enough to allow for deep carving later without breaking through the surface. -
Drape and Shape:
Gently drape your clay slab over the foil armature. Smooth the edges down into an oval shape, pressing slightly to adhere it to the form without flattening your curve. -
Mark Major Features:
Use a needle tool or toothpick to lightly sketch where the eyes, nose, and mouth will sit. Place the eyes slightly higher than center to leave room for the elongated mouth area.
Step 2: Sculpting the Features
-
Build the Brow:
Add two thick snakes of clay across the forehead area to create a heavy, protruding brow ridge. Blend the edges seamlessly into the forehead using your thumbs or a modeling tool. -
Construct the Nose:
Form a triangular wedge of clay for the nose. Attach it firmly between the eyes, blending the sides down into the cheeks. Keep the bridge wide and strong. -
Define the Eye Sockets:
Using your thumbs or a large balling tool, press deep indentations under the brow ridge. You want heavy shadows here, so don’t be afraid to push deep. -
Cut the Eyes:
Slice almond-shaped openings inside the sockets. Smooth the cut edges with a damp finger so they don’t look ragged. -
Establish the Mouth:
Roll a thick coil for the mouth area and attach it. Carve a deep, downturned frown into this raised area, curling the corners downward for a displeased look. -
Add Teeth Detail:
Inside the mouth opening, use a small tool to press vertical lines, creating the suggestion of wide, clenched teeth. Keep them blocky and stylized.
Crack Control
If your clay starts cracking while sculpting, smooth a tiny bit of water or slip (clay paste) over the cracks immediately to seal them before they deepen.
Step 3: Carving the Texture
-
Carve Forehead Lines:
Use a U-shaped loop tool to carve deep, horizontal arcs across the forehead. These should mimic wood grain and worry lines simultaneously. -
Create Cheek Furrows:
Carve sweeping, curved lines starting from the nose wings and hooking down around the mouth. This emphasizes the snarl. -
Detail the Brow Hairs:
Instead of individual hairs, carve distinct vertical notches or grooves into the heavy brow ridge you built earlier. -
Add Wood Texture:
I like to take a stiff brush or a piece of scratchy sandpaper and drag it vertically over the entire surface. This adds fine, subtle lines that look like wood grain. -
Dry Completely:
Allow the clay to dry fully according to the package instructions. If using air-dry clay, turn it over halfway through the drying process to let the back breathe.
Sandy Finish
To mimic the photo’s beach look, mix actual fine sand into your final light paint coat or dust sand onto wet clear sealant for gritty realism.
Step 4: The Faux Wood Finish
-
Base Coat:
Paint the entire mask with a diluted wash of light tan or ochre acrylic paint. Let this soak into the texture. -
Darken the Grooves:
Mix a dark brown paint with a little water. Brush it heavily into all the deep carvings, eyes, and mouth, then immediately wipe the high points with a rag, leaving the darkness in the crevices. -
Dry Brushing:
Dip a dry stiff brush into a lighter beige paint. Wipe most of it off on a paper towel, then lightly whisk it over the raised surfaces to highlight the ‘wood’ texture. -
Final Weathering:
For an aged look, dab a tiny bit of watered-down grey paint in random spots to simulate sun-bleached wood.
Once the paint is dry, your ancient warrior mask is ready to be displayed as a powerful artifact

The Complete Guide to Pottery Troubleshooting
Uncover the most common ceramic mistakes—from cracking clay to failed glazes—and learn how to fix them fast.
Whimsical Animal Face Mask
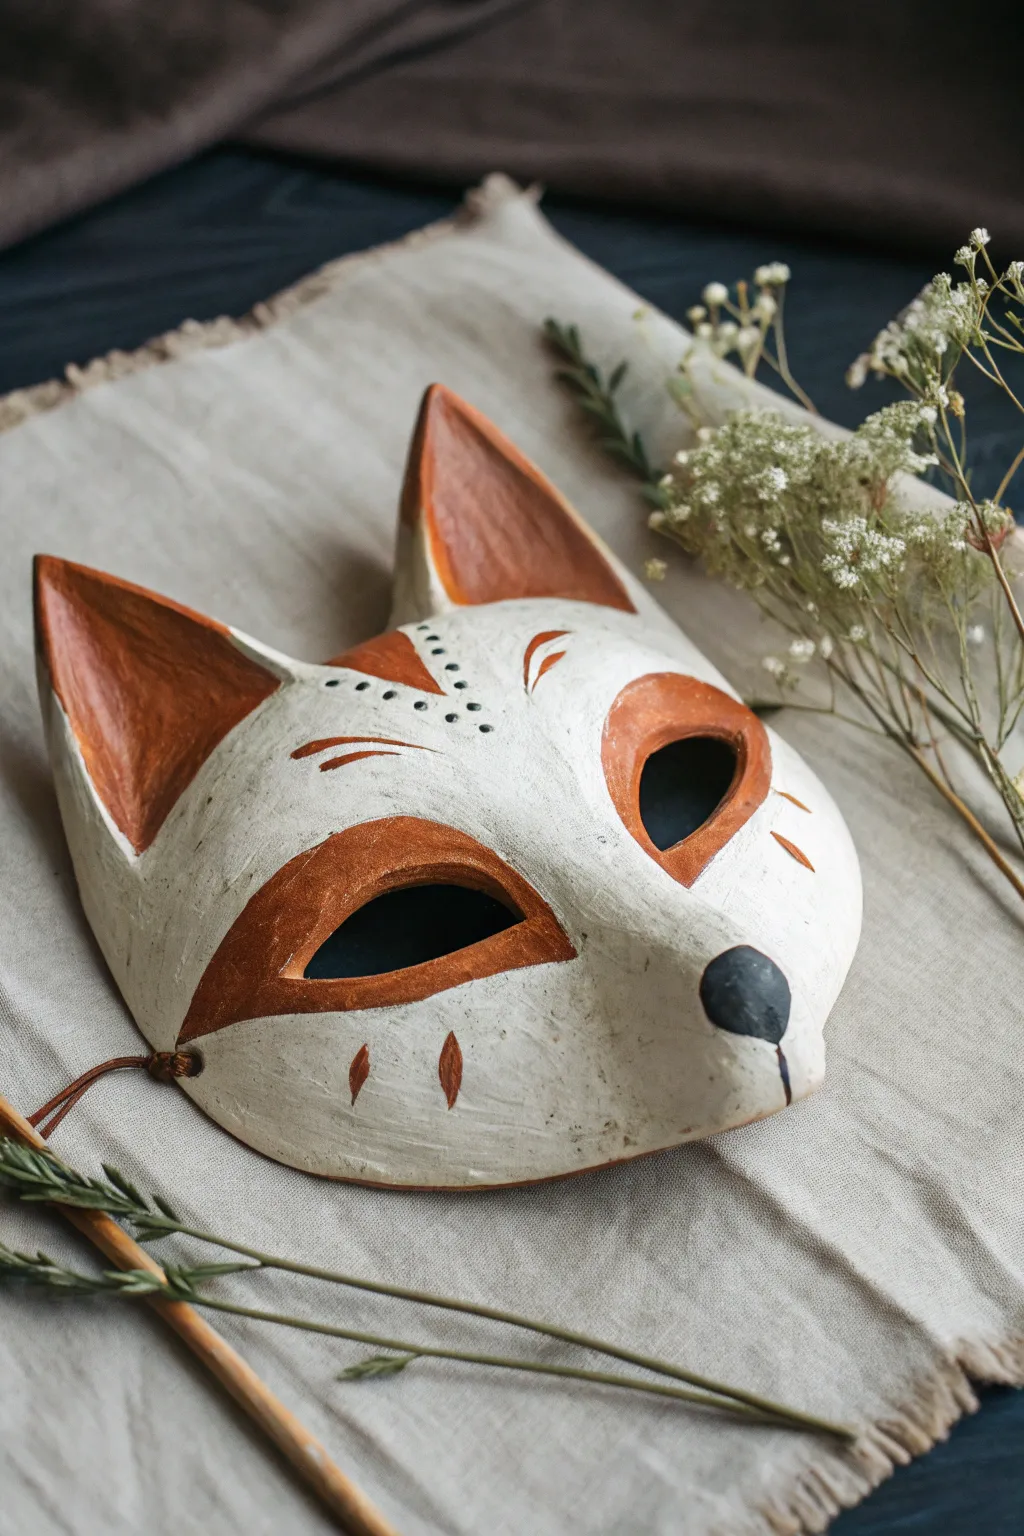
This charming fox mask combines a classic, streamlined animal shape with earthy, rustic textures. The finished piece features a matte, bone-white finish with warm terracotta accents, perfect for a whimsical wall hanging or costume prop.
Step-by-Step
Materials
- White air-dry clay or low-fire earthenware clay
- Rolling pin
- Fettling knife or clay cutting tool
- Face form template or a crumpled aluminum foil base
- Clay sculpting tools (loop tool, needle tool)
- Sponge and water
- Acrylic paints (Titanium White, Burnt Sienna/Rust, Black)
- Matte varnish or sealant
- Fine grit sandpaper
- Small round brushes
Step 1: Sculpting the Form
-
Prepare the slab:
Start by rolling out your clay into a slab approximately 1/4 inch thick. Aim for an even thickness, as this prevents cracking during the drying process. -
Cut the base shape:
Using a needle tool or fettling knife, cut out an oval shape that is slightly wider at the top and tapers down to a point for the chin. It doesn’t need to be perfect yet. -
Form the curve:
Drape your clay slab over a mask mold or a form made of crumpled aluminum foil to give it a convex, face-fitting curve. Smooth the clay gently onto the form. -
Establish the nose:
Pinch the clay near the bottom center to pull out a protruding snout. You can add a small extra coil of clay here and blend it thoroughly if you need more volume for the nose. -
Add the ears:
Cut two large triangles from your leftover slab. Score and slip the contact points on the top of the head, then firmly press the ears into place, blending the seams until invisible. -
Define the eyes:
Mark the position of the eyes with a tool first to ensure symmetry. Using a sharp knife, cut out two almond-shaped holes, slanting them upwards at the outer corners for a fox-like expression. -
Carve the details:
Use a carving tool to gently create recessed areas inside the ears and around the eyes. This adds depth and simulates the bone structure of the face.
Step 2: Refining and Drying
-
Smooth the surface:
Dip a sponge in water (squeeze it out well so it’s just damp) and run it over the entire mask to soften harsh tool marks, but leave a little texture for that organic look. -
Pierce the attachment holes:
If you plan to wear or hang the mask, use a straw or large needle tool to punch holes on the sides near the temples before the clay hardens. -
Full uneven drying check:
Allow the clay to dry completely. For air-dry clay, this takes 24-48 hours; for ceramic clay, leather-hard to bone-dry takes longer. I like to flip it occasionally so air reaches the underside. -
Light sanding:
Once bone dry, use fine-grit sandpaper to gently smooth any sharp edges around the eye holes or the rim of the mask.
Structure Pro-Tip
When attaching the ears, curve them slightly forward rather than keeping them flat. This simple curve adds significant realism and dimension to the animal.
Step 3: Painting and Finishing
-
Base coat application:
Paint the entire mask with a matte white acrylic or underglaze. It doesn’t need to be opaque; a slightly streaky application adds to the weathered, handmade aesthetic. -
Painting the fox markings:
Mix a rusty orange color (Burnt Sienna is perfect). Paint the insides of the ears, patches around the eyes, and a triangular patch on the forehead. -
Adding fine details:
Using a smaller brush and the same rust color, add small accent dashes on the cheeks, forehead, and bridge of the nose to suggest fur patterns. -
The nose and dots:
Paint the tip of the nose shape solid black. Use the very tip of a brush or a toothpick to add black stippling dots on the forehead for decoration. -
Seal the work:
Finish with a coat of matte varnish to protect the paint without making it look glossy or plastic.
Cracking Issues?
If using air-dry clay, minor cracks can appear as it shrinks. Make a ‘slurry’ of clay and water to fill these cracks, let dry again, and sand smooth.
Now hang your woodland creation on a wall or thread a leather cord through the side holes to complete a unique costume piece
Elephant Or Pig Snout Mask
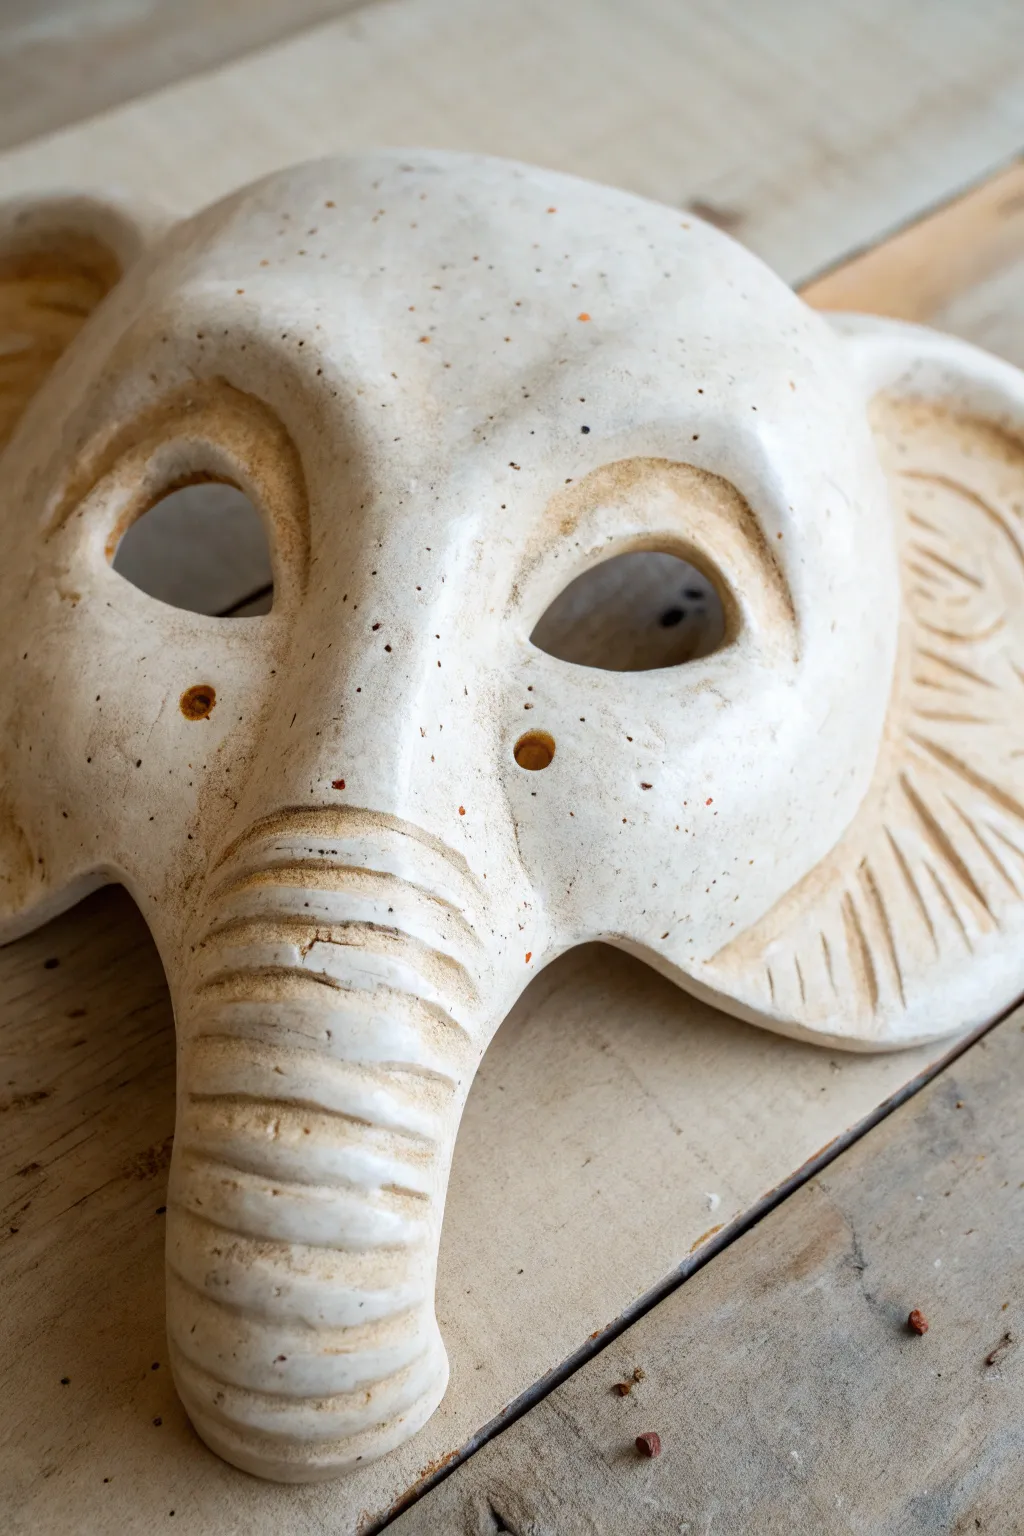
Transform a slab of clay into this whimsical elephant face, featuring a textured trunk and gently flared ears. The finished piece has a lovely artisanal feel with its speckled white glaze and natural ridges, perfect for hanging on a wall or using in a performance.
Detailed Instructions
Materials
- White stoneware clay with speckles (or plain white clay)
- Rolling pin
- Canvas mat or wooden board
- Needle tool
- Fettling knife
- Small loop tool or carving tool
- Rib tool (kidney)
- Slip and scoring tool (or serrated rib)
- Sponge
- Newspaper or paper towels
- Plastic wrap (for slow drying)
- White glaze (glossy or satin)
- Kiln
Step 1: Forming the Base Face
-
Roll the Slab:
Begin by wedging your clay to remove air bubbles. Roll out a slab of clay to an even thickness of about 1/4 to 3/8 of an inch on your canvas mat. -
Cut the Shape:
Using a needle tool, lightly sketch an oval shape that widens slightly at the top for the forehead. Once satisfied, cut out this basic face shape. -
Create Cylinder Support:
To give the mask its curve, crumple a large ball of newspaper and place it under the center of the slab. Gently press the edges down so the face arches effectively. -
Mark Eye Placement:
Lightly mark two large ovals for the eyes. They should be spaced wide enough apart to accommodate the trunk in the middle. -
Cut the Eyes:
Cut out the eye holes carefully with a fettling knife. Smooth the sharp cut edges immediately with a damp finger or sponge to prevent cracking later.
Crack Control
If the trunk starts cracking at the join during drying, score the crack, add fresh slip, and wrap that specific area tightly with plastic to rehydrate and bond it.
Step 2: Sculpting the Trunk & Ears
-
Roll a Coil:
Roll a thick coil of clay for the trunk. It should be wider at the top and taper down toward the bottom end. -
Attach the Trunk:
Score the space between the eyes and the back of your coil. Apply slip, then firmly press the trunk onto the face, blending the clay upwards into the forehead so the seam disappears. -
Curve the Trunk:
Gently bend the trunk slightly to one side or keep it straight, depending on the expression you want. If it’s heavy, tuck a small piece of paper towel underneath for support while it stiffens. -
Carve Trunk Texture:
Using a wooden tool or loop tool, carve horizontal ridges all the way down the trunk to mimic wrinkled elephant skin. I like to vary the depth of these lines for a more organic look. -
Make the Earlaps:
Roll two smaller semi-circles of clay for the ears. Attach them to the sides of the mask using the score-and-slip method. -
Blend Seams:
Blend the seams where the ears meet the face on both the front and back. The transition should be smooth and strong. -
Detail the Ears:
Carve radiating lines into the ears, starting from the connection point and moving outward, similar to the ridges on the trunk.
Step 3: Finishing Touches & Surface
-
Refine the Eyes:
Use a modeling tool to press a gentle indentation around the eye sockets, creating a subtle brow bone effect. -
Add Cheek Details:
Using the back of a small paintbrush or a round tool, impress two small circular indentations on the cheeks or snout area for added texture. -
Smooth the Surface:
Wipe the entire mask with a slightly damp sponge. This smooths out rough tool marks and brings the fine grog or speckles to the surface. -
Poke Breathing Holes:
If this mask is meant to be worn, carefully poke small breathing holes beneath the trunk area or near the nostrils. -
Dry Slowly:
Cover the mask loosely with plastic wrap. Let it dry very slowly over several days to prevent the trunk from pulling away or the mask warping. -
Bisque Fire:
Once bone dry, fire the piece to cone 04 (or your clay’s specific bisque temperature). -
Glaze Application:
Dip or brush a coat of white glaze over the mask. Ensure the glaze gets into the carved lines of the trunk and ears. -
Wipe Back (Optional):
For an antique look, gently wipe the raised areas with a sponge, leaving more glaze in the recesses to highlight the texture. -
Final Fire:
Glaze fire the piece to the appropriate temperature for your clay body (likely Cone 5/6 for stoneware).
Earthy Tones
Instead of a full white glaze, try an iron oxide wash. Wipe it back so the dark color stays only in the deep wrinkles of the trunk, giving it a weathered, ancient look.
Hang your finished elephant proudly or add ribbon to the sides to complete the transformation


What Really Happens Inside the Kiln
Learn how time and temperature work together inside the kiln to transform clay into durable ceramic.
Friendly Monster Mask
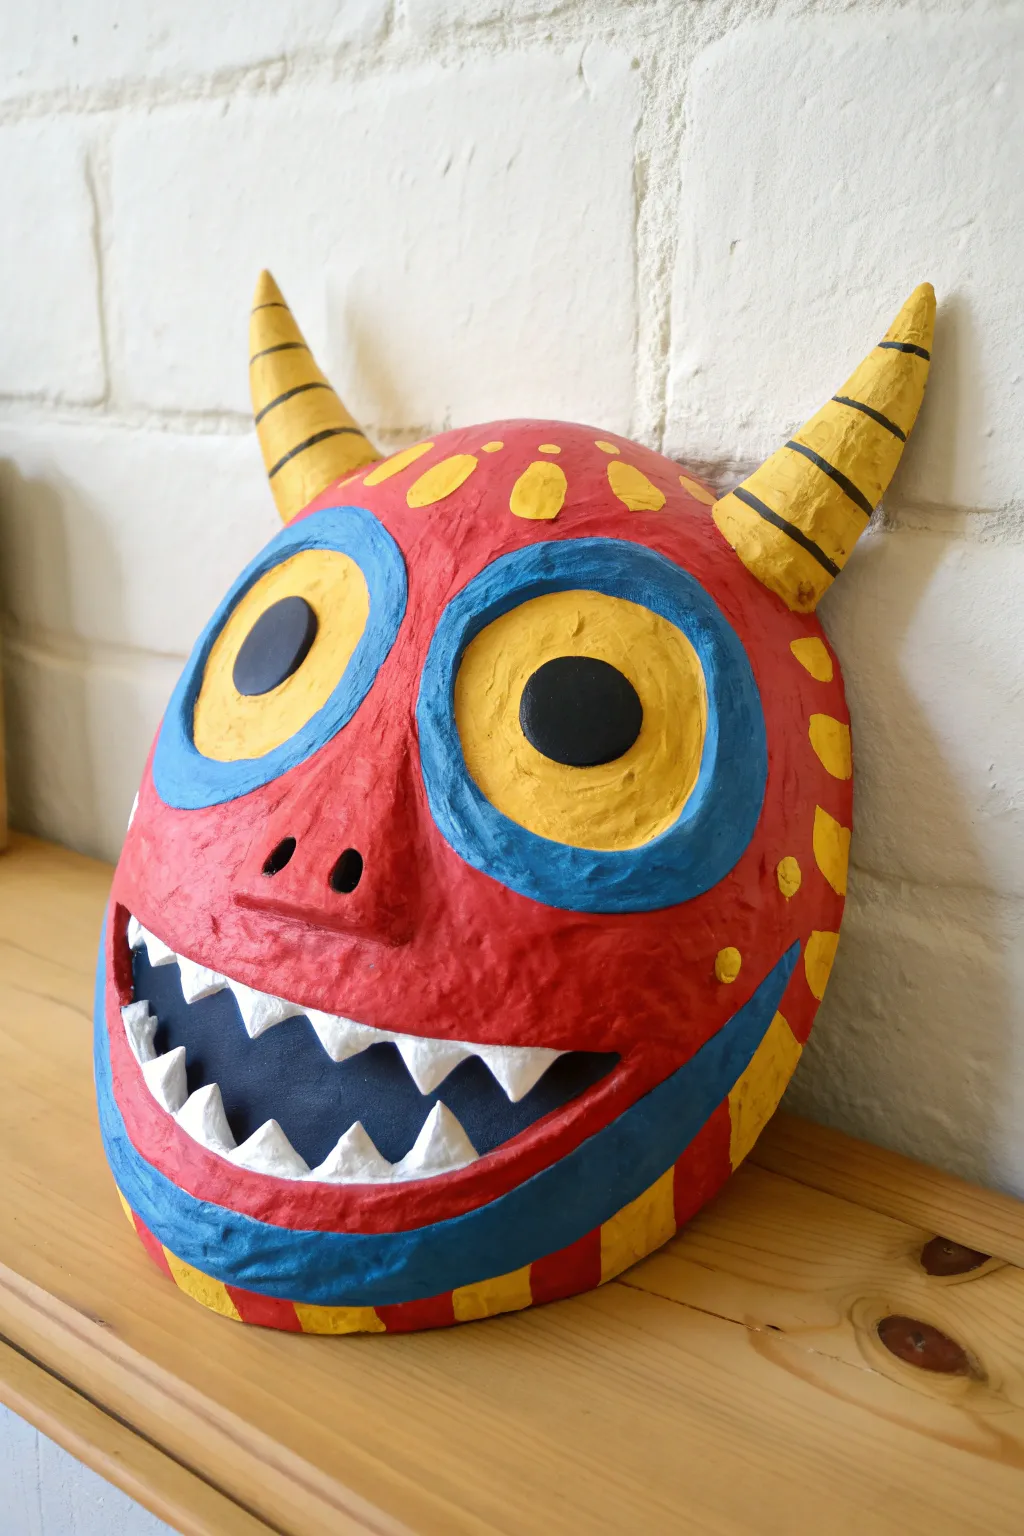
Bring a playful creature to life with this vibrant papier-mâché style mask featuring big, googly eyes and a wide, toothy grin. Its cheerful primary color palette and bold cartoonish features make it a perfect, non-scary project that pops on any wall.
Step-by-Step Tutorial
Materials
- Plastic face mask form (as a base)
- Cardboard or stiff cardstock
- Masking tape
- Newspaper strips
- Flour and water paste (or white glue mixture)
- Air-dry clay (optional, for finer details)
- Acrylic paints (Red, Bright Blue, Yellow, White, Black)
- Paintbrushes (medium flat brush, small detail brush)
- Matte or satin varnish
Step 1: Designing the Shape
-
Prepare the base:
Start with a basic plastic face mask mold. If you don’t have one, you can shape a rounded oval form using crumpled newspaper secured tightly with masking tape to create the core structure of the head. -
Construct the horns:
Roll two cone shapes out of cardstock or stiff cardboard. Make them about 3-4 inches long and tape them securely to the top corners of the mask. -
Build the nose:
Crumple a small ball of paper or use a small piece of cardboard to build up a snout area in the center of the face. Tape this down so it protrudes slightly, giving the monster some dimension. -
Define the eyes:
Cut two large circles from cardboard to define the oversized eye sockets. Tape these flat onto the upper face area; this creates that distinct, wide-eyed look before we start pasting.
Smooth Operator
To get the smoothest possible finish on your final papier-mâché layer, tear your paper strips instead of cutting them. The torn, fibrous edges blend together much better seamlessly.
Step 2: Papier-Mâché Layers
-
Mix your paste:
Whisk together flour and water until you have a smooth, pancake-batter consistency. I prefer adding a splash of white glue to the mix for extra durability. -
Apply the first layer:
Dip strips of newspaper into the paste, squeegee off the excess with your fingers, and lay them over the entire mask form. Smooth them down completely to avoid air bubbles. -
Build up features:
As you layer, subtle details can be added. Roll thin snakes of glue-soaked paper to create the raised rims around the eyes and to define the upper lip line above the mouth. -
Strengthen the horns:
Wrap newspaper strips spirally around the cardboard horns. This integrates them seamlessly into the head so they don’t look like they were just stuck on. -
Dry thoroughly:
Let this base layer dry completely until it is hard to the touch. This usually takes overnight, but placing it in a sunny spot helps speed things up. -
Refine with a final layer:
Apply a final layer of white paper or paper towel strips. This creates a blank, textured canvas that makes the paint colors appear much brighter later on.
Step 3: Sculpting Details
-
Shape the teeth:
Using air-dry clay or very dense papier-mâché pulp, shape triangular teeth. Attach them along the bottom of the upper lip and the top of the lower jaw area. -
Add nostrils:
Use a tool or your finger to press two indentations into the snout area for nostrils, or build up small clay rings to define them. -
Smooth the surface:
Once all added clay or pulp is dry, give any rough patches a very light sanding if you want a smoother finish, though the rough texture adds character.
Add Some texture
Instead of smooth paint, mix a little sand or sawdust into your red base coat. This gives the monster a fuzzy or bumpy skin texture that looks great under lighting.
Step 4: Painting the Monster
-
Base coat:
Paint the entire face with a bright, solid red acrylic paint. You may need two coats to get that rich, opaque coverage shown in the photo. -
Paint the eyes:
Fill the large eye circles with bright yellow. Once dry, carefully paint the raised rims around them with a vibrant blue. -
Add pupils:
Using black paint, place large dots in the center of the yellow eyes. Try to make them slightly different sizes or off-center for a goofy expression. -
Detail the horns:
Paint the horns yellow. Once the yellow is dry, paint thin black rings around them to give them a striped, bumblebee-like pattern. -
The mouth and teeth:
Paint the interior of the mouth with a dark blue or black to create depth. Carefully paint the teeth white, using a small brush to keeps edges crisp. -
Final decorative touches:
Add extra personality by painting yellow spots on the forehead and cheeks, and a blue stripe along the chin line.
Hang your masterpiece on the wall and enjoy the colorful, creative energy it brings to the room
Spooky Texture Creature Mask
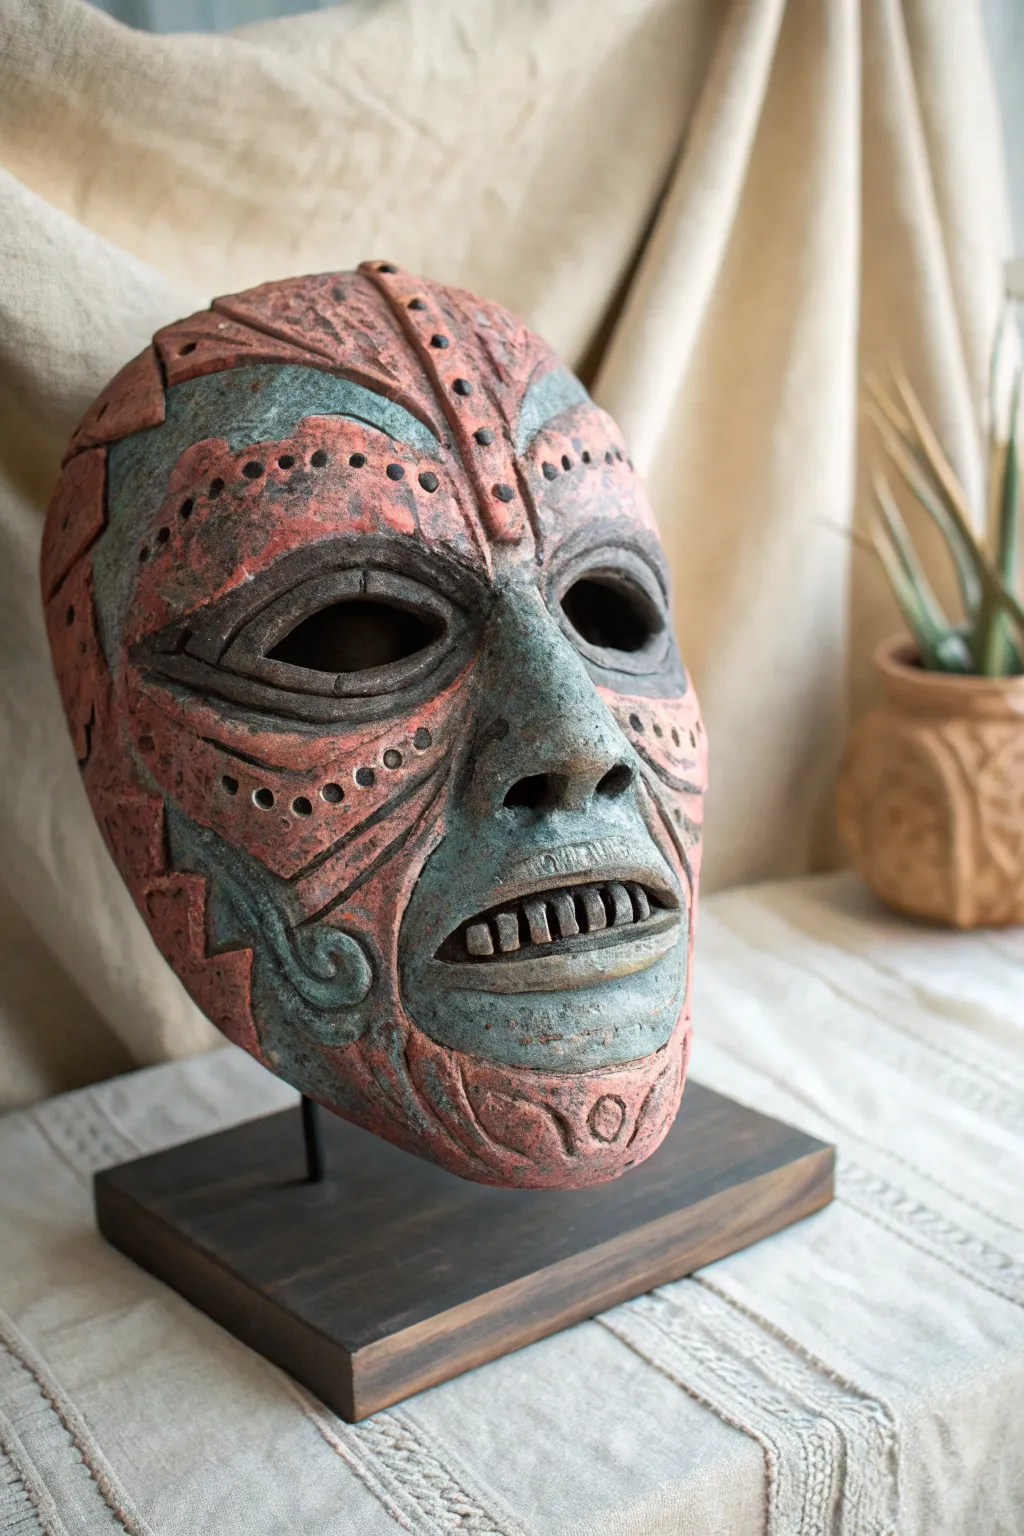
Channel the mystery of forgotten civilizations with this textured, two-toned clay mask that mimics weathered stone and oxidized copper. This project focuses on building distinct facial planes and using a unique dry-brushing technique to achieve an eerie, artifact-like finish.
Step-by-Step
Materials
- Red earthenware clay or air-dry clay (terracotta color preferred)
- Wooden sculpting tools (needle tool, loop tool)
- Small bowl of water
- Rolling pin
- Newspaper or aluminum foil ball (for armature)
- Acrylic paints (teal/patina green, oxide red, black, dark brown)
- Stiff bristle paintbrushes
- Sponge
- Matte varnish spray
Step 1: Forming the Base Structure
-
Prepare the Armature:
Begin by crumpling a large ball of newspaper or shaping aluminum foil into an oval mound. This will support the mask’s curve while you work. Cover it with a layer of plastic wrap so the clay doesn’t stick. -
Roll the Slab:
Roll out a slab of clay to about 1/2 inch thickness. It needs to be sturdy enough to hold its shape. Drape this oval slab over your prepared armature, smoothing it down gently to establish the basic convex face shape. -
Define the Brow and Nose:
Add extra clay to build up a significant, protruding brow ridge. Blend the edges seamlessly into the forehead. Pull clay downwards from the center of the brow to form a wide, flat nose bridge, ensuring it connects strongly to the cheeks. -
Sculpt the Eyes:
Using a loop tool, carve out large, almond-shaped eye sockets just below the brow ridge. Roll two snake-like coils of clay and attach them around the eye openings to form heavy, pronounced eyelids, blending the outer edges into the face.
Step 2: Detailing and Texturing
-
Carve the Mouth:
Cut a horizontal slit for the mouth, curving it slightly downwards for a somber expression. Push the clay inwards to create depth. -
Insert the Teeth:
Form small, rectangular blocks of clay for the teeth. Score and slip the inside of the mouth cavity, then press these blocks into place, leaving small gaps between them for a primitive look. -
Divide the Face Planes:
Using a needle tool, lightly sketch deep lines to separate the face into geometric sections. Follow the natural contours: isolate the mouth area, create a central vertical strip for the forehead, and define the cheekbones. -
Add Pitted Texture:
Take a blunt tool or the rounded end of a paintbrush handle and press rows of small dots into specific sections, particularly along the forehead strip and cheek panels. Varry the depth for a weathered effect. -
Engrave Geometric Patterns:
Carve angular, tribal-inspired triangles and lines into the outer edges of the mask. Keep these lines sharp and deliberate to contrast with the organic skin texture. -
Create Surface Roughness:
I like to dab a rough sponge or crumpled foil over the entire surface now. This removes the ‘perfect’ smooth clay finish and makes it look like eroded stone.
Uneven is Better
Don’t smooth your clay water too much. Leaving small cracks and fingerprints actually helps the final ‘ancient’ paint job look more authentic.
Step 3: The Antique Finish
-
Base Coat:
Once the clay is fully bone dry (and fired if using kiln clay), paint the entire mask with a mix of dark brown and black. Get this paint into every crack and crevice. -
Wipe Back:
Before the dark paint dries completely, wipe the surface with a damp sponge. You want the dark color to remain in the deep textures, pits, and carved lines, acting as shadows. -
Dry Brush the Red Patina:
Mix a rusty red oxide color. Dip a very dry, stiff brush into the paint, wipe most of it off on a paper towel, and lightly graze it over the raised areas of the forehead, cheeks, and chin patterns. -
Apply the Verdigris:
Mix a teal or sea-foam green paint to mimic oxidized copper. Use the dry-brush technique again, creating patches of this color on the nose, around the eyes, and in the deep recesses of the mouth area. -
Highlighting High Points:
Use a lighter version of the teal or a dusty grey to hit just the very highest points—the tip of the nose, eyebrow ridge, and teeth. This makes the features pop. -
Final Seal:
Protect your ancient artifact with a coat of matte varnish spray. Avoid glossy finishes, as they will ruin the old stone effect.
Add a Stand
Before drying, punch a small hole in the bottom chin area. You can glue a metal rod or dowel into a wooden block and mount the finished mask for display.
Now you have a mask that looks like it was just dug up from an archaeological site

TRACK YOUR CERAMIC JOURNEY
Capture glaze tests, firing details, and creative progress—all in one simple printable. Make your projects easier to repeat and improve.
Three-Eyed Fantasy Mask
Channel ancient aesthetics with this stunning mask project that mimics the look of weathered ivory and bronze. Featuring a central gem inlay and intricate incised details, this mask makes a striking wall hanging or a centerpiece for a costume.
Step-by-Step Guide
Materials
- Air-dry clay (white or off-white)
- Face mask mold or plastic face form
- Sculpting tools (needle tool, loop tool, smoothing tool)
- Clay rolling pin
- Faux turquoise cabochons (one large round, one medium teardrop)
- Acrylic paints: Cream/Bone, Metallic Bronze/Copper, Dark Brown wash
- Paintbrushes (detail and broad)
- Sandpaper (fine grit)
- Clear matte sealant spray
- Twine or leather cord (optional for tassels)
Step 1: Sculpting the Base Form
-
Prepare the Clay Slab:
Begin by wedging your clay to remove air bubbles, then roll it out into a smooth, even slab approximately 1/4 inch thick. Make sure it is wide enough to cover your face form entirely. -
Drape Over Mold:
Gently lift the clay slab and drape it over your plastic face mold. Press the clay firmly but carefully against the mold’s contours, ensuring the nose, forehead, and chin areas are well-defined. -
Trim the Excess:
Using a needle tool or fettling knife, trim the excess clay around the perimeter of the mask to create a clean oval shape. Smooth the raw edges with a damp sponge or your finger. -
Cut Eye Holes:
Locate the eyes on the mold and carefully cut out the almond-shaped eye openings. Keep these shapes distinct and symmetrical. -
Refine Facial Features:
Add small bits of extra clay to build up the nose bridge and the lips for more definition. Use a smoothing tool to blend these additions seamlessly into the base slab so no seams are visible.
Smooth Surface Secret
Keep a small bowl of water nearby while sculpting. Dip your finger in it to smooth out fingerprints and cracks instantly before the clay begins to harden.
Step 2: Detailing and Inlay
-
Create the Third Eye Setting:
Roll a small coil of clay and form it into a teardrop shape on the forehead. Flatten it slightly to create a raised border. Press your large turquoise cabochon gently into the center to create an impression, then remove the gem for now (we glue it later). -
Add Brow Decoration:
Just below the forehead teardrop, sculpt a small diamond-shaped setting and press the smaller teardrop gem into it to mark its place. Again, remove the gem before the clay dries. -
Incise Tribal Lines:
Using a needle tool or a fine carving tool, carve the decorative lines. Add stripes on the cheeks, triangles above the eyebrows, and curved lines under the eyes. Ensure the grooves are deep enough to hold paint later. -
Add Texture Details:
Use the end of a paintbrush handle or a small ball stylus to press a row of dots across the forehead line. Add defined ridges around the eye holes by scoring a border line about 1/4 inch from the opening. -
Dry the Mask:
Allow the clay to dry completely according to the package instructions. This usually takes 24-48 hours. I like to let this dry slowly away from direct heat to prevent warping.
Step 3: The Antique Finish
-
Sand and Smooth:
Once fully dry, lightly sand any rough edges or bumps with fine-grit sandpaper. Wipe away all dust with a slightly damp cloth. -
Base Coat:
Paint the entire mask with a cream or bone-colored acrylic paint. You may need two coats for opaque coverage. -
Paint the Accents:
Using a steady hand and a fine brush, paint the lips, the raised eye borders, and the carved patterns (cheek stripes, forehead symbols) with metallic bronze or copper paint. -
Apply an Antiquing Wash:
Mix a small amount of dark brown paint with water to create a thin wash. Brush this over the mask, letting it settle into the carved crevices and textures, then immediately wipe the raised surfaces clean with a paper towel. This creates that aged, stony look. -
Attach Gems:
Use a strong craft glue or super glue to permanently attach the turquoise stones into the indentations you made earlier. -
Seal the Work:
finish by spraying the mask with a clear matte sealant to protect the paint job and unify the sheen. -
Optional Tassels:
If desired, glue cords or tassels to the bottom edge or drill small holes (before drying) to tie them on for extra flair.
Warping Woes?
If the clay mask starts to flatten out while drying, prop it up on crumpled newspaper or a towel to help it hold its curved shape until fully rigid.
Hang your finished artifact on the wall and admire the mysterious, ancient energy it brings to the room.
Sun Face Mask With Rays
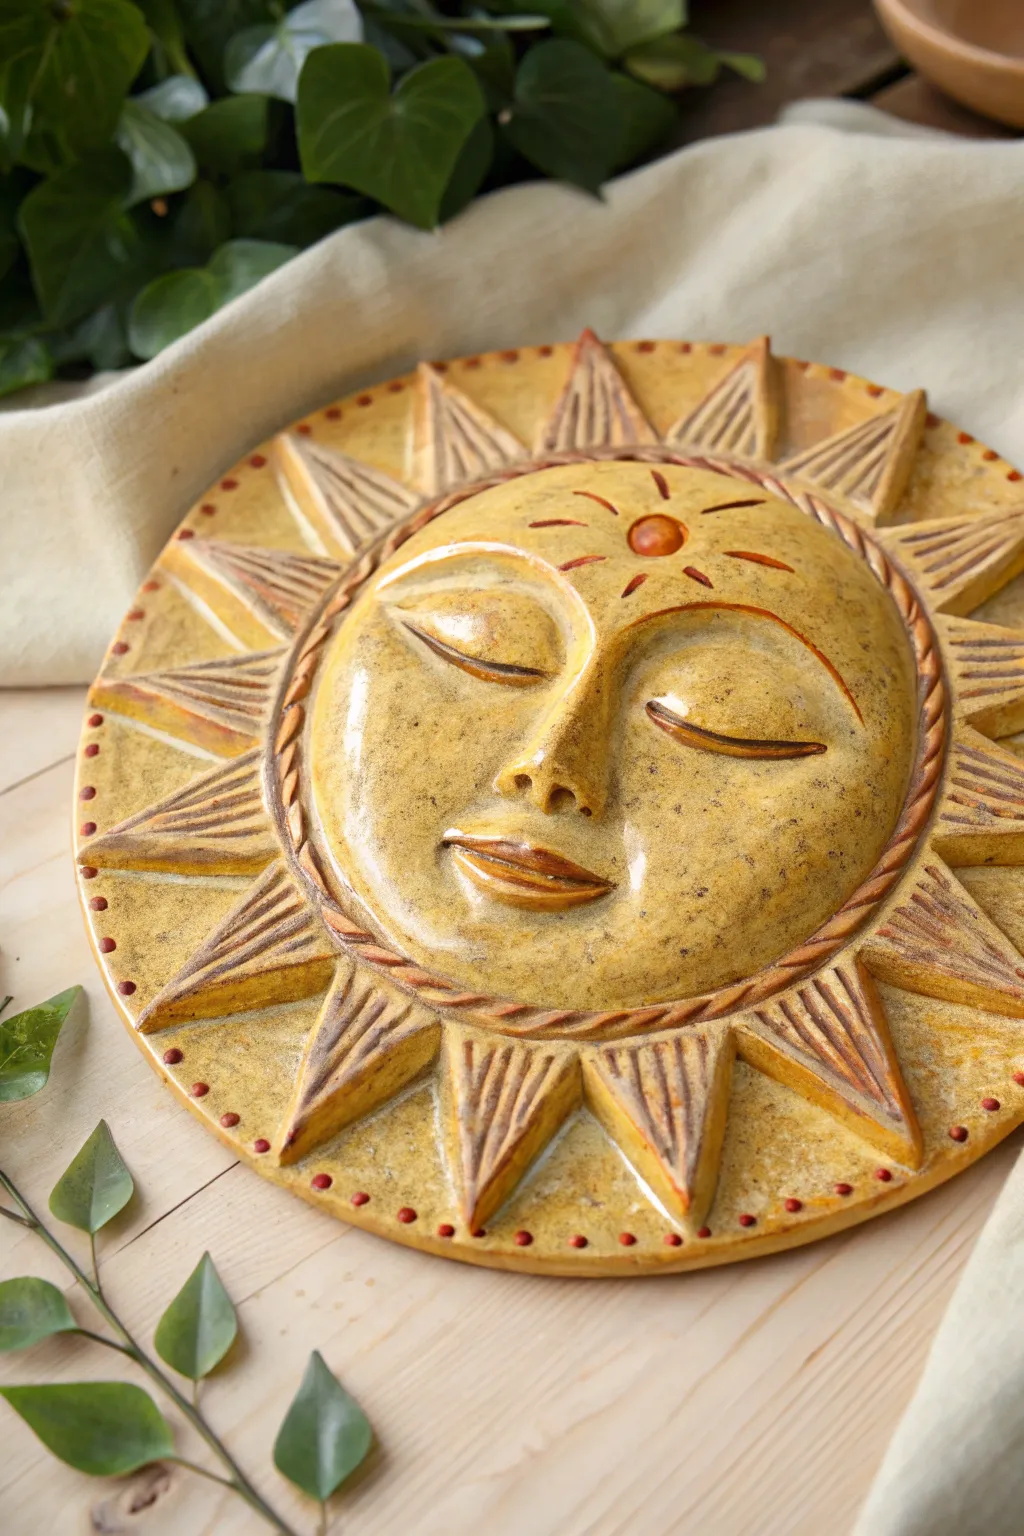
This celestial project captures the warmth of the sun in a textured clay relief, featuring a serene, slumbering face surrounded by geometric rays. The finished piece glows with a golden-ochre finish and subtle antiquing that highlights every carved detail.
Step-by-Step
Materials
- Air-dry clay or earthenware clay (approx. 2-3 lbs)
- Rolling pin
- Canvas mat or heavy cloth (for rolling)
- Needle tool or fettling knife
- Loop tool (for carving)
- Slip (clay mixed with water) and scoring tool
- Modeling tools (wooden or rubber)
- Sponge
- Acrylic paints (Yellow Ochre, Burnt Sienna, Metallic Gold)
- Clear sealant or varnish (optional)
Step 1: Forming the Base
-
Roll the Slab:
Begin by rolling out a medium-sized slab of clay on your canvas mat to a thickness of about 3/8 inch. Ensure it is even to prevent cracking during drying. -
Cut the Circle:
Place a round template (like a dinner plate or bowl) over the clay and trace around it with a needle tool to cut out a perfect circle. This will form the entire backdrop for the sun. -
Create the Central Face Dome:
Take a separate ball of clay and flatten it slightly into a thick disc or shallow dome shape. It should be smaller than your main circle, leaving a wide border for the rays. -
Attach the Dome:
Score the center of your base circle and the back of your dome vigorously. Apply slip to both scored areas and press the dome firmly onto the center of the base. Smooth the edges of the dome down so it seamlessly merges with the flat base.
Uneven Drying?
If the thin rays dry faster than the thick face, the clay might warp. Place a small weight (like a bag of rice) gently on the center while drying to keep it flat.
Step 2: Sculpting the Features
-
Map the Facial Features:
Lightly sketch the position of the eyes, nose, and mouth on the domed surface using a needle tool to ensure symmetry before adding clay. -
Add the Nose:
Form a small pyramid or triangular wedge of clay. Score and slip the attachment area, place the nose, and blend the edges smooth into the cheeks and forehead. -
Shape the Eyes:
For the closed eyelids, attach two almond-shaped pieces of clay. Use a modeling tool to smooth them into the face, creating a gentle curve. Then, carve a single horizontal line across each to define the closed lid. -
Sculpt the Mouth:
Add a small coil for the lips. Blend it onto the face, then use a tool to press an indentation for the mouth line. Shape the upper and lower lips to look full and relaxed. -
Refine the Expression:
Use your fingers and a wet sponge to smooth out any harsh tool marks on the face, giving the skin a polished look. I like to double-check the profile view here to ensure the nose projects enough. -
Add the Forehead Detail:
Place a tiny ball of clay in the center of the forehead for the ‘bindi’ or third eye symbol. Carve three small curved lines radiating above it for decoration.
Step 3: Adding the Border and Rays
-
Create the Rope Border:
Roll a long, thin coil of clay. Twist it gently or use a tool to press diagonal indentations along its length to mimic a rope texture. -
Attach the Border:
Score and slip the circumference where the face dome meets the flat border. Wrap your textured coil around this seam to frame the face. -
Carve the Rays:
On the flat outer ring of the base slab, use a needle tool to lightly draw triangular ray shapes all around the circle. -
Add Relief to Rays:
Add thin, triangular slabs of clay on top of every other ray you drew to create dimension. Alternatively, carve deep grooves between the rays to make them stand out. -
Texture the Rays:
Use a needle tool or knife to carve straight lines radiating outward on each ray. This creates the striated texture seen in the reference. -
Add Dotted Accents:
Using the blunt end of a paintbrush handle or a small round tool, press small divots around the very outer edge of the sun disc for a dotted border effect.
Smoother Features
Dip your finger in a tiny bit of vegetable oil (for oil-based clay) or water (for water-based) to get a glass-smooth finish on the eyelids and cheeks.
Step 4: Finishing and Painting
-
Dry the Piece:
Allow the clay to dry slowly under a loose plastic sheet for the first day, then uncover to air dry completely for several days until bone dry. Fire if using kiln clay. -
Base Coat:
Paint the entire sculpture with a mix of Yellow Ochre and a touch of Metallic Gold acrylic paint. Let this layer dry completely. -
Antiquing Wash:
Mix Burnt Sienna paint with water to create a thin wash. Brush this over the entire piece, engaging all the textures. -
Wipe Back:
Before the wash dries, gently wipe the raised surfaces (face cheeks, nose, tops of rays) with a damp sponge or rag. This leaves the dark brown color in the crevices and grooves, emphasizing the carving. -
Final Highlights:
Add a small touch of reddish-orange paint to the forehead dot and the dotted border for a pop of color.
Hang your solar creation on a wall to bring a permanent ray of sunshine into your room
Moon Face Mask With Stars
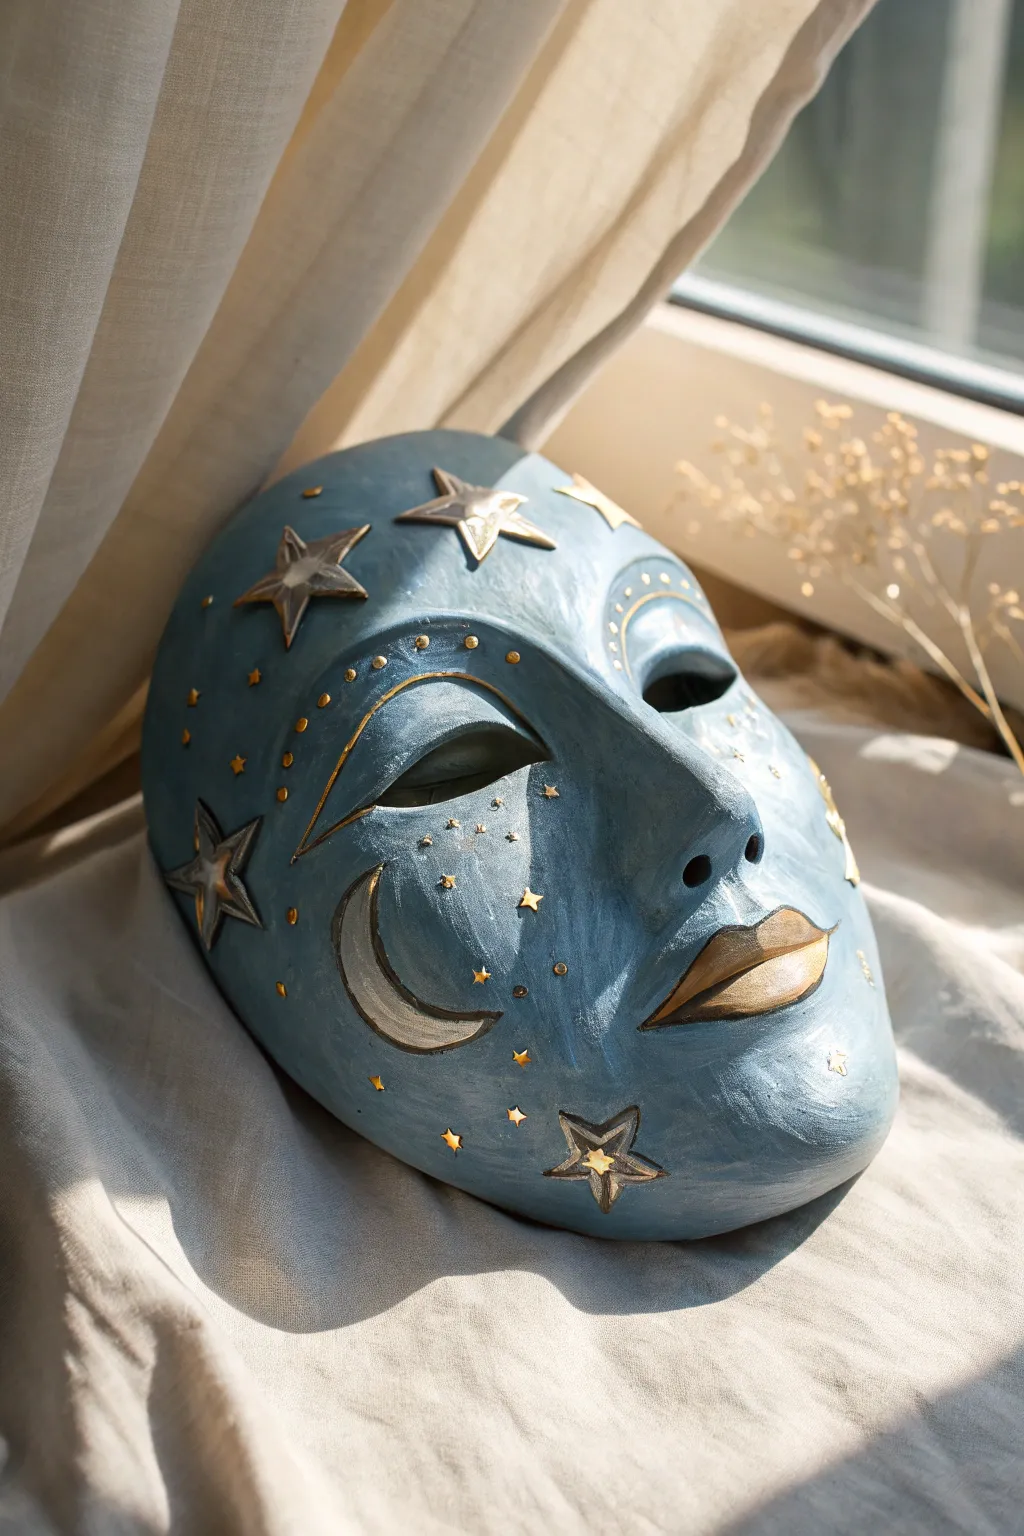
Bring the night sky to life with this mystical, moon-inspired wall mask. Featuring a soothing blue complexion adorned with raised gold stars and a crescent moon cheek, this project combines sculpture and painting for a dreamy, ethereal finish.
Detailed Instructions
Materials
- Plastic face mask mold (or DIY aluminum foil form)
- Air-dry clay (smooth texture)
- Small rolling pin
- Sculpting tools (needle tool, blending tool)
- Water cup and sponge
- Acrylic paints: Slate Blue, Metallic Gold, Silver
- Paintbrushes: Flat shader, fine liner brush
- Gloss varnish or sealant
- Shape cutters: Star shapes (small and medium)
- Sandpaper (fine grit)
Step 1: Sculpting the Base
-
Prepare the Form:
Begin by covering your plastic mask mold with a very thin layer of petroleum jelly or plastic wrap to ensure easy release later. If you don’t have a mold, you can scrunch aluminum foil into a face shape. -
Roll the Clay Sheet:
Roll out a large slab of air-dry clay to about 1/4 inch thickness. Creating an even thickness here is crucial so the mask dries without cracking. -
Drape the Face:
Gently drape the clay sheet over your mold. Start pressing it down from the nose outward, smoothing it against the form to capture the facial contours like the nose bridge, brow bone, and lips. -
Refine the Features:
Use your fingers and a damp sponge to smooth out any wrinkles. Carefully cut out the eye holes with a needle tool, smoothing the rough edges immediately with a wet finger. -
Add the Eyelids:
Roll two small, thin coils or teardrop shapes of clay. Attach them above the eye openings to create distinct, heavy upper eyelids, blending the top edge into the forehead for a seamless look. -
Sculpt the Lips:
Add a small amount of extra clay to the lip area to build up volume. Use a sculpting tool to define the cupid’s bow and the separation between the upper and lower lip.
Step 2: Adding Galaxy Details
-
Create the Crescent Moon:
Roll a small amount of clay flat and cut out a crescent moon shape. Score the back of the moon and the mask’s left cheek, add a dab of water (slip), and press the moon firmly onto the cheek. -
Cut and Attach Stars:
Use small star cutters to create 5-7 stars of varying sizes. Attach these randomly around the forehead, cheeks, and chin using the score-and-slip method. I like to slightly curve the star points to match the mask’s contour. -
Add Decorative Dots:
Roll tiny spheres of clay for raised dots. Place a line of them following the curve of the eyebrow, and scatter a few solitary dots across the forehead as distant stars. -
Dry Completely:
Let the mask dry for at least 24-48 hours. Keep it on the mold for the first half of drying to hold the shape, then remove it carefully to let the back dry. -
Sand and Smooth:
Once fully cured, use fine-grit sandpaper to gently smooth any rough fingerprints or jagged edges on the stars and eyelids.
Crack Control
If small cracks appear during drying, make a paste of clay and water (slip). Fill the cracks, smooth with a damp finger, and let dry again before sanding.
Step 3: Painting the Night Sky
-
Apply the Base Coat:
Paint the entire surface of the mask with slate blue acrylic paint. You may need two coats to get an opaque, matte finish. Avoid painting the raised stars and moon if your hand is steady, but it’s okay if you paint over them. -
Gilding the Stars:
Using a fine brush, carefully paint the raised stars with metallic gold. Apply silver to the crescent moon on the cheek for contrast, or stick with gold for a warmer look. -
Highlighting Features:
Paint the lips entirely in gold. take a very fine liner brush and paint the tiny raised dots above the eye in gold to create a jeweled eyebrow effect. -
Painting Tiny Stars:
Dip the tip of a toothpick or a detail brush into gold paint. Hand-paint tiny 4-point stars and small dots directly onto the flat blue areas to fill in empty spaces. -
Outline Details:
For extra definition, use a very thin brush with dark blue or diluted black paint to outline the crescent moon and the large stars, making them pop against the background. -
Seal the Artwork:
Finish by applying a coat of gloss varnish. This protects the paint and gives the mask a ceramic-like shine that catches the light beautifully.
Hanging Hack
While the clay is still wet, use a straw to poke two holes near the temples. Once dry, loop a ribbon through them so you can hang your celestial masterpiece.
Display your serene moon face near a window where natural light can catch the metallic gold accents.
Half Human, Half Animal Mask
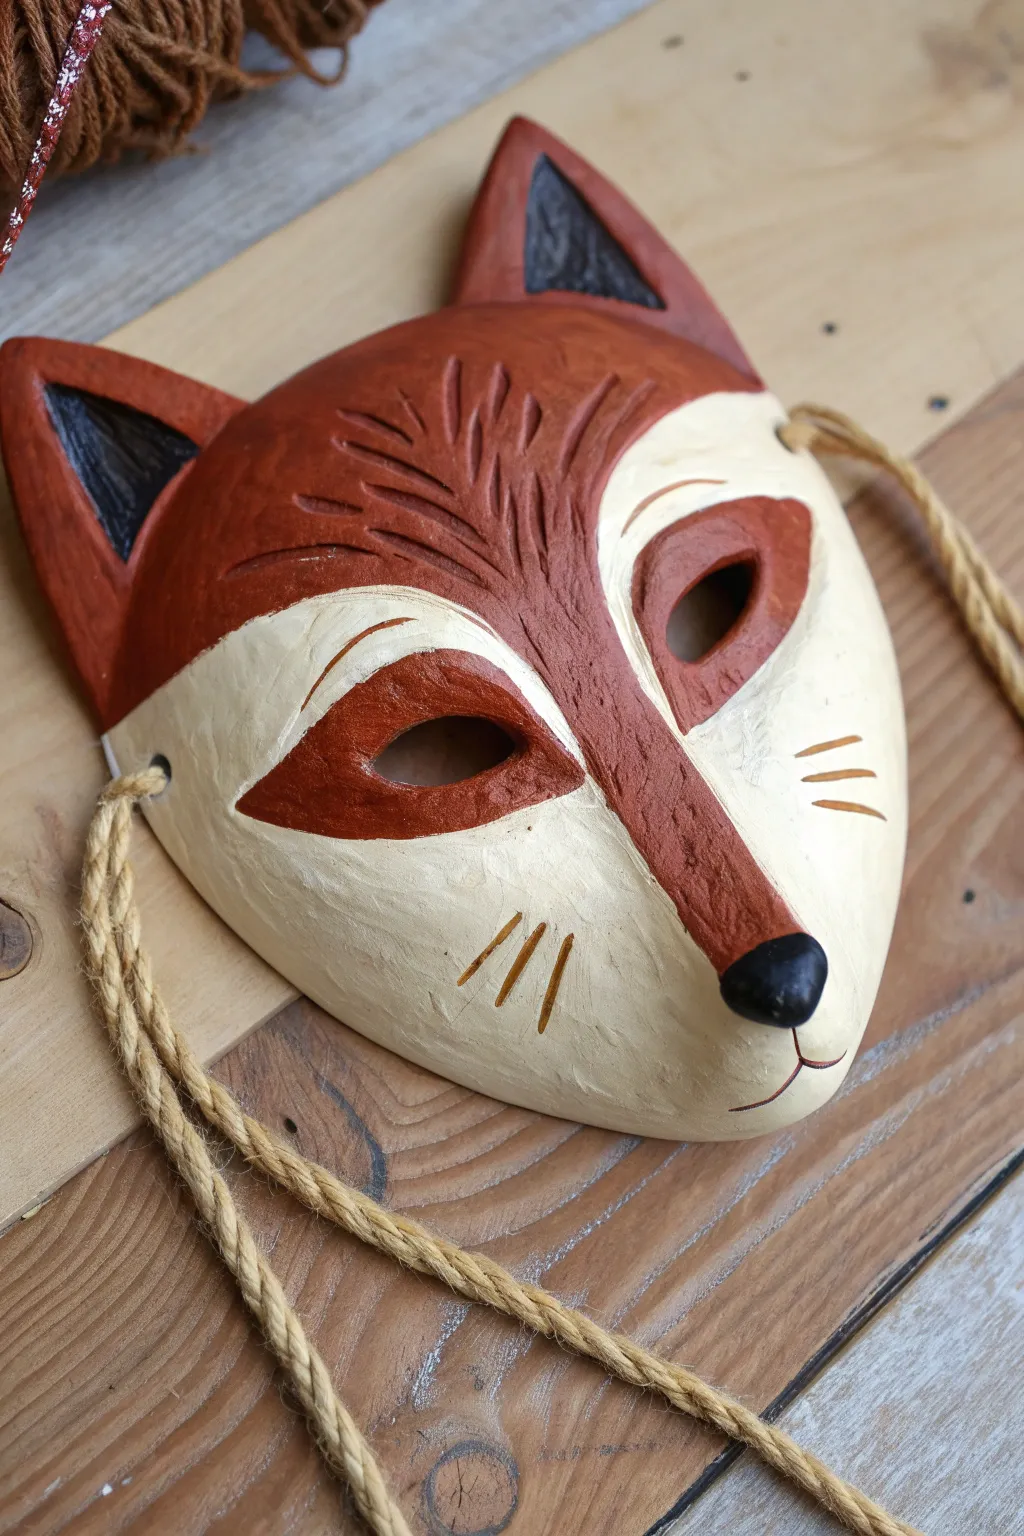
Channel the cunning spirit of the forest with this stylized fox mask, featuring bold color blocking and carved textures. The simplified, smooth form contrasts beautifully with the etched fur details, creating a piece that feels both folk-art inspired and modern.
How-To Guide
Materials
- Air-dry clay or polymer clay
- Rolling pin
- Aluminum foil (for armature)
- Clay carving tools (needle tool, loop tool)
- Acrylic paints (burnt orange/sienna, cream/off-white, black)
- Small paintbrush and medium flat brush
- Clear matte varnish or sealant
- Hemp cord or thick jute twine
- Sandpaper (fine grit)
- Water and sponge (for smoothing)
Step 1: Shaping the Base
-
Prepare the armature:
Crumple aluminum foil into a domed shape that roughly mimics the curve of a human face. This will support the clay while it dries so it retains a wearable curve. -
Roll out the clay:
Roll your clay out into an even slab, approximately 1/4 inch thick. Make sure it is large enough to cover the upper half of a face. -
Drape and cut:
Gently drape the clay slab over your foil form. Using a needle tool, cut out the basic fox shape: a wide forehead tapering down to a pointed snout. -
Add the ears:
Cut two triangular shapes from leftover clay for the ears. Score and slip the attachment points, then press them firmly onto the top corners of the head. Smooth the seams until they are invisible. -
Define the nose:
Roll a small ball of clay and attach it to the very tip of the snout to create the nose button. Blend the edges slightly so it looks integrated but distinct.
Clean Lines Hack
If you struggle with steady painting hands, try using thin masking tape or washi tape to block off the cream areas before painting the orange sections.
Step 2: Refining and Carving
-
Cut the eyes:
Identify where the eye holes should sit. Use a craft knife or needle tool to cut out almond-shaped openings. Smooth the inner edges with a damp finger so they aren’t sharp. -
Engrave fur texture:
Using a needle tool or a sharp V-gouge, carve stylized fur lines into the forehead area. Start from the center and fan them outwards and upwards to suggest volume. -
Punch tie holes:
While the clay is still wet, use a straw or large tool to punch holes on the far left and right sides of the mask for the strap. -
Carve details:
Carve three small lines on each cheek for whiskers. You can also lightly incise the outlines where the color changes will happen (around the eyes and snout) to guide your painting later. -
Dry completely:
Allow the mask to dry fully according to your clay’s instructions. Air-dry clay may take 24-48 hours. I usually flip it halfway through drying to let the inside get air.
Cracking Clay?
Small cracks during drying are common with air-dry clay. Patch them with a sloppy mix of fresh clay and water (slip), smooth it over, and let it dry again.
Step 3: Painting and Finishing
-
Sand imperfections:
Once bone dry, take fine-grit sandpaper and gently smooth the edges of the mask and the eye holes to ensure a comfortable fit. -
Base coat the light areas:
Paint the cheeks, snout, and lower forehead with a cream or off-white acrylic paint. Apply two coats for solid coverage. -
Apply the orange coat:
Paint the nose bridge, upper forehead, and outer ears with a rich burnt orange or sienna color. Use a steady hand to create clean lines where the orange meets the cream sections. -
Add dark accents:
Paint the inside triangles of the ears and the nose button in solid black. Use a fine liner brush to paint the whisker indentations you carved earlier. -
Paint the eye patches:
Carefully paint the almond-shaped patches around the eye holes in the same burnt orange color. This creates the classic fox mask look. -
Seal the work:
Apply a coat of clear matte varnish to protect the paint and give the mask a finished, professional sheen. -
Attach the cord:
Thread a length of thick hemp cord or jute twine through the side holes. Knot them securely on the front based on the image style, or on the back for a cleaner look.
Now your mask is ready to be hung on the wall or worn for a costume event
Split Personality Two-Expression Mask
Explore the duality of expression with this intriguing ceramic mask project that combines sculptural techniques with a clever glazing strategy. By bisecting the face with two subtle variations in finish, you’ll create an evocative piece that looks like an ancient artifact resting on fabric.
Step-by-Step Tutorial
Materials
- Pottery clay (low fire white earthenware or stoneware)
- Clay rolling pin
- Newsprint or plastic wrap (for armature)
- Bowl or plastic mold (face shape)
- Fettling knife
- Loop tools and modeling tools
- Needle tool
- Slip and score tool aka ‘rib’
- Sponge
- Clear matte glaze
- Beige or light ochre underglaze (optional wash)
Step 1: Forming the Foundations
-
Prepare the armature:
Begin by crumpling newsprint into an oval mound roughly the size of a human face to serve as your support structure, or use a plastic face mold covered in plastic wrap to prevent sticking. -
Roll out the slab:
Roll your clay out to a consistent thickness of about 1/4 inch. Gently drape this slab over your prepared armature, smoothing it down the sides to establish the basic convex curve of the mask. -
Trim the outline:
Using your fettling knife, cut the excess clay away to form a clean oval shape. Smooth the rough cut edges with a damp sponge so they are rounded and finished.
Keep the hollow strong
Pack the inside of the nose and chin with small balls of paper before adding clay. This supports the hollow forms so they don’t collapse while you work.
Step 2: Sculpting the Features
-
Mark the centerline:
Lightly draw a vertical line down the exact center of the mask with a needle tool. This will guide your symmetry while sculpting, though we will intentionally define this line later. -
Build up the nose:
Create a small wedge of clay for the nose. Score both the mask surface and the wedge, apply a little slip, and press firmly into place. Smooth the edges of the nose into the cheeks so it looks seamless. -
Define the brow ridge:
Add small coils of clay above the eye area to build up the eyebrows. Blend the clay downward into the bridge of the nose and upward into the forehead for a natural, prominent brow bone. -
Cut the eyes:
Sketch the almond shapes of the eyes first to ensure they are level. Use a sharp knife to cut out the eye holes completely, beveling the cut slightly inward to create deeper shadows. -
Form the eyelids:
Roll thin coils of clay and attach them above and below the cut-out eyes to form eyelids. I find using a small wooden tool helps to smooth these coils without flattening them too much. -
Sculpt the mouth:
Add a tear-drop shape for the upper lip and a crescent for the lower lip. Blend them onto the face, then use a modeling tool to carve distinct creases at the corners of the mouth to suggest a subtle smile. -
Refine the cheeks:
From the inside of the mask, gently push outward on the cheek areas to give them volume, or add small pads of clay to the exterior to create high cheekbones.
Cracks during drying?
If hairline cracks appear while drying, score the crack, add a tiny bit of vinegar or slip, and compress the clay from both sides with a wooden tool.
Step 3: Detailing and Dividing
-
Create the split:
Using a modeling tool, gently incise a groove directly down the vertical centerline of the face, starting from the forehead, going down the nose bridge, and through the lips and chin. -
Differentiate texture:
Keep the left side of the face (viewer’s left) very smooth using a rib tool. On the right side, use a slightly rougher sponge or a bristle brush to tap in a subtle, organic texture. -
Define the outlines:
Enhance the perimeter of the eyes and the separation of the lips with a needle tool or fine brush handle to ensure the features pop. -
Dry slowly:
Cover the mask loosely with plastic and allow it to dry slowly over several days to the leather-hard stage, then to bone dry. This prevents warping. -
Bisque fire:
Fire the bone-dry mask in a kiln to cone 04 (or according to your clay’s specifications) to create durable bisque ware.
Step 4: Finishing the Surface
-
Apply a wash:
Mix a small amount of beige or ochre underglaze with water to create a thin wash. Brush this over the entire mask, letting it settle into the textured right side and the creases of the eyes and lips. -
Wipe back:
Using a clean, damp sponge, wipe the surface of the mask. Remove most of the color from the high points, leaving the darker pigment only in the recessed lines and the textured right half. -
Glaze and final fire:
Apply a coat of clear matte glaze to seal the piece without making it overly shiny. Fire the mask a final time to complete the ceramic process.
Now you have a striking two-toned mask ready to display on a wall or shelf
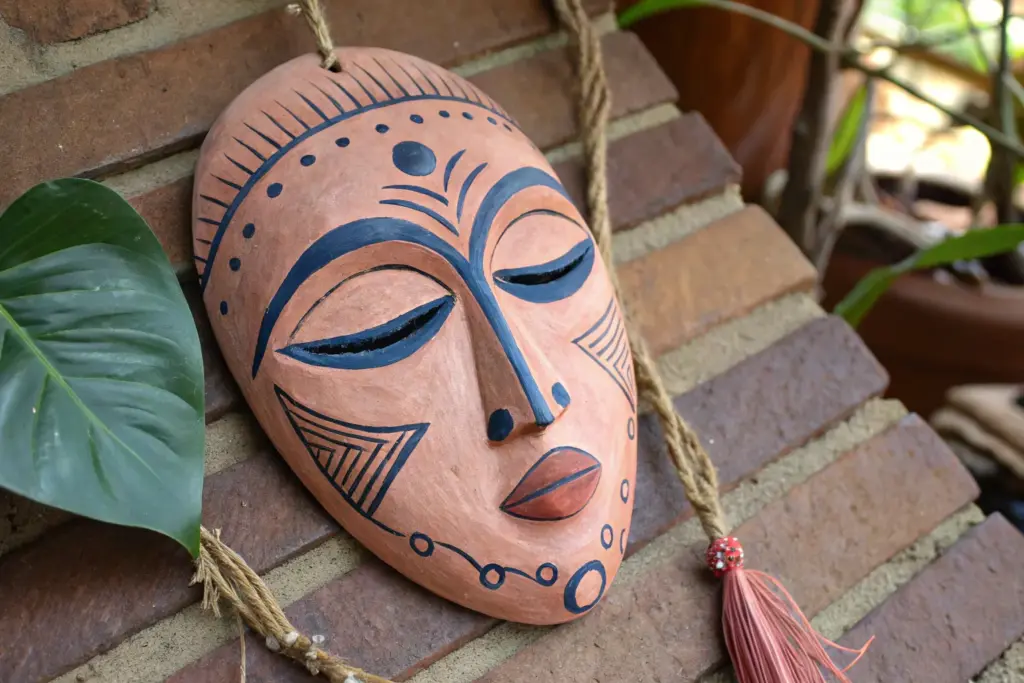
Geometric Pattern Face Mask
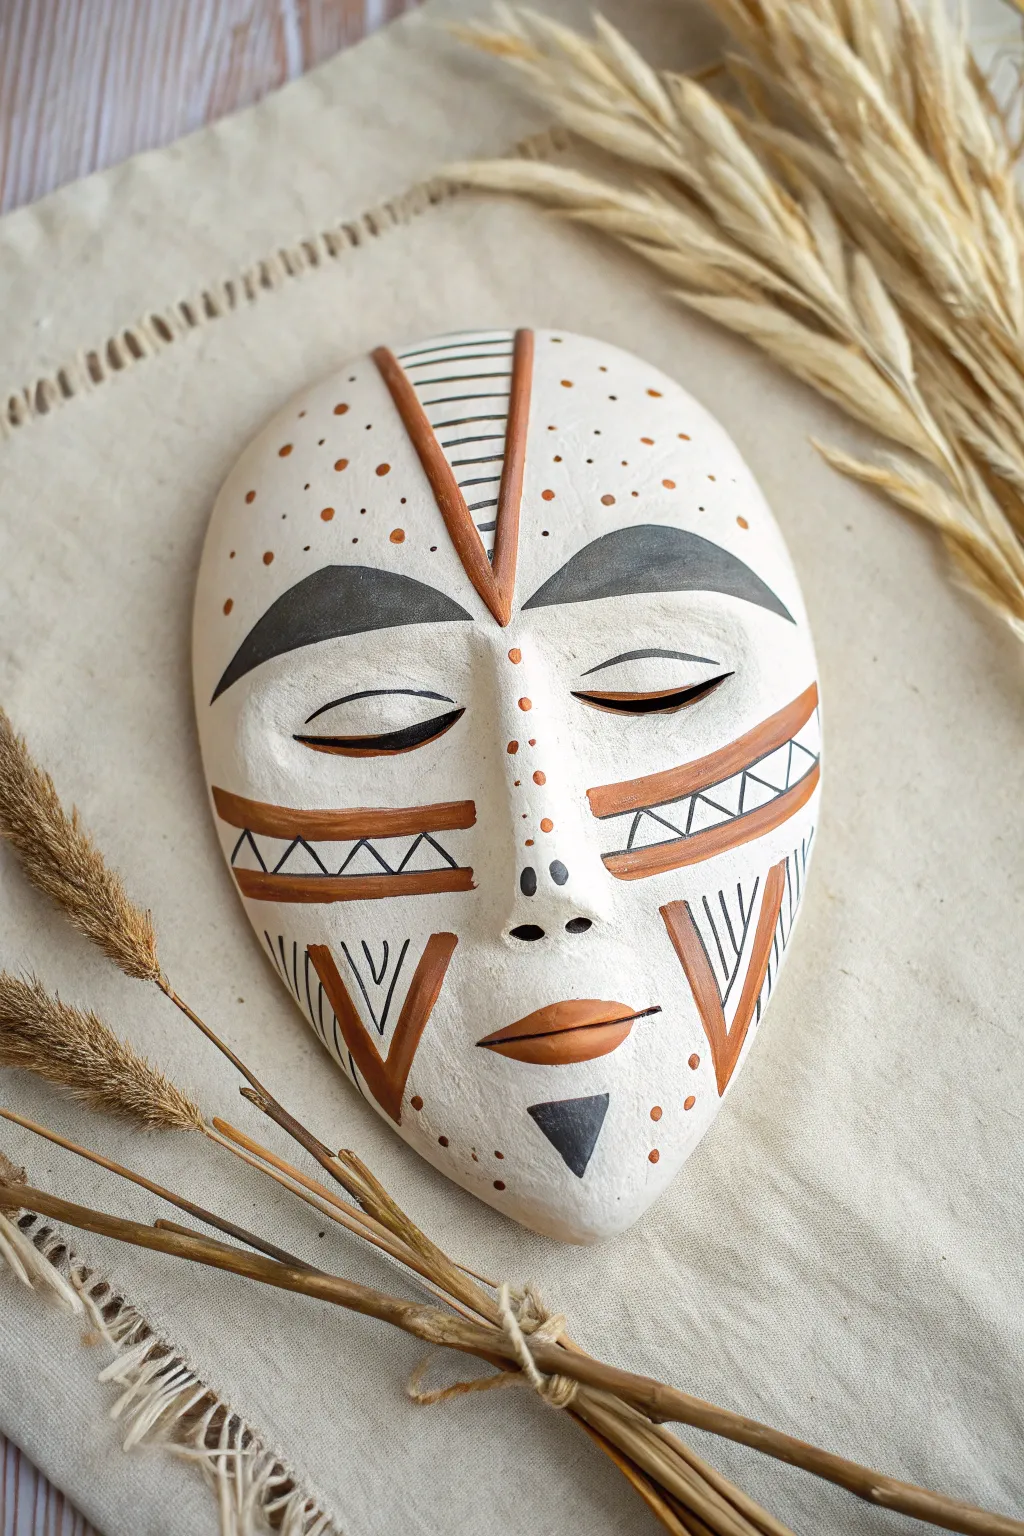
This striking wall mask combines traditional-style elongated features with bold geometric patterns in earthy terracotta and charcoal tones. The project is an excellent study in symmetry and line work, resulting in a piece that feels both ancient and modern.
Step-by-Step
Materials
- White or cream air-dry clay (approx. 1 lb)
- Clay rolling pin
- Fettling knife or plastic clay tool
- Bowl or curved form (to shape the mask)
- Plastic wrap
- Sponge and small cup of water
- Needle tool or toothpick
- Acrylic paints: Burnt Sienna (terracotta), Black, and White (optional for touch-ups)
- Fine detail paintbrush (size 0 or 1)
- Small flat paintbrush (size 4 or 6)
- Matte varnish or sealant
Step 1: Sculpting the Base
-
Prepare the slab:
Begin by rolling out your clay into an even slab, approximately 1/4 to 1/2 inch thick ensuring there are no air bubbles. -
Cut the outline:
Using a needle tool or knife, cut out a long oval shape that is slightly wider at the top and tapers toward the chin. -
Establish the curve:
Cover your bowl or curved form with plastic wrap to prevent sticking, then gently lay your clay oval over it to create the convex mask shape. -
Add the nose:
Roll a coil of clay and attach it down the center of the face to form the nose; blend the edges seamlessly into the cheeks using your fingers and a little water. -
Refine the surface:
Smooth out the entire surface with a damp sponge, paying special attention to where the nose connects to the face to ensure a continuous, organic terrain. -
Carve features:
Carve the closed eyelids as two downward-curving crescents, then add the lips by shaping a small added piece of clay or carving directly into the surface for relief. -
Create nostrils:
Use the back of a paintbrush or a specialized clay tool to gently indent two nostrils at the base of the nose.
Clean Lines Hack
For the crispest geometric lines on the cheeks, use thin artist’s tape or wash tape to mask off the areas before painting the terracotta stripes.
Step 2: Drying and Sketching
-
Initial drying:
Allow the clay to dry on the form until it is ‘leather hard’—firm enough to hold its shape but not fully dry. -
Remove from form:
Carefully lift the mask off the mold and place it on a flat surface to finish drying completely; this usually takes 24-48 hours depending on humidity. -
Sketch the symmetry:
Once fully dry, lightly sketch the geometric patterns with a pencil, drawing the forehead triangles, cheek bands, and chin details to ensure symmetry.
Step 3: Painting and Detailing
-
Paint the brow:
Using black paint, fill in the half-moon shapes above the eyes to create bold eyebrows, ensuring sharp, crisp edges. -
Add terracotta accents:
Use the Burnt Sienna paint to fill in the V-shape on the forehead, the lips, the cheek bands, and the triangular flared details on the lower jaw. -
Line work:
Switch to your finest brush and black paint to outline the terracotta shapes, particularly the cheek bands and the forehead ‘V’. -
Geometric fillers:
Paint the zig-zag pattern inside the cheek bands and the horizontal stripes inside the upper forehead triangle using black. -
Eyelid definition:
Identify the slit of the eye and paint a thin, dark line along the crease to give the sleeping eyes definition. -
Dot patterns:
Dip the non-brush end of your paintbrush into the terracotta paint and stamp small dots along the nose ridge, forehead, and perimeter of the face. -
Final black details:
Add the inverted triangle on the chin and the triangular outlines on the lower cheeks with black paint. -
Seal the work:
Once all paint is completely dry, apply a coat of matte varnish to protect the finish without making it too glossy.
Uneven Drying?
If the edges curl up while drying off the mold, gently weigh them down with small sandbags or rice-filled socks to keep the mask shape consistent.
Hang this serene piece on a gallery wall to add a touch of handcrafted artistry to your room
Sgraffito Linework Mask
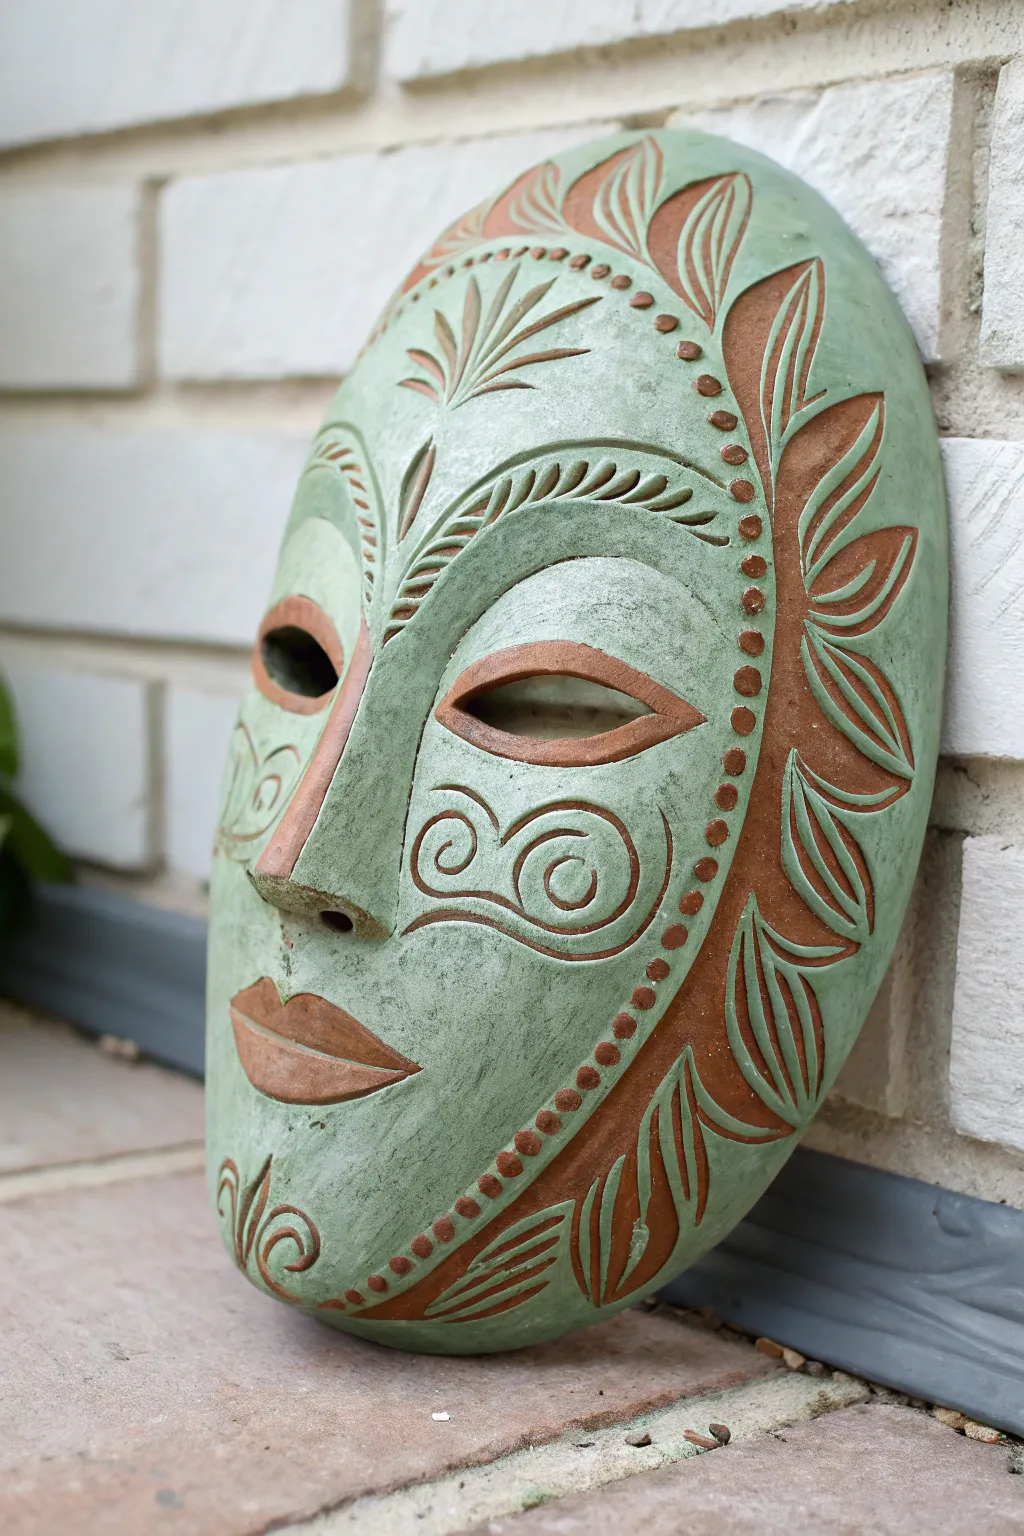
This striking ceramic mask uses the sgraffito technique to reveal warm terracotta clay beneath a cool sage green underglaze. The design features bold, stylized facial features framed by a radiating sun-ray pattern, perfect for exploring texture and contrast.
Step-by-Step Guide
Materials
- Red earthenware or terracotta clay (approx. 2-3 lbs)
- Sage green underglaze
- Rolling pin and guide strips (optional)
- Newspaper or paper towels
- Needle tool
- Loop tool or carving tools
- Sponge
- Soft paintbrush
- Small bowl or hump mold (optional)
Step 1: Forming the Base
-
Prepare the slab:
Begin by rolling out a slab of red earthenware clay to a thickness of about 1/2 inch. Ensure the clay is free of air bubbles by wedging it well beforehand. -
Cut the oval shape:
Use a needle tool to cut a large, smooth oval shape from your slab. This will be the main face of the mask. -
Create the curve:
Gently drape your clay slab over a hump mold or a mound of crumpled newspaper. This gives the mask its convex, face-like curve. Smooth out the surface with a damp sponge. -
Build up features:
Roll a coil of clay to create the nose bridge and attach it securely by scoring and slipping. Add extra clay to build up the brow ridge and the cheekbones slightly for dimension. -
Cut out eyes:
Carefully slice out two almond-shaped eyes using a fettling knife or needle tool. Smooth the cut edges with a damp finger so they aren’t sharp.
Don’t Go Too Deep
When carving sgraffito, you only need to scratch through the thin layer of color. Avoid digging deep into the clay body itself, which creates unnecessary grooves.
Step 2: Applying Underglaze
-
Leather hard stage:
Allow the clay to dry until it reaches the leather-hard stage. It should be firm enough to hold its shape perfectly but still cool to the touch and able to be carved. -
Apply base color:
Paint the entire front surface of the mask with 2-3 coats of sage green underglaze. Let each coat dry until it’s no longer shiny before applying the next. -
Drying check:
Wait until the final coat of underglaze is dry to the touch. The surface should look matte and chalky.
Step 3: Sgraffito Carving
-
Outline the features:
Using a loop tool, gently carve away the green underglaze to reveal the red clay around the eyes, creating an almond-shaped border. Do the same for the lips, defining a stylized mouth shape. -
Create the border:
Carve a thick border along the right side of the face. Inside this border, carve stylized leaf or sun-ray shapes that point outward, removing the green background to leave red patterns. -
Add detail dots:
Use the tip of a dull pencil or the back of a paintbrush to press a line of small, uniform dots running down the center of the face, separating the patterned side from the plain side. -
Cheek spirals:
On the left cheek, carve two connecting spirals that resemble a mustache or stylized wind symbol. Keep your lines fluid and confident. -
Forehead and chin details:
Carve a fan-like plant motif on the forehead and a simple scroll design near the chin. -
Define the eyebrow:
Above the left eye, carve short, hatched lines to suggest a textured eyebrow, curving it deeply around the brow ridge. -
Cleanup:
I like to use a soft, dry brush to gently sweep away the clay crumbs (burrs) created by carving. Don’t blow on the dust, as clay dust is unsafe to inhale.
Smudged Lines?
If you accidentally smudge green underglaze onto a carved red area, wait for it to dry completely, then gently scrape the smudge off with a clean knife tool.
Step 4: Finishing
-
Slow drying:
Loosely cover the mask with plastic to let it dry very slowly. This prevents the added nose or edges from warping or cracking. -
Bisque fire:
Once bone dry, bisque fire the mask to Cone 04. -
Clear glaze (optional):
For a glossy finish, apply a clear glaze and fire again. However, leaving the underglaze matte creates a beautiful, rustic stone-like texture.
Hang your finished mask on a garden wall or display it on a shelf to show off the intricate contrast between the earth and the glaze
Zipper Mouth Surreal Mask
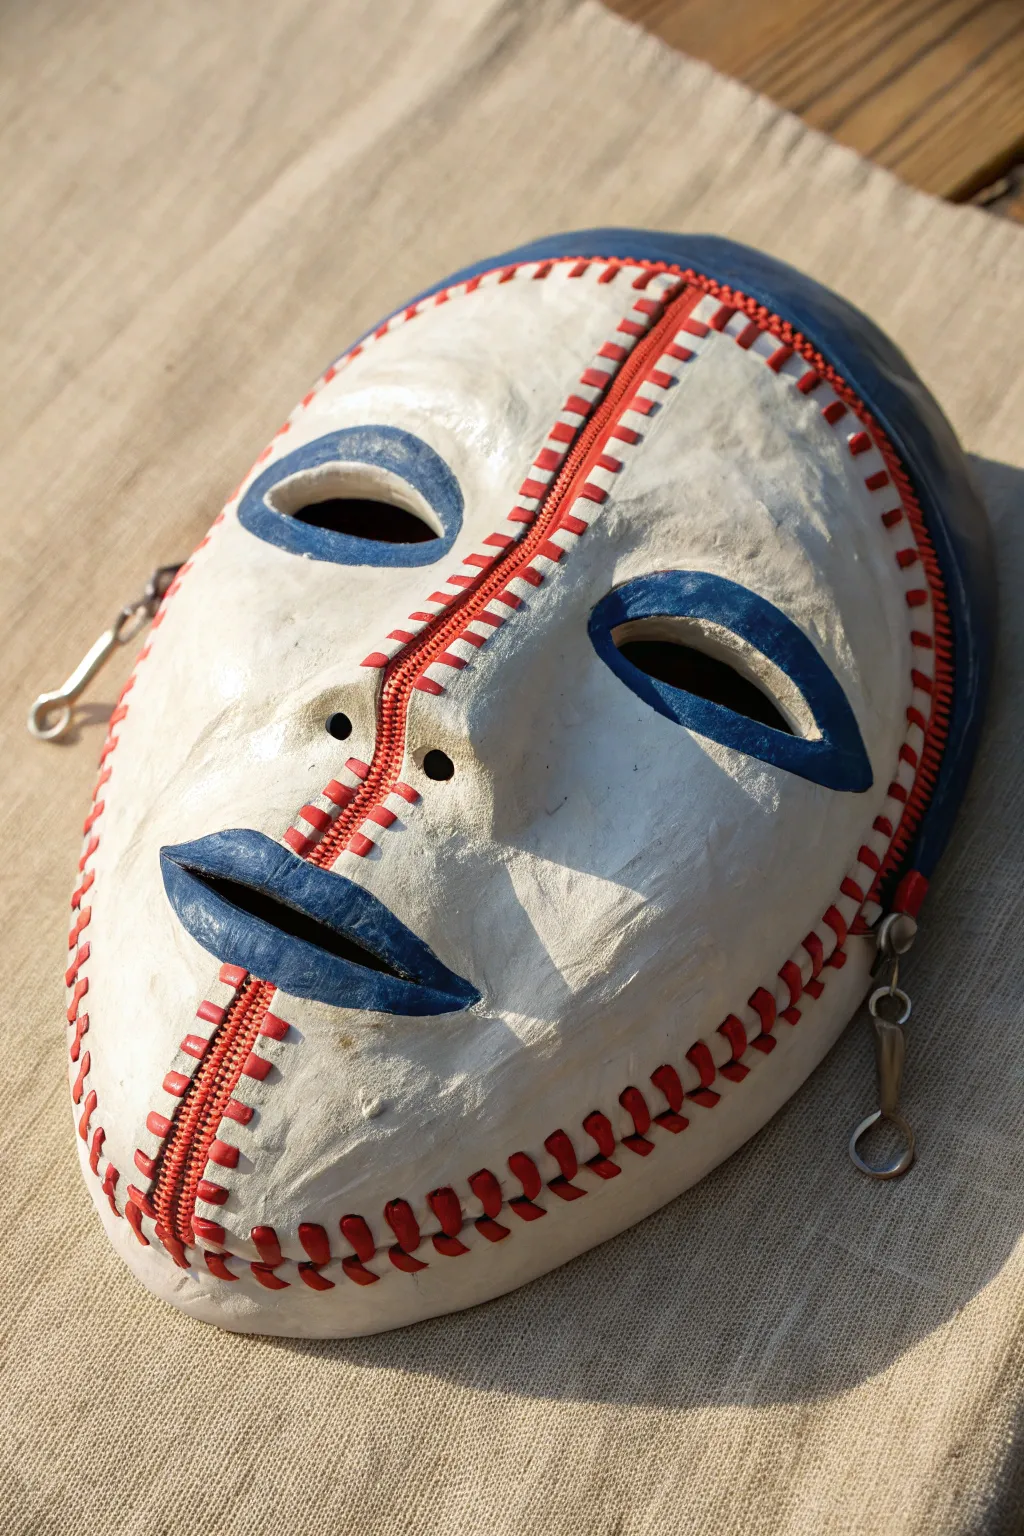
This striking mask blends sculpture with everyday objects, featuring a bold red zipper dividing the face for a surreal, fragmented effect. The stark white base contrasts beautifully with the industrial zipper and deep blue accents, making it a standout project for exploring mixed media.
Detailed Instructions
Materials
- Plastic face mold or mannequin head
- Paper clay or air-dry clay (white)
- Red metal zipper (approx. 8-10 inches)
- Acrylic paints: White, Deep Blue, Red
- Small round paintbrushes
- Sculpting tools (needle tool, smoother)
- Vaseline or plastic wrap (release agent)
- Fine-grit sandpaper
- Clear matte varnish
- Strong craft glue (E6000 or similar)
Step 1: Base Construction
-
Prepare the mold:
Begin by coating your plastic face form or mannequin head with a thin layer of Vaseline or covering it tightly with plastic wrap. This ensures you can remove the clay later without it sticking. -
Position the zipper:
Lay your closed red zipper vertically down the center of the face mold. The pull tab should be at the bottom near the chin. You can use a tiny dab of hot glue at the very top and bottom to tack it in place temporarily. -
Apply the clay base:
Roll out sheets of paper clay or air-dry clay to about 1/4 inch thickness. Carefully drape and press the clay onto the mold, working on either side of the zipper. -
Embed the zipper tape:
This is crucial: Press the clay *over* the fabric tape edges of the zipper, leaving only the metal teeth and the central red fabric strip exposed. Smooth the clay down so the zipper feels integrated, not just sitting on top. -
Sculpt facial features:
Build up the nose area around the zipper and define the brow ridges. Cut out the eye holes with a craft knife or sculpting tool while the clay is soft, creating a slightly sad or downturned shape as seen in the reference.
Step 2: Refining and Drying
-
Create stitch marks:
Using a needle tool or a small stylus, press consistent, evenly spaced indentations along the clay edge bordering the zipper. These will guide your painting later to simulate stitching. -
Refine the perimeter:
Smooth the outer edges of the mask. You can create a similar ‘stitched’ texture around the entire outside rim of the mask if desired. -
Add nostrils and mouth:
Sculpt small nostril holes on either side of the zipper. For the mouth, build up slightly raised lips. The zipper should pass right through the center of the mouth, effectively slicing the lips in two. -
Dry thoroughly:
Allow the mask to dry completely. This usually takes 24-48 hours depending on clay thickness. I prefer to let it dry slowly away from direct heat to prevent cracking. -
Sand and prime:
Once bone dry, gently pop the mask off the mold. Sand the surface with fine-grit sandpaper for a smooth finish, then wipe away dust and apply a base coat of white acrylic paint.
Zipper Won’t Stick?
If the clay pulls away from the zipper tape as it shrinks while drying, fill the gaps with a little wet clay or white glue mixed with water, then smooth over.
Step 3: Painting and Finishing
-
Paint the eyes:
Using a steady hand and a small brush, outline the eye holes with a thick band of Deep Blue acrylic paint. The shape should be almond-like and expressive. -
Paint the lips:
Fill in the sculpted lip area with the same Deep Blue. Ensure the paint stops cleanly at the zipper’s edge for that split effect. -
Detail the zipper stitching:
Using a very fine brush and Red acrylic paint, fill in the small indentations you made earlier along the zipper. Paint short, perpendicular dashes to look like heavy thread holding the zipper in place. -
Detail the rim stitching:
Repeat the red dash pattern around the entire outer perimeter of the mask face to complete the sewn-together aesthetic. -
Clean up the zipper:
If any white clay or paint got onto the red fabric or metal teeth of the zipper, carefully scrape it off or paint over it with a matching red to keep it looking sharp. -
Seal:
Protect your work with a coat of clear matte varnish. -
Add hardware (optional):
If you want the metallic keychain look shown in the image, attach small metal clasps or jewelry findings to the sides or the zipper pull using strong glue or wire.
Open Wide
For a creepier look, unzip the zipper slightly at the mouth before embedding it. Paint the skin underneath black or red to suggest an interior void.
Hang your surreal creation on a wall or display stand to spark conversation
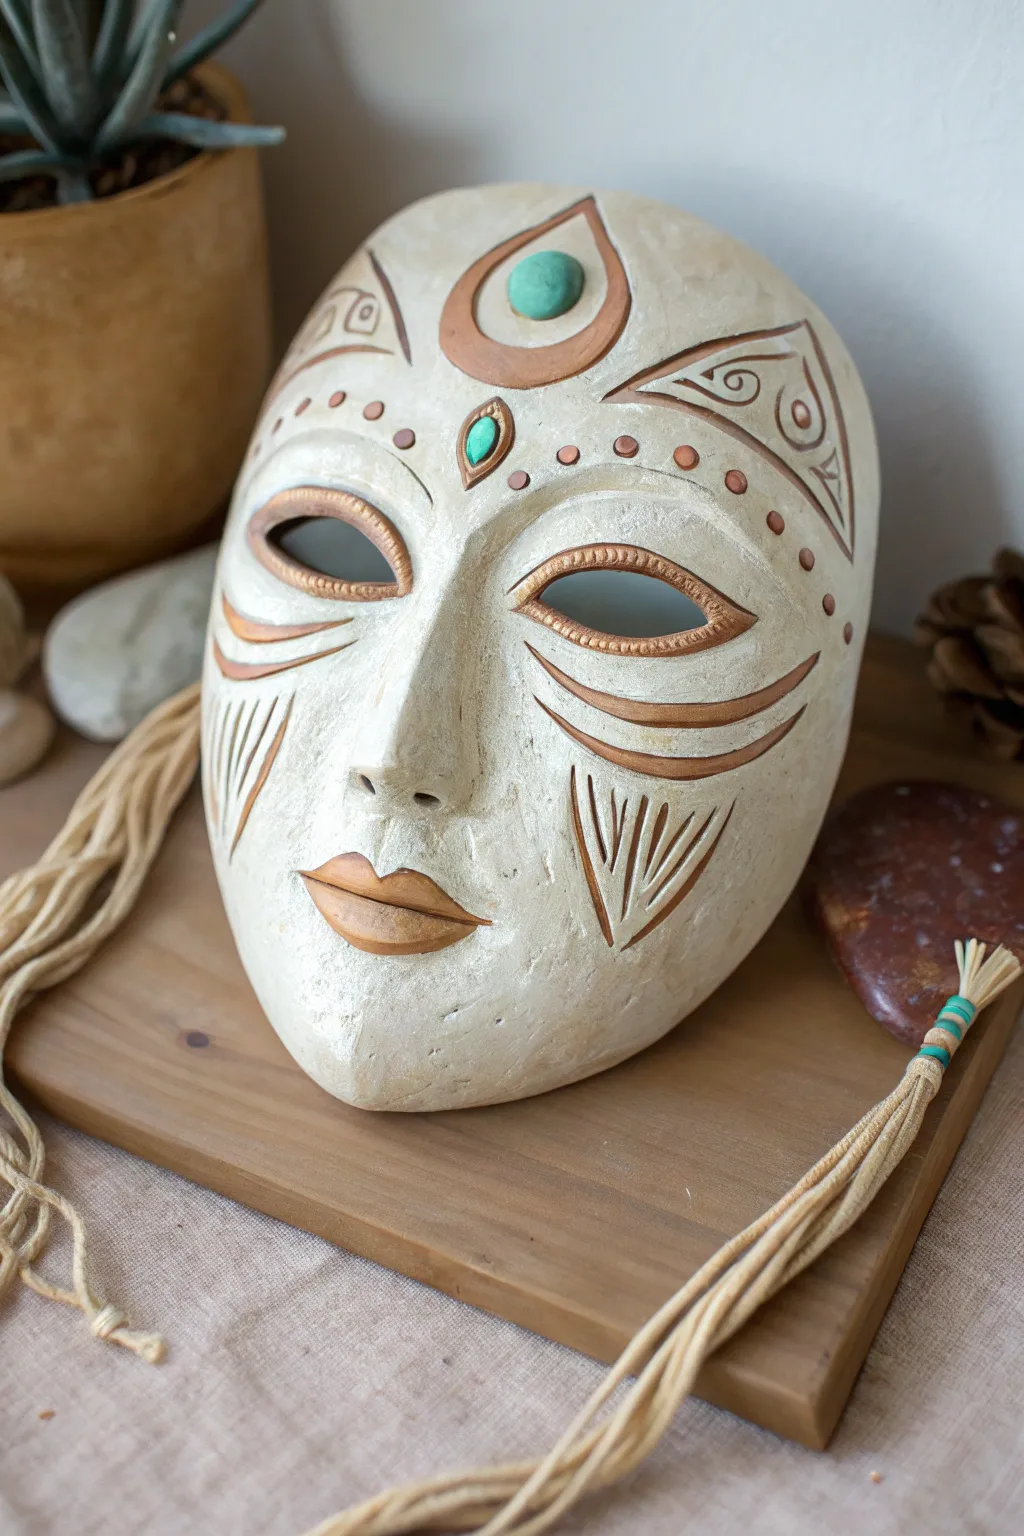
Openwork Cutout Lace Mask
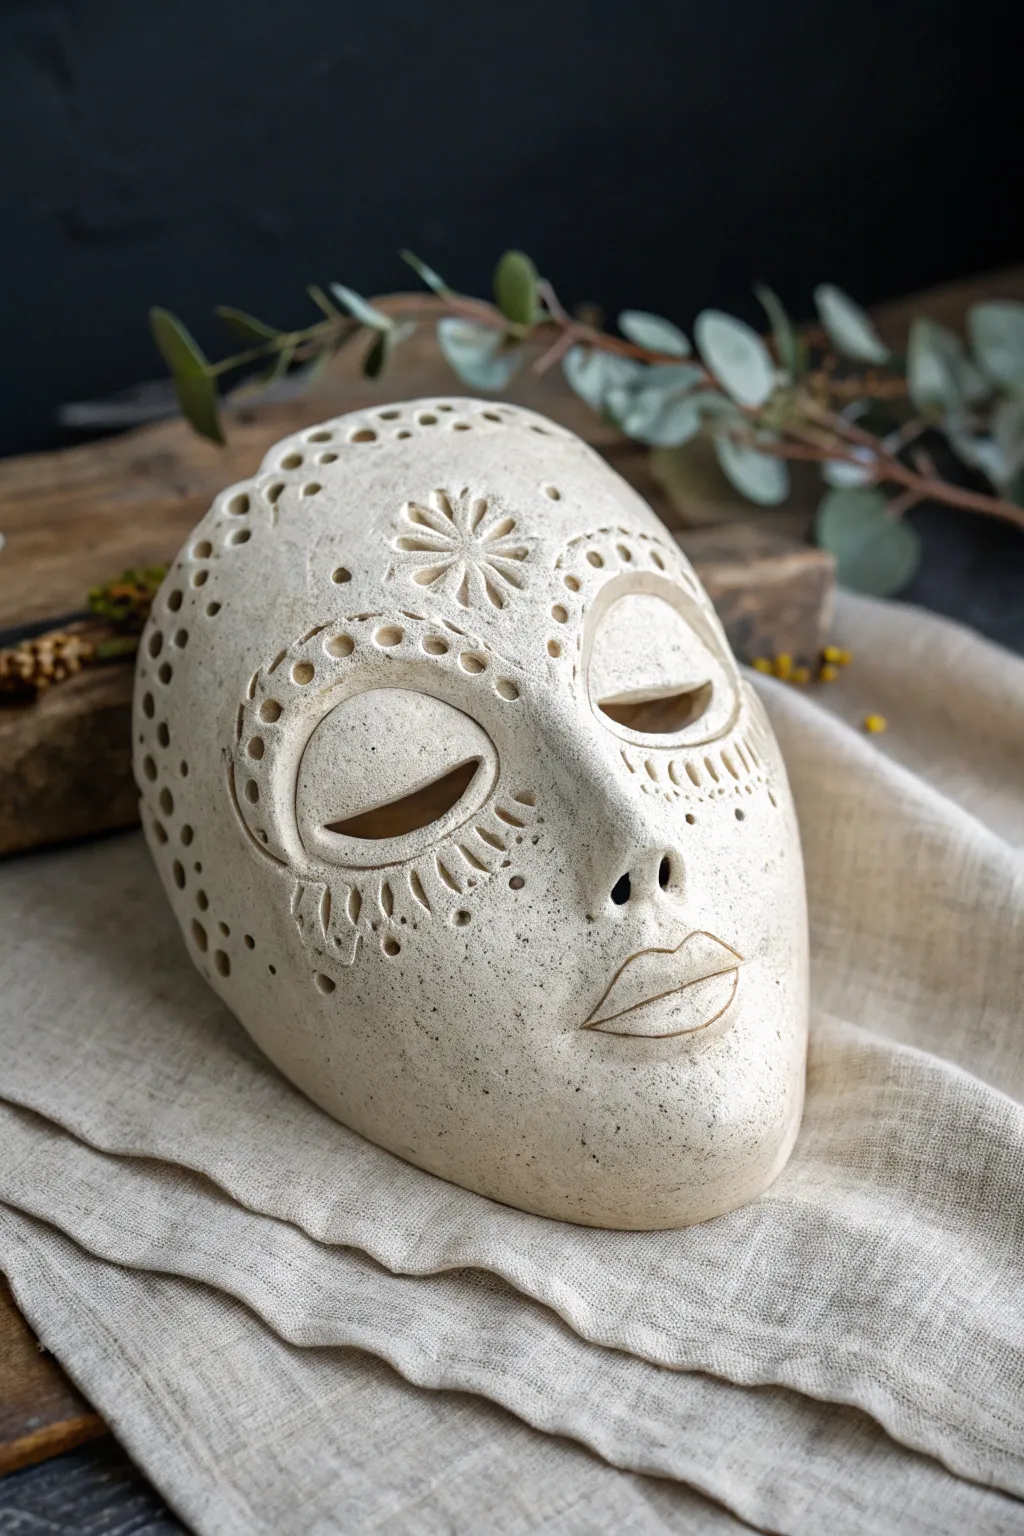
Transform a simple slab of speckled clay into an ethereal visage with delicate cutouts and lace-inspired patterning. This project combines structural hand-building with meditative carving techniques to create a stylized, decorative mask that feels ancient and modern all at once.
How-To Guide
Materials
- Speckled stoneware clay (white or light beige)
- Rolling pin
- Guide strips or slab roller (approx. 1/4 inch thick)
- Newsprint or canvas
- Mask mold (plaster hump mold or a DIY paper form)
- Needle tool
- Small loop tool or carving set
- Small hole cutters or straw
- Pottery sponge
- Rib tool (flexible metal or rubber)
- Slip and scoring tool
- Plastic wrap for slow drying
Step 1: Forming the Base
-
Roll the slab:
Start by rolling out your speckled clay into an even slab. Aim for a consistent thickness of about 1/4 inch creating a smooth, unblemished surface. -
Trace the shape:
Lay your oval template onto the clay slab. Using a needle tool, cut out the basic oval shape that will form the face, ensuring the edges are clean. -
Smooth the texture:
Before shaping, compress the clay surface gently with a flexible rib tool. This aligns the clay particles and creates that buttery smooth finish seen in the photo. -
Drape over the mold:
Carefully lift your clay oval and drape it over your hump mold. Gently press the clay down to conform to the curve, being careful not to stretch or thin it out in spots.
Slumping Issues?
If facial features sag while wet, prop them up with small bits of crumbled newspaper or foam until the clay stiffens to leather-hard.
Step 2: Sculpting the Features
-
Mark feature placement:
With the clay on the mold, lightly sketch the position of the eyes, nose, and mouth using the very tip of your needle tool; keep these lines faint as guides. -
Build the nose:
Form a small pyramid or coil of clay for the nose. Score and slip the attachment area on the mask, then press the nose firmly into place, smoothing the seams until they disappear completely. -
Shape the lips:
Roll a tiny coil and shape it into the outlined lips. Attach them securely with slip, then use a wooden modeling tool to refine the cupid’s bow and the separation line. -
Define the eye sockets:
Add flattened tear-drop shapes of clay for the eyelids. Blend the edges outward into the cheeks so they bulge slightly, creating the sleepy, closed-eye look. -
Carve the nostrils:
Using a small loop tool or the back of a paintbrush, gently press and scoop out the nostril holes to give the face depth and breathability.
Step 3: Creating the Lace Details
-
Outline the decorative zones:
Lightly incise the curved lines above the eyes and the floral motif on the forehead. Symmetry is key here, so measure if you need to. -
Carve the forehead flower:
For the central daisy shape, use a small V-tip carving tool to gouge out the petals. Press deeper at the center and lift out as you reach the petal tip. -
Pierce the perimeter:
Using a small hole cutter or a drinking straw, punch a series of holes along the outer edge of the mask. Vary the sizes slightly for a more organic, lace-like feel. -
Carve the eye details:
Around the closed eyelids, press a small hollow tube tool to create impressed circles. Below the eyes, carve small vertical dashes to mimic eyelashes or radiating light. -
Refine the cutouts:
Go back to every punched hole and carved line with a damp paintbrush. Smooth away any sharp burrs or clay crumbs to ensure the ‘lace’ looks crisp. -
Final smoothing:
Check the chin and cheek areas. Use your slightly damp sponge to do a final pass over the non-textured areas, exposing a bit of the speckle grain. -
Slow drying:
Cover the mask loosely with plastic. Because of the cutouts, the clay is fragile; drying it too fast can cause warping or cracking. Let it dry very slowly over several days. -
Bisque fire:
Once bone dry, fire the piece to bisque temperature. The natural speckled clay is beautiful on its own, so consider leaving it unglazed or applying a clear matte glaze to highlight the raw texture.
Clean Cuts Pro Tip
Wait until the clay is leather-hard before doing the intricate hole punching. If the clay is too soft, the holes will deform when you pull the tool out.
Once fired, your mask will have a stone-like serenity perfect for wall mounting or display
Nature-Imprint Forest Spirit Mask
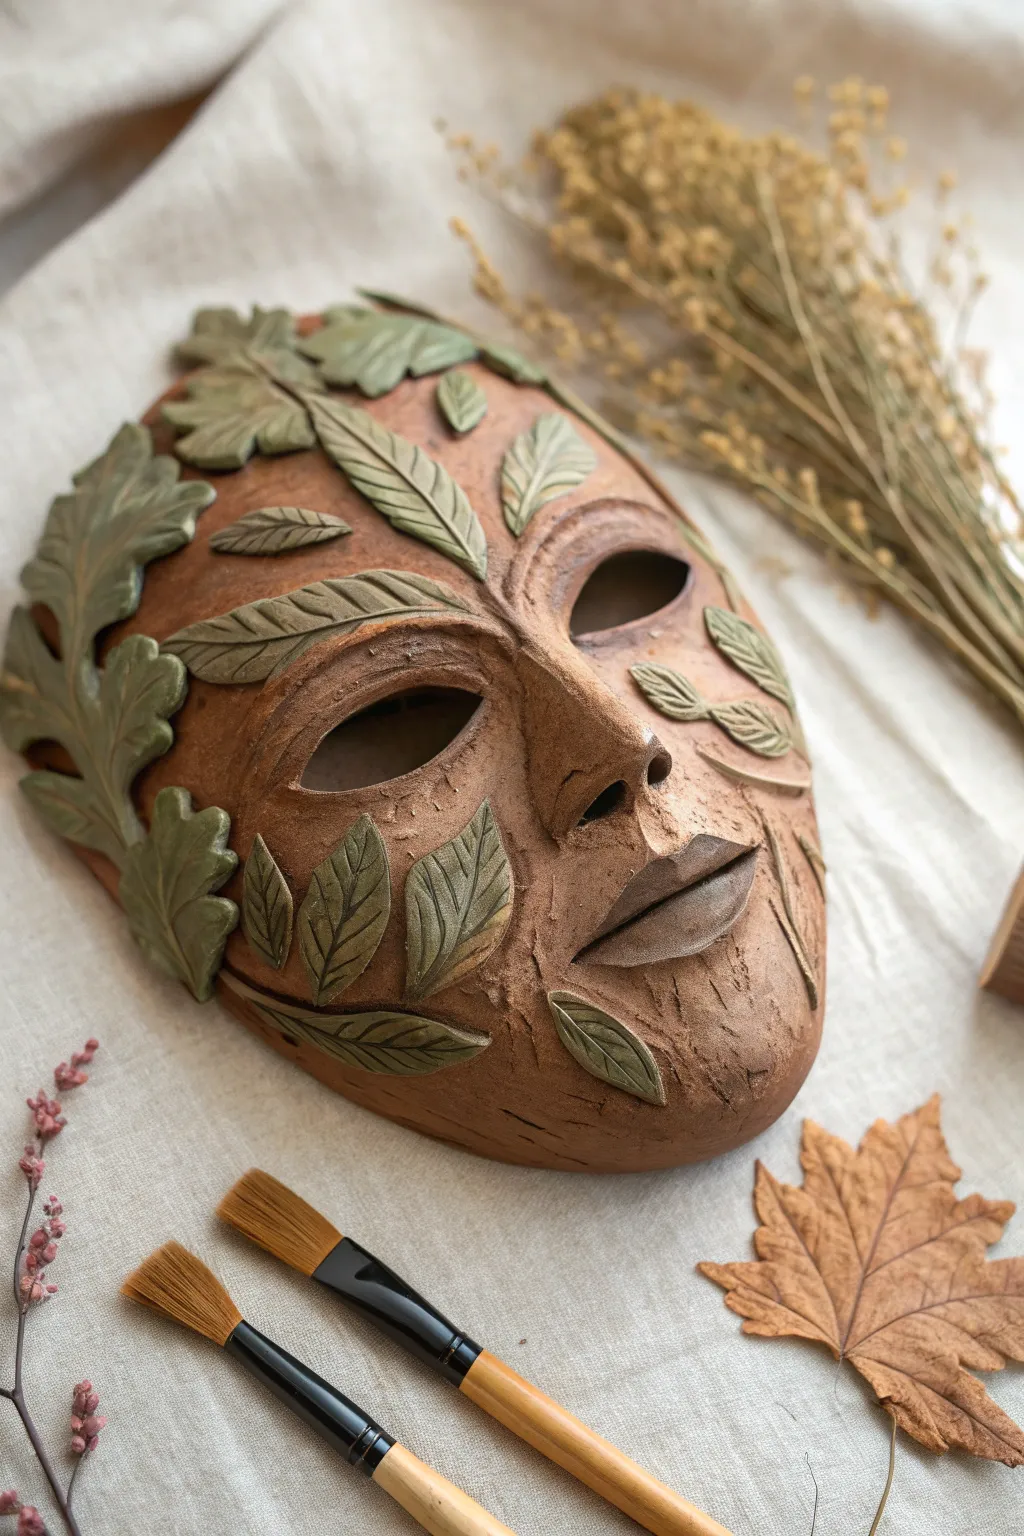
Channel the ancient woods with this earthy, nature-inspired mask featuring textured bark skin and delicate leafy embellishments. This project combines slab building with decorative appliqué techniques to create a piece that looks like it grew right out of the forest floor.
Detailed Instructions
Materials
- Earthenware or stoneware clay (terracotta color recommended)
- Green underglaze or acrylic paint (muted sage/olive tones)
- Black or dark brown acrylic wash (optional for antiquing)
- Mask mold (plastic or plaster face form)
- Rolling pin
- Fettling knife or needle tool
- Scoring tool (or an old toothbrush)
- Slip (clay mixed with water)
- Modeling tools (wooden sculpting ribs, loop tools)
- Soft paintbrushes
- Sponge
- Plastic wrap
Step 1: Forming the Base
-
Prepare the slab:
Roll out a slab of terracotta clay to a consistent thickness of about 1/4 inch; ensure it’s large enough to cover your face mold entirely with excess around the edges. -
Drape the mold:
Cover your mask mold with a piece of plastic wrap to prevent sticking, then gently drape your clay slab over the form. -
Shape the features:
Using a soft sponge or your fingers, press the clay gently against the mold to capture the details of the nose, lips, and brow ridge. Avoid pressing too hard, which can thin the clay excessively. -
Trim the excess:
Use a fettling knife or needle tool to trim the excess clay around the perimeter of the mask, creating a smooth, oval face shape. -
Cut the eyes:
Carefully slice out the eye openings; smooth the sharp cut edges with a damp finger or a small sponge.
Cracking Issues?
If leaves peel off during drying, your slip wasn’t wet enough. Try ‘repair paste’ (vinegar mixed with bone-dry clay dust) to re-attach stubborn pieces.
Step 2: Texturing and Sculpting
-
Create bark texture:
Score the surface of the mask vertically using a needle tool or a wire brush to simulate the rough, grooved texture of tree bark, focusing on the chin and forehead areas. -
Refine the mouth:
Use a wooden modeling tool to elaborate on the lips, giving them a slight separation and ensuring they look distinct from the ‘bark’ skin around them. -
Form the leaves:
Roll out a thinner slab of clay and cut out various leaf shapes; create a mix of simple oval leaves and more complex, lobed oak-style leaves. -
Detail the veins:
Use a needle tool to gently incision veins into each clay leaf for added realism.
Step 3: Assembly and Decoration
-
Score and slip:
Plan your placement, then heavily score both the back of a leaf and the spot on the mask where it will attach. Apply slip to both surfaces. -
Attach foliage:
Firmly press the leaves onto the mask, starting from the left temple (for the oak clusters) and scattering smaller leaves across the forehead and cheeks. -
Secure edges:
Use a modeling tool to gently seal the edges of the leaves down so they don’t curl up too much during drying, though a little lift adds life. -
Final smoothing:
Check over the entire piece for rough burrs or crumbs of clay and smooth them away with a slightly damp brush.
Make it Shine
Add tiny pressed dried flowers into the damp clay surface before drying, or glue real dried moss to the crevices after firing for a true mixed-media forest look.
Step 4: Finishing Touches
-
Drying:
Allow the mask to dry slowly under loose plastic for a day or two before removing it from the mold to finish drying completely. -
Bisque fire or dry hard:
If using kiln-fire clay, bisque fire the mask now. If using air-dry clay, ensure it is bone dry. -
Painting the leaves:
Paint the leaves carefully with a muted green underglaze or acrylic paint. I prefer leaving the veins unpainted or wiping paint back slightly to let the clay color show through. -
Antiquing wash:
Apply a very watered-down black or dark brown wash over the textured bark areas and wipe it off immediately with a sponge; this leaves darkness in the crevices to highlight the texture. -
Sealing:
Once all paint is dry, apply a matte sealant to protect the finish without making it look unnaturally glossy.
Now you have an ancient guardian ready to hang on the wall or watch over your garden
Mixed-Media Hair And Accessories Mask
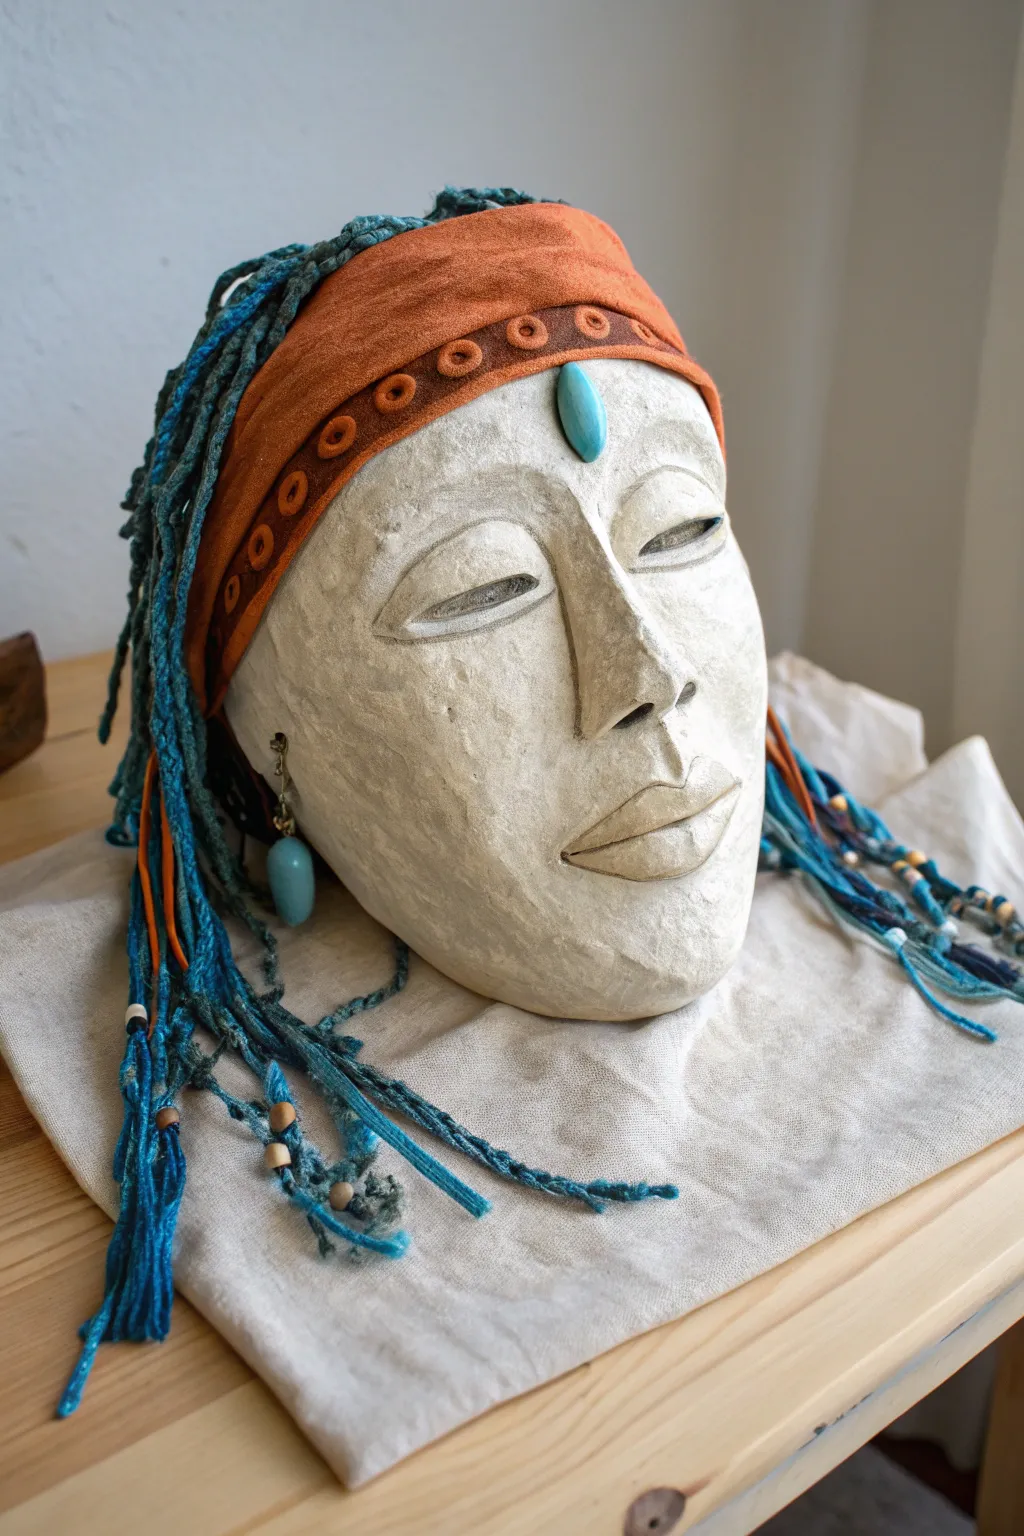
This stunning mixed-media mask project combines the tactile joy of clay sculpting with playful textile work. The finished piece features a soothing, natural clay visage adorned with vibrant blue yarn dreadlocks and a rustic faux-suede headband, perfect for exploring textural contrast.
How-To Guide
Materials
- Air-dry clay (white or light grey) or paper mache pulp
- Plastic face mold or mannequin head (as an armature)
- Sculpting tools (hook tool, needle tool, smoothing sponge)
- Acrylic water-based sealer or matte varnish
- Rust-orange faux suede or soft leather strip
- Assorted blue yarns (thick, thin, textured)
- Turquoise teardrop bead (large)
- Small wooden beads and assorted blue decorative beads
- Earring hook and eye pins
- Hot glue gun and glue sticks
- Fine grit sandpaper
- Water spray bottle
Step 1: Sculpting the Base
-
Prepare your armature:
Cover your face mold or mannequin head with plastic wrap to prevent sticking. This ensures the clay releases easily once dried. -
Apply the clay slab:
Roll out a slab of air-dry clay to about 1/4 inch thickness. Drape it over the mold, gently pressing it to conform to the basic facial contours like the nose bridge and eye sockets. -
Build up facial features:
Add small rolls of clay to build up the eyebrows, nose, and lips. I find it helpful to score and slip these additions for a strong bond. Smooth the edges into the base layer so there are no seams. -
Carve the eyes:
Instead of cutting holes, sculpt the eyelids closed for a serene look. Define the crease of the lid and the lash line using a fine needle tool or a small wooden skewer. -
Refine the surface:
Use a damp sponge to smooth out fingerprints and harsh tool marks. Aim for a slightly textured, organic finish rather than perfection; the handmade look adds character. -
Add connection points:
Before the clay dries, carefully insert small eye pins or create small holes near the ears if you plan to attach hanging earrings later. -
Dry and sand:
Let the mask dry completely (usually 24-48 hours depending on thickness). Once bone dry, lightly sand any sharp edges or rough spots with fine-grit sandpaper. -
Seal the surface:
Brush a coat of matte acrylic sealer or varnish over the entire clay surface to protect it and give it a finished sheen.
Step 2: Creating the Headdress
-
Prepare the headband:
Cut a wide strip of rust-colored faux suede fabric. It should be long enough to wrap around the forehead area of the mask. If you have decorative trim or grommets, attach them to this strip now. -
Prepare the dreadlocks:
Cut lengths of various blue yarns, mixing textures and shades. Braid some strands, knot others, and leave some loose to create volume and visual interest. -
Bead the hair:
Thread wooden beads and blue accent beads onto the ends of random yarn strands. Tie a simple knot below each bead to secure it in place. -
Group the strands:
Gather your yarn strands into small bundles. It’s easier to attach them in clusters rather than individually. -
Attach hair to the mask:
Using a hot glue gun, adhere the yarn bundles to the top and sides of the mask’s forehead area. Don’t worry about neatness here; the headband will cover the glue points. -
Secure the headband:
Wrap the prepared suede headband over the glued yarn ends. Pull it tight across the forehead and glue it securely at the back or sides, ensuring it hides the hair attachment points.
Cracking Clay?
If small cracks appear while drying, mix a tiny bit of fresh clay with water to make a paste (slip) and fill the cracks. Smooth it out and let it dry again.
Step 3: Final Adornments
-
Apply the forehead gem:
Glue the large turquoise teardrop bead partially onto the center of the forehead and partially overlapping the headband. This anchors the look visually. -
Attach the earring:
Using pliers, attach a dangling turquoise bead earring to the eye pin you instered earlier on the left side (or both sides if you prefer symmetry). -
Final fluff:
Gently arrange the yarn hair, trimming any uneven ends if necessary, to ensure the strands fall naturally around the face.
Textured Finishes
For a stone-like effect, dab the wet clay with a crumpled ball of aluminum foil or a coarse sponge before it dries to create subtle surface pitting.
Display your finished mask on a wall or stand to bring a peaceful, artistic presence to your space