When I’m craving a quick, satisfying clay session, I always reach for mini air dry clay projects because they’re cute, fast, and low-pressure. Here are my favorite mini air dry clay ideas that feel totally doable, even if you’re still getting comfy with the basics.
Cute Mini Clay Magnets With Faces
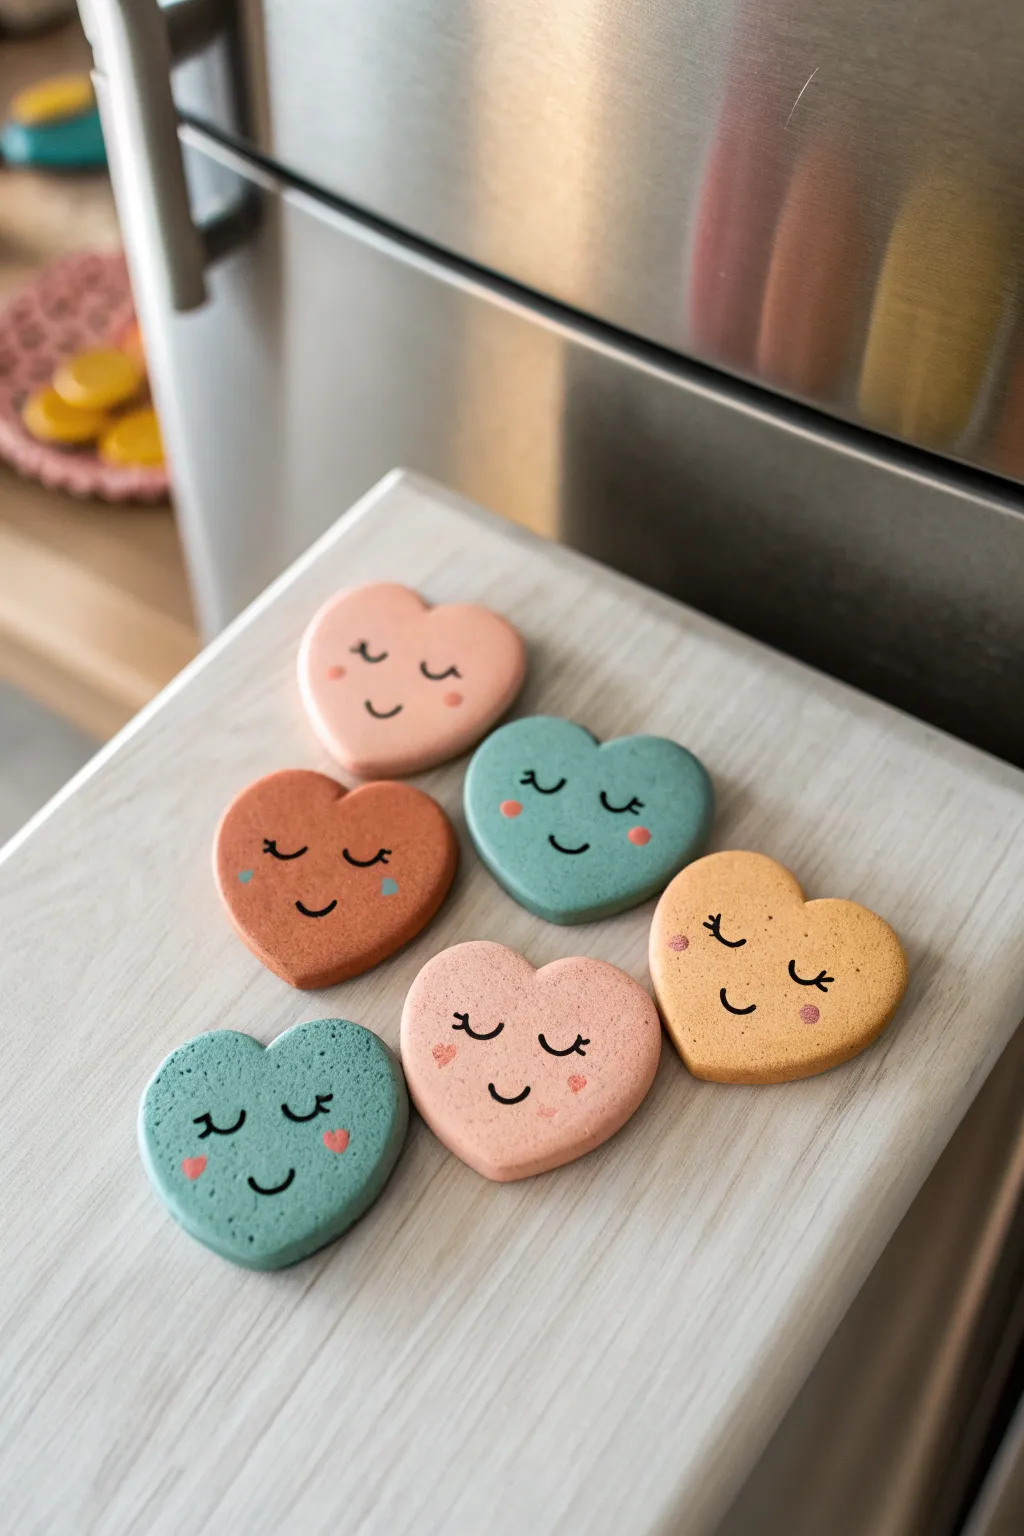
These adorable heart-shaped magnets with their serene, sleeping faces are the perfect way to add a touch of sweetness to your fridge or magnetic board. The project combines simple shaping techniques with minimal painting for a clean, modern aesthetic.
Step-by-Step
Materials
- Air dry clay (white)
- Acrylic paints (dusty pink, teal/sage green, terra cotta, yellow ochre)
- Black fine-point permanent marker or acrylic paint pen
- Small round magnets
- Strong craft glue (e.g., E6000)
- Rolling pin
- Heart-shaped cookie cutter (approx. 1.5 – 2 inches width)
- Fine grit sandpaper (320-400 grit)
- Small paintbrush
- Matte spray varnish (optional)
Step 1: Shaping the Hearts
-
Condition the clay:
Start by taking a chunk of your air dry clay and kneading it in your hands until it feels soft, pliable, and free of cracks. -
Roll it out:
Using a rolling pin, flatten the clay on a clean, non-stick surface until it is an even slab, approximately 1/4 inch thick. You want them substantial enough to hold the magnet but not too heavy. -
Cut the shapes:
Press your heart-shaped cookie cutter firmly into the clay slab to cut out six hearts. If you don’t have a cutter, you can hand-cut the shapes using a template and a craft knife. -
Smooth the edges:
Dip your finger in a tiny bit of water and gently run it along the cut edges of each heart to soften any sharp corners or roughness left by the cutter. -
Dry completely:
Lay the hearts flat on a piece of parchment paper or a wire rack. Let them air dry for at least 24-48 hours, flipping them halfway through to ensure even drying.
Step 2: Adding Color
-
Sand for smoothness:
Once fully dry and hard, gently sand the edges and surface with fine-grit sandpaper to remove any remaining bumps or fingerprints. -
Mix your palette:
Prepare your acrylic paints. I prefer muted, earthy tones for this look—mix white into your base colors to achieve those soft pastel shades of pink, teal, ochre, and rust. -
Paint the first coat:
Apply the base color to the top and sides of each heart. You will likely want two pinks, two greens, one yellow, and one rust color to match the set. -
Dry and repeat:
Let the first coat dry for about 15-20 minutes. Apply a second coat to ensure opaque, solid coverage. -
Paint the backs:
Once the front is dry to the touch, flip the hearts over and paint the backs for a professional finish.
Smooth Surface
If your clay surface looks rough before painting, dip a finger in water and ‘polish’ the raw clay until it’s silky smooth before letting it dry.
Step 3: Drawing the Faces
-
Draw the eyes:
Using a fine-point black marker or paint pen, draw two curved, U-shaped lines for the sleeping eyes in the center of the heart. -
Add eyelashes:
Carefully add three tiny lashes to the outer corner of each eye curve. -
Draw the smile:
Place a smaller U-curve centered between and slightly below the eyes to create a gentle smile. -
Add rosy cheeks:
Dip the back end of a paintbrush into pink or peach paint and gently dot it onto the cheeks. Alternatively, use a tiny heart stamp or draw small hearts or circles. -
Seal the surface:
To protect the paint from scratching, give the hearts a light coat of matte spray varnish. -
Attach the magnets:
Apply a dab of strong craft glue to the back of each heart and press a round magnet firmly into the glue. Let this cure according to the glue instructions before using.
Make ‘Em Sparkle
Mix a tiny pinch of gold mica powder into your acrylic paint or varnish for a subtle shimmer that catches the light.
Now these charming little faces are ready to brighten up your kitchen


Mini Animal Charms You Can Make in One Sitting
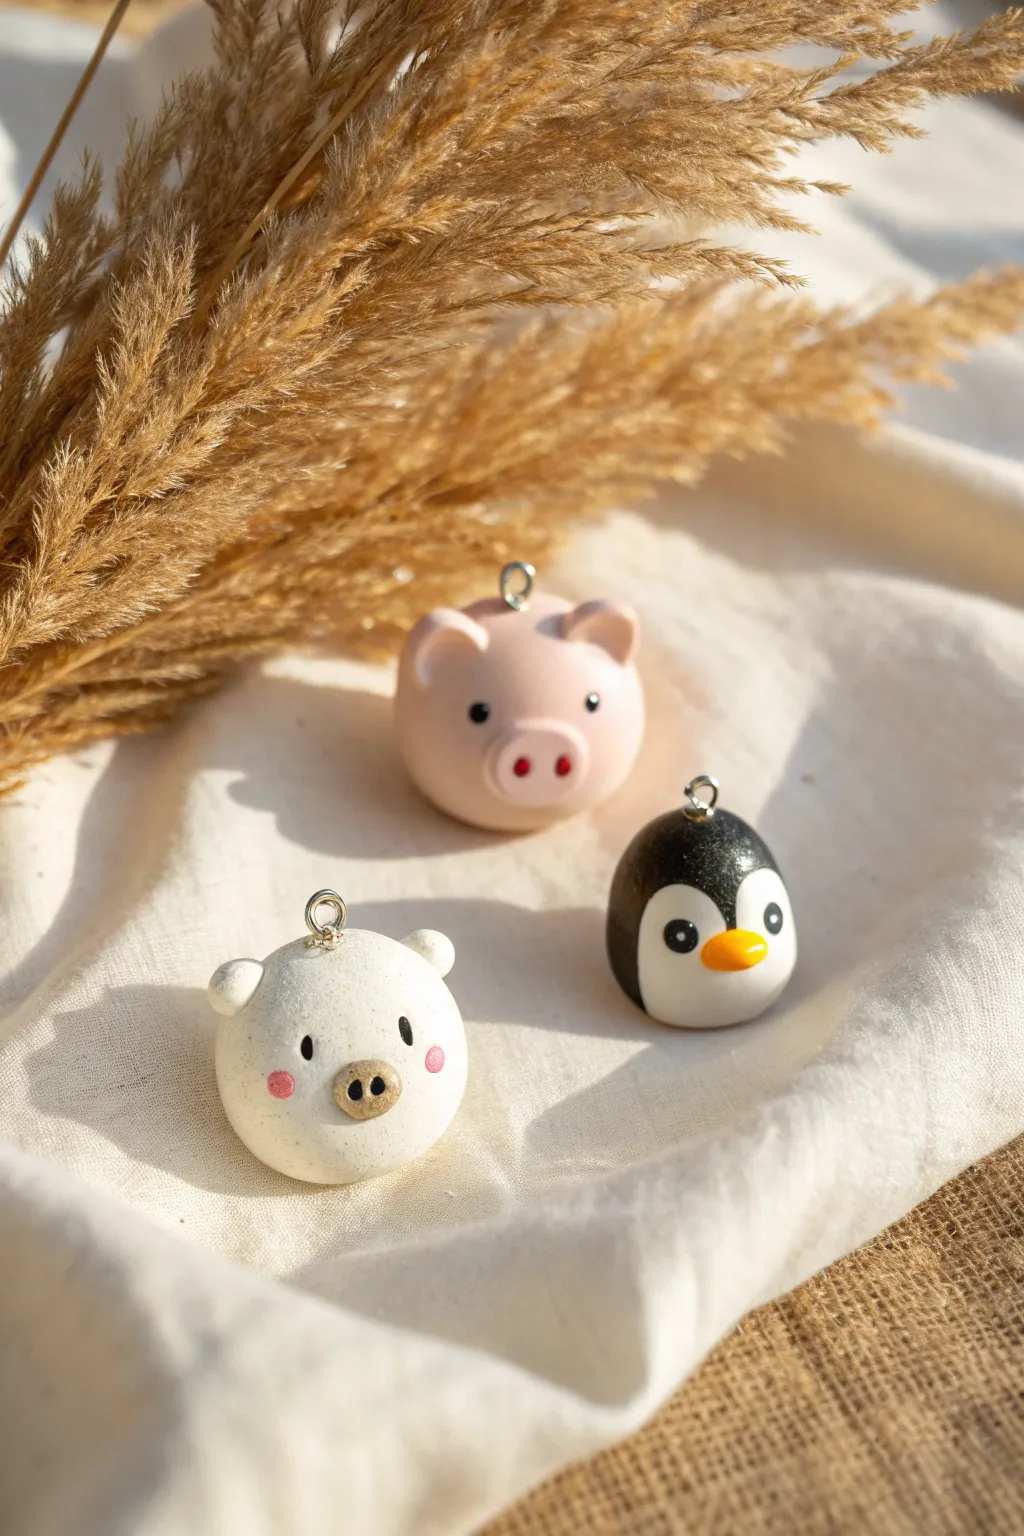
These delightfully chubby charms—a classic pink pig, a speckled white piglet, and a stoic penguin—are perfect beginner sculptures. Their simple spherical bases make them easy to shape, while the tiny painted details bring their personalities to life.
How-To Guide
Materials
- Air dry clay (white)
- Acrylic paints (pink, black, white, orange/yellow)
- Fine detail paintbrushes (size 0 or 00)
- Eye screw pins or metal loop hooks
- Glossy varnish or sealant (optional but recommended)
- Dotting tool or toothpick
- Cup of water
- Sandpaper (fine grit)
Step 1: Farming the Base Shapes
-
Roll the spheres:
Start by conditioning three equal grape-sized amounts of white clay, rolling each briskly between your palms until you have three perfect, crack-free spheres. -
Flatten the bottoms:
Gently tap the bottom of each sphere against your work surface. You want them to sit upright without rolling away, but try to keep the overall shape nice and round. -
Insert the hardware:
While the clay is still wet, screw an eye pin into the very top center of each ball. If the clay resists, twist the pin back and forth gently to act like a drill.
Loose Eye Pins?
If the metal pin feels loose after the clay dries, unscrew it carefully, add a tiny drop of super glue into the hole, and screw it back in for a permanent hold.
Step 2: The Pink Pig
-
Mix pink clay:
Knead a very small drop of red or pink acrylic paint directly into a ball of white clay to tint it a soft pastel pink before shaping. -
Add the snout:
Roll a tiny oval of the pink clay and press it onto the center of the face. Flatten it slightly so it integrates with the head rather than just sticking out. -
Form the ears:
Create two small teardrop shapes from pink clay. Press them onto the top of the head, flattening them slightly with your thumb to create the inner ear depression. -
Detail the nose:
Use a dotting tool or a dull toothpick to press two deep nostrils into the oval snout.
Make it a Set
Why stop at three? Try making a blue bear or a yellow chick using the same spherical base technique to expand your collection into a full rainbow zoo.
Step 3: The Speckled White Piglet
-
Add the ears:
Keep the main body plain white. Roll two tiny balls of white clay and attach them near the top sides of the head. Press a round tool into the center of each to make them cup-shaped. -
Create the snout:
Roll a very small flattened circle for the nose. I like to keep this slightly more proportional than the pink pig’s snout for a different character look. -
Poke the nostrils:
Just like the first pig, indent two nostrils into the snout using your needle tool or toothpick.
Step 4: The Penguin
-
Keep the base smooth:
The penguin relies mostly on painting later, so for the sculpting phase, ensure the white sphere is absolutely smooth with the eye pin secured. -
Attach the beak:
Roll a minuscule cone of clay. Press the wider end onto the face, slightly lower than the center line, so the beak points outward. -
Dry completely:
Set all three friends aside to dry for at least 24-48 hours. Turn them occasionally so the bottoms dry evenly.
Step 5: Painting & Finishing
-
Paint the penguin’s tuxedo:
Using black acrylic, paint the main body of the penguin, leaving a white heart-shaped or oval area on the belly and face. Paint carefully around the beak. -
Color the beaks:
Paint the penguin’s beak a bright orange-yellow. For the speckled piglet, paint the snout a soft metallic gold or beige to distinguish it from the white face. -
Add eyes and cheeks:
Use a dotting tool dipped in black paint for the eyes. For the pink pig, add white highlights. For the speckled piglet, dab soft pink cheeks on either side of the snout. -
Apply the speckles:
Dip an old toothbrush or stiff brush into diluted brown or grey paint and gently flick it over the white piglet (masking off the eyes first) for a stone-like texture. -
Seal the deal:
Once fully dry, coat each charm in a layer of glossy varnish to protect the paint and give them a ceramic-like shine.
String them onto a necklace cord or attach a keyring and enjoy your new miniature companions


Mini Sloth Or Dino Shelf Sitters
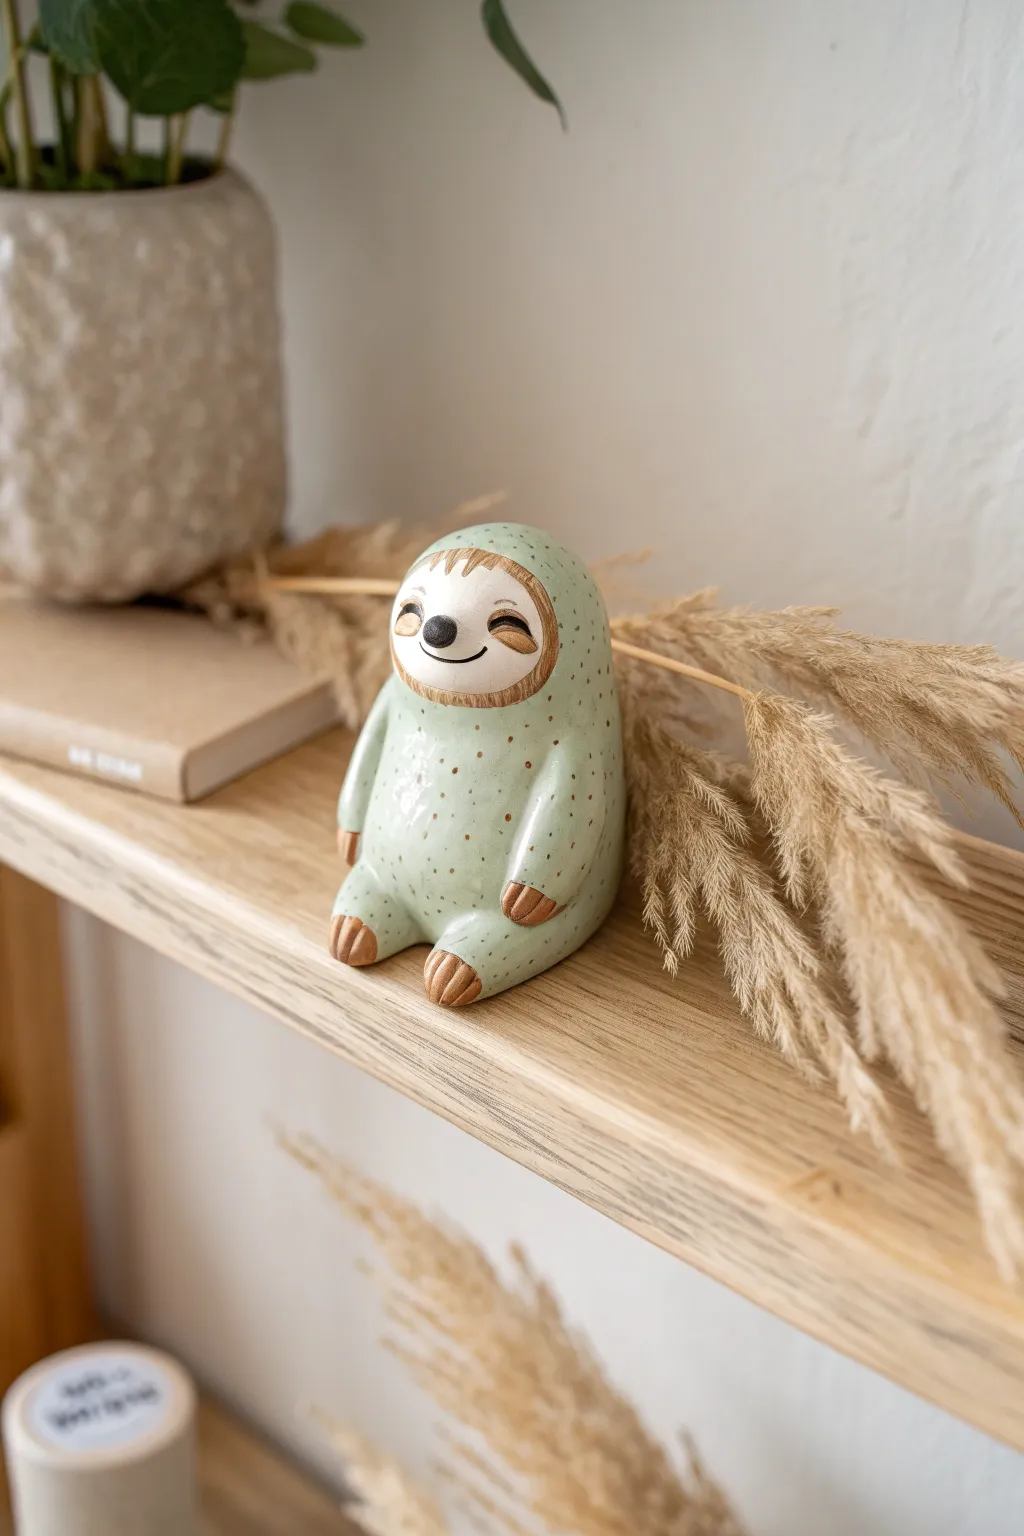
This adorable sloth figurine brings a calm, earthy vibe to your shelf with its soft mint green body and delicate speckling. Its simple, rounded form makes it perfect for beginners, while the painted details add a high-quality, ceramic-like finish.
Step-by-Step Guide
Materials
- Air dry clay (white)
- Acrylic paints (mint green, warm brown, cream/off-white, black)
- Glossy varnish or glaze
- Small paintbrush (for details)
- Old toothbrush (for speckling)
- Modelling tools or a dull knife
- Water formatting and smoothing
- Sandpaper (fine grit)
Step 1: Sculpting the Form
-
Form the body:
Start with a golf-ball-sized lump of conditioned white air dry clay. Roll it into a smooth egg shape, slightly flattening the bottom so it sits securely on a flat surface. -
Shape the head:
Gently taper the narrower top part of the egg to define the head area, ensuring it flows seamlessly into the body without a dedicated neck. -
Add the arms:
Roll two small, thin logs of clay for the arms. Attach them vertically along the sides of the body, curving them slightly forward so the hands rest near the belly. -
Create the legs:
Make two small, flattened balls for feet. Attach them to the bottom front of the body, positioned slightly wider than the arms to give a sturdy, sitting posture. -
Define the face:
Use a small ball of clay flattened into an oval to create the face plate. Press this firmly onto the upper front of the body, smoothing the edges until they blend completely. -
Sculpt claws:
Using a modelling tool or knife, gently impress three lines into the ends of both the hands and the feet to suggest claws. -
Refine the surface:
Dip your finger in a little water and smooth out any fingerprints or cracks. The surface should be as pristine as possible before drying. -
Dry completely:
Let the sloth dry for 24-48 hours. I find flipping it over halfway through helps the bottom dry evenly.
Fixing Cracks
If small cracks appear while drying, don’t panic. Mix a tiny bit of fresh clay with water to make a paste (slip) and fill the cracks, then sand smooth once dry.
Step 2: Painting and Finishing
-
Sand imperfections:
Once fully dry, use fine-grit sandpaper to gently buff away any rough spots or bumps. -
Base coat:
Paint the entire hooded part of the body (everything except the oval face, hands, and feet claws) with a soft mint green acrylic. You may need two coats for opaque coverage. -
Detail the face:
Paint the oval face section with a cream or off-white color. Use a warm, medium brown to paint the claw tips on the hands and feet. -
Add facial features:
With the brown paint, create the ‘mask’ markings around the eyes. Use a fine brush to add two curved slits for sleeping eyes and a tiny black oval for the nose. -
Refine expression:
Paint a very thin, gentle smile line below the nose using black or dark brown paint. -
Hair texture:
paint tiny, thin strokes of brown at the top edge of the face mask to mimic fur texture overlapping the face. -
Speckle effect:
Dilute a small amount of brown paint with water. Dip an old toothbrush into it and flick the bristles with your thumb to spray tiny speckles over the mint green body. Test on paper first to control the density. -
Seal:
Finish with a coat of high-gloss varnish to give it that polished, ceramic look and protect the paint.
Super Smooth Finish
To get that porcelain look without a kiln, apply a few layers of “Triple Thick” glaze at the end. It self-levels and mimics fired ceramic perfectly.
Place your little sloth on a bookshelf near some plants for the perfect cozy display


Tiny Food Charms With Sweet Expressions

Transform a small lump of clay into an irresistibly cute donut charm complete with a glossy pink glaze and a tiny smiling face. This project captures the whimsy of miniature food art with the durability of air dry clay, perfect for keychains or necklaces.
Step-by-Step Tutorial
Materials
- Air dry clay (white or beige)
- Acrylic paints (pink, dark brown, red, beige/ochre)
- Tiny metal charm loop or eye pin
- Gloss varnish or clear nail polish
- Small dotting tool or toothpick
- Fine detail paintbrush
- Sandpaper (fine grit)
- Rolling pin or smooth round marker
Step 1: Shaping the Base
-
Mix Dough Color:
Start by tinting a small ball of white air dry clay with a tiny drop of beige or yellow ochre paint. You want a realistic ‘baked dough’ color, so add paint sparingly and knead until the color is completely uniform. -
Form the Ring:
Roll the clay into a smooth ball about the size of a large marble, then gently flatten it into a thick disc. Use the back of a paintbrush or a small modeling tool to poke a hole directly through the center. -
Refine the Shape:
Widen the center hole slightly by rotating your tool, smoothing the edges as you go so the donut looks puffy and rounded, not sharp. The hole will shrink slightly as it dries, so make it a tiny bit larger than your final desired look. -
Add Hardware:
While the clay is still soft, gently press a small metal eye pin or jump ring into the top edge of the donut. Ensure it goes deep enough to be secure but leaves the loop exposed. -
Drying Time:
Set the donut aside on a piece of parchment paper to dry completely. This usually takes 24 hours, depending on humidity; turn it over halfway through to ensure the bottom dries evenly.
Cracking Clay?
If small cracks appear as the clay dries, mix a tiny bit of fresh clay with water to make a paste (slip) and smooth it into the cracks with your finger.
Step 2: Glazing and Details
-
Create the Icing:
Once the base is hard, mix a soft, strawberry-pink acrylic paint. Using a small brush, paint a wavy, uneven circle on the top half of the donut to mimic poured glaze. I like to let the ‘icing’ drip down the sides in one or two spots for realism. -
Add Texture:
Before the pink paint dries completely, you can gently stipple it with a dry brush or an old toothbrush to give it a slightly aerated, sugary texture, though a smooth coat works lovely too. -
Painting the Eyes:
Dip a small dotting tool (or the head of a pin) into dark brown or black paint. Place two small dots wide apart on the lower half of the pink icing area to create the eyes. -
Adding the Smile:
Using your finest detail brush or a very sharp toothpick, draw a tiny, shallow ‘U’ shape between the eyes for the mouth. Keep the line thin and delicate. -
Rosy Cheeks:
Switch to a bright red or coral paint. Paint two small, rectangular or oval blush marks directly under the eyes to enhance the kawaii expression. -
Sprinkle Texture (Optional):
For added detail, you can dip an old toothbrush in watered-down brown paint and flick tiny speckles over the pink icing to look like vanilla bean specs or spice.
Pro Tip: Eye Highlights
Add a microscopic dot of white paint to the top corner of each black eye pupil. This ‘catchlight’ brings the character to life instantly.
Step 3: Finishing Touches
-
Seal the Charm:
Once all paint is thoroughly dry, coat the entire donut with a layer of gloss varnish. This protects the clay from moisture and gives the ‘glaze’ a realistic shine. -
Double Coat:
Apply a second coat of varnish specifically over the pink icing area to make it look extra wet and sticky compared to the dough. -
Clean the Hardware:
If any varnish got onto your metal eye pin, wipe it off quickly before it hardens so you can easily attach a chain later.
Now you have a sweet little companion ready to hang on your bag or gift to a friend

What Really Happens Inside the Kiln
Learn how time and temperature work together inside the kiln to transform clay into durable ceramic.
Mini Geometric Earrings in Modern Shapes
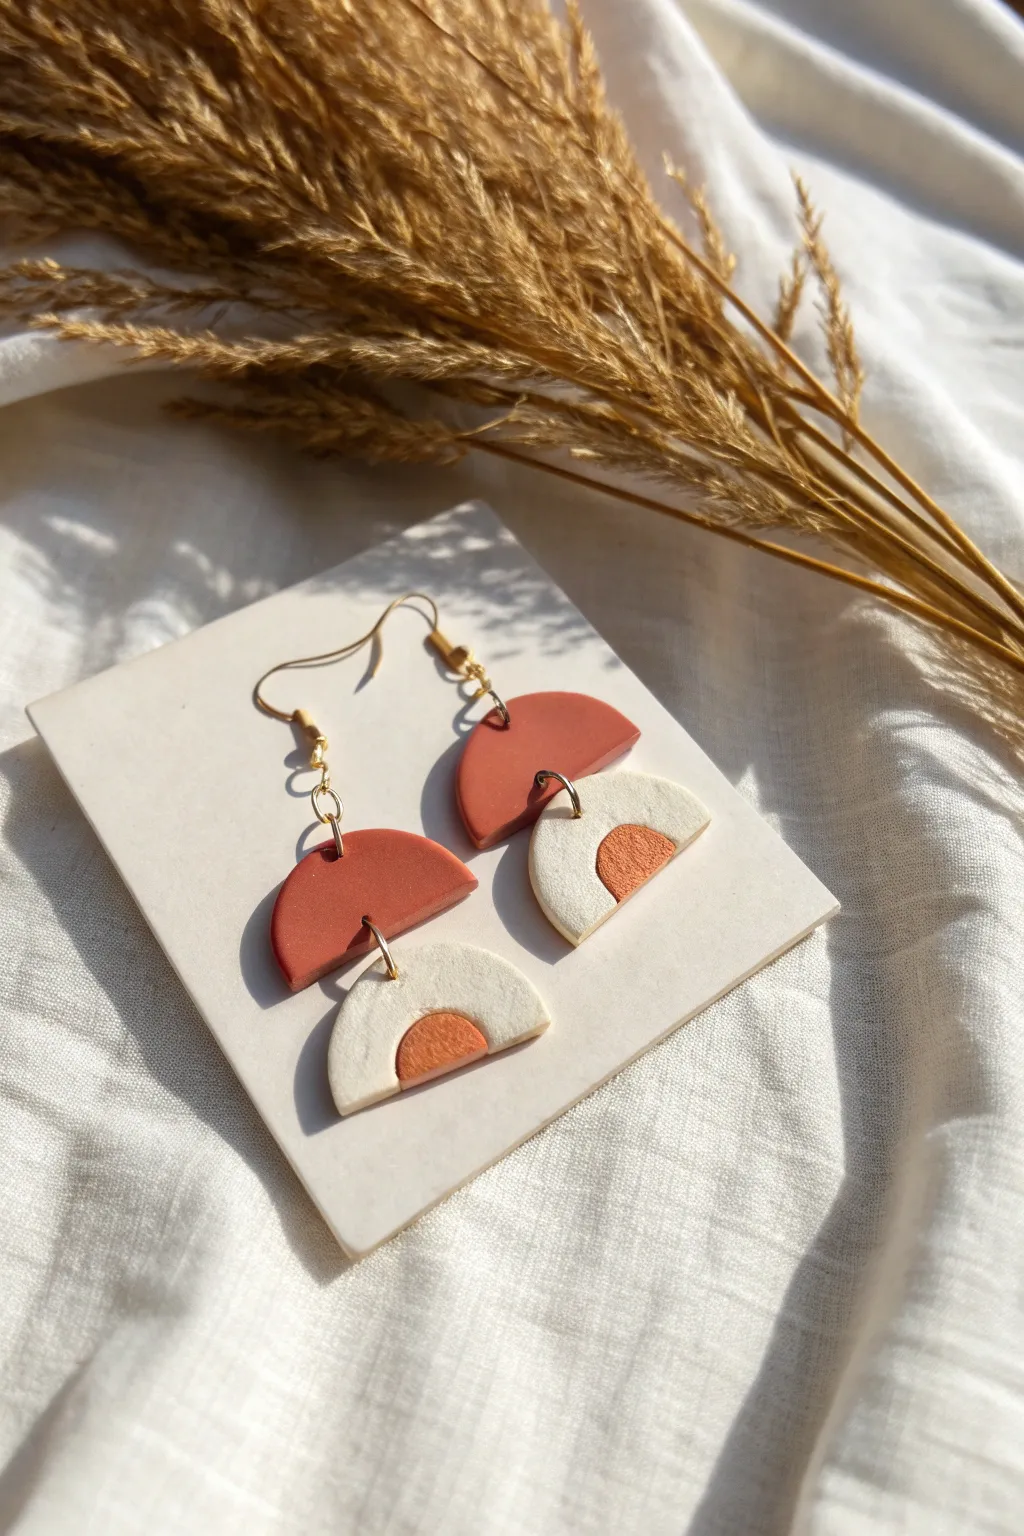
These stylish earrings combine a warm terracotta rust tone with creamy white clay in a sleek, architectural design. The geometric shapes offer a contemporary look that feels both earthy and modern, perfect for elevating a simple everyday outfit.
Detailed Instructions
Materials
- White air dry clay
- Terracotta or rust-colored air dry clay (or white clay + acrylic paint to mix)
- Clay roller or acrylic rolling pin
- Circle cutters (various sizes: approx 1 inch and 0.5 inch diameter)
- Craft knife or scalpel
- Sandpaper (fine grit)
- Jump rings (gold finish)
- Earring hooks (gold finish)
- Jewelry pliers (flat nose and round nose)
- Needle tool or small drill bit
- Small bowl of water (for smoothing)
- Gloss or matte varnish (optional)
Step 1: Shaping the Clay
-
Prepare your colors:
Begin by conditioning your clay. If you don’t have pre-colored terracotta clay, mix a small amount of burnt orange or rust acrylic paint into a lump of white clay until the color is uniform and streak-free. -
Roll it out:
Roll out a slab of the terracotta clay and a slab of the white clay. Aim for an even thickness of about 3mm (1/8 inch) for durability without excessive weight. -
Cut the top shapes:
Use a medium-sized circle cutter to punch out a circle from the terracotta clay. Use your craft knife to slice this circle exactly in half to create two semi-circles. These will be the top tier of your earrings. -
Create the bottom base:
From the white clay, cut two matching arch or bell shapes. You can do this by cutting a circle and trimming the sides slightly, or freehand cutting an arch shape that is slightly wider at the bottom. -
Add the inner detail:
Using a very small circle cutter or your knife, remove a small semi-circle from the bottom center of your white pieces to create an indented arch. This negative space is crucial for the design. -
Fill the detail:
Roll a small amount of terracotta clay and cut a tiny semi-circle that fits perfectly inside the cutout you just made in the white clay. -
Merge the pieces:
Gently press the tiny terracotta piece into the white arch cutout. I like to score the edges slightly and use a tiny drop of water to help them bond securely into a single flat unit.
Cleaner Cuts
Before cutting your shapes, place a sheet of plastic wrap over the clay. Press your cutters down through the plastic. This creates softly beveled, rounded edges that require much less sanding later.
Step 2: Finishing and Assembly
-
Create holes:
While the clay is still wet, use a needle tool to poke holes for assembly. You need one hole at the top of the terracotta semi-circle (for the hook) and one at the bottom center. -
Holes for the base:
Poke a corresponding hole at the top center of the white/terracotta mixed piece. Ensure the holes are large enough for your jump rings but not too close to the edge. -
Let them dry:
Place all pieces on a flat surface lined with parchment paper. Allow them to dry completely for 24-48 hours, flipping them occasionally to prevent curling. -
Sand for smoothness:
Once fully dry, use fine-grit sandpaper to gently smooth the edges of your shapes. Pay special attention to the seam where the two colors meet on the bottom piece to ensure it feels like one seamless surface. -
Clean up dust:
Wipe the pieces down with a slightly damp cloth or baby wipe to remove any sanding dust. -
Seal (Optional):
If you want extra protection or a specific finish, apply a thin coat of matte or gloss varnish to the front and back. Let this dry fully before handling. -
Open jump rings:
Using two pairs of pliers, carefully twist open your jump rings sideways—never pull them apart outward, as this weakens the metal. -
Connect the tiers:
Thread a jump ring through the bottom hole of the top semi-circle and the top hole of the bottom arch. Close the ring securely. -
Attach the hook:
Open the loop on your earring hook (or use a small jump ring if needed) and attach it to the top hole of the terracotta semi-circle. Close the loop.
Texture Twist
Before cutting the shapes, gently press a piece of canvas or coarse fabric onto the wet clay surface. This imprints a subtle, woven texture that adds depth to the simple geometric design.
Pair these handcrafted beauties with a linen top and enjoy the compliments on your modern art accessories
Tiny Pendant Discs and Beads for Layering
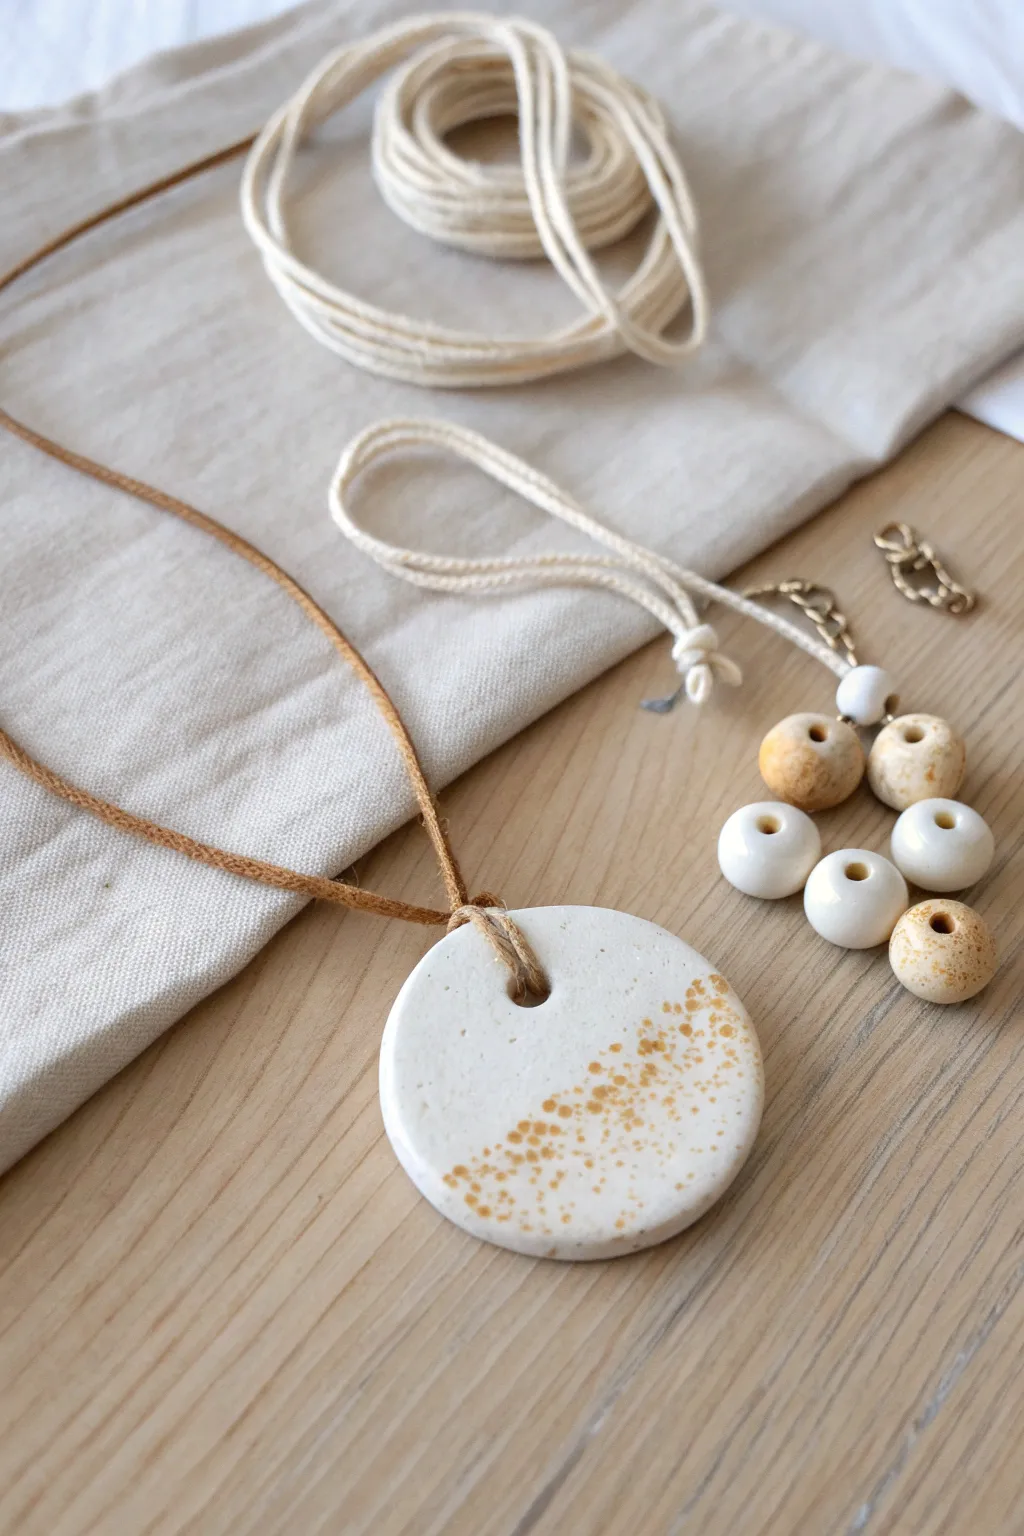
Embrace a natural, minimalist aesthetic with this simple air dry clay pendant featuring charming gold speckles. The organic shape and warm metallic accents make it a perfect everyday accessory or a heartfelt handmade gift.
How-To Guide
Materials
- White polymer or air dry clay
- Rolling pin or smooth glass jar
- Round cookie cutter (approx. 2 inches)
- Small straw or toothpick (for poking holes)
- Sandpaper (fine grit)
- Gold acrylic paint
- Small stiff-bristled paintbrush or old toothbrush
- Glossy varnish or sealant (optional)
- Leather cord or suede string
Step 1: Shaping the Clay
-
Condition the material:
Begin by kneading a small ball of white clay in your hands until it becomes soft, pliable, and free of cracks. -
Roll it out:
Place the clay on a smooth, clean surface and use your rolling pin to flatten it into an even sheet. Aim for a thickness of about 1/4 inch so the pendant feels substantial but not heavy. -
Cut the shape:
Press your round cookie cutter firmly into the clay to create a perfect circle. Peel away the excess clay from the edges. -
Smooth the edges:
Dip your finger in a tiny bit of water and gently run it around the circumference of the circle to smooth out any rough texture left by the cutter. -
Create the hanging hole:
Using a straw or a tool, pierce a hole about half an inch from the top edge. Make sure the hole is wide enough to accommodate your leather cord later. -
Make matching beads:
With the leftover clay, roll small spheres between your palms. Poke holes through the center of each to create chunky beads that will complement the pendant. -
Allow to cure:
Set your clay pieces aside in a dry, safe spot. Let them dry completely according to the package instructions, usually for 24-48 hours. Flipping them halfway through helps prevent warping.
Smooth Moves
To get a truly professional finish, dip your finger in water and smooth every edge before drying. Sanding is easier if the clay is already mostly smooth
Step 2: Refining and Decorating
-
Sand for smoothness:
Once fully dry, take a piece of fine-grit sandpaper and gently buff the edges and surface of the pendant. This removes any fingerprints or uneven spots. -
Clean dust away:
Wipe the piece down with a slightly damp cloth or a dry brush to ensure no clay dust remains before painting. -
Prepare the gold paint:
Squeeze a small amount of gold acrylic paint onto a palette or scrap paper. You can add a tiny drop of water if the paint feels too thick for splattering. -
Apply the speckles:
Dip a stiff brush or toothbrush into the gold paint. Hold it over the bottom half of the pendant and flick the bristles with your thumb to spray fine speckles across the surface. -
Concentrate the pattern:
Focus more splatters near the bottom edge to create an ombre or dipped effect, letting the speckles fade out as they move up the circle. -
Do the beads:
Repeat the splatter technique on your clay beads, turning them to ensure coverage on all sides. -
Let paint dry:
Wait for the acrylic specks to dry completely, which should only take about 15-20 minutes. -
Seal the piece:
For durability, apply a thin coat of matte or gloss varnish over the entire pendant and beads. This protects the clay from moisture and everyday wear.
Step 3: Assembly
-
Prepare the cord:
Cut a length of leather cord or suede string to your desired necklace length. -
Attach the pendant:
Fold the cord in half to find the center, push the loop through the pendant hole, and pass the cord tails through the loop to create a lark’s head knot. -
Final touches:
Tie the ends of the cord with adjustable sliding knots or attach a metal clasp if you prefer a more finished look.
Texture Twist
Before the clay dries, press a piece of lace or a leaf into the surface for an imprinted texture, then dry-brush gold paint over the raised areas
Now you have a chic, custom piece of jewelry ready to layer with your favorite outfits


The Complete Guide to Pottery Troubleshooting
Uncover the most common ceramic mistakes—from cracking clay to failed glazes—and learn how to fix them fast.
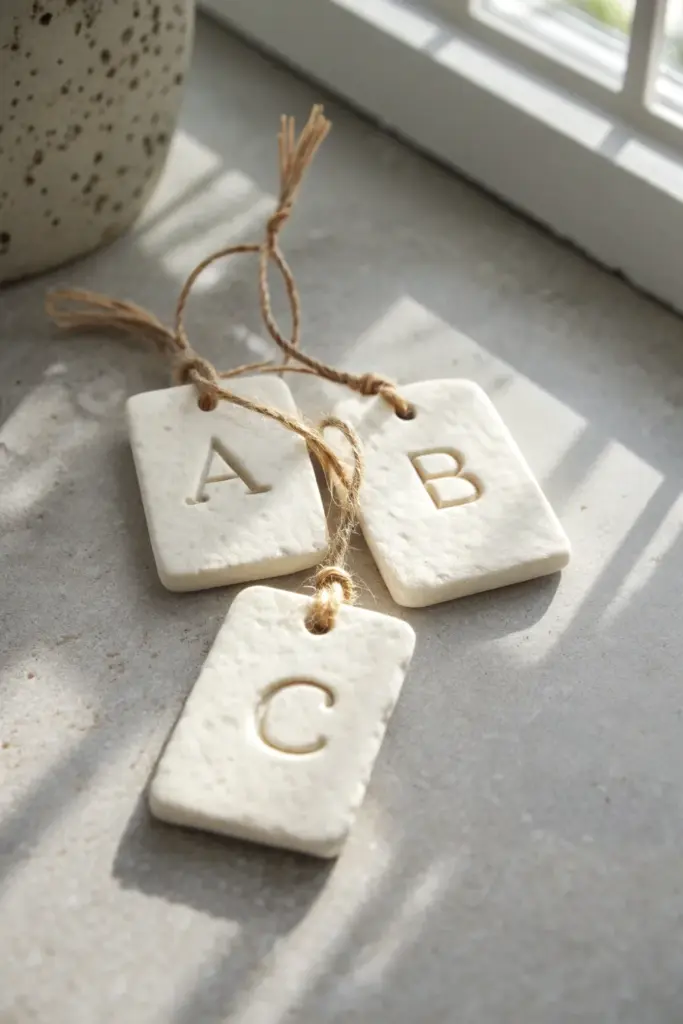
Mini Alphabet Tags and Gift Ornaments
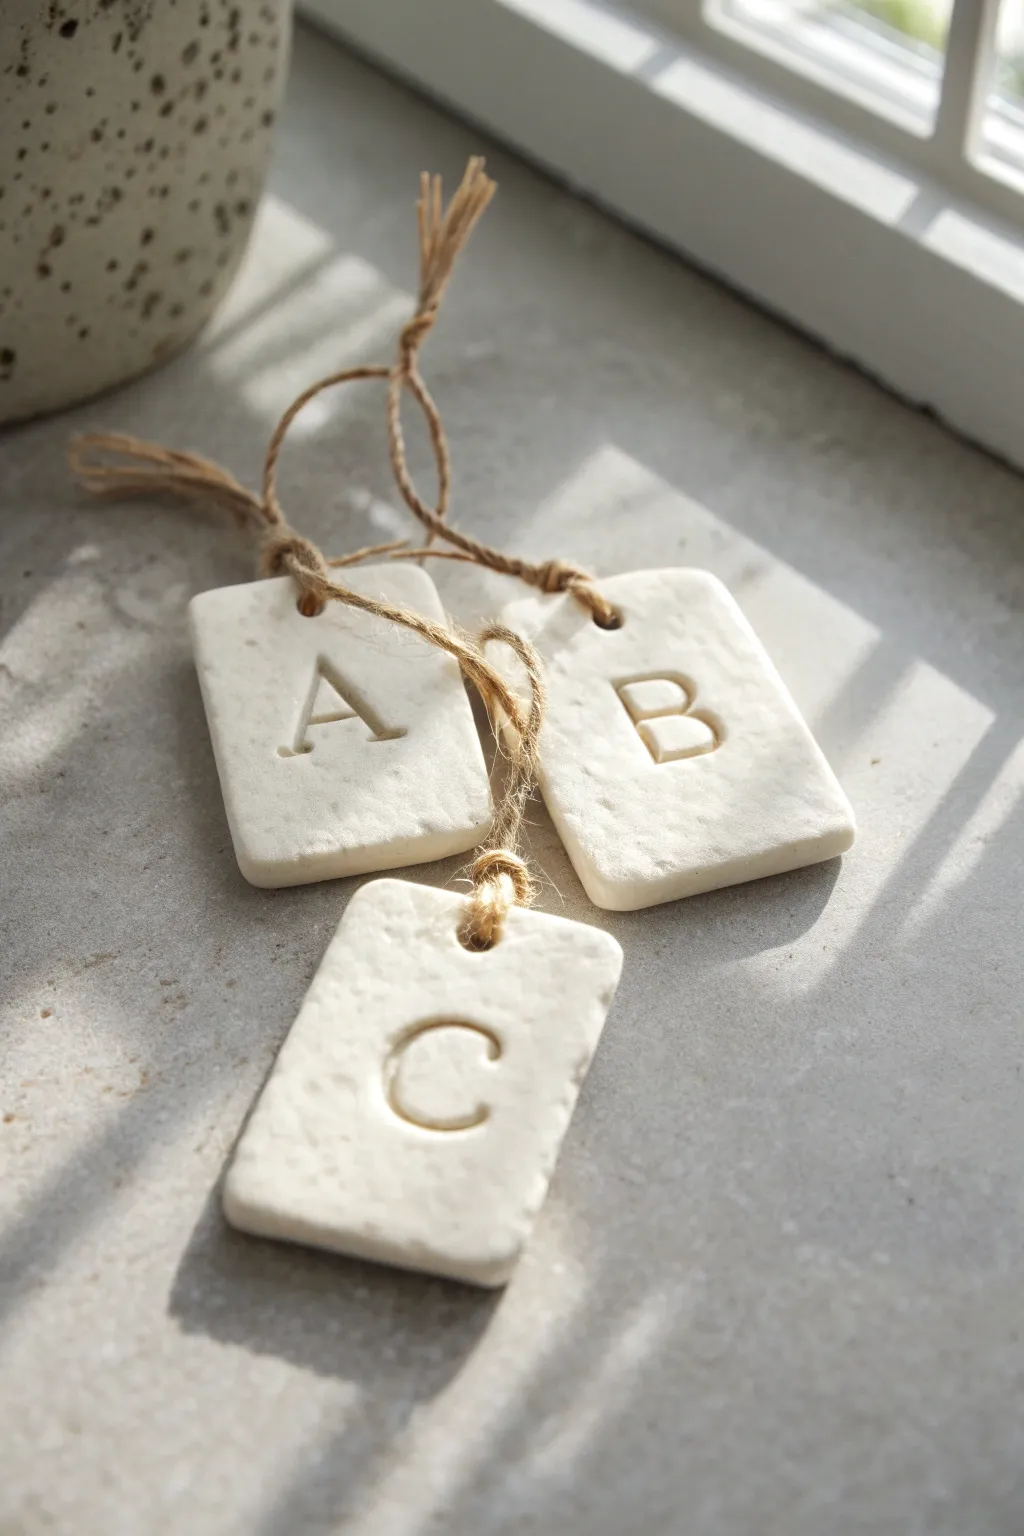
Create these minimalist, sophisticated tags that mimic the look of white stone or unglazed bisque ceramic. Their simple rectangular shape and deeply impressed typography make them perfect for personalized gift wrapping or understated holiday ornaments.
Step-by-Step Guide
Materials
- White air dry clay (stone effect or standard)
- Small rolling pin
- Sharp craft knife or blade
- Alphabet letter stamps
- Parchment paper or non-stick mat
- Ruler
- Standard drinking straw or small round cutter
- Fine grit sandpaper
- Natural jute twine
- Small bowl of water
- Flat, smooth work surface
Step 1: Shaping the Clay
-
Condition the clay:
Take a handful of white air dry clay and knead it gently in your hands. You want it warm and pliable but not sticky. If you are using a stone-effect clay, you’ll feel the texture immediately. -
Roll it out:
Place the clay on your parchment paper. Using the rolling pin, roll the clay out to an even thickness of about 4-5mm. Keep it slightly thick to ensure the tags feel substantial and stone-like. -
Initial cutting:
Using your ruler as a guide, cut a long, straight strip of clay. The width of this strip will determine the width of your tags, so aim for approximately 1.5 inches. -
Measure the segments:
Along your strip, mark out rectangular sections. For the look in the photo, a 2:3 ratio works well, meaning if the width is 1.5 inches, make the height about 2 to 2.25 inches. -
Slicing the tags:
Use your sharp craft knife to slice firmly straight down through the clay at your marked points. Try to slice in one motion rather than dragging the blade to keep edges crisp.
Step 2: Stamping and Refining
-
Soften the edges:
Dip your finger in a tiny bit of water and run it gently along the sharp cut edges of each rectangle. You don’t want to round them off completely, just soften the ‘fresh cut’ look to simulate tumbled stone. -
Position the stamp:
Select your letter stamp. Center it visually on the lower two-thirds of the rectangle, leaving room at the top for the hanging hole. -
Make the impression:
Press the stamp firmly and evenly into the clay. I usually give it a very slight wiggle before lifting straight up to ensure the impression is deep and clean. -
Create the hole:
Press a drinking straw or small circular cutter into the top center of the tag, about 0.5cm from the top edge. Twist slightly and lift to remove the clay plug. -
Final smooth:
Check the back of the tag for any distortion caused by stamping and gently pat it flat against the table if needed.
Stamp Release Trick
If your stamp sticks to the clay, dust the stamp face very lightly with cornstarch or baby powder before pressing it down. This ensures a clean release.
Step 3: Finishing Touches
-
Drying phase:
Lay the tags flat on a piece of parchment paper away from direct heat. Flip them over carefully every few hours to ensure they dry evenly and don’t curl. Let them cure for 24-48 hours. -
Sanding:
Once bone dry, take your fine grit sandpaper and very lightly buff the edges and surface. This removes any fingerprints and enhances the matte, stone-like texture. -
Dusting off:
Wipe the tags with a dry, soft cloth or brush to remove any clay dust from the sanding process, paying special attention to the stamped grooves. -
Preparing the twine:
Cut a length of natural jute twine, approximately 8 inches long for each tag. -
Attaching the hanger:
Fold the twine in half to create a loop. Push the folded end through the hole from front to back. -
Securing the knot:
Pull the loose ends of the twine through the loop you just pushed through the hole (a lark’s head knot) and pull tight. -
Final knot:
Tie the two loose ends of the twine together in a simple overhand knot to create the hanging loop.
Gold Inlay
For a luxe upgrade, mix a drop of gold acrylic paint with water and paint inside the stamped letter, carefully wiping any excess off the surface immediately.
Now you have a set of personalized tags ready to elevate your gift wrapping or decor